

Page 1
Before Starting Installation
NOTE
Kit parts are prefaced by the word kit and appear in
bold print.
3651 N Highway 89 • Chino Valley, AZ 86323
(928) 636-7080 • www.p-a-g.net
JEEP WRANGLER,
RUBICON, UNLIMITED (TJ, TJL)
ROCKER PANEL KIT
INSTALLATION INSTRUCTIONS
1997-2006 TJ W/OUT BAR
KIT# 84200
1997-2006 TJ W/ BAR
KIT# 84201
2004-2006 TJL W/OUT BAR
KIT# 84204
2004-2006 TJL W/ BAR
KIT# 84202
WARNING
Before you install this kit, read and understand all
instructions, warnings, cautions, and notes in this
instruction sheet and in the vehicle owner’s manual.
1. Carefully read all warnings and instructions completely before beginning.
2. Verify all parts have been received in this kit by
checking the parts list at the end of this document.
NOTE
If parts are missing from kit, please be prepared to provide the following information:
1. Name of purchase location
2. Bar Code on side of box
3. Date above bar code
4. Date inside box cover
5. Inspector # from inside box cover
3. Only install this kit on the vehicle for which it is
specified. If anytime during the installation you
encounter something different from what is outlined
in the instructions, call technical support at (928)
636-7080.
4. Special tools needed:
a. Drill with 5/16” and 3/8” drill bits
b. 21/64” center punch
c. 1/4”-20 rivet nut tool (optional, but recom-
mended)
CAUTION
Proper installation of this kit requires knowledge of the
factory recommended procedures for removal and
installation of original equipment components. We recommend that the factory shop manual and any special
tools needed to service your vehicle be on hand during
the installation. Installation of this kit without proper
knowledge of the factory recommended procedures
may affect the performance of these components and
the safety of the vehicle. We strongly recommend that
a certified mechanic familiar with the installation of similar components install this kit.
WARNING
Always wear eye protection when operating power
tools.
WARNING
Before you install this kit, block the vehicle tires to prevent the vehicle from rolling.
5. Park vehicle on a clean, dry, flat, level surface and
block tires so vehicle cannot roll in either direction.
Engine Compartment
1. Disconnect both battery cables. Disconnect nega-
tive cable first, then positive cable.
1 Jeep TJ, TJL Rocker Panels
Page 2
Prepare to Install Kit
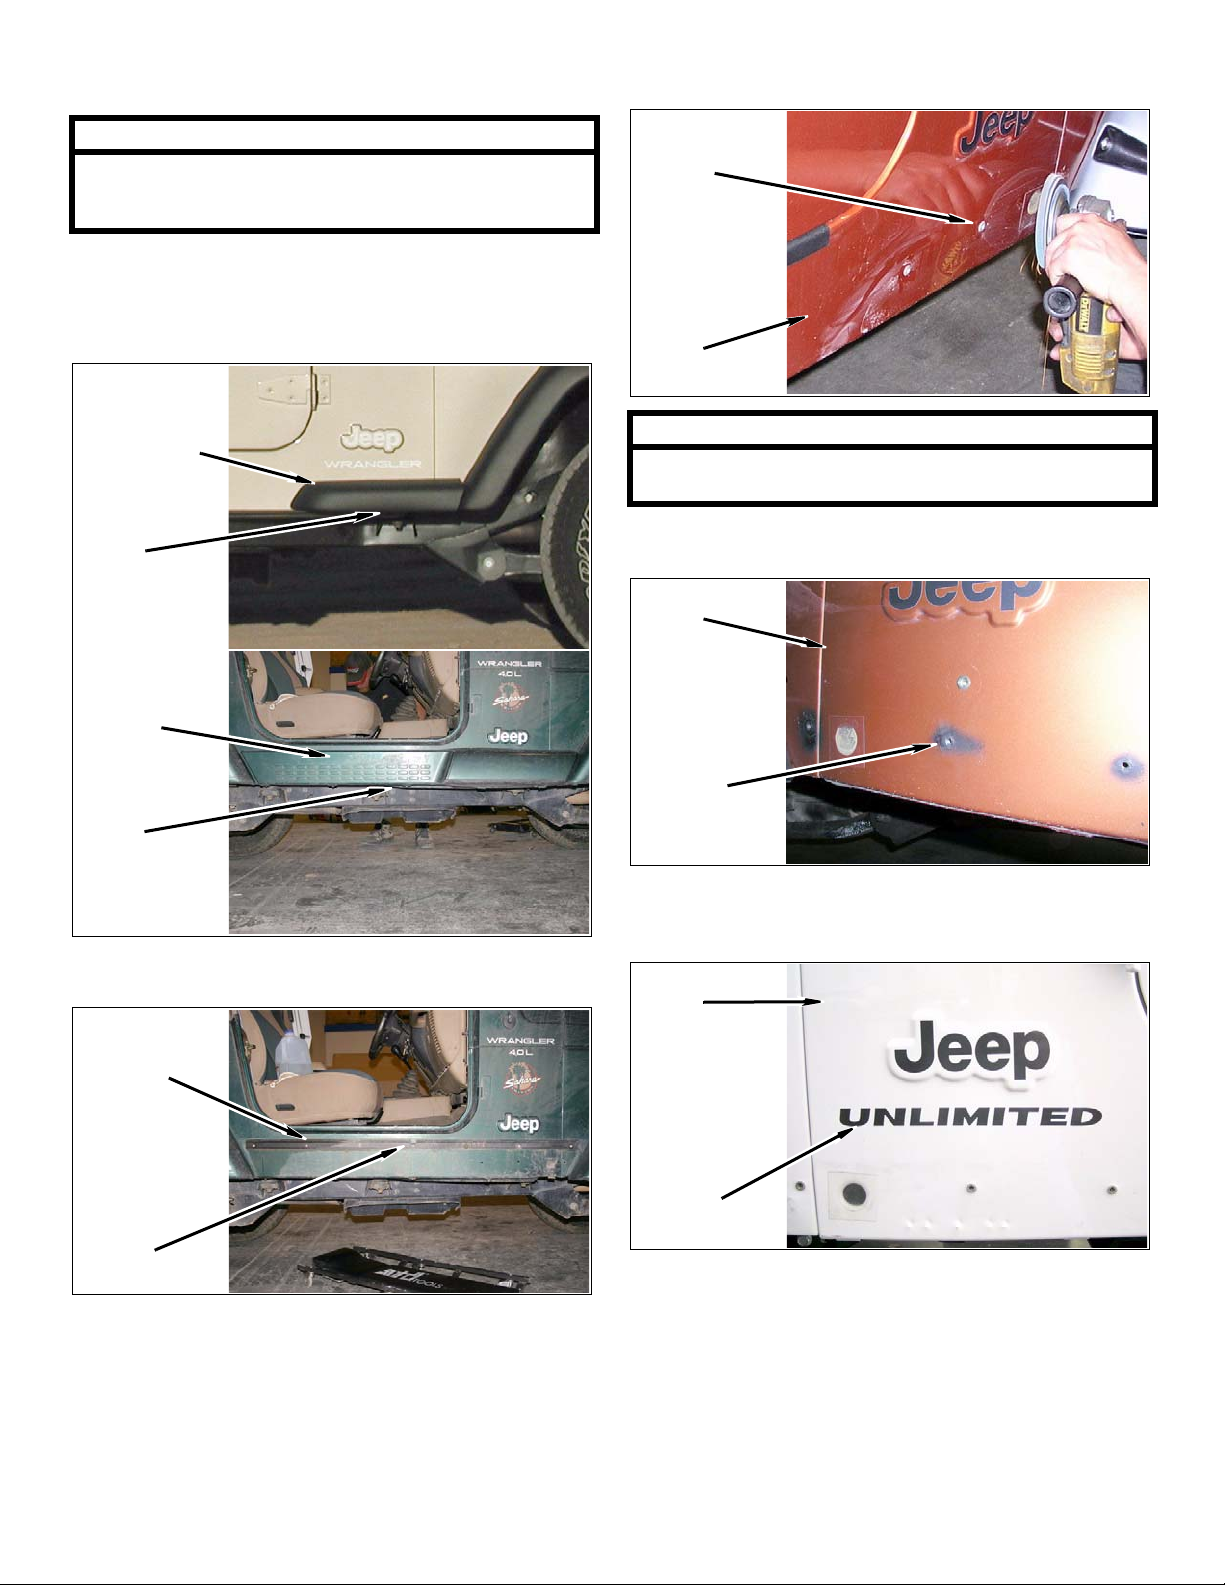
c. Grind attachment points on driver and passen-
ger side of body.
NOTE
If installing OR-FAB Sport Cage Floor Mount kit#
87001 in conjunction with this kit, install kit# 87001
prior to installation of this kit.
1. Factory fender flare extensions & rocker panels
a. Remove bolts and driver and passenger front
fender flare extensions or factory rocker panels.
Fender
Flare
Extensions
Bolts
Factory
Rocker
Panels
Attachment
Points
Body
NOTE
Grinding attachment points will ensure proper fitment
between kit rocker panels and body.
d. Paint or seal ground points to prevent oxidation
of body panels.
Body
Bolts
b. Sahara Models: Grind rivets and re move metal
trim bracket from driver and passenger side.
Metal Trim
Bracket
Rivets
Painted
Attachment
Points
2. Remove “Unlimited” or “Wrangler” decals from driver
and passenger side body. They will be obscured by
kit rocker panels.
Body
Decals
2 Jeep TJ, TJL Rocker Panels
Page 3
Inside of Vehicle
Install Kit
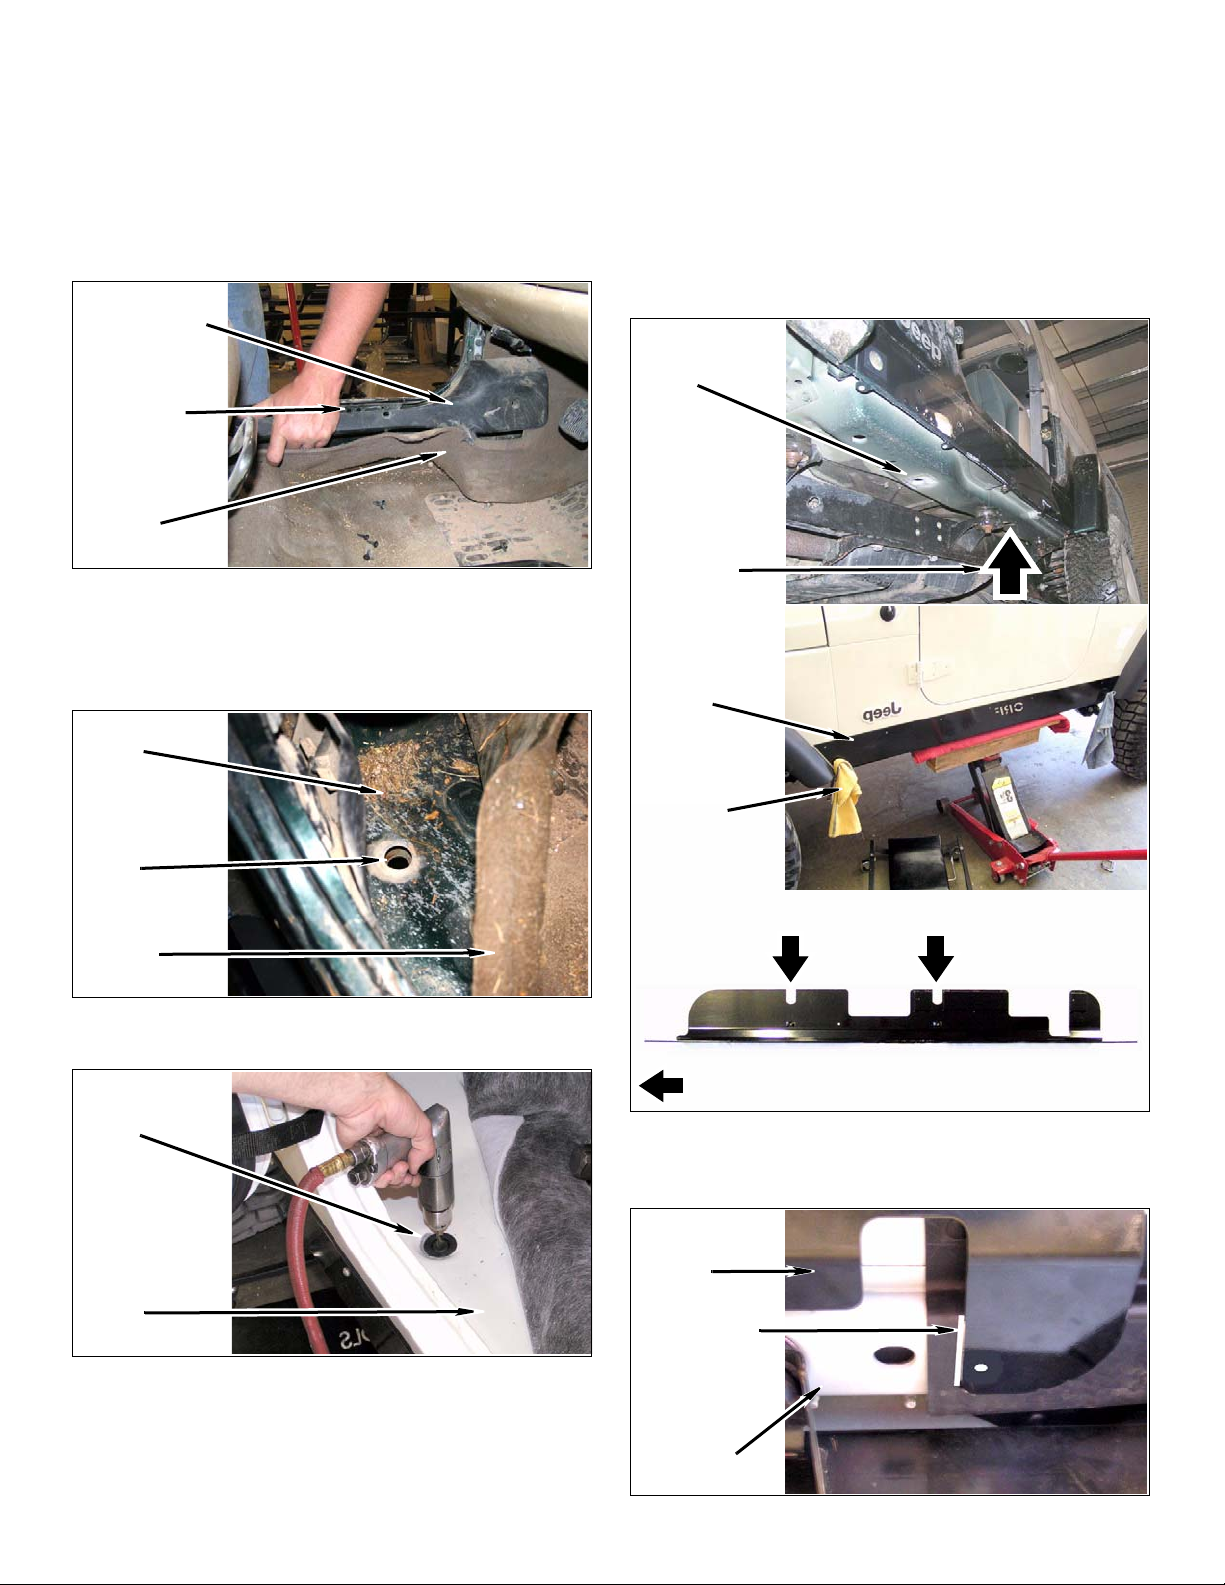
1. Interior trim panels
a. Remove hardware and driver and passenger
kick panels if equipped.
b. Remove driver and passenger carpet beneath
door sills if equipped.
Kick Panels
Door Sills
Carpet
c. Carefully move wiring harness away from driver
door sill.
d. Pull up driver and passenger carpet from floor to
expose drain hole plugs.
1. TJL Models: Driver rocker panel
a. Using a hydraulic floor jack or other brace, posi-
tion kit rocker panel (driver) onto body. Ensure
kit rocker panel mates flush against body.
b. Align two slot s with front drain plug hole and rear
body channel hole.
Drain Plug
Hole
Rear Body
Channel
Hole
Kit Rocker
Panel
Floor
Drain Hole
Plug
Carpet
e. Drill 1/2” hole through driver and passenger
drain hole plugs.
Drain Hole
Plug
Floor
Clamps
Align Slot W/ Drain
Plug Hole
FRONT
c. Scribe rear plastic fender well along forward
edge of kit rocker panel (driver) rear mount as
shown.
Kit Rocker
Panel
Mark Rear
Plastic
Fender Well
Align Slot W/ Body
Channel Hole
Body
Channel
3 Jeep TJ, TJL Rocker Panels
Page 4
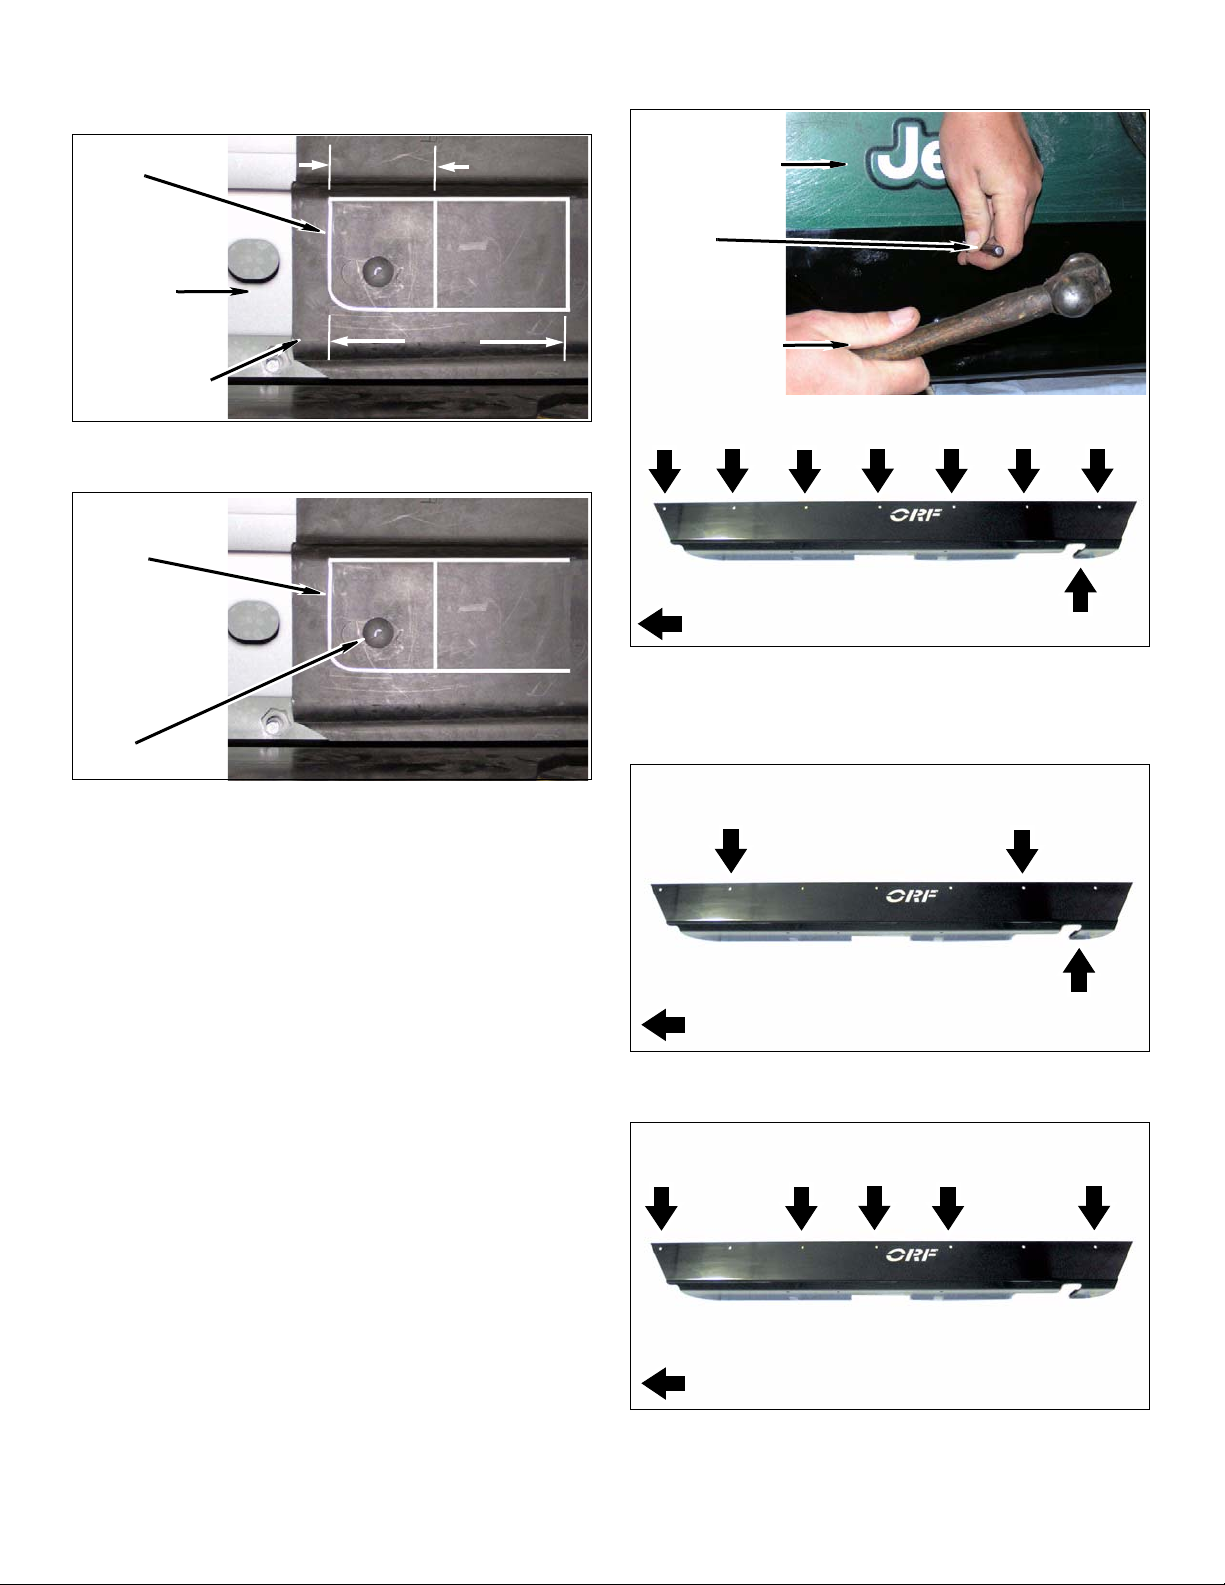
d. Remove kit rocker panel (driver) and measure
2-1/2” and 5-1/2” rearward from scribed line and
scribe two parallel lines as shown.
Mark
Body
Channel
2-1/2”
h. Using 21/64” center punch, mark seven body
mount holes and one lower body channel hole.
Body
21/64”
Center Punch
Plastic
5-1/2”
Fender Well
e. Remove push clip and cut rear plastic fender
well along scribed lines indicated below.
Cut Along
Lines
Push
Clip
f. Using a hydraulic floor jack or other brace, posi-
tion kit rocker panel (driver) onto body. Ensure
kit rocker panel mates flush against body.
g. Align two slot s with front drain plug hole and rear
body channel hole. Secure kit rocker panel
(driver) to body with c-clamps or locking pliers.
Kit Rocker
Panel
FRONT
i. Remove kit rocker panel (driver) from vehicle.
j. Drill three 3/8” holes into body and bottom of
body channel as indicated below.
Drill 3/8” Holes
Into Body
Drill 3/8” Holes Here
Into Body Channel
FRONT
k. Drill five 5/16” holes into body as indicated
below.
Drill 5/16” Holes Into Body
FRONT
l. Repeat above substeps for passenger rocker
panel.
4 Jeep TJ, TJL Rocker Panels
Page 5
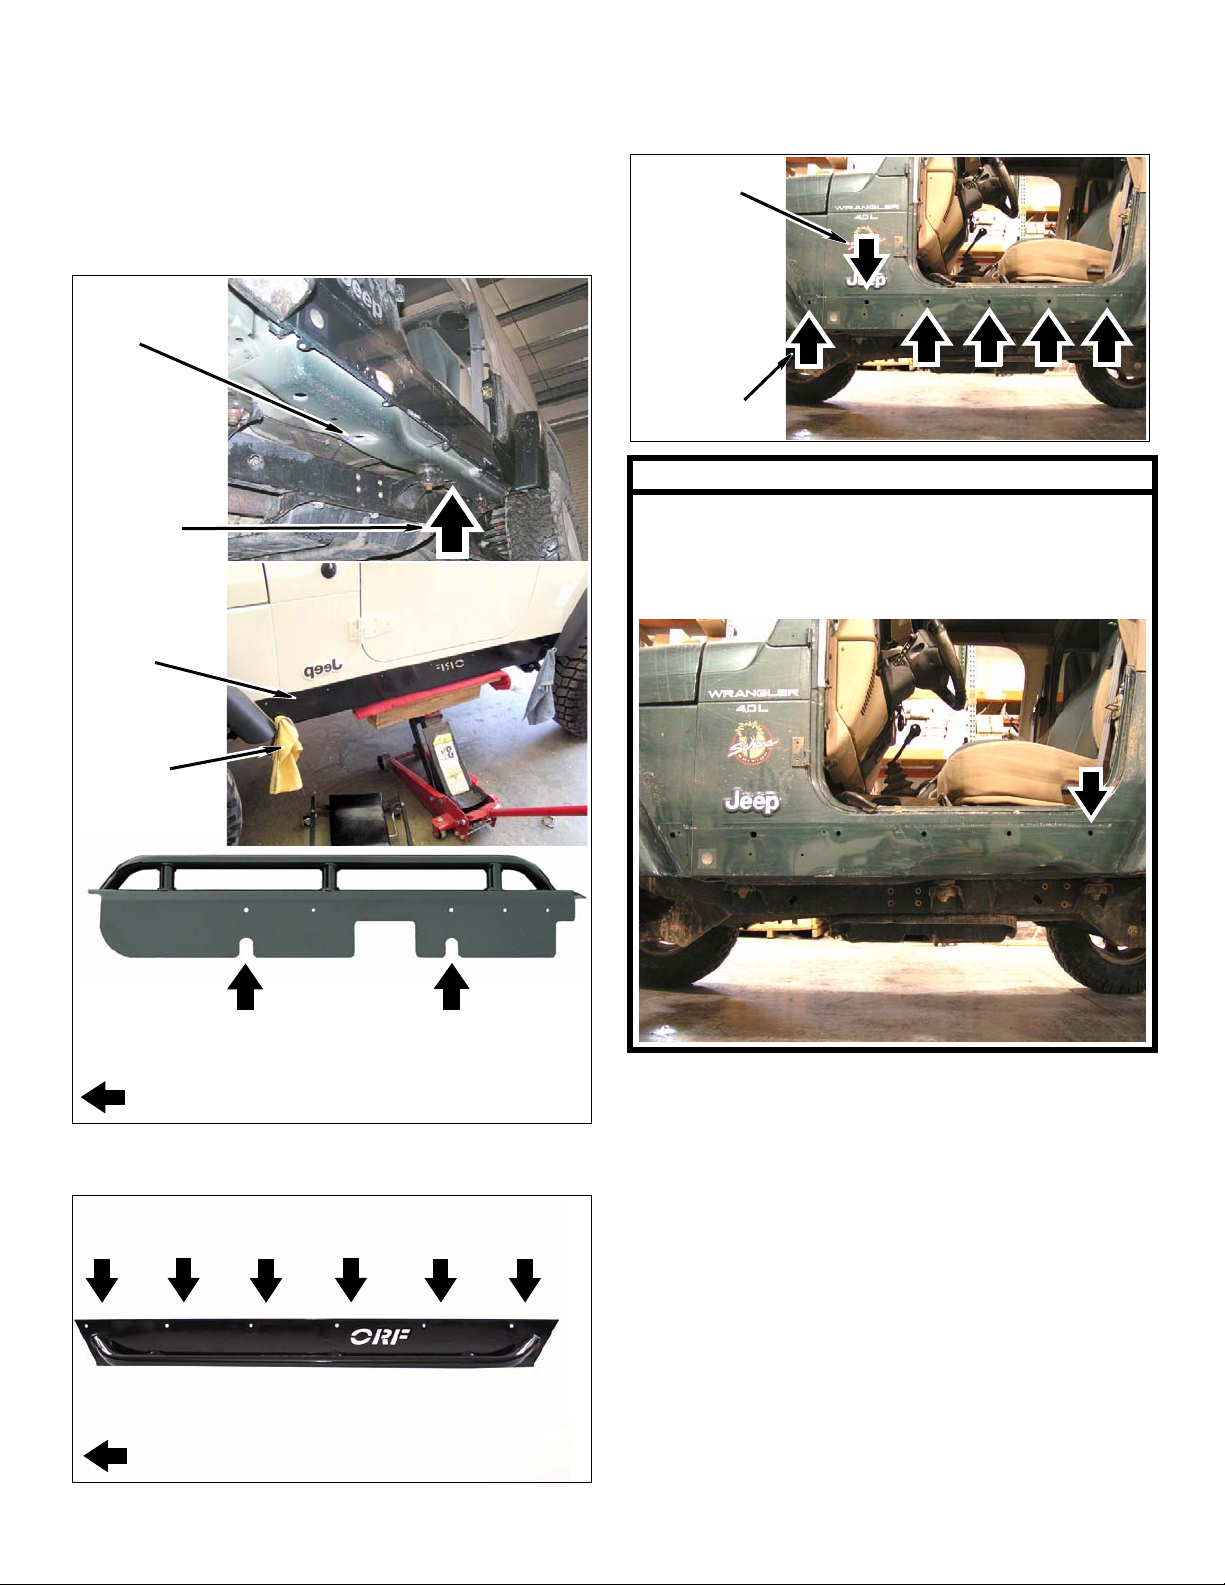
2. TJ Models: Driver rocker panel
d. Remove kit rocker panel (driver) from vehicle.
a. Using a hydraulic floor jack or other brace, posi-
tion kit rocker panel (driver) onto body. Ensure
kit rocker panel mates flush against body.
b. Align two slot s with front drain plug hole and rear
body channel hole. Secure kit rocker panel
(driver) to body with c-clamps or locking pliers.
Drain Plug
Hole
Rear Body
Channel
Hole
Kit Rocker
Panel
e. Drill one 3/8” and five 5/16” holes into body as
indicated below.
Drill 3/8”
Hole Here
Into Body
Drill 5/16”
Holes Here
Into Body
NOTE
Later model TJs may require the rearmost hole to be
drilled to 3/8” if there is no access beneath door sill to
install kit nut and kit washer on backside of body
inside the cab.
Clamps
Align Slot W/ Drain
Plug Hole
Align Slot W/ Body
Channel Hole
FRONT
c. Using 21/64” center punch, mark six body mount
holes into body.
Mark Holes Into Body
f. Repeat above substeps for passenger rocker
panel.
FRONT
5 Jeep TJ, TJL Rocker Panels
Page 6
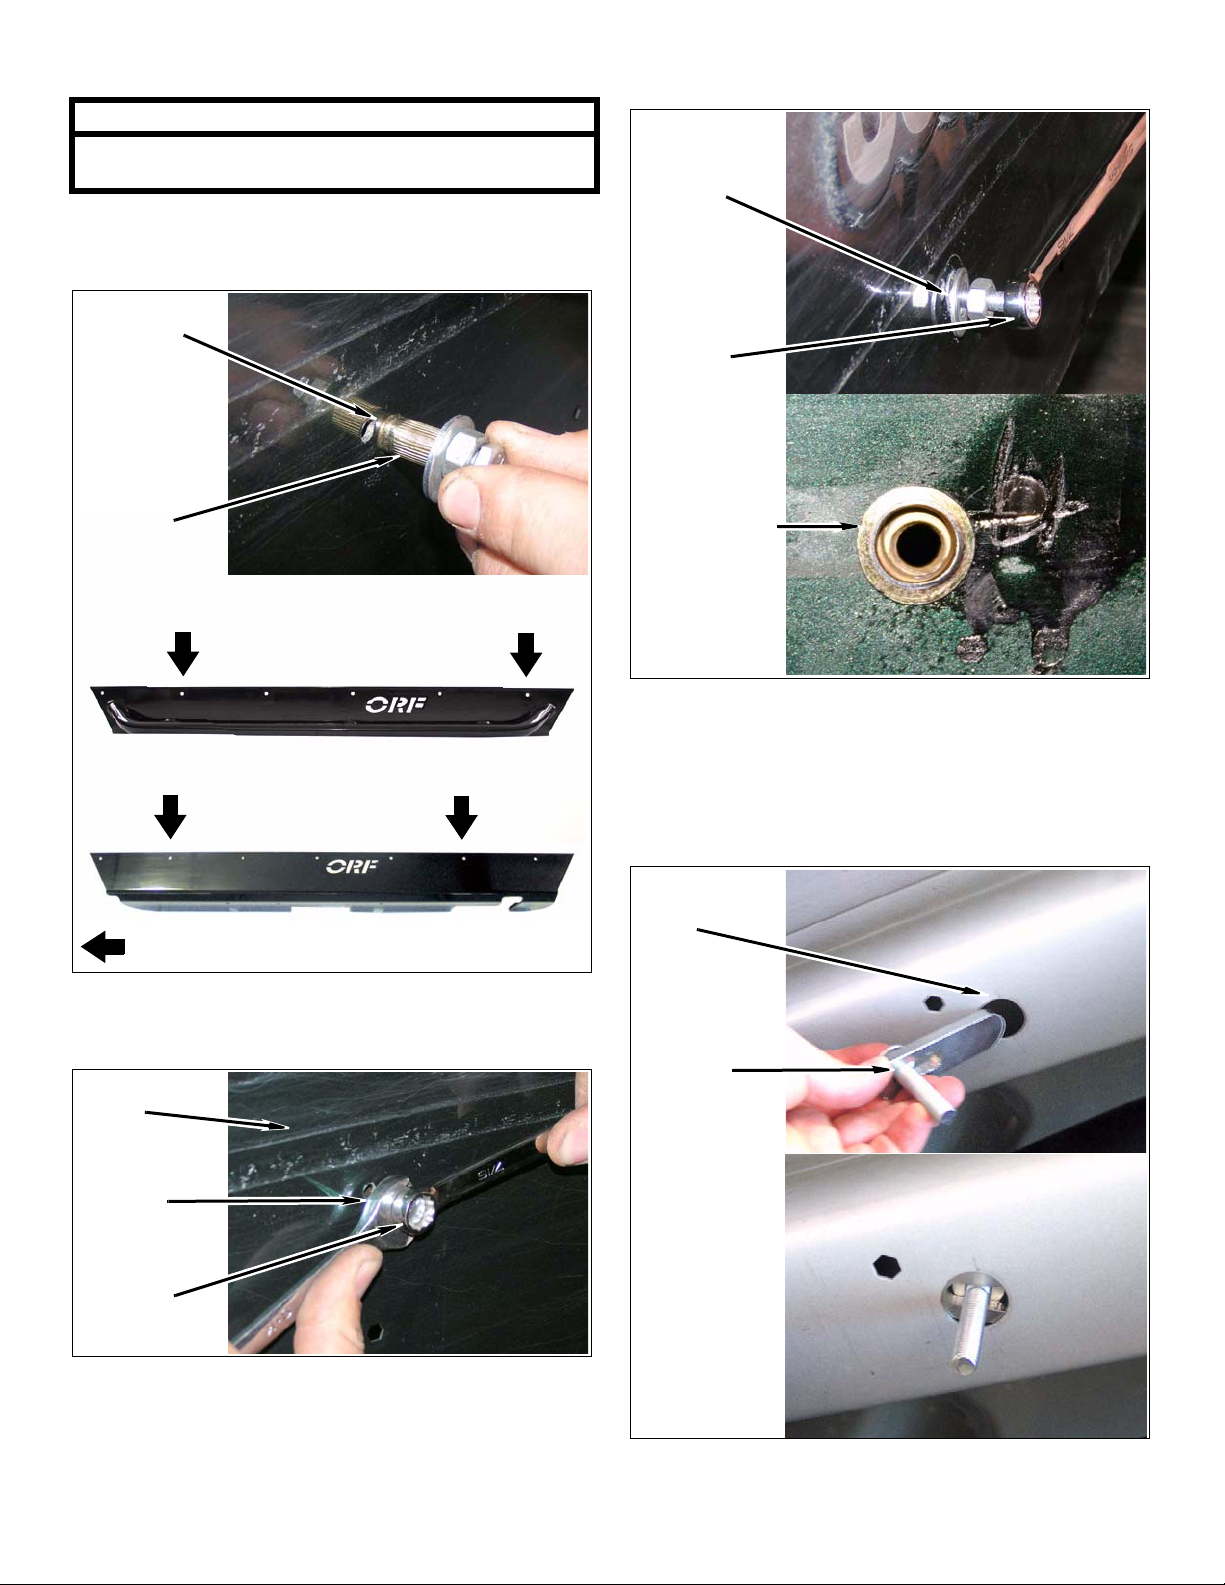
3. Driver rivet nut(s)
NOTE
TJL Models: DO NOT install kit rivet nut into drilled 3/
8” hole on bottom of body channel.
a. Install kit rivet nut into 3/8” hole(s) on side of
body with kit washer (1/4” SAE), kit nut (5/16”),
and kit bolt (1/4” x 1-1/4”) as shown.
3/8” Hole
Kit Rivet Nut,
Kit Washer
(1/4” SAE),
Kit Nut
(5/16”),
Kit Bolt
(1/4” x 1-1/4”)
TJ MODELS
Install Kit Rivet Nut
Into Body
*
c. Remove kit bolt (1/4” x 1-1/4”), kit washer (1/4”
SAE), and kit nut (5/16”).
Kit Washer
(1/4” SAE),
Kit Nut
(5/16”)
Kit Bolt
(1/4” x 1-1/4”)
Kit Rivet Nut
TJL MODELS
Install Kit Rivet Nuts
Into Body
FRONT
b. Keeping kit rivet nut firmly against body, hold kit
nut (5/16”) and tighten kit bolt (1/4” x 1-1/4”)
until kit rivet nut is secure in 3/8” hole(s).
Body
Kit Nut
(5/16”)
*TJ Models: Install ONLY if this
hole in BODY drilled to 3/8” !!!
d. Repeat above substeps for passenger rivet
nut(s).
4. Driver rocker panel
a. Install kit hangar (slotted) and kit bolt (3/8” x 2”
carriage) into rear body channel hole.
Body Channel
Hole
Kit Hangar
(Slotted),
Kit Bolt
(3/8” x 2”
Carriage)
Kit Bolt
(1/4” x 1-1/4”)
INSTALLED
6 Jeep TJ, TJL Rocker Panels
Page 7
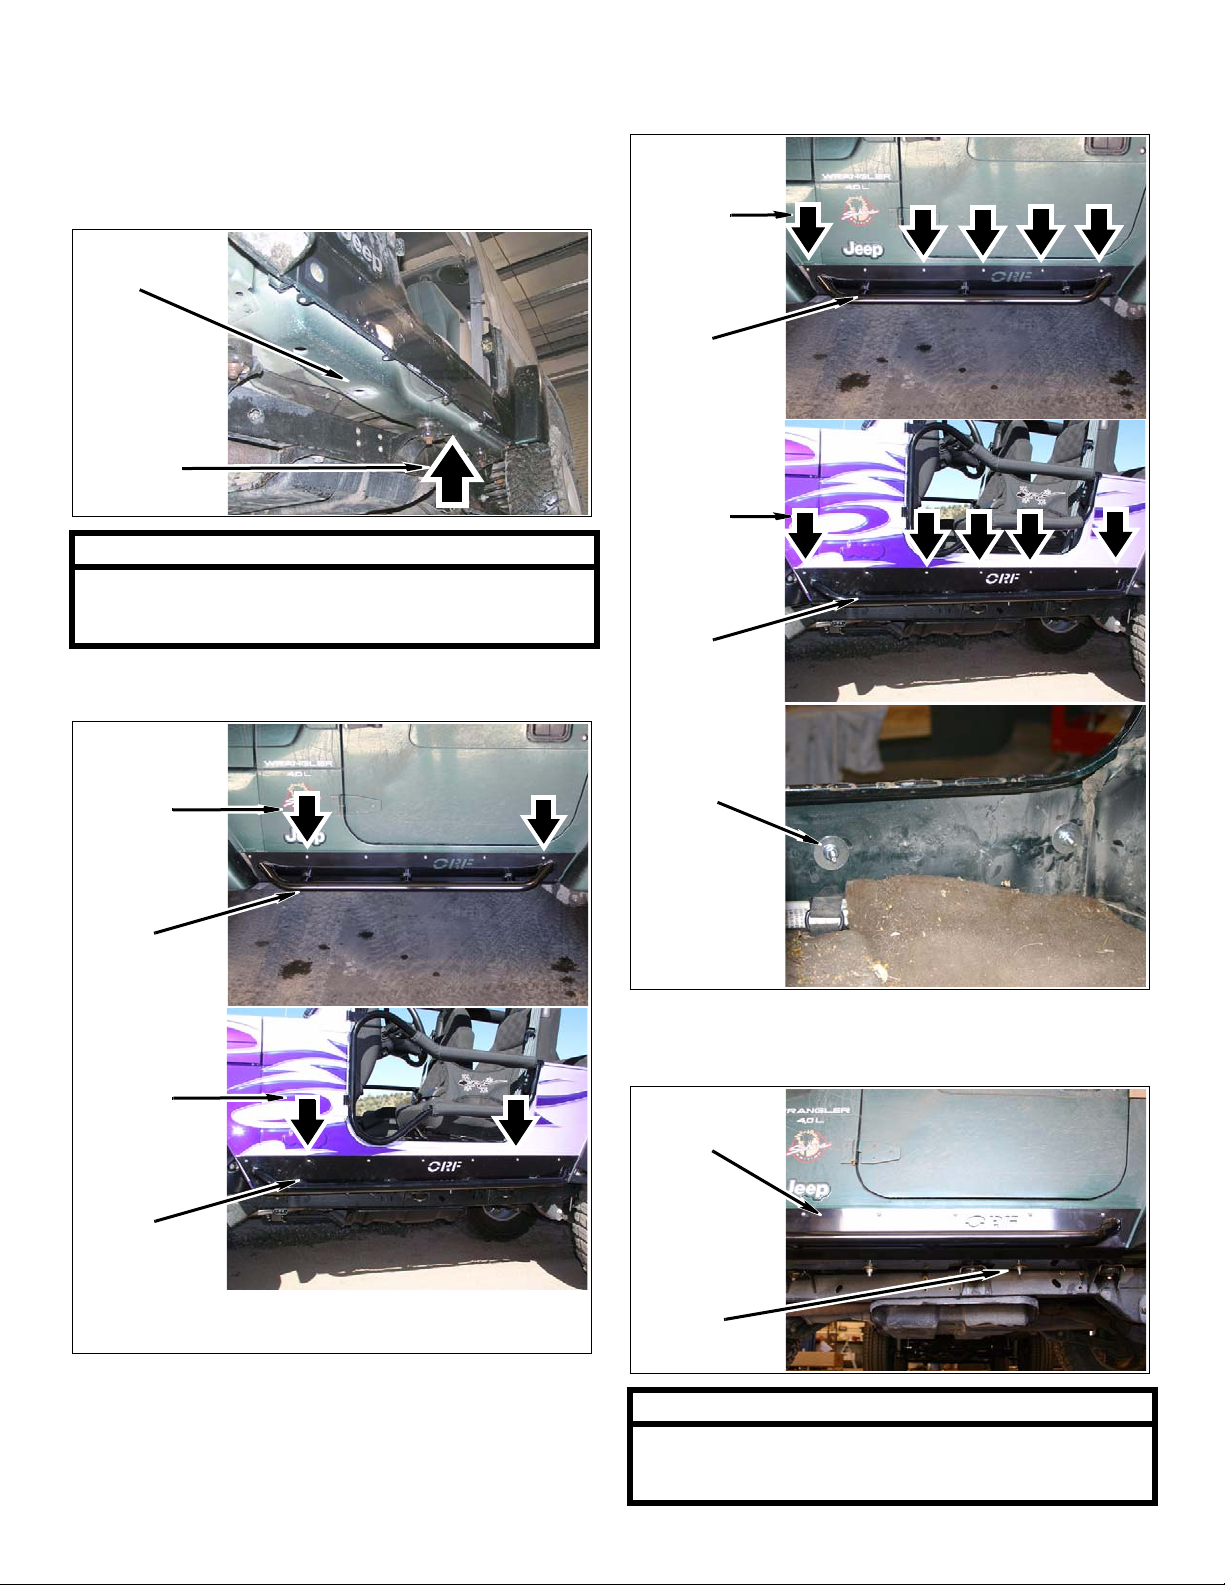
b. Using a hydraulic floor jack or other brace, posi-
tion kit rocker panel (driver) onto body. Ensure
kit rocker panel mates flush against body.
e. Install kit rocker panel (driver) onto body with
five kit bolts (1/4” x 1”), five kit washers (1/4”
fender), and fit kit nuts (1/4” flange).
c. Align two slots with front drain plug hole and rear
body channel hole. Secure kit rocker panel
(driver) to body with c-clamps or locking pliers.
Drain Plug
Hole
Rear Body
Channel
Hole
NOTE
TJL Models: When aligning kit rocker panel (driver) in
above substep, ensure rear most mount aligns with 3/
8” hole drilled into bottom body channel.
d. Inst all kit rocker panel (driver) onto body with kit
bolts (1/4” x 1”) as shown below.
TJ MODELS
Kit Bolt
(1/4” x 1”)
*
TJ MODELS
Kit Bolt
(1/4” x 1”)
Kit Rocker
Panel
TJL MODELS
Kit Bolt
(1/4” x 1”)
Kit Rocker
Panel
Kit Washers
(1/4” Fender),
Kit Nuts
(1/4” Flange)
Kit Rocker
Panel
TJL MODELS
Kit Bolt
(1/4” x 1”)
Kit Rocker
Panel
*TJ Models: Install ONLY if this hole in BODY
drilled to 3/8” and has kit rivet nut installed!!!
f. Install kit rocker panel (driver) onto body chan-
nel and kit bolt (3/8” x 2” carriage) with kit
washer (1/2” x 2”) and kit nut (3/8” flange).
Kit Rocker
Panel
Kit Washer
(1/2” x 2”),
Kit Nut
(3/8” Flange)
NOTE
It may be necessary to use additional kit washers (1/2”
x 2”) to fill space between body channel and kit rocker
panel (driver).
7 Jeep TJ, TJL Rocker Panels
Page 8
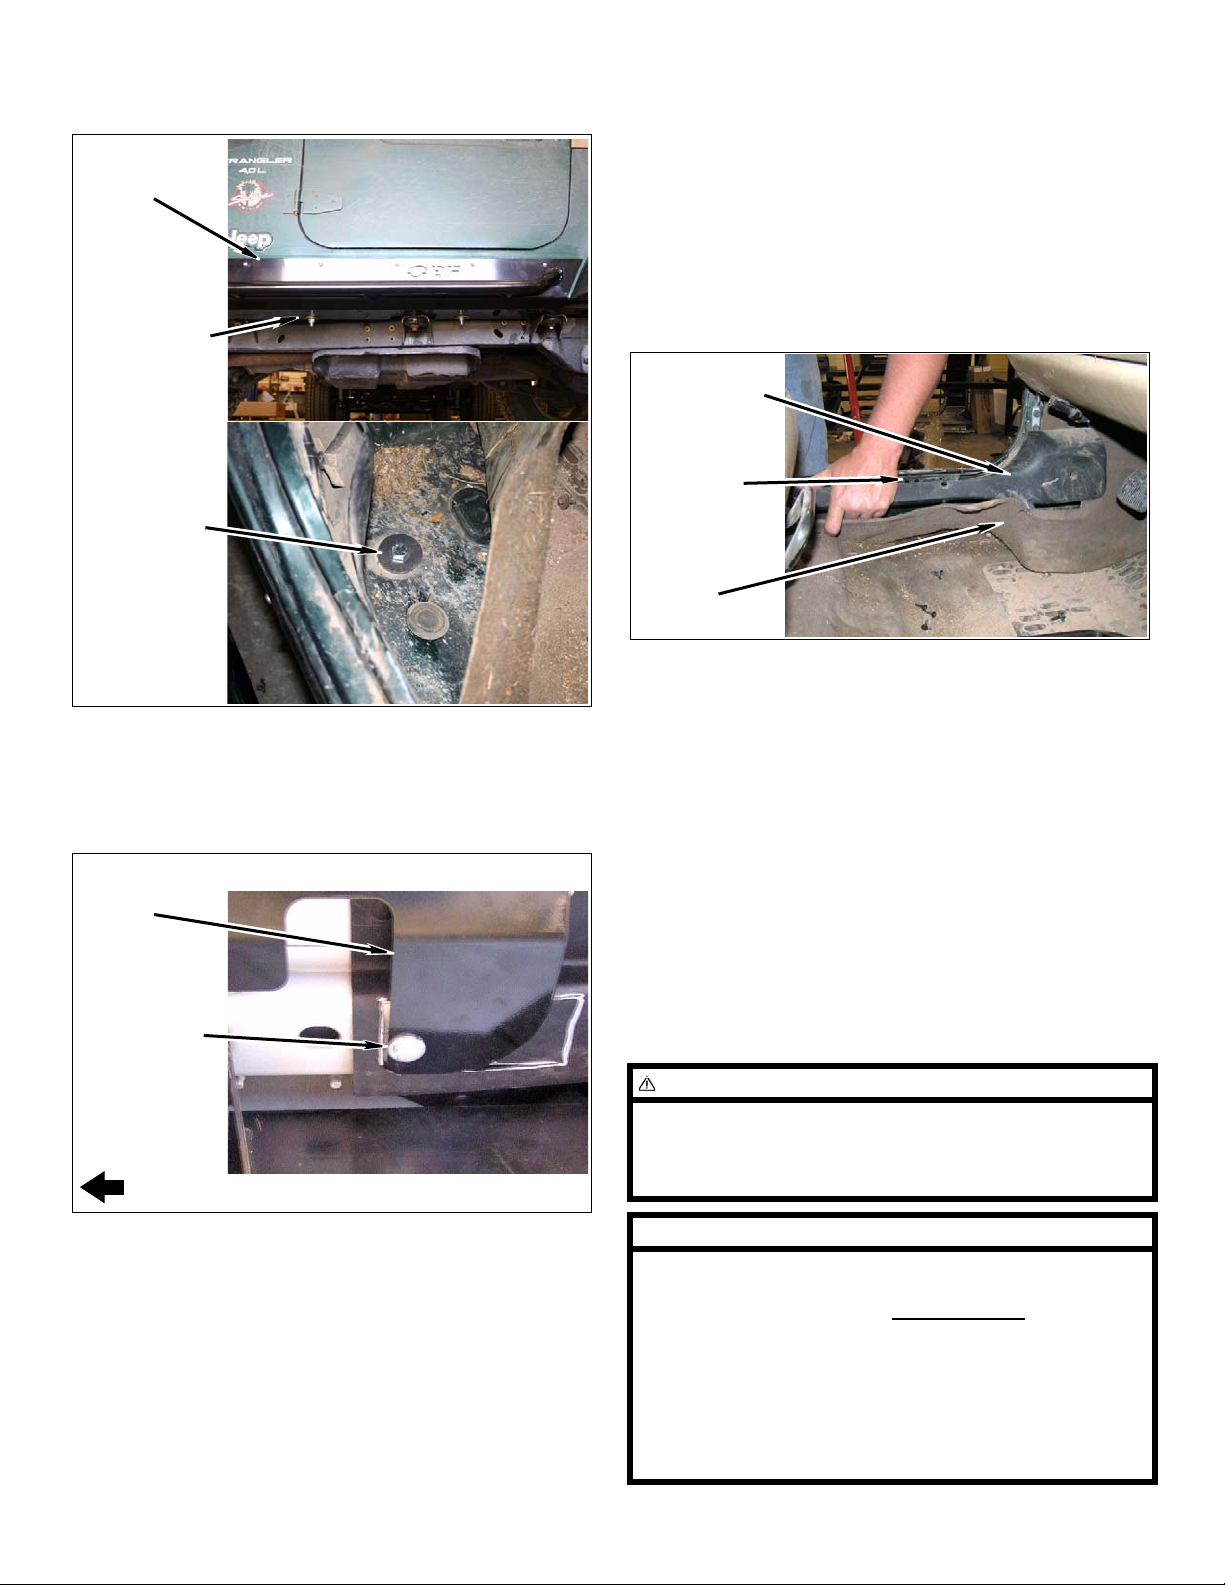
g. Inst all kit rocker panel (driver) onto body chan-
nel with kit bolt (1 /2” x 2-1/2”), two kit washers
(1/2” x 2”), and kit nut (1/2” Nylock).
Inside of Vehicle
1. Interior trim panels
Kit Rocker
Panel
Kit Washer
(1/2” x 2”),
Kit Nut
(1/2” Nylock)
Kit Bolt
(1/2” x 2-1/2”),
Kit Washer
(1/2” x 2”)
h. TJL Models: Install kit rocker panel (driver)
onto rear 3/8” drilled body channel hole with kit
bolt (3/8” x 1-1/2”), kit washer (3/8” USS), and
kit nut (3/8” flange). Use cutout rear plastic
fender for access.
a. Lay down driver and passenger carpet onto
floor.
b. Inst all carpet beneath driver and passenger door
sills if equipped.
c. Install driver and passenger kick panels onto
vehicle with hardware if equipped.
Kick Panels
Door Sills
Carpet
After Completing Installation
Engine Compartment
1. Connect both battery cables. Connect positive cable
first, then negative cable.
Kit Rocker
Panel
Kit Bolt
(3/8” x 1-1/2”),
Kit Washer
(3/8” USS),
Kit Nut
(3/8” Flange)
FRONT
i. Repeat above substeps for passenger rocker
panel.
Miscellaneous
1. Check all fasteners to ensure they are tight.
2. Ensure all wires, hoses, cables, etc. are properly
connected and there is ample slack.
WARNING
Retorque all fasteners after 500 miles and after off road
use. All body lift components should be visually
inspected and fasteners retorqued during routine vehicle servicing.
NOTE
All warranty information, instruction sheets, and other
documents regarding the installation of this product
must be retained by the vehicle owner
contained in the instructions and on the warranty card
will be required for any warranty claims. The vehicle
owner needs to understand the modifications ma de to
the vehicle and how they affect vehicle handling and
performance. Failure to provide the customer with this
information can result in damage to the vehicle and
severe personal injury.
. Information
8 Jeep TJ, TJL Rocker Panels
Page 9
Accessories
g
Kit Parts List
The following accessories are also available:
Kit# 83200: Rock Slider Front Bumper
Kit# 83201: Rock Slider Front Bumper w/
Grille Guard
Kit# 83100: Rock Slider Rear Bumper
Kit# 82200: Sport Cage
Qty. Description
1 Rocker panel (driver)
1 Rocker panel (passenger)
1 ZH24 (Hardware Bag)
2 Bolt (1/2" x 2-1/2")
14 Bolt (1/4" x 1")
1 Bolt (1/4" x 1-1/4")
2 Bolt (3/8" x 1-1/2")
2 Bolt (3/8" x 2" carriage)
2 Han
2 Nut (1/2" Nylock)
10 Nut (1/4" flange)
4 Nut (3/8" flange)
1 Nut (5/16")
4 Rivet nut
14 Washer (1/2" x 2")
10 Washer (1/4" fender)
1 Washer (1/4" SAE)
2 Washer (3/8" USS)
ar (slotted)
NOTE
Depending on the vehicle configuration (TJ or TJL
model), some parts may not be used.
Copyright 04/06
Performance Automotive Group
www.p-a-g.net
9 Jeep TJ, TJL Rocker Panels
 Loading...