

Page 1
3651 N Highway 89 • Chino Valley, AZ 86323
(928) 636-7080 • www.p-a-g.net
JEEP WRANGLER 2 & 4 DOOR
ROCK SLIDER REAR BUMPER
INSTALLATION INSTRUCTIONS
2007-2012 KIT# 83205
WARNING
Before you install this kit, read and understand all
instructions, warnings, cautions, and notes in this
instruction sheet and in the vehicle owner’s manual.
CAUTION
Proper installation of this kit requires knowledge of the
factory recommended procedures for removal and
installation of original equipment components. We recommend that the factory shop manual and any special
tools needed to service your vehicle be on hand during
the installation. Installation of this kit without proper
knowledge of the factory recommended procedures
may affect the performance of these components and
the safety of the vehicle. We strongly recommend that
a certified mechanic familiar with the installation of similar components install this kit.
WARNING
Many states and municipalities have laws restricting
bumper heights and vehicle lifts. Consult state and
local laws to determine if the changes you intend to
make to the vehicle comply with the law.
WARNING
Always wear eye protection when operating power
tools.
WARNING
Before you install this kit, block the vehicle tires to prevent the vehicle from rolling.
NOTE
Performance Automotive Group recommends using
the Loctite® supplied in the kit on the threads of all kit
nuts and bolts unless specified otherwise in these
instructions.
1 Rock Slider Rear Bumper - Kit 83205
Page 2
Before Starting Installation
Rear Bumper
NOTE
Kit parts are prefaced by the word kit and appear in
bold print.
1. Carefully read all warnings and instructions com-
pletely before beginning.
2. Verify all parts have been received in this kit by
checking the parts list at the end of this document.
NOTE
If parts are missing from kit, please be prepared to provide the following information:
1. Name of purchase location
2. Bar Code on side of box
3. Date above bar code
4. Date inside box cover
5. Inspector # from inside box cover
3. Only install this kit on the vehicle for which it is
specified. If anytime during the installation you
encounter something different from what is outlined
in the instructions, call technical support at (928)
636-7080.
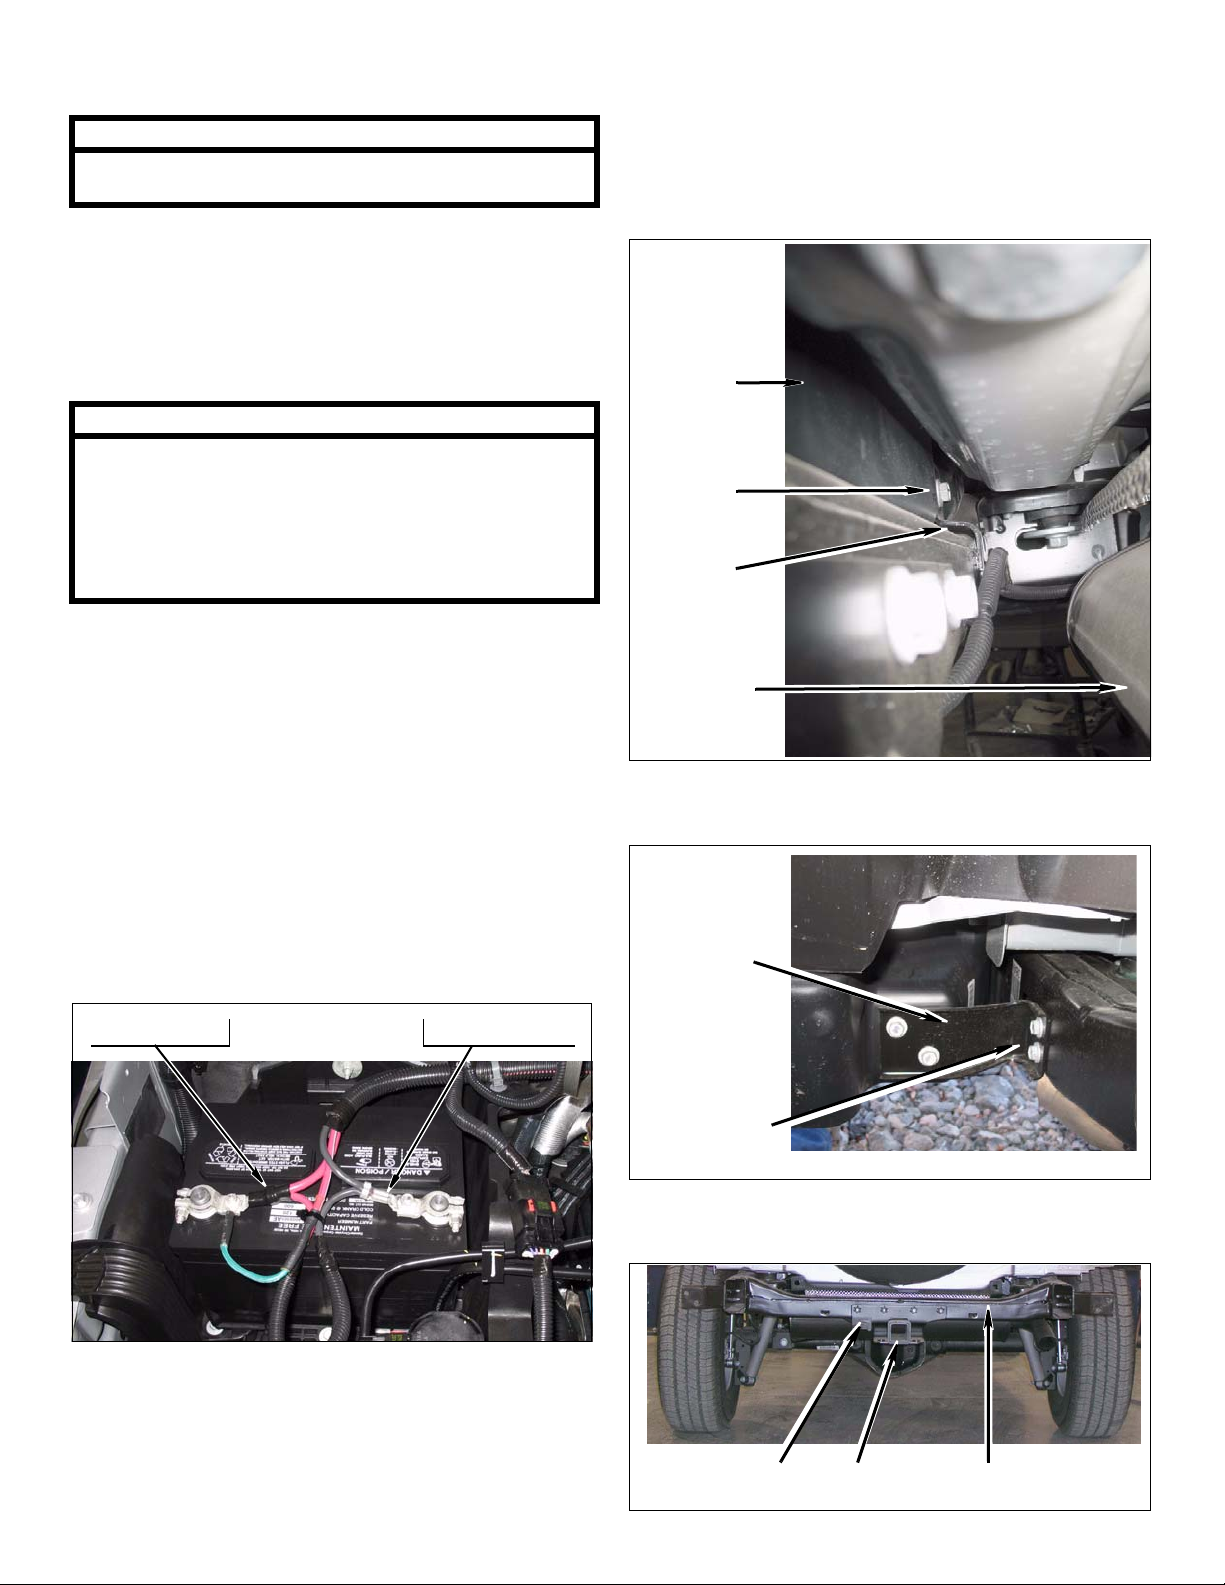
1. Remove Factory Bumper
a. Remove two bolts from brackets on back side of
bumper.
Bumper
Bolt
Bracket
Muffler
4. Park vehicle on a clean, dry, flat, level surface and
block tires so vehicle cannot roll in either direction.
Engine Compartment
1. Disconnect both battery cables. Disconnect nega-
tive cable first, then positive cable.
Positive Cable Negative Cable
b. Remove two bolts from each bumper bracket at
frame and remove bumper.
Bumper
Bracket
Bolts at
Frame
c. Hitch Vehicles: Remove four bolts, from frame
cross support.
Bolts Frame Cross
2 Rock Slider Rear Bumper - Kit 83205
Hitch
Support
Page 3
Prepare to Install Kit
Rear Bumper Assembly
1. Rear Bumper
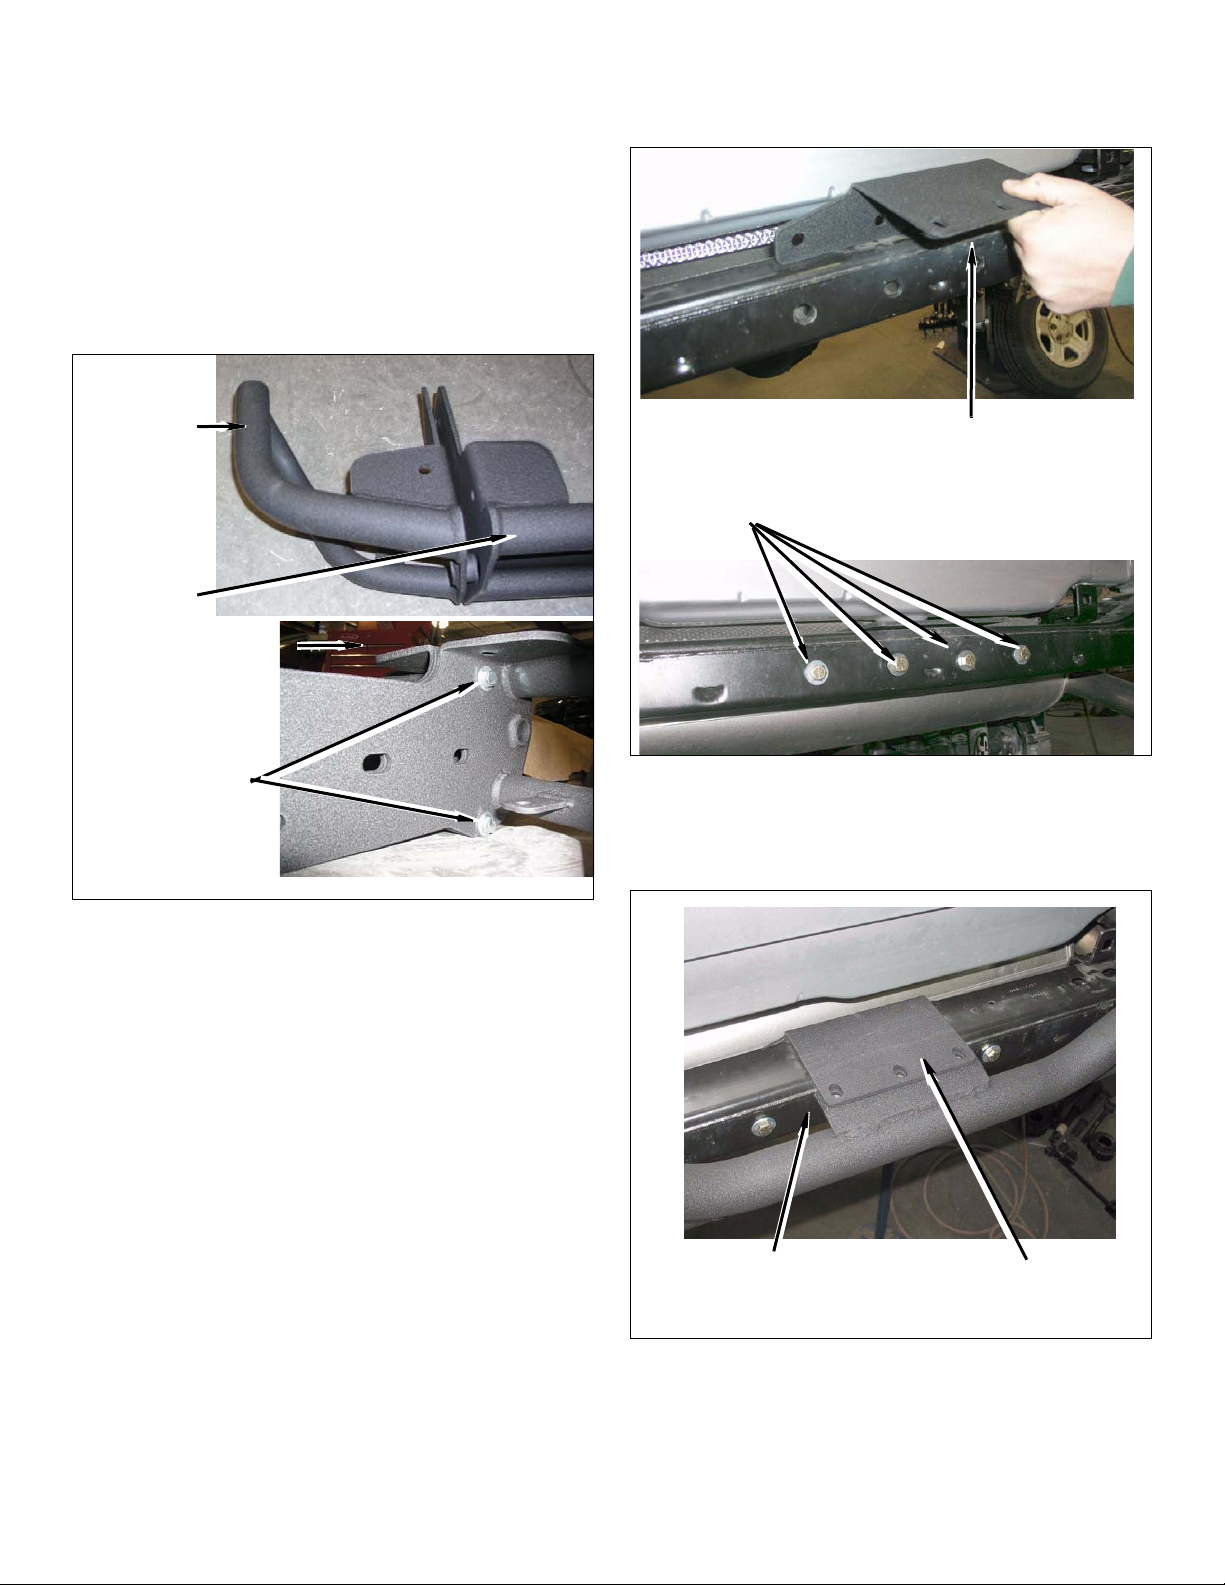
a. Install kit bumper (driver) to kit bumper (center)
with two kit bolts (7/16” x 1”), two kit washers
(3/8” USS), and two kit nuts (7/16” flange). DO
NOT TIGHTEN BOLTS.
Kit Bumper
(driver)
Kit Bumper
(center)
a. Non-Hitch Vehicle: Install four kit bolts (7/16” x
4”), four kit washers (3/8” USS), four kit nuts (7/
16 flange), and kit plate (bumper, rear)
Kit Plate (bumper, rear)
Kit Bolts ( 7/16” x 4”),
Kit Washers (3/8” USS),
Kit Nuts (7/16” flange)
Kit Bolts ( 7/16” x 1”),
Kit Washers (3/8”
USS),
Kit Nuts (7/16”
flange)
b. Repeat for kit bumper (passenger).
Rear Bumper Install
1. Kit Rear Bumper Plate
b. Hitch Vehicle: Install four kit bolts (7/16” x 4”),
four kit washers (3/8”), and kit plate (bumper,
rear). Install kit bolts from back side of bumper
cross brace into factory weld nuts..
Factory Weld Nuts
Kit Plate (bumper,
rear)
3 Rock Slider Rear Bumper - Kit 83205
Page 4
2. Install kit bumper on vehicle.
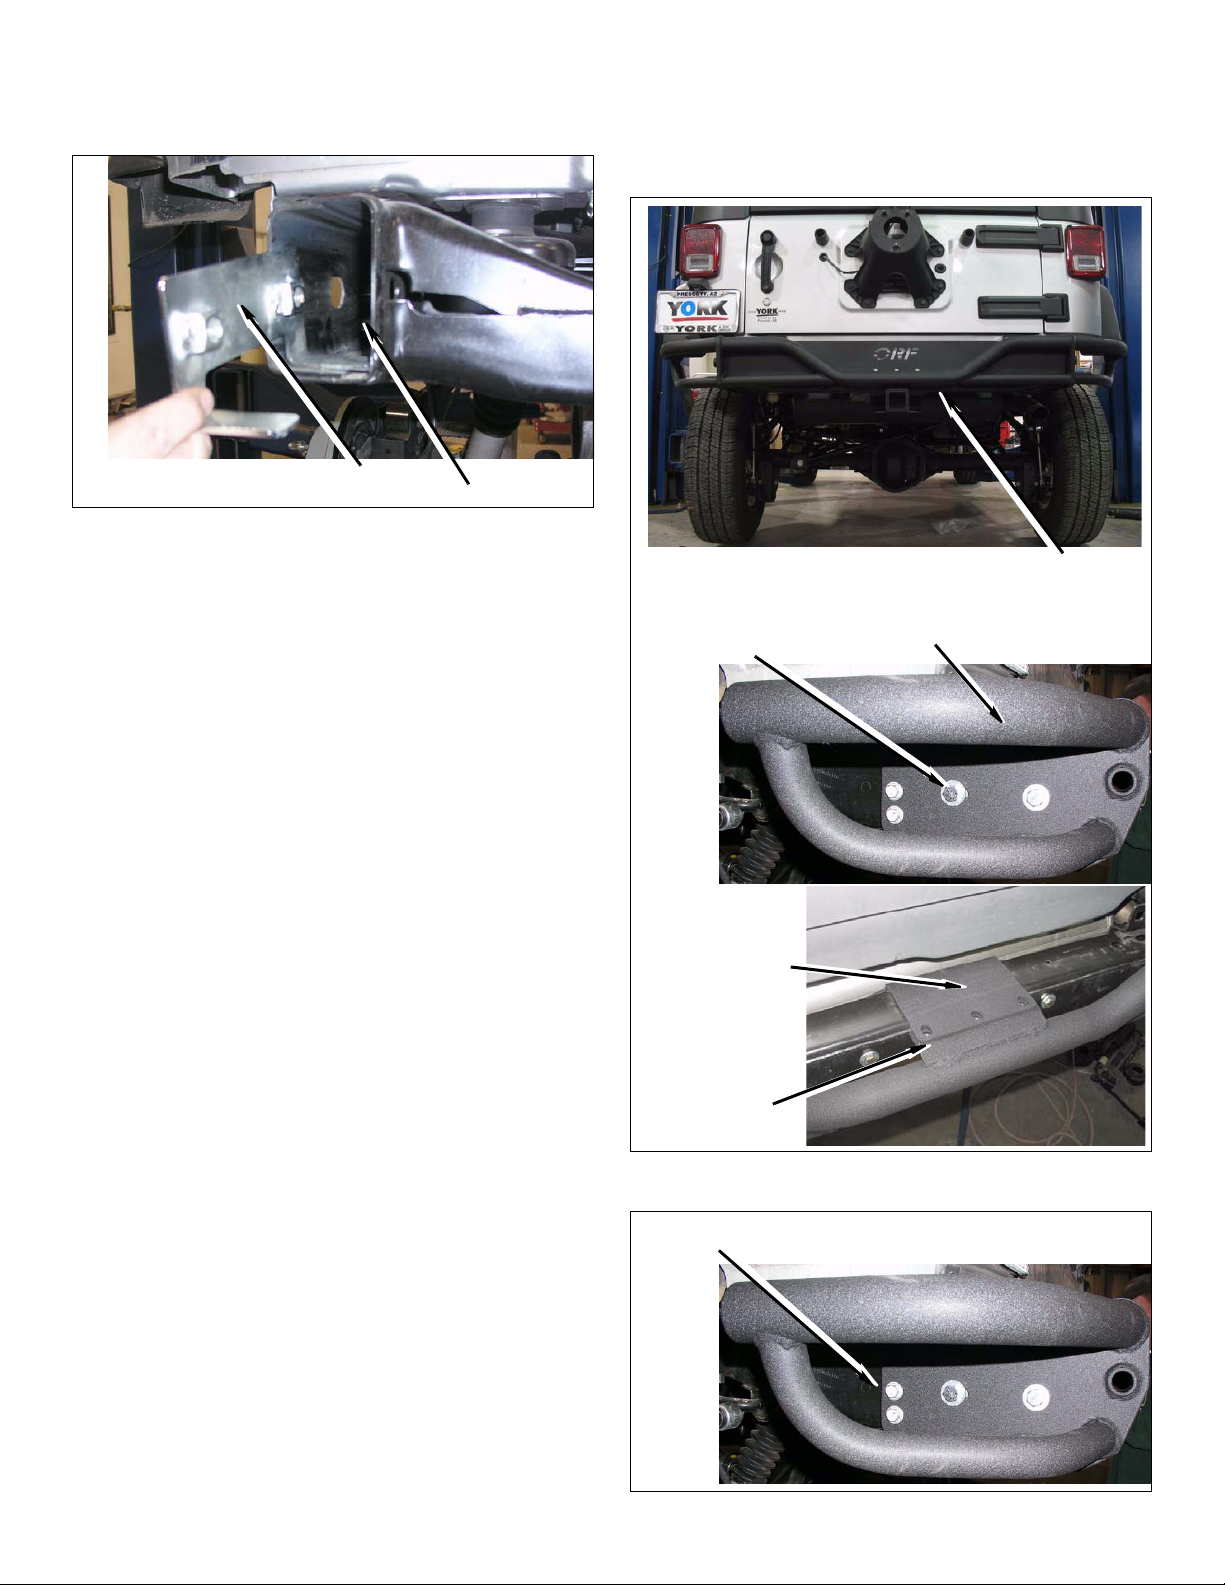
a. Slide kit bracket (nut plate) into each frame rail.
Kit Nut Plate Frame Rail
b. Place assembled bumper onto vehicle making
sure bolt tab on kit bumper is under the kit
bracket (plate, rear). Loosely install four kit
bolts (1/2” x 1 1/2”) and four kit washers (7/16”
USS) into kit bracket (nut plate).
Kit Bolts (1/2” x 1 1/2”),
Kit Washers (7/16”
USS)
Install bumper
(plate, rear) on
top of tab welded on center of
bumper.
Kit Bumper
Tab
Kit Bumper
Kit Bumper
(driver)
c. Install four factory bolts in kit bumper (driver)
Factory Bolts
4 Rock Slider Rear Bumper - Kit 83205
Page 5
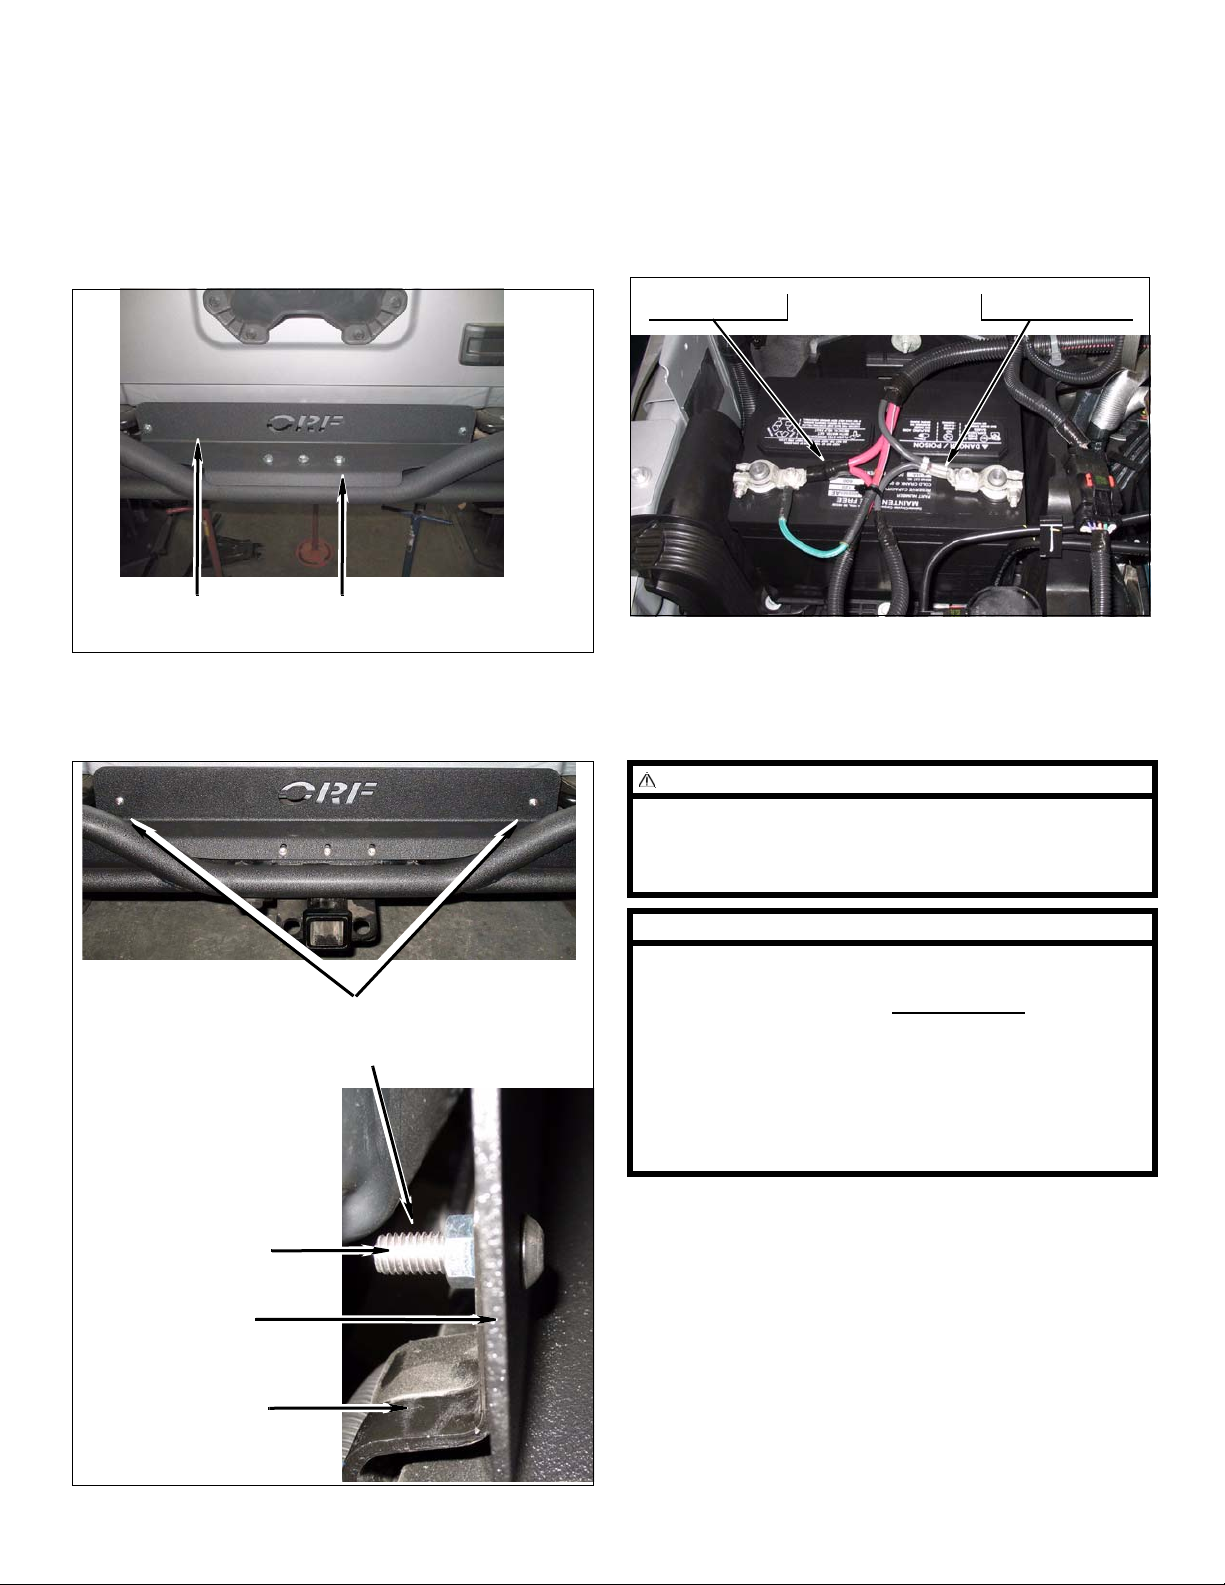
d. Repeat on passenger side.
3. Kit Bumper (Plate Upper)
4. Align kit bumper assembly and tighten all mounting
bolts.
a. Install three kit bolts (3/8” x 1” button head),
three kit washsers (5/16” USS), and kit plate
(bumper, upper) on top of kit bumper (center).
DO NOT TIGHTEN.
Kit Plate (bumper,
upper)
b. Install two kit bolts (3/8” x 1” button head), four
kit washers (5/16” USS), and two kit nuts (3/8”
flange).
Kit Bolt (3/8” x 1” button
head)
Engine Compartment
1. Connect both battery cables. Connect positive cable
first, then negative cable.
Positive Cable Negative Cable
Miscellaneous
1. Check all fasteners to ensure they are tight.
Kit Nut (3/8” flange)
Kit Washers (5/16
USS)
Kit Plate (bumper,
upper)
Kit Bolt (3/8” x 1”
button head)
WARNING
Retorque all fasteners after 500 miles and after off road
use. All body lift components should be visually
inspected and fasteners retorqued during routine vehicle servicing.
NOTE
All warranty information, instruction sheets, and other
documents regarding the installation of this product
must be retained by the vehicle owner
contained in the instructions and on the warranty card
will be required for any warranty claims. The vehicle
owner needs to understand the modifications ma de to
the vehicle and how they affect vehicle handling and
performance. Failure to provide the customer with this
information can result in damage to the vehicle and
severe personal injury.
. Information
Factory Bracket
5 Rock Slider Rear Bumper - Kit 83205
Page 6

Kit Parts List
Qty. Description
1 Bumper, Main Center - Rear
1 Bumper, Corner Left - Rear
1 Bumper, Corner Right - Rear
2 Cap, Domed End - Urethane
1 Plate, Bumper Rear - Center
1 Plate, Bumper Rear - Upper
1
4 Bolt, 7/16” x 4”
4 Bolt, 7/16” x 1”
5 Bolt, Button Head 3/8” x 1 1/4”
4 Bolt, 1/2” x 1 1/2”
2 Bracket, Nut Plate
8 Nut, Flange 7/16”
2 Nut, Flange 3/8”
8 Washer, 3/8” USS
7 Washer, 5/16” USS
4 Washer, 7/16” USS
83205BAG (Hardware bag kit)
6 Rock Slider Rear Bumper - Kit 83205
 Loading...