

Page 1

EN
Model: WW338
User Manual
Manual del Usuario
Manual do Usuário
Manuel de L’utilisateur
Page 2

EN
Page 3

EN
Important Safety Instruction ...................... 1
Safety Tips ................................................... 2
Introduction ................................................. 3
Key Features ............................................... 3
Handset and Base Unit – Front View ...... 4
Base Unit – Bottom View ........................ 4
Handset – Front View .............................. 4
Charger – Front View ............................... 5
Getting Started ............................................ 6
Connecting the AC Adaptor .................... 6
Connecting to Phone Line ...................... 6
Installing the Handset Batteries .............. 6
Installing the Base Unit Batteries ........... 6
Charging the Handset Batteries .............. 6
Final Safety Tips ..................................... 7
Electrical Safety ...................................... 7
Basic Functions .......................................... 7
Making a Call ........................................... 7
Answering a Call ...................................... 7
Ending a Call ........................................... 7
Call waiting .............................................. 8
Message Waiting ..................................... 8
Adjusting the Speaker Volume ............... 8
TABLE OF CONTENTS
Redialing a Call ...................................... 8
Redial from the Last 10 Numbers ........... 8
Fast Redial ............................................... 8
Deleting a Redial Number ...................... 8
Saving Dialed Numbers into Memory .... 8
Phonebook .................................................. 8
Storing Numbers in Phonebook .............. 8
Keys to Use ............................................... 9
Deleting Numbers from Phonebook ....... 9
Editing Numbers in the Phonebook ....... 9
Calling Numbers from Phonebook ........ 10
Quick Browsing of Phonebook .............. 10
Caller ID Display ....................................... 10
Viewing Caller ID Records .................... 10
Saving Caller ID Records in Phonebook .. 1 0
Formatting Caller ID Numbers .............. 10
Deleting Caller ID Records .................... 10
No Caller ID ............................................ 11
Missed Calls ........................................... 11
During a Call .............................................. 11
Using the Mute Function ....................... 11
Using Speakerphone During a Call ...... 11
Handset Settings ...................................... 11
Setting the Ring Tone ........................... 11
Setting the Ring Tone Volume ............. 11
Setting the Display language ............... 11
Setting the Dial Mode ........................... 12
Setting the Time / Date Format ........... 12
Setting the Area Code .......................... 12
MODEL: WW338
USER MANUAL
2.4GHz Digital Expandable
Cordless Phone with
Integrated Weather Station
Page 4

EN
Conference Call ........................................ 12
Weather Forcasting .................................. 12
Weather Forecasting on the Handset ... 12
Temperature on the Handset ................ 13
Changing from Celsius to Fahrenheit... 13
Operating the Remote Sensor ................. 13
Installing Batteries ................................. 13
Low Battery Warning ............................. 14
Setting a Channel in Remote Sensor .. 14
Table Stand or Wall Mount................... 14
The Reset Button ................................... 14
Operating the Base Unit ........................... 14
Paging the Handsets ............................. 15
Settings the Base Unit Time ................. 15
Setting the Time Format....................... 15
Setting the Date Format ........................ 15
Setting the Date .................................... 15
Selecting Celsius or Fahrenheit ........... 15
Setting the Base Unit Alarm ................. 16
Turning the Alarm Off ........................... 16
Installing the Sensor .............................. 16
Using Multiple Handsets .......................... 16
Intercom Calling Between Handsets .... 17
Answering Intercom Calls ...................... 17
Call Waiting ........................................... 17
Call Transfer Between Handsets ........... 17
Registering Handsets to Base Unit ........ 17
Registration Procedure .......................... 17
De-Registration of Handsets .................. 17
Playing the Game (Snake) ....................... 18
Playing the Game ................................. 18
Resetting Your System ............................. 18
Setting Your Default Settings ............... 18
Your Default Settings ............................. 18
Keypad Symbols .................................... 19
Safety & Care ............................................ 19
Safety Precautions................................. 19
Caring for the Product ........................... 19
Caution ................................................... 19
Troubleshooting......................................... 20
Potential Issues ...................................... 20
Problems with Multi-Handset Use ......... 21
Other Important Items ............................ 21
Specifications ........................................... 21
About Oregon Scientific ........................... 22
FCC Statement .......................................... 2 2
Declaration of Conformity ........................ 22
Copyright .................................................... 23
Page 5

EN
Some of the following information may not apply
to your particular product; however, when using
conference phone equipment, basic safety
precautions should always be followed to reduce
the risk of fire, electric shock and injury to
persons, including the following:
1. Read and understand all instructions.
2. Follow all warnings and instructions marked on
the product.
3. Unplug this product from the wall outlet before
cleaning. Do not use liquid cleaners or aerosol
cleaners. Use a damp cloth for cleaning.
4. This product should not be used while you are
in a bathtub, shower or pool. Immersion of the
product in water could cause an electrical
shock.
5. Slots and openings in the cabinet back or bottom are provided for ventilation, to protect it
from overheating. These openings must not be
blocked or covered. The openings should
never be blocked by placing the product on
the bed, sofa, rug, or other similar surface.
This product should not be placed in a built-in
installation unless proper ventilation is
provided.
6. This product should be operated only from the
type of power source indicated on the marking
label. If you are not sure of the type of power
supply to your home, consult your dealer or
local power company.
7. Do not allow anything to rest on the power
cord. Do not locate this product where the cord
will be abused by persons walking on it.
8. Do not overload wall outlets and extension
cords as this can result in the risk of fire or
electric shock.
9. Never push objects of any kind into this product through cabinet slots as they may touch
dangerous voltage points or short out parts
that could result in a risk of fire or electric
shock. Never spill liquid of any kind on the
product.
10.To reduce the risk of electric shock, do not
disassemble this product, but take it to a
qualified serviceman when service or repair
work is required. Opening or removing covers
may expose you to dangerous voltages or
other risks. Incorrect reassembly can cause
electric shock when the telephone equipment
is subsequently used.
11. Do not expose the product to extreme temperatures such as areas near a hot radiator or
stove or in a hot car.
12. Do not place lighted candles, cigarettes, cigars,
etc., on the telephone.
13. Never touch uninsulated telephone wires or
terminals unless the telephone line has been
disconnected at the network interface.
14. Never install or modify telephone wiring during
a lightning storm.
15. Never install telephone jacks in wet locations
unless the jack is specifically designed
for wet locations.
16. Use caution when installing or modifying telephone lines to prevent electrical shock and/or
fire.
17. Unplug this product from the wall outlet and
refer servicing to qualified service personnel
under the following conditions:
A. When the power supply cord or plug is
damaged or frayed.
B. If the product has been exposed to rain or
water.
C. If the product does not operate normally by
following the operating instructions.
D. If the product’s cabinet has been damaged.
1
IMPORTANT SAFETY
INSTRUCTIONS
Page 6
EN
E. If the product exhibits a distinct change in
performance.
18. Avoid using a telephone (other than a cordless
type) during an electrical storm. There may be
a remote risk of electric shock from lightning.
19. Do not use the telephone to report a gas leak
in the vicinity of the leak.
20. Do not place this product on an unstable cart,
stand or table.
The product may fall, causing serious damage
to the product.
21. Plug the adaptor to the socket-outlet which
near the equipment and shall be easily
accessible.
22.
Risk of explosion if battery is replace
by an incorrect type, use only SANIK, 3SNAAA75H-S-JIF. Dispose of used batteries
according to the instructions.
23. For servicing or replacement, you can purchase a suitable headset through service
center or retailer shop.
(see in www. oregonscientic.com)
This product is designed to give you years of
service if handled properly. Observe the following
guidelines:
• Clean the unit with a damp cloth and mild
detergent. Avoid dropping the unit or placing it
in a high-traffic location.
• Never immerse the unit in water. This can
cause electrical shock and damage the unit.
• Do not subject the Base Unit to extreme
force, shock, or fluctuations in humidity.
• Do not tamper with the internal components.
• Do not mix new and old batteries or batteries
of different types.
• Remove the batteries if storing this product
for a long period of time.
You must use a Class 2 power
source that supplies 9V DC and
delivers at least 400mA. Its plug
must fit the phone’s DC IN 9V jack.
The supplied adapter meets these specifications. Using an adapter that does not meet
these specifications could damage the phone
or the adapter.
Always connect the AC adapter to the phone
before you connect it to AC power. When you
finish, disconnect the adapter from AC power
before you disconnect from the phone.
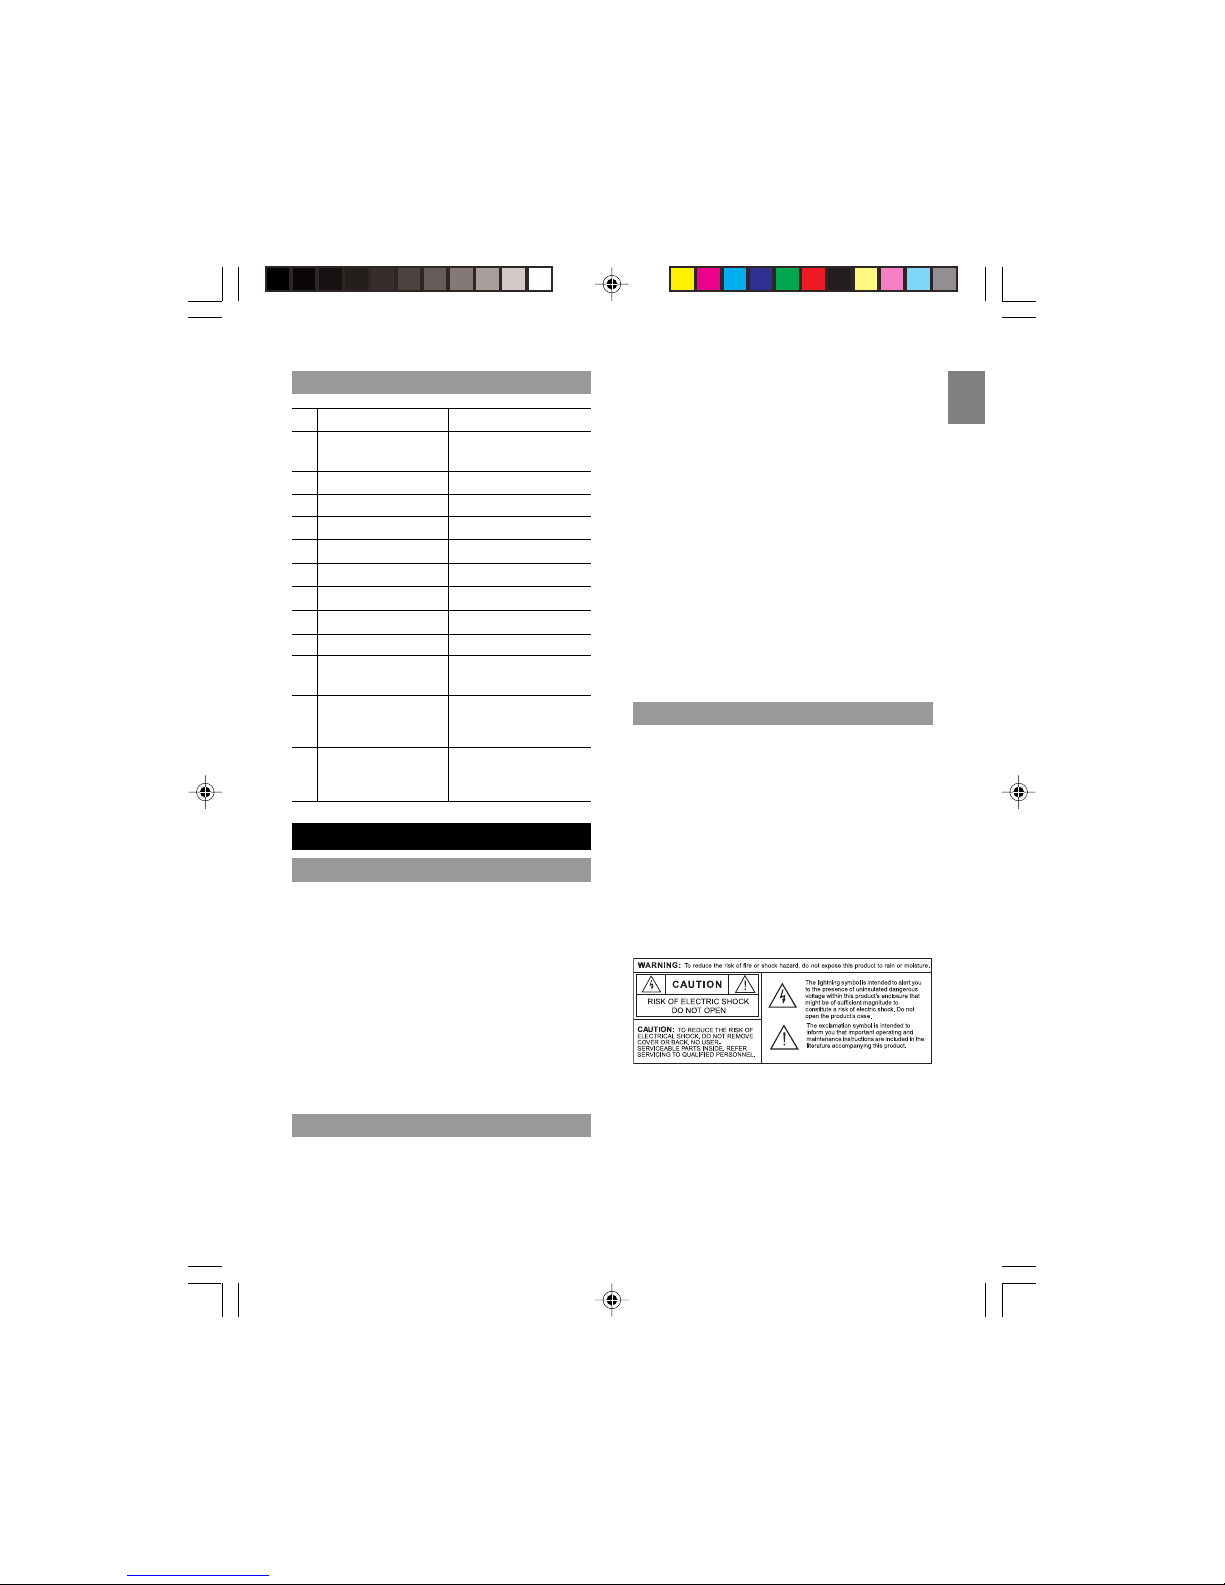
CAUTION
CAUTION
To reduce the risk of fire, use only
No. 26 AWG or larger
telecommunication line cord.
2
SAFETY TIPS
• Do not scratch the LCD display.
• Do not make any changes or modifications to
this product. Unauthorized changes may void
your right to use this product.
• The technical specifications for this product
and the contents of the user guide are subject
to change without notice.l
SAVE THESE INSTRUCTIONS
Page 7
EN
Thank you for selecting the Oregon Scientific™
WW338 2.4GHz Digital Expandable Cordless
Phone with Integrated Weather Station as your
product of choice. The Base Unit of the WW338
has a built-in thermometer and clock station that
is capable of keeping track of minimum and
maximum temperatures in different locations via
transmissions from the remote sensor.
This powerful device bundles animated weather
forecasting, indoor / outdoor wireless temperature
and humidity readings, time / date keeping, and
dual alarm features into a single tool that you can
use from the convenience of your home.
The following items should be included in this
package:
WW338
• 1 handset
• 1 base unit
• AC / DC adaptor for the Base Unit
• Telephone line for the Base Unit
• Remote thermo-hygro sensor
• Handset battery pack
• Sensor wall-mount bracket
• Belt clip
• Sensor batteries
• User manual
KEY FEATURES
WW338H:
• 2 handsets
• 1 base unit
• 1 charger
• AC / DC adaptor for the Base Unit
• Telephone line for the Base Unit
• Remote thermo-hygro sensor
• Handset batteries
• Sensor wall-mount bracket
• Belt clip
• Sensor batteries
• User manual
The WW338 Digital Phone Features:
• Handset speakerphone
• Intercom/Call Transfer/Conference call
capability
• Weather forecasting
• Dual-crescendo alarms
• High/low temperature/hygrometer alarm
• Dual alarm with snooze function
• Up to 3 remote thermo-hygro sensors
• Full-dot graphic handset display
• 40-Caller ID memory
• User-selectable Celsius or Fahrenheit
• Built-in game on handset
• 10 ringer melodies and 4 standard ring tones
• Mute/Flash/Redial functionality
• Multiple language display – English, French,
Spanish and Portuguese
• Caller ID display
• Headset jack & belt clip
• Sensor wall-mount bracket
• Phonebook review during conversation
• Redial feature for last 10 numbers
NOTE: Keep this manual handy as you use your
new product. It contains practical step-by-step
instructions, as well as technical specifications
and warnings you should know.
INTRODUCTION
3
Page 8
EN
1
2
4
3
5
6
9
8
7
1
1
10
2
1
4
5
6
8
7
3
9
10
1
1
13
12
15
16
14
3
2
1
8
7
6
5
4
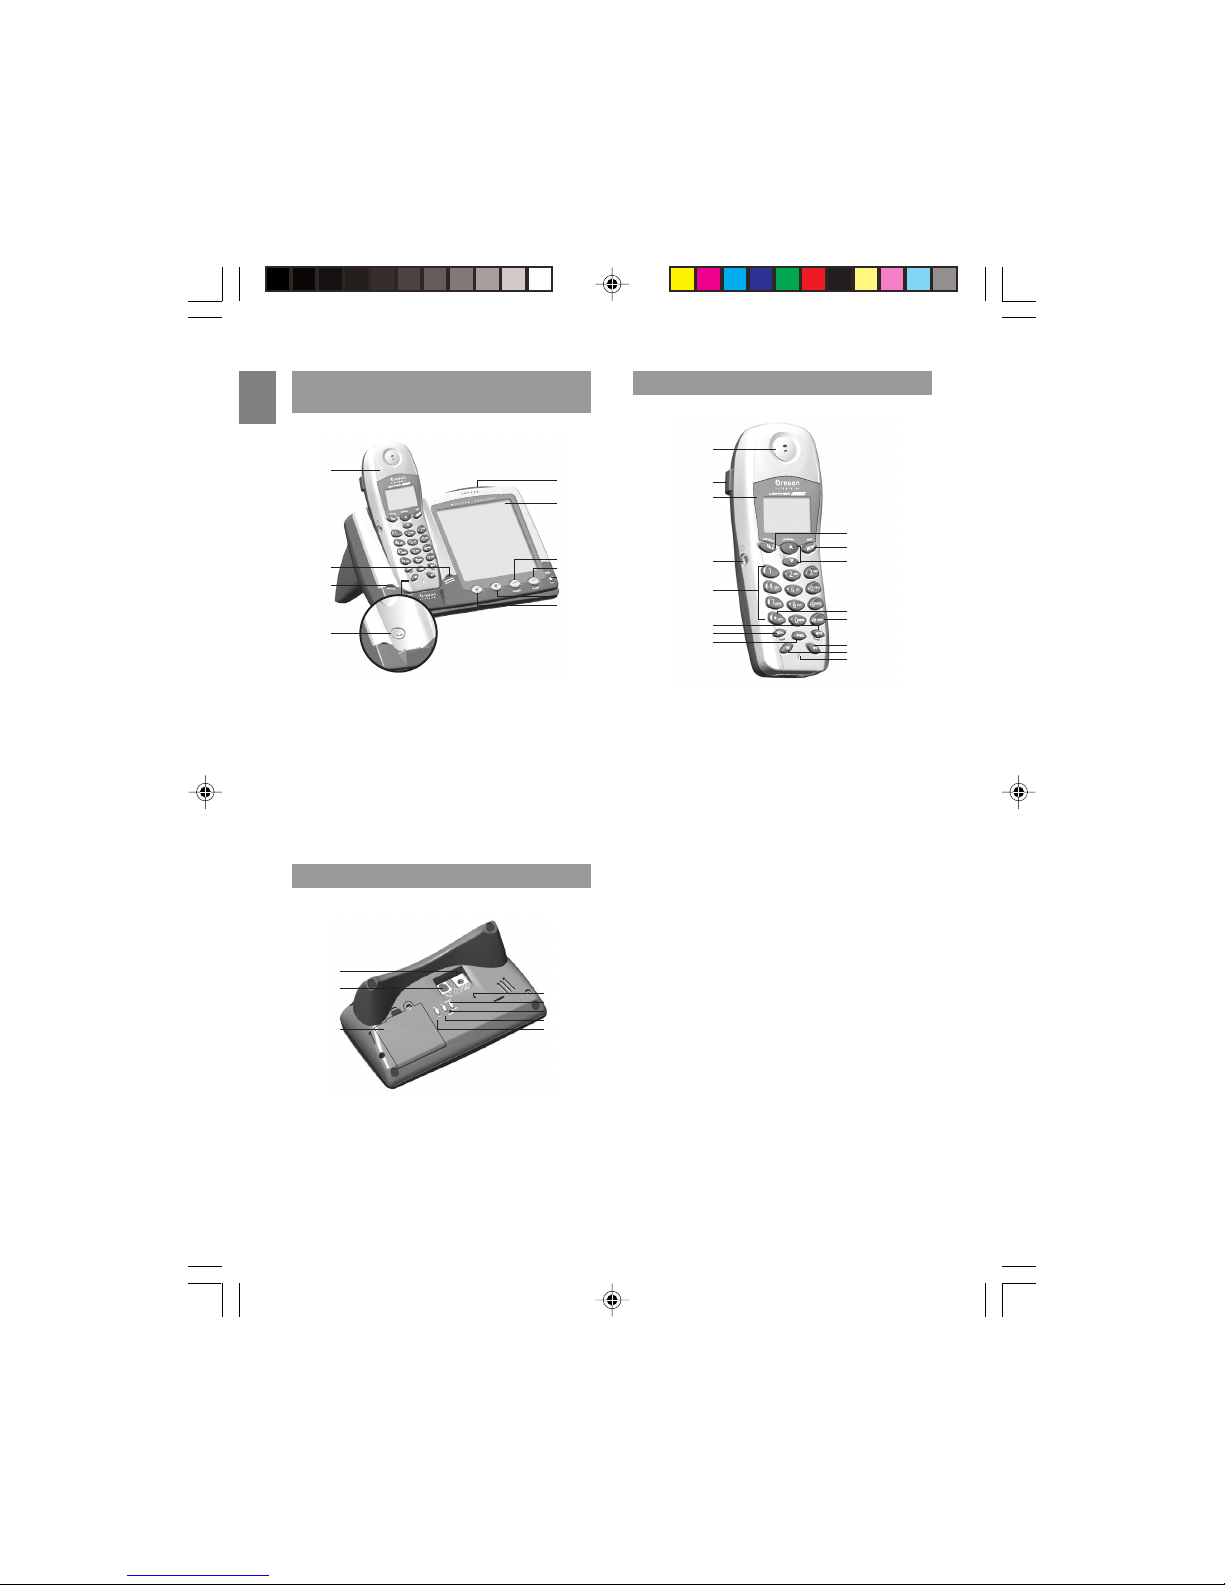
HANDSET AND BASE UNIT
– FRONT VIEW
1. Handset
2. LED Charge Indicator
3. UNANSWERED CALL /
IN USE Indicator
4. PAGE Button
5. SNOOZE / LIGHT
button
6. Base Unit LCD
1. Power jack
2. Telephone line jack
3. Battery box
4. Speaker outlet
7. CHANNEL
button
8. ALARM button
9. SET button
10. DOWN button
11. UP button
BASE UNIT - BOTTOM VIEW
5. ON / OFF ALARM
button
6. RESET hole
7. UP button
8. HI/LO button
HANDSET - FRONT VIEW
1. Receiver
2. Belt Clip
3. LCD Display
4. Headphone jack
5. Keypad
• Keypad 0-9, A-Z buttons.
• Press the number to dial the call or use for
text input i.e. editing the phonebook or
caller identification.
6. MUTE / FORMAT button
• Press this to mute the microphone during a
call.
• Press to select the format you want to use
for a phone number i.e. no area code, with
area code, with area and international code.
7. REDIAL / DELETE button
• Press to browse redial list.
• Press to redial a phone number.
• Press to delete digits when dialing a phone
number.
8. PHONEBOOK (PHBK) button
• Press to view the phonebook.
4
Page 9
EN
9. TALK / CALLBACK button
• Press to begin and end a phone call.
• Press to callback a number.
10. MENU / FLASH button
• Press to access main menu.
• Press to confirm a selected option.
• Press to move from a current call, to call
waiting.
11. ARROW KEYS
• Press to move up and down menu options.
• Press to increase or decrease the speaker
volume.
• Press to browse Caller ID records,
phonebook and redial list.
12. EXIT / * button
• Press to exit an operation and return to
standby mode.
• Press to use * in text.
13. CONF / # button
• Press to make a conference call.
• Press to use # in text.
14. SPEAKERPHONE (SPK) button
• Press to turn the speakerphone on or off.
15. INTERCOM (INT) button
• Press to make an intercom call.
• Press to make a conference call.
• Press to transfer a call.
16. Microphone
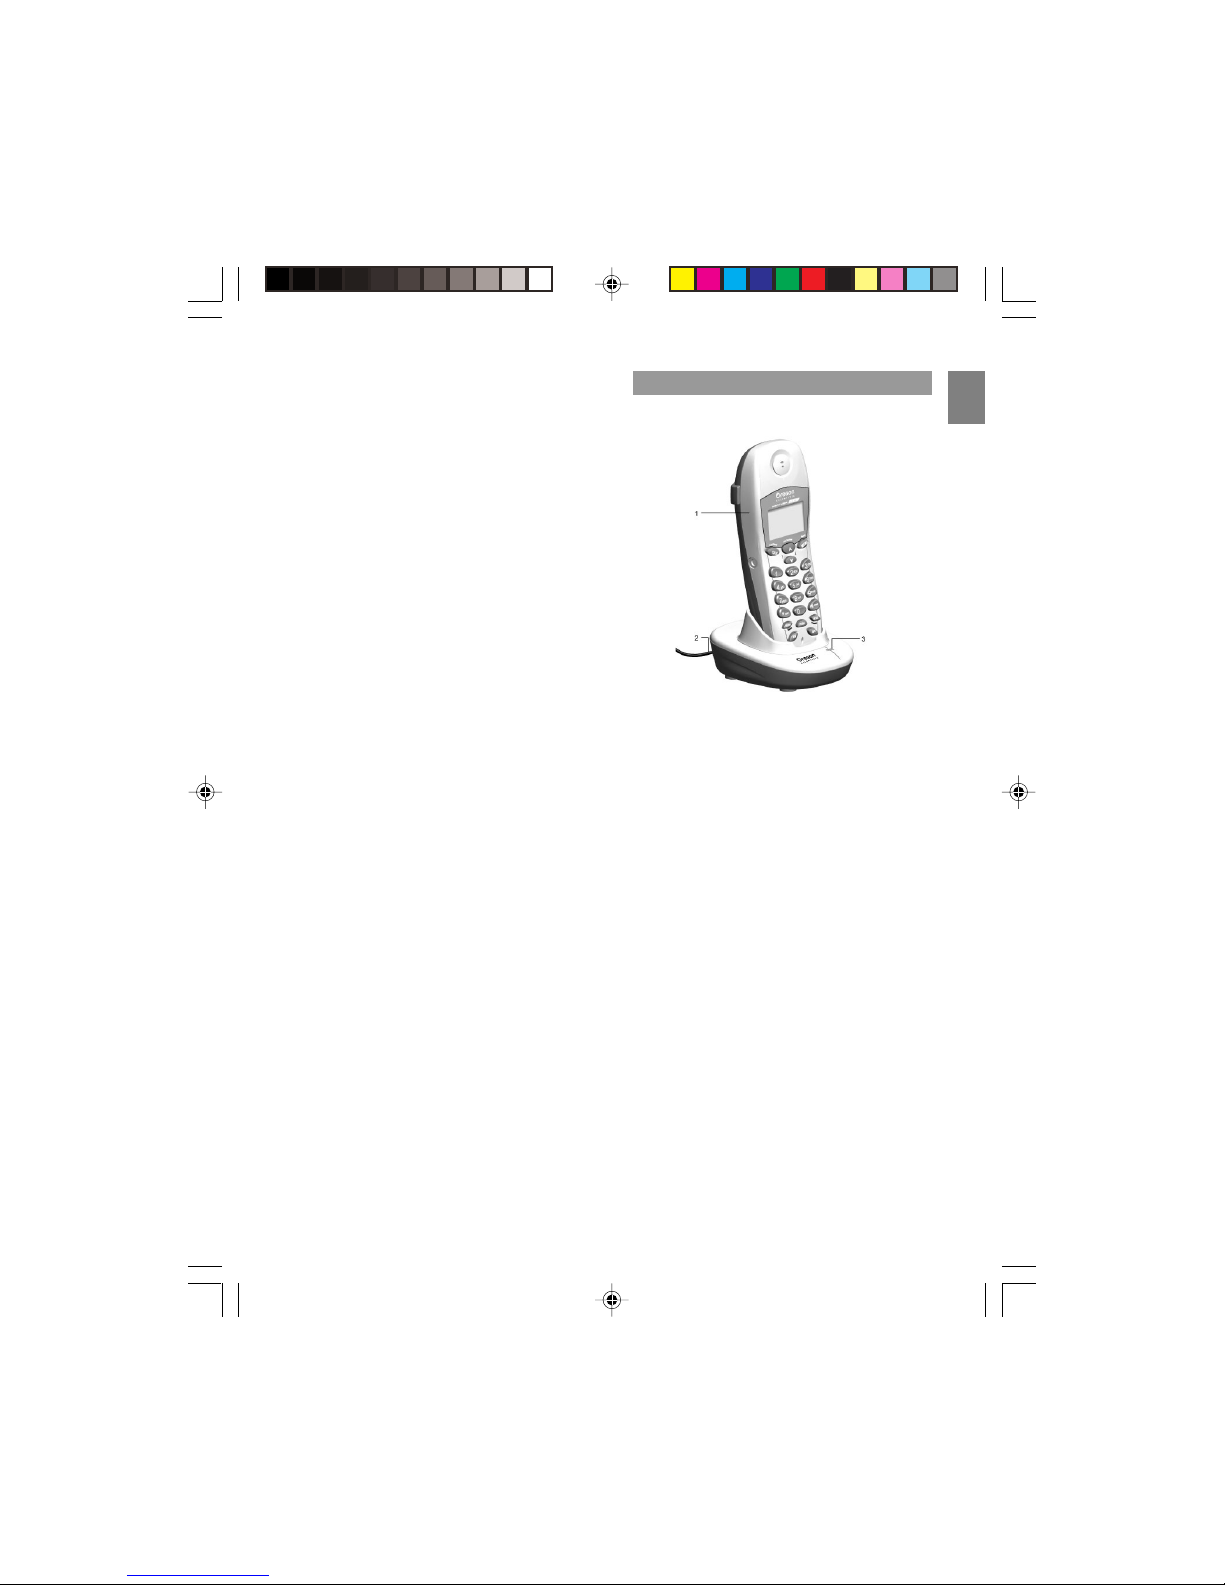
CHARGER - FRONT VIEW
1. Handset
2. AC / DC power
3. Charge LED
5
Page 10
EN
GETTING STARTED
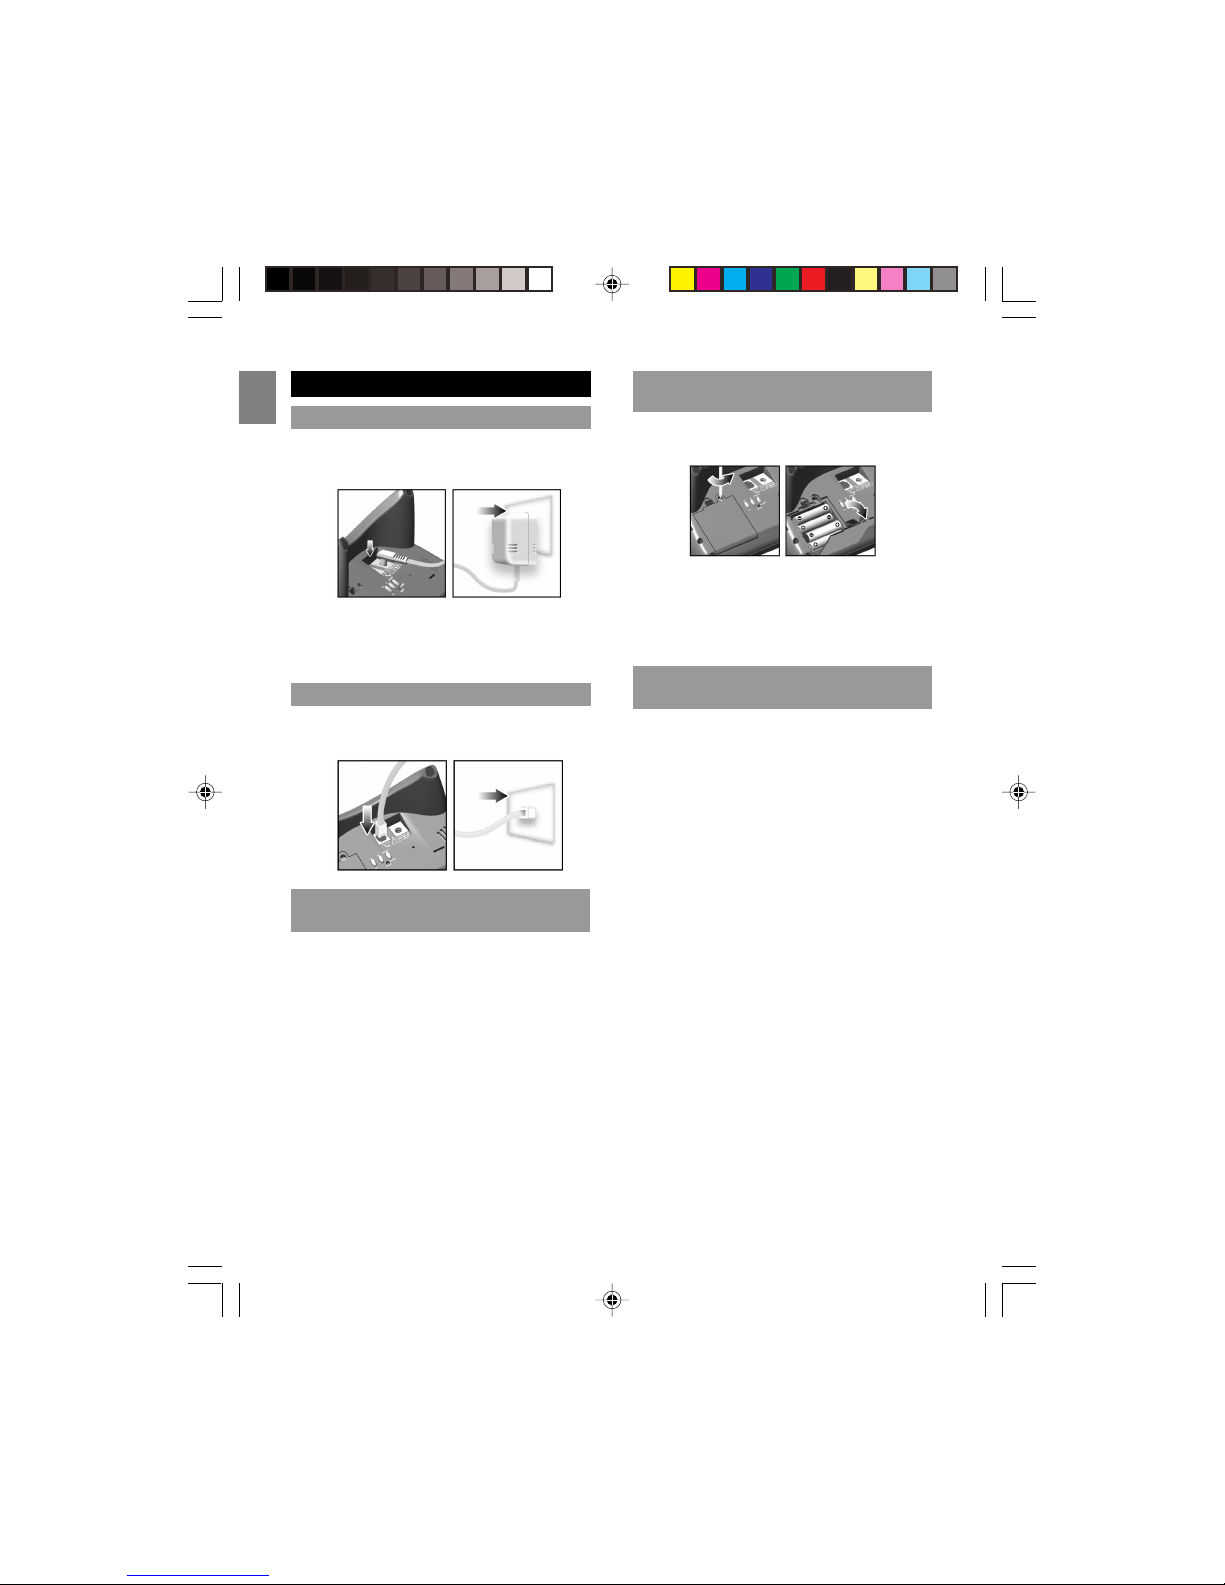
1. Connect the AC adaptor socket to the Base
Unit and to your room’s power socket.
2. Rest the handset on the Base Unit to charge.
Once plugged in, allow the handset to charge
for 15 hours before using.
Connect the phone line to the Base Unit and to
your room’s telephone socket.
CONNECTING THE AC ADAPTOR
CONNECTING TO PHONE LINE
Batteries come with your phone. One is already
installed in one handset, while the other needs to
be installed in the second handset.
Fitting the batteries in the handset
1. Insert the battery into the handset by inserting
the piece at the end of the wire into the top
left of the battery indention on the handset.
2. Fit the battery compartment cover by sliding it
down so that it clicks firmly into place.
INSTALLING THE HANDSET
BATTERIES
INSTALLING THE BASE UNIT
BATTERIES
6
Four batteries (AAA size) come with your Base
Unit.
Insert the four batteries as indicated, matching
correct polarity (+, -)
NOTE: Reversing the orientation may damage the
Base Unit.
Before using the handset, charge the handset for
at least 15 hours.
Whenever you see the battery icon on the handset display become nearly empty, or hear the
warning tone during the call, please:
• End the call as soon as possible.
• Don’t use the speakerphone mode for conservation since this will further reduce the take
time.
• Put the handset back on the charger for
charging until the battery icon returns to high
level.
To charge the handset, place the handset in the
charger. The base charge light will come on to
indicate the charging of handset. Always put the
handset in the base cradle with the keypad facing
outwards.
NOTE: Please note the following:
• Standby time: 5 days
• Talk time: 7 hours
• Handset charging time: 15 hours
• Normal conditions of use: 0°C to 45°C
• AC adaptor for base unit: 120VAC 9V 60Hz
400mA
CHARGING THE HANDSET
BATTERIES
Page 11
EN
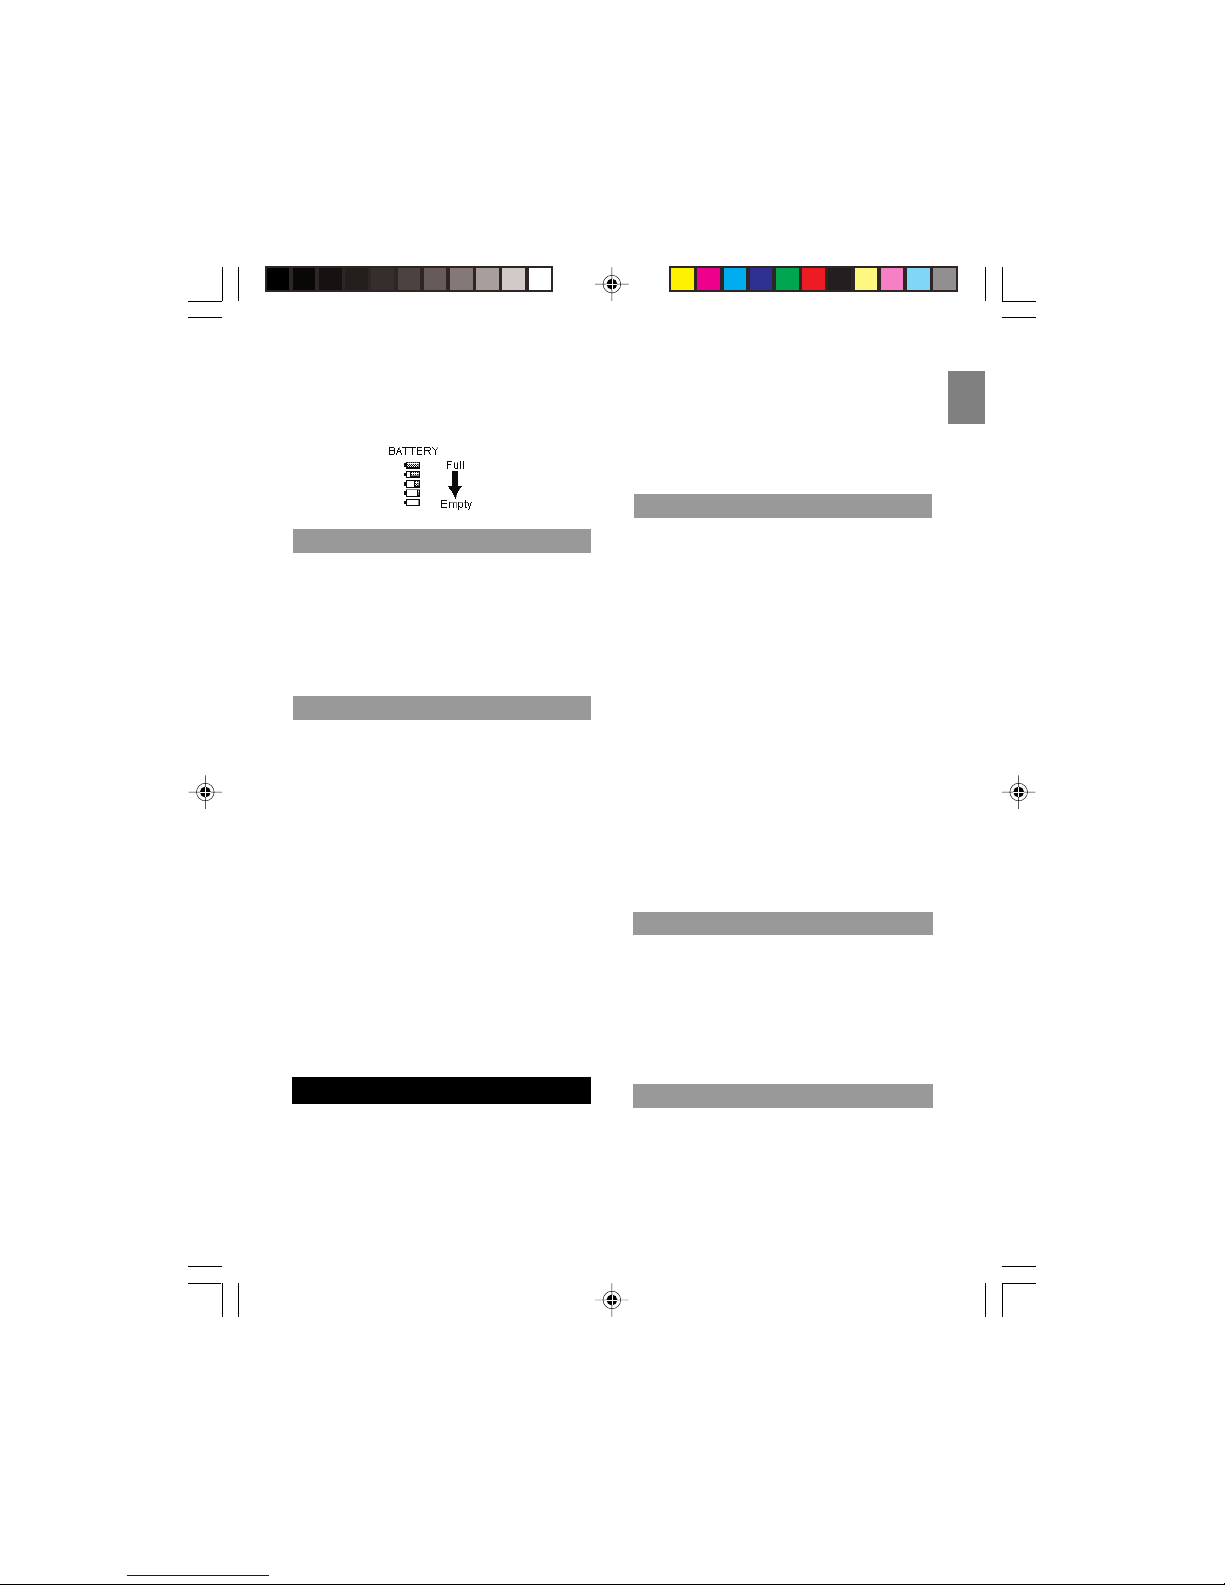
When the battery is fully charged, the handset
battery icon will show the battery full in the top
right on the LCD display.
Due to radio interference in the environment,
occasional loss of synchronization between the
handset and base may occur for a very short
duration. The base will very quickly change to
another channel automatically to overcome the
interference and restore synchronization.
• Do not install the base unit near a sink, bath
or shower, or anywhere else where it could get
wet. Electrical equipment can cause serious
injury if used while you are wet or standing in
water.
• If the base unit ever falls into water, do not
retrieve it until you have unplugged the power
lead from the mains and the telephone line
plug from the telephone socket; then pull it out
by the unplugged cables.
• Never use your weather phone in the open air
during a thunderstorm - unplug the Base Unit
from the telephone line and the main socket
when there are storms in your area. Damage
caused to your phone by lightning is not
covered by the guarantee.
Usually, a loss of reception means you are too
far from the Base Unit, or there is interference
between the two units. Make sure to:
• Stay within a range of 300 meters from the
Base Unit while using the handset.
FINAL SAFETY TIPS
ELECTRICAL SAFETY
• Avoid interference such as TV or other
electrical appliances.
NOTE: In this user manual, all BOLDED,
capitalized letters are buttons that appear in your
new weather phone.
Using the TALK button:
1. Press TALK to get the dial tone, and dial the
number. If you make a mistake, press TALK
again to cancel the whole number.
OR
2. Dial the number then press TALK.
NOTE: You can use the TALK button to toggle
between Talk Mode and Standby Mode.
Using the Speakerphone (SPK) button:
1. Press SPK to get the dial tone, and dial the
number.
OR
2. Dial the number then press SPK.
NOTE: If you are in Speakerphone Mode and you
want to use the handset, press TALK to switch off
the speakerphone first.
The handset will ring when there is an external call.
• Press TALK OR press SPK. (This will enable
the speakerphone function).
NOTE: If the handset is placed in the recharge
cradle of the Base Unit when it is in Talk Mode, it
will automatically enter the Standby Mode.
• Press TALK.
BASIC FUNCTIONS
MAKING A CALL
7
ANSWERING A CALL
ENDING A CALL
Page 12

EN
STORING NUMBERS IN THE
PHONEBOOK
You will hear a call waiting tone:
• Press FLASH to switch from an existing call to
call waiting.
• “Message Waiting” will appear on the screen.
Follow the voice message commands to enter
your phone network operator’s message
service.
To adjust the speaker volume:
• Press TALK, then press the ARROW KEYS to
adjust the speaker volume accordingly.
• Press TALK, then press REDIAL.
1. Press REDIAL to see your last call record.
2. Use the ARROW KEYS to select a number.
3. Press TALK to dial the number.
If you want to edit the phone number before
redialing:
1. Press REDIAL, then press MENU.
2. Use ARROW KEYS to select “Edit for Call”,
then press MENU.
3. Use the 0-9 buttons to edit the number.
4. Press TALK to dial the number.
When you make a call and hear the busy tone,
press REDIAL. The phone will quickly redial the
number within 3 seconds.
MESSAGE WAITING
ADJUSTING THE SPEAKER VOLUME
REDIALING A CALL
REDIAL FROM THE LAST 10 NUMBERS
1. Press REDIAL to see your last call record.
2. Use the ARROW KEYS to select a number,
then press MENU.
3. Select “Delete Record”.
4. Press MENU.
5. Select “Yes” and then press MENU to confirm.
The handset will automatically save the last 10
numbers you dialed. To save dialed numbers into
your Phonebook:
1. Press REDIAL. (The last number is listed).
2. Use the ARROW KEYS to select a phone
number, then press MENU.
3. Select ‘Save Phonebook” to save number,
then press MENU. “SAVED” will appear on the
screen to confirm the action.
• The phone can store 50 phone numbers in the
phonebook of up to 24 digits.
• The name of the phone number can be stored
with a maximum of 15 characters.
1. Press PHBK.
2. Press MENU.
3. Use the ARROW KEYS to select “Add
Record”, then press MENU.
4. The handset display shows “<Enter Name>”
and “<Enter Number>”.
5. Enter the name (see key guide below) and
then press MENU.
6. Enter the number and then press MENU to
confirm.
FAST REDIAL
DELETING A REDIAL NUMBER
SAVING DIALED NUMBERS INTO
MEMORY
8
PHONEBOOK
CALL WAITING
Page 13
EN
7. The handset will beep twice indicating that the
record has been stored.
NOTE: If only a phone number and no name is
input, then the record can still be saved.
When entering a name, “B” will be entered by
pressing the “2” button once, followed by pressing
“2” again within 1 second. If pressed beyond 1
second, “A” is entered and the second press of “2”
will give the entry of “AA”.
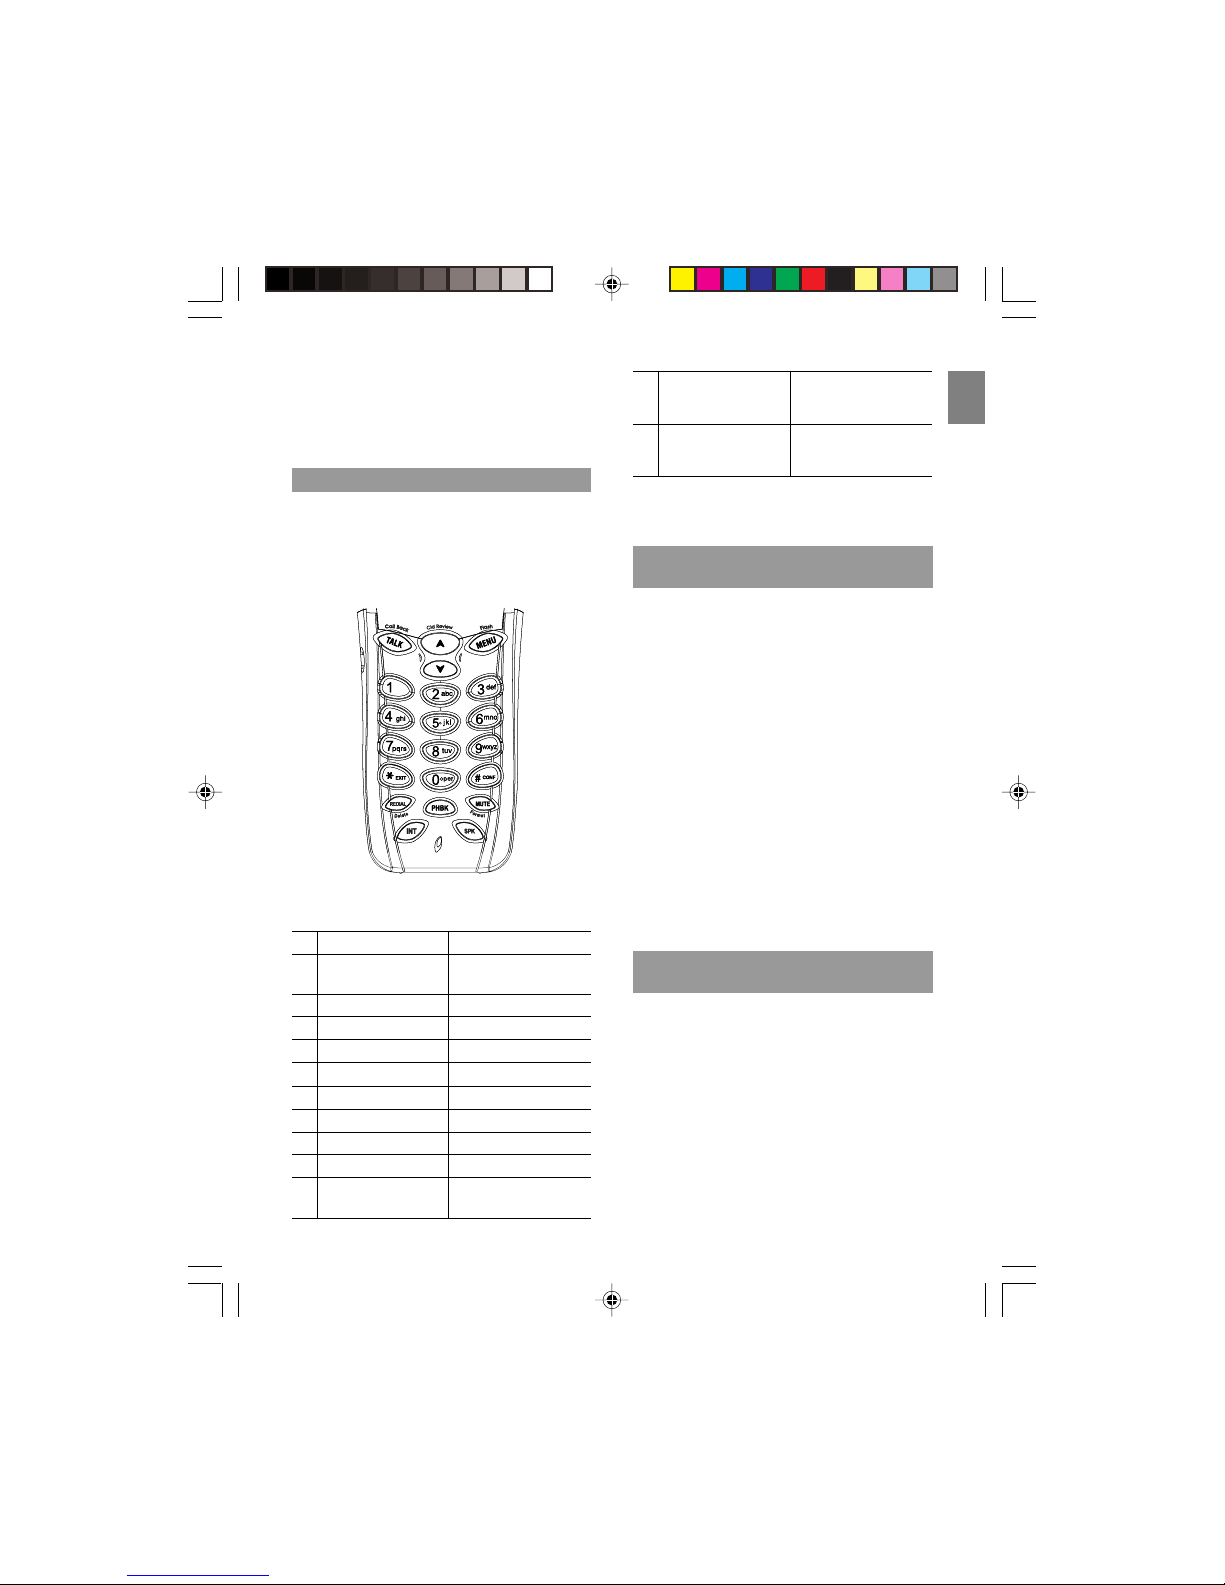
KEYS TO USE
The list of characters is shown below:
Capital Letter Small Letter
1 SPACE 1 _ - + = ^ SPACE 1 _ - + = ^
~ . , ; : ? ! ~ . , ; : ? !
2 ABC2ДЖЕАБВГЗ abc2джеабвгз
3 DEF3ИЙКЛР def3ийклр
4 GHI4МНОП ghi4ìíîï
5 JKL5 jkl5
6 MNO6ЦШТУФХС mno6цштуфхс
7 PQRS7 pqrs7
8 TUV8ÙÚÛÜ tuv8ùúûü
9 WXYZ9ÝÞ wxyz9ýþ
0 0 * # $ & % / \ | ( ) 0 * # $ & % / \ | ( )
[ ] < > [ ] < >
DELETING NUMBERS FROM
PHONEBOOK
9
NOTE: Use the # key to change from uppercase
to lowercase.
To delete 1 record:
1. Press PHBK.
2. Use the ARROW KEYS to select the number
you want to remove, then press MENU.
3. Select “Delete Record” and then press
MENU.
4. When asked to confirm the deletion, select
“Yes”.
5. Press MENU to remove the number.
6. The handset will beep twice indicating that the
record has been deleted.
To delete all records:
1. Follow steps 1-3 above and select “Delete
all?”
2. Now follow steps 4-6 above.
1. Press PHBK.
2. Use the ARROW KEYS to select the number
you want to edit, then press MENU.
3. Select “Edit Record” and then press MENU.
4. Edit the name if needed, then press MENU.
5. Edit the phone number if needed, then press
MENU.
6. You will hear the double beep from the handset
indicating that the task is complete.
* Press when editing Press when editing
a name to return to a number to get “*”
Standby Mode
# Press to change Press to change
between capital and between capital and
small letter small letter
EDITING NUMBERS IN THE
PHONEBOOK
Page 14

EN
DELETING CALLER ID RECORDS
1. Press PHBK whilst on an active call.
2. Use the ARROW KEYS to select a number,
then press MENU to dial the number.
1. Press PHBK.
2. Use the ARROW KEYS to select a phonebook
entry, OR press the key with the 1
st
letter of
the person’s name you are looking for. E.g.
Press key 7, 4 times to get quick access to a
name beginning with ‘S’
3. Press TALK to dial.
NOTE: You can use the Phonebook function whilst
on an active call.
If you have subscribed to this service from your
phone network operator, the caller’s phone number
will be shown on the handset display when there is
an incoming call. The phone can store the caller
ID’s of up to 40 different call numbers.
NOTE: If the caller’s phone number was stored in
the phonebook, the associated name will be
displayed with the phone number.
Each entry in the caller list has:
• Caller number (up to 24 digits).
• The caller name (up to 15 characters) if this is
stored in the phonebook or supplied from the
phone network.
• The date and time of the call.
• The number of calls made to this number (up
to 40).
1. When the phone is in Standby Mode use the
ARROW KEYS to browse through Caller ID
records.
CALLLING NUMBERS FROM
PHONEBOOK
QUICK BROWSING OF PHONEBOOK
2. If you need to edit the phone number before
making the call press MENU, then use the
ARROW KEYS to select “Edit for Call.”
3. Use the 0-9 buttons to edit the number.
4. Press TALK to dial the number.
NOTE: If “NO CALLS”, appears on the screen
then no records are stored in the Caller ID
memory.
When you have a Caller ID record on your
screen:
1. Press MENU, then use the ARROW KEYS to
select “Save Phonebook”.
2. Press MENU. “SAVED” will appear on the
screen to confirm the action.
NOTE: When the Caller ID memory is full, it will
automatically delete your 1
st
Caller ID record.
1. Use the ARROW KEYS to select a phone
number in the Caller ID memory, then press
the FORMAT key.
2. The number you selected can now be formatted by pressing FORMAT to get the format
you prefer.
3. When the format is selected, press TALK to
dial the number.
To delete 1 record:
1. Press the ARROW KEYS whilst in Standby
Mode and select the number you want to
delete. Then, press MENU.
2. Select “Delete Record”, then press MENU.
3. Select “Yes” and then press MENU to confirm.
To delete all records:
1. Press the ARROW KEYS whilst in Standby
Mode. Then, press MENU.
VIEWING CALLER ID RECORDS
SAVING CALLER ID RECORD IN
PHONEBOOK
FORMATTING CALLER ID NUMBERS
10
CALLER ID DISPLAY
Page 15

EN
2. Select “Delete All”, then press MENU.
3. Select “Yes” and then press MENU to confirm.
If a caller has withheld their Caller ID name and /
or number, one of the following messages will
appear on your screen:
• BLOCKED NUMBER
• UNKNOWN NUMBER
• BLOCKED NAME
• UNKNOWN CALLER
• BLOCKED CALL
• UNKNOWN NAME
If you miss a call, the handset will display this
symbol
When you view the Caller ID of your
missed calls the following notifications will appear
on the screen:
•“NEW” – This is the first missed call from this
particular Caller ID.
•“REPT” – This is not the first missed call from
this particular Caller ID.
To mute the handset:
• Press MUTE.
• Press MUTE again to un-mute the handset and
return to the normal mode.
NOTE: If the phone is muted, you cannot dial any
digits until the mute button is released.
During a conversation:
• Press SPK to turn the speakerphone on.
• Press TALK again to turn the speakerphone
off.
NO CALLER ID
MISSED CALLS
IMPORTANT:
• If you press the TALK button you will enter
Talk Mode.
• If you press the MENU button you will enter
Menu Mode.
• You cannot enter the Menu Mode when the
phone is in Talk Mode. To exit the Talk Mode
press TALK.
You have a choice of 10 melodies and 4 tones for
incoming calls. To select a ring tone:
1. Press MENU, then use the ARROW KEYS to
select “Handset Setting”.
2. Press MENU.
3. Select “Ringtone”, then press MENU.
4. Select the melody or tone you prefer, then
press MENU to confirm.
NOTE: If the ring volume is turned off, you will
not hear the ring melody while adjusting the ring
tone and LCD will display “
“ icon.
1. Press MENU, then use the ARROW KEYS to
select “Ringer Volume”.
2. Press MENU.
3. Use the ARROW KEYS to increase or
decrease the volume.
4. Press MENU to confirm.
To change language:
1. Press MENU, use the ARROW KEYS to select
“Handset Setting”, then press MENU.
2. Select “Language”, the press MENU.
3. Select the language you want, then press
MENU to confirm.
DURING A CALL
USING THE MUTE FUNCTION
USING SPEAKERPHONE DURING A
CALL
SETTING THE RING TONE
11
SETTING THE RING TONE VOLUME
SETTING THE DISPLAY LANGUAGE
HANDSET SETTINGS
Page 16
EN
WEATHER FORECASTING ON THE
HANDSET
NOTE: The default language for the handset
display is English. You can also change the
language to French, Spanish and Portuguese.
In order to provide compatibility with other phone
systems, your phone can be set to either Pulse
dialing (same as rotary dial phones), or Tone
dialing (DTMF).
To set the Dial Mode:
1. Press MENU, then use the ARROW KEYS to
select “Handset Setting”.
2. Press MENU.
3. Select “Dialing”, then press MENU.
4. Select either “Tone” or “Pulse” mode, then
press MENU to confirm.
1. Press MENU, then use ARROW KEYS to
select “Handset setting”.
2. Press MENU.
3. Select “Time & Date”, then press MENU.
4. Select either “Time Format” or “Date
Format”, then press MENU.
5. Then select your chosen format and press
MENU.
1. Press MENU, then use the ARROW KEYS to
select “Handset Setting”.
2. Press MENU.
3. Select “Area Code”, then press MENU.
4. Enter your 3-digit area code, then press MENU
to confirm.
SETTING THE DIAL MODE
SETTING THE TIME / DATE FORMAT
You can have a conference conversation with an
external call party and 2 internal calling parties.
1. First establish the call with the external party
by either making an external call or answering
an incoming call.
2. Press INT to make an intercom call to another
handset. The external party will be on hold.
3. The internal party answers your intercom call
by pressing TALK.
4. Then you press CONF and hold for about 2
seconds (you will hear a confirmation key
tone).
5. Then the external party, the other internal
party and you can talk together.
OR
A second internal party can join in on a call
between an internal and external party by simply
pressing TALK.
NOTE: You cannot have an intercom conversation
between a handset and the Base Unit.
The weather forecast display is the first LCD
display on the Base Unit. The outdoor temperature
is shown on the second line of the LCD display. It
has an icon on the left to represent the temperature recorded by the external sensor on channel 1,
as well as the humidity shown on the right of the
icon.
To display the weather forecasting symbols on the
handset:
1. Press MENU.
2. Use the arrow keys to select “Weather”, then
press MENU.
SETTING THE AREA CODE
CONFERENCE CALL
12
WEATHER FORECASTING
Page 17
EN
13
3. Use the ARROW KEYS to select “Forecast”,
then press MENU.
4. After the double beeps confirming selection,
press the EXIT key.
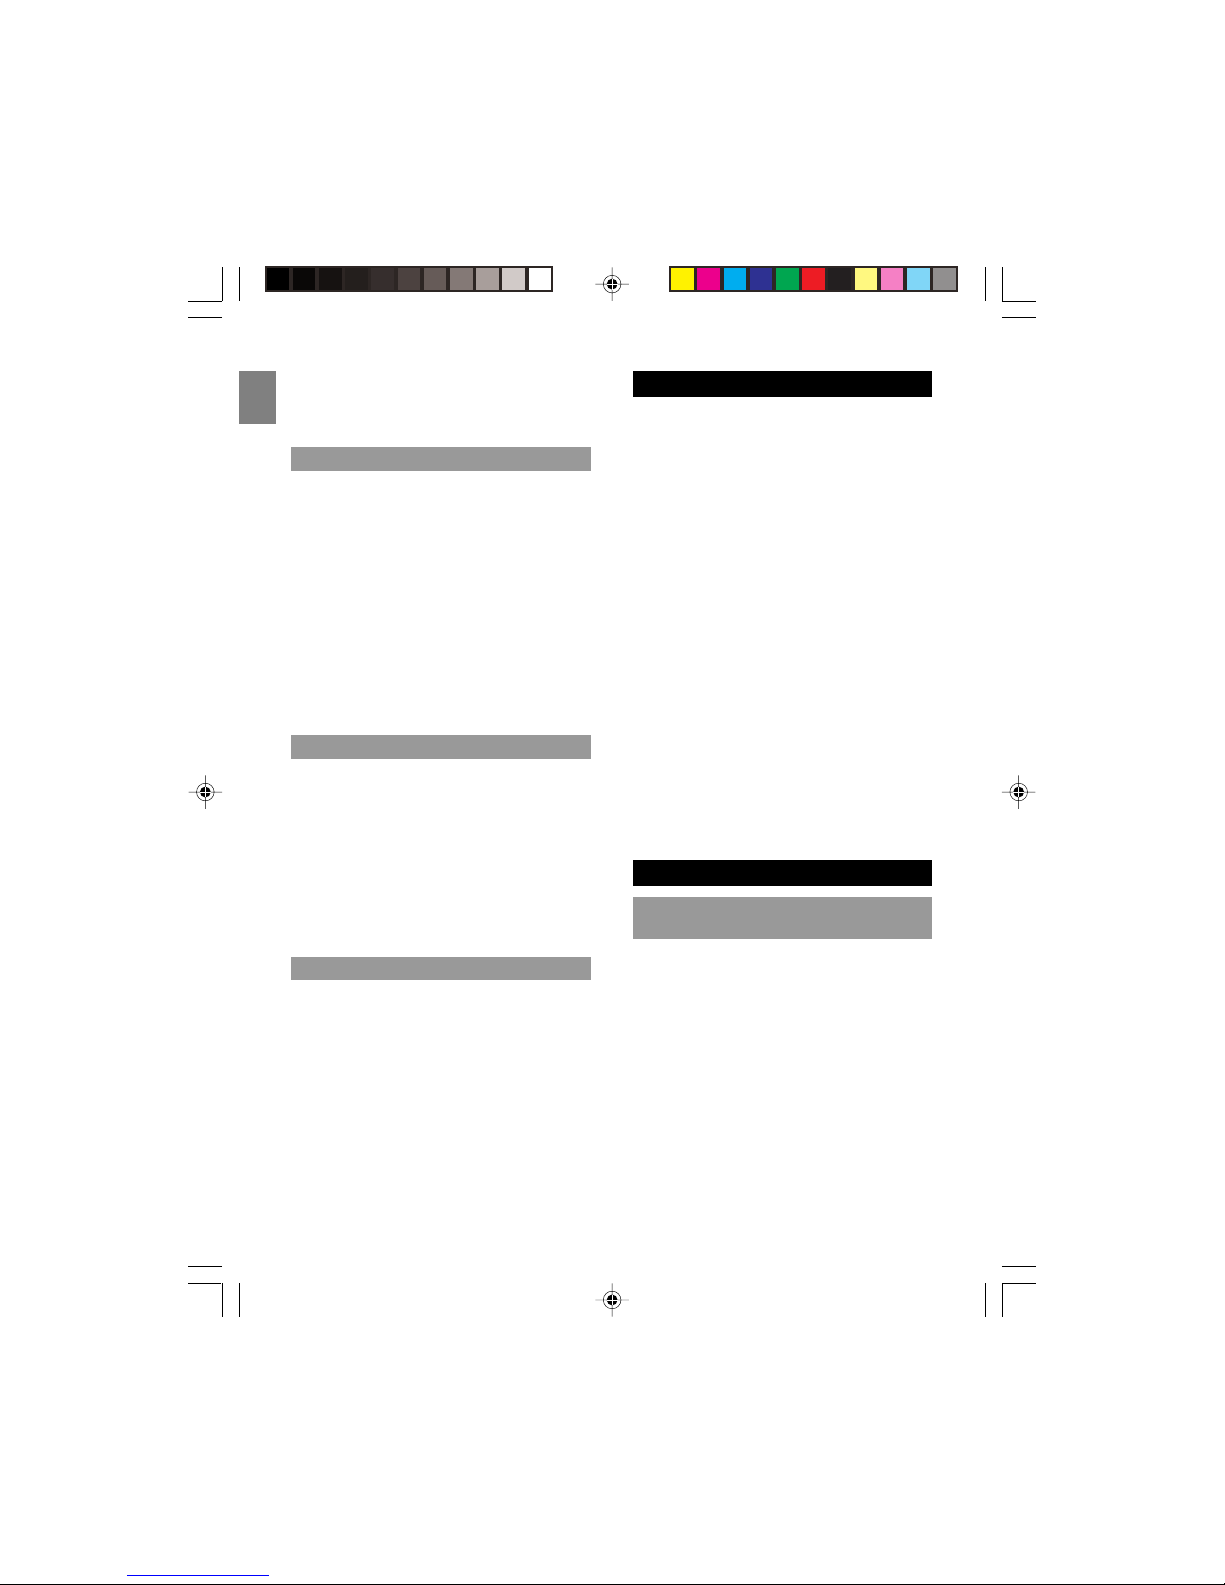
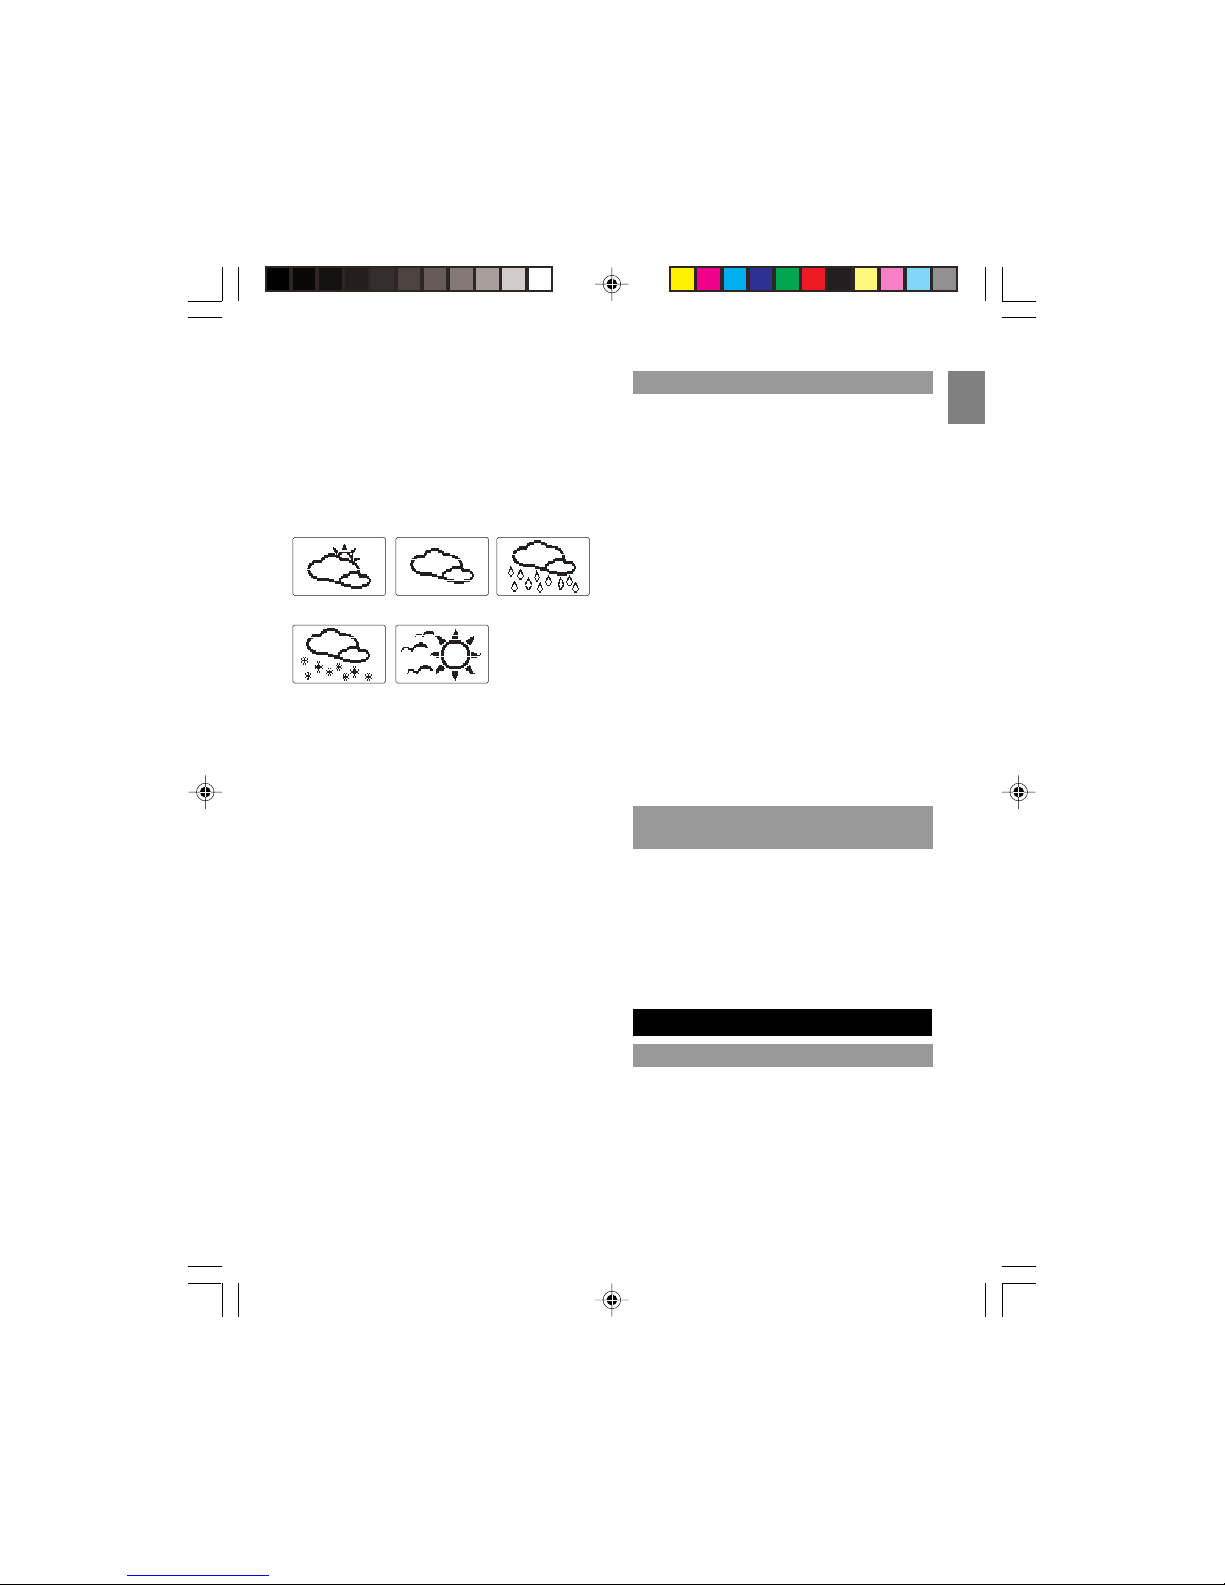
You should now be in stand-by mode showing one
of the five forecasting symbols. These include:
IMPORTANT:
• The accuracy of weather forecasting when
using pressure trend alone is about 70 to 75
percent and, therefore, the manufacturers and
suppliers cannot be held responsible for any
inconvenience caused by an inaccurate
weather forecast.
• The weather forecast symbols may not reflect
current weather condition. The symbols are
forecasting the future.
• A “sunny” forecast covering the nighttime
reflects fine, clear weather.
To remove the weather forecasting symbols on
the handset:
1. Press MENU.
2. Use the ARROW KEYS to select “Weather”,
then press MENU.
3. Use the ARROW KEYS to select “Off”, then
press MENU.
4. After the double beeps confirming selection,
press the EXIT key.
The handset can display the temperature Information for both the built-in and external sensors. To
view the temperature readings on the handset
display:
1. Press MENU.
2. Use the ARROW KEYS to select “Weather”,
then press MENU.
3. Use the ARROW KEYS to select
“Temperature”, then press MENU.
4. After the double beeps confirming selection,
press the EXIT key.
The display will toggle between the date, time and
internal/external temperature with relative
humidity.
NOTE: If multiple sensors are installed to gather
temperature and humidity readings from other
areas, the phone will cycle through these readings
as well.
1. Press the MENU button, then use the ARROW
KEYS to select “Handset setting”.
2. Press the MENU button.
3. Select “Temp Format”, then press MENU.
4. Select either “Fahrenheit” or “Celsius”, then
press MENU to confirm.
To begin using the remote sensor:
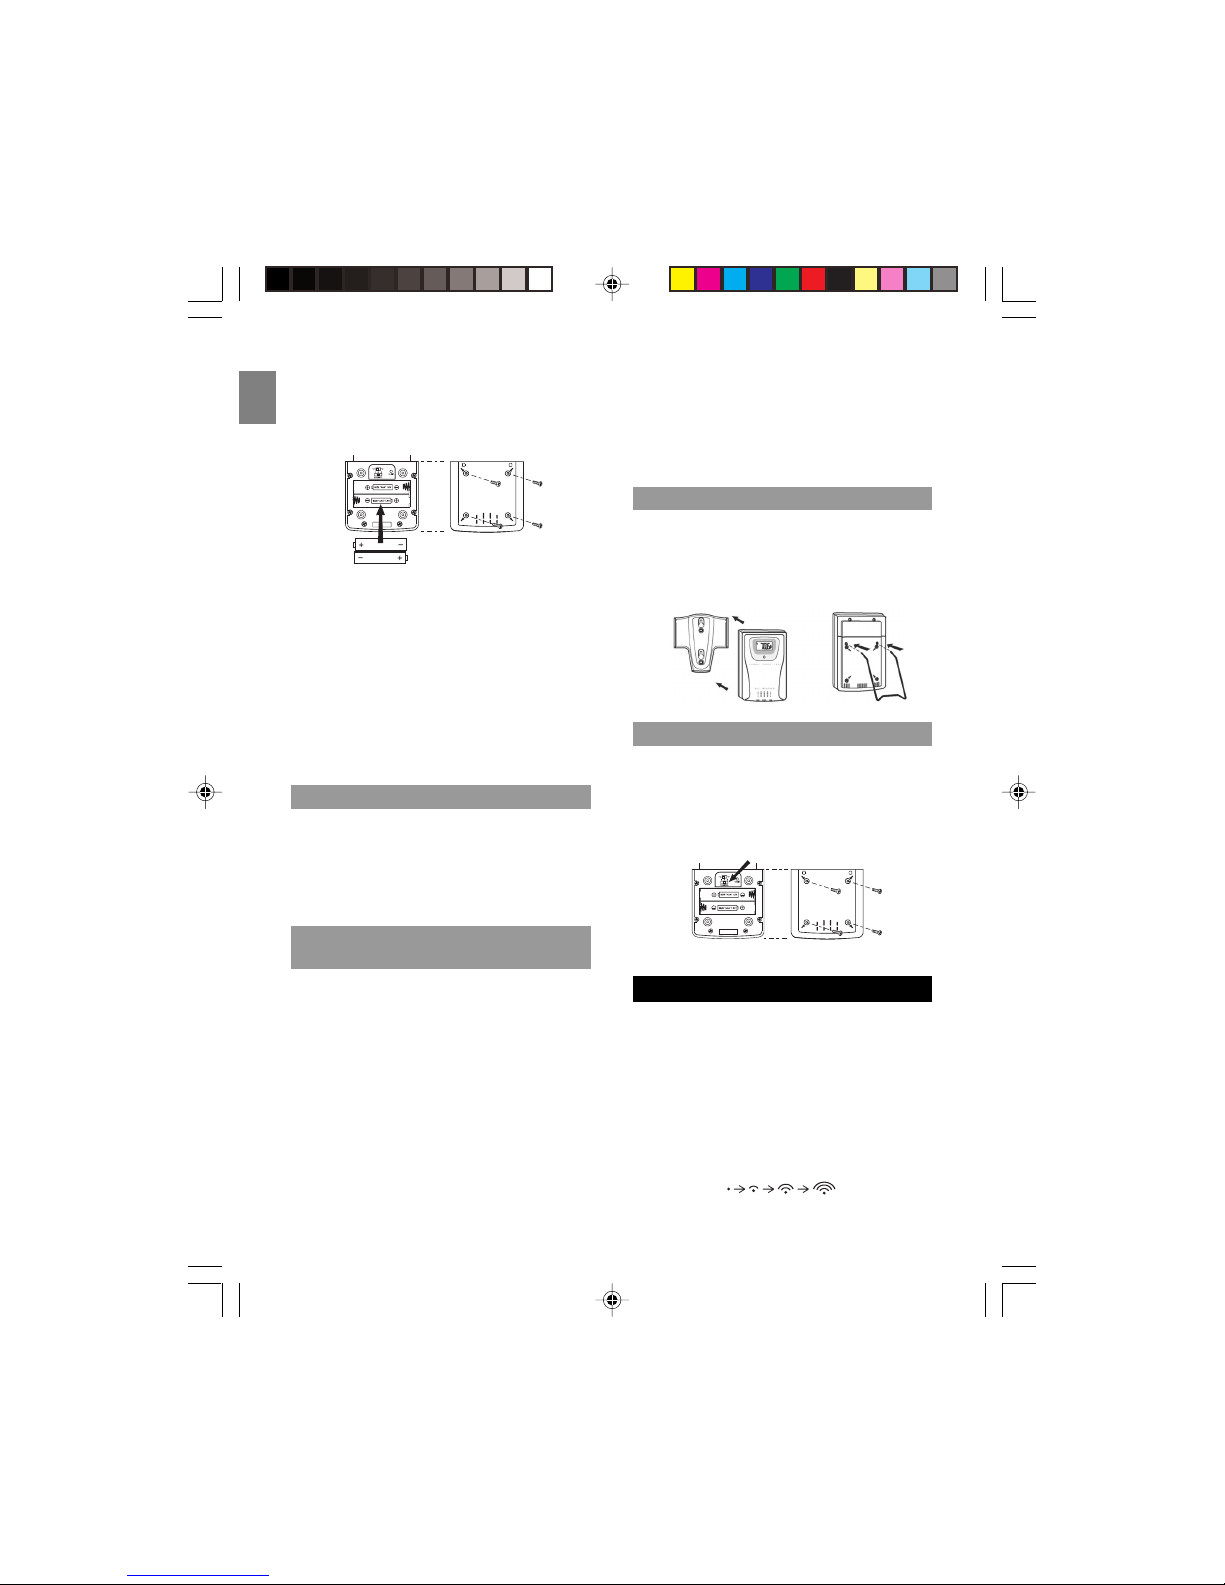
1. You must first install two triple “A” (AAA)
batteries by taking a Philips screwdriver and
removing the four screws in the back bracket.
2. Insert batteries into the back.
TEMPERATURE ON THE HANDSET
CHANGING FROM CELSIUS TO
FAHRENHEIT
OPERATING THE REMOTE SENSOR
INSTALLING BATTERIES
Partially cloudy Cloudy Rainy
Snowing Sunny
Page 18
EN
OPERATING THE BASE UNIT
3. Before screwing the back bracket on to the
remote sensor, you need to reset the sensor
by pressing the reset hole with a blunt stylus,
such as an “unfolded” paper clip.
NOTE: Beside the RESET button on the back of
the remote sensor, there is a switch to select the
channel of the remote sensor.
4. Take the four bolts and screw them back in to
replace the back bracket.
NOTE: Make sure the thin black rubber lining
around the circumference of the batteries lines up
with the crease in the back bracket so water does
not seep in to the sensor if wet.
When it is time to replace the batteries, the lowbattery indicator will show up when the respective
channel is selected. The battery level of the main
unit will be shown on the indoor temperature
display when it is running low.
The individual channel temperatures will be
displayed on the 2
nd
line and the indoor tempera-
ture on the 3
rd
line. The Base Unit will automatically update its readings at about 30-second
intervals.
1. Take a Philips screwdriver and remove the
four screws in the back bracket.
2. Move the black switch to 1, 2 or 3.
3. Take the four bolts and screw them back in to
replace the back bracket.
LOW BATTERY WARNING
If no signals are received, blanks “__ • __ °C__%“ will
be displayed and the kinetic wave icon will show.
NOTE: Once a channel is assigned to a remote
unit, you can only change it by replacing the
batteries or resetting the unit.
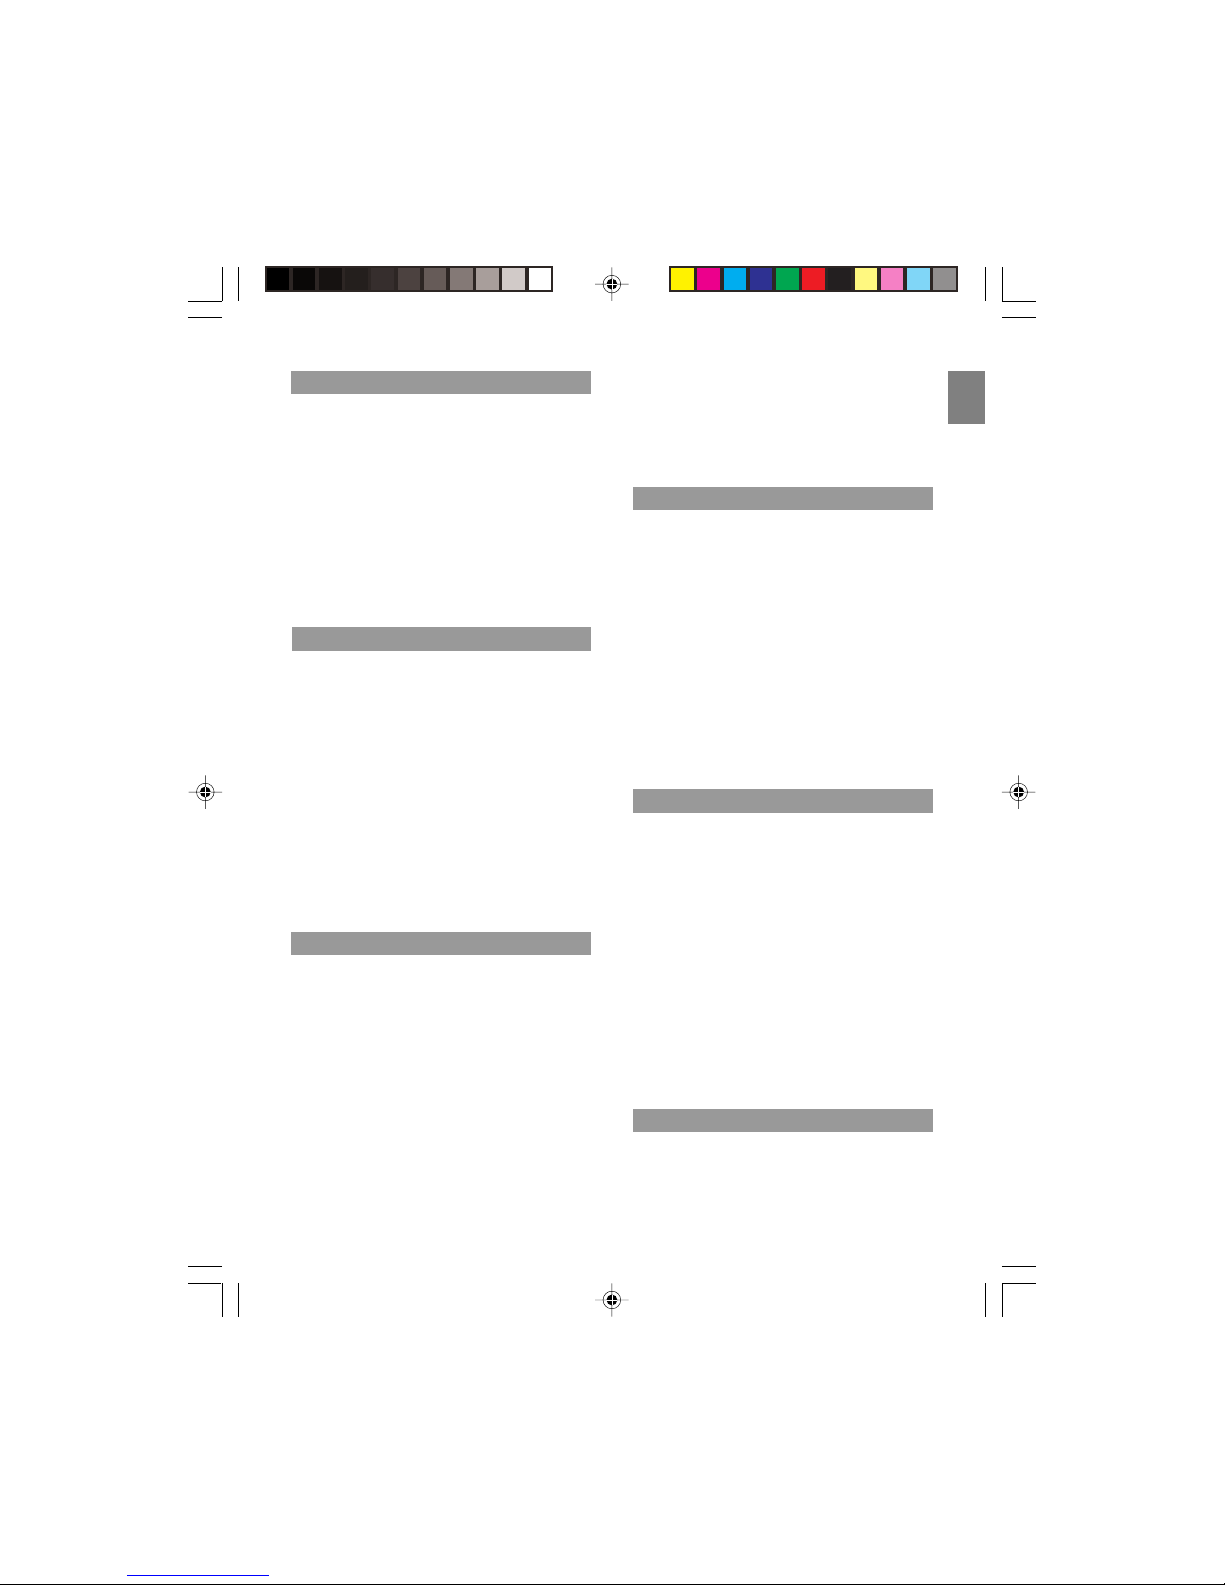
The remote sensor has a retractable table stand,
which when flipped open can support the unit on a
flat surface. Or you can flip close the stand and
mount the unit on a wall using the recessed screw
hole.
This button is only used when the unit is operating
in an unfavorable way or malfunctioning. Insert a
pointed object such as an unfolded paper clip into
the reset hole, then press and hold. All settings
will return to their default values.
The Weather Base Unit displays the weather forecast as well as the outdoor and indoor temperature and relative humidity. You may also set
the alarm to activate, indicating when a certain
temperature or humidity has been reached.
NOTE: On the top line in the Base Unit, the radio
signal should show the signal emitting a radio frequency to the remote sensor.
SETTING A CHANNEL IN REMOTE
SENSOR
14
TABLE STAND OR WALL MOUNT
THE RESET BUTTON
Page 19
EN
This feature is very useful if you can’t remember
where you put your handset. Make the lost handset ring for a fixed time of 2 minutes by pressing
PAGE in the cradle on the Base Unit.
NOTE: You cannot have an intercom conversation
between a handset and the Base Unit.
• To look for all handsets, press the PAGE
button in the cradle of the Base Unit.
• To stop the paging, select any key on the
handset or press the PAGE button again.
1. Press the ALARM button 2 or 3 times to set it
at the month-and-day screen.
2. Press and hold down the SET button for 2 or
more seconds. You should now see “24hr/12hr”
flashing on the bottom left of the screen.
3. Press the SET button again to change the
flashing image to the time.
4. Use the ARROW KEYS to change the time
5. Once the time is set, press the SET button
five more times to escape the set-up mode.
NOTE: Updating the date and time on the Base
Unit will synchronize all other handsets.
1. Press the ALARM button 2 or 3 times to set it
at the month-and-day screen.
2. Press and hold down the SET button for 2 or
more seconds. You should now see “24hr/12hr”
flashing on the bottom left of the screen.
3. Use the ARROW KEYS to change the time
format.
NOTE: By entering this mode, you can also
change time display, M/D vs. D/M, date and
month and Fahrenheit and Celsius (see below for
more instruction).
PAGING THE HANDSETS
SETTING THE BASE UNIT TIME
4. When set, then press the SET to escape setup mode.
NOTE: By pressing and holding down the UP or
DOWN buttons, you can increase or decrease the
settings at a much faster rate.
1. Press the ALARM button 2 or 3 times to set it
at the month-and-day screen.
2. Press and hold down the SET button for 2 or
more seconds. You should now see “24hr/12hr”
flashing on the bottom left of the screen.
3. Press the SET button twice more to change
the flashing image to the date in the lower right
of the screen.
4. Use the ARROW KEYS to change the date
format.
5. Once the time is set, then press the SET
to escape set-up mode.
1. Press the ALARM button 2 or 3 times to set it
at the month-and-day screen.
2. Press and hold down the SET button for 2 or
more seconds. You should now see “24hr/12hr”
flashing on the bottom left of the screen.
3. Press the SET button 3 more times to change
the flashing image to the date in the lower right
of the screen.
4. Use the ARROW KEYS to change the date,
then press the SET to escape set-up mode.
NOTE: The latest setting on any handset will
supercede the previous setting on other handsets
and Base Unit.
1. Press the ALARM button 2 or 3 times to set it
at the month-and-day screen.
2. Press and hold down the SET button for 2 or
SETTING THE DATE FORMAT
SETTING THE DATE
SETTING THE TIME FORMAT
15
SELECTING CESIUS OR FAHRENHEIT
Page 20

EN
USING MULTIPLE HANDSETS
INTERCOM CALLING BETWEEN
HANDSETS
more seconds. You should now see “24hr/12hr”
flashing on the bottom left of the screen.
3. Press the SET button 4 more times to change
the flashing image to a “C” in the lower right of
the screen.
4. Use the ARROW KEYS to select either Celsius or
Fahrenheit, then press the SET button.
There are two channels for the dual alarm
function. To choose one of the alarms:
1. Press the ALARM button on the Base Unit to
select alarm ((1)).
2. Press the ALARM button again to change it to
alarm ((2)), or press ALARM again to select
alarm ((1)).
3. Use the ARROW KEYS to set the time of the
alarm.
4. When time is set, press the SET key to set
the alarm.
NOTE: Your Base Unit has 2 daily crescendo
alarms. If both set, the alarms will sound daily at
the set time.
Once an alarm sounds, you have two options:
Option 1:
1. Press any key except the SNOOZE button to
turn the alarm off completely.
Option 2:
1. Press the SNOOZE button. (The alarm will
return on after 8 minutes).
This sensor works as a radio-frequency clock
transmitter for the Base Unit. This remote sensor
is used to transmit radio frequency signals for the
radio-controlled clock, and to measure the
temperature and humidity.
TURNING THE ALARM OFF
Mount the remote sensor on a flat surface using
the recess holes in the back of the unit. (You
need to slip on the white wall-mount bracket to get
a recess hole).
Additional sensors can be purchased to allow
reporting from up to 3 locations.
Place the remote sensor somewhere dry outside
so that you can read the temperature and humidity, as well as forecast the weather.
For best results:
• Do not place the sensor in direct sunlight or
moisture.
• Position the sensor so that it faces the indoor
Base Unit.
• Minimize obstructions, such as doors, walls
and furniture.
• To maximize radio frequency reception for the
clock, place the remote unit in a location with a
clear view to the sky. You may need to
experiment with various locations to find the
best reception.
NOTE: Please note that the remote sensor must
be placed within 300 meters of the Base Unit to
be fully functional.
Your base unit can synchronize with up to 2
handsets. If you have multiple handsets
registered with the base, 2 handsets can make
intercom calls.
1. Press INT on your handset.
2. Type in the number of the handset (1-4) that
you want to reach.
3. The paged handset will ring. The display of the
SETTING THE BASE UNIT ALARM
INSTALLING THE SENSOR
16
Page 21

EN
paged handset will show “INT CALL”.
NOTE: To cancel the intercom call, press TALK.
1. Press TALK to answer an intercom call.
2. Press TALK to end the intercom call.
If an external call comes in during an intercom
conversation, you will hear a call waiting tone.
1. To end an intercom call, press TALK.
2. The external line will ring. Press TALK again to
answer the external call.
You can transfer an external call from one
handset to another.
1. During an external phone conversation, press
INT. Your caller will be put on hold.
2. Type in the handset number (1-4) to which you
want the call transferred.
3. The paged handset will ring and “INT CALL”
will appear on the display.
4. To answer the call on the paged handset, press
TALK.
5. Press TALK on the paging handset to complete
the operation.
NOTE: If the other handset does not answer,
press INT to end the intercom call and get back to
the external line. Pressing TALK will end both the
intercom call and the external call.
The handset and Base Unit shall be factory preregistered among each other with the identification
digital security codes, which are stored into the
non-volatile memory. Therefore, the unit should
ANSWERING INTERCOM CALLS
CALL WAITING
CALL TRANSFER BETWEEN HANDSETS
be in full working order out of the box.
When you purchase an additional handset, you
have to register it to the Base Unit in order to
make and answer calls.
You can register up to 3 more handsets to make
and answer calls via the same Base Unit.
Handsets are numbered 1 to 4.
To register a new handset:
1. On the handset, press MENU.
2. Use the ARROW KEYS to select “Handset
Setting”, then press MENU.
3. Select “Registration”, then press MENU.
4. Select “Yes” then press MENU. (You will see
the message: “Registering”).
5. Press and hold the PAGE button on the cradle
of the base unit.
NOTE: The Base Unit will then send a signal to the
handset registering the handset to the Base Unit.
Once the registration function has been
completed, the handset will return to Standby
Mode.
To de-register handsets to the base unit:
1. On the handset, press MENU.
2. Use the ARROW KEYS to select “Handset
Setting,” then press MENU.
3. Select “Remove HS”, then press MENU.
4. Use the ARROW KEYS to select the handset
number, then press MENU.
5. Select “Yes,” then press MENU to confirm the
de-registration.
17
REGISTRATION PROCEDURE
DE-REGISTRATION OF HANDSETS
REGISTERING HANDSETS TO
BASE UNIT
Page 22
EN
The weather phone handset contains one game:
The Snake Game.
The objective of snake is to let it eat as many
gemstones as possible without ever hitting the
walls or itself.
To play:
1. Press MENU.
2. Use the ARROW KEYS to select “Game”,
then press MENU.
3. Select “Snake” and then press the MENU
button.
4. Use the ARROW KEYS to choose the level of
the game, with level 5 being the most difficult,
then press MENU.
NOTE: The game will commence as soon as you
press MENU.
When the game starts, you will see a snake
moving along the screen. To win the game, you
will have to direct the snake to the eggs without
hitting the wall or letting the snake hit itself.
Using the keypad, press as follows to direct the
snake:
BUTTON ACTION
5Up
9 Right
8 Down
7 Left
EXIT End game
NOTE: When the snake is moving, you only need
to turn the snake to the left or right. There is no
need to move the snake forward. If you move the
snake backwards, it will hit itself and the game will
be over.
PLAYING THE GAME (SNAKE)
PLAYING THE GAME
If you need to reset your system, you will lose
any information that you have stored and all
settings will return to their default settings.
To reset your system to the default settings:
1. Press MENU.
2. Use the ARROW KEYS to select “Handset
Setting” , then press MENU.
3. Use the ARROW KEYS to select “Set
Default”, then press MENU.
4. When prompted, select “Yes”. You will then
hear the double beep to indicate the default
settings have been restored.
Your default settings are:
Language: English
INT melody: Melody 1
Ring volume: 3
Dial mode: Tone
Ear volume: Vol. 1
Phonebook: Empty
CLID list: Empty
Redial list: Empty
Weather: OFF
Area Code: —Time format: 12Hr
Date format: MM / DD
Temperature format: Fahrenheit
Time: 12:00 AM
RESETTING YOUR SYSTEM
SETTING YOUR DEFAULT SETTINGS
YOUR DEFAULT SETTINGS
18
Page 23
EN
KEYPAD SYMBOLS
Please observe the following safety precautions
when setting up and using this product.
• LCD panel – The LCD panel is made of glass,
and may break if the unit is dropped.
• Heat sources – Keep the product away from
heat sources, such as radiators, stoves,
heaters, and other heat-generating products.
• Water and moisture – Do not use the product
in or near water or in high moisture areas, such
as a bathroom.
To ensure you receive the maximum benefit from
using this product, please observe the following
guidelines.
Capital Letter Small Letter
1 SPACE 1 _ - + = ^ SPACE 1 _ - + = ^ ~
~ . , ; : ? ! . , ; : ? !
2 ABC2ДЖЕАБВГЗ abc2джеабвгз
3 DEF3ИЙКЛР def3ийклр
4 GHI4МНОП ghi4ìíîï
5 JKL5 jkl5
6 MNO6ЦШТУФХС mno6цштуфхс
7 PQRS7 pqrs7
8 TUV8ÙÚÛÜ tuv8ùúûü
9 WXYZ9ÝÞ wxyz9ýþ
0 0 * # $ & % / \ | ( ) 0 * # $ & % / \ | ( )
[ ] < > [ ] < >
* Press when editing Press when editing
a name to return to a number to get “*”
Standby Mode
# Press to change Press to change
between capital and between capital and
small letter small letter
• Do not clean any part of your weather phone
with benzene, thinner or other solvent chemicals - this may cause permanent damage that
is not covered by the guarantee. When necessary, clean it with a damp cloth.
• Keep your weather phone away from hot,
humid conditions or strong sunlight.
• Every effort has been made to ensure the
highest standards of reliability for your
weather phone. However, if something does
go wrong, please do not try to repair it
yourself-consult your supplier.
• Do not use your weather phone outdoors in the
rain, or handle it with wet hands – water can
damage electrical equipment.
• To avoid risk of fire or injury, do not attempt
to charge non-rechargeable batteries.
• Replace only batteries with the same or
equivalent type recommended by the
manufacturer.
• Please dispose of old, defective batteries in
an environmentally friendly manner in
accordance with the relevant legislation.
• No naked flames, such as lighted candles,
should be placed near the apparatus.
19
SAFTEY AND CARE
SAFETY PRECAUTIONS
CARING FOR THIS PRODUCT
CAUTION
Page 24

EN
If your weather phone is not working correctly,
check the points here before returning it for repair.
Whatever your problem, you should first check
that:
• You have installed the Base Unit correctly,
and it is plugged into the telephone line and the
main power socket.
• Main power is switched on at the socket.
• You have installed the batteries into the handset.
NEVER attempt any repairs or adjustments
yourself - you could make the problem worse and
invalidate your guarantee.
Problems with making and answering calls:
“I cannot make or answer calls.”
• Try moving the handset closer to the Base
Unit.
• If this doesn’t work, try a different position for
the Base Unit - perhaps higher up if possible.
• The battery charge level may be low - place
the handset in the charging cradle of the Base
Unit to recharge the battery.
• Switch off the power at the main socket, wait
a few seconds and then switch the power back
on, this may solve the problem.
“When I press the TALK button, I cannot make
a call.”
• Please check if the line is already in use by
other handsets registered to the same Base
Unit. The EXT symbol on your handset would
indicate this.
“When I press keys on my handset, digits
appear on the display but I cannot make an
outside call.”
• Try moving the handset closer to the Base
Unit.
• If this doesn’t work, try a different position for
the Base Unit. Make sure it is not near any
electrical equipment, such as another phone,
TV, radio, washing machine, fridge, etc. If
possible, position the Base Unit higher up.
• If any other handsets are registered to the
same Base Unit, make sure they are not
already on a call — you would see the EXT
symbol on your own handset.
• You may need to change the dial type setting
to Pulse dialing if your local telephone exchange does not support Tone dialing.
“My call was cut off when I went out of range
of the Base Unit. Now I cannot use my
handset.”
• Please move the handset closer to the Base
Unit.
“I hear a tone while I am using my handset,
and the battery symbol on the display is
“empty”.
• The battery needs to be recharged. Put the
handset into the charger; it will take up to 15
hours to be fully charged.
“I’ve tried recharging the batteries, but I still
get a warning that it is not charged.”
• The batteries probably need to be replaced.
“The handset does not ring when a call comes
in.”
• Check that you have not set the ringing
volumes to “off” (see section Setting the
Ring Tone Volume).
“The Caller Display function is not working”
• Please check if you have subscribed to the
Caller Display service with your network provider.
“The Caller Display function is working but
the Caller’s Name from the phonebook is not
displayed even if the same telephone number
calls in”
• You need to store the full telephone number
including the STD code into your phonebook
memory.
20
POTENTIAL ISSUES
TROUBLESHOOTING
Page 25
EN
“I have tried several times to press the TALK
button but I cannot make a call and the green
LED on the base is not on”
• Unplug the power adapter at the bottom of the
Base Unit, then reconnect the power adapter.
Press and hold PAGE on the Base Unit until IN
USE (green LED) is flashing.
• Repeat steps as outlined in the “Registering
Handsets to Base Unit” section.
“I cannot make a call.”
• Only one outside call and one intercom call
can take place at once. Make sure no other
handset user is already on a call.
• Please check if another handset has engaged
the line already.
Weight Dimension
Charger: 5.64 ounces (including adaptor)
Charger: 0.19 x 0.35 x 0.35 inches (without
adaptor)
Handset: 3.7 ounces (without battery)
Handset: 0.53 x 0.22 x 0.15 inches (H x W x D)
WARNING
• The contents of this manual and technical
specification are subject to change.
• Due to printing limitation, picture and display
showed in this manual may be slightly
different from real one.
• The contents of this manual may not be
reproduced without the permission of the
manufacturer.
• In case a Ni-Cadmium rechargeable battery is
used, the draining of its contents should be d
done in accordance to the law re: special
waste material.
Your phone operates on a 2.4GHz ISM digital
Worldwide Digital Cordless Telecommunication
(WDCT) platform technology. This product uses
75 regular channels plus 14 channels for
substitution when the environment is interfered.
Here are the specifications for your weather
phone:
21
PROBLEMS WITH MULTI-HANDSET
USE
TYPE DESCRIPTION
Standard Worldwide Digital
Cordless Telecommuni-
cation (WDCT)
Frequency range 2.4GHz ISM
Channel bandwidth 0.824MHz
Modulation GFSK
Speech coding Adaptive Differential
Pulse Code Modulation
(ADPCM)
Communication range Up to 300 meters in
open space
Base power supply Input 120V / 60Hz
Handset charger Input 120V / 60Hz
power supply
Handset power supply 1 pack rechargeable
batteries, NiMH
750mAh
Handset battery 15 hours
charging time
Operating time Standby: approxi-
mately 5 days
Talk: approximately
7 hours
Operating temperature 0°C to 45°C
Storage temperature -20°C to 60°C
(outdoor)
Storage temperature -5°C to 50°C
(indoor)
Humidity range 25% to 90%
OTHER IMPORTANT ITEMS
SPECIFICATIONS
Page 26

EN
22
Visit our website (www.oregonscientific.com) to
learn more about Oregon Scientific products such
as digital cameras; MP3 players; children's
electronic learning products and games; projection
clocks; health and fitness gear; weather stations;
and digital and conference phones. The website
also includes contact information for our customer
care department in case you need to reach us, as
well as frequently asked questions and customer
downloads.
We hope you will find all the information you need
on our website, however if you'd like to contact
the Oregon Scientific Customer Care department
directly, please visit www2.oregonscientific.com/
service/support or call 949-608-2848 in the US.
For international enquiries, please visit www2.
oregonscientific.com/about/international/default.
asp.
This device complies with Part 15 of the FCC
Rules. Operation is subject to the following two
conditions: (1) This device may not cause harmful
interference, and (2) This device must accept any
interference received, including interference that
may cause undesired operation.
WARNING: Changes or modifications to this unit
not expressly approved by the party responsible
for compliance could void the user’s authority to
operate the equipment.
NOTE: This equipment has been tested and found
to comply with the limits for a Class B digital
device, pursuant to Part 15 of the FCC Rules.
These limits are designed to provide reasonable
protection against harmful interference in a
residential installation.
This equipment generates, uses and can
radiate radio frequency energy and, if not
installed and used in accordance with the
instructions, may cause harmful interference
to radio communications.
However, there is no guarantee that interference
will not occur in a particular installation. If this
equipment does cause harmful interference to
radio or television reception, which can be
determined by turning the equipment off and on,
the user is encouraged to try to correct the
interference by one or more of the following
measures:
• Reorient or relocate the receiving antenna.
• Increase the separation between the equipment and receiver.
• Connect the equipment into an outlet on a
circuit different from that to which the receiver
is connected.
• Consult the dealer or an experienced radio / TV
technician for help.
The following information is not to be used as
contact for support or sales. Please call our
customer service number (listed on our website at
www.oregonscientific.com, or on the warranty card
for this product) for all inquiries instead.
Name: Oregon Scientific, Inc.
Address: 19861 SW 95th Place,
Tualatin, Oregon 97062
USA
Tel No.: 1-800-853-8883
Fax No.: 1-503-684-8883
Declares that the product:
Product No. : WW338
- 1 handset
- 1 base unit
- 1 sensor
Product No. : WW338-H
- 2 handsets
ABOUT OREGON SCIENTIFIC
FCC STATEMENT
DECLARATION OF CONFORMITY
Page 27

EN
23
- 1 base unit
- 1 charger
- 1 sensor
Product Name : 2.4GHz Digital
Expandable Cordless
Phone with Integrated
Weather Station
Manufacturer : IDT Technology Limited
Address : Block C, 9/F, Kaiser
Estate, Phase 1,
41 Man Yue St.
Hung Hom, Kowloon
Hong Kong
The WW338HSC - one HS and charger only
is in conformity with Part 15 of the FCC Rules.
Operation is subject to the following two
conditions: 1) this device may not cause harmful
interference. 2) This device must accept any
interference received, including interference that
may cause undesired operation.
© 2004 Oregon Scientific. All rights reserved.
COPYRIGHT
Page 28

Consumer Information:
This equipment complies with Part 68 of the FCC rules and the requirements adopted by the ACTA. On the
bottom of this equipment is a label that contains, among other information, a product identifier in the format US:
KT5W400BWW338. If requested, this number must be provided to the telephone company.
An applicable certification jacks Universal Service Order Codes (USOC) for the equipment is provided (i.e.,
RJ11C) in the packaging with each piece of approved terminal equipment.
A plug and jack used to connect this equipment to the premises wiring and telephone network must comply
with the applicable FCC Part 68 rules and requirements adopted by the ACTA. A compliant telephone cord and
modular plug is provided with this product. It is designed to be connected to a compatible modular jack that is
also compliant. See installation instructions for details.
The REN is used to determine the number of devices that may be connected to a telephone line. Excessive
RENs on a telephone line may result in the devices not ringing in response to an incoming call. In most but not
all areas, the sum of RENs should not exceed five (5.0). To be certain of the number of devices that may be
connected to a line, as determined by the total RENs, contact the local telephone company. [For products
approved after July 23, 2001, the REN for this product is part of the product identifier that has the format US:
KT5W400BWW338. The digits represented by 0.0B are the REN without a decimal point (e.g., 03 is a REN of
0.3). For earlier products, the REN is separately shown on the label.]
If this equipment WW338 causes harm to the telephone network, the telephone company will notify you in
advance that temporary discontinuance of service may be required. But if advance notice isn’t practical, the
telephone company will notify the customer as soon as possible. Also, you will be advised of your right to file a
complaint with the FCC if you believe it is necessary.
The telephone company may make changes in its facilities, equipment, operations or procedures that could
affect the operation of the equipment. If this happens the telephone company will provide advance notice in
order for you to make necessary modifications to maintain uninterrupted service.
Please follow instructions for repairing if any (e.g. battery replacement section); otherwise do not alternate or
repair any parts of device except specified.
Connection to party line service is subject to state tariffs. Contact the state public utility commission, public
service commission or corporation commission for information.
NOTICE: If your home has specially wired alarm equipment connected to the telephone line, ensure the
installation of this [equipment ID] does not disable your alarm equipment. If you have questions about what will
disable alarm equipment, consult your telephone company or a qualified installer.
This equipment is hearing aid compatible.
NOTICE: According to telephone company reports, AC electrical surges, typically resulting from lightning
strikes, are very destructive to telephone equipment connected to AC power sources. To minimize damage
from these types of surges, a surge arrestor is recommended.
CAUTION: To maintain compliance with the FCC's RF exposure guidelines place the base unit at least 20cm
from nearby persons.
 Loading...