

Page 1

Emergency Portable Weather Radio
Model: WR601N
User Manual
Page 2

Page 3

Emergency Portable Weather Radio
Model: WR601N
User Manual
CONTENTS
Introduction ............................................................... 2
About the National Weather Radio system ............ 2
Key features ............................................................. 3
Front ....................................................................... 3
Back .......................................................................3
Top ......................................................................... 3
Left / Right .............................................................. 4
7.5V AC / DC adapter ............................................. 4
Carrying holder ....................................................... 5
Cradle ..................................................................... 5
LCD ........................................................................ 5
Getting started .......................................................... 5
Installing the batteries ............................................6
Different display modes .......................................... 6
Early warning alert system ...................................... 7
Message codes used by the NWR ......................... 8
Finding local NWR channels and county codes ..... 8
About radio channels ............................................. 9
Programming “SAME” county codes .................... 10
Radio volume .......................................................12
Reception test ........................................................ 12
Reception problems and solutions .................... 13
Many things affect reception!............................... 1 3
Clock and calendar ................................................. 13
How to set the time and date ............................... 13
How to set the alarms .......................................... 14
Disabling an alarm ............................................... 14
Enabling an alarm ................................................15
How to stop an alarm ...........................................15
Snooze ..................................................................... 15
Backlight ................................................................. 15
Emergency Alert System (EAS) .............................15
SAME messages ..................................................... 17
Care and maintenance ...........................................18
Specifications .........................................................19
About Oregon Scientific ........................................ 19
FCC statement .......................................................19
1
NE
Page 4

NE
INTRODUCTION
Thank you for selecting the compact Emergency
Portable Weather Radio (WR601N) from Oregon
Scientific™. The WR601N is a multi-function device
that operates on the same radio frequencies used by
the NOAA Weather Radio (NWR) and Weatheradio
Canada. With an Early Alert system, users are alerted to
weather and other environmental dangers.
This small, lightweight device is constructed of
durable materials and has a reception range of up to
50 miles (64 km). It is also equipped with a digital clock
and daily alarm.
The 2-line liquid crystal display (LCD) is easy to read.
Switching from 1 display mode to another is a 1-step
procedure, and the electroluminescent (EL) backlight
ensures that nighttime warnings can be seen in low
light levels.
ABOUT THE NATIONAL WEATHER RADIO
SYSTEM
The National Weather Service (NWS) is an agency within
the National Oceanic & Atmospheric Administration
(NOAA) that operates a nationwide network of radio
stations known as the NOAA Weather Radio (NWR).
The NWR radio system broadcasts warning information
for all types of hazards both natural and technological.
Working in conjunction with the Emergency Alert System
(EAS), NWR is an all-in-one hazards radio network and is
considered to be the single source of all comprehensive
weather and emergency information.
A nationwide network, the NWR consists of more than
800 stations in the United States, Puerto Rico, the U.S.
Virgin Islands and U.S. Pacific Territories. Broadcasts are
designed to meet local
repeated every few minutes and consists of local forecast,
regional conditions and marine forecasts.
information, including river stages and climatic data,
is also provided. During emergencies, these routine
broadcasts are interrupted to report specific warnings,
watches or other critical information.
Likewise, Weatheradio Canada is operated by Environment Canada's Meteorological Service and
broadcasts weather and environmental inform ation 24
hours a day in both official languages on 7 dedicated
frequencies within the VHF public service band. This
permits the transmission of a tone and Specific Area
Message Encoding (SAME) codes ahead of a warning
message that will activate the Weatheradio receiver
and alert you to an incoming important message.
2
needs. Routine programming is
Additional
Page 5

KEY FEATURES
FRONT
1. LCD
2. MODE BUTTON
• Switch between clock, calendar, and alarms
(1 and 2).
• Enables clock, calendar, and alarm setting.
3. CHANNEL BUTTON
• Enable / exit channel setting mode.
• Press CHANNEL and
activate / deactivate the keypad lock.
4. INDICATOR
Red / green LED indicates radio (on / off) and alert status
5. COUNTY BUTTON
• Enables county mode for entering county
or CLC code
• Change county/CLC settings (0-6)
in quick succession to
• Enter / change the setting of a displayed county
code.
6. RADIO SPEAKER
Adjustable voice-speaker volume.
BACK
1. BATTERY COMPARTMENT LATCH
2. BATTERY COMPARTMENT
Houses 3 UM-3 or “AA” size 1.5V alkaline batteries.
TOP
.
3
EN
Page 6

EN
1. SP JACK
Line out jack for optional external speakers.
2. NOAA BUTTON
• Switches between NOAA (on / standby / mute
and off) modes.
• Direct access to NOAA-on mode from NOAAmute mode during SAME message alerts.
LEFT / RIGHT
• Press CHANNEL and in quick succession to
activate / deactivate the keypad lock.
2. DOWN
• Decrease settings in any setting mode.
• Decreases volume.
•Turns selected daily alarm (1 or 2) on / off.
•Scrolls downward to select county code (6-0).
3. ANTENNA
Receives radio signals.
4. SNOOZE BUTTON
• Enables the snooze function when alarm sounds.
• Momentarily activates backlight.
5. AC / DC POWER PORT
AC / DC power jack for connecting unit to external
power source.
7.5V AC / DC ADAPTER
VOLUME BUTTON
1. UP
VOLUME BUTTON
• Increase settings in any setting mode.
• Increases volume.
•Turns selected daily alarm (1 or 2) on / off.
• Scrolls upward to select county code (0-6).
4
Page 7

CARRYING HOLDER
1. CARRYING HOLDER
Mount
on a wall or attach to a belt for easy portability.
CRADLE
House your weather radio in this cradle for convenient
placement.
LCD
7
4 8
NOAA
1. Voice radio in NOAA on [
standby [
2. Radio frequency channel.
3. County code display.
4. Time / date / alarm displays.
5. Low battery warning icon.
6. Warning message indicators (WARNING, WATCH,
ADVISO
7. Alarm (1 and 2) icons.
8. Keypad lock icon.
], NOAA mute [ ], and NOAA off).
RY and TEST).
GETTING STARTED
The WR601N LCD display will light up once the batteries
are inserted. To turn the LCD display on or off, press and
hold
the NOAA key for 2 seconds.
To conserve power, the radio can be turned off, set to
A standby, NOAA mute, or NOAA off modes instead
NOA
of NOAA on.
] position (NOAA
N
E
NOTE Leaving the radio in NOAA on mode will consume
substantially
that the WR601N be on NOAA standby when the user
is not listening to radio broadcasts.
5
more power. To save power, it is recommended
Page 8

N
E
INSTALLING THE BATTERIES
The WR601N uses 3 UM-3 or “AA” size 1.5V alkaline
batteries.
shows when batteries are low.
NOTE The non-volatile flash memory enables the unit
store your settings in the event of temporary power loss.
to
NOT
E Do no t use r ec ha rgea bl e ba tte ri es . It is
recommended
produc
batteries properly to prevent harm to the environment.
Standard
of water. Because of this they will freeze in low temperatures
of
approximately 10°F (-12°C). Disposable Lithium batteries
have
estimated
that you use alkaline batteries with this
t for longer performance. Please dispose of used
Alkaline batteries contain significant amounts
a much lower threshold for temperature with an
freezing range of below -40°F (-40°C). The
Liquid
Crystal Display in outdoor thermometers will remain
operational to -20
Wireless
as extremely cold temperatures. Extreme cold may
such
temporarily
unit?s performance fails due to low temperature, the unit
resume proper functioning as the temperature rises to
will
the normal temperature range (i.e. no permanent
within
damage will occur to the unit due to low temperatures).
DIFFERENT DISPLAY MODES
The LCD displays different types of information depending
the display mode. Display modes can be subdivided
upon
into 2 basic categories:
1. Clock Display Mode: Relates to functions of time and
te, shows current time, date or alarm time and
da
status for either alarm.
2. Radio Status Mode: Displays information specific to
the early-warning functions of the radio.
6
°F (-28°C) with adequate power.
ranges can be impacted by a variety of factors
reduce the effective range of the unit. If the
Page 9
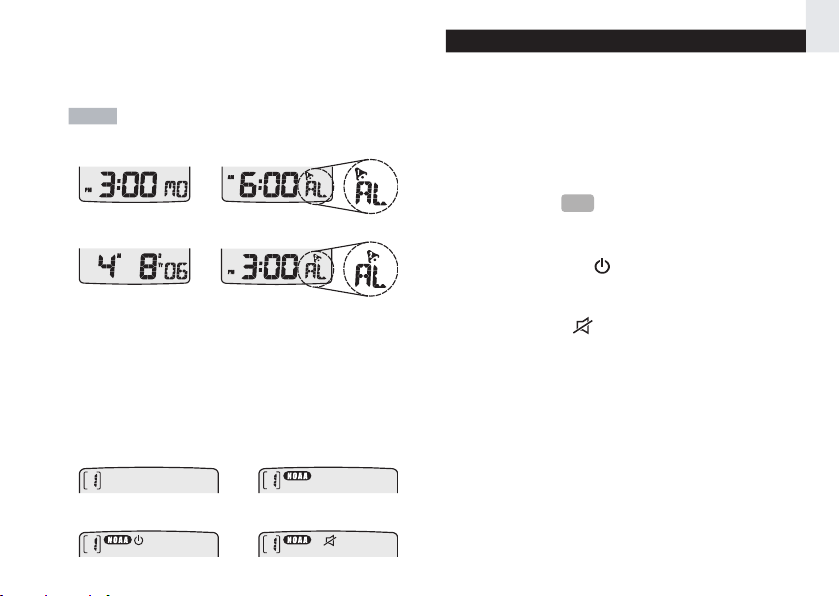
To alternate between various time / date displays:
Press MODE to advance the second line through the
time, date and alarm displays.
NOTE Each press will advance the display sequentially.
Current time Alarm 1
Alarm 2Current date
To alternate between various radio-status displays:
Press NOAA button to scroll through the NOAA mode
option
s (on, standby, mute, or off). The NOAA mode is
displayed on the top line of the LCD.
NOAA OFF NOAA ON
NOA
A Standby NOAA Mute
EARLY WARNING ALERT SYSTEM
The early warning system uses radio signals to alert the
user
to environmental dangers. A built-in radio receiver
will respond to 7 specified signal channels. To use the
early warning function, select 1 of 4 options to determine
the activity status of the radio receiver.
Radio-status options are:
• Radio ON [
The radio is ON and voice messages can be heard
continuously.
• Radio Standby [
radio is in Standby and will switch to the ON
The
position when an alert signal is received.
• Radio Mute [ ]
Th
e
radio is in Standby and the LED will flash red to
indicat
e that the unit has received an alert signal.
Voice messages cannot be heard until the unit is
switched to the ON position.
• Radio OFF
Th
e radio is turned OFF and the unit will not respond
to
alert signals.
To select radio settings:
Press NOAA to alternate between various radio status
settings. Each press will advance the setting by 1 unit.
7
NOAA
]
]
N
E
Page 10

NE
To listen to an alert signal from the radio mute
position:
Press NOAA until the unit enters the radio on position
and adjust the volume level if necessary.
MESSAGE CODES USED BY
NWR/WEATHERADIO CANADA
When NWR/Weatheradio Canada air urgent warnings,
a digital code known as Specific Area Message
Encoding (SAME) is included as part of the message.
This coding system contains specific information
including the localized geographical area affected and
the expiration time of the message. The WR601N
retrieves and interprets SAME code messages and
alerts the user. When SAME/CLC codes for a specific
region have been entered into the unit, the unit alerts
the user to relevant warning information for the
specified region. Once alerted, a voice broadcast can
be heard. At the end of the broadcast message, the
listener will hear a brief end-of-message static burst.
In Standby mode, the
a specific location and then the voice radio will
automatically activate so that voice message can be
heard. Several minutes after the message is
completed, the unit will automatically deactivate the
voice radio and revert to Standby mode.
FINDING LOCAL CHANNELS AND
COUNTY/AREA CODES
Successful operation of the WR601N requires that the
user obtain appropriate NWR/Weatheradio Canada
channels and SAME/CLC codes for a specific county
or region.
After NWR information on finding channels and
frequencies, add the same information for Weatheradio Canada as included in the Quick Start Guide.
unit will retrieve messages from
To contact the NWS by telephone:
1. Phone 1-888-NWR-SAME (1-888-697-7263).
2. Follow prompts through a simple voice menu.
To obtain NWS radio channels and SAME codes on
the internet:
1. Locate
2. Click the State for which information is needed.
For example, clicking on “Montana” will give a list of
information relevant to the State of Montana including
the names of counties, SAME codes, NWR transmitter
locations, the frequency of the transmitter, the strength
of the signal in WATTS, and any remarks as applicable.
8
www.nws.noaa.gov/nwr/indexnw.htm
Page 11
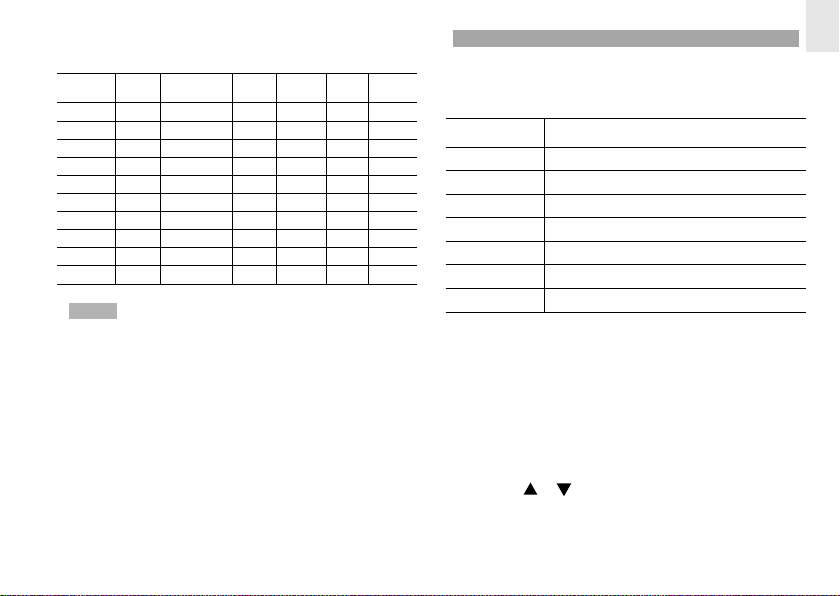
Example of the first 10 county radio channels and
SAME codes for Montana:
COUNTY/ SAME # NWR FREQ. CALL WATTS REMARKS
CITY/AREA TRANSMITTER
Beaverhead 030001 Butte, MT 162.550 WXL79 100
Beaverhead 030001 Dillon, MT 162.475 WNG638 150
Big Horn 030003 Billings, MT 162.550 WXL27 300
Blaine 030005 Havre, MT 162.400 WXL53 300
Blaine 030005 Malta, MT 162.475 WWG85 100
Broadwater 030007 Helena, MT 162.400 WXK66 1000
Carbon 030009 Billings, MT 162.550 WXL27 300
Carter 030011 Baker, MT 162.550 WXK57 300 N
Cascade 030013 Great Falls, MT 162.550 WXJ43 300
Chouteau 030015 Belgian Hill, MT 162.500 WWG84 300
NOTE Many counties have been subdivided into as
many as 9 smaller subsections. The numbers 1 to 9 in the
far left column of the SAME code identifies speci fic
subsections of a county. If a county has not been
subdivided, the first digit of the county code will be zero.
ABOUT RADIO CHANNELS
The NWR/Weatheradio Canada channels work in the
same way as a regular radio channel. All of the NWR
transmission stations operate on 1 of 7 frequencies.
CHANNEL CORRESPONDING RADIO FREQUENCY
1 162.400 MHz
2 162.425 MHz
3 162.450 MHz
4 162.475 MHz
5 162.500 MHz
6 162.525 MHz
7 162.550 MHz
The WR601N labels each frequency as a channel (1-7).
Once the radio frequency for a region has been selected,
the WR601N will reeived voice and code information
from that station. The radio channel information is located
on the upper left hand corner of the LCD.
To change to radio channel:
1. In any of the time displays, press and hold CHANNEL
for 2 seconds.
2. Press
or to switch between various channels.
3. When the appropriate channel has been selected,
press MODE to confirm and return to the ClockDisplay mode.
9
NE
Page 12
N
E
PROGRAMMING “SAME” COUNTY CODES
SAME county codes are required to receive weather and
environmen
the WR601N. U p to 6 specific SAME cod es ca n be
entered into 6 display fields.
NOTE The system can only alert the user to weather or
warning
has been entered and enabled.
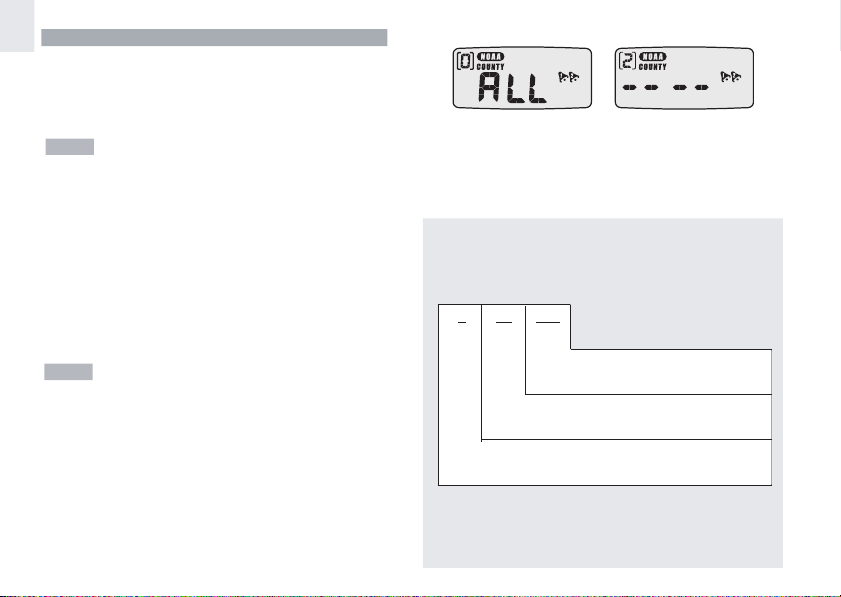
When the county code display is first entered, the user
will
(ALL)
will
messages from a specified channel can be received. If
none
weather
have been specified with respective county codes.
tal information, and need to be entered into
information after SAME county-code information
see a display field providing the option of selecting all
or none [----] of the county codes. Selecting ALL
set t he unit so all of the warnin gs and weather
[----] is selected the unit will receive warning or
information only from the specific regions that
mentioned in the section “Finding local NWR channels
As
County codes”, a toll-free phone number or Internet
and
website
are available to locate county code information.
DESCRIPTION OF SPECIFIC AREA MESSAGE
ENCODING CODES.
A SAME code is broken into 6 fields of numbers.
003043
NOTE It is recommended to select a SAME code field
between
(1-6) and then enter a specific code for that
field.
Selecting ALL will result in the unit giving warnings
for
regions that are not relevant to the user. These
regions
are quite large and can encompass about 5,000
square miles (13 sq km).
6 display fields permit up to 6 county codes to be entered.
The
user can select less than 6 codes by leaving the
unused display fields empty.
Code for Cochise County
Code for
Arizona
Code
for northeast
sub-section of Cochise County
County code for Cochise County, Arizona
10
Page 13
State-county coding:
The 3 digits on the far right refer to the state county
coding. Each county within a state will have an independent
3-digit code.
NOTE To receive all of the alerts for a given state, insert
000 into the county section.
State codes:
Moving towards the left, the next 2 digits are for state
coding. Each of the 50 U.S. states has their own 2-digit
code.
County sub-section code:
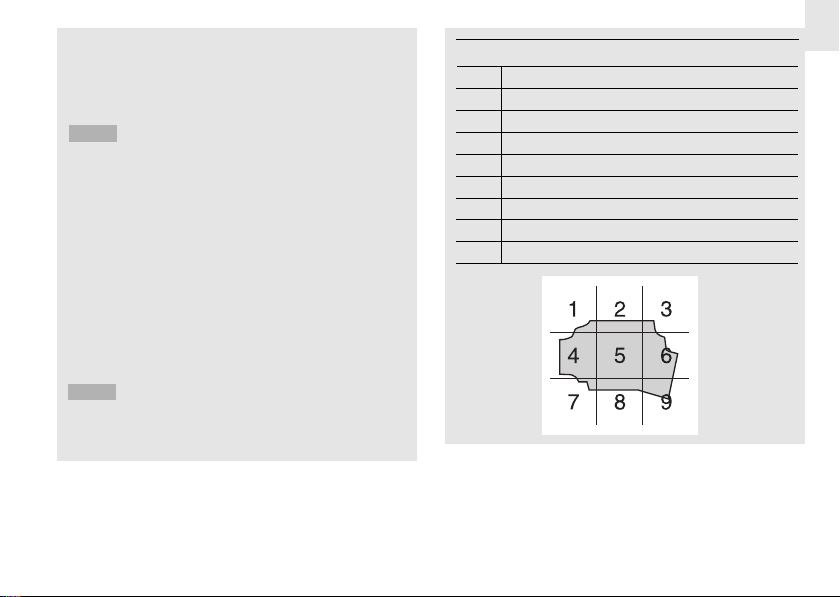
The last digit on the extreme left is the county subsection. A county may be subdivided into nine subsections; each number between (1-9) represents a specific
county sub-section.
NOTE If the county sub-section code is stated as 0,
then that county is not sub-divided and all alerts for that
county will be received. To receive all of the alerts for a
given county, insert 0 into the county sub-section.
EN
A county can be subdivided as follows:
1 Northwest
2 North Central
3 Northeast
4West Central
5 Central
6 East Central
7Southwest
8 South Central
9 Southeast
11
Page 14
NE
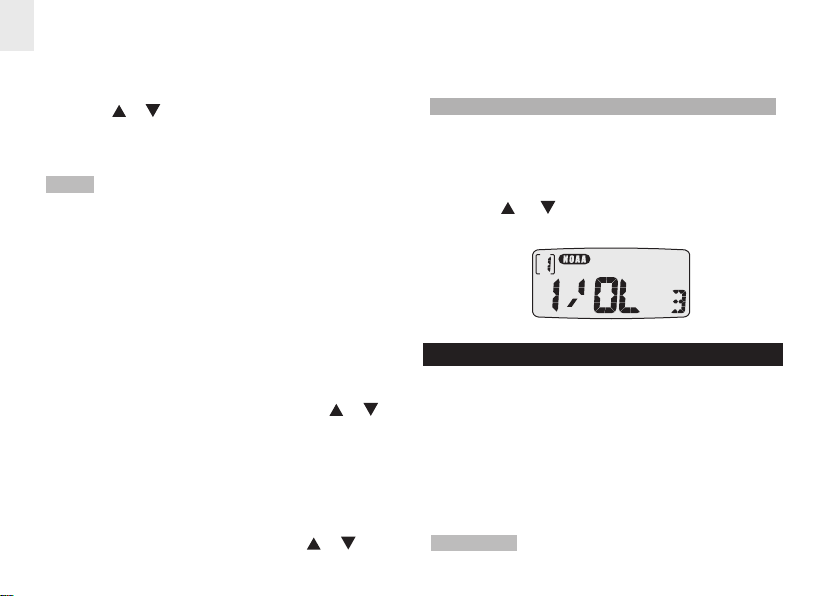
To receive all warnings or only warnings from
specified localities:
1. Press COUNTY to enter the county-code display
from any Clock Display Mode.
2. Press
warnings or only warnings from specified local
areas [----].
or to switch between receiving all (ALL)
6. When finished, press COUNTY to advance to the
next coun ty-code field, or wait 9 seconds to
automatically return to Clock Display Mode.
RADIO VOLUME
Before you can set the volume, the radio needs to be
in NOAA on mode.
NOTE If (1-6) [----] (specified local area) is selected,
local county codes need to be programmed into the
unit.
To enter the appropriate county code:
1. Press COUNTY to enter the county-code display
from Clock Display Mode.
2. Press COUNTY to bypass the county-code field 0
and advance to county code field 1.
3. To enter the county-code in this field, press and hold
COUNTY for 2 seconds. The extreme left county-
code digit will flash.
4. To enter the first county-code digit, press
Remember: This part of the code subdivides a county
into localized sub-sections. If the county code has not
been subdivided into smaller sub-sections, select (0) in
the far left column.
5. Enter the remaining 5 digits by following the same
process. Press COUNTY followed by
or .
or .
To set the radio volume:
In Clock Display Mode, with the radio set to NOAA
on, press
volume is 7, no sound is 1.)
or to adjust the volume. (Maximum
RECEPTION TEST
The fact that you can get clear voice reception does
not guarantee that an emergency alert will trigger your
unit's alert tone. To test actual reception, your unit must
receive a test or emergency alert signal broadcast. The
National Weather Service (NWS) or Weatheradio
Canada broadcast a test alert every week on Wednesday
between 11AM and 12PM (noon). To find out the specific
test schedule in your area, contact your local Nation
Weather Service or Weatheradio Canada office. These
offices are usually listed online or in the telephone book.
REMEMBER For your system to be effective, you must
12
Page 15
place the emergency radio in a location where it can
receive an emergency alert signal, you can hear its siren,
and see its flashing indicator lights.
RECEPTION PROBLEMS AND SOLUTIONS
MANY THINGS AFFECT RECEPTION!
Forests, deserts, and hills / mountains tend to greatly
reduce reception. Metal roofs on homes or buildings
may limit reception indoors for transmissions and
alerts. Reception in cities may be reduced due to steel
and concrete, while higher elevations will enhance the
signal. Reception can vary from room to room. Moving
even a few feet can enhance signal reception.
Place the your weather radio
RECOMMENDATION
near a window, away from other electronic equipment,
and on an upper level of your house.
CLOCK AND CALENDAR
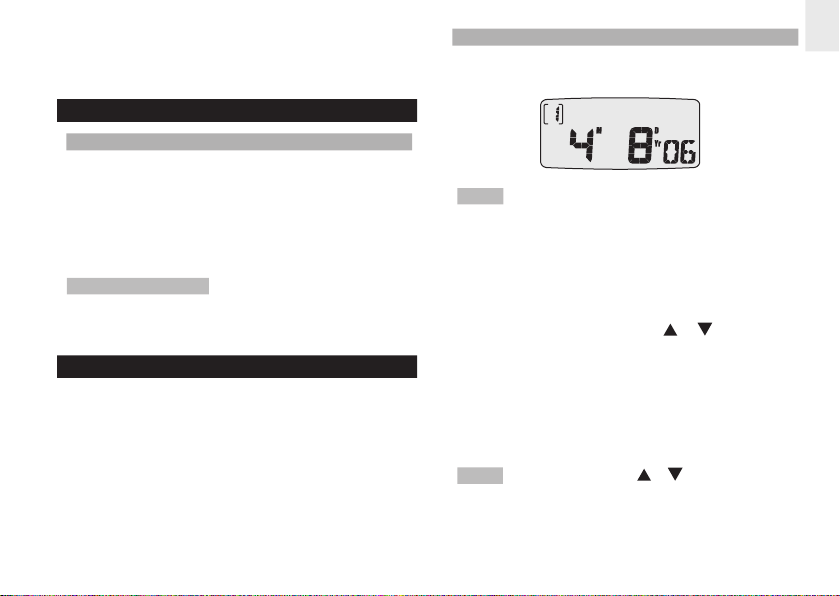
The Clock Display Mode is the unit’s default display mode.
When in another display mode it will automatically return
to the Clock-Display after 9 seconds.
Setting the clock and calendar is sequential. Any part
of the setting sequence can be bypassed by pressing
MODE. Once changes are made and the setting mode
has been exited, the day-of-the-week will automatically
be determined. Days of the week are viewable in 3
languages: English, French and Spanish.
HOW TO SET THE TIME AND DATE
You can choose between 12 / 24-hour clock or month /
y, day / month display format.
da
NOTE At any stage of the setting sequence, if no entry
made after 9 seconds, the unit will automatically exit
is
Clock-Setting mode and return to the Clock Display
e
th
.
e
Mod
To set the time:
In Clock Display Mode, press and hold MODE for
1.
2 seconds.
2.
To change the setting, press or .
3.
Press MODE to confirm and move onto the next
setting.
4.
The setting sequence is 12 / 24 hour format, hour,
minute, year, month-date format, month, day and
day of the week language (English, French or
Spanish).
NOTE Pressing and holding or will advance digits
in rapid sequence.
13
NE
Page 16
N
E
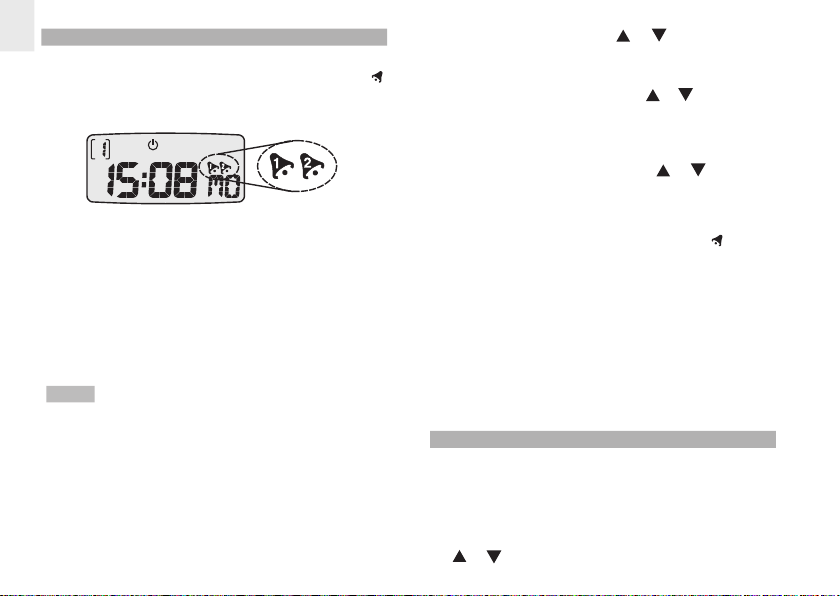
HOW TO SET THE ALARMS
The WR601N has 2 alarms (alarm 1 and alarm 2). They
be used together or independently. The alarm icons
can
only displayed when alarm 1 or alarm 2 are active. No
are
icon(s) indicate that the alarm(s) have not been set.
Remember: From the Clock Display Mode, press MODE
to enter Calendar-Display and then again to set Alarm.
1. Press MODE once more to set Alarm 2.
Setting the Alarm:
1. With the clock displayed, press MODE until alarm
(1 or 2) display is entered.
NOTE The last set time of the alarm will be displayed.
If you have not set the alarm before, or if the alarm has
been disabled, the time will be displayed as [----].
2. Press and hold MODE for 2 seconds.
Remember: At any stage of the setting sequence, if no
entry is made after 9 seconds, the unit will automatically
return to the Clock Display Mode.
3. To enter the hour, press or until the desired
hour has been selected.
Remember:
digits in rapid sequence.
When the desired hour is reached, press MODE to
4.
advance select minutes. Press or to change
values.
5.
After selecting the minutes, press MODE or wait
9 seconds to exit Alarm-Setting Mode and return to
Clock Display Mode. The alarm ON icon ( ) for the
chosen alarm, will be shown to indicate that the
alarm is set and will sound at the set time.
When
EL backlight will activate. Alarms 1 and 2 are identified
different sounds: Alarm 1 has 2 short bursts of sound
by
followed
short
repeats.
of 1 minute before automatically turning o
DISABLING
When
displayed
blanks [----].
To disable alarm (1 or 2):
Press
by
14
Pressing and holding or will advance
an alarm goes off, it will sound for 1 minute, the
by a pause which then repeats. Alarm 2 has 4
bursts of sound followed by a pause, which then
Unless disabled, the alarms will sound for a total
ff.
AN ALARM
disabled, the respective alarm icon will not be
. A disabled alarm display is indicated by
MODE to enter alarm-1 or alarm-2 display followed
or .
Page 17
NOTE When an alarm is activated, the alarm time will
be displayed in the alarm display. In the Clock Display
Mode, the respective alarm-on icon will appear indicating
that alarm 1, 2 (or both) is set.
ENABLING AN ALARM
When disabled, the respective alarm icon will not be
displayed. The display will show blanks [----].
To enable alarm (1 or 2):
Press MODE to enter alarm 1 or alarm 2 display followed
or . The respective alarm-on icon will appear
by
and the [----] alarm time will be replaced with the alarm
time set.
HOW TO STOP AN ALARM
An alarm can be disabled but remain set so that it will
activate at the same time the following day.
To stop an alarm:
When the alarm sound is activating, press any button
(except
will activate again at the same time the next day.
. The alarm will be stopped and
SNOOZE
When either alarm 1 or 2 sounds, pressing
will stop the alarm for 8 minutes before it sounds again.
BACKLIGHT
The EL back light casts a blue light evenly across the LCD
making information easy to read in low light conditions.
To activate the backlight, press .
EMERGENCY ALERT SYSTEM (EAS)
The Emergency Alert System (EAS) uses the latest
technology to allow local authorities to broadcast important
emergency information to specific areas. The Emergency
Alert system was originally designed as a communications
link between the President and the general public during
times of emergency. The EAS communication link is instant
and can target the State, National, and Local Area levels.
The EAS and NWS share the same digital signal used on
the National Oceanic and Atmospheric Administration’s
Weather Radio (NWR). Ultimately, the purpose of EAS is
to deliver emergency alert information to those who need it.
This product is equipped to receive all required
NOTE
NOAA and newly added EAS events.
Environment Canada's Meteorological Service
operates its Weatheradio Canada using the same
system as EAS in the United States, using SAME
technology and the same frequencies for easy use
of the same radio in either country and using either
system - only the county or CLC codes change.
To receive EAS events, make sure your WR601N radio is
working properly. Please refer to the “SAME Messages”
section for information about how to receive “Test” messages. When an EAS event is sent by the NWS, any 1 of
the following messages will be displayed on your radio:
“WARNING”, “WATCH”, or “ADVISORY” Please refer
to the list of the National Events and Messages below:
15
NE
Page 18
EN
16
NATURE OF ACTIVATION MESSAGE
Administrative message ADVISORY
Avalanche Watch WATCH
Avalanche Warning WARNING
Biological Hazard Warning WARNING
Boil Water Warning WARNING
Blizzard Warning WARNING
Child Abduction Emergency ADVISORY
Civil Danger Warning WARNING
Civil Emergency Message WARNING
Coastal Flood Watch WATCH
Coastal Flood Warning WARNING
Chemical Hazard Warning WARNING
Contaminated Water Warning WARNING
Dam Watch WATCH
Dam Break Warning WARNING
Contagious Disease Warning WARNING
Practice / Demo ADVISORY
Dust Storm Warning WARNING
Emergency Action Notification WARNING
Emergency Action Termination ADVISORY
Earthquake Warning WARNING
Immediate Evacuation WARNING
Evacuation Watch WATCH
Food Contamination Warning WARNING
NATURE OF ACTIVATION MESSAGE
Flash Flood Watch WATCH
Flash Flood Statement ADVISORY
Flash Flood Warning WARNING
Flood Watch WATCH
Flood Statement ADVISORY
Flood Warning WARNING
Fire Warning WARNING
Flash Freeze Warning WARNING
Freeze Warning WARNING
Hurricane Statement ADVISORY
Hazardous Materials Warning WARNING
Hurricane Watch WATCH
Hurricane Warning WARNING
High Wind Watch WATCH
High Wind Warning WARNING
Iceberg Warning WARNING
Industrial Fire Warning WARNING
Local Area Emergency ADVISORY
Law Enforcement Warning WARNING
Land Slide Warning WARNING
National Audible Test ADVISORY
National Information Center ADVISORY
Network Notification ADVISORY
National Periodic Test ADVISORY
Page 19
NATURE OF ACTIVATION MESSAGE
National Silent Test ADVISORY
Nuclear Power Plant Warning WARNING
Power Outage Advisory ADVISORY
Radiological Hazard Warning WARNING
Required Monthly Test ADVISORY
Required Weekly Test ADVISORY
Special Marine Warning WARNING
Special Weather Statement ADVISORY
Shelter In-Place Warning WARNING
Severe Thunderstorm Watch WATCH
Severe Thunderstorm Warning WARNING
Severe Weather Statement ADVISORY
Tornado Watch WATCH
911 Telephone Outage Emergency
Tornado Warning WARNING
Tropical Storm Watch WATCH
Tropical Storm Warning WARNING
Tsunami Watch WATCH
Tsunami Warning WARNING
Volcano Warning WARNING
Wild Fire Watch WATCH
Wild Fire Warning WARNING
Winter Storm Watch WATCH
Winter Storm Warning WARNING
ADVISORY
NATURE OF ACTIVATION MESSAGE
Unrecognized Watch WATCH
Unrecognized Emergency ADVISORY
Unrecognized Statement ADVISORY
Unrecognized Warning WARNING
The 4 “Unr ecogn ized” mess ages above will
NOTE
appear when a new NOAA alert message is created and
broadcasted. The unit will not be able to recognize the
message as it is not in the software database.
For more information about the Emergency Alert System
and event codes, please visit:
www.fcc.gov/eb/eas/ or
http://www.nws.noaa.gov/os/eas_codes.shtml
SAME MESSAGES
The WR601N receives SAME warning messages in 3
classifications depending upon the level of emergency:
Warning, Watch and Advisory. In addition to these 3
classifications, there is another type of message - Test.
The purpose of this NWR/Weatheradio Canada service
is to assist you in verifying that your WR601N weather
radio is set up and working properly. Each week your
local weather office will broadcast a test message in SAME
format. To receive the Test message, your WR601N
needs to be in NOAA-on, NOAA
mode with a county/ClC code and channel selected and
programmed into the radio. If your WR601N is properly set,
a flashing “Test” icon will be displayed on the LCD when a
Test message is received. The “Test” icon will continue
17
-standby, or NOAA-mute
NE
Page 20

EN
to flash for over an hour after the Test message is
received. "NOAA Weather Radio/Weatheradio Canada
stations broadcast the Test Message every Wednesday
between 10:00AM and Noon, local t
may also be sent on other days and times when there is
a threat of severe weather in the listening area or for
other reasons).
Corresponding with the “Test” icon, the following broadcast
will be made immediately after sounding the Test alarm:
the National Weather Service Office in ... (city) ....
“This is
The preceding signal was a test of the Weather Radio
Station ... (call sign) ... public warning system. During
potentially dangerous weather situations, specially built
receivers can be automatically activated by this signal to
warn of the impending hazard. Tests of this signal and
receivers’ performance are normally conducted by the
National Weather Service at ... (time) ... each Wednesday.
If there is a threat of severe weather, the test will be
postponed to the next good-weather day. Reception of
this broadcast, and especially the warning alarm, will
vary at any given location. This variability, normally more
noticeable at greater distances from
occur even though you are using a good quality receiver
in good working order. To provide the most consistent and
dependable warning service possible, the warning alarm
will be activated for hazardous watches and warnings for
the following counties .... (list of counties)...”
When more than 1 state is involved, the names of the
states will always preceed the names of the counties
in that state.
ime. (Test messages
the transmitter, can
If the Test is cancelled due to the threat of severe weather,
the Test broadcast schedule will resume with the next
available good-weather day.
lf you have any questions regarding alarm tests or to
verify if a test was conducted, contact the programming
office of your local weather service station.
CARE AND MAINTENANCE
When handled properly, this unit is engineered to give
years of satisfactory service.
To properly maintain this product:
1. The unit is splash proof but do not immerse it in
water. If the unit comes in contact with water, dry it
with a soft lint-free cloth.
2. Do not clean the unit with abrasive or corrosive
materials. Abrasive cleaning agents may scratch
the plastic parts and corrode the electronic circuit.
3. Do not subject the unit to excessive force, shock,
dust, temperature, or humidity. Such treatment may
result in malfunction, a shorter electronic life span,
damaged batteries, or distorted parts.
4. Do not tamper with the unit’s internal components.
Doing so will terminate the unit’s warranty and may
cause damage. The unit contains no user-serviceable
parts.
5. Only use new batteries as specified in this instruction
manual. Do not mix new and old
batteries may leak corrosive or hazardous fluids.
18
batteries as the old
Page 21
SPECIFICATIONS
RADIO FUNCTIONS
Channels: Digital PLL tuning for 7 NOAA
SAME code 6 independent setting
setting options: or ALL counties
Volume: 7 adjustment levels
channels
NE
CAUTION
• The content of this manual is subject to change
without notice.
• Due to printing limitations, the display shown in this
manual may differ from the actual product display.
• The contents of this manual may not be reproduced
without the permission of the manufacturer.
TIME FUNCTIONS
Clock: 12 or 24 hour format
Calendar: Calendar day-of-the-week display
User-select month/day or day/
Daily alarms: 2 one-minute duration alarms
Snooze: 8-minute alarm delay
Accuracy: + / - 0.5 seconds / day
GENERAL SPECIFICATIONS
Battery Type: 3 UM-3 or “AA” size 1.5V alkaline
AC / DC Adapter: 7.5V - 350mA
LCD Dimensions:
Unit Dimensions: 5.4 (L) x 3 (W) x 1.4 (D) inches
Unit Weight: 4.5 oz (131 g) without batteries
Operating Temperature:
in English, French or Spanish
month format
batteries
2 (L) x 0.9 (W) inches (50 x 22 mm)
(137 x 74 x 35 mm)
23°F to 122°F (-5°C to 50°C)
ABOUT OREGON SCIENTIFIC
Visit our website (www.oregonscientific.com) to learn
more about Oregon Scientific products. If you’re in the
US and would like to contact our Customer Care
department directly, please visit:
www2.oregonscientific.com/service/support.asp
For international inquiries, please visit:
www2.oregonscientific.com/about/international.asp
FCC STATEMENT
This device complies with Part 15 of the FCC Rules.
Operation is subject to the following two conditions: (1)
This device may not cause harmful interference, and
(2) This device must accept any interference received,
including interference that may cause undesired
operation.
WARNING Changes or modifications not expressly
approved by the party responsible for compliance could
void the user’s authority to operate the equipment.
19
Page 22

N
NOTE This equipment has been tested and found to
E
comply with the limits for a Class B digital device,
pursuant to Part 15 of the FCC Rules. These limits are
designed to provide reasonable protection against
harmful interference in a residential installation.
This equipment generates, uses and can radiate radio
frequency energy and, if not installed and used in
accordance with the instructions, may cause harmful
interference to radio communications. However, there
is no guarantee that interference will not occur in a
particular installation.
If this equipment does cause harmful interference to
radio or television reception, which can be determined
by turning the equipment off and on, the user is encour
aged to try to correct the interference by one or more of
the following measures:
• Reorient or relocate the receiving antenna.
• Increase the separation between the equipment
and receiver.
• Connect the equipment into an outlet on a circuit
different from that to which the receiver is
connected.
• Consult the dealer or an experienced radio / TV
technician for help.
DECLARATION OF CONFORMITY
The following information is not to be used as contact
for support or sales. Please visit our website at www2.
oregonscientific.com/service for all enquiries.
We
Name: Oregon Scientific, Inc.
Address: 1 9861 SW 95th Ave.,Tualatin,
Oregon 97062 USA
Telephone No.: 1-800-853-8883
declare that the product
Product No.: WR601N
Product Name: Emergency Portable
Weather Radio
Manufacturer: IDT Technology Limited
Address: Block C, 9/F, Kaiser Estate,
Phase 1, 41 Man Yue St.,
Hung Hom, Kowloon,
Hong Kong
is in conformity with Part 15 of the FCC Rules.
Operation is subject to the following two conditions:
1) This device may not cause harmful interference.
2) This device must accept any interference received,
including interference that may cause undesired
operation.
20
Page 23

Page 24

© 2011 Oregon Scientific. All rights reserved.
300102485-00002-10
 Loading...