

Page 1
INTRODUCTION
Weather
logo
are compatible with this
NOTE
Please keep this manual handy as you use
warnings you should know about.
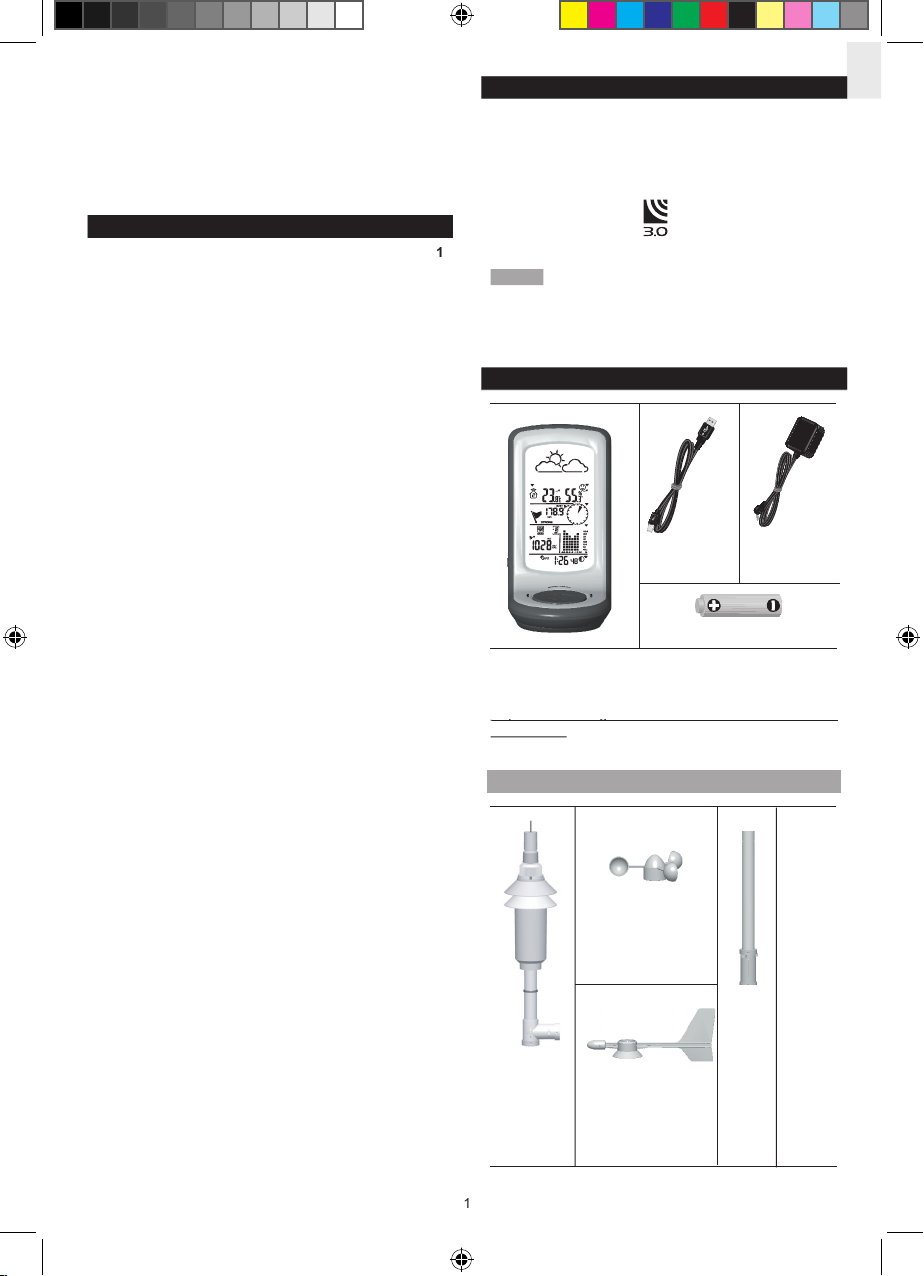
PACKAGING CONTENTS
he “Virtual Weather Station” so
ftware and manual are
wmr100.exe
WIND SENSOR
Adapter
Advanced Weather Station
with Wireless Sensor Set
CONTENTS
Wind Sensor ................................................................ 1
Wind Sensor ................................................................ 4
Auto Scanning Function ........................................... 8
Weather Forecast ....................................................... 8
Wind Direction / Speed ............................................ 10
Weather Alarms ........................................................ 11
Accessories – Sensors ............................................ 12
About Oregon Scientifi c .......................................... 14
Wind Direction
Vane
with
WMR100_EN_86L4515-017.indd 1 6/15/06 4:24:00 PM
Page 2

RAIN GAUGE
OVERVIEW
1. MEMORY / ON/OFF: Read the max
/ min memory record; activate / deactivate alarms
View and set alarms for barometer,
temperature, humidity, rainfall and wind speed
Switch between the different display modes /
settings
4.
Rotate left or right to increase or
decrease the values of the selected reading
Switch between the different areas
RESET:
Returns unit to default settings
Searches for sensors or for the radio-
controlled clock signal
4.
radio signal
4
x Screws
4
x UM-3
/ AA
Bottom
1
3
2
4
5
6
7
1
2
3
4
5
4
x Screws
WMR100_EN_86L4515-017.indd 2 6/15/06 4:24:24 PM
Page 3
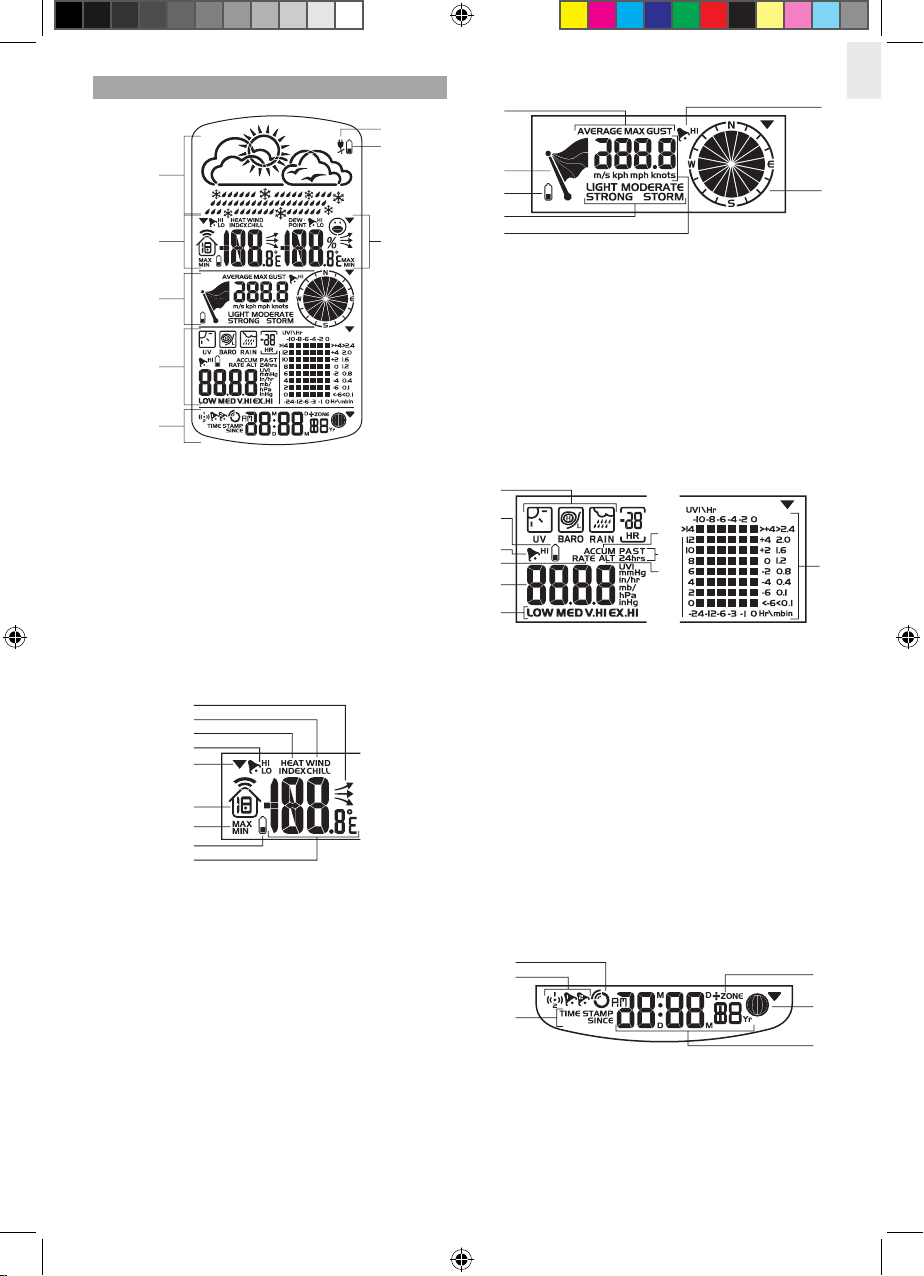
LCD DISPLAY
4. UVI / Barometer / Rainfall Area
4. HI / LO temperature, HI Heat Index and LO Wind
Chill alarms are set
is displayed
Wind Speed / Wind Direction Area
4. Wind speed level description
or knots)
4. Rain rate is showing
hPa) / rainfall readings (in / hr or mm / hr)
chart display
4. Offset time zone
1
2
3
4
5
6
7
8
1
2
3
4
5
6
7
8
9
1
2
3
4
5
6
7
1
2
3
4
7
8
9
5
6
10
1
2
3
4
5
6
WMR100_EN_86L4515-017.indd 3 6/15/06 4:24:43 PM
Page 4

4. Humidity trend
WIND SENSOR
4.
hole
RAIN GAUGE
button
GETTING STARTED
SET UP REMOTE WIND SENSOR
NOTE
For best results, ensure that the wind direction
up the wind sensor main body on the steel
wind sensor.
pointer.
4. Use the screw (Type B) to fi x.
protective sleeve to the left to unlock.
1
2
3
4
5
6
1
2
5
6
3
4
1
2
3
1
2
1
2
3
4
WMR100_EN_86L4515-017.indd 4 6/15/06 4:24:53 PM
Page 5
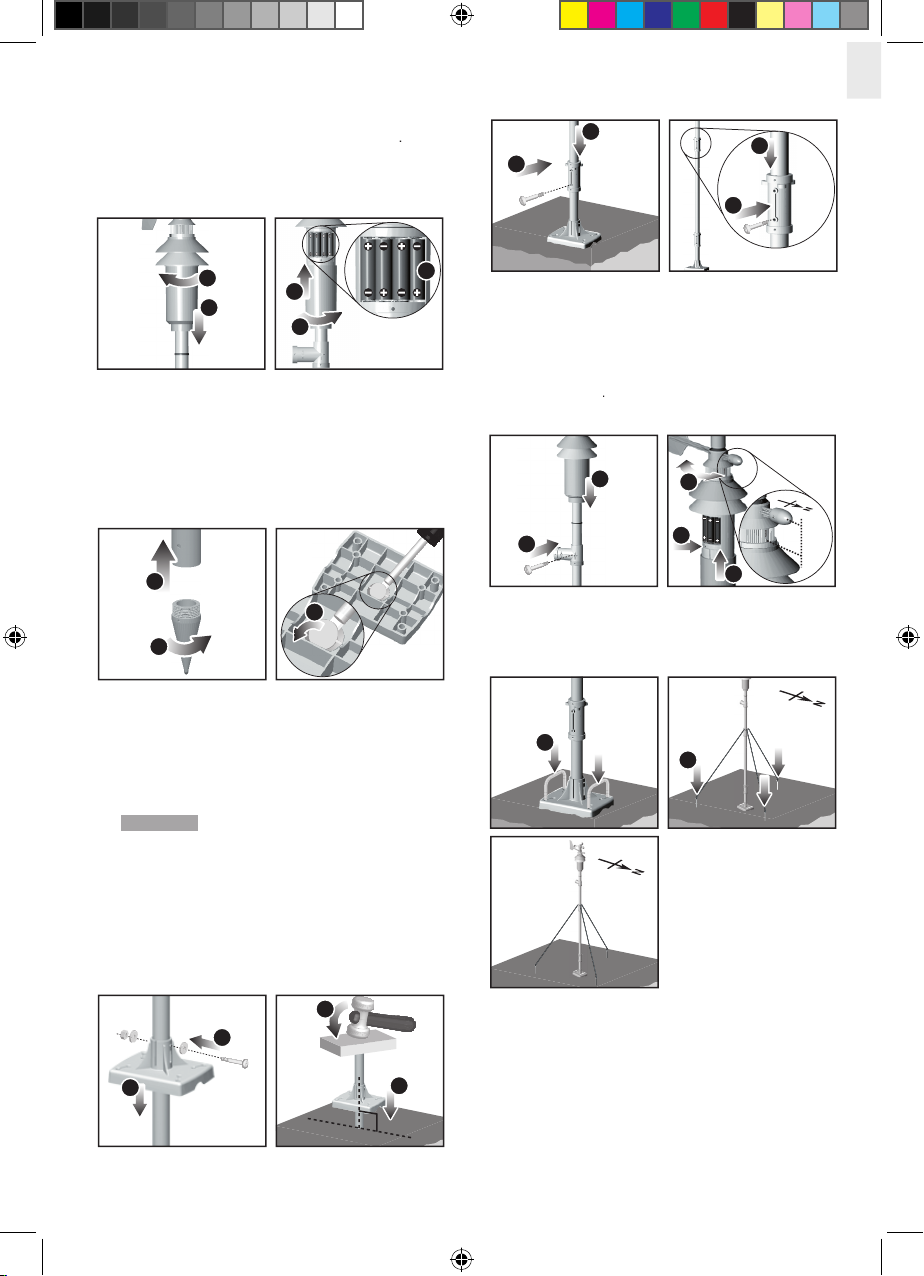
pole. Use the screw (Type A) to fi x.
the
indicator points to the “North”.
fi rmly fi x the pole.
the tension strings to the ground.
at the end of the top pole.
previously installed.
4. Assemble it at the end of the top pole using the
screw that is already attached on the base, with the
washers and bolts to fi x.
14
15
16
12
13
17
18
9
8
10
11
compartment.
matching the polarity (+ / -) and press
compartment.
bottom steel pole.
the pole.
4. Inse
screw hole aligns with the support.
with the washers and bolts to fi x.
at a perpendicular angle into the ground.
WARNING Make sure that there are NO electric
cables / power lines, gas / water pipes in the area
where you are placing the steel pole. Do not place
the pole into a hard rocky type of ground as it may
bend or break the pole. It should be inserted into
soft soil.
a hammer, hit the wooden block to insert the pole at
a perpendicular angle to the ground until reaching
the base.
7
5
8
9
6
1
2
3
4
5
6
7
WMR100_EN_86L4515-017.indd 5 6/15/06 4:25:13 PM
Page 6
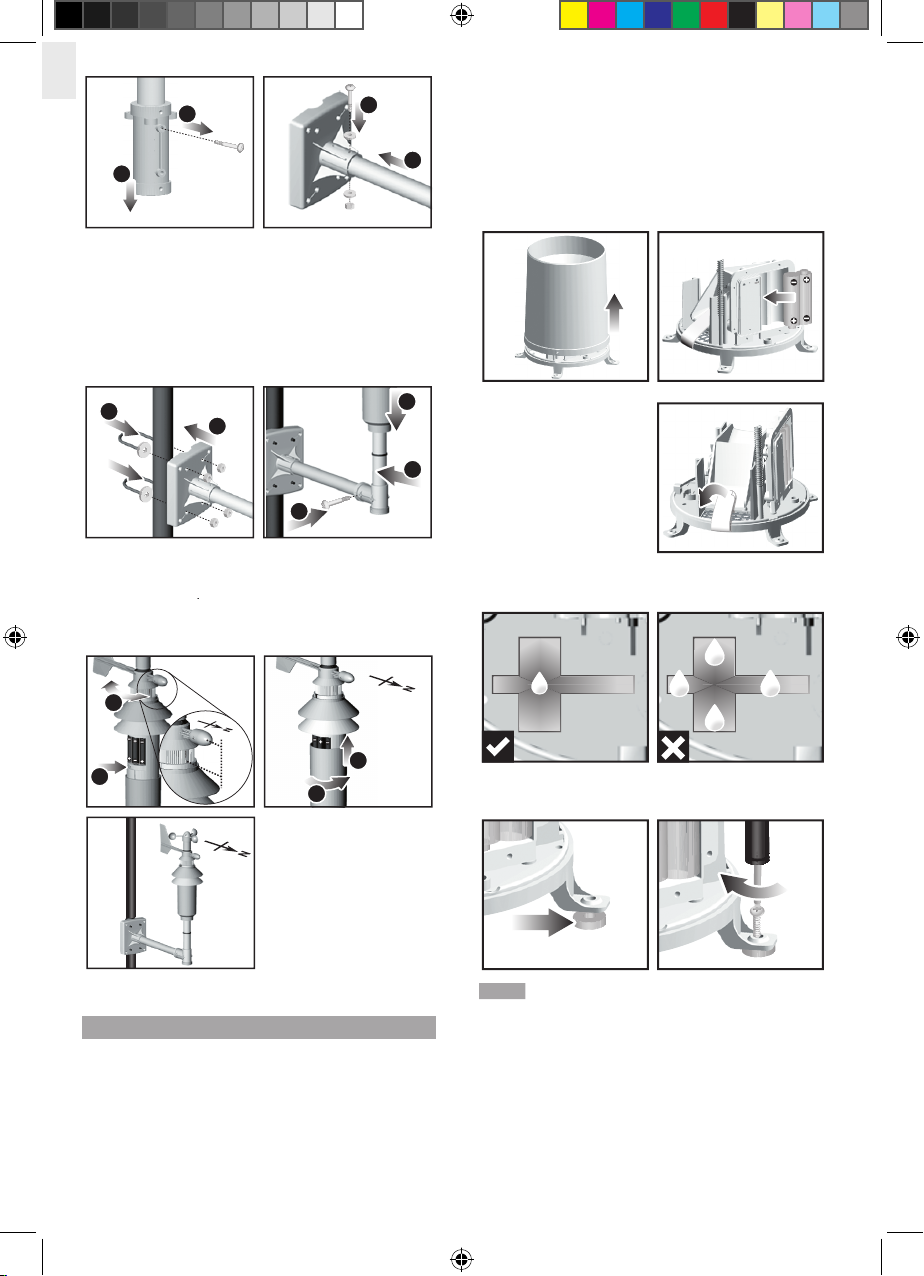
using the 4 washers and bolts.
the pole.
the
indicator points to the “North”.
SET UP REMOTE RAIN GAUGE
within effective range: about 100 meters (328 feet) in an
from trees or other obstructions to allow rain to fall
3 / AA), matching the polarity (+ / -).
few drops of water on the cross at the base of
the funnel to check the horizontal level.
4. If ne
NOTE
For best results, ensure the base is horizontal to
4
3
1
2
7
9
8
5
6
12
13
10
11
7
9
1
23
4
WMR100_EN_86L4515-017.indd 6 6/15/06 4:25:43 PM
Page 7
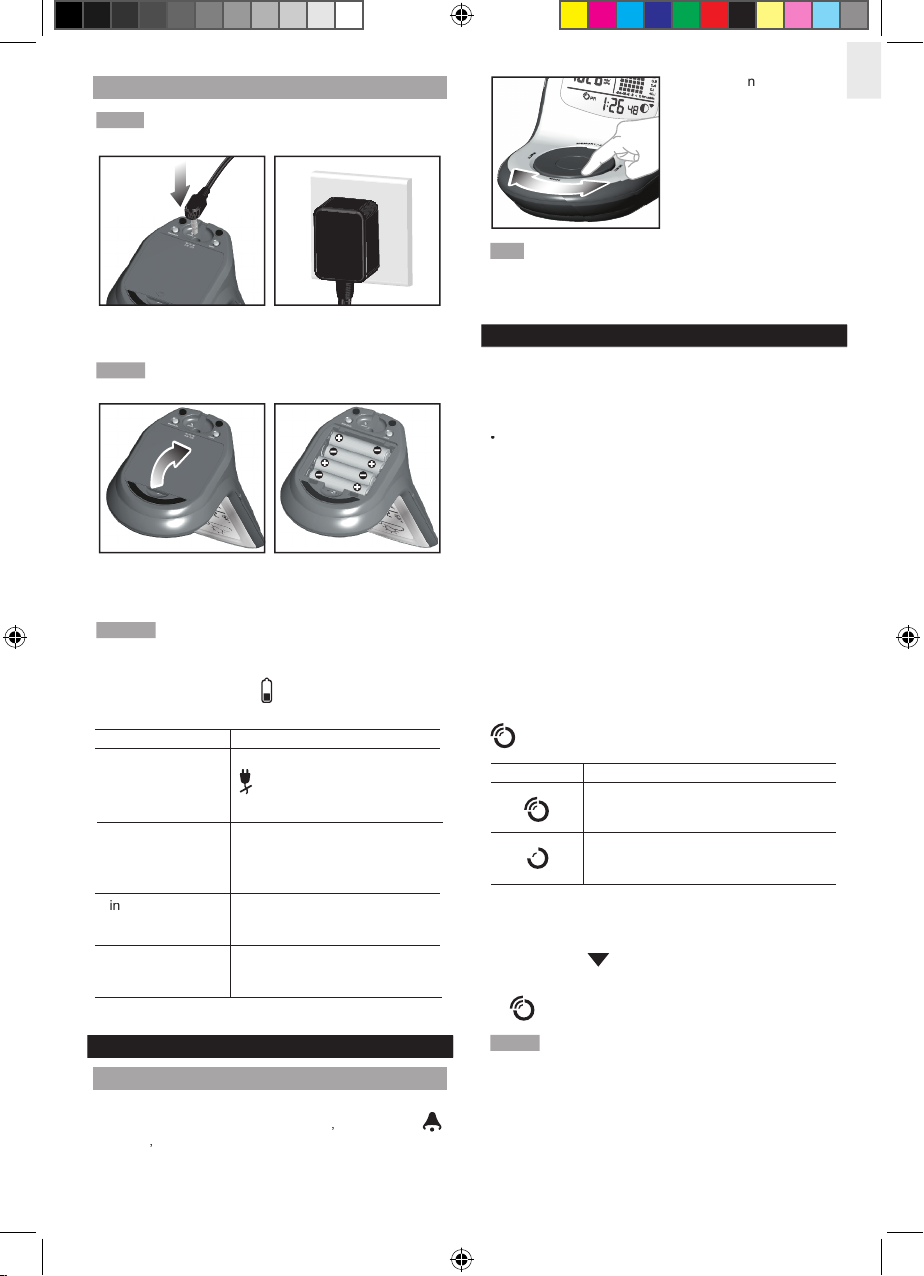
buttons
TIP
xit
from the setting mode, push any button.
Alternatively, the base station will automatically exit after
CLOCK RECEPTION
WMR100:
DCF-7
Central Europe
WMR100
Collins, Colorado
WMR100 only - slide the
switch to the appropriate
whenever
Receiving signal is strong
not synchronized.
Receiving signal is weak
to navigate to the Clock / Calendar /
Alarm Area.
will show next to the Area.
appears when it is enabled.
NOTE
For best reception, the base station should be
SET UP BASE STATION
NOTE
Install batteries in the remote sensor before the
NOTE
Please make sure the socket-outlet is installed
after each
NOTE
indicator may
appear in the
following areas:
BASE STATION
CHANGE DISPLAY / SETTING
MODE
and
Weather Forecast
Area
Area
W
/
/
will
show when AC adapter is
WMR100_EN_86L4515-017.indd 7 6/15/06 4:26:07 PM
Page 8
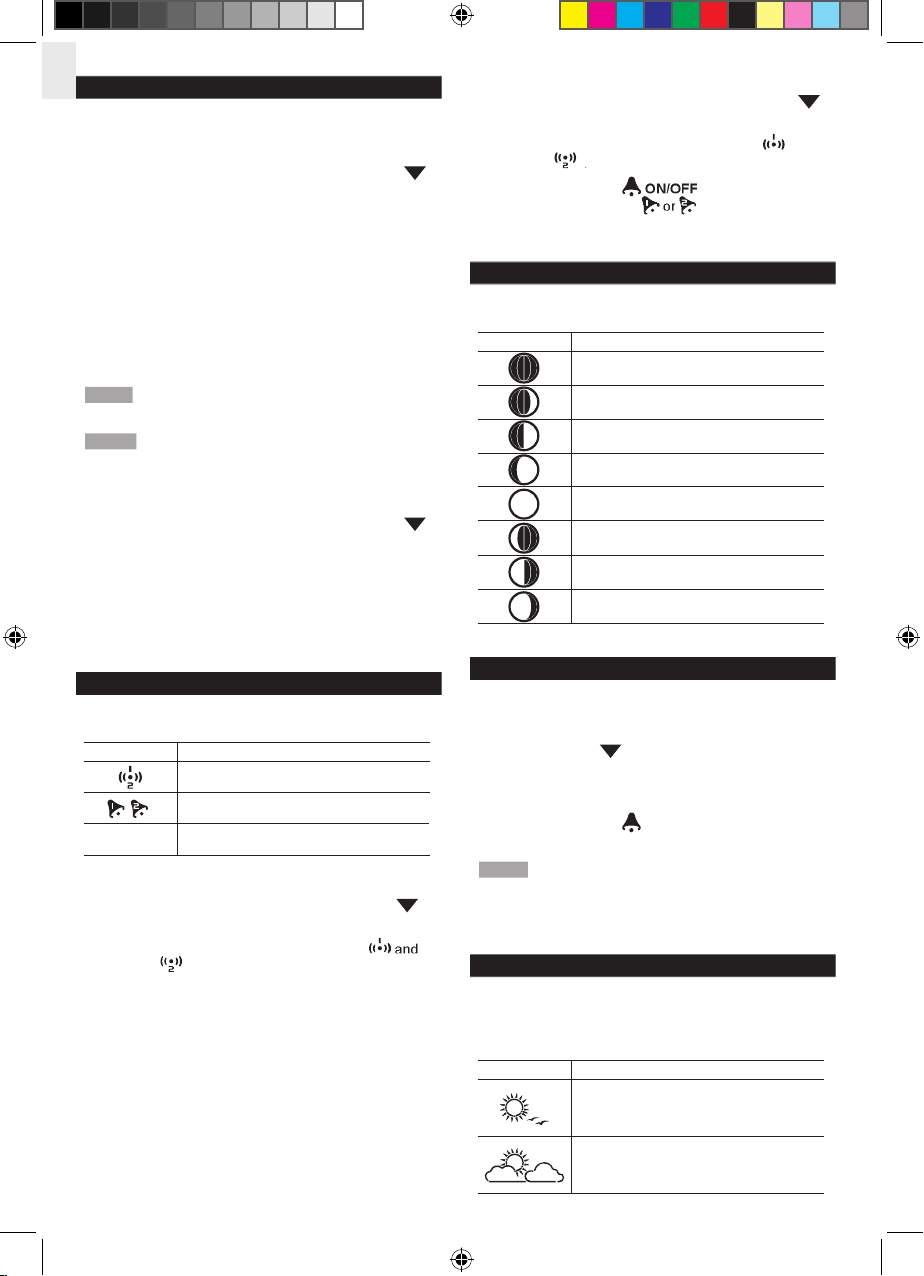
CLOCK / CALENDAR
to navigate to the Clock Area.
will show next to the Area.
to change the clock setting.
The setting will blink.
the setting value.
4. Press
hour (+ / -23 hours), 12 / 24 hour format, hour,
minute, year, date / month format, month, date and
weekday language.
NOTE
If you enter +1 in the time zone setting, this will
NOTE
The weekday is available in English, French,
to navigate to the Clock Area.
will show next to the Area.
to toggle between:
CLOCK ALARM
Ala
icons No alarm is set
to navigate to the Clock Area.
will show next to the Area.
ALARM
alarm 2
display.
change, press and hold
will blink.
4. Rotate the dial left or right to change the setting.
to confi rm.
to navigate to the Clock Area.
will show next to the Area.
ALARM
to toggle between alarm 1
and
alarm 2
to activate or
deactivate the alarm.
appears when the
alarm is activated.
MOON PHASE
ICON
DESCRIPTION
moon
xing crescent
AUTO SCANNING FUNCTION
Humidity Area.
will show next to the Area.
to activate auto-scan. The
temperature and humidity display will scroll from
indoor to ch1 through to ch10.
ON/OFF
or
or
NOTE
Additional temperature and humidity sensors can use
WEATHER FORECAST
Weather Forecast Area
cloudy
WMR100_EN_86L4515-017.indd 8 6/15/06 4:26:18 PM
Page 9
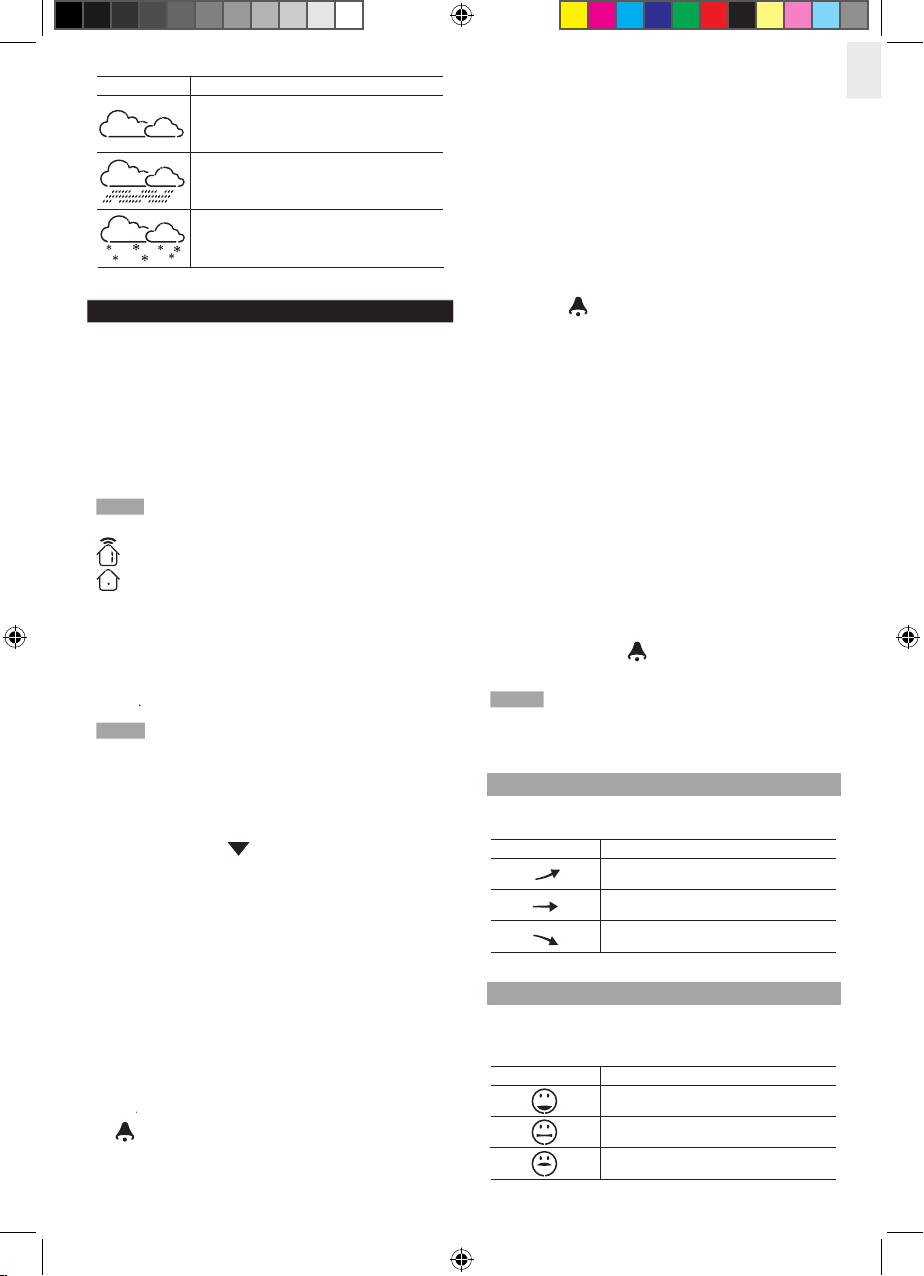
Snowy
TEMPERATURE AND HUMIDITY
relative humidity.
NOTE
Channel 1 is dedicated for outdoor temperature
shows which remote sensor’s data you are viewing.
appears when indoor data is displayed.
(at the bottom of the base station) to select
NOTE
The unit of all temperature related displays will
to navigate select the Temperature
or Humidity Area.
will show next to the Area.
repeatedly to cycle through the readings for:
e
ON/OFF
between:
Area.
ON/OFF
to clear the readings.
wind chill, humidity and dew point alarms:
repeatedly to toggle between high / low
alarms for temperature, heat index, wind chill,
humidity and dew point readings.
to enter the alarm setting.
4. Press
ALARM
repeatedly to select the desired alarm.
ON/OFF
to activate or
deactivate the alarm.
NOTE
The dew point advises at what temperature
TEMPERATURE AND HUMIDITY TREND
COMFORT LEVEL
WMR100_EN_86L4515-017.indd 9 6/15/06 4:26:22 PM
Page 10
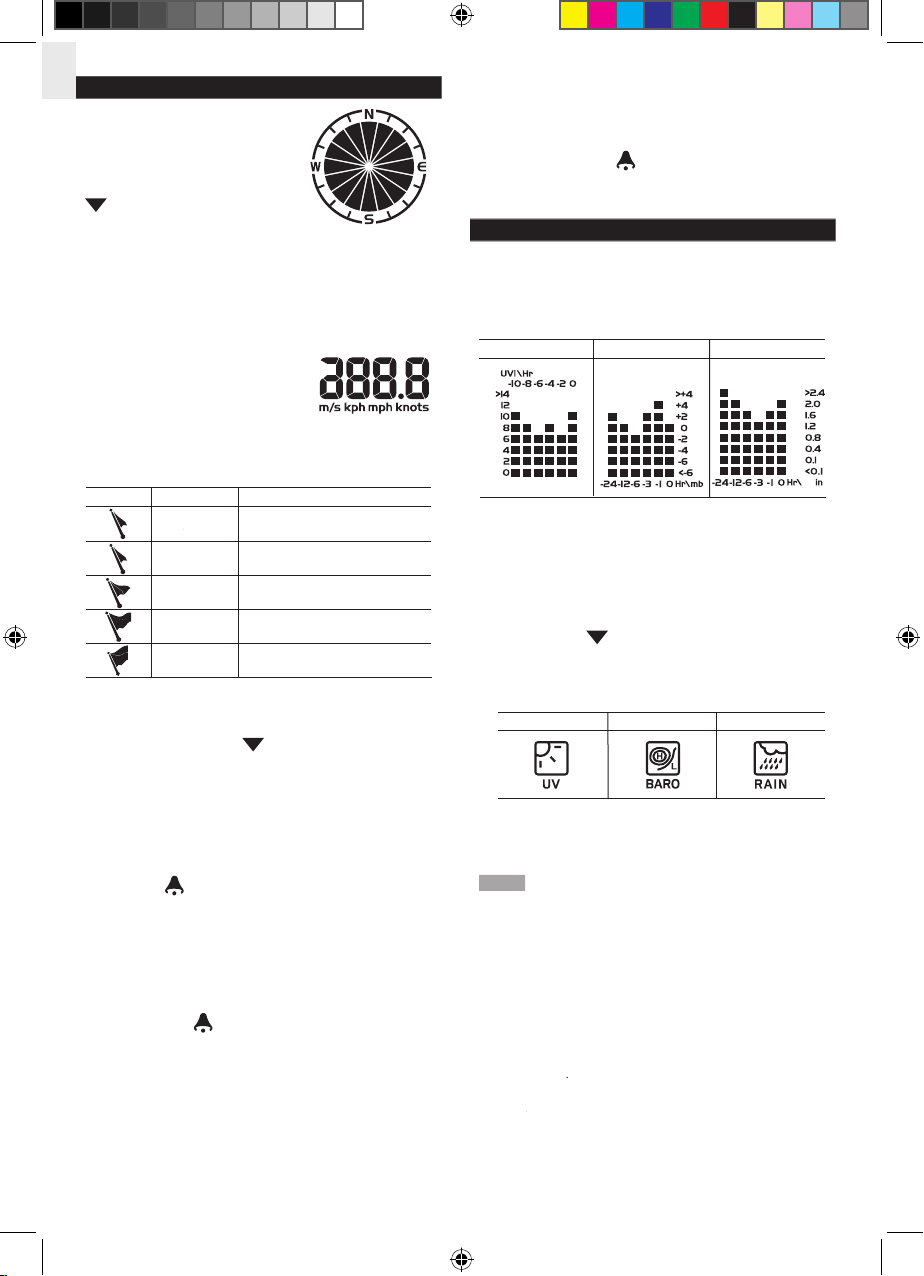
WIND DIRECTION / SPEED
wind speed and wind
fi nd the compass point the
is pointing to.
timestamp records the date and time when storing
(at the bottom of the base station) to switch
<2 mph (<4km/h)
to navigate to the Wind Speed and
Wind Direction Area.
will show next to the Area.
to toggle between AVERAGE and
GUST wind readings.
ON/OFF
to toggle between wind speed
/ MAX GUST wind readings. The timestamp is displayed
ON/OFF
to clear the readings.
and hold
to enter the high gust wind alarm
setting.
to confi rm the settings.
ALARM
repeatedly to select the desired alarm.
ON/OFF
to activate or
deactivate the alarm.
UVI / BAROMETER / RAINFALL
UVI
To view the UV / Barometer / Rainfall readings:
to navigate to the UV / Barometer /
Rainfall Area.
will show next to the Area.
to toggle between UVI / Barometer
/ Rainfall readings. The corresponding icon will
appear:
for the selected area. The corresponding historical
readings are showing.
NOTE
The number shown in the HR icon indicates how
(at the
inches of mercury
hour
(in / hr)
or millimeters per hour
WMR100_EN_86L4515-017.indd 10 6/15/06 4:26:27 PM
Page 11
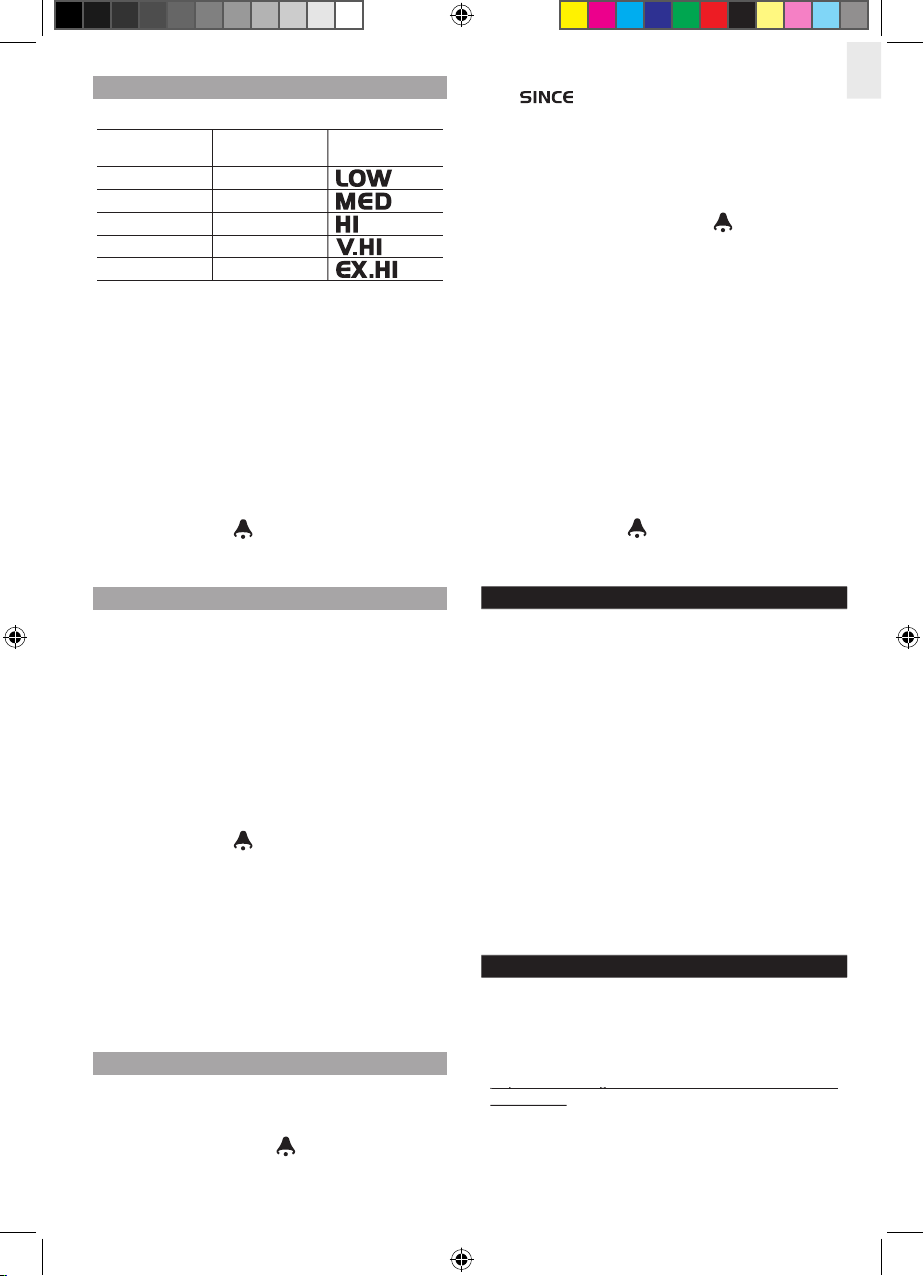
UV INDEX
DANGER ICON
reading display. Press and hold
ALARM
to enter the
high UV alarm setting.
to confi rm the settings.
reading display, press
ALARM
repeatedly to select
the desired alarm.
ON/OFF
to activate or
deactivate the alarm.
BAROMETER
reading display. press and hold
ALARM
to enter the
Barometer alarm setting.
ALARM
to confi rm the settings.
reading display, press
ALARM
repeatedly to select
the desired alarm.
ON/OFF
to activate or
deactivate the alarm.
reading display. Press and hold
to enter the
altitude setting.
to confi rm the setting.
RAINFALL
MEMORY / ON/OFF
repeatedly to
To toggle between rainfall & rain rate display:
In the UV / Barometer / Rainfall Area and Rainfall reading
display, press and hold MODE.
To reset the accumulated rainfall and timestamp:
In the UV / Barometer / Rainfall Area and Rainfall reading
display. Press and hold MEMORY / ON/OFF to
reset
reading display, press and hold
ALARM
to enter the
Rainfall alarm setting.
ALARM
to confi rm the settings.
reading display, press
ALARM
repeatedly to select
the desired alarm.
ON/OFF
to activate or
deactivate the alarm.
WEATHER ALARMS
Weather alarms are used to alert you of certain weather
Alarms can be set for:
and high/low humidity
Press any button or rotate the
CONNECTION TO PC
Weather Station” software can read the latest weather
wmr100.exe
details see the “Virtual Weather Station” software
WMR100_EN_86L4515-017.indd 11 6/15/06 4:26:29 PM
Page 12
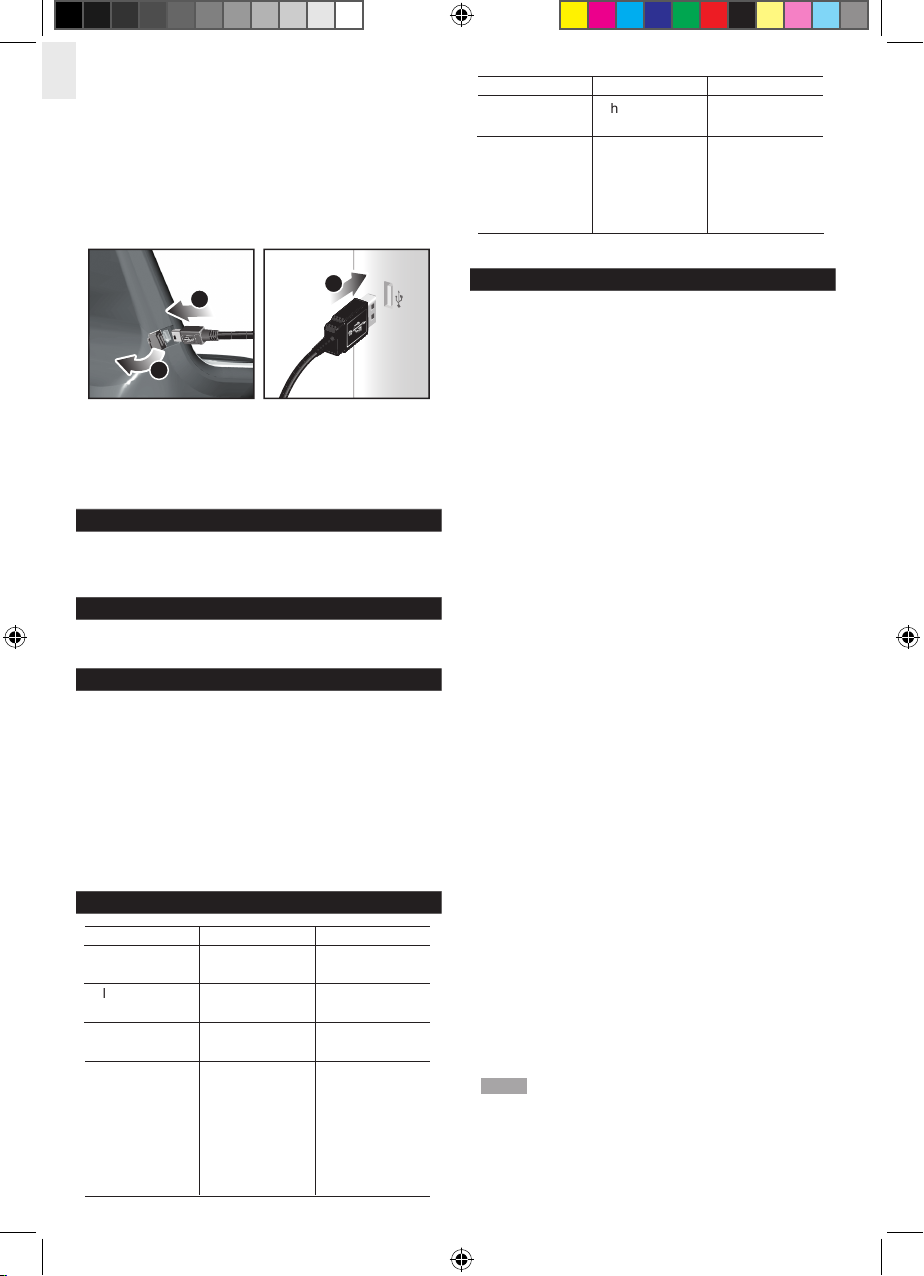
Weather Station” software is:
base station.
BACKLIGHT
RESET
to return to the default settings.
ACCESSORIES – SENSORS
TROUBLESHOOTING
PRECAUTIONS
This unit is engineered to give you years of
satisfactory service if you handle it carefully. Here are
a few precautions:
•
Placement of this product on wood surfaces with
certain types of fi nishes, such as clear varnish, may
result in damage to the fi nish. Consult the furniture
manufacturer’s care instructions for direction as to
the types of objects that may safely be placed on
the wood surface. Oregon Scientifi c shall not be
responsible for any damage to wood surfaces from
contact with this product.
•
Do not cover the ventilation holes. Make sure
items that are nearby such as newspapers,
tablecloths, curtains etc cannot accidentally cover
the ventilation holes.
•
Do not immerse the unit in water. If you spill liquid
over it, dry it immediately with a soft, lint-free cloth.
•
Do not clean the unit with abrasive or corrosive
materials. This may scratch the plastic parts and
corrode the electronic circuit.
•
Do not subject the unit to excessive force, shock,
dust, temperature or humidity, which may result in
malfunction, shorter electronic life span, damaged
battery and distorted parts.
•
This product may malfunction if electrostatic
discharge or radio interference appears in the
environment and / or affects the ac power line. The
unit will revert to normal operation when interference
stops.
•
Do not tamper with the unit’s internal components.
Doing so will invalidate the warranty on the unit and
may cause unnecessary damage. The unit contains
no user-serviceable parts.
•
Only use fresh batteries as specifi ed in the user’s
instructions. Do not mix new and old batteries as the
old ones may leak.
•
Do not dispose this product as unsorted municipal
waste. Collection of such waste separately for special
treatment is necessary.
•
Due to printing limitations, the displays shown in this
manual may differ from the actual display.
•
The contents of this manual may not be reproduced
without the permission of the manufacturer.
NOTE The technical specifi cations for this product and
the contents of the user manual are subject to change
without notice.
1
2
3
batteries
activate radio-
controlled
clock
batteries
sensors are
within range
w
“LLL” or
WMR100_EN_86L4515-017.indd 12 6/15/06 4:26:31 PM
Page 13
SPECIFICATIONS
BASE STATION
Weight 300g (0.66 lbs) without battery
INDOOR BAROMETER
Accuracy +/- 10 mb/hPa
Altitude setting Sea level
User setting for compensation
Weather display Sunny, Partly Cloudy, Cloudy,
Rainy and Snowy
last 24hrs
INDOOR TEMPERATURE
Accuracy 0°C - 40°C: +/- 1°C (+/- 2.0°F)
40°C - 50°C: +/- 2°C (+/- 4.0°F)
Dew Point w/ min and max
Alarm Hi / Lo
INDOOR RELATIVE HUMIDITY
Accuracy 25% - 40%: +/- 7%
40% - 80%: +/- 5%
80% - 90%: +/- 7%
Alarm Hi / Lo
RADIO-CONTROLLED / ATOMIC CLOCK
Weekday in 5 (E, G, F, I, S)
AC adapter 6V
REMOTE WIND SENSOR UNIT
Weight 556 g (1.23 lbs) without battery
Wind speed unit m/s, kph, mph, knots
10 m/s ~ 56 m/s (+/- 10%)
wind speed signal
OUTDOOR TEMPERATURE
Accuracy -20°C – 0°C: +/- 2°C (+/- 4.0°F)
0°C - 40°C: +/- 1°C (+/- 2.0°F)
40°C - 50°C: +/- 2°C (+/- 4.0°F)
50°C - 60°C: +/- 3°C (+/- 6.0°F)
Dew Point w/ max and min
Wind chill temp. and min
RELATIVE HUMIDITY
Accuracy 25% - 40%: +/- 7%
40% - 80%: +/- 5%
80% - 90%: +/- 7%
RF TRANSMISSION
no obstructions
Temp. / Humidity
REMOTE RAIN GAUGE
Weight 134 g (0.3 lbs) without battery
Accuracy < 15 mm/hr: +/- 1 mm
15 mm to 9999 mm: +/- 7%
from last memory reset
WMR100_EN_86L4515-017.indd 13 6/15/06 4:26:33 PM
Page 14
ABOUT OREGON SCIENTIFIC
Visit our website (
www.oregonscientifi c.com
www.oregonscientifi c.com
fi tness gear; weather stations; and digital and conference
for our Customer Care department in case you need
We h
website, however if you’re in the US and would like to
www2.oregonscientifi c.com/service/default.asp
www2.oregonscientifi c.com/service/default.asp
www2.oregonscientifi c.com/about/international.asp
www2.oregonscientifi c.com/about/international.asp
EU-DECLARATION OF CONFORMITY
WMR100 is in compliance with the essential requirements
All EU countries, Switzerland
FCC STATEMENT
WARNING
Changes or modifi cations not expressly
void the user’s authority to operate the equipment.
NOTE
This equipment has been tested and found
frequency energy and, if not installed and used in
which can be determined by turning the equipment
receiver.
different from that to which the receiver is connected.
technician for help.
DECLARATION OF CONFORMITY
for support or sales. Please call our customer service
www.oregonscientifi c.
www.oregonscientifi c.
We
Address: 19861 SW 95th Ave., Tualatin,
Oregon 97062 USA
Address: Block C, 9/F, Kaiser Estate,
Phase 1,41 Man Yue St.,
Hung Hom, Kowloon,
Hong Kong
received, including interference that may cause
undesired operation.
WMR100_EN_86L4515-017.indd 14 6/15/06 4:26:34 PM
Page 15

Advanced Weather Station
with Wireless Sensor Set
&
WMR100_EN_86L4515-017.indd 15 6/15/06 4:26:34 PM
Page 16
© 2006 Oregon Scientifi c. All rights reserved.
086L004515-017
WMR100_EN_86L4515-017.indd 16 6/15/06 4:26:35 PM
 Loading...