

Page 1
CONTENTS
Introduction .......................................1
Key Features ..................................... 2
Getting Started ..................................4
Using the Voice Recorder ................4
Set Date and Time ......................4
Recording ..........................................5
Begin Recording ......................... 6
Display Remaining Record Time 6
Mark Indexes .............................. 6
Mark Messages as Important ..... 6
Folder Selection ......................... 7
Record Quality Selection ............ 7
“FULL” Displayed On Screen ..... 7
Microphone Sensitivity ............... 8
Voice Activated Recording ..........8
Connecting External Microphone 8
Playback ............................................ 9
Playing Back a Message ............ 9
Functions During Playback ........ 9
Connecting Your Earphone ........ 9
Changing Playback Speed ......... 10
Searching Important Messages ..10
Erasing Messages in STOP Mode 10
Voice Recorder Settings .................. 11
Configure Settings ...................... 11
Table of Settings ......................... 11
Button Press Confirmation Beep 11
Format ........................................ 11
Dual Alarms ................................ 11
Additional Features .......................... 12
Locking Recorder Buttons .......... 12
Battery Information .......................... 12
3V DC Connection Jack ................... 13
Voice Recorder Link .........................13
Voice Recorder Link Software .... 13
LCD Displays Connected to PC . 13
System Requirements ................ 13
Voice Recorder Software ................. 14
Installing the Software ................ 14
Attach Voice Recorder to PC ..... 14
Loading Voice Recorder Program 15
Display Information .................... 15
Recorder Playback (PC) ............ 15
Saving Messages (Recorder/PC) 15
Loading Messages (PC/Recorder) 16
Deleting Messages in Recorder . 16
Troubleshooting ............................... 17
Digital Voice Recorder ............... 17
Software ..................................... 18
Caution .............................................. 18
Safety and Care ................................ 19
Technical Specifications ................. 20
About Oregon Scientific .................. 20
ENFRDEITESPORNLSWE
INTRODUCTION
Thank you for selecting the Oregon
Scientific™ VR668 Digital Voice
Recorder. The VR668 is compact and
easy to use, making it ideal to bring
along for voice memos, conversations,
and discussion recordings. This device
allows you to record up to 198 messages,
totaling up to 265 minutes recording time
and has the ability to organize recordings
into 2 separate folders.
Other features of this product include:
• PC-Link
Transfer messages to and from PC.
• Index Marking
Helps you search for desired sections
in a message.
• Important Marked Messages
Mark messages as important to prevent
them from accidentally being erased.
• MIC Sensitivity Control (Hi or Lo)
Maintain good recording quality
independent of voice loudness.
• Voice Activated Recording (Auto)
Start and stop recording automatically
when sound is detected.
1
Page 2
• Two Folder Selection
Organize your memos by placing
them in separate folders.
• Button Lock
Lock your recorder to prevent buttons
from being accidentally activated.
• Dual Alarms (AL1 or AL2)
Set an alarm for up to two different
times.
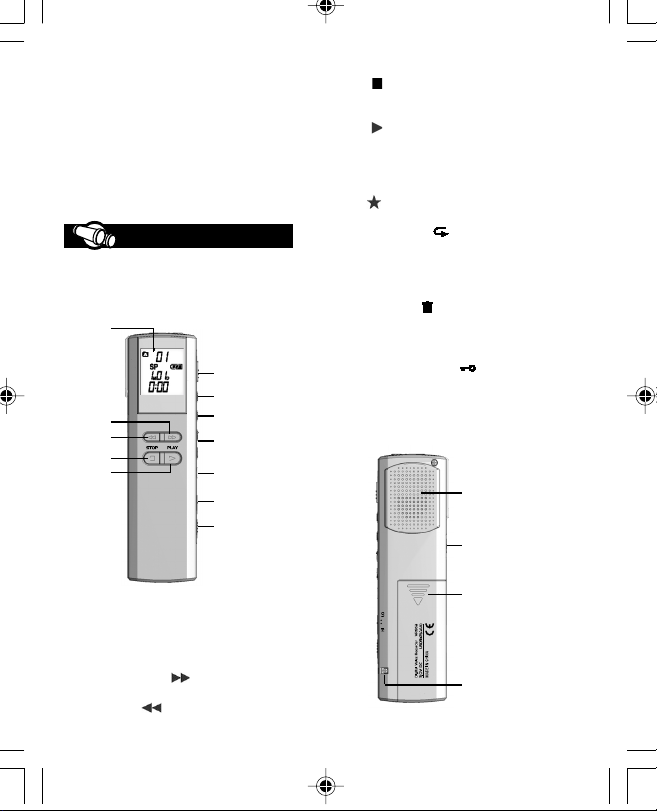
KEY FEATURES
NOTE: Images are not drawn to scale.
FRONT
1
6
7
2
3
4
5
8
9
10
11
12
4. Stop ( ) :
Switch between STOP and
STANDBY modes.
5. Play ( ):
Play current message or select /
confirm various menu options.
6. REC Switch:
Starts or stops recordings.
7. IMP ( ):
Mark messages as important.
8. MENU / Repeat ( ):
- MENU: Mode selection.
- Repeat: Repeat messages.
9. VOL +/- Buttons:
Press to change the volume.
10. Erase Button ( ):
Press to delete messages.
11. MIC Sensitivity (MIC):
Adjust the microphone sensitivity level.
12. Button Lock Switch ( ):
Locks button controls to prevent
accidental activation.
BACK
13
14
Description
1. LCD:
Voice recorder status display.
2. Forward:
Fast forward ( ).
3. Backward:
Rewind ( ).
2
15
16
Page 3
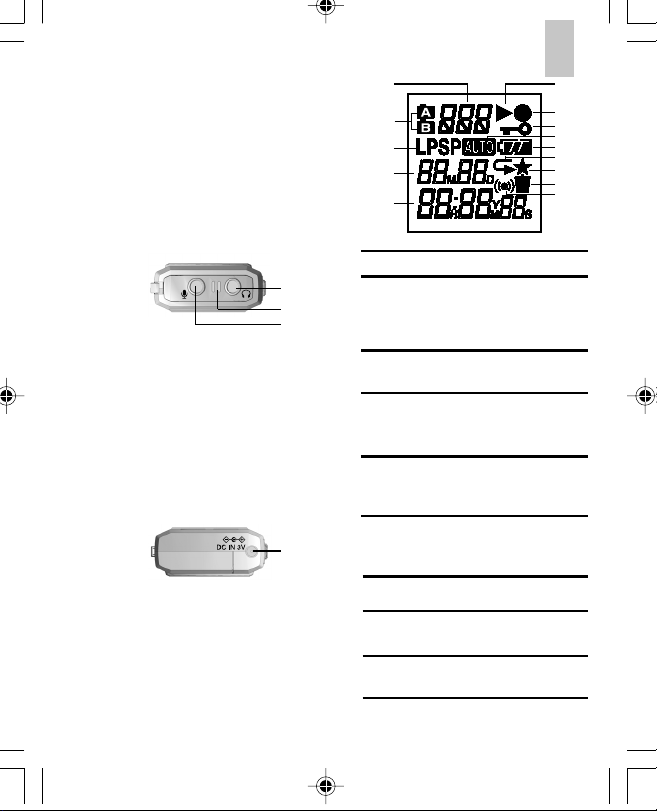
Descriptions
13. Speaker:
14. USB Port:
Attach cable for USB link.
15. Battery Cover:
(Covers the battery compartment).
16. Strap Connector:
Attach a handstrap here.
TOP
17
18
19
Descriptions
17. Earphone Connection:
(Earphone provided)
18. Internal Microphone.
19. External Microphone:
For connecting an external
condenser microphone.
BOTTOM
20
Descriptions
20. For AC Adaptor Connection.
1
2
3
4
5
Icons Name Status
Mode,
1
Message,
and Alarm
display
Folder A / B Message storage
2
Recording
3
Mode
Date
4
5Time
Playback Message playback6
Recording Message is being
7
Button
8
Lock
Displays current
mode, message
count, and
selected alarm
folder
Recording format
(Long Play or
Standard Play)
Current date and
date message
was recorded
Current time and
time message
was recorded
recorded
Buttons are
locked
ENFRDEITESPORNLSWE
6
7
8
9
10
11
12
13
14
3
Page 4
Voice
9
Activated
Recording
level
Repeat Repeat playback
11
Important
12
Mark
Erase Erasing File
13
Alarm Alarm Set14
GETTING STARTED
Voice activated
recording is
enabled
Battery Level10 Battery
Message has
been marked as
important
3. Press to exit STANDBY mode.
4. Press MENU to change modes
5. Set time and date.
USING THE VOICE RECORDER
NOTE: The voice recorder will automatically
switch to STANDBY mode if you do not
press any keys for three minutes.
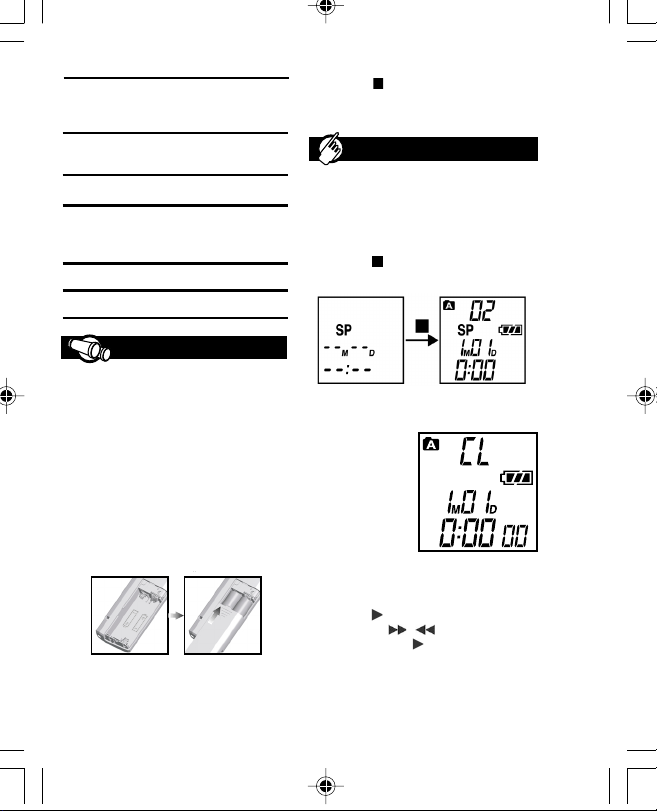
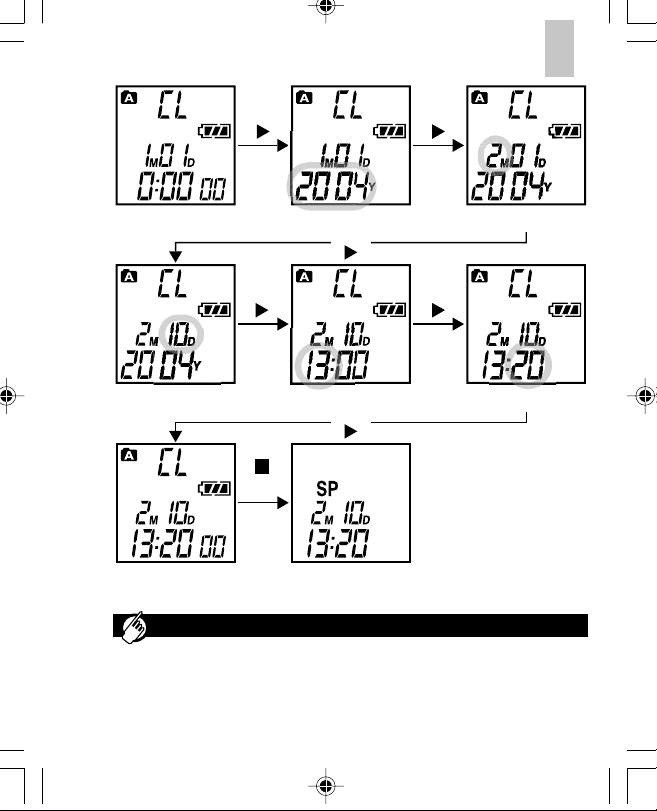
Set the Date and Time
1. Press to exit STANDBY and enter
STOP mode.
Press
1. Check package contents.
• VR668 Digital Voice Recorder
• Earphone (mono)
• Pouch
• CD-ROM
• PC-Link cable (USB 1.1)
• 2 x AAA batteries
• User Manual
• Quick Start Guide
2. Install the batteries. Match
polarities as shown in the
battery compartment.
NOTE: Refer to the "Battery Information"
section for more information about batteries.
4
STANDBY
mode
2. Press
MENU until
SETTING
mode is
displayed.
3. Setting the Date and Time:
Press to start changing values.
Pressing / changes values
and pressing sets them.
STOP
mode
Page 5
Press Press
ENFRDEITESPORNLSWE
1. CLOCK mode
4. Set Day 5. Set Hour 6. Set Minute
7. The clock is
now set.
2. Set Year
Press
Press Press
Press
Press
twice
8. STANDBY mode
3. Set Month
RECORDING
This unit is optimized for recordings in small conference rooms such as for 7-8 people.
If you are using it in locations larger than the above, it is recommended that you use
an external microphone for extra coverage.
5
Page 6
Begin Recording
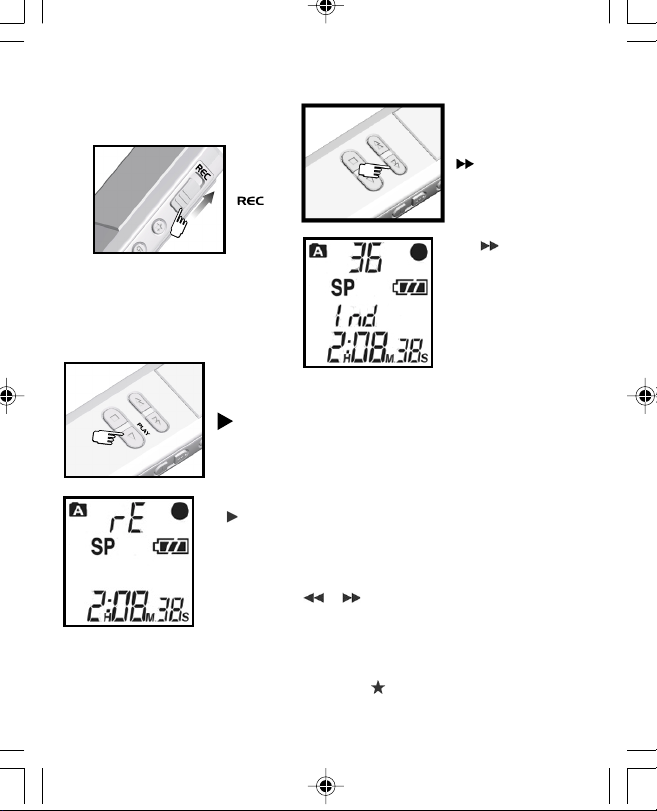
1. To begin recording, simply slide the
recording switch to on in any mode.
2. When you want recording to stop,
slide the recording switch to off.
Display Remaining Recording Time
While Recording
Press and
hold while
recording is in
progress. “rE”
will show on
the display
along with
recordable
time left.
6
Mark Indexes While Recording
Press while
recording is in
progress. "Ind"
will show on the
display.
Indexes can be added to messages while
recording is in progress so you can later
retrieve selected portions of the recording
easily.
• A total of 125 indexes may be
marked per message.
• A single message can be subdivided
into indexes for review.
To mark an index:
NOTE: To search for an indexed portion
of the message in STOP mode, just toggle
or .
Marking Messages as Important During
recording
You can add an important mark by pressing
and holding for two seconds during
recording or playback.
Page 7
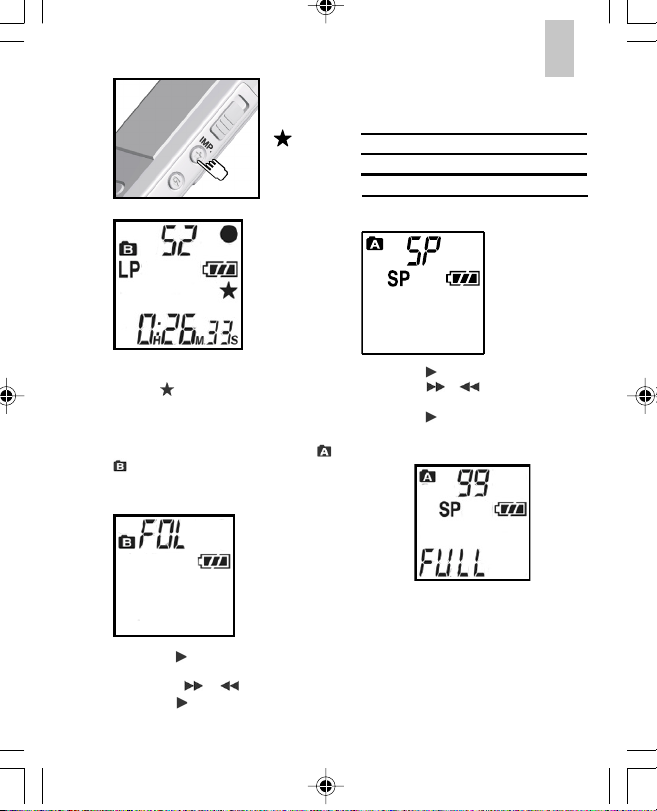
2 SEC
This prevents
users from
accidentally
deleting
important
information.
Record Quality Selection (SP / LP)
You can choose between two different
recording quality settings.
Selection
Quality
Recording Time
To change settings:
SP
High
132 265
ENFRDEITESPORNLSWE
LP
Low
In STOP mode,
press MENU
until "LP" or "SP"
is displayed.
NOTE: To delete an important mark, press
and hold for two seconds during playback
or recording.
Folder Selection
You can select two different folders ( or
) and store up to 99 messages in each.
To select folders:
In STOP mode
press MENU
until "FOL" is
displayed.
• Press to activate then
choose the desired folder by
shifting or .
• Press to save the selection.
• Press to activate.
• Press or to switch between
settings.
• Press to confirm.
“FULL” Displayed On-Screen
Under the following situations the word
“FULL” will be displayed:
• Activating REC when the memory
is already full.
• Activating REC when the current
folder already had 99 stored
messages.
7
Page 8
• During a recording the memory gets
used up.
NOTE: You can erase messages to
make extra room for recording (->10).
Microphone Sensitivity (Sen)
You can choose between two different
levels of sensitivity:
Hi
High sensitivity - Clear and louder recording,
but more susceptible to noise and distortion.
Lo
Low sensitivity - Lower recording volume,
but less suseptible to noise and distortion.
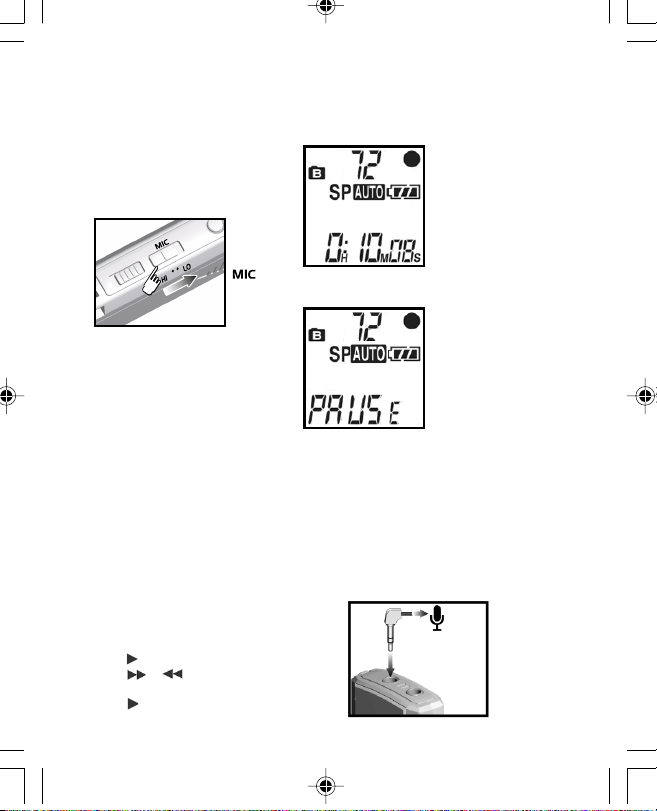
Voice Activated Recording (Aut)
You can activate the automatic record
function (Aut) so that your player will
begin recording whenever a sustained
audible sound is picked up.
To access this function:
1. Enter STOP mode.
2. Press MENU until “Aut” is displayed.
3. Press to activate.
4. Press or to switch this
feature “on” or “off”.
5. Press to confirm.
8
NOTE: Having activated the Aut function,
you must also slide the record switch on.
Voice Activated Recording In Progress:
Recording will
begin automatically
when sound is
detected.
Voice Activated Recording Paused:
Recording is
paused
automatically
when no sound is
detected for two
seconds or more.
TIP: If the background noise is relatively high
and the microphone sensitivity is set to Hi,
the recorder will not recognize a silence
and keep on recording; setting the microphone sensitivity to Lo should solve this.
Connecting an External Microphone
To use an external microphone for
recording, insert the microphone jack into
the microphone connector.
Page 9
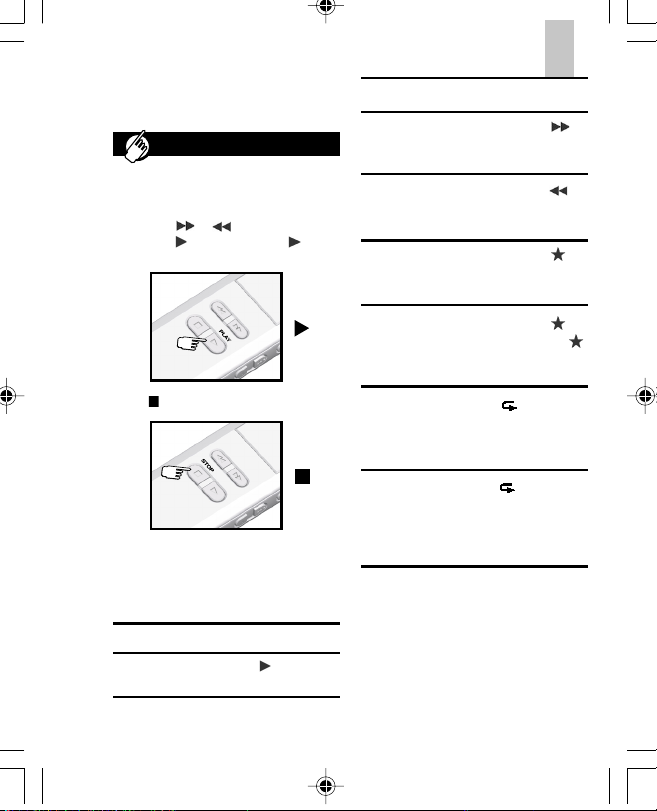
NOTE: Use a condenser type microphone,
other types may not work with your voice
recorder.
PLAYBACK
Playing Back Messages:
1. Enter STOP mode.
2. Press or to select message.
3. Press to start playback, icon
will show on the display.
Scan forward
through current
message
Scan backwards
through current
message
Mark
important
messages
ENFRDEITESPORNLSWE
Press VOL+ or VOL-Adjust Volume
Press and hold
Press and hold
Press and hold
(2 seconds) to mark
current message
Press to end.
Functions During Playback
During message playback, the voice
recorder can perform a number of
different functions:
Functions
Display available
recording time
Descriptions
Press during
playback
Delete
important
mark
Repeat
indexed
section
playback
Repeat
whole
message
Connecting Your Earphone
Use the included earphone to listen to
messages.
Press and hold (2
seconds) to delete
mark while message
is playing back
Press to playback
an indexed portion
only
Press to playback
an entire current
message if no
indexes have been
marked on it
9
Page 10
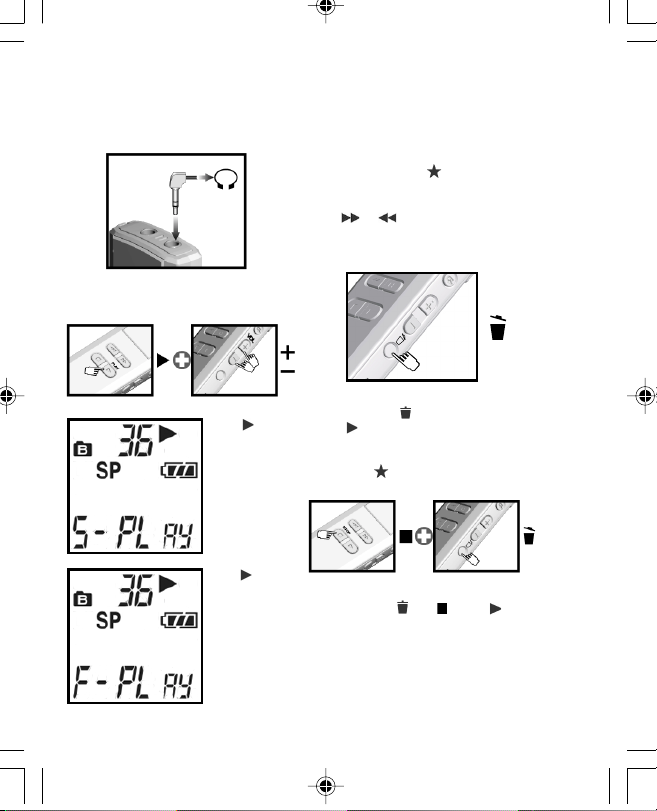
CAUTION: Using the earphone to listen
to messages too loudly may cause
permanent ear damage. Lower the
volume of the recorder before listening.
Changing Playback Speed
While message is playing back:
NOTE: Time count shown may be
inaccurate during fast or slow playback.
Searching for Important Messages
In STOP mode:
• Press and hold for two seconds.
• Search for previous or next
important message by pressing
or .
Erasing Messages in STOP mode
2 SEC
10
Press and
VOL -
simultaneously
to decrease
playback speed
(S-Play).
Press and
VOL +
simultaneously
to increase
playback speed
(F-Play).
Press and hold for two seconds,
press to confirm the deletion.
Erasing all messages except those
marked as :
Press and hold and , press to
confirm.
NOTE: Settings remain unchanged after
messages are erased.
Page 11
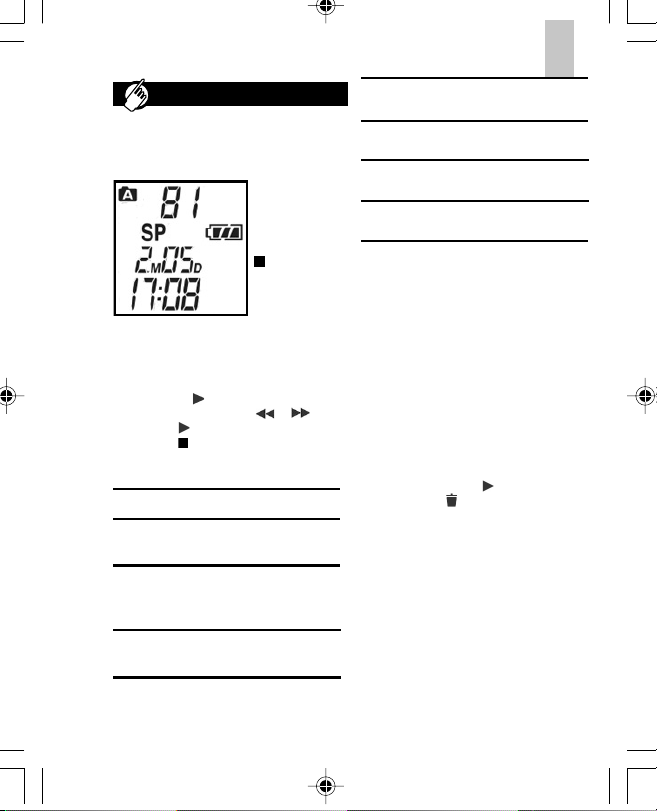
VOICE RECORDER SETTING
Configure Settings
Your voice recorder has various settings
that can be configured:
NOTE: Before
you can access
any settings
functions, you
must first press
to enter
STOP mode.
• To change recorder settings, in
STOP MODE press MENU to
find the desired function.
• Change the mode settings by
pressing and adjust
settings by pressing or .
• Press button to confirm settings.
• Press button to exit settings.
Table Of Settings
Setting Description Options
Currently active
FOL
folder selected
SP
Different recording
quality and
capacity
AL
Alarm Setting
1 / 2
AL1 or AL2
Folder A /
Folder B
SP (Standard
Play) / LP
(Long Play)
On / Off
ENFRDEITESPORNLSWE
CL Clock setting
Voice activated
Aut
recording
bE Button press
confirmation tone
FO
Format
Folder selection (FOL)
Choose the current folder (Folder A or
Folder B) to organize your messages.
Each can hold up to 99 messages.
Button Press Confirmation Beep (bE)
This feature alerts the user every time a
button has been pressed.
NOTE: Button press confirmation beep
will not sound during recording to prevent
the beep tone from being recorded.
Format (FO)
This feature formats the memory.
In format setting press , when FO blinks
press and hold to begin formatting
memory.
NOTE: All memory, including files marked
as important will be erased.
Dual Alarms (AL1 / AL2)
You can set two different alarm times to
help keep track of important events.
Make sure you set the clock before
attempting to set an alarm, otherwise the
alarm feature will not be available.
Adjust time
and date
On / Off
On / Off
Format
memory
11
Page 12
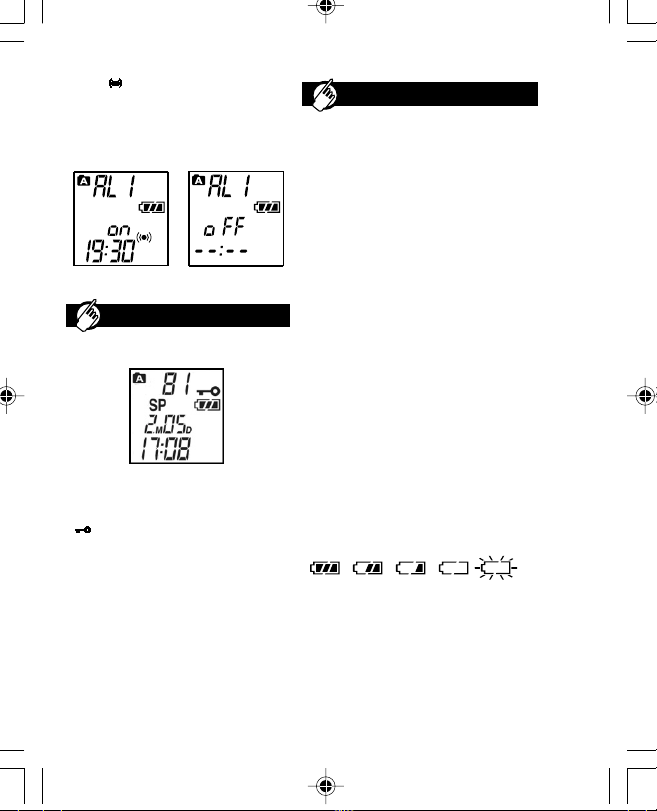
Note: A will indicate that an alarm has
been set. It will also blink during the alarm
setting process.When an alarm has been
deactivated, "OFF" will appear on the
LCD display.
Alarm offAlarm on
ADDITIONAL FEATURES
Locking Recorder Buttons
This feature disables all recorder buttons,
preventing playback, and erasing of
messages. Simply slide HOLD into position.
A will show to indicate that all buttons
have been locked.
NOTE: You can still record messages
when the unit is locked.
BATTERY INFORMATION
When changing or removing batteries,
recorded messages will not be erased but
some menu settings such as the current
time may be lost. If this happens, refer to
the section "Using the Voice Recorder" for
information about how to reconfigure the
settings.
Battery Life
At full capacity, the batteries should last
approximately:
• 16 hours of continuous playback at
medium volume.
• 20 hours of continuous recording.
NOTE: When battery levels are low, only
the time and date will show, none of the
buttons will work. When replacing the
batteries, do not mix new batteries with
old ones.
Battery Level Indication:
If the battery mark occasionally flashes
during playback but not during recording,
this is due to differences in the power
needed for recording and playback. When
this happens, replace the batteries.
Full Medium Low Empty Replace
When the voice recorder will not be used
for an extended period of time, remove
the batteries to prevent leakage.
12
Page 13
3V DC ADAPTOR
You can power the recorder through the
mains by using a 3V DC Adaptor (output
3V DC 500mA). Please contact your local
distributor for more information about this
feature. The adaptor is an alternate power
source for your player and cannot be used
to charge batteries.
CAUTION: When connecting the AC
Adaptor, be sure to turn off the power of
the recorder. Do not disconnect the AC
adaptor while recording as this may cause
damage to the data.
NOTE: Recorded messages are not lost
after the batteries have been removed
but all settings including the current time
will be lost.
VOICE RECORDER LINK
Oregon Scientific Voice Recorder Link
Software Features
• Save digital recordings (including
date/time stamp) from voice recorder
to PC.
• Load digital recordings (including
date/time stamp) from PC to voice
recorder.
• Archive and organize important
recordings.
• Convert recordings into *.WAV file
format for use with different programs.
• Send voice files as attachments
with emails.
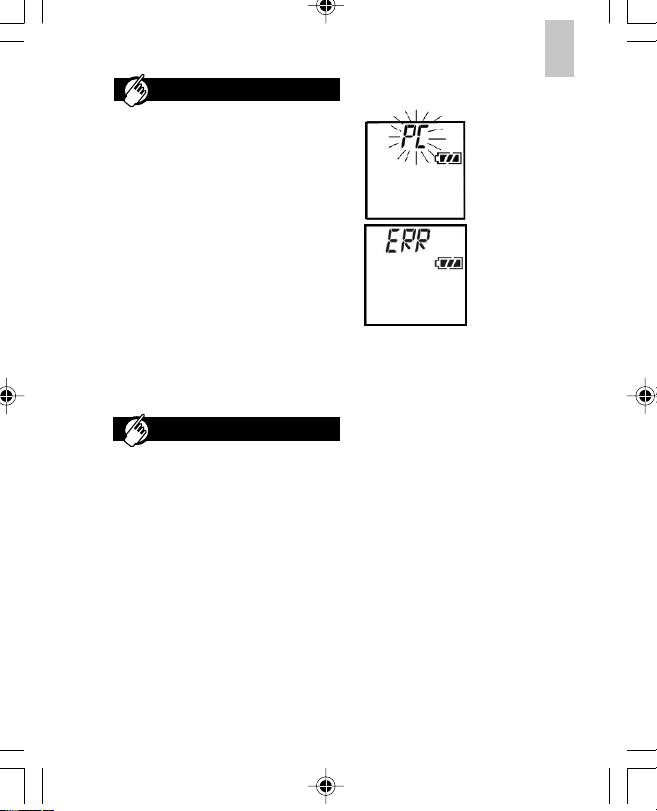
Digital Recorder LCD Displays When
Connected to the Computer:
"PC" is displayed
when connection is
established. In this
state voice recorder
buttons are inactive.
Error message
"ERR" is displayed
when an internal
error occurs.
System Requirements
Before installing the Voice Recorder Link
software onto your computer, you must
first check to make sure your system
meets the following requirements:
• Operating System - MS -Windows
98 98SE, MS Windows ME, MS
Windows 2000 Professional or MS
Windows XP Home Edition, and
MS-Windows XP Professional.
• CPU requirement - Pentium 233 MHz
(Pentium II 300MHz or above is
recommended).
• Available hard-disk space - 5MB for
software and 300MByte for recorded
data.
• CD ROM drive.
• RAM size - 64MByte (128MByte or
above is recommended).
• Display - SVGA or above.
• Audio - 16 bit sound card.
• Communication port - 1 available
USB port.
ENFRDEITESPORNLSWE
13
Page 14
NOTE: The Voice Recorder Link software
is not compatible with Macintosh operating
systems.
VOICE RECORDER LINK SOFTWARE
NOTE: Windows XP users may encounter
some warnings when installing the software.
These are not errors. Please continue the
installation process by clicking "Continue
Anyway", the software and driver installation
will proceed normally.
STEP 1: Install the Software (First Time
Users)
1. Shut down any programs that are
running.
2. Place the software disk into your
computer’s CD-ROM drive. The
installer should begin automatically.
If the installer doesn’t begin automatically, initialize it manually by:
A. Double-click the My Computer
icon on desktop.
B. Double-click CD-ROM icon.
Note to Windows XP users, if the
"Found New Hardware Wizard"
appears:
1. Select "install the software automatically (Recommended)", then
click Next.
2. When the "This software hasn't
passed windows logo testing"
message appears, click Continue
Anyway.
3. Click Next
4. Follow the onscreen installation
guide.
5. When installation is complete click
Finish, then close all programs
and restart your computer.
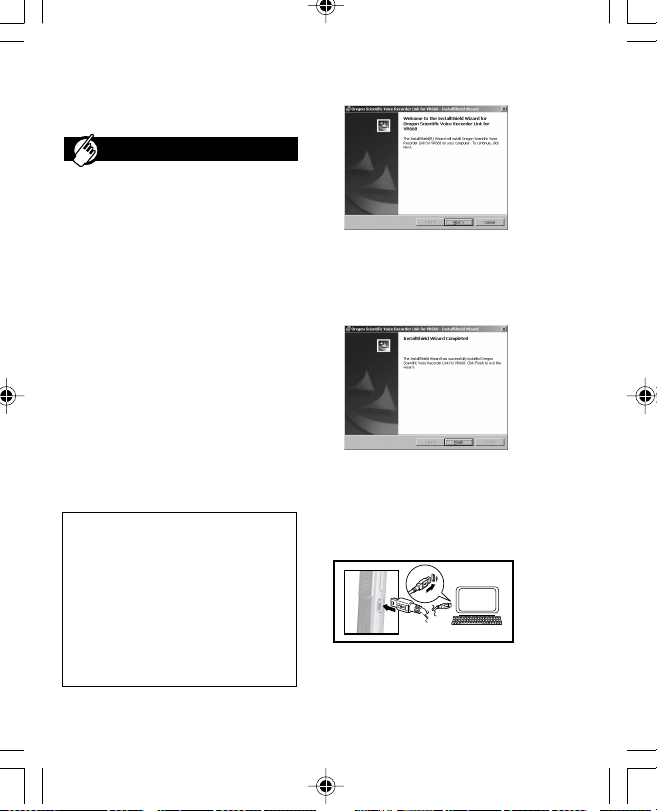
STEP 2: Attach Voice Recorder to PC
Once the software is successfully
installed, attach the supplied USB cable
to the computer’s USB port and the
recorder’s digital terminal.
14
Page 15
STEP 3: Load the Voice Recorder Link
Program
Double click the
desktop shortcut.
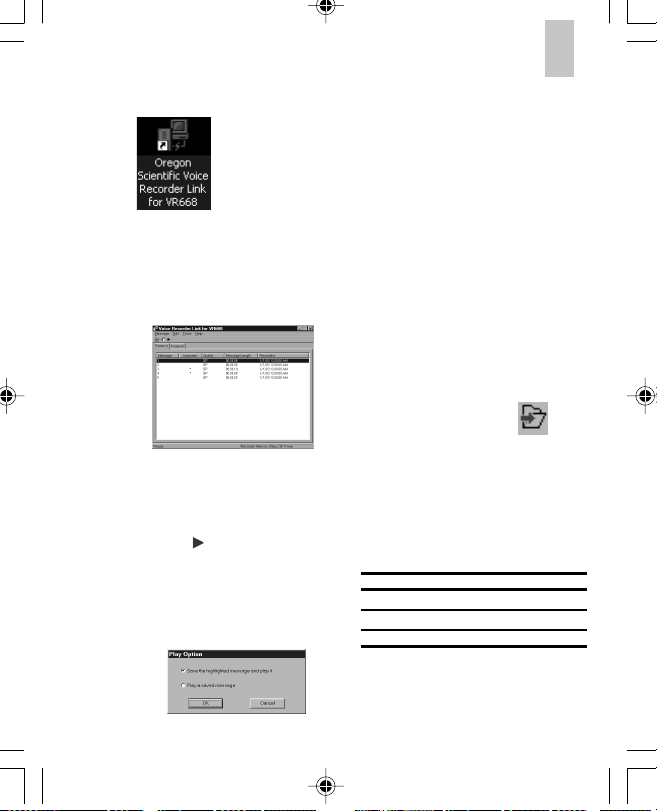
STEP 4: Display Message Information
If everything is attached correctly, when
you start the program your digital voice
recorder will automatically connect. This
screen will show all the messages recorded
on your voice recorder:
Playback Messages Recorded on Your
Digital Voice Recorder / Saved on Your PC:
1. Select desired message by choosing
one of the following methods:
• Press .
• Select Message Play in pull down
menu.
• Right click Message and then
select Play.
• Double click the message
2. The following dialogue box will appear:
You can either:
• Save the highlighted message
on the PC in (*.WAV) format and
then play it.
• Play a previously saved (*.WAV)
message
3. Choose the directory you want to
save the file to (Save As), or you
can play a message by selecting
(Open), then finding the file where
the message is located.
4. Your default *.WAV format player
should begin playing back the
message.
Saving Messages (Recorder to PC)
1. Select the desired message by
choosing one of the following
methods:
• Press the Save icon:
• Select Message and then choose
Save from Voice Recorder to
PC in the pull down menu.
• Right click the message and then
select Save from Voice Recorder
to PC.
2. Choose the location, name and file
format to save your information in:
File Format
PCM (*.wav)
Truespeech (*.wav)
RAW (*.dvb)
ENFRDEITESPORNLSWE
Record Quality
High
Low
Same
15
Page 16
NOTE: The RAW file format cannot be
listened to, and is for backup purposes
only. It can be loaded from the PC to
voice recorder.
The default save file name includes the
following information:
• MSG: Message
• A: From folder
• 03: Message Number
• 0101_0000: Month/Day/Hour/Minute
Loading Messages (PC to Voice
Recorder)
When a connection between your PC and
Voice recorder has been established, you
can load previously saved messages in
(*.dvb) format by:
1. Select the folder by Either:
A / B tab
OR
Menu (Tools) -> View
-
>Folder (A or B)
2. To load, select
3. Choose the desired (*.dvb) message
to load to your voice recorder.
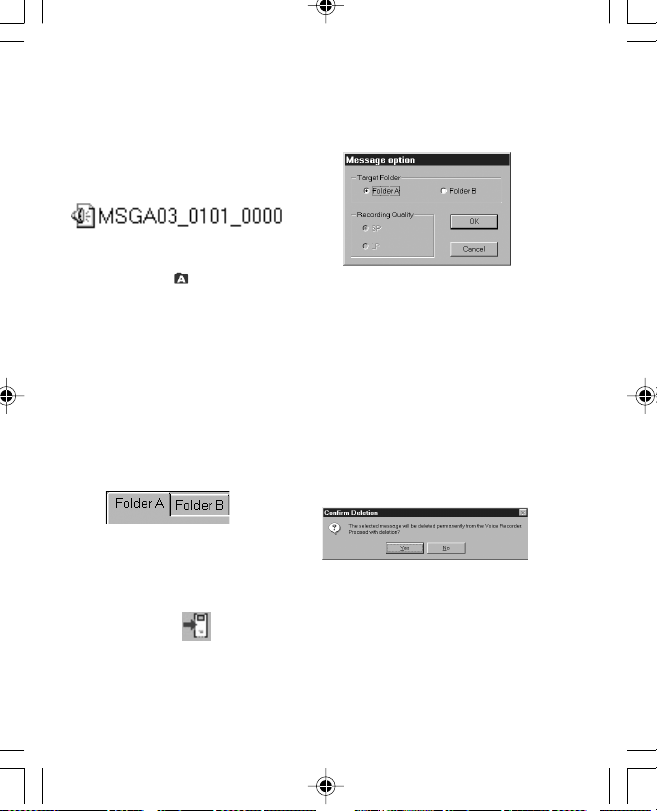
4. A message option box will popup,
choose the folder on your voice
recorder you want the message to
be saved to, then click OK
NOTE: Indexes marked during recording
will remain marked after loading it to the
voice recorder.
Deleting Messages in Voice Recorder
Your Digital Voice Recorder must first be
connected to the PC:
1. Select the message you want to
delete by clicking to highlight it.
2. To clear the message, either:
• Delete on keyboard
• Menu->Edit->Delete
3. Click Yes to confirm.
NOTE: In PC mode, Messages marked
as important cannot be deleted. Please
make the deletions on the voice recorder
(->10).
16
Page 17
TROUBLESHOOTING
This section includes a list of frequently asked questions for problems you may
encounter with your digital voice recorder unit. Check here before contacting our
customer service department.
Digital Voice Recording Unit
Problem Check Remedy
No Power
Buttons do not
work
No Sounds Volume is not turned up
Problem with
external
microphone
Cannot record
messages
“FULL” is
displayed on LCD
screen)
Cannot mark
indexes
Operation not
normal
Make sure the batteries
are installed correctly.
Make sure the batteries
have not run out.
Voice recorder HOLD is on
Earphone is not plugged
correctly
External microphone not
plugged in
Condenser type
microphone not used
The maximum 99
messages has been
reached in current folder
Maximum storage capacity
has been reached
Maximum amount of 125
indexes has been reached
within current message
Device should be reset Reset the unit by removing the
Check that polarities match those
shown in the battery compartment. (->4)
Replace old batteries with new
ones.
Unlock the HOLD switch (->3)
Press VOL+ during playback
Make sure earphone is plugged in
correctly (->10)
Make sure microphone is plugged
in correctly (->8)
Plug in a condenser type
microphone
Erase some messages (->10) or
choose other folder with fewer
messages (->7)
Erase some messages (->10)
Start recording a new message
(->6)
batteries. Wait 5 seconds, and
then reinsert the batteries
ENFRDEITESPORNLSWE
17
Page 18
Software
Problem Symptom Check This
Cannot locate voice
recorder on PC
Cannot store messages Error message states
Time-out error When transferring a
File error
Failed to save the file
to the selected path
Memory error When the PC does not
Unable to playback
*.WAV files
Error message states
unit is not properly
connected
memory is full
message to and from
PC to unit you get no
response or a time-out
When you try selecting
a file format that is not
supported
When the selected output
path / drive is either full
or read only
have enough memory for
the operation
When you do not have
compatible *.WAV format
file player
USB cable is properly
attached
Erase some messages
(->10) to make room
TIP: If the message is
important then you should
first save it (->15)
USB cable is properly
attached
The file was not created by
Voice Recorder Link
software
Please make sure that the
selected drive has enough
free space, or that any write
protect features have been
disabled
Delete unwanted files on
your hard drive to create
space
Install *.WAV format player
CAUTION
In case of electrostatic discharge, the product may not function properly and will require
a manual reset. After reset, messages recorded will remain intact; if a message was
being recorded it will be lost.
18
Page 19

SAFETY AND CARE
SAFETY
To ensure that you use your voice recorder
correctly, read these Safety Notes and your
User Manual carefully. The warnings given
here provide important safety information
and should be observed at all times.
GENERAL WARNINGS
• Do not attempt to repair the voice
recorder yourself. Contact the retailer
or our customer service department
if your product requires servicing.
• The voice recorder is a precision
instrument. Never attempt to take
this device apart. There is a serious
danger of powerful electric shocks.
• Do not immerse the voice recorder
in water.
• Do not, under any circumstances,
touch the exposed electronic circuitry
of the voice recorder, as there is a
danger of electric shock should it
become exposed.
• Take special care when handling a
damaged LCD display, as the liquid
crystals can be harmful to your health.
• Do not use or store the voice recorder
in locations that may adversely affect
the product such as rain, snow, desert,
and magnetic fields.
• Do not use this device in aircrafts or
hospitals. The use of the voice recorder
can cause malfunctions in the control
devices of other equipment.
• Do not subject the voice recorder to
impact or shock while recording.
About Noise
• During recording OR playback,
noise may be generated if too close
to a power lead, florescent light, or
portable phone.
• If the unit is bumped or rubbed during
recording, noise may be recorded.
Cleaning for Your Voice Recorder
Use a soft, dry cloth to clean the LCD
display. Use a damp cloth and mild
detergent to wipe the unit. Dry immediately.
Storage
Remove the device from the pouch and
keep it in a well-ventilated place to
prevent molding.
Check all major functions when the voice
recorder has been unused for a long period
of time to check that the device is fully
operational.
OTHER NOTICES
Statement of Responsibility
Oregon Scientific assumes no responsibility
for any incidental losses (such as the
costs of recording or the loss of income
from recording) incurred as a result of
faults with this product.
Oregon Scientific will not be held liable
for any bodily injury, death, property
damages or any other claims of whatever
nature resulting from the misuse or
negligence of the VR product, whether
intentional or unintentional. Oregon Scientific
will not be responsible for any deviations
in the usage of the device from those
specified in the user instructions or any
unapproved alterations or repairs of the
product.
ENFRDEITESPORNLSWE
19
Page 20
Copyright
Voices or sounds recorded using your voice recorder cannot be used in ways that
infringe copyright laws. Note that some restrictions apply to the recording of performances,
entertainments and exhibits, even when intended purely for personal use.
Users are also asked to note that the transfer of memory containing data protected
under copyright laws is only permissible within the restrictions imposed.
TECHNICAL SPECIFICATIONS
Type
Recording Medium Solid state memory
Recording Time Standard
Speaker Ceramic speaker dia. 23mm
Actual Maximum Output 19mW
PC Connection USB 1.1
Battery Type 2 x AAA 1.5V Alkaline batteries
Battery Life
Size 118.2mm (L) x 32mm (W) x 13mm (T)
Weight 30g without batteries
Display
NOTE: Design and specifications are subject to change without notice.
Description
Long
Approx. 16 hours of continuous playback
Approx. 20 hours of continuous recording
(14.5mm [T] at speaker)
20.6mm (W) x 20.6mm (L)
132 min
265 min
ABOUT OREGON SCIENTIFIC
Visit our website (www.oregonscientific.com) to learn more about other Oregon Scientific™
products such as digital cameras, projection clocks, health and fitness gear, and weather
stations. The website also includes contact information for our customer service
department, in case you need to reach us.
20
 Loading...