

Page 1

1
EN
TABLE OF CONTENTS
About this guide ................................................. 2
Product overview ................................................ 3
Getting started ................................................... 7
Batteries ......................................................... 7
AC power adapter .......................................... 7
Change settings ............................................. 7
Clock ................................................................... 8
Alarm................................................................. 1 0
Temperature ..................................................... 1 1
Backlight ........................................................... 11
Projector ........................................................... 1 1
Reset system .................................................... 1 2
Safety and care ................................................ 13
Warnings ........................................................... 13
Additional resources ........................................ 1 4
Troubleshooting................................................ 1 5
Specifications ................................................... 1 6
Page 2

2
EN
ABOUT THIS GUIDE
Congratulations on your selection of the Oregon
Scientific Silverstone Radio-Controlled Projection
Clock with Indoor Temperature (FAP-101). This
powerful device bundles time keeping, alarm,
projection, and indoor temperature measurement
features.
Keep this manual handy as you use your new
product. It contains practical step-by-step
instructions, as well as technical specifications and
warnings you should know.
In this box, you will find:
• Main unit
• Batteries
• AC/DC power adapter
Page 3
3
EN
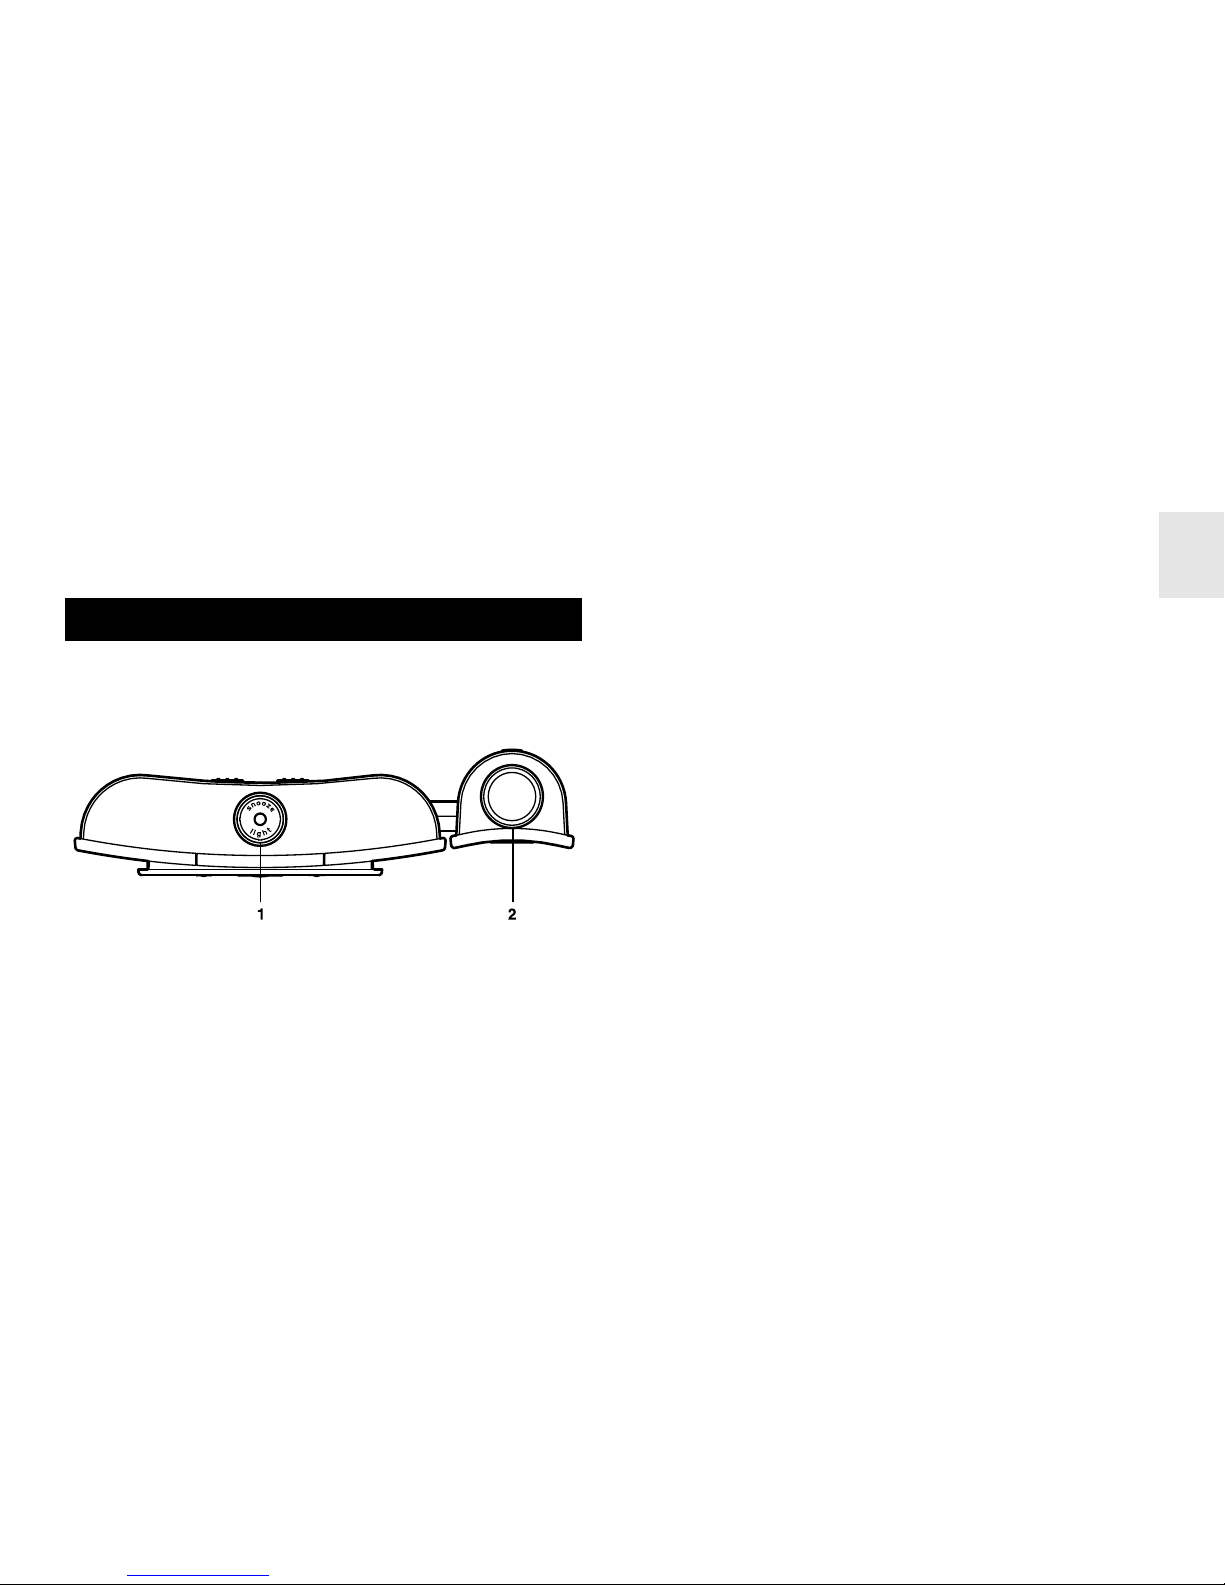
PRODUCT OVERVIEW
TOP VIEW
DESCRIPTIONS
1. Snooze / Light button (à 10, 11, 12)
2 . Projection lens (à 12)
Page 4
4
EN
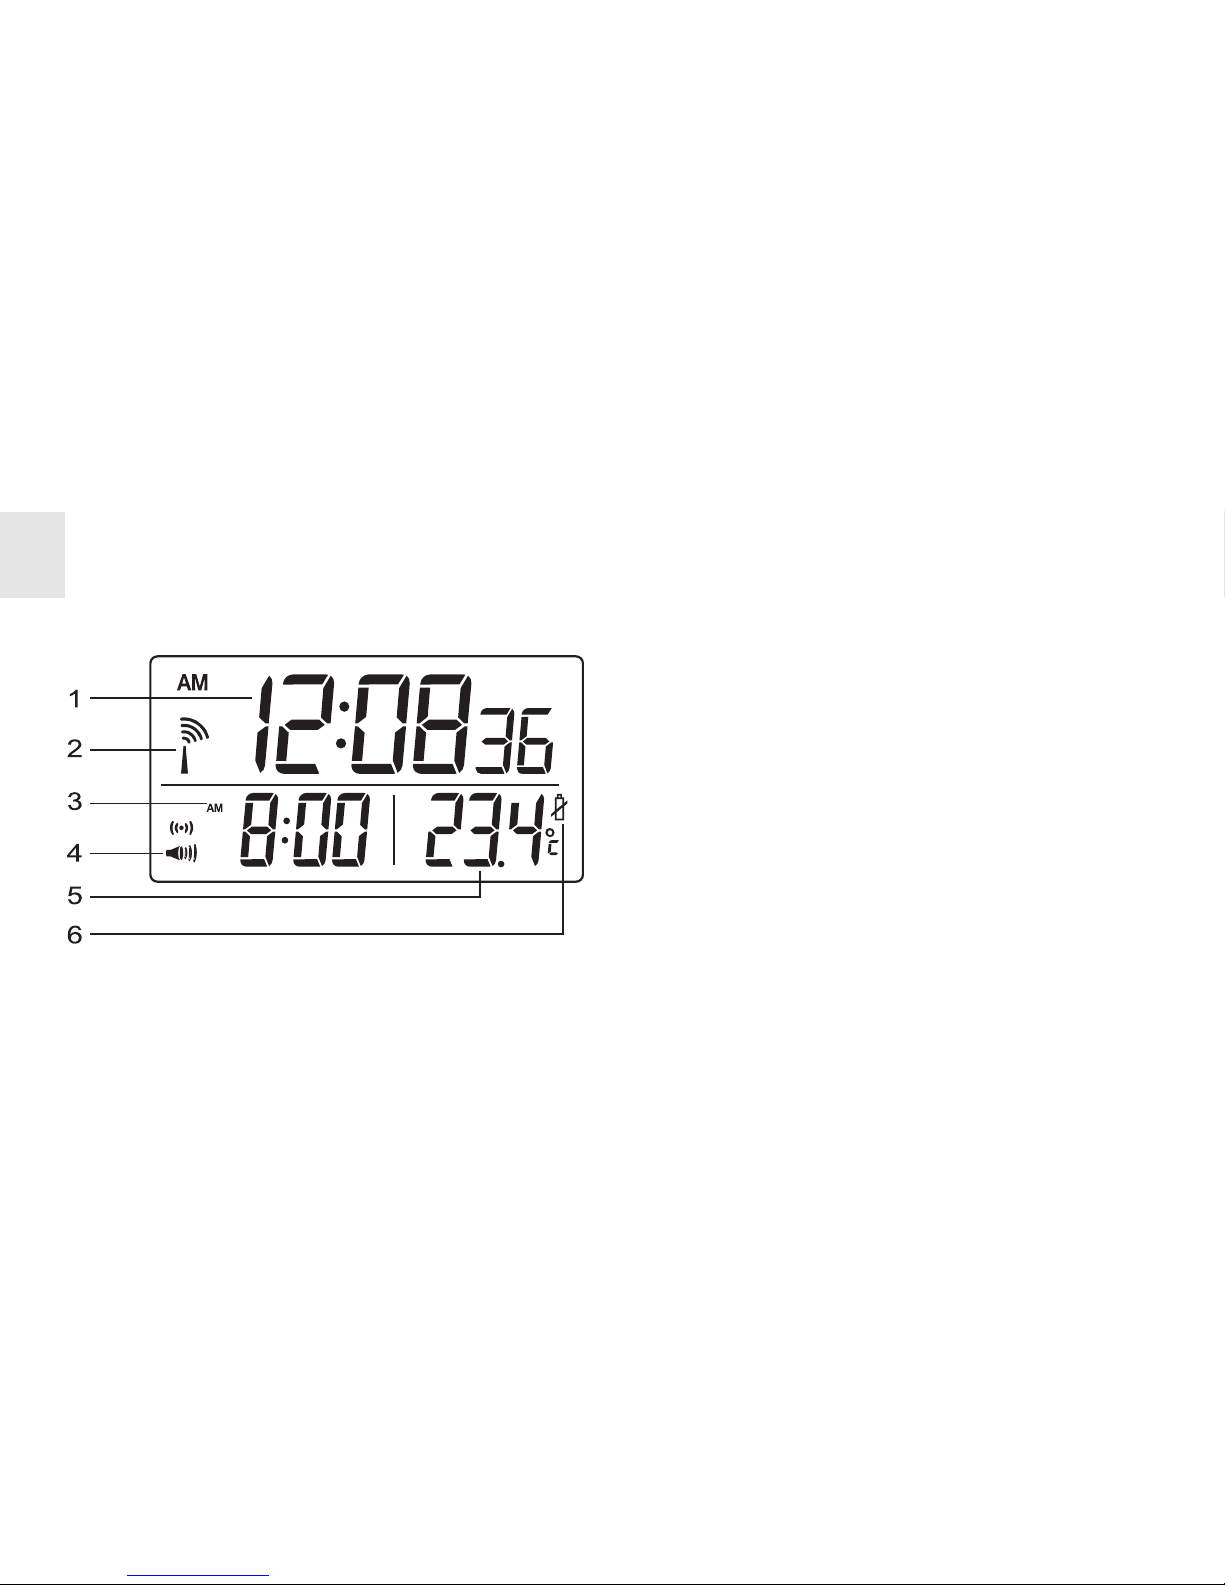
LCD DISPLAY DESCRIPTIONS
1 . Clock (à 8)
2 . RF Reception Signal (à 8)
3 . Date / Alarm (à 9, 10)
4 . Alarm Type (à 10)
5. Temperature (à 11)
6 . Low battery icon (à 7)
Page 5
5
EN
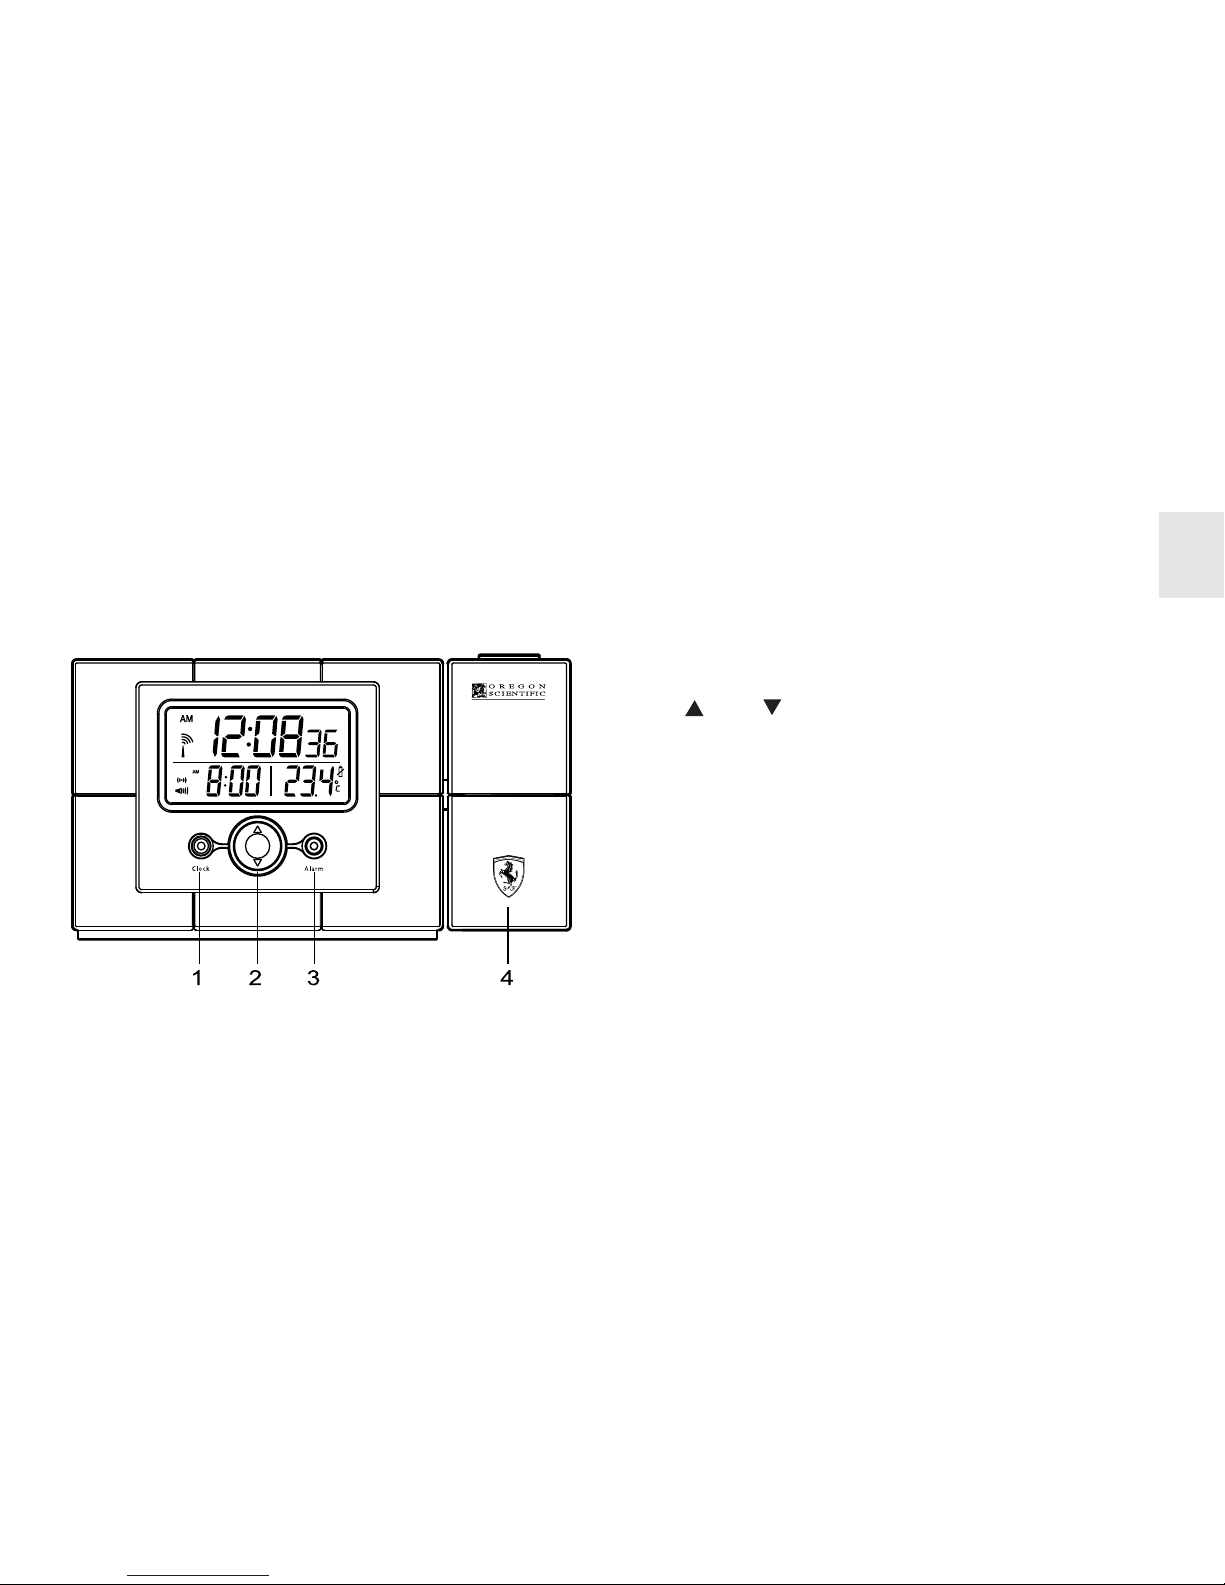
FRONT VIEW BUTTON DESCRIPTIONS
1. Clock – set time / date or view seconds / day of
week (à 7, 9, 10)
2. Up / Down – increase / decrease setting
or activate / deactivate auto-synchronization
(à 7, 9)
3. Alarm – set / activate / deactivate alarm
(à 10)
4 . Projector (à 11)
Page 6
6
EN
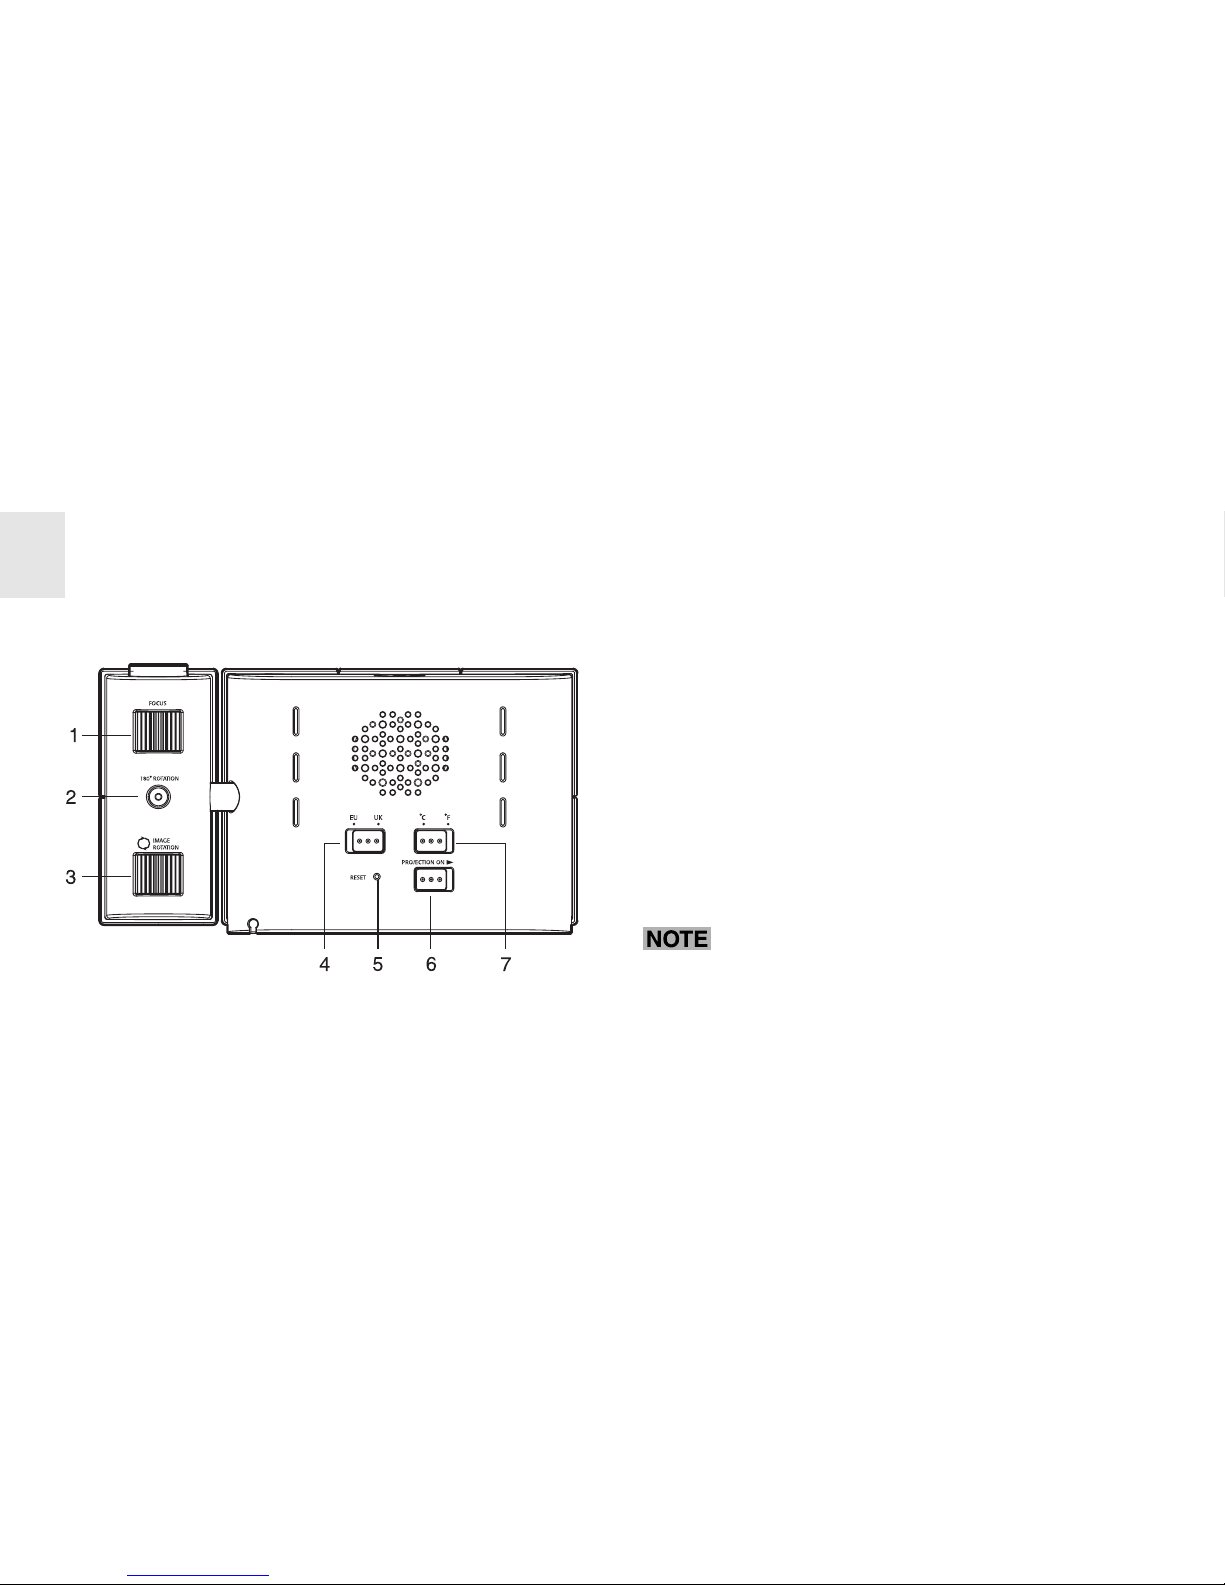
BA CK VIEW DESCRIPTIONS
1 . Projector focus knob (à 12)
2. 180° rotation (flip image) button (à 12)
3. Image rotation button (à 12)
4 . Radio signal format switch (à 8)
5. Reset button (à 12)
6 . Projector switch (à 12)
7 . °C/ °F switch (à 11)
AC power adapter and battery
compartment not shown.
Page 7

7
EN
AC POWER ADAPTER
An AC power adapter is supplied for use with this
product. You must connect the power adapter if
you wish to use the continuous projection feature.
The jack is located on the bottom of the unit.
If the AC power becomes unavailable, the
unit will automatically switch to battery power.
CHANGE SETTINGS
Press and hold CLOCK or ALARM for 2 seconds
to enter setting mode. Then, press UP or
GETTING STARTED
BATTERIES
Batteries are supplied with this product. Replace them
whenever the low battery signal ( ) displays. The
battery cover is located on the bottom of the unit. Slide
to open. Be sure to match the correct polarity, as
shown in the battery compartment. After you change
the batteries, press the RESET button with the point of
a blunt object (such as a ball point pen).
Do not use rechargeable batteries.
Page 8
8
EN
DOWN to change each setting. Press and hold to
enter fast-setting mode. Press CLOCK or ALARM
to switch between settings.
CLOCK
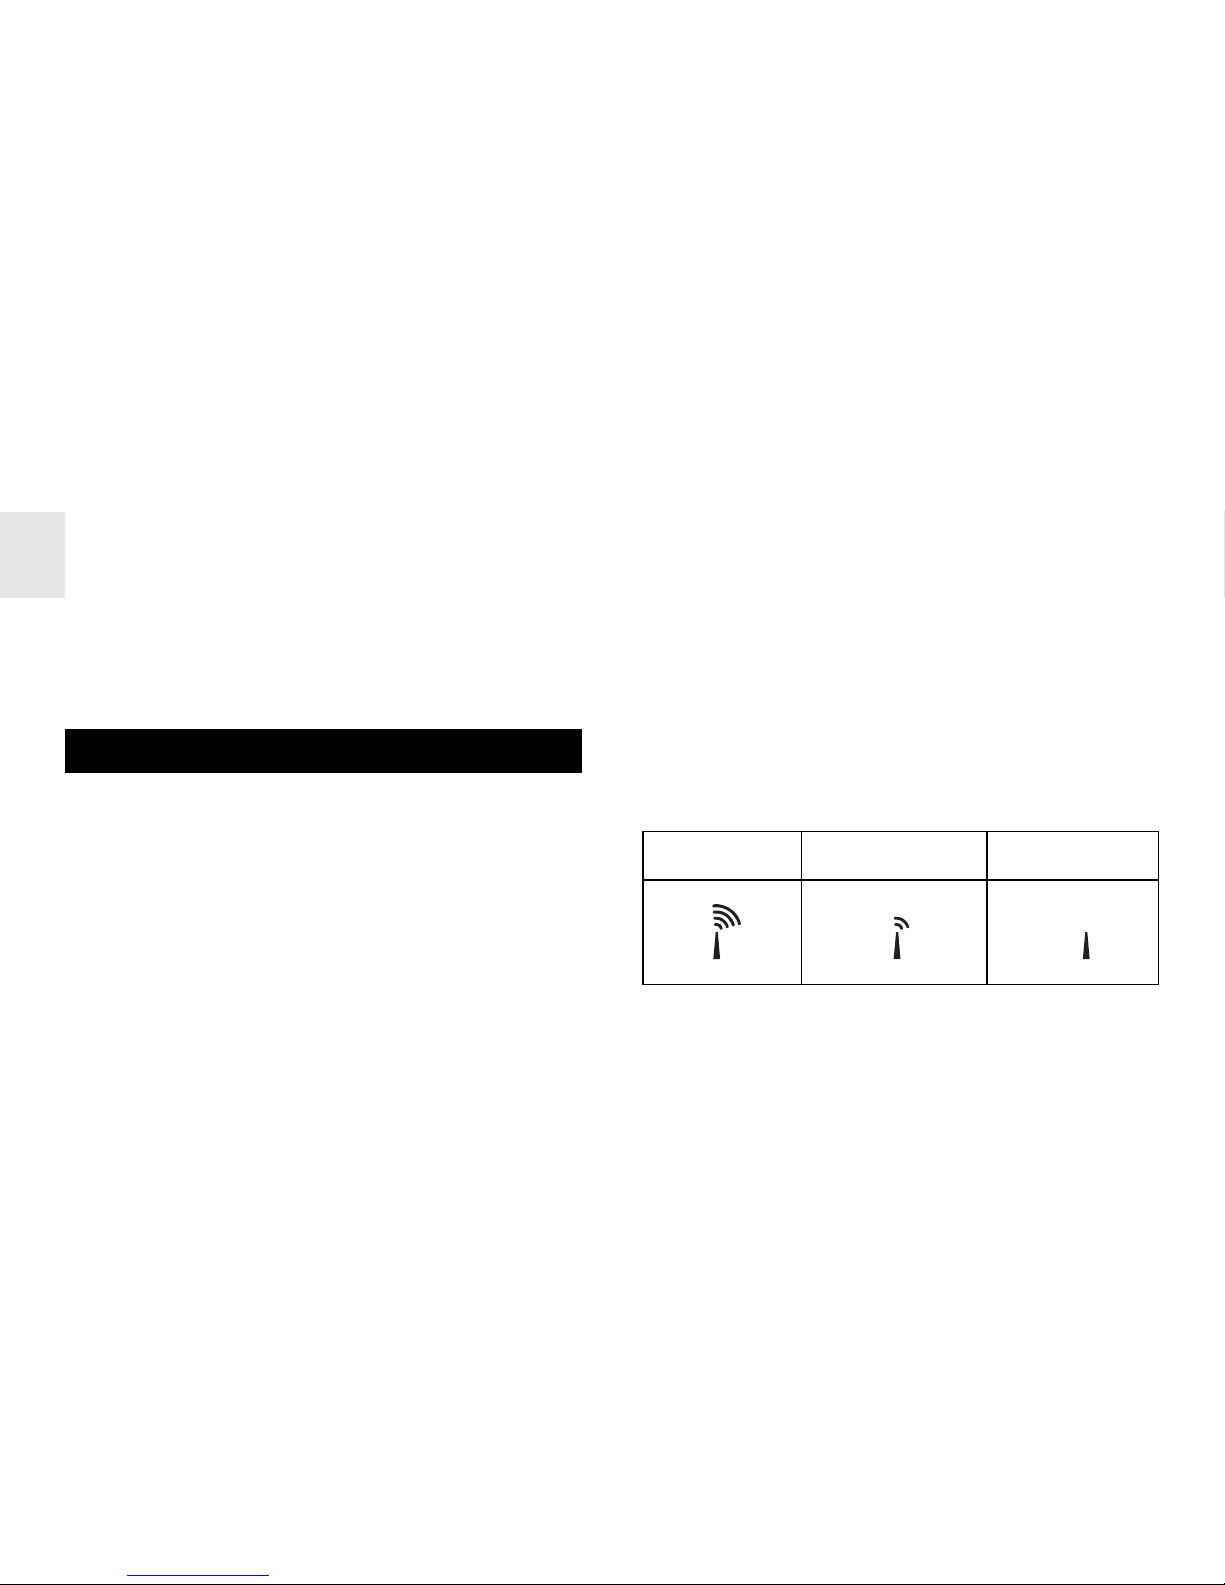
This product can automatically synchronize the date
and time with official time-keeping organizations in
Frankfurt (Germany) and Rugby (England). When
the unit is within 1500 km (932 miles) of a RF
signal, the reception icon will blink during reception.
SET RADIO SIGNAL FORMAT
The RADIO SIGNAL FORMAT switch is located on
the back of the product. Select EU (DCF) or UK
(MSF). Then, press RESET to reset the unit.
Reception takes 2 – 10 minutes to complete. Once
complete, the icon will stop blinking.
Strong signal Weak signal No signal
Page 9

9
EN
For best results, place the unit away from
metal or electrical objects, and near a window with
a clear view to the sky.
TO DISABLE OR ENABLE AUTOSYNCHRONIZATION
Press DOWN for 2 seconds to disable the autosynchronization. The unit will not respond to radio
signals until you reactivate the synchronization.
To enable auto-reception, press UP for 2
seconds.
SET OR CHANGE THE CLOCK
Clock auto-synchronization must be deactivated
before you manually set the clock.
1 . Press and hold CLOCK for 2 seconds to enter
setting mode.
2. Select the 12/24-hour format, hour, minute,
year, date/month format, month, date, and
display language. Press UP or DOWN to
change the setting. Press CLOCK to confirm.
Page 10
10
EN
The language options are (E) English,
(F) French, (D) German, (I) Italian, and (S)
Spanish.
VIEW DAY OF WEEK OR SECONDS
Press CLOCK.
ALARM
When activated, the Beep Alarm starts quietly, then
gradually becomes louder until it crescendos at 1
minute. It shuts off at two minutes. The LCD display
lights up for the first 5 seconds.
SET ALARM
1 . Press and hold ALARM for 2 seconds to enter
setting mode.
2. Select the hour, minute, and alarm type (
for Beep Alarm or for Ferrari Engine). Press
UP or DOWN to change the setting.
3 . Press ALARM to confirm.
SNOOZE
Press SNOOZE/LIGHT to temporarily disable the
alarm for 8 minutes. The alarm icon will blink while
Snooze is activated.
Page 11
11
EN
TO TURN THE ALARM OFF OR ON
Press CLOCK, UP, or DOWN.
To turn the alarm off completely (deactivate it for the
next day), press DOWN when the alarm time is
displayed. Press UP to activate the alarm again.
TEMPERATURE
This product measures current indoor temperature.
SET UNIT
Set the °C/°F switch on the back of the product to
Celsius or Fahrenheit degrees.
BACKLIGHT
Press SNOOZE/LIGHT to illuminate the backlight
for 5 seconds.
PROJECTOR
This product has a built-in projector for viewing the
time.
The maximum projection range is 2
meters (6 feet). The image gets larger the
farther you display it.
Page 12

12
EN
PROJECT THE TIME
In a darkened room, press SNOOZE/LIGHT to
display the time for 5 seconds.
MOVE IMAGE
Adjust the projector arm.
FLIP IMAGE
Press the 180° Rotation button while the projector
is on.
ROTATE IMAGE
The ROTATION knob is located on the back of the
projector. Rotate to adjust.
FOCUS IMAGE
The FOCUS knob is located on the back of the
projector. Rotate to adjust.
CONTINUOUS PROJECTION
The AC power adapter must be plugged in to use
this feature (à 7). Slide the PROJECTOR switch
located on the back of the product to the ON
position.
RESET SYSTEM
The RESET button is located on the back of the
product. Press it whenever you change the
Page 13

13
EN
batteries, or whenever the product is not performing
as expected (e.g., unable to establish radio
frequency link with automatic clock). This will return
all settings to default value, and you will lose any
stored information (alarm and clock settings).
SAFETY AND CARE
Wash the unit with a slightly damp cloth and mild
detergent. Avoid dropping the unit or placing it in a
location where the AC power adapter will be
stepped on.
WARNINGS
This product is designed to give you years of service
if handled properly. Observe the following
guidelines:
• Never immerse the unit in water. This can cause
electrical shock and damage the unit.
• Do not subject the main unit to extreme force,
shock, or fluctuations in temperature or
humidity.
• Do not tamper with the internal components.
• Do not mix new and old batteries or batteries
of different types.
Page 14

14
EN
• Do not use rechargeable batteries with this
product.
• Remove the batteries if storing this product for
a long period of time.
• Do not scratch the LCD display.
• Do not make any changes or modifications to
this product. Unauthorized changes may void
your right to use the product.
• The contents of this user guide are subject to
change without notice.
• Images not drawn to scale. Colors may vary.
ADDITIONAL RESOURCES
Visit our website (www .oregonscientific.com) to learn
more about your new product and other Oregon
Scientific products such as digital cameras, handheld organizers, health and fitness gear, and
weather stations. The website also includes contact
information for our customer service department,
in case you need to reach us.
Page 15
15
EN
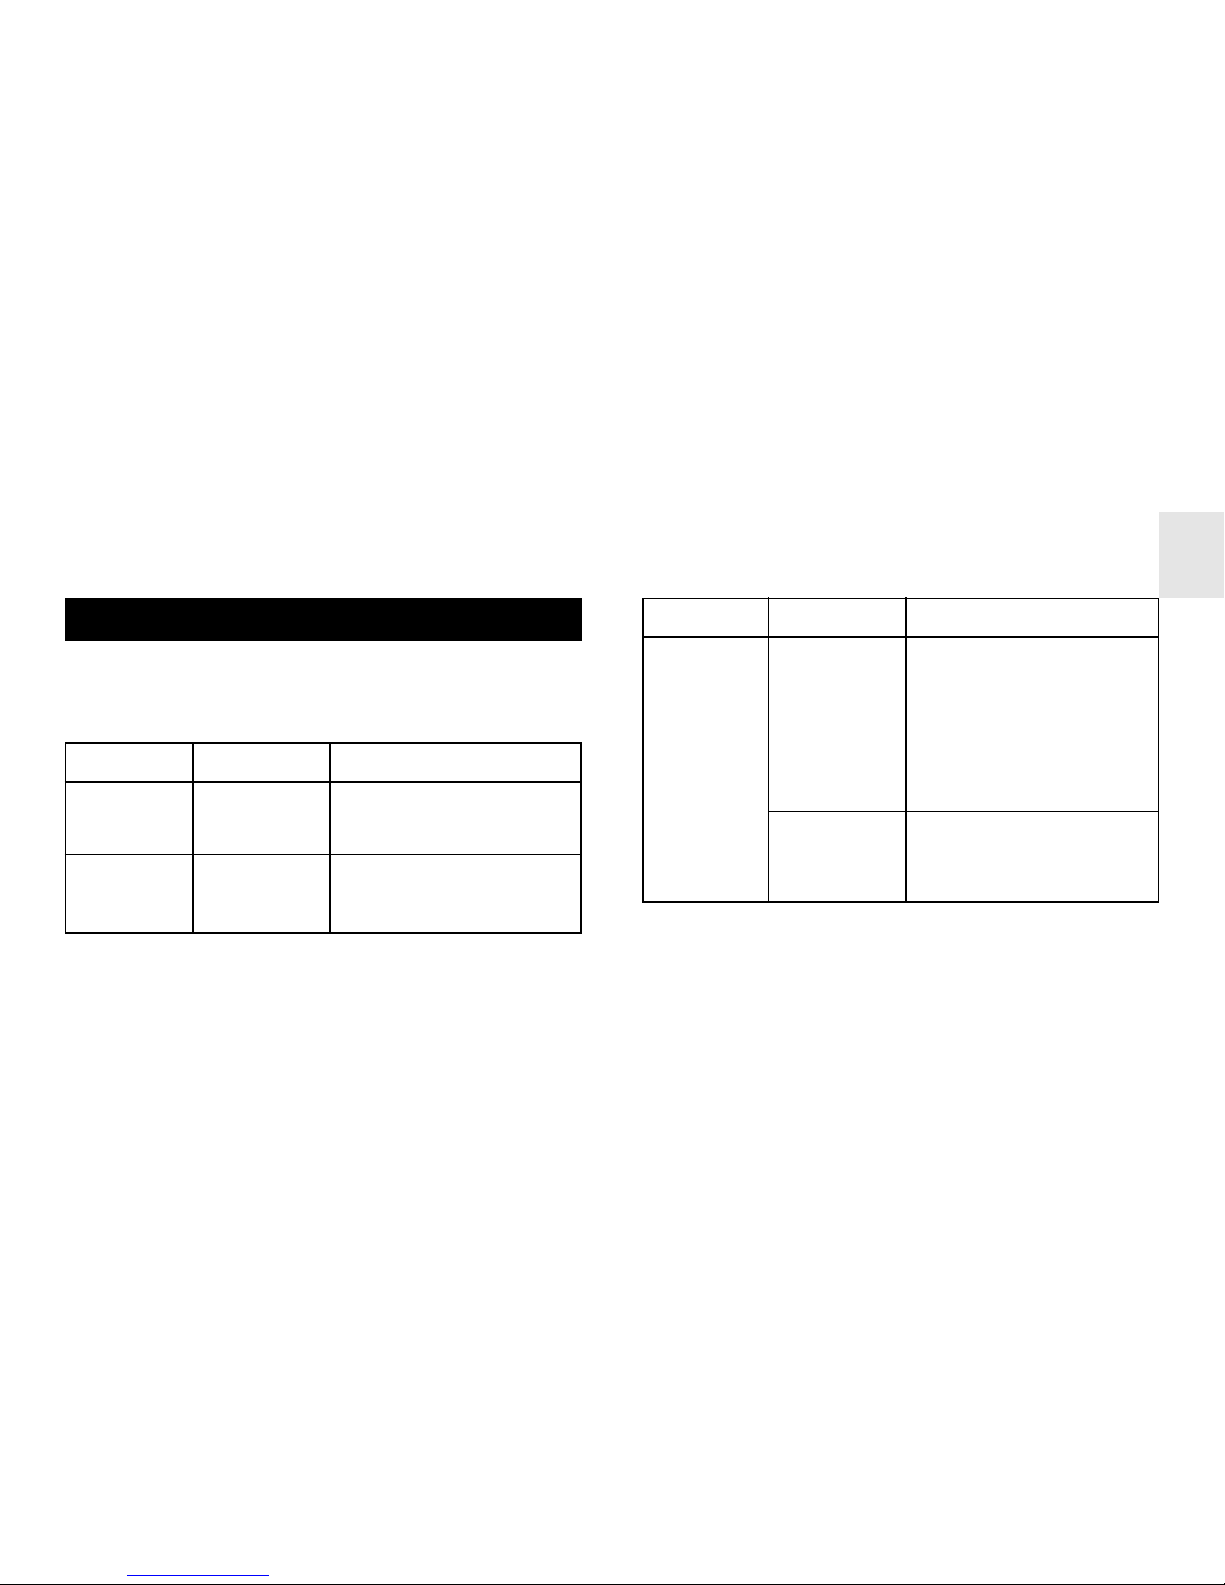
TROUBLESHOOTING
Check here before contacting our customer service
department.
Problem Symptom Remedy
Tem p Shows “LLL ”
or “HHH”
Temperature is out of
range.
Calendar Strange day
of week
Change language (à 9)
Problem Symptom Remedy
Clock Cannot
auto-synch
Adjust batteries, press
RESET (à 12), and
manually activate autosynch (à 9). If it still
fails, you may be too
far from a signal.
Cannot
change
clock
Disable auto-synching
(à 9)
Page 16

16
EN
SPECIFICATIONS
Main unit dimensions
L x W x H 168 x 42 x 93 mm
(6.61 x 1.65 x 3.66 inches)
Weight 272 grams (0.6 lbs) with batteries
Temperature
Unit °C or °F
Range -5 °C to 50 °C (23 °F to 122 °F)
Resolution 0.1 °C (0.2 °F)
Radio-controlled clock
Synchronization Auto or disabled
Clock display HH:MM:SS
Hour format 12hr AM/PM (MSF format)
24hr (DCF format)
Calendar DD/MM or MM/DD user
selectable; weekday selection
in 5 languages (E, D, F, I, S)
Alarm Ferrari Engine or Beep;
2 minute crescendo for Beep
Snooze 8 minutes
Power
Main unit 2 x UM-3 (AA) 1.5V alkaline
batteries
AC/DC 4.5V power adapter
(for continuous projector)
Page 17
17
EN
© 2003 Oregon Scientific. All rights reserved.
EC-DECLARA TION OF CONFORMITY
This product complies with the essential requirements of Article 3 of
the R&TTE 1999/5/EC Directives, if used for its intended use and that
the following standard(s) has/have been applied:
Efficient use of radio frequency spectrum
(Article 3.2 of the R&TTE Directive)
applied standard(s) N / A
Electromagnetic compatibility
(Article 3.1.b of the R&TTE Directive)
applied standard(s) ETS 300 683:1997
Safety of information technology equipment
(Article 3.1.a of the R&TTE directive)
applied standard(s) EN 60950:1997
Additional information:
The product is therefore conform with the Low V oltage Directive 73/23/
EC, the EMC Directive 89/336/EC and R&TTE Directive 1999/5/EC
(appendix II) and carries the respective CE marking.
VS-Villingen / Germany August 2001
Gerhard Preis
EC Representative of manufacturer
COUNTRIES RTTE APPRO VAL COMPLIED
All EC Countries, Switzerland, CH
and Norway N
Page 18

18
EN
Radio-Controlled Projection Clock with
Indoor Temperature
(Model #: FAP-101 Silverstone)
User Manual
 Loading...