

Page 1

PS M01 English Cover R7 op 7/24/03, 10:42 AM1
Black
Full Weather Station with Radio Controlled
Clock
(Model #: PS-M01 / PS-M01U)
User Manual
EN
Page 2

TABLE OF CONTENTS
About this guide ........................................................ 2
Product overview ....................................................... 3
Getting started .......................................................... 8
Batteries .............................................................. 8
AC power adapter ............................................... 8
Switch between modes ....................................... 8
Change settings .................................................. 9
Remote unit set up ..................................................... 9
Clock ...................................................................... 10
Alarm ...................................................................... 11
Calendar ................................................................. 12
Moon phase ............................................................ 12
Barometer ............................................................... 13
Weather forecast ..................................................... 14
Temperature & humidity ........................................... 14
Backlight ................................................................. 17
PS M01 English R17 op 7/24/03, 10:57 AM1
Black
EN
Reset system ........................................................... 18
Safety and care ....................................................... 18
Warnings ................................................................. 19
Troubleshooting ....................................................... 20
Specifications .......................................................... 21
Additional resources ................................................ 23
1
Page 3

EN
ABOUT THIS GUIDE
Congratulations on your selection of the Philippe Starck
with Oregon Scientific Full Weather Station with RadioControlled Clock (PS-M01 / PS-M01U). This powerful
device bundles time keeping, alarm, indoor and
wireless outdoor temperature and humidity monitoring,
and weather forecasting into a single tool you can use
from the convenience of your home.
Keep this manual handy as you use your new product.
It contains practical step-by-step instructions, as well as
technical specifications and warnings you should know.
PS M01 English R17 op 7/24/03, 10:57 AM2
Black
In this box, you will find:
• Main unit
• Remote sensor
• Batteries
• AC/DC power adapter
2
Page 4

PRODUCT OVERVIEW
EN
DESCRIPTIONS
TOP VIEW
1
2
PS M01 English R17 op 7/24/03, 10:57 AM3
Black
1. Snooze / Light button
2. Light sensor
3
Page 5

EN
LCD DISPLAY
1
2
3
4
5
6
PS M01 English R17 op 7/24/03, 10:57 AM4
Black
DESCRIPTIONS
1. Low battery icon
2. Clock
3. Barometer
4. Weather forecast
5. Moon phase
6. Calendar
7
8
7. Temperature and humidity
8. Alarm
4
Page 6

BACK VIEW
1
2
3
PS M01 English R17 op 7/24/03, 10:57 AM5
Black
EN
BUTTON DESCRIPTIONS
1. Select - switch modes / change settings
2. Up - increase setting / activate auto-synch
3. Down - decrease setting / deactivate auto-synch
4
5
4. Channel - switch remote unit
5. Alarm - activate / deactivate alarm
5
Page 7

EN
BOTTOM AND SIDE VIEW
DESCRIPTIONS
1. Battery compartment
2. Backlight switch
3. Reset button
4. Light sensitvity knob
5. DC Power input jack
Black
2
3
1
PS M01 English R17 op 7/24/03, 10:57 AM6
4
NOTE
AC power adapter not shown.
5
6
Page 8

REMOTE UNIT
1
2
3
PS M01 English R17 op 7/24/03, 10:57 AM7
Black
DESCRIPTIONS
1. Temperature / Trend display
4
2. Low battery icon
5
3. Humidity / Trend / Comfort Level display
6
4. °C/°F switch
5. Channel switch
7
6. Reset button
7. Battery compartment
8. Wall-Mount hole
9. Battery compartment lid
8
9
7
EN
Page 9
EN
GETTING STARTED
BATTERIES
Batteries for the remote and main units are supplied
with this product. Replace them whenever the low
battery signal ( ) displays. Remove the battery
compartment lid on the bottom of the main unit, and
insert the batteries. You will need a small Phillips
screwdriver to remove the remote unit compartment lid.
Be sure to match the correct polarity, as shown in the
battery compartment. Before you close the lid, press
the RESET button with the point of a blunt object
(such as a ball point pen).
PS M01 English R17 op 7/24/03, 10:57 AM8
Black
Insert the batteries in the remote unit before you
NOTE
set up the main unit. Do not use rechargeable batteries.
AC POWER ADAPTER
An AC power adapter is supplied for use with the main
unit. You must connect the power adapter if you wish to
use the continuous backlight feature. The jack is located
on the side of the unit.
NOTE
If the AC power becomes unavailable, the unit
will automatically switch to battery power.
SWITCH BETWEEN MODES
Press SELECT. The selected mode will flash. The
display will stop flashing if no key is pressed within
5 seconds.
8
Page 10
CHANGE SETTINGS
Press and hold SELECT for 2 seconds. Then, press
UP or DOWN to change each setting. Press SELECT
to switch options.
REMOTE UNIT SET UP
Up to 3 remote units can be used with this product to
monitor outdoor temperature and humidity. The
measurement unit (°C or °F) and channel number
(1, 2, or 3) switches are located in the battery
compartment, and should be set prior to installation.
NOTE
Additional remote units sold separately. If you
are using more than one remote unit, be sure to select a
different channel number for each unit.
PS M01 English R17 op 7/24/03, 10:57 AM9
Black
EN
INSTALLATION
Mount the remote unit on a flat surface using the recess
holes on the back of the unit.
For best results:
• Before you insert the batteries, select the
measurement unit and channel number first.
• Place the unit out of direct sunlight and moisture.
• Do not place the remote unit more than
20 - 30 meters (60 - 90 feet) from the main
(indoor) unit.
• Position the unit so that it faces the main (indoor)
unit. Minimize obstructions such as doors, walls,
and furniture.
You may need to experiment with various locations to
get the best reception.
9
Page 11
EN
CLOCK
This product can automatically synchronize the date and
time with official time-keeping organizations in Frankfurt,
Germany (PS-M01) or Rugby, England (PS-M01U).
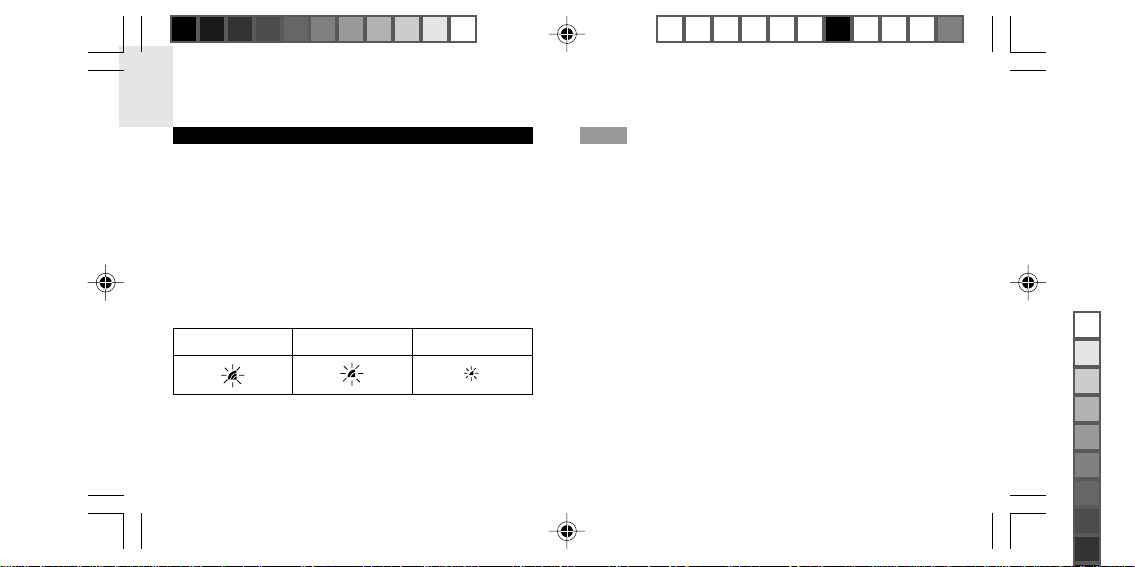
When the unit is within 1500 km (932 miles) of a RF
signal, the reception icon will blink during reception.
RECEPTION
Reception takes 2 - 10 minutes to complete. Once
complete, the icon will stop blinking.
Strong signal Weak signal No signal
PS M01 English R17 op 7/24/03, 10:57 AM10
Black
For best results, place the unit away from
NOTE
metal or electrical objects, and near a window with a
clear view to the sky.
TO DISABLE OR ENABLE AUTOSYNCHRONIZATION
In Clock mode, press DOWN for 2 seconds to disable
the auto-synchronization. The unit will not respond to
radio signals until you reactivate the synchronization.
To enable auto-reception, press UP for 2 seconds.
10
Page 12
SET OR CHANGE THE CLOCK
1. Press SELECT to switch to the Clock Mode.
The time will flash.
2. Press and hold SELECT for 2 seconds to enter
the setting mode.
3. Select the 12/24-hour format, hour, and minute.
Press UP or DOWN to change the setting.
Press SELECT to confirm.
EN
SET ALARM
1. Press SELECT several times until the Alarm
area flashes.
2. Press and hold SELECT for 2 seconds to enter
the setting mode.
3. Select the hour, minute, melody (1 - 7) and
volume level (Lo or Hi). Press UP or DOWN to
change the setting. Press SELECT to confirm.
4. Press SELECT again when you are finished.
ALARM
When activated, the Melody Alarm starts quietly, then
gradually becomes louder. It shuts off after two minutes.
The LCD display lights up for the first 8 seconds.
PS M01 English R17 op 7/24/03, 10:57 AM11
Black
SNOOZE
Press the SNOOZE/LIGHT button the top of the unit
to temporarily disable the alarm for 8 minutes. The alarm
icon will blink while Snooze is activated.
11
Page 13
EN
TO TURN THE ALARM OFF OR ON
Press any button to stop the alarm.
To turn the alarm off completely (deactivate it for the
next day), press ALARM.
CALENDAR
3. Select the year, month, date, and language.
Press UP or DOWN to change the setting.
Press SELECT to confirm.
NOTE
The language options are (E) English,
(F) French, (D) German, (I) Italian, and (S) Spanish.
SET DATE
Clock auto-synchronization must be deactivated before
you manually set the date. ( 10)
1. Press SELECT several times until the calendar
area flashes.
2. Press and hold SELECT for 2 seconds to enter
the calendar setting mode.
PS M01 English R17 op 7/24/03, 10:57 AM12
Black
MOON PHASE
Press SELECT until the Calendar Area flashes. Then,
press UP or DOWN to change the date and view the
corresponding moon phase.
12
Page 14
BAROMETER
This product tracks barometric pressure changes over
the past 24 hours to provide the weather forecast
( 14) and a trend line showing the direction of
barometric change. Barometric changes are measured
by the main (indoor) unit.
Trend Description Pressure change
(mb/hPa)
1 hr 6 hrs
Rising
+
1
+
3
EN
BAROMETRIC TREND
The barometric trend arrow for the last 30 minutes is
always displayed.
PS M01 English R17 op 7/24/03, 10:57 AM13
Black
Steady
Falling
Steady Steady
-1 -3
VIEW THE LAST 24 HOURS
Press SELECT 2 times until the Barometer Area
flashes. Then, press UP or DOWN to view the last
24 hours history.
13
Page 15
EN
SET UNIT AND ALTITUDE
You can set the unit of measurement (mb/hPa or inHg)
and altitude. Setting the altitude allows the product to
take more accurate barometric measurements.
1. Press SELECT 2 times until the Barometer
Area flashes.
2. Press and hold SELECT for 2 seconds.
3. Select altitude (-100 meters to 2500 meters in
increments of 10) and the unit of measurement
(mb/hPa or inHg). Press UP or DOWN to
change the setting. Press SELECT to confirm.
PS M01 English R17 op 7/24/03, 10:57 AM14
Black
WEATHER FORECAST
This product forecasts the next 12 to 24 hours of
weather within a 30 to 50 km (19 - 31 mile) radius with
70 to 75 percent accuracy. The weather forecast is
always displayed.
Clear Partly Cloudy Cloudy Rainy
TEMPERATURE AND HUMIDITY
With the press of a button, you can check the current
indoor or outdoor temperature, humidity percentage,
comfort level, trend, and record measurements.
14
Page 16
Outdoor measurements are collected by the remote
unit.
Temperature is give at the top; humidity is below.
VIEW MIN / MAX / CURRENT MEASUREMENTS
Press SELECT 3 times until the Temperature and
Humidity Areas flash. Press UP or DOWN to scan the
readings.
EN
SELECT REMOTE UNIT CHANNEL
While in the Temperature / Humidity Mode, press
CHANNEL to switch between CH 1, 2, or 3, or press
and hold CHANNEL for 2 seconds to enter Auto scan
mode. If only 1 remote unit is in use, you will not be able
to change channels or select Auto. If you select “Auto”,
the channel will change every 3 seconds.
To deactivate, press and hold CHANNEL for
2 seconds again.
CLEAR MIN / MAX RECORDS
While viewing Min/Max records, press and hold UP or
DOWN for 2 seconds until a beep sounds. This clears
the previous measurements from the memory.
PS M01 English R17 op 7/24/03, 10:57 AM15
Black
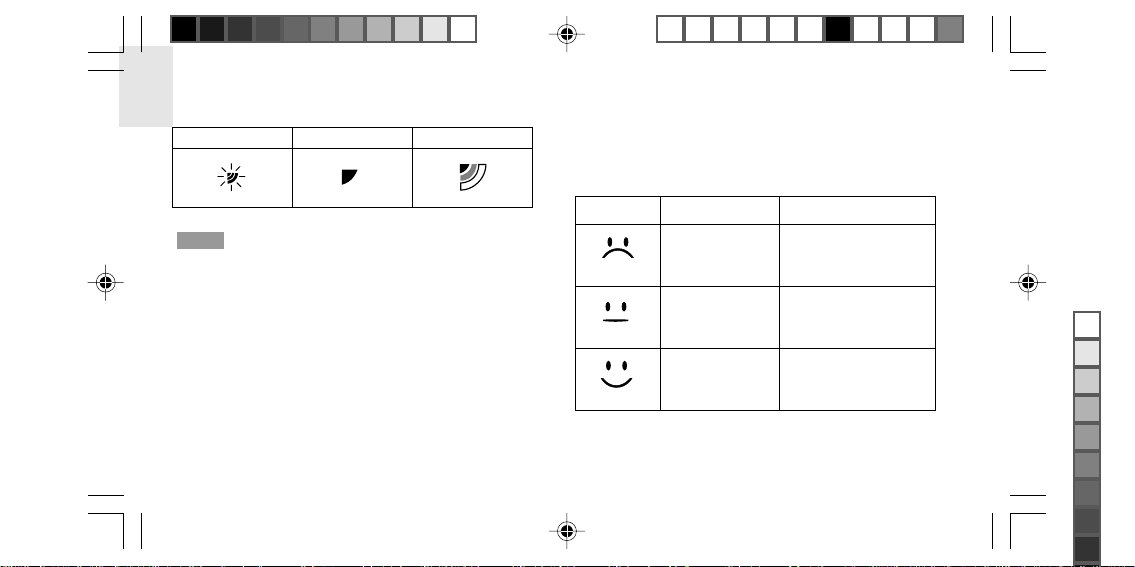
SENSOR SEARCHING
If there is no remote unit signal, the temperature and
humidity measurements will be blank. Check the remote
unit batteries, or press and hold UP and DOWN for
2 seconds to search for the remote unit(s).
15
Page 17
EN
Searching No sensor Sensor found
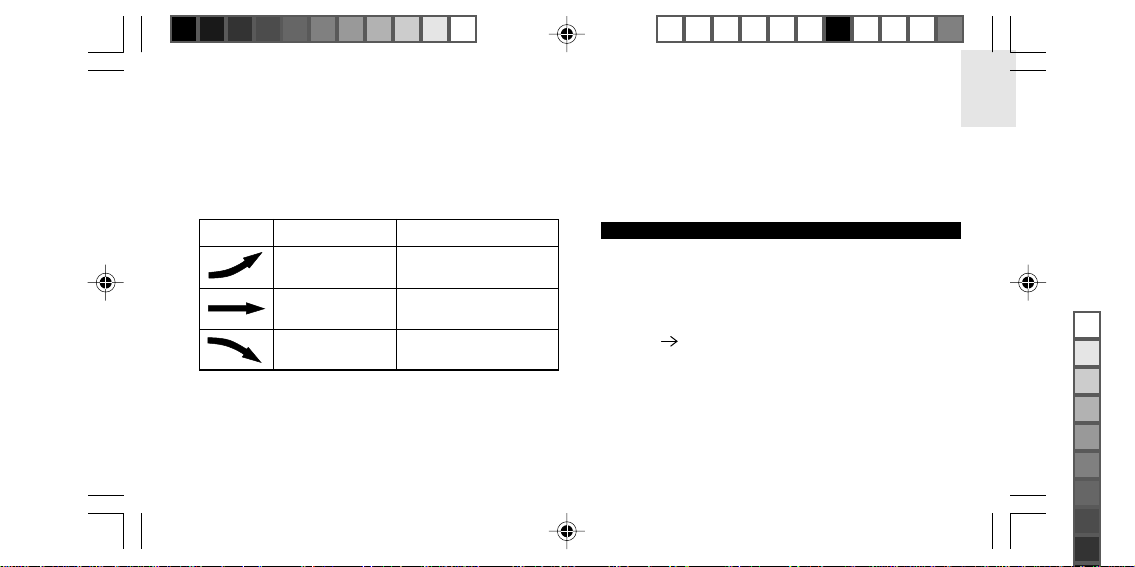
COMFORT ZONE
The indoor and outdoor comfort zones are shown for
the following conditions.
Signals from household electrical appliances
NOTE
such as doorbells and home security systems can
cause temporary reception failures between the indoor
and outdoor units. This is normal and does not affect
the general performance of the product. Reception will
automatically resume once the interference ends.
PS M01 English R17 op 7/24/03, 10:57 AM16
Black
16
Zone
Wet
Dry
Comfort
Temperature
RelativeHumidity
Any >70%
Any
20 - 25 °C
(68 - 77 °F)
<40%
40 - 70%
Page 18
TRENDS
The trend arrow for the last 30 minutes always displays.
Indoor and outdoor temperature and humidity trends are
shown separately.
EN
SET UNIT
While in Temperature / Humidity Mode, press SELECT
for 2 seconds. Press UP or DOWN to switch between
°C and °F. Press SELECT to confirm.
Trend Temperature Relative Humidity
+
0.5 °C
-0.5 °C -3%
PS M01 English R17 op 7/24/03, 10:57 AM17
Black
BACKLIGHT
+
3%
SteadySteady
Press SNOOZE/LIGHT to illuminate the backlight for
5 seconds.
CONTINUOUS BACKLIGHT
The AC power adapter must be plugged in to use this
feature (
8).
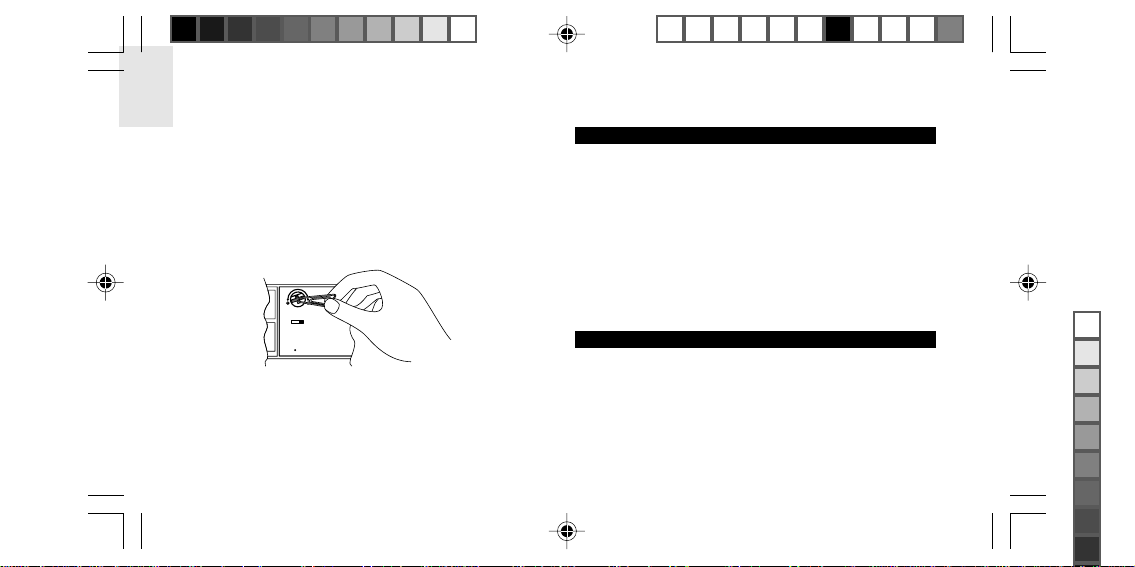
1. The BACKLIGHT switch is located in the battery
compartment. Move it to the “ON” position to
enable the continuous backlight. Move it to the
“OFF” position to disable.
17
Page 19
EN
2. Move it to the “AUTO” position to enable
continuous backlight controlled by light intensity.
When activated, the backlight will be on
whenever the unit perceives that the room is
dark.
3. The Light sensitivity knob is located in the
battery compartment. Rotate to adjust.
I
E
O
LIGHT SENSOR
LIGHT
ON OFF AUTO
RESET
4. When activated, the continuous backlight will be
half as bright as usual. To achieve full brightness,
press SNOOZE/LIGHT.
PS M01 English R17 op 7/24/03, 10:57 AM18
Black
RESET SYSTEM
The RESET buttons are located in the battery
compartments for the main and remote units. Press
these buttons with the tip of a blunt object (such as a
ball point pen) whenever you change the batteries, or
whenever performance is not behaving as expected
(e.g., unable to establish radio frequency link with
remote unit or automatic clock, etc.) This will return all
settings to default value, and you will lose all stored
information (minimum / maximum temperature and
humidity, etc.).
SAFETY AND CARE
Wash the unit with a slightly damp cloth and mild
detergent. Avoid dropping the unit or placing it in a
location where the AC power adapter will be stepped
on.
18
Page 20
WARNINGS
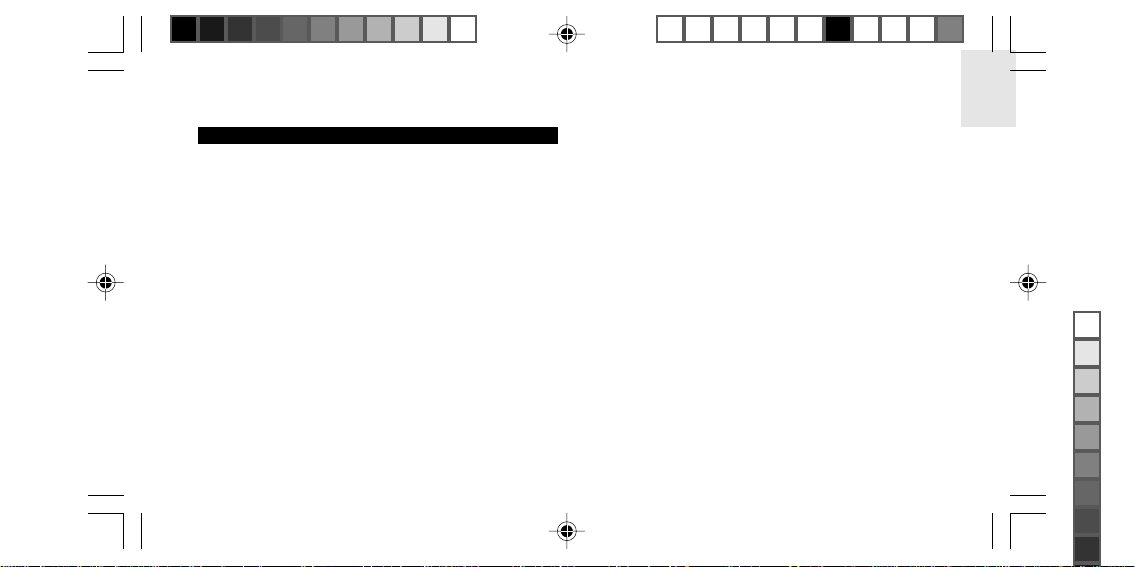
This product is designed to give you years of service if
handled properly. Observe the following guidelines:
• Never immerse the unit in water. This can
cause electrical shock and damage the unit.
• Do not subject the main unit to extreme force,
shock, or fluctuations in temperature or humidity.
• Do not tamper with the internal components.
• Do not mix new and old batteries or batteries of
different types.
• Do not use rechargeable batteries with this
product.
• Remove the batteries if storing this product for a
long period of time.
• Do not scratch the LCD display.
PS M01 English R17 op 7/24/03, 10:57 AM19
Black
EN
• Do not make any changes or modifications to
this product. Unauthorized changes may void
your right to use the product.
• The contents of this user manual are subject to
change without notice.
• Images not drawn to scale.
19
Page 21
EN
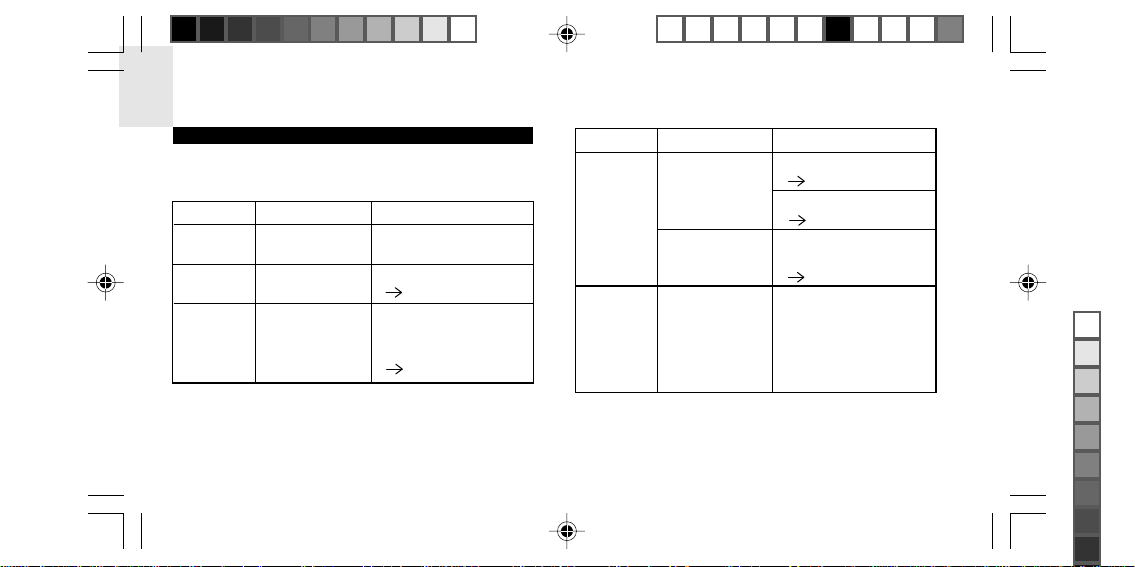
TROUBLESHOOTING
Check here before contacting our customer service
department.
Problem Symptom Remedy
Temp
Shows “LLL” or
“HHH”
Calendar Strange date /
month
Backlight No continuous
backlight
Temperature is out-ofrange.
Change language
( 12)
Plug in AC power
adapter. Check the
BACKLIGHT switch.
( 8, 17)
PS M01 English R17 op 7/24/03, 10:57 AM20
Black
Problem Symptom Remedy
Remote
unit
Cannot locate
remote unit
Cannot change
channel
Clock Cannot auto-
synchronize
20
Check batteries
( 8)
Check location
( 9)
Check sensors. Only
one sensor is working
( 15 )
1. Remove batteries.
2. Press RESET. All
memory items will
return to default.
3. Replace batteries.
Page 22
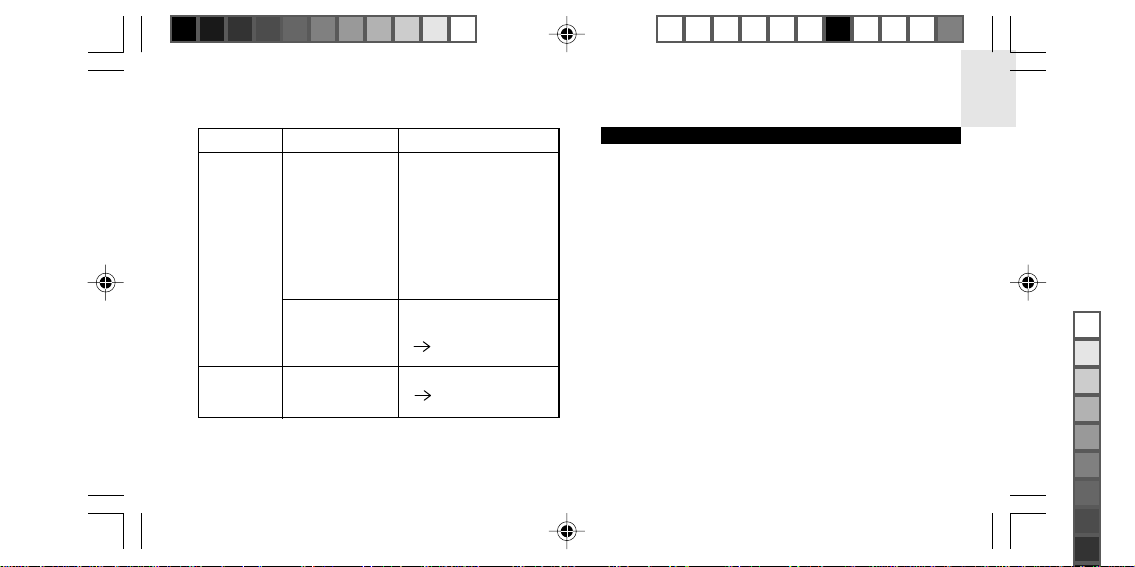
Problem Symptom Remedy
4. Place clock near
If it still fails, you may
be too far from a signal.
Cannot change
clock
Disable autosynchronization
( 10)
Baro
Strange reading
Set altitude / unit
( 14)
PS M01 English R17 op 7/24/03, 10:57 AM21
Black
window / away
from electrical
devices, and wait
10 - 20 minutes.
EN
SPECIFICATIONS
Main unit dimensions
L x W x H 129 x 43 x 133.3 mm
(5.1 x 1.7 x 5.2 inches)
Weight 457 grams with batteries
Remote unit dimensions
L x W x H 75 x 35 x 78.3 mm
(3 x 1.4 x 3.1 inches)
Weight 136 grams with battery
Temperature
Unit °C or °F
Range Main unit: -5 ºC to 50 ºC
(23 ºF to 122 ºF)
Remote Unit: -20 °C to 60 °C
(-4 °F to 140 °F)
21
Page 23
EN
Resolution 0.1 °C (0.2° F)
Comfort 20 °C to 25 °C (68 °F to 77 °F)
(see also, Relative humidity)
Memory Minimum / maximum
Trend
+
/- 0.5 °C (+/- 0.9 °F) change
Relative humidity
Range Main & Remote Unit: 25% to 95%
Resolution 1%
Comfort 40% to 70%
(see also, Temperature)
Memory Minimum / maximum
Trend 3% change
PS M01 English R17 op 7/24/03, 10:57 AM22
Black
Barometer
Unit mb/hPa or inHg
Range 500 to 1050 mb
(14.77 to 31.01 inHg)
Resolution 1mb (0.03 inHg)
Altitude -100 to 2500 meters
(-328 to 8202 feet)
Display Rainy, cloudy, partly cloudy, sunny
Memory 24 hour
Trend 1mb change in 1 hour or 3mb
change in 6 hours
Remote unit
RF frequency 433 MHz
Range 30 meters (98 feet) with no
obstructions
Transmission approximately every 40 seconds
22
Page 24
Channel No. 1, 2, or 3
Unit °C or °F
Radio-controlled clock
Synchronization Auto or disabled
Clock display HH:MM:SS
Hour format 12hr AM/PM (MSF format)
24hr (DCF format)
Calendar DD/MMM; weekday selection
in 5 languages (E, D, F, I, S)
Moon phase High, medium, and low tide
Alarm 7 melody; 2 minute crescendo
Snooze 8 minutes
PS M01 English R17 op 7/24/03, 10:57 AM23
Black
EN
Power
Main unit 4 x UM-3 (AA) 1.5V alkaline
batteries (back-up)
AC/DC 6V power adapter
(for normal operation and
continuous backlight)
Remote unit 2 x UM-4 (AAA) 1.5V alkaline
batteries
ADDITIONAL RESOURCES
Visit our website (www.oregonscientific.com) to learn
more about your new product and other Oregon
Scientific products such as digital cameras, hand-held
organizers, health and fitness gear, and weather
stations. The website also includes contact information
for our customer service department, in case you need
to reach us.
23
Page 25
EN
EC-DECLARATION OF CONFORMITY
This product contains the approved transmitter module
TX 07 and complies with the essential requirements of
Article 3 of the R&TTE 1999/5/EC Directives, if used for
its intended use and that the following standard(s)
has/have been applied:
Radio frequency spectrum
(Article 3.2 of the R&TTE Directive)
applied standard(s)
Electromagnetic compatibility
(Article 3.1.b of the R&TTE Directive)
ETSI EN 300 220-3 (Ver.1.1.1):2000-09
applied standard(s) ETSI EN 301 489-1-3 (Ver.1.4.1):2002-08
Safety of information technology equipment
(Article 3.1.a of the R&TTE directive)
applied standard(s)
PS M01 English R17 op 7/24/03, 10:57 AM24
Black
EN 60950:2000
Additional information:
The product is therefore conform with the Low Voltage
Directive 73/23/EC, the EMC Directive 89/336/EC and
R&TTE Directive 1999/5/EC (appendix II) and carries the
respective CE marking.
VS-Villingen / Germany August 2003
Gerhard Preis
R&TTE Representative of manufacturer
RTT&E Compliant Countries:
All EC Countries, Switzerland ,
and Norway
©2003 Oregon Scientific. All rights reserved.
24
CH
N
 Loading...