

Page 1

ENGLISH
FRENCH
GERMAN
ITALIAN
SPANISH
PORTUGUESE
DShot II/III Digital Camera (Model: DS6888/A)
USER’S MANUAL
Contents
Overview ................................................................................................................................. 2
Getting to Know the DShot II/III Digital Camera .............................................................. 2
Buttons and Controls ....................................................................................................... 2
Indicators ......................................................................................................................... 4
Status Display .................................................................................................................. 5
Getting Started ....................................................................................................................... 5
Installing/Replacing Batteries .......................................................................................... 5
Inserting/Removing Memory Card .................................................................................. 6
Basic Operation ...................................................................................................................... 6
Turning Power On or Off ................................................................................................. 6
Operation Modes ............................................................................................................. 6
Taking Photos ..................................................................................................................7
Recording Movies ............................................................................................................ 7
Deleting Photos or Movies .............................................................................................. 7
Setting Photo Counter Behavior ...................................................................................... 7
Setting Video Output System ........................................................................................... 7
Connecting to TV, Computer ................................................................................................ 7
Connecting to TV ............................................................................................................. 7
Connecting to Computer .................................................................................................. 8
TV Playback Mode Operation .............................................................................................. 8
Index ................................................................................................................................ 8
Review ............................................................................................................................. 8
Slideshow ......................................................................................................................... 9
Delete All ......................................................................................................................... 9
Language .......................................................................................................................... 9
Camera Information ......................................................................................................... 9
Settings ............................................................................................................................ 9
Windows PC Software ........................................................................................................... 9
Installing Windows PC Software ..................................................................................... 10
Using My DShot II/III Camera on PC ............................................................................. 11
Using Windows® Netmeeting® ......................................................................................... 12
MAC Software ........................................................................................................................ 12
Installing QuickTime on MAC ........................................................................................ 12
Installing My DShot II/III Camera on MAC ................................................................... 12
Using My DShot II/III Camera on MAC ......................................................................... 12
Technical Notes ....................................................................................................................... 13
Customer Assistance ........................................................................................................ 13
Warranty ........................................................................................................................... 13
Notice of FCC Compliance ............................................................................................. 13
Taking Care of Your Camera ........................................................................................... 14
Specifications ................................................................................................................... 15
1
ENGLISH
FRENCH
GERMAN
ITALIAN
SPANISH
PORTUGUESE
Page 2
DShot II/III Digital Camera (Model: DS6888/A)
Overview
Thank you for purchasing the DShot II/III digital camera.
ENGLISH
Convenience, quality, flexibility and fun are all what the DShot II/III digital camera provides. With the true
Mega-pixel image sensor and features like flashlight, 2x digital zoom, close-up and self-timer,
1.3
the DShot II/III
the DShot II/III digital camera can also be used to record short movies or used as web camera to perform
video on network/internet. Photos and movies can be uploaded to PC or MAC for storage, sharing or
manipulating with the software packages included. If you do not have a computer around or you do not
want to upload them, you can also view them on TV.
Please read this instruction manual carefully in order to get the most out of your DShot II/III digital
FRENCH
camera.
digital camera takes quality photos in any condition. In addition to still pictures,
Getting to Know the DShot II/III Digital Camera
4 5
GERMAN
16
ITALIAN
18
12 3
17
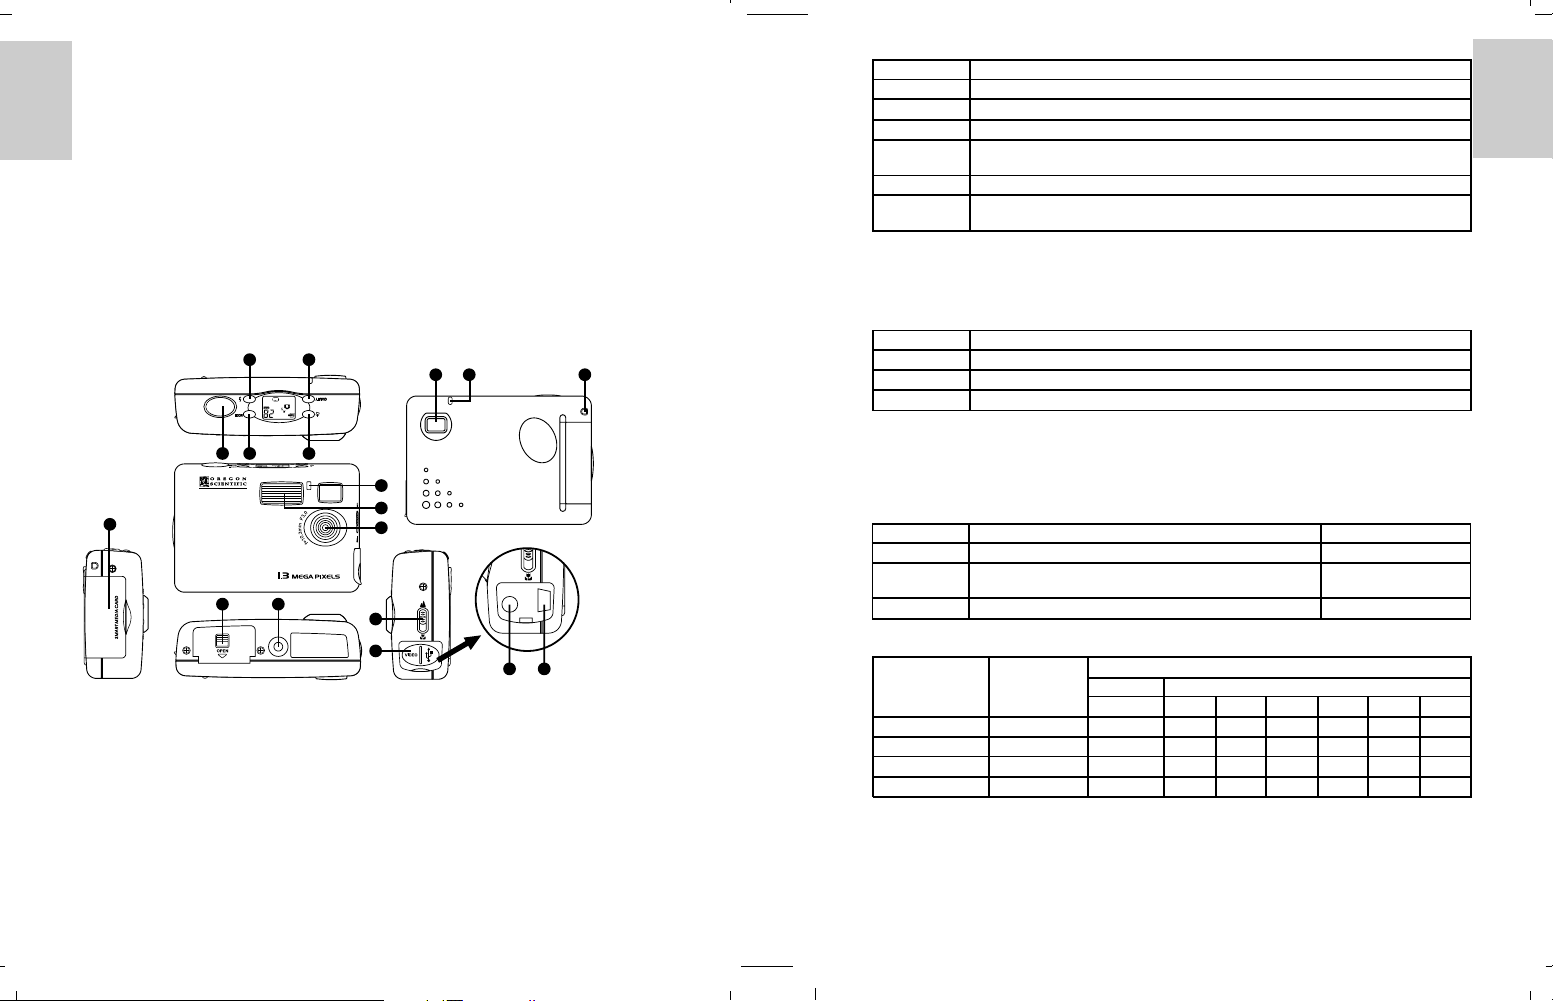
Buttons and Controls
(1) Power button
SPANISH
• Press to toggle the power the camera on and off.
(2) Shutter button
• Press to take photos in still camera mode.
• Press to start/stop recording of movies in movie camera mode.
• Press to enter File Deletion mode in Setting mode.
• Press to confirm selections or start/stop operations in TV Playback mode.
(3) Mode button
• Press to switch between different operation modes.
12 15
8
13
14
6
9
7
10
11
PORTUGUESE
Setting
Normal
Self-timer
Digital zoom
Self-timer &
Digital zoom
Movie Camera
Setting
• Press to navigate (to previous item) through the on-screen-display menu (on TV) in TV Playback mode.
(4) Flashlight button
• Press to cycle through the 3 flashlight modes – auto, on and off.
Setting Description
Auto Flashlight turns on when lighting is poor
On Flashlight turns on regardless of lighting condition
Off No Flashlight regardless of lighting condition
• Press to toggle between counting up (showing the number of photos taken) and counting down
showing the number of additional photos that can be taken) in setup mode.
• Press to navigate (to next item) through the on-screen-display menu (on TV) in TV Playback mode.
(5) Quality button
• Press to cycle through the 3 levels of photo quality – super fine, fine and basic.
Setting
Fine
Normal
Basic
Approx. Number of photos vs. Memory Card Capacity and Photo Quality
Photo Quality Resolution 2 4 8 16 32 64 128
Fine 1280x1024 5 14 28 57 116 232 464
Normal 1280x1024 7 20 40 81 163 327 655
Basic 640x512 15 43 88 176 354 709 1421
2X Digital zoom 640x512 15 43 88 176 354 709 1421
• Press to select file type (photo or movie) to be deleted in File Deletion mode.
• Press to toggle video output system between NTSC and PAL in Setup mode.
• Press to exit to main menu in TV Playback mode.
Description
Photo will be taken when Shutter button is pressed.
Photo will be taken in 10 sec. after Shutter button has been pressed.
Zoomed-in photo will be taken when Shutter button is pressed.
Zoomed-in photo will be taken in 10 sec. after Shutter button has been pressed.
Movie will be recorded when Shutter button is pressed.
Delete photos or movies, set color system of video output, confirmation tone on/off or
set behavior of photo counter
Description
Resolution of photo is 1280x1024
Resolution of photo is 1280x1024
(with reduced level of details)
Resolution of photo is 640x512
Memory Size (Mbyte)
Built-in Memory Card
32
Memory Usage
High
Medium
Low
ENGLISH
FRENCH
GERMAN
ITALIAN
SPANISH
PORTUGUESE
Page 3
(6) Scene/Close-up mode selector
• Slide to select Scene or Close-up mode.
Mode Focus Range
Scene 1m to infinity
ENGLISH
Close-up Approx. 26cm
Indicators
ENGLISH
(7) Status indicator
Color Status Description
Green On Ready to shoot
FRENCH
Orange On Flashlight charging
Green/Orange Blinking Processing the last photo before turn off or PC connection
Red On Card error
(8) Self-timer indicator
GERMAN
Color Status Description
Red On Self-timer started
(9) Connector cover
(10) USB connector
(11) Video output connectors
ITALIAN
(12) Viewfinder
(13) Flashlight
(14) Lens
(15) Hand-strap hole
(16) Memory card slot/slot cover
SPANISH
(17) Tripod socket
(18) Battery compartment cover/latch
Blinking Ready to shoot (Camera is processing the last photo)
Blinking Camera is processing the last photo or PC connection
Blinking Less than 5 sec. before photo will be taken
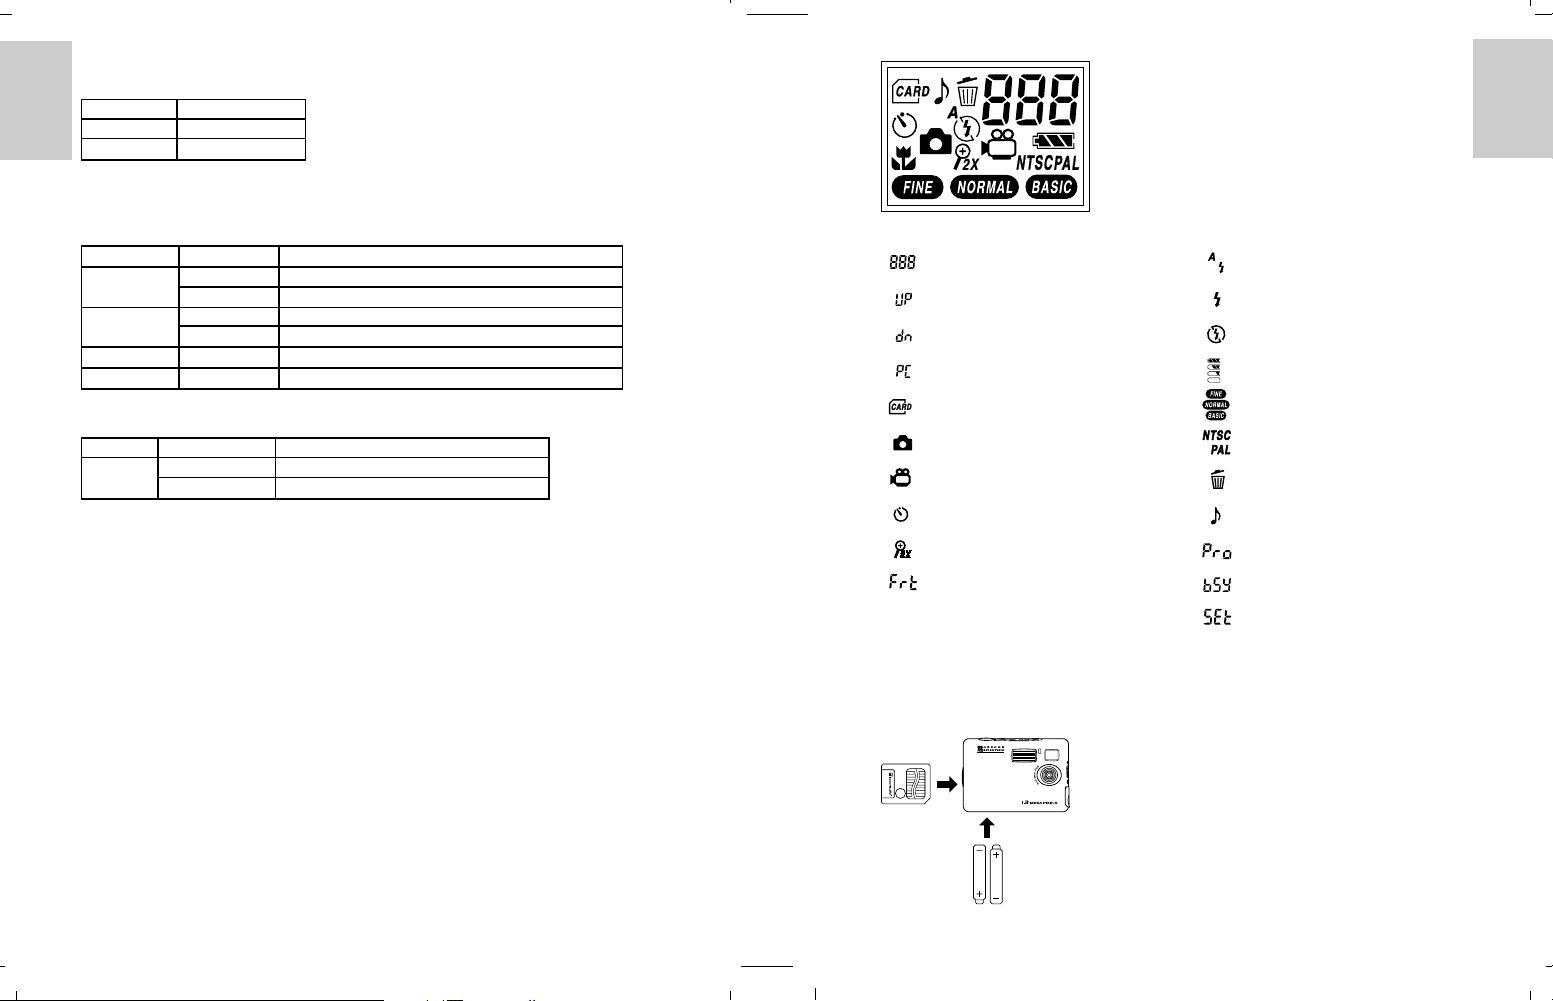
Status Display
[ ] Photo count
[
] Counting up
[
] Counting down
[
] PC communication mode
[
] Memory card detected
[
] Still camera mode
[
] Movie camera mode
[
] Self-timer mode
[
] 2X Digital zoom mode
] Format
[
] Auto flashlight
[
[
] Flashlight on
[
] Flashlight off
[
] Battery status
[
] Photo resolution
[
] Video output system
[
] File deletion mode
[
] Confirmation tone
[
] Card is write protected
[
] Busy
[
] Setting mode
Getting Started
Installing/Replacing Batteries
1. Open the battery compartment cover.
2. Insert batteries (2 x AA-size) according to the indicated polarity.
3. Close the battery compartment cover.
FRENCH
GERMAN
ITALIAN
SPANISH
PORTUGUESE
Note: Photos and movies in your DShot II/III digital camera remain even when there is no battery.
4
5
PORTUGUESE
Page 4

Important: Do not mix old batteries with new batteries. Always dispose of exhausted batteries properly.
Do not insert anything except appropriate batteries into the battery compartment as this may
cause damage to the camera.
Inserting/Removing Memory Card
ENGLISH
1. Turn off the power of your DShot II/III digital camera.
2. Open the memory card slot cover.
3. Insert memory card as indicated fully.
4. Close the memory card slot cover.
Note: When memory card has been inserted, the built-in memory will not be available.
Important: Removing memory card when the power of your DShot II/III digital camera is turned on may
lead to data loss.
FRENCH
Basic Operation
Turning Power On or Off
• When the camera is turned off, press Power button to turn the power of the camera on.
• When the camera is turned on, press Power button to turn the power of the camera off.
Note: In order to minimize power consumption, the camera will automatically turn off after 1 minute
(default) of inactivity or processing complete. Please refer to Settings in TV Playback mode for
customization of the auto-power-off duration.
GERMAN
Operation Modes
The DShot II/III digital camera will be in still camera mode when it is turned on. Press Mode button to
cycle through the various operation modes:
ITALIAN
1. Still Camera mode (Normal)
Photo will be taken when Shutter button is pressed.
2. Still Camera mode (Self-timer)
Photo will be taken in 10 sec. after Shutter button has been pressed.
SPANISH
3. Still Camera mode (Digital Zoom)
Zoomed-in photo will be taken when Shutter button is pressed.
4. Still Camera mode (Self-timer and Digital Zoom)
Zoomed-in photo will be taken in 10 sec. after Shutter button has been pressed.
5. Movie Camera mode
Recording of movie starts when Shutter button is pressed once and stops when Shutter button is pressed again.
6. Setting mode
• Press Shutter button to delete photos or movies.
• Press Quality button to set video output system (NTSC or PAL) and confirmation tone (on or off).
• Press Flashlight button to set behavior of the photo counter (count up or count down).
Taking Photos
1. Select one of the 4 Still Camera modes desired.
2. Select one of the 3 levels of photo quality.
3. Select one of the 3 Flashlight modes according to lighting condition.
4. Select Scene or Close-up mode according to the distance of the object.
5. Press Shutter button to take photo.
Note: When photo counter is set to “Counting down”, the photo count shown is only an estimation of
number of additional photos that can be taken. Since the file sizes of photos differ, the counter may
not decrease or decrease by 2 occasionally.
Recording Movies
1. Select Movie Camera mode.
2. Press Shutter button to start recording movie, press again to stop.
Note:
• Flashlight is turned off in movie camera mode.
• With a Compact Flash memory card (with minimum 7MB memory available), the maximum duration
of a movie clip is approximately 90 seconds. In case the camera is operating with the internal memory,
the maximum duration of a movie clip is approximately 18 seconds.
Deleting Photos or Movies
1. Select Setting mode.
2. Press Shutter button to select File Deletion mode.
3. Press Quality button to select file type (photos or movies) to be deleted.
4. Press Flashlight button to select the identification number of the photo or movie to be deleted.
5. Press Shutter button to delete the selected photo or movie. For delete all (display shows “ALL”), press
and hold the Shutter button for 3 seconds to delete all photos or movies.
6. Press Mode button to exit to Setting mode.
Setting Photo Counter Behavior
1. Select Setting mode.
2. Press Flashlight button to set photo counter behavior:
• Counting up (showing the number of photos taken)
• Counting down (showing the number of additional photos that can be taken)
Setting Video Output System
1. Select Setting mode.
2. Press Quality button to set video output system (NTSC or PAL) and confirmation tone (on or off).
Connecting to TV, Computer
Connecting to TV
1. Open the connector cover.
2. Plug the camera end of the video cable into the video output connector on your DShot II/III digital camera.
3. Plug the TV end of the video cable into the video input connector on your TV.
4. Press Quality button to set video output system (NTSC or PAL) to match with the video system of your TV.
ENGLISH
FRENCH
GERMAN
ITALIAN
SPANISH
PORTUGUESE
6 7
PORTUGUESE
Page 5

ENGLISH
Note: Please refer to the instruction manual of your TV for the video system of your TV. Video output of
your DShot II/III digital camera will not be shown correctly if there is mismatch in video system.
Connecting to Computer
1. Open the connector cover.
2. Plug the camera end of the USB cable into the USB connector on your DShot II/III digital camera.
FRENCH
3. Plug the computer end of the USB cable into the USB connector on your PC/MAC.
GERMAN
Note:
• Please refer to Using My DShot II/III Camera on PC or Using My DShot II/III Camera on MAC
section of this manual for instructions on how to upload files.
• Please refer to Using Windows
your DShot II/III digital camera as web camera for video conferencing.
TV Playback Mode Operation
Your DShot II/III digital camera enters TV playback mode automatically when video cable is plugged in.
ITALIAN
You may view photos, play movies or customize settings of your DShot II/III digital camera.
Index
Thumbnail view of all photos taken or movies recorded are shown. The first photo or movie will be
selected by default.
• Press Flashlight button to select the next photo or movie.
• Press Mode button to select the previous photo or movie.
• Press Shutter button to view the selected photo or play the selected movie in full-screen size
• Press Quality button to exit to main menu.
SPANISH
Review
You may choose to view photos or play movies in full-screen size or view the information of a photo or
movie and delete it when desired.
When a photo or movie is being shown in full-screen size, you may:
• Press Flashlight button to view the next photo or play the next movie.
• Press Mode button to view the previous photo or play the previous movie.
• Press Shutter button to view information of the photo or movie.
• Press Quality button to exit to main menu.
®
Netmeeting® section of this manual for instructions on how to use
When information of a photo or movie is being shown, you may choose to delete it by:
1. Select Delete.
2. Press Shutter button to confirm the deletion.
Slideshow
Photos or movies will be shown or played automatically in a certain time interval (5 sec. by default).
• Press Flashlight button to view the next photo or play the next movie.
• Press Mode button to view the previous photo or play the previous movie.
• Press Shutter button to stop the slideshow.
• Press Quality button to exit to main menu.
Delete All
You may choose to delete all photos and movies by:
1. Select Delete all
2. Press Shutter button to confirm the deletion
Language
You may choose one of the 5 languages (English, French, German, Spanish and Italian) for menu.
• Press Flashlight button to view the next language.
• Press Mode button to view the previous language.
• Press Shutter to confirm the selection of language.
• Press Quality button to exit to main menu.
Camera Information
Memory and firmware information of your DShot II/III digital camera will be shown.
• Press Quality button to exit to main menu.
Settings
The following items may be customized according to your preference:
• Slideshow mode – Once / Repeat
• Slideshow duration (seconds) – 3 / 5 / 10 / 15
• Beep tone – On / Off
• Picture counter – Count up / Count down
• Restore default settings
• Save
1. Press Flashlight or Mode button to select an item.
2. Press Shutter button to set the selected item.
3. Press Flashlight or Mode button to change the setting.
4. Press Shutter button to confirm the setting.
Windows PC Software
A collection of Windows PC Software is included to let you enjoy the most with your DShot II/III digital
camera. Details of operation are available in the on-line help in each of the software.
• My DShot II/III Digital Camera
With My DShot II/III Camera, you can view the information (name, size and type) and upload them to
PC. You can also manipulate the files in your DShot II/III digital camera like you do in other file folders.
Note: Photos and movies in your DShot II/III digital camera have to be uploaded to PC before they can
be opened by other Windows PC software.
ENGLISH
FRENCH
GERMAN
ITALIAN
SPANISH
PORTUGUESE
8 9
PORTUGUESE
Page 6

• DShot II/III TWAIN Device Driver
The DShot II/III digital camera is a TWAIN compliant input device. Convenience is provided by
allowing you to take new or upload photos from within image editing software, for example,
Imaging (included with Windows) or Photo Base that support twain input devices.
ENGLISH
• Photo Base
With Photo Base you can create photo albums, slide shows, video postcards, greeting cards, or send
your photos by email to friends and relatives.
Note: A collection of photos is available in the Photos album in the album list. They were not taken
with DShot II/III digital camera and were included by ArcSoft
• Photo Studio
After photos have been arranged in a photo album, with Photo Studio you can change the way they
look. Use Photo Studio to edit and retouch photos, change colors, cut and paste, and add special effects.
FRENCH
• Photo Fantasy
Photo Fantasy is a collection of photos, including football and basketball players, ballerina and astronaut,
to which you can add your face or any other face from a downloaded photo.
Note: The Windows PC software CD must be in the CD-ROM Drive to use this software.
• Photo Montage
Turn your photo into a montage collage with Photo Montage.
Note: The Windows PC software CD must be in the CD-ROM Drive to use this software.
GERMAN
• Photo Printer
With a compatible color printer connected to your PC, you can print out your photos using Photo Printer.
• QuickTime Player
Play the movies recorded with your DShot II/III digital camera.
®
• Windows
With Windows® Netmeeting®, your DShot II/III digital camera can be used as a Web camera for commu
nicating live with your friends, or video conferencing.
ITALIAN
NetMeeting
®
®
for demonstration purposes.
Installing Windows PC Software
1. Make sure that no programs, such as games or anti-virus software, are running on the PC. If programs
are open, close and exit from the programs before proceeding.
2. Insert the CD-ROM into the CD-ROM drive of your PC.
3. After a short period, a setup menu appears.
4. From the setup menu, choose the software you would like to install.
5. Follow the on-screen instructions to install the software.
If a setup menu does not automatically appear after inserting the CD-ROM into the CD-ROM drive:
SPANISH
1. Click Start button on your Windows desktop and choose Run on Start menu.
2. Type “<CD-ROM drive letter>:\Setup”
3. Click [OK] button or press Enter key on your keyboard. The setup menu appears.
After installation, icons or folders of the installed software will be created on the Start-Programs menu.
For Windows 2000 Users:
• Click [Yes] button when “Digital Signature Not Found” message appears.
• The Windows 2000 Professional CD may be required during installation. In this case, switch CDs as
directed by on-screen instructions.
Note:
• The DShot II/III digital camera does not need to be connected to the PC during the software installation
process.
• At the end of software installation, click “Yes, I want to restart my computer now” only if the message
box “InstallShield Wizard Complete” is shown. Otherwise, click “No, I will restart my computer later.”
Using My DShot II/III Camera on PC
Before using My DShot II/III Camera, make sure that your DShot II/III digital camera has been connected to your PC.
Viewing Files
1. Open My Computer folder and double-click My DShot II/III Camera.
2. Names, sizes and types of the files (photos or movies) in your DShot II/III digital camera will be shown.
Selecting Files
A single or multiple files can be selected for manipulation.
• To select a single file, click on the photo you want.
• To select multiple files, hold Ctrl key on your keyboard, and then click each file you want.
• To select a group of adjacent photos, click in a blank area of the window, and then drag around the files
you want to select.
• To select all the files, choose Select All on the Edit menu.
Copying and Pasting Files
Files can be copied from My DShot II/III Camera window and pasted to other file folders or vice versa.
1. Select files to be copied and pasted.
2. To copy selected files, choose Copy on the Edit menu or choose Copy on the right-click menu when
the mouse pointer is on the selected photos.
3. To paste the copied files, choose Paste on the Edit menu or choose Paste on the right-click menu when
the mouse pointer is on the destination file folder.
Dragging and Dropping Files
Files can be dragged from My DShot II/III Camera window and dropped to other file folders or vice versa.
1. Select files to be dragged and dropped.
2. Make sure the destination file folder is visible.
3. Press the left mouse button when the mouse pointer is on the selected files and hold it down while the
files are dragged to the destination file folder.
4. Release the left mouse button to drop the files.
Note:
• Filenames longer than 8 characters or duplicated filenames will be renamed automatically.
• Pasting or dropping will be cancelled if there is conflict in automatic renaming or when there is insuf
ficient memory.
Deleting Files
Files in your DShot II/III digital camera can be deleted in order to free up memory.
1. Select files to be deleted.
2. Press the Delete key on your keyboard or choose Delete on the right-click menu when the mouse
pointer is on the selected files.
Note: Backup the files you want to keep. Files deleted cannot be recovered from the Recycle Bin.
Using DShot II/III Digital Camera as a TWAIN Input Device
Before using your DShot II/III digital camera as a TWAIN device, make sure that your DShot II/III digital
camera has been connected to your PC.
If you are using Imaging (included with Windows):
ENGLISH
FRENCH
GERMAN
ITALIAN
SPANISH
PORTUGUESE
10 11
PORTUGUESE
Page 7

1. Choose Select Source on File menu.
2. Select “Oregon Scientific DShot II/III”.
3. Choose Acquire Image or Scan New on File menu.
4. A control interface appears.
• To upload and open a photo, click [Open Selection] button.
ENGLISH
• To upload and save a photo, click [Save Selection] button.
• To erase a photo, click [Erase Selection] button.
• To erase all photos, click [Erase All] button.
• To take a new photo, click [Take Picture] button.
• To view camera status, click [Camera Status] button.
• To exit, click [Close] button.
Note: The names and locations of the menus may be different between image editing software.
Using Windows® Netmeeting
FRENCH
1. Connect the camera to your PC.
2. Run the Windows® Netmeeting®.
3. Choose Options on the Tools menu.
4. Choose the Video tap.
5. Select “Oregon Scientific Stream Driver” as the video capture device and click OK.
Note: An Internet account is required for connection to the Internet.
®
MAC Software
GERMAN
Photos and movies in your DShot II/III digital camera have to be uploaded to MAC before they can be
opened by the QuichTime or other MAC software. With My DShot II/III Camera, you can view the
information (name, size and type) and upload them to MAC. You can also manipulate the files in your
DShot II/III digital camera like you do in other file folders.
Installing QuickTime on MAC
1. Select the folder “ QuickTime 5 \ English ”.
2. Double click the file “ QuickTime Installer ”.
3. Follow the on-screen instruction to install the software. When installation is completed, a My DShot II/III
Camera icon will be created on the desktop of your MAC.
ITALIAN
Installing My DShot II/III Camera on MAC
1. Select the folder “My DShot Camera Driver”.
2. Double click My DShot Camera.
3. Follow the on-screen instruction to install the software. When installation is completed, a My DShot II/III
Camera icon will be created on the desktop of your MAC.
Using My DShot II/III Camera on MAC
Before using My DShot II/III Camera, make sure that your DShot II/III digital camera has been connected to your MAC.
SPANISH
Viewing Files
1. Double-click My DShot II/III Camera icon on the desktop of your MAC.
2. Names, sizes and types of the files (photos or movies) in your DShot II/III digital camera will be shown.
Selecting Files
A single or multiple files can be selected for manipulation.
• To select a single file, click on the file you want.
• To select multiple files, hold Shift key on your keyboard, and then click each file you want.
• To select a group of adjacent files, click in a blank area of the window, and then drag around the files
you want to select.
• To select all the files, choose Select All on the File menu.
Opening Files
1. Select the file (photos or movies) to be opened
2. Choose Open on the File menu, a Save As dialog box pops up.
3. Select the location and name for the file to be saved, an Open With dialog box pops up.
4. Select the application to open the file with.
Dragging and Dropping Files
Files can be dragged from My DShot II/III Camera window and dropped to other file folders or vice versa.
1. Select files to be dragged and dropped.
2. Make sure the destination file folder is visible.
3. Press the left mouse button when the mouse pointer is on the selected files and hold it down while the
files are dragged to the destination file folder.
4. Release the left mouse button to drop the files.
Note:
• Filenames longer than 8 characters or duplicated filenames will be renamed automatically.
• Pasting or dropping will be cancelled if there is conflict in automatic renaming or when there is insuf
ficient memory.
Deleting Files
Files in your DShot II/III digital camera can be deleted in order to free up memory.
1. To delete selected files, select the files to be deleted and then choose Delete on the File menu.
2. To delete all files, choose Delete All on the File menu.
3. Press the Delete key on your keyboard or choose Delete on the right-click menu when the mouse
pointer is on the selected photos.
Note: Backup the files you want to keep. Files deleted cannot be recovered from the Trash.
Technical Notes
Customer Assistance
Should you have questions or require additional information, please contact our Customer Service Department at 800-853-8883 or via email at helpme@oscientific.com
Warranty
Oregon Scientific warrants this product to be free of manufacturing defects for 90 days from retail purchase.
Defective products are be returned to the place of retail purchase. This warranty does not cover products
subjected to tampering, abuse, misuse or accidental damage.
Notice of FCC Compliance
Tested To Comply With FCC Standards FOR HOME OR OFFICE USE
This device complies with Part 15 of the FCC Rules. Operation is subject to the following two conditions:
1) This device may not cause harmful interference, and 2) This device must accept any interference received,
including interference that may cause undesired operation.
Warning:
Changes or modifications to this product not expressly approved by the party responsible for compliance
could void user’s authority to use this product.
ENGLISH
FRENCH
GERMAN
ITALIAN
SPANISH
PORTUGUESE
12 13
PORTUGUESE
Page 8

Note:
This product has been tested and found to comply with the limits for a Class B digital device, pursuant to
Part 15 of the FCC Rules. These limits are designed to provide reasonable protection against harmful
interference in a residential installation. This product generates, uses and radiate radio frequency energy
and, if not installed and used in accordance with the instructions, may cause harmful interference to radio
ENGLISH
communications. However, there is no guarantee that interference will not occur in particular installation.
If this product does cause harmful interference to radio or television reception, which can be determined
by turning the product off and on, the user is encouraged to correct the interference by one or more of the
following measures:
• Increase the separation between the product and the affected equipment.
• Consult the dealer or an experienced radio/television technician for assistance.
Note:
During file transfer or in the Web Camera mode, if the camera or computer is suddenly froze or no response,
it may be due to the electrostatic phenomenon, please follow the procedures below to recover the operation:
FRENCH
• Unplug the USB cable from the camera
• Close the software application in the computer (or re-boot the computer if necessary)
• Re-connect the USB cable to the camera.
Important: Shielded cables must be used with this product to ensure compliance with the Class B FCC limits.
Taking Care of Your Camera
With careful treatment you will have many years of fun with your DShot II/III digital camera:
1. Do not immerse the camera in water. Water will damage the electronic components.
2. Do not bang or drop the camera as this may damage the electronic components.
3. Do not clean the camera with household cleaners or chemicals.
GERMAN
4. To clean the camera casing, carefully wipe the casing with a clean soft cloth that has been slightly
dampened with water.
5. To clean the lens, gently blow on the lens to remove dust and dirt, then wipe the lens with a camera lens
cleaning tissue.
6. Turn the camera off when not in use.
7. When battery power is exhausted, replace the old batteries with new batteries. Do not mix old batteries
with new batteries.
8. Only insert the batteries in the polarity direction as shown in page 5.
9. Do not put anything into the battery compartment except batteries.
10. Batteries contain dangerous chemicals and if mistreated or improperly disposed of can cause harm,
ITALIAN
injury or damage.
11. Do not open the camera casing or tamper with the camera’s electronic components; doing so will void
the camera’s warranty.
Specifications
Image Sensor: 1.3Mega-pixel CMOS
Photo Resolution: 1280 x 1024 (Fine or Normal quality)
Focus range: 1m to infinity (Scene mode)
Internal Memory: 2M-byte (non-volatile Flash memory)
External Memory: SmartMedia card (not included)
Flashlight range: 2 meter
Self Timer: 10 seconds
Movie Camera Mode: 10 frame per second at 160 x 120 resolution
Web Camera Mode: 15 frame per second at 160 x 120 resolution
Computer Interface: USB
Video Output System: NTSC or PAL
Power: 2 x AA-size 1.5V alkaline batteries
Battery Life: Approx. 100 shots (without flashlight)
Automatic Off: 60 seconds (default)
Temperature: 32°F – 104°F (0°C – 40°C)
Storage: -4°F – 140°F (-20°C – 60°C)
Weight: 162g (including batteries)
Dimensions: 95mm (w) x 65mm (h) x 30mm (d)
Accessories: Software CD-ROM (for PC and MAC)
Note: All company and/or product names are trademarks and/or registered trademarks of their respective
holders.
* The product might not function properly in case of electrostatic discharge. In that case, resetting
is required to bring it back to normal.
640 x 512 (Basic quality)
Approx. 26cm (Close-up mode)
2 x AA-size 1.5V alkaline batteries
Hand strap
Instruction manual
Quick start guide
USB cable
Video cable
Pouch
ENGLISH
FRENCH
GERMAN
ITALIAN
SPANISH
PORTUGUESE
14 15
SPANISH
PORTUGUESE
Page 9

If during the use happen that : Explanation and suggested solution :
• Camera goes OFF. • Battery are discharge, please change.
ENGLISH
• Flash settled, but no work and goes OFF. • Battery are discharge, please change.
• Camera goes locked. • It might be caused by a too fast use of all the buttons,
• Camera is locked, with LED or LCD • Switch OFF the camera, wait for some seconds and
display due to unexpected data error. switch it ON; if the problem still exist please follow
• “ALL” flashing to long time. procedure as below:
• “Err” flashing. • Remove the batteries.
• Key are disable. • Remove the SmartMedia card (if any).
FRENCH
GERMAN
• Photos number and LED flashing. • This is normal, the camera is busy because the
• After a quick use of the shutter (a lot previous taken photos are going to be stored into
of pictures in a short time) the "bsy" the camera; wait few seconds before making others
message appear at next. photo, till the LED and the progressive (or regressive)
ITALIAN
Picture already in memory will be kept.
after making a photo. See below
• Wait for approximately 30 seconds.
• Install two new batteries.
• Turn ON the camera and connect it to a TV by using
the included video cable.
• Select ‘Delete All’ from TV ‘Main menu’. Camera
will display “Frt” message, any key must not be
pressed during this procedure, wait completion until
TV and camera will return back to the ‘Main menu’.
• Turn OFF the camera and unplug the video cable
from TV.
• Install the SmartMedia card (if any).
• Turn the camera on and it can now resume to normal
operation.
number stop to flashing.
ENGLISH
FRENCH
GERMAN
ITALIAN
SPANISH
PORTUGUESE
SPANISH
16
PORTUGUESE
 Loading...