

Page 1
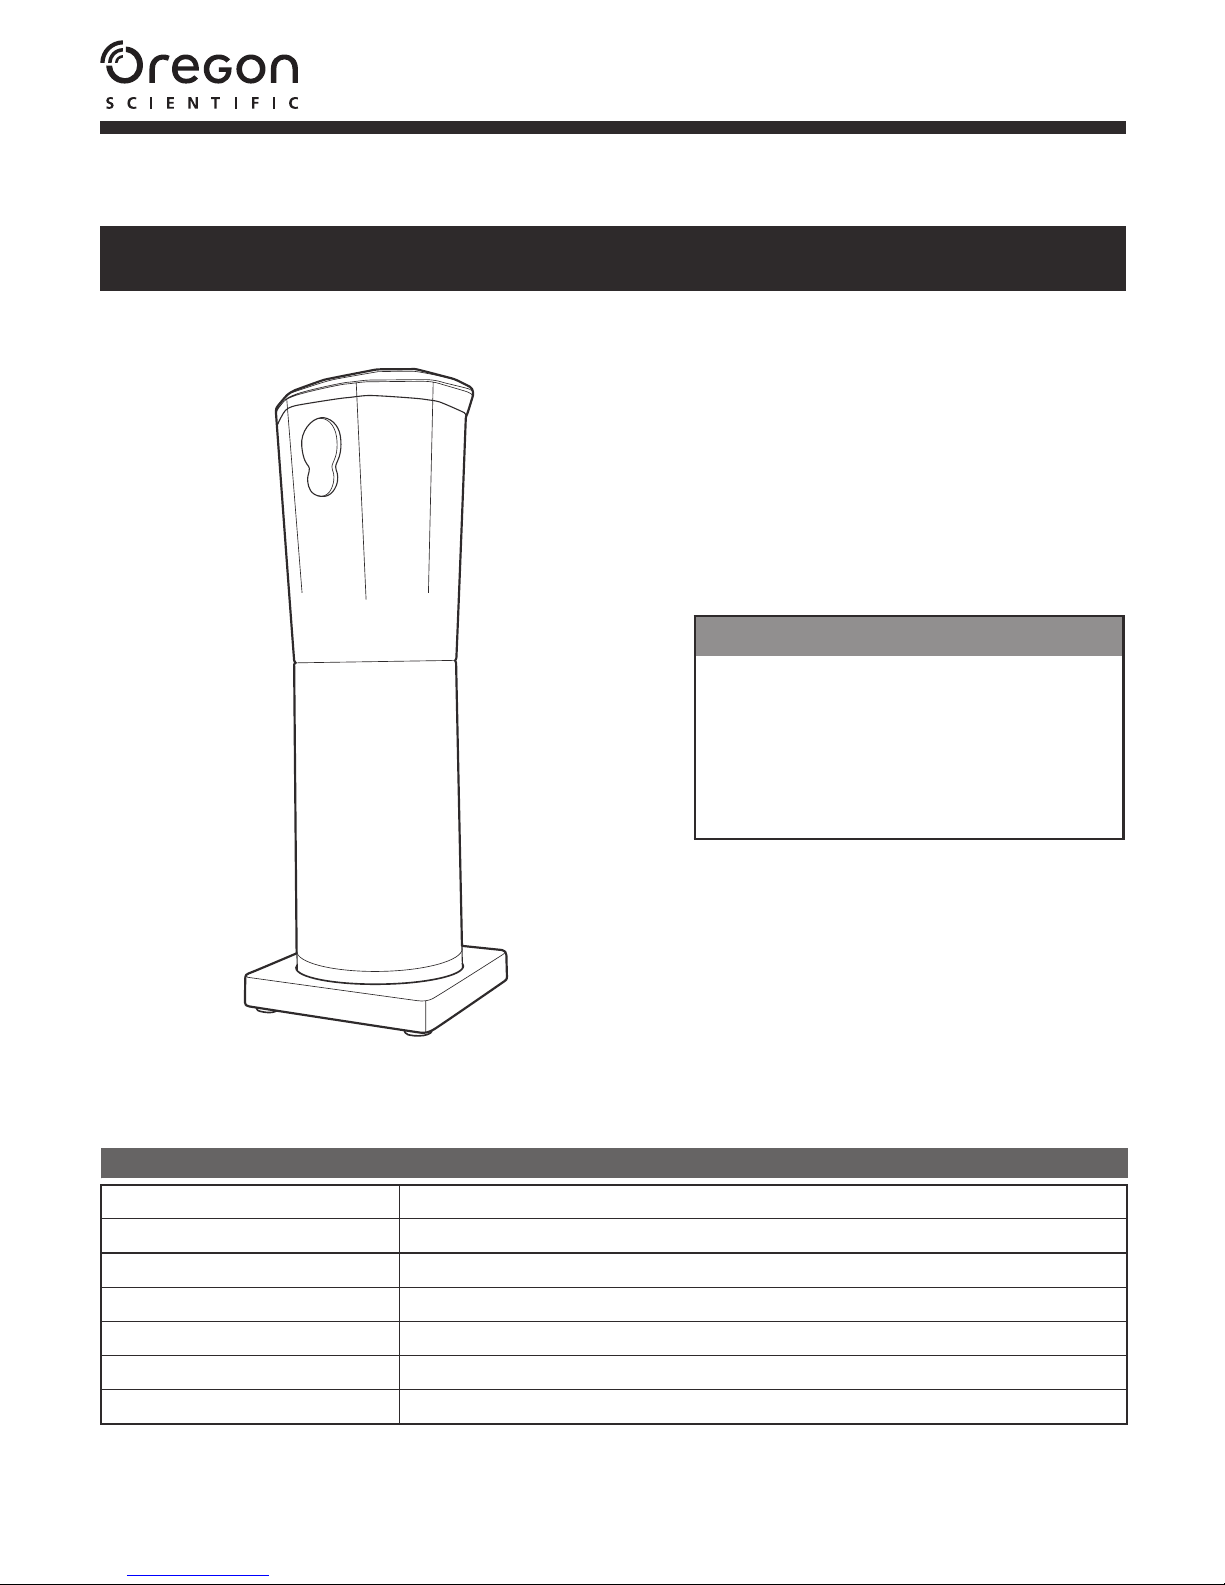
Cordless Ice Slicer DOSICE17
Instruction Manual
Contents
Product Specifications
Thank you for purchasing Otona- Cordless Ice
Slicer. To ensure proper use and for your safety,
please read this instruction manual thoroughly
before operating this appliance. Please retain
this instruction manual for your future use.
Safety Precautions --------------------- P. 2-3
Parts and Features --------------------- P. 4
Using your Ice Slicer ------------------ P. 5-8
Care, Cleaning and Storage --------- P. 9-10
Troubleshooting Guide --------------- P. 11
Model Code
Input Voltage and Power Supply
Continuous Opereating Time
Product Size
Product Weight
Safety Device
Accessories
DOSICE17
DC6V (Using 4 AA Alkaline Batteries)
1 minutes
(Approx.) W9.5 x D10 x H31.5 cm (Excluding the stand)
(Approx.) 760g (Excluding Batteries)
Ice Chamber Sensor Switch
1 Stand, 1 Recipe, Instruction Manual, Warranty
● Product Specifications may be changed without prior
notifications due to product renewal.
Page 2
Safety Precautions
Warning
Caution
Meaning and Example of the icon
Don't
Don'tuse
Do
Don't
disassemble
Don'ttouchwith
wethands
Don'tletthis
appliancegetwet
2
● Read all the safety precautions carefully before using this appliance.
● Follow all the safety precautions strictly.
● Retain and save the instruction manual for furture reference.
This icon indicates that death or serious injury of human beings may be resulted if the contents
written are implemented wrongly.
This icon indicates that personal injury or property damage may be resulted if the contents written
are implemented wrongly.
(Property damage includes damages on housing, belongings, domestic animals and pets.)
This icon means "must not do". The detailed content of the prohibited actions is indicated by
graphics and sentences inside or near the icon.
For example, the icon in the left means "don't disassemble".
This icon means "must do". The detailed content of the mandatory actions is indicated by
graphics and sentences inside or near the icon. For example, the icon in the left means
"must do".
Warning
Avoid damaging the batteries. Do not squeeze,
bend and modify the batteries forcibly. Do not
place heavy objects on top of the appliance. Do
not place this appliance between other objects
closely in order to ensure proper ventilation.
It will cause electric shock, burn and fire hazard.
Do not let children to operate this appliance on
their own. Do not use this appliance when near
infants.
It will cause injury, burnt and electric shock.
Do not put metals like pin and wire inside the
gap of the appliance.
It will cause electric shock and injury.
Wash the eye with water immediately and visit
the doctor when battery acid splashed into the
eye.
It will cause blindness and eye injury.
Remove the batteries when this appliance is not
in use.
It will cause breakdown and battery leakage.
Do not disassemble. This applicance must be
repaired by qualified technicians only.
It will cause electric shock, fire hazard and injury.
Do not touch and change the batteries with wet
hands.
It will cause electric shock.
Do not immerse the upper part of the main body
in water. Do not wash with water.
Do not place and use this appliance in places
that get wet easily.
It will cause electric shock and eletrical short.
Stop using and remove the batteries when
abnormal situation happens. (Like smoke and
burnt smell, etc).
It will cause electric shock and fire hazard.
Do not use and store this appliance in places of
high temperature, near fire flames and under
sunlight.
It will cause breakdown and deformation. Besides
the main body, it also affects the batteries.
Page 3
Caution
Don't touch
Don't
Don't
Do
3
Do not touch the blades and spikes directly.
It will cause injury.
Do not put large ice cubes or ice cubes that
sold in the market into the ice chamber.
It will cause damage and breakdown.
Do not lossen the fixed screw of the blades.
It will cause injury and breakdown.
Insert the batteries in correct electrical polarity.
It will cause breakdown and battery leakage.
Avoid continuously running this appliance for
more than 1 minute at a time. Rest for 30
seconds or above for the next operation.
After running this appliance continuously for 6
times, rest for 1 hour or above before the next
operation.
It will cause breakdown of the motor.
Do not use household detergent, thinner,
benzine, alcohol and polishing powder when
cleaning.
It will cause discolouration, deformation, electric
shock and breakdown.
Do not use the appliance when it is deformed
or damaged. It will cause electric shock, fire
hazard and injury.
Do not use different types of batteries, new
and old batteries together at the same time.
Do not use batteries whose recommended
usage period are expired. It will cause
breakdown, fire hazard and battery leakage.
Do not use for business purpose. Do not use
for other purposes besides cooking.
This appliance is designed for household use
only, do not use for business purpose.
Do not place this appliance on unstable,
oblique and high area. Do not place this
appliance where children and pets always run
around.
It will cause fall, breakdown or damage.
Do not hold and place this appliance inversely
when it is filled with ice.
It will cause water seepage to the main body,
electric shock and breakdown.
Do not put things besides ice into the ice
chamber.
It will cause damage and breakdown.
Page 4

Parts and Features
※
Front
Back
Switch
Main Body
Ice Pusher
Spike
Ice Chamber
Inner ring
Blade unit
Stand
4
Ice Chamber Sensor Switch
(Stored inside)
Limit for the amount of ice
stored
Put the ice by the indicated
line of the label stuck on the
ice chamber.
Do not put the ice over this
indicated line.
(Dotted line is not printed)
Grip of Battery
Compartment Lid
Battery
Compartment Lid
Battery
Compartment Lid
Battery
Compartment
Page 5

Using your Ice Shaver
Warning
Caution
Caution
1.
※
2.
3.
4.
5
Before First Use
Rinse and dry the parts under the main body thoroughly
Refer to "Care, Cleaning and Storage" (Pg. 9-10), disassemble,
rinse and dry the parts under the main body.
Do not immerse the main body into water.
It will cause breakdown.
Insert the batteries
Take the battery compartment out from the back of
the main body.
Push the grip of the battery compartment lid from the
back of the main body, open the lid and take out the
battery compartment.
▪ Check carefully for the electrical polarity
of the battery If inserting the batteries
wrongly, it will not only stop the operation,
but it will also cause battery leakage and
breakdown.
▪ Do not put the battery compartment on
the metal Metal plates are located on the
outer surface of the battery compartmnet.
It will cause electrical short.
Insert the batteries to the battery compartment
Prepare 4 pieces of AA Alkaline Batteries sold in the
market. Insert the batteries according to the illustrations
marked on the battery compartment.
After inserti ng the batteries into the battery
compartment, put the battery compartment back to
the main body When returning the batt ery
compartment t o the main body, return it by putting the
metal plates of the battery compartment onto the 2
pieces of springs inside the main body.
Close the battery compartment lid
Snap the 2 claws of the battery compartment lid into
the upper part of the battery. compartment and close
the lid. Make sure that the lid is closed by pushing the
grip.
▪ Make sur e that the batter y com partment li d is closed
If the lid is not well cl osed, the batter ies wil l dr op out
when using. It w il l cause acci dents.
▪ If the battery compartment l id cannot be closed or
the battery com partment is hot, take the batter y
com partment out and r epeat fr om Step 2.
Please chec k i f the batteri es are i nser ted corr ectly
and if unrel ated i tem is found inside the com par tment.
Please note that the lid may sprang open when
pushing the grip of the lid.
Grip of Battery Compartment Lid
Battery Compartment Lid
Battery Compartment
Metal plates
Springs (2 pieces)
Claws of the battery compartment
Space for inserting
the battery compartment
The side that has a spring is negative
Page 6

Using your Ice Shaver
Ice-shaving
Caution
1.
2.
3.
6
▪ Do not use this appliance on places besides tables.
▪ Do not let children to operate this appliance on their
own. Do not use this appliance when near infants.
Remove the main body from the ice chamber
Put this appliance on the stand and on a flat place.
Use one hand to hold the ice chamber firmly and use
another hand to rotate the main body clockwisely,
matching the icon▼of the main body with the icon ● of
the ice chamber and remove the main body from the
ice chamber.
* Keep an eye on the spikes to avoid getting injured.
Put the ice into the ice chamber
Put the ice (ice cubes that are made by ice cube
making tray or by refrigerator that has automatic
ice-making function) into the ice chamber that is
connected with the inner ring without exceeding the
limit for the amount of the ice stored (indicated line on
the caution label stuck on the ice chamber).
Attach the main body to the ice chamber
Make sure that the ice chamber is placed on the stand.
As shown in the illustration, use one hand to hold the ice
chamber and use another hand to push the main body
into the ice chamber, matching the icon ▼of the main
body with the icon ● of the ice chamber and rotating
anti-clockwisely to the position of icon ▲ to lock both
parts.
* When the main body is attached to the ice chamber,
make sure that the main body
* When the main body is attached to the ice chamber,
make sure that the main body does not get stuck with
the rib of the inner ring.
Caution
• The surface inside the ice chamber must
be flatten before installing the main body.
Otherwise, main body cannot be closed.
▪ Do not use the ice cubes sold in
supermarkets and convenience stores.
It will cause breakdown.
▪ Do not hold and place this appliance
inversely
It will cause water seepage to the main body
and breakdown.
When it is closed
When it is opened
Main Body
Main Body
Ice Chamber
Ice Chamber
Ice Chamber
Main Body
Limit for the amount
of ice stored
Main body cannot
be installed if the
limit is exceeded.
※
Rib of Inner
Ring
When it is closed
When it is opened
Main Body
Main Body
Ice Chamber
Ice Chamber
Page 7

4.
Switch
②Shake the ice chamber
Move the ice cubes
7
▶▶
Continues in the next page▶▶
Using your Ice Shaver (Continued)
Shave the ice
Hold the main body and the ice chamber with both
hands, take it over the utensil and press the switch.
* Do not use the stand when shaving the ice. Only
take the main body and the ice chamber.
This appliance will not operate when the switch is
not pressed. Also, this appliance will not operate
when the main body is not attached to the ice
chamber.
This appliance will stop when the switch is not
pressed.
* This appliance will not stop automatically when
there is no ice. Stop the appliance by releasing
the button.
* Do not shave the ice that contains alcohol.
* When shaving the ice to utensils that have a
narrow rim like glass, shave in places that can get
wet or put a towel under the glass during
ice-shaving.
When stop using the appliance, put it back on the stand.
* Note that the ice will melt and the water will accumulate in
the stand if it is left too long.
The following situations may happen during the ice-shaving
▪ The appliance may produce a loud noise and stop
operation when the ice is jammed. But note that it is not a
breakdown.
▪ When there is only a small amount of ice and the areas of
ice that the blades can touch become smooth, the amount
of ice shaved will decrease.
Solutions
Release the switch and press it again when facing
both situations. If the problem is not solved, please try
the methods below.
1. Remove the main body from the ice chamber
2. Shake the ice chamber to let the ice cubes move,
or take out one ice cube.
3. Install the main body again and press the switch.
▪ Avoid continuously running this
application for more than 1 minute.
▪ Rest for 30 seconds or above for the
next operation.
▪ After running this appliance continu-
ously for 6 times, rest or above before
the next operation.
It will cause breakdown of the motor if
operated continuously.
①Remove the main body
Caution
Page 8

5.
6.
Using your Ice Shaver (Continued)
8
Remove the main body and throw away the remaining
ice in the ice chamber Structurally, breakdown will not be
caused if ice is remained in the ice chamber. When
shaving the ice continuously, the remaining ice in the ice
chamber of previous usage must be throwed away.
Blades cannot work smoothly and ice cannot be shaved
if the remaining ice is left and new ice is added at the
same time.
* After using this appliance, water may drop from the
main body. Dry the appliance by putting it on a towel.
Caution
▪ Do not hold and place this appliance
inversely
It will cause water seepage to the main
body and breakdown.
▪ Throw away the remaining ice after using
the appliance.
Blades cannot work smoothly and ice
cannot be shaved if the remaining ice is left
and new ice is added at the same time.
Caution
▪ Clean and dry thoroughly after using the
appliance.
Rust and mold may be formed if the
appliance is left unclean.
▪ Remove the batteries when the appliance
is not in use.
It will cause breakdown and battery
leakage.
After shaving ice, rinse and dry the parts besides
the main body. (Refer to "Care, Cleaning and
Storage" Pg. 9) Clean the appliance after using it
Page 9

Care, Cleaning and Storage
1.
2.
3.
Warning
Warning
Caution
9
When cleaning, batteries must be removed from the battery compartment.
It will cause electric shock, injury, burn hazard and breakdown.
Do not use alcohol, thinner, benzine and etc for cleaning.
It will cause discolouration and deformation.
Do not immerse the main body into water.
It will cause breakdown and burn hazard.
▪ Do not touch spikes with bare hands.
▪ Do not let the main body get wet.
It will cause electrical short and electric shock.
Main Body・Ice Pusher (Spike)
Put the appliance on the stand and remove the battery
compartment.
Put the stand on a flat place and put the appliance on the
stand. Remove the battery compartment whose lid is closed.
(Refer to "Insert the batteries" Pg. 5)
* Battery compartment lid must be closed to avoid getting spilt
by water.
* Keep an eye on the place where the removed battery
compartment is put.
Remove the main body from the ice chamber
Use one hand to hold the ice chamber firmly and use another
hand to rotate the main body clockwisely, matching the icon
▼of the main body with the icon●of the ice chamber and
remove the main body from the ice chamber.
Dry the Main Body・Ice Pusher (Spike) with a dry towel.
Dry the parts above the ice pusher without leaving any water
drops on it.
Page 10

Care, Cleaning and Storage (Continued)
1.
2.
Ice Chamber
Inner Ring
Blade unit
Stand
10
Ice Chamber, Inner Ring, Blade Unit, Stand
Disassembly Guide
As shown in the illustration, hold the ice chamber and the
blade unit, rotate according to the arrow direction, remove the
unit and take the inner ring out.
▪Do not touch the blades with bare hands.
▪When removing the blade unit, be careful
for not touching the blades.
▪Do not loosen and remove the fixed screws
of the blades.
It will cause injury.
Caution
Caution
Remove the dirt and water of the blades and dry
them thoroughly
Disassemble and wash the ice chamber, inner
ring, blade unit and the stand with water.
When the blades are very dirty, wash them
thoroughly with tepid water and dilute utensil
detergent
After drying the blades, apply cooking oil on them for
storage
To avoid rusting, apply cooking oil on the blades
beforehand.
Long-term Storage Guide
When this appliance will not be used for a long period
of time, it must be dried thoroughly, put into the box
and stored in a place with no moisture.
* If the appliance is not cleaned and dried thoroughly,
rust or mold may be formed.
Remove the battery when it is not in use.
It will cause injury and battery leakage.
Page 11

Troubleshooting Guide
11
Warning
This applicance must be disassembled and repaired by qualified technicians only.
Please refer to below checklist when you encounter problems of your appliance.
Problem Possible Causes Solutions
The appliance is not
operated even
pressing the switch.
Sound can be heard
from the appliance
but no ice is shaved.
The speed of iceshaving is
slow.
The operation stops during
the process of ice-shaving.
To inspect your ice slicer frequently if it has been used for a long period of time
Keep the surface inside the ice chamber
as flat as possible.
▪ The surface inside the ice chamber is
not flat.
▪ The remaining ice of previous usage is
left in the ice
▪ The ice is jammed inside the ice
chamber.
▪ Blades cannot work smoothly and
touch the ice
▪ Only a small amount of ice is left in the
ice chamber.
▪ The areas of ice cube that the blades
can touch become smooth.
▪ Too much ice.
▪ The ice is jammed inside the ice
chamber.
Adjust the amount of ice within the limit.
Release the switch and press it again.
If the problem is not solved, remove the
main body from the ice chamber. Shake
the ice chamber to let the ice cubes
move, or take out one ice cube. Then,
install the main body again and press
the switch. (Refer to Pg. 7)
The main body cannot be
attached to the ice chamber.
▪ Too much ice.
Reduce the amount of ice and adjust the
amount within the limit.
Check if the electrical polarity is matched
correctly (Refer to Pg. 5).
Metal Plates must be matched with the
springs in the main body when installing
the compartment (Refer to Pg. 5).
Install correctly.
* The appliance will not operate with the
main body only.
▪ The main body is not attached
correctly to the ice chamber.
▪ Batteries are not put correctly chamber.
▪ Battery compartment is not installed
correctly.
▪ Battery life has ended.
Change and use new ice (Refer to Pg. 7
and 8).
Put ice into the ice chamber.
▪ No ice is put inside the ice chamber.
Change and install a new battery.
Does it have below problems?
▪ Battery compartment is abnormally hot.
▪ It has burnt smell.
It has other defects and breakdown.
When your appliance has these problems, stop
using it immediately to avoid accidents. Remove
the batteries and consult with the supplier for
inspection.
Page 12

Do not shave ice that contains alcohol with this appliance.
It will cause damage to the appliance.
Cautions- when putting ice into the ice chamber
182×257mm(B5) 2016.09.26
PANTONE186CK
The following situations may happen during the ice-shaving
Caution
①Remove the
main body
●The surface inside the ice chamber must be flatten before installing the main body.
Otherwise, main body cannot be closed.
● Do not use the ice cubes sold in supermarkets and convenience stores.
It will cause breakdown.
②Shake the ice
chamber
Move the
ice cubes
D160928
↕15mm
The appliance must rest for 30 seconds or above when it is used for ice-shaving
continuously.
Solutions
Release the switch and press it again when facing both situations.
If the problem is not solved, remove the main body from the ice
chamber, shake the ice chamber to let the ice cubes move, or take
out one ice cube. Then install the main body again and press the
switch. If the problem is still not solved, change to new AA Alkaline
batteries (4 pieces).
●
The appliance may produce a loud noise and stop operation when the
ice is jammed. But note that it is not a breakdown.
●
When there is only a small amount of ice and the areas of ice that the
blades can touch become smooth, the amount of ice shaved will
decrease.
Limit for the
amount of ice
stored
Main body
cannot be
installed if the
limit is
exceeded.
※
 Loading...