

Page 1
Page 2

Dear Parent/Guardian
Thank you for choosing the Barbie™ Digital Camera.
Designed and engineered with extreme precision, the Barbie™ Digital Camera is
packed with an awesome Barbie™ Photo Designer CD-ROM.
You can take a maximum of 208 digital pictures (320 X 240 pixels with compression),
save your memories, record cool video clips and use it as a web cam.
The Barbie™ Photo Designer CD-ROM provides loads of photo fun. You can get
creative and decorate your own photos with fun frames, greeting cards, cool
calendars and much more!
Parents, we recommend helping your child with their Barbie™ Digital Camera. This
manual is designed using technical information in order to allow you to achieve the best
results. Some children will need your guidance setting up, learning and understanding
how to use the different aspects of the camera and software.
Your use of the BarbieTMPhoto Designer CD-ROM is subject to a License Agreement contained inside the CD.
BARBIE and associated trademarks and trade dress are owned by, and used under license from, Mattel, Inc.
© 2004 Mattel, Inc.All Rights Reserved.
Page 3

Barbie™ Digital Camera & Photo Designer CD-ROM
I Camera Precautions 1
II Technical Specifications 1
III Computer System Requirements 2
IV Camera Description 2
V Quick Start 3
• Battery Installation 3
• Power On/ Off 3~4
• Taking Photos 4
VI Camera Mode Selections 5~9
VII Download Images and Movie Clips 10
VIII Web Cam mode 11
IX Welcome to PhotoImpression 12
• System Requirements 12
•
Installing ArcSoft PhotoImpression and the Camera Driver
12
• Working with PhotoImpression 13
• Working with Albums 15
• Editing Images 16
• Barbie
TM
Custom Art 17
• Saving Images 18
• Printing Images 19
• Getting Help 19
Page 4

II) Technical Specifications
• Sensor Resolution CMOS, 640 x 480 pixels
• Built-in Memory 8MB
• Image Storage 640 x 480 pixels
26 images (w/o compression)
52 images (with compression)
320 x 240 pixels
104 images (w/o compression)
208 images (with compression)
• Status LCD 2-digit B/W on back for functions
• White Balance Auto
• Exposure Auto
• View Finder Optical
• Focusing Fixed range from 40cm~infinity
• Focal Length 6.0 mm
• Aperture F=2.8
• Self Timer 10 seconds
• File Format Still images--- JPEG
Movie images--- AVI
• Interface USB
• Delete Image All / last one
• Movie clip supported
• Video Teleconference PC camera, Net Meeting 10 fps-CIF resolution
• Auto Power Off 20 seconds
• Battery 3xAAA Alkaline Battery
• Dimensions 85.6x54x23 mm
• Weight 50g(w/o Battery)
• Operation System WIN98/98SE/2000/XP
1
I) Camera Precautions
Notice the following guidelines when using your camera.
• Do not place this camera in a damp or dusty location. This may cause a fire or an electrical shock.
• Do not leave this camera in places subject to extremely high temperatures, such as in direct sunlight.
This may affect the camera case and internal components.
• Take care this camera is not bumped when it is being activated. This may cause the camera to malfunction.
• Choose a flat surface free from vibration to store the camera.
• When the lens or the viewfinder is dirty, please clean them with a lens brush or soft cloth.
• Under the following circumstances, have the camera repaired by qualified personnel.
a) The cable or plug is damaged or worn.
b) The device has been dropped and/or the casing has been damaged.
c) Liquid has entered the camera.
Page 5
III) Computer System Requirements (Children should ask for a parent to help them
with this section.)
• Personal computer designed for Win98, 98SE, 2000 or XP
• A CD-ROM drive to install software, min. 200 MHz microprocessor
• Available USB port
• Color display monitor with a minimum resolution of 640 x 480 (1024 x 768 recommended; 24-bit True
Color recommended)
• 48 MB available RAM for WIN98, ME; 64 MB for WIN 2000 and WIN XP
• 120 MB of available hard disk space
IV) Camera Description
Front Side---Fig. (1)
1.Viewfinder
2. Lens
3. Battery compartment door
4. Hand strap lug
5. Shutter release button
6. Hand strap
7. Stand
8. Instruction Manual
9. Photo Designer CD-Rom
Back Side---Fig. (2)
10. Status LCD
11. Power button
12. USB port and its rubber cover
13. Viewf inder
14. Mode button
15. Camera stand slot installation
16. USB Cable
2
Page 6
Power on/off
Power On
Method 1
Press the “POWER” button until the status LCD
lights up. See Fig. (5).
Method 2
Plug in the USB cable and connect it with your PC
and the camera will be powered by USB power source.
See Fig. (6).
V) Quick Start
Battery Installation
1. Using a Phillips-head screwdriver, open the battery cover
at the left side of the unit. Refer to Fig. (3).
2. Insert three AAA alkaline batteries into the battery compartment with
the polarity in the direction as shown. Refer to Fig. (4).
3. Replace the cover.
Important: When the batteries are low, you will see the status LCD
continuously blinking. Always download photos to PC prior to your
replacing batteries to avoid memory loss.
Note:
a) Do not mix old and new batteries together. Replace all the
batteries at once.
b) Remove the batteries if the camera is not going to be used for
some time. This will save the battery life.
c) Do not mix alkaline, standard (carbon-zinc) or rechargeable
(nickel-cadmium) batteries
d) Battery installation - should operate under adult supervision.
3
Page 7
Power Off
Method 1 The camera will be turned off automatically
after 20 seconds when it is not being used.
Method 2 Press the mode button until the “Status
LCD” shows as Fig. (7). Then press the “Shutter
Release button” to turn off the camera.
Note: If the camera is connected with your PC, you
have to unplug the USB cable to turn off the camera.
1. Look through the “Viewfinder” to aim at the subject that you want to shoot.
2. Press the “Shutter-Release button” to take photos.
3. The frame number shown on “Status LCD” indicates how many shots are still available before the memory
is full. The counter will automatically deduct one after each shot is taken. It is displayed in a countdown way.
4. When a photograph is taken, a single short “beep” will be heard. After the beep sounds, the camera is ready to
take another photo.
Important: If the environment is too dark for this camera to get acceptable image quality, the camera’s self
detection device will prevent you from taking photos.
Note: Whenever you hear two “beep” sounds, it means the memory is full or the light is not bright enough.
No photo can be taken under this circumstance.
Taking Photos
Once the camera is turned on, you will see the “Status LCD” show “Hi” and frame number “26” after that. Refer to
Fig. (8) If there are images already saved in the camera, the frame number shown on the “Status LCD” will
indicate how many shots are
available for shooting.
4
Page 8
5
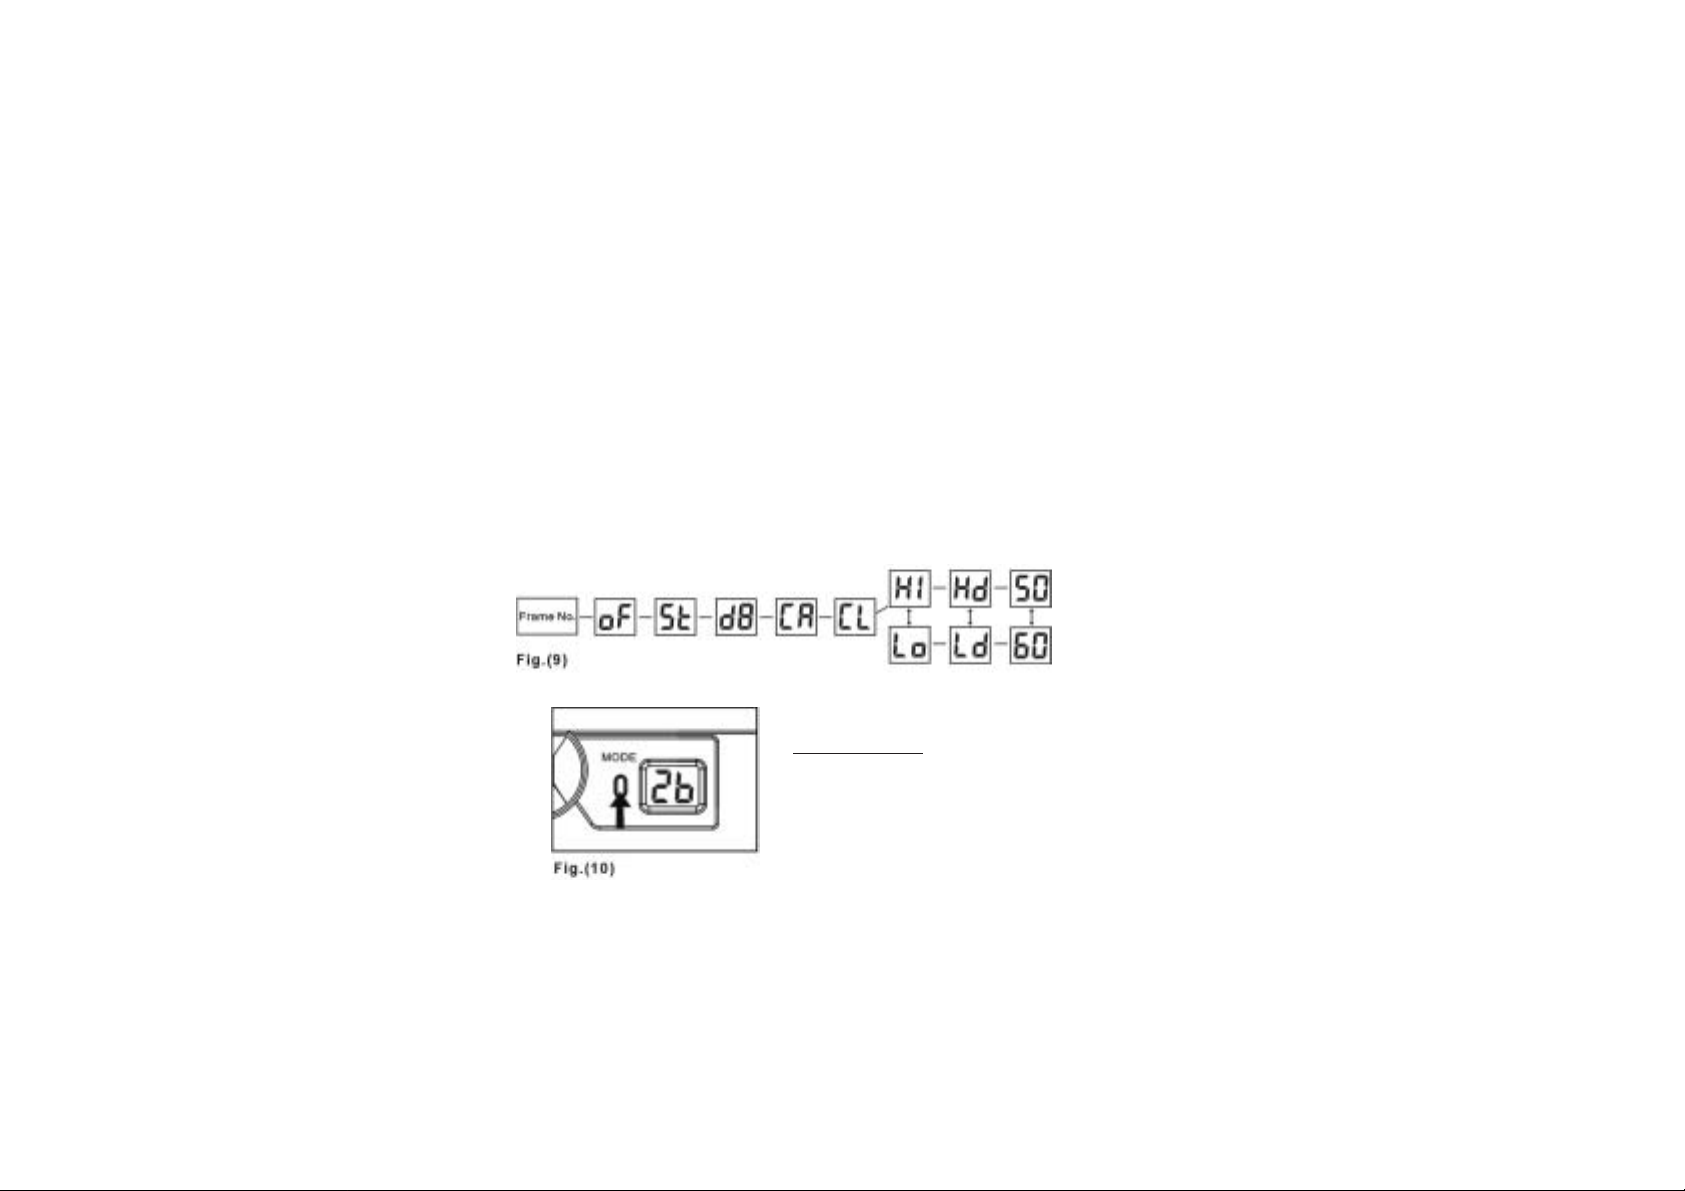
VI) Camera Mode Selection
1. You can cycle through different shooting modes by pressing the "Mode button" repeatedly. The "Status LCD"
will display each mode as you press the "MODE button" again and again.
2. The different mode icons are shown as below in Fig. (9).
OF: Power off--Turns camera power off
St: Self timer--10 Second timer
d8: Video Clip--Captures a filmstrip style movie
CA: Delete all photos in the memory--Erases all pictures stored in the camera
CL: Delete the last picture-- Erases the last picture taken
Hi: High resolution (640 X 480 pixels)--Largest photo format/ less storage capability
Lo: Low resolution (320 X 240 pixels)--Smallest photo format/ more storage capability
Hd: Enable compression-- More storage capability
Ld: Disable compression--less storage capability
50: Lighting AC power frequency 50Hz--Refer to chart on page 9
60: Lighting AC power frequency 60Hz--Refer to chart on page 9
a) Default (Hi) resolution
The camera can take 26 photos in “Ld” storage format,
without compression. If in compression “Hd ”
mode, the camera can take 52 shots. (see Fig. (10))
For more information on resolution see point (g).
Page 9

b) Power Off
To turn the camera off, press the "MODE button" until the
"Status LCD" displays "oF" (see Fig.(11)). Then press the
"Shutter Release button". You will hear a "beep" and the
camera will turn off.
c) Self Timer
To enter the self-timer feature, press the "MODE button" until the
"Status LCD" displays "St" (see Fig. (12)). Press the "Shutter
Release button" to activate the timer and start shooting.
There is a 10 second shooting delay. During this interval,
you can hear “beep” sound at every second.
d) Video Clip
Use this mode to capture action or motion shots. The Video Clip can
be downloaded and viewed as a movie or as individual photos.
To access the Video Clip mode, press the "MODE button" until
the "Status LCD" displays "d8". (see Fig. (13)).
e) Delete All Photos
To delete all photos stored in your camera, press the "MODE button"
until the "Status LCD" displays "CA". (Refer to Fig. (14)). When in
this mode, press the "Shutter Release button" to start deleting all
photos. The symbol “CA” will blink 5 seconds to confirm the
deletion. Press the shutter release button again to delete the photo(s);
otherwise, the delete command will be cancelled and the camera will
revert to the default mode.
Important:
Before activating this mode, make sure that all desirable photos
have been downloaded to your PC.
6
Page 10

7
f) Delete the Last Photo
To delete the last photo you shot, press the “MODE button”
until the “Status LCD” displays “CL”. Refer to Fig. (15).
Press the “Shutter Release button” to delete the last shot.
Repeat these two steps to individually delete your photos.
g) Resolution
This camera lets you take both high (640 X 480 pixels) and low
(320 X 240 pixels) resolution photos. High resolution photos
are better quality because they have more pixels. Low
resolution photos have fewer pixels but you can take a lot more
photos in low resolution mode. The number of photos your
camera can take depends on both the resolution and the
compression you choose. Please refer to the chart below
(Fig. A) to select the correct resolution and compression for
the number of photos you want to take.
Fig. A
RESOLUTION COMPRESSION
NUMBER OF PHOTOS
Hi Hd 52
Ld 26
Lo Hd 208
Ld 104
Note: Since the “Status LCD” can only display two digits, it will show “99”
for any mode settings that let you take 104 or 208 pictures. The “Status
LCD” will continue to show “99” while you take pictures and the camera
will store all your pictures but will not be able to display the remaining shots
available until you have reached 99.
During mode selection, “Hi” stands for high resolution and “Lo”
stands for low resolution.
To switch between high and low resolution, press the “MODE
button” until the “Status LCD” displays either “Lo” or “Hi”. (See
Fig. (16)). If it is set on “Hi”, press the “Shutter Release button”
to switch to “Lo”. If it is set on “Lo”, press the “Shutter Release
button” to switch to “Hi”.
Page 11

i) 50:Lighting AC Power Frequency
If the suggested frequency is 50Hz, it is recommended
you set your camera to 50. Press the mode button to
check the setting. If it is set on 60, press the shutter
release button to switch it to 50. See Fig. (18)
j) 60: Lighting AC Power Frequency
If the suggested frequency is 60Hz, it is recommended
you set your camera to 60. Press the mode button to
check the setting. If it is set on 50, press the shutter
release button to switch it to 60. See Fig. (19)
Please refer to the “Worldwide AC Electrical
Power Frequency” Table in page 9 for
choosing the correct frequency.
h) Compression
This camera lets you “compress” your shots so you can store
more of them. The number of photos your camera can store
depends on both the compression and resolution you choose.
Please refer to the chart above (Fig. A) to select the correct
compression and resolution for the number of photos you
want to take and store. During mode selection, “Hd” stands
for enable compression—or turning it on, and “Ld” stands for
disable compression—or turning it off. To switch between enable
and disable, press the “MODE button” until the “Status LCD”
displays either “Hd” or “Ld”. (See Fig. (17)). If it is set on “Hd”,
press the “Shutter Release button” to switch to “Ld”. If it is set
on “Ld”, press the “Shutter Release button” to switch to “Hd”.
Note: In “Hd” mode, the “Status LCD” will display “- -“ while processing
and you will have to wait for the compression to process before you can take
the next shot. The “- -“ will disappear when the compression is complete.
8
Page 12

9
Argentina 50 Germany 50 Netherlands 50
Australia 50 Greece 50 New Zealand 50
Austria 50 Hong Kong 50 Pakistan 60
Belgium 50 Hungary 40, 50 Panama 60
Brazil 60 India 50 Philippines 60
Bulgaria 50 Indonesia 50 Poland 50
Canada 60 Iran 50 Portugal 50
China 50 Israel 50 Romania 50
Colombia 60 Italy 50 Saudi Arabia 50, 60
Czechoslovakia 50 Japan 50, 60 Spain 50
Demark 50 Morocco 50 Sweden 50
Dominica 60 Korea 60 Switzerland 50
Dubai 50 Kuwait 50 Thailand 50
England 50 Luxemburg 50 Taiwan 60
Finland 50 Malaya 50 U. S. A. 60
France 50 Mexico 50, 60 U. S. S. R. 50
Frequency
(Hz)
Country Frequency
(Hz)
CountryCountry Frequency
(Hz)
Note: It is suggested to choose the correct frequency in your territory when taking
photos indoors, because the indoor lighting frequency may cause image noise.
Worldwide AC Electrical Power Frequency Reference Table
Page 13

10
VII) Download Images and Movie Clips
1. After you’ve finished taking pictures, connect your camera
to your PC using the USB cable. Open the folder titled
“My DSC” on desktop, double click the ”MY DSC”
icon to run the downloading program. A screen will
open with function icons at the bottom.
2.Click the “Camera” function icon to download files from the
camera. Files will appear as thumbnails. By clicking the
“Floppy Disk” icon, you can select the destination folder
to save the chosen photos. Still images will be saved in
JPEG format and movies will be saved in AVI format.
Page 14

11
VIII) Web Cam mode
The Web Cam mode lets you share video images of yourself with
your friends and family. To do this you will need a computer with
Internet access. Children should ask for parental supervision before
sending or receiving images over the Internet.
Connect your camera to the camera stand and set it up near your
computer. Point the camera at the image (yourself) you would like
to send and follow the instructions below to start the Web Cam
mode!
1. Turn your camera on. Connect it to your PC using the USB
cable. Be careful not to place your camera too far away from
your PC. You don't want the USB cable to become disconnected
from either your camera or your PC.
2. On your computer, open the folder titled “My DSC”, double
click “PC Cam” icon to run the web cam activation program.
A square frame will be opened. If no image appears, you may
click “Preview” in the “Options” menu inside the frame to
activate the driver.
3. Click “Start Capture” inside the “Capture” menu to start
taking video. Click “Stop Capture” to end the video.
4. Click the “Video Capture Pin” inside the “Options” menu to
select the resolution of video. The default is QVGA (320 x 240).
Note:You can also run Arcsoft PhotoImpression 4 to
trigger web camera functionality. After opening the program,
press “Camera/Scanner” button on the left bottom and set
“Select Source” as “Dual-Mode DSC”. Than, click the
“Video Camera” icon at bottom and press “Live”, the video
image will appear in the main window, you can capture images
into your desired album.
Page 15

IX) Welcome to PhotoImpression
ArcSoft PhotoImpression is an easy-to-use photo-editing program. The program enables you to edit, retouch,
enhance or add special effects to digital images with point-n-click simplicity. From custom frames prints and
calendars to greeting cards and contact sheets, PhotoImpression brings you a complete photo editor and
project-maker that’s both rich in features and easy to use.
Computer System Requirements For Windows
(Children should ask for a parent to help them with this section.)
• Windows 98/Se/Me/2000/XP
• Pentium-based processor or equivalent
(Pentium II 300 or equivalent recommended)
• 275 MB free hard disk space
• 64 MB RAM (128 MB recommended)
• 16-bit color display at 800 x 600
Installing ArcSoft PhotoImpression and the Camera Driver
For Windows:
1. Insert the Barbie™ Photo Designer CD into your CD-ROM drive. The software will start running automatically
on your system. Follow the instructions on screen.
2. After finalizing the installation of the PhotoImpressions, complete the installation of the Camera Driver by
clicking the “Finish “ icon. Upon re-start, you will have a new folder titled “My DSC” appearing on the desktop
screen. The full installation is now complete.
Note: If the Autorun feature on your PC is turned off, you’ll have to install the software manually
by taking the following steps:
1. Insert the CD into your CD-ROM drive.
2. Click Start>Run.
3. In the Run dialog box, type in D:/Setup.exe (where "D" is your CD-ROM drive).
4. Click OK.
5. Follow the instructions on screen to complete the installation.
12
Page 16

13
Working with PhotoImpression
Getting Started
In your computer
1. Click Start.
2. Select Programs>ArcSoft PhotoImpression 4>PhotoImpression 4. The PhotoImpression Main
Screen will appear on your desktop.
Navigation
Window
Magnification
Controls
Toolbar
Command
Buttons
Options on the Main Screen:
Command Buttons:
Main Screen
Get Photo - lets you open a photo or stored image to start decorating. The Get Photo button opens images
from an album (Album) or acquires images from other devices such as photo scanners.
Edit - brings up editing tools for manipulating images. Options include Crop/Resize Retouch, Text,
Enhance, and Effects.
Create - brings up custom Barbie™ templates, including Frames & Edges, Cookie Cutter, Calendars,
Greeting Cards, and Clip Arts.
Save - lets you save or export your image in a variety of ways. The To File option lets you save your image
as a new file. The Email option lets you send the image as a file attachment in an email (a MAPI-compliant
software program is required).
Note: Children should ask for parental supervision prior to sending or receiving images over the Internet.
Page 17

Resize Layer – resizes the layer when the corner handles are dragged. You can also reposition the
image by dragging it.
Freehand Rotate – rotates the currently selected layer at the user's discretion when the corner handles
are dragged.
Flip Horizontally – applies a mirror effect to the currently selected layer by flipping it.
Rotate All Layers –rotates the image in 90-degree increments.
Undo – reverses the last change you've made.
Redo – reverses the last action you’ve undone.
Copy – copies the selected area, layer, or image onto the Clipboard.
Paste – pastes what’s on the Clipboard onto the selected image as a new layer.
Delete Layer – deletes the currently selected layer.
Close Image – closes the currently selected image.
14
Print - offers five printing options: One-Size Photos, Mixed Photos, Avery Templates, Kodak Templates
and Greeting Card.
Info - Click the Info button to be directed to the Frequently Asked Questions web page for more
information about your Barbie™ Photo Designer software.
View Controls:
Navigation Window - shows a miniature view of the current image. Even if you zoom in on a specific part of the
image, you will still be able to see the whole picture in the Navigation Window.
Magnification Controls - display the currently viewed size of the image as a percentage. They allow you to zoom
in (+), out (-), or reset the image to its original, full size (1:1). The Full Screen icon (to the right of the 1:1 icon)
allows you to display the image on the entire screen. You can get out of the full screen mode by pressing the Esc
key on the keyboard.
Toolbar:
Page 18

15
Acquiring an Image From a TWAIN Device
TWAIN refers to the standards which link software applications and image acquisition devices, like the Barbie
TM
Digital Camera, and make accessing images easy.
PhotoImpression accepts images acquired via standard TWAIN devices.
1. Click the Get Photo button on the Main Screen, and select Camera/Scanner. A list of your
TWAIN devices will appear.
2. Select your desired device from the Select Source pull-down.
3. Select the album to which you wish to link the acquired image(s).
4. Click the Acquire Options button to set your acquire parameters:
a. Specify the file format for the acquired images.
b. Specify the save directory for the acquired images.
c. Choose whether or not to retain the original file format (for example, some cameras may save in a
specific format—you can have the program convert the files to an option of your choice, or retain
the original format).
d. Set the file names for the incoming files. You can choose to have the program automatically name
the files using the current date, or you can specify your own unique file name.
5. Click the Acquire button if you are capturing from a still camera or scanner, click the Video Camera
button if you are capturing a still from a video. Follow the procedures specific to your device to
import the image into PhotoImpression.
Working with Albums
Photo albums allow easy identification and access to images for viewing, editing, printing, etc. Simply click on the
Get Photo button on the Main Screen, and select Album to view the album options. It is important to remember that
albums do not store images. When an album is created, thumbnails are generated and a reference to where the files
are located is recorded in the album file. For example, if a thumbnail is added into an album from a floppy disk,
that floppy disk must be in the floppy drive in order to view the file.
Album Tools:
Select Album – allows you to view your albums through a pull-down. You can also create new albums. You can
give new albums unique names by typing over the existing name.
Page 19

Add to Album – launches an Open dialog that allows you to browse your system to select files you'd
like to add to the current album.
Search – launches a Find dialog, allowing you to find image files in an album or on your system.
Sort – allows you to sort the thumbnails in your album by name, type, size, or date. You can also sort in
reverse order.
Slide Show – launches the Slide Show dialog with options that allow you to run a slide show of the
images in the current album. You can include transitions and even have a soundtrack.
View Album (Windows only) – runs a full-screen image viewer, which displays the images in the
current album in a "notebook. It flips through each image, displaying one image per page.
Album Screen Saver – lets you make a Screen Saver Slide Show for your system.
Delete – removes the selected thumbnail(s) from your album. You have the option of removing only the
thumbnails or both the thumbnails and the actual image files. Removing the image files will delete them
permanently from your system.
Editing Images
Click the Edit button on the Main Screen to display the various editing options.
Crop/Resize:
Rectangle - allows you to select a rectangular area on an image.
Circle - works the same as the Rectangle tool except a circle is drawn instead of a rectangle.
Text:
When text is added, a new layer will be automatically created. Settings include font, style, size, and color. You can
add a shadow to the text as well.
Enhance:
Auto Enhance – applies a quick, overall enhancement to an image with one click. This is an easy way to make a
picture look better instantly.
Brightness/Contrast – allows you to adjust the brightness and contrast of the current layer.
Negative – inverts the grayscale or color brightness values for the entire layer. This will make
your image look like a photographic negative.
16
Page 20

17
Effects:
PhotoImpression includes a variety of special effects to transform images in a number of interesting ways. Click on
a desired effect to preview it on your image. You can use the Intensity slider to adjust the intensity of the effect. To
keep the effect, click Apply. To cancel, choose any other effect or click a different button.
BarbieTMCustom Art
The Barbie™ Photo Designer CD-ROM contains special BarbieTMartwork just for you!
There is a huge assortment of art for you to select and create custom designs, cool frames, calendars and
greeting cards. Just click on the Create Button to see all the options listed below.
Create
Button
Template
Categories
Templates
Apply
Element
Create Exciting Barbie™ Custom Designs, Calendars, Cards, etc.
· Frames & Edges:
You can add a frame, edge, or border to an image by selecting the option you wish, and then clicking Apply. (You
can preview different options before settling on a particular one).
Creating and Decorating Screen
Page 21

18
· Cookie Cutter:
You can “stamp” out a template of your image by selecting the shape you want to use, and then clicking Apply.
· Calendars:
You can create customized calendars by inserting your image into a calendar template. Select the month, year,
and style that you want, and then click Apply.
· Greeting Cards:
Several different styles of greeting cards are available for you to use with your images. Simply choose a style that
you like, and click Apply.
· Clip Arts:
Choose different styles of clip art to use with your images. Simply choose a style that you like, and click Apply.
Saving Images
Once you’ve clicked on the Save button on the Main Screen, the following options will become available:
1. To File:
• Save As –allows you to save the file in a new location, with a new name, and even a new file type.
2. Email:
Select the desired image, and then click send.
Note: If your email program is not MAPI–compliant, or if MAPI is not enabled in the program, you will not be
able to use this function. You can use the “insert” or “attach” function in your email program to manually select the
image file(s) for inclusion in an email.
Page 22

19
Printing Images
PhotoImpression provides five different print options:
One-Size Photos
Choose One-Size Photos to print photos of the same size on a sheet.
Mixed Photos
Choose Mixed Photos to print photos of in a variety of sizes on a single sheet.
Avery Templates
Choose Avery Template printing to print a variety of preformatted Avery brand labels.
Avery template number accompanies these printing options for reference.
Kodak Templates
Choose Kodak Template printing to print on preformatted Kodak photo paper.
Greeting Card
Choose Greeting Card printing to format and print photos as greeting cards. There are two options: One-Fold
Card- two images (front of card, back of card) on one sheet. Fold the sheet in half to complete the card. Two Fold
Card- four images (front of card, back of card, inside left, inside right) on one sheet. Fold the sheet in half two
times to complete the card.
Getting Help
PhotoImpression provides extensive online help. If you need more information or instructions on how to
use a specific feature or tool, click the Help (?) button in the upper right–hand corner of the screen.
Page 23

Oregon Scientific, Inc.
19861 SW 95th Place
Tualatin, OR 97062, USA
Hotline: 1-800-853-8883
Warning:
Changes or modifications to this unit not expressly approved by the party responsible for compliance could void the user’s authority
to operate the equipment.
NOTE:
This equipment has been tested and found to comply with the limits for a Class B digital device,pursuant to Part 15 of the FCC
Rules. These limits are designed to provide reasonable protection against harmful interference in a residential installation. This
equipment generates, uses, and can radiate radio frequency energy and,if not installed and used in accordance with the instructions,
may cause harmful interference to radio communications. However, there is no guarantee that interference will not occur in a
particular installation. If this equipment does cause harmful interference to radio or television reception, which can be determined by
turning the equipment off and on, the user is encouraged to try to correct the interference by one or more of the following measures:
• Reorient or relocate the receiving antenna.
• Increase the separation between the equipment and receiver.
• Connect the equipment into an outlet on a circuit different from that to which the receiver is connected.
• Consult the dealer or an experienced radio TV technician for help.
“ This Class B digital apparatus complies with Canadian ICES-003.”
“ Cet appareil mumérique de la class B est conforme à la norme NMB-003 du Canada”
"It may contains small parts due to abuse and/or damage to the unit
- Not suitable for children under 3 years"
BARBIE and associated trademarks and trade dress are owned by, and used under license from, Mattel, Inc.
© 2004 Mattel, Inc.All Rights Reserved.
Page 24

 Loading...