

Page 1

EN
Cube Phone with
MP3 Player and FM Radio
Model: CU328
USER MANUAL
MANUALE D’USO
MANUAL DO USUÁRIO
MANUAL DE USUARIO
Page 2

Cube Phone with MP3 Player and FM Radio
Model: CU328
USER MANUAL
CONTENTS
INTRODUCTION ................................................................................... 1
Key Features .................................................................................. 1
Handset – Front View ..................................................................... 2
Handset/Base – Back and Bottom View ........................................ 3
GETTING STARTED ............................................................................ 4
Choosing a Base Unit Location ...................................................... 4
Connecting the Base Unit .............................................................. 4
Battery Set-up................................................................................. 5
EN
EN
Charging Handset Batteries ........................................................... 5
Low Battery Charging ..................................................................... 5
Handset Reception ......................................................................... 5
Handset LCD Symbols ................................................................... 6
BASIC TELEPHONE FUNCTIONS ...................................................... 6
Switching to Phone Mode ................................................................ 6
Making a Call ................................................................................... 6
Answering a Call ............................................................................. 7
Ending a Call ................................................................................... 7
Call Waiting ..................................................................................... 7
Message Waiting ............................................................................. 7
Adjusting the Speaker Volume ........................................................ 7
Redialing a Call ............................................................................... 7
Redialing from the Last 10 Numbers ............................................. 7
Fast Redial ...................................................................................... 8
Deleting a Redial Number .............................................................. 8
Saving Dialed Numbers in Memory ............................................... 8
Page 3

PHONEBOOK ....................................................................................... 9
EN
Storing Numbers in the Phonebook ............................................... 9
Keys to Use .................................................................................. 10
Deleting Numbers from Phonebook ............................................. 10
Editing Numbers in Your Phonebook............................................. 11
Calling Numbers from Your Phonebook ........................................ 11
Quick Browsing of Your Phonebook .............................................. 11
CALLER ID DISPLAY ......................................................................... 12
Viewing Caller ID Records ............................................................ 12
Saving Caller ID Records in Phonebook ..................................... 12
Deleting Caller ID Records........................................................... 13
No Caller ID .................................................................................. 13
Missed Calls .................................................................................. 13
DURING A CALL ................................................................................ 14
Using the Mute Function .............................................................. 14
HANDSET SETTINGS ......................................................................... 14
Setting the Ring Tone .................................................................... 14
Setting the Ring Tone Volume ...................................................... 14
Setting the Display Language ...................................................... 15
Setting the Dial Tone ..................................................................... 15
Setting the Time / Date ................................................................ 15
Setting the Time / Date Format .................................................... 16
Setting the Alarm .......................................................................... 16
Snooze / Turning the Alarm Off .................................................... 17
Call Waiting ................................................................................... 17
Setting the Idle Display ................................................................ 17
CONFERENCE CALLS ...................................................................... 18
OPERATING THE BASE UNIT ........................................................... 18
Paging the Handset ...................................................................... 18
REGISTERING HANDSETS TO BASE UNIT ..................................... 18
RESETTING YOUR SYSTEM .............................................................. 19
THE MP3 FUNCTIONS ....................................................................... 20
Page 4

Driver Installation.......................................................................... 20
Inserting the SD Card into Your Handset .................................... 21
Connecting to Your Computer ...................................................... 21
Disconnecting From Your Computer ............................................ 22
MP3 BASIC OPERATION ................................................................ 22
Switching to Your MP3 Player ...................................................... 22
Operating Your MP3 Player .......................................................... 22
Play Mode ..................................................................................... 23
Setting the Sleep Timer ................................................................ 23
EQ Mode ........................................................................................ 24
Play Time Information .................................................................. 24
Tag Information ............................................................................. 25
Volume Control ............................................................................. 25
Handling Incoming Calls ............................................................... 25
THE FM RADIO ................................................................................ 25
EN
Switching to FM Radio .................................................................. 26
FM Scan Mode ............................................................................... 26
Saving a Radio Station ................................................................. 26
Deleting a Radio Station ............................................................... 26
FM Preset Mode ............................................................................ 27
Setting the Sleep Timer ................................................................ 27
Volume Control ............................................................................. 27
HEADSET JACK ................................................................................. 27
SAFETY AND CARE .......................................................................... 28
CHANGING THE HANDSET BATTERY .......................................... 29
TROUBLESHOOTING ........................................................................ 29
RECYCLING NICKEL-METAL BATTERIES ..................................... 30
SPECIFICATIONS ............................................................................... 31
ABOUT OREGON SCIENTIFIC ......................................................... 32
DECLARATION OF CONFORMITY .................................................... 32
Page 5

INTRODUCTION
EN
Congratulations on your purchase of this Oregon Scientific telephone.
Your Cube Phone has been carefully designed and produced by a world
leader of consumer electronic equipment
KEY FEATURES
Your Cube Phone with FM radio and MP3 stereo player is a high-quality
home communications product with many advanced features, such as:
• Caller ID memory that holds up to 40 numbers.
• Electronic telephone book that holds up to 50 numbers.
• Microphone mute function.
• Adjustable ring tones (including MP3 ring tone), volume levels, lan
guage display, handset IDs and low-battery / out-of-range warning
signals.
• Rechargeable batteries and up to 7-hours of continuous talk time.
• Support for MP3 and WMA audio file formats
• Multi-format support for mass data storage
• 5 preset equalizer settings
• Multilanguage menu support
IMPORTANT: To use all of the features of this telephone, you must
subscribe to either the standard Caller ID service or Caller ID with Call
Waiting service from your local telephone company.
The following items should be included in the CU328 package:
• Base unit
• Telephone audio station
• 1 AC adaptor
• Telephone line cord
• 1 battery
• Battery order sheet
• User manual
• CD-ROM (MP303S) USB driver for Windows98®
• Stereo headset with mic
• USB cable
1
Page 6
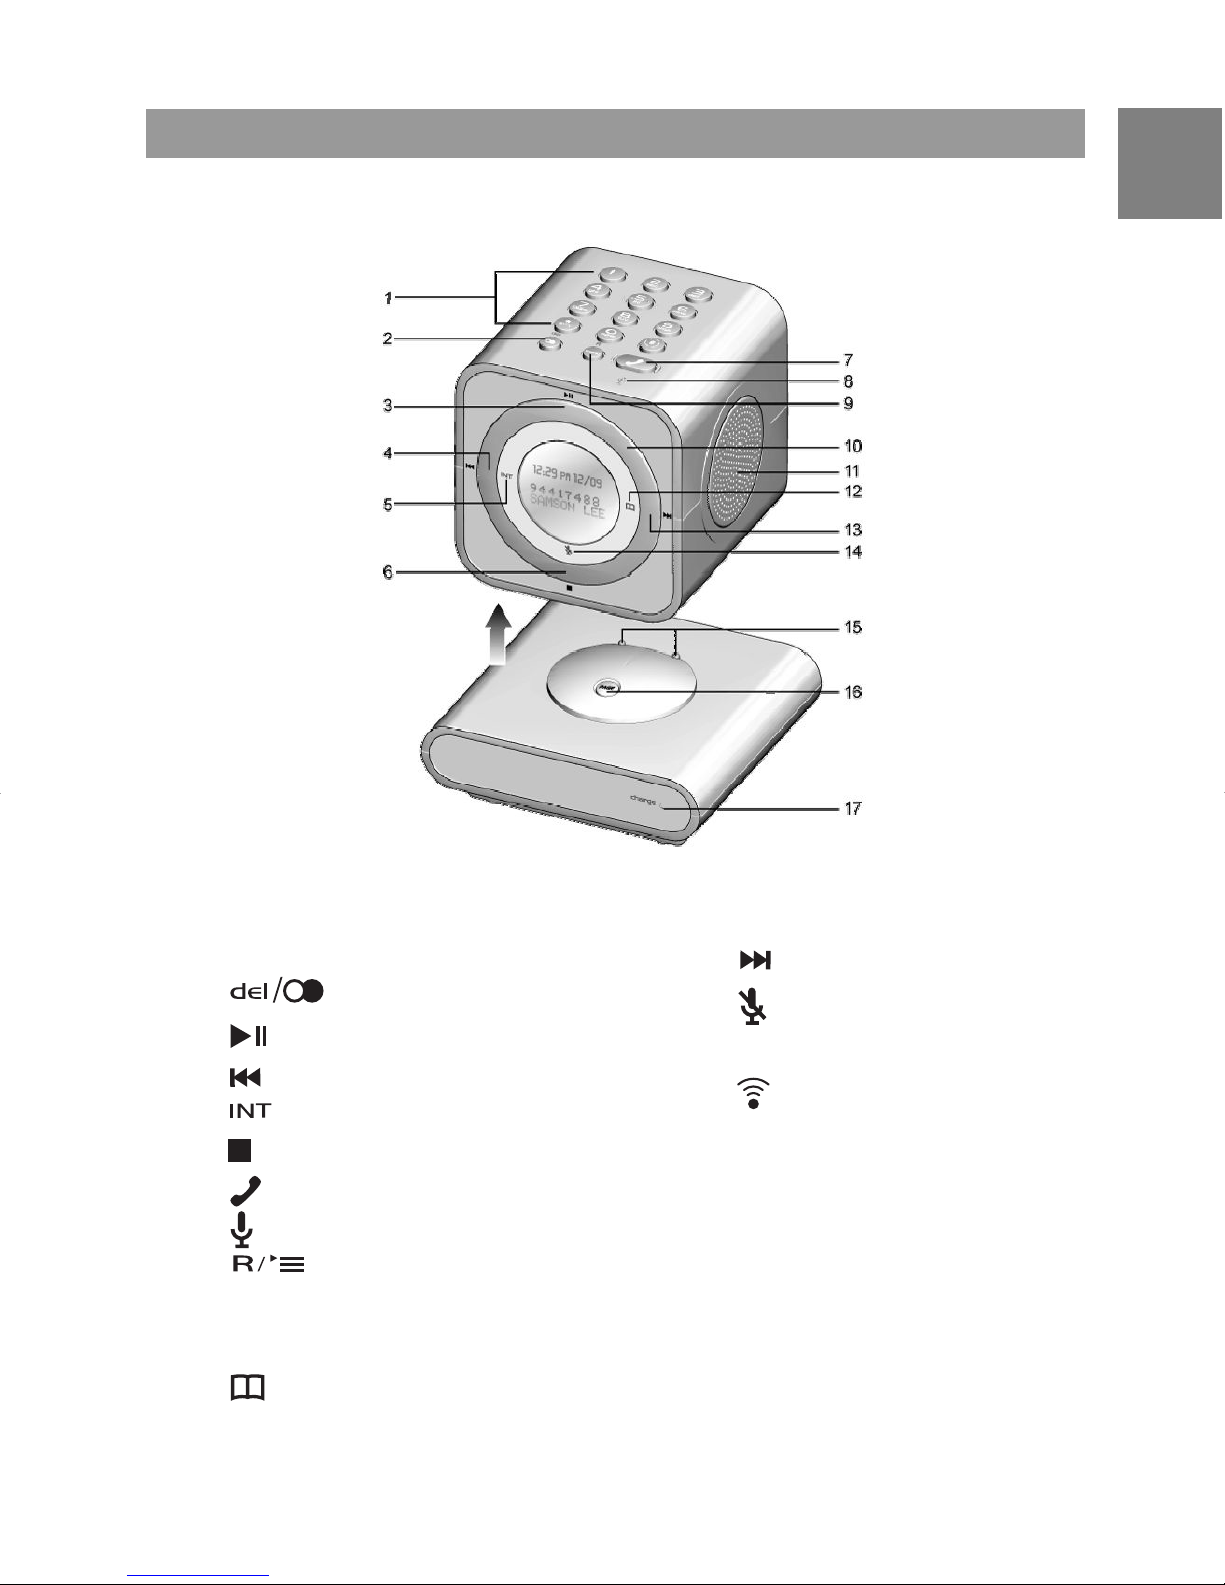
HANDSET – FRONT VIEW
EN
1. Number keys
2. [DELETE] key
3.
4.
5. [INTERCOM] key
6.
7.
8. [Microphone]
9.
10. Track ring
11. Speaker
12.
[PLAY / PAUSE] key
[REWIND] key
[STOP] key
[TALK] key
key
[Address Book] key
13.
14.
15. Charging prongs
16.
17. Charge/in-use indicator
[FORWARD] key
[MUTE] key
button
2
Page 7

EN
HANDSET/BASE – BACK AND BOTTOM VIEW
1. USB socket
2. SD CARD slot
3.
4.
5. POWER jack
6. TELEPHONE jack
3
HEADSET jack
Radio antenna
Page 8
GETTING STARTED
Certain other communication devices may use the 1.9GHz frequency for
communication and, if not set properly, these devices may interfere with
your new telephone.
CHOOSING A BASE UNIT LOCATION
When selecting a location for your base unit, please observe the following guidelines:
• Choose a location that provides easy access to an AC power source
and telephone jack.
• Do not place the base unit near a sink, bathtub or shower, or close to
heat sources.
• Do not place the base unit near large metal objects or electronic appliances that may cause radio interference.
EN
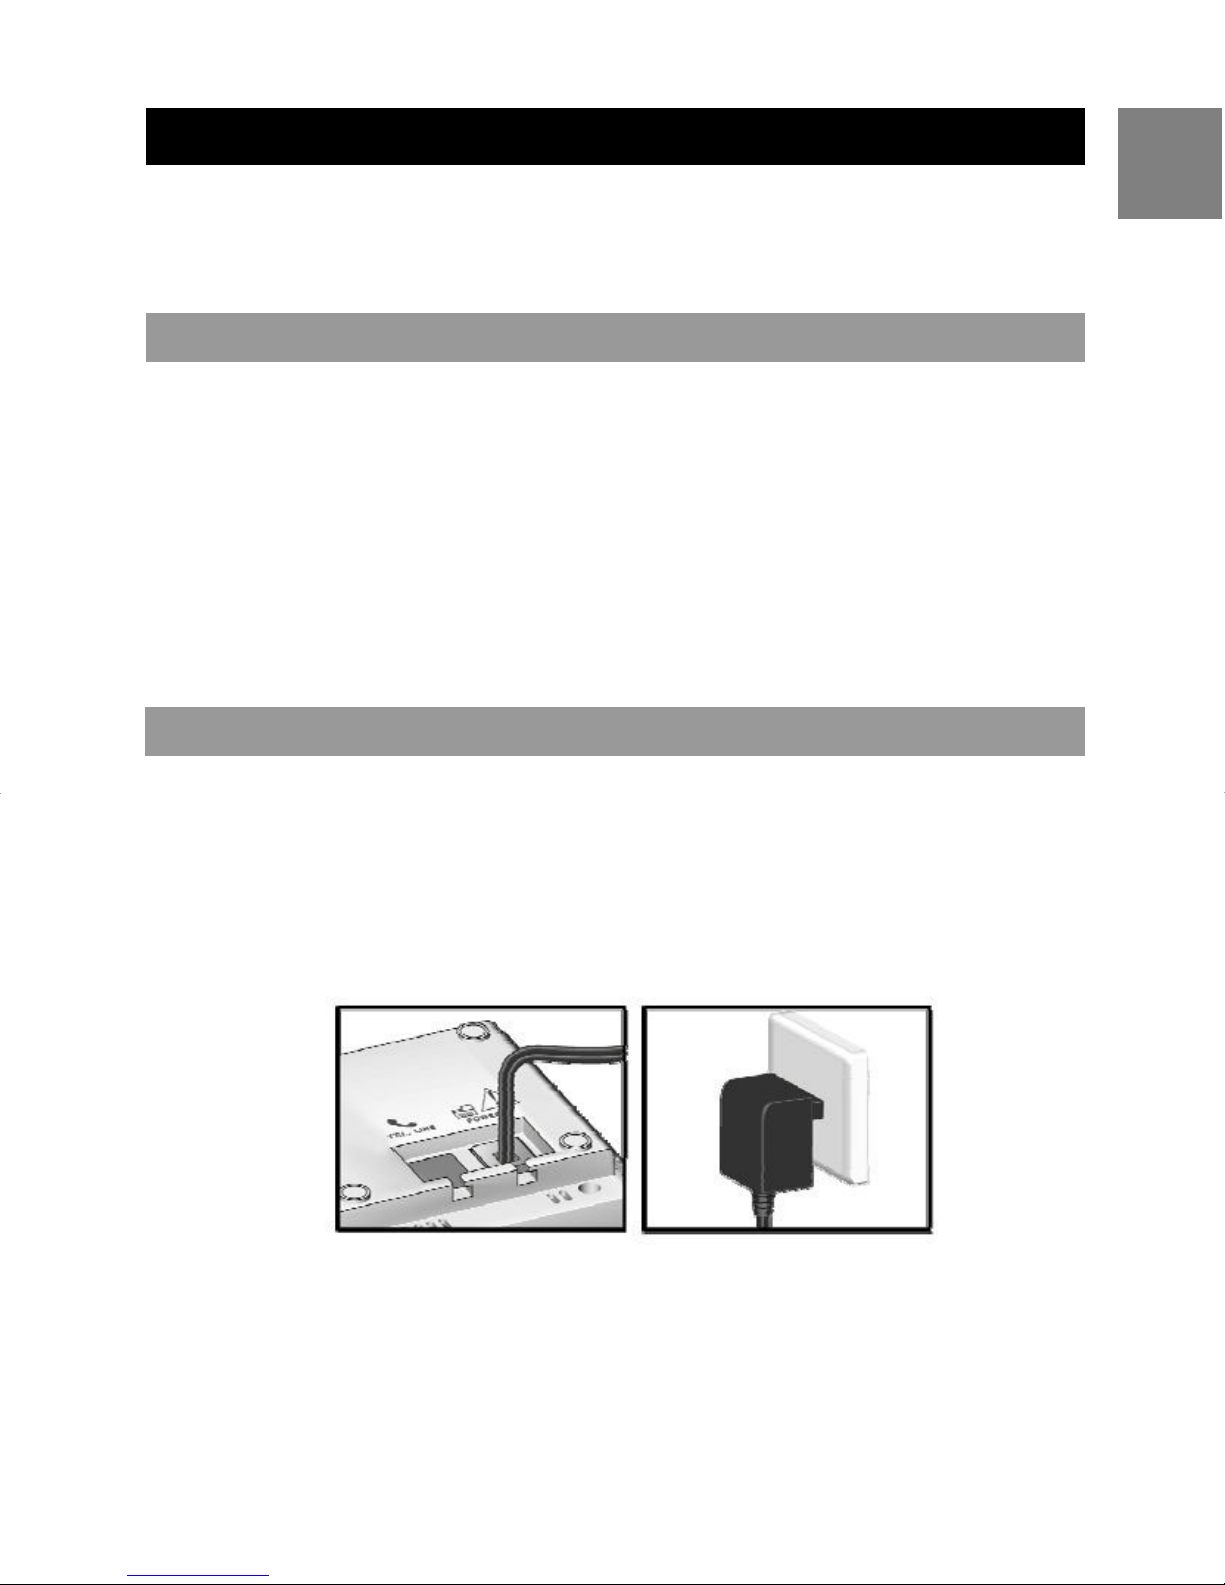
CONNECTING THE BASE UNIT
To connect the base unit:
1. Plug the AC adaptor into the power jack on the bottom of the base, and
then plug the other end into an electrical outlet (see below).
2. Plug the telephone line cord into the telephone line jack on the bottom
of the base unit, and then plug the other end into your phone jack.
4
Page 9

BATTERY SETUP
EN
To install the battery in your handset:
1. Open the battery compartment cover located at the bottom of the
handset.
2. Plug the battery connector into the socket.
3. Place battery in the battery compartment.
4. Replace the battery compartment cover by sliding it into place. (The
cover clicks into place when it is secured).
NOTE: The handset comes with the battery already installed.
CHARGING HANDSET BATTERIES
You must charge the handset batteries for 15 continuous hours the first
time you use them.
When the battery icon in the top right corner on the LCD screen appears
empty, or if you hear a warning beep during a call, please:
• End the call as soon as possible.
• Charge the handset by putting it back on the base cradle. (The handset
will begin to beep to indicate that the handset is charging).
LOW BATTERY CHARGING
When the battery is low and has only 4 minutes of talk time left, the
handset will beep a warning tone and the LCD display will flash “Low
Battery”. When this happens, please end the call as soon as possible,
and put the handset back on the charger until the battery symbol returns
to high level.
HANDSET RECEPTION
Usually, a loss of reception means you are too far from the base unit, or
there is interference between the base unit and handset. Make sure to:
• Stay within a range of 300 meters (984 feet) from the base unit while
using the handset.
• Avoid interference such as TV or other electrical appliances.
NOTE: If your handset is out of range of the base unit, the range
symbol
5
starts flashing.
Page 10
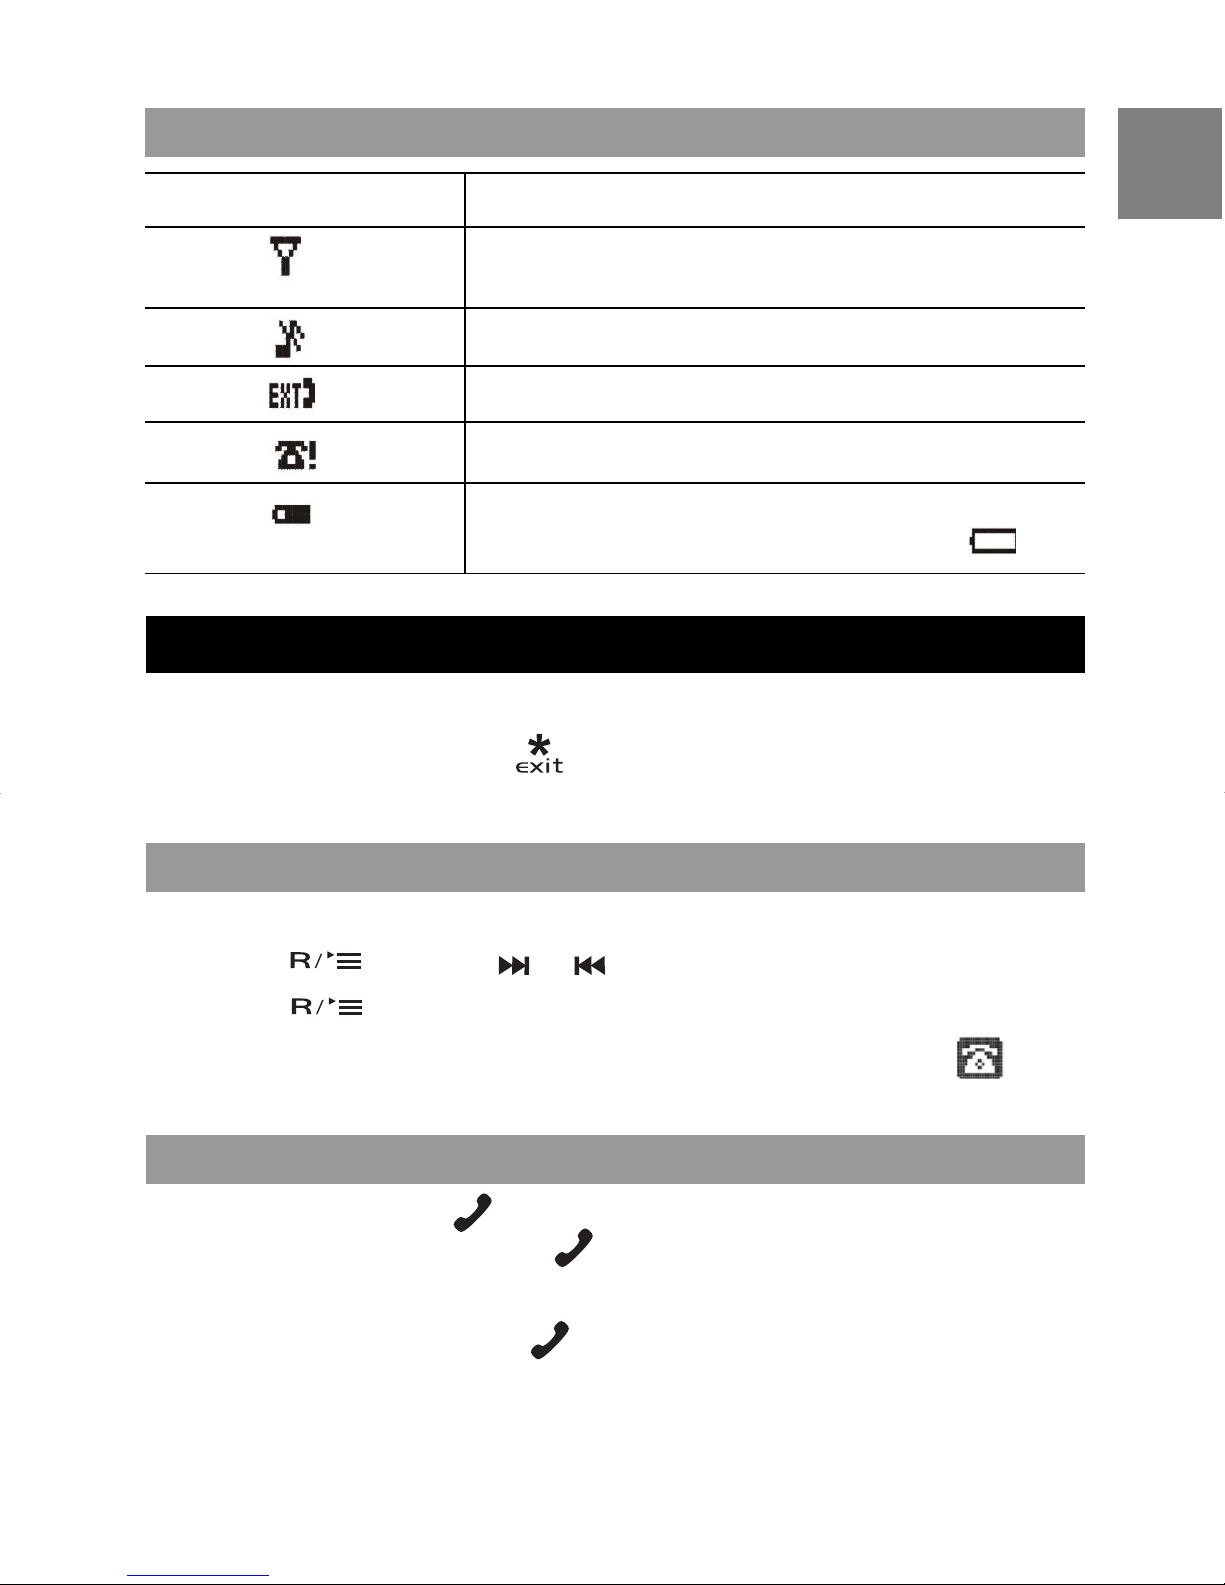
HANDSET LCD SYMBOL
SYMBOL MEANING
- Within range indicator
- Flashing when out of range
Ringer is set to off
Line-in-use
Missed call
- Battery (5 levels)
- Flashing when battery is low (level 1
)
BASIC TELEPHONE FUNCTIONS
While operating your Cube Phone, if you want to escape from the menu
or the current mode, press
.
EN
NOTE: The following instructions are for the Phone Mode.
SWITCHING TO PHONE MODE
To change to Phone Mode:
1. Press
2. Press
NOTE: When you enter the Phone Mode, the telephone icon
appear at the top of your LCD display.
, then use or to select “Goto Phone”.
.
MAKING A CALL
To make a call, press
(If you make a mistake, press
OR
Dial the number, then press
to get the dial tone, and then dial the number.
again to cancel the whole number).
.
will
6
Page 11
ANSWERING A CALL
EN
The handset will ring when there is an external call.
To answer a call, press
To answer a call while music is playing, press
automatically).
.
. (The audio will pause
ENDING A CALL
To end a call, simply press
.
CALL WAITING
When you hear a call waiting tone, press
call, to call waiting.
NOTE: You must subscribe to this service from your local telephone
company.
to switch from an existing
MESSAGE WAITING
When someone has called and left you a message, “Message Waiting”
will appear on the screen. Follow the voice message commands to access message.
ADJUSTING THE SPEAKER VOLUME
To adjust the speaker volume:
1. Press
2. Then turn the track ring to adjust the speaker volume accordingly.
.
REDIALING A CALL
To redial a call, press
, and then press .
REDIALING FROM THE LAST 10 NUMBERS
To redial from the last 10 numbers:
1. Press
to see your last call record.
2. Use
3. Press
7
, or the track ring to select a number.
to dial the number.
Page 12

If you want to edit the phone number before redialing:
1. Press
2. Press .
3. Use
4. Use and 0-9 buttons to edit the number.
5. Press
, or the track ring to select “Edit for Call”, then press
.
to dial the number.
FAST REDIAL
When you make a call and hear the busy tone, press
will quickly redial the number within 3 seconds.
DELETING A REDIAL NUMBER
To delete a redialed number:
1. Press
to see your last call record.
EN
. The phone
2. Use
3. Select “Delete Record” to delete 1 number, or “Delete All” to delete all
numbers.
4. Press
5. Select “Yes”, then press
, or the track ring to select a number, then press .
.
to confirm.
SAVING DIALED NUMBERS INTO MEMORY
The handset will automatically save the last 10 numbers you dialed.
To save dialed numbers into your phonebook:
1. Press
2. Use , or the track ring to select a phone number, then press
.
3. Select “Save Phonebook” to save number, then press
(“Saved” will appear on the screen to confirm the action).
. (The last number is listed).
.
8
Page 13

PHONEBOOK
EN
Your phone can store 50 phone numbers.
STORING NUMBERS IN THE PHONEBOOK
To store a number in your phonebook:
1. Press
2. Use
3. The handset display shows a record or “—Empty—“. Press
4. Use
5. Enter the name (see KEYS TO USE below) and then press .
6. Enter the phone number and then press
beep twice indicating that the record has been stored.
NOTE: If only a phone number and no name is input, then the record can
still be saved.
, or the track ring to select “Phone Book”, then press
.
, or the track ring to select “Add Record”.
.
.
. The handset will
9
Page 14

KEYS TO USE
When entering a name, “B” will be entered by pressing the “2” button once,
followed by pressing “2” again within 1 second. If pressed beyond 1
second, “A” is entered and the second press of “2” will give the entry of
“AA”.
The list of characters is shown below:
CAPITAL LETTERS SMALL LETTERS
1 SPACE 1 _ - + = ^ ~ . , ; : ? ! SPACE 1 _ - + = ^ ~ . , ; : ? !
2 ABC2ДЖЕАБВГЗ abc2джеабвгз
3 DEF3ИЙКЛР def3ийклр
4 GHI4ÌÍÎÏ ghi4ìíîï
5 JKL5 jkl5
6 MNO6ЦШТУФХС mno6цштуфхс
7 PQRS7 pqrs7
8 TUV8ÙÚÛÜ tuv8ùúûü
EN
9 WXYZ9ÝÞ wxyz9ýþ
0 0 * # $ & % / \ | ( ) [ ] < > 0 * # $ & % / \ | ( )[ ] < >
* Press when editing a name to return to Standby Mode.
Press when editing a number to get “*”.
# Press to change between capital and small letters.
DELETING NUMBERS FROM PHONEBOOK
To delete a record in your phonebook:
1. Press
2. Use
3. The handset display shows a record. Use
select the record you want to delete. Press
4. Use , or the track ring to select “Delete Record”.
, or the track ring to select “Phone Book”, then press
.
.
, , or the track ring to
.
5. Press
.
10
Page 15

EN
6. Select “Yes” to complete deletion. The handset will beep twice indicating
that the record has been deleted.
To delete all records:
1. Follow steps 1-4 above and select “Delete All?”
2. Now follow steps 5-6 above.
EDITING NUMBERS IN YOUR PHONEBOOK
To edit a record in your phonebook:
1. Press
2. Use
3. Press
“Edit Record”.
4. Press
KEYS TO USE section) and then press
5. Use
set will beep twice indicating that the record has been stored.
, or the track ring to select “Phone Book”, then press
.
.
again, and then use , or the track ring to select
. Use , 0-9 and , to edit the name. (See
.
to edit the number and then press . The hand-
CALLING NUMBERS FROM PHONEBOOK
To call using a number in your phonebook:
1. Press
2. Use
, or the track ring to select “Phone Book”, then press
.
.
3. Use
the number.
, or the track ring to select a number, then press to dial
QUICK BROWSING OF YOUR PHONEBOOK
To browse through your phonebook quickly:
1. Press
2. Then press the key with the 1
looking for. (For example, press key 7, 4 times to get quick access to
a name beginning with ‘S’).
Press
Mode.
11
and then use or to browse through your phonebook.
to dial the selected number, or press to return to Standby
st
letter of the person’s name you are
Page 16

NOTE: You can use the phonebook function while on an active call.
CALLER ID DISPLAY
If you have subscribed to this service, the caller’s phone number will
display when there is an incoming call.
NOTE: If the caller’s phone number was stored in the phonebook, the
associated name will be displayed with the phone number.
Each entry in the caller list has the:
• Caller number (up to 24 digits)
• Caller name (up to 15 characters
• Date and time of the call
• Number of calls made to this number (up to 40).
VIEWING CALLER ID RECORDS
To view caller ID records:
EN
1. When the phone is in Standby Mode use the track ring to browse
through Caller ID records.
2. If you need to edit the phone number before making the call press
.
3. Use
4. Use and 0-9 buttons to edit the number.
5. Press
NOTE: If “No Calls” appears on the screen, then no records are stored in
the Caller ID memory.
NOTE: When the Caller ID memory is full, it will automatically delete your
ST
1
Caller ID record.
, or the track ring to select “Edit for Call”.
to dial the number.
SAVING CALLER ID RECORDS IN YOUR PHONEBOOK
When you have a Caller ID record on your screen:
1. Press
Phonebook”.
2. Press
action.
, then use , or the track ring to select “Save
“Saved” will appear on the screen to confirm the
12
Page 17

DELETING CALLER ID RECORDS
EN
To delete a record:
1. Press the track ring whilst in Standby Mode and select the number you
want to delete. Then, press
2. Select “Delete Record”, then press
3. Select “Yes”, then press to confirm.
To delete all records:
1. Press
2. Select “Delete All”, then press
3. Select “Yes”, then press to confirm.
, or the track ring whilst in Standby Mode. Then, press
.
.
.
.
NO CALLER ID
If a caller has withheld their Caller ID name and / or number, one of the
following messages will appear on your screen:
• “Blocked Number”
• “Unknown Number”
• “Blocked Name”
• “Unknown Name”
• “Unknown Caller”
• “Blocked Call”
MISSED CALLS
If you miss a call, the handset will display:
When you view the Caller ID of your missed calls, the following notifica-
tions will appear on the screen:
• “NEW” – This is the first missed call from this particular Caller ID.
• “REPT” – This appears when more than one call has been missed from
this particular Caller ID.
.
13
Page 18

DURING A CALL
USING THE MUTE FUNCTION
To mute the handset, press .
EN
To un-mute the handset, press
mode.
again. You will return to the normal
HANDSET SETTINGS
IMPORTANT:
• If you press
• If you press
• You cannot enter the Menu Mode when the phone is in Talk Mode. To exit
the Talk Mode press
• To leave a setting at any time and return to Standby Mode, press the
button.
NOTE: When you have completed a setting, 2 beeps will sound to indicate that the task is complete.
SETTING THE RING TONE
the button, you will enter Talk Mode.
the button, you will enter Menu Mode.
.
You have a choice of 10 polyphonic melodies, 4 tones and MP3 songs for
incoming calls.
To select a ring tone:
1. Press
Display”.
2. Press
3. Select “Ringer Tone”, then press .
4. Select the melody or tone you prefer, then press
You will hear a demonstration of the tone/song selected.
, then use , or the track ring to select “Sound &
.
to confirm.
SETTING THE RING TONE VOLUME
To set the ring tone volume:
1. Press
, then use, or the track ring to select “Sound & Display”.
14
Page 19

2. Press
, then use, or the track ring to select “Ringer Volume”.
EN
Then press
3. Use
4. Then press
NOTE: If the ring volume is turned off, you will see the
, or the track ring to increase or decrease the volume.
or to confirm.
to confirm.
icon.
SETTING THE DISPLAY LANGUAGE
To change the language:
1. Press , then use , or the track ring to select “Phone
Setup”.
2. Press
then press
3. Select the language you want, then press
NOTE: The default language for the handset display is English. You can
also change the language to French, Spanish, German, Italian, Dutch,
Portuguese, Swedish, Finnish, Danish or Norwegian.
, then use , or the track ring to select “Language”,
.
to confirm.
SETTING THE DIAL TONE
In order to provide compatibility with other phone systems, your phone
can be set to either Pulse dialing (same as rotary dial phones), or Tone
dialing (DTMF).
To set the Dial Mode:
1. Press
Setup”.
2. Press
3. Press
4. Select either “Tone” or “Pulse” mode, then press to confirm.
, then use , or the track ring to select “Phone
, then use , or the track ring to select “Dialing”.
.
SETTING THE TIME/DATE
To set the time / date format:
1. Press
, then use , or the track ring to select “Clock &
Timer”.
2. Press
15
.
Page 20

3. Select “Date & Time”, then press
.
4. Select “Set Time” or “Set Date”, then press
5. Use the number keys to set the time/date. (Use
or minutes to set).
6. Press
to confirm.
.
, to select hour
SETTING THE TIME/DATE FORMAT
To set the time / date format:
1. Press , then use , or the track ring to select “Clock &
Timer”.
2. Press
3. Select “Date & Time”, then press
4. Select either “Time Format” or “Date Format”, then press .
5. Use the number keys to set the Time/Date Format.
6. Press
.
.
to confirm.
EN
SETTING THE ALARM
Your Cube Phone comes with dual alarm functionality.
To set the alarm:
1. Press
2. Press .
3. Select “Alarms”, then press
4. Select Alarm1 or Alarm2, then press
5. Use the number keys to set the alarm time.
6. Press
NOTE: You can select Alarm Tone 1, 2, 3, 4 or radio.
NOTE: The alarm will be set automatically upon confirmation.
, then use or to select “Clock & Timer”.
.
.
to confirm.
16
Page 21

SNOOZE / TURNING THE ALARM OFF
EN
Once an alarm sounds, you may, press any key once and the alarm will
snooze for 8 minutes.
OR
Press and hold
NOTE: If no button is pressed for 2 minutes the alarm will turn itself off.
to turn off the alarm.
CALL WAITING
If an external call comes in during an intercom conversation, you will hear
a call waiting tone.
To end an intercom call:
1. Press
2. Press again to answer the external call.
. (The external line will ring).
SETTING THE IDLE DISPLAY
The idle display shows the phone status and time on your LCD Display
during phone standby.
To set your idle display:
1. Press
Display”.
2. Press
3. Press
4. Select “Phone Status” or “Digital Clock” then press
confirm.
NOTE: It will take 12 minutes for the idle display to be activated after
confirmation.
, then use , or the track ring to select “Sound &
then use , or the track ring to select “Idle Display”.
.
to
17
Page 22

CONFERENCE CALLS
You can have a conference call with an external party and 2 internal
parties.
To have a conference call:
1. First establish the call with the external party by either making an
external call or answering an incoming call.
EN
2. Press
party will be put on hold. The internal party answers your intercom call
by pressing
3. Then you press
confirmation key tone).
You, the external party and the other internal party can talk together in a
conference call.
to make an intercom call to another handset. (The external
).
and hold for about 2 seconds (you will hear a
OPERATING THE BASE UNIT
PAGING THE HANDSET
To look for your handset, press the
unit.
To stop the paging, press any button once.
button in the cradle of the base
REGISTERING HANDSETS TO BASE UNIT
The handset and base unit are factory pre-registered with each other.
When you purchase an additional handset, you have to register it to the
base unit in order to make and answer calls.
You can register up to 4 more handsets to make and answer calls via the
same base unit. Handsets are numbered 1 to 4.
To register a new handset:
1. Press and hold the
Registration Mode.
2. On the handset, press
3. Use
, or the track ring to select “Phone Setup”, then press
.
button on the cradle of the base unit to enter
.
18
Page 23

4. Select “Registration”, then press .
EN
5. Use
6. Enter the default Pin Code “0000” then press
7. You will see the message: “Registering”.
8. When the registration is complete, “Registration Success” will appear
on the screen.
NOTE: The base unit will then send a signal to the handset registering the
handset to the base unit. Once the registration function has been completed,
the handset will return to Standby Mode.
, or the track ring to select “Base 1, 2, 3 or 4”, then press
.
.
RESETTING YOUR SYSTEM
To reset your system to the default settings:
1. Press
2. Press
, then use and to select “Phone Setting”.
.
3. Select “Set Default”, then press
4. When prompted, select “Yes”. You will then hear the double beep to
indicate the default settings have been restored.
Your default settings are:
• Language: English
• INT melody: Melody 1
• Handset name: Handset
• Ring volume: 3
• Dial mode: Tone
• Battery indicator: On
• Ear /Speaker volume: 1
• Range indicator: On
.
19
Page 24

THE MP3 FUNCTIONS
Your CU328 comes with a built-in MP3 player, which supports multiple
audio standards, such as WMA (Windows Media AudioTM Version 8) and
MP3 formats. You can also transfer files easily via a USB2.0 TM
connection.
Please ensure your computer meets the following minimum system
requirements:
• Intel ® Pentium ® 133MHz or faster
• CD-ROM Drive
• USB1.1 port or USB2.0 port
• 10MB free hard disk space
• Microsoft ® Windows ®, 98SE, ME, 2000 or XP
• Mac OS 9.0 or above
NOTE: WMA data bit rates lower than 22kbps are not supported by the
CU328.
EN
DRIVER INSTALLATION
Windows® ME, 2000, XP Users
Windows® already provides the USB driver.
Windows 98SE Users
Installing the MP3 driver software is necessary.
To install the MP3 driver software:
1. Insert the MP3 CD-ROM into your computer.
2. Follow the on-screen instructions.
3. Restart your computer.
20
Page 25

INSERTING THE SD CARD INTO HANDSET
EN
The SD card stores files downloaded from your computer via the USB
cable.
To insert the SD card into your handset:
1. Locate the SD socket at the back of the handset, and insert the SD
card with the “clipped” corner on the top right.
2. Push the SD card into the socket all the way. (You will hear a click; this
indicates that the card is in place).
To remove the SD card from the handset:
1. Push the SD card inwards until you hear the clicking sound that indi
cates that it will self-eject.
2. Pull the SD card from the slot.
NOTE: The SD card capability is from 32MB to 1GB.
NOTE: Any songs you downloaded from your computer while the SD
card was inside your handset will be stored in your SD card. Therefore
make sure you protect the SD card from moisture and damage.
CONNECTING TO YOUR COMPUTER
Insert the USB cable to the USB port in your PC and connect the miniUSB connector to your USB port. The unit will automatically begin charging.
IMPORTANT: Do not disconnect while downloading data from your PC.
21
Page 26

DISCONNECTING FROM YOUR COMPUTER
Please follow the procedures below.
For Windows 98SE:
1. Double click the My Computer icon.
2. Right click the removable drive letter your player has been assigned.
3. Click “Eject” from list before disconnecting.
For Windows ME, 2000, XP:
Before disconnecting, click the “Stop USB Mass Storage Device”
icon on the Windows taskbar at the bottom right of your computer screen
to stop the device.
For Macintosh:
Drag and drop the “Untitled” icon from the desktop to the “Trash” icon to
eject the player before disconnecting.
NOTE: Before unplugging your player from your computer, wait at least
EN
15 seconds after the audio or data file transfer is completed to prevent
any data loss that may occur.
MP3 BASIC OPERATION
SWITCHING TO YOUR MP3 PLAYER
To switch to MP3 Mode:
1. Press
2. Press .
NOTE: The MP3 player functionality will not work unless you have inserted the SD card into the SD socket at the back of the handset.
NOTE: To escape from the menu or the current mode, press
OPERATING YOUR MP3 PLAYER
The operation of your MP3 player is simple and intuitive.
, then use or to select “Goto MP3”.
.
To play a song, while in the MP3 Mode, press .
To stop a song, press
volume ring).
. (This button is at the bottom of the silver
22
Page 27

To pause a song, press .
EN
To fast forward through a track, press and hold
more than the current track, press and hold the
To rewind to a previous track, press and hold
back to more than the previous track, press and hold the
. If you want to skip
button.
. If you want to rewind
button.
PLAY MODE
You have a number of choices of how to play your songs, including:
• Repeat All – Plays all audio files over and over in chronological order.
• Repeat One – Plays the selected audio file continuously.
• Random Repeat – This setting will repeat randomly selected audio
files.
• Random – Plays audio files that are selected randomly.
• Normal – Plays all audio files in chronological order.
To switch to Play Mode while in MP3 Mode:
1. Press
2. Use , or the track ring to select “Play Mode”.
3. Press
4. Once you are in Play Mode, simply use
select the mode of your choice.
5. Once you have selected, press
.
.
, or the track ring to
.
SETTING THE SLEEP TIMER
The Sleep Timer is designed to automatically shut off audio after a
certain period of time. (This feature enables you to fall asleep with the
music on without having it play all night).
To set the sleep timer function:
1. Press
2. In the MP3 Mode (or Radio Mode), use
“Sleep Timer”, then press
.
, or the track ring to select
.
3. Use , or the track ring to select a timer setting, then press
. (2 beeps will sound to confirm selection).
23
Page 28

EQ MODE
You have a number of choices of how to equalize your music, including:
• Classic – Affects sound to enhance all classical music.
• Live – Affects sound to enhance all live music.
• Pop – Affects sound to enhance pop music.
• Rock – Affects sound to enhance rock music.
• Normal – No audio settings set to enhance sound.
To switch to EQ Mode while in MP3 Mode:
1. Press
2. Use
3. Press
4. Once you are in EQ Mode, simply use , or the track ring to select
the mode of your choice.
5. Once you have selected, press
, or the track ring to select “EQ Mode”.
.
.
.
EN
PLAY TIME INFORMATION
You have two choices of how to display your play time information, which
include:
• Elapse – Shows time passed since beginning of audio file.
• Remain – Shows time to play until audio file finishes.
To switch to Play Time Information Mode while in MP3 Mode:
1. Press
2. Use
3. Press
4. Once you are in Play Time Info Mode, simply use
ring to select the time display of your choice.
5. Once you have selected, press
, or the track ring to select “Play Time Info”.
.
.
, or the track
.
24
Page 29

TAG INFORMATION
EN
You have two choices of how to tag your files in your MP3 player: ON or
OFF.
To switch to Tag Info Mode while in MP3 Mode:
1. Press
2. Use
3. Press
4. Once you are in Tag Info Mode, simply use , or the track ring to
select “On” or “Off”.
5. Once you have selected, press
, or the track ring to select “Tag Info”.
.
.
.
VOLUME CONTROL
To adjust the volume, move the track ring clockwise to increase the
volume, or counter-clockwise to decrease the volume.
HANDLING INCOMING CALLS
When there is an incoming call while the user is listening to the MP3 or
Radio, the Cube Phone will pause playing automatically.
To receive an incoming call while music is on, press
After the call ends, your Cube Phone will return to the MP3 or FM Mode.
.
THE FM RADIO (87.5 – 108MHz)
You can preset up to ten radio stations in your telephone. Pull out the
antenna located at the back of the handset to maximize your reception).
25
Page 30

SWITCHING TO FM RADIO
To switch to the FM Mode:
1. Press
2. Press
NOTE: When you enter the FM Mode, the radio icon will appear at the
top of your LCD display.
, then use , or the track ring to select “Goto FM”.
.
FM SCAN MODE
To get to the FM Scan Mode while in FM Mode:
1. Press
2. Use , or the track ring to select “FM Scan Mode”.
3. Press
4. Once you are in FM Scan Mode, simply use
station, or press and hold
station with good reception.
.
.
or to find a FM
or to search automatically for a FM
EN
SAVING A RADIO STATION
To save a radio station:
1. Press
2. Use
3. Press
4. Once you are in Save Stations Mode, simply use or to select a
channel from a list of ten stations (channels).
5. Press
, to select “Save Stations”.
.
.
to save the selected radio station.
DELETING A RADIO STATION
To delete a radio station:
1. Press
2. Use , to select “Delete Stations”.
3. Press
.
.
4. Use
or to select a channel from the list of ten stations (channels).
26
Page 31

5. Press to delete the selected station.
EN
NOTE: The deleted radio station will disappear from the list, but when you
enter the “Save Stations” Mode, the channel will be listed but will show
“—Empty—-“.
FM PRESET MODE
To get to the FM Preset Mode while in FM Mode:
1. Press
2. Use , to select “FM Preset Mode”.
3. Press
4. Once you are in FM Preset Mode, simply use
preset radio station from the list of ten stations (channels). The radio
will then play.
NOTE: The LCD display will show the channel number under the word
“Preset”.
.
.
or to select a
SETTING THE SLEEP TIMER
Please see SETTING THE SLEEP TIMER in the MP3 BASIC OPERATIONS section of this manual.
VOLUME CONTROL
The volume works the same way as for the MP3 player. (See VOLUME
CONTROL in the MP3 BASIC OPERATIONS section).
HEADSET JACK
A headset can be used with your telephone for hands-free conversation.
To use a headset, plug it into the HEADSET jack located at the back of the
handset.
While the headset is connected, press
NOTE: The headset is worn with the strap around the back of the head,
not around the top of the head.
to answer or place a call.
27
Page 32

SAFETY AND CARE
This product is designed to give you years of service if handled properly.
Please observe the following guidelines:
• Do not subject the main unit to extreme force, shock or fluctuations in
humidity.
• Do not make any changes or modifications to this product. (Unauthorized
changes may void your right to use the product).
• Keep your player away from any strong magnetic fields. Exposure to
magnetic fields may cause the memory to be erased or even damaged.
• Do not expose your telephone to direct sunlight or moisture.
• Clean the phone with a soft cloth, but never use a strong cleaning agent
or abrasive powder. This will damage the finish.
• Periodically clean the charge contacts on the handset and base unit
with a clean pencil eraser.
FM RADIO
EN
Causes of poor reception:
• Aluminum siding
• Foil backing on insulation
• Heating ducts and other metal construction shielding radio signals
• You are too close to appliances, such as microwaves, stoves or com
puters
• Atmospheric conditions, such as strong storms
• The unit is installed in the basement or lower floor of the house
• Base unit is plugged into an AC outlet with other electronic devices
• Handset battery is low
• You are out of the transmission range
NOTE: If you are having poor reception, be sure to pull out the antenna
at the back of the unit.
28
Page 33

CHANGING THE HANDSET BATTERY
EN
When the handset operating time becomes short even after a battery has
been recharged, please replace the battery. With normal usage, your
battery should last about one year.
REPLACING THE BATTERY
1. Make sure the telephone is turned OFF.
2. Slide off the battery compartment cover.
3. Disconnect the battery plug from the jack in the compartment and
remove the battery pack.
4. Insert the new battery pack and connect the cord into the jack.
5. Put the battery compartment cover back on.
6. Place handset on the base to charge the new battery for 15 hours.
CAUTION: To reduce the risk of fire or personal injury, use a 3.6 V,
1200mAh battery. Contact your place of purchase.
TROUBLESHOOTING
If your Cube Phone is not working correctly, check the points here before
returning it for repair.
Whatever your issue, you should first check that:
• You have installed the Base Unit correctly, and it is plugged into the
telephone line and the main power socket.
• Main power is switched on at the socket.
• You have installed the batteries into the handset.
NEVER attempt any repairs or adjustments yourself - you could make
the issue worse and invalidate your guarantee.
POTENTIAL ISSUES
Problems with making and answering calls:
“I have tried several times to press
but I cannot make a call”
• Unplug the power adapter at the bottom of the Base Unit, then recon
nect the power adapter. Press and hold PAGE on the Base Unit until IN
29
Page 34

USE (green LED) is flashing.
“The Caller Display function is not working”
• Please check if you have subscribed to the Caller Display service with
your network provider.
“My call was cut off when I went out of range of the Base Unit. Now
I cannot use my handset.”
• Please move the handset closer to the Base Unit.
“The handset does not ring when a call comes in.”
• Check that you have not set the ringing volumes to “off”.
RECYCLING NICKEL-METAL HYDRIDE BATTERIES
Nickel-metal hydride batteries must be disposed of properly.
EN
Please take your used battery pack to a store that recycles Ni-MH
batteries.
30
Page 35

SPECIFICATIONS
EN
Here are the specifications for your Cube Phone:
TYPE DESCRIPTION
Standard WDCT for US
DECT for Europe
Frequency range 2.4GHz ISM for US
1880 to 1990MHz for Europe
Channel bandwidth 864MHz for US
1.728MHz for Europe
Modulation GFSK
Speech coding Adaptive Differential Pulse Code Modulation
(ADPCM)
Communication range Up to 300 metres (984 feet) in open space
Base power supply Input: AC 120V/60HZ for US
Output: 9V 200mA / 9V DC 400mA for US
Input: AC 220-230V/50HZ for Europe
Output: 9V AC 200mA / 9V DC 400mA for
Europe
Handset power supply 1 rechargeable battery, NiMH AA 3.6V
1200mAh
Handset battery 15 hours (approx.)
charging time
Operating time Standby: 5 days (approx.)
Talk: 7 hours (approx.)
Operating temperature 0°C to 45°C
Storage temperature -20°C to 60°C
Weight Handset: 335g (11.8 ounces);
Base unit: 120g (4.2 ounces)
Dimensions Handset: 80 x 80 x 80mm
31
(3.2 x 3.2 x 3.2inches)
Base unit: 92 x 98 x 37.8mm
(3.6 x 3.9 x 1.5inches)
Page 36

NOTE: The technical specifications for this product and the contents of
the user guide are subject to change without notice.
ABOUT OREGON SCIENTIFIC
Visit our website (www.oregonscientific.com) to learn more about Oregon
Scientific products such as digital cameras; MP3 players; children’s
electronic learning products and games; projection clocks; health and
fitness gear; weather stations; and digital and conference phones. The
website also includes contact information for our Customer Care department in case you need to reach us, as well as frequently asked questions
and customer downloads.
We hope you will find all the information you need on our website,
however if you’re in the US and would like to contact the Oregon Scientific Customer Care department directly, please visit:
www2.oregonscientific.com/service/support
EN
OR
Call 1-800-853-8883.
For international inquiries, please visit:
www2.oregonscientific.com/about/international/default.asp
DECLARATION OF CONFORMITY
“Hereby, Oregon Scientific declares that this Cube Phone (CU328) is in
compliance with the essential requirements and other relevant provisions
of Directive 1999/5/EC. A copy of the signed and dated Declaration of
Conformity is available on request via our Oregon Scientific Customer
Service.”
COUNTRIES RTTE APPROVAL COMPLIED
All EC countries, Switzerland
and Norway
32
 Loading...