

Page 1
AF 0513 - F/N 547361
ORIGINAL INSTRUCTION MANUAL
CHAIN SAW MODEL CS250
MANUEL D’INSTRUCTION ORIGINAL
TRONÇONNEUSE MODÈLECS250
MANUAL DE INSTRUCCIONES ORIGINAL
MOTOSIERRA MODELO CS250
Page 2

Page 3

1
OREGON® CORDLESS TOOL SYSTEM
CHAIN SAW MODEL CS250
AF 0513 F/N 547361
ENGLISH . . . . . . . . . . . . . . . . . . . . . . . . . . . . . . . . . . . . . . . 2
WARNING: READ AND UNDERSTAND ALL SAFETY WARNINGS AND ALL INSTRUCTIONS. FAILURE TO FOLLOW
THE WARNINGS AND INSTRUCTIONS MAY RESULT IN ELECTRIC SHOCK, FIRE AND/OR SERIOUS INJURY.
SAVE ALL WARNINGS AND INSTRUCTIONS FOR FUTURE REFERENCE.
FRANÇAIS . . . . . . . . . . . . . . . . . . . . . . . . . . . . . . . . . . . . . 31
AVERTISSEMENT: VEUILLEZ LIRE ET COMPRENDRE TOUS LES AVERTISSEMENTS DE SÉCURITÉ ET TOUTES
LES INSTRUCTIONS. LE NON-RESPECT DES AVERTISSEMENTS DE SÉCURITÉ ET DES INSTRUCTIONS PEUT ENTRAÎNER
UNE DÉCHARGE ÉLECTRIQUE, UN INCENDIE ET/OU DES BLESSURES GRAVES.
CONSERVEZ L’ENSEMBLE DES AVERTISSEMENTS ET INSTRUCTIONS POUR RÉFÉRENCE ULTÉRIEURE.
ESPAÑOL . . . . . . . . . . . . . . . . . . . . . . . . . . . . . . . . . . . . . . 60
ADVERTENCIA: LEA Y COMPRENDA TODAS LAS ADVERTENCIAS DE SEGURIDAD Y TODAS LAS INSTRUCCIONES.
NO SEGUIR LAS ADVERTENCIAS Y LAS INSTRUCCIONES PUEDE PROVOCAR CHOQUES ELÉCTRICOS, INCENDIOS Y/O
LESIONES GRAVES.
CONSERVE TODAS LAS ADVERTENCIAS E INSTRUCCIONES COMO REFERENCIA PARA EL FUTURO.
Page 4

2
OREGON® CORDLESS TOOL SYSTEM
CHAIN SAW MODEL CS250
TABLE OF CONTENTS
AF 0513 F/N 547361
TABLE OF CONTENTS
SYMBOLS AND LABELS . . . . . . . . . . . . . . . . . . . . . . . . . . . . . . . 3
SAFETY RULES . . . . . . . . . . . . . . . . . . . . . . . . . . . . . . . . . . . . . 4
GENERAL POWER TOOL SAFETY WARNINGS. . . . . . . . . . . . .4
WORK AREA SAFETY . . . . . . . . . . . . . . . . . . . . . . . . . . . . . 4
ELECTRICAL SAFETY . . . . . . . . . . . . . . . . . . . . . . . . . . . . . 4
PERSONAL SAFETY . . . . . . . . . . . . . . . . . . . . . . . . . . . . . . 5
SERVICE . . . . . . . . . . . . . . . . . . . . . . . . . . . . . . . . . . . . . . 6
CHAIN SAW SAFETY WARNINGS . . . . . . . . . . . . . . . . . . . . . 7
STORAGE, TRANSPORTING, AND DISPOSAL . . . . . . . . . . . . . 9
BATTERY SAFETY. . . . . . . . . . . . . . . . . . . . . . . . . . . . . . . 10
CHARGER SAFETY . . . . . . . . . . . . . . . . . . . . . . . . . . . . . . 11
PRODUCT IDENTIFICATION . . . . . . . . . . . . . . . . . . . . . . . . . . . 12
SPECIFICATIONS AND COMPONENTS . . . . . . . . . . . . . . . . . . . . 13
CHAIN SAW NAMES AND TERMS. . . . . . . . . . . . . . . . . . . . . . . . 14
ASSEMBLY . . . . . . . . . . . . . . . . . . . . . . . . . . . . . . . . . . . . . . . 15
UNPACKING . . . . . . . . . . . . . . . . . . . . . . . . . . . . . . . . . . 15
FILLING OIL RESERVOIR . . . . . . . . . . . . . . . . . . . . . . . . . . 15
OPERATING THE SAW. . . . . . . . . . . . . . . . . . . . . . . . . . . . . . . .16
BATTERY PACK AND CHARGER . . . . . . . . . . . . . . . . . . . . . 16
GENERAL OPERATION . . . . . . . . . . . . . . . . . . . . . . . . . . . 18
CUTTING . . . . . . . . . . . . . . . . . . . . . . . . . . . . . . . . . . . . 19
SHARPENING WITH POWERSHARP®. . . . . . . . . . . . . . . . . . . . . . 22
MAINTENANCE AND CLEANING . . . . . . . . . . . . . . . . . . . . . . . . 23
REPLACING THE BAR AND CHAIN . . . . . . . . . . . . . . . . . . . 24
TENSIONING INSTRUCTIONS . . . . . . . . . . . . . . . . . . . . . . 25
REPLACING THE SHARPENING STONE . . . . . . . . . . . . . . . . 26
CLEANING THE SAW . . . . . . . . . . . . . . . . . . . . . . . . . . . . 26
BATTERY PACK . . . . . . . . . . . . . . . . . . . . . . . . . . . . . . . . 26
CHARGER . . . . . . . . . . . . . . . . . . . . . . . . . . . . . . . . . . . . 26
TROUBLESHOOTING . . . . . . . . . . . . . . . . . . . . . . . . . . . . . . . . 27
WARRANTY AND SERVICE . . . . . . . . . . . . . . . . . . . . . . . . . . . . 29
© Blount, Inc. Pricing and specifications subject to change without notice. All rights reserved. OREGON® and PowerSharp®
are registered trademarks of Blount, Inc. in the United States and/or in other countries.
Page 5
3
OREGON® CORDLESS TOOL SYSTEM
CHAIN SAW MODEL CS250
SYMBOLS AND LABELS
AF 0513 F/N 547361
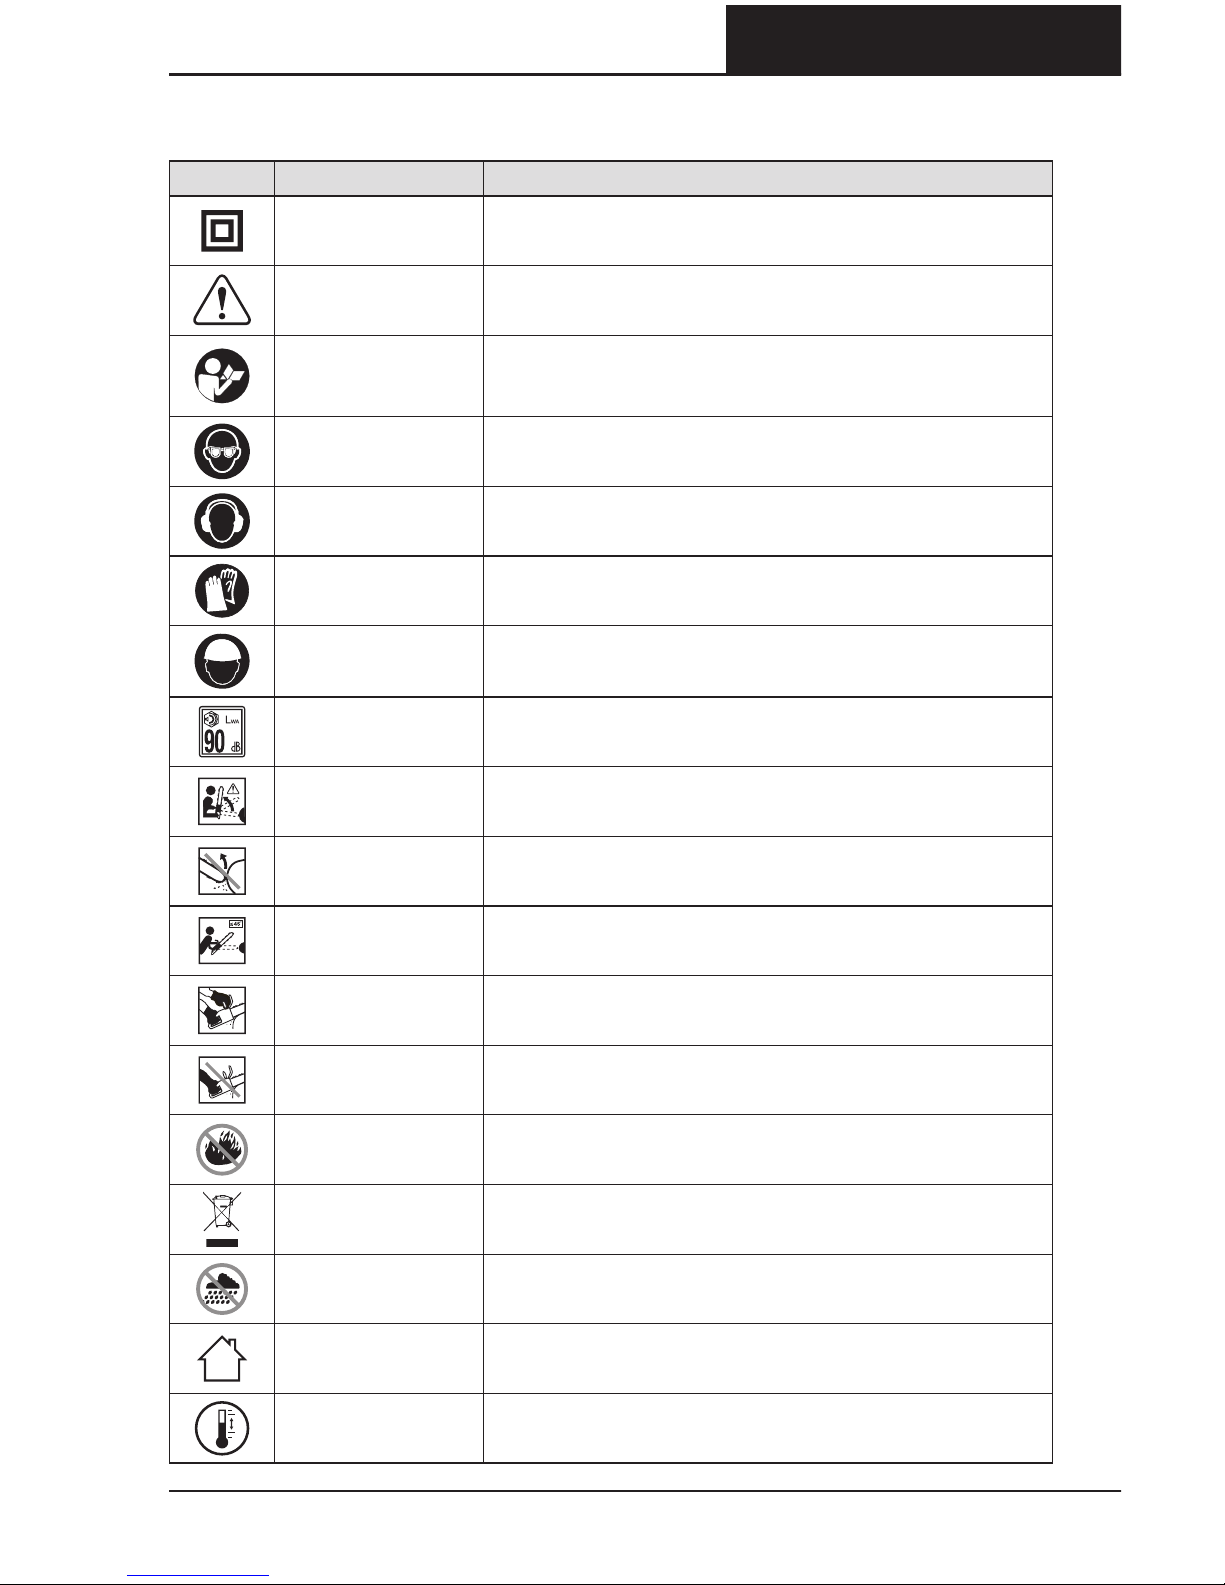
SYMBOLS AND LABELS
SYMBOL
NAME EXPLANATION
CLASS II
CONSTRUCTION
DESIGNATED DOUBLE INSULATED CONSTRUCTION
TOOLS
SAFETY ALERT
SYMBOL
INDICATES THAT THE TEXT THAT FOLLOWS EXPLAINS A
DANGER, WARNING, OR CAUTION.
READ
INSTRUCTIONS
THE ORIGINAL INSTRUCTION MANUAL CONTAINS
IMPORTANT SAFETY AND OPERATING INFORMATION.
READ AND FOLLOW THE INSTRUCTIONS CAREFULLY.
WEAR EYE
PROTECTION
WEAR EYE PROTECTION WHEN OPERATING THE CHAIN
SAW.
WEAR HEARING
PROTECTION
WEAR HEARING PROTECTION WHEN OPERATING THE
CHAIN SAW.
WEAR HAND
PROTECTION
WEAR GLOVES WHEN OPERATING THE CHAIN SAW AND
WHEN HANDLING THE BAR AND CHAIN.
WEAR HEAD
PROTECTION
WEAR A HARD HAT WHEN USING THE CHAIN SAW.
SOUND POWER SOUND POWER LEVEL IS 90 DB.
BEWARE OF
KICKBACK
DANGER! KICKBACK CAN CAUSE SEVERE INJURIES.
BAR NOSE
CONTACT
AVOID BAR NOSE CONTACT.
CHAIN KICKBACK
ANGLE
USE LOW KICKBACK CHAIN.
TWOHANDED
HOLD
HOLD SAW WITH TWO HANDS.
ONEHANDED
HOLD
DO NOT HOLD SAW WITH ONE HAND.
DO NOT
INCINERATE
DO NOT DISPOSE IN FLAMES.
DO NOT DISPOSE
DO NOT THROW IN THE HOUSEHOLD WASTE. TAKE TO
AN AUTHORIZED RECYCLER.
DO NOT EXPOSE
TO RAIN
DO NOT OPERATE THE CHARGER IN WET CONDITIONS.
INDOOR USE ONLY INTENDED FOR INDOOR USE ONLY.
OPERATING
TEMPERATURE
ONLY USE THE BATTERY PACK AT A TEMPERATURE
BETWEEN 32°F TO 104°F 0°C AND 40°C.
Page 6

4
OREGON® CORDLESS TOOL SYSTEM
CHAIN SAW MODEL CS250
SAFETY RULES
AF 0513 F/N 547361
INTRODUCTION
This chain saw is designed for occasional light duty use. It is not designed to fell
large trees or cut large diameter logs. This chain saw is not designed for tree
service. Do not cut trees or wooden timbers that have a diameter equal to or
greater than the bar length.
SAFETY RULES
GENERAL POWER TOOL SAFETY WARNINGS
WARNING: READ AND UNDERSTAND ALL SAFETY WARNINGS
AND ALL INSTRUCTIONS. FAILURE TO FOLLOW THE WARNINGS
AND INSTRUCTIONS MAY RESULT IN ELECTRIC SHOCK, FIRE AND/OR
SERIOUS INJURY.
SAVE ALL WARNINGS AND INSTRUCTIONS FOR FUTURE REFERENCE. THE
TERM “POWER TOOL” IN THE WARNINGS REFERS TO YOUR MAINSOPERATED
CORDED POWER TOOL OR BATTERY OPERATED CORDLESS POWER TOOL.
WORK AREA SAFETY
• Keep work area clean and well lit.
Cluttered or dark areas invite accidents.
• Do not operate the chain saw in
explosive atmospheres, such as in the
presence of flammable liquids, gases
or dust. Power tools create sparks which may
ignite the dust or fumes.
• Keep children and bystanders away
while operating the chain saw.
Distractions can cause you to lose control.
• Identify and avoid gas lines,
electrical hazards, tripping hazards,
and potential sources of body
entanglement.
• Establish a safe zone for helpers. Helpers
should never stand directly in front of or
behind the operator. Helpers should always
stand to the side or perpendicular to the
direction of the cut.
ELECTRICAL SAFETY
• Charger plugs must match the outlet.
Never modify the plug in any way. Do
not use any adapter plugs with earthed
(grounded) charger. Unmodified plugs
and matching outlets will reduce the risk of
electric shock.
• Avoid body contact with earthed or
grounded surfaces, such as pipes,
radiators, ranges and refrigerators.
There is an increased risk of electric shock if
your body is earthed or grounded.
• Accidental splashing of water against
the chain saw from any direction will
present no harmful shock or hazard to
the operator.
• Do not abuse the cord. Never use
the cord for carrying, pulling or
unplugging the charger. Keep cord
away from heat, oil, sharp edges or
moving parts. Damaged or entangled cords
increase the risk of electric shock.
• While operating the charger outdoors,
use an extension cord suitable for
outdoor use. Use of a cord suitable for
outdoor use reduces the risk of electric shock.
Page 7
5
OREGON® CORDLESS TOOL SYSTEM
CHAIN SAW MODEL CS250
SAFETY RULES
AF 0513 F/N 547361
• If operating a power tool in a damp
location is unavoidable, use a residual
current device (RCD) protected supply
or ground fault circuit interrupter
(GFCI). Use of a RCD (GFCI) reduces the risk of
electric shock.
PERSONAL SAFETY
• Stay alert, watch what you are
doing and use common sense when
operating the chain saw. Do not use
the chain saw while you are tired or
under the influence of drugs, alcohol or
medication. A moment of inattention while
operating chain saw may result in serious
personal injury.
• Use personal protective equipment.
Always wear eye protection. Protective
equipment such as a dust mask, non-skid
safety shoes, hard hat, or hearing protection
used for appropriate conditions will reduce
personal injuries.
• Remove any adjusting key or wrench
before turning the chain saw on. A
wrench or key left attached to a rotating part
of the chain saw may result in personal injury.
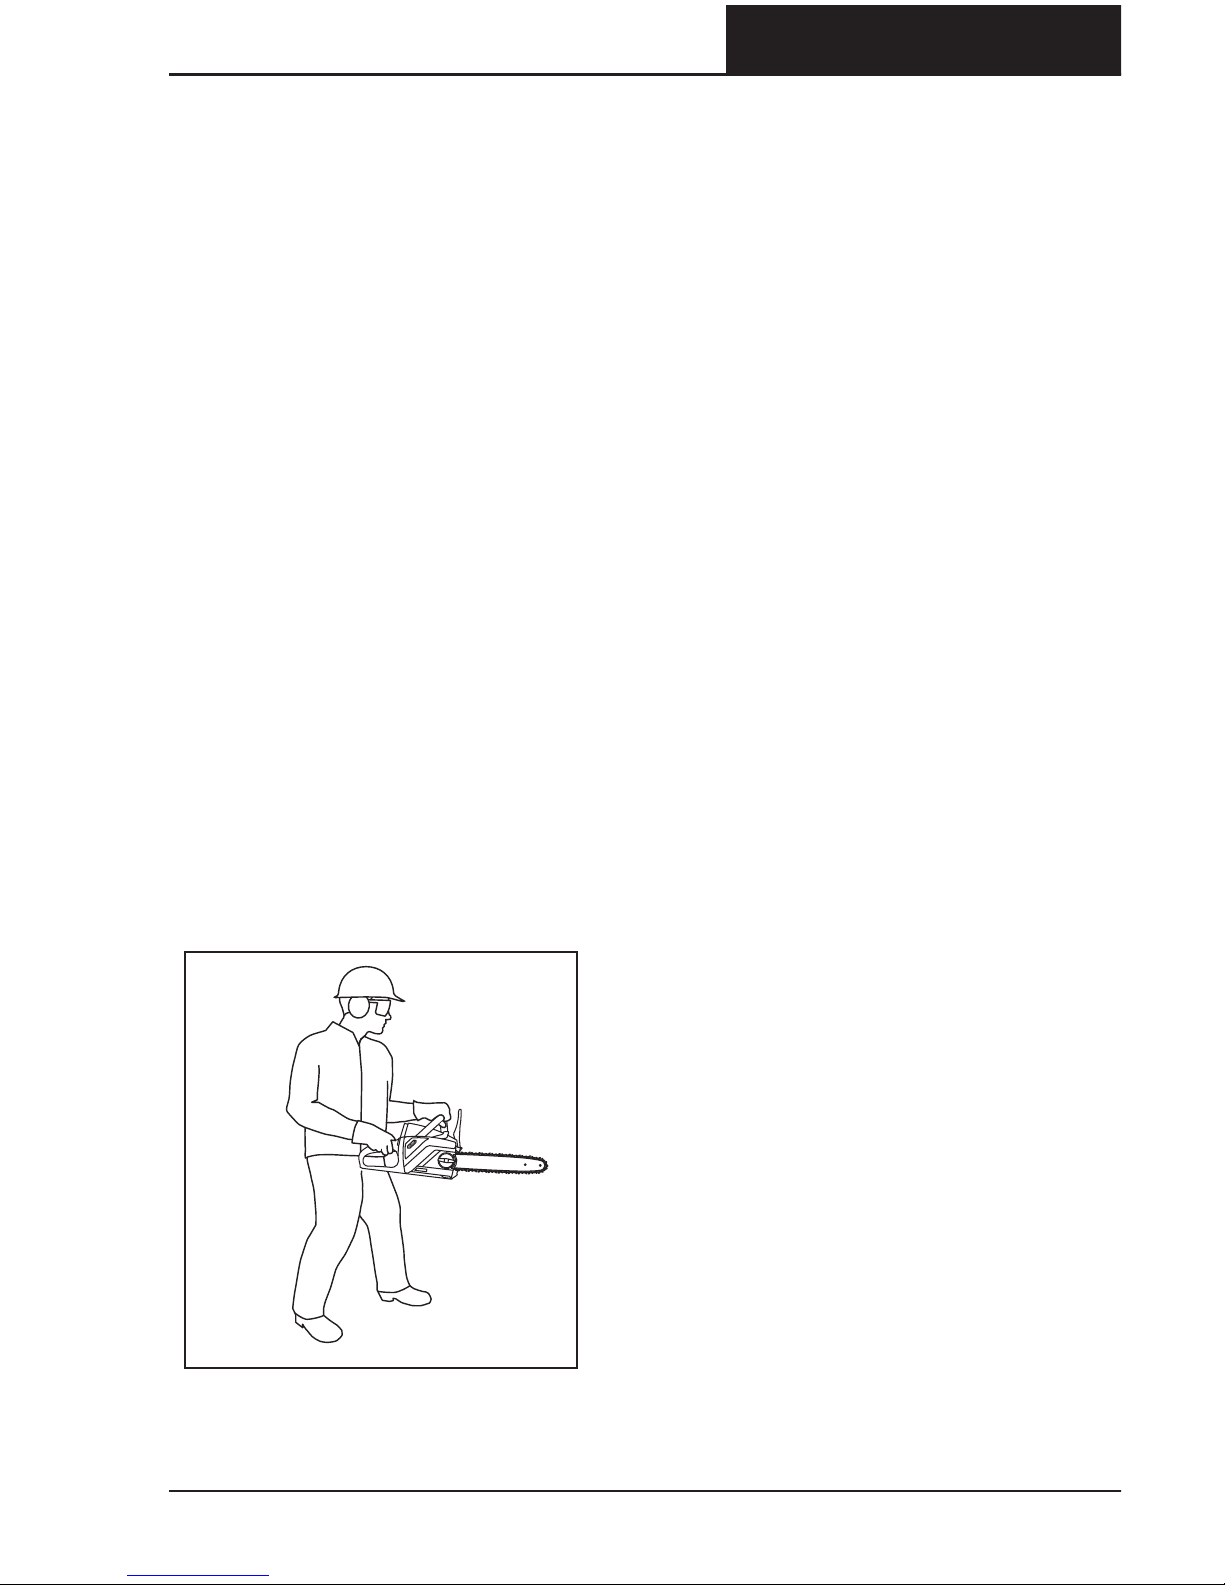
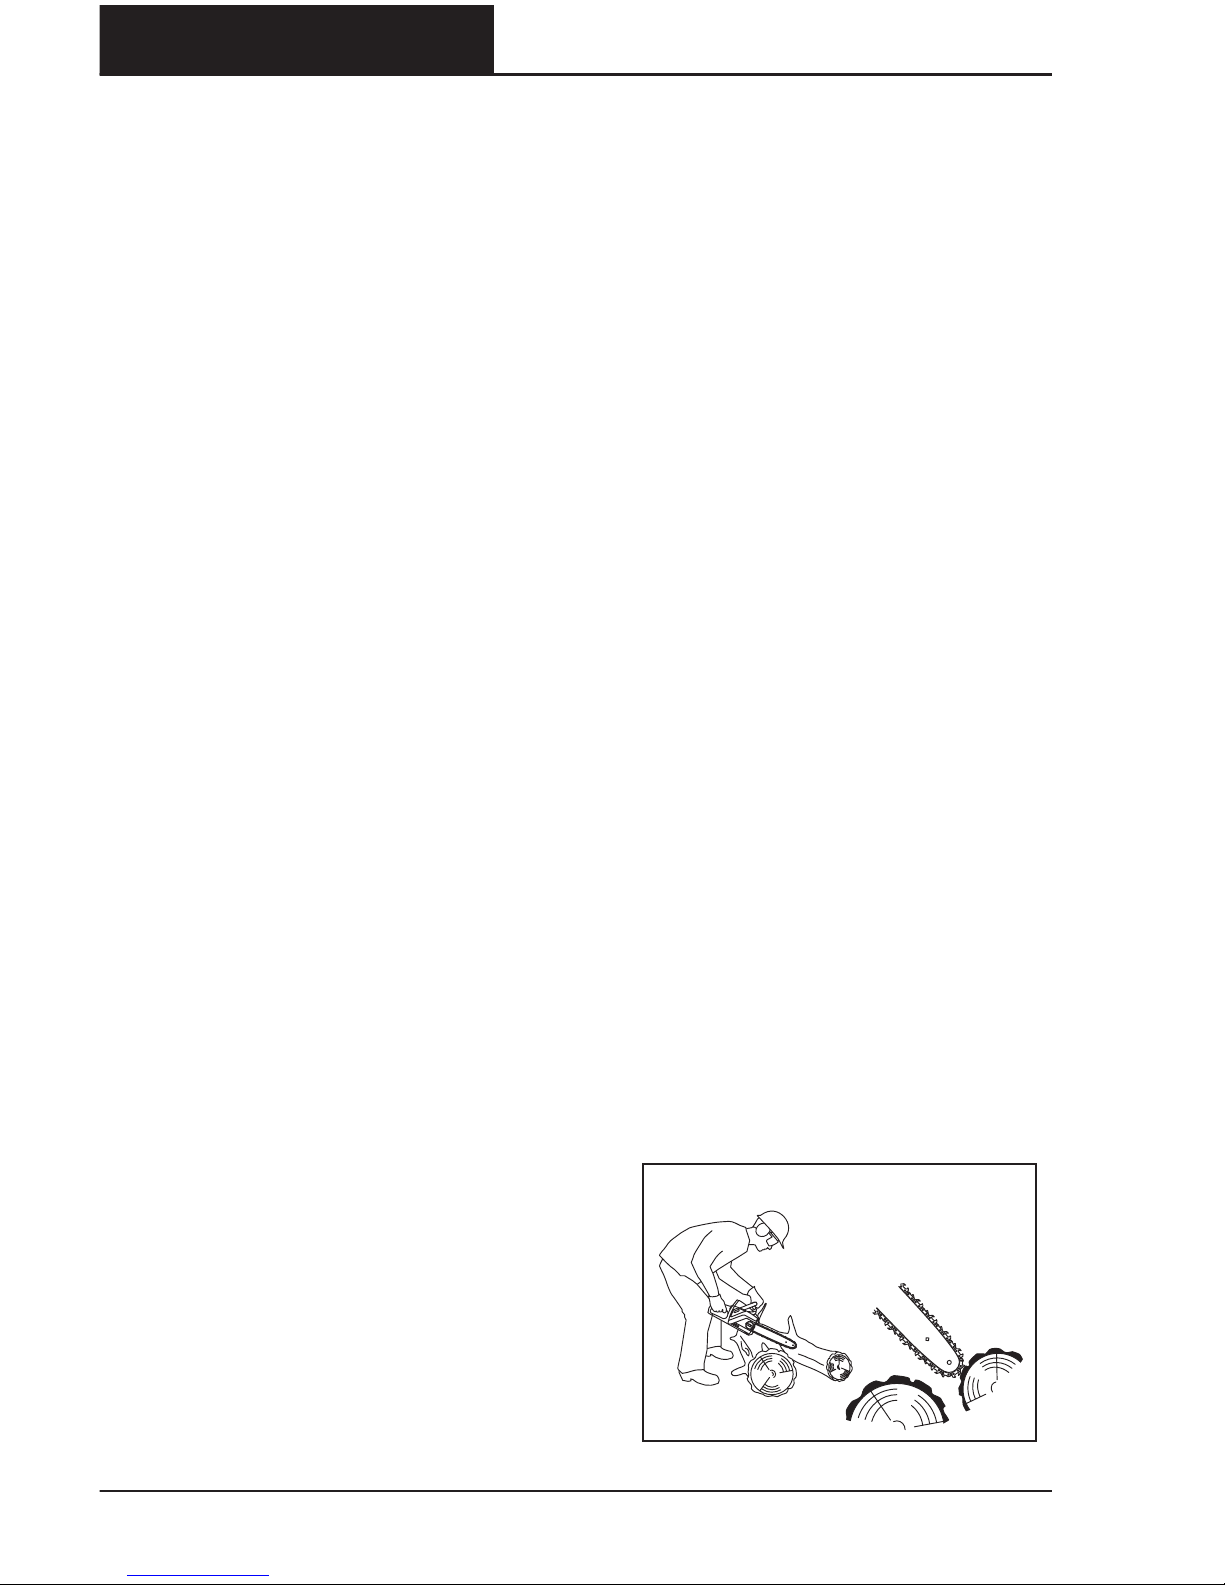
• Do not overreach. Keep proper footing
and balance at all times (Fig. ). This
enables better control of the chain saw in
unexpected situations.
• Dress properly. Do not wear loose
clothing or jewelry. Keep your hair,
clothing and gloves away from moving
parts. Loose clothes, jewelry or long hair can
be caught in moving parts.
• Use two hands when operating the
chain saw.
• The work piece, bar, and chain can be
hot after cutting. Wear gloves to avoid
burns.
• Use proper auxiliary equipment
and ensure that it is not damaged,
of adequate strength, and securely
placed. Use auxiliary equipment only for the
purpose for which it is intended.
• Prolonged use of power tools has been
reported to cause vascular, muscular,
or neurological disorders (such as
vibration white finger or Raynaud’s
syndrome). To reduce the risk of injury,
follow these instructions:
– Wear gloves and keep hands and body
warm.
– Maintain a firm grip on the hedge
trimmer, but do not use prolonged,
excessive pressure.
– Take frequent breaks.
The vibration in normal use can differ
from the stated values depending on the
material being cut, maintenance of the
cutting system, and other factors.
POWER TOOL USE AND CARE
• Do not force the chain saw. Use the
correct chain saw for your application.
The correct chain saw will do the job better
and safer at the rate for which it was designed.
• Do not use the chain saw if the switch
does not turn it on and off.
Any power tool that cannot be controlled with
the switch is dangerous and must be repaired.
• Prevent unintentional starting. Ensure
the switch is in the off-position before
connecting to power source and/or
battery pack, picking up or carrying
the tool. Carrying power tools with your
finger on the switch or energizing power tools
that have the switch on invites accidents.
FIG. 1
Page 8

6
OREGON® CORDLESS TOOL SYSTEM
CHAIN SAW MODEL CS250
SAFETY RULES
AF 0513 F/N 547361
• Disconnect the battery pack from
the chain saw before making any
adjustments, changing accessories, or
storing the chain saw. Such preventative
safety measures reduce the risk of starting the
chain saw accidently.
• Store idle chain saws out of the reach
of children and do not allow persons
unfamiliar with the chain saw or these
instructions to operate the chain saw.
Chain saws are dangerous in the hands of
untrained users.
• Maintain the chain saw. Check for
misalignment or binding of moving
parts, breakage of parts and any other
condition that may affect the chain
saw’s operation. If damaged, have the
chain saw repaired before use.
Many accidents are caused by poorly
maintained power tools.
• Keep cutting tools sharp and clean.
Properly maintained cutting tools with sharp
cutting edges are less likely to bind and are
easier to control.
• Use the chain saw, accessories and
tool bits etc. in accordance with these
instructions, taking into account the
working conditions and the work to
be performed. Use of the chain saw for
operations different from those intended
could result in a hazardous situation.
BATTERY TOOL USE AND CARE
• Recharge only with the charger
specified by OREGON®. A charger that
is suitable for one type of battery pack may
create a risk of fire when used with another
battery pack.
• Use the chain saw only with specifically
designated battery packs.
Use of any other battery packs may create risk
of injury and fire.
• When battery pack is not in use, keep
it away from other metal objects, like
paper clips, coins, keys, nails, screws
or other small metal objects, that can
make a connection from one terminal
to another. Shorting the battery terminal
may cause burns or a fire.
• Under abusive conditions, liquid may
be ejected from the battery; avoid
contact. If contact accidentally occurs, flush
with water. If liquid contacts eyes, additionally
seek medical help. Liquid ejected from the
battery may cause irritation or burns.
• Do not disassemble the chain saw,
charger, or battery pack or attempt to
repair these products. Doing so could
result in electrical shock.
SERVICE
Have your chain saw serviced by a
qualified repair person using only
identical replacement parts.
This will ensure that the safety of the
chain saw is maintained.
Page 9
7
OREGON® CORDLESS TOOL SYSTEM
CHAIN SAW MODEL CS250
SAFETY RULES
AF 0513 F/N 547361
CHAIN SAW
SAFETY WARNINGS
• Keep all parts of the body away from
the saw chain when the chain saw is
operating. Before you start the chain
saw, make sure the saw chain is not
contacting anything. A moment of
inattention while operating chain saws may
cause entanglement of your clothing or body
with the saw chain.
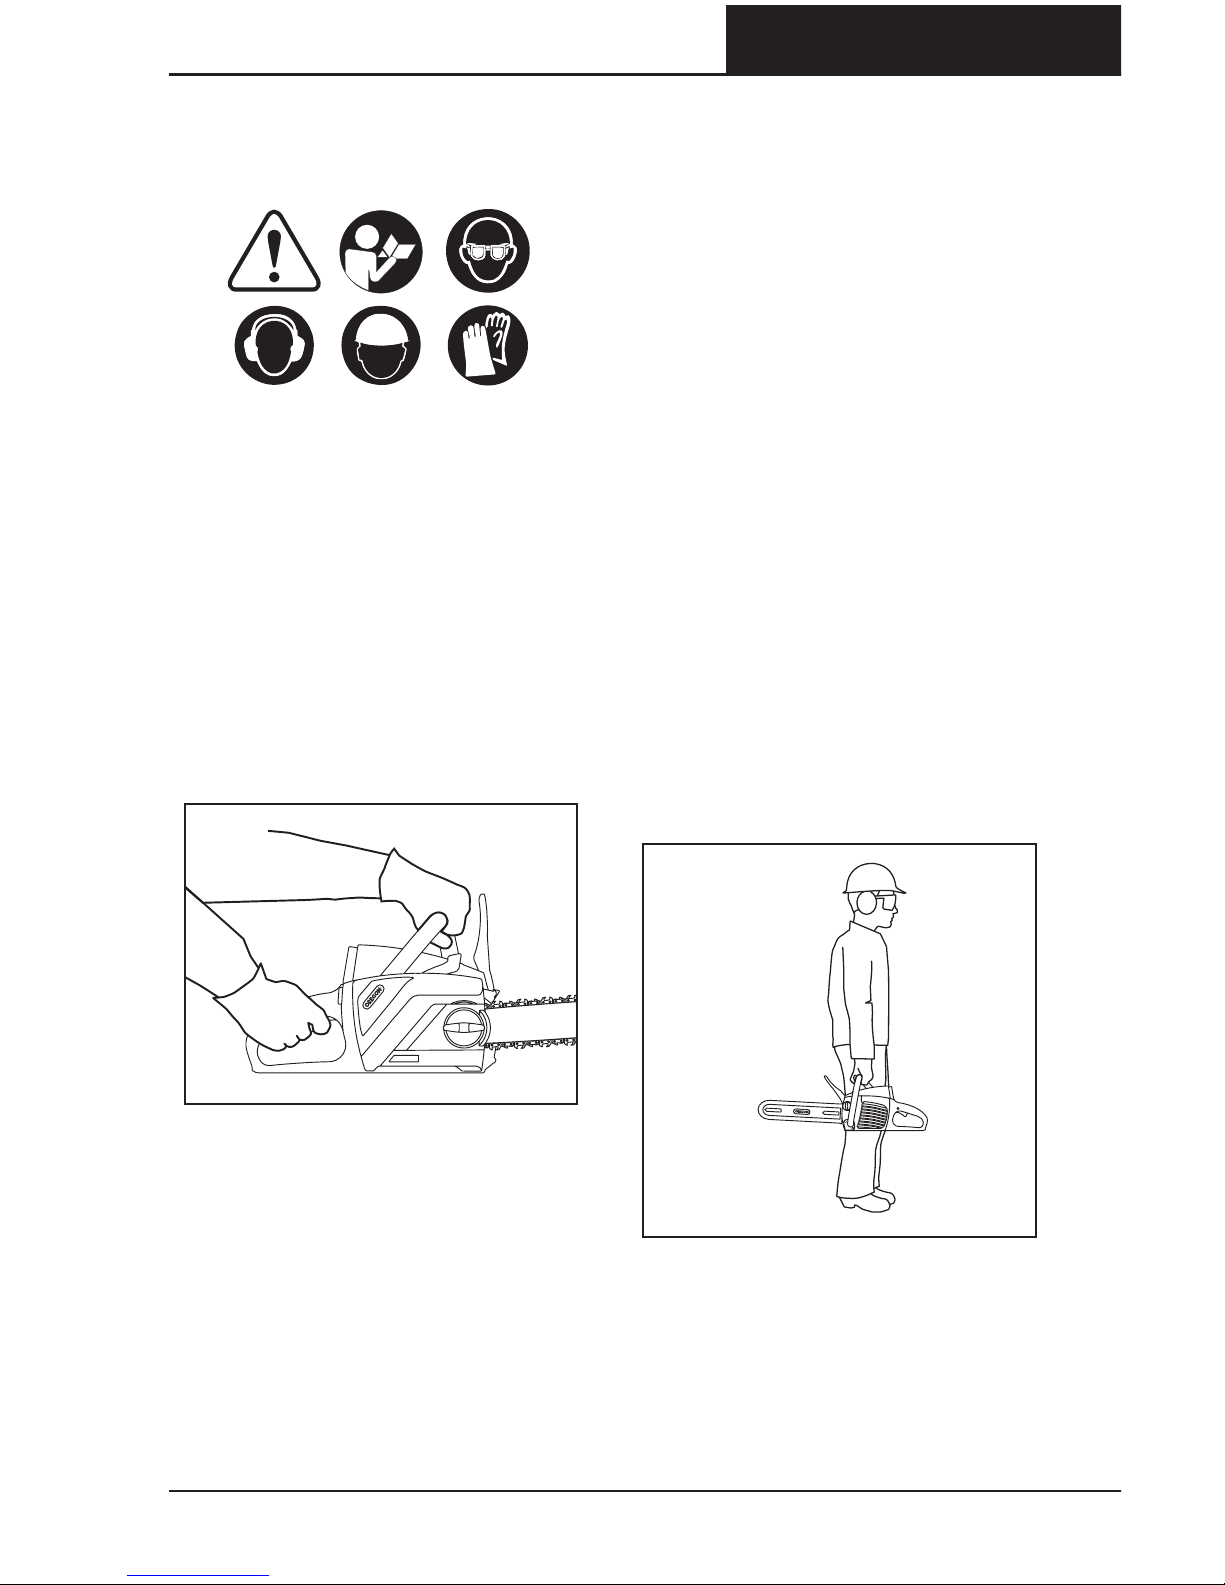
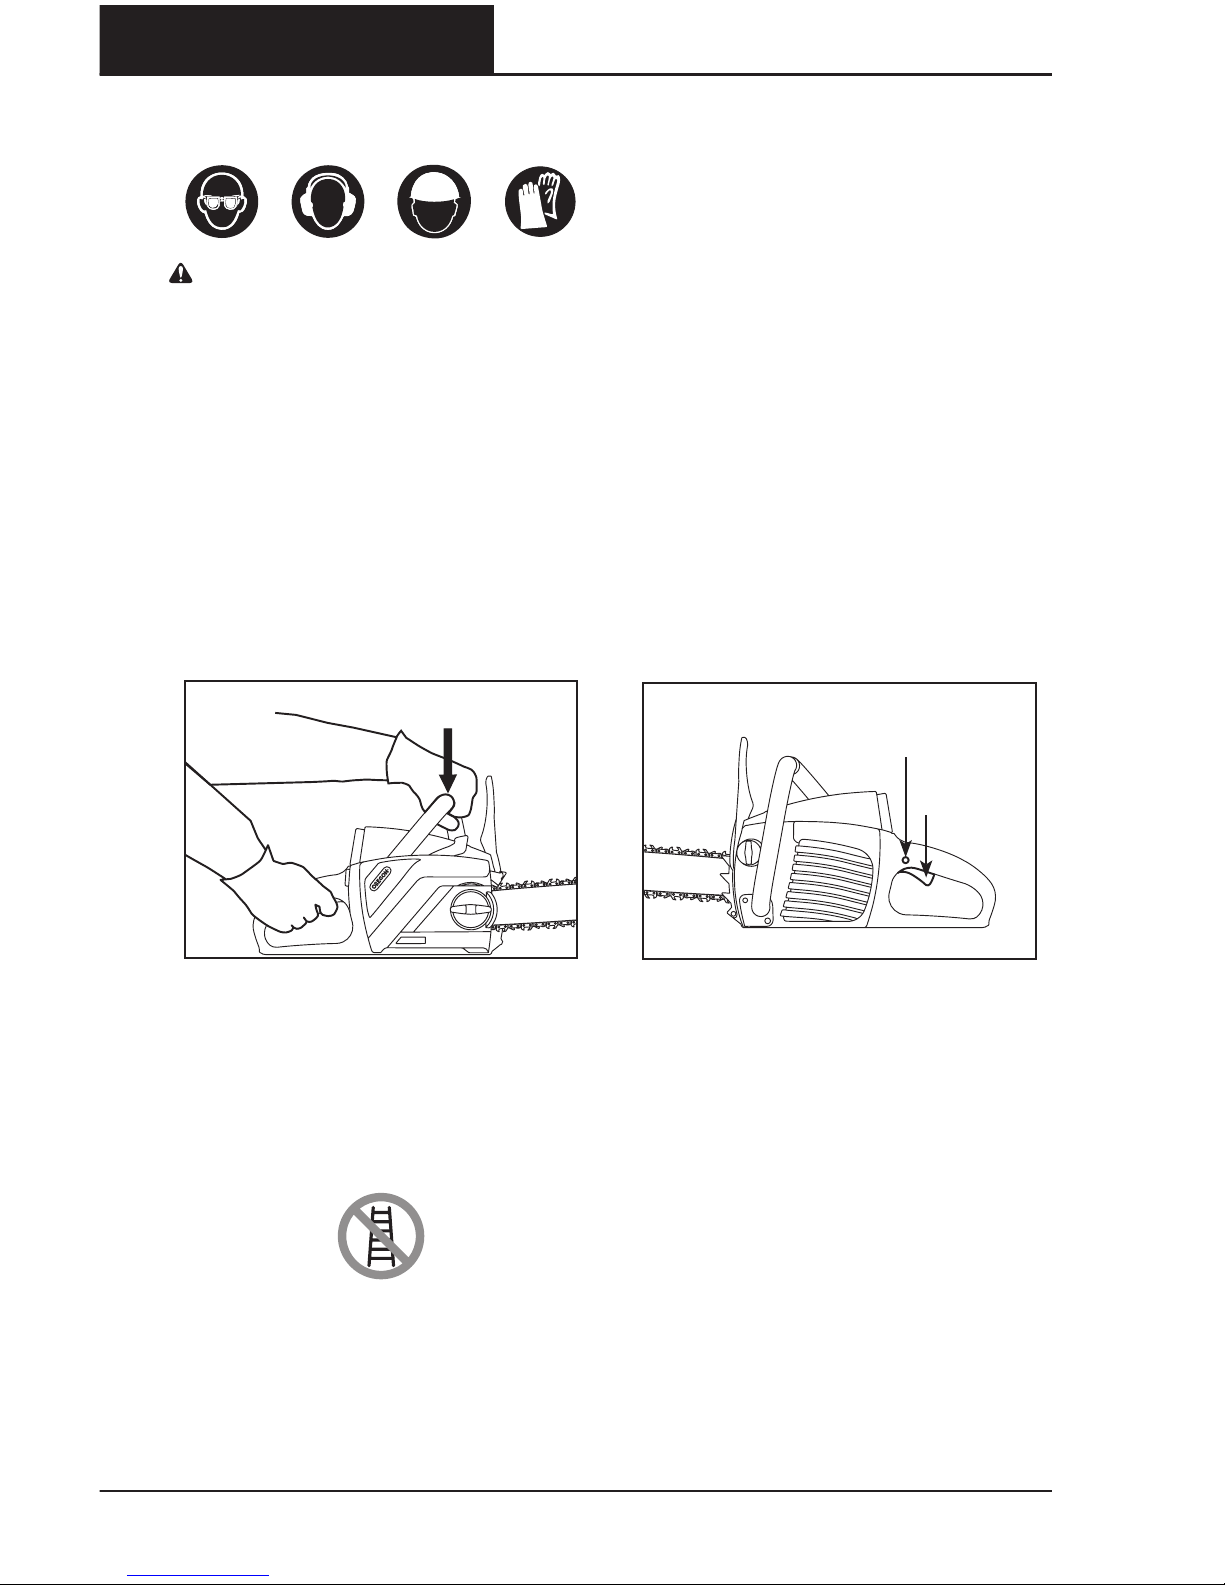
• Always hold the chain saw with your
right hand on the rear handle and your
left hand on the front handle (Fig. ).
Holding the chain saw with a reversed hand
configuration increases the risk of personal
injury and should never be done.
• Wear safety glasses and hearing
protection. Further protective
equipment for head, hands, legs and
feet is recommended. Adequate protective
clothing will reduce personal injury by flying
debris or accidental contact with the saw
chain.
• Do not operate a chain saw in a tree.
Operation of a chain saw while up in a tree
may result in personal injury.
• Always keep proper footing and
operate the chain saw only when
standing on a fixed, secure and level
surface. Slippery or unstable surfaces may
cause a loss of balance or control of the chain
saw.
• When cutting a limb that is under
tension, be alert for spring back. When
the tension in the wood fibers is released the
spring loaded limb may strike the operator
and/or throw the chain saw out of control.
• Use extreme caution when cutting
brush and saplings. The slender material
may catch the saw chain and be whipped
toward you or pull you off balance.
• Carry the chain saw by the front handle
with the chain saw switched off and
away from your body. When
transporting or storing the chain saw
always fit the guide bar cover (Fig. ).
Proper handling of the chain saw will reduce
the likelihood of accidental contact with the
moving saw chain.
FIG. 2
FIG. 3
Page 10
8
OREGON® CORDLESS TOOL SYSTEM
CHAIN SAW MODEL CS250
SAFETY RULES
AF 0513 F/N 547361
• Follow instructions for lubricating,
chain tensioning and changing
accessories. Improperly tensioned or
lubricated chain may either break or increase
the chance of kickback.
• Keep handles dry, clean, and free of oil
and grease. Greasy, oily handles are slippery
causing loss of control.
• Cut wood only. Do not use the chain
saw for purposes not intended. For
example: do not use chain saw for
cutting plastic, masonry, or non-wood
building materials. Use of the chain saw
for operations different than intended could
result in a hazardous situation.
• It is recommended that the first
time user should have practical
instruction in the use of the chain saw
and the protective equipment from
an experienced operator. The initial
practice should be cutting logs on a
saw-horse or cradle.
• Other than the wear parts identified in
this manual, the chain saw has no user
serviceable parts.
KICKBACK CAUSES AND
OPERATOR PREVENTION
Kickback may occur when the nose or
tip of the guide bar touches an object, or
when the wood closes in and pinches the
saw chain in the cut.
Tip contact in some cases may cause
a sudden reverse reaction, kicking the
guide bar up and back towards the
operator.
Pinching the saw chain along the top of
the guide bar may push the guide bar
rapidly back towards the operator.
Either of these reactions may cause you
to lose control of the saw which could
result in serious personal injury. Do not
rely exclusively upon the safety devices
built into your saw. As a chain saw user,
you should take several steps to keep
your cutting jobs free from accident or
injury.
Kickback is the result of tool misuse and/
or incorrect operating procedures or
conditions and can be avoided by taking
proper precautions as given below:
• Maintain a firm grip, with thumbs
and fingers encircling the chain saw
handles, with both hands on the saw
and position your body and arm to
allow you to resist kickback forces.
Kickback forces can be controlled by the
operator. Do not let go of the chain saw.
• Do not overreach and do not cut
above shoulder height. This helps prevent
unintended tip contact and enables better
control of the chain saw in unexpected
situations.
• Only use replacement bars and
chains specified by OREGON®.
Incorrect replacement bars and chains may
cause chain breakage and/or kickback.
• Follow the OREGON® sharpening and
maintenance instructions for the saw
chain. Decreasing the depth gauge height
can lead to increased kickback.
KICKBACK SAFETY DEVICES
ON THIS SAW
CHAIN BRAKE
The chain saw comes equipped with a
chain brake, which stops both the motor
and the motion of the chain when
kickback occurs (Fig. ). The chain brake
can be activated by the forward motion
of the hand guard as the saw rotates
backward during kickback; it can also be
activated by the inertial forces generated
during rapid pushback.
FIG. 4
Page 11
9
OREGON® CORDLESS TOOL SYSTEM
CHAIN SAW MODEL CS250
SAFETY RULES
AF 0513 F/N 547361
DANGER: NEVER MODIFY OR
ATTEMPT TO DISABLE THE CHAIN
BRAKE.
CHAIN
This saw comes equipped with a saw
chain that met the reduced kickback
requirements of ANSI B. when tested
on a representative sample of chain saws.
For replacement chain, see “Specifications
and Components” in this manual.
BAR
This saw comes equipped with a guide
bar that has a small radius nose. Small
radius noses generally have less potential
for kickback.
When replacing the bar, be sure to order
the bar listed in this manual.
STORAGE, TRANSPORTING,
AND DISPOSAL
STORING THE SAW
• Remove the battery pack and
thoroughly clean the saw. See
“Maintenance and Cleaning” in this
manual. Install the blade cover prior to
storing.
• Store in a dry place out of reach of
children or pets.
• It is normal for a small amount of oil to
seep from the bar when the chain saw is
not in use. To protect against seepage,
install the blade cover and place an
absorbent pad under the guide bar.
STORING THE BATTERY PACK
When storing the battery pack longer
than nine months, follow these
guidelines:
• Remove the battery pack from the chain
saw or charger.
• Store in a cool, dry place.
• Keep out of reach of children or pets.
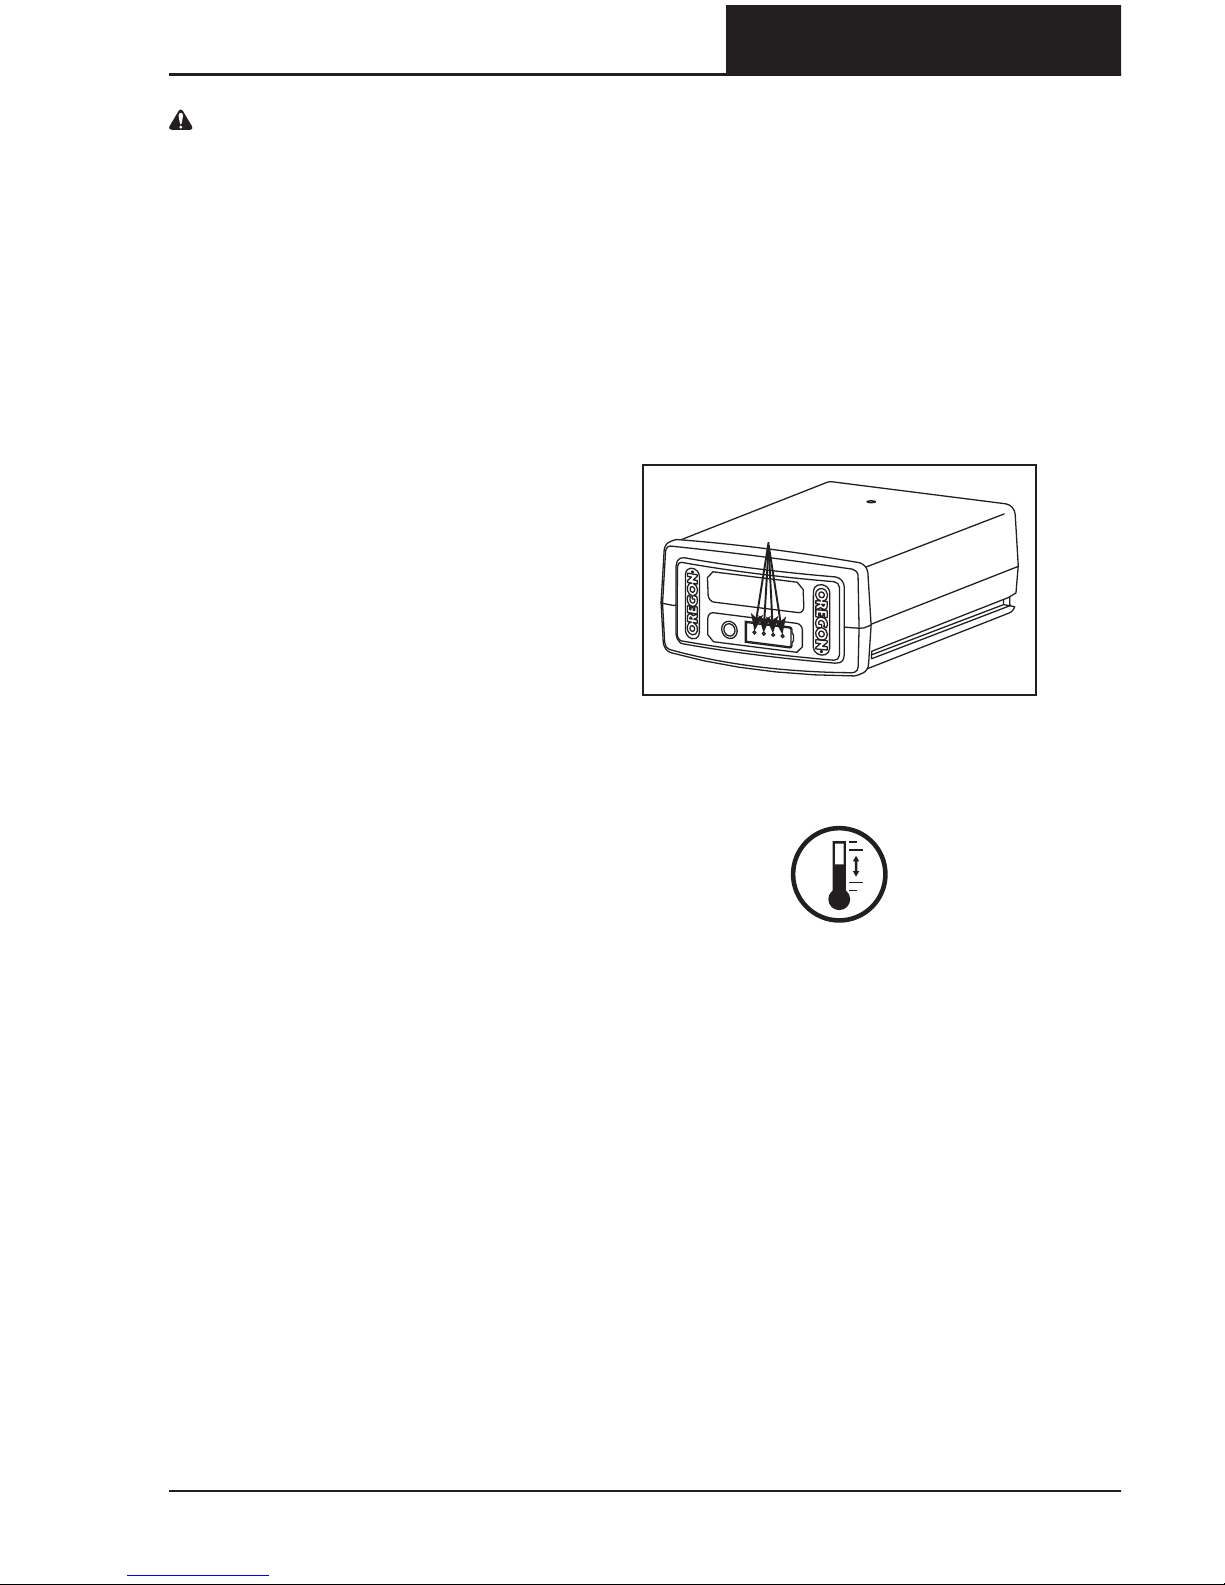
• To prolong battery life, never store
battery pack in a completely discharged
condition. (Fig. ).
• Store at a temperature between -°F to
°F (-°C and °C).
STORING THE CHARGER
• Remove battery pack from the charger.
• Disconnect charger from power source.
• Store in a dry place.
• Keep out of reach of children or pets.
See “Maintenance and Cleaning” for more
information.
FIG. 5
INDICATOR LIGHTS
Page 12

10
OREGON® CORDLESS TOOL SYSTEM
CHAIN SAW MODEL CS250
SAFETY RULES
AF 0513 F/N 547361
TRANSPORTING THE CHAIN SAW
Remove the battery pack from the saw
and install the blade cover. Clean the saw
thoroughly and if desired, drain the bar
and chain oil to reduce seepage.
TRANSPORTING THE BATTERY PACK
Observe national regulations when
shipping lithium ion batteries. Special
package labeling may be required.
BATTERY PACK DISPOSAL
Do not dispose of battery pack in
household garbage or incinerate. Local
waste management and recycling
agencies have information on proper
recycling or disposal instructions. Battery
packs can be collected in the United
States or Canada through Rechargeable
Battery Recycling Corporation. OREGON®
has already paid the costs involved to
recycle battery packs. Return end of life
battery packs to participating retailer or
recycling center. Return locations and
more information can be found at
www.callrecycle.org or --BATTERY.
BATTERY SAFETY
DANGER: FAILURE TO FOLLOW
THESE SAFETY RULES CAN
CAUSE THE BATTERY PACK TO
LEAK HAZARDOUS CHEMICALS,
OVERHEAT, EMIT SMOKE, BURST,
FLARE, EXPLODE, AND/OR IGNITE.
CAUTION: DO NOT DISPOSE
OF THE BATTERY PACK IN THE
HOUSEHOLD WASTE OR FIRE.
LITHIUM ION BATTERY PACKS
SHOULD BE RECYCLED BY LOCAL
AUTHORIZED RECYCLER.
CAUTION: DO NOT EXPOSE
BATTERY PACK TO EXCESSIVE
HEAT, SUCH AS THE INTERIOR OF A
VEHICLE IN HOT WEATHER. SUCH
EXPOSURE CAN CAUSE A LOSS IN
PERFORMANCE AND/OR SERVICE
LIFE. DO NOT ATTEMPT TO RE
CHARGE A NONRECHARGEABLE
BATTERY PACK.
• Do not disassemble or modify the
battery pack. The battery pack is
equipped with built-in safety and
protection features which may be
inadvertently disabled.
• Do not connect the positive (+) and
negative (-) terminals with metal objects.
Do not transport or store the battery
pack together with metal objects such
as coins or screws. Short-circuiting may
occur or the metal object in contact
with the battery pack can generate heat.
• Do not discard the battery pack into
fire or otherwise expose to excessive
heat. Such conditions can cause the
insulation to melt or safety features to
be damaged.
• Do not use, charge, or store the battery
pack near a heat source as fire or a
heater that generate temperatures
above °F (°C). Overheating and/or
internal short circuiting may occur.
Page 13

11
OREGON® CORDLESS TOOL SYSTEM
CHAIN SAW MODEL CS250
SAFETY RULES
AF 0513 F/N 547361
• Do not immerse the battery pack in
water or expose it to extremely wet
conditions. Moisture can cause the
protective features to be damaged,
resulting in charging with extremely
high current and voltage, which may
lead to abnormal chemical reactions.
• To recharge the battery pack, use the
battery charger specifically designed
for the battery pack and observe the
specified charger safety precautions
detailed in this manual. Failure to do so
may result in extremely high current and
voltage, which may lead to abnormal
chemical reactions.
• Do not use OREGON® branded battery
packs in non-OREGON® branded tools.
• Do not strike, pierce, or throw battery
pack.
• Do not use an apparently damaged or
deformed battery pack.
• If the recharging operation fails to
complete even after the specified
recharging time has elapsed,
immediately stop further recharging.
• If the battery pack gives off an odor,
generates heat, becomes discolored
or deformed, or in any way appears
abnormal during use, recharging, or
storage, immediately remove it from the
equipment or charger.
• Any liquid leaking from the battery is
corrosive, can damage eyes and skin,
and may be toxic if swallowed.
CHARGER SAFETY
IMPORTANT SAFETY INSTRUCTIONS
SAVE THESE INSTRUCTIONS
CAUTION: THIS APPLIANCE IS NOT
INTENDED FOR USE BY PERSONS
INCLUDING CHILDREN WITH
REDUCED PHYSICAL, SENSORY OR
MENTAL CAPABILITIES, OR LACK
OF KNOWLEDGE, UNLESS THEY
HAVE BEEN GIVEN SUPERVISION
OR INSTRUCTION BY A PERSON
RESPONSIBLE FOR THEIR SAFETY.
CHILDREN SHOULD BE SUPERVISED
TO ENSURE THAT THEY DO NOT PLAY
WITH THE APPLIANCES.
CAUTION: RISK OF INJURY FROM
ELECTRIC SHOCK AND FIRE. CHARGE
ONLY WITH LITHIUM ION BATTERIES
INTENDED FOR THIS APPLIANCE.
THIS CHARGER IS INTENDED FOR
DRY LOCATION USE ONLY. BEFORE
USING THE CHARGER, READ AND
UNDERSTAND ALL INSTRUCTIONS
AND SAFETY MARKINGS IN THIS
MANUAL, ON THE CHARGER AND ON
THE BATTERY PACKS.
CAUTION: USE THIS CHARGER
ONLY WITH THE SUPPLIED POWER
CORD, MAKING SURE THAT THE
INPUT PLUG CORRECTLY MATES TO
THE OUTPUT RECEPTACLE.
• Do not expose the charger to rain.
• Disconnect the charger from the power
supply when not in use.
• Do not disassemble the charger. THERE
ARE NO USER SERVICEABLE PARTS
INSIDE. Take it to an approved service
location when repair is required.
• Do not use the charger if it has been
dropped, received a sharp impact, or
otherwise damaged in any way. Replace
or take the charger to an approved
service location immediately.
• To reduce the risk of injury, charge only
the lithium ion batteries specified for
the charger.
• Do not operate the charger with
a damaged cord or plug. Replace
damaged power cord with the power
cord part number located in the
instructions. See “Specifications and
Components” in this manual.
• Locate the cord so that it will not be
tripped over, stepped on, or otherwise
subjected to potential damage.
• Never unplug the charger by pulling on
the cord; always pull by the plug.
Page 14
12
OREGON® CORDLESS TOOL SYSTEM
CHAIN SAW MODEL CS250
PRODUCT IDENTIFICATION
AF 0513 F/N 547361
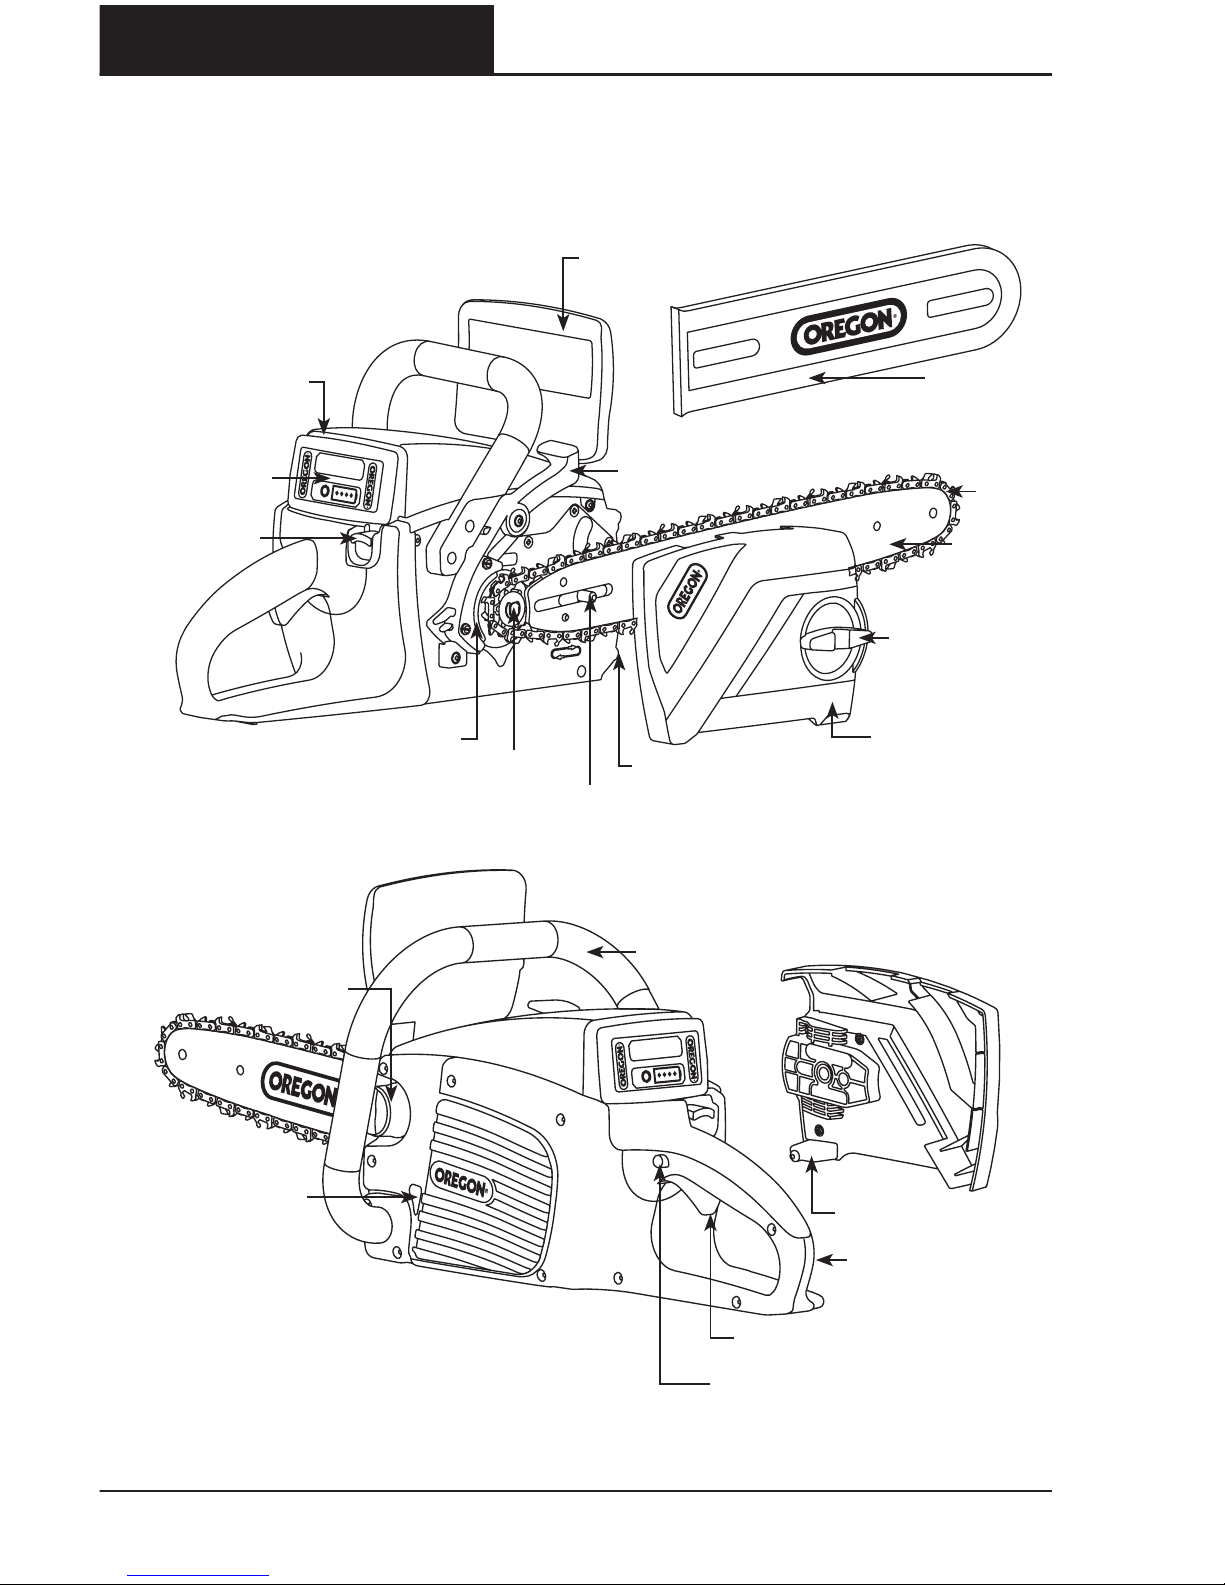
PRODUCT IDENTIFICATION
KNOW THE CHAIN SAW
SIDE COVER
HAND GUARD / CHAIN BRAKE
SIDE COVER KNOB
POWERSHARP® LEVER
CHAIN
BLADE COVER
GUIDE BAR
BATTERY
PAC K
SPROCKET
SHARPENING STONE
BARMOUNTING STUD
BATTERY PORT
BATTERY
RELEASE
CHAIN TENSIONER SCREW
SIDE COVER CHAIN CATCH
REAR HANDLE
TRIGGER SWITCH
TRIGGER LOCKOUT
FRONT HANDLE
OIL RESERVOIR CAP
OIL INSPECTION
WINDOW
Page 15

13
OREGON® CORDLESS TOOL SYSTEM
CHAIN SAW MODEL CS250
SPECIFICATIONS AND COMPONENTS
AF 0513 F/N 547361
SPECIFICATIONS AND COMPONENTS
REPLACEMENT COMPONENTS PART NUMBER
GUIDE BAR
14 inch (35 cm) 91 SDE,
.050 inch (1.3 mm)
554874
SAW CHAIN AND STONE,
POWERSHARP®
14 inch (35 cm) 91,
LOW-KICKBACK
554873
ALTERNATIVE SAW CHAIN
14 inch (35 cm) 3/8 inch LOW
PROFILE 91 LOW-KICKBACK RATED
CHAIN
OREGON® S52
BATTERY PACK, MODEL B600E 548208
BATTERY PACK, MODEL B400E 545938
BATTERY PACK, MODEL B500S 545937
CHARGER WITH CORD, MODEL C600 540580
CHARGER WITH CORD, MODEL C750 548185
CHARGER, MODEL C600
INPUT 100240V~ 5060Hz 60W
INPUT
U.S. AND CANADA ONLY 120V~ 60Hz 60W
OUTPUT 41.5V 1.25A
POWER CORD
US/CAN P/N: 546636 EU P/N: 547383
UK P/N: 547384 AU/NZ P/N: 560663
BATTERY PACK
TYPE LITHIUM ION
OPERATING TEMPERATURES 32°F TO 104°F 0°C TO 40°C
MODEL
CAPACITY,
NOMINAL
VOLTAGE,
NOMINAL
C600 CHARGE
TIME APPROX.
B600E 4.00 Ah / 144 Wh +36 VDC 210 MINUTES
B400E 2.40 Ah / 89 Wh +37 VDC 120 MINUTES
B500S 1.25 Ah / 47 Wh +37 VDC 60 MINUTES
CHAIN SAW
OIL CAPACITY 5.9 oz 175 ml)
BAR AND CHAIN OIL OREGON® BRAND
DRY WEIGHT WITH B400E 12.0 lb 5.4 kg
DRY WEIGHT WITHOUT
BATTERY, BAR, AND CHAIN
7.9 lb 3.6 kg
SOUND POWER LEVEL 90dB
VIBRATION 2.87 m/s
2
(K, 1.5 m/s2)
MAX BAR LENGTH 14 inch (35 cm)
CHAIN PITCH 3/8 inch LOW PROFILE - 91
CHAIN GAUGE .050 inch (1.3 mm)
SPROCKET TEETH 6
NO LOAD CHAIN SPEED 12 m/s
Page 16

14
OREGON® CORDLESS TOOL SYSTEM
CHAIN SAW MODEL CS250
CHAIN SAW NAMES AND TERMS
AF 0513 F/N 547361
CHAIN SAW NAMES AND TERMS
Alignment flange: The long, raised portion
of the bar pad holding the mounting
stud.
Automatic oiler: A system that
automatically lubricates the guide bar
and saw chain.
Bucking: The process of cross-cutting a
felled tree or log into lengths.
Chain brake: A device used to stop the
saw chain.
Chain saw powerhead: A chain saw
without the saw chain or guide bar.
Drive sprocket: The toothed part that
drives the saw chain.
Felling: The process of cutting down a
tree.
Felling back cut: The final cut in a tree
felling operation made on the opposite
side of the tree from the notching
undercut.
Front handle: The support handle located
at or toward the front of the chain saw.
Hand guard: A structural barrier between
the front handle of a chain saw and
the guide bar, which also serves as an
activating mechanism for the chain
brake.
Guide bar: A railed structure that supports
and guides the saw chain.
Kickback: The backward or upward
motion, or both, of the guide bar
occurring when the saw chain near the
nose of the top area of the guide bar
contacts any object such as a log or
branch, or when the wood closes in and
pinches the saw chain in the cut.
Low-kickback chain: A chain that
complies with the kickback performance
requirements of ANSI B..
Normal cutting position: Those positions
assumed in performing the bucking and
felling cuts.
Notching undercut: A notch cut in a tree
that directs the tree’s fall.
Rear handle: The support handle located
at or toward the rear of the saw.
Reduced kickback guide bar: A guide bar
which has been demonstrated to reduce
kickback significantly.
Saw chain: A loop of chain having
cutting teeth, that cuts the wood, and
that is driven by the powerhead and is
supported by the guide bar.
Trigger lock-out: A movable stop that
prevents the unintentional operation
of the trigger switch until manually
actuated.
Trigger switch: A device that turns the
chain saw on and off.
Page 17
15
OREGON® CORDLESS TOOL SYSTEM
CHAIN SAW MODEL CS250
ASSEMBLY
AF 0513 F/N 547361
ASSEMBLY
UNPACKING
DANGER: DO NOT ATTEMPT TO
OPERATE THE CHAIN SAW IF ANY
PART IS DAMAGED OR MISSING.
Some chain saw kits come completely
assembled. If the chain saw has been
packaged without the saw chain and
guide bar installed, see “Replacing the Bar
and Chain” in this manual for installation
instructions. After removing the chain
saw from its box, inspect it carefully to
make sure no damage has occurred
during shipping.
Inspect the chain saw for missing parts.
If any parts are damaged or missing,
contact OREGON® to obtain replacement
parts at ...
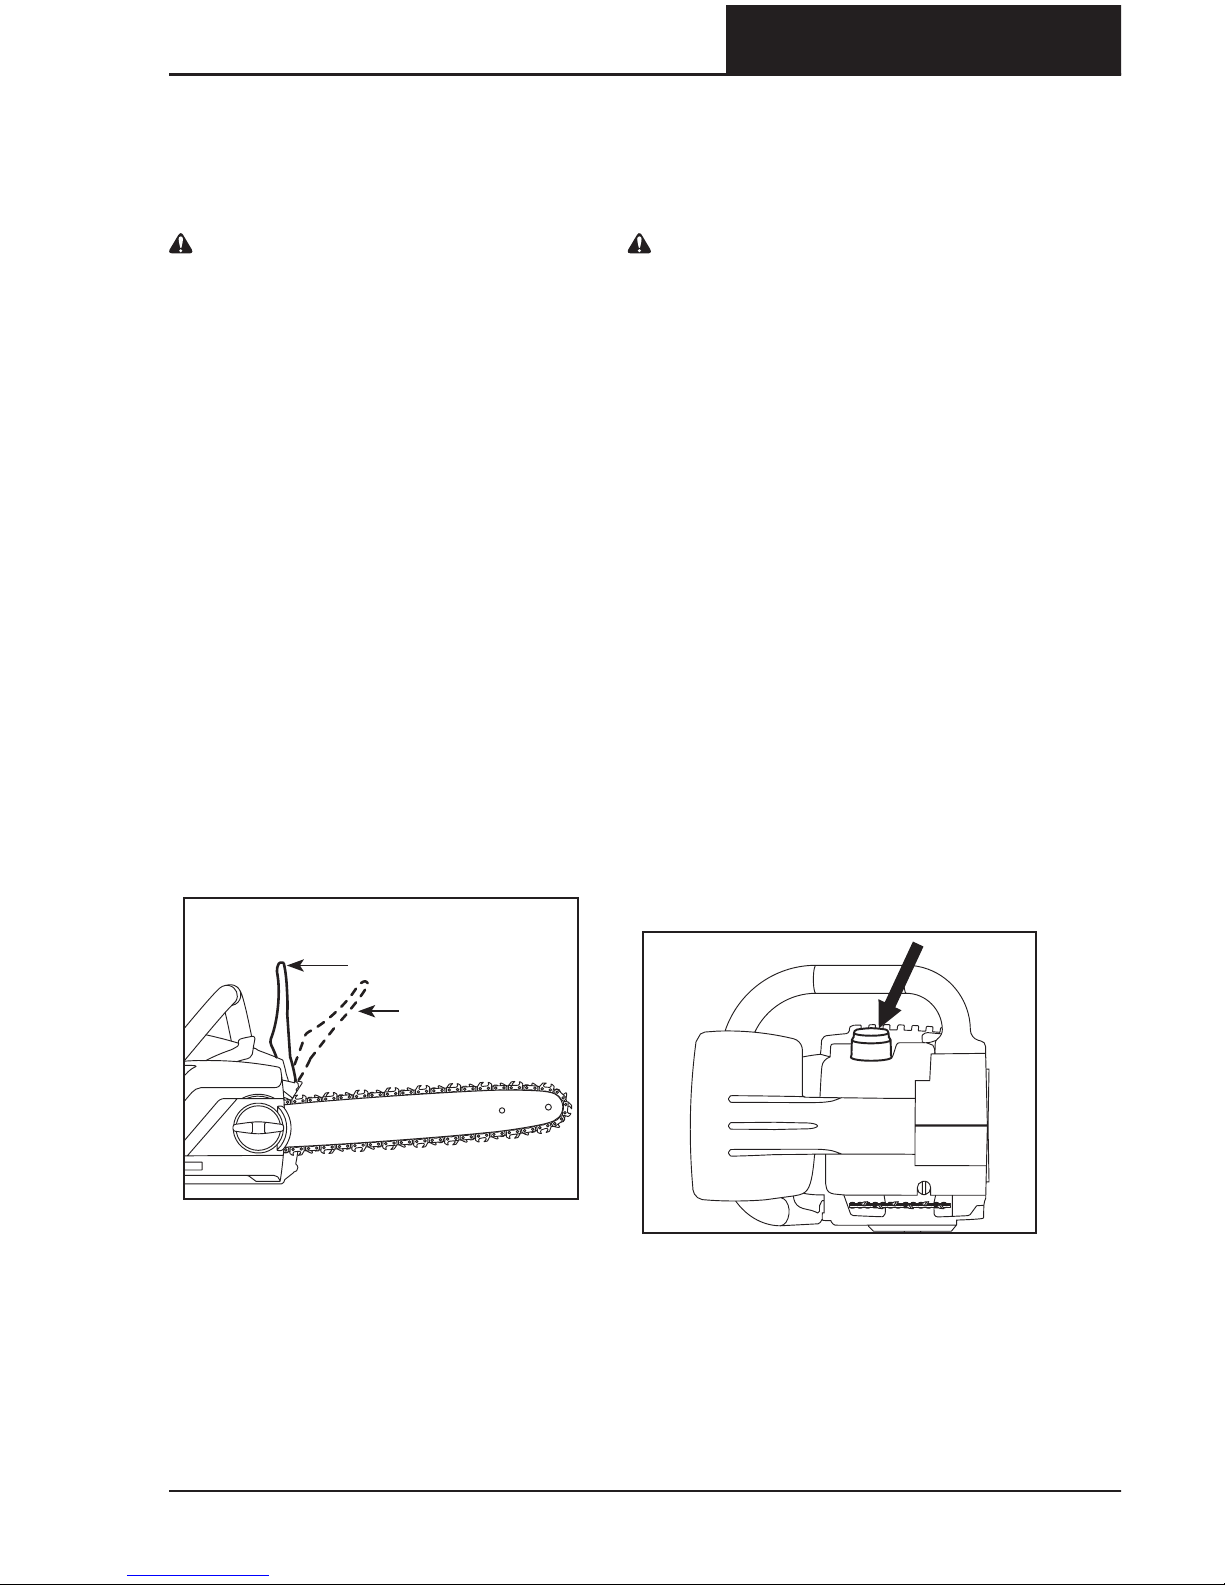
IMPORTANT: AFTER UNPACKING THE
CHAIN SAW, CHECK THE POSITION OF
THE HAND GUARD. THE CHAIN SAW
WILL NOT RUN WITH THE CHAIN BRAKE
ENGAGED. PULL THE HAND GUARD
BACK TOWARDS THE FRONT HANDLE
BEFORE OPERATION (FIG. ).
INSTALLING BUCKING SPIKES
Some chain saw kits come with metal
bucking spikes as an accessory. To install
the spikes, position on the front of the
saw with the spikes facing upward, then
fasten with the two supplied screws.
FILLING OIL RESERVOIR
CAUTION: CHECK OIL LEVEL
FREQUENTLY AND FILL AS NEEDED.
NEVER OPERATE THE CHAIN SAW IF
OIL IS NOT VISIBLE.
Bar and chain oil is required to properly
lubricate the bar and chain. Use
OREGON® bar and chain oil for best
results. It is specially designed to provide
low friction and faster cuts. NEVER use
oil or other lubricants not specifically
designed for use on the bar and chain.
This can lead to a clogged oil system,
which may cause premature wear of the
bar and chain.
Place the chain saw on its side on a firm,
flat surface, so that the oil cap is on top
(Fig. ). After cleaning any debris from the
cap area, remove the cap and carefully
pour the bar and chain oil into the
reservoir. Replace the cap and check the
presence of oil through the oil inspection
window. Additional bar and chain oil is
necessary shortly after oil is no longer
viewable through the oil inspection
window.
FIG. 6
HAND GUARD IN
OPERATING POSITION
HAND GUARD IN
BRAKE POSITION
FIG. 7
Page 18
16
OREGON® CORDLESS TOOL SYSTEM
CHAIN SAW MODEL CS250
OPERATING THE SAW
AF 0513 F/N 547361
OPERATING THE SAW
BATTERY PACK AND CHARGER
WARNING: DO NOT CHARGE THE
BATTERY PACK IN THE RAIN.
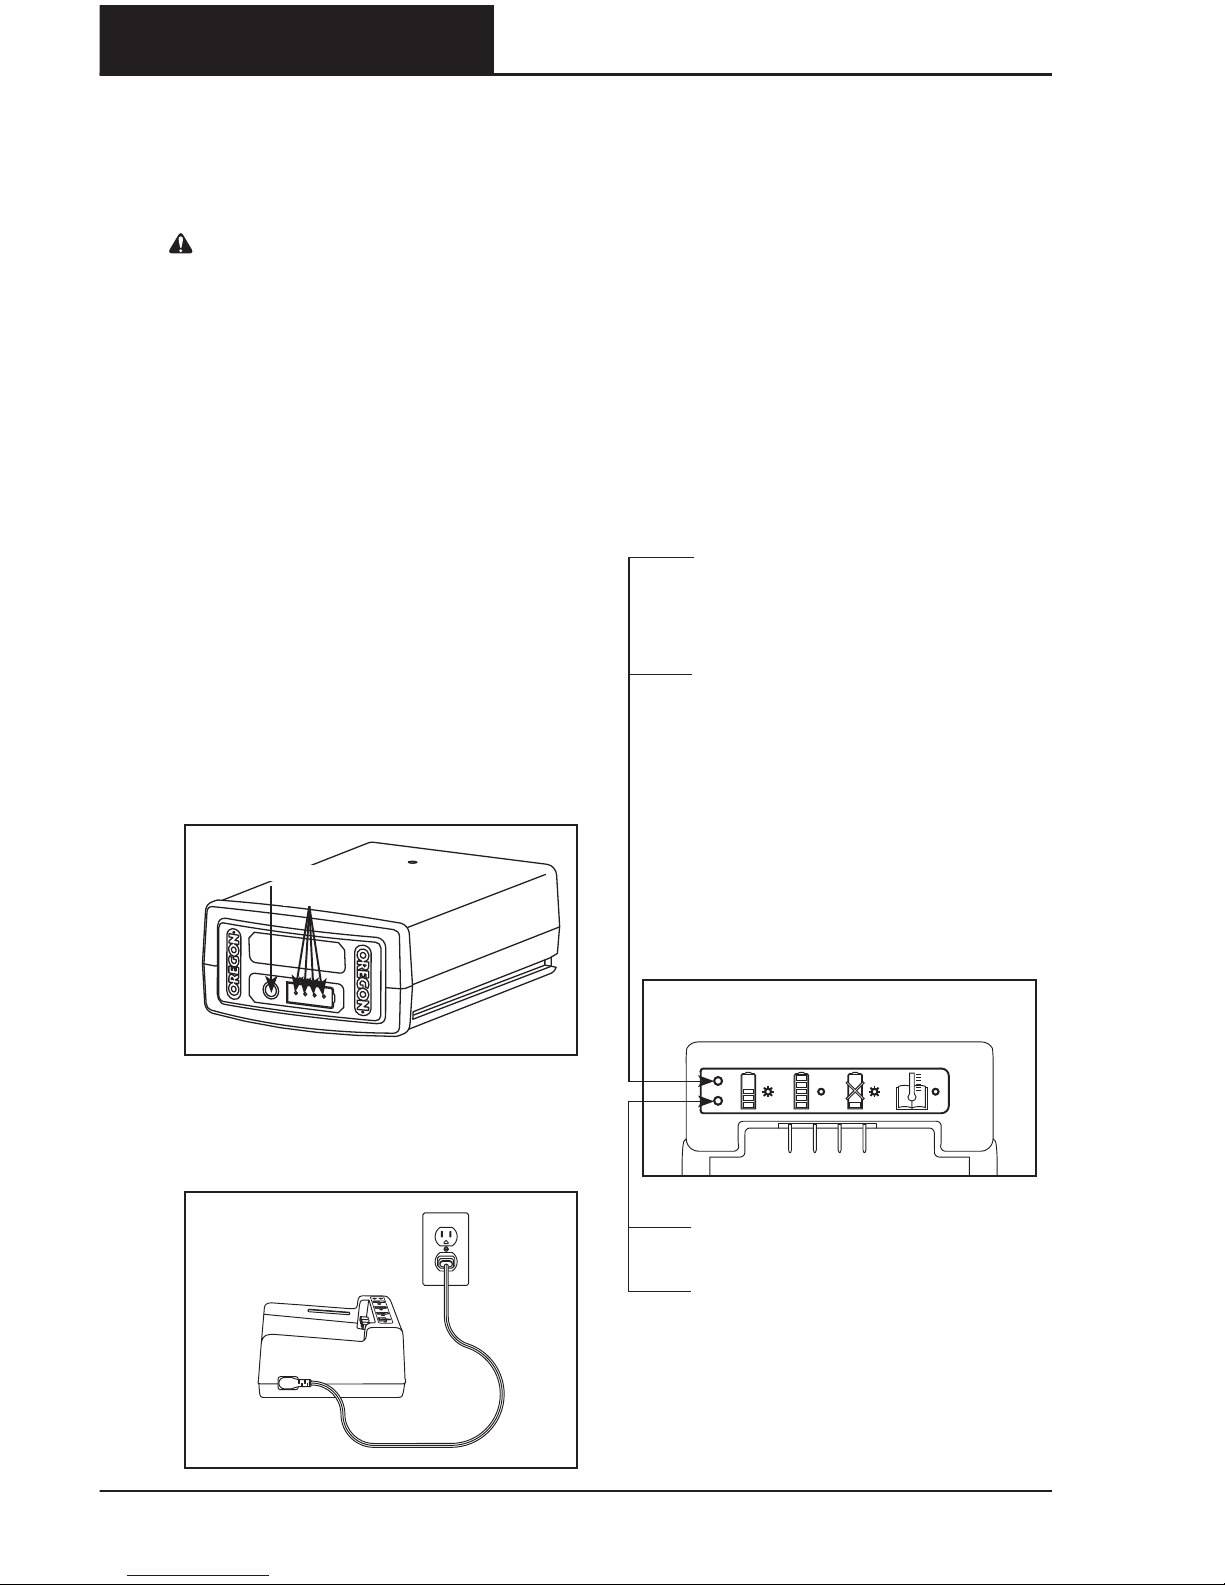
BATTERY PACK LED CHARGELEVEL
INDICATOR
The lithium ion battery pack is equipped
with an LED charge-level indicator. To test
the charge level of the battery pack, press
the indicator button on the battery pack’s
face (Fig. ).
No lights: recharge.
One steady green light:
less than % charged.
Charge battery pack before use.
Two steady green lights:
–% charged.
Three steady green lights:
–% charged.
Four steady green lights:
–% charged.
CONNECTING THE CHARGER
Connect the charger cord to the charger
and to the proper electrical outlet (Fig. ).
Only use the cord set that was supplied
with the charger. At first use, verify that
the plug type matches the receptacle.
CHARGER LED CHARGESTATE
INDICATOR
The battery charger is equipped with an
LED charge-state indicator that indicates
the state of charging as well as conditions
that may delay or prevent charging
(Fig. ).
Note: Until a battery pack is inserted, no
lights will be visible.
Blinking orange light: a fault
condition exists. There are
several potential causes. See
“Troubleshooting” in this manual.
Steady orange light: the battery
pack temperature is beyond the
acceptable range (°F/°C to
°F/°C). Allow the battery pack
to reach the acceptable
temperature range before
charging. The pack may be left on
the charger as the temperature
adjusts. Charging will begin when
the proper temperature is
reached.
Blinking green light: battery pack
is charging.
Steady green light: battery pack is
ready for use.
FIG. 8
INDICATOR LIGHTS
INDICATOR BUTTON
FIG. 9
FIG. 10
Page 19

17
OREGON® CORDLESS TOOL SYSTEM
CHAIN SAW MODEL CS250
OPERATING THE SAW
AF 0513 F/N 547361
CHARGING THE BATTERY PACK
WARNING: FAILURE TO FOLLOW
PROPER CHARGING PROCEDURES
MAY CAUSE EXCESSIVE VOLTAGE,
EXCESSIVE CURRENT FLOW, LOSS
OF CONTROL DURING CHARGING,
LEAKAGE OF HAZARDOUS
CHEMICALS, HEAT GENERATION,
BURSTING, OR FIRE.
With the charger cord connected to the
charger and plugged into an electrical
outlet, align the grooves in the battery
with the rails on the charger and slide the
battery pack onto the charger until fully
seated (Fig. ).
Check the charge-state indicator for
charging conditions.
INSERTING AND RELEASING
THE BATTERY PACK
Only use the OREGON® brand battery
packs specified in these operating
instructions.
Align the groove in the battery with the
rails inside the battery port. Firmly insert
the battery pack into the chain saw’s
battery port, pressing forward until it
clicks as it locks into place (Fig. ).
To remove the battery pack, lift up on
the battery release and remove the pack
(Fig. ).
FIG. 11
FIG. 12
FIG. 13
Page 20
18
OREGON® CORDLESS TOOL SYSTEM
CHAIN SAW MODEL CS250
OPERATING THE SAW
AF 0513 F/N 547361
GENERAL OPERATION
WARNING: ALWAYS WEAR PROPER
GLOVES, HEAD, EAR, AND EYE
PROTECTION.
OPERATING TEMPERATURE
This chain saw is designed to operate
within a temperature range of °F to
°F (°C to °C).
GRIP
With the saw on a firm, flat surface, grasp
the front handle with the left hand and
the rear handle with the right. Fingers
should wrap over the top of the handle
and the thumb below the handle (Fig. ).
STANCE
Both feet should be on solid ground, with
weight evenly spread between them.
Do not overreach and do not stand on a
ladder, stepstool, or any raised position
that is not fully secured.
STOPPING THE SAW
Release the trigger switch to stop the
chain saw.
TESTING THE BRAKE
Make sure the chain brake is working
before using the chain saw. To check
brake operation, start the saw on a firm
flat surface, and then move the hand
guard forward to manually activate the
chain brake. A properly functioning
chain brake stops the motor and saw
chain immediately.
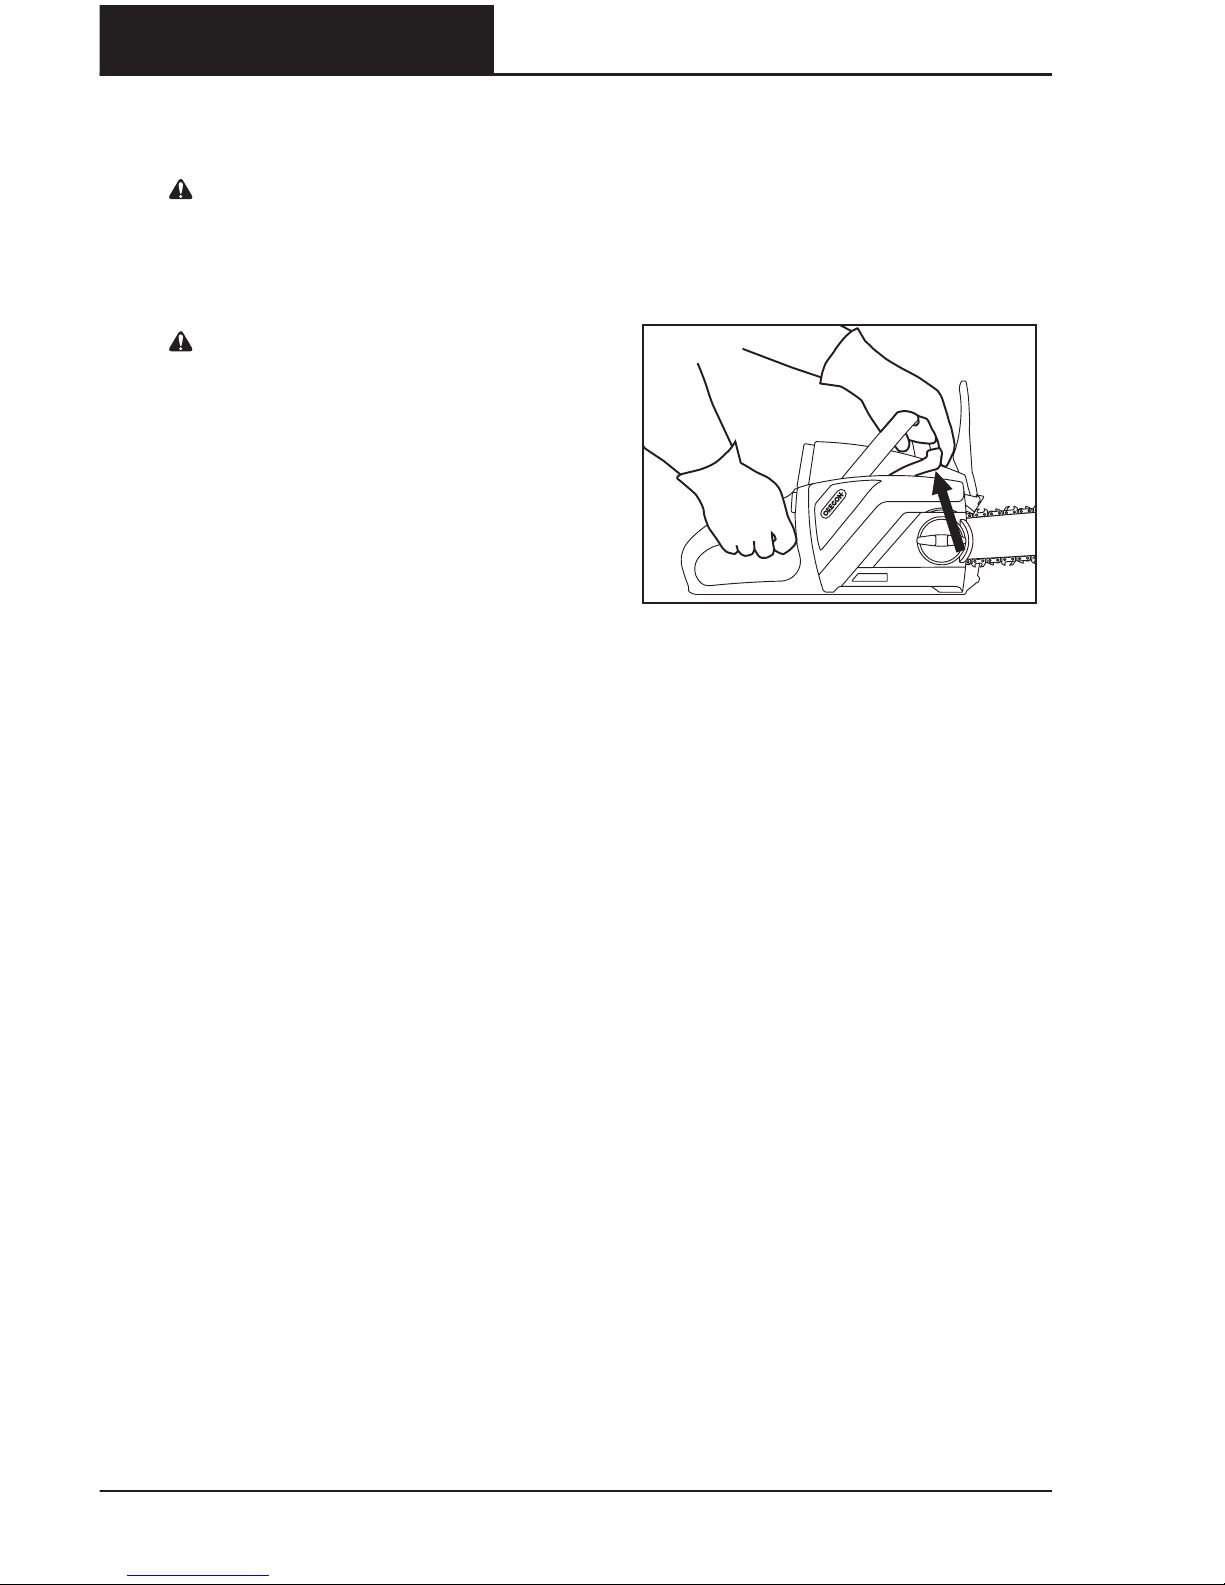
STARTING THE SAW
Grasp the top and rear handles firmly.
Press and hold the trigger lock-out with
the thumb (). To start the saw, squeeze
the trigger switch () (Fig. ). There is no
need to continue to press the trigger
lock-out.
GRIP WITH THUMB
BELOW HANDLE
FIG. 14
1 TRIGGER LOCKOUT
2 TRIGGER
SWITCH
FIG. 15
Page 21
19
OREGON® CORDLESS TOOL SYSTEM
CHAIN SAW MODEL CS250
OPERATING THE SAW
AF 0513 F/N 547361
CUTTING
BASIC CUTTING
WARNING: ALWAYS BE SURE OF
FOOTING AND HOLD THE CHAIN
SAW FIRMLY WITH BOTH HANDS
WHILE THE MOTOR IS RUNNING.
Assume the proper cutting grip and
stance in front of the wood with the
saw off. Press the trigger lock-out and
squeeze the trigger switch. Let the chain
reach full speed before beginning the
cut.
Begin cutting by lightly pressing the
guide bar against the wood. Use only
light pressure, letting the saw do the
work.
Maintain a steady speed throughout the
cut, releasing pressure just before the
end of the cut.
PRUNING
When pruning, make sure bystanders or
helpers are a safe distance from falling
branches and not directly in front of or
behind the saw operator. Secure any
branches that might be hazardous. Use
proper auxiliary equipment. Maintain
good footing, hold the saw firmly with
both hands, and do not overreach.
With the saw at full speed, bring the
bottom of the guide bar into contact with
the branch to cut. Apply light pressure.
For larger branches, first make a shallow
undercut on the bottom of the branch,
then finish the cut from the top. Cutting
a large branch completely from the top
could cause splintering; a complete cut
from the bottom can cause the branch to
pinch the bar.
Some saws have metal bucking spikes
mounted to the front of the saw.
Depending on user technique, bucking
spikes may reduce pruning cut quality.
FELLING A TREE
When bucking and felling operations are
being performed by two or more persons
at the same time, the felling operation
should be separated from the bucking
operation by a distance of at least twice
the height of the tree being felled. Trees
should not be felled in a manner that
would endanger any person, strike any
utility line or cause any property damage.
If the tree does make contact with any
utility line, the utility company should be
notified immediately.
Use the plastic spikes on the front of the
saw to support the saw on the wood. If
equipped, set metal bucking spikes into
the wood and use as a leverage point
to increase stability when cutting large
diameter wood.
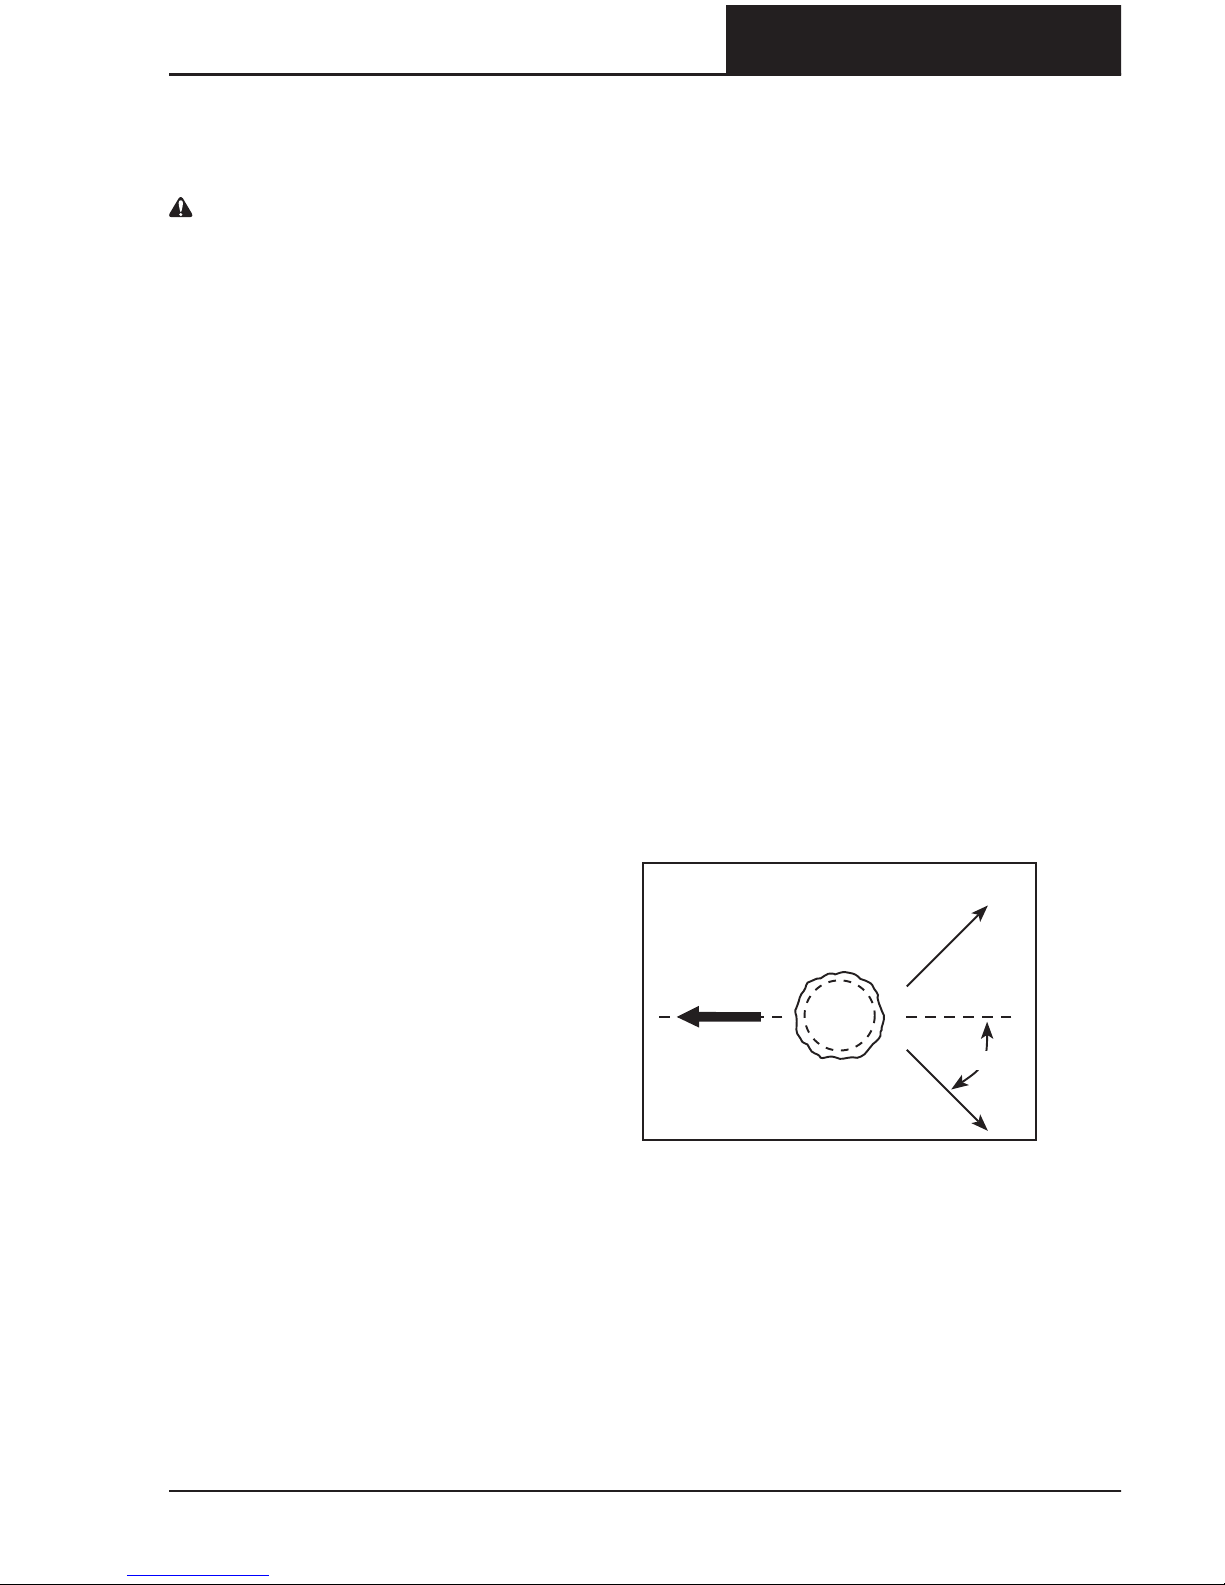
The chain saw operator should keep on
the uphill side of the terrain as the tree is
likely to roll or slide downhill after it is
felled. A retreat path should be planned
and cleared as necessary before cuts are
started. The retreat path should extend
back and diagonally to the rear of the
expected line of fall (Fig. ).
Before felling is started, consider the
natural lean of the tree, the location of
larger branches and the wind direction
to judge which way the tree will fall.
Remove dirt, stones, loose bark, nails,
staples, and wire from the tree where
felling cuts are to be made.
RETREAT PATH
OPTIONS
DIRECTION
OF FALL
RETREAT
RETREAT
FIG. 16
45°
Page 22
20
OREGON® CORDLESS TOOL SYSTEM
CHAIN SAW MODEL CS250
OPERATING THE SAW
AF 0513 F/N 547361
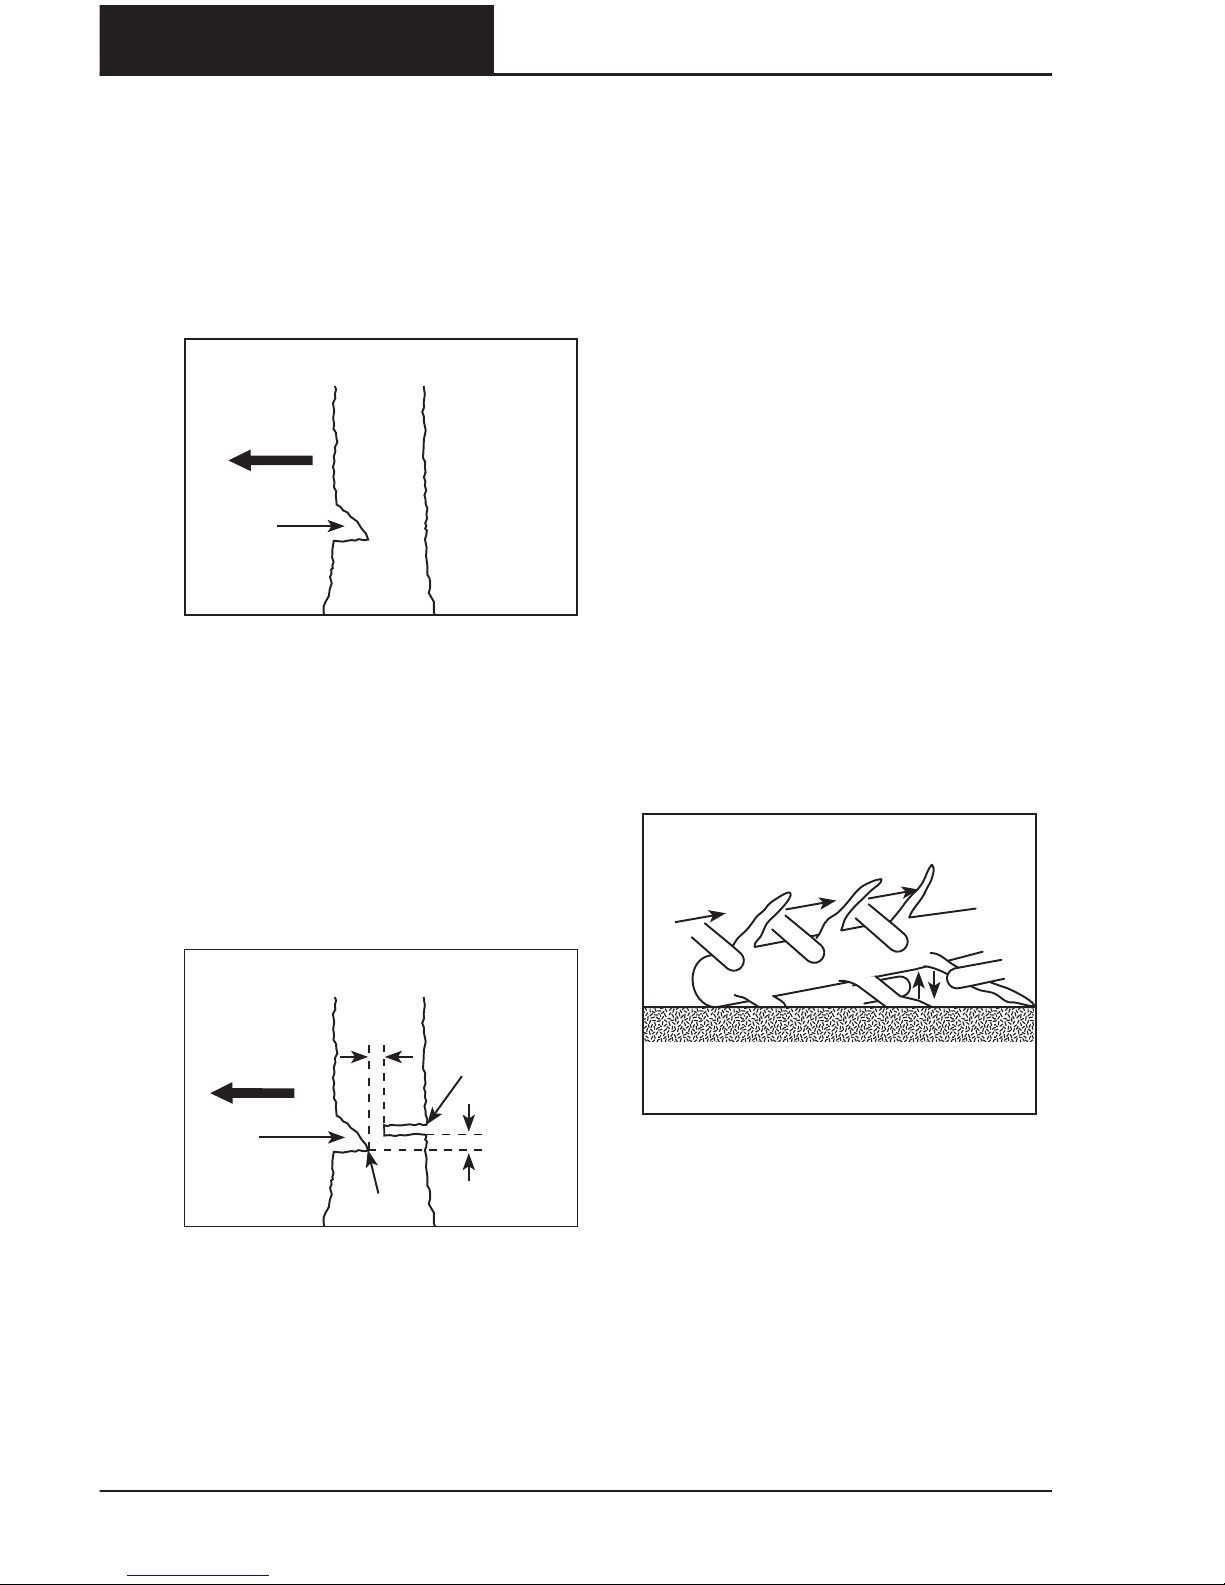
) NOTCHING UNDERCUT
Make the notch / the diameter of
the tree, perpendicular to the
direction of fall. Make the lower
horizontal notching cut first. This will
help to avoid pinching of either the
saw chain or the guide bar when the
second notch is being made (Fig. ).
) FELLING BACK CUT
Make the felling back cut at least ~ in
( mm) higher than the horizontal
notching cut (Fig. ). Keep the felling
back cut parallel to the horizontal
notching cut. Make the felling back
cut so enough wood is left to act as a
hinge. The hinge wood keeps the tree
from twisting and falling in the wrong
direction. Do not cut through the
hinge.
As the felling cut gets close to the
hinge the tree should begin to fall.
If there is any chance that the tree
may not fall in the desired direction
or it may rock back and bind the saw
chain, stop cutting before the felling
back cut is complete and use wedges
of wood, plastic or aluminum to open
the cut and drop the tree along the
desired line of fall.
When the tree begins to fall, remove
the chain saw from the cut, stop the
motor, put the chain saw down, then
use the retreat path planned. Be alert
for overhead limbs falling and watch
footing.
) LIMBING A TREE
Limbing is removing the branches
from a fallen tree. When limbing, leave
larger lower limbs to support the log
off the ground. Remove the small
limbs in one cut. Branches under
tension should be cut from the
bottom up to avoid binding the chain
saw (Fig. ).
) BUCKING A LOG
Bucking is cutting a log into lengths.
It is important to make sure footing is
firm and weight is evenly distributed
on both feet. When possible, the log
should be raised and supported by
the use of limbs, logs or chocks.
NOTCHING UNDERCUT
DIRECTION
OF FALL
NOTCH
FIG. 17
FELLING BACK CUT
FELLING
BACK CUT
HINGE
DIRECTION
OF FALL
NOTCH
2 INCHES
2 INCHES
FIG. 18
TREE LIMBING
LIMB CUT
KEEP WORK OFF GROUND
LEAVE SUPPORT LIMBS UNTIL LOG IS CUT
FIG. 19
Page 23
21
OREGON® CORDLESS TOOL SYSTEM
CHAIN SAW MODEL CS250
OPERATING THE SAW
AF 0513 F/N 547361
FOLLOW THESE SIMPLE DIRECTIONS
FOR EASY CUTTING:
IMPORTANT: PRACTICE CUTTING
LOGS ON A SAWHORSE OR CRADLE
UNTIL YOU BECOME COMFORTABLE
OPERATING THE SAW.
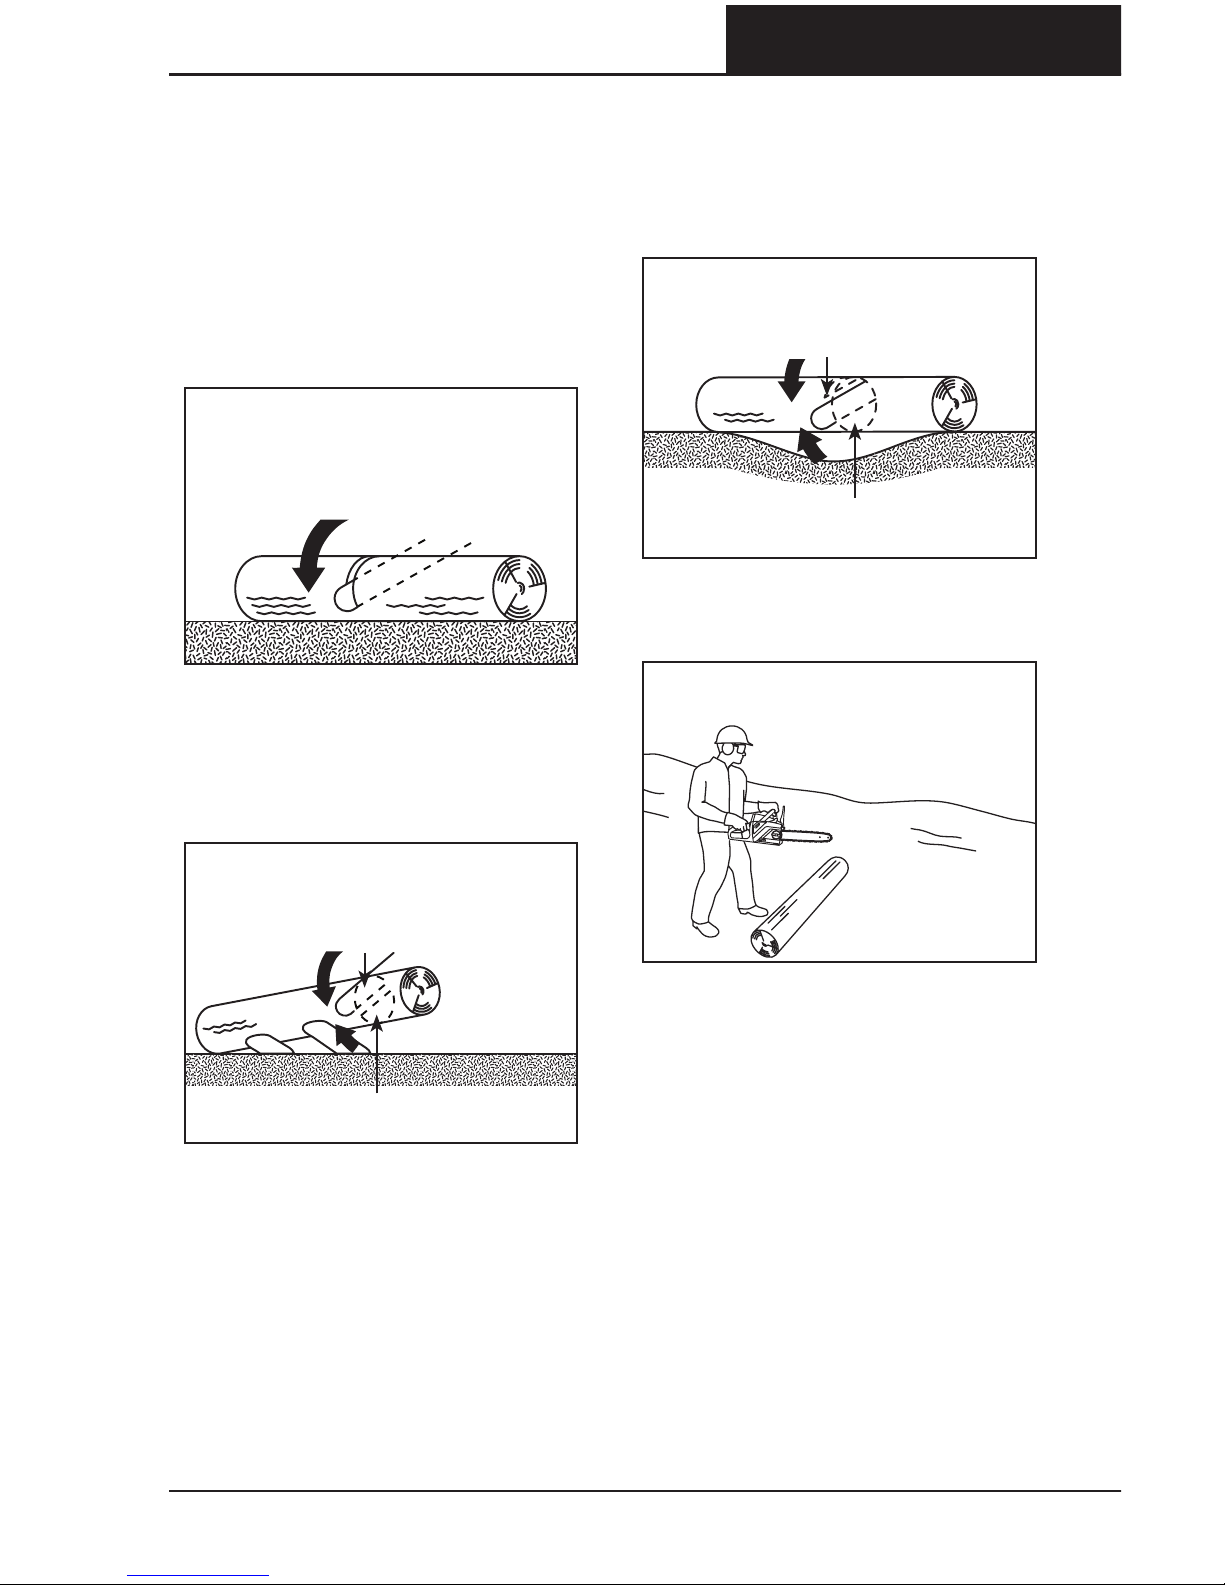
When the log is supported along its
entire length, it is cut from the top
(overbuck) (Fig. ).
When the log is supported on one end,
cut / the diameter from the underside
(underbuck). Then make the finished cut
by overbucking to meet the first cut
(Fig. ).
When the log is supported on both ends,
cut / of that diameter from the top
overbuck. Then make the finished cut by
underbucking the lower / to meet the
first cut (Fig. ).
When bucking on a slope, always stand
on the uphill side of the log (Fig. ).
To maintain complete control when
cutting through, release the cutting
pressure near the end of the cut without
relaxing the grip on the chain saw
handles. Don’t let the chain contact the
ground. After completing the cut, wait for
the saw chain to stop before you move
the chain saw. Always stop the motor
before moving from tree to tree.
LOG IS SUPPORTED
ALONG ITS ENTIRE LENGTH
CUT FROM TOP OVERBUCK
AVOID CUTTING EARTH
FIG. 20
LOG IS SUPPORTED ONE END
1ST CUT UNDERBUCK 1/3 DIAMETER
TO AVOID SPLINTERING
2ND CUT OVERBUCK 2/3 DIAMETER
TO MEET 1ST CUT TO AVOID PINCHING
FIG. 21
BUCKING A LOG
1ST CUT OVERBUCK 1/3 DIAMETER
TO AVOID SPLINTERING
2ND CUT UNDERBUCK 2/3 DIAMETER TO
MEET 1ST CUT TO AVOID PINCHING
FIG. 22
BUCKING ON A SLOPE
STAND ON UPHILL
SIDE WHEN CUTTING
BECAUSE LOG MAY ROLL
FIG. 23
Page 24
22
OREGON® CORDLESS TOOL SYSTEM
CHAIN SAW MODEL CS250
SHARPENING WITH POWERSHARP®
AF 0513 F/N 547361
SHARPENING WITH POWERSHARP®
WARNING: POWERSHARP®
SHOULD NOT BE USED IN THE
PRESENCE OF EXPOSED, EXTREMELY
FLAMMABLE MATERIALS SUCH AS
GASOLINE AND ACETYLENE.
CAUTION: SHARPENING WITH THE
POWERSHARP® SYSTEM PRODUCES
LOW ENERGY SPARKS.
INTRODUCTION TO
POWERSHARP®
This chain saw is equipped with the
PowerSharp® integrated sharpening
system, a fast and easy way to sharpen
chain on the saw. It is time to sharpen the
saw chain when cuts take longer or the
wood chips become smaller, in extreme
cases turning to saw dust.
OPERATION
IMPORTANT: THE POWERSHARP®
INTEGRATED SHARPENING
SYSTEM IS FOR USE ONLY WITH
POWERSHARP® CHAIN. NEVER
ATTEMPT TO SHARPEN OTHER
CHAIN WITH THE INTEGRATED
SHARPENER. DAMAGE TO THE CHAIN
AND SHARPENER WILL OCCUR.
IMPORTANT: POWERSHARP® CHAIN
USES UNIQUE TOPSHARPENING
CUTTERS AND CAN ONLY BE
SHARPENED WITH A GENUINE
POWERSHARP® SHARPENER.
• With the saw at full speed, lightly lift
the PowerSharp® lever for – seconds
(Fig. ). Sparks will be visible when the
cutters are in contact with the
sharpening stone.
• Make a test cut to determine if the chain
has been sufficiently sharpened. If not,
repeat the sharpening procedure until
the chain is sufficiently sharp.
IMPORTANT: DO NOT APPLY TOO
MUCH FORCE WHEN SHARPENING.
EXCESSIVE FORCE CAN REDUCE
THE PERFORMANCE OF THE
SHARPENING STONE.
IMPORTANT: IT IS NORMAL TO SEE
A SMALL AMOUNT OF SPARKS AND
SMOKE DURING SHARPENING AS
THE CUTTERS CONTACT THE STONE
AND FRICTION HEATS THE CHAIN.
WHEN TO REPLACE THE
SHARPENING STONE
The sharpening stone is designed to wear
at the same rate as the chain. Always
replace the stone when replacing the
chain, even if it appears to have more life.
See “Replacing the Sharpening Stone” in
this manual.
FIG. 24
Page 25

23
OREGON® CORDLESS TOOL SYSTEM
CHAIN SAW MODEL CS250
MAINTENANCE AND CLEANING
AF 0513 F/N 547361
MAINTENANCE AND CLEANING
WARNING: INSPECT THE CHAIN
SAW. REGULAR INSPECTION
IS THE FIRST STEP TO PROPER
MAINTENANCE. BY FOLLOWING
THE GUIDELINES BELOW, YOU
CAN MAXIMIZE SAFETY AND
SATISFACTION. SHOULD YOU
IDENTIFY ANY DAMAGED OR
EXCESSIVELY WORN PARTS, REPLACE
THEM IMMEDIATELY. FAILURE TO
IDENTIFY AND REPLACE DAMAGED
OR WORN PARTS CAN CAUSE
SERIOUS PERSONAL INJURY.
WARNING: REMOVE THE BATTERY
PACK FROM THE CHAIN SAW
BEFORE INSPECTING, CLEANING,
OR PERFORMING MAINTENANCE. A
BATTERY OPERATED TOOL WITH THE
BATTERY PACK INSERTED IS ALWAYS
ON AND CAN START ACCIDENTLY.
CAUTION: WHEN CLEANING THE
CHAIN SAW, DO NOT IMMERSE IN
WATER OR OTHER LIQUIDS.
BEFORE EACH USE
• Handles: Front and rear handles should
not have cracks or other damage. They
should be clean and dry.
• Hand Guard: The hand guard should be
free of damage and able to move easily
back and forth. When moved, the hand
guard should activate the chain brake.
• Guide Bar: The guide bar should be
straight and free of chips, cracks, or
excessive wear.
• Saw Chain: The chain should be properly
tensioned, and all components free of
cracks, chips, or excessive wear.
• Side Cover: The side cover should be
free of cracks or other damage. It should
fit tightly to the saw body with no
warping. Make sure the chain catch is
free of cracks.
• Battery Pack: The battery pack should
be clean, dry, with no signs of puncture,
impact, or other damage. The contacts
should be clean, dry and free of debris.
• Battery Port: The battery port and
contacts should be clean, dry, and free
of debris.
• Chain Brake: Test the chain brake to
make sure it is functioning properly.
• Oil Level: Oil should fill the inspection
window. If not, fill the oil reservoir before
use.
• Motor Cover: Check for cracks in the
cover and debris in the air intake vents.
PERIODICALLY
• Drive Sprocket: Look for deep grooves,
broken teeth, or burrs.
• Tensioning Screw: Inspect the head
and body of the tensioning screw for
excessive wear, stripped or crossed
threads, or other damage.
• Bar-Mounting Area: Make sure the barmounting stud is not bent, stripped, or
cross-threaded and that the bar pad and
alignment flange are free of debris and
intact.
• Charger: The charger should be clean,
dry, and free of punctures or other
damage. The battery tray and contacts
should be free of debris.
Page 26
24
OREGON® CORDLESS TOOL SYSTEM
CHAIN SAW MODEL CS250
MAINTENANCE AND CLEANING
AF 0513 F/N 547361
REPLACING THE BAR
AND CHAIN
CAUTION: ONLY POWERSHARP®
SAW CHAIN CAN BE SHARPENED BY
THE POWERSHARP® LEVER ON THE
CHAIN SAW.
WARNING: REMOVE THE
SHARPENING STONE WHEN
USING SAW CHAIN OTHER THAN
POWERSHARP®. FAILURE TO DO SO
MAY RESULT IN DAMAGE TO THE
SAW CHAIN, SHARPENING SYSTEM,
AND/OR CHAIN SAW.
Wear gloves. Turn the chain saw off and
let it cool. Remove the battery pack,
loosen the side cover knob (Fig. ), and
remove the side cover. Make sure the bar
pad, sprocket, and tensioning screw are
free of debris.
NOTE: This is a good time to inspect the
drive sprocket and tensioning screw for
excessive wear or damage.
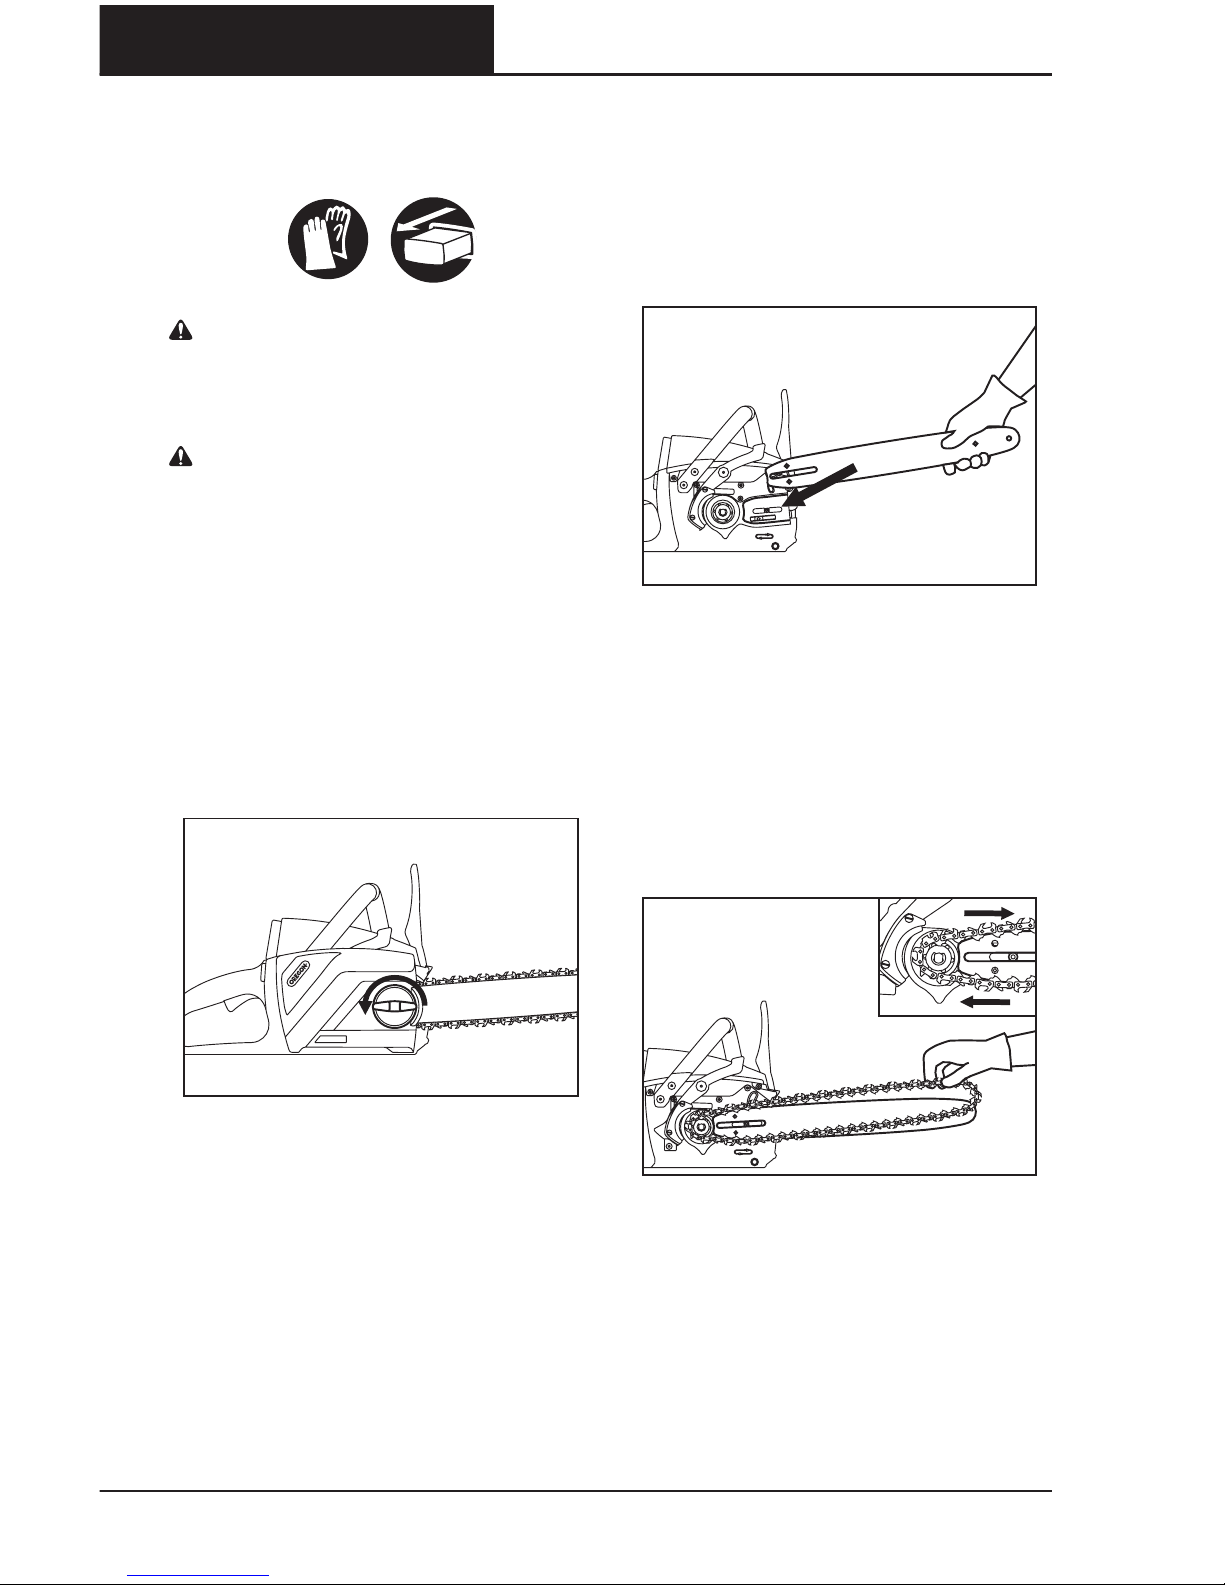
Install the new bar and chain as follows:
• Remove the sharpening stone if
replacing with a chain other than
PowerSharp®.
• Adjust the tensioning pin as far back
towards the rear of the saw as it will go.
Place the guide bar on the mounting
pad, by sliding the bar slot over the
alignment flange (Fig. ), making sure
the bar adjusting pin is inserted in the
bottom hole in the tail of the bar.
• Loop the new chain onto the drive
sprocket with teeth cutting edges facing
away from along the top edge of the
guide bar.
• Feed the chain into the groove of the
bar and slide the bar away from the
motor to remove slack from the chain
(Fig. ). Adjust the position of the bar
adjusting pin until it engages the hole in
the bar.
FIG. 25
FIG. 26
FIG. 27
Page 27
25
OREGON® CORDLESS TOOL SYSTEM
CHAIN SAW MODEL CS250
MAINTENANCE AND CLEANING
AF 0513 F/N 547361
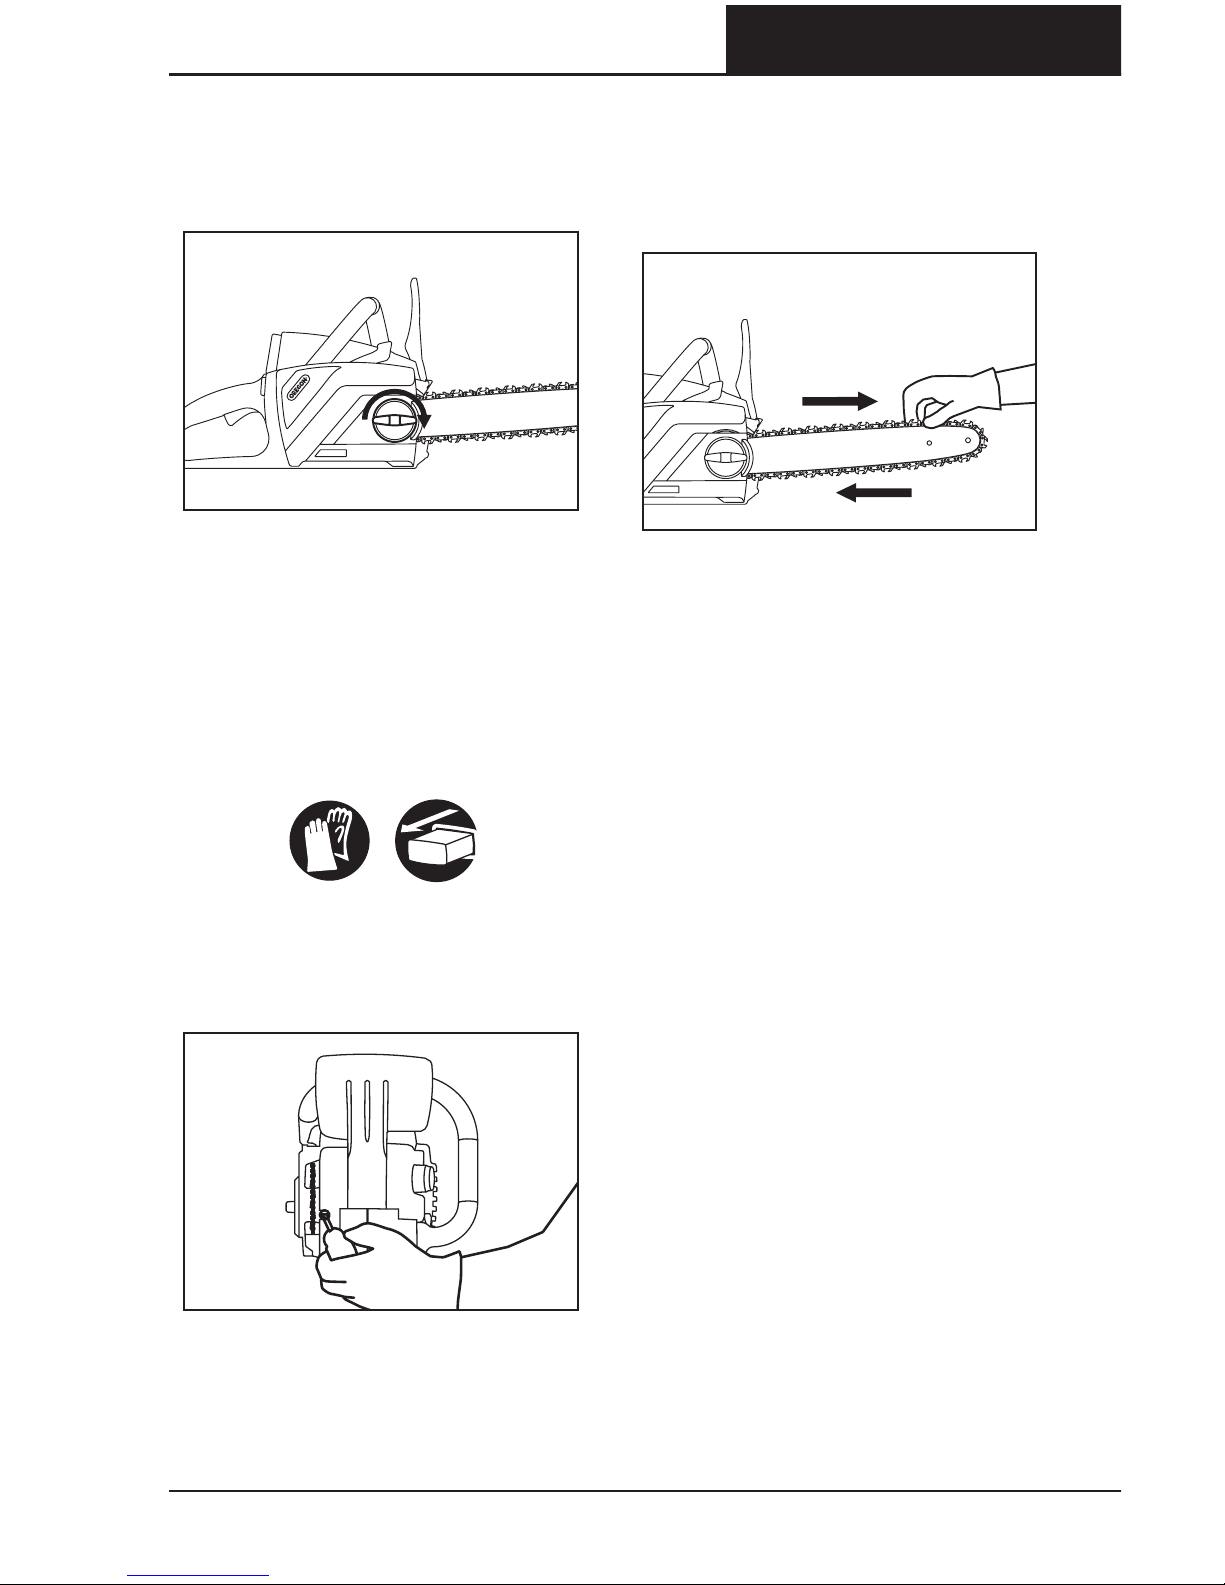
• Reattach the side cover, making sure
the chain catch is properly seated in its
hole. Lightly tighten the side cover
knob (Fig. ).
IMPORTANT: THE SAW CHAIN
MUST BE PROPERLY TENSIONED
BEFORE USING. SEE TENSIONING
INSTRUCTIONS BELOW.
* To even bar wear and maximize bar
life, invert the bar occasionally.
TENSIONING INSTRUCTIONS
• Wear gloves. Remove the battery before
tensioning. Loosen the side cover knob,
hold up the nose of the bar, and tighten
the chain tensioning screw (Fig. ).
• Tighten the side cover knob securely.
Chain tension is correct when, with some
effort, with a gloved hand you are able to
pull the chain smoothly around the bar.
The chain should touch the underside of
the bar rail (Fig. ).
During its early life use, run the chain saw,
not cutting for a minute or two, making
sure the chain is getting a good supply of
oil. Stop the motor and check the chain
tension. If it has loosened, readjust.
After a short period of use, allow the
chain to cool and once again recheck the
tension (remove the battery first). Watch
tension carefully for the first half-hour
of use and periodi cally throughout the
life of the chain, readjusting as required
when the chain and bar are cool to the
touch. Never tighten chain when it is hot.
Lubricate the chain properly with
OREGON® brand bar and chain oil. It has
been specially formulated to maximize
power and reduce friction. Make certain
the chain is getting an adequate supply
of oil. Oil should be thrown from the nose
of the bar when the chain saw is running,
but not in the cut.
Saw chain will stretch as a result of
normal use, but insufficient oil, aggressive
use, or failure to perform recommended
maintenance can lead to premature
stretching.
FIG. 28
FIG. 29
FIG. 30
Page 28

26
OREGON® CORDLESS TOOL SYSTEM
CHAIN SAW MODEL CS250
MAINTENANCE AND CLEANING
AF 0513 F/N 547361
REPLACING THE
SHARPENING STONE
CAUTION: REPLACE
POWERSHARP® SAW CHAIN AND
THE SHARPENING STONE AT THE
SAME TIME. FAILURE TO DO SO
COULD RESULT IN DECREASED
PERFORMANCE OR DAMAGE TO
THE CHAIN AND/OR SHARPENING
STONE.
IMPORTANT: THE POWERSHARP®
INTEGRATED SHARPENING
SYSTEM IS FOR USE ONLY WITH
POWERSHARP® CHAIN.
With the chain saw off and cool and the
battery pack removed, remove the side
cover by removing the side cover knob.
Install the new sharpening stone as
follows:
• Remove the two screws holding the
sharpening stone. Remove the stone
(Fig. ).
• Make sure the PowerSharp® lever and
surrounding area are free of debris.
• Place the new stone in place. Replace
the screws and tighten snugly.
• Reinstall side cover and tighten the side
cover knob.
CLEANING THE SAW
CAUTION: WHEN CLEANING THE
CHAIN SAW POWER HEAD, DO NOT
IMMERSE IN WATER OR OTHER
LIQUIDS.
• Remove battery pack before cleaning.
• Remove wood chips and other debris
from the battery port. Make sure the
contacts are clean and dry.
• After use, clean debris from the chain
and guide bar. Wipe power head with a
clean cloth moistened with a mild soap
solution. Never use harsh cleaners or
solvents.
• Always clean out wood chips, saw dust,
and dirt from the bar groove when
replacing the saw chain.
BATTERY PACK
WARNING: THERE ARE NO
USER SERVICEABLE PARTS INSIDE
THE BATTERY PACK. DO NOT
DISASSEMBLE.
Lithium ion batteries have a finite
operating life. If the amount of cutting
time per charge decreases noticeably, the
battery pack is at the end of its useful life
and should be replaced.
• Make sure the battery pack, including
the contacts, is clean, dry, and has no
signs of puncture, impact, or other
damage. Broken batteries can cause
fires or emit hazardous chemicals.
• Clean dirty contacts with a soft, dry
cloth. Dirt or oil can cause a poor
electrical connection, resulting in loss of
power.
CHARGER
• Unplug the charger from the electrical
outlet.
• Clean dirty contacts with a soft, dry
cloth.
FIG. 31
Page 29

27
OREGON® CORDLESS TOOL SYSTEM
CHAIN SAW MODEL CS250
TROUBLESHOOTING
AF 0513 F/N 547361
TROUBLESHOOTING
Use this table to see possible solutions for possible problems with the chain
saw. If these suggestions do not solve the problem, see “Service and support
information”.
SYMPTOM POSSIBLE CAUSE RECOMMENDED ACTIONS
Motor does
not run or runs
intermittently
Chain brake engaged
Before starting, make sure the hand guard is in its
most rearward position (chain brake disengaged).
For correct hand guard position, see “Starting the
Saw” in this manual.
Battery discharged
Recharge. See “Charging the Battery Pack” in this
manual.
Trigger lock-out not
pressed
Trigger lock-out must be depressed. See “Starting
the Saw” in this manual.
Battery pack not fully
inserted
Clean debris from the battery port and terminals
with a clean dry cloth or non-conductive brush.
Debris in side cover
Remove battery pack, then remove side cover and
clean out debris.
Battery pack cold
Allow battery to warm above the minimum
operating temperature of 10°F (-12°C).
Motor runs,
but chain does
not rotate
Chain not engaging
drive sprocket
Reinstall the chain, making sure the drive links
on the chain are fully seated on the sprocket. See
“Maintenance and Cleaning” in this manual for
installation instructions.
Chain brake does
not engage
Debris preventing full
movement of hand
guard
Clean debris from external chain brake mechanism.
Possible chain brake
malfunction
Contact an approved service location immediately.
WARNING: OPERATING A CHAIN SAW WITHOUT
A FUNCTIONING CHAIN BRAKE COULD LEAD TO
SERIOUS PERSONAL INJURY.
Chain saw does
not cut properly
Insufficient chain
tension
See “Tensioning Instructions” in this manual.
Dull chain See “Sharpening with PowerSharp®” in this manual.
Chain installed
backwards
See “Replacing the Bar and Chain” in this manual.
Worn chain
Replace both the chain and stone. They are
designed to wear at the same rate.
Dry or excessively
stretched chain
Check the oil level. Refill oil reservoir if necessary.
See “Assembly” in this manual. Check for a clogged
oil system. A small amount of oil should be
delivered to the bar.
Chain not in bar groove See “Replacing the Bar and Chain” in this manual.
Page 30

28
OREGON® CORDLESS TOOL SYSTEM
CHAIN SAW MODEL CS250
TROUBLESHOOTING
AF 0513 F/N 547361
SYMPTOM POSSIBLE CAUSE RECOMMENDED ACTIONS
Battery pack does
not charge
Battery pack over/under
temperature protection
is activated
This may occur when the saw is run continuously or
exposed to high ambient temperatures. Allow the
battery pack to reach the appropriate temperature
before charging (the overtemp indicator light on
the charger will be on when an over- or undertemperature condition exists). See “Charging the
Battery Pack” in this manual.
Dirty or damaged
contacts on the battery
pack or charger
Inspect the contacts on the both the battery pack
and charger. If necessary, clean according to the
instructions in this manual. Reinsert battery pack
into the charger, making sure it is fully seated.
Battery pack is at the
end of its life
All batteries have a finite life. If the battery pack
is more than two years old or has been recharged
frequently, it may be time to replace it. Replace
only with the battery specified for the chain saw.
Charger faulty
Take the charger to an approved service location
for a function check.
Low cut time per
battery charge
Dull chain See “Sharpening with PowerSharp®” in this manual.
Worn chain
Replace both the chain and stone. See
“Maintenance and Cleaning” in this manual.
Dry chain
Check the oil level according to the instructions.
Refill oil reservoir if necessary. See “Filling Oil
Reservoir” in this manual.
Improper cutting
technique
See “Basic Cutting” in this manual for proper cutting
technique.
Debris in side cover
Remove battery pack, then remove side cover and
clean out debris.
Battery pack not fully
charged
See “Charging the Battery Pack” in this manual.
Blinking orange
light on charge
state indicator
Possible causes include
charger short circuit,
charger over current,
over voltage limit, open
circuit on battery pack,
or charge/pre-charge
time out error.
Follow these steps:
1. Check to ensure that the plugs into the charger
and the outlet are fully inserted.
2. Make sure the charger is receiving the correct
voltage.
3. If available, try charging a different battery pack
(only packs specified for this charger).
If this does not correct the problem, take the
battery pack and charger to an approved service
location.
Page 31

29
OREGON® CORDLESS TOOL SYSTEM
CHAIN SAW MODEL CS250
WARRANTY AND SERVICE
AF 0513 F/N 547361
WARRANTY AND SERVICE
WARRANTY
Blount, Inc. warrants all registered
OREGON® Cordless Tools and Chargers
for a period of three () years and all
registered OREGON® Cordless Battery
Packs for two () years from original
date of purchase. Registered OREGON®
Cordless Tools, Battery Packs and
Chargers are warranted for two () years
if used for commercial purposes. This
limited warranty applies to the OREGON®
Cordless Tool System manufactured
products. During the warranty period,
Blount will replace or, at its option,
repair for the original purchaser only,
free of charge, any product or part
which is found upon examination by
Blount to be defective in material and/
or workmanship. The purchaser shall be
responsible for all transportation charges
and any cost of removing any part
submitted for replacement under this
warranty.
SERVICE AND SUPPORT
INFORMATION
Visit us on the web at
OregonCordless.com for service center
information, or contact our customer
service department at .. for
assistance, additional technical advice,
repair, or replacement parts.
For safety, use only genuine factory
replacement parts on the power tool.
Our service center is staffed with trained
personnel to efficiently provide support
and assistance with adjustment, repair,
or replacement of all OREGON® Cordless
Tool System products.
Page 32

Page 33

31
TABLE DES MATIÈRES
AF 0513 F/N 547361
OREGON® CORDLESS TOOL SYSTEM
MODÈLE DE TRONÇONNEUSE CS250
TABLE DES MATIÈRES
SYMBOLES ET ÉTIQUETTES . . . . . . . . . . . . . . . . . . . . . . . . . . . 32
RÈGLES DE SÉCURITÉ. . . . . . . . . . . . . . . . . . . . . . . . . . . . . . . . 33
AVERTISSEMENTS DE SÉCURITÉ GÉNÉRAUX RELATIFS
AUX OUTILS ÉLECTRIQUES . . . . . . . . . . . . . . . . . . . . . . . . 33
SÉCURITÉ DE LA ZONE DE TRAVAIL . . . . . . . . . . . . . . . . . . 33
SÉCURITÉ ÉLECTRIQUE. . . . . . . . . . . . . . . . . . . . . . . . . . . 33
SÉCURITÉ PERSONNELLE . . . . . . . . . . . . . . . . . . . . . . . . . 34
RÉPARATION. . . . . . . . . . . . . . . . . . . . . . . . . . . . . . . . . .35
AVERTISSEMENTS DE SÉCURITÉ RELATIFS
À LA TRONÇONNEUSE . . . . . . . . . . . . . . . . . . . . . . . . . . . 36
ENTREPOSAGE, TRANSPORT ET ÉLIMINATION. . . . . . . . . . . 38
SÉCURITÉ DE LA BATTERIE . . . . . . . . . . . . . . . . . . . . . . . . 39
SÉCURITÉ DU CHARGEUR . . . . . . . . . . . . . . . . . . . . . . . . 40
IDENTIFICATION DU PRODUIT . . . . . . . . . . . . . . . . . . . . . . . . . 41
CARACTÉRISTIQUES ET COMPOSANTS . . . . . . . . . . . . . . . . . . . 42
NOMS ET TERMES RELATIFS À LA TRONÇONNEUSE. . . . . . . . . . . 43
ASSEMBLAGE . . . . . . . . . . . . . . . . . . . . . . . . . . . . . . . . . . . . . 44
DÉBALLAGE . . . . . . . . . . . . . . . . . . . . . . . . . . . . . . . . . . 44
REMPLISSAGE DU RÉSERVOIR D’HUILE . . . . . . . . . . . . . . . 44
FONCTIONNEMENT DE LA TRONÇONNEUSE . . . . . . . . . . . . . . . 45
BATTERIE ET CHARGEUR . . . . . . . . . . . . . . . . . . . . . . . . . 45
UTILISATION GÉNÉRALE. . . . . . . . . . . . . . . . . . . . . . . . . .47
DÉCOUPAGE. . . . . . . . . . . . . . . . . . . . . . . . . . . . . . . . . .48
AFFÛTAGE AVEC POWERSHARP®. . . . . . . . . . . . . . . . . . . . . . . .51
ENTRETIEN ET NETTOYAGE . . . . . . . . . . . . . . . . . . . . . . . . . . . 52
REMPLACEMENT DU GUIDE ET DE LA CHAÎNE . . . . . . . . . . 53
INSTRUCTIONS DE TENSION . . . . . . . . . . . . . . . . . . . . . . 54
REMPLACEMENT DE LA PIERRE À AIGUISER . . . . . . . . . . . . 55
NETTOYAGE DE LA TRONÇONNEUSE. . . . . . . . . . . . . . . . . 55
BATTERIE . . . . . . . . . . . . . . . . . . . . . . . . . . . . . . . . . . . . 55
CHARGEUR. . . . . . . . . . . . . . . . . . . . . . . . . . . . . . . . . . . 55
DÉPANNAGE. . . . . . . . . . . . . . . . . . . . . . . . . . . . . . . . . . . . . . 56
GARANTIE ET ENTRETIEN . . . . . . . . . . . . . . . . . . . . . . . . . . . . . 58
© Blount, Inc. Les tarifs et caractéristiques peuvent être modifiés sans avis préalable. Tous droits réservés. OREGON® et
PowerSharp® sont des marques déposées de Blount, Inc. aux États-Unis et/ou dans d’autres pays.
Page 34

32
SYMBOLES ET ÉTIQUETTES
AF 0513 F/N 547361
OREGON® CORDLESS TOOL SYSTEM
MODÈLE DE TRONÇONNEUSE CS250
SYMBOLES ET ÉTIQUETTES
SYMBOLE DÉSIGNATION EXPLICATION
CONSTRUCTION
DE CLASSE II
OUTILS DE CONSTRUCTION DÉSIGNÉS COMME
DOUBLEMENT ISOLÉS.
SYMBOLE
D’ALERTE DE
SÉCURITÉ
SIGNIFIE QUE LE TEXTE QUI SUIT EXPLIQUE UN
DANGER, UN AVERTISSEMENT OU UNE MISE EN GARDE.
LISEZ LES
INSTRUCTIONS
LE MANUEL D’INSTRUCTIONS ORIGINAL COMPORTE
D’IMPORTANTES INFORMATIONS SUR LA SÉCURITÉ
ET LE FONCTIONNEMENT. LISEZ ET SUIVEZ
ATTENTIVEMENT LES INSTRUCTIONS.
PROTECTION DES
YEUX
PORTEZ UNE PROTECTION POUR LES YEUX LORSQUE
VOUS UTILISEZ LA TRONÇONNEUSE.
PORTEZ UNE
PROTECTION
AUDITIVE
PORTEZ UNE PROTECTION AUDITIVE LORSQUE VOUS
UTILISEZ LA TRONÇONNEUSE.
PROTECTION DES
MAINS
PORTEZ DES GANTS LORSQUE VOUS UTILISEZ LA
TRONÇONNEUSE ET LORSQUE VOUS MANIPULEZ LE
GUIDE ET LA CHAÎNE.
PORTEZ UNE
PROTECTION POUR
LA TÊTE
PORTEZ UN CASQUE DE SÉCURITÉ LORSQUE VOUS
UTILISEZ LA TRONÇONNEUSE.
PUISSANCE
ACOUSTIQUE
LE NIVEAU DE PUISSANCE ACOUSTIQUE EST DE 90 DB.
ATTENTION
À L’EFFET DE
REBOND
DANGER! L’EFFET DE REBOND PEUT PROVOQUER DE
GRAVES BLESSURES.
CONTACT AVEC
L’EXTRÉMITÉ DU
GUIDE
ÉVITEZ TOUT CONTACT AVEC L’EXTRÉMITÉ DU GUIDE.
ANGLE D’EFFET
DE REBOND DE LA
CHAÎNE
UTILISEZ UN ANGLE D’EFFET DE REBOND FAIBLE.
TENUE À DEUX
MAINS
TENEZ LA TRONÇONNEUSE AVEC LES DEUX MAINS.
TENUE À UNE MAIN NE TENEZ PAS LA TRONÇONNEUSE AVEC UNE SEULE MAIN.
NE PAS INCINÉRER NE LA JETEZ PAS AU FEU.
NE PAS JETER
NE LA JETEZ PAS DANS LES ORDURES MÉNAGÈRES.
APPORTEZLA DANS UN CENTRE DE RECYCLAGE AGRÉÉ.
PROTÉGER DE LA
PLUIE
N’UTILISEZ PAS LE CHARGEUR DANS DES CONDITIONS
D’HUMIDITÉ.
UTILISATION
À L’INTÉRIEUR
UNIQUEMENT
CONÇUE POUR UNE UTILISATION À L’INTÉRIEUR
UNIQUEMENT.
TEMPÉRATURES DE
FONCTIONNEMENT
UTILISEZ UNIQUEMENT LA BATTERIE À UNE
TEMPÉRATURE COMPRISE ENTRE 0 °C ET 40 °C 32 °F ET
104 °F.
Page 35

33
RÈGLES DE SÉCURITÉ
AF 0513 F/N 547361
OREGON® CORDLESS TOOL SYSTEM
MODÈLE DE TRONÇONNEUSE CS250
INTRODUCTION
Cette tronçonneuse est conçue pour une utilisation légère et occasionnelle. Elle n’est
pas conçue pour abattre de grands arbres ou couper des troncs d’un gros diamètre.
Cette tronçonneuse n’est pas conçue pour l’entretien des arbres. Ne coupez pas
d’arbres ni de bois dont le diamètre est égal ou supérieur à la longueur du guide.
RÈGLES DE SÉCURITÉ
AVERTISSEMENTS DE SÉCURITÉ GÉNÉRAUX RELATIFS AUX
OUTILS ÉLECTRIQUES
AVERTISSEMENT : LISEZ ET COMPRENEZ L’ENSEMBLE DES AVERTISSEMENTS
DE SÉCURITÉ ET DES INSTRUCTIONS. LE NONRESPECT DES
AVERTISSEMENTS DE SÉCURITÉ ET DES INSTRUCTIONS PEUT ENTRAÎNER
UNE DÉCHARGE ÉLECTRIQUE, UN INCENDIE ET/OU DES BLESSURES GRAVES.
CONSERVEZ L’ENSEMBLE DES AVERTISSEMENTS ET INSTRUCTIONS POUR
RÉFÉRENCE ULTÉRIEURE. LE TERME OUTIL ÉLECTRIQUE UTILISÉ DANS LES
AVERTISSEMENTS FAIT RÉFÉRENCE À VOTRE OUTIL ÉLECTRIQUE ALIMENTÉ SUR
SECTEUR CÂBLÉ OU FONCTIONNANT SUR BATTERIE SANS CÂBLE.
SÉCURITÉ DE LA ZONE DE
TRAVAIL
• Maintenez la zone de travail propre et
bien éclairée.
Les zones en désordre ou mal éclairées
augmentent les risques d’accident.
• Ne faites pas fonctionner la
tronçonneuse dans une atmosphère
explosive, ni en présence de liquides
inflammables, gaz ou de poussières.
Les outils électriques produisent des étincelles
qui peuvent enflammer la poussière.
• Maintenez à distance les enfants et
les personnes présentes lorsque vous
utilisez la tronçonneuse. Une distraction
peut vous faire perdre le contrôle de l’outil.
• Identifiez et évitez les conduits de gaz,
les dangers électriques et toute source
potentielle d’accrochage corporel.
• Établissez une zone sécurisée pour
les aides. Les aides ne doivent jamais se
tenir debout directement devant ou derrière
l’utilisateur. Les aides doivent toujours se tenir
debout sur le côté ou perpendiculairement à la
direction de coupe.
SÉCURITÉ ÉLECTRIQUE
• La fiche d’alimentation du chargeur
doit correspondre à la prise secteur. Ne
modifiez jamais la fiche d’alimentation
de quelque manière que ce soit.
N’utilisez pas de fiches d’adaptateur
avec un chargeur mis à la terre (relié à
la terre). L’utilisation de fiches non modifiées
et de prises correspondantes réduit le risque de
décharge électrique.
• Évitez tout contact du corps avec
des surfaces reliées à la terre, comme
des tuyaux, radiateurs, fourneaux et
réfrigérateurs. Le risque de décharge électrique
augmente si votre corps est relié à la terre.
• Les éclaboussures d’eau accidentelles
sur la tronçonneuse, provenant
de n’importe quelle direction, ne
présentent aucun risque nocif ou
dangereux pour l’utilisateur.
• Maniez le câble avec précaution.
N’utilisez jamais le câble pour
transporter, tirer ou débrancher le
chargeur. Tenez le câble éloigné de la
chaleur, de l’huile, des bords affûtés
et des pièces mobiles. Des câbles
endommagés ou entremêlés augmentent le
risque de décharge électrique.
• Lorsque vous faites fonctionner le
chargeur à l’extérieur, utilisez une
Page 36

34
RÈGLES DE SÉCURITÉ
AF 0513 F/N 547361
OREGON® CORDLESS TOOL SYSTEM
MODÈLE DE TRONÇONNEUSE CS250
rallonge conçue pour un usage extérieur.
L’utilisation d’un câble adapté à un usage
extérieur diminue le risque de décharge électrique.
• Si vous ne pouvez pas éviter de
faire fonctionner le chargeur dans
un endroit humide, utilisez une
alimentation protégée par un
disjoncteur-détecteur de fuites à
la terre (DDFT). L’utilisation d’un DDFT
diminue le risque de décharge électrique.
SÉCURITÉ PERSONNELLE
• Restez sur vos gardes, regardez ce que
vous faites et faites preuve de bon sens
lorsque vous utilisez la tronçonneuse.
N’utilisez pas la tronçonneuse si vous
êtes fatigué ou sous l’influence de
médicaments, d’alcool ou de drogues.
Un moment d’inattention lors de l’utilisation
de la tronçonneuse peut entraîner de graves
blessures corporelles.
• Utilisez des équipements de protection
individuelle. Portez toujours des
lunettes de protection. Un équipement
de sécurité comme un masque antipoussières,
des chaussures de sécurité antidérapantes,
un casque de sécurité ou un casque antibruit,
utilisé selon la tâche à effectuer, permettront
de diminuer le risque de blessures corporelles.
• Retirez toute clé ou clavette de calage
avant la mise en marche du chargeur.
Une clé ou une clavette qui reste attachée à
un élément rotatif de la tronçonneuse peut
provoquer des blessures corporelles.
• Ne vous penchez pas trop en avant.
Maintenez constamment votre
équilibre et votre prise au sol (Fig. ).
Cela améliore le contrôle de la tronçonneuse
en cas de situations imprévues.
• Habillez-vous de manière appropriée.
Ne portez pas de vêtements amples
ou de bijoux. Maintenez vos cheveux,
vêtements et gants à l’écart des pièces
mobiles. Les vêtements amples, bijoux ou
cheveux longs peuvent s’enchevêtrer dans les
pièces mobiles.
• Utilisez vos deux mains lors de
l’utilisation de la tronçonneuse.
• La pièce de bois, le guide et la chaîne
peuvent être chauds après la coupe.
Portez des gants pour éviter les brûlures.
• Utilisez un équipement auxiliaire
adéquat et assurez-vous qu’il est
en bon état, suffisamment solide et
correctement placé. N’utilisez l’équipement
auxiliaire que ce pour quoi il a été conçu.
• L’utilisation prolongée d’outils
électriques peut entraîner des
troubles vasculaires, musculaires ou
neurologiques (comme le syndrome du
doigt mort ou syndrome de Raynaud
causé par les vibrations). Respectez les
instructions suivantes pour réduire le risque de
blessure :
– Portez des gants et gardez vos mains et
votre corps au chaud.
– Maintenez fermement la tronçonneuse,
mais n’exercez pas de pression excessive
ou prolongée.
– Faites souvent des pauses.
Les vibrations en condition normale
d’utilisation peuvent différer des valeurs
indiquées selon le matériau coupé,
l’entretien du système de coupe et
d’autres facteurs.
UTILISATION ET ENTRETIEN
DES OUTILS ÉLECTRIQUES
• Ne forcez pas sur la tronçonneuse.
Utilisez la tronçonneuse adaptée
à votre application. La tronçonneuse
adaptée effectuera un travail de meilleure
qualité et plus sûr, à la vitesse pour laquelle
elle a été conçue.
• N’utilisez pas la tronçonneuse si vous
ne pouvez pas basculer l’interrupteur
de la gâchette de la position allumée
FIG. 1
Page 37

35
RÈGLES DE SÉCURITÉ
AF 0513 F/N 547361
OREGON® CORDLESS TOOL SYSTEM
MODÈLE DE TRONÇONNEUSE CS250
à la position éteinte. Tout outil électrique
ne pouvant être contrôlé au moyen de
l’interrupteur est dangereux et doit être réparé.
• Empêchez les démarrages non
souhaités. Assurez-vous que
l’interrupteur est en position éteinte
avant de brancher l’outil sur le courant
et/ou la batterie, avant de le prendre
ou de le porter. Porter les outils électriques
avec le doigt sur l’interrupteur ou les alimenter
quand l’interrupteur est en position de marche
peut provoquer des accidents.
• Débranchez la batterie de la
tronçonneuse avant d’effectuer les
réglages, de changer les accessoires ou
d’entreposer la tronçonneuse. De telles
mesures de sécurité préventives réduisent
le risque de démarrer la tronçonneuse par
accident.
• Entreposez les tronçonneuses à l’arrêt
hors de portée des enfants. N’autorisez
pas les personnes non habituées à la
tronçonneuse, ou n’ayant pas lu les
instructions, à l’utiliser. Les tronçonneuses
sont dangereuses lorsqu’elles sont entre les
mains d’utilisateurs novices.
• Entretenez la tronçonneuse. Vérifiez
l’absence de mauvais alignement
ou de grippage des pièces mobiles,
de rupture de pièces et de tout
autre état pouvant affecter le
fonctionnement de la tronçonneuse. Si
elle est endommagée, faites réparer la
tronçonneuse avant de l’utiliser.
De nombreux accidents sont causés par des
outils mal entretenus.
• Maintenez les outils de coupe affûtés
et propres. Les outils tranchants entretenus
et aux bords affûtés risqueront moins de se
coincer et seront plus faciles à maîtriser.
• Utilisez la tronçonneuse, les
accessoires, les outils, etc. en
respectant ces instructions et en tenant
compte des conditions de travail ainsi
que du travail à effectuer. Une utilisation
de la tronçonneuse différente de celle pour
laquelle elle a été conçue peut engendrer des
situations dangereuses.
UTILISATION ET ENTRETIEN DE
LA BATTERIE
• Rechargez la batterie uniquement avec
le chargeur indiqué par OREGON®. Un
chargeur adapté à un certain type de batterie
peut être à l’origine d’un incendie s’il est utilisé
avec une autre batterie.
• N’utilisez que les batteries conçues
spécialement pour cette tronçonneuse.
L’utilisation d’autres batteries peut être à
l’origine d’un incendie ou d’une blessure.
• Lorsque la batterie n’est pas utilisée,
tenez-la éloignée des autres objets
métalliques, notamment des
trombones, pièces de monnaie, clés,
clous, vis ou autres petits objets
métalliques, qui peuvent établir une
connexion entre les deux bornes.
Court-circuiter les bornes de la batterie peut
provoquer des brûlures ou un incendie.
• Dans des conditions extrêmes, du
liquide peut être éjecté de la batterie;
éviter tout contact avec celui-ci. En cas
de contact accidentel, rincer avec de l’eau.
Si du liquide entre en contact avec les yeux,
demandez également un avis médical. Le
liquide éjecté de la batterie peut entraîner une
irritation ou des brûlures.
• Ne démontez pas la tronçonneuse, le
chargeur ou la batterie, et n’essayez
pas de les réparer. Cela pourrait provoquer
une décharge électrique.
RÉPARATION
Faites entretenir la tronçonneuse par
un réparateur agréé n’utilisant que des
pièces de rechange identiques.
Cela garantira que la sécurité de la
tronçonneuse est maintenue.
Page 38

36
RÈGLES DE SÉCURITÉ
AF 0513 F/N 547361
OREGON® CORDLESS TOOL SYSTEM
MODÈLE DE TRONÇONNEUSE CS250
AVERTISSEMENTS DE
SÉCURITÉ RELATIFS À LA
TRONÇONNEUSE
• Conservez toutes les parties du
corps éloignées de la chaîne de la
tronçonneuse lorsque vous l’utilisez.
Avant de mettre en marche la
tronçonneuse, assurez-vous que
la chaîne n’est pas en contact avec
d’autres corps. Un moment d’inattention
lors de l’utilisation de la tronçonneuse peut
entraîner un accrochage vestimentaire ou
corporel de la chaîne.
• Veillez à toujours tenir la tronçonneuse
avec votre main droite sur la poignée
arrière et votre main gauche sur la
poignée avant (Fig. ). Il est conseillé de ne
jamais tenir la tronçonneuse en inversant la
position des mains, car cela augmente les
risques de blessures.
• Portez des lunettes de sécurité et une
protection auditive. Il est également
conseillé de protéger votre tête, vos
mains, vos jambes et vos pieds. Des
vêtements de protection adéquats réduiront
le risque de blessure corporelle due à des jets
de débris ou à un contact accidentel avec la
chaîne de la tronçonneuse.
• N’utilisez pas une tronçonneuse dans
un arbre. L’utilisation d’une tronçonneuse
alors que vous vous trouvez dans un arbre
peut entraîner des blessures.
• Maintenez constamment votre prise
au sol et utilisez la tronçonneuse
uniquement lorsque vous êtes debout
sur une surface plate, sécurisée et fixe.
Les surfaces glissantes ou instables peuvent
provoquer la perte d’équilibre ou de contrôle
de la tronçonneuse.
• Lorsque vous coupez une branche
sous tension, faites attention au
redressement de celle-ci. Lorsque la
tension des fibres de bois est relâchée, le
redressement qui en résulte peut heurter
l’utilisateur et/ou projeter la tronçonneuse et
la rendre incontrôlable.
• Faites très attention lorsque
vous coupez des buissons ou des
arbrisseaux. Ce bois fin peut attraper la
chaîne de la tronçonneuse qui peut alors
glisser vers vous ou vous faire perdre votre
équilibre.
• Portez la tronçonneuse par la poignée
avant avec l’interrupteur en position
éteinte et loin de votre corps. Lorsque
vous transportez ou entreposez la
tronçonneuse, mettez toujours le
couvercle du guide-chaîne (Fig. ). Une
manipulation correcte de la tronçonneuse
réduit la probabilité de contact accidentel
avec la chaîne en mouvement.
FIG. 2
FIG. 3
Page 39

37
RÈGLES DE SÉCURITÉ
AF 0513 F/N 547361
OREGON® CORDLESS TOOL SYSTEM
MODÈLE DE TRONÇONNEUSE CS250
• Suivez les instructions pour la
lubrification, la tension de la chaîne et
le remplacement des accessoires. Une
chaîne mal lubrifiée ou mal tendue peut casser
ou augmenter le risque de rebond.
• Gardez les poignées sèches, propres
et exemptes d’huile et de graisse. Des
poignées huileuses et couvertes de graisse
sont glissantes, ce qui peut provoquer la perte
du contrôle.
• Coupez uniquement du bois. N’utilisez
pas la tronçonneuse pour des tâches
non adaptées. Par exemple : n’utilisez
pas la tronçonneuse pour découper
du plastique, de la maçonnerie ou des
matériaux de construction qui ne sont
pas en bois. L’utilisation de la tronçonneuse
pour des tâches différentes de celles pour
lesquelles elle a été conçue peut engendrer des
situations dangereuses.
• Lors de la première utilisation, il est
recommandé à l’utilisateur de disposer
d’instructions pratiques, de la part
d’un utilisateur expérimenté, quant
à l’utilisation de la tronçonneuse
et de l’équipement de protection.
La pratique initiale doit consister à
découper des bûches sur un chevalet
de sciage.
• À l’exception des pièces usées décrites
dans ce manuel, la tronçonneuse ne
possède aucune pièce remplaçable par
l’utilisateur.
EFFET DE REBOND CAUSES
ET PRÉCAUTIONS PAR
L’UTILISATEUR
Un effet de rebond peut se produire
lorsque l’extrémité ou la pointe du guidechaîne touche un objet ou lorsque le
bois se referme et vient pincer la chaîne
pendant la découpe.
Dans certains cas, un contact avec la
pointe peut provoquer une réaction
d’inversion soudaine, ce qui peut
soulever le guide-chaîne et le renvoyer à
l’utilisateur.
Un pincement de la chaîne le long
du haut du guide-chaîne peut faire
reculer le guide-chaîne rapidement vers
l’utilisateur.
Ces réactions peuvent faire perdre
le contrôle de la tronçonneuse et
provoquer ainsi des blessures graves.
Ne vous fiez pas exclusivement aux
dispositifs de sécurité intégrés dans votre
tronçonneuse. Quand vous utilisez une
tronçonneuse, vous devez passer par
plusieurs étapes afin d’éviter les accidents
et les blessures lors de la coupe.
L’effet de rebond est causé par une
mauvaise utilisation de l’outil et/ou de
l’application incorrecte des procédures ou
des conditions, il peut être évité en prenant
les précautions indiquées ci-après :
• Maintenez fermement les poignées
de la tronçonneuse en les encerclant
avec les pouces et les doigts. Tenez la
tronçonneuse avec les deux mains et
positionnez votre corps et vos bras de
manière à pouvoir résister aux forces
des effets de rebond. L’utilisateur peut
contrôler la force des effets de rebond. Ne
laissez pas la tronçonneuse vous échapper.
• Ne visez pas trop haut et ne découpez
pas à une hauteur qui dépasse votre
épaule. Cela permet d’éviter les contacts
accidentels avec l’extrémité et un meilleur
contrôle de la tronçonneuse dans les
situations imprévues.
• Utilisez uniquement les guides et les
chaînes de remplacement indiqués
par OREGON®. Des guides et des chaînes
de remplacement non préconisés peuvent
casser la chaîne et/ou provoquer des effets de
rebond.
• Suivez les instructions d’entretien
et d’affûtage de la chaîne de la
tronçonneuse indiquées par OREGON®.
L’abaissement de la hauteur du limiteur de
profondeur peut augmenter les effets de
rebond.
Page 40

38
RÈGLES DE SÉCURITÉ
AF 0513 F/N 547361
OREGON® CORDLESS TOOL SYSTEM
MODÈLE DE TRONÇONNEUSE CS250
DISPOSITIFS DE SÉCURITÉ
CONCERNANT L’EFFET
DE REBOND SUR CETTE
TRONÇONNEUSE
FREIN DE CHAÎNE
La tronçonneuse est équipée d’un frein de
chaîne, qui arrête le moteur et le
mouvement de la chaîne en cas d’effet de
rebond (Fig. ). Le frein de chaîne peut être
activé lors d’un mouvement vers l’avant du
protège-main et lorsque la chaîne tourne
vers l’arrière pendant l’effet de rebond; il
peut également être activé par la force
d’inertie générée par un recul rapide.
DANGER : NE MODIFIEZ PAS OU
N’ESSAYEZ PAS DE DÉMONTER LE
FREIN DE CHAÎNE.
CHAÎNE
Cette tronçonneuse est fournie avec une
chaîne qui répond aux exigences de faible
effet de rebond de la norme ANSI B.,
testée avec des modèles spécifiques
de tronçonneuses. Pour obtenir des
informations sur la chaîne de remplacement,
consultez la section « Caractéristiques et
composants » de ce manuel.
GUIDE
Cette tronçonneuse est équipée d’un
guide-chaîne mais sa hauteur de pointe
est faible. Les petites hauteurs de pointe
ont en règle générale un potentiel d’effet
de rebond plus faible.
Lorsque vous remplacerez le guide,
veillez à commander le guide mentionné
dans ce manuel.
ENTREPOSAGE, TRANSPORT
ET ÉLIMINATION
ENTREPOSAGE DE LA
TRONÇONNEUSE
• Enlevez la batterie et nettoyez
soigneusement la tronçonneuse.
Consultez la section « Entretien et
nettoyage » de ce manuel. Installez le
couvre-lame avant l’entreposage.
• Entreposez dans un endroit sec, hors de
portée des enfants et des animaux.
• Il est normal qu’une petite quantité
d’huile s’écoule du guide lorsque la
tronçonneuse n’est pas utilisée. Afin de
vous protéger contre ces fuites, installez
le couvre-lame et mettez un tissu
absorbant sous le guide-chaîne.
ENTREPOSAGE DE LA BATTERIE
Lorsque vous entreposez la batterie
pendant plus de neuf mois, suivez les
consignes suivantes :
• Enlevez la batterie de la tronçonneuse
ou du chargeur.
• Entreposez-la dans un endroit frais et sec.
• Tenez-la hors de portée des enfants et
des animaux.
• Pour prolonger la durée de vie de la
batterie, ne l’entreposez jamais
complètement déchargée (Fig. ).
• Entreposez-la à une température comprise
entre - °C et °C (entre - °F et °F).
FIG. 4
FIG. 5
VOYANTS
Page 41

39
RÈGLES DE SÉCURITÉ
AF 0513 F/N 547361
OREGON® CORDLESS TOOL SYSTEM
MODÈLE DE TRONÇONNEUSE CS250
ENTREPOSAGE DU CHARGEUR
• Retirez la batterie du chargeur.
• Débranchez le chargeur de la source
d’alimentation.
• Entreposez dans un endroit sec.
• Tenez-le hors de portée des enfants et
des animaux.
Consultez la section « Entretien et
nettoyage » pour de plus amples
informations.
TRANSPORT DE LA TRONÇONNEUSE
Enlevez la batterie de la tronçonneuse
et installez le couvre-lame. Nettoyez
soigneusement la tronçonneuse et si
vous le voulez, purgez l’huile du guide et
de la chaîne pour limiter les fuites.
TRANSPORT DE LA BATTERIE
Respectez les réglementations nationales
concernant le transport des batteries au
lithium-ion. Un étiquetage spécial peut
être requis.
ÉLIMINATION DE LA BATTERIE
Ne jetez pas la batterie dans une
poubelle réservée aux ordures
ménagères et ne la brûlez pas. Les
organismes locaux de gestion et de
recyclage des déchets disposent
d’informations concernant son
élimination appropriée ou son recyclage.
Les batteries peuvent être recueillies aux
États-Unis ou au Canada par l’organisme
Rechargeable Battery Recycling
Corporation. OREGON® s’est déjà acquitté
des frais liés au recyclage des batteries.
Déposez les batteries en fin de vie auprès
d’un détaillant participant ou dans un
centre de recyclage. Pour trouver des
centres de dépôt et des informations
supplémentaires, consultez le site Web
www.callrecycle.org ou composez le
--BATTERY.
SÉCURITÉ DE LA BATTERIE
DANGER : LE NONRESPECT DE
CES RÈGLES DE SÉCURITÉ PEUT
ENTRAÎNER LA FUITE DE LIQUIDES
DANGEREUX DE LA BATTERIE, UNE
CHALEUR EXCESSIVE, UNE ÉMISSION
DE FUMÉE, UN ÉCLATEMENT, UNE
COMBUSTION, UNE EXPLOSION
ET/OU UN INCENDIE.
MISE EN GARDE : NE JETEZ PAS
LA BATTERIE DANS LE FEU OU
À LA POUBELLE. LES BATTERIES
AU LITHIUMION DOIVENT ÊTRE
RECYCLÉES PAR UN ORGANISME DE
RECYCLAGE LOCAL AGRÉÉ.
MISE EN GARDE : N’EXPOSEZ
PAS LA BATTERIE À UNE CHALEUR
EXCESSIVE, COMME L’INTÉRIEUR
D’UN VÉHICULE PAR TEMPS CHAUD.
CES EXPOSITIONS PEUVENT
DIMINUER LA PERFORMANCE
ET/OU RÉDUIRE SA DURÉE DE
FONCTIONNEMENT. N’ESSAYEZ PAS
DE RECHARGER UNE BATTERIE NON
RECHARGEABLE.
• Ne démontez pas la batterie et ne
la transformez pas. La batterie est
équipée de fonctions de sécurité et de
protection incorporées qui peuvent être
désactivées par inadvertance.
• Ne branchez pas les bornes positive (+)
et négative (-) à des objets métalliques.
Ne transportez pas et n’entreposez pas
la batterie avec des objets métalliques
comme des pièces ou des vis. Cela peut
provoquer un court-circuit ou l’objet
métallique en contact avec la batterie
peut émettre de la chaleur.
• Ne jetez pas la batterie dans le feu et ne
l’exposez pas à une chaleur excessive.
De telles conditions peuvent faire
fondre l’isolation ou endommager les
fonctions de sécurité.
• N’utilisez pas, ne chargez pas ou
n’entreposez pas la batterie près d’une
source de chaleur, comme du feu ou un
radiateur atteignant une température
supérieure à °C ( °F). Il peut en
résulter une chaleur excessive et/ou un
court-circuit.
Page 42

40
RÈGLES DE SÉCURITÉ
AF 0513 F/N 547361
OREGON® CORDLESS TOOL SYSTEM
MODÈLE DE TRONÇONNEUSE CS250
• Ne plongez pas la batterie dans l’eau
et ne l’exposez pas à des conditions
d’humidité extrêmes. L’humidité
peut endommager les fonctions de
protection, ce qui entraîne une charge
avec un courant et une tension très
élevées, ce qui peut provoquer des
réactions chimiques anormales.
• Pour recharger la batterie, utilisez le
chargeur de batterie spécialement
conçu pour cette batterie et respectez
les précautions de sécurité spécifiques
au chargeur décrites dans ce manuel.
Ne pas respecter ces précautions peut
provoquer un courant et une tension
élevés, ce qui peut entraîner des
réactions chimiques anormales.
• N’utilisez pas les batteries de la marque
OREGON® dans des outils d’une autre
marque qu’OREGON®.
• Ne donnez pas de coups, ne percez pas
et ne jetez pas la batterie.
• N’utilisez pas une batterie présentant
des dommages apparents ou déformée.
• Si vous ne parvenez pas à recharger
totalement la batterie, même une fois
écoulé le temps de charge énoncé, arrêtez
immédiatement le processus de charge.
• Si la batterie dégage une odeur, de la
chaleur, se décolore ou se déforme, ou si
elle semble anormale durant l’utilisation,
la charge ou l’entreposage, enlevez-la
immédiatement de son support ou du
chargeur.
• Tout liquide fuyant de la batterie est
corrosif, peut endommager les yeux et
la peau et peut être toxique s’il est avalé.
SÉCURITÉ DU CHARGEUR
INSTRUCTIONS DE SÉCURITÉ
IMPORTANTES CONSERVEZ CES
INSTRUCTIONS
MISE EN GARDE : CET APPAREIL
NE DOIT PAS ÊTRE UTILISÉ PAR
DES PERSONNES INCLUANT DES
ENFANTS AYANT DES CAPACITÉS
PHYSIQUES, SENSORIELLES OU
MENTALES RÉDUITES, UN MANQUE
DE CONNAISSANCES, SAUF SI ELLES
ONT ÉTÉ FORMÉES ET SUPERVISÉES
PAR UNE PERSONNE RESPONSABLE
DE LEUR SÉCURITÉ. LES ENFANTS
DOIVENT ÊTRE SURVEILLÉS AFIN DE
VOUS ASSURER QU’ILS NE JOUENT
PAS AVEC CET APPAREIL.
MISE EN GARDE : RISQUE DE
BLESSURE PROVENANT D’UNE
DÉCHARGE ÉLECTRIQUE OU D’UN
INCENDIE. NE CHARGEZ QUE DES
BATTERIES AU LITHIUMION CONÇUES
POUR CET APPAREIL. CE CHARGEUR
EST CONÇU UNIQUEMENT POUR UNE
UTILISATION À SEC. AVANT D’UTILISER
CE CHARGEUR, LISEZ ET COMPRENEZ
TOUTES LES INSTRUCTIONS ET
CONSIGNES DE SÉCURITÉ DE
CE MANUEL, CONCERNANT LE
CHARGEUR ET LA BATTERIE.
MISE EN GARDE : N’UTILISEZ
CE CHARGEUR QU’AVEC LE CÂBLE
D’ALIMENTATION FOURNI, EN
VEILLANT À CE QUE LA PRISE DE
COURANT SOIT BIEN ADAPTÉE À LA
PRISE DE SORTIE.
• Protégez le chargeur de la pluie.
• Débranchez le chargeur de la source
d’alimentation lorsqu’il n’est pas utilisé.
• Ne démontez pas le chargeur. IL NE
CONTIENT AUCUNE PIÈCE POUVANT
ÊTRE ENTRETENUE PAR L’UTILISATEUR.
Apportez-le à un réparateur agréé au
besoin.
• N’utilisez pas le chargeur s’il est tombé,
s’il a une trace d’impact pointu, ou s’il est
endommagé d’une quelconque façon.
Remplacez le chargeur ou apportez-le
immédiatement à un réparateur agréé.
• Pour réduire le risque de blessures, ne
chargez que les batteries au lithium-ion
spécifiques à ce chargeur.
• Ne faites pas fonctionner le
chargeur avec un câble ou une prise
endommagé(e). Remplacez le cordon
endommagé à l’aide de la pièce et
de son numéro indiqués dans les
consignes d’emploi. Consultez la section
« Caractéristiques et composants » de ce
manuel.
• Placez le câble de façon à ce qu’on
ne puisse ni trébucher, ni marcher
dessus, ni qu’il puisse représenter un
quelconque danger.
• Ne débranchez jamais le chargeur en
tirant sur le câble; tirez toujours depuis
la prise.
Page 43

41
IDENTIFICATION DU PRODUIT
AF 0513 F/N 547361
OREGON® CORDLESS TOOL SYSTEM
MODÈLE DE TRONÇONNEUSE CS250
IDENTIFICATION DU PRODUIT
CONNAÎTRE LA TRONÇONNEUSE
PANNEAU LATÉRAL
PROTÈGEMAIN/FREIN
DE CHAÎNE
BOUTON DE
VERROUILLAGE DU
PANNEAU LATÉRAL
LEVIER POWERSHARP®
CHAÎNE
COUVRELAME
GUIDE
CHAÎNE
BATTERIE
PIGNON
PIERRE À AIGUISER
GOUJON DE MONTAGE DU GUIDECHAÎNE
PORT DE BATTERIE
LIBÉRATION
DE LA
BATTERIE
VIS DE TENSION DE LA CHAÎNE
ATTRAPECHAÎNE DU
PANNEAU LATÉRAL
POIGNÉE ARRIÈRE
GÂCHETTE
BOUTON DE VERROUILLAGE
DE LA GÂCHETTE
POIGNÉE AVANT
BOUCHON DU
RÉSERVOIR D’HUILE
REGARD DU
NIVEAU D’HUILE
Page 44

42
CARACTÉRISTIQUES ET COMPOSANTS
AF 0513 F/N 547361
OREGON® CORDLESS TOOL SYSTEM
MODÈLE DE TRONÇONNEUSE CS250
CARACTÉRISTIQUES ET COMPOSANTS
COMPOSANTS DE RECHANGE
RÉFÉRENCE DE LA
PIÈCE
GUIDECHAÎNE
35 cm (14 po) 91 SDE,
1,3 mm (0,05 po)
554874
CHAÎNE DE TRONÇONNEUSE ET
PIERRE, POWERSHARP®
35 cm (14 po) 91,
FAIBLE EFFET DE REBOND
554873
CHAÎNE DE TRONÇONNEUSE
ALTERNATIVE
35 cm (14 po) 3/8 po PROFIL
BAS 91 FAIBLE EFFET DE
REBOND CHAÎNE ÉVALUÉE
OREGON® S52
BATTERIE, MODÈLE B600E 548208
BATTERIE, MODÈLE B400E 545938
BATTERIE, MODÈLE B500S 545937
CHARGEUR AVEC CÂBLE, MODÈLE C600 540580
CHARGEUR AVEC CÂBLE, MODÈLE C750 548185
CHARGEUR, MODÈLE C600
ENTRÉE 100240 V~ 5060 Hz 60 W
ENTRÉE
ÉTATSUNIS ET CANADA UNIQUEMENT 120 V~ 60 Hz 60 W
SORTIE 41,5 V
1,25 A
CÂBLE D’ALIMENTATION
RÉF EU/CAN : 546636 RÉF EUR : 547383
RÉF RU : 547384 RÉF AU/NZ : 560663
BATTERIE
TYPE LITHIUM ION
TEMPÉRATURES DE FONCTIONNEMENT 0 °C À 40 °C 32 °F À 104 °F
MODÈLE
CAPACITÉ
NOMINALE
TENSION
NOMINALE
TEMPS DE CHARGE
DU C600 ENV.
B600E 4 Ah/144 Wh +36 V C.C. 210 MINUTES
B400E 2,4 Ah/89 Wh +37 V C.C. 120 MINUTES
B500S 1,25 Ah/47 Wh +37 V C.C. 60 MINUTES
TRONÇONNEUSE
CAPACITÉ D’HUILE 175 ml 5,9 oz)
HUILE POUR CHAÎNE ET GUIDE MARQUE OREGON®
POIDS À SEC AVEC B400E 5,4 kg 12 lb
POIDS À SEC SANS LA BATTERIE, LE
GUIDE ET LA CHAÎNE
3,6 kg 7,9 lb
NIVEAU DE PUISSANCE ACOUSTIQUE 90 dB
VIBRATIONS 2,87 m/s
2
(K, 1,5 m/s2)
LONGUEUR DU GUIDE MAX. 35 cm (14 po)
PAS DE CHAÎNE 3/8 po PROFIL BAS - 91
CALIBRE DE CHAÎNE 1,3 mm (0,05 po)
DENTS DE PIGNON 6
VITESSE DE LA CHAÎNE HORS CHARGE 12 m/s
Page 45

43
AF 0513 F/N 547361
OREGON® CORDLESS TOOL SYSTEM
MODÈLE DE TRONÇONNEUSE CS250
NOMS ET TERMES RELATIFS À LA
TRONÇONNEUSE
NOMS ET TERMES RELATIFS À LA
TRONÇONNEUSE
Abattage : Processus de coupe d’un arbre.
Bouton de verrouillage de la
gâchette : Arrêt mobile qui évite
un fonctionnement non voulu de
l’interrupteur de la gâchette, jusqu’à ce
qu’il soit activé manuellement.
Burette à huile automatique : Système
qui lubrifie automatiquement le guidechaîne et la chaîne de la tronçonneuse.
Chaîne à faible effet de rebond : Chaîne
conforme aux exigences de performance
d’effet de rebond de la norme ANSI B..
Chaîne de tronçonneuse : Chaîne dentelée
en boucle, qui coupe le bois, et qui est
entraînée par le moteur et soutenue par
le guide-chaîne.
Collet d’alignement : Partie longue et
saillante de la plaque du coussinet du
guide étant en contact avec le goujon.
Effet de rebond : Mouvement vertical ou
arrière, ou les deux, du guide-chaîne
qui se produit lorsque la chaîne près de
l’extrémité supérieure du guide-chaîne
frappe un objet comme un billot ou une
branche, ou lorsque la chaîne est prise
dans une entaille du tronc.
Entaille d’abattage : Entaille dans le tronc
qui dirige la chute de l’arbre.
Frein de chaîne : Dispositif servant à
arrêter le mouvement de la chaîne.
Guide-chaîne : Structure sur rail qui
supporte et guide la chaîne de la
tronçonneuse.
Guide-chaîne à effet de rebond réduit :
Guide-chaîne qui réduit de façon
significative et prouvée l’effet de rebond.
Interrupteur de la gâchette : Dispositif
qui sert à allumer et à éteindre la
tronçonneuse.
Pignon d’entraînement : Partie crantée qui
conduit la chaîne de la tronçonneuse.
Poignée arrière : Poignée d’appui logée à
ou vers l’arrière de la tronçonneuse.
Poignée avant : Poignée d’appui située à
l’avant ou vers l’avant de la tronçonneuse.
Position normale de coupe : Positions
utilisées lors du tronçonnage et des
entailles d’abattage.
Protège-main : Barrière structurelle entre
la poignée avant d’une tronçonneuse
et le guide-chaîne, qui sert également
de mécanisme d’activation du frein de
chaîne.
Tête motrice de la tronçonneuse :
Tronçonneuse sans chaîne ni guidechaîne.
Trait d’abattage : Dernière entaille lors du
processus d’abattage pratiquée sur le
côté opposé à l’entaille d’abattage sur le
tronc d’un arbre.
Tronçonnage : Processus de coupe
transversale d’un arbre abattu ou d’un
tronc en morceaux.
Page 46

44
ASSEMBLAGE
AF 0513 F/N 547361
OREGON® CORDLESS TOOL SYSTEM
MODÈLE DE TRONÇONNEUSE CS250
ASSEMBLAGE
DÉBALLAGE
DANGER : N’ESSAYEZ PAS
DE FAIRE FONCTIONNER LA
TRONÇONNEUSE SI UNE PIÈCE EST
ENDOMMAGÉE OU MANQUANTE.
Certaines parties de la tronçonneuse
sont déjà entièrement montées. Si la
tronçonneuse a été emballée sans que la
chaîne et le guide-chaîne soient montés,
consultez la section « Remplacement
du guide et de la chaîne » de ce manuel
pour les instructions d’installation. Après
avoir sorti la tronçonneuse de sa boîte,
inspectez-la avec soin afin de vous
assurer qu’elle n’a pas été endommagée
pendant le transport.
Vérifiez qu’il ne manque aucune pièce de
la tronçonneuse. S’il manque des pièces
ou s’il y a des pièces endommagées,
contactez OREGON® au -
pour obtenir des pièces de rechange.
IMPORTANT : UNE FOIS LA
TRONÇONNEUSE DÉBALLÉE, VÉRIFIEZ
LA POSITION DU PROTÈGE-MAIN. LA
TRONÇONNEUSE NE FONCTIONNERA
PAS SI LE FREIN DE CHAÎNE EST
ENGAGÉ. TIREZ LE PROTÈGE-MAIN
VERS L’ARRIÈRE JUSQU’AU NIVEAU DE
LA POIGNÉE AVANT, AVANT DE LA
FAIRE FONCTIONNER (FIG. ).
INSTALLATION DES
CRAMPONS POINTUS
Certaines parties de la tronçonneuse
ont comme accessoires des crampons
pointus en métal. Pour installer les
crampons, placez-les à l’avant de la
tronçonneuse, face vers le haut, puis fixez
à l’aide des deux vis fournies.
REMPLISSAGE DU RÉSERVOIR
D’HUILE
MISE EN GARDE : VÉRIFIEZ
SOUVENT LE NIVEAU D’HUILE ET
REMETTEZEN SI NÉCESSAIRE. NE
FAITES JAMAIS FONCTIONNER LA
TRONÇONNEUSE SI L’HUILE N’EST
PAS VISIBLE.
Il est nécessaire de lubrifier correctement
le guide et la chaîne avec de l’huile
adaptée. Pour de meilleurs résultats,
utilisez l’huile pour guide et chaîne
OREGON®. Elle a été spécialement
conçue pour réduire les frictions et
accélérer les coupes. N’utilisez JAMAIS
d’huile ou d’autre lubrifiant n’ayant pas
été spécialement conçu pour le guide
et la chaîne. Cela peut entraîner une
coagulation de l’huile dans le système, ce
qui peut user prématurément le guide et
la chaîne.
Posez la tronçonneuse sur le côté sur
une surface plate et solide, afin que
le bouchon d’huile soit sur le dessus
(Fig. ). Après avoir enlevé les débris
autour du bouchon, enlevez-le et versez
doucement de l’huile pour guide et
chaîne dans le réservoir. Remettez le
bouchon en place et vérifiez le niveau
d’huile à travers le regard. Il est
nécessaire de lubrifier correctement le
guide et la chaîne avec de l’huile dès
que le niveau d’huile n’est plus visible à
travers le regard.
FIG. 6
PROTÈGEMAIN
EN POSITION DE
FONCTIONNEMENT
PROTÈGEMAIN
EN POSITION
DE FREIN
FIG. 7
Page 47

45
AF 0513 F/N 547361
OREGON® CORDLESS TOOL SYSTEM
MODÈLE DE TRONÇONNEUSE CS250
FONCTIONNEMENT DE LA
TRONÇONNEUSE
FONCTIONNEMENT DE LA TRONÇONNEUSE
BATTERIE ET CHARGEUR
AVERTISSEMENT : NE CHARGEZ
PAS LA BATTERIE SOUS LA PLUIE.
INDICATEUR LED DU NIVEAU DE
CHARGE DE LA BATTERIE
La batterie au lithium-ion est équipée d’un
indicateur LED de niveau de charge. Pour
tester le niveau de charge de la batterie,
appuyez sur le bouton indicateur situé à
l’avant de la batterie (Fig. ).
Aucun voyant : recharge.
Un voyant vert fixe :
moins de % de charge.
Chargez la batterie avant toute
utilisation.
Deux voyants verts fixes :
entre et % de charge.
Trois voyants verts fixes :
entre et % de charge.
Quatre voyants verts fixes :
entre et % de charge.
CONNEXION DU CHARGEUR
Connectez le câble du chargeur au
chargeur et à une prise de courant
adaptée (Fig. ).
N’utilisez que le jeu de câbles fourni avec
le chargeur. La première fois, vérifiez que
le type de fiche correspond à la prise.
INDICATEUR LED DE NIVEAU DE
CHARGE DU CHARGEUR
Le chargeur de batterie est équipé d’un
indicateur de charge LED qui indique le
niveau de charge, ainsi que les situations
pouvant retarder ou empêcher la mise en
charge (Fig. ).
Remarque : Aucun voyant n’est visible
avant la mise en place de la batterie.
Voyant orange clignotant :
signale une défaillance. Elle peut
avoir plusieurs raisons. Consultez
la section « Dépannage » de ce
manuel.
Voyant orange fixe : la
température de la batterie
dépasse la plage de tolérance (de
°C à °C/de °F à °F).
Laissez la batterie redescendre à
une température acceptable avant
de la mettre en charge. La batterie
peut être laissée sur le chargeur
jusqu’à ce que la température
redevienne normale. La mise en
charge commencera lorsque la
température adéquate sera
atteinte.
Voyant vert clignotant : la batterie
est en charge.
Voyant vert fixe : la batterie est
prête à fonctionner.
FIG. 8
VOYANTS
BOUTON INDICATEUR
FIG. 9
FIG. 10
Page 48

46
AF 0513 F/N 547361
OREGON® CORDLESS TOOL SYSTEM
MODÈLE DE TRONÇONNEUSE CS250
FONCTIONNEMENT DE LA
TRONÇONNEUSE
CHARGEMENT DE LA BATTERIE
AVERTISSEMENT : LE NON
RESPECT DES PROCÉDURES DE
CHARGEMENT PEUT ENTRAÎNER
UNE SURTENSION, UNE INTENSITÉ
DE COURANT EXCESSIVE, UNE PERTE
DE CONTRÔLE DURANT LA CHARGE,
UNE FUITE DE PRODUITS CHIMIQUES
DANGEREUX, UNE PRODUCTION DE
CHALEUR, UNE EXPLOSION OU UN
INCENDIE.
Une fois le câble du chargeur connecté et
branché dans une prise de courant,
alignez les rainures de la batterie sur les
rails du chargeur et faites glisser la
batterie sur le chargeur jusqu’à ce qu’elle
soit bien enclenchée (Fig. ).
Vérifiez les conditions de charge sur
l’indicateur de niveau de charge.
INSERTION ET DÉBLOCAGE
DE LA BATTERIE
Utilisez uniquement les batteries de la
marque OREGON® indiquées dans ces
instructions d’utilisation.
Alignez la rainure de la batterie sur les
rails du port de batterie. Insérez
fermement la batterie dans le port de
batterie de la tronçonneuse, puis
appuyez jusqu’à ce que vous entendiez
un clic qui enclenche la batterie (Fig. ).
Pour pouvoir retirer la batterie, levez
le bouton de libération de la batterie
(Fig. ).
FIG. 11
FIG. 12
FIG. 13
Page 49

47
AF 0513 F/N 547361
OREGON® CORDLESS TOOL SYSTEM
MODÈLE DE TRONÇONNEUSE CS250
FONCTIONNEMENT DE LA
TRONÇONNEUSE
UTILISATION GÉNÉRALE
AVERTISSEMENT : PORTEZ
TOUJOURS DES GANTS ADAPTÉS,
AINSI QUE DES PROTECTIONS POUR
LA TÊTE, LES OREILLES ET LES YEUX.
TEMPÉRATURES DE
FONCTIONNEMENT
Cette tronçonneuse est conçue pour
fonctionner à des températures
comprises entre °C et °C (entre °F
et °F).
PRISE EN MAIN
Posez la tronçonneuse sur une surface
solide et plate, puis attrapez la poignée
avant avec la main gauche, et la poignée
arrière avec la main droite. Vos doigts
doivent s’enrouler autour de la poignée,
avec le pouce sous la main (Fig. ).
BONNE POSITION
Vos pieds doivent être sur un sol solide,
votre poids également réparti entre eux.
Ne vous penchez pas trop en avant et ne
vous tenez pas sur une échelle, un
escabeau ou dans toute position élevée
qui n’est pas complètement sécurisée.
ARRÊT DE LA TRONÇONNEUSE
Relâchez l’interrupteur de la gâchette
pour arrêter la tronçonneuse.
TEST DU FREIN
Assurez-vous que le frein de
chaîne fonctionne avant d’utiliser
la tronçonneuse. Pour vérifier le
fonctionnement du frein, mettez
en marche la tronçonneuse sur une
surface plate solide, puis déplacez
le protège-main vers l’avant pour
activer manuellement le frein de
la chaîne. Si le frein de la chaîne
fonctionne correctement, le moteur et
la chaîne de la tronçonneuse s’arrêtent
immédiatement.
DÉMARRAGE DE LA TRONÇONNEUSE
Tenez fermement les poignées avant et
arrière. Appuyez et maintenez enfoncé le
bouton de verrouillage de la gâchette
avec le pouce (). Pour démarrer la
tronçonneuse, appuyez sur l’interrupteur
de la gâchette () (Fig. ). Il n’est pas
nécessaire de continuer à appuyer sur le
bouton de verrouillage de la gâchette.
ATTRAPPEZ AVEC LE
POUCE SOUS LA POIGNÉE
FIG. 14
1 BOUTON DE
VERROUILLAGE DE
LA GÂCHETTE
2 GÂCHETTE
FIG. 15
Page 50

48
AF 0513 F/N 547361
OREGON® CORDLESS TOOL SYSTEM
MODÈLE DE TRONÇONNEUSE CS250
FONCTIONNEMENT DE LA
TRONÇONNEUSE
DÉCOUPAGE
COUPE DE BASE
AVERTISSEMENT : ASSUREZ
VOUS D’ÊTRE TOUJOURS STABLE
ET DE TENIR FERMEMENT LA
TRONÇONNEUSE AVEC LES DEUX
MAINS LORSQUE LE MOTEUR TOURNE.
Vérifiez la bonne adhérence de la poignée
et tenez-vous face au bois à couper, la
tronçonneuse éteinte. Appuyez sur le
bouton de verrouillage de la gâchette,
puis sur l’interrupteur. Attendez que la
chaîne ait atteint sa vitesse maximale
avant de commencer la coupe.
Commencez la coupe en enfonçant
légèrement le guide-chaîne contre le
bois. N’appuyez que légèrement : laissez
la tronçonneuse faire son travail.
Conservez une vitesse constante durant
toute la coupe, en relâchant la pression
juste avant la fin de la coupe.
ÉLAGAGE
Lors de l’élagage, assurez-vous que les
personnes à proximité et les aides sont
à une distance raisonnable du point
de chute des branches et qu’ils ne sont
pas directement en face ou derrière
l’utilisateur de la tronçonneuse. Sécurisez
les branches pouvant être dangereuses.
Utilisez un équipement auxiliaire adapté.
Gardez un bon équilibre, tenez la
tronçonneuse fermement avec les deux
mains et ne visez pas trop haut.
Lorsque la tronçonneuse est à sa vitesse
maximale, amenez le haut du guidechaîne en contact avec la branche à
couper. Appliquez une légère pression.
Pour les branches plus grosses, faites
d’abord une petite coupe sur le bas de la
branche, puis terminez la coupe à partir
du haut. Le fait de couper complètement
une grosse branche depuis le haut
peut provoquer des éclats; une coupe
complète depuis le bas peut entraîner un
pincement du guide avec la branche.
Certaines tronçonneuses sont pourvues
de crampons pointus en métal sur la
partie avant. En fonction de la technique
de l’utilisateur, les crampons pointus
peuvent diminuer la qualité de la coupe.
ABATTAGE D’UN ARBRE
Lorsque les opérations de tronçonnage
et d’abattage sont exécutées par deux
ou plusieurs personnes simultanément,
le tronçonnage doit être effectué à une
distance d’au moins deux fois la hauteur
de l’arbre à tronçonner, par rapport à
l’emplacement de l’abattage. On ne doit
pas tronçonner d’arbre de sorte à mettre
la vie d’une personne en danger, de
frapper des fils du réseau électrique ou
de provoquer des dommages aux biens.
Si un arbre touche un fil du réseau public,
l’entreprise du réseau public doit être
avisée immédiatement.
Utilisez des crampons en plastique
à l’avant de la tronçonneuse pour
supporter celle-ci sur le bois. Si la
tronçonneuse en est équipée, placez les
crampons pointus en métal dans le bois
et utilisez-les en tant que point de levier
pour renforcer la stabilité lors de la coupe
de bois avec un diamètre important.
L’utilisateur de la tronçonneuse doit se
tenir en amont de la pente, car l’arbre
risque de rouler ou de glisser une fois
abattu. Vous devez prévoir et dégager
une voie de retrait avant le début de
l’abattage. La voie de retrait doit être
augmentée à l’arrière et en diagonale
vers l’avant de la ligne de chute prévue
(Fig. ).
Avant l’abattage, observez le penchant
naturel de l’arbre, l’emplacement de
grandes branches et la direction du vent
pour évaluer la ligne de chute de l’arbre.
Retirez la saleté, les roches, les morceaux
d’écorce détachés, les clous, agrafes et fils
métalliques de l’arbre avant de débuter
la coupe.
OPTIONS DE VOIE DE
RETRAIT
DIRECTION
DE LA CHUTE
RETRAIT
RETRAIT
FIG. 16
45°
Page 51

49
AF 0513 F/N 547361
OREGON® CORDLESS TOOL SYSTEM
MODÈLE DE TRONÇONNEUSE CS250
FONCTIONNEMENT DE LA
TRONÇONNEUSE
) ENTAILLE D’ABATTAGE
Entaillez le tronc de / du diamètre
de celui-ci, perpendiculaire à la
direction de la chute. Faites d’abord
l’entaille horizontale inférieure. Cela
aidera à éviter tout pincement de la
chaîne de la tronçonneuse ou du
guide-chaîne lorsque la seconde
entaille sera effectuée (Fig. ).
) TRAIT D’ABATTAGE
Effectuez le trait d’abattage au moins
mm (~ po) au-dessus de l’entaille
horizontale (Fig. ). Gardez le trait
d’abattage parallèle à l’entaille
d’abattage horizontale. Effectuez le
trait d’abattage de sorte qu’il y ait
assez de bois pour servir de charnière.
Cette charnière naturelle empêche
l’arbre de se tordre et de tomber dans
la mauvaise direction. Ne la découpez
pas de part en part.
Dès que le trait d’abattage se
rapproche de la charnière naturelle,
l’arbre devrait débuter sa chute. S’il
y a un risque que l’arbre ne tombe
pas dans la direction souhaitée ou s’il
risque de rouler en arrière et coincer
la tronçonneuse, arrêtez la coupe
avant que le trait d’abattage ne soit
complet et utilisez des coins en bois,
plastique ou aluminium pour ouvrir la
coupe et faire basculer l’arbre le long
de la ligne de chute souhaitée.
Lorsque l’arbre commence sa chute,
retirez la tronçonneuse du trait, arrêtez
le moteur et déposez-la sur le sol, puis
reculez dans la voie de retrait prévue.
Faites attention aux chutes de branches
et regardez où vous marchez.
) ÉBRANCHAGE D’UN ARBRE
L’ébranchage est la coupe des branches
d’un arbre abattu. Pour ce faire,
conservez intactes les branches
maîtresses inférieures pour supporter le
billot au-dessus du sol. Retirez les
petites branches d’un seul mouvement.
Les branches sous tension doivent être
coupées depuis le bas pour éviter le
grippage de la tronçonneuse (Fig. ).
) TRONÇONNER UN BILLOT
Le tronçonnage consiste à débiter un
tronc en morceaux. Il est important
de vous assurer un bon équilibre et
de veiller à ce que votre poids soit
également réparti sur vos deux pieds.
Si possible, le tronc doit être surélevé
et soutenu par des branches, des
troncs ou des cales.
ENTAILLE D’ABATTAGE
DIRECTION
DE LA CHUTE
ENTAILLE
FIG. 17
TRAIT D’ABATTAGE
TRAIT
D’ABATTAGE
CHARNIÈRE
DIRECTION
DE LA CHUTE
ENTAILLE
5,08 CM
2 POUCES
5,08 CM
2 POUCES
FIG. 18
BRANCHE D’ARBRE
COUPE DES
BRANCHES
MAINTENEZ LA PIÈCE AUDESSUS DU SOL
CONSERVEZ UN SUPPORT DE BRANCHE
JUSQU’À CE QUE LE TRONC SOIT COUPÉ
FIG. 19
Page 52

50
AF 0513 F/N 547361
OREGON® CORDLESS TOOL SYSTEM
MODÈLE DE TRONÇONNEUSE CS250
FONCTIONNEMENT DE LA
TRONÇONNEUSE
SUIVEZ CES INSTRUCTIONS SIMPLES
POUR UN TRONÇONNAGE FACILITÉ :
IMPORTANT : EXERCEZVOUS
À COUPER DES BILLOTS SUR
UN CHEVALET DE SCIAGE
JUSQU’À VOUS FAMILIARISER
AU FONCTIONNEMENT DE LA
TRONÇONNEUSE.
Une fois le tronc soutenu sur toute sa
longueur, coupez-le depuis le haut
(tronçonnage par le dessus) (Fig. ).
Si le tronc n’est soutenu qu’à une
extrémité, coupez / du diamètre à
partir du dessous (tronçonnage par le
dessous). Puis terminez la coupe en
tronçonnant par le dessus la première
entaille (Fig. ).
Si le tronc est soutenu des deux
extrémités, coupez / du diamètre
depuis le haut (tronçonnage par le
dessus). Puis terminez la coupe en
tronçonnant par le dessous les
/ inférieurs du tronc pour rejoindre la
première entaille (Fig. ).
Si vous tronçonnez en pente, restez
toujours en amont du tronc (Fig. ).
Pour conserver un parfait contrôle lors
de la coupe, relâchez la pression près
de la fin du tronçonnage, sans toutefois
relâcher la prise sur les poignées de la
tronçonneuse. Ne laissez pas la chaîne
toucher le sol. Une fois la coupe terminée,
attendez l’immobilisation complète
de la chaîne avant de déplacer la
tronçonneuse. Arrêtez toujours le moteur
avant de vous déplacer vers un autre
arbre.
TRONC SOUTENU
SUR TOUTE SA LONGUEUR
TRONÇONNER PAR LE DESSUS
POUR ÉVITER DE COUPER LE SOL
FIG. 20
LE TRONC EST SOUTENU À
UNE SEULE EXTRÉMITÉ
1
ER
TRONÇONNAGE PAR LE DESSOUS 1/3 DU
DIAMÈTRE POUR ÉVITER LES ÉCLATS
2
E
TRONÇONNAGE PAR LE DESSUS 2/3 DU
DIAMÈTRE POUR REJOINDRE LE 1ER TRAIT
DE COUPE POUR ÉVITER LE PINCEMENT
FIG. 21
TRONÇONNER UN BILLOT
1ER TRONÇONNAGE PAR LE
DESSUS 1/3 DU DIAMÈTRE
POUR ÉVITER LES ÉCLATS
2E TRONÇONNAGE PAR LE DESSOUS 2/3 DU
DIAMÈTRE POUR REJOINDRE LE 1
ER
TRAIT DE
SCIE POUR ÉVITER LE PINCEMENT
FIG. 22
TRONÇONNER EN PENTE
SE TENIR EN AMONT DU BILLOT
LORS DU TRONÇONNAGE CAR LE
BILLOT RISQUE DE ROULER VERS
LE BAS
FIG. 23
Page 53

51
AFFÛTAGE AVEC POWERSHARP®
AF 0513 F/N 547361
OREGON® CORDLESS TOOL SYSTEM
MODÈLE DE TRONÇONNEUSE CS250
AFFÛTAGE AVEC POWERSHARP®
AVERTISSEMENT : POWERSHARP®
NE DOIT PAS ÊTRE UTILISÉ
EN PRÉSENCE DE MATÉRIAUX
EXTRÊMEMENT INFLAMMABLES
COMME DE L’ESSENCE OU DE
L’ACÉTYLÈNE.
MISE EN GARDE : L’AFFÛTAGE
AVEC LE SYSTÈME POWERSHARP®
PROVOQUE DE PETITES ÉTINCELLES.
PRÉSENTATION DE
POWERSHARP®
Cette tronçonneuse est équipée du
système d’affûtage intégré PowerSharp®,
qui permet d’affûter rapidement et
facilement la chaîne de la tronçonneuse.
Vous devez affûter la chaîne de la
tronçonneuse lorsque la coupe prend
plus de temps, ou quand les éclats de
bois deviennent plus petits, en devenant
au pire de la sciure.
FONCTIONNEMENT
IMPORTANT : LE SYSTÈME
D’AFFÛTAGE INTÉGRÉ
POWERSHARP® EST RÉSERVÉ
UNIQUEMENT À LA CHAÎNE
POWERSHARP®. N’ESSAYEZ JAMAIS
D’AIGUISER UNE AUTRE CHAÎNE
AVEC L’AFFÛTEUR INTÉGRÉ. CELA
POURRAIT ENDOMMAGER LA
CHAÎNE ET L’AFFÛTEUR.
IMPORTANT : LA CHAÎNE
POWERSHARP® UTILISE DES
GOUGES UNIQUES TRÈS AIGUISÉES
ET NE PEUT ÊTRE AFFÛTÉE
QU’AVEC L’AFFÛTEUR D’ORIGINE
POWERSHARP®.
• Une fois la tronçonneuse fonctionnant
à plein régime, soulevez légèrement le
levier PowerSharp® pendant à
secondes (Fig. ). Vous verrez des
étincelles lorsque les gouges entreront
en contact avec la pierre à aiguiser.
• Faites une coupe d’essai afin
de déterminer si la chaîne a été
suffisamment affûtée. Si ce n’est pas
le cas, recommencez la procédure
d’affûtage jusqu’à ce que la chaîne soit
suffisamment affûtée.
IMPORTANT : N’EXERCEZ PAS DE
PRESSION TROP FORTE LORS DE
L’AFFÛTAGE. UNE FORCE EXCESSIVE
PEUT RÉDUIRE LA PERFORMANCE DE
LA PIERRE À AIGUISER.
IMPORTANT : IL EST NORMAL
DE VOIR UNE PETITE QUANTITÉ
D’ÉTINCELLES ET DE FUMÉE
DURANT LA PHASE D’AFFÛTAGE,
ÉTANT DONNÉ QUE LES GOUGES
SONT EN CONTACT AVEC LA PIERRE
ET QUE LA FRICTION CHAUFFE LA
CHAÎNE.
QUAND REMPLACER LA PIERRE
À AIGUISER
La pierre à aiguiser est censée s’user de
la même façon que la chaîne. Remplacez
toujours la pierre lorsque vous changez
la chaîne, même si elle vous semble
pouvoir durer plus longtemps. Consultez
la section « Remplacement de la pierre à
aiguiser » de ce manuel.
FIG. 24
Page 54

52
ENTRETIEN ET NETTOYAGE
AF 0513 F/N 547361
OREGON® CORDLESS TOOL SYSTEM
MODÈLE DE TRONÇONNEUSE CS250
ENTRETIEN ET NETTOYAGE
AVERTISSEMENT : INSPECTEZ LA
TRONÇONNEUSE. UNE INSPECTION
RÉGULIÈRE EST LA PREMIÈRE
ÉTAPE D’UN ENTRETIEN CORRECT.
EN SUIVANT LES CONSIGNES
CIDESSOUS, VOUS POURREZ
AUGMENTER LA SÉCURITÉ ET
VOTRE TAUX DE SATISFACTION.
SI VOUS DÉTECTEZ DES PIÈCES
ENDOMMAGÉES OU TROP USÉES,
REMPLACEZLES IMMÉDIATEMENT.
NE PAS IDENTIFIER ET REMPLACER
LES PIÈCES ENDOMMAGÉES OU
USÉES PEUVENT ENTRAÎNER DE
GRAVES BLESSURES CORPORELLES.
AVERTISSEMENT : ENLEVEZ LA
BATTERIE DE LA TRONÇONNEUSE
AVANT L’INSPECTION, LE
NETTOYAGE OU L’ENTRETIEN.
UN OUTIL FONCTIONNANT SUR
BATTERIE AVEC LA BATTERIE
ENCLENCHÉE EST TOUJOURS SOUS
TENSION ET PEUT DÉMARRER DE
FAÇON ACCIDENTELLE.
MISE EN GARDE : LORSQUE VOUS
NETTOYEZ LA TRONÇONNEUSE, NE
LA PLONGEZ PAS DANS L’EAU NI
DANS TOUT AUTRE LIQUIDE.
AVANT CHAQUE UTILISATION
• Poignées : Les poignées avant et arrière
ne doivent pas comporter de craquelure
ni tout autre défaut. Elles doivent être
propres et sèches.
• Protège-main : Le protège-main ne doit
pas être endommagé et doit pouvoir
facilement être déplacé vers l’avant et
l’arrière. Lorsqu’il est déplacé, le protègemain devrait activer le frein de la chaîne.
• Guide-chaîne : Le guide-chaîne doit être
droit et ne pas être ébréché, craquelé, ni
excessivement usé.
• Chaîne de tronçonneuse : La chaîne
doit être correctement tendue, et
aucun composant ne doit être craquelé,
ébréché ou excessivement usé.
• Panneau latéral : Le panneau latéral
ne doit pas comporter de craquelure
ni tout autre défaut. Il doit s’ajuster
correctement au corps de la
tronçonneuse, sans aucune torsion.
Assurez-vous que l’attrape-chaîne ne
comporte aucune craquelure.
• Batterie : La batterie doit être propre,
sèche, ne pas comporter de trous,
d’impacts ou tout autre défaut. Les
connecteurs doivent être propres, secs
et ne pas être obstrués par des débris.
• Port de batterie : Le port de batterie et
les connecteurs doivent être propres,
secs et ne pas être obstrués par des
débris.
• Frein de chaîne : Testez le frein de chaîne
afin de vous assurer qu’il fonctionne
correctement.
• Niveau d’huile : Le niveau d’huile doit
arriver en haut du regard. Si ce n’est pas
le cas, remplissez le réservoir avant toute
utilisation.
• Capot du moteur : Vérifiez qu’il n’y a
aucune craquelure sur le capot et aucun
débris dans les grilles d’aération.
RÉGULIÈREMENT
• Pignon d’entraînement : Vérifiez qu’il
ne comporte ni rainures profondes, ni
dents cassées, ni bavures.
• Vis de serrage : Vérifiez la tête et la tige
de la vis de serrage pour être sûr qu’il
n’y a pas d’usure excessive, de filetage
dénudé ou croisé, ni tout autre défaut.
• Logement pour le goujon de montage :
Assurez-vous que le goujon de montage
du guide-chaîne n’est pas tordu,
dénudé, que le filetage n’est pas faussé
et que la plaque du coussinet et le collet
d’alignement sont intacts et ne sont pas
obstrués par des débris.
• Chargeur : Le chargeur doit être propre,
sec, exempt de trou ou de tout autre
défaut. Le support de batterie et
les connecteurs ne doivent pas être
obstrués par des débris.
Page 55

53
ENTRETIEN ET NETTOYAGE
AF 0513 F/N 547361
OREGON® CORDLESS TOOL SYSTEM
MODÈLE DE TRONÇONNEUSE CS250
REMPLACEMENT DU GUIDE
ET DE LA CHAÎNE
MISE EN GARDE : SEULE LA
CHAÎNE DE LA TRONÇONNEUSE
POWERSHARP® PEUT ÊTRE AFFÛTÉE
GRÂCE AU LEVIER POWERSHARP® DE
LA TRONÇONNEUSE.
AVERTISSEMENT : ENLEVEZ
LA PIERRE À AIGUISER LORSQUE
VOUS UTILISEZ UNE CHAÎNE DE
TRONÇONNEUSE AUTRE QUE
POWERSHARP®. SI VOUS NE LE
FAITES PAS, CELA PEUT ABÎMER LA
CHAÎNE DE LA TRONÇONNEUSE, LE
SYSTÈME D’AFFÛTAGE ET/OU LA
TRONÇONNEUSE.
Portez des gants. Éteignez la tronçonneuse
et laissez-la refroidir. Enlevez la batterie,
dévissez le bouton de verrouillage du
panneau latéral (Fig. ) et retirez le
panneau latéral. Assurez-vous que la plaque
du coussinet, le pignon et la vis de serrage
ne sont pas obstrués par des débris.
Remarque : C’est le moment opportun
pour vérifier que le pignon d’entraînement
et la vis de serrage n’ont pas subi d’usure
ou de dommage excessif.
Installez le nouveau guide et la nouvelle
chaîne comme suit :
• Enlevez la pierre à aiguiser lorsque
vous remplacez par une chaîne de
tronçonneuse autre que PowerSharp®.
• Ajustez la goupille de réglage le plus en
arrière possible sur la chaîne. Placez le
guide-chaîne sur le support de montage
en faisant glisser l’encoche du guide sur
le collet d’alignement (Fig. ), tout en
veillant à ce que la goupille de réglage
du guide soit insérée dans le trou
inférieur de la queue du guide.
• Enroulez la nouvelle chaîne sur le
pignon d’entraînement, en plaçant les
bords tranchants des dents le long du
bord supérieur du guide-chaîne.
• Rentrez la chaîne dans la rainure du
guide et faites glisser le guide loin du
moteur afin d’enlever du mou de la
chaîne (Fig. ). Réglez la position du
guide en ajustant la goupille jusqu’à ce
qu’elle engage le trou dans le guide.
FIG. 25
FIG. 26
FIG. 27
Page 56

54
ENTRETIEN ET NETTOYAGE
AF 0513 F/N 547361
OREGON® CORDLESS TOOL SYSTEM
MODÈLE DE TRONÇONNEUSE CS250
• Attachez à nouveau le panneau latéral en
vous assurant que l’attrape-chaîne est
correctement positionné dans le trou.
Serrez doucement le bouton de
verrouillage du panneau latéral (Fig. ).
IMPORTANT : LA CHAÎNE DE LA
TRONÇONNEUSE DOIT ÊTRE
CORRECTEMENT TENDUE AVANT
TOUTE UTILISATION. MERCI DE
CONSULTER LES INSTRUCTIONS DE
TENSION CIDESSOUS.
* Afin de réduire l’usure du guide et
d’augmenter sa durée de vie, pensez à
l’inverser de temps en temps.
INSTRUCTIONS DE TENSION
• Portez des gants. Enlevez la batterie avant
d’effectuer la traction. Desserrez le bouton
de verrouillage du panneau latéral, tenez
l’extrémité du guide et serrez la vis de
serrage de la chaîne (Fig. ).
• Tournez complètement le bouton de
verrouillage du panneau latéral.
La tension de la chaîne sera correcte
lorsque vous pourrez, en forçant un peu
et en portant des gants, tirer doucement
la chaîne autour du guide. La chaîne
devrait pouvoir toucher le dessous du rail
du guide (Fig. ).
Durant les premières utilisations, faites
tourner la tronçonneuse en continu
pendant une ou deux minutes, afin de
vous assurer que la chaîne reçoit un bon
apport en huile. Arrêtez le moteur et
vérifiez la tension de la chaîne. Si elle est
détendue, resserrez-la.
Après plusieurs utilisations, laissez la
chaîne refroidir et vérifiez à nouveau la
tension (pensez à retirer la batterie au
préalable). Contrôlez soigneusement la
tension pendant la première demi-heure
d’utilisation, et régulièrement tout au
long de la durée de vie de la chaîne, en la
réglant si nécessaire, une fois la chaîne et
le guide refroidis. Ne resserrez jamais la
chaîne quand elle est chaude.
Lubrifiez correctement la chaîne avec une
huile pour chaîne et guide de la marque
OREGON®. Elle a été spécialement
formulée pour augmenter la puissance
et réduire la friction. Assurez-vous que
la chaîne reçoit une quantité d’huile
suffisante. L’huile doit être versée
depuis l’extrémité du guide lorsque la
tronçonneuse fonctionne, pas lorsqu’elle
est arrêtée.
La chaîne de la tronçonneuse se tendra,
ce qui est le résultat d’une utilisation
normale. Un apport insuffisant en huile,
une utilisation agressive ou un défaut
d’entretien peut provoquer un étirement
prématuré.
FIG. 28
FIG. 29
FIG. 30
Page 57

55
ENTRETIEN ET NETTOYAGE
AF 0513 F/N 547361
OREGON® CORDLESS TOOL SYSTEM
MODÈLE DE TRONÇONNEUSE CS250
REMPLACEMENT DE LA
PIERRE À AIGUISER
MISE EN GARDE : REMPLACEZ
LA CHAÎNE DE LA TRONÇONNEUSE
POWERSHARP® ET LA PIERRE À
AIGUISER EN MÊME TEMPS. NE PAS
RESPECTER CETTE CONSIGNE PEUT
DIMINUER LA PERFORMANCE OU
ENDOMMAGER LA CHAÎNE ET/OU LA
PIERRE À AIGUISER.
IMPORTANT : LE SYSTÈME
D’AFFÛTAGE INTÉGRÉ
POWERSHARP® EST RÉSERVÉ
UNIQUEMENT À LA CHAÎNE
POWERSHARP®.
Une fois la tronçonneuse éteinte et
refroidie et la batterie enlevée, retirez le
panneau latéral en enlevant le bouton de
verrouillage du panneau latéral. Installez
la nouvelle pierre à aiguiser comme suit :
• Enlevez les deux vis qui maintiennent la
pierre à aiguiser. Enlevez la pierre (Fig. ).
• Assurez-vous que le levier PowerSharp®
et la zone qui l’entoure ne sont pas
encombrés de débris.
• Mettez la nouvelle pierre en place.
Replacez les vis et serrez bien.
• Remettez le panneau latéral en place et
serrez le bouton de verrouillage du
panneau latéral.
NETTOYAGE DE LA
TRONÇONNEUSE
MISE EN GARDE : LORSQUE VOUS
NETTOYEZ LE BLOC MOTEUR DE LA
TRONÇONNEUSE, NE LE PLONGEZ PAS
DANS L’EAU NI DANS TOUT AUTRE
LIQUIDE.
• Enlevez la batterie avant le nettoyage.
• Enlevez les copeaux de bois et autres
débris du port de batterie. Vérifiez que
les connecteurs sont propres et secs.
• Après l’utilisation, nettoyez les débris de
la chaîne et du guide-chaîne. Essuyez le
bloc moteur avec un chiffon propre et
humidifié avec une solution additionnée
de savon. N’utilisez jamais de nettoyants
corrosifs ni de solvants.
• Nettoyez toujours les copeaux de
bois, la sciure et la saleté se trouvant
dans la rainure du guide lorsque vous
remplacez la chaîne.
BATTERIE
AVERTISSEMENT : LA BATTERIE NE
CONTIENT AUCUNE PIÈCE POUVANT
ÊTRE RÉPARÉE PAR L’UTILISATEUR.
NE LA DÉMONTEZ PAS.
Les batteries au lithium-ion ont un
temps de fonctionnement prédéfini. Si
le temps de coupe par charge diminue
considérablement, cela signifie que la
batterie arrive en fin de vie et doit être
remplacée.
• Assurez-vous que la batterie, y compris
les connecteurs, est propre, sèche et
exempte de trou, d’impact ou d’autre
défaut. Une batterie cassée peut
provoquer des incendies ou libérer des
produits chimiques dangereux.
• Nettoyez les connecteurs sales à l’aide
d’un chiffon doux et sec. La poussière
ou l’huile peut entraîner une mauvaise
connexion électrique, causant ainsi une
perte de puissance.
CHARGEUR
• Débranchez le chargeur de la prise de
courant.
• Nettoyez les connecteurs sales à l’aide
d’un chiffon doux et sec.
FIG. 31
Page 58

56
DÉPANNAGE
AF 0513 F/N 547361
OREGON® CORDLESS TOOL SYSTEM
MODÈLE DE TRONÇONNEUSE CS250
DÉPANNAGE
Utilisez le tableau suivant pour obtenir des solutions éventuelles en cas de
problème avec la tronçonneuse. Si ces propositions ne résolvent pas le problème,
consultez la section « Informations sur l’entretien et l’assistance ».
CONSTAT CAUSE ÉVENTUELLE MESURES RECOMMANDÉES
Le moteur ne
démarre pas ou
démarre de façon
intermittente
Frein de la chaîne engagé
Avant de démarrer la machine, vérifiez que le protègemain est en position arrière (frein de la chaîne
désengagé). Consultez la section « Démarrage de la
tronçonneuse » de ce manuel pour voir la position
correcte du protège-main.
Batterie déchargée
Rechargez la batterie. Consultez la section « Chargement
de la batterie » de ce manuel.
Le bouton de verrouillage
de la gâchette n’est pas
enfoncé
Le bouton de verrouillage de la gâchette doit être relevé.
Consultez la section « Démarrage de la tronçonneuse »
de ce manuel.
La batterie n’est pas
enclenchée correctement
Nettoyez tous les débris du port et des bornes de la
batterie à l’aide d’un chiffon sec ou d’une brosse isolante.
Présence de débris dans le
panneau latéral
Retirez le bloc de batterie puis le panneau latéral afin de
nettoyer les débris.
Batterie froide
Laissez la batterie se réchauffer jusqu’à la température
minimale de fonctionnement de -12° C (10° F).
Le moteur
fonctionne,
mais la chaîne
ne tourne pas
Chaîne qui ne s’engage
pas dans le pignon
d’entraînement
Remettez la chaîne en place en vérifiant que les liens
d’entraînement sur la chaîne sont correctement placés
sur le pignon. Consultez la section « Entretien et
nettoyage » de ce manuel pour obtenir les instructions
d’installation.
Frein de la chaîne
qui ne s’engage
pas
Débris qui bloquent
l’amplitude de
mouvement du protègemain
Nettoyez les débris du mécanisme externe de freinage
de la chaîne.
Mauvais fonctionnement
possible du frein de
chaîne
Contactez immédiatement un réparateur agréé.
AVERTISSEMENT : FAIRE FONCTIONNER UNE
TRONÇONNEUSE SANS FREIN DE CHAÎNE OPÉRATIONNEL
PEUT ENTRAÎNER DE GRAVES BLESSURES CORPORELLES.
La tronçonneuse
ne coupe pas
correctement
Tension de la chaîne
insuffisante
Consultez la section « Instructions de tension » de ce
manuel.
Chaîne émoussée
Consultez la section « Affûtage avec PowerSharp® » de
ce manuel.
Chaîne montée dans le
mauvais sens
Consultez la section « Remplacement du guide et de la
chaîne » de ce manuel.
Chaîne usée
Remplacez la chaîne et la pierre. Elles sont conçues pour
s’user de façon identique.
Chaîne trop sèche ou trop
tendue
Vérifiez le niveau d’huile. Remplissez le réservoir si
nécessaire. Consultez la section « Assemblage » de ce
manuel. Vérifiez que le système d’huile n’a pas coagulé.
Il est nécessaire de verser une petite quantité d’huile sur
le guide.
Chaîne sortie de la rainure
du guide
Consultez la section « Remplacement du guide et de la
chaîne » de ce manuel.
Page 59

57
DÉPANNAGE
AF 0513 F/N 547361
OREGON® CORDLESS TOOL SYSTEM
MODÈLE DE TRONÇONNEUSE CS250
CONSTAT CAUSE ÉVENTUELLE MESURES RECOMMANDÉES
La batterie ne se
charge pas
La protection de la
batterie contre les
températures trop basses/
élevées est activée
Cela peut se produire lorsque la tronçonneuse
fonctionne en continu ou est exposée à une
température élevée. Laissez la batterie atteindre une
température appropriée avant de la charger (le voyant
de sur-température du chargeur sera allumé en cas de
condition de sur ou sous-température). Consultez la
section « Chargement de la batterie » de ce manuel.
Contacts salis ou
endommagés dans le bloc
de batterie ou le chargeur
Vérifiez les connecteurs de la batterie et du chargeur. Si
nécessaire, nettoyez-les en suivant les instructions de ce
manuel. Remettez la batterie en place sur le chargeur, en
vous assurant qu’elle est bien enclenchée.
La batterie est en fin de
vie
Toutes les batteries ont une durée de vie limitée. Si la
batterie a plus de deux ans ou si elle a été fréquemment
rechargée, il est peut-être temps de la remplacer.
Remplacez-la uniquement par une batterie spécialement
conçue pour la tronçonneuse.
Chargeur défectueux
Apportez le chargeur à un réparateur agréé pour qu’il
vérifie son fonctionnement.
Temps de coupe
faible pour chaque
charge de batterie
Chaîne émoussée
Consultez la section « Affûtage avec PowerSharp® » de
ce manuel.
Chaîne usée
Remplacez la chaîne et la pierre. Consultez la section
« Entretien et nettoyage » de ce manuel.
Chaîne sèche
Vérifiez le niveau d’huile conformément aux instructions.
Remplissez le réservoir si nécessaire. Consultez la section
« Remplissage du réservoir d’huile » de ce manuel.
Mauvaise technique de
coupe
Consultez la section « Coupe de base » de ce manuel
pour avoir une bonne technique de coupe.
Présence de débris dans le
panneau latéral
Retirez le bloc de batterie puis le panneau latéral afin de
nettoyer les débris.
La batterie n’est pas à
pleine charge
Consultez la section « Chargement de la batterie » de ce
manuel.
L’indicateur d’état
de charge clignote
en orange
Plusieurs causes sont
possibles comme un
court-circuit, un courant
trop élevé du chargeur,
une limite supérieure de la
tension, un circuit ouvert
sur la batterie, une erreur
de temps de charge/précharge.
Procédez comme suit :
1. Vérifiez que les prises du chargeur et de l’alimentation
sont correctement branchées.
2. Assurez-vous que le chargeur reçoit une tension
correcte.
3. Si possible, essayez de charger une autre batterie
(mais uniquement une batterie conçue pour ce
chargeur).
Si cela ne permet pas de résoudre le problème, apportez
la batterie et le chargeur à un réparateur agréé.
Page 60

58
GARANTIE ET ENTRETIEN
AF 0513 F/N 547361
OREGON® CORDLESS TOOL SYSTEM
MODÈLE DE TRONÇONNEUSE CS250
GARANTIE ET ENTRETIEN
GARANTIE
Blount, Inc. garantit tous les outils à
batterie et les chargeurs enregistrés
chez OREGON® pour une période
de trois () ans et toutes les batteries
enregistrées chez OREGON® pour une
période de deux () ans à compter de la
date d’achat initial. Les outils à batterie,
les batteries et les chargeurs enregistrés
chez OREGON® sont garantis pour une
période de deux () ans s’ils sont utilisés
dans un cadre commercial. Cette garantie
limitée s’applique aux produits fabriqués
par Cordless Tool System OREGON®.
Pendant la période de garantie, Blount
remplacera ou décidera de réparer, sans
frais, et uniquement pour l’acheteur
initial, tout produit ou pièce qui, après
avoir été examiné par Blount, révèle
un défaut de matériel et/ou de maind’œuvre. Les frais de transport sont à la
charge de l’acheteur ainsi que tous frais
de remplacement de pièce soumise à la
présente garantie.
INFORMATIONS SUR
L’ENTRETIEN ET L’ASSISTANCE
Pour plus d’informations sur le service
après-vente, consultez notre site Web
à l’adresse OregonCordless.com. Vous
pouvez également contacter notre
service à la clientèle au -
pour obtenir de l’aide, des conseils
techniques supplémentaires, une
réparation ou des pièces de rechange.
Pour votre sécurité, n’utilisez que des
pièces de rechange pour outil électrique
fabriquées dans nos ateliers. Le personnel
de notre service après-vente a été
formé pour vous fournir un soutien et
une assistance efficaces en matière de
réglage, réparation ou remplacement de
tous les produits Cordless Tool System
OREGON®.
Page 61

Page 62

60
ÍNDICE
AF 0513 F/N 547361
OREGON® CORDLESS TOOL SYSTEM
MOTOSIERRA MODELO CS250
ÍNDICE
SÍMBOLOS Y ETIQUETAS . . . . . . . . . . . . . . . . . . . . . . . . . . . . . 61
REGLAS DE SEGURIDAD. . . . . . . . . . . . . . . . . . . . . . . . . . . . . . 62
ADVERTENCIAS GENERALES DE SEGURIDAD
DE HERRAMIENTAS ELÉCTRICAS . . . . . . . . . . . . . . . . . . . . 62
SEGURIDAD DEL ÁREA DE TRABAJO . . . . . . . . . . . . . . . . . 62
SEGURIDAD ELÉCTRICA . . . . . . . . . . . . . . . . . . . . . . . . . .62
SEGURIDAD PERSONAL . . . . . . . . . . . . . . . . . . . . . . . . . . 63
MANTENIMIENTO . . . . . . . . . . . . . . . . . . . . . . . . . . . . . . 64
ADVERTENCIAS DE SEGURIDAD DE LA MOTOSIERRA . . . . . 65
ALMACENAMIENTO, TRANSPORTE Y RESIDUOS . . . . . . . . . 67
SEGURIDAD DE LA BATERÍA . . . . . . . . . . . . . . . . . . . . . . . 68
SEGURIDAD DEL CARGADOR . . . . . . . . . . . . . . . . . . . . . . 69
IDENTIFICACIÓN DEL PRODUCTO. . . . . . . . . . . . . . . . . . . . . . . 70
ESPECIFICACIONES Y COMPONENTES . . . . . . . . . . . . . . . . . . . . 71
NOMBRES Y TÉRMINOS DE LA MOTOSIERRA. . . . . . . . . . . . . . . .72
MONTAJE. . . . . . . . . . . . . . . . . . . . . . . . . . . . . . . . . . . . . . . . 73
DESEMBALAJE . . . . . . . . . . . . . . . . . . . . . . . . . . . . . . . . 73
LLENADO DEL DEPÓSITO DE ACEITE . . . . . . . . . . . . . . . . . 73
FUNCIONAMIENTO DE LA MOTOSIERRA . . . . . . . . . . . . . . . . . . 74
BATERÍA Y CARGADOR . . . . . . . . . . . . . . . . . . . . . . . . . . .74
OPERACIÓN GENERAL . . . . . . . . . . . . . . . . . . . . . . . . . . . 76
CORTE . . . . . . . . . . . . . . . . . . . . . . . . . . . . . . . . . . . . . . 77
AFILADO CON POWERSHARP® . . . . . . . . . . . . . . . . . . . . . . . . . 80
MANTENIMIENTO Y LIMPIEZA . . . . . . . . . . . . . . . . . . . . . . . . . 81
REEMPLAZO DE LA BARRA Y LA CADENA . . . . . . . . . . . . . . 82
INSTRUCCIONES PARA TENSAR . . . . . . . . . . . . . . . . . . . . 83
REEMPLAZO DE LA PIEDRA DE AFILADO . . . . . . . . . . . . . . 84
LIMPIEZA DE LA MOTOSIERRA . . . . . . . . . . . . . . . . . . . . . 84
BATERÍA . . . . . . . . . . . . . . . . . . . . . . . . . . . . . . . . . . . . . 84
CARGADOR . . . . . . . . . . . . . . . . . . . . . . . . . . . . . . . . . . 84
RESOLUCIÓN DE PROBLEMAS . . . . . . . . . . . . . . . . . . . . . . . . . 85
GARANTÍA Y SERVICIO . . . . . . . . . . . . . . . . . . . . . . . . . . . . . . . 87
© Blount, Inc. Los precios y las especificaciones están sujetos a cambio sin previo aviso. Todos los derechos reservados.
OREGON® y PowerSharp® son marcas comerciales registradas de Blount, Inc. en los Estados Unidos y/o en otros países.
Page 63

61
SÍMBOLOS Y ETIQUETAS
AF 0513 F/N 547361
OREGON® CORDLESS TOOL SYSTEM
MOTOSIERRA MODELO CS250
SÍMBOLOS Y ETIQUETAS
SÍMBOLO
NOMBRE EXPLICACIÓN
CONSTRUCCIÓN DE
CLASE II
HERRAMIENTAS DE CONSTRUCCIÓN DESIGNADAS CON
DOBLE AISLAMIENTO.
SÍMBOLO DE
ALERTA DE
SEGURIDAD
INDICA QUE EL TEXTO SIGUIENTE EXPLICA UN
PELIGRO, UNA ADVERTENCIA O UNA PRECAUCIÓN.
LEA LAS
INSTRUCCIONES
EL MANUAL DE INSTRUCCIONES ORIGINAL CONTIENE
INFORMACIÓN IMPORTANTE SOBRE LA SEGURIDAD Y
LA OPERACIÓN. LEA LAS INSTRUCCIONES Y SÍGALAS
ATENTAMENTE.
UTILICE
PROTECCIÓN PARA
LOS OJOS
UTILICE PROTECCIÓN PARA LOS OJOS CUANDO USE LA
MOTOSIERRA.
UTILICE PROTECCIÓN
PARA LOS OÍDOS
UTILICE PROTECCIÓN PARA LOS OÍDOS CUANDO USE
LA MOTOSIERRA.
UTILICE
PROTECCIÓN PARA
LAS MANOS
UTILICE GUANTES CUANDO USE LA MOTOSIERRA Y
CUANDO MANIPULE LA BARRA Y LA CADENA.
UTILICE
PROTECCIÓN PARA
LA CABEZA
UTILICE UN CASCO DURO CUANDO USE LA SIERRA DE
PÉRTIGA
POTENCIA DEL
SONIDO
EL NIVEL DE POTENCIA SONORA ES DE 90 DB.
CUIDADO CON EL
REBOTE
PELIGRO! EL REBOTE PUEDE PROVOCAR LESIONES
GRAVES.
CONTACTO CON LA
PUNTA DE LA BARRA
EVITE EL CONTACTO CON LA PUNTA DE LA BARRA.
ÁNGULO DE REBOTE
DE LA CADENA
USE UNA CADENA DE POCO REBOTE.
AGARRE CON DOS
MANOS
SUJETE LA MOTOSIERRA CON LAS DOS MANOS.
AGARRE CON UNA
MANO
NO SUJETE LA MOTOSIERRA CON UNA MANO.
NO QUEMAR NO ARROJAR AL FUEGO
NO ELIMINAR
NO ARROJAR JUNTO CON LOS RESIDUOS DOMÉSTICOS.
LLEVAR A UN RECICLADOR AUTORIZADO.
NO EXPONER A LA
LLUVIA
NO UTILICE EL CARGADOR EN AMBIENTES HÚMEDOS.
USO EN INTERIORES
ÚNICAMENTE
PARA USO EN INTERIORES ÚNICAMENTE.
TEMPERATURA DE
USO
UTILICE LA BATERÍA SOLO ENTRE 0 °C Y 40 °C ENTRE
32 °F Y 104 °F.
Page 64

62
REGLAS DE SEGURIDAD
AF 0513 F/N 547361
OREGON® CORDLESS TOOL SYSTEM
MOTOSIERRA MODELO CS250
INTRODUCCIÓN
Esta motosierra está diseñada para un uso ocasional en trabajos livianos. No
está diseñada para talar árboles grandes ni cortar troncos de gran diámetro. Esta
motosierra no está diseñada para trabajos profesionales de tala de árboles. No se
debe utilizar para cortar árboles o ramas que tengan un diámetros igual o mayor
que la longitud de la barra.
REGLAS DE SEGURIDAD
ADVERTENCIAS GENERALES DE SEGURIDAD DE HERRAMIENTAS
ELÉCTRICAS
ADVERTENCIA: LEA Y COMPRENDA TODAS LAS ADVERTENCIAS
DE SEGURIDAD Y LAS INSTRUCCIONES. NO SEGUIR LAS
ADVERTENCIAS Y LAS INSTRUCCIONES PUEDE PROVOCAR
DESCARGAS ELÉCTRICAS, INCENDIOS Y/O LESIONES GRAVES.
CONSERVE TODAS LAS ADVERTENCIAS E INSTRUCCIONES COMO
REFERENCIA PARA EL FUTURO. EL TÉRMINO “HERRAMIENTA ELÉCTRICA” SE
REFIERE A LAS HERRAMIENTAS ELÉCTRICAS ENCHUFADAS A LA RED ELÉCTRICA
CON CABLE Y A LAS QUE FUNCIONAN CON BATERÍA SIN CABLE.
SEGURIDAD DEL ÁREA DE
TRABAJO
• Mantenga el área de trabajo limpia y
bien iluminada. Las áreas desordenadas y
oscuras aumentan las posibilidades de que se
produzca un accidente.
• No utilice la motosierra en atmósferas
explosivas, como en presencia de
líquidos, gases o polvo inflamables. Las
herramientas eléctricas producen chispas que
pueden provocar una explosión con el polvo o
las emanaciones.
• Mantenga a los niños y a otras personas
que circulen por los alrededores
alejados mientras opera la motosierra.
Las distracciones pueden provocar que pierda
el control de la herramienta.
• Identifique y evite las líneas de gas,
los peligros eléctricos, los obstáculos
que le puedan hacer tropezar y otros
elementos en los que se puedan
enganchar otras partes del cuerpo.
• Establezca una zona segura para sus
ayudantes. Los ayudantes nunca deben
estar parados directamente ni delante ni
detrás del operador. Los ayudantes siempre
deben pararse al costado o en forma
perpendicular a la dirección del corte.
SEGURIDAD ELÉCTRICA
• Los enchufes del cargador deben
coincidir con el tomacorriente. Nunca
modifique el enchufe de ningún
modo. No utilice adaptadores con
el cargador conectado a tierra. Los
enchufes no modificados y los tomacorrientes
que coincidan reducirán el riesgo de que se
produzca una descarga eléctrica.
• Evite el contacto del cuerpo con
superficies conectadas a tierra,
como tuberías, radiadores, estufas y
refrigeradores. Si su cuerpo se encuentra
conectado a tierra, existe mayor riesgo de que
se produzca una descarga eléctrica.
• Si accidentalmente se salpica con
agua la motosierra desde cualquier
dirección, no se producirán descargas
eléctricas peligrosas para el operador.
• No fuerce el cable. Nunca utilice el cable
para transportar, tirar o desenchufar el
cargador. Mantenga el cable alejado de
fuentes de calor, aceite, bordes afilados
o piezas en movimiento. Los cables
dañados o enredados aumentan el riesgo de
que se produzca una descarga eléctrica.
• Mientras opere el cargador al aire libre,
utilice un cable alargador adecuado para
el uso al aire libre. La utilización de un cable
adecuado para el uso al aire libre reduce el riesgo
de que se produzca una descarga eléctrica.
Page 65

63
REGLAS DE SEGURIDAD
AF 0513 F/N 547361
OREGON® CORDLESS TOOL SYSTEM
MOTOSIERRA MODELO CS250
• Si es inevitable la operación del
cargador en un lugar húmedo, utilice
un suministro protegido con un
interruptor de circuito de falla a tierra
(ground fault circuit interrupter, GFCI).
La utilización de un GFCI reduce el riesgo de
que se produzca una descarga eléctrica.
SEGURIDAD PERSONAL
• Permanezca atento, preste atención a
lo que hace y utilice el sentido común
cuando utilice la motosierra. No
utilice la motosierra si está cansado o
bajo la influencia de drogas, alcohol
o medicamentos. Solo un momento de
distracción mientras utiliza la motosierra
puede provocar lesiones personales graves.
• Utilice equipo de protección personal.
Utilice siempre protección para los
ojos La utilización de equipos de protección,
como una máscara contra el polvo, calzado
de seguridad antideslizante, un casco de
seguridad o protección para los oídos reducirá
las lesiones personales.
• Retire cualquier llave de ajuste o llave
fija antes de encender la motosierra.
Cualquier llave fija o llave de ajuste que deje
acoplada a una pieza giratoria de la motosierra
podría provocar lesiones personales.
• No estire el cuerpo para intentar llegar
a algo fuera de su alcance. Mantenga
los pies bien apoyados y un equilibrio
adecuado en todo momento (Figura ).
Esto permite controlar mejor la motosierra en
situaciones imprevistas.
• Vístase en forma adecuada. No utilice
ropas sueltas ni joyas. Mantenga el
pelo, la ropa y los guantes alejados
de las piezas en movimiento. La ropa
suelta, las joyas o el pelo largo pueden quedar
atrapados en las piezas en movimiento.
• Utilice las dos manos al operar la
motosierra.
• La pieza de trabajo, la barra y la cadena
pueden estar calientes después de
cortar. Utilice guantes para evitar quemaduras.
• Utilice equipo auxiliar adecuado y
asegúrese de que no esté dañado, que
tenga la resistencia adecuada y que
esté colocado en forma segura. Utilice
equipo auxiliar únicamente para el fin para el
que se diseñó.
• Se ha informado que el uso
prolongado de herramientas
mecánicas provoca trastornos
vasculares, musculares o neurológicos
(como el dedo blanco por vibración o
síndrome de Raynaud). Para reducir el
riesgo de que se produzcan lesiones, siga estas
instrucciones:
– Utilice guantes y mantenga las manos y
el cuerpo calientes.
– Sujete la motosierra con firmeza, pero
no ejerza una presión prolongada y
excesiva.
– Descanse con frecuencia.
La vibración durante el uso normal puede
ser diferente a los valores especificados
en función del material que se esté
cortando, el mantenimiento del sistema
de corte y otros factores.
USO Y CUIDADO DE LA
HERRAMIENTA MECÁNICA
• No fuerce la motosierra. Utilice la
motosierra correcta para su aplicación.
La motosierra correcta hará el trabajo mejor y
de forma más segura si se utiliza al ritmo para
el que fue diseñada.
• No utilice la motosierra si el interruptor
no la enciende y la apaga. Cualquier
herramienta eléctrica que no se pueda
controlar con el interruptor es peligrosa y debe
ser reparada.
FIGURA 1
Page 66

64
REGLAS DE SEGURIDAD
AF 0513 F/N 547361
OREGON® CORDLESS TOOL SYSTEM
MOTOSIERRA MODELO CS250
• Evite que se ponga en marcha de
forma involuntaria. Asegúrese de
que el interruptor esté en posición de
apagado antes de levantar, transportar
o conectar la herramienta a una
fuente de electricidad o a una batería
Transportar las herramientas eléctricas
mientras su dedo está sobre el interruptor, o
hacer funcionar las herramientas que estén
encedidas invita accidentes.
• Desconecte la batería de la
motosierra antes de realizar cualquier
ajuste, cambiar accesorios o guardar
la motosierra. Estas medidas de seguridad
preventivas reducen el riesgo de que la
herramienta se ponga en marcha de forma
accidental.
• Guarde las motosierras que no se
encuentren en uso fuera del alcance de
los niños y no permita que las operen
personas que no estén familiarizadas
con su funcionamiento o con estas
instrucciones. Las motosierras son
herramientas peligrosas en las manos de
usuarios no capacitados.
• Realice mantenimiento a la motosierra.
Revise si las piezas movibles están
desalineadas o se han atascado, si
hay alguna pieza rota o cualquier
otra condición que pudiese afectar
al funcionamiento de la motosierra.
En caso de detectar cualquier daño,
haga reparar la motosierra antes de
utilizarla. Con frecuencia son herramientas
eléctricas con un mantenimiento deficiente las
que provocan muchos de los accidentes.
• Mantenga las herramientas de corte
afiladas y limpias. Las herramientas de
corte a las que se realiza el mantenimiento
adecuado y que tienen los bordes de corte
afilados tienen menos probabilidades de
atascarse y son más fáciles de controlar.
• Utilice la motosierra, los accesorios,
los vástagos de herramientas, etc.
de acuerdo con estas instrucciones,
teniendo en cuenta las condiciones
de trabajo y la tarea que se desea
realizar. La utilización de la motosierra para
operaciones distintas de aquellas para las que
fue diseñada podría provocar una situación
peligrosa.
USO Y CUIDADO DE LA
BATERÍA
• Recargue la batería solo con el
cargador especificado por OREGON®.
Un cargador que es adecuado para un tipo
de batería podría crear un riesgo de incendio
cuando se utiliza con otra batería diferente.
• Utilice la motosierra solamente con
baterías específicamente diseñadas.
La utilización de cualquier otra batería puede
originar riesgo de lesiones e incendio.
• Cuando no utilice la batería,
manténgala alejada de objetos
metálicos como monedas, llaves,
clavos, tornillos u otros pequeños
objetos de metal que puedan hacer
conexión de un terminal a otro. Un corto
en el terminal de la batería puede causar
quemaduras o un incendio.
• Si se opera en forma indebida, es
posible que salga líquido de la batería;
evite el contacto con él. Si se produce
el contacto de manera accidental,
lave con agua. Si el líquido entra en
contacto con los ojos, busque también
ayuda médica. El líquido que sale de la
batería puede causar irritación o quemaduras.
• No desarme la motosierra, el cargador
ni la batería, ni intente reparar estos
productos. Hacerlo podría generar una
descarga eléctrica.
MANTENIMIENTO
El mantenimiento de su motosierra lo
debe realizar un técnico de reparación
cualificado que utilice solamente piezas
de repuesto idénticas.
Esto garantizará que se mantenga la
seguridad de la motosierra.
Page 67

65
REGLAS DE SEGURIDAD
AF 0513 F/N 547361
OREGON® CORDLESS TOOL SYSTEM
MOTOSIERRA MODELO CS250
ADVERTENCIAS DE SEGURIDAD
DE LA MOTOSIERRA
• Mantenga todas las partes del cuerpo
alejadas de la cadena de la motosierra
cuando esta esté funcionando. Antes
de poner en marcha la motosierra,
asegúrese de que la cadena de esta no
se encuentre en contacto con nada.
Un solo momento de distracción mientras
opera motosierras puede hacer que la ropa
o el cuerpo se enreden con la cadena de la
motosierra.
• Sujete siempre la motosierra con la
mano derecha en el asa trasera y la
mano izquierda en el asa frontal
(Figura ). Sujetar la motosierra con las
manos en la posición inversa aumenta el
riesgo de que se produzcan lesiones
personales y no debe hacerse nunca.
• Utilice gafas de seguridad y protección
para los oídos. Se recomienda utilizar
equipo de protección adicional para
la cabeza, las manos, las piernas y los
pies. Utilizar ropa protectora adecuada
reducirá las lesiones personales producidas
por partículas que puedan salir despedidas o
por el contacto accidental con la cadena de la
motosierra.
• No opere una motosierra subido a un
árbol. Utilizar una motosierra mientras se
encuentra subido a un árbol puede provocar
lesiones personales.
• Mantenga siempre un apoyo adecuado
y utilice la motosierra solamente
cuando se encuentre en una superficie
fija, segura y plana. Las superficies
resbaladizas o inestables pueden provocar
la pérdida del equilibrio o del control de la
motosierra.
• Cuando corte una rama que se
encuentre sometida a tensión, tenga
en cuenta el efecto rebote. Al liberar la
tensión en las fibras de madera, la rama que
estaba en tensión puede golpear al operador
y/o hacer que este pierda el control de la
motosierra.
• Tenga extrema precaución al cortar
maleza y brinzales. Es posible que el
material delgado se enganche en la cadena
de la motosierra y se produzca un efecto
látigo hacia usted o le de tirones hasta hacerle
perder el equilibrio.
• Transporte la motosierra sujetándola
por el asa frontal con la herramienta
apagada y alejada del cuerpo. Al
transportar o guardar la motosierra
ajuste siempre la tapa de la barra
(Figura ). La adecuada manipulación de la
herramienta reducirá las probabilidades de
que se produzca un contacto accidental con la
cadena de la motosierra en movimiento.
FIGURA 2
FIGURA 3
Page 68

66
REGLAS DE SEGURIDAD
AF 0513 F/N 547361
OREGON® CORDLESS TOOL SYSTEM
MOTOSIERRA MODELO CS250
• Siga las instrucciones respecto
de la lubricación, la tensión de la
cadena y el cambio de accesorios.
Una cadena tensada o lubricada en forma
inadecuada puede romperse o aumentar las
probabilidades de rebote.
• Mantenga las asas secas, limpias y
sin aceite ni grasa. Las asas grasosas y
aceitosas son resbaladizas y provocan la
pérdida del control.
• Corte madera solamente. No utilice
la motosierra para fines para los
que no fue diseñada. Por ejemplo:
no utilice la motosierra para cortar
plástico, mampostería o materiales de
construcción que no sean madera. La
utilización de la motosierra para operaciones
distintas de aquellas para las que fue
diseñada podría provocar una situación
peligrosa.
• Se recomienda que un operador
con experiencia imparta instrucción
práctica sobre el uso de la motosierra
y el equipo protector a aquellos que la
usan por primera vez. La práctica debe
comezar cortando troncos sobre un
caballete o andamio.
• Más allá de las piezas con desgaste
identificadas en este manual, la
motosierra no contiene piezas cuyo
mantenimiento pueda realizar el
usuario.
EL REBOTE: CAUSAS Y
PREVENCIÓN POR PARTE DEL
OPERADOR
El rebote puede ocurrir cuando la punta
de la barra toca un objeto o cuando la
madera se cierra y pinza la cadena de la
motosierra en el corte.
En algunos casos, el contacto de la punta
puede provocar una reacción inversa
súbita, moviendo la barra hacia arriba y
hacia el operador.
Pinzar la cadena de la motosierra a lo
largo de la parte superior de la barra
puede empujar la barra con rapidez hacia
el operador.
Cualquiera de estas reacciones puede
hacer que usted pierda el control de
la motosierra, lo que podría provocar
lesiones personales graves. No confíe
exclusivamente en los dispositivos de
seguridad integrados en su motosierra.
Como usuario de motosierras, usted
debe tomar varias medidas para
asegurarse de realizar sus trabajos de
corte sin accidentes ni lesiones.
El rebote es el resultado de la mala
utilización de la herramienta y/o de
procedimientos operativos o condiciones
incorrectos, y puede evitarse tomando las
precauciones adecuadas que se detallan
a continuación:
• Mantenga una sujeción firme, con
los pulgares y los dedos alrededor de
las asas de la motosierra, con ambas
manos en la motosierra, y posicione
el cuerpo y el brazo de modo que le
permitan resistir las fuerzas de rebote.
El operador puede controlar las fuerzas de
rebote. No suelte la motosierra.
• No se estire más allá de su alcance y
no corte por encima de la altura del
hombro. Esto ayuda a prevenir el contacto
no intencional de la punta y permite un
mejor control de la motosierra en situaciones
imprevistas.
• Solamente utilice las barras y
cadenas de repuesto especificadas
por OREGON®.
Las barras y cadenas de repuesto
incorrectas pueden provocar la rotura de la
cadena y/o rebote.
• Siga las instrucciones de afilado y
mantenimiento de OREGON® para
la cadena de la motosierra. Disminuir
la altura del talón de profundidad puede
provocar un aumento en el rebote.
Page 69

67
REGLAS DE SEGURIDAD
AF 0513 F/N 547361
OREGON® CORDLESS TOOL SYSTEM
MOTOSIERRA MODELO CS250
DISPOSITIVOS DE SEGURIDAD
CONTRA EL REBOTE EN ESTA
MOTOSIERRA
FRENO DE LA CADENA
La motosierra incluye un freno de la
cadena, que detiene tanto el motor como
el movimiento de la cadena cuando se
produce el rebote (Figura ). El freno de la
cadena puede activarse por el movimiento
hacia adelante del protector a medida que
la motosierra rota hacia atrás durante el
rebote; también puede activarse por las
fuerzas de inercia generadas durante el
empuje hacia atrás rápido.
PELIGRO: NUNCA MODIFIQUE NI
INTENTE DESHABILITAR EL FRENO
DE LA CADENA.
CADENA
Esta motosierra incluye una cadena
de motosierra que cumplió con los
requisitos de rebote reducido de la
norma B. del Instituto Nacional
de Normalización Estadounidense
(American National Standards Institute,
ANSI) cuando se probó en una muestra
representativa de motosierras. Para
obtener una cadena de repuesto,
consulte la sección “Especificaciones y
componentes” de este manual.
BARRA
Esta motosierra incluye una barra que
tiene una punta de radio pequeño. Por
lo general, con puntas de radio pequeño
existen menos probabilidades de que se
produzca rebote.
Al reemplazar la barra, asegúrese de
pedir la barra designada en este manual.
ALMACENAMIENTO,
TRANSPORTE Y RESIDUOS
CÓMO ALMACENAR LA MOTOSIERRA
• Retire la batería y limpie
minuciosamente la motosierra. Consulte
la sección “Mantenimiento y limpieza”
de este manual. Instale la funda de barra
antes del almacenamiento.
• Almacene en un lugar seco fuera del
alcance de los niños o las mascotas.
• Es normal que se filtre una pequeña
cantidad de aceite de la barra cuando la
motosierra no se encuentra en uso. Para
brindar protección contra la filtración,
instale la funda de barra y coloque una
almohadilla absorbente debajo de la
barra.
CÓMO GUARDAR LA BATERÍA
Cuando tenga que guardar la batería
durante más de nueve meses, siga estas
instrucciones:
• Retire la batería de la motosierra o del
cargador.
• Guárdela en un lugar fresco y seco.
• Manténgala fuera del alcance de los
niños o de las mascotas.
• Para maximizar el rendimiento de la
batería, no almacene nunca baterías
que estén completamente descargadas.
(Figura ).
• Guárdela en un lugar que esté entre
- °C y °C (entre - °F y °F).
FIGURA 4
FIGURA 5
LUCES INDICADORAS
Page 70

68
REGLAS DE SEGURIDAD
AF 0513 F/N 547361
OREGON® CORDLESS TOOL SYSTEM
MOTOSIERRA MODELO CS250
CÓMO GUARDAR EL CARGADOR
• Retire la batería del cargador.
• Desconecte el cargador de la fuente de
alimentación.
• Guárdelo en un lugar seco.
• Manténgalo fuera del alcance de los
niños o de las mascotas.
Consulte la sección “Mantenimiento y
limpieza” para obtener más información.
CÓMO TRANSPORTAR LA MOTOSIERRA
Retire la batería de la motosierra e instale
la funda de barra. Limpie la motosierra
minuciosamente y, si lo desea, drene el
aceite de la barra y la cadena para reducir
la filtración.
CÓMO TRANSPORTAR LA BATERÍA
Cumpla las respectivas reglamentaciones
nacionales al enviar baterías de ion-litio;
es posible que se requiera un etiquetado
obligatorio.
CÓMO DESHACERSE DE LA BATERÍA
No elimine la batería junto con los desechos
domésticos normales. No incinere la
batería. Las agencias de reciclado y
manejo de desechos locales cuentan
con información sobre la eliminación o el
reciclado adecuados, de conformidad con
las reglamentaciones ambientales.
SEGURIDAD DE LA BATERÍA
PELIGRO: NO SEGUIR ESTAS
REGLAS DE SEGURIDAD PUEDE
HACER QUE LA BATERÍA
PIERDA SUSTANCIAS QUÍMICAS
PELIGROSAS, QUE SE RECALIENTE,
QUE DESPIDA HUMO, QUE ESTALLE,
QUE SE QUEME, QUE EXPLOTE Y/O
QUE SE INCENDIE.
PRECAUCIÓN: NO ARROJE LA
BATERÍA A LA BASURA DOMÉSTICA
NI AL FUEGO. LAS BATERÍAS DE
IONLITIO LAS DEBE RECICLAR EL
RECICLADOR LOCAL AUTORIZADO.
PRECAUCIÓN: NO EXPONGA
LA BATERÍA AL CALOR EXCESIVO,
COMO EL INTERIOR DE UN VEHÍCULO
CUANDO HACE CALOR. DICHA
EXPOSICIÓN PUEDE PROVOCAR
UNA PÉRDIDA DE RENDIMIENTO
Y/O DISMINUIR SU VIDA ÚTIL. NO
INTENTE RECARGAR UNA BATERÍA
NO RECARGABLE.
• No desarme ni modifique la batería. La
batería está equipada con características
de protección y de seguridad integradas
que pueden inhabilitarse de manera
inadvertida.
• No conecte los terminales positivo (+)
y negativo (-) con objetos de metal.
No transporte ni almacene la batería
junto con objetos de metal, como
monedas o tornillos. Puede producirse
un cortocircuito, o los objetos de metal
que entren en contacto con la batería
pueden generar calor.
• No arroje la batería al fuego ni la
exponga al calor excesivo de otro modo.
Dichas condiciones pueden hacer que
se funda el aislamiento o que se dañen
las características de seguridad.
• No utilice, cargue ni almacene la batería
cerca de una fuente de calor, como fuego
o un calentador que genere temperaturas
por encima de los °C ( °F). Pueden
producirse recalentamiento y/o
cortocircuito interno.
Page 71

69
REGLAS DE SEGURIDAD
AF 0513 F/N 547361
OREGON® CORDLESS TOOL SYSTEM
MOTOSIERRA MODELO CS250
• No sumerja la batería en agua ni la
exponga a condiciones de humedad
extremas. La humedad puede causar
daños en las características de protección
y producir una carga con corriente y
voltaje extremadamente altos como
resultado. Esto puede provocar
reacciones químicas anormales.
• Para recargar la batería, utilice el cargador
de baterías específicamente diseñado
para la batería y cumpla las precauciones
de seguridad especificadas respecto del
cargador que se detallan en este manual.
No hacerlo puede producir corriente y
voltaje extremadamente altos, lo que
puede provocar reacciones químicas
anormales.
• No utilice baterías de marca OREGON®
en herramientas que no sean de la
marca OREGON®.
• No golpee, perfore ni arroje la batería.
• No utilice una batería que parezca estar
dañada o deformada.
• Si la operación de recarga no se completa
incluso después de que haya transcurrido
el tiempo de recarga especificado, deje
de recargarla de inmediato.
• Si la batería despide olor, genera calor,
se descolora o se deforma, o si parece
anormal por otra razón durante el uso, la
recarga o el almacenamiento, retírela del
equipo o del cargador de inmediato.
• Cualquier líquido que se fugue de la
batería es corrosivo, puede dañar a los ojos
y la piel, y puede ser tóxico si se ingiere.
SEGURIDAD DEL CARGADOR
INSTRUCCIONES DE SEGURIDAD
IMPORTANTES: CONSERVE ESTAS
INSTRUCCIONES
PRECAUCIÓN: ESTE DISPOSITIVO
NO ESTÁ DISEÑADO PARA USO POR
PARTE DE PERSONAS INCLUIDOS
LOS NIÑOS CON CAPACIDADES
FÍSICAS, SENSORIALES O MENTALES
REDUCIDAS, O CON FALTA DE
CONOCIMIENTO, A MENOS QUE
HAYAN SIDO SUPERVISADAS O
INSTRUIDAS POR UNA PERSONA
RESPONSABLE DE SU SEGURIDAD. LOS
NIÑOS DEBEN SER SUPERVISADOS,
A FIN DE GARANTIZAR QUE NO
JUEGUEN CON LOS DISPOSITIVOS.
PRECAUCIÓN: RIESGO DE
LESIONES POR DESCARGA
ELÉCTRICA E INCENDIO. CARGAR
ÚNICAMENTE CON BATERÍAS DE
IONLITIO DISEÑADAS PARA ESTE
DISPOSITIVO. ESTE CARGADOR ESTÁ
DISEÑADO PARA SER UTILIZADO
ÚNICAMENTE EN UN LUGAR SECO.
ANTES DE UTILIZAR EL CARGADOR,
LEA Y COMPRENDA TODAS LAS
INSTRUCCIONES Y LAS MARCAS DE
SEGURIDAD DE ESTE MANUAL, EL
CARGADOR Y LAS BATERÍAS.
PRECAUCIÓN: UTILICE ESTE
CARGADOR ÚNICAMENTE CON
EL CABLE DE ALIMENTACIÓN
SUMINISTRADO, ASEGURÁNDOSE
DE QUE EL ENCHUFE DE ENTRADA
COINCIDA CORRECTAMENTE CON EL
RECEPTÁCULO DE SALIDA.
• No exponga el cargador a la lluvia.
• Desconecte el cargador del suministro de
energía cuando no se encuentre en uso.
• No desmonte el cargador. EN EL INTERIOR
NO HAY PIEZAS CUYO MANTENIMIENTO
PUEDA REALIZAR EL USUARIO. Se debe
llevar a un lugar de servicio aprobado
cuando se requiera una reparación.
• No utilice el cargador si se ha caído,
ha recibido un impacto fuerte o si se
ha dañado de cualquier otro modo.
Reemplace o lleve el cargador a un lugar
de servicio aprobado de inmediato.
• Para reducir el riesgo de que se
produzcan lesiones, cargue únicamente
las baterías de ion-litio especificadas
para el cargador.
• No opere el cargador con un cable o un
enchufe dañados. Reemplace el cable
de alimentación con el número de pieza
del cable de alimentación ubicado en
las instrucciones. Consulte la sección
“Especificaciones y componentes” de
este manual.
• Ubique el cable de modo que no sea
posible tropezar con él, pisarlo ni someterlo
a ningún otro tipo de daño posible.
• Nunca desenchufe el cargador jalando
del cable; siempre tire del enchufe.
Page 72

70
IDENTIFICACIÓN DEL PRODUCTO
AF 0513 F/N 547361
OREGON® CORDLESS TOOL SYSTEM
MOTOSIERRA MODELO CS250
IDENTIFICACIÓN DEL PRODUCTO
CONOZCA LA MOTOSIERRA
NOTA: Consulte la sección “Desembalaje” para ver la lista de los elementos incluidos.
TAPA LATERAL
PROTECTOR / FRENO DE
LA CADENA
TUERCA DE AJUSTE
DE LA TAPA LATERAL
PALANCA POWERSHARP®
CADENA
FUNDA DE BARRA
BARRA
BATERÍA
PIÑÓN
PIEDRA DE AFILADO
GUÍA DE CENTRADO DE BARRA
ALOJAMIENTO
DE LA BATERÍA
DESBLOQUEADOR
DE LA BATERÍA
TORNILLO DE AJUSTE DE TENSIÓN DE LA CADENA
RETENCIÓN DE LA
CADENA DE LA TAPA
LATERAL
ASA TRASERA
ACELERADOR
BLOQUEO DEL
ACELERADOR
ASA FRONTAL
TAPA DEL DEPÓSITO
DE ACEITE
VENTANA DE
INSPECCIÓN
DEL ACEITE
Page 73

71
ESPECIFICACIONES Y COMPONENTES
AF 0513 F/N 547361
OREGON® CORDLESS TOOL SYSTEM
MOTOSIERRA MODELO CS250
ESPECIFICACIONES Y COMPONENTES
COMPONENTES DE REPUESTO REFERENCIA
BARRA
35 cm (14 in) 91 SDE,
1,3 mm (0,050 in)
554874
CADENA Y PIEDRA PARA
MOTOSIERRA, POWERSHARP®
35 cm (14 in) 91,
POCO REBOTE
554873
CADENA ALTERNATIVA PARA
MOTOSIERRA
CADENA DE 35 cm (14 in)
3/8 in PERFIL BAJO 91 DE
POCO REBOTE
OREGON® S52
BATERÍA MODELO B600E 548206
BATERÍA MODELO B400E 545938
BATERÍA MODELO B500S 545937
CARGADOR CON CABLE, MODELO C600
EU 554933
UK 554872
AU/NZ 560663
CARGADOR CON CABLE, MODELO C750
EU 558697
UK 558698
AU/NZ 558699
CARGADOR, MODELO C600
ENTRADA 100240 V~ 5060 HZ 60 W
ENTRADA
SOLAMANTE EE. UU. Y CANADÁ 120 V~ 60 HZ 60 W
SALIDA 41,5 V 1,25 A
CABLE DE ALIMENTACIÓN
US/CAN P/N: 546636 EU P/N: 547383
UK P/N: 547384 AU/NZ P/N: 559380
BATERÍA MODELO B400E
TIPO IONLITIO
TEMPERATURAS OPERATIVAS DE 0 °C A 40 °C DE 32 °F A 104 °F
MODELO
CAPACIDAD
NOMINAL
VOLTAJE
NOMINAL
TIEMPO DE CARGA
C600 APROX.
B600E 4,00 Ah / 144 Wh +36 V CC 210 MINUTOS
B400E 2,40 Ah / 89 Wh +37 V CC 120 MINUTOS
B500S 1,25 Ah / 47 Wh +37 V CC 60 MINUTOS
CADENA DE LA MOTOSIERRA
CAPACIDAD DE ACEITE 175 ml 5,9 oz)
ACEITE PARA BARRA Y CADENA MARCA OREGON®
PESO EN SECO CON B400E 5,4 kg 12,0 lb
PESO EN SECO SIN BATERÍA,
BARRA NI CADENA
3,6 kg 7,9 lb
NIVEL DE POTENCIA DEL SONIDO 90 dB
VIBRACIÓN 2,87 m/s
2
(K, 1,5 m/s2)
LONGITUD MÁXIMA DE LA BARRA
35 cm (14 in)
PASO DE LA CADENA PERFIL BAJO de 3/8 in - 91
CALIBRE DE LA CADENA 1,3 mm (0,050 in)
DIENTES DEL PIÑÓN 6
VELOCIDAD DE LA CADENA SIN
RESISTENCIA
12 m/s
Page 74

72
NOMBRES Y TÉRMINOS DE LA MOTOSIERRA
AF 0513 F/N 547361
OREGON® CORDLESS TOOL SYSTEM
MOTOSIERRA MODELO CS250
NOMBRES Y TÉRMINOS DE
LA MOTOSIERRA
NOMBRES Y TÉRMINOS DE LA MOTOSIERRA
Acelerador: dispositivo que, enciende y
apaga la motosierra.
Asa frontal: asa de apoyo ubicada en la
parte frontal de la motosierra o cerca de
ella.
Asa trasera: asa de apoyo ubicada en la
parte trasera de la motosierra o cerca de
esta.
Barra: estructura con carriles que da
apoyo a la cadena de la motosierra y le
sirve de guía.
Barra de rebote reducido: barra que se
ha demostrado que reduce el rebote en
forma significativa.
Bloqueo del acelerador: tope móvil que
impide la operación accidental del
acelerador hasta que se accione en
forma manual.
Brida de alineación: la parte larga y
elevada de la caja de la barra que
sostiene la guía de centrado
Cadena de la motosierra: aro de cadena
con dientes cortantes que corta la
madera, y es impulsado por el cuerpo de
la motosierra y se apoya en la barra.
Cadena de poco rebote: cadena que
cumple los requisitos de rendimiento con
respecto al rebote del estándar B. del
ANSI.
Corte demarcador: muesca que se hace en
un árbol y que dirige su caída.
Corte trasero: el corte final en una
operación de tala, que se hace del lado
opuesto del árbol en el que se hace el
corte demarcador.
Cuerpo de la motosierra: la motosierra sin
la cadena ni la barra.
Engrasador automático: sistema que
lubrica la barra y la cadena de la
motosierra en forma automática.
Freno de la cadena: dispositivo que se usa
para detener la cadena de la motosierra.
Piñón de accionamiento: parte dentada
que acciona la cadena de la motosierra.
Posición de corte normal: posiciones que
se asumen al realizar cortes de tronzado
y tala.
Protector: guidera estructural que separa
el asa frontal de una motosierra y la barra,
que también sirve como mecanismo de
activación para el freno de la cadena.
Rebote: movimiento hacia atrás, hacia
arriba o en ambas direcciones de la barra,
que se produce cuando la cadena de la
motosierra cerca de la punta de la parte
superior de la barra entra en contacto
con cualquier objeto, como un tronco o
una rama, o cuando la madera se cierra
y pinza la cadena de la motosierra en el
corte.
Tronzado: el proceso de realizar cortes
transversales para dividir en partes un
tronco o un árbol derribado.
Tala: el proceso de cortar y derribar un
árbol.
Page 75

73
MONTAJE
AF 0513 F/N 547361
OREGON® CORDLESS TOOL SYSTEM
MOTOSIERRA MODELO CS250
MONTAJE
DESEMBALAJE
PELIGRO: NO INTENTE OPERAR
LA MOTOSIERRA SI HAY ALGUNA
PIEZA DAÑADA O FALTA ALGÚN
COMPONENTE.
Algunos kits de motosierra vienen
completamente montados. Si la motosierra
se empaquetó sin instalar la cadena y la
barra, consulte la sección “Sustitución de
la barra y la cadena” de este manual para
obtener instrucciones sobre la instalación.
Después de sacar la motosierra de su caja,
inspecciónela con cuidado para asegurarse
de que no se haya producido ningún daño
durante el envío.
Inspeccione la cadena y asegúrese
de que no falta ninguna pieza. Si hay
alguna pieza dañada o falta algún
componente, comuníquese con
OREGON® al .. para obtener
piezas de repuesto.
IMPORTANTE: DESPUÉS DE
DESEMBALAR LA MOTOSIERRA,
VERIFIQUE LA POSICIÓN DEL
PROTECTOR. LA MOTOSIERRA NO SE
PONDRÁ EN FUNCIONAMIENTO CON
EL FRENO DE LA CADENA ACTIVADO.
TIRE DEL PROTECTOR HACIA ATRÁS, EN
DIRECCIÓN AL ASA FRONTAL ANTES
DE COMENZAR A OPERAR FIGURA .
INSTALACIÓN DE LAS GARRAS
DENTADAS DE TRONZADO
Algunos kits de motosierra vienen con
garras dentadas de tronzado metálicas
como accesorio. Para instalar las guías
dentadas, colóquelas en la parte frontal
de la motosierra con los dientes hacia
arriba y luego sujételas con los dos
tornillos suministrados.
LLENADO DEL DEPÓSITO DE
ACEITE
PRECAUCIÓN: VERIFIQUE EL NIVEL
DE ACEITE CON FRECUENCIA Y LLENE
EL DEPÓSITO SEGÚN SEA NECESARIO.
NUNCA PONGA EN MARCHA LA
MOTOSIERRA SI NO VE ACEITE.
Se necesita aceite para barra y cadena
para lubricar la barra y la cadena en forma
adecuada. Para obtener los mejores
resultados, use el aceite OREGON®
para barra y cadena. Este aceite fue
especialmente diseñado para proporcionar
baja fricción y cortes más rápidos. NUNCA
use aceite ni otros lubricantes que no
hayan sido diseñados específicamente
para usar en la barra y la cadena. Esto
podría hacer que se obstruya el sistema de
aceite, lo que podría provocar el desgaste
prematuro de la barra y la cadena.
Coloque la motosierra de lado sobre una
superficie firme y plana, de modo que la
tapa del depósito de aceite esté hacia
arriba (Figura ). Después de limpiar todos
los desechos del área de la tapa, retire la
tapa y vierta el aceite para barra y cadena
con cuidado en el depósito. Vuelva a
colocar la tapa y verifique la presencia del
aceite a través de la ventana de inspección
de aceite. Se necesita más aceite para
barra y cadena poco tiempo después de
que deje de verse aceite a través de la
ventana de inspección de aceite.
FIGURA 6
PROTECTOR EN
POSICIÓN OPERATIVA
PROTECTOR EN
POSICIÓN DE
FRENO
FIGURA 7
Page 76

74
FUNCIONAMIENTO DE LA MOTOSIERRA
AF 0513 F/N 547361
OREGON® CORDLESS TOOL SYSTEM
MOTOSIERRA MODELO CS250
FUNCIONAMIENTO DE LA MOTOSIERRA
BATERÍA Y CARGADOR
ADVERTENCIA: NO CARGUE LA
BATERÍA BAJO LA LLUVIA.
INDICADOR LED DE NIVEL DE CARGA
DE BATERÍA
La batería de ion-litio está equipada con
un indicador LED de nivel de carga. Para
evaluar el nivel de carga de la batería,
presione el botón del indicador que se
encuentra en la cara de la batería (Figura ).
Sin luces: recargar.
Una luz verde fija:
menos del % de carga.
Cargue la batería antes de usarla.
Dos luces verdes fijas:
entre el % y el % de carga.
Tres luces verdes fijas:
entre el % y el % de carga.
Cuatro luces verdes fijas:
entre el % y el % de carga.
CÓMO CONECTAR EL CARGADOR
Conecte el cable del cargador al cargador
y al enchufe adecuado (Figura ).
Use solo el cable suministrado con el
cargador. Al usarlo por primera vez,
verifique que el tipo de enchufe coincida
con el receptáculo.
INDICADOR LED DEL ESTADO DE
CARGA DEL CARGADOR
El cargador de la batería está equipado
con un indicador LED del estado de carga
que le muestra el estado de la carga,
así como las condiciones que podrían
retrasar o impedir la carga (Figura ).
Nota: Hasta que se inserte una batería, no
se verá ninguna luz.
Luz naranja intermitente: hay
algún problema. Hay varias causas
posibles. Consulte la sección
“Resolución de problemas” de este
manual.
Luz naranja fija: la temperatura
de la batería supera el rango
aceptable (entre °C y °C [entre
°F y °F]). Deje que la batería
alcance el rango de temperatura
aceptable antes de cargarla. Puede
dejar la batería en el cargador
mientras se ajusta la temperatura.
El proceso de carga comenzará
cuando se alcance la temperatura
adecuada.
Luz verde intermitente: la batería
se está cargando.
Luz verde fija: la batería está lista
para usar.
FIGURA 8
LUCES INDICADORAS
BOTÓN DEL INDICADOR
FIGURA 9
FIGURA 10
Page 77

75
FUNCIONAMIENTO DE LA MOTOSIERRA
AF 0513 F/N 547361
OREGON® CORDLESS TOOL SYSTEM
MOTOSIERRA MODELO CS250
CÓMO CARGAR LA BATERÍA
ADVERTENCIA: NO SEGUIR LOS
PROCEDIMIENTOS DE CARGA
ADECUADOS PUEDE PROVOCAR
VOLTAJE EXCESIVO, FLUJO DE
CORRIENTE EXCESIVO, PÉRDIDA
DE CONTROL DURANTE LA CARGA,
FILTRACIÓN DE PRODUCTOS
QUÍMICOS PELIGROSOS,
GENERACIÓN DE CALOR, ESTALLIDO
O INCENDIO.
Con el cable del cargador conectado al
cargador y enchufado en un
tomacorriente, alinee las ranuras de la
batería con los carriles del cargador y
deslice la batería en el cargador hasta
que esté completamente asentada
(Figura ).
Controle el indicador del estado de la
carga para conocer las condiciones de
carga.
INTRODUCCIÓN Y DESBLOQUEO DE
LA BATERÍA
Utilice solo las baterías de marca
OREGON® especificadas en estas
instrucciones de funcionamiento.
Alinee la ranura de la batería con los
carriles que están dentro del puerto de
batería. Introduzca con firmeza la batería
en el puerto de batería de la motosierra, y
presione hacia adelante hasta que oiga el
clic que indica que ya está encajada en su
sitio (Figura ).
Para retirar la batería, levante el
desbloqueador de la batería y retírela
(Figura ).
FIGURA 11
FIGURA 12
FIGURA 13
Page 78

76
FUNCIONAMIENTO DE LA MOTOSIERRA
AF 0513 F/N 547361
OREGON® CORDLESS TOOL SYSTEM
MOTOSIERRA MODELO CS250
OPERACIÓN GENERAL
ADVERTENCIA: UTILICE SIEMPRE
GUANTES ADECUADOS Y LA
PROTECCIÓN ADECUADA PARA LA
CABEZA, LOS OJOS Y LOS OÍDOS.
TEMPERATURA DE USO
Esta motosierra está diseñada para
funcionar en un rango de temperaturas
entre °C y °C (entre °F y °F).
SUJECIÓN ADECUADA
Con la motosierra sobre una superficie
firme y plana, sujete el asa frontal con la
mano izquierda y el asa trasera con la
derecha. Los dedos deben envolver la
parte superior del asa, y el pulgar debe
colocarse debajo del asa (Figura ).
POSTURA ADECUADA
Ambos pies deben estar sobre suelo
firme, con el peso distribuido de manera
uniforme entre ellos.
No se estire más allá de su alcance y no se
suba a una escalera, taburete ni cualquier
otro lugar elevado que no esté
totalmente asegurado.
CÓMO DETENER LA MOTOSIERRA
Suelte el acelerador para detener la
motosierra.
CÓMO PROBAR EL FRENO
Asegúrese de que el freno de la cadena
funcione antes de usar la motosierra.
Para verificar el funcionamiento del
freno, encienda la motosierra en una
superficie firme y plana y, luego, mueva
el protector hacia adelante para activar
el freno de la cadena en forma manual.
Cuando el freno de la cadena funciona
adecuadamente, este detiene el motor y
la cadena de la motosierra de inmediato.
CÓMO PONER EN MARCHA LA
MOTOSIERRA
Sujete con firmeza las asas superior y
trasera. Presione y sostenga el bloqueo
del acelerador con el pulgar (). Para
arrancar la motosierra, apriete el
acelerador () (Figura ). No es necesario
seguir presionando el bloqueo del
acelerador.
SUJECIÓN CON PULGAR
DEBAJO DEL ASA
FIGURA 14
1 BLOQUEO DEL
ACELERADOR
2
ACELERADOR
FIGURA 15
Page 79

77
FUNCIONAMIENTO DE LA MOTOSIERRA
AF 0513 F/N 547361
OREGON® CORDLESS TOOL SYSTEM
MOTOSIERRA MODELO CS250
CORTE
CORTE BÁSICO
ADVERTENCIA: ASEGÚRESE
SIEMPRE DE TENER BUEN APOYO Y
SOSTENGA LA MOTOSIERRA CON
FIRMEZA CON AMBAS MANOS
MIENTRAS EL MOTOR ESTÉ EN
FUNCIONAMIENTO.
Adopte la sujeción y la postura de corte
adecuadas frente a la madera con la
motosierra apagada. Presione el bloqueo
del acelerador y apriete el acelerador.
Deje que la cadena alcance la velocidad
máxima antes de comenzar a cortar.
Comience a cortar presionando
levemente la barra contra la madera.
Ejerza solo una leve presión y deje que la
motosierra haga el trabajo.
Mantenga una velocidad constante
durante todo el corte y libere la presión
justo antes del final del corte.
PODA
Al podar, asegúrese de que los
transeúntes o los ayudantes se
encuentren a una distancia segura de
las ramas que caigan y no directamente
frente al operador de la motosierra ni
detrás de él. Asegure cualquier rama
que pueda ser peligrosa. Use el equipo
auxiliar adecuado. Mantenga un buen
apoyo, sostenga la motosierra con
firmeza con ambas manos y no se estire
más allá de su alcance.
Con la motosierra a velocidad máxima,
ponga la base de la barra en contacto con
la rama que debe cortar. Ejerza una presión
leve. Para las ramas más grandes, primero,
realice un corte superficial en la base de
la rama y, luego, finalice el corte desde la
parte superior. Cortar una rama grande por
completo desde la parte superior podría
provocar astillamiento; un corte completo
desde la base puede hacer que la rama
pince la barra.
Algunas motosierras tienen garras
dentadas de tronzado de metal montadas
en la parte frontal de la motosierra. Según
la técnica del usuario, las guías dentadas
de tronzado pueden reducir la calidad de
corte de la escamonda.
TALA DE UN ÁRBOL
Cuando dos o más personas realizan
operaciones de tronzado y tala al mismo
tiempo, debe separarse la operación de
tala de la de tronzado a una distancia de,
al menos, dos veces la altura del árbol
que se talará. Los árboles no deben
talarse de modo tal que puedan poner en
peligro a alguna persona, golpear alguna
línea de servicios públicos o provocar
daños a alguna propiedad. Si el árbol
efectivamente entra en contacto con
alguna línea de servicios públicos, debe
notificarse a la compañía de servicios
públicos de inmediato.
Utilice la garra dentada de plástico
que está al frente de la motosierra para
apoyarla en la madera. Si se encuentra
equipada con ellas, coloque la garra
dentada de tronzado de metal en la
madera y úselas como punto de palanca
para aumentar la estabilidad al cortar
madera de gran diámetro.
El operador de la motosierra debe
mantenerse en el lado más alto del
terreno, ya que es probable que el árbol
ruede o se deslice cuesta abajo después
de talarlo. Debe planificarse y limpiarse,
según sea necesario, un camino de
retirada antes de comenzar los cortes. El
camino de retirada debe extenderse hacia
atrás y en forma diagonal a la parte trasera
de la línea de caída prevista (Figura ).
Antes de comenzar la tala, tenga en
cuenta la inclinación natural del árbol,
la ubicación de las ramas más grandes
y la dirección del viento para calcular
dónde caerá el árbol. Retire la suciedad,
las piedras, la corteza floja, los clavos, las
grapas y los cables del árbol donde se
realizarán los cortes de tala.
OPCIONES DE CAMINO
DE RETIRADA
DIRECCIÓN
DE CAÍDA
RETIRADA
RETIRADA
FIGURA 16
45°
Page 80

78
FUNCIONAMIENTO DE LA MOTOSIERRA
AF 0513 F/N 547361
OREGON® CORDLESS TOOL SYSTEM
MOTOSIERRA MODELO CS250
) CORTE DEMARCADOR
Haga la muesca de / del diámetro
del árbol, perpendicular a la dirección
de caída. Primero, haga el corte
demarcador inferior horizontal. Esto
ayudará a evitar el pinzamiento de la
cadena de la motosierra o la barra al
realizar la segunda muesca (Figura ).
) CORTE TRASERO
Haga el corte trasero, al menos,
mm (~ in) más alto que el corte
demarcador horizontal (Figura ).
Mantenga el corte trasero paralelo al
corte demarcador horizontal. Haga el
corte trasero de modo que quede
madera suficiente para actuar como
bisagra. La madera bisagra evita que
el árbol gire y caiga en la dirección
equivocada. No corte a través de la
bisagra.
A medida que el corte de tala
se acerque a la bisagra, el árbol
comenzará a caer. Si existe alguna
posibilidad de que el árbol no caiga
en la dirección deseada o de que
pueda balancearse hacia atrás y
atascar la cadena de la motosierra,
deje de cortar antes de completar el
corte trasero y use cuñas de madera,
plástico o aluminio para abrir el corte
y hacer que el árbol caiga a lo largo de
la línea de caída deseada.
Cuando el árbol comience a caer,
retire la motosierra del corte, detenga
el motor, deje la motosierra en el
suelo y use el camino de retirada
planificado. Esté atento a la caída de
ramas y mire dónde pisa.
) PODA DE UN ÁRBOL
Podar consiste en retirar las ramas de
un árbol caído. Al podar, deje las
ramas inferiores más grandes para
que mantengan el tronco alejado del
suelo. Retire las ramas pequeñas de
un corte. Las ramas que se
encuentran sometidas a tensión
deben cortarse desde la base hacia
arriba para evitar que la motosierra se
atasque (Figura ).
) TRONZADO DE UN TRONCO
Tronzar consiste en cortar un tronco
en partes. Es importante asegurarse
de que el apoyo sea firme y de que
el peso se distribuya de manera
uniforme en ambos pies. Cuando sea
posible, el tronco debe levantarse y
apoyarse mediante el uso de ramas,
troncos o calces.
CORTE DEMARCADOR
DIRECCIÓN
DE CAÍDA
MUESCA
FIGURA 17
CORTE TRASERO
CORTE
TRASERO
BISAGRA
DIRECCIÓN
DE CAÍDA
MUESCA
50 MM
50 MM
FIGURA 18
PODA DE UN ÁRBOL
PODA DE
RAMAS
MANTENGA EL TRABAJO ALEJADO DEL
SUELO. DEJE LAS RAMAS DE APOYO HASTA
QUE EL TRONCO ESTÉ CORTADO.
FIGURA 19
Page 81

79
FUNCIONAMIENTO DE LA MOTOSIERRA
AF 0513 F/N 547361
OREGON® CORDLESS TOOL SYSTEM
MOTOSIERRA MODELO CS250
SIGA ESTAS INSTRUCCIONES
SIMPLES PARA REALIZAR UN CORTE
FÁCILMENTE:
IMPORTANTE: PRACTIQUE CORTAR
TRONCOS EN UN CABALLETE
O SOPORTE HASTA QUE SE
SIENTA CÓMODO AL OPERAR LA
MOTOSIERRA.
Cuando el tronco está apoyado en toda
su longitud, se corta desde arriba
(tronzado superior) (Figura ).
Cuando el tronco esté apoyado sobre
un extremo, corte / del diámetro
desde la parte de abajo (tronzado
inferior). Luego, haga el corte final con
un tronzado superior hasta conectar
con el primer corte (Figura ).
Cuando el tronco esté apoyado en
ambos extremos, corte / de ese
diámetro con un tronzado superior.
Luego, haga el corte final con un
tronzado inferior de los / del diámetro
inferior hasta conectar con el primer
corte (Figura ).
Cuando tronce en una pendiente,
manténgase siempre en el lado del
tronco en el que el terreno sea más alto
(Figura ).
Para mantener el control completo al
cortar de lado a lado, libere la presión de
corte hacia el final del corte, sin relajar la
sujeción en las asas de la motosierra. No
deje que la cadena entre en contacto con
el suelo. Después de completar el corte,
espere a que la cadena de la motosierra
se detenga antes de mover la motosierra.
Detenga siempre el motor antes de pasar
de un árbol a otro.
TRONCO APOYADO
EN TODA SU LONGITUD
CORTE DESDE ARRIBA
TRONZADO SUPERIOR.
EVITE CORTAR TIERRA.
FIGURA 20
TRONCO APOYADO EN
UN EXTREMO
HACER UN PRIMER CORTE DE TRONZADO
INFERIOR 1/3 DEL DIÁMETRO
PARA EVITAR EL ASTILLAMIENTO.
HACER UN SEGUNDO CORTE DE TRONZADO
SUPERIOR 2/3 DEL DIÁMETRO HASTA
LLEGAR AL PRIMER CORTE PARA EVITAR EL
PINZAMIENTO.
FIGURA 21
TRONZADO DE UN TRONCO
HACER UN PRIMER CORTE DE TRONZADO
SUPERIOR 1/3 DEL DIÁMETRO PARA
EVITAR EL ASTILLAMIENTO.
HACER UN SEGUNDO CORTE DE TRONZADO
INFERIOR 2/3 DEL DIÁMETRO HASTA
LLEGAR AL PRIMER CORTE PARA EVITAR EL
PINZAMIENTO.
FIGURA 22
TRONZADO EN UNA
PENDIENTE
AL CORTAR, MANTÉNGASE EN EL
LADO MÁS ALTO DEL TERRENO
PORQUE EL TRONCO PUEDE
RODAR.
FIGURA 23
Page 82

80
AFILADO CON POWERSHARP®
AF 0513 F/N 547361
OREGON® CORDLESS TOOL SYSTEM
MOTOSIERRA MODELO CS250
AFILADO CON POWERSHARP®
ADVERTENCIA: EL SISTEMA
POWERSHARP® NO DEBE UTILIZARSE
EN PRESENCIA DE MATERIALES
EXPUESTOS EXTREMADAMENTE
INFLAMABLES, COMO GASOLINA Y
ACETILENO.
PRECAUCIÓN: AFILAR CON EL
SISTEMA POWERSHARP® PRODUCE
CHISPAS DE BAJA ENERGÍA.
INTRODUCCIÓN A
POWERSHARP®
Esta motosierra está equipada con
el sistema de afilado integrado
PowerSharp®, una manera rápida y fácil
de afilar la cadena de la motosierra. La
cadena de la motosierra debe afilarse
cuando lleva más tiempo hacer los
cortes o cuando las astillas de la madera
se vuelven más pequeñas y, en casos
extremos, se convierten en serrín.
OPERACIÓN
IMPORTANTE: EL SISTEMA
DE AFILADO INTEGRADO
POWERSHARP® DEBE USARSE SOLO
CON LA CADENA POWERSHARP®.
NUNCA INTENTE AFILAR OTRA
CADENA CON LA AFILADORA
INTEGRADA. SE DAÑARÁN LA
CADENA Y EL AFILADOR.
IMPORTANTE: LA CADENA
POWERSHARP® USA DIENTES
EXCLUSIVOS DE AFILADO SUPERIOR
Y SOLO PUEDE AFILARSE CON
UN AFILADOR POWERSHARP®
ORIGINAL.
• Con la motosierra a velocidad máxima,
levante levemente la palanca
PowerSharp® durante a segundos
(Figura ). Se observarán chispas
cuando las cortadoras entren en
contacto con la piedra de afilado.
• Haga un corte de prueba para
determinar si la cadena ha sido afilada
lo suficiente. Si no es así, repita el
procedimiento de afilado hasta que la
cadena esté lo suficientemente afilada.
IMPORTANTE: NO EJERZA
DEMASIADA FUERZA AL AFILAR. LA
FUERZA EXCESIVA PUEDE REDUCIR
EL RENDIMIENTO DE LA PIEDRA DE
AFILADO.
IMPORTANTE: ES NORMAL VER QUE
SALE UNA PEQUEÑA CANTIDAD
DE CHISPAS Y DE HUMO DURANTE
EL AFILADO, DEBIDO A QUE LOS
DIENTES ENTRAN EN CONTACTO
CON LA PIEDRA Y LA FRICCIÓN
CALIENTA LA CADENA.
CUÁNDO REEMPLAZAR LA
PIEDRA DE AFILADO
La piedra de afilado está diseñada para
durar el mismo tiempo que la cadena.
Reemplace la piedra siempre que
reemplace la cadena, incluso aunque
parezca que todavía le queda más vida
útil. Consulte la sección “Reemplazo de la
piedra de afilado” de este manual.
FIGURA 24
Page 83

81
MANTENIMIENTO Y LIMPIEZA
AF 0513 F/N 547361
OREGON® CORDLESS TOOL SYSTEM
MOTOSIERRA MODELO CS250
MANTENIMIENTO Y LIMPIEZA
ADVERTENCIA: INSPECCIONE
LA MOTOSIERRA. LA INSPECCIÓN
REGULAR ES EL PRIMER PASO PARA
UN MANTENIMIENTO ADECUADO.
AL SEGUIR LAS PAUTAS QUE
FIGURAN A CONTINUACIÓN, USTED
PUEDE MAXIMIZAR LA SEGURIDAD
Y LA SATISFACCIÓN. SI IDENTIFICA
ALGUNA PIEZA DAÑADA O
DESGASTADA EN FORMA EXCESIVA,
REEMPLÁCELA DE INMEDIATO.
NO IDENTIFICAR NI REEMPLAZAR
PIEZAS DAÑADAS O DESGASTADAS
PUEDE PROVOCAR LESIONES
PERSONALES GRAVES.
ADVERTENCIA: RETIRE LA
BATERÍA DE LA MOTOSIERRA ANTES
DE INSPECCIONARLA, LIMPIARLA
O REALIZAR EL MANTENIMIENTO.
UNA HERRAMIENTA QUE FUNCIONA
A BATERÍA Y TIENE LA BATERÍA
INTRODUCIDA ESTÁ SIEMPRE
ENCENDIDA Y PUEDE ARRANCAR EN
FORMA ACCIDENTAL.
PRECAUCIÓN: CUANDO LIMPIE LA
MOTOSIERRA, NO LA SUMERJA EN
AGUA NI EN OTROS LÍQUIDOS.
ANTES DE CADA USO
• Asas: las asas frontales y traseras no
deben tener grietas ni otro tipo de daño.
Deben estar limpias y secas.
• Protector: el protector no debe tener
daños y debe poder moverse fácilmente
hacia atrás y hacia adelante. Al moverse,
el protector debe activar el freno de la
cadena.
• Barra: la barra debe estar derecha y
no tener astillas, grietas ni desgaste
excesivo.
• Cadena de la motosierra: la cadena debe
tener la tensión adecuada y ningún
componente debe tener grietas, astillas
ni desgaste excesivo.
• Tapa lateral: la tapa lateral no debe
tener grietas ni otro tipo de daño. Debe
ajustarse bien al cuerpo de la motosierra
sin combarse. Asegúrese de que la
retención de la cadena no tenga grietas.
• Batería: la batería debe estar limpia,
seca, sin signos de perforación, impacto
ni otro tipo de daño. Los contactos
deben estar limpios, secos y no tener
desechos.
• Alojamiento de la batería: el puerto
de batería y los contactos deben estar
limpios, secos y no tener desechos.
• Freno de la cadena: pruebe el freno
de la cadena para asegurarse de que
funcione adecuadamente.
• Nivel de aceite: el aceite debe llenar la
ventana de inspección. Si no es así, llene
el depósito de aceite antes de usar la
motosierra.
• Tapa del motor: verifique que no haya
grietas en la tapa ni desechos en los
conductos de entrada de aire.
DE FORMA PERIÓDICA
• Piñón de accionamiento: busque
ranuras profundas, dientes rotos o
rebabas.
• Tornillo de ajuste de tensión:
inspeccione la cabeza y el cuerpo
del tornillo de ajuste de tensión para
detectar desgaste excesivo, roscas
estropeadas o cruzadas u otro tipo de
daño.
• Área de centrado de barra: asegúrese de
que la guía de centrado de barra no esté
torcida, estropeada ni tenga la rosca
cruzada y que la caja de la barra y la
brida de alineación no tengan desechos
y estén intactas.
• Cargador: el cargador debe estar limpio,
seco y no tener perforaciones ni otro
tipo de daño. La bandeja y los contactos
de la batería no deben tener desechos.
Page 84

82
MANTENIMIENTO Y LIMPIEZA
AF 0513 F/N 547361
OREGON® CORDLESS TOOL SYSTEM
MOTOSIERRA MODELO CS250
REEMPLAZO DE LA BARRA
Y LA CADENA
PRECAUCIÓN: LA PALANCA
POWERSHARP® DE LA MOTOSIERRA
SOLO PUEDE AFILAR LA CADENA
POWERSHARP® RETIRE LA PIEDRA
DE AFILADO CUANDO USE UNA
CADENA DE MOTOSIERRA QUE NO
SEA POWERSHARP®. NO HACERLO
PUEDE DAÑAR LA CADENA DE
LA MOTOSIERRA, EL SISTEMA DE
AFILADO Y/O LA MOTOSIERRA.
Utilice guantes. Apague la motosierra y
déjela enfriar. Retire la batería, afloje la
tuerca de ajuste de la tapa lateral (Figura
) y retire la tapa lateral. Asegúrese de
que la caja de la barra, el piñón y el
tornillo de ajuste de tensión no tengan
desechos.
NOTA: Este es un buen momento para
inspeccionar el piñón de accionamiento
y el tornillo de ajuste de tensión para
detectar desgaste excesivo o daño.
Instale la barra y la cadena nuevas de la
siguiente manera:
• Retire la piedra de afilado si reemplaza
la cadena con una que no sea
PowerSharp®.
• Ajuste la clavija tensora hacia la parte
trasera de la motosierra tanto como
pueda. Coloque la barra en la caja de
centrado, deslizando la ranura de la
barra sobre la brida de alineación (la
parte larga y levantada de la caja de la
barra que sostiene la guía de centrado)
(Figura ), y asegúrese de que la clavija
de ajuste de la barra esté introducida en
el orificio de la base en la cola de la
barra.
• Enganche la cadena nueva en el piñón
de accionamiento con los bordes
de corte de los dientes orientados
en la dirección contraria al piñón de
accionamiento, a lo largo del borde
superior de la barra.
• Introduzca la cadena en la ranura de la
barra y deslice la barra alejándola del
motor, a fin de que la cadena no esté
demasiado floja (Figura ). Ajuste la
posición de la clavija de ajuste de la
barra hasta que enganche en el orificio
en la barra.
FIGURA 25
FIGURA 26
FIGURA 27
Page 85

83
MANTENIMIENTO Y LIMPIEZA
AF 0513 F/N 547361
OREGON® CORDLESS TOOL SYSTEM
MOTOSIERRA MODELO CS250
• Acople nuevamente la tapa lateral y
asegúrese de que la retención de la
cadena esté asentada adecuadamente
en su orificio. Apriete levemente la
tuerca de ajuste de la tapa lateral
(Figura ).
IMPORTANTE: LA CADENA DE
LA MOTOSIERRA DEBE TENER
LA TENSIÓN APROPIADA ANTES
DE UTILIZARLA. CONSULTE LAS
INSTRUCCIONES PARA TENSAR QUE
SE MENCIONAN A CONTINUACIÓN.
* Para compensar el desgaste de la barra
y maximizar su vida útil, invierta la
barra de vez en cuando.
INSTRUCCIONES PARA TENSAR
• Utilice guantes. Retire la batería antes de
tensar. Afloje la tuerca de ajuste de la
tapa lateral, levante la nariz de la barra y
apriete el tornillo para tensar la cadena
(Figura ).
• Apriete bien la tuerca de ajuste de la
tapa lateral.
La tensión de la cadena es correcta
cuando, con un poco de esfuerzo, se
puede mover la cadena suavemente por
la barra con una mano enguantada. La
cadena debe tocar la parte inferior del
carril de la barra (Figura ).
Durante el comienzo de su vida útil,
haga funcionar la motosierra, sin
cortar, durante uno o dos minutos para
asegurarse de que la cadena reciba un
buen suministro de aceite. Detenga el
motor y controle la tensión de la cadena.
Si se ha aflojado, ajústela nuevamente.
Después de un período breve de uso,
deje que la cadena se enfríe y controle
la tensión una vez más (primero
retire la batería). Observe la tensión
detenidamente durante la primera
media hora de uso y, en forma periódica,
durante la vida útil de la cadena, y vuelva
a ajustarla según lo requerido cuando
la cadena y la barra estén frías al tacto.
Nunca apriete la cadena cuando está
caliente.
Lubrique la cadena adecuadamente
con el aceite para barra y cadena de
marca OREGON®. Ha sido formulado
especialmente para maximizar la potencia
y reducir la fricción. Asegúrese de que la
cadena reciba un suministro adecuado
de aceite. Debe aplicarse aceite en la nariz
de la barra cuando la motosierra está en
funcionamiento, pero no en el corte.
La cadena de la motosierra se estirará
como consecuencia del uso normal, pero
puede estirarse en forma prematura si le
falta aceite, se usa en forma agresiva o no
se le da el mantenimiento recomendado.
FIGURA 28
FIGURA 29
FIGURA 30
Page 86

84
MANTENIMIENTO Y LIMPIEZA
AF 0513 F/N 547361
OREGON® CORDLESS TOOL SYSTEM
MOTOSIERRA MODELO CS250
REEMPLAZO DE LA
PIEDRA DE AFILADO
PRECAUCIÓN: REEMPLACE LA
CADENA DE LA MOTOSIERRA Y LA
PIEDRA DE AFILADO POWERSHARP®
AL MISMO TIEMPO. NO HACERLO
PODRÍA PROVOCAR UNA
DISMINUCIÓN DEL RENDIMIENTO
O DAÑO A LA CADENA Y/O A LA
PIEDRA DE AFILADO.
IMPORTANTE: EL SISTEMA
DE AFILADO INTEGRADO
POWERSHARP® DEBE USARSE SOLO
CON LA CADENA POWERSHARP®.
Retire la tapa lateral quitando la tuerca
de ajuste de la tapa lateral cuando la
motosierra esté apagada y fría, y después
de retirar la batería. Instale la nueva
piedra de afilado de la siguiente manera:
• Retire los dos tornillos que sostienen la
piedra de afilado. Retire la piedra (Figura
).
• Asegúrese de que no haya desechos
en la palanca PowerSharp® ni en el área
circundante.
• Coloque la nueva piedra en su lugar.
Reemplace los tornillos y apriételos
bien.
• Instale nuevamente la tapa lateral y
apriete la tuerca de ajuste de la tapa
lateral.
LIMPIEZA DE LA MOTOSIERRA
PRECAUCIÓN: CUANDO LIMPIE
EL CUERPO DE LA MOTOSIERRA, NO
LO SUMERJA EN AGUA NI EN OTROS
LÍQUIDOS.
• Retire la batería antes de limpiarla.
• Retire las astillas de madera y otros
desechos del puerto de batería.
Asegúrese de que los contactos estén
limpios y secos.
• Después de usarla, limpie los desechos
de la cadena y la barra. Limpie el cuerpo
de la motosierra con un paño limpio,
humedecido con una solución de
jabón suave. Nunca use limpiadores ni
solventes fuertes.
• Limpie siempre las astillas de madera,
el serrín y la suciedad de la ranura de la
barra cuando reemplace la cadena de la
motosierra.
BATERÍA
ADVERTENCIA: DENTRO DE LA
BATERÍA NO HAY PIEZAS CUYO
MANTENIMIENTO PUEDA REALIZAR
EL USUARIO. NO LA DESARME.
Las baterías de ion-litio tienen una vida
útil operativa predeterminada. Si detecta
que el tiempo de uso entre recarga
y recarga es cada vez más corto, eso
significa que la batería está al final de su
vida útil y debe reemplazarse.
• Asegúrese de que la batería y sus
contactos estén limpios y secos, y sin
signos de perforación, impacto ni ningún
otro tipo de daño. Las baterías rotas
pueden causar incendios o permitir la
fuga de productos químicos peligrosos.
• Limpie los contactos sucios con un paño
suave y seco. La suciedad o el aceite
en los contactos puede provocar una
conexión eléctrica deficiente, lo que
causaría pérdida de potencia.
CARGADOR
• Desconecte el cargador del enchufe.
• Limpie los contactos sucios con un paño
suave y seco.
FIGURA 31
Page 87

85
RESOLUCIÓN DE PROBLEMAS
AF 0513 F/N 547361
OREGON® CORDLESS TOOL SYSTEM
MOTOSIERRA MODELO CS250
RESOLUCIÓN DE PROBLEMAS
Utilice esta tabla para identificar posibles soluciones a los problemas de la
motosierra. Si estas sugerencias no solucionan el problema, consulte “Información
sobre servicio y asistencia técnica”.
SÍNTOMA POSIBLE CAUSA MEDIDAS RECOMENDADAS
El motor no
funciona o
funciona en forma
intermitente.
El freno de la cadena está
activado.
Antes de arrancarla, asegúrese de que el protector esté tan
atrás como sea posible (freno de la cadena desactivado).
Para ver la posición correcta del protector, consulte la
sección “Arranque de la motosierra” de este manual.
La batería está
descargada.
Recárguela. Consulte la sección “Carga de la batería” de
este manual.
El bloqueo del acelerador
no está presionado.
El bloqueo del acelerador debe estar oprimido. Consulte
la sección “Arranque de la motosierra” de este manual.
La batería no está
completamente insertada.
Limpie los desechos del puerto de batería y las terminales
con un paño seco y limpio o con un pincel no conductor.
Hay desechos en la tapa
lateral.
Retire la batería y luego retire la tapa lateral y limpie
los desechos.
La batería está fría.
Deje que la batería se caliente hasta superar la
temperatura operativa mínima de 10 °F (-12 °C).
El motor funciona,
pero la cadena
no rota.
La cadena no está
enganchando en el piñón
de accionamiento.
Vuelva a instalar la cadena, asegurándose de
que los eslabones motrices de la cadena estén
completamente asentados en el piñón. Consulte la
sección “Mantenimiento y limpieza” de este manual
para obtener las instrucciones de instalación.
El freno de la
cadena no se activa.
Hay desechos que
impiden el movimiento
completo del protector.
Limpie los desechos del mecanismo externo del freno
de la cadena.
Hay un posible problema
en el funcionamiento del
freno de la cadena.
Comuníquese con un lugar de servicio aprobado de
inmediato. ADVERTENCIA: UTILIZAR UNA MOTOSIERRA
SIN QUE FUNCIONE EL FRENO DE LA CADENA PODRÍA
PROVOCAR LESIONES PERSONALES GRAVES.
La motosierra no
corta de forma
correcta
La cadena no tiene la
tensión suficiente.
Consulte la sección “Instrucciones para tensar” de este
manual.
La cadena está desafilada.
Consulte la sección “Afilado con PowerSharp®” de este
manual.
La cadena está instalada
al revés.
Consulte la sección “Reemplazo de la barra y la cadena”
de este manual.
La cadena está
desgastada.
Reemplace la cadena y la piedra. Están diseñadas para
durar el mismo tiempo.
La cadena está seca o
excesivamente estirada.
Controle el nivel de aceite. Vuelva a llenar el depósito
de aceite si es necesario. Consulte la sección “Montaje”
de este manual. Verifique que el sistema de aceite no
esté obstruido. Debería llegar a la barra una pequeña
cantidad de aceite.
La cadena no está en la
ranura de la barra.
Consulte la sección “Reemplazo de la barra y la cadena”
de este manual.
Page 88

86
RESOLUCIÓN DE PROBLEMAS
AF 0513 F/N 547361
OREGON® CORDLESS TOOL SYSTEM
MOTOSIERRA MODELO CS250
SÍNTOMA POSIBLE CAUSA MEDIDAS RECOMENDADAS
La batería no se
carga.
La protección de
la batería contra
temperaturas altas/bajas
está activada.
Esto puede ocurrir cuando la motosierra se deja en
funcionamiento en forma continua o se expone a
temperaturas ambiente elevadas. Deje que la batería
alcance la temperatura apropiada antes de cargarla
(la luz indicadora de sobretemperatura del cargador
estará encendida cuando la temperatura esté
demasiado alta o baja). Consulte la sección “Carga de
la batería” de este manual.
Los contactos de la
batería o del cargador
están sucios o dañados.
Inspeccione los contactos de la batería y del cargador.
En caso de ser necesario, límpielos de acuerdo con
las instrucciones de este manual. Vuelva a insertar
la batería en el cargador y asegúrese de que esté
completamente asentada.
La batería está llegando
al final de su vida útil.
Todas las baterías tienen una vida limitada. Si la
batería tiene más de dos años de antigüedad o si la
ha recargado con frecuencia, es posible que sea hora
de reemplazarla. Reemplácela solo con la batería
especificada para la motosierra.
Hay una falla en el
cargador.
Lleve el cargador a un lugar de servicio aprobado para
que verifiquen si funciona correctamente.
Se obtiene poco
tiempo de corte
en relación con la
carga de la batería.
La cadena está desafilada.
Consulte la sección “Afilado con PowerSharp®” de este
manual.
La cadena está
desgastada.
Reemplace la cadena y la piedra. Consulte la sección
“Mantenimiento y limpieza” de este manual.
La cadena está seca.
Controle el nivel de aceite de acuerdo con las
instrucciones. Vuelva a llenar el depósito de aceite si es
necesario. Consulte la sección “Llenado del depósito
de aceite” de este manual.
La técnica de corte no es
la adecuada.
Consulte la sección “Corte básico” de este manual para
ver la técnica de corte adecuada.
Hay desechos en la tapa
lateral.
Retire la batería y luego retire la tapa lateral y limpie
los desechos.
La batería no está
completamente cargada.
Consulte la sección “Carga de la batería” de este
manual.
El indicador
del estado de
carga muestra
una luz naranja
intermitente.
Las causas posibles
incluyen que haya
un cortocircuito del
cargador, que la corriente
del cargador sea excesiva,
que se haya superado
el límite de voltaje, que
haya un circuito abierto
en la batería o un error en
el tiempo de espera de
carga/precarga.
Siga estos pasos:
1. Verifique que los enchufes correspondientes estén
completamente insertados en el cargador y en el
tomacorriente.
2. Asegúrese de que el cargador esté recibiendo el
voltaje correcto.
3. Si tiene una, intente cargar otra batería (solo
baterías especificadas para este cargador).
Si esto no corrige el problema, lleve la batería y el
cargador a un centro de servicio aprobado.
Page 89

87
GARANTÍA Y SERVICIO
AF 0513 F/N 547361
OREGON® CORDLESS TOOL SYSTEM
MOTOSIERRA MODELO CS250
GARANTÍA Y SERVICIO
GARANTÍA
Blount, Inc. ofrece una garantía durante
un período de tres () años, desde la
fecha original de compra, para todas las
herramientas de batería y cargadores
OREGON® registrados; y durante un
período de dos () años, desde la
fecha original de compra, para todas
las baterías OREGON® registradas.
Esta garantía limitada se aplica a los
productos fabricados por OREGON®
Cordless Tool System. Durante el período
de la garantía, Blount reemplazará o, a
su discreción, reparará sin cargo alguno
cualquier producto o pieza que Blount
considere defectuosos en materiales o
en fabricación al examinarlos, solo para el
comprador original. El comprador deberá
pagar todos los cargos de transporte y
cualquier costo de retirar alguna pieza
que deba sustituir en virtud de esta
garantía.
INFORMACIÓN SOBRE
SERVICIO TÉCNICO Y
ASISTENCIA
Visítenos en Internet, en
OregonCordless.com, para obtener
información sobre los centros de
reparación o póngase en contacto con
nuestro departamento de atención
al cliente para recibir asistencia o
asesoramiento técnico adicional, y
solicitar reparaciones o piezas de
repuesto. Para obtener números
de teléfono específicos de países,
consulte la sección “Servicio de
atención al cliente por país”.
Por seguridad, solo utilice piezas de
repuesto originales de fábrica en la
herramienta eléctrica. Nuestro centro
de reparación cuenta con personal
capacitado para proporcionar soporte
y asistencia adicional de forma
efectiva para el ajuste, la reparación o
la sustitución de todos los productos
OREGON® Cordless Tool System.
Page 90

OregonCordless.com
Blount International Inc.
4909 Southeast International Way
Portland, OR 97222-4679
USA
 Loading...