

Page 1

ORIGINAL INSTRUCTION MANUAL..........4
EN
BG
EN
DE
FR
BG
RO
HR
ENDEBG
RO
EN
DE
FR
SV
IT
ES
BG
RO
HR
SR
BA
SL
EN
DE
FR
SV
IT
ES
PT
NL
DA
FI
NO
HU
EL
PL
BG
RO
HR
SR
BA
SL
ET
LT
LV
BY
SK
UK
AR
JA
EN
DE
FR
SV
IT
ES
PT
BG
RO
HR
SR
BA
SL
ET
BG
RO
EN
DE
FR
SV
IT
ES
PT
NL
DA
FI
NO
HU
EL
PL
CS
TR
HE
RU
BG
RO
HR
SR
BA
SL
ET
LT
LV
BY
SK
UK
AR
JA
ZH
CHAINSAW MODEL CS1200-092
MANUEL D’INSTRUCTION ORIGINAL .......32
TRONÇONNEUSE MODÈLE CS1200-092
ORIGINAL-BEDIENUNGSANLEITUNG.......60
KETTENSÄGE MODELL CS1200-092
MANUAL ORIGINAL DE INSTRUCCIONES ...88
MOTOSIERRA MODELO CS1200-092
ORYGINALNA INSTRUKCJA OBSŁUGI .....116
PILARKI ŁAŃCUCHOWEJ,
MODEL CS1200-092
MANUAL DE INSTRUÇõES ORIGINAIS .....144
MODELO DE SERRA DE CORRENTE
CS1200-092
MANUAL UTILIZARE ORIGINAL...........172
PENTRU FERĂSTRĂU CU LANŢ
MODEL CS1200-092
ОРИГИНАЛЬНОЕ РУКОВОДСТВО
ПО ЭКСПЛУАТАЦИИ ....................200
ЦЕПНАЯ ПИЛА МОДЕЛЬ CS1200-092
Page 2

EN
BG
English. . . . . . . . . . . . . . . . . . . . . . . . . . . . . . . . . . . . . . . . . . . . . . . 4
EN
DE
FR
BG
RO
HR
ENDEBG
RO
EN
DE
FR
SV
IT
ES
BG
RO
HR
SR
BA
SL
WARNING: Read and understand all safety warnings and all instructions. Failure to follow the
warnings and instructions may result in electric shock, fire and/or serious injury. Save all warnings
and instructions for future reference.
This instruction manual contains translations of a manual drafted in English and are provided to assist those
who do not speak English as their first language. Being a technical writing, some terms may not have a like
or equivalent meaning as translated. Therefore, you should not rely on this translation, and should crossreference the English version, where relying on the translated instructions could result in harm to your person
or property.
Français . . . . . . . . . . . . . . . . . . . . . . . . . . . . . . . . . . . . . . . . . . . . . . . . . . 32
AVERTISSEMENT : Lisez et comprenez l’ensemble des instructions et avertissements de sécurité.
Le non-respect des avertissements de sécurité et des instructions peut entraîner une décharge
électrique, un incendie et/ou des blessures graves. Conservez l’ensemble des avertissements et des
instructions pour référence ultérieure.
Ce manuel d’instruction contient des traductions d’un manuel rédigé en anglais et fournies pour aider les personnes
dont l’anglais n’est pas la langue maternelle. La présente étant une documentation technique, certains termes
peuvent ne pas avoir de synonyme ou de signification équivalente dans la langue de la traduction. Par conséquent,
vous ne pouvez pas vous fier à cette traduction et devez vous reporter à la version anglaise, car s’en tenir aux
instructions traduites pourrait causer du tort à votre personne et à votre propriété.
Deutsch . . . . . . . . . . . . . . . . . . . . . . . . . . . . . . . . . . . . . . . . . . . . . .60
WARNHINWEIS: Alle Sicherheitshinweise und Anweisungen lesen und verstehen. Die
Nichtbefolgung der Warungen und Anweisungen kann zu Stromschlag, Brand und/oder schweren
Verletzungen führen. Alle Warnhinweise und Anweisungen für zukünftigen Gebrauch aufbewahren.
Diese Betriebsanleitung enthält Übersetzungen aus einer Anleitung, die in englischer Sprache verfasst worden
ist. Sie dienen denjenigen, deren Muttersprache nicht Englisch ist, als Hilfe. Da es sich um ein technisches
Dokument handelt, kann es vorkommen, dass manche Begriffe in der Übersetzung nicht die gleiche Bedeutung
haben. Verlassen Sie sich daher nicht nur auf die Übersetzung. Lesen Sie als Referenz auch die englische
Version und vermeiden Sie somit Schäden an Personen und Eigentum.
Español . . . . . . . . . . . . . . . . . . . . . . . . . . . . . . . . . . . . . . . . . . . . . .88
ADVERTENCIA: Lea y comprenda todas las advertencias de seguridad y las instrucciones. La
omisión en seguir estas advertencias e instrucciones podría ocasionar una descarga eléctrica,
un incendio y/o lesiones personales graves. Guarde todas las advertencias e instrucciones para
referencia futura.
Este manual de instrucciones contiene traducciones de un manual redactado en inglés y se provee para ayudar
a aquellas personas que no hablan inglés como su primer idioma. Dado que el manual es un documento técnico,
es posible que algunos términos no tengan un significado similar o equivalente al traducirlos. Por lo tanto, no
debe confiar en esta traducción y debe consultar la versión en inglés; confiar en las instrucciones traducidas
podría provocar lesiones personales o daños materiales.
Page 3

EN
DE
FR
SV
IT
ES
PT
NL
DA
FI
NO
HU
EL
PL
BG
RO
HR
SR
BA
SL
ET
LT
LV
BY
SK
UK
AR
JA
Polski . . . . . . . . . . . . . . . . . . . . . . . . . . . . . . . . . . . . . . . . . . . . . . . . . . . 116
EN
DE
FR
SV
IT
ES
PT
BG
RO
HR
SR
BA
SL
ET
BG
RO
EN
DE
FR
SV
IT
ES
PT
NL
DA
FI
NO
HU
EL
PL
CS
TR
HE
RU
BG
RO
HR
SR
BA
SL
ET
LT
LV
BY
SK
UK
AR
JA
ZH
OSTRZEŻENIE: Przeczytaj ze zrozumieniem wszystkie ostrzeżenia bezpieczeństwa i instrukcje.
Nieprzestrzeganie ostrzeżeń i instrukcji może spowodować porażenie prądem, pożar i/lub poważne obrażenia.
Zachowaj wszystkie ostrzeżenia i instrukcje na przyszłość.
Niniejsza instrukcja obsługi zawiera tłumaczenie podręcznika w języku angielskim i jest przeznaczona dla osób, dla
których język angielski nie jest językiem ojczystym. Ze względu na techniczny charakter tekstu znaczenie niektórych
terminów może odbiegać od oryginału. Ponieważ korzystanie z przetłumaczonej instrukcji może doprowadzić do
obrażeń ciała lub uszkodzenia mienia, tłumaczenie należy traktować jako źródło dodatkowe i powoływać się na
wersję angielską.
Português . . . . . . . . . . . . . . . . . . . . . . . . . . . . . . . . . . . . . . . . . . . . 144
AVISO: Leia e compreenda todas as instruções e aviso de segurança. A falta de cumprimento
das instruções e avisos pode resultar em choque elétrico, incêndio e /ou lesões ou ferimentos
graves. Conserve todas as advertências e instruções para futura consulta e referência.
Este manual de instruções contém traduções de um manual elaborado em Inglês, sendo fornecidas para
ajudar as pessoas que não falam Inglês. Sendo uma redação técnica, alguns termos podem não dispor de um
significado equivalente quando traduzido. Portanto, o utilizador não deve confiar plenamente na presente
tradução, sendo necessário comparar com a versão em Inglês, na medida em que contar com as instruções
traduzidas pode resultar em danos à sua pessoa ou propriedade.
Română . . . . . . . . . . . . . . . . . . . . . . . . . . . . . . . . . . . . . . . . . . . . . 172
ATENŢIONARE: Citiţi și înţelegeţi toate avertizările de siguranţă și toate instrucţiunile.
Nerespectarea avertizărilor și a instrucţiunilor poate duce la electrocutare, incendii și / sau
vătămări grave. Păstraţi toate avertismentele și instrucţiunile pentru a face referire la acestea în
viitor.
Acest manual de instrucţiuni conţine traducerea manualului redactat în limba engleză și este furnizat pentru a
ajuta pe cei care nu vorbesc engleza ca limbă maternă. Fiind o lucrare tehnică, unii termeni pot avea un înţeles
sau echivalent diferit atunci când sunt traduşi. Prin urmare, nu ar trebui să vă bazaţi pe această traducere şi ar
trebui să consultaţi versiunea în limba engleză. Bazându-vă pe versiunea tradusă a instrucţiunilor poate duce
la vătămări personale sau la prejudicii bunurilor dvs.
Русскоязычный. . . . . . . . . . . . . . . . . . . . . . . . . . . . . . . . . . . . . . . . . . . . . 200
НИМАНИЕ: Прочитайте и уясните все предупреждения и инструкции по технике
безопасности невыполнение предупреждений и инструкций может привести к поражению
электрическим током, пожару и/или серьезным травмам. Сохраните все предупреждения и
инструкции для дальнейшего использования.
Данная инструкция по эксплуатации содержит переводы инструкции, подготовленной на английском
языке; переводы предоставляются для того, чтобы помочь тем, для кого английский не является родным
языком. Это техническая документация, поэтому некоторые термины в тексте перевода могут иметь
значение, отличающееся от значения терминов в тексте оригинала. Таким образом, вам не следует
полагаться на перевод и сверяться с версией на английском языке, поскольку следование переведенным
инструкциям может привести к получению травмы или на
Page 4

Table of Contents
Table of Contents
Important Safety Information . . . . . . . . . . . . . . . . . . . . . . . . . . . . . . . . . . . . 5
Safety Signal Definitions . . . . . . . . . . . . . . . . . . . . . . . . . . . . . . . . . . . . . 5
General Power Tool Safety Warnings. . . . . . . . . . . . . . . . . . . . . . . . . . . . . . 5
Work Area Safety . . . . . . . . . . . . . . . . . . . . . . . . . . . . . . . . . . . . . . . . . 5
Electrical Safety . . . . . . . . . . . . . . . . . . . . . . . . . . . . . . . . . . . . . . . . . . 5
Personal Safety . . . . . . . . . . . . . . . . . . . . . . . . . . . . . . . . . . . . . . . . . . 6
Power Tool Use and Care. . . . . . . . . . . . . . . . . . . . . . . . . . . . . . . . . . . . . 6
Service . . . . . . . . . . . . . . . . . . . . . . . . . . . . . . . . . . . . . . . . . . . . . . . 7
Chainsaw Safety Warnings. . . . . . . . . . . . . . . . . . . . . . . . . . . . . . . . . . . . 7
Causes and Operator Prevention of Kickback . . . . . . . . . . . . . . . . . . . . . . . . . 8
Kickback Safety Devices on this Saw. . . . . . . . . . . . . . . . . . . . . . . . . . . . . . 9
Storage, Transporting, and Disposal . . . . . . . . . . . . . . . . . . . . . . . . . . . . . . 9
Symbols and Labels. . . . . . . . . . . . . . . . . . . . . . . . . . . . . . . . . . . . . . . . . . 10
Chainsaw Names and Terms. . . . . . . . . . . . . . . . . . . . . . . . . . . . . . . . . . . . . 11
Product Identification . . . . . . . . . . . . . . . . . . . . . . . . . . . . . . . . . . . . . . . . .12
Preparing for Use . . . . . . . . . . . . . . . . . . . . . . . . . . . . . . . . . . . . . . . . . . .13
What’s in the Box?. . . . . . . . . . . . . . . . . . . . . . . . . . . . . . . . . . . . . . . . . 13
Checking the Front Hand-Guard Position . . . . . . . . . . . . . . . . . . . . . . . . . . .13
Filling the Bar and Chain Oil Reservoir . . . . . . . . . . . . . . . . . . . . . . . . . . . . .13
Assembling the Guide Bar and Saw Chain . . . . . . . . . . . . . . . . . . . . . . . . . . . 14
Tensioning the Saw Chain . . . . . . . . . . . . . . . . . . . . . . . . . . . . . . . . . . . .15
Operating the Chainsaw . . . . . . . . . . . . . . . . . . . . . . . . . . . . . . . . . . . . . . .16
General Operation . . . . . . . . . . . . . . . . . . . . . . . . . . . . . . . . . . . . . . . . . 16
Power Cord Use and Care. . . . . . . . . . . . . . . . . . . . . . . . . . . . . . . . . . . . . 17
Cutting . . . . . . . . . . . . . . . . . . . . . . . . . . . . . . . . . . . . . . . . . . . . . . .18
Maintenance and Cleaning . . . . . . . . . . . . . . . . . . . . . . . . . . . . . . . . . . . . . . 23
Inspection. . . . . . . . . . . . . . . . . . . . . . . . . . . . . . . . . . . . . . . . . . . . . . 23
Cleaning. . . . . . . . . . . . . . . . . . . . . . . . . . . . . . . . . . . . . . . . . . . . . . .23
Tensioning the Saw Chain . . . . . . . . . . . . . . . . . . . . . . . . . . . . . . . . . . . .24
Sharpening the Saw Chain . . . . . . . . . . . . . . . . . . . . . . . . . . . . . . . . . . . .24
Replacing a Worn Saw Chain. . . . . . . . . . . . . . . . . . . . . . . . . . . . . . . . . . . 25
Maintaining the Guide Bar . . . . . . . . . . . . . . . . . . . . . . . . . . . . . . . . . . . .26
Replacing a Worn Guide Bar . . . . . . . . . . . . . . . . . . . . . . . . . . . . . . . . . . .26
Replacing the Drive Sprocket . . . . . . . . . . . . . . . . . . . . . . . . . . . . . . . . . .27
Additional Maintenance Information . . . . . . . . . . . . . . . . . . . . . . . . . . . . . .27
Troubleshooting . . . . . . . . . . . . . . . . . . . . . . . . . . . . . . . . . . . . . . . . . . . . 28
Specifications and Components . . . . . . . . . . . . . . . . . . . . . . . . . . . . . . . . . . .30
Warranty and Service . . . . . . . . . . . . . . . . . . . . . . . . . . . . . . . . . . . . . . . . .31
EC - Declaration of Conformity . . . . . . . . . . . . . . . . . . . . . . . . . . . . . . . . . . 229
Customer Service by Country . . . . . . . . . . . . . . . . . . . . . . . . . . . . . . . . . . . 230
© Blount, Inc. Pricing and specifications subject to change without notice. All rights reserved. Oregon® is a registered trademark of Blount, Inc.
in the United States and/or in other countries.
4
Chainsaw Model CS1200-092
Page 5

Important Safety Information
Important Safety Information
Introduction
This chainsaw is designed for occasional light-duty use. It is not designed to fell large trees
or cut large diameter logs. This chainsaw is not designed for tree service. Do not cut trees or
wooden timbers that have a diameter greater than the effective cutting length of the chainsaw,
cm ( inches).
Safety Signal Definitions
SYMBOL SIGNAL MEANING
WARNING
CAUTION
IMPORTANT
Indicates a potential hazard which could result in serious injury.
Indicates a potential hazard which could seriously damage the tool or
cause minor to moderate injury.
Following this instruction will increase satisfaction with the tool.
General Power Tool Safety Warnings
WARNING: Read and understand all safety warnings and all instructions.
Failure to follow the warnings and instructions may result in electric shock, fire,
and/or serious injury.
Save all warnings and instructions for future reference. The term “power tool” in the
warnings refers to your mains-operated (corded) power tool or battery operated (cordless)
power tool.
Work Area Safety
• Keep work area clean and well lit.
Cluttered or dark areas invite accidents.
• Do not operate the power tool in explosive
atmospheres, such as in the presence of
flammable liquids, gases or dust. Power
tools create sparks which may ignite the dust
or fumes.
• Keep children and bystanders away while
operating the power tool. Distractions can
cause you to lose control.
Electrical Safety
• Power tool plugs must match the outlet.
Never modify the plug in any way. Do
not use any adapter plugs with earthed
(grounded) power tools. Unmodified plugs
and matching outlets will reduce risk of
electric shock.
• Avoid body contact with earthed or
grounded surfaces, such as pipes,
radiators, ranges and refrigerators. There
is an increased risk of electric shock if your
body is earthed or grounded.
• Do not expose power tools to rain or wet
conditions. Water entering a power tool will
increase the risk of electric shock.
• Do not abuse the cord. Never use the cord
for carrying, pulling or unplugging the
power tool. Keep cord away from heat, oil,
sharp edges or moving parts. Damaged or
entangled cords increase the risk of electric
shock.
• When operating a power tool outdoors,
use an extension cord suitable for outdoor
use. Use of a cord suitable for outdoor use
reduces the risk of electric shock.
Chainsaw Model CS1200-092
5
Page 6
Important Safety Information
• If operating a power tool in a damp
location is unavoidable, use a ground
fault circuit interrupter (GFCI) protected
supply. Use of a GFCI reduces the risk of
electric shock.
Personal Safety
• Stay alert, watch what you are doing
and use common sense when operating a
power tool. Do not use a power tool while
you are tired or under the influence of
drugs, alcohol or medication. A moment of
inattention while operating power tools may
result in serious personal injury.
• Use personal protective equipment.
Always wear eye protection. Protective
equipment such as dust mask, non-skid safety
shoes, hard hat, or hearing protection used for
appropriate conditions will reduce personal
injuries.
• Prevent unintentional starting. Ensure
the switch is in the off-position before
connecting to power source and/or
battery pack, picking up or carrying the
tool. Carrying power tools with your finger on
the switch or energising power tools that have
the switch on invites accidents.
• Remove any adjusting key or wrench
before turning the power tool on. A wrench
or a key left attached to a rotating part of the
power tool may result in personal injury.
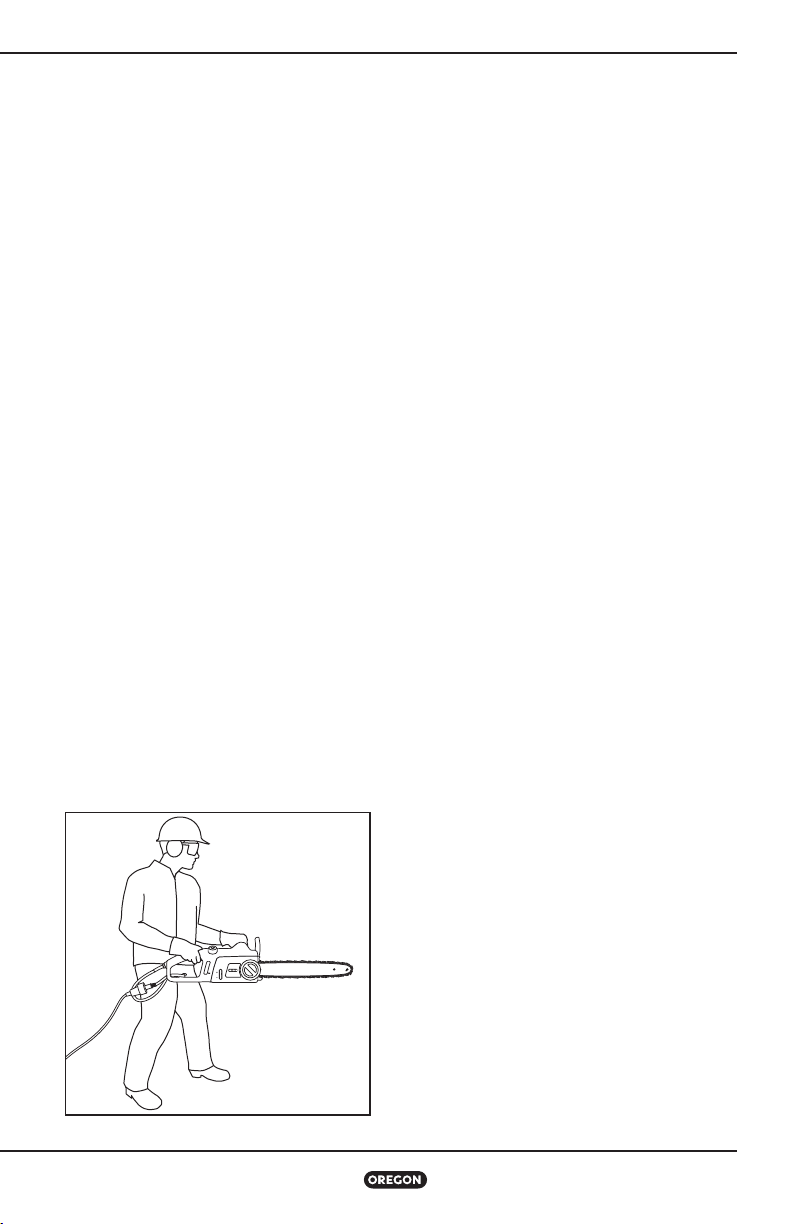
• Do not overreach. Keep proper footing
and balance at all times (Fig. ). This
enables better control of the power tool in
unexpected situations.
FIG. 1
• Dress properly. Do not wear loose clothing
or jewellery. Keep your hair, clothing, and
gloves away from moving parts. Loose
clothes, jewellery, or long hair can be caught
in moving parts.
• If devices are provided for the connection
of dust extraction and collection facilities,
ensure these are connected and properly
used. Use of dust collection can reduce dust-
related hazards.
• Do not let familiarity gained from
frequent use of tools allow you to become
complacent and ignore tool safety
principles. A careless action can cause
severe injury within a fraction of a second.
Power Tool Use and Care
• Do not force the power tool. Use the
correct power tool for your application.
The correct power tool will do the job
better and safer at the rate for which it was
designed.
• Do not use the power tool if the switch
does not turn it on and off. Any power tool
that cannot be controlled with the switch is
dangerous and must be repaired.
• Disconnect the plug from the power
source and/or the battery pack, if
detachable, from the power tool before
making any adjustments, changing
accessories or storing power tools. Such
preventive safety measures reduce the risk of
starting the power tool accidentally.
• Store idle power tools out of the reach
of children and do not allow persons
unfamiliar with the power tool or these
instructions to operate the power tool.
Power tools are dangerous in the hands of
untrained users.
• Maintain power tools. Check for
misalignment or binding of moving
parts, breakage of parts and any other
condition that may affect the power tool’s
operation. If damaged, have the power
tool repaired before use. Many accidents
are caused by poorly maintained power tools.
• Keep cutting tools sharp and clean.
Properly maintained cutting tools with sharp
cutting edges are less likely to bind and are
easier to control.
6
Chainsaw Model CS1200-092
Page 7
Important Safety Information
• Use the power tool, accessories and
tool bits, etc. in accordance with these
instructions taking into account the
working conditions and the work to
be performed. Use of the power tool for
operations different from those intended could
result in a hazardous situation.
• Keep handles and grasping surfaces
dry, clean and free from oil and grease.
Slippery handles and grasping surfaces do not
allow for safe handling and control of the tool
in unexpected situations.
Service
Have your power tool serviced by a
qualified repair person using only identical
replacement parts. This will ensure that the
safety of the power tool is maintained.
Chainsaw Safety Warnings
• Keep all parts of the body away from
the saw chain when the chainsaw is
operating. Before you start the chainsaw,
make sure the saw chain is not contacting
anything. A moment of inattention while
operating chainsaws may cause entanglement
of your clothing or body with the saw chain.
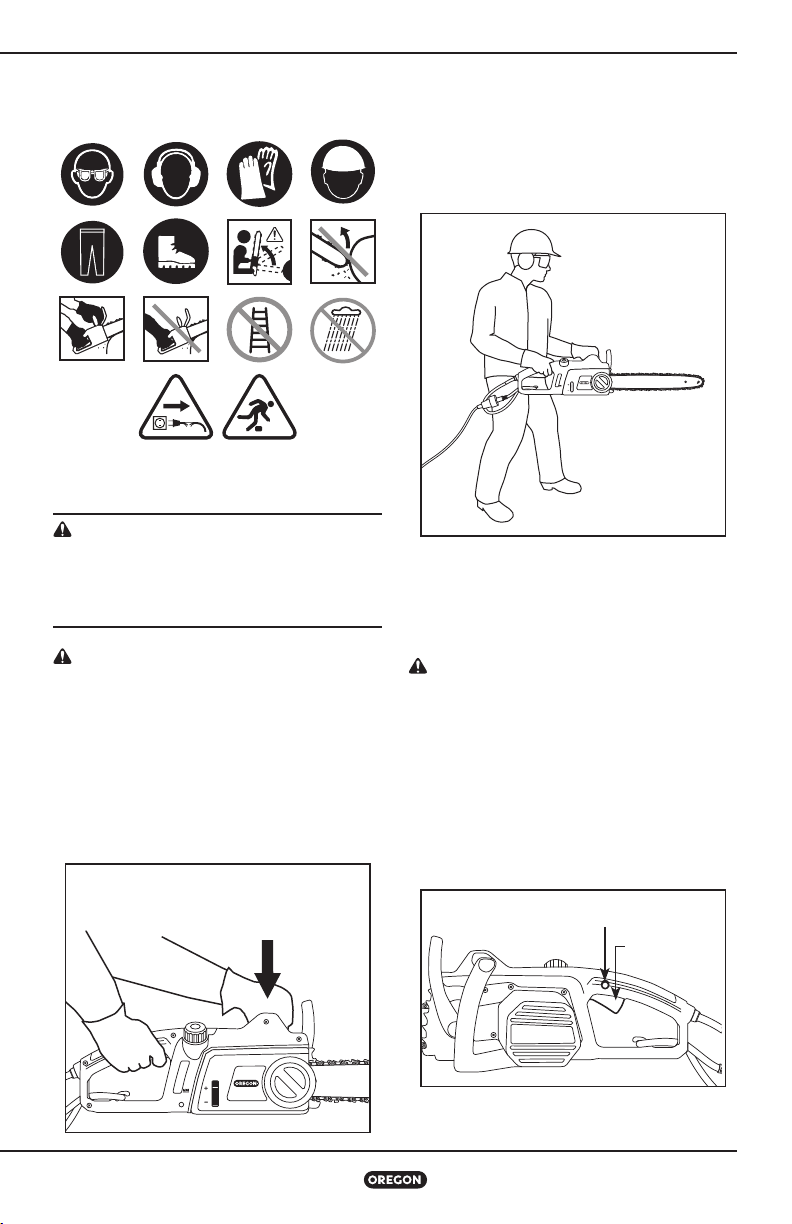
• Always hold the chainsaw with your right
hand on the rear handle and your left
hand on the front handle (Fig. ). Holding
the chainsaw with a reversed hand
configuration increases the risk of personal
injury and should never be done.
Saw chains contacting a “live” wire may make
exposed metal parts of the power tool “live”
and could give the operator an electric shock.
• Wear safety glasses and hearing
protection. Further protective equipment
for head, hands, legs, and feet is
recommended. Adequate protective clothing
will reduce personal injury by flying debris or
accidental contact with the saw chain.
• Do not operate a chainsaw in a tree.
Operation of a chainsaw while up in a tree may
result in personal injury.
• Always keep proper footing and operate
the chainsaw only when standing on a
fixed, secure and level surface. Slippery
or unstable surfaces may cause a loss of
balance or control of the chainsaw.
• When cutting a limb that is under tension,
be alert for spring back. When the tension
in the wood fibres is released, the spring
loaded limb may strike the operator and/or
throw the chainsaw out of control.
• Use extreme caution when cutting brush
and saplings. The slender material may
catch the saw chain and be whipped toward
you or pull you off balance.
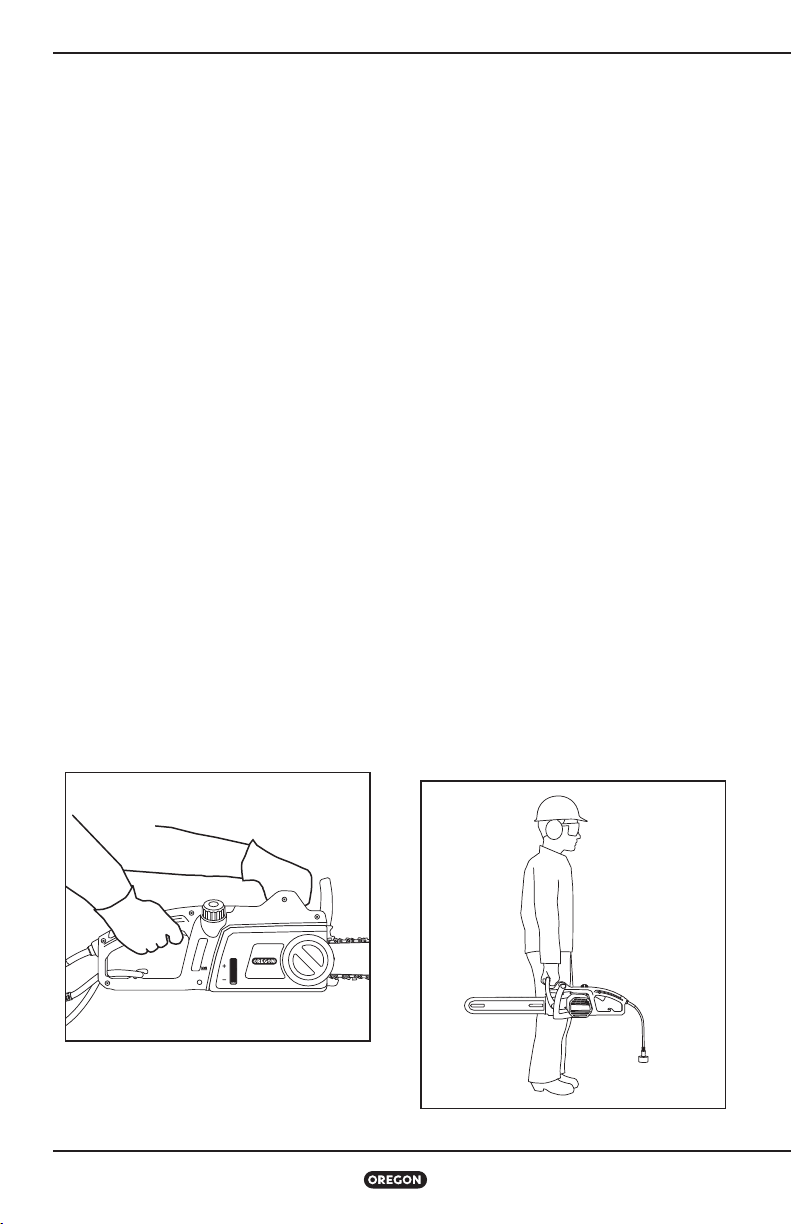
• Carry the chainsaw by the front handle
with the chainsaw switched off and away
from your body. When transporting or
storing the chainsaw, always fit the guide
bar cover (Fig. ). Proper handling of the
chainsaw will reduce the likelihood of
accidental contact with the moving saw chain.
FIG. 2
• Hold the power tool by insulated gripping
surfaces only, because saw chain may
contact hidden wiring or its own cord.
Chainsaw Model CS1200-092
FIG. 3
7
Page 8

Important Safety Information
• Follow instructions for lubricating, chain
tensioning, and changing accessories.
Improperly tensioned or lubricated chain
may either break or increase the chance of
kickback.
• Keep handles dry, clean, and free of oil
and grease. Greasy, oily handles are slippery
causing loss of control.
• Cut wood only. Do not use the chainsaw
for purposes not intended. For example:
do not use chainsaw for cutting plastic,
masonry, or non-wood building materials.
Use of the chainsaw for operations different
than intended could result in a hazardous
situation.
• It is recommended that the first time user
should have practical instruction in the
use of the chainsaw and the recommended
protective equipment from an experienced
operator. The initial practice should be
cutting logs on a saw-horse or cradle.
• Other than the wear parts identified in
this manual, the chainsaw has no user
serviceable parts.
• The work piece, bar, and chain can be hot
after cutting. Wear gloves to avoid burns.
• Prolonged use of power tools has been
reported to cause vascular, muscular,
and/or neurological disorders (such
as vibration white finger or Raynaud’s
syndrome), particularly when operating
the tool in cold weather. If you experience
numbness or loss of feeling in your
extremities, stop using the tool until
symptoms fade. To reduce the incidence
of vibration induced trauma, follow these
instructions:
– Wear gloves and keep hands and body
warm.
– Maintain a firm grip on the chainsaw,
but do not use prolonged, excessive
pressure. Let the chainsaw do the work.
– Assure that the cutting system is
maintained properly.
– Take frequent breaks.
The vibration in normal use can differ from
the stated values in this manual, depending
on the material being cut, maintenance of the
cutting system and other factors.
• Keep the cord behind you, and know the
position of the cord at all times. Keeping
the cord behind you and knowing the position
of the cord will help minimize tripping hazards
and prevent severing of the cord with the
chainsaw.
• If the cord is cut or damaged, immediately
stop using the chainsaw and disconnect
the cord from the mains. A damaged or cut
cord increases the risk of electrical shock.
• When used in a wet environment use a
GFCI with a tripping current of less than
mA. Use of a GFCI reduces the risk of
electric shock.
Causes and Operator Prevention
of Kickback
Kickback may occur when the nose or tip of the
guide bar touches an object, or when the wood
closes in and pinches the saw chain in the cut.
Tip contact, in some cases, may cause a sudden
reverse reaction, kicking the guide bar up and
back towards the operator.
Pinching the saw chain along the top of the
guide bar may push the guide bar rapidly back
towards the operator.
Either of these reactions may cause you to
lose control of the saw which could result in
serious personal injury. Do not rely exclusively
on the safety devices built into your saw. As a
chainsaw user, you should take several steps
to keep your cutting jobs free from accident and
injury.
Kickback is the result of tool misuse and/or
incorrect operating procedures or conditions
and can be avoided by taking proper
precautions as given below:
• Maintain a firm grip with thumbs and fingers
encircling the chainsaw handles, with both
hands on the saw and position your body and
arm to allow you to resist kickback forces.
Kickback forces can be controlled by the
operator if proper precautions are taken. Do
not let go of the chainsaw.
8
Chainsaw Model CS1200-092
Page 9
Important Safety Information
• Do not overreach and do not cut above
shoulder height. This helps prevent
unintended tip contact and enables better
control of the chainsaw in unexpected
situations.
• Follow the Oregon
®
sharpening and
maintenance instructions for the saw chain.
Decreasing the depth gauge height can lead to
increased kickback.
Kickback Safety Devices
on this Saw
DANGER: Never modify or attempt to
disable the chain brake.
DANGER: Only use replacement bars
and chains specified by Oregon. Incorrect
replacement bars and chains may cause
chain breakage and increased risk of
kickback injury.
CHAIN BRAKE
This chainsaw comes equipped with a chain
brake, which stops both the motor and the
motion of the chain when kickback occurs
(Fig. ). The chain brake can be activated by
the forward motion of the front hand-guard as
the saw rotates backward during kickback; it
can also be activated by the inertial forces
generated from a kickback event.
FIG. 4
CHAIN
This chainsaw comes equipped with a
saw chain that met the reduced kickback
performance requirements of the American
National Standards Institute (ANSI) and
Canadian Standards Association (CSA), ANSI
B., ISO , and CSA Z. respectively,
when tested according to the provisions of
the standards. For replacement chain, see
“Specifications and Components” in this
manual.
BAR
This saw comes equipped with a reduced
kickback guide bar that has a small radius nose.
Smaller radius noses have less potential for
kickback than a bar of the same size with a
larger nose radius.
When replacing the bar, only order the bar
listed in this manual to maintain low kickback
performance.
Storage, Transporting, and
Disposal
STORING THE CHAINSAW
• Unplug the chainsaw.
• Inspect the cord for cuts or damage.
• Clean chainsaw thoroughly.
• Install the guide bar cover.
• Store in a dry place.
• Keep out of reach of children or pets.
• It is normal for a small amount of oil to seep
from the guide bar when the chainsaw is not
in use. To protect against seepage, install the
guide bar cover and place an absorbent pad
under the bar.
TRANSPORTING THE CHAINSAW
Tools can shift during transport. Ensure the tool
is secure and cannot fall or move into contact
with people or property.
• Unplug the chainsaw.
• Install the guide bar.
• If desired, drain the bar and chain oil to reduce
seepage.
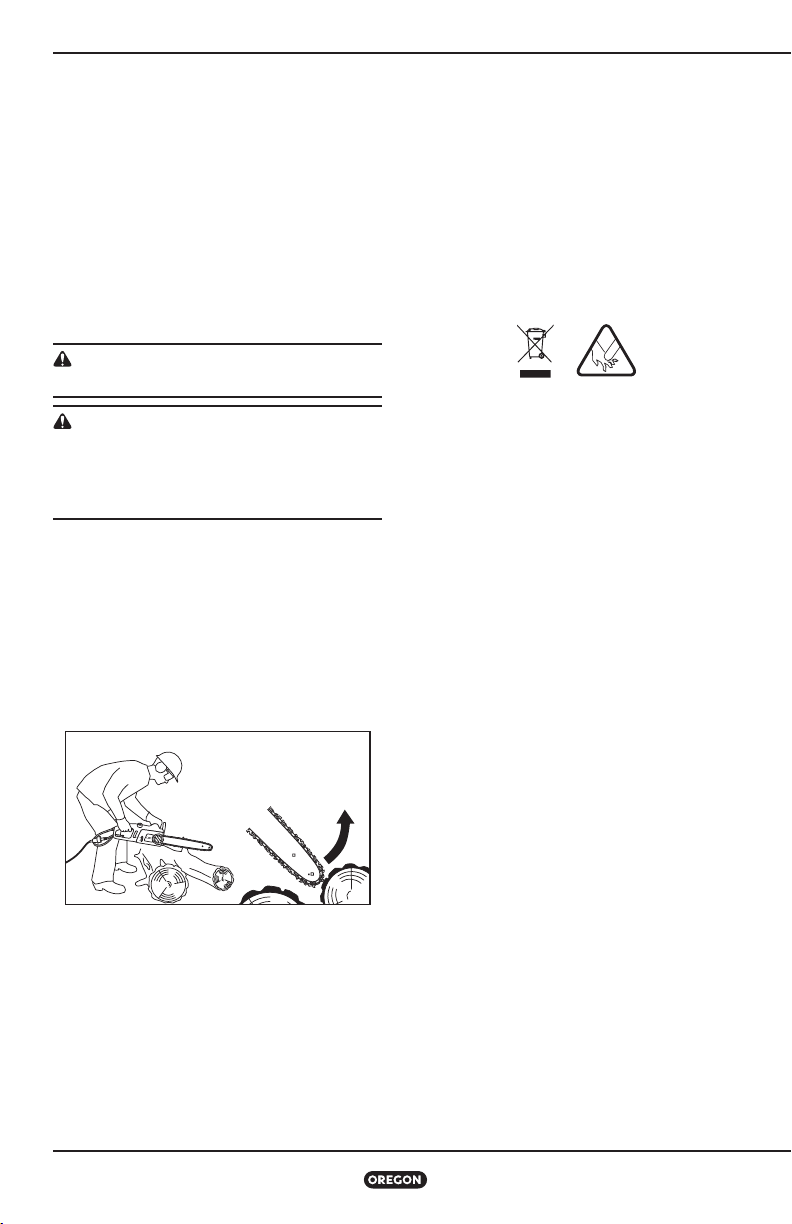
CHAINSAW DISPOSAL
This Oregon
manufactured with high quality materials and
components which can be recycled and reused.
Upon product end-of-life, and according to
Directive //EC, the electrical appliance
should be disposed of separately from
household waste. In the European Union,
there are separate collection systems for
used electrical and electronic products. Please
dispose of this equipment in an environmentally
correct manner at a local community waste
collection/recycling centre.
®
product is designed and
Chainsaw Model CS1200-092
9
Page 10
Symbols and Labels
108
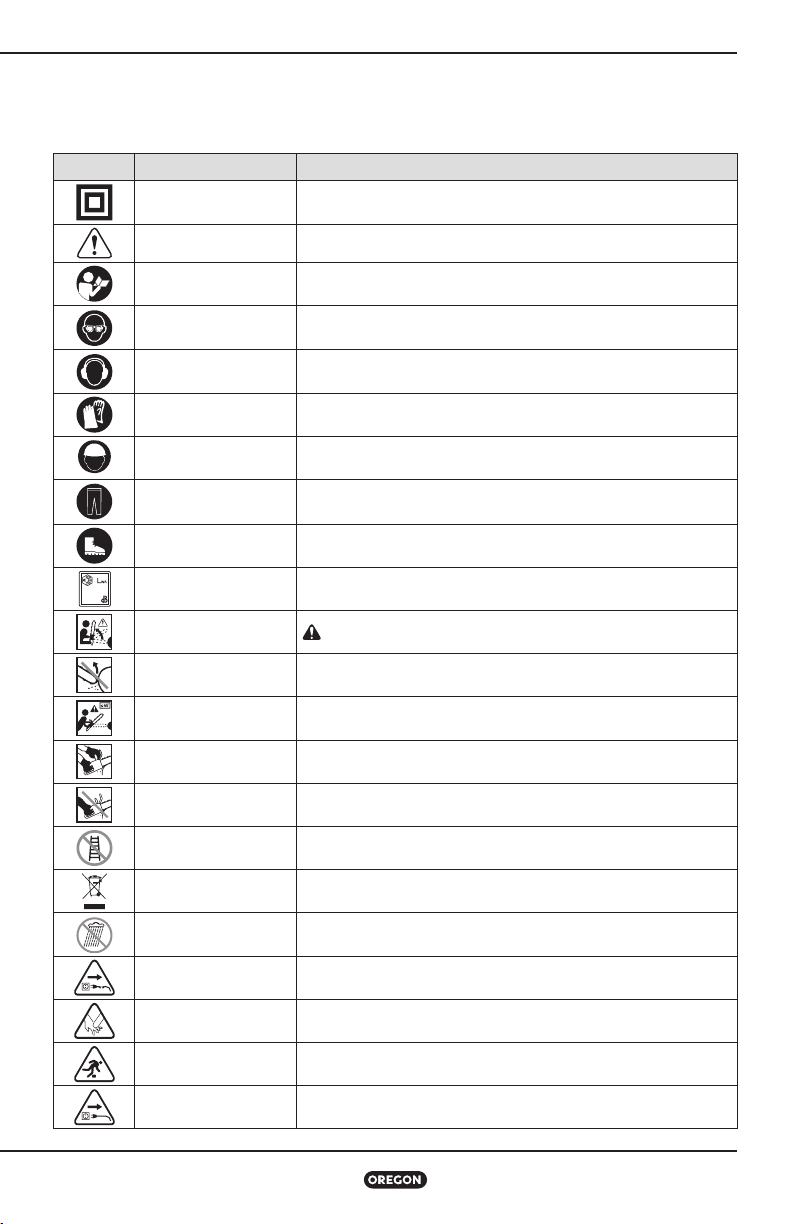
Symbols and Labels
These symbols and labels appear on the chainsaw and/or in this manual.
SYMBOL NAME EXPLANATION
Class II construction Designated double insulated construction tools
Safety alert symbol
Read instructions
Wear eye protection Wear eye protection when operating the chainsaw.
Indicates that the text that follows explains a danger, warning, or
caution.
The original instruction manual contains important safety and
operating information. Read and follow the instructions carefully.
Wear hearing
protection
Wear hand protection
Wear head protection Wear head protection when operating the chainsaw.
Wear long pants Wear long pants when operating the chainsaw.
Wear foot protection
Sound power, Lwa Sound power level
Beware of kickback
Bar nose contact Avoid bar nose contact.
Chainsaw kickback
angle
Two-handed hold Hold saw with both hands.
One-handed hold Do not hold the saw with one hand.
Do not use a ladder Never stand on a ladder when using the chainsaw.
Do not dispose Do not throw in household waste. Take to an authorised recycler.
Do not expose to rain Do not operate the chainsaw in wet conditions.
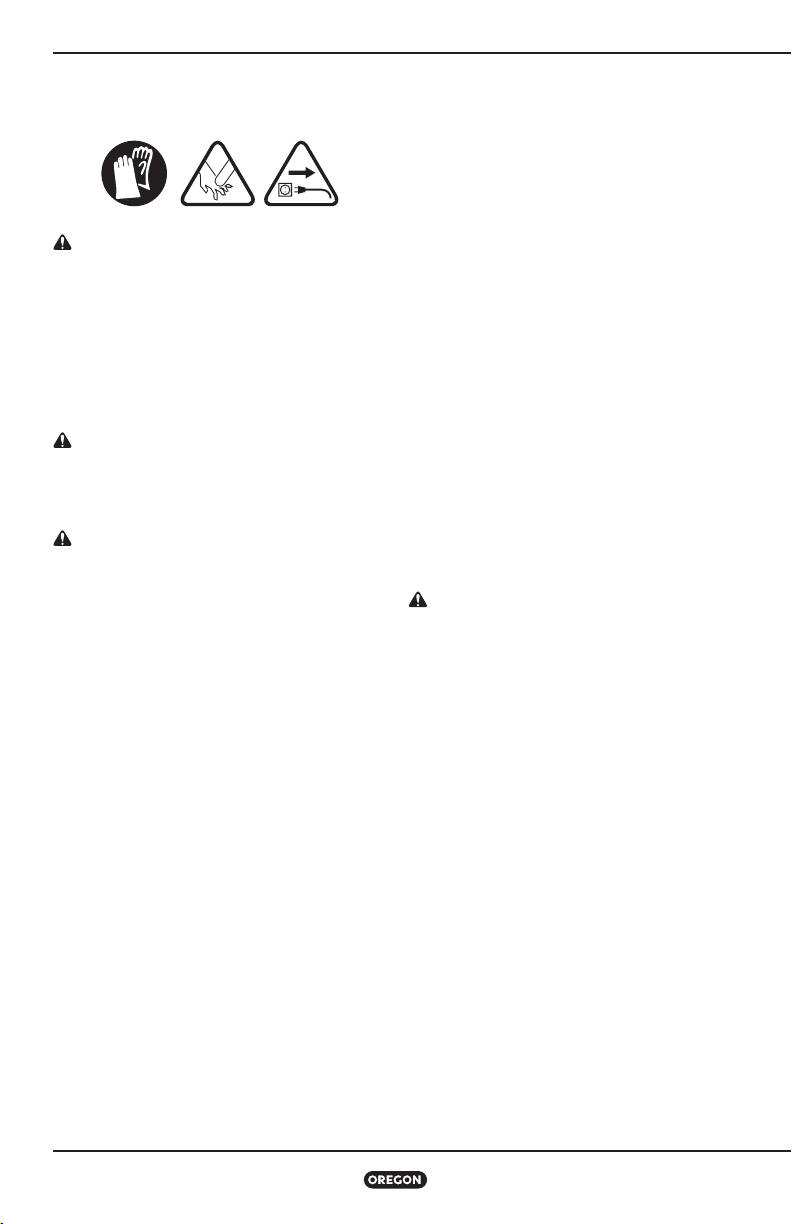
Wear hearing protection when operating the chainsaw.
Wear gloves when operating the chainsaw and when handling the
saw chain.
Wear appropriate closed-toe work boots when operating the
chainsaw.
Danger: Kickback can cause severe injuries.
Designed for use with low kickback saw chain.
10
Damaged cable
Cutting tool
Trip hazard Know the location of the cord at all times.
Unplug before
maintenance
Inspect the power cord regularly for damage. Remove the plug
from the mains immediately if the cable is damaged or cut.
Cutting tool. Do not touch the chain without first deactivating the
chainsaw by unplugging it.
Unplug before performing any maintenance.
Chainsaw Model CS1200-092
Page 11

Chainsaw Names and Terms
Chainsaw Names and Terms
Alignment flange: The protrusion on the bar pad
that fits into the bar slot.
Automatic oiler: The system that automatically
lubricates the guide bar and saw chain.
Bar pad: The mounting pad on the powerhead that
helps ensure proper alignment of the guide bar.
Bar slot: The cut-out portion of the guide bar that
fits on to the alignment flange and mounting stud.
Bystander safety zone: A m ( ft) circle around
the operator that must remain free from bystanders,
children and pets.
Chain brake: A device for stopping or locking the
saw chain, activated manually or non-manually when
kickback occurs.
Chain catcher: A device for retaining the saw chain if
it breaks or derails.
Chain gauge: The thickness of the saw chain drive
link, where it fits into the bar groove, indicated by the
part number stamped on the drive links.
Chain pitch: The distance between any three
consecutive rivets on the saw chain divided by two,
indicated by the part number stamped on the drive
links.
Chainsaw powerhead: A chainsaw without the saw
chain or guide bar.
Chain tensioning dial: The dial on the side cover,
that when turned, adjusts the saw chain tension.
Drive link: The fin-shaped link of the saw chain that
fits into the groove on the guide bar.
Drive sprocket: The toothed part that drives the
saw chain.
Effective cutting length: The approximate distance
from the root of the spiked bumper to the outside
edge of the cutting link with the tensioner set to the
middle position.
Felling back cut: The final cut in a tree felling
operation made on the opposite side of the tree from
the notching undercut.
Front handle: The support handle located at or
toward the front of the chainsaw intended to be
gripped by the left hand.
Front hand-guard: A structural barrier between the
front handle of a chainsaw and the guide bar, which
also serves as an activating mechanism for the chain
brake.
Guide bar: A railed structure that supports and
guides the saw chain. Sometimes simply called the
“bar”.
Guide bar cover: The plastic cover that protects the
guide bar and saw chain when the chainsaw is not
in use.
Kickback: The rapid backward and/or upward motion
of the guide bar, occurring when the saw chain near
the top area of the nose of the guide bar contacts any
object (such as a log or branch), or when the wood
closes in and pinches the saw chain in the cut.
Low-kickback chain: A chain that complies with
the low kickback performance requirements of ANSI
B. and CSA Z..
Motor housing: The plastic cover of the chainsaw
powerhead.
Mounting stud: The threaded protrusion on the
alignment flange that extends through the bar slot.
Notching undercut: A notch cut in a tree to direct
the tree’s fall.
Rear handle: The support handle located at or
toward the rear of the saw intended to be gripped by
the right hand.
Rear hand-guard: A structural barrier at the bottom
right side of the rear handle to protect the operator in
case of rupture or derailing of the saw chain.
Reduced kickback guide bar: A guide bar with a
maximum nose radius as specified in ANSI B.
and CSA Z. and which has been demonstrated to
reduce kickback significantly.
Saw chain: A loop of chain having cutting teeth, that
cuts the wood, that is driven by the powerhead and is
supported by the guide bar. Sometimes simply called
the “chain”.
Side cover: The plastic cover on the powerhead
that covers the drive sprocket which is removed and
installed with the side cover release knob.
Side cover tab: The protrusion on the side cover that
fits into a slot in the powerhead. Use it to properly
align the side cover during installation.
Spiked bumper: A device fitted to the front of the
saw acting as a pivot point when in contact with a
tree or log to make cutting easier. Also known as
“bucking spikes”.
Strain relief bracket: The hook on the rear handle
to which the extension cord is looped to protect the
cord and prevent unplugging during operation.
Trigger lock-out: A movable stop that prevents the
unintentional operation of the trigger switch until
manually actuated.
Trigger switch: A device that turns the chainsaw on
and off.
Wear parts: Parts such as the saw chain and guide
bar that can wear during use and can be replaced by
the user.
Chainsaw Model CS1200-092
11
Page 12
Product Identification
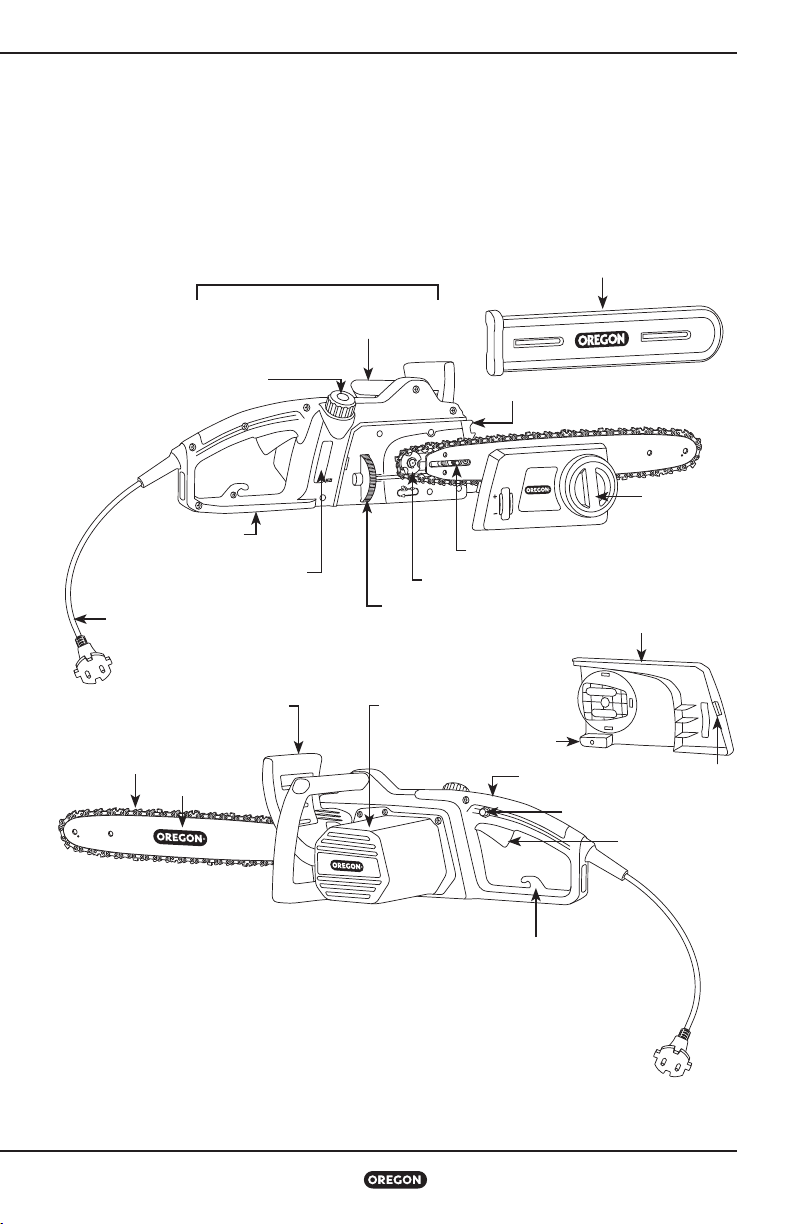
Know the Chainsaw
Product Identification
OIL RESERVOIR CAP
REAR HAND-GUARD
OIL INSPECTION WINDOW
POWER CORD
SAW CHAIN
GUIDE BAR
POWERHEAD
FRONT HANDLE
SPIKED BUMPER
MOUNTING STUD
DRIVE SPROCKET
CHAIN TENSIONING DIAL
PRODUCT NAME PLATEFRONT HAND-GUARD
CHAIN CATCHER
GUIDE BAR COVER
REAR HANDLE
TRIGGER LOCK-OUT
SIDE COVER
RELEASE KNOB
SIDE COVER
SIDE COVER
TAB
TRIGGER SWITCH
NOTE: See “Preparing for Use” for a list of included items.
12
STRAIN RELIEF BRACKET
Chainsaw Model CS1200-092
Page 13
Preparing for Use
Preparing for Use
DANGER: To avoid serious personal
injury, do not operate the chainsaw
without the guide bar, saw chain, and side
cover properly assembled.
WARNING: Do not attempt to operate
the chainsaw if any part is damaged or
missing.
WARNING: An electric power tool
that is plugged in can start accidentally.
Unplug the chainsaw before preparing for
use or performing maintenance.
What’s in the Box?
These items ship with the chainsaw:
• Chainsaw powerhead
• Saw chain and guide bar
• Guide bar cover
After removing the chainsaw from the box,
inspect it carefully to ensure no damage has
occurred during shipping and that no parts are
missing. If any parts are damaged or missing,
do not use the chainsaw. Contact Oregon
®
to
obtain replacement parts. For country-specific
telephone numbers, see “Customer Service by
Country”.
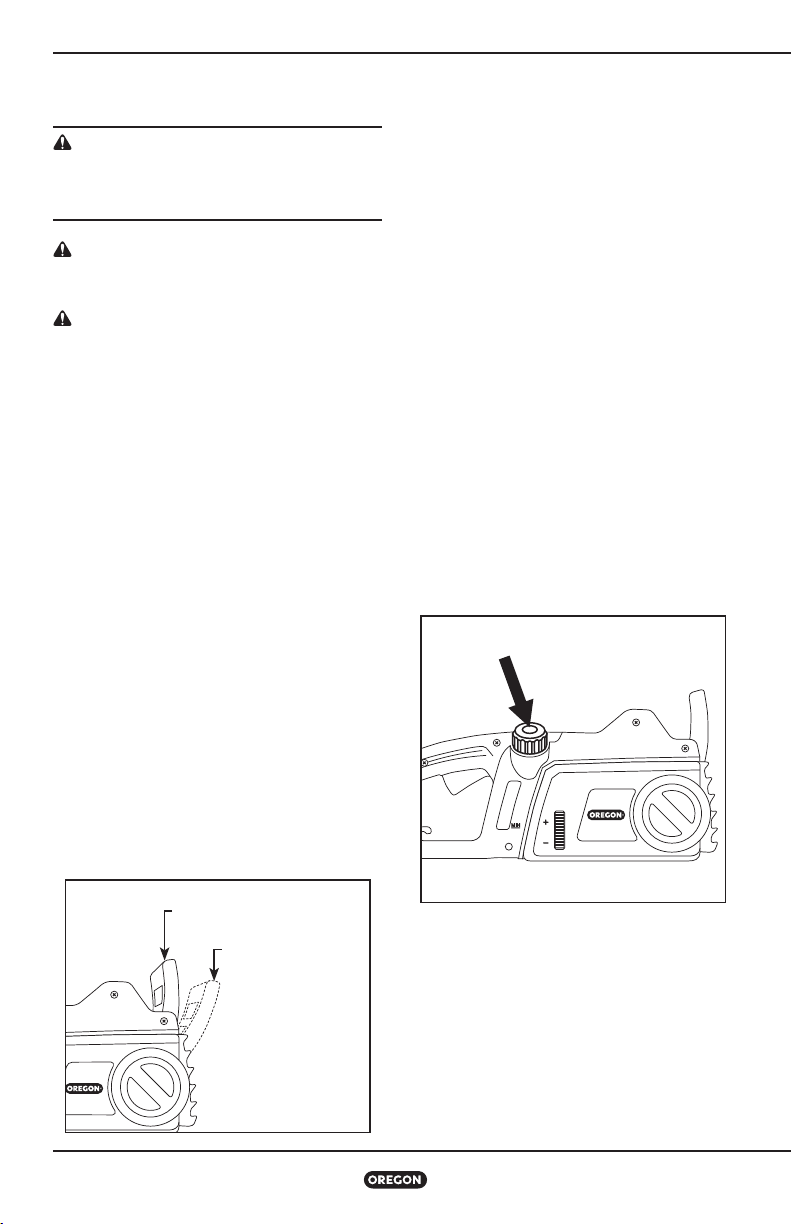
Checking the Front HandGuard Position
After unpacking the chainsaw, check the
position of the front hand-guard. The chainsaw
will not run with the chain brake engaged. Pull
the front hand-guard back towards the front
handle before operation (Fig. ).
FIG. 5
FRONT HAND-GUARD
IN OPERATING POSITION
FRONT HAND-GUARD
IN BRAKE POSITION
Filling the Bar and
Chain Oil Reservoir
IMPORTANT: Bar and chain oil prevents
premature wear. Never operate the
chainsaw if oil is not visible in the
inspection window. Check oil level
frequently and fill as needed.
Bar and chain oil is required to properly
lubricate the guide bar and saw chain. The
chainsaw is equipped with an automatic oiler
that deposits oil on the bar and chain when
running, keeping them properly lubricated. Use
®
Oregon
bar and chain oil for best results. It is
specially designed to provide low friction and
faster cuts. NEVER use oil or other lubricants
that have not been specifically designed for use
on the bar and chain. This can lead to a clogged
oil system which may cause premature wear of
the bar and chain.
Place the chainsaw on a firm, flat surface so
that the oil cap () is on top (Fig. ).
FIG. 6
(1)
(2)
• Clean any debris from the cap area.
• Remove the cap.
• Carefully pour the bar and chain oil into the
reservoir.
• Replace the cap and make sure oil is visible in
the reservoir ().
Chainsaw Model CS1200-092
13
Page 14
Preparing for Use
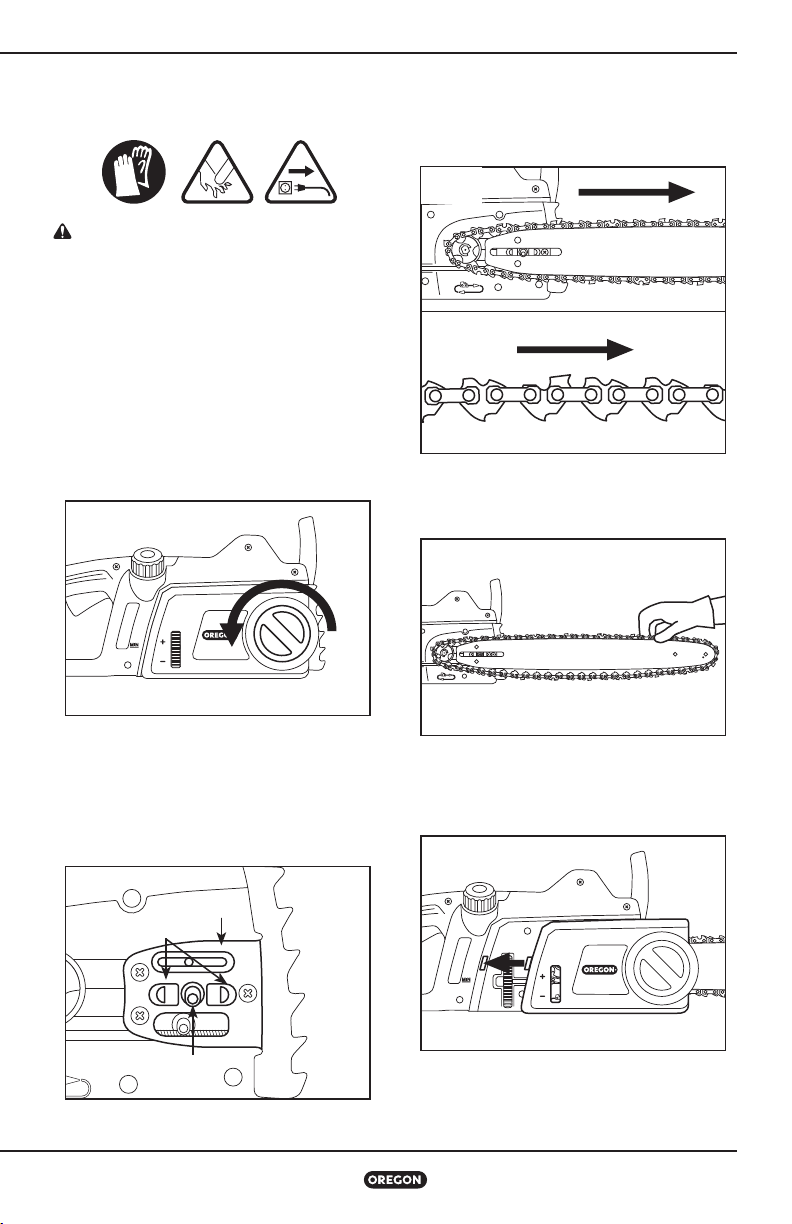
Assembling the Guide Bar and
Saw Chain
WARNING: An electric power tool
that is plugged in can start accidentally.
Unplug the chainsaw before preparing for
use or performing maintenance.
Wear gloves.
• Unplug the chainsaw.
• Loosen the side cover release knob slightly
(), but do not remove the side cover (Fig. ).
• Loosen the chain tensioning dial () as far as
it will go.
• Loosen the side cover release knob and
remove the side cover.
FIG. 7
(1)
(2)
• Loop the saw chain onto the drive sprocket so
that the cutting edges of the teeth along the
top of the bar face away from the powerhead
(Fig. ).
FIG. 9
• Feed the chain into the groove of the bar and
slide the bar away from the motor to remove
slack from the chain (Fig. ).
FIG. 10
• Place the guide bar on the bar pad by sliding
the bar slot over the alignment flange (Fig. ),
with the mounting stud inserted through the
slot in the guide bar. Align the lower
tensioning hole on guide bar to seat on the
tensioning stud.
FIG. 8
BAR PAD
ALIGNMENT FLANGE
MOUNTING STUD
14
• Install the side cover, making sure the chain
catcher and side cover tab are seated in their
proper locations (Fig. ), then lightly tighten
the side cover release knob.
FIG. 11
• Tension the chain as described in “Tensioning
the Saw Chain” in the “Preparing for Use”
section of the manual.
Chainsaw Model CS1200-092
Page 15
Preparing for Use
IMPORTANT: The saw chain must be
properly tensioned before using. See
“Tensioning the Saw Chain” in the
“Preparing for Use” section of the
manual.
Tensioning the Saw Chain
WARNING: An electric power tool
that is plugged in can start accidentally.
Unplug the chainsaw before preparing for
use or performing maintenance.
WARNING: If the chain is still loose
when the saw is at maximum tension,
replace the chain.
IMPORTANT: Only tension the saw chain
when the chain is cool. A hot chain may
contract and damage the guide bar or
chain as it cools.
Wear gloves.
• Unplug the chainsaw before tensioning.
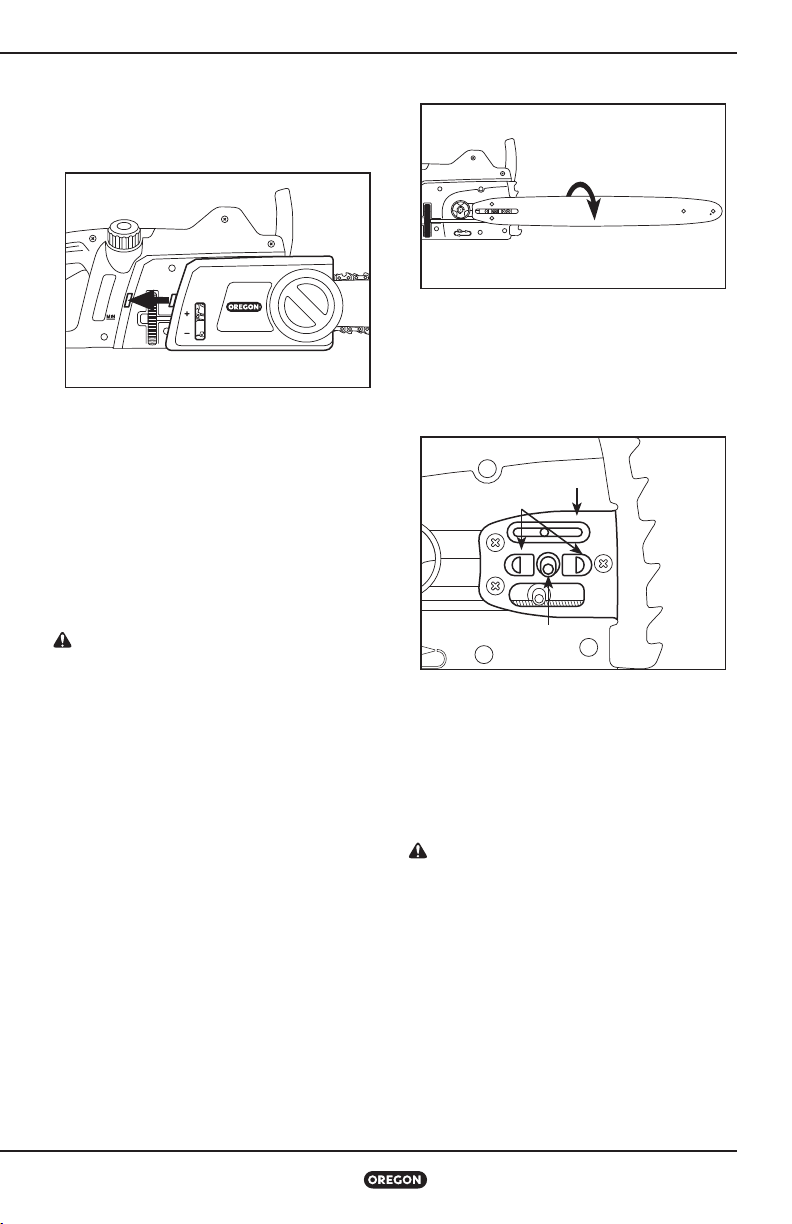
• Loosen the side cover release knob slightly,
but do not remove the side cover.
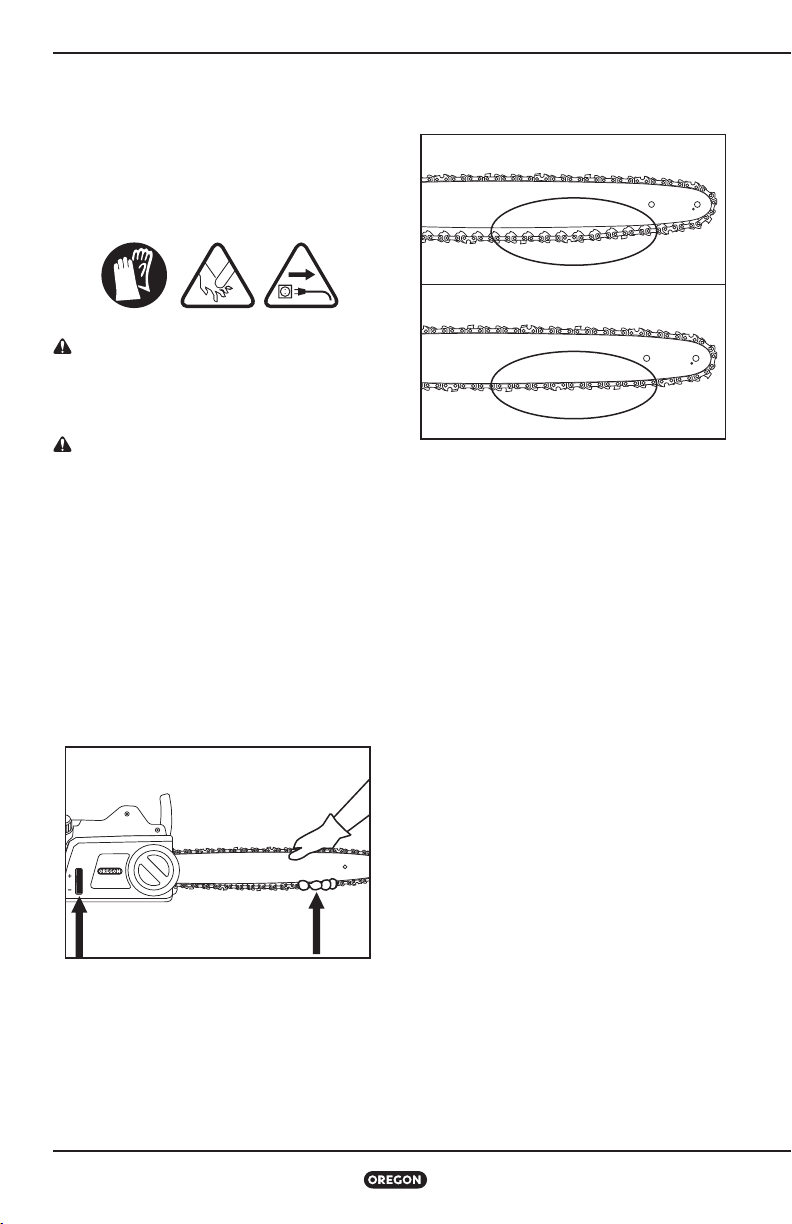
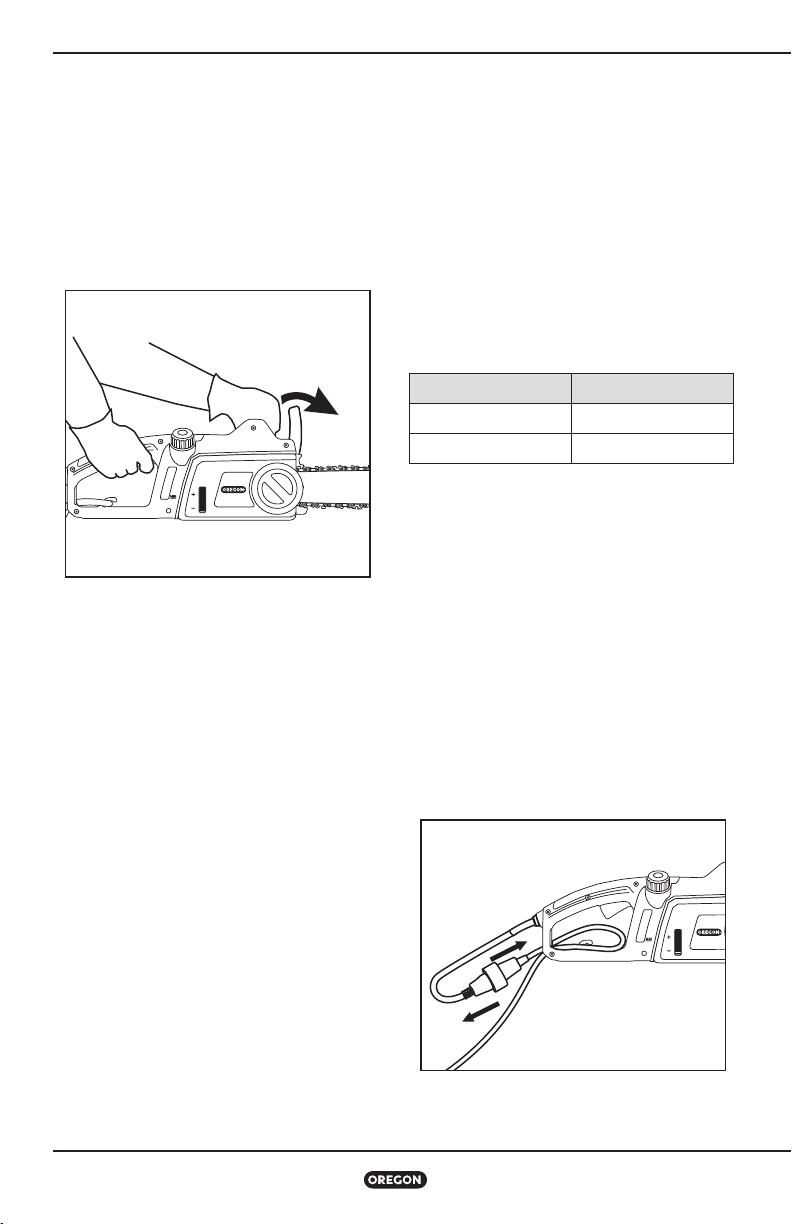
• Hold up the nose of the guide bar (Fig. ) and
rotate the chain tensioning dial up to tighten.
FIG. 12
• Tighten until the lowest cutters underneath
the bar solidly contact the bar (Fig. ).
FIG. 13
INCORRECT
CORRECT
• Tighten the side cover release knob.
• Lightly pull on the chain. The tension is correct
when the chain snaps back after being pulled
mm away from the guide bar.
• After a short period of use, allow the chain
to cool, unplug the chainsaw and check the
tension again. Watch tension carefully for
the first half-hour of use and periodically
throughout the life of the chain readjusting as
required when the chain and bar are cool to
the touch. Never tension chain when it is hot.
Chain will stretch as a result of normal use,
however, insufficient oil, aggressive use, or
failure to perform recommended maintenance
can lead to premature stretching.
Chainsaw Model CS1200-092
15
Page 16
Operating the Chainsaw
Operating the Chainsaw
General Operation
DANGER: To avoid serious personal
injury, do not overreach and do not stand
on a ladder, stepstool, or any raised
position that is not fully secured. Never
cut above shoulder height.
WARNING: To reduce the risk of injury,
always wear proper boots, gloves, head,
ear, and eye protection.
GRIP
Always grip the tool with both hands. Grasp
the front handle with the left hand and the
rear handle with the right (Fig. ). Wrap the
fingers over the top of the handle with the
thumb below the handle.
FIG. 14
GRIP WITH THUMB
BELOW HANDLE
FOOTING
Stand with both feet on solid ground with
weight evenly spread between them (Fig. ).
FIG. 15
STOPPING THE CHAINSAW
Release the trigger switch to stop the
chainsaw.
STARTING THE CHAINSAW
WARNING: To reduce the risk of injury,
never defeat the interlock by taping,
wiring or tying down the trigger lock-out.
Make sure the chain brake is not engaged.
Grasp the front and rear handles firmly. Press
and hold the trigger lock-out with the thumb
(). To start the saw, squeeze the trigger switch
() (Fig. ). There is no need to continue to
press the trigger lock-out. It will remain
disengaged until the trigger is released.
FIG. 16
(1) TRIGGER LOCK-OUT
(2) TRIGGER
SWITCH
16
Chainsaw Model CS1200-092
Page 17
Operating the Chainsaw
TESTING THE CHAIN BRAKE
Make sure the chain brake is working before
using the chainsaw. To check brake operation:
• Place the saw on a firm, flat surface.
• Start the saw briefly.
• Keep the left hand on the front handle and roll
the left wrist to move the front hand-guard
forward to manually activate the chain brake
(Fig. ).
FIG. 17
• Release the trigger switch.
A properly functioning chain brake stops the
motor and saw chain immediately. If the motor
and saw chain do not stop immediately, have
the chain brake checked at an approved service
location.
• Return the front hand-guard to operating
position.
Power Cord Use and Care
SELECTING AN EXTENSION CORD
Select an extension cord that is:
• Specifically labelled for outdoor use
• Of a wire size (AWG) heavy enough to carry
the current the full length of the cable
according to the table below
Select the gauge of extension cord based
on the desired length and the electrical
specifications found on the product label.
These are the recommended gauges based on
the length of cord.
CORD LENGTH (M) MIN. WIRE SIZE
0–15 14 AWG (1.5mm2)
16–30 12 AWG (3.0mm2)
Make sure the insulation is free of cracks and
that the plugs on both ends are undamaged.
USING THE STRAIN RELIEF BRACKET
It is important to use the strain relief bracket
for two reasons:
• It saves wear on both the power cord and the
extension cord and their plugs.
• It prevents the chainsaw from becoming
unplugged from the extension cord
accidentally.
To use the strain relief bracket, bend the
extension cord into a U-shape and put it
through the hole in the rear handle. Slide the
loop of cord over the hook and tug lightly until
snug (Fig. ).
Chainsaw Model CS1200-092
FIG. 18
17
Page 18
Operating the Chainsaw
Cutting
WARNING: To reduce the risk of injury,
wear proper boots, gloves, head, ear, and
eye protection.
WARNING: To reduce the risk of
electric shock, make sure the cord
insulation is intact and that the cord is in
a dry location where there is no danger of
it being cut or tripped over.
WARNING: To reduce the risk of injury,
always be sure of footing and hold the
chainsaw firmly with both hands while the
motor is running.
WARNING: To reduce the risk of injury,
plan ahead and plan multiple escape
paths before beginning work.
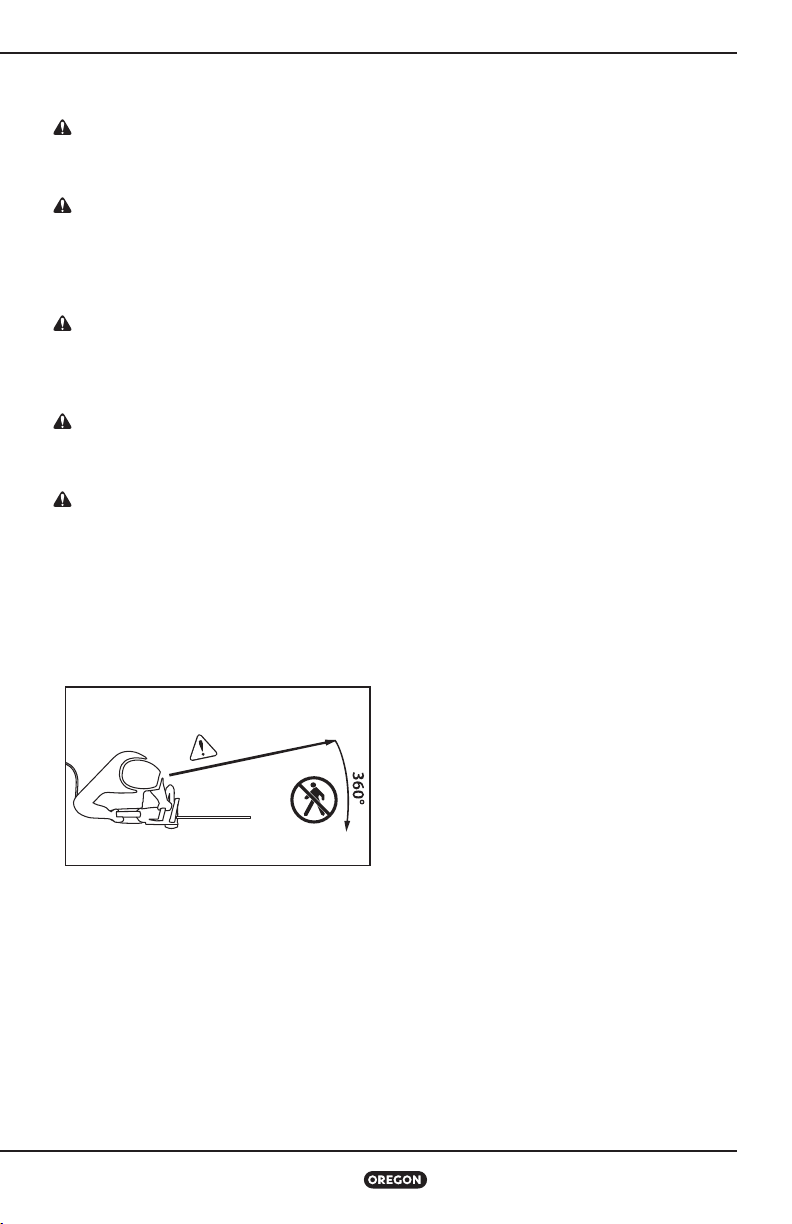
CAUTION: Establish a bystander safety
zone of 6 m (20 ft) prior to operation of
this equipment. Bystander safety zone is
a minimum 6 m (20 ft) circle around the
operator that must remain free from
bystanders, children and pets (Fig. 19).
Felling operations require a larger safety
zone according to the size of the tree, see
“Felling a Tree” section.
FIG. 19
6 m (20 ft)
IMPORTANT: Practice cutting logs on
a sawhorse or cradle until you become
comfortable operating the saw.
To get the best performance and to operate the
saw safely, follow these instructions:
• Observe all applicable national and municipal
rules and regulations for cutting.
• Take frequent breaks to reduce the risk of
injury.
• Before beginning to cut, make sure the saw
chain is properly tensioned and the chain is
sharp.
Saw chains are made to cut wood only. Do not
use the chainsaw to cut any other materials,
and do not allow the chain to come into contact
with dirt, stones, nails, staples, or wire. These
materials are extremely abrasive and will wear
away protective plating from the chain in a very
short time.
Sharpen or replace the saw chain if any of these
conditions occur:
• The pressure required to make cuts increases
noticeably.
• Wood chips coming off of the chain are very
fine or dust-like.
Do not work with a dull chain as it will increase
the effort required to cut, cause jagged cuts,
increase wear on the chainsaw and increase the
risk of kickback. Never force a dull chain to cut.
• Assume the proper cutting grip and stance
in front of the wood with the saw turned off.
Press the trigger lock-out and squeeze the
trigger switch. Let the chain reach full speed
before beginning the cut.
• Begin cutting by lightly pressing the guide bar
against the wood. Use only light pressure and
let the saw do the work.
• Maintain a steady speed throughout the cut
releasing pressure just before the end of the
cut.
• Know the location of the cord at all times to
avoid trip hazards and avoid cutting the cord.
• Know the location of the tip of the bar at all
times and avoid contact with other objects.
• If the saw stops suddenly when cutting,
remove the saw from the cut, then resume
cutting using lighter pressure on the work
piece.
18
Chainsaw Model CS1200-092
Page 19
Operating the Chainsaw
PRUNING
CAUTION: Falling limbs may bounce or
“spring back” after they hit the ground so
it is essential to keep the ground clear to
provide multiple retreat paths. Clear the
work area and wear head protection.
Pruning is removing dead or overgrown
branches to maintain plant health.
• Plan retreat paths before beginning to cut,
and make sure there are no obstructions.
Always know how to get out of the way of
falling branches.
• Make sure bystanders or helpers are a safe
distance from falling branches. Bystanders or
helpers should not stand directly in front of or
behind the operator. See Fig. .
• Maintain solid footing and hold the chainsaw
firmly with both hands. Do not overreach.
Never climb a tree or ladder to reach high
limbs.
• Secure any branches that might be hazardous.
• Use proper auxiliary equipment.
• Prune lower limbs before pruning higher ones.
• Allow the saw chain to achieve full speed
before cutting.
• Apply light pressure to the branch.
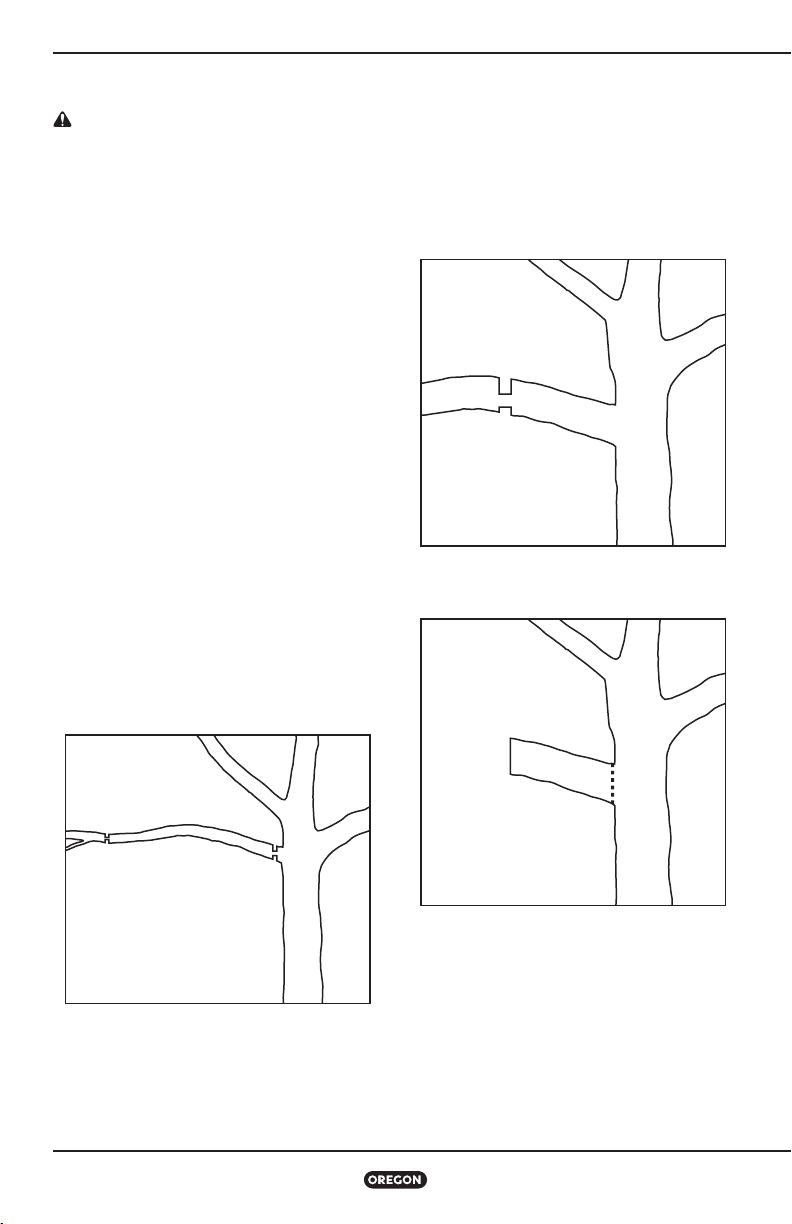
• For long limbs (Fig. ), cut the end of the limb
first () to relieve pressure from the limb, then
prune closer to the trunk ().
• Thick limbs (greater than cm ( inch) in
diameter) can splinter or pinch the chain when
making a single cut from the top. To avoid
pinching or splintering, first make one shallow
relief cut on the bottom surface of the limb (),
then cut the limb all of the way through from
the top of the limb () to match the bottom
cut (Fig. ).
FIG. 21
(2)
(1)
• After most of the limb has been removed,
make one smooth cut near the trunk (Fig. ).
FIG. 22
FIG. 20
(1)
Chainsaw Model CS1200-092
(2)
19
Page 20
Operating the Chainsaw
FELLING A TREE
CAUTION: A tree is likely to roll or
slide downhill after it is felled. Plan and
clear a retreat path before cuts are
started. The retreat path should extend
back and diagonally to the rear of the
expected line of fall (Fig. 23).
FIG. 23
RETREAT PATH OPTIONS
RETREAT
DIRECTION
OF FALL
45°
RETREAT
Felling is cutting down a tree.
• Before felling is started, consider the natural
lean of the tree, the location of larger
branches and the wind direction to judge
which way the tree will fall.
• Remove dirt, stones, loose bark, nails, staples
and wire from the tree where felling cuts are
to be made.
• When bucking and felling operations are being
performed by two or more persons at the
same time, separate the felling operation from
the bucking operation by a distance of at least
twice the height of the tree being felled.
• Trees should not be felled in a manner that
would endanger any person, strike any utility
line or cause any property damage. If the tree
contacts any utility line, immediately leave
the area and notify the utility company.
• Use the metal spikes on the front of the saw
to support the saw on the wood. Set metal
spiked bumper into the wood and use as a
leverage point to increase stability when
cutting large diameter wood.
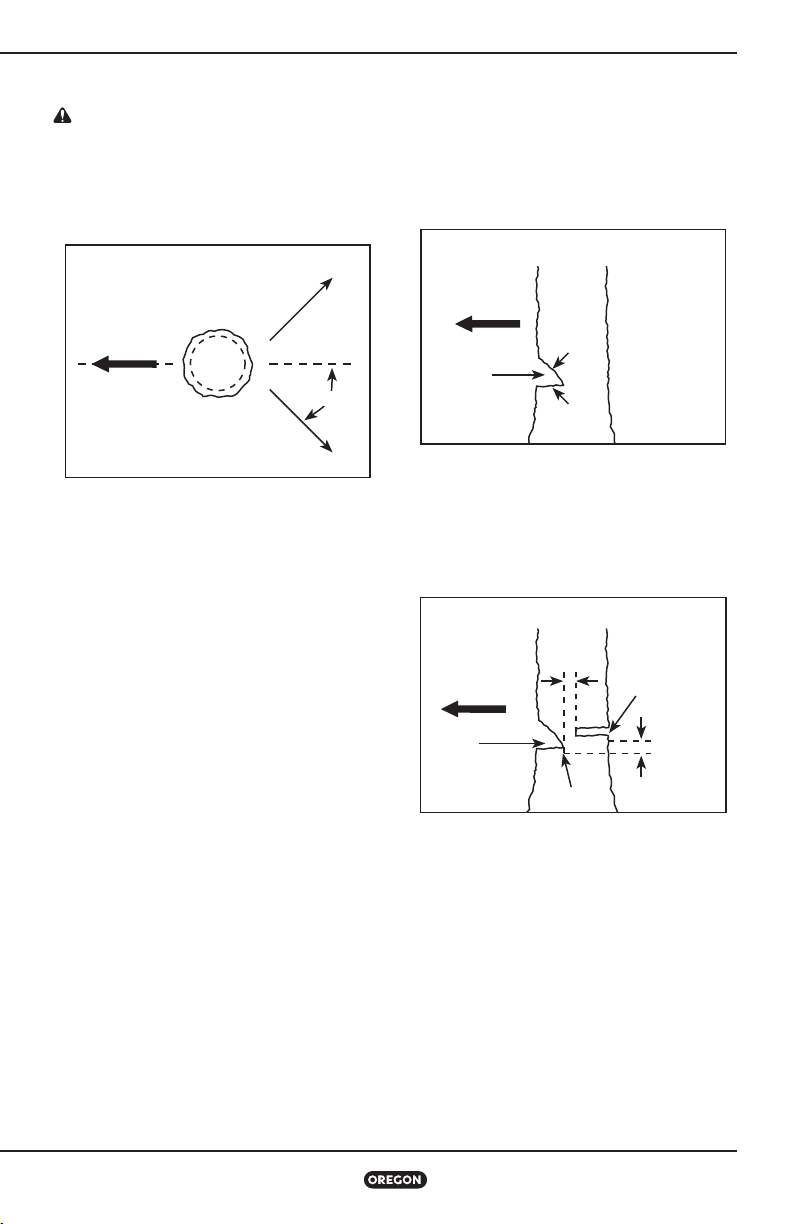
Notching Undercut
• First, make the notch / the diameter of the
tree perpendicular to the direction of fall.
Make the lower horizontal notching undercut
first (). This will help to avoid pinching of
either the saw chain or the guide bar when the
second cut () is being made (Fig. ).
FIG. 24
NOTCH
NOTCHING UNDERCUT
DIRECTION
OF FALL
(2)
(1)
Felling Back Cut
• Second, make the felling back cut at least
mm ( in) higher than the horizontal
notching undercut (Fig. ). Keep the felling
back cut parallel to the horizontal notching
undercut.
FIG. 25
DIRECTION
OF FALL
NOTCH
FELLING BACK CUT
50 MM
(2 IN)
HINGE
FELLING
BACK CUT
50 MM
(2 IN)
• Make the felling back cut so enough wood is
left to act as a hinge. The hinge wood keeps
the tree from twisting and falling in the wrong
direction. Do not cut through the hinge.
• As the felling cut gets close to the hinge, the
tree should begin to fall.
20
Chainsaw Model CS1200-092
Page 21
Operating the Chainsaw
• If there is any chance that the tree may not
fall in the desired direction or it may rock back
and bind the saw chain, stop cutting before
the felling back cut is complete and use
wedges of wood, plastic or aluminium to open
the cut and drop the tree along the desired
line of fall.
• When the tree begins to fall, remove the
chainsaw from the cut, stop the motor, put
the chainsaw down, then use the retreat path
planned.
• Be alert for overhead limbs falling and watch
footing.
LIMBING A TREE
CAUTION: Limbs under tension can
“spring back” and contact the operator
or throw the chainsaw out of control
resulting in personal injury. Always be
alert for wood under tension which may
strike the operator or chainsaw when cut.
Limbing is removing the branches from a fallen
tree.
• When limbing, leave larger lower limbs to
support the log off the ground.
• Remove the small limbs in one cut.
• Branches under tension should be cut from
the bottom up to avoid binding the chainsaw
(Fig. ).
FIG. 26
LIMB CUT
TREE LIMBING
BUCKING A LOG
CAUTION: Bucking logs under tension
increases the chance of kickback. Use one
of the methods below to support the log
when bucking.
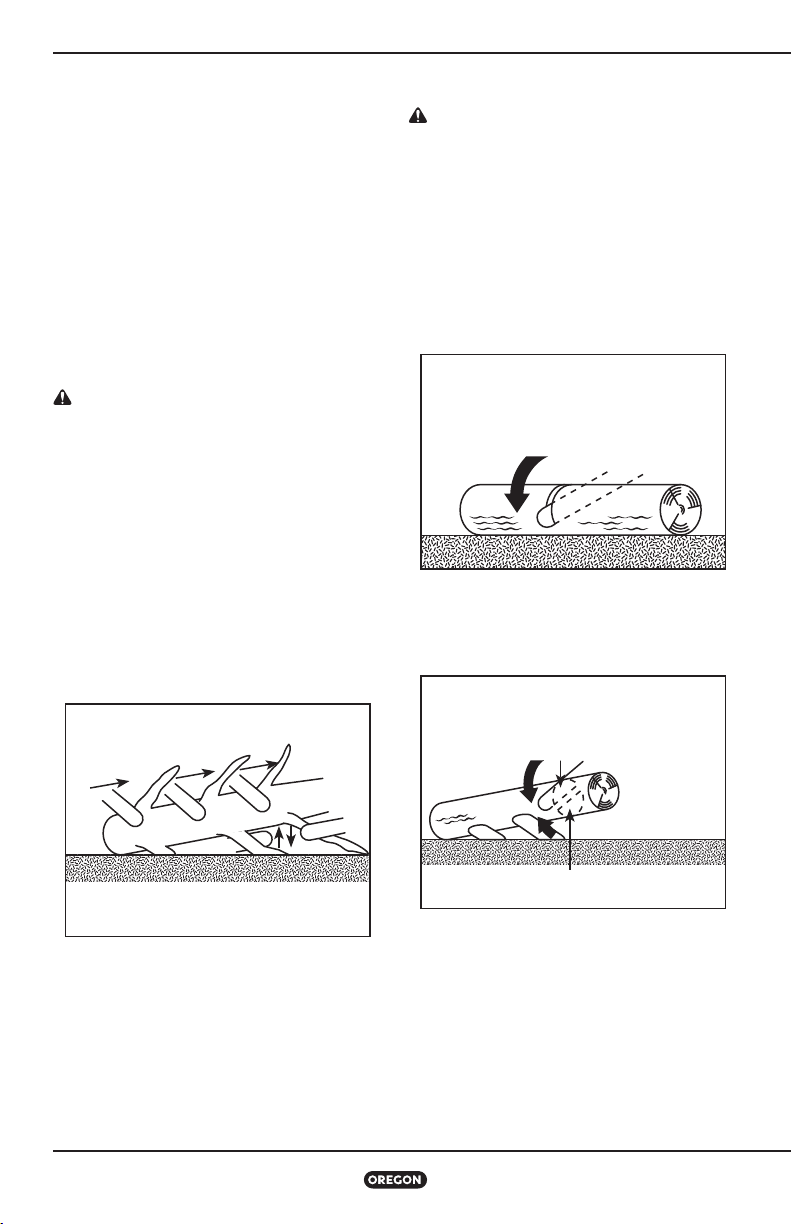
Bucking is cutting a log into lengths. It is
important to make sure footing is firm and
weight is evenly distributed on both feet.
When possible, the log should be raised and
supported by the use of limbs, logs or chocks.
• When the log is supported along its entire
length, cut from the top (overbuck) (Fig. ).
FIG. 27
LOG IS SUPPORTED
ALONG ITS ENTIRE LENGTH
CUT FROM TOP (OVERBUCK)
AVOID CUTTING EARTH
• When the log is supported on one end, cut
/ the diameter from the underside
(underbuck), then make the finished cut by
overbucking to meet the first cut (Fig. ).
FIG. 28
LOG IS SUPPORTED ONE END
2ND CUT OVERBUCK (2/3 DIAMETER)
TO MEET 1ST CUT (TO AVOID PINCHING)
KEEP WORK OFF GROUND
LEAVE SUPPORT LIMBS UNTIL LOG IS CUT
Chainsaw Model CS1200-092
1ST CUT UNDERBUCK (1/3 DIAMETER)
TO AVOID SPLINTERING
21
Page 22
Operating the Chainsaw
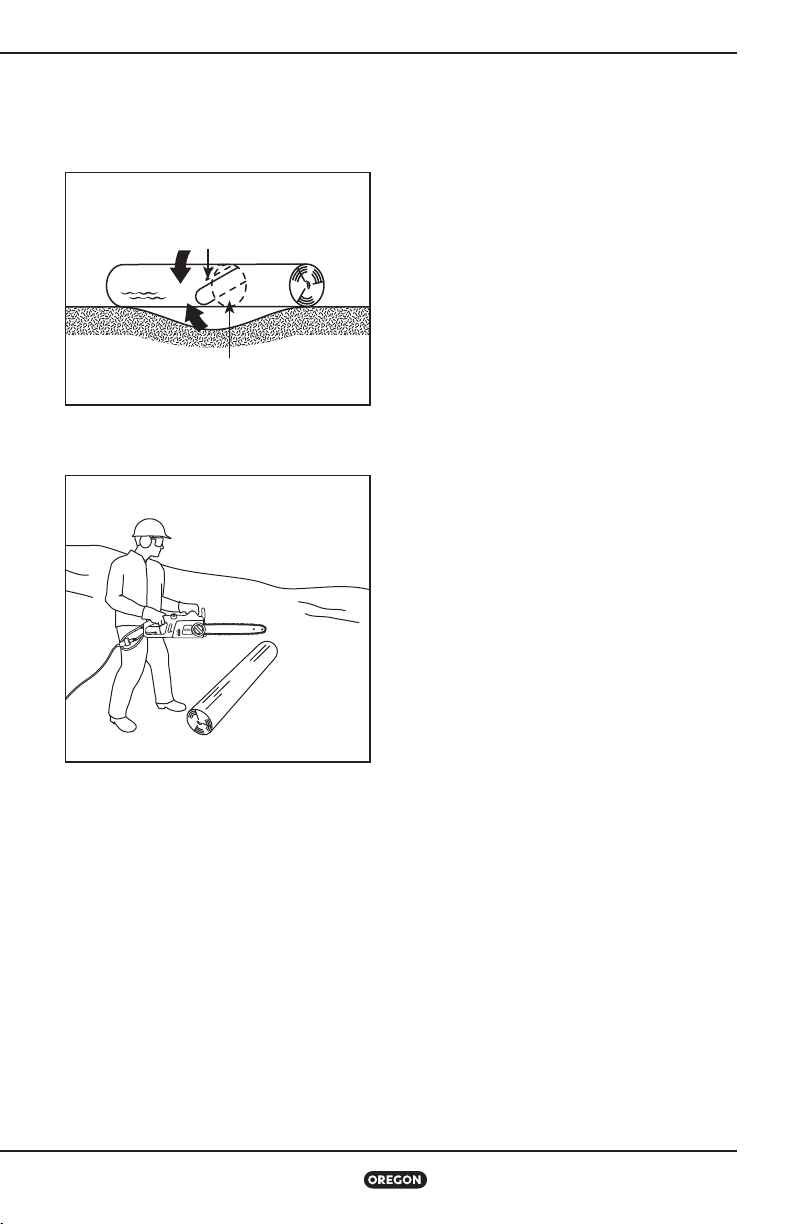
• When the log is supported on both ends, cut
/ of that diameter from the top overbuck,
then make the finished cut by underbucking
the lower / to meet the first cut (Fig. ).
FIG. 29
1ST CUT OVERBUCK (1/3 DIAMETER)
TO AVOID SPLINTERING
2ND CUT UNDERBUCK (2/3 DIAMETER) TO
MEET 1ST CUT (TO AVOID PINCHING)
BUCKING A LOG
• When bucking on a slope, always stand on the
uphill side of the log (Fig. ).
FIG. 30
BUCKING ON A SLOPE
STAND ON UPHILL SIDE
WHEN CUTTING BECAUSE
LOG MAY ROLL
• To maintain complete control when cutting
through, release the cutting pressure near the
end of the cut without relaxing the grip on the
chainsaw handles.
• Don’t let the chain contact the ground.
• After completing the cut, wait for the saw
chain to stop before you move the chainsaw.
• Always stop the motor before moving from
tree to tree.
22
Chainsaw Model CS1200-092
Page 23
Maintenance and Cleaning
Maintenance and Cleaning
WARNING: Failure to identify and
replace damaged or worn parts can
cause serious personal injury. Inspect the
chainsaw regularly. Regular inspection
is the first step to proper maintenance.
Follow the guidelines below to maximise
safety and satisfaction. Have any
damaged or excessively worn parts
replaced immediately.
WARNING: An electric power tool
that is plugged in can start accidentally.
Unplug the chainsaw before preparing for
use or performing maintenance.
CAUTION: When cleaning the
chainsaw, do not immerse in water or
other liquids.
Inspection
Before each use and if the chainsaw has been
dropped, inspect these parts:
• Cord: Ensure the plug is in good condition and
not bent or corroded, and that the insulation
is intact. If the cord is damaged, do not use.
Contact an authorised service dealer.
• Handles: Front and rear handles should not
have cracks or other damage. They should be
clean and dry.
• Front Hand-Guard: The front hand-guard
should be free of damage and able to move
easily back and forth. When moved, the front
hand-guard should activate the chain brake.
• Guide Bar: The bar should be straight and free
of chips, cracks or excessive wear.
• Saw Chain: The chain should be properly
tensioned and sharp and all components free
of cracks, chips, broken teeth or excessive
wear. See “Tensioning the Saw Chain” and
“Sharpening the Saw Chain”.
• Side Cover: The side cover should be free of
cracks or other damage. It should fit tightly to
the saw body with no warping. Make sure the
chain catcher is free of cracks.
• Chain Brake: Test the chain brake to make
sure it is functioning properly. See “Testing the
Chain Brake” under “General Operation.”
• Oil Level: Make sure the oil reservoir is full
before use.
• Motor Housing: Check for cracks in the cover
and debris in the air intake vents.
Periodically inspect these parts:
• Drive Sprocket: Look for deep grooves, broken
teeth or burrs.
• Bar-Mounting Area Underneath Side Cover:
Make sure the bar mounting stud is not bent,
stripped or cross-threaded and that the bar
pad and alignment flange are free of debris
and intact.
Cleaning
CAUTION: When cleaning the chainsaw
powerhead, do not immerse in water or
other liquids.
Wear gloves.
• Unplug the chainsaw.
• Remove wood chips and other debris from the
motor housing and the vents.
• Always clean out wood chips, saw dust, and
dirt from the bar groove when replacing the
chain.
• Make sure the cord and plug are dry before
connecting to an outlet.
Chainsaw Model CS1200-092
23
Page 24
Maintenance and Cleaning
Tensioning the Saw Chain
IMPORTANT: Only tension the saw chain
when the chain is cool. A hot chain may
contract and damage the guide bar or
chain as it cools.
If the chain does not touch the underside of the
bar when the chainsaw is off and cool, it should
be tensioned.
Tension the chain as described in “Tensioning
the Saw Chain” in the “Preparing for Use”
section of the manual.
Sharpening the Saw Chain
It is recommended that an Oregon® Service
Dealer sharpen the chain, but it can also be
sharpened by the operator.
WARNING: If the chain is incorrectly
sharpened or the depth gauge is set too
low, there is an increased risk of injury.
Always sharpen the chain according to the
specifications described in this manual.
IMPORTANT: Sharpening according to
these instructions will address minor
damage to the saw chain from contact
with dirt or similar occurrences. To repair
more serious saw chain damage (such
as after contact with concrete), take the
chain to an authorised Oregon® service
dealer, or replace the chain.
Chain sharpening requires these tools (available
in a kit from Oregon®; see “Specifications and
Components”):
• File guide
• . mm round saw chain sharpening file (use
only special saw chain sharpening files)
• . inch (. mm) depth gauge tool
• Flat file
After collecting the tools, wear gloves and eye
protection, and unplug the chainsaw. Then, file
the chain to set the depth gauge:
• Loosen the side cover knob and remove side
cover.
• Loosen the chain tensioning dial as far as it
will go.
• Remove the chain.
• Place the chain in a vise to hold it steady.
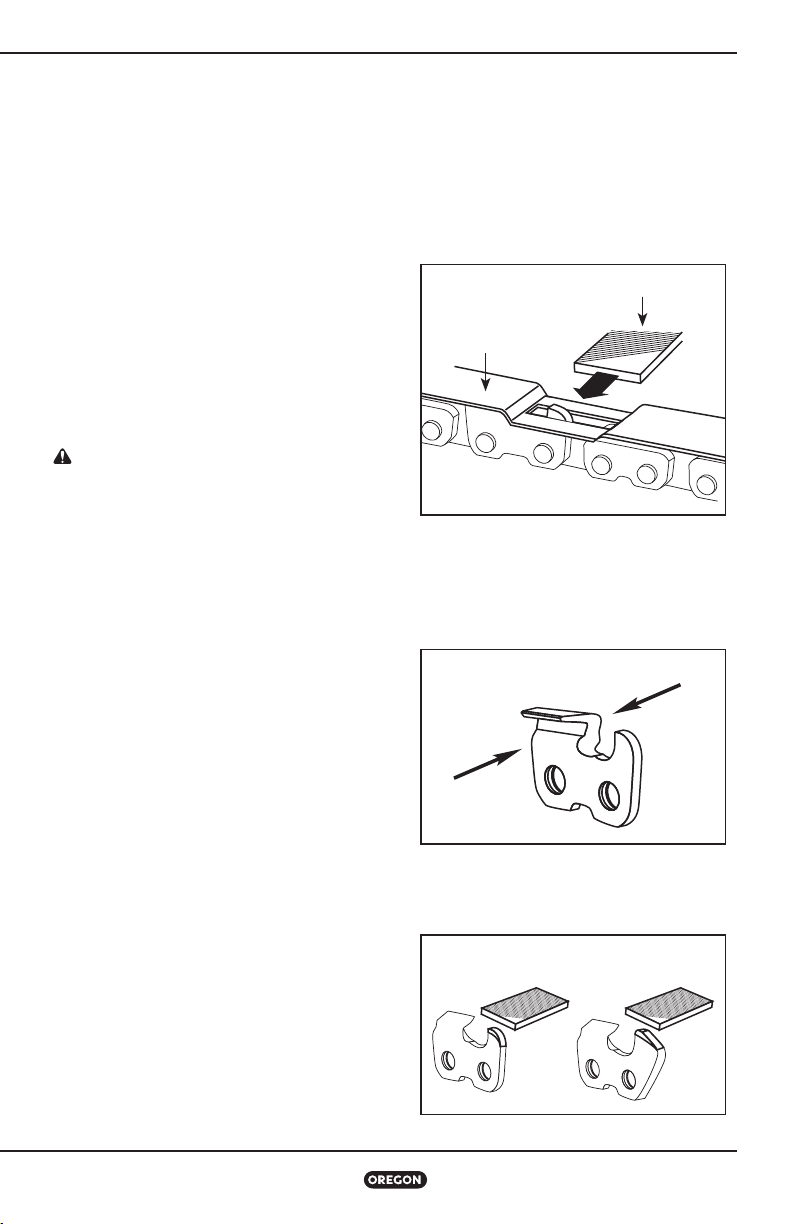
• Place the depth gauge tool on top of the chain
so that one depth gauge protrudes through
the slot in the tool.
• If the depth gauge extends above the top of
the slot, file the depth gauge down level with
the top of the tool using a flat file (Fig. ).
Never file the depth gauge down enough to
exceed the depth gauge setting specified in
this manual.
FIG. 31
DEPTH GAUGE
TOOL
FLAT FILE
IMPORTANT: Sharpen in one direction
only, from inside to outside. Never
sharpen with a back-and-forth motion.
• File from the inside surface of the depth
gauge to the outside (Fig. ).
FIG. 32
INSIDE
OUTSIDE
• Remove the depth gauge tool.
• After lowering, always file off the front corner
of each depth gauge parallel to its original
rounded or ramped shape (Fig. ).
FIG. 33
24
Chainsaw Model CS1200-092
Page 25
Maintenance and Cleaning
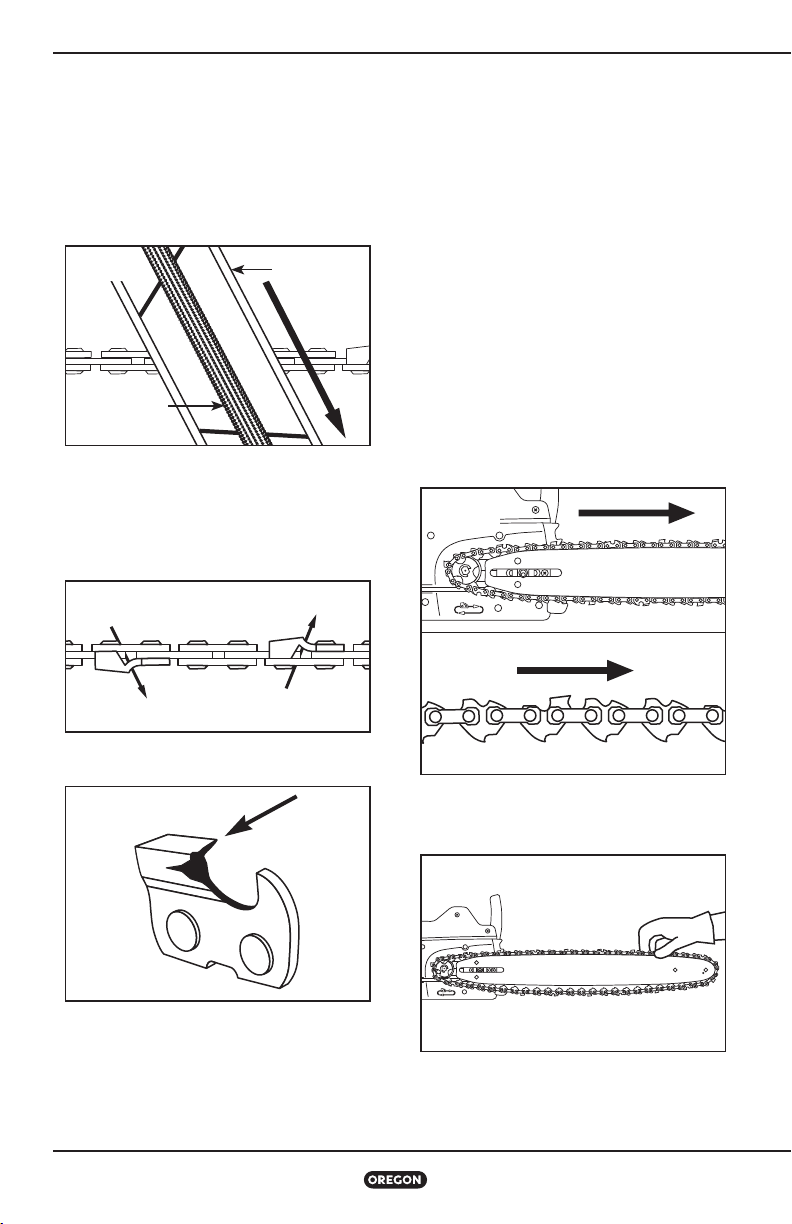
• Repeat for each depth gauge on the chain.
After setting the depth gauge, sharpen the
cutters:
• Place the chain file into the file guide.
• Align the file guide so that the correct top
plate filing angle marked on the file guide is
parallel to the chain (Fig. ).
FIG. 34
ROUND FILE
FILE GUIDE
• Sharpen cutters on one side of the chain first.
Make - strokes with the file from the inside
of each cutter to the outside. Use the same
number of strokes on each cutter. Then, turn
the chainsaw around and repeat for cutters on
the other side of the chain (Fig. ).
FIG. 35
Replacing a Worn Saw Chain
When the saw chain becomes cracked or has
broken teeth, is stretched to the point that
it cannot be kept at proper tension or simply
cannot be sharpened, it must be replaced.
Wear gloves.
• Unplug the chainsaw.
• Loosen the side cover release knob slightly,
but do not remove the side cover.
• Loosen the chain tensioning dial as far as it
will go.
• Loosen the side cover release knob and
remove the side cover.
• Remove the saw chain.
• Loop the new saw chain onto the drive
sprocket so that the cutting edges of the
teeth along the top of the bar face away from
the powerhead (Fig. ).
FIG. 37
• File back any damage on the chrome top or
side plates (Fig. ).
FIG. 36
• Keep all cutter lengths equal.
• After sharpening all cutters, use the file guide
to check the depth gauges again. Reset the
depth gauge if necessary.
• Replace the chain and the side cover.
Chainsaw Model CS1200-092
• Feed the chain into the groove of the bar and
slide the bar away from the motor to remove
slack from the chain (Fig. ).
FIG. 38
25
Page 26
Maintenance and Cleaning
• Install the side cover, making sure the chain
catcher and side cover tab are seated in their
proper locations (Fig. ), then lightly tighten
the side cover release knob.
FIG. 39
• Tension the chain as described in “Tensioning
the Saw Chain” in the “Preparing for Use”
section of the manual.
IMPORTANT: The saw chain must be
properly tensioned before using. See
“Tensioning the Saw Chain” in the
“Preparing for Use” section of the
manual.
Maintaining the Guide Bar
CAUTION: The guide bar can be hot
after cutting. Wear gloves to avoid burns.
To even bar wear and maximise bar life, flip the
bar occasionally.
Wear gloves.
• Unplug the chainsaw.
• Loosen the side cover release knob slightly,
but do not remove the side cover.
• Loosen the chain tensioning dial as far as it
will go.
• Loosen the side cover release knob and
remove the side cover.
• Remove the bar and chain and inspect for
damage and wear.
• Flip the bar (Fig. ).
FIG. 40
• Place the guide bar on the bar pad by sliding
the bar slot over the alignment flange, with
the mounting stud inserted through the slot in
the guide bar. Align the lower tensioning hole
on guide bar to seat on the tensioning stud
(Fig. ).
FIG. 41
BAR PAD
ALIGNMENT FLANGE
MOUNTING STUD
• Replace the saw chain as described in
“Replacing a Worn Saw Chain”.
• Tension the chain as described in “Tensioning
the Saw Chain” in the “Preparing for Use”
section of the manual.
Replacing a Worn Guide Bar
WARNING: The edges of a worn guide
bar, particularly the edges of the groove
where the chain touches the bar, can be
extremely sharp. Use appropriate hand
protection.
When the guide bar becomes cracked or has
excessive wear around the edges, particularly
in the groove where the saw chain touches
the bar, it must be replaced. Also, if the nose
sprocket is worn, has teeth missing or does not
turn smoothly, the bar must be replaced.
26
Chainsaw Model CS1200-092
Page 27
Maintenance and Cleaning
Wear gloves.
• Unplug the chainsaw.
• Loosen the side cover release knob slightly,
but do not remove the side cover.
• Loosen the chain tensioning dial as far as it
will go.
• Loosen the side cover release knob and
remove the side cover.
• Remove the bar and chain.
• Replace the guide bar as described in
“Maintaining the Guide Bar”.
• Replace the chain as described in “Replacing a
Worn Saw Chain”.
• Tension the chain as described in “Tensioning
the Saw Chain”.
Replacing the Drive Sprocket
Replace the drive sprocket after every two saw
chain replacements or when the sprocket is
damaged.
Wear gloves.
• Unplug the chainsaw.
• Loosen the side cover release knob slightly,
but do not remove the side cover.
• Loosen the chain tensioning dial as far as it
will go.
• Loosen the side cover release knob and
remove the side cover.
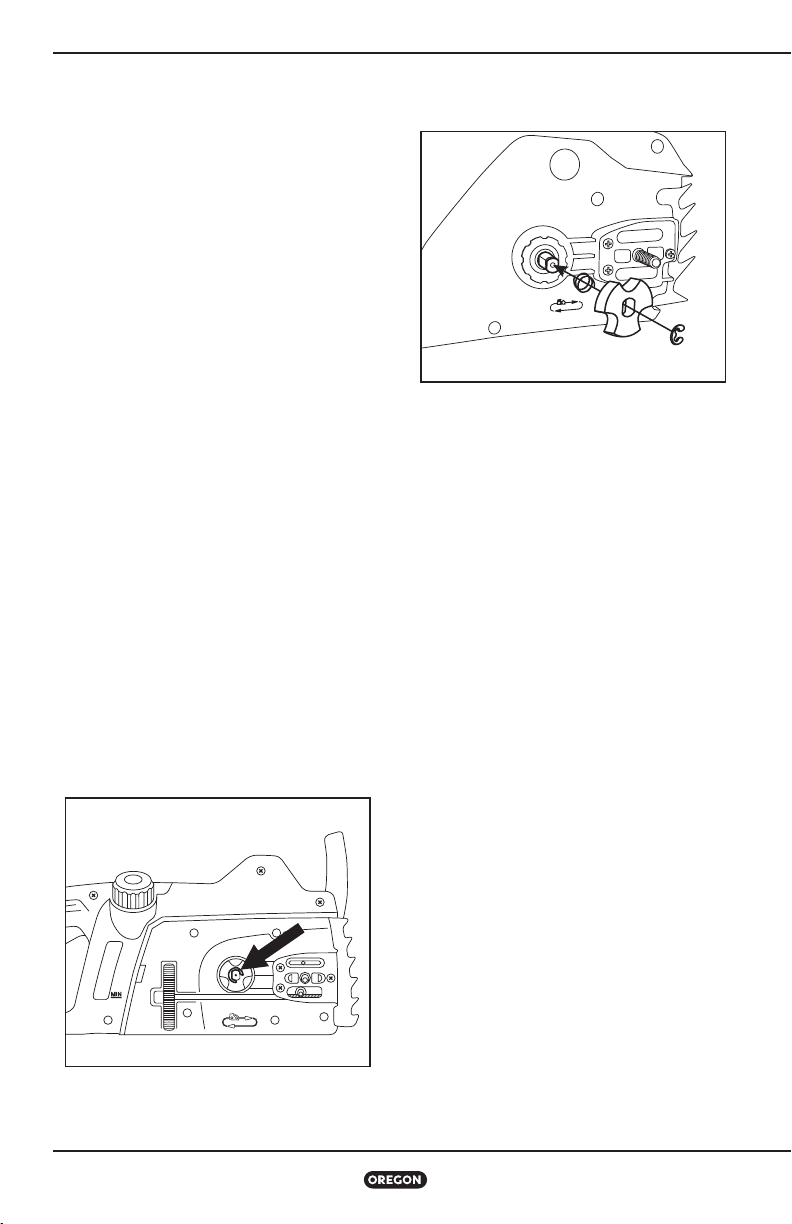
• Remove the bar and chain.
• Use a small flat screwdriver to pry open and
remove the e-clip, then remove the drive
sprocket and spring (Fig. ).
• Insert the new spring and drive sprocket, and
install the new e-clip (Fig. ).
FIG. 43
• Replace the bar and chain as described in
“Replacing a Worn Saw Chain”.
• Tension the chain as described in “Tensioning
the Saw Chain” in the “Preparing for Use”
section of the manual.
Additional Maintenance
Information
For further information on maintaining the saw
chain, guide bar and drive sprocket, consult the
®
Oregon
Maintenance and Safety Manual at
http://www.oregonproducts.eu/en/customerservice/maintenance-safety-manual.html.
FIG. 42
Chainsaw Model CS1200-092
27
Page 28

Troubleshooting
Troubleshooting
Use this table to see possible solutions for problems with the chainsaw. If these suggestions do not
solve the problem, see “Warranty and Service”.
SYMPTOM POSSIBLE CAUSE RECOMMENDED ACTIONS
Undercut limb to relieve pressure on limb. See
“Cutting”.
If extension cord is damaged, do not use and replace
it. If chainsaw cord is damaged, do not use and
contact an approved service location.
Set the front hand-guard to the operating position
as described in “Checking the Front Hand-Guard
Position”.
If extension cord is damaged, do not use and replace
it. If chainsaw cord is damaged, do not use and
contact an approved service location.
Unplug extension cord, reset GFCI and plug the
extension cord back in.
Set the front hand-guard to the operating position
as described in “Checking the Front Hand-Guard
Position”.
Press the trigger lock-out before squeezing the
trigger switch. See “General Operation”.
Unplug the chainsaw, then remove side cover and
clean out debris.
Clean debris from external chain brake mechanism.
WARNING: Operating a chainsaw without a
functioning chain brake could lead to serious
personal injury. Contact an approved service
location before using.
Reinstall the chain, making sure the drive links on
the chain are fully seated on the drive sprocket. See
“Replacing a Worn Saw Chain”.
Replace the guide bar. See “Replacing a Worn Guide
Bar”.
Motor stops
while cutting
Motor does
not run or runs
intermittently
Motor does not
stop when chain
brake is engaged
Motor runs, but
saw chain does
not rotate
Chain pinched in cut
Cord is damaged or
severed
Chain brake is engaged
Saw is not plugged in Plug in the saw.
Cord is damaged or
severed
GFCI outlet is tripped
Bad electrical outlet Plug extension cord into a different outlet.
Chain brake engaged
Trigger lock-out not
pressed
Debris in side cover
Debris preventing full
movement of front handguard
Possible chain brake
malfunction
Chain not engaging drive
sprocket
Guide bar nose sprocket
is not turning
28
Chainsaw Model CS1200-092
Page 29

Troubleshooting
SYMPTOM POSSIBLE CAUSE RECOMMENDED ACTIONS
Insufficient chain tension
Dull chain See "Sharpening the Saw Chain".
Tension the chain. See “Tensioning the Saw Chain”
in the “Preparing for Use” section of the manual.
Chainsaw does
not cut properly
Chain loosening
or coming off of
guide bar
Bar and chain
excessively hot
and/or smoking
Chain installed
backwards
Worn chain
Dry or excessively
stretched chain
Chain not in bar groove
Side cover not
installed correctly
Chain is under-lubricated
Install the chain with the teeth facing the correct
direction. See “Replacing a Worn Saw Chain”.
Replace the chain. See “Replacing a Worn Saw
Chain”.
Check the oil level. Refill oil reservoir if necessary.
See “Filling the Bar and Chain Oil Reservoir”.
Reseat chain onto groove. See “Replacing a Worn
Saw Chain”.
Properly install side cover ensuring the tab at rear
of side cover is tucked into saw body.
Check the oil level. Refill oil reservoir if necessary.
See “Filling the Bar and Chain Oil Reservoir”.
Chainsaw Model CS1200-092
29
Page 30

Specifications and Components
Specifications and Components
WARNING: Using replacement parts other than those specified in this instruction
manual increases the risk of injury. Never use cutting attachments other than those
described in this manual. Serious or even fatal injuries could result if the wrong cutting
attachments are used.
REPLACEMENT COMPONENTS PART NUMBER
Guide bar 140SDEA041
Saw chain Q91VG052E (B52)
CHAINSAW SPECIFICATIONS
Voltage 230 V ~50 Hz
Power 1800 W
Oil capacity 100 ml
Bar and chain oil Oregon
Dry weight assembled 4.5 kg
Dry weight without bar and chain 3.8 kg
Guaranteed sound power level Lwa (1) (2) 108 dB
Vibration 5.944 m/s2 (K=1.5 m/s2)
Max bar length 36 cm (14 inches)
Effective cutting length 34.3 cm (13.5 inches)
Drive sprocket teeth 6
No load chain speed 14.5 m/s
®
() According to Noise directive //EC, amended by //EC
() Measured according to EN -:+A: and EN--:+A:;
Sound Pressure level, LpA, is .dB(A) with an uncertainty KpA of .dB(A)
30
Chainsaw Model CS1200-092
Page 31

Warranty and Service
Warranty and Service
Warranty
Blount, Inc. warrants all Oregon® CS
Chainsaws for a period of three () years. This
warranty is valid only for units that have been
used for personal use that have not been hired
or rented, or used for commercial or industrial
use. During the warranty period, Blount will
replace or, at its option, repair for the original
purchaser only, free of charge, any product or
part which is found upon examination by Blount
to be defective in material and/or workmanship.
The purchaser shall be responsible for all
transportation charges and any cost of
removing any part submitted for replacement
under this warranty.
Keep Original Receipt
Please attach original receipt from initial
purchase to this manual and file. For warranty
service, please bring product and receipt to
the dealer where product was purchased. Or
contact Oregon by telephone. For countryspecific telephone numbers, see “Customer
Service by Country”.
Service and Support Information
Visit us on the web at OregonProducts.com
for service centre information, or contact
our customer service department for
assistance, additional technical advice, repair,
or replacement parts. For country-specific
telephone numbers, see “Customer Service by
Country”.
For safety, use only genuine factory
replacement parts on the chainsaw. Our service
centre is staffed with trained personnel to
efficiently provide support and assistance
with adjustment, repair, or replacement of all
Oregon products.
Chainsaw Model CS1200-092
31
Page 32

Table des matières
Table des matières
Instructions de sécurité importantes . . . . . . . . . . . . . . . . . . . . . . . . . . . . . . . . 33
Définitions des signaux de sécurité . . . . . . . . . . . . . . . . . . . . . . . . . . . . . . .33
Avertissements de sécurité généraux relatifs aux outils électriques . . . . . . . . . . .33
Sécurité de la zone de travail . . . . . . . . . . . . . . . . . . . . . . . . . . . . . . . . . .33
Sécurité électrique . . . . . . . . . . . . . . . . . . . . . . . . . . . . . . . . . . . . . . . .33
Sécurité personnelle . . . . . . . . . . . . . . . . . . . . . . . . . . . . . . . . . . . . . . .34
Power Tool Use and Care. . . . . . . . . . . . . . . . . . . . . . . . . . . . . . . . . . . . . 34
Réparation . . . . . . . . . . . . . . . . . . . . . . . . . . . . . . . . . . . . . . . . . . . . .35
Avertissements de sécurité relatifs à la tronçonneuse . . . . . . . . . . . . . . . . . . .35
Causes et préventions de rebonds par l’utilisateur. . . . . . . . . . . . . . . . . . . . . . 36
Dispositifs de sécurité concernant l’effet de rebond sur cette tronçonneuse . . . . . .37
Entreposage, transport et élimination . . . . . . . . . . . . . . . . . . . . . . . . . . . . .37
Symboles et étiquettes. . . . . . . . . . . . . . . . . . . . . . . . . . . . . . . . . . . . . . . . 38
Noms et termes relatifs à la tronçonneuse . . . . . . . . . . . . . . . . . . . . . . . . . . . . 39
Identification du produit . . . . . . . . . . . . . . . . . . . . . . . . . . . . . . . . . . . . . . .40
Préparation avant utilisation . . . . . . . . . . . . . . . . . . . . . . . . . . . . . . . . . . . .41
Contenu de la boîte . . . . . . . . . . . . . . . . . . . . . . . . . . . . . . . . . . . . . . . . 41
Vérification de la position du protège-main avant . . . . . . . . . . . . . . . . . . . . . .41
Remplissage du réservoir d’huile du guide et de la chaîne . . . . . . . . . . . . . . . . .41
Montage du guide-chaîne et de la chaîne de tronçonneuse . . . . . . . . . . . . . . . .42
Tension de la chaîne de tronçonneuse . . . . . . . . . . . . . . . . . . . . . . . . . . . . . 43
Utilisation de la tronçonneuse. . . . . . . . . . . . . . . . . . . . . . . . . . . . . . . . . . . . 44
Utilisation générale . . . . . . . . . . . . . . . . . . . . . . . . . . . . . . . . . . . . . . . . 44
Utilisation et entretien du câble d’alimentation . . . . . . . . . . . . . . . . . . . . . . .45
Découpage . . . . . . . . . . . . . . . . . . . . . . . . . . . . . . . . . . . . . . . . . . . . .46
Entretien et nettoyage . . . . . . . . . . . . . . . . . . . . . . . . . . . . . . . . . . . . . . . .51
Inspection. . . . . . . . . . . . . . . . . . . . . . . . . . . . . . . . . . . . . . . . . . . . . . 51
Nettoyage . . . . . . . . . . . . . . . . . . . . . . . . . . . . . . . . . . . . . . . . . . . . .51
Tension de la chaîne de tronçonneuse . . . . . . . . . . . . . . . . . . . . . . . . . . . . . 51
Affûtage de la Chaîne. . . . . . . . . . . . . . . . . . . . . . . . . . . . . . . . . . . . . . . 52
Remplacement d'une chaîne usée . . . . . . . . . . . . . . . . . . . . . . . . . . . . . . .53
Entretien du guide-chaîne . . . . . . . . . . . . . . . . . . . . . . . . . . . . . . . . . . . . 54
Remplacement d’un guide-chaîne usé . . . . . . . . . . . . . . . . . . . . . . . . . . . . . 54
Remplacement du pignon d’entraînement. . . . . . . . . . . . . . . . . . . . . . . . . . . 55
Informations supplémentaires relatives à l’entretien . . . . . . . . . . . . . . . . . . . .55
Dépannage . . . . . . . . . . . . . . . . . . . . . . . . . . . . . . . . . . . . . . . . . . . . . . .56
Caractéristiques et composants. . . . . . . . . . . . . . . . . . . . . . . . . . . . . . . . . . .58
Garantie et entretien . . . . . . . . . . . . . . . . . . . . . . . . . . . . . . . . . . . . . . . . .59
Déclaration de conformité « CE » . . . . . . . . . . . . . . . . . . . . . . . . . . . . . . . . . 229
Service après-vente par pays . . . . . . . . . . . . . . . . . . . . . . . . . . . . . . . . . . . 230
© Blount, Inc. Les tarifs et caractéristiques peuvent être modifiés sans avis préalable. Tous droits réservés. Oregon®, est une marque déposée
de Blount, Inc. aux États-Unis et/ou dans d’autres pays.
32
Tronçonneuse Modèle CS1200-092
Page 33

Instructions de sécurité importantes
Instructions de sécurité importantes
Introduction
Cette tronçonneuse est conçue pour une utilisation légère et occasionnelle. Elle n’est pas conçue pour
abattre de grands arbres ou couper des troncs d’un gros diamètre. Cette tronçonneuse n’est pas conçue
pour l’entretien des arbres. Ne coupez pas d’arbres ni de bois dont le diamètre est supérieur à la longueur de
coupe effective de la tronçonneuse, c’est-à-dire cm ( pouces).
Définitions des signaux de sécurité
SYMBOLE SIGNAL SIGNIFICATION
AVERTISSEMENT
MISE EN GARDE
IMPORTANT
Indique un risque potentiel qui pourrait causer de graves blessures.
Indique un risque potentiel qui pourrait gravement endommager l’outil
ou causer des blessures légères ou modérées.
En suivant ces instructions, vous augmenterez votre degré de
satisfaction quant à l’utilisation du produit.
Avertissements de sécurité généraux relatifs aux outils électriques
AVERTISSEMENT : lisez et comprenez l’ensemble des instructions et avertissements
de sécurité. Le non-respect des avertissements de sécurité et des instructions peut entraîner
une décharge électrique, un incendie et/ou des blessures graves.
Conservez l’ensemble des avertissements et des instructions pour référence ultérieure.
Le terme « outil électrique » utilisé dans les avertissements fait référence à votre outil électrique alimenté sur
secteur (câblé) ou fonctionnant sur batterie (sans câble).
Sécurité de la zone de travail
• Maintenez la zone de travail propre et bien
éclairée. Les zones en désordre ou mal éclairées
augmentent les risques d’accidents.
• Ne faites pas fonctionner l’outil électrique dans
une atmosphère explosive, telle qu’en présence
de liquides inflammables, gaz ou poussières.
Les outils électriques produisent des étincelles qui
peuvent enflammer la poussière ou les émanations.
• Maintenez à distance les enfants et les
personnes à proximité lorsque vous utilisez un
outil électrique. Une distraction peut vous faire
perdre le contrôle de l’outil.
Sécurité électrique
• La fiche d’alimentation de l’outil électrique doit
correspondre à la prise secteur. Ne modifiez
jamais la fiche d’alimentation de quelque
manière que ce soit. N’utilisez pas de fiches
d’adaptateurs avec des outils électriques mis à
la terre (reliés à la terre). L’utilisation de fiches
non modifiées et de prises correspondantes réduit le
risque de décharge électrique.
• Évitez tout contact du corps avec des surfaces
reliées à la terre, comme des tuyaux, radiateurs,
fourneaux et réfrigérateurs. Le risque de décharge
électrique augmente si votre corps est relié à la terre.
• Protégez les outils électriques de la pluie et
des conditions d’humidité. Le risque de décharge
électrique augmente si de l’eau pénètre dans l’outil
électrique.
• Maniez le câble avec précaution. N’utilisez jamais
le câble pour transporter, tirer ou débrancher l’outil
électrique. Tenez le câble éloigné de la chaleur, de
l’huile, des bords affûtés et des pièces mobiles.
Des câbles endommagés ou entremêlés augmentent le
risque de décharge électrique.
• Lorsque vous faites fonctionner un outil
électrique à l’extérieur, utilisez une rallonge
conçue pour un usage extérieur. L’utilisation d’un
câble adapté à un usage extérieur diminue le risque
de décharge électrique.
• Si vous ne pouvez pas éviter de faire
fonctionner l’outil électrique dans un endroit
humide, utilisez une alimentation protégée par
un disjoncteur-détecteur de fuites à la terre
(DDFT). L’utilisation d’un DDFT diminue le risque de
décharge électrique.
Tronçonneuse Modèle CS1200-092
33
Page 34

Instructions de sécurité importantes
Sécurité personnelle
• Restez sur vos gardes, regardez ce que vous
faites et faites preuve de bon sens lorsque
vous utilisez un outil électrique. N’utilisez
pas un outil électrique si vous êtes fatigué
ou sous l’influence de médicaments, d’alcool
ou de drogues. Un moment d’inattention lors de
l’utilisation d’outils électriques peut entraîner de
graves blessures corporelles.
• Utilisez des équipements de protection
individuelle. Portez toujours des lunettes de
protection. Un équipement de sécurité comme un
masque anti-poussières, des chaussures de sécurité
antidérapantes, un casque de sécurité ou une
protection auditive, utilisé selon la tâche à effectuer,
permettra de diminuer le risque de blessures
corporelles.
• Empêchez les démarrages non souhaités.
Assurez-vous que l’interrupteur est en position
éteinte avant de brancher l’outil sur le courant
et/ou la batterie, avant de le prendre ou de le
porter. Porter les outils électriques avec le doigt sur
l’interrupteur ou les alimenter quand l’interrupteur est
en position de marche, peut provoquer des accidents.
• Retirez toute clé ou clavette de calage avant la
mise en marche de l’outil électrique. Une clé ou
une clavette qui reste attachée à un élément rotatif
de l’outil électrique peut provoquer des blessures
corporelles.
• Ne vous penchez pas trop en avant. Maintenez
constamment votre équilibre et votre prise au
sol (Fig. ). Cela améliore le contrôle de l’outil
électrique en cas de situations imprévues.
FIG. 1
• Habillez-vous de manière appropriée. Ne
portez pas de vêtements amples ni de bijoux.
Maintenez vos cheveux, vêtements et gants à
l’écart des pièces mobiles. Les vêtements amples,
bijoux ou cheveux longs peuvent s’enchevêtrer dans
les pièces mobiles.
• Si des dispositifs sont fournis pour raccorder
des installations d’extraction et de collecte
des poussières, assurez-vous que ceux-ci sont
connectés et correctement utilisés. L’utilisation
d’un système de collecte des poussières peut
réduire les risques liés à la poussière.
• Ne laissez pas l’habitude due à une
utilisation fréquente des outils vous faire
oublier les principes de sécurité lors de leur
manipulation. Un geste imprudent peut entraîner
de graves blessures en une fraction de seconde.
Power Tool Use and Care
• Ne forcez pas sur l’outil électrique. Utilisez le
taille-haie adapté à votre application. L’outil
électrique adapté effectuera un travail de meilleure
qualité et plus sûr, à la vitesse pour laquelle il a été
conçu.
• N’utilisez pas l’outil électrique si vous ne pouvez
l’allumer ou l’éteindre à l’aide de l’interrupteur.
Tout outil électrique ne pouvant être contrôlé au moyen
de l’interrupteur est dangereux et doit être réparé.
• Débranchez la fiche de la source d’alimentation
et/ou la batterie de l’outil électrique, si amovible,
avant d’effectuer des réglages, de changer les
accessoires ou d’entreposer les outils électriques.
De telles mesures de sécurité préventives réduisent le
risque de démarrer l’outil électrique par accident.
• Maintenez les outils électriques à l’arrêt hors
de portée des enfants. N’autorisez pas les
personnes non habituées à l’outil électrique, ou
n’ayant pas lu les instructions, à l’utiliser. Les
outils électriques sont dangereux lorsqu’ils sont
entre les mains d’utilisateurs novices.
• Entretenez les outils électriques. Vérifiez
l’absence de mauvais alignement ou de
grippage des pièces mobiles, de rupture de
pièces et de tout autre état pouvant affecter
le fonctionnement de l’outil électrique. S’il est
endommagé, faites-le réparer avant de l’utiliser.
De nombreux accidents sont causés par des outils
mal entretenus.
• Maintenez les outils de coupe affûtés et
propres. Les outils tranchants entretenus et aux
bords affûtés risqueront moins de se coincer et
seront plus faciles à maîtriser.
• Utilisez l’outil électrique, les accessoires, les
outils, etc. en respectant ces instructions et en
tenant compte des conditions de travail ainsi
que du travail à effectuer. L’utilisation de l’outil
électrique différente de celle pour laquelle il a été
conçu peut engendrer des situations dangereuses.
• Gardez les poignées et les surfaces de prise
sèches, propres et exemptes d’huile et de
graisse. Des poignées manipulées par des mains
glissantes ne garantissent pas une manipulation et
un contrôle sûr de l’outil en cas d’imprévu.
34
Tronçonneuse Modèle CS1200-092
Page 35

Instructions de sécurité importantes
Réparation
Faites entretenir votre outil électrique par un
réparateur agréé n’utilisant que des pièces de
rechange identiques. Cela garantira que la sécurité
de l’outil électrique est maintenue.
Avertissements de sécurité
relatifs à la tronçonneuse
• Conservez toutes les parties du corps éloignées
de la chaîne de la tronçonneuse lorsque
vous l’utilisez. Avant de mettre en marche la
tronçonneuse, assurez-vous que la chaîne n’est
pas en contact avec d’autres corps. Un moment
d’inattention lors de l’utilisation de la tronçonneuse
peut entraîner un accrochage vestimentaire ou
corporel à la chaîne.
• Veillez à toujours tenir la tronçonneuse avec
votre main droite sur la poignée arrière et votre
main gauche sur la poignée avant (Fig. ). Il est
conseillé de ne jamais tenir la tronçonneuse en
inversant la position des mains, car cela augmente
les risques de blessures.
FIG. 2
• Maintenez constamment votre prise au sol et
utilisez la tronçonneuse uniquement lorsque
vous êtes debout sur une surface plate,
sécurisée et fixe. Les surfaces glissantes ou
instables peuvent provoquer la perte d’équilibre ou
de contrôle de la tronçonneuse.
• Lorsque vous coupez une branche sous tension,
faites attention au redressement de celle-ci.
Lorsque la tension des fibres de bois est relâchée,
le redressement qui en résulte peut heurter
l’utilisateur et/ou projeter la tronçonneuse et la
rendre incontrôlable.
• Faites très attention lorsque vous coupez des
buissons ou des arbrisseaux. Ce bois fin peut
attraper la chaîne de la tronçonneuse qui peut alors
glisser vers vous ou vous faire perdre votre équilibre.
• Portez la tronçonneuse par la poignée avant
avec l’interrupteur en position éteinte et loin
de votre corps. Lorsque vous transportez ou
entreposez la tronçonneuse, mettez toujours le
couvercle du guide-chaîne (Fig. ). Une
manipulation correcte de la tronçonneuse réduit la
probabilité de contact accidentel avec la chaîne en
mouvement.
FIG. 3
• Tenez l’outil électrique par les surfaces de
prise isolées uniquement, car la chaîne de la
tronçonneuse peut entrer en contact avec des
câbles dissimulés ou son propre câble. Des chaînes
de tronçonneuse en contact avec un câble alimenté
peuvent alimenter à leur tour les parties métalliques
exposées de l’outil électrique et transmettre une
décharge électrique à l’utilisateur.
• Portez des lunettes de sécurité et une
protection auditive. Il est également conseillé
de protéger votre tête, vos mains, vos jambes
et vos pieds. Des vêtements de protection
adéquats réduiront le risque de blessure corporelle
due à des jets de débris ou à un contact accidentel
avec la chaîne de la tronçonneuse.
• N’utilisez pas une tronçonneuse dans un arbre.
L’utilisation d’une tronçonneuse alors que vous vous
trouvez dans un arbre peut entraîner des blessures.
Tronçonneuse Modèle CS1200-092
• Suivez les instructions pour la lubrification,
la traction de la chaîne et le remplacement
des accessoires. Une chaîne mal lubrifiée ou
mal tendue peut casser ou augmenter le risque de
rebond.
• Gardez les poignées sèches, propres et
exemptes d’huile et de graisse. Des poignées
huileuses et couvertes de graisse sont glissantes, ce
qui peut provoquer la perte du contrôle.
• Coupez uniquement du bois. N’utilisez pas la
tronçonneuse pour des tâches non adaptées.
Par exemple : n’utilisez pas la tronçonneuse
pour découper du plastique, de la maçonnerie
35
Page 36

Instructions de sécurité importantes
ou des matériaux de construction qui ne sont
pas en bois. L’utilisation de la tronçonneuse pour
des tâches différentes de celles pour lesquelles
elle a été conçue peut engendrer des situations
dangereuses.
• Lors de la première utilisation, il est
recommandé à l’utilisateur de disposer
d’instructions pratiques, de la part d’un
utilisateur expérimenté, quant à l’utilisation
de la tronçonneuse et de l’équipement de
protection recommandé. La pratique initiale doit
consister à découper des billes sur un chevalet de
sciage ou un berceau.
• À l’exception des pièces usées décrites dans
ce manuel, la tronçonneuse ne possède aucune
pièce remplaçable par l’utilisateur.
• La pièce de bois, la barre et la chaîne peuvent
être chaudes après la coupe. Portez des gants
pour éviter les brûlures.
• L’utilisation prolongée d’outils électriques peut
entraîner des troubles vasculaires, musculaires
et/ou neurologiques (comme le syndrome du
doigt mort ou syndrome de Raynaud causé
par les vibrations), en particulier lorsque vous
utilisez l’outil par temps froid. Si vous ressentez
un engourdissement ou une perte de sensibilité
au niveau de vos extrémités, arrêtez d’utiliser
l’outil jusqu’à ce que vos symptômes s’estompent.
Pour réduire l’incidence du traumatisme causé par la
vibration, suivez ces instructions :
– Portez des gants et gardez vos mains et
votre corps au chaud.
– Maintenez fermement la tronçonneuse,
mais n’exercez pas de pression excessive ou
prolongée. Laissez la tronçonneuse effectuer
cette tâche.
– Assurez-vous que le système de coupe est
bien entretenu.
– Faites souvent des pauses.
Les vibrations en condition normale d’utilisation
peuvent différer des valeurs indiquées dans le
présent manuel, selon le matériau à couper,
l’entretien du système de coupe et d’autres
facteurs.
• Gardez le câble derrière vous et assurez-vous
de connaître la position de celui-ci à tout
moment. Ces mesures permettront de réduire les
risques de chute et d’empêcher la rupture du câble
avec la tronçonneuse.
• Si le câble est coupé ou endommagé, cessez
immédiatement d’utiliser la tronçonneuse
et débranchez le câble du secteur. Un cordon
endommagé ou coupé augmente le risque de
décharge électrique.
• Lorsque vous utilisez la tronçonneuse dans un
milieu humide, utilisez un DDFT avec un courant
de déclenchement inférieur à mA. L’utilisation
d’un DDFT diminue le risque de décharge électrique.
Causes et préventions de rebonds
par l’utilisateur
Un effet de rebond peut se produire lorsque
l’extrémité ou la pointe du guide-chaîne touche un
objet ou lorsque le bois se referme et vient pincer la
chaîne dans la découpe.
Dans certains cas, un contact avec la pointe peut
provoquer une réaction d’inversion soudaine, pouvant
soulever le guide-chaîne et le renvoyer à l’utilisateur.
Un pincement de la chaîne le long du haut du guidechaîne peut faire reculer le guide-chaîne rapidement
vers l’utilisateur.
Ces réactions peuvent faire perdre le contrôle de la
tronçonneuse et provoquer ainsi des blessures graves.
Ne vous fiez pas exclusivement aux dispositifs de sécurité
intégrés dans votre tronçonneuse. Quand vous utilisez
une tronçonneuse, vous devez passer par plusieurs
étapes afin d’éviter les accidents et les blessures lors des
découpages.
L’effet de rebond est causé par une mauvaise
utilisation de l’outil et/ou de l’application incorrecte
des procédures ou des conditions, il peut être évité en
prenant les précautions indiquées ci-après :
• Maintenez fermement les poignées de la
tronçonneuse en les encerclant avec les pouces
et les doigts. Tenez la tronçonneuse avec les
deux mains et positionnez votre corps et vos bras
de manière à pouvoir résister aux forces des effets
de rebond. L’utilisateur peut contrôler la force des
effets de rebond, si des précautions adéquates sont
prises. Ne laissez pas la tronçonneuse s’échapper.
• Ne visez pas trop haut et ne découpez pas à une
hauteur qui dépasse votre épaule. Cela permet
d’éviter les contacts accidentels avec l’extrémité et
un meilleur contrôle de la tronçonneuse dans les
situations imprévues.
• Suivez les instructions d’entretien et d’affûtage de
la chaîne de la tronçonneuse indiquées par Oregon®.
L’abaissement de la hauteur du limiteur de profondeur
peut augmenter les effets de rebond.
36
Tronçonneuse Modèle CS1200-092
Page 37

Instructions de sécurité importantes
Dispositifs de sécurité
concernant l’effet de rebond
sur cette tronçonneuse
DANGER : ne modifiez pas ou n’essayez pas
de démonter le frein de chaîne.
DANGER : utilisez uniquement les guides
et les chaînes de remplacement indiqués
par Oregon. Des guides et des chaînes de
remplacement non préconisés peuvent casser
la chaîne et augmenter le risque de blessures
causées par les effets de rebond.
FREIN DE CHAÎNE
La tronçonneuse est équipée d’un frein de chaîne, qui
arrête le moteur et le mouvement de la chaîne en cas
d’effet de rebond (Fig. ). Le frein de chaîne peut être
activé lors d’un mouvement vers l’avant du protègemain avant et lorsque la chaîne tourne vers l’arrière
pendant l’effet de rebond ; il peut également être
activé par la force d’inertie générée par un effet de
rebond.
FIG. 4
CHAÎNE
La tronçonneuse est équipée d’une chaîne conforme
aux exigences de performance d’effet de rebond réduit
de l’American National Standards Institute (ANSI)
et de l’Association canadienne de normalisation
(Canadian Standards Association, CSA), respectivement
ANSI B., ISO , et CSA Z., testée selon
les dispositions de ces normes. Pour obtenir des
informations sur la chaîne de remplacement, consultez
la section « Caractéristiques et composants » de ce
manuel.
BARRE
Cette tronçonneuse est équipée d’un guide-chaîne à
effet de rebond réduit, mais sa hauteur de pointe est
faible. Un guide avec une hauteur de pointe réduite
présente moins de risques d’effet de rebond qu’un
guide de la même taille avec une hauteur de pointe
plus importante.
Lorsque vous remplacez le guide, commandez
uniquement le guide répertorié dans le présent
manuel afin de maintenir la performance d’effet de
rebond faible.
Entreposage, transport et
élimination
ENTREPOSAGE DE LA TRONÇONNEUSE
• Débranchez la tronçonneuse.
• Vérifiez que le câble n’est pas coupé ou
endommagé.
• Nettoyez minutieusement la tronçonneuse.
• Installez le couvercle du guide-chaîne.
• Entreposez dans un endroit sec.
• Tenez-le hors de portée des enfants ou des
animaux.
• Il est normal qu’une petite quantité d’huile s’écoule du
guide-chaîne lorsque la tronçonneuse n’est pas utilisée.
Afin de vous protéger contre ces fuites, installez
le couvercle du guide-chaîne et mettez un tissu
absorbant sous le guide.
TRANSPORT DE LA TRONÇONNEUSE
Les outils peuvent bouger pendant le transport. Assurezvous que l’outil est sécurisé et qu’il ne peut ni tomber ni
entrer en contact avec des personnes ou des biens.
• Débranchez la tronçonneuse.
• Installez le guide-chaîne.
• Si vous le voulez, purgez l’huile de la barre et de la
chaîne pour limiter les fuites.
ÉLIMINATION DE LA TRONÇONNEUSE
Ce produit Oregon® est conçu et fabriqué avec des
matériaux et des composants de grande qualité
pouvant être recyclés et réutilisés. À la fin de vie
du produit, et conformément à la directive //
EC, les appareils électriques ne doivent pas être
éliminés dans votre poubelle domestique. Dans
l’Union européenne, il existe des systèmes de
collecte distincts pour les composants électriques
et les produits électroniques usés. Veuillez
éliminer ce matériel d’une façon respectueuse de
l’environnement dans votre déchetterie/centre de
recyclage local(e).
Tronçonneuse Modèle CS1200-092
37
Page 38

Symboles et étiquettes
108
Symboles et étiquettes
Ces symboles et étiquettes apparaissent sur la tronçonneuse et/ou dans le présent manuel.
SYMBOLE DÉSIGNATION EXPLICATION
Construction de classe II Outils de construction désignés comme doublement isolés
Symbole d’alerte de
sécurité
Lisez les instructions
Lunettes de protection Portez des lunettes de protection lorsque vous utilisez la tronçonneuse.
Signifie que le texte qui suit explique un danger, un avertissement
ou une mise en garde.
Le manuel d’instructions original comporte d’importantes informations
sur la sécurité et le fonctionnement. Lisez et suivez attentivement les
instructions.
Portez une protection
pour les oreilles
Protection pour les mains
Portez une protection
pour la tête
Porter un pantalon Portez un pantalon lorsque vous utilisez la tronçonneuse.
Chaussures de protection
Puissance acoustique,
Lwa
Attention à l’effet de
rebond
Contact avec l’extrémité
de la barre
Angle d’effet de rebond de
la tronçonneuse
Tenue à deux mains Tenez la tronçonneuse avec les deux mains.
Tenue à une main Ne tenez pas la tronçonneuse avec une seule main.
Ne pas utiliser une échelle
Ne pas jeter
Protéger de la pluie N’utilisez pas la tronçonneuse dans des conditions d’humidité.
Câble endommagé
Outil de coupe
Portez une protection pour les oreilles lorsque vous utilisez la
tronçonneuse.
Portez des gants lorsque vous utilisez la tronçonneuse et lorsque vous
manipulez la chaîne de tronçonneuse.
Portez une protection pour la tête lorsque vous utilisez la tronçonneuse.
Portez des chaussures de travail fermées appropriées lorsque vous
utilisez la tronçonneuse.
Niveau de puissance acoustique
Danger:
L’effet de rebond peut provoquer de graves blessures.
Évitez tout contact avec l’extrémité de la barre.
Conçu pour une utilisation avec une chaîne de tronçonneuse à faible effet
de rebond.
Ne vous tenez jamais sur une échelle lorsque vous utilisez la
tronçonneuse.
Ne pas jeter dans les ordures ménagères. L’apporter dans un centre de
recyclage agrée.
Vérifiez régulièrement que le câble d’alimentation n’a pas subi de
dommages. Retirez immédiatement la fiche du secteur si le câble est
endommagé ou coupé.
Outil de coupe. Ne touchez pas la chaîne sans avoir d’abord désactivé
la tronçonneuse en la débranchant.
38
Risque de chute Connaissez l’emplacement du câble à tout moment.
Débrancher avant
l’entretien
Débranchez avant d’effectuer toute opération d’entretien.
Tronçonneuse Modèle CS1200-092
Page 39

Noms et termes relatifs à la tronçonneuse
Noms et termes relatifs à la tronçonneuse
Collet d’alignement : saillie sur la plaque du coussinet
qui s’intègre dans l’encoche du guide.
Burette à huile automatique : système qui lubrifie
automatiquement le guide-chaîne et la chaîne de la
tronçonneuse.
Plaque du coussinet : support de montage situé sur la
tête motrice qui permet d’assurer l’alignement adéquat du
guide-chaîne.
Encoche du guide : partie découpée du guide-chaîne
qui s’ajuste sur le collet d’alignement et le goujon de
montage.
Zone de sécurité pour les personnes à proximité :
cercle de m ( pi) autour de l’utilisateur qui ne doit
inclure aucun(e) personne, enfant ou animal à proximité.
Frein de chaîne : dispositif qui sert à arrêter
ou verrouiller la chaîne de tronçonneuse, activé
manuellement ou non en cas d’effet de rebond.
Attrape-chaîne : dispositif qui sert à retenir la chaîne de
tronçonneuse si elle casse ou déraille.
Calibre de chaîne : épaisseur du maillon d’entraînement
de la chaîne de tronçonneuse, là où il s’insère dans la
rainure de barre, déterminée par la référence de pièce
indiquée sur les maillons d’entraînement.
Pas de chaîne : distance entre trois rivets consécutifs sur
la chaîne de tronçonneuse divisée par deux, déterminée
par la référence de pièce indiquée sur les maillons
d’entraînement.
Tête motrice de la tronçonneuse : tronçonneuse sans
chaîne ni guide-chaîne.
Molette de tension de la chaîne : Molette sur le
panneau latéral qui, lorsque vous la tournez, règle la
tension de la chaîne de tronçonneuse.
Maillon d’entraînement : maillon de la chaîne de
tronçonneuse en forme d’aileron qui s’engage dans la
rainure sur le guide-chaîne.
Pignon d’entraînement : partie crantée qui conduit la
chaîne de la tronçonneuse.
Longueur de coupe effective : distance approximative
entre la base de la griffe d’abattage et le bord extérieur
du maillon de coupe avec le tendeur réglé en position
centrale.
Trait d’abattage : dernière entaille lors du processus
d’abattage pratiquée sur le côté opposé à l’entaille
d’abattage sur le tronc d’un arbre.
Poignée avant : poignée d’appui située à l’avant ou vers
l’avant de la tronçonneuse et prévue pour une prise par la
main gauche.
Protège-main : barrière structurelle entre la poignée
avant d’une tronçonneuse et le guide-chaîne, qui sert
également de mécanisme d’activation du frein de chaîne.
Guide-chaîne : structure sur rail qui supporte et guide la
chaîne de la tronçonneuse. Appelé parfois « guide ».
Couvercle du guide-chaîne : couvercle en plastique qui
protège le guide-chaîne et la chaîne de tronçonneuse
lorsque la tronçonneuse n’est pas utilisée.
Effet de rebond : mouvement rapide vertical et/ou arrière
du guide-chaîne qui se produit lorsque la chaîne située
près de l’extrémité supérieure du guide-chaîne frappe
un objet comme un billot ou une branche, ou lorsque la
chaîne est prise dans une entaille du tronc.
Chaîne à faible effet de rebond : chaîne conforme aux
exigences de performance d’effet de rebond faible des
normes ANSI B. et CSA Z..
Boîtier du moteur : couvercle en plastique de la tête
motrice de la tronçonneuse.
Goujon de montage : saillie filetée sur le collet
d’alignement qui s’étend à travers l’encoche du guide.
Entaille d’abattage : entaille dans le tronc pour diriger la
chute de l’arbre.
Poignée arrière : poignée d’appui située à l’arrière ou
vers l’arrière de la tronçonneuse et prévue pour une prise
par la main droite.
Protège-main arrière : barrière structurelle située
dans la partie inférieure droite de la poignée arrière pour
protéger l’utilisateur en cas de rupture ou de déraillement
de la chaîne de tronçonneuse.
Guide-chaîne à effet de rebond réduit :
guide-chaîne avec un rayon maximal tel qu’indiqué
dans les normes ANSI B. et CSA Z. et qui sert à
réduire de façon significative l’effet de rebond.
Chaîne de tronçonneuse : chaîne dentelée en boucle, qui
coupe le bois, entraînée par la tête motrice et soutenue
par le guide-chaîne. Appelée parfois « chaîne ».
Panneau latéral : couvercle en plastique sur la tête
motrice qui couvre le pignon d’entraînement et le
dispositif de serrage de la chaîne qui est retiré et installé
avec le bouton de déverrouillage du panneau latéral.
Patte du panneau latéral : La saillie sur le panneau
latéral qui se loge dans une fente de la tête motrice.
Utilisez-la pour aligner correctement le panneau latéral
pendant l’installation.
Griffe d’abattage : dispositif installé à l’avant de la
tronçonneuse qui sert de point d’articulation lorsqu’il est
en contact avec un arbre ou une bûche afin de faciliter la
coupe. Également appelée « crampons pointus ».
Support de décharge de traction : crochet sur la
poignée arrière auquel se fixe la rallonge pour protéger le
câble et empêcher la déconnexion pendant l’utilisation.
Bouton de verrouillage de la gâchette : arrêt mobile qui
évite un fonctionnement non voulu de l’interrupteur de la
gâchette, jusqu’à ce qu’il soit activé manuellement.
Interrupteur de la gâchette : un dispositif qui sert à
allumer et à éteindre la tronçonneuse.
Pièces usées : pièces telles que la chaîne de
tronçonneuse et le guide-chaîne qui peuvent s’user
pendant leur utilisation et être remplacées par
l’utilisateur.
Tronçonneuse Modèle CS1200-092
39
Page 40

Identification du produit
Identification du produit
Connaître la tronçonneuse
BOUCHON DU RÉSERVOIR D’HUILE
PROTÈGE-MAIN ARRIÈRE
REGARD DU NIVEAU D’HUILE
CÂBLE D’ALIMENTATION
PROTÈGE-MAIN AVANT
CHAÎNE DE
TRONÇONNEUSE
GUIDE-CHAÎNE
TÊTE MOTRICE
POIGNÉE AVANT
COUVERCLE DU GUIDE-CHAÎNE
GRIFFE D’ABATTAGE
GOUJON DE MONTAGE
PIGNON D’ENTRAÎNEMENT
MOLETTE DE TENSION DE
LA CHAÎNE
PLAQUE SIGNALÉTIQUE
DU PRODUIT
ATTRAPE-CHAÎNE
BOUTON DE
DÉVERROUILLAGE DU
PANNEAU LATÉRAL
PANNEAU LATÉRAL
POIGNÉE ARRIÈRE
BOUTON DE VERROUILLAGE
DE LA GÂCHETTE
GÂCHETTE
PATTE DU
PANNEAU LATÉRAL
SUPPORT DE DÉCHARGE
DE TRACTION
Remarque : voir la section « Préparation avant utilisation » pour une liste des articles inclus.
40
Tronçonneuse Modèle CS1200-092
Page 41

Préparation avant utilisation
Préparation avant utilisation
DANGER : pour éviter les blessures
corporelles graves, n’utilisez la tronçonneuse
qu’avec le guide-chaîne, la chaîne et le panneau
latéral correctement assemblés.
AVERTISSEMENT : n’essayez pas de faire
fonctionner la tronçonneuse si une pièce est
endommagée ou manquante.
AVERTISSEMENT : un outil électrique branché
peut démarrer de façon accidentelle. Débranchez
la tronçonneuse avant de la préparer pour une
utilisation ou avant l’entretien.
Contenu de la boîte
La tronçonneuse est livrée avec les éléments
suivants :
• Tête motrice de la tronçonneuse
• Chaîne de tronçonneuse et guide-chaîne
• Couvercle du guide-chaîne
Après avoir déballé la tronçonneuse, inspectez-la
avec soin afin de vous assurer qu’elle n’a pas été
endommagée pendant le transport et qu’aucune
pièce ne manque. Si des pièces sont manquantes
ou endommagées, n’utilisez pas la tronçonneuse.
Contactez Oregon
Pour connaître les numéros de téléphone propres à
chaque pays, consultez la section « Service après-vente
par pays ».
®
pour obtenir des pièces de rechange.
Vérification de la position
du protège-main avant
Une fois la tronçonneuse déballée, vérifiez la position
du protège-main avant. La tronçonneuse ne
fonctionnera pas si le frein de chaîne est engagé.
Tirez le protège-main avant vers l’arrière jusqu’au
niveau de la poignée avant avant de l’utiliser (Fig. ).
FIG. 5
PROTÈGE-MAIN AVANT
EN POSITION DE FONCTIONNEMENT
PROTÈGE-MAIN AVANT
EN POSITION DE FREIN
Remplissage du réservoir d’huile
du guide et de la chaîne
IMPORTANT : l’huile du guide et de la chaîne sert
à éviter l’usure prématurée. Ne faites jamais
fonctionner la tronçonneuse si l’huile n’est pas
visible à travers le regard. Vérifiez souvent le
niveau d’huile et remettez-en si nécessaire.
Il est nécessaire de lubrifier correctement le guide et
la chaîne avec de l’huile adaptée. La tronçonneuse
est dotée d’un graisseur automatique qui graisse le
guide et la chaîne lorsque la tronçonneuse tourne pour
qu’ils soient correctement lubrifiés. Pour de meilleurs
résultats, utilisez l’huile pour barre et chaîne Oregon®.
Elle a été spécialement conçue pour réduire les frictions
et accélérer les coupes. N’utilisez JAMAIS d’huile ou
d’autre lubrifiant n’ayant pas été spécialement conçu
pour la barre et la chaîne. Cela peut entraîner une
coagulation de l’huile dans le système, ce qui peut user
prématurément le guide et la chaîne.
Posez la tronçonneuse sur une surface plate et
solide, afin que le bouchon d’huile () soit sur le
dessus (Fig. ).
FIG. 6
(1)
(2)
• Enlevez tous les débris autour du bouchon.
• Enlevez le bouchon.
• Versez doucement de l’huile pour guide et chaîne
dans le réservoir.
• Remettez le bouchon en place et vérifiez que l’huile
est visible dans le réservoir ().
Tronçonneuse Modèle CS1200-092
41
Page 42

Préparation avant utilisation
Montage du guide-chaîne et de la
chaîne de tronçonneuse
AVERTISSEMENT : un outil électrique branché
peut démarrer de façon accidentelle. Débranchez
la tronçonneuse avant de la préparer pour une
utilisation ou avant l’entretien.
Portez des gants.
• Débranchez la tronçonneuse.
• Desserrez légèrement le bouton de déverrouillage
du panneau latéral (), mais ne retirez pas le
panneau latéral (Fig. ).
• Desserrez la molette de tension de la chaîne ()
autant que possible.
• Desserrez le bouton de déverrouillage du panneau
latéral et retirez le panneau latéral.
FIG. 7
(1)
(2)
• Passez la nouvelle chaîne de tronçonneuse autour
du pignon d’entraînement afin que les bords
coupants des dents situées le long de la partie
supérieure du guide-chaîne soient dos à la tête
motrice(Fig. ).
FIG. 9
• Passez la chaîne dans la rainure du guide. Faites
tourner le dispositif de serrage de la chaîne pour
éloigner le guide du moteur en le faisant coulisser
afin de tendre la chaîne (Fig. ).
FIG. 10
• Placez le guide-chaîne sur le coussinet du guide en
faisant coulisser l’encoche du guide sur le collet
d’alignement (Fig. ) avec le goujon de montage
inséré dans la fente du guide-chaîne. Alignez le trou
de tension inférieur du guide-chaîne avec le goujon
de tension.
FIG. 8
PLAQUE DU COUSSINET
COLLET D’ALIGNEMENT
GOUJON DE MONTAGE
42
• Installez le panneau latéral en veillant à ce que
l’attrape-chaîne et le panneau latéral soient
correctement positionnés dans leurs emplacements
(Fig. ), puis serrez légèrement le bouton de
déverrouillage du panneau latéral.
FIG. 11
Tronçonneuse Modèle CS1200-092
Page 43

Préparation avant utilisation
• Réglez la tension de la chaîne comme décrit à la
section « Tension de la chaîne de tronçonneuse » au
chapitre « Préparation avant utilisation » du présent
manuel.
IMPORTANT : la chaîne de la tronçonneuse doit
être correctement tendue avant toute utilisation.
Consultez la section « Tension de la chaîne de
tronçonneuse » au chapitre « Préparation avant
utilisation » du présent manuel.
Tension de la chaîne de
tronçonneuse
AVERTISSEMENT : un outil électrique branché
peut démarrer de façon accidentelle. Débranchez
la tronçonneuse avant de la préparer pour une
utilisation ou avant l’entretien.
AVERTISSEMENT : si la chaîne est toujours
lâche lorsque la tronçonneuse est à sa tension
maximale, remplacez la chaîne.
IMPORTANT : tendez la chaîne de tronçonneuse
uniquement lorsque la chaîne est froide. Une
chaîne encore chaude peut se rétracter et
endommager le guide-chaîne ou la chaîne à
mesure qu’elle refroidit.
Portez des gants.
• Débranchez la tronçonneuse avant de tendre la
chaîne.
• Desserrez légèrement le bouton de déverrouillage
du panneau latéral, mais ne retirez pas le panneau
latéral.
• Maintenez l’extrémité du guide-chaîne (Fig. ) puis
faites tourner la molette de tension de la chaîne
pour serrer.
• Serrez jusqu’à ce que les lames les plus basses
sous le guide entrent bien en contact avec le
guide (Fig. ).
FIG. 13
• Serrez le bouton de déverrouillage du panneau
latéral.
• Tirez légèrement sur la chaîne. La tension est
correcte lorsque la chaîne revient à sa position
initiale après avoir été écartée de mm du guidechaîne.
• Après une courte période d’utilisation, laissez la
chaîne refroidir, débranchez la tronçonneuse et vérifiez
à nouveau la tension. Contrôlez soigneusement la
tension pendant la première demi-heure d’utilisation,
et régulièrement tout au long de la durée de vie de la
chaîne, en la réglant si nécessaire, une fois la chaîne et
le guide refroidis. Ne tendez jamais la chaîne quand elle
est chaude.
La chaîne se tendra suite à une utilisation normale.
Un apport insuffisant en huile, une utilisation
agressive ou un défaut d’entretien peut toutefois
provoquer un étirement prématuré.
INCORRECT
CORRECT
FIG. 12
Tronçonneuse Modèle CS1200-092
43
Page 44

Utilisation de la tronçonneuse
Utilisation de la tronçonneuse
POSITION
Tenez-vous debout, les pieds posés sur un sol ferme,
votre poids également réparti sur chaque pied (Fig. ).
Utilisation générale
DANGER : pour éviter les blessures corporelles
graves, ne vous penchez pas trop en avant et
ne vous tenez pas sur une échelle, un escabeau
ou dans une position élevée qui n’est pas
complètement sécurisée. Ne découpez jamais à
une hauteur qui dépasse votre épaule.
AVERTISSEMENT : pour réduire le risque de
blessure, portez toujours des chaussures, des
gants et des protections pour la tête, les oreilles
et les yeux adéquats.
PRISE EN MAIN
Prenez toujours l’outil avec les deux mains. Attrapez
la poignée avant avec la main gauche et la poignée
arrière avec la main droite (Fig. ). Entourez la
poignée avant de vos doigts, le pouce étant placé en
dessous.
FIG. 14
SAISISSEZ AVEC LE POUCE
SOUS LA POIGNÉE
ARRÊT DE LA TRONÇONNEUSE
Relâchez l’interrupteur de la gâchette pour arrêter la
tronçonneuse.
DÉMARRAGE DE LA TRONÇONNEUSE
AVERTISSEMENT : pour réduire le risque
de blessure, ne forcez jamais le mécanisme de
verrouillage en scotchant, attachant ou arrimant
le bouton de verrouillage de la gâchette.
Assurez-vous que le frein de chaîne n’est pas engagé.
Attrapez fermement les poignées avant et arrière.
Appuyez et maintenez enfoncé le bouton de
verrouillage de la gâchette avec le pouce (). Pour
démarrer la tronçonneuse, appuyez sur l’interrupteur
de la gâchette () (Fig. ). Il n’est pas nécessaire de
continuer à appuyer sur le bouton de verrouillage de
la gâchette. Il restera désengagé tant que la gâchette
sera relâchée.
FIG. 15
FIG. 16
(1) BOUTON DE VERROUILLAGE
DE LA GÂCHETTE
(2) INTERRUPTEUR
DE LA GÂCHETTE
44
Tronçonneuse Modèle CS1200-092
Page 45

Utilisation de la tronçonneuse
TEST DU FREIN DE CHAÎNE
Assurez-vous que le frein de chaîne fonctionne
avant d’utiliser la tronçonneuse. Pour vérifier le bon
fonctionnement du frein :
• Placez la tronçonneuse sur une surface plate et
solide.
• Démarrez brièvement la tronçonneuse.
• Gardez la main gauche sur la poignée avant et
tournez le poignet gauche afin de faire avancer le
protège-main avant et d’activer manuellement le
frein de chaîne (Fig. ).
FIG. 17
• Relâchez l’interrupteur de la gâchette.
Si le frein de la chaîne fonctionne correctement, le
moteur et la chaîne de la tronçonneuse s’arrêtent
immédiatement. Si le moteur et la chaîne de la
tronçonneuse ne s’arrêtent pas immédiatement,
faites contrôler le frein de chaîne chez un réparateur
agréé.
• Replacez le protège-main avant en position de
fonctionnement.
Utilisation et entretien du
câble d’alimentation
CHOIX D’UNE RALLONGE
Choisissez une rallonge qui soit :
• explicitement indiquée comme conçue pour un
usage extérieur
• de calibre (AWG) suffisant pour acheminer
le courant sur toute la longueur du câble,
conformément au tableau ci-dessous
Choisissez le calibre de la rallonge en fonction de la
longueur souhaitée et des caractéristiques électriques
indiquées sur l’étiquette du produit.
Voici les calibres recommandés en fonction de la
longueur du câble.
LONGUEUR DU
CÂBLE (m)
De 0 à 15 14 AWG (1,5 mm
De 16 à 30 12 AWG (3,0 mm2)
Assurez-vous que l’isolation ne comporte pas de
craquelure et que les fiches de chaque extrémité ne
sont pas endommagées.
UTILISATION DU SUPPORT DE
DÉCHARGE DE TRACTION
Il est important d’utiliser le support de décharge de
traction pour deux raisons :
• il permet de réduire l’usure du câble d’alimentation
et de la rallonge ainsi que de leurs fiches ;
• il empêche la tronçonneuse de se débrancher
accidentellement de la rallonge.
Pour utiliser le support de décharge de traction, pliez la
rallonge en forme de U et faites-la passer dans le trou
de la poignée arrière. Faites glisser la boucle du câble
au-dessus du crochet et tirez doucement jusqu’à bien
l’ajuster (Fig. ).
CALIBRE MINIMAL
2
)
Tronçonneuse Modèle CS1200-092
FIG. 18
45
Page 46

Utilisation de la tronçonneuse
Découpage
AVERTISSEMENT : pour réduire le risque de
blessure, portez des bottes, des gants et des
protections pour la tête, les oreilles et les yeux
adéquats.
AVERTISSEMENT : pour réduire le risque
d’électrocution, assurez-vous que l’isolation
du câble est intacte et que le câble est au sec
et ne risque pas d’être coupé ou d’être dans le
passage.
AVERTISSEMENT : pour réduire le risque de
blessure, assurez-vous d’être toujours stable
et de tenir fermement la tronçonneuse avec les
deux mains lorsque le moteur tourne.
AVERTISSEMENT : pour réduire le risque de
blessure, soyez prévoyant et préparez plusieurs
voies de retrait avant de commencer à travailler.
MISE EN GARDE : établissez une zone de
sécurité de 6 m (20 pi) pour les personnes à
proximité avant d’utiliser cet équipement. Cette
zone de sécurité est un cercle d’au moins 6 m
(20 pi) autour de l’utilisateur qui ne doit inclure
aucune personne, aucun enfant, ni aucun animal
(Fig. 19). Les opérations d’abattage exigent une
zone de sécurité plus grande en fonction de la
taille de l’arbre, consultez la section « Abattage
d’un arbre ».
FIG. 19
6 m (20 ft)
IMPORTANT : exercez-vous à couper des billes
sur un chevalet ou un berceau de sciage jusqu’à
vous familiariser avec le fonctionnement de la
tronçonneuse.
Pour obtenir les meilleures performances et manier la
tronçonneuse en toute sécurité, suivez ces instructions :
• Respectez l’ensemble des règles et règlementations
nationales et municipales applicables relatives à la
coupe ;
• Faites régulièrement des pauses pour réduire le risque
de blessure ;
• Avant de commencer la coupe, assurez-vous que la
chaîne de la tronçonneuse est bien tendue et affûtée.
Les chaînes de tronçonneuse sont prévues pour couper
du bois uniquement. N’utilisez pas la tronçonneuse pour
couper une autre matière et ne laissez pas la chaîne
entrer en contact avec de la saleté, des pierres, des
clous, des agrafes ou des câbles. Ces matériaux sont
extrêmement abrasifs et abîmeront très rapidement le
revêtement protecteur de la chaîne.
Affûtez ou remplacez la chaîne de la tronçonneuse si :
• La pression nécessaire à la coupe augmente de façon
significative ;
• Les copeaux de bois qui sortent de la chaîne sont très
fins ou semblables à de la sciure.
Ne travaillez pas avec une chaîne émoussée, car cela
provoque une augmentation de l’effort nécessaire à la
coupe, une coupe irrégulière et un risque accru d’effet de
rebond. Ne forcez jamais une chaîne émoussée à couper.
• Vérifiez la bonne adhérence de la poignée et tenezvous face au bois à couper, tronçonneuse éteinte.
Appuyez sur le bouton de verrouillage de la gâchette,
puis sur l’interrupteur. Attendez que la chaîne ait
atteint sa vitesse maximale avant de commencer la
coupe.
• Commencez la coupe en enfonçant légèrement
le guide-chaîne contre le bois. N’appuyez que
légèrement : laissez la tronçonneuse faire son travail.
• Conservez une vitesse constante durant toute la coupe,
puis relâchez la pression juste avant la fin.
• Sachez toujours où se trouve le câble d’alimentation
pour ne pas risquer de trébucher dessus ou de le
couper.
• Sachez toujours où se trouve l’extrémité du guide et
évitez tout contact avec d’autres objets.
• Si la tronçonneuse s’arrête brusquement pendant la
coupe, retirez-la du morceau de bois, puis reprenez la
coupe en exerçant une pression plus légère.
46
Tronçonneuse Modèle CS1200-092
Page 47

Utilisation de la tronçonneuse
ÉLAGAGE
MISE EN GARDE : les branches qui tombent
peuvent rebondir ou se redresser après avoir touché
le sol, il est donc indispensable de garder le terrain
déblayé pour laisser plusieurs voies de retrait.
Déblayez l’espace de travail et portez une protection
pour la tête.
L’élagage consiste à retirer les branches mortes ou trop
développées pour entretenir la bonne santé de la plante.
• Prévoyez des voies de retrait avant de commencer la coupe
et assurez-vous qu’il n’y a pas d’obstacle. Sachez toujours
comment vous éloigner du point de chute des branches.
• Assurez-vous que les personnes à proximité et les
aides sont à une distance suffisante du point de chute
des branches. Les personnes à proximité et les aides ne
doivent jamais se tenir directement devant ou derrière
l’utilisateur. Consultez la Fig. .
• Restez toujours stable et tenez fermement la
tronçonneuse avec les deux mains. Ne vous penchez
pas trop en avant. Ne montez jamais sur un arbre ou
sur une échelle pour atteindre les branches hautes.
• Sécurisez les branches pouvant être dangereuses.
• Utilisez un équipement auxiliaire adapté.
• Élaguez les branches les plus basses avant de passer
à de plus hautes.
• Laissez la chaîne atteindre la pleine vitesse avant de
commencer la coupe.
• Appliquez une pression légère sur la branche.
• Pour les branches longues (Fig. ), coupez d’abord
l’extrémité de la branche () pour réduire sa pression,
puis élaguez-la plus près du tronc ()
.
• Les branches épaisses (de plus de cm [ po] de
diamètre) peuvent provoquer des éclats ou pincer la
chaîne si elles sont coupées en une seule fois par le
haut. Pour l’éviter, coupez d’abord légèrement le bas de
la branche pour réduire la pression (), puis coupez
entièrement la branche en partant du haut () jusqu’à
rejoindre l’entaille du bas
FIG. 21
(2)
(1)
(Fig. ).
• Après avoir coupé la plus grande partie de la branche,
tronçonnez-la d’une coupe régulière près du tronc
(Fig. ).
FIG. 22
FIG. 20
(1)
Tronçonneuse Modèle CS1200-092
(2)
47
Page 48

Utilisation de la tronçonneuse
ABATTAGE D’UN ARBRE
MISE EN GARDE : un arbre est susceptible de
rouler ou de glisser le long d’une pente après avoir
été abattu. Prévoyez et déblayez une voie de
retrait avant de commencer la coupe. La voie de
retrait doit se prolonger en arrière et en diagonale
derrière la ligne de chute prévue
FIG. 23
DIRECTION
DE LA CHUTE
OPTIONS DE VOIE DE
RETRAIT
L’abattage consiste à faire tomber un arbre.
• Avant l’abattage, observez le penchant naturel de
l’arbre, l’emplacement de grandes branches et la
direction du vent pour évaluer la ligne de chute de
l’arbre.
• Retirez la saleté, les roches, les morceaux d’écorce
détachés, les clous, agrafes et fils métalliques de
l’arbre avant de débuter la coupe.
• Lorsque les opérations de tronçonnage et
d’abattage sont exécutées par deux ou plusieurs
personnes simultanément, le tronçonnage doit
être effectué à une distance d’au moins deux fois la
hauteur de l’arbre à abattre.
• On ne doit pas tronçonner d’arbre de sorte à mettre
la vie d’une personne en danger, de frapper des fils
du réseau électrique ou de provoquer des dommages
aux biens. Si l’arbre touche un fil du réseau électrique,
quittez immédiatement les lieux et avertissez
l’entreprise du réseau.
• Utilisez les crampons de métal à l’avant de
la tronçonneuse pour la maintenir sur le bois.
Placez les crampons de métal dans le bois et
utilisez-les comme points de levier pour renforcer
la stabilité lors de la coupe de bois de diamètre
important.
(Fig. 23).
RETRAIT
45°
RETRAIT
Entaille d’abattage
• Entaillez d’abord le tronc sur un tiers de son
diamètre, perpendiculairement à la direction de la
chute. Commencez par l’entaille horizontale
inférieure (). Cela permettra d’éviter tout
pincement de la chaîne de la tronçonneuse ou du
guide-chaîne lorsque la seconde entaille () sera
effectuée (Fig. ).
FIG. 24
DIRECTION
DE LA CHUTE
ENTAILLE
ENTAILLE D’ABATTAGE
(2)
(1)
Trait d’abattage
• Effectuez ensuite le trait d’abattage au moins
mm ( po) au-dessus de l’entaille horizontale
(Fig. ). Gardez le trait d’abattage parallèle à
l’entaille horizontale.
FIG. 25
DIRECTION
DE LA CHUTE
NOTCH
TRAIT D’ABATTAGE
50 MM
(2 IN)
CHARNIÈRE
TRAIT
D’ABATTAGE
50 MM
(2 IN)
• Effectuez le trait d’abattage de sorte qu’il y ait
assez de bois pour servir de charnière. Cette
charnière naturelle empêche l’arbre de se tordre
et de tomber dans la mauvaise direction. Ne la
découpez pas de part en part.
• Dès que le trait d’abattage se rapproche de la
charnière naturelle, l’arbre devrait amorcer sa chute.
48
Tronçonneuse Modèle CS1200-092
Page 49

Utilisation de la tronçonneuse
• S’il y a un risque que l’arbre ne tombe pas dans la
direction souhaitée ou qu’il roule en arrière et coince
la tronçonneuse, arrêtez la coupe avant de terminer
le trait d’abattage et utilisez des coins en bois, en
plastique ou en aluminium pour ouvrir l’entaille et
faire basculer l’arbre le long de la ligne de chute
souhaitée.
• Lorsque l’arbre commence sa chute, retirez
la tronçonneuse du trait, arrêtez le moteur et
déposez-la sur le sol, puis reculez dans la voie de
retrait prévue.
• Faites attention aux chutes de branches et regardez
où vous marchez.
ÉBRANCHAGE D’UN ARBRE
MISE EN GARDE : les branches sous
tension peuvent se redresser et heurter
l’utilisateur ou lui faire perdre le contrôle de
la tronçonneuse et provoquer des blessures.
Faites toujours attention aux branches sous
tension qui peuvent heurter l’utilisateur ou la
tronçonneuse lors de leur coupe.
L’ébranchage est la coupe des branches d’un arbre
abattu.
• Pour ce faire, conservez intactes les branches
maîtresses inférieures pour supporter le billot audessus du sol.
• Retirez les petites branches d’un seul mouvement.
• Les branches sous tension doivent être coupées
depuis le bas pour éviter de coincer la tronçonneuse
(Fig. ).
FIG. 26
COUPE DES
BRANCHES
BRANCHE D’ARBRE
TRONÇONNER UN TRONC
MISE EN GARDE : le tronçonnage de troncs
sous tension augmente le risque de rebond.
Utilisez l’une des méthodes suivantes pour
soutenir le tronc lors de son tronçonnage.
Le tronçonnage consiste à débiter un tronc en
morceaux. Il est important de vous assurer un bon
équilibre et de veiller à ce que votre poids soit
également réparti sur vos deux pieds. Si possible, le
tronc doit être surélevé et soutenu par des branches,
des troncs ou des cales.
• Lorsque le tronc est soutenu sur toute sa longueur,
coupez-la depuis le haut (tronçonnage par le
dessus) (Fig. ).
FIG. 27
• Lorsque la bille est soutenue à l’une de ses
extrémités, faites une entaille du tiers de son
diamètre par le bas (tronçonnage par le dessous),
puis terminez la coupe en tronçonnant par le dessus
jusqu’à la première entaille (Fig. ).
FIG. 28
e
TRONÇONNAGE PAR LE DESSUS (2/3 DU
2
DIAMÈTRE) POUR REJOINDRE LE 1
DE COUPE (POUR ÉVITER LE PINCEMENT)
TRONC SOUTENU
SUR TOUTE SA LONGUEUR
TRONÇONNER PAR LE DESSUS
POUR ÉVITER DE COUPER LE SOL
LE TRONC EST SOUTENU À
UNE SEULE EXTRÉMITÉ
er
TRAIT
MAINTENEZ LA PIÈCE AU-DESSUS DU SOL
CONSERVEZ UN SUPPORT DE BRANCHE JUSQU’À
CE QUE LE TRONC SOIT COUPÉ
Tronçonneuse Modèle CS1200-092
er
TRONÇONNAGE PAR LE DESSOUS (1/3 DU
1
DIAMÈTRE) POUR ÉVITER LES ÉCLATS
49
Page 50

Utilisation de la tronçonneuse
• Lorsque le tronc est soutenue aux deux extrémités,
tronçonnez un tiers de son diamètre par le dessus,
puis terminez la coupe en tronçonnant par le
dessous les deux tiers restants jusqu’à rejoindre la
première entaille (Fig. ).
FIG. 29
2
DIAMÈTRE) POUR REJOINDRE LE 1er TRAIT DE
SCIE (POUR ÉVITER LE PINCEMENT)
TRONÇONNER UN TRONC
er
1
TRONÇONNAGE PAR LE DESSUS (1/3 DU
DIAMÈTRE) POUR ÉVITER LES ÉCLATS
e
TRONÇONNAGE PAR LE DESSOUS (2/3 DU
• Si vous utilisez la tronçonneuse sur un terrain en
pente, tenez-vous toujours en amont du tronc
(Fig. ).
FIG. 30
TRONÇONNER EN PENTE
SE TENIR EN AMONT DU TRONC
LORS DU TRONÇONNAGE, CAR
LE TRONC RISQUE DE ROULER
VERS LE BAS
• Pour conserver un parfait contrôle lors de la coupe,
relâchez la pression près de la fin du tronçonnage,
sans toutefois relâcher la prise sur les poignées de
la tronçonneuse.
• Ne laissez pas la chaîne toucher le sol.
• Une fois la coupe terminée, attendez
l’immobilisation complète de la chaîne avant de
déplacer la tronçonneuse.
• Arrêtez toujours le moteur avant de vous déplacer
vers un autre arbre.
50
Tronçonneuse Modèle CS1200-092
Page 51

Entretien et nettoyage
Entretien et nettoyage
AVERTISSEMENT : ne pas identifier et
remplacer les pièces endommagées ou usées
peut entraîner de graves blessures corporelles.
Inspectez régulièrement la tronçonneuse. Une
inspection régulière est la première étape d’un
entretien correct. Suivez les consignes cidessous pour garantir un niveau de sécurité et de
satisfaction optimal. Remplacez immédiatement
toute pièce endommagée ou présentant une
usure excessive.
AVERTISSEMENT : un outil électrique branché
peut démarrer de façon accidentelle. Débranchez
la tronçonneuse avant de la préparer pour une
utilisation ou avant l’entretien.
MISE EN GARDE : lorsque vous nettoyez la
tronçonneuse, ne la plongez pas dans l’eau ni
dans un autre liquide.
Inspection
Avant chaque utilisation et si la tronçonneuse est
tombée, inspectez les éléments suivants :
• Câble : vérifiez que la fiche est en bon état,
qu’elle n’est ni pliée ni corrodée et que l’isolation
est intacte. Si le câble est endommagé, ne l’utilisez
pas. Contactez un réparateur agréé.
• Poignées : les poignées avant et arrière ne doivent
pas comporter de craquelure ni tout autre défaut.
Elles doivent être propres et sèches.
• Protège-main avant : le protège-main ne doit pas être
endommagé et doit pouvoir être facilement déplacé
vers l’avant et l’arrière. Lorsqu’il est déplacé, le
protège-main doit pouvoir activer le frein de la chaîne.
• Guide-chaîne : le guide doit être droit et ne pas être
ébréché, fissuré, ni excessivement usé.
• Chaîne de tronçonneuse : la chaîne doit être
correctement tendue et aiguisée et aucun
composant ne doit présenter de fissures,
d’écailles, de dents cassées ou d’usure excessive.
Consultez les sections « Tension de la chaîne de
tronçonneuse » et « Affûtage avec PowerSharp ».
• Panneau latéral : le panneau latéral ne doit pas
comporter de craquelure ni tout autre défaut. Il doit
s’ajuster correctement au corps de la tronçonneuse,
sans aucune torsion. Assurez-vous que l’attrapechaîne ne comporte aucune craquelure.
• Frein de chaîne : testez le frein de chaîne afin
de vous assurer qu’il fonctionne correctement.
Consultez la section « Test du frein de chaîne » dans
le chapitre « Utilisation générale ».
• Niveau d’huile : vérifiez que le réservoir d’huile est
plein avant toute utilisation.
• Boîtier du moteur : vérifiez qu’il n’y a aucune
craquelure sur le capot et aucun débris dans les
grilles d’aération.
Inspectez périodiquement les éléments suivants :
• Pignon d’entraînement : vérifiez l’absence de
rainures profondes, de dents cassées ou de bavures.
• Logement pour le goujon de montage sous le
panneau latéral : vérifiez que le goujon de montage
du guide-chaîne n’est pas tordu ou dénudé, que
le filetage n’est pas faussé et que la plaque du
coussinet et le collet d’alignement sont intacts et
ne sont pas obstrués par des débris.
Nettoyage
MISE EN GARDE : lorsque vous nettoyez la tête
motrice de la tronçonneuse, ne la plongez pas dans
l’eau ni dans un autre liquide.
Portez des gants.
• Débranchez la tronçonneuse.
• Éliminez les copeaux de bois et les autres débris du
boîtier du moteur et des évents.
• Nettoyez toujours les copeaux de bois, la sciure et
la saleté présents dans la rainure du guide-chaîne
lorsque vous remplacez la chaîne.
• Vérifiez que le câble et la fiche sont secs avant de
brancher cette dernière sur une prise.
Tension de la chaîne
de tronçonneuse
IMPORTANT : tendez la chaîne de tronçonneuse
uniquement lorsque la chaîne est froide. Une
chaîne encore chaude peut se rétracter et
endommager le guide-chaîne ou la chaîne à
mesure qu’elle refroidit.
Si la chaîne n’est pas en contact avec le dessous du
guide-chaîne quand la tronçonneuse est éteinte et
refroidie, elle doit être retendue.
Réglez la tension de la chaîne comme décrit
à la section « Tension de la chaîne de tronçonneuse »
au chapitre « Préparation avant utilisation » du
présent manuel.
Tronçonneuse Modèle CS1200-092
51
Page 52

Entretien et nettoyage
Affûtage de la Chaîne
Il est recommandé de confier l'affûtage de la chaîne
à un service technique OREGON®, mais l'opérateur
peut aussi s'en charger.
AVERTISSEMENT : En cas d'affûtage
incorrect de la chaîne ou de réglage
insatisfaisant des limiteurs de profondeur, le
risque de lésion corporelle est plus important.
Il faut impérativement affûter la chaîne
conformément aux spécifications décrites dans
ce manuel.
IMPORTANT : Affûter la chaîne conformément
à ces indications permettra de remédier
à toute dégradation mineure subie par la
chaîne à la suite de contacts avec le sol ou
d'événements similaires. Pour réparer des
dégâts plus sérieux (tels que ceux subis par
suite d'un contact avec une dalle en béton),
remplacez la chaîne ou confiez-la à un service
technique agréé Oregon®.
L'affûtage de la chaîne requiert les outils suivants
(proposés en kit par Oregon® ; voir « Caractéristiques
et composants ») :
• Guide d'affûtage
• Lime d'affûtage ronde de 4,5 mm (servez-vous
exclusivement de limes spécialement conçues pour
l'affûtage des chaînes de scie)
• Outil d'ajustage des limiteurs de profondeur à 0,65
mm (0,025 pouce)
• Lime plate
Après avoir rassemblé les outils, équipez-vous de
gants et de protections oculaires, puis débranchez la
tronçonneuse. Ensuite, limez la chaîne pour en régler
les limiteurs de profondeur :
• Desserrez le bouton de fixation du carter latéral,
puis déposez ce dernier.
• Desserrez la molette de tension de la chaîne autant
que possible.
• Déposez la chaîne.
• Serrez la chaîne dans un étau pour l'immobiliser.
• Placez l'outil d'ajustage des limiteurs de profondeur
de telle sorte que l'un d'entre eux passe à travers la
fente de l'outil.
• Si le limiteur de profondeur concerné déborde
au-delà du haut de la fente, servez-vous d'une
lime plate pour travailler le limiteur de
profondeur jusqu'à ce qu'il affleure la région
supérieure de l'outil (Fig. 31). Abstenez-vous de
limer les limiteurs de profondeur au point
d'atteindre un niveau inférieur à la valeur
d'ajustage des limiteurs de profondeur indiquée
dans ce manuel.
FIG. 31
OUTIL D'AJUSTAGE
DES LIMITEURS DE
PROFONDEUR
LIME PLATE
IMPORTANT : Affûtez dans une seule direction,
de l'intérieur vers l'extérieur. Abstenez-vous
systématiquement d'exécuter un mouvement
de va-et-vient lors de l'affûtage.
• Limez en progressant de l'intérieur vers l'extérieur
du limiteur de profondeur (Fig. ).
FIG. 32
INTÉRIEUR
EXTÉRIEUR
• Déposez l'outil d'ajustage des limiteurs de
profondeur.
• Après abaissement, limez systématiquement le coin
avant de chaque limiteur de profondeur
parallèlement à son profil initial arrondi ou incliné
(Fig. ).
FIG. 33
52
Tronçonneuse Modèle CS1200-092
Page 53

Entretien et nettoyage
• Répétez la procédure pour chacun des limiteurs de
profondeur que comporte la chaîne.
Après avoir ajusté les limiteurs de profondeur, affûtez
les gouges :
• Placez la lime d'affûtage de la chaîne dans le guide
d'affûtage.
• Alignez le guide d'affûtage de telle sorte que l'angle
d'attaque frontale approprié et repéré sur le guide
d'affûtage soit parallèle à la chaîne (Fig. ).
FIG. 34
LIME RONDE
GUIDE
D'AFFÛTAGE
• Affûtez d'abord les gouges situées du même côté
de la chaîne. Donnez 3 ou 4 coups de lime en
progressant de l'intérieur vers l'extérieur de chaque
gouge. Appliquez le même nombre de coups de lime
sur chaque gouge. Ensuite, retournez la
tronçonneuse puis répétez l’opération pour les
lames présentes de l’autre côté de la chaîne
(Fig. 35).
FIG. 35
• Veillez à ce que les gouges possèdent une longueur
identique.
• Après avoir procédé à l'affûtage de toutes les
gouges, servez-vous du guide d'affûtage pour
vérifier à nouveau l'ajustement des limiteurs
de profondeur. Procédez au besoin à un nouvel
ajustage des limiteurs de profondeur.
• Remettez la chaîne et le panneau latéral en place.
Remplacement d'une chaîne usée
Lorsque la chaîne de la tronçonneuse est fissurée ou
comporte des dents cassées, qu’elle est tendue au
point qu’elle ne peut être maintenue à une tension
correcte ou tout simplement qu’elle ne peut pas être
affûtée, elle doit être remplacée.
Portez des gants.
• Débranchez la tronçonneuse.
• Desserrez légèrement le bouton de déverrouillage
du panneau latéral, mais ne retirez pas le panneau
latéral.
• Desserrez la molette de tension de la chaîne autant
que possible.
• Desserrez le bouton de déverrouillage du panneau
latéral et retirez le panneau latéral.
• Retirez la chaîne de la tronçonneuse.
• Faites une boucle avec la nouvelle chaîne sur le
pignon d’entraînement afin que les bords coupants
des dents situées le long de la partie supérieure du
guide-chaîne soient dos à la tête motrice (Fig. ).
• Limez toute dégradation que pourraient présenter
les flancs latéraux ou supérieurs chromés (Fig. ).
FIG. 36
Tronçonneuse Modèle CS1200-092
FIG. 37
53
Page 54

Entretien et nettoyage
• Insérez la chaîne dans la rainure du guide et faites
glisser le guide pour l’éloigner du moteur afin de
tendre la chaîne (Fig. ).
FIG. 38
• Installez le panneau latéral en veillant à ce que
l’attrape-chaîne et le panneau latéral soient
correctement positionnés dans leurs emplacements
(Fig. ), puis serrez légèrement le bouton de
déverrouillage du panneau latéral.
FIG. 39
• Desserrez le bouton de déverrouillage du panneau
latéral et retirez le panneau latéral.
• Retirez le guide et la chaîne, puis inspectez-les pour
déceler tout dommage ou signe d’usure.
• Retournez le guide
FIG. 40
• Placez le guide-chaîne sur la plaque du
coussinet en faisant glisser l’encoche du guide
sur le collet d’alignement avec le goujon de
montage inséré dans la fente du guide-chaîne.
Alignez le trou de tension inférieur du guidechaîne sur le goujon de tension (Fig. ).
FIG. 41
COLLET D’ALIGNEMENT
(Fig. ).
PLAQUE DU COUSSINET
• Réglez la tension de la chaîne comme décrit à la section
« Tension de la chaîne de tronçonneuse » au chapitre
« Préparation avant utilisation » du présent manuel.
IMPORTANT : la chaîne de la tronçonneuse doit
être correctement tendue avant toute utilisation.
Consultez la section « Tension de la chaîne de
tronçonneuse » au chapitre « Préparation avant
utilisation » du présent manuel.
Entretien du guide-chaîne
MISE EN GARDE : le guide-chaîne peut être
chaud après la coupe. Portez des gants pour éviter
les brûlures.
Afin de réduire l’usure du guide-chaîne et d’augmenter
sa durée de vie, pensez à le retourner de temps en
temps.
Portez des gants.
• Débranchez la tronçonneuse.
• Desserrez légèrement le bouton de déverrouillage du
panneau latéral, mais ne retirez pas le panneau latéral.
• Desserrez la molette de tension de la chaîne autant
que possible.
54
GOUJON DE MONTAGE
• Replacez la chaîne de la tronçonneuse comme décrit à la
section
“Remplacement d'une chaîne usée”.
• Réglez la tension de la chaîne comme décrit à la
section « Tension de la chaîne de tronçonneuse » au
chapitre « Préparation avant utilisation » du présent
manuel
.
Remplacement d’un guide-chaîne usé
AVERTISSEMENT : les bords d’un guide-chaîne
usé, en particulier les bords de la rainure au point
de contact entre la chaîne et le guide, peuvent être
extrêmement coupants. Utilisez une protection pour
les mains adaptée.
Lorsque le guide-chaîne est fissuré ou présente une usure
excessive sur les bords, en particulier dans la rainure au
point de contact entre la chaîne et le guide, il doit être
remplacé. En outre, si le pignon est usé, qu’il lui manque des
dents ou qu’il ne tourne pas facilement, le guide-chaîne doit
être remplacé.
Tronçonneuse Modèle CS1200-092
Page 55

Entretien et nettoyage
Portez des gants.
• Débranchez la tronçonneuse.
• Desserrez légèrement le bouton de déverrouillage du
panneau latéral, mais ne retirez pas le panneau latéral.
• Desserrez la molette de tension de la chaîne autant
que possible.
• Desserrez le bouton de déverrouillage du panneau
latéral et retirez le panneau latéral.
• Enlevez le guide et la chaîne.
• Remettez le guide-chaîne en place comme décrit à la
section « Entretien du guide-chaîne ».
• Replacez la chaîne de la tronçonneuse comme décrit à la
section
“Remplacement d'une chaîne usée”.
• Réglez la tension de la chaîne comme décrit à la section
« Tension de la chaîne de tronçonneuse ».
Remplacement du pignon
d’entraînement
Remplacez le pignon d’entraînement tous les
deux remplacements de chaîne ou lorsqu’il est
endommagé.
Portez des gants.
• Débranchez la tronçonneuse.
• Desserrez légèrement le bouton de déverrouillage
du panneau latéral, mais ne retirez pas le panneau
latéral.
• Desserrez la molette de tension de la chaîne autant
que possible.
• Desserrez le bouton de déverrouillage du panneau
latéral et retirez le panneau latéral.
• Enlevez le guide et la chaîne.
• Utilisez un petit tournevis plat pour ouvrir et retirez
l’anneau e-clip, puis retirez le pignon
d’entraînement et le ressort (Fig. ).
• Insérez le nouveau ressort et le nouveau pignon
d’entraînement, puis installez le nouvel anneau
e-clip (Fig. ).
FIG. 43
• Replacez la chaîne de la tronçonneuse comme décrit à la
section
“Remplacement d'une chaîne usée”.
• Réglez la tension de la chaîne comme décrit à la section
« Tension de la chaîne de tronçonneuse ».
Informations supplémentaires
relatives à l’entretien
Pour plus d’informations sur l’entretien de la chaîne
de tronçonneuse, du guide-chaîne et du pignon
d’entraînement, consultez le manuel d’entretien
et de sécurité d’Oregon®, disponible sur http://
www.oregonproducts.eu/en/customer-service/
maintenance-safety-manual.html
FIG. 42
Tronçonneuse Modèle CS1200-092
55
Page 56

Dépannage
Dépannage
Utilisez le tableau suivant pour obtenir des solutions éventuelles en cas de problème avec la tronçonneuse. Si
ces propositions ne résolvent pas le problème, consultez la section « Garantie et entretien ».
SYMPTÔME CAUSE ÉVENTUELLE MESURES RECOMMANDÉES
Le moteur s’arrête
pendant la coupe.
Le moteur ne
démarre pas ou
démarre de façon
intermittente.
Le moteur ne
s’arrête pas
lorsque le frein de
chaîne est engagé.
Le moteur
fonctionne, mais
la chaîne ne
tourne pas.
La chaîne se coince
pendant la coupe.
Le câble est endommagé
ou coupé.
Le frein de la chaîne
est engagé.
La tronçonneuse n’est
pas branchée.
Le câble est endommagé
ou coupé.
La prise DDFT est
enclenchée.
Mauvaise prise de
courant.
Frein de la chaîne
engagé
Le bouton de
verrouillage de la
gâchette n’est pas
enfoncé.
Présence de débris dans
le panneau latéral
Des débris empêchent le
mouvement complet du
protège-main.
Mauvais fonctionnement
possible du frein de
chaîne
Chaîne qui ne s’engage
pas dans le pignon
d’entraînement.
Le pignon du guidechaîne ne tourne pas.
Entaillez la branche pour réduire la pression exercée
sur celle-ci. Consultez la section « Coupe ».
Si la rallonge est endommagée, ne l’utilisez pas et
remplacez-la. Si le câble de la tronçonneuse est
endommagé, ne l’utilisez pas et contactez un centre
de réparation agréé.
Placez le protège-main avant en position de
fonctionnement comme décrit à la section
« Vérification de la position du protège-main avant ».
Branchez la tronçonneuse.
Si la rallonge est endommagée, ne l’utilisez pas et
remplacez-la. Si le câble de la tronçonneuse est
endommagé, ne l’utilisez pas et contactez un centre
de réparation agréé.
Débranchez la rallonge, réinitialisez la prise DDFT,
puis rebranchez la rallonge.
Branchez la rallonge sur une autre prise.
Placez le protège-main avant en position de
fonctionnement comme décrit à la section
« Vérification de la position du protège-main
avant ».
Appuyez sur le bouton de verrouillage de la
gâchette avant d’appuyer sur l’interrupteur de
la gâchette. Consultez le chapitre « Utilisation
générale ».
Débranchez la tronçonneuse, puis enlevez le
panneau latéral et nettoyez les débris.
Nettoyez les débris du mécanisme externe de
freinage de la chaîne.
AVERTISSEMENT : faire fonctionner une
tronçonneuse sans frein de chaîne opérationnel
peut entraîner de graves blessures corporelles.
Contactez un centre de réparation agréé avant toute
utilisation.
Remettez la chaîne en place en vérifiant que
les maillons d’entraînement sur la chaîne sont
correctement placés sur le pignon. Consultez la
section « Remplacement d'une chaîne usée ».
Remplacez le guide-chaîne. Consultez la section
« Remplacement d’un guide-chaîne usé ».
56
Tronçonneuse Modèle CS1200-092
Page 57

Dépannage
SYMPTÔME CAUSE ÉVENTUELLE MESURES RECOMMANDÉES
Tension de la chaîne
insuffisante
Chaîne émoussée Consultez la section « Affûtage De La Chaîne ».
Retendez la chaîne. Consultez la section « Tension
de la chaîne de tronçonneuse » au chapitre
« Préparation avant utilisation » du présent manuel.
La tronçonneuse
ne coupe pas
correctement.
Chaîne détendue
ou déraillant du
guide-chaîne
Le guide et la
chaîne sont
excessivement
chauds et/ou
fument.
Chaîne posée dans le
mauvais sens
Chaîne usée
Chaîne trop sèche ou
trop tendue
Chaîne sortie de la
rainure de barre
Le panneau latéral n’est
pas bien installé
La chaîne n’est pas
assez lubrifiée.
Installez la chaîne avec les dents orientées
dans la bonne direction. Consultez la section
« Remplacement d'une chaîne usée ».
Remplacez la chaîne. Consultez la section
« Remplacement d'une chaîne usée ».
Vérifiez le niveau d’huile. Remplissez le réservoir si
nécessaire. Consultez la section « Remplissage du
réservoir d’huile du guide et de la chaîne ».
Réinstallez la chaîne dans la rainure. Consultez la
section « Remplacement d'une chaîne usée ».
Installez le panneau latéral correctement en vous
assurant que la patte à l’arrière du panneau est bien
engagée dans le corps de la tronçonneuse.
Vérifiez le niveau d’huile. Remplissez le réservoir si
nécessaire. Consultez la section « Remplissage du
réservoir d’huile du guide et de la chaîne ».
Tronçonneuse Modèle CS1200-092
57
Page 58

Caractéristiques et composants
Caractéristiques et composants
AVERTISSEMENT : l’utilisation de pièces de rechange autres que celles spécifiées dans le présent
manuel augmente les risques de blessures. N’utilisez jamais d’accessoires de coupe autres que ceux
décrits dans le présent manuel. Des blessures graves, voire mortelles, pourraient survenir si de
mauvais accessoires de coupe sont utilisés.
COMPOSANTS DE RECHANGE RÉFÉRENCE DE LA PIÈCE
Guide-chaîne 140SDEA041
Chaîne de tronçonneuse Q91VG052E (B52)
CARACTÉRISTIQUES DE LA TRONÇONNEUSE
Tension 230 V ~50 Hz
Puissance 1800 W
Contenance d’huile 100 ml
Huile pour chaîne et guide Oregon
Poids à sec, assemblée 4.5 kg
Poids à sec, sans le guide et la chaîne 3.8 kg
Niveau de puissance sonore garanti Lwa (1) (2) 108 dB
Vibrations 5.944 m/s2 (K=1.5 m/s2)
Longueur maximale du guide-chaîne 36 cm (14 po)
Longueur de coupe effective 34.3 cm (13.5 po)
Dents du pignon d’entraînement 6
Vitesse de la chaîne hors charge 14.5 m/s
®
() conformément à la directive //CE, relative au bruit, corrigée par la norme //CE
() mesuré selon les normes EN-:+A: et EN--:+A: ;
le niveau de pression acoustique, LpA, est égal à dB(A) avec une incertitude KpA de , dB(A)
58
Tronçonneuse Modèle CS1200-092
Page 59

Garantie et entretien
Garantie et entretien
Garantie
Blount, Inc. garantit toutes les tronçonneuses CS
enregistrées chez Oregon® pour une période de
trois () ans. Cette garantie est valable uniquement
pour les appareils qui ont été utilisés à des fins
personnelles et qui n’ont pas été empruntés, loués
ou utilisés à des fins commerciales ou industrielles.
Pendant la période de garantie, Blount remplacera
ou décidera de réparer, sans frais, et uniquement
pour l’acheteur initial, tout produit ou pièce qui, après
avoir été examiné(e) par Blount, révèle un défaut
de matériel et/ou de main-d’œuvre. Les frais de
transport sont à la charge de l’acheteur ainsi que
tous frais de remplacement de pièce soumise à la
présente garantie.
Conservez le reçu original
Veuillez joindre le reçu original de l’achat initial à ce
manuel et ce dossier Pour un entretien sous garantie,
veuillez apporter le produit et le reçu au revendeur
chez lequel le produit a été acheté. Ou contactez
Oregon par téléphone. Pour connaître les numéros
de téléphone propres à chaque pays, consultez la
section « Service après-vente par pays ».
Informations sur l’entretien
et l’assistance
Pour plus d’informations sur le service aprèsvente, consultez notre site Web à l’adresse
OregonProducts.com. Vous pouvez également
contacter notre service après-vente pour obtenir de
l’aide, des conseils techniques supplémentaires, une
réparation ou des pièces de rechange. Pour connaître
les numéros de téléphone propres à chaque pays,
consultez la section « Service après-vente par pays ».
Pour votre sécurité, n’utilisez que les pièces de
rechange pour tronçonneuse fabriquées dans nos
ateliers. Notre service après-vente emploie du
personnel qualifié afin de fournir un soutien et une
assistance efficaces en cas de réglage, réparation ou
remplacement de tous les produits Oregon.
Tronçonneuse Modèle CS1200-092
59
Page 60

Inhaltsverzeichnis
Inhaltsverzeichnis
WICHTIGE SICHERHEITSHINWEISE . . . . . . . . . . . . . . . . . . . . . . . . . . . . . . . .61
SICHERHEITSSIGNALDEFINITIONEN. . . . . . . . . . . . . . . . . . . . . . . . . . . . . .61
ALLGEMEINE SICHERHEITSHINWEISE FÜR ELEKTROWERKZEUGE . . . . . . . . . . . 61
SICHERHEIT IM ARBEITSBEREICH . . . . . . . . . . . . . . . . . . . . . . . . . . . . . . .61
ELEKTRISCHE SICHERHEIT . . . . . . . . . . . . . . . . . . . . . . . . . . . . . . . . . . .61
PERSÖNLICHE SICHERHEITSVORKEHRUNGEN . . . . . . . . . . . . . . . . . . . . . . .62
GEBRAUCH UND PFLEGE VON ELEKTROGERÄTEN . . . . . . . . . . . . . . . . . . . . .62
WARTUNG . . . . . . . . . . . . . . . . . . . . . . . . . . . . . . . . . . . . . . . . . . . . .63
WARNHINWEISE FÜR KETTENSÄGE. . . . . . . . . . . . . . . . . . . . . . . . . . . . . . 63
URSACHEN FÜR DEN RÜCKSCHLAG UND VORSICHTSMASSNAHMEN
DES BEDIENERS. . . . . . . . . . . . . . . . . . . . . . . . . . . . . . . . . . . . . . . . . . 64
RÜCKSCHLAG-SICHERHEITSEINRICHTUNGEN AN DIESER SÄGE . . . . . . . . . . . . . 65
LAGERUNG, TRANSPORT UND ENTSORGUNG . . . . . . . . . . . . . . . . . . . . . . . . 65
SYMBOLE UND BESCHRIFTUNGEN . . . . . . . . . . . . . . . . . . . . . . . . . . . . . . . .66
KETTENSÄGENBEZEICHNUNGEN UND - BEGRIFFE. . . . . . . . . . . . . . . . . . . . . . .67
PRODUKTBESCHREIBUNG. . . . . . . . . . . . . . . . . . . . . . . . . . . . . . . . . . . . . . 68
INBETRIEBNAHME . . . . . . . . . . . . . . . . . . . . . . . . . . . . . . . . . . . . . . . . . .69
WAS BEFINDET SICH IN DER VERPACKUNG?. . . . . . . . . . . . . . . . . . . . . . . . .69
ÜBERPRÜFUNG DER POSITION DES VORDEREN HANDSCHUTZES. . . . . . . . . . . . 69
BEFÜLLUNG DES SCHIENEN- UND KETTENÖLBEHÄLTERS . . . . . . . . . . . . . . . .69
MONTAGE VON FÜHRUNGSSCHIENE UND SÄGEKETTE . . . . . . . . . . . . . . . . . .70
ANSPANNUNG DER KETTE . . . . . . . . . . . . . . . . . . . . . . . . . . . . . . . . . . .71
BEDIENUNG DER KETTENSÄGE . . . . . . . . . . . . . . . . . . . . . . . . . . . . . . . . . .72
ALLGEMEINER BETRIEB . . . . . . . . . . . . . . . . . . . . . . . . . . . . . . . . . . . . . 72
NUTZUNG UND WARTUNG DES NETZKABELS . . . . . . . . . . . . . . . . . . . . . . . . 73
SCHNEIDEN . . . . . . . . . . . . . . . . . . . . . . . . . . . . . . . . . . . . . . . . . . . .74
WARTUNG UND REINIGUNG. . . . . . . . . . . . . . . . . . . . . . . . . . . . . . . . . . . . . 79
KONTROLLE . . . . . . . . . . . . . . . . . . . . . . . . . . . . . . . . . . . . . . . . . . . .79
REINIGUNG . . . . . . . . . . . . . . . . . . . . . . . . . . . . . . . . . . . . . . . . . . . . . 79
ANSPANNUNG DER KETTE . . . . . . . . . . . . . . . . . . . . . . . . . . . . . . . . . . .80
DIE SÄGEKETTE SCHÄRFEN. . . . . . . . . . . . . . . . . . . . . . . . . . . . . . . . . . . 80
AUSTAUSCH EINER VERSCHLISSENEN SÄGEKETTE . . . . . . . . . . . . . . . . . . . .81
PFLEGE DER FÜHRUNGSSCHIENE . . . . . . . . . . . . . . . . . . . . . . . . . . . . . . . 82
ERSATZ ABGENUTZTER FÜHRUNGSSCHIENEN . . . . . . . . . . . . . . . . . . . . . . .82
ERSATZ DES ANTRIEBSKETTENRADS. . . . . . . . . . . . . . . . . . . . . . . . . . . . . 83
ZUSÄTZLICHE WARTUNGSINFORMATIONEN . . . . . . . . . . . . . . . . . . . . . . . . .83
FEHLERBEHEBUNG. . . . . . . . . . . . . . . . . . . . . . . . . . . . . . . . . . . . . . . . . . 84
TECHNISCHE DATEN UND KOMPONENTEN. . . . . . . . . . . . . . . . . . . . . . . . . . . .86
GARANTIE UND SERVICE . . . . . . . . . . . . . . . . . . . . . . . . . . . . . . . . . . . . . .87
EG-KONFORMITÄTSERKLÄRUNG . . . . . . . . . . . . . . . . . . . . . . . . . . . . . . . . 228
KUNDENDIENST INTERNATIONAL . . . . . . . . . . . . . . . . . . . . . . . . . . . . . . . 230
© Blount, Inc. Preis- und Spezifikationsänderungen vorbehalten. Alle Rechte vorbehalten. Oregon® ist eine eingetragene Marke von Blount,
Inc. in den Vereinigten Staaten und/oder in anderen Ländern.
60
Kettensäge Modell CS1200-092
Page 61

Wichtige Sicherheitshinweise
Wichtige Sicherheitshinweise
EINFÜHRUNG
Diese Kettensäge ist für gelegentliche leichte Beanspruchung ausgelegt. Sie ist nicht darauf ausgelegt, große
Bäume zu fällen oder Rundstämme mit großem Durchmesser zu schneiden. Diese Kettensäge ist nicht für die
Baumpflege konzipiert. Nutzen Sie die Kettensäge nicht, um Bäume und Holz zu sägen, die einen größeren
Umfang haben als die tatsächliche Schnittlänge der Säge (d. h. cm).
SICHERHEITSSIGNALDEFINITIONEN
SYMBOL SIGNAL BEDEUTUNG
WARNHINWEIS
ACHTUNG
WICHTIG
ALLGEMEINE SICHERHEITSHINWEISE FÜR ELEKTROWERKZEUGE
WARNHINWEIS: LESEN SIE ALLE SICHERHEITSHINWEISE UND STUDIEREN SIE
ALLE ILLUSTRATIONEN UND SPEZIFIKATIONEN ZU DIESEM ELEKTROWERKZEUG.
DAS NICHTBEACHTEN DER WARNHINWEISE UND ANWEISUNGEN KANN ZU STROMSCHLAG,
BRAND UND/ODER SCHWEREN VERLETZUNGEN FÜHREN.
ALLE WARNHINWEISE UND ANWEISUNGEN FÜR ZUKÜNFTIGEN GEBRAUCH AUFBEWAHREN. DER
BEGRIFF „ELEKTROWERKZEUG“ IN DEN WARNHINWEISEN BEZIEHT SICH AUF ELEKTROWERKZEUGE, DIE AM
STROMNETZ (MIT KABEL) ODER AUCH MIT EINEM AKKU (KABELLOS) BETRIEBEN WERDEN.
Zeigt eine potenzielle Gefahr an, die zu schweren Verletzungen führen
könnte.
Zeigt eine potenzielle Gefahr an, die das Werkzeug ernsthaft
beschädigen oder zu leichten bis mittelschweren Verletzungen führen
könnte.
Durch das Befolgen dieser Anleitung können Sie das Gerät zu Ihrer
vollen Zufriedenheit verwenden.
SICHERHEIT IM ARBEITSBEREICH
• Halten Sie den Arbeitsbereich sauber und
sorgen Sie für gute Beleuchtung. Unordnung oder
unbeleuchtete Arbeitsbereiche können zu Unfällen
führen.
• Betreiben Sie das Elektrowerkzeug nicht in
explosionsgefährdeten Bereichen, wie z. B. in der
Nähe von brennbaren Flüssigkeiten, Gasen oder
Staub. Elektrowerkzeuge erzeugen Funken, die den
Staub oder die Dämpfe entzünden könnten.
• Halten Sie Kinder und umstehende Personen
während des Betriebs des Elektrowerkzeugs
fern. Ablenkungen können dazu führen, dass Sie das
Gerät nicht mit der erforderlichen Aufmerksamkeit
bedienen.
ELEKTRISCHE SICHERHEIT
• Die Stecker des Elektrowerkzeugs müssen
zur Steckdose passen. Der Stecker darf in
keiner Weise verändert werden. Es dürfen
keine Adapterstecker mit dem geerdeten
Elektrowerkzeug zusammen verwendet werden.
Original-Stecker und dazu passende Steckdosen
verringern die Stromschlaggefahr.
Kettensäge Modell CS1200-092
• Vermeiden Sie Körperkontakt mit geerdeten
Oberflächen, wie Rohren, Heizkörpern, Herden
und Kühlschränken. Es besteht ein erhöhtes Risiko
von Stromschlägen, wenn Ihr Körper geerdet ist.
• Elektrowerkzeuge nicht bei Regen oder in
feuchten Umgebungen verwenden. Dringt Wasser
in das Gehäuse eines Elektrowerkzeugs ein, besteht
erhöhte Stromschlaggefahr.
• Das Kabel nicht missbräuchlich verwenden. Das
Kabel niemals zum Tragen, Ziehen oder Trennen
des Elektrowerkzeugs von der Steckdose
verwenden. Das Kabel von Wärmequellen,
Öl, scharfen Kanten und beweglichen Teilen
fernhalten. Beschädigte oder verwickelte Kabel
erhöhen die Stromschlaggefahr.
• Wird ein Elektrowerkzeug im Freien betrieben,
ist ein dafür geeignetes Verlängerungskabel
zu verwenden. Der Gebrauch eines Kabels, das für
den Einsatz im Freien geeignet ist, verringert die
Stromschlaggefahr.
• Wenn sich der Betrieb des Elektrowerkzeugs an
einem feuchten Ort nicht vermeiden lässt, eine
Stromversorgung mit einem FI-Schutzschalter
verwenden. Der Einsatz eines FI-Schalters reduziert
die Stromschlaggefahr.
61
Page 62

Wichtige Sicherheitshinweise
PERSÖNLICHE
SICHERHEITSVORKEHRUNGEN
• Bleiben Sie aufmerksam, üben Sie Ihre
Handlungen mit Bedacht aus und wenden
Sie gesunden Menschenverstand bei der
Bedienung des Elektrowerkzeugs an. Arbeiten
Sie nicht mit Elektrowerkzeugen, wenn Sie
müde sind oder unter dem Einfluss von Drogen,
Alkohol oder Medikamenten stehen. Ein
Moment der Unachtsamkeit beim Gebrauch von
Elektrowerkzeugen kann zu schweren Verletzungen
führen.
• Verwenden Sie persönliche Schutzausrüstung.
Tragen Sie stets einen Augenschutz.
Schutzausrüstungen wie eine Staubmaske,
rutschfeste Sicherheitsschuhe, Schutzhelm
oder Gehörschutz für die entsprechenden
Einsatzbedingungen verringern das Verletzungsrisiko.
• Vermeiden Sie das versehentliche Starten
des Gerätes. Stellen Sie sicher, dass sich der
Schalter des Geräts in der Stellung „Aus“
befindet, bevor Sie es an das Stromnetz und/
oder den Akkupack anschließen, es aufheben
oder tragen. Das Tragen von Elektrowerkzeugen
mit dem Finger am Ein-/Ausschalter oder die
Herstellung der Verbindung zur Stromversorgung mit
dem Schalter in der Stellung „Ein“ kann zu Unfällen
führen.
• Entfernen Sie Einstellwerkzeuge oder
Schraubenschlüssel vor dem Einschalten des
Elektrowerkzeugs. Ein Werkzeug oder Schlüssel, der
sich in einem drehenden Teil des Elektrowerkzeugs
befindet, kann zu Verletzungen führen.
• Nicht oberhalb der Schulterhöhe schneiden.
Bewahren Sie jederzeit einen sicheren Stand
und das Gleichgewicht (Abb. ). Dies ermöglicht
eine bessere Kontrolle über das Elektrowerkzeug in
unerwarteten Situationen
ABB. 1
.
• Tragen Sie geeignete Kleidung. Keine weite
Kleidung oder Schmuck tragen. Haare, Kleidung
und Handschuhe von beweglichen Teilen
fernhalten. Lockere Kleidung, Schmuck oder lange
Haare können von sich bewegenden Teilen erfasst
werden.
• Wenn Zusatzelemente für den Anschluss
von Staubabscheidung und Staubfang
vorhanden sind, stellen Sie sicher, dass
diese ordnungsgemäß angeschlossen und
verwendet werden. Die Verwendung eines
Entstaubungssystems kann staubbedingte Gefahren
mindern.
• Beachten Sie die Sicherheitsgrundsätze
unbedingt auch dann, wenn Sie mit der
Handhabung ähnlicher Geräte vertraut sind.
Eine unvorsichtige Vorgehensweise kann innerhalb
des Bruchteils einer Sekunde schwere Verletzungen
herbeiführen.
GEBRAUCH UND PFLEGE
VON ELEKTROGERÄTEN
• Üben Sie keine Gewalt auf das Elektrowerkzeug
aus. Verwenden Sie das für die jeweilige
Anwendung richtige Elektrowerkzeug. Das
richtige Elektrowerkzeug führt die Aufgabe besser,
sicherer und in der Geschwindigkeit aus, für die sie
konzipiert wurde.
• Verwenden Sie das Elektrowerkzeug nicht, wenn
es nicht mit dem Schalter ein- und ausgeschaltet
werden kann. Ein Elektrowerkzeug, das nicht mit
dem Schalter betätigt werden kann, ist gefährlich und
muss repariert werden.
• Trennen Sie den Stecker von der Steckdose
bzw. nehmen Sie den Akkupack, falls dieser
abnehmbar ist, aus dem Elektrowerkzeug, bevor
Sie Einstellungen ändern, Zubehör wechseln
oder das Elektrowerkzeug einlagern. Durch diese
präventiven Sicherheitsmaßnahmen wird das Risiko
reduziert, dass das Werkzeug versehentlich gestartet
wird.
• Bewahren Sie unbenutzte Elektrowerkzeuge
außerhalb der Reichweite von Kindern
auf und lassen Sie Personen, die mit dem
Elektrowerkzeug oder den vorliegenden
Anweisungen nicht vertraut sind, das Gerät nicht
bedienen. Elektrowerkzeuge sind in den Händen
unerfahrener Bedienpersonen gefährlich.
• Elektrowerkzeuge warten. Achten Sie auf
fehlerhafte Ausrichtung oder Klemmen der
beweglichen Teile, Bruch von Bestandteilen
und sonstige Zustände, die den Betrieb des
Elektrowerkzeugs beeinträchtigen können.
Bei Beschädigungen das Elektrowerkzeug
vor Gebrauch reparieren lassen. Viele Unfälle
werden durch schlecht gewartete Elektrowerkzeuge
verursacht.
62
Kettensäge Modell CS1200-092
Page 63

Wichtige Sicherheitshinweise
• Halten Sie Schneidwerkzeuge scharf und sauber.
Sorgfältig gewartete Schneidwerkzeuge mit scharfen
Schneidkanten verklemmen sich weniger häufig und
sind leichter zu kontrollieren.
• Verwenden Sie das Elektrowerkzeug, Zubehör,
Einsatzwerkzeuge usw. entsprechend diesen
Anweisungen, und berücksichtigen Sie die
Arbeitsbedingungen sowie die auszuführende
Tätigkeit. Die Nutzung des Elektrowerkzeugs für
andere als die vorgesehenen Anwendungen kann zu
gefährlichen Situationen führen
• Achten Sie darauf, dass Haltegriffe und
Griffflächen stets trocken, sauber sowie öl- und
fettfrei sind. Rutschige Haltegriffe und Griffflächen
gefährden die sichere Handhabung und können dazu
führen, dass Sie in unerwarteten Situationen die
Kontrolle über das Gerät verlieren.
.
WARTUNG
Lassen Sie das Elektrowerkzeug nur von
qualifiziertem Fachpersonal und nur mit
Originalersatzteilen warten. Dadurch wird die
Sicherheit des Elektrowerkzeugs gewährleistet.
WARNHINWEISE FÜR
KETTENSÄGE
• Alle Teile des Körpers von der Sägekette
fernhalten, wenn die Kettensäge in Betrieb ist.
Vor dem Start der Kettensäge sicherstellen, dass
die Sägekette nichts berührt. Ein Moment der
Unachtsamkeit beim Gebrauch von Kettensägen kann
dazu führen, dass sich die Kleidung in der Sägekette
verfängt oder der Körper mit ihr in Berührung kommt.
• Die Kettensäge mit der rechten Hand am
hinteren Griff und mit der linken Hand am
vorderen Griff halten (Abb. ). Die Kettensäge
sollte niemals mit der entgegengesetzten
Handkombination gehalten werden, da sich dadurch
das Risiko von Verletzungen erhöht
ABB. 2
.
oder dem eigenen Stromkabel kommen
kann. Der Kontakt der Kettensäge mit einer
spannungsführenden Leitung kann Geräteteile aus
Metall unter Strom setzen und dem Bediener einen
elektrischen Schlag versetzen.
• Eine Schutzbrille und Gehörschutz tragen.
Weitere Schutzausrüstungen für Kopf, Hände,
Beine und Füße werden empfohlen. Angemessene
Schutzkleidung verringert die Verletzungsgefahr
durch umherfliegende Teile oder versehentlichen
Kontakt mit der Sägekette.
• Eine Kettensäge nicht im Baum betreiben.
Der Betrieb einer Kettensäge im Baum kann zu
Körperverletzungen führen.
• Immer auf einen sicheren Stand achten und die
Kettensäge nur betreiben, wenn Sie auf einer
festen, sicheren und ebenen Oberfläche stehen.
Rutschige oder nicht stabile Flächen können zum
Verlust des Gleichgewichts oder der Kontrolle über
die Kettensäge führen.
• Beim Sägen eines Astes, der unter Druck steht,
daran denken, dass er zurückschlagen kann.
Wenn die Spannung in den Holzfasern nachlässt,
kann der unter Druck stehende Ast den Bediener
treffen und/oder die Kettensäge außer Kontrolle
geraten lassen.
• Beim Sägen kleiner Büsche und junger Bäume
besonders vorsichtig vorgehen. Das schwache
Material kann sich in der Sägekette verfangen
und in Ihre Richtung schlagen oder Sie aus dem
Gleichgewicht bringen.
• Tragen Sie die Kettensäge bei ausgeschaltetem
Motor am vorderen Griff und immer vom Körper
abgewandt. Setzen Sie beim Transport oder der
Lagerung der Kettensäge immer den
Führungsschienenschutz auf (Abb. ). Eine
ordnungsgemäße Handhabung der Kettensäge
verringert die Wahrscheinlichkeit eines
unbeabsichtigten Kontaktes mit der sich bewegenden
Sägekette.
ABB. 3
• Halten Sie das Elektrowerkzeug nur an den
isolierten Griffflächen, da die Kettensäge in
Berührung mit verborgenen Stromleitungen
Kettensäge Modell CS1200-092
63
Page 64

Wichtige Sicherheitshinweise
• Befolgen Sie die Hinweise zum Schmieren,
Kettenspannen und Auswechseln des Zubehörs.
Eine nicht ordnungsgemäß gespannte oder
geschmierte Kette kann brechen oder die Möglichkeit
des Rückschlags erhöhen.
• Achten Sie darauf, dass die Griffe immer trocken,
sauber sowie öl- und fettfrei sind. Fettige und
ölige Griffe sind rutschig und führen zum Verlust der
Kontrolle.
• Sägen Sie nur Holz. Verwenden Sie die
Kettensäge nur für den Zweck, für den sie
bestimmt ist. Beispiel: Verwenden Sie die
Kettensäge nicht zum Sägen von Kunststoff,
Mauerwerk oder Baumaterialien, die nicht aus
Holz bestehen. Die Verwendung der Kettensäge für
einen anderen als den beabsichtigten Zweck könnte
zu gefährlichen Situationen führen.
• Es wird empfohlen, dass erstmalige Bediener an
einer praktischen Schulung zum Arbeiten mit
Kettensägen und zur Verwendung erforderlicher
Schutzausrüstung teilnehmen. Der Bediener muss
die Handhabung der Kettensäge an einem Sägebock
oder Gestell üben.
• Mit Ausnahme der in diesem Handbuch
angegebenen Verschleißteile hat die Kettensäge
keine Bestandteile, die vom Benutzer gewartet
werden können.
• Das Werkstück, die Führungsschiene und die
Kette können nach dem Schneiden heiß sein.
Handschuhe tragen, um Verbrennungen zu
vermeiden.
• Es wurde berichtet, dass längerer Gebrauch
von Elektrowerkzeugen zu Gefäß-, Muskelund/oder neurologischen Erkrankungen führt
(wie z. B. durch Vibrationen verursachte
Durchblutungsstörungen der Finger, auch als
Raynaud-Syndrom bezeichnet), insbesondere
wenn das Gerät bei kaltem Wetter verwendet
wird. Wenn Sie in Ihren Extremitäten ein
Taubheitsgefühl oder eine Gefühlsstörung
wahrnehmen, verwenden Sie das Gerät erst
wieder, nachdem die Symptome abgeklungen
sind. Um vibrationsinduzierte Traumata zu verringern,
befolgen Sie diese Anleitungen:
– Tragen Sie Handschuhe und halten Sie Hände
und Körper warm.
– Nehmen Sie die Kettensäge fest in den Griff,
üben Sie aber keinen längeren, übermäßigen
Druck aus. Lassen Sie die Säge die Arbeit
erledigen.
– Stellen Sie sicher, dass das Schneidsystem
ordnungsgemäß gewartet ist.
– Legen Sie regelmäßig Pausen ein.
Die Vibrationen bei normaler Verwendung können
von den hier angegebenen Werten abweichen.
Dies ist abhängig von Schnittgut, Wartung der
Schneidekomponenten und anderen Faktoren.
• Lassen Sie das Kabel hinter sich verlaufen und
seien Sie sich jederzeit über den Verlauf des
Kabels bewusst. Dadurch werden Stolpergefahren
und versehentliches Herausziehen vermieden.
• Wenn das Kabel durchschnitten oder beschädigt
wird, stellen Sie die Verwendung der Kettensäge
sofort ein und trennen Sie das Kabel vom
Netzteil. Ein beschädigtes oder durchgeschnittenes
Kabel führt zu erhöhter Stromschlaggefahr.
• Bei der Verwendung an einem feuchten Ort,
einen FI-Schutzschalter mit mA Auslösestrom
oder geringer benutzen. Der Einsatz eines FI-
Schalters reduziert die Stromschlaggefahr.
URSACHEN FÜR DEN
RÜCKSCHLAG UND
VORSICHTSMASSNAHMEN DES
BEDIENERS
Ein Rückschlag kann auftreten, wenn das obere Ende
bzw. die Spitze der Führungsschiene einen Gegenstand
berührt, oder das Holz die Sägekette beim Schnitt
einklemmt.
Der Kontakt mit der Spitze kann in manchen Fällen
ein plötzliches Zurückfedern verursachen, wodurch die
Führungsschiene nach oben und zurück zum Bediener
gestoßen wird.
Wenn die Sägekette oben an der Führungsschiene
eingeklemmt wird, kann die Führungsschiene
blitzschnell zum Bediener zurückfedern.
Jede dieser Aktionen kann dazu führen, dass Sie die
Kontrolle über die Säge verlieren, was zu schweren
Körperverletzungen führen kann. Verlassen Sie sich
nicht ausschließlich auf die in Ihre Säge eingebauten
Sicherheitseinrichtungen. Als Benutzer einer
Kettensäge sollten Sie alle Schritte unternehmen,
damit es bei Ihrer Arbeit zu keinem Unfall und keinen
Verletzungen kommt.
Rückschläge entstehen durch die falsche
Verwendung des Werkzeugs und/oder falsche
Bedienungshandlungen oder -bedingungen, was durch
die im Folgenden genannten Sicherheitsmaßnahmen
verhindert werden kann:
• Bewahren Sie einen festen Griff, mit Daumen und
Finger rings um die Griffe der Kettensäge, mit beiden
Händen an der Säge und positionieren Sie Ihren
Körper und Arm so, dass Sie Rückschlagkräften
widerstehen können. Rückschlagkräfte können
durch den Betreiber kontrolliert werden, sofern
Vorsichtsmaßnahmen ergriffen werden. Lassen Sie
die Kettensäge nicht los.
64
Kettensäge Modell CS1200-092
Page 65

Wichtige Sicherheitshinweise
• Arbeiten Sie nicht zu hoch und sägen Sie nicht
über Schulterhöhe. Dadurch vermeiden Sie
einen unbeabsichtigten Kontakt der Spitze der
Führungsschiene und können die Kettensäge in
unerwarteten Situationen besser kontrollieren.
• Befolgen Sie die Hinweise von Oregon
und zur Wartung der Sägekette. Eine Verringerung
der Tiefeneinstellung kann zu erhöhtem Rückschlag
führen.
®
zum Schärfen
RÜCKSCHLAGSICHERHEITSEINRICHTUNGEN
AN DIESER SÄGE
GEFAHR: DIE KETTENBREMSE NIEMALS
MODIFIZIEREN UND NIEMALS VERSUCHEN SIE
ZU DEAKTIVIEREN.
GEFAHR: NUR VON OREGON
EMPFOHLENE ERSATZFÜHRUNGSSCHIENEN
UND -KETTEN VERWENDEN. FALSCHE
ERSATZFÜHRUNGSSCHIENEN UND -KETTEN
KÖNNEN ZUM BRUCH DER KETTE UND/ODER
RÜCKSCHLAG FÜHREN.
KETTENBREMSE
Diese Kettensäge ist mit einer Kettenbremse
ausgestattet, die sowohl den Motor als auch die
Bewegung der Kette stoppt, wenn der Rückschlag
auftritt (Abb. ). Die Kettenbremse kann durch die
Vorwärtsbewegung des vorderen Handschutzes
aktiviert werden, wenn sich die Säge während des
Rückschlags rückwärts dreht; sie kann auch durch die
Trägheitskräfte aktiviert werden, die bei einem
Rückschlag erzeugt werden.
ABB. 4
KETTE
Diese Kettensäge ist mit einer Sägekette
ausgestattet, die gemäß der in Übereinstimmung mit
den Normen durchgeführten Tests den reduzierten
Rückschlagsanforderungen des American National
Standards Institute (ANSI) und der Canadian Standards
Association (CSA) – ANSI B., ISO , und CSA
Z. – entspricht. Informationen über Ersatzketten
finden Sie unter „Technische Daten und Komponenten“
in diesem Handbuch.
FÜHRUNGSSCHIENE
Diese Säge ist mit einer Führungsschiene mit
reduziertem Rückschlag ausgestattet, die eine Nase
mit kleinem Radius hat. Nasen mit einem kleineren
Radius senken die Rückschlaggefahr im Vergleich
mit Schienen der gleichen Größe, jedoch mit einem
größeren Nasenradius.
Achten Sie beim Austausch der Führungsschiene
darauf, die Führungsschiene mit niedrigem Rückschlag
zu bestellen, die in diesem Handbuch angegeben ist.
LAGERUNG, TRANSPORT UND
ENTSORGUNG
LAGERUNG DER KETTENSÄGE
• Kettensäge ausstecken.
• Kabel auf Schnitte oder Schäden hin überprüfen.
• Kettensäge gründlich reinigen.
• Führungsschienenschutz anbringen.
• Lagern Sie das Gerät an einem trockenen Ort.
• Außerhalb der Reichweite von Kindern oder
Haustieren lagern.
• Es ist normal, dass eine kleine Menge Öl von der
Führungsschiene tropft, wenn die Kettensäge nicht
in Gebrauch ist. Zum Schutz gegen austropfendes
Öl den Führungsschienenschutz anbringen und eine
saugfähige Unterlage unter die Führungsschiene
platzieren.
TRANSPORT DER KETTENSÄGE
Werkzeuge können beim Transport verrutschen. Sorgen
Sie dafür, dass das Werkzeug gesichert ist, nicht
herunterfallen oder sich bewegen und dabei in Kontakt
mit Menschen oder Sachen kommen kann.
• Kettensäge ausstecken.
• Führungsschiene anbringen.
• Falls gewünscht, lassen Sie das Führungsschienenund Kettenöl ab, um das Austropfen zu verringern.
ENTSORGUNG DER KETTENSÄGE
Für die Konstruktion und Herstellung dieses Oregon®Produkts wurden qualitativ hochwertigen Materialien
und Komponenten verwendet, die recycelt und
wiederverwendet werden können. Nach Ablauf der
Produktlebensdauer und entsprechend der Richtlinie
//EG sollte das Elektrogerät vom Hausmüll
getrennt entsorgt werden. In der Europäischen Union
gibt es separate Sammelsysteme für gebrauchte
Elektrik- und Elektronikprodukte. Bitte entsorgen Sie
dieses Gerät auf umweltgerechte Weise in Ihrer lokalen
Abfallsammelstelle bzw. in einem Recyclingzentrum.
Kettensäge Modell CS1200-092
65
Page 66

Symbole und Beschriftungen
108
Symbole und Beschriftungen
Diese Symbole und Beschriftungen sind auf der Kettensäge und/oder in dieser Anleitung vorhanden.
SYMBOL NAME BESCHREIBUNG
BAUARTKLASSE II GEKENNZEICHNETE DOPPELT ISOLIERTE BAUWERKZEUGE
SICHERHEITSWARNSYMBOL
ANLEITUNG LESEN
AUGENSCHUTZ TRAGEN SCHUTZBRILLE BEI DER BEDIENUNG DER KETTENSÄGE TRAGEN.
GEHÖRSCHUTZ TRAGEN GEHÖRSCHUTZ BEI DER BEDIENUNG DER KETTENSÄGE TRAGEN.
WEIST DARAUF HIN, DASS DER NACHSTEHENDE TEXT EINE GEFAHR,
WARNUNG ODER VORSICHTSMASSNAHME ERKLÄRT.
DIE ORIGINALANLEITUNG ENTHÄLT WICHTIGE INFORMATIONEN ZUR
SICHERHEIT UND ZUM BETRIEB. DIE ANWEISUNGEN SORGFÄLTIG LESEN UND
VERSTEHEN.
HANDSCHUTZ TRAGEN
KOPFSCHUTZ TRAGEN KOPFSCHUTZ BEI DER BEDIENUNG DER KETTENSÄGE TRAGEN.
LANGE HOSE TRAGEN LANGE HOSEN BEI DER BEDIENUNG DER KETTENSÄGE TRAGEN.
GESCHLOSSENE SCHUHE
TRAGEN
SCHALLLEISTUNG, LWA SCHALLLEISTUNGSPEGEL
VORSICHT VOR
RÜCKSCHLAG
KONTAKT MIT
FÜHRUNGSSCHIENENNASE
KETTENRÜCKSCHLAGWINKEL
ZWEIHÄNDIGES HALTEN HALTEN SIE DIE SÄGE MIT BEIDEN HÄNDEN FEST.
EINHÄNDIGES HALTEN HALTEN SIE DIE SÄGE NICHT MIT EINER HAND.
NICHT AUF LEITERN
VERWENDEN
NICHT ENTSORGEN
BENUTZEN SIE DAS GERÄT
NICHT BEI REGEN.
BESCHÄDIGTES KABEL
SCHNEIDEWERKZEUG
HANDSCHUHE BEI DER BEDIENUNG UND BEIM UMGANG MIT DER KETTENSÄGE
TRAGEN.
FESTES SCHUHWERK MIT GESCHLOSSENEM ZEHENBEREICH BEI DER
BEDIENUNG DER KETTENSÄGE TRAGEN.
GEFAHR: EIN RÜCKSCHLAG KANN SCHWERE VERLETZUNGEN
VERURSACHEN.
VERMEIDEN SIE DEN KONTAKT MIT DER FÜHRUNGSSCHIENENNASE.
FÜR DIE VERWENDUNG MIT EINER SÄGEKETTE MIT GERINGEM RÜCKSCHLAG
ENTWORFEN.
VERWENDEN SIE DIE KETTENSÄGE NICHT AUF LEITERN.
DAS GERÄT NICHT IM HAUSMÜLL ENTSORGEN. ÜBERGEBEN SIE ES EINEM
AUTORISIERTEN RECYCLINGUNTERNEHMEN.
DAS LADEGERÄT NICHT IN FEUCHTEN UMGEBUNGEN BETREIBEN.
KONTROLLIEREN SIE NETZKABEL REGELMÄSSIG AUF BESCHÄDIGUNGEN.
ZIEHEN SIE SOFORT DEN STECKER AUS DER STECKDOSE, WENN DAS KABEL
BESCHÄDIGT ODER DURCHTRENNT IST.
SCHNEIDEWERKZEUG. FASSEN SIE DIE KETTE NICHT AN, SOLANGE DIE
KETTENSÄGE NOCH ANGESTECKT IST.
66
STOLPERGEFAHR SIE MÜSSEN ZU JEDER ZEIT WISSEN, WO DAS KABEL VERLÄUFT.
VOR DER WARTUNG
AUSSTECKEN
STECKEN SIE DIE KETTENSÄGE VOR JEGLICHEN WARTUNGSARBEITEN AUS.
Kettensäge Modell CS1200-092
Page 67

Kettensägenbezeichnungen und - Begriffe
Kettensägenbezeichnungen und - Begriffe
Ausrichtungsflansch: Überstand auf dem
Führungsschienenflansch, der in den Schlitz der
Führungsschiene passt.
Automatisches Schmiersystem: Das System, das
die Führungsschiene und die Sägekette automatisch
schmiert.
Führungsschienenflansch: Der Montageflansch auf
dem Antriebskopf, der die richtige Ausrichtung der
Führungsschiene sicherstellt.
Schlitz der Führungsschiene: Die Öffnung in der
Führungsschiene, in die der Ausrichtungsflansch oder
Montageflansch passt.
Sicherheitszone für umstehende Personen: Ein Kreis
mit einem Radius von m um den Bediener darf nicht
von umstehenden Personen, Kindern und Haustieren
betreten werden.
Kettenbremse: Ein Gerät, das die Kette anhält oder
sperrt. Wird bei Rückschlägen entweder manuell oder
automatisch aktiviert.
Kettenfänger: Ein Gerät, das die Kette beim Bremsen
oder Abrutschen zurückhält.
Kettendicke: Die Dicke der Treibglieder der Kette an der
Stelle, an der sie in die Nut der Führungsschiene passt.
Wird durch die Teilenummer gekennzeichnet, die auf den
Treibgliedern vorhanden ist.
Kettenteilung: Die Entfernung zwischen drei beliebigen
nebeneinanderliegenden Kettennieten geteilt durch
zwei. Wird durch die Teilenummer gekennzeichnet, die
auf den Treibgliedern vorhanden ist.
Kettensägen-Antriebskopf: Eine Kettensäge ohne
Sägekette oder Führungsschiene.
Kettenspannscheibe: Ring auf der Seitenabdeckung,
mit dem durch Drehen die Kettenspannung eingestellt
werden kann.
Treibglied: Das zahnförmige Glied der Kette, die in die
Nut der Führungsschiene passt.
Kettenrad: Mit Zähnen ausgestattetes Teil, das die
Sägekette antreibt.
Tatsächliche Schnittlänge: Die ungefähre Entfernung
vom Krallenanschlag zur äußeren Kante des
Schneideglieds, wobei das Spanngerät auf mittlere
Position eingestellt ist.
Fällschnitt: Der letzte Schnitt beim Fällen von Bäumen,
der an der Kerbe der gegenüberliegenden Seite des
Baumes gesetzt wird.
Vorderer Griff: Der Stützgriff an oder in der Nähe der
Vorderseite der Kettensäge. Muss idealerweise mit der
linken Hand gehalten werden.
Vorderer Handschutz: Eine Barriere zwischen dem
vorderen Griff einer Kettensäge und der Führungsschiene,
die auch als Auslösemechanismus für die Kettenbremse
dient.
Führungsschiene: Eine Schienenstruktur zur Stützung
und Führung der Sägekette. Oftmals nur als „Schiene“
bezeichnet.
Führungsschienenschutz: Die Kunststoffabdeckung,
die die Führungsschiene und die Kette schützt, wenn die
Kettensäge außer Betrieb ist.
Rückschlag: Die schnelle nach hinten oder nach oben
gerichtete Bewegung der Führungsschiene, die auftritt,
wenn die Sägekette in der Nähe der Nase des oberen
Abschnitts der Führungsschiene ein Objekt berührt (z. B.
einen Baumstamm oder Ast) oder wenn sich das Holz
biegt und die Sägekette im Schnitt einklemmt.
Kette mit geringem Rückschlag: Eine Kette, die den
Rückschlagleistungsanforderungen nach ANSI B. und
CSA Z. entspricht.
Motorgehäuse: Die Kunststoffabdeckung des
Antriebskopfs der Kettensäge.
Montagebolzen: Der verkantete Überstand auf
dem Ausrichtungsflansch, der durch den Schlitz der
Führungsschiene verläuft.
Fällkerb-Unterschnitt: Eine in einen Baum geschnittene
Kerbe, die die Fallrichtung des Baumes vorgibt.
Hinterer Griff: Der Stützgriff an oder in der Nähe der
Rückseite der Kettensäge. Muss idealerweise mit der
rechten Hand gehalten werden.
Hinterer Handschutz: Eine Barriere an der unteren
Seite des hinteren Griffs, der den Bediener im Falle von
Kettenrissen oder Abrutschen schützt.
Führungsschiene mit reduziertem Rückschlag: Eine
Führungsschiene mit maximalem Nasenradius gemäß
ANSI B. und CSA Z.. Reduziert Rückschläge
nachweislich in erheblichem Maße.
Sägeketten: Eine Schleife der Kette mit Schneidzähnen,
die das Holz durchschneidet. Sie wird durch den
Antriebskopf angetrieben und durch die Führungsschiene
gestützt. Oftmals nur als „Kette“ bezeichnet.
Seitenabdeckung: Die Kunststoffabdeckung des
Antriebskopfs, die das Antriebskettenrad abdeckt und
mittels Entriegelungsknopf an der Seitenabdeckung
entfernt und angebracht wird.
Lasche an der Seitenabdeckung: Überstand auf der
Seitenabdeckung, der in den Schlitz des Antriebskopfs
passt. Damit können Sie die Seitenabdeckung während
der Installation ordnungsgemäß ausrichten.
Kralle: Ein Gerät an der Vorderseite der Kettensäge,
das einfachheitshalber beim Kontakt mit einem Baum
oder Stamm als Drehpunkt agiert. Auch als „Prelldorne“
bekannt.
Zugentlastungsklammer: Der Haken am hinteren Griff,
über den das Verlängerungskabel geführt wird. Dient
zum Schutz des Kabels und schützt vor versehentlichem
Herausziehen.
Auslösesperre: Ein beweglicher Anschlag, der die
unbeabsichtigte Betätigung des Drehzahlhebels
verhindert, bis dieser manuell betätigt wird.
Drehzahlhebel: Ein Gerät, das die Kettensäge ein- und
ausschaltet.
Verschleißteile: Teile wie die Ketten und die
Führungsschiene, die nach häufigem Betrieb abgenutzt
sind und durch den Bediener ersetzt werden können.
Kettensäge Modell CS1200-092
67
Page 68

Produktbeschreibung
Produktbeschreibung
KENNEN SIE DIE KETTENSÄGE
ÖLBEHÄLTERDECKEL
HINTERER HANDSCHUTZ
NETZKABEL
SÄGEKETTE
FÜHRUNGSSCHIENE
ANTRIEBSKOPF
ÖLSCHAUGLAS
VORDERER GRIFF
KETTENSPANNSCHEIBE
TYPENSCHILDVORDERER HANDSCHUTZ
MONTAGEBOLZEN
KETTENRAD
FÜHRUNGSSCHIENENSCHUTZ
KRALLE
KETTENFÄNGER
HINTERER GRIFF
ENTRIEGELUNGSKNOPF
AUF DER SEITENABDECKUNG
SEITENABDECKUNG
LASCHE AN DER
SEITENABDECKUNG
DREHZAHLHEBELSPERRE
DREHZAHLHEBEL
ZUGENTLASTUNGSKLAMMER
HINWEIS: Eine Liste aller im Umfang enthaltenen Komponenten finden Sie im Abschnitt „Inbetriebnahme“
68
Kettensäge Modell CS1200-092
Page 69

Inbetriebnahme
Inbetriebnahme
GEFAHR: VERMEIDEN SIE KÖRPERSCHÄDEN,
INDEM SIE DIE KETTENSÄGE NICHT OHNE
FÜHRUNGSSCHIENE, SÄGEKETTE UND
ORDNUNGSGEMÄSS ANGEBRACHTEN
SEITENABDECKUNGEN VERWENDEN.
WARNHINWEIS: VERSUCHEN SIE NICHT, DIE
KETTENSÄGE IN BETRIEB ZU NEHMEN, WENN
EIN TEIL FEHLT ODER BESCHÄDIGT IST.
WARNHINWEIS: AN DIE STROMQUELLE
ANGESTECKTE ELEKTROWERKZEUGE KÖNNEN
VERSEHENTLICH STARTEN. STECKEN SIE DIE
KETTENSÄGE VOR DER INBETRIEBNAHME ODER
VOR WARTUNGSARBEITEN AUS.
WAS BEFINDET SICH IN
DER VERPACKUNG?
Diese Komponenten sind im Lieferumfang enthalten:
• Kettensägen-Antriebskopf
• Sägenkette und Führungsschiene
• Führungsschienenschutz
Untersuchen Sie die Kettensäge nach der Entnahme
aus der Verpackung sorgfältig, um sicherzustellen,
dass während des Transports keine Schäden
entstanden sind und der Lieferumfang vollständig
enthalten ist. Nehmen Sie die Kettensäge nicht in
Betrieb, wenn Teile beschädigt sind oder fehlen.
Wenden Sie sich zum Bezug von Ersatzteilen an
®
. Die länderspezifischen Telefonnummern finden
Oregon
Sie im Abschnitt „Customer Service by Country“.
ÜBERPRÜFUNG DER POSITION
DES VORDEREN HANDSCHUTZES
Nach dem Auspacken der Kettensäge überprüfen Sie
die Position des vorderen Handschutzes. Die
Kettensäge kann nicht betrieben werden, wenn die
Kettenbremse eingelegt ist. Ziehen Sie den vorderen
Handschutz vor der Inbetriebnahme in Richtung des
vorderen Griffs zurück (Abb. ).
ABB. 5
VORDERER HANDSCHUTZ
IN BETRIEBSPOSITION
VORDERER HANDSCHUTZ
IN BREMSPOSITION
BEFÜLLUNG DES SCHIENENUND KETTENÖLBEHÄLTERS
WICHTIG: SCHIENEN- UND KETTENÖL
VERMEIDET VORZEITIGEN VERSCHLEISS. DIE
KETTENSÄGE NICHT IN BETRIEB NEHMEN,
WENN KEIN ÖL IM SCHAUGLAS SICHTBAR IST.
DEN ÖLSTAND HÄUFIG ÜBERPRÜFEN UND BEI
BEDARF NACHFÜLLEN.
Führungsschienen- und Kettenöl wird zur korrekten
Schmierung der Führungsschiene und der Kette
benötigt. Die Kettensäge ist mit einem automatischen
Schmiersystem ausgestattet, das die Schiene und
die Kette bei Bedarf mit Öl einschmiert. Um beste
Ergebnisse zu erzielen, verwenden Sie Oregon
Führungsschienen- und Kettenöl. Es ist speziell für
geringe Reibung und schnellere Schnitte konzipiert.
NIEMALS Öl oder andere Schmiermittel verwenden,
die nicht speziell für die Verwendung auf der
Führungsschiene und der Kette konzipiert wurden. Dies
kann zu einem verstopften Ölsystem führen und somit
vorzeitigen Verschleiß von Führungsschiene und Kette
verursachen.
®
Kettensäge Modell CS1200-092
69
Page 70

Inbetriebnahme
Kettensäge auf eine stabile, ebene Fläche stellen,
sodass sich der Öleinfülldeckel () auf der Oberseite
befindet (Abb. ).
ABB. 6
(1)
(2)
• Deckelbereich reinigen.
• Deckel entfernen.
• Führungsschienen- und Kettenöl vorsichtig in den
Behälter gießen.
• Öleinfülldeckel wieder anbringen und durch das
Ölschauglas prüfen, ob Öl vorhanden ist ().
MONTAGE VON
FÜHRUNGSSCHIENE UND
SÄGEKETTE
WARNHINWEIS: AN DIE STROMQUELLE
ANGESTECKTE ELEKTROWERKZEUGE KÖNNEN
VERSEHENTLICH STARTEN. STECKEN SIE DIE
KETTENSÄGE VOR DER INBETRIEBNAHME ODER
VOR WARTUNGSARBEITEN AUS.
Tragen Sie Handschuhe.
• Kettensäge ausstecken.
• Den Entriegelungsknopf auf der Seitenabdeckung
etwas lockern (), doch die Seitenabdeckung nicht
vollständig entfernen (Abb. ).
• Die Kettenspannscheibe () soweit wie
möglich lockern.
• Den Entriegelungsknopf auf der Seitenabdeckung ein
bisschen lockern und die Seitenabdeckung entfernen.
ABB. 7
• Die Führungsschiene auf den
Führungsschienenflansch legen, indem der Schlitz der
Führungsschiene über den Ausrichtungsflansch
geschoben wird (Abb. ), wobei der Montagebolzen
durch das Loch in der Führungsschiene gesteckt wird.
Richten Sie die untere Öffnung auf der
Führungsschiene mit dem Spannbolzen aus.
ABB. 8
FÜHRUNGSSCHIENENFLANSCH
AUSRICHTUNGSFLANSCH
MONTAGEBOLZEN
• Die neue Kette so auf das Kettenrad auflegen, dass
die Schnittkanten der Zähne entlang der oberen
Kante der Führungsschiene vom Antriebskettenrad
abgewendet sind (Abb. ).
ABB. 9
• Die Kette in die Nut der Führungsschiene einsetzen
und die Führungsschiene vom Motor weg schieben,
um Spiel aus der Kette zu entfernen (Abb. ).
ABB. 10
70
(1)
(2)
Kettensäge Modell CS1200-092
Page 71

Inbetriebnahme
• Die Seitenabdeckung wieder anbringen und darauf
achten, dass der Kettenfang und die Lasche an der
Seitenabdeckung korrekt in ihren Öffnungen sitzen
(Abb. ). Anschließend den Entriegelungsknopf an
der Seitenabdeckung leicht festziehen.
ABB. 11
• Die Kette entsprechend der Anleitungen
in „Anspannung der Kette“ im Abschnitt
„Inbetriebnahme“ anspannen.
WICHTIG: DIE SÄGEKETTE MUSS VOR DER
VERWENDUNG KORREKT GESPANNT WERDEN.
SIEHE „ANSPANNUNG DER KETTE“ IM
ABSCHNITT „INBETRIEBNAHME“.
ANSPANNUNG DER KETTE
• Halten Sie die Spitze der Führungsschiene nach oben
(Abb. ) und ziehen Sie durch Drehen den
Kettenspannring an.
ABB. 12
• Solange festziehen, bis die tiefsten Schneideglieder
unter der Schiene in festem Kontakt mit der Schiene
sind (Abb. ).
ABB. 13
FALSCH
RICHTIG
WARNHINWEIS: AN DIE STROMQUELLE
ANGESTECKTE ELEKTROWERKZEUGE KÖNNEN
VERSEHENTLICH STARTEN. STECKEN SIE DIE
KETTENSÄGE VOR DER INBETRIEBNAHME ODER
VOR WARTUNGSARBEITEN AUS.
WARNHINWEIS: WENN DIE KETTE BEI
HÖCHSTSPANNUNG IMMER NOCH LOCKER IST,
ERSETZEN SIE DIE KETTE.
WICHTIG: SÄGEKETTE NUR ANSPANNEN,
WENN DIE KETTE KÜHL IST. EINE HEISSE
KETTE KANN SICH ZUSAMMENZIEHEN UND
DIE FÜHRUNGSSCHIENE ODER DIE KÜHLENDE
KETTE BESCHÄDIGEN.
Tragen Sie Handschuhe.
• Kettensäge vor dem Anspannen ausstecken.
• Den Entriegelungsknopf auf der Seitenabdeckung
ein bisschen lockern, doch die Seitenabdeckung nicht
vollständig entfernen.
Kettensäge Modell CS1200-092
• Den Entriegelungsknopf der Seitenabdeckung
festziehen.
• Ziehen Sie leicht an der Kette. Die Spannung ist
korrekt eingestellt, wenn die Kette zurückschnellt,
nachdem sie mm von der Führungsschiene
weggezogen wird.
• Nach kurzer Gebrauchszeit die Kette abkühlen
lassen und die Spannung erneut prüfen. Die
Spannung während der ersten halben Stunde der
Verwendung und in regelmäßigen Abständen während
der gesamten Lebensdauer der Kette sorgfältig
beobachten. Bei Bedarf die Kette nachjustieren, wenn
die Kette und Führungsschiene handwarm sind. Die
Kette nie spannen, wenn sie heiß ist.
Die Kette wird sich im Laufe der normalen Verwendung
dehnen, aber unzureichende Ölversorgung oder
Nichtdurchführung der empfohlenen Wartungsarbeiten
kann zu einer vorzeitigen Dehnung führen.
71
Page 72

Bedienung der Kettensäge
Bedienung der Kettensäge
ALLGEMEINER BETRIEB
SICHERER STAND
Beide Füße auf festem Boden positionieren und das
Gewicht gleichmäßig auf beide Beine verteilen (Abb. ).
ABB. 15
GEFAHR: NICHT ÜBER SCHULTERHÖHE
SCHNEIDEN UND NICHT VON EINER LEITER,
TRITTLEITER ODER EINER ERHÖHTEN POSITION
AUS SCHNEIDEN, WENN KEIN SICHERER
STAND GEWÄHRLEISTET IST. NICHT ÜBER
SCHULTERHÖHE SÄGEN.
WARNHINWEIS: VERRINGERN SIE DIE
VERLETZUNGSGEFAHR, INDEM SIE IMMER
ANGEMESSENE SCHUHE, HANDSCHUHE,
KOPF-, OHREN- UND AUGENSCHUTZ TRAGEN.
GRIFF
Halten Sie das Gerät immer mit beiden Händen. Den
vorderen Griff mit der linken Hand und den hinteren
Griff mit der rechten Hand halten (Abb. ). Die Finger
müssen die Oberseite und der Daumen die Unterseite
des vorderen Griffs umschließen.
ABB. 14
GRIFFHALTUNG MIT DAUMEN
UNTER DEM TRAGEGRIFF
STOPPEN DER SÄGE
Den Drehzahlhebel freigeben, um die Kettensäge zu
stoppen.
STARTEN DER SÄGE
WARNHINWEIS: HEBELSPERRE NIEMALS
DURCH ABKLEBEN, VERDRAHTEN ODER
FESTBINDEN DER DREHZAHLHEBELSPERRE
AUSSER BETRIEB SETZEN, UM VERLETZUNGEN
ZU VERMEIDEN.
Stellen Sie sicher, dass die Kettenbremse nicht
eingelegt ist.
Halten Sie die vorderen und hinteren Griffe mit festem
Griff. Drücken Sie die Drehzahlhebelsperre und halten
Sie sie mit dem Daumen () gedrückt. Um die Säge zu
starten, drücken Sie den Drehzahlhebel () (Abb. ). Es
ist nicht notwendig, die Drehzahlhebelsperre weiterhin
gedrückt zu halten. Sie bleibt ausgeschaltet, bis der
Drehzahlhebel freigegeben wird.
ABB. 16
(1) AUSLÖSESPERRE
(2)
DREHZAHLHEBEL
72
Kettensäge Modell CS1200-092
Page 73

Bedienung der Kettensäge
PRÜFUNG DER KETTENBREMSE
Stellen Sie sicher, dass die Kettenbremse funktioniert,
bevor Sie die Kettensäge verwenden. So überprüfen Sie
die Funktionstüchtigkeit der Bremse:
• Die Kettensäge auf eine stabile, ebene Fläche legen.
• Die Säge kurz einschalten.
• Linke Hand auf dem vorderen Griff lassen und das
linke Handgelenk bewegen, um den vorderen
Handschutz nach vorne zu schieben. Dadurch wird die
Kettenbremse aktiviert (Abb. ).
ABB. 17
• Drehzahlhebel loslassen.
Eine korrekt funktionierende Kettenbremse stoppt den
Motor und die Sägekette sofort. Wenn der Motor und
die Sägekette nicht sofort zum Stillstand kommen,
lassen Sie die Kettenbremse bei einer autorisierten
Service-Stelle überprüfen.
• Den vorderen Handschutz wieder in die
Ausgangsposition zurückschieben.
NUTZUNG UND WARTUNG
DES NETZKABELS
AUSWAHL EINES VERLÄNGERUNGSKABELS
Beachten Sie diese Anforderungen für
Verlängerungskabel:
• Spezifisch für die Verwendung im Freien geeignet
• Kabel (AWG) eignet sich zur Leitung des Stroms
entlang der gesamten Länge des Kabels
entsprechend der unten angezeigten Tabelle
Wählen Sie die Dicke des Verlängerungskabels
basierend auf der gewünschten Länge und den
elektrischen Daten auf dem Produktetikett.
Nachfolgend finden Sie Angaben zur empfohlenen
Dicke basierend auf der Länge des Kabels.
KABELLÄNGE
(M)
0 - 15 14 AWG (1,5 mm2)
16 - 30 12 AWG (3,0 mm2)
Vergewissern Sie sich, dass die Isolierung keine
Risse aufweist und dass die Stecker an beiden Seiten
unbeschädigt sind.
NUTZUNG DER ZUGENTLASTUNGSKLAMMER
Es gibt zwei wichtige Gründe für die Nutzung der
Zugentlastungsklammer:
• Sie verhindert die Abnutzung des Stromkabels sowie
des Verlängerungskabels und der Stecker.
• Sie verhindert, dass die Kettensäge versehentlich
vom Verlängerungskabel getrennt wird.
Biegen Sie zur Nutzung der Zugentlastungsklammer
das Verlängerungskabel in U-Form und stecken Sie es
durch das Loch am hinteren Griff. Legen Sie die
Kabelschlaufe über den Haken und ziehen Sie leicht
daran (Abb. ).
MIN. KABELQUERSCHNITT
Kettensäge Modell CS1200-092
ABB. 18
73
Page 74

Bedienung der Kettensäge
SCHNEIDEN
WARNHINWEIS: VERRINGERN SIE
DIE VERLETZUNGSGEFAHR, INDEM SIE
ANGEMESSENE SCHUHE, HANDSCHUHE, KOPF, OHREN- UND AUGENSCHUTZ TRAGEN.
WARNHINWEIS: UM DIE
STROMSCHLAGGEFAHR ZU VERRINGERN
VERGEWISSERN SIE SICH, DASS DIE
KABELISOLIERUNG INTAKT IST UND DASS
DAS KABEL AN EINEM TROCKENEN ORT
AUFBEWAHRT WIRD, AN DEM ES NICHT
BESCHÄDIGT WERDEN KANN ODER EINE
STOLPERGEFAHR DARSTELLT.
WARNHINWEIS: IMMER AUF SICHEREN
STAND ACHTEN UND DIE KETTENSÄGE FEST
MIT BEIDEN HÄNDEN HALTEN, WÄHREND DER
MOTOR LÄUFT, UM VERLETZUNGSGEFAHR ZU
VERRINGERN.
WARNHINWEIS: PLANEN SIE IM VORAUS
UND ÜBERLEGEN SIE SICH MEHRERE
FLUCHTWEGE, BEVOR SIE MIT DER ARBEIT
BEGINNEN, UM DIE VERLETZUNGSGEFAHR ZU
VERRINGERN.
ACHTUNG: BILDEN SIE EINE
SICHERHEITSZONE FÜR UMSTEHENDE
PERSONEN MIT EINEM RADIUS VON 6 METERN,
BEVOR SIE DIESES GERÄT BEDIENEN. DIE
SICHERHEITSZONE BESTEHT AUS EINEM KREIS
MIT EINEM MINDESTRADIUS VON 6 M UM DEN
BEDIENER, IN DEM SICH KEINE UMSTEHENDEN
PERSONEN, KINDER UND HAUSTIERE
AUFHALTEN DÜRFEN (ABB. 19).
BAUMFÄLLARBEITEN ERFORDERN EINEN
GRÖSSEREN SICHERHEITSBEREICH
ENTSPRECHEND DER HÖHE DES BAUMES.
LESEN SIE DEN ABSCHNITT „BAUMFÄLLEN“.
ABB. 19
6 m (20 ft)
Befolgen Sie für bestmögliche Leistung und sicheren
Betrieb der Säge diese Anleitungen:
• Beachten Sie alle für das Schneiden geltenden
nationalen und kommunalen Regeln und
Bestimmungen.
• Machen Sie in regelmäßigen Abständen Pausen, um
die Verletzungsgefahr zu verringern.
• Bevor Sie mit dem Schneiden beginnen, stellen
Sie sicher, dass die Kettensäge ordnungsgemäß
angespannt ist und die Kette scharf ist.
Kettensägen dienen nur zum Schneiden von Holz.
Schneiden Sie mit der Säge keine anderen Materialien
und vermeiden Sie den Kontakt der Säge mit Schmutz,
Steinen, Nägeln, Klammern oder Draht. Diese
Materialien sind extrem abrasiv und verursachen, dass
die Schutzbeschichtung in kürzester Zeit von der Kette
absplittert.
Schleifen oder ersetzen Sie die Sägekette unter diesen
Umständen:
• Der zum Schneiden erforderliche Druck steigt stark an.
• Die von der Kette absplitternden Holzspäne sind sehr
fein oder ähneln Staub.
Arbeiten Sie nicht mit stumpfen Ketten, da dies zu
höherer Anstrengung, unpräzisen Schnitten und
höherer Abnutzung der Kette führt. Außerdem erhöht
dies auch die Rückschlaggefahr. Üben Sie niemals
erhöhten Druck auf stumpfe Ketten aus.
• Halten Sie die Kettensäge richtig und nehmen Sie die
richtige Stellung vor dem Holz ein, wenn die Säge
ausgeschaltet ist. Die Drehzahlhebelsperre drücken
und den Drehzahlhebel drücken. Lassen Sie die Kette
die volle Drehzahl erreichen, bevor Sie den Schnitt
beginnen.
• Beginnen Sie den Schnitt, indem Sie die
Führungsschiene leicht gegen das Holz drücken.
Wenden Sie nur leichten Druck an und lassen Sie die
Säge die Arbeit machen.
• Achten Sie auf eine konstante Geschwindigkeit
während des Schnitts, reduzieren Sie den Druck kurz
vor dem Ende des Schnitts.
• Seien Sie sich jederzeit über den Verlauf des Kabels
bewusst, um die Stolpergefahr zu verringern und die
Beschädigung des Kabels zu vermeiden.
• Seien Sie sich jederzeit über die Ausrichtung der
Spitze der Schiene bewusst und vermeiden Sie den
Kontakt mit anderen Objekten.
• Falls sich die Säge beim Schneiden plötzlich
ausschaltet, entfernen Sie sie aus dem zu
schneidenden Objekt und üben Sie anschließend beim
Schneiden weniger Druck aus.
WICHTIG: ÜBEN SIE SÄGEN AN BAUMSTÄMMEN
AUF EINEM SÄGEBOCK ODER GESTELL, BIS SIE
MIT DEM BETRIEB DER SÄGE VERTRAUT SIND.
74
Kettensäge Modell CS1200-092
Page 75

Bedienung der Kettensäge
STUTZEN
ACHTUNG: HERUNTERFALLENDE ÄSTE
KÖNNEN AM BODEN ABPRALLEN ODER
„ZURÜCKSPRINGEN“. AUS DIESEM GRUND
MUSS DER BODEN STETS FREI GEHALTEN
WERDEN, UM MEHRERE FLUCHTWEGE ZU
HABEN. SÄUBERN SIE DEN ARBEITSBEREICH
UND TRAGEN SIE KOPFSCHUTZ.
Beim Stutzen werden abgestorbene oder zu lange
Äste abgeschnitten, um die Gesundheit der Pflanze zu
gewährleisten.
• Überlegen Sie sich vor Arbeitsbeginn mehrere
Fluchtwege und stellen Sie sicher, dass diese frei
sind. Seien Sie sich stets bewusst, wie Sie einem
fallenden Ast ausweichen können.
• Vergewissern Sie sich, dass umstehende Personen
und Helfer in sicherer Entfernung zu herabfallenden
Ästen stehen. Umstehende Personen und Helfer
dürfen nicht direkt vor oder hinter dem Bediener
stehen. Siehe Abb. .
• Stehen Sie stets fest auf beiden Beinen und halten
Sie die Kettensäge mit beiden Händen. Nicht oberhalb
der Schulterhöhe schneiden. Klettern Sie niemals auf
Bäume oder Leitern, um hohe Äste zu erreichen.
• Sichern Sie alle Äste, die gefährlich sein könnten.
• Verwenden Sie geeignete Hilfsmittel.
• Stutzen Sie zuerst die unteren Äste und arbeiten Sie
sich dann nach oben.
• Warten Sie vor dem Schneiden, bis die Kettensäge
die volle Geschwindigkeit erreicht hat.
• Üben Sie leichten Druck auf den Ast aus.
• Schneiden Sie bei langen Ästen (Abb. ) zuerst das
Astende () ab, um Druck vom Ast zu nehmen. Danach
können Sie näher am Stamm stutzen ().
• Dicke Äste (Durchmesser größer als cm) können
splittern oder die Kette einklemmen, wenn Sie nur
einen einzigen Schnitt von oben machen. Um das
Splittern oder Einklemmen zu vermeiden, machen Sie
zuerst einen flachen Entlastungsschnitt auf der
Unterseite des Astes () und beenden Sie dann den
Schnitt von oben () bis zum Schnitt auf der
Unterseite (Abb. ).
ABB. 21
(2)
(1)
• Machen Sie einen sauberen Schnitt näher am Stamm,
nachdem Sie den Großteil des Astes entfernt haben
(Abb. ).
ABB. 22
ABB. 20
(1)
Kettensäge Modell CS1200-092
(2)
75
Page 76

Bedienung der Kettensäge
BAUMFÄLLEN
ACHTUNG: NACHDEM EIN BAUM GEFÄLLT
WURDE, ROLLT ODER RUTSCHT ER
WAHRSCHEINLICH BERGAB. ÜBERLEGEN SIE
SICH EINEN FLUCHTWEG UND RÄUMEN SIE IHN
FREI, BEVOR SIE LOSSCHNEIDEN. DER
FLUCHTWEG SOLLTE NACH HINTEN UND
DIAGONAL ZUR HINTERSEITE DER
ERWARTETEN FALLRICHTUNG VERLAUFEN
(ABB. 23).
ABB. 23
RÜCKZUGSWEG-OPTIONEN
RÜCKZUG
FALLRICHTUNG
45°
RÜCKZUG
Beim Fällen wird ein Baum abgesägt.
• Vor dem Fällen auf die natürliche Neigung des
Baumes, die Lage größerer Äste und die Windrichtung
achten, um zu beurteilen, in welche Richtung der
Baum fallen wird.
• Entfernen Sie Schmutz, Steine, lose Rinde, Nägel,
Klammern und Draht aus dem Baum, wo die
Fällschnitte durchgeführt werden.
• Wenn zwei oder mehr Personen gleichzeitig
Durchtrenn- und Fällarbeiten durchführen, muss die
Fällarbeit durch einen Abstand von mindestens der
doppelten Höhe des zu fällenden Baumes räumlich
getrennt werden.
• Bäume dürfen nicht auf eine Weise gefällt
werden, die Personen gefährden, eine externe
Stromversorgung berühren oder Sachschäden
verursachen könnten. Sollte der Baum in Kontakt
mit einer Versorgungsleitung kommen, muss das
Versorgungsunternehmen unverzüglich verständigt
werden.
• Verwenden Sie die Metalldorne auf der Vorderseite
der Säge, um die Säge auf dem Holz abzustützen.
Setzen Sie die Metallkrallen in das Holz ein und
verwenden Sie sie als Ansatzpunkt zur Erhöhung
der Stabilität beim Schneiden von Holz mit großem
Durchmesser.
Fällkerb-unterschnitt
• Schneiden Sie zuerst die Kerbe über / des
Stammdurchmessers senkrecht zur Fallrichtung.
Setzen Sie zuerst die untere waagrechte Kerbe ().
Dies hilft, das Einklemmen der Sägekette oder der
Führungsschiene zu vermeiden, wenn der zweite
Schnitt () gemacht wird (Abb. ).
ABB. 24
FALLRICHTUNG
FÄLLKERB-UNTERSCHNITT
(2)
KERBE
(1)
Fällschnitt
• Setzen Sie anschließend den Fällschnitt mindestens
mm oberhalb des unteren waagrechten Fällkerbs
an (Abb. ). Führen Sie den Fällschnitt parallel zum
unteren waagrechten Fällkerb.
ABB. 25
FALLRICHTUNG
KERBE
FÄLLSCHNITT
50 MM
FÄLLSCHNITT
50 MM
SCHARNIER
• Setzen Sie den Fällschnitt so, dass genug Holz übrig
bleibt, über das der Baum wie bei einem Scharnier
abknicken kann. Dieses Holzscharnier verhindert,
dass sich der Baum dreht und in die falsche Richtung
fällt. Nicht durch das Scharnier schneiden.
• Wenn der Fällschnitt fast das Scharnier erreicht,
sollte der Baum zu fallen beginnen.
76
Kettensäge Modell CS1200-092
Page 77

Bedienung der Kettensäge
• Wenn eine Möglichkeit besteht, dass der Baum
nicht in die gewünschte Richtung fallen wird oder
zurückschnellen und die Sägekette einklemmen kann,
den Fällschnitt beenden, bevor er abgeschlossen
ist und Keile aus Holz, Kunststoff oder Aluminium
verwenden, um den Schnitt zu öffnen und den Baum
entlang der gewünschten Linie zum Fallen zu bringen.
• Wenn der Baum zu fallen beginnt, entfernen Sie die
Kettensäge aus dem Schnitt, stoppen Sie den Motor,
setzen die Kettensäge ab und verlassen Sie den
Bereich auf dem geplanten Rückzugsweg.
• Achten Sie auf herunterfallende Äste und auf
den Boden.
ENTASTEN EINES BAUMS
ACHTUNG: UNTER DRUCK STEHENDE ÄSTE
KÖNNEN ABPRALLEN UND DEN BEDIENER
BERÜHREN ODER DIE KETTENSÄGE AUSSER
KONTROLLE GERATEN LASSEN UND SOMIT ZU
VERLETZUNGEN FÜHREN. ACHTEN SIE STETS
AUF UNTER DRUCK STEHENDE ÄSTE, DIE DEN
BEDIENER BERÜHREN ODER DIE KETTENSÄGE
AUSSER KONTROLLE GERATEN LASSEN
KÖNNEN.
Entasten bedeutet das Entfernen der Äste vom
gefällten Baum.
• Beim Entasten belassen Sie größere untere Äste, um
den Stamm vom Boden abzustützen.
• Entfernen Sie die kleinen Äste in einem Schnitt.
• Unter Spannung stehende Äste sollten von unten
geschnitten werden, um das Einklemmen der
Kettensäge zu vermeiden (Abb. ).
ABB. 26
ASTSCHNITT
BAUMENTASTUNG
DURCHTRENNEN EINES STAMMS
ACHTUNG: DAS DURCHTRENNEN VON
STÄMMEN UNTER DRUCK ERHÖHT DIE
RÜCKSCHLAGGEFAHR. SETZEN SIE EINE DER
NACHFOLGEND GENANNTEN METHODEN EIN,
UM DEN STAMM ZU STÜTZEN.
Durchtrennen bedeutet das Zuschneiden eines Stamms
in bestimmte Abschnitte. Es ist wichtig, den sicheren
Stand und die gleichmäßige Verteilung des Gewichts
auf beide Füße sicherzustellen. Wenn möglich, sollte
der Stamm angehoben und mit Hilfe von Ästen,
Blöcken oder Unterlegkeilen unterstützt werden.
• Wenn der Stamm über seine gesamte Länge
gestützt wird, wird er von der Oberseite her
durchtrennt (Abb. ).
ABB. 27
STAMM WIRD ENTLANG SEINER
GESAMTEN LÄNGE UNTERSTÜTZT
VON OBEN DURCHTRENNEN
NICHT IN ERDE SÄGEN
• Wenn der Stamm an einem Ende gestützt wird,
durchtrennen Sie von der Unterseite her ein Drittel
des Stammdurchmessers. Führen Sie dann den
endgültigen Schnitt durch, indem Sie den Stamm von
der Oberseite her durchtrennen, bis der erste Schnitt
erreicht wird (Abb. ).
ABB. 28
STAMM WIRD AN EINEM ENDE UNTERSTÜTZT
2. SCHNITT: VON OBEN (2/3 DES DURCHMESSERS)
DURCHTRENNEN, BIS 1. SCHNITT ERREICHT WIRD
(UM EINKLEMMEN ZU VERMEIDEN)
DEN ARBEITSBEREICH ÜBER DEM BODEN HALTEN
STÜTZÄSTE BELASSEN, BIS DER STAMM
GESCHNITTEN WIRD
Kettensäge Modell CS1200-092
1. SCHNITT: VON UNTEN (1/3 DES DURCHMESSERS)
DURCHTRENNEN, UM ABSPLITTERUNG ZU VERMEIDEN
77
Page 78

Bedienung der Kettensäge
• Wenn der Stamm an beiden Enden gestützt wird,
durchtrennen Sie ein Drittel des Stammdurchmessers
von der Oberseite her. Führen Sie dann den
endgültigen Schnitt durch, indem Sie von der
Unterseite her zwei Drittel des Stammdurchmessers
durchtrennen, bis der erste Schnitt erreicht wird
(Abb. ).
ABB. 29
DURCHTRENNEN EINES STAMMS
1. SCHNITT: VON OBEN (1/3 DES DURCHMESSERS)
DURCHTRENNEN, UM ABSPLITTERUNG ZU VERMEIDEN
2. SCHNITT: VON UNTEN (2/3 DES DURCHMESSERS)
DURCHTRENNEN, BIS 1. SCHNITT ERREICHT WIRD
(UM EINKLEMMEN ZU VERMEIDEN)
• Stehen Sie bei Durchtrennarbeiten am Hang immer
auf der Bergseite des Stammes (Abb. ).
ABB. 30
DURCHTRENNEN AM HANG
AUF DER BERGSEITE STEHEN,
DA DER STAMM ROLLEN KANN
• Um die vollständige Kontrolle beim Durchschneiden
zu bewahren, verringern Sie den Sägedruck vor
Beendigung des Schnitts ohne den Griff an den
Kettensägegriffen zu lockern.
• Lassen Sie die Kette nicht den Boden berühren.
• Nach Fertigstellung des Schnitts warten Sie, bis die
Sägekette stoppt, bevor Sie die Kettensäge bewegen.
• Stoppen Sie stets den Motor, bevor Sie sich von Baum
zu Baum bewegen.
78
Kettensäge Modell CS1200-092
Page 79

Wartung und Reinigung
Wartung und Reinigung
WARNHINWEIS: WENN BESCHÄDIGTE
ODER ABGENUTZTE TEILE NICHT
IDENTIFIZIERT UND ERSETZT WERDEN,
KÖNNEN SCHWERE VERLETZUNGEN DIE
FOLGE SEIN. KONTROLLIEREN SIE DIE
KETTENSÄGE REGELMÄSSIG. REGELMÄSSIGE
KONTROLLE IST DER ERSTE SCHRITT IN
DER ORDNUNGSGEMÄSSEN WARTUNG.
BEACHTEN SIE DIE FOLGENDEN RICHTLINIEN,
UM SICHERHEIT UND ZUFRIEDENHEIT ZU
OPTIMIEREN. WECHSELN SIE BESCHÄDIGTE
ODER ÜBERMÄSSIG ABGENUTZTE TEILE
SOFORT AUS.
WARNHINWEIS: AN DIE STROMQUELLE
ANGESTECKTE ELEKTROWERKZEUGE KÖNNEN
VERSEHENTLICH STARTEN. STECKEN SIE DIE
KETTENSÄGE VOR DER INBETRIEBNAHME ODER
VOR WARTUNGSARBEITEN AUS.
ACHTUNG: BEIM REINIGEN DER
KETTENSÄGE DIESE NICHT IN WASSER ODER
ANDERE FLÜSSIGKEITEN EINTAUCHEN.
• Seitenabdeckung: Die Seitenabdeckung sollte keine
Risse oder andere Beschädigungen aufweisen. Sie
sollte ohne Verzug eng am Sägegehäuse anliegen.
Achten Sie darauf, dass der Kettenfang keine Risse
aufweist.
• Kettenbremse: Überprüfen Sie die Kettenbremse,
um ihre ordnungsgemäße Funktion sicherzustellen.
Lesen Sie die Abschnitte „Prüfung der Kettenbremse“
unter „Allgemeiner Betrieb“.
• Ölstand: Vergewissern Sie sich vor der Verwendung,
dass der Ölbehälter voll ist.
• Motorgehäuse: Prüfen Sie auf Risse in der Abdeckung
und Verunreinigungen in den Lufteinlässen.
Überprüfen Sie in regelmäßigen Abständen
diese Teile:
• Kettenrad: Suchen Sie nach tiefen Rillen, gebrochenen
Zähnen oder Graten.
• Kettenspanngerät: Suchen Sie nach Rissen, Spänen,
lockeren Schrauben, Verzügen oder sonstigen
Schäden.
• Befestigungsfläche der Führungsschiene unter
der Seitenabdeckung: Achten Sie darauf, dass
der Montagebolzen der Führungsschiene nicht
verbogen, ausgerissen oder verkantet ist, und
dass der Führungsschienenflansch und der
Ausrichtungsflansch frei von Verunreinigungen und
intakt sind.
REINIGUNG
KONTROLLE
Kontrollieren Sie vor jedem Gebrauch und wenn die
Kettensäge fallen gelassen wurde diese Teile:
• Kabel: Vergewissern Sie sich, dass der Stecker in
gutem Zustand und nicht verbogen oder korrodiert ist.
Überprüfen Sie auch die Isolierung. Wenn das Kabel
beschädigt ist, verwenden Sie es nicht. Wenden Sie
sich an eine autorisierte Service-Stelle.
• Griffe: Der vordere und hintere Griff sollte keine Risse
oder sonstige Beschädigungen aufweisen. Die Griffe
sollten sauber und trocken sein.
• Vorderer Handschutz: Der vordere Handschutz sollte
unbeschädigt und leicht hin und her bewegbar sein.
Die Bewegung des vorderen Handschutzes sollte die
Kettenbremse aktivieren.
• Führungsschiene: Die Schiene sollte gerade sein und
keine Späne, Risse oder übermäßigen Verschleiß
aufweisen.
• Sägeketten: Die Kette sollte korrekte Spannung
aufweisen und scharf sein. Die Komponenten
sollten keine Risse, Späne, gebrochene Zähne
oder übermäßigen Verschleiß aufweisen. Lesen Sie
die Abschnitte „Anspannung der Kette“ und „Die
Sägekette Schärfen“.
Kettensäge Modell CS1200-092
ACHTUNG: BEIM REINIGEN DES
ANTRIEBSKOPFS DER KETTENSÄGE
DIESEN NICHT IN WASSER ODER ANDERE
FLÜSSIGKEITEN EINTAUCHEN.
Tragen Sie Handschuhe.
• Kettensäge ausstecken.
• Holzspäne und sonstige Verunreinigungen vom
Motorgehäuse und den Belüftungsöffnungen
entfernen.
• Beim Wechseln der Kette stets Holzschnitzel,
Sägespäne und Schmutz aus der Nut der
Führungsschiene entfernen.
• Vor dem Einstecken sicherstellen, dass das Kabel und
der Stecker trocken sind.
79
Page 80

Wartung und Reinigung
ANSPANNUNG DER KETTE
WICHTIG: SÄGEKETTE NUR ANSPANNEN,
WENN DIE KETTE KÜHL IST. EINE HEISSE
KETTE KANN SICH ZUSAMMENZIEHEN UND
DIE FÜHRUNGSSCHIENE ODER DIE KÜHLENDE
KETTE BESCHÄDIGEN.
Wenn sich die Kette und die Unterseite der Schiene im
ausgeschalteten und kühlen Zustand nicht berühren,
ist die Kette angespannt.
Die Kette entsprechend der Anleitungen in
„Anspannung der Kette“ im Abschnitt „Inbetriebnahme“
anspannen.
DIE SÄGEKETTE SCHÄRFEN
Es wird empfohlen, die Kette von einem Oregon®Servicehändler schärfen zu lassen, sie kann aber auch
vom Bediener geschliffen werden.
WARNHINWEIS: WIRD DIE KETTE
UNSACHGEMÄSS GESCHLIFFEN ODER DAS
TIEFENMASS ZU GERING GEWÄHLT, BESTEHT
ERHÖHTE VERLETZUNGSGEFAHR. SCHÄRFEN
SIE DIE KETTE IMMER IN ÜBEREINSTIMMUNG
MIT DEN VORGABEN AUS DIESER ANLEITUNG.
WICHTIG: MIT DER HIER BESCHRIEBENEN
VORGEHENSWEISE LASSEN SICH
GERINGFÜGIGE SCHÄDEN AN DER SÄGEKETTE
BEHEBEN, DIE VOM KONTAKT MIT SCHMUTZ
ODER ÄHNLICHEM HERRÜHREN. UM
SCHWERERE SCHÄDEN AN DER SÄGEKETTE
ZU BEHEBEN (Z. B. NACH KONTAKT MIT
BETON), BRINGEN SIE DIE KETTE ZU EINEM
ANERKANNTEN OREGON®-SERVICEHÄNDLER
ODER ERSETZEN SIE DIE KETTE.
Zum Schärfen der Kette benötigen Sie folgende
Werkzeuge (Bestandteil des Oregon®-Werkzeugsatzes;
siehe ‚Technische Daten und Bestandteile‘):
• Feilenführung
• , mm runde Sägekettenfeile (verwenden Sie
ausschließlich speziell für Sägeketten konzipierte
Feilen)
• , mm (. Zoll) Tiefenmesslehre
• Flachfeile
Bitte tragen Sie bei dieser Arbeit Handschuhe
und Augenschutz und ziehen Sie den Stecker der
Kettensäge aus der Steckdose. Dann feilen Sie die
Kette, um das Tiefenmaß einzustellen:
• Lösen Sie den Drehknopf und entfernen Sie die
Seitenabdeckung.
• Die Kettenspannscheibe soweit wie möglich lockern.
• Nehmen Sie die Kette ab.
• Klemmen Sie die Kette in einen Schraubstock, um sie
zu fixieren.
• Setzen Sie die Tiefenmesslehre so auf die Kette, dass
ein Tiefenbegrenzer durch das Fenster des Werkzeugs
ragt.
• Wenn der Tiefenbegrenzer im Fenster hinausragt,
feilen Sie ihn mit einer Flachfeile auf die Ebene des
Fensters ab (Abb. ). Feilen Sie den Tiefenbegrenzer
keinesfalls so weit herab, dass er das in dieser
Anleitung vorgegebene Tiefenmaß unterschreitet.
ABB. 31
TIEFENMESSLEHRE
FLACHFEILE
WICHTIG: NUR IN EINE RICHTUNG SCHLEIFFEN,
VON INNEN NACH AUSSEN. KEINESFALLS MIT
VOR- UND ZURÜCKBEWEGUNGEN SCHÄRFEN.
• Feilen Sie von der Innenfläche des Tiefenbegrenzers
nach außen (Abb. ).
ABB. 32
INNEN
AUSSEN
• Entfernen Sie den Tiefenmesser.
• Nach dem Abfeilen stets die Vorderkante jedes
Tiefenbegrenzers parallel zu seiner ursprünglichen
gerundeten oder ansteigenden Form abfeilen
(Abb. ).
ABB. 33
• Wiederholen Sie dies für jeden Tiefenbegrenzer der
Kette.
80
Kettensäge Modell CS1200-092
Page 81

Wartung und Reinigung
Nach der Anpassung der Tiefenbegrenzer schärfen Sie
die Sägezähne:
• Positionieren Sie die Kettenfeile in der Feilenführung.
• Richten Sie die Feilenführung so aus, dass der auf ihr
markierte korrekte Feilwinkel der oberen Platte
parallel zur Kette verläuft (Abb. ).
ABB. 34
RUNDFEILE
FEILENFÜHRUNG
• Schärfen Sie zuerst alle Sägezähne auf einer Seite der
Kette. Führen Sie nun mit der Feile bis
Schleifbewegungen pro Sägezahn durch, von dessen
Innenseite nach außen. Führen Sie stets die gleiche
Anzahl Schleifbewegungen pro Zahn aus. Drehen Sie
die Kettensäge anschließend herum und wiederholen
Sie den Vorgang für die Schneideglieder auf der
anderen Seite der Kette (Abb. ).
ABB. 35
AUSTAUSCH EINER
VERSCHLISSENEN SÄGEKETTE
Wenn die Sägekette Risse oder abgebrochene Zähne
aufweist, bis zu dem Punkt angespannt ist, dass die
korrekte Spannung nicht aufrechterhalten werden
kann, oder nicht mehr geschliffen werden kann, muss
sie ersetzt werden.
Tragen Sie Handschuhe.
• Kettensäge ausstecken.
• Den Entriegelungsknopf auf der Seitenabdeckung
ein bisschen lockern, doch die Seitenabdeckung nicht
vollständig entfernen.
• Die Kettenspannscheibe soweit wie möglich lockern.
• Den Entriegelungsknopf auf der Seitenabdeckung ein
bisschen lockern und die Seitenabdeckung entfernen.
• Die Sägekette entfernen.
• Die neue Kette so auf das Kettenrad auflegen, dass
die Schnittkanten der Zähne entlang der oberen
Kante der Führungsschiene vom Antriebskettenrad
abgewendet sind (Abb. ).
ABB. 37
• Korrigieren Sie sämtliche Beschädigungen an den
oberen und seitlichen verchromten Platten (Abb. ).
ABB. 36
• Sorgen Sie dafür, dass die Länge aller Schneidezähne
stets gleich ist.
• Nach dem Schärfen aller Sägezähne kontrollieren
Sie die Tiefenbegrenzer noch einmal mit der
Feilenführung. Wenn nötig, passen Sie die
Tiefenbegrenzer an.
• Ersetzen Sie die Kette und die Seitenabdeckung.
Kettensäge Modell CS1200-092
• Die Kette in die Nut der Führungsschiene einsetzen
und die Führungsschiene vom Motor weg schieben,
um Spiel aus der Kette zu entfernen (Abb. ).
ABB. 38
81
Page 82

Wartung und Reinigung
• Die Seitenabdeckung wieder anbringen und darauf
achten, dass Kettenfang und Lasche an der
Seitenabdeckung in der korrekten Position sitzen
(Abb. ). Anschließend den Entriegelungsknopf auf
der Seitenabdeckung leicht festziehen.
ABB. 39
• Die Kette entsprechend der Anleitungen
in „Anspannung der Kette“ im Abschnitt
„Inbetriebnahme“ anspannen.
WICHTIG: DIE SÄGEKETTE MUSS VOR DER
VERWENDUNG KORREKT GESPANNT WERDEN.
SIEHE „ANSPANNUNG DER KETTE“ IM
ABSCHNITT „INBETRIEBNAHME“.
PFLEGE DER FÜHRUNGSSCHIENE
ACHTUNG: NACH DEM SCHNEIDEN IST DIE
FÜHRUNGSSCHIENE GEGEBENENFALLS HEISS.
HANDSCHUHE TRAGEN, UM VERBRENNUNGEN ZU
VERMEIDEN.
Um die Abnutzung der Führungsschiene auszugleichen
und die Lebensdauer der Führungsschiene zu
verlängern, die Führungsschiene von Zeit zu Zeit
umdrehen.
Tragen Sie Handschuhe.
• Kettensäge ausstecken.
• Den Entriegelungsknopf auf der Seitenabdeckung
ein bisschen lockern, doch die Seitenabdeckung nicht
vollständig entfernen.
• Die Kettenspannscheibe soweit wie möglich lockern.
• Den Entriegelungsknopf auf der Seitenabdeckung ein
bisschen lockern und die Seitenabdeckung entfernen.
• Die Schiene und die Kette entfernen und auf Schäden
und Zeichen der Abnutzung hin überprüfen.
• Schiene umdrehen (Abb. ).
ABB. 40
• Die Führungsschiene auf den
Führungsschienenflansch legen, indem der Schlitz
der Führungsschiene über den Ausrichtungsflansch
geschoben wird, wobei der Montagebolzen durch das
Loch in der Führungsschiene gesteckt wird. Richten
Sie die untere Öffnung auf der Führungsschiene mit
dem Spannbolzen aus (Abb. ).
ABB. 41
FÜHRUNGSSCHIENENFLANSCH
AUSRICHTUNGSFLANSCH
MONTAGEBOLZEN
• Die Sägekette entsprechend der Anleitungen in
„Ersatz abgenutzter Ketten und Schleifsteine“
austauschen.
• Die Kette entsprechend der Anleitungen
in „Anspannung der Kette“ im Abschnitt
„Inbetriebnahme“ anspannen.
ERSATZ ABGENUTZTER
FÜHRUNGSSCHIENEN
WARNHINWEIS: DIE KANTEN EINER
ABGENUTZTEN FÜHRUNGSSCHIENE,
BESONDERS DIE IM NUTBEREICH, WO SICH
DIE KETTE UND DIE SCHIENE BERÜHREN,
KÖNNEN SEHR SCHARF SEIN. VERWENDEN SIE
ANGEMESSENEN HANDSCHUTZ.
Wenn die Führungsschiene Risse oder stark abgenutzte
Kanten aufweist, besonders im Nutbereich, wo sich
die Kette und die Schiene berühren, muss sie ersetzt
werden. Die Schiene muss auch dann ausgetauscht
werden, wenn die Umlenkrolle abgenutzt ist, fehlende
Zähne aufweist oder sich nur schwer dreht.
Tragen Sie Handschuhe.
• Kettensäge ausstecken.
82
Kettensäge Modell CS1200-092
Page 83

Wartung und Reinigung
• Den Entriegelungsknopf auf der Seitenabdeckung
ein bisschen lockern, doch die Seitenabdeckung nicht
vollständig entfernen.
• Die Kettenspannscheibe soweit wie möglich lockern.
• Den Entriegelungsknopf auf der Seitenabdeckung ein
bisschen lockern und die Seitenabdeckung entfernen.
• Schiene und Kette entfernen.
• Die Schraube aus der Rückseite des
Kettenspanngeräts nehmen und das Gerät
entsprechend der Anleitungen in „Pflege der
Führungsschiene“ von der Führungsschiene
entfernen.
• Das Kettenspanngerät an der neuen Führungsschiene
anbringen und Schraube einsetzen.
• Führungsschiene entsprechend der Anweisungen in
„Pflege der Führungsschiene“ wieder montieren.
• Die Sägekette entsprechend der Anleitungen
in „Austausch einer verschlissenen Sägekette“
austauschen.
• Die Ketten entsprechend der Anleitungen in
„Anspannung der Kette“ anspannen.
ERSATZ DES
ANTRIEBSKETTENRADS
Tauschen Sie das Antriebskettenrad nach jedem
zweiten Wechsel der Sägekette aus oder sobald das
Antriebskettenrad beschädigt ist.
Tragen Sie Handschuhe.
• Kettensäge ausstecken.
• Den Entriegelungsknopf auf der Seitenabdeckung
ein bisschen lockern, doch die Seitenabdeckung nicht
vollständig entfernen.
• Die Kettenspannscheibe soweit wie möglich lockern.
• Den Entriegelungsknopf auf der Seitenabdeckung ein
bisschen lockern und die Seitenabdeckung entfernen.
• Schiene und Kette entfernen.
• Mit einem kleinen flachen Schraubenzieher die
E-Klammer öffnen und entfernen. Anschließend
Antriebskettenrad und Feder abnehmen (Abb. ).
• Neue Feder und neues Antriebskettenrad platzieren
und neue E-Klammer anbringen (Abb. ).
ABB. 43
• Schiene und Kette entsprechend der Anleitungen
in „Austausch einer verschlissenen Sägekette“
austauschen.
• Die Kette entsprechend der Anleitungen
in „Anspannung der Kette“ im Abschnitt
„Inbetriebnahme“ anspannen.
ZUSÄTZLICHE
WARTUNGSINFORMATIONEN
Weitere Informationen zur Wartung der Sägekette,
Führungsschiene und des Antriebskettenrads erhalten
Sie im Wartungs- und Sicherheitshandbuch von
®
unter http://www.oregonproducts.eu/en/
Oregon
customer-service/maintenance-safety-manual.html.
ABB. 42
Kettensäge Modell CS1200-092
83
Page 84

Fehlerbehebung
Fehlerbehebung
Verwenden Sie diese Tabelle, um Hinweise auf mögliche Lösungen für Probleme mit der Kettensäge zu erhalten.
Wenn das Problem mit den nachfolgenden Schritten nicht behoben wird, siehe Abschnitt „Garantie und Service“.
FEHLER MÖGLICHE URSACHE EMPFOHLENE MASSNAHMEN
MOTOR SCHALTET
SICH BEIM
SCHNEIDEN AUS
MOTOR LÄUFT NICHT
ODER LÄUFT MIT
UNTERBRECHUNGEN
MOTOR STOPPT
NICHT, WENN
KETTENBREMSE
EINGELEGT IST
KETTE HAT SICH
EINGEKLEMMT
KABEL IST BESCHÄDIGT
ODER DURCHGESCHNITTEN
KETTENBREMSE IST
EINGELEGT
KETTENSÄGE IST NICHT
EINGESTECKT
KABEL IST BESCHÄDIGT
ODER DURCHGESCHNITTEN
FI-SCHUTZSCHALTER IST
AUSGEKLINKT
SCHLECHTE STECKDOSE
KETTENBREMSE
EINGELEGT
AUSLÖSESPERRE IST
NICHT GEDRÜCKT
ABLAGERUNGEN IN DER
SEITENABDECKUNG
ABLAGERUNGEN
VERHINDERN DIE
VOLLSTÄNDIGE BEWEGUNG
DES VORDEREN
HANDSCHUTZES
MÖGLICHE FEHLFUNKTION
DER KETTENBREMSE
FLACHEN UNTERSCHNITT AM AST MACHEN, UM DRUCK
ABZUNEHMEN. SIEHE „SCHNEIDEN“.
WENN DAS VERLÄNGERUNGSKABEL BESCHÄDIGT
IST, NICHT MEHR VERWENDEN UND AUSTAUSCHEN.
WENN DAS NETZKABEL BESCHÄDIGT IST, NICHT MEHR
VERWENDEN UND SICH AN EINE AUTORISIERTE SERVICESTELLE WENDEN.
VORDEREN HANDSCHUTZ IN BETRIEBSPOSITION
SCHIEBEN ENTSPRECHEND DER ANLEITUNGEN IN
„ÜBERPRÜFUNG DER POSITION DES VORDEREN
HANDSCHUTZES“.
KETTENSÄGE EINSTECKEN.
WENN DAS VERLÄNGERUNGSKABEL BESCHÄDIGT
IST, NICHT MEHR VERWENDEN UND AUSTAUSCHEN.
WENN DAS NETZKABEL BESCHÄDIGT IST, NICHT MEHR
VERWENDEN UND SICH AN EINE AUTORISIERTE SERVICESTELLE WENDEN.
VERLÄNGERUNGSKABEL AUSSTECKEN, FISCHUTZSCHALTER ZURÜCKSETZEN UND
VERLÄNGERUNGSKABEL WIEDER EINSTECKEN.
VERLÄNGERUNGSKABEL IN EINE ANDERE STECKDOSE
STECKEN.
VORDEREN HANDSCHUTZ IN BETRIEBSPOSITION
SCHIEBEN ENTSPRECHEND DER ANLEITUNGEN IN
„ÜBERPRÜFUNG DER POSITION DES VORDEREN
HANDSCHUTZES“.
AUSLÖSESPERRE DRÜCKEN, BEVOR DER
DREHZAHLHEBEL BETÄTIGT WIRD. SIEHE „ALLGEMEINER
BETRIEB“.
KETTENSÄGE AUSSTECKEN, DIE SEITENABDECKUNG
ABNEHMEN UND VERUNREINIGUNGEN ENTFERNEN.
ABLAGERUNGEN VOM ÄUSSEREN MECHANISMUS DER
KETTENBREMSE ENTFERNEN.
WARNHINWEIS: DIE INBETRIEBNAHME
EINER KETTENSÄGE OHNE FUNKTIONIERENDE
KETTENBREMSE KANN ERNSTHAFTE VERLETZUNGEN
VERURSACHEN. KONTAKTIEREN SIE VOR DER
VERWENDUNG EINE AUTORISIERTE SERVICE-STELLE.
84
Kettensäge Modell CS1200-092
Page 85

Fehlerbehebung
FEHLER MÖGLICHE URSACHE EMPFOHLENE MASSNAHMEN
DIE KETTE WIEDER EINBAUEN, SICHERSTELLEN, DASS
DIE ANTRIEBSGLIEDER DER KETTE VOLLSTÄNDIG AUF
DEM ANTRIEBSKETTENRAD SITZEN. SIEHE „AUSTAUSCH
EINER VERSCHLISSENEN SÄGEKETTE“.
FÜHRUNGSSCHIENE AUSTAUSCHEN. SIEHE „AUSTAUSCH
EINER VERSCHLISSENEN SÄGEKETTE“.
KETTE ANSPANNEN. SIEHE „ANSPANNUNG DER KETTE“
IM ABSCHNITT „INBETRIEBNAHME“.
MOTOR LÄUFT, ABER
DIE KETTE DREHT
SICH NICHT
KETTE GREIFT NICHT IN
ANTRIEBSKETTENRAD EIN
UMLENKROLLE DER
FÜHRUNGSSCHIENE DREHT
SICH NICHT
UNGENÜGENDE
KETTENSPANNUNG
STUMPFE KETTE SIEHE „DIE SÄGEKETTE SCHÄRFEN“.
KETTENSÄGE
SCHNEIDET NICHT
RICHTIG
LOCKERUNG DER
KETTE ODER
ABSPRINGEN DER
KETTE VON DER
FÜHRUNGSSCHIENE
SCHIENE UND KETTE
SIND ÜBERMÄSSIG
HEISS UND/ODER
GEBEN RAUCH AB.
KETTE VERKEHRT
EINGEBAUT
VERSCHLISSENE KETTE
TROCKENE ODER
ÜBERMÄSSIG GEDEHNTE
KETTE
KETTE NICHT IN NUT DER
FÜHRUNGSSCHIENE
SEITENABDECKUNG NICHT
KORREKT ANGEBRACHT
KETTE IST NICHT
AUSREICHEND GEÖLT
KETTE MIT KORREKT AUSGERICHTETEN ZÄHNEN
ANBRINGEN. SIEHE „AUSTAUSCH EINER VERSCHLISSENEN
SÄGEKETTE“.
KETTE ERSETZEN. SIEHE „AUSTAUSCH EINER
VERSCHLISSENEN SÄGEKETTE“.
DEN ÖLSTAND KONTROLLIEREN. BEI BEDARF DEN
ÖLBEHÄLTER AUFFÜLLEN. SIEHE „AUSTAUSCH EINER
VERSCHLISSENEN SÄGEKETTE“.
KETTE RICHTIG AUF DIE NUT SETZEN. SIEHE „AUSTAUSCH
EINER VERSCHLISSENEN SÄGEKETTE“.
BRINGEN SIE DIE SEITENABDECKUNG RICHTIG AN UND
STELLEN SIE SICHER, DASS DIE LASCHE HINTEN AN
DER SEITENABDECKUNG IM SÄGENGEHÄUSE STECKT.
DEN ÖLSTAND KONTROLLIEREN. BEI BEDARF DEN
ÖLBEHÄLTER AUFFÜLLEN. SIEHE „BEFÜLLUNG DES
SCHIENEN- UND KETTENÖLBEHÄLTERS“.
Kettensäge Modell CS1200-092
85
Page 86

Technische Daten und Komponenten
Technische Daten und Komponenten
WARNHINWEIS: DIE VERWENDUNG VON IN DIESER ANLEITUNG NICHT EMPFOHLENEN
ERSATZTEILEN ERHÖHT DIE VERLETZUNGSGEFAHR. AUSSCHLIESSLICH DIE IN DIESER ANLEITUNG
BESCHRIEBENEN SCHNEIDEEINRICHTUNGEN VERWENDEN. DIE VERWENDUNG NICHT GEEIGNETER
SCHNEIDEEINRICHTUNGEN KANN ZU SCHWERWIEGENDEN VERLETZUNGEN BIS HIN ZUM TOD
FÜHREN.
ERSATZKOMPONENTEN TEILENUMMER
FÜHRUNGSSCHIENE 140SDEA041
SÄGEKETTE Q91VG052E (B52)
SPEZIFIKATIONEN
SPANNUNG 230 V ~50 Hz
LEISTUNG 1800 W
ÖLVOLUMEN 100 ml
FÜHRUNGSSCHIENEN- UND KETTENÖL Oregon
TROCKENGEWICHT, MONTIERT 4,5 kg
TROCKENGEWICHT OHNE FÜHRUNGSSCHIENE
UND KETTE
GARANTIERTER SCHALLLEISTUNGSPEGEL
LWA (1) (2)
VIBRATION 5.944 m/s2 (K = 1,5 m/s2)
MAX. FÜHRUNGSSCHIENENLÄNGE 36 cm
TATSÄCHLICHE SCHNITTLÄNGE 34,3 cm
ANTRIEBSKETTENRADZÄHNE 6
KETTENGESCHWINDIGKEIT OHNE LAST 14.5 m/s
®
3,8 kg
108 dB
() Gemäß der Lärmschutzrichtlinie //EC, geändert durch //EC
() Gemessen entsprechend EN -:+A: und EN--:+A:;
Schalldruckpegel, LpA, beträgt . dB(A) mit einer Messunsicherheit, KpA, von , dB(A)
86
Kettensäge Modell CS1200-092
Page 87

Garantie und Service
Garantie und Service
GARANTIE
Blount, Inc. gewährt allen registrierten Kettensägen
des Modells CS von Oregon
drei () Jahren. Diese Garantie gilt nur für Einheiten,
die für persönliche Zwecke verwendet werden, und
nicht gemietet oder verliehen oder für betriebliche
oder industrielle Zwecke eingesetzt wurden. Während
der Garantiezeit wird Blount ausschließlich für den
Originalkäufer Produkte oder Teile entweder kostenlos
reparieren oder nach eigenem Ermessen ersetzen,
wenn sich bei einer von Blount durchgeführten
Prüfung herausstellt, dass sie Material- und/oder
Verarbeitungsfehler aufweisen. Der Käufer trägt
die Verantwortung für sämtliche Transport- und
Ausbaukosten in Bezug auf Teile, die gemäß dieser
Garantie zum Ersatz eingeschickt werden.
®
eine Garantie von
ORIGINALKAUFBELEG
AUFBEWAHREN
Befestigen Sie bitte den Original-Kaufbeleg an
dieser Bedienungsanleitung. Bringen Sie für
Garantieleistungen das Produkt und den Beleg zu
dem Händler, bei dem das Produkt gekauft wurde.
Oder nehmen Sie telefonisch Kontakt mit Oregon auf.
Die länderspezifischen Telefonnummern finden Sie im
Abschnitt „Customer Service by Country“.
INFORMATIONEN ZU WARTUNG
UND KUNDENDIENST
Besuchen Sie uns im Internet unter
OregonProducts.com, um Informationen zu
Servicestandorten zu erhalten oder kontaktieren Sie
unsere Kundendienstabteilung bzgl. Hilfestellung,
zusätzlicher technischer Beratung, Reparatur oder
Ersatzteilen. Die länderspezifischen Telefonnummern
finden Sie im Abschnitt „Customer Service by Country“.
Aus Sicherheitsgründen bitte nur echte
Werksersatzteile für die Kettensäge verwenden. Das
Personal unseres Wartungszentrums kann Ihnen
fachgerechte Unterstützung und Hilfestellung in Bezug
auf Einstellung, Reparatur und Ersatz aller OregonProdukte geben.
Kettensäge Modell CS1200-092
87
Page 88

Índice
Índice
Instrucciones importantes de seguridad . . . . . . . . . . . . . . . . . . . . . . . . . . . . . .89
Definiciones de las marcas de seguridad. . . . . . . . . . . . . . . . . . . . . . . . . . . . 89
Advertencias generales de seguridad sobre la herramienta eléctrica . . . . . . . . . . . 89
Seguridad en el área de trabajo . . . . . . . . . . . . . . . . . . . . . . . . . . . . . . . . . 89
Seguridad eléctrica . . . . . . . . . . . . . . . . . . . . . . . . . . . . . . . . . . . . . . . .89
Seguridad personal . . . . . . . . . . . . . . . . . . . . . . . . . . . . . . . . . . . . . . . .90
Uso y cuidado de la herramienta eléctrica . . . . . . . . . . . . . . . . . . . . . . . . . . .90
Servicio técnico . . . . . . . . . . . . . . . . . . . . . . . . . . . . . . . . . . . . . . . . . .91
Advertencias de seguridad sobre la motosierra. . . . . . . . . . . . . . . . . . . . . . . . 91
Causas y prevención de rebotes del operador. . . . . . . . . . . . . . . . . . . . . . . . .92
Dispositivos de seguridad contra rebotes en esta sierra . . . . . . . . . . . . . . . . . .93
Almacenamiento, transporte y desecho . . . . . . . . . . . . . . . . . . . . . . . . . . . .93
Símbolos y etiquetas . . . . . . . . . . . . . . . . . . . . . . . . . . . . . . . . . . . . . . . . .94
Nombres y términos de la motosierra . . . . . . . . . . . . . . . . . . . . . . . . . . . . . . .95
Product Identification . . . . . . . . . . . . . . . . . . . . . . . . . . . . . . . . . . . . . . . . .96
Preparación para el uso. . . . . . . . . . . . . . . . . . . . . . . . . . . . . . . . . . . . . . . . 97
¿Qué hay en la caja? . . . . . . . . . . . . . . . . . . . . . . . . . . . . . . . . . . . . . . .97
Revisión de la posición del protector frontal . . . . . . . . . . . . . . . . . . . . . . . . .97
Llenar el depósito de aceite de la barra y la cadena . . . . . . . . . . . . . . . . . . . . . 97
Montaje de la barra de guía y la cadena . . . . . . . . . . . . . . . . . . . . . . . . . . . . 98
Tensado de la cadena de la sierra. . . . . . . . . . . . . . . . . . . . . . . . . . . . . . . . 99
Uso de la motosierra . . . . . . . . . . . . . . . . . . . . . . . . . . . . . . . . . . . . . . . . 100
Operación general . . . . . . . . . . . . . . . . . . . . . . . . . . . . . . . . . . . . . . . . 100
Uso y cuidado del cable de alimentación. . . . . . . . . . . . . . . . . . . . . . . . . . . 101
Corte. . . . . . . . . . . . . . . . . . . . . . . . . . . . . . . . . . . . . . . . . . . . . . . . 102
Mantenimiento y limpieza . . . . . . . . . . . . . . . . . . . . . . . . . . . . . . . . . . . . . 107
Inspección. . . . . . . . . . . . . . . . . . . . . . . . . . . . . . . . . . . . . . . . . . . . . 107
Limpieza . . . . . . . . . . . . . . . . . . . . . . . . . . . . . . . . . . . . . . . . . . . . . 107
Tensado de la cadena de la sierra. . . . . . . . . . . . . . . . . . . . . . . . . . . . . . . 108
Afilado de la cadena de sierra . . . . . . . . . . . . . . . . . . . . . . . . . . . . . . . . . 108
Reemplazo de una cadena de sierra . . . . . . . . . . . . . . . . . . . . . . . . . . . . . 109
Mantenimientode la barra de guía . . . . . . . . . . . . . . . . . . . . . . . . . . . . . . 110
Reemplazo de una barra de guía desgastada.. . . . . . . . . . . . . . . . . . . . . . . . 110
Reemplazar la rueda dentada de accionamiento . . . . . . . . . . . . . . . . . . . . . . 111
Información adicional sobre el mantenimiento . . . . . . . . . . . . . . . . . . . . . . . 111
Solución de problemas . . . . . . . . . . . . . . . . . . . . . . . . . . . . . . . . . . . . . . . 112
Especificaciones y componentes . . . . . . . . . . . . . . . . . . . . . . . . . . . . . . . . . 114
Garantía y servicio técnico . . . . . . . . . . . . . . . . . . . . . . . . . . . . . . . . . . . . . 115
Declaración de Conformidad (CE) . . . . . . . . . . . . . . . . . . . . . . . . . . . . . . . . . 229
Servicio al cliente por país . . . . . . . . . . . . . . . . . . . . . . . . . . . . . . . . . . . . . 230
© Blount, Inc. Los precios y las especificaciones están sujetos a cambios sin previo aviso. Todos los derechos reservados. Oregon® es una
marca comercial de Blount, Inc. en los Estados Unidos y/o en otros países.
88
Motosierra modelo CS1200-092
Page 89

Instrucciones importantes de seguridad
Instrucciones importantes de seguridad
Introducción
Esta motosierra está diseñada para uso moderado ocasional. No está diseñada para talar árboles
grandes ni cortar troncos de grandes diámetros. Esta motosierra no está diseñada para la poda de
árboles. No corte árboles o piezas de madera con un diámetro superior a la longitud de corte efectiva de
la motosierra, cm ( pulgadas).
Definiciones de las marcas de seguridad
SÍMBOLO MARCA SIGNIFICADO
ADVERTENCIA
PRECAUCIÓN
IMPORTANTE
Indica un posible peligro que podría provocar una lesión grave.
Indica un posible peligro que podría provocar un daño considerable a la
herramienta o una lesión leve o moderada.
Seguir estas instrucciones aumentará su satisfacción con la
herramienta.
Advertencias generales de seguridad sobre la herramienta eléctrica
ADVERTENCIA: Lea y comprenda todas las advertencias de seguridad y las
instrucciones. La omisión en seguir estas advertencias e instrucciones podría
ocasionar una descarga eléctrica, un incendio y/o lesiones graves.
Guarde todas las advertencias e instrucciones para futura referencia. El término
“herramienta eléctrica” en las advertencias se refiere a su herramienta alimentada desde la
red (cableada) o la batería (sin cable).
Seguridad en el área de trabajo
• Mantenga el área de trabajo limpia y bien
iluminada. Las zonas abarrotadas u oscuras
son propensas a los accidentes.
• No use la herramienta eléctrica en
ambientes explosivos, como aquellos
con presencia de líquidos, gases o polvo
inflamables. Las herramientas eléctricas crean
chispas que podrían encender el polvo o los
gases.
• Mantenga alejados a los niños y a los
transeúntes mientras esté utilizando la
herramienta eléctrica. Las distracciones
podrían hacerle perder el control.
Seguridad eléctrica
• El enchufe de una herramienta eléctrica
tiene que coincidir con el tomacorriente.
Nunca modifique el enchufe en forma alguna.
No use adaptadores con las herramientas
eléctricas puestas a tierra. El uso de enchufes
no modificados y tomacorrientes adecuados
reduce el riesgo de que se produzcan descargas
eléctricas.
• Evite el contacto del cuerpo con superficies
conectadas a tierra, como tuberías,
radiadores, estufas y refrigeradores. Hay un
mayor riesgo de sufrir una descarga eléctrica si
su cuerpo está puesto a tierra.
• No exponga las herramientas eléctricas a
condiciones húmedas ni a la lluvia. Si entra
agua en una herramienta eléctrica, habrá mayor
riesgo de que ocurra una descarga eléctrica.
• No abuse el cable de alimentación. Nunca
use el cable para transportar, acarrear
ni desenchufar la herramienta eléctrica.
Mantenga el cable alejado del calor, el
aceite, los bordes filosos y las piezas
móviles. Un cable dañado o enredado conlleva
mayor riesgo de que se produzca una descarga
eléctrica.
• Para usar una herramienta eléctrica al aire
libre, use un prolongador apto para uso al
aire libre. El uso de un cable apto para uso al
aire libre reduce el riesgo de que se produzca una
descarga eléctrica.
• Si es inevitable usar la herramienta eléctrica
en un lugar húmedo, utilice un suministro
protegido con un disyuntor por falla a tierra
(GFCI). La utilización de un GFCI reduce el riesgo
de que se produzca una descarga eléctrica.
Motosierra modelo CS1200-092
89
Page 90

Instrucciones importantes de seguridad
Seguridad personal
• Permanezca alerta, esté atento a lo que
hace y use su sentido común al usar
una herramienta eléctrica. No use una
herramienta eléctrica si está cansado o si
está bajo la influencia de drogas, alcohol o
medicamentos. Si se despista por un momento
mientras usa una herramienta eléctrica, podría
sufrir lesiones personales graves.
• Use equipo de protección personal. Siempre
use protección para los ojos. El uso de equipo
de protección adecuado para las condiciones de
trabajo, tal como una máscara contra el polvo,
calzado de seguridad antideslizante, un casco de
seguridad o protección para los oídos, reduce el
riesgo de sufrir lesiones personales.
• Evite el arranque accidental de la
herramienta. Asegúrese de que el
interruptor esté en la posición de apagado
antes de conectar la herramienta a la
fuente de alimentación y/o al módulo de la
batería y antes de levantar o transportar
la herramienta. Transportar herramientas
eléctricas con el dedo sobre el acelerador o
energizarlas con el interruptor en la posición de
encendido es buscar un accidente.
• Quite toda llave de ajuste antes de encender
la herramienta eléctrica. Si se deja una llave
conectada a una pieza móvil de la herramienta
eléctrica, podrían producirse lesiones personales.
• No se estire demasiado. Mantenga un apoyo
firme y un buen equilibrio en todo momento
(Fig. ). Esto permite un mejor control de la
herramienta en caso de situaciones inesperadas.
FIG. 1
• Vístase correctamente. No use ropa ni joyas
sueltas. Mantenga su cabello, su ropa y
sus guantes alejados de las piezas móviles.
La ropa, las joyas o el cabello sueltos podrían
quedar atrapados en las piezas móviles.
• Si se proporcionan dispositivos para la
conexión de instalaciones de extracción y
recolección de polvo, asegúrese de que estas
estén conectadas y de que se utilicen en
forma adecuada. La utilización de sistemas de
recolección de polvo puede reducir los peligros
relacionados con el polvo.
• No permita que la familiaridad adquirida
con el uso frecuente de herramientas le
permita volverse complaciente e ignorar los
principios de seguridad de las herramientas.
Una acción descuidada puede causar lesiones
graves en una fracción de segundo.
Uso y cuidado de la
herramienta eléctrica
• No fuerce la herramienta eléctrica. Use la
herramienta eléctrica adecuada para su
aplicación. La herramienta eléctrica adecuada
hará el trabajo mejor y en forma más segura al
ritmo para el cual fue diseñada.
• No use la herramienta eléctrica si el
interruptor no permite encenderla y
apagarla. Toda herramienta que no pueda
controlarse con el interruptor es peligrosa y debe
repararse.
• Antes de realizar ajustes, cambiar
accesorios o almacenar herramientas
eléctricas, si es desmontable, desconecte
el enchufe de la fuente de alimentación o
la batería de las mismas. Estas medidas
de seguridad preventivas reducen el riesgo de
arranques accidentales de la herramienta.
• Almacene las herramientas eléctricas que
no se encuentren en uso fuera del alcance de
los niños y no permita que las usen personas
que no conozcan la herramienta eléctrica
ni estas instrucciones. Las herramientas
eléctricas son peligrosas en las manos de
usuarios no capacitados.
• Proporcione mantenimiento a las
herramientas eléctricas. Verifique que las
piezas móviles no estén mal alineadas ni
atascadas, que no haya piezas rotas y que
no haya ninguna otra condición que pudiera
afectar el funcionamiento de la herramienta.
Si la herramienta se daña, hágala reparar
antes de usarla. Muchos accidentes ocurren
por no dar un buen mantenimiento a las
herramientas eléctricas.
90
Motosierra modelo CS1200-092
Page 91

Instrucciones importantes de seguridad
• Mantenga las herramientas de corte afiladas
y limpias. Las herramientas de corte con buen
mantenimiento y bordes de corte afilados tienen
menos probabilidades de atascarse y son más
fáciles de controlar.
• Utilice la herramienta eléctrica, los
accesorios, las brocas, etc. de acuerdo
con estas instrucciones, y tome en cuenta
las condiciones de trabajo y la tarea por
realizar. El uso de la herramienta eléctrica para
tareas distintas de las previstas podría provocar
una situación peligrosa.
• Mantenga las asas y las superficies de
agarre secas, limpias y libres de aceite y
grasa. Las asas resbaladizas y las superficies de
agarre no permiten un manejo y control seguros
de la herramienta en situaciones inesperadas.
Servicio técnico
Encargue el servicio técnico de su
herramienta eléctrica a un técnico de
reparación calificado que utilice únicamente
piezas de repuesto idénticas. Esto garantizará
que se mantenga la seguridad de la herramienta
eléctrica.
Advertencias de seguridad
sobre la motosierra
• Mantenga todas las partes del cuerpo
alejadas de la cadena al usar la motosierra.
Antes de encender la motosierra, asegúrese
de que la cadena no esté en contacto con
ningún objeto. Un momento de distracción
mientras usa una motosierra puede provocar el
enredo de su ropa o su cuerpo con la cadena.
• Sostenga siempre la motosierra con la mano
derecha en el asa trasera y la mano
izquierda en el asa frontal (Fig. ). Sostener
la motosierra con una configuración de manos
inversa aumenta el riesgo de lesiones personales
y no debe hacerse.
• Sostenga la herramienta únicamente por
las superficies de agarre aisladas, porque
la cadena podría entrar en contacto con
cables ocultos o su propio cable.
motosierras que contienen un cable “vivo”
podrían energizar las piezas metálicas expuestas
de la herramienta y provocar una descarga.
• Use gafas de seguridad y protección para
los oídos. Se recomienda el uso de equipo
de protección adicional para la cabeza, las
manos, piernas y pies. El contacto con la
suciedad proyectada o el contacto accidental con
la cadena de la sierra pueden causar lesiones
personales.
• No opere la motosierra en un árbol. La
operación de una motosierra mientras se
encuentra encima de un árbol puede provocar
lesiones personales.
• Mantenga siempre un apoyo firme y opere
la motosierra solo cuando se encuentre en
una superficie fija, segura y nivelada. Las
superficies resbalosas o inestables pueden
provocar la pérdida de equilibrio o control de la
motosierra.
• Al cortar una rama que esté bajo tensión,
esté atento al rebote. Cuando se libera la
tensión en las fibras de la madera, la rama
cargada con rebote puede golpear al operador
y/o hacer que la motosierra quede fuera de
control.
• Tenga extremo cuidado al cortar matorrales
y árboles jóvenes. El material ligero puede
atrapar la cadena y azotarse hacia usted o
desequilibrarlo.
• Transporte la motosierra por el asa frontal
con la motosierra apagada y lejos de su
cuerpo. Al transportar o almacenar la
motosierra, coloque siempre la cubierta de la
barra guía (Fig. ). El manejo apropiado de la
motosierra reducirá la probabilidad de contacto
accidental con el movimiento de la cadena.
Las
FIG. 2
Motosierra modelo CS1200-092
FIG. 3
91
Page 92

Instrucciones importantes de seguridad
• Siga las instrucciones para la lubricación,
la tensión de la cadena y el cambio
de accesorios. Una tensión o lubricación
inadecuada de la cadena puede aumentar la
probabilidad de sufrir lesiones debido al rebote.
• Mantenga siempre las asas secas, limpias y
libres de aceite y grasa. Las asas grasosas o
aceitosas son resbalosas y provocan la pérdida
del control.
• Corte madera solamente. No use la
motosierra para fines no previstos. Por
ejemplo: no use la motosierra para cortar
plástico, mampostería o materiales de
construcción que no sean madera. El uso
de la motosierra para tareas distintas de
las previstas podría provocar una situación
peligrosa.
• Se recomienda que el usuario principiante
reciba instrucción práctica en el uso de
la motosierra y el equipo de protección
recomendado por un operador
experimentado. La práctica inicial debe ser
cortar troncos sobre un caballete de serrar o una
base.
• Excepto por las piezas de desgaste
identificadas en este manual, la motosierra
no tiene piezas que el usuario pueda reparar.
• La pieza de trabajo, la barra y la cadena
pueden estar calientes después de cortar.
Use guantes para evitar quemaduras.
• Se ha informado que el uso prolongado de
herramientas eléctricas provoca trastornos
vasculares, musculares y/o neurológicos
(como el dedo blanco por vibración o
síndrome de Raynaud), especialmente al
operar la herramienta en un clima frío. Si
experimenta entumecimiento o pérdida de
sensibilidad en sus extremidades, deje de
usar la herramienta hasta que los síntomas
desaparezcan. Para reducir la incidencia de
trauma inducido por la vibración, siga estas
instrucciones:
– Utilice guantes, y mantenga las manos y
el cuerpo calientes.
– Sujete la motosierra con firmeza, pero no
ejerza una presión prolongada y excesiva.
Deje que la motosierra haga el trabajo.
– Asegúrese de que el sistema de corte se
mantenga de manera apropiada.
– Descanse con frecuencia.
La vibración durante el uso normal puede
diferir de los valores que se consignan en este
manual dependiendo del material que se corta,
el mantenimiento del sistema de corte y otros
factores.
• Mantenga el cable detrás de usted, y
conozca la posición del cable en todo
momento. Mantener el cable detrás de usted
y conocer la posición del cable ayudarán a
minimizar los riesgos de tropiezo y evitan la
ruptura del cable con la motosierra.
• Si el cable está cortado o dañado, deje
de usar la motosierra inmediatamente y
desconecte el cable de la red eléctrica. Un
cable dañado o cortado conlleva mayor riesgo de
que se produzca una descarga eléctrica.
• Cuando se use en un ambiente húmedo,
utilice un GFCI con una corriente de
desconexión de menos de mA. La
utilización de un GFCI reduce el riesgo de que se
produzca una descarga eléctrica.
Causas y prevención de rebotes
del operador
El rebote se puede producir cuando la punta de la
barra de guía toca un objeto, o cuando la madera
cierra y atasca la cadena de la sierra en el corte.
El contacto con la punta, en algunos casos, puede
provocar una reacción inversa repentina, y hacer
que la barra de guía rebote hacia arriba y vuelva
hacia el operador.
Atascar la cadena a lo largo de la parte superior
de la barra de guía puede empujar la barra de guía
rápidamente de regreso hacia el operador.
Cualquiera de estas reacciones puede hacer
que usted pierda el control de la sierra, lo cual
provocaría lesiones personales graves. No
dependa exclusivamente de los dispositivos de
seguridad integrados a su sierra. Como usuario
de la motosierra, debe tomar varias medidas para
hacer que sus trabajos de corte estén libres de
accidentes y lesiones.
El rebote es el resultado del uso indebido de la
herramienta y/o procedimientos o condiciones
de operación incorrectos y se puede evitar si se
toman las precauciones correctas de acuerdo a lo
siguiente:
• Sujete firmemente la motosierra con los
pulgares y dedos alrededor de las asas de la
motosierra, con ambas manos en la sierra y
posicione su cuerpo y su brazo de modo que
le permita resistir las fuerzas de rebote. Si se
toman las medidas necesarias, el operador
puede controlar las fuerzas de rebote. No suelte
la motosierra.
92
Motosierra modelo CS1200-092
Page 93

Instrucciones importantes de seguridad
• No se estire excesivamente y no corte por
encima de la altura de su hombro. Esto ayuda
a evitar el contacto no deseado con la punta y
permite un mejor control de la motosierra en
situaciones inesperadas.
• Siga las instrucciones de afilado y
mantenimiento de Oregon
la sierra. Disminuir la altura del medidor de
profundidad puede llevar a un aumento de los
rebotes.
®
para la cadena de
Dispositivos de seguridad
contra rebotes en esta sierra
PELIGRO: Nunca modifique ni intente
desactivar el freno de la cadena.
PELIGRO: Use solo las barras y cadenas
de repuesto especificadas por Oregon
repuestos incorrectos de barra y cadena
pueden provocar una ruptura de la cadena
y un aumento del riesgo de lesiones por
rebotes.
FRENO DE LA CADENA
Esta motosierra viene equipada con un freno de
cadena, que detiene el motor y el movimiento de
la cadena cuando se produce un rebote (Fig. ). El
freno de la cadena se puede activar por el
movimiento de avance del protector frontal
porque la sierra gira hacia atrás durante el rebote;
también se puede activar mediante las fuerzas
inerciales generadas de un caso de rebote.
FIG. 4
CADENA
Esta motosierra viene equipada con una
cadena de sierra que cumple con los requisitos
de desempeño de rebote reducido del ANSI
(American National Standards Institute, Instituto
Nacional Estadounidense de Estándares) y la
CSA (Canadian Standards Association, Asociación
Canadiense de Estándares), ANSI B., ISO ,
y CSA Z. respectivamente, cuando se sometan
a pruebas conforme a las disposiciones de las
normas. Para obtener información sobre la cadena
de la sierra, vea la sección “Especificaciones y
componentes” de este manual.
®
. Los
BARRA
Esta sierra viene equipada con una barra de guía
de rebote reducido que tiene una punta de radio
pequeño. Las puntas de radio más pequeño tienen
menor potencial para el rebote que una barra del
mismo tamaño con un radio de punta más grande.
Al reemplazar la barra, pida solo la barra indicada
en este manual para mantener un desempeño de
rebote bajo.
Almacenamiento, transporte y
desecho
ALMACENAMIENTO DE LA MOTOSIERRA
• Desenchufe la motosierra.
• Inspeccione el cable para ver si tiene cortes o
está dañado.
• Limpie la motosierra minuciosamente.
• Instale la cubierta de la barra de guía.
• Almacene en un lugar seco.
• Mantenga fuera del alcance de los niños o las
mascotas.
• Es normal que se filtre una pequeña cantidad
de aceite desde la barra de guía cuando
la motosierra no está en uso. Para evitar
filtraciones, instale la cubierta de la barra de guía
y una almohadilla absorbente debajo de la barra.
TRANSPORTE DE LA MOTOSIERRA
Las herramientas pueden desplazarse durante el
transporte. Asegure la herramienta para que no
se caiga ni se mueva y así evitar provocar lesiones
personales o daños materiales.
• Desenchufe la motosierra.
• Instale la barra de guía.
• Si lo desea, drene el aceite de la barra y de la
cadena para reducir las filtraciones.
DESECHO DE LA MOTOSIERRA
Este producto de Oregon® está diseñado y
fabricado con materiales y componentes de alta
calidad que se pueden reciclar y reutilizar. Según
la Directiva //CE, cuando el dispositivo
eléctrico alcance el final de su vida útil, no se
debe desechar junto con los residuos domésticos
normales. En la Unión Europea existen sistemas
de recogida diferentes para los distintos
productos eléctricos y electrónicos usados.
Deseche este equipo de un modo respetuoso con
el medioambiente en el centro de reciclaje o de
recogida de residuos de su comunidad.
Motosierra modelo CS1200-092
93
Page 94

Símbolos y etiquetas
108
Símbolos y etiquetas
Estos símbolos y etiquetas aparecen en la motosierra y/o en el manual.
SÍMBOLO NOMBRE EXPLICACIÓN
Construcción de
clase II
Símbolo de alerta de
seguridad
Lea las instrucciones
Use protección para
los ojos
Use protección para
los oídos.
Use protección para
las manos
Use protección para la
cabeza.
Use pantalones largos. Use pantalones largos al utilizar la motosierra.
Use calzado de
seguridad.
Potencia acústica, Lwa El nivel de potencia acústica
Herramientas de construcción designadas con doble aislamiento.
Indica que el texto que sigue explica un peligro, una advertencia
o una precaución.
El manual original de instrucciones contiene información
importante sobre la seguridad y el uso. Lea y siga las
instrucciones atentamente.
Use protección para los ojos al utilizar la motosierra.
Use protección para los oídos al utilizar la motosierra.
Use guantes cuando utilice la motosierra y al manipular la
cadena de la sierra.
Use protección para la cabeza al utilizar la motosierra.
Use botas de trabajo cerradas y adecuadas al utilizar la
motosierra.
94
Cuidado con el rebote
Contacto con la punta
de la barra
Ángulo de rebote de la
motosierra
Agarre con dos manos Sujete la motosierra con ambas manos.
Agarre de una mano No sostenga la motosierra con una sola mano.
No use una escalera. Nunca se pare sobre una escalera al utilizar la motosierra.
No desechar
No exponga el
producto a la lluvia.
Cable dañado
Herramienta de corte
Riesgo de tropiezo Conozca la ubicación del cable en todo momento.
Desenchufe
antes de realizar
mantenimiento
Peligro: el rebote puede provocar lesiones graves.
Evite el contacto con la punta de la barra.
Diseñado para el uso con motosierra de rebote bajo.
No deseche el producto con la basura doméstica. Llévelo a un
centro de reciclaje autorizado.
No use la motosierra en condiciones húmedas.
Inspeccione el cable de alimentación regularmente para detectar
daños. Si el cable está dañado o cortado, retire el enchufe de la red
eléctrica de inmediato.
Herramienta de corte. No toque la cadena sin antes desactivar la
motosierra mediante el desenchufe de la misma.
Desenchufe antes de realizar cualquier tarea de mantenimiento.
Motosierra modelo CS1200-092
Page 95

Nombres y términos de la motosierra
Nombres y términos de la motosierra
Brida de alineación: protuberancia en la almohadilla de
la barra que encaja en la ranura de la barra.
Engrasador automático: sistema que lubrica
automáticamente la barra de guía y la cadena de la
sierra.
Almohadilla de la barra: almohadilla de montaje en el
cabezal de potencia que ayuda a garantizar la alineación
correcta de la barra de guía.
Ranura de la barra: parte recortada de la barra de guía
que se ajusta en la brida de alineación y el perno de
montaje.
Zona de seguridad para transeúntes: círculo de
m ( pies) alrededor del operador que tiene que
mantenerse libre de transeúntes, niños y mascotas.
Freno de la cadena: un dispositivo para detener o
bloquear la cadena; se activa en forma manual o no
manual cuando se produce el rebote.
Retén de la cadena: un dispositivo para retener la
cadena si esta se rompe o se descarrila.
Calibre de la cadena: espesor de los eslabones
motrices de la cadena de la sierra, donde esta encaja
en la ranura de la barra, indicado por el número de pieza
impreso en los eslabones motrices.
Paso de la cadena: distancia entre cualquiera de los
tres remaches consecutivos de la cadena de la sierra,
dividida por dos, indicada por el número de pieza impreso
en los eslabones motrices.
Cabezal de potencia de la motosierra: motosierra sin
la cadena de la sierra ni la barra de guía.
Disco tensor de la cadena: El disco en la tapa lateral
que, al girarlo, ajusta la tensión de la cadena.
Anillo tensor de la cadena: anillo que se encuentra
alrededor de la perilla de liberación de la tapa lateral
cuando se gira, ajusta la tensión de la cadena.
Eslabón motriz: eslabón en forma de aleta de la cadena
de la sierra que se ajusta en la ranura de la barra de guía.
Rueda dentada de accionamiento: parte dentada que
acciona la cadena de la sierra.
Longitud de corte eficaz: distancia aproximada desde
la raíz del tope claveteado hasta el borde exterior del
eslabón de corte con el tensor en posición intermedia.
Corte posterior de tala: el corte final en una operación
de tala de árbol realizado en el lado opuesto del árbol
desde el corte al ras en muesca.
Asa frontal: asa de apoyo ubicada en la parte frontal de
la motosierra o cerca de esta destinada al agarre con la
mano izquierda.
Protector del lado derecho: barrera estructural entre
el asa frontal de la motosierra y la barra de guía, que
también sirve como mecanismo de activación del freno
de la sierra.
Barra de guía: estructura con rieles que soporta y guía
la cadena de la sierra. A veces, simplemente se la llama
“barra”.
Cubierta de la barra de guía: tapa de plástico que
protege la barra de guía y la cadena de la sierra cuando
la motosierra no está en uso.
Rebote: movimiento rápido de la barra guía hacia atrás
y/o hacia adelante, que se produce cuando la cadena
cerca del área superior de la punta de la barra guía entra
en contacto con cualquier objeto (tal como un tronco o
rama), o cuando la madera cierra y atasca la cadena en
el corte.
Cadena de rebote bajo: cadena que cumple con los
requisitos de rendimiento de bajo rebote de ANSI B.
y CSA Z..
Carcasa del motor: cubierta plástica del cabezal de
potencia de la motosierra.
Perno de montaje: protuberancia roscada de la brida
de alineación que se extiende a través de la ranura de
la barra.
Corte al ras en muesca: un corte al ras en forma de
muesca en un árbol para direccionar la caída del árbol.
Asa trasera: asa de apoyo ubicada en la parte trasera
de la sierra o cerca de esta destinada al agarre con la
mano derecha.
Defensa de lado derecho: barrera estructural en el lado
inferior derecho del asa trasera para proteger al operador
en caso de ruptura o descarrilamiento de la cadena.
Barra de guía de rebote reducido: barra de guía con
un radio máximo de punta tal como especifica la ANSI
B. y la CSA Z. y que se ha probado que reduce el
rebote en forma significativa.
Cadena de la sierra: bucle de cadena con dientes de
corte que cortan la madera, que es accionado por el
cabezal de potencia y se apoya en la barra de guía. A
veces, simplemente se la llama “cadena”.
Cubierta lateral:
potencia que cubre la rueda dentada de accionamiento y
el engranaje tensor de la cadena; se extrae y se instala
con la perilla de liberación de la cubierta.
Pestaña de la tapa lateral: La protuberancia en la
tapa lateral que cabe en una ranura en el cuerpo de
motosierra. Úsela para alinear correctamente la tapa
lateral durante la instalación.
Tope claveteado: dispositivo adaptado a la parte frontal
de la sierra que actúa como punto de pivote cuando entra
en contacto con un árbol o tronco para facilitar el corte.
También conocido como “dientes de tronzado”.
Soporte de alivio de tensión: gancho en el asa trasera
sobre el cual se monta el cable de extensión a fin de
proteger el cable y evitar que se desenchufe durante la
operación.
Bloqueo del acelerador: tope móvil que evita la
activación accidental del interruptor de gatillo hasta que
este sea accionado manualmente.
Interruptor de gatillo: dispositivo que enciende y apaga
la motosierra.
Piezas de desgaste: ciertas piezas, como la cadena de
la sierra y la barra de guía, que se desgastan durante el
uso y que el usuario puede cambiar.
cubierta plástica del cabezal de
Motosierra modelo CS1200-092
95
Page 96

Product Identification
Conozca la motosierra
Product Identification
CABEZAL DE POTENCIA
TAPA DEL DEPÓSITO DE ACEITE
PROTECTOR TRASERO
VENTANA DE INSPECCIÓN DEL ACEITE
CABLE DE ALIMENTACIÓN
PROTECTOR FRONTAL
CADENA DE LA SIERRA
BARRA DE GUÍA
ASA FRONTAL
RUEDA DENTADA DE ACCIONAMIENTO
DISCO TENSOR DE LA CADENA
PLACA DE NOMBRE
DEL PRODUCTO
RETÉN DE LA CADENA
CUBIERTA DE LA BARRA DE GUÍA
TOPE CLAVETEADO
PERNO DE MONTAJE
ASA TRASERA
BLOQUEO DEL ACELERADOR
TUERCA DE
AJUSTE DE
LA CUBIERTA
LATERAL
CUBIERTA LATERAL
PESTAÑA DE LA
TAPA LATERAL
INTERRUPTOR
DE GATILLO
SOPORTE DE ALIVIO DE TENSIÓN
NOTA: Consulte la sección “Preparación para el uso” para conocer la lista de elementos que se incluyen.
96
Motosierra modelo CS1200-092
Page 97

Preparación para el uso
Preparación para el uso
PELIGRO: Para evitar lesiones personales
graves, no use la motosierra si el eje de
extensión, la barra de guía, la cadena de la
sierra o la cubierta lateral no están armados
correctamente.
ADVERTENCIA: Si hay piezas dañadas
o faltan piezas, no intente operar la
motosierra.
ADVERTENCIA: Una herramienta
eléctrica enchufada puede arrancar
de manera accidental. Desenchufe la
motosierra antes de prepararla para usar o
realizar el mantenimiento.
¿Qué hay en la caja?
Los siguientes artículos se envían con la
motosierra:
• Cuerpo de motosierra
• Cadena de la motosierra y barra de guía
• Tapa de la barra de guía
Luego de sacar la motosierra de la caja, examínela
cuidadosamente para asegurarse de que no
haya sufrido daños durante el envío y que no
falten piezas. Si hay piezas dañadas o faltan
piezas, no use la motosierra. Llame a Oregon
.. para obtener piezas de repuesto.
®
al
Revisión de la posición
del protector frontal
Luego de desempacar la motosierra, revise la
posición del protector frontal. La motosierra no
funcionará con el freno de la cadena activado. Tire
para atrás el protector frontal hacia el asa frontal
antes de la operación (Fig. )
FIG. 5
PROTECTOR FRONTAL EN
POSICIÓN OPERATIVA
.
PROTECTOR FRONTAL
EN POSICIÓN DE
FRENO
Llenar el depósito de aceite
de la barra y la cadena
IMPORTANTE: El aceite de la barra y la
cadena evita el desgaste prematuro. Nunca
opere la motosierra si no hay aceite visible
en la ventana de inspección. Verifique el
nivel de aceite con frecuencia y llene el
depósito cuando sea necesario.
El aceite de la barra y la cadena es necesario
para lubricar adecuadamente la barra de guía y la
cadena de la sierra. La motosierra cuenta con un
engrasador automático que deposita aceite en la
barra y la cadena cuando están en funcionamiento
para mantenerlas lubricadas. Para obtener
mejores resultados, use aceite Oregon
barra y la cadena. Está diseñado especialmente
para proporcionar una baja fricción y cortes más
rápidos. NO use aceite ni otros lubricantes que
no estén diseñados específicamente para su uso
en la barra y la cadena. Esto puede provocar una
obstrucción en el sistema de aceite, lo cual puede
ocasionar un desgaste prematuro de la barra y la
cadena.
Coloque la motosierra sobre una superficie firme y
plana, de modo que la tapa del aceite () quede en
la parte superior (Fig. )
FIG. 6
(2)
.
(1)
®
para la
Motosierra modelo CS1200-092
• Limpie cualquier suciedad de la zona de la tapa.
• Quite la tapa ().
• Vierta cuidadosamente el aceite para la barra y
la cadena en el depósito.
• Coloque la tapa y asegúrese de que puede ver el
aceite en el depósito ()
97
Page 98

Preparación para el uso
Montaje de la barra de guía y la
cadena
ADVERTENCIA: Una herramienta
eléctrica enchufada puede arrancar
de manera accidental. Desenchufe la
motosierra antes de prepararla para usar o
realizar el mantenimiento.
Utilice guantes.
• Desenchufe la motosierra.
• Afloje un poco el botón de desenganche de la
tapa lateral (), pero no saque la tapa (Fig. ).
• Afloje el disco tensor de la cadena () tanto
como sea posible.
• Afloje el botón de la tapa lateral girándolo al
contrario de las agujas del reloj y a continuación
saque la tapa lateral
FIG. 7
.
(1)
(2)
• Enganche la nueva cadena de sierra en el piñón
de accionamiento de forma que la parte cortante
de los dientes a lo largo de la parte superior de
la barra esté en sentido contrario al cuerpo de la
motosierra (Fig. ).
FIG. 9
• Coloque la cadena en la ranura de la barra. Haga
rotar el mecanismo de tensado de la cadena para
alejar la barra del motor con el fin de templar la
holgura de la cadena (Fig. ).
FIG. 10
• Coloque la barra de guía en la caja de la barra
desplazando la ranura sobre el reborde de
alineamiento (Fig. ), con la guía de centrado
insertada a través de la ranura de la barra de
guía. Alinee el orificio de tensión inferior en la
barra de guía para asentarlo en el perno de
tensión..
FIG. 8
BRIDA DE ALINEACIÓN
ALMOHADILLA
DE LA BARRA
PERNO DE MONTAJE
98
• Coloque la tapa lateral asegurándose de que
el receptor de la cadena y la pestaña de la
tapa lateral estén adecuadamente situados
en sus ubicaciones (Fig. ) y luego tense
ligeramente el botón de desenganche de la
tapa lateral.
FIG. 11
Motosierra modelo CS1200-092
Page 99

Preparación para el uso
• Tense la cadena como se describe en la sección
“Tensado de la cadena de la sierra” en la sección
“Preparación para el uso” de este manual.
IMPORTANTE: La cadena de la sierra debe
estar correctamente tensada antes de
usarla. Vea la sección “tensado de la cadena
de la sierra” en la sección “preparación para
el uso” de este manual.
Tensado de la cadena de la sierra
ADVERTENCIA: Una herramienta
eléctrica enchufada puede arrancar
de manera accidental. Desenchufe la
motosierra antes de prepararla para usar o
realizar el mantenimiento.
ADVERTENCIA: Si la cadena aún está
floja cuando la sierra se encuentra a la
máxima tensión, reemplace la cadena.
IMPORTANTE: Tense únicamente la cadena
de la sierra cuando la cadena esté fría. Una
cadena caliente se puede contraer y dañar
la barra de guía o la cadena a medida que
se enfría.
Utilice guantes.
• Desenchufe la motosierra antes de tensar.
• Afloje la perilla de la cubierta lateral, pero no
quite la cubierta lateral.
• Levante la nariz de la barra de guía (Fig. ) y
gire el disco tensor de la cadena hacia arriba para
apretarlo.
FIG. 12
• Apriete hasta que las cuchillas más bajas por
debajo de la barra entren en contacto firme con
el raíl de la barra (Fig. ).
FIG. 13
INCORRECT
CORRECT
• Ajuste la perilla de liberación de la cubierta
lateral.
• Tire ligeramente de la cadena. La tensión es
correcta cuando la cadena se ajusta de nuevo
después de haber sido extraída a mm de la
barra de guía.
• Después de un corto período de uso, deje que
la cadena se enfríe, desenchufe la motosierra
y vuelva a comprobar la tensión. Controle
cuidadosamente la tensión durante la primera
media hora de uso y periódicamente durante la
vida útil de la cadena. Vuelva a ajustarla según
sea necesario cuando la cadena y la barra estén
frías al tacto. Nunca ajuste la cadena si está
caliente.
La cadena se estirará como resultado del
uso normal, pero la falta de aceite suficiente,
el uso agresivo o la falta de mantenimiento
recomendado pueden causar un estiramiento
prematuro.
Motosierra modelo CS1200-092
99
Page 100

Uso de la motosierra
Uso de la motosierra
Operación general
PELIGRO: Para evitar lesiones personales
graves, no se estire excesivamente ni
se pare sobre una escalera, un taburete
ni en una posición de altura que no esté
totalmente asegurada. nunca corte por
encima de la altura del hombro.
ADVERTENCIA: Para reducir el riesgo
de lesiones, siempre use protección para la
cabeza, los oídos y los ojos, botas y guantes
adecuados.
SUJECIÓN
Siempre agarre la herramienta con ambas manos.
Sujete el asa frontal con la mano izquierda y el
asa trasera con la derecha (Fig. ). Envuelva los
dedos sobre la parte superior del asa con el pulgar
debajo del asa
FIG. 14
AGARRE CON EL PULGAR
DEBAJO DEL ASA
POSICIÓN
Párese con ambos pies sobre suelo sólido, con el
peso distribuido de manera uniforme entre ellos
(Fig. ).
FIG. 15
DETENCIÓN DE LA MOTOSIERRA
Suelte el interruptor de gatillo para detener la
motosierra.
ARRANQUE DE LA MOTOSIERRA
ADVERTENCIA: Para reducir el riesgo de
lesiones, nunca anule el sistema de bloqueo
al unir, cablear o atar el bloqueo del gatillo.
Asegúrese de que el freno de la cadena no esté
conectado.
Sujete los mangos frontal y trasero con firmeza.
Presione y mantenga apretado el bloqueo del
gatillo con el pulgar (). Para arrancar la sierra,
presione el interruptor de gatillo () (Fig. ). No
hay necesidad de continuar presionando el
bloqueo del gatillo. Permanecerá desconectado
hasta que se suelte el gatillo.
FIG. 16
(1) BLOQUEO DEL GATILLO
(2) INTERRUPTOR
DE GATILLO
100
Motosierra modelo CS1200-092
 Loading...