

Page 1

User Manual
Clima Control
Model: RMR500 / RMR500A
Page 2

EN
1
Clima Control
Model: RMR500 / RMR500A
USER MANUAL
CONTENTS
Overview............................................................................2
Front View...........................................................................2
LCD Display........................................................................2
Back View...........................................................................3
Outdoor Sensor - THGN500................................................3
Remote Sensor - THGR122N..............................................3
Getting Started..................................................................4
Insert Batteries....................................................................4
Name Tags..........................................................................4
Remote Sensors................................................................4
Clock and Calendar..........................................................5
Clock Reception..................................................................5
Manually Set Clock.............................................................6
Temperature and Humidity..............................................6
Mold Alert............................................................................6
Weather Forecast..............................................................6
Backlight............................................................................6
Reset..................................................................................7
Specifications...................................................................7
Precautions.......................................................................7
About Oregon Scientific...................................................8
EU-Declaration of Conformity..........................................8
FCC Statement..................................................................8
Declaration of Conformity....................................................9
Page 3

EN
2
OVERVIEW
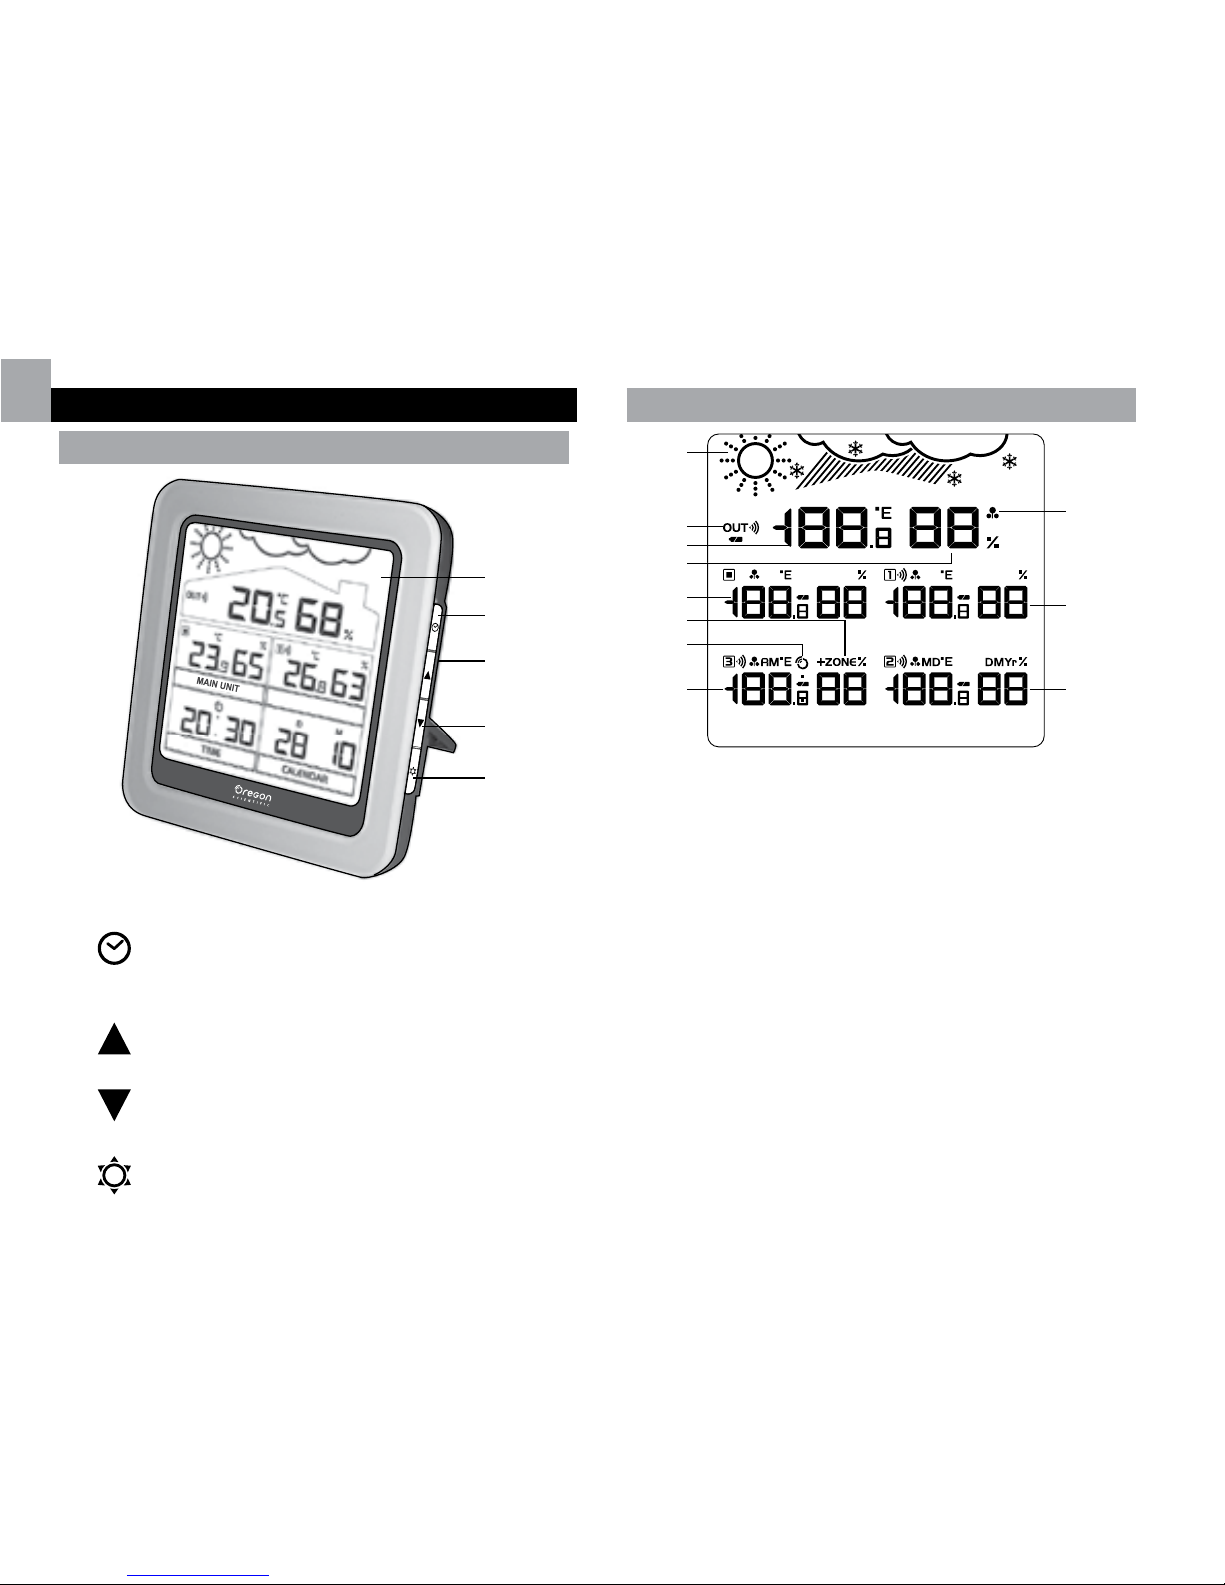
FRONT VIEW (FIG 1)
2
1
3
4
5
1. LCD Display
2.
: Toggle between clock, calendar and temperature /
humidity displays; enter setting mode
3.
: Increase values in setting mode; activate clock
signal reception
4.
: Decrease values in setting mode; deactivate clock
signal reception
5.
: Activate backlight
LCD DISPLAY (FIG 2)
1
2
3
4
5
6
7
8
9
10
11
1. Weather forecast icon
2. Outdoor sensor reception icon
3. Outdoor temperature display for THGN500*
4. Outdoor humidity display for THGN500*
5. Temperature/humidity display for main unit
environment
6. Time zone
7. Clock signal reception indicator
8. Clock display (or temperature/humidity display for
optional sensor)
9. Mold alert
10. Temperature/humidity display for THGR122N remote
sensor
11. Calendar display (or temperature/humidity display for
optional sensor)
Page 4
EN
3
* This product is designed to display the temperature and
humidity reading of THGN500 in the outdoor temperature/
humidity area only.
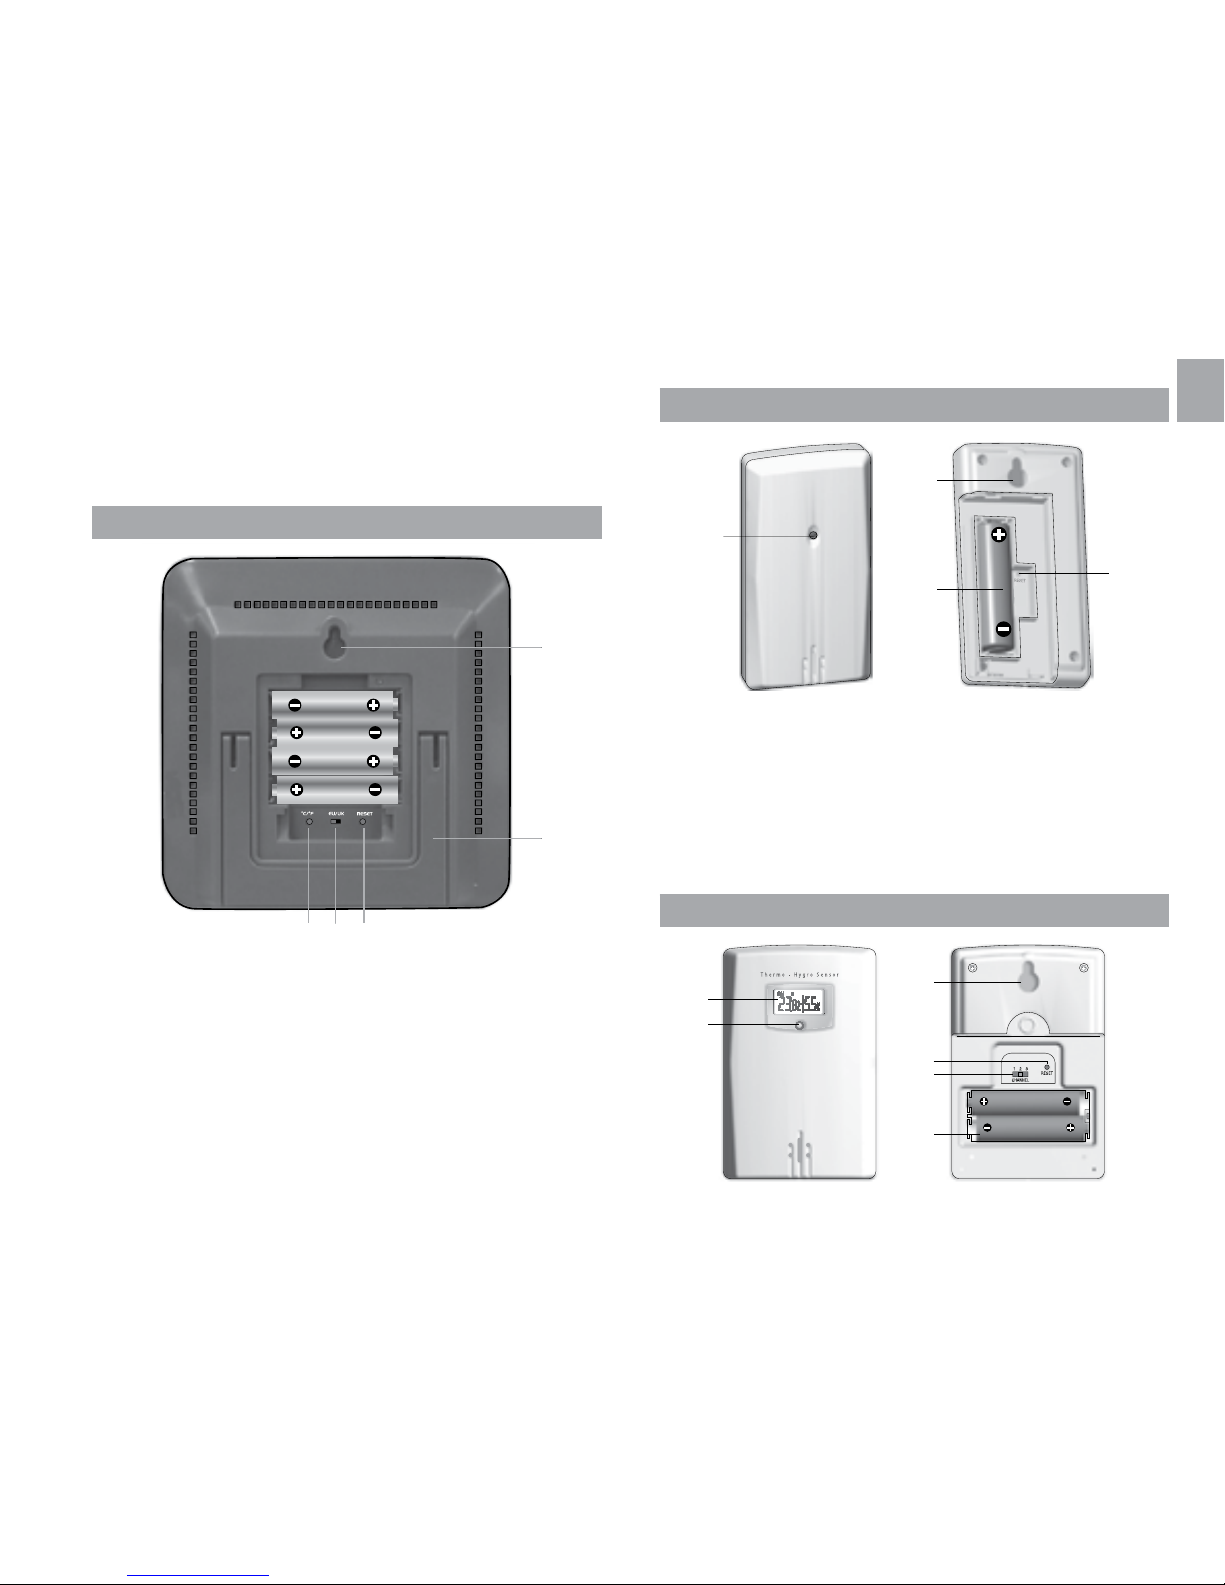
BACK VIEW (FIG 3)
34 5
1
2
1. Wall mount hole
2. Foldable stand
3. °C / °F: Select temperature unit
4. EU / UK: Select the nearest radio signal (RMR500
only)
5. RESET: Reset unit to default settings
OUTDOOR SENSOR - THGN500 (FIG 4)
1
2
3
4
1. LED status indicator
2. Wall mount hole
3. Battery compartment
4. RESET hole
REMOTE SENSOR - THGR122N (FIG 5)
2
1
3
4
5
6
Page 5

EN
4
1. LCD display
2. LED status indicator
3. Wall mount hole
4. RESET hole
5. CHANNEL switch
6. Battery compartment
GETTING STARTED
INSERT BATTERIES
1. Remove the battery compartment.
2. Insert the batteries, matching the polarities (see FIG
3).
3. Press RESET after each battery change.
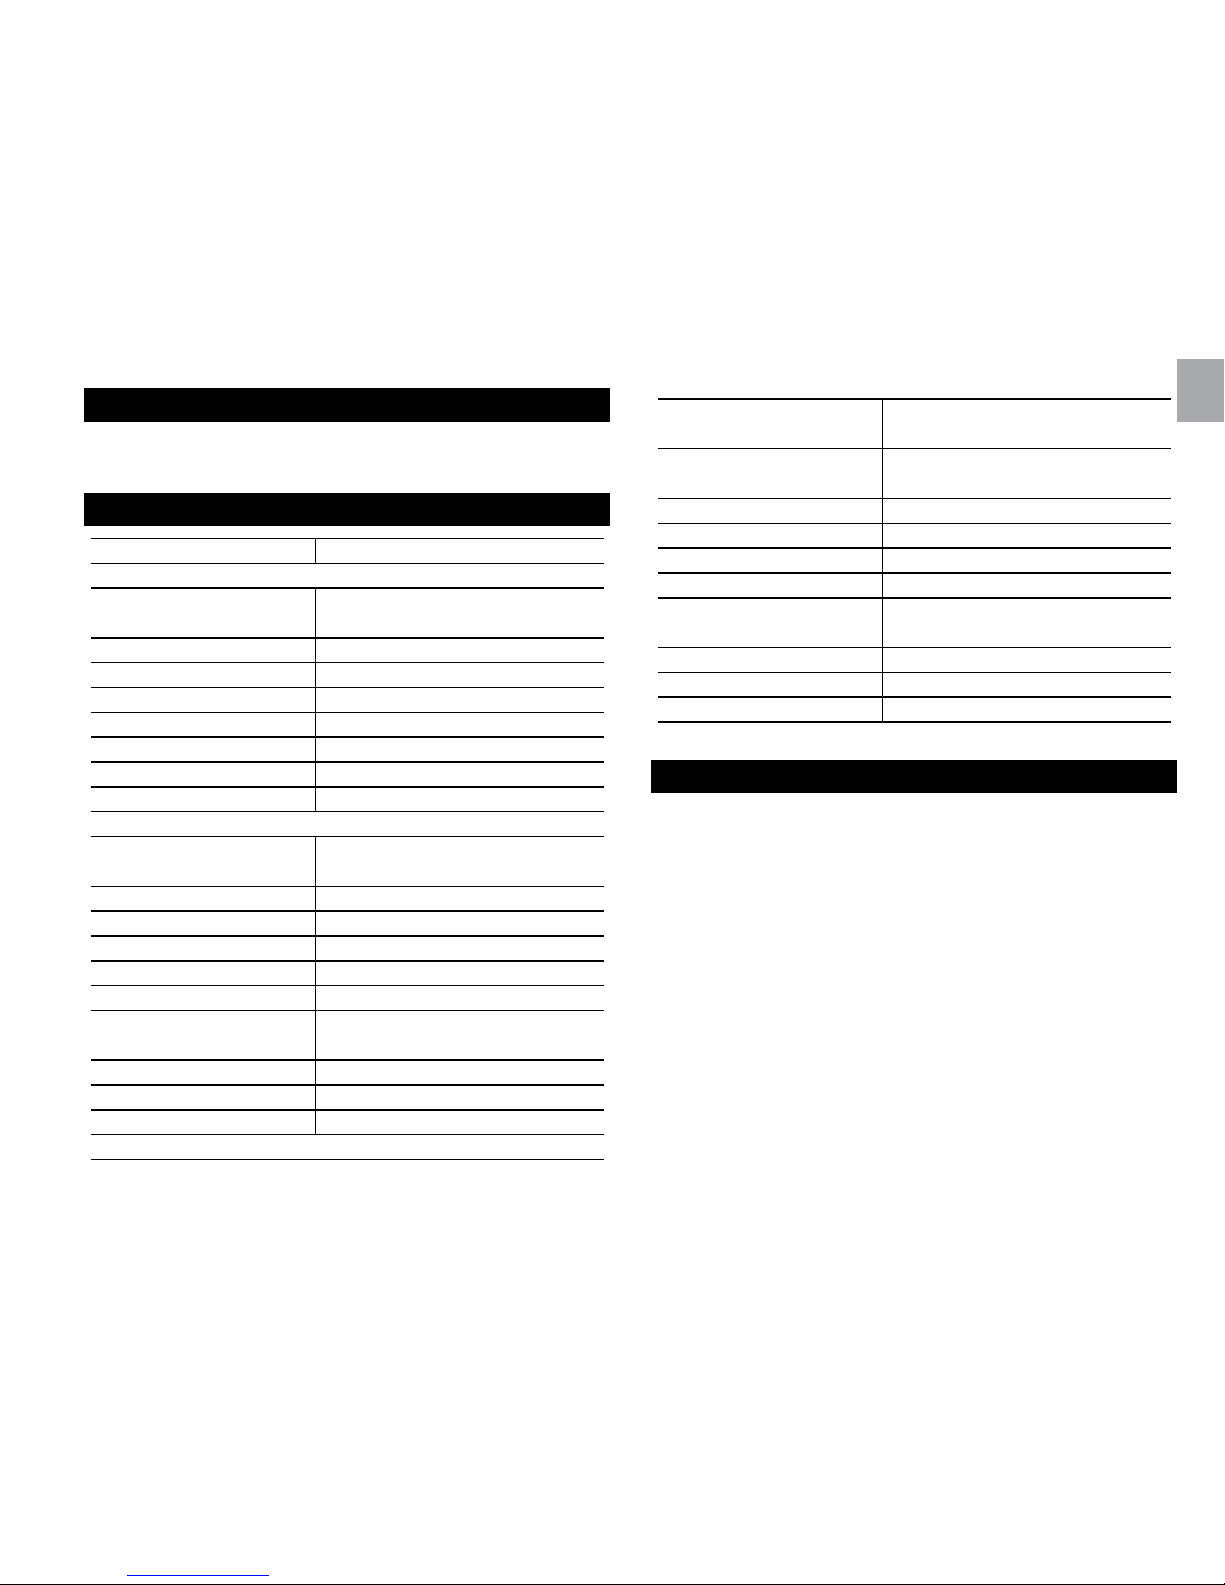
LOCATION
MEANING
Outdoor temperature/
humidity area (THGN500)
Outdoor sensor battery low
Main unit environment area Main unit batteries low
Remote sensor area
(THGR122N)
Remote sensor batteries
low
Clock and calendar area
(or optional sensors area)
Optional sensors batteries
low
NAME TAGS
Name tags can be inserted in the main unit as in Fig. 1.
There are 10 name tags provided in this package, with 7
blank tags and 3 tags printed as “MAIN UNIT”, “TIME” and
“CALENDAR”. You can write in the blank tags the name of
the location where THGR122N and other optional sensors
are installed.
NOTE If optional sensors are installed, “CALENDAR” and
“TIME” tags will be replaced.
REMOTE SENSORS
This product can work with up to 4 sensors at any one time
to capture temperature and relative humidity readings in
various locations.
2 remote sensors (THGN500 and THGR122N) are provided
in this package, while 2 more optional wireless remote
sensors can be purchased separately.
To set up the remote sensor:
1. Open the battery compartment and insert batteries,
matching the polarity.
2. Select a channel then press RESET.
3. Close the battery door.
4. Place the remote sensor within 30 m (98 ft) from the
main unit.
NOTE Use alkaline batteries for longer usage and consumer
grade lithium batteries in temperatures below freezing.
Page 6

EN
5
To search for a sensor:
Press and hold
+ at the same time.
The remote sensor reception icon will show the following
status:
ICON DESCRIPTION
Main unit is searching for
sensor(s).
A channel has been found.
The sensor cannot be
found.
TIP The transmission range may vary depending on many
factors. You may need to experiment with various locations
to get the best results.
CLOCK AND CALENDAR
NOTE
If optional sensors are installed:
• clock and calendar display will be replaced by
temperature/humidity readings.
• press
to toggle between clock and temperature/
humidity display, or calendar and temperature/humidity
display; the display will return to temperature/humidity
display after 1 minute.
CLOCK RECEPTION
This product is designed to synchronize its clock
automatically with a clock signal.
RMR500:
Slide EU / UK to select the signal received.
• EU: DCF-77 signal: within 1500 km (932 miles) of
Frankfurt, Germany.
• UK: MSF-60 signal: within 1500 km (932 miles) of
Anthorn, England.
RMR500A:
WWVB-60 signal: within 3200 km (2000 miles) of Fort
Collins, Colorado.
To enable / disable clock signal reception:
Press and hold
to enable or to disable clock signal
reception.
NOTE Reception takes 2-10 minutes. If the signal is weak,
it can take up to 24 hours to get a valid signal. If signal
reception is unsuccessful, place your unit next to a window,
press and hold
to force another signal search.
Page 7

EN
6
Clock signal reception indicator:
STRONG
SIGNAL
WEAK SIGNAL NO SIGNAL
MANUALLY SET CLOCK
To set the clock manually, disable the clock signal reception
first.
1. Press and hold
.
2. Press
or to change the settings. The settings
order is: time zone, 12/24 hr format, hour, minute, year,
calendar mode (month – day / day – month), month and
day.
3. Press
to confirm.
RMR500: Time zone sets the clock +/- 23 hours from the
received clock signal time. If you have deactivated the clock
signal reception, do not set a value for time zone.
RMR500A: Select the time zone: (0) Pacific, (+1) Mountain,
(+2) Central or (+3) Eastern.
TEMPERATURE AND HUMIDITY
To toggle temperature unit:
Press °C / °F.
NOTE “HH.H” or “LL.L” will be displayed when the received
temperature is out of the specified temperature range.
MOLD ALERT
This product features moisture alert function for the
prevention of mold. If the humidity is over 60%, the mold
alert icon
will flash, and will stop flashing if the humidity
is less than 60%.
WEATHER FORECAST
This product forecasts the next 12 to 24 hours of weather
within a 30-50 km (19-31 mile) radius with 75% accuracy.
Sunny
Partially Cloudy
Cloudy
Rainy
Snowy
BACKLIGHT
Press to activate LED backlight for 5 seconds.
Page 8
EN
7
RESET
Press RESET to return to the default settings.
SPECIFICATIONS
TYPE DESCRIPTION
MAIN UNIT
L x W x H
134 x 27 x 134 mm
(5.3 x 1.1 x 5.3 in)
Weight 300 g (10.58 oz) without battery
Signal frequency 433 MHz
Temperature range -5°C to 50°C (23°F to 122°F)
Temperature resolution 0.1°C (0.2°F)
Humidity range 25% - 95%
Humidity resolution 1%
Power 4 x UM-4 (AAA) 1.5 V batteries
REMOTE UNIT (THGN500)
L x W x H
50 x 22 x 96 mm
(1.9 x 0.9 x 3.8 in)
Weight 63 g (2.22 oz) without battery
Signal frequency 433 MHz
Number of channel 1
Transmission range 30 m (100 ft) unobstructed
Temperature range -20°C to 60°C (-4°F to 140°F)
Temperature resolution 0.1°C (0.2°F)
Humidity range 25% - 95%
Humidity resolution 1%
Power 1 x UM-3 (AA) 1.5 V battery
REMOTE UNIT (THGR122N)
L x W x H
92 x 60 x 20 mm
(3.6 x 2.4 x 0.79 in)
Weight
63 g (2.22 oz)
without battery
Signal frequency 433 MHz
Number of channel 3
Transmission range 30 m (100 ft) unobstructed
Temperature range -20°C to 60°C (-4°F to 140°F)
Temperature resolution 0.1°C (0.2°F)
Humidity range 25% - 95%
Humidity resolution 1%
Power 2 x UM-4 (AAA) 1.5 V battery
PRECAUTIONS
• Do not subject the unit to excessive force, shock, dust,
temperature or humidity.
• Do not cover the ventilation holes with any items such
as newspapers, curtains etc.
• Do not immerse the unit in water. If you spill liquid over
it, dry it immediately with a soft, lint-free cloth.
• Do not clean the unit with abrasive or corrosive
materials.
• Do not tamper with the unit’s internal components. This
invalidates the warranty.
• Only use fresh batteries. Do not mix new and old
batteries.
• Images shown in this manual may differ from the actual
display.
Page 9

EN
8
• When disposing of this product, ensure it is collected
separately for special treatment and not as normal
household waste.
• Placement of this product on certain types of wood
may result in damage to its finish for which Oregon
Scientific will not be responsible. Consult the furniture
manufacturer's care instructions for information.
• The contents of this manual may not be reproduced
without the permission of the manufacturer.
• Do not dispose old batteries as unsorted municipal
waste. Collection of such waste separately for special
treatment is necessary.
• Please note that some units are equipped with a
battery safety strip. Remove the strip from the battery
compartment before first use.
NOTE The technical specifications for this product and the
contents of the user manual are subject to change without
notice.
ABOUT OREGON SCIENTIFIC
Visit our website (www.oregonscientific.com) to learn more
about Oregon Scientific products. If you’re in the US and
would like to contact our Customer Care department directly,
please visit: www2.oregonscientific.com/service/support
OR
Call 1-800-853-8883.
For international inquiries, please visit:
www2.oregonscientific.com/about/international
EU-DECLARATION OF CONFORMITY
Hereby, Oregon Scientific, declares that this Clima Control
(model: RMR500 / RMR500A) is in compliance with the
essential requirements and other relevant provisions of
Directive 1999/5/EC. A copy of the signed and dated
Declaration of Conformity is available on request via our
Oregon Scientific Customer Service.
COUNTRIES RTTE APPROVED COMPLIED
All EU countries, Switzerland CH
and Norway N
FCC STATEMENT
This device complies with Part 15 of the FCC Rules.
Operation is subject to the following two conditions: (1) This
device may not cause harmful interference, and (2) This
device must accept any interference received, including
interference that may cause undesired operation.
WARNING Changes or modifications not expressly
Page 10

EN
9
approved by the party responsible for compliance could void
the user’s authority to operate the equipment.
NOTE This equipment has been tested and found to comply
with the limits for a Class B digital device, pursuant to Part
15 of the FCC Rules. These limits are designed to provide
reasonable protection against harmful interference in a
residential installation.
This equipment generates, uses and can radiate radio
frequency energy and, if not installed and used in accordance
with the instructions, may cause harmful interference to
radio communications. However, there is no guarantee
that interference will not occur in a particular installation.
If this equipment does cause harmful interference to radio
or television reception, which can be determined by turning
the equipment off and on, the user is encouraged to try
to correct the interference by one or more of the following
measures:
• Reorient or relocate the receiving antenna.
• Increase the separation between the equipment and
receiver.
• Connect the equipment into an outlet on a circuit different
from that to which the receiver is connected.
• Consult the dealer or an experienced radio / TV technician for
help.
DECLARATION OF CONFORMITY
The following information is not to be used as contact for
support or sales. Please call our customer service number
(listed on our website at www.oregonscientific.com, or on
the warranty card for this product) for all inquiries instead.
We
Name: Oregon Scientific, Inc.
Address: 19861 SW 95
th
Ave.,Tualatin,
Oregon 97062 USA
Telephone No.: 1-800-853-8883
declare that the product
Product No.: RMR500 / RMR500A
Product Name: Clima Control
Manufacturer: IDT Technology Limited
Address: Block C, 9/F, Kaiser Estate,
Phase 1,41 Man Yue St., Hung
Hom, Kowloon,
Hong Kong
is in conformity with Part 15 of the FCC Rules. Operation is
subject to the following two conditions: 1) This device may
not cause harmful interference. 2) This device must accept
any interference received, including interference that may
cause undesired operation.
Page 11

ES
1
Control del clima
Modelo: RMR500 / RMR500A
MANUAL DE USUARIO
ÍNDICE
Resumen...........................................................................2
Vista Frontal......................................................................2
Pantalla LCD......................................................................2
Vista Trasera.......................................................................3
Sensor Remoto - THGN500................................................3
Sensor Remoto - THGR122N..............................................3
Para Empezar....................................................................4
Cómo Introducir las Pilas..................................................4
Etiquetas de Nombre.........................................................4
Sensores Remotos...........................................................4
Reloj y Calendario............................................................5
Recepción del Reloj...........................................................5
Ajuste Manual del Reloj.....................................................6
Temperatura y Humedad.................................................6
Alerta de Moho...................................................................6
Predicción Meteorológica................................................6
Iluminación de la Pantalla..............................................7
Reinicio..............................................................................7
Ficha Técnica....................................................................7
Precaución.........................................................................7
Sobre Oregon Scientific..................................................8
EU - Declaración de Conformidad....................................8
Page 12
ES
2
RESUMEN
VISTA FRONTAL (FIG 1)
2
1
3
4
5
1. Pantalla LCD
2.
: Alternar entre pantallas de reloj, calendario
y humedad/temperatura; acceder a modo de
configuración
3.
: Incrementar valores en modo de configuración;
activar recepción de señal del reloj
4.
: Reducir valores en modo de configuración;
desactivar recepción de señal del reloj
5.
: Activar retroiluminación
PANTALLA LCD (FIG 2)
1
2
3
4
5
6
7
8
9
10
11
1. Icono de predicción meteorológica
2. Icono de recepción del sensor exterior
3. Pantalla de temperatura exterior para THGN500*
4. Pantalla de humedad exterior para THGN500*
5. Pantalla de temperatura/humedad para el entorno de la
unidad principal
6. Huso horario
7. Indicador de recepción de la señal del reloj
8. Pantalla de reloj (o pantalla de temperatura/humedad
con sensor opcional)
9. Alerta de moho
10. Pantalla de humedad/temperatura para el sensor
remoto THGR122N
11. Pantalla de calendario (o pantalla de temperatura/
humedad con sensor opcional)
Page 13

ES
3
* Este producto está diseñado para mostrar las lecturas
de temperatura y humedad de THGN500, solamente en
el área de temperatura/humedad exterior.
VISTA TRASERA (FIG 3)
34 5
1
2
1. Orificio para montaje en pared
2. Soporte plegable
3. °C / °F: Selección de unidad de temperatura
4. EU / UK: Seleccionar la señal de radio más cercana
(sólo RMR500)
5. RESET: La unidad vuelve a los ajustes
predeterminados
SENSOR REMOTO - THGN500 (FIG 4)
1
2
3
4
1. Indicador LED de estado
2. Orificio para montaje en pared
3. Compartimiento para las pilas
4. Orificio de RESET
SENSOR REMOTO - THGR122N (FIG 5)
2
1
3
4
5
6
Page 14

ES
4
1. Pantalla LCD
2. Indicador LED de estado
3. Orificio para montaje en pared
4. Orificio de RESET
5. Cambio de CANAL
6. Compartimiento para las pilas
PARA EMPEZAR
CÓMO INTRODUCIR LAS PILAS
1. Retire el compartimiento para pilas.
2. Introduzca las pilas haciendo coincidir la polaridad
(véase FIG 3).
3. Pulse RESET cada vez que cambie las pilas.
UBICACIÓN
SIGNIFICADO
Área de Temperatura/
humedad Exterior
(TGHN500)
La pila del sensor exterior
está casi gastada
Entorno de la unidad
principal
Las pilas de la unidad
principal están casi
gastadas
Área del sensor remoto
(THGR122N)
Indicador de que la pila del
sensor remoto está casi
gastada
Área de reloj y calendario
(o área de sensores
opcionales)
Indicador de que la pila de
los sensores opcionales
está casi gastada
ETIQUETAS DE NOMBRE
Las etiquetas de nombre se pueden introducir en la unidad
principal tal y como muestra la Fig. 1.
Hay 10 etiqueta de nombre en este paquete, 7 en blanco y 3
con “MAIN UNIT”, “TIME” y “CALENDAR”. En las etiquetas
puede escribir la ubicación del THGR122N y otros sensores
opcionales.
NOTA Si se intalan sensores opcionales, las etiquetas
“CALENDAR” y “TIME” serán reemplazadas.
SENSORES REMOTOS
Este producto puede funcionar con hasta 4 sensores en
cualquier momento para capturar temperatura, humedad
relativa o índices de rayos UVA en distintos lugares.
Este paquete incluye 2 sensores remotos (THGN500 y
THGR122N), y puede adquirir otros 2 sensores remotos
inalámbricos por separado.
Para configurar el sensor remoto:
1. Abra la tapa del compartimiento para pilas e introduzca
las pilas respetando la polaridad.
2. Seleccione un número de canal y pulse RESET.
3. Cierre el compartimiento de las pilas.
4. Coloque el sensor remoto en un radio de 30 m (98 pies)
de la unidad principal.
Page 15

ES
5
NOTA Use pilas alcalinas con este producto para que
funcione durante más tiempo, y use pilas de litio en
temperaturas bajo cero.
Para buscar un sensor:
Pulse
+ y manténgalas pulsadas a la vez.
El icono de recepción del sensor remoto mostrará el
siguiente estado:
ICONO DESCRIPCIÓN
La unidad principal está
buscando sensor(es).
Se ha encontrado un
canal.
No se encuentra el
sensor.
CONSEJO El alcance de transmisión puede variar debido
a muchos factores. Es posible que tenga que probar varias
ubicaciones para obtener los mejores resultados.
RELOJ Y CALENDARIO
NOTA
Si se instalan sensores opcionales:
• la pantalla de reloj y calendario será reemplazada por
lecturas de temperatura/humedad.
• pulse
para alternar entre pantalla de reloj o
de temperatura/humedad, o pantalla de calendario
o de temperatura/humedad; la pantalla volverá a
temperatura/humedad transcurrido 1 minuto.
RECEPCIÓN DEL RELOJ
Este producto ha sido diseñado para sincronizar
automáticamente su reloj con una señal de reloj.
RMR500:
Deslice el interruptor EU / UK para elegir la señal.
• UE: señal DCF-77: a 1500 m (932 millas) de Frankfurt,
Alemania.
• Reino Unido: señal MSF-60: a 1500 m (932 millas) de
Anthorn, Inglaterra.
RMR500A:
Señal WWVB-60: a 3200 m (2000 millas) de Fort Collins,
Colorado.
Para activar / desactivar la señal de recepción del reloj:
Pulse
y manténgalo pulsado para activar la recepción
de señal del reloj, o
para desactivarla.
NOTA La recepción tarda entre 2 y 10 minutos. Si la
señal de radio es débil, puede tardarse hasta 24 horas
en conseguir una señal válida. Si no se encuentra señal,
coloque la unidad cerca de una ventana, pulse
y
Page 16

ES
6
manténgalo pulsado para forzar una búsqueda de señal.
Recepción del indicador de la señal del reloj:
SEÑAL FUERTE SEÑAL DÉBIL
NO SE RECIBE
SEÑAL
AJUSTE MANUAL DEL RELOJ
Para configurar manualmente el reloj, primero deberá
desactivar la señal de recepción del reloj.
1. Pulse
y manténgalo pulsado.
2. Pulse
o para modificar la configuración. La
secuencia de configuración es: zona horaria, formato de
12 ó 24 horas, hora, minuto, año, formato del calendario
(mes / día, día / mes), mes y día.
3. Pulse
para confirmar.
RMR500: La zona horaria ajusta el reloj a + / -23 horas de
la hora recibida por la señal del reloj. Si ha desactivado
la recepción de señal del reloj, no ajuste un valor para la
zona horaria.
RMR500A: Elija la zona horaria: (0) Pacífico, (+1) Montaña,
(+2) Central o (+3) Este.
TEMPERATURA Y HUMEDAD
Selección de unidad de temperatura:
Pulse °C / °F.
NOTA Si la temperatura recibida está fuera de la gama de
temperatura especificada, se mostrará “HH.
H” o “LL.L”.
ALERTA DE MOHO
Este producto dispone de función de alerta de moho para
evitar la formación del mismo. Si la humedad supera el 60%,
el icono de alerta de modo parpadeará
y no dejará de
parpadear hasta que la humedad baje del 60%.
PREDICCIÓN METEOROLÓGICA
Este producto predice el tiempo de las próximas 12 a 24
horas en un radio de 30 a 50 (12-31 millas) km con un 75%
de precisión.
Despejado
Parcialmente nublado
Nublado
Lluvia
Nieve
Page 17

ES
7
ILUMINACIÓN DE LA PANTALLA
Pulse para iluminar la pantalla LED durante 5
segundos.
REINICIO
Pulse RESET para volver a la configuración
predeterminada.
FICHA TÉCNICA
TIPO DESCRIPCIÓN
UNIDAD PRINCIPAL
L X A X A
134 x 27 x 134 mm
(5,3 x 1,1 x 5,3 pulgadas)
Peso 300 g (10,58 oz) sin pila
Frecuencia de la señal 433 MHz
Alcance de temperatura -5°C a 50°C (23°F a 122°F)
Resolución de temperatura 0,1°C (0,2°F)
Escala de humedad 25% - 95%
Resolución de la humedad 1%
Alimentación 4 pilas UM-4 (AAA) de 1,5 V
UNIDAD REMOTA (THGN500)
L X A X A
50 x 22 x 96 mm
(1,9 x 0,9 x 3,8 pulgadas)
Peso 63 g (2,22 oz) sin pila
Frecuencia de la señal 433 MHz
Número de canales 1
Cobertura de transmisión 30 m (98 pies) sin obstáculos
Alcance de temperatura -20°C a 60°C (-4°F a 140°F)
Resolución de temperatura 0,1°C (0,2°F)
Escala de humedad 25% - 95%
Resolución de la humedad 1%
Alimentación 1 pila UM-3 ( AA) de 1,5 V
UNIDAD REMOTA (THGR122N)
L X A X A
92 x 60 x 20 mm
(3,6 x 2,4 x 0,79 pulgadas)
Peso 63 g (2,22 oz) sin pila
Frecuencia de la señal 433 MHz
Número de canales 3
Cobertura de transmisión 30 m (98 pies) sin obstáculos
Alcance de temperatura -20°C a 60°C (-4°F a 140°F)
Resolución de temperatura 0,1°C (0,2°F)
Escala de humedad 25% - 95%
Resolución de la humedad 1%
Alimentación 2 pilas UM-4 (AAA) de 1,5 V
PRECAUCIÓN
• No exponga el producto a demasiada fuerza, golpes,
polvo, cambios bruscos de temperatura o humedad.
• No cubra los orificios de ventilación con objetos como
periódicos, cortinas, etc.
• No sumerja el dispositivo en agua. Si se vertiera
líquido en la unidad, límpiela con un paño suave y sin
electricidad estática.
• No limpie la unidad con materiales abrasivos o
corrosivos.
• No manipule los componentes internos. De hacerlo
se invalidaría la garantía.
Page 18

ES
8
• Use siempre pilas nuevas. No mezcle pilas viejas con
pilas nuevas.
• Las imágenes de esta guía para el usuario puede ser
distintas al producto en sí.
• Cuando se deshaga de este producto, asegúrese
de que no vaya a parar a la basura general, sino
separadamente para que pueda ser reciclado.
• La colocación de este producto encima de ciertos tipos
de madera puede provocar daños a sus acabados.
Oregon Scientific no se responsabilizará de dichos
daños. Consulte las instrucciones de cuidado del
fabricante para obtener más información.
• Los contenidos de este manual no pueden reproducirse
sin permiso del fabricante.
• No tire las pilas gastadas con la basura normal. Es
necesario desecharlas a parte para que puedan ser
recicladas.
• Tenga en cuenta que algunas unidades disponen de una cinta
de seguridad para las pilas. Retire la cinta de compartimento
para pilas antes de usarlo por primera vez.
NOTA La ficha técnica de este producto y los contenidos
de este manual de usuario pueden cambiarse sin aviso.
SOBRE OREGON SCIENTIFIC
Visite nuestra página web (www.oregonscientific.com) para
conocer más sobre los productos de Oregon Scientific. Si
está en EE.UU y quiere contactar directamente con nuestro
Departamento de Atención al Cliente, por favor visite
www2.oregonscientific.com/service/support.asp
o llame al 1-800-853-8883.
Si está en España y quiere contactar directamente con
nuestro Departamento de Atención al Cliente, por favor
visite www.oregonscientific.es o llame al 902 338 368. Para
consultas internacionales, por favor visite
www2.oregonscientific.com/about/international.asp.
EU - DECLARACIÓN DE CONFORMIDAD
Por medio de la presente Oregon Scientific declara que el
Control del clima (Modelo: RMR500 / RMR500A) cumple con
los requisitos esenciales y cualesquiera otras disposiciones
aplicables o exigibles de la Directiva 1999/5/CE. Tiene a su
disposición una copia firmada y sellada de la Declaración
de Conformidad, solicítela al Departamento de Atención al
Cliente de Oregon Scientific PAÍSES.
PAÍSES BAJO LA DIRECTIVA RTTE
Todos los países de la UE, Suiza CH
y Noruega N
Page 19

DE
1
Clima Control
Modell: RMR500 / RMR500A
BEDIENUNGSANLEITUNG
INHALT
Übersicht............................................................................2
Vorderansicht......................................................................2
LCD-Anzeige.......................................................................2
Rückansicht.........................................................................3
Äußere Sendeeinheit - THGN500......................................3
Funksendeeinheit - THGR122N...........................................3
Erste Schritte.....................................................................4
Batterien einlegen...............................................................4
Namensschilder..................................................................4
Funksendeeinheiten.........................................................4
Uhr und Kalender.............................................................5
Zeitsignalempfang..............................................................5
Die Uhr manuell einstellen.................................................6
Temperatur und Luftfeuchtigkeit...................................6
Schimmelalarm..................................................................6
Wettervorhersage............................................................7
Hintergrundbeleuchtung................................................7
Reset................................................................................7
Technische Daten.............................................................7
Vorsichtsmaßnahmen....................................................8
Über Oregon Scientific...................................................8
EU-Konformitätserklärung.........................................9
Page 20

DE
2
ÜBERSICHT
VORDERANSICHT (ABB. 1)
2
1
3
4
5
1. LCD-Anzeige
2.
: Zwischen Anzeigearten von Uhr, Kalender
und Temperatur / Luftfeuchtigkeit wechseln;
Einstellungsmodus aufrufen
3.
: Werte im Einstellungsmodus erhöhen;
Zeitsignalempfang aktivieren
4.
: Werte im Einstellungsmodus verringern;
Zeitsignalempfang deaktivieren
5.
: Hintergrundbeleuchtung aktivieren
LCD-ANZEIGE (ABB. 2)
1
2
3
4
5
6
7
8
9
10
11
1. Symbol für Wettervorhersage
2. Empfangssymbol für äußere Sendeeinheit
3. Anzeige der Außentemperatur für THGN500*
4. Anzeige der Außen-Luftfeuchtigkeit für THGN500*
5. Anzeige von Temperatur/Luftfeuchtigkeit für Umgebung
der Basiseinheit
6. Zeitzone
7. Indikator für Zeitsignalempfang
8. Anzeige von Uhrzeit (oder Anzeige von Temperatur/
Luftfeuchtigkeit für optionale Sendeeinheit)
9. Schimmelalarm
10. Anzeige von Temperatur/Luftfeuchtigkeit für
Funksendeeinheit THGR122N
11. Anzeige von Kalender (oder Anzeige von Temperatur/
Page 21

DE
3
Luftfeuchtigkeit für optionale Sendeeinheit)
* Dieses Produkt zeigt den Messwert der Temperatur
und Luftfeuchtigkeit von THGN500 nur im Bereich der
Außentemperatur/ Luftfeuchtigkeit an.
RÜCKANSICHT (ABB. 3)
34 5
1
2
1. Öffnung für Wandmontage
2. Ausklappbarer Ständer
3. °C / °F: Temperatureinheit auswählen
4. EU / UK: Nächstgelegenes Funksignal auswählen (nur
bei RMR500)
5. RESET: Gerät auf Standardeinstellungen zurücksetzen
ÄUßERE SENDEEINHEIT - THGN500 (ABB. 4)
1
2
3
4
1. LED-Statusanzeige
2. Öffnung für Wandmontage
3. Batteriefach
4. RESET-Öffnung
FUNKSENDEEINHEIT - THGR122N (ABB. 5)
2
1
3
4
5
6
Page 22

DE
4
1. LCD-Anzeige
2. LED-Statusanzeige
3. Öffnung für Wandmontage
4. RESET-Öffnung
5. CHANNEL-Schalter
6. Batteriefach
ERSTE SCHRITTE
BATTERIEN EINLEGEN
1. Öffnen Sie das Batteriefach.
2. Legen Sie die Batterien ein und achten Sie auf die
Übereinstimmung der Polaritäten (siehe ABB. 3).
3. Nach jedem Batteriewechsel auf RESET drücken.
STELLE
BEDEUTUNG
Bereich der Außentemperatur/Luftfeuchtigkeit
(THGN500)
Batterieladung der äußeren
Sendeeinheit ist niedrig
Umgebungsbereich der
Basiseinheit
Batterieladung der
Basiseinheit ist niedrig
Bereich der
Funksendeeinheit
(THGR122N)
Batterieladung der
Funksendeeinheit ist
niedrig
Bereich für Uhr und
Kalender (oder Bereich der
optionalen Sendeeinheit)
Batterieladung der
optionalen Sendeeinheit
ist niedrig
NAMENSSCHILDER
Die Namensschilder können in der Basiseinheit eingefügt
werden (wie in Abb. 1).
Es sind 10 Namensschilder im Lieferumfang enthalten, 7
leere Schilder und 3 Schilder, die mit “MAIN UNIT”, “TIME”
und “CALENDAR” bedruckt sind. Sie können den Namen
des Standorts auf die leeren Schilder schreiben, an dem
die THGR122N und andere optionale Sendeeinheiten
aufgestellt sind.
HINWEIS Wenn optionale Sendeeinheiten installiert sind,
werden die Schilder “CALENDAR” und “TIME” ersetzt.
FUNKSENDEEINHEITEN
Dieses Produkt kann mit bis zu 4 Sendeeinheiten gleichzeitig
betrieben werden, um Messwerte der Temperatur und
relativen Luftfeuchtigkeit an mehreren Standorten zu
erfassen.
2 Funksendeeinheiten (THGN500 und THGR122N) sind
im Lieferumfang enthalten; 2 weitere optionale, kabellose
Funksendeeinheiten können gesondert erworben werden.
So richten Sie die Funksendeeinheit ein:
1. Öffnen Sie das Batteriefach, legen Sie die Batterien ein
und achten Sie auf die Übereinstimmung der Polarität.
2. Wählen Sie einen Kanal aus und drücken Sie auf
RESET.
Page 23

DE
5
3. Schließen Sie die Batterieabdeckung.
4. Platzieren Sie die Funksendeeinheit innerhalb von 30 m
(98 Fuß) von der Basiseinheit entfernt.
HINWEIS Verwenden Sie Alkaline-Batterien für längere
Betriebsdauer und Lithium-Batterien für Endverbraucher bei
Temperaturen unter dem Gefrierpunkt.
So suchen Sie nach einer Sendeeinheit:
Halten Sie
+ gleichzeitig gedrückt.
Das Empfangssymbol der Funksendeeinheit zeigt den
folgenden Status an:
SYMBOL BESCHREIBUNG
Basiseinheit sucht
Sendeeinheit(en).
Ein Kanal wurde
gefunden.
Die Sendeeinheit konnte
nicht gefunden werden.
TIPP Die Übertragungsreichweite kann von mehreren
Faktoren abhängen. Sie müssen eventuell mehrere
Standorte testen, um optimale Ergebnisse zu erzielen.
UHR UND KALENDER
HINWEIS
Wenn optionale Sendeeinheiten installiert sind:
• Wird die Anzeige von Uhr und Kalender durch die
Messwerte der Temperatur/Luftfeuchtigkeit ersetzt.
• Drücken Sie auf
, um zwischen der Anzeige von Uhr
und Temperatur/Luftfeuchtigkeit, oder der Anzeige von
Kalender und Temperatur/Luftfeuchtigkeit zu wechseln;
das Display kehrt nach 1 Minute zur Anzeige der
Temperatur/Luftfeuchtigkeit zurück.
ZEITSIGNALEMPFANG
Dieses Produkt synchronisiert seine Uhr automatisch mit
einem Zeitsignal.
RMR500:
Verschieben Sie den Schalter EU / UK, um das
Empfangssignal auszuwählen.
• EU: Signal DCF-77: innerhalb von 1500 km (932 Meilen)
von Frankfurt, Deutschland.
• UK: Signal MSF-60: innerhalb von 1500 km (932 Meilen)
von Anthorn, England.
RMR500A:
Signal WWVB-60: innerhalb von 3200 km (2000 Meilen) von
Fort Collins, Colorado.
Page 24

DE
6
So aktivieren / deaktivieren Sie den Zeitsignalempfang:
Halten Sie
gedrückt, um den Zeitsignalempfang zu
aktiveren, oder
, um ihn zu deaktivieren.
HINWEIS Der Empfang nimmt etwa 2-10 Minuten in
Anspruch. Wenn das Signal schwach ist, kann es bis zu 24
Stunden dauern, bis ein gültiges Signal empfangen wird.
Wenn der Signalempfang nicht erfolgreich ist, stellen Sie
Ihr Gerät in die Nähe eines Fensters und halten Sie
gedrückt, um eine erneute Signalsuche zu veranlassen.
Indikator für Zeitsignalempfang:
STARKES
SIGNAL
SCHWACHES
SIGNAL
KEIN SIGNAL
DIE UHR MANUELL EINSTELLEN
Um die Uhr manuell einzustellen, müssen Sie zuerst den
Zeitsignalempfang deaktivieren.
1. Halten Sie
gedrückt.
2. Drücken Sie auf
oder , um die Einstellungen
zu ändern. Die Reihenfolge der Einstellungen lautet:
Zeitzone, 12-/24-Stundenformat, Stunde, Minute, Jahr,
Kalendermodus (Monat – Tag / Tag – Monat), Monat
und Tag.
3. Drücken Sie zur Bestätigung auf .
RMR500: Die Zeitzone stellt die Uhr auf bis zu +/- 23
Stunden von der empfangenen Signalzeit ein. Wenn Sie
den Zeitsignalempfang deaktiviert haben, dürfen Sie keinen
Wert für die Zeitzone einstellen.
RMR500A: Wählen Sie die Zeitzone aus: (0) Pacific, (+1)
Mountain, (+2) Central oder (+3) Eastern.
TEMPERATUR UND LUFTFEUCHTIGKEIT
So wechseln Sie die Temperatureinheit:
Drücken Sie auf °C / °F.
HINWEIS “HH.H” oder “LL.L” wird angezeigt, wenn sich
die empfangene Temperatur außerhalb des vorgegebenen
Temperaturbereichs befindet.
SCHIMMELALARM
Dieses Produkt enthält eine Alarmfunktion für Feuchtigkeit,
um Schimmelbildung zu vermeiden. Wenn die
Luftfeuchtigkeit mehr als 60 % beträgt, blinkt das Symbol für
den Schimmelalarm
; es hört auf zu blinken, wenn die
Luftfeuchtigkeit weniger als 60 % beträgt.
Page 25

DE
7
WETTERVORHERSAGE
Dieses Produkt erstellt eine Wettervorhersage der nächsten
12 bis 24 Stunden innerhalb eines Radius von 30-50 km (1931 Meilen), bei einer Genauigkeit von 75%.
Sonnig
Teilweise bewölkt
Bewölkt
Regnerisch
Verschneit
HINTERGRUNDBELEUCHTUNG
Drücken Sie auf , um die LED-Hintergrundbeleuchtung
5 Sekunden lang zu aktivieren.
RESET
Drücken Sie auf RESET, um das Gerät auf die
Standardeinstellungen zurückzusetzen.
TECHNISCHE DATEN
TYP BESCHREIBUNG
BASISEINHEIT
L x B x H 134 x 27 x 134 mm
Gewicht 300 g (ohne Batterie)
Signalfrequenz 433 MHz
Temperaturbereich -5 °C bis 50 °C (23 °F bis 122 °F)
Temperaturauflösung 0,1 °C (0,2 °F)
Luftfeuchtigkeits-
bereich
25 % - 95 %
Luftfeuchtigkeitsauflösung
1 %
Stromversorgung 4 Batterien UM-4 (AAA) 1,5 V
FUNKSENDEEINHEIT (THGN500)
L x B x H 50 x 22 x 96 mm
Gewicht 63 g (ohne Batterie)
Signalfrequenz 433 MHz
Anzahl der Kanäle 1
Übertragungs-
reichweite
30 m (ohne Hindernisse)
Temperaturbereich -20 °C bis 60 °C (-4 °F bis 140 °F)
Temperaturauflösung 0,1 °C (0,2 °F)
Luftfeuchtigkeits-
bereich
25 % - 95 %
Luftfeuchtigkeitsauflösung
1 %
Stromversorgung 1 Batterie UM-3 (AA) 1,5 V
FUNKSENDEEINHEIT (THGR122N)
L x B x H 92 x 60 x 20 mm
Gewicht 63 g (ohne Batterie)
Signalfrequenz 433 MHz
Page 26

DE
8
Anzahl der Kanäle 3
Übertragungs-
reichweite
30 m (ohne Hindernisse)
Temperaturbereich -20 °C bis 60 °C (-4 °F bis 140 °F)
Temperaturauflösung 0,1 °C (0,2 °F)
Luftfeuchtigkeits-
bereich
25 % - 95 %
Luftfeuchtigkeitsauflösung
1 %
Stromversorgung 2 Batterien UM-4 (AAA) 1,5 V
VORSICHTSMASSNAHMEN
• Setzen Sie das Gerät keiner extremen Gewalteinwirkung
und keinen Stößen aus, und halten Sie es von übermäßigem
Staub, Hitze oder Feuchtigkeit fern.
• Sie dürfen die Belüftungsöffnungen nicht mit Gegenständen
abdecken, wie z.B. Zeitungen, Vorhänge, usw.
• Tauchen Sie das Gerät niemals in Wasser. Falls Sie
eine Flüssigkeit über das Gerät verschütten, trocknen
Sie es sofort mit einem weichen, faserfreien Tuch.
• Reinigen Sie das Gerät keinesfalls mit scheuernden
oder ätzenden Mitteln.
• Machen Sie sich nicht an den internen Komponenten
des Geräts zu schaffen, da dies zu einem Verlust der
Garantie führen kann.
• Verwenden Sie nur neue Batterien. Verwenden Sie
keinesfalls neue und alte Batterien gemeinsam.
• Die in dieser Anleitung dargestellten Abbildungen
können sich vom Original unterscheiden.
• Entsorgen Sie das Produkt nicht im allgemeinen
Hausmüll, sondern ausschließlich in den dafür
vorgesehenen, kommunalen Sammelstellen, die Sie
bei Ihrer Gemeinde erfragen können.
• Wenn dieses Produkt auf bestimmte Holzflächen gestellt
wird, kann die Oberfläche beschädigt werden. Oregon
Scientific ist nicht haftbar für solche Beschädigungen.
Entsprechende Hinweise entnehmen Sie bitte der
Pflegeanleitung Ihres Möbelherstellers.
• Der Inhalt dieser Anleitung darf ohne Genehmigung des
Herstellers nicht vervielfältigt werden.
• Verbrauchte Batterien gehören nicht in den Hausmüll.
Bitte geben Sie sie bei einer Sammelstelle für
Altbatterien bzw. Sondermüll ab.
• Bitte beachten Sie, dass manche Geräte mit einem
Batterieunterbrechungsstreifen bestückt sind. Vor dem
ersten Gebrauch müssen Sie den Streifen aus dem
Batteriefach ziehen.
HINWEIS Die technischen Daten für dieses Produkt
und der Inhalt der Bedienungsanleitung können ohne
Benachrichtigung geändert werden.
ÜBER OREGON SCIENTIFIC
Besuchen Sie unsere Website www.oregonscientific.
de und erfahren Sie mehr über unsere Oregon Scientific-
Produkte. Auf der Website finden Sie auch Informationen,
wie Sie im Bedarfsfall unseren Kundendienst erreichen und
Daten herunterladen können. Für internationale Anfragen
besuchen Sie bitte unsere Website: www2.oregonscientific.
com/about/international.
Page 27

DE
9
EU-KONFORMITÄTSERKLÄRUNG
Hiermit erklärt Oregon Scientific, dass Clima Control (Modell:
RMR500 / RMR500A) mit den grundlegenden Anforderungen
und anderen relevanten Vorschriften der Richtlinie 1999/5/
EG übereinstimmt. Eine Kopie der unterschriebenen und mit
Datum versehenen Konformitätserklärung erhalten Sie auf
Anfrage über unseren Oregon Scientific Kundendienst.
KONFORM IN FOLGENDEN LÄNDERN
Alle Länder der EU, Schweiz CH
und Norwegen N
Page 28

FR
1
Station Climatique Modèle
RMR500 / RMR500A
MANUEL DE L’UTILISATEUR
TABLE DES MATIÈRES
Vue d’ensemble.................................................................2
Face Avant..........................................................................2
Ecran LCD..........................................................................2
Face Arrière.......................................................................3
Sonde Sans Fil Exterieure - THGN500...............................3
Sonde Sans Fil - THGR122N.............................................4
Au Commencement..........................................................4
Mise en Place des Piles....................................................4
Espace de Titre...................................................................4
Sonde Sans Fil..................................................................4
Horloge et Calendrier.......................................................5
Réception de I’Horloge........................................................5
Régler Manuellement I’Horloge..........................................6
Température et Humidité.................................................6
Alerte de Moisissure ..........................................................7
Prévisions Météorologiques............................................7
Rétro-éclairage..................................................................7
Reinitialisation...................................................................7
Caractéristiques................................................................7
Précautions.......................................................................8
À Propos d’Oregon Scientific.........................................8
Europe - Déclaration de Conformité..............................9
Page 29

FR
2
VUE D’ENSEMBLE
FACE AVANT (FIG 1)
2
1
3
4
5
1. Ecran LCD
2.
: Vous permet d’alterner entre les affichages de
l’horloge, du calendrier, de la température/humidité ;
d’entrer dans le mode réglage
3.
: Augmente la valeur d’un réglage, active le signal
de réception de l’horloge
4.
: Diminue la valeur d’un réglage, désactive la signal
de réception de l’horloge
5. : Permet d’activer le rétro-éclairage
ECRAN LCD (FIG 2)
1
2
3
4
5
6
7
8
9
10
11
1. Icônes de prévisions météo
2. Icône de réception de la sonde sans fil extérieure
3. Affichage des températures extérieures pour la sonde
THGN500*
4. Affichage de l’humidité extérieure pour la sonde
THGN500*
5. Affichage des températures/humidité pour la zone de
l’appareil principal
6. Fuseaux horaires
7. Indicateur de réception du signal de l’horloge
8. Affichage de l’horloge (ou affichage des températures/
humidités pour la sonde sans fil en option)
9. Alerte de moisissure
Page 30

FR
3
10. Affichage de la température/humidité pour la sonde
sans fil THGR122N
11. Affichage du calendrier (ou affichage des températures/
humidités pour la sonde sans fil en option)
* Ce produit est conçu pour afficher les relevés des
températures et d’humidité de la sonde THGN500
uniquement dans la zone de température/humidité.
FACE ARRIÈRE ( FIG 3)
34 5
1
2
1. Trou de fixation murale
2. Support pliable
3. °C / °F : Permet de sélectionner l’unité de mesure de la
température
4. EU / UK : Sélectionne le signal radio le plus proche
(modèle RMR500 uniquement)
5. RESET (REINITIALISER) : Réinitialise l’appareil aux
réglages par défaut
SONDE SANS FIL EXTERIEURE - THGN500 (FIG 4)
1
2
3
4
1. Indicateur LED
2. Trou de fixation murale
3. Compartiment des piles
4. Fente RESET (Réinitialiser)
Page 31

FR
4
SONDE SANS FIL - THGR122N (FIG 5)
2
1
3
4
5
6
1. Affichage LCD
2. Indicateur LED
3. Trou de fixation murale
4. Fente RESET (Réinitialiser)
5. Bouton CHANNEL
6. Compartiment des piles
AU COMMENCEMENT
MISE EN PLACE DES PILES
1. Retirez le couvercle du compartiment des piles.
2. Insérez les piles, en respectant les polarités (voir FIG
3).
3. Appuyez sur RESET (REINITIALISER) après chaque
changement de piles.
EMPLACEMENT
SIGNIFICATION
Zone de température/
humidité extérieure
(THGN500)
La pile de la sonde sans fil
est faible
Zone de l’appareil principal Piles faibles
Zone de la sonde sans fil
(THGR122N)
Piles de la sonde sans fil
faibles
Zone de l’horloge et du
calendrier (ou zone des
sondes en option)
Piles des sondes en
options faibles
ESPACE DE TITRE
Vous pouvez insérer des noms sur l’appareil principal
comme indiqué dans la Fig. 1.
Trois espaces sont disponibles, sept espaces vierges et
trois espaces en lettres capitales comme « MAIN UNIT »,
« TIME » et « CALENDAR ». Vous pouvez également
insérer dans l’espace vierge le nom de l’emplacement du
THGR122N ou d’autres sondes installées.
REMARQUE Si vous installez des sondes en option
« CALENDAR » et « TIME » seront remplacés.
SONDE SANS FIL
Ce produit peut être accompagné à tous moments de
4 sondes au maximum relevant en divers endroits la
température et l’humidité relative.
Vous trouverez dans la boite 2 sondes (THGN500 et
Page 32

FR
5
THGR122N), vous pouvez les compléter de 2 sondes sans
fil en option vendues séparément.
Installation de la sonde sans fil :
1. Ouvrez le compartiment des piles et insérez les piles
en respectant les polarités.
2. Sélectionnez un canal. Appuyez sur RESET.
3. Fermez le couvercle du compartiment des piles.
4. Positionnez la sonde à 30 m maximum (98 pieds) de
l’appareil principal.
REMARQUE Utilisez des piles alcalines pour un usage
prolongé et des piles au lithium pour la consommation lors
de températures inférieures au gel.
Recherche d’une sonde :
Appuyez et maintenez simultanément
+ .
L’icône de réception de la sonde sans fil indiquera le statut
suivant :
ICONE DESCRIPTION
L’appareil principal est
à la recherche de la/des
sonde(s).
Un canal a été trouvé.
La sonde est introuvable.
ASTUCE La distance de transmission peut varier en
fonction de plusieurs facteurs. Vous pouvez essayer
plusieurs emplacements, afin d’obtenir les meilleurs
résultats possibles.
HORLOGE ET CALENDRIER
REMARQUE
Si des sondes en option sont installées :
• L’affichage de l’horloge et du calendrier sera remplacé
par les relevés de température/humidité.
• Appuyez sur
pour alterner entre l’affichage de
l’horloge et de la température/humidité ; l’affichage
reviendra aux températures/humidités après 1 minute.
RÉCEPTION DE L’HORLOGE
Ce produit est conçu pour synchroniser automatiquement
l’horloge avec le signal radio.
Page 33

FR
6
RMR500 :
Positionnez l’encoche EU / UK pour sélectionner le signal
à recevoir.
• EU : Signal DCF-77 : dans un rayon de 1500 Km (932
miles) depuis Frankfort, Allemagne.
• UK : Signal MSF-60 : dans un rayon de 1500 Km (932
miles) depuis Anthorn, Angleterre.
RMR500A :
Signal WWVB-60 : dans un rayon de 3200 km (2000 miles)
de Fort Collins, Colorado.
Pour activer / désactiver le signal de réception de l’horloge :
Appuyez et maintenez
pour activer, ou pour
désactiver la réception du signal.
REMARQUE La réception prend de 2 à 10 minutes. Si le
signal est faible, 24 heures peuvent être nécessaires pour
obtenir un signal valide. Si la réception échoue, positionnez
votre appareil à proximité d’une fenêtre, appuyez et
maintenez
pour forcer la recherche de signal.
Indicateur de réception du signal de l’Horloge :
SIGNAL FORT SIGNAL FAIBLE AUCUN SIGNAL
REGLER MANUELLEMENT L’HORLOGE
Pour régler manuellement l’horloge, vous devez, tout
d’abord, désactiver la réception du signal.
1. Appuyez et maintenez le bouton
.
2. Appuyez sur
ou pour modifier les réglages.
Les réglages s’effectuent dans l’ordre suivant : Fuseau
horaire, format 12/24 heures, heure, minutes, année,
mode calendrier (format mois-jour / jour –mois) mois,
jour.
3. Appuyez sur
pour confirmer.
RMR500 : La fonction de fuseau horaire règle l’horloge à +/- 23
heures de l’heure du signal reçu. Si vous avez désactivé la
réception du signal de l’horloge, ne configurez pas de valeur
pour le fuseau horaire.
RMR500A : Sélectionnez le fuseau horaire : (0) Pacifique,
(+1) Montagnes, (+2) Central ou (+3) Côte Est.
TEMPÉRATURE ET HUMIDITÉ
Pour sélectionner l’unité de température :
Appuyez sur °C / °F.
REMARQUE “HH.H” ou “LL.L” s’affichera si la température
reçue est hors de portée de la gamme spécifiée.
Page 34

FR
7
ALERTE DE MOISISSURE
Ce produit est équipé d’une fonction d’alerte de moisissure
pour empêcher sa formation. Si l’humidité est supérieure à
60%, l’icône d’alerte de moisissure
clignotera, elle ne
s’arrêtera de clignoter qu’une fois l’humidité inférieure à 60 %.
PRÉVISIONS MÉTÉOROLOGIQUES
Ce produit vous permet de connaître les prévisions
météorologiques pour les 12 à 24 heures dans un rayon de
30 à 50 Km (19-31 miles) avec un taux de fiabilité de 75 %.
Ensoleillé
Partiellement nuageux
Nuageux
Pluvieux
Neigeux
RÉTRO-ÉCLAIRAGE
Appuyez sur pour activer le rétro-éclairage LED
pendant 5 secondes.
REINITIALISATION
Appuyez sur RESET pour que l’appareil revienne aux
réglages par défaut.
CARACTÉRISTIQUES
TYPE DESCRIPTION
APPAREIL PRINCIPAL
L x l x H
134 x 27 x 134 mm
(5,3 x 1,1 x 5,3 pouces)
Poids
300 g (10,58 onces) sans les
piles
Fréquence du signal 433 MHz
Plage de mesure de la
température
-5°C à 50°C (23°F à 122°F)
Résolution de la
température
0,1°C (0,2°F)
Gamme de l’humidité 25% - 95%
Résolution de l’humidité 1%
Alimentation 4 piles UM-4 (AAA) 1,5V
SONDE SANS FIL (THGN500)
L x l x H
50 x 22 x 96 mm
(1,9 x 0,9 x 3,8 pouces)
Poids 63 g (2,22 onces) sans les piles
Fréquence du signal 433 MHz
Nombre de canaux 1
Distance de transmission 30 m (98 pieds) sans obstruction
Plage de mesure de la
température
-20°C à 60°C (-40°F à 140°F)
Résolution de la
température
0,1°C (0,2 °F)
Gamme de l’humidité 25% - 95%
Résolution de l’humidité 1%
Alimentation 1 pile UM-3 (AA) 1,5V
Page 35

FR
8
SONDE SANS FIL (THGR122N)
L x l x H
92 x 60 x 20 mm
(3,6 x 2,4 x 0,79 pouces)
Poids 63 g (2,22 onces) sans les piles
Fréquence du signal 433 MHz
Nombre de canaux 3
Distance de transmission 30 m (98 pieds) sans obstruction
Plage de mesure de la
température
-20°C à 60°C (-40°F à 140°F)
Résolution de la
température
0,1°C (0,2°F)
Gamme de l’humidité 25% - 95%
Résolution de l’humidité 1%
Alimentation 2 piles UM-4 (AAA) 1,5V
PRECAUTIONS
• Ne pas soumettre le produit à une force excessive, au
choc, à la poussière, aux changements de température
ou à l’humidité.
• Ne pas couvrir les trous de ventilation avec des
journaux, rideaux etc.
• Ne pas immerger le produit dans l’eau. Si vous renversez
du liquide sur l’appareil, séchez-le immédiatement avec
un tissu doux.
• Ne pas nettoyer l’appareil avec des matériaux corrosifs
ou abrasifs.
• Ne pas trafiquer les composants internes. Cela
invalidera votre garantie.
• N’utilisez que des piles neuves. Ne pas mélanger des
piles neuves et usagées.
• Les images de ce manuel peuvent dif férer de l’aspect
réel du produit.
• Lorsque vous désirez vous débarrasser de ce produit,
assurez-vous qu’il soit collecté séparément pour un
traitement adapté.
• Le poser sur certaines surfaces en bois peut endommager
la finition du meuble, et Oregon Scientific ne peut en
être tenu responsable. Consultez les mises en garde du
fabricant du meuble pour de plus amples informations.
• Le contenu du présent manuel ne peut être reproduit
sans la permission du fabriquant.
• Ne pas jeter les piles usagées dans les containers
municipaux non adaptés. Veuillez effectuer le tri de ces
ordures pour un traitement adapté si nécessaire.
• Veuillez remarquer que certains appareils sont équipés
d’une bande de sécurité. Retirez la bande bande
ducompartiment des piles avant la première utilisation.
REMARQUE Les caractéristiques techniques de ce
produit et le contenu de ce manuel peuvent être soumis à
modifications sans préavis.
À PROPOS D’OREGON SCIENTIFIC
Pour plus d‘informations sur les produits Oregon Scientific
France, rendez-vous sur notre site:
www.oregonscientific.fr.
Si vous êtes aux Etats-Unis, vous pouvez contacter notre
support consommateur directement sur le site:
www2.oregonscientific.com/service/support.asp
OU
Page 36

FR
9
par téléphone au: 1-800-853-8883
Pour des renseignements internationaux, rendez vous sur le
site: www2.oregonscientific.com/about/international.asp.
EUROPE - DECLARATION DE CONFORMITE
Par la présente Oregon Scientific déclare que l’appareil
Station Climatique Modèle (Modèle:RMR500 / RMR500A)
est conforme aux exigences essentielles et aux autres
dispositions pertinentes de la directive 1999/5/CE. Une
copie signée et datée de la déclaration de conformité est
disponible sur demande auprès de notre Service Client.
PAYS CONCERNÉS RTT&E
Tous les pays Européens, la Suisse CH
et la Norvège N
Page 37

IT
1
Clima Control
Stazione meteo multi-ambiente
Modello: RMR500 / RMR500A
MANUALE PER L’UTENTE
INDICE
Panoramica........................................................................2
Vista Anteriore.....................................................................2
Display LCD........................................................................2
Vista Posteriore...................................................................3
Sensore Esterno - THGN500.............................................3
Sensore Remoto - THGR122N ...........................................4
Operazioni Preliminari......................................................4
Inserimento delle Batterie...................................................4
Etichette Distintive...............................................................4
Sensori Remoti..................................................................4
Orologio e Calendario......................................................5
Ricezione dell’ora................................................................5
Impostazione Manuale dell’ora...........................................6
Temperatura e Umidità.....................................................6
Allarme Umidità...................................................................6
Previsioni Meteorologiche...............................................7
Retroilluminazione........................................................7
Funzione Reset.................................................................7
Specifiche Tecniche.........................................................7
Avvertenze.........................................................................8
Informazioni Agli Utenti dei Prodotti di
Tipo “Domestico”..............................................................8
Informazioni su Oregon Scientific.................................9
Dichiarazione di Conformita’ UE....................................9
Page 38

IT
2
PANORAMICA
VISTA ANTERIORE (FIG. 1)
2
1
3
4
5
1. Display LCD
2.
: consente di alternare le visualizzazioni di orologio,
calendario e temperatura / umidità e di accedere alla
modalità impostazioni
3.
: consente di aumentare i valori in modalità
impostazioni e di attivare la ricezione del segnale
orario
4.
: consente di diminuire i valori in modalità
impostazioni e di disattivare la ricezione del segnale
orario
5. : consente di attivare la retroilluminazione
DISPLAY LCD (FIG.2)
1
2
3
4
5
6
7
8
9
10
11
1. Icona delle previsioni meteorologiche
2. Icona della ricezione del sensore esterno
3. Visualizzazione della temperatura esterna rilevata dal
THGN500*
4. Visualizzazione dell’umidità esterna rilevata dal
THGN500*
5. Visualizzazione di temperatura/umidità dell’ambiente
dall’unità principale
6. Fuso orario
7. Indicatore della ricezione del segnale orario
8. Visualizzazione dell’ora (o di temperatura/umidità
Page 39

IT
3
rilevata dal sensore opzionale)
9. Allarme umidità (richio muffe)
10. Visualizzazione di temperatura/umidità rilevata dal
sensore remoto THGR122N
11. Visualizzazione del calendario (o di temperatura/
umidità rilevata dal sensore opzionale)
* Questo prodotto è progettato per visualizzare le
rilevazioni di temperatura e umidità del THGN500
unicamente nell’area di temperatura / umidità esterna.
VISTA POSTERIORE (FIG. 3)
34 5
1
2
1. Foro per fissaggio a parete
2. Supporto pieghevole
3. °C / °F: consente di selezionare l’unità di misura della
temperatura
4. EU / UK: consente di selezionare il segnale radio più
vicino (solo il modello RMR500)
5. RESET: consente di ripristinare i valori predefiniti
dell’unità
SENSORE ESTERNO - THGN500 (FIG. 4)
1
2
3
4
1. Indicatore LED
2. Foro per fissaggio a parete
3. Vano batterie
4. Foro RESET
Page 40

IT
4
SENSORE REMOTO - THGR122N (FIG. 5)
2
1
3
4
5
6
1. Display LCD
2. Indicatore LED
3. Foro per fissaggio a parete
4. Foro RESET
5. Selettore CHANNEL
6. Vano batterie
OPERAZIONI PRELIMINARI
INSERIMENTO DELLE BATTERIE
1. Togliere la copertura del vano batterie.
2. Inserire le batterie, rispettando la polarità indicata (FIG.
3).
3. Premere RESET dopo ogni sostituzione di batteria.
POSIZIONE
SIGNIFICATO
Area di temperatura/umidità
esterna (THGN500)
Batteria del sensore
esterno in esaurimento
Area ambiente unità
principale
Batterie dell’unità
principale in esaurimento
Area del sensore remoto
(THGR122N)
Batterie del sensore
remoto in esaurimento
Area orologio e calendario (o
area dei sensori opzionali)
Batterie dei sensori
opzionali in esaurimento
ETICHETTE DISTINTIVE
È possibile inserire nell’unità principale, come in Fig. 1,
etichette distintive.
Con la confezione vengono fornite in dotazione 10 etichette
distintive, 7 in bianco e 3 che riportano la dicitura “MAIN
UNIT”, “TIME” e “CALENDAR”. L’utente può scrivere
sulle etichette in bianco il nome dell’ambiente in cui sono
posizionati il THGR122N e gli altri sensori installati.
NOTA Se vengono installati sensori opzionali, le etichette
“CALENDAR” e “TIME” possono essere sostituite.
SENSORI REMOTI
Questo prodotto può funzionare con un numero massimo di
4 sensori contemporaneamente per rilevare la temperatura,
l’umidità relativa in diversi ambienti.
Page 41

IT
5
Vengono forniti in dotazione 2 sensori remoti (THGN500 e
THGR122N), mentre è possibile acquistare separatamente
altri 2 sensori remoti opzionali senza fili.
Impostazione del sensore:
1. Aprire il vano batterie ed inserire le batterie rispettando
la polarità indicata.
2. Selezionare un canale, quindi premere RESET.
3. Chiudere il vano batterie.
4. Posizionare il sensore remoto entro 30 m dall’unità
principale.
NOTA Utilizzare batterie alcaline in caso di uso prolungato
e batterie al litio in ambienti con temperature inferiori allo 0.
Ricerca di un sensore:
Tenere premuti contemporaneamente
e .
L’icona della ricezione del sensore remoto indica uno dei
seguenti stati:
ICONA DESCRIZIONE
L’unità principale è alla
ricerca del/i sensore/i
È stato rilevato un
canale
Impossibile trovare il
sensore
SUGGERIMENTO Il campo di trasmissione può variare
in base a molti fattori. È possibile dover provare diverse
posizioni prima di ottenere i risultati migliori.
OROLOGIO E CALENDARIO
NOTA
Se sono stati installati sensori opzionali:
• la visualizzazione di orologio e calendario viene
sostituita dalle rilevazioni di temperatura e umidità.
• premere
per alternare le visualizzazioni di ora e
temperatura/umidità, oppure quelle di calendario e
temperatura/umidità; la visualizzazione di temperatura/
umidità verrà ripristinata dopo 1 minuto.
RICEZIONE DELL’ORA
Questo prodotto è progettato per sincronizzare
automaticamente il proprio orologio con un segnale orario.
RMR500:
Spostare la levetta EU / UK per selezionare il segnale da
ricevere.
• EU: segnale DCF-77: entro 1500 km da Francoforte,
Germania.
• UK: segnale MSF-60: entro 1500 km da Anthorn,
Inghilterra.
RMR500A:
Segnale WWVB-60: entro 3200 km da Fort Collins,
Colorado.
Page 42

IT
6
Attivazione / disattivazione della ricezione del segnale
orario:
Per attivare la ricezione del segnale, tenere premuto
,
per disattivarla tenere premuto
.
NOTA Per la ricezione sono necessari dai 2 ai 10 minuti.
Se il segnale è debole, possono occorrere fino a 24 ore per
riceverne uno valido. Se la ricezione non riesce, posizionare
l’unità vicino a una finestra, tenere premuto
per forzare
la ricerca di un altro segnale.
Indicatore della ricezione del segnale dell’ora:
SEGNALE
FORTE
SEGNALE
DEBOLE
NESSUN
SEGNALE
IMPOSTAZIONE MANUALE DELL’ORA
Per impostare l’ora manualmente, disattivare prima la
ricezione del segnale.
1. Tenere premuto
.
2. Premere
o per modificare le impostazioni.
L’ordine delle impostazioni è: fuso orario, formato ora 12 /
24, ore, minuti, anno, modalità calendario (mese – giorno /
giorno – mese), mese e giorno.
3. Premere per confermare.
RMR500: La differenza di fuso orario imposta l’orologio a
+ / - 23 ore dall’ora del segnale ricevuto. Se la ricezione
del segnale orario è stata disattivata, non impostare nessun
valore per il fuso orario.
RMR500A: Selezionare la zona relativa al fuso orario: (0)
Pacific, (+1) Mountain, (+2) Central oppure (+3) Eastern.
TEMPERATURA E UMIDITÀ
Alternanza delle unità di misura della temperatura:
Premere °C / °F.
NOTA Quando la temperatura rilevata dall’unità principale
o dai sensori è superiore o inferiore al campo di misurazione
(da -20°C a +60°C), sul display saranno visualizzati
rispettivamente “HH.
H” o “LL.L”.
ALLARME UMIDITA
Questo prodotto dispone della funzione di allarme umidità
per la prevenzione della formazione di muffe. Se l’umidità
supera il 60%, appare l’icona di allarme muffa
, che
smette di lampeggiare quando il livello di umidità scende al
di sotto del 60%.
Page 43

IT
7
PREVISIONI METEOROLOGICHE
Questo prodotto è in grado di mostrare le previsioni
meteorologiche per le successive 12-24 ore entro un raggio
di 30-50 km con una precisione del 75%.
Sereno
Parzialmente nuvoloso
Nuvoloso
Pioggia
Neve
RETROILLUMINAZIONE
Premere per attivare la retroilluminazione LED per 5
secondi.
FUNZIONE RESET
Premere RESET per ripristinare le impostazioni predefinite.
SPECIFICHE TECNICHE
TIPO DESCRIZIONE
UNITÀ PRINCIPALE
L x P x H 134 x 27 x 134 mm
Peso 300 g senza batteria
Frequenza segnale 433 MHz
Campo di misurazione della
temperatura
da -5°C a 50°C
Risoluzione temperatura 0,1°C
Campo di misurazione umidità 25% - 95%
Risoluzione umidità 1%
Alimentazione
4 batterie UM-4 (AAA)
da 1,5 V
UNITÀ REM OTA (THGN500)
L x P x H 50 x 22 x 96 mm
Peso 63 g senza batteria
Frequenza segnale 433 MHz
Numero canali 1
Campo di trasmissione 30 m senza ostruzioni
Campo di misurazione della
temperatura
da -20°C a 60°C
Risoluzione temperatura 0,1°C
Campo di misurazione umidità 25% - 95%
Risoluzione umidità 1%
Alimentazione
1 batteria UM-3 (AA)
da 1,5 V
UNITÀ REM OTA (THGR122N)
L x P x H 92 x 60 x 20 mm
Peso 63 g senza batteria
Frequenza segnale 433 MHz
Numero canali 3
Campo di trasmissione 30 m senza ostruzioni
Campo di misurazione della
temperatura
da -20°C a 60°C
Risoluzione temperatura 0,1°C
Page 44

IT
8
Campo di misurazione umidità 25% - 95%
Risoluzione umidità 1%
Alimentazione
2 batterie UM-4 (AAA)
da 1,5 V
AVVERTENZE
• Non sottoporre il prodotto a forza eccessiva, urti,
polvere, temperatura o a umidità.
• Non otturare i fori di aerazione con oggetti come giornali,
tende, etc.
• Non immergere l’unità in acqua. Se si versa del liquido
sul prodotto, asciugarlo immediatamente con un panno
morbido e liscio.
• Non pulire l’unità con materiali abrasivi o corrosivi.
• Non manomettere i componenti interni. In questo modo
si invalida la garanzia.
• Utilizzare solo batterie nuove. Non mescolare batterie
nuove con batterie vecchie.
• Le immagini del manuale possono differire dalla realtà.
• Al momento dello smaltimento del prodotto, utilizzare la
raccolta differenziata.
• Oregon Scientific declina ogni responsabilità per
eventuali danni alle finiture causati dal posizionamento
del prodotto su determinati tipi di legno. Consultare le
istruzioni fornite dal fabbricante del mobile per ulteriori
informazioni.
• Il contenuto di questo manuale non può essere
ristampato senza l’autorizzazione del fabbricante.
• Non smaltire le batterie vecchie come rifiuto non
differenziato. È necessario che questo prodotto venga
smaltito mediante raccolta differenziata per essere
trattato in modo particolare.
• Alcune unità sono dotate di una striscia di sicurezza per
le batterie. Rimuovere la striscia dal vano batterie prima
del primo utilizzo.
NOTA Le specifiche tecniche del prodotto e il contenuto
del manuale per l’utente possono essere modificati senza
preavviso.
INFORMAZIONI AGLI UTENTI DEI PRODOTTI DI
TIPO “DOMESTICO”
INFORMAZIONE AGLI UTENTI
ai sensi dell’art. 13 del Decreto Legislativo 25 luglio 2005,
n. 151”Attuazione delle Direttive 2002/95/CE, 2002/96/CE
e 2003/108/CE, relative alla riduzione dell’uso di sostanze
pericolose nelle apparecchiature elettriche ed elettroniche,
nonché allo smaltimento dei rifiuti”.
Il simbolo del cassonetto barrato riportato sull’apparecchiatura
o sulla sua confezione indica che il prodotto alla fine della
propria vita utile deve essere raccolto separatamente dagli
altri rifiuti.
L’utente dovrà, pertanto, conferire l’apparecchiatura giunta
a fine vita agli idonei centri di raccolta differenziata dei
rifiuti elettronici ed elettrotecnici, oppure riconsegnarla
al rivenditore al momento dell’acquisto di una nuova
Page 45

IT
9
apparecchiatura di tipo equivalente, in ragione di uno a
uno.
L’adeguata raccolta differenziata per l’avvio successivo
dell’apparecchiatura dismessa al riciclaggio, al trattamento
e allo smaltimento ambientalmente compatibile contribuisce
ad evitare possibili effetti negativi sull’ambiente e sulla
salute e favorisce il reimpiego e/o riciclo dei materiali di cui
è composta l’apparecchiatura.
Lo smaltimento abusivo del prodotto da parte dell’utente
comporta l’applicazione delle sanzioni amministrative
previste dalla normativa vigente.
INFORMAZIONI SU OREGON SCIENTIFIC
Per avere maggiori informazioni sui nuovi prodotti Oregon
Scientific visita il nostro sito internet www.oregonscientific.
it, dove potrai trovare tutte le informazioni di cui hai bisogno.
Per ricerche di tipo internazionale puoi visitare invece il sito
www2.oregonscientific.com/about/international.asp.
DICHIARAZIONE DI CONFORMITA’ UE
Con la presente Oregon Scientific dichiara che questo
prodotto (Modello: RMR500/RMR500A) è conforme ai
requisiti essenziali ed alle altre disposizioni pertinenti
stabilite dalla direttiva 1999/5/CE. Una copia firmata e datata
della Dichiarazione di Conformità è disponibile, su richiesta,
tramite il servizio clienti della Oregon Scientific.
PAESI CONFORMI ALLA DIRETTIVA R&TTE
Tutti I Paesi Ue, Svizzera CH
E Norvegia N
Page 46

NL
1
Clima Control
Model: RMR500 / RMR500A
HANDLEIDING
INHOUDSOPGAVE
Overzicht...........................................................................2
Voorkant.............................................................................2
LCD-scherm ........................................................................2
Achterkant ..........................................................................3
Buitensensor – THGN500...................................................3
Buitensensor – THGR122N................................................3
Starten...............................................................................4
Plaats de Batterijen...........................................................4
Labels.................................................................................4
Buitensensoren.................................................................4
Klok en Kalender..............................................................5
Klok Ontvangst....................................................................5
Klok Handmatig Instellen....................................................6
Temperatuur en Vochtigheid...........................................6
Schimmelalarm...................................................................6
Weersverwachting............................................................6
Schermverlichting.............................................................7
Reset..................................................................................7
Specificaties......................................................................7
Kenmerken........................................................................7
Over Oregon Scientific....................................................8
EU Conformiteits Verklaring...........................................8
Page 47

NL
2
OVERZICHT
VOORKANT (FIG 1)
2
1
3
4
5
1. LCD-Scherm
2.
: Schakelen tussen klok, kalender en temperatuur-/
vochtigheidsweergave; start instellingsmodus
3.
: Waarde verhogen in instellingsmodus; activeren
ontvangst radiosignaal klok
4.
: Waarde verlagen in instellingsmodus; deactiveren
ontvangst radiosignaal klok
5.
: Activeren Schermverlichting
LCD-SCHERM (FIG 2)
1
2
3
4
5
6
7
8
9
10
11
1. Weersverwachtingsicoon
2. Ontvangsticoon buitensensor
3. Weergave buitentemperatuur voor THGN500*
4. Weergave buitenvochtigheid voor THGN500*
5. Temperatuur-/vochtigheidsweergave voor de omgeving
van het basisstation
6. Tijdzone
7. Ontvangstindicator van kloksignaal
8. Klokweergave (of temperatuur-/vochtigheidsweergave
voor optionele sensor)
9. Schimmelalarm
10. Temperatuur-/vochtigheidsweergave voor de
THGR122N sensor
11. Kalenderweergave (of temperatuur-/
vochtigheidsweergave voor optionele sensor)
Page 48

NL
3
* Dit product kan de temperatuur- en
vochtigheidsgegevens van de THGN500 alleen
weergeven in het buitentemperatuur-/vochtigheidsvak.
ACHTERKANT (FIG 3)
34 5
1
2
1. Muurbevestigingsgat
2. Opvouwbare standaard
3. °C / °F: Temperatuureenheid Selecteren
4. EU / UK: Selecteer dichtstbijzijnde kloksignaal (alleen
RMR500)
5. RESET: Het apparaat terugzetten op
standaardinstellingen
BUITENSENSOR – THGN500 (FIG 4)
1
2
3
4
1. Statusindicator LED
2. Muurbevestigingsgat
3. Batterijvak
4. RESET gat
BUITENSENSOR – THGR122N (FIG 5)
2
1
3
4
5
6
Page 49

NL
4
1. LCD-Scherm
2. Statusindicator LED
3. Muurbevestigingsgat
4. RESET gat
5. KANAAL schakelaar
6. Batterijvak
STARTEN
PLAATS DE BATTERIJEN
1. Verwijder het klepje van het batterijvak.
2. Plaats de batterijen volgens de aangegeven polariteit
(Zie FIG. 3).
3. Druk op RESET nadat u de batterijen vervangen
heeft.
LOCATIE
BETEKENIS
Buitentemperatuur-/
vochtigheidsvak (THGN500)
Batterij buitensensor raakt
leeg
Omgevingsvak basisstation
Batterij van het apparaat
zwak
Buitensensorvak
(THGR122N)
Batterij buitensensor raakt
leeg
Klok- en kalendervak (of vak
voor optionele sensor)
Batterij optionele sensor
zwak
LABELS
Labels kunnen ingevoerd worden in het basisstation als in
Fig.1.
Er zijn 10 mogelijker labels in dit pakket, waaronder 7
lege labels en 3 standaardlabels, “MAIN UNIT”, “TIME” en
“CALENDAR”. U kunt in de lege labels de naam van de
locatie van de THGR122N en andere optionele sensoren
invullen.
NB Als u optionele sensoren hebt geïnstalleerd, dan worden
de “CALENDAR” en “TIME” vervangen.
BUITENSENSOREN
Dit product kan met 4 sensoren tegelijkertijd werken om
gegevens te verzamelen over temperatuur en relatieve
vochtigheid op verschillende plekken.
2 buitensensoren (THGN500 en THGR122N) zijn
inbegrepen in dit pakket, en 2 extra optionele sensoren zijn
apart verkrijgbaar.
Om de buitensensor in te stellen:
1. Open het batterijvak en plaats de batterijen met de
polariteit zoals aangegeven.
2. Selecteer een kanaal.
3. Druk op RESET.
4. Sluit het batterijvak.
Page 50

NL
5
5. Plaats de buitensensor binnen 30m (98 ft) van het
apparaat.
NB Wij raden u aan alkalinebatterijen te gebruiken voor
langdurig gebruik en lithium batterijen bij temperaturen
onder het vriespunt.
Om een sensor te zoeken:
Houd tegelijkertijd
+ ingedrukt.
Het sensorontvangsticoon van de buitensensor toont de
volgende status:
ICOON BESCHRIJVING
Het apparaat zoekt
sensor(en).
Kanaal gevonden.
De sensor kan niet
gevonden worden.
TIP Het zendbereik kan variëren, afhankelijk van allerlei
factoren. U kunt het best verschillende plekken uitproberen
om de beste voor uw sensor te vinden.
KLOK EN KALENDER
NB
Als u optionele sensoren hebt geïnstalleerd:
• klok- en kalenderweergave worden vervangen door
temperatuur-/vochtigheidsgegevens.
• druk op
om te schakelen tussen klok en
temperatuur-/vochtigheidsweergave, of kalender
en temperatuur-/vochtigheidsweergave; het
scherm keert na 1 minuut naar de temperatuur-/
vochtigheidsweergave.
KLOK ONTVANGST
Dit product is ontworpen om zijn klok automatisch te
synchroniseren door middel van een kloksignaal.
RMR500:
Schuif de EU / UK schakelaar naar het te ontvangen
signaal.
• EU: DCF-77 signaal: binnen 1500 km (932 mijl) van
Frankfurt, Duitsland.
• UK: MSF-60 signaal: binnen 1500 km (932 mijl) van
Anthorn, Engeland.
RMR500A:
WWVB-60 signaal: binnen 3200 km (2000 mijl) van Fort
Collins, Colorado (VS).
Om signaalontvangst klok aan/uit te zetten:
Houd
ingedrukt om signaalontvangst aan te zetten of
om het uit te zetten.
Page 51

NL
6
NB Ontvangst kan 2-10 minuten duren. Als het signaal
zwak is, kan het tot 24 uur duren om een geldig signaal te
ontvangen. Indien geen signaal gevonden wordt, zet het
apparaat dan bij een raam en houd
ingedrukt om het
zoeken naar een signaal te forceren.
Ontvangstindicator van kloksignaal:
STERK
SIGNAAL
ZWAK
SIGNAAL
GEEN SIGNAAL
KLOK HANDMATIG INSTELLEN
Om de klok handmatig in te stellen, moet u eerst
klokontvangstsignaal uit zetten.
1. Houd
ingedrukt.
2. Druk
of om de instelling te wijzigen. De
volgorde van instellingen is: tijdzone, 12 / 24 uur
formaat, uren, minuten, jaar, kalendermodus (maand–
dag / dag–maand), maand en dag.
3. Druk op
om te bevestigen.
RMR500: De tijdzone stelt de klok in op tot + / -23 uur van
het ontvangen kloksignaal. Als u kloksignaalontvangst hebt
uitgezet, dan hoeft u geen tijdzone in te stellen.
RMR500A: Selecteer de tijdzone: (0) Westkust, (+1)
Gebergte, (+2) Centraal, of (+3) Oostkust.
TEMPERATUUR EN VOCHTIGHEID
Om de temperatuureenheid in te stellen:
Druk °C / °F.
NB “HH.H” of “LL.L” verschijnt op het scherm wanneer de
temperatuur buiten het meetbereik valt.
SCHIMMELALARM
Dit product is voorzien van een vochtigheidsalarm voor het
voorkomen van schimmel. Als de vochtigheid boven de 60%
komt, gaat het icoon van het schimmelalarm
knipperen,
en het icoon houdt op met knipperen zodra de vochtigheid
weer onder de 60% zakt.
WEERSVERWACHTING
Dit product voorspelt de volgende 12 tot 24 uur weer in een
straal van 30-50 km (19-31 mijl) met een nauwkeurigheid
van 75%.
Zonnig
Half Bewolkt
Bewolkt
Regenachtig
Sneeuw
Page 52

NL
7
SCHERMVERLICHTING
Druk op om de schermverlichting gedurende 5
seconden te activeren.
RESET
Druk RESET om de standaardinstellingen te gebruiken.
SPECIFICATIES
TYPE BESCHRIJVING
BASISSTATION
L x B x H
134 x 27 x 134 mm
(5,3 x 1,1 x 5,3 in)
Gewicht 300 g (10,58 oz) zonder batterij
Signaalfrequentie 433 MHz
Temperatuurbereik -5°C tot 50°C (23°F tot 122°F)
Temperatuurresolutie 0,1°C (0,2°F)
Vochtigheidsbereik 25% - 95%
Resolutie vochtigheid 1%
Voeding 4 x UM-4 (AAA) 1,5 V batterijen
BUITENSENSOR (THGN500)
L x B x H
50 x 22 x 96 mm
(1,9 x 0,9 x 3,8 in)
Gewicht 63 g (2,22 oz) zonder batterij
Signaalfrequentie 433 MHz
Kanaalnummer 1
Zendbereik 30 m (100 ft) zonder obstakels
Temperatuurbereik -20°C tot 60°C (-4°F tot 140°F)
Temperatuurresolutie 0,1°C (0,2°F)
Vochtigheidsbereik 25% - 95%
Resolutie vochtigheid 1%
Voeding 1 x UM-3 (AA) 1,5 V batterij
BUITENSENSOR (THGR122N)
L x B x H
92 x 60 x 20 mm
(3,6 x 2,4 x 0,79 in)
Gewicht 63 g (2,22 oz) zonder batterij
Signaalfrequentie 433 MHz
Kanaalnummer 3
Zendbereik 30 m (100 ft) zonder obstakels
Temperatuurbereik -20°C tot 60°C (-4°F tot 140°F)
Temperatuurresolutie 0,1°C (0,2°F)
Vochtigheidsbereik 25% - 95%
Resolutie vochtigheid 1%
Voeding 2 x UM-4 (AAA) 1,5 V batterijen
KENMERKEN
• Stel het apparaat niet bloot aan extreme klappen,
schokken, stof, temperatuur of vochtigheid.
• Dek de ventilatiegaten niet af met kranten, gordijnen etc.
• Dompel het product nooit onder in water. Als u water
over het apparaat morst, droog het dan onmiddellijk af
met een zachte stofvrije doek.
• Reinig het apparaat niet met krassende of bijtende
materialen.
• Laat de interne componenten met rust. Anders kan dit
de garantie beïnvloeden.
• Gebruik alleen nieuwe batterijen. Gebruik nooit oude en
nieuwe batterijen door elkaar.
Page 53

NL
8
• De in deze handleiding weergegeven plaatjes kunnen
afwijken van de werkelijkheid.
• Wanneer u dit product weg gooit, zorg dan dat het opgehaald
wordt door de daarvoor bestemde afvaldienst.
• Dit product kan eventueel schade veroorzaken aan
de laklaag van bepaalde houtsoorten. Oregon Scientific
is hiervoor niet aansprakelijk. Lees de instructies van
de fabrikant van het meubel voor meer informatie.
• De inhoud van deze handleiding mag niet worden
vermenigvuldigd zonder toestemming van de fabrikant.
• Gooi lege batterijen niet bij het huisvuil. Dergelijk afval
moet gescheiden verwerkt worden.
• Let op, sommige apparaten zijn voorzien van een
batterijstrip. Verwijder deze strip uit het batterijvak
alvorens het apparaat te gebruiken.
NB De technische specificaties van dit product en
deinhoud van de handleiding zijn zonder voorafgaande
waarschuwing aan veranderingen onderhevig.
OVER OREGON SCIENTIFIC
Bezoek onze website (www.oregonscientific.com) om meer
te weten over uw nieuwe product en andere Oregon Scientific
producten zoals digitale fototoestellen, gezondheids- en
fitnessuitrusting en weerstations. Op deze website vindt
u tevens de informatie over onze klantendienst, voor het
geval u ons wenst te contacteren.
EU CONFORMITEITS VERKLARING
Bij deze verklaart Oregon Scientific dat deze Clima Control
(Model: RMR500 / RMR500A) voldoet aan de essentiële
eisen en aan de overige relevante bepalingen van Richtlijn
1999/5/EC. Een kopie van de getekende en gedateerde
Conformiteits verklaring is op verzoek beschikbaar via
onze Oregon Scientific klanten service.
LANDEN DIE ZIJN ONDERWORPEN AAN RTT&E
Alle EU landen, Zwitserland CH
en Noorwegen N
Page 54

POR
1
Controle de clima
Modelo: RMR500 / RMR500A
MANUAL DO USUÁRIO
CONTEÚDO
Visão Geral........................................................................2
Vista Frontal.......................................................................2
Display de LCD...................................................................2
Vista Traseira......................................................................3
Sensor Remoto - THGN500................................................3
Sensor Remoto - THGR122N.............................................3
Introdução.........................................................................4
Inserção das Pilhas...........................................................4
Etiquetas de Nome............................................................4
Sensores Remotos...........................................................4
Relógio e Calendário.......................................................5
Recepção do Relógio.........................................................5
Ajuste Manual do Relógio..................................................6
Temperatura e Umidade..................................................6
Alerta de Mofo....................................................................6
Previsão do tempo............................................................6
Luz de Fundo....................................................................7
Reset..................................................................................7
Especificações..................................................................7
Precauções........................................................................7
Sobre a Oregon Scientific................................................8
CE – Declaração de Conformidade.................................8
Page 55

POR
2
VISÃO GERAL
VISTA FRONTAL (FIG 1)
2
1
3
4
5
1. Display de LCD
2.
: alterna entre as exibições de hora, calendário e
temperatura/umidade; entra no modo de ajuste
3.
: aumenta os valores no modo de ajuste; ativa a
recepção do sinal do relógio
4.
: diminui os valores no modo de ajuste; desativa a
recepção do sinal do relógio
5.
: ativa a luz de fundo
DISPLAY DE LCD (FIG 2)
1
2
3
4
5
6
7
8
9
10
11
1. Ícone de previsão do tempo
2. Ícone de recepção do sensor externo
3. Exibição de temperatura externa do THGN500*
4. Exibição de umidade externa do THGN500*
5. Exibição de temperatura/umidade do ambiente da
unidade principal
6. Fuso horário
7. Indicador de recepção do sinal do relógio
8. Exibição de hora (ou exibição de temperatura/umidade
do sensor opcional)
9. Alerta de mofo
10. Exibição da temperatura/umidade do sensor remoto
THGR122N
11. Exibição de calendário (ou exibição de temperatura/
umidade do sensor opcional)
Page 56

POR
3
* Este produto foi projetado para exibir leituras de
temperatura e umidade do THGN500 somente na área
de temperatura/umidade externa.
VISTA TRASEIRA (FIG 3)
34 5
1
2
1. Orifício para montagem em parede
2. Base dobrável
3. °C / °F: seleciona a unidade de temperatura
4. EU / UK: seleciona o sinal de rádio mais próximo
(RMR500 apenas)
5. RESET: retorna a unidade aos valores de ajuste
padrão
SENSOR REMOTO - THGN500 (FIG 4)
1
2
3
4
1. Indicador LED de status
2. Orifício para montagem em parede
3. Compartimento de pilhas
4. Orifício de RESET
SENSOR REMOTO - THGR122N (FIG 5)
2
1
3
4
5
6
Page 57

POR
4
1. Display de LCD
2. Indicador LED de status
3. Orifício para montagem em parede
4. Orifício de RESET
5. Interruptor CHANNEL
6. Compartimento de pilhas
INTRODUÇÃO
INSERÇÃO DAS PILHAS
1. Remova a tampa do compartimento de pilhas.
2. Insira as pilhas, fazendo a correspondência das
polaridades (consulte a FIG 3).
3. Pressione RESET após a troca das pilhas.
LOCAL
SIGNIFICADO
Área de temperatura /
umidade externa (THGN500)
Pilhas do sensor
externo fracas
Área do ambiente da
unidade principal
Pilhas da unidade
principal fracas
Área do sensor remoto
(THGR122N)
Pilhas do sensor
remoto fracas
Área do relógio e calendário
(ou área do sensor opcional)
Pilhas do sensor
opcional fracas
ETIQUETAS DE NOME
Etiquetas de nome podem ser inseridas na unidade
principal, conforme a Fig. 1.
Há 10 etiquetas de nome fornecidas com este pacote,
7 etiquetas em branco e 3 com os escritos “MAIN UNIT”,
“TIME” e “CALENDAR”. É possível escrever nas etiquetas
em branco o nome do local no qual o THGR122N e outros
sensores opcionais estiverem instalados.
NOTA Se sensores opcionais forem instalados, as
etiquetas “CALENDAR” e “TIME” serão substituídas.
SENSORES REMOTOS
Este produto pode funcionar com até 4 sensores
simultaneamente para capturar leituras de temperatura e
umidade relativa do ar em diversos locais.
2 sensores remotos (THGN500 e THGR122N) são
fornecidos com o pacote, enquanto 2 sensores remotos
sem fio opcionais podem ser adquiridos separadamente.
Para ajustar o sensor remoto:
1. Abra a tampa do compartimento de pilhas e insira as
pilhas, fazendo a correspondência das polaridades.
2. Selecione um canal e pressione RESET.
3. Feche a tampa do compartimento de pilhas.
4. Coloque o sensor remoto dentro de 30 m (98 pés) da
unidade principal.
Page 58

POR
5
NOTA Use pilhas alcalinas para um maior tempo de uso
e baterias de lítio consumíveis em temperaturas abaixo do
nível de congelamento.
Para pesquisar um sensor:
Pressione e segure
+ ao mesmo tempo.
O ícone de recepção do sensor remoto mostra o status a
seguir:
ÍCONE DESCRIÇÃO
A unidade principal
está pesquisando o(s)
sensor(es).
Um canal foi localizado.
O sensor não pôde ser
localizado.
DICA A faixa de transmissão pode variar dependendo de
muitos fatores. Talvez seja necessário testar em vários
locais para obter os melhores resultados.
RELÓGIO E CALENDÁRIO
NOTA
Se houver sensores opcionais instalados:
• A exibição de hora e calendário será substituída pelas
leituras de temperatura/umidade.
• Pressione para alternar entre a exibição de hora
e temperatura/umidade, ou a exibição de calendário
e temperatura/umidade; a exibição retornará para a
temperatura/umidade após 1 minuto.
RECEPÇÃO DO RELÓGIO
Este produto foi projetado para sincronizar seu relógio
automaticamente com um sinal do relógio.
RMR500:
Deslize EU / UK para selecionar o sinal recebido.
• EU: Sinal DCF-77: dentro de 1500 km (932 milhas) de
Frankfurt, Alemanha.
• UK: Sinal MSF-60: dentro de 1500 km (932 milhas) de
Anthorn, Inglaterra.
RMR500A:
Sinal WWVB-60: dentro de 3200 km (2000 milhas) de Fort
Collins, Colorado.
Para ativar/desativar a recepção do sinal do relógio:
Pressione e segure
para ativar ou para desativar
a recepção do sinal.
NOTA A recepção leva de 2 a 10 minutos. Se o sinal estiver
fraco, poderá levar até 24 horas para obter um sinal válido.
Se a recepção do sinal não for bem sucedida, coloque sua
Page 59

POR
6
unidade ao lado de uma janela, pressione e segure
para forçar outra pesquisa de sinal.
Indicador de recepção do sinal do relógio:
SINAL FORTE SINAL FRACO NENHUM SINAL
AJUSTE MANUAL DO RELÓGIO
Para ajustar o relógio manualmente, desative primeiro a
recepção do sinal do relógio.
1. Pressione e segure
.
2. Pressione
ou para alterar os ajustes. A ordem
de ajuste é: fuso horário, formato de 12/24 horas, hora,
minuto, ano, modo calendário (mês - dia / dia- mês),
mês e dia.
3. Pressione
para confirmar.
RMR500: O fuso horário ajusta o relógio em + / - 23 horas
com base na hora do sinal do relógio recebido. Se você
desativou a recepção do sinal do relógio, não defina um
valor para o fuso horário.
RMR500A: Selecione o fuso horário: (0) Pacífico, (+1)
Montanhas, (+2) Central ou (+3) Leste.
TEMPERATURA E UMIDADE
Para alternar a unidade de temperatura:
Pressione °C / °F.
NOTA “HH.H” ou “LL.L” será exibido quando a temperatura
recebida ficar fora da faixa especificada.
ALERTA DE MOFO
Este produto contém alerta de umidade para evitar o mofo.
Se a umidade for superior a 60%, o ícone de alerta de mofo
piscará e parará de piscar quando a umidade ficar
inferior a 60%.
PREVISÃO DO TEMPO
Este produto faz previsões do tempo para as próximas 12
a 24 horas em um raio de 30 a 50 km (19 a 31 milhas) com
uma precisão de 75%.
Ensolarado
Parcialmente nublado
Nublado
Chuvoso
Neve
Page 60

POR
7
LUZ DE FUNDO
Pressione para ativar o LED de luz de fundo por 5
segundos.
RESET
Pressione RESET para retornar aos ajustes padrão.
ESPECIFICAÇÕES
TIPO DESCRIÇÃO
UNIDADE PRINCIPAL
C x L x A
134 x 27 x 134 mm
(5,3 x 1,1 x 5,3 pol)
Peso 300 g (10,58 onças) sem pilha
Freqüência do sinal 433 MHz
Faixa de temperatura -5°C a 50°C (23°F a 122°F)
Resolução de
temperatura
0,1ºC (0,2ºF)
Faixa de umidade 25% - 95%
Resolução de umidade 1%
Energia 4 pilhas UM-4 (AAA) de 1,5 V
UNIDADE REMOTA (THGN500)
C x L x A
50 x 22 x 96 mm
(1,9 x 0,9 x 3,8 pol)
Peso 63 g (2,22 onças) sem pilha
Freqüência do sinal 433 MHz
Número de canais 1
Faixa de transmissão 30 m (100 pés) sem obstrução
Faixa de temperatura -20°C a 60°C (-4°F a 140°F)
Resolução de
temperatura
0,1ºC (0,2ºF)
Faixa de umidade 25% - 95%
Resolução de umidade 1%
Energia 1 pilha UM-3 (AA) de 1,5 V
UNIDADE REMOTA (THGR122N)
C x L x A
92 x 60 x 20 mm
(3,6 x 2,4 x 0,79 pol)
Peso 63 g (2,22 onças) sem pilha
Freqüência do sinal 433 MHz
Número de canais 3
Faixa de transmissão 30 m (100 pés) sem obstrução
Faixa de temperatura -20°C a 60°C (-4°F a 140°F)
Resolução de
temperatura
0,1ºC (0,2ºF)
Faixa de umidade 25% - 95%
Resolução de umidade 1%
Energia 2 pilhas UM-4 (AAA) de 1,5 V
PRECAUÇÕES
• Não submeta a unidade a forças excessivas, impactos,
poeiras, oscilações de temperatura ou umidade.
• Não obstrua as aberturas de ventilação com itens como
jornais, cortinas, etc.
• Não mergulhe a unidade na água. Se respingar líquido
nela, seque-a imediatamente com um pano macio e
que não solte fi apos.
• Não limpe a unidade com material abrasivo ou
Page 61

POR
8
corrosivo.
• Não altere os componentes internos da unidade. Isso
invalidará sua garantia.
• Utilize apenas pilhas novas. Não misture pilhas novas e
usadas.
• As imagens mostradas neste manual podem diferir da
imagem real.
• Os materiais utilizados nos produtos Oregon podem
ser reutilizados e reciclados após o fim de sua vida útil.
Encaminhe os produtos a serem descartados aos locais
de coleta apropriados, atentando para as legislações
locais.
• A colocação deste produto sobre certos tipos de madeira
pode resultar em danos ao seu acabamento, pelos quais
a Oregon Scientific não se responsabilizará. Consulte
as instruções de cuidados do fabricante do móvel para
obter informações.
• O conteúdo deste manual não pode ser reproduzido
sem a permissão do fabricante.
• Não descarte baterias usadas em locais não
apropriados. É necessária a coleta do lixo em questão
de maneira separada para tratamento especial.
• Observe que algumas unidades estão equipadas com
uma tira de segurança da bateria. Remova a tira do
compartimento de bateria antes do primeiro uso.
NOTA As especificações técnicas para este produto
e o conteúdo do manual do usuário estão sujeitos à
alteração sem aviso prévio.
SOBRE A OREGON SCIENTIFIC
Visite nosso site (www.oregonscientific.com.br) para saber
mais sobre os produtos Oregon Scientific.
Caso você necessite de mais informações ou tenha dúvidas,
entre em contato com o nosso Serviço de Atendimento ao
Consumidor através do telefone (11) 5095 2329 ou e-mail
sac@oregonscientific.com.br.
CE – DECLARAÇÃO DE CONFORMIDADE
Oregon Scientific declara que este(a) Controle de clima
(Modelo: RMR500 / RMR500A) está conforme com os
requisitos essenciais e outras provisões da Diretriz 1999/5/
CE. Uma cópia assinada e datada da Declaração de
Conformidade está disponível para requisições através do
nosso SAC.
PAISES SUJEITOS A NORMA R&TTE
Todos os paises da União Européia, Suíça CH
e Noruega N
Page 62

SWE
1
Klimatkontroll
Modell: RMR500 / RMR500A
BRUKSANVISNING
INNEHÅLL
Produktöversikt................................................................2
Vy Framsida........................................................................2
LCD Display........................................................................2
Vy Baksida..........................................................................3
Utomhusgivare – THGN500.................................................3
Trådlös Fjärrenhet – THGR122N........................................3
Att Komma Igång..............................................................4
Sätta I Batterier...................................................................4
Namntaggar.................................................................4
Trådlösa Fjärrenheter.......................................................4
Klocka och Datum............................................................5
Klockmottagning.............................................................5
Manuell Inställning av Klockan..........................................6
Temperatur och Luftfuktighet.........................................6
Mögelbildningsalarm..........................................................6
Väderprognos...................................................................6
Bakgrundsbelysning........................................................7
Reset (Återställning)........................................................7
Specifikationer..................................................................7
Försiktighetsåtgärder.......................................................7
Om Oregon Scientific.......................................................8
EU-försäkran om Överensstämmelse.............................8
Page 63

SWE
2
PRODUKTÖVERSIKT
VY FRAMSIDA (FIG 1)
2
1
3
4
5
1. LCD display
2.
: Växlar mellan visning av klocka, datum och
temperatur / luftfuktighet; gå in i inställningsläge
3.
: Öka värden i inställningsläge; aktivera
radiokontrollerad klocka
4.
: Minska värden i inställningsläge; avaktivera
radiokontrollerad klocka
5.
: Aktivera bakgrundsbelysning
LCD DISPLAY (FIG 2)
1
2
3
4
5
6
7
8
9
10
11
1. Ikon för väderprognosen
2. Mottagningsikon för utomhussensor
3. Display för utomhustemperatur från THGN500*
4. Display för utomhusfuktighet från THGN500*
5. Visning av temperatur / luftfuktighet där huvudenheten
är placerad
6. Tidszon
7. Indikator för radiomottagningssignal
8. Visning av klocka ( eller temperatur / fuktighet från
extra givare)
9. Mögelbildningsalarm
10. Visning av temperatur / fuktighet för givare
THGR122N
11. Visning av datum (eller temperatur / fuktighet för extra
givare)
Page 64

SWE
3
* Denna produkt är konstruerad för att visa temperatur
och luftfuktighet från THGN500 endast utomhus.
VY BAKSIDA (FIG 3)
34 5
1
2
1. Väggmonteringshål
2. Utfällbart stativ
3. °C / °F: Välj temperaturenhet
4. EU / UK: Välj närmsta radiosignal (endast RMR500)
5. RESET: Återställ enheten till fabriksinställning
UTOMHUSGIVARE – THGN500 (FIG 4)
1
2
3
4
1. LED indikator
2. Väggmonteringshål
3. Batterifack
4. RESET knapp
TRÅDLÖS FJÄRRENHET – THGR122N (FIG 5)
2
1
3
4
5
6
Page 65

SWE
4
1. LCD display
2. LED indikator
3. Väggmonteringshål
4. RESET knapp
5. Kanalomkopplare
6. Batterifack
ATT KOMMA IGÅNG
SÄTTA I BATTERIER
1. Öppna batteriluckan.
2. Se till att batterierna sätts in med rätt polaritet (se figur
3).
3. Tryck RESET efter varje batteribyte.
PLATS
FÖRKLARING
Område för utomhus
temperatur och luftfuktighet (THGN500)
Batteriet i
utomhusgivaren är svagt
Området där huvudenheten är placerad
Låg batterinivå i
huvudenheten
Trådlös fjärrenhet
(THGR122N)
Låg nivå för batterier i
trådlös fjärrenhet
Klocka och datum (eller
extra sensor)
Låg batterinivå i extra
sensorer
NAMNTAGGAR
Namntaggar kan sättas in i huvudenheten som visas i Fig. 1.
10 namntaggar bifogas, varav 7 blanka och 3 tryckta med
“MAIN UNIT”, “TIME” och “CALENDAR”. Du kan skriva på
de blanka taggarna namnet på de ställen där THGR122N
och andra extra givare är placerade.
NOTERA Om extra givare är installerade, måste
“CALENDAR” och “TIME” taggarna bytas.
TRÅDLÖSA FJÄRRENHETER
Denna produkt kan hantera upp till 4 givare för temperatur
och relativ luftfuktighet på olika ställen.
2 fjärrsensorer (THGN500 och THGR122N) medföljer detta
paket medan 2 extra sensorer kan köpas separat.
Att ställa in fjärrsensorn:
1. Öppna batterifacket och se till att batterierna sätts in
med rätt polaritet.
2. Välj en kanal, tryck sedan RESET.
3. Stäng batteriluckan.
4. Placera sensorn inom 30m från huvudenheten.
NOTERA Använd alkaline batterier för längre livslängd och
lithiumbatterier vid temperaturer under fryspunkten.
Page 66

SWE
5
För att leta efter en sensor:
Tryck och håll inne
+ samtidigt.
Ikonen för sensormottagningen visar följande status:
IKON BESKRIVNING
Huvudenheten söker
efter fjärrenhet(er).
En kanal har hittats.
Fjärrenheten kan inte
hittas.
TIPS Sändningsräckvidden kan variera beroende på många
faktorer. Du kan behöva experimentera med olika platser för
att erhålla det bästa resultatet.
KLOCKA OCH DATUM
NOTERA
Om extra givare är installerade:
• klocka och datum ersätts med temperatur /
luftfuktighet.
• tryck
för att växla mellan visning av klocka och
temperatur/fuktighet, eller datum och temperatur/
fuktighet; displayen återgår till att visa temperatur/
fuktighet efter 1 minut.
KLOCKMOTTAGNING
Denna produkt är gjord för att automatiskt synkronisera
klockan när den tar emot en klocksignal.
RMR500:
Ställ EU / UK för att välja önskad signal.
• EU: DCF-77 signal: inom 1500 km från Frankfurt,
Tyskland.
• UK: MSF-60 signal: inom 1500 km från Anthorn,
England.
RMR500A:
WWVB-60 signal: inom 3200 km (2000 miles) från Fort
Collins, Colorado.
Att aktivera / avaktivera klocksignalmottagning:
Tryck och håll inne
för att aktivera eller för att
avaktivera signalmottagningen.
NOTERA Mottagning tar 2-10 minuter. Om signalen är svag
kan det ta upp till 24 timmar för enheten att få kontakt med
signalen. Om signalmottagningen är otillräcklig, placera
enheten i närheten av ett fönster, tryck och håll inne
för
att starta en ny sökning.
Page 67

SWE
6
Indikator för radiomottagningssignal:
STARK SIGNAL SVAG SIGNAL INGEN SIGNAL
MANUELL INSTÄLLNING AV KLOCKAN
Avaktivera radiomottagningen innan manuell inställning.
1. Tryck och håll inne
.
2. Tryck
eller för att ändra inställningarna.
Ordningen för inställningarna är: tidszon, 12/24 tim
format, timme, minut, år, datum mode (månad – dag /
dag – månad), månad och dag.
3. Tryck
för att bekräfta.
RMR500: Tidszonsinställningen kan användas för att ställa
klockan upp till + / -23 timmar från den mottagna klocktiden.
Om klockradiosignalen är avaktiverad, skall inget offsetvärde
för tidszonen ställas in.
RMR500A: Välj tidszonen: (0) Pacific, (+1) Mountain, (+2)
Central eller (+3) Eastern.
TEMPERATUR OCH LUFTFUKTIGHET
För att växla temperaturenhet:
Tryck °C / °F.
NOTERA “HH.H” eller “LL.L” visas när den
mottagna temperaturen är utanför det specificerade
temperaturområdet.
MÖGELBILDNINGSALARM
Denna produkt har en varningsfunktion för att varna
om mögel. Om fuktigheten är över 60% kommer
mögelvarningsikonen
att blinka och slutar först när
fuktigheten är lägre än 60%.
VÄDERPROGNOS
Denna produkt förutspår vädret för de kommande 12 till 24
timmarna inom en 30 - 50 km (19 - 31 miles) radie, med
75% säkerhet.
Sol
Halvklart
Moln
Regn
Snö
Page 68

SWE
7
BAKGRUNDSBELYSNING
Tryck för att aktivera LED bakgrundsbelysning i 5
sekunder.
RESET (ÅTERSTÄLLNING)
Tryck RESET för att återställa produkten till
grundinställning.
SPECIFIKATIONER
TYP BESKRIVNING
HUVUDENHET
L x B x H
134 x 27 x 134 mm
(5.3 x 1.1 x 5.3 tum)
Vikt 300 g (10.58 oz) utan batteri
Sändningsfrekvens 433 MHz
Temperaturområde -5°C till 50°C (23°F till 122°F)
Temperaturupplösning 0.1°C (0.2°F)
Luftfuktighetsområde 25% - 95%
Upplösning luftfuktighet 1%
Drift 4 x UM-4 (AAA) 1.5V batterier
TRÅDLÖS SENSOR (THGN500)
L x B x H
50 x 22 x 96 mm
(1.9 x 0.9 x 3.8 tum)
Vikt 63 g (2,22 oz) utan batteri
Sändningsfrekvens 433 MHz
Antal kanaler 1
Överföringsavstånd 30 m vid fri sikt
Temperaturområde -20°C till 60°C (-4°F till 140°F)
Temperaturupplösning 0.1°C (0.2°F)
Luftfuktighetsområde 25% - 95%
Upplösning luftfuktighet 1%
Drift 1 x UM-3 (AA) 1.5V batteri
TRÅDLÖS FJÄRRENHET (THGR122N)
L x B x H
92 x 60 x 20 mm
(3.6 x 2.4 x 0.79 tum)
Vikt 63 g (2,22 oz) utan batteri
Sändningsfrekvens 433 MHz
Antal kanaler 3
Överföringsavstånd 30 m vid fri sikt
Temperaturområde -20°C till 60°C (-4°F till 140°F)
Temperaturupplösning 0.1°C (0.2°F)
Luftfuktighetsområde 25% - 95%
Upplösning luftfuktighet 1%
Drift 2 x UM-4 (AAA) 1.5V batteri
FÖRSIKTIGHETSÅTGÄRDER
• Utsätt inte apparaten för kraftigt våld, stötar, damm,
extrema temperaturer eller fukt.
• Täck inte för ventilationshålen. Försäkra dig om att
närliggande föremål såsom tidningar, dukar,
gardiner m.m. inte täcker för ventilationshålen.
• Utsätt inte produkten för vatten. Om du spiller vätska
över den, torka omedelbart med en mjuk, luddfri trasa.
• Rengör inte apparaten med frätande eller slipande
material.
• Mixtra inte med enhetens interna komponenter då detta
kan påverka garantin.
Page 69

SWE
8
• Använd enbart nya batterier. Blanda inte nya och gamla
batterier.
• Av trycktekniska skäl, kan displaybilderna i denna
manual skilja sig från dem i verkligheten.
• Förbrukad produkt måste sorteras som specialavfall på
avsedd miljöstation och får inte slängas som vanligt
restavfall.
• Om denna produkt placeras på ytor med speciell finish
såsom lackat trä etc. kan dessa ytor skadas. Ta kontakt
med din möbeltillverkare för att få mer information
om huruvida det går bra att placera föremål på ytan.
Oregon Scientific kan inte hållas ansvariga för skador
på träytor som uppkommit på grund av kontakt med
denna produkt.
• Innehållet I denna manual får ej kopieras utan
tillverkarens medgivande.
• Kassera inte gamla batterier som osorterade sopor.
Insamling av kasserade batterier måste ske separat.
• Notera att vissa enheter är utrustade med en
batterisäkerhetsstrip. Ta bort denna strip från
batteriutrymmet innan produkten används första
gången.
NOTERING De tekniska specifikationerna för denna
produkt och innehållet I användarmanualen kan komma att
ändras utan vidare upplysning.
OM OREGON SCIENTIFIC
Besök vår hemsida (www.oregonscientific.se) för att se
mer av våra produkter såsom digitalkameror; MP3 spelare;
projektionsklockor; hälsoprodukter; väderstationer; DECTtelefoner och konferenstelefoner.
Hemsidan innehåller också information för våra kunder i de
fall ni behöver ta kontakt med oss eller behöver ladda ner
information.Vi hoppas du hittar all information du behöver
på vår hemsida och om du vill komma i kontakt med Oregon
Scientific kundkontakt besöker du vår lokala hemsida www.
oregonscientific.se eller www.oregonscientific.com för att fi
nna telefonnummer till respektive supportavdelning.
EU-FÖRSÄKRAN OM ÖVERENSSTÄMMELSE
Härmed intygar Oregon Scientific att denna Klimatkontroll
(Modell:RMR500 / RMR500A) står I överensstämmelse
med de väsentliga egenskapskrav och övriga relevanta
bestämmelser som framgår av direktiv 1999/5/EG. En
signerad kopia av “DECLARATION OF CONFORMITY”
kan erhållas vid hänvändelse till OREGON SCIENTIFIC
servicecenter.
LÄNDER SOM OMFATTAS AV RTTE-DIREKTIVET
Alla länder inom EU, Schweiz CH
och Norge N
Page 70

© 2008 Oregon Scientific. All rights reserved.
086L005356-034
 Loading...