

Page 1

UK VERSION
76071-01 REV A
Powerful, Lightweight
Upright Vacuum
XL3
User’s
Guide
Important!
Read all instructions carefully, and keep for future reference.
Page 2
Safety.
ENGLISH
General Warnings
IMPORTANT SAFETY INSTRUCTIONS!
When using an electrical appliance, basic precautions should always be followed, including the following:
READ ALL INSTRUCTIONS BEFORE USING THIS VACUUM CLEANER
WARNING To reduce the risk of fire, electric shock, or injury:
• Do not leave appliance unattended when plugged in. Unplug from outlet when not in use and before servicing.
• Do not use outdoors or on wet surfaces.
• Do not operate the unit while in the upright and locked position.
• Do not let the unit run while in any one stationary position for any period of time. Keep the unit moving while
in operation.
• Do not allow to be used as a toy. Close attention is necessary when used by or near children.
• Use only as described in this manual. Use only manufacturer’s recommended attachments.
• Do not use with damaged cord or plug. If appliance is not working as it should, has been dropped, damaged,
left outdoors, or dropped into water, return it to a service center or call customer service at:
• Do not pull or carry by cord, use cord as a handle, close door on cord, or pull cord around sharp edges
or corners.
• Keep cord away from heated surfaces.
• Do not run appliance over cord.
• Do not unplug by pulling on cord. To unplug, grasp the plug, not the cord.
• Do not handle plug or appliance with wet hands.
• Do not put any object into openings. Do not use with any opening blocked; keep free of dust, lint, hair
and anything that may reduce air flow.
• Keep hair, loose clothing, fingers and all parts of body away from openings and moving parts.
• Do not use to pick up anything that is burning or smoking, such as cigarettes, matches, or hot ashes.
• Do not use without filter bag assembly in place.
• Turn off all controls before unplugging.
• Use extra care when cleaning on stairs.
• Do not use to pick up flammable or combustible liquids, such as gasoline or lighter fluid, or use in areas where
they may be present.
• Do not use appliance in an enclosed space where flammable, explosive or toxic vapors are given off by oil base
paint, paint thinner, some mothproofing substances, or in an area where flammable dust is present.
• Do not pick up toxic material such as chlorine bleach, drain cleaner, gasoline, etc. with this appliance.
• Use caution when vacuuming over area rug edges and fringe.
0845 603 0153.
Enjoy.
SAVE THESE INSTRUCTIONS
Household Use Only
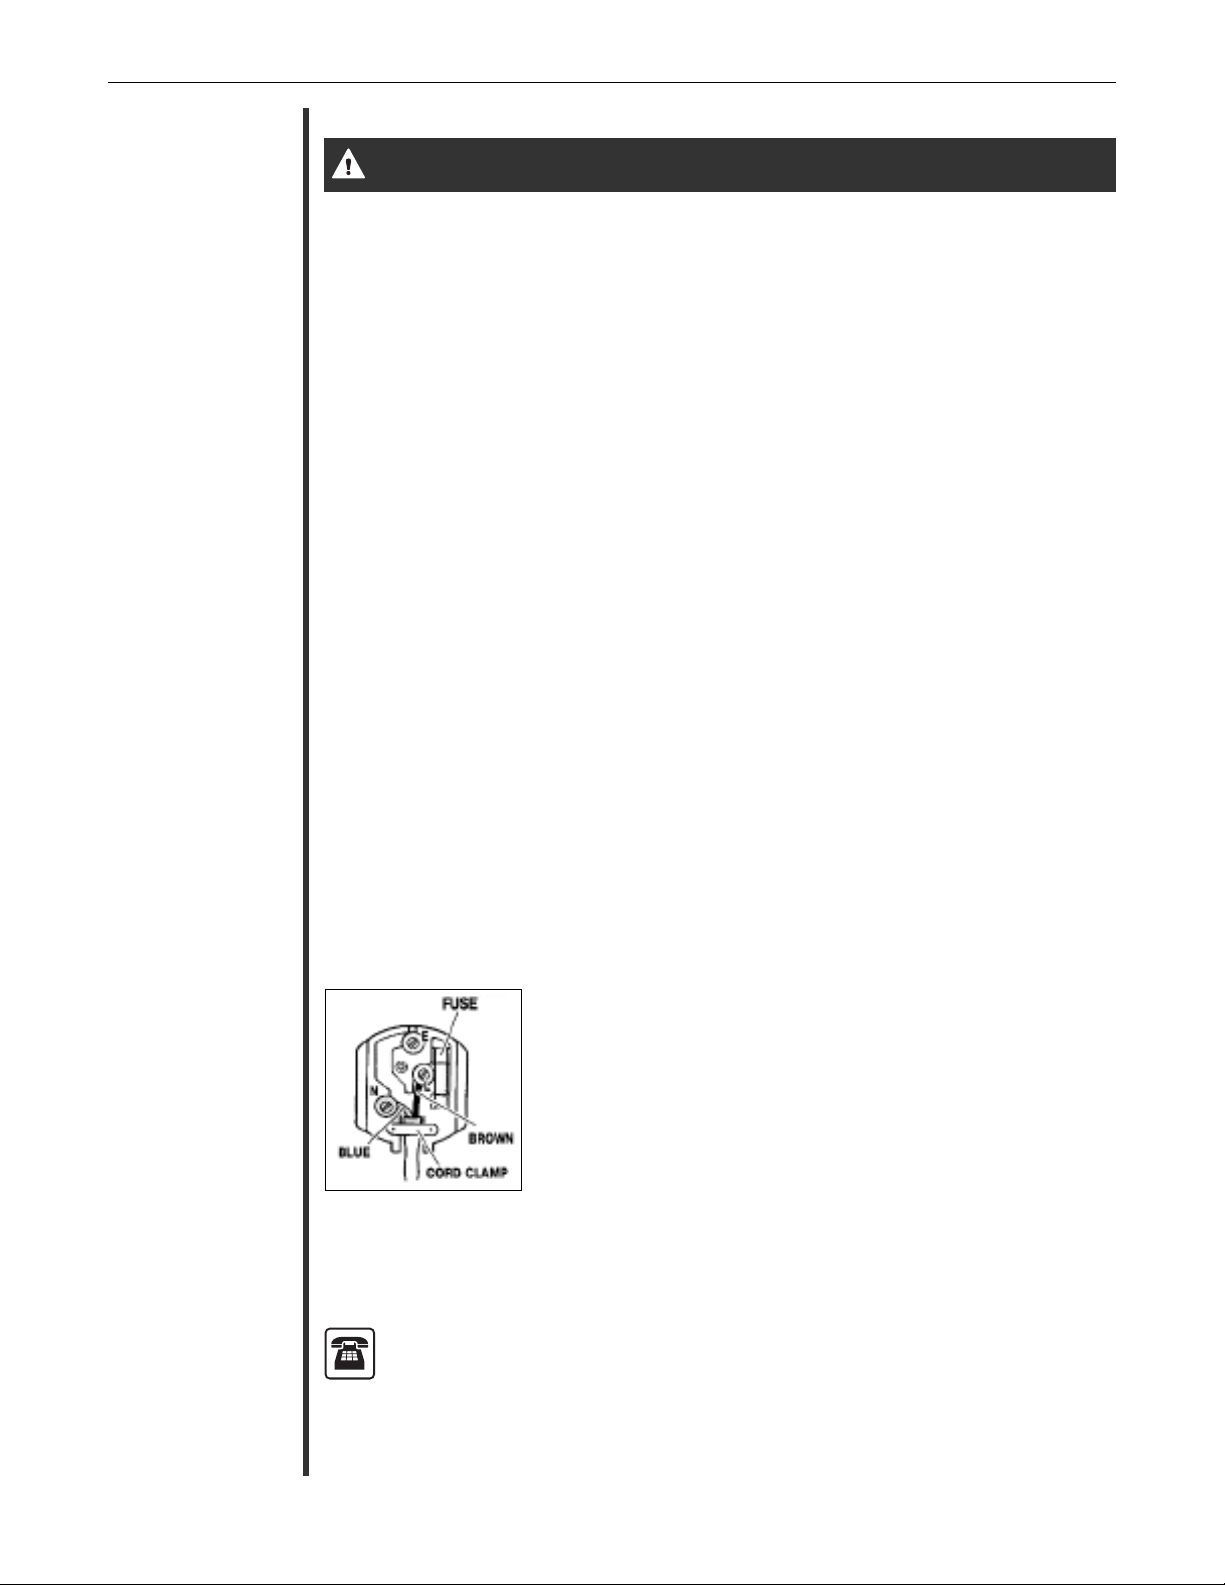
The wires in this mains lead are coloured in accordance with the following code:
Blue: Neutral Brown: Live
As the colours of the wires in the mains lead of this appliance may not correspond
with the coloured markings identifying the terminals in your plug, proceed as follows;
The wire which is coloured Blue must be connected to the terminal which is marked
with the letter
The wire which is coloured Brown must be connected to the terminal which is marked
with the letter
Neither wire is to be connected to the earth pin of the 3 pin plug.
Replace fuse with same size fuse.
Thank you for purchasing our Oreck XL3 upright vacuum cleaner. It is the quietest, most powerful upright Oreck has ever
developed. The XL3 features a 3-year warranty. The Celoc
pollen, mould spores and pet dander. And because it's an Oreck, it can restore the pile of your carpet the very first time
you use it.
To speak with an Oreck representative call: 0845 603 0153
N or coloured Black.
L or coloured Red.
®
filtration traps more than 99.99% of all particles including
2
Page 3
Contents.
Total Cleaning System
E N G L I S H
Safety . . . . . . . . . . . . . . . . . . . . . . . . . . . . . . . . . . . . . . . . . . . . . . . . . . . . . . . . . . . . . . . . . . . . . . . . . .2
General Warnings . . . . . . . . . . . . . . . . . . . . . . . . . . . . . . . . . . . . . . . . . . . . . . . . . . . . . . . . . . . . . . 2
Operation . . . . . . . . . . . . . . . . . . . . . . . . . . . . . . . . . . . . . . . . . . . . . . . . . . . . . . . . . . . . . . . . . . . . . . .3
Parts List . . . . . . . . . . . . . . . . . . . . . . . . . . . . . . . . . . . . . . . . . . . . . . . . . . . . . . . . . . . . . . . . . . . . . 3
Assembling the Handle Tube . . . . . . . . . . . . . . . . . . . . . . . . . . . . . . . . . . . . . . . . . . . . . . . . . . . . .4
Operating the XL3 . . . . . . . . . . . . . . . . . . . . . . . . . . . . . . . . . . . . . . . . . . . . . . .
Operating Recommendations . . . . . . . . . . . . . . . . . . . . . . . . . . . . . . . . . . . . . . . . . . . . . . . . . . . . . 4
General Information . . . . . . . . . . . . . . . . . . . . . . . . . . . . . . . . . . . . . . . . . . . . . . . . . . . . . . . . . . . . . . 5
Disposable Odour Fighting Dust Bags. . . . . . . . . . . . . . . . . . . . . . . . . . . . . . . . . . . . . . . . . .
Intellashield Technology
®
Celoc
Filtration System . . . . . . . . . . . . . . . . . . . . . . . . . . . . . . . . . . . . . . . . . . . . . . . . . . . . . . . . .5
The Belt . . . . . . . . . . . . . . . . . . . . . . . . . . . . . . . . . . . . . . . . . . . . . . . . . . . . . . . . . . . . . . . . . . . . . . 5
Lubrication . . . . . . . . . . . . . . . . . . . . . . . . . . . . . . . . . . . . . . . . . . . . . . . . . . . . . . . . . . . . . . . . . . . . 5
Maintenance . . . . . . . . . . . . . . . . . . . . . . . . . . . . . . . . . . . . . . . . . . . . . . . . . . . . . . . . . . . . . . . . . . . .6
Replacing Disposable Odour Fighting Dust Bag. . . . . . . . . . . . . . . . . . . . . . . . .
Replacing Worn Belt . . . . . . . . . . . . . . . . . . . . . . . . . . . . . . . . . . . . . . . . . . . . . . . . . . . . . . . . . . . . 6
Adjusting or Replacing Brushroll . . . . . . . . . . . . . . . . . . . . . . . . . . . . . . . . . . . . . . . . . . . . . . . . . 6
Replacing Edge Brush . . . . . . . . . . . . . . . . . . . . . . . . . . . . . . . . . . . . . . . . . . . . . . . . . . . . . . . . .
Using an Oreck Fresh Air
Replacing Light Bulbs . . . . . . . . . . . . . . . . . . . . . . . . . . . . . . . . . . . . . . . . . . . . . . . . . . . . . . . . . . 7
Stuffing or Blockage . . . . . . . . . . . . . . . . . . . . . . . . . . . . . . . . . . . . . . . . . . . . . . . . . . . . . . . . . . . . 8
Troubleshooting . . . . . . . . . . . . . . . . . . . . . . . . . . . . . . . . . . . . . . . . . . . . . . . . . . . . . . . . . . . . . . . . . .8
Parts . . . . . . . . . . . . . . . . . . . . . . . . . . . . . . . . . . . . . . . . . . . . . . . . . . . . . . . . . . . . . . . . . . . . . . . . . . .9
Replacement Parts . . . . . . . . . . . . . . . . . . . . . . . . . . . . . . . . . . . . . . . . . . . . . . . . . . . . . . . . . . . . . 9
Warranty . . . . . . . . . . . . . . . . . . . . . . . . . . . . . . . . . . . . . . . . . . . . . . . . . . . . . . . . . . . . . . . . . . . . . . . .9
™
. . . . . . . . . . . . . . . . . . . . . . . . . . . . . . . . . . . . . . . . . . . . . . . . . . . . . . . . 5
®
Tab . . . . . . . . . . . . . . . . . . . . . . . . . . . . . . . . . . . . . . . . . . . . . . . . . . . . 7
. . . . . . . . . . . . . . .4
. . . . 5
. . . . . . . . . . . . . 6
. 7
Operation.
To assist you in
identifying your
vacuum’s components,
the parts have been
numbered as follows.
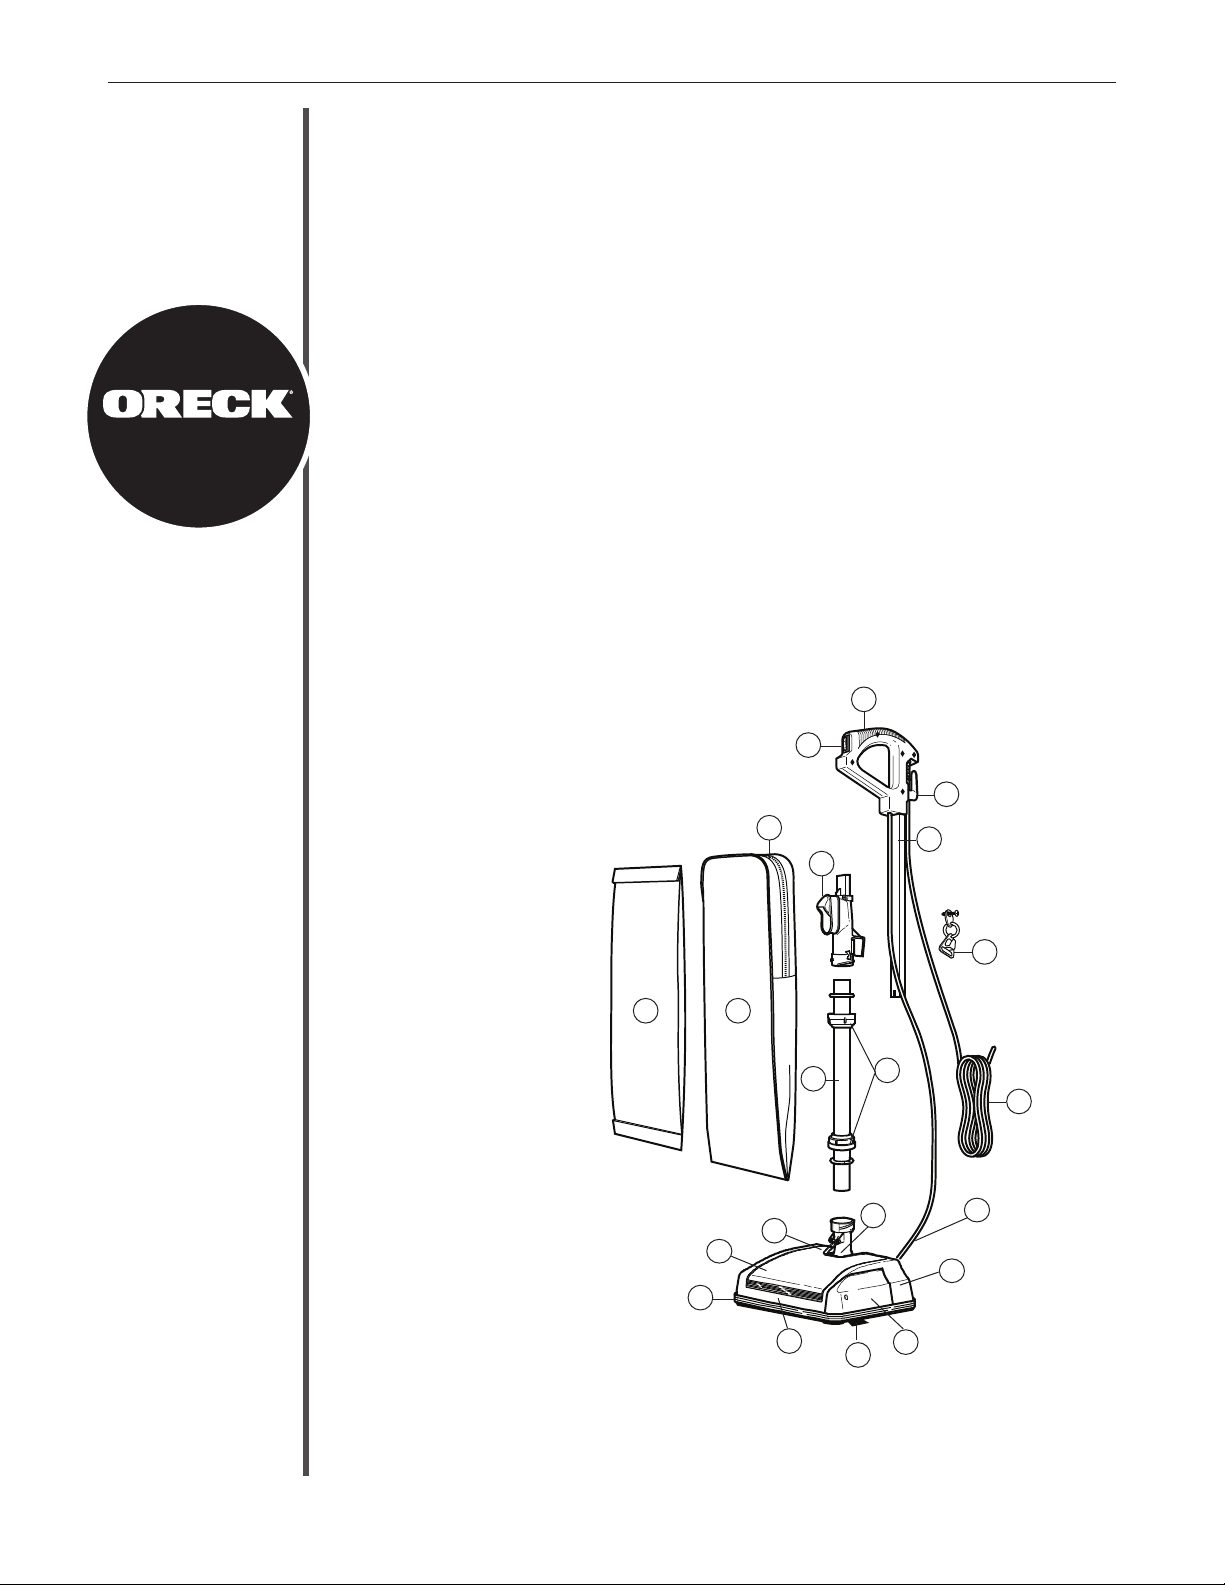
Parts List
1 Handle
2 On/Off Switch
3 Cord Hook
4 Handle Tube
5 Zipper
6 Bumper
7 Edge Brush
8 Belt Door
9 Power Cord
10 Connector Deflector Assembly
11 Collars
12 Lower Tube
13 Fan Housing
14 Bag Spring
15 Outer Bag
16 Power Head
17 Disposable Filter Dust Bag
18 Fascia
19 Housing
20 Cord Strain Relief Assembly
21 Harness
17
2
1
3
5
4
10
20
15
12
11
9
21
14
13
18
19
6
16
8
7
3
Page 4
Operation.
E N G L I S H
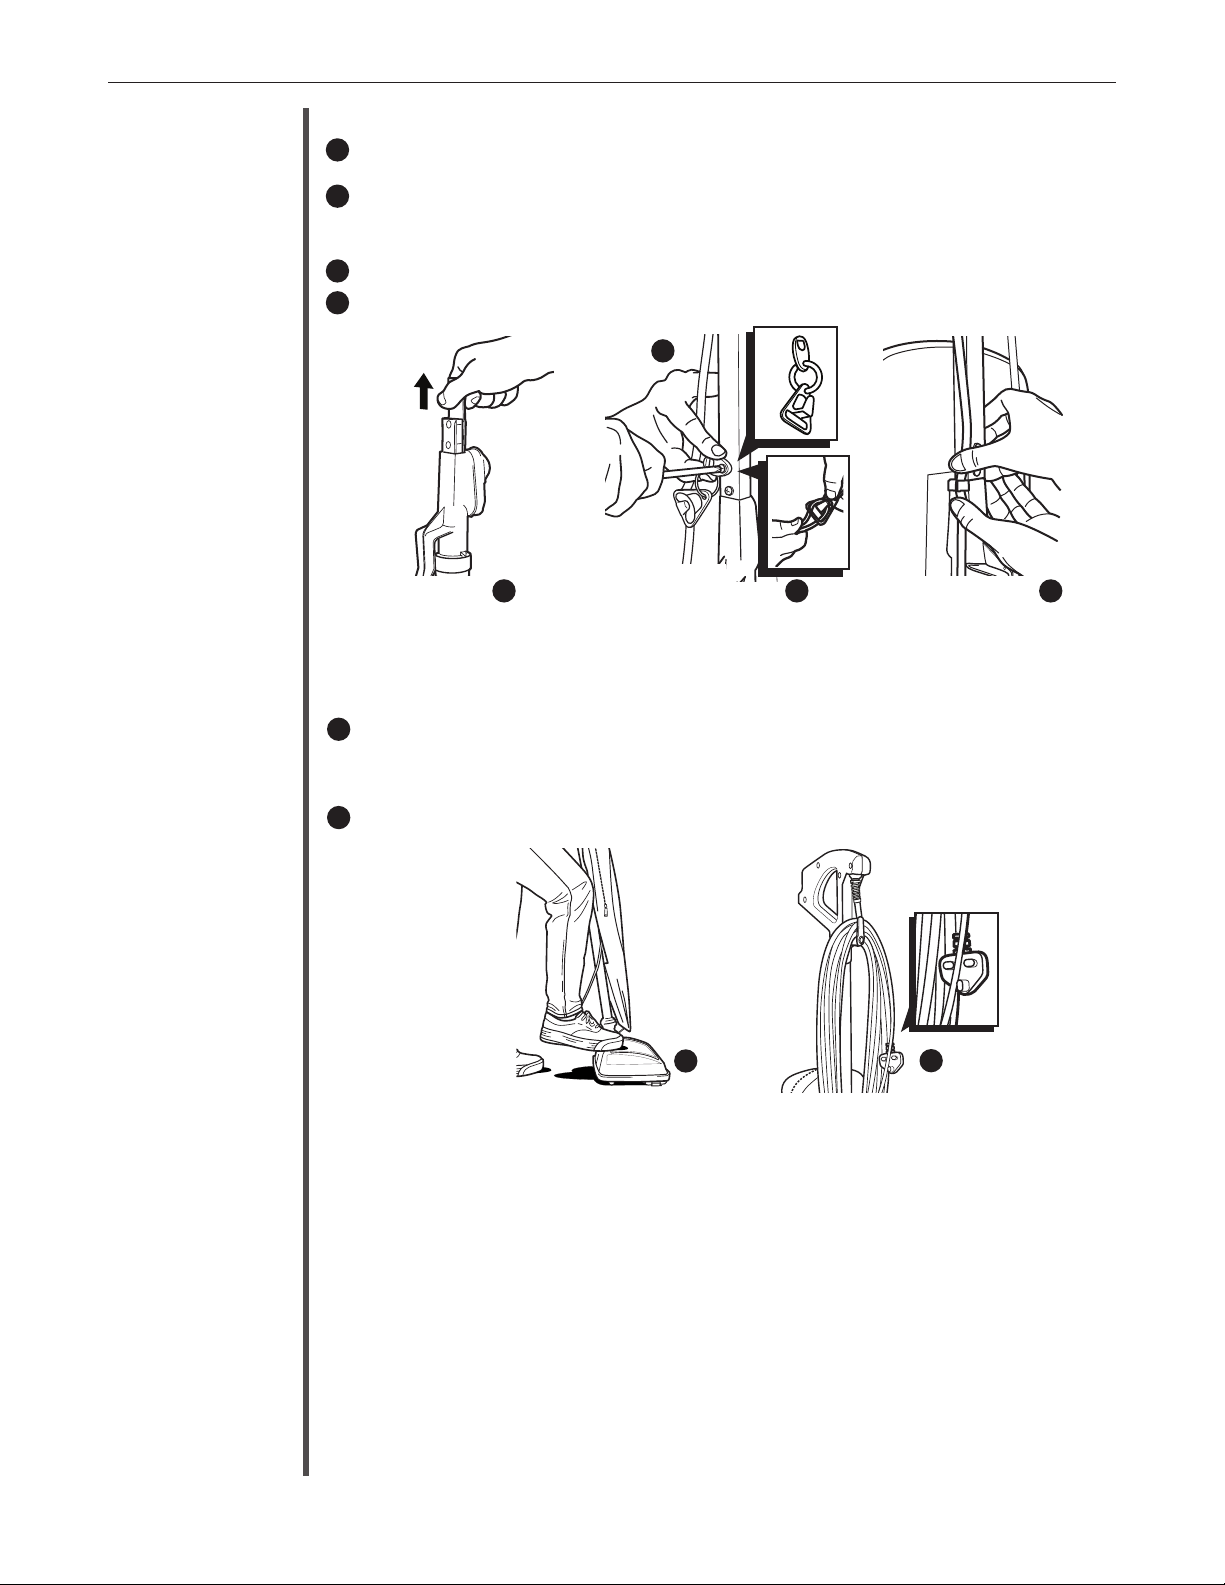
Assembling the Handle Tube
Before assembling appliance, remove two screws from the connector assembly. Remove cardboard insert by
1
pulling upward.
2
Slide upper handle section over the matching section of the connector assembly. Hold tab of cord strain relief
flush with
tighten to connector assembly. Insert remaining screw in bottom hole of connector assembly and tighten firmly.
Loop the Power Cord through the Strain Relief Kit as illustrated.
2.1
Take hold of the Harness (21 on parts list pg 3) - and push it into the clip located on the left side of the
3
Conector Deflector Assembly (10 on parts list).
TOP hole in connector assembly. Insert screw th
2
Connector
1
Assembly
rough hole in tab of cord strain relief and firmly
TAB
2.1
3
Operating the XL3
Make sure the Disposable Odour Fighting dust bag is in place. DO NOT operate the cleaner without a dust bag.
Plug the power cord into an electrical outlet and press the On ( l ) - OFF ( O )switch on handle assembly when
re
ady to operate.
4
Up-Position Lock -Place foot on power head and lean handle back gently to release lock for vacuum use.
Return handle to the full upright position to engage lock. Note: Do not operate the unit while in the upright and
locked position. Do not let the unit run while in any one stationary position for any period of time.
Keep the unit moving while in operation.
5
Easy Power Cord Storage - Wrap power cord around cord hook on handle and cord hook on connector.
4
Operating Instructio
This new ORECK Upright is one of the finest, fastest, and strongest units in its class. You’ll love the way it cleans,
gets under things, and it’s SO lightweight and easy to use.
The following are a few simple suggestions regarding its operation:
1. When inserting a new disposable dust bag -FIRST PU
2. When the disposable dust bag is full, REPLACE IT.
3. If at any time the machine does not pick up properly or makes an unusual noise, STOP OPERATION and service.
4. Although your upright will pick up pins, paper clips, and other small objects, it is recommended that these be
removed from the floor before you vacuum. Failure to do so may result in permanent damage to the motor
suction fan and its housing.
5. WARNING: Do not use your vacuum cleaner on damp or wet surfaces. This will cause damage to the vacuum
cleaner and is dangerous to the user. Damage caused by use on wet or damp surfaces is not covered under warranty.
6. For optimal performance, replace the belt every 6 months.
7. Check the disposable filter dust bag at least once a month.
8. DO NOT run the vacuum cleaner over
9. Use caution when vacuuming over area rug edges and fringe.
sn
FF OUT and OPEN THE BAG.
the cord. The revolving brush could damage the cord.
5
4
Page 5

General
ENGLISH
The performance of your new cleaner greatly depends upon care and maintenance. The instructions in this manual
will guide you in performing basic care and maintenance. To obtain the most satisfying years of service read the
instructions and keep them handy for future reference.
Information.
Disposable Odour Fighting Dust Bags
Disposable Odour Fighting dust bags play a very important role in the efficiency of your ORECK vacuum cleaner.
The purpose of the dust bag is to trap dirt, but at the same time it must be porous enough to allow air to pass
through. If the dust bag becomes clogged, no air can pass through the cleaner and cleaning cannot take place,
regardless of the cleaner’s power.
To keep your cleaner operating at maximum efficiency, change the dust bag frequently.
DO NOT FILL ABOVE THE LINE INDICATED ON THE DUST BAG.
Be sure the disposable filter dust bag is installed properly. Note: All disposable filter dust bags are not the same.
Your ORECK disposable dust bags have been designed to be used with the ORECK cleaner. Using bags other than
genuine ORECK TYPE CC disposable bags will affect the cleaning ability of your cleaner and could cause damage
to it.
Intellashield™Technology
Oreck added Intellashield technology to various touch points, including the handle, outer bag, and bag dock while
manufacturing this upright vacuum cleaner in order to provide you with antibacterial protection that continuously
fights the growth of microbes that can cause stains, odours and product degradation.When microbes, such as bacteria, mould and mildew come in contact with the product surface, Intellashield penetrates the cell wall and disrupts
key functions so they cannot grow or reproduce. Your Oreck will stay cleaner, longer.
Celoc®Filtration System
The Celoc outer bag of your vacuum cleaner is high filtration medical material designed to filter the smallest
of dust particles. It is important that the inside of the outer bag be cleaned. Vacuum the inside of the outer bag or hand
wash, turned inside out, with warm water, and air dry. If desired, the Celoc outer bag can be replaced for renewed
efficiency. The Celoc layered disposable inner dust bag must be replaced once a month even if it is not full. Change
it more often if it is used in extremely dirty areas. Increase the cleaning power of your vacuum by changing the bag
often.
The Belt
The belt on your vacuum cleaner controls the speed of the revolving brush and is very important for the effective
operation of the cleaner. If the belt becomes stretched or cut, it will cause the revolving brush to stop completely or
slow down. See instructions in the manual for replacing belt.
Note: An extra belt is stored in the baseplate of your cleaner. When buying replacement belts, use ONLY ORECK
genuine belts. Belts other than Oreck belts will not operate the revolving brush correctly and may create undue
stress which will cause damage to the motor and brush bearings. Using belts other than ORECK belts will void the
warranty.
Lubrication
The vacuum cleaner motor bearings are factory lubricated and sealed. Further lubrication is not required.
CAUTION
Wood Floors, Soft (Vinyl, Asphalt Tile, etc.) Floor Surfaces and Polished Floor Finishes
Use floor and floor finish manufacturer’s recommended methods of cleaning. The roller
brush may also scuff very soft finishes. Do not operate the unit while in the upright and locked position. Do not let
the unit run while in any one stationary position for any period of time. Keep the unit moving while in operation.
Note: At least once a month, check for and remove excessive lint, string or hair from
revolving brush. Patented cleaning grooves on brush roll will allow easier cleaning.
Wipe the outside of the cleaner with a damp cloth. Also clean the connector deflector
assembly area, base of cleaner and fan housing area. If there is dust in the outer bag,
vacuum it or shake it out.
A little preventative maintenance will keep your cleaner looking new and will ensure
continued cleaning effectiveness.
5
Page 6

Maintenance.
ENFONCEZ JUSQUENFONCEZ JUSQU’À’À
ENTENDRE UN BRUITENTENDRE UN BRUIT
P
RESIONE HASTPRESIONE
H
ASTAA
E
SCUCHAR UN ESCUCHARUN
CHASQUIDO DE SUJECICHASQUIDO DE SUJECIÓÓNN
ENFONCEZ JUSQU’À
ENTENDRE UN BRUIT
P
RESIONE HASTA
E
SCUCHAR UN
CHASQUIDO DE SUJECIÓN
ENGLISH
Replacing Disposable Odour Fighting Dust Bag
WARNING: Unplug cord from electrical outlet before servicing.
BAG REMOVAL:
6
Unzip outer bag completely.
Pull bag cardboard collar to release bag dock door from connector. Bag dock door will hinge downward.
7
Gently pull bag cardboard collar upward out of the bag dock. Saniseal
8
®
dust seal will close automatically.
BAG INSTALLATION:
9
Slide the cardboard collar completely onto bag dock door.
10
Firmly push bag dock door with both thumbs on indication point until it snaps shut.
6 7 8 9 10
Replacing Worn Belt
WARNING: Unplug cord from electrical outlet before servicing.
11
Remove the replacement belt from the storage channel.
Remove the door by removing the hold down screw located on side of power head.
12
Fold door away from the power head and lift it away.
13
Remove the belt from the motor drive shaft and brush roll pulley.
14
Loop the new belt over the brush roll pulley. Place the opposite end of the belt on the motor drive shaft.
15
Replace the door by placing the bottom tab on door into slots located inside power head and pressing the
13
door closed.
Replace the hold down screw and tighten.
12
11
12
13
14 15
Adjusting or Replacing Brushroll
WARNING: Unplug cord from electrical outlet before servicing.
To determine if the brushroll is worn, place a firm straight edge across the nozzle opening. If brushroll bristles do
not extend beyond baseplate, brushroll should be adjusted.
Remove the baseplate by removing 5 screws. Then, remove the belt and brushroll from the housing.
16
Rotate both bearing assemblies at ends or brushroll to show “OLD” and replace in the holding channels in the housing.
17
Note: The bearing assembly setting market “OLD” has no ribs on the top of the assembly.
18
The one marked “NEW” has several ribs. When rotating bearings, make sure both bearing assembly settings are
19
the same and face up when replacing the brushroll.
Reassemble the belt.
15
Reassemble the baseplate.
16
6
Page 7

ENGLISH
If a previous adjustment has already been made and bristle height does not extend above the baseplate, a new brush assembly should be ordered.
IMPORTANT: Unless the brush is worn as indicated above, both bearings must be in the “NEW” position. When rotating, both
bearings must be in the “OLD” position. Unmatched settings can cause damage to the unit.
NEW
19
16
17
OLD
18
Replacing Edge Brush
WARNING: Unplug cord from electrical outlet before servicing.
Turn the power head over. With baseplate facing up, remove the screw located in the centre of each edge brush.
Remove both edge brushes and replace with new ones. Replace both screws and tighten.
Using an Oreck Fresh Air®Tab
Your ORECK XL3 vacuum cleaner has a special ORECK FRESH AIR®tab pocket.
This pocket is located inside the outer cloth bag in the area where the disposable dust
bag attaches to the intake tube. Insert tablet in pocket if desired.
Replacing Light Bulbs
16
Remove the baseplate by removing 5 screws.
20
Remove the belt from the brushroll pulley. Then, remove the brushroll from the housing.
21
Remove the fascia by removing 2 screws.
Rotate fascia away from the power head and lift it away.
22
Pull burned out bulb from holder and replace with new bulb.
23
Reassemble the fascia.
22
Reassemble the brushroll and belt.
20
Reassemble the baseplate.
16
20
21
22 23
7
Page 8

Maintenance.
ENGLISH
Stuffing or Blockage
IMPORTANT: On plush and new carpets, stuffing may occur inside the the intake tube and the lower tube
assembly. This is due to excessive fuzz and loose cuttings in the carpet. Stuffing could occur for the first few
cleanings until all the loose material is removed. Due to the high efficiency of the cleaner, many older carpets
will cause stuffing when the cleaner is first used on them. If your vacuum cleaner does not pick up properly, or
makes unusual noise and the outer bag does not fluff up or balloon open, follow these steps:
WARNING: Unplug cord from electrical outlet before servicing.
24
Check for blockage at the mouth of the intake opening. If there is blockage, remove it with long-nose pliers,
a screwdriver or coat hanger. If you can not reach the blockage, remove baseplate. Remove the baseplate by
removing 5 screws (see “Adjusting or Replacing Brushroll”).
If the blockage is not at the base, remove lower tube. Unhook bag spring, releasing bottom of bag.
25
26
Twist lower collar counterclockwise to slide up. Pull tube out of base.
Check for blockage. If blockage is in the tube, remove with a coat hanger.
27
If tube is not blocked, look into fan housing. Remove debris with long-nose pliers, a screwdriver or coat hanger.
28
To reassemble, check O-ring on tube, and replace if damaged. Replace tube by first lining up slot at base of
26
tube with tab inside fan housing. Insert tube and push down until the tube is seated. Make sure O-ring is in
place against fan housing opening. Replace and tighten collar until collar locking tabs are locked in place.
Reattach bag spring.
Many times blockage occurs due to a full dust bag causing dirt to back down the air flow system. When that
29
happens, the blockage will be at the top of the system, starting in the area where the dust bag connects to the
connector assembly.
Note: If the above actions do not correct the problem, contact an Oreck authorised service centre or call the
customer service centre.
Trouble-
shooting.
Service problems that
appear to be major can
often be solved easily.
You can be your own
troubleshooter by
reviewing this guide.
All other servicing
should be done by an
Oreck authorised
service centre.
24
25 26 27 28 29
PPrroobblleemm CChheecckk WWhhaatt ttoo ddoo
Cleaner will not run. • Not plugged in properly. • Be sure cleaner is f irmly plugged into wall outlet.
• No electricity in wall outlet. • Check electrical source – fuse or circuit breaker.
Cleaner does not pick up. • Filter Bag is full. • Replace f ilter bag. See “Replacing Disposable
Odour Fighting Dust Bag”.
• Nozzle or intake pivot • Clear obstruction.
clogged.
• Belt is broken or stretched. • Replace belt.
• Brush is worn. • See “Adjusting or Replacing Brush roll”.
•Bag tube clogged. • Clear obstruction.
• Bag pores are clogged • Change bag.
with fine dust.
• Impeller fan is broken. • Return to Service Centre for repair.
• Revolving brush is not • Check bearing seal. Make sure words “OLD”
even at both ends. or “NEW” at each end.
Unit still does not • Check all the • Contact Oreck for service.
operate properly. above points.
8
Page 9

Parts.
Warranty.
ENGLISH
All accessories and replacement parts are sold separately. To order, call our customer service group at 0845 603 0153
or visit our website www.oreck.co.uk. Please have your model number from the data label on the back of the unit.
Replacement Parts
IItteemm PPaarrtt NNuummbbeerr
Dust Bag, 8 Pack, Saniseal® Odour Fighting Hypo-Allergenic CCPK8OF
Dust Bag, 8 Pack, Saniseal
Belts, 3 Pack 3BELTS
ORECK MANUFACTURING COMPANY: (Oreck 1400 Salem Road; Cookeville, TN, USA 38506
gives you the following warranty for this product only if it was originally purchased for residential use,
not resale from Oreck or an Oreck Authorised Retail Dealer.)
Oreck will repair or replace, free of charge, to the original purchaser, any part that is found to be
defective in material or workmanship within three (3) years of date of purchase; ten (10) years on
housing. This warranty applies to normal domestic use. Any commercial use of this product will void
this warranty. This limited warranty covers the revolving roller brush for one (1) year for residential
use only.
This warranty does not cover the replacement of expendable or consumable parts such as carbon motor
brushes, edge brushes, belts, bulbs, disposable bags and other parts subject to normal wear unless they
are defective in material or workmanship.
This warranty does not apply to any part subjected to accident, abuse, alteration, misuse, damage
caused by act of God, the use of voltages other than indicated on the serial number displayed on this
product or service of this product by other than Oreck or a participating Factory Authorised Service
Centre.
Oreck does not authorise any person or representative to assume or grant any other warranty obligation
with the sale of this product.
Oreck’s warranty is valid only if you retain proof of purchase from Oreck or an Oreck Authorised Retail
Dealer for this product. If you purchase this product from any other source, your purchase is “AS IS,”
which means Oreck grants you no warranty, and that you, not Oreck, assume the entire risk of the
quality and performance of this product, including the entire cost of any necessary servicing or repairs
of any defects.
This warranty is in addition to your statutory and other legal rights.
®
Hypo-Allergenic CCPK8DW
9
Page 10

10
Page 11

11
Page 12

©2009 Oreck Holdings, LLC. All rights reserved. All word marks, logos product configurations and registered trademarks are owned and used under the authority of Oreck Holdings, LLC.
76071-01 REV A 01/09 ECN # R-9251
 Loading...