

Page 1
ENGLISH
SIMPLY AMAZING
FRANÇAIS
®
GUIDE D’UTILISATION PAGE 8
ESPAÑOL
GUIA DEL USUARIO PAGE 14
USER’S GUIDE
COMMERCIAL
U2000R-1
U2000RBOX-1
U2000R4-1
HIGH SPEED UPRIGHT VACUUM
CLEANER WITH
®
CLEANING SYSTEM
•IMPORTANT•
SAVE THIS BOOKLET!
Includes:
• Safety Warnings
• Warranty
• Operating Instructions
• Trouble Diagnosis
• Accessories
Page 2

ENGLISH
Français Guide D’utilisation
Español Guia Del Usuario
Hospitality:
Canada:
Commercial: 1-800-242-1378
Hospitality: 1-888-23-ORECK
Canada: 1-866-74-ORECK
ITEM PART #
BEFORE OPERATING
CLEANER, READ ALL
INSTRUCTIONS IN THIS
MANUAL CAREFULLY.
Table of Contents
Maintenance and Customer Service,
Important Safety Instructions . . . . . . . page 2
Warranty,
Troubleshooting Guide . . . . . . . . . . . . page 3
Assembly,
Operating Instructions . . . . . . . . . . . . . page 4
Operating Instructions cont.,
To Replace Paper Filter Dust Bag . . page 5
How to Replace a Worn Belt,
Stuffing or Blockage . . . . . . . . . . . . . . page 6
Using an Oreck Fresh Air
Grounding Instructions,
To Adjust or Replace Brush . . . . . . . . page 7
Maintenance and
Customer Service
Your ORECK vacuum cleaner is a product of precise engineering.
The motor bearings are permanently lubricated and should not be
oiled. If you require additional information or have problems with
your ORECK appliance, you may call ORECK commercial
customer service at:
Commercial: 1-800-242-1378
Please specify the model number and serial/code number which
can be found on the data plate on the back of the vacuum.
Save your sales or purchase slip. Should your ORECK appliance
require warranty service in the U.S.A., present this slip to the
Authorized Service Center as your proof of purchase date or, in
Canada, call customer service.
Accessories
Sold Separately
1. Dust Bag, 25 Pack, Regular PK800025
®
Tab,
. . . . . . . . . . page 8
. . . . . . . . . . . page 14
1-888-23-ORECK
1-866-74-ORECK
IMPORTANT
SAFETY INSTRUCTIONS
When using an electrical appliance, basic
precautions should always be followed,
including the following:
READ ALL INSTRUCTIONS BEFORE
USING THIS VACUUM CLEANER
WARNING
To reduce the risk of fire, electric shock, or injury:
• Do not leave appliance unattended when plugged in. Unplug from outlet
when not in use and before servicing.
• Do not use outdoors or on wet surfaces.
• Do not operate the unit while in the upright and locked position.
• Do not let the unit run while in any one stationary position for any period of
time. Keep the unit moving while in operation.
• Do not allow to be used as a toy. Close attention is necessary when used
near children.
• Use only as described in this manual. Use only manufacturer’s recommended attachments.
• Do not use with damaged cord or plug. If appliance is not working as it
should, has been dropped, damaged, left outdoors, or dropped into water,
return it to a service center or call customer service at:
Commercial: 1-800-242-1378
Hospitality: 1-888-23-ORECK
Canada: 1-
• Do not pull or carry by cord, use cord as a handle, close door on cord, or
pull cord around sharp edges or corners. Keep cord away from heated
surfaces.
• Do not run appliance over cord.
• Do not unplug by pulling on cord. To unplug, grasp the plug, not the cord.
• Do not handle plug or appliance with wet hands.
• Do not put any object into openings. Do not use with any opening blocked;
keep free of dust, lint, hair and anything that may reduce air flow.
• Keep hair, loose clothing, fingers and all parts of body away from openings
and moving parts.
• Do not use to pick up anything that is burning or smoking, such as
cigarettes, matches, or hot ashes.
• Do not use without filter bag assembly in place.
• Turn off all controls before unplugging.
• Use extra care when cleaning on stairs.
• Do not use to pick up flammable or combustible liquids, such as gasoline
or lighter fluid, or use in areas where they may be present.
• Do not use appliance in an enclosed space where flammable, explosive or
toxic vapors are given off by oil base paint, paint thinner, some
mothproofing substances, or in an area where flammable dust is present.
• Do not pick up toxic material such as chlorine bleach, drain cleaner,
gasoline, etc. with this appliance.
•
Use caution when vacuuming over area rug edges and fringe.
•
Your appliance is provided with an extension cord. In case of
damage or loss of function, only replace this extension cord with
an SJT type, rated 300 Volt - 105 degrees C (221 degrees F), 3
wire grounded, #18 AWG (American Wire Gauge), no longer than
50 feet. Failure to use the proper cord could result in fire or
electric shock.
•
Product contains chemicals known to the State of California to
cause cancer and birth defects or other reproductive harm.
•
Keep cord away from heated surfaces.
866-74-ORECK
2. Belts, 3 Pack 0300604
®
3. Oreck Fresh Air
Tabs AIRTABS
SAVE THESE INSTRUCTIONS
For Commercial Use
2
Page 3

ENGLISH
Warranty
ORECK MANUFACTURING COMPANY: (Oreck gives you the
following limited warranty for this product only if it was originally
purchased for use, not resale, from Oreck or an Oreck Authorized
Retail Dealer.)
Oreck will repair or replace, free of charge, to the original
purchaser, any part which is found to be defective in material or
workmanship within one (1) year of the date of purchase. This
limited warranty covers the revolving roller brush for thirty (30)
days for commercial use only.
This limited warranty does not cover the replacement of
expendable or consumable parts such as carbon motor brushes,
edge brushes, drive belts, bulbs, disposable bags and other parts
subject to normal wear unless they are defective in material or
workmanship.
This limited warranty does not apply to any part subjected to
accident, abuse, or alteration, misuse, damage caused by fire or
act of God, the use of voltages other than indicated on the serial
number plate of this product or service of this product by other
than Oreck or an Oreck Factory Authorized Service Center.
Oreck does not authorize any person or representative to
assume or grant any other warranty obligation with the sale of
this product.
Oreck’s limited warranty is valid only if you retain proof of
purchase from Oreck or an Oreck Authorized Retail Dealer for
this product. If you purchase this product from any other source,
your purchase is “AS IS,” which means Oreck grants you no
warranty, and that you, not Oreck, assume the entire risk of the
quality and performance of this product, including the entire cost
of any necessary servicing or repairs of any defects.
Oreck’s liability for damages to you for any costs whatsoever
arising out of this statement of limited warranty shall be limited to
the amount paid for this product at the time of original purchase,
and Oreck shall not be liable for any direct, indirect, consequential or incidental damages arising out of the use or inability
to use this product.
Some states do not allow the exclusion or limitation of incidental
or consequential damages, so the above limitation or exclusion
may not apply to you.
ALL EXPRESS AND IMPLIED WARRANTIES FOR THIS
PRODUCT, INCLUDING IMPLIED WARRANTIES OF
MERCHANTABILITY AND FITNESS FOR A PARTICULAR
PURPOSE, ARE LIMITED IN DURATION TO THE WARRANTY
PERIOD, AND NO WARRANTIES, WHETHER EXPRESS OR
IMPLIED, WILL APPLY AFTER THIS PERIOD.
Some states do not allow limitations on the duration of implied
warranties, so the above limitation may not apply to you.
This warranty gives you specific legal rights, and you may also
have other rights which vary from state to state.
Troubleshooting Guide
WARNING: Unplug cord from
electrical outlet before servicing.
SAVE SERVICE CALLS...CHECK THESE FIRST:
• Is the disposable filter dust bag full?
• Are pores of filter dust bag clogged with powder or fine dust?
• Is anything clogging the revolving brush, lower tube, intake
opening, fan housing or connector assembly opening?
• Is the belt in place and turning the brush?
• Are the brush ends in the proper location?
• Does the brush turn freely? Are hair, string or rug fibers
wound around the brush?
PROBLEM POSSIBLE SOURCE AREAS TO CHECK
CLEANER
WILL NOT RUN
CLEANER
DOES NOT PICK UP
ALL OTHER SERVICING SHOULD BE DONE BY AN
ORECK AUTHORIZED SERVICE CENTER.
CALL COMMERCIAL CUSTOMER SERVICE HOT LINE
Commercial: 1-800-242-1378
Hospitality: 1-888-23-ORECK
Canada: 1-866-74-ORECK
Not plugged in
properly.
No electricity in
wall outlet.
Filter bag is full.
Nozzle or intake
pivot clogged.
Belt is broken or
stretched.
Brush is worn.
Tube clogged.
Bag pores are
clogged with fine
dust.
Impeller fan is
broken.
Revolving brush
is not even at
both ends.
Be sure cleaner is
firmly plugged
into wall outlet.
Check electrical
source–fuse or
circuit breaker.
Replace filter bag.
See “To Install
Paper Filter Dust
Bag.”
Clear obstruction.
Replace belt.
See “To Replace
or Adjust Brush. ”
Clear obstruction.
Change bag.
Return to Service
Center for repair.
Check brush roll
end cards. Make
sure words “old”
or “new” match at
each end.
Whenever calling, please be sure to have your model and
serial number from data plate.
3
Page 4
ENGLISH
To Operate
ON
- OFF
General Information
Operating Recommendations
WARNING:
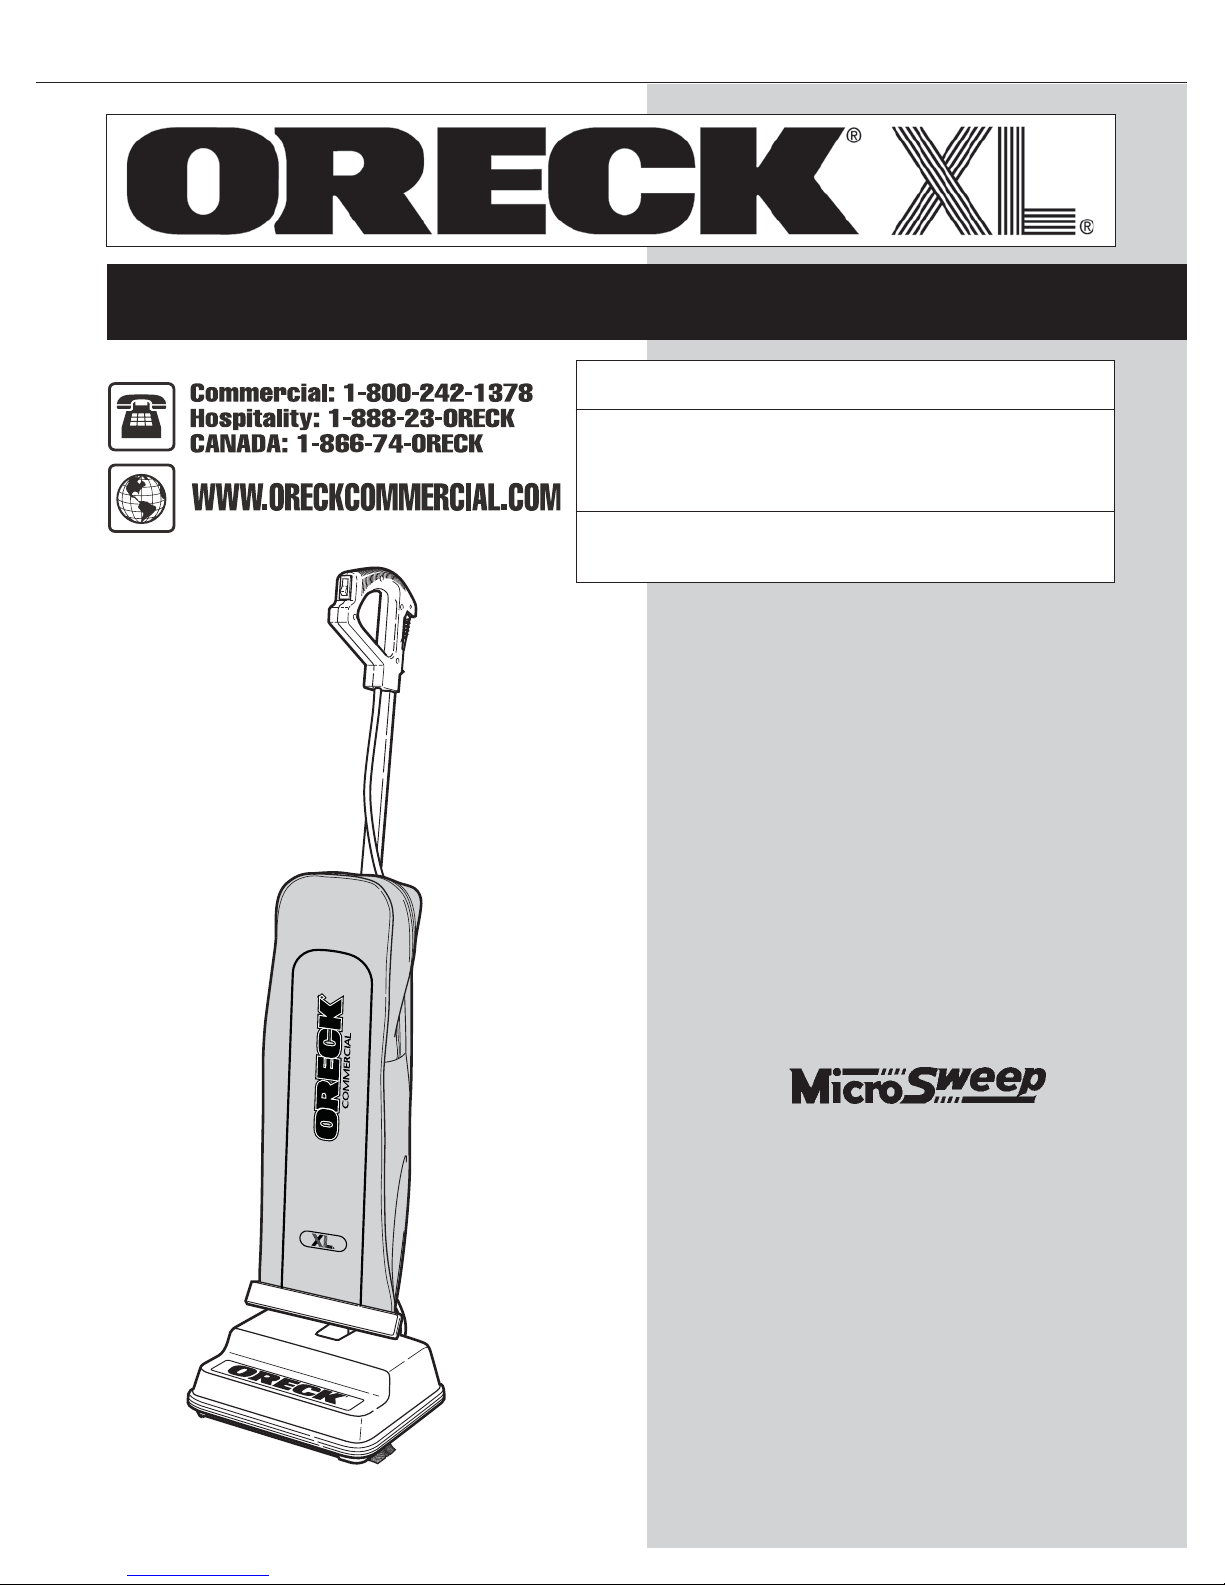
Assembly
To assist you in identifying components of your vacuum, the parts
have been numbered as follows
1 Handle section, upper
2 Tube, lower
3 Power head
4 Outer bag
5 Paper filter
dust bag
6 Power cord
7 Retaining
spring
8 Bag tension
9 Zip fastener
10 ON/OFF
switch
11 Cord hook
12 Plastic loop/cable clamp
13 Connector Assembly/
Rear Carry Handle
14 Fan housing
15 Cord assembly
16 Cord-Lock
17 Pigtail
1
:
10
9
5
4
8
7
3
Before assembling
appliance, remove two
screws from the connector
assembly. Remove plastic
insert by pulling upward.
12
17
1
13
bar
2
14
11
15
16
6
2
Upper
Handle
Connector
Assembly
3
With ON/OFF switch facing
the front of the unit, slide
upper handle section over
matching section of the
connector assembly. Place
brace against handle and
connection assembly
aligning the holes. Insert one
screw into top hole and one
screw into the bottom hole
then tighten firmly until
handle is no longer loose.
Attach cord to cord clip by
pressing cord above and
below clip ensuring the cord
is fully rested in clip.
Operating Instructions
Make sure disposable paper filter dust bag is in place. DO NOT
operate the cleaner without a paper filter dust bag. Plug the
power cord into an electrical outlet and press the
(O) switch on Helping Handle Assembly, or on top of base for
Straight Handle Models when ready to operate.
The performance of your new cleaner greatly depends upon
care and maintenance. The instructions in this manual will guide
you in performing basic care and maintenance. To obtain the
most satisfying years of service read the instructions and keep
them handy for future reference.
The following are a few simple suggestions regarding its
operation:
1. When inserting a new disposable paper filter dust bag—
FIRST PUFF OUT and OPEN THE BAG.
2. When the disposable filter dust bag is full, REPLACE IT.
3. If at any time the machine does not pick up properly or
makes an unusual noise, STOP OPERATION and service.
4. Although your upright will pick up pins, paper clips, and
other small objects, it is recommended that these be
removed from the floor before you vacuum. Failure to do so
may result in permanent damage to the motor suction fan
and its housing.
5.
wet surfaces. This will cause damage to the vacuum
cleaner and is dangerous to the user. Damage caused by
use on wet or damp surfaces is not covered under
warranty.
6. REPLACE THE BELT EVERY 6 MONTHS.
7. Change the disposable filter dust bag at least once a
month—even if it is not full! The collected dust in the dust
bag can cause odor, attract moisture, act as a breeding
area and can affect the efficiency of the cleaner.
Do not use your vacuum cleaner on damp or
(l)
4
Page 5
ENGLISH
Disposable Paper Filter Dust Bags
The Belt
Lubrication
General Cleaner Care
CAUTION—Wood Floors, Soft
(Vinyl, Asphalt Tile, etc.) Floor
Surfaces and Polished Floor
Finishes
BAG INSTALLATION:
IMPORTANT:
8. DO NOT run the vacuum cleaner over cord. The revolving
brush could damage the cord.
9. Use caution when vacuuming over area rug edges &
fringe.
Disposable paper filter dust bags play a very important role in
the efficiency of your ORECK vacuum cleaner. The purpose of
the filter bag is to trap dirt, but at the same time it must be
porous enough to allow air to pass through. If the filter bag
becomes clogged, no air can pass through the cleaner and
cleaning cannot take place, regardless of the cleaner’s power.
To keep your cleaner operating at maximum efficiency, change
the dust bag frequently. DO NOT FILL ABOVE THE LINE
INDICATED ON THE DUST BAG.
Be sure the disposable paper filter dust bag is installed
properly.
All paper dust bags are not the same. Your ORECK
disposable dust bags have been designed to be used with
the ORECK cleaner. Using bags other than genuine ORECK
disposable bags will affect the cleaning ability of your
cleaner and could cause damage to it.
The belt on your vacuum cleaner controls the speed of the
revolving brush and is very important for the effective operation
of the cleaner. If the belt becomes stretched or cut, it will cause
the revolving brush to stop completely or slow down. See
instructions in the manual for replacing belt.
An extra belt is stored in the baseplate of your cleaner.
When buying replacement belts, use ONLY ORECK genuine
belts. Belts other than ORECK belts will not operate the
revolving brush correctly and may create undue stress
which will cause damage to the motor and brush bearings.
Using belts other than ORECK belts will void the warranty.
The vacuum cleaner motor bearings are factory lubricated and
sealed. Further lubrication is not required.
At least once a month, check for and remove excessive lint,
string or hair from revolving brush.
Wipe the outside of the cleaner with a damp cloth. Also, clean
the connector deflector
assembly area, base of cleaner
and fan housing area. If there is
dust in the outer bag, vacuum it
or shake it out.
A little preventative maintenance will keep your cleaner
looking new and will ensure
continued cleaning effectiveness.
Use floor and floor finish
manufacturer’s recommended methods of cleaning. The metal
strip on the base of the cleaner could be damaged if used on
concrete or abrasive surfaces, and, therefore, cause damage to
wood floors, soft (vinyl, asphalt tile, etc.) floor surfaces and
polished floor finishes. The roller brush may also scuff very soft
finishes. Do not operate the unit while in the upright and locked
position. Do not let the unit run while in any one stationary
position for any period of time. Keep the unit moving while in
operation.
To Replace Filter
Dust Bag
WARNING: Unplug cord from
electrical outlet before servicing.
1. Hook bottom of bag collar
opening under lip “B” of
A
connector assembly. Pull up
on bag collar and snap over
B
lip “A” of connector.
2. Press on edges of bag collar
to insure bag is completely
installed.
Check to make
sure bag collar is behind lips
“A” and “B”.
If it is not, dust will leak into
outer bag. When filter bag is
in place, close outer bag
with zipper fastener.
Cord-Lock Instructions
WARNING: Unplug cord from electrical
outlet before servicing or removing cordlock.
Assembly:
1. Connect plug and receptacle.
2. Snap cord into lock.
3. Rotate insert until secure against
plug.
4. Ensure rotation is as depicted
to ensure proper engagement.
Disassembly:
1. Remove cord from lock
2. Disconnect plug and receptacle.
Assembly
Disassembly
5
Page 6
ENGLISH
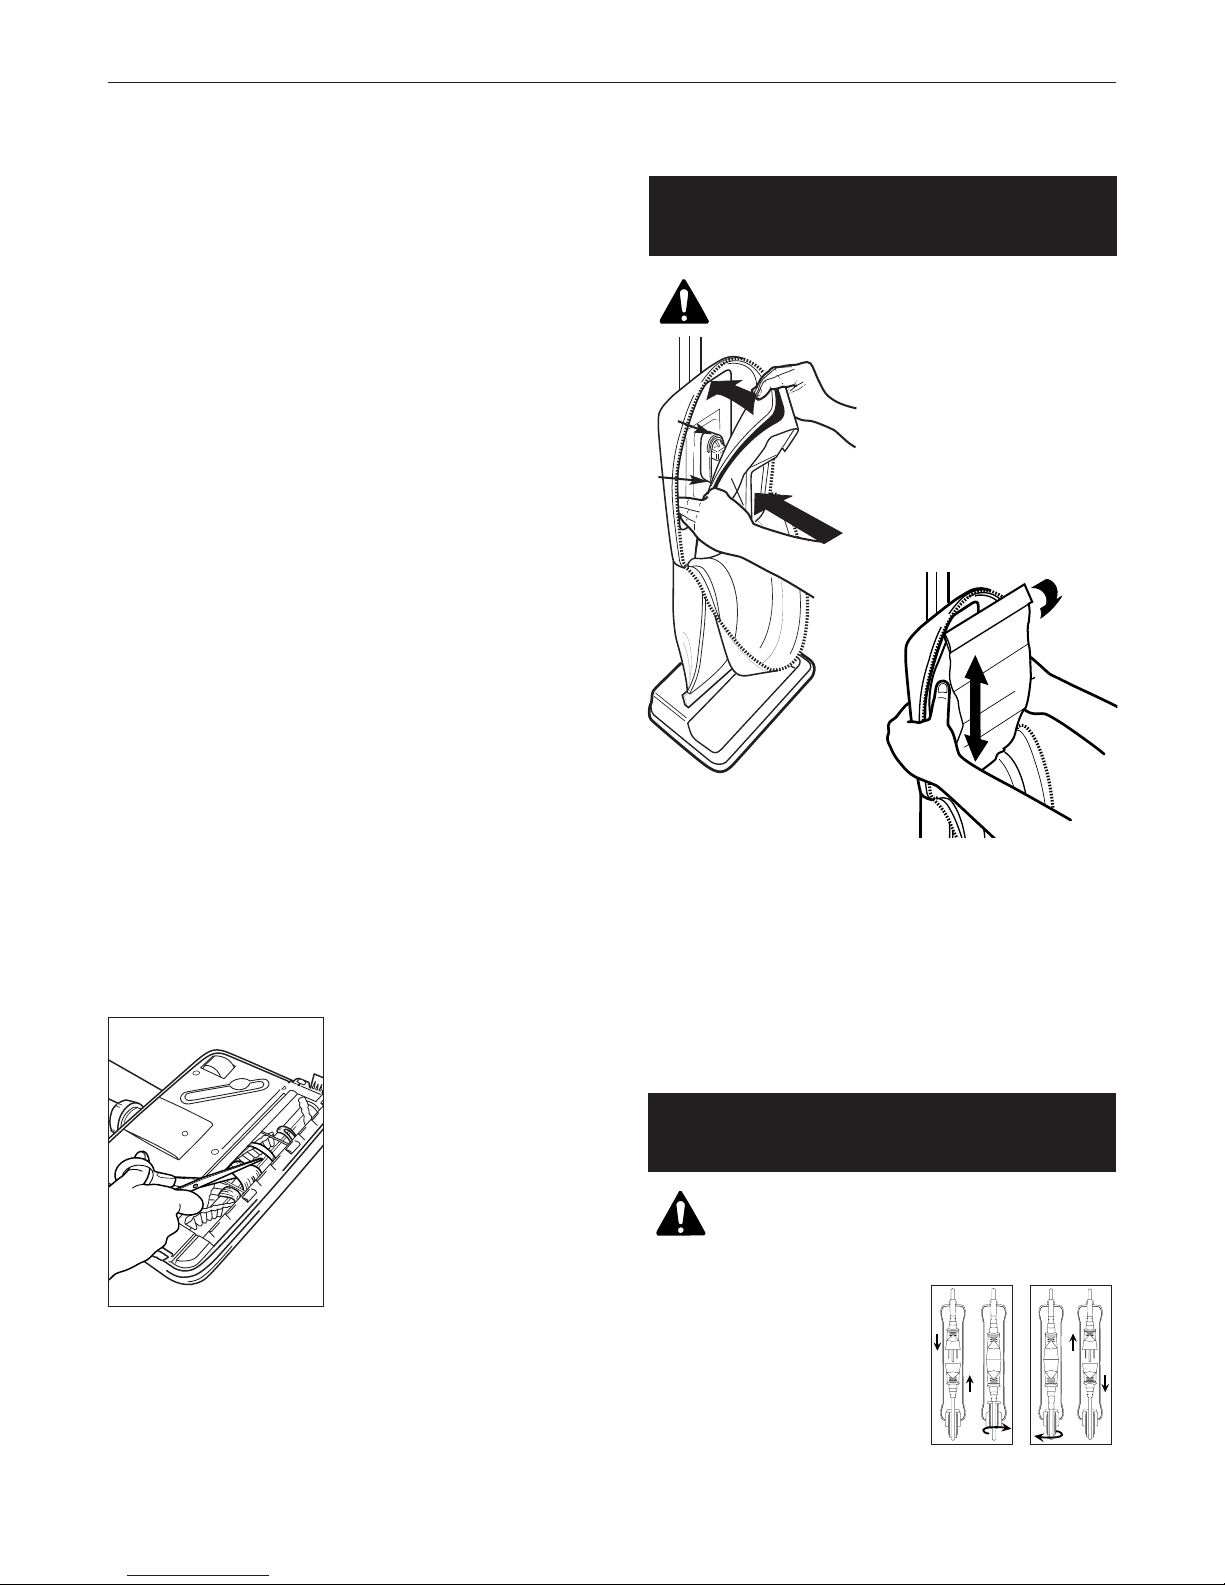
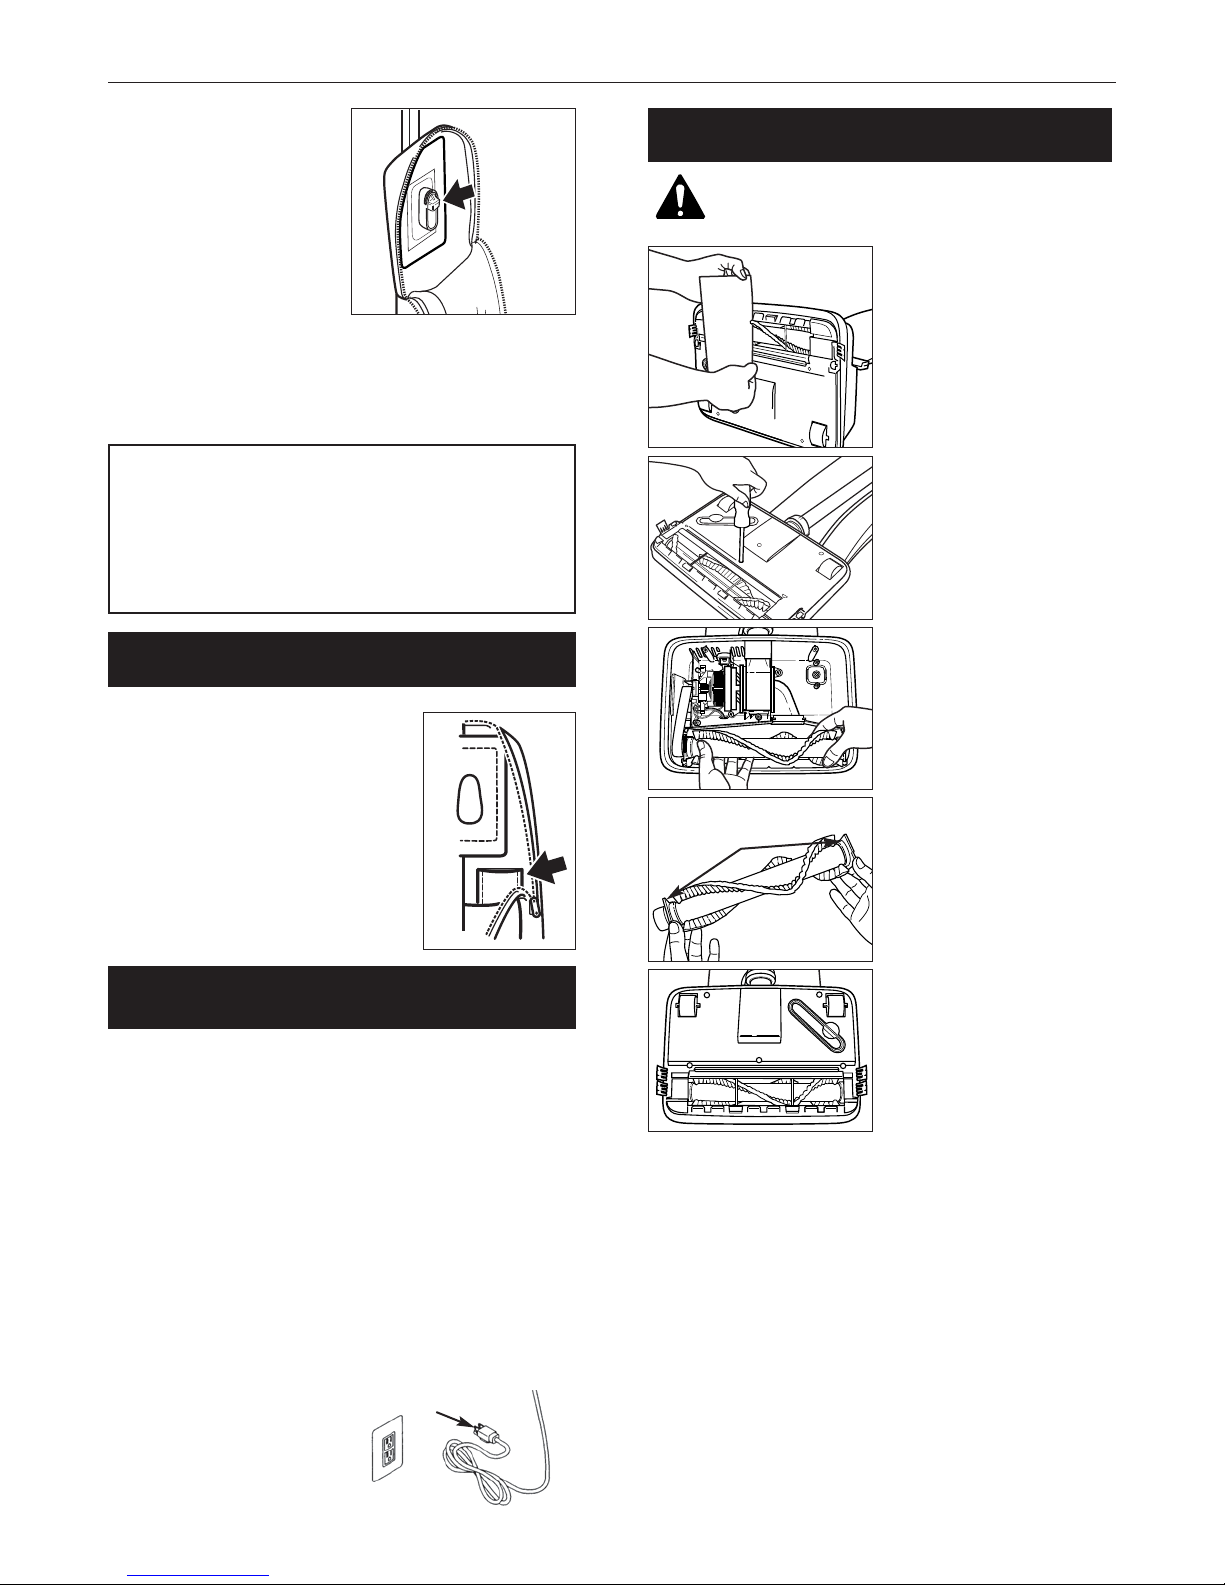
How to Replace a Worn Belt
WARNING: Unplug cord from
electrical outlet before servicing.
Remove the replacement
belt from the storage
channel.
Remove the door by
removing the hold down
screw located on side of
power head.
Slide the door forward by
prying open with a
screwdriver or coin.
Remove the belt from
the brush roll pulley and
the motor drive shaft.
Loop the new belt over
the motor drive shaft.
Place the opposite end
of the belt on the brush
roll pulley.
Rotate the brush roll
three (3) complete
revolutions to ensure
that no part of the belt is
overhanging the end of
the motor drive shaft.
Replace the door by
sliding it into the groove
at the bottom of the
housing. Replace the
hold down screw.
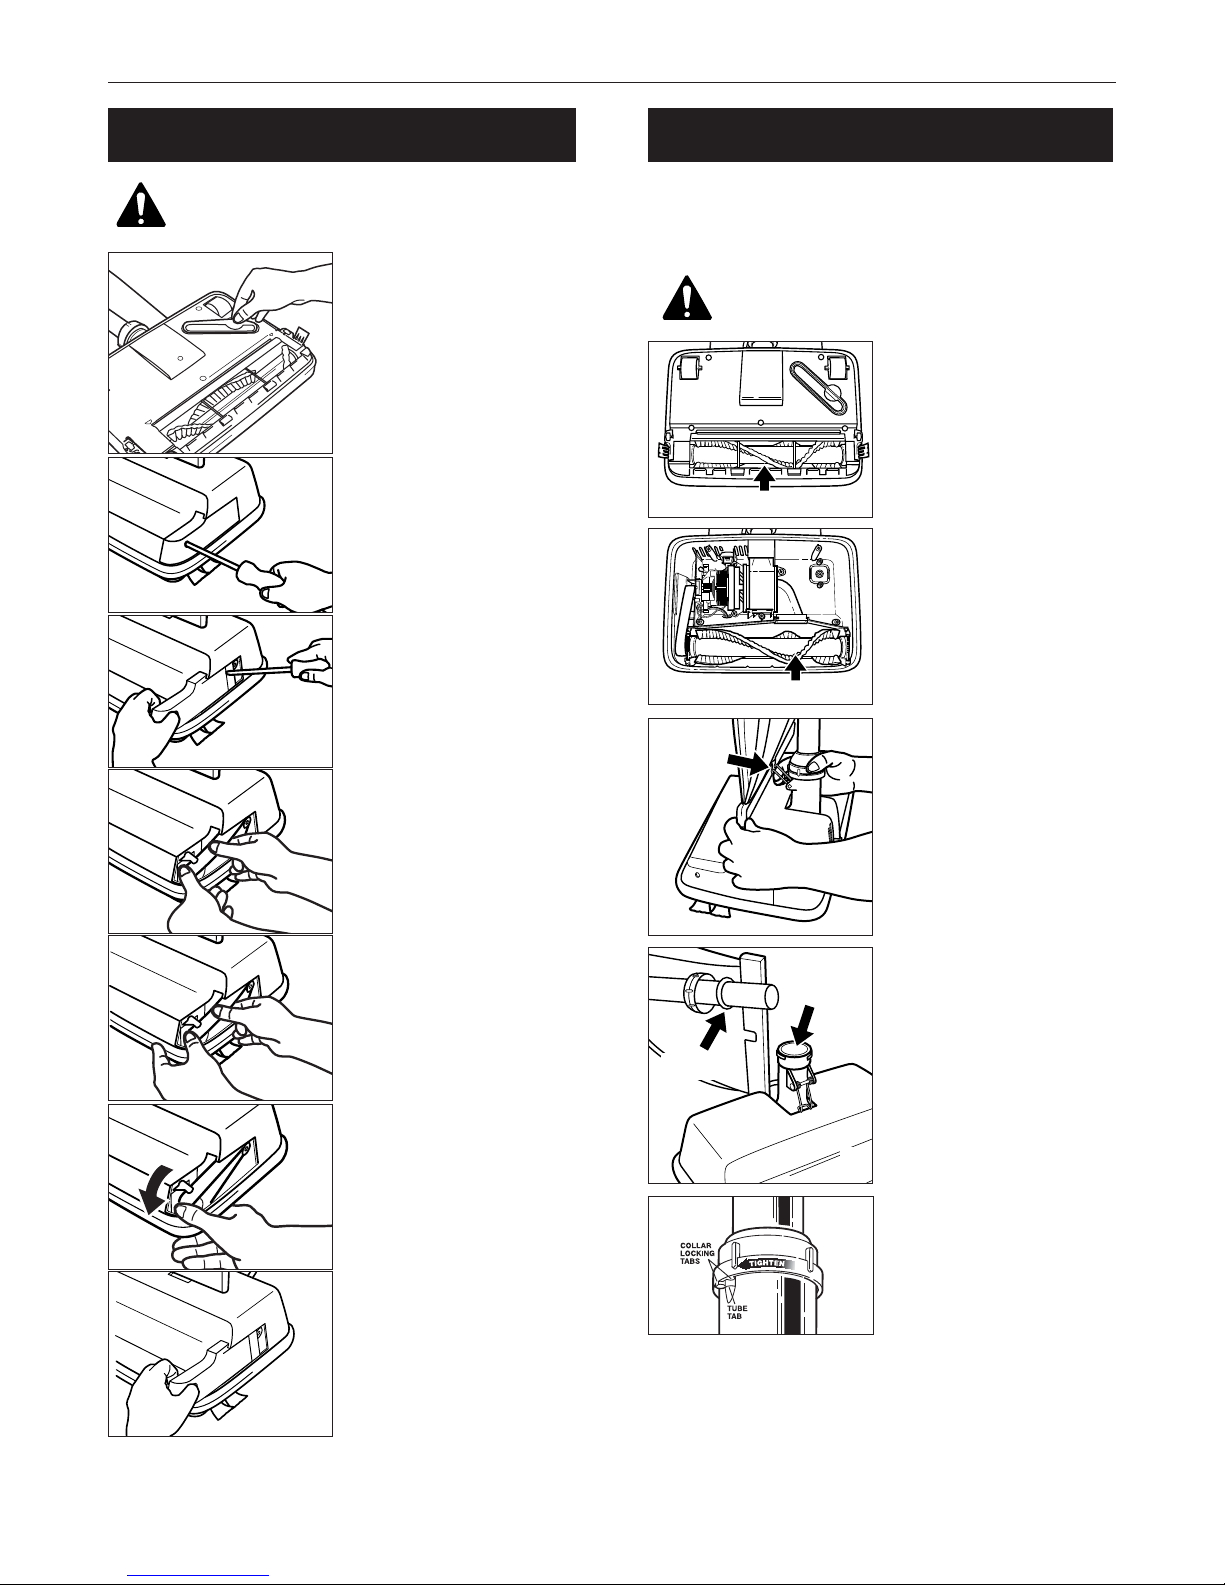
Stuffing or Blockage
Under certain conditions it is possible to stuff or block the intake
tube and the lower tube assembly. If your vacuum cleaner does
not pick up properly, or makes unusual noise and the outer bag
does not fluff up or balloon open, follow the following steps:
WARNING: Unplug cord from electrical
outlet before servicing.
1. Check for blockage at the
mouth of the intake
opening. See illustration A.
If there is blockage, remove
it with long-nose pliers, a
screwdriver or coat hanger.
If you can not reach the
A
Intake Opening
B
Intake Opening
Retainer
Spring
C
O-ring
E
Fan
Housing
D
blockage, remove
baseplate. See illustration
B.
2. If the blockage is not at the
base, remove lower tube.
See illustration C. Unhook
retainer spring, releasing
bottom of bag. Twist lower
collar counterclockwise to
slide up. Pull tube out of
base. Check for blockage. If
blockage is in the tube,
remove with a coat hanger.
3. If tube is not blocked, look
into fan housing. See illustration D. Remove debris
with long-nose pliers, a
screwdriver or coat hanger.
4. To reassemble, check Oring on tube, and replace if
damaged. Vacuum will not
operate properly without the
tube O-ring. Slide O-ring to
approximately 2" from base
of tube. Replace tube by
first lining up slot at base of
tube with inner tab inside
fan housing. Then reinsert
tube and push down until
the tube is seated. Make
sure O-ring is in place
against fan housing
opening. Replace and
tighten collar until collar
locking tabs are locked in
place. See illustration E.
Make sure collar is not
cross threaded on housing.
6
Page 7
NOTE
l l
l
IMPORTANT: Unless the
brush is worn as indicated
above, both bearings
must be in the “NEW”
position. When
rotating,
both bearings must be in
the “OLD” position.
Unmatched settings will
cause damage to your
machi
ne.
ENGLISH
DANGER:
5. Many times blockage occurs
due to a full dust bag
causing dirt to back down
the air flow system. When
that happens, the blockage
will be at the top of the
system, starting in the area
where the dust bag connects
to the connector assembly.
See illustration F.
: If the above actions do not correct the problem, contact
an ORECK authorized service center or call the commercial
customer service center.
IMPORTANT: On plush and new carpets, stuffing may occur
due to excessive fuzz and loose cuttings in the carpet.
Stuffing could occur for the first few cleanings until all the
loose material is removed. Due to the high efficiency of the
cleaner, many older carpets will cause stuffing when the
cleaner is first used on them.
Commercial: 1-800-242-1378
Hospitality: 1-888-23-ORECK
Canada: 1-866-74--ORECK
F
Connector
Deflector
Opening
Using An Oreck Fresh Air®Ta b
To Adjust or Replace Brush
WARNING: Unplug cord from
electrical outlet before servicing.
To determine if the brush
is worn, place a firm
straight edge across the
nozzle opening. If brush
bristles do not extend
beyond baseplate, brush
should be adjusted.
Remove the baseplate by
removing 5 screws. Then,
remove the belt and brush
roll from the housing.
Rotate both bearing
assemblies at ends of
brush roll to show “OLD”
and replace in the holding
channels in the housing.
Your ORECK XL vacuum cleaner has
a special FRESH AIR tab pocket. This
pocket is located inside the outer bag
in the area where the disposable
paper bag attaches to the intake tube.
Insert tablet in pocket.
Grounding Instructions
This appliance must be grounded. If it should malfunction or
break down, grounding provides a safe path of least resistance
for electrical current, reducing the risk of electric shock. The
cord for this appliance has an equipment-grounding conductor
and a grounding plug. It must only be plugged into an electrical
outlet that is properly installed and grounded in accordance with
all local codes and ordinances.
conductor can result in a risk of electrical shock. Check with a
qualified electrician or service person if you are in doubt as to
whether the outlet is grounded. If not, have a proper outlet
installed by a qualified electrician.
This appliance is for use on a nominal 120-volt circuit. It has a
grounding plug similar to the example shown. Make sure the
appliance is connected to an outlet with the same configuration
as the plug. No adapter should be used with this appliance.
Improper connection of the equipment-grounding
Grounding Pin
Rotate and match
bearing assemblies
NOTE: The bearing
assembly setting marked
“OLD” has two notches
(
) on the top of the
assembly. The one
marked “NEW” has one
notch (
). When
rotating bearings, make
sure both bearing
assembly settings are the
same and face up when
replacing the brush roll.
Reassemble the belt and
the baseplate and check
bristle height above
baseplate at each end of
brush.
If a previous adjustment
has already been made
and bristle height does not
extend above baseplate, a
new brush assembly
should be ordered.
Grounded Outlet
7
Page 8

SIMPLY AMAZING
Español
Guia Del Usuario
Hospitality:
Canada:
COMMERCIAL: 1-800-242-1378
HOSPITALITY: 1-888-23-ORECK
CANADA: 1-866-67-ORECK
ITEM PART #
AVANT D’UTILISER L’ASPIRATEUR,
®
LIRE ATTENTIVEMENT TOUTES LES
GUIDE D’UTILISATION
FRANÇAIS
INSTRUCTIONS DE CE MANUEL.
Table des matières
Entretien et service à la clientèle,
Accessoires . . . . . . . . . . . . . . . . . . . . . page 8
Consignes de sécurité importantes,
Garantie . . . . . . . . . . . . . . . . . . . . . . . page 9
Guide de dépannage,
Assemblage . . . . . . . . . . . . . . . . . . . . page 10
Mode d’emploi, . . . . . . . . . . . . . . . . . . page 11
Remplacement du sac à poussières filtrant,
Remplacement d’une courroie usée . . page 12
Blocage ou bourrage,
Utilisation d’une tablette Oreck Fresh
®
Air
, Instructions de mise à la terre . . page 13
Réglage ou remplacement du balai,
. . . . . . . . . . . . . . . . . page 14
Entretien et service à la
clientèle
UTILISATION COMMERCIALE
U2000R-1
U2000RBOX-1
U2000R4-1
ASPIRATEUR VERTICAL RAPIDE
A VEC SYSTÉME DE NETTOYAGE
®
•IMPORTANT•
CONSERVEZ CE FASCICULE
Comprend:
Avertissements de sécurité
Garantie
Mode d’emploi
Guide de dépannage
Accessoires
Votre aspirateur ORECK est un produit utilisant des mécanismes
précis. Les paliers du moteur sont lubrifiés de façon permanente
et ne doivent pas être huilés. Si vous avez besoin d’informations
supplémentaires ou si vous avez des problèmes avec votre
appareil ORECK, vous pouvez appeler le service à la clientèle
commerciaux ORECK au:
Commercial: 1
Veuillez indiquer le numéro de modèle et le numéro de série/code
apparaissant sur la plaque signalétique derrière l’aspirateur.
Conservez votre reçu de vente ou de caisse. Si votre appareil
ORECK a un jour besoin d’une réparation sous garantie aux
États-Unis, présentez ce coupon au centre autorisé de service
après-vente comme preuve d’achat datée. Au Canada, appelez le
service à la clientèle.
-
800-242-1378
1-888-23-ORECK
1-866-74-ORECK
Accessoires
Vendu Séparément
1. 25 Sacs à poussière normaux PK800025
2. 3 courroies 0300604
®
3. Plaquettes Fresh Air
d’Oreck AIRTABS
8
Page 9

FRANÇAIS
CONSIGNES DE SÉCURITÉ
IMPORTANTES
Lorsque vous utilisez un appareil électroménager,
vous devez toujours prendre certaines précautions
de base, y compris les suivantes:
LIRE TOUTES LES INSTRUCTIONS AVANT
D’UTILISER CET ASPIRATEUR
AVERTISSEMENT
Pour réduire les risques d’incendie, d’électro-
cution et de blessure:
• Ne jamais laisser l’appareil branché sans surveillance. L’appareil doit être
débranché après chaque utilisation et avant toute réparation.
• Ne jamais utiliser à l’extérieur ou sur une surface humide.
• Ne faites pas fonctionner l'unité dans la position verticale verrouillée.
• Le faites pas fonctionner l'unité pendant une longue période en position
stationnaire. Continuez de déplacer l'unité lorsqu'elle est en marche.
• Ne doit pas servir de jouet. Il faut rester vigilant quand il est utilisé près d’enfants.
• Utilisez uniquement selon les instructions figurant dans ce manuel. Utiliser
uniquement les accessoires recommandés par le fabricant.
• Ne jamais utiliser si le cordon d’alimentation ou la fiche de connexion sont endommagés. Si l’appareil ne fonctionne pas normalement, s’il a été échappé, s’il a été
endommagé, s’il a été laissé à l’extérieur ou s’il est tombé dans l’eau, il faut le
retourner à un centre de service après-vente ou appelez le centre de service à la
clientèle commerciale de la société ORECK au :
Commercial: 1-800-242-1378 Hospitality: 1-888-23-ORECK
Canada: 1-866-74-ORECK
• Ne jamais tirer ou transporter l’appareil par le cordon d’alimentation, ni utiliser le
cordon en guise de poignée, ni fermer une porte sur le cordon, ni tirer le cordon
autour d’un coin à angle pointu. Garder le cordon à l’écart des surfaces chaudes.
• Ne pas faire avancer l’appareil sur le cordon.
• Ne jamais débrancher l’appareil en tirant sur le cordon. Pour débrancher, saisir la
fiche et non le cordon.
• Ne jamais manipuler la fiche de connexion et l’appareil avec les mains humides.
• Ne jamais insérer d’objet dans les ouvertures. Ne pas utiliser si des ouvertures
sont bloquées. Elles doivent être exemptes de poussière, de charpie, de cheveux
et de toute autre substance pouvant réduire le débit d’air.
• Garder les cheveux, les vêtements amples, les doigts et toutes les parties du
corps à bonne distance des ouvertures et des pièces mobiles.
• Ne jamais utiliser pour ramasser des substances chaudes ou fumantes, comme
des cigarettes, des allumettes ou des cendres chaudes.
• Ne jamais utiliser sans sac filtrant.
• Avant de débrancher, arrêter toutes les commandes.
• Redoubler de prudence lors du nettoyage d’escaliers.
• Ne jamais utiliser pour ramasser des liquides inflammables ou combustibles,
comme de l’essence à moteur ou à briquet.
• Ne jamais utiliser l’appareil dans un espace clos où se dégage des vapeurs
inflammables, explosives ou toxiques provenant d’une peinture à l’huile, d’un
diluant à peinture, de substances antimites, ni dans un espace où il y a des
poussières inflammables.
• Cet appareil ne doit jamais servir à ramasser des substances toxiques comme la
Javel, les produits de débouchage, l’essence, etc.
• Faites attention en nettoyant à l'aspirateur les bords et la frange
finis de couverture de zone.
• Votre appareil est fourni avec un cordon prolongateur. En cas de dommage ou de
perte de fonctionnalité, ne remplacez ce cordon prolongateur que par un autre de
type SJT, spécifié pour 300 V et résistant à 105 °C (221°F), avec 3 fils pour la terre,
de calibre #18 AWG et ne faisant pas plus de 15 mètres (50 pieds) de long.
L’utilisation d’un cordon inadéquat peut entraîner un départ d’incendie ou une
commotion électrique.
• Gardez le cordon à l’écart des surfaces chauffées.
CONSERVER CES INSTRUCTIONS
Usage commercial
AVERTISSEMENT: Contient des produits chimiques reconnus
par l'état de la California comme pouvant causer le cancer,
entraîner des malformations à la naissance ou affecter le
système reproductif.
Garantie
ORECK MANUFACTURING COMPANY: (ORECK vous fournit
cette garantie limitée pour le produit uniquement s’il a été acheté
à l’origine pour une utilisation commerciale, et non pour revente,
à partir d’Oreck ou d’un revendeur Oreck agréé).
Oreck s’engage à réparer ou remplacer, sans frais pour
l'acheteur d'origine, toute pièce trouvée défectueuse pour cause
de matériaux ou de main d'oeuvre, durant un (1) an à compter de
la date d'achat. Cette garantie limitée couvre la brosse à rouleau
tournante durant trente (30) jours en utilisation commerciale
uniquement.
Cette garantie limitée ne couvre pas le remplacement de pièces
non réutilisables ou consommables telles que charbons de
moteur, brosses pour les bords, courroies d’entraînement
ampoules, sacs jetables et autres pièces soumises à l’usure
normal, sauf si elle souffraient d’un défaut du aux matériaux ou à
la main d’œuvre.
Cette garantie limitée ne couvre pas toute pièce ayant subi
accident, utilisation abusive ou excessive, dommages par catastrophe naturelle, alimentation sur un secteur de valeur autre que
celle mentionnée sur l’étiquette signalétique du produit, ou intervention par une entité autre qu’Oreck ou un centre de service
agréé par Oreck.
Oreck n’autorise aucune personne ou représentant à assumer ou
fournir une quelconque obligation de garantie avec la vente de ce
produit.
Si vous avez acheté ce produit depuis une autre source, c’est un
achat « TEL QUEL » ce qui signifie qu’Oreck ne vous accorde
aucune garantie et que c’est vous, et non Oreck, qui assumera
les risques liés à la qualité et à la performance pour ce produit, y
compris le coût intégral de tous entretiens ou réparations de tous
défauts.
La responsabilité d’Oreck concernant des dommages pour vous
ou tous coûts survenant dans le cadre de cette garantie limité se
limiteront au montant payé pour ce produit au moment de son
achat d’origine, et Oreck ne pourra pas être tenu pour responsable de tous dommages directs ou indirects, accessoires ou
consécutifs, causés par l’utilisation ou l’impossibilité d’utilisation
de ce produit.
Certaines provinces ne permettent pas l’exclusion ou la limitation
des responsabilités pour dommages accessoires ou consécutifs,
en vertu de quoi la limitation ou exclusion formulée plus haut peut
ne pas s’appliquer pour vous.
TOUTES GARANTIES EXPLICITES OU IMPLICITES POUR CE
PRODUIT, INCLUANT LES GARANTIES IMPLICITES DE
VALEUR MARCHANDE ET D’ADÉQUATION POUR UNE UTILISATION SPÉCIFIQUE, SONT LIMITÉES EN DURÉE À LA
DURÉE DE LA GARANTIE DU PRODUIT, AUCUNE GARANTIE
EXPLICITE OU IMPLICITE NE SERA APPLICABLE À L’ISSUE
DE LA PÉRIODE DE GARANTIE.
Certaines provinces ne permettent pas les limitations sur ma
durée des garanties implicites, la limitation formulée ci-dessus
peut donc ne pas être applicable pour vous.
Cette garantie vous donne des droits légaux spécifiques, et vous
pouvez avoir d’autres droits qui varient d’une province à l’autre.
9
Page 10

FRANÇAIS
Guide de dépannage
AVERTISSEMENT: Avant d’exécuter
cette opération, débranchez le cordon
d’alimentation de la prise murale.
NE CONSULTEZ PAS INUTILEMENT UN RÉPARATEUR...
VÉRIFIEZ D’ABORD CE QUI SUIT:
• Est-ce que le sac jetable en papier filtre est plein?
• Est-ce que les pores du sac filtrant sont bouchés avec de la
poudre ou de la poussière fine?
• Quelque chose bloque-t-il le balai tournant, le tube inférieur,
l’ouverture d’admission, le ventilateur ou l’ouverture du
onnecteur?
c
• Est-ce que la courroie est en place et fait tourner le balai?
• Est-ce que les extrémités du balai sont correctement
placées?
• Est-ce que le balai tourne librement? Y a-t-il des cheveux,
des fils ou des fibres de moquette enroulées autour du balai?
PROBLÉME CAUSE POSSIBLE VÉRIFICATIONS
L’ASPIRATEUR NE
FONCTIONNE PAS
L’ASPIRATEUR NE
RAMASSE PAS LES
SALETÉS
L’appareil est mal branché.
Aucune électricité n’arrive
à la prise murale.
Le sac filtrant est plein.
Blocage au niveau du bec
d’aspiration ou du pivot
d’admission.
La courroie est
endommagée ou étirée.
Le balai est usé.
Le tube du sac est bouché.
Assurez-vous que
l’aspirateur est
correctement branché
dans la prise murale.
Vérifiez le fusible ou le
disjoncteur du circuit
utilisé.
Remplacez le sac filtrant
(voir «Installation du sac à
poussières en papier
filtre»).
Dégagez les blocages.
Remplacez la courroie.
Remplacez le balai si les
poils ne dépassent pas le
bord de la plaque de base.
Assemblage
Pour vous aider à aider à identifier les composants
de votre aspirateur, les pièces ont été
numérotées comme suit:
1 Poignée, partie haute
2 Tube, partie basse
3 Tête motorisée
4 Sac extérieur
5 Sac à poussière à filtre
papier
6 Cordon d’alimentation
7 Ressort de retenue
8 Barre de tension de sac
9 Attache à glissière
10 Interrupteur M/A
11 Crochet pour cordon
12 Boucle en
plastique/serre-câble
13 Ensemble de
connecteur/poignée
arrière de transport
14 Carter de ventilateur
15 Ensemble de cordon
16 Verrouillage de
cordon
17 Raccord en tire-
bouchon
1
5
8
Avant d'assembler l'appareil,
retirez deux vis du connecteur.
Enlevez l’insert en plastique en le
tirant vers le haut.
10
9
12
4
13
2
7
14
3
17
11
1
16
6
15
Les pores du sac sont
bouchés par de la
poussière fine.
Le ventilateur d’aspiration
est défectueux.
Le balai rotatif n’est pas à
égalité aux deux
extrémités.
TOUTES LES AUTRES RÉPARATIONS DOIVENT ÊTRE
FAITES DANS UN CENTRE DE RÉPARATION AUTORISÉ.
APPELEZ LE SERVICE TÉLÉPHONIQUE GRATUIT
D’AIDE AUX CLIENTS COMMERCIAUX
Commercial: 1-800-242-1378
Hospitality: 1-888-23-ORECK
Canada: 1-866-74-ORECK
Lorsque vous téléphonez, n’oubliez pas de noter le numéro de modèle et
le numéro de série de l’appareil, lesquels figurent sur sa plaque signalétique.
Dégagez le blocage.
Remplacez le sac.
Retournez l’appareil au
centre de réparation.
Vérifiez le joint des paliers.
Assurez-vous que les mots
«old» ou «new» correspondent à chaque
extrémité.
10
Instructions pour
verrouillage de cordon
AVERTISSEMENT : Débranchez le cordon de la
prise électrique avant une intervention de service
ou le désassemblage du verrouillage de cordon.
Assemblage :
1. Branchez la fiche dans la prise.
2. Encliquetez le cordon dans le
verrouillage.
3. Faites tourner l’insert jusqu’à ce qu’il
soit fixé contre la prise.
4. Assurez-vous que la rotation est telle
que décrite pour assurer un
engagement correct.
Désassemblage :
1. Sortez le cordon du verrouillage.
2. Débranchez la fiche de la prise.
Assemblage
Désassemblage
Page 11

FRANÇAIS
Utilisation
Informations générales
Recommandations de fonctionnement
AVERTISSEMENT:
Sacs à poussière jetables en papier filtre
Courroie
Lubrification
Entretien général de l’aspirateur
ATTENTION-Planchers, revêtements de sols souples (dalles PVC,
carreaux à base de bitume) et sols cirés
2
Section
supérieur
du manche
Alors que l'interrupteur est
orienté vers l'avant de l'appareil,
faites glisser la section du
manche par dessus la section
correspondante de l'assemblage
Connecteur
du connecteur.
Visser une vis
dans le trou supérieur et
l´autre dans le trou inférieur.
Bien les serrer jusqu´ à ce
que la poignée ne bouge
plus.
3
Fixez le cordon sur la pince en
le faisant passer au-dessus et
au-dessous de la pince, puis
assurez-vous qu'il est
solidement enfoncé dans la
pince.
Mode d’emploi
Assurez-vous que le sac à poussières jetable en papier filtre est
correctement installé. N’utilisez jamais l’aspirateur sans un sac à
poussières en papier filtre. Lorsque l’appareil est prêt à l’emploi,
branchez le cordon d’alimentation dans une prise électrique et
appuyez sur l’interrupteur du manche (ou sur le dessus de la
base si vous avez un modèle à manche droit).
Les performances de votre nouvel aspirateur dépendent
considérablement de l’entretien et des soins que vous lui
accordez. Les instructions fournies dans ce manuel vous
aideront à exécuter les procédures d’entretien appropriées. Pour
que votre appareil fonctionne de façon satisfaisante pendant de
nombreuses années, lisez les instructions et gardez-les à portée
de main pour référence future.
Voici quelques suggestions simples concernant son utilisation:
1. Lorsque vous insérez un nouveau sac à poussières jetable,
commencez par le secouer, puis ouvrez-le.
2. Lorsque le sac à poussières jetable est plein,
REMPLACEZ-LE.
3. Si l’appareil vient à mal nettoyer ou à produire un bruit
inhabituel, DÉBRANCHEZ-LE et faites les réparations
nécessaires.
4. Même si votre aspirateur vertical ramasse les épingles à
cheveux, les trombones à papier et d’autres petits objets, il
est préférable de les ramasser à la main avant de passer
l’aspirateur. Autrement, vous risquez d’endommager de
façon permanente le mécanisme de succion et son boîtier.
5.
surface mouillée ou humide. Cela pourrait endommager
l’aspirateur et blesser l’utilisateur. Les dommages causés
par une utilisation sur une surface mouillée ou humide ne
sont pas couverts par la garantie.
6. REMPLACEZ LA COURROIE TOUS LES SIX MOIS.
7. Remplacez le sac à poussières jetable au moins une fois
par mois, même s’il n’est pas plein! Les poussières
accumulées dans le sac peuvent dégager des odeurs,
attirer la moisissure, favoriser le développement des
bactéries et nuire au bon fonctionnement de l’appareil.
8. Ne passez pas l’aspirateur sur son cordon d’alimen-
N’utilisez jamais l’aspirateur sur une
tation. Le balai rotatif pourrait endommager le cordon
d’alimentation.
9. Faites attention en nettoyant à l'aspirateur les bords et la
frange finis de couverture de zone.
Les sacs à poussière jetables en papier filtre sont un élément
très important de l’efficacité de votre aspirateur ORECK. Le sac
à poussières doit attraper les saletés, mais il doit également
être suffisamment poreux pour laisser passer l’air. Si le sac en
papier se bouche, aucun air ne peut passer et le nettoyage ne
peut se faire, quelle que soit la puissance de l’aspirateur.
Pour que votre aspirateur conserve une efficacité maximale,
remplacez fréquemment le sac à poussière. NE REMPLISSEZ
PAS LE SAC AU-DELÀ DE LA LIGNE DE REMPLISSAGE.
Assurez-vous que le sac à poussières jetable en papier filtre
est correctement installé.
Les sacs à poussière en papier ne sont pas tous
identiques. Vos sacs à poussière jetables ORECK ont été
spécialement conçus pour les aspirateurs ORECK et l’utilisation de sacs jetables ne portant pas la marque ORECK
risque d’affecter la puissance de nettoyage de votre
appareil et même de l’endommager.
La courroie de votre aspirateur contrôle la vitesse de votre balai
rotatif et constitue un élément très important du fonctionnement efficace de l’appareil. Si la courroie s’étire ou se coupe,
le balai rotatif ralentira ou s’arrêtera complètement. Pour le
remplacement de la courroie, suivez les instructions du manuel.
Une courroie de rechange est rangée dans la plaque de
base de votre aspirateur. Lorsque vous achetez une
courroie de rechange, choisissez uniquement une courroie
de marque ORECK. Les courroies ne portant pas la marque
ORECK ne feront pas fonctionner correctement le balai
tournant et peuvent créer une résistance capable d’endommager le moteur et les paliers du balai. L’utilisation d’une
courroie ne portant pas la marque ORECK annule la
garantie.
Les paliers du moteur de l’aspirateur ont été lubrifiés en usine
et fermés hermétiquement. Aucune lubrification supplémentaire
n’est nécessaire.
Au moins une fois par mois, vérifiez le balai rotatif et enlevez-y
la charpie, les bouts de fil et les cheveux.
Essuyez l’extérieur de l’aspirateur avec un chiffon humide.
Nettoyez également le
déflecteur du connecteur, la
base de l’aspirateur et le boîtier
du ventilateur. S’il y a de la
poussière dans le sac extérieur,
passez-y l’aspirateur ou
secouez-le.
Un peu d’entretien préventif
permettra à votre aspirateur de
conserver une apparence
neuve et une grande efficacité.
Employez les méthodes de finition de sols et revêtements de
sols préconisées par le fabricant. La bande métallique à la base de
l’aspirateur peut être endommagée en frottant contre du ciment ou
une surface abrasive et, par la suite, rayer des sols cirés ou en
matières souples (dalles en PVC, carreaux à base de bitume). La
brosse peut aussi marquer les finis délicats. Ne pas opérer avec
l’appareil verrouillé et en position verticale. Ne pas laisser l’appareil
11
Page 12

FRANÇAIS
INSTALLATION DU SAC:
IMPORTANT :
tourner à la même place pendant longtemps. Il faut toujours le
déplacer quand le moteur est en marche.
Remplacement du sac
à poussières filtrant
AVERTISSEMENT: Avant d’exécuter
cette opération, débranchez le cordon
d’alimentation de la prise murale.
1. Accrochez le fond de
l’ouverture du sac sur la
lèvre «B» du connecteur.
Tirez le collier du sac et
faites-le passer sur la lèvre
«A» du connecteur.
2. Appuyez sur les rebords du
collier du sac pour vous
assurer que le sac est
correctement installé.
Remplacement d’une
courroie usée
AVERTISSEMENT: Avant d’exécuter
cette opération, débranchez le cordon
d’alimentation de la prise murale.
Enlevez la courroie de
remplacement du compartiment de rangement.
Enlevez la vis de retenue
sur le côté de la tête de
nettoyage, puis faites sortir
la porte.
Faites glisser la porte vers
l’avant en la soulevant avec
un tournevis ou une pièces
de monnaie.
Assurez-vous
que le collier du sac est
passé derrière les lèvres
«A» et «B». Si le collier
n’est pas passé, la
poussière s’infiltrera dans le
sachet extérieur. Lorsque le
sac filtrant est installé,
refermer la fermeture à
glissière du sac extérieur.
Enlevez la courroie sur la
poulie du balai et sur l’arbre
d’entraînement du moteur.
Enrouler la nouvelle
courroie autour de l’arbre
d’entraînement du moteur.
Placer l’extrémité opposée
de la courroie sur la poulie
de brosse rotative.
Faire tourner la brosse
rotative pour trois (3) révolutions complètes afin de
s’assurer qu’aucune partie de
la courroie ne déborde de
l’arbre d’entraînement du
moteur.
Replacez la porte en la
faisant glisser dans la
rainure au fond du boîtier.
Replacez la vis de retenue.
12
Page 13

REMARQUE :
FRANÇAIS
DANGER:
Patte de mise à la terre
Prise avec mise à la terre
Blocage ou bourrage
Sous certaines conditions, il est possible que le tube d’admission et
le tube inférieur se bloquent ou se bourrent. Si votre appareil aspire
mal, s’il produit un bruit inhabituel ou si le sac extérieur ne se gonfle
pas, exécutez les opérations suivantes:
AVERTISSEMENT: Avant d’exécuter cette
opération, débranchez le cordon d’alimentation de la prise murale.
1. Vérifiez s’il y a un blocage à
l’entrée de l’admission d’air
(voir l’illustration A). S’il y a un
blocage, enlevez-le avec des
pinces à bec long, un tournevis
ou un cintre. Si vous ne
pouvez pas atteindre le
Ouverture d’admission
A
Ouverture d’admission
B
Ressort de
retenue
C
Anneau
torique
Boîtier
du
ventilateur
D
Languettes
de verrouillage
du collier
E
Languette
du tube
blocage, enlevez la plaque de
base (voir l’illustration B).
2. Si le blocage ne se situe pas à
la base, enlevez le tube
inférieur (voir l’illustration C).
Déconnectez le ressort de
maintien pour relâcher le bas
du sac. Tournez le collier
inférieur dans le sens contraire
des aiguilles d’une montre pour
le glisser vers le haut. Tirez le
tube de la base. Si le bouchon
est dans le tube, retirez-le avec
un porte-manteaux.
3. Si le tube n’est pas bloqué,
regardez dans le boîtier du
ventilateur (voir l’illustration D).
Enlevez les débris avec des
pinces à bec long, un tournevis
ou un cintre.
4. Avant de réassembler les
composants, vérifiez l’anneau
torique sur le tube et rem
placez-le s’il est endommagé.
L’aspirateur ne peut pas
fonctionner sans l’anneau
torique du tube. Faites glisser
l’anneau torique jusqu’à
environ 2 pouces (5cm) de la
base du tube. Replacez-le tube
en alignant d’abord la fente sur
la base du tube avec la patte
intérieure dans le boîtier du
ventilateur. Insérez ensuite le
tube et poussez jusqu’au fond.
Assurez-vous que l’anneau
torique est correctement
installé sur l’ouverture du ventilateur. Remettre en place et
serrer le collier jusqu ce que
les languettes de verrouillage
de collier soient bloques en
place. Voir l’illustration E.
Vérifiez que le collier n’est pas
contrevissé sur le cadre.
5. Il arrive souvent que des
blocages surviennent parce que
le sac à poussières est plein et
que les saletés refoulent dans le
système de circulation d’air.
Dans ces situations, le blocage
se concentre dans la partie
supérieure du système, particulièrement là où le sac à
poussières est raccordé au
connecteur (voir l’illustration F).
Si les opérations ci-dessus ne corrigent pas le
Ouverture du
connecteur
déflecteur
problème, appelez le centre de service à la clientèle commerciale
de la société ORECK au :
Commercial: 1-800-242-1378
Hospitality: 1-888-23-ORECK
Canada: 1-866-74--ORECK
IMPORTANT : Sur les moquettes neuves ou de peluche, un
blocage peut survenir à cause d’un surplus de peluche ou de fils
non fixés sur la moquette. Un blocage pourrait survenir durant les
premiers nettoyages, jusqu’à ce que tous les matériaux libres soient
enlevés. Étant donné le niveau élevé d’efficacité de l’aspirateur,
plusieurs anciennes moquettes peuvent causer des blocages les
premières fois qu’elles sont nettoyées avec cet aspirateur.
Utilisation d’une
tablette Oreck Fresh Air
Votre aspirateur ORECK XL possède une
poche spéciale pour y placer une tablette
FRESH AIR. Cette poche de couleur claire est
située à l’intérieur du sac en vinyle, là où le sac
jetable en papier se fixe au tube d’admission.
Insérez la tablette dans la poche.
Instructions de mise à
la terre
Cet appareil doit être relié à la terre. S’il venait à mal fonctionner ou
tomber en panne, la mise à la terre procure une trajectoire sûre de
faible résistance pour faire passer le courant électrique, réduisant ainsi
les risques d’électrocution. Le cordon d’alimentation de cet appareil est
équipé d’un fil conducteur de mise à la terre et d’une fiche assortie.
Cette dernière ne doit être branchée que sur une prise électrique
installée et mise à la terre conformément à la réglementation en
vigueur.
peut amener des risques d’électrocution. Si vous avez des doutes sur la
convenance de la prise, vérifiez auprès d’un électricien ou d’un
technicien qualifié. Si nécessaire, demandez à un électricien qualifié
d’installer une prise adéquate.
Cet appareil est conçu pour fonctionner sur un circuit utilisant une
tension nominale de 120 volts. Il est équipé d’une fiche de mise à la
terre semblable à l’exemple
illustré. Assurez-vous que la fiche
est branchée dans une prise ayant
la même configuration. Cet
appareil ne doit jamais être utilisé
avec un adaptateur.
13
Une mauvaise connexion du conducteur de mise à la terre
F
®
Page 14

(II)
(I)
FRANÇAIS
Réglage ou remplacement
du balai
SIMPLY AMAZING
®
AVERTISSEMENT: Avant d’exécuter
cette opération, débranchez le cordon
d’alimentation de la prise murale.
Pour savoir si le balai est
usé, placez un rebord
droit sur l’ouverture du
bec. Si les poils du balai
ne dépassent pas la
plaque de base, le balai
doit être réglé.
Enlevez les 5 vis de la
plaque de base, puis la
plaque de base. Enlevez
ensuite la courroie et le
balai rouleau dans le
boîtier.
Faites tourner les deux
paliers aux extrémités du
balai rouleau jusqu’à
l’indication «old» et
replacez-les dans les
rainures de retenue du
boîtier.
GUIA DEL USUARIO
ESPAÑOL
Faites tourner les deux
paliers pour que leur
position corresponde.
IMPORTANT : Sauf si la
brosse est usée comme
indiqué ci-dessus, les
deux roulements doivent
être dans la position «
NEW ». En procédant à
une rotation, les deux
roulements doivent être
dans la position « OLD
». Des positionnements
non appareillés endommageraient votre
machine.
REMARQUE: Le rglage
de roulement marqu OLD
(Ancien) a deux barres
en haut de lensemble.
Celui marqu NEW
(nouveau) a une barre
Lors de la rotation des
roulements, sassurer que
les deux rglages de
roulement soient les
mmes et quils soient
tourns vers le haut lors de
la mise en place du
rouleau brosse.
Réassemblez la courroie
et la plaque de base, puis
assurez-vous que les
poils dépassent la plaque
de base aux deux
extrémités du balai.
Si le réglage ci-dessus est
effectué et que les poils
ne dépassent toujours pas
la plaque de base, un
nouveau balai doit être
commandé.
.
COMERCIAL
U2000R-1
U2000RBOX-1
U2000R4-1
ASPIRADORA VERTICAL DE ALTA
VELOCIDAD CON EL SISTEMA DE LIMPIEZA
®
•IMPORTANTE•
¡GUARDE ESTE FOLLETO!
Incluye:
Advertencias de seguridad
Garantía
Instrucciones de operación
Diagnóstico de problemas
Accesorios
14
Page 15

ESPAÑOL
Hospitality:
Canada:
COMMERCIAL: 1-800-242-1378
HOSPITALITY: 1-888-23-ORECK
CANADA: 1-888-67-ORECK
ITEM PART #
ANTES DE OPERAR LA
ASPIRADORA, LEA CON CUIDADO
TODAS LAS INSTRUCCIONES
INCLUIDAS EN ESTE MANUAL.
Indice
Mantenimiento y servicio a clientes,
Accesorios,Instrucciones importantes
de seguridad, . . . . . . . . . . . . . . . . . .página 15
Garantía, Guía para la identificatón
de problemas . . . . . . . . . . . . . . . . . .página 16
Ensamblaje, Para reemplazar la
bolsa para polvo de filtro . . . . . . . . .página 17
Instrucciones de operación . . . . . . . .página 18
Cómo reemplazar una correa
desgastada, Para ajustar o
reemplazar el cepillo . . . . . . . . . . . . .página 19
Relleno o bloqueo, Uso de una
tableta de Oreck Fresh Air
®
,
Instrucciones para el aterrizado . . . .página 20
Mantenimiento y servicio
a clientes
Su aspiradora ORECK es un producto de diseño preciso. Los
cojinetes del motor están lubricados permanentemente y no debe
ponerles aceite. Si requiere información adicional o si tiene
problemas con su aparato ORECK, llame al servicio a clientes
comerciales de ORECK al:
Commercial: 1
Por favor especifique el número de modelo y el número de
serie/código, el cual se puede encontrar en la placa de datos en
la parte posterior de la aspiradora.
Guarde su recibo de ventas o de compra. En caso que su aparato
ORECK necesitara servicio de garantía en los EE. UU., presente
este recibo en el centro de servicio autorizado como su
comprobante de fecha de compra, o en Canadá, llame a servicio
a clientes.
-
800-242-1378
1-888-23-ORECK
1-866-74-ORECK
Accesorios
Vendido por separado
1. Paquete de 25 bolsas para polvo, regulares PK800025
2. Correas, paquete de 3 0300604
3. Tabletas Oreck Fresh Air
®
AIRTABS
INSTRUCCIONES IMPORTANTES DE
SEGURIDAD
Cuando utilice un aparato eléctrico, siempre
debe seguir precauciones básicas, incluyendo las
siguientes:
LEA TODAS LAS INSTRUCCIONES ANTES DE USAR
ESTA ASPIRADORA
ADVERTENCIA
Para reducir el riesgo de incendio, descarga
eléctrica o lesiones:
• No deje el aparato sin atender cuando esté conectado. Desconéctelo de la toma de
corriente cuando no esté en uso y antes de darle servicio.
• No la use en exteriores ni en superficies mojadas.
• No permita que se use como juguete. Es necesario poner mucha atención cuando la
usen los niños o cuando se use cerca de ellos.
• No operar la unidad mientras está en posición vertical y trabada.
• No permitir que la unidad funcione mientras esté en cualquier posición fija
por cualquier período de tiempo. Se requiere supervisión cuando se utiliza cerca de
niños.
• Usela solamente como se describe en este manual. Utilice solamente los aditamentos
recomendados por el fabricante.
• No la use con el cordón o clavija dañados. Si la aspiradora no funciona como debería, si
se ha caído, dañado, dejado en exteriores, o dejado caer en agua, envíela a un centro
de servicio o llame a servicio a clientes al:
Commercial: 1-800-242-1378 Hospitality: 1-888-23-ORECK
Canada: 1-866-74-ORECK
• No tire de ella ni la mueva por el cordón, ni use el cordón como asa, no cierre la puerta
sobre el cordón, ni jale el cordón alrededor de bordes o esquinas afiladas. Mantenga el
cordón lejos de las superficies calientes.
• No opere el aparato sobre el cordón.
• No lo desconecte jalando el cordón. Para desconectarlo, tome la clavija, no el cordón.
• No manipule la clavija ni el aparato con las manos mojadas.
• No ponga objetos pesados en las aberturas. No lo use con alguna abertura bloqueada;
manténgalo libre de polvo, pelusa, cabello y cualquier cosa que pueda reducir el flujo de
aire.
• Mantenga el cabello, ropa suelta, dedos y todas las partes del cuerpo lejos de las
aberturas y partes móviles.
• No la use para que aspire cualquier cosa que se esté quemando o arrojando humo,
como cigarrillos, cerillos o cenizas calientes.
• No la use sin el ensamblaje de la bolsa de filtro en su lugar.
• Apague todos los controles antes de desconectarla.
• Tenga cuidado especial cuando limpie alguna escalera.
• No la use para aspirar líquidos inflamables o combustibles, como gasolina o líquido para
encendedores, ni la use en áreas donde puedan estar presentes.
• No use el aparato en espacios cerrados donde puedan emanarse vapores inflamables,
explosivos o tóxicos por pintura a base de aceite, adelgazador de pintura, algunas
sustancias a prueba de moho, o en un área donde haya presente polvo inflamable.
• No aspire con este aparato material tóxico como blanqueador con cloro, limpiador de
drenajes, gasolina, etc.
• Faites attention en nettoyant à l'aspirateur les bords et la frange finis de couverture de
zone.
• Su aparato está equipado con un cable de extensión. En caso de daño o pérdida de
función, reemplace este cable de extensión sólo con un cable tipo SJT, con capacidad
para 300 Voltios / 105ºC (221ºF), 3 alambres incluyendo el alambre de conexión a
tierra, #18 AWG (calibre de alambre estadounidense), con longitud no superior a 15.24
m (50 pies). No utilizar el cable apropiado podría resultar en incendio o descarga
eléctrica.
• Mantenga el cable alejado de las superficies calientes
GUARDE ESTAS INSTRUCCIONES
Para uso comercial
ADVERTENCIA: El producto contiene sustancias químicas
conocidas por el Estado de California como causantes de
cáncer y defectos de nacimiento, u otros daños en el sistema
reproductor.
15
Page 16

ESPAÑOL
Garantía
ORECK MANUFACTURING COMPANY: (ORECK Manufacturing
Company le otorga la siguiente garantía limitada para este
producto, solamente si fue comprado inicialmente para uso
residencial, no para la reventa, de ORECK o un minorista autorizado de ORECK).
ORECK reparará o reemplazará gratuitamente al comprador
original, cualquier pieza que resulte defectuosa en los materiales
o la fabricación, dentro de un (1) año, contado a partir de la fecha
de compra. Esta garantía limitada ampara el cepillo rotatorio de
rodillo durante treinta (30) días, solamente para uso comercial.
Esta garantía limitada no ampara el reemplazo de piezas
desechables o fungibles, tales como los cepillos de carbono para
el motor, los cepillos del borde, las correas de transmisión, las
bombillas, las bolsas desechables y demás piezas susceptibles
de desgaste normal, a menos que sean defectuosas en los
materiales o la fabricación.
Esta garantía limitada no se aplicará a ninguna pieza que sufra
un accidente o a la cual se maltrate, se altere, se le dé un mal
uso o se estropee por incendio, fuerza mayor o caso fortuito; por
el uso de voltajes distintos de los indicados en la placa del
número de serie de este producto o por cualquier reparación del
mismo, no efectuada por ORECK o un centro de reparaciones
autorizado por la fábrica.
ORECK no autoriza a ninguna persona o representante a asumir
o conceder ninguna otra obligación de garantía con la venta de
este producto.
La garantía limitada de ORECK será válida solamente si usted
conserva la prueba de la compra de este producto de ORECK o
un minorista autorizado de ORECK. Si compra este producto de
cualquier otra fuente, lo adquirirá “COMO SE ENCUENTRA”, lo
cual significa que ORECK no le concederá ninguna garantía y
que usted, no ORECK, asumirá totalmente los riesgos de calidad
y funcionamiento de este producto, inclusive la totalidad del
costo de cualquier conservación o la reparación de cualquier
defecto.
La responsabilidad de ORECK por los daños y perjuicios que se
le causen por cualesquier costos, sean cuales fueren, originados
en esta enunciación de garantía limitada, se limitará a la suma
pagada por este producto en el momento de la compra inicial, y
ORECK no responderá por ningunos daños y perjuicios directos,
indirectos, derivados de las consecuencias de los actos de las
partes ni derivados del incumplimiento del contrato, originados
en el uso de este producto o en la incapacidad de usarlo.
Algunos estados no permiten la exclusión o limitación de los
daños y perjuicios derivados del incumplimiento o de las consecuencias de los actos de las partes; por consiguiente, las
anteriores limitaciones o exclusiones quizá no le sean aplicables
a usted.
TODA GARANTÍA EXPRESA O TÁCITA DE ESTE PRODUCTO,
INCLUSIVE LAS GARANTÍAS TÁCITAS DE FÁCILVENTA E
IDONEIDAD PARA UN FIN DETERMINADO, ESTÁN
LIMITADAS EN SU DURACIÓN AL PERÍODO DE LA
GARANTÍA, Y NINGUNA GARANTÍA EXPRESA O TÁCITA
SERÁ APLICABLE CON POSTERIORIDAD A ESTE PERÍODO.
Algunos estados no permiten limitaciones de la duración de las
garantías tácitas; por lo tanto, la anterior limitación quizá no le
sea aplicable a usted.
Esta garantía le concede derechos legales específicos, y quizá
tenga otros derechos, que varían de un estado a otro.
Guía para identificación
de problemas
ADVERTENCIA: Desconecte el cordón de
la toma eléctrica antes de dar servicio.
AHORRESE LAS LLAMADAS DE SERVICIO… REVISE
PRIMERO LO SIGUIENTE:
• ¿Está llena la bolsa para polvo de filtro desechable?
• ¿Hay poros de la bolsa para polvo de filtro tapados con polvo
fino?
• ¿Hay algo que tape el cepillo revolvente, el tubo inferior, la
abertura de admisión, el bastidor del ventilador, o la abertura
de ensamblaje de la conexión?
• ¿Los extremos del cepillo están en la ubicación adecuada?
• ¿El cepillo gira libremente? ¿Hay cabellos, hilos o fibras de
tapete alrededor del cepillo?
PROBLEMA POSIBLE CAUSA AREAS A VERIFICAR
LA ASPIRADORA NO
FUNCIONA
EL APARATO NO
ASPIRA
No está bien conectada.
No hay electricidad en la
toma de corriente en la
pared.
La bolsa del filtro está
llena.
La boquilla o el pivote de
admisión está tapado.
La correa está rota o
estirada.
El cepillo está desgastado.
El tubo de la bolsa está
tapado.
Los poros de la bolsa
están tapados con polvo
fino.
El impulsor del ventilador
está roto.
El cepillo revolvente no
está uniforme en ambos
extremos.
TOUTES LES AUTRES RÉPARATIONS DOIVENT ÊTRE
FAITES DANS UN CENTRE DE RÉPARATION AUTORISÉ.
LLAME AL SERVICIO A CLIENTES
COMERCIALES DE ORECK AL:
Commercial: 1-800-242-1378
Hospitality: 1-888-23-ORECK
Canada: 1-866-74-ORECK
Lorsque vous téléphonez, n’oubliez pas de noter le numéro de modèle et
le numéro de série de l’appareil, lesquels figurent sur sa plaque signalétique.
16
Asegúrese que la
aspiradora esté firmemente
conectada en la toma de
corriente de la pared.
Revise el fusible de la
fuente de electricidad o el
interruptor automático del
circuito.
Reemplace la bolsa del
filtro. Vea la sección “Cómo
instalar la bolsa para polvo
de filtro de papel.”
Limpie las obstrucciones.
Reemplace la correa.
Reemplace el cepillo si las
cerdas no se extienden
más allá de la placa base.
Limpie la obstrucción.
Cambie la bolsa.
Envíe al Centro de Servicio
para su reparación.
Verifique el sello del
cojinete. Asegúrese que las
palabras “old” o “new”
correspondan en cada
extremo.
Page 17

ESPAÑOL
INSTALACION DE LA BOLSA:
IMPORTANTE:
Ensamblaje
de la
conexión
Sección del asa,
superior
Ensamblaje
Para ayudarle a identificar los
componentes de su aspiradora,
las piezas se han numerado
como sigue:
1 Sección de manija,
superior
2 Tubo, inferior
3 Cabezal de potencia
4 Bolsa exterior
5 Bolsa recolectora de
polvo tipo filtro de
papel
6 Cable de suministro
de energía
7 Resorte de retención
8 Barra tensora de
bolsa
9 Cremallera
10 Interruptor de
Encendido/Apagado
11 Gancho para cable
12 Aro plástico /
abrazadera de cable
13 Conjunto de conector
/ Manija de trans
porte trasera
14 Carcasa del venti
lador
15 Conjunto de cable
16 Sujetador del cable
17 Espiral
1
5
8
Antes de armar la
máquina, retire los dos
tornillos del conjunto
conector. Remueva el
inserto plástico halando
hacia arriba
2
Deslice la sección del
mango superior sobre la
sección correspondiente
10
9
12
17
1
11
del conjunto conector.
Inserte un tornillo en el
agujero superior y un
tornillo en el agujero
inferior, y luego apriete
firmemente hasta que el
16
4
13
3
6
2
mango quede ajustado.
Fije el cordón en la grapa
oprimiéndolo encima y
debajo de la grapa para
asegurarse que quede
completamente metido en
ella.
15
7
14
Para reemplazar la
3
bolsa para polvo de filtro
ADVERTENCIA: Desconecte el cordón de
la toma eléctrica antes de dar servicio.
1. Enganche la parte inferior de la
abertura del collarín de la bolsa
A
B
sobre el reborde “B” del
ensamblaje de la conexión. Jale
sobre el collarín de la bolsa y
encaje sobre el reborde “A” de
la conexión.
2. Oprima sobre los bordes del
collarín de la bolsa para
asegurarse que la bolsa esté
totalmente instalada.
Instrucciones para el
sujetador del cable
ADVERTENCIA: Antes de suministrar servicio de
mantenimiento o remover el sujetador del cable,
desenchufe el cable fuera del tomacorriente
eléctrico.
Ensamblaje:
1. Conecte el conector y receptáculo.
2. Inserte a presión el cable dentro del
sujetador.
3. Gire el inserto hasta que asegure
contra el conector
4. Verifique que la rotación se realice
según se muestra para garantizar el
enganche apropiado
Desensamblaje:
1. Remueva el cable fuera del sujetador
2. Desconecte el conector y receptáculo.
Ensamblaje
Desensamblaje
17
asegurarse que el collarín de la
bolsa esté detrás de los
rebordes “A” y “B”. Si no, el
polvo se filtrará hacia la bolsa
exterior. Cuando la bolsa de
filtro está en su lugar, cierre la
bolsa exterior con el sujetador
de cremallera.
Verifique para
Page 18

ESPAÑOL
Cómo operarla
Bolsas para polvo con filtro de papel desechables.
La correa
Lubricación
Cuidados generales de la aspiradora
PRECAUCION-Pisos de madera,
superficies suaves de madera (vinilo,
baldosas de asfalto, etc.) y pisos
enc
erados
Instrucciones de operación
Asegúrese que la bolsa para polvo de filtro de papel esté en su
lugar. NO opere la aspiradora sin una bolsa para polvo de filtro
de papel. Conecte el cordón de alimentación en una toma
eléctrica y cuando esté listo para operarla oprima el interruptor
de encendido/apagado (On/Off) sobre el ensamblaje del mango
de ayuda o en la parte superior de la base para los modelos con
mango vertical.
Información general
El desempeño de su nueva aspiradora depende en gran parte
del cuidado y el mantenimiento. Las instrucciones de este
manual le guiarán para realizar el cuidado y mantenimiento
básico. Para obtener muchos años de servicio satisfactorio, lea
las instrucciones y manténgalas a la mano para futura referencia.
Recomendaciones de operación
Las siguientes son sólo algunas sugerencias sencillas
relacionadas con su operación:
1. Cuando inserte una nueva bolsa desechable para polvo
con filtro de papel, PRIMERO INFLELA y ABRA LA BOLSA.
2. Cuando la bolsa para polvo con filtro desechable esté
llena, CAMBIELA.
3. Si en cualquier momento la máquina no absorbe
adecuadamente o hace un ruido inusual, DEJE DE
OPERARLA y déle servicio.
4. Aunque su aspiradora vertical absorbe alfileres, sujetadores de papel y otros objetos pequeños, se recomienda
que los retire del suelo antes de aspirar. En caso de no
hacerlo el ventilador de succión del motor y el bastidor
pueden quedar con daños permanentes.
5. ADVERTENCIA: No use su aspiradora en superficies
húmedas o mojadas. Esto provocará daños en la
aspiradora y es peligroso para el usuario. Los daños provocados por el uso en superficies húmedas o mojadas no
están cubiertos por la garantía.
6. REEMPLACE LA CORREA CADA 6 MESES.
7. Cambie la bolsa para polvo con filtro desechable por lo
menos una vez al mes, aunque no esté llena. El polvo
recolectado en la bolsa de polvo puede provocar olores,
atraer la humedad, actuar como área de multiplicación, y
puede afectar la eficiencia de la aspiradora.
8. NO opere la aspiradora por encima del cordón. El
cepillo revolvente puede dañar el cordón.
9. Tenga cuidado al limpiar los bordes y la franja excesivos de
la manta con la aspiradora del área.
Las bolsas para polvo con filtro de papel desechables tienen
una función muy importante en la eficiencia de su aspiradora
ORECK. El objetivo de la bolsa de papel es atrapar la mugre,
pero al mismo tiempo debe ser lo suficiente porosa para que el
aire pase a través de ella. Si se tapa la bolsa de papel, no
puede pasar el aire a través de la aspiradora y no se puede
aspirar, independientemente de la potencia de la aspiradora.
Para mantener su aspiradora operando con la máxima
eficiencia, cambie la bolsa de polvo con frecuencia. NO LLENE
LA BOLSA SOBRE LA lInEA INDICADA EN LA BOLSA PARA
POLVO.
Asegúrese que la bolsa para polvo de filtro de papel esté en la
posición adecuada.
No todas las bolsas para polvo de papel son iguales. Sus
bolsas para polvo desechables de ORECK han sido
diseñadas para utilizarse con la aspiradora ORECK y si usa
otras bolsas que no sean las bolsas desechables genuinas
de ORECK se afectará la capacidad de limpieza de su
aspiradora y podría dañarse.
La correa de su aspiradora controla la velocidad del cepillo
revolvente y es muy importante para la operación eficaz de la
aspiradora. Si la correa se corta o se estira, provocará que el
cepillo revolvente se detenga completamente o que se haga
más lento. Vea las instrucciones en el manual para la correa
revolvente.
En la placa base de su aspiradora se almacena una correa
extra. Cuando compre las correas de repuesto, use
SOLAMENTE correas genuinas de ORECK. Otras correas
que no sean de ORECK no operarán el cepillo revolvente
de manera correcta y pueden provocar tensión indebida, la
cual provocará daños al motor y a los cojinetes del cepillo.
Si utiliza otras correas que no sean de ORECK se anulará
la garantía.
Los cojinetes del motor de la aspiradora se lubrican y sellan en
la fábrica. No se requiere lubricación adicional.
Por lo menos una vez al mes, revise y retire el exceso de
pelusa, hilos o cabello del cepillo revolvente.
Limpie el exterior de la aspiradora con una tela húmeda.
También limpie el área de ensamblaje del deflector de la
Utilizar los métodos de limpieza para pisos y terminaciones de
pisos recomendados por el fabricante. La tira de metal en la
base del limpiador puede dañarse si se utiliza en concreto o en
superficies abrasivas, y por lo tanto, puede causar daño a los
pisos de madera, superficies suaves de madera (vinilo,
baldosas de asfalto, etc.) y pisos encerados. El cepillo del
rodillo también puede manchar las terminaciones muy suaves.
No operar la unidad mientras que se encuentre en posición
vertical o trancada. No permitir que la unidad funcione mientras
que esté en cualquier posición estacionaria por cualquier plazo
de tiempo. Mantener la unidad en movimiento mientras que
esté funcionando.
conexión, la base de la
aspiradora y el área del bastidor
del ventilador. Si hubiera polvo
en la bolsa exterior, aspírelo o
sacúdalo. Un poco de mantenimiento preventivo mantendrá
su aspiradora como nueva y
asegurará la eficacia continua
de limpieza.
18
Page 19

ESPAÑOL
Cómo reemplazar una
correa desgastada
ADVERTENCIA: Desconecte el cordón de
la toma eléctrica antes de dar servicio.
Retire la correa de
reemplazo del canal de
almacenamiento.
Retire la puerta retirando
el tornillo de sujeción
localizado por un lado de
la cabeza motriz.
Deslice la puerta hacia
adelante haciendo
palanca con un de
stornillador o una
moneda.
Retire la correa de la
polea del rodillo del
cepillo y el eje de
impulsión del motor.
Haga pasar la nueva
correa sobre el eje de
accionamiento del motor.
Coloque el extremo
opuesto de la correa
sobre la polea del rodillo
del cepillo.
Haga girar el rodillo del
cepillo tres (3) revoluciones completas, para
asegurar que ninguna
parte de la correa sobresalga del extremo del eje
de accionamiento del
motor.
Regrese a su lugar la
puerta deslizándola
sobre la ranura en la
parte interior del
bastidor. Regrese a su
lugar el tornillo de
sujeción.
Para ajustar o reemplazar
ADVERTENCIA: Desconecte el cordón de
la toma eléctrica antes de dar servicio.
Gire y haga corresponder los ensamblajes
de los cojinetes.
IMPORTANTE: A menos
que el cepillo esté
gastado como se indica
más arriba, ambos
apoyos deben encontrarse en la posición
‘NUEVO’ (‘NEW’). Al
hacer la rotación, ambos
apoyos deben encontrarse en la posición
‘VIEJO’ (‘OLD’). Si las
posiciones no coinciden,
su máquina sufrirá
daños.
19
el cepillo
Para determinar si el
cepillo está desgastado,
coloque un borde recto
firme a través de la
abertura de la boquilla. Si
las cerdas del cepillo no
se extienden más allá de
la placa base, debe de
ajustar el cepillo.
Quite la placa base
retirando 5 tornillos.
Luego quite la correa y el
rodillo del cepillo del
bastidor.
Gire ambos ensamblajes
de cojinetes en los
extremos del rodillo del
cepillo hasta que
aparezca “OLD” y
reemplácelo en los
canales de ensamblaje
del bastidor.
NOTA: El ajuste del
conjunto de cojinetes,
marcado "OLD" tiene dos
barras (II) en la parte
superior del conjunto. El
marcado "NEW" tiene una
barra (I). Cuando se den
vuelta los cojinetes,
asegurarse que los dos
ajustes del conjunto de
cojinetes sean iguales y
estén hacia arriba al
reponer el rodillo de
cepillo.
Monte nuevamente la
correa y la placa base y
verifique la altura de las
cerdas por arriba de la
placa base en cada
extremo del cepillo.
Si ya se ha hecho el
ajuste previo y la altura de
las cerdas no se extiende
más allá de la placa base,
deberá ordenar un nuevo
ensamblaje de cepillo.
Page 20

ESPAÑOL
NOTA:
PELIGRO:
Espiga de aterrizado
Salida de aterrizado
Relleno o bloqueo
Bajo ciertas condiciones, es posible que se rellene o se bloquee el
ensamblaje del tubo de admisión y del tubo inferior. Si su aspiradora no
aspira adecuadamente, o si hace ruidos inusuales y la bolsa exterior no
se esponja o infla, siga los siguientes pasos:
ADVERTENCIA: Desconecte el cordón de
la toma eléctrica antes de dar servicio.
1. Revise que la boca de la
abertura de entrada no esté
bloqueada. Vea la ilustración A.
Si hubiera un bloqueo, retírelo
con unos alicates largos, un
destornillador o una percha para
ropa. Si no puede alcanzar el
A
Abertura de admisión
Abertura de admisión
B
Resorte
retenedor
C
Anillo
tórico
Bastidor
del
ventilador
D
Lengüetas
de fijación
del collar
E
75965-02 ©2012 Oreck Holdings, LLC. All rights reserved. All word marks, logos, product configurations, and registered trademarks are owned and used
05/12 ECN# 11061 under the authority of Oreck Holdings, LLC.
APRETAR
Lengüeta
del tubo
bloqueo, quite la placa base. Vea
la ilustración B.
2. Si el bloqueo no está en la base,
retire el tubo inferior. Vea la
ilustración C. Desenganche el
resorte retenedor, liberando la
parte inferior de la bolsa. Gire el
collarín en sentido contrario de
las agujas del reloj para
deslizarlo hacia arriba. Jale el
tubo fuera de su base. Verifique
el bloqueo. Si está en el tubo,
retírelo con una percha para ropa.
3. Si el tubo no está bloqueado,
vea el bastidor del ventilador.
Vea la ilustración D. Retire los
residuos con unos alicates
largos, un destornillador o una
percha para ropa.
4. Para armar nuevamente,
verifique el anillo tórico en el
tubo, y reemplácelo si está
dañado. La aspiradora no
operará adecuadamente sin el
anillo tórico del tubo. Deslice el
anillo tórico aproximadamente
2” de la base del tubo. Coloque
otra vez el tubo alineando
primero la ranura en la base
del tubo con la lengüeta
interior dentro del bastidor del
ventilador. Luego inserte
nuevamente el tubo y empuje
hacia abajo hasta que el tubo
esté asentado. Asegúrese que
el anillo tórico esté en su lugar
en la abertura del bastidor del
ventilador.
Reponer y apretar el collar
hasta que las orejetas de
fijación estén trabadas en su
lugar. Ver la ilustración E.
Asegurarse que el collar no
estropee las roscas en la caja.
5. Muchas veces ocurre un
bloqueo debido a que la bolsa
para polvo está llena, lo que
provoca que el polvo baje al
sistema de flujo de aire. Cuando
eso sucede, el bloqueo estará
en la parte superior del sistema,
comenzando en el área donde
la bolsa para polvo se conecta
al ensamblaje de la conexión.
Vea la ilustración F.
Si las medidas anteriores no corrigen el problema, llame
Abertura del
deflector de
la conexión
F
al servicio a clientes comerciales de ORECK al:
Commercial: 1-800-242-1378
Hospitality: 1-888-23-ORECK
Canada: 1-866-74-ORECK
IMPORTANTE: En alfombras nuevas y afelpadas, puede
ocurrir un bloqueo por el exceso de pelusa y de cortes
sueltos en la alfombra. El bloqueo puede ocurrir en las
primeras limpiezas, hasta que se retire todo el material
suelto. Debido a la alta eficiencia de la aspiradora, muchas
alfombras más viejas provocarán bloqueos cuando se use en
ellas la aspiradora por primera vez.
Uso de una tableta
Oreck Fresh Air
Su aspiradora ORECK XL tiene un bolsillo para
una tableta FRESH AIR. Este bolsillo de color
claro se localiza dentro de la bolsa de vinilo, en
el área donde la bolsa desechable de papel se
fija al tubo de entrada. Inserte la tableta en el
bolsillo.
®
Instrucciones para
el aterrizado
Este dispositivo debe aterrizarse. Si tuviera un mal funcionamiento o si
se descompusiera, el aterrizado ofrece una trayectoria segura de menor
resistencia para la corriente eléctrica, lo que reduce el riesgo de una
descarga eléctrica. El cordón de este aparato tiene un conductor para
el aterrizado del equipo y una clavija para el aterrizado. Deberá
conectarse solamente en una toma eléctrica que esté adecuadamente
instalada y aterrizada en conformidad con todos los códigos y
reglamentos locales.
equipo puede dar como resultado el riesgo de una descarga eléctrica.
Verifique con un electricista o personal de servicio calificado en caso
que tenga duda respecto a si la toma de corriente es correcta, y pida a
un electricista calificado que le instale una toma adecuada.
Este aparato es para usarse en un circuito nominal de 120 voltios.
Tiene una clavija de aterrizado
similar al ejemplo mostrado.
Asegúrese que el aparato esté
conectado a una toma con la
misma configuración que la
clavija. No deberá usar adaptadores en este aparato.
La conexión inadecuada del conductor de aterrizado del
 Loading...