

Page 1
P
O
W
E
R
20061-01 Rev. A
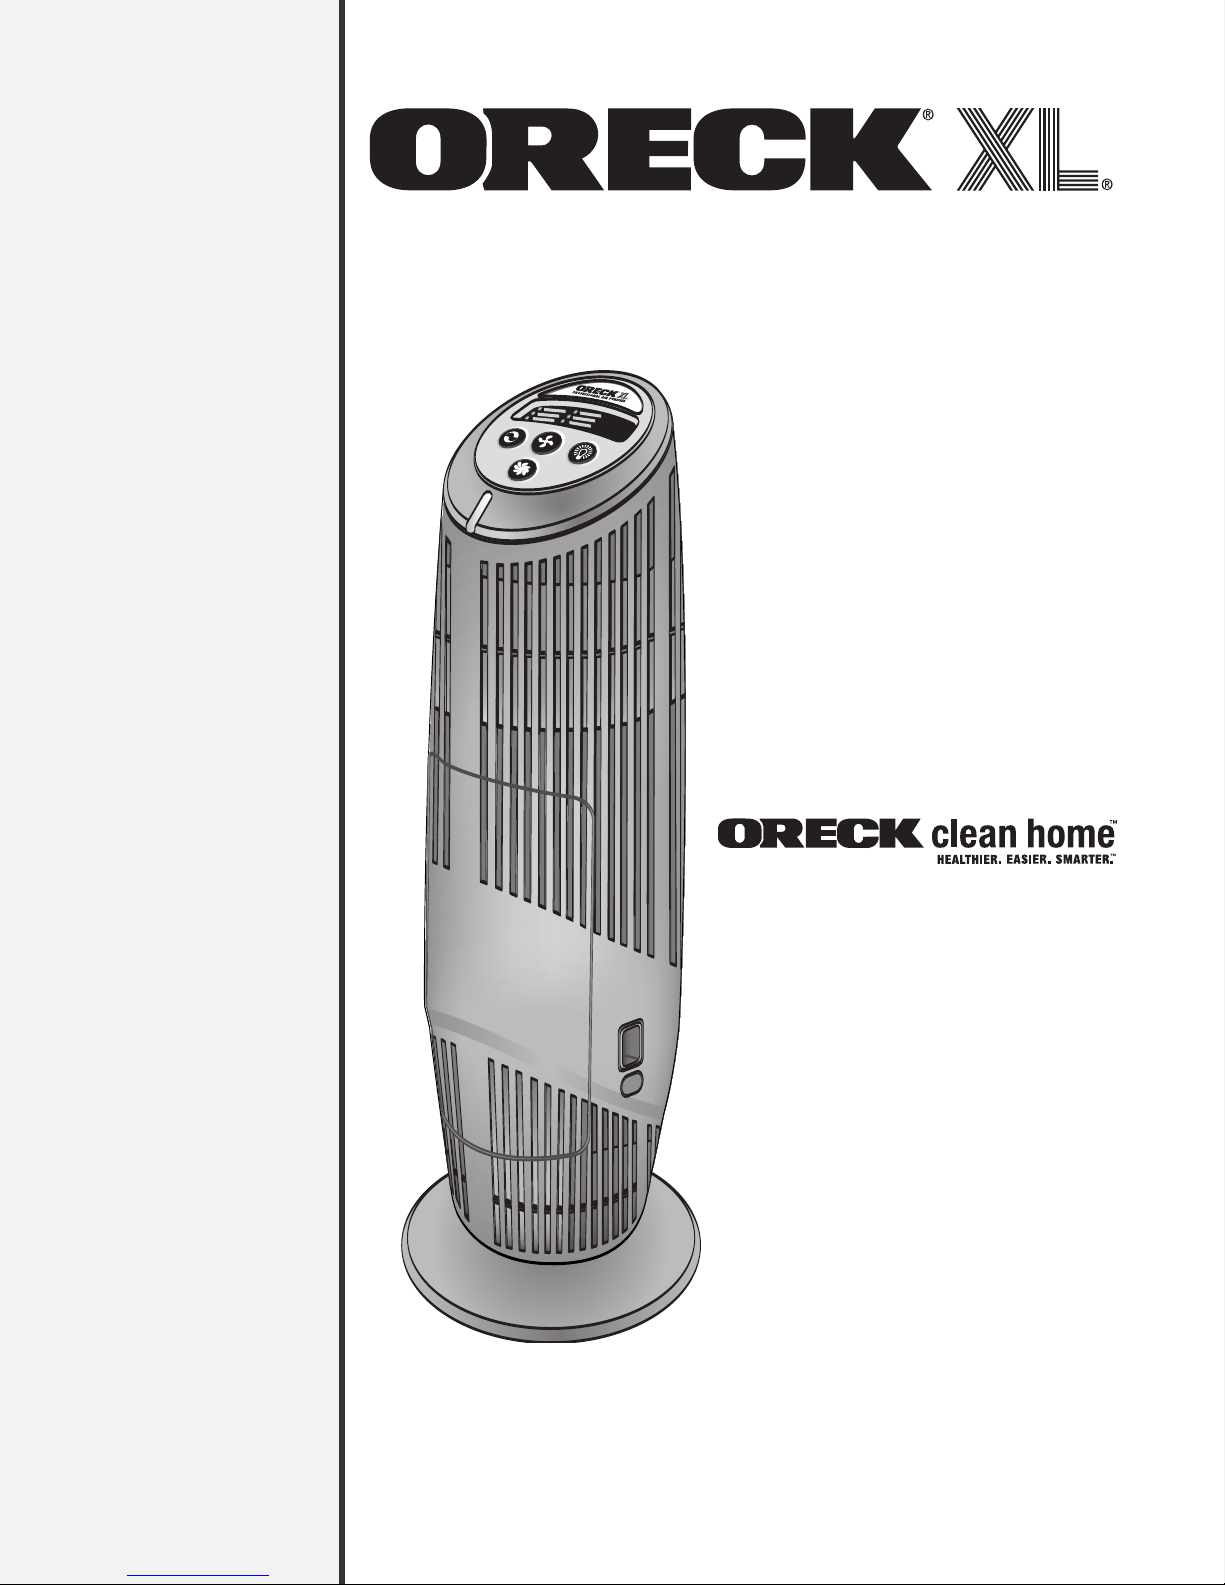
Professional Air Purifier
AIRT Series
User’s
Guide
Important!
Read all instructions carefully, and keep for future reference.
Page 2
Enjoy
Total Cleaning System
ENGLISH
Thank you for purchasing an Oreck Professional Air Purifier!
You will enjoy years of cleaner, fresher air with the Oreck air purifier
.
in your home. It includes six different air purification technologies to
provide unique protection against airborne pollutants and allergens:
Stage 1. The pre-filter removes large particles, including dust,
lint, and hair.
Stages 2 and 3 are part of the Truman Cell™ proprietary technology.
Stage 2. Positive charging wires electrostatically charge smaller
particles such as dust, smoke, pollen, bacteria, molds,
viruses, and fungi.
Stage 3. The electronic collector cell collects the electrostatically
charged particles and destroys the bacteria, molds, viruses
and fungi.
Stage 4. The optional odor absorber removes common household
odors and chemical fumes.
Stage 5. The Oxygenator changes atmospheric ozone to harmless
oxygen.
Stage 6. The optional air revitalizer negative ion generator provides
additional air freshness and a pleasant, clean scent through
the release of negative ions.
Call.
Click.
Visit.
This combination of technologies provides broad protection against a
wide range of contaminants to make your home healthier, cleaner, and
more livable. Enjoy!
At Oreck, we understand that our customers are unique and expect
superior service. To meet your needs, we offer different customer
service options to work with your lifestyle and preferences.
Welcome to our
To speak with an Oreck representative call:
USA:
Canada: 1•888•676•7325
On the web, point and click at:
www.oreck.com
Visit us in person at one of over 450 store locations.
To find the nearest store, please call
(888-673-2578) or visit www.oreckstore.com.
Call. Click. Visit. customer service program.
1•800•989•3535
888-oreckstore
2
Page 3

ENGLISH
Safety . . . . . . . . . . . . . . . . . . . . . . . . . . . . . . . . . . . . . . . . . . . . . . 4
Contents.
General Warnings . . . . . . . . . . . . . . . . . . . . . . . . . . . . . . . . . 4
Parts . . . . . . . . . . . . . . . . . . . . . . . . . . . . . . . . . . . . . . . . . . . . . . 5
Accessories . . . . . . . . . . . . . . . . . . . . . . . . . . . . . . . . . . . . . . 5
Replacement Parts . . . . . . . . . . . . . . . . . . . . . . . . . . . . . . . . 5
Operation . . . . . . . . . . . . . . . . . . . . . . . . . . . . . . . . . . . . . . . . . . 6
Cleaning . . . . . . . . . . . . . . . . . . . . . . . . . . . . . . . . . . . . . . . . . . . 8
Cleaning Times . . . . . . . . . . . . . . . . . . . . . . . . . . . . . . . . . . . 8
Cleaning the Cabinet . . . . . . . . . . . . . . . . . . . . . . . . . . . . . . 8
Cleaning the Air Purifier Components . . . . . . . . . . . . . . . . 8
Cleaning the Collector Cell . . . . . . . . . . . . . . . . . . . . . . . . . 9
Cleaning the Pre-Filter . . . . . . . . . . . . . . . . . . . . . . . . . . . . . 9
Cleaning the Oxygenator . . . . . . . . . . . . . . . . . . . . . . . . . . . 10
Maintenance . . . . . . . . . . . . . . . . . . . . . . . . . . . . . . . . . . . . . . . 10
Replacing the optional Odor Absorber . . . . . . . . . . . . . . . . 10
Troubleshooting . . . . . . . . . . . . . . . . . . . . . . . . . . . . . . . . . . . . . 11
Warranty . . . . . . . . . . . . . . . . . . . . . . . . . . . . . . . . . . . . . . . . . . . 12
Español Guía del usuario . . . . . . . . . . . . . . . . . . . . . . . . . . . . . 13
3
Page 4

Safety.
ENGLISH
General Warnings
IMPORTANT SAFETY INSTRUCTIONS!
When using an electrical appliance, basic precautions should always be followed,
including the following:
READ ALL INSTRUCTIONS BEFORE USING THIS AIR PURIFIER
WARNING To reduce the risk of fire, electric shock, or injury:
• Do not use outdoors or on wet surfaces.
• Use only as described in this manual.
• Do not use with damaged cord or plug. If appliance is not working as it should, has
been dropped, damaged, left outdoors, or dropped into water, return it to a service
center or call customer service at:
USA: 1-800-989-3535 Canada: 1-888-676-7325
• Do not unplug by pulling on cord. To unplug, grasp the plug, not the cord.
• Do not handle plug or appliance with wet hands.
• Do not put any object into openings. Do not use with any opening blocked; keep free
of dust, lint, hair and anything that may reduce air flow.
• Keep hair, loose clothing, fingers and all parts of body away from openings and
ving parts.
mo
• Turn off all controls before unplugging.
• Do not use appliance in an enclosed space w
toxic vapors are given off or in an area where flammable dust is present.
• You should consult your oxygen and medical equipment providers before using the air
purifier around oxygen tanks, hoods, or other medical devices using concentrated
oxygen.
and other combustible gases could result in fires or explosions, potentially causing
serious injur
Using electronic de
y or even death.
vices, including an air purifier, in the presence of oxygen
here oxygen, flammable, e
xplosive or
SAVE THESE INSTRUCTIONS
CAUTION!
y cause
Installing a w
melting of internal components during use.
• DO NOT place a wet or damp collector cell in the air purifier.
• DO NOT wash the odor absorber. Replace, if necessary.
• Dry the collector cell thoroughly outside of the air purifier before reinstalling it into
the air purif
are dry before reinstalling into the air purifier.
et or e
. Ensure that all areas including cor
ier
ners and areas that ma
en damp collector cell into the air purif
v
ier ma
y trap w
ater
FOR COMMERCIAL USE:
High voltage from collector cell may cause ignition of flammable or explosive
gases/particles in the circulating air.
• DO NOT use in an area that contains flammable or explosive gases/particles in
the circulating air.
4
Page 5
T
I
P
S
f
o
r
c
l
e
a
n
a
i
r
Use
ONLY Oreck
certifi ed parts and
accessories.
ENGLISH
• Do not place open flames, including candles, directly in front of the air purifier.
Doing so may result in minor or moderate injury.
• Keep objects away from the front grill.
It is important to consider the following when deciding on where to locate the
air purifier:
• Position the air purifier on a flat, solid, stable surface.
• Position the air purifier where the dirty air is not drawn across your head or body while
sitting or sleeping.
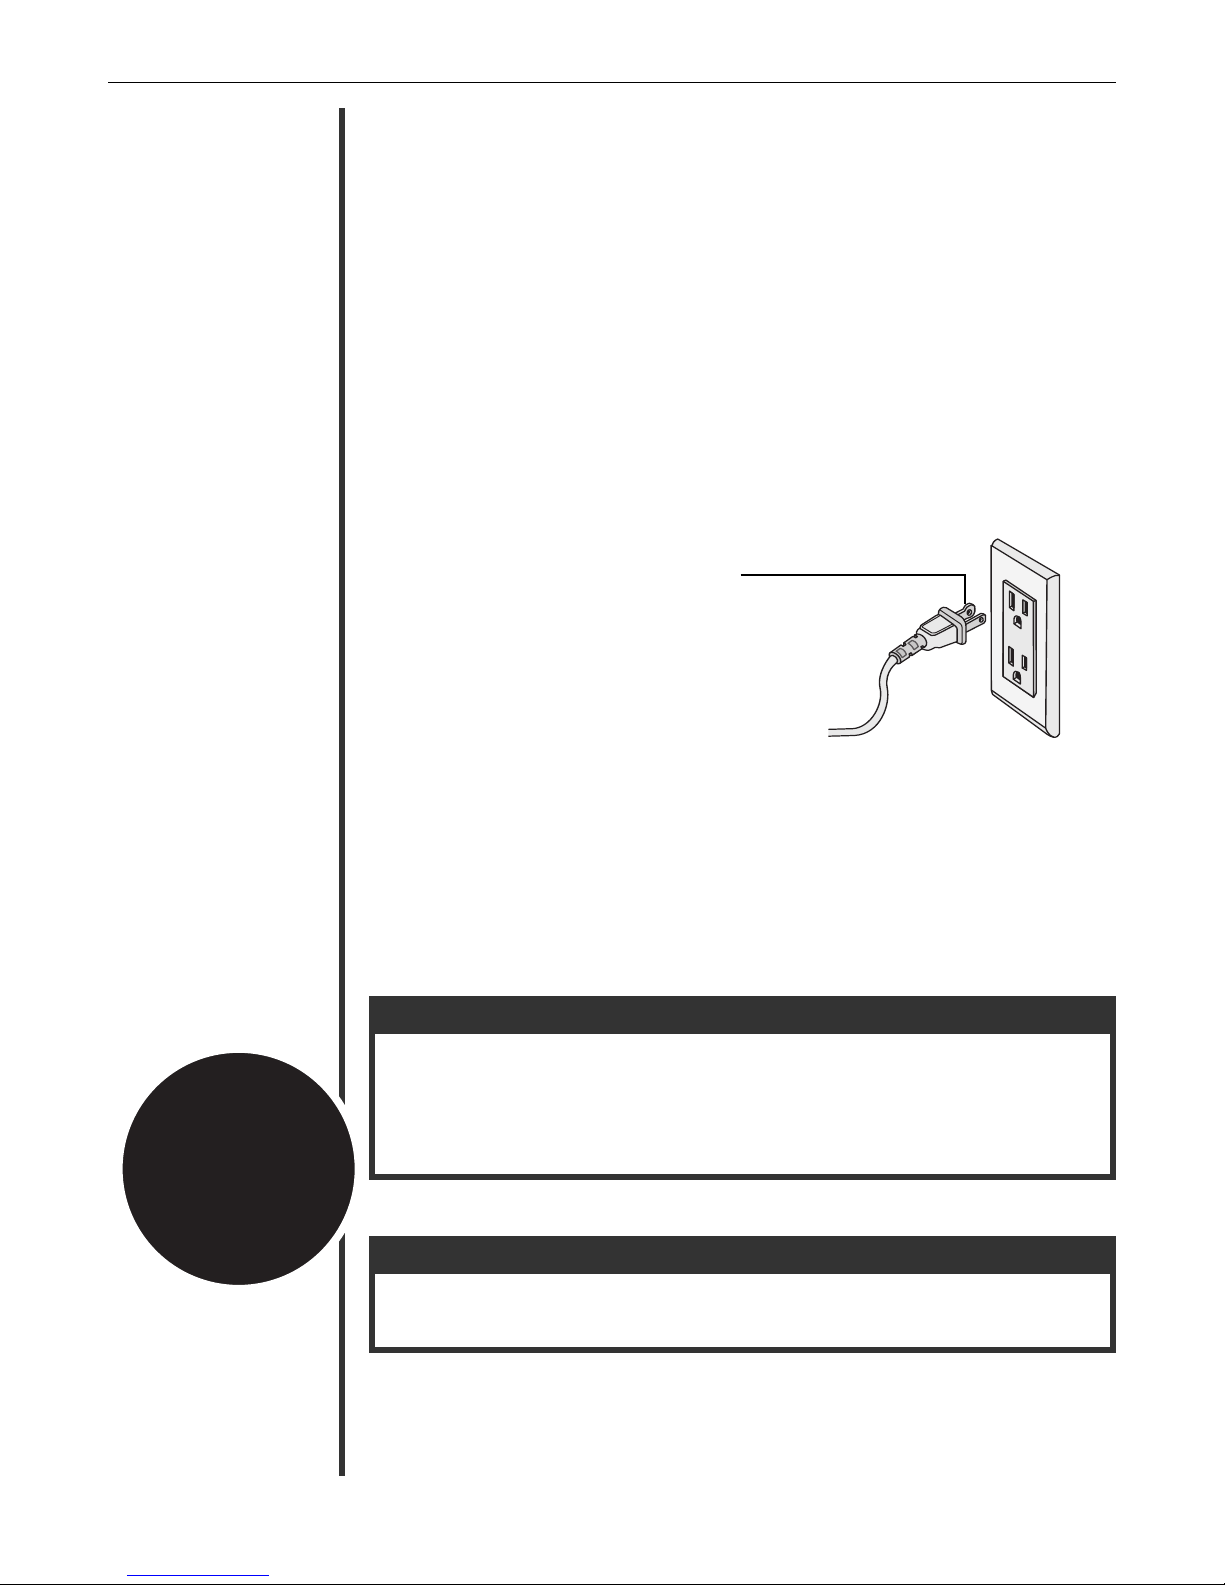
• Position the air purifier so the plug on the power cord easily reaches a standard
electrical outlet for a polarized plug.
• Do not use an extension cord.
• Do not place the air purifier near sources of heat, such as stove tops, ovens,
radiators or computers.
A polarized plug has one rounded prong
and one straight prong. The rounded end
goes into the longest socket slot.
To reduce the risk of electric shock, this equipment
has a polarized plug (one blade is wider than the
This plug will fit in a polarized outlet only
other).
one way. If the plug does not f
reverse the plug. If it still does not fit, contact
qualified personnel to install the proper outlet.
Do not alter the plug in an
it fully in the outlet,
y way.
Parts.
All accessories and replacement parts are sold separately. To order, call our customer
service group or visit our website. Please have your model number from the data label
inside the cabinet door of the unit.
Accessories
IItteemm PPaarrtt NNuummbbeerr
Assail-a-Cell®Collector Cell Cleaner
Spring Mulberry
Blooming Jasmine
Absorber Plus
Odor
®
Scent Cartridges, 8 pack FA2PK
®
Scent Cartridges, 8 pack FA3PK
, 20 oz. 32358
T1PKT
A
Replacement Parts
IItteemm PPaarrtt NNuummbbeerr
Pre-Filter 09-20200-01
Collector Cell 09-20080-01
Customer Service Hotline
USA: 1•800•989•3535 Canada: 1•888•676•7325
website: www.oreck.com
5
Page 6
1
1
2
1
2
3
1
2
3
4
Captures and Destroys Bacteria, Molds, viruses, and Fungi
CHANGE ODOR ABSORBER
H
IGH
MEDIUM
SILENCE
NIGHT
LIGHT
CHECK COLLECTOR CELL
AIR REVITALIZER
P
O
W
E
R
T
URBO
T
I
P
S
f
o
r
c
l
e
a
n
a
i
r
Tur b o i s
great for tough
problems like pet odors,
cigar smoke or
burnt toast.
ENGLISH
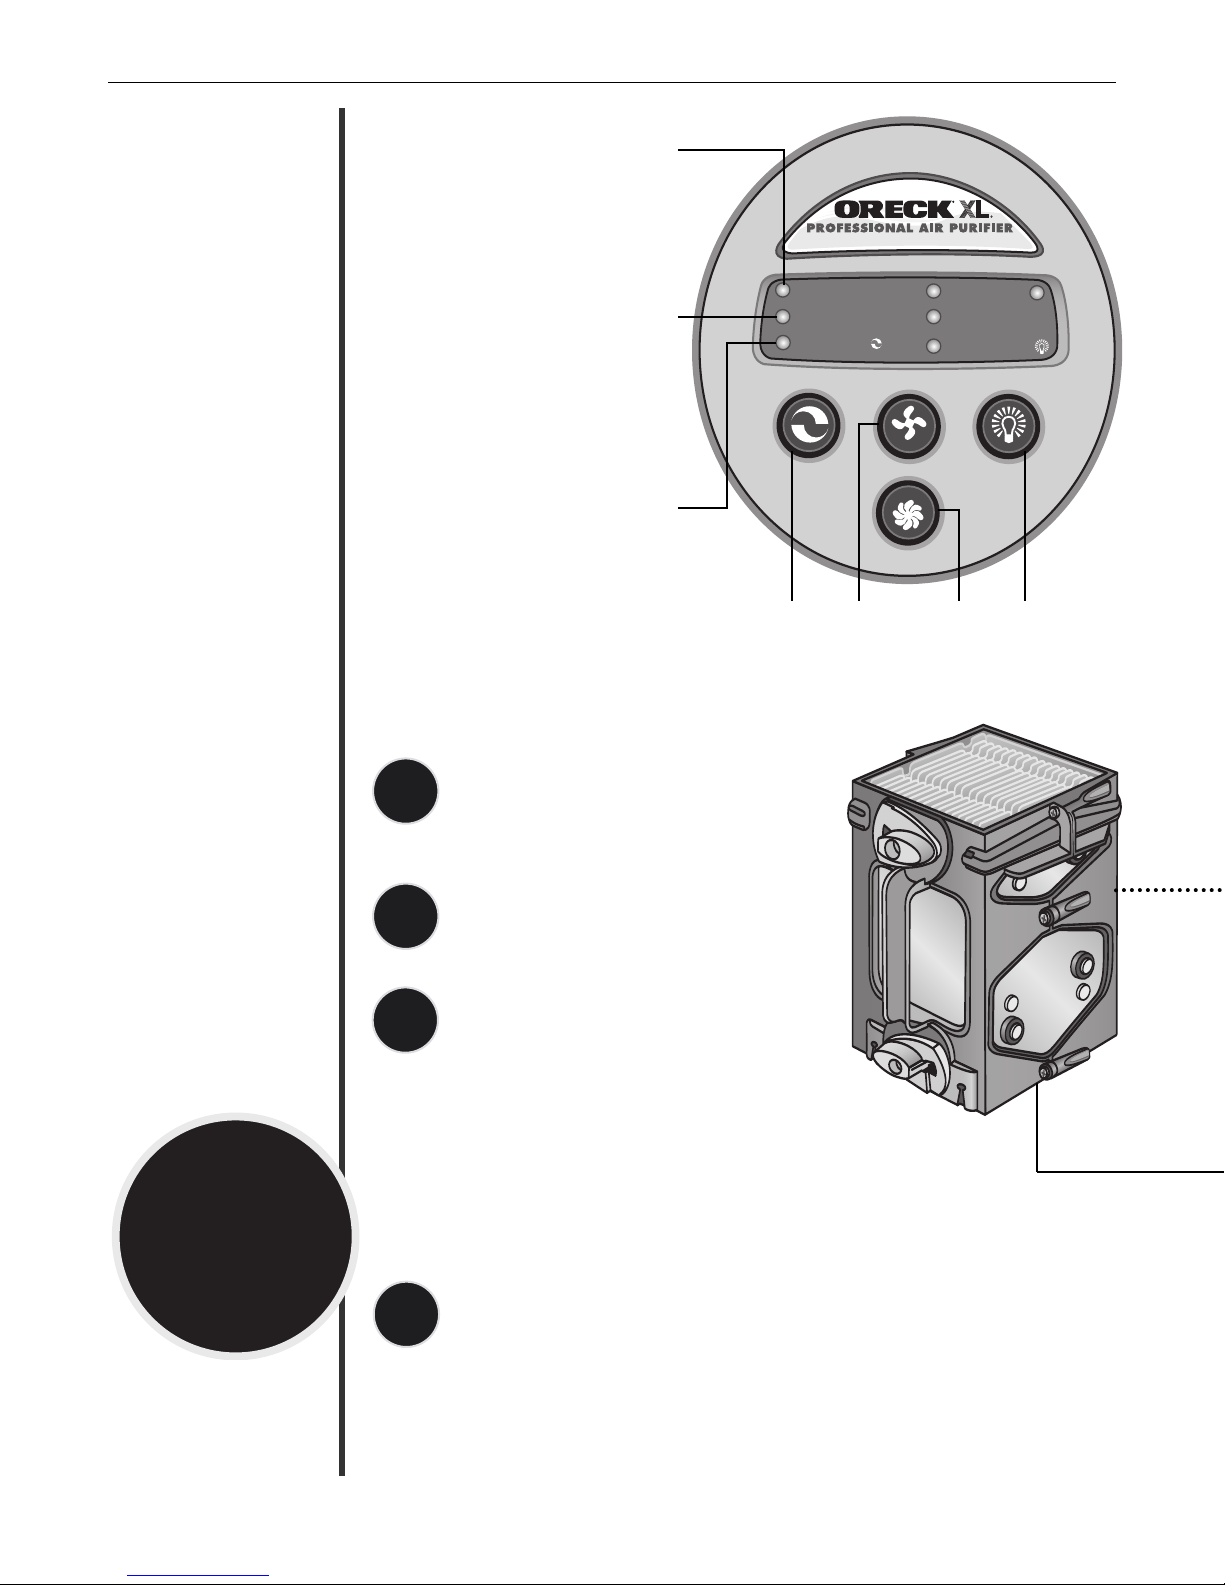
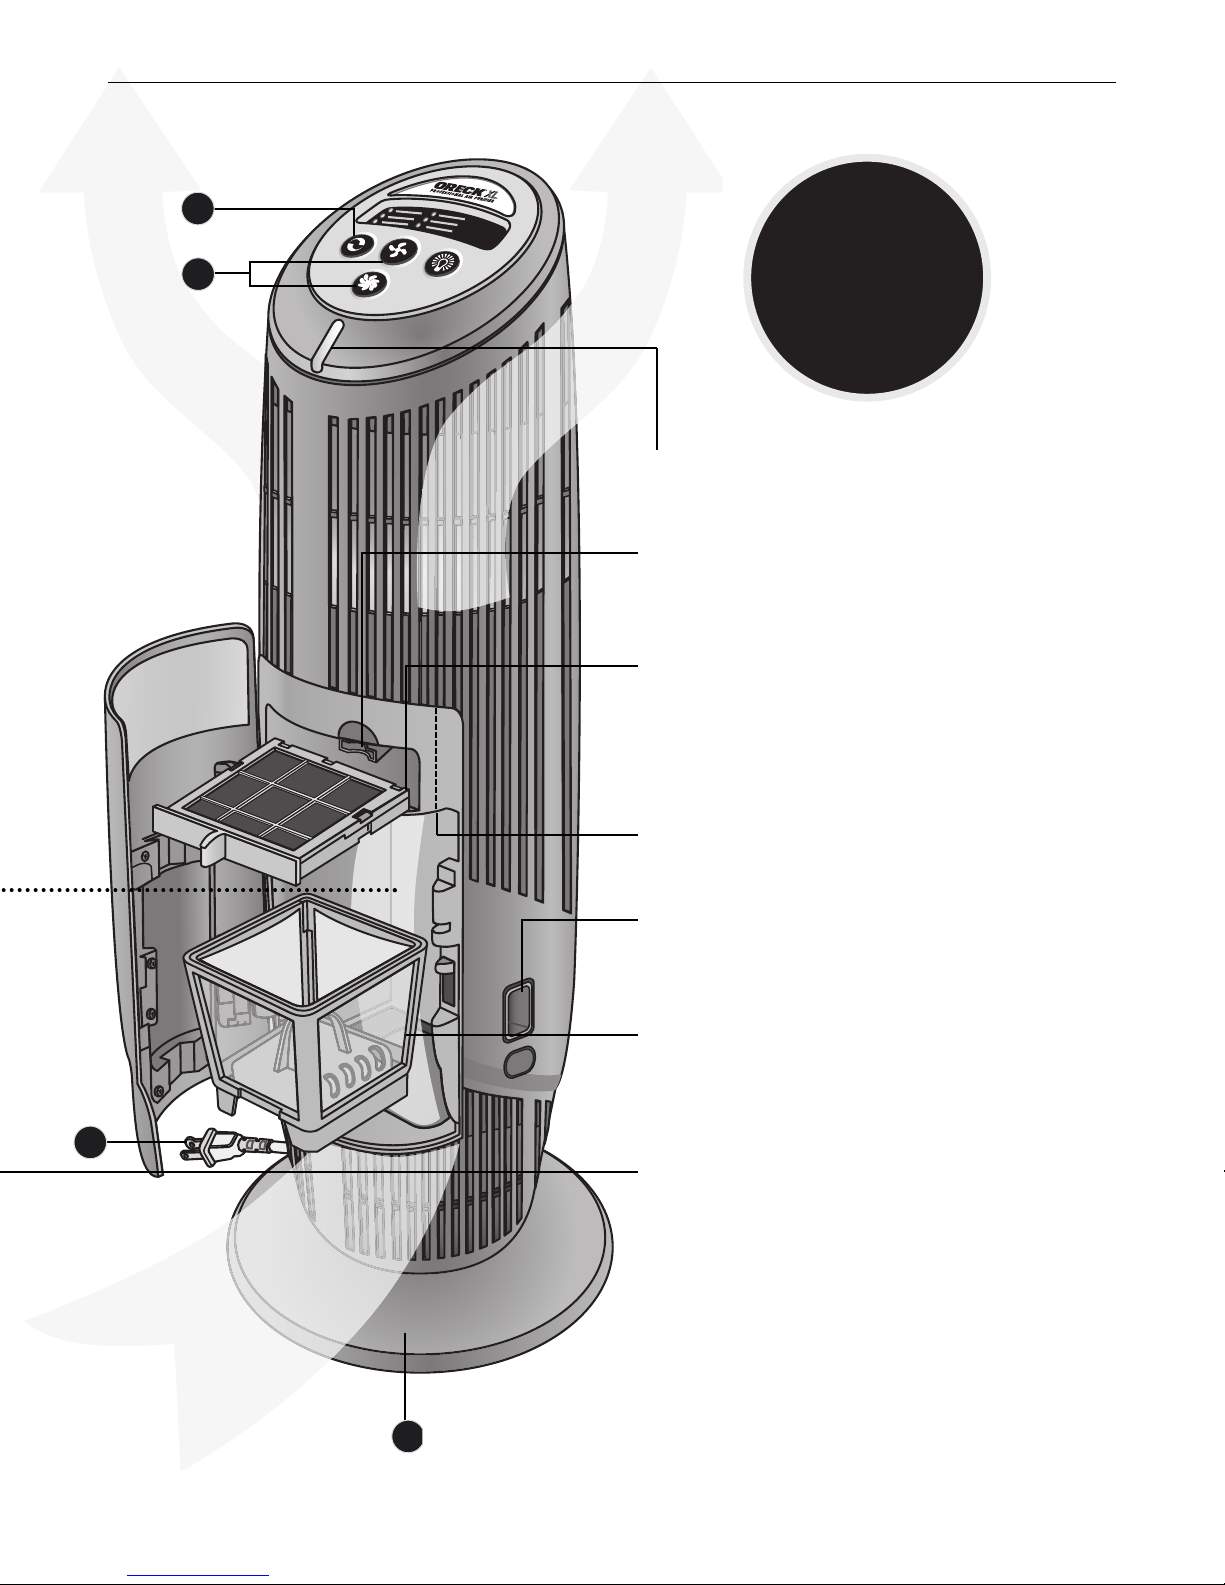
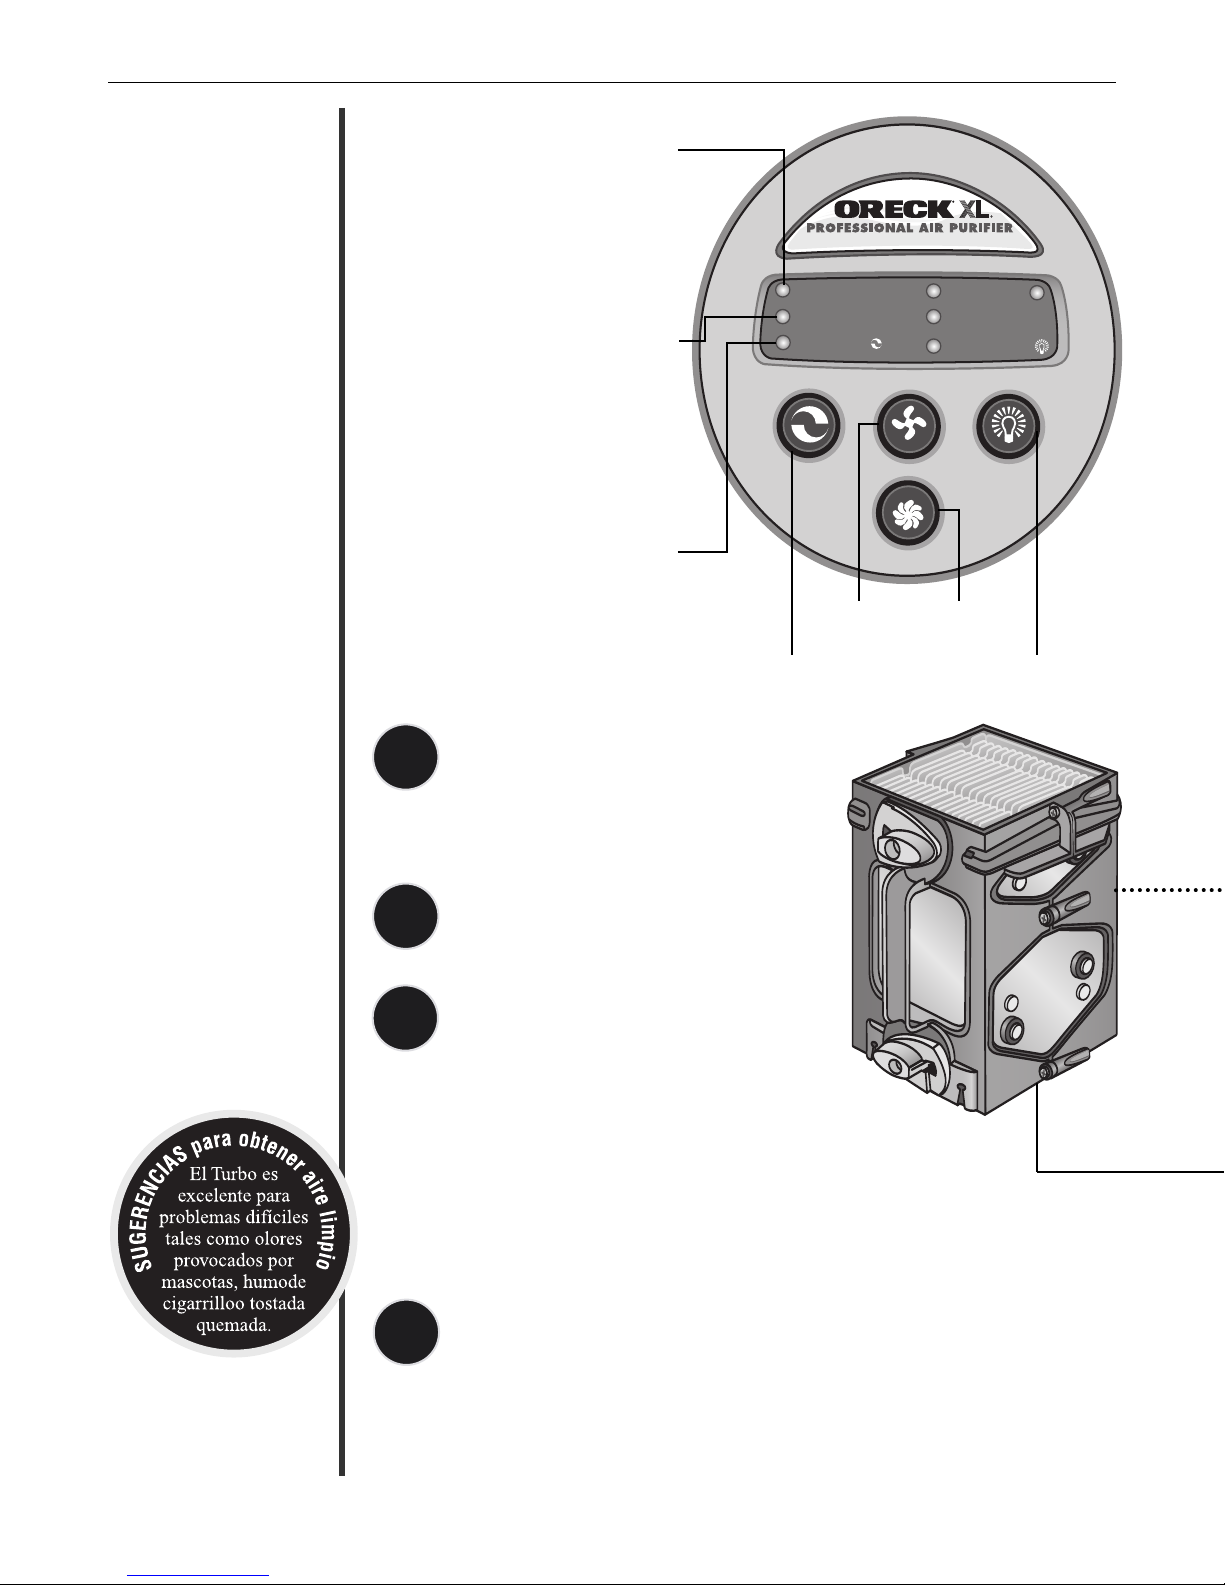
Operation.
Simply follow the
numbered steps to use
your Air Purifier.
Each call out
describes the features
of the Air Purifier and
how it functions.
Collector Cell Light
Turns red when the collector cell
needs cleaning. Automatically
resets when the collector cell
has been removed for cleaning.
Odor Absorber Light
Turns red when the optional odor
absorber has been in use 12 months.
Automatically resets when the odor
absorber has been replaced.
Air Revitalizer Light
Indicates when the
Air Revitalizer is ON.
Air Revitalizer
Button
Power
Button
Turbo
Button
Night Light
Button
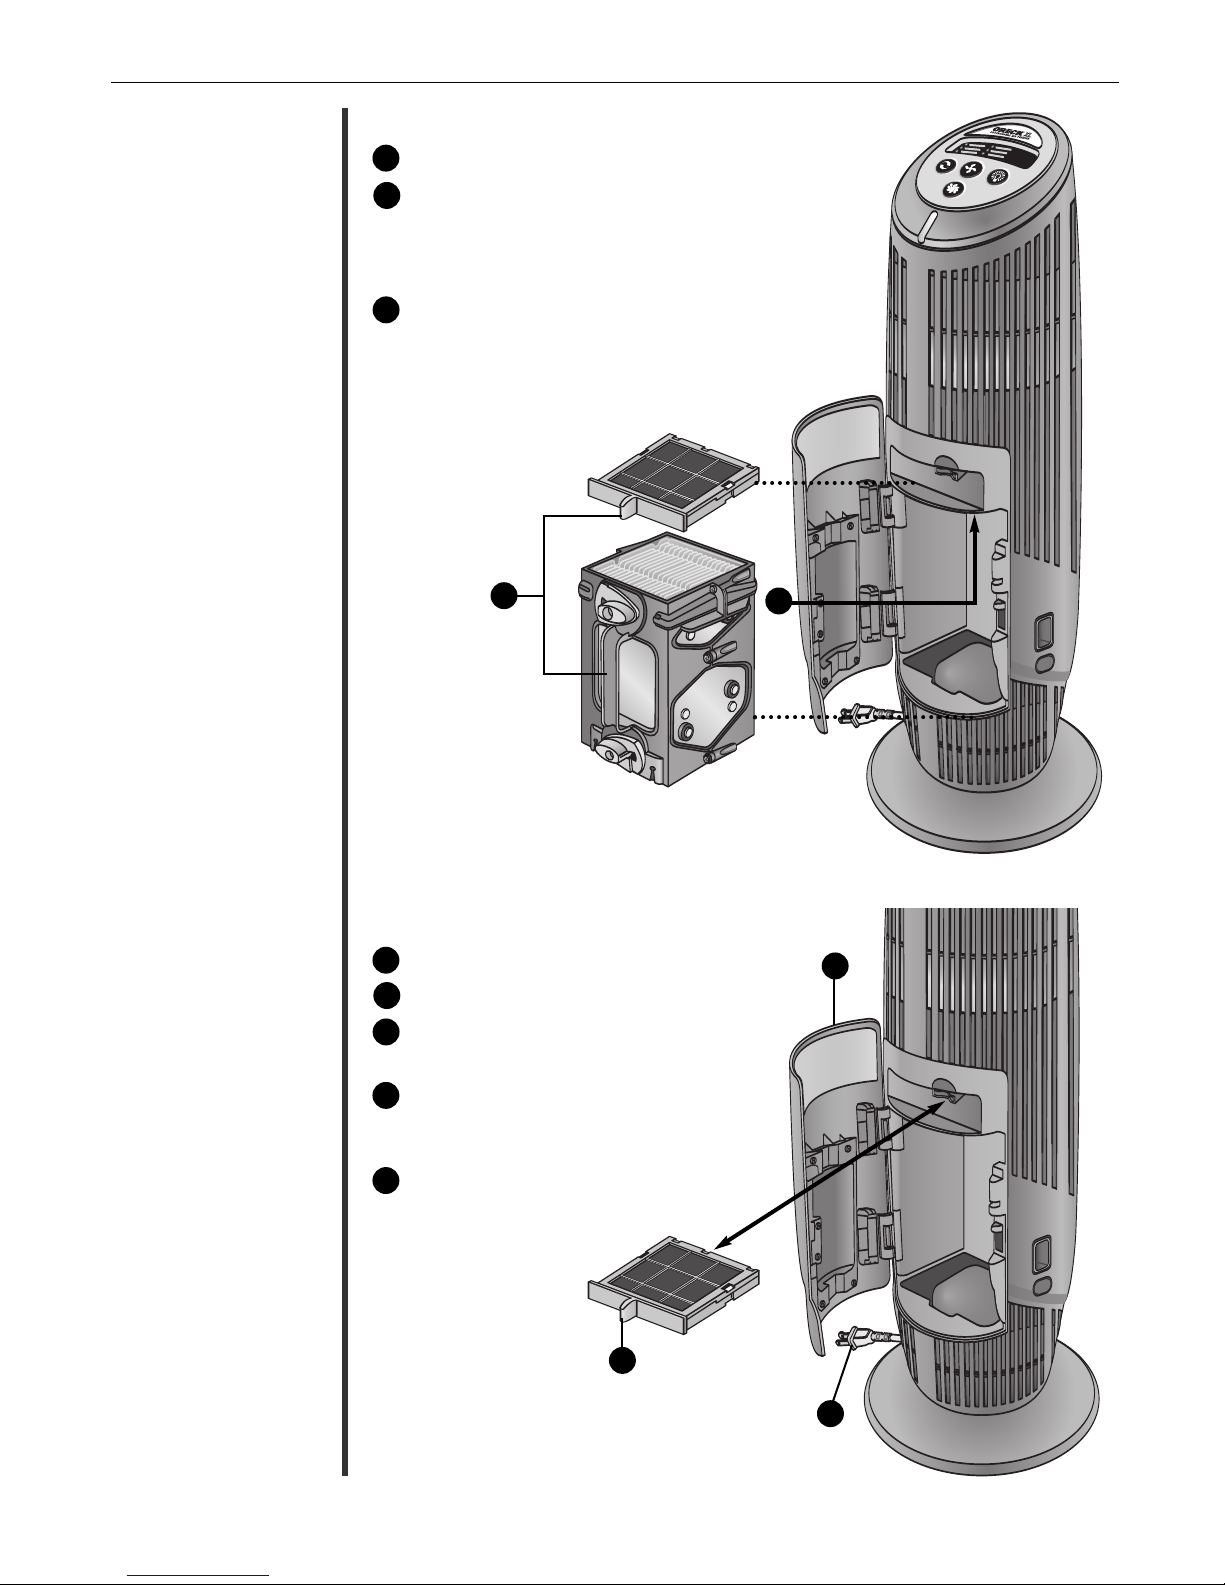
Place.
Locate the air purif
Do not position the air purif
it draws dirty air across the head or body.
ier on the floor.
ier so that
Plug In.
Plug into nearest standard electrical
outlet that accepts a polarized plug.
Select the air cleaning speed.
Press the power button for the desired speed.
High for maximum cleaning.
•
•
Medium for normal use.
Silence for Silence Technology®.
•
The quietest setting, cleaning the air
vely but more slowly than
fecti
as ef
the higher settings.
•
Turbo provides greatest cleaning
er for the toughest prob
w
po
Turn on the Air Revitalizer.
Provides additional air freshness and a pleasant, clean
scent through the release of negative ions. Negative
ions may cause dust to settle from the air onto the air
ier and surrounding furnishings. Designed to
purif
run continually, but may be turned off if desired.
6
lems.
Page 7
P
O
W
E
R
Position the
Air Purifier so dirty
air is not drawn
across your head
or body.
T
I
P
S
f
o
r
c
l
e
a
n
a
i
r
1
1
2
1
2
3
1
2
3
4
ENGLISH
Night Light
Conveniently lights your room if desired.
Fragrance Compartment
Holds the scent cartridge to provide optional fragrances
to the air returned to the room.
Odor Absorber
Optional feature that removes odors and chemical
fumes from glue, solvents, and synthetic materials.
The purifier continues to clean the air with or without
the odor absorber.
Oxygenator
Permanent cartridge con
verts ozone into oxygen.
Cabinet Door Button
To open the cabinet door, press in on the bottom button
and press down on the top button.
Pre-Filter
Removes large particles such as dust, hair and lint. It is
located under the collector cell and can be pulled out by
the handle in the bottom of the bask
et.
Collector Cell
ges, collects and destro
Electrostaticall
ticles such as dust, smok
par
viruses and fungi.
Remove the collector cell by turning the yellow latches
counterclockwise. Pull out b
y char
e, pollen, bacteria, mold
lack handle.
y the b
ys small
,
7
Page 8
P
O
W
E
R
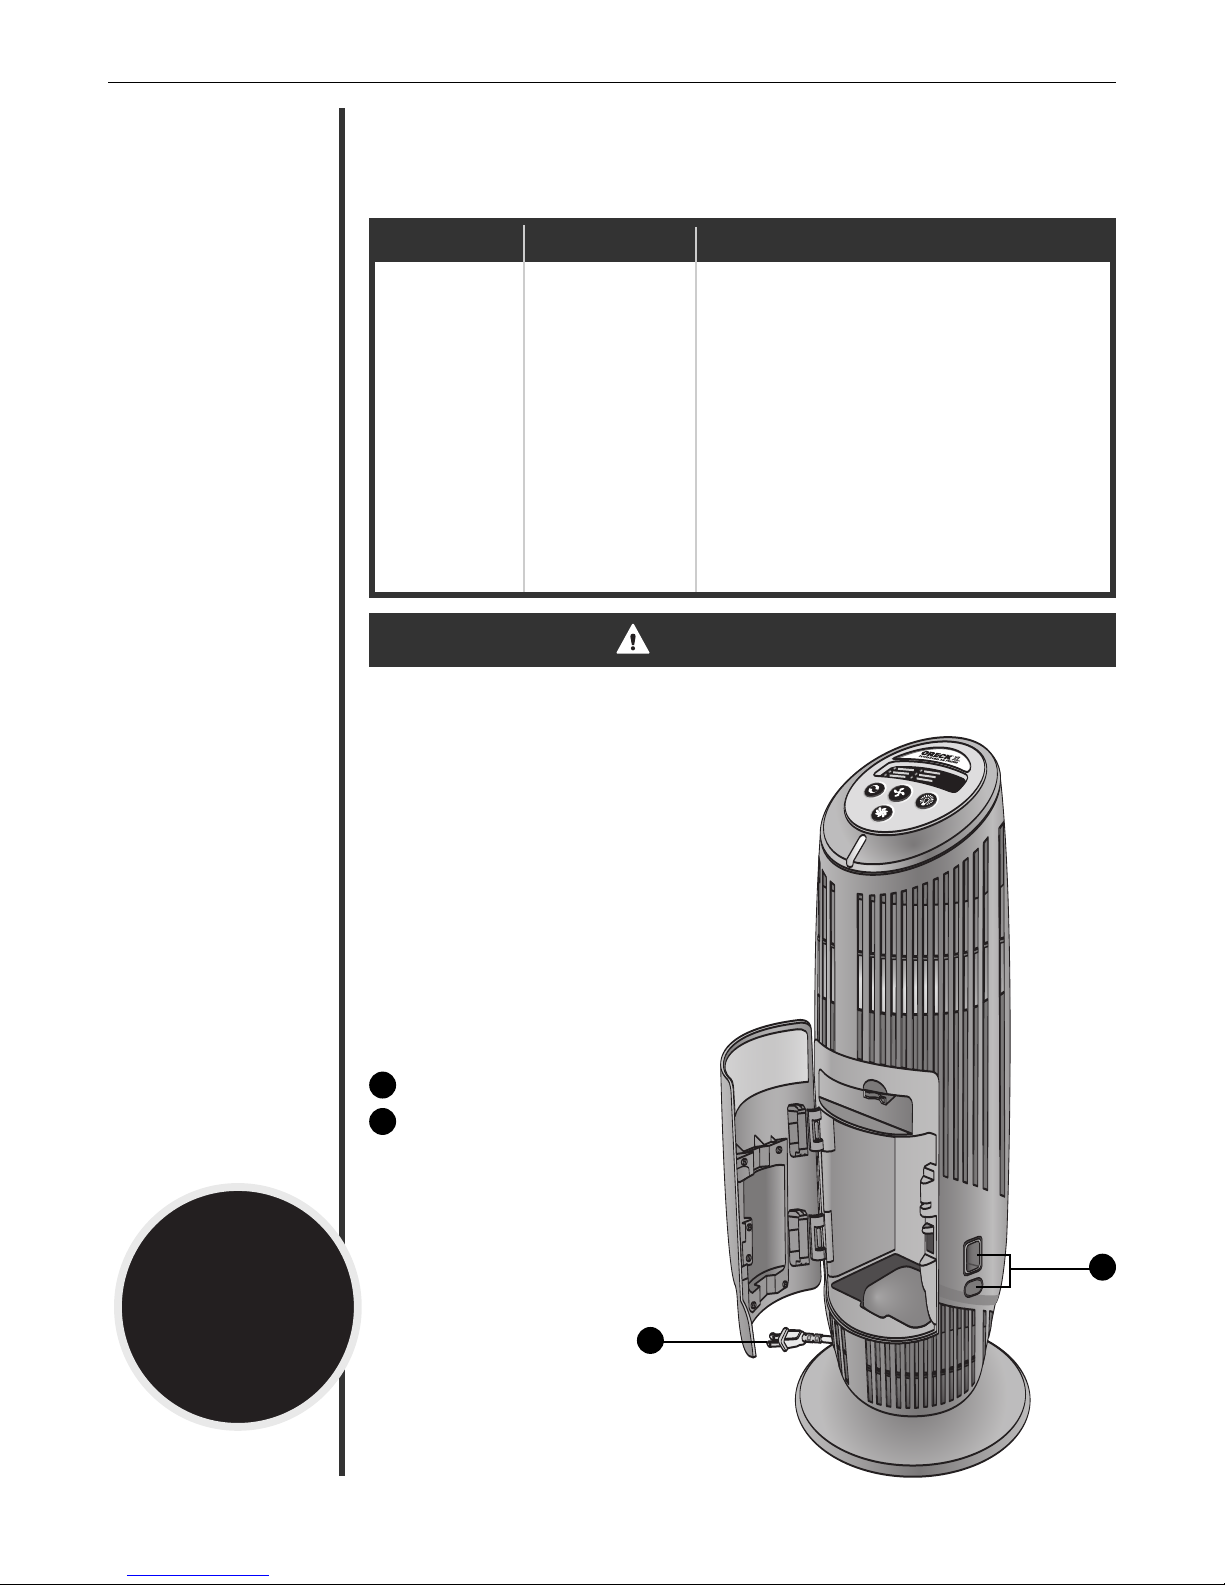
Cleaning.
The
air purifier will
not run if the cabinet
door is not closed
securely.
T
I
P
S
f
o
r
c
l
e
a
n
a
i
r
ENGLISH
Cleaning Times
Proper care and cleaning of the air purifier is critical to performance. The unit has been
designed to make this as simple as possible. The following chart shows the cleaning
intervals and methods.
PPaarrtt CClleeaanniinngg TTiimmee MMeetthhoodd
Cabinet As needed Wipe with damp cloth first. If required, follow
with mild, non-abrasive cleaner.
Collector Cell 2 to 4 weeks, Spray Oreck Assail-a-Cell
or as needed in warm water with mild liquid detergent.
Rinse and dry thoroughly.
Pre-filter 2 to 4 weeks, Rinse thoroughly in warm water.
or as needed
Odor 12 months, Replace (optional for odor removal). Do not
Absorber or as needed wash or get wet. Vacuum to clean, if necessary.
Oxygenator As needed Vacuum the front with a soft brush attachment.
Do not use any liquids for cleaning.
®
cleaner or soak
WARNING!
Cleaning the unit while it is plugged in may result in electric shock, electric spark and
serious injury. Unplug the unit before cleaning or maintenance.
Cleaning the Cabinet
You can clean the Air Purifier cabinet with mild,
non-abrasive cleanser and a soft cloth.
IMPORTANT: Unplug the unit from its
electrical power source. Do not spray cleansers
or furniture polish into louvers or grill areas.
Cleaning the Air Purifier Components
All components to your air purifier are
located behind the cabinet door. Before you
begin any cleaning process you must:
1
Unplug the air purifier.
2
Open the cabinet door, press in on
the bottom button and press down
on the top b
utton.
2
1
8
Page 9

P
O
W
E
R
T
I
P
S
f
o
r
c
l
e
a
n
a
i
r
Oreck
Assail-A-Cell
cleaner is an excellent
way to clean the
collector cell.
®
ENGLISH
Cleaning the Collector Cell
Note: The collector cell may require more frequent cleaning if “arcing”
occurs. Arcing is a sharp snapping sound that occurs when large particles
of dust are collected in the collector cell. If prolonged or continuous
arcing occurs the collector cell should be cleaned.
IMPORTANT: Do not try to clean the collector cell by inserting
a cloth, brush, or other object between the cell plates.
1
To remove the collector cell, turn the yellow latches counterclockwise.
Pull straight out by the black handle.
Place collector cell in sink, bathtub, or other location where cleaner and
2
contaminants will rinse away without damaging surfaces.
3
Spray Oreck Assail-A-Cell
between each cell plate. Allow the cleaner to soak for a few minutes and
rinse with clean water. Do not let the cleaner dry on the collector cell.
An alternative method to clean the collector cell
is to soak it in warm water for two to three hours.
Mild liquid dish detergent may be used to help
break down dirt. Rinse thoroughly with water.
Note: Do not put in dishwasher or inser
to clean the collector cell. Do not wash the
collector cell with bleach or other abrasive cleaners.
®
cleaner thoroughly
t objects
3
Tough residue such as tar from tobacco smoke
may need additional applications or longer soaking.
4
Allow to dry completely outside of the air purifier.
Do not use heated or compressed air to dry.
IMPORTANT: Do not reinsert the collector cell
until it is completely dry. If the “Check Collector
Cell” light blinks red after replacing the collector cell,
then the collector cell is still w
cell and allow it to finish air drying.
5
Place the collector cell back into the air purif
straight into the cabinet. Lock the yellow latches by turning
clockwise.
6
Close the cabinet door securely.
Cleaning the Pre-Filter
Note: The pre-f
collector cell first by following step 1 in the above procedure.
Grasp the blue handle located in the middle of the pre-filter basket and
1
pull the pre-filter straight up and out of the cabinet.
2
Lightly brush the surface to loosen the dirt and wash the filter in warm
water. Do not bend or twist the filter during cleaning.
3
Thoroughly rinse the pre-filter and let it air dry completely before placing it
back in the cabinet. Do not use heated or compressed air as part of the drying process.
4
5
Place the pre-filter back into the unit and then replace the collector cell by following step 4 in the above procedure.
Close the cabinet door securely.
et. Remove the collector
ier b
ilter is located under the collector cell.
y sliding it
ou must remo
Y
9
e the
v
1
1
Page 10
P
O
W
E
R
P
O
W
E
R
ENGLISH
Cleaning the Oxygenator
1
R
emove the collector cell and odor absorber.
Locate the Oxygenator above the
2
fragrance compartment. Lightly vacuum the bottom
of the Oxygenator with a soft-brush attachment.
Do not use liquids to clean. Liquids will damage
the oxygenator.
3
Replace collector cell and odor absorber.
Make sure the door is closed securely.
Maintenance.
1
Replacing the optional Odor Absorber
Unplug the air purifier.
1
2
Open the cabinet door.
Grasp and squeeze the odor absorber
3
handle and pull straight out.
Replace with a new odor absorber.
4
The odor absorber is designed so that
it can onl
y be inser
ted in one direction.
2
2
5
Close the door securel
.
y
3
1
10
Page 11

Trouble-
shooting.
ENGLISH
PPrroobblleemm CChheecckk WWhhaatt ttoo ddoo
Unit does not turn on. • Power Cord • Plug in the power cord.
• Power Button • Set power button for desired
blower speed.
• Cabinet Door • Make sure cabinet door is closed
securely.
Service problems that
appear to be major can
often be solved easily.
You can be your own
troubleshooter by
reviewing this guide.
All other ser
should be done by an
Oreck authorized
service center.
vicing
“Check Collector Cell” • Collector Cell • Wash collector cell. Make sure it
has turned red. is thoroughly clean and dry before
reinstalling.
“Check Collector Cell” • Collector Cell • Collector cell may need cleaning.
light is flashing red. Clean collector cell.
• Collector cell may not be completely
dry. Allow it to air dry longer.
• Collector cell may be damaged.
Contact Oreck for service.
Unit does not • Collector Cell • Wash collector cell. Make sure it is
remove pollutants. thoroughly clean and dry before
reinstalling.
Unit sparks, crackles • Collector Cell • Sparking or popping noise (arcing)
and pops. occurs when a large particle is
captured in the collector cell.
• If the unit is arcing excessively, the
collector cell may be dirty. Try
cleaning the collector cell.
• If excessive arcing continues after
proper cleaning, the cell may be
damaged or w
contact Oreck for service.
et. If damaged,
“Check Odor Absorber” • Odor Absorber • Replace odor absorber if desired.
light has turned red.
Does not remove odor. • Odor Absorber • Vacuum odor absorber with a soft
Unit still does not •
operate properly. above points.
Check all the • Contact Oreck for service.
11
• If the odor absorber is not replaced,
remove old odor absorber to turn off
“Check Odor Absorber” light.
brush attachment if dirty. Do not
y liquids to clean the odor
use an
absorber.
• Replace odor absorber if desired.
Page 12

Warranty.
Total Cleaning System
ENGLISH
ORECK MANUFACTURING COMPANY: (Oreck Manufacturing Company gives you
the following limited warranty for this product only if it was originally purchased for
residential use, not resale, from Oreck or an Oreck Authorized Retail Dealer.)
Oreck will repair or replace, free of charge, to the original purchaser, any part that is
found to be defective in material or workmanship within five (5) years of the date
of purchase and a lifetime warranty on the Collector Cell for all residential models.
NOTE: If the unit is used commercially, a one (1) year overall warranty applies.
This limited warranty does not cover the replacement of expendable or consumable parts
such as filters, cartridges, and other parts subject to normal wear unless they are defective
in material or workmanship.
This limited warranty does not apply to any part subjected to accident, abuse,
commercial use, alteration, misuse, damage caused by act of God, the use of voltages
other than on the data plate of this product or service of this product by other than Oreck
or a participating Factory Authorized Service Center.
Oreck does not authorize any person or representative to assume or grant any other
warranty obligation with the sale of this product.
s limited warranty is valid only if you retain proof of purchase from Oreck or an
Oreck’
Oreck Authorized Retail Dealer for this product. If you purchase this product from any
other source, your purchase is “AS IS,” which means Oreck grants you no warranty, and
that you, not Oreck, assume the entire risk of the quality and performance of this product,
y servicing or repairs of any defects.
y to y
y necessar
ou.
including the entire cost of an
s liability for damages to you for any costs whatsoever arising out of this statement
Oreck’
of limited warranty shall be limited to the amount paid for this product at the time of
original purchase, and Oreck shall not be liable for any direct, indirect, consequential or
incidental damages arising out of the use or inability to use this product. Some states do
not allo
limitation or e
ALL EXPRESS AND IMPLIED WARRANTIES FOR THIS PRODUCT, INCLUDING
IMPLIED WARRANTIES OF MERCHANTABILITY AND FITNESS FOR A
PARTICULAR PURPOSE, ARE LIMITED IN DURATION TO THE WARRANTY
PERIOD, AND NO WARRANTIES, WHETHER EXPRESS OR IMPLIED, WILL
APPLY AFTER THIS PERIOD.
Some states do not allow limitations on the duration of implied warranties, so the above
limitation ma
This warranty gives you specific legal rights, and you may also have other rights which
vary from state to state.
w the exclusion or limitation of incidental or consequential damages, so the above
xclusion may not apply to you.
y not appl
© 2006 Oreck Holdings, LLC.
All rights reserved. All word marks, logos, product configurations and registered
trademarks are owned and used under the authority of Oreck Holdings, LLC.
12
Page 13
Guía del
P
O
W
E
R
usuario
ESPAÑOL
Purificador profesional de aire
Serie AIRT
¡Importante!
Lea todas las instrucciones cuidadosamente, y conserve esta Guía
para consultas en el futuro.
13
Page 14

Disfrute.
Sistema de limpieza total
ESPAÑOL
¡Gracias por comprar un Purificador Profesional de Aire Oreck!
Usted disfrutará de muchos años de aire más limpio y fresco con el
purificador de aire Oreck en su hogar. Incluye cinco tecnologías
diferentes de purificación de aire, para proporcionar una protección
exclusiva contra los contaminantes y alérgenos que se encuentran
en suspensión en el aire:
Etapa 1. El prefiltro elimina partículas grandes, incluidas las del
polvo, la pelusa y los cabellos.
Las Etapas 2 y 3 son parte de la tecnología patentada Truman Cell™.
Etapa 2. Los alambres de carga positiva cargan electrostáticamente
partículas pequeñas como las de polvo, humo, polen,
bacterias, moho, virus y hongos.
Etapa 3. La celda colectora electrónica recolecta las partículas
cargadas electrostáticamente y destruye las bacterias, moho,
virus y hongos.
Etapa 4. El absorbedor de olores opcional elimina los olores
domésticos y emanaciones químicas más comunes.
Etapa 5. El oxigenador convierte el ozono atmosférico en oxígeno
inocuo.
Etapa 6. El revitalizador de aire (generador de iones negativos)
opcional proporciona al aire una frescura adicional y un
aroma agradable y limpio, gracias a la liberación de
iones negativos.
Llame.
Haga clic.
Visite.
Esta combinación de tecnologías proporciona protección plena
contra una amplia gama de contaminantes, para hacer su hogar
más sano, limpio y habitable. Disfrute.
En Oreck comprendemos que nuestros clientes son únicos y
esperan un servicio superior. A fin de satisfacer sus necesidades
ofrecemos diferentes opciones de servicio al cliente, para trabajar
con su estilo de vida y sus preferencias. Le damos la bienvenida a
nuestro programa de servicio al cliente
Para hablar con un representante Oreck llame a:
En E. U. de A.:
En Canadá: 1•888•676•7325
En la Web, apunte y haga clic en: www.oreck.com
Visítenos personalmente en uno de los 450 sitios en
tiendas. Para encontrar la tienda más cercana, por favor
llame al teléfono
www.oreckstore.com.
1•800•989•3535
888-oreckstore (888-673-2578) o visite
'Llame. Haga clic. Visite.'
14
Page 15

ESPAÑOL
Seguridad . . . . . . . . . . . . . . . . . . . . . . . . . . . . . . . . . . . . . . . . . . 16
Índice.
Advertencias generales . . . . . . . . . . . . . . . . . . . . . . . . . . . . . 16
Piezas . . . . . . . . . . . . . . . . . . . . . . . . . . . . . . . . . . . . . . . . . . . . . 17
Accesorios . . . . . . . . . . . . . . . . . . . . . . . . . . . . . . . . . . . . . . . 17
Piezas de repuesto . . . . . . . . . . . . . . . . . . . . . . . . . . . . . . . . . 17
Operación . . . . . . . . . . . . . . . . . . . . . . . . . . . . . . . . . . . . . . . . . . 18
Limpieza . . . . . . . . . . . . . . . . . . . . . . . . . . . . . . . . . . . . . . . . . . . 20
Tiempos de limpieza . . . . . . . . . . . . . . . . . . . . . . . . . . . . . . . 20
Limpieza de gabinete . . . . . . . . . . . . . . . . . . . . . . . . . . . . . . 20
Limpieza de los componentes del purificador de aire . . . . 20
Limpieza de la celda colectora . . . . . . . . . . . . . . . . . . . . . . 21
Limpieza del prefiltro . . . . . . . . . . . . . . . . . . . . . . . . . . . . . . 21
Limpieza del oxigenador . . . . . . . . . . . . . . . . . . . . . . . . . . . 22
Mantenimiento . . . . . . . . . . . . . . . . . . . . . . . . . . . . . . . . . . . . . . 22
Reemplazo del absorbedor de olores . . . . . . . . . . . . . . . . . 22
Localización de fallas . . . . . . . . . . . . . . . . . . . . . . . . . . . . . . . . 23
Garantía . . . . . . . . . . . . . . . . . . . . . . . . . . . . . . . . . . . . . . . . . . . . 24
15
Page 16

ESPAÑOL
Advertencias generales
Seguridad.
¡CINSTRUCCIONES DE SEGURIDAD IMPORTANTES!
Cuando se use un artefacto eléctrico deben observarse siempre las precauciones básicas, incluidas
as siguientes:
l
LEA TODAS LAS INSTRUCCIONES ANTES DE UTILIZAR ESTE PURIFICADOR
DE AIRE
ADVERTENCIA - Para reducir el riesgo de incendio, choque eléctrico o lesiones:
• No lo use en exteriores o sobre superficies húmedas.
• Úselo únicamente de la forma descrita en este manual.
• No lo use con un cordón o enchufe dañado. Si el artefacto no está funcionando como debería, o
si se ha caído, dañado, dejado a la intemperie o sumergido en el agua, devuélvalo a un centro de
servicio o llame al Servicio al Cliente, a:
En E. U. de A.: 1-800-989-3535 En Canadá: 1- 888-676-7325
• No lo desenchufe tirando del cordón. Para desenchufar sujete el enchufe, no el cordón.
• No maneje el enchufe o el artefacto con las manos húmedas.
• No inserte ningún objeto por las aberturas. No use el artefacto con alguna abertura bloqueada;
manténgalo libre de polvo, pelusa, cabellos y todo aquello que pueda reducir el flujo de aire.
• Mantenga su cabello, ropa suelta, dedos y todas las partes de su cuerpo lejos de las aberturas y
de las partes móviles.
• Lleve todos los controles a la posición APAGADO (OFF) antes de desenchufar.
• No use el artefacto en un espacio encerrado en el que haya desprendimiento de oxígeno o
vapores inflamables, explosivos o tóxicos, o en un área en la que esté presente polvo inflamable.
• Usted debe consultar a sus proveedores de oxígeno y equipos médicos antes de utilizar el
purificador de aire cerca de tanques de oxígeno, campanas u otros dispositivos médicos que
usen oxígeno concentrado. La utilización de dispositivos electrónicos -incluido un purificador
de aire- en presencia de oxígeno y otros gases combustibles, podría provocar incendios o
explosiones, con la posibilidad de causar graves lesiones o incluso la muerte.
EXCEPTO ESTAS INSTRUCCIONES
¡ATENCIÓN!
La instalación de una celda colector
purificador de aire puede provocar el derretimiento de componentes internos
durante el uso.
NO coloque una celda colectora mojada o húmeda en el purificador de aire.
•
• NO lave el absorbedor de olores. Reemplácelo, si fuera necesario.
• Antes de volver a instalar la celda colectora en el purificador de aire, séquela bien a fondo fuera
del equipo. Asegúrese de que todas las áreas, en especial los ángulos y las áreas en las que
pueda quedar atrapada agua, estén secas antes de su reinstalación en el purificador de aire.
ARA USO COMERCIAL:
P
La alta tensión de la celda colectora puede provocar la ignición de gases y/o partículas inflamables
o explosivas presentes en el aire circulante.
NO utilice el equipo en un área que conteng
•
presentes en el aire circulante.
a mojada o aun húmeda dentr
a gases y/o partículas inflamables o explosivas
16
o del
Page 17

ESPAÑOL
• No coloque llamas abiertas, incluidas las velas, directamente frente al purificador de aire. Si lo
ace, puede recibir lesiones menores o moderadas.
h
• Mantenga los objetos lejos de la rejilla frontal.
Al decidir dónde ubicar el purificador de aire, es importante considerar lo siguiente:
• Posicione el purificador de aire sobre una superficie plana, sólida y estable. No coloque nunca
la unidad sobre superficies blandas como una cama, sofá o alfombra.
• Posicione el purificador de aire donde el aire sucio no sea conducido hacia su cabeza o su
cuerpo cuando se siente o esté durmiendo.
• Posicione el purificador de aire de modo que el enchufe del cordón de alimentación eléctrica
alcance fácilmente un tomacorriente eléctrico estándar para enchufe polarizado.
• No utilice un cordón de extensión.
• No coloque el purificador de aire cerca de fuentes de calor, como cocinas encimeras, hornos,
radiadores o computadoras.
Un enchufe polarizado tiene una espiga de conexión
redondeada y otra recta. El extremo redondeado
va en la ranura más larga del tomacorriente.
Para reducir el riesgo de choque eléctrico, este equipo
uenta con un enchufe polarizado (una paleta es más ancha
que la otra). Este enchufe se podrá insertar en un
tomacorriente polarizado, de una sola manera. Si el
enchufe no se inserta completamente en el tomacorriente,
inviértalo. Si sigue sin poder conectarse, comuníquese
con una persona calificada para que instale un tomacorriente adecuado. No altere el enchufe de ninguna forma.
Piezas.
Todos los accesorios y piezas de repuesto se venden separadamente. Para hacer pedidos, llame a
nuestro grupo de servicio al cliente o visite nuestro sitio Web. Por favor, tenga presente el número
de modelo indicado en la etiqueta de datos que está en la cara inferior de la unidad.
Accesorios
EElleemmeennttoo NNúúmmeerroo ddee ppiieezzaa
Limpiador de celda colectora Assail-a-Cell®, 600 mL (20 onzas). 32358
tuchos de aroma Spring Mulberry®, paquete de 8
Car
Cartuchos de aroma Blooming Jasmine
Absorbedor de olores AP1PKP
®
, paquete de 8 FA3PK
FA2PK
Piezas de repuesto
EElleemmeennttoo NNúúmmeerroo ddee ppiieezzaa
Prefiltro 09-20200-01
Celda colectora 09-20080-01
Línea gratuita de servicio al cliente
En E. U. de A.: 1•800•989•3535 En Canadá: 1•888•676•7325
Sitio Web: www.oreck.com
17
Page 18
1
1
2
1
2
3
1
2
3
4
Captures and Destroys Bacteria, Molds, viruses, and Fungi
CHANGE ODOR ABSORBER
HIGH
MEDIUM
SILENCE
NIGHT
LIGHT
CHECK COLLECTOR CELL
AIR REVITALIZER
P
O
W
E
R
TURBO
ESPAÑOL
Operación.
Simplemente siga los
pasos numerados
para utilizar su
Purificador de Aire.
Cada anotación describe
las características del
Purificador de Aire
y cómo funcionan.
Bombilla de Celda Colectora
Se enciende cuando la celda colectora
necesita limpieza. Se apaga
utomáticamente cuando la celda
a
colectora ha sido removida para
impieza.
l
Bombilla del Absorbedor
de Olores
Se enciende cuando el absorbedor de
olores opcional ha estado en uso
durante 12 meses. Se apaga
automáticamente cuando el absorbedor
de olores ha sido reemplazado.
Bombilla del Revitalizador
de Aire
Esta bombilla indica cuándo está
encendido el Revitalizador de Aire.
Botón de
Encendido
Botón del
Revitalizador de Aire
Botón de
Turbo
Botón de Luz
Nocturna
Ubique.
Coloque el purificador de aire sobre el piso.
Ubique el purificador de aire de tal modo que
éste no arrastre el aire contaminado alrededor de
su cabeza o cuerpo.
Enchufe.
Enchufe en el tomacorriente eléctrico estándar
más cercano que acepte un enchufe polarizado.
Seleccione la velocidad de
limpieza del aire.
Presione el botón de encendido para la velocidad
deseada.
•
Alta (High) para máxima limpieza.
Media (Medium) para uso nor
•
• Silencio (Silence) para la Tecnología de Silencio (Silence
Technology
efectividad pero más lentamente que los valores de may
Turbo proporciona la mayor energía de limpieza para los problemas
•
de mayor contaminación.
®
). El valor más silencioso, limpia el aire con igual
mal.
or v
elocidad.
Encienda el Revitalizador de Aire.
Proporciona frescura de aire adicional y una fragancia a limpio
placentera, mediante la liberación de iones negativos. Los iones
gativos podrían causar que el polvo se asiente del aire sobre el
ne
icador de aire y las superf
purif
funcionar de manera continua, pero puede apag
icies circundantes. Está diseñado para
arse si se desea.
18
Page 19

P
O
W
E
R
1
1
2
1
2
3
1
2
3
4
ESPAÑOL
Luz Nocturna
Ilumina de manera conveniente su salón si se desea.
Compartimiento de Fragancias
Sostiene el car
opcionales al aire que se entrega de regreso al salón.
tucho de fragancia para suministrar fragancias
Absorbedor de Olores
Característica opcional que elimina los olores y los vapores
químicos procedentes de pegamentos, solventes, y materiales
sintéticos. El purificador continúa limpiando el aire con o sin
el absorbedor de olores.
Oxigenador
El cartucho permanente convierte el ozono en oxígeno.
Botón de Puerta del Gabinete
Para abrir la puerta del gabinete, presione el botón inferior y
presione el botón superior.
Prefiltro
Remueve las partículas grandes tales como polvo, pelo y
pelusas. Está ubicado debajo de la celda colectora y puede
extraerse mediante la manija ubicada en la parte inferior de la
canasta.
Celda Colectora
a electroestáticamente, recoge y destruye las partículas
g
Car
pequeñas tales como polvo, humo, polen, bacterias, moho,
virus y hongos.
a la celda colectora girando en sentido antihorario
v
Remue
los cerrojos amarillos. Extraiga mediante la manija de color
negro.
19
Page 20

Limpieza.
P
O
W
E
R
ESPAÑOL
Tiempos de limpieza
Un cuidado y limpieza apropiados del purificador de aire son decisivos para el buen
funcionamiento. La unidad ha sido diseñada para ser lo más sencilla posible. La siguiente tabla
muestra los métodos e intervalos de limpieza.
PPiieezzaa TTiieemmppooss ddee MMééttooddoo
lliimmppiieezzaa
abinete Según necesidad Limpie primero con un paño húmedo. Si fuera nece-
G
sario, continúe con un limpiador suave, no abrasivo.
®
Celda Colectora 2 a 4 semanas, Rocíe el limpiador Assail-a-Cell
o según necesidad remoje en agua caliente con un detergente líquido
suave. Enjuague y seque bien a fondo.
Prefiltro 2 a 4 semanas, Enjuague bien a fondo en agua caliente.
o según necesidad
Absorbedor 12 meses, Reemplace (opcional, para la eliminación de olores).
de Olores o según necesidad No lo lave ni lo moje. Si fuera necesario, limpie
con aspiradora.
Oxigenador Según necesidad Pase por el frente una aspiradora con un accesorio de
cepillo suave. No use ningún líquido para la limpieza.
de Oreck, o
¡ADVERTENCIA!
Limpiar la unidad mientras está enchufada podría resultar en descarga eléctrica, chispa eléctrica y
lesiones físicas graves. Desenchufe la unidad antes de limpiar o realizar servicio de mantenimiento.
Limpieza del gabinete
Usted puede limpiar el gabinete del Purificador de
Aire con un limpiador suave no-abrasivo y un trapo
suave. IMPORTANTE: Desenchufe la unidad de su
fuente de energía eléctrica. No rocíe limpiadores o
cera para muebles dentro de las aberturas o las áreas
de rejilla.
Limpieza de los componentes del
purificador de aire
Todos los componentes de su purificador de
aire están ubicados detrás de la puer
gabinete. Antes de iniciar cualquier proceso
de limpieza, usted debe:
Desenchufar el purificador de aire.
1
Abrir la puerta del gabinete, presione
2
el botón inferior y presione el botón
superior
.
ta del
2
1
20
Page 21

P
O
W
E
R
ESPAÑOL
Limpieza de la Celda Colectora
Nota: La celda colectora podría requerir una limpieza más frecuente si se escucha un
“sonido crujiente”. El sonido crujiente es un sonido de chasquidos agudos que se
produce cuando se recogen partículas grandes de polvo en la celda colectora. Si se
escucha un sonido crujiente prolongado o continuo, la celda colectora debe limpiarse.
MPORTANTE:No trate de limpiar la celda colectora insertando un trapo, cepillo,
I
u otro objeto entre las placas de celda.
1
Para remover la celda colectora, gire en sentido antihorario los cerrojos
amarillos. Extraiga en línea recta mediante la manija de color negro.
Coloque la celda colectora en un recipiente, bañera, u otro lugar donde el
2
limpiador y los contaminantes serán enjuagados sin dañar las superficies.
Rocíe minuciosamente el limpiador Assail-A-Cell® de Oreck entre cada placa de
3
celda. Permita que el limpiador sea absorbido durante unos pocos minutos y enjuague
con agua limpia. No permita que el limpiador se seque en la celda colectora.
Un método alternativo de limpiar la celda colectora es sumergirlo en agua
tibia durante dos a tres horas. Puede utilizarse detergente para platos
líquido suave para ayudar a descomponer la suciedad.
Enjuague minuciosamente con agua.
Nota: No la coloque dentro de una máquina lavadora de
platos ni inserte objetos para limpiar la celda colectora. No
lave la celda colectora con blanqueador u otros limpiadores
abrasivos.
3
Los residuos difíciles tales como alquitrán del humo de
tabaco podrían requerir aplicaciones adicionales o remojo
más prolongado.
4
Permita secar completamente afuera del purificador de
aire. No utilice aire caliente ni comprimido para secar.
IMPORTANTE: No reinserte la celda colectora hasta que
esté completamente seca. Si la bombilla “Revisar Celda
Colectora” (Check Collector Cell) destella después de colocar nuevamente la celda colectora, entonces la celda colectora todavía
a la celda colectora y per
está mojada. Remue
Coloque la celda colectora nuev
5
v
amente dentro del purif
mita terminar el secado al aire.
icador de aire deslizándola
1
en línea recta dentro del gabinete. Asegure los cerrojos amarillos girando en sentido horario.
Cierre firmemente la puerta del gabinete.
6
Limpieza del Prefiltror
Nota: El prefiltro está ubicado debajo de la celda colectora. Usted primero debe remover
la celda colectora siguiendo el paso 1 en el anterior procedimiento.
Agarre la manija azul ubicada en el centro de la canasta del prefiltro y
1
hale el prefiltro en línea recta hacia arriba y afuera del gabinete.
2
Cepille sua
emente la superf
v
icie para aflojar la suciedad y la
agua tibia. No doble ni retuerza el filtro durante la limpieza.
e el filtro en
v
1
3
Enjuague minuciosamente el prefiltro y permita que se seque al aire completamente antes de
colocarlo nuevamente en el gabinete. No utilice aire caliente ni comprimido como parte del proceso de secado.
4
Coloque el prefiltro nuevamente en la unidad y luego coloque nuevamente la celda colectora siguiendo el paso 4 del anterior
procedimiento.
5
Cierre firmemente la puerta del gabinete.
21
Page 22
P
O
W
E
R
P
O
W
E
R
ESPAÑOL
Limpieza del Oxigenador
1
Remueva la celda colectora y el absorbedor de olores.
Localice el Oxigenador sobre el compartimiento de
2
fragancia. Limpie por aspiración suave la parte inferior del
Oxigenador con un accesorio de cepillo blando. No utilice
líquidos para limpiar. Los líquidos dañarán el oxigenador.
Coloque nuevamente la celda colectora y el absorbedor de
3
olores. Verifique que la puerta está cerrada firmemente.
Manten-
imiento.
1
2
Reemplazo del Absorbedor de Olores opcional
Desenchufe el purificador de aire.
1
2
Abra la puerta del gabinete.
Agarre y apriete la manija del absorbedor de
3
olores y hale en línea recta hacia afuera..
Reemplace con un absorbedor de olores nuevo.
4
El absorbedor de olores está diseñado de modo
que sólo pueda inser
tarse en una dirección.
2
5
Cier
re la puer
ta de manera se
3
22
gura.
1
Page 23

Localización
de fallas
Algunos problemas de servicio
que parecen ser importantes,
pueden a menudo resolverse
fácilmente. Consultando esta
guía, usted puede ser su propio
localizador de fallas.
odo otro servicio
T
debe realizarlo un
centro autorizado
de servicio Oreck.
ESPAÑOL
PPrroobblleemmaa VVeerriiffiiqquuee QQuuéé hhaacceerr
a unidad no enciende.
L
La luz ‘Verificar celda
olectora’ ('Check Collector
c
ell') ha cambiado al rojo.
C
La luz ‘Verificar celda
colectora’ ('Check Collector
Cell') está destellando con
color rojo.
La unidad no elimina • Celda colectora • Lave la celda colectora. Asegúrese de que esté
los contaminantes. bien limpia y seca antes de volver a instalarla.
La unidad chispea, cruje • Celda colectora • El ruido de chispeo o de chasquido (generación
y emite chasquidos. de arcos) ocurre cuando la celda colectora
Cordón de • Enchufe el cordón de alimentación eléctrica.
•
alimentación eléctrica
• Botón ‘Encendido’ • Seleccione la velocidad deseada del soplador
'Power') con el botón ‘Encendido’('Power').
(
• Puerta del gabinete • Verifique que la puerta del gabinete está
cerrada firmemente.
• Celda colectora • Lave la celda colectora. Asegúrese de que esté
bien limpia y seca antes de volver a instalarla.
Celda colectora • La celda colectora puede necesitar limpieza.
•
Limpie la celda colectora.
• La celda colectora puede no estar completamente seca. Déjela secar al aire por más tiempo.
• La celda colectora puede estar dañada.
Comuníquese con Oreck para el servicio.
captura una partícula grande.
• Si la unidad genera arcos en exceso, es posible
que la celda colectora esté sucia. Intente la
limpieza de la celda colectora.
• Si el fenómeno del arco continúa produciéndose
en forma excesiva después de una limpieza
adecuada, es posible que la celda esté dañada
o mojada. Si estuviera dañada, comuníquese
con Oreck para el servicio.
La luz ‘Cambiar
absorbedor de olores’
('Change Odor Absorber')
ha cambiado al rojo.
y eliminación
No ha
de olor
es.
La unidad sigue sin •
funcionar correctamente. puntos anteriores.
• Absorbedor de olores • Reemplace el absorbedor de olores, si lo desea.
Absorbedor de olores • Si el absorbedor de olores estuviera sucio,
•
Verifique todos los • Comuníquese con Oreck para el servicio.
• Si el absorbedor de olores no se reemplaza,
retire el absorbedor viejo para que se apague
la luz ‘Cambiar el absorbedor de olores’
('Change Odor Absorber').
límpielo con una aspiradora pro
accesorio de cepillo suave. No use ningún
líquido para limpiar el absorbedor de olores.
•
Reemplace el absorbedor de olores, si lo desea.
vista de un
23
Page 24

Garantía.
Sistema de limpieza total
ESPAÑOL
ORECK MANUFACTURING COMPANY: (Oreck Manufacturing Company le otorga la
iguiente garantía limitada para este producto, únicamente si el mismo ha sido comprado
s
originalmente para uso residencial, no para reventa, a Oreck o a un Distribuidor Minorista
utorizado Oreck).
A
reck reparará o reemplazará, sin costo, para el comprador original, cualquier pieza que se
O
etermine está defectuosa en cuanto a material o fabricación dentro de un periodo de
d
cinco (5) años de la fecha de compra y una garantía de por vida en la Celda Colectora para
todos los modelos residenciales. NOTA: Si la unidad se utiliza comercialmente, se aplica
un (1) año de garantía general.
Esta garantía limitada no cubre el reemplazo de piezas fungibles o consumibles como filtros,
cartuchos y otras piezas sujetas al desgaste normal, a menos que estén defectuosas en cuanto al
material o mano de obra.
Esta garantía limitada no se aplica a ninguna pieza sujeta a accidente, maltrato, uso comercial,
alteración, uso indebido, daño causado por hechos de fuerza mayor, uso de tensiones eléctricas
distintas de las indicadas en la placa de datos de este producto, o servicio de este producto que no
haya sido realizado por Oreck o un Centro de Servicio participante, autorizado por la fábrica.
Oreck no autoriza a ninguna persona o representante a asumir u otorgar cualquier otra
obligación de garantía junto con la venta de este producto.
La garantía limitada de Oreck es válida únicamente si usted retiene el comprobante de la compra
a Oreck o a un distribuidor minorista autorizado por Oreck para este producto. Si usted compra
este producto a cualquier otra fuente, su compra es ‘TAL CUAL’, lo que significa que Oreck no le
otorga ninguna garantía, y que usted, y no Oreck, asume en su totalidad el riesgo de la calidad y
desempeño de este producto, incluyendo el costo total de cualquier servicio, o reparación de
cualquier defecto, que fueran necesarios.
La responsabilidad de Oreck hacia usted por daños, por todo costo de cualquier clase que surja de
esta declaración de garantía limitada, se limitará a la cantidad pagada por este producto en ocasión
de su compra original, y Oreck no será responsable de ningún daño directo, indirecto,
consiguiente o incidental que surja de la utilización o de la inhabilidad para la utilización de este
producto. Algunos estados no permiten la exclusión o limitación de los daños incidentales o
consiguientes, por lo que la limitación o exclusión indicada puede no ser aplicable a su caso.
LA DURACIÓN DE TODAS LAS GARANTÍAS EXPRESAS E IMPLÍCITAS DE ESTE
PR
ODUCTO, CON INCLUSIÓN DE LAS GARANTÍAS IMPLÍCITAS DE
COMERCIABILIDAD Y ADECUACIÓN PARA UN PROPÓSITO PARTICULAR, ESTÁ
A AL PERÍODO DE GARANTÍA, Y NO SE APLICARÁN GARANTÍAS, YA
AD
LIMIT
SEA EXPRESAS O IMPLÍCITAS, DESPUÉS DE TRANSCURRIDO ESE PERÍODO.
Algunos estados no permiten limitaciones en la duración de las garantías implícitas, por lo que la
limitación indicada puede no ser aplicable a su caso.
Esta garantía le otorga derechos legales específicos, y usted puede tener también otros derechos
que varían de un estado a otro.
© 2006 Oreck Holdings, LLC.
Todos los derechos reservados. La propiedad y la utilización de todas las marcas, logotipos
y configuraciones de producto están sujetas a la autorización de Oreck Holdings, LLC.
20061-01 Rev. A 07/06 ECN # R-8278
24
 Loading...