

Page 1
Important!
Read all instructions carefully, and keep for future reference.
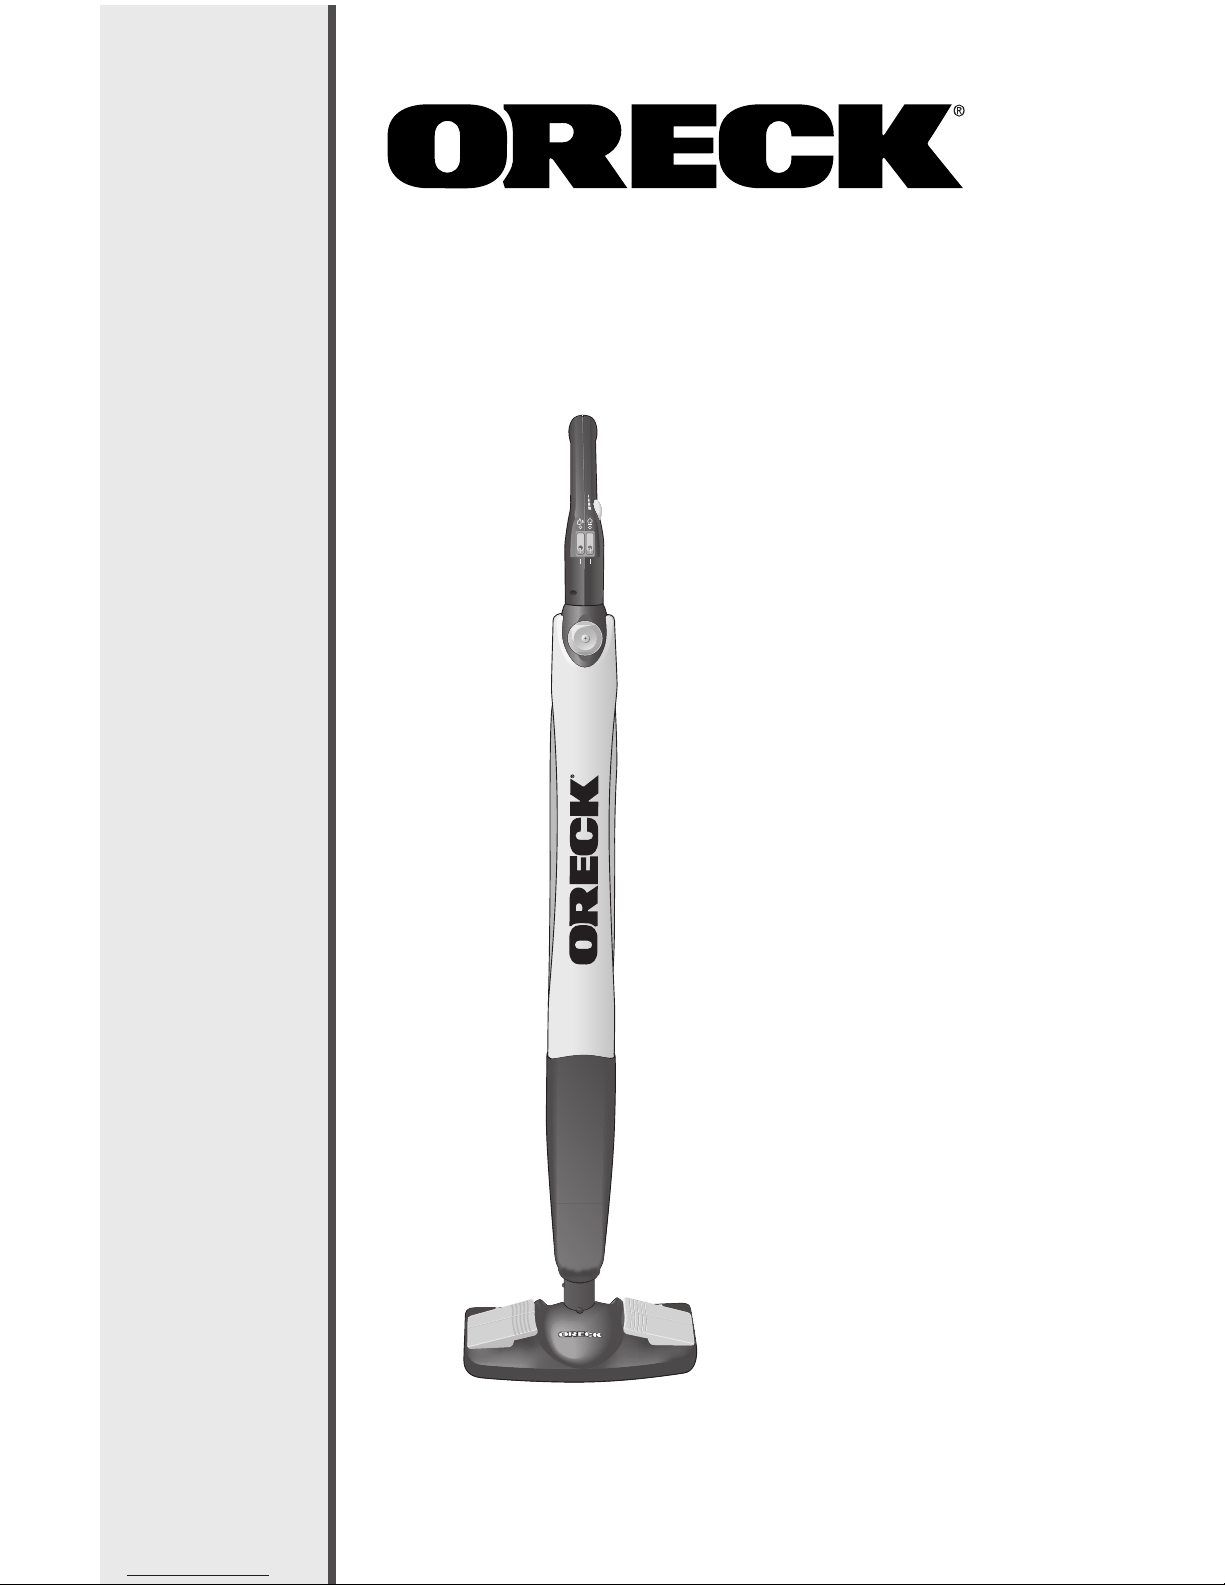
STEAM-IT
®
All Purpose Steam Wand
STEAM100LRH & STEAM100S
User’s
Guide
Page 2
Thank You for purchasing an Oreck Steam-It®All Purpose Steam Wand!
This state of the art steam wand will help you have a cleaner home.
At Oreck, we understand that our customers are unique and expect superior
service. To meet your needs, we offer different customer service options to work
with your lifestyle and preferences.
Welcome to our Call. Click.customer service program.
To speak with an Oreck representative call:
USA: 1-800-989-3535
Canada: 1-888-676-7325
On the web, point and click at: www.oreck.com and click locate
a store on the top right
Enjoy
Contents
Call
Click
2
Safety . . . . . . . . . . . . . . . . . . . . . . . . . . . . . . . . . . . . . . . . . . . . 3
Parts . . . . . . . . . . . . . . . . . . . . . . . . . . . . . . . . . . . . . . . . . . . . . 5
Product Components & Accessories . . . . . . . . . . . . . . . 5
Operation . . . . . . . . . . . . . . . . . . . . . . . . . . . . . . . . . . . . . . . . . 6
Operating Instructions . . . . . . . . . . . . . . . . . . . . . . . . . . . 6
Using the Steam-It
®
. . . . . . . . . . . . . . . . . . . . . . . . . . . . . 6
Cleaning Surface/Steam Setting Reference . . . . . . . . . . 7
Hard Floor Cleaning . . . . . . . . . . . . . . . . . . . . . . . . . . . . 7
Attaching an Accessory . . . . . . . . . . . . . . . . . . . . . . . . . . 8
Maintenance . . . . . . . . . . . . . . . . . . . . . . . . . . . . . . . . . . . . . . 9
After Each Use . . . . . . . . . . . . . . . . . . . . . . . . . . . . . . . . . 9
Cleaning the Steam Generator . . . . . . . . . . . . . . . . . . . . 9
Unblocking the Steam Outlet . . . . . . . . . . . . . . . . . . . . . 9
Cleaning the Cloths . . . . . . . . . . . . . . . . . . . . . . . . . . . . . 9
Troubleshooting . . . . . . . . . . . . . . . . . . . . . . . . . . . . . . . . . . . . 10
Warranty . . . . . . . . . . . . . . . . . . . . . . . . . . . . . . . . . . . . . . . . . . 11
E N G L I S H
Page 3

3
IMPORTANT SAFETY INSTRUCTIONS!
General Warnings
When using an electrical appliance, basic precautions should always be followed,
including the following:
READ ALL INSTRUCTIONS BEFORE USING THIS STEAM CLEANER
WARNING! To reduce the risk of fire, electric shock, or injury:
• Do not leave the steam cleaner unattended when plugged in. Unplug it from
the socket when not in use.
• To prevent electric shock do not use outdoors.
• Not to be used as a toy. Close supervision is necessary when used near children.
• Use only as directed in this manual.
• Do not use with damaged cord or plug. If appliance is not working as it
should, has been dropped, damaged, left outdoors, or dropped into water, return
it to a service center or call customer service at:
USA: 1-800-989-3535 Canada: 1-888-676-7325
• Do not pull or carry by the cord, use the cord as a handle, allow the cord to
come into contact with hot or sharp surfaces or close a door on the cord.
• Do not unplug by pulling on the cord.
• Do not handle the plug or cleaner with wet hands.
• Do not put any objects into openings or operate with openings blocked.
• Do not use without the tank cap in place.
• Turn off all controls before unplugging.
• Do not use an extension cord.
• Store indoors, put away after use to prevent tripping accidents.
• Using improper voltage may result in damage to the steam cleaner and
possible injury to the user. The correct voltage is listed on the rating label.
• This steam cleaner is intended for household use only.
• A hazard may occur if the steam cleaner runs over the power cord.
• Never immerse the steam cleaner in water or other liquids.
• The steam cleaner is not suitable for outdoor use.
• Do not operate the steam cleaner without water in the tank.
• Empty the water tank when the steam cleaner is not in use.
• Do not fill the water tank with anything other than water or Oreck Fresh Air
®
Steam Mop Essence. Never put additives (such as perfume, stain remover or
products containing alcohol) in the water as they may damage the steam
cleaner or make it dangerous to use.
• Always remove the power cord from the outlet and handle the steam cleaner
with care when filling with water.
• Do not overfill the tank. Do not exceed the maximum prescribed filling level.
Please use the funnel included.
Safety
E
N G L I S H
Page 4

• Ensure that the water tank’s closure cap has been screwed down fully before use.
• Do not touch any hot areas on the steam cleaner. It is normal for the steam
cleaner to heat up during operation.
• Do not use the steam cleaner to treat any item of clothing while being worn on
the body.
• The force and heat of the steam may have an adverse effect on some materials.
Always test the steamer on a small concealed area to determine if it is
suitable for treatment with the steam cleaner.
• Never aim the steam cleaner at people, animals or plants (risk of scalding!)
Do not aim the steam cleaner at electrical systems or wires.
• Accessories become hot during use - allow them to cool down before handling.
• Do not use the steam cleaner directly overhead.
• Not for use on fine silks, velour, very thin plastics, unsealed hardwood,
laminates, engineered hard floor surfaces, ceilings, drywall and exterior paint
of automobiles, electronics or items using electricity.
• WARNING: Product contains chemicals known to the State of California to
cause cancer and birth defect or other repoductive harm.
NOTE: Be sure to test in a hidden area prior to use.
IMPORTANT! This steam cleaner is equipped with a steam release valve
mechanism, located at the rear of the steam generator. In the event of a
steam flow blockage, the safety valve is designed to release the steam.
Regular cleaning of the steam chamber and nozzle is therefore recommended to avoid such an occurrence. If the steam is released from the safety
valve, stop cleaning and unplug the steam cleaner from the electrical outlet.
Allow the steam cleaner to cool down thoroughly for at least one hour. After
this time, clean the steam chamber and nozzle.
If steam is still being released from the safety valve after cleaning, contact a
service center.
SAVE THESE INSTRUCTIONS
Household Use Only
4
IMPORTANT SAFETY INSTRUCTIONS!
General Warnings
Safety
E
N G L I S H
Page 5
5
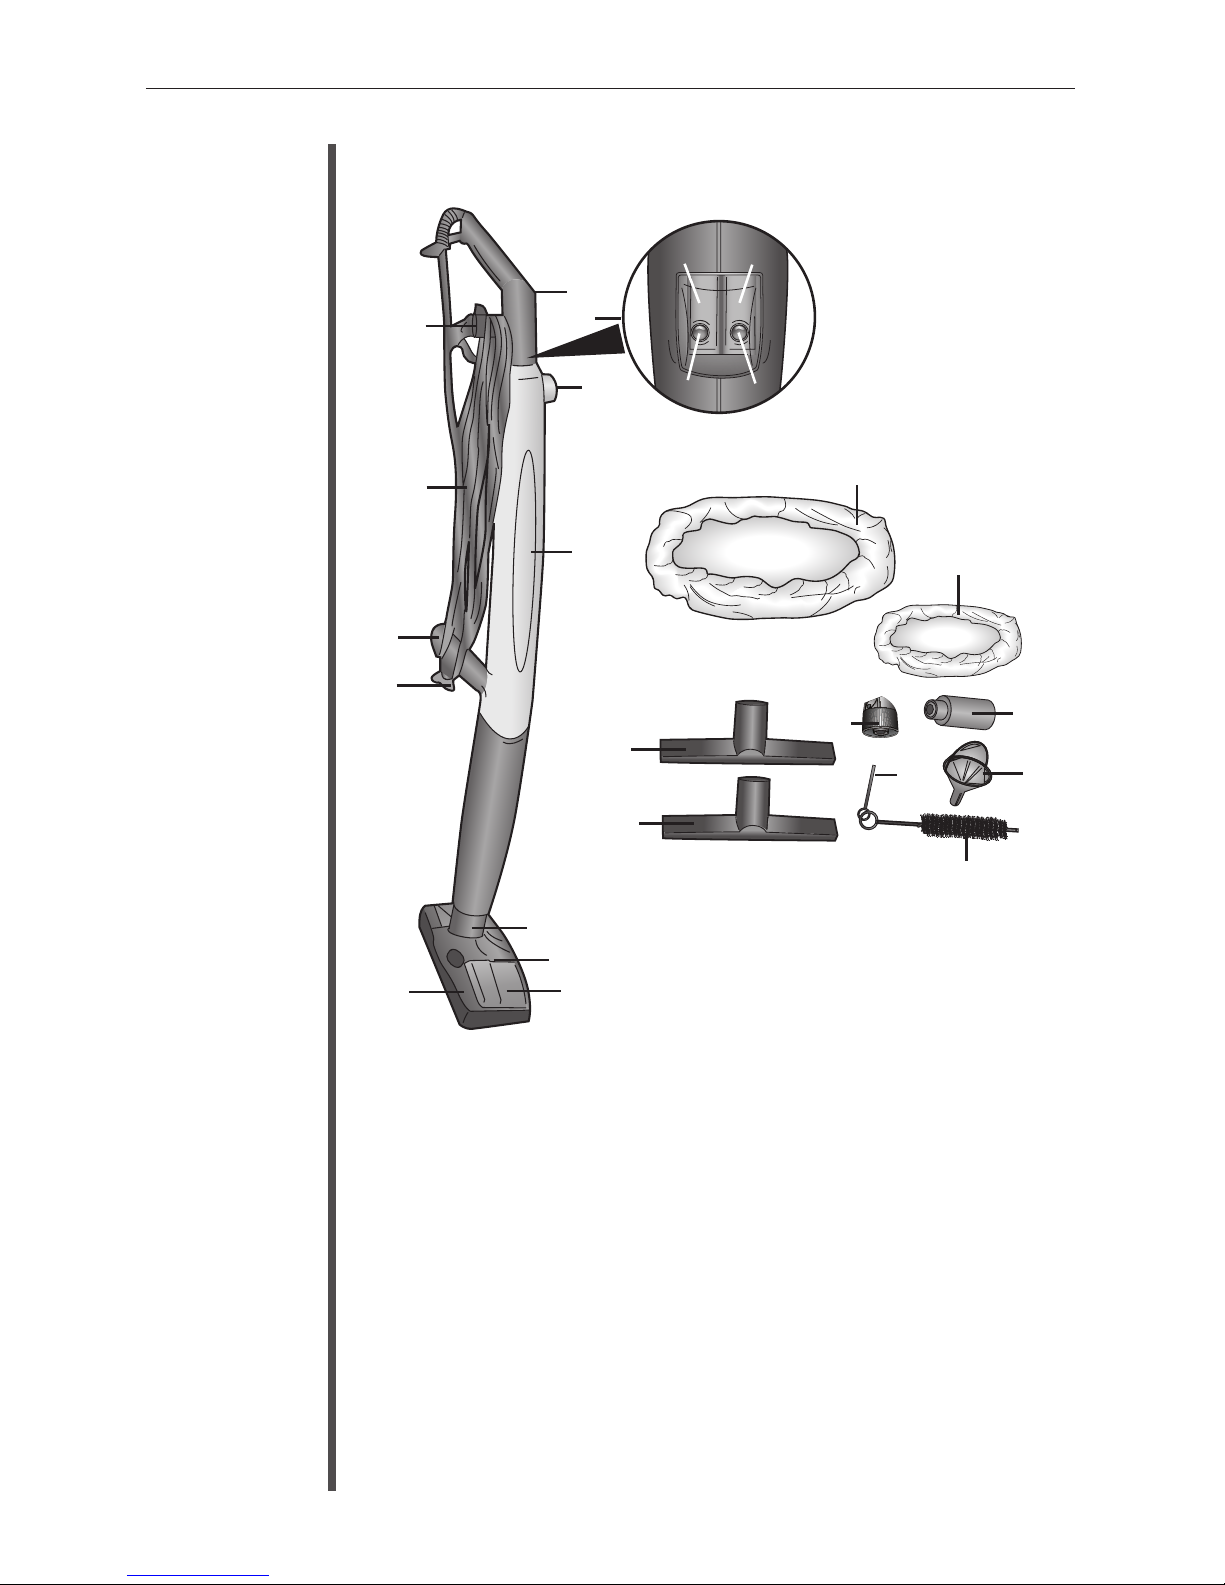
Product Components & Accessories
Parts
E N G L I S H
1 Steam Regulator
2 Control Switches
3 Water Tank Cap
4 Water Tank
5 Lock Button
6 Powerhead
7 Towel Grips
8 Brush Slides
9 Cord Wrap
10 Lower Handle
11 Power Cord
12 Cord Dump
13 Squeegee
14 Utility Tool
15 Deflector Nozzle
16 Floor Cloth
17 Utility Cloth
18 Spot Brush
19 Nozzle Brush
20 Nozzle Pin
21 Funnel
22 On/Off Switch
23 Steam Switch
24 Power ON Light
(red)
25 Steam Ready Light
(green)
1
3
4
2
5
6
7
8
9
10
11
12
13
14
15
16
17
18
19
21
20
22
23
24
25
Accessories
Parts
Page 6
Operating Instructions
1. Place the steam cleaner in a
horizontal position and remove
the water tank cap. Use the funnel
provided to slowly fill the water
tank with clean water. Replace the
cap securely.
2. Insert the power plug into an
electrical outlet. Make sure the
steam cleaner is switched off.
3. Press the ON/OFF switch located
on the handle to switch the steam cleaner on. The red heater “ON”
light should now be illuminated.
4. Press the steam switch to the “ON” position. After approximately
45 seconds the green “steam ready” light should come on.
5. Turn the steam regulator control to maximum and point the steam
nozzle towards a cloth or sink for approximately 10 - 15 seconds, to
stabilize the flow and produce a continuous steam.
NOTE: Ensure the steam switch is turned off and the powerhead has
cooled before connecting the powerhead or any of the other cleaning
accessories.
Using the Steam-It
®
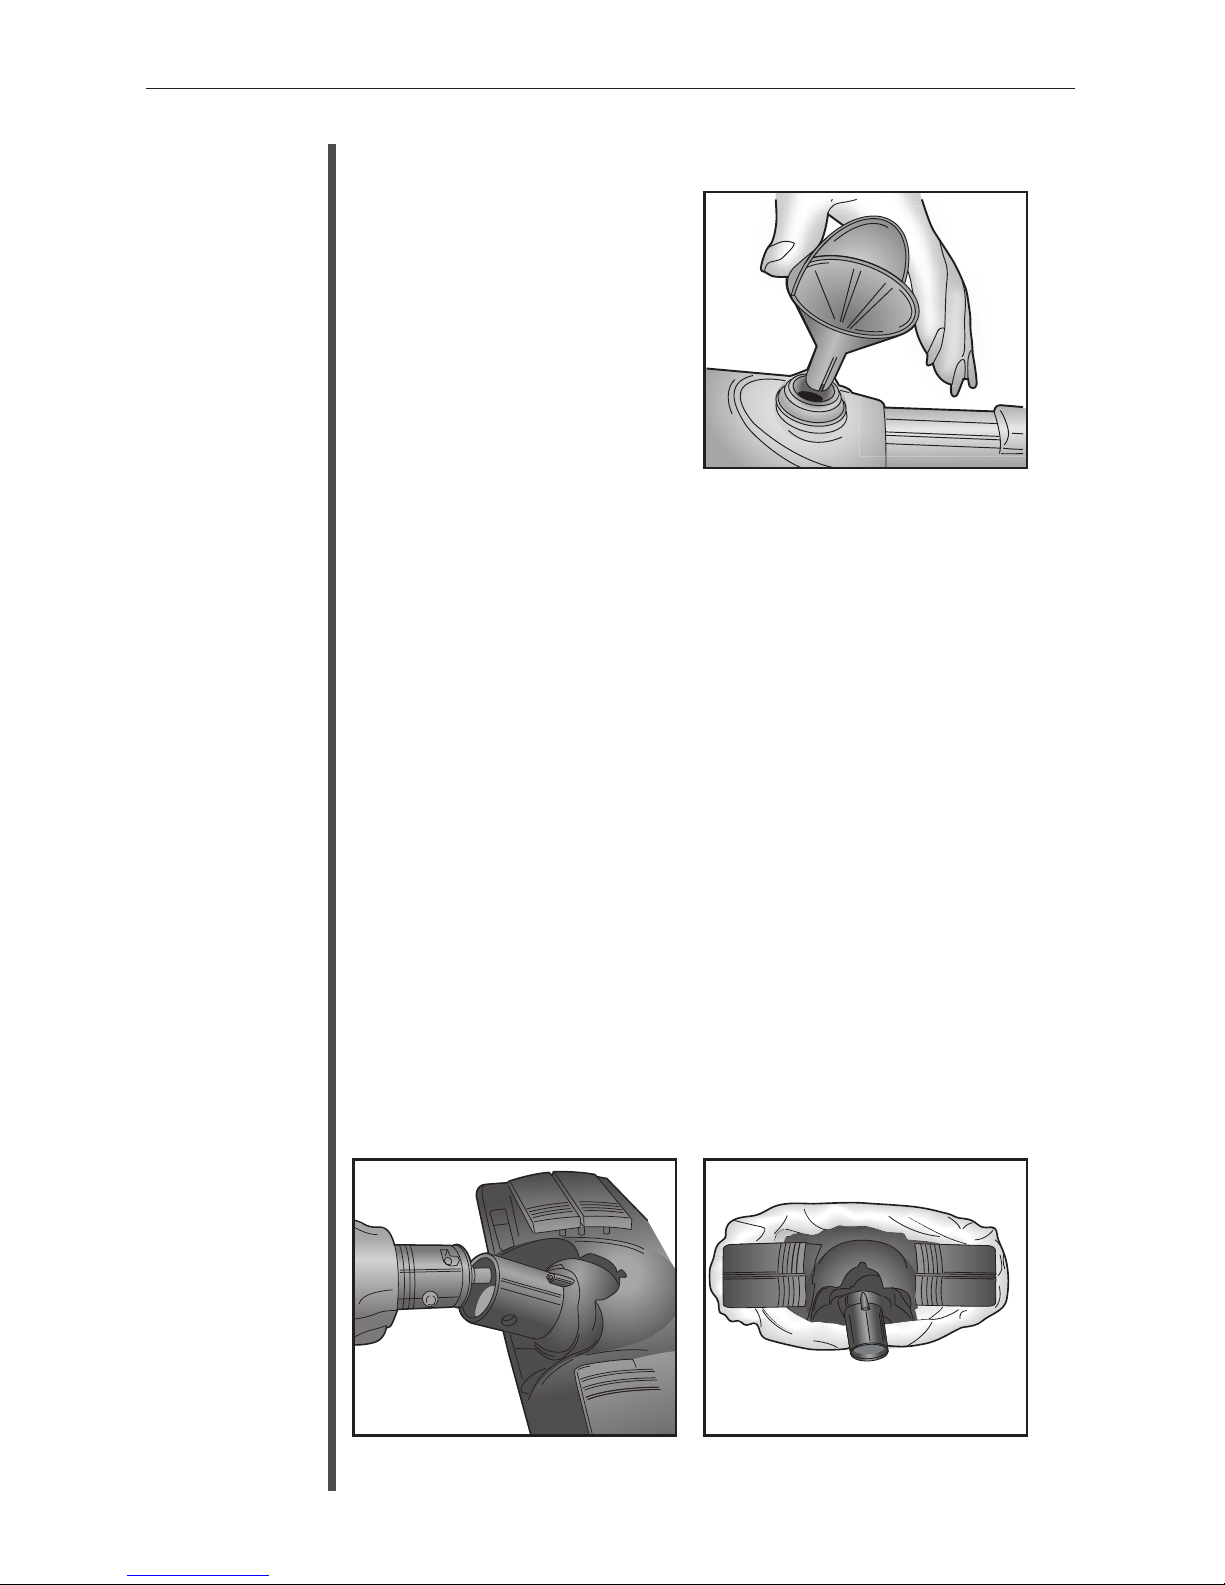
1. Align the hole in the side of the powerhead with the lock button
on the main body of the steam cleaner. Ensure that the lock
button clicks firmly into place.
2. After assembling powerhead, connect the floor cloth to the powerhead
by using the towel grips.
3. Turn the steam switch on.
Operation
E N G L I S H
6
Page 7
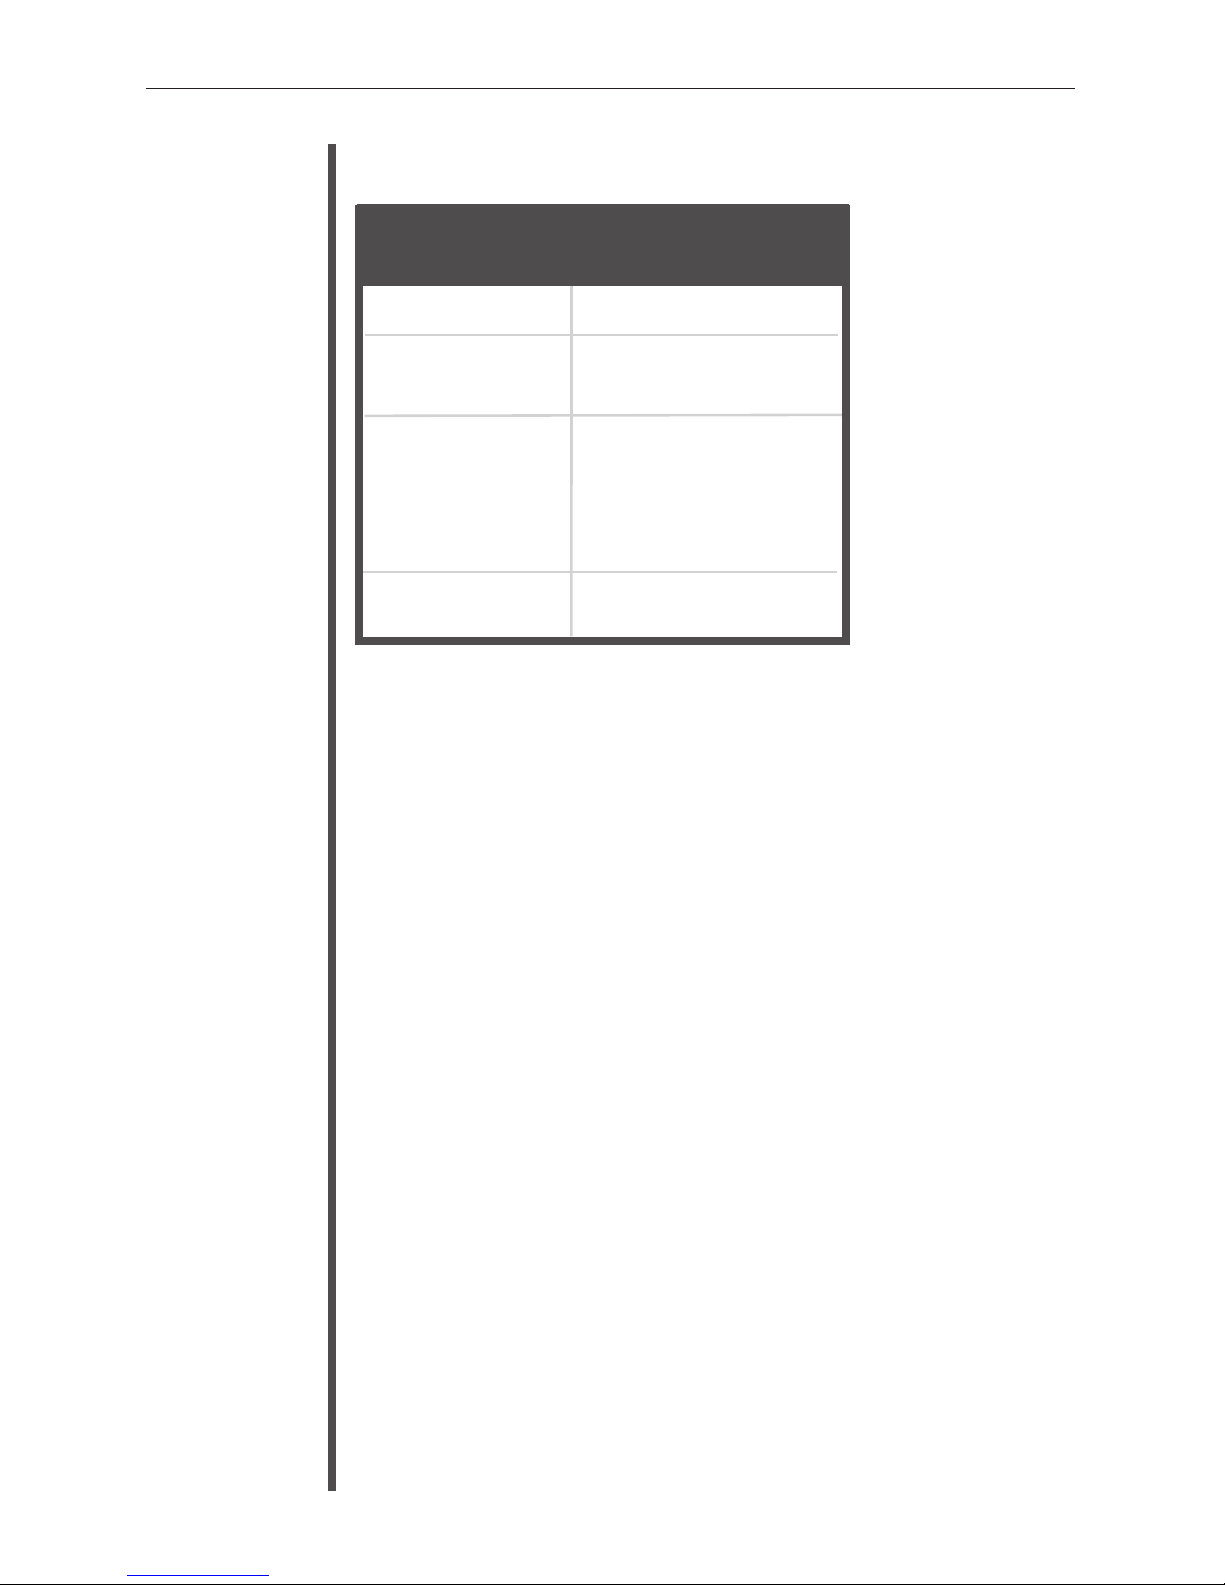
Glass & Mirrors
Grout on Hard
Surfaces
Tiled Surfaces,
Cabinets &
Countertops in
Kitchens &
Bathrooms
Sealed Hardwood
Minimum (Low)
Medium to High
Low to Medium
Low
Operation
E N G L I S H
7
Cleaning
Surfaces
Steam
Regulator Setting
Cleaning Surface/Steam Setting Reference
Hard Floor Cleaning
Reduce the steam flow to a lower setting by turning the steam control
regulator. Use both forward and backward strokes across the floor area.
NOTE: When the cloth becomes very wet, let cool, ring out the
moisture, use the reverse side or replace with a clean, dry cloth.
To Sanatize Hard Floor Surfaces:
• Allow unit to heat for one minute.
• Set steam regulator to “HIGH”.
• Use short scrubbing motions on hard floor area for at least 5 seconds.
Attaching an Accessory
Accessories can be used on the main body of the steam cleaner by
removing the powerhead and then attaching the desired accessory.
1. Press the lock button to remove the powerhead when cool.
2. Attach the desired accessory by aligning the hole in the side of the
accessory with the lock button on the main body of the steam cleaner.
Ensure the lock button clicks firmly into place.
Page 8
E N G L I S H
8
Operation
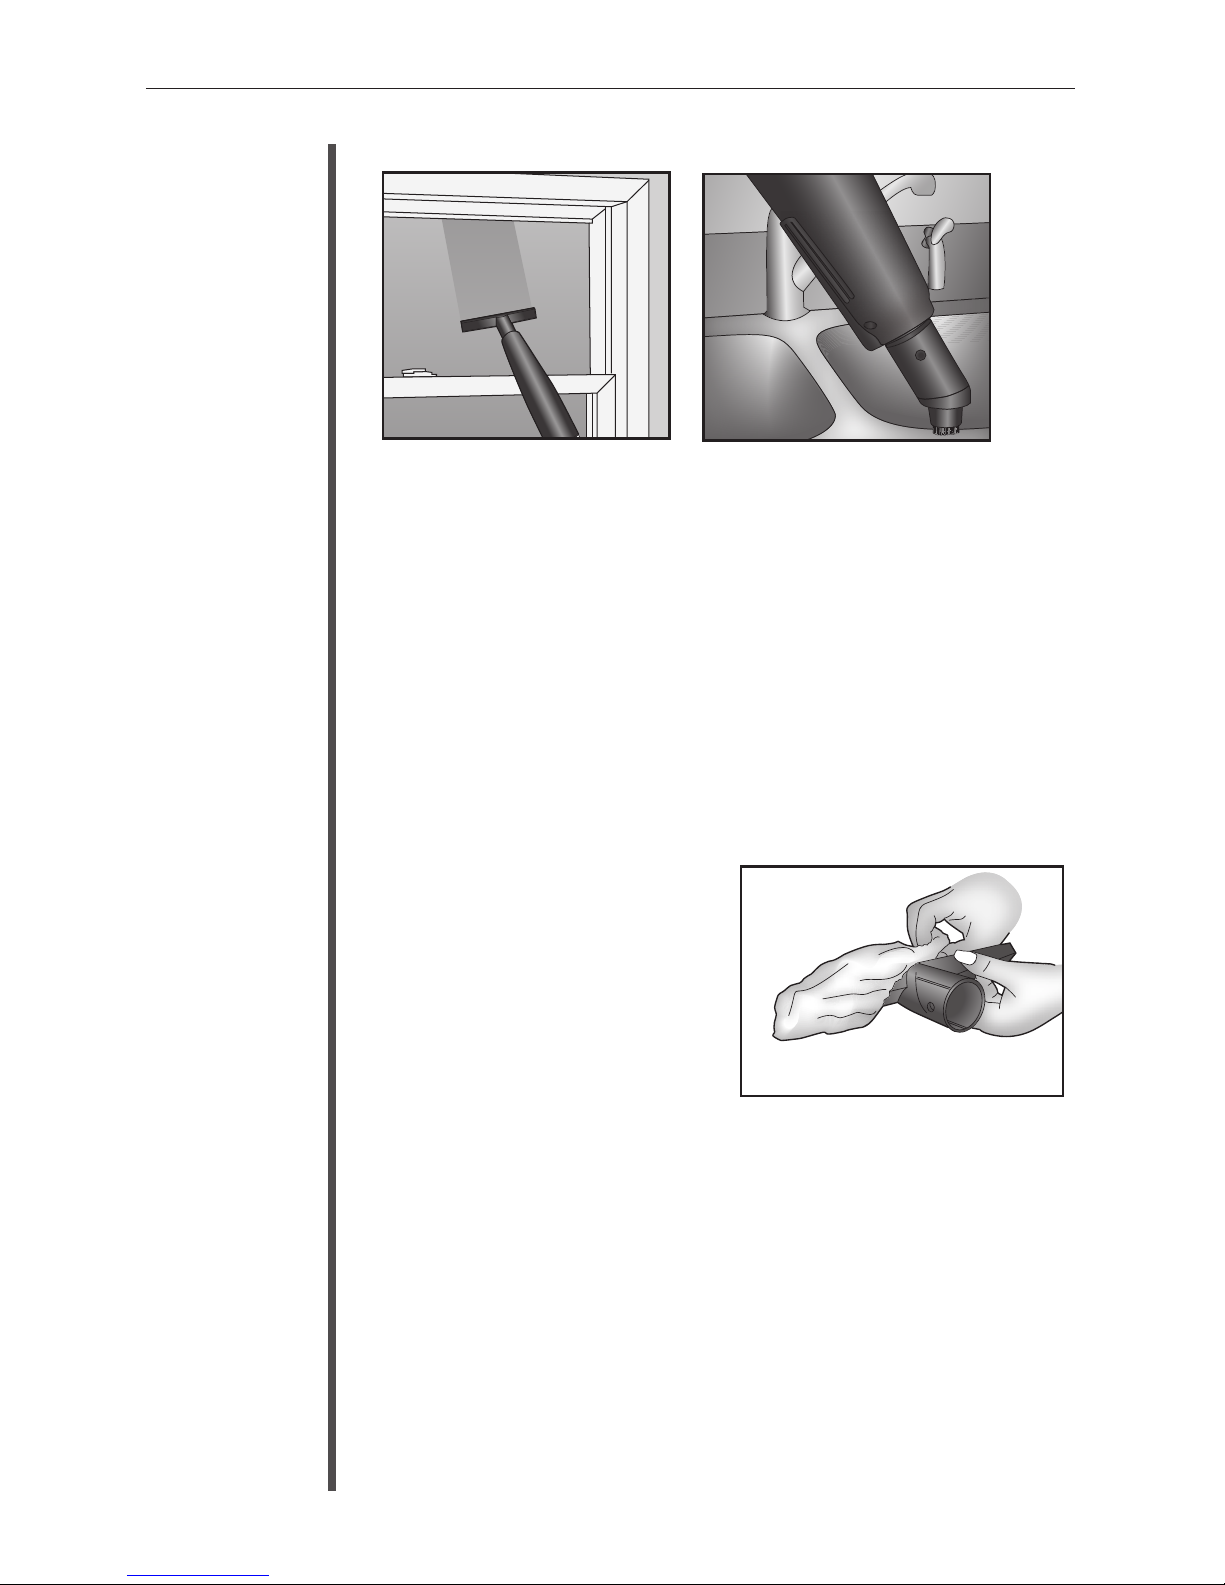
Squeegee
For cleaning glass and mirror panels. Use the squeegee at a
very low steam flow. Achieve this by adjusting the steam regulator. A cloth can be used to wipe the blade and remove excess
water during usage when cool. For small window panels,
remove the squeegee tool and spray the steam directly onto the
surface. Use the squeegee separately to wipe away the moisture.
Spot Brush
For cleaning the grout between tiles or stubborn marks and
stains on hard surfaces. Use at medium or high steam flow.
Utility Tool
For cleaning tiled surfaces, cabinets and
countertops in kitchens and bathrooms.
Use on a low to medium steam flow.
Cover the utility tool with the elasticised
cloth.
Deflector Nozzle
For cleaning sanitary ware such as toilet bowls, taps or
drain covers. Use this nozzle at maximum steam flow. Point it
directly at stains on carpets or upholstery while holding a
clean cloth near the stained area to capture any loosened dirt.
Page 9

Mainte-
nance
E N G L I S H
9
After Each Use
NOTE: When you have finished steam cleaning, ensure that both the
power switch and steam switch are turned off and that the plug is
removed from the electrical outlet.
Empty any remaining water from the tank by unscrewing the cap and
turning the steam cleaner upside down over a sink or outdoors. If
needed store the steam cleaner by using the hanging strap at the top
of the handle.
Cleaning the Steam Generator
IMPORTANT! Only follow these instructions when the steam cleaner is completely cooled down. Also ensure that the plug is removed
from the electrical outlet.
1. Pull down the nozzle lock and twist the
steam nozzle first, before pulling the nozzle
out of the steam chamber completely.
2. Insert the nozzle brush into the chamber
and rotate the brush while pulling in and out
of the chamber.
3. Insert the steam nozzle back into the chamber
and turn it clockwise to lock back into position.
NOTE: Oreck recommends cleaning the chamber at least after every
12 - 15 uses to ensure optimum performance.
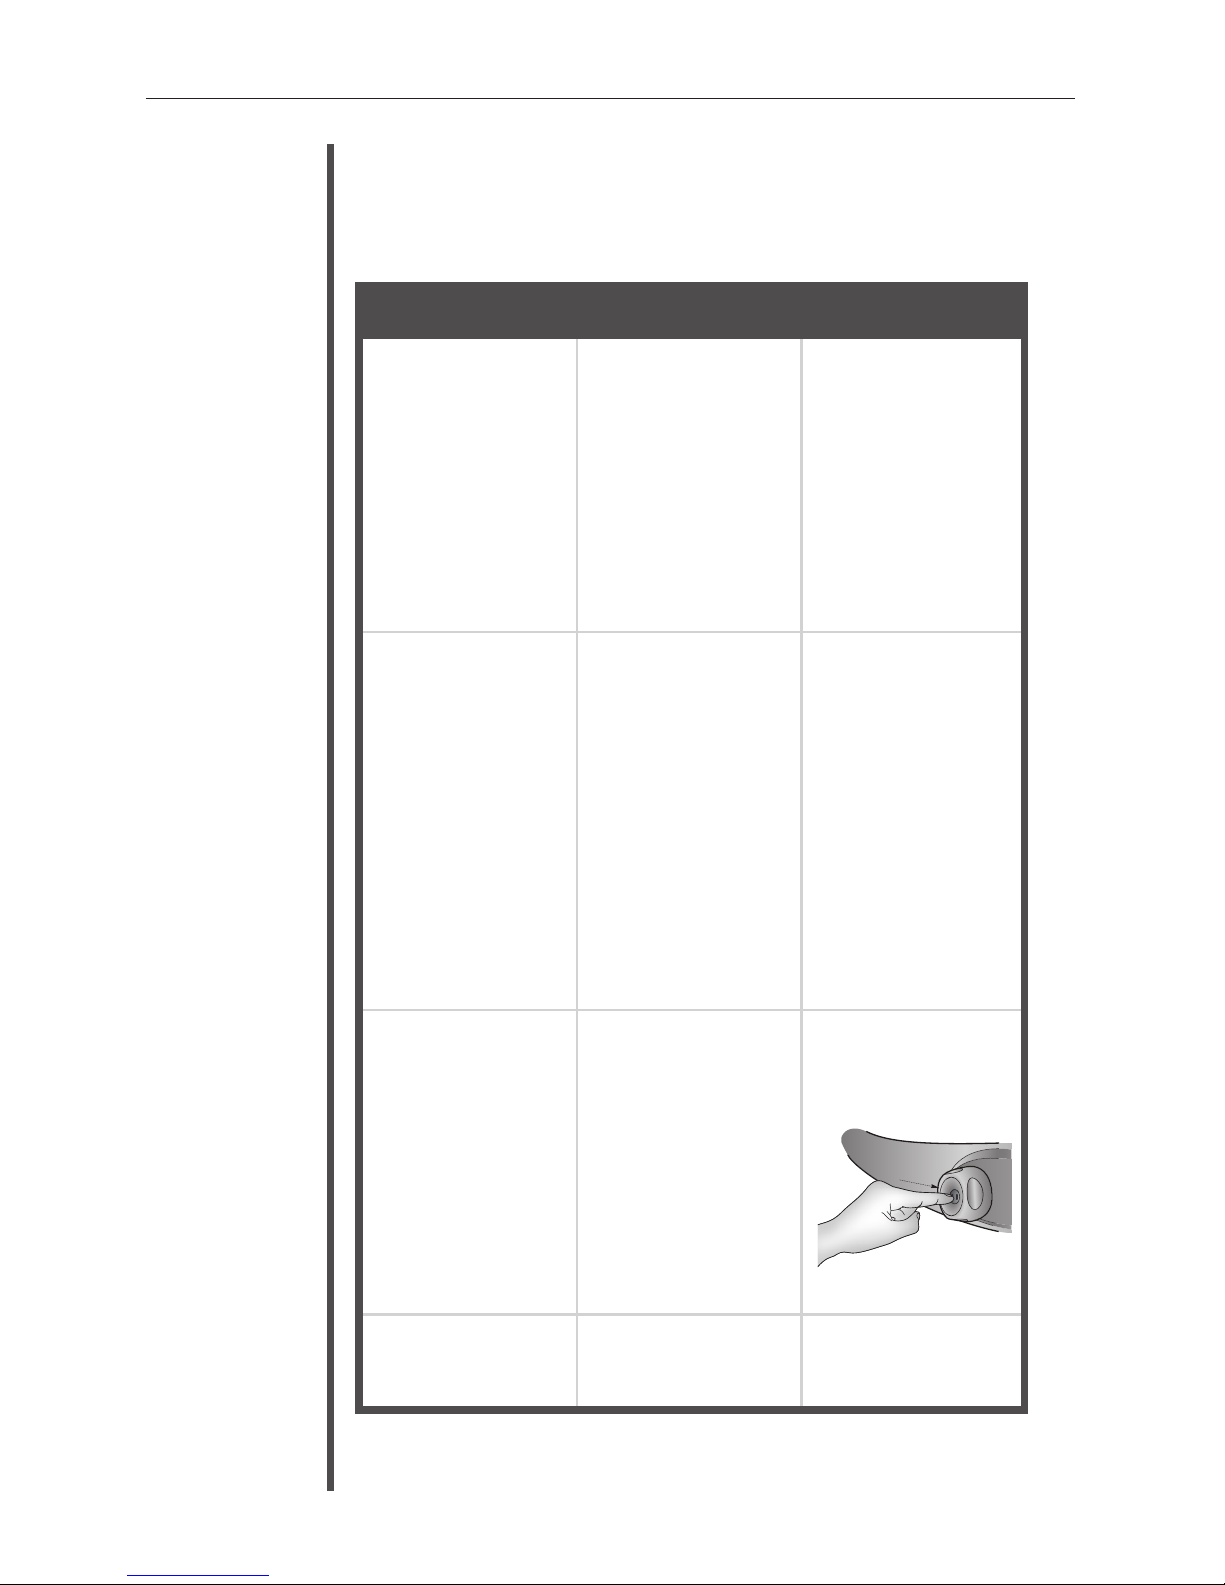
Unblocking the Steam Outlet
If steam flow appears reduced, the steam nozzle may be blocked. Unplug
the unit from the electrical outlet and allow it to cool.
1. Insert the nozzle pin into the center of the steam nozzle to clear any
blockage that may have formed.
Cleaning the Cloths
Both the floor and utility cloths can be machine washed (140˚F max). For
heavy soiling, soak the cloths in warm water and detergent or a mild stain
remover. Allow the cloths to dry completely before storing.
Page 10
Problem Cause Solution
Troubleshooting
E N G L I S H
If the following troubleshooting tips do not resolve the problem please contact
Oreck Customer Service. U.S.: 1-800-989-3535 Canada: 1-888-676-7325
IMPORTANT! Always unplug and allow the steam cleaner to cool down before
conducting any troubleshooting. See safety warnings.
Steam Cleaner has
no power.
Very low or no
steam is emitted
when the steam
cleaner is on.
The water tank
appears out of
shape.
Unit still does not
operate properly.
Steam cleaner is not
properly plugged into
an electrical outlet or
is not switched on.
The socket is faulty.
The tank is empty.
The Steam Nozzle is
blocked.
Despite the green
light, the steam
switch is not activated properly.
The weighted tube in
the tank is not
immersed in water.
The steam regulator
is set to minimum.
A vacuum is being
created inside the
wate tank, causing it
to deform.
This could be because
the water cap’s airinlet valve is stuck.
Check all the above
points.
Insert the plug into
an electrical outlet
and switch the steam
cleaner on.
Check the socket by
unplugging the steam
cleaner and plugging
in a different appliance.
Fill the water tank.
See “Unblocking the
Steam Outlet”
Press down the steam
switch fully.
Shake the steam
cleaner gently.
Turn the steam controller until sufficient
steam is emitted.
Press the center of
the cap to release the
vacuum.
Contact Oreck for
service.
10
Page 11

Warranty
E N G L I S H
ORECK MANUFACTURING COMPANY: (Oreck gives you the following
limited warranty for this product only if it was originally purchased for use, not
resale, from Oreck or an Oreck Authorized Retail Dealer.)
Oreck will repair or replace, free of charge, to the original purchaser, any part
which is found to be defective in material or workmanship within one (1) year
of the date of purchase. This limited warranty applies to normal domestic use.
This limited warranty does not cover the replacement of expendable or consumable
parts subject to normal wear.
This limited warranty does not apply to any part subjected to accident, abuse,
commercial use, alteration, misuse, damage caused by fire or act of God, the
use of voltages other than indicated on the serial number plate of this product or
service of this product by other than Oreck or an Oreck Factory Authorized
Service Center.
Oreck does not authorize any person or representative to assume or grant any
other warranty obligation with the sale of this product.
Oreck’s limited warranty is valid only if you retain proof of purchase from Oreck
or an Oreck Authorized Retail Dealer for this product. If you purchase this product
from any other source, your purchase is “AS IS,” which means Oreck grants you
no warranty, and that you, not Oreck, assume the entire risk of the quality and
performance of this product, including the entire cost of any necessary servicing
or repairs of any defects.
ORECK’S LIABILITY FOR DAMAGES TO YOU FOR ANY COSTS WHATSOEVER ARISING OUT OF THIS STATEMENT OF LIMITED WARRANTY
SHALL BE LIMITED TO THE AMOUNT PAID FOR THIS PRODUCT AT
THE TIME OF ORIGINAL PURCHASE, AND ORECK SHALL NOT BE
LIABLE FOR ANY DIRECT, INDIRECT, CONSEQUENTIAL OR INCIDENTAL DAMAGES ARISING OUT OF THE USE OR INABILITY TO USE
THIS PRODUCT.
Some states do not allow the exclusion or limitation of incidental or consequential
damages, so the above limitation or exclusion may not apply to you.
ALL EXPRESS AND IMPLIED WARRANTIES FOR THIS PRODUCT,
INCLUDING IMPLIED WARRANTIES OF MERCHANTABILITY AND
FITNESS FOR A PARTICULAR PURPOSE, ARE LIMITED IN DURATION
TO THE WARRANTY PERIOD, AND NO WARRANTIES, WHETHER
EXPRESS OR IMPLIED, WILL APPLY AFTER THIS PERIOD.
Some states do not allow limitations on the duration of implied warranties, so the
above limitation may not apply to you.
This warranty gives you specific legal rights, and you may also have other rights
which vary from state to state.
If there is an issue with your vacuum that you believe is covered by this warranty,
Contact Oreck Customer Service at 1-800-989-3535.
11
Page 12

¡Importante!
Lea todas las instrucciones cuidadosamente, y conserve esta
Guía para consultas en el futuro.
STEAM-IT
®
Boquilla de vapor multiuso
STEAM100LRH & STEAM100S
Guía del
usuario
Page 13

Gracias por comprar una Boquilla de vapor multiuso Steam-It®de Oreck.
Esta boquilla de vapor de tecnología avanzada le ayudará a mantener un hogar
más limpio.
En Oreck comprendemos que nuestros clientes son únicos y esperan un servicio
superior. A fin de satisfacer sus necesidades ofrecemos diferentes opciones de
servicio al cliente, para trabajar con su estilo de vida y sus preferencias.
Le damos la bienvenida a nuestro programa de servicio al cliente 'Llame. Haga clic.'
Para hablar con un representante Oreck llame a los números que siguen.
En los Estados Unidos: 1-800-989-3535
En Canadá: 1-888-676-7325
En la Web, apunte y haga clic en: www.oreck.com y luego haga
clic en ‘localice una tienda’, en el ángulo superior derecho.
Disfrute
Índice
Llame
Haga
clic
13
Seguridad . . . . . . . . . . . . . . . . . . . . . . . . . . . . . . . . . . . . . . . . . 14
Piezas . . . . . . . . . . . . . . . . . . . . . . . . . . . . . . . . . . . . . . . . . . . . 16
Componentes y accesorios del producto . . . . . . . . . . . . 16
Operación . . . . . . . . . . . . . . . . . . . . . . . . . . . . . . . . . . . . . . . . . 17
Instrucciones de operación . . . . . . . . . . . . . . . . . . . . . . . 17
Uso de la Steam-It
®
. . . . . . . . . . . . . . . . . . . . . . . . . . . . . 17
Relación entre las superficies a limpiar y el ajuste de vapor . . 18
Limpieza de pisos duros . . . . . . . . . . . . . . . . . . . . . . . . . 18
Colocación de accesorios . . . . . . . . . . . . . . . . . . . . . . . . . 18
Mantenimiento . . . . . . . . . . . . . . . . . . . . . . . . . . . . . . . . . . . . . 20
Después de cada uso . . . . . . . . . . . . . . . . . . . . . . . . . . . . 20
Limpieza del generador de vapor . . . . . . . . . . . . . . . . . . 20
Desbloqueo de la salida de vapor . . . . . . . . . . . . . . . . . . 20
Limpieza de los paños . . . . . . . . . . . . . . . . . . . . . . . . . . . 20
Localización de fallas . . . . . . . . . . . . . . . . . . . . . . . . . . . . . . . 21
Garantía . . . . . . . . . . . . . . . . . . . . . . . . . . . . . . . . . . . . . . . . . . 22
E S P A Ñ O L
Page 14

14
INSTRUCCIONES IMPORTANTES DE SEGURIDAD
Advertencias Generales
Cuando se use un artefacto eléctrico deben observarse siempre las precauciones
básicas, incluidas las siguientes:
LEA TODAS LAS INSTRUCCIONES ANTES DE UTILIZAR ESTA
LIMPIADORA DE VAPOR
¡ADVERTENCIA! Para reducir el riesgo de incendio, choque elé ctrico o
lesiones:
• No deje la limpiadora de vapor desatendida mientras está enchufada.
Desenchúfela del tomacorriente cuando no la use.
• Para evitar choques eléctricos, no use la unidad en exteriores.
• No se debe usar como un juguete. Es necesario mantener una especial super
visión cuando se utilice cerca de niños.
• Use la unidad únicamente como se indica en este manual.
• No la use con un cordón o enchufe dañado. Si el artefacto no está funcionando
como debería, o si se ha caído, dañado, dejado a la intemperie o sumergido
en el agua, devuélvalo a un centro de servicio o llame a Servicio al cliente:
En los Estados Unidos: 1-800-989-3535 En Canadá: 1-888-676-7325
• No tire del cordón para transportar la unidad, ni use el cordón como manija, ni
deje que el cordón entre en contacto con superficies calientes o aguzadas, ni
cierre una puerta sobre el cordón.
• No la desenchufe tirando del cordón.
• No maneje el enchufe o la limpiadora con las manos húmedas.
• No coloque ningún objeto en las aberturas ni haga funcionar la unidad con las
aberturas bloqueadas.
• No utilice la unidad sin tener colocada la tapa del tanque.
• Lleve todos los controles a la posición 'Apagado' ('Off') antes de desenchufar.
• No utilice un cordón de extensión.
• Almacene la unidad en interiores, y guárdela después de usarla para evitar
tropiezos accidentales.
• El uso de una tensión incorrecta puede dar como resultado un daño en la
limpiadora de vapor, y posibles lesiones al usuario. La tensión correcta se
indica en la etiqueta de especificaciones.
• Esta limpiadora de vapor está diseñada únicamente para uso doméstico.
• Puede existir un riesgo si la limpiadora de vapor pasa sobre el cordón de
alimentación eléctrica.
• No sumerja nunca la limpiadora de vapor en agua ni en otros líquidos.
• La limpiadora de vapor no es apta para uso en exteriores.
• No haga funcionar la limpiadora de vapor sin agua en el tanque.
• Vacíe el tanque de agua cuando la limpiadora de vapor no esté en uso.
• No llene el tanque de agua con nada diferente a agua o la Esencia para
Trapeadores a Vapor Fresh Air
®
(Fresh Air®Steam Mop Essence) de
Seguridad
E
S P A Ñ O L
Page 15

Oreck. Nunca agregue aditivos al agua (tales como perfume, quitamanchas o
productos que contienen alcohol) ya que estos podrían dañar el limpiador a
vapor o volverlo peligroso de usar.
• Quite siempre el cordón del tomacorriente y maneje la limpiadora de vapor
con cuidado cuando la llene con agua.
• No llene el tanque en exceso. No supere el nivel de llenado máximo indicado.
Utilice el embudo incluido.
• Antes del uso, asegúrese de que la tapa de cierre del tanque de agua se haya
enroscado por completo.
• No toque ninguna zona caliente de la limpiadora de vapor. Es normal que la
limpiadora de vapor se caliente durante la operación.
• No use la limpiadora de vapor para tratar ninguna vestimenta mientras esté
colocada en el cuerpo.
• La fuerza y el calor del vapor pueden tener un efecto desfavorable en algunos
materiales. Pruebe siempre la vaporización de una zona pequeña y poco visible
para determinar si es apta para el tratamiento con la limpiadora de vapor.
• No apunte nunca la limpiadora de vapor a las personas, animales o plantas
(¡existe riesgo de escaldadura!). No apunte la limpiadora de vapor a cables o
sistemas eléctricos.
• Los accesorios se calientan mucho durante el uso; espere a que se enfríen antes
de manejarlos.
• No use la limpiadora de vapor directamente sobre su cabeza.
• No debe usarse en sedas delgadas, terciopelo, plásticos muy delgados, madera
dura sin sellar, laminados, superficies de pisos duros de diseño especial, cielos
rasos, paneles ‘drywall’ y pintura exterior de automóviles, sistemas electrónicos
o elementos que utilicen electricidad.
• ¡ADVERTENCIA!: El producto contiene sustancias químicas conocidas por el
Estado de California como causantes de cáncer y defectos de nacimiento, u
otros daños en el sistema reproductor.
NOTA: asegúrese de hacer una prueba en un área oculta antes del uso.
IMPORTANTE Esta limpiadora de vapor está equipada con un mecanismo
de válvula de salida de vapor, ubicado en la parte trasera del generador de
vapor. En caso de un bloqueo del flujo de vapor, la válvula de seguridad está
diseñ ada para dar salida al vapor. Por lo tanto, se recomienda la limpieza
perió dica de la boquilla y la cámara de vapor para evitar ese evento. Si se
produce la salida de vapor por la válvula de seguridad, interrumpa la
limpieza y desenchufe la limpiadora de vapor del tomacorriente. Deje que la
limpiadora de vapor se enfrí e bien, durante una hora como mí nimo.
Despué s de transcurrido este tiempo, limpie la boquilla y la cámara de
vapor.
Si sigue saliendo vapor por la válvula de seguridad despué s de la limpieza,
pó ngase en contacto con un centro de servicio.
CONSERVE ESTAS INSTRUCCIONES
Uso doméstico únicamente
15
Advertencias Generales
Seguridad
E
S P A Ñ O L
INSTRUCCIONES IMPORTANTES DE SEGURIDAD
Page 16

16
Componentes y accesorios del producto
Piezas
E S P A Ñ O L
1 Regulador de vapor
2 Interruptores
de control
3 Tapa del tanque
de agua
4 Tanque de agua
5 Botón de bloqueo
6 Cabezal motorizado
7 Agarraderas de toalla
8 Guías de cepillo
9 Dispositivo para
enrollar el cordón
10 Manija inferior
11 Cordón de
alimentación eléctrica
12 Pasador para cordón
13 Escobilla de caucho
14 Herramienta de
uso general
15 Boquilla deflectora
16 Paño para pisos
17 Paño de uso general
18 Cepillo para manchas
19 Cepillo de boquilla
20 Pasador de boquilla
21 Embudo
22 Interruptor
Encendido/Apagado
(On/Off)
23 Interruptor de vapor
24 Luz de encendido
(roja)
25 Luz de vapor listo
(verde)
1
3
4
2
5
6
7
8
9
10
11
12
13
14
15
16
17
18
19
21
20
22
23
24
25
Accesorios
Piezas
Page 17

Instrucciones de operación
1. Coloque la limpiadora de vapor en
una posición horizontal y quite la
tapa del tanque de agua. Utilice el
embudo provisto para llenar lenta
mente el tanque de agua con agua
limpia. Vuelva a colocar la tapa.
Ajústela firmemente.
2. Inserte el enchufe en un
tomacorriente. Asegúrese de que
la limpiadora de vapor esté apagada.
3. Oprima el interruptor Encendido/Apagado (On/Off) ubicado en la
manija, para encender la limpiadora de vapor. Debe encenderse la luz
roja de encendido del calentador.
4. Oprima el interruptor de vapor para ir a la posición ‘Encendido’
(‘On’). Después de aproximadamente 45 segundos debe encenderse la
luz verde ‘Vapor listo’.
5. Lleve el control del regulador de vapor al máximo y apunte la boquilla
de vapor hacia un paño o un fregadero durante unos 10 a 15 segundos,
para estabilizar el caudal y producir un vapor continuo.
NOTA: asegúrese de que el interruptor de vapor esté en posición
‘Apagado’ (‘Off') y el cabezal motorizado se haya enfriado antes de conectar el cabezal o cualquiera de los otros accesorios de limpieza.
Uso de la Steam-It
®
1. Alinee el agujero del costado del cabezal motorizado con el botón de
bloqueo del cuerpo principal de la limpiadora de vapor. Asegúrese de
que el botón de bloqueo encaje firmemente en su posición con un ‘clic’.
2. Después de montar el cabezal motorizado, conecte el paño para pisos al
cabezal motorizado mediante las agarraderas de toalla.
3. Pase el interruptor de vapor a la posición ‘Encendido’ (‘On’).
Operación
E S P A Ñ O L
17
Page 18

Relació n entre las superficies a limpiar y el ajuste de vapor
Limpieza de pisos duros
Reduzca el caudal de vapor a un ajuste menor girando el regulador de
control de vapor. Aplique pasadas hacia adelante y hacia atrás por el
área del piso.
NOTA: cuando el paño esté muy mojado déjelo enfriar, escúrralo para
quitarle la humedad y utilice el lado opuesto, o reemplácelo por un paño
seco y limpio.
Para esterilice de pisos duros:
• Deje que la unidad se caliente durante un minuto.
• Ajuste el regulador de vapor en 'ALTO' (‘HIGH’).
• Realice movimientos de restregado cortos sobre un área de piso
duro durante 5 segundos como mínimo.
Colocación de accesorios
Pueden utilizarse accesorios en el cuerpo principal de la limpiadora de vapor,
quitando el cabezal motorizado y colocando luego el accesorio deseado.
1. Oprima el botón de bloqueo para quitar el cabezal motorizado,
cuando se encuentre frío.
2. Para colocar el accesorio deseado, alinee el agujero del costado del
accesorio con el botón de bloqueo del cuerpo principal de la
limpiadora de vapor. Asegúrese de que el botón de bloqueo encaje
firmemente en su posición con un ‘clic’.
Vidrio y espejos
Lechada en
superficies duras
Superficies embaldosadas o azulejadas, armarios y
cubiertas en cocinas
y bañ os
Madera dura sellada
Mï nimo (Bajo)
Medio o Alto
Bajo o Medio
Baja
Operación
E S P A Ñ O L
18
Superfice
a limpiar
Ajuste del
regulador de vapor
Page 19

Escobilla de caucho
Para la limpieza de paneles de vidrio y espejos. Utilice la escobilla de caucho con un caudal de vapor muy bajo. Para lograrlo, ajuste el regulador de
vapor. Puede utilizarse un paño para frotar la lámina de la escobilla y eliminar el exceso de agua durante el uso, cuando esté fría. Para paneles de ventana pequeños, quite la escobilla y rocíe el vapor directamente sobre la
superficie. Utilice la escobilla separadamente para quitar la humedad.
Cepillo para manchas
Para limpiar la lechada entre baldosas o azulejos, y las marcas y manchas
rebeldes de las superficies duras. Utilícelo con un caudal de vapor medio
o alto.
Herramienta de uso general
Para la limpieza de superficies
embaldosadas o azulejadas, armarios
y cubiertas en cocinas y baños.
Utilícelo con un caudal de vapor bajo
o medio. Cubra la herramienta de uso
general con el paño elastizado.
Boquilla deflectora
Para la limpieza de artefactos sanitarios como tazas de inodoro, grifos o
tapas de drenaje. Utilice esta boquilla con el caudal de vapor máximo.
Apunte directamente a las manchas en alfombras o tapicería, a la vez que
sostiene un paño limpio cerca del área manchada para capturar toda posible suciedad suelta.
E S P A Ñ O L
19
Operación
Page 20

Manteni
miento
E S P A Ñ O L
20
Después de cada uso
NOTA: Cuando haya terminado la limpieza de vapor, asegúrese de que
tanto el interruptor de encendido como el interruptor de vapor estén en
posición 'Apagado' ('Off') y el enchufe esté quitado del tomacorriente.
Vacíe el agua que hubiera quedado en el tanque. Para ello desenrosque la tapa e invierta la limpiadora de vapor sobre un fregadero o
en exteriores. Si fuera necesario, al guardar la limpiadora de vapor
utilice la correa colgante que está en la parte superior de la manija.
Limpieza del generador de vapor
IMPORTANTE! Siga estas instrucciones únicamente cuando la
limpiadora de vapor se haya enfriado por completo. Asegúrese
tambié n de que el enchufe se haya extraí do del tomacorriente.
1. Tire de la traba de la boquilla hacia abajo y gire
la boquilla de vapor primero; luego tire de la
boquilla hacia afuera hasta extraerla por comple
to de la cámara de vapor.
2. Inserte el cepillo de boquilla en la cámara y haga
girar el cepillo mientras lo mueve hacia adentro y
afuera de la cámara.
3. Inserte la boquilla de vapor de nuevo en la cámara
y hágala girar en sentido horario para volver a
trabarla en su posición.
NOTA: Oreck recomienda limpiar la cámara cada 12 a 15 usos como
mínimo, a fin de asegurar un desempeño óptimo.
Desbloqueo de la salida de vapor
Si el caudal de vapor parece haberse reducido, es posible que la boquilla
de vapor esté bloqueada. Desenchufe la unidad del tomacorriente y deje
que se enfríe.
1. Inserte el pasador de boquilla en el centro de la boquilla de vapor
para despejar el bloqueo que se hubiera formado.
Limpieza de los paños
Tanto los paños para pisos como los paños de uso general pueden lavarse
a máquina (140 ºF máx.). Si hay mucha suciedad acumulada, remoje los
paños en agua tibia y detergente, o un eliminador de manchas suave. Deje
que los paños se sequen por completo antes de guardarlos.
Page 21

Problema Causa Solución
Localización
de fallas
Si los consejos de localización de fallas que siguen no resuelven el
problema, comuníquese con el Servicio al cliente de Oreck.
En Estados Unidos: 1-800-989-3535 En Canadá: 1-888-676-7325
IMPORTANTE!Antes de realizar cualquier localización de fallas,
desenchufe siempre la limpiadora de vapor y espere a que se enfríe.
Vea las advertencias de seguridad.
21
La limpiadora de
vapor no tiene alimentació n elé ctrica.
Cuando se enciende
la limpiadora de
vapor, no hay vapor
o el caudal de vapor
emitido es muy
bajo.
El tanque de agua
parece estar deformado.
La unidad sigue sin
funcionar correctamente.
La limpiadora de
vapor no está enchufada correctamente
en un tomacorriente
o no está encendida.
El tomacorriente está
defectuoso.
El tanque está vacío.
La boquilla de vapor
está bloqueada.
A pesar de la luz
verde encendida, el
interruptor de vapor
no está activado correctamente.
El tubo contrapesado
del tanque no está
sumergido en el agua.
El regulador de vapor
está ajustado en el
mínimo.
Se ha creado un vacío
dentro del tanque de
agua, lo que hace que
se deforme.
Esto puede deberse a
que la válvula de
entrada de aire de la
tapa del agua esté
atascada.
Verifique todos los
puntos anteriores.
Inserte el enchufe en
un tomacorriente y
encienda la limpiadora de vapor.
Revise el tomacorriente; para ello desenchufe la limpiadora
de vapor y enchufe
un artefacto diferente.
Llene el tanque de
agua.
Vea ‘Desbloqueo de
la salida de vapor’.
Oprima a fondo el
interruptor de vapor.
Agite suavemente la
limpiadora de vapor.
Haga girar el controlador de vapor hasta
que se emita suficiente vapor.
Oprima el centro de
la tapa para liberar el
vacío.
Comuníquese con
Oreck para el servicio.
E S P A Ñ O L
Page 22

Garantía
ORECK MANUFACTURING COMPANY: (Oreck le otorga la siguiente garantía limitada para este producto, únicamente si el mismo ha sido comprado originalmente para su uso, no para reventa, a Oreck o a un Distribuidor Minorista
Autorizado Oreck).
Oreck reparará o reemplazará sin cargo alguno, al comprador original, cualquier pieza
que se encuentre defectuosa en cuanto al material o mano de obra durante un (1) año a
partir de la fecha de compra. Esta garantía limitada se aplica al uso doméstico normal.
Esta garantía limitada no cubre el reemplazo de piezas fungibles o consumibles
sujetas al desgaste normal.
Esta garantía limitada no se aplica a ninguna pieza sujeta a accidente, maltrato,
uso comercial, alteración, uso indebido, daño causado por incendio o por hechos
de fuerza mayor, utilización de tensiones eléctricas distintas de las indicadas en
la placa del número de serie de este producto, o servicio de este producto que no
haya sido realizado por Oreck o por un Centro de Servicio Autorizado por la
fábrica Oreck.
Oreck no autoriza a ninguna persona o representante a asumir u otorgar cualquier otra
obligación de garantía junto con la venta de este producto.
La garantía limitada de Oreck es válida únicamente si usted retiene el comprobante de
la compra a Oreck o a un distribuidor minorista autorizado por Oreck para este producto. Si usted compra este producto a cualquier otra fuente, su compra es ‘TAL CUAL’,
lo que significa que Oreck no le otorga ninguna garantía, y que usted, y no Oreck,
asume en su totalidad el riesgo de la calidad y desempeño de este producto, incluido el
costo total de cualquier servicio o reparación de cualquier defecto que fueran necesarios.
LA RESPONSABILIDAD DE ORECK HACIA USTED POR DAÑOS, POR
TODO COSTO DE CUALQUIER CLASE QUE SURJA DE ESTA
DECLARACIÓN DE GARANTÍA LIMITADA, SE LIMITARÁ A LA CANTIDAD
PAGADA POR ESTE PRODUCTO EN OCASIÓN DE SU COMPRA ORIGINAL,
Y ORECK NO SERÁ RESPONSABLE DE NINGÚN DAÑO DIRECTO, INDIRECTO, CONSIGUIENTE O INCIDENTAL QUE SURJA DE LA UTILIZACIÓN
O DE LA INHABILIDAD PARA LA UTILIZACIÓN DE ESTE PRODUCTO.
Algunos estados no permiten la exclusión o limitación de los daños incidentales o consiguientes, por lo que la limitación o exclusión indicada puede no ser aplicable a su
caso.
LA DURACIÓN DE TODAS LAS GARANTÍAS EXPRESAS E IMPLÍCITAS DE
ESTE PRODUCTO, CON INCLUSIÓN DE LAS GARANTÍAS IMPLÍCITAS DE
COMERCIABILIDAD Y ADECUACIÓN PARA UN PROPÓSITO PARTICULAR,
ESTÁ LIMITADA AL PERÍODO DE GARANTÍA, Y NO SE APLICARÁN
GARANTÍAS, YA SEA EXPRESAS O IMPLÍCITAS, DESPUÉS DE TRANSCURRIDO ESE PERÍODO.
Algunos estados no permiten limitaciones en la duración de las garantías implícitas,
por lo que la limitación indicada puede no ser aplicable a su caso.
Esta garantía le otorga derechos legales específicos, y usted puede tener también otros
derechos que varían de un estado a otro.
Si hay un problema con su aspiradora que usted crea está cubierto por esta
garantía, comuníquese con Servicio al Cliente de Oreck al 1-800-989-3535.
E
S P A Ñ O L
22
Page 23

Important!
Lisez attentivement toutes les instructions, et conservez-les comme
référence ultérieure.
STEAM-IT
®
Tube nettoyeur à vapeur polyvalent
STEAM100LRH & STEAM100S
Guide
d’utilisation
Page 24

Merci d’avoir acheté un tube à vapeur polyvalent Steam-It®d’Oreck. Ce tube à
vapeur haut de gamme vous aidera à garder votre domicile plus propre.
Chez Oreck nous réalisons que nos clients sont uniques et attendent un service
supérieur. Pour satisfaire vos besoins, nous proposons des options de service différentes pour convenir à votre style de vie et à vos préférences.
Bienvenue dans notre programme de service à la clientèle Appelez. Cliquez.
Pour parler avec un représentant d’Oreck, téléphonez:
USA: 1-800-989-3535
Canada: 1-888-676-7325
Sur le Web, allez sur le site www.oreck.com et cliquez en haut à
droite pour trouvez un magasin proche.
Appréciez
Contenu
Appelez
Cliquez
24
Sécurité . . . . . . . . . . . . . . . . . . . . . . . . . . . . . . . . . . . . . . . . . . 25
Pièces . . . . . . . . . . . . . . . . . . . . . . . . . . . . . . . . . . . . . . . . . . . . 27
Composants et accessoires du produit . . . . . . . . . . . . . . 27
Fonctionnement . . . . . . . . . . . . . . . . . . . . . . . . . . . . . . . . . . . . 28
Instructions d’utilisation . . . . . . . . . . . . . . . . . . . . . . . . . 28
Utilisation du Steam-It
®
. . . . . . . . . . . . . . . . . . . . . . . . . . 28
Référence pour nettoyage de surface/réglage de vapeur .29
Nettoyage de sol dur . . . . . . . . . . . . . . . . . . . . . . . . . . . . 29
Fixation d’un accessoire . . . . . . . . . . . . . . . . . . . . . . . . . 29
Entretien . . . . . . . . . . . . . . . . . . . . . . . . . . . . . . . . . . . . . . . . . . 31
Après chaque utilisation . . . . . . . . . . . . . . . . . . . . . . . . . 31
Nettoyage du générateur de vapeur . . . . . . . . . . . . . . . . . 31
Déblocage de la sortie de vapeur . . . . . . . . . . . . . . . . . . 31
Nettoyage des garnitures . . . . . . . . . . . . . . . . . . . . . . . . . 31
Dépannage . . . . . . . . . . . . . . . . . . . . . . . . . . . . . . . . . . . . . . . . 32
Garantie . . . . . . . . . . . . . . . . . . . . . . . . . . . . . . . . . . . . . . . . . . 33
F R A N Ç A I S
Page 25

25
IMPORTANTES INSTRUCTIONS DE SÉCURITÉ!
Avertissements généraux
Quand vous utilisez un appareil électrique, des précautions élémentaires doivent
toujours être prises, incluant celles-ci:
LISEZ TOUTES LES INSTRUCTIONS AVANT D’UTILISER LE
NETTOYEUR À VAPEUR
AVERTISSEMENT! Pour ré duire le risque de dé part d’incendie, de commotion
é lectrique ou de blessure:
• Ne laissez pas un nettoyeur à vapeur sans surveillance quand il est branché.
Débranchez-le de sa prise quand il n’est pas utilisé.
• Pour éviter une commotion électrique ne l’utilisez pas à l’extérieur.
• Ne laissez pas l’appareil être utilisé comme un jouet. Il faut faire bien
attention quand il est utilisé près d’enfants.
• Ne l’utilisez que comme indiqué dans ce manuel.
• Ne l’utilisez pas avec un cordon ou une fiche d’alimentation secteur présentant
des dommages. Si l’appareil ne fonctionne pas comme il le devrait, est tombé,
a été endommagé, laissé dehors ou plongé dans l’eau, ramenez-le à un centre
de dépannage ou appelez notre service à la clientèle:
USA: 1-800-989-3535 Canada: 1-888-676-7325
• Ne tirez pas et ne transportez pas l’appareil par son cordon, n'utilisez pas ce
cordon comme une poignée, ne le laissez pas entrer en contact avec des sur
faces chaudes ou tranchantes, ou ne refermez pas une porte dessus.
• Ne débranchez pas de la prise secteur en tirant sur le cordon.
• Ne manipulez ni la fiche secteur ni l’appareil avec des mains humides.
• N’introduisez pas d’objets dans les ouvertures de l’appareil, ou ne le faites pas
fonctionner avec ses ouvertures bloquées.
• N’utilisez pas l’appareil sans que son capuchon de réservoir soit en place.
• Coupez toutes les commandes avant de débrancher.
• N’utilisez pas de rallonge d’alimentation électrique.
• Entreposez l’appareil à l’intérieur, mettez-le de côté pour éviter un
trébuchement accidentel.
• Le branchement sur une tension incorrecte peut entraîner des dommages pour
le nettoyeur à vapeur, et de possibles blessures pour son utilisateur. La tension
correcte est mentionnée sur l’étiquette signalétique.
• Ce nettoyeur à vapeur n’est prévu que pour une utilisation domestique.
• Il peut y a voir un risque si le nettoyeur à vapeur est passé sur son cordon
d’alimentation.
• N’immergez jamais le nettoyeur à vapeur dans de l’eau ou d’autres liquides.
• Le nettoyeur à vapeur ne convient pas à une utilisation à l’extérieur.
• Ne faites pas fonctionner le nettoyeur à vapeur sans qu’il y ait de l’eau
dans son réservoir.
• Videz le réservoir d’eau quand le nettoyeur à vapeur n’est pas en utilisation.
• Ne remplissez pas le réservoir d'eau avec autre chose que de l'eau ou du fluide
pour vadrouille à vapeur Oreck Fresh Air
®
. Ne mettez jamais d'additifs
(tels que du parfum, du détachant ou un produit alcoolisé) car ils pourraient
endommager le nettoyeur à vapeur ou le rendre dangereux à utiliser.
Sécurité
F
R A N Ç A I S
Page 26

• Enlevez toujours le cordon d’alimentation de la prise secteur et manipulez le
nettoyeur à vapeur avec soin pendant son remplissage avec de l’eau.
• Ne remplissez pas le réservoir avec excès. Ne dépassez pas le niveau maximal
de remplissage indiqué. Veuillez utiliser l’entonnoir inclus.
• Assurez-vous que le capuchon de fermeture du réservoir d’eau est bien vissé
complètement avant l’utilisation.
• Ne touchez aucune des parties chaudes sur le nettoyeur à vapeur. Il est que le
nettoyeur à vapeur chauffe durant son fonctionnement.
• N’utilisez pas le nettoyeur à vapeur pour traiter n’importe quelle pièce d'ha
billement encore portée sur le corps.
• La force et la chaleur de la vapeur peuvent avoir un effet néfaste sur certaines
matières. Testez toujours l’appareil sur une petite zone peu visible afin de
déterminer si un traitement convient.
• Ne dirigez jamais le nettoyeur à vapeur vers des personnes, des animaux ou
des plantes (sous risque d’échaudage). Ne le dirigez pas non plus vers des
systèmes ou des câbles électriques.
• Les accessoires peuvent devenir très chauds en fonctionnement - laissez-les
refroidir avant toute manutention.
• N’utilisez pas le nettoyeur à vapeur directement surélevé.
• À ne pas utiliser sur des soies délicates, du velours, des plastiques très fins,
du bois dur non-enduit, des laminés, des surfaces de sol dur aménagées, des
plafonds, des cloisons sèches et de la peinture extérieure d’automobiles, de
l’électronique ou des appareils utilisant de l’électricité.
• AVERTISSEMENT : Ce produit contient des éléments chimiques reconnus par
l’État de Californie pour causer le cancer et des anomalies congénitales, ou
d’autres atteintes à la reproduction.
REMARQUE: Assurez-vous de faire un essai préliminaire sur une zone
cachée avant de tout traiter.
IMPORTANT! Ce nettoyeur à vapeur est é quipé d’un mé canisme à
vanne de purge de vapeur, situé à l’arriè re du gé né rateur de vapeur.
Dans l’é ventualité d’un blocage d’é coulement de la vapeur, cette vanne de
sé curité est conç ue pour libé rer la vapeur. Un nettoyage ré gulier de la
chambre de vapeur et de la buse est cependant recommandé pour é viter
une telle é ventualité . Si la vapeur est libé ré e par la vanne de sé curité ,
arrê tez le nettoyage et dé branchez le nettoyeur à vapeur de la prise
secteur. Laissez la vapeur bien refroidir pendant au moins une heure. Aprè s
ce dé lai, nettoyez la chambre de vapeur et la buse.
Si de la vapeur continue de sortir de la vanne de sé curité , contactez un
centre de ré paration.
CONSERVEZ CES INSTRUCTIONS
Usage domestique uniquement
26
IMPORTANTES INSTRUCTIONS DE SÉCURITÉ!
Avertissements généraux
Sécurité
F
R A N Ç A I S
Page 27

27
Composants et accessoires du produit
Pièces
F R A N Ç A I S
1. Régulateur de vapeur
2. Commutateurs de
commande
3. Capuchon de
réservoir d’eau
4. Réservoir d’eau
5. Bouton de
verrouillage
6. Tête motorisée
7. Attaches de garniture
8. Glissières de brosse
9. Enroulage de cordon
10. Poignée inférieure
11. Cordon
d’alimentation
12. Libération du cordon
13. Raclette
14. Outil d’usage général
15. Buse déflectrice
16. Garniture pour sol
17. Garniture d’usage
général
18. Brosse ponctuelle
19. Brosse de buse
20. Goupille de brosse
21. Entonnoir
22 Commutateur M/A
23 Commutateur
de vapeur
24.Voyant de mise sous
tension (rouge)
25.Voyant de vapeur
prête (vert)
1
3
4
2
5
6
7
8
9
10
11
12
13
14
15
16
17
18
19
21
20
22
23
24
25
Accessoires
Pièces
Page 28

Instructions d’utilisation
1. Placez le nettoyeur à vapeur en
position horizontale et ôtez le capu
chon de son réservoir d’eau.
Utilisez l’entonnoir fourni pour
remplir lentement le réservoir d’eau
avec de l’eau pure. Refermez bien en
place le capuchon.
2. Branchez la fiche du cordon
d’alimentation dans une prise
secteur. Assurez-vous que le
nettoyeur à vapeur est bien en
position d’arrêt (OFF).
3. Actionnez le commutateur M/A situé sur la poignée pour mettre
le nettoyeur à vapeur en marche (ON). Le voyant rouge de mise
sous tension (ON) doit être maintenant allumé.
4. Poussez le commutateur de vapeur sur la position d’activation (ON).
Après environ 45 secondes le voyant vert indiquant que la vapeur
est prête doit s’allumer.
5. Tournez la commande de régulateur de vapeur à son maximum, et
dirigez la buse de vapeur vers un chiffon ou lavabo pendant environ
10-15 secondes afin de stabiliser le débit et de produire de la vapeur
en continu.
REMARQUE: Assurez-vous que le commutateur de vapeur est sur l’arrêt (OFF) et que la tête motorisée a refroidi avant de la brancher ou de
brancher n’importe quel autre accessoire de nettoyage.
Utilisation du Steam-It
®
1. Alignez le trou sur le côté de la tête motorisée avec le bouton de ver
rouillage sur le corps de l’appareil. Assurez-vous que le bouton de
verrouillage s’encliquette fermement en place.
2. Après avoir assemblé la tête motorisée, fixez la garniture pour sols sur
la tête avec les attaches de garniture.
3. Passez le commutateur de vapeur en position d'activation (ON).
Fonction-
nement
F R A N Ç A I S
28
Page 29

Fonction-
nement
Ré fé rence pour nettoyage de surface/ré glage de
vapeur
Nettoyage de sol dur
Réduisez la sortie de vapeur à un réglage inférieur en tournant la commande du régulateur de vapeur. Faites des passages en avant et en arrière
au travers de la surface du sol.
REMARQUE: Quand la garniture devient trop mouillée, laissez refroidir
puis essorez son humidité et utilisez-la sur son autre face, ou remplacez-la
par une autre propre et sèche.
Sur des surfaces dures du disenfect du plancher:
• Laissez l’unité chauffer durant une minute.
• Passez le régulateur de vapeur sur position forte (HIGH).
• Effectuez des mouvements de décapage sur la zone de sol dur
pendant au moins 5 secondes.
Fixation d’un accessoire
Les accessoires peuvent être utilisés sur le corps lui-même du nettoyeur à
vapeur en enlevant la tête motorisée et en fixant l’accessoire voulu.
1. Appuyez sur le bouton de verrouillage pour ôter la tête motorisée
une fois refroidie.
2. Fixez l’accessoire voulu en alignant le trou sur son côté avec le
bouton de verrouillage sur le corps de l’appareil. Assurez-vous
que le bouton de verrouillage s’encliquette fermement en place.
Vitres et miroirs
Joints sur surfaces
dures
Carrelages, meubles
et dessus de
comptoirs dans les
cuisines et toilettes
Bois dur
impré gné
Minimum (Low)
Medium à High
Low à Medium
Low
F R A N Ç A I S
29
Nettoyage
de surface
Réglage du régulateur de vapeur
Page 30

Raclette
Accessoire pour le nettoyage des surfaces de vitres et miroirs. Utilisez la
raclette avec un écoulement très faible de vapeur. Obtenez ce petit débit en
réglant le régulateur de vapeur. Un chiffon peut être utilisé pour essuyer la
lame et éliminer l’excédent d’eau pendant l’utilisation quand elle est refroidie. Pour des petits carreaux de fenêtre, enlevez l’outil raclette et envoyez la
vapeur directement sur la surface. Utilisez alors la raclette séparément pour
chasser l’humidité.
Brosse ponctuelle
Sert pour nettoyer les joints entre les carreaux ou les marques et taches
coriaces sur des surfaces dures. S’utilise avec une sortie de vapeur
moyenne à forte.
Outil d’usage gé né ral
Sert au nettoyage de surfaces carrelées, de meubles et dessus de
comptoirs, dans des cuisines ou des
toilettes. S’utilise avec une sortie de
vapeur de faible à moyenne.
Recouvrez cet outil d’usage général
avec la garniture élastique.
Buse dé flectrice
Sert pour le nettoyage de sanitaires tels que des cuvettes de toilettes, des
robinets ou des couvercles de drainages. Cette buse s’utilise avec une sortie de vapeur au maximum. Pointez-la directement sur des taches sur
moquette ou rembourrage tout en tenant un chiffon propre près de la zone
tachée afin de capturer toute la saleté détachée.
Fonction-
nement
F R A N Ç A I S
30
Page 31

Entretien
F R A N Ç A I S
31
Après chaque utilisation
REMARQUE: Quand vous avez terminé de nettoyer à la vapeur, assurezvous qu’à la fois les commutateurs de marche et d’activation de vapeur
sont en position d’arrêt, et que la fiche d’alimentation est retirée de la
prise secteur.
Videz toute l’eau résiduelle du réservoir en dévissant son capuchon
et en retournant le nettoyeur à vapeur au-dessus d’un lavabo ou
dehors. Si nécessaire, pour ranger l’appareil utilisez son attache de
suspension en haut du manche.
Nettoyage du générateur de vapeur
IMPORTANT! Only follow these instructions when the steam cleaner is completely cooled down. Also ensure that
the plug is removed from the electrical outlet.
1. Tirez vers le bas le verrouillage de buse et
commencez par tourner la buse de vapeur
avant de la tirer pour la sortir complètement
de la chambre à vapeur.
2. Insérez la brosse de buse dans la chambre et
faites-la tourner tout en l’enfonçant et en la
retirant de la chambre.
3. Remettez en place la buse de vapeur sur la
chambre et tournez-la en sens horaire pour la
verrouiller en position.
REMARQUE: Oreck recommande de nettoyer la chambre au moins
toutes les 12-15 utilisations afin d’assurer une performance optimale.
Déblocage de la sortie de vapeur
Si la sortie de vapeur semble réduite, la buse de vapeur peut être obstruée.
Débranchez alors l’unité de la prise secteur et laissez-la refroidir.
1. Insérez la tige de buse au centre de la buse afin de libérer toute
obstruction qui aurait pu se former.
Nettoyage des garnitures
Les garnitures pour sol et d’usage général peuvent se laver en machine (à
140 °F au maximum). En cas de grosse salissure, faites-les tremper dans
de l’eau tiède avec du détergent ou un produit détachant doux. Laissez
sécher complètement les garnitures avant de les ranger.
Page 32

Le nettoyeur à
vapeur n’est pas
sous tension.
Trè s peu ou pas de
vapeur est é mise
quand le nettoyeur
à vapeur est mis en
marche.
Le ré servoir d’eau
semble dé formé .
L’unité ne fonctionne toujours pas
correctement.
L'appareil n'est pas
correctement branché
sur une prise secteur,
ou n'est pas commuté
sur la position de
marche (ON).
La prise secteur est
défectueuse.
Le réservoir d’eau est
vide.
La buse de vapeur est
obstruée.
Malgré le voyant vert
allumé, le commutateur de vapeur n’est
pas bine positionné.
Le tube lesté dans le
réservoir n’est pas
immergé dans l’eau.
Le régulateur de
vapeur est réglé au
minimum de sortie.
Du vide a été créé
dans le réservoir
d’eau, ce qui cause sa
déformation.
Cela peut venir d’un
collage de la vanne
d’admission d’air du
capuchon.
Vérifiez de nouveau
tous les points qui
précèdent.
Insérez la fiche d’alimentation dans une
prise secteur et
passez le commutateur sur marche.
Vérifiez l’état de la
prise en débranchant
le nettoyeur à vapeur
et en branchant un
autre appareil électrique à la place.
Remplissez le réservoir d’eau.
Consultez
"Déblocage de la
sortie de vapeur".
Enfoncez complètement le commutateur
de vapeur.
Secouez doucement
le nettoyeur à vapeur.
Tournez la commande de vapeur
pour une émission
suffisante.
Appuyez sur le centre du capuchon pour
relâcher le vide.
Contactez Oreck pour
demander du service.
Problème Cause Solution
Dépannage
F R A N Ç A I S
Si les conseils de dépannage qui suivent n’ont pas résolu le problème, veuillez
contacter le service à la clientèle d’Oreck:
USA: 1-800-989-3535 Canada: 1-888-676-7325
IMPORTANT! Débranchez toujours le nettoyeur à vapeur et laissez-le refroidir
avant toute intervention de dépannage. Consultez les mises en garde de sécurité.
32
Page 33

Garantie
F R A N Ç A I S
ORECK MANUFACTURING COMPANY : (Oreck vous procure la garantie
limitée qui suit pour ce produit uniquement s’il a été à l’origine acheté pour être
utilisé, et non revendu, chez Oreck ou un détaillant Oreck agréé.)
Oreck réparera ou remplacera, sans frais pour l’acheteur d’origine, toute pièce
avérée défectueuse pour cause de matériaux ou de main-d’œuvre, pendant une
(1) année suivant la date d’achat. Cette garantie limitée s’applique pour une utilisation domestique normale.
Cette garantie limitée ne couvre pas le remplacement de fournitures courantes ou
de consommables subissant une usure normale.
Cette garantie limitée ne s’applique pas à toute pièce ayant subi : accident, abus,
utilisation commerciale, altération, mésusage, dommages dus au feu ou à une
catastrophe naturelle, alimentation par des tensions autres que celles de la plaque
signalétique, intervention sur le produit par un tiers autre qu’Oreck ou un centre
de dépannage agréé par l’usine.
Oreck n’autorise aucune personne ou représentation à assumer ou à garantir toute
obligation de garantie avec la vente de ce produit.
La garantie limitée d’Oreck n’est valide que si vous avez conservé la preuve de
votre achat chez Oreck ou un détaillant Oreck agréé. Si l’achat de ce produit s’est
fait auprès d’une autre source, vous l’avez obtenu "TEL QUEL", ce qui fait
qu’Oreck n’assure aucune garantie, et que c’est vous, et non Oreck, qui porte le
risque entier sur la qualité et la performance de ce produit, y compris le coût de
toutes interventions nécessaires de service et de réparation de tous défauts
éventuels.
LA RESPONSABILITÉ D’ORECK POUR DES PRÉJUDICES QUE VOUS
SUBIRIEZ POUR DES DÉPENSES QUELCONQUES RÉSULTANT DE
CETTE FORMULATION DE GARANTIE LIMITÉE SERA RESTREINTE
AU MONTANT PAYÉ POUR CE PRODUIT AU MOMENT DE SON ACHAT
D’ORIGINE, ET ORECK NE SERA TENU POUR RESPONSABLE D’AUCUN DOMMAGE DIRECT OU INDIRECT, CONSÉCUTIF OU ANNEXE,
RÉSULTANT DE L’UTILISATION, OU DE L’IMPOSSIBILITÉ D’UTILISATION, DE CE PRODUIT.
Certaines provinces ne permettent pas la limitation ou l’exclusion des dommages
consécutifs ou annexes, de ce fait la limitation ou exclusion précédente peut ne pas
s’appliquer dans votre cas.
TOUTES LES GARANTIES EXPLICITES OU IMPLICITES POUR CE PRODUIT, INCLUANT LES GARANTIES IMPLICITES DE VALEUR
MARCHANDE ET D’ADÉQUATION À UNE FINALITÉ SPÉCIFIQUE,
SONT LIMITÉES EN DURÉE À LA PÉRIODE DE GARANTIE, ET
AUCUNE GARANTIE, EXPLICITE OU IMPLICITE, NE SERA APPLICABLE APRÈS CETTE PÉRIODE.
Certaines provinces ne permettent pas de limitations sur la durée des garanties
implicites, de ce fait, la limitation précédente peut ne pas s’appliquer dans votre cas.
Cette garantie vous donne des droits légaux spécifiques, et vous pouvez également avoir d’autres droits qui varient d’une province à l’autre. S'il y a un souci
avec votre aspirateur que vous pensez être couvert par cette garantie, contactez le
service à la clientèle d'Oreck au 1-800-989-3535.
33
Page 34

34
Page 35

35
Page 36

53591-02 REV A
08/11 ECN# R-10732
©2011 Oreck Holdings, LLC. All Rights Reserved. All word marks, logos, product
configurations, and registered trademarks are owned and used under the license from
Oreck Holdings, LLC.
 Loading...