

Page 1
OWNER’S MANUAL
SF600
Read this instuctio n m an u al carefu lly before any use of the mach i n e, keep it as a reference.
Also, the engine m an ual is included as a set with th e owners man u al . Please read both carefully.
For any questions about this manual, please contact your OREC dealer, the
distributor in your country, or go to : http://www.orecamerica.com
0031-71010
Page 2

Getting Started
y
g
play
DANGER
CAUTION
WARNING
NOTICE
Thank you for purchasing this machine. These instructions explain the correct and easy way
to alwa
Please read these instructions fully before using this machine in order to understand the
safest, most efficient way of operating it, and the correct way maintain it.
Please keep these instructions in a safe place where they can be easily referred to at any
time. We hope you will use this machine for many years to come.
Please understand that ongoing enhancements in quality and performance, and
other possible parts improvements may cause the actual machine to vary slightly from what is
described in these instructions.
s keep this machine in fine working order and operate it safely.
Machine Regulations
This machine is designed to cut overgrown weeds and brush, and is not a lawn mower.
Therefore it can not offer the same quality cut as a finishing mower.
This machine is desi
ned mainly for commercial and agricultural users.
Definitions and Signs
In these instructions, the following signs and definitions are used to indicate the level of
danger that exists. Please adhere to the following warnings and have a full understanding of
the meaning of the signs.
Sign Definition
Displayed when failure to obey instructions can result in death or
serious injury.
Dis
Displayed when failure to follow instruct ions c an result in injury, or
when not attending to the machine and correcting it can also result in
injury.
Displayed when it is important to know about operation and
maintenance specific to this machine, or at times when
misunderstanding and mistakes are common.
ed when there is a danger of death or serious injury.
㻝
Page 3

-
-
-
-
-
-
-
-
-
-
-
-
-
-
-
-
-
-
-
-
-
Contents
For Safe Operation----------------------------------------------------------------------------------3
Warning Symbols------------------------------------------------------------------------------------Important Safety Points-----------------------------------------------------------------------------
Name of Parts---------------------------------------------------------------------------------------How to Operate the Machine--------------------------------------------------------------------
How to start and stop the engine---------------------------------------------------------------How to drive, turn, change speed, and stop------------------------------------------------Tilling------------------------------------------------------------------------------------------------------
Oiled Parts Inspection, Replacement, and Lubrication--------------------------------
Transmission oil inspection, replacement and lubrication----------------------------Engine oil inspection, replacement, lubrication-------------------------------------------How to Lubricate Each Part-----------------------------------------------------------------------
How to Inspect, Maintain, and Adjust Each Part-----------------------------------------
How to inspect and adjust the spark plug---------------------------------------------------How to clean the air filter--------------------------------------------------------------------------Tire pressure adjustment--------------------------------------------------------------------------Adjusting the Cables--------------------------------------------------------------------------------Belt Inspection----------------------------------------------------------------------------------------Tine Inspection and Replacement--------------------------------------------------------------Inspection and Replacement of EZ Anker----------------------------------------------------
Long-term Storage---------------------------------------------------------------------------------- 26
Specifications Reference values--------------------------------------------------------------- 27
Included Tools--------------------------------------------------------------------------------------Consumable Parts List-----------------------------------------------------------------------------27
Periodic Voluntary Inspection Table--------------------------------------------------------Troubleshoot----------------------------------------------------------------------------------------When engine won't work properly------------------------------------------------------------- 30
Warranty parts--------------------------------------------------------------------------------------LIMITED WARRANTY------------------------------------------------------------------------------
3
5
11
13
13
15
17
18
19
20
21
21
21
22
22
23
24
25
26
27
28
29
31
32
Page 4

For Safe Operation
y
g
Please read these instructions regarding safety and operation before operating this machine.
In order for this machine to satisfactorily demonstrate its tr ue per formance, please preform r egular
maintenance and inspection
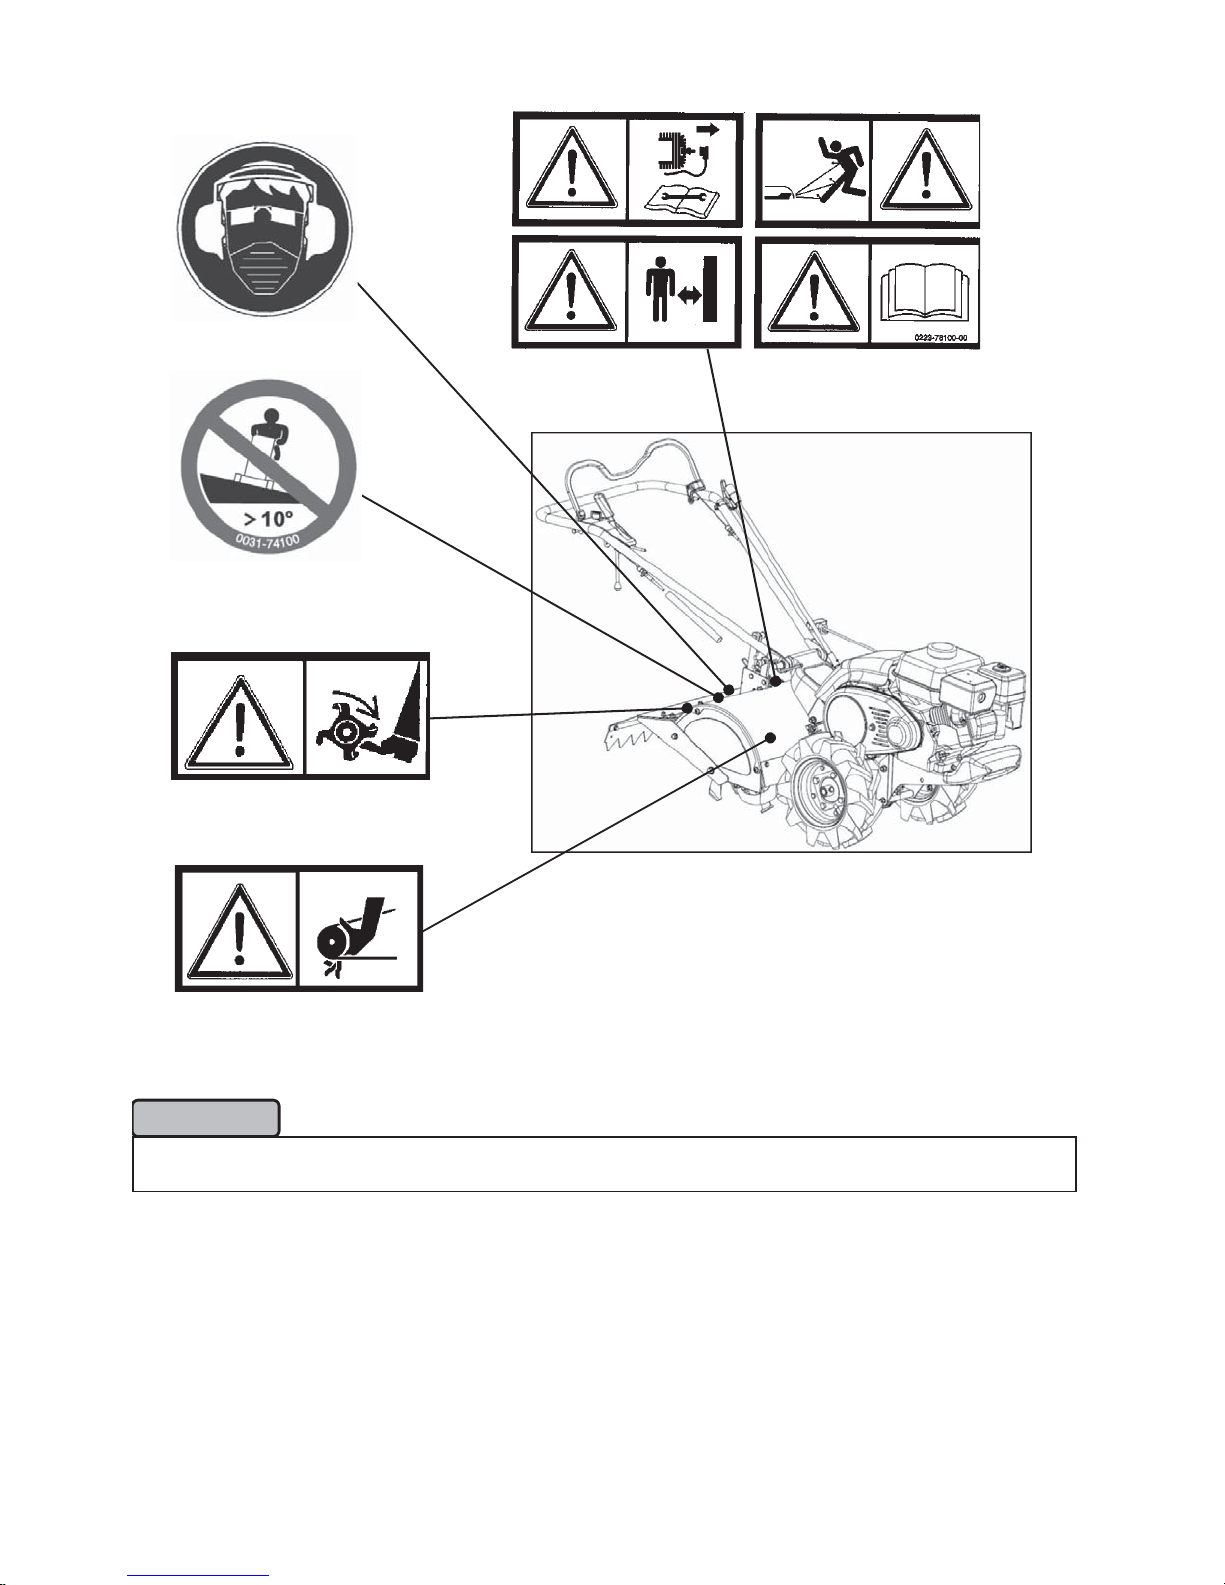
Warning Symbols
The warning symbols are attached to the machine to draw attent ion to particularly serious dangers.
Please be sure to fully understand the meaning of each warning symbol before operating
this machine.
࣭ Read the safety and operating manual.
࣭ Remove all objects that could be thrown by the tines. Beware of
thrownobjects.
࣭ Pinch hazard. Keep bod
Always wear safety glasses and ear protection while operating
䞉
࣭ Do NOT use on slopes of more than 10 de
parts away from rotating parts
rees
࣭ Keep body parts away from rotating tines
࣭ For safety, disconnect the spark plug when performing
inspections and maintenance
࣭
Do not operate the machine near people or animals.
Stand clear the machine.
㻟
Page 5
0215-83200
0031-74100
83-1260-909-10
0223-76100
80-1488-928-10
ᵬᵭᵲᵧᵡᵣ
Ɣ
In the case that these warning symbols become difficult to see, please replace them so
that they can be easily seen und understood.
㻠
Page 6

Important Safety Points
ᵥ
ᵥ
ᵥ
This machine is equipped with a high-powered engine and fast moving tines. Misuse of
this machine canresult in serious injury or death. Before using this machine, please be sure to
read these instructions and understand and adhere to the following warnings
ŶNotes for the operator of this machine.
ᵵᵟᵰᵬᵧᵬ
Ɣ
The operator of this machine should fully read these instructions. You can safely use this
machine only after gaining a full understanding of its operat ion and safety use guidelines.
Ɣ
Operate this machine only after fully reading and understanding the included
engine’s instructions.
Ɣ
The operation and maintenance of this machine should only be performed by trained
persons
Ɣ
Do not allow children, expectant mothers or any untrained person to use this m achine,
accident and injury can result. Also, please check and observe local laws which may
place age limits on the operation of machinery.
Ɣ
Do not operate if suffering from overwork or illness or if under the influence of alcohol
or drugs. Accidents and injury can result.
ŶWhen lending this machine to another person
ᵵᵟᵰᵬᵧᵬ
When lending t his m a chine t o another person it is the owner’s responsibility that the following
measures are carried out.
Ɣ
The owner should explain how to operate the machine and require the new operator to fully
read these instructions. The owner should then guide the new operator until t hey have
a comprehensive understanding of the machine’s operation and saf et y guidelines.
The owner should lend these instructions to the new operator with the machine.
Ɣ
When lending this machine to a person who can not read Engl ish, the owner
should take responsibility for fully explaining its safe operation.
Ɣ
The owner holds responsibility for the managem ent of this machine, including checking
that all parts are correctly attached and that all functions are working correct ly bef or e
lending it to anyone.
ŶManaging gasoline safely
ᵢᵟᵬᵥᵣᵰ
Ɣ
Absolutely do not handle gasoline in the presence of lit cig arettes, open flame, or ot her
sources of ignition. Gasoline is an extr em ely flammable liquid and its high volatility means
there is a danger of f ire and explosions.
Ɣ
Do not use a type of gasoline other than that descr ibed. There is a danger of fire and
explosions.
ᵵᵟᵰᵬᵧᵬ
Ɣ
Store gasoline and oil safely away from sources of flame and places where children can easily
reach. Accidents and injury can result.
Ɣ
Please refuel in a place that is well ventilated. As gasoline is a hig hly volatile substance, t here
is a danger that you will feel unwell if you operate the machine in a poorly ventilated place.
Ɣ
Do not open the fuel cap while running the engine.
Ɣ
When refueling, be sure to stop the engine and allow it to cool down. T her e is a danger of
suffering burns.
㻡
Page 7

Ɣ
ᵥ
ᵥ
When refueling, be sure not to f ill t he fuel tank over the maximum level. If you do overfill the fuel
tank, remove fuel until it sits below the maximum level. Over-fueling can cause fire and
other accidents.
Ɣ
After refueling , secur ely close the fuel cap and store the machine in a safe place with no
sources of ignition. Ther e is a danger of fire.
Ɣ
If you spill gasoline, move the machine a safe distance away without starting the engine.
Starting the machine in close proximity to a fuel spill can result in a fire or other accident . Use
a waste cloth to wipe away the spill and dispose of the cloth in accordance with local laws.
Ɣ
Be sure to change your clothes immediately if t hey come int o cont act with gasoline. There is a
danger that any gasoline on your clothes could ignite or cause you to feel unwell.
Ɣ
Do not refuel in places such as inside a car or on a truck , they could move unexpectedly. Refuel
after placing your fuel cont ainer safely on the ground, away from vehicles.
Fuel spills can cause fire and other accidents.
Ɣ
Do not remove the refueling nozzle from the fuel tank until you have finished refueling.
Fuel spills can cause fire and other accidents.
ŶCaution when starting the engine
ᵢᵟᵬᵥᵣᵰ
Ɣ
Do not modify the engine as this can cause accidents or explosions. You will bear responsibilit y
for any accidents or problems caused by modification. Also, trying to claim compensation in
such cases will be ineffective
Ɣ
Do not try to alter the position of the engine governor or change the set r ot ation speeds.
Ɣ
Do not run the engine in a place that is poorly ventilated. Eng ine exhaust is odor less and
contains carbon monoxide which can cause death or serious injury.
ᵵᵟᵰᵬᵧᵬ
Ɣ
Do not allow highly flammable substances near the engine or t he path of the exhaust as
this can cause a fire.
Ɣ
Do not touch the engine or muffler as they become extremely hot during operation and can
cause severe burns.
Ɣ
Do not allow weeds and leaves to accumulate in the engine, especially in the recoil cover,
airfilter, and near to the muffler. Overheating and fire can result.
Ɣ
Ensure that the clutch lever is in the [OFF] posit ion, t he speed change
lever is in the [N] position, before star t ing the engine. Not taking precautionswhen starting
the engine can cause injury and accidents.
Ɣ
After starting t he engine with the clutch lever in the [OFF] position, check t he
belt to be absolutely certain that it is not moving . I f the belt is moving even a little,
immediately switch off the engine and adj ust the belt guard and the wire. Not tak ing pr ecautions
can cause injury and accidents.
ŶCaution when loadi ng and unloading
ᵵᵟᵰᵬᵧᵬ
Ɣ
When loading or unloading using a truck, proceed carefully and be certain to park on a
flat and safe surface. A truck moving suddenly could cause injury and accidents.
Ɣ
Attach a gently sloping ramp securely to the t r uck’s loading platform and lower the running of
the engine. The speed change lever should be put in the forward [1] position for loading , and in
the reverse [R] position for unloading . Proceed with caution as injury and accidents can be
caused by the machine tipping over or running out of cont r ol.
㻢
Page 8

ŶBefore operating the machine
)
p
ᵥ
ᵵᵟᵰᵬᵧᵬ
Ɣ
Absolutely do not try to modify this machine (including m odification of the protect ive cover and
safety cover) as this can cause injury and accidents. You will bear responsibility for any
accidents or problems caused by modification. Or ec America will not bear any responsibility for
modified machines.
Ɣ
Do not change or tamper with the safety apparat us. I nspection should be performed
periodically to ensure the safety apparatus is working cor r ectly.
Ɣ
For safety reasons, use the recommended accessories and att achments that are best suited
to the ground you are working on and the type of work you are per forming
Ɣ
This machine can not be ridden, do not try to ride it or allow children or pets to ride on it. This
can cause injury to people/pets and damage to the machine.
Ɣ
Wear suitable clot hing when operating this machine. Please wear the following items to protect
against injury and reduce the possibility of accidents.
㸫Long sleeves, long pants 㸫Protective glasses
㸫Non-slip shoes 㸫Gloves
㸫Helmet 㸫Ear protection, etc.
Cuffs, hems of loose clothing, and jewelry can become entangled in the
machine. Avoid wearing such items to help prevent injury and accidents. Long hair
should be tied up inside a helmet.
Ɣ
Ensure that no part of your body comes into contact with the m oving t ines of this machine.
There is the possibility of serious injury such as the severing of hands and feet.
Ɣ
Do not remove any parts of this machine that have been f itted as standard. To prevent
accidents, be sure to use all covers and parts in the same state as t hey have been fit t ed.
Ɣ
Be sure that there are no people, animals or vehicles close by. Not taking precautions
can cause injury and accidents.
Ɣ
Before starting, rem ove any rocks or br anches t hat could be thrown and cause injury to
bystanders or damage to the machine
Ɣ
Use this machine during daylight or with sufficient artificial light. Do not operate this machine
at night when poor visibility will not allow you to be completely aware of your surroundings.
Being unable to notice dangerous objects and bystanders is a cause of injury and accidents.
Ɣ
Absolutely do not operate this machine in places where there are dangerous dr ops, dit ches or
embankments. Accidents can be caused by the machine tipping over.
Ɣ
Do not use this machine on wet grass. It is easy to slip on wet grass, causing injury and
accidents.
ŶSpark arrester (optional
Ɣ
This product is NOT equipped with a spark arrester. In some areas, it is illegal to
operate the engine without a spark arrester. Please check local laws and regulations.
An optional USDS approved spark arrester is available through your engine service
dealer.
S
ark arrestor (Honda) item code: 18355-ZL0-000
㻣
Page 9

ŶCaution during operation
Ɣ
During operation, tines and belts are hidden by a cover, be sure to keep hands and feet well
away. Touching these parts can cause serious injury such as the severing of hands and feet.
Ɣ
During operation, the rotating tines come right to the edge of the tine cover. Absolutely
do not put your feet inside the cover. Not taking precautions can cause injury.
Ɣ
Before removing entangled grass or other foreign objects from the tines, be sure to stop
the engine and remove the spark plug cord. Check that the tines have stopped moving
before carefully removing any entangled material.
Ɣ
Be sure that there are no people, animals or vehicles close by. When operating this m achine,
always maintain a distance of 100 FEET between you and bystanders. If people or animals
come near, release the clutch and switch off t he engine. Not taking precautions can cause
injury and accidents.
Ɣ
For safety reasons, do not make sudden star t s/stops or sharp turns.
Ɣ
Take care to move and turn the machine gently, and stop the tines when not tilling
Not taking precautions can cause injury and accidents
Ɣ
The operater should always be behind the machine during use (handlebar side). When this
machine’s engine is running, do not stand in front of the path where you are tilling.
Not taking precautions can cause injury and accidents.
Ɣ
If you notice any strange noises, smells, heat , or vibrations during the operation of this machine,
switch off the engine immediat ely, r emove the spark plug cord and ensure that all m ovable
parts have completely stopped. Be sure to have the machine inspected f or dam age and
obstructions and have any damaged parts repaired.
Ɣ
Watch for holes in the ground and protruding tree roots. Also look out for obstructions
that could be buried in ground. The handlebars can be taken from your control, causing
injury and accidents.
Ɣ
Be careful when approaching blind corners, bushes, and tr ees which block your line of sight.
Such obstructions can hide children and animals from view.
Ɣ
Do not operate this machine in the direction of rivers and drop-offs, people and buildings.
Accidents can be caused by falls and collisions.
Ɣ
When moving the m achine backwards, check that there are no people or obstacles behind
you and that you have a secure foothold. When reversing, there is a danger of being trapped
between the machine and a wall or falling from drop-offs.
Ɣ
Exercise caution when operating the machine alongside fences, buildings and trees.
The machine’s handlebars can be taken fr om your cont r ol if you come into contact with
obstacles, possibly causing injury and accidents.
Ɣ
Do not leave the machine unattended with the engine running. When leaving the machine
unattended, park on a flat sur face with the engine switched off, put t he dr ive clutch lever in
[OFF]. Injury and accidents can be caused if t he machine moves while unattended
ᵡᵟᵳᵲᵧᵭᵬ
Ɣ
When operating the machine close to buildings, or trees, t ake care not to cause
accidents and damage by crashing into them. I f you do hit something, switch off the engine
immediately. Confirm that the tines have stopped moving and then check them for dam age
such as bending and cracking. Check all areas of the machine for damage and have part s
repaired or replaced if necessary
㻤
Page 10

ŶUsing the machine on slopes
ᵥ
ᵥ
ᵥ
ᵵᵟᵰᵬᵧᵬ
When operating on slopes, serious accidents can be caused by you slipping and the machine
rolling over. Be especially careful when working in such areas and stop oper at ing the machine
immediately if you feel in any danger at all.
Ɣ
Do not operate the machine on slopes of more t han 15°.
Ɣ
Till across the face of slopes; never up and down. The handlebar s can be t aken from
your control, or rollover, causing injury and accidents
Ɣ
When changing direction on a slope, do it slowly and carefully. The machine could roll over,
causing injury and accidents.
Ɣ
Do not operate the machine on wet slopes. There is a danger of slipping, causing injury.
Ɣ
Watch for holes in the ground and protruding tree roots. Also look out for obstructions
that could be buried in ground. The handlebars can be taken from your control, causing
injury and accidents.
Ɣ
When operating on slopes, do not leave the machine with its clutch off or t he speed change
lever in neutral. The machine could run out of control, causing injury and accidents.
ŶChildren
ᵵᵟᵰᵬᵧᵬ
When operating this machine, be particularly aware of children. Childr en ar e often interested in
tillers and may be curious. As children may not be concentrating on their surroundings,
accidents can occur if you take your eyes off t hem . Please treat the following points with great car e.
Ɣ
Do not allow children to come into the area where you are working. Make sure that young
children are securely in the care of an adult other t han the operator.
Ɣ
Switch off the engine immediately if children enter the area where you are working.
Ɣ
Do not allow children to operate the machine. Check and obey local laws which
may place age limits on the operation of m achinery
Ɣ
Be careful when approaching blind corners, bushes, and tr ees which block your line of sight.
Such obstructions can hide children from view.
ŶMaintenance
ᵵᵟᵰᵬᵧᵬ
Ɣ
Be sure to switch off the engine and r em ove the spar k plug cord before performing any
inspection, adjustment or maintenance on this machine.
Ɣ
When performing inspection, adjustment or m aintenance, use the correct tools to
work as safely as possible
Ɣ
Perform periodic inspections in order t o work as safely as possible. If you discover any worn or
damaged parts, please replace them with recomm ended par ts only.
Ɣ
When inspecting or handling the machine, do not directly touch the t ines. Exercise caut ion
by wearing gloves and wrapping the tines in cloth. If you notice any abnormalities
in the tines, do not try to repair them, have them r eplaced with OEM parts from Orec.
Not taking this precaution can cause injur y and accidents
Ɣ
Damage to the belt cover, tine cover, or rear guard, could cause injury or
accidents. Be sure to have any damaged parts replaced befor e using the machine again.
Ɣ
Be sure to check that the covers of r otating parts are refit ted correctly in their original positions
after being removed. Poorly f it t ed covers could open dur ing operation and cause serious injury
Ɣ
Check that all nuts and bolts are securely tight ened
Ɣ
Perform comprehensive inspection and adjustment of such parts as drive clutch,
throttle, and gear change.
㻥
Page 11

Ɣ
When rubber fuel lines become old, they can split and dangerous fuel leaks can occur. Change
rubber parts if they split or every 3 years regardless of damage. At this time, also change
the fastening bands for the new parts.
Ɣ
Be sure to check that the bolts in the wheels and blades are tightly fastened.
Ɣ
When replacing the tines, also replace the attached nuts and bolts. There is a possibility of
accidents caused by worn or damaged parts. Never substitute nuts and bolts with those that
are not recommended.
Ɣ
Remove fuel when storing or transporting the machine. Accidents and damage can be caused
by fuel spills or expired fuel.
Ɣ
When storing the machine, place it on a flat surface away from sources of flame. Not taking
precautions can cause accidents and damage.
Ɣ
Before storing the machine, remove such foreign material as weeds and leaves. Clean away
any oil spills or fragments stained with oil.
Ɣ
Make sure that the engine has completely cooled before covering the machine with
a storage cover.
Depending on operating conditions, there may be occasions when incidents arise which are not
covered by the warnings in this manual. The operator should always use common sense and put
safety first when using this machine
㻝㻜
Page 12

䛀
䛁
Name of Parts
Note: the model in the pictures may slight ly different than the actual m achine.
1: Clutch lever
3: Engine stop switch
4: Diff lock lever
5: Adjustable handle
2: Throttle lever
6: Speed change lever
8: Depth adjustment bar
7: Rear guard
㻝㻝
Page 13

1: Clutch lever
r
Operates by turning power transmission [ON] / [ OFF] from the engine to the drive transmission.
Lower the lever and grip it together with the handlebars to t ransfer power to the transmission
and start driving the machine [ON] .
Release your grip on the lever and it will automatically return to its raised position,
power transmission will be cut and the machine will stop moving.
2: Throttle lever
Adjusts the engine rotating speed (RPM)
3: Engine stop switch
Switches the engine ON/OFF.
4: Diff lock lever
When the lever is put int o its forward position, the differential gear lock is [ O N].
Normally, the machine should be operated with this lever [OFF].
When you are operating on a slope or soft ground where the tire on one side m ay slip and it
may be difficult to go in a st r aight line, when unloading from a truck, or when you need to
operate the machine in a straight line, switch the diff lock lever on to stop the t ir es from moving
left and right, to increase the machine's ability to move forward in a straight line.
ᵡᵟᵳᵲᵧᵭᵬ
Ɣ
There is a danger of damage to the gears if the diff lock lever is operated with
the drive clutch lever [ON].
Ɣ
For safety reasons, turn the diff lock lever [ON] when on slopes.
5: Adjustable handle
Handlebar height can be adjusted based on operator's height
6: Speed change lever
Select tilling speed. There are two forward speeds levels and one reverse.
When you select the tilling position[ ], the machine will begin tilling.
There is only one travel speed when tilling.
7: Rear guard
Protects the operator's feet from the tines and thr own object s when tilling .
8: Depth adjustment ba
Adjusts tilling depth.
㻝㻞
Page 14

How to Operate the Machine
䠖
㸸
ᵥ
ᵥ
How to start and stop the engine
(Refer engine manual)
ŶBefore starting the engine
Place the machine on a flat surface and per form the following procedures to check the quantity of
engine oil and fuel.
Prep 1
Ɣ
Ɣ
Check engine oil
ᵵᵟᵰᵬᵧᵬ
Make sure the engine has cooled down before checking oil. There is a danger of burns.
ᵬᵭᵲᵧᵡᵣ
When this machine is shipped, it is l ubricated with oil; however, before operating
the machine,make sure that it is lubricated with the described oil.
1.
Unscrew the dipstick and inspect, using oil gaug e.
Note: Check oil level by inserting and removing
the dipstick wit hout screwing it into
the filler hole.
2.
If the oil does not lie between the upper level and
lower level, replenish to bring the oil to the upper level.
DIPSTICK
Note:
Please make sure not to overfill t he engine oil
Prep 2
Check fuel
ᵢᵟᵬᵥᵣᵰ
Ɣ
Absolutely do not handle gasoline in the presence of lit cig ar et tes, open flame, or other sources
of ignition.Gasoline is an extrem ely flammable liquid and its high volatility means ther e is
a danger of fires and explosions.
ᵵᵟᵰᵬᵧᵬ
Ɣ
Please refuel in a place that is well ventilated. As gasoline is a hig hly volatile substance,
there is a danger that you will feel unwell if you operate the m achine in a poorly ventilated place.
Ɣ
When refueling, be sure to stop the engine and allow it to cool down. T her e is a danger
of suffering bur ns.
Ɣ
When refueling, do not overfill the fuel tank above the maximum level. If you do overfill
the fuel tank, rem o ve fuel until it sits below the maximum level. Over-fueling can cause fire and
other accidents
Ɣ
After refueling , secur ely close the fuel cap and store the machine in a safe place with
no sources of flame.Ther e is a danger of fire.
Ɣ
If you accidentally spill gasoline, move the machine a safe dist ance away without starting
the engine. Starting the machine in close proximity to a fuel spill can result in f ir e or
other accident. Use a cloth to wipe away waste gasoline then dispose of according to local laws.
Refuel the machine with regular unleaded gasoline.
1.
(Refer to fuel tank specifications on quantity)
㻝㻟
Page 15

ŶHow to start the engine
ᵢᵟᵬᵥᵣᵰ
Ɣ
Do not start the engine in a confined space or a place with insufficient ventilation.
Engine exhaust gas is odorless and contains carbon monoxide which can cause death.
Put the speed change lever in the [N] position.
1.
2.
Move the fuel valve lever to the [ON] position
3.
To start a cold engine, move the choke lever to
the [ CLOSED ] position.
Throttle lever
Starter grip
If the engine has been warmed up,
there is no need to use the choke.
Turn the throttle lever between the [ ] and [ ]
4.
positions
Grip the starter knob, pull slowly until you feel tension and
5.
then pull strongly from this position.
Immediately after the eng ine has st arted, slowly return
the startknob to its or iginal position.
If the choke lever to moved to t he [CLOSED] position
6.
to start the engine, g radually move it to the [OPEN] position
as the engine warms up
ᵬᵭᵲᵧᵡᵣ
Ɣ
Please warm up the engine by leaving it engaged,
with the throttle in [ LOW ] for approximately 2 minutes.
㻝㻠
Page 16

ŶHow to stop the engine
ᵥ
ᵥ
Turn the throttle lever to t he [ ] position, then move
Throttle lever
How to drive, turn, change speed, and stop
ᵵᵟᵰᵬᵧᵬ
Ɣ
Confirm that all around you is safe before proceeding to drive the machine.
ʊ If driving the machine alongside ditches or the edg es of paths, there is a danger that the
weight of the machine could cause the ground t o collapse. Exercise sufficient caution when
operating the machine on soft ground.
ʊ Do not operate the machine on slopes of more than 10° or on slippery gr ound. There is a
danger of the machine rolling over or r unning out of control.
1.
the engine stop switch to the [ OFF ] position t o st op
the engine.
Shift the fuel valve to the [CLOSED] position
2.
ᵵᵟᵰᵬᵧᵬ
Ɣ
Do not touch the hot engine immediately after
switching off. Allow time f or it to cool down as
there is a danger of burns
ŶHow to dri ve
Start the engine.
1.
Be sure to shift the speed change lever securely in the
2.
necessary position, [ 1 ], [ 2 ] or [ R ]
Do not shift in the [ ] position.
Ɣ
If the speed change lever is not securely in place,
there is a real danger that gear s could be r eleased
while driving the machine. If a gear is difficult to engag e,
do not force it. Press the clut ch lever t o t he [ON]
position and be certain tocheck the gear change
clutch lever
3.
ᵬᵭᵲᵧᵡᵣ
Ɣ
Place the machine on a flat surface and r elease t he diff lock lever [OFF].
Ɣ
When you are operating on a slope where the tires may slip and it may be difficult t o go in a
straight line, switch the diff lock lever [ON] to help your progr ess.
one more time.
Ɣ
Turn the throttle lever to [ ] position. [ ] position
will increase the risk of sudden start.
Adjust throttle speed using the thr ot tle lever after
operating the clutch lever
The machine will start moving, when the clutch lever is
pushed down.
㻝㻡
Page 17

ŶHow to turn
ᵥ
ᵥ
ŶHow to change speed
clutch lever
Steer the machine by lifting the handle bar so that
the tines come to the ground surface.
Ɣ
Do not shift the speed change lever to [ ] position.
Rotating tines may cause serious injury and accident.
ᵬᵭᵲᵧᵡᵣ
Ɣ
Release the diff lock lever [O FF] when turning. Release
the drive clutch lever [OFF] to operate the diff lock lever.
Locking the differential makes both tires rotat e at
the same speedso that it helps to drive straight forward,
however it creates a larger turning radius as well as
a greater work-load on the transmission.
Release the clutch lever [OFF] and allow the machine
1.
to stop
ᵵᵟᵰᵬᵧᵬ
Ɣ
Do not try to change speed with the drive clutch
lever [ON].This can cause accidents and
transmission damage.
ŶHow to stop
clutch lever
Please be sure to securely shift it to the necessar y position.
2.
ᵵᵟᵰᵬᵧᵬ
Ɣ
Do not shift the speed change lever to [ ] position.
Rotating tines may cause serious injury and accident.
Release the drive clutch lever [OFF] and allow the machine
1.
to stop.
2.
Shift the speed change lever to [ N ] position and
stop the engine.
Ɣ
Please park the machine on flat, open ground with
no obstacles nearby .The machine may accidentally
move if it's on a slope.
Ɣ
Please turn off the eng ine when unattended.
㻝㻢
Page 18

Tilling
ᵥ
Please carefully read and understand the following im por t ant safety points.
Ɣ
Please clean inside the tine cover ONLY AFTER turning off the engine.
Doing so without turning off the engine may cause serious injury.
Ɣ
Please remove objects, such as big rocks, in advance, when
operating this machine on rocky soil to prot ect the machine from damage.
Ɣ
Do not push the handle bar down when operating but support lightly, as it causes extr a st r ain
to the machine, and the machine may move forward due to t he r ot ational reaction force
Ɣ
When working on har d com pacted soil, till several times using a shallow depth setting.
Ɣ
This machine will stop when the clutch lever is off. Please stop m achine r eleasing
the clutch lever in an emergency.
Ɣ
Always use your hands to operate the clutch lever. Never use string or steel wire to hold
the handle, as it may cause serious injury, because the turn off action will be delayed.
Shift the speed change lever into [ ] posit ion.
1.
Difflocklever
Clutch lever
ᵵᵟᵰᵬᵧᵬ
Ɣ
Start tilling after checking that the rear g uar d is attached
in the correct position. Tilling without t he r ear guard
may throw outobjects and cause accidents.
Pressing the clutch lever will start the tines and wheels
2.
rotating
Ɣ
Please be careful of the rotating tines.
Use the diff lock lever set t o [ ON ] when necessary.
3.
Note:
Put the diff lock lever [ OFF ] when flat and soil is
in good condition.Use [ ON ], when working on
slopes and loose ground.
㻝㻣
Page 19

ŶHow to stop
䛀
䛁
ᵥ
ᵥ
ᵵᵟᵰᵬᵧᵬ
Ɣ
Please park the machine on flat open g r ound.
If the machine moves when unattended it may cause accidents or machine damage.
Please turn off the eng ine when unattended.
Release the clutch lever
1.
Turn the throttle lever [ ] position then turn the engine
2.
stop switch [ OFF ] position.
Clutch lever
ŶHow to adjust the depth.
Pull the depth adjustment bar to unlock then move up and
1.
down to set and lock it at desired depth. Ther e ar e
6 depth positions.
Move the depth adjustment bar up when tilling deeper.
Depthadjustmentbar
Move the depth adjustment bar down when tilling
2.
more shallow
Note:
If the depth adjustment bar becomes hard to move,
remove any objects such as clogged mud, and
lubricate with engine oil.
Depthadjustmentbar
Ŷ How to adjust the handle height.
The handle height is adjustable for operator.
Remove the handle adjust bolt then re-tig ht en at
the proper position, with both tooth are biting each other.
Handleadjustbolt
Oiled Parts Inspection, Replacement, and Lubr i cation
ᵵᵟᵰᵬᵧᵬ
Ɣ
When this machine is shipped, it is lubricated with oil;however, before operating t he machine,
make sure that it is lubricated with the described oil.
Ɣ
Before operating the ma chine, m akesure that it is lubricated with the described oil,
in the described parts, and in the described quant it ies.
Ɣ
To always operate this machine in good condition, perf orm oil changes periodically
㻝㻤
Page 20

Ɣ
When performing inspection, replacement, or lubr ication of oiled parts, place the machine on a
flat, open surface. Switch on t he engine and warm it up to confirm it is work ing properly. Then
switch off the engine, allow it to cool down and remove the spark plug cord.
After switching off, please wait at least 10 minutes for all parts to cool down sufficiently before
you touch the machine.
Immediately after the engine has stopped, the body will be very hot and
can cause burns if touched. Also the oil will still be in the engine and transmission
so the quantity of oil remaining will not be accurately displayed.
Ɣ
After changing the oil, please dispose of waste oil appropriately.
Transmission oil inspection, replacement and lubrication
Inspection
Inspect around the oil inlet at the lef t side of the transmission,
after removing the oil plug If the oil level surface can be seen
from there, ther e is a sufficient amount of oil.
Oil plug
Replacement
Place an oil pan under the transmission, then remove the
drain plug at the left bottom of the transmission near drive shaft
and drain old oil.
Drain plug
Change the gear oil after t he first 20 hours of
operation and every 100 hours thereafter
Lubrication
After reattaching t he drain plug, fill with 3.2 qt ( 3 L ) of gear oil
(#90) by pouring through the oil inlet .
㻝㻥
Page 21

Engine oil inspection, replacement, lubrication
ᵥ
ᵵᵟᵰᵬᵧᵬ
Ɣ
Before changing oil, please switch on the eng ine and warm it up. Allow at least 10 min for
all parts to cool down after switched off in or der to prevent burns.
Inspection
Perform this inspection bef or e every use, and check oil quantity and quality using the dipstick
Make sure the engine oil is always at the maximum level on the
level gauge. Inspect with the engine horizontal and do not screw
in the dipstick.
Replacement
Remove the oil filler cap and the drain plug. Dr ain all old oil.
Replace engine oil after the f ir s t 5 hour s of operation and roughly
every 25 hours thereafter.
Lubrication
Remove the oil filler cap then put in the new engine oil (SAE10W-30) with 0.6qt (0.6L)
(Refer to the engine manual )
After the oil has been removed, securely ret u r n t he drain plug to its original position.
1.
Fill with new engine oil from the oil filler.
After filling with eng ine oil, secur e ly reat t a ch t he oil inlet plug so that oil does not leak out
2.
Note:
The oil may bleed when the oil filler cap and the drain plug has not been t ightened enough.
㻞㻜
Page 22

How to Lubricate Each Part
r
䛀
䛁
䠝
䠝
䠝
䠝
䠝
ᵡᵟᵳᵲᵧᵭᵬ
Ɣ
Be sure to lubricate each part with grease or lubricat ing oil (#30) every 30 hours.
Operation will become heavy and the machine could be damaged if you neglect lubrication and
allow oil to run out
Lubricate all parts indicated by "A" in the pictures below
The clutch cable and the clutch lever The diff lock cable and clut ch lever
pivoting point. pivoting point
The depth adjustment ba
How to Inspect, Maintain, and Adjust Each Part
How to inspect and adjust the spark plug
Remove the spark plug with a plug wrench and clean away
1.
any carbon deposits on the electrode with a wire brush
and wipe away any moisture if present.
Replace the spark plug with a new one if the ceramic part
2.
has cracked or the electrode has suffered extensive wear
and tear.
Plug: Honda GX200 ---- BPR6ES㸦NGK㸧
Please adjust the spark plug electr ode clear ance t o
3.
0.028-0.031in (0.7-0.8mm)
ᵬᵭᵲᵧᵡᵣ
Ɣ
When attaching a spark plug onto the engine, scr ew by hand at fir st before tightening with
a plug wrench. If you start by using a plug wrench to screw in the spark plug, there is
a danger of cross-threading it
㻞㻝
Page 23

How to clean the air filter
ᵥ
ᵵᵟᵰᵬᵧᵬ
Ɣ
Be sure to periodically clean the air filters. I f you continue to use the machine with
the air filter and recoil starter clogged with weeds, etc., exhaust temperatur e will increase and
could ignite fuel, resulting in a fire.
Cleaning, replacement time (approx.)
Replacement
Every 200 hours or 1 year
Every 200 hours or 1 year
Foam element
Paper element
Cleaning
Every 25 hours
Every 50 hours
Take care to clean the f ilt er more frequently when operating in an environm ent with a lot of
dust or grime.
Release the wing nut and air cleaner cover
1.
Remove the paper and foam elements and check
2.
for damage
Note:
Wash the foam element with a pH neutral
3.
Replace with new parts if damaged
detergent. After washing, be sure to squeeze out all the
water and allow it to dry. Then soak it in
new engine oil (SAE10W-30 equivalent), wring it out hard,
and shake to remove any surplus oil.
Lightly tap the paper element several times to r em ove any
4.
waste. Blow any dirt from the inside of the filter in an
outward direction
Wipe any dirt f r om the inside of the case and reassemble
5.
back to its original position
ᵬᵭᵲᵧᵡᵣ
Ɣ
Replace the paper element with a new one if it is very dirty.
Ɣ
Take care when tapping the paper element so as not to cause any damage to the filter.
Ɣ
Do not use a brush as this could scrape the filter.
Tire pressure adjustment
Tire pressure
Please adjust tire pressure to 17.4 psi (0.12 MPa)
If the air pressure of the left and right tires is not equal, there is
a danger of losing control of the handlebars.
㻞㻞
Page 24

Adjusting the Cables
ᵥ
ᵵᵟᵰᵬᵧᵬ
Ɣ
Check that you are taking suf ficient safety precautions when adjusting each cable by
placing the machine on a flat, open surface with the engine switched off and the spark plug
cord removed.
Clutch cable
If the V-belt slips and the machine becomes over- loaded
even when you grip the handlebar with the clutch lever
-Loosen the lock nut and move the adjust nut
Clutch wire
Lock nut
Adjust nut
in the direction B
If the machine still moves when the drive clutch lever is
released.
-Loosen the lock nut and move the adjust nut
in the direction A
Please securely tighten the lock nut after the adjustment.
Lock nut
Differential locking
Adjust nut
Diff lock cable
If the machine does not function even when diff lock lever
is ON.
-Loosen the lock nut and move the adjust nut
in the direction B
If the machine still functions even when diff lock lever
is OFF.
-Loosen the lock nut and move the adjust nut
in the direction A
Please securely tighten the lock nut after the adjustment.
㻞㻟
Page 25

Belt Inspection
ᵥ
ᵵᵟᵰᵬᵧᵬ
Ɣ
Before working on the machine, st op the engine and remove the spark plug cord. Not taking this
precaution could lead to serious injury and accident
Please check the belt regularly as it is a consumable part s and subject to wear and tear.
If you notice wear or cracks in any of these par t s , please r eplace immediately
Cog belt: Size----- HP-2 SB33 x 1
Ɣ
Inspection time:
After the first 2- 3 hour s of operation and then every 30 hours of operation ther eafter
Adjustment
Depress the clutch lever to [ON], and make sure the belt
has about 1/4" deflection when it is pressed with 6 lbs force.
If the adjuster at t he clut ch cable doesn't allow you to set it
within the range, you can also adjust by loosening
the engine mounts bolt to move the engine position.
Replacement
After changing or adj ust the belt, please adjust belt holder's
position.
When the clutch lever is in [ ON ] position, the gap between
the belt and the belt holder is 3/16" (4mm ) on the upper side,
and 1/8" (3mm) on the lower side.
Confirming the attachment of the belt af t er replacing
Return the spark plug cord t o it s or iginal position and run the engine for ar ound 2 minutes with the
blade clutch lever and drive clutch lever in both the [ON] and [OFF] positions to confirm that the belt
is operating normally. Afte r confirming, set nuts, bolts, and covers securely to their original positions
㻞㻠
Page 26

Tine Inspection and Replacement
ᵥ
ᵵᵟᵰᵬᵧᵬ
Ɣ
When inspecting or r eplacing the tines, place the machine on a flat, open ar ea.
Always be sure to switch off the engine as there is a danger of injury.
Ɣ
When replacing or r epair ing tines, always have the work performed by someone with
the correct tools and experience.
Ɣ
The inspection or replacement of blades should be performed by 2 people. The handlebars
should be held firmly to stop the rear of the machine from f alling down. Not taking this precaution
can cause injury.
Ɣ
To avoid injury, wear safety gloves when performing inspection or r eplacem ent and wrap the tips
of the tines in cloth.
Ɣ
Replace the tines if you detect any abnormalities. If you ignore wear and tear, cracks, and
bending, there is a danger that the tines could break and fly out of the m achine, severely
injuring the operator or any bystanders.
Ɣ
When replacing t he t ines, be sur e t o also r eplace the nuts and bolts which tighten the tines.
This prevents accidents caused by wear and tear on the nuts and bolts. Never use nuts and bolts
that are not recommended for this specified purpose.
Stop the engine and move the fuel valve to [ CLOSE] position
1.
and remove the spark plug cap
Lift the machine's handlebars up to raise the rotor part
2.
of the machine.
ᵬᵭᵲᵧᵡᵣ
Ɣ
Do not leave the machine in a tilted position, as
the fluids may shift and prevent the eng ine from
starting properly.
Inspect for any cracks, bending and wear.
3.
Inspect all the tine setting bolts to be sur e t hey are secur ely tig ht ened
4.
Replacing Tines
Place the rotor on flat surf ace and check from behind. When each tine's edge has no overlap,
it's time to replace.
Tine distributions
Remove the tine setting bolts when replacing
tines.
Please refer to the picture on t he left, when
attaching new tines.
Please check the curb directions and position
of offset tines. Securely tighten with the tine
setting bolts.
䈜The picture shown is the view from behind
the machine.
ᵬᵭᵲᵧᵡᵣ
Ɣ
We recomm end pur chasing a replacement set in advance.
Please check the rotating direction as well.
When you replace, go from the left t o r ig ht,
one by one this will help you complete correctly.
If the direction or positon is incorrect, there
may beclumping and uneven tilling.
㻞㻡
Page 27

Inspection and Replacement of EZ Anke
r
䛀
䛁
ᵥ
ᵥ
ᵵᵟᵰᵬᵧᵬ
Ɣ
EZ Anker is a consumable part. Using worn EZ Ank er will prevent proper r esist ance,
and the machine may run rapidly on the ground, which may cause accidents.
If the length of t he EZ Anker has become shorter than
1.
the rotor's rotating r adius, it 's time for replacement.
When the machine r uns r apidly on the ground surface,
please check the EZ Anker for wear.
Please attach in the same direction when replacing.
2.
Long-term Storage
If you do not plan to use the machine for m or e than 30 days, please follow these procedures for
proper storage.
If the machine is not stored pr oper ly, t here is a danger of fuel spoilag e, the machine failing to
start, ordifficulty in running the machine.
ᵵᵟᵰᵬᵧᵬ
Ɣ
Please work on the machine in a place that is well ventilated. Gas fum es can fill a room and
cause accidents.
Ɣ
Before working on the machine, switch off the engine and remove the spark plug cord.
Ɣ
Store the machine on a flat surface in a place protected from the elem ents that is well ventilated
and cool.
Ɣ
When removing fuel, do not work near lit cigaret t es or other sources of open flame
Also, keep fireworks and fir ear m s away as there is a danger of the machine catching fire.
Ɣ
When removing fuel, be sure that the engine and muffler have cooled before touching the
machine. There is a danger of bur ns. Take care to dispose of f uel in accor dance with
local laws and regulations.
Empty fuel from inside the fuel tank and the carburetor.
1.
To remove fuel from inside the carburetor, remove the
drain screw from underneath and allow any fuel to
flow out.
Wash all part s well.
4.
࣭ Clean the recoil starter, air filter , m uffler, around the carbur etor, and inside the belt cover by
blowing air through them to remo ve dirt and dust .
࣭ Remove rust from affected ar eas and apply anti- cor r osion paint.
࣭ If you continue to operate with an accumulation of grass and dust in t he m achine, the engine
can become clogged, causing it to overheat and possibly catch fire.
Refuel and lubricate the necessary parts and have any defective parts r epair ed
5.
Put a cover over the machine to keep dust out.
6.
ᵬᵭᵲᵧᵡᵣ
Ɣ
During storage, check t he t ir e pr essur e per iodically and add air as necessar y
Clean away any fuel on the outside of the engine or
2.
machinewith a rag.
Please replace the engine oil.
3.
Refer to [ Replacing Eng ine O il ]
㻞㻢
Page 28

䛀
䛁
䛀
䛁
䛀
䛁
g
Specifications Reference values
Name
Model
Tilling width
Tines
Size of Cog belt
Weight
Size of tire
Clutch
Speeds
Engine
Included Tools
No Name of Tool
Dual head wrench
Dual head wrench
Spark plug wrench
Forward (MPH)
Reverse (MPH)
Name
Type
Power
Oil
Fuel tank
Mighty
SF600
67"x 23"x 38" (1690×590×970mm)Total length × Total width × Total height
19.7in (500mm)
12
HP-ϩSB33 x 1
185 lbs.( 84kg )
3.50-7 (ij350㹫㹫)
Belt tightener
[1] 0.72 [2] 2.78
[R] 0.72
HONDA GX200
UT2-SAR
4.8 kW (6.5HP)
0.6 qt (0.6L)
0.8 gallon (3.1L)
Specification Qty
10-12 (mm) 1
14-17 (mm)
Remarks
1
1 Engine tool
Consumable Parts List
No
1
2
3
4
5
6
7
8
9
10
11
12
Name of the Parts Parts No
Belt 89-6133-003301
Regular tine 㹊 80-1310-821-00
Re
ular tine R 80-1310-822-00
Offset tine 㹊 80-1310-826-00
Offset tine 㹐 80-1310-827-00
Tine attaching bolt
&nut set
Cable, clutch 83-1260-932-00
Throttle cable assy 0023-72400
Cable, diff lock 0016-73100
EZ Anker 0031-02100
Qty/Unit
1
4
4
2 Marked as A㹐50S㹊
2
85-1321-835-00 12
1
1
1
1
Remarks
HP-2 SB33
Marked as A㹐50㹊
Marked as A㹐50R
Marked as A㹐50SR
M10(round head
square neck bolt )
㻞㻣
Page 29

䛀
䛁
Periodic Voluntary Inspection Table
Neglecting inspection and maintenance is a cause of accidents and damage. Perform inspection
referring to [Periodic voluntary inspection table] in order to always keep the machine functioning
correctly
Perform annual inspection once a year and monthly inspection once a month, and starting checks
every time you use the machine
D: Daily M: Monthly Y: Yearly
Inspection Content
Main Body
Engine
Lubrication
Fuel
Electrics
Purity
Cooling
Transmitter
Belt
Transmission
Body Drive
Body
Cover
Lever&Cables
Tires
(Wheel)
Labels
Condition at startup, abnormal noise Machine starts up easily.
Revolution and acceleration
exhaust and gas leakage Exhaust color, smell, and sound are normal
Air filter damage, loosening, cleanlinessNo damage, loosening, or noticeably dirty.
Loosening of the attachment Gas leak, cracking, noticeable corrosion.
of cylinder head and manifolds (Tightened to the correct torque, not loose)
Valve clearance Clearance looks right range
Compressive pressure Compressive pressure looks straight
Engine base cracking or deformity, The engine base is not cracked or deformed
loosening of nuts and bolts and the nuts and bolts are not loose.
Quantity, cleanliness
Oil leakage Oil seal and gasket are not leaking oil.
Fuel leakage Fuel is not leaking
Fuel filter blockage Not noticeably dirty, deformed, or clogged
Fuel quantity/quality
Loosening. damage to electrical
wire connections
Spark Plug
Dirtying of air filter element Air filter element is not dirty.
Element breakage Element is not torn or worn out.
Grass etc. clogged in the
recoil cover
Accumulation of grass in the muffler There is no accumulation of grass around the muffler
Loosening There is suitable tension on the belt
Damage, cleanliness Belt is not cracked, damaged or noticeably dirty
Abnormal noise, strange
heat movement
Oil quantity, cleanliness
Oil leakage Oil seal and packing parts are not leaking oil.
Cracking or deformity, Mounting nuts
and bolts are loose or have fallen off
Cracking, deformity, corrosion No cracking, deformity or corrosion
Damage, loosening, rattling
of levers and cables, loss of split pins
Air pressure and tread depth Standard values are observed
Cracking, damage, wear and tear No cracks, damage or wear and tear.
Metal, stones, etc., stuck in the tires There is no debris in the tires
Loose or missing nuts and bolts Nuts and bolts are not loose or missing
Rattling, strange noise Mounted parts do not rattle or are missing.
Damage Warning labels and nameplate are attached and not damaged
Revolution speed increases gradually and smoothly
Oil quantity is suitable, not dirty or
mixed with any water or metals.
There is fuel in the engine and it is of good quality.
Harness connections are suitable, not loose or damaged
There are no cracks in the ceramic, the electrodes
are not worn, and there are no carbon deposits
Recoil cover is not clogged with grass
There are no abnormalities, strange noises or heat,
when running the machine
There is a suitable quantity of oi l and i t is not dirty.
Frame is not cracked or deformed. Nuts and
bolts have not fallen off.
When moving or loading there is no damage,
loosening, rattling and nothing has fallen off.
nspection
Freq.
DMY
If you do not understand any of these points, please consult with the retailer where you
purchased this machine.
㻞㻤
Page 30

䛀
䛁
Troubleshoot
If any of the following effects occur, refer to the instruction manual and take the appropriate action
Effect
Clumping tillage
Tiller jumps forward and
away
Does not till evenly
Belt slips
Wheel slips
Diff. is not locked
Engine bog
Can't move the depth
adjustment bar
Cause
Tines are worn out, Replace whole set of tines.
Tines are attached in the wrong direction Reattach tines in the right direction
Too much work load Till at a shallow depth setting.
Ground is too compacted, hard Divide area into smaller sections
Tines are attached in the wrong direction Attach tines in the right directions
Belt tension is too low. Adjust belt tension
Entangled grass or other foreign objects in the
tine cover
Ground is wet Wait until ground dries
Belt worn Change belt
Too much work load Till with shallow depth.
Tine cover is clogged with mud etc. Clean them up
Ground is wet Wait until ground dries
The diff lock lever is [ OFF ] position Switch the diff lock lever [ ON ] position
Cable is stretched Adjust cable
Engine rotation speed is low Raise throttle
Mud and grasses are clogged up.
Clean them up
Take them out
Treatment
If you do not understand any of these points, please consult with the retailer where you purchased
this machine
㻞㻥
Page 31

䛀
䛁
t
When engine won't work properly
If the engine malfunctions, perform diagnosis by referring to the following table and then taking the appropriate ac
Effect Cause
trouble
starting the engine
(Engine won't start)
Output shortage
Treatment
Engine stop switch is not in the [ ON] position. Put the safety switch to the [ ON ]
Choke lever has not been turned to [ CLOSE ].
Fuel is not flowing properly.
There is air or water mixed in the fuel
delivery system.
In cold weather, oil becomes thick, and the engine
rotation is sluggish
Ignition coil or unit is defective Replace the ignition coil or unit.
Defective spark plug.
Fuel shortage. Refuel the machine.
Clogged air filter. Clean the element.
Poor quality fuel. Replace with good quality fuel.
Choke has not been fully opened. Return the choke bar to [ OPEN ] completely
When cooling the engine, put the choke bar [CLOSE ]
position
Inspect fuel tank, remove impure deposits
or water. Remove the fuel valve strainer and clean
out any sediment deposited inside the cap
together with any other attached dirt.
Remove foreign objects, inspect fastening bands,
replace damaged parts with new ones.
Use the correct oil depending on the outside
temperature.
Inspect the gap between spark plug electrodes and
adjust
Replace with a new spark plug
Cooling system is clogged. Clean around the recoil starter
The engine stalls
suddenly.
Exhaust is
abnormally black
Muffler emits black
smoke and power
output falls.
Muffler emits gray
smoke.
Engine revolution is
Fuel shortage. Refuel the machine.
Fuel valve is closed. Open the fuel valve.
Poor quality fuel. Replace with good quality fuel.
Overfilled with engine oil. Adjust to correct fuel level
Air filter element is clogged. Clean the elements
Choke has not been fully opened
Overfilled with engine oil. Adjust to correct fuel level
Cylinder or piston ring is worn out Replace the ring.
Choke has not been fully opened Return the choke bar to [ OPEN ] completely
Return the choke bar to [ OPEN ] completely
not stable (does
not increase).
Poor quality fuel Replace with good quality fuel.
Defective ignition coil. Replace the ignition coil.
Momentary stall.
Fuel filter is clogged. Clean the fuel filter.
Exhaust has an
unusual smell
Poor quality fuel Replace with good quality fuel.
If you do not understand any of these points, please consult with the retailer where you purchased
this machine
㻟㻜
Page 32

䕔
m
m
Warranty parts
The supply term (period) during which replacement parts will be supplied is 9 years from the ti
last OREC product is produced. However, even during the supply period, it may be necessary
consult with OREC when seeking to purchase specific parts. If you have a request for replace
parts after this period has passed, please consult with OREC for prices and availability.
If you have any questions please talk to staff at the point of purchase or at our head office. At
time, please inform us of your machine’s [model type, serial number, and engine type].
㻟㻝
Page 33

LIMITED WARRANTY
s
Terms and Conditions
• Orec America, Inc. provides a limited warranty of two (2) years for residential users, one
one (1) year for commercial users, and one (1) year for rental companies, of its products against
defects in workmanship and materials when said products are put to ordinary and normal use.
The terms and conditions of the limited warranty are as set forth herein.
• The second year of the residential warranty shall cover only parts and NOT service.
• Crawlers are guaranteed for one hundred eighty (180) days after initial purchase.
This warranty covers defects in materials or workmanship only, and does not include damage to
crawlers from normal use and other external factors.
• The warranty shall commence from the date of purchase.
This warranty is available only to the original purchaser, and is not transferable.
• OREC reserves the right to inspect covered machines and parts in order to determine the
validity of warranty claims
• For the purposes of the above warranties “ordinary and normal use” does not include misuse,
accidents, or damage due to inadequate maintenance.
• Under this warranty, the responsibility of Orec America is limited to replacement or repair
of defective parts at Orec America, or at an authorized Orec dealer.
• Routine maintenance and adjustments, as defined by the manufacturer’s owner's manuals,
are the responsibility of the user and are not covered by the warranty.
•Degradation or deterioration of the product due to everyday use are excluded from the warranty
•Expendable components including but not limited to such as belts, blades, filters, spark plugs,
bags, wheels hoses, cables, wires, brake pads and flappers, are excluded from the warranty.
This warranty does NOT cover tire replacement or repair caused by punctures from outside
objects, such as nails, thorns, stumps or glass.
• During the warranty period, the warranty holder is responsible for equipment transportation
charges, and transportation expenses needed to process the claim will not be reimbursed.
• The following are excluded from the warranty:
࣭Repairs necessary due to inappropriate use or abuse including, but not limited to, damage
caused by towing objects or overspeeding the engine.
࣭Paint peeling or rust that occur through exposure to the elements or through everyday use
shall not be covered by the warranty.
࣭Repairs necessary because of operator negligence, including but not limited to, electrical and
mechanical damage caused by improper storage, failure to use the proper grade and amount
of engine oil, failure to keep the mowing deck clear of flammable debris, or the failure to
maintain the equipment according to the instructions contained in the owner’s manual.
࣭Repairs necessary because of accidents.
࣭Engine (fuel system) cleaning or repairs caused by fuel determined to be contaminated or
oxidized (stale). In general, fuel should be used within thirty (30) days of its purchase date.
࣭Claims made after expiration of the warranty.
࣭Claims that are NOT specifically covered by warranty.
• Repairs, maintenance and/or modifications performed by unauthorized persons or dealers, as well a
the use of unauthorized parts or accessories will lead to the immediate forfeiture
of the warranty.
• Under NO circumstances shall Orec America be liable for damages or expenses of any kind resulting
from inappropriate use of its products.
• Orec America shall NOT be responsible for incidental or consequential costs or damages resulting
from defects in its machinery.
Such excluded costs and damages may include 1) Labor 2) Lost sales 3) Cost of replacement parts.
• This warranty shall apply only to models sold within the United States and purchased from
authorized dealers.
㻟㻞
Page 34

Note: to request warranty service, please contact an authorized Orec dealer or refer to your
owner’s manual for the proper procedure
THIS WARRANTY GIVES YOU SPECIFIC LEGAL RIGHTS AND YOU MAY HAVE
OTHER RIGHTS WHICH MAY VARY FROM STATE TO STATE. SOME STATES DO
NOT ALLOW THE EXCLUSION OR LIMITATION OF INCIDENTAL OR CONSEQUENTIAL
DAMAGES, SO THE ABOVE LIMITATIONS MAY NOT APPLY TO YOU.
Warranty Registration
Register your information within 30 days of purchase at http://www.orecamerica.com/warranty
Warranty Claim Procedure
Should this Orec product fail due to a defect in materials and/or workmanship, the owner should use
the following procedure to make a warranty claim:
1) The owner must take the machine to the dealer from whom they purchased the machine or to
an authorized Orec America dealer.
2) The owner must present the warranty registration sheet or the invoice or receipt received at
time of purchase.
3) The warranty claim will be taken and verified by the Orec Dealer or distributor service manager
and submitted to an Orec distributor. The dealer or distributors service managerwill make a report
and submit it to Orec America for consideration of Warranty.
4) Orec will research the claim and may request that parts be returned for further examination.
Orec will report their decision to the distributor service manager or dealer from whom the claim
was received.
5) In the event that OREC approves the claim, parts will be exchanged free of charge and repairs
performed by the dealer.
6) The decision by the Quality/Service department to approve or reject a warranty is final and
binding.
Note: to process a warranty claim, it is necessary to include the model, and serial number
㻟㻟
 Loading...