

Page 1
Steam-All Canister
®
Important!
Read this manual carefully,
and keep for future reference.
User’s
Guide
TM
STEAM200
Page 2

2
Thank You for purchasing our top-of-the-line Oreck Steam-All™
Canister Steam Cleaner. This powerful, environmentally
friendly cleaner will help you clean both hard floors and
refresh carpets.
At Oreck, we understand that our customers are unique
and expect superior service. To meet your needs, we offer
different customer service options to accommodate your
lifestyle and preference.
Welcome to our Call. Click. Visit. customer service
program. To speak with an Oreck representative call, click or
visit using the information below.
Enjoy
Click
Call
Visit
USA: 1•800•989•3535
Canada: 1•888•676•7325
On the web, point and click at: www.oreck.com
or visit www.oreck.com and click locate a store on
the top right.
Visit us in person at one our store locations.
To find the nearest store, please call 888•oreck
(1•888•673•2578).
Page 3

3
Contents
Safety . . . . . . . . . . . . . . . . . . . . . . . . . . . . . . . . 4
General Warnings . . . . . . . . . . . . . . . . . . . . . . . . 4
Parts . . . . . . . . . . . . . . . . . . . . . . . . . . . . . . . . . 7
Product Components . . . . . . . . . . . . . . . . . . 7
Features . . . . . . . . . . . . . . . . . . . . . . . . . . . . . . 8
Assembly . . . . . . . . . . . . . . . . . . . . . . . . . . . . . . 9
Attach the Hose/Handle
. . . . . . . . . . . . . . . . 9
Attach the Floor Nozzle
. . . . . . . . . . . . . . . . . 9
Attaching the Jet Adaptor to Nozzles . . . . . . 10
Use
. . . . . . . . . . . . . . . . . . . . . . . . . . . . . . . . . 12
Choose the Attachments
. . . . . . . . . . . . . . . 12
Adaptors . . . . . . . . . . . . . . . . . . . . . . . . . . 12
Nozzles and Their Accessories
. . . . . . . . . . 12
Before You Begin Cleaning
. . . . . . . . . . . . . 13
Apply Steam . . . . . . . . . . . . . . . . . . . . . . . 16
After Using the Steamer . . . . . . . . . . . . . . . 18
Maintenance. . . . . . . . . . . . . . . . . . . . . . . . . . . 19
Rinsing the Boiler Tank
. . . . . . . . . . . . . . . . 19
De-scaling the Boiler Tank . . . . . . . . . . . . . 19
Troubleshooting . . . . . . . . . . . . . . . . . . . . . . . . 20
Replacement Parts . . . . . . . . . . . . . . . . . . . . . . 21
Warranty . . . . . . . . . . . . . . . . . . . . . . . . . . . . . 22
Page 4

4
Safety
IMPORTANT SAFETY INSTRUCTIONS
!
General Warnings
Read all instructions before using the steam cleaner.
WARNING! To reduce the risk of fire, electric shock, or injury
when using an electrical appliance, basic precautions should
always be followed, including the following:
• Do not leave appliance unattended when plugged in.
Unplug from outlet when not in use and before servicing.
• To prevent shock, do not use outdoors. The steam cleaner is
intended for household use only.
• Do not let the unit run while in any one stationary position
for any period of time. Keep the unit moving during use.
• Do not allow to be used as a toy.
• This product is not to be used by children.
• Do not use the steam cleaner directly overhead.
• Do not put any objects into openings or operate with
openings blocked.
• Never immerse the steam cleaner in water or liquids.
• Use only as described in this manual. Use only
manufacturer’s recommended attachments.
• Do not use with damaged cord or plug. If appliance is not
working as it should, has been dropped, damaged, left
outdoors, or dropped into water, return it to a service center
or call customer service at: US: 1-800-989-3535
Canada: 1-888-676-7325.
• Do not pull or carry by the power cord, use cord as a
handle, close a door on the power cord, or pull the power
cord around sharp edges or corners.
• Keep the power cord away from heated surfaces.
• Do not run the steam cleaner over the power cord.
• Do not use an extension cord.
• Turn off all controls before unplugging. Always remove the
power cord from the outlet and handle the steam cleaner
with care when filling the boiler tank with water.
• Do not unplug by pulling on the power cord. To unplug,
grasp the plug, not the power cord.
Page 5

5
• Do not handle the plug or appliance with wet hands.
• Do not over fill the boiler tank. Do not exceed the
maximum fill level. Use the measuring jug to measure the
correct amount of water.
• Do not use without the filler cap in place. Check that the
filler cap is completely screwed down before use.
• Do not operate without water in the boiler tank.
• Do not fill the water tank with anything other than water or
Oreck Fresh Air® Steam Mop Essence. Never put additives
(such as perfume, stain remover, or products containing
alcohol) in the water as they may damage the steam cleaner
or make it dangerous to use.
• Empty the boiler tank when the steam cleaner is not in use.
• Do not touch any hot areas on the steam cleaner or
accessories. Allow them to cool down before handling them.
• The force and heat of the steam may have an adverse effect
on some materials. Always test the steamer on a small
concealed area to determine if it is suitable for treatment.
• Never point or aim the steam cleaner at people, animals
(risk of scalding!), plants, electrical systems or wires.
• Do not use to treat clothing being worn on the body.
• Connecting the steam cleaner to improper voltage may
result in damage to the steam cleaner and possible injury.
Always plug the steam cleaner into a power outlet with
the correct voltage. See the rating label on the unit for the
correct voltage.
• Put in storage after each use to prevent tripping accidents.
• Steam through the hose and handle may cause them to get
hot. Avoid contact with hot areas.
WARNING! This steamer product is equipped with a safety
locking filler cap. The red button, located in the center of the
cap, will rise above flush with cap when the system is heating
and under pressure. This will prevent the user from removing
the cap. Do not defeat the safety mechanism. Turn the unit
“OFF” and depress the trigger to relieve pressure. Do not
attempt to remove the cap and fill the tank until you have
relieved as much pressure as possible and the unit has cooled or
the red button returns to its original position. Always use
caution when removing the cap.
Page 6
6
Parts
!
DANGER
Improper connection of the equipment-grounding conductor
can result in a risk of electrical shock. Check with a qualified
electrician or service person if you are in doubt as to whether
the outlet is grounded. If not, have a proper outlet installed by a
qualified electrician.
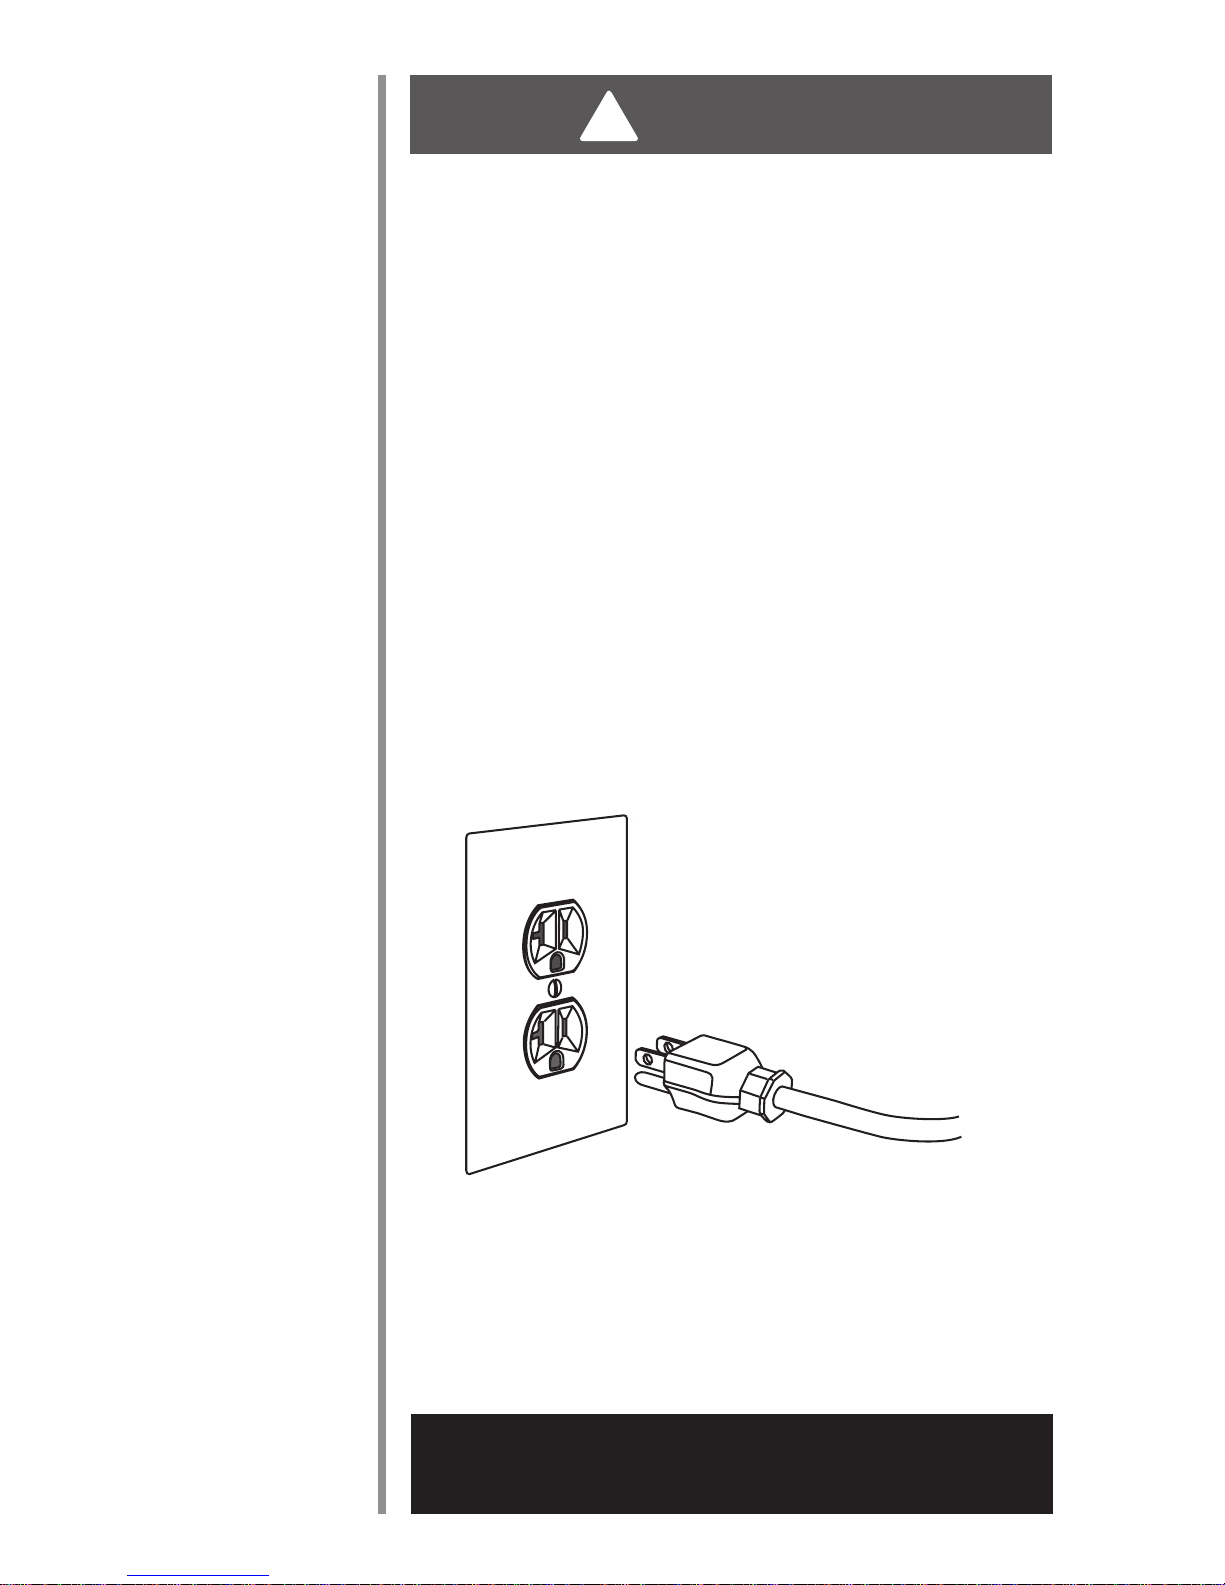
This appliance is for use on nominal 120-volt circuit. It has a
grounding plug similar to the example shown. Make sure the
appliance is connected to an outlet with the same configuration
as the plug. No adapter should be used with this appliance.
Grounded Plug
This appliance must be grounded. If it should malfunction or
break down, grounding provides a safe path of least resistance
for electrical current, reducing the risk of electrical shock.
The cord for this appliance has an equipment-grounding
conductor and a grounding plug. It must only be plugged into
an electrical outlet that is properly installed and grounded in
accordance with all local codes and ordinances.
SAVE THESE INSTRUCTIONS
For household use only
Page 7
7
Parts
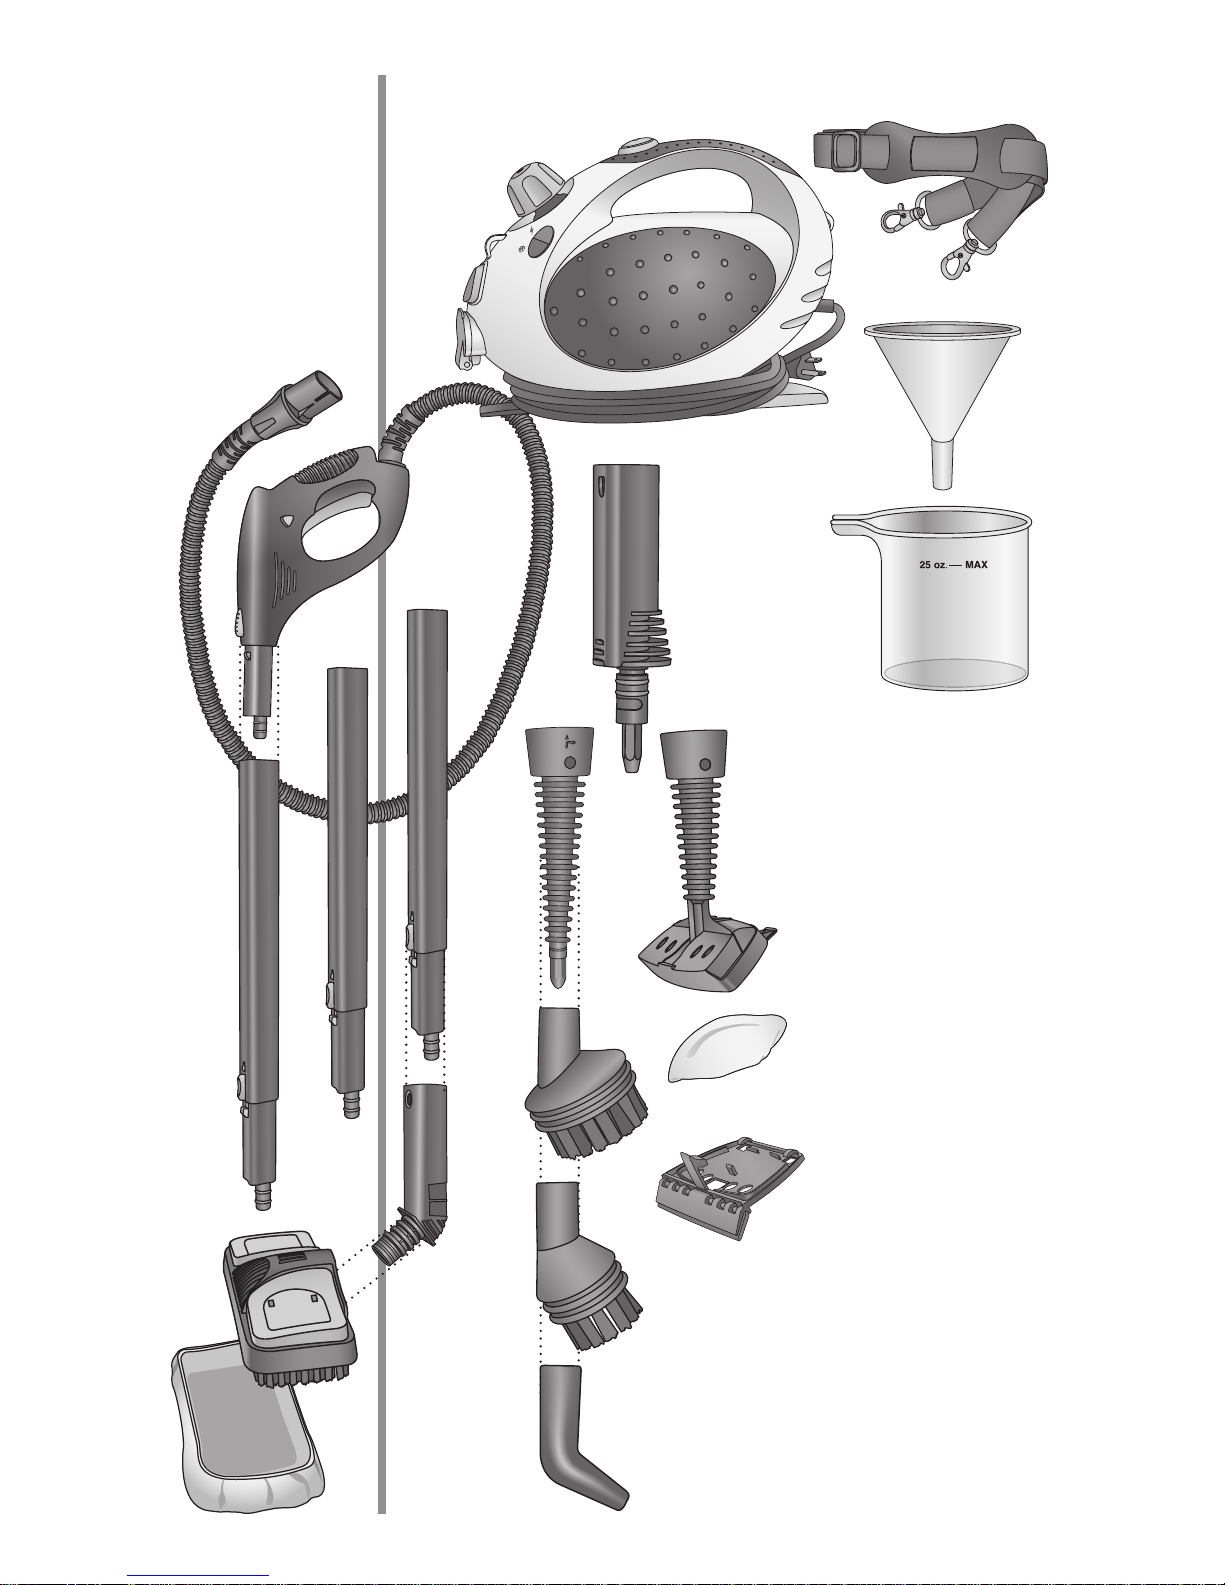
Product Components
1. Steam-All™ Steamer
2. Shoulder strap
3. Handle/hose
4. Extension tube (3)
5. Floor nozzle adaptor
6. Floor nozzle
7. Cotton floor towel
8. Jet nozzle adaptor
9. Jet nozzle
10. Large brush
11. Small brush
12. Angled nozzle
13. Upholstery nozzle
14. Cotton Bonnet for
upholstery nozzle
15. Window squeegee
16. Funnel
17. Measuring cup
2
1
12
9
11
4
5
8
7
10
13
14
6
16
17
15
3
Page 8
8
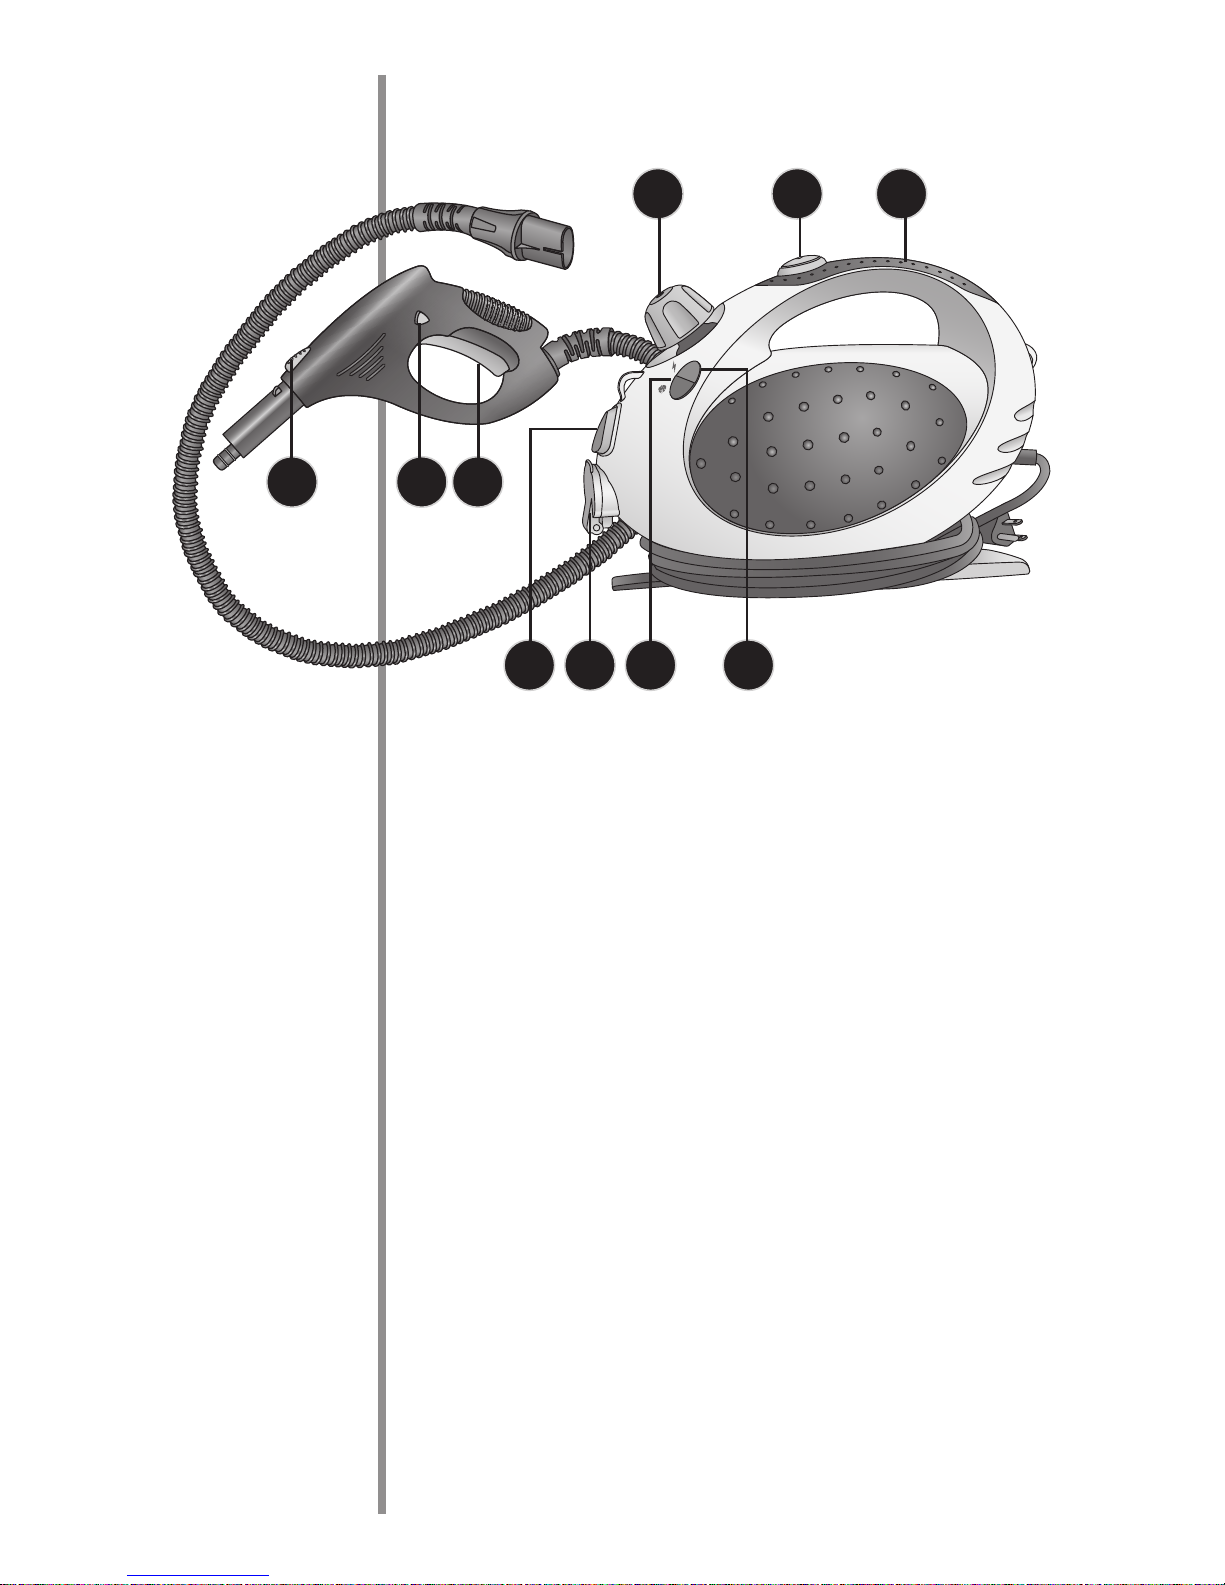
Features
1. Filler Cap and
Boiler Tank
The filler cap prevents
steam from escaping
from the boiler tank.
The boiler tank holds
the water/steam.
2. ON/OFF Button
Turns the steamer on
and off.
3. Carrying Handle
Used to carry the
steamer and hold
during use.
4. Hose handle button
Used to control the
direction of the steam
and connect the
attachments to the
steamer.
5. Safety lock button
Used to lock the trigger
and prevent accidental
release of steam.
6. Steam trigger
Used to apply steam.
7. Hose Release Button
Releases hose.
8. Hose Inlet and Flap
Hose connection location.
9. Thermostat Indicator Light
Illuminates when steamer
is turned ON and steam
is building up. Turns off
when the correct steam
temperature has been
reached.
10. Power Light
Indicates steamer has been
turned ON.
11. Cord Storage Foot
Use to wrap the power cord
when storing the Steam-All
™
Steamer.
321
4 5 6
7 8 9
10
Page 9

9
!
WARNING!
Assembly
Tip!
To reduce the risk of personal injury,
unplug the power cord from the electrical
outlet and let the unit/accessories cool
down completely before handling.
Attach the Hose/Handle
1. Pull the hose inlet flap down.
2. Line up the keyway on the hose/handle with the socket of
the Steam-All™ Steamer.
3. Push the keyway into the socket.
See page 12
to determine the
correct attachments
for your cleaning
job.
Plug
Keyway on
hose/handle
Hose inlet flap
Attach the Floor Nozzle
1. Position the floor nozzle adaptor so the tube portion is
pointing down.
2. Insert floor nozzle adaptor into the floor nozzle and rotate
the adaptor so the tube is now pointing up.
3. Pull on the floor nozzle adaptor to make sure it is locked.
4. Place the floor nozzle assembly on the hose/handle, or
extension tube until they are locked together.
You will hear a click and the yellow interlock
should be in the hole on the attachment.
Extension
tube
Floor nozzle
adaptor tube
Floor nozzle
Floor nozzle assembly
Page 10

10
Attaching the Jet Adaptor to Nozzles
Note: The jet adaptor is used when attaching the upholstery
nozzle and jet nozzle.
1. Align the keyway on the jet nozzle adaptor so it is lined up
with the key in the nozzle.
2. Insert the jet adaptor into the nozzle of choice and rotate so
the two are locked together.
3. Insert the assembly into the hose/handle, or extension tube
until they are locked together. You will hear a click and the
yellow interlock should be in the hole on the attachment.
Attaching the Accessories
To attach the window
squeegee to the upholstery
nozzle:
1. Slide the two tabs on
the upholstery nozzle
under the two tabs on the
window squeegee.
2. Rotate the upholstery
nozzle forward until it
engages with the front
clip of the squeegee.
Jet Nozzle
Upholstery
Nozzle
Jet Adaptor
Release button
Yellow interlock button
Upholstery
Nozzle tabs
Squeegee
tab
Squeegee clip
Page 11

11
To attach the cotton floor
towel to the floor nozzle:
1. Lift the clip on the top of the
floor nozzle.
2. Place the cotton towel under
clip and release.
3. Repeat steps one and two for
the opposite clip on the
floor nozzle.
Floor nozzle clip
To attach the shoulder strap:
If you would like to use the shoulder strap:
1. Attach the hooks on the strap to the plastic rings on the
Steam-All™.
2. Adjust for comfort by sliding the strap length adjuster.
Strap hook
Steamer ring
Strap length adjustor
Page 12

12
Use
Choose the Attachments
To determine the right tool the for the job, you must first
choose the correct adaptor, nozzle and accessory.
Nozzles and Their Accessories
Floor Nozzle
The floor nozzle is used for cleaning large floor
areas.
Floor Nozzle Accessories
Cotton Towel: Cleans sensitive surfaces such
as sealed wood and linoleum.
Upholstery Nozzle
The upholstery nozzle is used for cleaning cushions,
carpets and car seats.
Upholstery Nozzle Accessories
Squeegee: Cleans glass surfaces, mirrors,
ceramic tile, and other non-porous surfaces.
Important! Sudden application of excessive
heat may shatter glass (see Safety Warning
on page 17).
Large Cotton Bonnet: Cleans sensitive surfaces.
Jet Nozzle
Cleans multiple surfaces such as stainless steel
and enamel.
Jet Nozzle Accessories:
Brushes: Best for removing stains.
Angled Nozzle: Use for hard to reach areas
such as corners, blinds, radiators and toilets.
Adaptors
Extension Tube: Use for additional reach. There
are three extension tubes to extend your reach an
additional forty inches.
Floor Nozzle Adaptor: Attaches to the Floor Nozzle.
Jet Nozzle Adaptor: Attaches to the Jet Nozzle and
Upholstery Nozzle.
Page 13

13
Before You Begin Cleaning
!
WARNING!
To reduce the risk of personal injury, unplug the
power cord from the electrical outlet and let the unit/
accessories cool down completely before handling.
Steam may cause serious injury if in contact with
body parts. Always allow the steamer to cool down
before handling.
Do not fill the water tank with any thing other than
water or Oreck Fresh Air® Steam Mop Essence.
Never put additives (such as perfume, stain remover,
or products containing alcohol) in the water as they
may damage the steam cleaner or make it dangerous
to use.
Fill the Boiler Tank
1. Unplug the power cord and
remove the filler cap by
pressing down and turning
it counter-clockwise.
2. Using the measuring cup
and funnel, fill the boiler
tank. The boiler tank can
hold twenty-five fl. oz.
(739 ml). Do not overfill.
3. Replace the filler cap on
the boiler tank.
Cleaning Tips
Using warm water
will reduce heat-up
time and risk of
spitting out water
during start-up.
Important! The filler cap is
a safety feature and must be
properly seated and closed
before generating steam.
Filler cap
Boiler tank spout
Page 14

14
!
WARNING!
To reduce the risk of personal injury, unplug the
power cord from the electrical outlet and let the
unit/accessories cool down completely
before handling.
Steam may cause serious injury if in contact with
body parts. Always release all steam pressure
before removing the filler cap.
Refilling the Boiler Tank
1. Press the steam trigger and
release all the steam pressure.
2.
Allow the steamer and assembly
to cool down.
3. Refill the boiler tank (see Filling
the Boiler Tank on page 13).
Important! If the boiler tank is dry,
turn the steamer OFF and allow it to
cool down until the red indicator on
the filler cap has gone back in. It is
now safe to refill the boiler tank. Do
not attempt to remove the cap when
the indicator is pushed out.
Connect the Hose/Handle and Attachments
1. Choose the adaptor, nozzle and accessory needed for your
cleaning job.
2. Follow the assembly steps as described on page 9 to
assemble the Steamer in the configuration that you need.
Safety lock
Steam trigger
Page 15

15
!
WARNING!
Steam may cause serious injury if in contact with
body parts. Ensure the filler cap is seated properly
and tight, and the safety lock button on the hose
handle is engaged before turning the steamer ON.
Always direct the trigger away from the user and
away from any bystanders.
Turn the Steamer ON
Important! The red indicator on the filler cap is a safety device.
It will push out when there is steam pressure in the boiler
and go back in when it is safe to refill the boiler tank. Do not
attempt to remove the cap when the indicator is pushed out.
Turning the unit off and depressing the trigger will assist in
reducing pressure in the system.
1. Insert the power plug into a polar-
ized electrical outlet.
2. Check the filler cap is seated
properly and tight.
3. Engage the trigger lock by pushing
the safety lock button on the left
side of the hose handle.
4. Press down on the ON/OFF button.
The power and thermostat indicator
will illuminate.
Important! Turning the unit off and
depressing the trigger will assist in
reducing pressure in the system.
It takes approximately five minutes
to reach the correct temperature.
The thermostat indicator light turns
off when the correct temperature
has been reached.
Tip!
Filling the unit
with hot water will
reduce the preheat
time.
Left safety
lock button
ON/OFF button
Power light
Thermostat
indicator light
Filler cap
Red indicator
Page 16

16
!
WARNING!
Apply Steam
To reduce the risk of personal injury, unplug the
power cord from the electrical outlet and let the
unit/accessories cool down completely before
handling.
Hot water may be ejected at start-up and possibly
cause serious injury if in contact with body parts.
Always direct the steam into a cloth, bucket or
sink until the steam is emitted evenly.
The steam may cause serious injury if in contact
with body parts. Never point the steamer at people
or pets when in use. Always turn the steamer OFF
and unplug when the steamer is not in use.
Right safety
lock button
Steam trigger
NOTICE
Using the steamer on objects or surfaces that cannot resist
extreme temperatures (ie: unsealed wooden surfaces,
laminates, plastics, delicate materials) may cause damage.
Always check with the manufacturer if there is a doubt about
using the steamer on a surface or fabric.
Do not concentrate steam in one place for an extended
period of time. This may damage the surface or fabric.
Always test a hidden area before using steam on any surface
or fabric.
•
•
1. Disengage the trigger lock by
pushing the safety lock button
on the right side of the hose
handle.
2. Test how the steam will effect
the surface or fabric.
3. Press and hold the steam
trigger. Direct the steam at the
surface to be cleaned. Remove
the dirt by moving the steam
jet backwards and forwards
over the area.
4. Release steam trigger to stop
the steam jet.
Cleaning TIP
For more control of
the steam temperature
and cleaning power move
the handle closer to or
farther away from the
surface being
cleaned.
Page 17

17
!
WARNING!
Cleaning Glass Surfaces
Sudden application of excessive heat may shatter glass and
cause serious injury. Always warm glass surfaces gradually
when applying steam to the glass.
1. Warm the glass by applying the steam evenly to the glass
from a distance of eight to ten inches.
2. Apply steam to clean the glass at a distance of four to six
inches.
3. Switch the steam OFF and wipe the moisture off the glass
(top to bottom) with the window squeegee.
4. Wipe the squeegee and lower edge of the glass. Dry after
each pass.
Bedding and Upholstery
1. Attach the upholstery nozzle.
2. Pass the steam slowly and evenly over the surfaces ensuring
all areas are cleaned.
3. Repeat the process in a cross pattern.
4. Allow the mattress or furniture to dry before covering with
bedding or covers.
To clean very dirty areas move the nozzle slowly across
the surface.
Turn the cloth and change regularly to optimize cleaning
power of the cloth.
•
•
Cleaning
TIPS
Page 18

18
After Using the Steamer
1. Switch the steamer OFF, unplug the power cord and allow
the steamer to cool off.
2. Press the steam trigger and release any steam pressure.
3. Engage the steam safety lock button.
4. Remove the filler cap.
5. Empty the boiler tank and allow the tank to dry before
placing the cap back on.
6. Press the hose release button and release the hose.
7. Wrap the cord around the cord storage foot and storage
release lever. For quick release of the cord rotate the
storage release lever.
Page 19

19
Maintenance
Rinsing the Boiler Tank
!
WARNING!
To reduce the risk of personal injury, unplug the
power cord from the electrical outlet and let the
unit/accessories cool down completely
before handling.
1. Fill the boiler tank with water.
2. Place the filler cap on and shake vigorously to release lime
scale deposits on the bottom of the boiler tank.
3. Over a sink, remove the filler cap and pour the water out.
De-scaling the Boiler Tank
!
WARNING!
Do not fill the water tank with anything other than water or
Oreck Fresh Air® Steam Mop Essence. Never put additives
(such as perfume, stain remover, or products containing
alcohol) in the water as they may damage the steam cleaner or
make it dangerous to use.
Do not preheat unit when de-scaling.
User should release pressure with the trigger any time they are
cooling and removing the cap.
1. Switch the steamer OFF, unplug the power cord and allow
the steamer to cool off.
2. Remove the filler cap and empty the water out.
3. Pour 25 fl. oz. (739 ml) of de-scaler solution into the tank.
4. Place the filler cap back on and swirl the solution around
the tank.
5. Let the solution sit for thirty minutes.
6. Empty the solution.
7. Wipe the traces of the solution off the steamer housing.
Page 20

20
Troubleshooting
Service problems that appear to be major can often be solved
easily. You can be your own troubleshooter by reviewing this
guide. All other servicing should be done by an Oreck
authorized service center.
Problem Check Solution
Unit fails to steam
Heating indicator
light does not
illuminate,
power light is
illuminated but
unit fails to
steam
•
•
Not plugged in properly.
Household circuit
breaker/ground fault
interrupter has tripped or
blown a fuse.
•
•
Be sure cleaner is firmly
plugged into wall outlet.
Reset circuit breaker/ground
fault interrupter, or replace
fuse. If you need assistance
contact a licensed
electrician.
•
•
Thermostat
indicator light does
illuminate, but unit
fails to steam.
Mineral build-up in unit.
Unit may be suffering
from internal mechanical
problems.
•
•
See De-scaling the Boiler
Tank on page 19.
Unplug unit and contact
Customer support for repair
or replacement assistance.
•
•
Steam output is
weak or
intermittent.
Mineral build-up in unit. It is normal for the unit to
periodically stop steaming for a
few seconds. If steam stays off
for longer periods, follow the
De-scaling the Boiler Tank
instructions on page 19.
Excessive
gurgling in hose
handle.
Water drips from
nozzle.
•
•
Water condensation in
hose/handle.
Boiler has been overfilled
•
•
Some gurgling is a natural
effect of the steaming
process. For excessive
gurgling or dripping water,
point the nozzle towards the
ground and shake to remove
the excess water.
Empty some water out of the
boiler so that is contains no
more than 25 oz. of water.
•
•
…
Page 21

21
Replacement Parts
All accessories and replacement parts are sold separately.
To order, call our customer service group or visit our website.
Please have your model number from the data label on the
bottom of the unit.
Item Number
Accessories
Four cotton floor towels, two cotton
bonnets
STEAMKIT200
Replacement Parts
Steam-All Shoulder Strap 53547-01
Steam-All Extension Tube 53548-01
Steam-All Hose 53549-01
Steam-All Floor Nozzle 53550-01
Steam-All Upholstery Nozzle 53551-01
Steam-All Window Squeegee 53552-01
Steam-All Measuring Cup 53553-01
Steam-All Jet Nozzle 53554-01
Steam-All Funnel 53555-01
Steam-All Jet Nozzle Adaptor 53556-01
Steam-All Large Cleaning Brush 53557-01
Steam-All Small Cleaning Brush 53558-01
Steam-All Angled Nozzle 53559-01
Page 22

22
Warranty
Steam-All
Canister
ORECK MANUFACTURING COMPANY: (Oreck Manufacturing
Company gives you the following limited warranty for this product
only if it was originally purchased for residential use, not resale, from
Oreck or an Oreck Authorized Retail Dealer.)
Oreck will repair or replace, free of charge, to the original purchaser,
any part that is found to be defective in material or workmanship
within one (1) year of the date of purchase. This limited warranty
applies to normal domestic use. Any commercial use of this product
will void this limited warranty.
This limited warranty does not cover the replacement of expendable
or consumable parts such as towels, bonnets and other parts subject to
normal wear unless they are defective in material or workmanship.
This limited warranty does not apply to any part subjected to
accident, abuse, commercial use, alteration, misuse, damage caused
by act of God, the use of voltages other than indicated on the serial
number displayed on this product or service of this product by other
than Oreck or a participating Factory Authorized Service Center.
Oreck does not authorize any person or representative to assume or
grant any other warranty obligation with the sale of this product.
Oreck’s limited warranty is valid only if you retain proof of purchase
from Oreck or an Oreck Authorized Retail Dealer for this product.
If you purchase this product from any other source, your purchase is
“AS IS,” which means Oreck grants you no warranty, and that you,
not Oreck, assume the entire risk of the quality and performance of
this product, including the entire cost of any necessary servicing or
repairs of any defects.
Oreck’s liability for damages to you for any costs whatsoever arising out of this statement of limited warranty shall be limited to the
amount paid for this product at the time of original purchase, and
Oreck shall not be liable for any direct, indirect, consequential or
incidental damages arising out of the use or inability to use this
product. Some states do not allow the exclusion or limitation of
incidental or consequential damages, so the above limitation or
exclusion may not apply to you.
ALL EXPRESS AND IMPLIED WARRANTIES FOR THIS
PRODUCT, INCLUDING IMPLIED WARRANTIES OF
MERCHANTABILITY AND FITNESS FOR A PARTICULAR
PURPOSE, ARE LIMITED IN DURATION TO THE
WARRANTY PERIOD, AND NO WARRANTIES, WHETHER
EXPRESS OR IMPLIED, WILL APPLY AFTER THIS PERIOD.
Some states do not allow limitations on the duration of implied
warranties, so the above limitation may not apply to you.
This warranty gives you specific legal rights, and you may also have
other rights which vary from state to state. If appropriate, see
additional information for extended warranty.
Page 23

23
Page 24

© 2010 Oreck Holdings, LLC.
All rights reserved. All marks, text, logo’s, product
configurations and registered trademarks are owned and used
under the authority of Oreck Holdings, LLC
53539-01 REV A 09/10 ECN R-10091
 Loading...