

OREC America Snow Bull SGW803 Owner's Manual
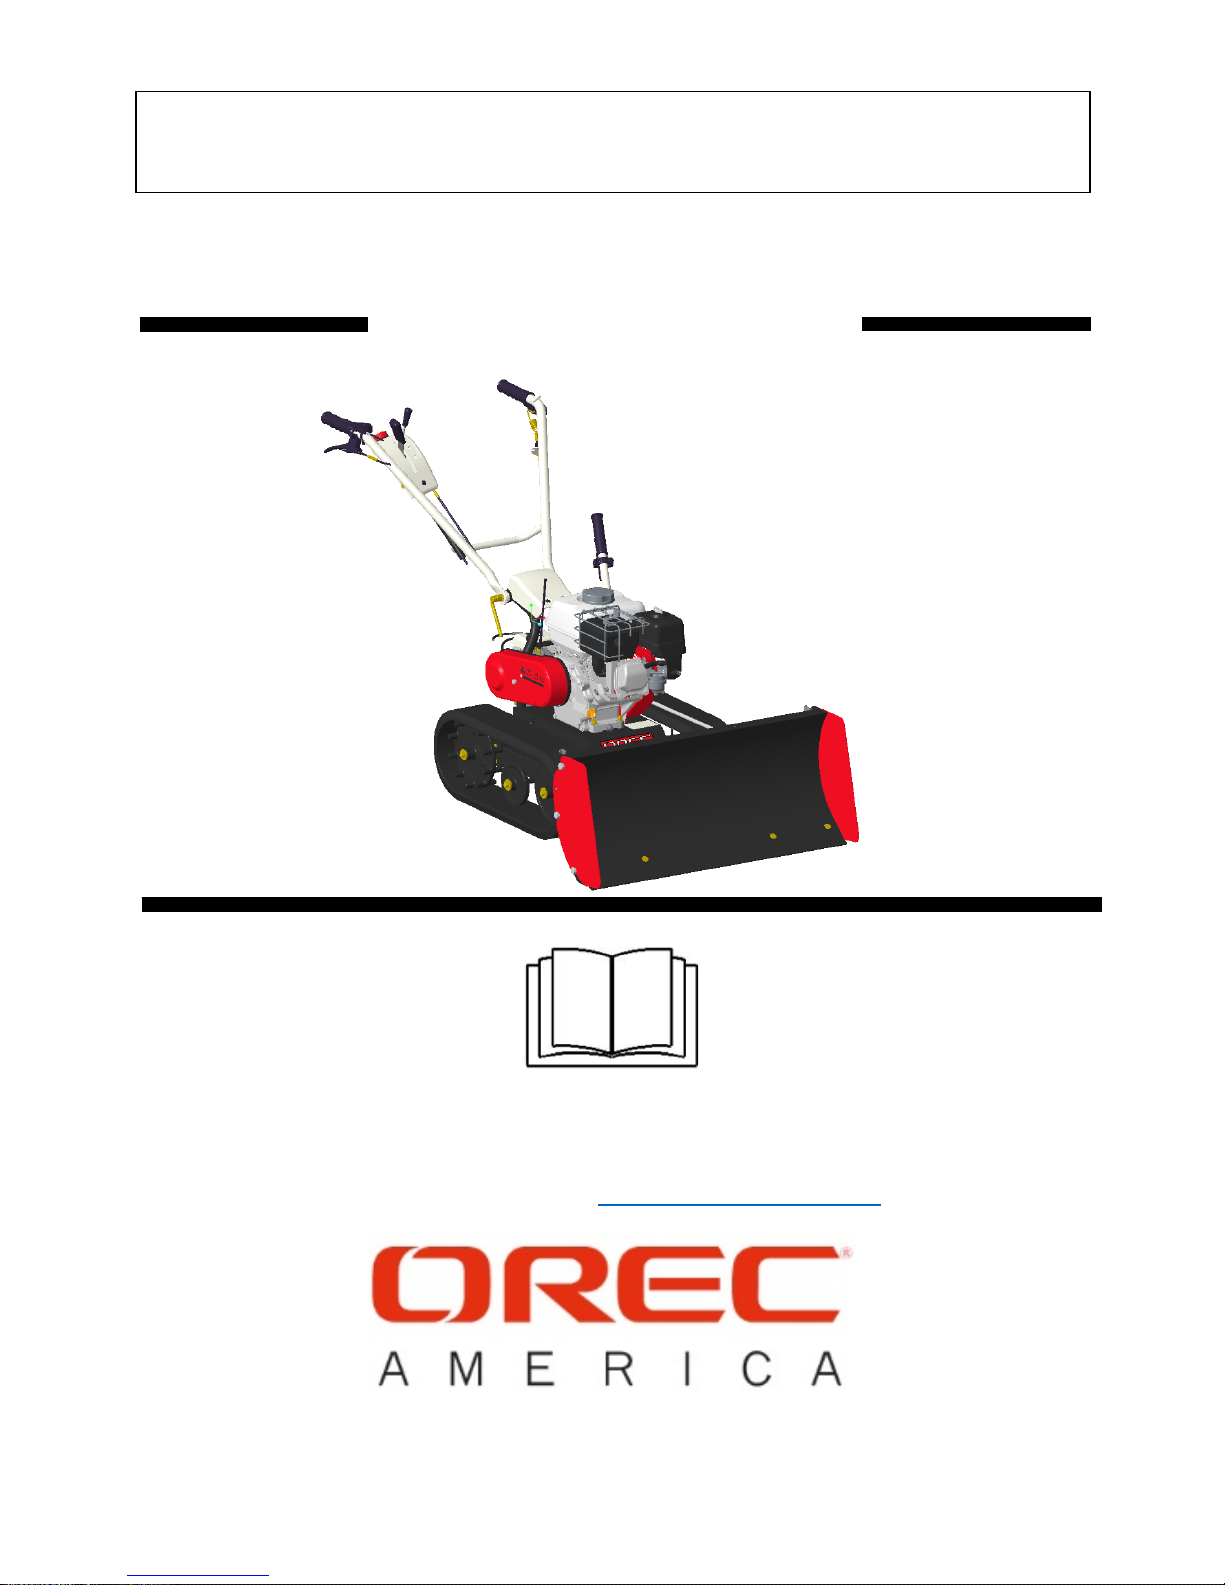
SNOW BULL
Read this instruction manual carefully before any use of the machine, keep it as a reference.
Also, the engine manual is included as a set with the owner’s manual. Please read both
carefully. For any questions about this manual, please contact your OREC dealer, the distributor
in your country, or go to : http://www.orecamerica.com
Owner’s Manual
SGW803
-1-
Getting Started
Thank you for purchasing this machine. Please read these instructions fully before using this
machine in order to understand the safest, most efficient way of operating it, and the correct way
maintain it. Please keep these instructions in a safe place where they can be easily referred to at
any time. We hope you will use this machine for many years to come. Please understand that
ongoing enhancements in quality and performance, and other possible parts improvements may
cause the actual machine to vary slightly from what is described in these instructions.
Machine Regulations
This is a snow cleaner that has been designed to remove snow. It is not to be used for any other
purpose.
About manual
・ Please read these instructions regarding safety and operation before operating this machine.
・ Please carry this manual all times when using the machine.
・ Please provide this manual to any new operator of the machine.
・ Please ask your dealer for a new manual if this one is lost.
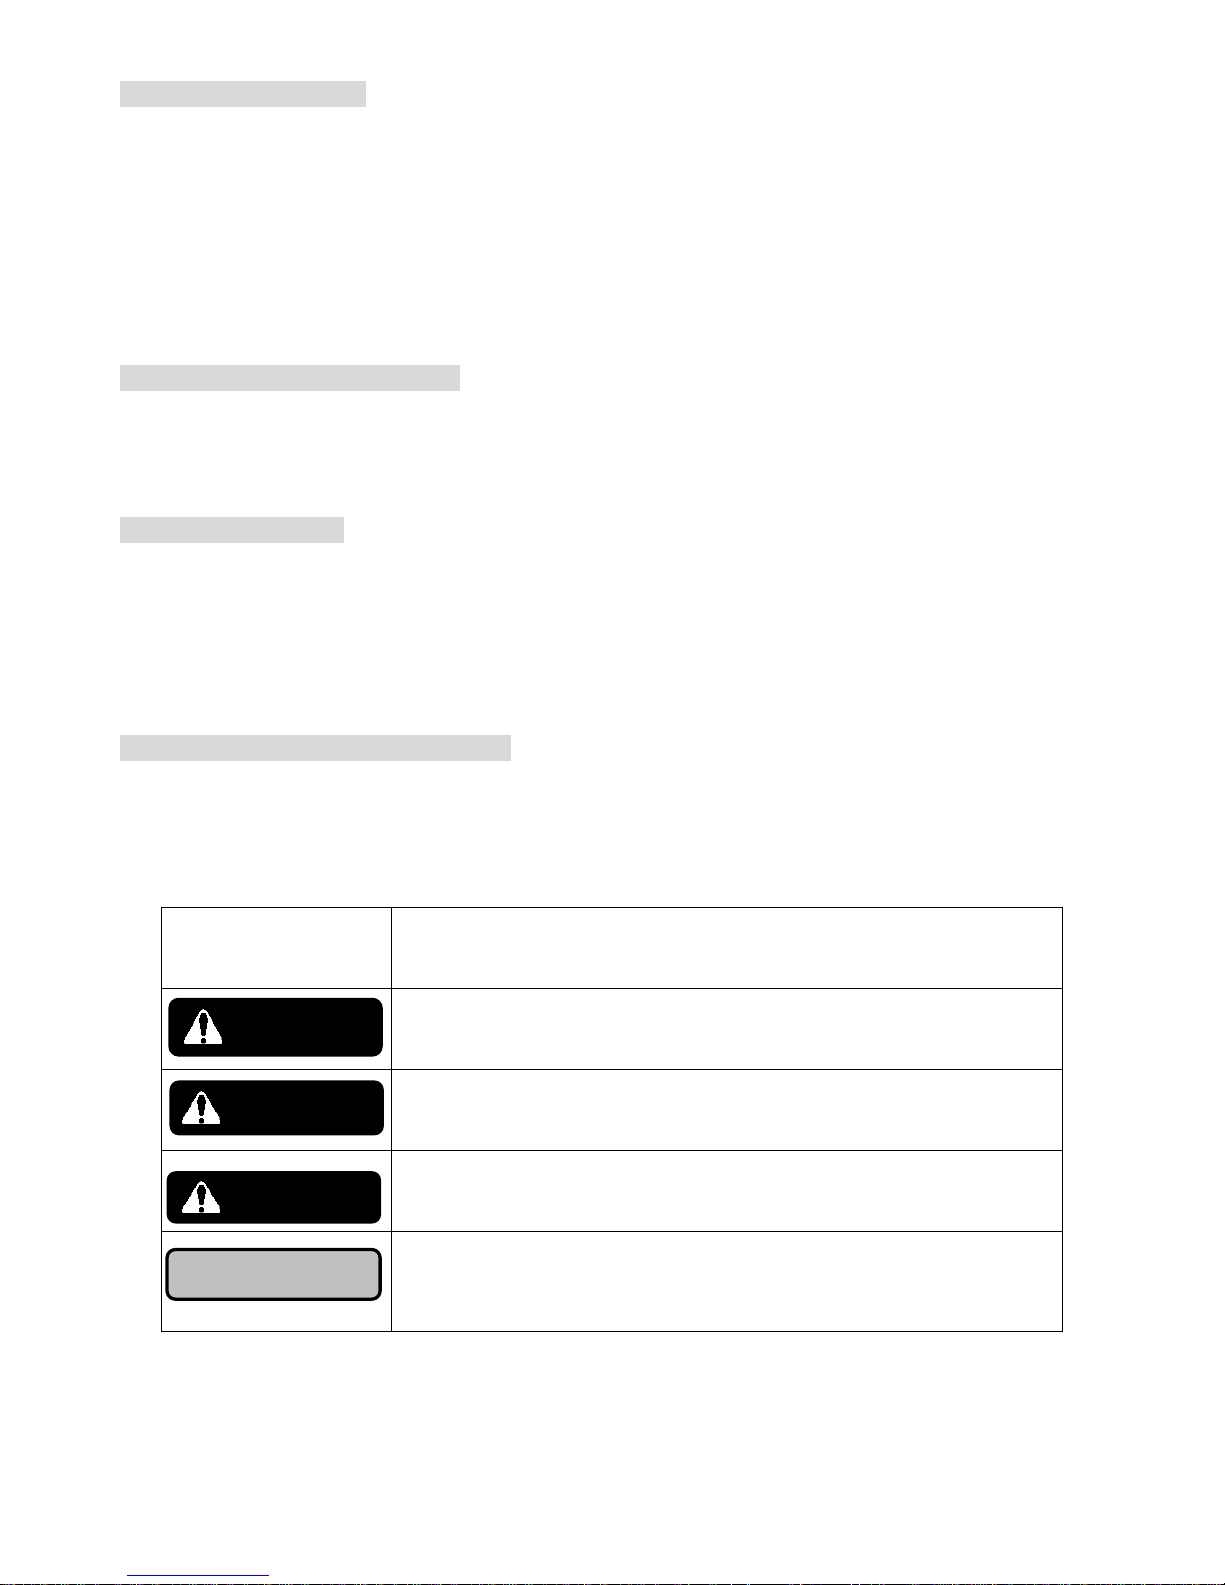
Definitions and Symbols
In these instructions, the following signs and definitions are used to indicate the level of danger
that exists. Please obey the following warnings and have a full understanding of the meaning of the
symbols.
Symbol Definition
Displayed when failure to obey instructions can result in death or
serious injury.
Displayed when there is a danger of death or serious injury.
Displayed when failure to follow instructions can result in injury.
Displayed when it is important to know about operation and
maintenance specific to this machine, or at times when
misunderstanding and mistakes are common.
DANGER
WARNING
CAUTION
NOTICE

Notes for operation-----------------------------------------------------------------------------------3
Important safety points--------------------------------------------------------------------------
-
3
Warning labels--------------------------------------------------------------------------------------
-
6
Parts description and function-------------------------------------------------------------------7
12
How to operate the mach ine----------------------------------------------------------------------14
How to start and stop the engine-------------------------------------------------------------
-
14
How to operate the machine-------------------------------------------------------------------
-
16
Loading------------------------------------------------------------------------------------------------
19
Inspection and maintenance----------------------------------------------------------------------20
Engine & Transmission oil inspection, replacement and lubrication-------------
-
20
How to Inspect, Maintain, and Adjust each part-----------------------------------------
-
22
22
24
Long term storage---------------------------------------------------------------------------------
-
27
Specifications------------------------------------------------------------------------------------------29
Included tools------------------------------------------------------------------------------------------29
Consumable parts------------------------------------------------------------------------------------29
30
Troubleshoot----------------------------------------------------------------------------------------
-
30
When engine won't work properly------------------------------------------------------------
31
Periodic inspection table------------------------------------------------------------------------
-
32
Parts supply-------------------------------------------------------------------------------------------- 34
LIMITED WARRANTY--------------------------------------------------------------------------------35
Contents
Inspection before operation----------------------------------------------------------------------
-
Inspection table---------------------------------------------------------------------------------------
-
Air filter, Spark plug , Sediment cup-----------------------------------------------
-
Tracks, Scraper, Cables, Belt---------------------------------------------------------

-3-
1. Notes for operation
1.1 Notes for the operator of this machine.
・ Do not operate this machine without full understanding this manual.
・ Do not operate if fatigued or if under the influence of alcohol or drugs.
・ Those who are pregnant or too young to understand instructions should never operate this
machine.
・ Always wear appropriate clothing; no loose or hanging clothes, non-slip boots and protective
gear are always recommended to prevent injury from rotating parts.
1.2 Before operation
・ Absolutely do not handle gasoline in the presence of open flame. Be careful not to spill fuel. If
you spill fuel, please clean it up accordance with local laws and regulations. There is a danger
of fire and explosion.
・ When refueling, always stop the engine and allow it to cool down. There is a danger of fire and
burns when refueling a hot engine.
・ Please refuel in a place that is well ventilated.
・ Do not remove any parts from this machine that have been fitted as standard. To prevent
accidents, be sure to use all covers and parts in the same state as they have been fitted.
・ Do not modify the machine as this can cause accidents or explosions. Altering this machine in
any way will void the warranty.
Orec America, Inc. will bear no responsibilities for accidents or problems caused by
alterations or modification.
・ Always work is good visibility. There is possib ility of accident when you can’t see clearly around
you.
・ Use extreme caution around water, such as lakes or rivers. Do not work on steep slope. Please
operate this machine on a flat and safe place.
・ Do not release driving clutch lever on a slope. This may cause loss of control.
・ Do not operate the machine in a situation in which the machine may get very we t.
・ Be sure that there are no people especially children, animals or vehicles close by before
operation.
・ Always work with appropriate safety gear and clothing for the weather.
WARNING
DANGER
WARNING
CAUTION

-4-
1.3 During operation
・ Always work with comfortable posture and take breaks appropriately.
・ Do not allow flammable substances near the engine or the path of the exhaust as this can cause
a fire. Do not touch the engine or muffler as they become extremely hot during operation and
can cause severe burns.
・ Always keep hands and feet clear of the tracks
・ Always operate the machine horizontally on slopes. Use extra caution when turning, the
machine may slip and fall toward you. Do not operate the machine on slopes above 10°.
・ To avoid injury, use caution while turning on slopes.
・ When reversing, check that there are no people or obstacles behind you and that you have a
secure foothold.
・ If you notice any strange noises, smells, heat, or vibrations during the operation of this machine,
switch off the engine immediately. Have the machine inspected for damage and obstructions
and have any damaged parts repaired.
・ Always stop the engine and wear appropriate globes before an inspection of the engine.
・ When inspecting or lifting, take precautions to prevent the machine from falling.
・ Be sure that there are no people especially children, animals or vehicles close by. If children
approach the machine, please turn off the engine immediately.
・ Please release the driving clutch lever and move main clutch lever to “START” position to start
engine.
・ If anything, such as a rock, or branch, gets into the track, stop the engine immediately and
carefully remove the obstruction.
・ When leaving the machine unattended, park on a flat surface with the engine switched off.
WARNING
CAUTION
-5-
1.4 Loading and unloading the machine
・ Use the vehicle of appropriate size to transport the machine.
・ Park on a flat place for loading/unloading.
・ Secure the machine with a strong rope during transport.
Drive safely and avoid sudden starts and stops and sharp turning during transport.
・ Use a ramp designed for the job, be sure it is wide and sturdy enough and that the machine
stays in the middle of the ramp. Always use the lowest forward gear to load, and reverse to
unload.
1.5 Inspection , Maintenance
Periodic inspection is necessary for keeping the quality and performance of the machine. Please
perform an inspection before every operation, and ask your retailer for an annual inspection. Orec
America will bear no responsibilities for any accidents or problems caused by neglecting any
inspections.
To avoid injury, accident, and damage of the machine, be sure to follow all instructions
bellow.
・ To keep the machine safe and in good condition, perform the daily and annual inspections, and
recommended maintenance.
・ When you inspect, adjust or maintain the machine, make sure all any parts have cooled down,
wear appropriate protective gear and use appropriate tools. Work on a flat and open area and
keep the machine balanced to prevent machine tipping.
・ Make sure all parts are at the correct position and are securely tightened after an inspection,
maintenance or replacing. When replacing the driving wheel, replace driving wheel mounting
bolt at the same time.
・ Do not modify this machine or add attachments witch are not OREC option.
・ Be sure to check that the covers of rotating parts are refitted correctly in their original positions
after being removed.
・ When rubber fuel lines become old, they can split and dangerous fuel leaks can occur. Change
rubber parts if they split or every 3 years regardless of damage. At this time, also change the
fastening bands for the new parts.
To avoid machine damage, keep these instructions.
・ When you wash the machine, do not get the engine wet.
・ Inspect and adjust the clutch, throttle and transmission carefully.
・ To avoid burns and fire, cover the machine only after making sure that the engine has cooled
down,
WARNING
WARNING
CAUTION
-6-
1.6 Long-term storage
To avoid damage, please
・ close the fuel valve for safety.
・ store this machine inside for long-term storage.
・ get remove any trash, dust, or s now on and around the machine.
If you don’t follow these instructions, there is a danger of fire.
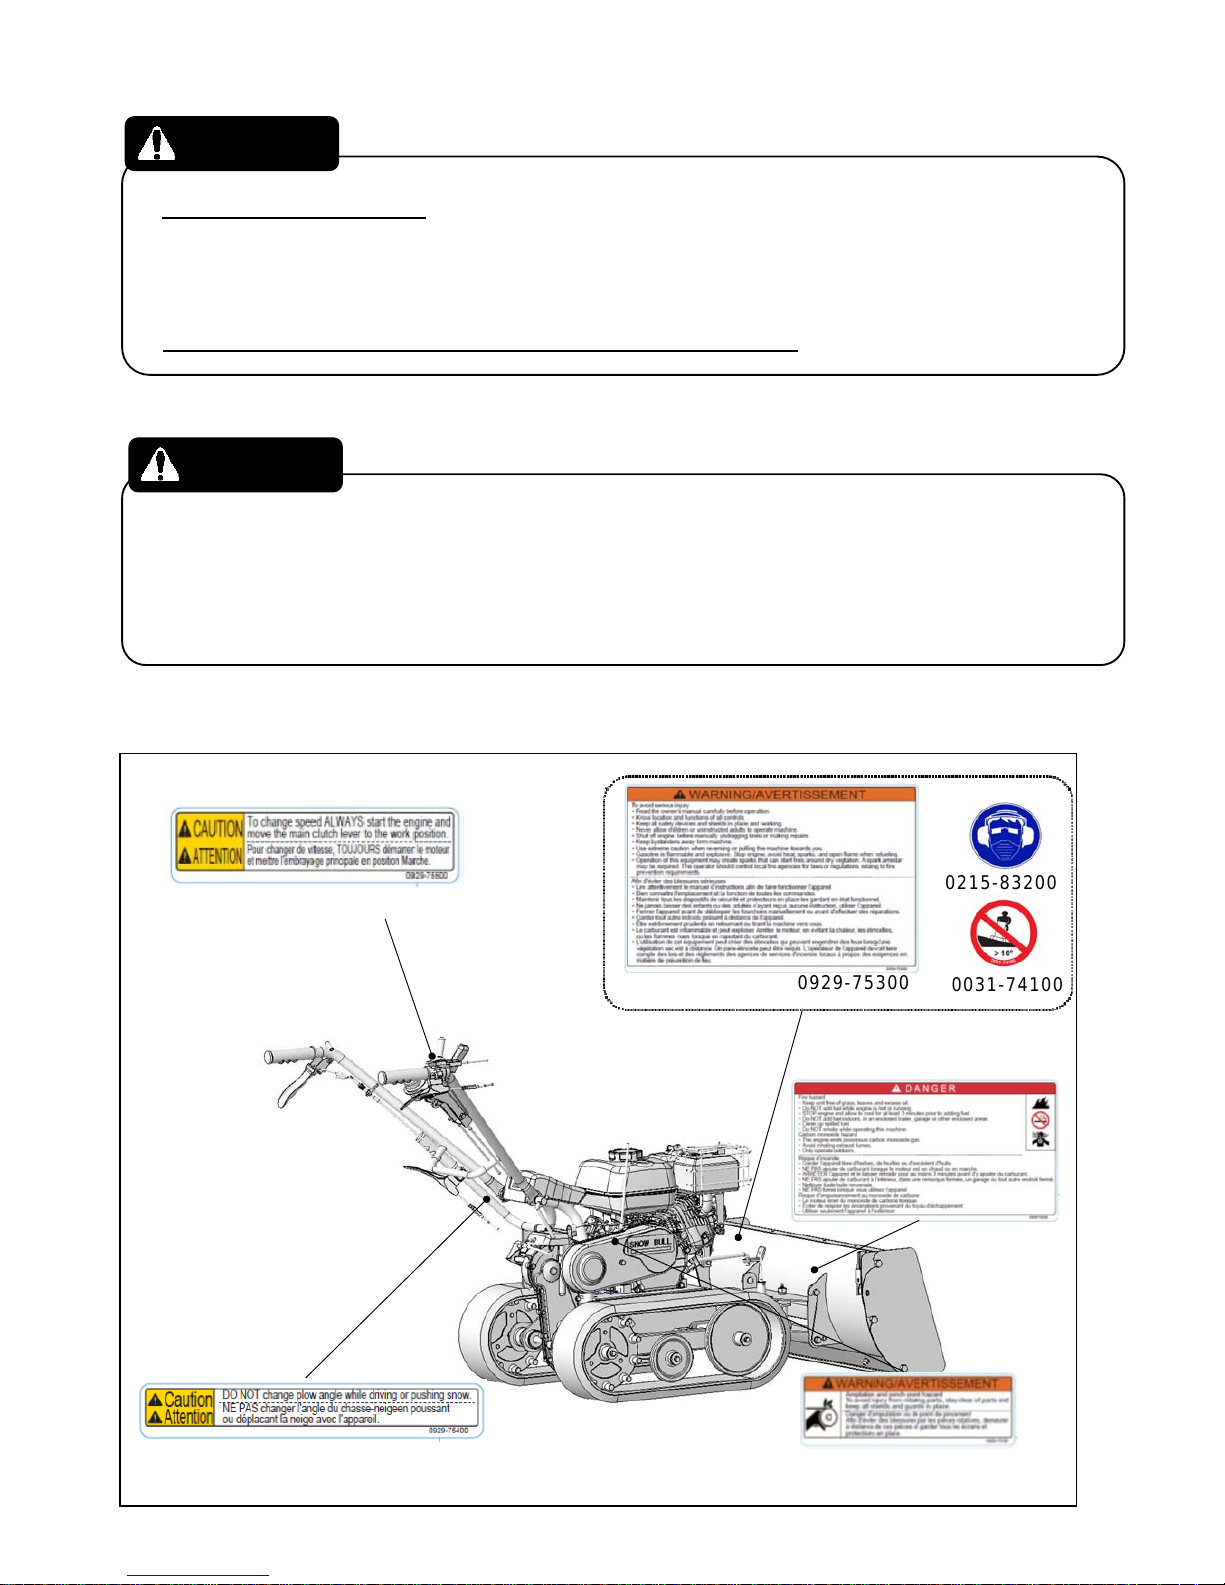
1.7 Warning labels
・ Warning labels are attached to the machine to draw attention to particularly serious dangers.
Please be sure to fully understand the meaning of each warning label before operating this
machine. ※ In the case that these warning labels become difficult to see, please replace them
so that they can be easily seen and understood.(contact your dealer)
The position of warning labels:
WARNING
WARNING
0304-71100
0929-75100
0215-83200
0031-74100
0929-75500
0929-75300
0929-75400
0929-75200
-7-
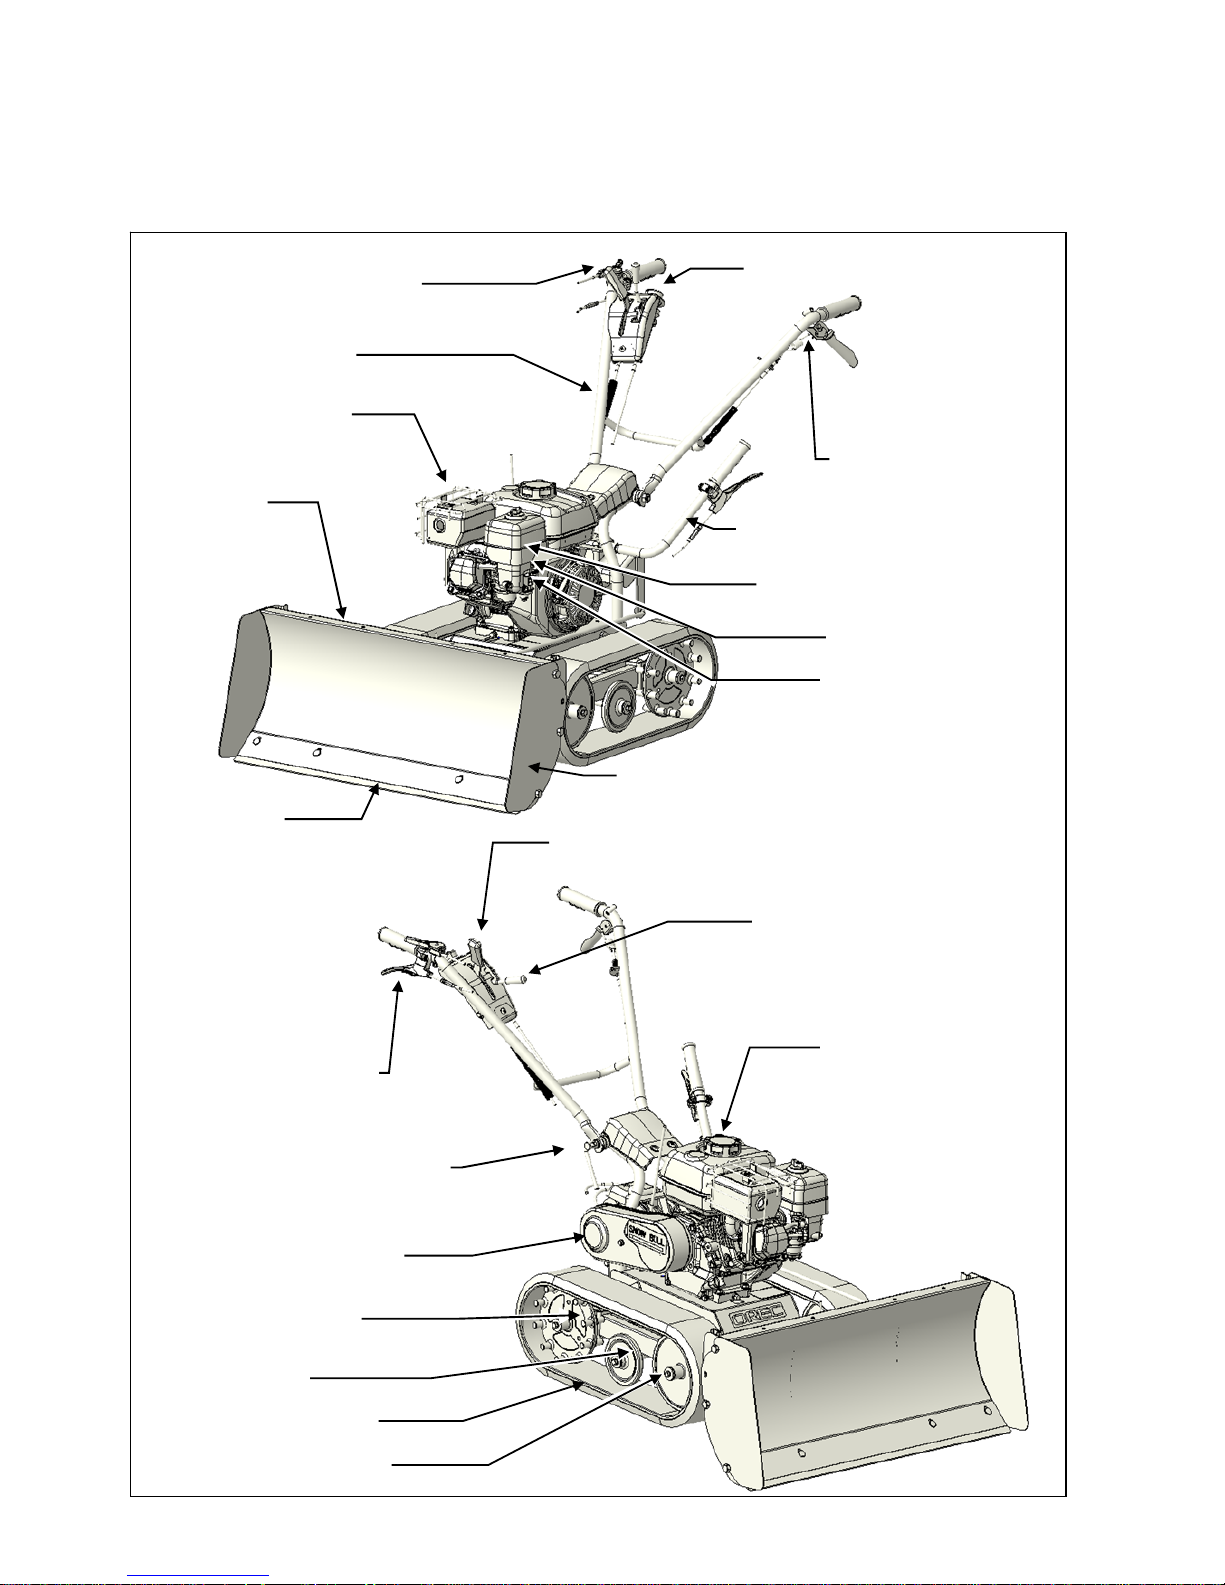
2. Parts description and function
2.1 Parts description
Note: The model in the pictures may vary slightly from the actual machine.
Fuel cap
Track
Belt cover
Handle height adjusting bolt
Main clutch lever
Speed change lever
Plow side plate
Plow angle adjustment lever
Driving clutch lever
Engine stop switch
Throttle lever
Muffler
Plow
Scraper
Plow height
adjustment lever
Handle
Guide wheel
Air cleaner
Fuel valve
Driving wheel
Choke lever
Guide wheel
-8-
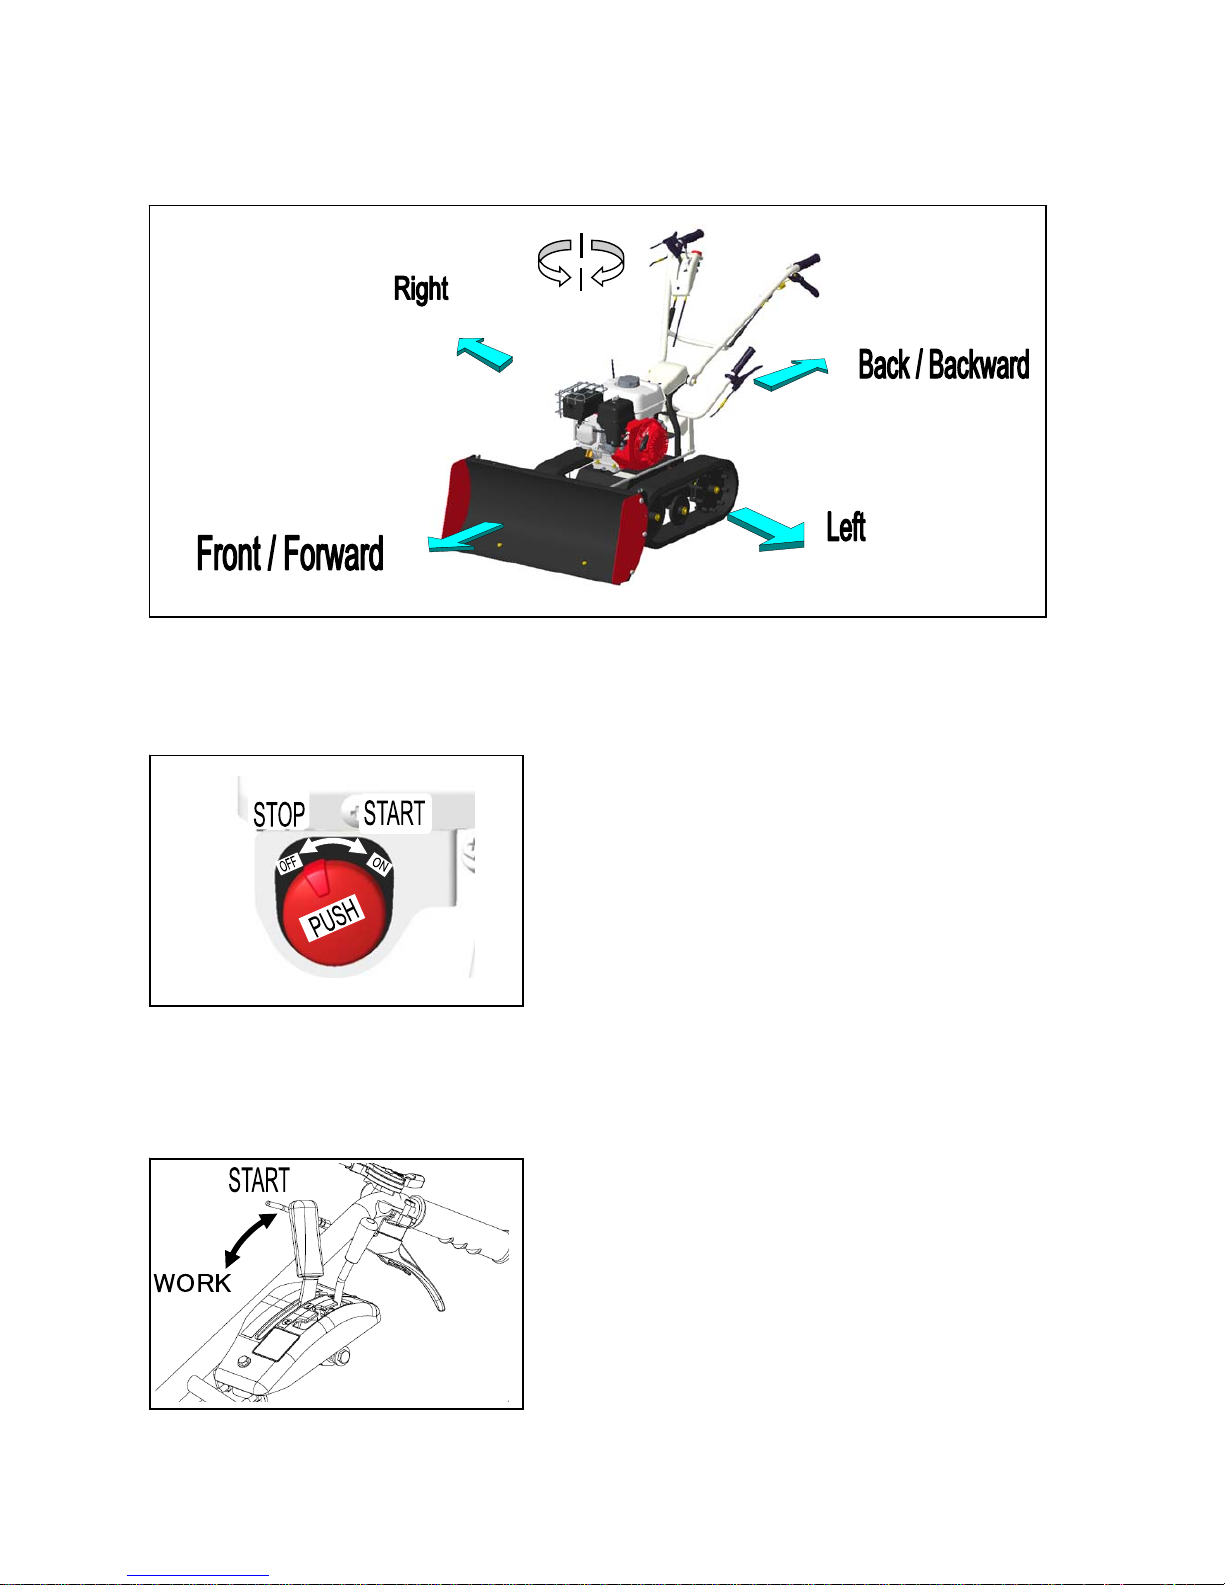
2.2 Machine direction
The machine directions are shown below, from the operator’s perspective behind the machine.
2.3 Function of each part
Engine switch
Use this switch when you start / stop the engine.
“START” … the engine starts.
“STOP” … the engine stops.
・ If you push this switch, the engine will imme diately
stop.
Main clutch lever
Shift the main clutch lever when you start the engine or
when you start work.
“START” … When you start the engine.
“WORK” … When you start working.
Please make sure that the lever is moved to the correct
position when you operate.
-9-
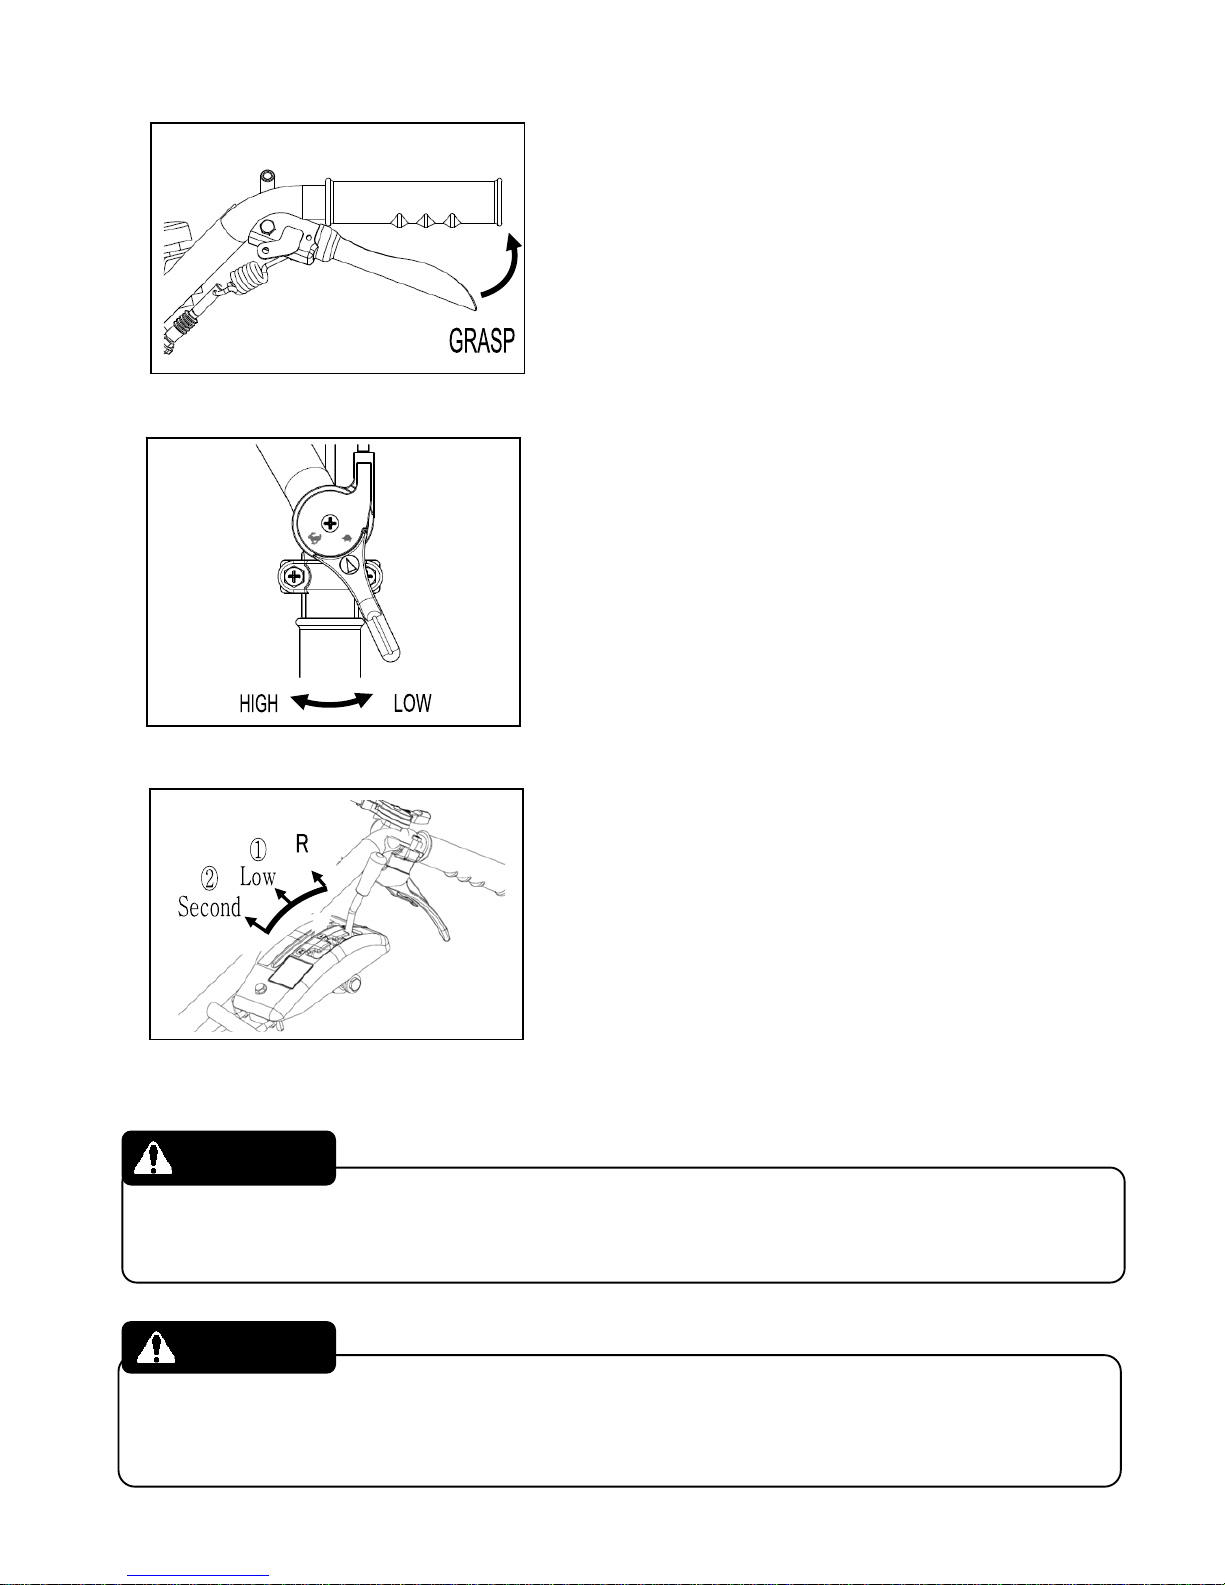
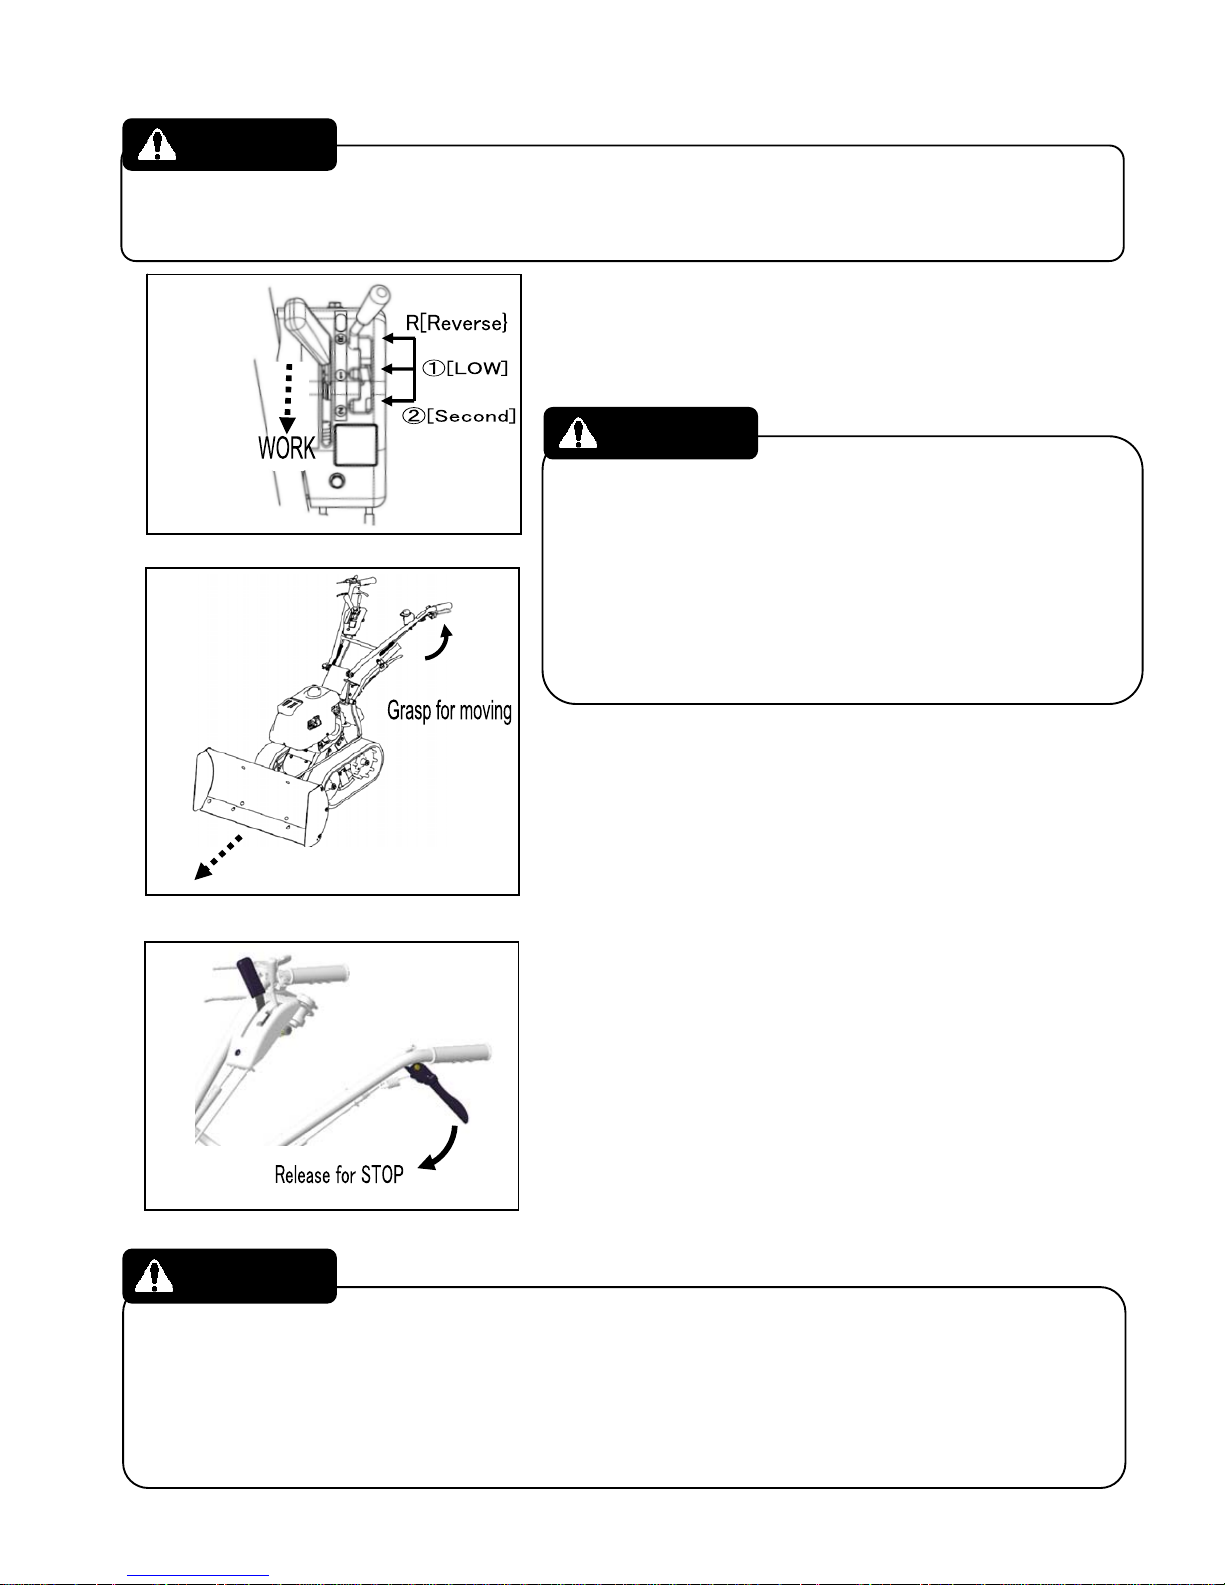
Driving clutch lever
For operation
“GRASP” … Starts moving.
“RELEASE” … Stops moving
・ This action is only when the main clutch lever is in
“WORK” position.
Throttle lever
Move the throttle lever to adjust the engine RPM, and
use to adjust the speed of driving and the pressure of
pushing snow.
“Move right” … Lower the engine RPM
“Move left” … Raise the engine RPM
Speed change lever
Shift the lever when you change the speed.
“ R “ … Reverse
“ 1 “ … Forward slowly
“ 2 “ … Forward fast
・ Make sure that the lever is fixed at the right position.
・ The machine may not move backward if the plow gets
stuck in the snow. If this occurs, lower the handle to
raise the plow higher than snow.
・ When you chose "R" , the machine moves toward your foot. Check around and behind for safety,
then lower the engine speed to keep working.
To change speed ALWAYS start the engine and move the main clutch lever to the work position
and release the driving clutch lever. Shifting speed change lever while you are grasping driving
clutch lever may break the gear inside of the transmission.
WARNING
CAUTION
-10-
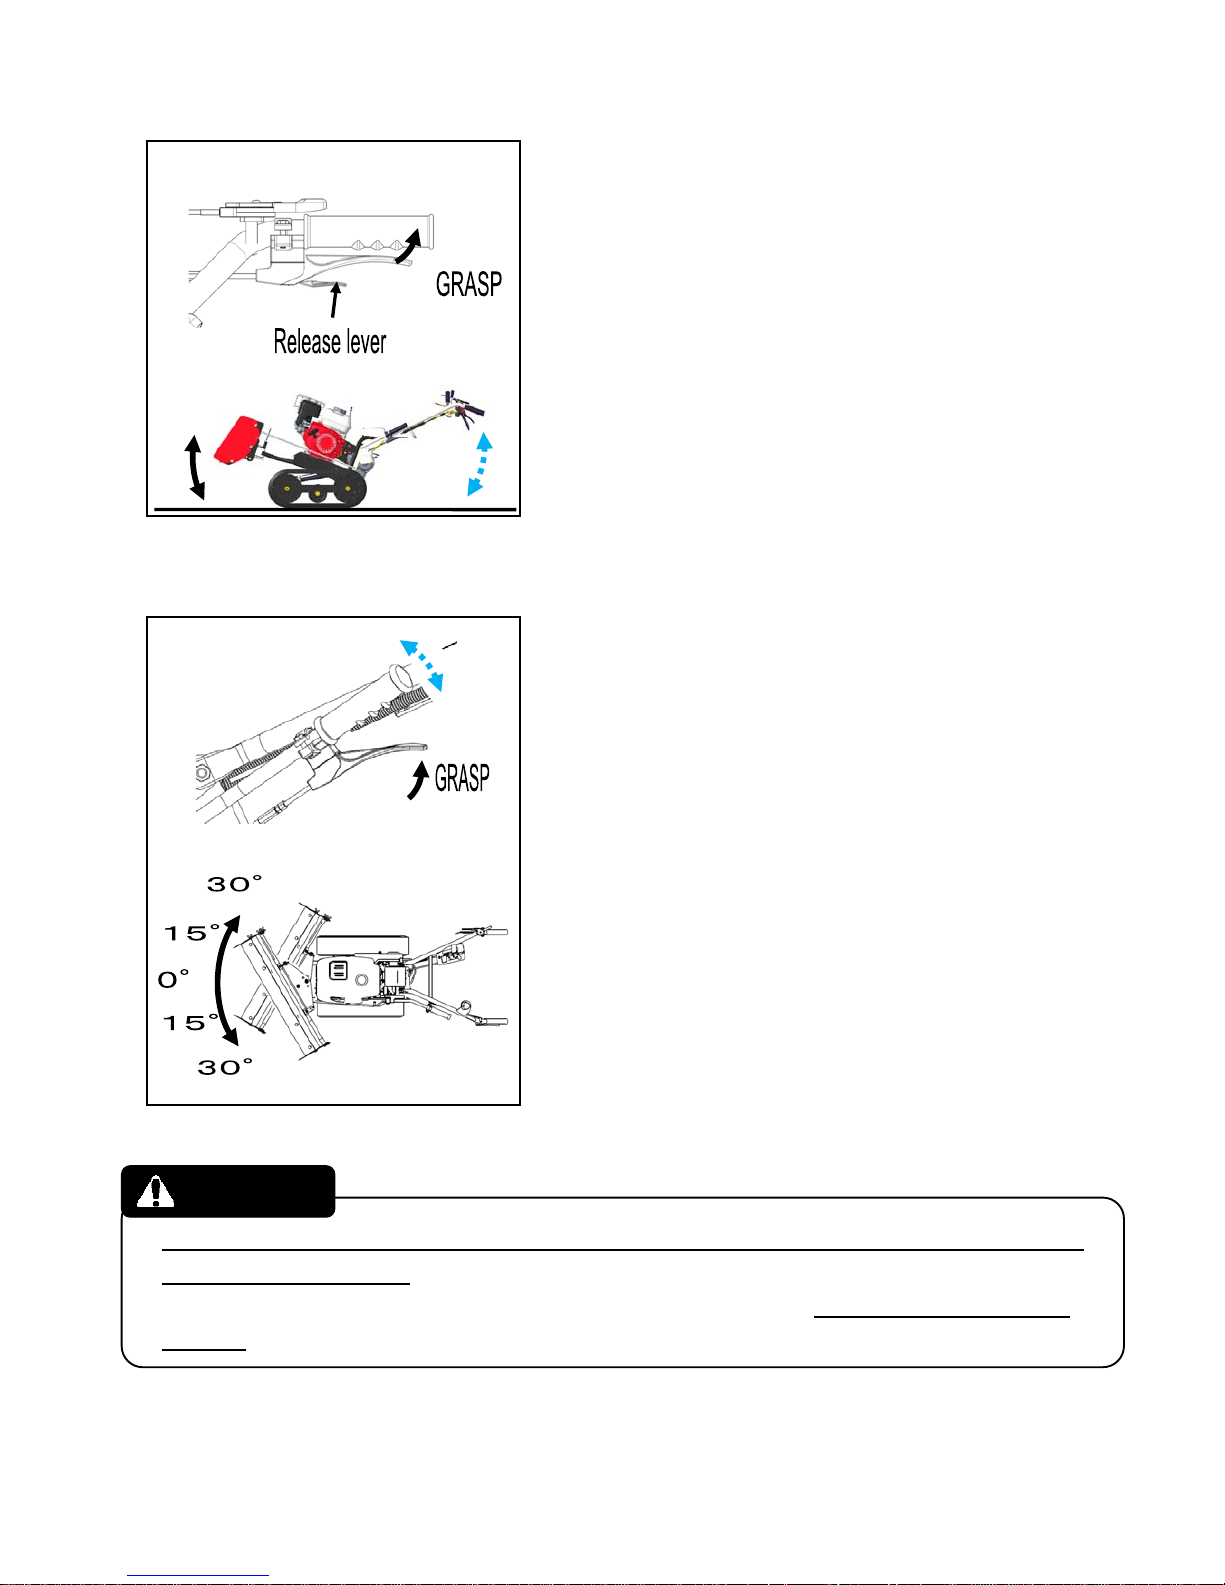
Plow
The plow enables the operator to push and clear the
snow.
Depending on the situation, adjust the angle and height
of plow.
<How to adjust height of plow>
・ To adjust the height of plow, grasp the lever lightly
with your right hand and lower the handle. To set the
height of plow, release the lever. You can set the
plow at any height.
・ Holding the plow height adjustment lever locks the
lever, so you can keep working with the height of the
plow free. To unlock the lever, grasp the release
lever at the bottom of the lever.
・ Depending on the situation, you can chose “fixed
height” or “free height” of plow.
< How to adjust angle of plow>
・ To adjust the angle of plow at th e 15° or 30° position,
hold the angle adjust lever and move it up/down.
When you want to secure the plow angle, release the
plow angle adjustment lever to the position you want
to secure.
Do not change the angle of plow while the machine is moving forward/backward and while
the plow is on the snow. It might be difficult to adjust the angle of plow because of snow
resistance, or impossible to secure the plow at the height you want. It may cause mechanical
failures.
CAUTION
-11-
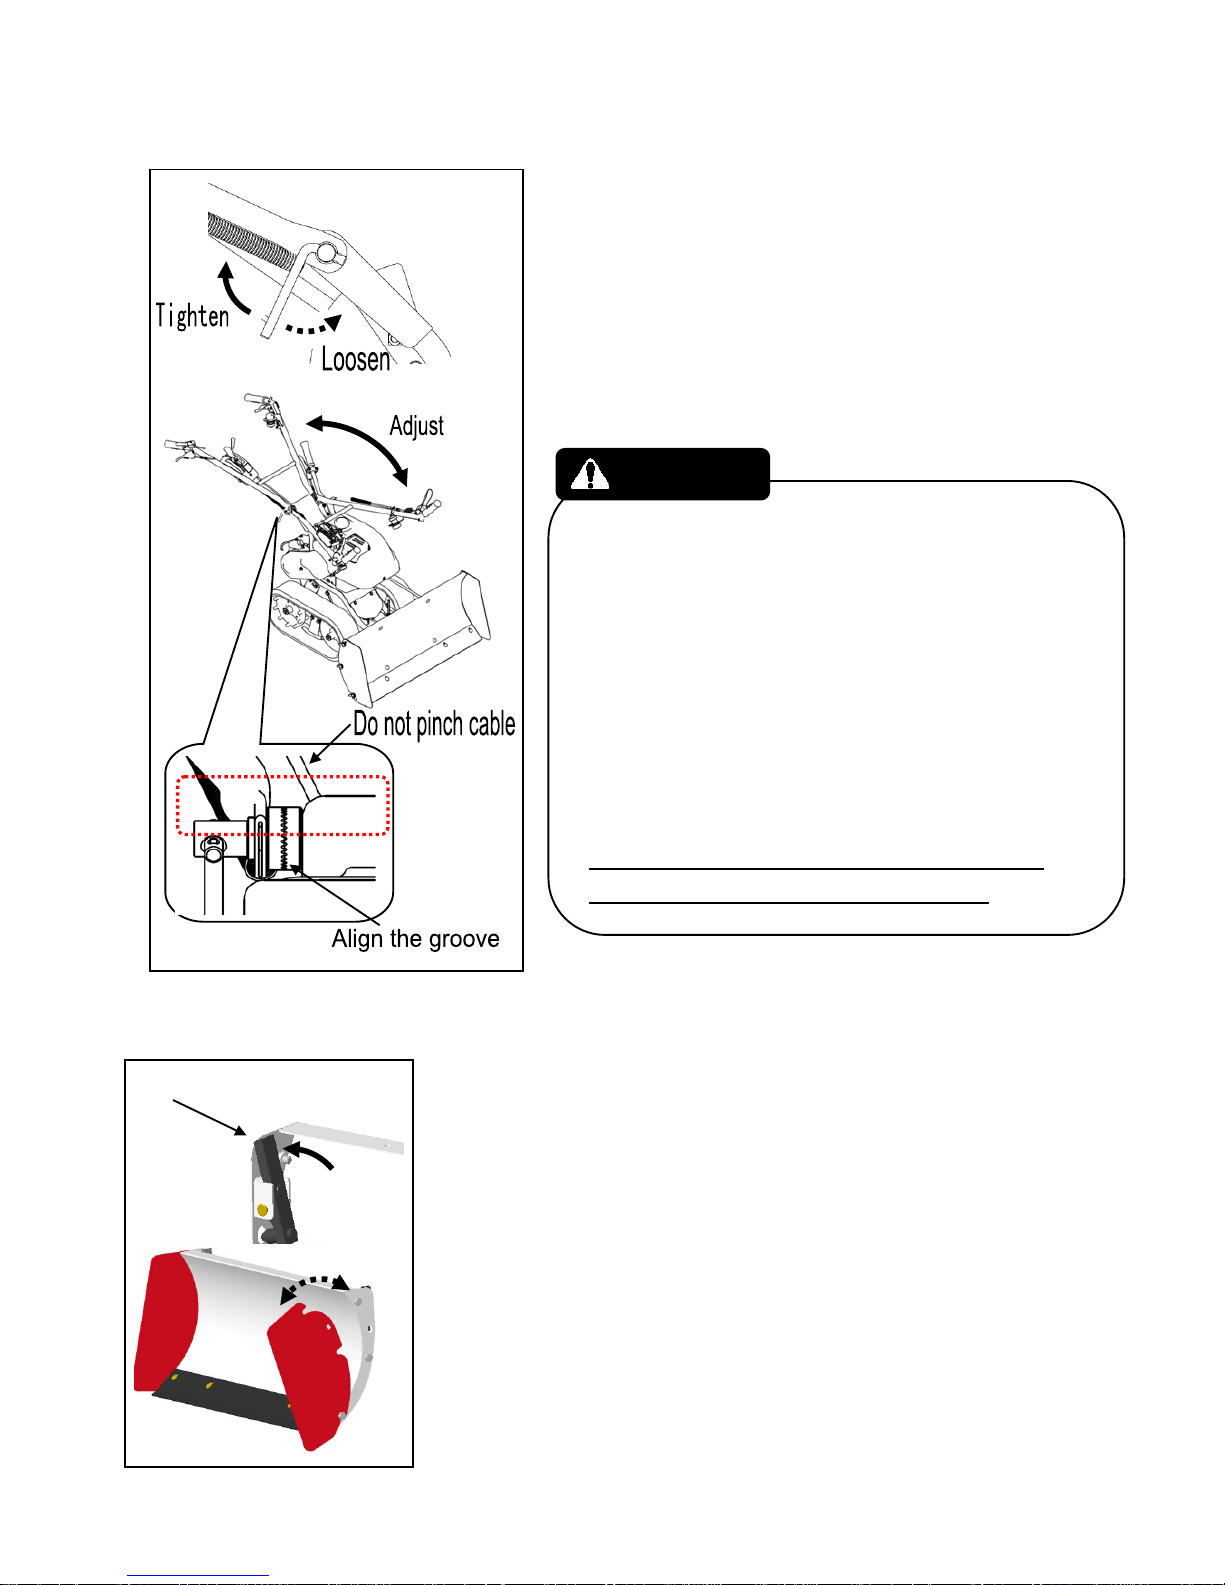
Handle, Handle adjusting bolt
The handle height is adjustable for the operator.
・ To adjust the handle height, stop the engine. Remove
the handle adjust bolt then re-tighten at the proper
position, making sure the grooves are aligned.
・ For storage only, the handle can be folded down.
・ Adjust the handle height holding it tight at the flat
area. If you don’t tighten the adjusting bolt enough,
the handle will fold on its own.
・ When you fold in handle or adjust the handle height,
be sure not to pinch or bend the cable.
・ When you adjust the handle height, tighten the
adjusting bolt firmly aligning the groove at the bottom
of handle.
To avoid injury, accidents, or damage to the
machine, please follow all instructions.
Side Plate
The way to remove and attach the side plates
“Removing” … Grasp the side plate fixing lever, and rotate the
side plate to remove it.
“Attaching” … Align the bottom hole of the side plate with the bolt
slit. Then, grasp the side plate fixing lever to attach
the side plate.
・If you see snow or dusts on bolt slit, please remove them before
attaching the side plate.
CAUTION
Side plate fixing leve r
Grasp
-12-
3. Inspection before operation
To ensure safe operation always do the inspection according to "7.3 periodic inspection table "Page
32 and perform any necessary maintenance.
・ Always stop the engine before inspection, adjustment, and maintenance.
・ Please check the position of levers, and the work area around you when you do the moving test
with engine on.
・ Please carefully read the warning labels on this machine.
Follow all instructions to avoid injury.
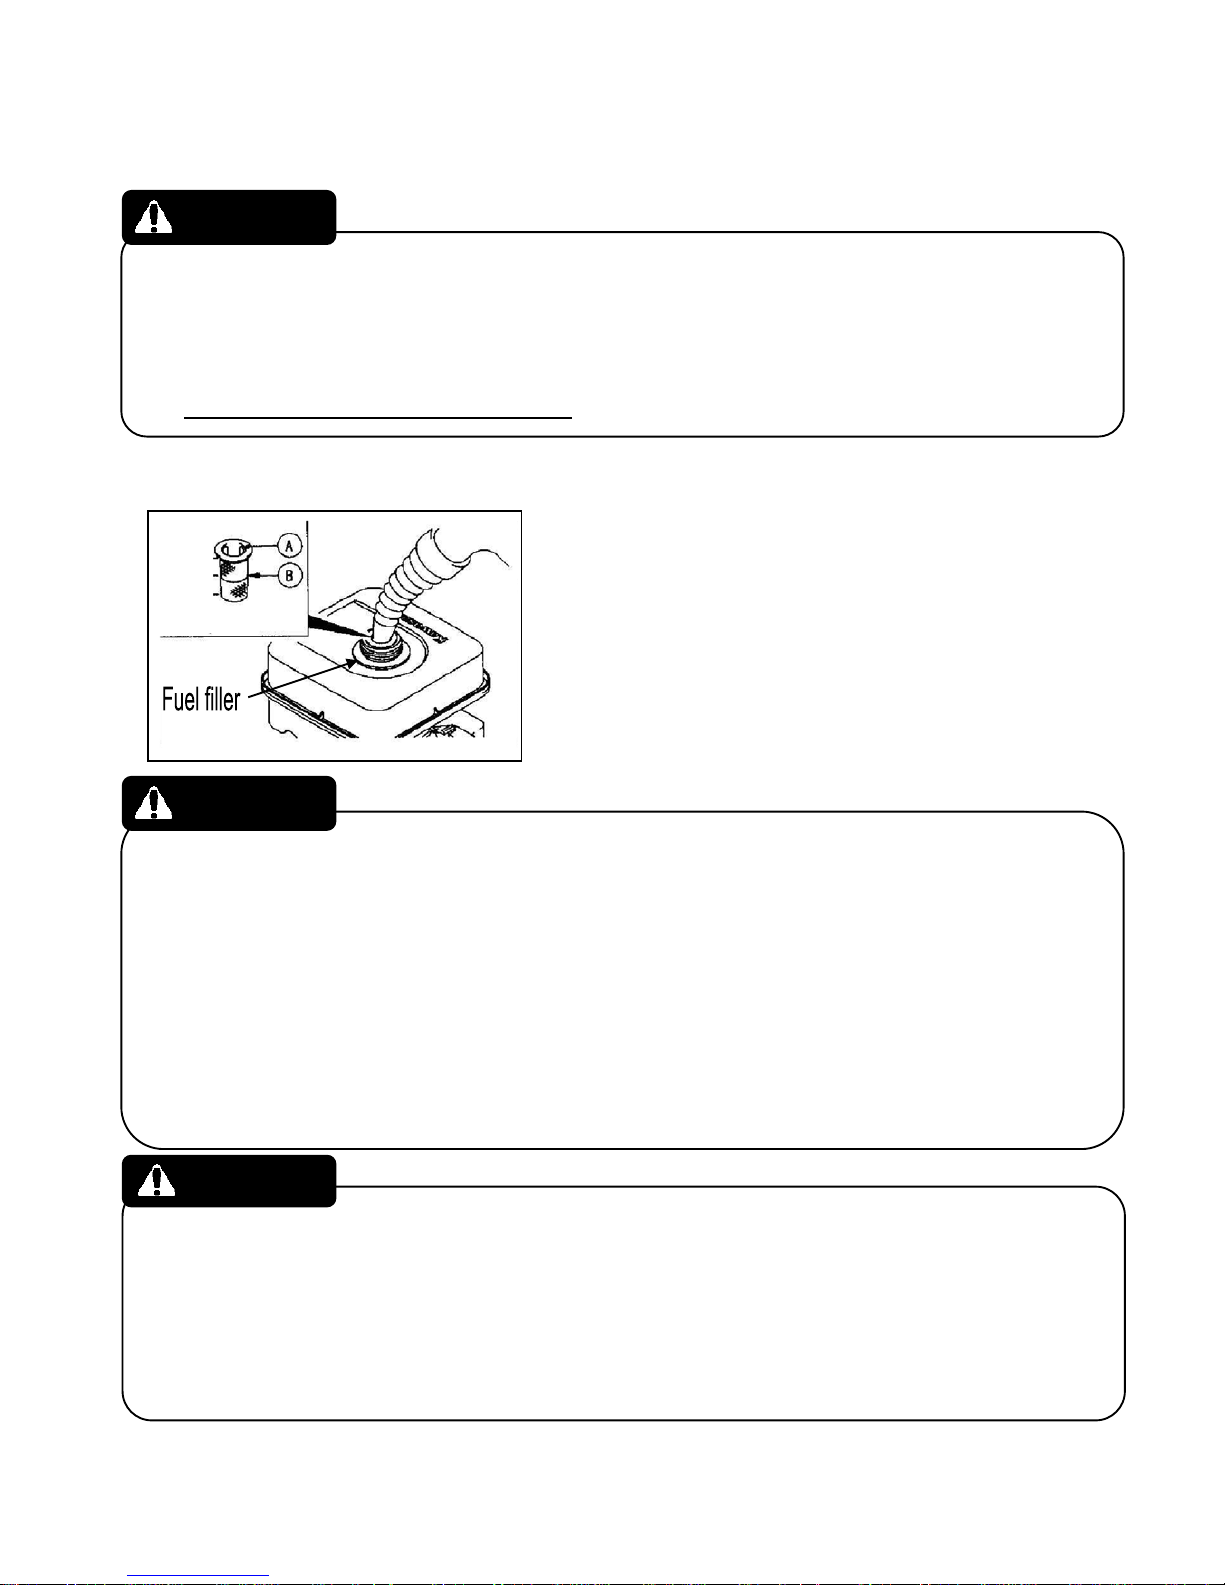
3.1 Inspection of fuel
・ Remove the fuel filler cap after setting the unit in a
horizontal position, then check the amount of gas
from the fuel filler. “B” line is the maximum level. Do
not overfill the fuel tank.
Type of fuel: Regular unleaded gasoline
・ Make sure to close the fuel filler cap after refueling.
When you refuel the gas, please follow these instructions.
・ Please refuel the gas on a flat and well ventilated area.
・ Stop the engine.
・ Keep away from sources of ignition.
・ Do not refuel until the engine cools down
・ Be careful of static electricity. It could cause fire due to vaporized gas.
・ Do not overfill the fuel tank above the maximum level. If you spill gas, clean it in accordance
with local laws and regulations.
・ If you refuel the gas while it’s snowing, make sure that the snow or rain doesn’t get into the fuel
tank. It could cause engine failure.
・ Only use unleaded regular gasoline, as other types could damage the engine.
・ Gas deteriorates when left sitting and can cause damage to engines. Please change to fresh
gasoline if the machine has not been used over 30 days. Do not use gas that is kept in a plastic
container.
WARNING
WARNING
CAUTION
-13-
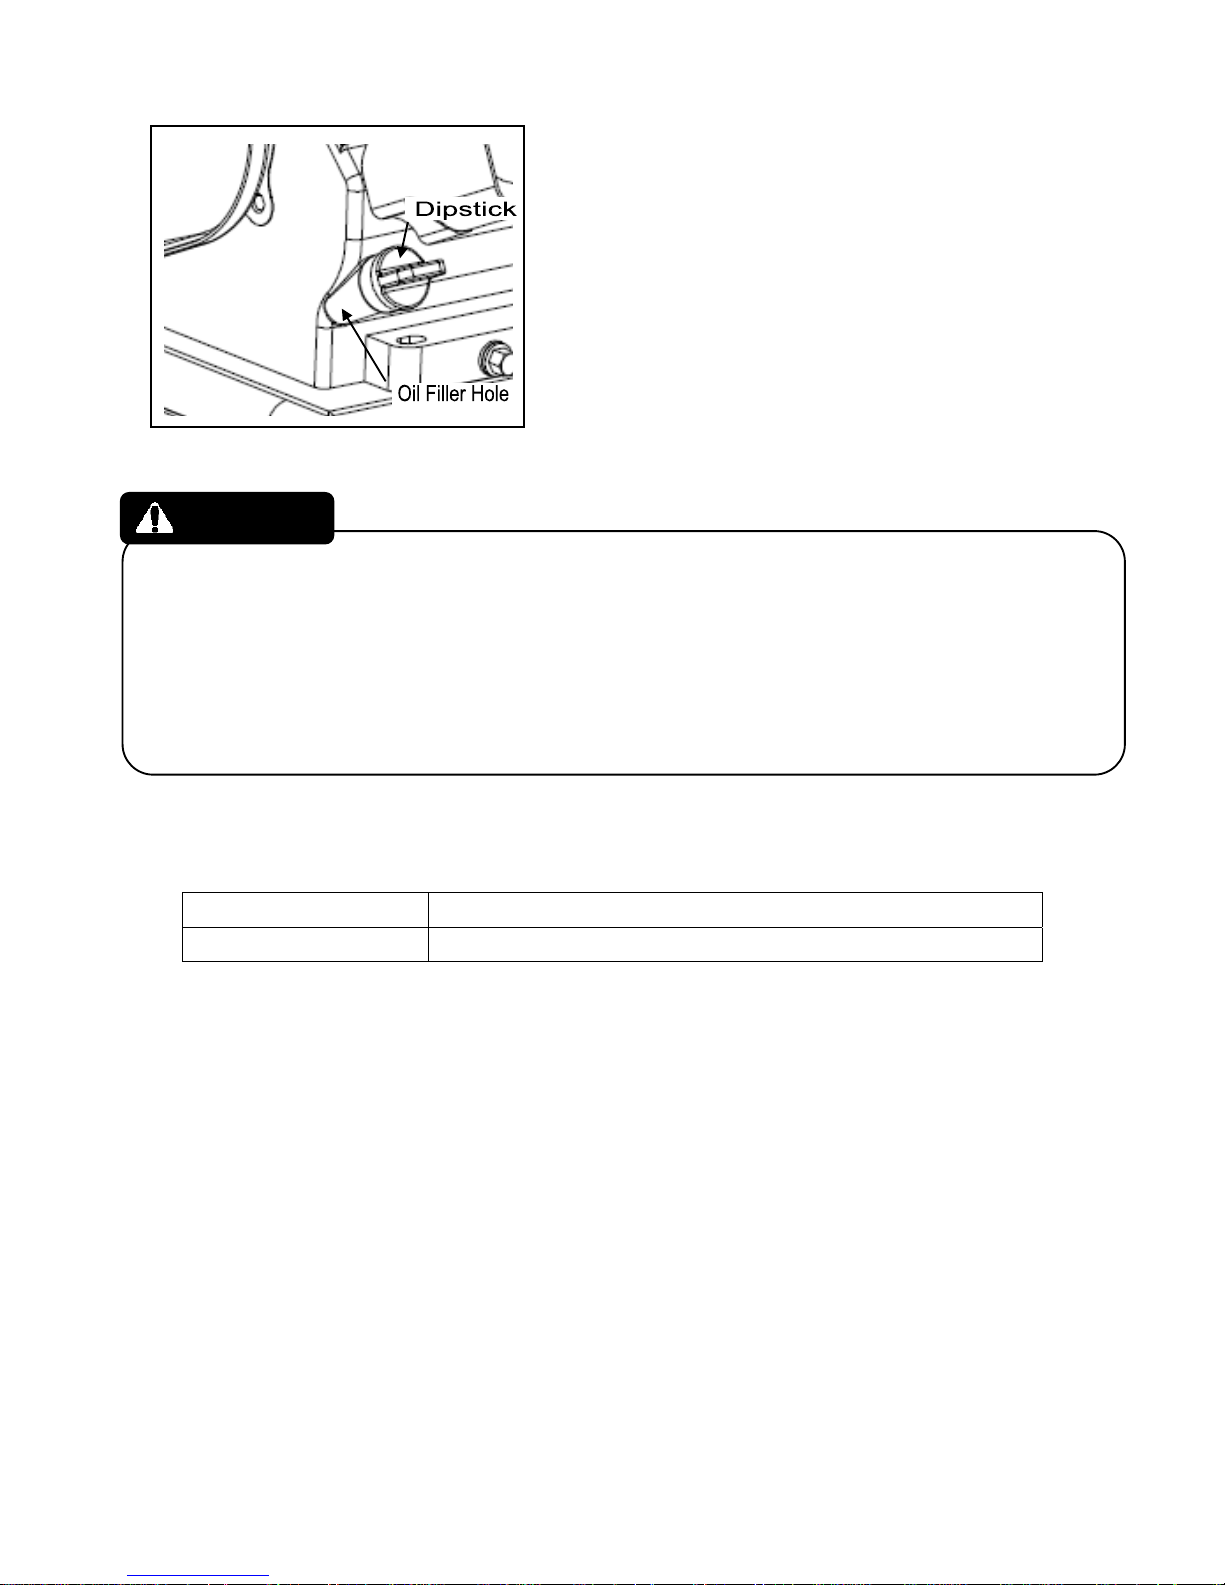
3.2 Inspection of engine oil level
・ To check the oil level, place the machine on a flat
surface. Unscrew the dipstick and inspect, using oil
gauge. Check oil level by inserting and removing the
dipstick without screwing it into the filler hole. If the
oil level is low, add oil to the upper level
・ To avoid injury, make sure the engine has cooled down before checking oil.
・ This machine is shipped WITHOUT engine oil. Fill with engine oil to the correct level before
starting the engine, even if there are traces of residual oil in the engine from factory testing.
・
Please always use the proper quality oil, see below. The proper oil for the outside temperature
will ensure the best performance.
・ After refueling the oil, make sure to tighten the dipstick, to prevent leaking.
Recommend type of oil
Summer [over 50°F]
SAE30, SAE10W-30 , or SAE4 0
Winter [under 10°F]
SAE5W20, or SAE10W-30
CAUTION
-14-
4. How to operate the machine
4.1 Start & Stop
・ Always use the machine in a well ventilated area, and never indoors.
・ Start the engine on a flat surface after verifying the area is free of obstructions.
・ To avoid injury please do not stand next to crawler.
・ If it is difficult to mo ve on the icy ground due to the track slipping, hold the handle firmly to enable
track to grip the snow then move forward slowly.
・ Mark obstacles, grooves, slopes or soft ground so you can avoid those areas.
・ To avoid burns, do not touch the muffler while operating the machine. Let it cool for at least 10
minutes before touching, or covering for storage.
Be sure to avoid injury and accidents by reading and understanding all instructions.
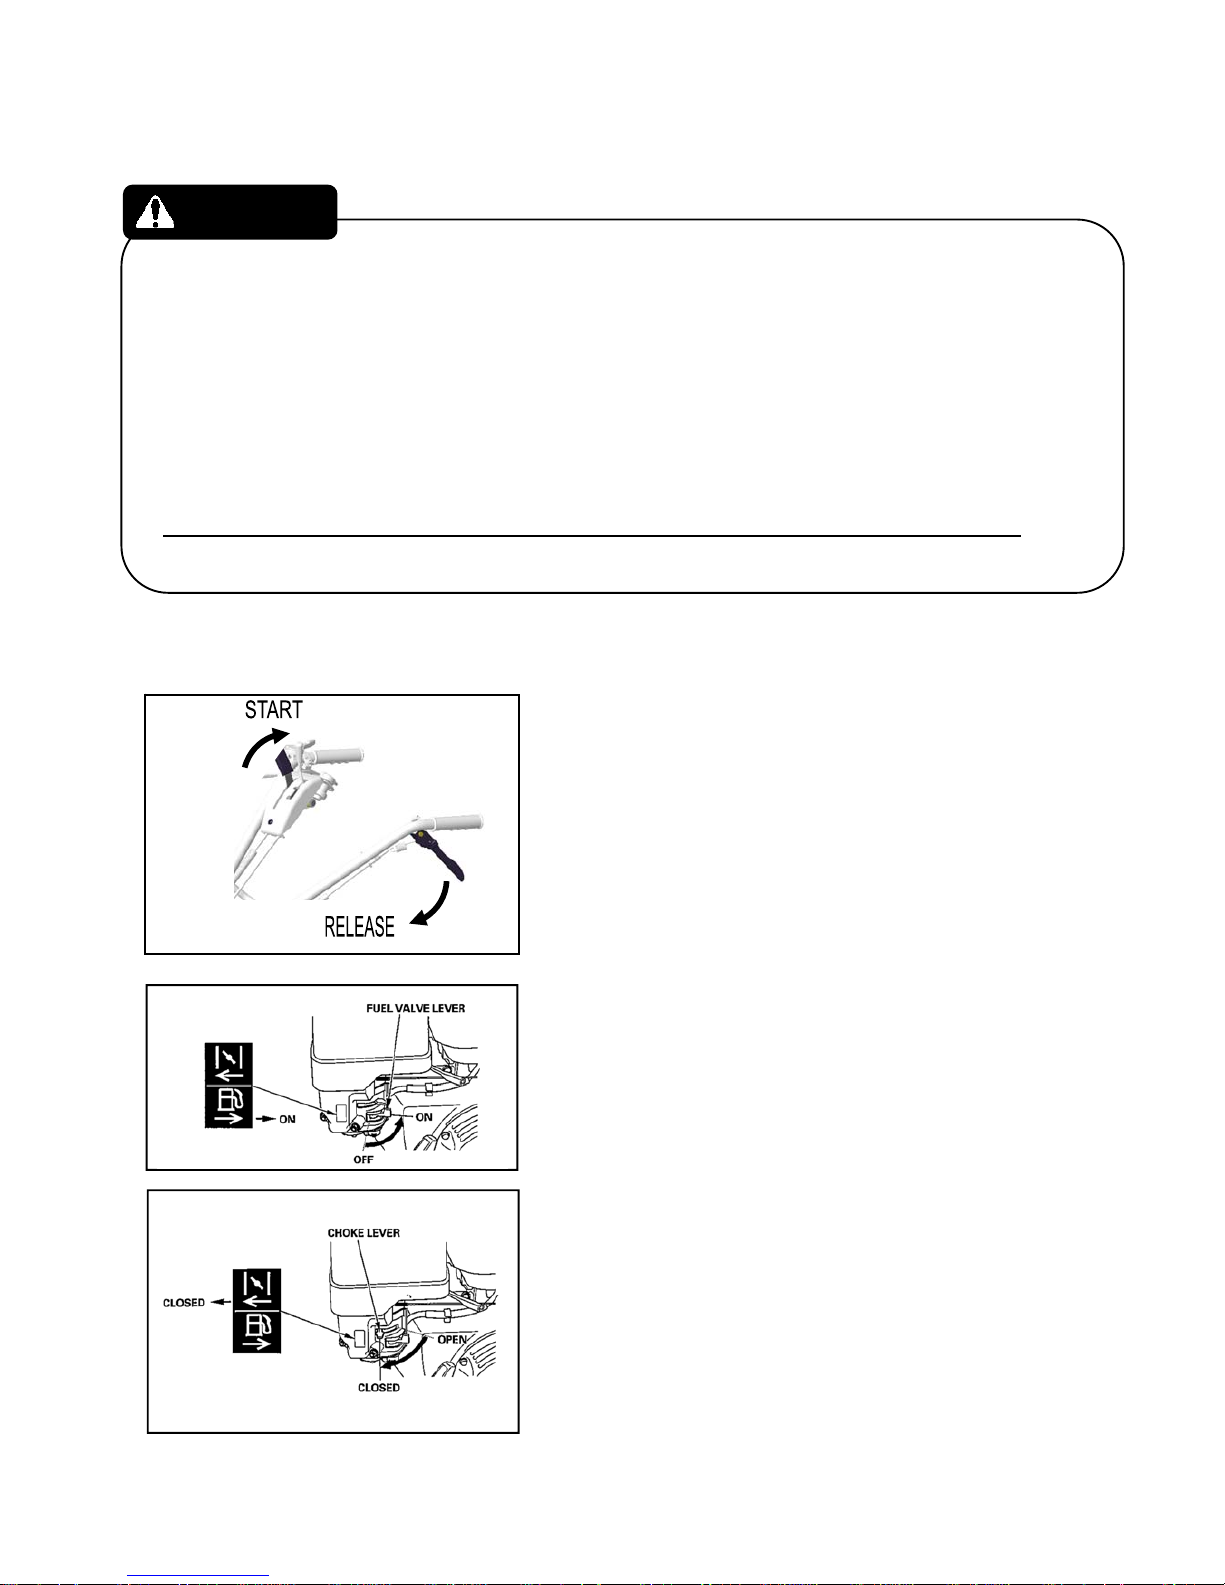
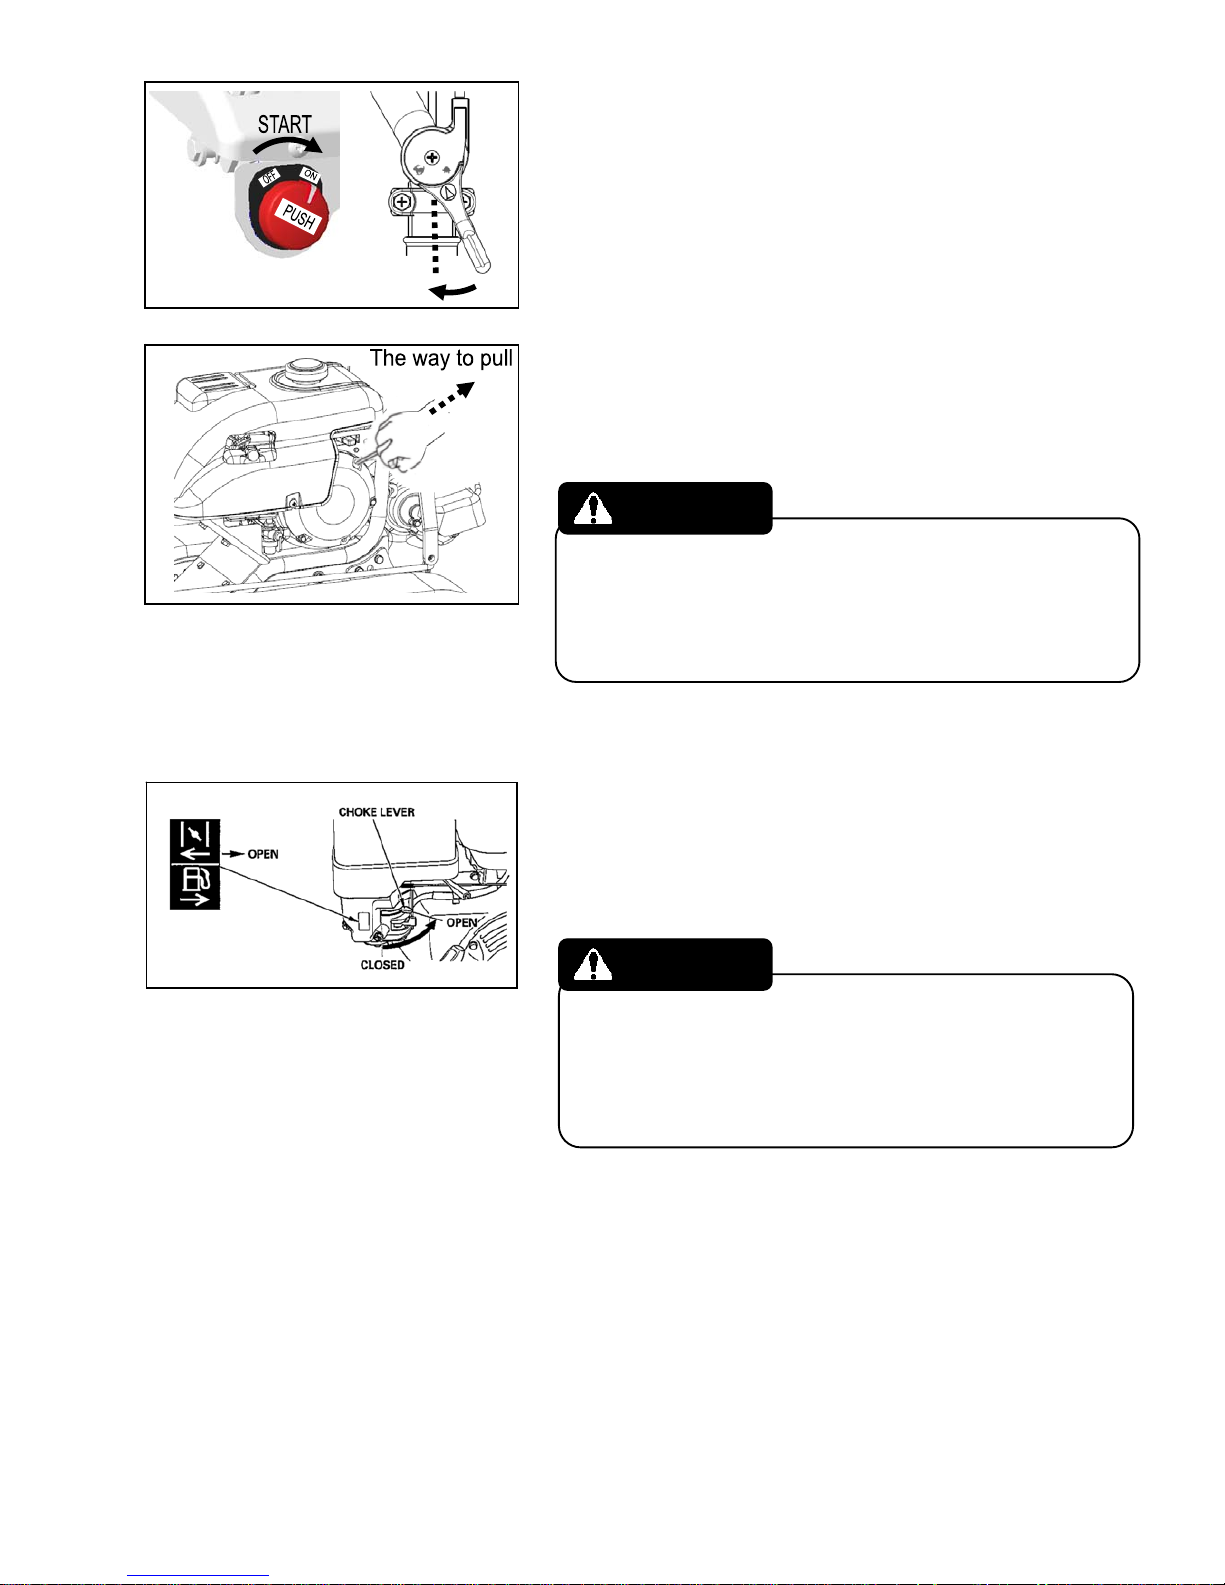
4.1.1 How to start the engine
・ Move the main clutch lever to the “START” position,
and release the driving clutch lever.
・ Move the fuel valve lever to the ON position.
・ To start a cold engine, move the choke lever to the
CLOSED position.
*To restart a warm engine, leave the choke lever in
the OPEN position.
WARNING
-15-
・ Turn the engine switch to the “ON” position, then
move the throttle lever to the middle position.
・ Pull the starter grip lightly until you feel engine
resistance, then pull briskly in the direction of the
arrow as shown in the picture.
・ Return the starter grip gently.
・ Before starting the engine, be sure the area around
you is free from obstacles and other people. Release
the starter grip slowly to avoid damage to the
machine.
・ After starting the eng ine, move the choke lever
gradually to the OPEN position, while checking the
RPM’s, and move the throttle lever to the low position
and let it warm up for 5 minutes.
・ When the RPM’s are stable, move the choke lever all
the way to the right. To prevent damage to the engine,
do not operate with the choke lever in the CLOSED
position.
CAUTION
CAUTION
-16-
4.1.2 Operation (Removing the snow)
・ Always wear appropriate winter wear and shoes, gloves, hats, etc. for safe operation.
・ Always operate the machine from behind the track at the center, and hold firmly.
・ Move the main clutch lever to the “WORK” position.
Then shift the speed change lever to change speed.
To change speed ALWAYS start the engine and
move the main clutch lever to the work position. If
the gear won’t move easily, do not force the gear
shifted. Try to move forward or backward or grasp
the driving clutch lever then shift the speed change
lever firmly. If shifting speed is inadequate, there is
a possibility of gear failure, which is dangerous.
・ Grasp the driving clutch lever. Start working after the
machine moves. Adjust speed using throttle lever.
・ Raise the plow above snow when you turn the
machine.
・ The machine stops moving when you release the
driving clutch lever.
・ Release the driving clutch lever to change the speed.
After the machine stops, you can shift the speed
change lever. Grasp the driving clutch lever to start
moving.
・ Be aware of your surroundings when changing directions, especially forward to reverse, and
reverse to forward. When you are operating in reverse, the machine moves toward your feet –
be sure you have removed any tripping hazards.
・ Raise the plow, by pushing the handle down, to move backward.
・ Always stop the engine if you leave it unattended.
WARNING
CAUTION
CAUTION
-17-
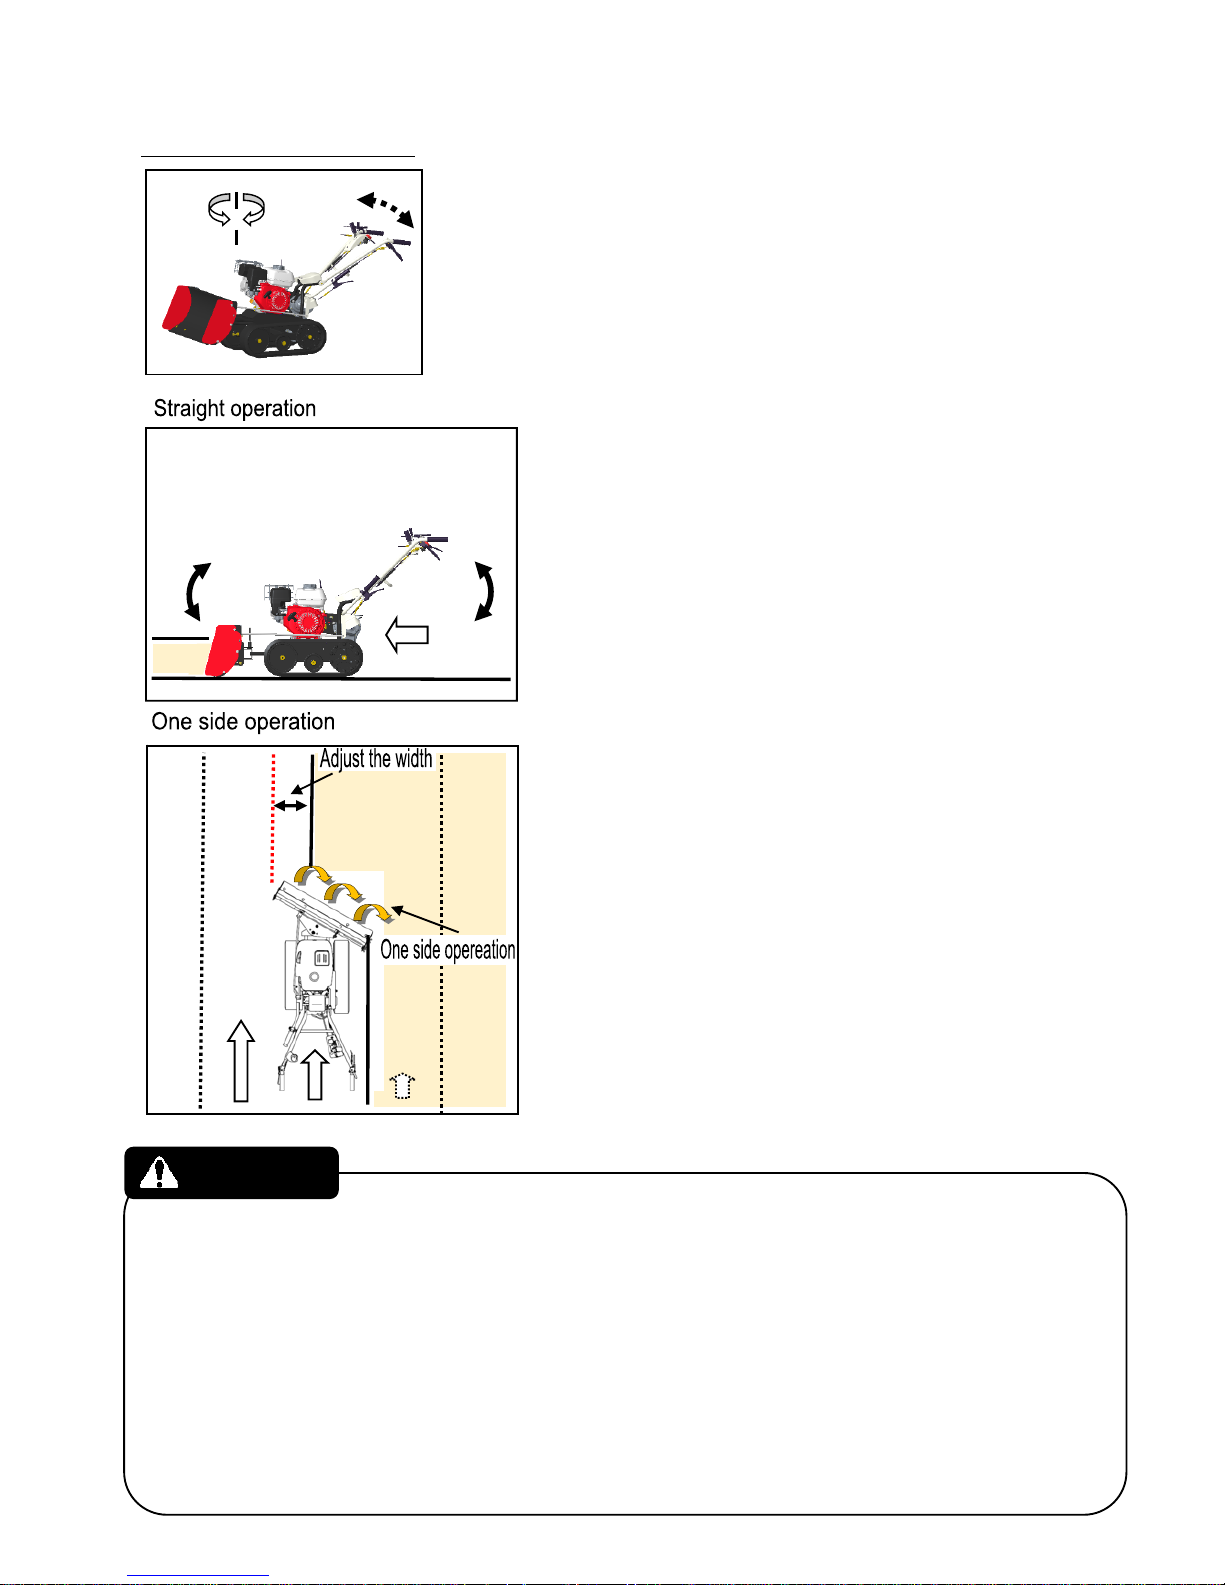
<Tips>
How to turn the machine
1. Push down the handle bar to keep the blade height, and lock it.
2. If you turn the machine around the front part of the track, you
can turn it comfortably.
・ If you experience difficulty pushing snow due to the
amount, or weight of the snow, adjust the height to
remove it.
・ If you feel the tracks slipping, you can increase
power of pushing by pushing down on the handle.
However, if the tracks continue to slip or the engine
loses power, this is due to an excessive weight of
snow. In this case, please clear snow more gradually
or adjust the height of the plow.
・ You can push the snow to one side by removing side
plate of plow. After removing side plate re-tighten the
nut firmly.
・ If the amount of snow is c ausing difficulty, you should
adjust the width (see diagram).
・ You can move the machine without starting the
engine by moving main clutch lever to the “START”
position.
・ If anything , such as a rock, or branch, gets in to the track, stop the machine immediately and
carefully remove the obstruction.
・ Please allow a “breaking-in” period after purchase for about 1 week, or 3-4 hours o operation,
by not overloading the plow.
・ Always start at the lowest speed (1), and increas e as you are sure at the area you are clearing
is safe.
・ If you hit something, always stop the machine immediately and check for damages. Some
unrepaired damages can cause injuries.
・ Clean the machine after operation, to have it safe and ready for the next snow clearing project.
CAUTION
-18-
4.1.3 STOP
・ Always stop on a flat area. Stopping on a slope may cause the machine to tip , or loss of control.
・ Please always stop the engine if you must leave it unattended.
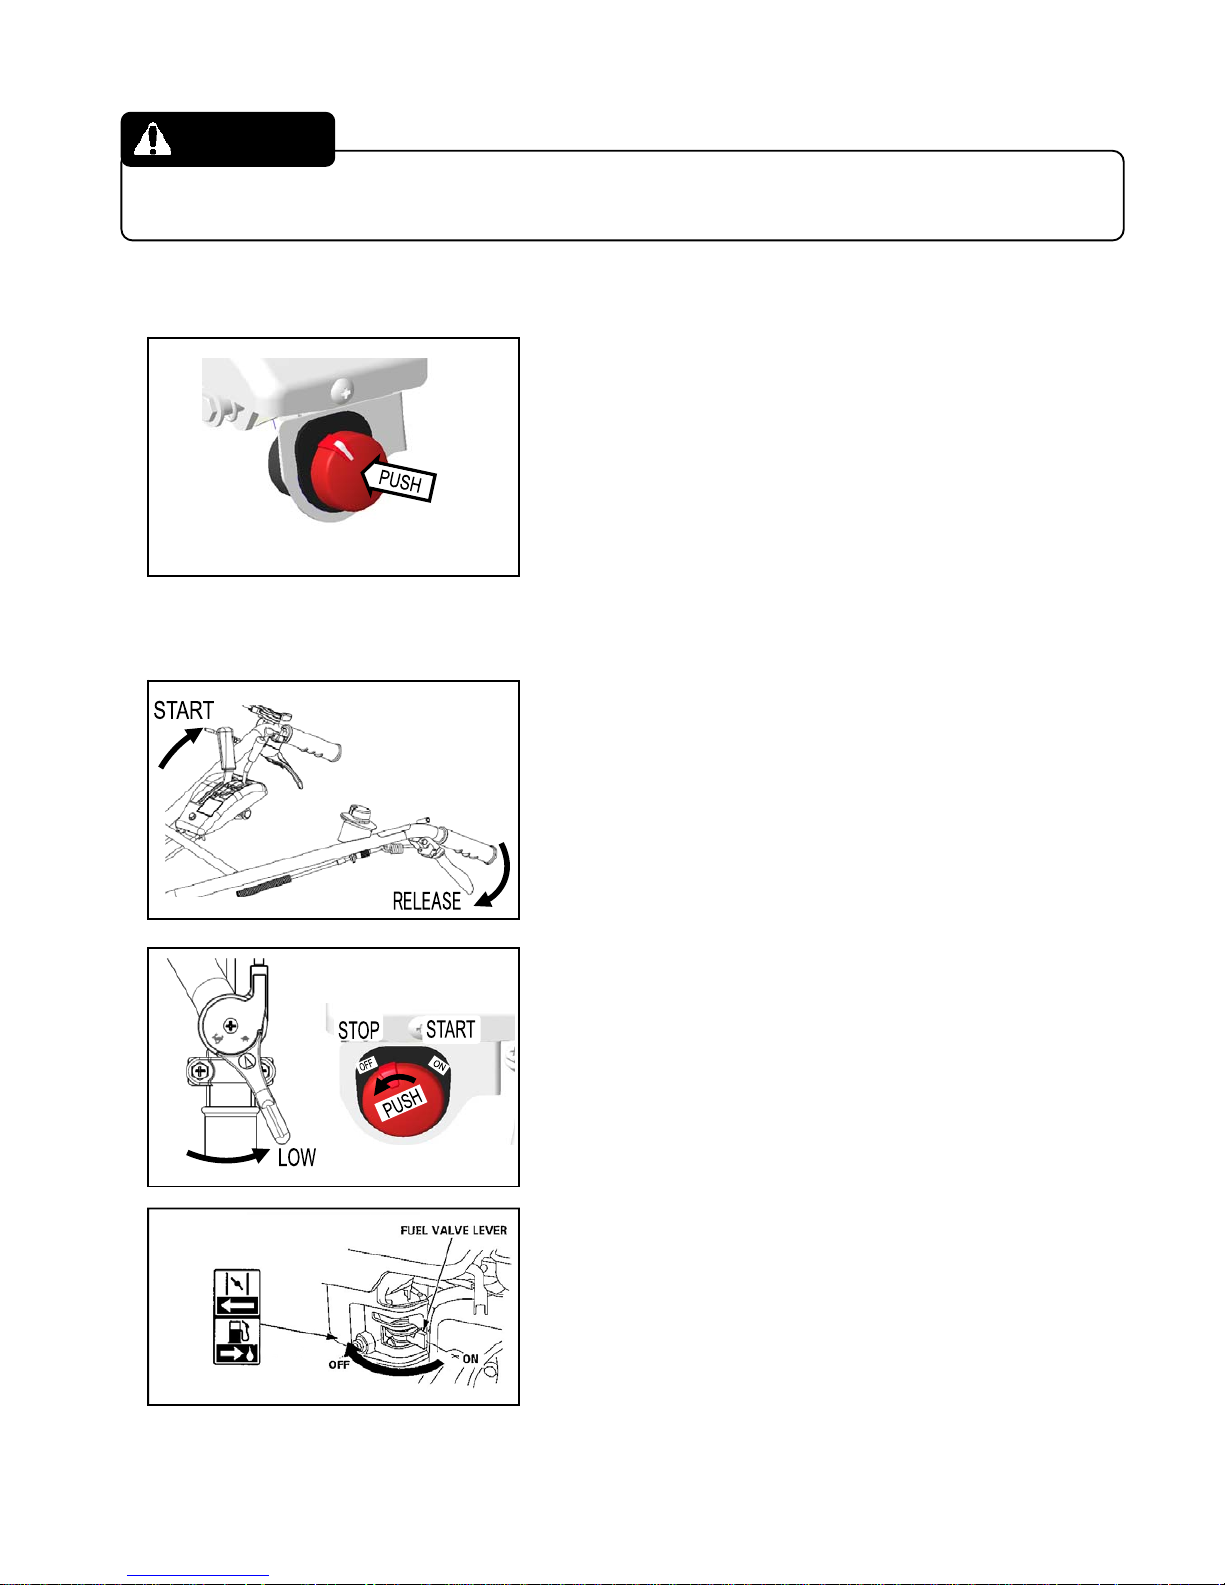
[How to stop the engine in emergency]
・ Push the engine stop switch to kill the engine.
・ If you kill the engine, please move each lever to the
correct position. See “How to start the engine” section
for re-start.
[How to stop the machine in normal conditions]
・ Release the driving clutch lever then move the main
clutch lever to “START” position.
・ Move the throttle lever to the low position then push
the engine stop switch to stop the engine.
・ Close the fuel valve.
・ Clean the machine of dirt, snow and water after operation. This helps, ensure safe operation
next time.
WARNING
-19-
4.2 Loading
To avoid damage, accidents, or injury, be sure to follow all instructions below, regarding
loading and unloading the machine.
・ When loading into a vehicle, be sure to check the area around you, and choose a flat surface
for stability.
・ Use a ramp designed for the job, be sure it is wide and sturdy enough and that the machine
stays in the middle of the ramp. Always use the lowest forward gear to load, and reverse to
unload.
・ Do not change speed while you are loading or unloading, and unload slowly.
・ When loading the machine, secure it with rope and take care not to damage cables or plastic
parts of the machine. Do not secure it so tightly that you change the shape of any parts.
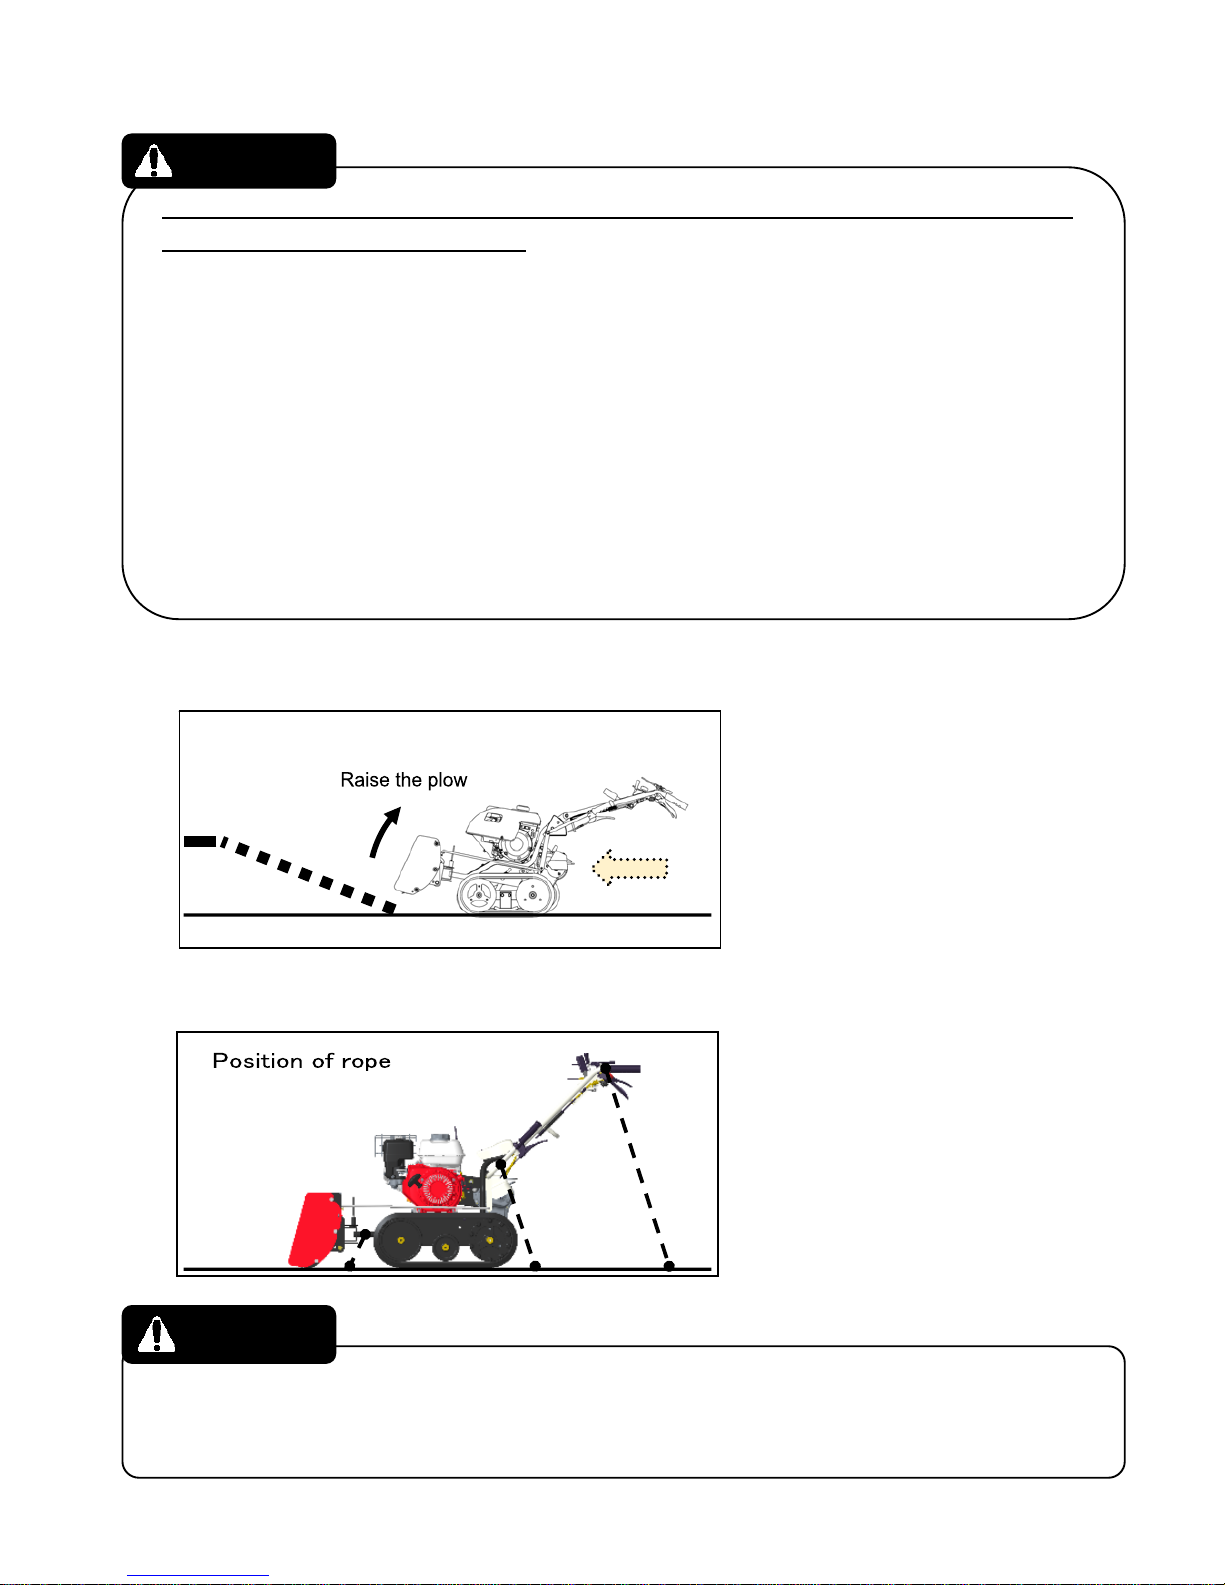
Loading
・ While loading, raise the plow so
that it doesn’t touch the ground.
・ Be sure your ramp is wide
enough to accommodate the
change in the center of gravity as
you move up the ramp. Stay to
the center.
Secure with Rope
・ Secure with a rope that is strong
enough to hold the machine
during transportation. Be sure the
machine doesn’t move.
・ Always stop the engine and close the fuel valve when you transport by vehicle. Leaking fuel can
ignite.
・ Also please do not tilt the machine more than necessary. There is a risk of leaking fuel.
WARNING
DANGER
-20-
5. Inspection and maintenance
Please inspect the machine using the “Periodic inspection table” ( Page 32) and “Inspection
before operation” (Page 30) section for safe and comfortable operation. Perform any maintenance
before working.
・ Please inspect the machine in an open and flat area with the engine off.
・ Keep open flame away from the unit. Also be careful of static electricity and lightning during
operation.
・ Please do not start the engine in poor ventilation or indoors.
・ Engine and oil are at high temperatures immediately after engine stops. Make sure that any
parts cool down before any inspection, maintenance or lubrication.
Follow all instructions to avoid injury and damage.
5.1 Inspection and Changing oil
・ This machine is shipped WITHOUT engine oil. Fill with the recommended engine oil to the correct
level before starting the engine.
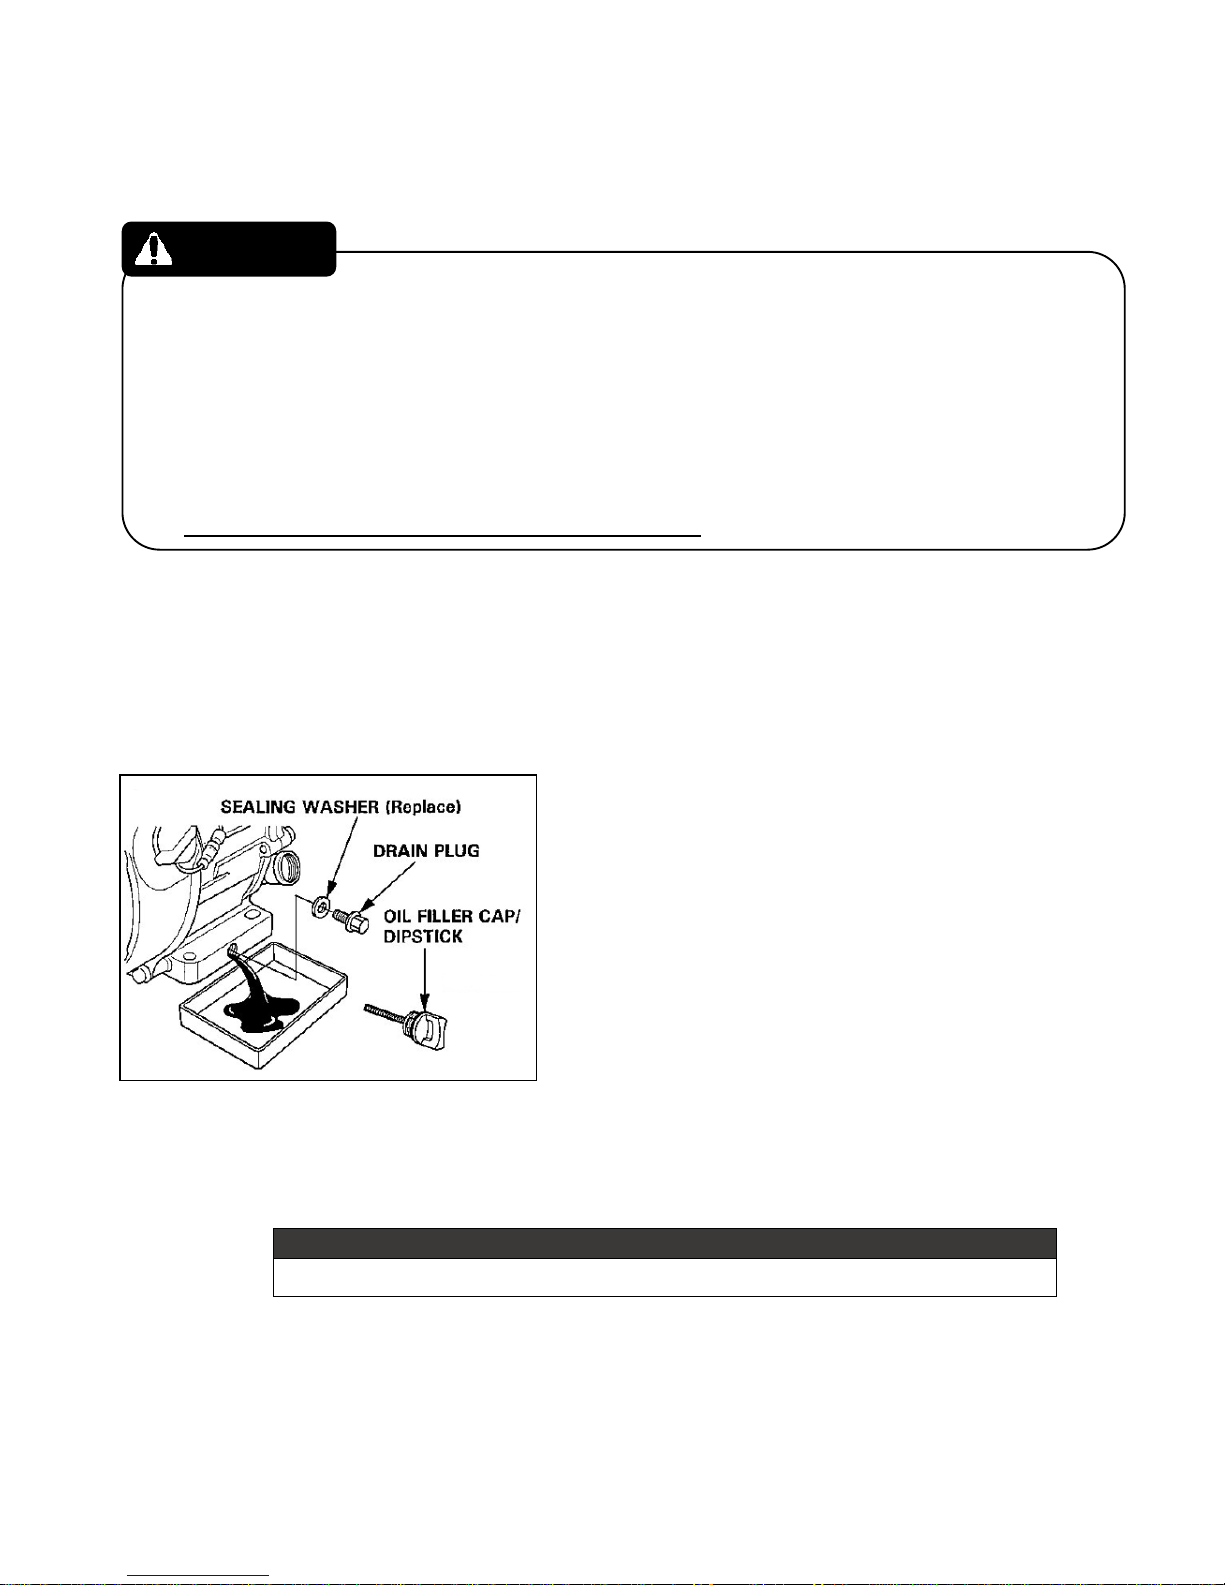
5.1.1 How to change the engine oil
1.Place an oil pan under the transmission.
2.Remove the drain plug at the bottom of the engine
and drain old oil.
Note
;
・ Removing the dipstick at the same time makes it easy
to drain the old oil.
3.After draining old oil, make sure to screw the drain
plug securely, and replace the dipstick
4.Add the recommended oil regarding “3.2 Inspection of
engine oil”( Page 13 ).
・ If you use continuously under high-load or high temperature, change the oil before
recommended period of changing oil.
・ After changing oil, make sure to put t he cover and oil filler cap securely.
Period of changing oil
First time: 5 hours / From the second time: Every 25 hours
WARNING
-21-
■ After chan ging the oil, please dispose o f waste oil in accord ance with loc al laws and r egulations.
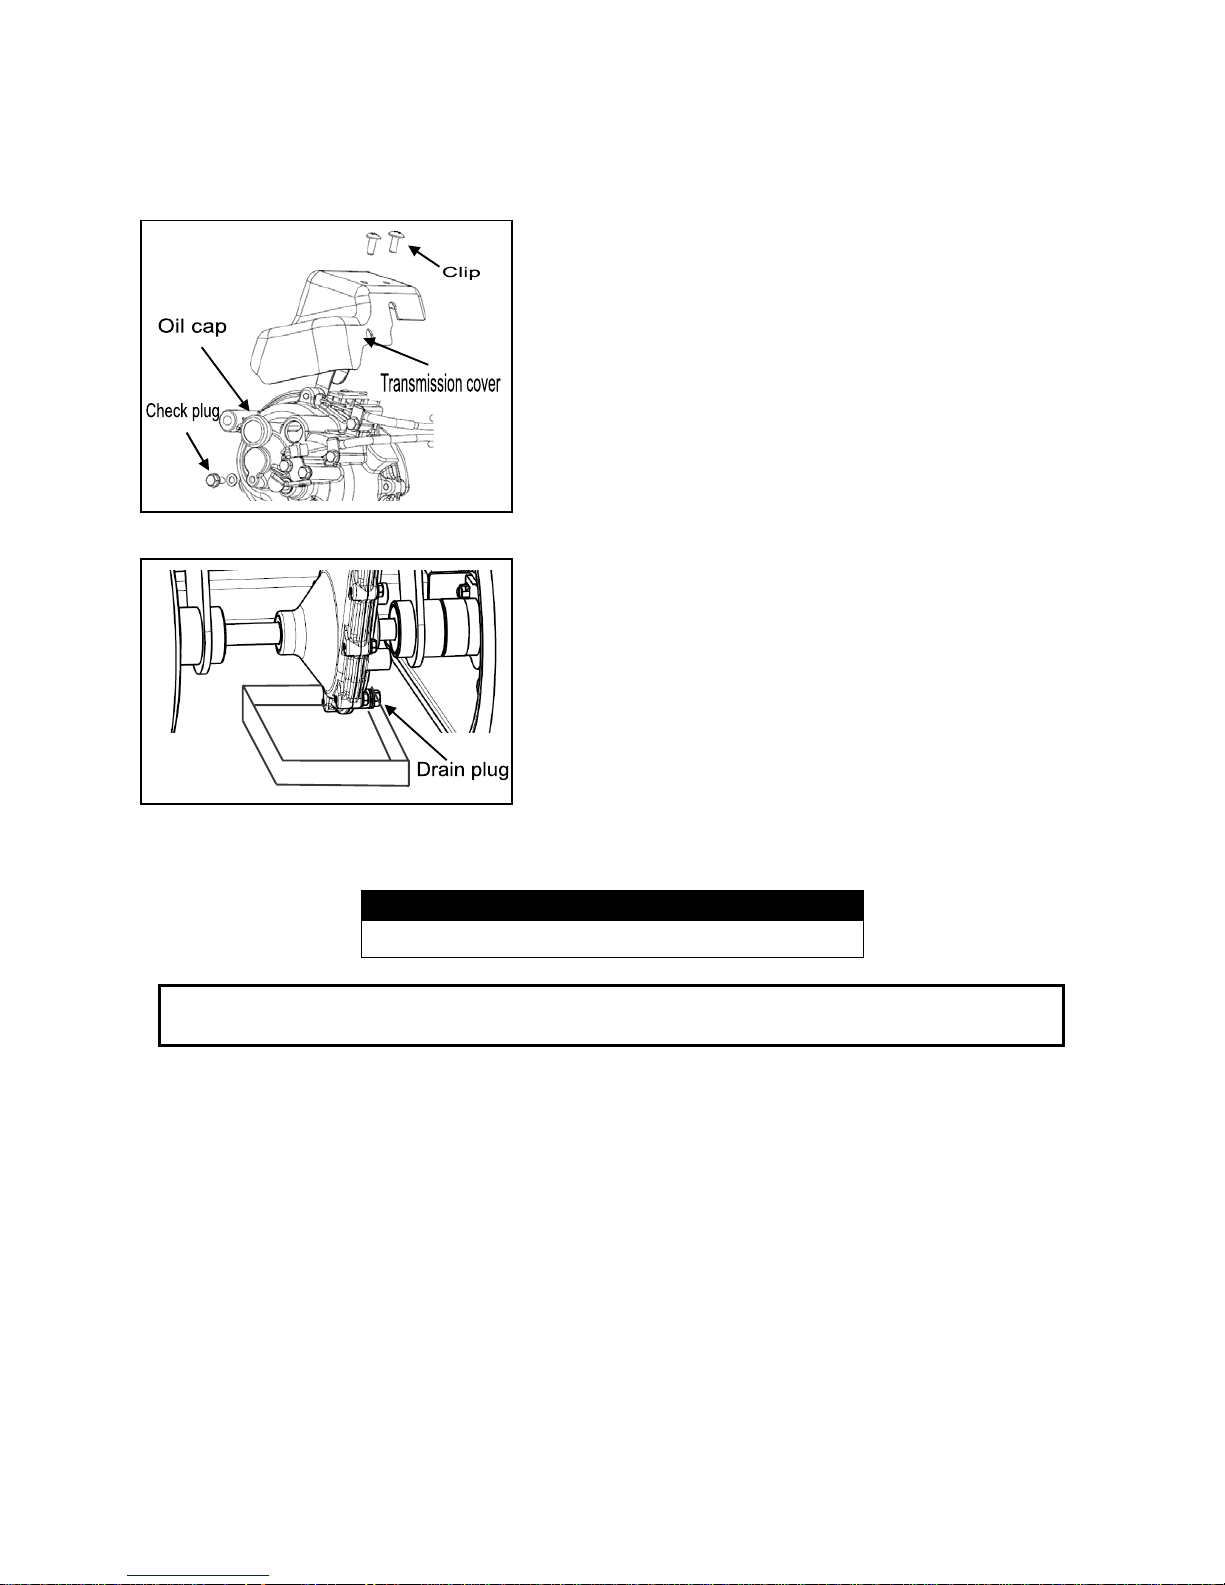
5.1.2 Inspection of transmission oil, How to change
・ To mainta in optimum performance, change oil as recomme nded
・ To prevent overfilling, pour oil slowly.
< Inspection>
1. Remove 2 clips on transmission cover, and lift the
cover.
2. Loosen check plug (M6 bolt) as shown in the picture.
There is enough gear oil if the oil comes out through
that hole.
3. Check oil level and quality. Replace if necessary.
< Oil Change>
Replace oil after the first 20 hours of operation and
roughly every 100 hours thereafter. Use an approved
container for the old oil. Remove the drain plug from
the bottom right side of the transmission case. Drain old
oil and replace the drain plug securely. Fill with 0 .8 US qt
(0.75L) of transmission oil (SAE 90 or SAE 80W-90) by
pouring through the oil inlet.
Recommendation
1st time: after 20Hrs, thereafter: every 100Hrs

-22-
5.2 How to inspect, maintain, and adjust each part
5.2.1 How to clean the air filter
- To avoid fire and da mage to the machine, always keep the air filter and recoil starter fre e of debris.
- Do not start the engine with the air filter removed. Dir t and du st will be sucked into the engine , causing
engine trouble and abnormal wear and tear.
1. Unscrew the wing nut and remove air cleaner cover.
2. Remove the paper and foam elements and check for da mage.
Note; Replace with new parts if damaged.
3. Wash the foam element with a pH neutral deterg ent. After
washing, be sure to squeeze out all the water and allow it to dr y.
After that, soak it in new engine oil (SAE10W-30 equivalent),
wring it out thoroughly, and then shake to remove any surplus oil.
4. Lightly tap the paper element several times to remove any
waste. Blow any dirt from the inside of the filter in an outward
direction
5. Wipe any dirt from the inside of the case and reassemble back
to its original position.
・ When washing the foam element, remove gently to avoid tearing.
Cleaning and replacement time s of the foam eleme nt (appro x)
Cleaning Every time after operation
Replacement Every 100 hours
・ Take care to clean the filter mor e frequently when operating in an environment with a lot of dust or grime.
5.2.2 How to clean sediment cup
・ Clean inside th e sediment cup after e very 50 hours of
operation.
・ Be sure yo u are working in a clean ar ea to prevent dusts
from entering the machine and causing dam age.
1. Move the fuel valve to the OFF position, and th en
remove the fuel sediment cup and O-ring.
2. Wash the sediment cup in non-flammable solvent,
and dry it thoroughly.
3. Place the O-ring in the fuel valve, and install the
sediment cup. Tighten the sediment cup securely.
4. Move the fuel valve to the ON position, and check
for leaks. Replace the O-ring if th ere is an y
leakage.
WARNING
CAUTION
-23-
・ Never use gasoline or thinner as it is highly flammable .
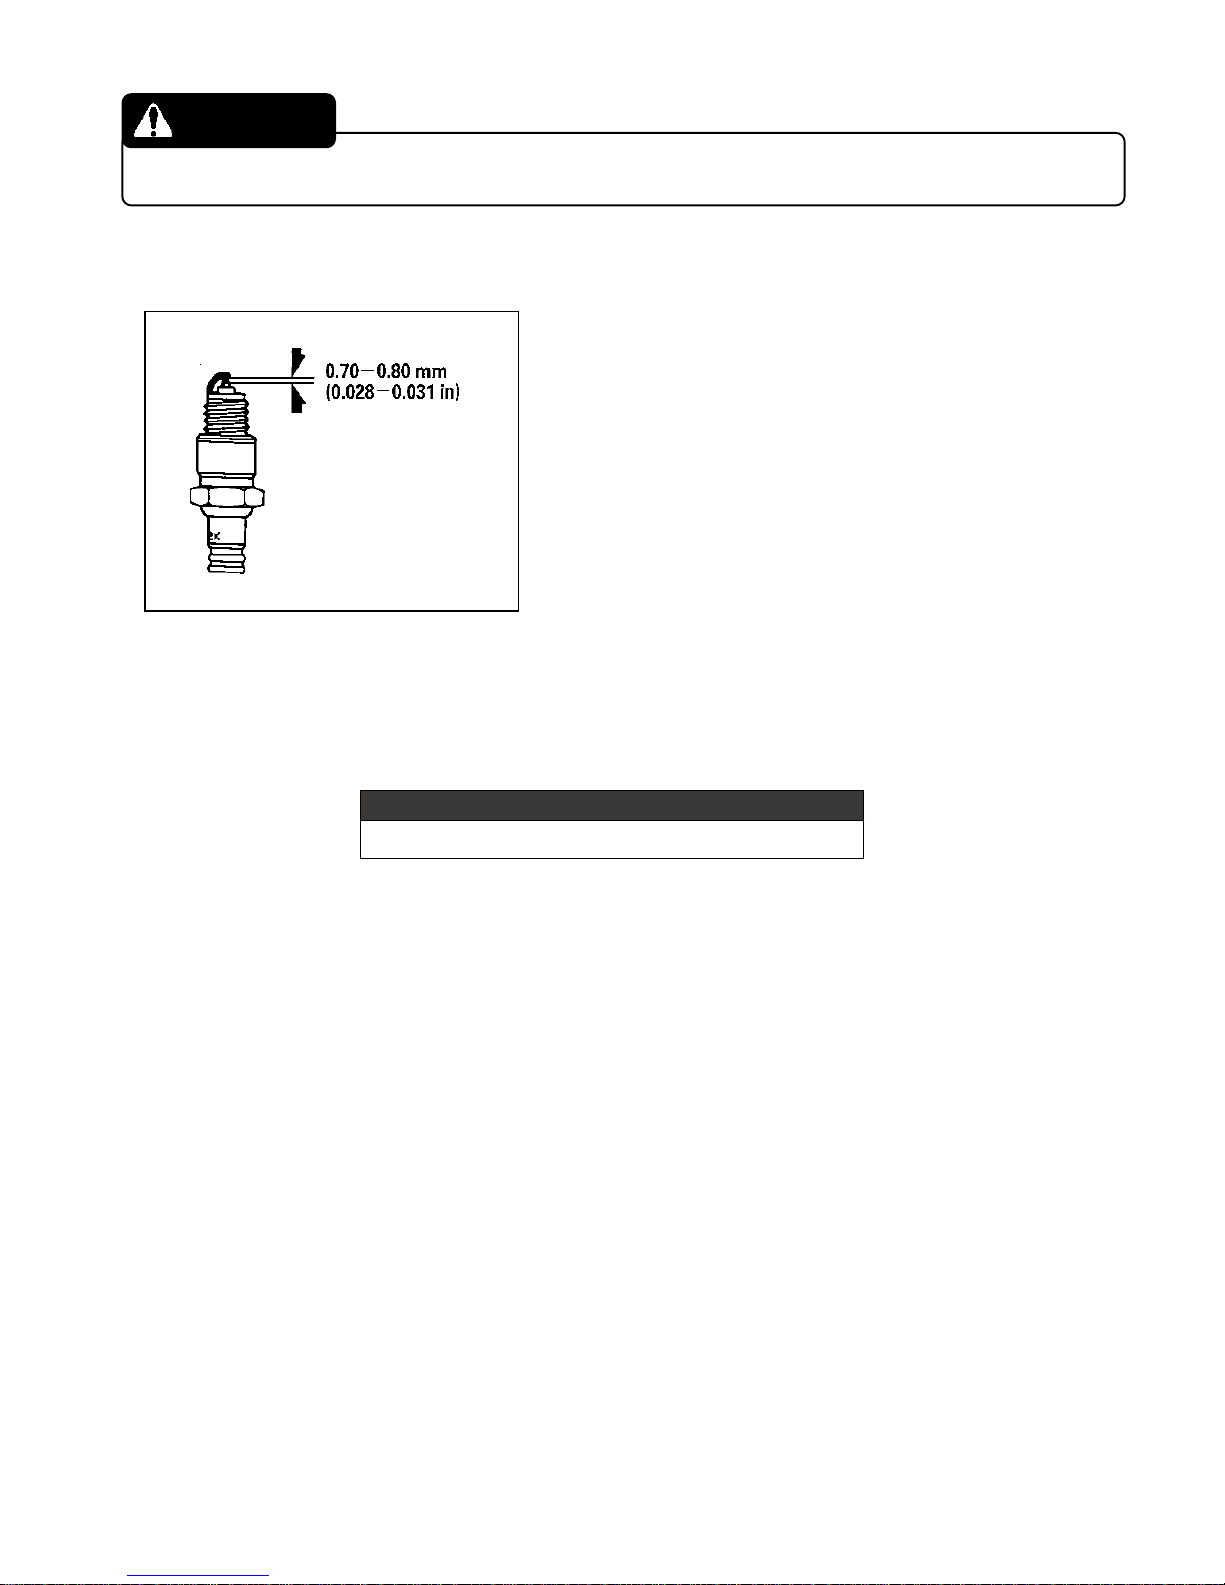
5.2.3 How to inspect and adjust the spark plug
Remo ve th e spark plug with a plug wrench and c lean away
any carbon deposits on the electrode with a wire b rush and
wipe away any moisture if present.
Replace the spark plug with a new one if the cera mic part
has cracked or the electrode shows extensive wear and
tear.
Please adjust the spark plug electrode clearance to 0.028-
0.031in (0.7-0.8mm).
When attaching a spark plug onto the engine, screw b y hand at first be fore tightenin g with a p lug wrench. If you
start by using a plug wrench to screw in the spar k plug, there is a risk o f cross-threading it.
Spark plug
W20EPR-U (DENSO)
WARNING
 Loading...