

Ordnance survey Trail 2 Bike, Trail 2 Quick Manual
Quick Guide
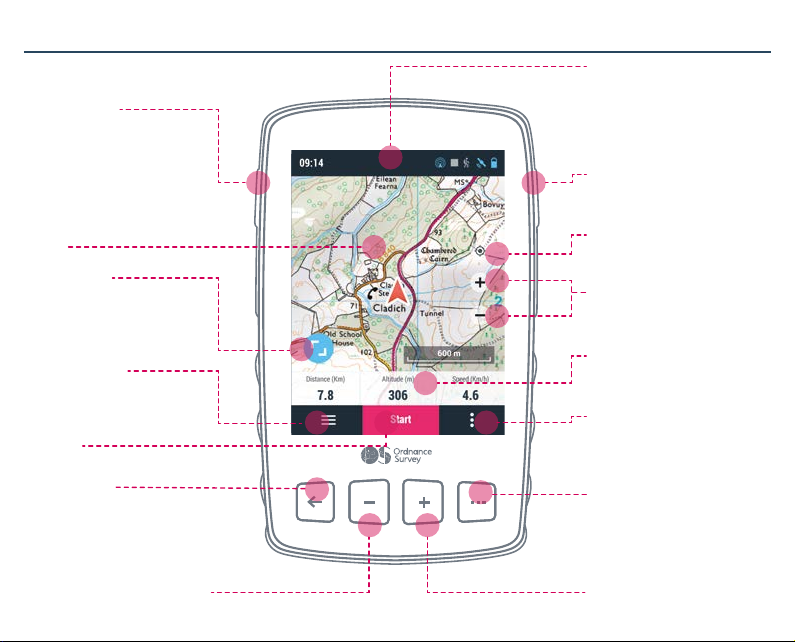
Device layout
Lock button :
Short press: Lock GPS /
Unlock GPS
Map:
Short press: Show tools
Long press: Show Pin
mode
Full screen:
Press to hide panels
Main menu:
Manage les and settings
on your device
Activity control:
Start, pause and nish an
activity.
Back button:
Short press: ‘Back’ in menus/ ‘Recentre’ in map
ZOOM- key: Zoom out map
Status menu:
Press to check the status
of the most frequently
used features (sensors,
GPS...)
Power button:
Long press: Turn GPS on /
Turn GPS o
Center:
Press to center current
position
Zoom:
Press + to zoom in and – to
zoom out of the map
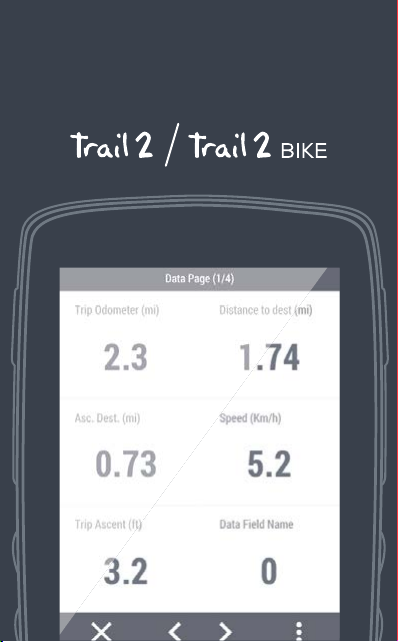
Data bar:
Press to access the data
pages
Contextual menu:
Press to access options
available for the current
page
Page button:
Short press: Show next
data page
Long press: Show main
menu
ZOOM+ key: Zoom in map

1 2
Get Started
Before you turn on your Trail 2* you’ll need to
register it with an OS Shop account.
To register your device go to:
os.uk/gpssetup
*Charge the device with a charger of at least 2A, and use the
included USB cable both for charging and connecting to a
computer for data transfer.
To complete the registration process you’ll need to
input your devices Serial Number (S/N).
To nd your S/N you’ll need to:
1. Turn your device over so you can see the back.
2. Find your S/N on the sticker at the bottom.
Once you’ve registered your GPS you’ll be sent
a conrmation email from TwoNav, which will
include your username and password to set up
SeeMe and GO.

3 4
Now you’ve registered your Trail 2, you’ll be able
to get your 6 free map tiles and buy any additional
ones via My OS GPS, under your OS Shop account.
To get tiles click on the Buy Maps tab, select
between 1:25k and 1:50k scale, drag your mouse
around the map and select the tiles you want, click
Conrm list selection then Proceed to checkout.
Follow the on-screen instructions and once your
transaction is completed, click on the head here
to install it on your device link and you’ll be
redirected back to My OS GPS.
To get your map tiles onto your device you’ll need
to download them.
To do this click on the Maps ready to download
tab under My OS GPS.
Connect your device to your computer using the
USB cable inside your box.
Click on the Download button next to your map
tile(s) and follow the on-screen instructions*.
*when downloading map tiles for the rst time, you’ll need
to download the downloader onto your computer.

5 6
Now that you’ve registered your Trail 2 and
downloaded your map tiles, you’re ready to turn
it on.
Disconnect your USB cable, then press down on
the Power button to turn your device on.
Once turned on make sure you connect your
GPS to Wi-Fi and download and install the latest
soware updates.
You may want to adjust the screen brightness
when turning your device on for the rst time, by
pressing Status menu > Brightness.
It’s important that you have a good GPS signal
before you start.
Stand outside in an open area to connect to as
many satellites as possible – check the status by
pressing Status menu > GPS > Status = GPS Fixed.
When the connection is ready, the icon will turn
blue at the top of the home screen.
 Loading...