

Page 1

ACS Report Number: 08-0307 - 15C Handheld
Certification Exhibit
FCC ID: WYU-HAND001
FCC Rule Part: 15.247 & 15.249
Manufacturer: Orderite, Inc.
Model: TR1000
Manual
5015 B.U. Bowman Drive Buford, GA 30518 USA Voice: 770-831-8048 Fax: 770-831-8598
Page 2

TouchBlock RM
User’s Guide
Version 1.2
Page 3

TouchBlock User’s Guide
TouchBlock RM
User’s Guide
Version 1.2
2 3
Page 4

TouchBlock User’s Guide
Contents
1. Getting Started
1.1 What is included with my system?
1.2 Using the unit for the rst time
1.3 About TouchBlock 1.2
1.4 Introduction to TouchBlock 1.2
1.5 Product Features
1.6 Product Handling and Care
2. Operating the Device
2.1 Precautions
2.2 Using the Touchblock out of the dock
2.2.1 Removing the unit from the dock
2.2.2 Navigating the checklist menus on the Touchblock
2.2.3 Transmitting data to the web
2.2.4 The settings menu
2.3 Checklist Data Entry
2.3.1 Temperature Probe
2.3.2 Yes/No
2.3.3 Number Pad Entry
2.4 Settings
2.4.1 Display
2.4.2 System
2.4.3 Wireless Temperature
2.5 Network
3. Operating the Web Site
3.1 Reports Page
3.1.1 Using the Interactive Calendar
3.1.2 Generating Custom Reports
3.2 List Page
3.2.1 Adding and Deleting Lists
3.2.2 Hiding List Items
3.2.3 Adding List Items
3.2.4 Interval Management
3.2.5 List Item Management
3.3 Devices Page
3.3.1 Connecting/Disconnecting Devices
3.3.2 Modifying Your Device
3.4 Users Page
3.4.1 Creating and Removing Authorized users for the System/Web Site
4
Page 5
TouchBlock User’s Guide
Contents cont.
4. Glossary
5. Regulatory and Safety Information
4.1 FCC Compliance……………………………………………33
4.2 Safe Operating Conditions
4.3 Warnings
4.4 Safety Precautions
6. Troubleshooting
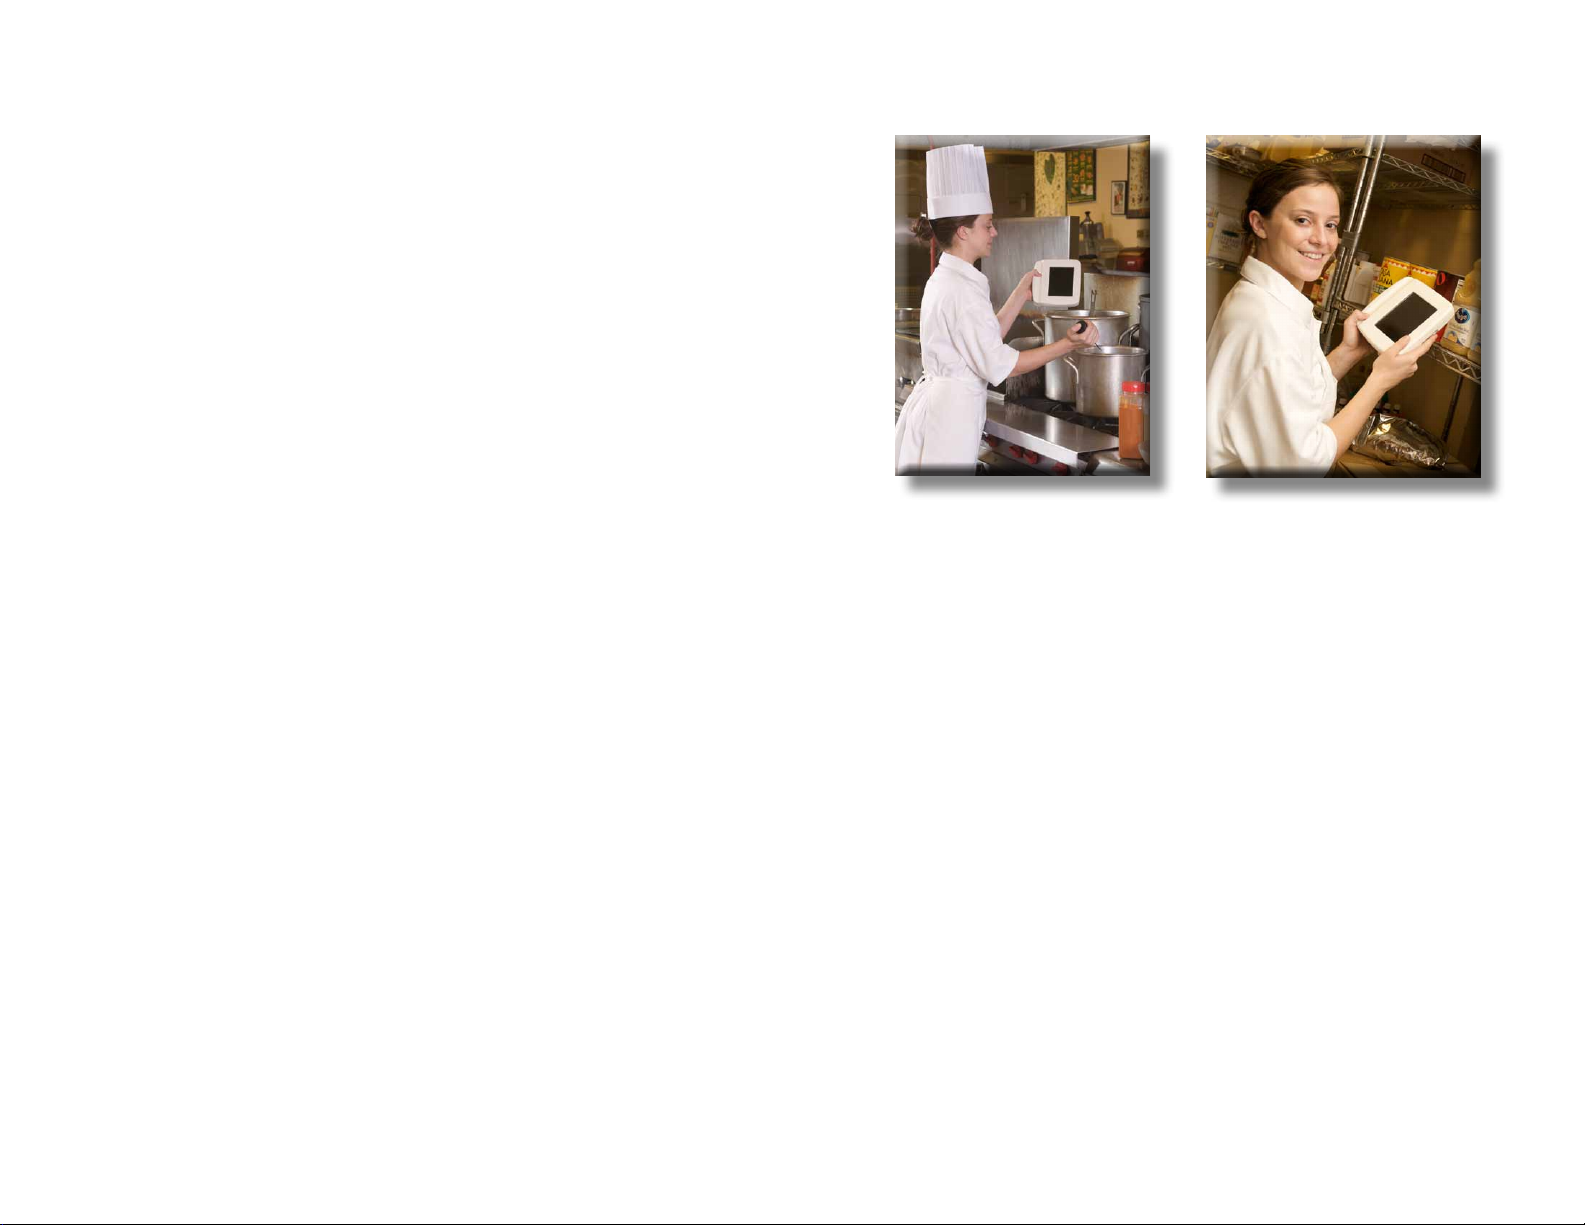
Thank you for choosing the Touchblock – RM 1.2 System. The
Touchblock RM System is your indispensable tool in reaching
your food health and safety compliance goals. It is our aim to
provide you with the best in food safety compliance hardware and
software. The Touchblock System will provide you with the ability
to maintain your highest standards of food quality, health and
safety without limiting your mobility and presence in other areas
of your company.
1
Page 6
TouchBlock User’s Guide
Quick Guide
• Remove unit from docking station
• Select the CHECKLISTS button
• Select specic checklist to perform
• When checklist is complete, press CHECKLIST COMPLETE button
• Return unit to docking station and view transmission
• Display screen darkens upon successful transmission
Call 1-877-425-7800 for help or assistance
• Always return unit to docking station, never lay down
• Clean with a damp cloth only - Use no chemicals
touchblock.com
1. Getting Started
1.1 What is Included in the System?
The system includes the following items:
The TouchBlock unit
A temperature probe
A wall mountable docking station
A template for mounting the dock
Wall anchors and screws
An AC Charger
The Users Manual
1.2 Using TouchBlock for the rst time
1.2.1 Mounting the dock on the wall
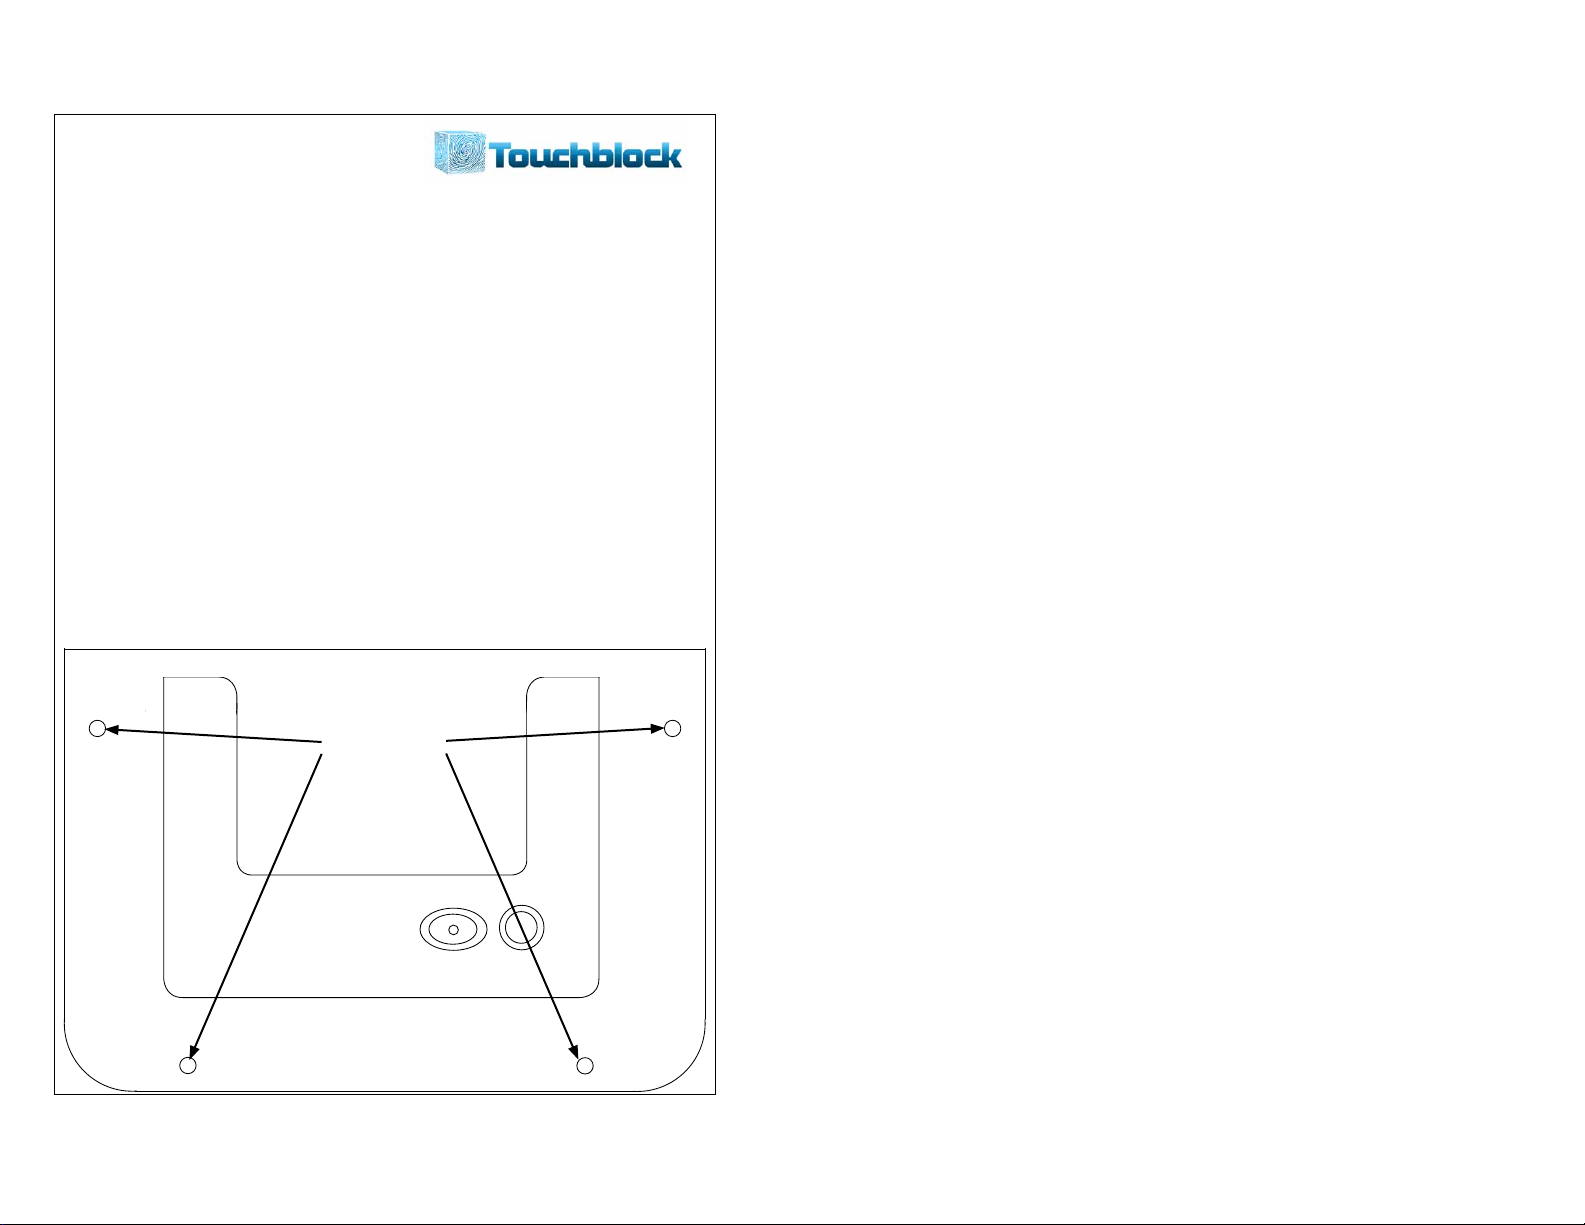
Adhere the included template to the wall near an electrical outlet that the charger can be plugged
into. (See the image on the opposite page to help identify the wall template.)
Drill holes
Sample wall template. The actual template that cam with your unit may dier from the one above.
2 3
Drill the 4 holes as indicated on the template.
Push the anchors into the wall and then hammer them in until flush with the wall.
Place the dock against the wall and line up the holes with the anchors.
Screw the screws into the anchors through the holes on the dock.
Plug the charger into the nearby outlet and attach the end of the cord to the underside of the dock. A
green light on the front of the dock will illuminate if it is plugged in properly.
1.2.2 Charging the battery
The TouchBlock battery will come with a partial charge from the factory, but the unit will
not activate until it is placed in the dock for the first time. It is recommended that you leave the unit in
the dock for at least 8 hours the first time to assure a complete charge. The TouchBlock unit should be
returned to the dock after each use to send the collected information and keep the unit at full charge.
Page 7
TouchBlock User’s Guide
If the is a loss of power that results in a complete discharge of the battery, please allow the
unit to charge for at least 30 minutes prior to use. This will prevent the unit from losing data during
the collection after the power is restored.
1.3 Introduction to TouchBlock 1.2
The TouchBlock 1.2 unit electronically gathers, records and reports product specific data
that is used in maintaining day-to-day operations of your business and can be tailored to the specific
needs of any individual type of business. It can be used to complete simple checklists, for tracking
current inventory and ordering replacement items, as well as monitoring temperature of foods to
maintain proper food safety. This can be done with either a fixed temperature probe or a portable
one, depending on preference.
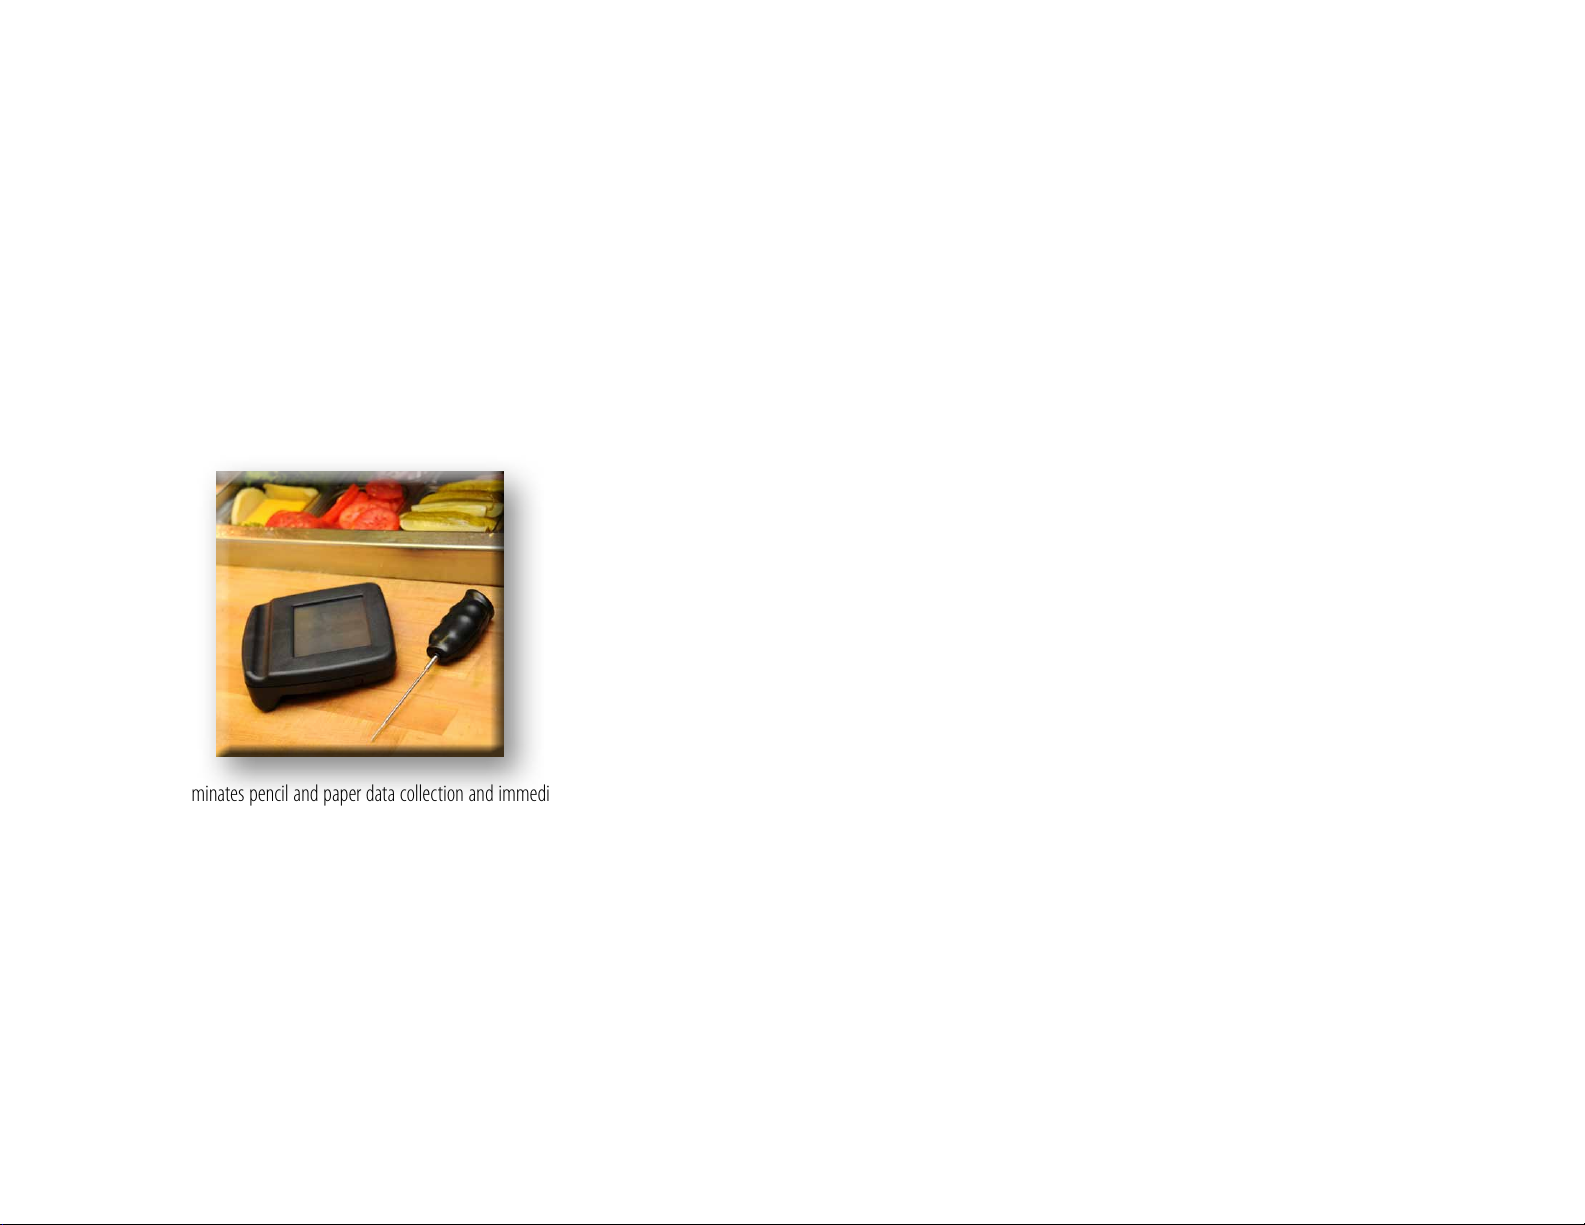
Use of TouchBlock eliminates pencil and paper data collection and immediately posts data to a web
portal for viewing and approved corrective action, if necessary. Every activity is time-stamped and
cannot be altered on the unit, so you know you will get accurate data every time. The web application
that the unit transmits the data to warehouses irrefutable compliance documentation history for trend
analysis and future reference.
1.4 About the TouchBlock 1.2
The TouchBlock 1.2 is an easy to use process management and food safety device that can
be fully customized to any restaurant or caterer’s particular needs. The system provides real time data
capture that is posted to the web either manually or at predetermined times that are programmed into
the unit. It can even be used to complete an inventory check to be utilized when placing orders from
food service vendors.
1.5 Product Summary
Touchblock RM is a kitchen and restaurant management system that will add efficiency
and productivity to any commercial kitchen environment. Our system is based on a handheld unit
designed for ease of use, ease of training, and data collection software based on your input of food
safety check lists, automated temperature probes strategically placed throughout the restaurant,
and manually operated temperature probes for nearly instantaneous audits of critical food items.
All features are accessible through a web-based software application that allows our customers to
customize lists that match your companies specific checklist. Our web based software also allows
monitoring from any web enable computer, if you are in California and check real time if tasks are
being completed, with Touchblock RM there is no need to wait for the reports to come in to your
office or for a regional manager to check on paper based reports in the restaurant it is true, real-time
information.
Touchblock RM is focused on three key areas of restaurant management:
• Accountability
• Financial Improvements
• Management Improvements
We make all your employees more accountable, our real time stamping no longer allows
data to be entered after the fact. If a time based parameter is missed, the software will time stamp
when it was actually completed or show it as not done. Touchblock studies have found that most paper
based systems exaggerate the correctness of data, it is too easy to add data to a paper based system
after the fact. As one of our regional managers told us, “He has never seen an incorrect paper based log
in all of his years in the field”. We strive to keep your employees and managers doing what they need
to do, selling and preparing food. By automating certain portions of their jobs, Touchblock RM can
give your employee more time to do other things. No more checking walk in cooler temperatures, no
more checking salad bar temperatures. Touchblock RM offers add-on sensors that will automate
temperature collection and the system can be programmed to automatically notify key employees
of anomalies. Touchblock RM improves management by being able to monitor several restaurants
from a web-enabled computer. A district or regional manager can check multiple locations many
times during the day to assure compliance with company and governmental regulations. He no longer
has to physically stop by a restaurant to check; he can do this on the web, thus making his visits to
each restaurant more productive and ultimately saving money. With Touchblock RM you could
conceivably manage all of your stores from a remote site.
4 5
Page 8
TouchBlock User’s Guide
1.6 Product Handling and Care Instructions
1.6.1 Handling the Touchblock unit.
The tips below will help you get the best use out of the Touchblock unit and extend the life of the
product. If you have any questions and are unable to find the answer in this manual, please call the
Touchblock support line at 888•###•####.
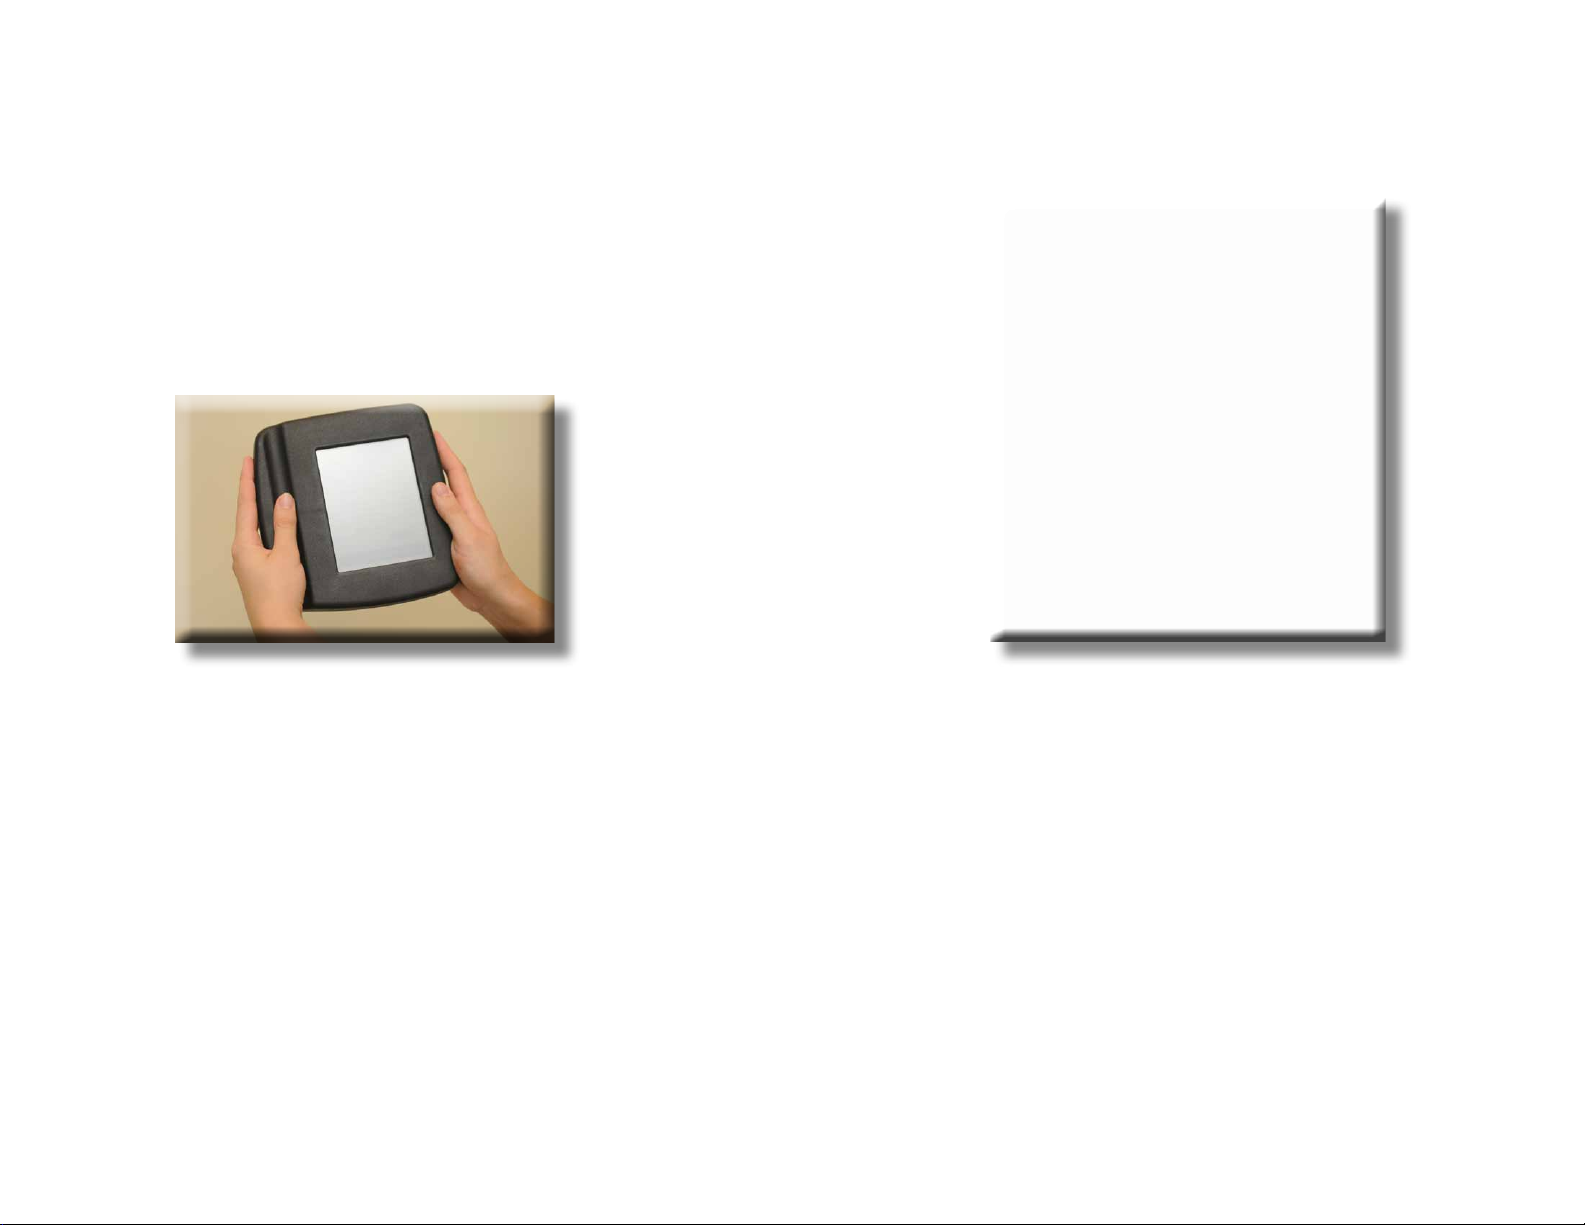
Always hold the device in your left hand and tap the screen with your right. The specially
designed handhold on the left side will give you a better grip and allows you to easily tap the buttons
on the screen.
Be sure to always return the Touchblock unit to the docking station after each
use. Doing so will allow for proper data collection and assure the battery is charged for each future
use.
Do not use sharp objects on the screen. Only use your fingertip to enter the info. Do not use
pens, knives, tongs or the temperature probe to press buttons on the screen. Doing so will damage the
screen and could make the unit inoperable.
Never apply too much pressure on the unit’s screen. A large amount of pressure can cause
the screen to crack.
Do not allow food items or liquids to get into the areas that connect the Touchblock
to the dock. Before the unit is docked each time, check to be sure the contacts are clean so that the
connection to the dock can be made. Clean the area with a rag that is damp with water only and wipe
it dry when clean. If the contacts are not clean, then the unit will likely not be able to transmit the data
when connected to the dock.
Do not leave the Touchblock near water or in a humid area. Water could get into the
unit and it will be come inoperable. Keep away from steam tables and dish washing equipment when
possible.
6 7
1.6.2 Caring for the Touchblock and dock:
With proper care the Touchblock and it’s dock will last quite some time. Please follow the few care
instructions that follow.
Clean the Touchblock and dock only with a rag that is damp with water. Never immerse the Touchblock
in water and use no chemicals on either part.
Never drop the Touchblock or place it where it could fall ! The screen is very fragile and the unit
will not work if it is cracked or broken.
Page 9

TouchBlock User’s Guide
2. Operating the Device
2.1 Precautions: The following sections will give the user an overview of how to use
the system, specific requirements needed to allow the system to work correctly and how to use the
unit when it is out of the dock to perform routine daily functions. The guide will go through the
menus on the Touchblock in the order they are found, however, the images of the screen that appear
in the manual may be different from your actual unit.
2.2 Using the Touchblock out of the Dock
2.2.1 Removing the unit from the Dock: The Toucblock is plugged into several
connectors when in the dock, so it may take some effort to remove it. Simply pull straight up from
the dock to safely remove the unit. Never pull the unit toward you, as you may break the dock or the
Touchblock.
After the Touchblock is out of the dock, the first screen you will see when the unit is
removed from the dock is the Welcome Screen that displays the reataurant’s logo, 2 buttons and
the store number and location. All of this information has been updated
when the unit was first docked. Each time the Touchblock is docked it
will be updated to reflect any new information.
The Checklist button leads the user into the preprogrammed checklist that is specific to your restaurant company and
location. The Settings button is used to alter any settings that are specific
to the unit. Checklists cannot be accessed here. They are only modified
from the web program covered in Section Three. Functions that can be
modified when pressing the Settings button are Display Settings,
System Settings and Wireless Temperature Settings.
8 9
Page 10
TouchBlock User’s Guide
2.2.2 Navigating the Checklist Menus on the Touchblock
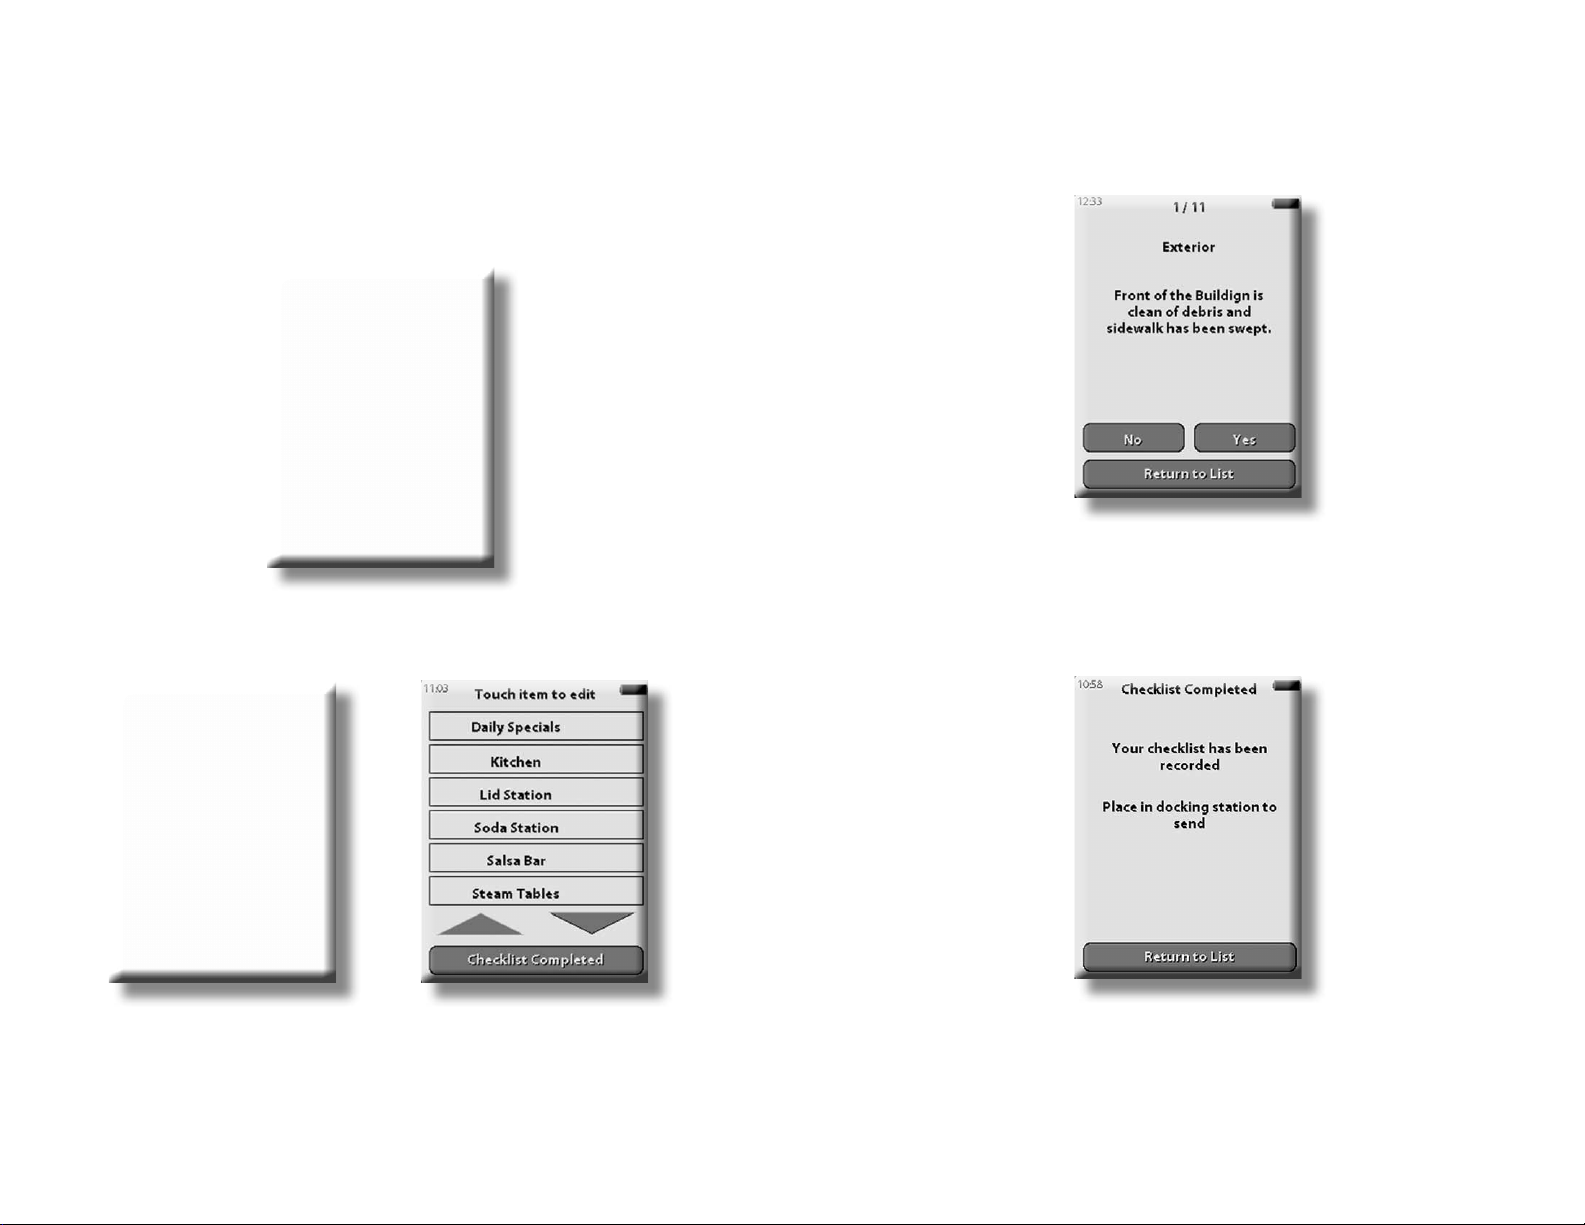
Pressing the Checklist button takes you to the list pictured below. From this list you may choose
which list you need to complete based on the time of the day or the shift you are working. The lists
will be specific to your type of restaurant and your particular location.
For example, if it is the beginning of the first shift, you would choose to complete the Opening list,
shown below on the left. The down arrow indicates that there are more items on the list that are not
button for the task, the screen will look something like what is in the next image. To record whether
the irtem has been completed or not, simply press the Yes or No button. After you answer yes or no
to a question, the Touchblock will automatically take you to the next question in the list.
Once you have answered all of the questions on the list, press the Checklist Completed button
and the the unit will remind you to put it back in the dock (next image) to upload the information
collected. The unit will only allow you to complete and upload one list at a time in order that the
information be uploaded to the data site in a timely fashion.
shown. Simply press the arrow to access the rest of the list. When the list has been moved up or down
the screen will display 2 arrows (above right) to allow you to scroll the list up or down. Upon reaching
the bottom of the list, the down arrow will disappear and only the upward facing arrow will remain.
Press a function to record whether the task named has been completed or not. After you press the
10 11
Using the Temperature Probe in the Checklists:
If you select a Checklist Item that requires data entry from the Temperature Probe, you will be taken to
a screen like the one in the following image. Please follow the instructions to use the handheld probe
Page 11
TouchBlock User’s Guide
to assure the reading you record is as accurate as possible. A
number of faulty readings will indicate either faulty heating
or cooling equipment or a fault in the Touchblock temperature
probe or system to the person who monitors the data
transmitted to the web.
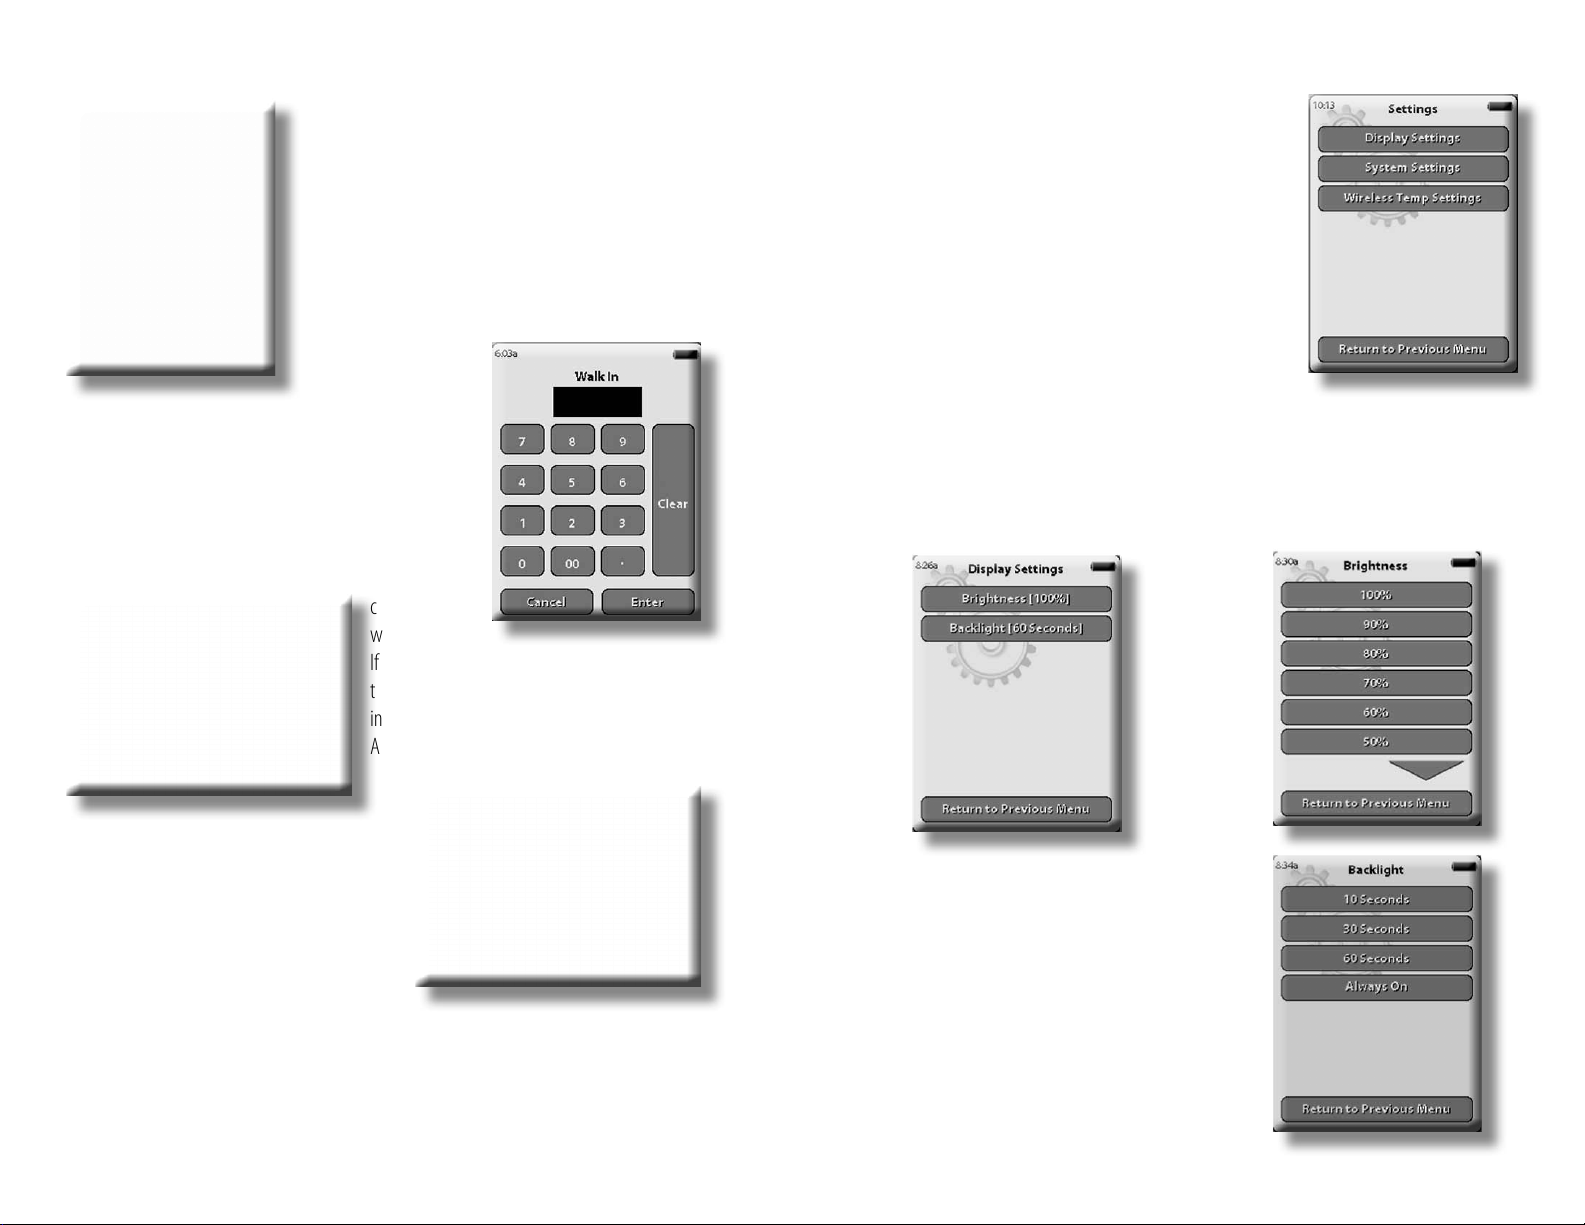
Using the Number Pad to Enter Items
If you select a Checklist Item that requires data entry from
“Number Pad Entry”, you
will be taken to a screen
like the one at right.
Simply enter the appropriate number that corresponds to the
item you are measuring and press enter to store the value.
2.2.3 Transmitting Data to the web
After the Touchblock is in the docking station, the screen will
come on and you will see the following image while the device
attempts to
connect to the
wireless router.
If the unit fails to connect to the router, please refer
to the Troubleshooting section of this guide to get
information on configuring the wifi settings.
After making the connection, the Touchblock will
Pressing the Settings button will show you the menu screen as
seen on the right. From this menu you will be able to modify the
settings for the items listed or you can press Return to Previous
Menu to return to the Welcome Screen and access a checklist for
your current shift. Now we will explore each of these individually.
The first in the menu, is Display Settings. By selecting this
menu, you are able to change the display’s brightness and the
legth of time the backlight stays on before the Touchblock dims
the screen to conserve battery power. The image below on the
left shows how this menu appears on the device with the levels
as currently set.
The figure on the right shows the increments by which the brightness can be adjusted. The presence
of the down arrow indicates that there are additional levels that can be accessed by pressing the arrow
itself. Pressing the desired level will instantly decrease the brightness. When you have reached the
desired setting, simply press the button marked Return to Previous Menu to modify the Backlight
settings or continue back to the Welcome Screen.
download any updates from the web program
and then will transmit the data collected from the
checklist you just completed. The image at right
shows what the screen will look like when the
transmission is happening.
2.2.4 The Settings Menu
Going back to the Welcome Screen, similar to the image on the right, you can access the Settings Menu
by pressing the Settings button from the Welcome Screen. This will take you to the Settings menu
where you will be able to change the date and time, adjust display options and assign temperature
probes.
12 13
The Backlight settings can be modified to keep the screen
lit for intervals of ten, thirty and sixty seconds or the
Touchblock can bet set to keep the unit always backlit. You
may want to choose a longer interval if iot takes time to
get from each place the checklist covers to the next. Simply
press the button for the desired time interval and the
Touchblock will return to the previous menu automatically
and from there you can press Return to Previous Menu to
go to the main settings menu.
Page 12
TouchBlock User’s Guide
The System Settings Menu will allow you to access the settings that controll the following:
Date and Time - assign the time zone and daylight savings
Power Management - modify the time before standby
mode and to power off the device
Update Device - makes the device look for an update the
next time it is in the dock
Information - general information about the system that
may be used for troubleshooting a problem
Generate a System Log - Creates a system log of
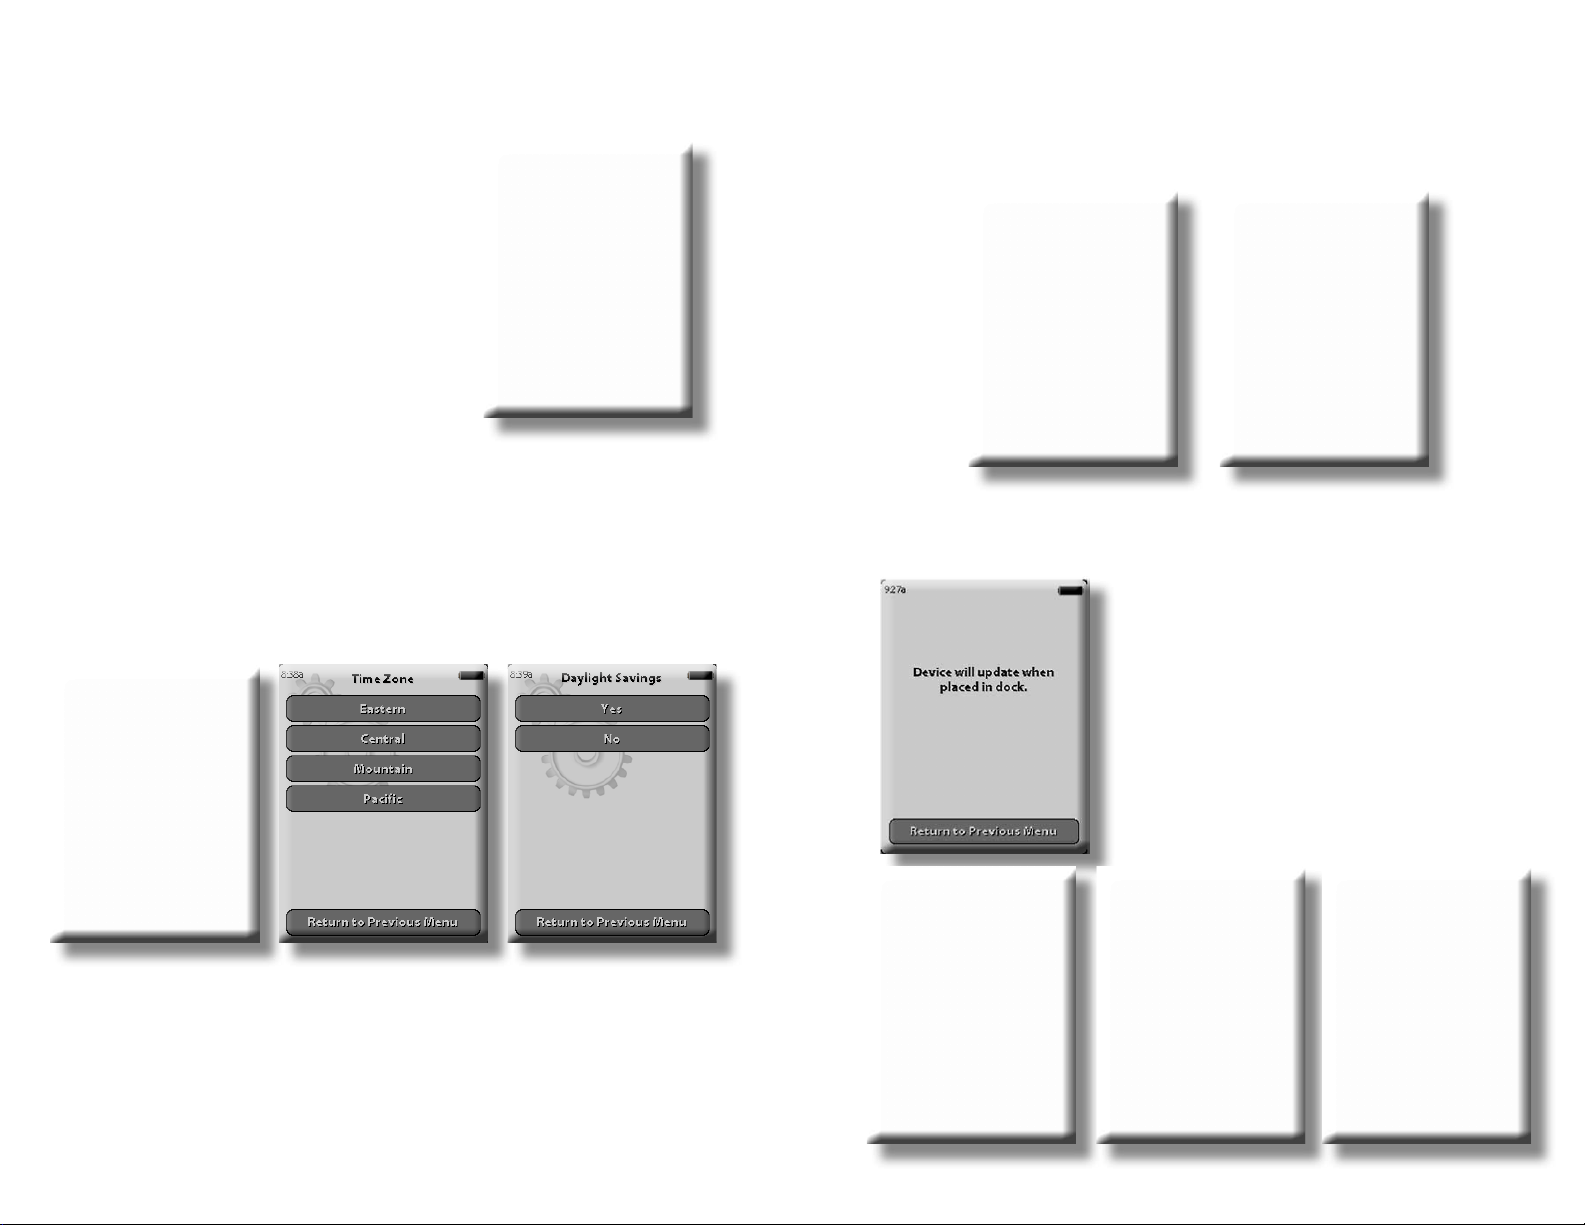
Access the System Settings menu by tapping it’s button. We
will go through the list in the order that it appears. First, tap on the Date and Time Button. Then
you will see a menu that looks like the imageon the left below. Now you are able to change the time
zone and allow for Daylight Savings Time if necessary. Notice that the the current setting appears in
brackets next to each button name. Once you have pressed the Time Zone button, you can choose
one of the 4 zones listed depending on your location, as shown in the middle image below. If you need
to adjust the time for Daylight savings, click the Yes button to turn on Daylight Savings mode and click
the No button to turn it off, as in the image at right below.
to set the desired length of time before the Touchblock goes to sleep. You may choose from 5, 10 or
30 minutes or never, as displayed on the right below. Now press Return to Previous Menu until
you get to the System Setings screen.
The next item is the Update Device button. This will force the Touchblock to look for a system
update the next itme it is placed in the dock. This function will never likely be used by anyone other
than a Touchblock technician on a trouble call. See the image below for what the screen will look like.
Go back to the System Settings screen again and now you will
press the Information button. This will provide a list of the
specifics about the particular Touchblock unit in your hand.
It will give helpfull information like the software version, the
unit’s network address, application info, list info and customer
info to those who are troubleshooting any software or hardware
related problems while the Touchblock is in your store. The
actual screens appear below and, since all of the items do not
fit on one screen, the up and down arrows indicate that more
information can be accessed by pressing them.
Now press the Return to Previous Menu button twice to return to the System Settings
menu. Then tap the Power Management buton and you will see two settings to modify as shown
in the left image on the following page. The first button, Idle Standby, adjusts the length of time
before the unit will go into sleep mode and the second, Power O, will power the device off entirely.
It is likely that you will never need to use the Power Off button. Now press the Idle Standby button
14 15
Page 13

TouchBlock User’s Guide
2. Operating the Website
2.1 Logging on: Go to http://tacocity.compliancemate.com/login and type in your
username and password that you were assigned and press the sign in button. The screen you will
enter the info into will look like the one below.
Once you have successfully logged in you will see the following screen:
16 17
Page 14

TouchBlock User’s Guide
18 19
Page 15

TouchBlock User’s Guide
20 21
Page 16

TouchBlock User’s Guide
22 23
Page 17

TouchBlock User’s Guide
24 25
Page 18

TouchBlock User’s Guide
26 27
Page 19

TouchBlock User’s Guide
28 29
Page 20

TouchBlock User’s Guide
30 31
Page 21

TouchBlock User’s Guide
Technical Specs
FCC Requirements –
FCC ID: WYU-HAND001
FCC ID: WYU-PROBE001
This device complies with part 15 of the FCC Rules. Operation is subject to the following two
conditions.
(1) This device may not cause harmful interference, and
(2) This device must accept any interference received, including interference that may cause
undesired operation.
Warning: Changes or modications to this device not expressly approved by Orderite could void the user’s authority to operate the equipment.
This equipment complies with FCC radiation exposure limits set forth for an
uncontrolled environment. This equipment should be installed and operated with
minimum distance 20cm between the radiator and your body. This transmitter
must not be co-located or operating in conjunction with any other antenna or
transmitter.
This equipment has been tested and found to comply with the limits for a Class A digital device,
pursuant to part 15 of the FCC Rules. These limits are designed to provide reasonable protection
against harmful interference when the equipment is operated in a commercial environment. This
equipment generates, uses, and can radiate radio frequency energy and, if not installed and used in
accordance with the instruction manual, may cause harmful interference to radio communications.
Operation of this equipment in a residential area is likely to cause harmful interference in which case
the user will be required to correct the interference at his own expense.
32 33
Page 22

TouchBlock User’s Guide
34 35
Page 23

TouchBlock User’s Guide
36 37
Page 24

TouchBlock User’s Guide
38 39
Page 25

TouchBlock User’s Guide
40 41
 Loading...