

ORCOM OP 42M1A User Manual

Plasma Monitor
Model : OP-42M1
OP-42M2
TPM-420
User’s Manual
select menu
volume
ENGLISH
IMPORTANT INFORMATION
Precautions
Please read this manual carefully before using your
plasma monitor and keep the manual handy for future
reference.
CAUTION
RISK OF ELECTRIC SHOCK
DO NOT OPEN
CAUTION : TO REDUCE THE RISK OF ELECTRIC SHOCK,
DO NOT REMOVE COVER. NO USERSERVICEABLE PARTS INSIDE. REFER
SERVICING TO QUALIFIED SERVICE
PERSONNEL.
This symbol warns the user that uninsulated
voltage within the unit may have sufficient
magnitude to cause electric shock.
Therefore, it is dangerous to make any kind
of contact with any part inside of this unit.
This symbol alerts the user that important
literature concerning the operation and
maintenance of this unit has been included.
Therefore, it should be read carefully in
order to avoid any problems.
WARNING
TO PREVENT FIRE OR SHOCK HAZARDS, DO NOT
EXPOSE THIS UNIT TO RAIN OR MOISTURE. ALSO DO
NOT USE THIS UNITÕS POLARIZED PLUG WITH AN
EXTENSION CORD RECEPTACLE OR OTHER OUTLETS,
UNLESS THE PRONGS CAN BE FULLY INSERTED.
REFRAIN FROM OPENING THE CABINET AS THERE ARE
HIGH-VOLTAGE COMPONENTS INSIDE. REFER
SERVICING TO QUALIFIED SERVICE PERSONNEL.
FCC STATEMENT
This equipment has been tested and found to comply
with the limits for a Class B digital device, pursuant to
Part 15 of the FCC Rules. These limits are designed to
provide reasonable protection against harmful
interference in a residential installation.
This equipment generates, uses and can radiate radio
frequency energy and, if not installed and used in
accordance with the instructions, may cause harmful
interference to radio communications. However, there is
no guarantee that interference will not occur in a
particular installation.
If this equipment does cause harmful interference to
radio or television reception which can be determined
by turning the equipment off and on, the user is
encouraged to try to correct the interference by one or
more of the following measures.
- Reorient of relocate the receiving antenna.
- Increase the separation between the equipment and
receiver.
- Connect the equipment into an outlet on a circuit
different from that to which the receiver is connected.
- Consult the dealer or an experienced radio, TV
technical for help.
- Only shielded interface cable should be used.
Finally, any changes or modifications to the equipment
by the user not expressly approved by the grantee or
manufacturer could void the users authority to operate
such equipment.
i

SAFETY INFORMATION
Warnings and Safety Precaution
This plasma monitor is designed and manufactured to
provide long, trouble-free service.
No maintenance other than cleaning is required. Use a
soft dry cloth to clean the panel. Never use solvents such
as alcohol or thinner to clean the panel surface.
The plasma display panel consists of fine picture
elements (cells). Although our company produces the
plasma display panels with more than 99.99 percent
active cells, there may be some cells that do not
produce light or remain lit.
For operating safety and to avoid damage to the unit,
read carefully and observe the following instructions.
To avoid shock and fire hazards:
1. Provide adequate space for ventilation to avoid
internal heat build-up. Do not cover rear vents or
install the unit in a closed cabinet or shelves.
If you install the unit in an enclosure, make sure
there is adequate space at the top of the unit to
allow hot air to rise and escape. If the monitor
becomes too hot, the overheat protector will be
activated and the monitor will be turned off. If this
happens, turn off the power to the monitor and
unplug the power cord. If the room where the
monitor is installed is particularly hot, move the
monitor to a cooler location, and wait for the
monitor to cool for 60 minutes.
If the problem persists, contact your dealer for
service.
2. Do not use the power cord polarized plug with
extension cords or outlets unless the prongs can be
completely inserted.
3. Do not expose the unit to water or moisture.
4. Avoid damage to the power cord, and do not attempt
to modify the power cord.
5. Unplug the unit during electrical storms or if the unit
will not be used over a long period.
6. Do not open the cabinet which has potentially
dangerous high voltage components inside. If the unit
is damaged in this way the warranty will be void.
Moreover, there is a serious risk of electric shock.
7. Do not attempt to service or repair the unit. We are
not liable for any bodily harm or damage caused if
unqualified persons attempt service or open the back
cover. Refer all service to authorized Service Centers.
To avoid damage and prolong operating life:
1. Use only with 100~240V 50/60Hz AC power supply.
Continued operation at line voltages other than
100~240V AC will shorten the life of the unit, and
might even cause a fire hazard.
2. Handle the unit carefully when installing it and do
not drop.
3. Set the unit away from heat, excessive dust, and
direct sunlight.
4. Protect the inside of the unit from liquids and small
metal objects. In case of accident, unplug the unit
and have it serviced by an authorized Service Center.
5. Do not hit or scratch the panel surface as this causes
flaws on the surface of the screen.
6. For correct installation and mounting it is strongly
recommended to use a trained, authorized dealer.
7. As is the case with any phosphor-based display (like a
CRT monitor, for example) light output will gradually
decrease over the life of a Plasma Display Panel.
Recommendations to avoid or minimize phosphor burn-in
Like all phosphor-based display devices and all other gas
plasma displays, plasma monitors can be susceptible to
phosphor burn under certain circumstances. Certain
operating conditions, such as the continuous display of a
static image over a prolonged period of time, can result
in phosphor burn if proper precautions are not taken. To
protect your investment in this plasma monitor, please
adhere to the following guidelines and recommendations
for minimizing the occurrence of image burn:
¥ Always enable and use your computerÕs screen saver
function during use with a computer input source.
¥ Display a moving image whenever possible.
¥ Change the position of the menu display from time to
time.
¥ Always power down the monitor when you are
finished using it.
If the plasma monitor is in long term use or continuous
operation take the following measures to reduce the
likelihood of phosphor burn:
¥ Lower the Brightness and Contrast levels as much as
possible without impairing image readability.
¥ Display an image with many colors and color
gradations (i.e. photographic or photo-realistic
images).
¥ Create image content with minimal contrast between
light and dark areas, for example white characters on
black backgrounds. Use complementary or pastel
color whenever possible.
¥ Avoid displaying images with few colors and distinct,
sharply defined borders between colors.
ii

ENGLISH
CONTENTS
❑
I
NTRODUCTION
Introduction to the Plasma Monitor ................... 1
The features youÕll enjoy include: .................... 1
Contents of the Package ................................ 1
Options ..................................................... 1
❑
P
ARTNAMES ANDFUNCTION
Front View / Side View .................................. 2
Rear View / Terminal Board ............................ 3
Remote Control ........................................... 4
Battery Installation and Replacement ............... 5
Operating Range .......................................... 5
Handling the remote control ........................... 5
❑
I
NST ALLA TION
................................................ 6
Connecting Your PC or Macintosh Computer ......... 7
Connections with Equipment that has a Digital
Interface ................................................... 7
Connecting Your VCR or Laser Disc Player ............ 7
Connecting Your DVD Player or Digital TV
Settop Box .................................................. 7
External Speaker Connections .......................... 8
Pin Assignments for D-sub 15 pin Connector
(Analog RGB1) ............................................. 9
Pin Configuration and Signal of the DVI 29 pin
Connector (Analog RGB2 and Digital RGB) ............ 9
❑
B
ASICOPERATIONS
1 POWER ................................................. 10
2 VOLUME ................................................ 10
3 MUTE ................................................... 10
4 DISPLAY ................................................ 10
5 DIGITAL ZOOM ........................................ 10
6 OFF TIMER ............................................. 10
7 Setting the Screen Mode ............................ 11
7-1 When watching videos or digital video discs ...... 11
7-2 When watching high definition video source ..... 11
7-3 When watching computer images .................. 11
8 Setting the Picture Mode ............................ 12
❑
OSD (ONS
CREENDISPLA Y
) C
ONTROLS
Menu Operations ........................................ 13
1 PICTURE Settings Menu ............................. 13
1-1 Adjusting the picture .................................. 13
1-2 Setting the picture mode ............................. 14
1-3 Setting the color temperature ....................... 14
1-4 Adjusting the color to the desired quality ......... 15
2 SOUND Settings Menu ............................... 15
3 SCREEN Settings Menu ............................... 16
4 SETUP Settings Menu ................................ 17
4-1 Setting the language for the menus ................ 17
4-2 Adjusting the position of the menu display ....... 17
4-3 Adjusting the background of the menu display ... 18
4-4 Resetting to the default values ..................... 18
4-5 Setting the OFF Timer ................................ 18
5 INPUT Setting Menu ................................. 19
❑
T
ABLE OFCOMPUTERSIGNALSSUPPORTED
.................. 20
❑
T
ROUBLESHOOTING
.................................................. 22
❑
S
PECIFICATIONS
...................................................... 24
iii

1
INTRODUCTION
❑
Introduction to the Plasma Monitor
Our Plasma Monitor is a seamless blend of cutting-edge
visual technology and sophisticated design. At 42-inches,
with a 16:9 aspect ratio, this Plasma Monitor certainly
makes a big impression. However, at a mere 3.1
inches/78 mm thin, the monitorÕs sleek techno-art lines
blend in well with your environment. Plasma MonitorÕs
crisp, vivid image quality will transform data from any
graphic medium from PCs to DVD players- into art. And
weighing only 66 lbs/ 30 kg, it actually can be hung
almost anywhere. We has made sure that a host of
multimedia resources can be easily connected and
displayed as brilliantly as intended on the Plasma
Monitor.
❑
The features you’ll enjoy include:
¥ 42-inch screen
¥ 16:9 aspect ratio
¥ 3.1 inch / 78 mm thin
¥ 66 lbs/ 30 kg light
¥ High-resolution screen: 852 x 480 pixels
¥ 160-degrees of off-axis viewing, horizontally and
vertically.
¥ Flicker and warp free display provides excellent
image geometry even in screen corners
¥ Not affected by magnetic fields, no color drift or
edge distortion.
¥ VGA, SVGA, XGA, SXGA, UXGA computer signal
compatibility
¥ NTSC, PAL, SECAM, composite and S-Video signal
compatibility
¥ 480P, 1080I, 720P and HDTV signal compatibility
¥ PCs, VCRs, Laser Disc and DVD player source
compatibility
¥ Scan conversion automatically converts VGA, SVGA, XGA,
SXGA and UXGA signals to the panelÕs native resolution
¥ RGB input (2 pairs), Video input (1 pairs), DVD/HD
input (2 pairs), Audio input (4 pairs), External Control
input (1 pair), Digital RGB input (1 pair)
¥ Plasma Monitor control system provides user
selectable on-screen color temperature settings
¥ New Drive Technology
¥ Component video input terminal for DVD, 15.734kHz,
15.625kHz (Y, CB, CR )
¥ Digital broadcasting source compatibility
¥ 8 languages (English, German, French, Italian,
Korean, Spanish, Swedish, and Japanese)
❑
Contents of the Package
■ plasma monitor
■ Power cord
■ RGB cable (D-Sub 15- pin connector)
■ Component cable
■ AV cable
■ Audio cable
■ Remote control with two AAA Batteries
■ UserÕs manual
❑
Options
■ Wall mount unit
■ Tabletop stand
■ Speakers
OFF
LIGHT
ON
RGB/PC DVD/HD
VIDEO
EXIT FREEZE
MENU
ZOOM
ZOOM VOLUME
MUTE
PICTURE
SCREEN
OFFTIMER
RECALL
ENGLISH
2
volume
select menu
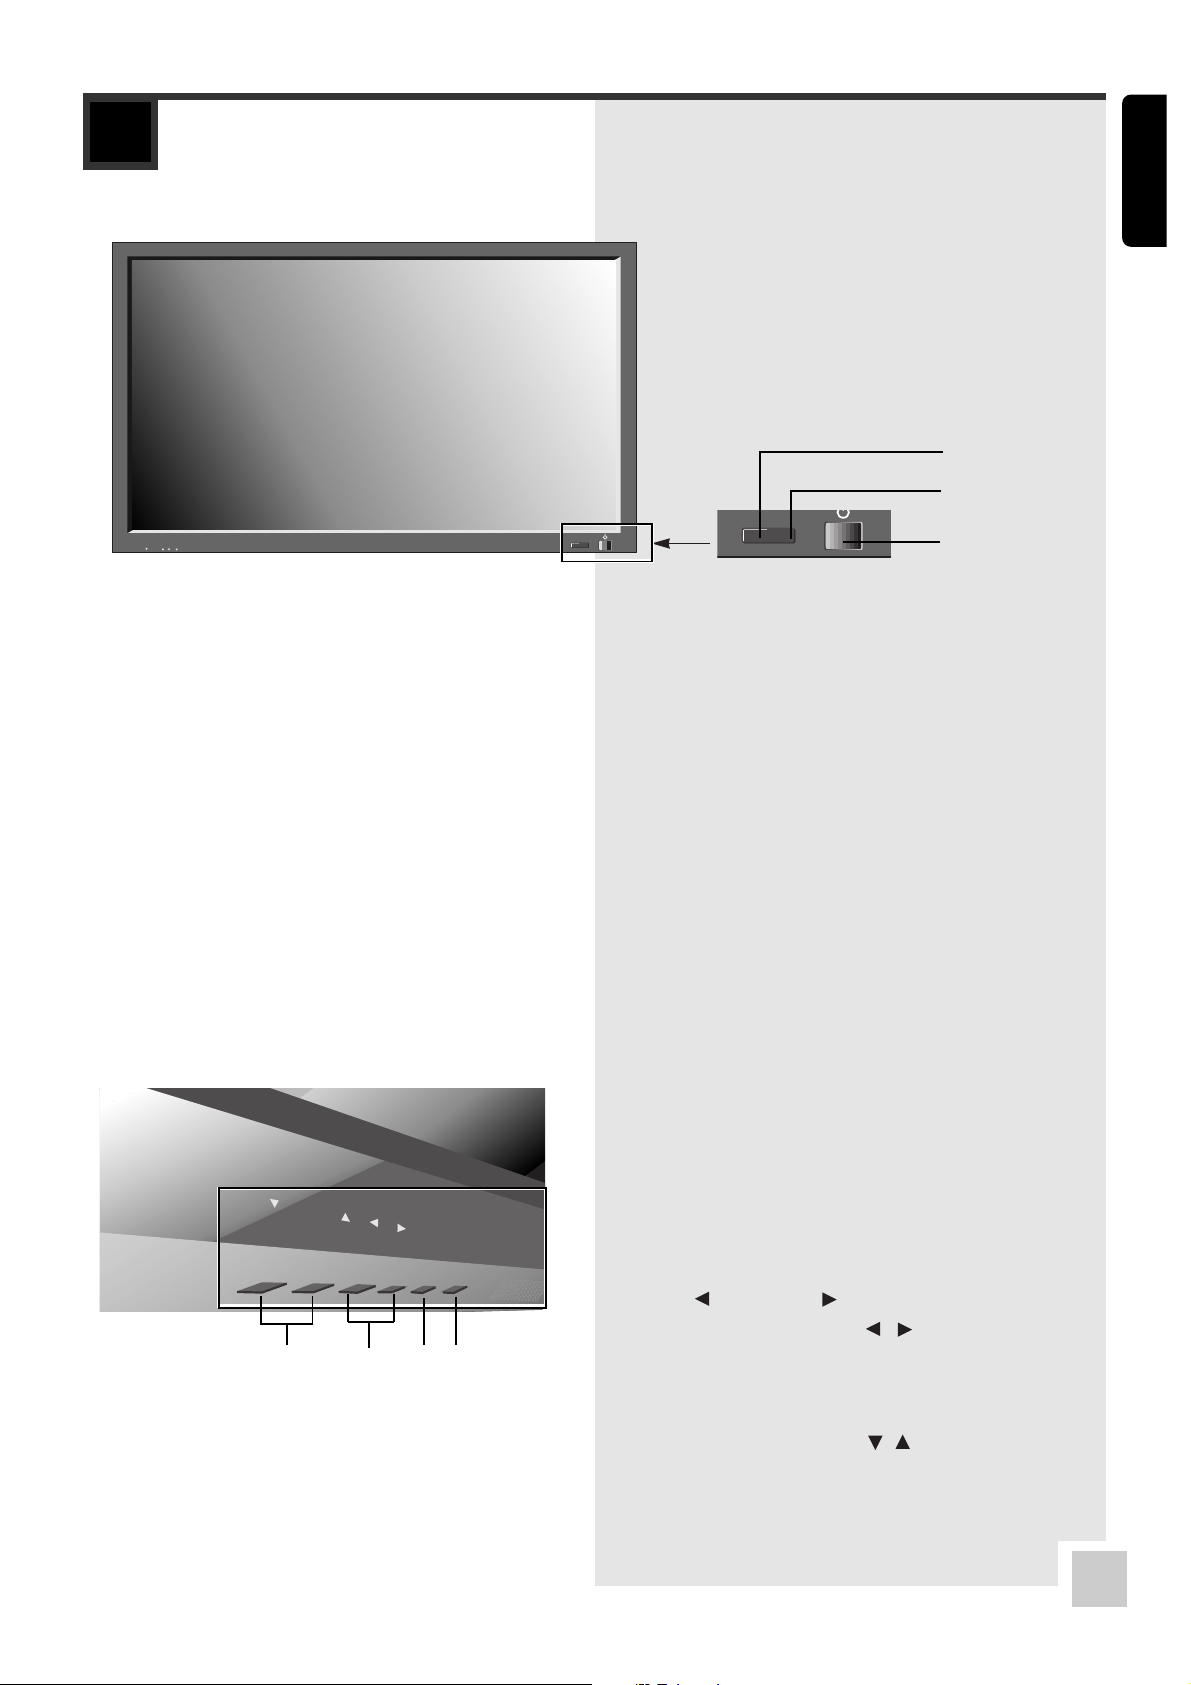
PART NAMES AND FUNCTION
❑
Front View
! Remote sensor window
Receives the signals from the remote control.
@ POWER/STANDBY indicator
When the power is on ..................... Lights green.
When the power is in the standby mode .. Lights red.
# P ower
Turns the monitorÕs power on and off.
❑
Bottom View
! MENU
Press this button to access the OSD controls.
@ INPUT SELECT / EXIT
Switches the input, in the following order.
VIDEO ➝ S-Video ➝ Component1 ➝ Component2 ➝
RGB1 ➝ DVI-RGB2 ➝DVI-DIGITAL RGB ➝VIDEO ➝ ...
Functions as the EXIT buttons in the On-Screen
Display (OSD) mode.
# LEFT /– and RIGHT /+
Functions as the CURSOR ( / ) buttons in the OnScreen Display (OSD) mode.
$ VOLUME Down and Up
Adjusts the volume.
Functions as the CURSOR (
/ ) buttons in the On-
Screen Display (OSD) mode.
!
@
!
@
#
$
volume
select menu
#
3
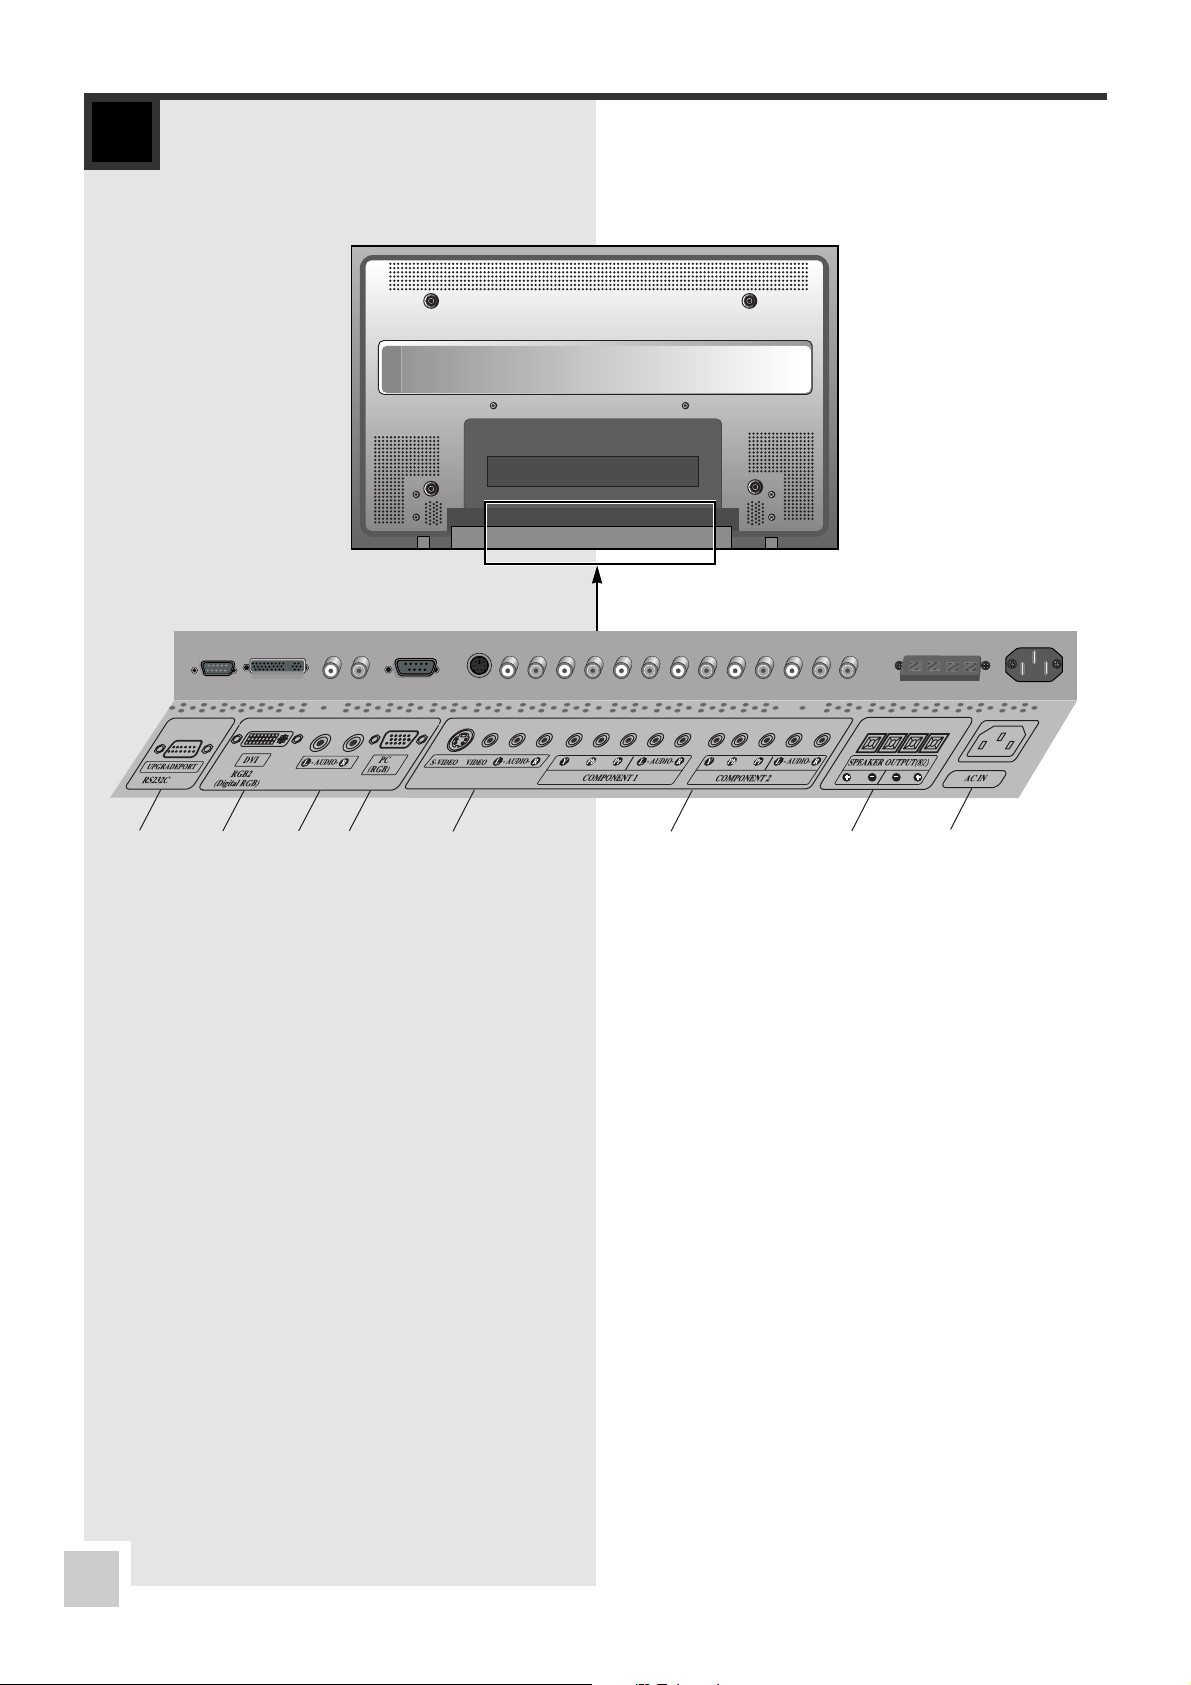
PART NAMES AND FUNCTION
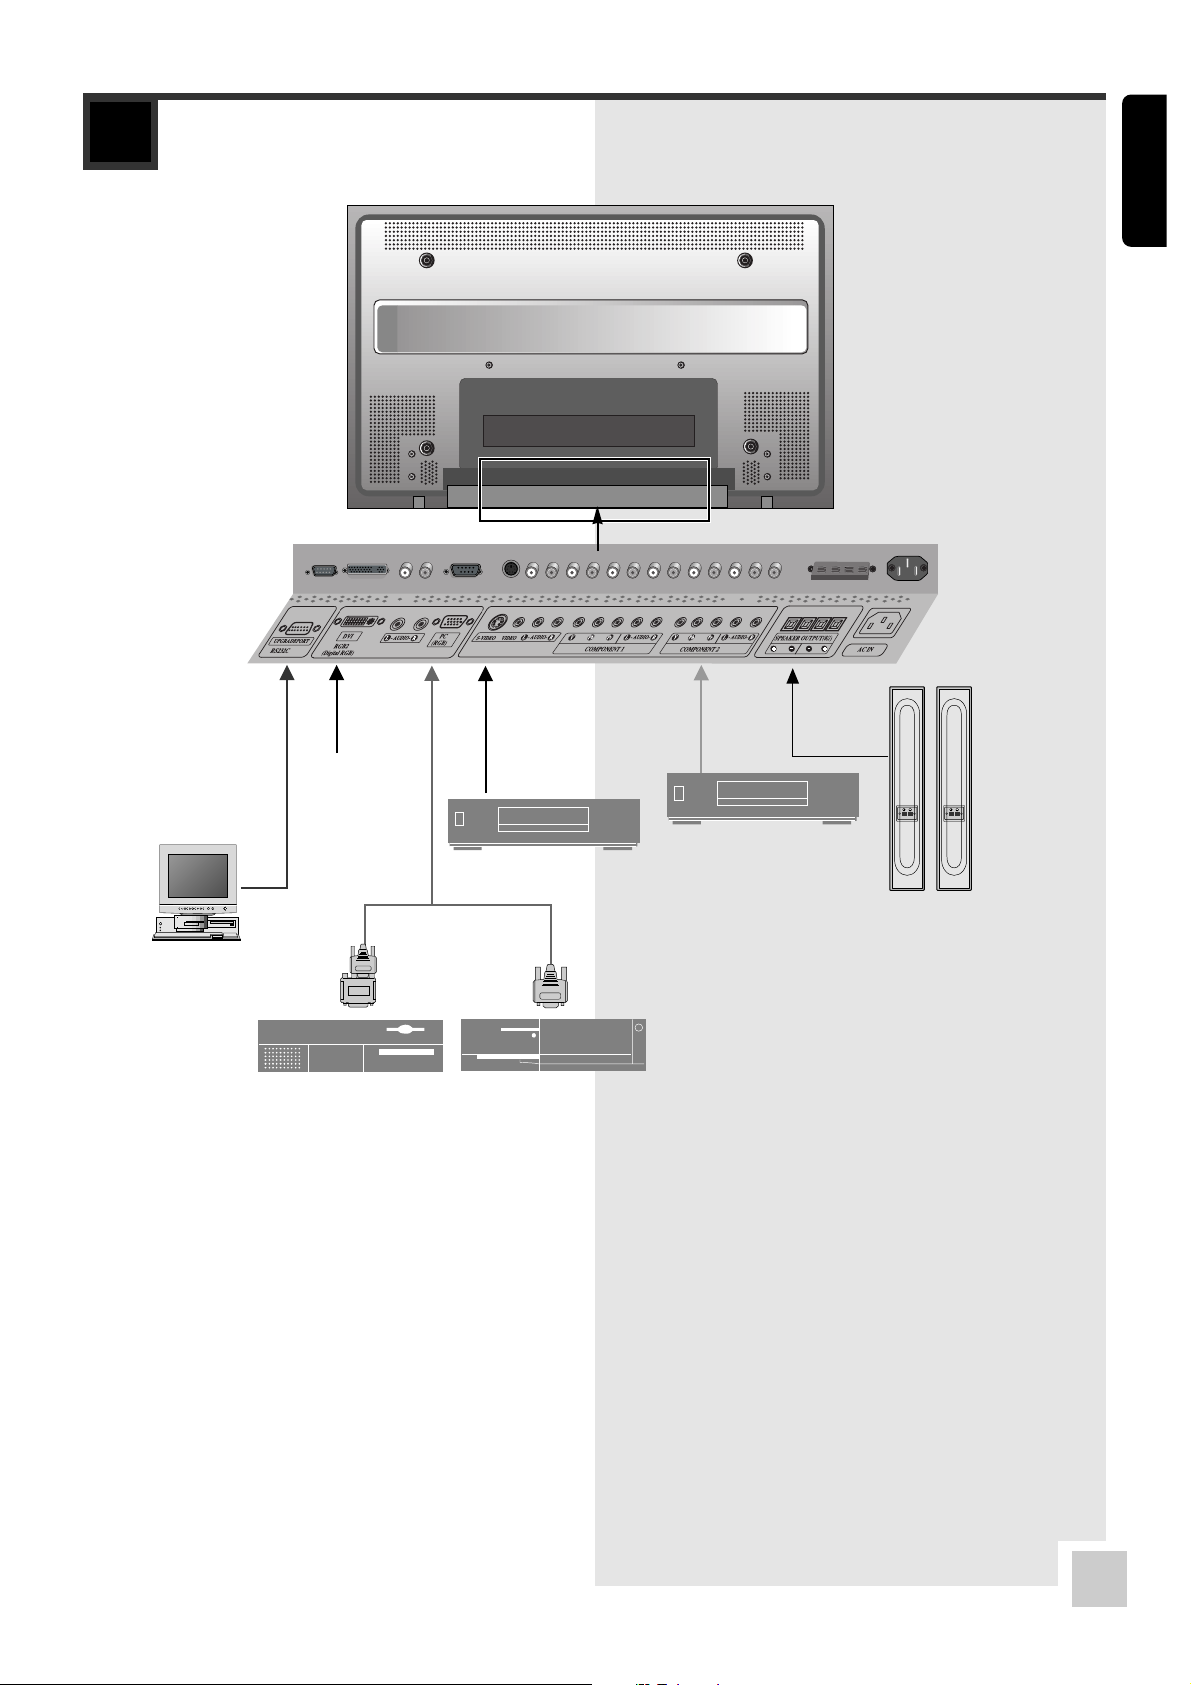
! EXTERNAL CONTROL
Only for service.
@ RGB2 (DVI 29pin)
Inputs a digital RGB signal (TMDS) or Analog RGB
signal.
# AUDIO
These are audio input terminals for RGB input.
$ RGB1(15pin D-Sub)
Inputs the analog RGB signal of personal computer,
etc.
% VIDEO, S-Video
Connect VCRÕs, DVDÕs or Laser Discs, etc. here.
^ COMPONENT1, 2
Connect DVDÕs or Digital TV settop box, etc. here.
& EXTERNAL SPEAKER L and R
Connect speakers here. Maintain the correct polarity.
* AC IN
Connect the included power cord here.
❑
Rear View/ Terminal Board
!@#$ % ^ & *
ENGLISH
4
PART NAMES AND FUNCTION
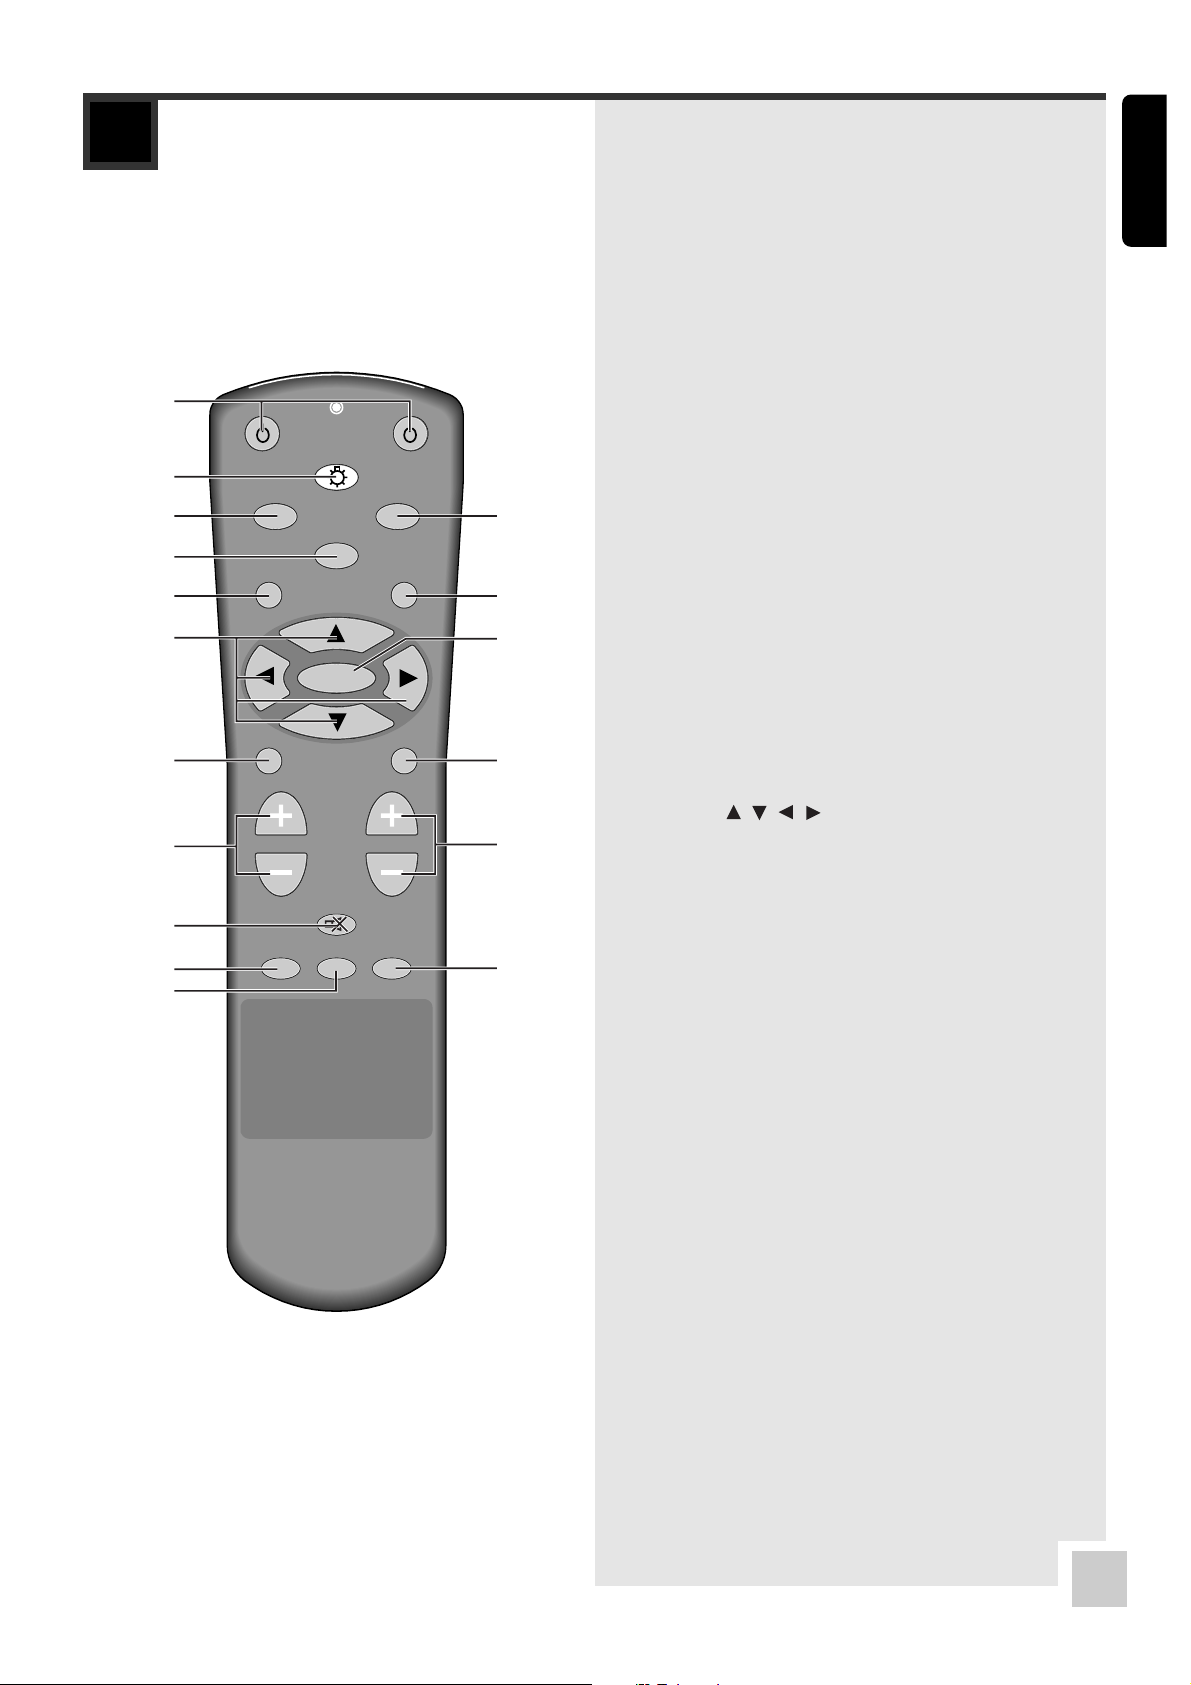
❑
Remote Control
! POWER ON/OFF
Switches Power ON/OFF. (This does not operate when
POWER/STANDBY indicator of the main unit is off.)
@ LIGHT
lights on every button of remote control.
# RGB/PC
Press this button to select RGB/PC as the source.
RGB1 ➝ RGB2 ➝ Digital RGB ➝ RGB1...
$ DVD / HD
Press this button to select DVD/HD as the source.
COMPONENT1 ➝ COMPONENT2 ➝ COMPONENT1...
% VIDEO
Press this button to select VIDEO as the source.
VIDEO➝ S-Video ...
^ EXIT
Press this button to exit the OSD controls in the main
menu. Press this button during the display of the sub
menu to return to the main menu.
& FREEZE
freezes current screen.
* CURSOR ( ///)
Use these buttons to select items or settings and to
adjust settings.
( MENU
Press this button to access the OSD controls.
) ZOOM
Enters into Zoom mode.
1 ZOOM (+ /–)
Enlarges or reduces the image.
2 RECALL
Displays the source settings on the screen.
3 VOLUME (+ /–)
Adjusts the volume.
4 MUTE
Mutes the sound.
5 OFF TIMER
Activates the off timer for the unit.
6 PICTURE
Press this button to select the mode of picture, and
the recommended picture mode is set.
USER ➝ NORMAL ➝ CINEMA ➝ DYNAMIC ➝ USER ...
7 SCREEN
Press this button to select the mode of screen.
NORMAL ➝ WIDE ➝ ZOOM1 ➝ ZOOM2 ➝ PANORAMA
➝ NORMAL ...
OFF
LIGHT
ON
RGB/PC DVD/HD
VIDEO
EXIT FREEZE
MENU
ZOOM
ZOOM VOLUME
MUTE
PICTURE
SCREEN
OFFTIMER
RECALL
!
$
&
(
2
3
7
@
#
%
^
*
)
1
4
5
6
5
PART NAMES AND FUNCTION
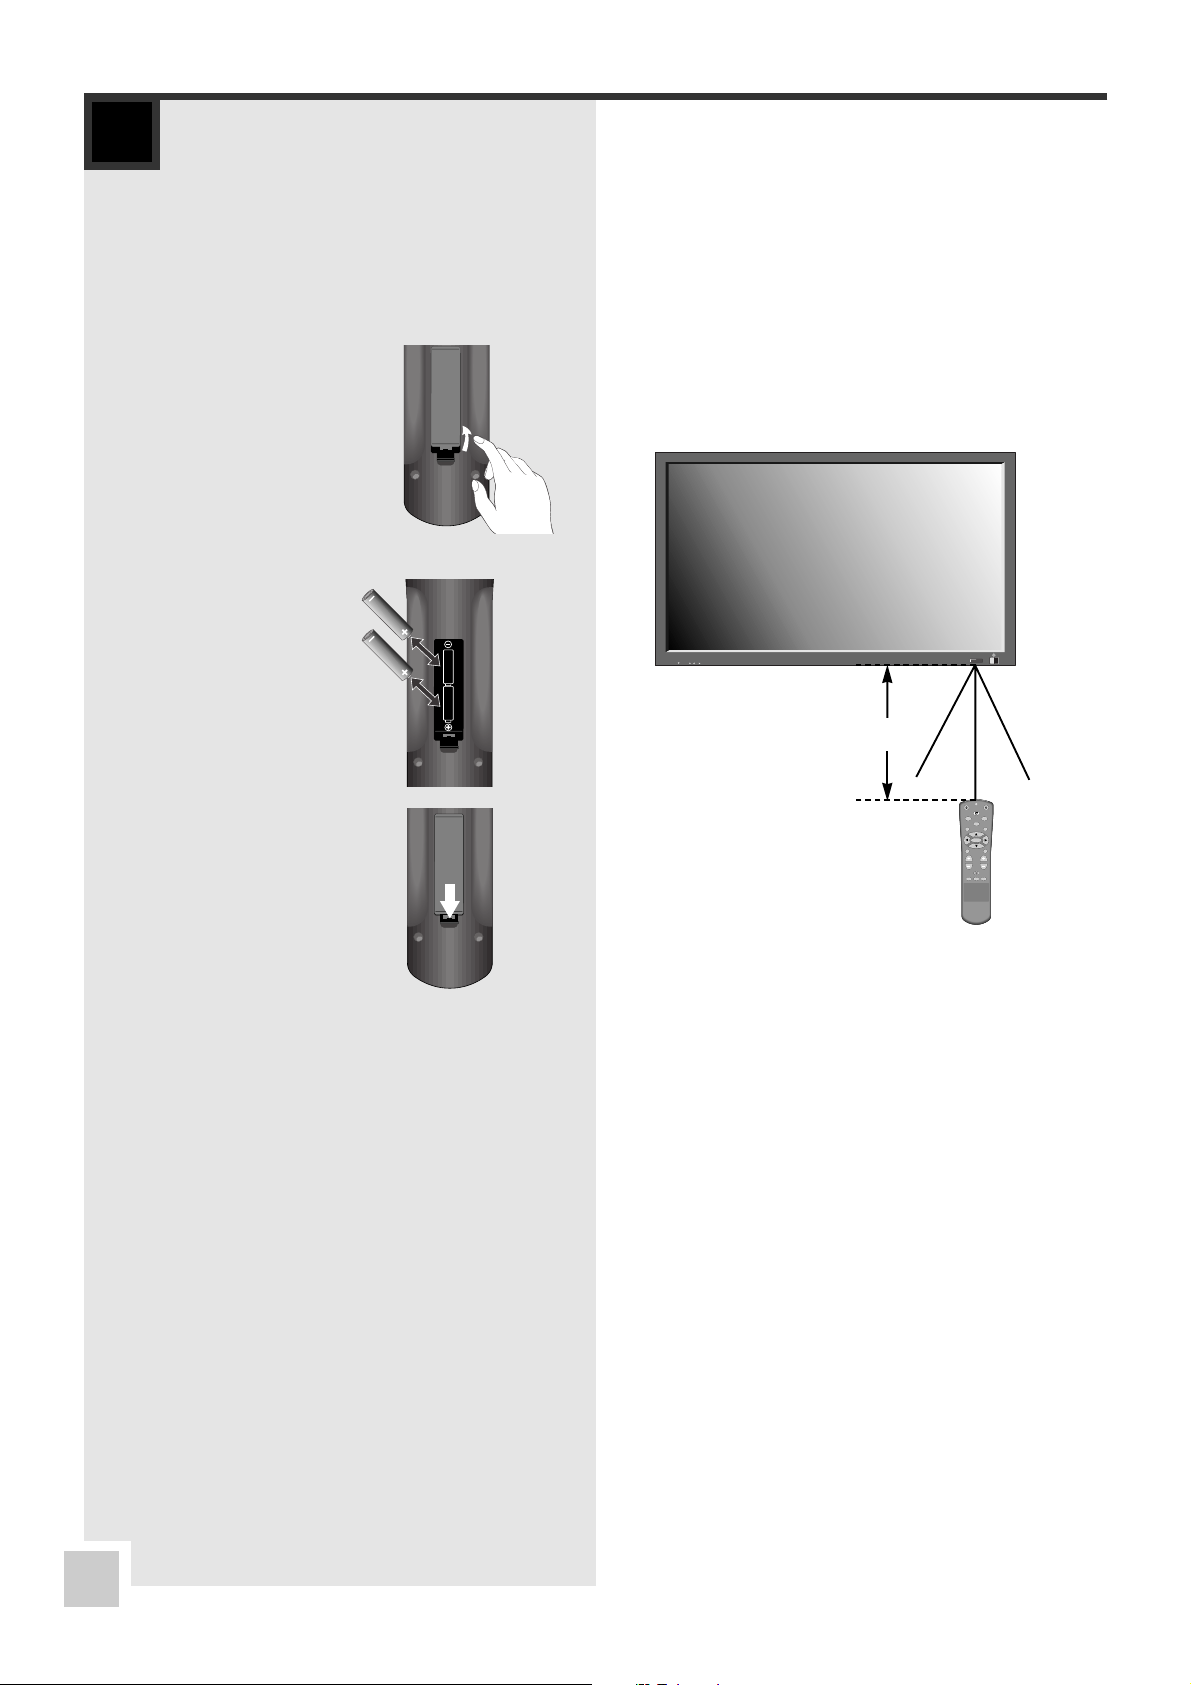
❑
Battery Installation and
Replacement
Insert the 2 ÒAAAÓ batteries, making sure to set them in
with the proper polarity.
1. Press and open the cover.
2. Align the batteries according to the (+) and (Ð)
indication inside the case.
3. Close the cover.
❑
Operating Range
* Use the remote control within a distance of about 7
m/ 23ft. from the front of the monitorÕs remote
control sensor and at horizontal and vertical angles of
up to approximately 30¡.
* The remote control operation may not function if the
monitorÕs remote control sensor is exposed to direct
sunlight or strong artificial light, or if there is an
obstacle between the sensor and the remote control.
❑
Handling the remote control
¥ Do not drop or mishandle the remote control.
¥ Do not get the remote control wet. If the remote
control gets wet, wipe it dry immediately.
¥ Avoid heat and humidity.
¥ When not using the remote control for a long period,
remove the batteries.
¥ Do not use new and old batteries together, or use
different types together.
¥ Do not take apart the batteries, heat them, or throw
them into a fire.
volume
select menu
OFF
LIGHT
ON
RGB/PC DVD/HD
VIDEO
EXIT FREEZE
MENU
ZOOM
ZOOM VOLUME
MUTE
PICTURE
SCREEN
OFFTIMER
RECALL
Approx..
7m(23ft)
30¡ 30¡
ENGLISH
6
INSTALLATION
External Speaker
(see page 8)
External Equipment
(only for service)
Personal
computer
with a digital
RGB output
DVD Player or HD Settop Box
IBM VGA or CompatibleMacintosh or Compatible
VCR , Laser Disc Player
or DVD Player
 Loading...