

Page 1

SoundWave 32Pro
User’s Manual
ORCHID
Page 2

1994, Orchid Technology. This manual is copyrighted. All rights reserved.
This document may not, in whole or part, be copied, reproduced, reduced or
translated by any means, either mechanical or electronic, without prior
consent in writing from Orchid Technology, Incorporated.
SoundWave 32Pro is a trademark of Orchid Technology. All other products
mentioned in this manual are trademarks of their respective manufacturers.
Orchid Technology
45365 Northport Loop West
Fremont, CA 94538-9973
Page 3

TABLE OF CONTENTS
Introduction 4
About This Manual 5
Before You Begin 6
CHAPTER 1 - HARDWARE AND SOFTWARE 7
Installing SoundWave 32Pro 7
Quick Installation 7
Hardware Installation 7
Software Installation 8
Audio Hardware Setup 9
Figure 1.1: SoundWave 32Pro Diagram 10
Preparing Your SoundWave 32Pro 11
Jumper Settings 11
Table 1.1: Jumper Settings 11
Jumper J3: I/O Address 11
Jumper JP1: Wavetable 12
Wavetable Configuration 12
Table 1.2: Wavetable Configuration 12
External Devices 13
Figure 1.7: SoundWave 32Pro Bracket 14
The MIDI Interface 14
Installing a CD-ROM Drive 15
Configuring SoundWave 32Pro for a CD-ROM 16
CD-ROM Device Drivers 16
SoundWave 32Pro CD-ROM Device Drivers 17
SoundWave 32Pro User's Manual 1
Page 4

CHAPTER 2 - ORCHID UTILITIES 21
SW32.EXE 21
Synthesis Algorithms 22
General MIDI and Q-Sound 22
Volume Control 23
SoundWave 32Pro Control Panels 24
Windows Control Panel 24
Windows Control Panel Menus 24
Windows Control Panel Features 26
DOS Control Panel 27
DOS Control Panel Features 27
Key-Z Player 29
Key-Z Player - Solo 32
Keyboard Notes 32
Notes Progression 32
Sustain 33
Key-Z Player Accompanied 33
APPENDIX A - TECHNICAL INFORMATION 35
CompuServe 35
Before You Begin 35
Troubleshooting the SoundWave 32Pro 36
Avoiding Address Conflicts 42
MIDI Usage 43
Technical Specifications 45
2 SoundWave 32Pro User's Manual
Page 5

Address Settings and Pin Assignments 48
CD-ROM Addresses 48
Sound Blaster Mode Addresses 48
Windows Sound System Mode Addresses 49
MPU-401 Mode Addresses 49
CD-ROM Audio Cable Connector 49
Joystick-MIDI Port Pin Assignments 50
SoundWave 32Pro MIDI Port Specifications 51
APPENDIX B - MIDI 53
MIDI Specifications 53
MIDI Overview 53
General MIDI 53
SoundWave 32Pro Sounds 54
SoundWave 32Pro Percussion Sounds 58
LIMITATION OF LIABILITY 59
FCC NOTICE 60
INDEX 61
SoundWave 32Pro User's Manual 3
Page 6

Introduction
Welcome to the exciting world of sound with the
Orchid SoundWave 32Pro! The SoundWave 32Pro™
is an advanced wavetable DSP (Digital Signal Processor) 16-bit sound card. For realistic sounds, the
SoundWave 32Pro has two megabytes of high-quality sound samples on-board. These samples can be
used by games or multimedia applications under
the General MIDI specification. In addition, 16-bit
stereo audio and ADPCM compression allow you to
record high-quality sounds directly to the hard disk.
SoundWave 32Pro uses Algorithmic/Wavetable
Synthesis (A/WS) for creating sounds. A/WS uses
FM emulation and wavetable synthesis both alone
and in combination with one another. Wavetable
synthesis is used for most of the acoustic voices, and
FM emulation synthesis is used on some "synthesizer" sounds. The result is some of the most dynamic and fascinating sounds ever to come out of a
sound card!
"Combo" modes allow the SoundWave 32Pro to
support several sound and multimedia standards.
The unique ability to combine various sound and
multimedia formats enables the SoundWave 32Pro
to be configured to produce the best balance between sound quality and features for your computer.
The flexible architecture of SoundWave 32Pro provides the ability to switch between sound standards
and to update to new sound standards without
additional hardware. SoundWave 32Pro also comes
with interfaces for Sony and Mitsumi CD-ROM
drives.
Thank you for purchasing the SoundWave 32Pro.
Care has been taken to ensure that it will provide
you with years of trouble-free operation. We believe
that you will be pleased with your purchase.
4 SoundWave 32Pro User's Manual
Page 7

About This Manual
This manual presumes that you are already familiar
with your IBM PC-compatible computer. While the
SoundWave 32Pro has been designed to be easy-toinstall, we recommend that you refer to your
computer’s reference manual when terminology or
installation steps are unfamiliar to you. Each section
is divided into short, easy-to-follow steps, to help you
understand the installation and function of the
SoundWave 32Pro.
Section 1: Hardware and Software
Whether you are a beginner or an experienced user,
this section will give you important information on
proper installation, and instructions on how to connect external devices to SoundWave 32Pro.
Section 2: Orchid Utilities
This section provides you with several Orchid utilities. These utilities will enhance the capabilities of
your SoundWave 32Pro and your CD-ROM drive.
Appendix A: Technical Information
If you are experiencing installation difficulties or
require troubleshooting information, this appendix
gives you checkpoints to ensure that your SoundWave
32Pro is operating properly. Appendix A also includes the technical specifications.
Appendix B: MIDI
Here you are given an overview of the MIDI specification and a list of the General MIDI and percussion
sounds used on SoundWave 32Pro.
SoundWave 32Pro User's Manual 5
Page 8

Before You Begin
This manual will familiarize you with the features,
installation and use of the SoundWave 32Pro. There
are several symbols and conventions used throughout
this manual which will help to draw your attention to
a feature or to focus on important information:
When you see the Magnifying Glass it
means the text is referring to something you should take a closer look at
before proceeding further.
When you see the Exclamation Mark,
it gives important information on
avoiding damage to property.
Common Names
BBS Bulletin Board System
DAC Digital/Analog Converter
DSP Digital Signal Processor
MIDI Musical Instrument Digital Interface
MPC Multimedia PC
PC Refers to the family of IBM PC, PC/XT or
PC/AT compatible computers
6 SoundWave 32Pro User's Manual
Page 9

Section 1: Hardware and Software
Chapter
1
STATIC!
Before
handling the
SoundWave
32Pro, be
sure to guard
against
electrostatic
discharge.
Be properly
grounded by
touching the
power supply
housing, or
you may
want to buy a
Ground strap
from your
local
computer
store.
INSTALLING SOUNDWAVE 32PRO
Designed to be easy to use and easy to install,
SoundWave 32Pro can be used with the preset
jumper settings. If you need to change the default
address settings, refer to "Preparing Your
SoundWave 32Pro" in this section. For details on
connecting external devices, refer to "External Devices" in this section.
Quick Installation
Hardware Installation
If you are connecting a CD-ROM drive, go to "Installing
a CD-ROM Drive," otherwise continue. Please refer to
Figures 1.2 and 1.5 for connection locations.
1. If you previously installed another sound card,
remove it and all associated files and drivers
from your hard drive.
2. Turn off the power to your computer, unplug all
power cords and remove the computer cover.
3. Install the SoundWave 32Pro into a 16-bit expansion slot.
4. If you are connecting external speakers to the
SoundWave 32Pro, connect the speaker cable to
the SPEAKER jack on the metal bracket.
5. If you are connecting amplified external speakers to the SoundWave 32Pro, connect the speaker
cable to the LINE OUT jack on the metal bracket.
6. If you are connecting a microphone to the
SoundWave 32Pro, connect the microphone
cable to the MIC jack on the metal bracket.
7. If you are connecting a MIDI device or a joystick
to the SoundWave 32Pro, connect the cable to
the joystick port on the metal bracket (refer to
Figure 1.5).
SoundWave 32Pro User's Manual 7
Page 10

Section 1: Hardware and Software
8. Reconnect previously removed cables and power
cords and replace the cover of the computer.
Software Installation
1. Start Microsoft Windows.
2. Insert the SoundWave 32Pro software disk into
your floppy drive.
3. From the Program Manager File menu, choose
Run.
4. Type the drive letter, then SETUP.EXE, e.g.,
A:\SETUP.EXE.
5. The SETUP.EXE program automatically copies
the SoundWave 32Pro drivers and application
programs to your hard drive.
6. Once the software is installed, the SETUP.EXE
program automatically updates your
CONFIG.SYS and AUTOEXEC.BAT files.
7. At this point, you will be prompted to restart
your system. The CD-ROM drive is initialized on
bootup. If it does not initialize on bootup, check
for an I/O, DMA or IRQ address conflict. Verify
the address settings of other peripherals in your
system to correct the address conflict(s).
The driver and utility software installation is complete! The Orchid software programs will be located
in the Orchid Audio Software group. Software applications are also included for use in the Windows
Multimedia environment. Install the individual
disk(s) for each application. For details on the software applications, refer to the Multimedia Applications User's Manual.
8 SoundWave 32Pro User's Manual
Page 11
Section 1: Hardware and Software
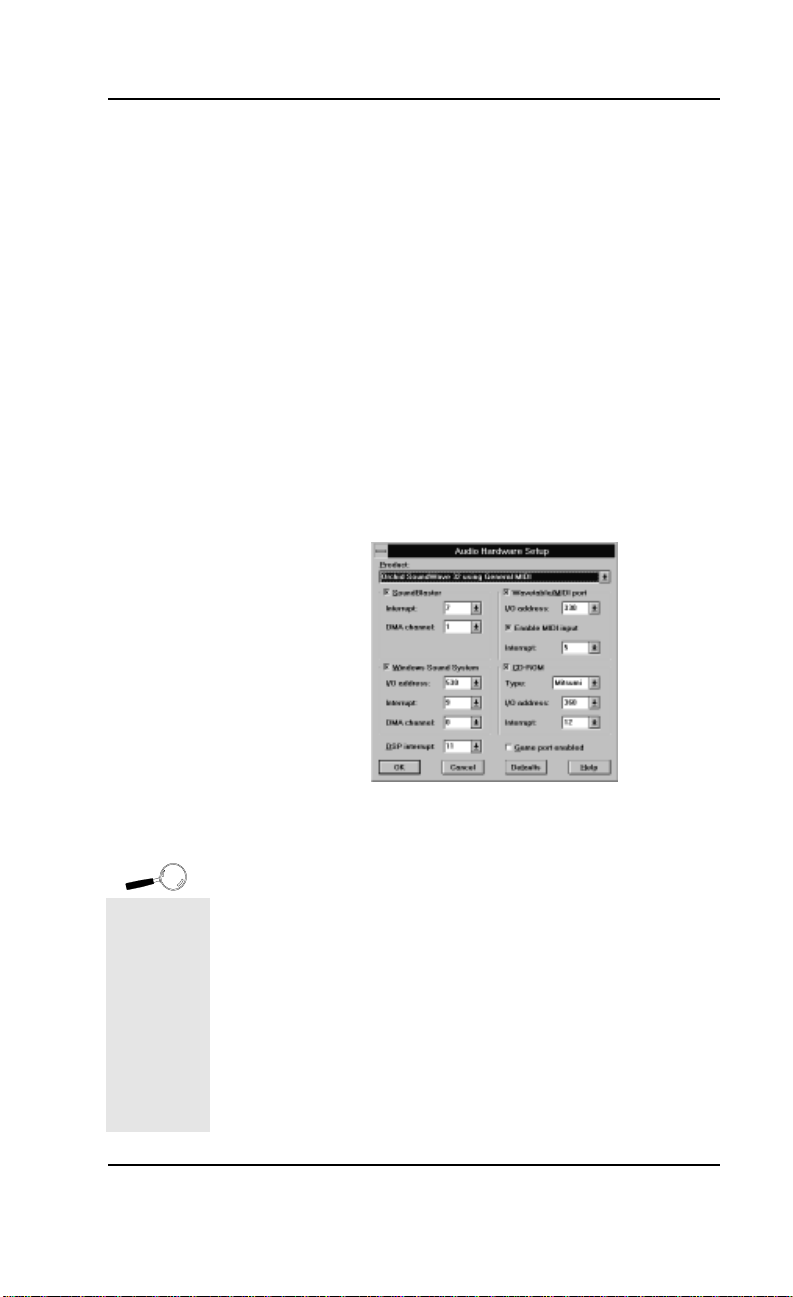
Audio Hardware Setup
Besides installing the SoundWave 32Pro's drivers
and applications, the SETUP.EXE program lets you
configure its audio hardware resources. Your
SoundWave 32Pro needs to claim some hardware
resources for exclusive use to signal its status and
needs to the system. Therefore, two hardware devices cannot share the same address. Refer to the
documentation that accompanies any other hardware products installed in your system for their
addresses.
Configuring the audio hardware resources:
1. From the Orchid Audio Software group, doubleclick on the Audio Hardware Setup icon.
To restore
the default
recommended
hardware
settings at
any time,
click on the
Defaults
button and
then on the
OK button.
Figure 1.1: Audio Hardware Setup Screen
2. Select your SoundWave 32Pro configuration from
the Product pull-down menu. Click on the Defaults button to see the most commonly used
hardware configurations.
3. Enable the sound standard(s) and other features
of your choice. To enable a selection, click in the
box next to the selection. For each selection
enabled, select addresses that will not duplicate
those of other hardware devices in your system.
4. Once all your selections are made, click on OK to
save your settings.
SoundWave 32Pro User's Manual 9
Page 12
Section 1: Hardware and Software
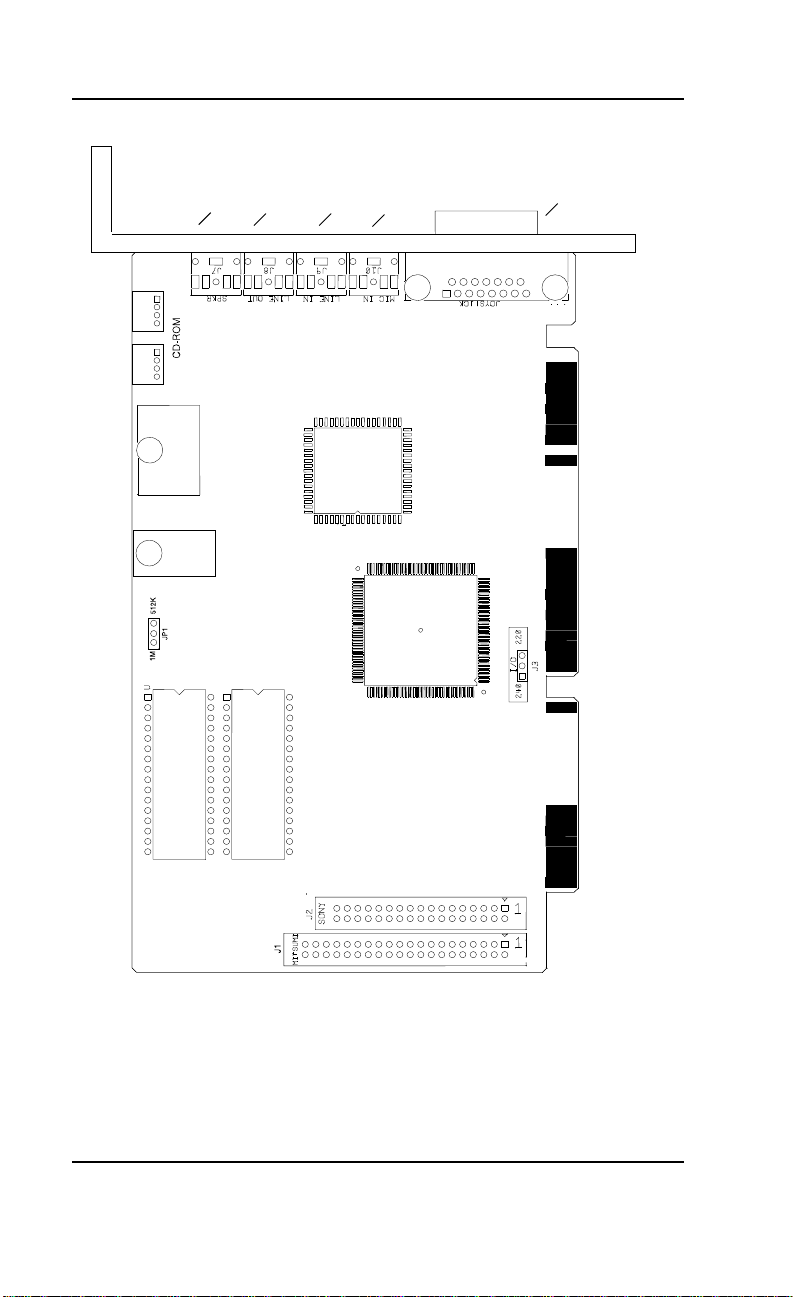
SPKR
Jack
Line
Out
Line
In
MIC
Jack
Joystick
Connector
Figure 1.2: SoundWave 32Pro Diagram
NOTE: Pin 1 on the card is indicated by a square.
10 SoundWave 32Pro User's Manual
Page 13

Section 1: Hardware and Software
Preparing Your SoundWave 32Pro
Jumper Settings
The following table lists the jumpers used in the
configuration of SoundWave 32Pro. The information following the table explains the jumpers in
more detail.
Jumper Setting Default Function
Jumper J3 Connect 1 & 2 Enable I/O address 240
Jumper JP1 Connect 1 & 2 Enable 2MB Wavetable (for
For help on
avoiding
address
conflicts, see
Appendix A.
Connect 2 & 3 ✔ Enable I/O address 220
optional 1MB ROMS)
Connect 2 & 3 ✔ Enable 1MB Wavetable (512K
ROMS)
Table 1.1: Jumper Settings
Jumper J3: I/O Address
Jumper J3 sets the base port address for Sound
Blaster mode. The default setting is 220 Hex.
Figure 1.3: Jumper J3 (pins 2 and 3
connected).
Default address
1 2 3
If you need to change the default address, connect pins 1 and
2 to select the optional address—240 Hex.
SoundWave 32Pro User's Manual 11
Page 14

Section 1: Hardware and Software
Jumper JP1: Wavetable
The SoundWave 32Pro uses two 512K Wavetable
ROM chips for 2MB of compressed sample sounds.
The 512K default setting gives you 2MB of authentic instrument recordings. The 1MB setting is for
the optional 1MB ROM chip size for 4MB of
compressed sample sounds. Refer to Table 1.2 for
details on the Wavetable configuration.
Figure 1.4: Jumper JP1 (pins
2 and 3 connected).
Default address
1 2 3
To configure for the optional 4MB of sample sounds, connect
pins 1 and 2 to select the 1MB address setting.
Wavetable Configuration
The DSP on the card decompresses the sample
sounds as it plays them. The following table details the wavetable configuration of SoundWave
32Pro.
Sample Sound Size Compressed Size ROM Size
2MB (1MB x 16) 1MB 2 x 512KB
4MB (2MB x 16) 2MB 2 x 1MB
Table 1.2: Wavetable Configuration
where:
Sample Sound Size = actual uncompressed sample size
Compressed Size = size of samples after compression
ROM Size = chips used to store the sample set
12 SoundWave 32Pro User's Manual
Page 15
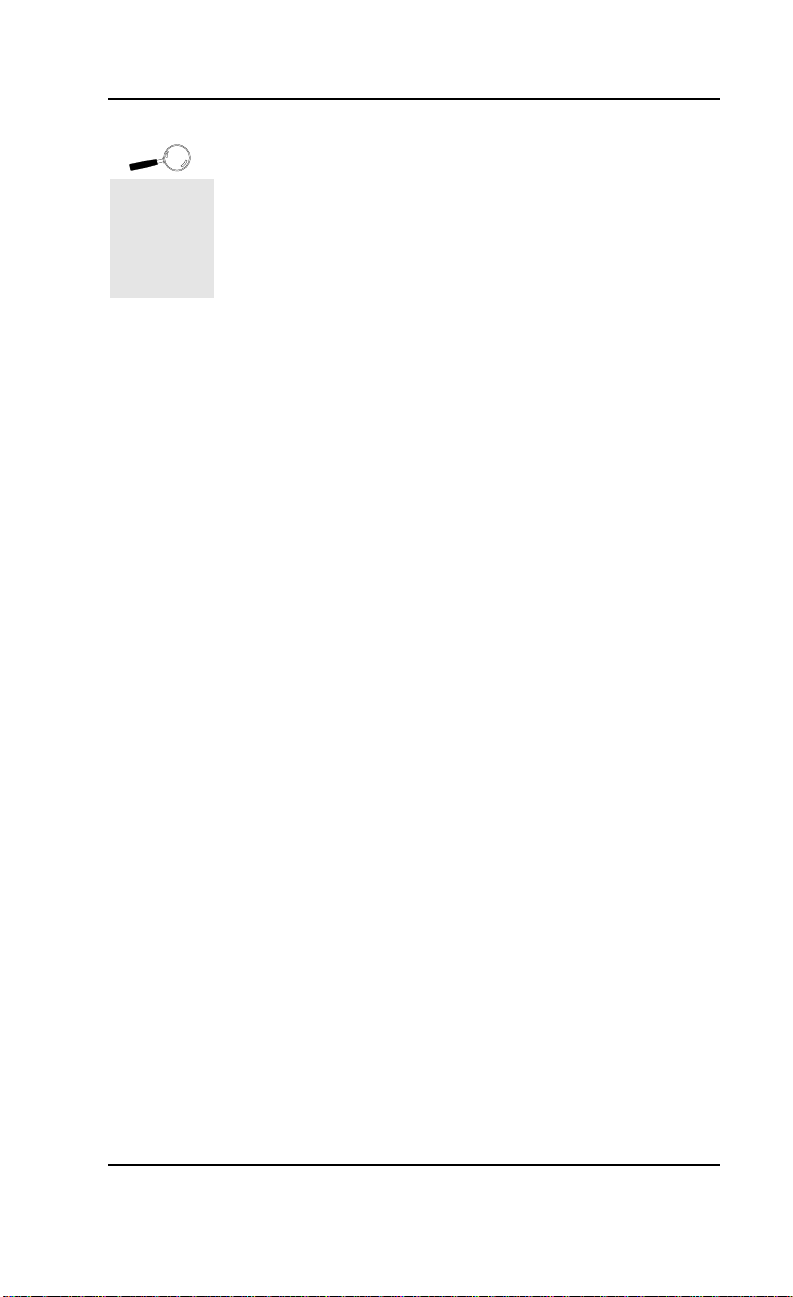
See Figure
1.5 for the
connection
locations of
the external
devices.
Section 1: Hardware and Software
External Devices
External Speakers
You can connect 4 or 8 ohm external speakers or
headphones to SoundWave 32Pro. The speakers
and headphones plug into the SPEAKER jack on the
SoundWave 32Pro metal bracket.
Joystick
Plug the joystick into the 15-pin connector on the
metal bracket.
MIDI
If you purchased the optional MIDI interface kit,
you can connect a MIDI IN device, or joystick at this
time. First plug the MIDI interface cable to the DB15 joystick/MIDI port on the SoundWave 32Pro.
Then connect your joystick or MIDI devices to the
appropriate MIDI interface cable connectors.
Line In
You can connect an external mono or stereo audio
source to the SoundWave 32Pro, such as a tape
player or radio. Use the appropriate converter cable
to interface to your external equipment.
Line Out
Allows you to connect the audio output of your
SoundWave 32Pro to your home stereo or VCR.
Microphone
You can connect a 600-10K ohm microphone to
SoundWave 32Pro. Plug it into the MIC jack on the
metal bracket.
CD-ROM
The SoundWave 32Pro has interface connectors for
the Mitsumi and Sony internal CD-ROM drives.
SoundWave 32Pro User's Manual 13
Page 16
Section 1: Hardware and Software
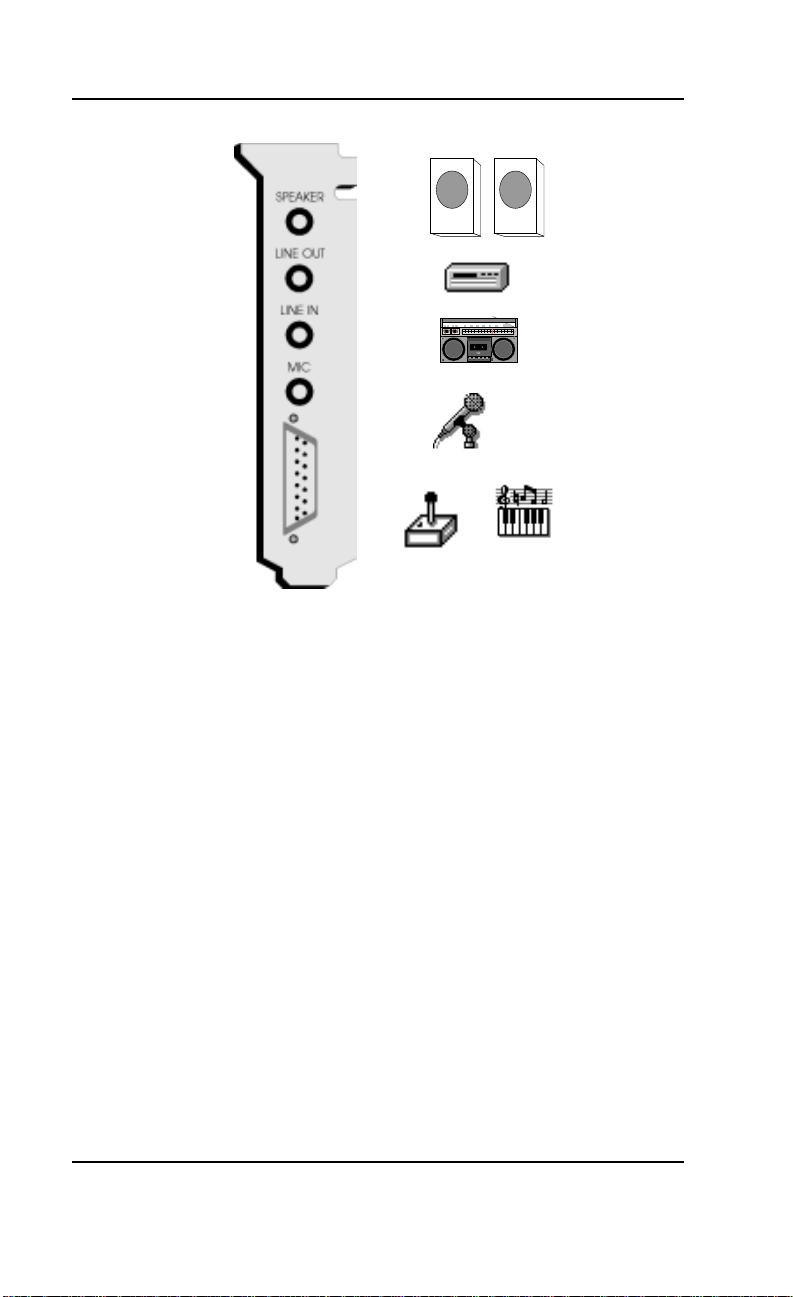
Figure 1.5: SoundWave 32Pro Bracket
(to Speaker jack)
(to Line Out jack)
(to Line In jack)
(to MIC jack)
(to Joystick
connector)
MIDI
Keyboard
The MIDI Interface
An optional MIDI Kit is available for SoundWave
32Pro. The kit includes a Sound Blaster-type MIDI
cable and MIDI software. To purchase the kit, call the
Orchid Sales department.
14 SoundWave 32Pro User's Manual
Page 17

Try to avoid
excessive
twists or
bends in the
cable that
might
damage it or
interfere with
other boards
in your
computer.
Please
contact your
CD-ROM
drive
manufacturer or local
dealer if you
need a CD
audio cable.
Section 1: Hardware and Software
Installing a CD-ROM Drive
There are several different brands and models of
CD-ROM drives that can be attached to SoundWave
32Pro. These instructions apply to all models, except
where indicated. If you are installing a CD-ROM drive
these instructions will help you, but you should also refer
to the documentation that came with your CD-ROM
drive.
Before starting the setup and installation, make sure
that your computer is turned OFF and the power
cord has been disconnected from the wall outlet.
Your CD-ROM drive kit should contain the following items:
❏ CD ROM Drive with optional slide rails
❏ Interface Cable
❏ Audio Cable
Install the CD-ROM hardware as recommended by
the CD-ROM manufacturer. Follow the steps below
for help on installing the CD-ROM interface and
audio cable.
Installing the cable:
1. Connect one end of the interface cable (ribbontype) to the CD-ROM drive interface connector.
Be sure to match the colored stripe to Pin 1 of the
CD-ROM drive connector.
2. Connect the other end of the cable to the Sony or
Mitsumi connector on the SoundWave 32Pro
card. Be sure to match the colored stripe to Pin 1
of the CD-ROM drive connector.
NOTE: The Sony CD-ROM connector has only
34 pins. If you received a 40-pin cable with your
Orchid or Sony CD-ROM drive, several pins will
hang over the connector. Those pins are not
used. Just be sure to line up Pin 1, and let the
excess pins hang off the other end of the connector.
SoundWave 32Pro User's Manual 15
Page 18

Section 1: Hardware and Software
3. Connect the audio cable to the CD-ROM drive's
audio connector.
4. Connect the other end of the audio cable to the
CD-ROM audio connector on the SoundWave
32Pro.
5. You are now ready to install the SoundWave
32Pro. Go to "Quick Installation" at the beginning of this section. See "Software Installation"
to install the SoundWave 32Pro software and
application programs.
Configuring SoundWave 32Pro for a CD-ROM
To configure a CD-ROM drive, you must run the
Audio Hardware Setup program. Follow the steps
below:
1. Start Microsoft Windows.
2. Open the Orchid Audio Software group and
click on the Audio Hardware Setup icon (see
Figure 1.1).
3. From the CD-ROM box, use the pull-down menus
to select the CD-ROM Type, I/O address, and
Interrupt.
4. Click on OK to save your selections and exit the
setup program.
CD-ROM Device Drivers
CD-ROM drives require device drivers to access the
drive. Device drivers are added to the CONFIG.SYS
and AUTOEXEC.BAT files. These modifications are
made automatically when a CD-ROM is selected.
16 SoundWave 32Pro User's Manual
Page 19

Section 1: Hardware and Software
SoundWave 32Pro CD-ROM Device Drivers
The following is a description of the device drivers
that are installed automatically in the CONFIG.SYS
and AUTOEXEC.BAT files, when a CD-ROM drive
option is selected from the Orchid Audio Hardware
Setup program. The CD-ROM selections available
are: Other, Sony and Mitsumi.
Other CD-ROM selection:
CONFIG.SYS
Device=C:\SWAVE32\SWCD.SYS /I:12 /A:360
The SWCD.SYS device driver initializes the
SoundWave 32Pro for the presence of a CD-ROM
drive. It is required by any CD-ROM option selected.
where:
/I: specifies the IRQ to the SoundWave 32Pro
used by the CD-ROM drive.
/A: specifies the I/O Address to the SoundWave
32Pro used by the CD-ROM drive.
NOTE: SWCD.SYS is the only device driver loaded
when the Other option is selected as the CD-ROM
choice. It must be loaded in the CONFIG.SYS file
before any other CD-ROM device driver. If you
have selected Other as your CD-ROM choice, you
will also have to install the device drivers provided
by your CD-ROM manufacturer. Refer to your CDROM manufacturer's documentation for installation procedures.
Sony CD-ROM selection:
CONFIG.SYS
Device=C:\SWAVE32\SWCD.SYS /I:12 /A:360
SoundWave 32Pro User's Manual 17
Page 20

Section 1: Hardware and Software
Device=C:\SWAVE32\SLCD.SYS /D:SWCD0001 /B:360
/M:P /V /C
Refer to the Other CD-ROM selection for a description of the SWCD.SYS device driver. The SLCD.SYS
device driver initializes a Sony CD-ROM drive.
where:
/D: specifies the device name of the CD-ROM drive.
The device name must be identical to the device
name specified in the CORELCDX.COM device
driver.
/B: specifies the I/O Address for the CD-ROM
drive.
/V: specifies verbose mode.
AUTOEXEC.BAT
C:\SWAVE32\CORELCDX.COM /D:SWCD0001
The CORELCDX.COM device driver initializes the
operating system, or DOS, for the presence of a CDROM drive.
where:
/D: specifies the device name of the CD-ROM
drive. The device name must be identical to
the device name specified in the SLCD.SYS
device driver.
Mitsumi CD-ROM selection:
CONFIG.SYS
Device=C:\SWAVE32\SWCD.SYS /I:12 /A:360
Device=C:\SWAVE32\MTMCDAS.SYS /D:SWCD0001
/P:360 /A:0
Refer to the Other CD-ROM selection for a description
18 SoundWave 32Pro User's Manual
Page 21

Section 1: Hardware and Software
of the SWCD.SYS device driver. The MTMCDAS.SYS
device driver initializes a Mitsumi CD-ROM drive.
where:
/D: specifies the device name of the CD-ROM
drive. The drive name must be identical to the
device name specified in the CORELCDX.COM
device driver.
/P: specifies the I/O Address for the CD-ROM
drive.
/A: sets audio play mode to stereo.
AUTOEXEC.BAT
C:\SWAVE32\CORELCDX.COM /D:SWCD0001
The CORELCDX.COM device driver initializes the
operating system, or DOS, for the presence of a CDROM drive.
where:
/D: specifies the device name of the CD-ROM drive.
The device name must be identical to the device
name specified in the MTMCDAS.SYS device
driver.
SoundWave 32Pro User's Manual 19
Page 22

Section 1: Hardware and Software
20 SoundWave 32Pro User's Manual
Page 23

Section
2
Section 2: Orchid Utilities
ORCHID UTILITIES
SoundWave 32Pro comes with DOS and Windows
utilities to enhance the capabilities of SoundWave
32Pro and your CD-ROM drive. The utilities are
automatically installed using the SETUP.EXE program. Refer to "Section 1: Hardware and Software"
if you have not installed the SoundWave 32Pro
software.
SW32.EXE
The SW32.EXE utility program configures the address settings and emulation modes of your
SoundWave 32Pro from the DOS command line.
From the DOS prompt, type the following:
CD\SWAVE32
then
For help on
eliminating
address
conflicts, see
Appendix A.
SW32 /C
The following screen appears:
SoundWave32 Configuration, Version 3.10-WP
(c) 1993-1994, Orchid Technology
Emulation Mode : Sound Blaster + General MIDI
Volume Level : 12
Startup Music : On
Joystick Port : Disable
Sound Blaster Interface : Disable
Windows Sound System : Port=530
MIDI (MPU-401) Interface: Port=330 IRQ=5
DSP Interface : Port=220 IRQ=11
Accept the above configuration
F2 = Set all Ports, IRQ's and DMA's to default values
↑↓ Move Cursor ↵ = Select Esc = Abort Configuration
Figure 2.1: SoundWave 32 Configuration Screen
SoundWave 32Pro User's Manual 21
Page 24

Section 2: Orchid Utilities
The command line options are as follows:
C:\SW32 /? - A listing of options and syntax
C:\SW32 /C - Change the hardware setup values
C:\SW32 /S - Status of the current configuration
C:\SW32 /V:x - Sets the volume, where x is 0 to 31
C:\SW32 - Reinitializes the hardware with the
last saved settings
Synthesis Algorithms
The SoundWave 32Pro comes with synthesis algorithms for different emulation modes and superior
sound quality. The algorithms include the following:
GENMID.LD General MIDI Synthesizer
3DFM.LD Q-Sound Algorithm
The synthesis algorithms can be executed from the
DOS prompt. For example, to set up Q-Sound to
run in a DOS game, change to the SWAVE32
subdirectory and type the following:
C:\SW32 /C
Highlight the Emulation Mode option and select
Q-Sound. The Q-Sound synthesis algorithm adds
three dimensional virtual audio sound to FM music synthesis for games.
22 SoundWave 32Pro User's Manual
Page 25

Volume Control
Section 2: Orchid Utilities
Some
software
applications
have a built-in
volume
control.
Check your
application
before using
the volume
control utility.
Some games
will disable
TSR
programs
before they
begin. These
games will
disable the
SWVOLUME
program.
The SWVOLUME.COM utility program allows
you to change the volume of the SoundWave
32Pro within a program, by using Hot Keys. This
utility can be executed from the SWAVE32
subdirectory or added to your AUTOEXEC.BAT
file.
The default Hot Keys values are:
ALT + :
ALT + "
You can define Hot Keys and make other changes
from the DOS command line. The DOS command
line options are:
/I - Installs the TSR
/S or /? - Display Status
/D - Disables the Hot Keys
/E - Enables the Hot Keys
/K<Key><Down><Up> - Defines the Hot Keys
<Key> is either C (CTRL) or A (ALT) key. Down
and Up can be any printable character. For example:
C:\SWVOLUME /I /KAXC
This installs the TSR and redefines the Hot Keys as:
ALT + X - to turn Down the volume
ALT + C - to turn Up the volume
SoundWave 32Pro User's Manual 23
Page 26
Section 2: Orchid Utilities
SoundWave 32Pro Control Panels
The SoundWave 32Pro Control Panels (DOS and
Windows) allow you to control the compatibility
options and MIDI performance parameters of the
SoundWave 32Pro. The control panels provide an
intuitive user interface as they send MIDI System
Exclusive (SYSEX) messages to the SoundWave
32Pro synthesizer.
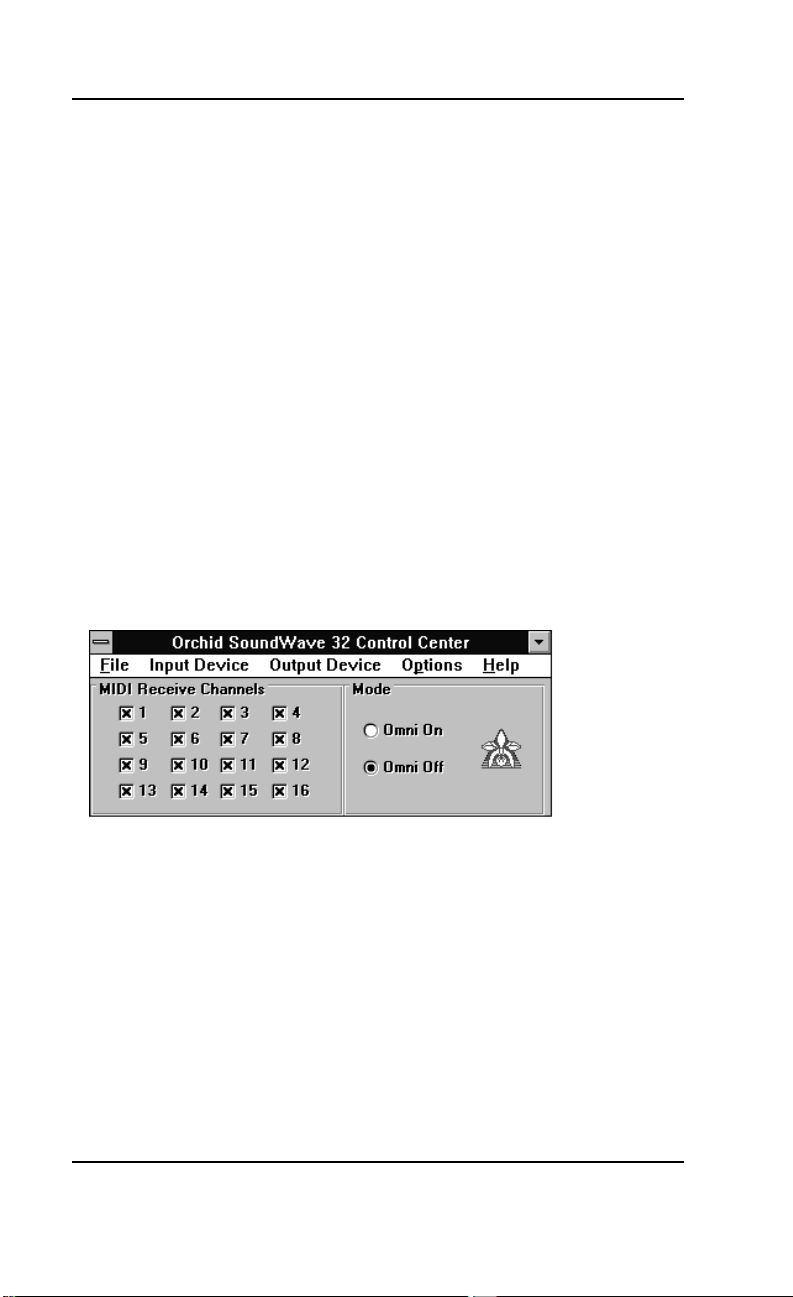
Windows Control Panel
The SoundWave 32Pro Windows Control Panel
allows you to easily configure your MIDI Input and
Output device(s) and fine tune your instrument
settings.
1. Double-click on the Orchid Control Center icon
and the following screen appears:
Figure 2.2: SoundWave 32 Windows Control Panel
2. Click on the button of your choice to make your
selection.
Windows Control Panel Menus
The SoundWave 32Pro Control Panel has five menu
selections: File, Input Device, Output Device, Options and Help. Use your mouse to click on the menu
or hold down the ALT key and press the underlined
letter.
24 SoundWave 32Pro User's Manual
Page 27

Section 2: Orchid Utilities
File Menu
Allows you to exit the control panel program.
Input Device
This selection shows the available MIDI devices on
your system. Select the device you would like to
receive MIDI IN information from. If you are using
an external MIDI device, like a keyboard synthesizer, make sure you have it connected to the MIDI
IN port on the SoundWave 32Pro.
Output Device
This selection shows the available MIDI devices on
your system. Select the device you would like to
send MIDI OUT information to. If it is an external
device, make sure you have it connected to the MIDI
OUT port on the SoundWave 32Pro.
Options
MIDI Through - enables any data coming into the
MIDI IN port on the SoundWave 32Pro to be echoed
back to the MIDI OUT port on the SoundWave
32Pro.
Always on Top - enabling this selection allows the
control panel to remain on top of any open Window
or application.
Release Device If Inactive - releases the MIDI driver for
use by another device. This is very important, since
only one application at a time can access the MIDI
driver under Windows. This option should usually
be set ON, as it allows you to have the SoundWave
32Pro and a sequencer open simultaneously. IM-
PORTANT NOTE: If the sequencer has a similar
option, enable it! Otherwise, you will get the following error message from Windows:
SoundWave 32Pro User's Manual 25
Page 28

Section 2: Orchid Utilities
"Device is currently in use by another application. Wait
until device is free then try again."
Remember, only one application at a time can access
the MIDI device driver.
Windows Control Panel Features
MIDI Receive Channels
The channel where MIDI messages are received.
This is mainly used when using the SoundWave
32Pro with external MIDI synthesizers. You can
have the SoundWave 32Pro respond only to MIDI
data on specific channels, allowing you to create
complex music arrangements utilizing multiple MIDI
devices.
Mode
OMNI ON mode allows an external keyboard or the
SoundWave 32Pro to receive MIDI data on all 16
MIDI channels at once.
OMNI OFF mode allows an external keyboard or the
SoundWave 32Pro to receive MIDI data on only the
MIDI channels selected.
26 SoundWave 32Pro User's Manual
Page 29

Section 2: Orchid Utilities
DOS Control Panel
The SoundWave 32Pro DOS Control Panel allows
you to easily fine tune your instrument settings for
DOS games and sequencing applications. Run the
DOS Control Panel from the DOS prompt by typing:
CD\SWAVE32
then
SW32DOS
The following menu appears:
Figure 2.3: SoundWave 32 DOS Control Panel
The changes you make while the SoundWave 32Pro
DOS Control Panel is open do not take effect until
the OK button is pressed.
DOS Control Panel Features
Record
Allows you to select the recording input volume
level for the selected device. It is useful for playing
external audio sources through the SoundWave
32Pro's amplifier.
SoundWave 32Pro User's Manual 27
Page 30

Section 2: Orchid Utilities
Input
This selection allows you to choose the type of audio
input source to be used during audio recording. The
devices available to record from are MIC, LINE, and
CD.
Volume
Here you can adjust the volume individually for CD
Audio and FM Synthesis files, or use the Master
selection for overall volume control.
MIDI Channel Enable
The channel where MIDI messages are received.
Mode
OMNI ON mode allows an external keyboard or the
SoundWave 32Pro to receive MIDI data on all 16
MIDI channels at once.
OMNI OFF mode allows an external keyboard or the
SoundWave 32Pro to receive MIDI data on only the
MIDI channels selected.
28 SoundWave 32Pro User's Manual
Page 31

Section 2: Orchid Utilities
Key-Z Player
Key-Z player allows you to play instrumental music
from your computer, using a standard computer
keyboard. The unique note mapping feature prevents you from playing an incorrect note in your
chosen Key or Scale. Your computer is transformed
into an intelligent polyphony (multiple notes at a
time) musical instrument that is exhilarating to play.
Key-Z Player incorporates the following features: a
standard MIDI file song player, graphic piano keyboard display, graphic mixer with volume, channel,
patch, pan and mute control, and over 40 song
styles.
To run Key-Z Player:
1. From the Orchid Audio Applications program
group, double-click on the Key-Z Player icon. The
following screen appears:
Figure 2.4: Key-Z Player Screen
The buttons at the top of the screen are from left to
right: File, Key, Scale, Layout, Settings, Player, Piano, Mixer, and Help. To access a feature, click once
on the feature.
SoundWave 32Pro User's Manual 29
Page 32

Section 2: Orchid Utilities
Key - allows you to choose from 12 different keys.
Click on the key of your choice. You can change the
key any time by clicking on the Key button and
selecting another key. NOTE: After you have made
your selection, a check mark appears next to your
selection.
Scale - Key-Z Player offers four types of scales:
Major, Minor, Blues and Harmonic Minor. Choose
a Scale the same way you choose a Key Signature.
Click once on the preferred scale to start playing
music from your computer keyboard.
Layout - maps the notes on your keyboard to your
choice of Jagged or Horizontal.
Jagged - maps the keys so that they progress up
the scale alternating rows. This mapping also
works well for organ solos and arpeggios.
Horizontal - maps the keys so that they progress
up the scale from left to right, from the bottom to
the top, while increasing the pitch for each row.
This mapping works great for quick string-scale
runs and playing blues’ piano.
Setting - offers the following four features:
MIDI Mapper - allows you to view your current
MIDI Mapper settings from inside Key-Z Player.
NOTE: All notes from Key-Z Player are routed
through the Mapper. Refer to the Windows
User’s Guide for instructions on setting up the
MIDI Mapper.
Multimedia Drivers - allows you to view your
currently installed multimedia drivers. NOTE:
Your multimedia drivers must be installed for
Key-Z Player to function.
30 SoundWave 32Pro User's Manual
Page 33

You may add
to the Patch
List by editing
the
PATCHES-INI
file located in
your Key-Z
Player
directory.
Section 2: Orchid Utilities
Patch Names - this feature gives you a list of eight
types of sound hardware:
0-127 1-128
General MIDI Proteus
MT-32 Roland GS
U-110 U-110 Tones
Keyboard - brings up a dialog box that allows you
to type in Channel, Patch and Volume changes.
Player - opens or hides the Song Player window that
includes the controls for playing standard MIDI
Song Files. You can also measure the length of a song
by using the Bar Control option.
Bar Control - the bar control detects the length of
the song, (how many measures the song consists
of). For example, if you have a 128 bar song, the
bar control will start at Bar Zero, which is the
beginning of the song. It will play through the
entire song, ending at Bar 128. NOTE: The song
must be stopped before using the bar control
slider.
Piano - graphically displays all notes that are playing. The graphic keyboard has seven full octaves.
Mixer - features 16 channels, and allows you to
control the Patch, Volume, Pan and Mute of each
track in the Song File. Make sure the patch for each
track is set to an appropriate patch for your output
device.
SoundWave 32Pro User's Manual 31
Page 34
Section 2: Orchid Utilities
Key-Z Player - Solo
Key-Z Player can be used to perform solo compositions, test melodies, play rhythm and bass tracks,
and learn scales and arpeggios in various keys.
To play Key-Z Player - Solo:
1. Select the Key and Scale you desire.
2. Select the Patch for the sound you desire.
3. Select the keyboard mapping from the Layout
menu.
4. Set your Volume and begin playing by tapping
out notes on your computer keyboard.
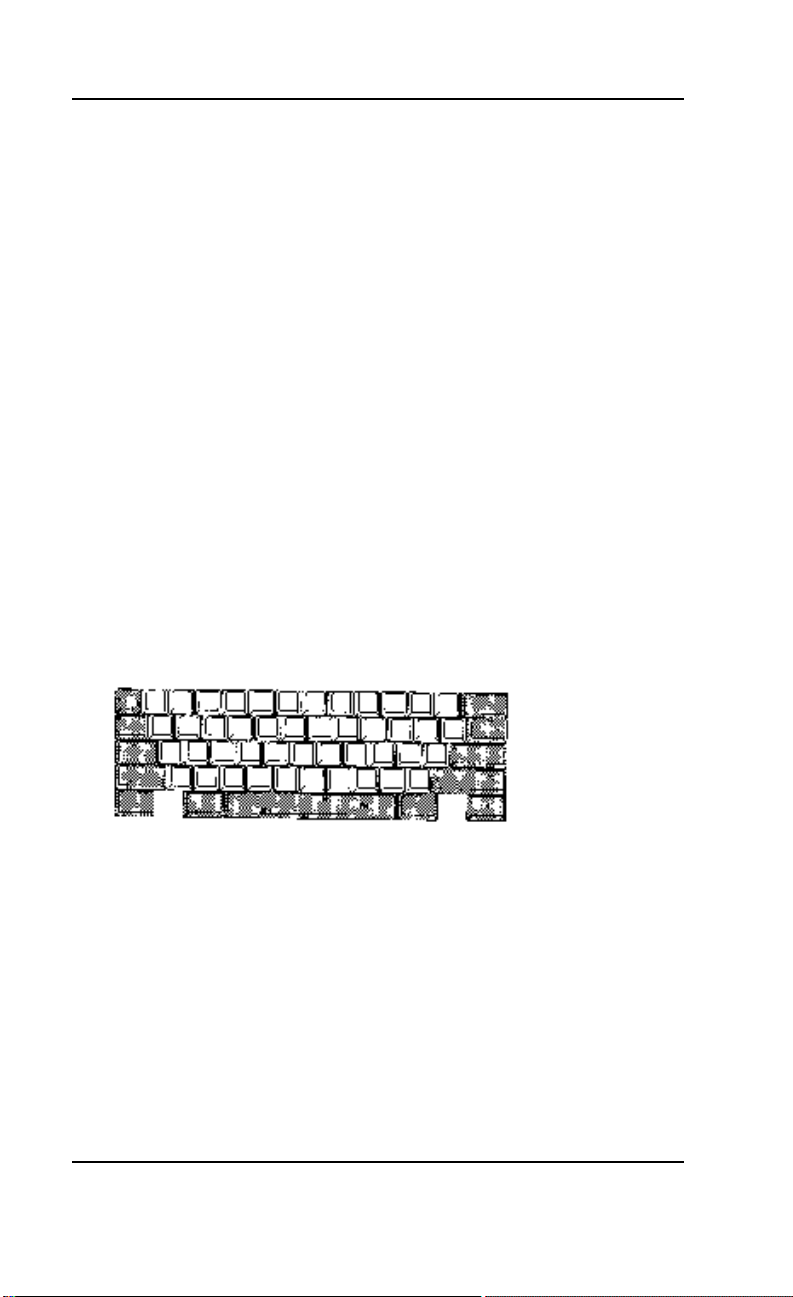
Keyboard Notes
The playable key is shown in white. You can play
multiple notes and chords by pressing several keys
at once (this is called polyphony).
Figure 2.5: Playable Keyboard Note
Note Progression
Notes begin with the lowest left row (the Z row) in
Horizontal Mapping, and the "A" key in Jagged
Mapping. This ends with the highest note on the
upper right.
32 SoundWave 32Pro User's Manual
Page 35

Section 2: Orchid Utilities
Sustain
There are several ways to get sustained notes: (1)
For continuous sustain, press the Caps Lock key.
The notes played are sustained until the Caps Lock
key is pressed again. (2) Hold down the Shift key
while playing various notes.
Key-Z Player - Accompanied
Key-Z Player can perform melodies while being
accompanied by any standard MIDI Song File played
in real-time.
To play Key-Z Player - Accompanied:
1. Open the Song Player window by clicking on the
Player menu button.
2. Click on the Open Song button and select a song
to play.
Please refer
to Appendix B
for the MIDI
Drum Patch
Settings.
3. When the file is opened, it will use the default
settings for Key, Scale and Tempo. In addition,
the track structure of the Song File (including the
instrument name and MIDI channel is set into
the Mixer.
NOTE: Key-Z Player can read and play Format 0
and Format 1 MIDI files. The standard MIDI files
included with Key-Z Player are Format 1 files
and contain the optional Key and Scale data.
SoundWave 32Pro User's Manual 33
Page 36

Section 2: Orchid Utilities
34 SoundWave 32Pro User's Manual
Page 37

Appendix
A
All commands can
be typed in
lower or
upper case
letters.
Appendix A: Technical Information
TECHNICAL INFORMATION
Orchid Technology is known for its responsiveness
to its customers. This section gives you helpful hints
for troubleshooting the SoundWave 32Pro, and the
technical specifications.
CompuServe
In addition to calling Orchid technology, technical
support is now available through the CompuServe
Information Service (CIS). You can also download
drivers and get new product information. To find us
on CompuServe, follow the instructions below:
1. Log onto CompuServe.
2. Type GO MULTIB to get into the Multimedia
Vendor Forum B. Once you are in this forum,
select Message Section #10. The message and
library sections are labeled Orchid . . .
or
You may type GO ORCHID to get immediate
access to the Orchid section.
3. If you would like to leave private mail for Orchid, type GO MAIL. Address your letters to our
technical support account number 72662,2672.
Before You Begin
Because of the unique hardware design of the
SoundWave 32Pro, each sound standard is independent of the other. This is how SoundWave 32Pro can
emulate multiple sound standards simultaneously.
When troubleshooting the SoundWave 32Pro for
potential conflicts, it is important to remember that
if a sound standard works correctly, the problem
generally becomes a software issue. For example,
SoundWave 32Pro User's Manual 35
Page 38

Appendix A: Technical Information
the startup music with the SW32.EXE program uses
the SoundBlaster interface. If the startup music
plays, the SoundBlaster interface is operating correctly. If an application that is emulating the
SoundBlaster standard is not operating properly,
contact the software manufacturer for possible configuration requirements or software updates.
Troubleshooting the SoundWave 32Pro
The following information will help you diagnose
problems you may have with the SoundWave 32Pro.
Following these simple steps serves a two-fold purpose:
You may be able to fix your problem and
avoid having to contact the Orchid Technology Technical Support Department...
or
if these steps do not help you solve your
problem, they will most certainly give you a
better handle on what to tell Technical
Support once you do contact them.
The information provided here is in symptom/
response form. That is, a symptom is given, and a
check point response is provided for you.
Symptom 1
System locks up on bootup with the SoundWave
32Pro installed.
Check
1. If a CD-ROM drive has been installed in the
system, verify that the SWCD.SYS device line in
the CONFIG.SYS file is loading before any other
CD-ROM device drivers.
36 SoundWave 32Pro User's Manual
Page 39

Appendix A: Technical Information
2. If the lock up occurs when loading the SW32.EXE
file, disable all sound settings by using SW32 /C.
Enable each sound setting one at a time to identify which setting is causing the lock up. Port
addresses and DMA conflicts will normally cause
a lock up. IRQ conflicts will cause continuous
noise from the speakers. When you have identified the conflict, change the address setting.
3. Check whether another peripheral in your system is using the same I/O address configured by
Jumper J3 on the SoundWave 32Pro.
Symptom 2
No startup sounds when running the SW32.EXE
program.
Check
1. Verify that the external speaker is properly connected to the SoundWave 32Pro stereo speaker
jack.
2. Verify that the Startup Music is on and the
volume is turned up in the SW32.EXE program.
3. Since the SoundWave 32Pro uses the
SoundBlaster interface to play the Startup Music, check for possible conflicts with the
SoundBlaster interface settings.
4. Verify that the ORCHID.WAV file is in the SW32
directory. This file is limited to 8-bit resolution
and 22KHz sample frequency (mono). If you
have replaced the ORCHID.WAV file with another wave file, verify that it does not exceed
these limits.
SoundWave 32Pro User's Manual 37
Page 40

Appendix A: Technical Information
Symptom 3
I cannot access the CD-ROM drive.
Check
1. If a CD-ROM drive is installed, verify that the
SWCD.SYS device line in the CONFIG.SYS file is
loading before any other CD-ROM device drivers.
2. Verify that the path and syntax for each of the
device driver lines are correct (refer to Device
Drivers in Section 2).
3. If there is an LASTDRIVE statement in the
CONFIG.SYS file, verify that the drive letter
used is set to a letter after the CD-ROM drive
(refer to your DOS manual for more information).
4. Verify that the colored stripe on ribbon cable is
correctly installed on Pin 1 on both the
SoundWave 32Pro and the CD-ROM drive.
Symptom 4
My CD-ROM drive does not play CD Audio.
Check
1. Verify that the audio cable used matches the pinouts for the CD Audio connector. See this appendix for the CD-ROM Audio Cable Connector pin
assignments. Contact the Orchid Sales department for cable options.
Symptom 5
My microphone recording level is too soft or unable to record properly.
38 SoundWave 32Pro User's Manual
Page 41

Appendix A: Technical Information
Check
1. Verify that your microphone has the proper
impedance or is too sensitive. The SoundWave
32Pro expects a microphone with an impedance
of approximately 600-10K ohms.
2. Verify that the software used to record, and the
Windows temporary directory are not on a drive
that is using a disk doubling utility.
3. Turn up the microphone input level.
4. Make sure that the microphone is selected as the
recording source.
Symptom 6
Wave files do not play correctly in Windows.
Check
1. In the SYSTEM.INI file in the Windows directory,
under the [drivers] portion of the file, verify that
the WAVE=WPPSA.DRV and AUX=WPPSA.DRV
lines are present.
2. Verify that the settings for the SoundWave 32Pro
driver in Windows are not in conflict with another hardware device.
Symptom 7
MIDI files do not play correctly in Windows.
Check
1. In the SYSTEM.INI file in the Windows directory, under the [drivers] portion of the file, verify
that the MIDI=WPPSA.DRV line is present.
2. Verify that the settings for the SoundWave 32Pro
driver in Windows are not in conflict with another hardware device.
SoundWave 32Pro User's Manual 39
Page 42

Appendix A: Technical Information
Symptom 8
Certain applications do not play sound.
Check
1. Verify that the SoundWave 32Pro and the software application are configured for the same
sound emulation modes (for example,
SoundBlaster for digitized sound and General
MIDI for music).
2. Many software applications require a large
amount of base memory, such as 640KB and are
unable to operate if any drivers or TSR programs
are installed. Try removing all unnecessary
drivers and TSRs or load them in high memory
(refer to your DOS user’s manual for more information).
3. Verify that the software application is configured for the same I/O, IRQ, and DMA settings as
the SoundWave 32Pro.
Symptom 9
Certain applications do not play digitized sound,
such as speech or sound effects.
Check
1. Check for a conflict with the SoundBlaster interface configuration settings. Digitized sounds are
played back through this interface.
2. Verify that the SET BLASTER statement is in the
AUTOEXEC.BAT file. Some applications look
specifically for this statement to set the
SoundBlaster environment. Verify that the settings of the statement match the configuration
for the SoundWave 32Pro and the software application.
40 SoundWave 32Pro User's Manual
Page 43

Appendix A: Technical Information
3. Verify that there is sufficient base memory to run
the software application. If you are configuring
the software application for SoundBlaster for
digitized sound, and MIDI for Music, the software application may omit digitized sound if
there is not enough base memory available.
Symptom 10
My joystick does not work when connected to the
SoundWave 32Pro.
Check
1. Verify that the Joystick Port selection in the
SW32.EXE program is enabled.
2. Many I/O adapter cards have a built-in joystick/
game port (even if they do not contain a 15-pin
DB connector). The SoundWave 32Pro has its
own joystick port. Disable the joystick/game
port on the I/O adapter card.
SoundWave 32Pro User's Manual 41
Page 44

Appendix A: Technical Information
Avoiding Address Conflicts
A conflict may occur if you have another card in
your system using the same I/O, DMA or IRQ
addresses as SoundWave 32Pro. Resolve the conflict by selecting another available address. When
selecting a different address, please note the following information:
☞ A BUS mouse commonly uses I/O address 240H
☞ Network cards commonly use the following ad-
dresses:
IRQ 10 or 11
I/O 300H, 320H, 340H or 360H
☞ Other devices such as SCSI cards, hard disks
andCD-ROM drives commonly use the following addresses:
IRQ 10, 11, 14 or 15
I/O 330H or 340H
☞ When you encounter an IRQ conflict, you will
normally hear a continuous noise from the speakers. I/O and DMA conflicts normally lock up
your system.
☞ SoundWave 32Pro must use DMA Channel 1. If
any other device is using DMA Channel 1, move
it to another location.
42 SoundWave 32Pro User's Manual
Page 45

Appendix A: Technical Information
MIDI Usage
Roland Synthesizers
Some Roland synthesizers, most notably the D-50,
send "all notes off" commands when all keys are
released. This causes SoundWave 32Pro sounds to
play in a "staccato" fashion. Holding down one key
while playing other notes will correct this.
Windows Sound System
The Windows Sound System applications that come
with the Windows Sound System hardware will
cause a "Windows Sound System board not installed" error. This error occurs because the applications require the actual Microsoft hardware to run.
You can correct this by loading the Microsoft Sound
Systems driver instead of the SoundWave 32Pro
driver, or you can use the retail version of Windows
Sound System (the software only version).
External keyboard control of SoundWave 32Pro
If you wish to plug a MIDI keyboard into SoundWave
32Pro, you may want to purchase the joystick/MIDI
cable adapter from Orchid. The Orchid SoundWave
32Pro also supports "standard" joystick/MIDI cable
sets, so if you have access to a Sound Blaster or Pro
Audio Spectrum MIDI cable or compatible cable, it
should work properly.
Due to the number mechanism used by various
keyboard manufacturers, access to some of the
SoundWave 32Pro sounds may be restricted. The
following are keyboards that may have sound access limitations:
• Korg M1 - The Korg M1 can access sounds 0 - 100.
Switching to the ROM card addressing restarts
the patch numbering from 0, not 101.
SoundWave 32Pro User's Manual 43
Page 46

Appendix A: Technical Information
• Yamaha DX-7 - This synthesizer can access
sounds 0 - 64 (internal and cartridge). If your DX7 has the E! retrofit, then cycling through the
upper banks will provide access to sounds 64 -
128.
44 SoundWave 32Pro User's Manual
Page 47

Appendix A: Technical Information
Technical Specifications
The features and specifications of the SoundWave
32Pro are covered in this section. Also included are
the specifications for the Joystick/MIDI Port.
Features
Full compatibility with software written for the
following sound and multimedia standards:
• Sound Blaster
• AdLib
• Microsoft Windows Sound System
• General MIDI
• Roland MPU-401
Chipsets
Analog Devices 20MHz ADSP-2115 DSP
Analog Devices 1848 CODEC and Gate Array
Video Standards Supported
MDA, CGA, EGA and VGA
Computers Supported:
ISA machines: 386, 486 and compatibles
Card Size:
6" x 4.5"
Connectors:
DB-15 port for joystick/MIDI input/output
3.5 mm mono jack for microphone input
3.5 mm stereo jack for amplified speaker output
3.5 mm stereo jack for line input, 1.8V RMS Max
3.5 mm stereo jack for line out
On-board interface for Sony CD-ROM drive
On-board interface for Mitsumi CD-ROM drive
Temperature:
Operating: from 0 to 40 degrees C
Storage: from -25 to 90 degrees C
SoundWave 32Pro User's Manual 45
Page 48

Appendix A: Technical Information
Humidity:
Operating: from 15% to 90%
Storage: from 0% to 90%
Additional Features:
20 MIPS of Digital Signal Processing Power (DSP)
FM Synthesizer
• OPL2 FM Emulation
Stereo Digital/Analog Mixer (built-in)
• Selectable input and mixing of all audio
sources for recording:
Line-In
Stereo CD-Audio
Mono Microphone
Stereo Digitized Audio Playback
• 8-bit and 16-bit sample modes
• Sampling Rate of :
2KHz to 48KHz (mono or stereo)
• Hardware audio decompression:
µ-Law MS ADPCM CR10
A-Law IMA ADPCM
Synthesizer Emulations
• General MIDI Mode
32 simultaneous voices
• Yamaha OPL2 emulation
FM Stereo
Sample Sounds
• 2 megabytes (1MBx16) wavetable samples,
compressed and stored in two 512K (1MB)
ROMS
46 SoundWave 32Pro User's Manual
Page 49

Appendix A: Technical Information
Audio Amplifier
• Frequency Response: 20Hz to 22KHz
Stereo Digitized Audio Recording
• 8-bit and 16-bit sample modes
• Sampling Rate of 2KHz to 48KHz
CD-ROM Kit
• One built-in Mitsumi CD-ROM interface
and one built-in Sony CD-ROM interface
MIDI Kit
• Sound Blaster type Joystick/MIDI cable
Joystick Port/MIDI Interface
• Standard built-in (15-pin D-sub) connector
• Game I/O port for PC analog joystick
• Built-in interface for Sound Blaster MIDI
cable with MIDI IN and MIDI OUT connectors
• MIDI time-stamp for Multimedia extension
• Sound Blaster MIDI compatible
• 64-byte FIFO buffer
Mono Microphone Input
• Automatic Gain Control for direct sound
input
SoundWave 32Pro User's Manual 47
Page 50
Appendix A: Technical Information
Address Settings and Pin Assignments
The SoundWave 32Pro address settings are
software configured using the Audio Hardware
Setup program in the Orchid Audio Software
group. The following information lists the
address settings and pin assignments in detail.
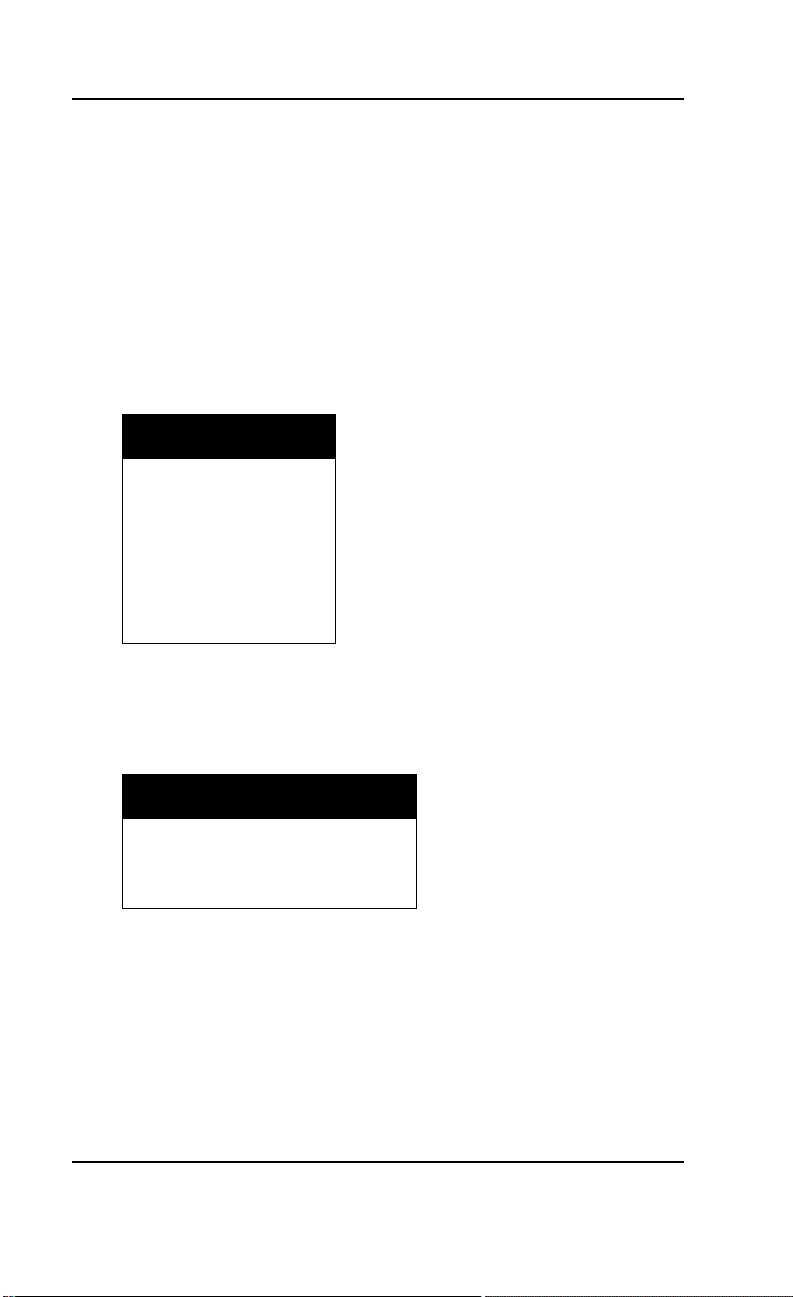
CD-ROM Addresses
*
IRQ
3
5
7
9
10
11
12
I/O
300
310
320
330
340
*
360
Table A.1: CD-ROM Addresses
Sound Blaster Mode Addresses
I/O
*
220
240
Table A.2: Sound Blaster Mode Addresses
* Default Setting
IRQ
*
3
5
7
DMA
*
1
48 SoundWave 32Pro User's Manual
Page 51

Appendix A: Technical Information
Windows Sound System Mode Addresses
I/O
*
530
640
E80
F40
Table A.3: Sound System Addresses
IRQ
7
9
10
11
DMA
MPU-401 Mode Addresses
*
IRQ
3
5
7
9
I/O
300
320
*
330
Table A.4: MPU-401 Addresses
* Default Setting
0
1
3
CD-ROM Audio Cable Connector
Pin Assignment
1 Ground
2 Left Channel
3 Ground
4 Right Channel
Table A.5: CD-ROM Audio Cable Pin-outs
SoundWave 32Pro User's Manual 49
Pin 1
Page 52
Appendix A: Technical Information
Joystick/MIDI Port Pin Assignments
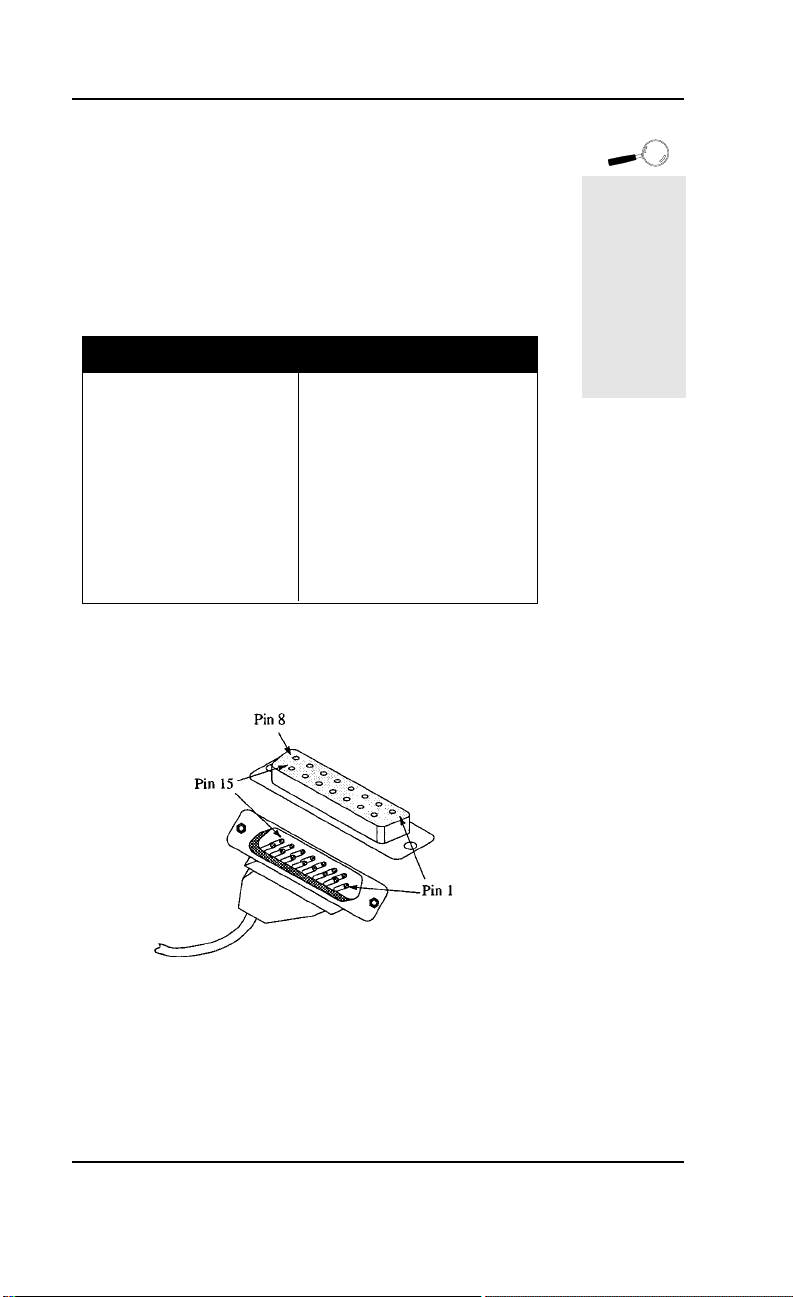
The joystick port on SoundWave 32Pro is identical
to the standard PC Game Control adapter. The 15pin D-sub connector is also used as the built-in
MIDI interface. The pin-out assignments are as
follows:
Pin Function Pin Function
1+5V 9 +5V
2 A-1 10 B-1
3 A-X 11 B-X
4 GND 12 MIDI-OUT
5 GND 13 B-Y
6 A-Y 14 B-2
7 A-2 15 MIDI-IN
8+5V
Table A.6: Joystick/MIDI Pin Assignments
If you want
to use the
joystick port
on your PC,
you can
disable the
joystick port
on the
SoundWave
32Pro (refer
to Section 2).
Figure A.1: Joystick/MIDI Pin-Outs
50 SoundWave 32Pro User's Manual
Page 53
Appendix A: Technical Information
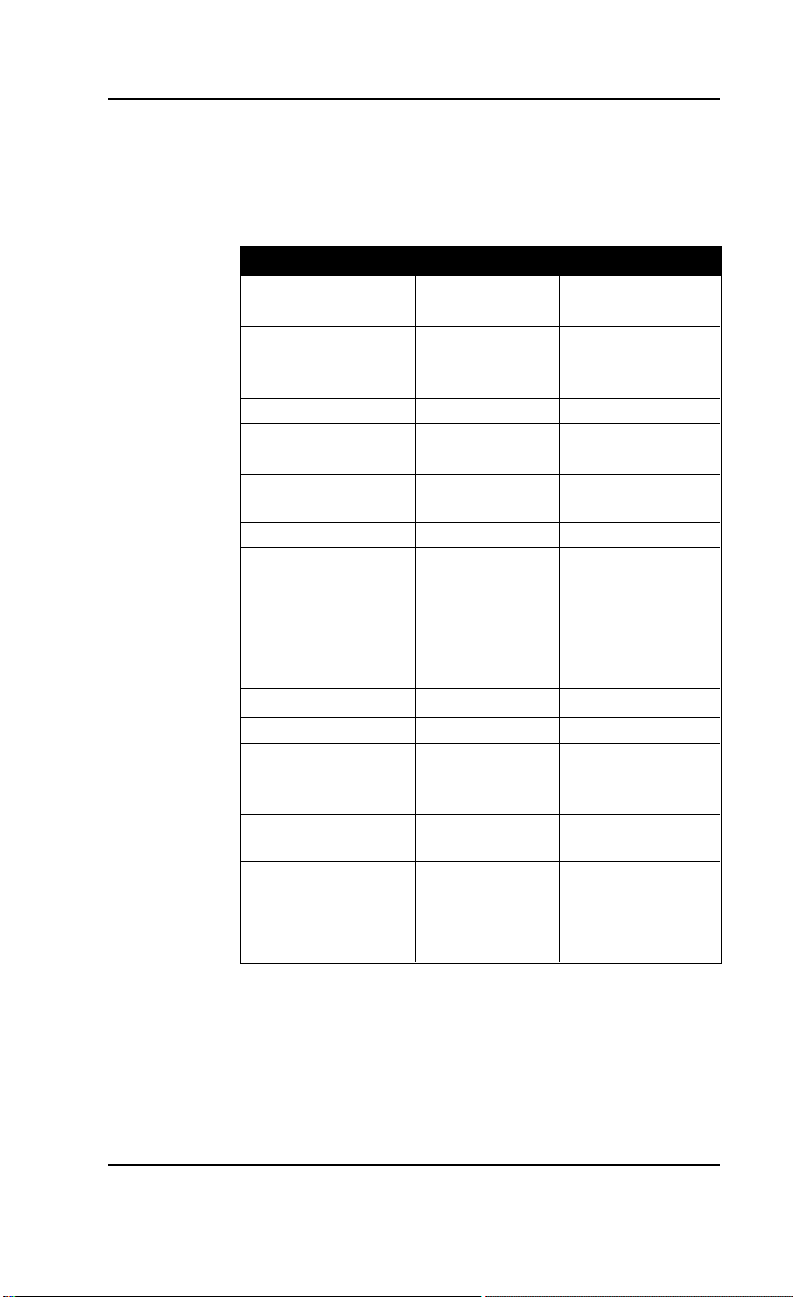
SoundWave 32Pro MIDI Port Specifications
The chart below details the MIDI implementation
for SoundWave 32Pro.
Function Setting Parameters
Basic Channel Default 1-16
Channels 1-16
Mode Default N o
Messages No
Altered No
Note Number True Voice 21-108
Velocity Note ON Yes
Note OFF Yes
After Touch Key Yes
Channel Yes
Pitch Blender Yes
Control Change 1 Mod Wheel
4 Foot Pedal
7 Volume
10 Pan
64 Sustain
Program Change True Number 0-127
System Exclusive Yes
System Common Song Position No
Song Select No
Tune No
System Read Time Clocks No
Commands No
Auxiliary Messages Local ON/OFF No
All Notes OFF Yes
Active Sense No
Reset Yes
SoundWave 32Pro User's Manual 51
Page 54

Appendix A: Technical Information
52 SoundWave 32Pro User's Manual
Page 55

Appendix
B
Appendix B: MIDI
MIDI
This section gives you an overview of the MIDI
specification, and provides a list of the Patches and
Percussion sounds stored on SoundWave 32Pro.
MIDI Overview
MIDI (Musical Instrument Digital Interface) is a
serial communications protocol designed specifically for electronic music devices. MIDI (pronounced "mid-ee") has revolutionized the composition, recording, and performance processes by allowing many instruments to be centrally-controlled
like one electronic orchestra. The MIDI Manufacturers Association (MMA) is responsible for the
development and evolution of MIDI.
MIDI contains instructions controlling how and
when devices like digital synthesizers produce
sound. You can think of MIDI as a sort of Postscript
for music. Postscript describes objects, rather than
casting them into bitmapped form. MIDI describes
the elements of the musical performance, rather
than casting them into the bitstreams of digital
audio.
General MIDI
The SoundWave 32Pro supports the General MIDI
wave synthesis specification. General MIDI defines
specific and predictable sounds for each of 128
program locations. This allows composers and
producers to include program change commands
in compositions that will configure the timbres
appropriately for the tracks.
SoundWave 32Pro User's Manual 53
Page 56

Appendix B: MIDI
SoundWave 32Pro Sounds
These are the General MIDI Patches (sounds) that
are stored on the SoundWave 32Pro. The
SoundWave 32Pro also contains over 40 percussion
instruments on MIDI channel 10.
Patch General MIDI Sound
1 Acoustic Grand Piano
2 Acoustic Bright Piano
3 Electric Grand Piano
4 Honky Tonk Piano
5 Fender Rhodes
6 Chorused Piano
7 Harpsichord
8 Clavinet
9 Celesta
10 Glockenspiel
11 Music Box
12 Vibraphone
13 Marimba
14 Xylophone
15 Tubular Bells
16 Dulcimer
17 Hammond Organ
18 Percussive Organ
19 Rock Organ
20 Church Organ
21 Reed Organ
22 Accordion
23 Harmonica
24 Tango Accordion
25 Nylon Acoustic Guitar
26 Steel Acoustic Guitar
27 Jazz Electric Guitar
28 Clean Electric Guitar
29 Muted Electric Guitar
30 Overdriven Guitar
31 Distorted Guitar
32 Guitar Harmonics
33 Acoustic Bass
34 Fingered Electric Bass
35 Picked Electric Bass
36 Fretless Bass
37 Slap Bass 1
54 SoundWave 32Pro User's Manual
Page 57

Appendix B: MIDI
38 Slap Bass 2
39 Synth Bass 1
40 Synth Bass 2
41 Violin
42 Viola
43 Cello
44 Contrabass
45 Tremelo Strings
46 Pizzicato Strings
47 Orchestral Harp
48 Timpani
49 String Section 1
50 String Section 2
51 Synth Strings 1
52 Synth String 2
53 Choir "Aahs"
54 Voice "Oohs"
55 Synth Voice
56 Orchestra Hit
57 Trumpet
58 Trombone
59 Tuba
60 Muted Trumpet
61 French Horn
62 Brass Section
63 Synth Brass 1
64 Synth Brass 2
65 Soprano Sax
66 Alto Sax
67 Tenor Sax
68 Baritone Sax
69 Oboe
70 Basoon
71 English Horn
72 Clarinet
73 Piccolo
74 Flute 81
75 Recorder
SoundWave 32Pro User's Manual 55
Page 58

Appendix B: MIDI
Patch General MIDI Sound
76 Pan Flute
77 Bottle Blow
78 Shakuhachi
79 Whistle
80 Ocarina
81 Lead 1
82 Lead 2
83 Lead 3
84 Lead 4
85 Lead 5
86 Lead 6
87 Lead Fifths
88 Lead + Bass
89 New Age Pad
90 Warm Pad
91 Polysynth Pad
92 Choir Pad
93 Bowed Pad
94 Metallic Pad
95 Halo Pad
96 Sweep Pad
97 Rain
98 Soundtrack
99 Crystal
100 Atmosphere
101 Brightness
102 Goblins
103 Echoes
104 Sci-Fi
105 Sitar
106 Banjo
107 Samisen
108 Koto
109 Kalimba
110 Bagpipe
56 SoundWave 32Pro User's Manual
Page 59

Appendix B: MIDI
111 Fiddle
112 Shanai
113 Tinkle Bell
114 Agogo
115 Steel Drums
116 Woodblock
117 Taiko Drum
118 Melodic Tom
119 Synth Drum
120 Reverse Cymbal
121 Guitar Fret Noise
122 Breath Noise
123 Seashore
124 Bird Tweet
125 Telephone Ring
126 Helicopter
127 Applause
128 Gunshot
SoundWave 32Pro User's Manual 57
Page 60

Appendix B: MIDI
SoundWave 32Pro Percussion Sounds
These are the Percussion sounds on the SoundWave
32Pro. These percussion instruments are accessed
by sending data to MIDI channel 10.
Key # Keyboard Note Sound
35 B0 Acoustic Bass Drum
36 C1 Bass Drum 1
37 C1+ Side Stick
38 D1 Acoustic Snare
39 D1+ Hand Clap
40 E1 Electric Snare
41 F1 Low Floor Tom
42 F1+ Closed Hi-Hat
43 G1 High Floor Tom
44 G1+ Pedal Hi-Hat
45 A1 Low Tom
46 A1+ Open Hi-Hat
47 B1 Low-Mid Tom
48 C2 Hi-Mid Tom
49 C2+ Crash Cymbal 1
50 D2 High Tom
51 D2+ Ride Cymbal 1
52 E2 Chinese Cymbal
53 F2 Ride Bell
54 F2+ Tambourine
55 G2 Splash Cymbal
56 G2+ Cow Bell
57 A2 Crash Cymbal 2
58 A2+ Vibraslap
59 B2 Ride Cymbal 2
60 C3 Hi Bongo
61 C3+ Low Bongo
62 D3 Mute Hi Conga
63 D3+ Open Hi Conga
64 E3 Low Conga
65 F3 High Timbale
66 F3+ Low Timbale
67 G3 High Agogo
68 G3+ Low Agogo
69 A3 Cabasa
70 A3+ Maracas
58 SoundWave 32Pro User's Manual
Page 61

Appendix B: MIDI
71 B3 Short Whistle
72 C4 Long Whistle
73 C4+ Short Guiro
74 D4 Long Guiro
75 D4+ Claves
76 E4 High Wood Black
77 F4 Low Wood Bock
78 F4+ Mute Cuica
79 G4 Open Cuica
80 G4+ Mute Triangle
81 A4 Open Triangle
NOTE: C1 refers to the lowest C-key on a standard 5-octave
keyboard. The + sign refers to a half-step (sharp).
SoundWave 32Pro User's Manual 59
Page 62

Appendix B: MIDI
60 SoundWave 32Pro User's Manual
Page 63

Limitation of Liability
Neither Orchid Technology nor anyone else who
has been involved in the creation, production, or
delivery of this product shall be liable for any direct,
indirect, special, punitive, consequential, or incidental damages (including, without limitation, damages for loss of business profits, business interruption, loss of business information, and the like)
arising out of the use of or inability to use this
product, even if Orchid Technology has been advised of the possibility of such damages.
Because some states do not allow the exclusion of
liability for consequential or incidental damages,
the above limitation may not apply to you. In any
event, Orchid Technology's liability arising in any
manner in connection with this product, whether
based in contract, product liability, or tort, shall not
exceed the purchase price of the product.
60 SoundWave 32Pro User's Manual
Page 64

FCC
FCC NOTICE
FCC# DDS7EF0393-93-SWA
Certified compliant with FCC Class B limits, part 15
To meet FCC requirements, shielded cables are required
to connect the unit to a Class B certified device
“This device complies with Part 15 of the FCC Rules. Operation is subject to the
following two conditions: (1) this device may not cause harmful interference, and (2)
this device must accept any interference received, including interference that may
cause undesired operation.”
This equipment generates and uses radio frequency energy and, if not installed and
used properly in strict accordance with the manufacturer’s instructions, may cause
interference to radio or television reception.
This device has been tested and found to comply with the limits for a Class B
computing device in accordance with the specifications in Subpart J of Part 15 of FCC
Rules, which are designed to provide reasonable protection against such interference in a residential installation. Only equipment (computer input/output devices,
terminals, printers, etc.) certified to comply with the Class B limits may be attached
to this product.
SoundWave 32
If this equipment causes interference to radio or television reception, which can be
determined by turning the equipment off and on, the user is encouraged to try and
correct the interference by one or more of the following measures:
1. Reorient the receiving antenna.
2. Relocate the computer with respect to the receiver.
3. Move the computer away from the receiver.
4. Plug the computer into an outlet which resides on a different circuit breaker
than the receiver.
5. If necessary, consult your dealer, or an experienced radio or television technician for additional suggestions.
You may find the booklet How To Identify and Resolve Radio-TV Interference
Problems helpful. It was prepared by the Federal Communications Commission and
is available from the U.S. Government Printing Office, Washington, DC 20402. Refer
to stock number: 004-000-00345-4.
Orchid Technology is not responsible for any radio or TV interference caused by
unauthorized modifications to this equipment. It is the responsibility of the user to
correct such interference.
Operation with non-certified equipment is likely to result in interference to radio
and TV reception. The user must use shielded interface cables in order to maintain
the product within FCC compliance.
SoundWave 32Pro User's Manual 61
Page 65

Index
INDEX
A
Address Settings - 48
Address Conflicts - 42
Audio Hardware Setup - 9
C
CD-ROM Device Drivers - 17
CompuServe - 35
Configuring
CD-ROM Device Drivers - 17
CORELCDX.COM Device Driver - 18
SoundWave 32Pro - 9, 11
Connecting External Devices - 10, 13, 14
D
D-sub connector for joystick/MIDI input - 14, 50
Device Drivers - 17
Diagram (SoundWave 32Pro) - 10
E
External Devices - 14
G
Game Port - 14, 50
H
Help
Troubleshooting - 36
62 SoundWave 32Pro User's Manual
Page 66
I
Installation
CD-ROM Drive - 15
Device Drivers - 17
Installing the SoundWave 32Pro - 7
Microphone - 7
J
Joystick port/MIDI Port Pin Assignments - 50
Jumpers
Locations of Jumpers - 11
Jumper Settings
J3 (I/O Address) - 11
JP1 (Wavetable) - 12
Summary - 11
L
Index
Line input jack - 10, 14
M
Microphone input jack - 10, 14
MIDI
General MIDI - 53
Interface - 14
Overview - 53
Specifications - 53
Usage - 43
Mitsumi CD-ROM Drive - 18
P
Preparing your SoundWave 32Pro - 11
SoundWave 32Pro User's Manual 63
Page 67

Index
Q
Q-Sound - 22
S
Software Installation - 8
Sounds
General MIDI - 54
Percussion - 58
Sony CD-ROM Drive - 17
Speaker output jack - 10, 14
Summary of Jumpers Settings - 11
SW32.EXE Utility - 21
Synthesis Algorithms - 22
T
Technical Information - 35
Technical Specifications - 45
Troubleshooting - 36
U
Utilities
Key-Z Player - 29
Key-Z Player Accompanied - 33
Key-Z Player Solo - 32
Synthesis Algorithms - 22
SW32.EXE - 21
Volume Control - 23
Windows Control Panel - 24
DOS Control Panel - 27
V
Volume Control Utility - 33
64 SoundWave 32Pro User's Manual
 Loading...