

Page 1

OrCam Read
User Manual
English
| orcam.com |
01
Page 2
© 2021 OrCam Technologies Ltd. All rights reserved.
OrCam® is the trademark and brand name of OrCam Technologies Ltd. (“OrCam”) and OrCam is
the sole proprietor of all the rights and all the intellectual property rights in this guide and/or any
other document produced by OrCam relating thereto. The documents are protected by applicable
intellectual property laws including and without limitation copyrights, patents, design patents,
trademarks, know how, trade secrets, and international treaties. No license or rights are hereby
transferred to the user of this guide and said guide shall remain the sole and exclusive property of
OrCam.
No part of this guide shall be used, reproduced, translated, converted, modied, adapted, displayed,
stored in a retrieval system, communicated, or transmitted by any means, for any commercial
purpose, including and without limitation, sale, resale, distribution, reproduction, license, rental, or
lease without receiving written permission from OrCam.
A list of OrCam’s patents can be found in https://www.orcam.com/en/patents/.
OrCam makes no expressed or implied representation or warranty as to the accuracy or
completeness of the contents of this guide, which is provided “as is”, and assumes no responsibility
or liability for any errors or inaccuracies that may appear in this document or for any product that
may be provided in association with this document.
OrCam devices are intended to enhance the day-to-day lives of individuals with visual impairments.
They are not substitutes for existing methods or forms of assistance and should not be relied upon in
circumstances that are potentially life- or health-threatening or that could lead to nancial loss.
OrCam devices should especially never be relied upon to drive vehicles or operate heavy machinery of
any kind.
Please refer to the OrCam website for additional safety information: www.orcam.com/safety.
To contact OrCam Support, please email support@orcam.com.
For the online user manual and tutorial videos, or for tips, advice, and troubleshooting support, visit
www.orcam.com/user-area.
Corporate Headquarters
OrCam Technologies
5 Kiryat HaMada St.
Jerusalem 9777513 Israel
+972.2.591.7800
United Kingdom
OrCam UK.
60 Gresham Street
London EC2V 7BB
United States and Canada
OrCam Inc.
1115 Broadway, 11th oor
New York, NY 10010
1.800.713.3741
Germany
OrCam GmbH
Gustav-Heinemann-Ufer 58
50968 Cologne
0800.358.5323
China
OrCam Shanghai Technology Consulting Co., Ltd.
奥看(上海)技术咨询有限公司
1277 W. Beijing Road Guolv Building 3/F,
Jing'an Shanghai +8618621553619
Print Date: OrCam Read, Software Version 9.10-EN, August 2021
02
Page 3

Table of
Contents.
Power Button.
Trigger Button.
Volume Buttons.
LED Indicators.
Charging OrCam Read.
Turn On OrCam Read.
Press the Trigger Button.
04What’s in the Box? ------------------
05Read Me First. ----------------------
05Safety and Warnings. ---------------
06Cleaning. --------------------------
07Parts and Buttons. ------------------
08Get Started. ------------------------
09Functions. --------------------------
Reading with OrCam Read.
Smart Reading.
General Tips.
Set and Tell the Time & Date.
Connect to WiFi and Software Update.
Bluetooth Connectivity.
Installation.
Pairing.
App Usage.
Settings.
12Features. ---------------------------
17Customize and Connect. -----------
18Mobile App. -------------------------
21Terms and Conditions. -------------
Double-Press the Trigger Button.
Press One Volume Button.
Press Both Volume Buttons.
Suspend Mode and Power Off.
Enter Suspend Mode.
Exit Suspend Mode.
Turn Off OrCam Read.
Automatic Suspend and Power Off.
Setting the Volume.
Vocal Commands.
Privacy.
Warranty.
Refund Policy.
10Get Familiar. ------------------------
FCC Compliance.
03
Page 4
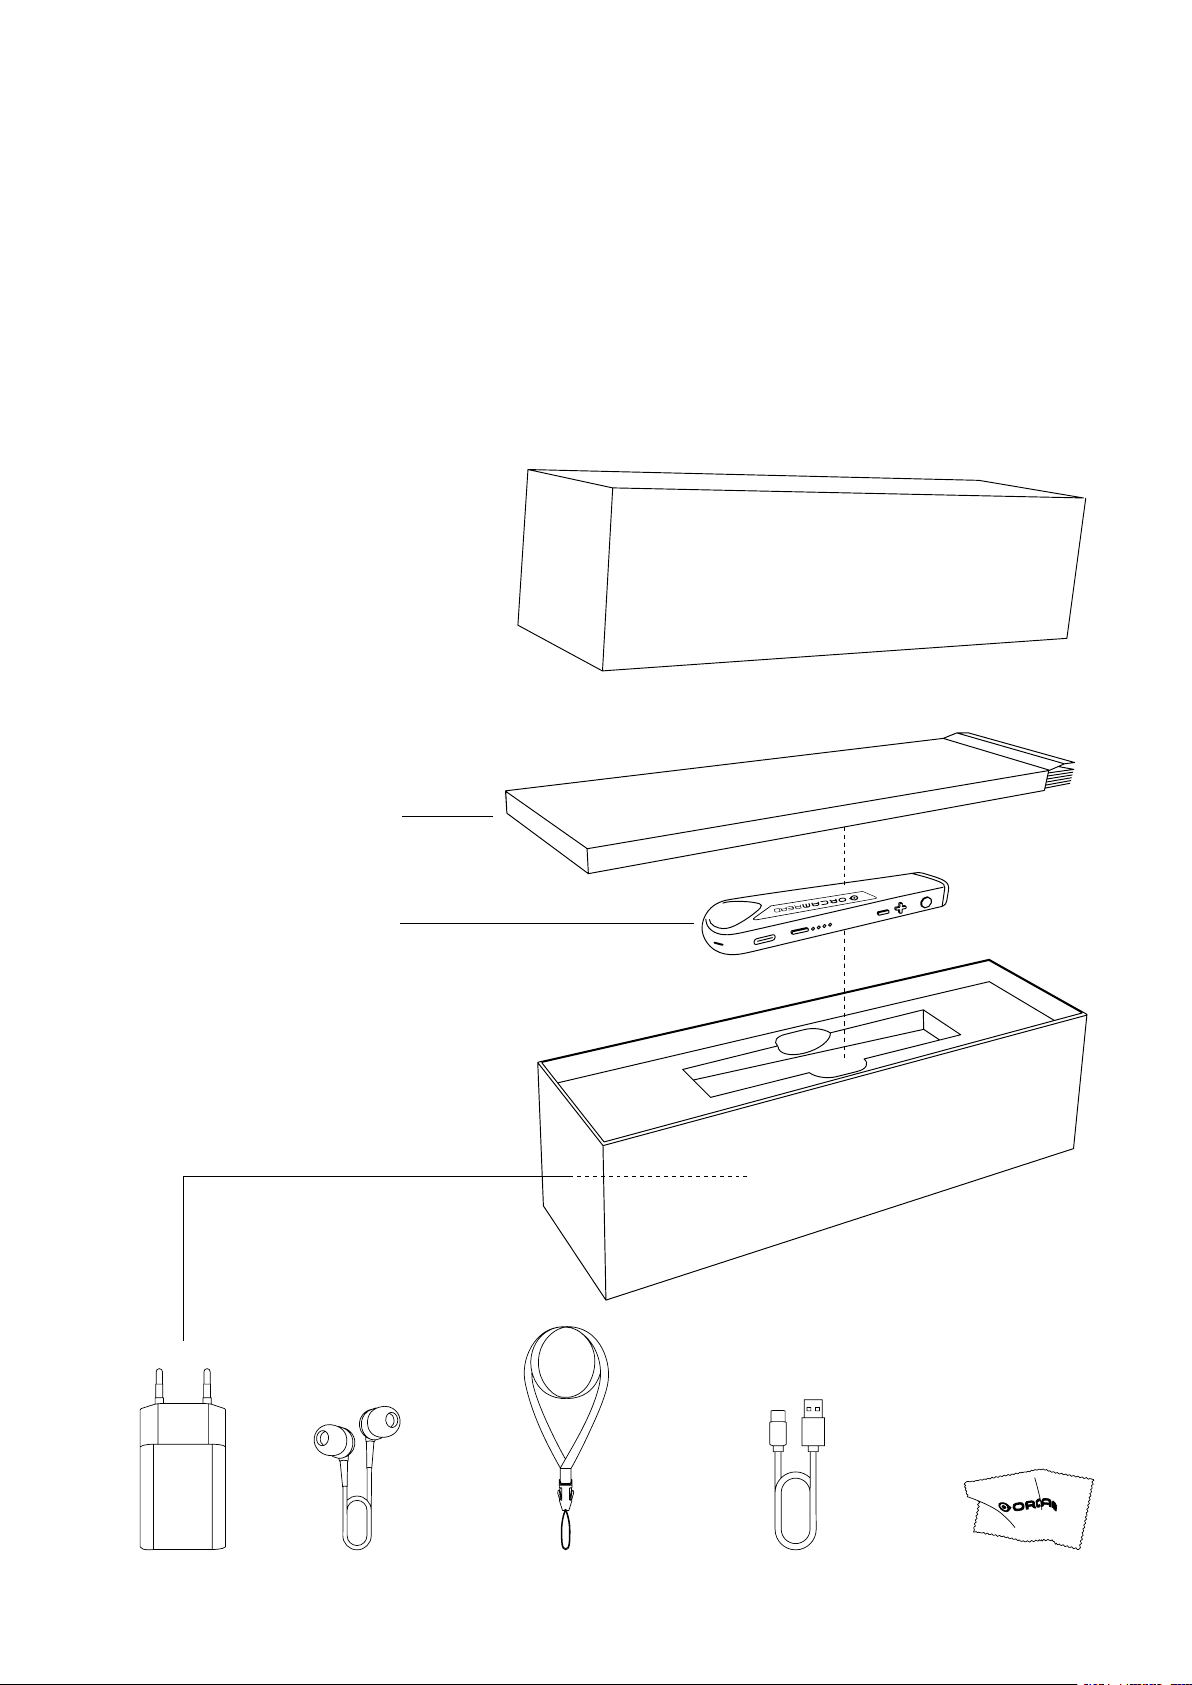
What’s in
the Box?
1. OrCam Read device
2. Quick User Guide
3. Wall charger
4. Charging cable
5. Wired earphones
6. Cleaning cloth
7. Lanyard
2.
1.
3. 4. 5. 6. 7.
04
Page 5

Read Me First.
Thank you for purchasing the OrCam Read assistive technology device!
You have chosen a highly advanced, effective – and easy-to-use – wearable solution that helps you access your
world and gain increased independence.
Before beginning your journey toward increased independence, please read this manual in full before using the
device to ensure safe and proper use. Follow along the instructions provided in this manual with your OrCam Read
to best get acquainted with your device and to test to ensure that all features of your OrCam Read function properly.
Safety and Warnings.
Before using the OrCam device, read these precautions carefully to avoid dangerous situations and to ensure ideal
performance of your device.
• Handle your OrCam device with care. It can be damaged if dropped, burned, punctured, or crushed. Do not open
the outer casing of the device.
• Check that there is no physical damage to your OrCam device such as any cracks or dents in the outer casing of
the device. Do not open the outer casing of the device.
• Check that the camera lens of your OrCam device is not cracked, damaged, or scratched.
• Conrm that the camera lens is not covered or dirty. Read the cleaning instructions below on how to properly
clean your OrCam device.
• There are three magnetic mounts provided in the box. Should one of them be broken, do not use it; use a different
one.
• Use only the charger supplied with your OrCam device. Using another charger may void your warranty and could
cause severe injury to you or damage to the OrCam device.
• Check that the wall charger and charging cable are not damaged or broken.
• Do not attempt to replace the battery; you may damage it, which could cause overheating and even injury. The
battery is designed to last for two years of average use (one charging cycle per day on average) after which it may
need to be replaced.
• The OrCam device is designed to work in ambient temperatures between 32⁰F and 104⁰F (0⁰C and 40⁰C) and
in normal conditions (Relative Humidity of 10% to 90% RH and Atmospheric Pressure of up to 2000m above
sea level (700hPa)). The device can be damaged if used outside of this range. Store and transport in a cool, dry
place (32⁰F to 104⁰F (0⁰C to 40⁰C) and Relative Humidity of 5% to 90% and atmospheric pressure of 700hPa to
1060hPa)). If the OrCam device overheats, the OrCam device will perform its powering-off procedure.
• The OrCam device is water-resistant but not waterproof. This means the device can withstand light rain or drizzle
for short periods of time, although it is not recommended. Do not use the OrCam device in heavy rain, at the
beach, near a swimming pool, or in or near a bathtub or shower. Do not submerge the OrCam device in any liquid.
The OrCam device meets the standards of IP Code: IP22.
• Do not force a connector into a port or apply excessive pressure to a button. This may cause damage that is not
covered under the warranty. If a connector does not insert easily, check for obstructions in the port and verify that
you have the correct connector for that port. Do not combine with software, hardware, or other equipment not
supplied by OrCam. Exposing the device to magnetic elds may damage the unit or erase your data.
• When using the OrCam device or charging the battery, it is normal for the device to get warm. If the unit becomes
excessively hot, leaks, or gives off a burning smell, turn the device off immediately and contact OrCam Support.
• If you experience any issues operating the OrCam device, or if the device or any of its components, such as the
camera lens or outer casing or charger, becomes damaged or stops working, please contact OrCam Support
and do not attempt to repair it by yourself. Only qualied OrCam personnel may repair or service your device.
Unauthorized repairs may void your warranty.
• OrCam recommends that the user should stay away from background noise so as to better hear the OrCam
device. OrCam recommends that the user use a Bluetooth audio device such as earphones to better hear the
OrCam device in loud environments.
• If you have specic questions about use alongside an internal pacemaker and/or debrillator and/or cochlear
implant, please, please consult your medical professional.
• If you experience an allergic reaction to any of the elements of the OrCam device, contact a medical professional
immediately.
• Do not use your OrCam device to read medication labeling.
• OrCam Read meets the standard requirements in the US and EU for Class 1 medical devices.
05
Page 6

Cleaning.
Clean your OrCam device if you feel it is dirty or has been transferred between users. OrCam recommends cleaning
your OrCam device at least once every two weeks, especially the camera lens. Never touch the camera lens with your
nger. Clean the lens only with the supplied microber cloth and eyeglass cleaning uid. Do not use any abrasive
materials as this may damage the OrCam device. Do not expose the device to chemicals, such as household cleaners,
aerosol sprays, solvents, alcohol, or ammonia as these may damage the OrCam device.
06
Page 7
Parts and Buttons.
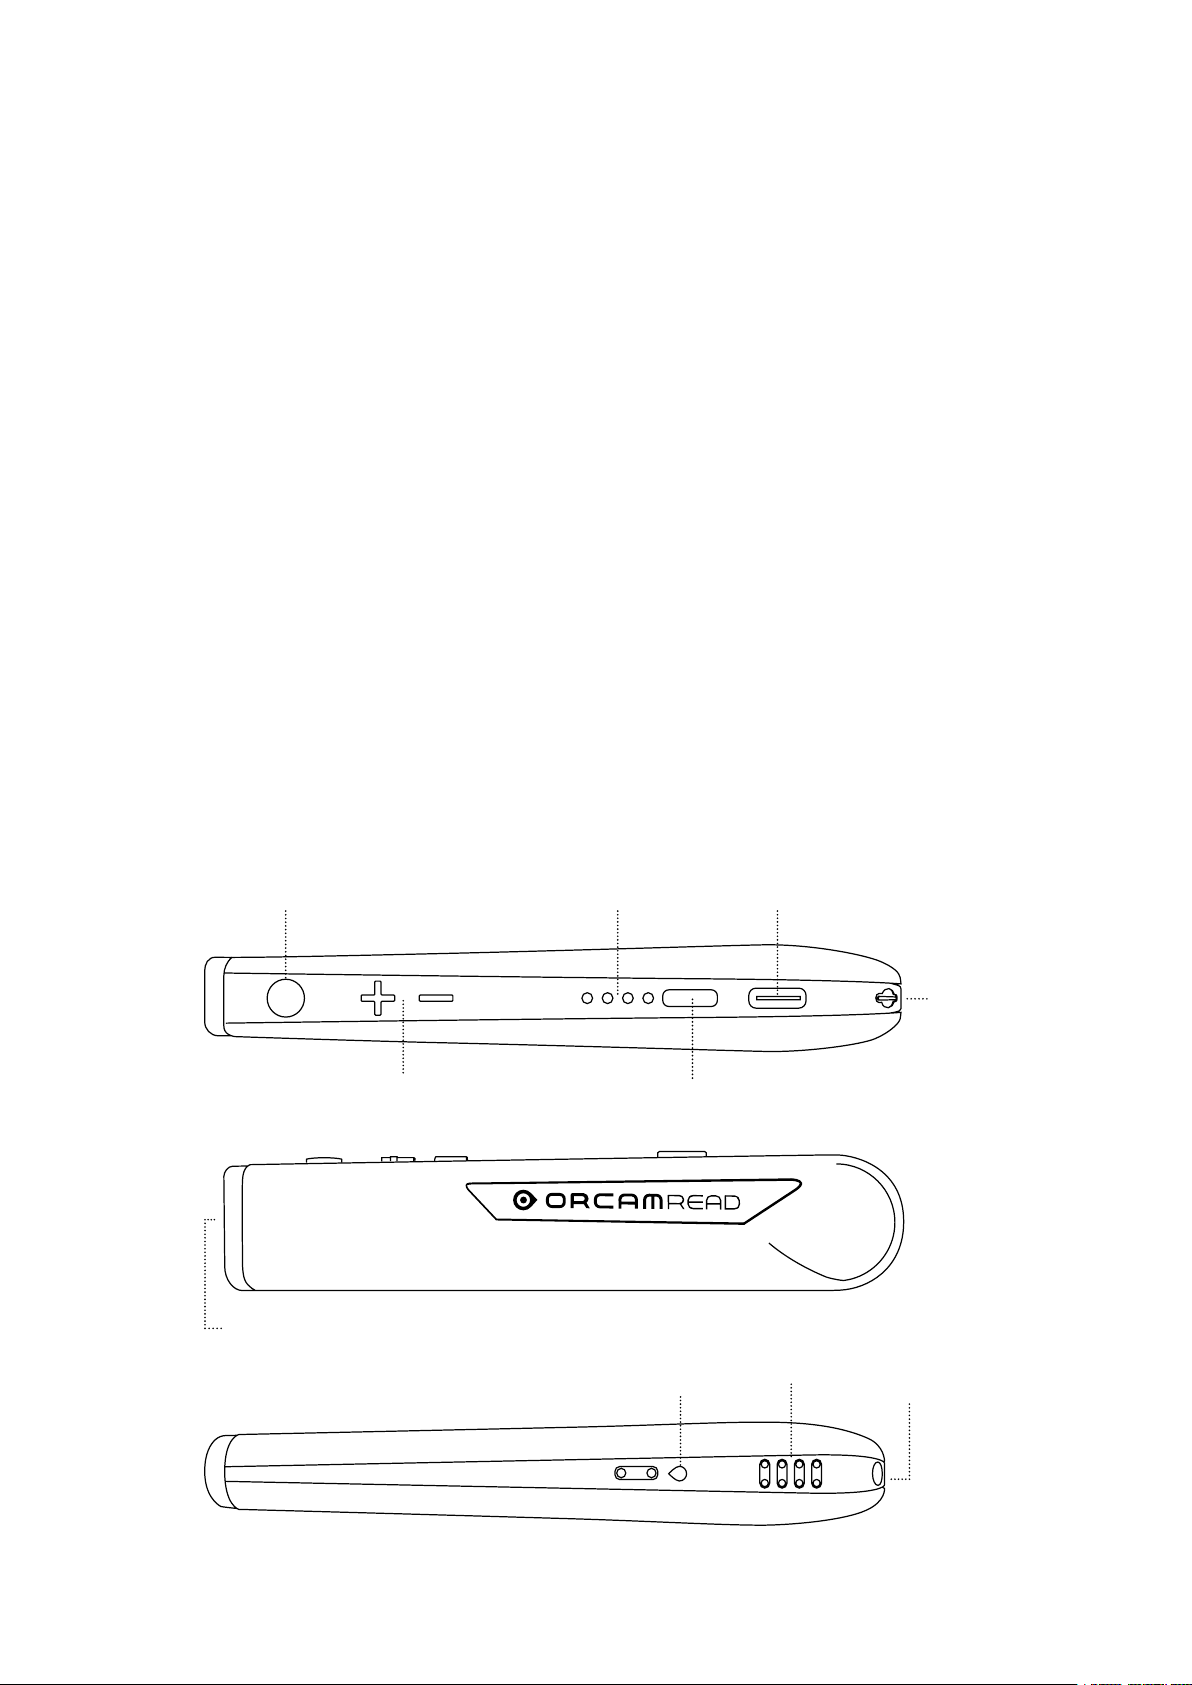
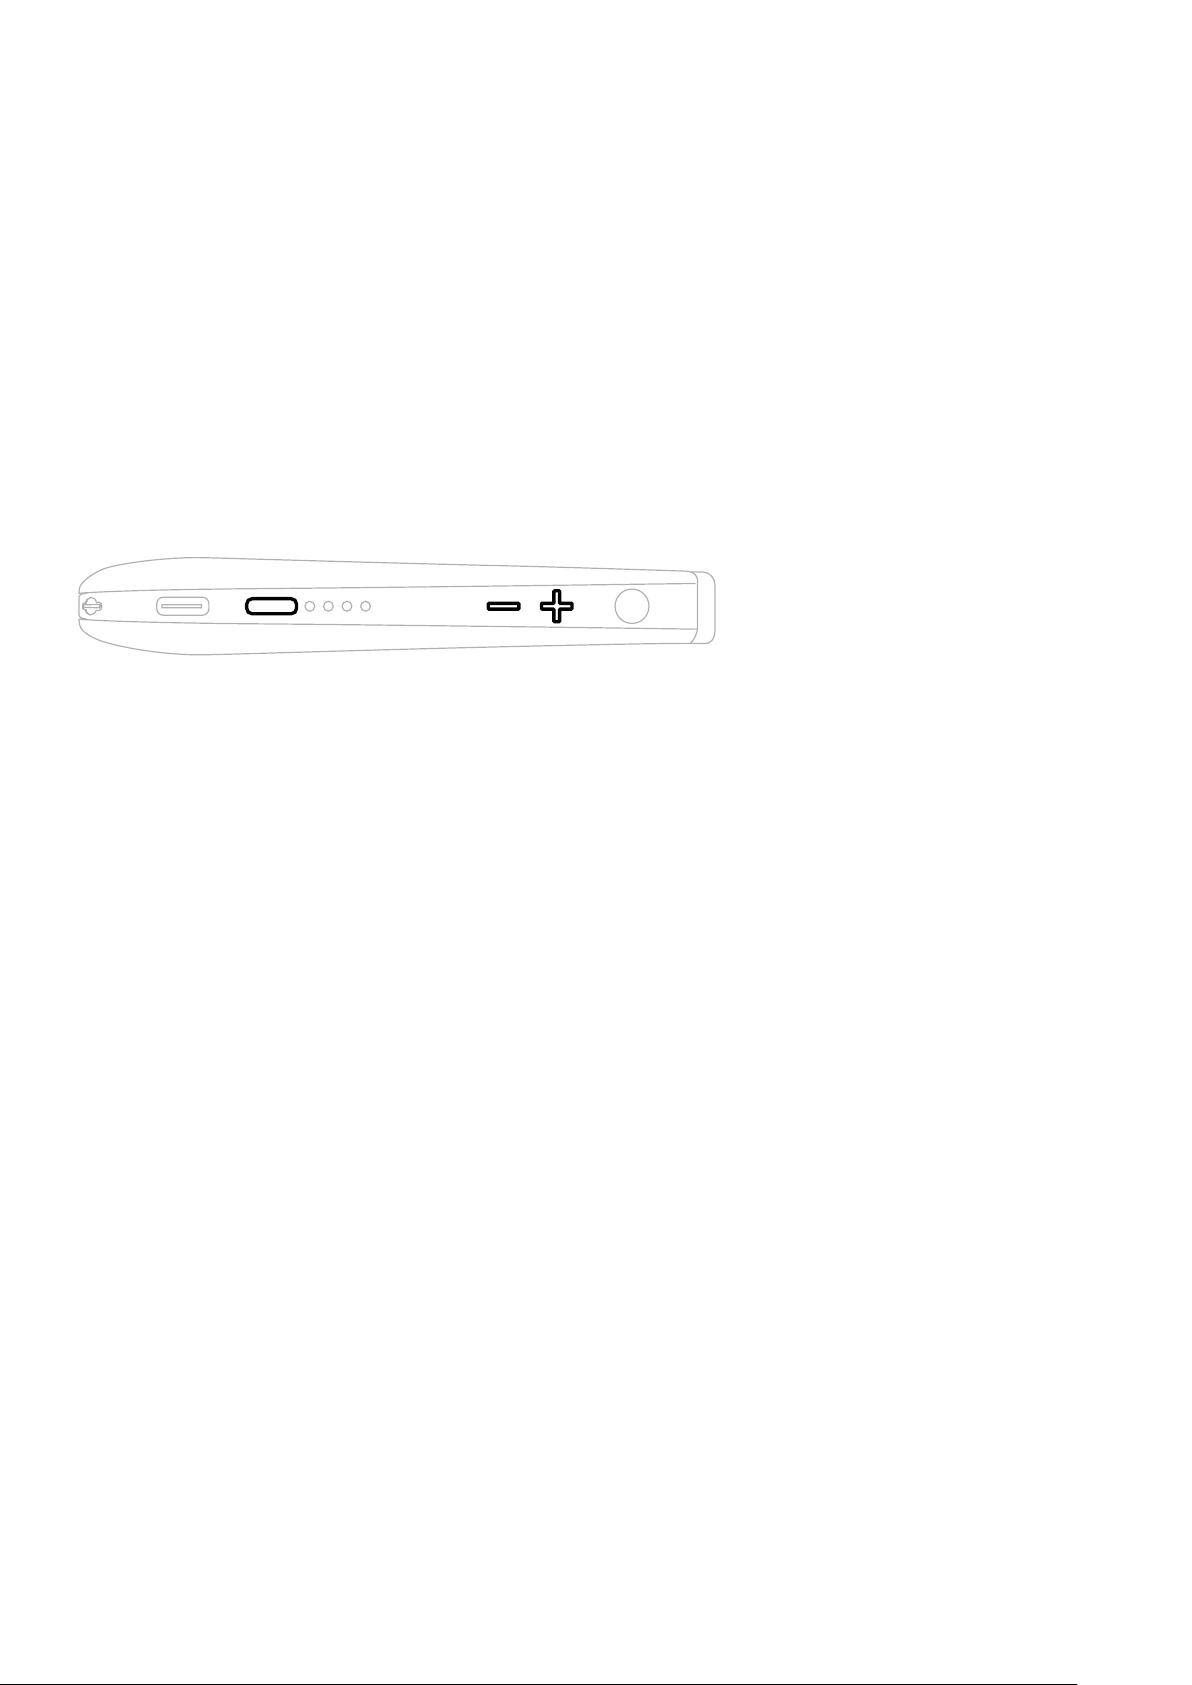
Power Button.
The power button is an embossed, thin, ovalshaped button on the thin, long side of the
device located near the charging inlet. Use the
power button to power the device and enter
the audio settings menu.
Trigger Button.
The trigger button is an embossed, circleshaped button that is located on the thin,
long side of the device near the camera. The
majority of functions are performed with the
trigger button.
Volume Buttons.
The volume buttons are embossed plus (“+”)
and minus (“-”) buttons that are located on the
thin, long side of the device near the trigger
button. Several functions are performed with
the volume buttons.
LED Indicators.
Battery LED Indicator.
There are 4 LED lights next to the power
button. Each light represents up to 25% of
available battery.
On/Off LED Indicator.
The On/Off LED Indicator is the small, OrCam
logo-shaped light located on the thin, buttonfree, long side of the device near the speaker.
The On/Off LED indicator will turn orange as
the device wakes up from power off, turning
blue upon fully awakening.
Trigger
button
Camera
and lasers
Volume
buttons
Power indicator
lights
Power
button
On/off LED
indicator
Charging intlet
(Type C)
Eyelet
loop
Speaker Audio outlet
(Aux)
07
Page 8
Get Started.
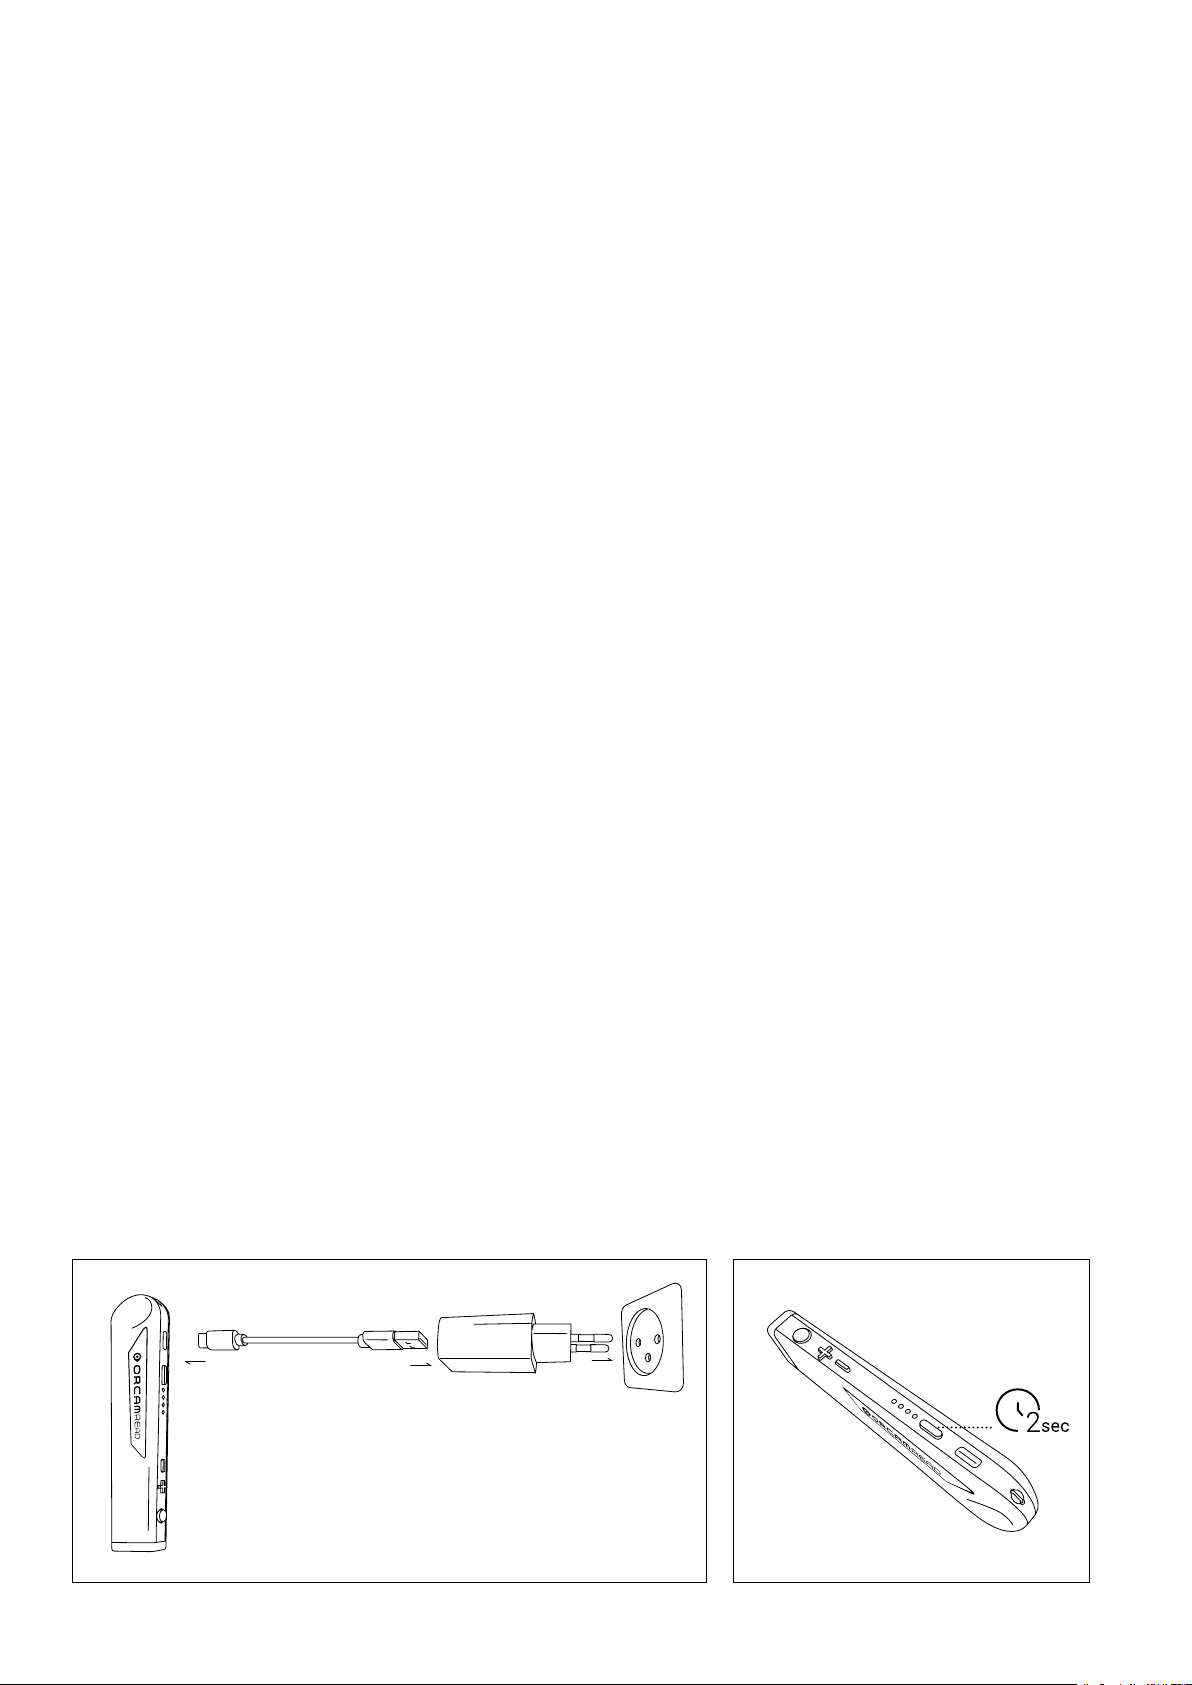
Charging OrCam Read.
Before turning on the device for the rst time, OrCam recommends charging the device for at
least three hours. For all subsequent charges, OrCam Read fully charges in 90-120 minutes.
To charge OrCam Read:
1. Insert the charging cable into the charging inlet of OrCam Read.
2. Plug the USB end of the charging cable into the wall charger.
3. Plug the wall charger into an electrical outlet.
Notes on Charging and Battery Level.
• OrCam recommends using only the original OrCam charger provided.
• The OrCam Read charger supports 100-240 V, 50/60 Hz.
• OrCam recommends charging your device at least once a month if you do not use your device
frequently.
• The device can charge when powered off, awake, and in Suspend mode. The device will wake up
when charging in Suspend mode or powered off. When awake or in Suspend mode, the device
will chime and announce it is charging. When powered off, the device will beep and the On/Off
LED indicator will turn orange for a few seconds, turning blue upon fully awakening.
• If the device’s battery level is too low, the device will announce, “Warning, battery is running low.
Currently [xx] percent charged”. When the device reaches one percent battery level, the device
will announce, “Battery is too low”. OrCam Read will then undergo its shutting down procedure.
Turn On OrCam Read.
1. Long press the power button for about 2 seconds. Let go of the power button once you hear
the beep.
2. The On/Off LED indicator will turn orange as the device wakes up, turning blue upon fully
awakening.
• After about one minute you will hear a chime and then, “OrCam version [xx] is ready. Battery is
[xx] percent charged”.
Note: If you did not hear the phrase, “OrCam version [xx] is ready”, or you are not sure that OrCam
Read is powered on, press the trigger button. If the device is powered on, you will hear an audio
response.
Charge Turn On
08
Page 9
Functions.
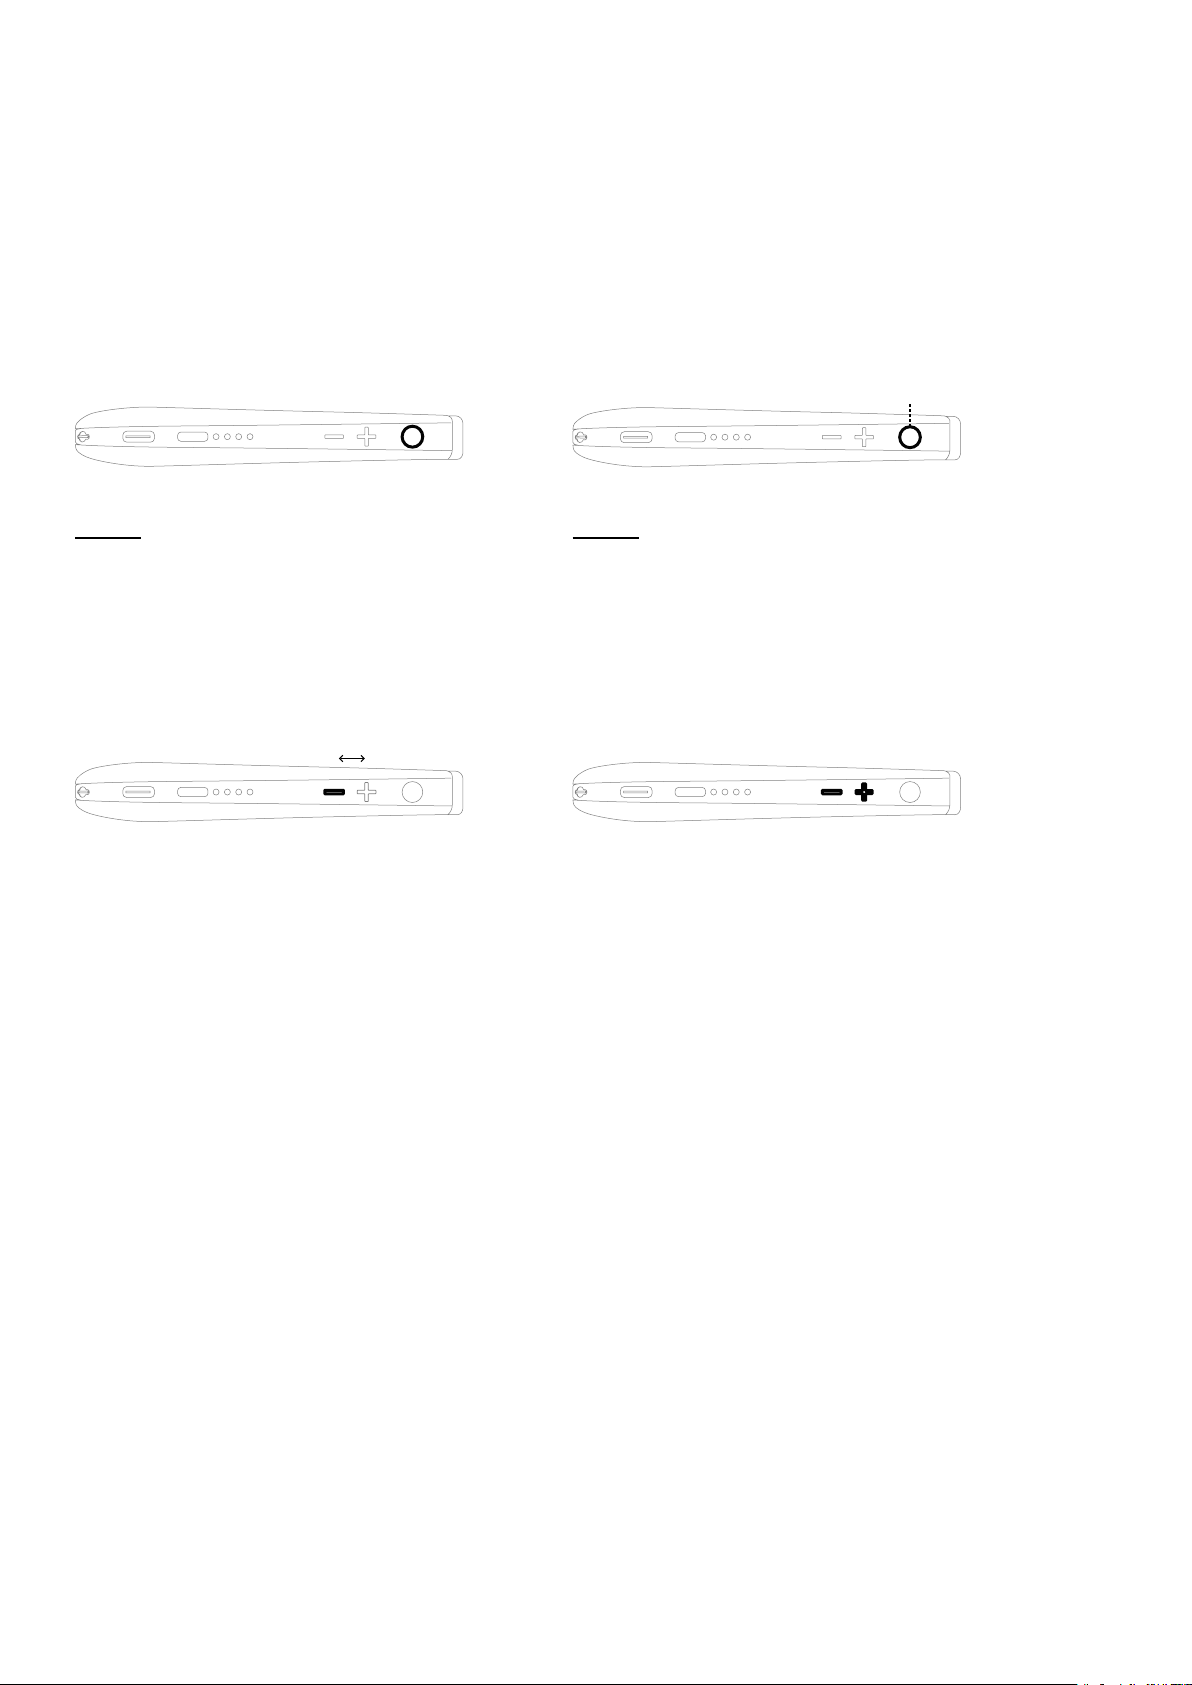
Press the Trigger Button.
Press the trigger button once and
OrCam Read will read captured text,
stop reading, wake up from Suspend
mode, or make selections in the
audio settings menu.
Press One Volume Button.
Press either volume button to adjust
the volume, rewind or fast forward
through text, or scroll through the
audio settings menu.
Double-Press the Trigger Button.
Rapidly press the trigger button
twice to pause or resume reading,
start a vocal command session,
or exit the audio settings menu.
x2
Press Both Volume Buttons.
Press both volume buttons to switch
between laser pointer modes.
09
Page 10

Get Familiar.
Suspend Mode and Power Off.
Enter Suspend Mode.
When the device is powered on, entering the Suspend mode allows you to conserve battery
life without shutting down your device completely.
1. Press the power button once.
2. You will hear a beep and, “Suspending. Press again to shut down”. Do not press the power
button again.
3. After a few seconds, you will hear, “Suspended” as the device enters the Suspend mode.
Exit Suspend Mode.
1. Press either the power button or trigger button once.
2. You will hear a beep and, “Waking up. Battery is [xx] percent charged”.
Turn Off OrCam Read.
1. Press the power button once. You will hear a beep and, “Suspending. Press again to shut
down”.
2. Press the power button again. You will hear a beep and, “Shutting down, please wait”.
3. Just before the device shuts down, you will hear, “Power off. Bye-bye”.
Automatic Suspend and Power Off.
• OrCam Read automatically enters the Suspend mode after three minutes of inactivity. This
timeframe can be adjusted to a shorter or longer time in the audio settings menu.
• OrCam Read powers itself off after three hours in the Suspend mode.
Note: When left dormant for the set "automatic suspend time", Suspend mode automatically
begins and a small beep is played (no "Suspended" announcement will be heard), and will wake up
when touched accompanied by a small beep (and not announce, "Waking up").
Setting the Volume.
• Increase the volume by one level by pressing the plus (“+”) volume button once.
• Decrease the volume by one level by pressing the minus (“-”) volume button once.
OrCam Read will announce whether the volume level was raised or lowered, as well as when you
reach the minimum or maximum volume level.
Note: You cannot change the volume while the device is reading. Pressing either volume button
during reading will cause the device to read either the next or previous sentence.
Vocal Commands.
OrCam vocal commands can be used to easily control your
OrCam Read, change settings, or receive information.
To use them:
1. Double-press the trigger button. You will hear a long beep.
2. Say a vocal command. You will then hear a chime.
3. OrCam Read will then perform the requested action.
Double
press
“Tell the Time”
Hey OrCam.
In addition to the traditional double-press of the trigger button, you may simply say, “Hey OrCam”,
followed by the desired vocal command. For example, you can say, “Hey OrCam, enter the user menu”.
Note that this feature is disabled by default. You may enable it in the audio settings menu.
10
Page 11

List of Vocal Commands by Category:
Category Command Meaning of Request
“Help”
Commands
"Information"
Commands
"List Help Commands" Hear the list of “Help” commands.
"List Information Commands" Hear the list of “Tell” commands, which are
commands that contain the word “tell” in
them. These are commands that provide
specic information.
"List Settings Commands" Hear the list of commands will help you
modify your device’s settings.
"List Smart Reading Commands" Hear the list of commands for the Smart
Reading feature.
“Tell the Time” Hear the current time.
“Tell the Date” Hear the current date.
“Tell the Build”/ "Tell the Version" Hear the software version.
“Tell the Battery Status” Hear the battery level and whether your device
is currently charging.
“Settings”
Commands
“Tell the Device Serial Number”
“Volume Up”/ "Speak Louder"
“Volume Down”/ "Speak Softer" Lowers volume one level.
“Reading Speed Up”/ "Read Faster" The device will speak and read at a faster rate.
“Reading Speed Down”/ "Read Slower" The device will speak and read at a slower rate.
“Enter the User Menu” Enter the audio settings menu.
“Change the Voice” Change the system and reading voice per
“Change the Auto Suspend Time” Choose the amount of time the device should
“Connect to the Bluetooth Audio Device” Start the process to connect to a Bluetooth
Hear the external and internal IDs of your device.
Raises volume one level.
language.
wait in an idle state before automatically going
into Suspend mode.
audio device.
“Check the Internet Connectivity” Hear the status of the device’s connectivity to
the internet.
“Enable the Reading Navigation” Enables reading navigation, allowing you
to pause, resume, fast forward, and rewind
during reading.
“Disable the Reading Navigation” Disables reading navigation.
11
Page 12
Features.
Reading with OrCam Read.
Reading with the Trigger Button.
1. Hold OrCam Read steady, directly facing the text, at a distance of about 6-14 inches (15-35 cm)
away from the text.
2. Press the trigger button. You will hear a camera shutter sound.
3. OrCam Read will make several beeps as it processes the text. It will then begin reading the text
and chime when nished reading.
Note: You can also read more specic text by long pressing the trigger button for up to 5 seconds.
During the long press, adjust the border laser frame or mouse laser pointer to capture the desired
text. If your nger is not released before 5 seconds transpire, the camera will not activate.
Reading Navigation.
Easily navigate any text while reading.
• To pause or resume reading, press the trigger button twice.
• To skip to the next sentence, press on the plus (“+”) volume button once.
• To go back to the previous sentence, press on the minus (“-”) volume button once.
• To stop reading, press the trigger button once.
OrCam Read will make a chime sound when nished reading.
Note: The reading navigation functions do not work while reading in Smart Reading mode.
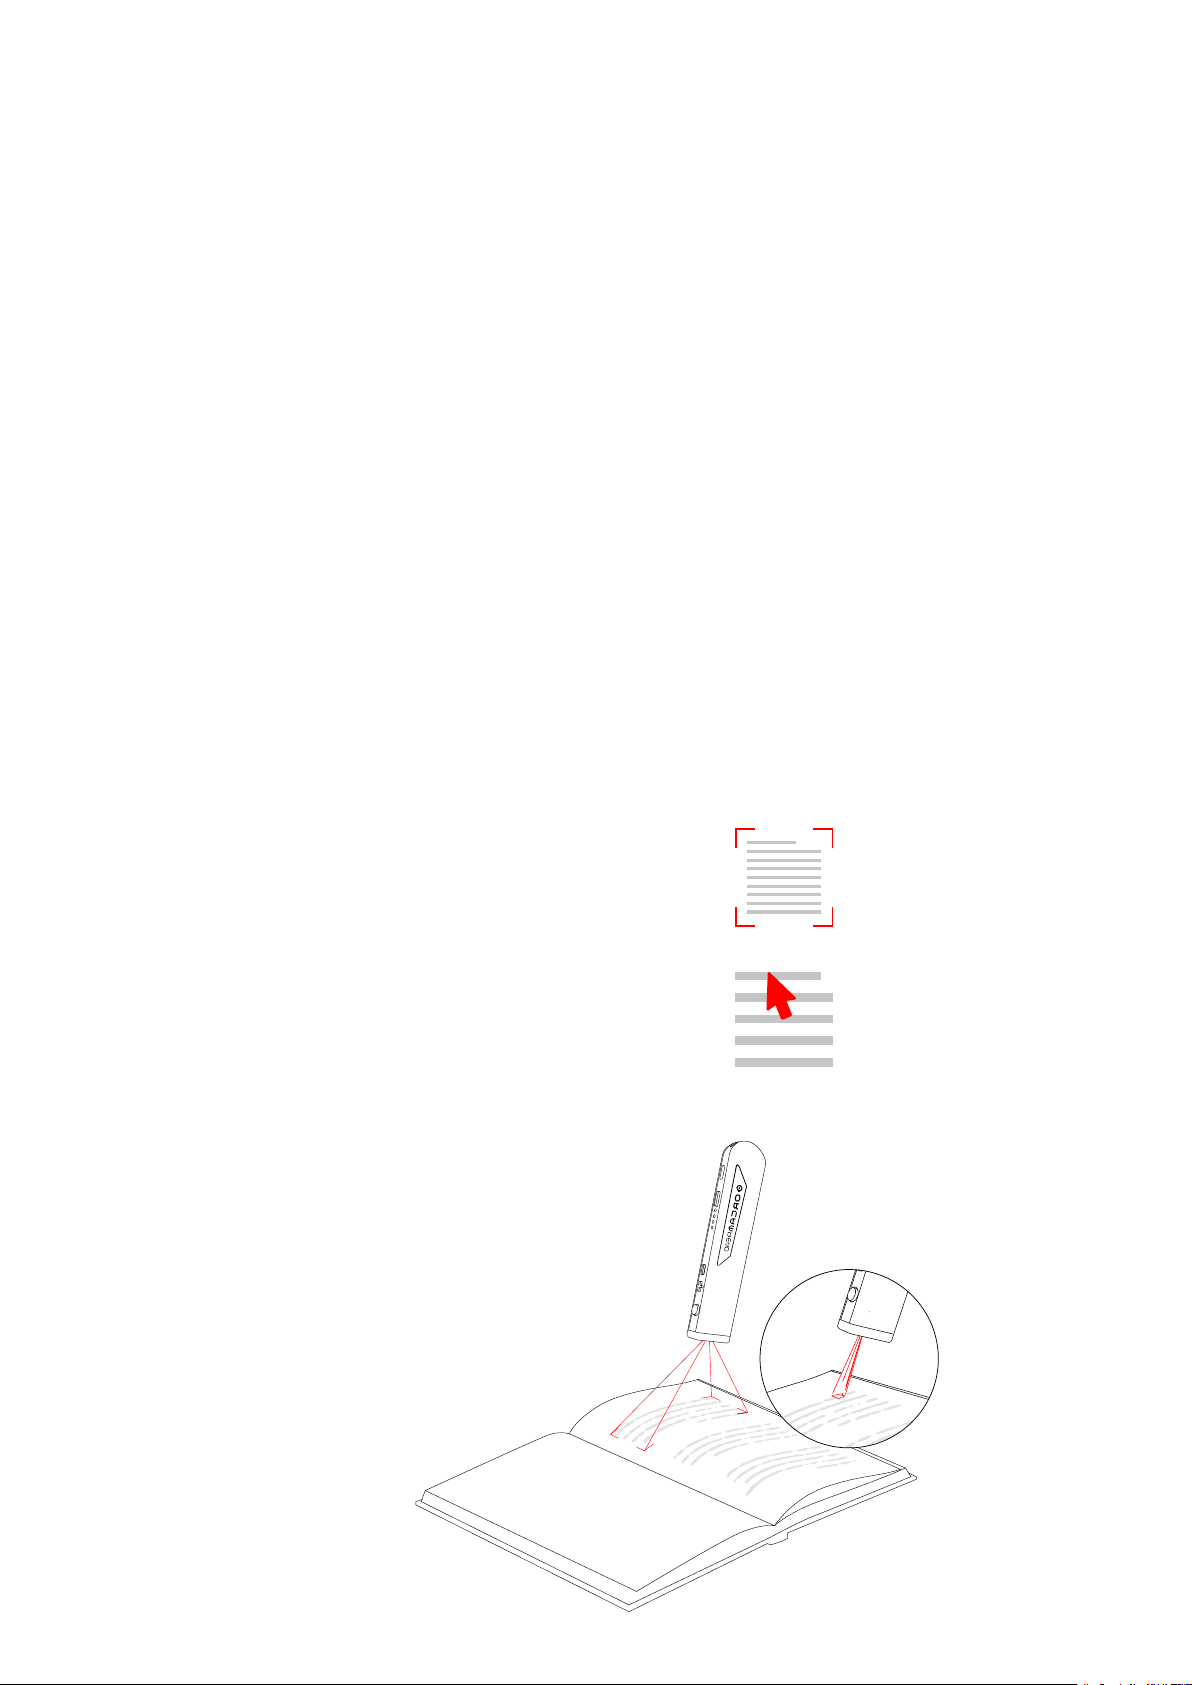
Laser Pointer Modes.
The laser pointers are designed to help you focus
your OrCam Read on any desired text. You can
switch the laser pointer mode by pressing the
plus and minus volume buttons at the same time.
There are two laser pointer modes:
• “Border” for reading framed text.
• “Mouse” to start reading at a specic location.
Note: OrCam Read captures the selected text
within 5 seconds of pressing and holding the
trigger button. If your nger is not released before
5 seconds transpire, the camera will not activate.
Border
Mouse
12
Page 13
Smart Reading.
1
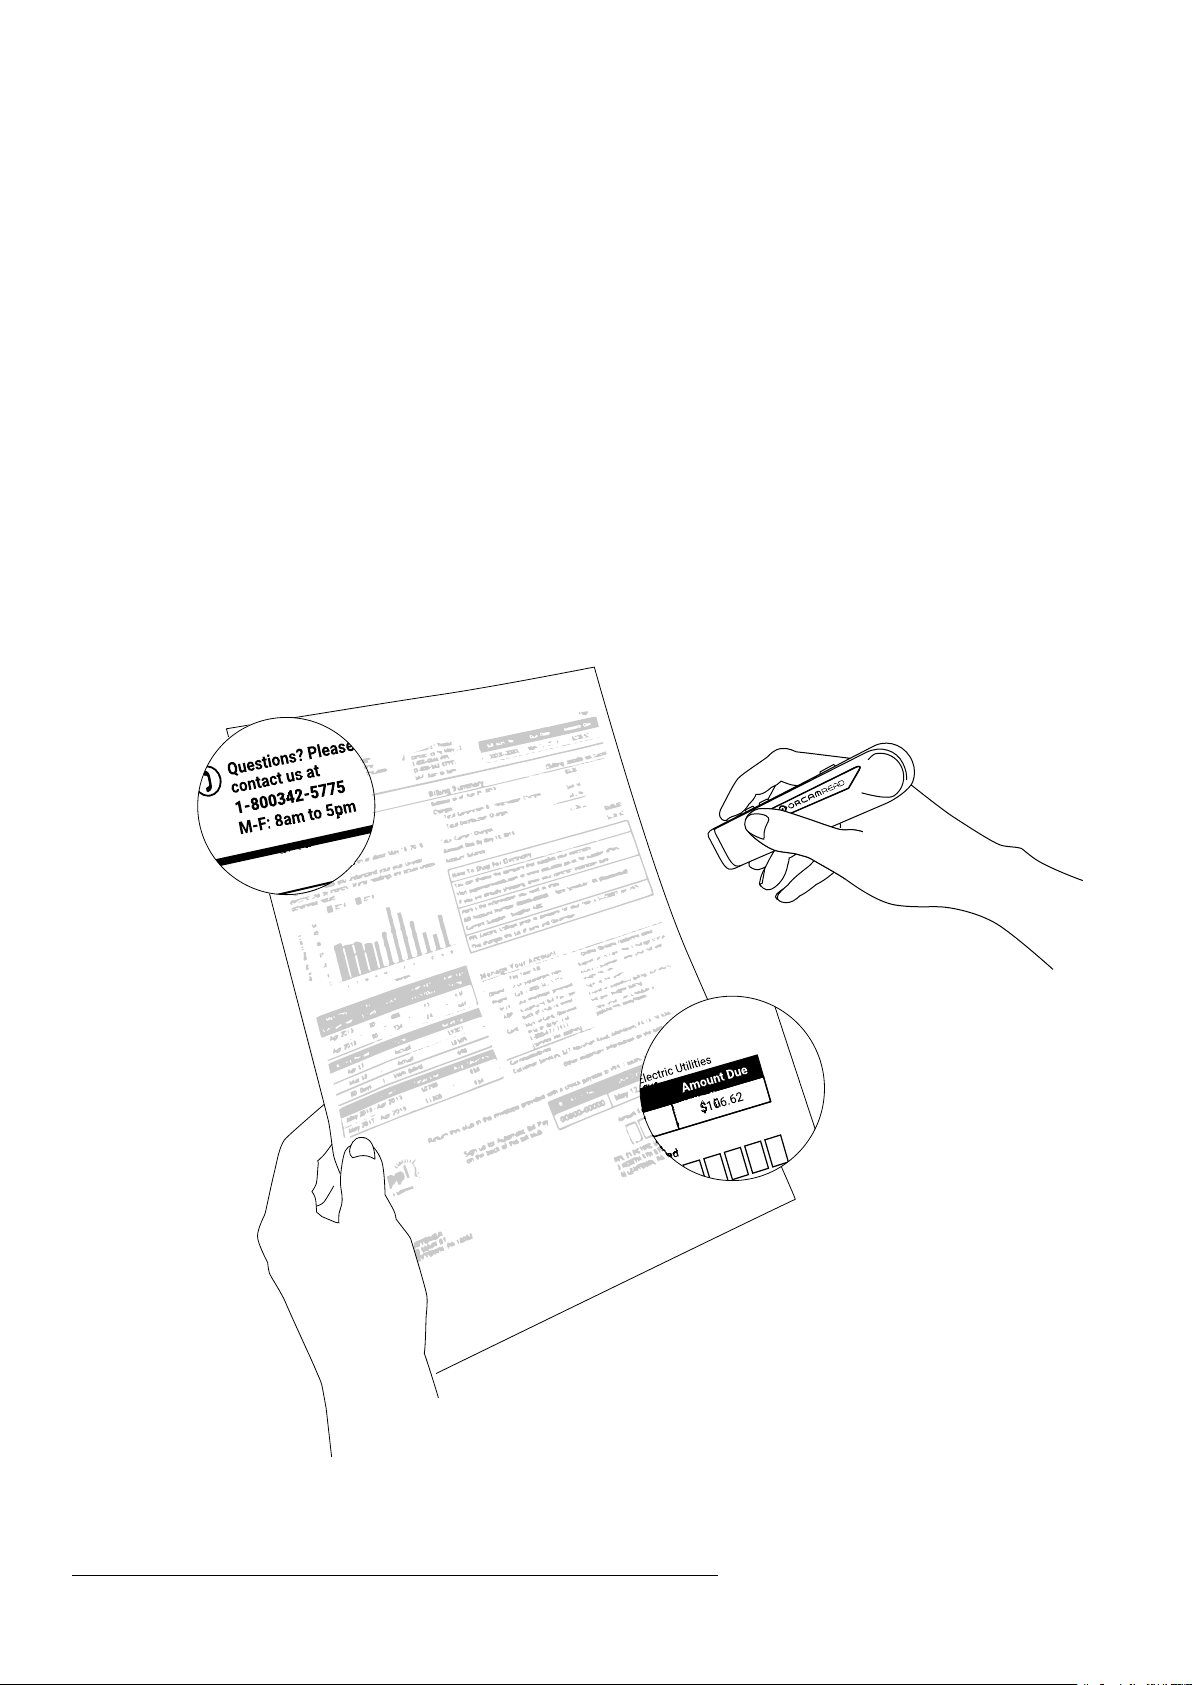
This feature is designed to help you nd the information you are looking for in a faster and
easier way. You can ask OrCam Read to read the due date and amount of your bills, read just the
desserts section of a menu, read the phone number off a business card, and more.
1. Hold OrCam Read directly facing the text at a distance of about 6-14 inches (15-35 cm) away
from the text.
2. Double-press the trigger button and say after the long beep, “Smart Reading”. The device will
start making camera shutter sounds.
3. After the device says, “Ready”, the device will always be listening. There is no need to
subsequently double-press the trigger button before every vocal command.
4. Say a vocal command.
5. If you wish to say a new command while the device is reading, press the trigger button once and
the device will return to “Always Listening” mode.
6. To exit this feature, either say, “Exit”, or long press the trigger button for 5 seconds and then
release. OrCam Read will say, “Exiting” as it exits the Smart Reading feature.
“Read the
Phone Numbers”
“Read the
Amounts”
1
Relevant only to supported languages.
13
Page 14

List of Smart Reading Vocal Commands:
Command Meaning of Request
“Help”
“Restart”
“Volume Up”/ "Speak Louder"
“Volume Down” / "Speak Softer"
“Reading Speed Up” / "Read Faster"
“Reading Speed Down”/ "Read Slower"
“Read Everything”
“Start from ‘X’” / "Jump to 'X'"
“Find ‘X’”
“Read the Dates”
“Read the Phone Numbers”
“Read the Amounts”
OrCam Read will list all the Smart Reading vocal commands.
OrCam Read will recapture the image.
OrCam Read will raise its volume by one level.
OrCam Read will lower its volume by one level.
OrCam Read will read at a faster rate.
OrCam Read will read at a slower rate.
OrCam Read will read all captured text.
OrCam Read will start reading from the specied word.
Note: ‘X’ is a placeholder for the word you are searching.
OrCam Read will nd and read all instances of the specied word.
Note: ‘X’ is a placeholder for the word you are searching.
OrCam Read will read all dates listed.
OrCam Read will read all phone numbers listed.
OrCam Read will read all currency amounts listed.
The currently supported currencies are:
• $ Dollar currencies
• € Euro
• £ British Pound
• ¥ Japanese yen
“Read the Headlines”
“Read Article Number ‘X’”
“Read the ‘X’ Article”
“Read the Article about ‘X’”
“Repeat”
“Previous”
“Next”
OrCam Read will only read the headlines
OrCam Read will read the specied article, whether article one or ten.
Note: “X” can be numbers 1 to 10.
OrCam Read will read the article you specied, whether the rst or tenth article.
Note: This command can be used up to the tenth article.
OrCam Read will read the article containing the specied word in the headline.
Note: “X” is a placeholder for the word you are searching.
OrCam Read will read the current instance.
Note: This command works in tandem with all the reading commands.
OrCam Read will read the previous instance.
Note: This command does not work in tandem with the following
commands:
• “Read Everything”
• “Start from ‘X’”
• “Jump to ‘X’”
OrCam Read will read the next instance.
Note: This command does not work in tandem with the following
commands:
• “Read Everything”
• “Start from ‘X’”
• “Jump to ‘X’”
14
Page 15
• General Tips.
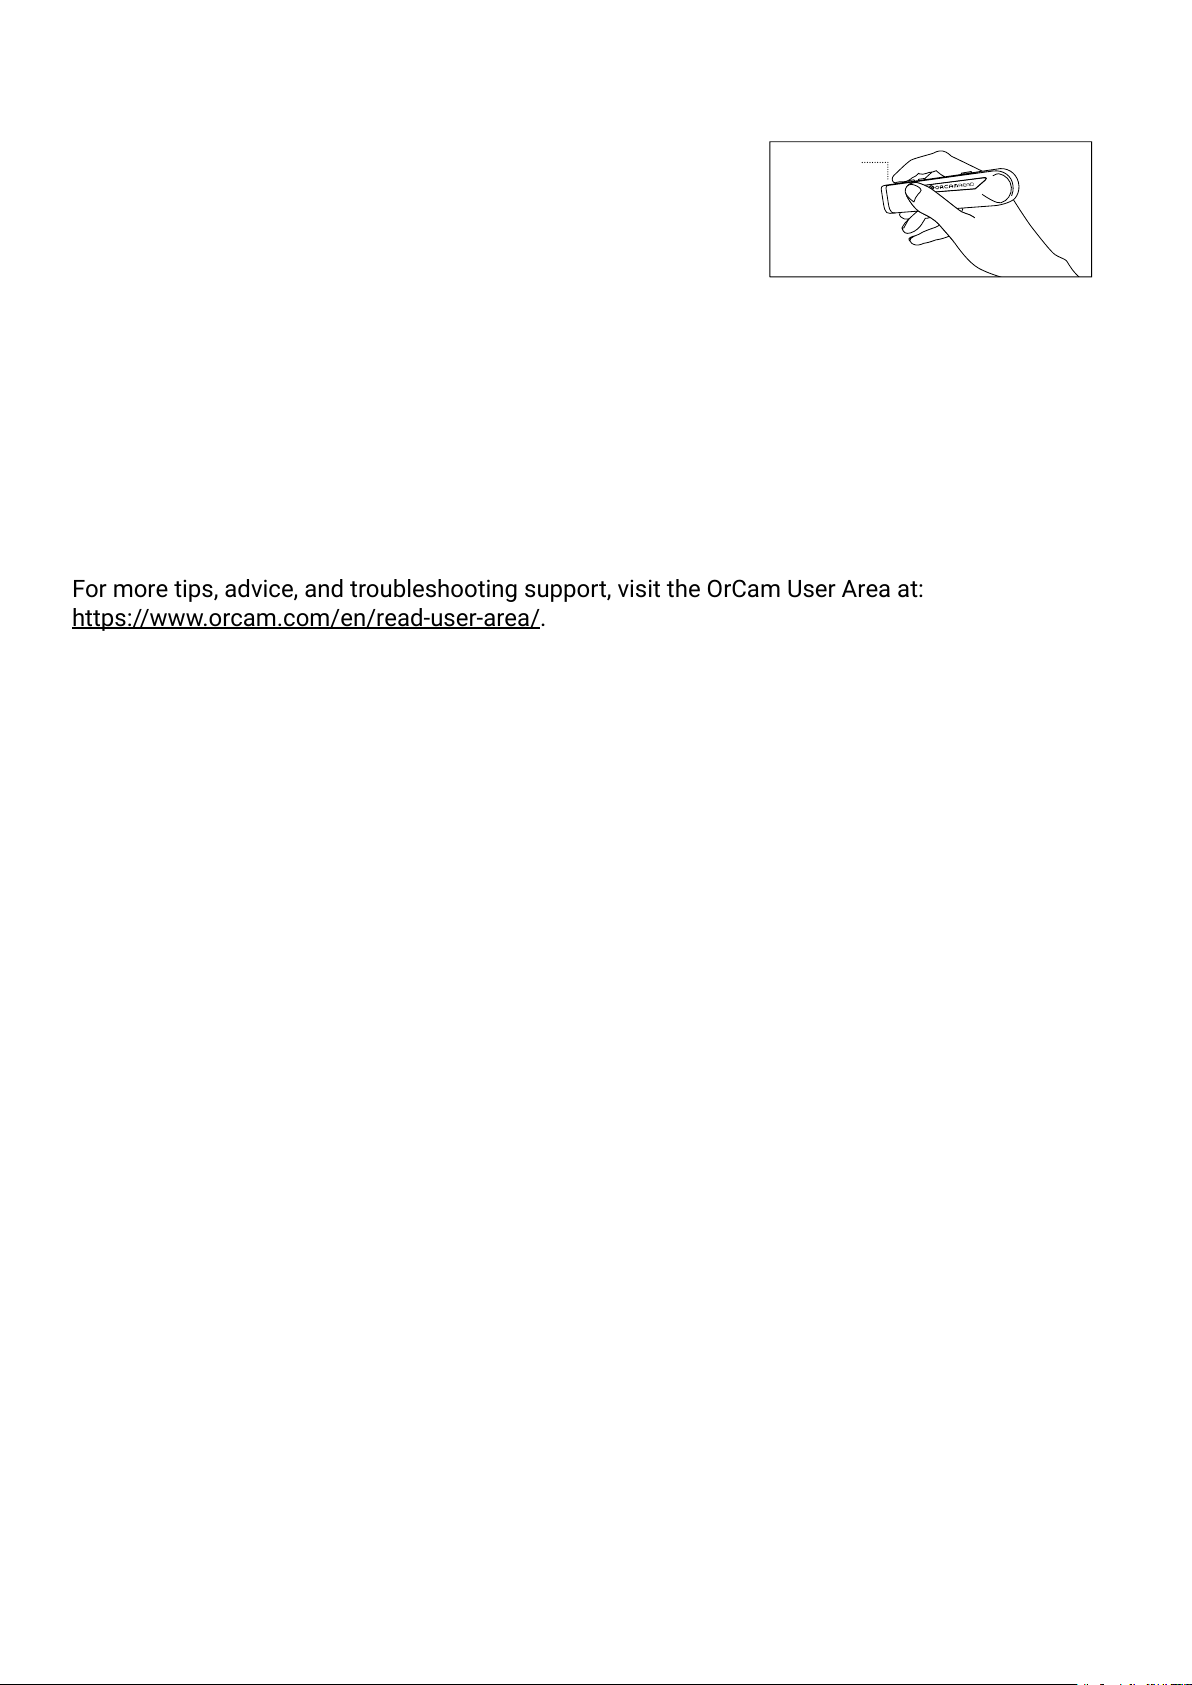
Buttons
facing
upward.
• For best detection, ensure that the camera lens is directly
facing the text or object with the long side of the device with
all of the buttons facing upward, and the lens is not covered
or dirty. The camera can only read text or recognize objects
in its eld of view.
• Make sure you do not move the texts or objects you would like OrCam Read to read or recognize
while the device is taking a picture.
• Avoid taking pictures while walking or at moving texts or objects as the device may not read or
recognize properly.
• OrCam Read will inform you whether the text is upside down, the environmental lighting is too
dark, or it is unable to read the text.
• If you attempt to perform a feature and OrCam Read responds with a short chime, then the
device is informing you that no action has taken place.
• If you are having trouble keeping the text steady, a book holder is recommended.
For more tips, advice, and troubleshooting support, visit the OrCam User Area at:
https://www.orcam.com/en/read-user-area/.
15
Page 16

Customize and Connect.
Set and Tell the Time & Date.
• There are three ways to set the internal clock of your device:
Go to the Time Set page on the website: www.orcam.com/timeset. Press the trigger button to
⸰
read the “OrCam Please Set Zone and Time” command on the screen.
Set the time manually through the audio settings menu.
⸰
The time will automatically be set or updated when your device is connected to WiFi.
⸰
To hear the current time and date, enter the audio settings menu. Go to General Settings Menu,
⸰
then to Set Time. Alternatively, you can use the vocal commands “Tell the Time” and “Tell the
Date”. After a few seconds, OrCam Read will announce the current time and/or date.
Note: If your country of residence changes clocks for daylight saving time, upon daylight saving
time beginning or ending, OrCam recommends following the instructions above to accurately set
the time on your device.
Connect to WiFi and Software Update.
OrCam Read can automatically update its software over WiFi. Connecting your OrCam Read to
a WiFi network ensures that your device will install the latest software updates throughout the
warranty period. During the warranty period, these updates are free of charge and typically include
software improvements for the device’s existing functionalities. They will not include new features
that may be available in the future. The device must be connected to the charger throughout the
downloading process in order to receive the software updates.
To enable automatic software updates, make sure you are in a location with a WiFi network that
you can access. You will need to know the WiFi network name and password, as well as connect
your device to the charger, before beginning this process. Please note that OrCam Read only
supports 2.4 GHz WiFi, not 5 GHz WiFi.
To connect to a WiFi network:
1. On your computer or smartphone:
a. Go to www.orcam.com/wiset.
b. Follow the instructions on the screen to set your WiFi network.
c. A QR code will appear on the screen.
2. With your OrCam Read:
a. Connect OrCam Read to the charger.
b. Hold OrCam Read in front of the screen (computer screen about 12-16 in [30-40 cm];
smartphone screen about 6-8 in [15-20 cm]) in order to scan the QR code.
c. Press the trigger button.
OrCam Read will chime and make several beeps as it scans the QR code and connects to the WiFi
network. OrCam Read will announce when it is connected.
Once you have connected to your WiFi network, OrCam Read will check for software updates every
time you connect it to the charger in the area of your WiFi network and automatically install the
newest updates that are available in your locality.
Bluetooth Connectivity.
1. Use Bluetooth to connect your OrCam Read to an external speaker or earphones.
a. On the speaker or the earphones:
b. Press the Bluetooth pairing button. You will receive an audio response from the speaker or
earphones.
16
Page 17

c. With your OrCam Read:
Enter the audio settings menu. Go to Connectivity Settings Menu, then to Bluetooth
⸰
Settings Menu.
Select “To connect to a Bluetooth audio device, press the trigger button; for other settings,
⸰
press the volume buttons”.
d. OrCam Read will list all available Bluetooth devices.
e. Press the volume buttons to scroll through the Bluetooth device options. Press the trigger
button to select the speaker or earphones to which you want to connect.
On some Bluetooth speakers or earphones, you will hear a “connected” announcement.
Mobile App.
Use the “OrCam Read” app to customize your OrCam Read’s settings, nd your device if you
misplace it, and play tutorials to learn how to use the device. To use the app, you will need to rst
connect your OrCam Read to your smartphone.
Note: The app is currently available only to iPhone and iPad users.
Installation.
To download the “OrCam Read” app, go to the app store on your smartphone. Search and
download the “OrCam Read” app.
Pairing.
Make sure that your smartphone's Bluetooth mode is turned on before pairing your OrCam Read to
the app. Follow the onscreen instructions while pairing the device (as provided below).
1. Hold your OrCam Read vertically with the camera pointing towards the ceiling and close to your
smartphone.
2. Enter your name and email to receive a conrmation code.
3. A conrmation code will be sent to your email. Check your email and write the conrmation
code within the “OrCam Read” app.
4. Read the Terms & Conditions. Once you have nished reading you may hit the Accept button.
5. Congratulations! Your OrCam Read is now paired with the “OrCam Read” app!
App Usage.
Note: To use the app, your OrCam Read device must be powered on, and not powered off or in the
Suspend mode.
The main screen contains the following features:
• Battery Indicator - An image that shows the battery charge percentage of your OrCam Read. If
voiceover is enabled on your smartphone, the app will announce the battery charge percentage.
• Find Icon - If you lost or misplaced your OrCam Read while it is powered on and connected to
the app, press this icon to make your device continuously beep. Press the icon again to stop the
beeping.
• Learn Icon - Press this icon to access the OrCam Read tutorials found on the OrCam website.
• Settings Icon - Press this icon to easily access, view, and change the settings of your OrCam
Read through the app in real-time instead of manually changing them on your device.
Notes on Mobile App.
• Do not allow unauthorized users access to your “OrCam Read” app. They might, unwittingly,
change your settings, which may create an inconvenience for you.
• The language of the Settings section in the “OrCam Read” app is determined by the system
language of your OrCam Read device, not by the language of your phone or app.
17
Page 18
Settings.
Customize your device’s settings via the audio settings menu.
Audio Settings Menu.
• To enter, while long pressing the power button, press either volume button and then release the
power button.
• Once you are in the audio settings menu, listen carefully to the audio instructions.
• Pressing the trigger button once conrms the selected option; pressing either volume button
scrolls through the options. Double-pressing the trigger button either sends the device back to
the main menu or exits the audio settings menu.
• If you do not make a selection, the device will repeat the same message. If no action is made
before 30 seconds transpire, the device will automatically exit the audio settings menu.
Audio Settings Menu Layout
• Reading Rate Menu
This setting determines how fast your device speaks to you and reads text. You may set
⸰
the reading rate level between 1 and 10, with 1 being the slowest setting and 10 being the
fastest setting.
• Volume Menu
You may set the volume level between 1 and 10, with 1 being the quietest setting and 10
⸰
being the loudest setting.
OrCam Read will announce whether the volume level was raised or lowered, as well as when
⸰
you reach the minimum or maximum volume level.
• Reading Settings Menu
Set Date Format
⸰
⁃ You may change the date format between “month day year”, “day month year”, and “year
month day”. This is to ensure that the device will read dates properly in texts.
Enable or Disable Reading Navigation
⸰
⁃ Reading navigation allows you to skip forward, backward, or pause while reading. You may
enable or disable the feature.
Enable or Disable Beeping when Paused during Reading
⸰
⁃ You may enable or disable beeping sounds when the device is paused during reading.
Set Reading Navigation Pause Time
⸰
⁃ Reading navigation pause time determines how long the reading is paused before it is
cancelled. You may set the reading navigation pause time to between 30 seconds and 5
minutes.
• Language Settings Menu
System Language Menu
⸰
◾
This is the language in which the device talks to you when making any system
announcements.
◾
You may change the system language to any of the installed languages on your OrCam Read.
Reading Language Menu
⸰
18
Page 19

◾
This is the language in which the device reads text to you.
◾
You may change the reading language to any of the installed languages on your OrCam Read.
◾
You may also set the reading language to “Automatic Detection” in which the device will
automatically detect and read text in any of the installed languages.
• Country Settings Menu
Device Country Menu
⸰
◾
Setting the country will change some parameters and settings, such as the time zone, time,
and icker rate of your device, so it can perform better within the chosen country. Your device
will restart upon exiting the audio settings menu.
◾
Note: Changing the country will not change settings such as reading and system languages.
• Connectivity Settings Menu
Bluetooth Settings Menu
⸰
◾
Connect to a Bluetooth audio device.
» Use this option to connect your OrCam Read to a Bluetooth audio device.
◾
Retrieve the name of the connected Bluetooth audio device.
» Use this option to retrieve the name of the connected Bluetooth audio device.
◾
Disconnect from the connected Bluetooth audio device.
» Use this option to disconnect from the connected Bluetooth audio device.
◾
Forget all Bluetooth audio devices.
» Use this option to forget all Bluetooth audio devices from your OrCam Read.
⸰ WiFi Settings Menu
◾
Connect to a WiFi Network using the QR code.
» Use this option to connect your OrCam Read to a WiFi Network using the QR code.
◾
Retrieve the name of the connected WiFi.
» Use this option to retrieve the name of the connected WiFi.
◾
Remove all WiFi networks.
» Use this option to remove all WiFi networks from your OrCam Read.
◾
Check the status of the internet connectivity.
» Use this option to check the status of the internet connectivity.
• General Settings Menu
Voice Menu
⸰
◾
You may change the default speaking voice of each language.
Set Time
⸰
◾
The device will announce the current time and date. You may change the timezone, year,
month, day, hour, and/or minute of the time and date.
Set Automatic Suspend Time
⸰
◾
Automatic suspend time determines the time the device will wait in an idle state before
entering the Suspend mode. You may set the time to between 2 minutes and 30 minutes.
Feedback Sounds Menu
⸰
◾
Enable or Disable Processing Sounds
» Processing sounds indicate the device is processing the captured images. You may enable
or disable the feature.
◾
Enable or Disable Announcements on Automatic Suspend and Resume
» These announcements indicate whether the device will announce “Suspended” and
“Waking up” or make a double beep sound upon automatic suspension of the device and
subsequently awakening the device.
» Enabling this feature means that OrCam Read will announce “Suspended” and “Waking up”
upon automatic suspension of the device and subsequently awakening the device.
» Disabling this feature means that OrCam Read will make a double beep sound without
announcing “Suspended” or “Waking up” upon automatic suspension of the device and
subsequently awakening the device.
19
Page 20

» You may enable or disable the feature.
Reset User Settings
⸰
◾
You will be able to reset all of the user settings back to the original default settings. Any
learned products or faces will be permanently deleted.
Change Camera Light Compatibility
⸰
◾
Here you may change the Flicker Rate to either 50 or 60 Hz depending on your region. It is
recommended to choose the setting based on your location.
◾
If you do not know the Flicker Rate of your location, we recommend changing the country
settings of your device in the Country Settings Menu.
Enable or Disable Light Conditions Notication
⸰
◾
Light conditions notication will test and announce whether there is enough light for the
device to work. You may enable or disable the feature.
Enable or Disable the Laser
⸰
◾
The laser pointers, both the border laser frame and the mouse laser pointer, are designed to
help you focus your OrCam Read on any desired text. You may enable or disable the feature.
Enable or Disable Automatic Flash
⸰
◾
Automatic ash will turn on the device lights in case you point or touch and there isn't enough
light for the device to work. You may enable or disable the feature.
Congure Vocal Commands
⸰
◾
OrCam vocal commands can be used to easily control your OrCam Read, change settings, or
receive information.
◾
Vocal commands settings determine in which cases a vocal command can be used, either
manually by double-pressing, fully either by saying, “Hey OrCam” or by double-pressing, or
you may choose to disable the feature instead.
OrCam Contact Information
⸰
◾
You can retrieve OrCam’s contact information here.
Reset Installation Retries
⸰
◾
If you have failed to upgrade your device, this feature will allow you to reset your device in
order to successfully upgrade without losing your learned data.
Device Serial ID
⸰
◾
You can retrieve the device’s serial ID with this option.
Version Information
⸰
◾
You will hear the full version information of the device by selecting this option, including all
supported languages and features.
• Exit
20
Page 21

Terms and Conditions.
Your use of your OrCam device (the “Product”) is subject to the Terms and Conditions found at orcam.com/terms-andconditions. Your agreement to these Terms and Conditions is a condition to your use of the Product.
Please read the User Manual in full, including the important Safety Instructions, before using your OrCam device. Do
not use your OrCam device until you have received in-person or online training by an authorized OrCam TrainerTM or
OrCam Training Program. OrCam can take no responsibility if the Product was used other than in accordance with
the instructions in the User Manual. Products should not be relied upon in circumstances that are potentially life- or
health-threatening or that could lead to nancial loss. OrCam devices should especially never be relied upon to drive
vehicles or operate heavy machinery of any kind. OrCam shall not be responsible in the event that Products are used
in such situations. OrCam may receive information from third parties (i.e. Barcodes of Grocery Products in selected
countries). OrCam received Barcode information from Barcodes of Grocery Products in Australia and New Zealand
from GS1 Australia. OrCam accepts no responsibility for the accuracy of the information obtained from third parties.
Privacy.
OrCam thinks highly of your privacy and we are committed to protecting and safeguarding our clients’ and users’
personal information. Please read our Privacy Policy found at https://www.orcam.com/privacy-policy/, which
describes how we process personal data regarding our clients and users in connection with services provided by
us, our website, and the OrCam Read mobile application (the “Services” and the “App”, respectively ); the types of
personal data we collect and process; to what purposes we use and process your personal data; how your personal
data is protected; and with whom your personal data may be shared. It is important for us to enable you to understand
our privacy policy and your rights in connection with the personal data we hold about you. You should also be aware
that we use cookies and similar technologies to collect and save information when you visit our website, available
at www.orcam.com, to ensure that we give you the best possible experience. To learn more about the use of such
technologies, please see our Cookie Policy at https://www.orcam.com/en/cookies-policy/.
If you feel that a concern you have in connection with your privacy has not been met by the Privacy Statement, please
contact us at [email protected] and let us know.
If you choose to download the App or use, interact with, register, or provide data to us in connection with the Services,
you explicitly agree to the use of such data in accordance with this Privacy Statement. You may not use the Services
or submit any data to us if you do not agree to any of the terms hereunder. This Privacy Statement shall not be
construed in any manner to derogate from our Terms of Conditions or any other agreement made by and between
OrCam and you.
Warranty.
Customer acknowledges that, other than as explicitly stated herein, OrCam does not make any representations or
warranties to Customer regarding the Product, its functions or any images it produces.
The OrCam end-user limited product warranty (the “Limited Warranty”) covers the owner of an OrCam product against
defects in material or workmanship at the time of its original purchase, for a subsequent period of one (1) year, and for
any additional applicable legal warranty period. Original proof of purchase/delivery is required from the owner in order
to obtain this coverage. OrCam will repair or replace, at its discretion, any product that is determined by OrCam to be
covered under this Limited Warranty. OrCam will not be responsible for conditions arising as a result of intentional
damage or misuse of the product. The owner is responsible for the costs of shipping the product to the location
specied by OrCam.
This Limited Warranty is the sole and exclusive warranty applicable to OrCam products. No third party has the
authority to make any representation, warranty, or agreement on behalf of OrCam with respect to OrCam products. No
warranty of any kind or nature is made by OrCam beyond those expressly stated herein.
In no event shall OrCam be liable for any special, collateral, indirect, punitive, incidental, consequential, or exemplary
damages in connection with or arising out of the use of the product. In no event shall OrCam’s liability exceed the price
paid for the product. Without limiting any provisions limiting liability under this agreement, the limited warranty set
forth herein will not apply, and the owner will reimburse OrCam for any costs and expenses incurred in the event that:
(i) the product has been used other than in accordance with the product documentation and terms of use or other
written operating instructions provided by OrCam
(ii) the product has been subject to tampering, misuse, negligence, or accident
(iii) the product or parts identication labels have been removed or the product has been otherwise altered
(iv) the product has been opened, modied, repaired, serviced, maintained, or altered by someone other than an
authorized OrCam representative
(v) the product has been combined with software, hardware, or other equipment not supplied by OrCam or not
approved in writing by an authorized OrCam representative
(vi) the product has been intentionally damaged or exposed to water, heat, or high voltage
(vii) the product has been used by a person who has not completed training by an authorized OrCam TrainerTM
Any parts replaced pursuant to this warranty will be under warranty for the remaining time of the original warranty
period or for ninety (90) days from the date of repair, whichever is longer. To register your device for warranty, please
21
Page 22

visit the warranty registration website: https://discover.orcam.com/warranty.
If you believe that your product needs warranty support, contact [email protected]. You will be responsible for
shipping costs. However, if it is determined that the warranty request is valid, OrCam will pay the total cost of shipping
the repaired or replaced product.
ORCAM DISCLAIMS ANY AND ALL WARRANTIES, WHETHER EXPRESSED OR IMPLIED, INCLUDING WITHOUT
LIMITATION, THE IMPLIED WARRANTIES OF NON-INFRINGEMENT OF THIRD-PARTY RIGHTS, MERCHANTABILITY
AND FITNESS FOR A PARTICULAR PURPOSE. ORCAM DOES NOT WARRANT THAT THE PRODUCT WILL BE ERRORFREE OR “BUG”-FREE, WILL OPERATE WITHOUT INTERRUPTION, THAT ANY IMAGES OR SOUNDS PRODUCED BY
THE PRODUCT WILL BE ACCURATE OR THAT THE OPERATION OF THE PRODUCT WILL BE SECURE AND HEREBY
DISCLAIMS ANY AND ALL LIABILITY ON ACCOUNT THEREOF. THIS SECTION SHALL BE ENFORCEABLE TO THE
FULLEST EXTENT ALLOWED BY APPLICABLE LAW.
Refund Policy.
You can return your undamaged device for a refund within the period required by local law or as agreed between
you and OrCam at the time of purchase. Training fees are non-refundable. Please contact your local representative
or OrCam Support to initiate a return process. When you return the OrCam device, please follow OrCam Support
instructions carefully. The device must be in the same condition that you received it and undamaged in any way. Your
refund and how it is issued may differ based on how the device was purchased, its condition, and how long you’ve had
the device. OrCam will process your return only after the carrier has received your device and delivered to OrCam. It
usually takes up to three weeks for OrCam to receive (for international shipping involving local customs it may take
longer) and process your return. Once OrCam issues your refund, it may take additional time for your funds to be made
available in your account by your nancial institution. For credit card payments, it may take 5 to 10 business days. If
you have any questions, please feel free to contact the OrCam Support team.
FCC Compliance.
This equipment has been tested and found to comply with the limits for a Class B digital device, pursuant to Part 15 of
the FCC rules. These limits are designed to provide reasonable protection against harmful interference in a residential
installation. This equipment generates, uses, and can radiate radio frequency energy and, if not installed and used in
accordance with the instructions, may cause harmful interference to radio communications. However, there is no
guarantee that interference will not occur in a particular installation. If this equipment does cause harmful interference
to radio or television reception, which can be determined by turning the equipment off and on, the user is encouraged
to try to correct the interference by one or more of the following measures
• Reorient or relocate the receiving antenna.
• Increase the separation between the equipment and receiver.
• Connect the equipment to an outlet on a circuit different from that to which the receiver is connected.
• Consult the dealer or an experienced radio/TV technician.
This device complies with Part 15 of the FCC Rules. Operation is subject to the following two conditions: (1)
This device may not cause harmful interference. (2) This device must accept any interference received, including
interference that may cause undesired operation.
FCC Warning.
Modications not expressly approved by the manufacturer could void the user authority to operate the equipment
under FCC Rules. NOTE: THE MANUFACTURER IS NOT RESPONSIBLE FOR ANY RADIO OR TV INTERFERENCE
CAUSED BY UNAUTHORIZED MODIFICATIONS TO THIS EQUIPMENT. SUCH MODIFICATIONS COULD VOID THE USER’S
AUTHORITY TO OPERATE THE EQUIPMENT.
EU Authorized Representative for OrCam:
Arazy Group GmbH
The Squaire 12, Am Flughafen,
60549 Frankfurt am Main, Germany
Telephone Number: +49 69 95932-5090
Applicable Standards.
OrCam MyEye 2 meets Annex VII of the medical device Directive 93/42/EEC and
2007/47/EEC and the essential requirements set out in Annex 1.
Applied Standards: EN IEC 60601-1. ETSI EN 301 489-1. ETSI EN 301 489-17. FCC
Part 15, Subpart B. IEC/EN 60601-1-6. IEC 62366-1:2015. EN IEC 60601-1-2. EN
62304. RoHS Directive 2011/65/EU. WEEE. EN ISO 14971:2016. Council Directive
93/42/EEC of 14 June 1993 concerning medical devices.
Waste Electrical and Electronic
Equipment Directive Compliant
Contact OrCam for proper disposal.
Substances Directive Compliant
(materials and components)
FCC ID:
2AAWI-READ
CE CompliantRestriction of Hazardous
Refer to User Instruction
Guide and Manual
22
 Loading...