

Page 1
OrCam User Guide
MyEye and MyReader
Version 8
June 2017
Page 2

OrCam User Guide Version 8
© 2017 OrCam Technologies Ltd. All rights reserved..
OrCam® is the trademark and brand name of OrCam Technologies Ltd. (“OrCam”) and OrCam is
the sole proprietor of all the rights and all the intellectual property rights in this guide and/or any
other document produced by OrCam relating thereto. The documents are protected by applicable
intellectual property laws including and without limitation copyrights, patents, trademarks, know
how, trade secrets, and international treaties. No license or rights are hereby transferred to the
user of this guide and said guide shall remain the sole and exclusive property of OrCam.
No part of this guide shall be used, reproduced, translated, converted, modied, adapted,
displayed, stored in a retrieval system, communicated, or transmitted by any means, for any
commercial purpose, including and without limitation, sale, resale, distribution, reproduction,
license, rental, or lease without receiving written permission from OrCam.
OrCam makes no expressed or implied representation or warranty as to the accuracy or
completeness of the contents of this guide, which is provided “as is”, and assumes no
responsibility or liability for any errors or inaccuracies that may appear in this document or for any
product that may be provided in association with this document.
OrCam devices are intended to enhance the day-to-day lives of individuals with visual
impairments. They are not substitutes for existing methods or forms of assistance and should not
be relied upon in circumstances which are potentially life- or health-threatening or which could
lead to nancial loss. OrCam devices should especially never be relied upon to drive vehicles or
operate heavy machinery of any kind.
United States and Canada
OrCam Inc.
1350 Broadway, Suite 1600
New York, NY 10018
1.800.713.3741
Website: www.orcam.com
Email: [email protected]
United Kingdom
OrCam UK
60 Gresham Street
London EC2V 7BB
0800.358.5323
Item Number: DOC000016A
Printing: MyEye 1 Version 8 EN – August 2017
Page 3

OrCam User Guide Version 8
Table of Contents
About the OrCam Device ........................................................................................... 3
Assembling the OrCam Device .................................................................................. 7
Getting Started ......................................................................................................... 11
Reading and Recognizing with OrCam ................................................................... 13
Face Recognition and Learning ............................................................................... 20
Products, Banknotes and Colors............................................................................. 22
OrCam System Messages ....................................................................................... 25
Conguration and Personalization........................................................................... 27
Instructions for Software Update using an SD Card .............................................. 31
Troubleshooting ........................................................................................................ 34
END-USER TERMS AND CONDITIONS ................................................................. 39
This User Guide is also available for online viewing and download in PDF and
audio formats at: www.orcam.com/userguide
OrCam Customer Support
United States and Canada: 1.800.713.3741
United Kingdom: 0800.358.5323
Page 4
OrCam User Guide Version 8
PAGE 3
About the OrCam Device
In addition to this overview of the features and functions of the OrCam device, we
recommend that you also view the tutorial videos at: www.orcam.com/tutorials
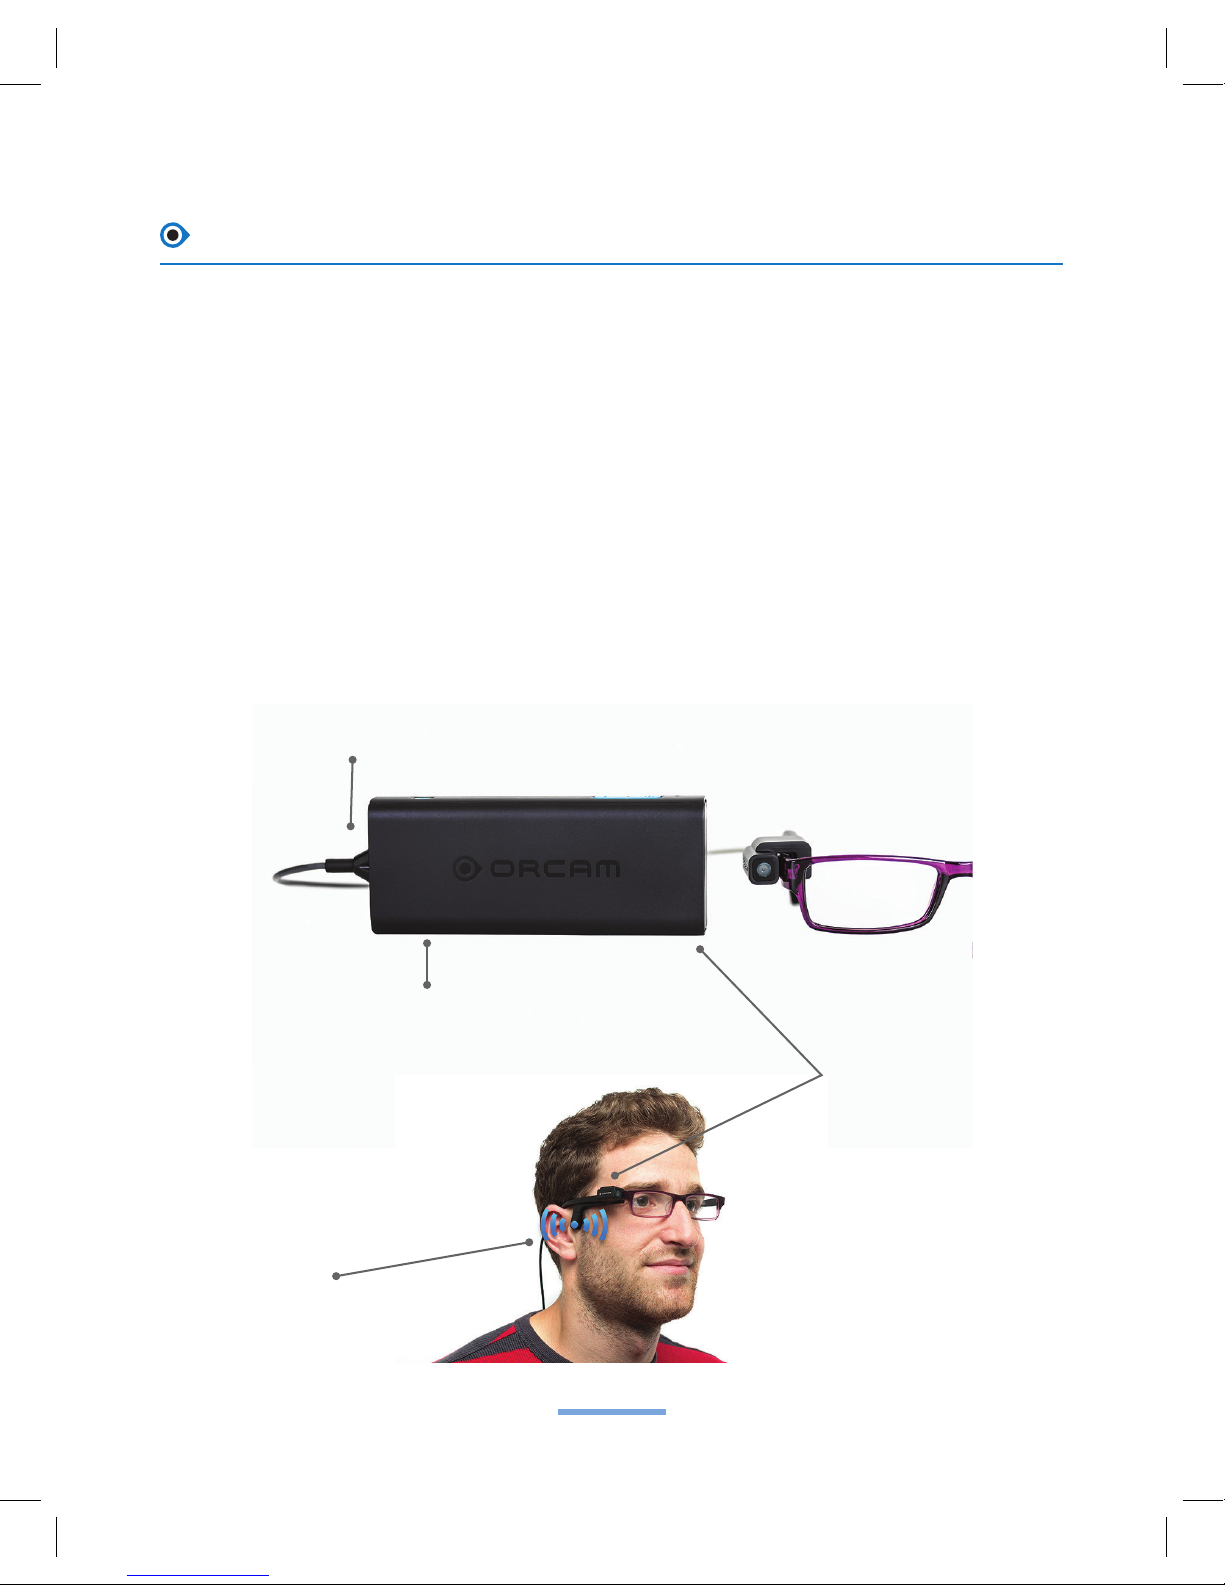
OrCam Components
To help orient you with the OrCam device, the top of the device is the side with the
full OrCam logo including the word ORCAM.
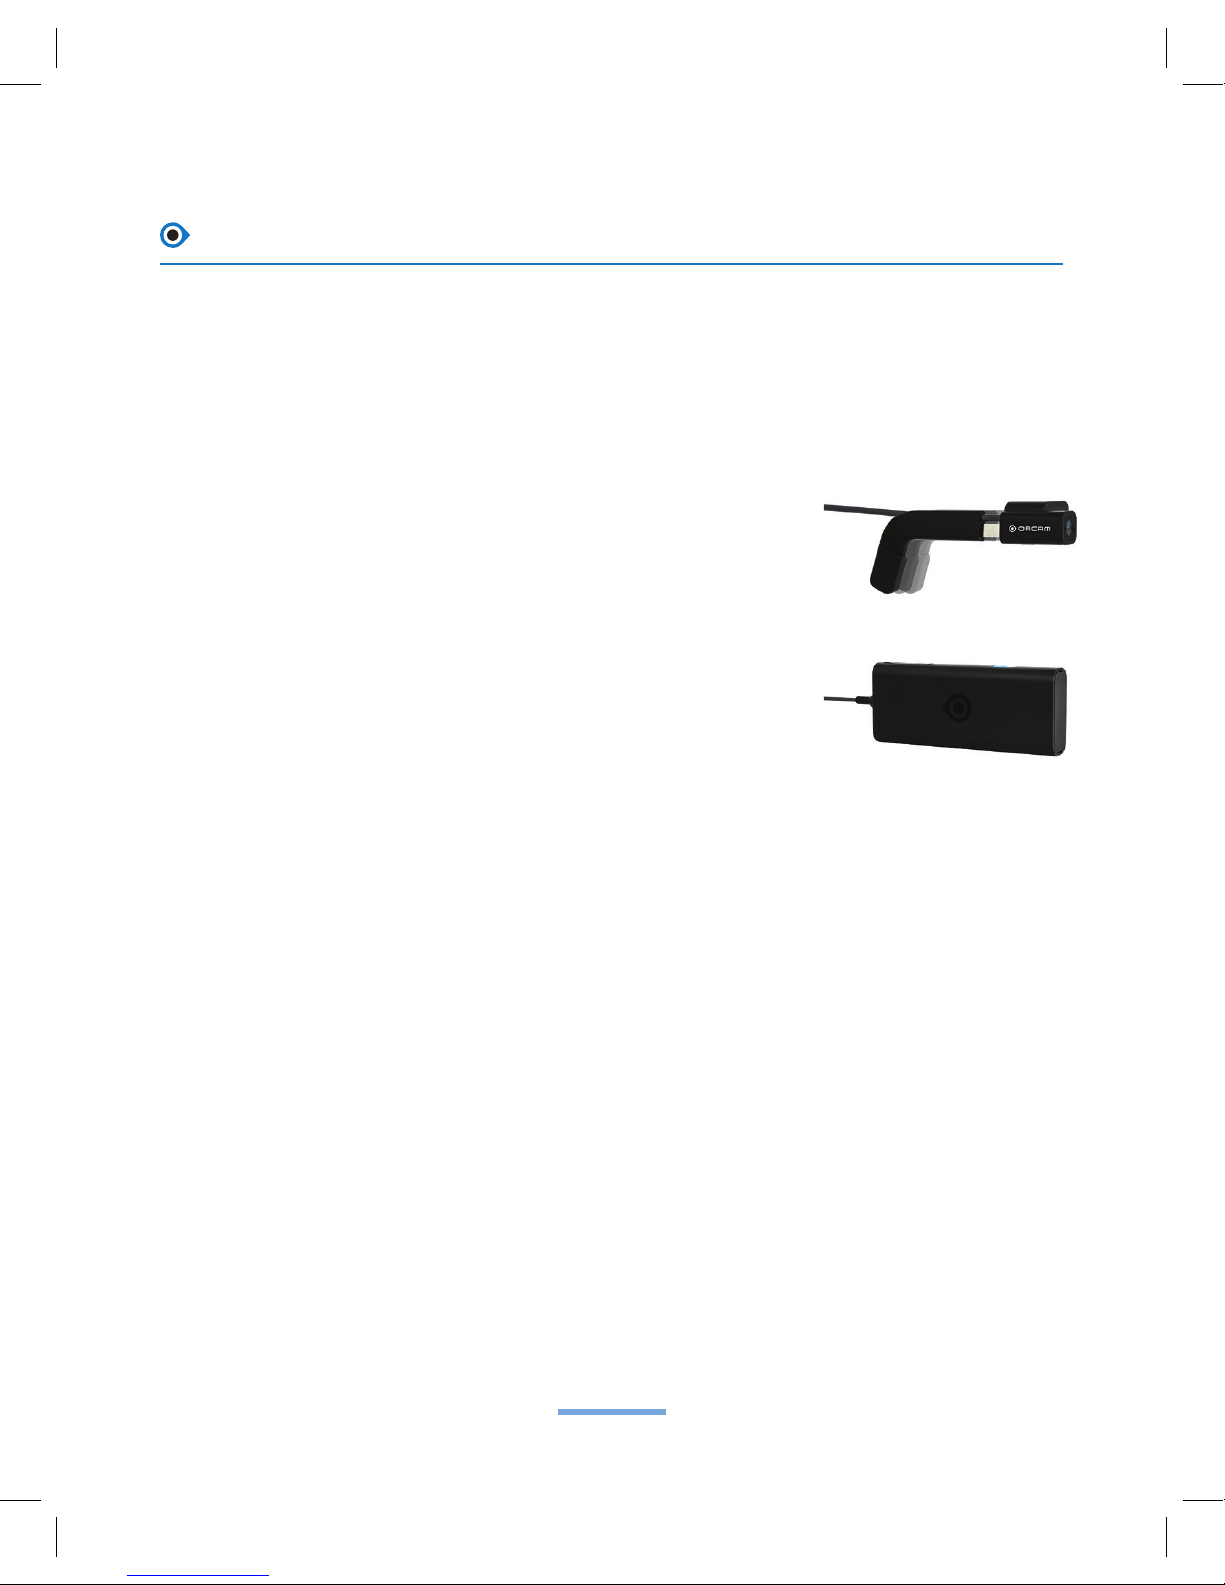
The OrCam Device consists of two main parts, The Head Unit and the Base Unit.
Connecting cable to
Head Unit
Base Unit
Head Unit with Camera
Mounted
Earpiece
Page 5
OrCam User Guide Version 8
PAGE 4
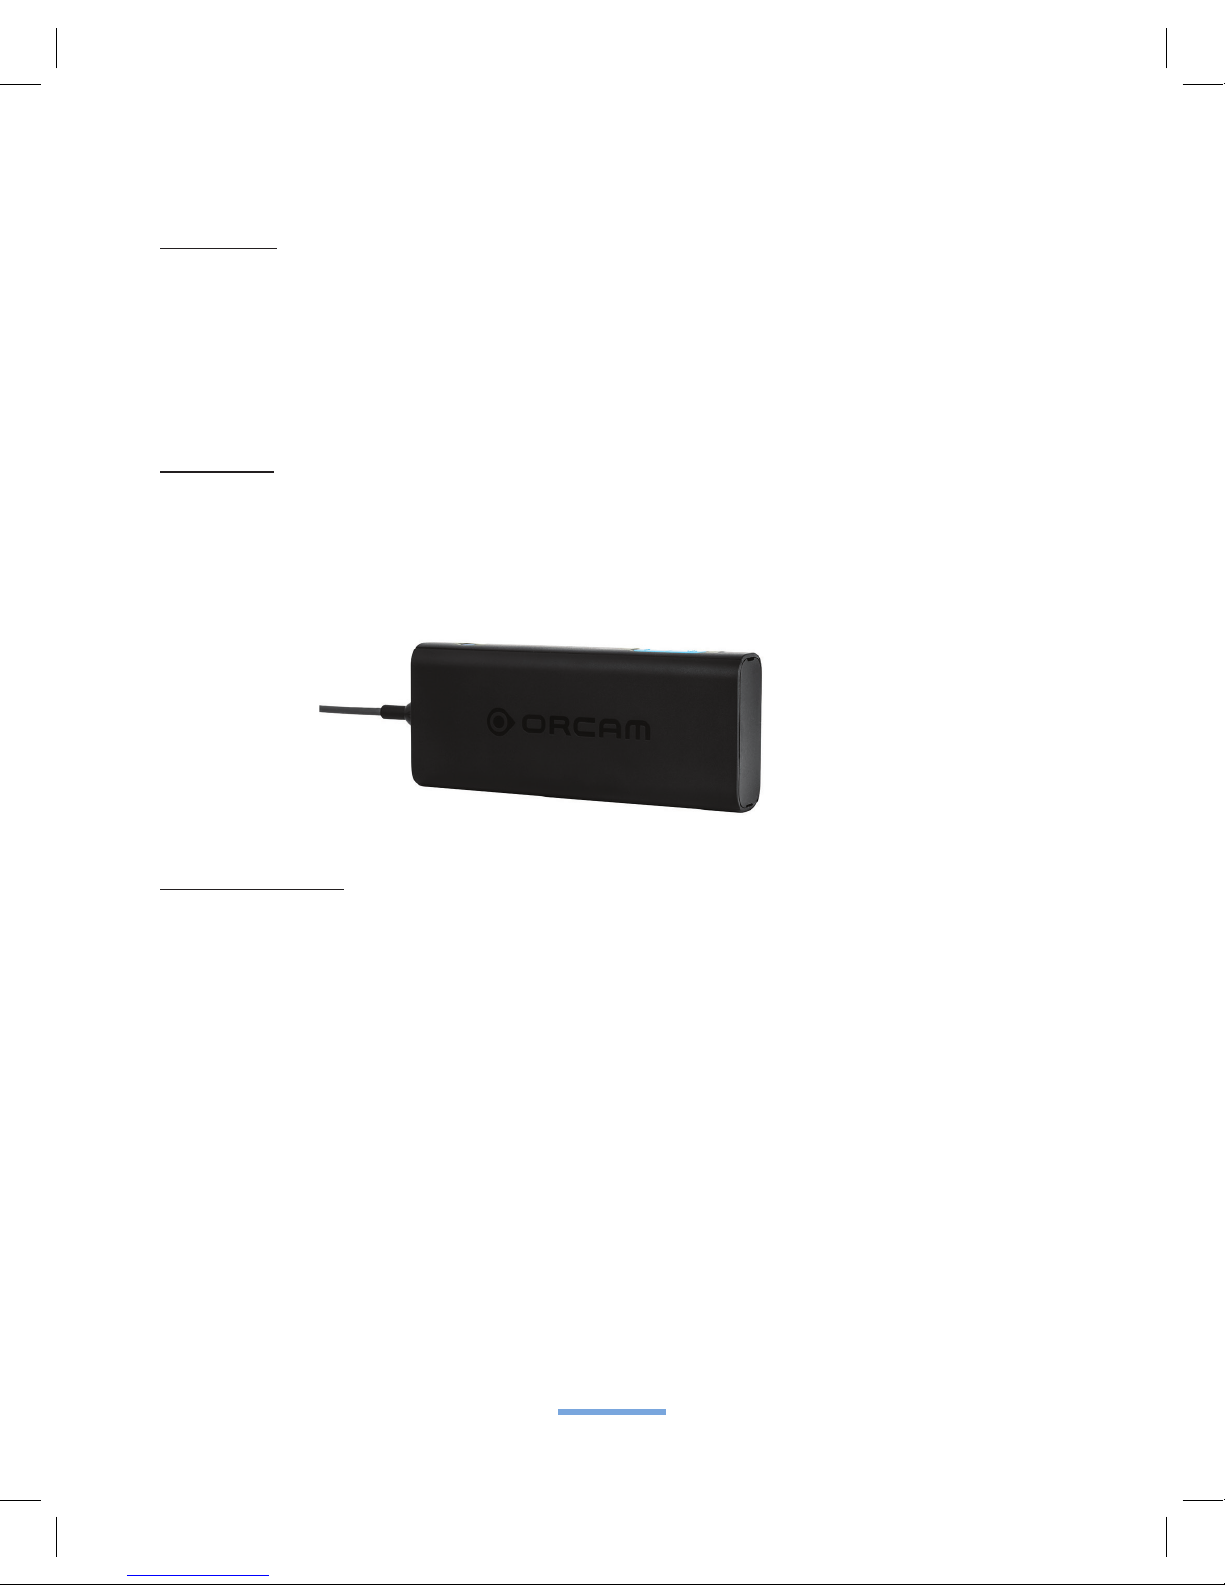
Head Unit
The Head Unit features a camera, an earpiece, a microphone, and a cord that
connects to the OrCam Base Unit. When you rst receive the OrCam delivery box,
and prior to initial use, you need to assemble the camera mount and connect it to
your eyeglasses frame .
Base Unit
The Base Unit contains sophisticated articial intelligence computer technology to
enable the OrCam device to read text, recognize faces, identify products for you,
and more.
OrCam Buttons
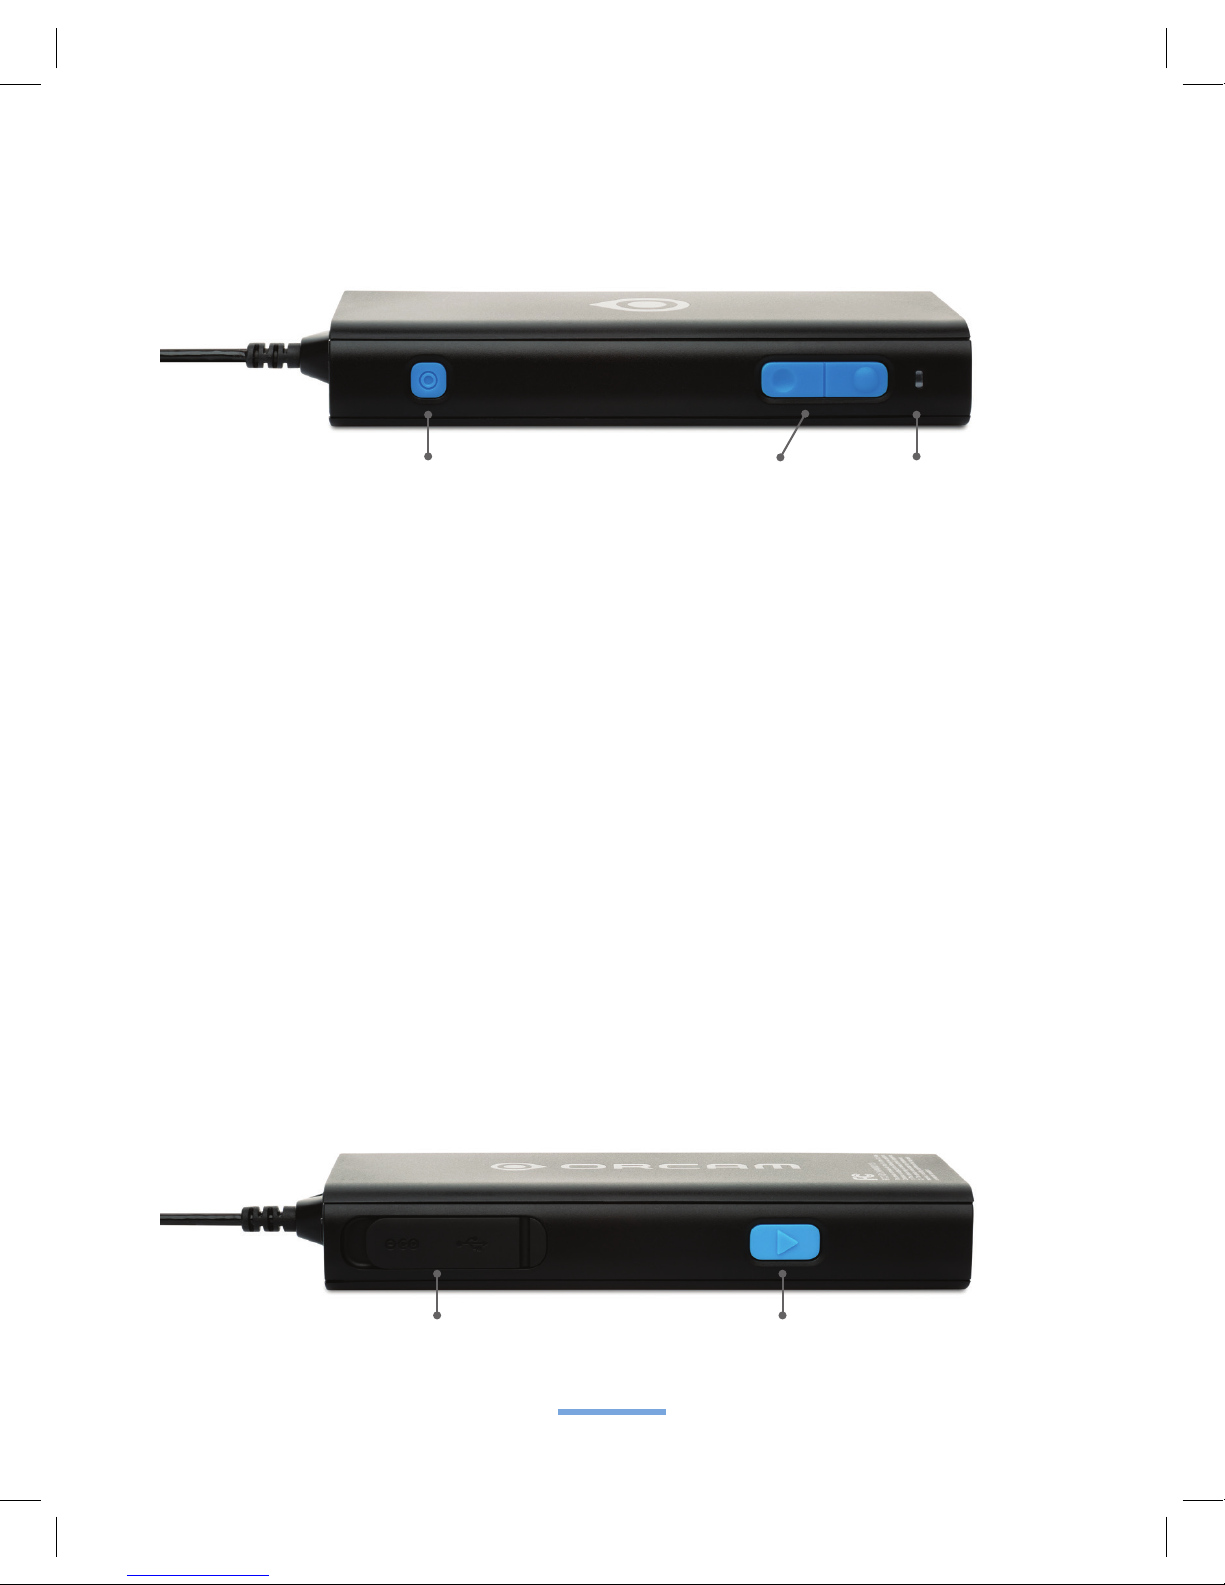
The OrCam Base Unit has three buttons: Power, Volume, and Trigger.
Power Button is a small, square shaped, recessed, blue button (yellow for OrCam
MyReader) on the right side of the Base Unit nearest to the socket for the Head
Unit cable. This button has four functions: Power On, Suspending, Waking Up,
and Power Off.
Volume Button is the long blue button (yellow for OrCam MyReader), on the
same side as the Power button. It has three functions: to change the volume; to
scroll up and down in Reading Navigation and in the Settings menu; and to wake
the device from Suspend. To change the volume, press the button on either side.
The protruding circle is the Volume Up button, whereas the indented circle is
the Volume Down button. You will hear the message “volume up” up to “volume
max” or “volume down” down to “volume minimum”. There are ten volume levels
available.
Page 6
OrCam User Guide Version 8
PAGE 5
Trigger Button is the blue button (yellow for OrCam MyReader) on the opposite
side of the Volume button, on the same side as the rubber ap. It has three
functions:
1. Activating the Camera: A short press activates the camera and initiates
reading text or recognizing faces, products, banknotes or colors.
2. Controlling Reading Rate Speed: While reading, press and hold the Trigger
button and simultaneously press the Volume Up or Down button to adjust
the Reading Rate speed (words per minute). The Reading Rate can be set
between 100 words per minute (very slow) to 300 words per minute (very fast).
3. Learning Mode: Press the trigger button for two seconds to activate Learning
Mode. You will hear the learning mode messages for Face or Product
Learning.
Power On/Off
Charging / Micro USB Connector
Volume Higher/
Lower
Trigger Button
Location of Power and Volume Buttons and LED Indicator
Charging and Micro USB Connectors and Trigger button
LED Indicator
Page 7
OrCam User Guide Version 8
PAGE 6
LED Indicator and Charging Ports
LED Indicator is near the volume button. The light may be steady or may blink.
When the light is ashing red, it indicates that the OrCam device is charging.
When the light is green, it indicates that the OrCam device is powered on. When
there is no light, it indicates that the OrCam device is suspended or powered off.
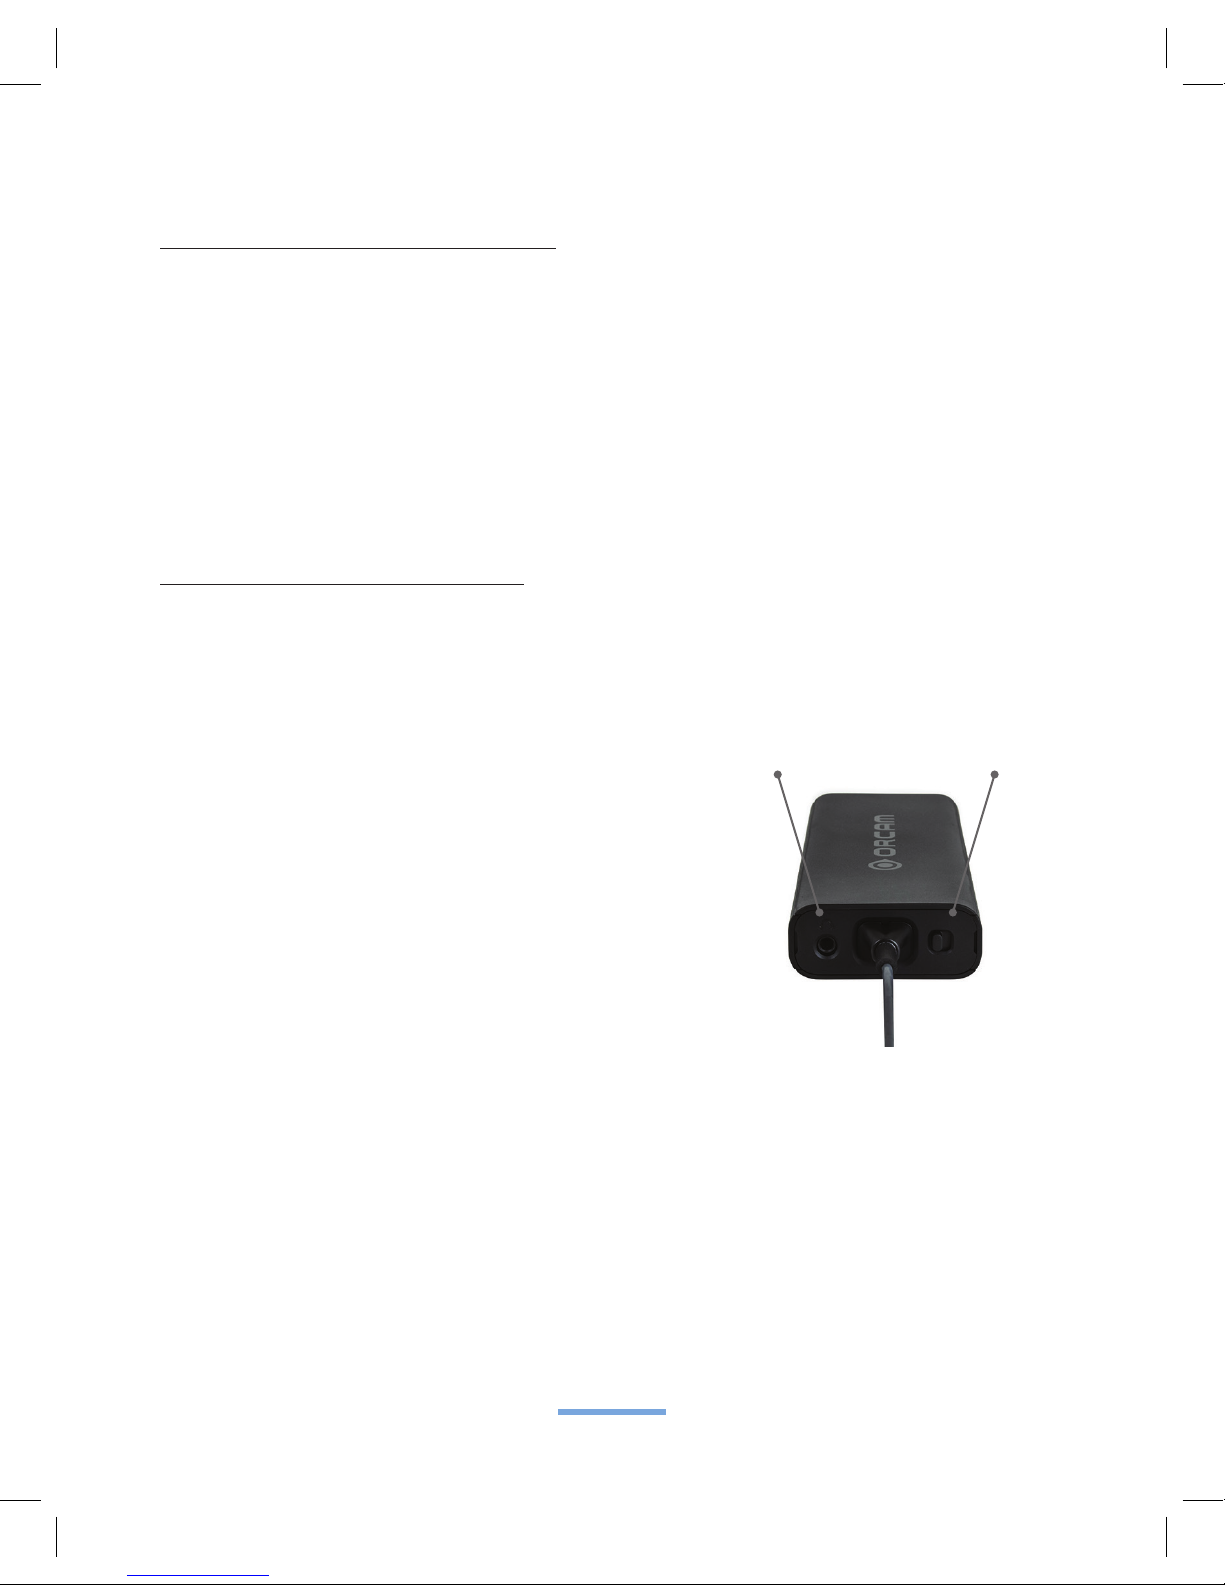
Charging Ports are on the same side as the Trigger button. There are two ports
beneath the protective rubber ap. The circular one is the port for the charger and
the other is the mini-USB port, which can be used to charge the OrCam device.
Audio Out and Connector Cord
Base Unit to Head Unit Connector Cord
The Base Unit is connected to the Head
Unit via a cord that plugs into a tted
connection at the end of the Base Unit.
Please do not attempt to disconnect
the Head Unit from the Base Unit unless
specically directed to do so by an OrCam
representative, as this may harm the device.
If instructed to do so, press and hold the
Head Unit Connector Release Button located
beside the Head Unit Connector on the
Base Unit, and gently remove or insert the
connector out of or into the socket.
Head Unit connector
release button
Audio Out
Socket
Page 8
OrCam User Guide Version 8
PAGE 7
Assembling the OrCam Device
This chapter explains how you connect the Head Unit of the device to your glasses.
You can leave the Head Unit attached to your glasses so that it is always ready for use.
Box Contents
Head Unit Head Unit with camera and earpiece (earpiece
can be detached)
Base Unit Base Unit with three blue buttons (yellow for
OrCam MyReader)
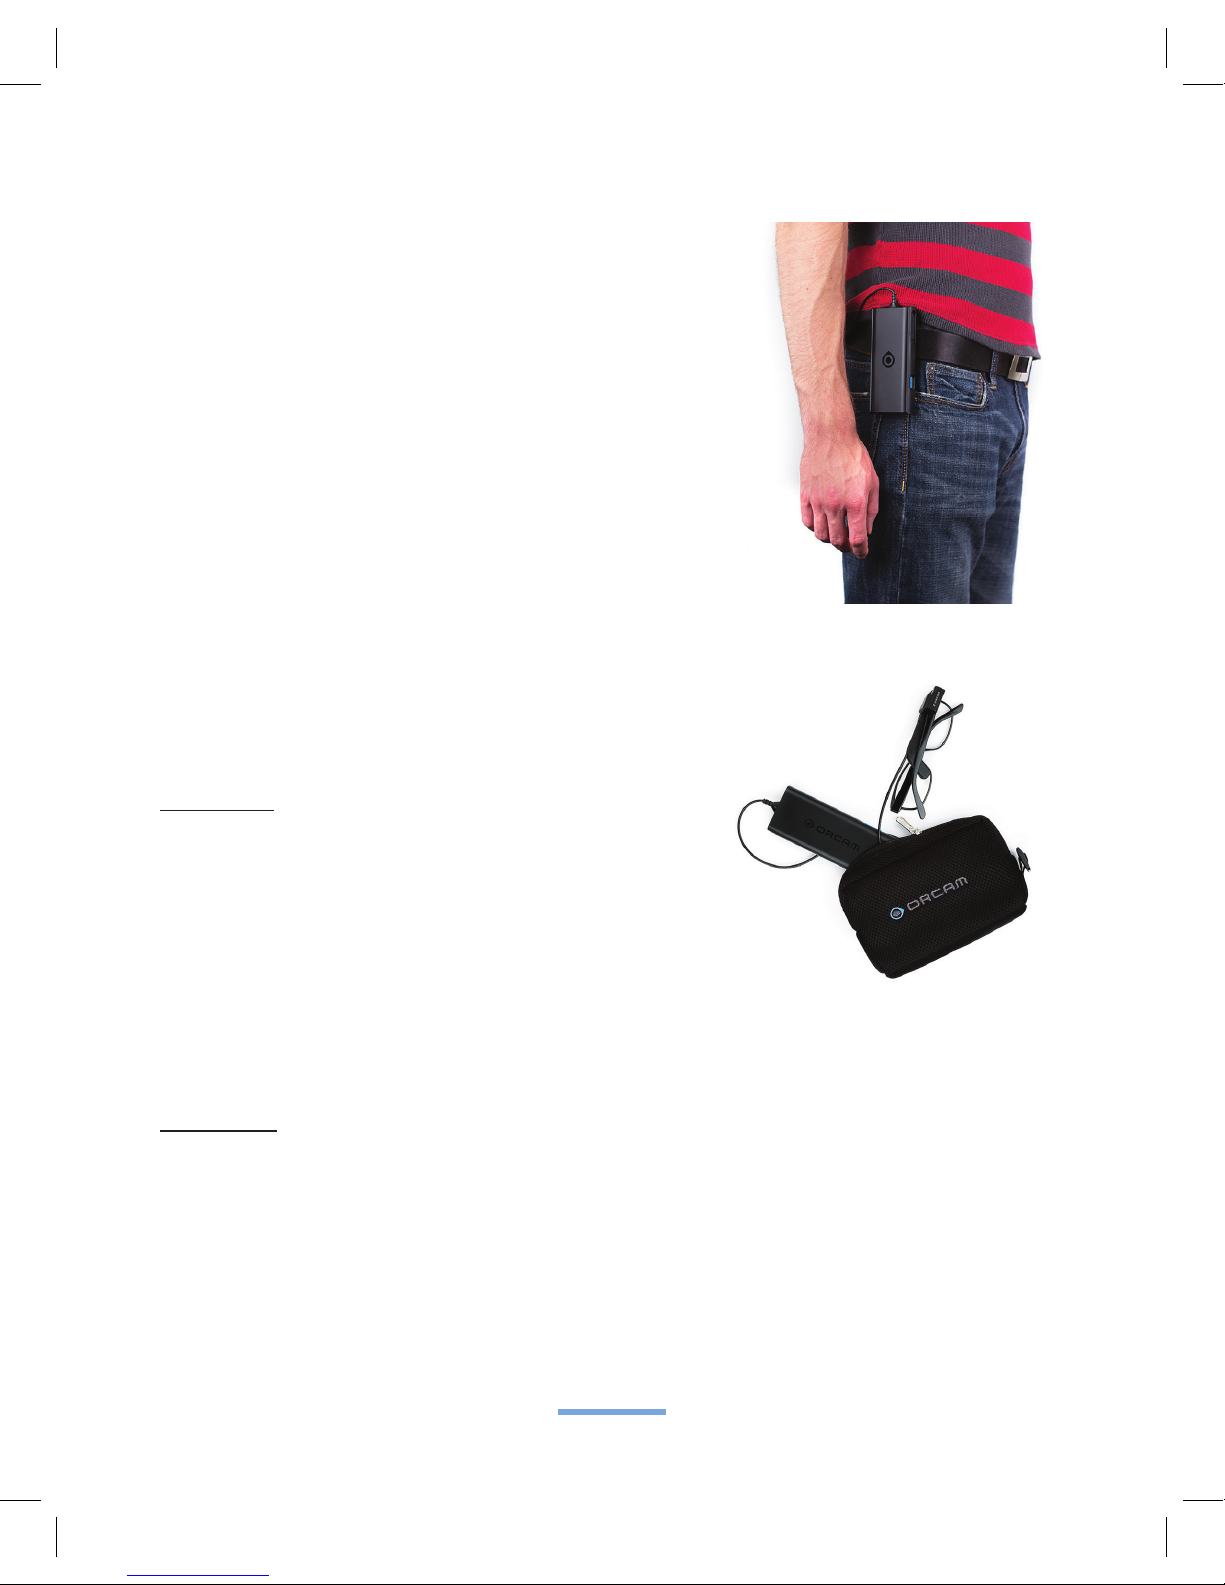
OrCam carrying pouch with accessories Containing:
Charger (including travel adaptor plugs), glasses frame
with a mount attached, glasses mount and mount kit, lens
cleaning cloth, belt clip, earphones.
User Guide This Guide and a refrigerator magnet with
contact details of OrCam User Support.
Mounting the Head Unit
The Head Unit of the OrCam device contains the video camera and must be
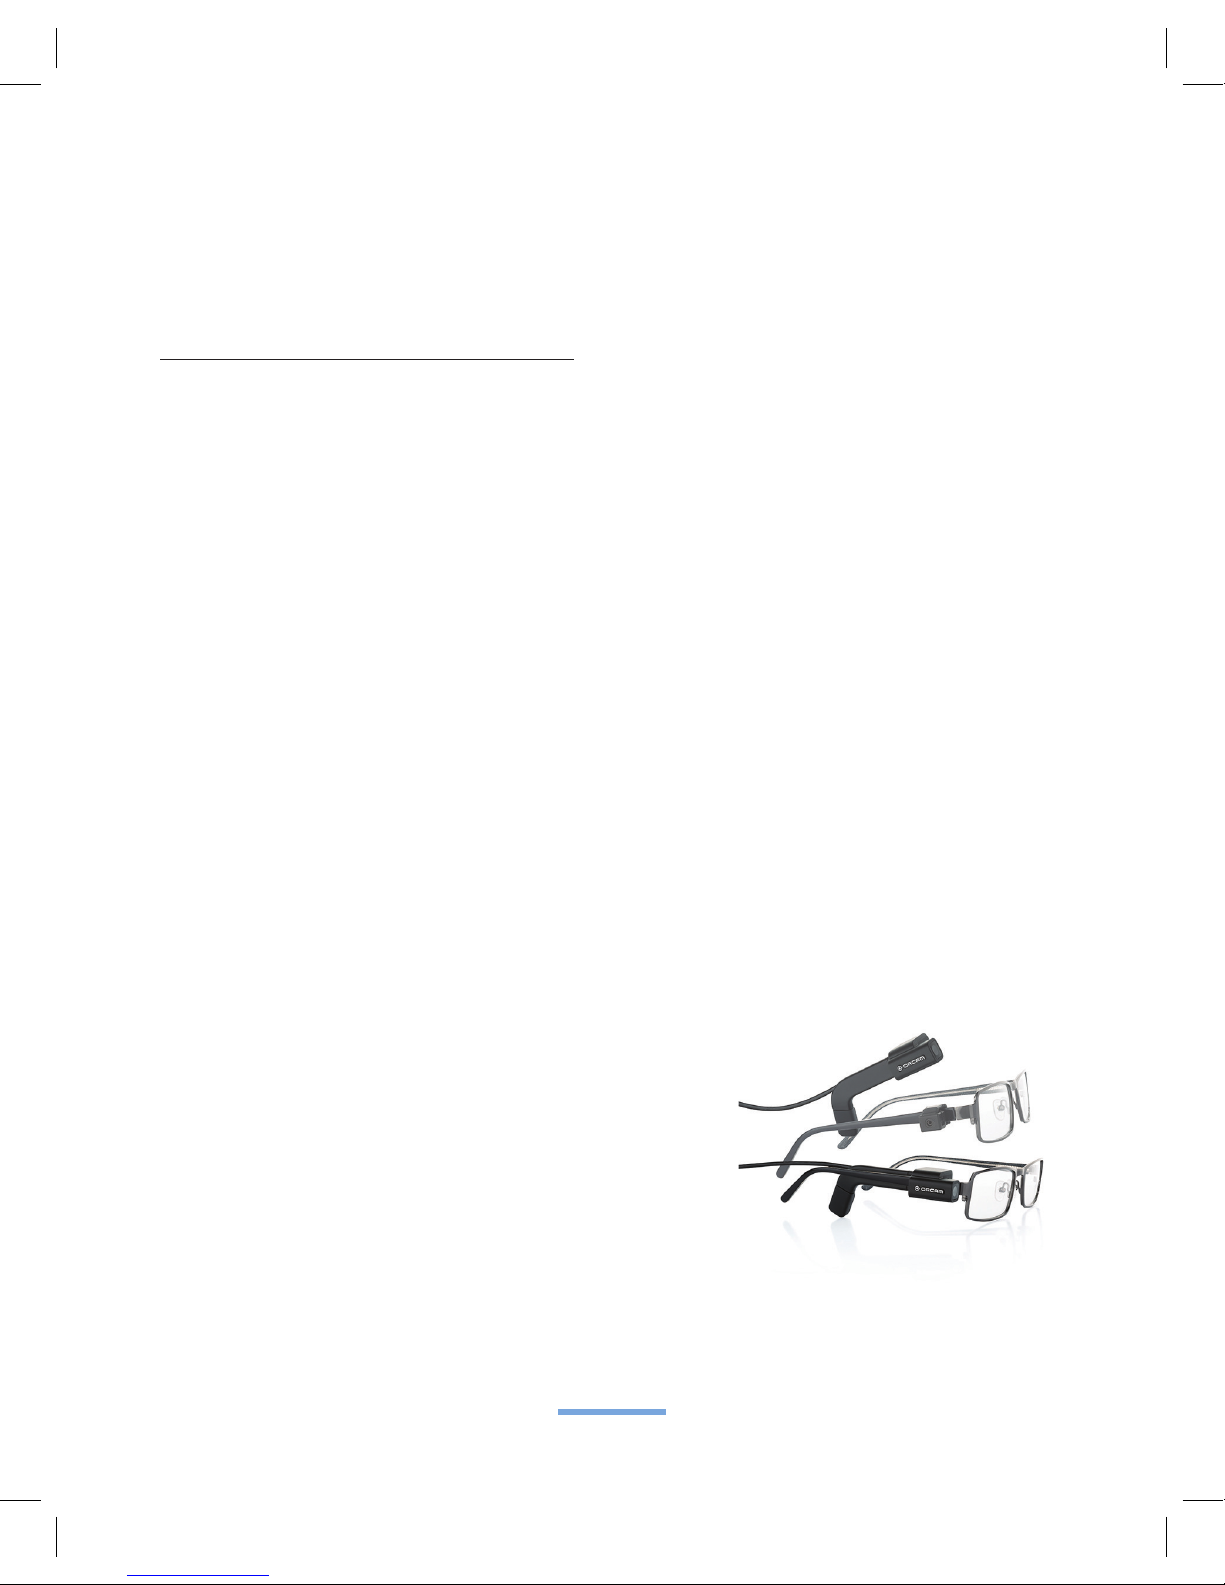
mounted on your eyeglasses. A small mount, or clamp, can be permanently
attached to the frame of your eyeglasses. The camera then can be snapped on and
off the mount as needed.
The mounts, along with the mount kit containing the spacers and an Allen key, are
included in the accessories box. These include: 2 mounts, 8 rubber spacers (2 each
of four sizes) and an Allen key.
Two mounts are provided so you can use the OrCam device with more than one pair
of glasses, such as your regular eyeglasses and reading glasses or sunglasses.
Four pairs of rubber spacers of different sizes are provided, to enable you to select
the size that best ts your eyeglass frames. The thinner the temple of your frames,
the larger the spacer should be.
Page 9

OrCam User Guide Version 8
PAGE 8
It is recommended to select eyeglasses with thicker frames for mounting the OrCam
camera. Very thin frames, such as many wire-frames, may cause the mount to come
loose, even if attached tightly using the largest spacer, after you snap the camera on
and off a few times.
If the mount comes off of the glasses frame and becomes stuck inside the Head
Unit, it is possible to remove it with a small screwdriver.
Attaching the Mount to Eyeglasses
The Head Unit of the OrCam device is designed to be mounted on the right side of
your eyeglasses. Therefore, the mount must be placed on the right side of the frame.
To attach the mount to the eyeglasses:
1. Check the mount. On the inside, opposite the keyhole, is a small rubber piece
that you can feel with your nger. Occasionally, this piece may fall out in the
box. If you feel a hole instead of a bump, locate the missing piece in the box
and replace it.
2. Insert the Allen key into the keyhole on the side of the mount and turn it
counterclockwise to open the mount to the widest position.
3. With your eyeglasses right side up, push the mount loosely downward onto
the right side of the frame.
4. Turn the eyeglasses upside down so you can see which size spacer is
required between the mount and the frame. Select the largest spacer that
allows the mount to slide onto the frame.
5. Remove the mount from the eyeglasses and slide the selected spacer into
the mount in the direction of the arrow. If it doesn’t slide in, loosen the mount
slightly with Allen key.
6. Push the mount downward onto the right side of the frame and slide it
almost as far forward as it can go. Be sure to leave a small amount of space
(one eighth of an inch) between the mount and the hinge, since the camera
housing takes up some space.
7. With the Allen key, tighten the mount to t snugly. Use the short end of the key
if necessary to complete the tightening process.
Page 10
OrCam User Guide Version 8
PAGE 9
The mount is now attached to the eyeglasses and can be left there permanently.
The glasses may be folded with the mount in place.
Attaching the Camera to the Mount
The Head Unit containing the camera is designed to snap on and off the mount as
often as you want. However, before using it the rst time, you should snap it on and
test it to verify you have attached the mount correctly.
To attach the camera to the mount for initial use:
1. Snap the Head Unit onto the mount with the camera on the outside of the
eyeglass frames and the earpiece on the inside. Verify the camera points
straight relative to the eyeglass frame.
2. Put on the eyeglasses. The earpiece should be between your cheek bone
and your ear, and should sit against your right temple bone. It should not be in
or on your ear.
3. If your eyeglasses have long frames, extend the earpieces as needed.
4. Verify that the camera is aligned with the line of sight of your eyeglasses. To
test the camera position, with the OrCam device on, extend your arm straight
forward beginning from your nose, pointing your nger upward. If you hear a
high-pitched, double-beep, the camera is adjusted correctly.
Note: If the camera is angled too high or too low, the OrCam camera may not
be accurately triggered, and may not perform correctly.
5. Place the wire behind your ear and tug on it
slightly. Verify that the mount does not move
and the camera remains facing forward, and
does not twist to face upwards.
6. Unsnap the Head Unit, and verify that the
mount does not twist or come off.
Page 11
OrCam User Guide Version 8
PAGE 10
Carrying the Base Unit
The Base Unit can be clipped to your belt or
placed in a pocket, pouch or other carrying
bag.
1. We recommend that the cord be
underneath your clothing so it does not
catch on things in your environment (tuck
the cord behind your ear where it comes
off the Head Unit).
2. Ensure that you can move freely and that
there is no tension on the cord between the
Base and Head Units.
Cleaning the OrCam Device
Base Unit
Clean the Base Unit immediately if it comes
in contact with anything that may be sticky or
cause stains. Remember to turn the device off
before you begin. Clean the device only with
a damp cloth; do not submerge the device
in water or pour water onto it. Avoid getting
moisture in any of its openings.
Head Unit
Clean only if you feel it is dirty or if you have noticed a decrease in performance. Never
touch the camera lens with your nger or any item that might transfer oil onto the glass.
Clean the lens only with the supplied microber cloth and eyeglass cleaning uid. Do not
use any abrasive materials.
Page 12
OrCam User Guide Version 8
PAGE 11
Getting Started
Initial Charging of the OrCam Device
Before you begin using the OrCam device, you must initially charge it for a period
of eight hours. An OrCam charger is included in the OrCam box.
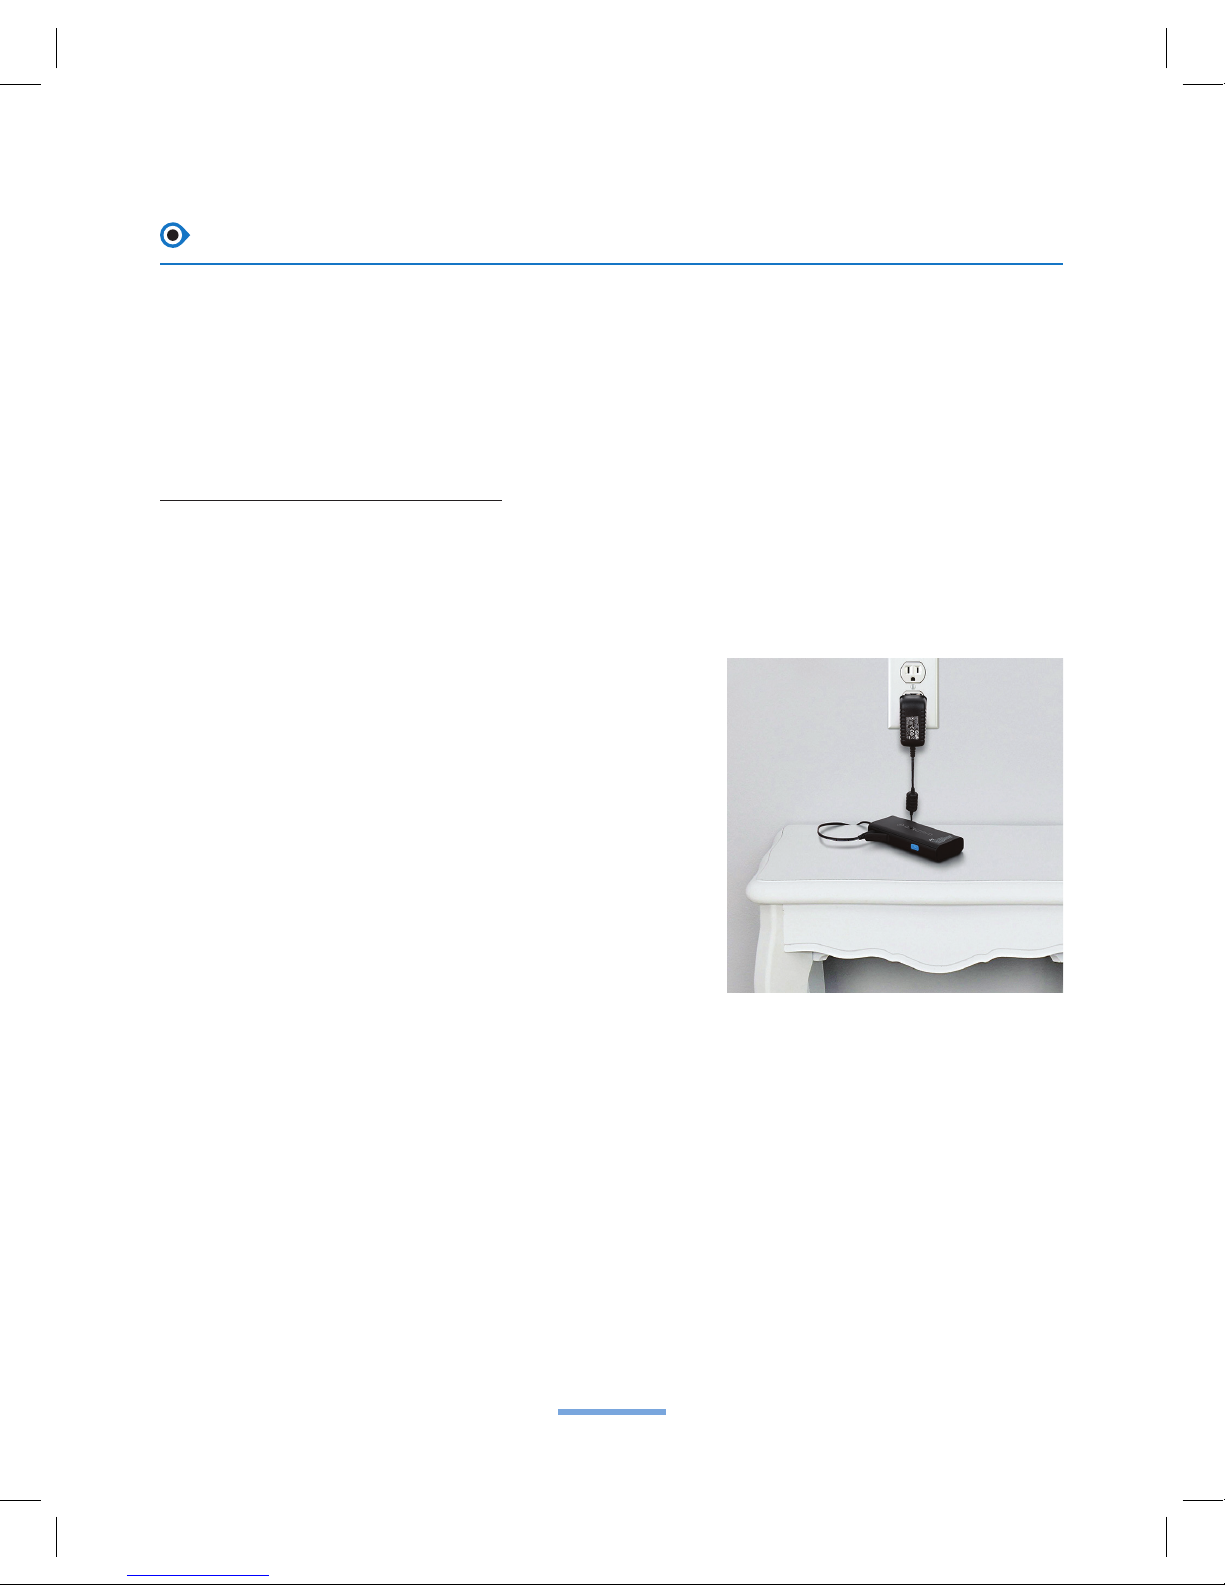
To charge the OrCam device:
1. Attach the OrCarm charger to the power socket under the rubber ap on the
OrCam Base Unit.
2. Plug the charger into an electric socket.
If this is the rst time you are charging the
device, you should charge the battery in the
Base Unit for at least eight hours. After this
initial charge, the battery requires at least
four hours of charging time, if it has been
completely depleted.
A fully charged battery should work for up to
four hours of constant use and can remain
in Suspend mode for as long as twenty-four
hours.
Each time the device is connected or
disconnected from charging, it vibrates. This
is to ensure that you are aware that the device
has been connected or disconnected. When
the device is activated from Suspend mode, it
informs you how much battery power remains.
Page 13

OrCam User Guide Version 8
PAGE 12
Turning the OrCam Device On or Off and Suspending
Before you turn the OrCam device on or off it is recommended that you wear your
OrCam device so that you hear the system messages.
To turn your OrCam device on or off:
1. To turn the device on, press the POWER button on the Base Unit. The device
vibrates. During the rst minute of powering on, you should hear continuous
beeping sounds. After approximately one minute you will hear, “OrCam
Version 8 is ready. Battery is [this many] percent charged.”
2. f you did not hear the phrase, “OrCam is ready,” or you are not sure that the unit
is on, press one of the volume buttons (UP or DOWN). If the device is on, you will
hear a response to your action.
3. To turn the device off, press the Power button once. You will hear the message
“Suspending. Press again to shut down.” Press the power button a second time.
You will hear, “Shutting down, please wait.” Right before the unit shuts down
completely, the device says, “Power off. Bye Bye.”
To enter or exit Suspend mode:
1. To enter Suspend mode, press the POWER button once. The device
announces “Suspending. Press again to shut down”, then announces
“Suspending” and automatically goes into Suspend Mode.
2. To exit Suspend mode press the TRIGGER or VOLUME button on the base Unit or
gently tap the center of the bottom of the Head Unit where the small OrCam logo is
situated. You will hear, “Waking up. Battery is [this many] percent charged.”
Automatic Suspend and Power Off: To conserve battery power, the OrCam
device has an automatic suspend feature. If you do not trigger the device in some
way, the device automatically goes into Suspend mode after three minutes of
inactivity. When the OrCam device is not used for about three hours, it shuts itself
off. This reduces the chance of unnecessarily depleting the battery.
Page 14

OrCam User Guide Version 8
PAGE 13
Reading and Recognizing with OrCam
The OrCam device reads to you when you point at a text or press the Trigger
button. The OrCam MyEye device can also recognize faces and products. It can
recognize all entered faces and products as well as pre-loaded products, such as
banknotes. The OrCam MyEye device continuously searches for faces. Each time
a face is recognized, the device announces the name of the person or informs you
how many people are in front of you. (Face Learning and Product Recognition are
only available in the OrCam MyEye device).
Triggering the Camera
The OrCam device knows when you want it to read or recognize by trigger actions
you perform. There are three ways to activate the OrCam device in order to begin
reading or recognizing:
1. Point with your nger.
2. Press the Trigger button on the Base Unit.
3. Tap the center of the Base Unit (disabled by default).
Detecting Your Finger
Pointing is the preferred gesture for showing the OrCam device. When the camera
sees your nger, it knows you want it to read or recognize something in front of
you. If you are right handed, use the index nger of your right hand. If you are left
handed, use the index nger of your left hand.
For the camera to recognize your nger, hold your nger vertically, so that the tip
of your nger is pointing up.
Extend your arm outward so that the tip of your nger remains at eye level.
Because the camera is located at eye level, it must detect your nger in order to
understand what you want it to recognize.
When the camera detects your nger, you will hear a double-beep. A high-pitched
beep indicates you are pointing at the center of the camera’s view frame. The
Page 15

OrCam User Guide Version 8
PAGE 14
beep becomes gradually lower-pitched as you
approach the margins of the frame. Pointing
while walking or in front of rapidly moving
items is not advised. Once you hear the beep,
immediately remove your nger from the frame
so that the camera can take a picture of what
it sees (without your nger getting in the way).
It works best to remove your nger by moving
your arm downwards out of the frame.
If you don’t hear a high-pitched double-beep,
try to move your head slightly up or down,
left or right, remove your nger, and try again.
When three consecutive gestures are made in the outer-most boundary, a warning
is given to move your nger in the direction of the center of the frame. Keep your
head steady and in the same position during the removal of your nger.
The camera shutter sound indicates that your nger has left the frame, and a
picture has been taken. If you do not hear a camera shutter sound within two
seconds, the camera did not detect that you removed your nger, and you should
try again.
Beginning to Read or Recognize
When you hold an item, such as a book or newspaper, you don’t have to touch
the item while pointing to it for the OrCam device to work, but many people nd it
easier to actually touch the item. Make sure you do not move the items.
After the camera shutter sound, the OrCam device immediately begins to read
the text, or in the case of a pre-entered face or product, it tells you who or what it
sees.
If more than one face is in view, the OrCam device will announce only the primary
face in the frame. If there is text in the same frame as a recognized face, the
OrCam device will say the name of the person and then read the text. If a face is
detected, but not recognized, then reading will begin after the appropriate face
recognition announcement.
Page 16

OrCam User Guide Version 8
PAGE 15
Changing the Reading Speed
It is possible to adjust the reading rate, or speed, of the OrCam device readback.
To change the reading speed while reading, press and hold the Trigger button as
you simultaneously press the Volume Up or Down button. You will hear the device
reading speed increase or decrease appropriately. When other settings, such as
Reading Navigation Mode, are enabled this method may be disabled.
Read-back speed can be set between ten available speeds, which enable a rate
of 100 (slow) to 300 (fast) words per minute.
Reading speed can also be adjusted using the Audio Settings menu.
Reading with OrCam
1. Make sure that OrCam is powered on and awake (not in Suspend mode).
2. Prepare what you want to be read. If you are reading a book, newspaper or
other document, turn to the page you wish to read and place the text at a
distance of about half an arm’s length, which is about 12 inches (30 cm) from
your face. Make sure your ngers are not covering any of the text.
3. Direct your gaze towards the middle of the page and point to the upper part of
the page or area where you wish OrCam to begin reading. The OrCam device
reads the entire page, beginning from where you pointed to and downwards,
and when nished reading, it makes a chime sound. Once reading has begun,
you can lower the text; the device continues to read to the end of the section
from its memory. Note that reading begins from just above your ngertip
downwards.
If you would like to stop the reading before OrCam has nished, you can either
press the Trigger button, point at an area without text, or use the Stop Gesture.
To activate the Stop Gesture command, extend your hand from your face forward
making sure that the back of your hand is facing you and all ngers are fully
spread and extended upwards so it covers the text you are reading.
Note: The Stop Gesture feature is disabled by default. It can be adjusted in the
“Gesture Settings” sub-menu in the Audio Settings Menu.
Page 17

OrCam User Guide Version 8
PAGE 16
Automatic Page Recognition
This feature enables “hands free” reading of a printed page without pointing or
pressing the Trigger button. Hold the page for a few seconds in front of your face at a
distance of about half an arm’s length, which is about 12 inches (30 cm), the camera
will automatically detect it and the OrCam device will begin to read it to you. For
optimal use, make sure at least 3 edges of the page are in the camera’s view frame.
Touch Reading Mode
The OrCam device enters “Touch Reading Mode” when pointing and keeping your
nger in one place for three seconds.
1. Reading begins approximately three lines above where the pointing nger is
detected, always from the beginning of the line. When no text is identied,
“Can’t read text is announced.
2. Moving your nger within the camera’s view frame (between three and ten
percent of the page) results in text being read continuously. When your nger
travels more than ten percent of the view frame, the device restarts “Touch
Reading Mode” – i.e., it stops current reading and starts in the new location if
text is available. A low-pitched beep indicates that the nger movement has
been detected. A double beep sound begins the reading of a new section. If
there is no text in the area selected, the device will announce “Blank area.”
3. When your nger exits the camera view frame entirely, the device will continue
reading until the end of that section.
4. Touch Reading Mode can be enabled/disabled within the Audio Setting menu.
Reading with the Trigger Button
When using the Trigger button to read text, the OrCam device attempts to read
all of the text it recognizes in the document. It then identies sections of text or
paragraphs as text blocks. This term is used interchangeably to describe any type
of text, such as a title, paragraph, column, section, and more. As it moves through
the document, it announces “Reading rst text block” and “Reading next text
block” to assist with navigation of the document.
Page 18

OrCam User Guide Version 8
PAGE 17
Resuming Reading
When the OrCam device reaches the end of a section, you will hear a chime
sound to signal that it has nished. In some situations, the OrCam device tries
to resume reading from where it left off if it identies that the continuation of the
section was cut off by the limits of the camera view frame. For example, if in a
given reading all of the text in the view frame was read, the same section was
pointed at again, and the OrCam device identies new text below the original
section, it announces “Resuming from” and continues reading from where it
left off.
This also occurs when it identies additional text at the bottom of the view frame
that it cannot see. When it reaches the end of the page or section, it announces:
“There may be more text below. Please raise the text and point again.” In this
case, you can point to the lower part of the page, and the OrCam device will begin
reading from the beginning of the last paragraph.
Reading Navigation
Reading Navigation allows you to skip forward, backward, or pause while reading
text. Pressing the Trigger button will stop the reading. When enabled, pressing
both Volume buttons at the same time will enter a pause state and a beep will
sound intermittently while paused. Pressing both Volume buttons again will
continue the reading from where you left off. The length of the pause time can be
personalized.
When Reading Navigation is enabled and while the device is reading, pressing the
Trigger button and simultaneously pressing the Volume Up button will skip to the
next punctuation mark (period, comma, question mark, etc.) or simultaneously
pressing the Volume Down button will skip to the previous punctuation mark.
Note: Reading Navigation is disabled by default. It can be adjusted in the
“Reading Settings” sub-menu in the Audio Settings Menu.
Page 19

OrCam User Guide Version 8
PAGE 18
Multi-Language Reading
This feature enables you to read printed text in the languages available in your
locality and device. Make sure to choose the reading language which you require
by enabling or disabling it in the Reading Settings Menu. Note that the audio
messages remain in the original language of the device. This means that if you
have an English-speaking device and you choose, for example, Spanish, you will
need to enable Spanish in the Reading Setup Menu; however, you will still hear
audio messages in English.
Changing the Reading Speed
It is possible to adjust the reading rate, or speed, of the OrCam device readback.
To change the reading speed while reading, press and hold the Trigger button as
you simultaneously press the Volume Up or Down button. You will hear the device
reading speed increase or decrease appropriately. When other settings, such as
Reading Navigation Mode, are enabled this method may be disabled.
Read-back speed can be set between ten available speeds, which enable a rate
of 100 (slow) to 300 (fast) words per minute.
Reading speed can also be adjusted using the Audio Settings menu.
Recognizing Text, Faces and Products
After the camera shutter sound, the OrCam device immediately begins to read
the text, or in the case of a pre-entered face or product, it tells you who or what it
sees.
If more than one face is in view, the OrCam device will announce only the primary
face in the frame. If there is text in the same frame as a recognized face, the
OrCam device will say the name of the person and then read the text. If a face is
detected, but not recognized, then reading will begin after the appropriate face
recognition announcement.
When you hold an item, such as a book or newspaper, you don’t have to touch
the item while pointing to it for the OrCam device to work, but many people nd it
easier to actually touch the item. Make sure you do not move the items.
Page 20

OrCam User Guide Version 8
PAGE 19
If the OrCam device does not recognize what it sees, it lets you know by making a
chime sound. If you hear a chime, try again, and make sure that you are pointing
at the text or a pre-entered product.
Messages Relating to Reading
If the OrCam device is having trouble reading, you may hear one of the following
messages:
There may be more text out of view above/below/on the left/on the right.
To read it, turn/tilt your head a bit to the left/right/above/below (or lower/
raise the text) and try again.
This means that the viewed section of text is not visible by the camera, either
above or below the frame, or on the right or left side of the frame. The OrCam
device cannot read the complete section. Adjust the angle of your head and/or
move the position of the text and try again.
Text may be too close. Some of the text may be cut-off.
Text is cut off by margins of frame (both left and right).
Skipped one line / [this many] lines of unreadable text.
Text was identied but was not readable - skipping a single line / several lines of
unreadable text. Try to read that section again.
Repeating from the beginning.
Is announced when pointing to the same section of text after reading it once
through completely.
The text seems upside-down. To read it, rotate the page and try again.
Page is recognized as text that is being held upside down.
Page 21

OrCam User Guide Version 8
PAGE 20
Face Recognition and Learning
You can personalize your OrCam MyEye device by teaching it to recognize faces.
This can assist you when you need to identify people such as friends, family and
co-workers. These features are not available on the OrCam MyReader.
The Face Recognition feature will, by default, also provide you with useful
information about unrecognized persons who stand in front of you. While in Fully
Automatic Face Recognition mode, the device will automatically announce either
learned person’s name or unfamiliar persons by announcing, “There is a child
or a young man/woman or a man/woman in front of you.” This will also occur
when pressing the Trigger button. You can personalize this feature in the Face
Recognition Set-Up Menu.
Note: If a face is not recognized repeatedly, it is possible that the conditions
are different than what they were when the face was learned. Performing Face
Learning of the same person under these new conditions would allow the device
to better recognize the face in the future. For example, if a person puts on
sunglasses, performing new face-learning would allow the device to recognize this
person with sunglasses, too.
Face Learning
To enter Face Learning Mode, press and hold
the Trigger button for about two seconds.
When the OrCam device identies that you are
looking at a face, a long press on the Trigger
button will enter a brief learning sequence.
Please position yourself approximately three
feet (one meter) in front of the person you
wish to learn. Both of you should not move
for a few seconds, and you should hold you
head steady. It is better to make sure you
learn people in a well-lit area with a neutral
background and avoid facing a light source directly.
Page 22

OrCam User Guide Version 8
PAGE 21
Face Learning Mode Messages
In the Face Learning mode, you will hear some of the following messages:
Please name the person in front of you after the beep.
Record person’s name after the beep. Speak clearly and loudly for best results.
Press button to conrm adding person, or press volume button to record
again.
Press the Trigger button to conrm the recording and adding of the person or rerecord the person’s name by pressing the volume button.
Person learned.
OrCam has completed the face learning process and the face has been successfully
added.
Face learning not successful, [Person is too close/far/not centered/not
facing you,] it is best to stand in front of a person from three feet away.
The face is not positioned correctly in front of you, adjust the angle or distance
between you and the person and ensure the person is facing you and looking
toward you.
Cancelling learning.
Button was not pressed to conrm adding a new face.
Too many faces detected. Cancelling learning.
More than one face is in the camera’s view frame. To teach a new face, position
yourself so that the camera can only see one face at a time.
Not enough light for learning.
The current lighting in the room is not sufcient to allow the OrCam device to learn
a new face. Please try again in an area with brighter lighting.
Page 23

OrCam User Guide Version 8
PAGE 22
Products, Banknotes and Colors
Product Learning and Identication
You can enter everyday products you use into
the OrCam device’s memory. Point or press the
trigger button to identify pre-entered products.
To enter a new product, hold the product you
wish to learn and press and hold the Trigger
button for about two seconds. When the
OrCam device identies that you are looking
at a product, you will hear the announcement:
“Start new product learning. Please point at the product three times at different
positions.”
Point at the center of the product three times, slightly moving the product each
time against its background such as rst at arm’s length, then point again holding it
closer to you, and then once against a different background. Typically, this is done
by pivoting your hand or body to the left or right. Make sure that each time you point
per side of the product you hear the double-beep and the camera shutter sound.
For any product, it is possible, but not required, to teach up to 4 sides.
Note: The Product Recognition feature is designed to recognize products with
unique textures, usually found on labels and packaging. You will receive the best
results with products that are between the size of a playing card and the size of a
cereal box. The OrCam device might nd it difcult to recognize objects with few
distinct features, such as a wallet or fruits.
Barcode Identication
You can identify a product by holding the barcode directly in front of the OrCam
device camera or by pointing to the barcode on the item’s packaging. It is best
to hold the product at a distance of approximately 12 inches or 30 centimeters.
Information about the product is announced. This information is provided by a
pre-loaded database of thousands of consumer products. If the barcode is not
Page 24

OrCam User Guide Version 8
PAGE 23
available in the pre-loaded database, the OrCam device will announce “unfamiliar
barcode”.
Note: Barcode identication is automatically enabled by default. It can be
activated manually or disabled in the Product Recognition Settings menu. This
feature is still not yet fully operational in all localities and barcodes in memory may
be limited in number.
Banknotes Identication
You can identify a banknote by looking at it for
a few seconds, pointing at it, or by pressing the
Trigger button. Hold the banknote in front of
you at a distance of about half an arm’s length,
which is about 12 inches (30-40 cm). You can
ensure correct amount by pointing twice. This
feature is enabled by default. In some localities,
you will be able to choose between currencies.
To set between currencies or to disable this
feature go to in the Products Recognitions
Settings sub-menu.
Color Detection
This feature enables you to recognize colors
of surfaces and clothing. Point at a colored
surface for a few seconds. Make sure that
your ngertip is facing it. With clothing, hold it
up towards you or place them on a table and
then point to it.
Note: Ensure proper lighting conditions, and
a distance of approximately 15 inches (40 cm)
(roughly a little more than half an arm’s length).
This feature is enabled by default. It can be
disabled in the Product Settings sub-menu.
Page 25

OrCam User Guide Version 8
PAGE 24
Product Learning Mode Messages
In the Product Learning mode, you will hear some of the following messages:
Let’s try again. Please point at the center of product three times. For
example, hold once at arm’s length, once closer, and then once against a
different background.
The OrCam device has successfully started learning a new product. Move and/or
slightly rotate the product to change the background and point again. The OrCam
device takes up to three pictures per side.
No product detected. Cancelling product learning.
The OrCam device was not successful in learning the new product and has
terminated product learning. Make sure that each time you point you hear the
double-beep and the camera shutter sound.
Did not learn this side.
The OrCam device did not recognize the additional side of the product. If no
additional product sides are needed, proceed in recording the product name.
Done with this side. You may point three times at another side of the
product or stop now.
The OrCam device has successfully learned one side of the new product. To
continue with an additional side, turn the product and point again. To complete the
process, remove the product from view.
Page 26

OrCam User Guide Version 8
PAGE 25
OrCam System Messages
Following is a list of some of the OrCam system messages that you are likely to
hear during normal operation.
OrCam Version 8 is ready. Battery is [this many] percent charged.
Initial greeting. OrCam is now ready to begin operation.
Suspending. Press again to shut down.
Press the power button again if you wish to power off the OrCam device entirely,
or wait for it to enter Suspend Mode.
Shutting down, please wait.
OrCam has begun the shutting down process.
Power off. Bye bye.
Shut down process is complete. Device is now off.
Suspended.
Going into a power saving mode. This occurs automatically after 3 minutes of
inactivity. Press the Trigger button to resume operation.
Waking up. Battery is [this many] percent charged.
Greeting when device rst begins active operation after waking up from suspend
mode.
Please Wait.
OrCam is currently processing its next action. Please wait.
Warning! Battery is running low.
The battery is extremely low and if you do not charge it soon, the device will
automatically shut down.
Battery is too low. Shutting down, please wait.
The battery is too low to enable operation. You must charge the battery and then
Page 27

OrCam User Guide Version 8
PAGE 26
restart the device.
Charger connected/disconnected.
The charger is connected/disconnected and OrCam is currently charging/no
longer charging.
No activity. Shutting down.
This occurs automatically after 3 hours of inactivity in suspend mode. You will
need to power the device on when you want to use it again.
OrCam needs to cool down before you can use it; shutting down, please
wait.
The temperature of the OrCam device is too high. Please allow it to rest for a few
minutes and resume normal operation. If the problem persists, contact support.
Low light.
You may receive this message in poor lighting conditions.
Page 28

OrCam User Guide Version 8
PAGE 27
Conguration and Personalization
This section details the settings of the OrCam device that can be changed to t the
personal preferences of the user. These settings include the reading speed (rate),
voice, gestures, outputs, automated face recognition, tap, touch reading, and more.
Audio Settings Menu
The Audio Settings Menu provides access to the OrCam device’s settings by listening
to a menu of options and selecting the setting you desire to change.
To enter the Audio Settings Menu:
1. Press the Trigger button and the Volume button simultaneously for two
seconds and then release. The device will announce: “To enter the setup
menu press the Trigger button, press either Volume button to cancel”. Press
the Trigger button.
2. Once you have entered the Audio Settings Menu, you will hear: “Main menu.
To set reading rate press Trigger, to change other settings press the Volume
buttons”.
3. Press the Volume Up (protruding circle) or Volume Down (indented circle)
buttons to move through the available settings categories. The device will
announce the current setting category Press the Trigger button to select the
desired category.
4. When entering a category, the device will announce the current setting of this
category. Follow the various instructions.
5. Once you have made a selection, the device will announce “[This category]
set/changed to [the new setting]”.
6. Some options require the device to enter Suspend Mode or to Restart in order
to take effect.
7. Pressing the Trigger button and the Volume simultaneously will return you to
the main menu, and from the main menu exit the Audio Settings Menu.
Note: If at any stage no button is pressed for a period of six seconds, the device
will repeat the last announcement three times, then exit the Audio Settings Menu.
Page 29

OrCam User Guide Version 8
PAGE 28
Audio Settings Menu Options
In the setup menu, you can customize the following for your OrCam use:
1. Reading Rate
2. Change Volume
3. Reading Language
4. Reading Settings
4.1. Touch Reading
4.2. Date Format
4.3. Automatic Page Recognition
4.4. Automatic Page Recognition Time
4.5. Reading Navigation
4.6. Reading Navigation Pause Time
4.7. Reading Navigation Control Buttons
5. Gesture Settings
5.1. Stop Gesture
5.2. Watch Gesture*
5.3. Gesture Sensitivity Level
6. Face Settings Menu*
6.1. Face Recognition Settings
6.2. Face Repetition Time
6.3. Review Stored Faces
6.4. Delete All Faces
6.5. Face Recognition Sensitivity Level
Page 30

OrCam User Guide Version 8
PAGE 29
7. Products, Barcodes, Bank Notes and Colors Recognition Settings*
7.1. Review Stored Products
7.2. Delete All Products
7.3. Product Recognition
7.4. Barcode Recognition Settings
7.5. Banknotes Recognition Settings
7.6. Banknotes Currency Settings
7.7. Color Recognition
8. General Settings Menu
8.1. Change Voice
8.2. Set Time
8.3. Auto Suspend Time
8.4. Reset All User Settings to Default
8.5. Camera Light Compatibility
8.6. Tap Functionality
8.7. Light Conditions Notications
8.8. OrCam Contact Information
8.9. Device Serial ID
8.10. Software Version Info
9. Exit
*[Items marked with an asterisk are] not available in OrCam MyReader.
Page 31

OrCam User Guide Version 8
PAGE 30
OrCam Please Commands
The OrCam Please commands provide an alternative method to set some of the
OrCam device settings by pointing at the “OrCam Please” phrases that appear
in this guide and on the OrCam website. When the command has been identied
successfully, the device will play a distinct tone.
Note: When pointing to “OrCam Please” commands, the device may not read the
command, but rather perform the command. The relevant conrmation message
will be played.
Any of the “OrCam Please” phrases can be printed individually or read from a
computer or smartphone screen – it is not required that you read them from this
User Guide. The text should be printed or displayed alone, without surrounding
text. Make sure to use capital letters in the beginning of each word and type the
word OrCam with capital C as well. The commands are provided below for your
convenience.
All available commands can be found on the OrCam website. Log in to the User
Area using your email address and password, then visit: http://www.orcam.com/
personalization/
Tell Time and Setting the Internal Clock
The OrCam device can announce the current time and date. To activate the
announcement, raise your hand upward with your st closed and the back of your
hand facing you, as if looking at your watch. The OrCam device will announce the
current time. If you keep your hand in place for more than 2 seconds, the OrCam
device will announce the current time, day of the week and the date.
Note: This feature is enabled by default. It can be adjusted in the “Gesture
Settings” sub-menu in the Audio Settings Menu.
To set the internal clock, please visit the User Area on the OrCam website or visit:
www.orcam.com/timeset. Read the “OrCam Please Set Time” command on the
screen.
Page 32

OrCam User Guide Version 8
PAGE 31
Instructions for Software Update using an SD Card
As new versions of OrCam software become available, you may receive a
software update kit. Follow this the step-by-step procedure for updating your
OrCam device to the latest software version.
Preparation: Check Battery Level and Power off the Device
1. Verify that the OrCam device is at least 50 percent charged. Connect the
charger and allow charging time if necessary.
2. Disconnect the device from the power supply or USB.
3. Power off the device. This is done by pressing the power button twice.
After a few seconds, the device will say “Power off, bye bye.”
Note: To conrm that the device is powered off, make sure the LED light is
not lit and press the Trigger and Volume buttons to make sure the device is
unresponsive.
Remove the Old SD Memory Card
Before you can insert the new SD card you received from OrCam, you must rst
remove the SD card currently in the device.
1. Open the rear cover of the device by pushing a paper clip (or something
similar) into the notched opening. Pry the cover open and remove.
Note: The rear cover is on the side of the Base Unit that does not have the
Base-to-Head Unit cable attached to it. Make sure the Base Unit is removed
from the belt-clip.
2. Push in and release the small SD card. It will pop out of the slot about 1/8th
(one-eighth) of an inch.
3. Remove the SD card and put it aside.
Page 33
OrCam User Guide Version 8
PAGE 32
Install a New SD Memory Card
1. Before inserting the new SD card, you should
review the label on the SD card to conrm
that you are in fact using the most up-to-date
version.
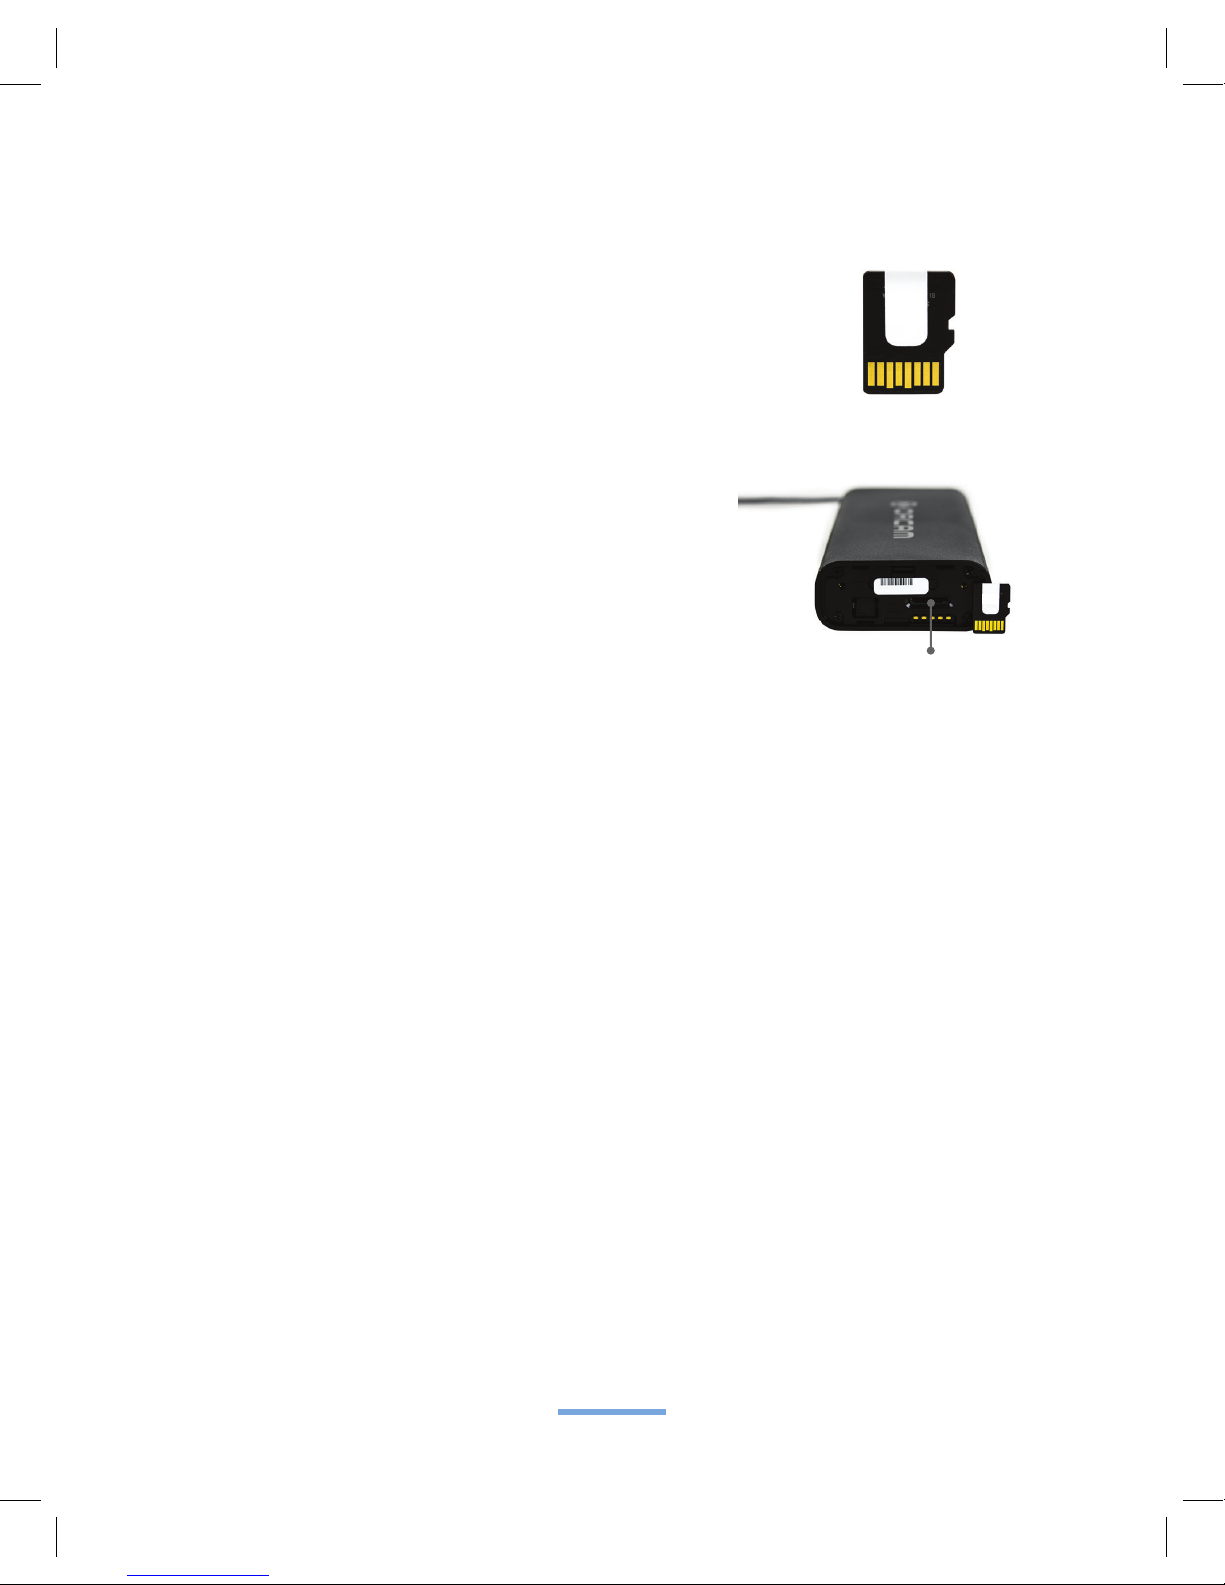
2. Locate the SD slot on the open panel of the
OrCam device.
3. Hold the new SD card so that the smoother
side of the SD card is closer to the center of
the OrCam Base Unit and the side with the
golden connector grooves is closer to the edge
of the Base Unit opposite the row of golden
prongs.
Note: It is very important that the SD card is
oriented correctly.
4. Push the new SD card into the OrCam slot
gently. You should feel it lock in place.
5. Close the rear cover of the Base Unit.
Update the OrCam software
The update process is initiated automatically by plugging the power charging
cable into the OrCam device with the new SD card inside. The power charging
cable needs to remain connected throughout the update process.
1. Wear your glasses with the Head Unit attached so that you can hear the
OrCam messages.
2. Connect the power cord to the device. The Base Unit will vibrate and the LED
light will initially turn red. About 20 seconds later, the LED will turn green.
3. About a minute after the device powers on, it announces: “OrCam Software
update will now begin. Please keep charger plugged-in until update
completes. Remaining time for update preparation [this many] minutes.”
V8
JUN
V8
SD Card Slot
Page 34

OrCam User Guide Version 8
PAGE 33
You may hear a steady beeping sound indicating the software update is in
progress.
Note: During the update process, which may take up to 20 minutes, the
LED blinks red and green. As it is updating, the device may announce the
estimated time remaining.
4. Once the update is completed, the device announces: “Congratulations
for upgrading to Version 8 of OrCam MyEye, which adds more functionality
to your device. I can now recognize barcodes when you hold them in front
of me, or when you point at them. When holding your nger over a blank
area, I will tell you it’s color. Reading and recognizing banknotes can now be
done faster, you just need to hold them in front of me. I can tell the age and
gender of people which I don’t recognize. All the previous features have been
improved as well.”
5. Press the Trigger button and then the OrCam device will announce “System
will restart now, please wait” and will restart itself and repeat the welcome
message detailed above. Your device is now ready to use.
Verify that the update is complete
1. If you wish, you can verify that the OrCam device has been updated. Turn the
OrCam device off and then on again as you normally would.
2. Listen to the startup message to verify the current version of the OrCam
software: “OrCam Version 8 is ready. Battery is [this many] percent charged.”
Page 35

OrCam User Guide Version 8
PAGE 34
Troubleshooting
For any questions or concerns regarding the use of the OrCam device, please do
not hesitate to call our customer support team for assistance at 1.800.713.3741
Lighting and Other Considerations
Just as we need a certain level of lighting to enable us to read, the OrCam device
is sensitive to light, too. It operates best in a brightly lit area. When using the
OrCam device, consider the following:
Avoid shining strong light into the camera. If facing a window or a lamp such that
the light is shining directly into the camera, the OrCam device may not be able to
focus properly on the text or product.
The device may announce a Low Light system message. This can be caused by
the camera adjusting to the current lighting conditions. It may take the camera up
to 10 seconds to adjust. If this occurs, stay in the same position for 10 seconds
and try again. Try not to change your position for these 10 seconds because this
may disrupt the camera’s adjustment.
Sound Considerations
In locations where there is a lot of noise, you may want to consider using the
included earphone or an external speaker. See the chapter on Personalization to
choose which audio outputs the device will use.
Battery Considerations
Battery is too low. Shutting down, please wait.
The battery is too low to enable operation. Connect the charger to the device.
When sufciently recharged, power on the device.
Page 36

OrCam User Guide Version 8
PAGE 35
If the OrCam device has been unused for ve days or longer, the battery level
messages may become inaccurate. In the event that the device does not hold a
charge, plug it in and charge it for eight hours without interruption. If this does not
solve the problem, please contact OrCam Support.
Reading
As the OrCam device is reading, you may encounter some of the following
messages:
Text is too small. Try to hold it closer.
This is announced when the image contains text, but the OrCam device cannot
recognize it. This may occur in the middle of a document.
Text seems blurry. Please hold it steady and try again.
This is announced when OrCam cannot understand the text due to camera or
item movement during image capture.
Can’t read text, please try again in a brighter area.
This is announced when OrCam cannot understand the text due to low light.
You may encounter an announcement from the OrCam device saying, “Text
seems blurry.” This may occur for several reasons:
1. You may be holding the book at an angle that makes it difcult to read the text.
2. You may have moved your head or the document while the OrCam device was taking
a picture of the text. An easy solution is to use a book holder. You may nd it more
comfortable and it may make it easier to keep the text steady.
3. If you are attempting to read in a location with dim lighting, it is very important to keep
the text stable. An easy solution is to improve the lighting by changing your position or
adding an additional lighting source.
Page 37

OrCam User Guide Version 8
PAGE 36
Face and Product Recognition
No face detected. Cancelling face learning.
The OrCam device was not successful in learning the new face and has terminated
learning. Please position yourself approximately three feet from the other person and
ask the other person not to move for a few seconds, as you hold your head steady.
No product detected. Cancelling product learning.
The OrCam device was not successful in learning the new product and has
terminated product learning. Make sure that each time you point you hear the
double-beep and the camera shutter sound.
Memory is full. Cannot learn additional products/faces.
The OrCam device can remember up to 150 products and 100 faces. If you have
added that many products or faces, you may have to delete some before you can
add any more.
A face was not recognized.
Perform face-learning on the person again, to help the device recognize the face
under different conditions (e.g., with sunglasses, or from a different angle.) If the
issue persists with different people, use the menu to change face-sensitivity to
High in the Audio Settings Menu.
Face recognition announces a certain name frequently, but on the wrong
person.
Delete the name from the device. Repeat the face-learning procedure in a well-lit
place, while the subject is three feet away looking at the camera and the camera
is not moving. If the issue persists, use the menu to change face-sensitivity to Low
in the Audio Settings Menu.
Page 38

OrCam User Guide Version 8
PAGE 37
General System Messages
Device version alert. Please contact OrCam support.
The OrCam device has a software problem and may not function properly. Please
contact OrCam Support immediately.
Update process doesn’t start
If after inserting the new SD card and plugging the power charging cable into the
OrCam device, you do not hear any message within ve minutes, please verify:
1. That the SD card is inserted correctly.
2. That the device is connected to the power supply. Software updates require
the device to be connected to a power source all the time.
If you hear the announcement “Update Process Failed”, please contact OrCam
Support.
Software Version
You may be asked by an OrCam support representative to check the version of
your OrCam device’s software. Please point at the following phrase.
OrCam Please Tell Build
Page 39

OrCam User Guide Version 8
PAGE 38
Reset Device
It is possible to remove information stored in the OrCam device’s internal
database. The following commands will remove all faces or products from the
device’s memory, or reset the device back to its default factory settings and also
remove both faces and products from memory.
OrCam Please Remove All Learned Faces
OrCam Please Remove All Learned Products
OrCam Please Clear User Settings
Page 40

OrCam User Guide Version 8
PAGE 39
END-USER TERMS AND CONDITIONS
These Terms and Conditions govern your use of your OrCam device (the “Product”). Your
agreement to these Terms and Conditions is a condition to your use of the Product.
Please read the User Guide in full, including the important Safety Instructions, BEFORE using
your OrCam device. DO NOT use your OrCam device until you have received in-person
or online training by an authorized OrCam Trainer™ or OrCam Training Program.
INTELLECTUAL PROPERTY; LICENSE GRANT; UPGRADES
Customer acknowledges and agrees that OrCam owns all rights, titles and interests in and to
any intellectual property rights, patents, know-how, trade secrets, trademarks, trade names,
copyright and other proprietary rights, whether registered or not, owned and/or otherwise utilized
in, by, or in connection with, its Products, related documentation and all goodwill related thereto
(the “IP Rights”). Customer acknowledges and agrees that the IP Rights may not be exploited,
reproduced, or used by Customer except as expressly permitted in these Terms and Conditions.
Subject to the terms and conditions in this Agreement, Customer is hereby granted a nonexclusive, non-transferable, limited license to use the software embedded in the Product or other
IP Rights solely as part of the OrCam device and for personal (not commercial) use. Customer
does not acquire any ownership or intellectual property rights in the software. The software
and any audio output shall not be used in a manner which is obscene, offensive, defamatory
or violates any third-party rights or privacy. Any rights not expressly granted to Customer
hereunder are reserved to OrCam and/or its licensors. Any audio output shall not be distributed
as part of applications, materials or multimedia works or otherwise be provided to a third party.
Customer agrees, to the extent such prohibition is permitted by applicable law, not to decompile,
disassemble, reverse engineer or otherwise attempt to reconstruct or discover the source code,
algorithms or process ows of any element of the Product or otherwise attempt to defeat any
security measures in the software. Customer agrees not to assign, sublicense, lease, rent, loan,
transfer, disclose, or otherwise make available such software, or remove proprietary notices on
Product or any documentation provided by OrCam. Customer shall be responsible for backing up
any data or databases.
Customer shall not alter or interfere in any way with the Product or make any technical changes,
additions or substitute replacements in the Product or take any other action to the detriment of
OrCam’s IP Rights in such. OrCam shall be entitled to make periodic upgrades to the Product as
it deems necessary. Customer shall fully cooperate with OrCam in making such upgrades and
any effort to prevent such upgrades shall be deemed a fundamental breach of this Agreement.
Such upgrades shall be covered by these license terms.
Page 41

OrCam User Guide Version 8
PAGE 40
COLLECTION OF INFORMATION; PRIVACY POLICY
OrCam will only collect information that was recorded in a device with Customer’s consent
and solely for purposes of providing service and support to Customer.
LIMITATION OF LIABILITY
OrCam will not be liable to Customer or any other third parties (whether under the laws of
contract, torts or otherwise) with respect to the use of, or otherwise in connection with the
Product: for any loss or damages, whether direct, indirect, special, punitive, exemplary or
consequential; or for any business or nancial losses, loss of revenue, income, prots or
anticipated savings, loss of contracts or business relationships, loss of reputation or goodwill,
or loss or corruption of information or data or other intangibles, delay or inability to make use
of the Product.
These limitations of liability apply even if OrCam has been expressly advised by Customer
of the potential loss. Nothing in these Terms and Conditions shall operate to exclude or limit
any liability which cannot be excluded or limited under applicable law. OrCam’s total liability
with respect to any of these results shall be limited to the amount paid by Customer for such
Product.
OrCam can take no responsibility if the Product was used other than in accordance with the
instructions in the User Guide. Products should not be relied upon in circumstances that
are potentially life- or health-threatening or that could lead to nancial loss. OrCam devices
should especially never be relied upon to drive vehicles or operate heavy machinery of any
kind. OrCam shall not be responsible in the event that Products are used in such situations.
OrCam received Barcode information from Barcodes of Grocery Products in Australia and
New Zealand from GS1 Australia. OrCam accepts no responsibility for the accuracy of the
barcode information attained from this or other providers.
FORCE MAJEURE
Neither Party shall be liable for any loss or damage of any nature incurred as a result of
any failures or delays in performance (other than payment obligations) due to any cause
or circumstances beyond its reasonable control and without the negligence of the nonperforming Party.
Page 42

OrCam User Guide Version 8
PAGE 41
GOVERNING LAW, JURISDICTION
These Terms and Conditions shall be governed by and construed under and in accordance with
the laws of the State of New York without reference to conict of laws principles. Any dispute
related to or arising from this Agreement shall be subject to the sole and exclusive jurisdiction
of the State or Federal Courts sitting in New York, New York and both parties hereby consent to
such jurisdiction and venue.
SEVERABILITY
If any provision of these Terms and Conditions is determined by a court of competent jurisdiction
to be invalid or unenforceable, such invalidity or unenforceability shall not invalidate nor render
unenforceable the entire Terms and Conditions but rather the Terms and Conditions shall be
construed as if not containing the particular invalid or unenforceable provision and the rights and
obligations of the Parties shall be construed and enforced accordingly.
NOTICES
All notices hereunder shall be given in writing.
WAIVER
No delay or failure of any party to exercise any right provided herein shall in any way affect
its right to enforce that right or any right under these Terms and Conditions at a later time. No
waiver shall be effective unless in writing and signed by the party against whom such waiver
is sought to be enforced.
Page 43

OrCam User Guide Version 8
PAGE 42
WARRANTY
Customer acknowledges that, other than as explicitly stated herein, OrCam does not make any
representations or warranties to Customer regarding the Product, its functions or any images it
produces
The OrCam end-user limited product warranty (the “Limited Warranty”) covers the owner of an
OrCam product against defects in material or workmanship at the time of its original purchase,
for a subsequent period of one (1) year, and for any additional applicable legal warranty period.
Original proof of purchase/delivery is required from the owner in order to obtain this coverage.
OrCam will repair or replace, at its discretion, any product that is determined by OrCam to be
covered under this Limited Warranty. OrCam will not be responsible for conditions arising as a
result of intentional damage or misuse of the product. The owner is responsible for the costs of
shipping the product to the location specied by OrCam.
This Limited Warranty is the sole and exclusive warranty applicable to OrCam products. No third
party has the authority to make any representation, warranty, or agreement on behalf of OrCam
with respect to OrCam products. No warranty of any kind or nature is made by OrCam beyond
those expressly stated herein.
In no event shall OrCam be liable for any special, collateral, indirect, punitive, incidental,
consequential, or exemplary damages in connection with or arising out of the use of the product.
Without limiting any provisions limiting liability under this agreement, the limited warranty set forth
herein will not apply, and the owner will reimburse OrCam for any costs and expenses incurred in
the event that:
i. the product has been used other than in accordance with the product documentation and
terms of use or other written operating instructions provided by OrCam
ii. the product has been subject to tampering, misuse, negligence, or accident
iii. the product or parts identication labels have been removed or the product has been
otherwise altered
iv. the product has been opened, modied, repaired, serviced, maintained, or altered by
someone other than an authorized OrCam representative
v. the product has been combined with software, hardware, or other equipment not supplied
by OrCam or not approved in writing by an authorized OrCam representative
vi. the product has been intentionally damaged or exposed to water, heat, or high voltage
vii. the product has been used by a person who has not completed training by an authorized
OrCam Trainer™
Page 44

OrCam User Guide Version 8
PAGE 43
Any parts replaced pursuant to this warranty will be under warranty for the remaining time of the
original warranty period or for ninety (90) days from the date of repair, whichever is longer.
If you believe that your product needs warranty support, contact [email protected]. You will
be responsible for shipping costs. However, if it is determined that the warranty request is valid,
OrCam will pay the total cost of shipping the repaired or replaced product.
ORCAM DISCLAIMS ANY AND ALL WARRANTIES, WHETHER EXPRESSED OR IMPLIED,
INCLUDING WITHOUT LIMITATION, THE IMPLIED WARRANTIES OF NON-INFRINGEMENT OF
THIRD-PARTY RIGHTS, MERCHANTABILITY AND FITNESS FOR A PARTICULAR PURPOSE.
ORCAM DOES NOT WARRANT THAT THE PRODUCT WILL BE ERROR FREE OR “BUG” FREE,
WILL OPERATE WITHOUT INTERRUPTION, THAT ANY IMAGES OR SOUNDS PRODUCED BY
THE PRODUCT WILL BE ACCURATE OR THAT THE OPERATION OF THE PRODUCT WILL BE
SECURE AND HEREBY DISCLAIMS ANY AND ALL LIABILITY ON ACCOUNT THEREOF. THIS
SECTION SHALL BE ENFORCEABLE TO THE FULLEST EXTENT ALLOWED BY APPLICABLE
LAW.
Refund policy
You can return your undamaged device for a refund within the period required by local law or 30
days following receipt, whichever is longer. Returns may be subject to a re-stocking fee. Training
fees are non-refundable. Please contact your local representative or OrCam Support to initiate a
return process.
To contact OrCam Support please e-mail [email protected] or call:
United States and Canada
OrCam Inc.
1350 Broadway, Suite 1600
New York, NY 10018
1.800.713.3741
United Kingdom
OrCam UK
60 Gresham Street, Suite 120
London EC2V 7BB
0800.358.5323
Page 45
OrCam User Guide Version 8
PAGE 44
FCC Compliance
This equipment has been tested and found to comply with the limits for a Class
B digital device, pursuant to Part 15 of the FCC rules. These limits are designed
to provide reasonable protection against harmful interference in a residential
installation. This equipment generates, uses and can radiate radio frequency energy
and, if not installed and used in accordance with the instructions, may cause
harmful interference to radio communications. However, there is no guarantee that
interference will not occur in a particular installation. If this equipment does cause
harmful interference to radio or television reception, which can be determined
by turning the equipment off and on, the user is encouraged to try to correct the
interference by one or more of the following measures:
Reorient or relocate the receiving antenna.
Increase the separation between the equipment and receiver.
Connect the equipment to an outlet on a circuit different from that to which the
receiver is connected.
Consult the dealer or an experienced radio/TV technician.
FCC Warning
Modications not expressly approved by the manufacturer could void the user
authority to operate the equipment under FCC Rules.
NOTE: THE MANUFACTURER IS NOT RESPONSIBLE FOR ANY RADIO OR
TV INTERFERENCE CAUSED BY UNAUTHORIZED MODIFICATIONS TO THIS
EQUIPMENT. SUCH MODIFICATIONS COULD VOID THE USER’S AUTHORITY
TO OPERATE THE EQUIPMENT.
CE Compliance - Authorized European Community Representative
Medes Limited
5 Beaumont Gate, Shenley Hill, Radlett, Hertfordshire, London WD7 7AR,
United Kingdom. Telephone: +44 20 8123 8056 Fax: +44 1923 859 810.
FCC
Compliant
CE Compliant Restriction of Hazardous
Substances Directive
Compliant (materials and
components)
Waste Electrical and Electronic
Equipment Directive Compliant Contact OrCam for proper
disposal
Refer to User
Instruction Guide
Page 46

OrCam User Guide Version 8
PAGE 45
Safety
Before using the OrCam device, read the following precautions carefully to avoid dangerous
situations and to ensure ideal performance of your OrCam device. Handle your OrCam device
with care. It can be damaged if dropped, burned, punctured, or crushed. Do not open the
Head or Base Units.
The OrCam device is designed to work in ambient temperatures between 32°F and
104°F (0°C and 40°C) and in normal conditions (Relative Humidity of 10% to 90% RH
and Atmospheric Pressure of up to 2000m above sea level (700hPa)). The device can be
damaged if used outside of this range. Store and transport in a cool, dry place (32°F to 104°F
(0°C to 40°C) and Relative Humidity of 5% to 90% and atmospheric pressure of 700hPa to
1060hPa)).
The OrCam device is water resistant but not waterproof. This means that the Head Unit can
withstand light rain or drizzle for short periods of time, although it is not recommended, as
long as the Base Unit is covered and protected. Do not use the OrCam device in heavy rain,
when at the beach or swimming pool, or in or near a bathtub or shower. Do not submerge the
OrCam device in any type of liquid. IP Code: IP22.
Do not expose the device to chemicals, such as household cleaners, aerosol sprays,
solvents, alcohol, or ammonia. If you experience an allergic reaction to any of the elements of
the OrCam device contact a medical professional.
There is a cord connecting the Head and Base Units. Do not disconnect this cord from either
the Head or Base Unit unless specically instructed by an OrCam representative. Do not pull
on the cord or cut it in any way.
Should you have a problem operating the OrCam device and believe there is something
wrong with the device, do not attempt to repair it by yourself. Only qualied OrCam personnel
may repair or service your device. Unauthorized repairs may void your warranty.
Do not attempt to replace the battery; you may damage it, which could cause overheating
and even injury. The battery is designed to last for three years of average use (three charging
cycles per week on average) after which it may need to be replaced. Use only the AC
adapter supplied with your OrCam device. Using another AC adapter may void your warranty
and could cause severe injury.
Do not force a connector into a port or apply excessive pressure to a button. This may cause
damage that is not covered under the warranty. If a connector does not insert easily, check
for obstructions in the port and verify that you have the correct connector for that port. Do
not combine with software, hardware, or other equipment not supplied by OrCam.
Ensure that the rubber cover on the bottom of the Base Unit is closed whenever the
connectors are not in use. Exposing the Base Unit to magnetic elds may damage the unit or
erase your data.
When you are using the OrCam device or charging the battery, it is normal for the Base Unit
to get warm. If the unit becomes excessively hot, leaks, or gives off a burning smell, turn the
device off immediately and contact OrCam Support.
Page 47

OrCam User Guide Version 8
PAGE 46
Notes
Page 48

Welcome to OrCam!
We are pleased to
present you with your
new OrCam device.
OrCam is very intuitive.
All you have to do is
point. See for yourself.
 Loading...