

Page 1
CMOS: GPL08 1A3-487A
9108
7
8
654
2 34
Suitable Model: C8236
6302000
User’s Instructions
RC WALL CLOCK
WITH INDOOR THERMOMETER
GETTING STARTED
1. Remove the battery door by slightly pressing the
knob downwards.
2. Insert one new AA size battery according to the
po l ari t y i nfo r mat i o n ma r ked o n t h e bat t ery
compartment.
3. Close the battery door.
4. When the battery is inserted, the normal LCD display
will be shown before entering the radio controlled
time reception mode.
5. The RC clock will automatically start scanning for
the radio controlled time signal in 8 seconds.
Note:
If there is no display on the LCD after inserting the battery,
try to replace with one new AA size battery or press the
“RESET” key. In some cases, you may not receive the RC
signal immediately. Due to the atmospheric disturbance,
the best reception often occurs during nighttime.
FUNCTION KEYS
RESET key:
MODE key:
SET key:
ADJUST key:
˚C/˚F key:
SNOOZE key:
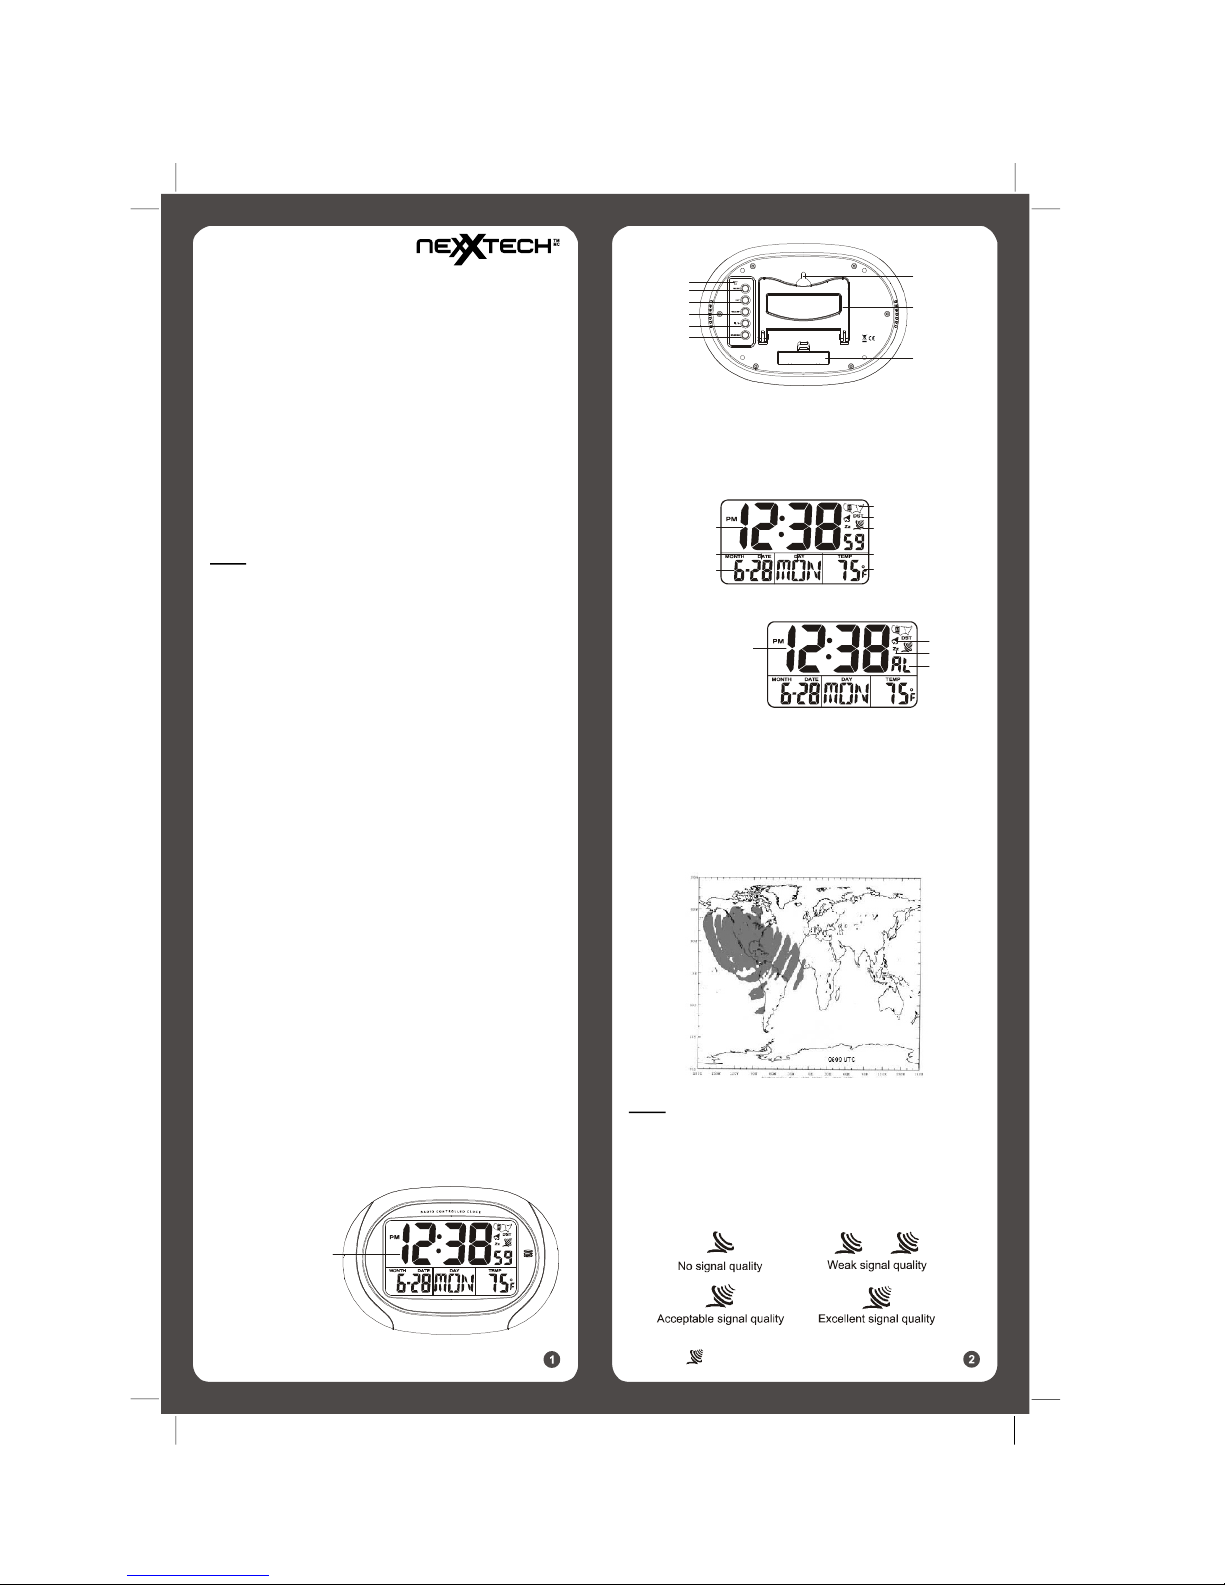
PRODUCT SETTINGS/DISPLAY
1. LCD display
2. RESET
3. MODE key
4. SET key
5. ADJUST key
6. ˚C/˚F key
7. SNOOZE key
8. Wall-mounting holder
9. Table stand
10. Battery door
Press to return all values to default values.
In case of mal-function, the unit may
be required to reset.
Press to toggle between normal time mode
and alarm time mode.
Press to turn the alarm and snooze on/off.
Press to stop the current alarm when
the bell is ringing, and to turn off the alarm
and snooze function.
In normal time mode, press to switch
between Month/Date and Year display.
In alarm time mode, press to select
the proper time zone.
In setting mode, press to change the
setting values.
Press to switch between Celsius and
Fahrenheit.
Press and hold for 3 seconds to
rece ive the RC signal for reception
testing.
Press to stop the current alarm when
the bell is ringing.
1
PANTONE: 445C SIZE: A5
2
3
4
5
6
7
Normal Time Mode
1. Time
2. Date
3. Month
4. Time zone map
1
2
3
5. Daylight savings time (DST)
6. Signal strength indicator
7. Day of the week
8. Temperature
Alarm Time Mode
1. Alarm time
2. Alarm icon
3. Snooze icon
4. Alarm mode
1
DAYLIGHT SAVINGS TIME (DST)
The clock has been programmed to automatically switch
when the daylight savings time is in effect. If you live in an
area where DST is not observed, the time display on your
clock will read +/- for one hour during the DST period.
WWVB COVERAGE MAP
Radio Controlled Clock may not work in some
Note:
locations or areas.
SIGNAL STRENGTH INDICATOR
The signal indicator displays signal strength in 4 levels.
Wave segment flashing means time signals are being
received. The signal quality is classified into four types:
If the RC clock receives the signal successfull
“ ” will appear on the LCD.
symbol
y, a sync-time
Page 2
MINU TE sett ing
SECO ND set ting
12/2 4 HR se ttin g
MIN UTE se tt ing
If unit has not received the time signal the signal
strength symbol will disappear from the LCD display.
Note
1.
You may use the “˚C/˚F” key to receive the time:
signal manuall
y. Be cautious of using the RECEIVE
mode for an extended length of time. The RECEIVE
mode will be shut off automatically in 6-12 minutes.
The RECEIVE mode consumesmore battery power,
which may reduce the battery lifetime.
2. Due to the radio frequency interference, the unit may
not obtain a communication link and can only returnto
the normal receiving condition when the interference
stops.
TIME ZON E SETTIN G
The default time zone is PACIFIC. If your location is not
in the Pacific zone, set the time zone as follows:
1. In normal time mode, press the “MODE” key to enter
the alarm time mode.
2. In alarm time mode, press the “ADJUST” key to
select the proper time zone: P=Pacific M=Mountain
C=Central E=Eastern
3. Press the “MODE” key to save and exit the setting
mode, or let it exit automatically 30 seconds later
without pressing any key.
TIME AND CA LENDAR SET TING
If you are out of the reach of the Radio Con tro lled
transmitter or if the reception is not reachable, the time
can be set manuall
is received again, the clock will automatically synchronize
with the exact time.
1. In normal time mode, press and hold the “SET” key
for 3 seconds until the HOUR digit flashes.
2. Press the “ADJUST” key to change the value of
the flashing HOUR digit.
3. Repeat the above operation to set the time and
calendar in this order: Hour > Minute > Second >
12/24 Hr > Year > Month > Date.
4. Press the “MODE” key to save and exit the setting
mode, or let it exit automatically 30 seconds later
without pressing any key.
NORMA L displ ay HOUR setti ng
DATE sett ing
MONTH sett ing
y. As soon as the signal of transmitter
YEAR s ettin g
ALARM TI ME SETTIN G
1. In normal time mode, press the “MODE” key once
to enter the alarm time mode.
2. Press and hold the “SET” key for 3 seconds until
the HOUR digit flashes.
3. Press the “ADJUST” key to change the value of
the flashing HOUR digit.
4. Repeat the above operations to set the alarm Minute.
5. Press the “MODE” key to save and exit the setting
mode, or let it exit automatically 30 seconds later
without pressing any key.
ALA RM Mod e HOU R sett in g
Note:
The alarm will be turned on automatically when you set
the alarm time.
USING THE A LARM AND SN OOZE FUNCT IONS
1. Set the alarm time as described in the previous
section.
2. Activate the Alarm by pressing the “SET” key once
so that the bell icon “
3. Activate the Snooze by pressing the “SET” key twice
so that the snooze icon “
4. To de-activate the Alarm and Snooze, press the
“SET” key again until both icons disappear.
“ appears.
“ appears.
Note:
1. When the snooze function is activated, the 4-step
crescendo alarm will sound 5 times in 5-minute
interval. The alarm duration is 60 seconds.
2. Press the “SNOOZE” key to stop the current alarm;
press the “SET” key to turn off the alarm and snooze.
USING THE TABLE STAND AND WALL-MOUNT ING
FUNCTIO N
The cloc k has both the deskto p and wall -moun ti ng
structures. You can place the clock on the desktop by its
table stand or hang it on the wall by its recessed hanger.
BATTERY REPLACEMENT
When the LCD becomes dim, replace with one new AA
size battery at once. Pay attention to the battery polarity.
Note:
Attention! Please dispose of the used unit or batteries in
an ecologically safe manner.
Suggestion:
Make sure you read the instructions before operating this
clock. We have developed this sophisticated
instrument for the best reception performance; however,
the signal transmitted from USA Atomic Clock transmitter
will be affected in certain situations. We advise you to
note the following instructions:
1. It is strongly recommended to start this clock at night
and let the clock receive the signal automatically
at midnight.
2. Always place the unit away from interfering sources
such as TV set, computer, etc.
3. Avoid placing the unit on or next to metal plates.
4. Closed areas such as airports, basements and
tower blocks, may not receive the RC signal.
5. Do not start reception in a moving vehicle such as
an automobile or train.
4
Page 3

CMOS: GPL08 1A3-487A
Suitable Model: C8236
LIMITED WARRANTY
ORBYX ELECTRONICS WARRANTY
ORBYX Electronics warrants that this product will be free
from defects in materials and workmanship for a period of
ninety (90) days from the date of purchase. Within this
period, simply take the product and your proof of
purchase to any ORBYX Electronics store or dealer and
the product will be repaired without charge for parts and
labour. ORBYX Electronics reserves the right to charge
for transportation. Any product which has been subject to
misuse or accidental damage is excluded from this
warranty.
This warranty is only applicable to a product purchased
through ORBYX Electronics' company owned stores and
dealers and to a product that is presented for repair in a
country where ORBYX Electronics offers the product for
sale. While this warranty does not confer any legal rights
other than those set out above, you may have additional
statutory rights which will vary under the laws of the
various countries, states, province and other
governmental entities in which ORBYX Electronics
operates. This warranty is subject to all statutory rights
you may have in the country of purchase.
PANTONE: 445C SIZE: A5
Imported in Canada for/
Importé au Canada pour
Orbyx Electronics,
Concord, Canada, L4K 4M3
Manufactured in China
For product support please contact
www.orbyxelectronics.com or 1-866-363-3059
Limited Warranty/Garantie Limitée
© 2008 ORBYX Electronics. All Rights Reser ved.
 Loading...