


WiFi I nte rnet/DAB/DAB+/FM radio and iPod dock
User's Guide
Software version: v2.019


Contents
Important Safety Information 5!
Water ....................................................................................................................................................5!
Cleaning.............................................................................................................................................5!
Care in use.........................................................................................................................................5!
Contact Information 5!
Package Contents 6!
Internet Radio Req uiremen ts.......................................................................................................................7!
Unit top & Controls Overview 8!
Front and Back Overview ..............................................................................................................................9!
Using the T4 10!
Switching on.................................................................................................................................................... 10!
Setup Wizard (first use) .............................................................................................................10!
Internet Radio.................................................................................................................................................. 12!
Local Stations................................................................................................................................. 13!
Choosing a Station ......................................................................................................................14!
Podcasts ...........................................................................................................................................15!
Internet Radio - Add Stations to ‘My favourites’.............................................................. 16!
Displaying Station Information................................................................................................................ 17!
Station Updates............................................................................................................................ 17!
Music Player Mode ( streaming music) .................................................................................................. 18!
DAB/DAB+ Mode ........................................................................................................................................... 19!
Manu al Tune:................................................................................................................................ 20!
Prune in valid stations ................................................................................................................ 20!
DRC (Dynamic Range Control) value.................................................................................. 21!
To change station order............................................................................................................ 21!
FM Mode ........................................................................................................................................................... 22!
Scan Setting................................................................................................................................... 22!
Audio Setting (Stereo / Mono)................................................................................................ 22!
Setting Station Presets............................................................................................................... 23!
iPod Mode .........................................................................................................................................................24!
AUX IN Mode ................................................................................................................................................... 25!
Other functions 26!
Sleep Function................................................................................................................................................ 26!
Setting Clock - Time / Date......................................................................................................................... 27!
Set hour format............................................................................................................................. 28!
Set timezone ................................................................................................................................. 28!
Daylight Savings......................................................................................................................... 28!
Setting Alarm................................................................................................................................................... 29!
To turn off Alarm.......................................................................................................................... 31!
General Operation 32!
Common functions ....................................................................................................................................... 32!
System Settings.............................................................................................................................................. 33!
Equaliser.......................................................................................................................................... 33!
Network Setup.............................................................................................................................. 34!
Contrast Setup (for Backlight) ................................................................................................ 34!
Language....................................................................................................................................... 34!
Factory Reset.................................................................................................................................. 35!

Software Updates........................................................................................................................ 35!
Enter Setup Wizard ..................................................................................................................... 36!
SW Version and Radio ID .......................................................................................................... 36!
Media Sharing Guide 37!
Set Up Media Sharing in WMP 11........................................................................................................... 37!
Set Up Media Sharing in MAC OSX........................................................................................................ 38!
Troubleshooting 39!
Specifications 40!
Orbitsound Warranty 41!

Important Safety Information
Water
1. Do not allow the unit to come into contact with water.
2. If the unit becomes wet when not in use, do not attempt to use or power the unit. Seek
advice from a qualified technician.
3. If the unit becomes wet when in use, immediately disconnect the power source taking care
not to touch a ny wet part of the unit or p ower supply. D o not attemp t to use the unit, s eek
advice from a qualified technician.
Cleaning
1. Clean with a dry or slightly damp clot h.
2. For stubbor n stains use a soft cl oth moi stene d with a deter gent and water.
3. DO NOT use sol vents, abrasive clot hs, thinners or alcohol on the unit.
Care in use
1. Do not block any ve ntilation hol es duri ng operation.
2. Do not place the radio near a he at sour ce when i n use.
3. Take car e t hat the powe r cord is not tr ipped ove r or damage d in another way.
4. NEVER USE the powe r supply if it is damaged. Contact orbitsound for a replacement power
supply if the re is damage apparent.
5. NEVER use the wrong powe r supply with the radio. The wrong power source may damage the
unit severely.
Contact Information
web
tel
email
UK company no
www.orbitsound.com
08456 521 219
info@orbitsound.com
06378666
The Sound House ,
Hunsdon Road,
Tor quay,
TQ1 1 QB.
Engl and

Package Contents
1. orbitsound T4 radio unit
2. AC-DC mains adaptor
3. Instruction booklet
4. iPod adaptors

7
Internet Radio Requirements
In order to use the WiFi Internet radio, you will ne ed the foll owing:
1. A broadband Internet connection.
2. A wireless access point (Wi-Fi) conne ct ed to your br oadband Int er ne t, (usually referred to as a
router).
3. If your wireless network is configured to use Wired Equivalent Privacy (WEP) or Wi-Fi P rote cted
Access (WPA) data encryption then you need to know the WEP or WPA code. This is sometimes
written on the router device as (WEB Key or WPA key)
4. If your wireless network is configured for trusted stations you will need to enter the Radio’s
MAC address into your wireless access point. To find the Radio’s MAC address use menu items as
follows: Main menu Syst em se tt i ngs Network Vie w set tings MAC Address
5. To e n t e r t h e M A C a d d r e s s i n t o y o u r w i r e l e s s a c c e s s p o i n t , y o u m u s t r e a d t h e i n s t r u c t i o n s
suppli ed wi th the wir eless access point.
6. Before you continue, make sure that your wireless access point is powered up and
connected to your broadband Internet. To get this part of the system working you must
read the instructions supplied with the wireless access point.

8
Unit top & Controls Overview
Button
Internet DAB+ FM
iPod mode
Press to turn on/off Radio
When alarm is sounding, press to turn off alarm
BACK
Press to goes to previ ous menu page
Press to tune backwards
FM mode : press and hold to auto-search
Previous Track
Press to confirm
FM mode : press to auto-search
Play/Pause
Press to tune forwards
FM mode : press and hold t o auto-search
Next Track
Press to increase or decrease volume level
ALARM 1
ALARM 2
Press to set alarm 1 / alarm 2
MODE
Press to swit ch sound source :
Internet Radio, Music Player, DAB, FM, iPod, AUX in modes.
SLEEP
Press to set SLEEP time, after which the radio will go into standby/sleep mode.
SCAN
No Function
Press to SCAN for station
No Function
PRESET
Press and hold to ‘Save Preset’
Tap to ‘Recall Preset’
No Function
INFO
Display Que ue information
No Function
MENU
Ente r Menu
SNOOZE
Press to pause alarm for a few minutes

9
Front and Back Overview
Remote control Overview
Unit Back Overview

10
Using the T4
Switching on
1. Connect to your Radio power adaptor and ensure the power LED is lit.
2. Press to switch the radio on.
3. On first use, the ‘Setup wizard’ is offered (se e bel ow)
Setup Wizard (first use)
1. Continue above, press to confirm ‘YES’, and then press or to your ideal
‘hour format’
2. Press to confirm.
3. Press or to ‘Update from Network’, and then pr e ss to confirm. Thi s will
search for enhanced software versions and updat e the unit if ne wer softwar e is availabl e.
4. Press or to your local ‘timezone’, and then press to confirm.
!
5. Press or to your preferred ‘Daylight saving’ status, and the n press to

11
confirm.
7. Press or to your local ‘Wlan regi on’, and then pr e ss to confirm.
8. Press or to your prefer ‘SSID’, press to confirm. Radio will save it in
memory.
Note: Your radio may find more than one network. Press or to your favorit e
one, press to confirm.
If your network is not configured to request a password (WEP/WPA), radio wi ll connect to the network
and display:
If a WEP/WPA key (password) is required, radi o wil l ask you to i nput the WEP/WPA code and display the
password entry screen as follows:
9. Press or to cycle through the alpha-numeric character list, press to
select an appointed character.

12
!
Note: WEP/WPA pass codes are case-sensi tive.
If you make a mistake while entering your password, select ‘ ’ (backspace) to delete
that character. You can reach the 'cancel', 'ok', and 'bksp' buttons by proceeding before '0' or
after 'Z'.
10. After selecting the final character of your password, press or to , and
then press to confirm. The WEP/WPA password is then stored – you will not need
to re-enter it.
11. Press to exi t.
Internet Radio
1. Press 'MENU' to and then press to ente r ‘Internet radio’ mode.
Note: Or, you may also press MODE repeatedl y unti l ‘Internet radio’ shows up, the n stop
pre ssing to enter.
2. The n, it wi ll say:

13
3. Move the cursor to < Station list >, then press to confirm.
Note: If there is a problem connecting to the WiFi connection, the unit will show the
following:
You need to check your WiFi connection:
1. Che ck your router, see it wor king normally or not;
2. Relocate your radio to a stronger signal position is necessary!
3. Make sure your password is correctly input.
Local Stations
Note: a. make sure your radio conne cte d to WiFi network. If there is no connection, press
‘BACK’.
1. Point the cursor to < Station list >, and then press to confirm.
2. Press or to highlight < Local XXX > (where XXX is your local region), and then
press to confi rm.

14
Press or to your favouri te item, press to confirm, and then ste p to ste p to the
program you de sired.
Choosing a Station
1. Press MENU, point the cursor to < Station list >, and then press to confi rm.
2. Press or to < Stations >, and then press to confirm.
The re are 5 options are available for you to choose a station.
1. Location
‘LOCATION’ enables you to choose from the radio stations provided by any country whi ch you can
choose from a list.
1. While cursor highlights < Location >, press to confirm.
2. Press or to the region you wanted is shows up, pre ss to confirm.
3. Use the navigation keys to select a station from the country list

15
2. Genre
‘GENRE’ enables you to choose radio stations according to their content, for example Classic Rock,
Spor t, Ne ws, et c.
1. Press or to < Genre > , press to confi rm.
2. Press or to highlight your prefe rred ge nre, press to confirm.
3. Press or to highlight the stati on you would like, pre ss to confirm.
Note: Some radio stations do not broadcast 24 hours per day, and some stations are not always
on-line.
Note: If this station has on-demand conte nt, that is, it gives an option of listening to the past
programs.
Podcasts
1. Press or to highlight < Podcasts >.
2. Press to confirm, and then pre ss or to your favorite opt ion.
3. Press to confirm, and then step by step to your required program.

16
Internet Radio - Add Stations to ‘My favourites’
You can add stations to the ‘my favourites’ area within the T4 by visiting the website:
http://www.wifiradio-frontier.com. You wi ll need to register and fol l ow the instructions onl ine to add
stations t o your favourites. You will also need an access code in order to give your radio access to your
pre ferred stations.
The scre enshot above shows the websi te whe re stat ions can be added to 'My Favourites'.
Note: Your added ‘my favourites’ stati ons are stored on the website. Therefore doing a factory
reset of the radio DOES NOT delete them. To remove your stations, remove them from your
account on the we bsite.
How to Get an Access Code (for website use)
1. Press or to highlight < Help >, and the n press to confirm.
Note: FAQ i s an audio channel for answering frequent questions.
2. Highlight < Get access code >, then press to confirm; you will see:

17
Displaying Station Information
It is possible to change the information that displays on the
second l ine of the display whe n liste ning to an Internet station.
Press INFO r epeatedl y to acce ss this feature.
Description of Station
Thi s scrolli ng te xt infor mation supplied by the Internet station. It
may comprise information on music titles or details of the
programme that is provided by the broadcast er.
Location of Station
Thi s is a de scr ipt ion of t he type of programme provi ded by either
internet radio stat ion or broadcaster.
Reliability of Station
Thi s will indicates the degree of reliability of station which you
are listening to.
Signal Information
Thi s shows t he di git al bit rat e and t he si gnal mode of cur rent
station.
Playback Buffer
Thi s displ ays the playback buffe r strengt h of current station. The
playback buffe r ensure s uninterrupted playback of the station.
Today’s Date
Thi s displ ays the date which i s provide d by the broadcaste r.
Station Updates
Occasionally, the T4 will tell you that it is receiving an updated station list. It does this automatically
and periodically, ensuring your radio always has the latest station directory on-board.

18
Music Player Mode (streaming music)
Note: To play streaming music, a confi gure d server needs t o be avai lable. Information on setting this
up can be found in the appendix.
Play Shared Media
1. Press MODE repeate dly until < Music player > is showing / active
2. While the cursor points to < Shared media >, press to confirm, and then step by step
to your pre fe r re d Musi c.
Repeat play mode
1. Press MENU, and then press or to < Repeat play: Off >, press to shift
‘Off’ to ‘On’, or press again then ‘Off’.
Shuffle play mode
1. Press MENU, and the n pre ss or to < Shuffle play: Off >, press to shift
‘Off’ to ‘On’, or press again then ‘Off’.

19
DAB/DAB+ Mode
Press MODE r epeatedl y until < DAB radi o > is shows up. For initial use, the T4 will do a ful l scan:
Note: in use, you can press SCA N to redo a ‘Full scan’, and add new station to your station li st.
Once the scan i s completed, the DAB+ and DAB stations will be displayed in alphanumer ic orde r. The
first station in the li st will be selected.
Note: if no DAB+, DAB signal is found in your area, try moving your T4 for better signal.
Change to Another DAB+ Station
1. Press 'BACK' to return to the station list:
2. While the cursor points to ‘Stati on list’, press to confirm.
3. Press or to cycle through stations in the list, and then press to
confirm and change the active station.
Dynamic Label Segment (DLS)
Some stations may have scr oll ing t ext information supplie d by the DAB+ station. It may comprise of
music title or detail of the program and is provided by the broadcaster.

20
Manual Tune:
1. Press MENU, and then press or to < Manual tune >, pre ss to confirm.
2. Press or to ste p betwee n the channe ls and press to select the
pre ferred channe l.
Note: If there is a multiplex corresponding to this channel and frequency, then the display will
show a tuning meter with the signal strengt h and the multiplex name after a fe w seconds.
3. Press again to exit.
Prune invalid stations
1. Press MENU, and then press or to < Prune invalid >, press to confirm.
2. Press or to ‘YES’, and press to confirm.

21
DRC (Dynamic Range Control) value
DRC make s DAB stations sound the same volume. This is an optional featur e. You can set the level of
the 'compression' of stations to e liminate the differences in dynamic range or sound l evel be tween
radio stations.
Set DRC to off indicates no compression. (I.e. no change to station volume)
set DRC to low indi cate s little compression.
set DRC to high shows maxi mum compression. (I.e. make all stations sound similar in volume)
1. Press MENU, and the n press or to < DRC >, press to confirm.
2. Press or to your ideal option, press to confirm.
To change station order
1. Press MENU, and then pre ss or to < Station orde r >, press to confirm.
Note: There are 3 options: Alphanumeric, Ensemble and Val id.
'#' shows the active ordering...
STATI ON O RDER
DESCRIPTION
Alphanumeric
Display all stations i n alphanume ric order.
Ense mble
List active stations [one s that are currently broadcasting] be fore inactive ones.
Valid
Remove inactive stations from the station list.
2. Press or to your ideal option, press to confirm.

22
FM Mode
1. Press MODE repeatedly until < FM Radio > is showing up.
When this mode is selecte d, t he T4 reme mbers the last listened to station.
For ini tial use , The T4 wil l be tune d to the star t of the FM freque ncy range (87.50MHz).
2. Press or to increase or de crease FM frequency by 0.05MHz pe r ste p.
3. To auto-sear ch, simply press , or press and hold or .
Note: To ‘auto-search’ the next active station, repeat step 3. The uni t wil l di splay t he
fre quency changing until it stops on the ne xt station. After it reaches the end of the
frequency range, it will se arch again fr om the begi nning of r ange.
Scan Setting
When in FM mode, press 'BACK' or 'MENU' to ent er its setting mode .
1. While the cursor points to < Scan setting >, press to confirm.
2. Press or to select ‘YES’ or ‘NO’, and then press to confirm.
Audio Setting (Stereo / Mono)
When in FM mode, press 'BACK' or 'MENU' to ent er its setting mode .
1. While the cursor points to < Audio setting >, press to confirm.
2. Press or to select ‘YES’ or ‘NO’, and the n press to confirm.

23
Setting Station Presets
The T4 can stor e 10 Interne t, 10 DAB+ and 10 FM st ations pre sets. To st ore t he cur re nt stat ion:
1. Press and hold PRESET, and the n press or to your desired preset 'slot'.
2. Press to confirm. And then it will return to its normal working condition, and preset
icon appeared on display.
Selecting a Preset station
1. Press PRESET, and then press or to your purpose one.
2. Press to confirm and recall the station.

24
iPod Mode
WARNING: Using the iPod dock without the correctly fitting adaptor can cause your iPod to be
badly supported and therefore risks damage to your iPod and/or orbitsound T4. orbitsound
does not accept responsibility for damage caused from badly fitted iPods to any equipment.
1. Insert the Dock Adapter that fi ts your iPod model:
The adapt or No. is marke d at the back or side of each dock adapt er.
Apple’s adapter no.
iPod Versions
13
iPod Nano 3rd Gen
14
iPod Touch 1st Gen
16
iPod Touch 2nd Gen
17
iPod Nano 4th Gen
2. Insert your iPod into the iPod dock, it will ask you to switch to iPod mode:
Note: the Dock will begin to charge your iPod if necessary. Charging will stop when the iPod is
fully charged (check the iPod screen).
Or another way to enter iPod mode by pressing MODE repeatedly until 'iPod' is displaye d.
You can choose tracks to play from the iPod control, or by using the selector buttons on the T4:
3. Press to previous track. Press to next track. Press to play/stop.
4. Adjust the volume level by pressing VOL or VOL repeatedly. Do not adjust the volume on
the iPod.

25
AUX IN Mode
AUX In allows external music/sound sources to play through the T4's airSOUND speakers. Good
connection sources include laptops, desktop computers, alternative MP3 players etc.
1. Conne ct a ste re o 3.5 mm j ack le ad to the sound source and the ot her end to t he AUX input on
the T4 (rear of unit).
2. Press MODE repe atedly until < AUX in > is showing up.
Note: Or enter ‘Main Menu’, and then press or to < AUX in >, press to
confirm.
3. To gain optimal volume levels, adjust the output volume level on both the source device and
on radio itself. It is usually better to set the source device to near maximum volume so the
overall volume is the same as when the T4 plays radio music.

26
Other functions
Sleep Function
The sle ep functi on will cause the T4 t o swi tch off (go int o standby) afte r a chosen time peri od.
1. Press SLEEP to directly enter its setting,
2. or It also can be activated from < Main menu > < Sleep > , press to confirm.
3. Press or to define the sleep period which between 0 – 60 minutes. When you
see the required ti me, stop pressing the sel ectors...
Note: The i nte rval t ime is 15minute s per step. The sle ep icon shows when sleep is active and
shows a 'countdown' to sle ep.
To wake the T4, press .

27
Setting Clock - Time / Date
Manually setting the Time/Date
1. Ti me se tt in g can be activated from < Main menu > < Syst em se ttings > < Time/Date >,
pre ss to confirm.
2. While the cursor points to < Set Time/Date > , press to confirm.
3. Press or to set the date, and then press to confirm.
4. Use the same method to set month, ye ar, hour and minut e in t urn.
Auto set Time/Date
Note: Choose <Auto update>, please ensure your radio is conne cting to interne t successfully.
1. Press or to < Auto update >, press to confirm.
2. You can either choose < Update from DAB > or < Update from Network >, press to
confirm, and the clock will synchroni se to t he chosen time source.
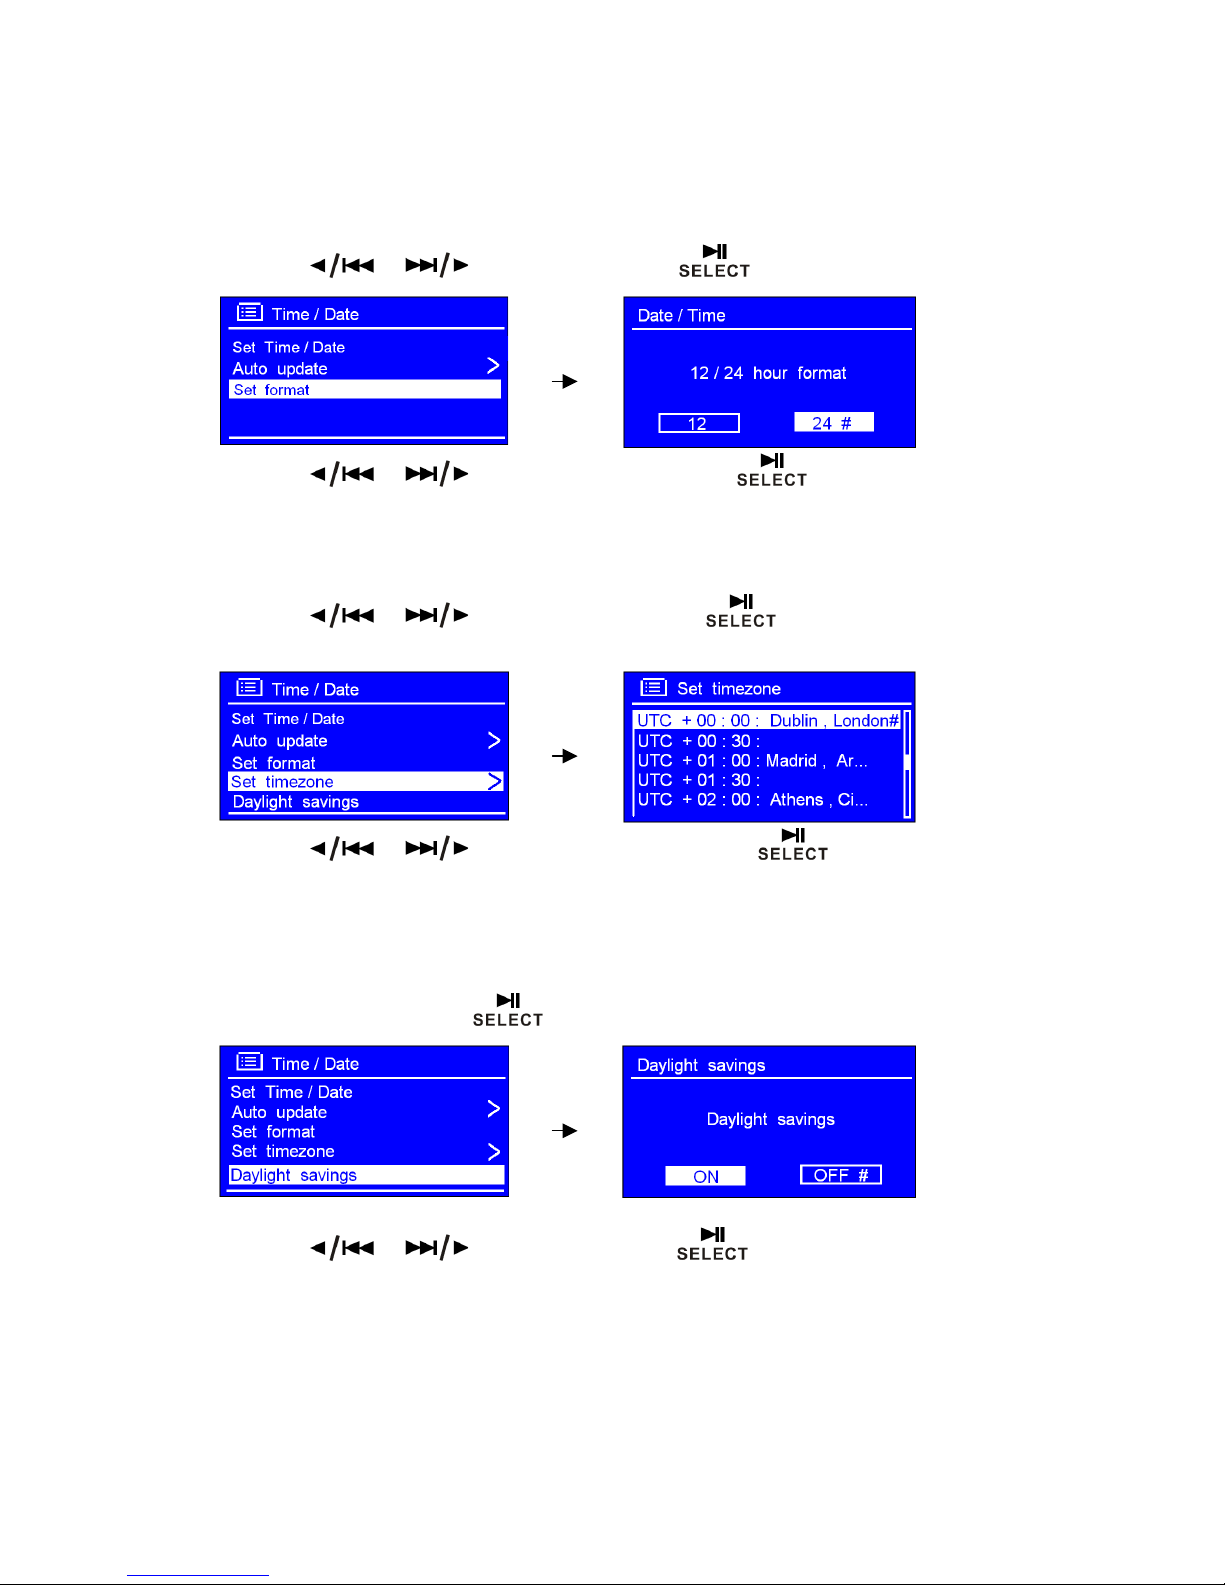
28
Set hour format
1. Press or to < Set for mat >, press to confi rm.
2. Press or to your favoured for mat, press to confirm.
Set timezone
1. Press or to < Set timezone >, pre ss to confirm.
2. Press or to your l ocation t imezone, press to confirm.
Daylight Savings
1. Thi s fe atur e is activated from < Main menu > < Syst em se ttings > < Time/Date > <
Dayli ght savings >, press to confi rm.
2. Press or to ‘ON’, and then pr ess to confirm, then daylight savings are
activated.

29
Setting Alarm
1. Press ALARM1 or ALARM2 to di rectly ente r its setting mode, or;
It also can be activated from < Main menu > < Alarms >, press to confirm, and then
pre ss or to your purpose one, press to confi rm.
2. While the cursor points to < Enable: Off >, press t o confi rm,
3. Press or to your ideal alarm frequency, press to confirm.
4. Press or to < Time: 00:00 >, press to confirm.
5. Press or to change hours, press to confirm.
6. Using the same method se t minutes, and then press to confirm.
7. Press or to < Mode: Internet radio >, press to confirm, and then press
or to set your favoure d alarm sound mode .

30
Note: Alternativel y, you may also press or to < Preset: Last liste ned > to
choice alarm sound.
8. Press to confirm, and the n press or to < Volume: 12 >, press
to confirm.
9. Press or to your ideal vol ume l evel, press to confirm.
10. Finally, pre ss or to < Save >, pre ss to confirm.
The displ ay wi ll show ‘A lar m Save d’ for 3 seconds, an alarm icon appears on the mai n scree n:
To check al arms st atus, pre ss to ent er standby mode - alarm i nformation is displaye d:

31
To turn off Alarm
When alarm is soundi ng, you can either press Alarm 1, Alarm2, or to turn it off, or
pre ss 'SNOO ZE' to pause the alarm temporari ly.
When alarm is soundi ng, touch SNOOZE repeatedl y, which located at top of unit, the snooze interval
time wil l be 5/10/15/30minutes in turn (changed by the number of t imes SNOOZE is pressed).
Note: While in SNOOZE mode, the relative alarm shoul d be twinkling, and shows how long it
will be before re-sounding, during this time, you also can press to turn the alarm off.
To Cancel Alarm Permanently
1. Select your chosen Alarm, ALARM 1 or ALARM 2, then enter alarms setting mode.
2. While the cursor points to ‘Enabl e: Daily (or other fre quency)’, press to ente r.
3. Press or to choose ‘Off ’, press t o confi rm.
4. Press or to < Save >, and then pr ess to confirm.

32
General Operation
Common functions
Return to Main Menu
Press MENU, and then pre ss or to choose < Main menu >, press to
confirm.
(Or, you can move back to radio’s top-line < Main menu >, at any t ime by pr essing BACK
repeatedly.)
Adjust Volume level
Adjust the volume level by pressing or .
The T4 will remember its previous volume level usually.
Browse Station Information
It is possible to view the information that is displayed on the second line of the display when
listening a radi o program. To browse more information, you can by pressing INFO repeatedl y this cycles through the information available.
Note: In aux mode there is no information to vi ew.

33
System Settings
Equaliser
1. Press MENU, and then press or to ‘Main Menu’, press to confirm.
2. Press or to highlight < System settings >, press to confirm.
3. Press or to < Equaliser >, press to confi rm.
4. Press or to your i deal option, press to confi rm.

34
Network Setup
To acce ss a di ffere nt r out er , use the internet wizard
If you want get MAC address, Wlan region, IP address etc. then you need 'View settings'
If you take the T4 to anothe r region, then you need 'Wlan region'
Manual settings allows direct access to the network configur ation (for advance d User s only).
1. Network Setup can be activated from < Main menu > < Syste m se ttings > < Network >,
pre ss to confirm.
2. Press or to your chosen option, press to confirm.
3. Fur the r fe atu re s ar e navi gat ed i n a si mil ar way.
Contrast Setup (for Backlight)
1. Contrast can be activated from < Main menu > < Syst em se ttings > < Contrast >, press
to confirm.
2. The contrast of 'Power On' (normal use) and 'Standby' (when not on) can be set independently
with the navigation buttons.
Language
1. Language setting can be activated from < Main menu > < Syst em se t tings > <
Language>, press to confirm.

35
Factory Reset
WARNING: running this will completely erase your radio’s memory, clearing all WEP/WPA codes
and other user s ettings.
1. It can be activate d from < Main menu > < Sy ste m settings > < Fact or y re se t >.
2. Press to confirm, and then pr e ss or to ‘YES’.
3. Press to confirm.
Software Updates
WARNING: When updating software: software update may take several minutes do not switch
Radio off until this procedure has been completed. Otherwise, may cause permanently
damaged.
1. Soft ware update s can be activated from < Main menu > < Sy ste m se ttings > < Software
update >, press to confirm.
2. While cursor point to < Auto- check setting > , press to confi rm.

36
3. Yo u ca n c ho o se t o u p da te t he so f t wa re an y t i me by sele cti ng 'Che ck Now'. The T4 will confi rm if
it is up to date.
Enter Setup Wizard
1. It can be activated from < Main menu > < Syst em set tings > < Setup wi zard >, press
to confirm.
SW Version and Radio ID
1. It can be activate d from < Main menu > < Syst em set tings > < Info >.
2. Press to confirm.
Note: Thi s informat ion may be re quest ed when de ali ng wi th te chnical suppor t i ssues

37
Media Sharing Guide
Set Up Media Sharing in WMP 11
Note: After you download and install Windows Medi a Player 11 for Wi ndows XP and connect your
Radio to the network, you ne ed to set up me dia shar ing so that you can share music with your Radio.
The foll owing st eps de scri be how t o set up me dia shari ng in Windows M edi a Pl ayer 1 1.
In Windows Media Player 11, click the small arrow below the Library tab, and then click Media Sharing.
In the Media Sharing dialogue box, select the Share my media check box.
Check the “shar e my medi a to” box. In the list, click your Radio *, cli ck Allow, the selected device wi ll
now show a green tick and then click OK. If your device does not appear in the list of devices, perform
the following steps:
1. From t he " Me dia Pl ayer" menu of your Internet radio, select "UPNP Se rvers", a list of available
computers will appear.
2. Select the requi red computer.
Your device will now appear in the list. If you want to check that this is your Radio, ri ght click on the
device and select “Properties”: your Radio's MAC address will be shown.

38
Set Up Media Sharing in MAC OSX
Using the Radio with a MAC will require Windows File Sharing (recent version of OSX, Tiger or later).
Set up Windows Fi le Sharing on OSX
1. From the 'Doc k', cl ick on 'Syste m Pre fere nce s'. Fr om the 'Syste m Pr efe renc es' wi ndow, unde r
the 'Internet & Network' section, click on 'Sharing'.
2. Under the 'Ser vices' section, enable 'Personal File Sharing' and 'Windows Sharing'. In order to
do thi s, ti ck the corre spondi ng boxes or click on 'Start' for each of these services.
3. Under the 'Fi re wall' se ct ion, swi tc h off t he fi re wall .
4. Under the 'Internet' section, switch off 'Internet Sharing'.
Accounts Setup
From t he 'System Prefe rences' window, i n the 'Syste m' secti on, click on 'Accounts'. Sele ct an account
and remembe r its 'Short Name ' and password. This will be used for the Radio to connect to the MAC.
Directory Setup
From t he 'Dock', click on 'Finder'. From the 'Finder' me nu, click on 'Applications then ‘Utilities'. Click on
'More Info' for 'Directory Access' and ensure that the 'Read/Write' option is enabled. Double-click on
'Directory Access' and enable the following:
AppleTalk
LDAPv3
SLP
SMB/CIFS
For 'SMB/CI FS', click on 'Configure' and sele ct an appropriate workgr oup.
Copy and paste the mp3 files to 'Document s' in the 'Finder' window.
Tur n on 'A irPor t' (wi rel ess shar ing).
Wait for a few mi nutes.
In the 'Media Player’ > ‘Windows Shares' menu, enter the MAC account's short name and password. The
Radio should the n be able to connect to the MAC.

39
Troubleshooting
If you experience any trouble with your wireless Internet Radio, then you may find it useful to visit the
help section on the we bpage: http://www.wifiRadio-frontie r.com.
If you have trouble connecting the Radio to your wirele ss network, the se steps may help to resolve the
problem:
1. Confi rm t hat a Wi-Fi conne ct ed PC can access the I nte rne t (i.e . can br owse t he we b) usi ng the
same ne twork.
2. Che ck that a DHCP serve r is availabl e, or that you have configured a static IP address on the
Radio. You can configur e a static IP address on the Radio using the menu item ‘System settings
Network Manual se tti ngs Wireless’, and then se lect ‘DHCP disable’.
3. Che ck your access point does not re strict conne ctions to par ti cular MAC addre sses. You can
view the Radio’s MAC addre ss using the menu item ‘System settings Net work View
settings MAC addr ess’.
4. If you have an encrypted network, check that you have entered the correct key or password
into the Radio. Remembe r that text-format keys are case sensitive. If, when attempting to
connect to an encrypted network, your Radio displays: ‘Wireless error’ followed by a 5-digit
number, then ple ase ensure that you enter the correct passphrase for the network. If the
problem persists, then you may need to consult your network configuration.
5. If your Radio can connect to the network successfully, but is unable to play particular stations,
it may be due to one of the following causes:
a. The stat i on is not broadcasting at this time of the day (re member it may be located in
a different time zone).
b. The station has reached the maximum allowe d number of simul tane ous liste ners.
c. The station is not broadcasting anymore.
d. The link on the Radio is out of date .
e. The Internet connection between the server (often located in a diffe rent country)
and you is slow.
Try usi ng a PC t o pl ay back t he str eam vi a the broadcast er’s we b site .
6. If you can play back the station with a PC, use the form at http://www.wifiRadio-frontier.com to
notify us so that we can change the station data that is used by the Radio.

40
Specifications
ITEMS
DESCRIPTION
Specifi cations:
Internet Radio/DAB+/DAB/FM/i Pod Docking Radio
Power Requirements:
AC Power Input: 100-240VAC, 50-60HZ
(for use, please refer rear panel silk-screen)
Freque ncy Range s:
(FM) 87.50 – 108.00 MHz
(DAB+,DAB) 174 - 240 MHz
LCD Display:
High resolution full dot display
Rated Output Power:
5Wrms
Speakers:
8 ohm, airSOUND mid/side array.
Headphone / Li ne out
socket:
32 ohm / 47K ohm
Dimensions:
109 x 109 x 1 43mm
Thi s symbol on t he pr oduc t packaging means that your electrical and electronic equipment should be
disposed at the end of its life separately from your household waste. There are separate collection
systems for recycling i n the EU.
Please recycle.
For more informat ion, please contact the local authority or your retai ler where you purchased the
product.

41
Orbitsound Warranty
Thi s Or bit sound product is supplie d wit h a 12 month l imite d manufacturer’s warranty dated from new
purchase date. This warranty covers repairs or re pl acement that may be re quired in the event of unit
failure during normal use, subject to the terms and conditions stated below and at the Age nt’s
discre ssion. This warranty is non transferable and excludes any routine maintenance, consumables or
parts, or any work arising from use of the equipment outside the recommendations in the handbook,
misuse or negligence.
Warranty Terms
‘Age nt’ means orbitsound Ltd. or an orbitsound representative appointed for the purposes of fulfilling
the manufacturer’s warranty.
‘Pur chaser’ means the company, firm or person using the product for the warr anty period.
‘Product’ me ans the good sold to the Purchase r under contract.
Making a Warranty Claim
In the event that the unit stops working or performing as described in the handbook, the following
procedure must be followe d in order to have the uni t restored or replaced by this warranty:
Cont act your Orbi tsound suppor t age nt FI RST. A list of support agents can be found on
www.orbitsound.com. If the support agent advises to do so, return the unit in its original packaging
complete with PROOF OF PURCHASE to the address advised. You will be advised by the Agent on the
action that will be taken and any costs payable, subject to the conditions of this warranty.
Orbitsound Ltd Warranty Terms and Conditions
1.RETURN TO BASE WARRANTY
Faulty pr oduct s will be repai red or replaced (as deeme d appropriate by the relevant Agent ) at the
Agent’s premises.
2. LIMITATIONS
The warranty cove rs t he pr oduct and any age nt inst all ed accessori es provide d that the e qui pment has
been install e d and used in accordance with the supplied handbook instructions. The warranty will not
cover repairs or replacements arising from mi suse or accidental damage. See Warranties and
Liabilities.
3. CHARGES
For war ranty repairs that are 100% covered by the manufacturer’s warrant y, the re wi ll be no charge
for any repair or replace me nt or return freight to the purchaser. Any r epairs or replacement s that are
found to be outside the scope of this manufacturer’s warr anty are chargeable, and the return fre ight
will be charged at the Agent’s discretion. Associated charges must be paid in full before the returned
item(s) will be dispatched to the Purchaser.
4. WARRANTIES AND LIABILITIES
Subj ect to the provisi ons be low the suppl ier warr ants that the product will pe rform i n a manne r fi t for
purpose. The Age nt shall be under no liability i n re spect of any defect in the product arising from any
action whatsoe ver by the Purchaser except such action as is de scribe d and recommended in the
handbook supplied. The Agent shall accepts no liability for any defect arising from excessive wear and
tear, willful or accidental damage, abuse, negligence, abnormal operating or storage conditions or

42
failure to follow the operati ng procedures. Unauthorised modification or repair by unauthorised
person(s) voids this warranty immediately.
The Age nt shall be unde r no l iabil ity unde r t his war rant y if the total agr eed pri ce for the pr oduct has
not been paid in full. The liability of the Agent shall not exceed the price paid for the product and the
Agent shall not be liable for any loss of profit or consequential damage or any other claim for
compensation. This warranty does not affect any statut ory consumer r ights that may exist whe re the
Product was purchased.
5. FORCE MAJEURE
The Age nt shall have no liabili ty for delay or failure to pe rform if such fai lur e is due directl y or
indirectly to any cause beyond the Agent’s reasonable control including but without limitation to acts
of God, explosion, fire, terrorism, accident, war or threats of war, prohibitions of any kind, embargoes,
strikes or lockouts.
GENERAL
The Age nt may assign or subcontr act re sponsi bilities and rights under this warranty. In all warranty
cases, please refer to the support pages of www.orbitsound.co.uk first.
ORBITSOUND LTD.
TQ1 1 QB UK
Tel 0 845 6 52 1 21 9
Web www.orbitsound.com Email info@orbitsound.com
For email support: support@orbitsound.com
Support tele phone : 08 45 5 39 0078
All trademarks, marks and registrations are the property of their respective owners.
 Loading...