

Page 1
®
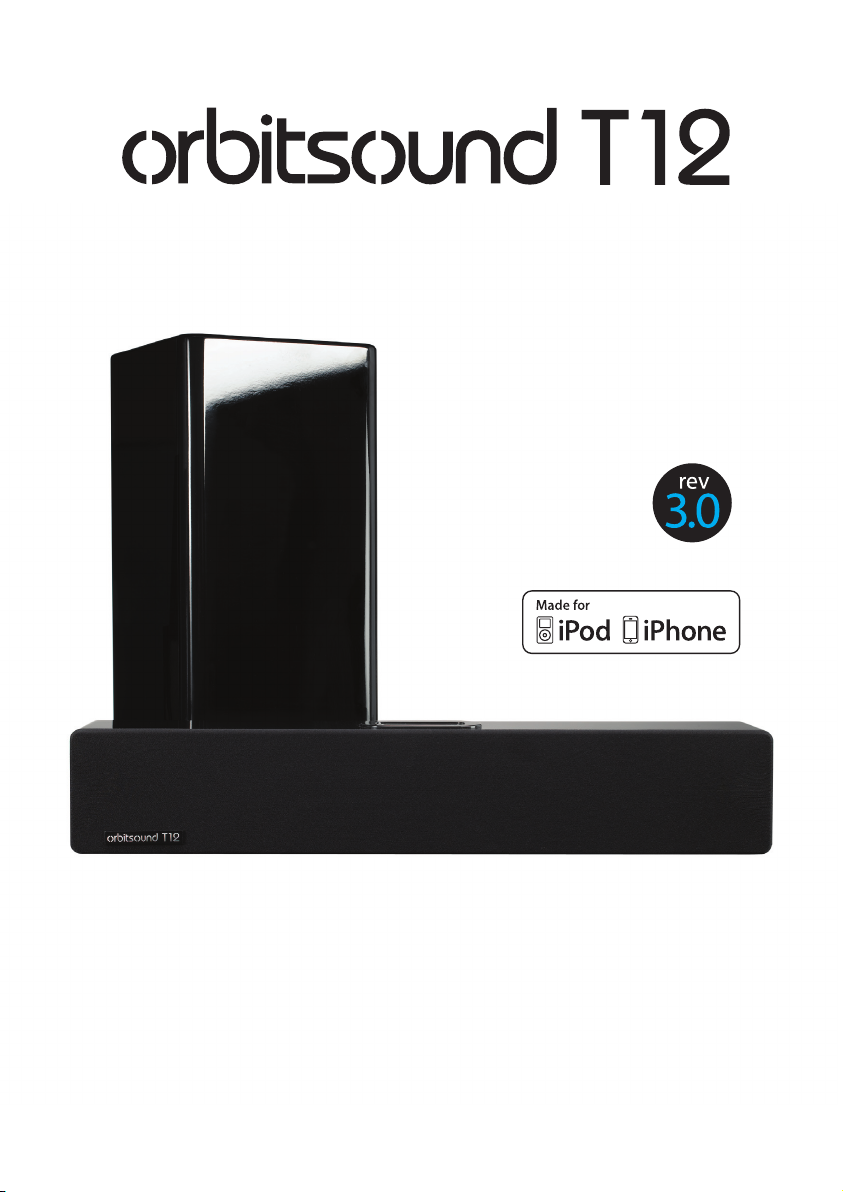
Soundbar and iPod dock with airSOUND®
BELIEVE YOUR EARS
User’s guide
1
Page 2

2
Page 3

1
Contents
Welcome 2
Package contents 2
The soundbar 3
Remote control 3
Setting up the T12 5
1. Connect subwoofer 5
2. Connect power 6
3. Connect a sound source 6
Basic operation 7
1. Power on 7
2. Source selection 7
3. Volume / Mute 8
4. airSOUND soundeld 8
5. Tone adjustment 8
Advanced Setup 9
1. Positioning: getting the most from airSOUND 9
2. Subwoofer placement: 9
3. airSOUND adjustment 10
Connection to TV 10
Enhancement to TV sound (replacing TV speakers) 10
iPod control & charge 11
Charge / Menu 11
Maintenance 12
Cleaning and care 12
Battery replacement (remote) 12
Troubleshooting 13
No sound is heard 13
Remote does not work 13
Sound is distorted 13
Sound is noisy / ‘hissy’ 13
Orbitsound Warranty 14
Warranty Terms 14
Making a Warranty Claim 14
Orbitsound Ltd Warranty Terms and Conditions 15
Specications 17
Page 4

2
Welcome
Thank you for purchasing the orbitsound T12 stereo soundbar with airSOUND®. With
proper use the orbitsound T12 delivers superb sound fidelity and stereo sound field
and will provide you with a high quality listening experience.
This instruction booklet covers important safety and setup information as well as
advice on how to get the most out of your orbitsound T12.
Contact information:
ORBITSOUND LTD.
The Sound House, Hunsdon Road, Torquay.
TQ1 1QB. UK
UK Oce Tel: +44 (0)8456 521 219
UK Support Tel: 0845 539 0078
International Support: see website below.
Web: www.orbitsound.com
Email: [email protected]
Package contents
Inside the T12 packaging you will nd:
Head unit (soundbar) with iPod® dock•
Subwoofer•
Remote control•
Power supply•
Subwoofer speaker cable•
Mains cable•
Handbook•
Audio connection cables•
iPod• ® dock adaptors
Page 5

3
The soundbar
IR receiver
Spatial stereo drivers
Status LED
LED State
RED: Standby
BLUE: On
BLUE (FLASHING): Mute mode
OFF: Power off
iPod Dock
The T12 soundbar produces most of the sound that you hear. It produces the
main signal and stereo information. It also houses the ampliers for itself and the
subwoofer.
Remote control
The T12 remote control provides volume control, tone control and sound source
selection, and additionally play/menu controls when using an iPod connected to the
iPod dock on the soundbar.
Page 6
4
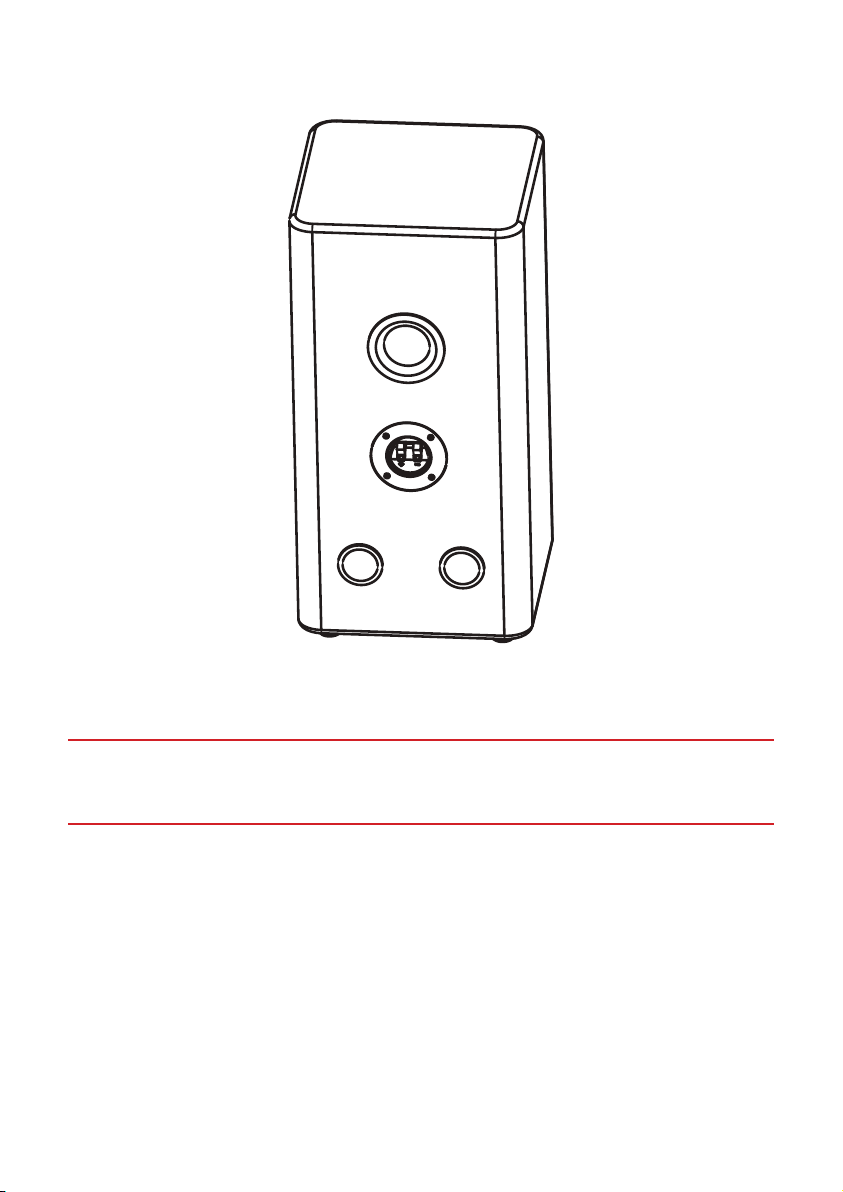
The subwoofer
The subwoofer is a passive loudspeaker designed to produce powerful sound at bass
frequencies.
IMPORTANT: When supplied, the subwoofer may be encased in plastic that
covers the ports. This plastic must be removed to allow the subwoofer to
operate properly.
Page 7
5
Setting up the T12
Power
On O
R
L
Stereo Width
O
Norm
Wide
Stereo
Line In
Approved
components used
Manufactured under license
from airSOUND LLP.
®
Volume
Volume control:
Push to switch inputs
Press and hold for standby
Press to resume from standby
Subwoofer Output
8 ohm minimum
CoaxialOptical
Aux In
Digital Input
CAUTION:
To prevent electric
shock, do not remove
screws. No User
serviceable parts inside.
Video out
Subwoofer Output
8 ohm minimum
(Only connect to T12 subwoofer)
(Contact area)
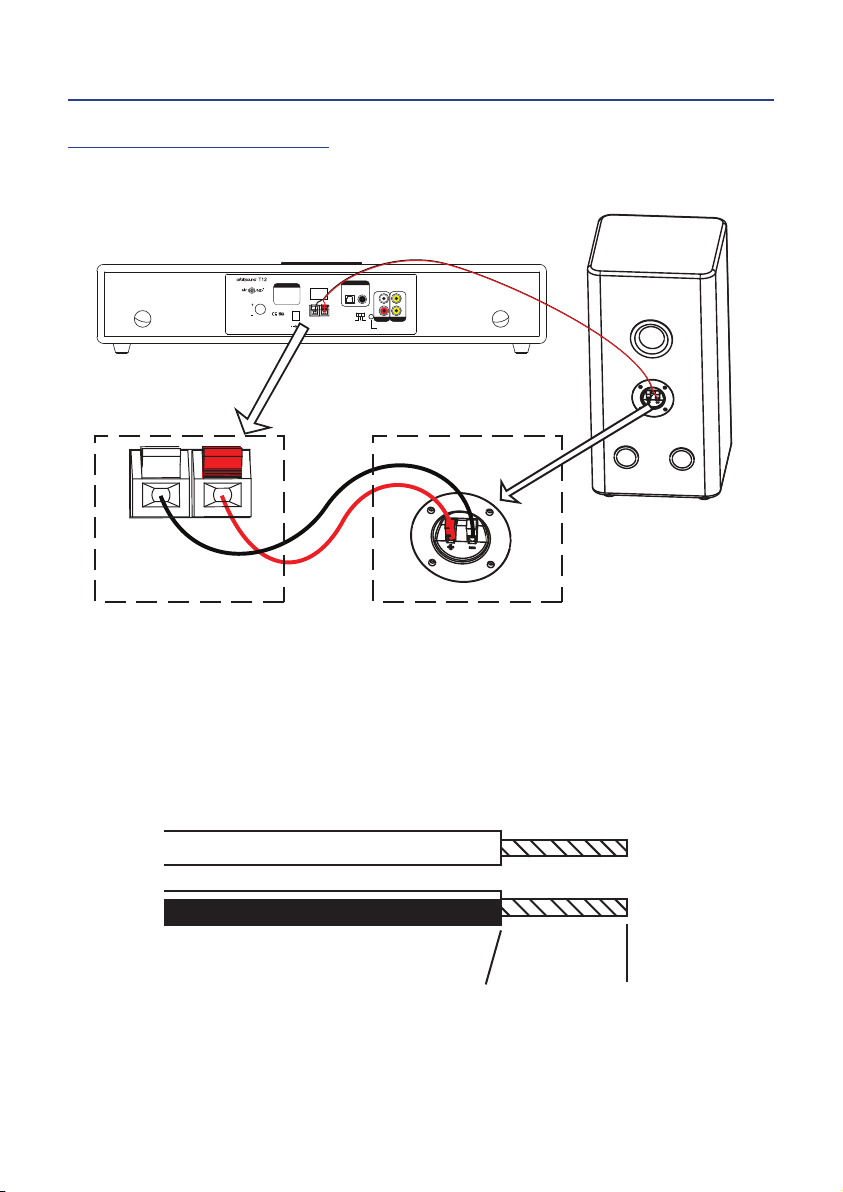
1. Connect subwoofer
Connect the subwoofer to the subwoofer output on the stereo soundbar as shown:
Note: The speaker wire is colour marked to make the job of identifying the correct wire for
speaker terminal easy. Connect the black striped wire to the black terminal at both ends,
and the red wire to the red terminals.
IMPORTANT: Make certain that the metal core of the wires only is inserted
into the wire socket to ensure metal-metal contact. The contact area is shown
below:
Page 8
6
2. Connect power
AC/DC Adaptor
Power Cable
Power
On
O
R
L
Stereo Width
O
Norm
Wide
Approved
components used
®
Volume
Volume control:
Push to switch inputs
Press and hold for standby
Press to resume from standby
Aux In
Digital Input
CAUTION:
Video out
IMPORTANT: Ensure power switch is ‘O’
when connecting power cable.
iPod
iPod Dock
Adapter
R
L
Aux In Video out
Music source
(optional)
A)
B)
iPod connection
AUX connection (rear of sound bar)
Stereo Width
O
Norm
Wide
Stereo
Line In
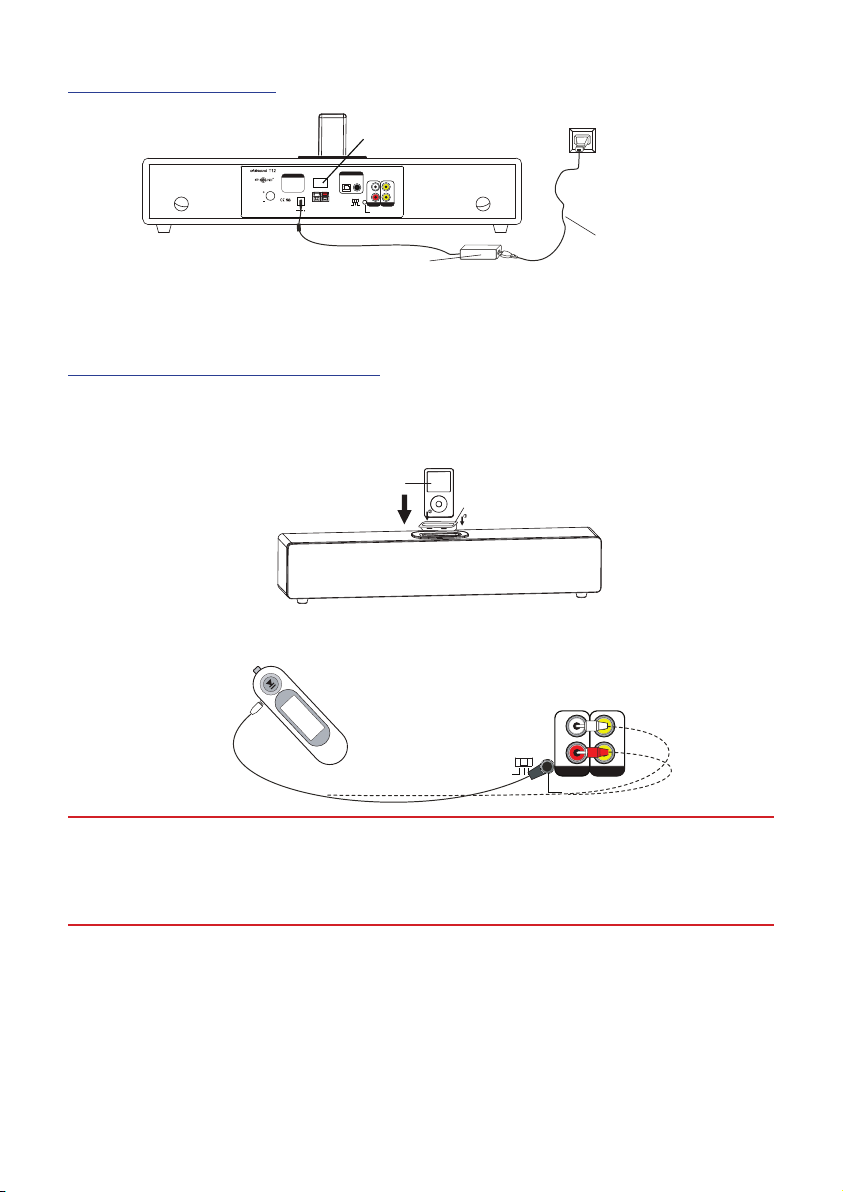
Connect the power supply as shown.
3. Connect a sound source
You can connect multiple sources to the T12 and listen to either:
IMPORTANT: (A) It is strongly advised that the iPod connection is used with the
correct iPod adaptor for your iPod model as supplied separately by Apple inc.
Use without an adaptor or incorrect type may cause damage to your iPod and/
or T12.
NOTE: (B) You can connect your sound source to either the 3.5mm line input OR dual RCA
(phono) AUX IN connectors OR the digital coax (RCA) OR optical (TOSLINK) inputs. Use
which ever is most convenient.
HINT: You can use the ‘headphones’ output from most televisions connected to the ‘line
in’ in order to use the T12 to replace the sound from your TV. Then, the volume control on
the TV will continue to function and control the level of sound from the T12.
Page 9
7
Basic operation
Power on Standby
or
Press & hold
iPod Dock AUX Digital Coax Optical
or
(PUSH)
or
(PUSH)
or
(PUSH)
or
(PUSH)
(when iPod connected)
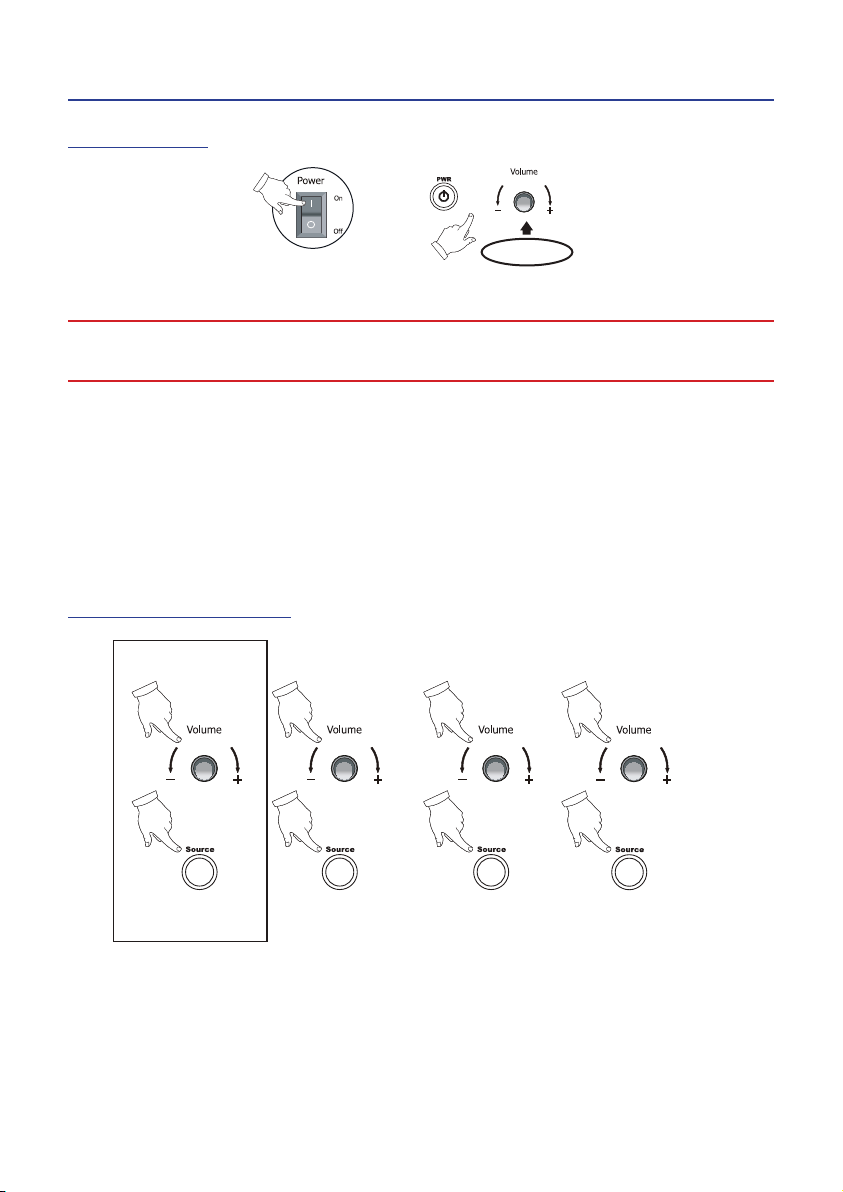
1. Power on
IMPORTANT: The main power switch must be on for T12 operation. This is
located on the rear of the soundbar unit.
Standby / On: The T12 may be put into ‘standby’ or switched on by pressing the
PWR button on the remote. Briey pressing the volume control on the rear of the
soundbar also switches on the unit. Pressing and holding the volume button for 2
seconds will enable standby mode.
NOTE: The colour of the LED on the front of the T12 shows the current status of the unit.
Red means the unit is in standby mode. Solid blue indicates that the unit is on.
2. Source selection
Source select: Press the ‘Source’ button on the remote (or briey press the volume
knob on the unit’s rear) to switch the sound source from iPod dock to Line/AUX
inputs to Digital Coax to Digital optical. The iPod selection is skipped if no iPod is
present (i.e. only 3 inputs when no iPod is in use).
Page 10
8
3. Volume / Mute
or
Mute
Main Volume adjust
+
-
Stereo off Normal Stereo Wide
Bass adjustTreble adjust
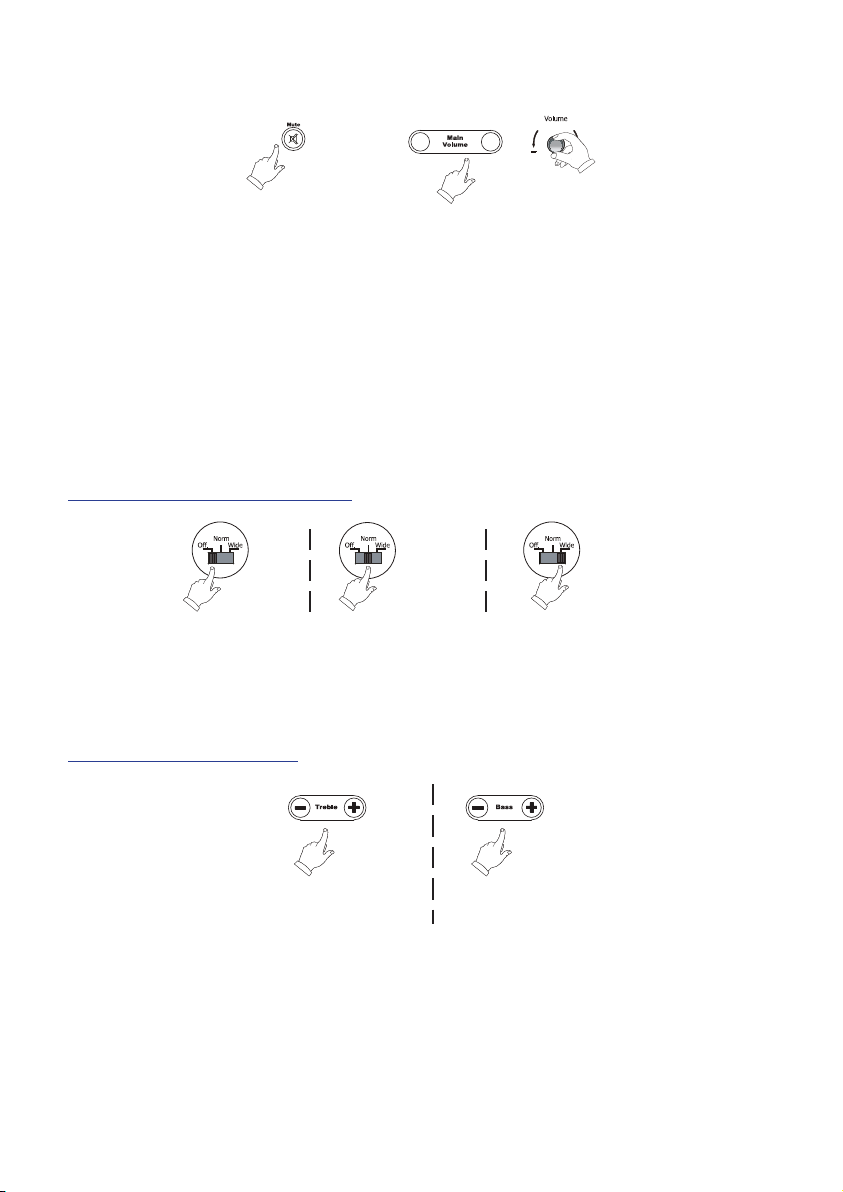
Mute: Press the mute button on the remote to silence or resume play through the
T12.
NOTE: When the T12 is on and mute is enabled, you will see a blue ashing light on the
front of the soundbar. A continuous blue light indicates that the T12 is on.
Volume: Volume may be adjusted from the + and - buttons on the remote, or
byturning the volume control on the rear of the unit.
4. airSOUND soundfield
The stereo sound eld may be adjusted via the stereo switch on the rear panel.
HINT: For most listening environments, leave this switch on ‘Wide’.
5. Tone adjustment
The sound tone may be adjusted with the remote control.
Note: the blue indicator light on the front of the sound bar will ash as the tone is
adjusted. It will stop ashing when the minimum or maximum bass or treble adjustment
is reached.
Page 11
9
Advanced Setup
Stereo field origin
The orbitsound T12 is easy to set up and enjoy, but even better sound can be
achieved by following these guidelines.
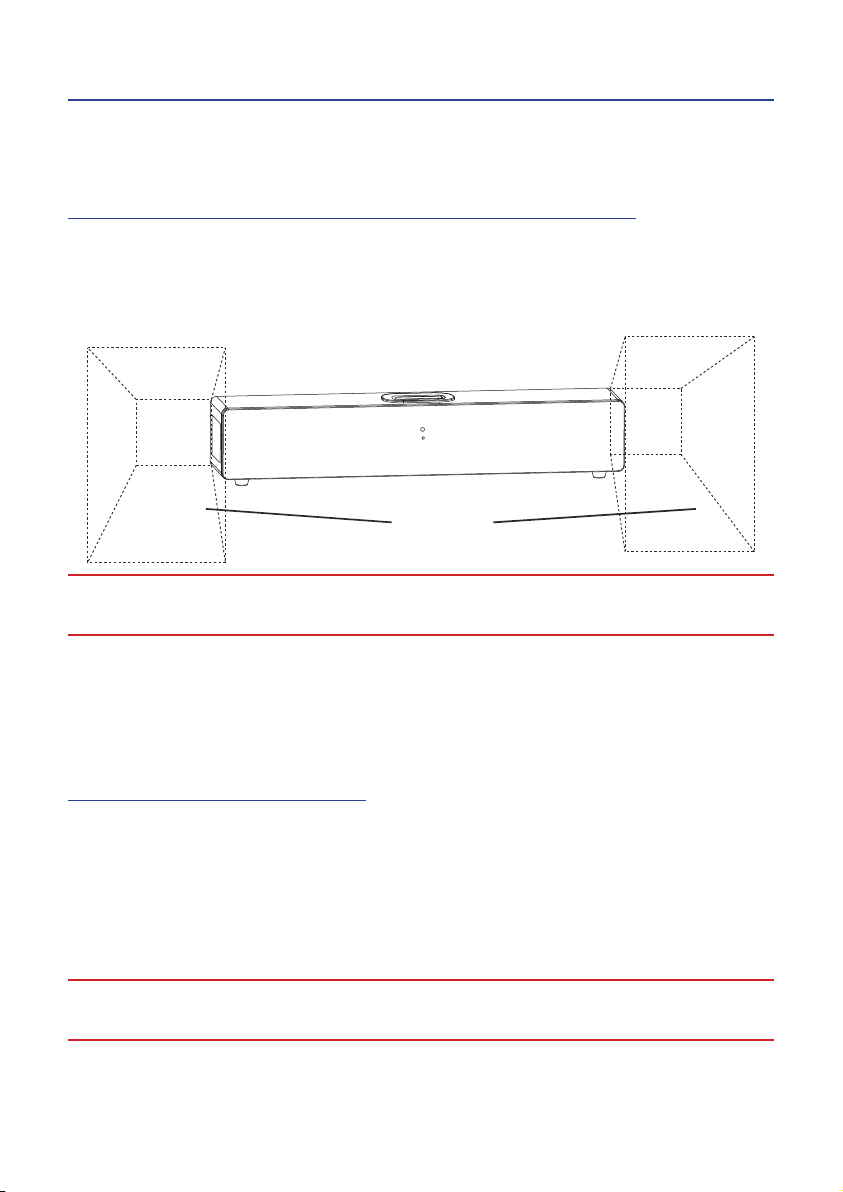
1. Positioning: getting the most from airSOUND
The stereo sound eld is produced by the speakers mounted in the side of the
soundbar. These stereo signals interact with the main signal to produce true stereo
in your listening environment:
IMPORTANT: The areas marked need to be clear of obstacles in order for the
airSOUND stereo sound eld to work eectively.
HINT: Because airSOUND produces a uniform stereo sound eld, the soundbar does
not need to be placed directly in front of the listener. Therefore, placing the soundbar
conveniently so that the sides are not obstructed is more important than central
placement, i.e. on low or high shelf, countertop, below/above TV
2. Subwoofer placement:
Subwoofer placement is not as critical as the placement of the soundbar. Position
the subwoofer after optimising placement of the soundbar.
HINT: The sound output from the subwoofer is omni directional, so this can be placed
anywhere. However, try to avoid placing the subwoofer too far from the soundbar as this
can cause a noticeable ‘separation’ eect.
IMPORTANT: Always make sure that the subwoofer’s side with ports (tubes) is
clear from obstruction.
Page 12
10
3. airSOUND adjustment
Analogue connection (alternative)
Analogue audio connection cable
R
L
CoaxialOptical
Aux In
Digital Input
Digital connection:
Use optical cable to connect to TV sound
output (or coaxial RCA)
OR
airSOUND does not use digital processing or modify the original sound; The stereo
width selection switch on the rear of the unit simply changes the volume of the side
facing stereo speakers that deliver the airSOUND signal. Once the T12 is set up for the
best listening in your environment, choose the stereo width setting (stereo switch on
rear panel) that sounds the best.
IMPORTANT: The stereo switch does not alter the tone of the sound
reproduction; choose the setting that suits your listening preference best.
HINT: In rooms that are large, or if there are unavoidable obstructions near the side facing
speakers, ‘Wide’ is usually the best setting. You do not need to worry that the sound is
being ‘altered’ by a high setting as airSOUND does not work like this.
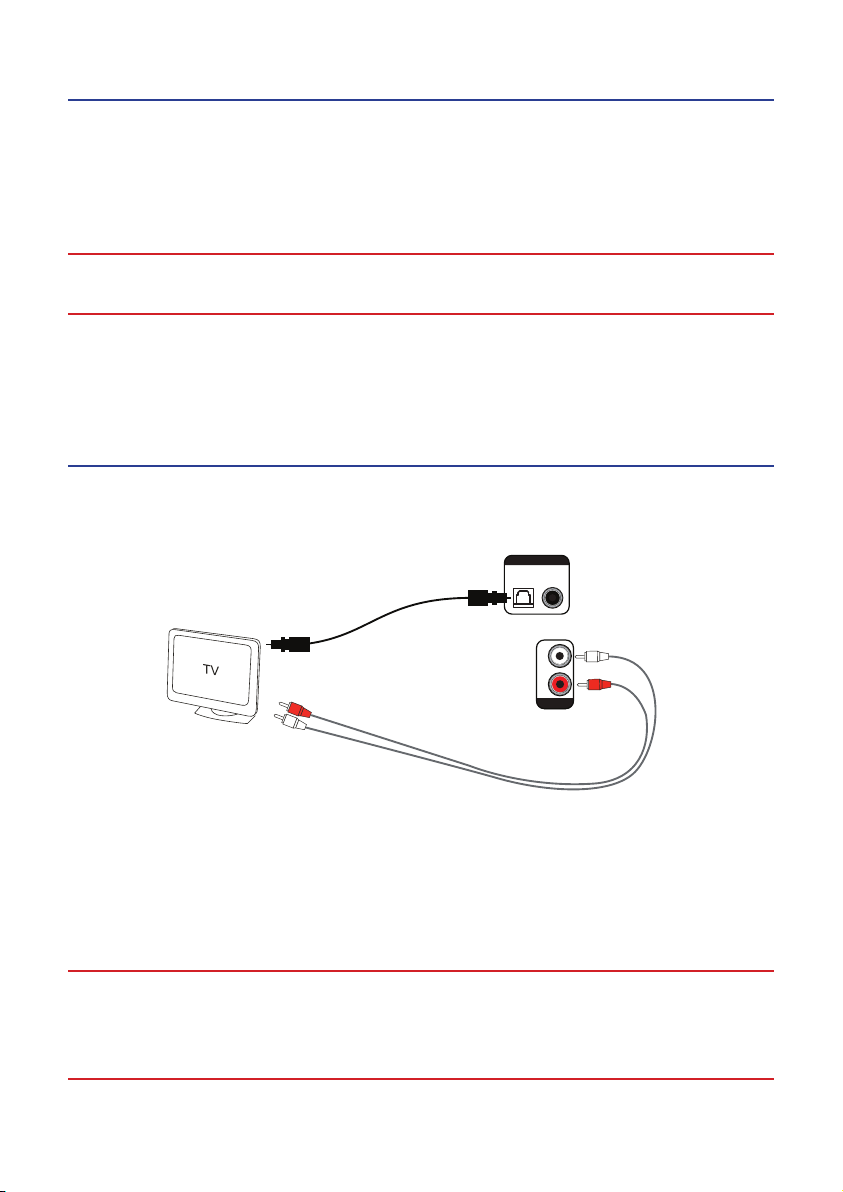
Connection to TV
This conguration can be used for TVs with optical/coaxial digital outputs or RCA
(phono) audio outputs. The TV outputs stereo sound directly to the T12.
HINT: When using the T12 in this way, it is normal that the sound output on the TV will
need to be turned down or muted to stop sound coming from the TV’s own speakers. It
will improve the overall listening experience if you do this.
HINT: You can also use the coax or optical (TOSLINK) digital inputs on the T12 with other
devices such as satellite units and DVD players that have an appropriate digital output.
IMPORTANT: Remember to remove the protective plastic covers from a new
TOSLINK cable before connecting to the optical port on the T12 or your TV.
Failure to remove these covers may result in damage and will interrupt the
sound output.
Page 13
11
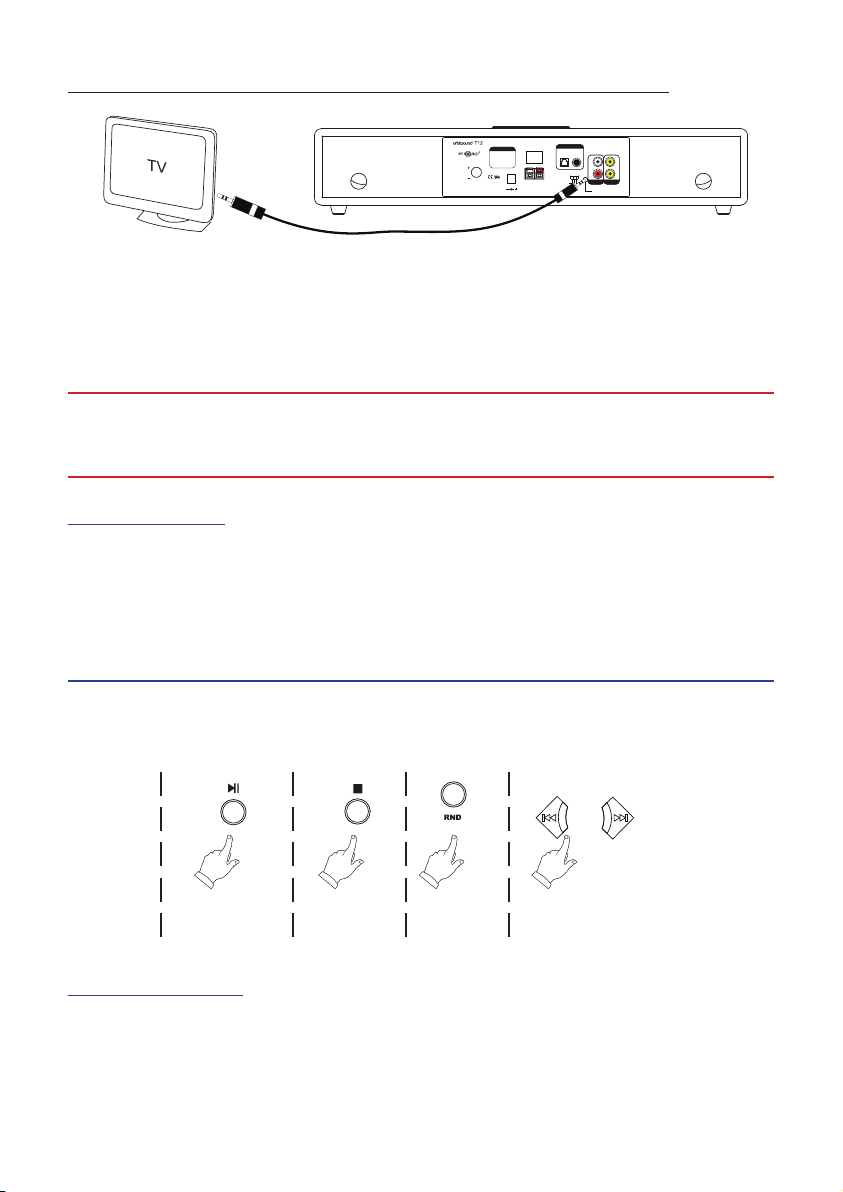
Enhancement to TV sound (replacing TV speakers)
Power
On O
R
L
Stereo Width
O
Norm
Wide
Approved
components used
®
rev 2.0
Volume
Volume control:
Push to switch inputs
Press and hold for standby
Press to resume from standby
Aux In
Digital Input
CAUTION:
Video out
Connect headphones out on TV to 3.5mm input on T12 (alternative connection)
RandomStopPlay/Pause Prev. track / Next track
HINT: When used in this way, the TV remote control should adjust the volume into the
T12, but the iPod dock volume will be dierent to the TV listening level (some TVs have a
menu option to mute internal speakers or alter the headphone out behaviour).
IMPORTANT: Make sure that the T12 is initially turned down when connecting
to a TV. Once the T12 is connected, raise the TV volume to about half, then
adjust the T12 volume to a comfortable listening level.
Video output
The T12 features 2x RCA composite video outputs. These will display video content
from your iPod/iPhone when it is played. There is no on screen menu, the video
output is a monitor for video content only.
iPod control & charge
Basic play control is achieved by pressing the following buttons on the T12 remote
control unit:
Charge / Menu
The iPod is charged when it needs charge and when connected. Also, the menus
may conveniently be navigated from the remote for most iPod models. Pressing the
‘iMenu’ button enters the iPod menu. Use the remote navigation functions to control
your iPod.
Page 14
12
Maintenance
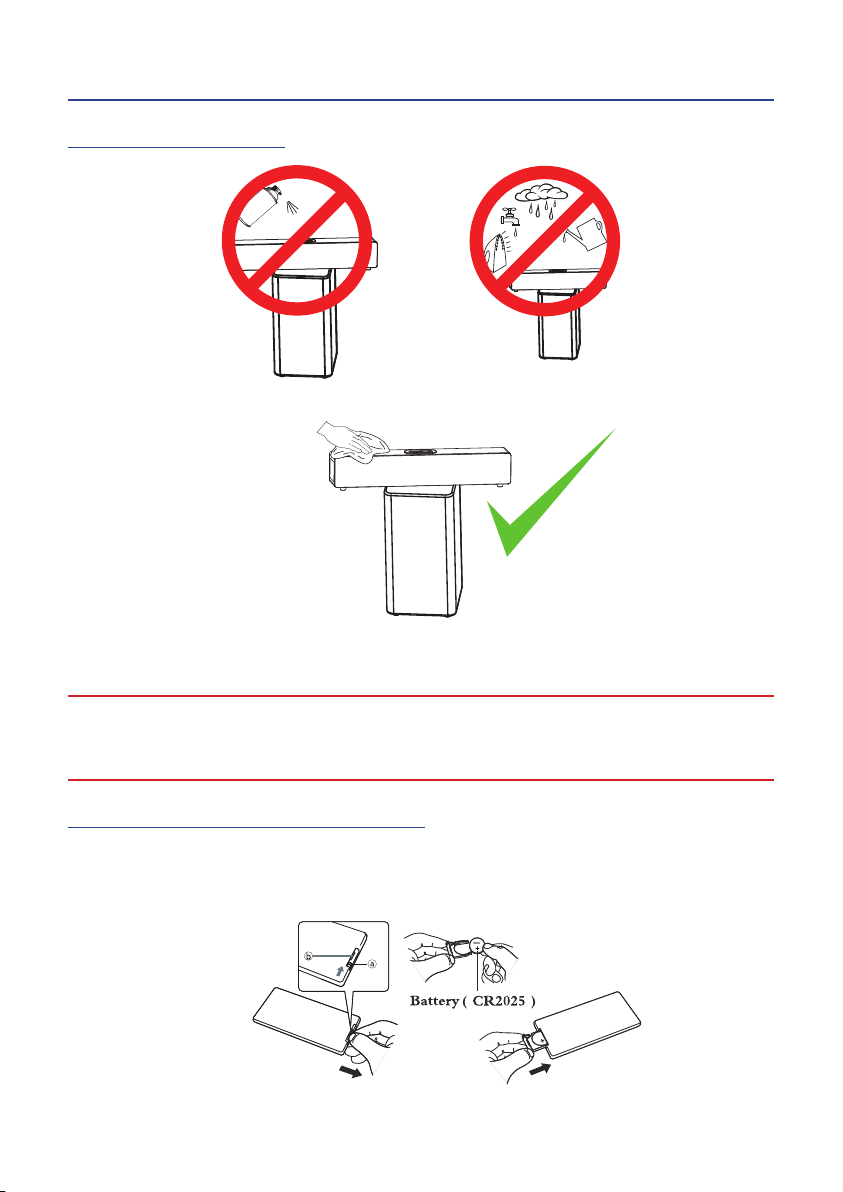
Cleaning and care
Use a soft, clean cloth moistened with plain, luke-warm water to clean the exterior of
the unit.
IMPORTANT: Never use solvents such as benzene or other strong chemical
cleaners since these could damage the unit’s nish. It is important that no
liquid reaches the inside of the unit.
Battery replacement (remote)
Replace remote battery with anode up (+) from back-side.
Page 15

13
Troubleshooting
No sound is heard
Check power connections and that there is a continuous blue light on the front •
of the unit.
Check that the iPod/TV or other sound source is playing and that it is connected •
properly to the T12. With iPod, check that the unit is docked fully. If unsure that
your media device is playing, unplug, and test with headphones.
Press the sound source button on the remote (or briey press volume knob on •
rear of soundbar) to change the sound source.
Adjust the volume of the T12 until sound is heard and press source button again •
if there is still no sound.
Remote does not work
Check that plastic strip in remote has been removed (this engages the battery)•
If the remote has had a lot of use, replace the battery.•
Check there are no obstructions between the remote and the front of the T12 •
soundbar.
Sound is distorted
Turn down the output of the device playing into the T12•
Turn up the master volume on the T12 if necessary.•
Check that all audio connections are well seated / plugged in fully.•
Sound is noisy / ‘hissy’
Turn down the volume of the T12 unit•
Turn up the output volume of music source to compensate.•
Use the digital coax or optical (TOSLINK) inputs if possible.•
Page 16

14
Orbitsound Warranty
This Orbitsound product is supplied with a 12 month limited manufacturer’s
warranty dated from new purchase date. This warranty covers repairs or replacement
that may be required in the event of unit failure during normal use, subject to the
terms and conditions stated below and at the Agent’s discression. This warranty is
non transferable and excludes any routine maintenance, consumables or parts, or
any work arising from use of the equipment outside the recommendations in the
handbook, misuse or negligence.
Warranty Terms
‘Agent’ means orbitsound Ltd. or an orbitsound representative appointed for the
purposes of fullling the manufacturer’s warranty.
‘Purchaser’ means the company, rm or person using the product for the warranty
period.
‘Product’ means the good sold to the Purchaser under contract.
Making a Warranty Claim
In the event that the unit stops working or performing as described in the handbook,
the following procedure must be followed in order to have the unit restored or
replaced by this warranty:
Contact your Orbitsound support agent FIRST. 1.
If the support agent advises to do so, return the unit in its original packaging 2.
complete with PROOF OF PURCHASE to the address advised.
You will be advised by the Agent on the action that will be taken and any costs 3.
payable, subject to the conditions of this warranty.
Page 17

15
Orbitsound Ltd Warranty Terms and Conditions
1.RETURN TO BASE WARRANTY
Faulty products will be repaired or replaced (as deemed appropriate by the relevant
Agent) at the Agent’s premises.
2. LIMITATIONS
The warranty covers the product and any agent installed accessories provided
that the equipment has been installed and used in accordance with the supplied
handbook instructions. The warranty will not cover repairs or replacements arising
from misuse or accidental damage. See Warranties and Liabilities.
3. CHARGES
For warranty repairs that are 100% covered by the manufacturer’s warranty, there will
be no charge for any repair or replacement or return freight to the purchaser. Any
repairs or replacements that are found to be outside the scope of this manufacturer’s
warranty are chargeable, and the return freight will be charged at the Agent’s
discretion. Associated charges must be paid in full before the returned item(s) will
be dispatched to the Purchaser.
4. WARRANTIES AND LIABILITIES
Subject to the provisions below the supplier warrants that the product will a.
perform in a manner t for purpose.
The Agent shall be under no liability in respect of any defect in the product b.
arising from any action whatsoever by the Purchaser except such action as is
described and recommended in the handbook supplied.
The Agent shall accepts no liability for any defect arising from excessive wear c.
and tear, willful or accidental damage, abuse, negligence, abnormal operating or
storage conditions or failure to follow the operating
Unauthorised modication or repair by unauthorised person(s) voids this d.
warranty immediately.
The Agent shall be under no liability under this warranty if the total agreed price e.
for the product has not been paid in full.
The liability of the Agent shall not exceed the price paid for the product and the f.
Agent shall not be liable for any loss of prot or consequential damage or any
Page 18

16
other claim for compensation.
This warranty does not aect any statutory consumer rights that may exist g.
where the Product was purchased.
5. FORCE MAJEURE
The Agent shall have no liability for delay or failure to perform if such failure is due
directly or indirectly to any cause beyond the Agent’s reasonable control including
but without limitation to acts of God, explosion, re, terrorism, accident, war or
threats of war, prohibitions of any kind, embargoes, strikes or lockouts.
GENERAL
The Agent may assign or subcontract responsibilities and rights under this warranty.
In all warranty cases, please refer to the support pages of www.orbitsound.com rst.
ORBITSOUND LTD.
TQ1 1QB
UK
Tel UK oce: +44 (0)8456 521 219
Web www.orbitsound.com
Email [email protected]
For email support: [email protected]
All trademarks, marks and registrations are the property of their respective owners.
Page 19

17
Specifications
Frequency range +/- 3 dB [Hz] 40 – 16KHz
Control; response (remote control) +,-6dB at 60Hz and 8KHz
Spatial level (slide switch) O, normal, wide
Maximum SPL [dB] 96dBA
Amp. power [Watts at 0.1% dist.] 40 + 20 + 20 RMS
Crossover frequencies [Hz] 160/5,000
Tweeter drivers 2 x 1” m/c
Midrange drivers 4 x 2.5 “
Spatial drivers 2 x 2” full-range
Enclosure type Reex/airSOUND
Sub-Bass driver 1 x 6”
Sub-Bass Enclosure type Tuned reex
Connection input(s) Stereo Line level -10dBu
3.5mm jack and RCA.
coax & optical digital inputs
on RCA phono and TOSLINK.
iPod (input and charging)
Connection output(s) RCA composite video x2
Recommended placement Main, in front of television
Sub, oor
Dimensions (H x W x D) [mm] 100 x 605 x 110 (main)
460 x 230 x 230 (sub)
Cabinet nish High gloss Chinese lacquer
Weight (in packaging) 13Kg / 28lb
Power consumption Standby / Idle 2.37W / 5.63W
Power charging iPod/iPhone 7.7W / 12W
Voltage / Power 22V DC
Remote Control IR lead code 08F7
 Loading...