

Page 1
1
Handbook v1
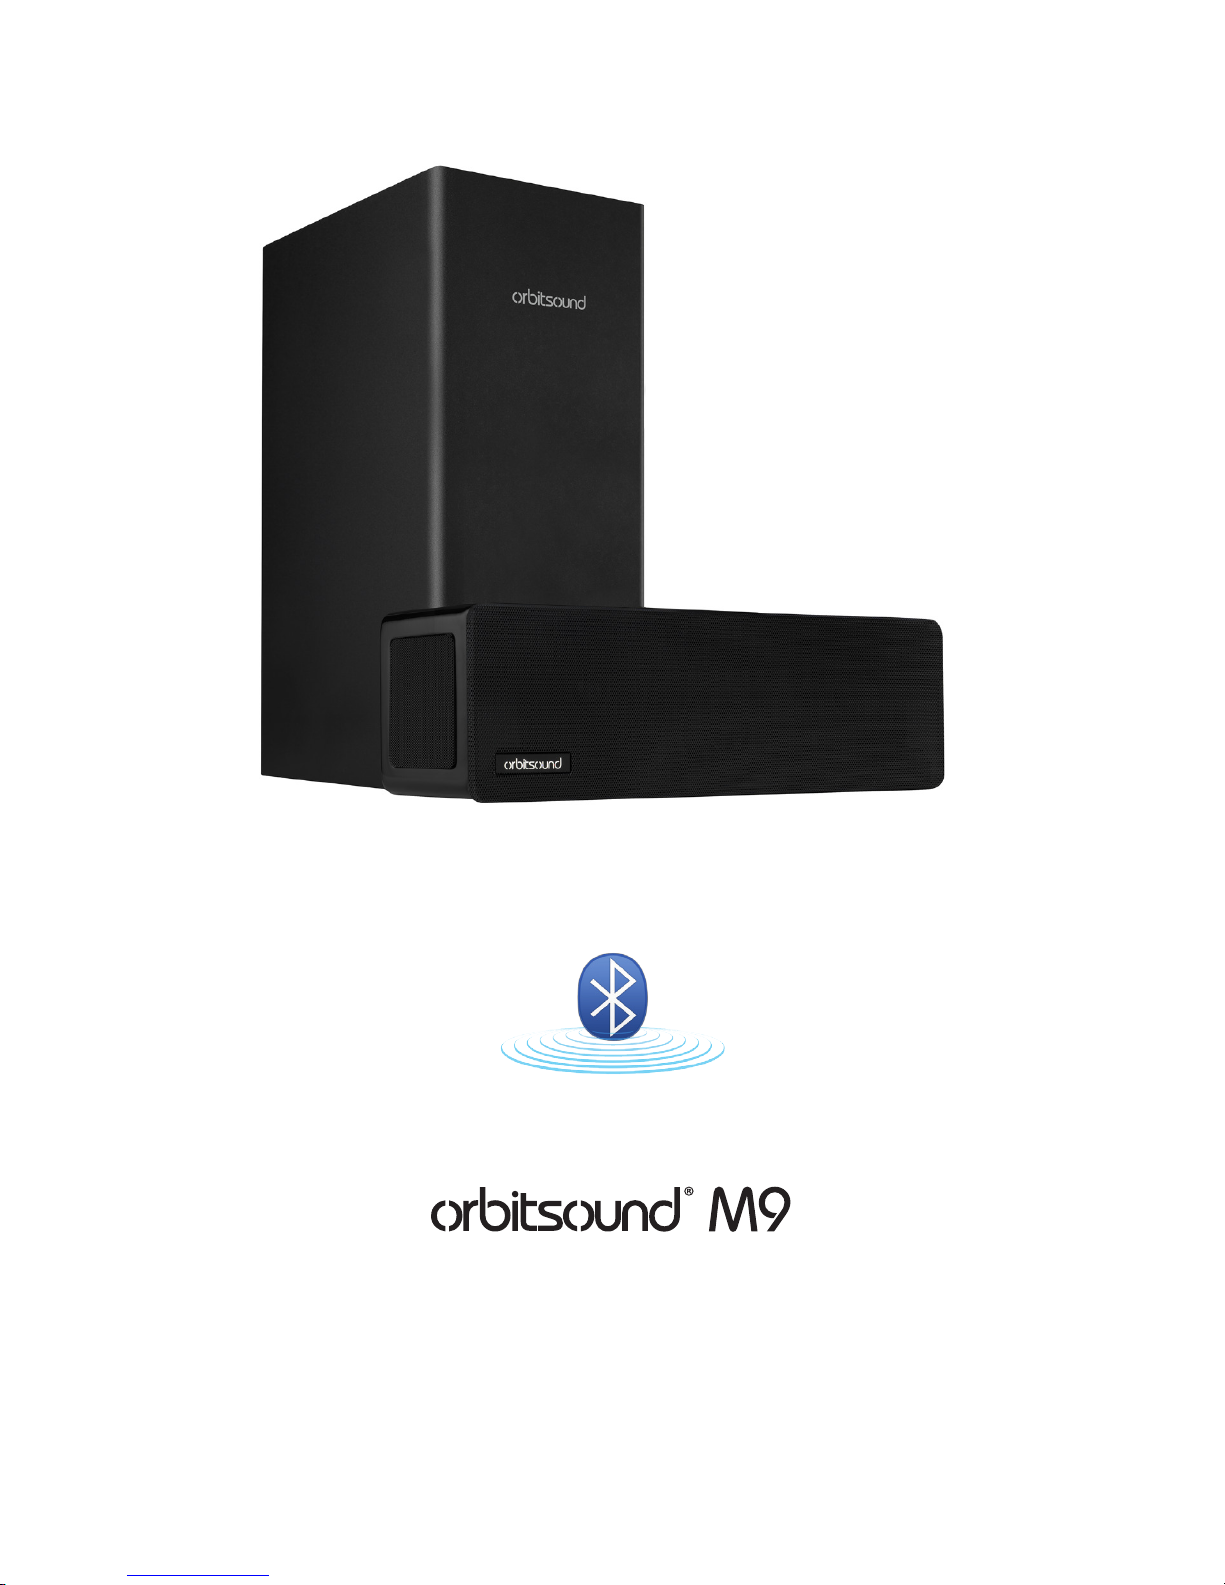
Compact High Performance Spatial Stereo Soundbar
with Wireless Subwoofer and Bluetooth®
Page 2

2
Page 3

1
Contents
Welcome 2
Orbitsound contact information 2
Package contents 2
The soundbar 3
Remote control 3
The subwoofer 3
Control panel overview 4
Getting Started 5
Set up - Connect, power on, check subwoofer volume 5
A) Connect the Soundbar to your TV 6
B) Bluetooth 8
C) AUX input 8
Remote control 9
Advanced Setup & Use 10
Positioning - getting the most from spatial stereo 10
Subwoofer placement 10
Subwoofer volume 11
Wireless 11
Channel selection 11
Pairing 12
Pairing multiple subwoofers / remote devices 13
Other features 13
Power saving 13
Setting memory 14
Reset soundbar 14
Auto-mute 14
Bluetooth resume / grab 14
Cleaning and care 15
Troubleshooting 16
No sound is heard 16
The sound is out of sync with the TV 16
Remote does not work 16
Sound is distorted 16
Sound is noisy / ‘hissy’ 16
Digital optical issues: ‘Clicking’ or no sound 17
No sound from subwoofer (soundbar working) 17
Battery replacement (remote) 17
Orbitsound Warranty 18
Warranty Terms 18
Making a Warranty Claim 18
Orbitsound Ltd Warranty Terms and Conditions 19
Additional Safety Information 20
Specications 21
Page 4

2
Welcome
Thank you for purchasing the orbitsound M9 compact spatial stereo soundbar with
wireless subwoofer and Bluetooth. With proper use the orbitsound M9 delivers
superb sound fidelity, engaging spatial stereo sound, and will provide you with a
fantastic listening experience.
This instruction booklet covers important safety and setup information as well as
advice on how to get the most out of your orbitsound M9.
Orbitsound contact information
ORBITSOUND LTD.
UK Support Tel: +44 (0)8456 521 219
International Support: www.orbitsound.com
Email: [email protected]
Package contents
Inside the packaging you will nd:
• M9 soundbar
• Wireless subwoofer
• Remote control
• Inline power supply + power cords
• Subwoofer power cable
• Handbook
• Quick start guide
• Audio connection cables - RCA and 3.5mm jack
• Digital optical (TOSLINK) connection cable
Page 5
3
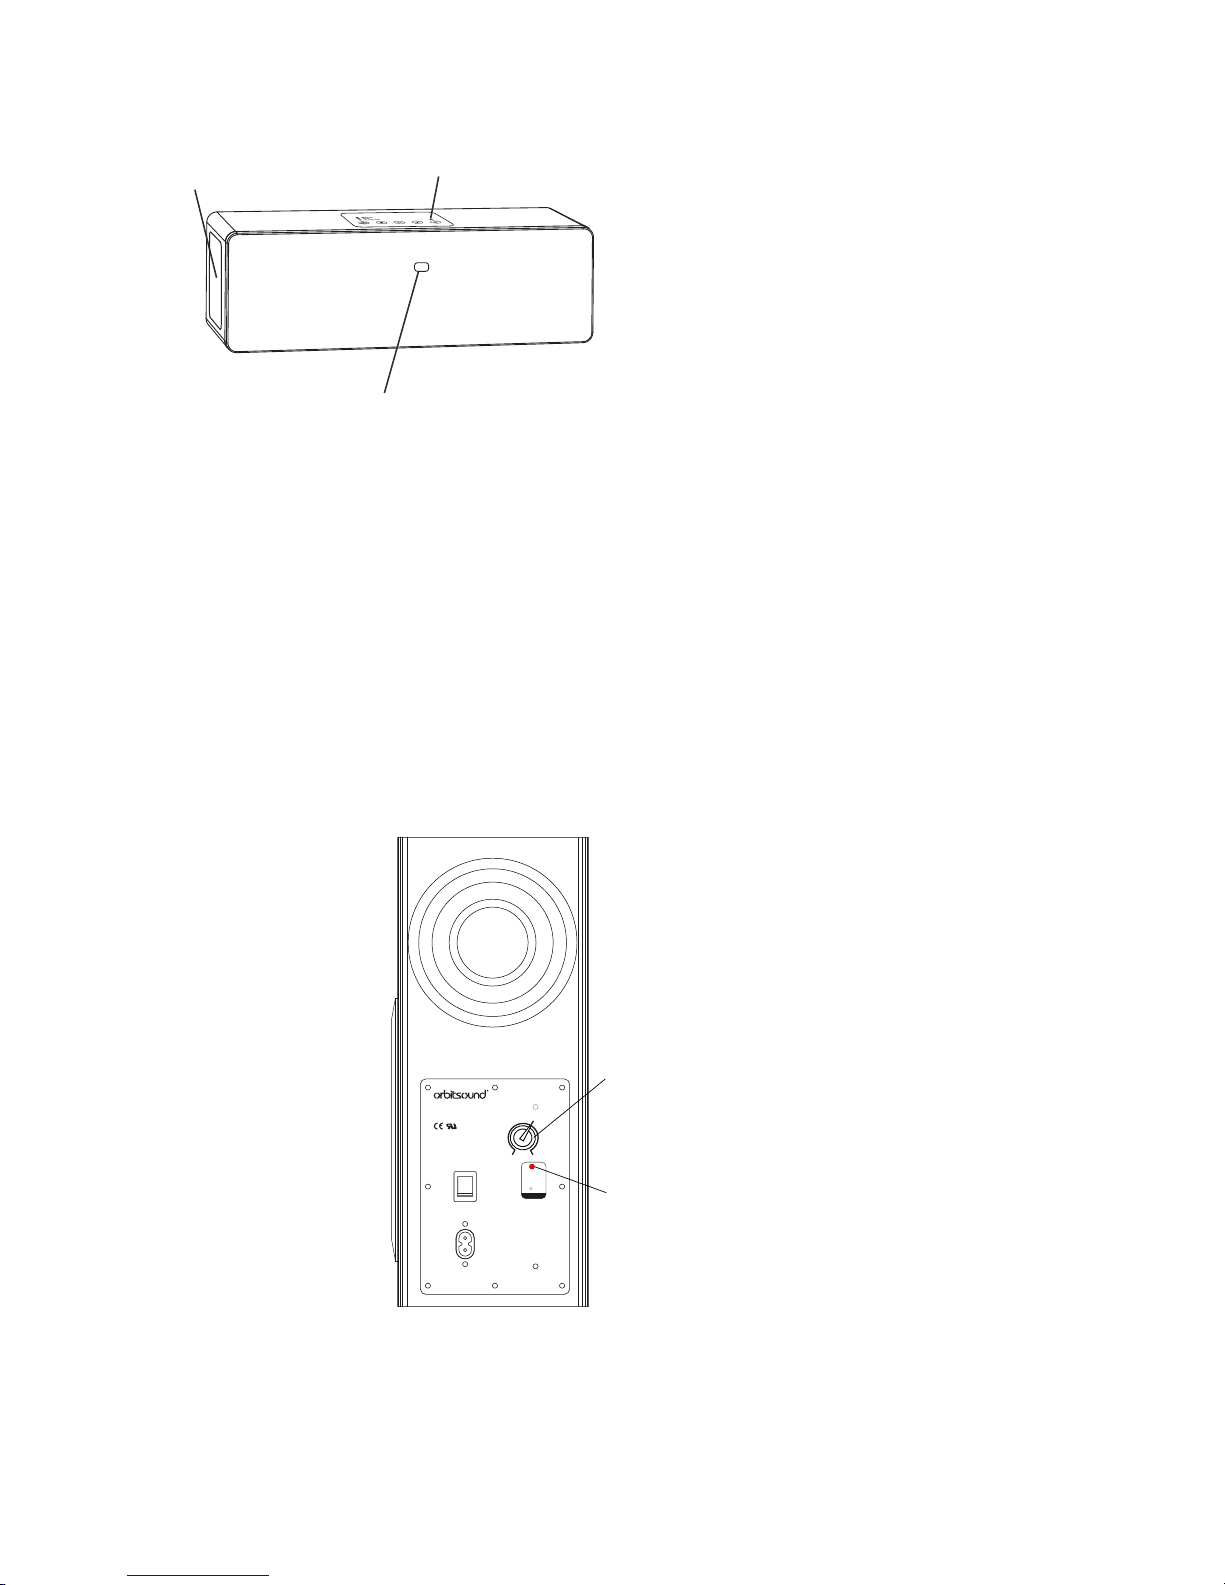
The soundbar
IR receiver
Spatial stereo generators
Status LED
Status LED State
RED: Standby
BLUE: On
OFF: Power off
The orbitsound M9 soundbar produces most of the sound that you hear. It produces
the main signal and spatial stereo information.
Remote control
The remote control provides volume control, tone control and sound source
selection, and additionally playback controls when using a connected Bluetooth
device.
The subwoofer
POWER
ON
OFF
100V-240V~
SUBWOOFER VOLUME
WIRELESS
NORMAL
MAXMIN
PAIR
PAIRING PROCEDURE:
Before you start: Long press the PAIR button
on subwoofer(s) to reset. WARNING - this
will cancel previous pairing.
1. Long press the PAIR button on the
soundbar until the unit conrms pairing
mode with a fast ashing STATUS light.
2. Short press the PAIR button on
subwoofer(s).
3. Short press PAIR on the soundbar to nish
pairing procedure.
STATUS
Compact Wireless Subwoofer
©2012 orbitsound ltd. Model: S1
Approved components used
AC IN
STATUS
ON: Paired
(good signal)
Flashing: No
signal / un-paired
O: O / Standby
Wireless STATUS:
OFF: No connection / No power
/ Low power state
ON: Good sync / connection
Flash: Bad connection
Subwoofer Volume:
Normal: Normal volume
Max: +8dB volume
Min: Minimum volume
(Back shown)
The subwoofer is a wireless active loudspeaker that produces powerful Hi-Fi bass. It
has been designed specially to complement the soundbar.
Page 6
4
Control panel overview
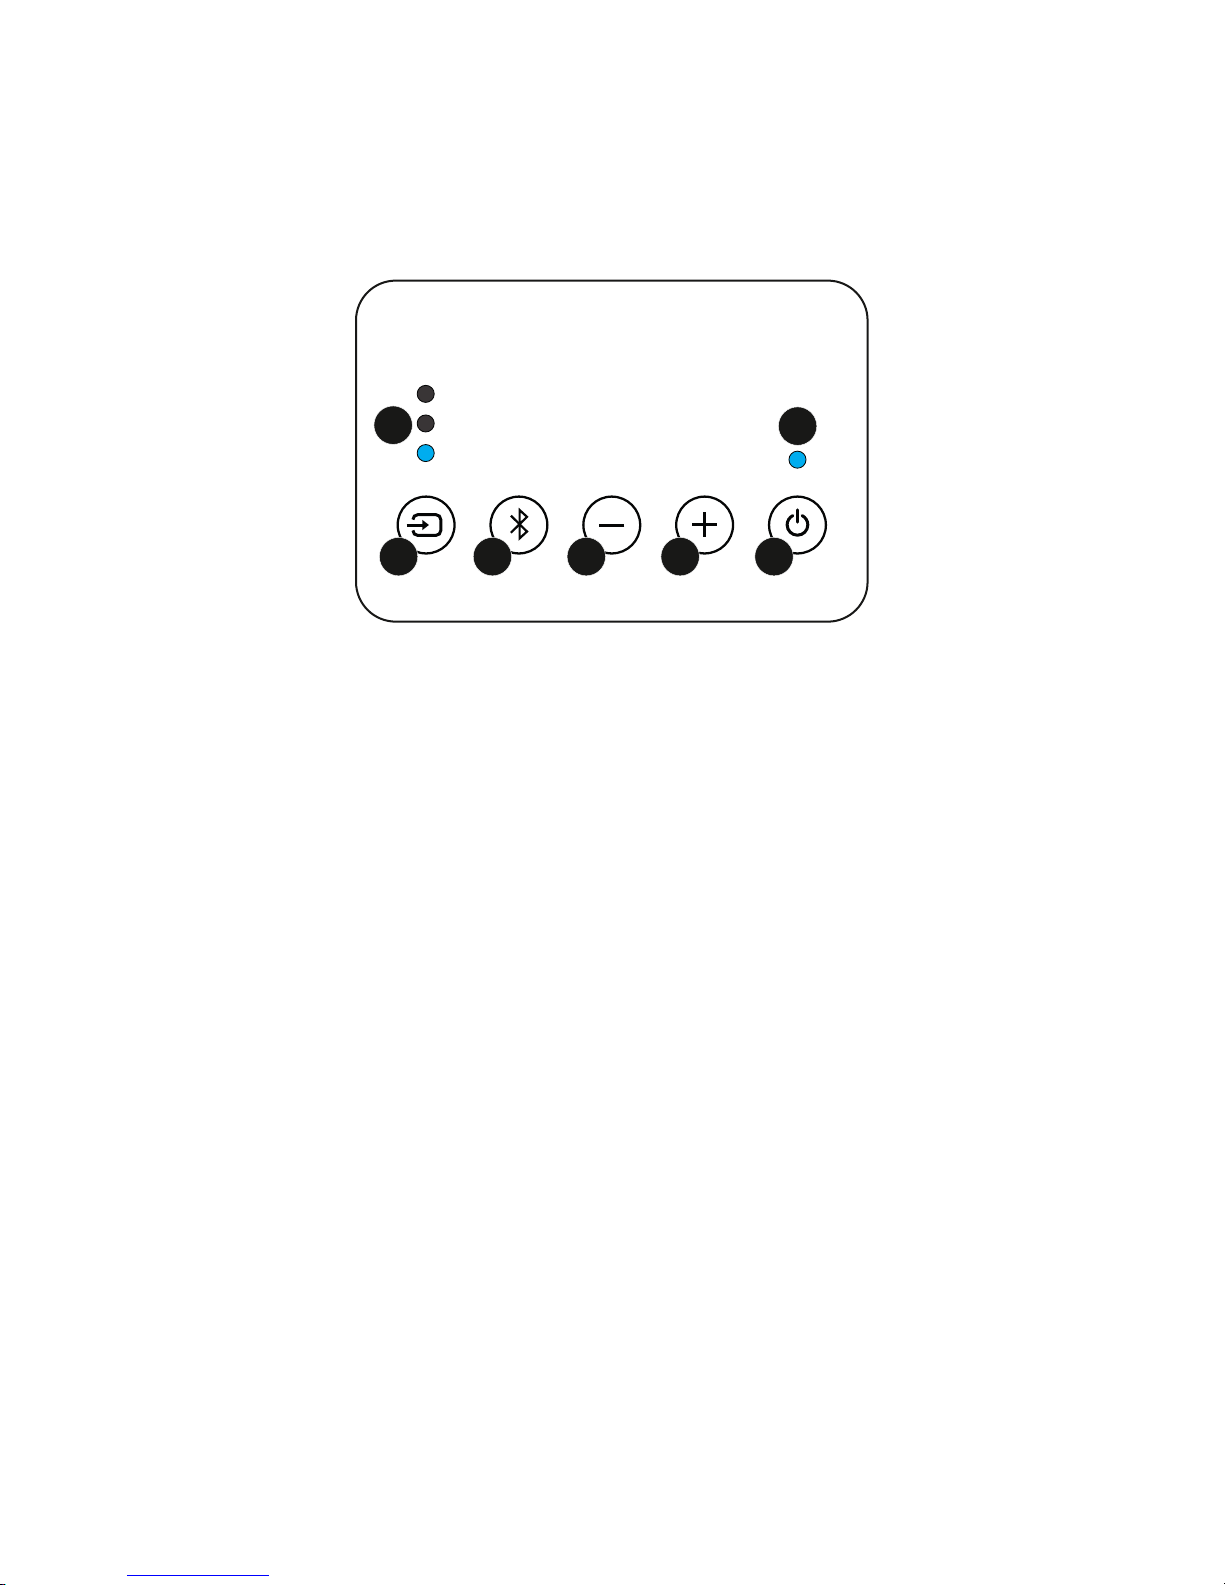
The soundbar can be controlled from the control panel:
Optical
Bluetooth
Aux
1
2 3 4
5
6
7
1. Source: Press to cycle through the inputs. This controls what device is
playing through the soundbar.
2. Bluetooth: Short press to renew a Bluetooth connection / start playback. Long
press (Press and hold) to enter pairing mode.
3. Vol - : Reduce soundbar volume.
4. Volume +: Increase soundbar volume
5. Standby: Enter standby mode or power on.
6. Source LED: Shows which source is currently playing
7. Status: Blue shows the soundbar is on. Red shows standby. The light will
ash when a button is pressed on the remote or on the control panel.
Hint: Long press the power button to reset the soundbar. This will reset the source,
volume, treble and bass memory to factory default settings. Press and hold for 3
seconds. The soundbar will conrm by ashing the power/status light 3 times. The unit
will reset and optical source will be selected.
Page 7
5
Getting Started
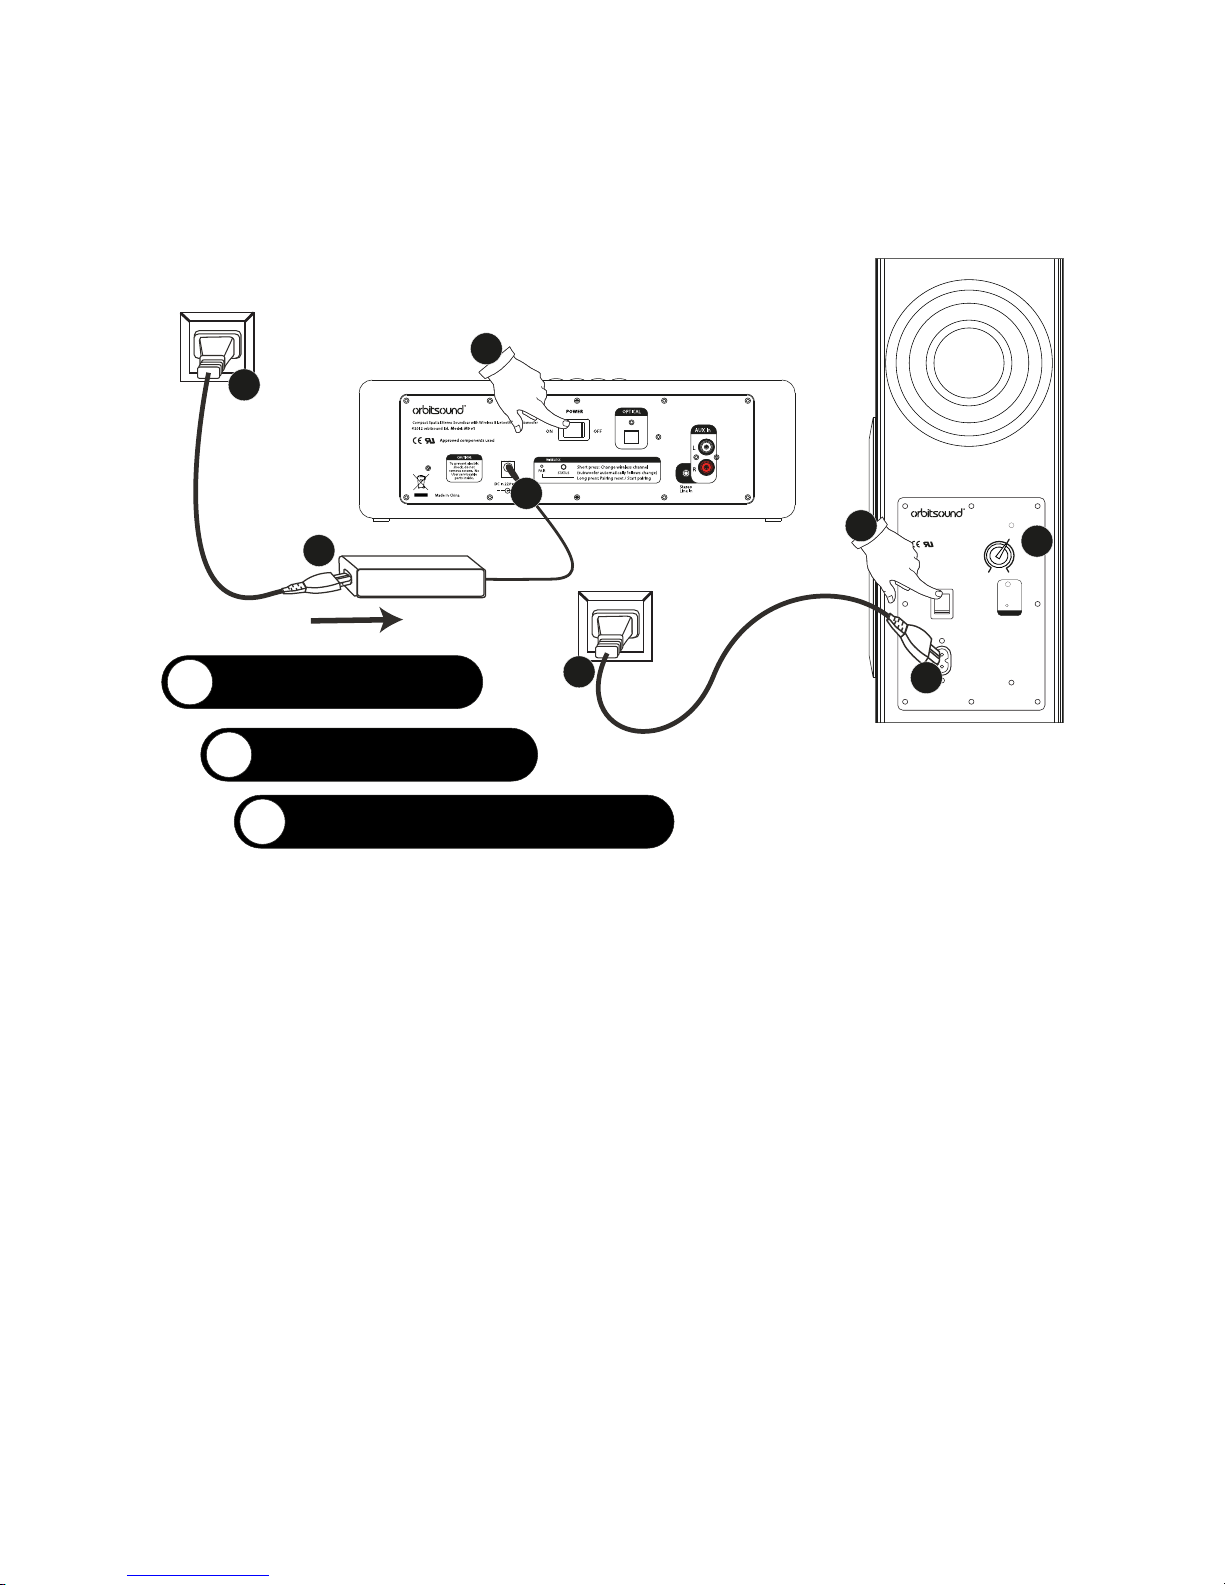
Set up - Connect, power on, check subwoofer volume
POWER
ON
OFF
100V-240V~
SUBWOOFER VOLUME
WIRELESS
NORMAL
MAXMIN
PAIR
PAIRING PROCEDURE:
Before you start: Long press the PAIR button
on subwoofer(s) to reset. WARNING - this
will cancel previous pairing.
1. Long press the PAIR button on the
soundbar until the unit conrms pairing
mode with a fast ashing STATUS light.
2. Short press the PAIR button on
subwoofer(s).
3. Short press PAIR on the soundbar to nish
pairing procedure.
STATUS
Compact Wireless Subwoofer
©2012 orbitsound ltd. Model: S1
Approved components used
AC IN
STATUS
ON: Paired
(good signal)
Flashing: No
signal / un-paired
O: O / Standby
1
Connect power
2
Switch on power
2
1
1
1
1
1
2
3
Check subwoofer level
3
1. Connect the power supply and mains cord to the soundbar. The subwoofer
connects directly to the mains via a mains cord (all cables included).
2. Switch on the power on both the soundbar and subwoofer.
3. Check the volume setting on the subwoofer. Point this to normal. You can adjust
this later as preferred.
Hint: See advanced setup for more information on (3) subwoofer level. For the moment,
set it to ‘normal’
Page 8
6
A) Connect the Soundbar to your TV
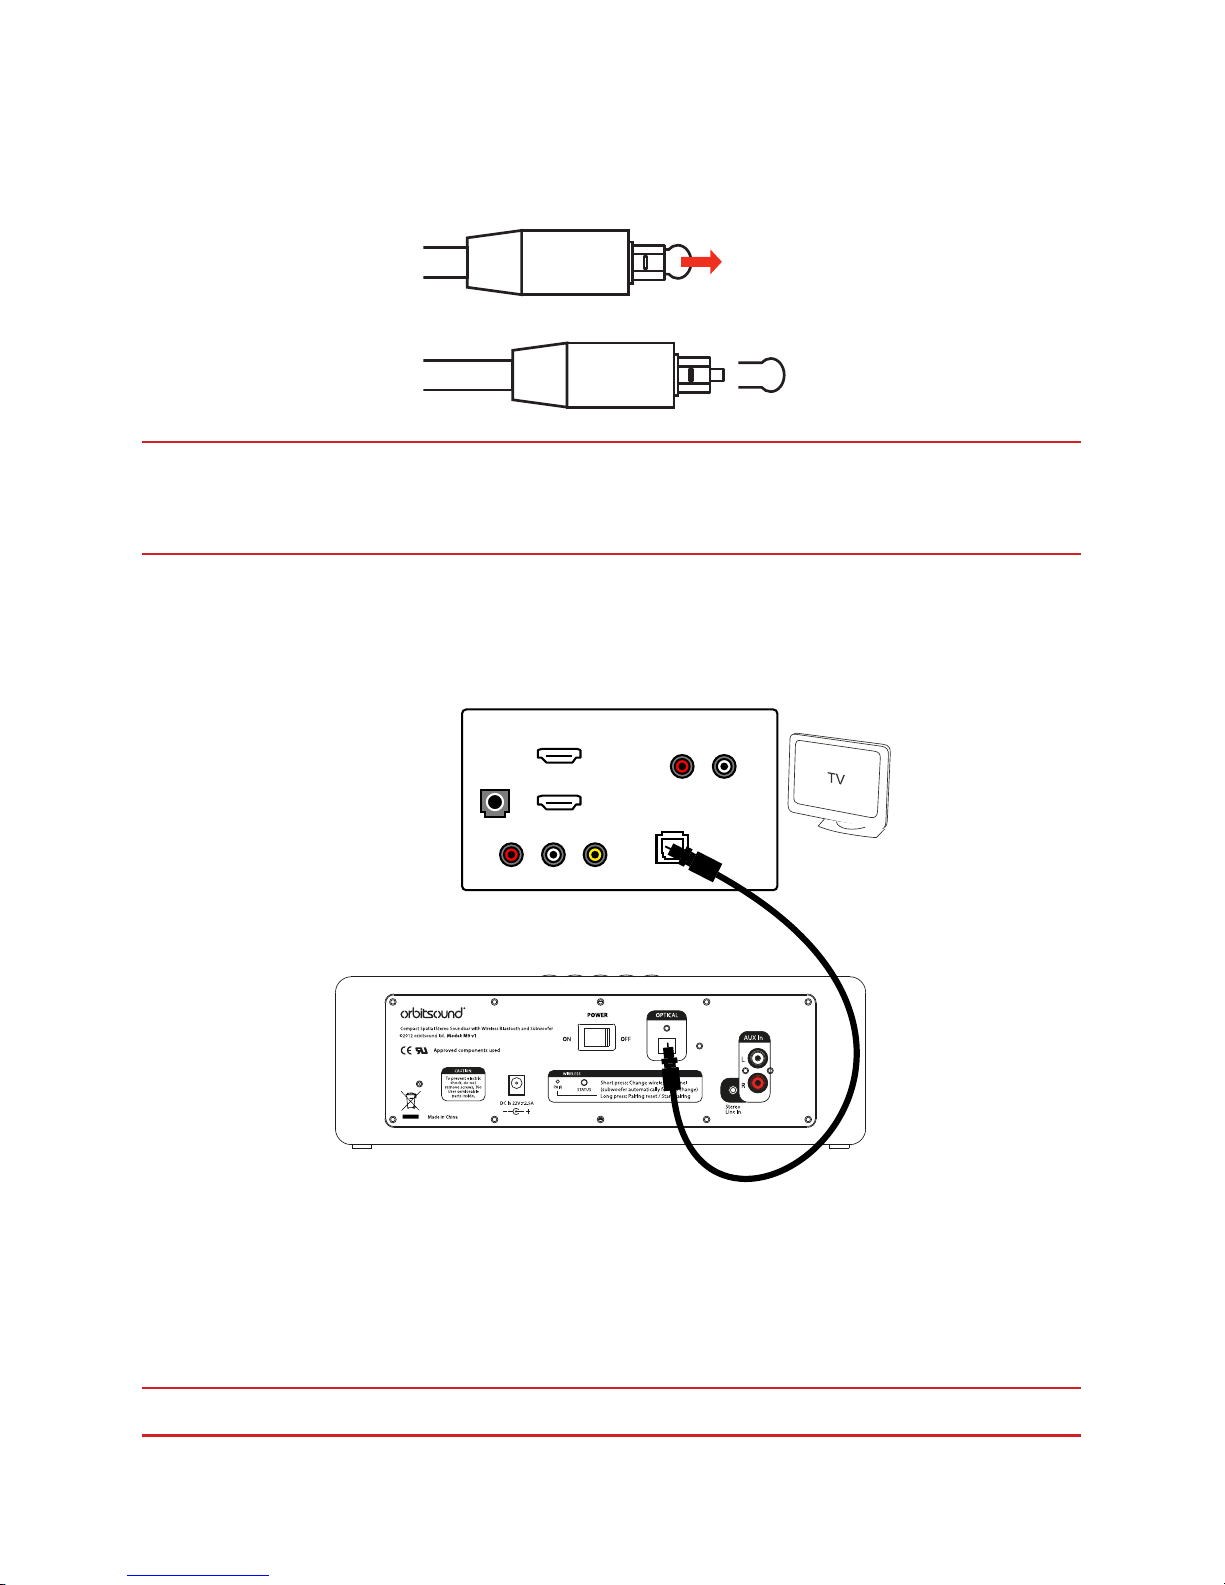
1) Remove plastic covers from optical cable:
IMPORTANT: Remove the protective plastic covers from a new TOSLINK (optical)
cable before connecting to the optical sockets. Failure to remove these covers
may result in damage and will interrupt the sound output.
2) Connect to your TV with the optical cable:
HDMI
IN 1
HDMI
IN 2
VIDEO INAUDIO IN
OPTICAL
AUDIO OUT
DVI
AUDIO IN
TV CONNECTION PANEL
AUDIO OUT
<CLICK>
<CLICK>
HINT: When using the soundbar in this way, it is normal that the speakers on the TV will
need to be turned down or muted to stop sound coming from the TV’s own speakers.
HINT: Make sure that the sound output mode for the optical output on the TV is set to
‘PCM’, or ‘Normal’. This provides the best overall listening experience.
IMPORTANT: FIRMLY CONNECT THE OPTICAL CABLE UNTIL IT ‘CLICKS’
Page 9
7
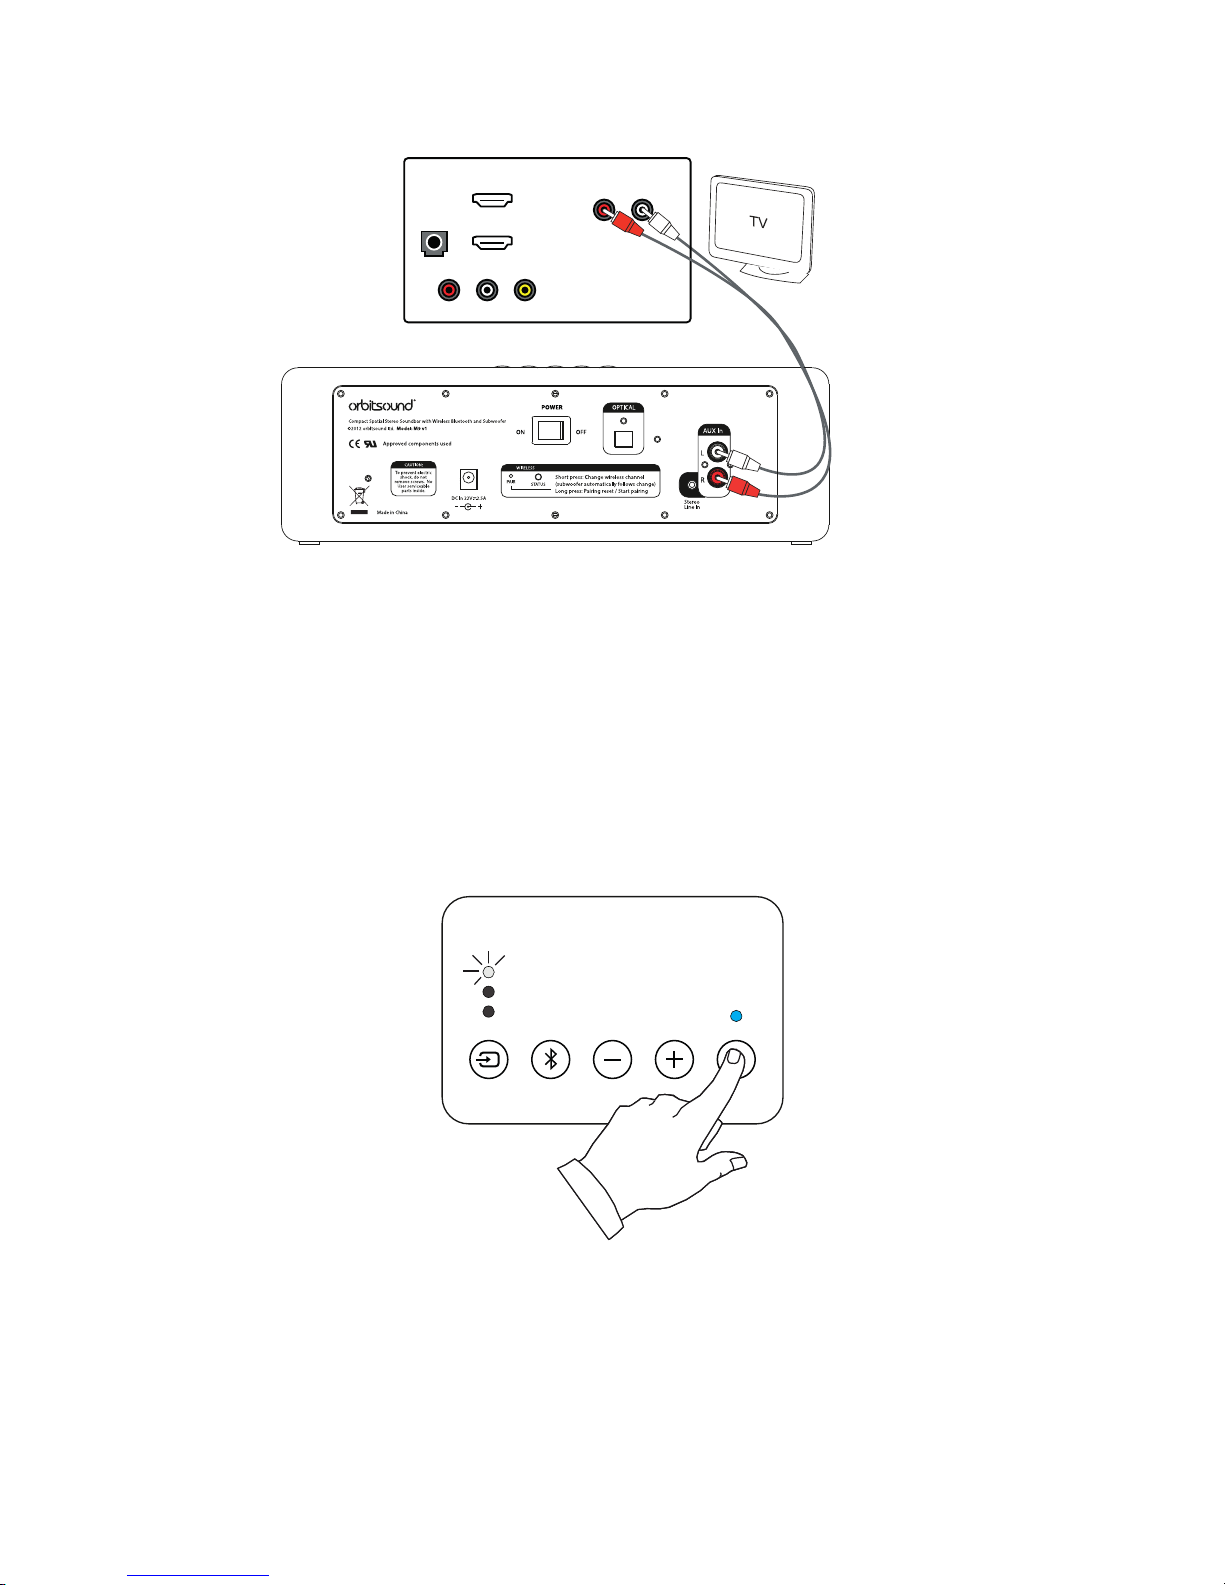
2) (OPTION) If your TV does not have an optical output:
HDMI
IN 1
HDMI
IN 2
VIDEO INAUDIO IN
DVI
AUDIO IN
TV CONNECTION PANEL
AUDIO OUT
Use the included RCA cable to connect the audio output from your TV to the
soundbar.
Note: Some TVs may only have a 3.5mm jack output, you can also use this output. If your
TV has no audio output, you can connect the optical cable to your set top box.
3) Turn the soundbar ON:
Optical
Bluetooth
Aux
Press the power button. The indicator light will turn blue, and the optical indicator
will light, showing the unit is playing the optical source.
You can now hear the sound from your TV via the digital optical cable.
Hint: Use the Volume + and - buttons to control playback volume.
Page 10

8
B) Bluetooth
You can connect your phone or tablet for Bluetooth playback.
Optical
Bluetooth
Aux
1
2
3
Solid blue light: You’re paired!
Slow ash blue light: Looking for previously paired device
Fast ash blue light: In pairing mode
1. Press to select Bluetooth sound source. The Bluetooth source light will show the
status of the Bluetooth connection.
2. To pair a new device: Press and hold the Bluetooth pairing button for 3 seconds.
The Bluetooth source light will ash quickly to show that pairing mode has started.
Look on your device for ‘Orbitsound’ in the Bluetooth device list, and pair with it.
When a device is paired, the soundbar Bluetooth source light will change to solid
blue.
3. If your device was previously paired, then you can short press the Bluetooth
button to ‘grab’ the device and resume playback.
Note: If you are asked for a PIN number, enter ‘0000’.
C) AUX input
The Jack and RCA inputs (AUX) input can be heard by choosing ‘AUX’ on the control
panel.
Hint: The RCA inputs and jack (3.5mm) inputs mix, so more than once external device can
be connected. The soundbar will mix the 2 sources together.
Page 11
9
Remote control
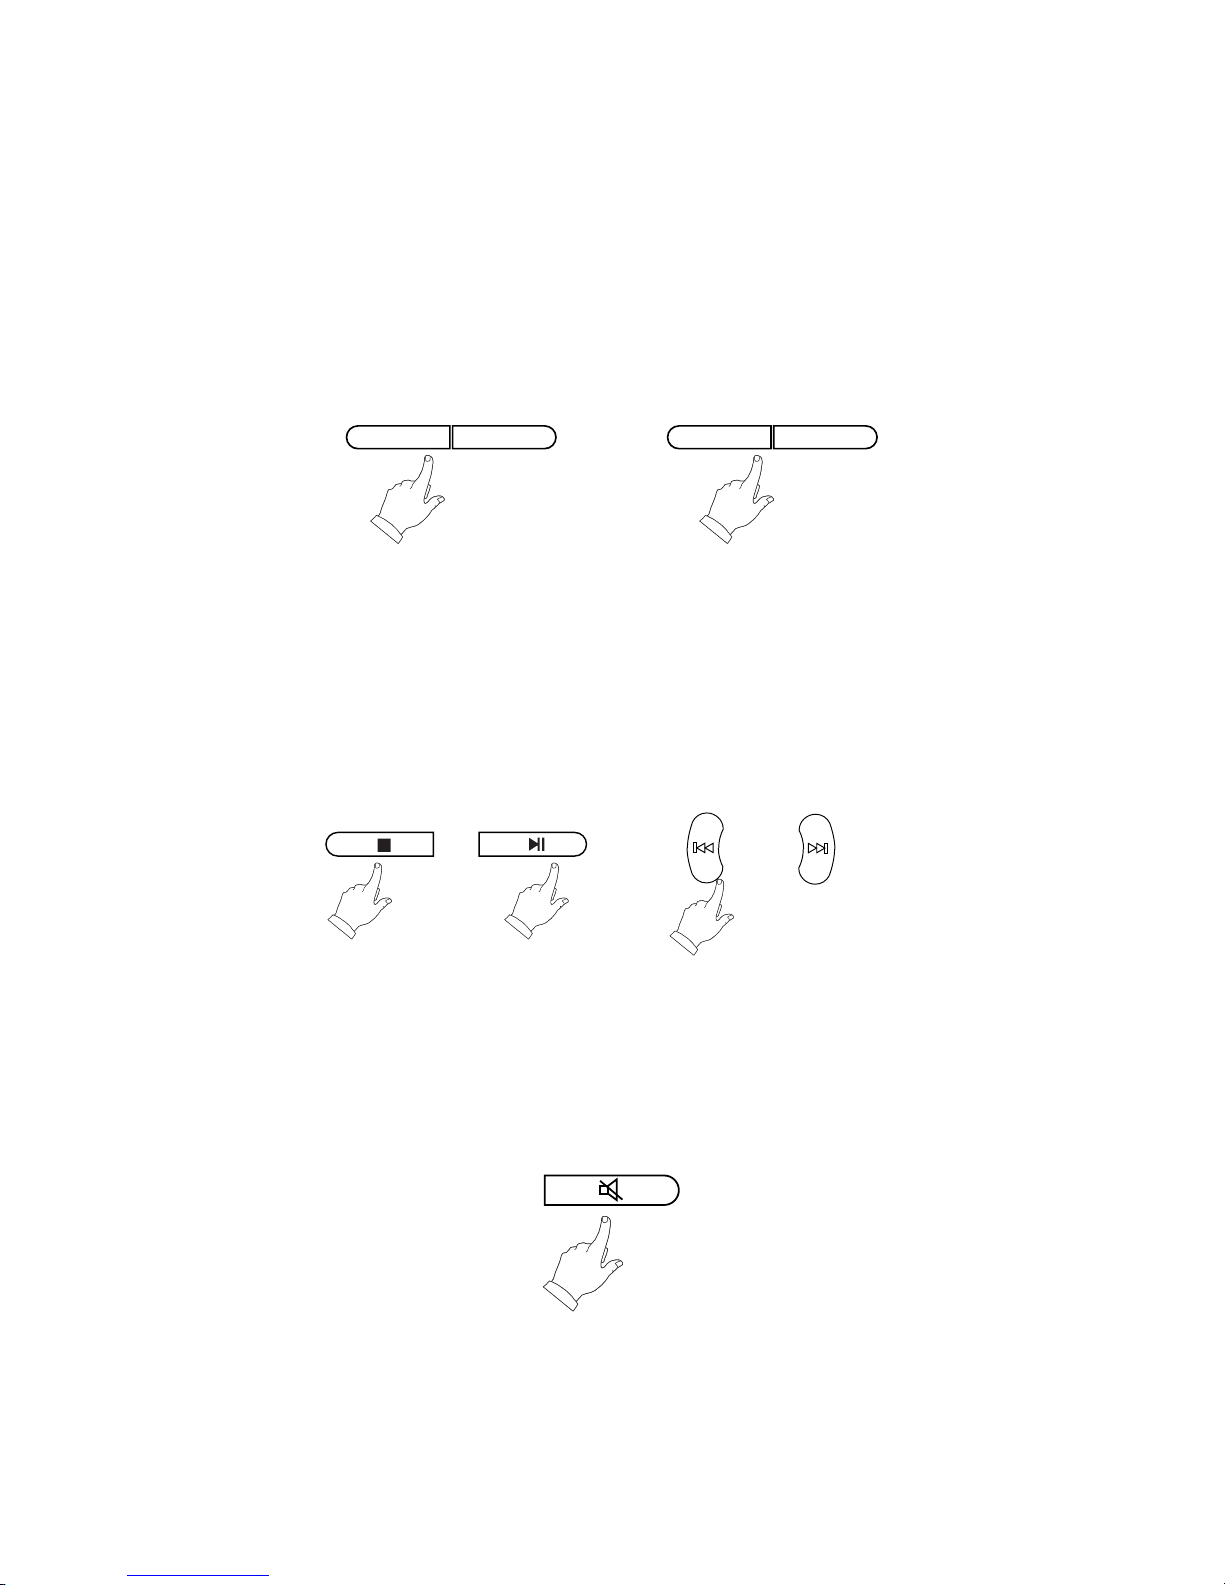
The control panel functions can also be done from the remote control:
Source Changes the input source
Volume + / - Controls volume
Power Enter standby / resume
Change tone: Bass and treble controls the sound:
Bass adjustTreble adjust
Bass+Bass-Treble+Treble-
Note: Treble changes the sound of the soundbar + / - 5 steps.
Note: Bass changes the volume of the subwoofer remotely + / - 5 steps.
Remote playback: You can control the track and playback of a connected Bluetooth
device:
Play/Pause Prev. track / Next track
Mute: Press the mute button to engage mute. This will stop all sound. The Soundbar
status light will ash blue when mute is enabled. To resume play, press mute again:
Page 12
10
Advanced Setup & Use
The orbitsound M9 is easy to set up and enjoy, but even better sound may be
achieved by following these guidelines.
Positioning - getting the most from spatial stereo
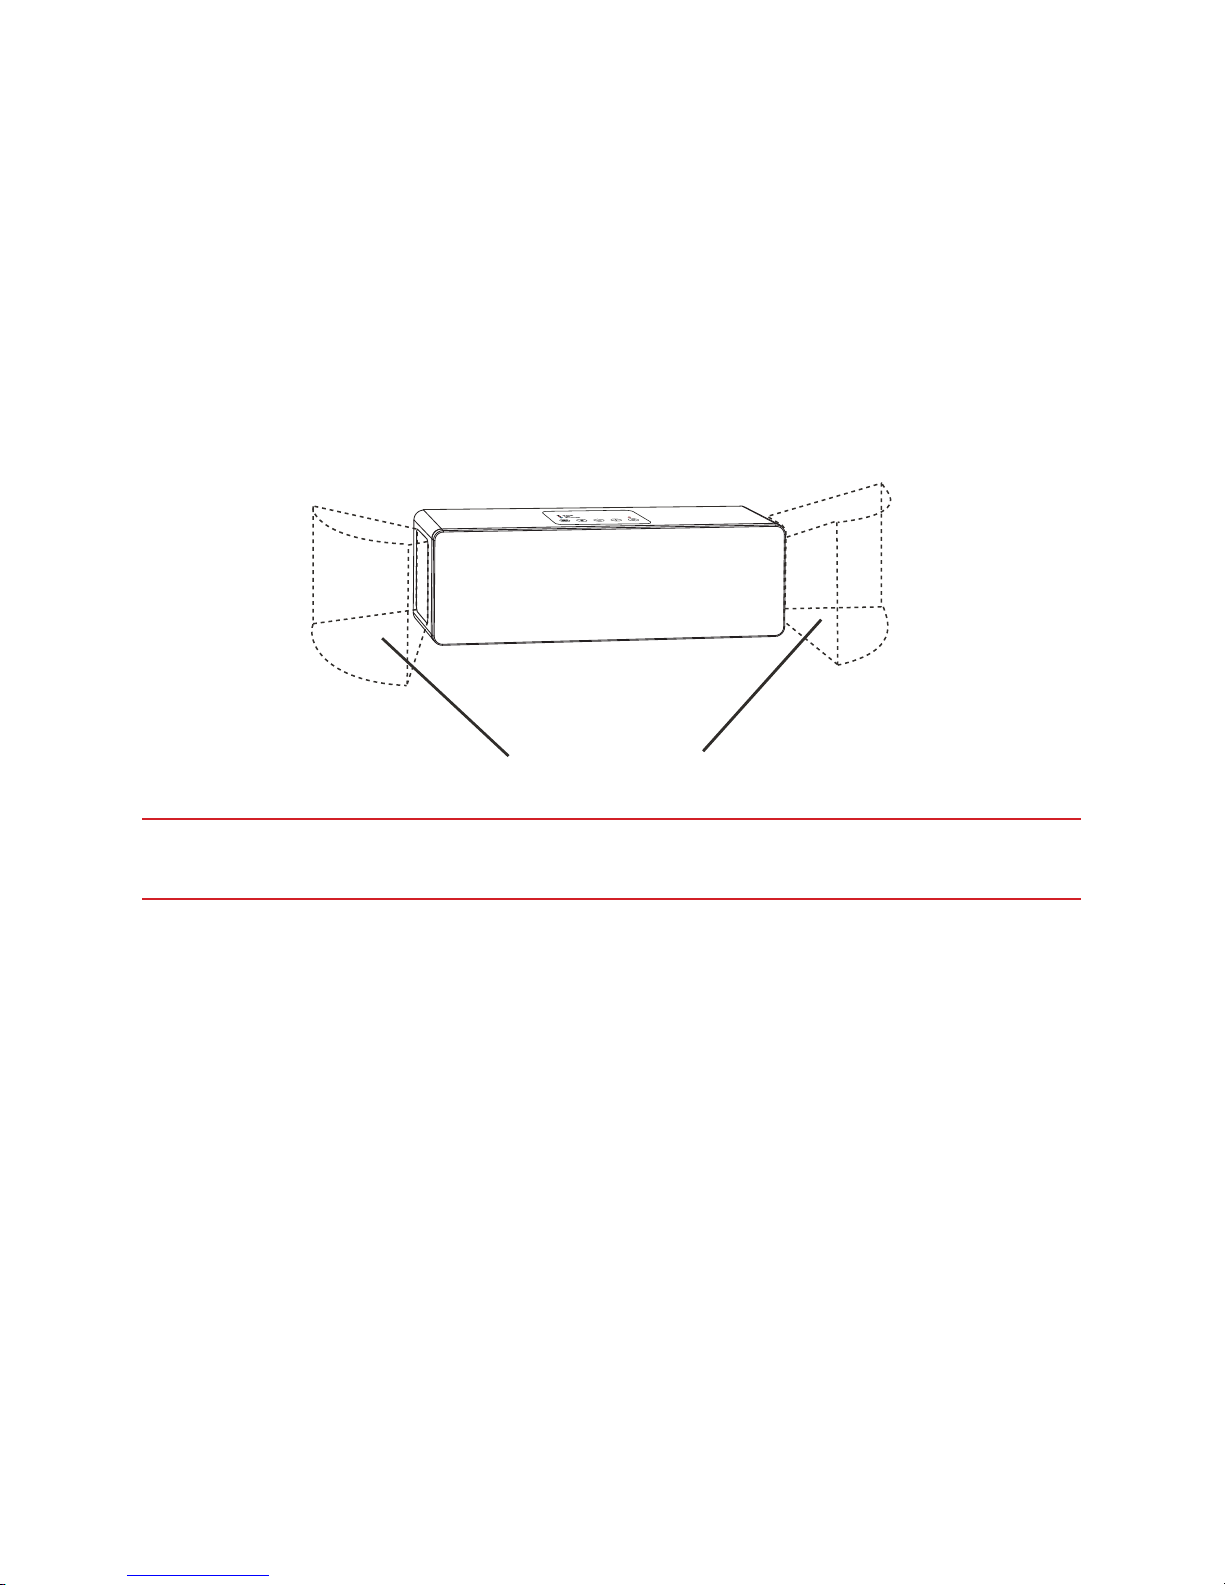
The spatial stereo sound eld is produced by the speakers in the sides of the
soundbar. These special signals interact with the main signal (front) to produce true
stereo in your listening environment:
Spatial generation zones
IMPORTANT: The areas marked need to be clear of obstacles in order for the
spatial stereo sound eld to work properly.
HINT: Because Orbitsound produces a uniform stereo sound eld, the soundbar does
not need to be placed directly in front of the listener. Therefore, placing the soundbar
conveniently so that the sides are not obstructed is more important than central
placement, i.e. on low or high shelf, counter top, below/above TV
Subwoofer placement
Subwoofer placement does not aect the overall sound much. Position the
subwoofer after optimising placement of the soundbar.
HINT: The sound output from the subwoofer is omni directional, so this can be placed
anywhere. However, try to avoid placing the subwoofer too far from the soundbar as this
can cause a noticeable ‘separation’ eect. A good place is below or beside your TV. For
standalone operation, try the subwoofer on the oor, next to the shelf or table that the
M9 is on.
Page 13

11
IMPORTANT: Always make sure that the subwoofer’s side with a port (rear) is
clear from obstruction. Covering this port will adversely aect the sound.
Subwoofer volume
The subwoofer volume control on the back of the subwoofer allows you to preset the
amount of bass that the system produces. Setting to ‘normal’ is the recommended
balance. For quiet TV use, you can reduce the level. For louder music, you can
increase the volume.
Note: The Bass control on the remote also changes the volume of the subwoofer.
Hint: Once the subwoofer volume is set, you won’t need to adjust it often. It is set for the
conditions of the room.
Wireless
The Orbitsound wireless system is uniquely developed to deliver the best possible
listening experience in terms of minimal delay, and maximum sound delity. The
system uses a digital 2.4GHz signal, similar to that used by computer WiFi systems.
For the subwoofer to work with the soundbar, it has to be paired. At the factory,
the soundbar and subwoofer are paired for you. The soundbar and subwoofer
should work out of the box. Here are some procedures for resetting or changing the
wireless setup:
Channel selection
If you experience interference from a router, computer, or another soundbar
operating on the same frequency, you can change the channel that the Orbitsound
wireless system is running on.
Note: Interference usually sounds like the bass is stopping and starting, and maybe a
‘popping’ sound. This is easily xed by changing channel.
To change channel - Make sure the soundbar AND subwoofer are switched on:
Page 14
12
1
2
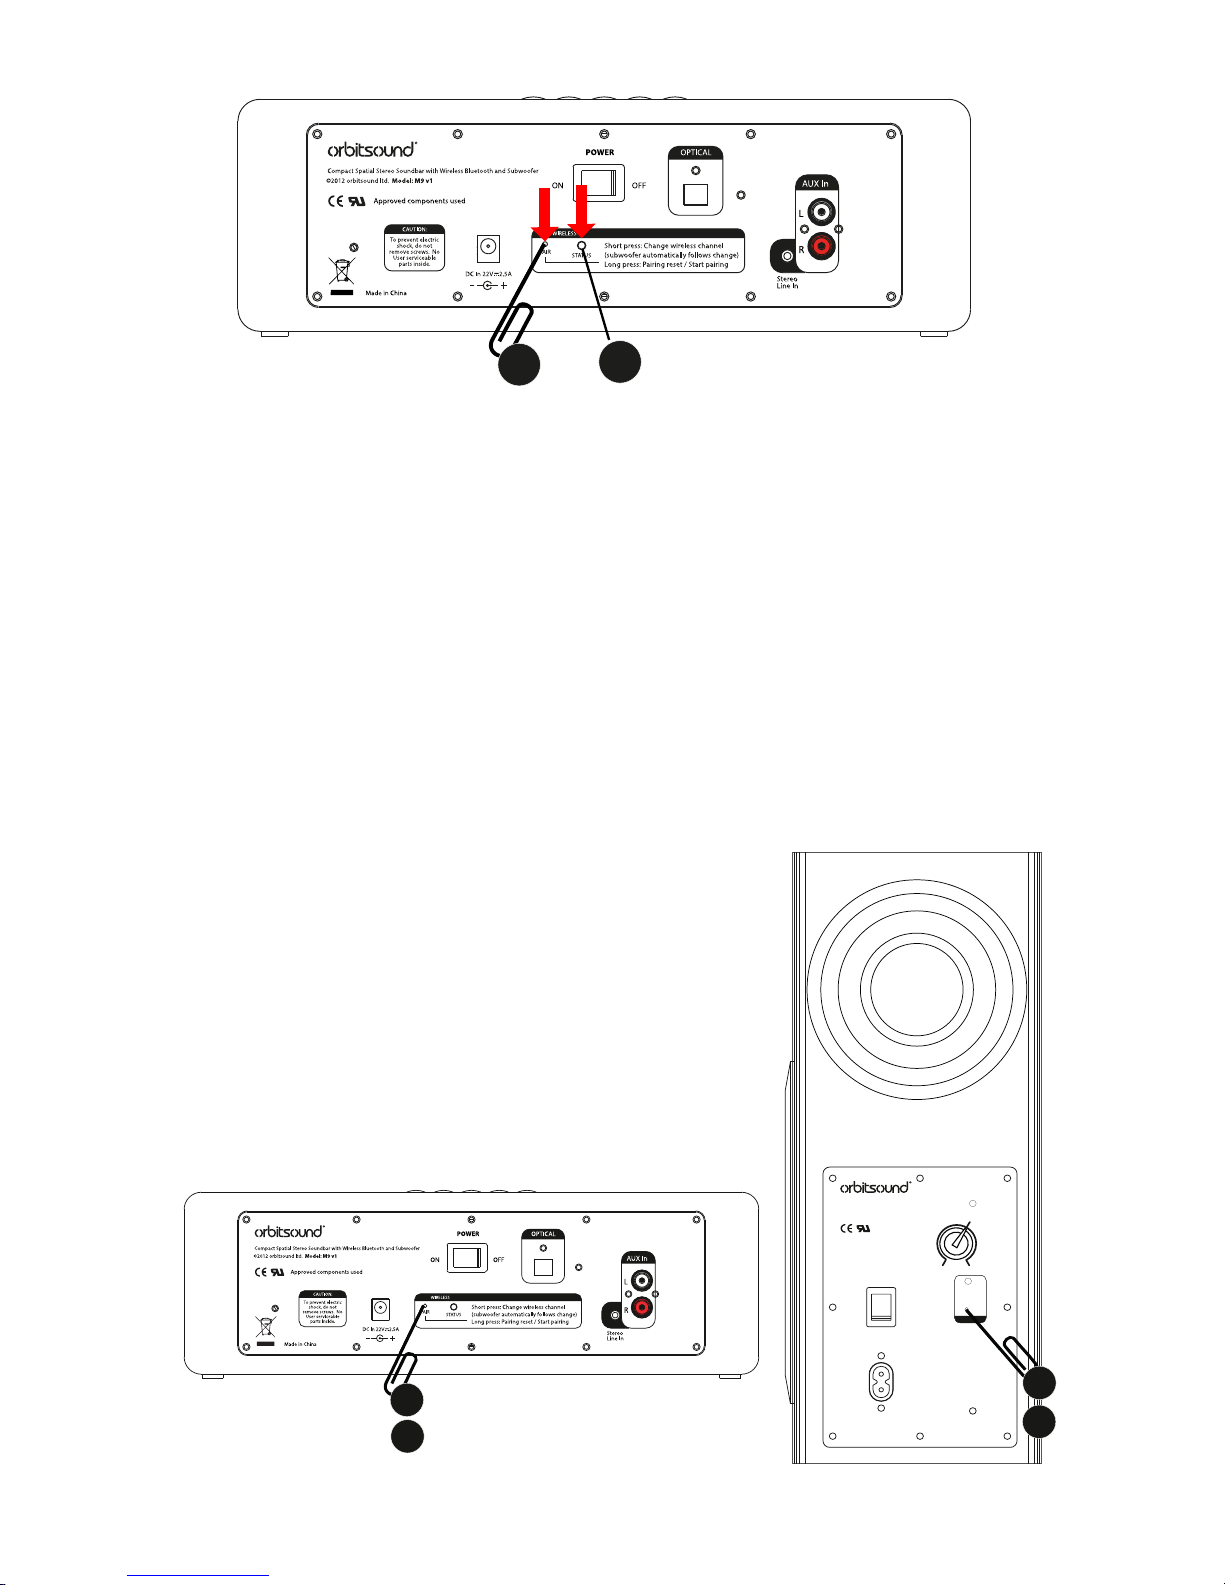
1. Use a paperclip to briey press the ‘PAIR’ button on the soundbar rear panel.
2. The soundbar PAIR status light will ash on the soundbar and woofer. This
acknowledges that the channel has changed.
There are a total of 10 channels. Shift the channel repeatedly until there is no more
interference. The soundbar will remember the channel when power is disconnected,
so once set, there is no need to re-set.
Pairing
To pair a subwoofer to the soundbar, follow this procedure:
POWER
ON
OFF
100V-240V~
SUBWOOFER VOLUME
WIRELESS
NORMAL
MAXMIN
PAIR
PAIRING PROCEDURE:
Before you start: Long press the PAIR button
on subwoofer(s) to reset. WARNING - this
will cancel previous pairing.
1. Long press the PAIR button on the
soundbar until the unit conrms pairing
mode with a fast ashing STATUS light.
2. Short press the PAIR button on
subwoofer(s).
3. Short press PAIR on the soundbar to nish
pairing procedure.
STATUS
Compact Wireless Subwoofer
©2012 orbitsound ltd. Model: S1
Approved components used
AC IN
STATUS
ON: Paired
(good signal)
Flashing: No
signal / un-paired
O: O / Standby
1
2
3
4
Page 15

13
1. Long press the subwoofer pair button (this erases any previous pairing). The
subwoofer STATUS will ash conrmation.
2. Long press the soundbar pair button to enter pairing mode. The soundbar pairing
STATUS will slow ash to show it has entered pairing mode.
3. Short press the subwoofer pair button for it to join the soundbar.
4. Short press the soundbar pair button to exit pairing mode. The soundbar
and subwoofer STATUS lights will ash together to show successful paring. The
subwoofer will start to function with the soundbar.
Note: A short version of these instructions is printed on the subwoofer
Pairing multiple subwoofers / remote devices
The Orbitsound wireless system supports multiple compatible devices. Using
multiple subwoofers increases the size of the sound and overall volume dramatically.
To add another subwoofer or compatible device to the wireless system:
1. Long press the remote devices’ (receivers’) pair buttons. to erase previous pairing.
2. Long press the soundbar pair button to enter pairing mode.
3. Short press the remote pair buttons to join the network (all of them).
4. Short press the soundbar pair button to exit pairing mode. The soundbar and
remote STATUS lights will ash together to show successful paring.
Other features
Power saving
The M9 features a low power state with wireless subwoofer low-power control.
When the soundbar enters standby mode, the power consumption drops. It is
recommended that Users routinely use standby mode as this also shuts down the
wireless subwoofer.
Page 16
14
Setting memory
When in standby mode, or if disconnected from the mains completely, the soundbar
will remember settings for pairing, bass, treble, volume and source selection.
Note that the volume will be reduced if set very high when the unit restarts to protect the
listener.
Reset soundbar
Optical
Bluetooth
Aux
<HOLD>
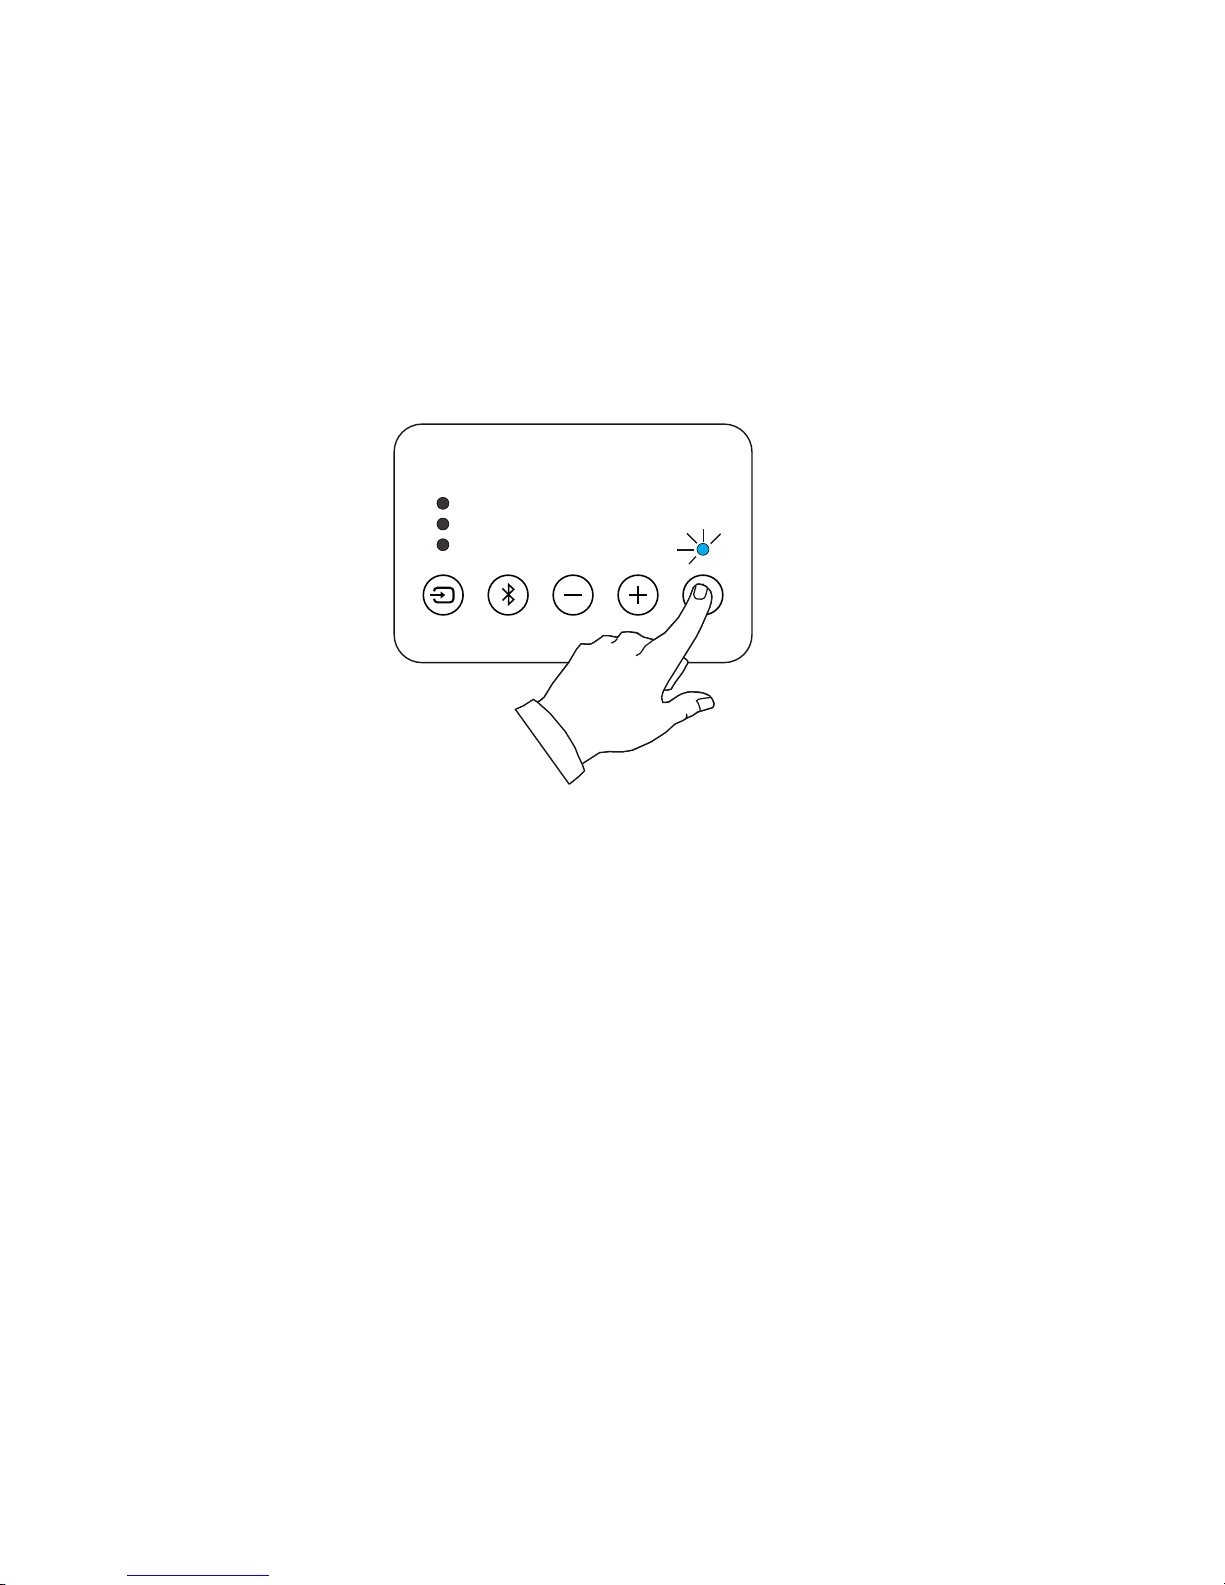
You may wish to reset the soundbar settings. To do this, switch the unit on, then
press and hold the power button for a few seconds on the control panel. The
soundbar status light will ash, and then the soundbar will reset. Optical source will
be selected with default settings.
Auto-mute
If there is no signal, or extremely low input signal, the soundbar will enter auto-mute
mode. This reduces power consumption, and also completely silences the soundbar
and subwoofer.
Bluetooth resume / grab
If you have previously paired your phone/tablet, there is no need to re-pair the
device. Simply choose the Bluetooth source, then short press the Bluetooth button
on the control panel. The soundbar will seek a previously paired device, and resume
playback.
Page 17
15
Maintenance
Cleaning and care
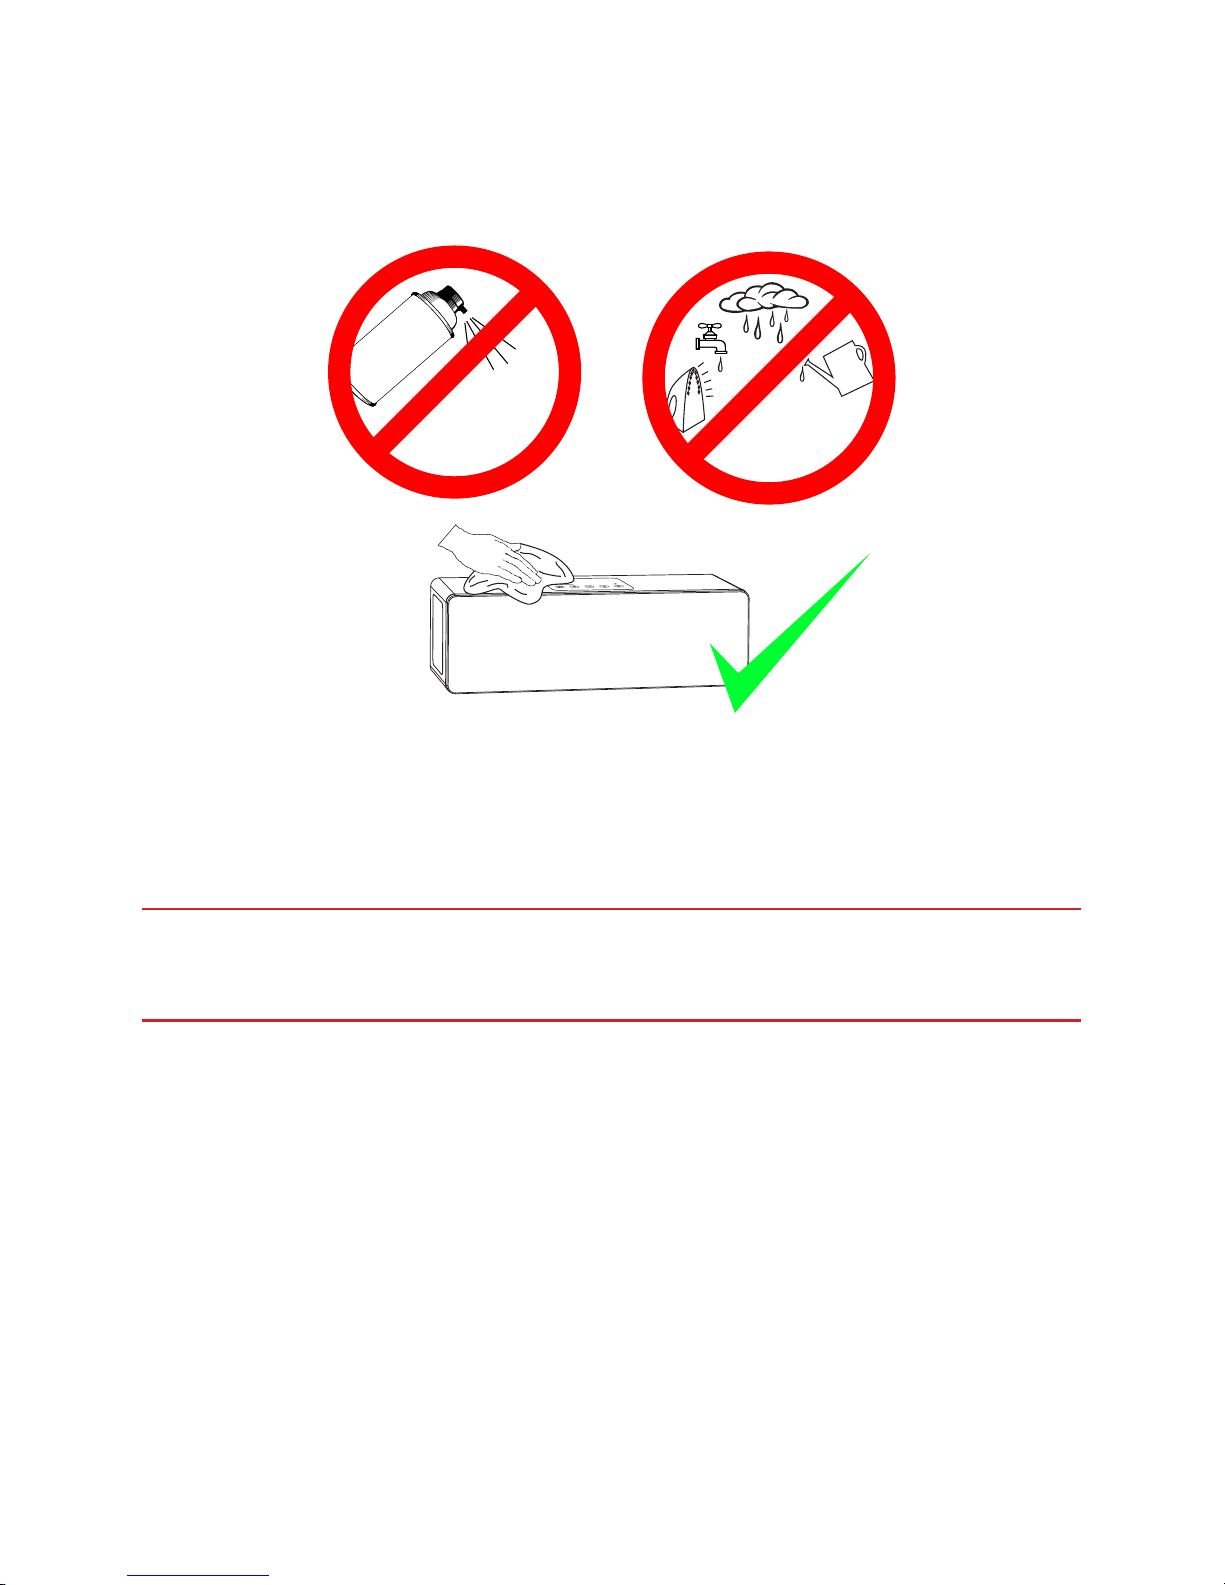
Use a soft, clean cloth moistened with plain, luke-warm water to clean the exterior
of the unit. Glass cleaner is a good way to remove nger marks, but please use it
sparingly, and avoid contact with the actual loudspeaker driver units.
IMPORTANT: Never use solvents such as benzene or other strong chemical
cleaners since these could damage the unit’s nish. It is VERY important that no
liquid reaches the inside of the unit.
Page 18

16
Troubleshooting
No sound is heard
• Check power connections and that there is a continuous blue light on control
panel.
• Check that the TV or other sound source is playing and that it is connected
properly to the soundbar. If unsure that your media device is playing, unplug,
and test with headphones.
• Press the sound source button on the remote control or control panel to change
the sound source. The indicators show which source is playing.
• Adjust the volume of the soundbar until sound is heard.
• Increase the volume of the playback device. The M9 features an energy saving
mode that cuts the power to the ampliers when there is no signal for a long
time.
The sound is out of sync with the TV
• Make sure all video sources are connected to the TV and that the soundbar is
connected to the TV optical output or RCA output sockets. This connection
method should re-align the sound. If it is still out of sync, look for a sound/time
alignment menu in the TV menus.
Remote does not work
• Check that plastic strip in remote has been removed.
• If the remote has had a lot of use, replace the battery.
• Check there are no obstructions between the remote and the front of the
soundbar.
Sound is distorted
• Turn down the output of the device playing into the soundbar
• Turn up the master volume on the soundbar if necessary.
• Check that all audio connections are well seated / plugged in fully.
Sound is noisy / ‘hissy’
• Turn down the volume of the soundbar unit
Page 19

17
• Turn up the output volume of music source to compensate.
• Use the digital optical (TOSLINK) inputs if possible to reduce noise.
Digital optical issues: ‘Clicking’ or no sound
• Connect the TV optical output to the soundbar optical input preferentially.
• Ensure both ends of the optical cable have had the protective plastic tip
removed.
• Ensure both ends of the cable have been inserted fully; a distinct ‘click’ will be
felt when the cable is properly seated.
• Check the output format of the optical signal from the playing device. Choose
‘normal’ or ‘PCM’ format. Refer to the TV manufacturer’s handbook for more
information. You can also contact Orbitsound for advice, see contact help line in
this handbook and on the packaging.
No sound from subwoofer (soundbar working)
• Check the subwoofer volume (back of subwoofer). Set to ‘normal’, then adjust to
preference.
• Switch o and switch on the subwoofer to reset it.
• Check power cables and power switches on soundbar and subwoofer.
• Try a dierent wireless channel. Use a paperclip to short press the pair button
on the back of the soundbar. (See Channel selection)
• If the subwoofer STATUS light is not lit, re-pair the subwoofer (see Pairing)
Battery replacement (remote)
Replace remote battery with anode up (+) from back-side.
BATTERY: CR 2025
Page 20

18
Orbitsound Warranty
This Orbitsound product is supplied with a 24 month limited manufacturer’s
warranty dated from new purchase date. This warranty covers repairs or replacement
that may be required in the event of unit failure during normal use, subject to the
terms and conditions stated below and at the Agent’s discretion. This warranty
is non transferable and excludes any routine maintenance, consumables or parts,
or any work arising from use of the equipment outside the recommendations in
the handbook, misuse or negligence. This Warranty does not aect any statutory
Consumer rights in the place of purchase.
Warranty Terms
‘Agent’ means Orbitsound Ltd. or an Orbitsound representative appointed for the
purposes of fullling the manufacturer’s warranty.
‘Purchaser’ means the company, rm or person using the product for the warranty
period.
‘Product’ means the good sold to the Purchaser under contract.
Making a Warranty Claim
In the event that the unit stops working or performing as described in the handbook,
the following procedure must be followed in order to have the unit restored or
replaced by this warranty:
1. Contact your Orbitsound support agent FIRST.
2. If the support agent advises to do so, return the unit in its original packaging
complete with PROOF OF PURCHASE to the address advised.
3. You will be advised by the Agent on the action that will be taken and any costs
payable, subject to the conditions of this warranty.
Page 21

19
Orbitsound Ltd Warranty Terms and Conditions
1.RETURN TO BASE WARRANTY
Faulty products will be repaired or replaced (as deemed appropriate by the relevant Agent) at
the Agent’s premises.
2. LIMITATIONS
The warranty covers the product and any agent installed accessories provided that the
equipment has been installed and used in accordance with the supplied handbook
instructions. The warranty will not cover repairs or replacements arising from misuse or
accidental damage. See Warranties and Liabilities.
3. CHARGES
For warranty repairs that are 100% covered by the manufacturer’s warranty, there will be
no charge for any repair or replacement or return freight to the purchaser. Any repairs or
replacements that are found to be outside the scope of this manufacturer’s warranty are
chargeable, and the return freight will be charged at the Agent’s discretion. Associated charges
must be paid in full before the returned item(s) will be dispatched to the Purchaser.
4. WARRANTIES AND LIABILITIES
Subject to the provisions below the supplier warrants that the product will perform in a
manner t for purpose.
a. The Agent shall be under no liability in respect of any defect in the product arising
from any action whatsoever by the Purchaser except such action as is described and
recommended in the handbook supplied.
b. The Agent shall accept no liability for any defect arising from excessive wear and
tear, willful or accidental damage, abuse, negligence, abnormal operating or storage
conditions or failure to follow the operating
c. Unauthorised modication or repair by unauthorised person(s) voids this warranty
immediately.
d. The Agent shall be under no liability under this warranty if the total agreed price for the
product has not been paid in full.
e. The liability of the Agent shall not exceed the price paid for the product and the Agent
shall not be liable for any loss of prot or consequential damage or any other claim for
compensation.
f. This warranty does not aect any statutory consumer rights that may exist where the
Product was purchased.
5. FORCE MAJEURE
The Agent shall have no liability for delay or failure to perform if such failure is due directly or
indirectly to any cause beyond the Agent’s reasonable control including but without limitation
to acts of God, explosion, re, terrorism, accident, war or threats of war, prohibitions of any
kind, embargoes, strikes or lockouts.
GENERAL
The Agent may assign or subcontract responsibilities and rights under this warranty. In all
warranty cases, please refer to the support pages of www.orbitsound.com rst.
Page 22

20
Additional Safety Information
1 - The apparatus shall not be exposed
to dripping or splashing and that
objects lled with liquids, such as vases,
coee mugs, glasses etc. shall not be
placed on apparatus.
2 - The mains plug/appliance coupler/
direct plug-in adapter is used as
disconnect device for the soundbar and
the subwoofer, the disconnect device
shall remain readily operable.
CAUTION: Danger of remote control
failure if battery is incorrectly replaced.
Replace only with the same or
equivalent type.
WARNING: The remote control
battery shall not be exposed to
excessive heat such as sunshine, re
or the like.
Correct Disposal of this product.
This marking indicates that this product
should not be disposed with other
household wastes throughout the
EU. To prevent possible harm to the
environment or human health from
uncontrolled waste disposal, recycle it
responsibly to promote the sustainable
reuse of material resources. To return
your used device, please use the return
and collection systems or contact
the retailer where the product was
purchased. They can take this product
for environmental safe recycling.
FCC Statement:
This equipment has been tested and found to comply
with the limits for a Class B digital device, pursuant
to part 15 of the FCC Rules. These limits are designed
to provide reasonable protection against harmful
interference in a residential installation. This equipment
generates, uses and can radiate radio frequency energy
and, if not installed and used in accordance with the
instructions, may cause harmful interference to radio
communications. However, there is no guarantee that
interference will not occur in a particular installation.
If this equipment does cause harmful interference to
radio or television reception, which can be determined
by turning the equipment o and on, the User is
encouraged to try to correct the interference by one or
more of the following measures:
- Reorient or relocate the receiving antenna.
- Increase the separation between the equipment and
receiver.
- Connect the equipment into an outlet on a circuit
dierent from that to which the receiver is connected.
- Consult the dealer or an experienced radio/TV
technician for help.
Caution: Any changes or modications not expressly
approved by the party responsible for compliance could
void the User’s authority to operate the equipment.
Page 23

21
Specifications
Frequency range +/- 3 dB [Hz] 45 – 16KHz
Control; response (remote control) +,-6dB at 100Hz and 10KHz
Maximum SPL [dB] 95dBA
Amp. power 200W total
Crossover frequencies [Hz] 190/5,000
Tweeter drivers 1 x 1” m/c
Front main drivers 2 x 2.5 “
Spatial drivers 2 x 2” full-range
Enclosure type Sealed/orbitsound spatial
Sub-Bass driver 1 x 6.5”
Sub-Bass Enclosure type Low prole tuned reex
Connection input(s) Stereo Line level -10dBu
3.5mm jack and RCA.
TOSLINK optical digital input
Bluetooth (wireless)
Output(s) Orbitsound 2.4GHz audio
Recommended placement Bar, in front of television
Sub, oor, port facing wall
Dimensions (H x W x D) [mm] 90 x 300 x 100mm (soundbar)
140 x 230 x 345mm (sub)
Cabinet nish Soundbar: High gloss
Subwoofer: High density PVC
Weight (in packaging) 10.4Kg
Power consumption Standby / Idle 0.4W / 4W
Voltage / Power 22V DC / 110-240v AC
Remote Control IR lead code 6122/01FE
 Loading...