

Orbitsound A70 Handbook

A70 AIRSOUND BAR
HANDBOOK

WELCOME
Thank you for purchasing the Orbitsound A70 airSOUND BAR. With
proper use the airSOUND BAR delivers superb sound fidelity, engaging
spatial sound, and will provide you with a fantastic listening experience
for TV, films, media and music.
PACKAGE CONTENTS
• A70 Soundbar
• S3 Subwoofer
• Remote control inc battery
• Soundbar power supply + power cord (country specific)
• Subwoofer power cord (country specific)
• Digital optical (TOSLINK) connection cable
• Analogue (AUX) connection cable
• Wall mounting kit
• Quick start guide
• Safety and warranty guide
ABOUT THE SOUNDBAR
The Orbitsound A70 is a high fidelity soundbar featuring airSOUND to
deliver a natural listening experience. The soundbar houses 5 speakers
in total. On the front there are 2 midrange loudspeakers, and a high
frequency tweeter. On the sides are compact airSOUND speakers
that work with the front speakers to create a fully immersive sonic
experience. The subwoofer is a tuned reflex system that connects
wirelessly to the soundbar through an ultra high speed wireless link. The
subwoofer produces powerful and controllable bass.
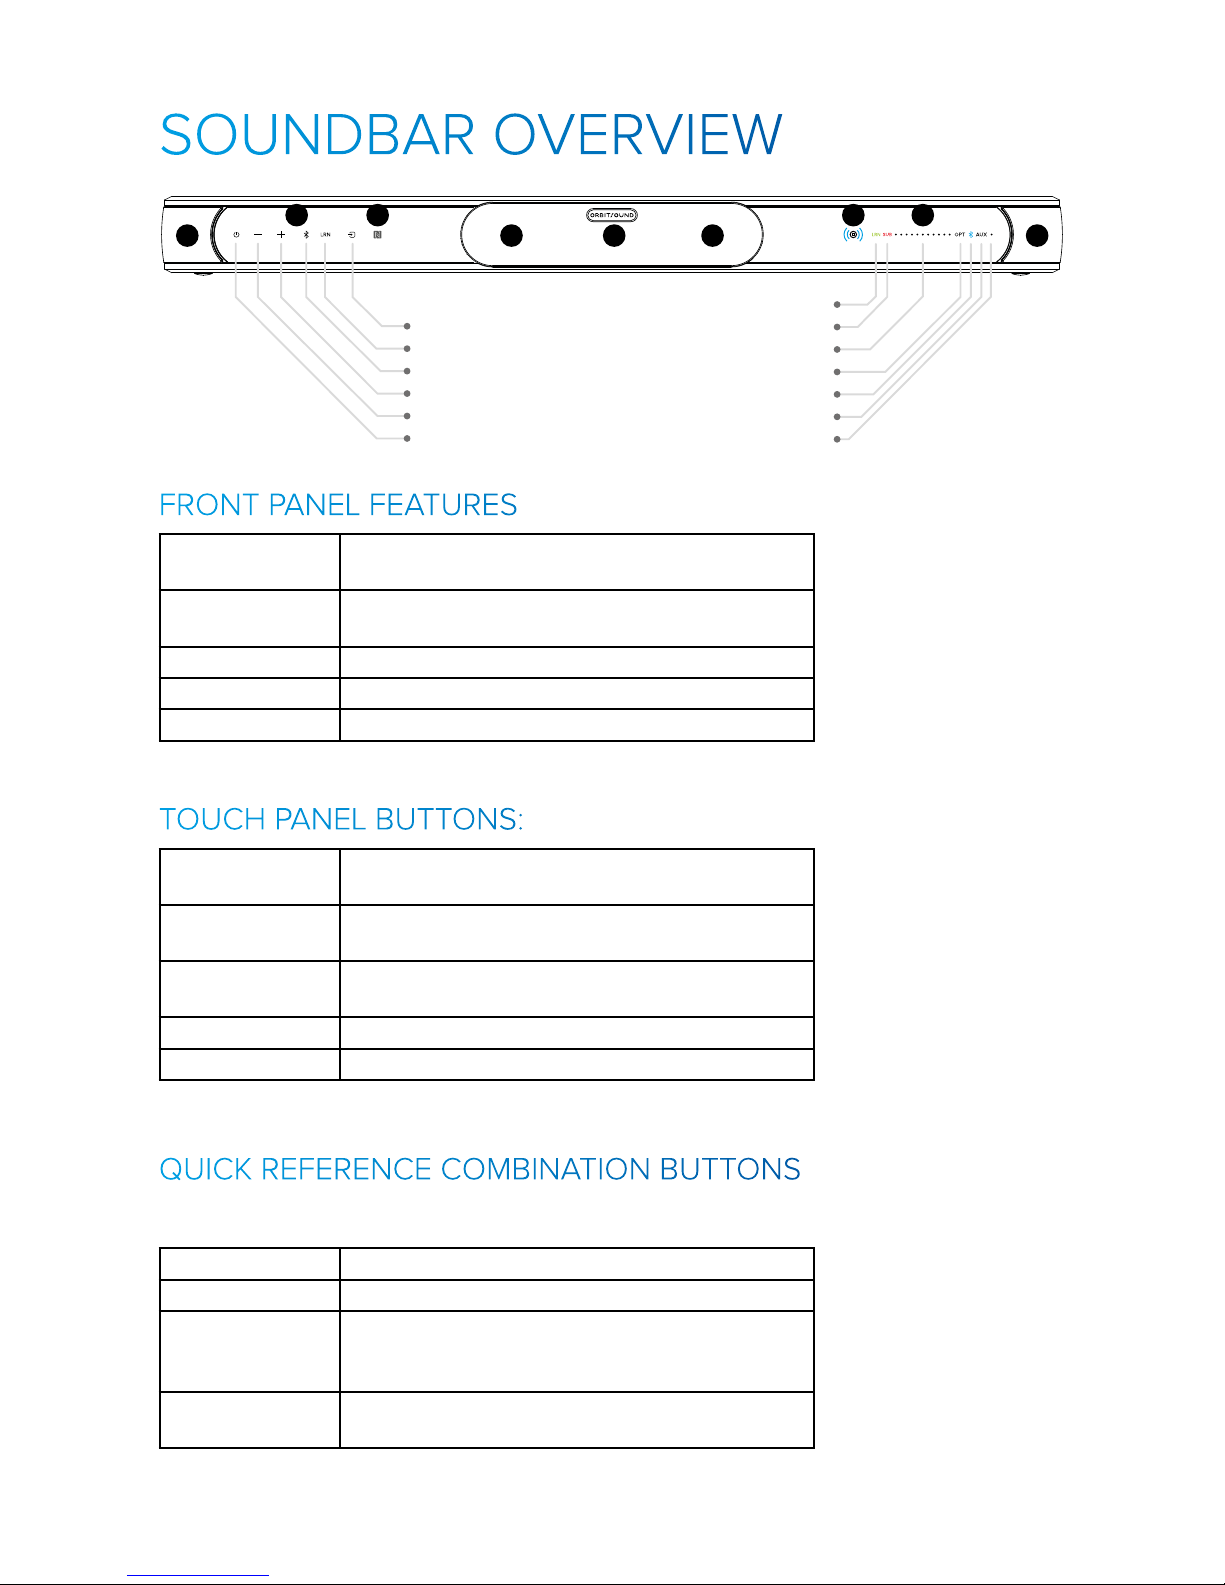
SOUNDBAR OVERVIEW
Bluetooth (Hold to pair)
Volume +
Volume -
Input Source
Remote Control Learning
Power / Standby
Remote Learning
Optical Source
Bluetooth Source
AUX Source
Wireless Subwoofer Error/Pairing
Volume/Bass/Treble
Power/Mute
Touch Panel Buttons
1 12
3 445
22
FRONT PANEL FEATURES
1 Side firing airSOUND loudspeakers that deliver
the spatial sound experience.
2 Front speaker array, midrange and high frequency
loudspeakers.
3 Infra red (remote control) receiver
4 Display panel
5 Touch panel buttons
TOUCH PANEL BUTTONS:
Input Source Chooses the soundbar sound source from Optical,
Bluetooth & AUX.
Remote Control
Learning
Starts the remote control learning process (see:
Remote Control Learning)
Bluetooth Controls Bluetooth connection & pairing (see:
Bluetooth)
Volume Controls the volume of the soundbar system
Power / Standby Switches on / o the soundbar
QUICK REFERENCE COMBINATION BUTTONS
These button combinations can be pressed to access special functions.
Press and hold for 3 seconds:
Vol+ & Vol- Subwoofer pairing mode
Power & Source System reset (keeps subwoofer pairing)
Bluetooth &
Source
Clear Bluetooth pairings (including subwoofer) note you will need to re-pair the subwoofer if you
use this feature.
Learn & Source Enter DFU mode (USB software upgrade) (unplug
soundbar to exit this mode)
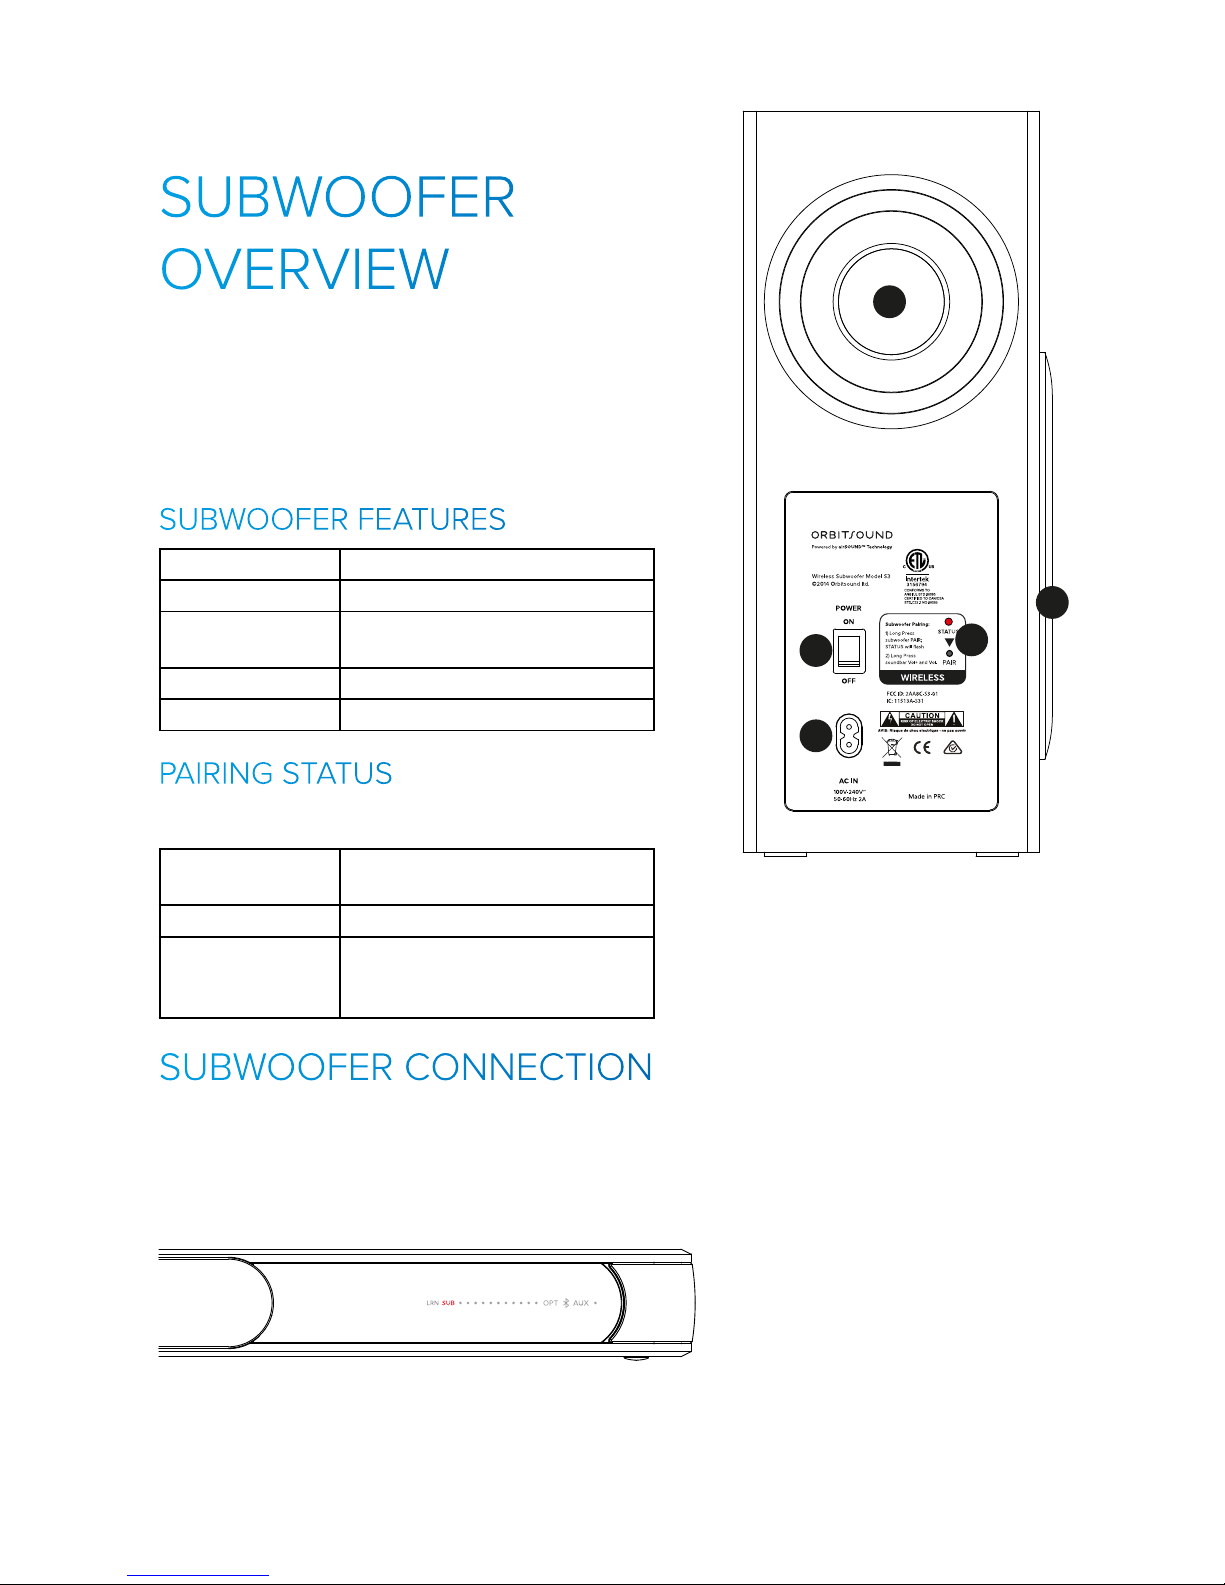
SUBWOOFER
OVERVIEW
The wireless subwoofer receives low frequency sound
from the soundbar via an ultra low latency Bluetooth
signal. To operate, the subwoofer must be paired with
the soundbar. At the factory, the subwoofer is paired with
the soundbar. You can re-pair a subwoofer if needed, see
‘SUBWOOFER PAIRING’ section.
SUBWOOFER FEATURES
1 Side firing subwoofer speaker
2 Rear facing tuned port
3 Subwoofer pairing button &
pairing status light
4 AC power inlet
5 Power swtich
PAIRING STATUS
The subwoofer STATUS indicator lights as follows:
ON Subwoofer is connected to the
soundbar and working
FLASHING Subwoofer is in pairing mode
OFF Suboofer is o, or in low power
state, or disconnected from
soundbar
SUBWOOFER CONNECTION
The subwoofer should not need to be re-paired. Only do the pairing
procedure if you have been instructed to do so by Customer Support,
or if the power is connected to the subwoofer, and the soundbar is
showing you that there is no subwoofer connected:
3 445
Note: The soundbar shows the red SUB light when there is no
subwoofer connected wirelessly. If the subwoofer is on, then it
needs to be paired to the soundbar. See ‘SUBWOOFER PAIRING’.
1
2
3
4
5
Note: the volume of
the subwoofer can be
controlled with the Bass
+/- button on the remote
control.
Resetting (factory reset)
on the the soundbar
also resets the bass
level to default.
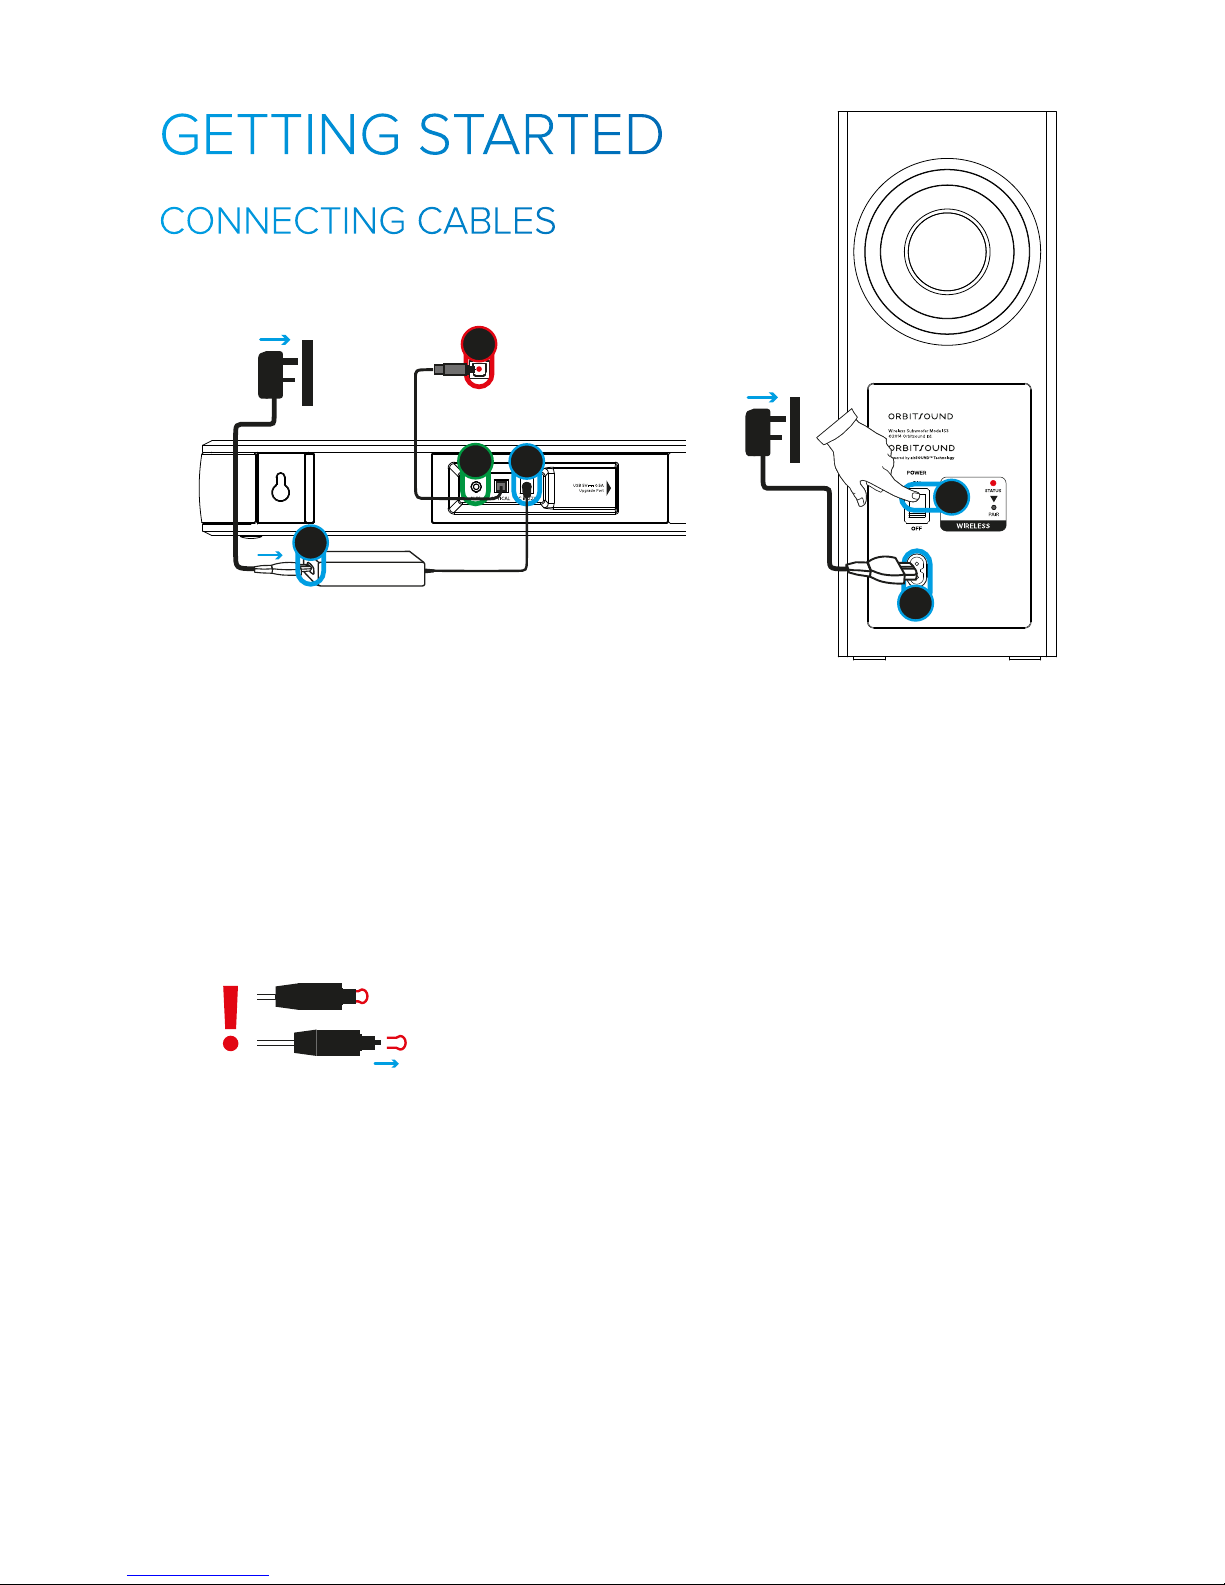
GETTING STARTED
CONNECTING CABLES
©2014 Orbitsound ltd.
1 12
3 445
22
Subwoofer Pairing:
1) Long Press
subwoofer PAIR;
STATUS will flash
2) Long Press
soundbar Vol+ and Vol-
1
2
2
Subwoofer Pairing:
1) Long Press
subwoofer PAIR;
STATUS will flash
2) Long Press
soundbar Vol+ and Vol-
TV OPTICAL
AUDIO OUT
1
1
1
2
3
1) CONNECT POWER:
Connect the subwoofer and soundbar to mains power sources as shown
above. Note, the soundbar power supply and subwoofer can accept
mains voltage from 110V to 250V AC. Note: be sure to switch on the
power switch on the rear of the subwoofer.
2) CONNECT TV AUDIO (OPTICAL):
Connect your TV OPTICAL AUDIO OUTPUT to the soundbar with the
provided optical cable. Make sure that the protective plastic covers
have been removed from the ends of the optical cable before use.
Please ensure that the optical output of your TV is enabled.
1 12
3 445
22
Subwoofer Pairing:
1) Long Press
subwoofer PAIR;
STATUS will flash
2) Long Press
soundbar Vol+ and Vol-
1
2
2
Important: Ensure that the chosen optical output mode is either
STEREO, PCM or NORMAL.
Note: make sure that the cable ‘CLICKS’ when plugging in to
make sure it is fully connected/inserted.
3) (OPTIONAL) - CONNECT AUX INPUT
The soundbar also accepts analoge audio from a standard 3.5mm
strereo jack plug. The included cable allows you to connect this to an
analogue output such as AUDIO OUT on a TV, or a CD player. Use this
input if your TV does not have an optical output.
©2014 Orbitsound ltd.
3 445
Subwoofer Pairing:
1) Long Press
subwoofer PAIR;
STATUS will flash
2) Long Press
soundbar Vol+ and Vol-
1
2
Subwoofer Pairing:
1) Long Press
subwoofer PAIR;
STATUS will flash
2) Long Press
soundbar Vol+ and Vol-
1
1
 Loading...