

Page 1

Orbit Reader 20™ User Guide Version
01.00.57
Features
These are a few of the features the Orbit Reader has to offer.
• 20 eight-dot refreshable braille cells
• Eight braille input keys and Space bar
• Navigation pad with four directional buttons (Up, Down, Left, Right)
and the Select button
• Micro B USB charging port
• SD card slot
• Power button
• Bluetooth® wireless technology
In the Box
Check that all the listed items are in the box you receive. The SD card
should already be inserted into the unit.
• Orbit Reader 20
• Standard-A to Micro-B USB cable
• AC adapter
• SD card with User Guide and content (installed in unit)
• Braille Quick-Start Guide
• Print Quick-Start Guide
Page 2
Introduction
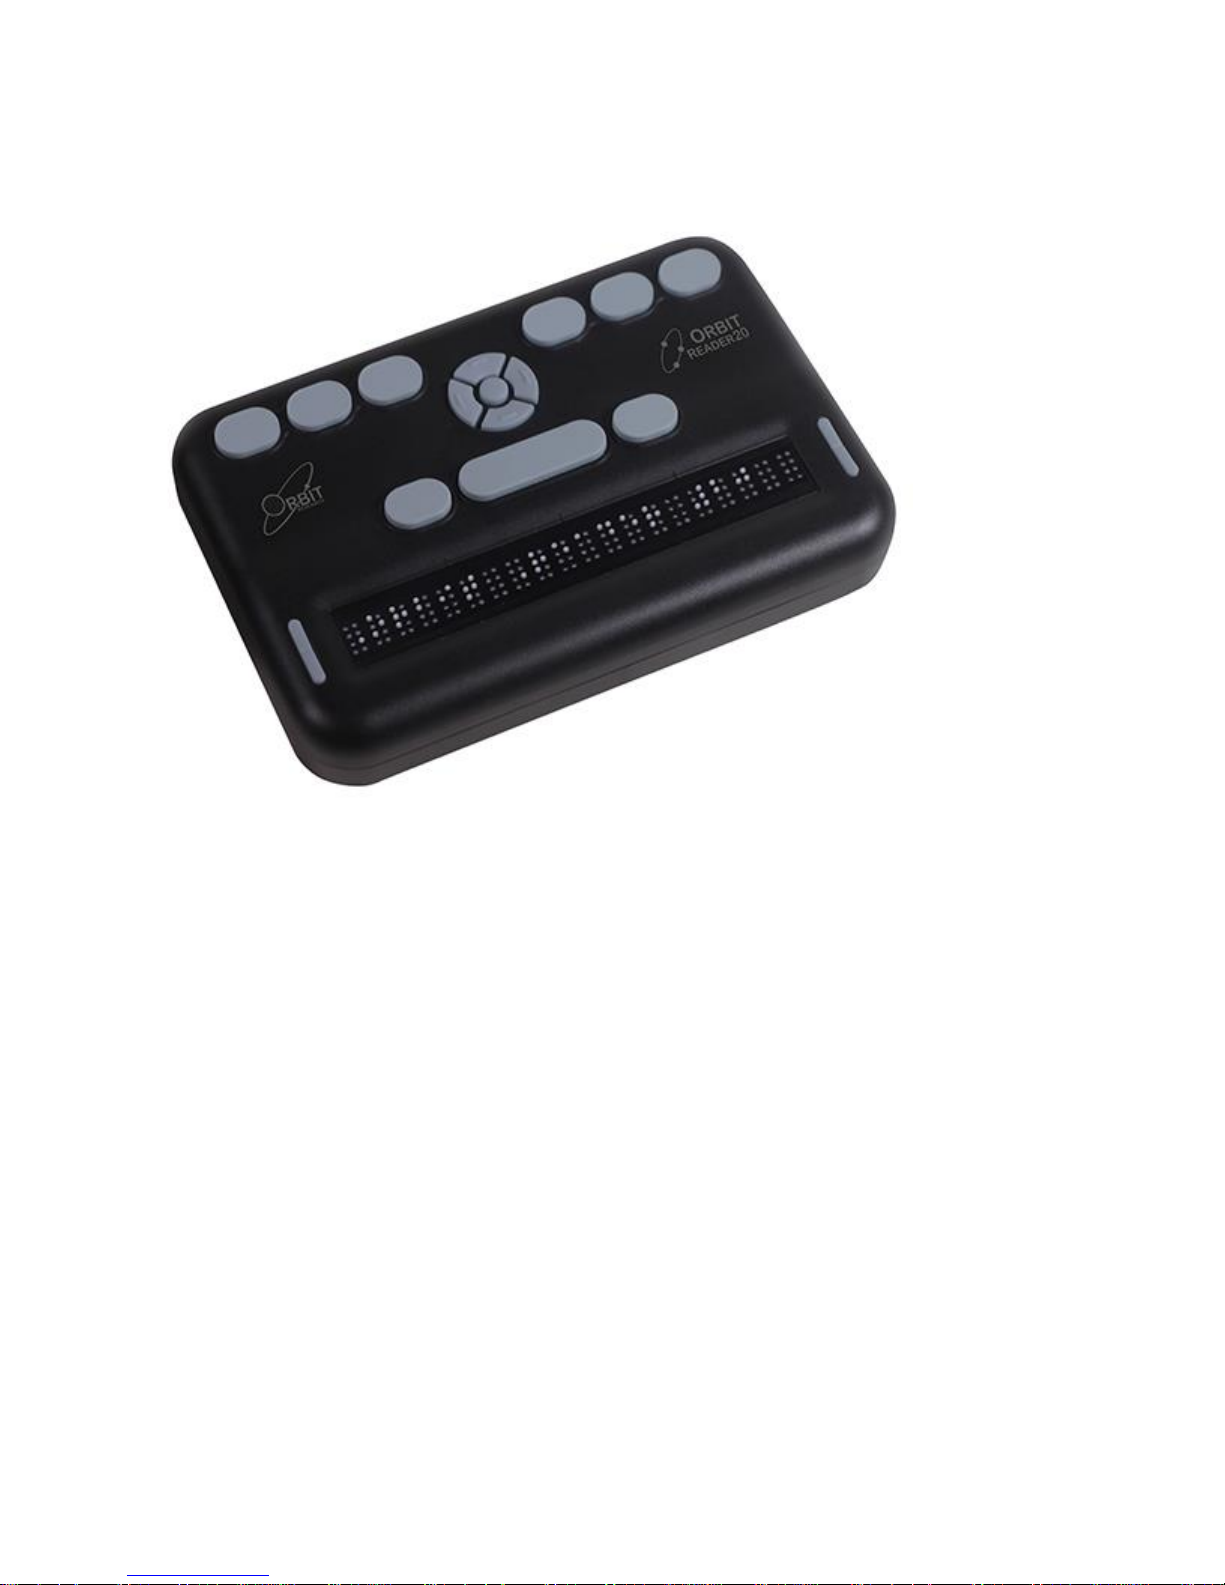
The Orbit Reader 20 is a portable, refreshable braille display and stand-alone
reader with the following features:
• a line of 20 braille cells with pins that arrange into the required pattern
to accurately represent any six- or eight-dot braille code, in any
language, and for any discipline
• reads the contents of files on an SD (Secure Digital) card for Stand
Alone mode
• remote connectivity to PCs and mobile devices for use with a screen
reader
• simple editing functions
• braille input keys
• contains rechargeable batteries
Documentation Conventions
For consistency and clarity, this documentation uses the following
conventions.
Braille keys are indicated by number. For example, if the documentation
indicates dot 1, it shows: dot 1.
Page 3

If multiple braille keys are required, the documentation indicates those keys
by showing the numbers separated by a space like this: dots 1 4.
When modifier keys are used, the documentation separates the modifiers
from the rest of the keys with a plus (+) sign like this: Space + dot 1. Recall
that modifiers, like the Shift key on a regular QWERTY keyboard, are keys
you hold down while pressing another key. This modifies the effect of the
pressed key. On a braille keyboard, Space is often used as a modifier to alter
the effect of the input keys.
Key mnemonics are written in capital letters for emphasis, but are typed in
braille lowercase (unless otherwise stated). When one key follows another,
the two keys are shown with a comma between them. For example, the
command Select, M means to press and release the Select key, then press
and release M (dots 1 3 4 simultaneously).
The Up, Down, Right, and Left directional buttons on the navigation pad are
interchangeably referred to as arrows, buttons, arrow buttons, and arrow
keys.
The words Keys and Buttons are used interchangeably.
In the descriptions of each menu option, this documentation indicates the
default setting.
Orientation
Orientation to the positioning of buttons, keys, cells, and slots is important
for understanding how the device operates and how you input and receive
information on the device.
To begin exploration of the Orbit Reader, place the device on a flat surface in
front of you with the row of braille cells closest to you. This is the proper
operational orientation.
Page 4
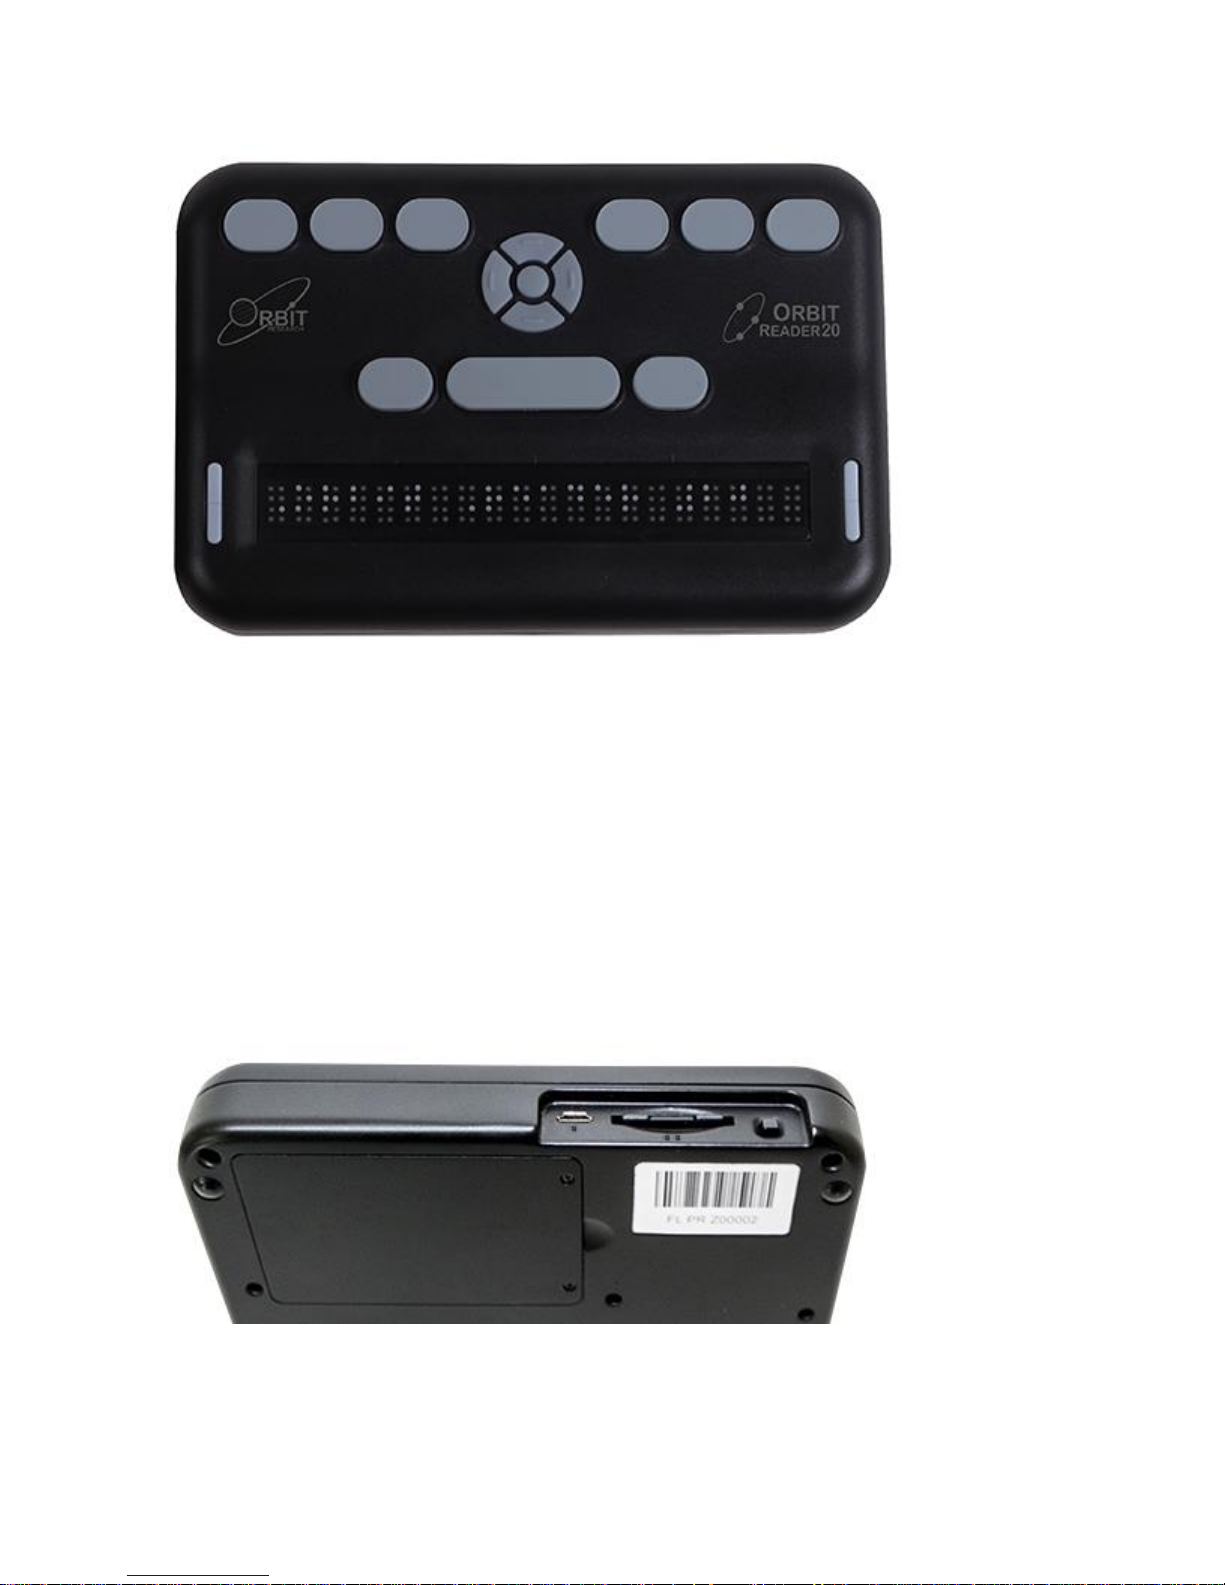
As you reach around from the front to the back of the device, from left to
right, there is the Power button (left), an SD card slot (middle), and a Micro
B USB port (right). (Image is reversed in photo.) They are all recessed in an
area in the left half of the back edge. The Power button sticks out enough to
make it easy to identify. The SD card slot has two small bumps directly
below it and the USB port has one bump below it.
The SD card slot is a standard type with spring feedback. The SD card is
inserted with the card connector fingers facing down. To release the card,
press in and remove your finger to allow the card to pop out.
The battery compartment is located on the bottom of the device.
Page 5
Key Placement and Use
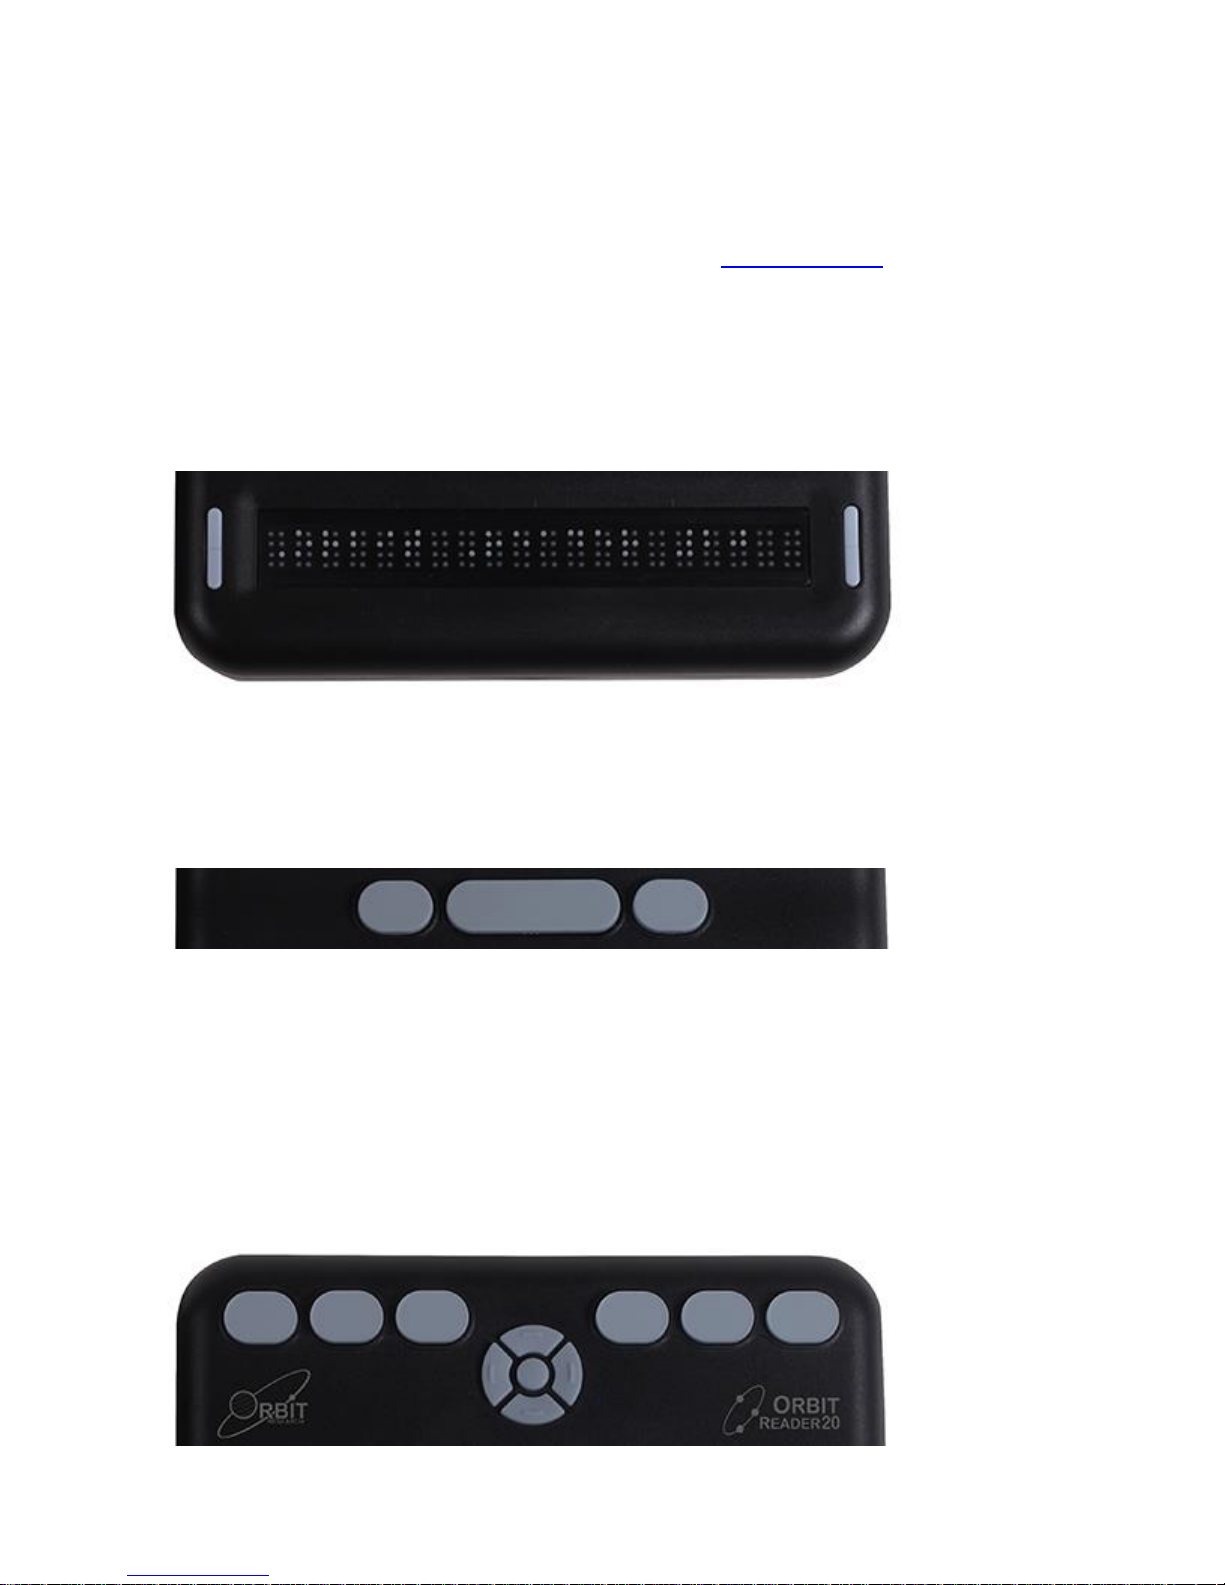
When properly oriented, the braille cells are closest to you. The Panning
keys are at each end of the braille display. See Panning Keys section for
more information.
For orientation purposes, there are three slightly raised tick marks located
above the braille cells. These orientation marks are spaced by every fifth
braille cell. For example, the first tick mark from the left would be between
the fifth and sixth braille cell.
Moving toward the top and away from you, find a row of three keys, with a
wider one in the middle. The wide key is the Space bar. The dot 7 input key
is to the left of the Space Bar, and the dot 8 input key is to the right of the
Space Bar.
As you continue toward the top of the face of the display, there is a
navigation pad in the middle, between the Braille Input keys and Space bar.
The navigation pad contains the four directional arrow buttons (Up, Down,
Left, Right) and the Select button.
The six traditional braille input keys are aligned along the top edge of the
face of the display, dots 1 2 3 on the left and dots 4 5 6 on the right.
Page 6

In Stand Alone mode, the braille input keys are the file navigation controls.
For example, dots 3 and 6 serve as Page Up and Page Down to move
through a title.
When using the display with a screen reader on a host device, such as an
iPhone, the Braille Input keys can be used to input text or control
functionality of applications and the device, acting as an input method to
your device.
Panning Keys
The Panning keys are two-function rocker keys found at either end of the
braille display. These keys control how you read lines of text: either next or
previous. Pushing on one end of the key results in one action, while pushing
on the opposite end results in the opposite action. To read the next display
of text (panning forward), press the bottom part of the key (down) on either
Panning key. To read the previous display of text (panning backward), press
the top part of the key (up) on either Panning key.
Braille Cells
If you are new to refreshable braille displays, you may not be familiar with
eight-dot braille. It is similar to six-dot braille with two additional dots below
dot 3 and dot 6. These two additional dots are called dot 7 and dot 8, and
they are used to indicate capitalization in the Computer Braille Code
(Computer Braille) or to indicate some attributed text or a cursor. Their
exact use depends on the software you use with the display. Check the
software documentation for exact usage.
Eight-dot Computer Braille is similar to uncontracted braille, except it
features a one-to-one correspondence with the plain text (ASCII) characters.
Computer Braille does not require an additional cell to show a capitalization
indicator. Instead, dot 7 is added to the lowercase version of the letter.
Getting Started
The Orbit Reader 20 has two modes: a Stand Alone mode and a Remote
mode. In Stand Alone mode, the device is a book reader that uses an SD
card as the reading media. In the Remote mode, the device works like other
braille displays and needs to be connected to a computer and a screen
reader. This section explains how to charge, turn the device on and off,
insert the SD card, and enter and exit the menus. Refer to the following
sections for additional support.
Page 7

Charging the Device
When you receive the Orbit Reader, it may already have a charge; however,
it should be charged fully before or during first use. You can use the device
and charge it at the same time, so this does not hinder your reading time.
To charge the device, use the provided Standard-A to Micro-B USB cable and
the power plug. Insert the small end of the cable into the Orbit Reader's USB
port with the bumps facing down. It should slide in without resistance; do
not force it. Then insert the large end of the cable into a computer USB
connector or the AC adapter provided. Plug the adapter into an AC wall
connector.
If the device is on when you connect the charger, the display shows
"Charger connected." When you unplug the charger, it shows "Charger
unplugged." The charger plug and unplug event indications are briefly
displayed even when the unit is off.
If you have charged the device for 4 or more hours, and it does not power
on, contact 1-866-659-1843 or email [email protected].
Powering On and Off
A square Power (on/off) button is found in a recessed area on the back of
the device. See Orientation section for more information.
To power on the device, press and hold the Power button for 2 seconds.
Orbit Reader flashes the first braille cell to let you know it is coming on.
When you turn the device on, Orbit Reader resumes from the last place of
the last file in use. If this is the first time you are using the device, or if this
is the first time you are inserting a new SD card, Orbit Reader shows the
first file or folder name on the SD card.
If the operating mode of the unit was Bluetooth when last powered off, and
the unit was turned off due to automatic power down event, then the device
turns back on in Bluetooth mode.
The Orbit Reader displays, "No SD card" when no card is inserted in the SD
card slot.
To turn off the device, press and hold the Power button for 2 seconds.
If no keys are pressed for 10 minutes and the device is running on batteries,
the unit automatically powers off to conserve power. If the Orbit Reader is
Page 8
connected using Bluetooth and there is no activity for 60 minutes, the unit
powers off.
Inserting and Formatting the SD Card
To insert the SD card, find the large slot on the back.
On one of the short sides of the SD card there are some ridges called SD
fingers or teeth. Situate the SD card with the teeth facing down. With the
device in the correct orientation for use, insert the short side with the teeth
into the device. The SD card should go in smoothly until it gets about a
quarter of an inch from being fully in the device. At that point, you feel a
slight resistance. The card slot works like a toaster. Gently push the SD card
in until you hear a click. The card is flush with the rear edge when properly
inserted.
To remove the card, power off the Orbit Reader, then press the card in a
little until it pops out (most of the way) and gently remove it.
Orbit Reader uses standard full-size SD cards from 4 to 32 GB in capacity.
The card must be formatted as Fat32. There is no way to format a card on
the device. Most cards come already formatted; however, you can format
one as Fat32 on a desktop computer for use with the Orbit Reader.
About Menus and File Names
Orbit Reader shows internal menus and file names in eight-dot Computer
Braille. See Braille Cells section for more information about eight-dot
Computer Braille.
For a complete reference to the characters comprising Computer Braille, see
the Appendix C - Computer Braille Chart.
Entering and Exiting Menus
To…
Do this
open the menu
press Select + Up Arrow (Remote and Stand Alone
modes) OR press Space (Stand Alone mode only)
exit the menu
press dot 7
move through the
menu choices
press the Up or Down Arrows
Page 9

see choices within a
menu option
use the Right and Left Arrows
select a menu item
press Select
Stand Alone Device Operational Mode
The Orbit Reader 20 has two functional modes. One mode is called Stand
Alone mode. The other mode is for use while connected with another device
and is called Remote mode.
Stand Alone mode is the default operational mode and allows the user to
read, edit, and browse files without being connected to another device. An
SD card must be inserted in the Orbit Reader while operating in Stand Alone
mode.
In Stand Alone mode, users read content stored on an SD card in one of two
ways:
• sent by library
• prepared on computer and copied to the device
In Stand Alone mode, the Orbit Reader displays the content of files stored on
an SD card. It does not do any translation or interpretation. You prepare the
files ahead of time on your computer, then store them on the SD card. For
example, if you want to read in UEB, prepare the UEB transcribed title on
your computer and then store it on the card.
Remote mode allows you to connect the Orbit Reader to iPhone®, iPad®,
and Android™ mobile devices, as well as desktop computers. In Remote
mode, Orbit Reader acts as an input and output device for the remotely
connected host via USB or Bluetooth. Users connect the device to a
computer or portable device with a screen reader and then do one of the
following:
• use apps like Kindle, Adobe Digital Editions, or iBooks to read
commercially available titles
• employ any accessible technology for browsing, utilities, and education
The screen reader translates the text into the braille code of choice.
To move back and forth between Stand Alone and Remote modes, use the
following commands:
Page 10

To switch to Remote mode: press Select + Right Arrow
To switch to Stand Alone mode: press Select + Left Arrow
Stand Alone mode operates in the following ways:
1. Menu
2. File Manager
3. Reader
4. Editor
1. Menu
Orbit Reader 20 provides a menu for setting options, checking battery, and
changing modes of operation.
To open the menu in Stand Alone mode, press Space. The device responds
by showing the first menu option as Battery. Some menu items (like
Battery) show status. Others let you select among a number of choices. For
example, the Arrange Files By item lets you select one of several ways to
arrange how files appear in the file manager. The selected option is
underlined with dots 7 8.
To scroll through the other possibilities, press either the Right or Left Arrow.
To select the option, press Select. Orbit Reader responds by underlining the
word with dots 7 8 to indicate the choice.
To close the menu and return to your work, press dot 7.
To move to another menu item, press the Up or Down Arrow. When you get
to the end of the list of options and press the Down Arrow again, Orbit
Reader moves back to the top menu item. Similarly, when you press the Up
Arrow from the first menu item, Orbit Reader moves to the last item in the
list. This feature allows quick access to the last few menu items. That is why
some options that may be frequently referenced are located near the bottom
of the menu list.
Page 11
Menu Availability
The menu is available for the Remote and Stand Alone modes. Press Select
+ Up Arrow to open the menu in either mode or press Space for Stand Alone
mode only.
To exit the menu and return to the previous mode, press dot 7.
Menu Options
A few of the Menu options have a default setting (indicated in the list below).
For most of these options, you can toggle back and forth between the
default setting and the alternative by pressing the Right or Left Arrows and
then pressing Select. Selected items are underlined with dots 7 8. Refer to
the specific section for further information.
Battery Status
Sort (Name)
Split Words (Off)
Filter Dot 7 (On)
Wrapping Text (On)
Compress Spaces (On)
Version
Reset Defaults
Serial
Bluetooth (On)
USB (HID)
Emulate (Off)
Cursor Blink (1)
Battery Status
The Battery Status menu item displays the amount of power left in your
battery. It also notes when the unit is charging.
Page 12

Sort Files
The Sort menu item lets you change the order of the files on the SD card,
using Orbit Reader's built-in File Manager. The categories are Name, Date,
Size, and Last Read. The default setting for Sort is Name. To return to the
File Manager, press dot 7 from Stand Alone mode.
In Remote mode, press Select + Up Arrow. This command takes you to the
Menu. Down Arrow to the Sort Files list item.
If in the File Manager or the Reader, press Space to enter the Menu, then
Down Arrow to Sort Files.
If in the Editor, exit out (Select, E OR Select, Select) and press Space to
enter the Menu. Down Arrow to Sort Files.
Additionally, you may sort the files within the selected category in Ascending
or Descending order. After selecting a category, press the Right or Left
Arrows until you reach either Ascend or Descend in the list and press the
Select button. Orbit Reader arranges the files in the indicated order. The
default setting for this menu item is Ascending (A→Z).
Split Words
The default setting for Split Words is Off. In the default setting, the Reader
tries to put as much content on the display as possible without splitting a
word; however, if you want 20 cells of braille, no matter the content, set
Split Words to On. When Split Words is on, the Reader can show partial
words. When you pan to the next 20 cells of braille, the remainder of that
word appears at the beginning of the line.
Filter Dot 7
The default setting for Filter Dot 7 is On. The Filter Dot 7 menu item lets you
turn off the dot 7 that frequently appears in some BRL and BRF files. The dot
7 is filtered by default, but if you wish to write eight-dot braille, turn this
setting off.
Wrapping Text
The default setting for Wrapping is On. The Wrapping option is Orbit
Reader's way of reflowing files that are already formatted for embossing.
Normally, formatted files contain line-end indicators every 38-40 characters,
which starts a new line. This option eliminates extra spaces, making it easier
to read on a 20-cell display.
Page 13

Compress Spaces
Carriage returns, blank lines, and tabs represent extra spaces (or white
space) in a document. These spaces take up lots of room and therefore slow
down reading on a braille display. The Compress Spaces option eliminates
blank lines and spaces. This setting is especially useful when reading
formatted text files that may contain many blank lines.
When there are multiple spaces, Orbit Reader can filter them so that only
one space is shown at most by default. The default setting for Compress
Spaces is On.
Software Version
The Version menu item displays the version of the software running on your
device.
Reset Defaults
The Reset Defaults menu item resets all user settings to the factory settings.
To reset to default settings, press the Select button. This action resets
defaults and takes you to the top of the Menu Options list (Battery Status).
Device Serial Number
The Serial Number menu item shows the individualized serial number of the
device you are using. This number may be important for warranty purposes.
Set Bluetooth
The default setting for Bluetooth is On. If the Orbit Reader is paired to a
Bluetooth device, it automatically connects to it again when the Orbit Reader
is next powered on.
Set USB Protocol
The USB menu item selects between the two possible USB protocols: Human
Interface Device (HID) or Serial. The default setting for USB is HID.
Set Pairing Scheme for Bluetooth
The Pair menu item selects a Bluetooth pairing scheme. Orbit Reader uses
the selected scheme when it responds to a Bluetooth pairing request from a
host device.
The appropriate scheme to select depends on your needs.
Page 14

The three choices are:
1. Just Works
2. Pass Key
3. Confirm Code
• Just Works is the easiest scheme to use. When using this scheme,
Orbit Reader automatically pairs to any device that sends the pair
request. The Just Works Bluetooth pairing scheme is the default.
• Pass Key requires you to type a number on the host to confirm the
pair request. The number Orbit Reader uses is 1234. When you initiate
the request to pair with Orbit Reader, the host device shows an edit
box where you enter this number to successfully pair the two devices.
This scheme is somewhat more secure than Just Works, because the
person requesting the pairing must know the Pass Key number.
• Confirm Code is the most secure pairing scheme. With this scheme,
Orbit Reader responds to pairing requests by showing a random
number on both the Orbit Reader's braille display and on the host
device. To confirm the request, ensure the numbers match and press
Orbit Reader's Select button.
Set Cursor Behaviour
The Cursor Blink option only works when editing in the Edit Box or Editor
mode. The options are determined by the number of seconds between
blinks. The default setting for the Cursor Blink option is 1, which is one
second between blinks. The setting choices are 1, 5, 15, 30, and 60 seconds,
and 0, which sets the cursor to not blink.
2. File Manager
Orbit Reader stores the titles you read on an SD card. Therefore, when using
it as a Reader, an SD card containing the content to read must be inserted.
No SD card is required when using the device in Remote Mode.
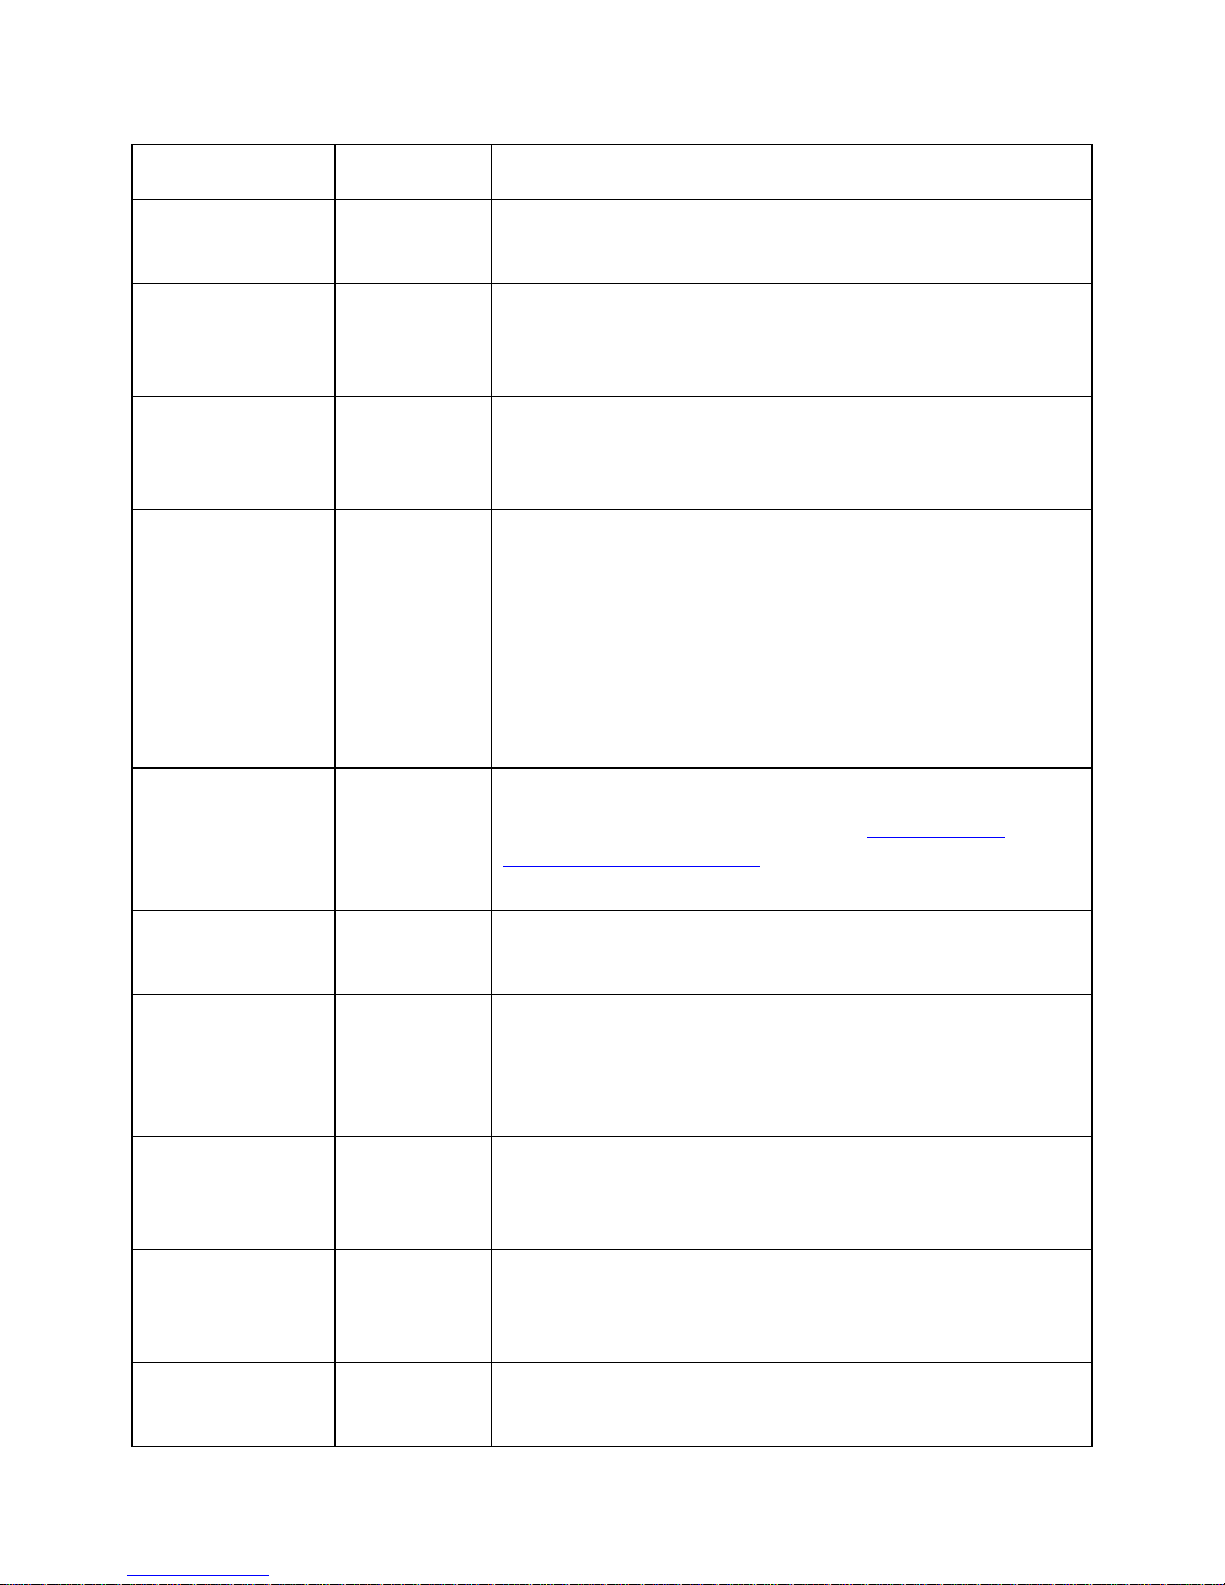
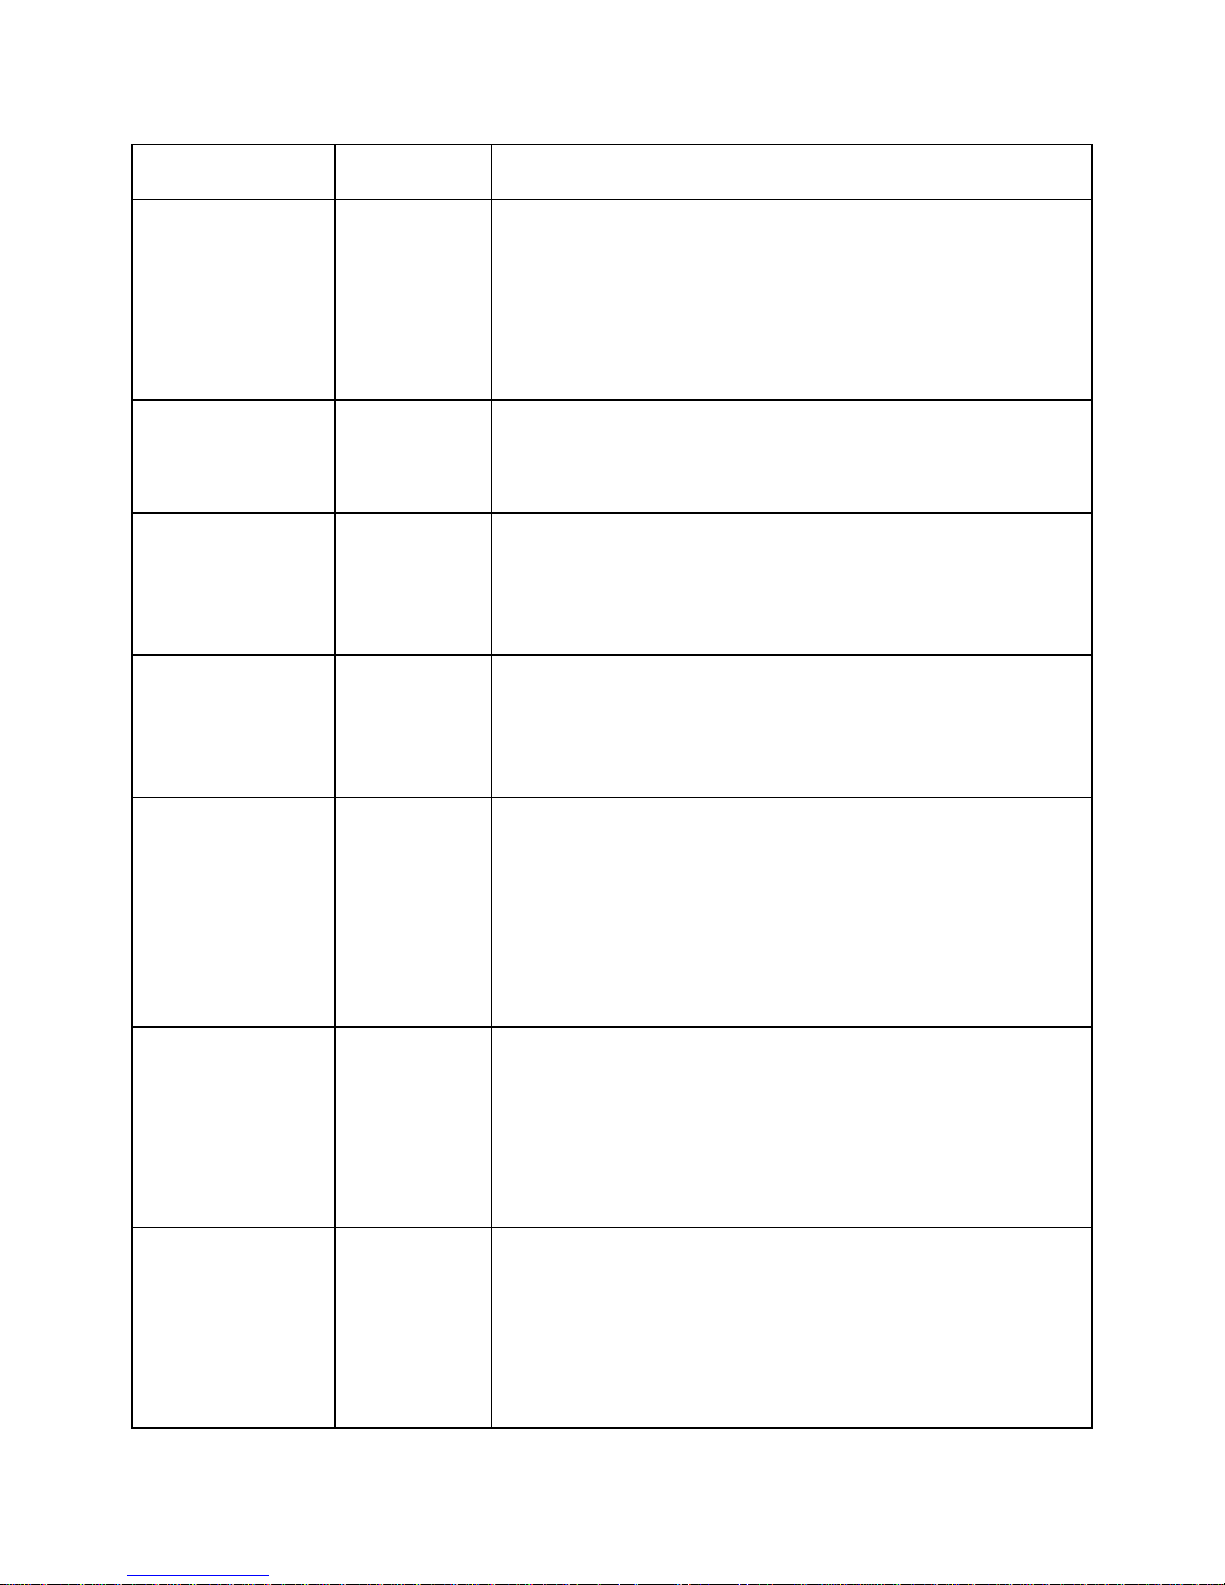
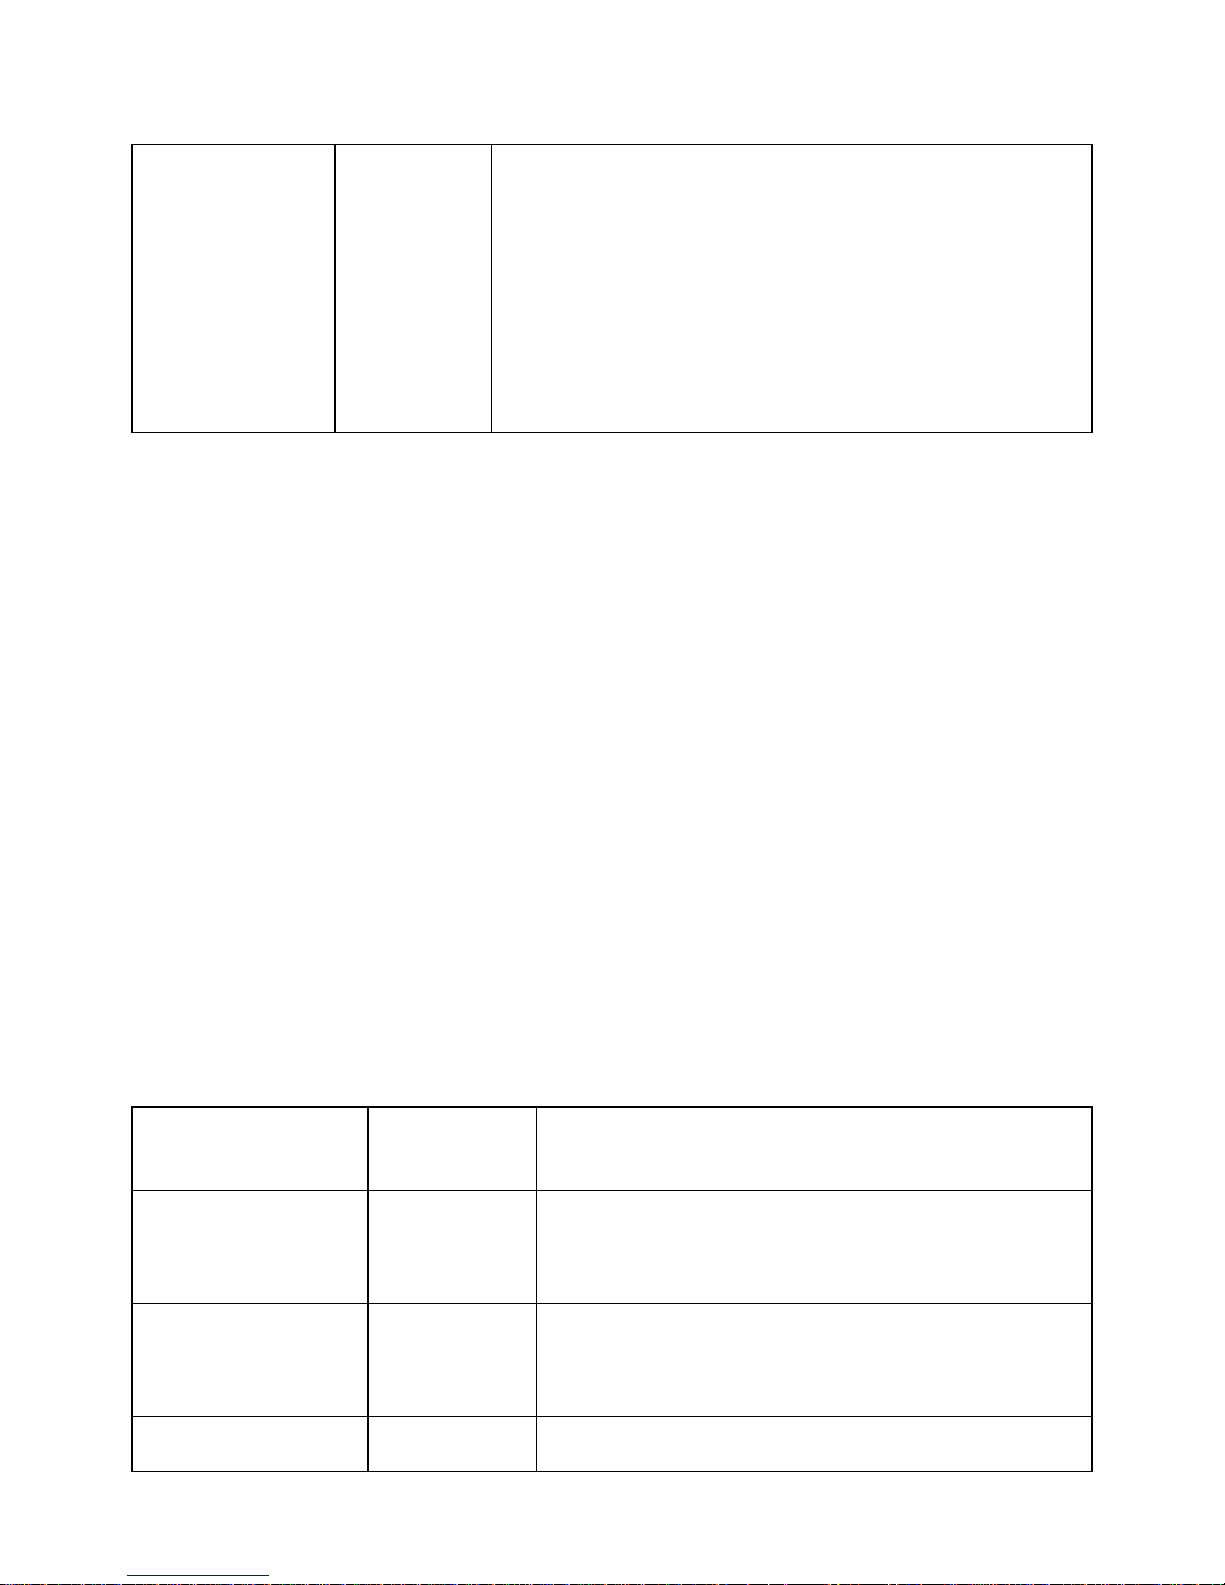
File Manager Commands
The commands for managing files and folders are essentially the same. For
example, you can use Space + R to rename either a file or a folder;
however, some commands do not apply to both. Be sure to reference the
File Manager Commands Table if you are unsure of the appropriate
command.
Page 15
To...
Press
Here's why and/or additional information
Open a file or
folder
dot 8
Pressing Select or dot 8 opens the file or
folder.
Exit a file or
folder
dot 7
Pressing dot 7 in a file or folder backs up one
file or folder respectively. When in root folder,
dot 7 does nothing.
Go to previous
or next file or
folder
Up or
Down
Arrow
Pressing Up or Down Arrow moves to the
previous or next file in the list.
Go back one
folder
dot 7
Dot 7 acts like a "back" key to exit the current
activity. If the user is already in the File
Manager, pressing dot 7 moves focus back one
level.
If you are at the root level, dot 7 does nothing.
If you are in one of the columns of information,
for example size or date, then pressing dot 7
returns to the filename.
Move through
file
information
Left or
Right
Arrow
This command moves you through the file
information by headings. See More About
Moving Through Files section for more
information.
Open the
Menu
Space
Pressing Space opens the menu.
Scroll text
Left or
Right
Panning
buttons
If the file name is longer than the display,
panning left or right displays more of the file
name.
Make a New
File
Space + N
(dots 1 3
4 5)
The New File command starts the Editor mode
with a new file in which to type.
Make a New
Folder
Space + O
(dots 1 3
5)
The New Folder command opens the Edit Box
where you may type the name of the new
folder.
Delete a file or
folder
Space + D
(dots 1 4
This action deletes the currently selected file(s)
or folder(s). Only empty folders can be
Page 16
5)
deleted.
Rename a file
or folder
Space + R
(dots 1 2
3 5)
The Rename File command allows you to
change the name of a file or folder. To use it,
press the Rename command. Orbit Reader
responds with an Edit Box containing the
original file or folder name. Edit the name or
type a new one and press dot 8.
Cut a file
Space + X
(dots 1 3
4 6)
This action cuts the currently selected file(s)
from their location and places it(them) on the
clipboard to be used with the paste command.
Copy a file
Space + C
(dots 1 4)
The Copy File command makes a copy of the
currently selected file(s) and places it(them)
on the clipboard to be used with the paste
command.
Paste a file
Space + V
(dots 1 2
3 6)
This action pastes the file(s) or folder(s) that
are currently on the clipboard into the current
location in the File Manager. If no file or folder
is on the clipboard, no action is taken.
Mark a file
Space + M
(dots 1 3
4)
When moving multiple files, use the Mark File
command to mark each individual file before
using Cut, Copy, or Delete. To Mark a file,
arrow to it and press Space + M.
To clear a marked file, press Space + M again.
File Manager indicates marked files by raising
dots 7 and 8 of the first letter of the file name.
Protect or
unprotect a
file
Space + P
(dots 1 2
3 4)
To protect a file from accidental changes,
arrow to the file and press Space + P. To
remove the protected status, select the file and
press Space + P again. To determine if a file is
Protected, arrow Right or Left to the Protected
heading.
Edit the
current file
Space + E
(dots 1 5)
When editing the current file, the Orbit Reader
switches to an Edit mode, which is indicated by
a cursor at the point of input. The cursor is at
the first character shown on the display when
you pressed the edit command. As you type,
everything is saved to the file.
Page 17
Go to Last Edit
File
Space +
dots 1 2 4
6
Using this command reopens the last file you
edited and returns the cursor to its last
position in that file.
The Edit Last File command is useful for taking
notes on what you read. Use the command to
quickly switch back to the Editor. Then close
the Editor to return to the title you are reading.
This command has no effect if you are already
editing a file.
More About Moving Through Files
When moving through the list of files, Orbit Reader shows the first 20
characters of the file name. The user may scroll to the rest of the
information about the file, such as the rest of a long file name, its size, and
date, by using the Panning keys to move the display window through the
rest of the contents on that line of the list of file names.
Each item on the file list includes the following items:
• File name and extension
• Current position in the file in number of characters
• Size in kb (kilobytes)
• Last modified date
• Protected or Unprotected
Pressing Left or Right Arrow moves to the previous or next column heading
(file information). If on Position when entering the file, upon exiting the file
the File Manager returns the user to the Position information.
File Movement Commands
To...
Press
Here's why and/or additional
information
Move to first file
Press
Space +
dots 1 2 3
Pressing Space + dots 1 2 3 moves the File
Manager selection to the first file in the
current folder.
Move to last file
Press
Space +
dots 4 5 6
Pressing Space + dots 4 5 6 moves the File
Manager selection to the last file in the
current folder.
Incrementally
Type the
To find a file, quickly type the first few
Page 18
search file list
file name
quickly
letters of the file's name. File Manager
highlights the first file matching the letters
you typed.
File Errors
When copying or pasting a file that results in another file with the same
name, File Manager adds an extension to indicate the new file is a copy. For
example: if you copy book.brf to a folder that already contains book.brf, the
new file becomes book1.brf and the original book.brf remains unchanged.
If the SD card runs out of space before a file operation completes, File
Manager shows, "Error copying file xxx" where xxx is the file's name.
File Progress
When copying large numbers of files, or large files that can take some time,
File Manager displays progress messages during the copy operation.
If copying a file that takes more than five seconds, File Manager displays,
"Copying xxx (yy%)" where xxx is the name of the file and yy is the
percentage complete. This percentage is updated at least every 10% of the
progress.
File Types
Braille files may contain any kind of braille, either six- or eight-dot, in any
language and for any topic. You create these files on a computer with a
translation software package, such as Duxbury or LibLouis, or you create
them in the Editor on the Orbit Reader.
Supported File Types
EXT
Type
Explanation
BRF
Translated, formatted braille
displays exact representation
BRL
Translated, unformatted braille
displays all text
TXT
Text
displays eight-dot Computer Braille
In addition to the supported file types, Orbit Reader shows the contents of
any file. Be aware that some files do not contain readable content. This
Page 19

feature is useful, however, to examine files that do contain readable text
even if it is not a supported file type.
Orbit Reader does not translate or interpret any file. It simply displays the
contents of a file in braille. So, if you put a plain text file onto the SD card,
Orbit Reader displays that file as it was written. Similarly, if you put a BRF
file on the SD card, no matter the language or code, Orbit Reader accurately
shows its contents. To use Word or PDF files, you must first translate them
on a desktop computer, then send the translated file to the SD card.
Preparing Files
To prepare files for placement on the Orbit Reader, follow these guidelines:
• Determine the translation type
• Translate the file
• Place the file onto the SD card or use Mass Storage Mode to copy from
your desktop computer
To copy files to the SD card, remove the card from the Orbit Reader and
place into a card reader on your computer, or connect the USB cable from
the Orbit Reader to your Computer and activate Mass Storage Mode on the
Orbit Reader by either pressing Space + dots 5 7 or selecting Mass Storage
Mode from the USB option in the menu. When in Mass Storage Mode, Orbit
Reader shows up as a drive on the computer. While in Mass Storage Mode,
you cannot use other functions on the Orbit Reader.
3. Reader
The Orbit Reader 20 is designed to be a stand-alone reader. Placing BRF,
BRL, or TXT content (see File Types section) on an inserted SD card turns it
into an on-the-go braille book reader. When first powered on, the Orbit
Reader displays the contents of the first file on the SD card. To get to the file
list, press dot 7. Once a file is selected (Up or Down Arrow and dot 8), the
file opens and can be easily read using the Left and Right Panning keys.
There are many other functions in reading mode such as Find, Power Move,
Bookmarks, and even a menu to set preferences. The following sections
describe commands and settings that can be used while reading.
Note: In Stand Alone mode, the Orbit Reader displays the content of files
stored on an SD card. It does not do any translation or interpretation.
When you turn the device on, Orbit Reader resumes from the last place of
the last file in use. For first-time use, it displays the first file or folder on the
SD card. Press dot 7 to close the file and display the File Manager, which
Page 20
shows a list of the files on the SD card. Press Select or dot 8 to open a file or
folder. If there is no SD card inserted, "No SD card" is displayed.
When you reach the end of a file, "End of file" is displayed by the Reader.
Similarly, if you are at the beginning of the file, "Start of file" is displayed.
Reader Commands
While in Stand Alone mode, the following commands are available.
To...
Press
Here's why and/or additional
information
Go to Previous
or Next display
use the
Panning
buttons
See Panning Keys section for more
information.
Go to Previous
or Next
Character
press Left
or Right
Arrows
If the user presses Right Arrow, the next
letter appears on the right side of the
display.
To conform to traditional braille display
navigation commands, the Reader also
supports Space + dot 3 and Space + dot 6.
Go to Previous
or Next Word
press
Space +
Left or
Right
Arrows
If the user presses Space + Right Arrow,
the next word appears on the right side of
the display.
The Reader also supports Space + dot 2 or
5.
Go to Previous
or Next
Paragraph
press Up or
Down
Arrows
Pressing the Previous or Next Paragraph
command moves to the previous or next
carriage return in the file.
Also works with Space + dot 1 or 4.
Go to Start of
paragraph
Space +
dot 7 +
Left Arrow
To place your cursor at the start of a
paragraph, press the Space + dot 7 + Left
Arrow.
Go to End of the
Paragraph
Space +
dot 7 +
Right
Arrow
To place your cursor at the end of a
paragraph, press the Space + dot 7 + Right
Arrow.
Go to Previous
press dot 3
Pressing dot 3 or dot 6 moves back or
Page 21
or Next Page
or dot 6
forward in the file to the next page marker
(form
feed) or 1000 characters, whichever comes
first.
Go to Top or
Bottom of a file
press dot 1
or dot 4
Pressing dot 1 moves to the top of a file;
pressing dot 4 moves to the bottom of a file.
(For compatibility with other devices, Space
+ dots 1 2 3 moves to the top and Space +
dots 4 5 6 moves to the bottom of a file.)
Exit File or Menu
press dot 7
If reading a file, pressing dot 7 returns you
to the File Manager. If exiting the Menu,
Orbit Reader returns you to your previous
location.
Open the Menu
press
Space bar
Pressing the Space bar opens the Menu.
Set or Clear a
Bookmark
press
Space + M
In addition to the automatic bookmark
placed when you close a file, Orbit Reader
lets you set additional bookmarks.
Reader displays the message "Bookmark
added" or "Bookmark cleared" if there was
already a bookmark at that position.
Go to Previous
or Next
Bookmark
press dot 2
or dot 5
The Reader responds by moving the cursor
to the bookmarked position. The
bookmarked location appears as the first
character on the display.
If there are no marks in the indicated
direction, "No more bookmarks" is
displayed.
Power
Move/Search
Forward and/or
Back
press dots
8 2 or dots
8 5
See Power Move Forward and Back section
for more information.
Find Braille
press
Space + F
(dots 1 2
4)
Pressing Space + F opens a blank input field
(Edit Box) with a cursor. This allows the
user to perform a search in a specific braille
format by typing the text in the same braille
format. See Edit Box and Find Braille
sections for more information.
Page 22
Find Braille
(Previous or
Next)
press dots
8 3 or dots
8 6
Pressing dots 8 3 repeats a previous search
backwards from the point in the file where
you are. Pressing dots 8 6 searches forward
again.
If there is no text in the Find Edit buffer, the
Reader uses the text at the cursor. For more
about finding text, see Find Braille section
for more information.
Edit Last File
Press
Space +
dots 1 2 4
6
Opens the editor on the last file you had
edited.
Power Move Forward and Back
Orbit Reader's power move commands provide a quick means of
moving/searching through large sections of a file to find a known location in
the document. A power move operates by using boundaries and moving
50% between them with each press of the key command. In essence, by
using a power move to search within a file, you are drilling down to the
information using a binary command. When you press dots 8 2 or dots 8 5,
the Reader moves in the following ways:
On the first press, the cursor moves half way between the current position
and the start (dots 8 2) or end (dots 8 5) of the file, which act as the
boundaries for the power search.
Subsequent presses treat the moved-from position as the new boundary in
that direction. So, if you are at the beginning of the file (or 0%) when you
press the dots 8 5, the Reader moves the cursor to half way between 0%
and 100%. You are now at 50%, and it becomes one of the boundaries. The
initial boundary is at the original position of 0%. Therefore, if you press dots
8 2, you move half way between 50% and 0% to end at 25%. Or, if you
press the dots 8 5, you move half way between 50% and 100% to end at
75%.
Each time you press contiguous dots 8 2 or dots 8 5 keys, the Reader shows
the percentage in the first few cells of the display line and fills the rest with
the text at that position. This continues until you press something other than
dots 8 2 or 8 5 or a Panning key. See Panning Keys section for more
information.
Page 23

Find Braille
To find specific braille text, use the Find command (Space + F). Orbit Reader
responds by opening a blank input field (see Edit Box section) with a cursor,
which is indicated by dots 7 and 8. Unlike the Power Move (see this section),
which searches by known location of text, the Find command searches the
entire file for instances of the braille text you enter in the input field. If you
had searched for something previously, that text appears in the Edit Box
with your cursor at the end.
To perform a search, type the braille text you wish to find, then press dots 8
to start the search. To search forward, towards the end of the file, press
dots 8 6. To search backward, towards the beginning of the file, press dots 8
3.
If you are searching for text in a contracted braille file, you must type the
text you want to search for in contracted braille.
If you are searching in a plain text file, you must type the text you want to
search for in Computer Braille. See Appendix C - Computer Braille Chart for
the Computer Braille Chart.
The Reader accepts search terms up to 255 characters long. Searches are
generally not case sensitive. A search for the word "animal" results in finding
both lowercase and uppercase versions of that word (animal/Animal);
however, if you want to find words with upper case letters specifically, type
the text you wish to find with the capitalization included. For example, a
search for the capitalized word "Animal" gives the results for "Animal"
(capitalized), but not "animal" (lowercase).
Additionally, searches match both whole and partial words. Searching for
"an" finds "an" (whole) and "man" (partial). To restrict searches to whole
words, add a space at the beginning and end of the word. The Reader
matches the space with any non-printing character such as spaces, tabs, and
line feeds.
Read the section on Edit Box for editing commands and navigation
functionality.
When you search files, the Reader moves the file reading position to the
next occurrence of the searched for text and displays it at the beginning of
the display line. If it cannot find the text, the Orbit Reader displays "Not
found" and leaves your file reading position where it was before the search.
If searching through a larger document, the Orbit Reader displays "Busy"
while conducting the search.
Page 24
To repeat a search moving forward toward the end of the file, press dots 8
6.
To repeat the search moving back toward the beginning of the file, press
dots 8 3.
Edit Box
Orbit Reader presents a text dialog or input field called an Edit Box in some
instances. These instances include finding text and renaming a file. The Edit
Box permits only one line of text.
To open an Edit Box, press Space + F to begin a search or press Space + R
to rename a file. Once in the Edit Box, insert text by typing the desired
braille text and then use the Edit Box commands to navigate. The Edit Box
displays a blinking cursor (dots 7 8) to indicate where you input the text you
are searching for or editing.
When Orbit Reader shows an edit box, it often provides default text, such as
a file name or a previously entered search term. This text is selected (as
indicated by the dot 7 8 combination added to each letter.) To remove the
selected text, type a letter or press the Backspace key. To edit the existing
text, press one of the arrow keys to remove the selection.
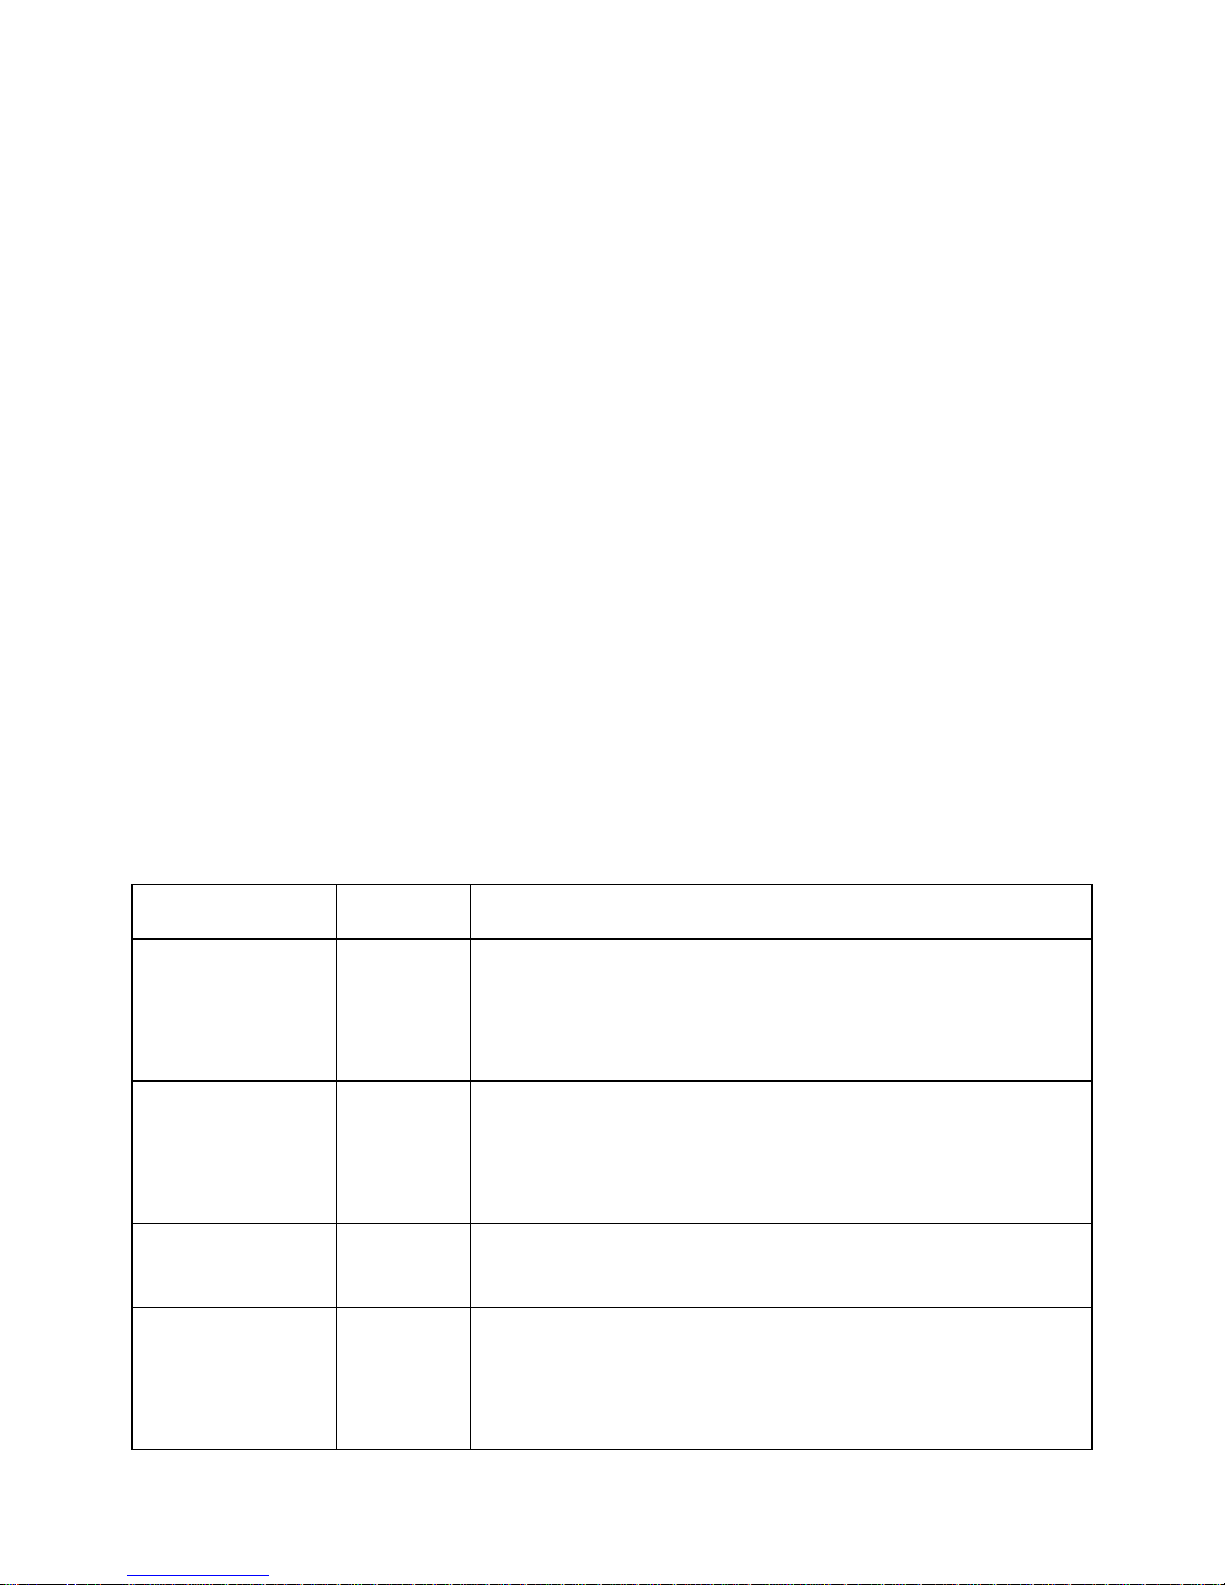
Edit Box Commands
To...
Press
Here's why and/or additional information
Move Left or
Right One
Letter
Left or
Right
Arrow
Pressing the letter movement commands moves
the cursor in the indicated direction. When the
cursor reaches the end of the edit box, it stops-it can move no further.
Backspace
dot 7
The Backspace key dot 7, deletes the letter
immediately left of the cursor. Use Backspace
when you make a typing mistake or to remove
small amounts of text.
Accept typed
text
dot 8
In this instance, pressing dot 8 acts as an
Enter/OK key.
Close the Edit
Box
Select
To close the edit box, use the Close command.
In single line controls, Close throws away what
you typed. In multiple line controls, all text is
automatically saved.
Page 25

4. Editor
In addition to serving as a tool for reading braille, Orbit Reader offers the
ability to write and edit text.
This feature allows you to create/edit new or existing files on the SD card.
While you are in the Editor mode, the cursor (dots 7 8) notes the current
position. The default setting for the cursor is 1 second. The blinking of the
cursor can be turned off from the Menu. See Set Cursor Behaviour section
for more information.
Once you exit from the Editor mode (Select, E OR Select, Select), the cursor
disappears, returning you to the Reader in the file you were editing.
If you are exiting from a new file, the editor automatically names the file
with the first 20 characters in the file. If a file already exists with that name,
the Editor appends a number to it until it produces a unique name. To
rename a file or to add an extension to the file name, highlight the file name
in File Manager, and use the Rename command. If there are Computer
Braille characters that cannot be used in a filename, such as a forward slash
(/) or an asterisk (*), the characters are replaced with an underscore (_).
Once you exit, the new file name in the File Manager is selected. If you wish
to rename the file, use the rename command (Space + R). If you want to
give the file a specific name, write that name as the first line in the file.
To insert text, type or paste the text at the cursor. The Editor adds the typed
or pasted text until it reaches the edit size limit, which is approximately
50,000 characters or about 50K of space. You can insert any text into an
open file using the Braille keys (dot 1 to dot 6).
There are three ways to edit a file. Each of these three commands is
available both from the Reader and the File Manager.
1. Create New File: Space + N
2. Edit current file: Space + E
3. Switch to last edited file: Space + dots 1 2 4 6
Context Menu
The Context menu is how you control the Editor. It allows you to find text,
set marks, or exit.
Press Select to open the Context menu. There are two ways to make a
selection from the Context menu after it is open.
Page 26
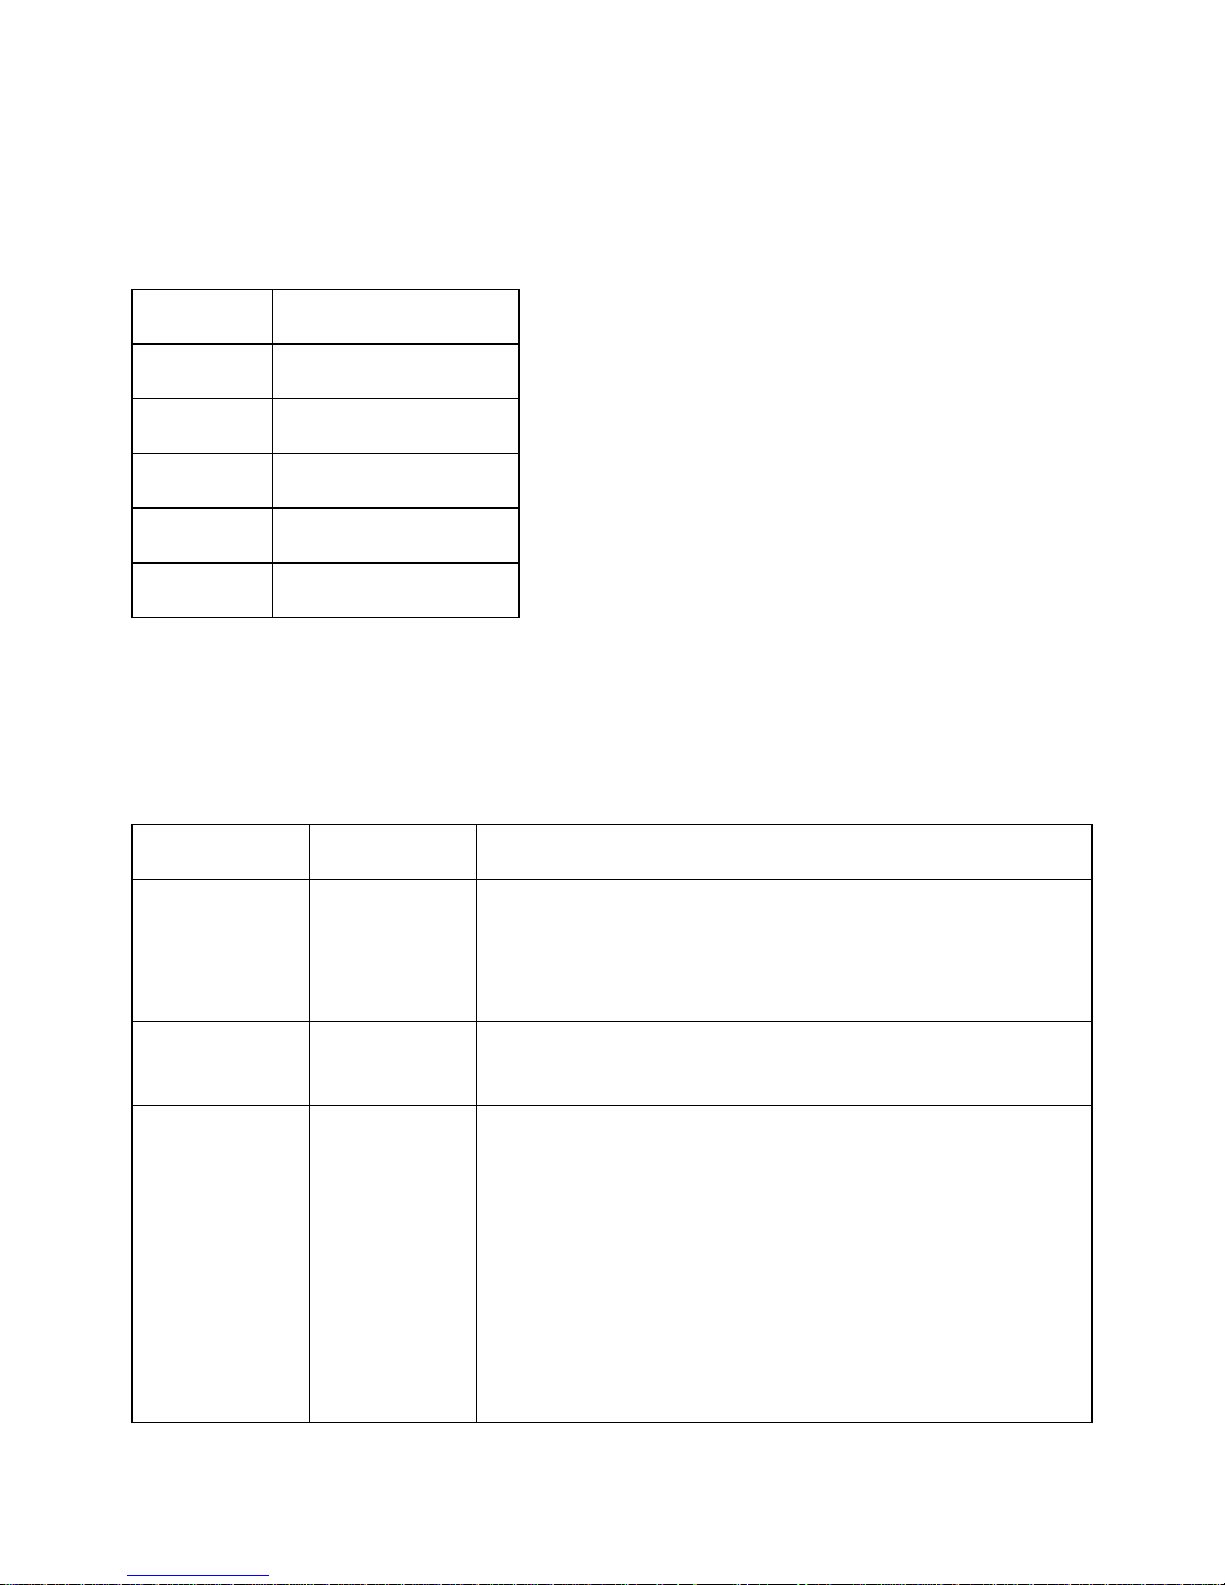
1. If you know the braille short cut for the command (the braille letter
associated with the function), press that letter.
2. If you do not know the braille short cut, press the Up or Down Arrow
key to scroll to your selection and press Select.
Function
Braille Short Cut
Exit
E
Mark
M
Copy
C
Paste
V
Cut
X
You can also press Select twice to quickly exit the Editor. The first press
opens the Context menu; the next press selects the first option, Exit, in the
menu.
Editor Commands
To ...
Press
Here's why and/or additional information
Add a new
line (Enter)
dot 8
Pressing dot 8 adds a new line (enters a
carriage return) at the end of a paragraph and
places the editing cursor in the first cell of the
next paragraph.
Delete a
character
dot 7
Pressing dot 7 deletes the character to the left
of the editing cursor.
Exit Editor
Select, E
OR Select,
Select
When you close a file, Editor saves and returns
back to the Reader or File Manager, depending
on your starting location. It automatically saves
your work.
If you opened the file from File Manager, File
Manager makes the new file the current item in
the list.
If you edited an existing file, Reader moves the
reading position to the place where the cursor
was.
Page 27
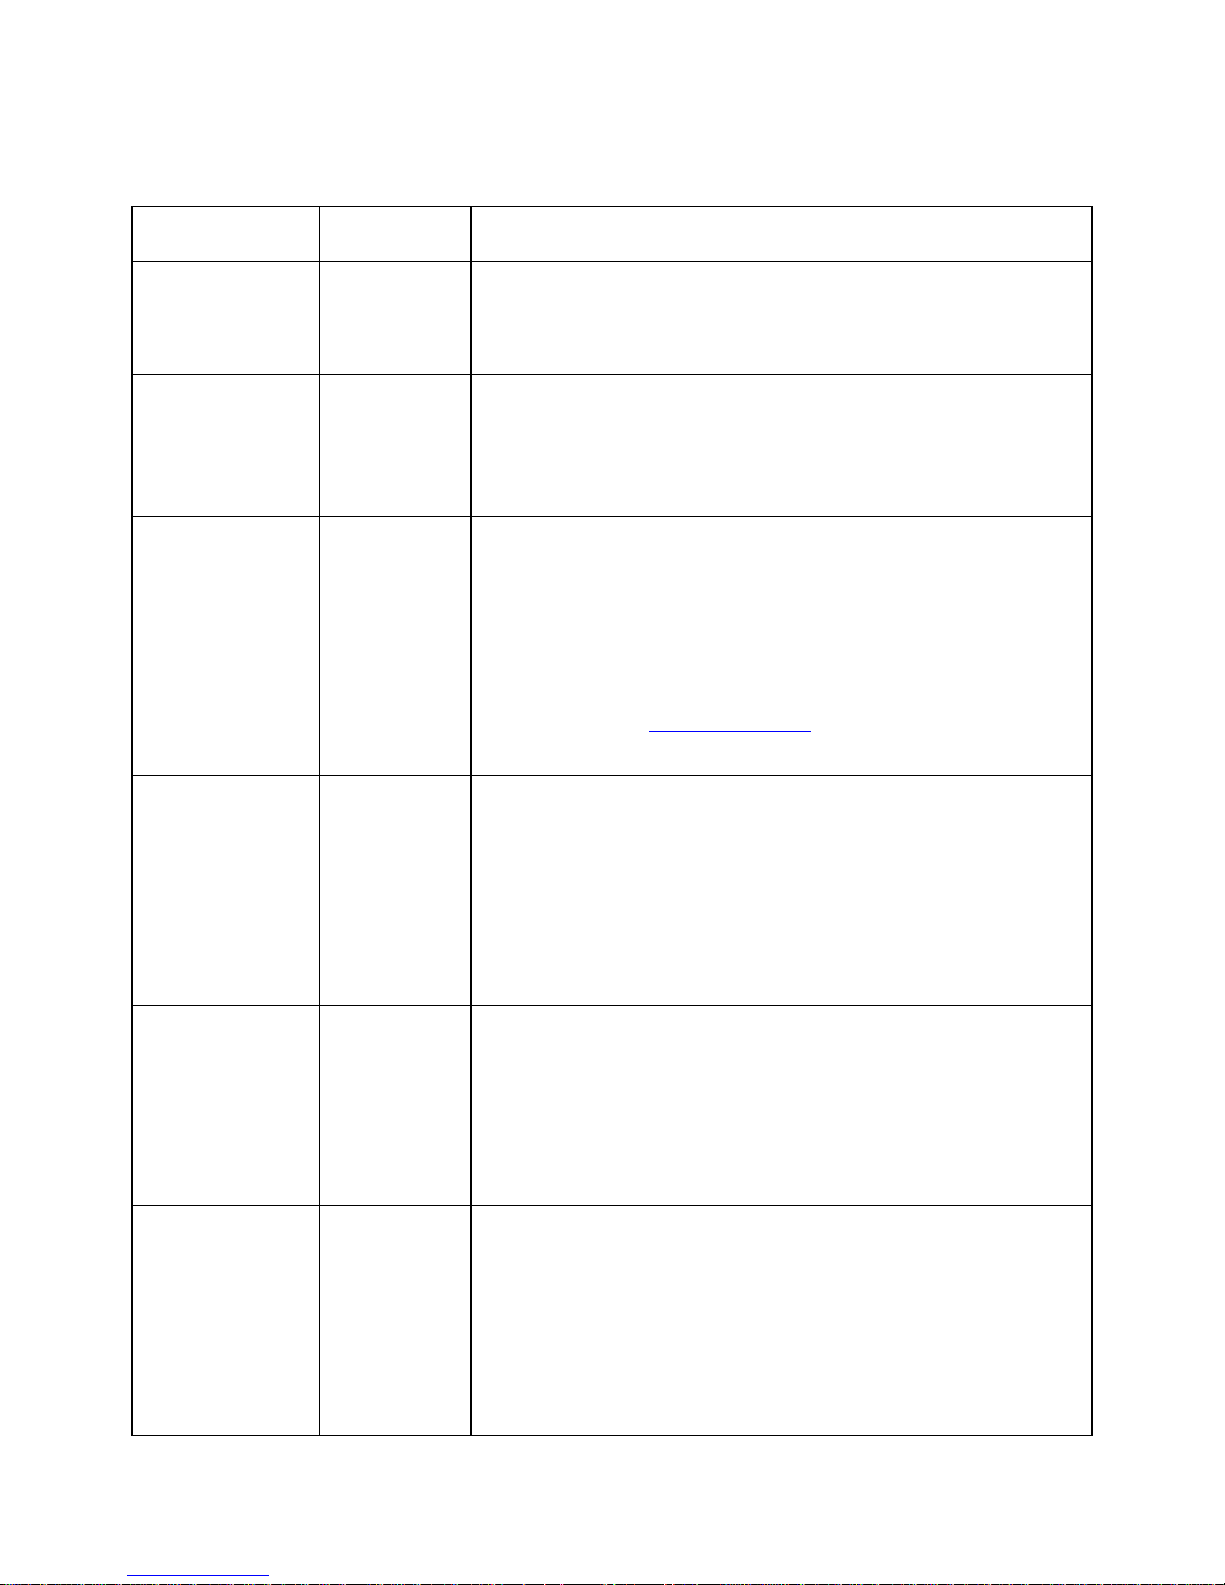
Editor Navigation Commands
To ...
Press
Here's why and/or additional information
Go to next or
previous
character
Left or
Right
Arrow
Pressing Left or Right Arrow moves the cursor to
the previous or next character.
Go to next or
previous
word
Space +
Left or
Right
Arrow
Pressing Space + Left or Right Arrow moves the
cursor to the start of the previous or next
grouping of letters and digits.
Previous or
next display
Pan up or
down
Pressing up or down on the Panning rocker keys
allows you to move to the previous or next
display of braille. If you press the bottom part of
the rocker key, the display pans forward. If you
press the top of the rocker key, the display pans
backward. The editing cursor is placed at the
first cell. See Panning Keys section for more
information.
Previous or
next
paragraph
Up or
Down
Arrow
Pressing the Up or Down Arrow moves the
editing cursor to the start of the previous or next
paragraph. If the start of the previous or next
paragraph is not on the display the display pans
the start of the previous or next paragraph to
the first cell on the display. The editing cursor is
placed at the first cell.
Start or end
of paragraph
Space +
dot 7 +
Left or
Right
Arrow
Pressing Space + dot 7 + Left or Right Arrow
moves the cursor to the start or end of the
current paragraph. If the start or end is not on
the current display the display pans the start or
end to the first cell of the display. The editing
cursor is placed at the first cell.
Previous or
next page
Space +
dot 7 +
Up or
Down
Arrow
Pressing Space + dot 7 + Up or Down Arrow
moves the cursor to the previous or next page.
If the first character of the previous or next page
is not on the current display the display pans the
first character of the previous or next page so
that it is located in the first cell with the editing
cursor.
Page 28
Go to top or
end of
document
Long
press Up
or Down
Arrow
Long pressing Up or Down Arrow moves the
cursor to the top or bottom of the document.
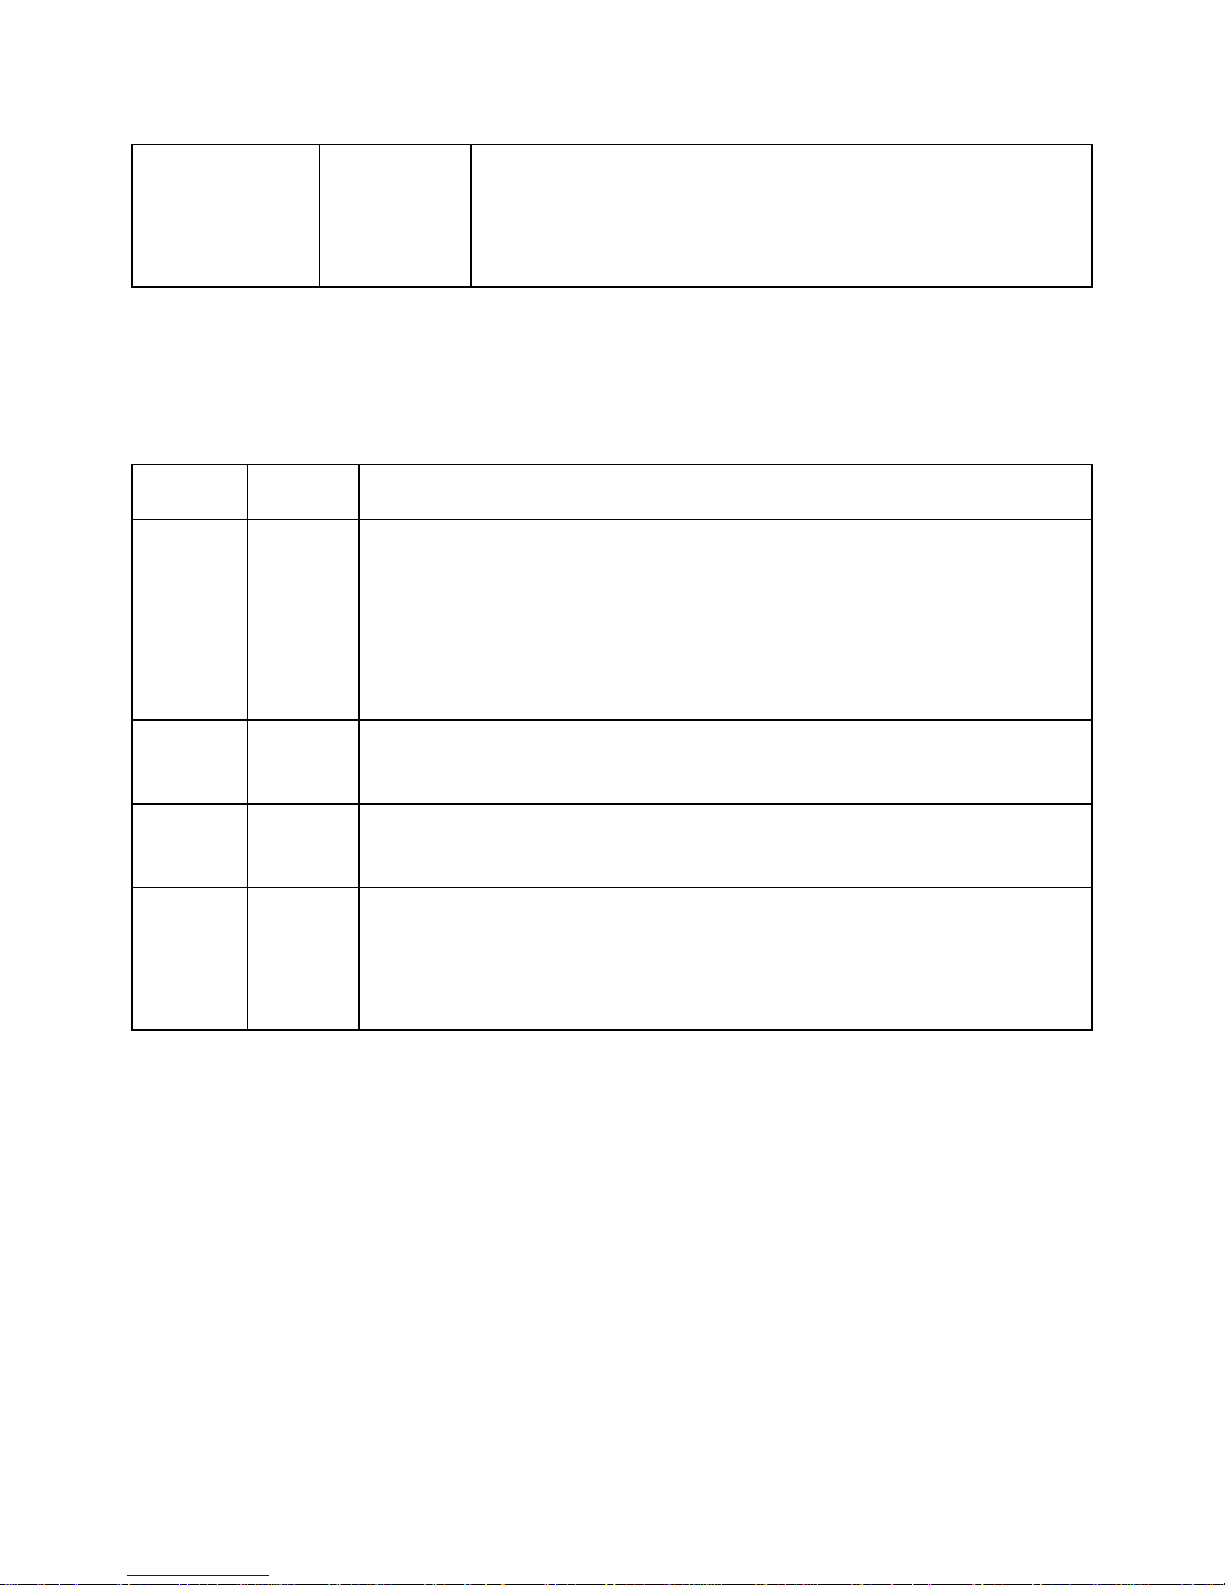
Editor Block Text Commands
The Editor block operations depend on a selection. The selection is the text
between the cursor and the mark.
To ...
Press
Here's why and/or additional information
Set or
clear
Mark
Select,
M
The editor indicates a mark by raising both dots 7 and 8
on the character where the mark occurs. To set or clear a
mark in the file, press the Mark command. If there was
already a mark at the cursor, the editor shows "Mark
cleared" on the display and removes the mark. If there
was not a mark, it shows "Mark set" and adds a mark.
Copy
Select,
C
The copy command places the selected text onto the
clipboard for later use in this or another file.
Paste
Select,
V
To paste the contents of the clipboard before the cursor,
use the Paste command.
Cut
Select,
X
To remove the selected text from the document and place
it onto the clipboard, use the Cut command. If you want
to put that text somewhere else, move to the desired
position, then use the Paste command.
Remote Device Operational Mode
In addition to using Orbit Reader as a portable reading tool and editor, it
connects with host devices (i.e., computers, phones, and tablets) to provide
braille input and output to that device. The host device must be running
software that supports braille.
- For Windows PCs - JAWS®, Window-Eyes, System Access, and NVDA
- For Mac® computers and iOS® devices - VoiceOver
- For Android devices - BrailleBack and TalkBack
Page 29
When you use Orbit Reader as a display for other hosts, the screen reader
on that host device provides the translation and other braille settings.
Consult the documentation for your screen reader.
The only hotkeys used with Remote mode that are not sent to the remote
device are:
• Pressing Select + Up Arrow opens the Orbit Reader Menus.
• Pressing Select + Left Arrow returns Orbit Reader to Stand Alone
mode.
• Pressing Select + Right Arrow returns Orbit Reader to Remote mode.
• Pressing Select + Down Arrow brings up an Edit box where you can
type and submit up to 255 characters of text to the remote device.
Press dot 8 to send the text and exit the Edit Box.
Bluetooth Connectivity
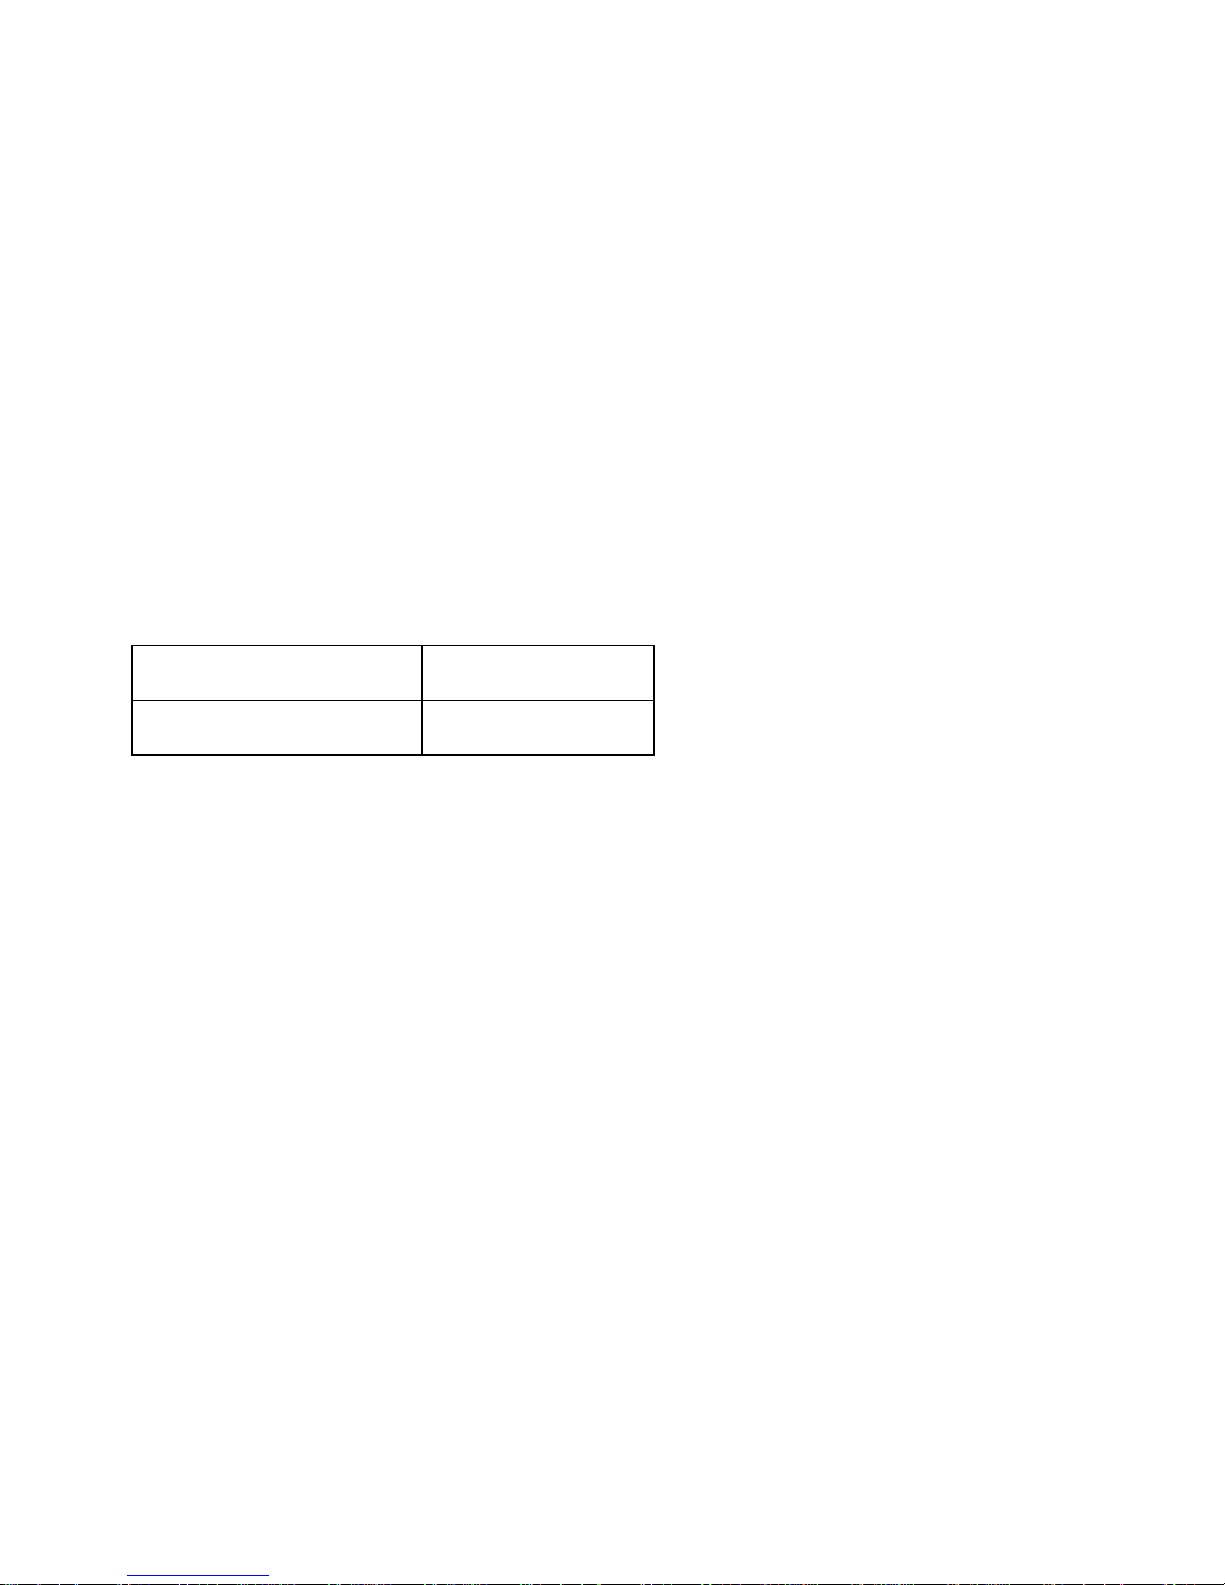
Command
Keys
Connect via Bluetooth
Space + dots 4 7
Bluetooth is a wireless connection method supported by many devices to
allow a similar setup between different kinds of devices including braille
displays. In Orbit Reader's default configuration, when the user turns on the
device, it is ready to pair or to connect via Bluetooth, if it has already been
paired with a host.
If the Orbit Reader is already connected with the USB cable that came with
the unit, Orbit Reader uses the connection to the host as the braille
interface. This connection also charges the battery and provides a file
transfer mechanism.
If the device is paired with a Bluetooth host, and that host is running access
software connected to the Orbit Reader, it switches from the USB connection
(if one existed) and makes the Bluetooth interface active.
If there is no access software requesting services via the Bluetooth or USB
connection, or the user switches to Stand Alone mode, Orbit Reader returns
to the last location in Stand Alone mode.
The Orbit Reader has a low-power standby or sleep mode that activates after
10 minutes of no activity. When connected by Bluetooth, Orbit Reader goes
into standby mode after 10 minutes and continues to try to reconnect for 1
Page 30
hour. If the connection is not reestablished after an hour, Orbit Reader
powers off.
If you wish to turn the Bluetooth option on or off, open the Menu by pressing
Space in Stand Alone mode, or Select + Up button in Remote mode. Once in
the Menu, Up or Down Arrow to the Bluetooth option. To toggle the option,
press the Right or Left Arrow buttons and then press the Select button.
Selected items are underlined with dots 7 and 8.
The only reason to turn the Bluetooth option off is to conserve power when
the device is not going to be used to connect to other devices.
The hot key to quickly switch to Bluetooth when the Orbit Reader is
connected using the supplied USB cable is Space + dots 4 7. The default is
to switch to Bluetooth automatically, but if you choose to switch to USB, the
hot key can be used to switch back.
Consult the documentation for the screen reader of choice for details about
host connection instructions and which commands to use for that screen
reader.
USB Connectivity
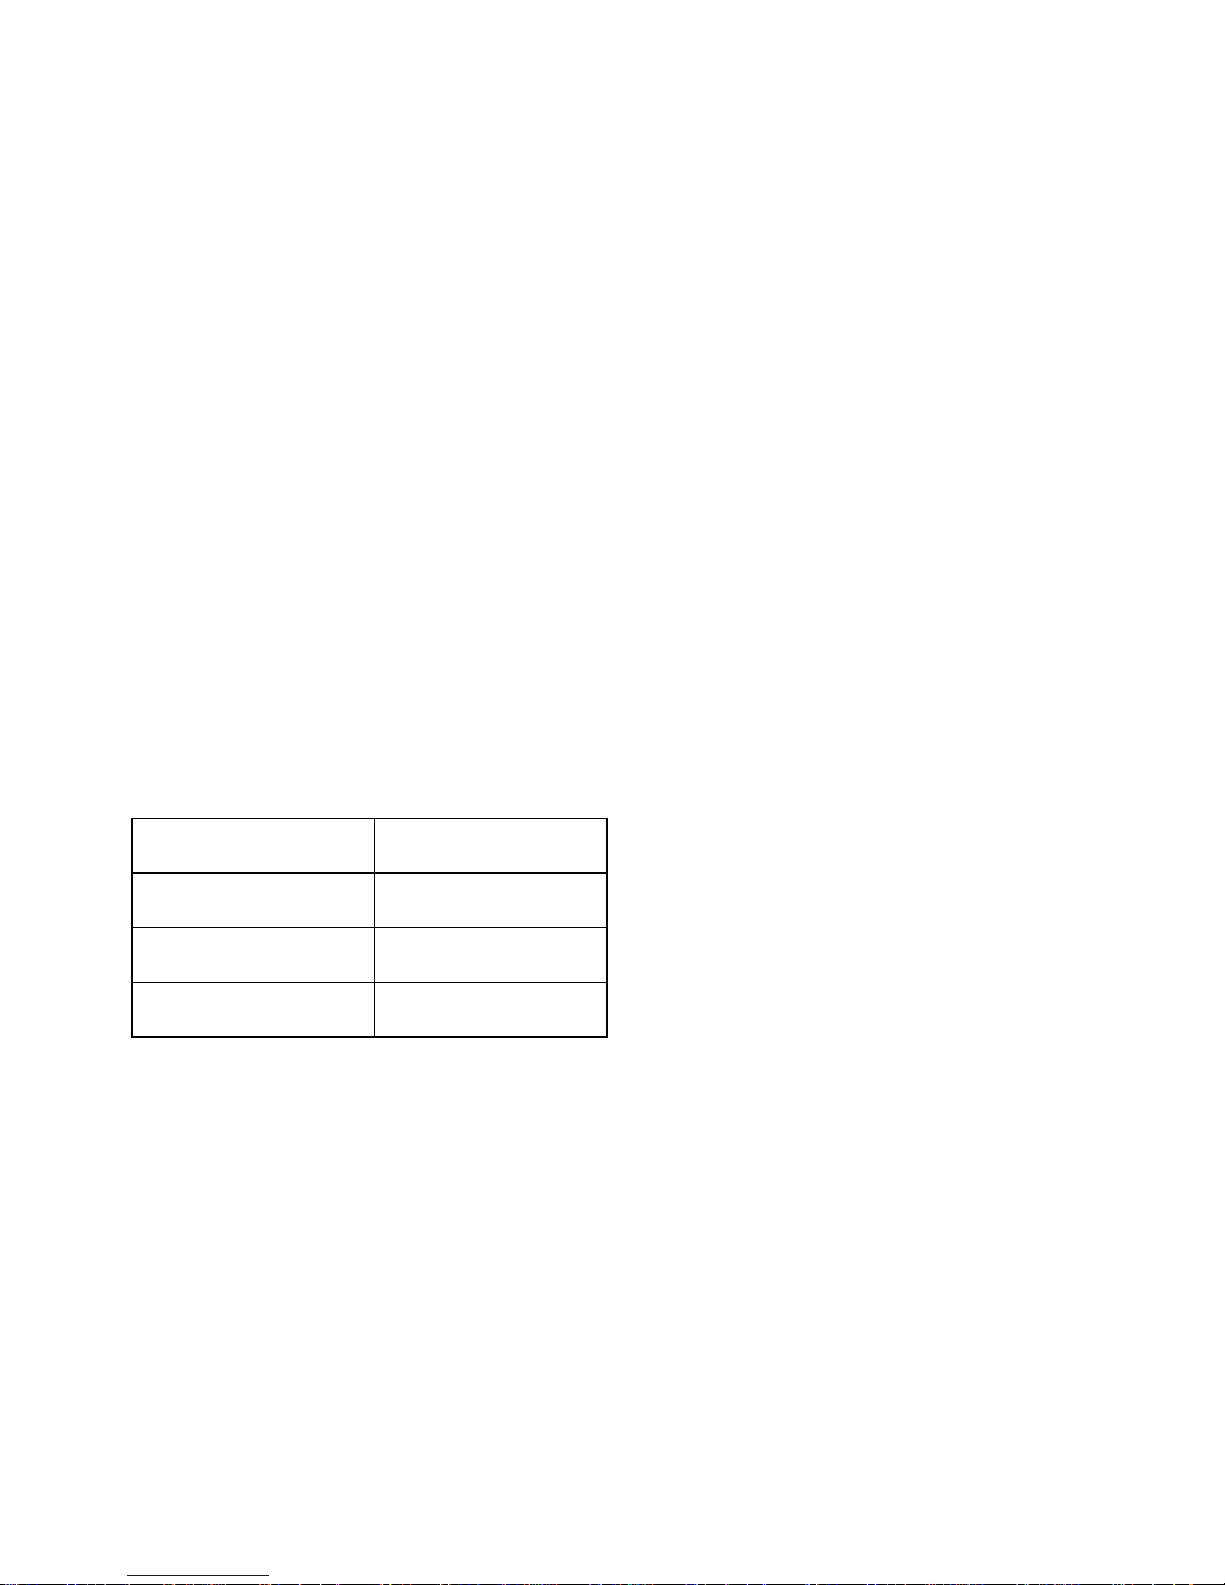
Command
Keys
Connect via HID
Space + dots 2 7
Connect via Serial
Space + dots 3 7
Transfer files
Space + dots 5 7
Orbit Reader comes with a USB cable. When connecting with the cable,
insert the small end into the Orbit Reader with the bumps facing down, and
insert the large end into the remote device. When connected, the Orbit
Reader communicates using three possible protocols: Serial, HID. or Mass
Storage. When connected to either a computer or wall plug, the Orbit Reader
is charged, which makes USB a good way to connect when the battery is
low.
In default configuration, if the USB is connected to the remote device, and it
also has a Bluetooth connection with another device, the Orbit Reader
switches to the Bluetooth connection. To keep this from happening,
Bluetooth can be turned off from the Menu or you can switch back to USB
mode by pressing one of the hot keys.
Page 31

Consult the documentation for the screen reader of choice for details about
which protocol (Serial or HID) and commands to use for that screen reader.
iOS Devices (Version 10.0 or later) SB Connectivity
Connecting Orbit Reader to an iOS device provides both braille feedback and
the ability to type and control the device with the Orbit Reader keyboard and
directional buttons.
In default configuration, the Orbit Reader is ready to pair with iOS with
Bluetooth. If Bluetooth has been turned off, it can be turned on in the Menu
or by pressing Space + dots 4 7 on the Orbit Reader.
Next, on the iOS device go to
Settings>General>Accessibility>VoiceOver>Braille and look for the name of
the unit in the list of possible braille displays. It shows up as Orbit Reader
plus the last four digits of the serial number.
Activate the Orbit Reader 20 device in the list to initiate pairing. iOS shows
you a dialog with a security code to confirm you want to pair with the Orbit
Reader. Check to make sure that the security code on the display matches
the code in the iOS security dialog. If the codes match, confirm this in the
dialog on the iOS device.
Once you pair the unit, iOS should start sending braille to the Orbit Reader,
and you can use the Orbit Reader input and navigation keys to control your
iOS device.
Page 32
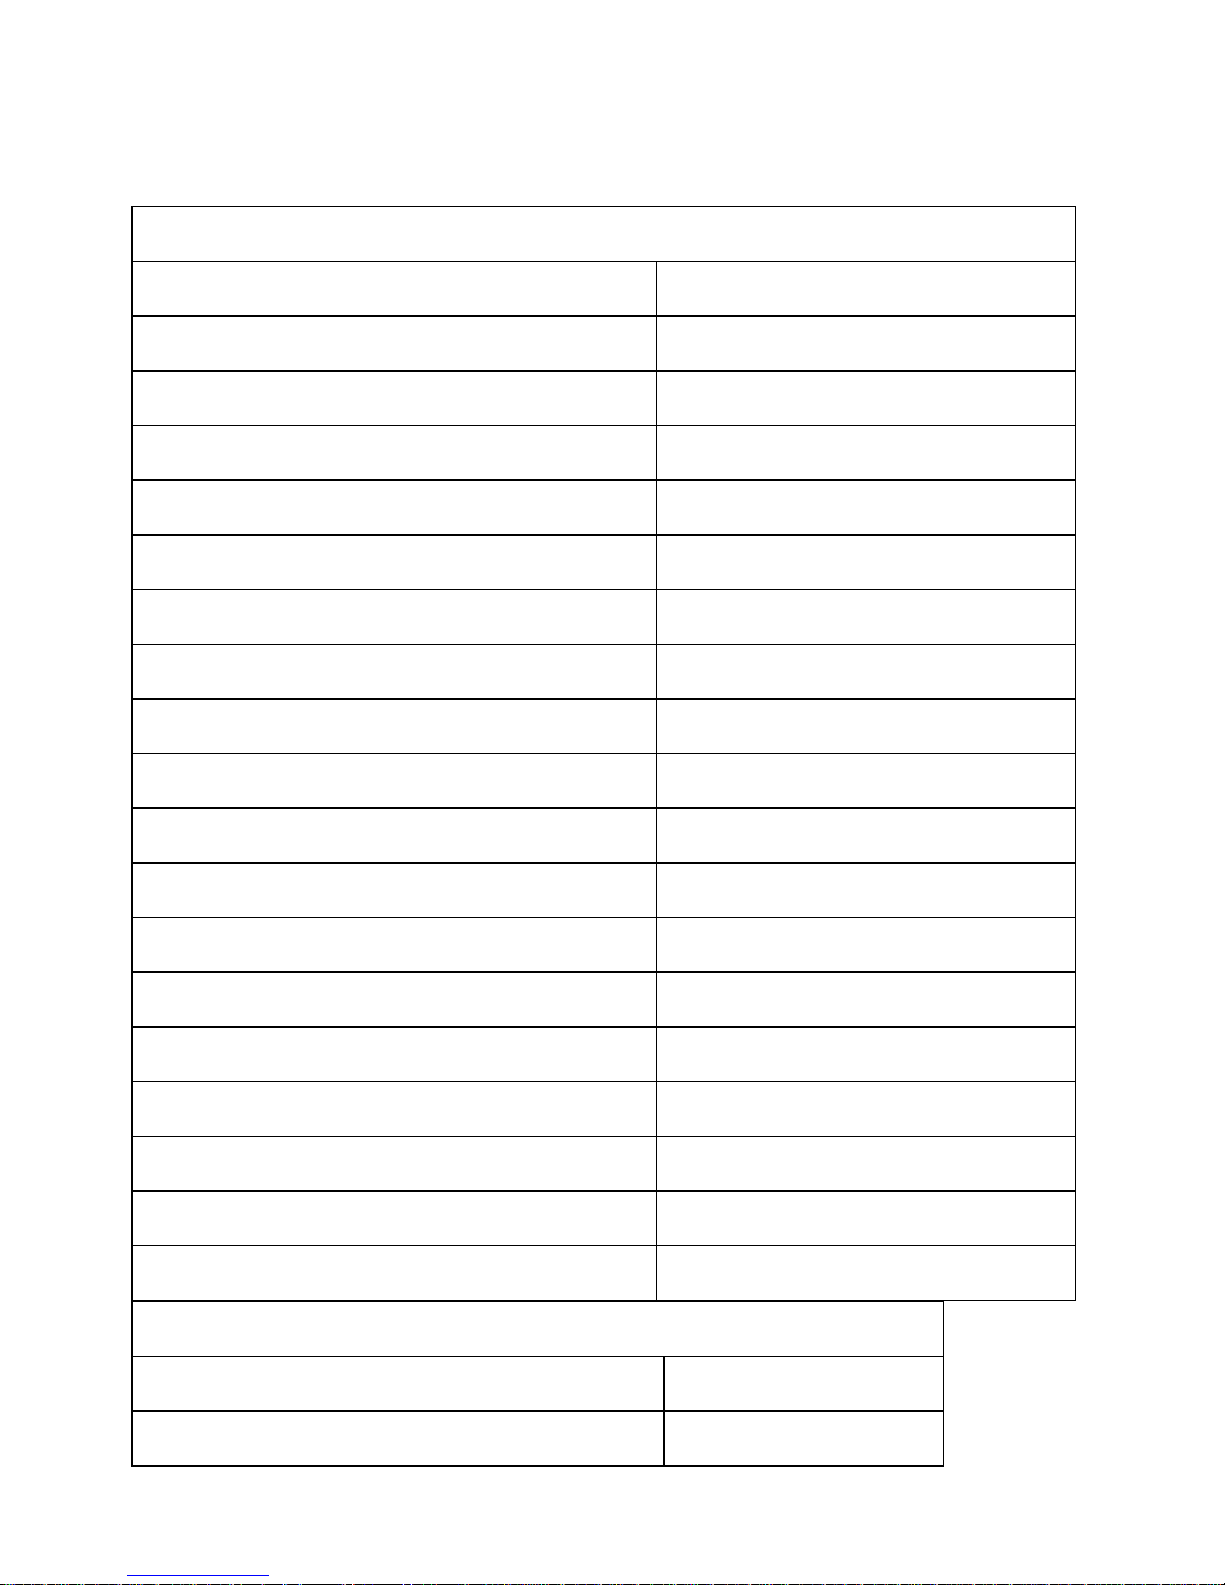
iOS Commands
iOS Navigation Commands
Function
Keys
Move to previous item
Space + dot 1
Move to next item
Space + dot 4
Pan braille left
Space + dot 2
Pan braille right
Space + dot 5
Move to the first element
Space + dots 1 2 3
Move to the last element
Space + dots 4 5 6
Scroll right one page
Space + dots 1 3 5
Scroll left one page
Space + dots 2 4 6
Move to the status bar
Space + S (dots 2 3 4)
Select previous rotor setting
Space + dots 2 3
Select next rotor setting
Space + dots 5 6
Move to previous item using rotor setting
Space + dot 3
Move to next item using rotor setting
Space + dot 6
Launch the Task Switcher
Space + dots 1 2 5 twice quickly
Scroll up one page
Space + dots 3 4 5 6
Scroll down one page
Space + dots 1 4 5 6
Go to Notification Center
Space + dots 4 6
Go to Control Center
Space + dots 2 5
iOS Reading Commands
Function
Keys
Read all starting at selected item
Space + R
Page 33
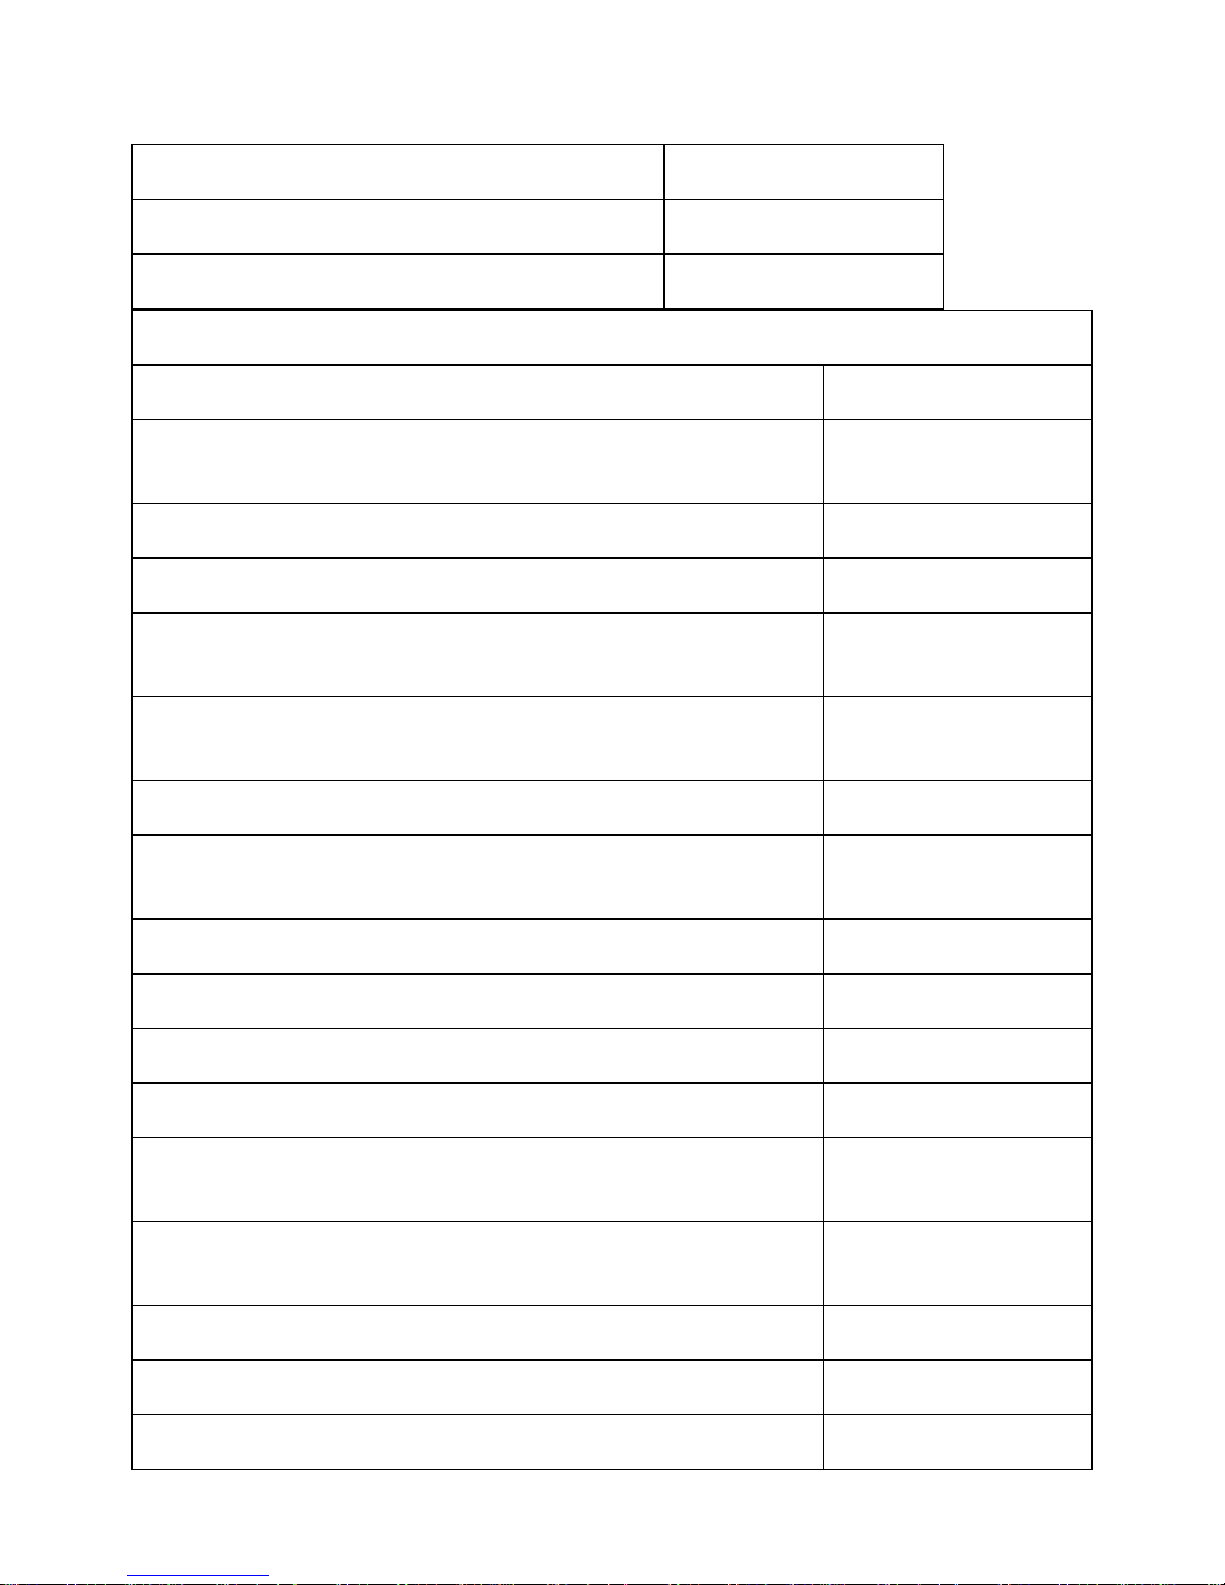
Read all, starting from the top
Space + dots 2 4 5 6
Pause or continue speech
Space + P
Announce page number or rows displayed
Space + dots 3 4
iOS General Commands
Function
Keys
Activate the Back button if present
Space + B (dots 1
2)
Activate the Delete key
Space + dot 7 or D
Activate the Return key
Space + E or dot 8
Switch between contracted and uncontracted braille
Space + dots 1 2 4
5
Activate the Home button (twice quickly to launch the
task switcher)
Space + H (dots 1
2 5)
Toggle speech on and off
Space + M
Activate the Tab key
Space + T (dots 2 3
4 5)
Select text
Space + dots 3 5 6
Unselect text
Space + dots 2 3 6
Volume up
Space + dots 3 4 5
Volume down
Space + dots 1 2 6
Toggle screen curtain on/off
Space + dots 1 2 3
4 5 6
Select all
Space + dots 2 3 5
6
Cut
Space + X
Copy
Space + C
Paste
Space + V
Page 34
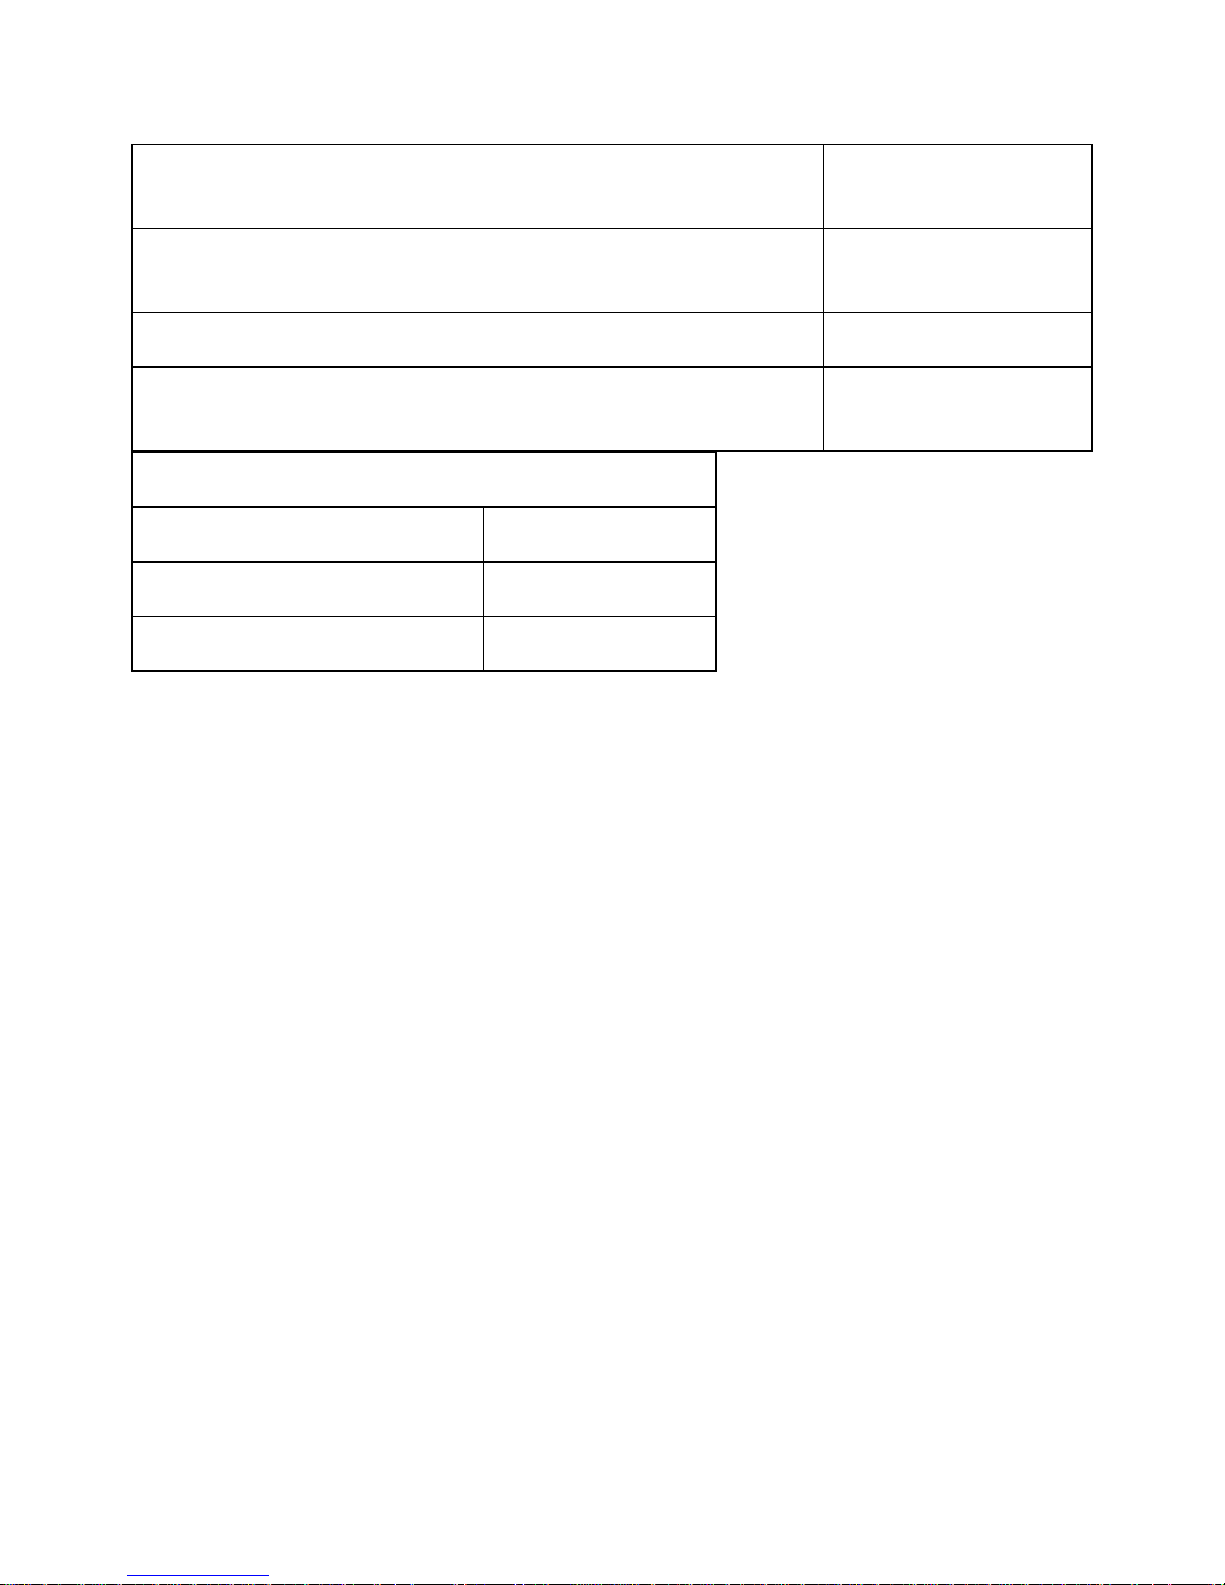
Undo typing
Space + dots 1 3 5
6
Redo typing
Space + dots 2 3 4
6
Activate Eject key
Space + dots 1 4 6
Toggle announcement history
Space + dots 1 3 4
5
iOS iPad Commands
Function
Keys
Move to previous container
Space + dots 1 7
Move to next container
Space + dots 4 7
Mac Computers
When connecting Orbit Reader to a Mac, there are two possible methods.
One is to connect using the USB cable that came in the box. The second is to
use Bluetooth for a wireless connection.
Connecting Mac with USB
The simplest way to connect the Orbit Reader to a Mac is to connect using a
USB Standard-A to Micro-B cable. First, switch Orbit Reader to Serial mode
by picking Serial in the USB option in the menu. Next, run VoiceOver by
pressing the Apple CMD key + F5. Then, attach the small end of the USB
cable to Orbit Reader 20 with the bumps facing down and the big end to the
Mac. VoiceOver automatically recognizes and starts using the display.
Connecting Mac with Bluetooth
In default configuration, the Orbit Reader is ready to pair with Mac through
Bluetooth. If Bluetooth has been turned off, it can be turned on in the Menu
or by pressing Space + dots 4 7 on the Orbit Reader.
To pair Orbit Reader with a Mac:
1. When VoiceOver is on, open VoiceOver Utility by pressing VO-F8.
2. Click the Braille category, click Displays, and then click the Add (+)
button.
Page 35

3. Select Orbit Reader in the list. VoiceOver filters the devices it detects
to list only the Bluetooth braille displays that are within range of your
computer and that appear to match a VoiceOver braille display driver.
4. Click the Orbit Reader device in the list to initiate pairing. Mac shows
you a dialog with a security code to confirm you want to pair with the
Orbit Reader 20.
5. Check that the security code on the Orbit Reader display matches the
code shown in the Mac security dialog. If the codes match, confirm this
in the dialog on the Mac.
If the Orbit Reader does not work with VoiceOver, it is likely that you are not
using the latest Mac OS. Check for updates.
Controlling Orbit Reader from Mac
To control how VoiceOver treats the display, follow these steps:
1. Open the VoiceOver Utility by pressing Command + F8 while
VoiceOver is running.
2. Scroll down to the Braille option.
3. Select the Braille Display tab.
To turn on contracted braille, check the Contracted Braille box.
For the Mac documentation on connecting and using braille displays, see
Apple's VoiceOver Info Guide.
Android Devices
In default configuration, the Orbit Reader is ready to pair with Android with
Bluetooth.
Step 1: Turn on Bluetooth.
If Bluetooth has been turned off, it can be turned on in the Menu or by
pressing Space + dots 7 4.
Step 2: Turn on the Android device.
To use the display with Android, turn it on before you unlock the phone.
Android and BrailleBack make a connection sound to indicate successful
communication.
Step 3: Check for support.
Step 4: Switch to emulation mode if necessary.
Step 5: Set up Android device.
Page 36

To set up your Android device, follow the Install and enable BrailleBack
instructions found on the Google™ Android Accessibility Help webpage.
Input and Output Text With BrailleBack
To input text with your braille keyboard, first enable the keyboard in your
Android settings under Language and Input. If you try to use the keyboard
before completing this step, you receive a prompt to change your settings.
To edit a text field, focus and activate the text field. You can then use the Up
and Down Arrow keys to move in the text field. When editing text,
BrailleBack switches to 8-dot braille known as Computer Braille. (See Braille
Cells section for more information.) Currently, BrailleBack does not support
any other braille as input.
By default, Android is set to display English Computer Braille.
To set BrailleBack to display English (UEB) - grade 2 braille, follow the steps
below:
1. Press H to open the Home screen.
2. Arrow to, and select
Apps>Settings>Accessibility>BrailleBack>Settings.
3. Arrow through this screen of items to "Braille type" and select.
o Android generates a dialog screen which indicates the type of
braille being displayed and provides two choices: Literary braille
or Computer Braille.
o Computer Braille is checked by default.
4. Arrow to "Literary braille" and select to check this item.
o When you check "Literary braille," you are returned to the
BrailleBack Settings screen.
5. Arrow to "Literary braille table" and select.
o Another dialog screen opens with a selection of output
translation tables.
6. Select English (UEB) - grade 2.
o You are returned to the BrailleBack Settings screen.
Page 37
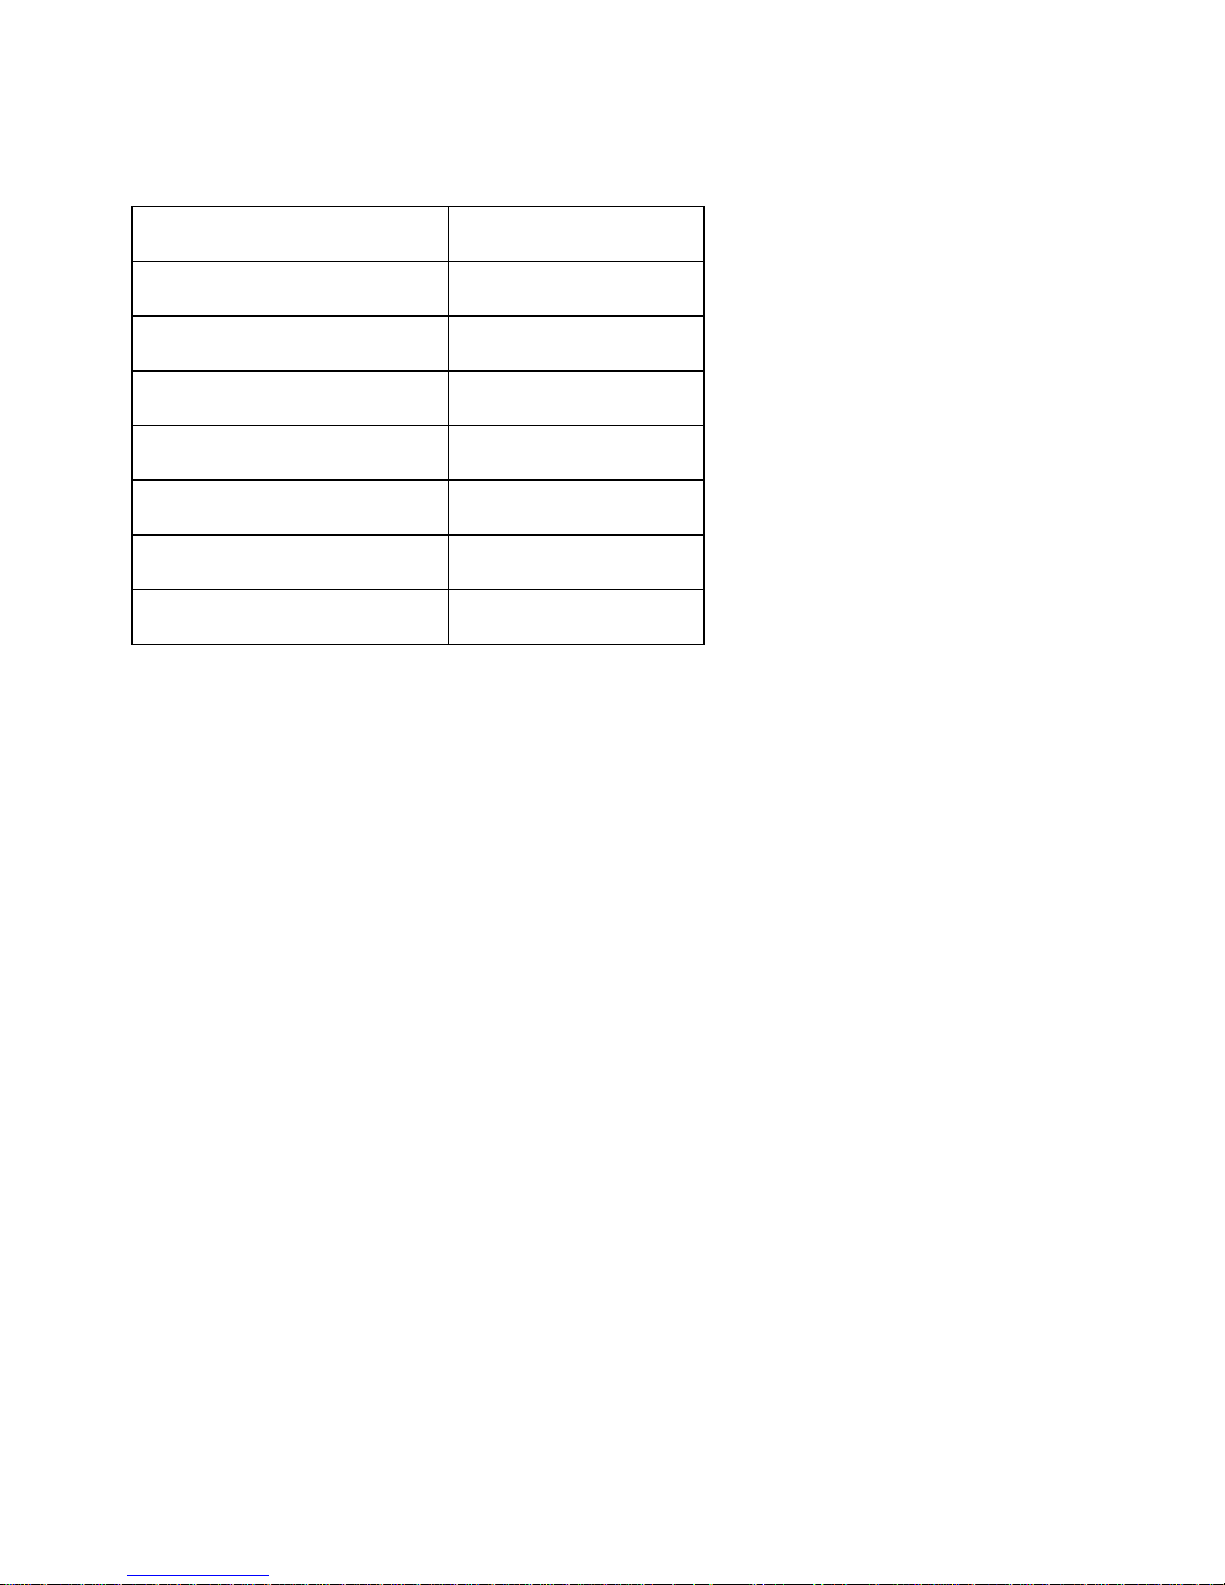
BrailleBack Commands
Function
Keys
Back
Space + B
Home
Space + H
BrailleBack help
Space + dots 1 2 3
Notifications
Space + N
Recent Apps
Space + R
Enter (in Edit field)
Space + dot 8
Backspace (in Edit field)
Space + dot 7
Windows PCs
Before connecting Orbit Reader with a PC, you must first decide how you
wish to connect: Bluetooth or USB. This is a personal preference. USB
charges the device as you use it, so it is a good choice when your battery is
low. Bluetooth does not use wires, so it is a good choice when you are on
the go.
Connecting Windows with USB
Normally, modern screen readers support the HID protocol, which means
you do not have to install any drivers to use Orbit Reader with a PC screen
reader. If your screen reader does not support HID, switch to Serial mode on
the Orbit Reader with the hot key or selecting Serial from the USB option in
the menu.
For Windows versions 7 and up, the serial interface requires the installation
of two drivers: one for the USB and one to make the USB port appear like a
COM port. The only exception is Windows XP. Because it is Serial only, it can
just be plugged in. The second driver is required because many screen
reading programs handle braille displays like a serial device. The COM port
assignment driver shows the assigned port number used to communicate
with the display. Take a note of the COM port number now for later use. If
you need to look it up at a later time, go to Device Manager while the
display is connected and look in the section for Ports: COM and LPT. One of
the COM ports is assigned to Orbit Reader 20. You need to use that number
when you set up your screen reader.
Page 38

Once the display is connected to the device you wish to use, configure the
software to use Orbit Reader.
Connecting Windows with Bluetooth
When connecting the Orbit Reader with Bluetooth, follow these steps:
1. On the PC, perform a Bluetooth search.
2. Select the Orbit Reader from the list of Bluetooth devices.
3. Compare the code shown in the Bluetooth dialog on the Windows PC
with the code shown on your display. If they are the same, press Yes.
If the code does not match, select No and try the next Orbit Reader in
the list. The purpose of this procedure is to allow for more than one
Orbit Reader device to be paired in the same room at the same time
without pairing the wrong device.
The device pairs with the Orbit Reader and an incoming Bluetooth virtual
serial port is set up on the PC.
Next, check the Ports list in the Windows Device Manager to find the COM
port number assigned to the incoming Bluetooth serial port. Make a note of
this number.
In your screen reader on the PC, set the active Braille display COM port to
use as the relevant Bluetooth serial port COM number.
NonVisual Desktop Access (NVDA) (Version 2016.3 or
later)
If you have NVDA installed on your PC, it may automatically recognize the
Orbit Reader, depending on the settings. If NVDA is not recognizing the
display, go to the NVDA Preferences menu and select Braille Settings from
the list. From the braille display drop-down menu, select
"Baum/Humanware/APH/Orbit Displays" and click OK.
If Orbit Reader 20 is not one of the displays shown in the Braille Display list,
upgrade NVDA to the newest version and repeat the process.
NVDA turns on braille output when it is configured for the display. To turn off
braille support, select No Braille from the Braille Display options in the Braille
Settings menu.
Page 39
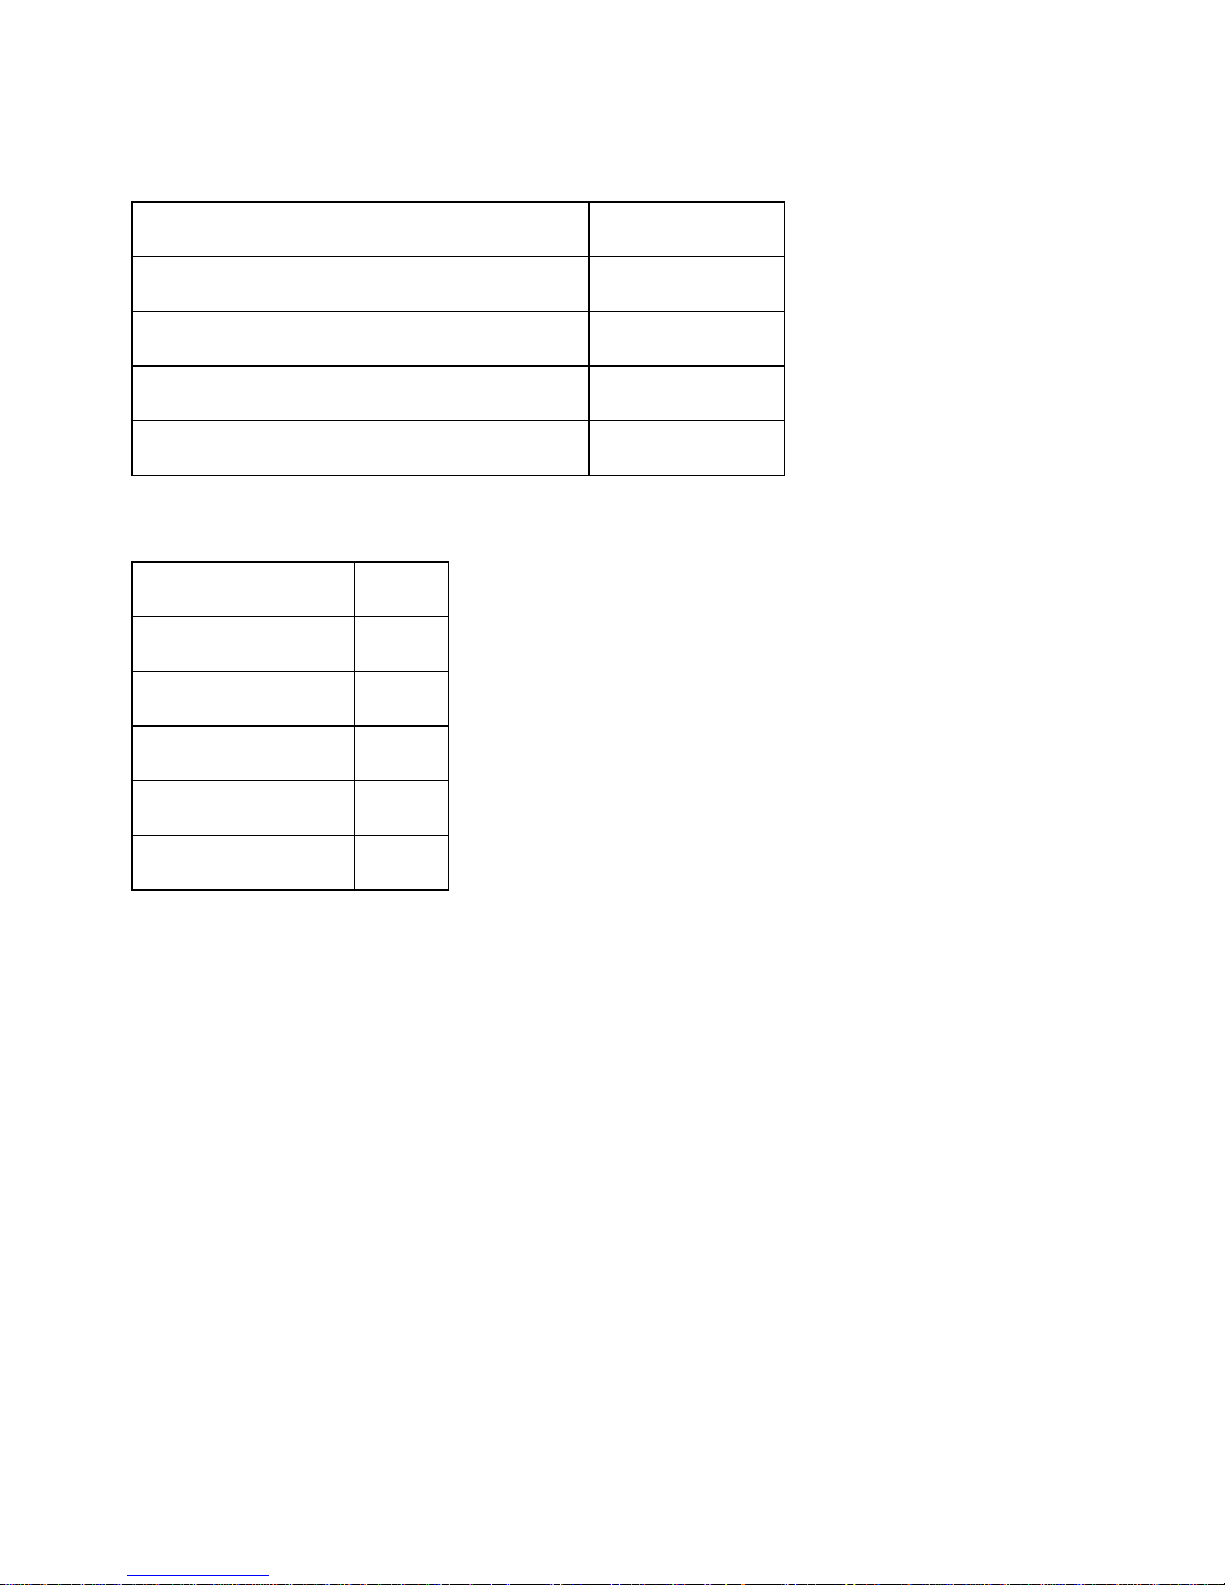
NVDA Commands
Function
Keys
Scroll braille display back
Space + dot 2
Scroll braille display forward
Space + dot 5
Move braille display to previous line
Space + dot 1
Move braille display to next line
Space + dot 3
For displays that have a joystick:
Function
Key
Up Arrow key
up
Down Arrow key
down
Left Arrow key
left
Right Arrow key
right
Enter key
select
JAWS
If you use the JAWS screen reader and it is already installed, the Orbit
Reader setup program installs drivers to make the braille display and JAWS
work together. If you have not already installed JAWS, install it first, then
run the Orbit Reader setup program.
Start JAWS, and open its main screen. For JAWS versions 11 or later, select
the Braille item in the Options menu. Select Orbit Reader 20 from the braille
display list.
JAWS turns on braille output when you configure it for the display. To turn
off braille support, select No Display from the Options/Braille menu.
Note: For a longer description of any of the following commands, turn JAWS
keyboard Help on by pressing Insert + 1 and type the command. Quickly
type the command twice to get an even longer description. Press Insert + 1
again to exit JAWS keyboard Help mode.
Page 40
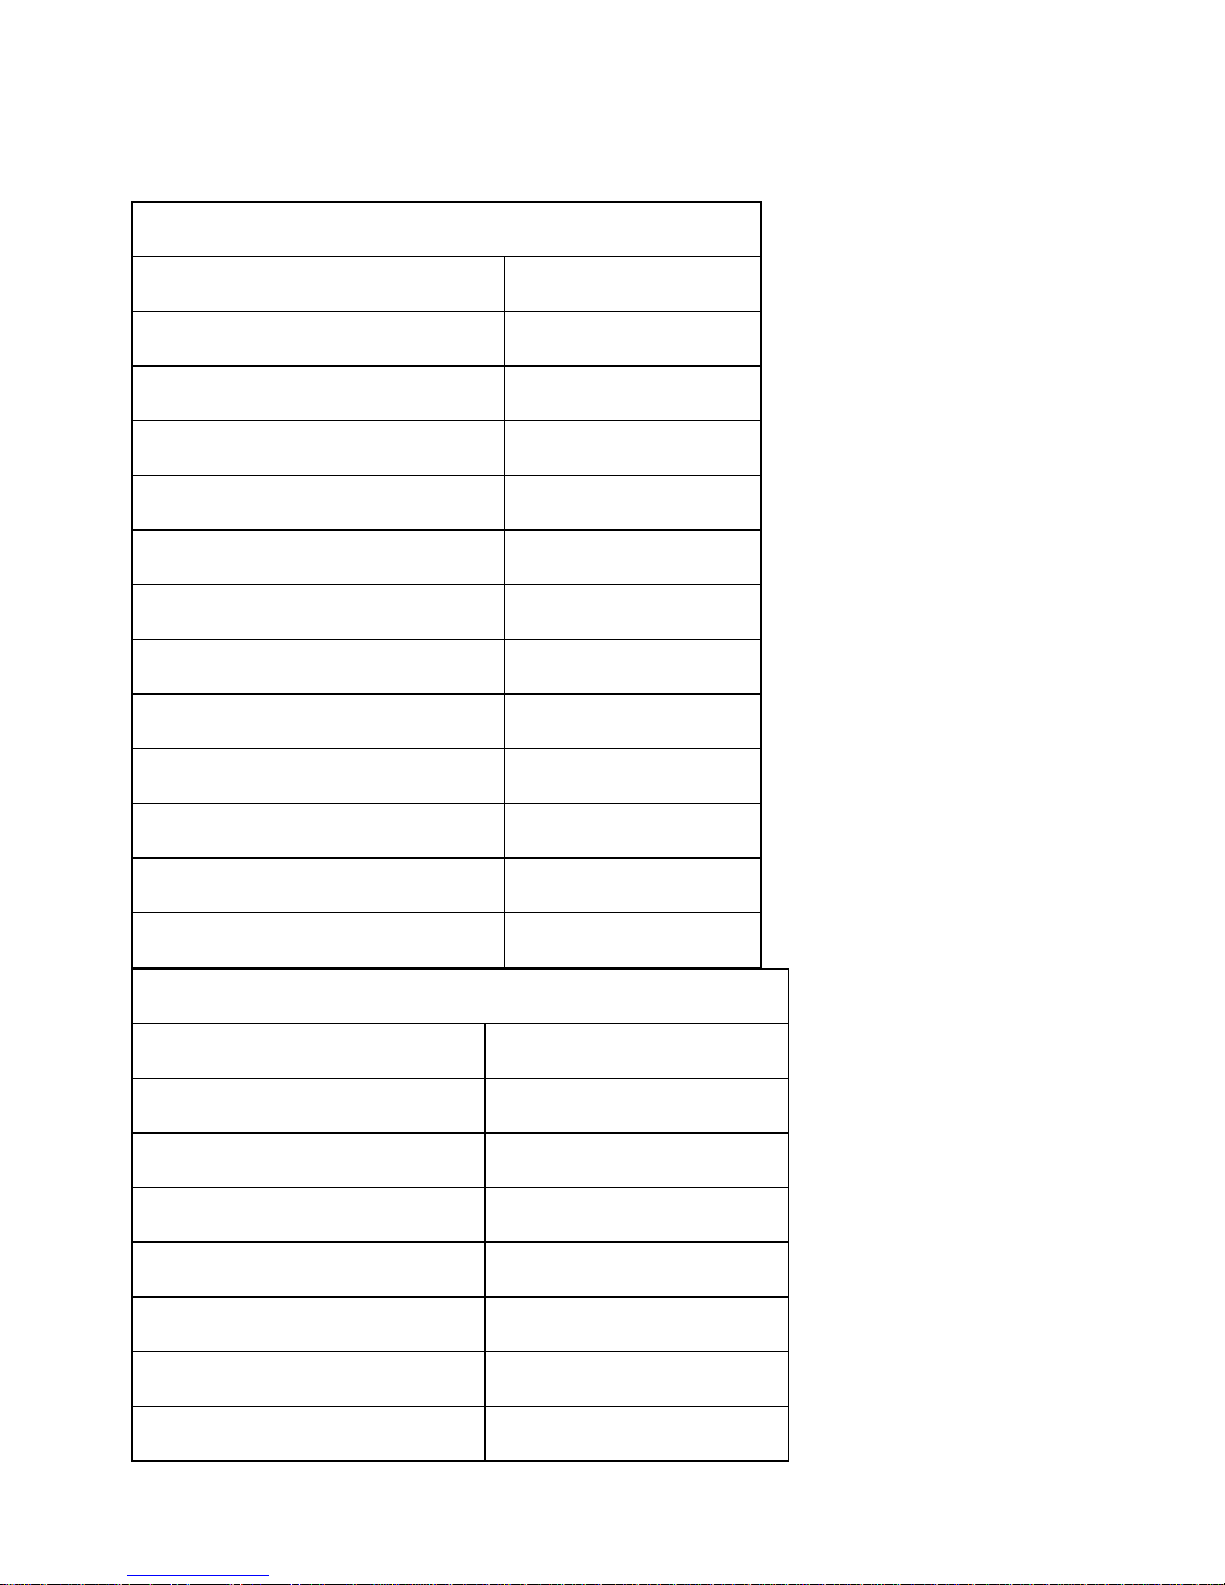
Jaws Commands
Jaws Reading Commands
Function
Key(s)
Move display to the left
Left Arrow
Move display to the right
Right Arrow
Move display up one line
Up Arrow
Move display down one line
Down Arrow
Pan left one braille window
Left Advance Bar
Pan right one braille window
Right Advance Bar
Top of active window
Select + dots 1 2 3
Bottom of active window
Select + dots 4 5 6
Route braille to active cursor
R
Say current line
Space + dots 1 4
Say current word
Space + dots 2 5
Say current character
Space + dots 3 6
Jaws Navigation Commands
Function
Keys
Previous document window
Space + dots 1 3
Next document window
Space + dots 4 6
Beginning of file
Space + dots 1 2 3
End of file
Space + dots 4 5 6
Page Up
Space + dots 1 2 3 4 5
Page Down
Space + dots 1 2 4 5 6
Home
Space + dots 1 2 3 4
Page 41
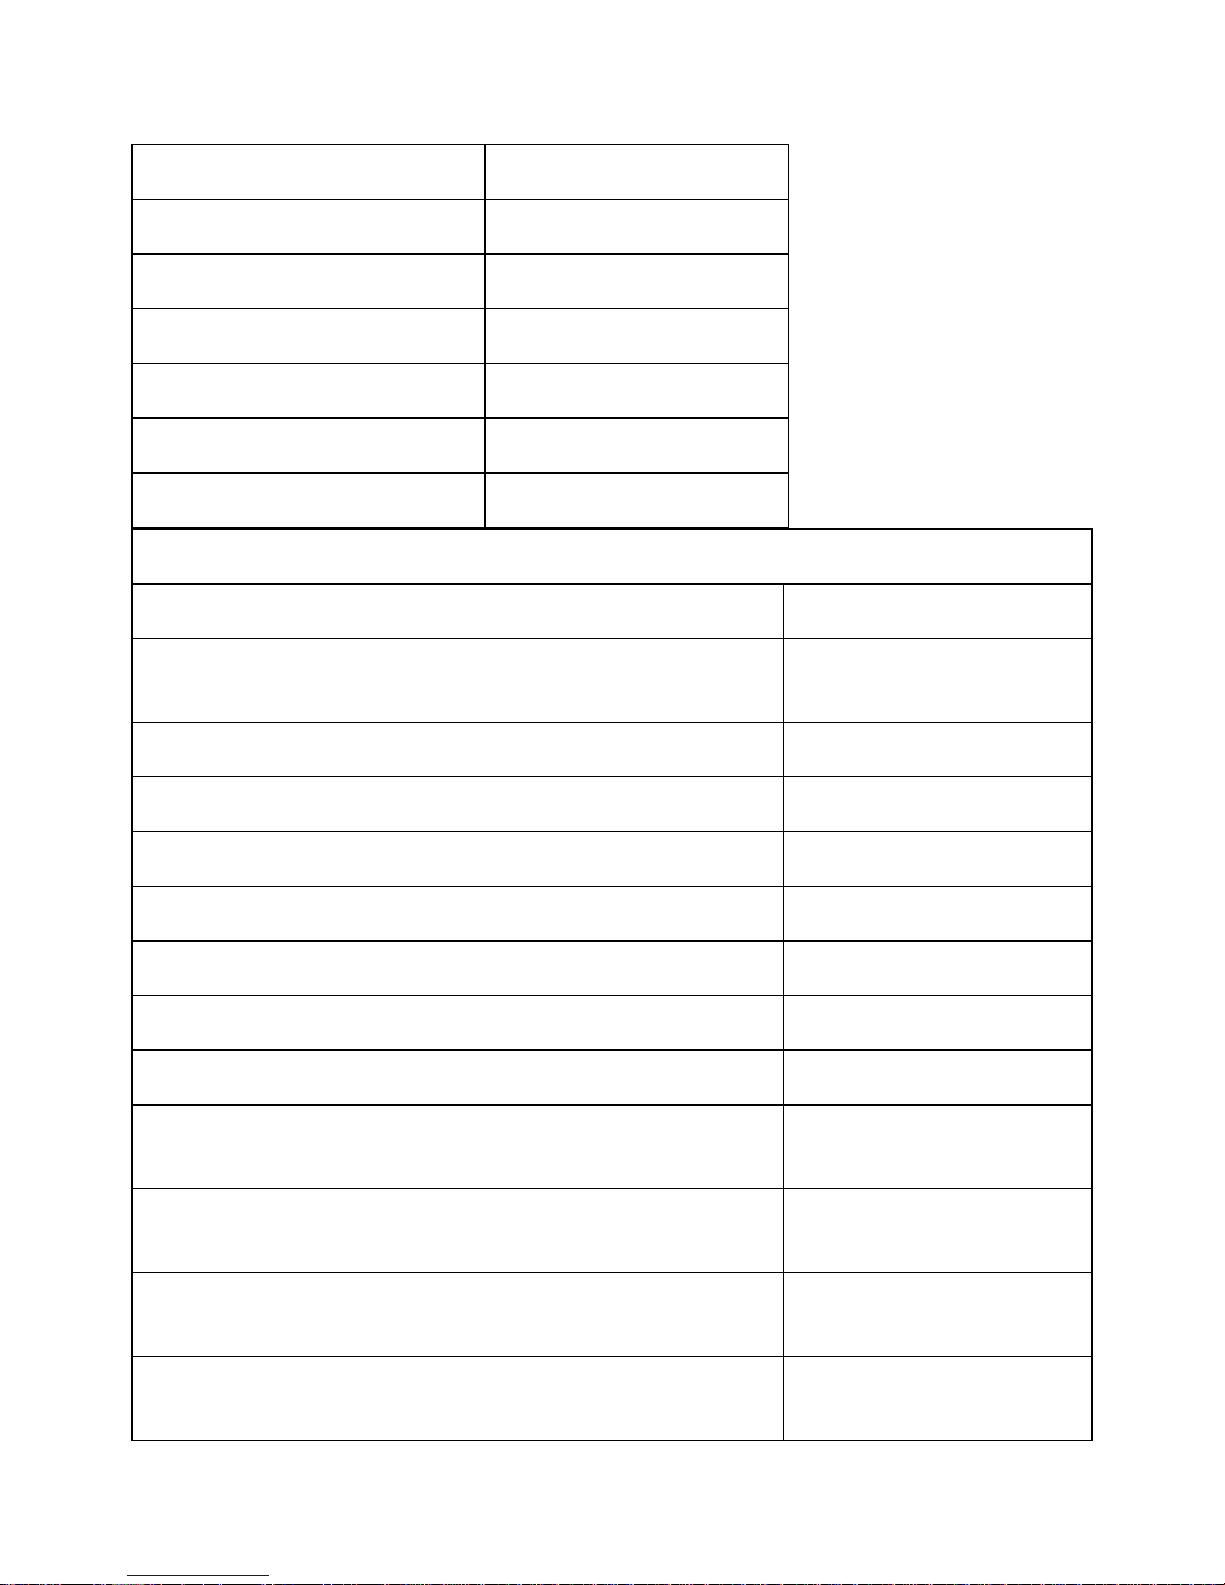
End
Space + dots 1 4 5 6
Up Arrow
Space + dot 1
Down Arrow
Space + dot 4
Previous word
Space + dot 2
Next word
Space + dot 5
Previous character
Space + dot 3
Next character
Space + dot 6
Jaws Editing Commands
Function
Keys
Backspace (acts as shift key when typing braille
characters)
Space + dot 7
Enter
Space + dot 8
Tab
Space + dots 4 5
Shift + Tab
Space + dots 1 2
Delete current character
Space + D
Select all
Space + dots 1 8
Select to top of document
Space + dots 1 2 3 7 8
Select to bottom of document
Space + dots 4 5 6 7 8
Select previous page
Space + dots 1 2 3 4 5
7 8
Select next page
Space + dots 1 2 4 5 6
7 8
Select to beginning of line
Space + dots 1 2 3 4 7
8
Select to end of line
Space + dots 1 4 5 6 7
8
Page 42
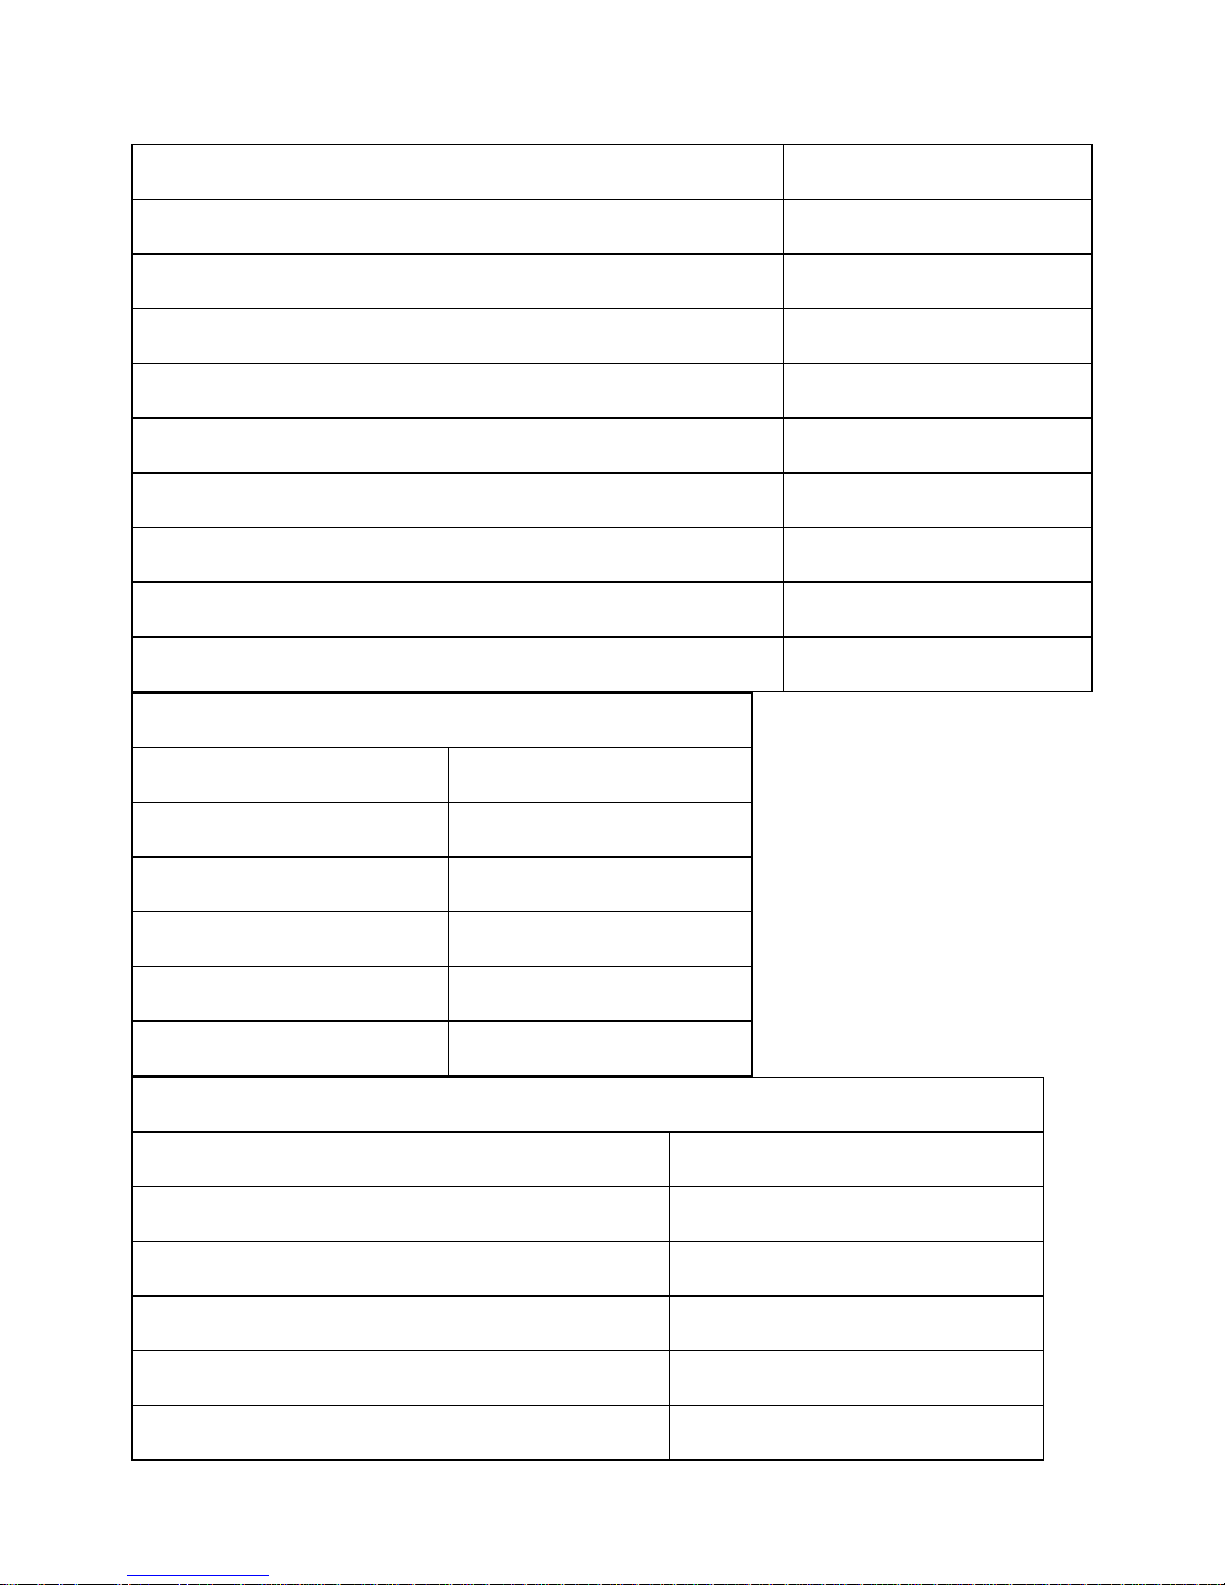
Select previous line
Space + dots 1 7 8
Select next line
Space + dots 4 7 8
Select previous word
Space + dots 2 7 8
Select next word
Space + dots 5 7 8
Select previous character
Space + dots 3 7 8
Select next character
Space + dots 6 7 8
Copy to clipboard
Space + dots 1 4 8
Cut to clipboard
Space + dots 1 3 4 6 8
Paste clipboard
Space + dots 1 2 3 6 8
Undo
Space + dots 1 3 5 6 8
Jaws Windows Commands
Function
Keys
Start menu
Space + dots 1 3 4 7 8
Toggle menu bar
Space + M
Escape
Space + dots 1 3 5 6
Alt Tab
Space + T
Minimize all applications
Space + dots 1 4 5 7 8
Jaws General Commands
Function
Keys
Toggle keyboard help
Space + dots 1 4 5 6
Toggle type keys mode
Space + dots 1 2 3 4 5 6
JAWS cursor
Select + J
PC cursor
Select + P
Route JAWS cursor to PC cursor
Select + dots 1 4
Page 43

Say all to bottom
Space + dots 1 2 3 4 5 6 7 8
Toggle grade 2 translation
Space + G (dots 1 2 4 5)
Toggle grade 2 translation of current word
Select + W (dots 2 4 5 6)
Display last flash message
Select, F
JAWS find
Space + F
JAWS find next
Space + dots 2 5 7 8
JAWS find previous
Space + dots 2 5 7 8
Toggle active cursor follows braille
Select + dot 1
Toggle braille follows active cursor
Select + dot 4
Cycle through braille modes
Select + M
Display six-dot braille
Select + dots 2 3 5
Display eight-dot braille
Select + dots 2 3 6
Toggle cursor shape
Select + dots 1 4 6
Restrict braille cursor
Select + R
Toggle characters and attributes
Select + dots 1 6
Braille colour marking
Select + dots 1 4
Select attributes to be displayed
Select + dots 1 3
Set 8 characters per space
Space + dots 2 3 6
Set unlimited characters per space
Space + dots 1 3 6
Toggle 8/unlimited characters per space
Select + dots 1 3 4 6
Cycle table reading options
Select + T
Cycle table header options
Select + H
Graphics labeler
Select + G
Adjust braille options
Select + B
Page 44
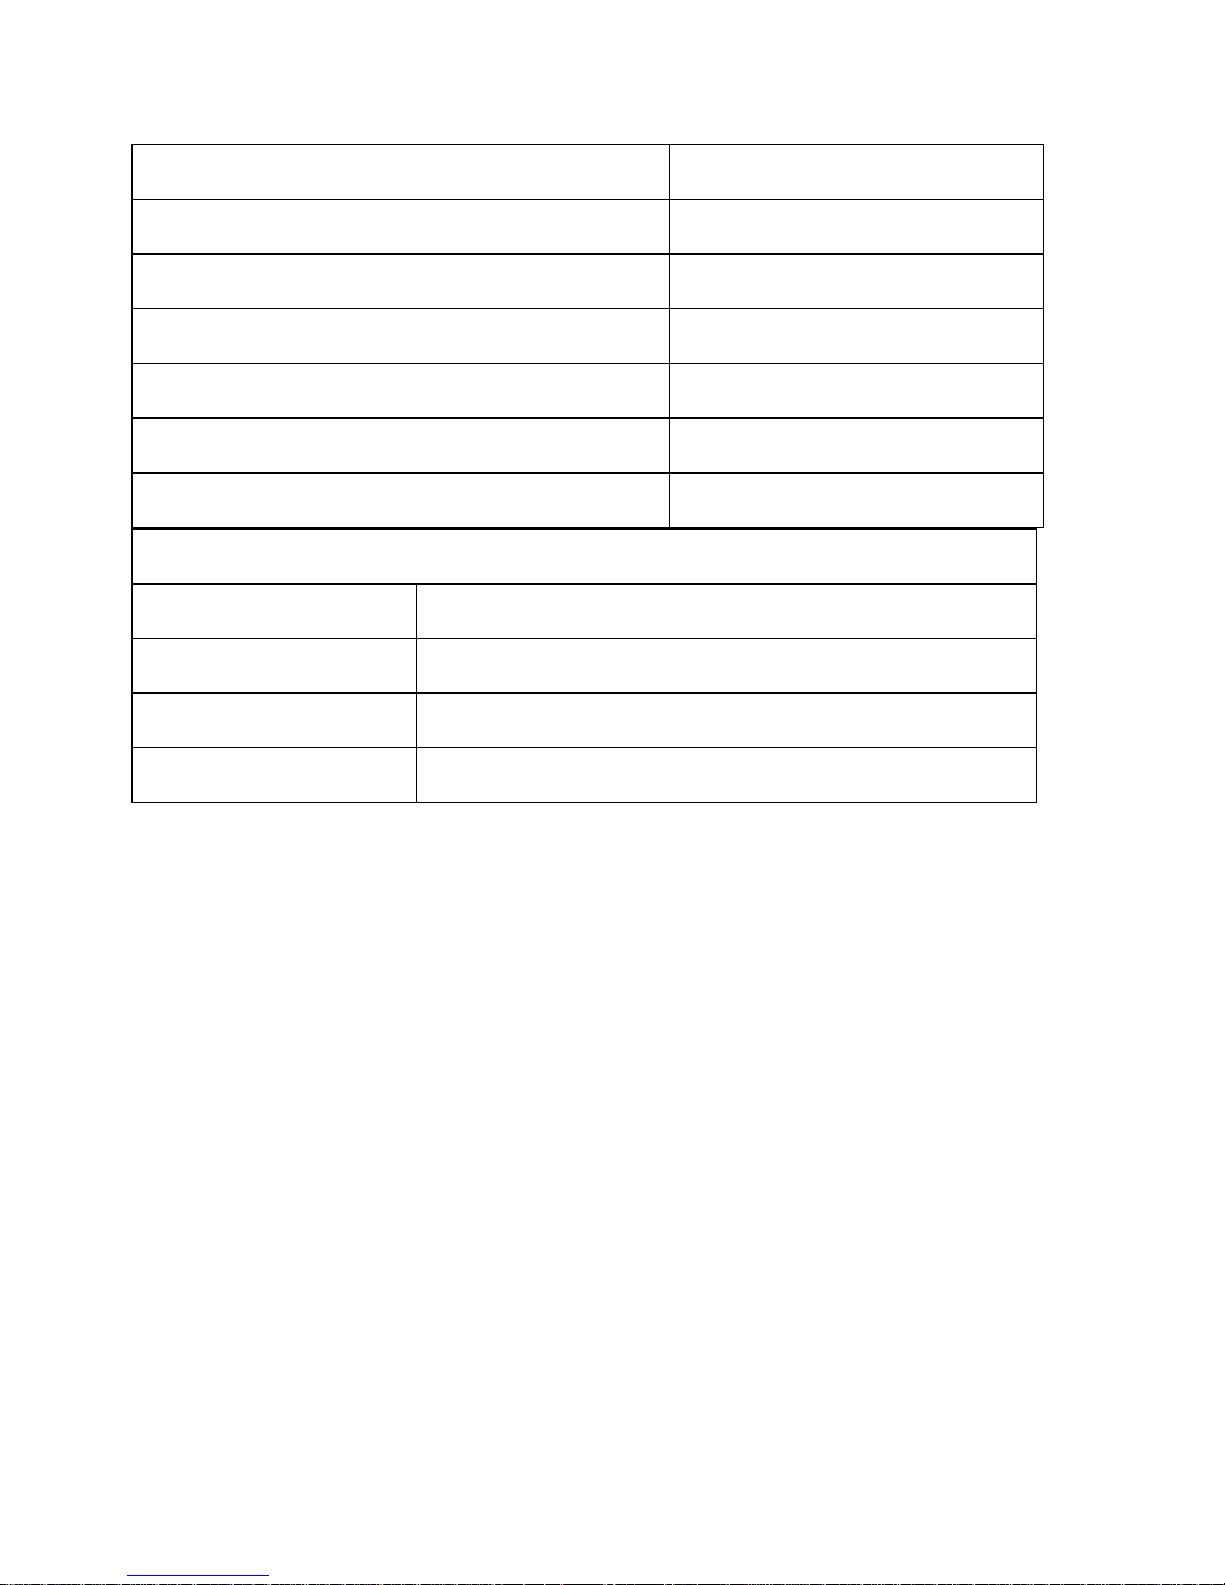
Adjust JAWS options
Select + dots 1 2 3 6
JAWS window
Space + J
Run JAWS Manager
Space + dots 2 3 7 8
List of links on page
Space + dots 2 3 5 6 7 8
Show current time
Space + dots 2 3 4 5 7 8
Show script file name
Select + dots 1 2 3 4 5
Quit JAWS
Space + dots 2 5 6 7 8
Jaws Special Key Commands
Function
Keys
Ctrl + A - Ctrl + Z
dot 8 + any letter
F1 - F10
dot 7 + Computer Braille number 1 - 0 (0 = F10)
Ctrl + F1 - Ctrl + F10
dot 8 + Computer Braille number 1 - 0
System Access
To connect Orbit Reader 20 to System Access, the device must be connected
by a Standard-A to Micro-B USB cable and set in HID protocol mode.
1. Press Space to open menu.
2. Arrow Down to the USB selection.
3. Arrow Right or Left to select HID.
4. Press select.
5. Press dot 7 to return to the last location.
Another way to quickly switch to HID mode is to use the short cut keys
Space + dots 2 7.
After running System Access in HID mode, connect the USB cable and wait
up to 30 seconds. System Access announces when Orbit Reader 20 is
connected.
Window-Eyes
To connect to Window-Eyes using USB, the Orbit Reader USB protocol must
be set to Serial. To set it to Serial, press Space to open the menu and arrow
Page 45

down to USB. Once on the USB menu item, press the Right or Left Arrow
keys to select Serial and then press Select. Pressing dot 7 exits the menu.
To select a display, open the Braille Display option in the Window-Eyes File
menu. There is no driver for Window-Eyes for versions prior to 7.1;
however, you may use Orbit Reader by selecting any Baum display with
input keys. The Vario Connect and the Braille Connect are two that work.
Select the display and set the COM port number established when
connecting to a Windows PC.
Key Lock Command
The Key Lock command prevents accidental key presses. The command is to
hold dots 7 8 for two seconds or more. Pressing and holding these same
keys again unlocks the keys. You can also unlock the keys by turning the
device off and back on again.
System Alerts
System alerts, such as "Battery low" are indicated by a periodic cycling of
the eight dots in the last cell of the device. Any information in that cell is
displayed again after the notification.
Alerts are seen by invoking the Menu or the Editor Context Menu. Pressing
Select causes the next alert to appear, if there are any more. The alert is
removed from the alert list once it has been displayed.
If no more alerts are in the list, the first Menu or Editor Context Menu item
appears. Pressing dot 7 clears all pending alerts and puts you back at the
first Menu or Editor Context Menu item.
If the alert message length is longer than 20 characters, the user can
navigate through the message using the Panning buttons. If you are already
in the Menu or Editor Context Menu when an alert happens, you can review
the alert by pressing the Space key.
Reboot the Device
The unit can be rebooted by pressing the lower Right Panning key + dot 8.
There is no indication of the reset event. The unit is in power off condition
after reset and needs to be powered on before it can be used.
Device Upgrade Procedure
Page 46

There are two parts to the upgrade: 1) downloading the software and 2)
upgrading the Orbit Reader 20. Each part of the upgrade is explained in the
following two sections of this document. Read each section carefully before
proceeding.
Download the Software
To implement this release, you need a PC running Microsoft® Windows XP or
later. Click on the Orbit Reader 20 firmware file to download the necessary
software.
When download is complete, follow these steps:
1. Open the folder on your computer where the firmware file was
downloaded.
2. Right click on the file and choose "Extract all" OR select the file by
arrowing to it, press the application key and choose "Extract all" from
the Context menu.
3. Follow the dialog steps to extract it to a folder of your choice.
When finished, your chosen folder should contain a folder named after the
version of the release, for example, OR20_XX.XX.XX. Make a note of the
location of this folder for use in the next section of this document.
Install the Software
The following are required to perform the upgrade to the Orbit Reader 20:
• Orbit Reader 20 Unit
• Standard-A to Micro-B USB cable
• A PC running Windows XP or later
• Orbit Reader 20 Upgrade Utility file found in the Orbit Reader 20 folder
(see Download the Software section).
• Orbit Reader 20 release bin file found in the Orbit Reader 20 folder
(see Download the Software section).
To upgrade the firmware, follow these steps:
1. Make sure the Orbit Reader is turned off.
2. Connect the Orbit Reader to the PC using the USB cable.
3. In the Release folder on your PC, run the Orbit Reader 20 Firmware
Upgrade Utility. If you receive an error message, see Troubleshooting
section. The utility shows message “Orbit Reader 20 is connected” in device
status field. It also shows the message “Do you want to upgrade the
device?” in the message field at the bottom of the dialog.
Page 47
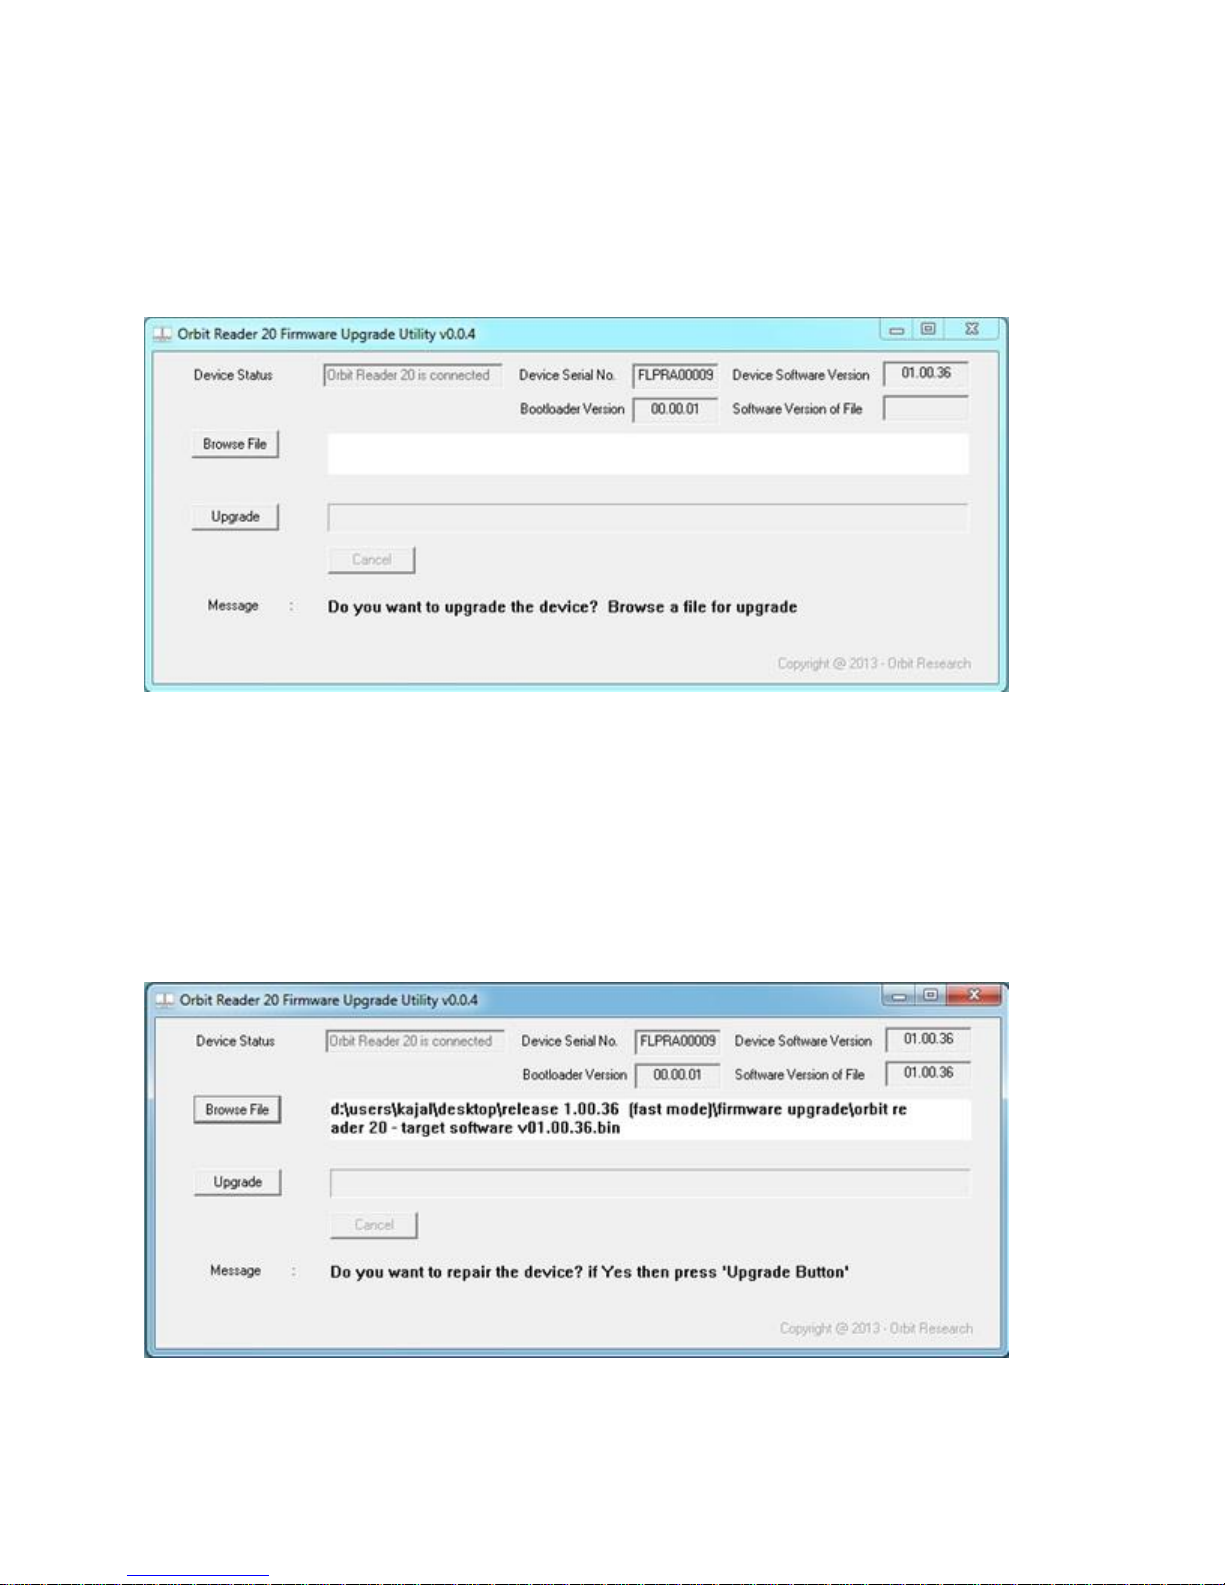
4. Press and hold down the Right Panning forward button + dot 5, then
press and hold dot 8.
5. Release dot 8 first, then release the Right Panning button and dot 5. This
switches the Orbit reader 20 into Upgrade mode. You should hear a tone on
your PC.
6. The utility shows the device serial number and the software version of the
device at top right corner of the window. If the serial number is blank,
repeat steps 4 and 5.
7. Activate the Browse button found in the dialog.
8. Browse and select the firmware bin file from your PC. The file is in the
folder you unzipped previously.
9. Once file is selected, the dialog shows the software version of the selected
file.
10. Activate the Upgrade button.
11. The utility starts upgrading the device.
Page 48
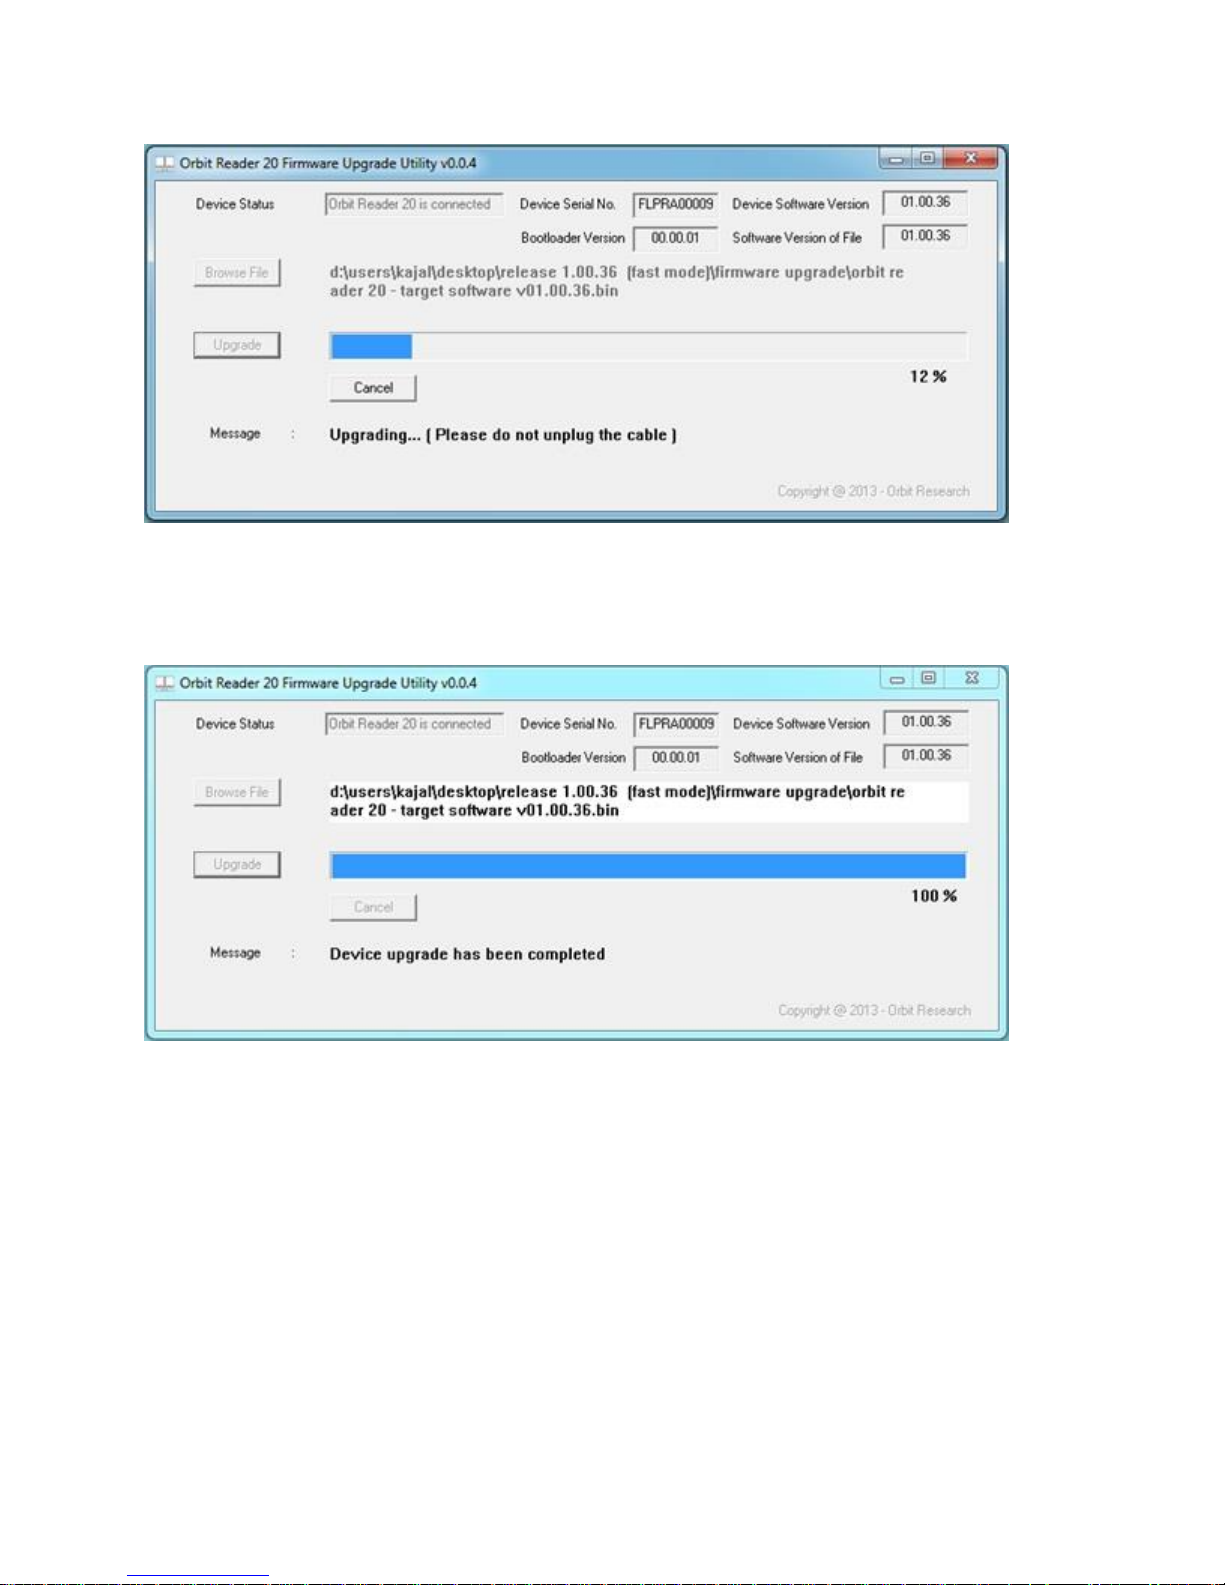
12. Do not unplug the cable. Wait for the message “Device upgrade has
been completed” on the upgrade utility or until the Orbit Reader reboots and
shuts down.
13. The Orbit Reader is upgraded. Turn on to start using the device.
To check for successful upgrade of the device, press Space to open the Orbit
Reader Menu and arrow to "Version" in the list. The version number of the
firmware release should match the number on the display.
Troubleshooting
If the upgrade utility shows the error message below, please download C++
Redistributable and install on the PC.
Page 49

Error message: The application has failed to start because its side-by-side
configuration is incorrect. Please see the application event log or use the
command-line sxstrace.exe tool for more detail.
If Orbit Reader does not come on or seems to freeze, use these steps:
1. Plug in power to ensure the battery is charged. Use the supplied AC
wall connector and cable to obtain the most reliable power source. Let
the unit charge for at least a few hours.
2. Hold the Power Button for at least two seconds. If the unit is on, it
should turn off. If it is off, it should come on.
3. Remove the SD card, then hold the Power button for two seconds. If
the card was the cause of the problem, the unit should come on.
4. Unplug Power, then hold the Power Button for at least two seconds.
5. Hold the Power Button for at least 10 seconds.
6. Press the Reset command (press Space + dot 5 + Right Panning key).
Try the Power button again.
7. Finally, remove the battery. Leave it out for a few minutes, reconnect
it, then try the steps again.
Battery Use and Replacement
Orbit Reader includes a rechargeable Lithium-ion 2200mAh capacity battery.
It fully charges in about three hours under optimal conditions. When you
plug in the cable, "Battery plugged in" is briefly displayed. Once charged,
"Battery charged" is displayed. A full battery charge lasts approximately
three days of typical use. Check the battery level in the menu.
The battery in Orbit Reader should last several years. Gradually, the battery
begins holding its charge for less and less time. When the amount of time
the battery holds a charge becomes inconvenient, it is time for replacement.
To replace the battery, follow these steps:
1. Obtain a replacement battery. Use only the battery designed for Orbit
Reader 20.
2. Remove the battery door screws.
3. Remove the battery door.
4. Carefully unplug the connector. Do not pull on the wire. Use the
connector instead.
5. Insert the new battery.
6. Replace the cover and screws.
Accessories Information
Page 50
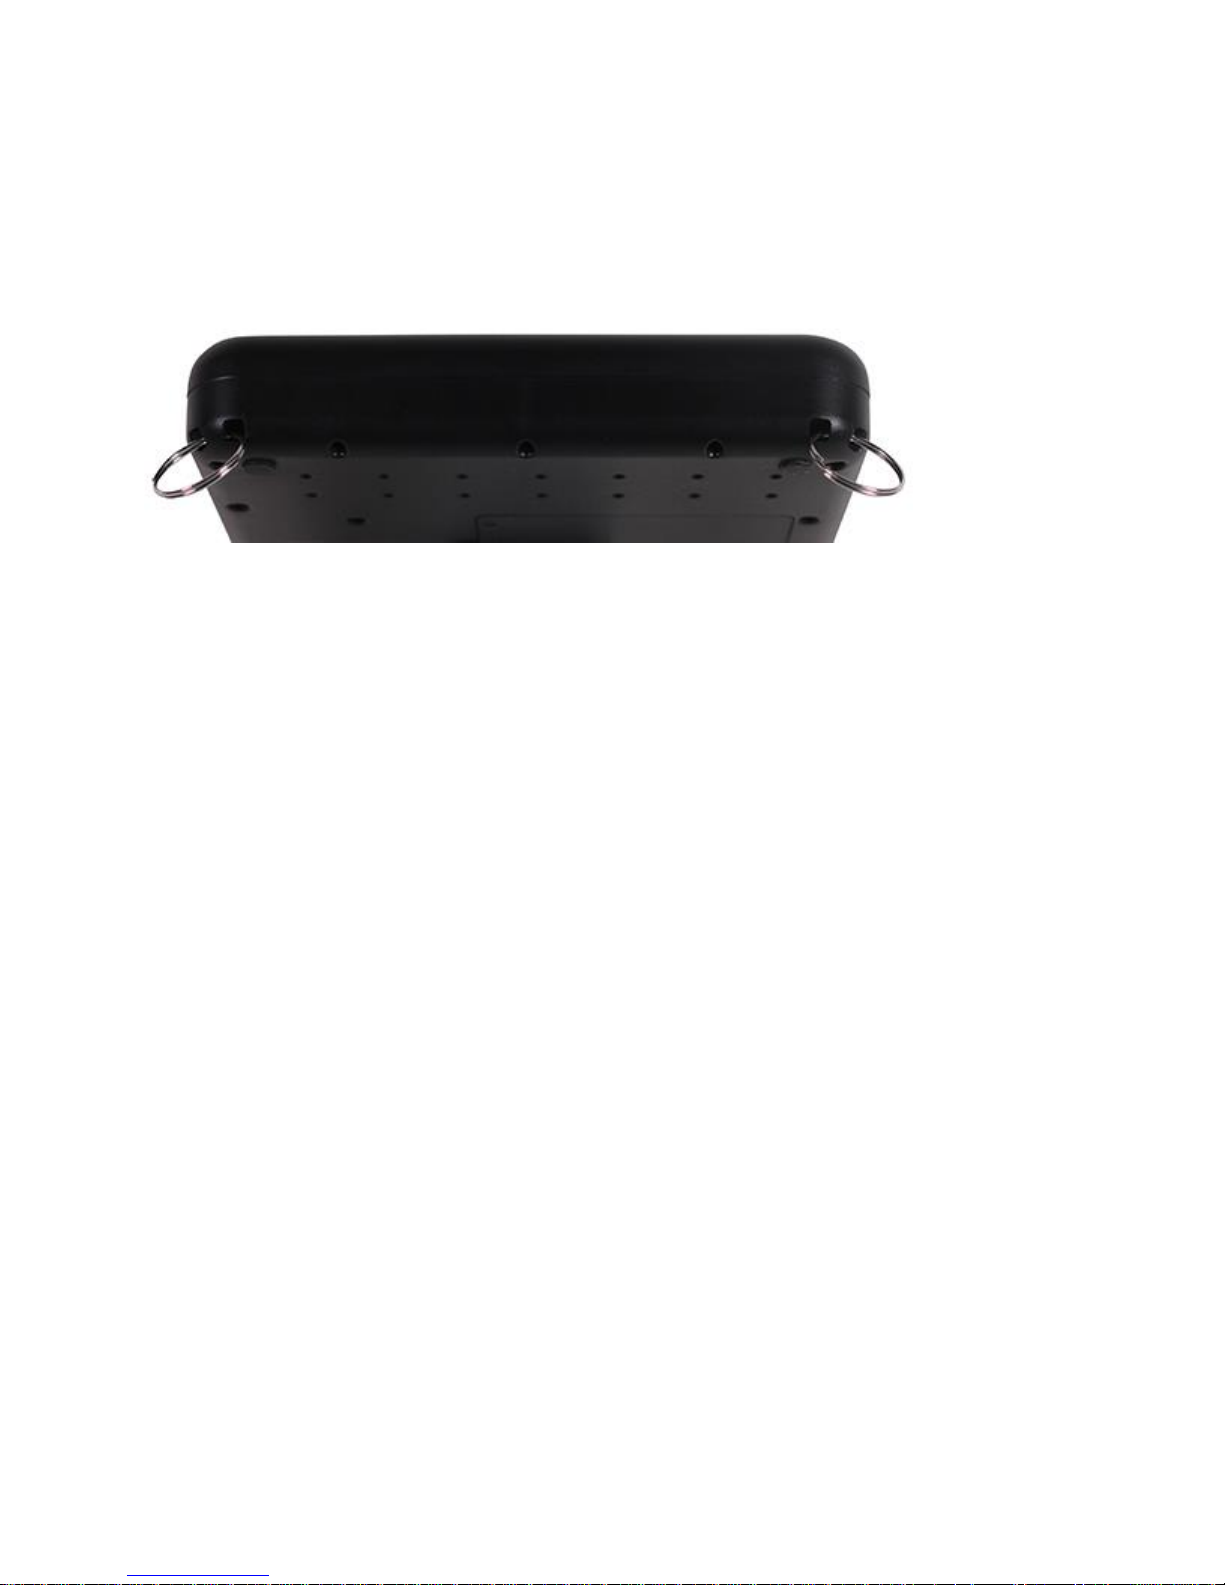
Orbit Reader 20 has two holes on the lower-back corners of the device, one
on each corner. The holes are there to provide a means to attach a strap to
the device with the use of key rings. The key rings can be 10-40mm in
diameter and up to 3mm in thickness. The strap and key rings are not
included with the purchase of the Orbit Reader 20.
Page 51
General Specifications
Dimensions
(WxHxD)
6.61 x 1.4 x 4.41 inch (168 x 3.56 x 112 cm)
Weight
0.99 lbs (450 grams)
Braille Cells
20 eight-dot refreshable braille cells; Refresh rate < 1
sec
Braille Input Keys
8-key Perkins style keypad, with space bar
High-quality scissors-type keys
Additional Keys
Power on/off button
4-way cursor keys and select key
2 pan keys, rocker type
Supported File
Formats
.txt, .brl, .brf
(reads other files as well, but output may not be
meaningful)
OS Support
Windows: NVDA, JAWS, Windows-Eyes, Supernova
Mac OS X: Voiceover
iOS: Voiceover
Android: Brailleback
Interfaces and
Ports
1x Micro B USB port, USB 2.0, for host interface,
firmware upgrade and battery charging
Bluetooth 2.1, Class 2
Flash Media Slot
1x SD card (4GB to 32GB capacity)
Battery
User-replaceable rechargeable Lithium-Ion battery;
2200mAH
Battery Life
3 days of typical use
Charging Method
PC charger: Charge over USB Port – 5V, 500mA Max
Wall charger: Charge over USB Port – 5V, 1000mA
Max; USB BC1.2 compliant charger required
Environmental
Conditions
Operational:
Temperature: 5° C to 45° C
Humidity: 10% - 70% relative humidity
Page 52

Storage:
Temperature: -15° C to 70° C
Humidity: 5% - 90% relative humidity
Page 53
Appendix A - Proper Trademark Notice
and Attribution
Android™ and Google™ are trademarks of Google Inc.
Apple®, iPad®, iPhone®, iPod®, and Mac® are registered trademarks or
service marks of Apple Inc., registered in the U.S. and other countries.
Bluetooth® is a registered trademark of Bluetooth SIG, Inc.
iOS® is a registered trademark of Cisco in the U.S. and other countries and
is used under license by Apple Inc.
JAWS® is a registered trademark of Freedom Scientific, Inc.
Microsoft® and Windows® are registered trademarks of Microsoft
Corporation in the U.S. and/or other countries.
Orbit Reader 20 is a trademark of Orbit Research.
Appendix B - Warranty Info
Hardware Limited Warranty
The Orbit Braille Reader 20 is under warranty for a period of one year from
the date of purchase by the original purchaser and covers manufacturer's
defects under normal use. Product modification, general wear and tear or
damage due to negligence are not covered by the warranty.
Appendix C - Computer Braille Chart
ASCII Code
Character
Dot Combination
33
!
2-3-4-6
34
"
5
35
#
3-4-5-6
36
$
1-2-4-6
37
%
1-4-6
Page 54

38
&
1-2-3-4-6
39
'
3
40
(
1-2-3-5-6
41
)
2-3-4-5-6
42
*
1-6
43
+
3-4-6
44
,
6
45
-
3-6
46
.
4-6
47
/
3-4
48
0
3-5-6
49
1
2
50
2
2-3
51
3
2-5
52
4
2-5-6
53
5
2-6
54
6
2-3-5
55
7
2-3-5-6
56
8
2-3-6
57
9
3-5
58
:
1-5-6
59
;
5-6
60
<
1-2-6
61
=
1-2-3-4-5-6
Page 55

62
>
3-4-5
63
?
1-4-5-6
64
@
4-7
65
A
1-7
66
B
1-2-7
67
C
1-4-7
68
D
1-4-5-7
69
E
1-5-7
70
F
1-2-4-7
71
G
1-2-4-5-7
72
H
1-2-5-7
73
I
2-4-7
74
J
2-4-5-7
75
K
1-3-7
76
L
1-2-3-7
77
M
1-3-4-7
78
N
1-3-4-5-7
79
O
1-3-5-7
80
P
1-2-3-4-7
81
Q
1-2-3-4-5-7
82
R
1-2-3-5-7
83
S
2-3-4-7
84
T
2-3-4-5-7
85
U
1-3-6-7
Page 56

86
V
1-2-3-6-7
87
W
2-4-5-6-7
88
X
1-3-4-6-7
89
Y
1-3-4-5-6-7
90
Z
1-3-5-6-7
91
[
2-4-6
92
\
1-2-5-6
93
]
1-2-4-5-6
94
^
4-5
95
_
4-5-6
96
`
4
97
a
1
98
b
1-2
99
c
1-4
100
d
1-4-5
101
e
1-5
102
f
1-2-4
103
g
1-2-4-5
104
h
1-2-5
105
i
2-4
106
j
2-4-5
107
k
1-3
108
l
1-2-3
109
m
1-3-4
Page 57
110
n
1-3-4-5
111
o
1-3-5
112
p
1-2-3-4
113
q
1-2-3-4-5
114
r
1-2-3-5
115
s
2-3-4
116
t
2-3-4-5
117
u
1-3-6
118
v
1-2-3-6
119
w
2-4-5-6
120
x
1-3-4-6
121
y
1-3-4-5-6
122
z
1-3-5-6
123
{
2-4-6-7
124
|
1-2-5-6-7
125
}
1-2-4-5-6-7
126
~
4-5-7
 Loading...