

Page 1

orbitorTM
98-PIECE 1200X
MICROSCOPE SET
Instructions
and
Learning Guide
Page 2
f
r
How to use your new microscope:
There’s a whole tiny universe around you ready to be explored! All you need is your microscope, and
a zest for adventure. Your microscope is an instrument with special lenses that make very small
objects appear much larger. There are millions of tiny living organisms that can be seen in amazing
detail through your microscope.
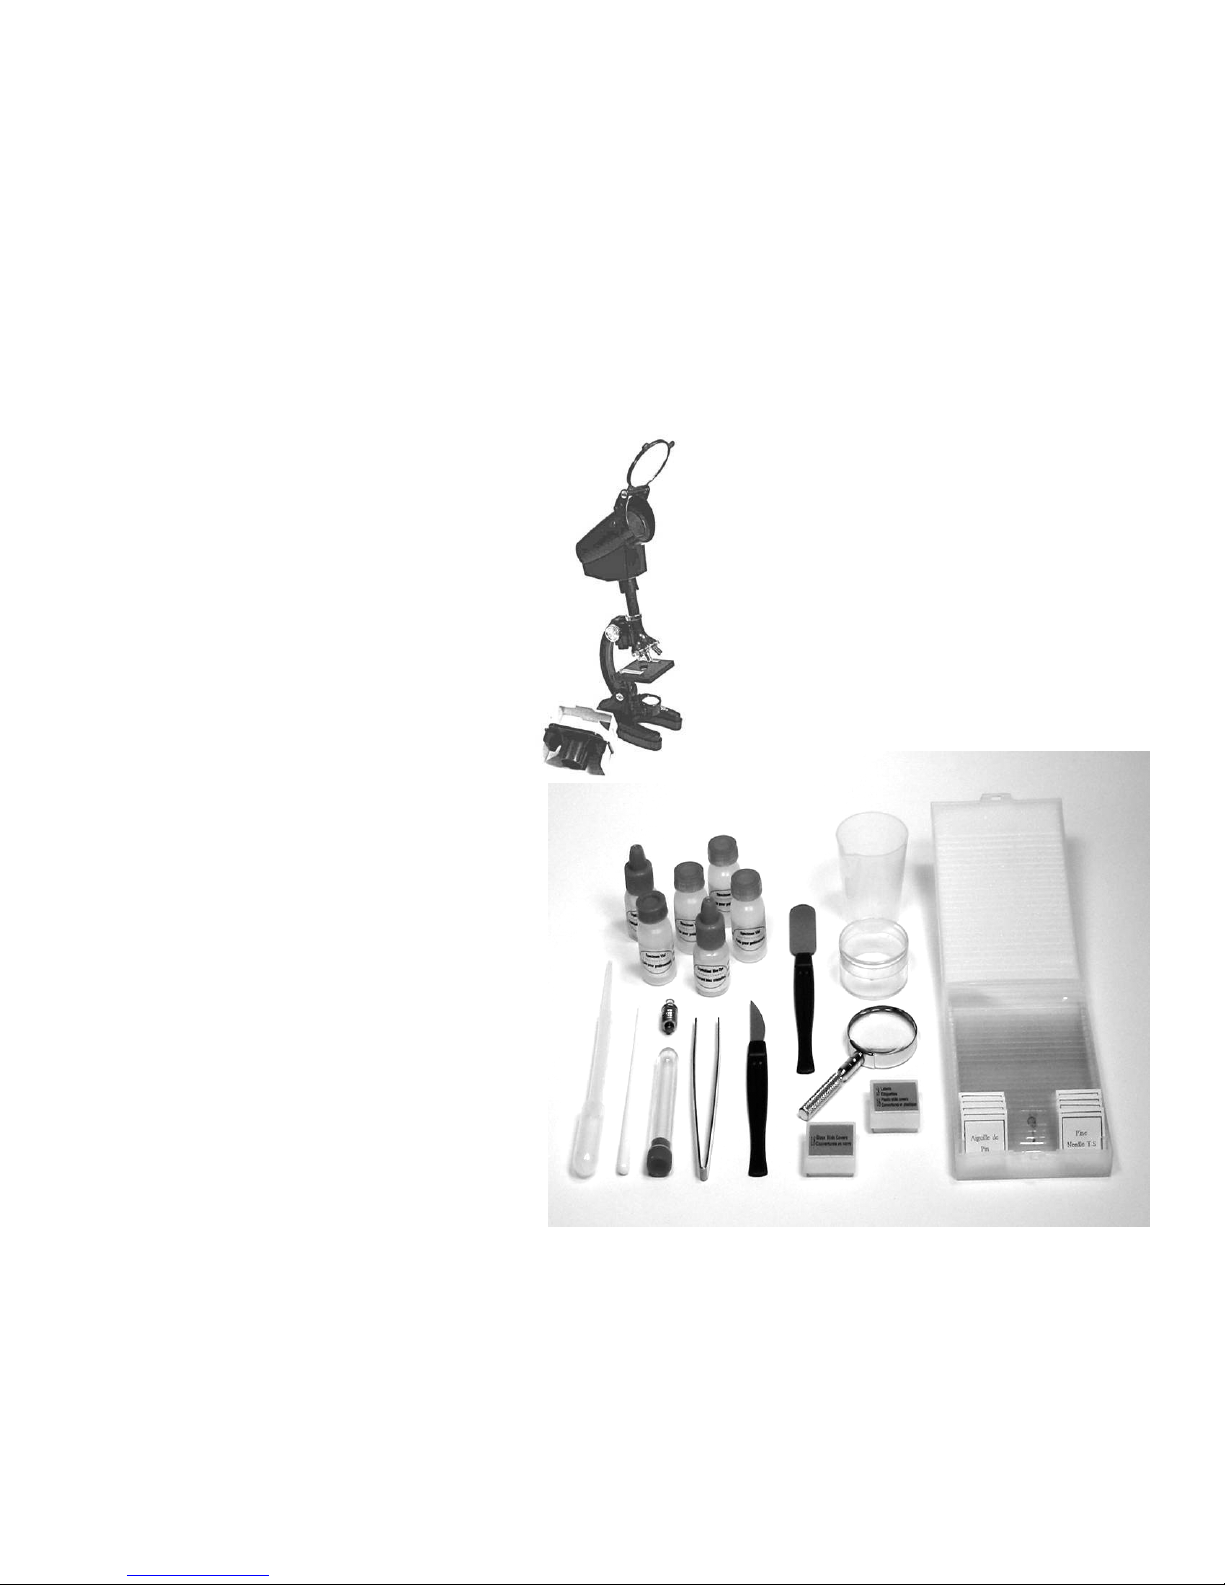
Your microscope set contains the following parts. Check your microscope kit and make sure that you
have all of the parts listed below. Put a check mark in the box beside each item you find.
1 die-cast microscope (a)
1 scalpel (b)
1 spatula (c)
1 tweezers (d)
4 collecting vials (e)
1 test tube with cap (f)
1 Petri dish (g)
1 pipette (h)
5 prepared slides (i)
18 blank slides (j)
18 slide labels (k)
m1
36 slide covers (l)
1 crystallized red dye (m1)
1 crystallized blue dye (m2)
1 stirring rod (n)
1 magnifying glass (o)
1 measuring graduate (p)
1 spare light bulb (q)
h
n
1 camera adapter (r)
1 projection device (s)
What are these things for?
a) Die-cast metal microscope – The microscope holds small items, called samples, to be studied on
clear slides. It shines a bright light from its mirror or bulb through the small sample, and then lenses
s
a
e
p
c
g
m2
q
o
j
i
k
d
b
l
2
Page 3

make the sample look very big. This microscope can make things look 300 times, 600 times, or even
1,200 times bigger than you can see them with your own eyes.
b) Scalpel – A scalpel is a sharp blade that is used to cut very thin pieces of material so you can look
at them with your microscope.
c) Spatula – The spatula has a large flat blade, but it is not as sharp as the scalpel. It is used for
scraping off bits of material for testing and to push down on soft samples to mash them flat.
d) Tweezers – The tweezers are like little pinchers. They are used to pick up small samples and to
handle samples that you don’t want to touch with your hands – like slimy mold!
e) Collecting vials – These are little plastic bottles with tight-fitting lids. They are used to carry your
samples from the place you collected them to the place you have your microscope set up.
f) Test tube with cap – This thin, clear tube is used to hold liquid samples when you want to see if
anything is happening, like when a sample changes color.
g) Petri dish – This is a round, flat dish with a clear cover. It is used to grow and observe samples
such as molds.
h) Pipette – This is a soft plastic tube with a squeeze bulb on one end that you use to transfer a drop
or two of liquid to a slide for examination.
i) Prepared slides – These are slides with professionally prepared samples on them for you to
examine.
j) Blank slides – These are clear slides for you to use in preparing your own subjects for
examination.
k) Slide labels – These are little pieces of paper with sticky backs. You can stick them on your slides
and record information, such as the name of the sample, or when the sample was prepared.
l) Slide covers – These are little circles or squares made of thin, clear plastic. They are used to cover
very small samples on a slide. When they are clean and dry they stick to the glass slide with a static
electricity charge.
m) Crystallized red dye and crystallized blue dye – In your set you will find two small plastic
bottles. One has a small amount of red powder in it and one has a small amount of blue powder. Add
enough warm water to half fill these plastic bottles. Place the lids on and make sure they are tight.
Shake well to make a supply of dye. If you add a drop of red or blue dye to a sample, like a thin slice
of onion, you will be able to see the cells much more clearly.
n) Stirring rod – Use this rod to mix liquids until they are well blended. An example is when you mix
salt in water.
o) Magnifying glass – This is useful for taking a close look at a sample before you examine it under
the high-power magnification of your microscope.
p) Measuring graduate – This plastic cup is marked with measuring lines so that you can accurately
measure quantities of liquids in your experiments.
3
Page 4
q) Spare light bulb – This spare bulb will replace the one in the illuminator lamp when it eventually
wears out.
r) Camera adapter – This adapter lets you attach a single use camera or a digital camera to the
microscope so you can make photographs or digital images of the exciting subjects you will see.
s) Projection device – With the projection device you can study the microscope image on a small
screen; or you can project an image onto a white wall or other white surface. You can even project
the image down onto a piece of white paper. This way you can trace the outline of the sample you are
studying and make your own drawing. You can save these drawings in an album, or you can use
them in school projects.
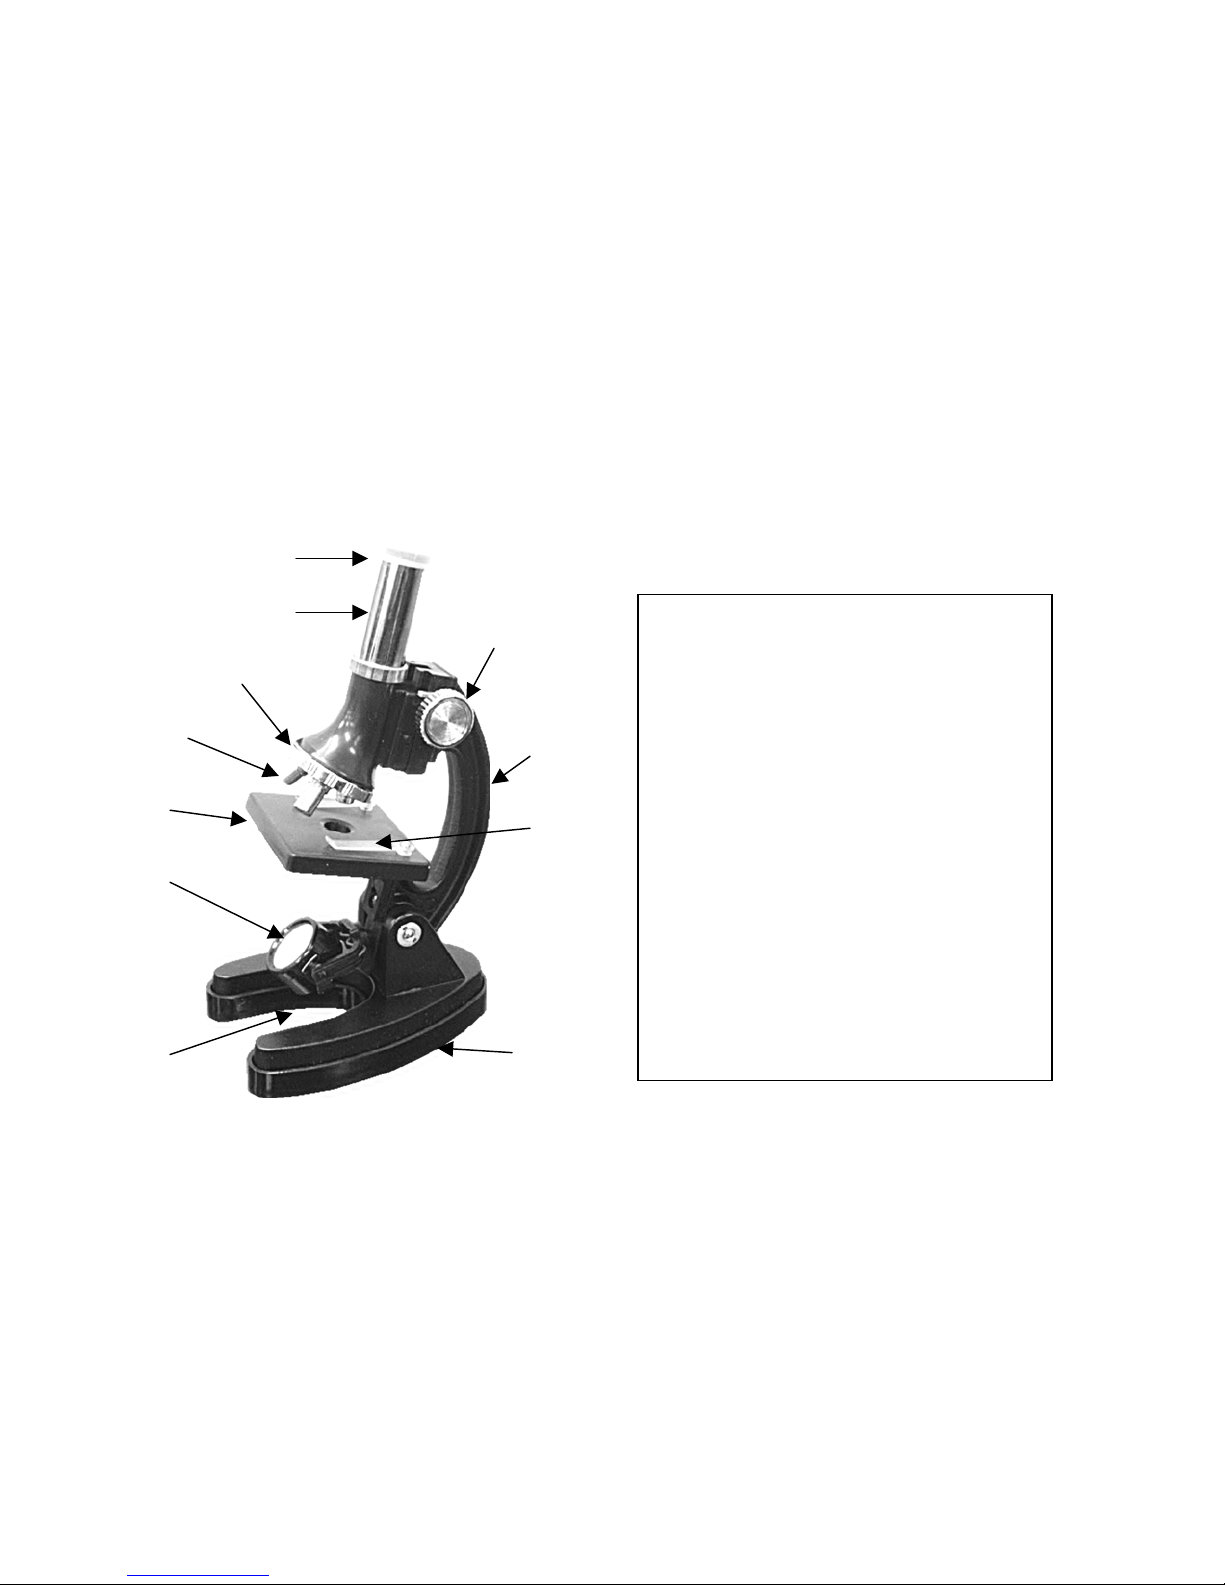
Parts of Your Microscope:
E
G
I
J
A. Eyepiece – The eyepiece is where you look into the microscope. It is a small magnifying lens that
collects the image projected by the objective lens.
B. Body tube – This is the main tube of the microscope. The image from the sample travels up this
tube to the eyepiece.
C. Focusing knobs – Turn these knobs very slowly to bring the image of your sample into focus so
you can see it sharply.
D. Revolving lens turret – The turret holds the three objective lenses. To change the lenses, rotate
the turret slowly until each lens clicks into position.
E. Objective lenses – These lenses give three different magnifying powers when working with the
eyepiece lens. They make samples look 300 times (300X), 600 times (600X) or 1,200 times (1,200X)
bigger than you can see them with your eyes alone.
D
A
B
A. Eyepiece
C
F
H
B. Body tube
C. Focusing knob
D. Revolving lens turret
E. Objective lenses
F. Arm
G. Stage
H. Slide clip
I. Mirror
J. Electric illuminator (on
opposite side of mirror)
K
K. Base (battery compartment)
4
Page 5
F. Arm – This curved piece is the “backbone” of the microscope and holds everything together. You
can tilt and adjust the angle of this arm to set the most comfortable viewing position.
G. Stage – The stage is the flat platform that supports your slides for viewing.
H. Slide clips – The two clips on the stage hold your slide in position so that it doesn’t move around
while you are looking at it.
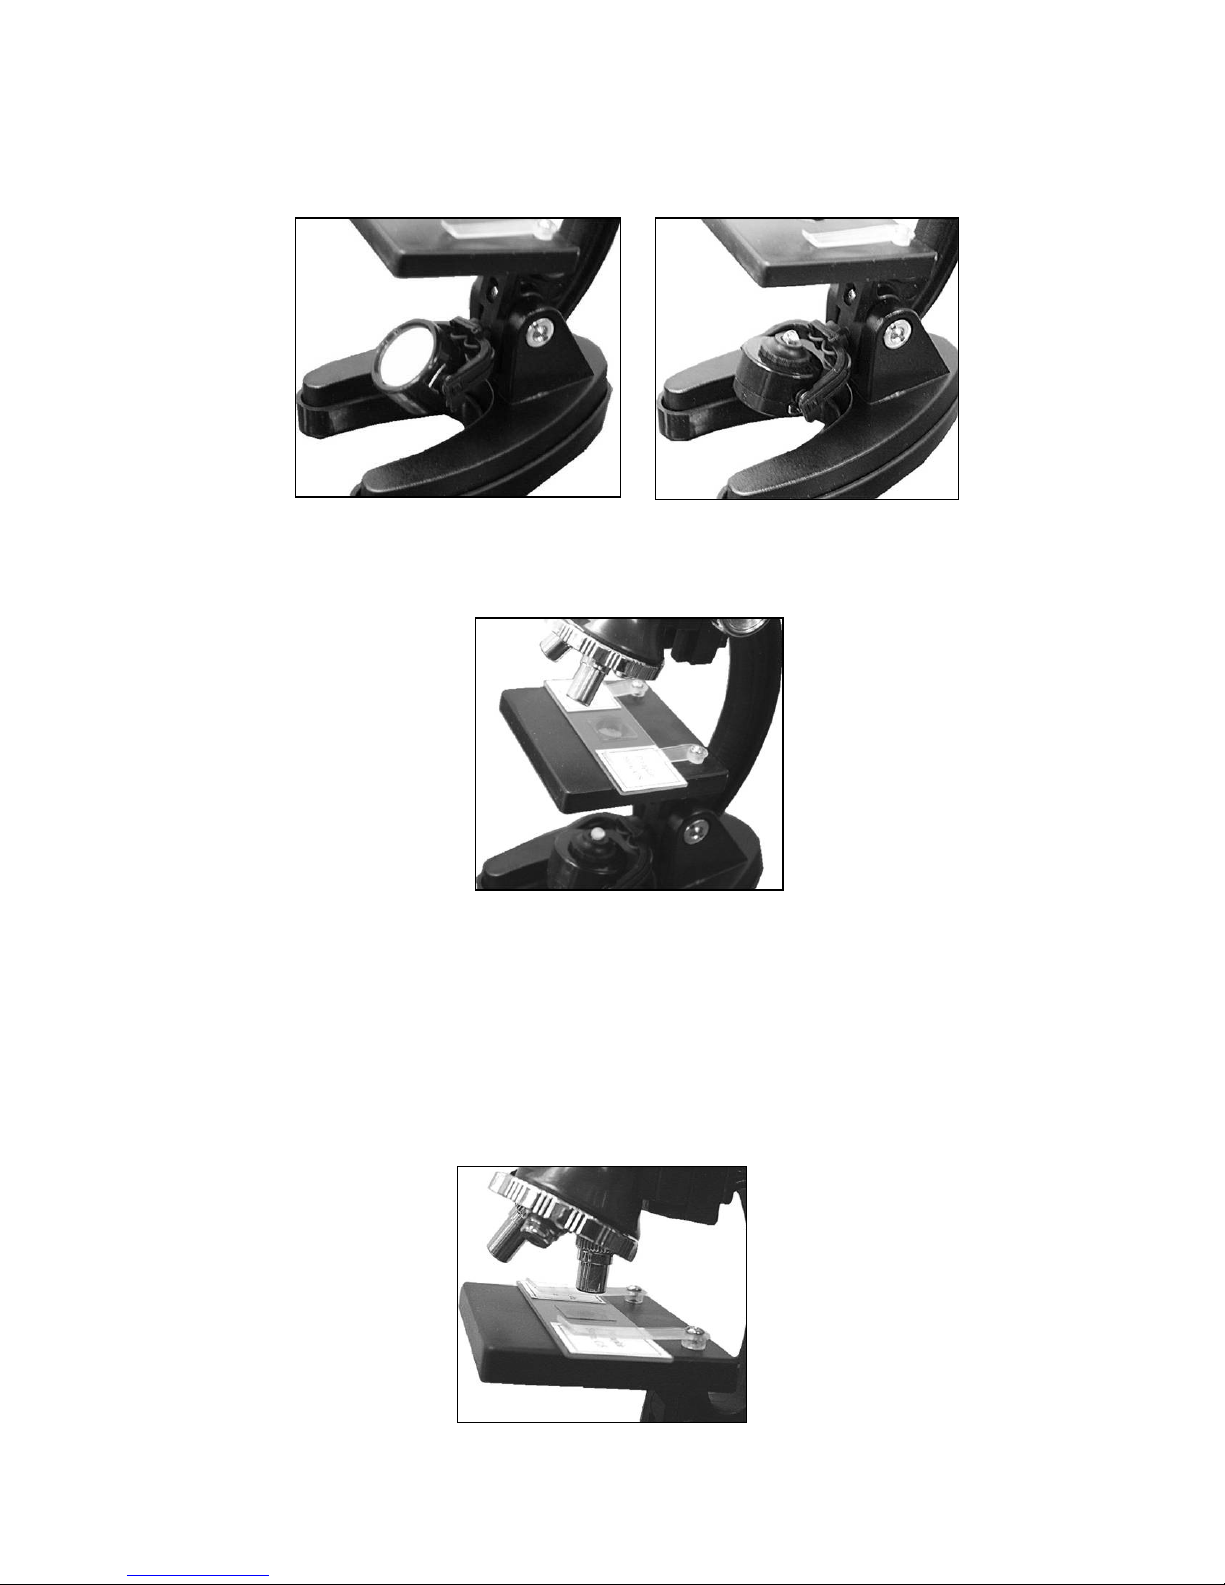
I. Mirror – The mirror aims light from a bright source, like a window or a table lamp, upward through
the slide you are studying so you can see it more clearly.
J. Electric illuminator – When there is not enough light available for the mirror to fully illuminate your
slide, you can turn the mirror over and use the bright electric illuminator bulb as your light source.
K. Base (battery compartment) – The base provides a solid support for your microscope. It also
holds the batteries for the electric illuminator. See the first section in ‘Getting Started’ for instructions
on installing and changing the batteries.
Helpful Hints
1) The most important parts of your microscope are the lenses. Handle them with care. If the lenses
are dirty or dusty you can clean them with a soft cotton cloth or a special lens-cleaning tissue. Do
not wipe them with a finger or a regular facial tissue.
2) Always store your microscope in its protective storage case.
Getting Started
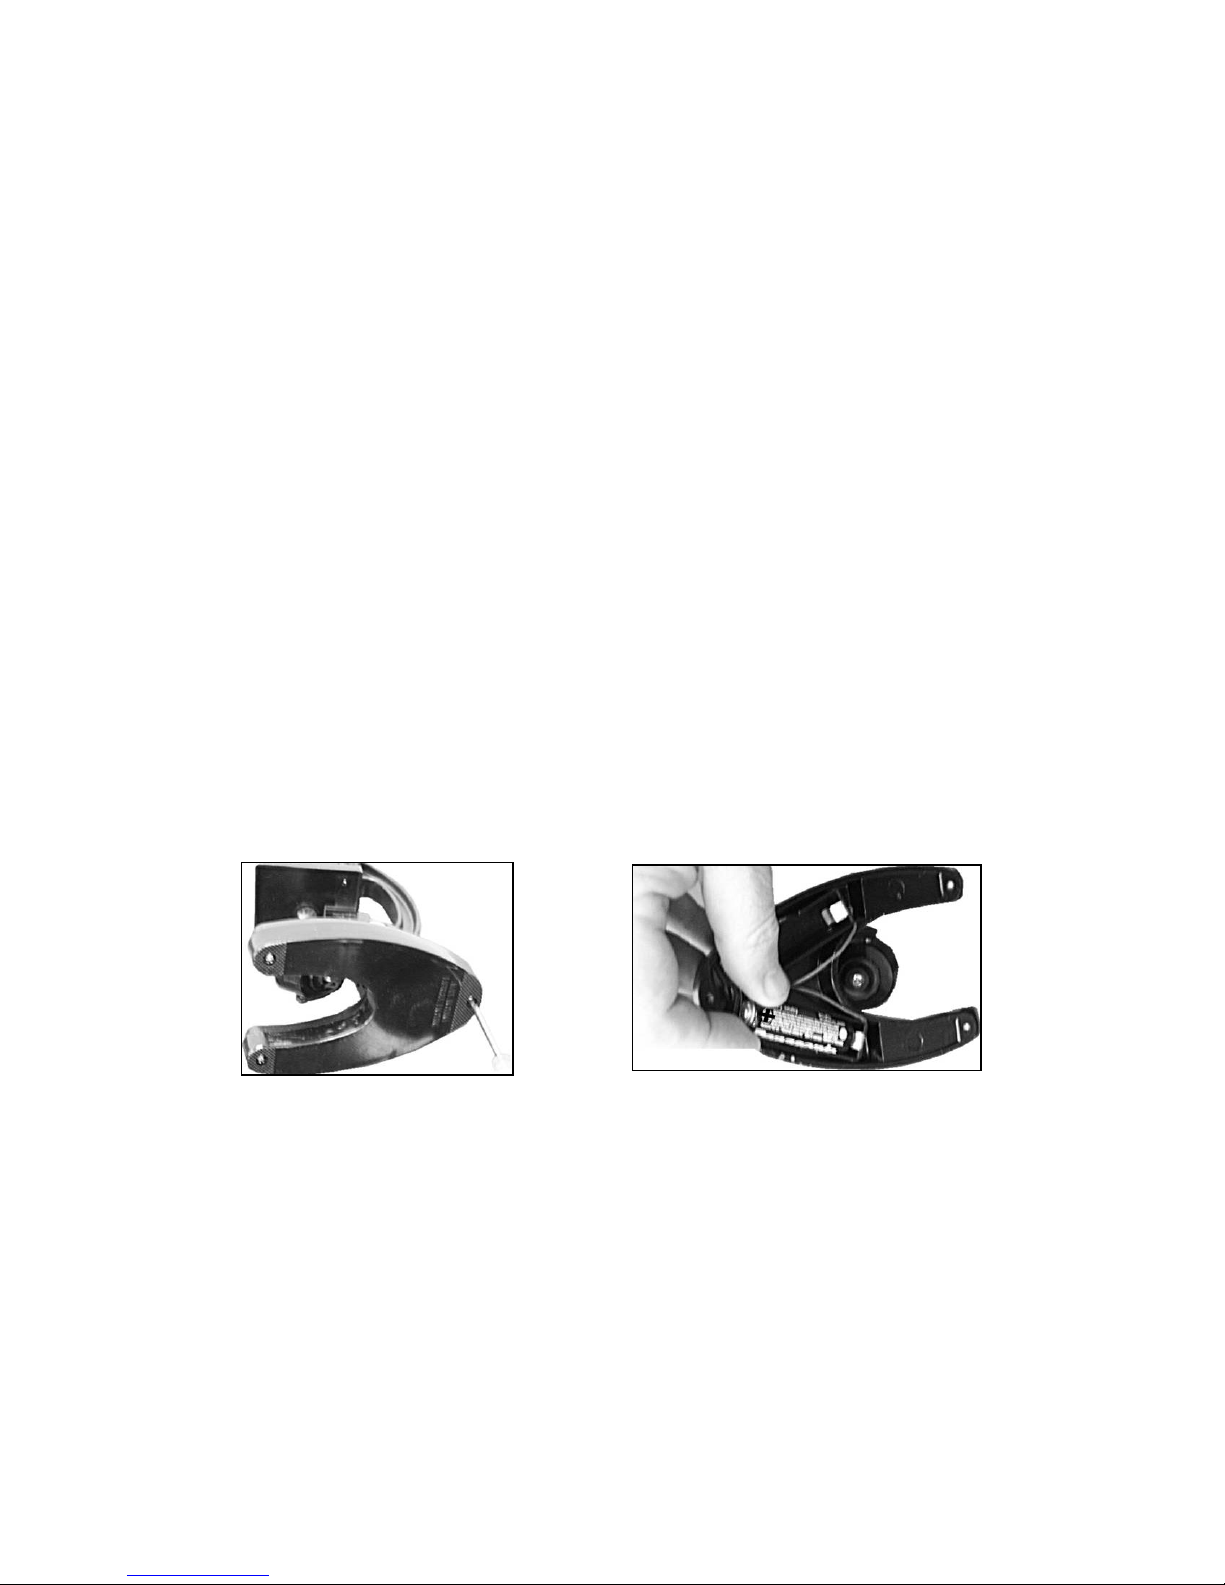
1) You will need to insert two AA alkaline batteries in the base of the microscope. First, you must
remove the rubber antiskid bottom cover to access the battery compartment. You will need to use
a Phillips-head (+) screwdriver to remove the two screws on this bottom cover. Once the cover is
removed, insert the batteries as shown, making sure that the (+) and (-) terminals are properly
aligned. Replace the cover and re-insert the screws. Do not overtighten.
2) Place the microscope on a flat surface near a bright light or window. There is no need to insert a
slide just yet. Adjust the angle of the mirror so that when you look into the eyepiece you see a
bright circle of light. Do not point the mirror toward the sun as eye damage may result. If
there is no bright light available, or if the room lighting is poor you can use the microscope’s
electric illuminator. To turn on the illuminator flip the mirror over so that the light bulb is aimed
upward. The light will come on by itself. Look through the eyepiece and adjust the angle of the
light until you see a bright circle.
5
Page 6
3) Once you can see a bright circle of light in the eyepiece your microscope is ready for use.
4) Choose one of the prepared sample slides from your set. Place it under the two spring clips on top
of the stage.
5) Next, choose the magnifying power you want to use. Your microscope can provide magnifying
powers of 300X, 600X, and 1,200X. Remember that the longer objective lenses provide the higher
powers. Most observing is done at low-power, and we suggest that you start with the 300X setting.
6) To change the magnifying strength turn the revolving lens turret until you hear a click.
6
Page 7
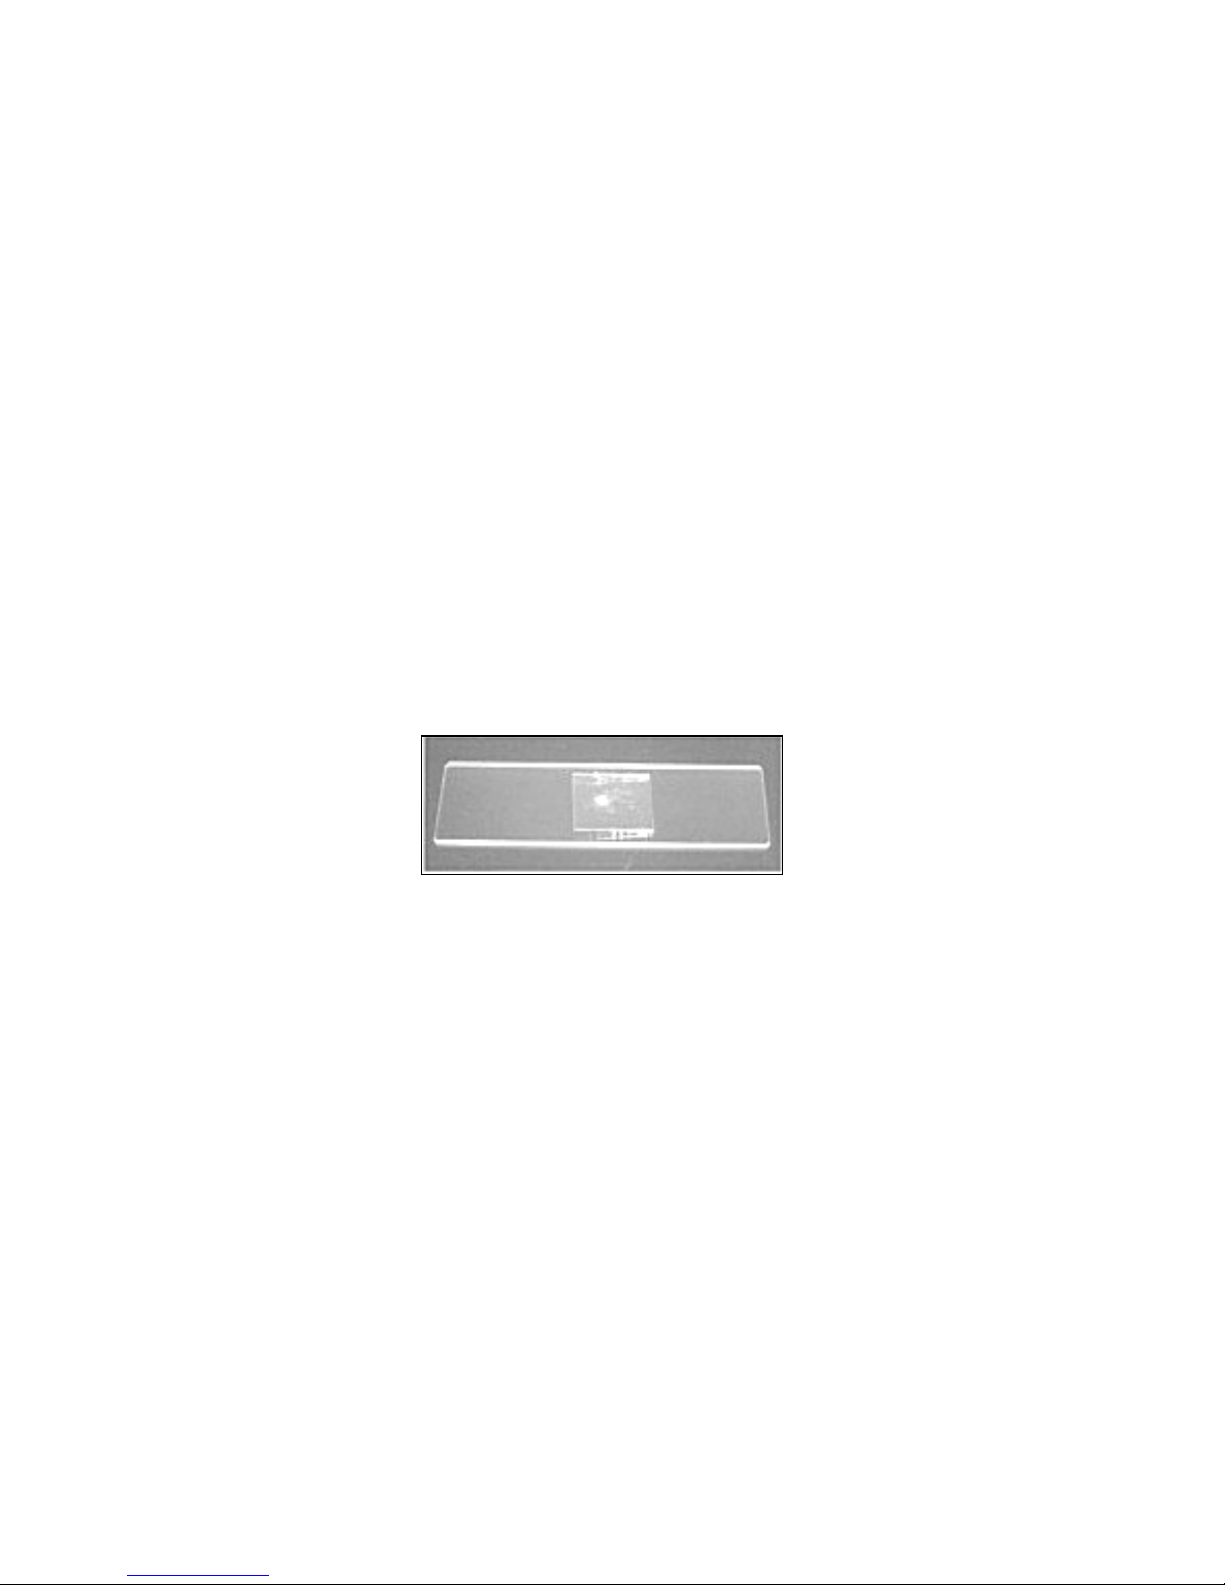
7) Turn the focusing knob until the objective lens is almost touching the slide. Don’t let the lens touch
the slide as you may break the slide and damage the lens. Now look through the eyepiece and
slowly turn the focusing knob back until you see the sample clearly.
How to make your own prepared slides
Samples for examination should be very thin so that light can pass through them. If the sample is too
thick it will appear dark in the microscope.
There are thousands of common items around the house and in the yard that can provide interesting
samples. To name just a few you could start with cloth fibers, hair, plant or vegetable leaves, grass,
paper, onion skin, pollen, dust, salt crystals, and even water!
If the sample is very thin and lacks color, a drop of red or blue dye can help make details show more
clearly. To prepare the dyes in your set add enough warm water to half fill the dye bottles. Replace
the lids tightly and shake well until the dye crystals are all dissolved. You can transfer a drop of dye
from the bottle to your slide with the pipette.
Always be careful when using the dyes as they can stain clothing, furniture, or carpets.
Making a Temporary Slide
A) Start with a clean blank slide. Clean slides are important. If your slide is dusty or dirty, you
should clean it with a soft cloth, so that you do not also magnify dirt or dust along with the
sample you want to view. This can be distracting and even confusing!
B) Prepare a thin sample. You may have to slice it with the scalpel. Always be very careful. You
should ask for adult help when using sharp objects.
C) Pick up your sample with the tweezers and put it on the center section of the slide. Add one
drop of water. To enhance viewing you may add a drop of dye instead of water.
D) Gently place a slide cover over the sample, being careful not to allow any air bubbles in.
E) Remove any excess water or dye with a piece of paper towel by pressing it down gently over
the slide cover.
F) Now you can observe your slide.
7
Page 8
How to Use the Camera Adapter
The camera adapter can hold a personal digital camera or a single use camera loaded with ISO400
type film. To position the adapter, remove the microscope eyepiece and place the camera adapter
over the focusing tube. Place the camera on the camera adapter base plate so that the camera lens
is directly over the hole in the base plate. Then place the “U” shaped camera holder over the camera
and push it down until the camera is held tightly.
If your digital camera has a video display screen you can preview the image for positioning and focus
sharpness. If your camera does not have this screen you may have to experiment with different focus
positions and checking the results. Depending on the camera design you may not need to make any
adjustment. Take your first pictures with the objective lens almost touching the glass slide. Measure
the position of the focusing tube carefully and keep records of each picture taking focus position.
When you find the best position that gives a sharp picture you may want to make a small mark on the
focusing tube so that the microscope can be set the same position for the next pictures you take.
Your best results will be at the 300X setting.
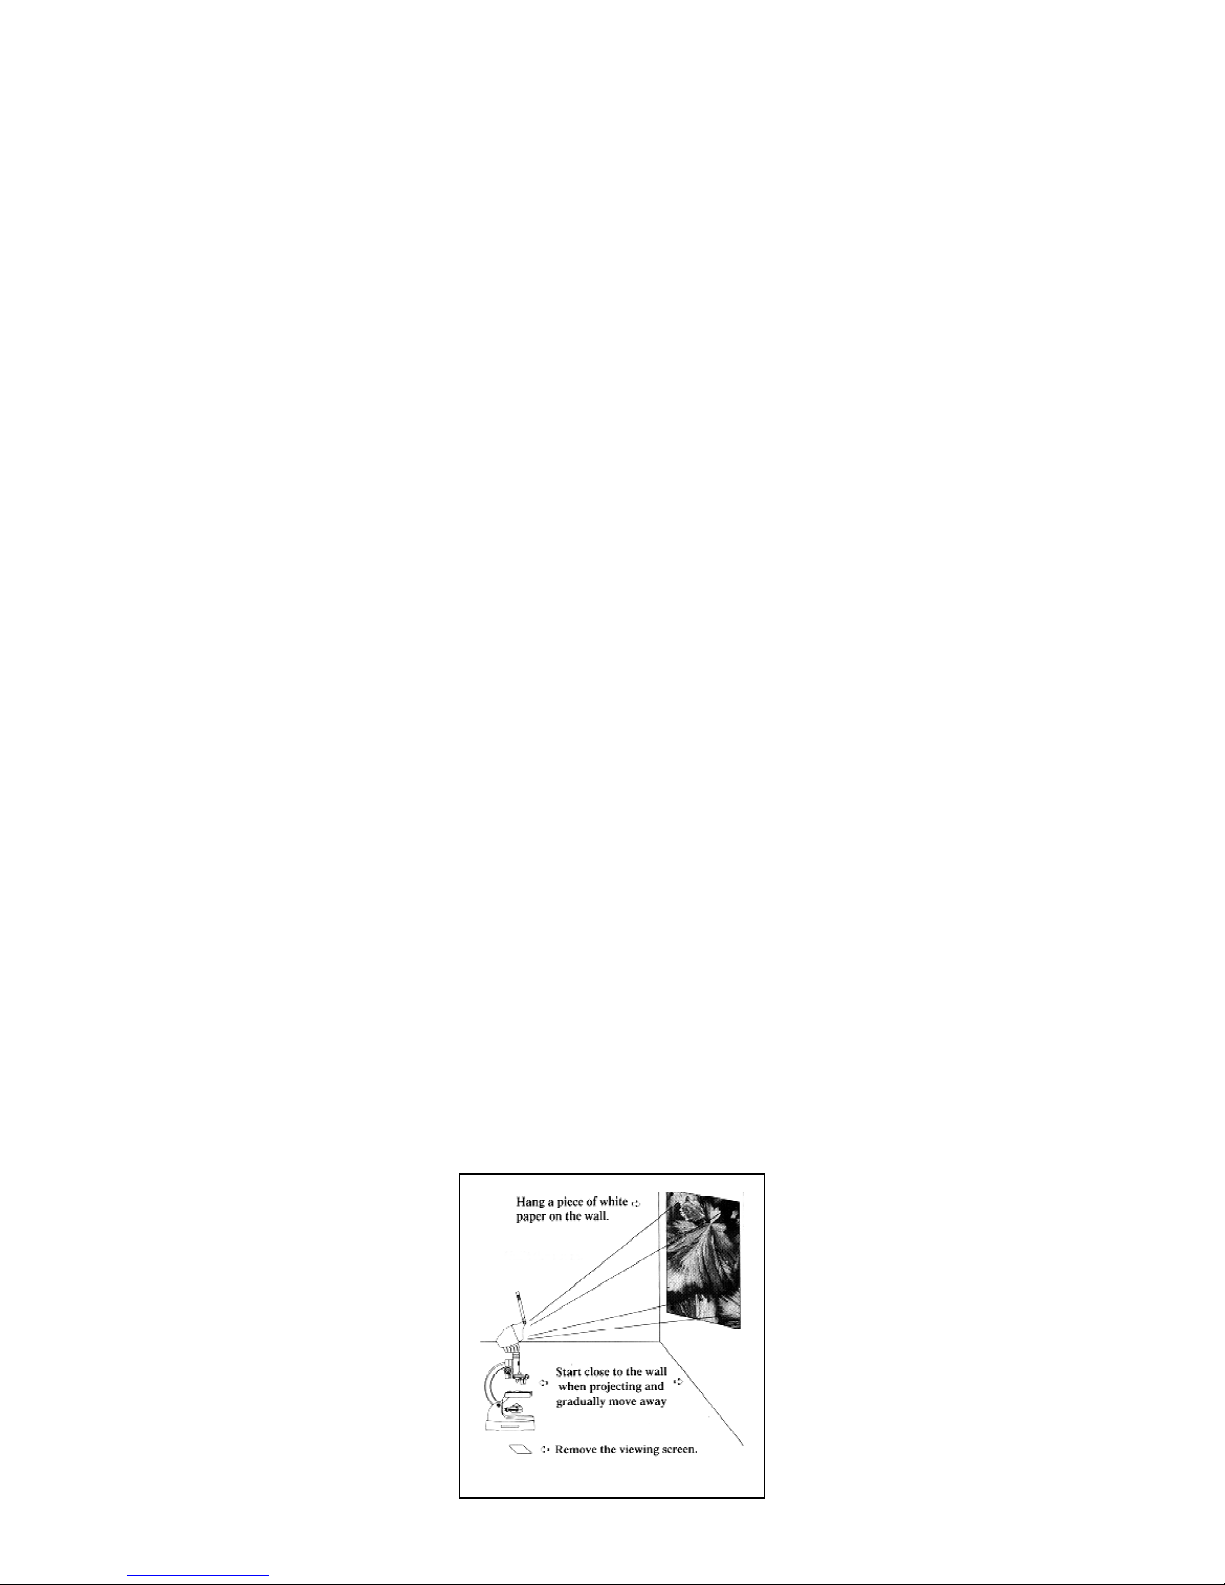
How to Use the Projection Device
1) Twist the eyepiece counter-clockwise and gently pull up to remove it. Insert the viewer head
over the focusing tube.
2) Face the viewer head towards a white wall or a piece of white paper.
3) Turn out the room lights and close any curtains. For best results the room should be dark.
4) Turn on the electric illuminator and place a prepared slide on the stage.
5) Try a distance of 1 to 1.5 meters (3 to 4 feet) from the wall or paper.
6) Adjust the illuminator lamp so that the image is as bright as possible.
7) Carefully adjust the focus until you see a sharp image. You may have to re-adjust the
illuminator position.
8) You should now see a clear projected image. If you use a higher magnification you will have to
re-focus the microscope.
8
Page 9
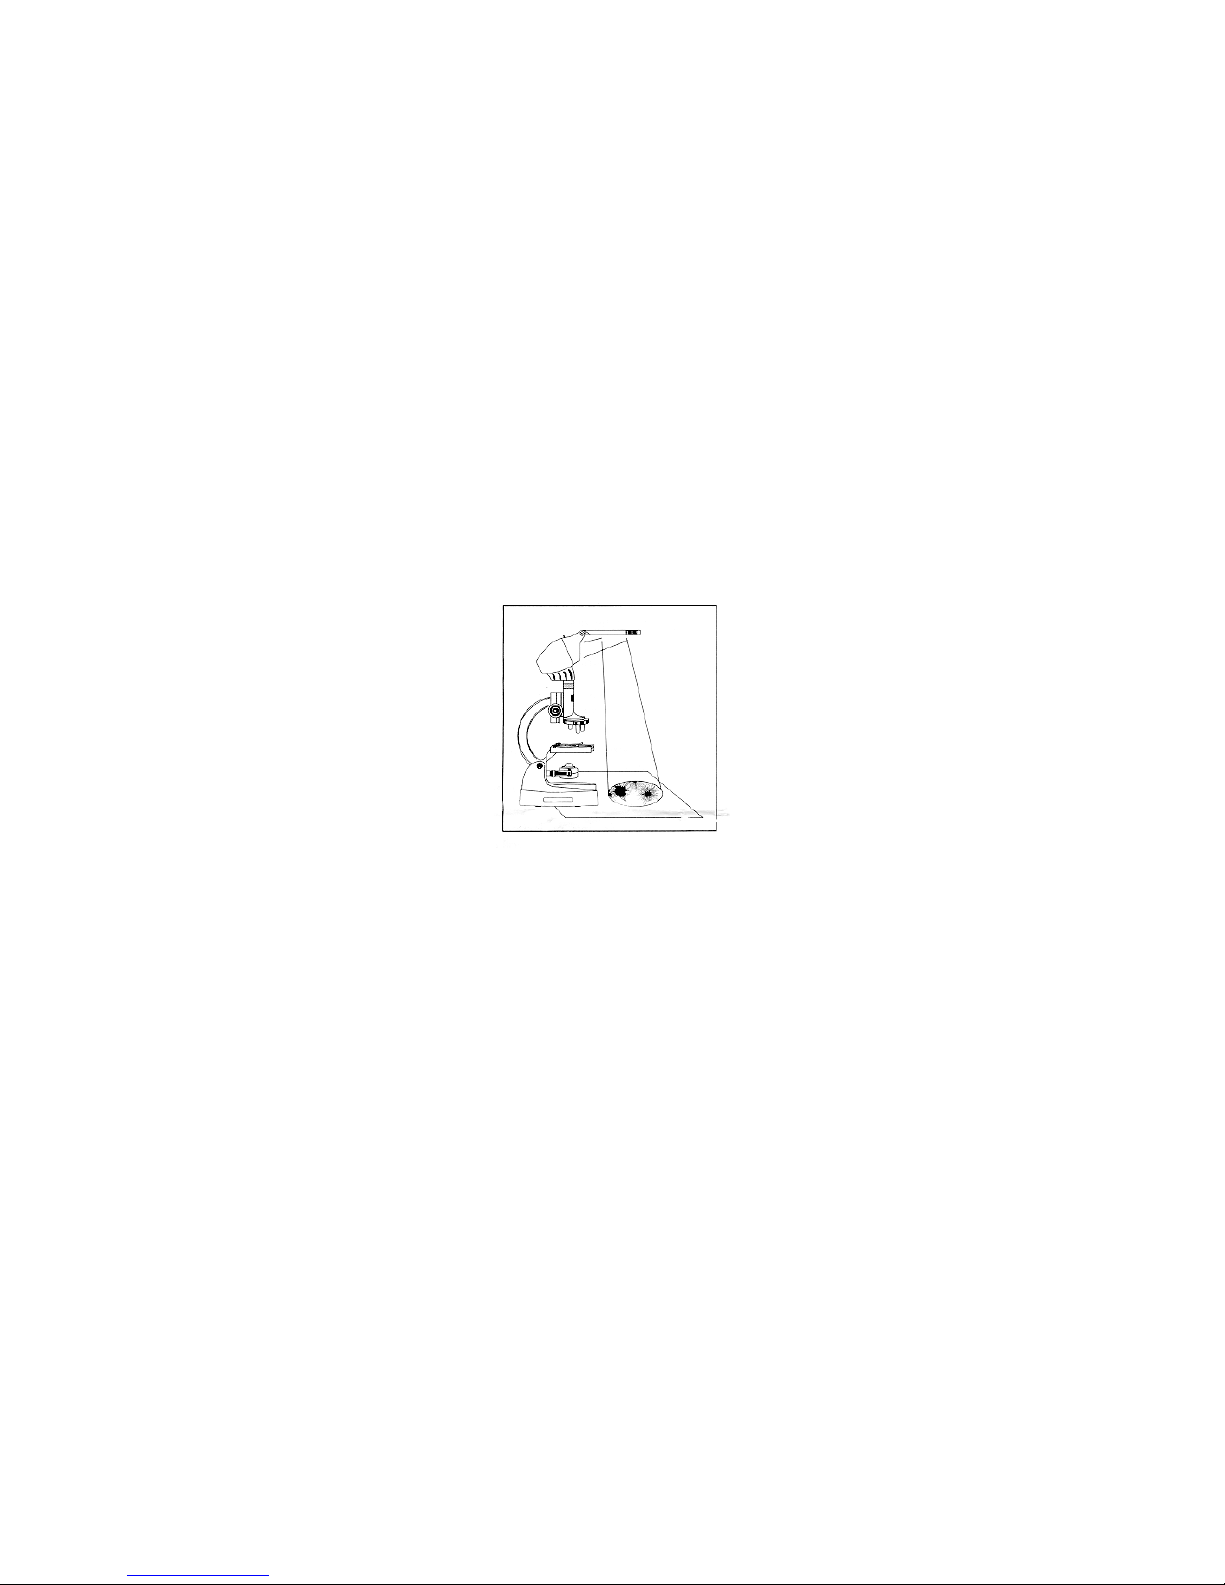
How to Use the Drawing Device
You can observe the image on the unit’s projection screen, or you can project an enlarged image
onto a white surface.
1) Make sure that the plastic viewing screen is in place in the slot on the top of the viewing hood.
2) Adjust the focus and illuminator until you see a clear image on the screen.
3) To see an enlarged image, remove the plastic viewing screen from its slot.
4) Make sure that the microscope is in the upright position.
5) Place a piece of white paper horizontally in front of the base of the microscope.
6) Darken the room and adjust the angle of the viewer hood mirror until you see the image
projected on the white paper. Adjust the focus and illuminator lamp position for the best result.
IMPORTANT SUGGESTIONS: When you are using the drawing device or the projection device
you must be in a darkened room. You will see the brightest views in a very dark room. Make
sure that the batteries are fresh and all lenses and mirrors are clean. Before studying your
slides in the dark, give your eyes a few minutes to adjust.
When using the projection device you may get some “light spill.” This is unwanted light that
comes directly from the illuminator or bounces off of reflective surfaces. This unwanted light
can overpower the projected image, making it very hard to see. If light spill is affecting your
projected image you might try placing your hand in front of the illuminator to block this extra
light.
9
Page 10

History of the Microscope
During the late Middle Ages (around A.D. 1200 to 1450), the growing demand for eyeglasses led to
experimentation with lenses and making small things appear larger. As a result of this
experimentation, the first microscope was created (probably in Holland in the late 16th century—the
Dutch were masters at the craft of magnification).
The first microscopes were operated with only one lens—then the compound microscope was
invented in the 1590s, which used two or more lenses to magnify objects even more. Among the most
famous people to use a compound microscope was Robert Hooke of England. During the 1600s,
Hooke observed and recorded the miniscule parts of nature previously unexplored, such as the
intricacies of feathers, insects, and even mold. Furthermore, Hooke introduced the concept of cells—
the smallest independently functioning part of an organism.
Today scientists use microscopes to aid in the world of medicine, help build better and stronger
materials for everyday use, and even discover hidden mysteries about ancient cultures and
environments.
One of the most powerful scientific instruments in existence is called the scanning electron
microscope (SEM). Instead of magnifying objects using lenses, like your microscope, the SEM
focuses a beam of invisible particles called electrons on the object, and collects the electrons as they
bounce back. These electrons are then turned into a black-and-white image on a television screen.
SEMs can magnify some small objects as many as 100,000 times—that’s about 50 times more
powerful than the strongest ordinary compound microscope.
Cells
One subject that’s easy to observe with your microscope is a cell. Both plants and animals have cells.
Plant cells (which Robert Hooke identified) have structured walls, and basically serve as mini–food
factories. Photosynthesis takes place inside the plat cell. Photosynthesis is the conversion of solar
energy into chemical energy (or the production of oxygen and glucose from water and carbon
dioxide).
Unlike plant cells, animal cells have a permeable membrane (instead of rigid, structured walls). This
permeable membrane—through which certain things can pass—encases a number of even smaller
specialized components called organelles. An animal’s body (including yours) is entirely made up of
these cells. They range in size and shape, depending on their function and location. Even the cell’s
life span varies from type to type—heart muscle cells, cartilage cells (the soft tissue connecting your
bones at the joints), and most neurons (brain cells) can never divide, regenerate, or be replaced. On
the other hand, liver cells are replaced about every 500 days, cells in your stomach lining about every
two days, and skin cells about every one to 34 days.
Check this out! Try taking a toothpick and gently swiping the inside of your cheek. Then take those
cells you’ve gathered on the toothpick and make a slide for your microscope. (See “How to make your
own prepared slides” on page 6.) What do you see when you observe the slide under magnification?
Now look at the prepared slides included with your microscope. Can you see the rigid walls that plant
cells are known for?
10
Page 11

Frequently Asked Questions
1) What can I see with my microscope?
You can see thousands of things that are difficult or impossible to see with your eyes. You can see
tiny plants and animals. You can observe plant and animal cells. You can see the differences
between different plants, different papers, different fibers, and hairs from different people. You can
study crystals, rocks, and minerals. The uses for your microscope are practically endless.
2) What is meant by power?
Power is a measure of the seeing ability of your microscope. It is really a short way of saying
“magnifying power.” Your microscope has three powers. They are 300X (pronounced “300 times”),
600X, and 1,200X. This means that your microscope can magnify the view of a sample so that it
appears 300 times, 600 times, or 1,200 times larger than the way you see it with your own eyes.
3) I look through my microscope and all I see is darkness. Why?
This could be because the mirror or light bulb is not positioned properly to aim light up into your
microscope. Or maybe the sample you are looking at is too thick so the light cannot shine through it.
4) All I can see is a partial circle of light. Why?
To see your sample properly, the light source must be centered through the slide to provide the
brightest and most even illumination. Try gently moving the mirror or light until you see a full, evenly lit
circle while looking through the microscope.
5) I have a very thin sample on my slide, but I can’t see any detail.
First, make sure that the image is in sharp focus by adjusting the focusing knobs. If the problem still
exists you should add a drop of red or blue stain to the sample. Stains make hard-to-see objects like
plant cells stand out so they can be seen better.
BATTERY INFORMATION:
This unit uses two AA batteries. Always use fresh batteries. Do not use rechargeable batteries. If the microscope will not
be used for a long time, remove the batteries. Non-rechargeable batteries are not to be recharged. Different types of
batteries or new and used batteries are not to be mixed. Do not take batteries apart. Exhausted batteries are to be
removed from the microscope. The supply terminals should not be short-circuited. Do not dispose of batteries in fire. They
may explode.
!
WARNING! CHOKING HAZARD –
Small parts. Not suitable for children
under 3 years.
Made in China
Part #: 260006
11
 Loading...