

Page 1
Educational Fun Telescope
The
from
orbitor
Page 2
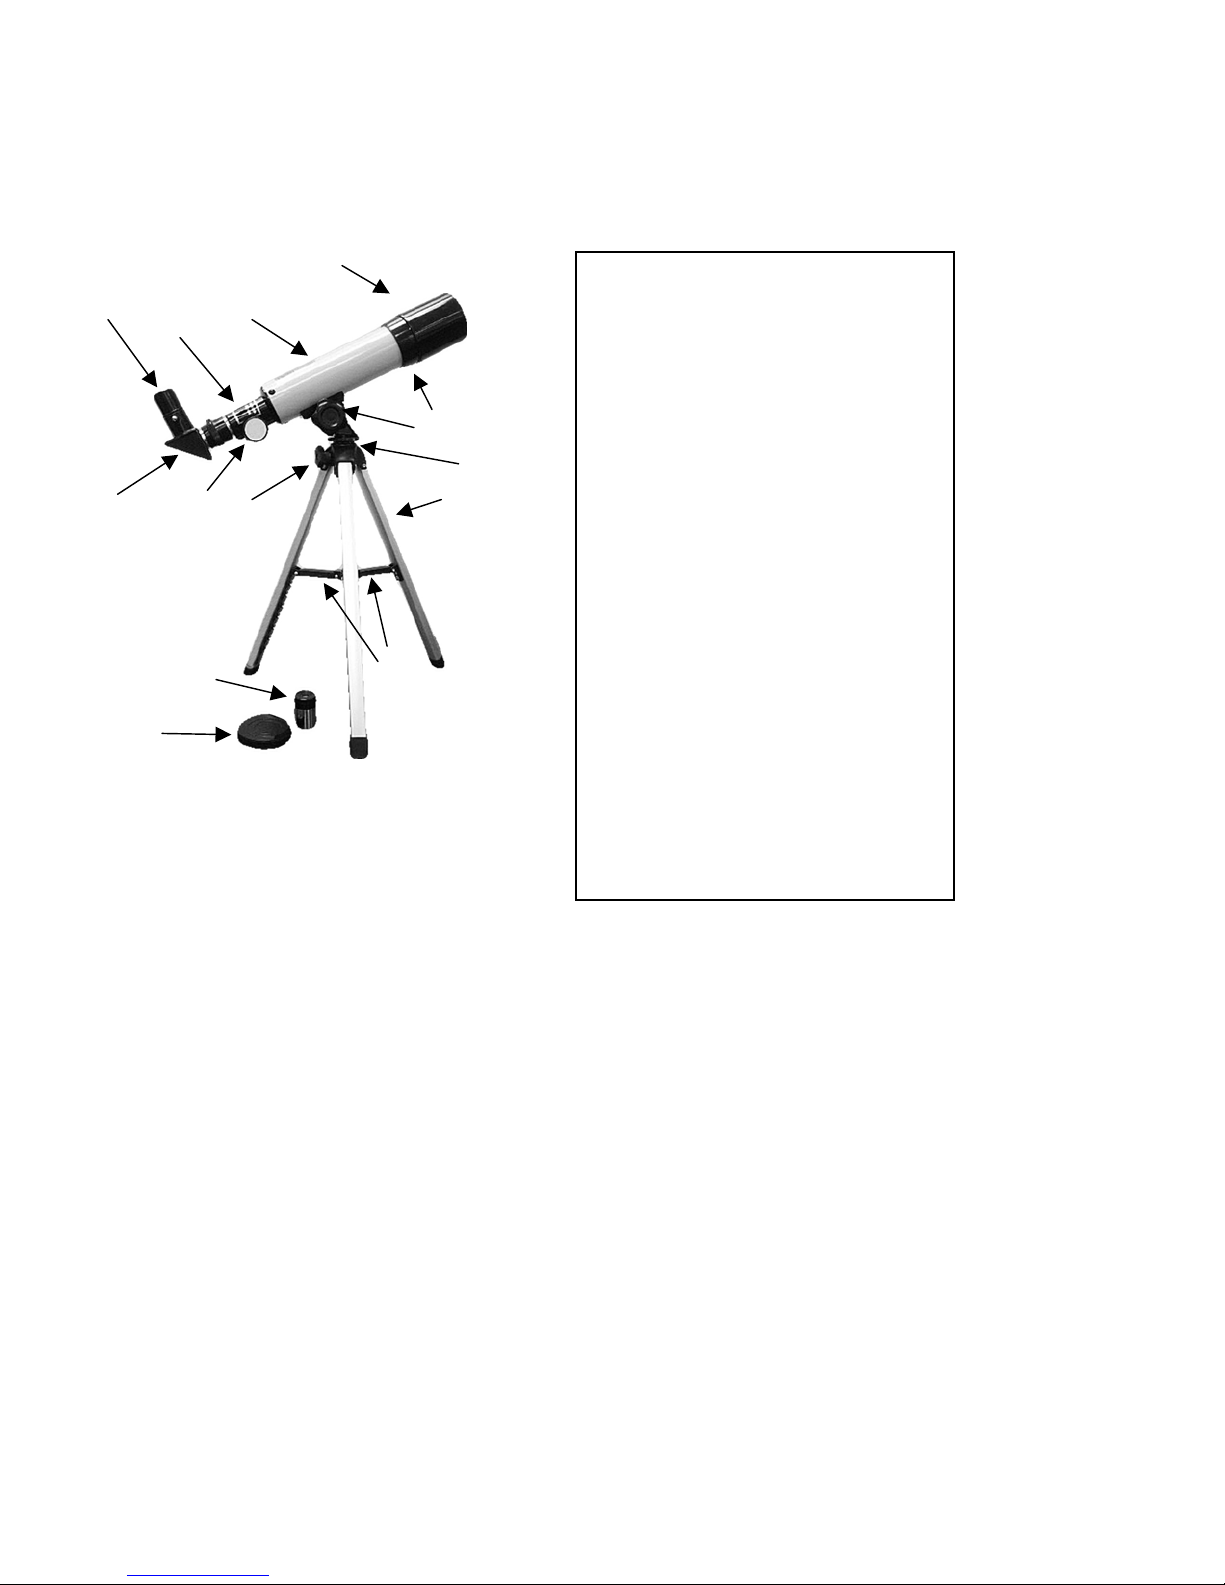
Here are the main parts of your C90T:
A: 20mm. Eyepiece
B: Focus Tube
C: Telescope Tube
D: Dew Shield
E: Diagonal Mirror
F: Focus Knob
G: Azimuth Lock Knob
H: Objective Lens (Not in view)
I: Altitude Lock Knob
J: Altazimuth Mount
K: Aluminum Tripod Leg
L: Dust Cap
M: 4mm. High Power Eyepiece
N: Tripod Supports
WARNING!
NEVER aim your telescope at the sun or even close to the sun!
Instant and irreversible damage can occur,
including blindness!
Do not let children use any telescope without adult supervision.
2
Page 3
Introduction:
Congratulations! You are now the owner of an orbitor telescope. With proper care and
handling of your telescope, you will have hours of fun looking at nature’s wondrous sights
for many years.
The C90T has been designed to show you the moon’s craters, Jupiter’s major moons, and
Saturn’s rings, in addition to dozens of galaxies, star clusters, and nebulae (huge glowing
areas in the night sky). The C90T also delivers great views of mountains, valleys, and
many other subjects, near and far, in the world around us.
You can use the C90T as a terrestrial (land) telescope to study animals and landscapes
at a distance. To obtain the best performance from your new telescope, please read this
manual carefully and completely.
Small parts. Not
!
WARNING!
CHOKING HAZARD
suitable for
children under 3 years.
3
Page 4
ASSEMBLY:
1.) Carefully remove all parts from the cardboard cartons and lay them on a table or
floor in order to take an inventory of all the pieces. Keep your box for storage or in
case you ever need to ship your telescope.
(Picture #1)
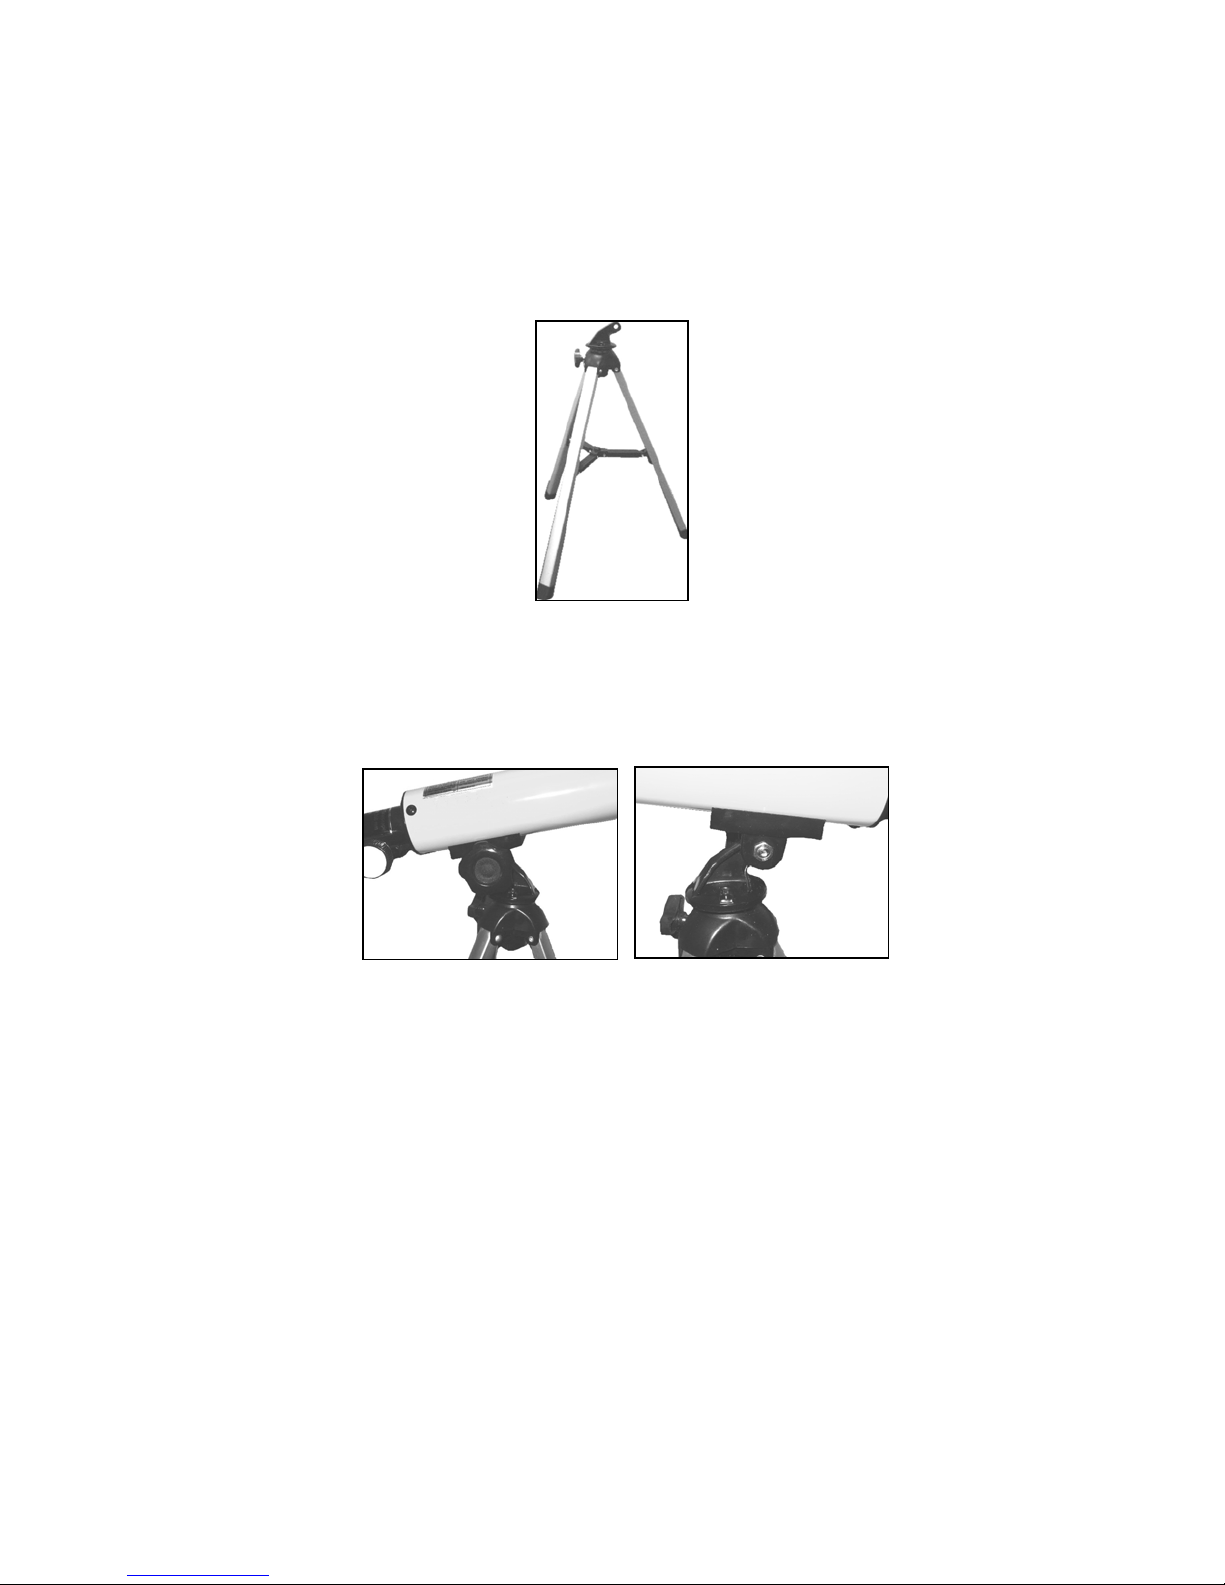
2.) Spread the three legs of the table-top tripod apart and gently press down on the
center of the tripod supports until they lock into place. (Picture #1)
(Picture #2) (Picture #3)
3.) Place the telescope tube over the altazimuth mount. Lower the telescope tube
onto the mount so that the plastic tongue on the mount slips into the bracket
underneath the telescope tube. (Picture #2)
4.) One of the short bracket arms has a hexagonal shaped cutout around its opening.
Insert the nut from the altitude lock knob into this cutout. Insert the altitude lock
knob through the bracket and tongue as shown in Picture #3. Turn the altitude lock
knob clockwise into this nut until it stops.
5.) Turn the tightening knob on the tripod mount clockwise until it stops. The
telescope is now securely attached to the tripod.
4
Page 5
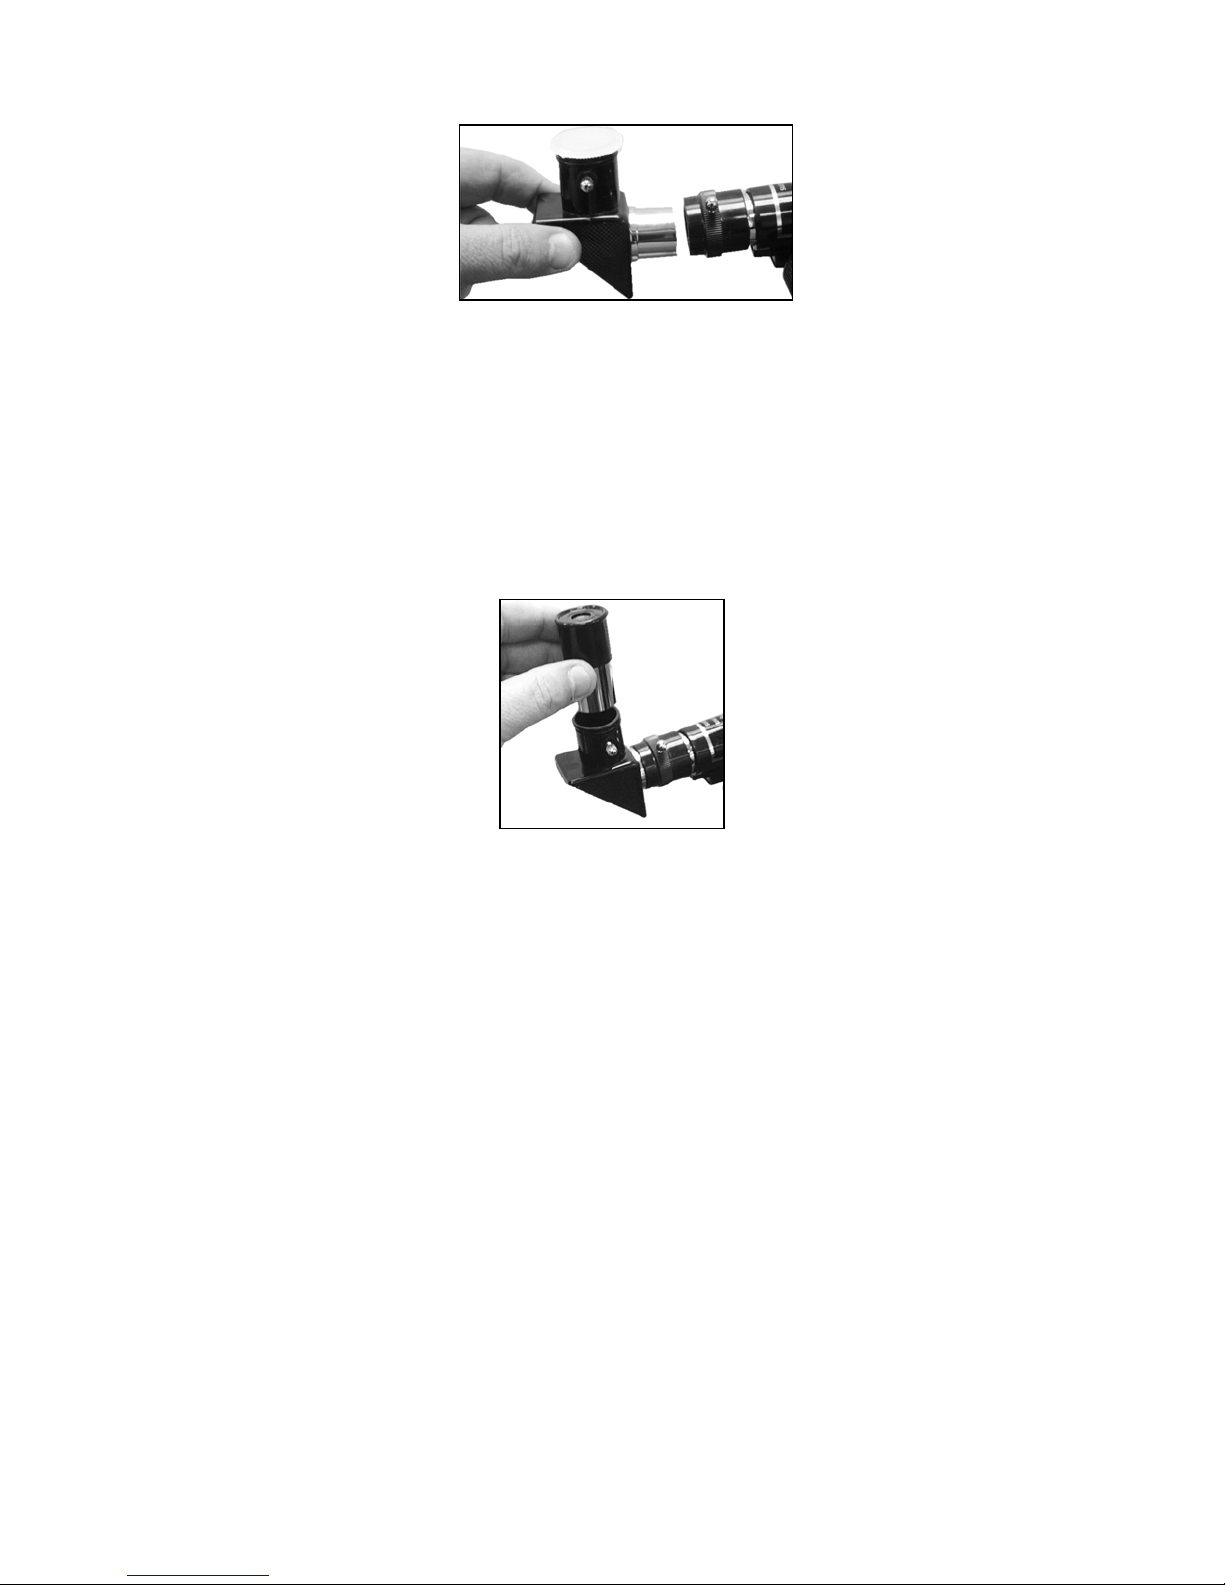
(Picture #4)
6.) Loosen the small chrome screw on the side of the focus tube by turning it
counterclockwise. Insert the shiny chrome end of the diagonal mirror into the focus
tube so that the opposite open end is facing upward. Tighten the small chrome screw
on the side of the focus tube to hold the diagonal mirror securely in position. (Picture
#4)
7.) Loosen the small chrome screw located on the side of the diagonal mirror by
turning it counterclockwise.
(Picture #5)
8.) Insert the low power eyepiece marked “H20mm” into the diagonal mirror. Tighten
the small chrome set screw by turning it clockwise to hold the eyepiece securely in
place. (Picture #5)
THE ALTAZIMUTH MOUNT
The C90T telescope is fitted with an Altazimuth mount. “Altitude" refers to the
vertical, or “up and down” movement of the telescope, while "Azimuth" refers to the
horizontal, or “side-to side” movement.
ABOUT MAGNIFICATION
The magnification power of a telescope indicates how much an image is enlarged or how
big and close it appears to the viewer. The focal length of the eyepiece, combined with
the focal length of the telescope, determine the magnification power. To calculate the
5
Page 6

power of your telescope with any particular eyepiece, simply divide the focal length of
the telescope (360mm) by the focal length of the eyepiece (indicated in “mm” on the
eyepiece collar).
Example: 360mm focal length (tube) = 18X magnification power
20mm focal length (eyepiece)
The two interchangeable eyepieces included, provide the following magnification powers:
Eyepiece Power
20mm 18X
4mm 90X
The level of magnification required depends on the object being observed.
A lower magnification power with a wider field of view is goodssssss for observing
galaxies and nebulae. Higher magnification powers should only be used for highly
detailed observations of the moon, Jupiter, and Saturn, or any object that is extremely
bright
USING YOUR TELESCOPE
1) Take your telescope outside. Viewing objects through closed or open windows is not
recommended. Your view can be distorted by reflections in the glass of a closed
window or by air currents, of differing temperatures, passing through an open
window.
2) Let your telescope adjust to the outside temperature. Your telescope will perform
much better if the lenses and the air inside the tube are the same temperature as
outside. It may take up to 30 minutes to equalize the temperatures when the
difference in temperatures is extreme.
3) Find a location far from glaring light. If you live in an urban area, your viewing will
probably improve the farther you move away from the city lights. The skyglow of a
town or city can dramatically reduce the telescope’s performance and viewing
capabilities.
When possible, avoid sudden temperature changes, as the moisture in the air will
condense on the objective lens. Should this occur after bringing your telescope inside,
6
Page 7

leave the lens cap off the objective lens, tilt the objective (front) lens face down, and
wait until the telescope reaches room temperature.
With the diagonal mirror already attached and in place, we recommend starting your
viewing with the low power 20mm eyepiece because it gives you the widest angle with
the brightest and sharpest views. To adjust the angle of the telescope, loosen the
azimuth lock knob by turning it counterclockwise. Adjust the telescope to the desired
angle, then tighten the azimuth lock knob.
NOTE: When using the diagonal mirror, objects will appear right-side up in your
telescope, but reversed, like a reflection in a mirror. This is normal, and does not
indicate a defect.
Care and Cleaning of Optics
Optical components of a telescope get dirty over time. Dirt or dust on a lens should be
removed only with the utmost care. A considerable amount of dirt or dust would have to
accumulate on the optical surface before your view would be compromised.
1.) Keeping any dust caps on during storage and transport will reduce dust collection.
2.) Condensation may collect on the optical surfaces when the telescope is not in use.
Remove the dust caps and allow the moisture to evaporate naturally. Point the telescope
downwards to minimize the accumulation of airborne dust.
3.) Once all moisture has evaporated, replace the dust caps.
4.) Filtered compressed air may be used to remove surface dust from lenses and
mirrors. Remove the dust cap and the dew shield. Once removed, point the can away
from the lens and gently expel some air and any condensation or dust that has
accumulated on the discharge tube. Spray the lens or mirror with short bursts of air to
carefully remove the dust particles. DO NOT HOLD THE TRIGGER OF THE
COMPRESSED AIR CAN FOR EXTENDED PERIODS BECAUSE PROPELLANT FROM
THE CAN MIGHT ESCAPE AND DAMAGE THE OPTICAL SURFACE.
If, after several attempts, you cannot remove the particles, take the telescope to an
optical professional for cleaning.
7
Page 8

If you keep the dust caps on your telescope when it is not in use and avoid handling the
lenses or mirrors, only minimal optical maintenance of your telescope should be required.
Extensive cleaning is usually only necessary every few years.
What to Look For in the Sky
There is a whole universe of objects you could view at night, so where do you start? We
recommend starting with the most prominent objects first.
The moon
The moon is the easiest target to find at night. When the moon is in full position, it
bathes the night with a silvery light that washes the sky of all but the brightest
objects. The best time to view the moon is not when it is full, but rather when it is less
than half full. The dividing line between dark and light on the moon, called the
terminator, shows the best detail in the craters and mountains.
The planets
The planets, our solar system companions, range in size from moon-size rocky bodies to
giant gas balls, which could hold Earth 1000 times over. To find the planets, you will
need information about their times of visibility. An astronomy magazine will give you the
locations of the planets, as they change position from month to month. The Internet is
also an excellent source of information, starcharts, maps, and more! The popular and
more familiar constellations often provide the easiest landmarks to help find the
planet’s locations and paths of orbit. Most people have looked up at night and seen some
of the planets without even realizing it. A planet appears like a bright star but does not
twinkle like a star; it will look like a tiny ball. Venus, Mars, Jupiter, and Saturn, are the
easiest planets to view. Mercury is dimmer, usually below the horizon, and is more
challenging to find.
Each of the planets provides interesting views. Venus is covered with clouds so all that
is visible is an extremely bright light, the brightest next to the moon. Venus, like the
moon, goes through phases, however. As it travels around the sun, different areas of
the planet’s surface are illuminated, producing crescent shapes of varying size. Mars is
the red planet. When it is above the horizon, it is noticeably red and stands out like a
beacon in the night sky. The apparent brightness of Mars varies as the planet orbits
around the sun and throughout its period of visiblity, it will brighten and dim depending
on how near or far it is from Earth.
8
Page 9

Jupiter is the largest planet in our solar system and the second brightest next to
Venus. Jupiter has many moons, four of which are often visible through your telescope,
when viewing conditions permit. As you watch them throughout the evening, you will see
that they change position relative to each other and to Jupiter. It is possible with
careful planning to actually see one of the moons disappear either in front of or behind
Jupiter as it orbits around the planet.
Saturn, the second largest planet, is not as bright as Jupiter and so its moons are not as
visible through small telescopes. The large rings that encircle Saturn are spectacular to
observe, however. The planet and its rings appear pale yellow.
Beyond our solar system, there are many more objects to be found. Galaxies, nebulae,
and star clusters abound!
FREQUENTLY ASKED QUESTIONS:
1) How far can I see?
If you stand outside and look up at the night sky on a clear evening, you can see
hundreds of stars with the unaided eye. The telescope is a light-gathering instrument
which magnifies the view—providing significantly more detail and unveiling more stars,
nebulae, and celestial objects. With the aid of a telescope, you will be able to enjoy
exciting views of Saturn’s rings, Jupiter’s major moons, the Orion Nebula, and much
more.
2) Why can’t I see anything?
If you see only gray or black when looking through your telescope, even after searching
for an object to view, it is very likely that you are using an eyepiece that is too
powerful. To solve this problem: Always start with the lowest power eyepiece first, and
only insert the higher power eyepiece after you have found an object.
3) When I use my high power eyepiece, everything looks much darker. Why?
As magnification in a telescope increases, brightness diminishes. Conversely, brightness
increases when magnification is reduced. If an image appears too dark or unclear, use a
lower-powered eyepiece. Views of small, bright objects are better than those of large,
dark or blurry ones! Atmospheric conditions, air currents, as well as light and air
pollution also affect viewing quality.
9
Page 10

4) As I look through my telescope, objects in the sky appear to move. Why is
that?
The constant rotation of the earth makes things appear to move. Lower-power eyepieces
will reduce this effect of movement considerably and allow you to observe an object for
a longer duration before you have to readjust your telescope.
Part #259924
10
 Loading...