

Page 1
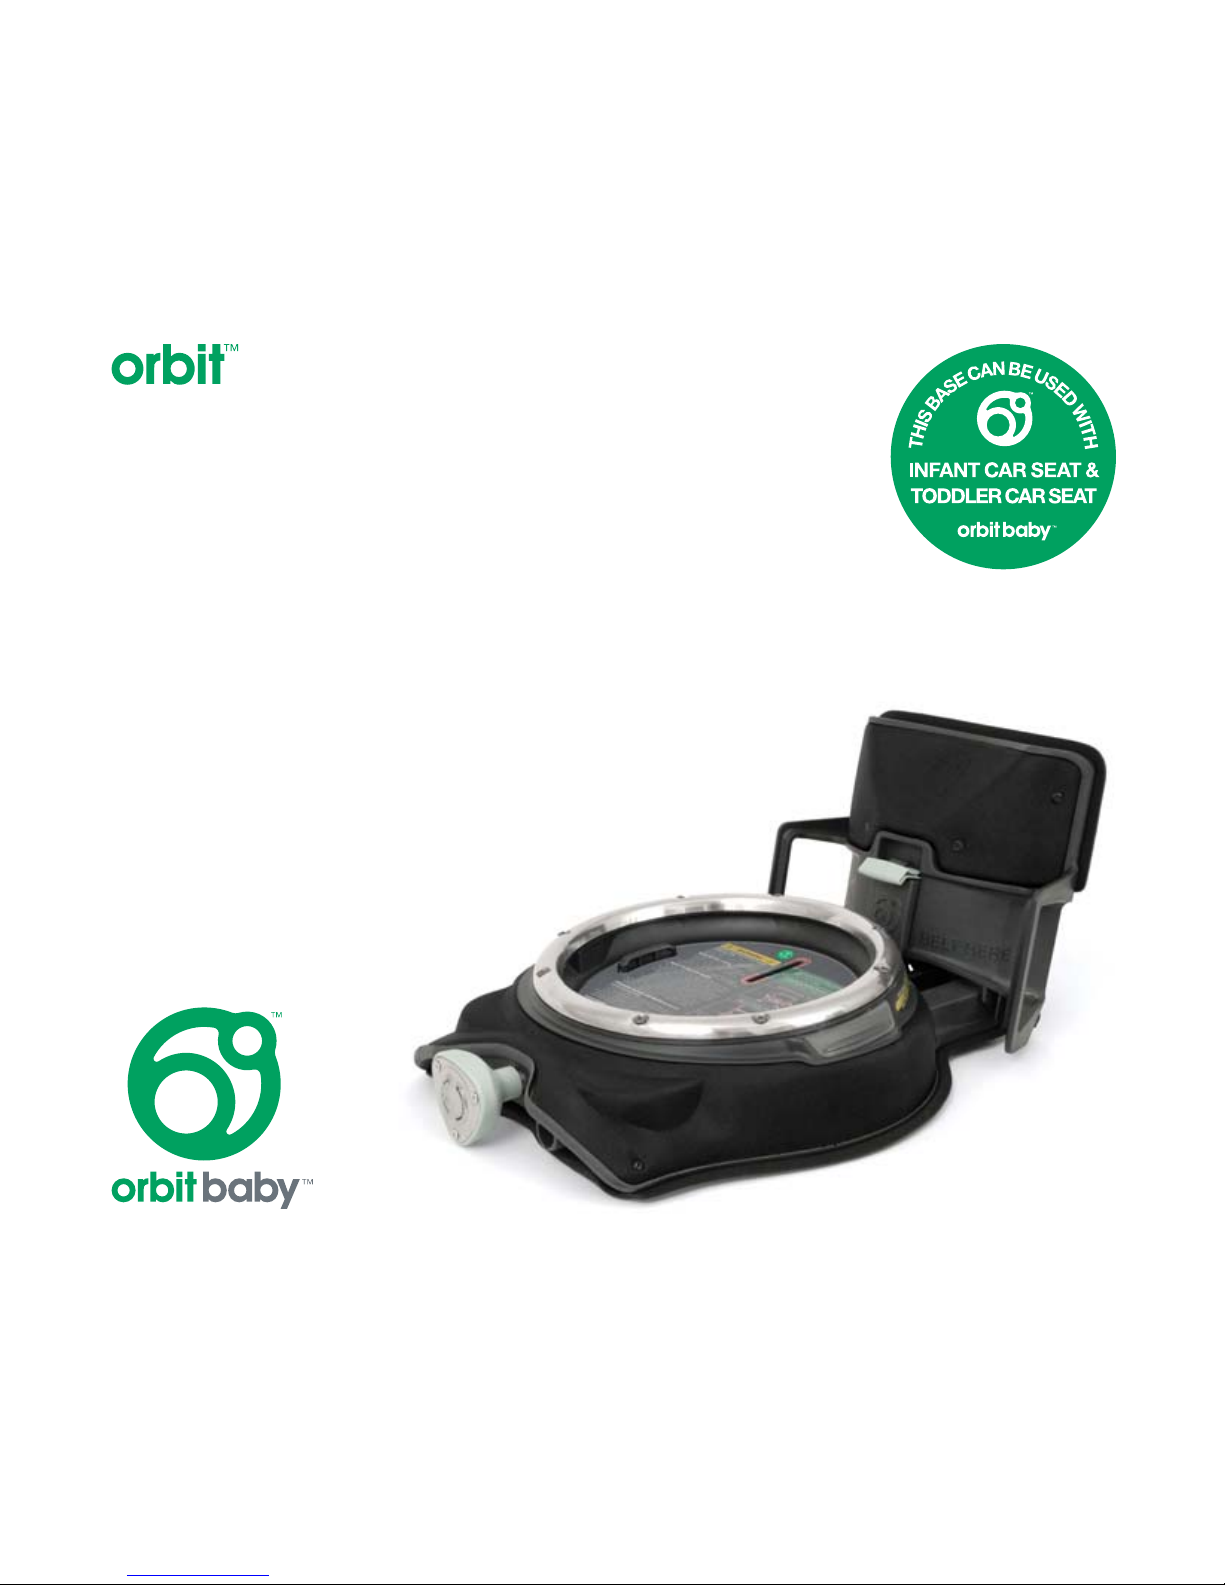
Base Manual
Page 2
Welcome to the Orbit Baby family!
Congratulations on the purchase of your Orbit Base.
Please take the time to read through this instruction manual carefully and
make sure anyone else using the Orbit Base reads it carefully as well.
Your Child’s Safety Depends on You 5
Expiration Date 8
Registering Your Orbit Base 9
Cleaning 43
Limited Customer Warranty 44
Terms You Need to Know 29
Installing the Base: with LATCH System 30
Installing the Base: with Vehicle Seat Belts 35
Removing the Base 41
Table of Contents
Some Important Warnings 13
Seat Positions & Vehicle Restraint Options 16
Need Help Securing Your Orbit Base? 27
Before You Begin
Usage Recommendations
Installing Your Orbit Base
Maintaining Your Orbit Infant System
Page 3
4
4
Before You Begin
5
Before You Begin
5
Before You Begin
Not all photos in this manual include the most up-to-date product specifi cations.
No child restraint system can guarantee protection from injury in every situation.
However, proper use of the Orbit Base and the applicable Orbit carseat reduces
the risk of serious injury or death to your child. Your child’s safety depends on
you installing and using this child restraint system correctly every time. This
instruction manual guides you in detail through the following eight steps:
1. Register Your Orbit Base and take note of the Expiration Date.
Orbit Baby will help you keep track of safety updates and product recalls
when you register with us.
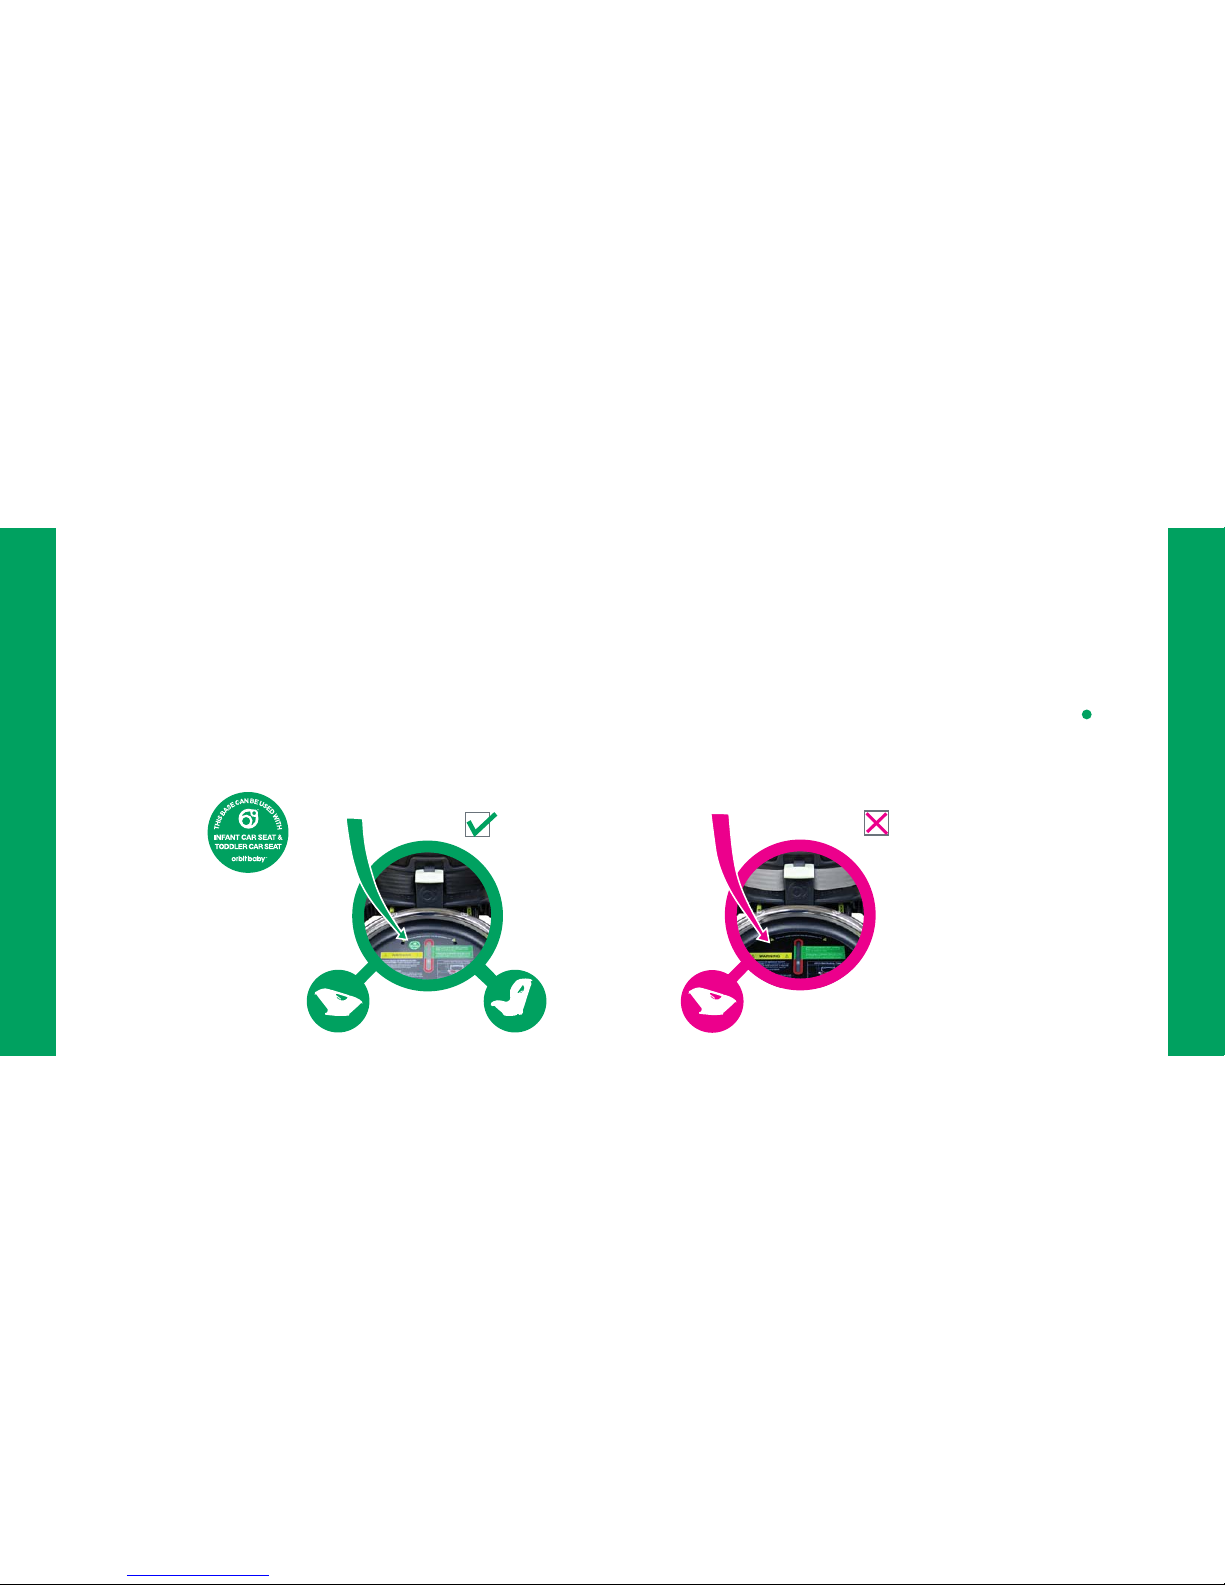
Important Notice: The Orbit Base has been updated to
extend its usage for the Toddler Car Seat (see pages 10-11).
You can only use your Orbit Base with your Toddler Car
Seat if it has the Green Circular Seal shown to the right. To
update your Orbit Base(s) for Toddler Car Seat use, contact
Orbit Baby or visit www.orbitbaby.com/support/upgrade.
All Orbit Bases can be used with the Infant Car Seat
without being upgraded.
Your Child’s Safety Depends on You 5
Expiration Date 8
Registering Your Orbit Base 9
Your Child’s Safety Depends on You
Page 4

6
6
Before You Begin
7
Before You Begin
7
2. Select a seating location in your car. An important overview of vehicle
seating locations is in the “Usage Recommendations” sections of this
manual. There you can nd information about air bags and different types of
vehicle seatbelts.
Note: According to accident statistics, children have less chance of injury
when properly restrained in rear vehicle seats.
3. Proper Installation. Properly secure the Orbit Base in the vehicle using the
attached LATCH Belt or by using a vehicle seat belt designed to secure a
child restraint system. Instructions can be found in the blue “Installing Your
Orbit Base” section. Have the manual handy when using your Orbit carseat
(either the Orbit Infant Car Seat or the Orbit Toddler Car Seat).
4. Ensure the Orbit Base is level. Level indicators show whether the Orbit
Base is properly leveled. The Orbit Base should not move more than 1 inch
(1”) in any direction once installed.
5. Properly dock your Orbit carseat into the Base. Follow the instruction
manual provided with your Orbit carseat (either the Orbit Infant Car Seat
or the Orbit Toddler Car Seat) for instructions on this step. Ensure that the
carseat is properly locked and facing in the correct direction.
CLICK AND CHECK: When using the Orbit Base, always pay attention
to the CLICK (through sound and feel) that says you’ve successfully
completed a step. Then, always immediately follow up with a CHECK
by tugging or pulling what you just clicked into place.
Note: Safety technicians recommend keeping children Rear-Facing for as
long as possible. The switch to Forward-Facing will depend on your child’s
age and size. Consult your Orbit carseat manual.
6. Secure your child. Consult the Orbit carseat manual to nd instructions
about adjusting the restraint harness to t your child and securing your child
into the carseat.
7. Check the security of the Orbit carseat. After your Orbit carseat is docked
on the Base, it should not move more than one inch (1”) in any direction once
installed.
8. Maintenance and Cleaning. The last section of this manual provides
instructions on how to clean your Orbit Base, as well as the limited customer
warranty.
Your Child’s Safety Depends on You cont’d
Page 5
8
8
Before You Begin
9
Before You Begin
9
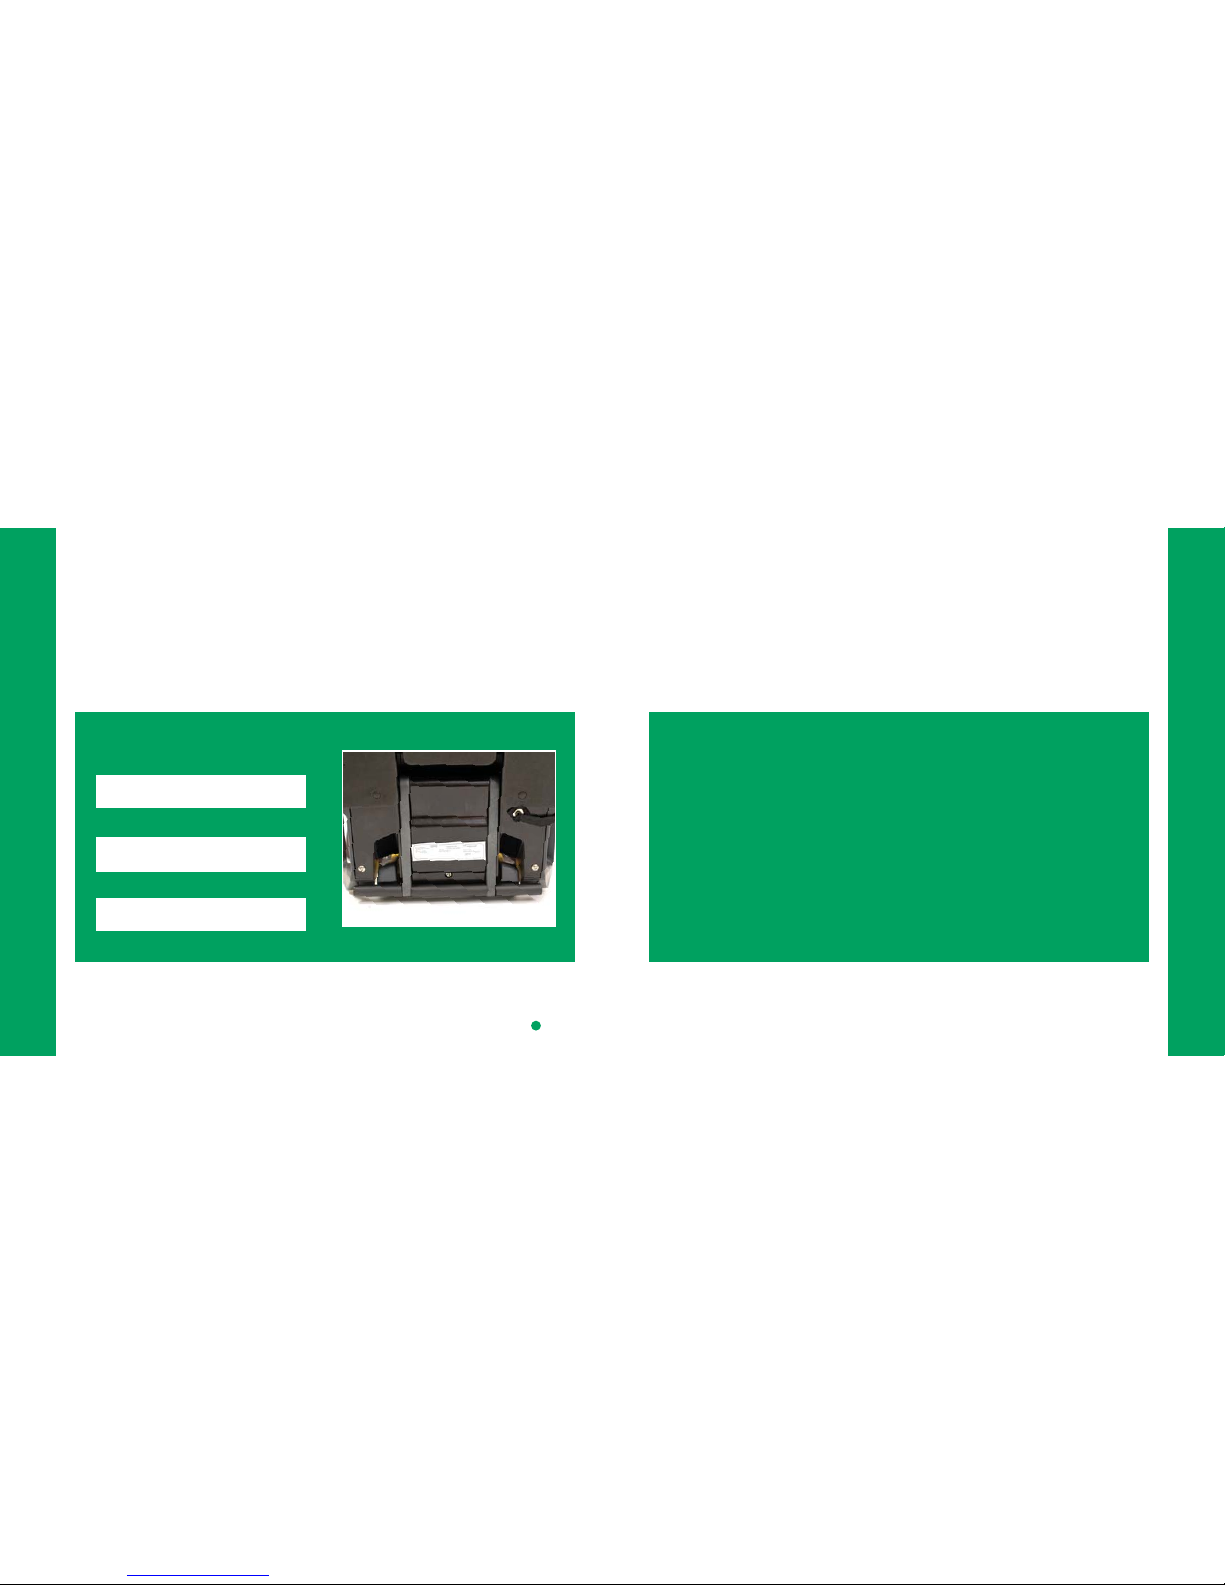
Label located on the back of the Base
DO NOT use the Orbit Base after the Expiration Date, which can be found on the
Product Information Label located at the back of the Orbit Base.
The Product Information Labels on the Infant Car Seat and Toddler Car Seat also
show their speci c serial numbers and model numbers.
Expiration Date
Orbit Base - ORB 802000
Serial Number:
Manufacture Date:
Expiration Date:
Child restraints could be recalled for safety reasons. You must register this
restraint to be reached in a recall.
You can nd the serial number and model information on the Product
Information Label (see page 8) on your Orbit Base.
Send your name, address, and the model number and
manufacturing date to Orbit Baby by
logging onto: www.orbitbaby.com/register
emailing: [email protected]
calling: 1-877-ORB-BABY (672-2229)
mailing the attached registration card to:
Orbit Baby, Inc.
8445 Central Ave.
Newark, CA 94560
For recall information, call the U.S. Government’s Vehicle Safety Hotline at
1–888–327–4236 (TTY: 1–800–424– 9153), visit the National Highway Traf c
Safety Administration’s website at www.NHTSA.gov, or contact Orbit Baby.
Registering Your Orbit Base
For your convenience, you can copy this information in the boxes above.
Page 6
10
10
Before You Begin
11
Before You Begin
11
Important Notice:
Orbit Base Upgrade for Toddler Car Seat Use
The Orbit Base has been updated to extend its use for the Toddler Car
Seat. If your Orbit Base is manufactured before 02/2008 you must upgrade it
before using it with your Toddler Car Seat. Note: The Toddler Car Seat can also
be used without the Orbit Base; consult your Toddler Car Seat manual. ALL
Orbit Bases can be used with the Infant Car Seat without being upgraded.
If your Orbit Base does NOT have the Green Circular Seal shown below,
you must upgrade it before you use it with the Orbit Toddler Car Seat.
You can upgrade any Orbit Base(s) manufactured before 02/2008 free of
charge, by doing one of the following:
• visit www.orbitbaby.com/support/upgrade
• ll out the Base Update Request Form tethered to a new Toddler Car Seat
• contact Orbit Baby at [email protected] or 877-ORB-BABY
No Green Circular Seal:
NOT UPGRADED
INFANT
can be used with
• Infant Car Seat
TODDLER
INFANT
UPGRADED
can be used with
• Infant Car Seat
• Toddler Car Seat
Green Circular Seal:
Page 7
12
12
Usage Recommendations
13
Usage Recommendations
13
Usage Recommendations
Some Important Warnings 13
Seat Positions & Vehicle Restraint Options 16
Need Help Securing Your Orbit Base? 27
Important Product Notice: The Orbit Base has been upgraded to extend its
usage for the Toddler Car Seat. To make sure your Base(s) are upgraded before
using them with the Toddler Car Seat, see pages 10-11.
!
WARNING
!
FAILURE TO FOLLOW THESE INSTRUCTIONS AND THE PRODUCT
LABELS CAN RESULT IN SERIOUS INJURY OR DEATH TO YOUR
CHILD.
To avoid serious injury or death, proper use is required. DO
NOT let others install or use the Orbit Base without reading all the
instructions fi rst.
Keep this instruction manual for future use. If the instruction manual is
missing, visit www.orbitbaby.com, email [email protected], or call
Orbit Baby at 1-877-ORB-BABY (1-877-672-2229) for a replacement
manual.
Your child can be injured in a vehicle even if you are not in a crash.
Sudden braking and sharp turns can injure your child if the Orbit Base is
not properly installed or if your child is not properly secured in the child
restraint.
Death or Serious Injury Can Occur
!
Some Important Warnings
Page 8
14
14
Usage Recommendations
15
Usage Recommendations
15
Never leave the Orbit Base unsecured in your vehicle. The LATCH
Belt or vehicle seat belt must stay tightly adjusted around the child restraint
system at all times, even when not occupied. Unsecured items can cause
injury in a sharp turn, sudden stop or crash.
Do not modify your Orbit Base. Only use products and accessories
approved by Orbit Baby. Follow the accompanying instruction manuals for
these products and accessories carefully.
Do not allow any re-use of the Orbit Base after a motor vehicle
collision of any kind. A collision can cause damage to the Orbit Base that
you cannot see.
Do not use the Orbit Base if any component is damaged, broken, or
missing parts. Do not use any straps or belts if they are cut or fraying.
Do not secure any Orbit carseat on the Orbit Base Forward Facing.
Do not secure any child restraint, besides either the Orbit Infant Car
Seat or the Orbit Todder Car Seat, on the Orbit Base.
!
!
!
!
!
!
WARNING
!
DO NOT PLACE THE ORBIT BASE IN VEHICLE SEATING
LOCATIONS WITH A FRONT AIR BAG. If the front air bag in ates, it can
hit the child restraint with great force and cause serious injury or death to
your child. Also refer to your vehicle owner’s manual about locations for
child restraints if there are side air bags.
Secure the Orbit Base with either the vehicle’s LATCH system or
vehicle seat belt, as shown in this manual. Not all vehicle seat belts
can be used with child restraints. Always check the security of your
installation by pulling side to side. The Orbit Base should not move more
than 1 inch in any direction.
Never leave an Orbit carseat or Orbit Base unsecured in your
vehicle. The LATCH Belt or vehicle seat belt must stay tightly adjusted
around the child restraint system at all times, even when not occupied.
Unsecured items can cause injury in a sharp turn, sudden stop or crash.
When installing the Orbit Base, check the level of the Base. The
Orbit Base must be properly angled. Avoid loosening the installed Base
unintentionally.
Death or Serious Injury Can Occur
!
!
!
!
WARNING
!
Death or Serious Injury Can Occur
!
!
!
!
Some Important Warnings cont’d
Page 9
16
16
Usage Recommendations
17
Usage Recommendations
17
Seat Positions & Vehicle Restraint Options
2. Choosing a Vehicle Seating Location
You may choose a seating location in your vehicle that has acceptable LATCH
anchors (part of the Lower Anchors and Tethers for CHildren system) or vehicle
seat belts approved by the vehicle manufacturer. Seat geometry and vehicle
seat belt geometry may also affect the installation of the Orbit Base.
According to crash statistics, children have less chance of injury when
properly restrained in rear vehicle seats, rather than front vehicle seats.
In addition, the center rear seating location is considered the best location
if ALL the following conditions are met:
a) Lower LATCH anchors are spaced, center-to-center, between 11 and 20 in.
(280 and 500 mm) apart or the seat has an acceptable vehicle seat belt
b) LATCH or vehicle seat belt provides a secure installation and remains tightly
adjusted around the car seat
c) The seat geometry allows the seat to be properly reclined once installed
d) If the vehicle seat back is adjustable, the vehicle seat back is locked into
the upright position
e) Installation in this seating location is permitted by the vehicle manufacturer
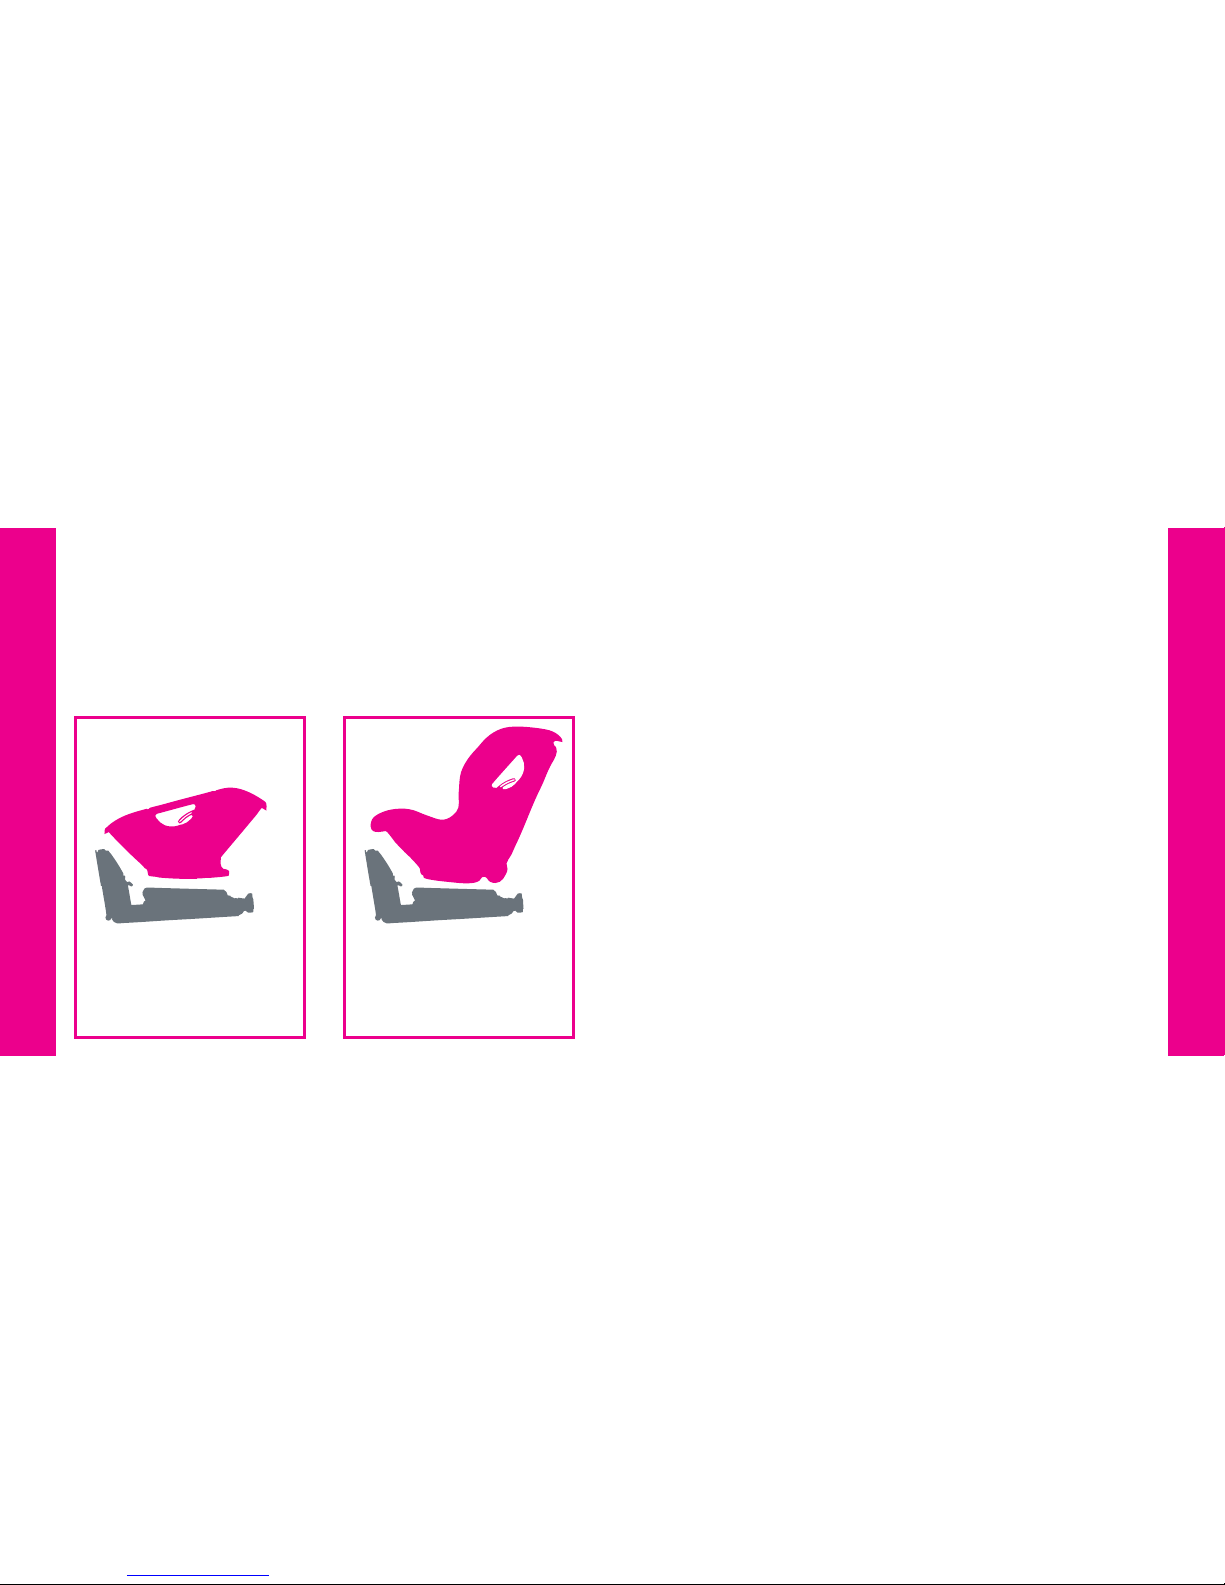
1. Your Child Restraint Options
Any Orbit Base with a Green Circular Seal (see pages 10-11) can be used with
either the Orbit Infant Car Seat or the Orbit Toddler Car Seat. Any Orbit Base
can be used with the Infant Car Seat. Seats such as the Orbit Toddler Stroller
Seat and the Orbit Bassinet cannot and will not dock onto the Orbit Base.
Orbit Infant
Car Seat
Orbit Toddler
Car Seat
Orbit Base Orbit Base
USE REAR-FACING ONLY
for infants that are
- less than 22 pounds AND
- less than 29 inches tall
USE REAR-FACING ONLY
for children that are
- 15-35 pounds
Page 10
18
18
18
18
19
Usage Recommendations
19
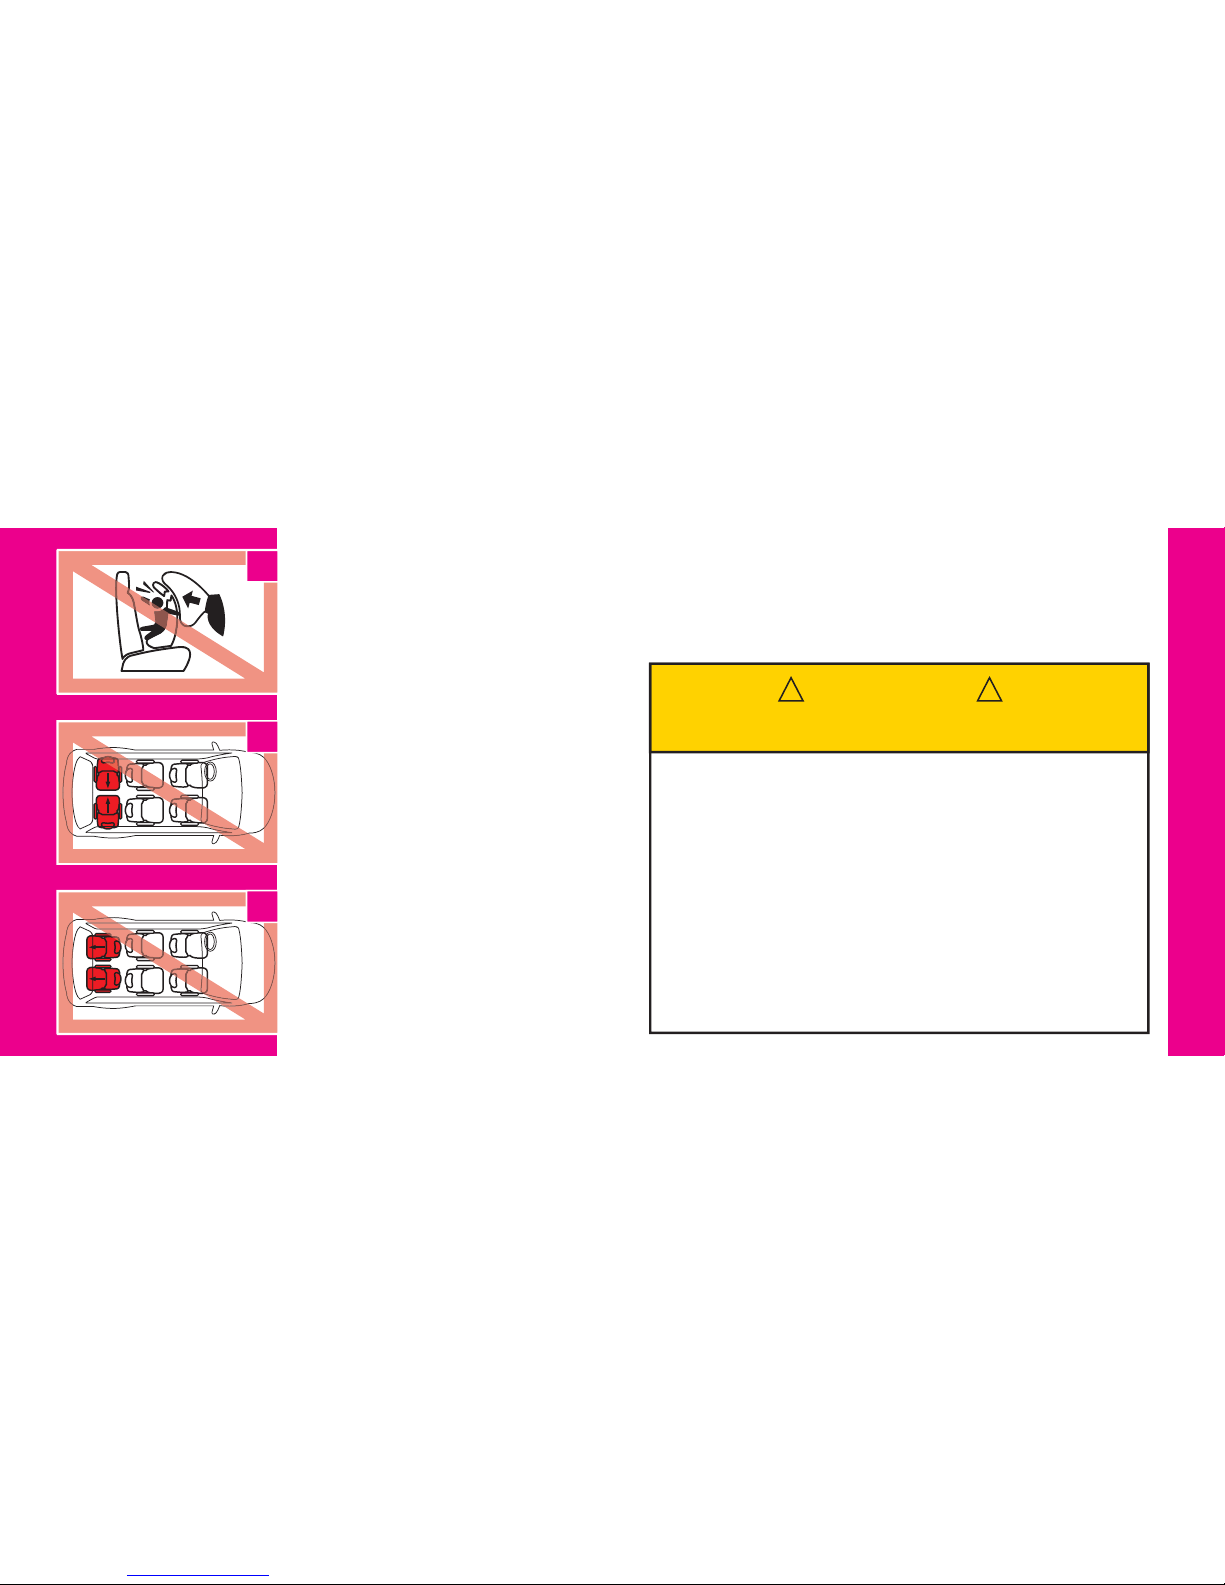
Guidelines:
- Never secure the Orbit Base in a seating
location with a front airbag. Check your
vehicle owner’s manual regarding air bag
compatibility with child carseats
(Figure A).
- Never secure the Orbit Base in a vehicle
seating location unless recommended
by the vehicle owner’s manual.
- Only install the Orbit Base in forwardfacing vehicle seats. Do not install
carseat in side-facing or rear-facing
vehicle seats (Figure B & C).
- Do not secure the Orbit Base in vehicle
seating locations where the vehicle
seat back does not lock in an upright
position.
Seat Positions & Vehicle Restraint
Options cont’d
After you’ve chosen a seating location, follow instructions in this manual for
installation using LATCH or vehicle seat belts, and the child restraint information
in your vehicle owner’s manual.
!
WARNING
!
Improper Placement of the Orbit Base
Increases the Risk of Serious Injury and Death
- If the LATCH Belt or vehicle seat belt does not stay tightly adjusted
around the Orbit Base at all times, reinstall or refer to your vehicle
owner’s manual.
- Some vehicles do not have any seating locations where a child
restraint system can be installed securely. If you are unsure where
to place the Orbit Base, refer to your vehicle owner’s manual for
instructions about carseat use.
- If the vehicle seat belt does not remain tight or the Orbit Base can move
more than 1 inch in any direction, your child could be seriously injured
in a sharp turn, sudden stop, or crash. Move the Orbit Base to another
seating location and try installing again. If in doubt, refer to the vehicle
owner’s manual for speci c instructions regarding child restraint use.
Usage Recommendations
A
B
C
Page 11
20
20
Usage Recommendations
21
Usage Recommendations
21
Seat Positions & Vehicle Restraint Options cont’d
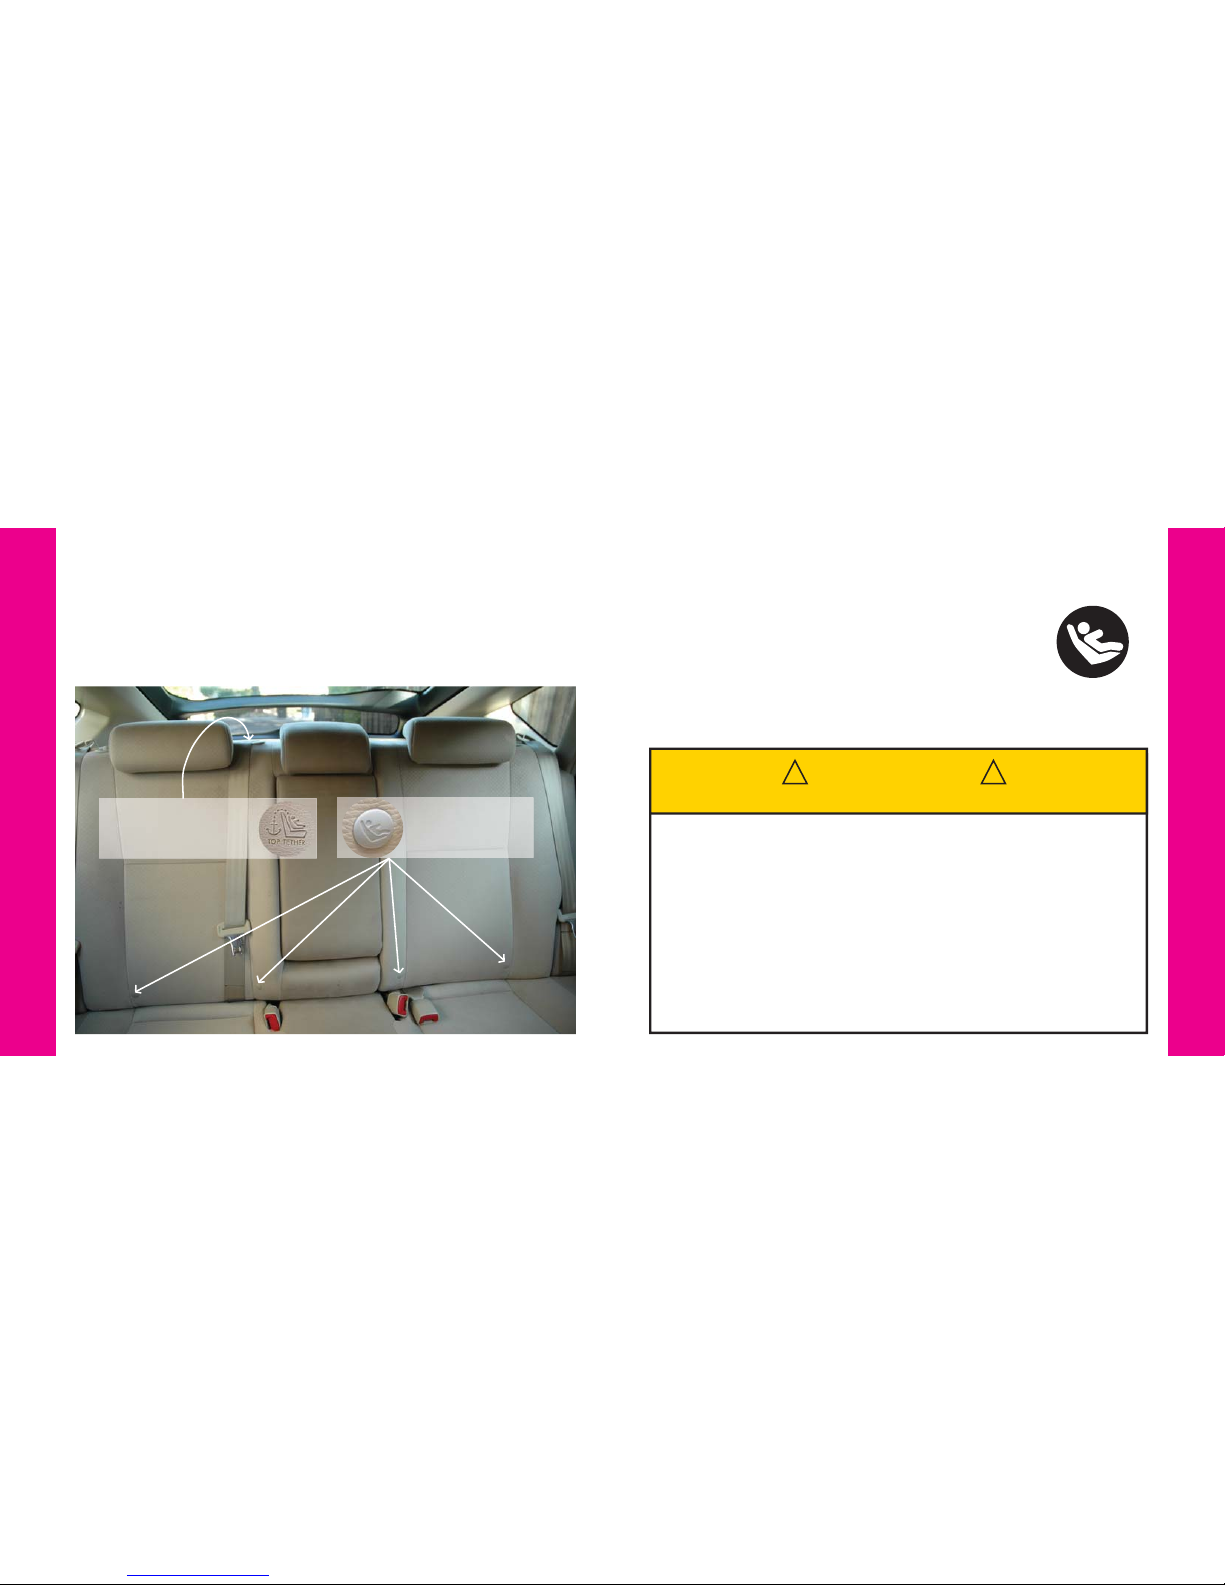
3. Vehicle Restraint Option 1: LATCH System
Lower LATCH
Anchors identifi ed
by this symbol
Top Tether Anchorage
(behind seat) identifi ed
by this symbol
Starting with the 2003 model year, all vehicles are required to
have one or more seating positions with LATCH attachment
system for carseats (Lower Anchors and Tethers for Children).
Many manufacturers began including LATCH systems with
their 2000 model year vehicles. The top tether anchor is
located somewhere behind the vehicle seat. The lower
anchors may be visible at the vehicle seat crease; if not, their
locations may be marked with the symbol to the right.
!
WARNING
!
Improper Installation Can Cause Serious Injury and Death
See your Vehicle Owner’s manual regarding requirements for using
LATCH anchorages with this child restraint system. If you are unsure
how to identify or use the LATCH system, contact the vehicle manufacturer.
LATCH Connectors must be secured to the vehicle LATCH anchors
only. Connections to other vehicle components could result in an insecure
installation of the Orbit Base.
Never attach two LATCH Connectors to one LATCH anchor, unless
recommended by the vehicle owner’s manual for your vehicle.
Never use both the lower LATCH anchors and the vehicle seat belt
system at the same time to secure the Orbit Base.
Page 12
22
22
Usage Recommendations
23
Usage Recommendations
23
Seat Positions & Vehicle Restraint
Options cont’d
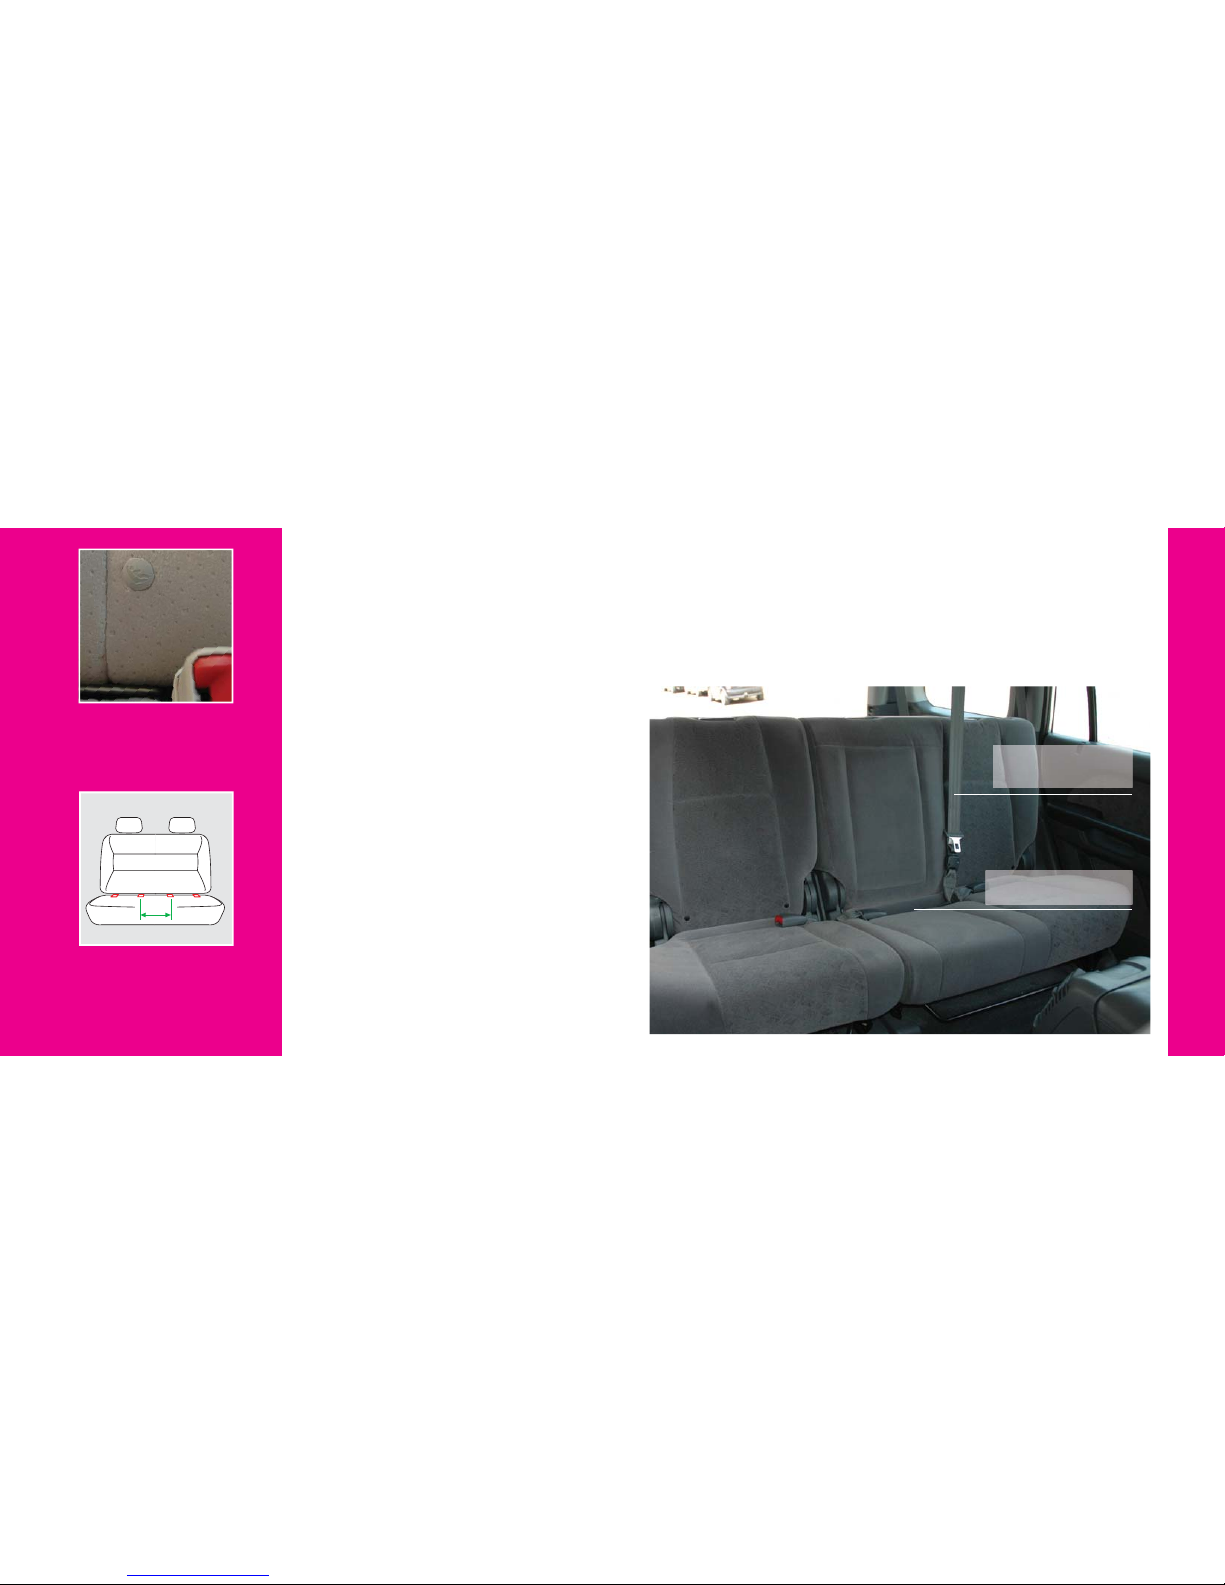
Image A
Close-up of typical Lower LATCH
symbol, found just above the
vehicle seat crease where the
LATCH anchorage is located.
Pay careful attention to the type of LATCH
anchors and vehicle seat belts that are in
your vehicle; some cargo anchors unsafe
to use with child restraints look the same
as LATCH anchors. Read your vehicle
owner’s manual for LATCH anchorage
locations.
Only install the Toddler Car Seat with
LATCH anchors if using a vehicle seating
location that is recommended by the
vehicle manufacturer. For rear-center
seating positions that have a center-tocenter LATCH anchor spacing between 11
and 20 inches (280 mm and 500 mm) (See
Image A), only use if recommended by the
vehicle manufacturer.
4. Vehicle Restraint Option 2: Vehicle Seat Belts
Shoulder-Lap
Vehicle Seat Belts
Vehicle Seat Crease
Page 13
24
24
Usage Recommendations
25
25
25
25
WARNING
! !
Death or Serious Injury Can Occur
Some vehicle seat belts cannot securely hold the Orbit Base. The
vehicle seat belt must hold a child restraint system tightly at all times.
There are many types of vehicle seat belts. Different types of seat belts may
even be used at different seating locations within the same vehicle.
If the vehicle seat belt does not remain tightly adjusted around the Orbit Base
or the Orbit Base can move more than 1 inch in any direction, your child could
be seriously injured in a sharp turn, sudden stop, or crash. If the Orbit Base is
loose, move the Orbit Base to another seating location and re-install.
Your vehicle owner’s manual will have information on which vehicle seat belts in
your vehicle can be used with a child restraint system. If in doubt, contact the
vehicle manufacturer for guidance.
Seat Positions & Vehicle Restraint Options cont’d
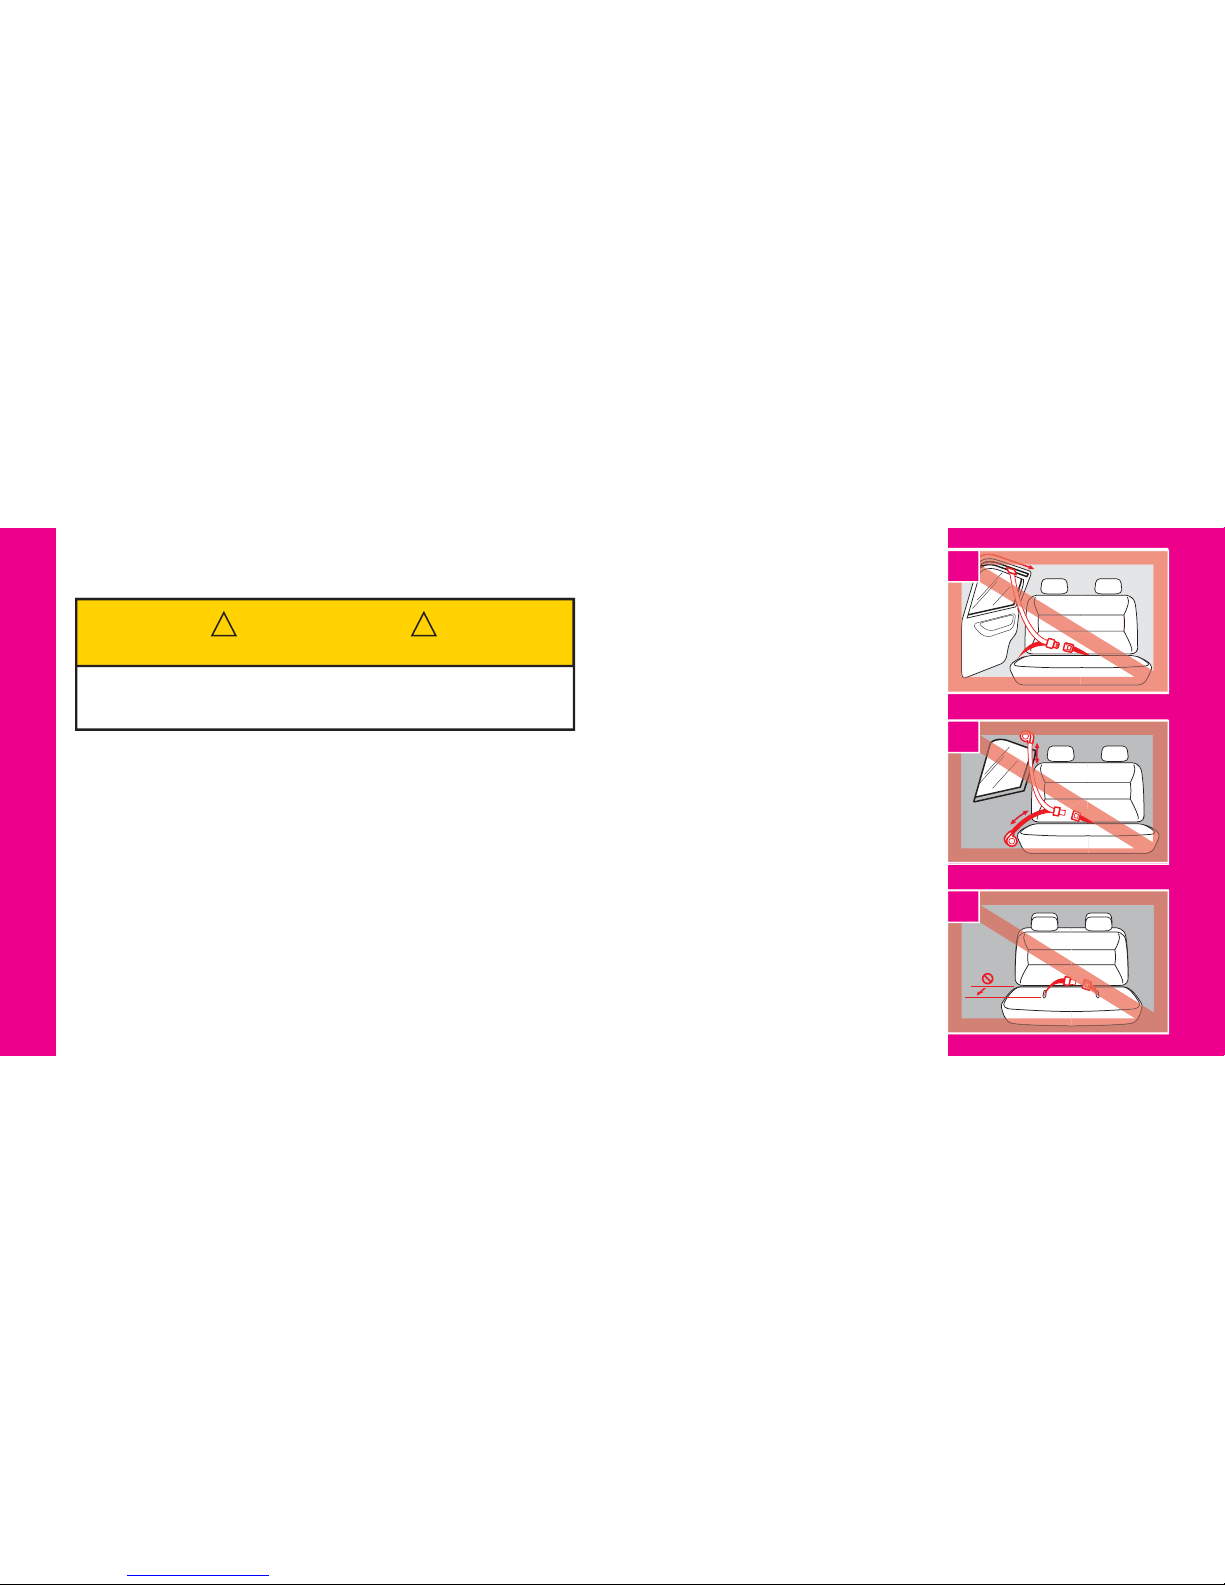
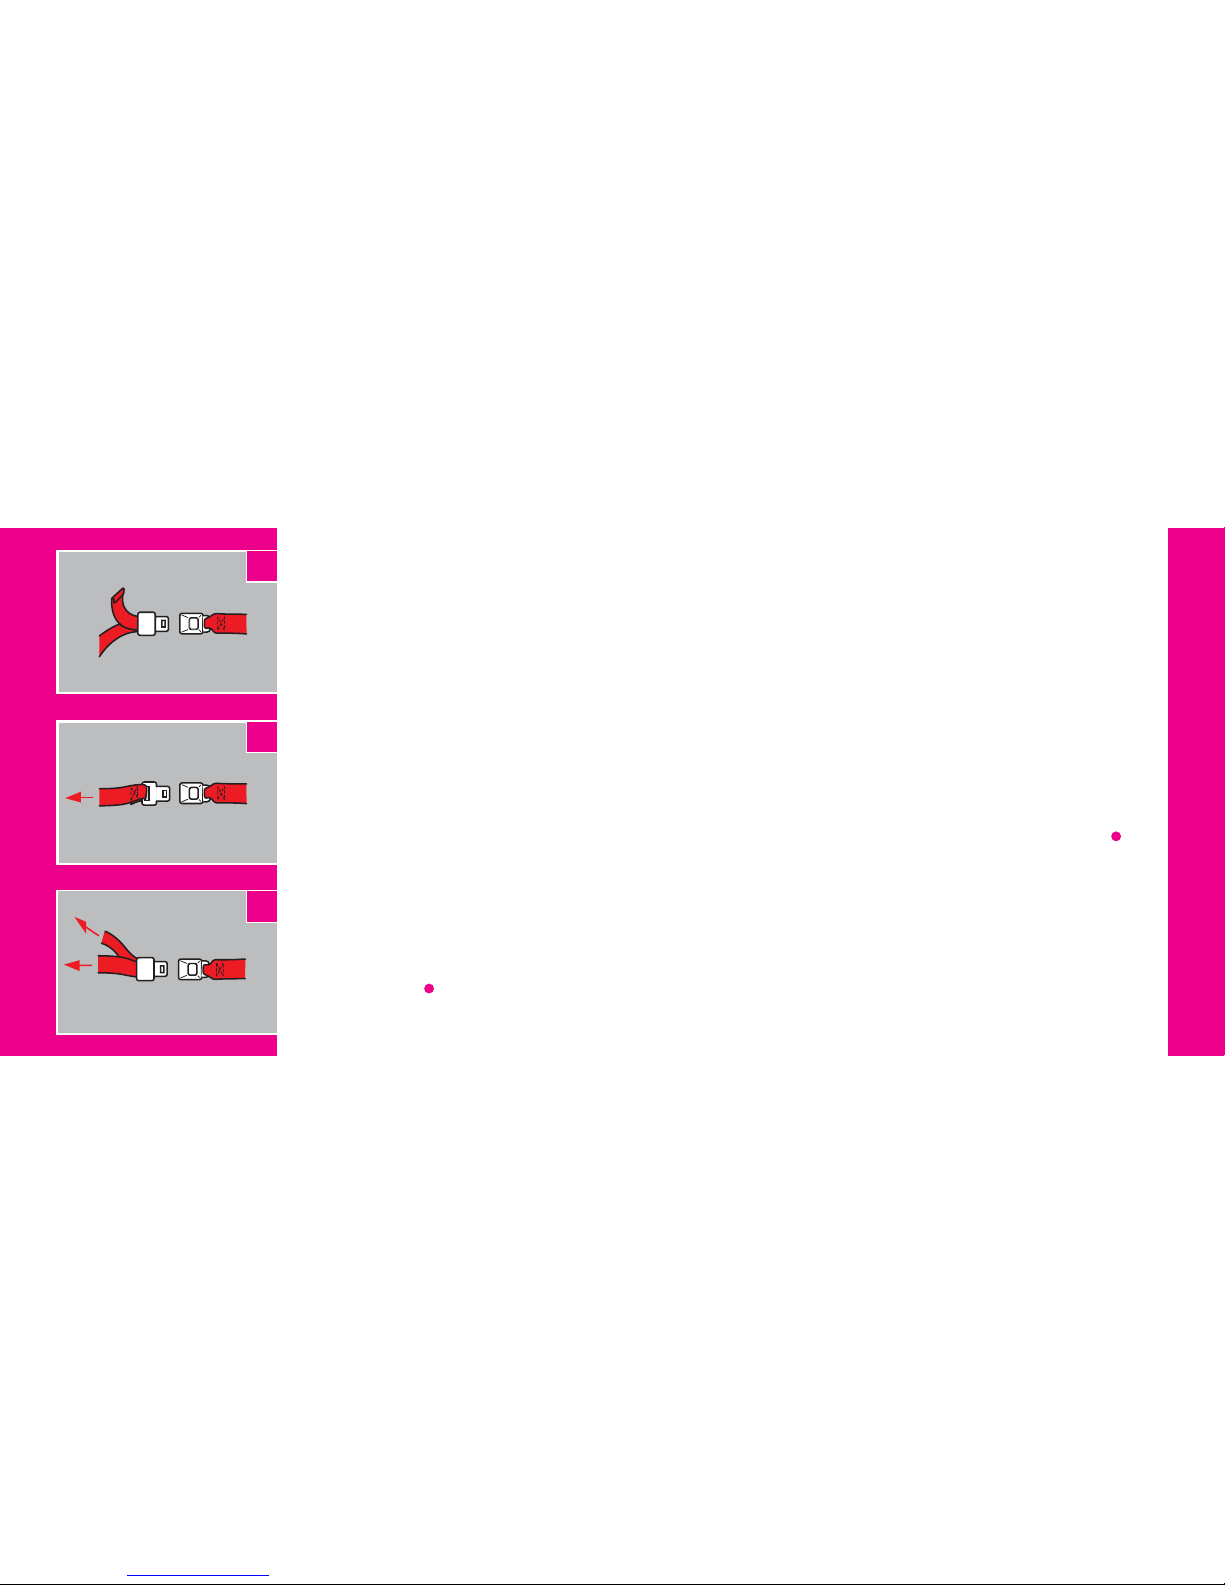
The following types of vehicle seat belts
are NOT compatible with the Orbit Base:
1) Lap, shoulder-lap or shoulder belts
mounted to the vehicle door (See
Image A)
2) Motorized automatic vehicle seat
belts
3) Three point vehicle seat belts that
have separate retractors for the
shoulder section and the lap section
(See Image B)
4) Vehicle seat belts with emergencylocking retractors that only lock in the
event of a crash
5) Lap belts forward of the seat crease
(See Image C)
Usage Recommendations
A
B
C
Page 14
26
26
26
26
27
Usage Recommendations
27
Do not install the Base using any of the
vehicle seat belt types listed above. Select
another seating position or use compatible
LATCH anchorage points instead.
If you determine that there are no
acceptable vehicle belt systems in your
vehicle, contact the vehicle manufacturer
for options.
The following vehicle seat belt systems
CAN be used with your Orbit Base when
following the appropriate instructions in
this manual:
1) Manually adjusted lap belts
(See Image D)
2) Lap belts with an automatic locking
retractor (See Image E)
3) Combination shoulder-lap belt with
locking latch plate or sliding latch plate
(See Image F)
Seat Positions & Vehicle Restraint
Options cont’d
Need Help Securing Your Orbit Base?
The following sources can be of assistance in checking whether your child
restraint system is properly installed:
a) Contact Orbit Baby at [email protected] or 1-877-672-2229
b) Your vehicle dealer may help you locate a child safety seat inspection
station in your area.
c) Call 1-866-SEAT CHECK (1-866-732-8243).
d) Visit www.nhtsa.dot.gov and select “Child Seat Inspections.”
e) Visit www.seatcheck.org.
f) Contact a certi ed child passenger safety technician in your area.
Usage Recommendations
D
E
F
Page 15
28
28
Installing Your Orbit Base
29
Installing Your Orbit Base
29
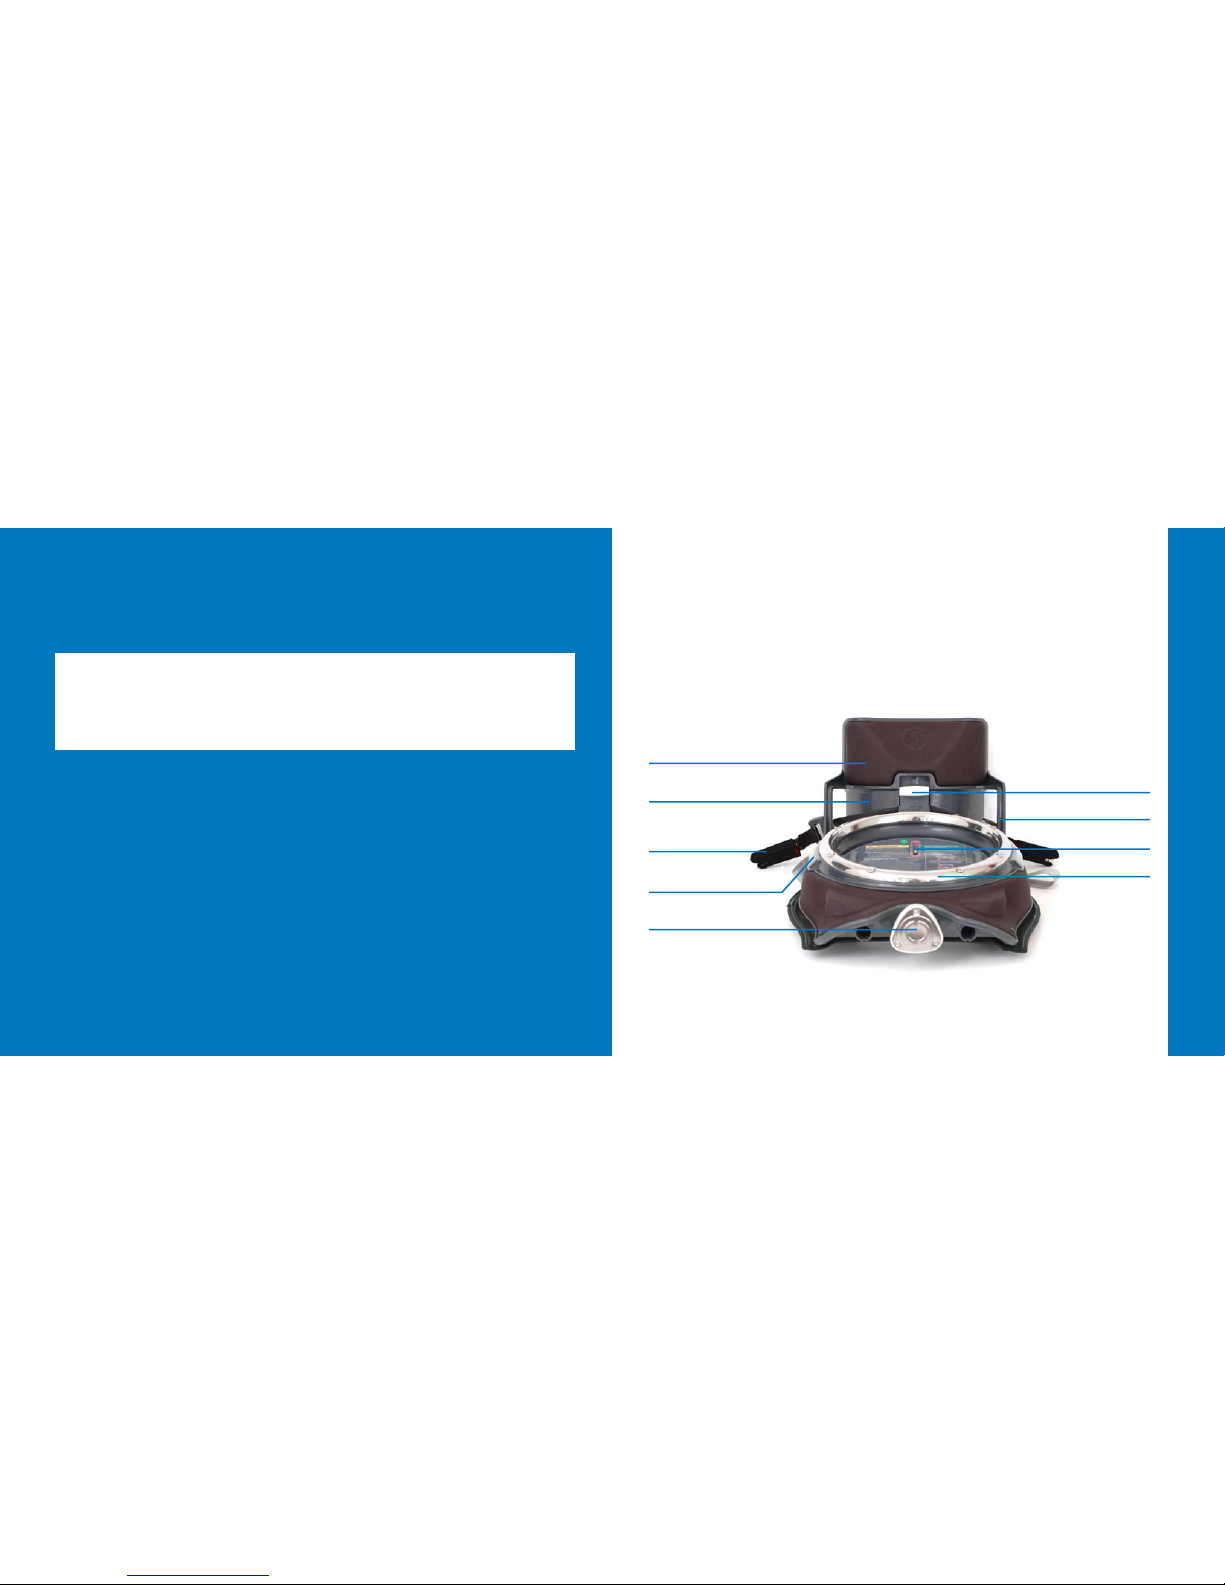
Terms You Need to Know
Installing Your Orbit Base
Terms You Need to Know 29
Installing the Base: with LATCH System 30
Installing the Base: with Vehicle Seat Belts 35
Removing the Base 41
Important Notice: The Orbit Base has been upgraded to extend its usage for the
Toddler Car Seat. To make sure your Base(s) are upgraded before using them
with the Toddler Car Seat, see pages 10-11.
SmartHub
StrongArm Knob
Rotation Indicators
Lock-off Clamp
Belt Path
LATCH
Connectors
Level Indicator
Belt Guides
Base Upright
TM
TM
Page 16
30
30
30
30
31
31
31
31
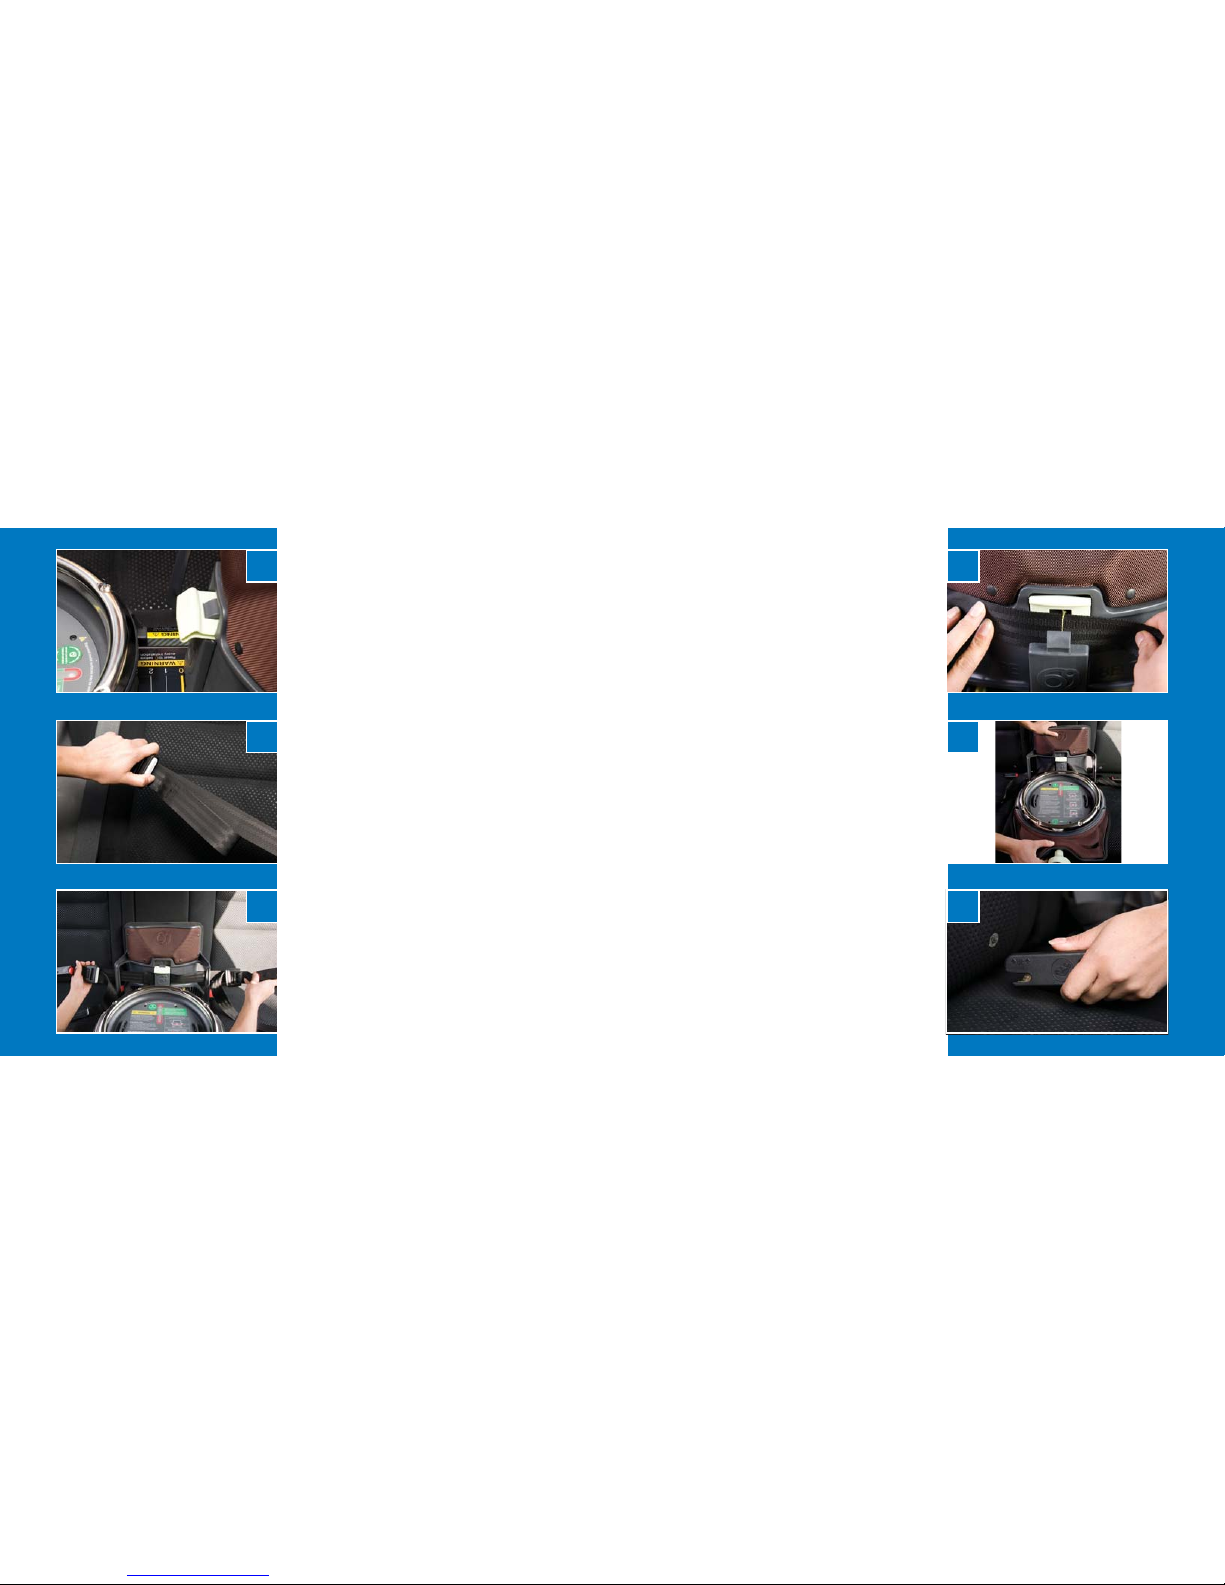
1. The Orbit Base should be installed
without your Orbit carseat docked. If
attached, rst remove the Orbit carseat.
2. Check that the Base StrongArm is reset
to zero (Photo A). If not, then turn the
StrongArm Knob counterclockwise until
the zero is visible.
3. Free the LATCH Connectors from their
storage locations by pressing the red
buttons and pulling them upwards at
the same time. For ease of installation,
extend the LATCH Belt to its maximum
length by pressing the grey tab on the
adjuster and pulling on the belt (Photo
B).
4. Position the LATCH Belt through the
Belt Guides as shown (Photo C).
5. The LATCH Belt must be secured in
place by the Lock-off Clamp. If it is
not:
- Center the colored stitch line of
the LATCH Belt in the middle of
the Lock-Off Clamp (Photo D)
- Close the Lock-Off Clamp and
secure it rmly upon the LATCH
Belt by ipping the top closure
down into place.
6. Place the Base in the vehicle seat
(Photo E), making sure the areas under
and behind the Base are clear of
obstructions.
7. If the vehicle seat back is adjustable,
lock the vehicle seat back into the
upright position.
8. Attach both LATCH Connectors to their
corresponding lower LATCH anchors.
With the LATCH Connector oriented as
shown (Photo F), push it straight onto
the metal bar until you hear and feel a
CLICK.
When using the LATCH system, the
Orbit Base uses only the lower anchors.
Installing the Base:
With LATCH System
Installing Your Orbit Base
Installing Your Orbit Base
A
B
C
D
E
F
Page 17
32
32
32
32
33
33
33
33
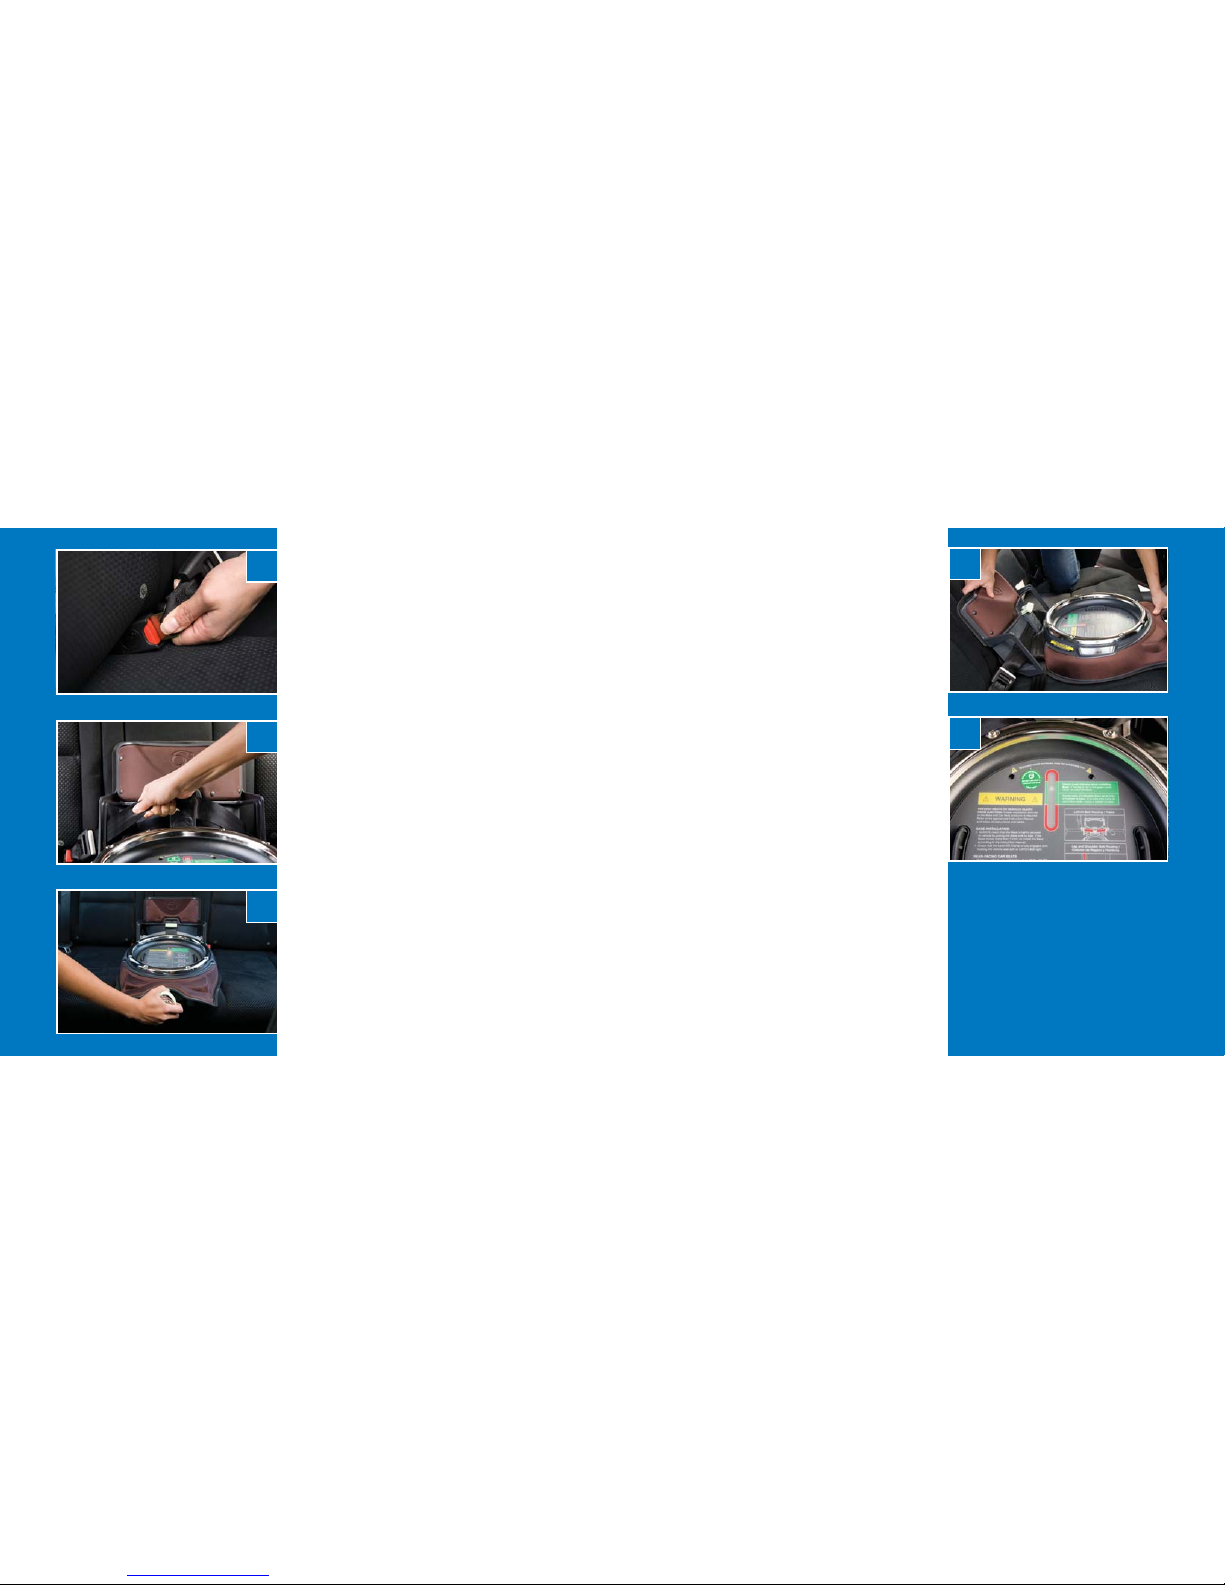
9. Pull on each LATCH Connector to be
sure it is locked onto the anchor (Photo
G).
10. Pull each LATCH Belt loop tight to
remove the slack and make sure the
Base is not loose (Photo H).
11. Turn the StrongArm Knob at the front of
the Base clockwise. (Photo I)
12. CHECK the installation is secure by
tugging and pulling the Base in various
directions (Photo J) – the Base should
not move by more than 1 inch in any
direction. If the Base is loose, remove
and re-install it beginning at Step #2.
13. CHECK that the Base is level by
looking at the Level Indicator (Photo K).
As you’re turning the Knob, the
StrongArm mechanism is amplifying
your strength and tightening the Base
into the car.
Each installation varies slightly, but
typically the Knob can turn almost 10
full revolutions.
You know that you have reached the
optimal tightness setting when the Base
Upright cannot move more than 1 inch
in any direction.
Installing the Orbit Base
Installing the Orbit Base
Installing the Base: With LATCH
System cont’d
G
H
I
J
K
Page 18
35
35
35
3534
3434
34
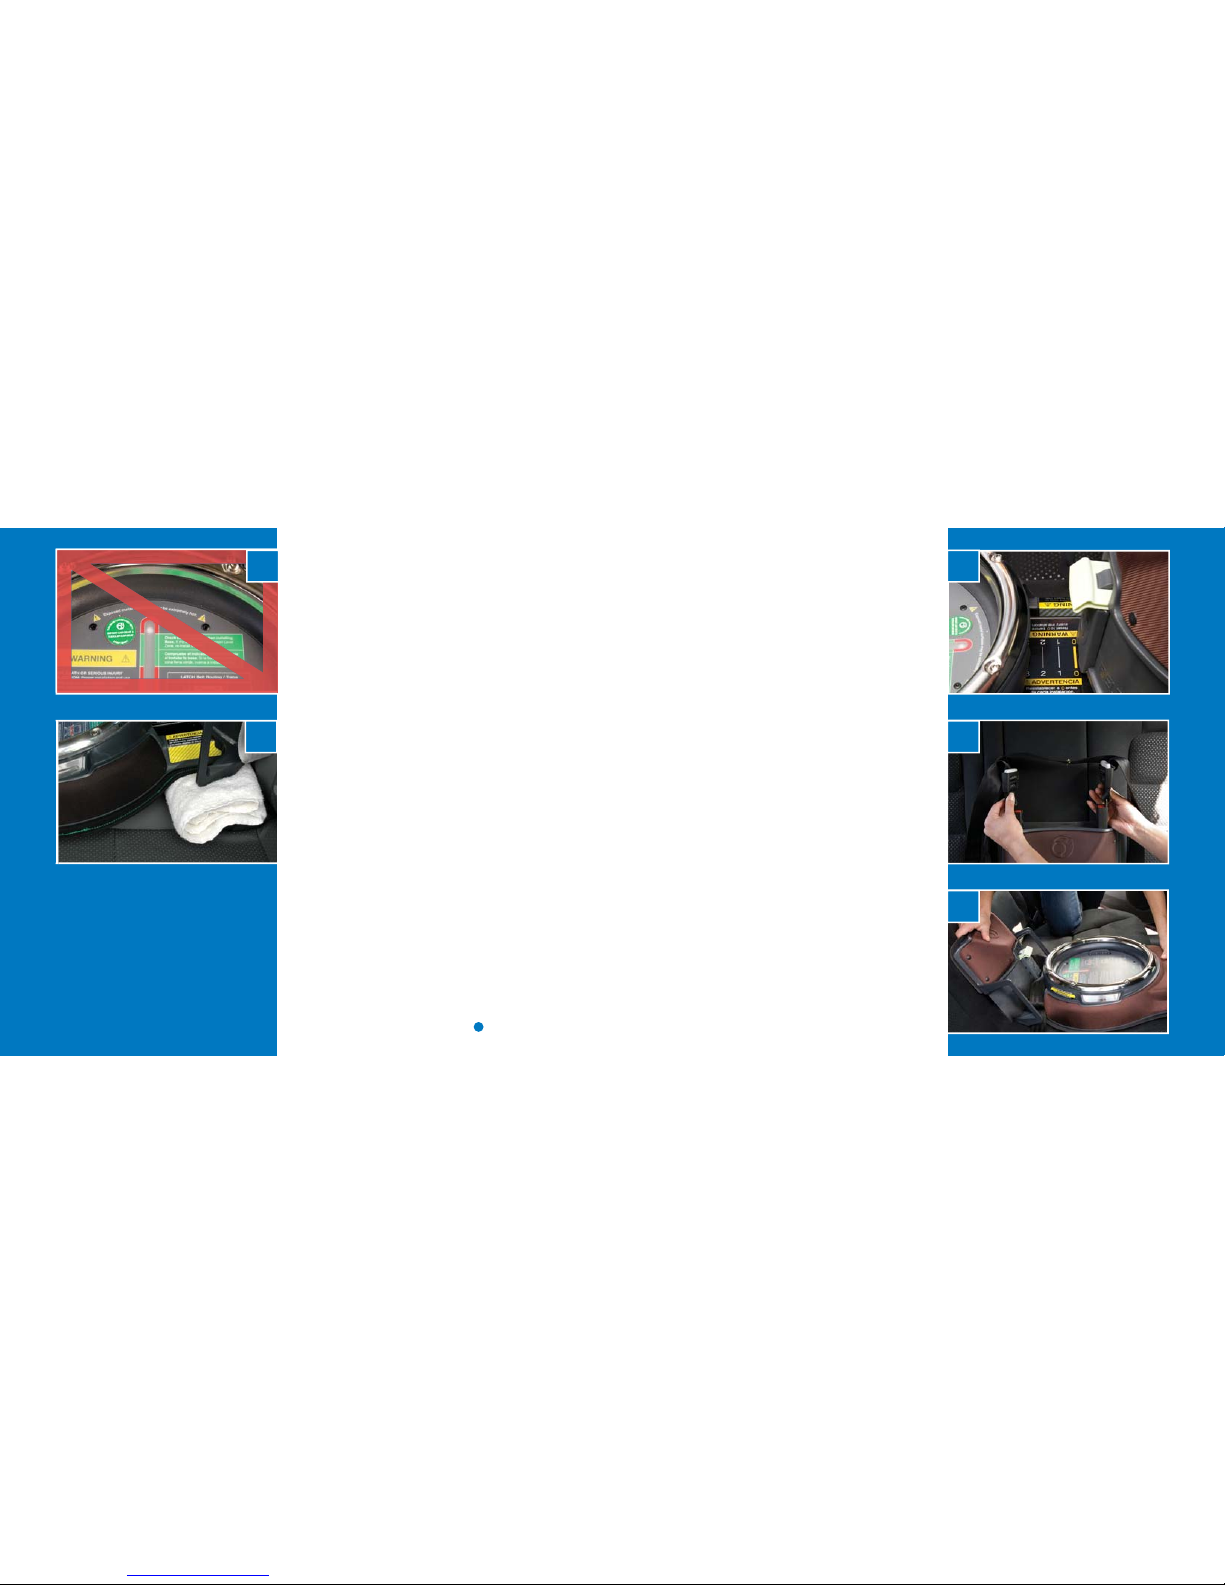
14. If the ball is not in the green zone
(Photo L), remove the Base, re-install it
by repeating Steps 2 - 13. If the Base
cannot be secured tightly with the
ball in the green zone, try any of the
following:
a) Remove the Base. Position a
rolled towel under the Base,
making sure the front of the Base
contacts the vehicle seat (Photo
M), and repeat Steps 2 to 13. The
towel should be compressed as
the StrongArm tightens the Base
into place.
b) Try installing the Base in a
different seating position.
c) Contact your vehicle dealer for
assistance and possible LATCH
modi cation parts.
d) Seek assistance from one of
the resources in the “Need Help
Securing Your Orbit Base?”
section (page 27).
Installing the Base: With LATCH
System cont’d
Before installing the Orbit Base with
vehicle seat belts, please read the “Use
Recommendations,” starting on page 12.
1. Install the Orbit Base without the Orbit
carseat docked. If it is attached, rst
remove the Orbit carseat.
2. CHECK that the Base StrongArm is reset
to zero (Photo N). If not, then turn the
StrongArm Knob counterclockwise until
the zero is visible.
3. Remove the LATCH Belt from the LockOff Clamp. (Note: The LATCH Belt is
permanently tethered to the Base). Store
the LATCH Connectors in the Base when
they are not in use (Photo O). Each
LATCH Connector will CLICK securely
into its own storage slot.
4. Place the Base in the vehicle seat
(Photo P), making sure the areas
under and behind the Base are clear of
obstructions.
Installing the Base:
With Vehicle Seat Belts
Installing Your Orbit Base
Installing the Orbit Base
N
O
P
L
M
Page 19
36
36
36
36
37
37
37
37
5. If the vehicle seat back is adjustable, lock
the vehicle seat back into the upright
position.
If using a shoulder-lap vehicle seat
belt to secure the Base, continue to
Step 6. If using a lap-only vehicle belt,
skip to Step 7.
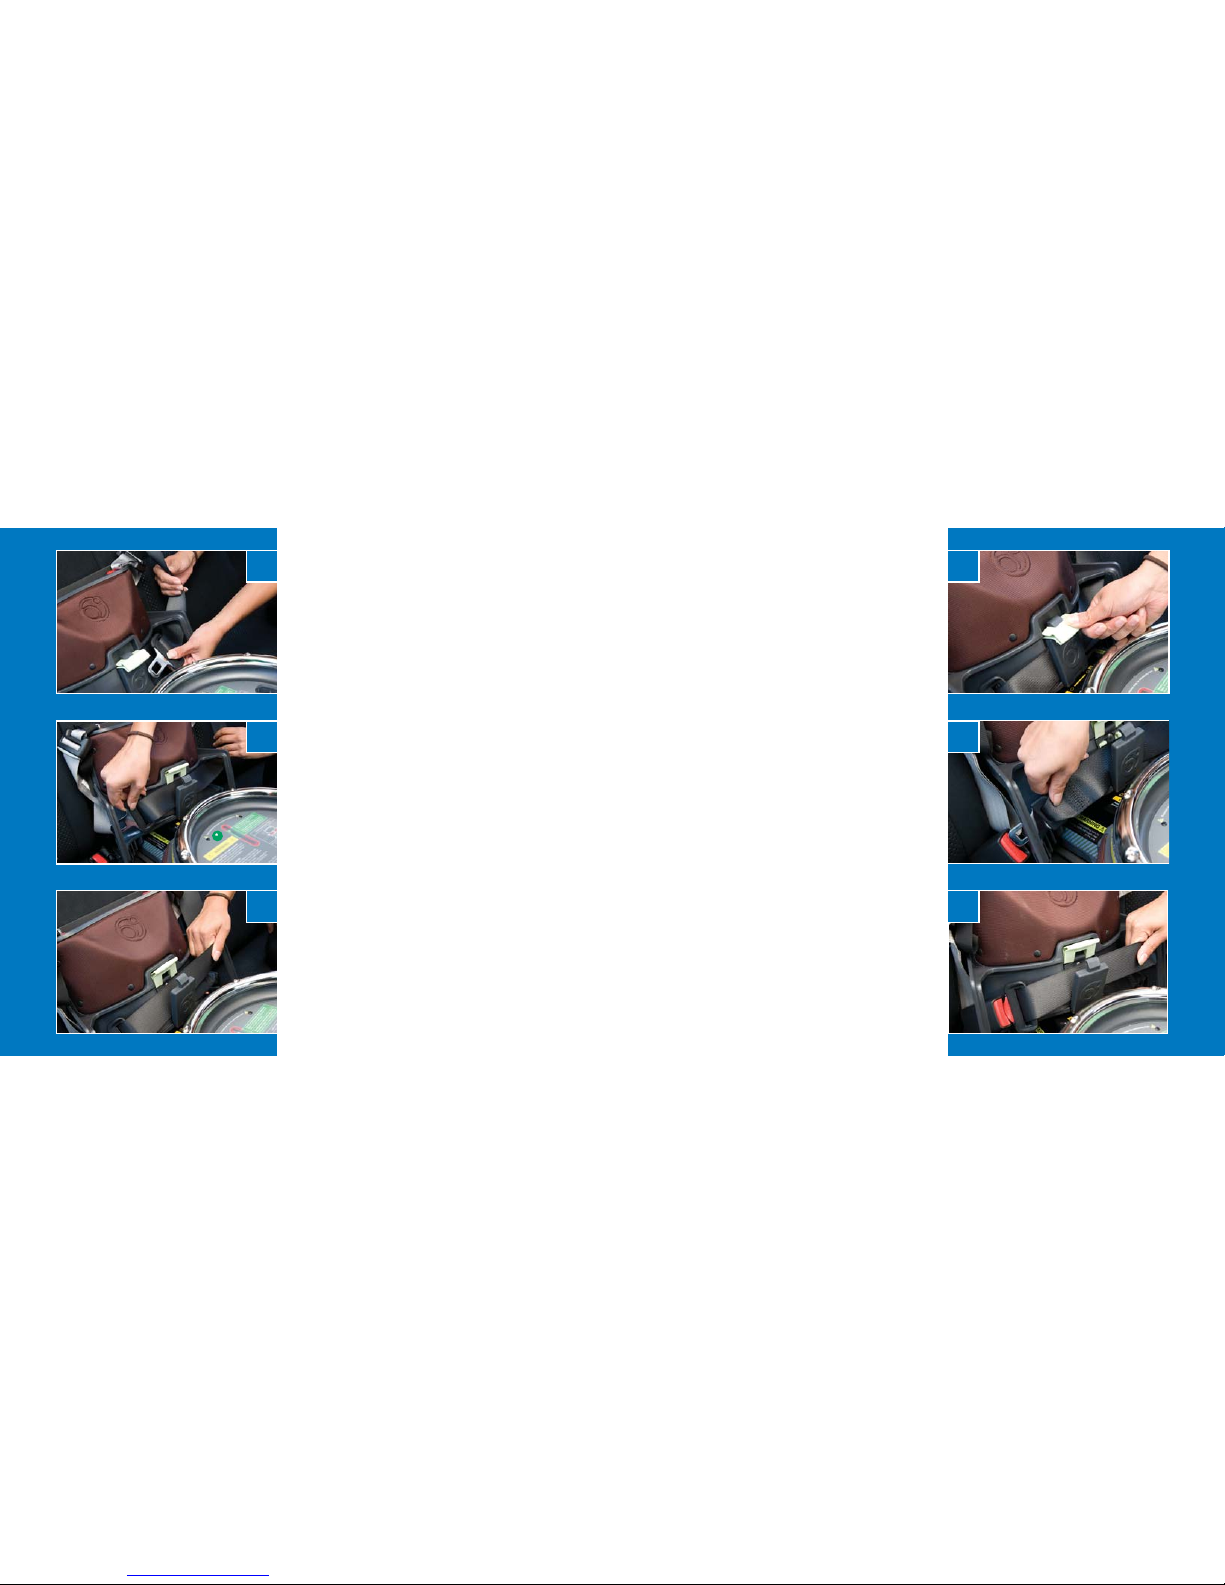
6. If using a shoulder-lap vehicle belt:
a) Open the Lock-Off Clamp.
b) Thread the shoulder-lap vehicle seat
belt through the Belt Guides (Photo Q).
c) Buckle the shoulder-lap vehicle seat belt.
d) Make sure the belts are not twisted
and that both straps lay at across the
Belt Path and the open Lock-Off Clamp
(Photo R).
e) Pull on the lap portion of the vehicle
seat belt to tighten it on the Belt Path
(Photo S).
f) While holding the shoulder portion of
the vehicle seat belt within the Belt
Path, secure the Lock-Off Clamp
rmly upon both straps (Photo T).
Continue on to Step # 8.
7. If using a lap-only vehicle seat belt:
a) Open the Lock-Off Clamp.
b) Thread the lap-only vehicle seat belt
through the Belt Guides (Photo U).
c) Buckle the lap-only vehicle seat belt.
d) Make sure the belt is not twisted and
lays at across the Belt Path and
across the open Lock-Off Clamp.
e) Pull on the lap-only vehicle seat belt to
tighten it along the Belt Path (Photo V).
Installing the Base: With Vehicle
Seat Belts cont’d
T
H
I
S
B
A
S
E
C
A
N
B
E
U
S
E
D
W
I
T
H
O
R
B
I
T
B
A
B
Y
IN
FA
N
T C
AR
S
EA
T &
T
ODDLE
R CAR
SE
AT
Installing Your Orbit Base
Installing Your Orbit Base
Q
R
T
U
V
S
Page 20
38
38
38
38
39
39
39
39
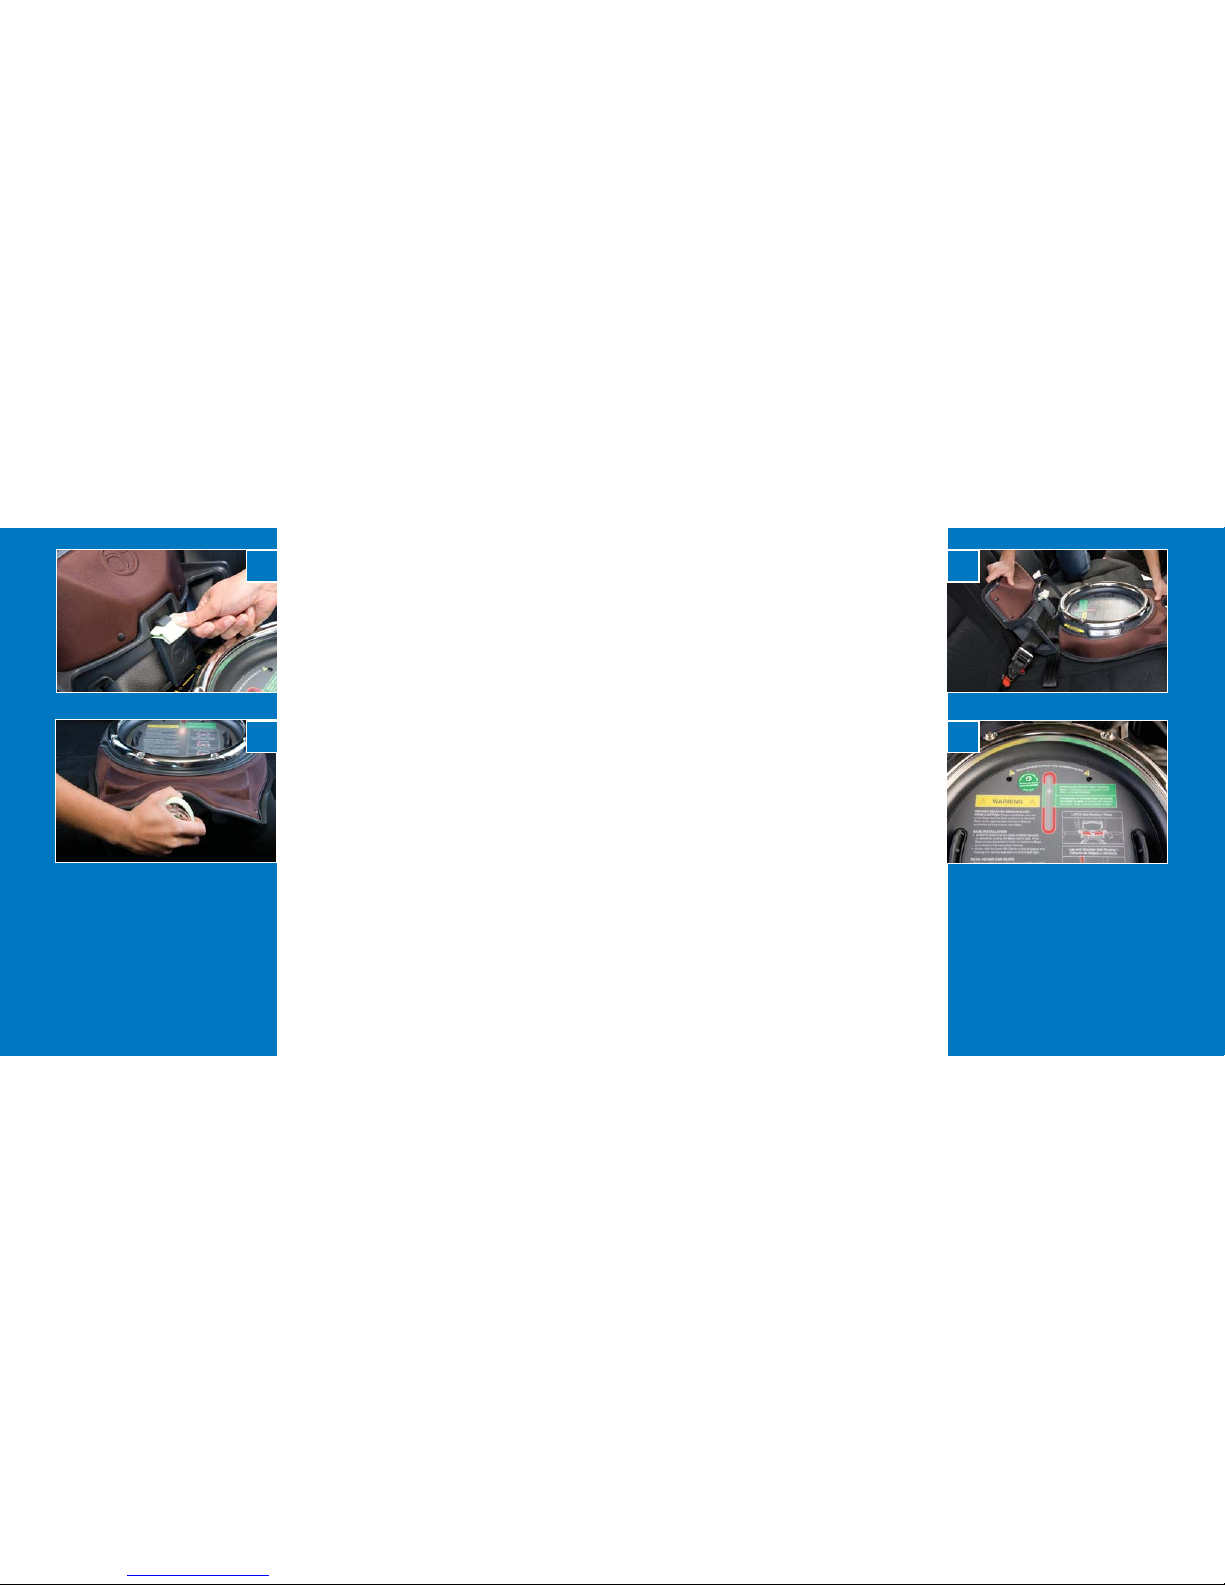
f) Secure the Lock-Off Clamp rmly
upon both portions of the lap-only
vehicle seat belt (Photo W).
Continue on to Step # 8.
8. Turn the StrongArm Knob at the front of
the Base clockwise. (Photo X)
9. CHECK the installation is secure by
pulling the Base in various directions
(Photo Y) – the Base Upright, where
the belt is secured, should not move by
more than 1 inch in any direction. If the
Base is loose, remove and re-install it
beginning at Step #2.
10.CHECK that the Base is level by looking
at the Level Indicator (Photo Z).
As you’re turning the Knob, the
StrongArm mechanism is amplifying
your strength and tightening the Base
into the car.
Each installation varies slightly, but
typically the Knob can turn about 10 full
revolutions.
You know that you have reached the
optimal tightness setting when the Base
Upright cannot move more than 1 inch
in any direction.
Installing the Base: With Vehicle
Seat Belts cont’d
Installing the Orbit Base
Installing the Orbit Base
W
X
Y
Z
Page 21
41
41
41
4140
4040
40
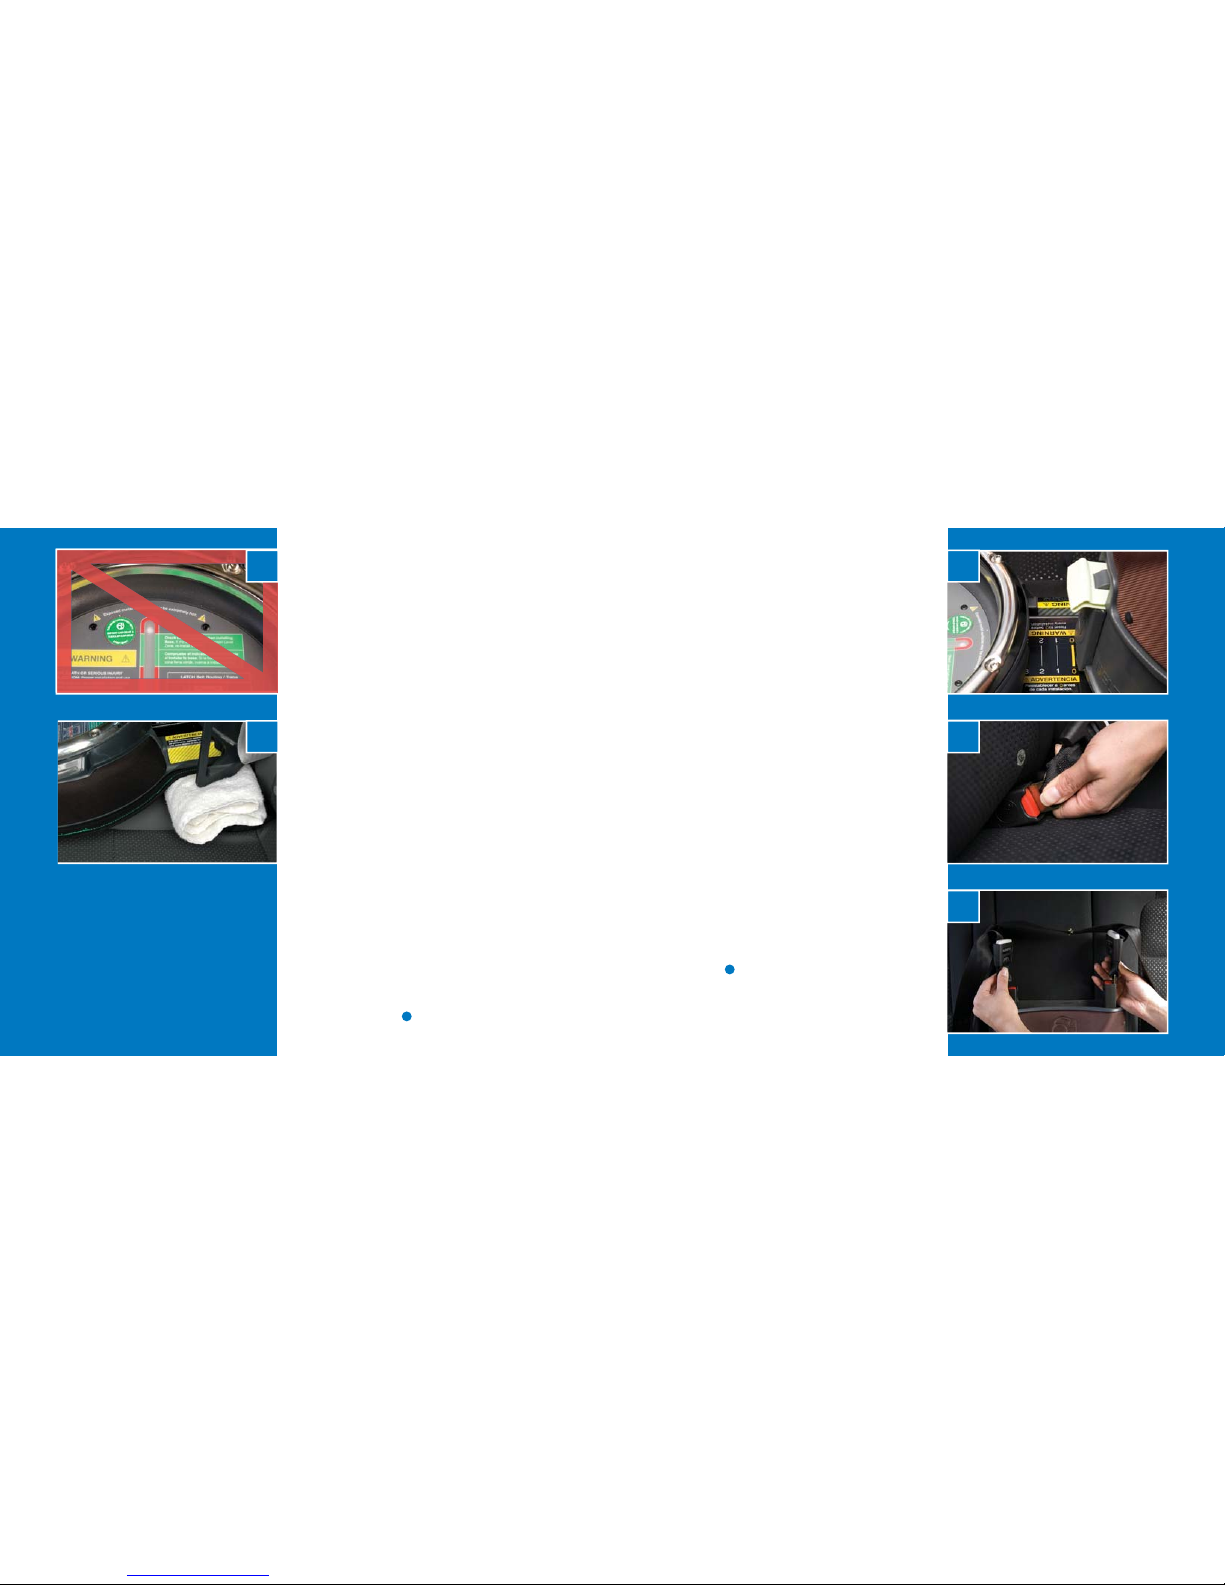
11. If the ball is not in the green zone
(Photo A), remove the Base and reinstall it by repeating Steps 2 - 10. If
the Base cannot be secured tightly with
the ball in the green zone, try any of the
following:
a) Remove the Base. Position a rolled
towel under the Base, making sure the
front of the Base contacts the vehicle
seat (Photo B), and repeat Steps 2 to
10. The towel should be compressed
as the StrongArm tightens the Base
into place.
c) Try installing the Base in a different
seating position.
d) Contact your vehicle dealer for
assistance and possible vehicle seat
belt modi cation parts.
e) Seek assistance from one of the
resources in the “Need Help Securing
Your Orbit Seat and Base?” section
(page 27).
Removing the Base
To un-install the Orbit Base and remove it
from your vehicle:
1. Turn the StrongArm Knob
counterclockwise and reset the Base
StrongArm to zero (Photo C).
2. If the Base is secured with LATCH,
push the red button on each LATCH
Connector and pull it from the LATCH
Anchor (Photo D). Open the Lock-Off
Clamp to release the LATCH Belt and
store the LATCH Connectors as shown
(Photo E).
If the Base is secured with a vehicle
seat belt, open the Lock-Off Clamp,
unbuckle the vehicle seat belt and
guide it through the Belt Guides.
3. Using both hands to support the weight
of the Base, remove it carefully from the
vehicle.
Installing the Base: With Vehicle
Seat Belts cont’d
Installing Your Orbit Base
Installing the Orbit Base
A
B
C
D
E
Page 22

42
42
Maintaining Your Orbit Base
43
Maintaining Your Orbit Base
43
Cleaning 43
Limited Customer Warranty 44
Metal and Plastic Parts
Metal and plastic parts on the Orbit Base may be wiped clean with a mild
soap and water solution. Do not use household detergents, such as bleach or
abrasive agents. These detergents can weaken plastic parts.
LATCH Strap and Connectors
The LATCH Strap and Connectors may be spot cleaned.
SmartHub, Rotational Check Mechanism, & Hub Locks
Keep the Base’s SmartHub and Rotational Check Mechanisms clean and free
of foreign material. As well, keep the Hub Locks on the Orbit carseat clean and
free of foreign material in order for the Orbit carseat to lock properly. Do not allow any liquids to enter these areas.
Cleaning
Maintaining Your Orbit Base
Page 23

44
44
Maintaining Your Orbit Base
45
Maintaining Your Orbit Base
45
Limitation of Remedies under Limited Warranty:
Your remedies under this limited warranty are limited to repair or replacement of the
product or components of the product. In no event will Orbit Baby or any of its retailers,
dealers, distributors or resellers be liable for incidental, indirect or consequential damages
relating to the product (including any repaired or replacement product or component) or
its use. Some states do not allow the exclusion or limitation of incidental or consequential
damages, so the above limitation and exclusion may not apply to you.
How State law applies:
This limited warranty gives you speci c legal rights, and you may have other rights which
vary from State to State.
What you must do to get service under this limited warranty:
To make a claim under this limited warranty you must rst contact Orbit Baby. You can
email [email protected], write to Orbit Baby, 8445 Central Ave., Newark, CA 94560,
or call 1-877-ORB-BABY. You must provide proof of purchase in the form of your original
sales receipt in order to obtain service under this limited warranty.
2-year Limited Customer Warranty
What this limited warranty covers and for how long:
Orbit Baby, Inc. (“Orbit Baby”) warrants that the product accompanied by this limited
warranty is free from manufacturing defects in material or workmanship for a period
of two (2) years from the date of original purchase. This warranty only applies to the
original purchaser of the product. The limited warranty period also applies to any implied
warranties that may exist under applicable law. Some States do not allow limitations on
how long an implied warranty lasts, so the above limitation may not apply to you.
What this Limited Warranty does not cover:
This limited warranty does not apply to: (1) defects resulting from repair (except by
Orbit Baby or its authorized service representatives) or alteration of the product, (2)
defects resulting from use with covers, inserts, accessories, tightening devices, or other
components not supplied by or expressly approved in writing by Orbit Baby, and (3)
defects resulting from misuse, including any use not in accordance with the product
instructions, abuse, accident, neglect, improper maintenance or handling, or normal wear
and tear.
What Orbit Baby will do:
If you believe the product is defective please return it to Orbit Baby in the manner
described below within the limited warranty period. If Orbit Baby determines a defect is
covered by this limited warranty, Orbit Baby will, at its option, repair or replace the product
or components of the product. This limited warranty extends to repaired and replacement
products and components only through the end of the original limited warranty period.
Page 24

46
46
Notes
Notes
Page 25

There are three ways to contact Orbit Baby Customer Service with questions or
comments, or to order replacement parts:
1. by internet: www.orbitbaby.com/support
3. by phone: 1-877-ORB-BABY (1-877-672-2229)
When you contact us, please have your product’s model number, serial number,
and date of manufacture ready. These numbers can be found on the Product
Information Label (See page 8).
Customer Service & Replacement Parts
If your Orbit Base was involved in a vehicle collision, please contact Orbit Baby
customer service or go to www.orbitbaby.com/support to nd out if the prod-
ucts qualify under our After-Impact Exchange program.
After-Impact Exchange
ORB300191 | Rev 5.1 | 2009JUL
U.S.Pat.Nos. 7,338,122. Other U.S. Patents Pending.
European Patent Application No. 05751808.6.
© 2009 Orbit Baby, Inc.
Please keep this instruction manual for future use.
 Loading...