

Page 1
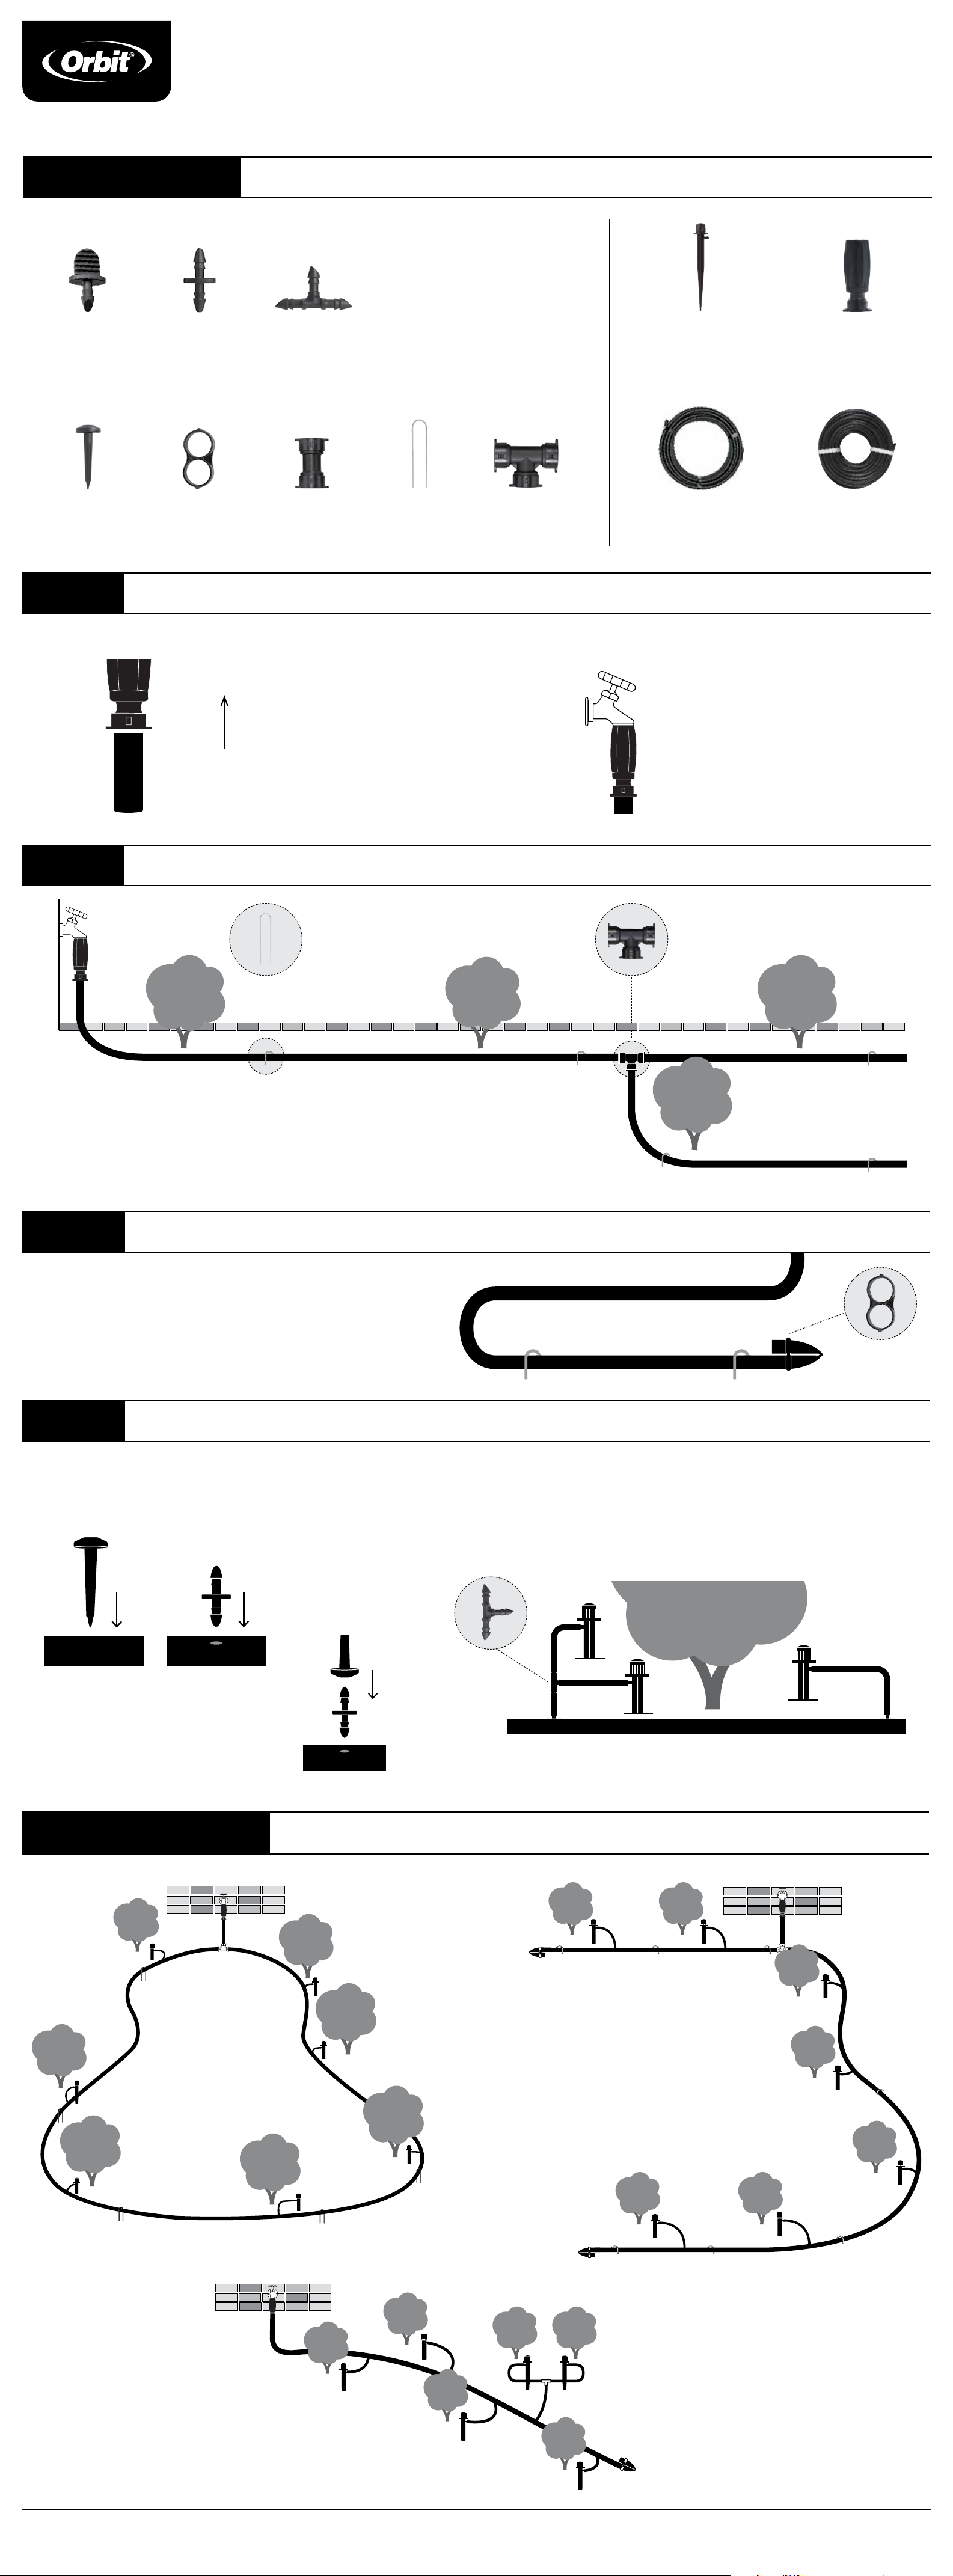
This kit contains:
¼" FIT TINGS
HOSE END WATERING FLOWERBED AND SHRUB KIT
INSTRUCTION MANUAL
(10) (10) (2)
End Plug
½" FITTINGS AND ACCESSORIES
Punch Tool
Step 1
Attach ½" tubing to the pressure reducing tubing adapter. Attach pressure reducer assembly to hose or hose faucet.
Coupling
Figure 8
End
ATTACH TO HOSE FAUCET
Tee
(1)(1) (2) (10)
Coupling Tubing Stake Tee
(1)
Adjustable Bubblers
(8) (1)
on Spike
(1) (1)
Pressure Reducing
Tubing Adapter
(50') ¼" Tubing(50') ½" Tubing
Push tubing firmly into the
fitting, ensuring the metal
teeth (inside the fitting) are
fully grasping the tubing.
Step 2
∙ Uncoil ½" tubing, running it next to your
trees and shrubs.
Tip: Lay the tubing in the sun prior to
installation to help it uncoil.
∙ Cut tubing when you reach the last plant.
∙ Use the ½" tubing stakes to hold
tubing in place.
LAYOUT TUBING
∙ Use the included ½" tee if you need to
branch tubing in two directions.
∙ Use the included ½" coupling if you need
to connect two pieces of ½" tubing.
Step 3
∙ Turn on water to flush debris from the tubing.
∙ Use the ½" Figure 8 End Fitting to end the ½" tubing line.
Step 4
∙ With the punch tool punch a small hole in one side of ½" tubing.
∙ Press a ¼" coupling into the hole created by the punch tool until
connection is tight and secure.
FLUSH TUBING AND ATTACH END FITTING
ATTACH SPRINKLERS
∙ Attach ¼" tubing to the end of the coupling and run the tubing to your
tree or shrub and cut.
∙ Attach the barbed end of the adjustable bubbler to the end of the ¼"
tubing and place spike next to the plant.
∙ Adjust water flow by turning the bubbler head
∙ Use ¼" End Plug to plug a hole in ½" tubing or to end a ¼" tubing line.
Note: The punch tool handle can be used
to insert a coupling into the distribution
tubing. Place the coupling in the hole on
the blunt end of the tool, and push the
exposed end into the distribution tubing.
LAYOUT EXAMPLES
Note: Insert a ¼" tee to use multiple sprinklers in
one area. Use of multiple sprinklers is ideal for trees
and plants that need additional watering.
For more information, please visit
our website www.orbitonline.com
or call us at 1-800-488-6156
For cold water outdoor irrigation use only.
Keep from freezing.
PN 56315-24 rA
Page 2
MANUAL DE INSTRUCCIONES DEL KIT DE
RIEGO DE ARBUSTOS Y CANTEROS DESDE
EL EXTREMO DE LA MANGUERA
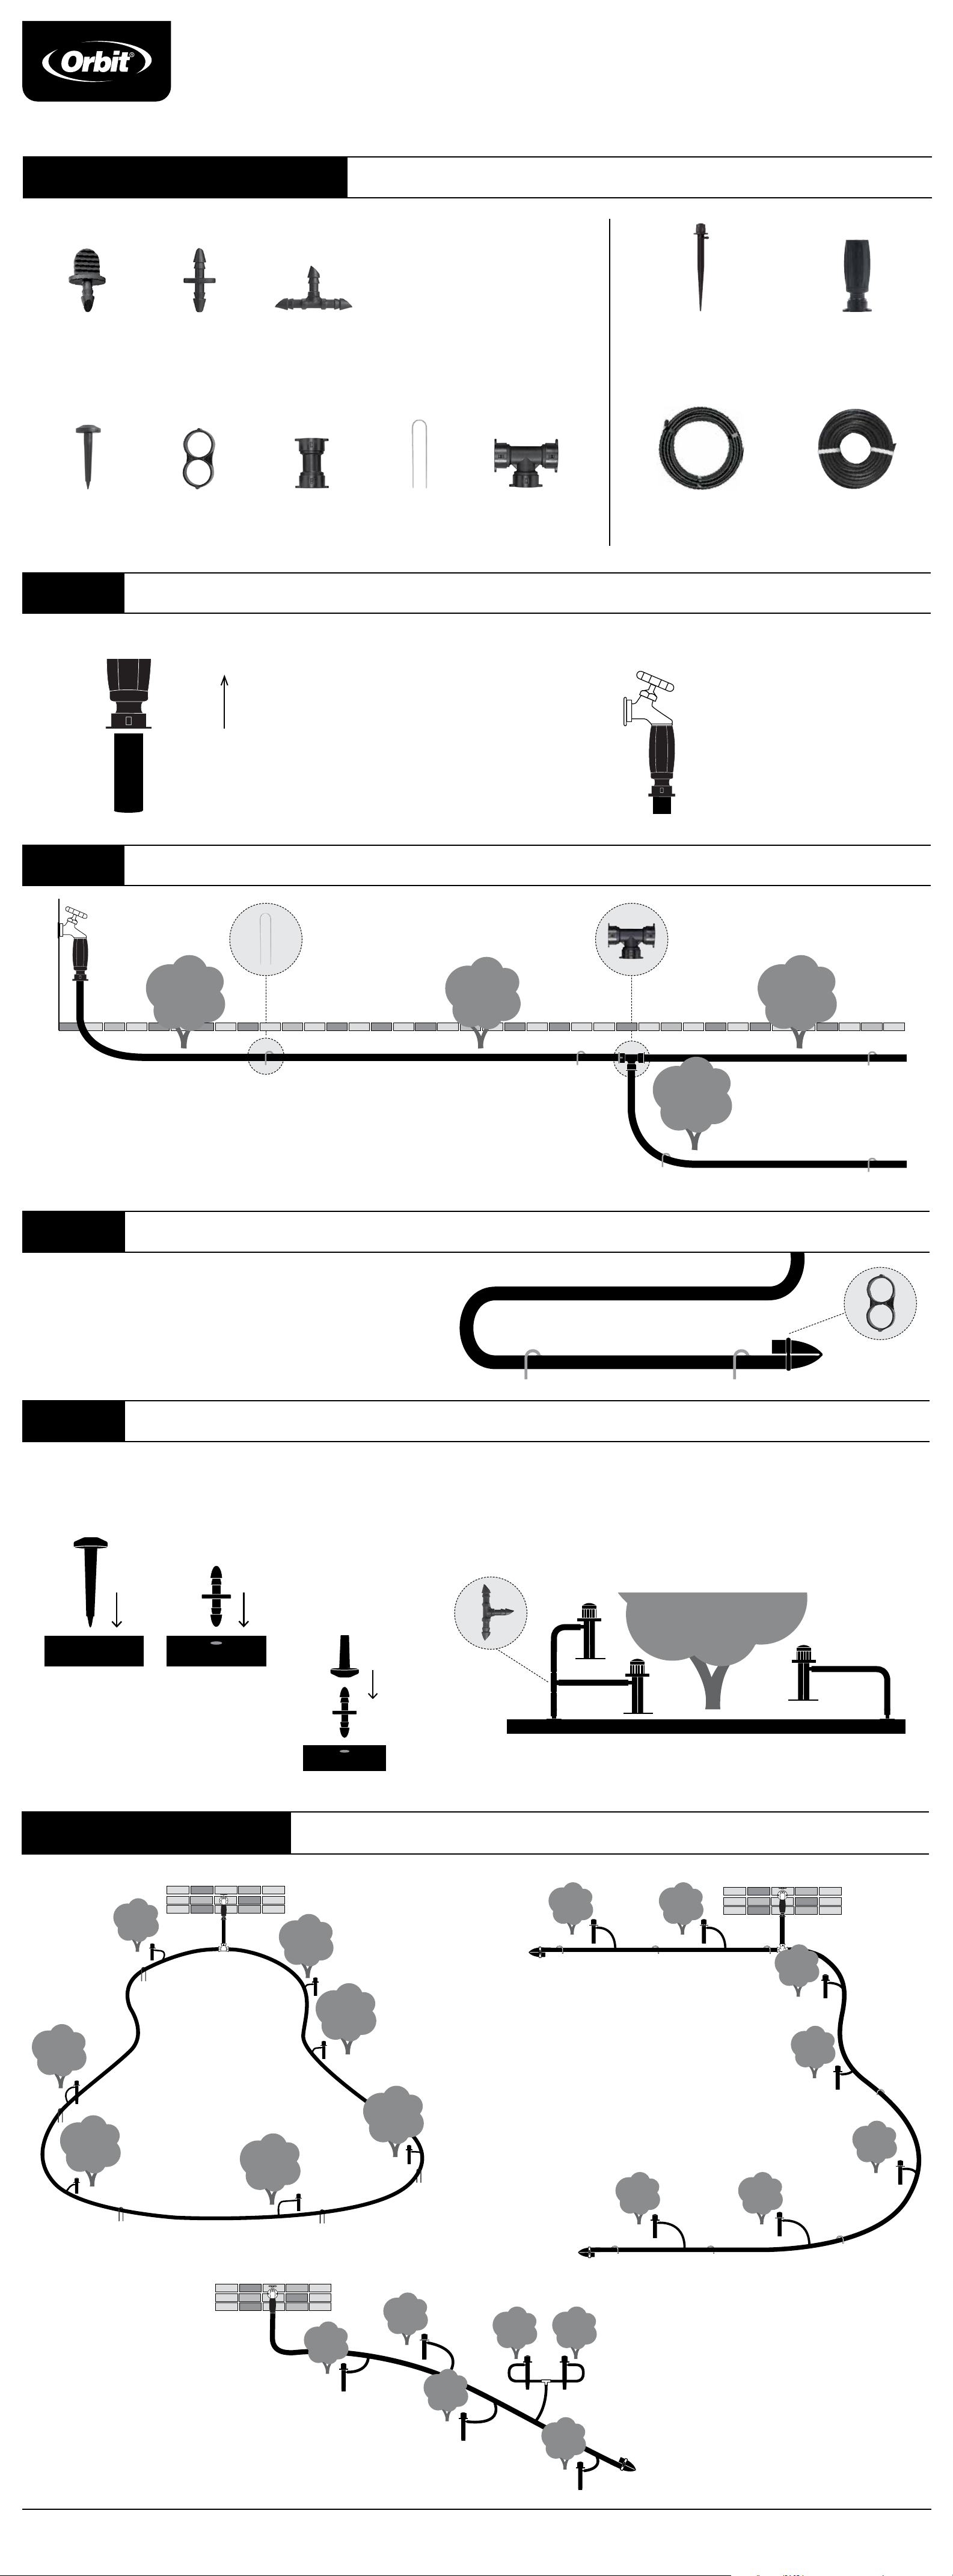
Este kit contiene lo siguiente:
CONECTORES DE ¼"
(10) (10) (2)
Tapones
terminales
CONECTORES Y ACCESORIOS DE ½"
Perforador
Paso 1
Fijar la tubería de ½" al adaptador de tubería para reducción de presión. Fije el conjunto del reductor de presión a la manguera o al grifo para manguera.
Acoplamientos
Conectores de
extremos en
forma de 8
FIJACIÓN DE LA TUBERÍA AL GRIFO PARA MANGUERA
Conectores
en T
(1)(1) (2) (10)
Acoplamiento Estacas de
tubería
regulables en estaca
(1)
Conector
en T
(8) (1)
Burbujeadores
(1) (1)
Tuberías de ½"
(50')
Adaptador de tubería para
reducción de presión
Tuberías de ¼"
(50')
Presione la tubería firmemente
para que encaje en el acoplamiento,
mientras verifica que los dientes
metálicos (dentro del acoplamiento)
sujeten la tubería por completo.
Paso 2
∙ Desenrolle la tubería de ½", mientras la
acomoda junto a los árboles y arbustos.
Consejo: Deje la tubería al sol antes de la
instalación para que sea más fácil desenrollarla.
∙ Corte la tubería cuando llegue a la última planta.
∙ Use las estacas para tubería de ½" para
sostener la tubería en su lugar.
DISTRIBUCIÓN DE LA TUBERÍA
∙ Use el conector en T de ½" incluido si
necesita bifurcar la tubería de ½"
en dos direcciones.
∙ Use el acoplamiento de ½" incluido
si necesita conectar dos piezas de
tubería de ½".
Paso 3
∙ Abra el suministro de agua para eliminar los desechos de la tubería.
∙ Use el conector de extremos en forma de 8 de ½" para cerrar
la línea de tuberías de ½".
Paso 4
∙ Haga un pequeño agujero con el perforador en un lado de la tubería de ½".
∙ Presione el acoplamiento de ¼" para que encaje en el agujero creado por el
perforador, hasta que la conexión quede fija y ajustada.
ENJUAGUE DE LA TUBERÍA Y FIJACIÓN DE LOS CONECTORES DE LOS EXTREMOS
FIJACIÓN DE LOS ASPERSORES
∙ Fije la tubería de ¼" al extremo del acoplamiento, lleve la tubería al árbol o
arbusto y córtela.
∙ Fije el extremo dentado del burbujeador regulable al extremo de la tubería
de ¼" y coloque la estaca junto a la planta.
∙ Gire el cabezal del burbujeador para regular el flujo de agua.
∙ Use un tapón terminal de ¼”para tapar un agujero en una tubería de ½"
o para cerrar una línea de tubería de ¼".
Nota: El mango del perforador se puede
usar para insertar un acoplamiento en
la tubería de distribución. Coloque el
acoplador en el agujero en el extremo
romo del perforador y presione el extremo
expuesto en la tubería de distribución.
EJEMPLOS DE DISEÑO
Nota: Inserte un conector en T de ¼" para utilizar varios burbujeadores
en un área. El uso de varios burbujeadores es ideal para los árboles y las
plantas que necesitan riego adicional.
For more information, please visit
our website www.orbitonline.com
or call us at 1-800-488-6156
Solo para uso de irrigación en exteriores con agua fría.
Evite el Congelamiento.
PN 56315-24 rA
 Loading...