

Page 1
Do not connect to power
source until after wiring
valves to timer
TIMER
QUICK START
GUIDE
RESET
PROGRAM
RAIN DELAY
AUTO
OFF
SET
CLOCK
SET
DATE
BUDGET
HOW
OFTEN
RUN
TIME
START
TIME
PN 96894-50 rA
p 801 295 9820
f 801 951 5815
www.fluid-studio.net
1065 South 500 West
Bountiful, Utah 84010
proof no: 1
date: 05.19.10
des: SM spck: XX
job no: NA
client: Orbit
sku: 96894
upc: NA
file name: 96894-50 rA.indd
software: InDesign CS3
colors
additional instructions:
· Font sizes cannot be smaller than 7 pt.
· Accordian Fold
fold color
non printing
PMS
????
PMS
????
color
non printing
PMS
????
Registration
K
Printers are responsible for
meeting print production
requirements. Any changes
must be approved by the
client and Fluid Studio.
printed piece must meet
designated specifications
on this form.
dimensions:
flat: w: 16" h: 14"
finished: w 16" d: " h 14"
© 2007 Fluid Studio. This
work is the property of Fluid
Studio, and cannot be used,
reproduced or distributed
in any way without their
express permission.
Or
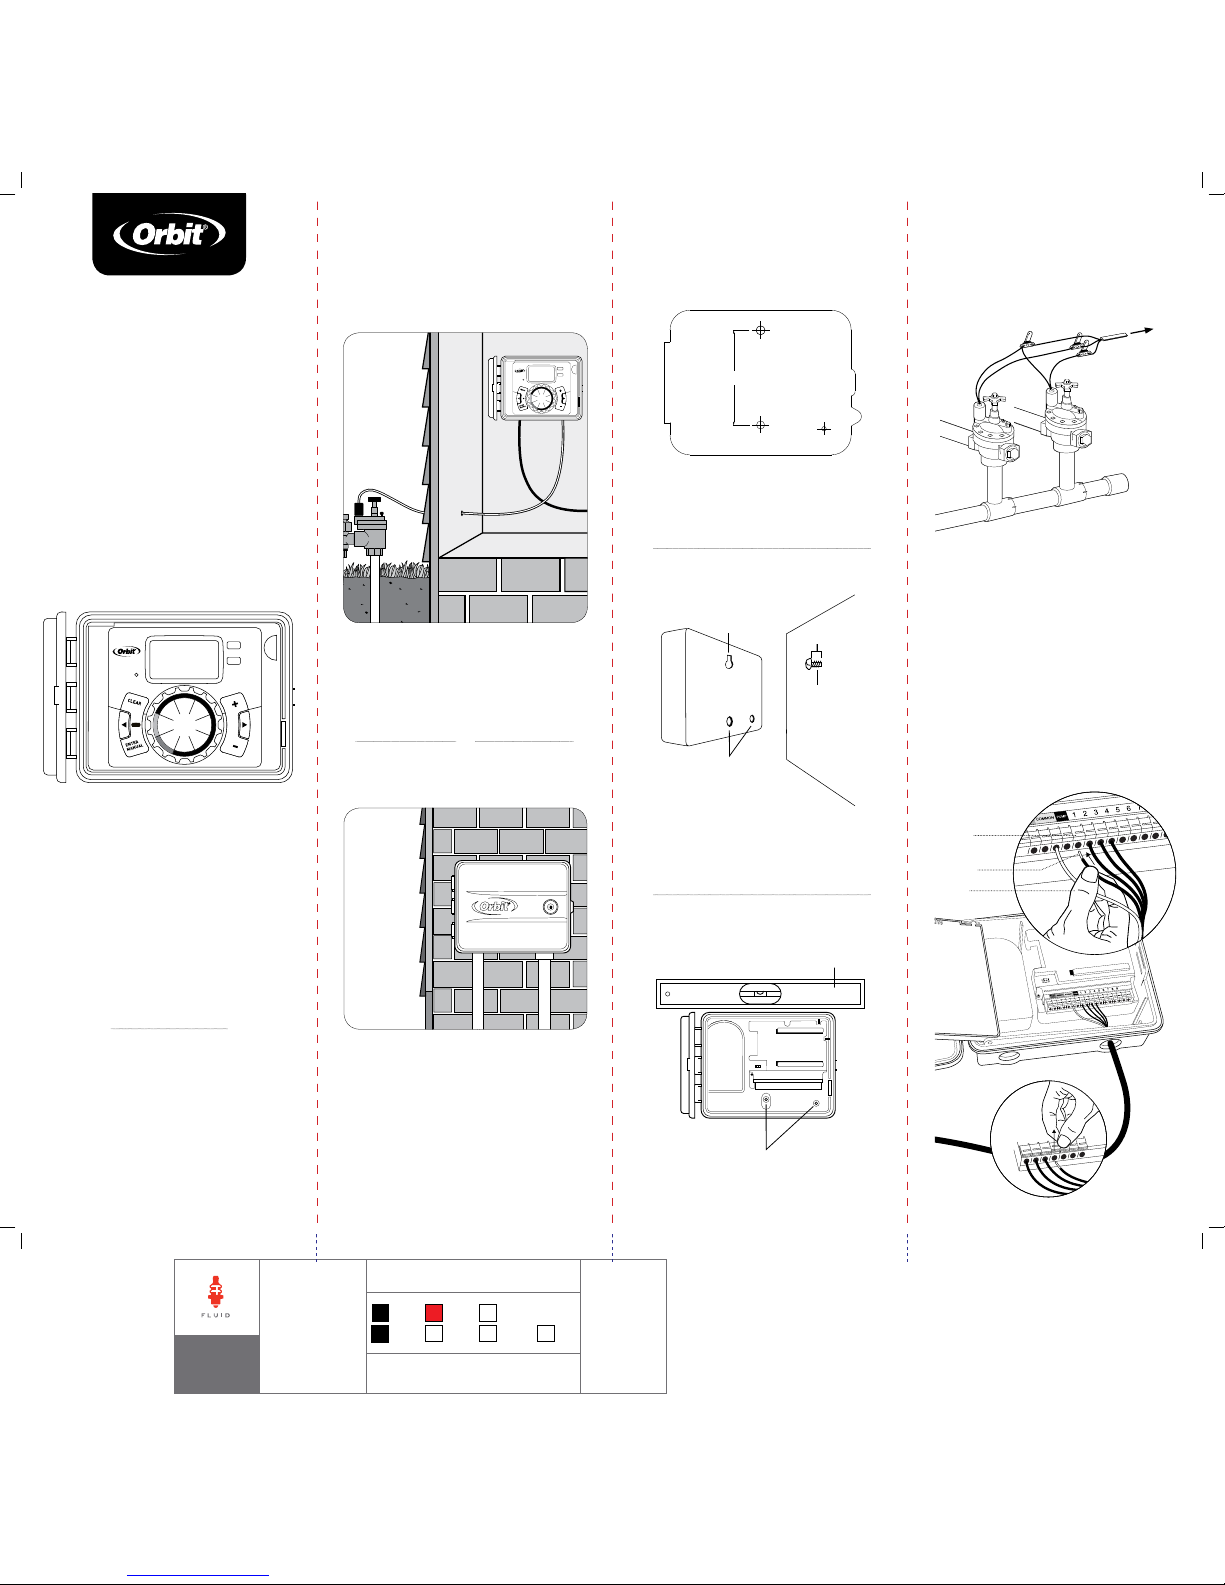
1. SELECT LOCATION
.
.
.
.
.
.
.
.
.
.
.
.
.
.
.
.
.
AUTO
OFF
SET
CLOCK
SET
DAY
BUDGET
HOW
OFTEN
RUN
TIME
START
TIME
.
For detailed instructions on outdoor wiring, see manual page 8
Warning: Check state and local codes. Orbit recommends using a
licensed electrical contractor for outdoor wiring of timer.
Indoor
Outdoor
Clean, dry, and out of direct sunlight
Allow 23 cm clearance for the swing door
4. CONNECT VALVE WIRE
TO TERMINAL
Station 1
Push tab
upward to
release wire
Strip wire
Push in
Only connect one valve to
each terminal (station)
Keyhole
Pre-formed
mounting holes
No. 8 Screw
Wall
3 mm
2. MOUNT TIMER
Level
Screw through one of the
pre-formed mounting holes.
MOUNTING TEMPLATE
GABARIT D`INSTALLATION
GUIA DE COLGAR
4.17”
(106mm)
Use included mounting template to
mark screw locations.
Hang timer on screw using keyhole.
To
Timer
Wire Nut
Solenoid
Common Wire
Valve
Connect one of the two wires from each valve to the
common wire leading to the timer (usually white).
Connect the other wire from each valve to one of the
colored wires leading to the timer.
3. CONNECT SPRINKLER
VALVES TO TIMER WIRES
REQUIRED TOOLS:
Phillips Screwdriver
Wire Strippers
Page 2
A
F
G
H
B
C
D
E
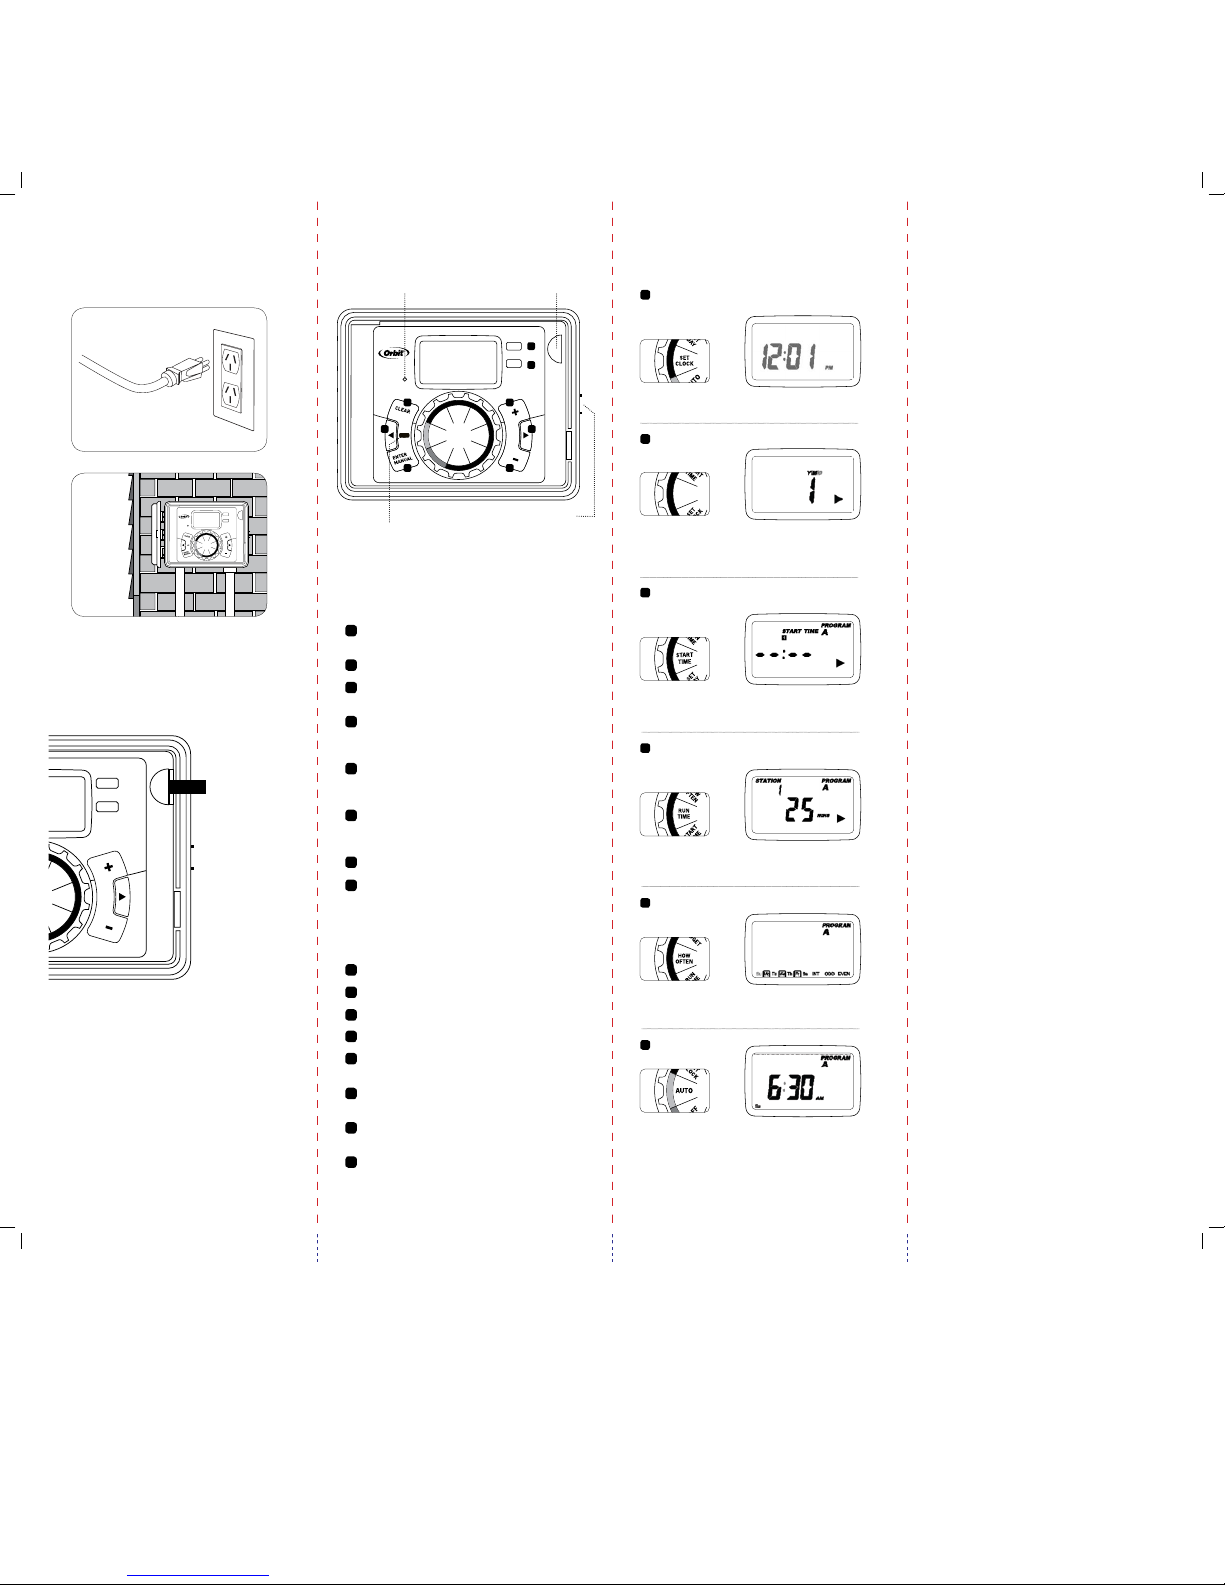
ENTER - To confirm a new setting
MANUAL - To water manually
CLEAR - To clear a setting
PROGRAM - to switch between
programs - A, B, and C
ARROW [ ] - To skip to the next
setting / watering station or move to
other programs/settings
ARROW [ ] - To go back to the
previous setting / watering station or
move to other programs/settings
RAIN DELAY - To pause operation
for 24-72 hours due to rain or other
factors
[+] - To increase a numeric setting
[-] - To decrease a numeric setting
Button Function:
I
N
O
P
J
K
L
M
AUTO - Watering mode
SET CLOCK - Set calendar and clock time
SET DATE - Year, Month, and Day
START TIME - Set time to begin watering
RUN TIME - Set watering duration for
each station
HOW OFTEN - Set frequency of
watering days
BUDGET - Adjust overall watering as
a percentage
OFF - Turn all stations off
Dial Position Function:
RESET
PROGRAM
RAIN DELAY
AUTO
OFF
SET
CLOCK
SET
DATE
BUDGET
HOW
OFTEN
RUN
TIME
START
TIME
A
B
C
F
D
E
G
H
Reset
Indicator
Swing
Out Panel
Release
5. CONNECT TO
ELECTRICAL POWER
Indoor
.
PROGRAM
RAIN DELAY
AUTO
OFF
SET
CLOCK
SET
DAY
BUDGET
HOW
OFTEN
RUN
TIME
START
TIME
Outdoor
Warning: See manual for outdoor wiring instructions
Turn dial to set date enter current date (+/-)
(enter or arrows will advance)
7. PROGRAM TIMER
Set Current Time
(e.g. pacific,
mountain standard)
A
Turn dial to set clock enter current time (+/-)
Set Date
B
SET
DATE
C
Set Start Time
Time to begin
watering
Turn dial to start time to enter the time to
begin watering (+/-)
D
Select Watering Duration
Set for each station
then press enter
Turn dial to run time enter the watering duration (+/- ) for
each station (enter or arrow to move between stations)
E
Set Watering Days
or Interval
Turn dial to how often to select watering days
(arrows to move and enter to select)
Set Auto Mode
F
Turn dial to auto—you have programmed your timer!
(See page 9 of manual for detailed instructions on programming.)
6. ACTIVATE BATTERY
PROGRAM
RAIN DELAY
HOW
OFTEN
RUN
TIME
START
TIME
Remove plastic
strip to activate
battery
One Lithium CR2032 battery (included) is
required to retain the program in memory
during power loss. Annual replacement is
recommended.
Remove the plastic strip to activate the
pre-installed battery.
Battery
HELP
1-800-488-6156 or 1-801-299-5555
www.orbitonline.com
Before returning this sprinkler timer
to the store, contact Orbit
®
Technical
Service at: 1-800-488-6156,
1-801-299-5555
 Loading...