

Page 1

NOTICE: This .pdf file should not
be used as the source to create
final, printed pieces of the file it
represents. Rather, it is a low
resolution visual reference only
containing relevant information
regarding the file (e.g., color, text
and image placement, etc.)
Page 2

ST2-RF SPRINKLER TIMER MANUAL
RF SYNC
ACTIVE BYPASS
N
O
W
A
T
E
R
I
N
G
D
A
Y
/
P
E
R
I
O
D
PN 57926-24 Rev A
MODELS:
57926, 57922,
57916, 57912,
91916, 91912, 91926, 91922,
94916, 94912, 94926, 94922
p 801 295 9820
f 801 951 5815
www.fluid-studio.net
1065 South 500 West
Bountiful, Utah 84010
proof no: 8
date: 02.16.07
des: MZ spck: MZ
job no: 07WTM002598
client: ORBIT
sku: 57926
upc: NA
file name: 07WTM002598
57926-24 rA.indd
software: InDesign CS2
colors
additional instructions:
·
color
non printing
PMS
280
PMS
????
color
non printing
PMS
????
Registration
BLACK
Printers are
responsible for
meeting print
production
requirements.
Any changes
must be approved
by the client and
Fluid Studio.
Printed piece
must meet
designated
specifications
on this form.
dimensions:
flat: w: 13.76" h: 5.7"
finished: w 6.88" d: 0" h 5.7"
07WTM002598 57926-24 rA.indd 1 2/16/07 2:07:18 PM
Page 3

2
Table of Contents
ENGLISH
• Introduction . . . . . . . . . . . . . . . . . . . . . . . . . . . . . . . . . . . . .2
• Getting Started . . . . . . . . . . . . . . . . . . . . . . . . . . . . . . . . . . .4
• Programing Your Timer . . . . . . . . . . . . . . . . . . . . . . . . . . . . .6
• Using the Remote Control Device . . . . . . . . . . . . . . . . . . . .11
• Using the Optional Rain-Freeze Sensor . . . . . . . . . . . . . . . .12
• Installing Indoor Mount Sprinkler Timer
and Remote Control Device Sleeve . . . . . . . . . . . . . . . . . . . 12
• Diagnostics Circuit Breaker . . . . . . . . . . . . . . . . . . . . . . . . .15
• Glossary of Terms. . . . . . . . . . . . . . . . . . . . . . . . . . . . . . . . 16
• Trouble Shooting . . . . . . . . . . . . . . . . . . . . . . . . . . . . . . . . 18
Section 1: Introduction
Thank you for selecting an Orbit® Signature Control timer,
the most advanced and versatile controller available. Orbit®
designers have combined the latest technological features with
an intuitive display to create a controller that fits every watering
need.
Please read this manual completely before you begin
programming and using the controller.
Important Features and Capabilities
PC Programmable
Visit www.orbitonline.com to download software which will
allow you to program and monitor your timer from your home
computer.
Dual Programs
The timer offers two programs – Program A and Program B – for
watering flexibility. Any of the watering stations can be assigned
to either program. For example, stations that water your garden
and flower beds could be assigned to Program A and watered
daily starting at 8 a.m., while stations that water your lawn could
be assigned to Program B and watered every third day starting at
5 a.m.
Six Cycle Start Times Per Program
The timer accommodates six different start times for each of the
two programs (A and B). Most timers only allow four different
cycle start times.
07WTM002598 57926-24 rA.indd 2 2/16/07 2:07:18 PM
Page 4

3
ENGLISH
No-Watering Days and Times
It’s easy to prevent watering on one or more days of the week
or during specific periods of the day. This comes in handy if
watering restrictions are imposed in your area.
Docking Port
This timer has been designed for convenience and “armchair”
programming. The timer’s docking port is mounted on a wall
and all wires are connected to it. The main timer unit can be
easily and quickly slid on and off the docking port, allowing
you to take the timer virtually anywhere to create or change
watering programs.
Remote Control Capabilities (Not included on all models)
This timer can be controlled by the included remote control
device via a radio frequency (RF) receiver and antennae, both
of which are built into the timer. The remote control device
allows you to turn stations on and off on the spot and to
perform programming tasks from anywhere within range. The
433 megahertz remote frequency is approved for use in the
United States, Canada, Europe and Australia, and permits an
effective line-of-sight range of 300 feet (reduced to 200 feet
with obstructions).
Programming Information Stored Safely
in Non-Volatile Memory
All programming information for Program A and Program
B is stored indefinitely in the timer’s non-volatile memory
(EEPROM) and internal memory. This high-end feature means
your programming won’t be lost or erased if the power and
batteries go out.
Easy-to-Read Back-Lit LCD Display
The timer’s back-lit blue LCD display screen is easy to read
under any lighting conditions.
Choice of Five Languages
You can easily set the LCD display to read in any of five
languages: English, Spanish, French, German or Italian.
Water Budgeting
This convenient feature provides a quick, easy way to increase
or decrease the watering durations of all stations in both
programs to match seasonal watering needs. You won’t have to
adjust each station’s watering time individually.
Rain Sensor (Optional)
An optional rain sensor can be purchased separately to prevent
programmed watering for a period of time after rain falls
(determined by the amount of rain and how quickly the
sensors dry out). If your unit is RF capable then you can use a
wireless sensor. Otherwise a hard-wired sensor can be used.
Commonly Used Controls
Digital Display with Text Messaging
A large LCD (Liquid Crystal Display) shows the time of day and
indicates many of the programming settings. Interactive text
messaging simplifies programming and current sprinkler timer
status. (See Figure 1)
07WTM002598 57926-24 rA.indd 3 2/16/07 2:07:18 PM
Page 5

4
Programming Buttons
These nine buttons are used for programming and other
operations:
A RF Sync (only on remote control model)
Allows the timer to synchronize with a new remote or wire
less sensor.
b Rain Delay
Push this button once while in AUTO to access the rain
delay option. NOTE: Pressing this button will access the
Language and No Watering Period options while in those
respective dial positions.
c Reset (pin hole)
Resets the timer to its factory settings.
d Increase
e Decrease
f Enter
g Next
h Clear
i Manual
Selection Dial
This dial is used for programming, reviewing and operating the
sprinkler timer.
Rain Sensor Bypass Switch
In Active position the controller will monitor the rain sensor, in
Bypass position the controller will ignore the rain sensor. (This
switch is for hard wired sensors only and does not effect wireless
rain sensors - sensors sold separately).
About This Manual
We have added the following features to this manual to assist
you:
• BLUE TEXT relates to the buttons used for programming.
• BLUE UNDERLINED TEXT relates to stop positions for the
selection dial.
• A glossary of the most common terms is included.
(see page 16)
Section 2: Getting Started
You can program this sprinkler timer in just a few basic steps.
Before you begin programming, it is important to:
• Activate the batteries
• Reset the sprinkler timer
• Select the preferred language
• Set the time of day and date
• Determine a watering plan
RF SYNC
ACTIVE BYPASS
N
O
W
A
T
E
R
I
N
G
D
A
Y
/
P
E
R
I
O
D
Figure 1: Front view of timer
d
e
f
g
h
i
07WTM002598 57926-24 rA.indd 4 2/16/07 2:07:19 PM
Page 6

5
ENGLISH
Activating the Batteries
• Slide the docking port off the timer unit to gain access to the
battery compartment door.
• Slide the door off the battery compartment in the direction
of the arrow.
• Remove the black strip from the battery compartment.
• Replace the battery compartment door.
• Slide the docking port back onto the main controller unit.
The display will show “LOW BATTERY” when it is time to
replace the batteries.
NOTE: Batteries alone will not operate the valves in your sprinkling
system. The transformer must be plugged in and have power to operate your system normally.
Reset the Timer
If this is the first time the sprinkler timer has been programmed, you should press the small recessed button labeled
RESET (located under the RAIN DELAY button). You will prob-
ably need a pen, pencil or similarly small object to push it.
Do not press the RESET button again unless you want to completely remove all your programming, including time and date.
If no programming occurs after the RESET button has been
pressed and the dial is left in the AUTO position the timer will
assume a default program mode. In default mode, the timer will
automatically water each station for 10 minutes, beginning at 5
a.m. each day.
Select the Preferred Language
• Turn the selection dial to BUDGETING/LANGUAGE.
• Press the RAIN DELAY button.
• Press the NEXT button until the desired language is
shown in the display.
• Exit the language selection mode by turning the selection dial
or pressing the RAIN DELAY button.
Set the Time of Day and Date
If this is the first time the timer has been programmed, press
the small recessed RESET button.
• Turn the selection dial to TIME/DATE.
• The top line of the display reads “SET TIME.” Set the current
time by pressing either the or button.
NOTE: To move faster through the time or other selections, hold the
or buttons down, rather than merely pressing and releasing.
• Press the ENTER button. The display now reads “SET
YEAR.” Set the current year by pressing either the
or button.
07WTM002598 57926-24 rA.indd 5 2/16/07 2:07:19 PM
Page 7

6
• Press the ENTER button. The display now reads “SET
MONTH.” Set the current month by pressing either the
or button.
• Press the ENTER button. The display now reads “SET
DATE.” Set the current day of the month by pressing either
the or button.
• Exit the set time and date mode at any time by turning the
selection dial.
Determine a Watering Plan
See page 20 for instructions.
Section 3: Programming Your Timer
Set Start Times
IMPORTANT: Multiple start times in Program A will repeat the watering program. Generally, only one cycle start time is required for each
program (A and B) Start times do not correspond to individual stations.
• Turn the selection dial to START TIMES for the program you
wish to set (A or B).
• Set Start Time 1 using the and buttons.
• If you wish to set additional start times (up to six) for the same
program, press the NEXT button or ENTER button.
• To remove a start time press CLEAR .
• Exit the set start time mode by turning the selection dial.
Set Station Watering Durations
• Turn the selection dial to DURATION for the program you
wish to set (A or B).
• Set the desired duration (0 - 120 minutes) for the station
displayed. Press NEXT or ENTER to advance to
the next station. Press CLEAR to remove a duration.
IMPORTANT: Each station can have two durations. For example:
Station 1 can have a duration of 5 minutes in Program A and a
duration of 25 minutes in Program B. Typically a station has only
one duration in either Program A of B. A station with a setting of 0
minutes will not water with that Program.
• If two programs are needed repeat these steps for the other
program.
• Exit the set watering durations mode by turning the
selection dial.
N
O
W
A
T
E
R
I
N
G
D
A
Y
/
P
E
R
I
O
D
Figure 2: Program A and Program B Dial Settings
C
C
07WTM002598 57926-24 rA.indd 6 2/16/07 2:07:20 PM
Page 8

7
ENGLISH
Set Watering Days
• Turn the selection dial to WATERING DAYS for the program
you wish to set (A or B).
Set to Water - Days of the Week:
• Press the NEXT button to move through the days of
the week. The selected day will flash.Press ENTER and
a water drop appears above that day of the week. The pro gram is now set to water on that day. The program can be set
to water any combination of days (ex. Mo, We, Fr).
• To deactivate watering for a particular day, press the
CLEAR button. The water drop will disappear.
Set to Water - Odd Days:
• Press the NEXT button until “ODD” flashes.
• Press the ENTER button. A water drop will appear
above “ODD.”
• You can deactivate the “ODD” mode by pressing the
CLEAR button or by selecting another watering day
mode. The water drop will disappear.
Set to Water - Even Days:
• Press the NEXT button until “EVEN” flashes.
• Press the ENTER button. A water drop will appear
above “EVEN.”
• You can deactivate the “EVEN” mode by pressing the
CLEAR button or by selecting another watering day
mode. The water drop will disappear.
Set to Water - Interval
• Press the NEXT button until “INT” (interval) flashes.
• Press the or buttons to select the desired interval
(select between every 1 day and every 32 days). An interval
of “2” means it will water every other day.
• You can deactivate the “INTERVAL” mode by pressing the
CLEAR button or by selecting another watering day
mode. The water drop will disappear.
Set the Timer to Automatically
Run Your Programs:
• Turn the selection dial to AUTO. The timer will be controlled
automatically by the programming parameters that have been
set.
To Turn All Watering Off:
• Turn the selection dial to OFF. This prevents the timer from
turning any watering station on at any time, regardless of
programming.
To Prevent Watering on a Particular Day:
There may be one or more days of the week when you never
want to have the water turn on, regardless of what the program
C
C
C
C
07WTM002598 57926-24 rA.indd 7 2/16/07 2:07:20 PM
Page 9

8
says. (For example, in some water districts, watering is
prohibited on certain days.) To cancel programmed watering on
specific days of the week, follow these steps:
• Turn the selection dial to NO WATERING DAY/PERIOD. On
the display, you will see the seven days of the week with a
water drop above each day. The water drop means watering
is allowed on that particular day.
• Press the NEXT button to select the day of the week
you don’t want to water. (The day will flash.)
• Press the CLEAR button. The water drop above that day
will disappear and the “ON” on the bottom right of the
display will change to “OFF.” This means the timer will pre vent watering on that day.
• To unblock a day that has been selected as a no watering day,
select the day (following the same steps), then press the
ENTER button. The water drop will reappear and the
“OFF” will change to “ON.”
• Exit the “NO WATERING DAY” selection mode by turning
the selection dial.
To Prevent Watering During a
Particular Period of the Day:
There may be a time of the day when you never want the water
to come on, regardless of what the program calls for. (Perhaps
your community has banned watering during certain periods
of the day, or you don’t want your children to get wet going to
school.) Here’s what to do:
• Turn the selection dial to NO WATERING DAY/PERIOD.
• Press the RAIN DELAY button. The display reads “SET NO
WATER START PERIOD.”
• Press either the or button to set the start time of the
period you don’t want the water to come on.
• Press the ENTER button. The display reads “SET NO
WATER END PERIOD.”
• Press either the or button to set the end time of the
period you don’t want the water to come on.
• Exit the “NO WATERING PERIOD” selection mode by turn ing the selection dial.
NOTE: If programmed watering is interrupted by a no-watering
period, the timer will resume the watering schedule where it left off
as soon as the no-watering period is over. If the no-watering period
prevents scheduled watering from starting, the timer will start the
watering as soon as the no-watering period is over. This feature is
called “stacking.”
Set Water Budgeting:
Water Budgeting is a quick way to adjust your set durations (10
to 200%) based on seasonal requirements.
• Turn the selection dial to BUDGETING/LANGUAGE.
• Either press the button to increase the watering times, or
press the button to decrease the times in increments
of 10 percent. A setting of 100% will not change the set
durations, a setting of 200% will increase a 10 minute
C
07WTM002598 57926-24 rA.indd 8 2/16/07 2:07:21 PM
Page 10

9
ENGLISH
duration to 20 minutes, and a setting of 10% will decrease a
10 minute duration to 1 minute.
• Exit the set water budgeting mode by turning the selection
dial.
Test All Stations:
With the “TEST ALL” function, you can easily test all the watering stations by turning them on in sequence for one minute
each.
• With the dial in the AUTO position press the MANUAL
button.
• The display reads “TEST ALL” to the right of the letters “A”
and “B.”
• Press the ENTER button.
Each watering station will turn on for one minute, in sequence.
To abort this process before the test is finished, press the
CLEAR button. To advance quickly from one station to
the next press NEXT . Otherwise, the timer will automatically exit the “TEST ALL” mode after all stations have run for
one minute.
Manual Watering - All Stations:
With the “MANUAL ALL” function, you can manually turn on
the watering stations at any time.
• With the dial in the AUTO position press the MANUAL
button.
• Press the NEXT button.
• The display reads “MANUAL ALL” to the right of the letters
“A” and “B.”
• Press the ENTER button.
Each station with a set duration will water in sequence. To
quickly advance from one station to the next press NEXT .
To abort this process before the manual watering is finished,
press CLEAR . Otherwise, the timer will automatically exit
the “MANUAL ALL” mode after all stations have run.
Manual Watering - Program A:
This will allow you to water only those stations with set durations in Program A.
• With the dial in the AUTO position press the MANUAL
button.
• Press the NEXT button until the display reads
“A MANUAL ALL”.
• Press the ENTER button.
Each station will water, in sequence, one after another, for the
same duration specified in Program A. To quickly advance from
one station to the next press NEXT .
To abort this process before the manual watering is finished,
press CLEAR . Otherwise, the timer will automatically
exit the “A – MANUAL ALL” mode after all Program A stations
have run.
C
C
C
07WTM002598 57926-24 rA.indd 9 2/16/07 2:07:21 PM
Page 11

10
Manual Watering - Program B:
This will allow you to water only those stations with set durations in Program B.
• With the dial in the AUTO position press the MANUAL
button.
• Press the NEXT button until the display reads “B
MANUAL ALL”.
• Press the ENTER button.
Each station will water, in sequence, one after another, for the
same duration specified in Program B. To quickly advance from
one station to the next press NEXT .
To abort this process before the manual watering is finished,
tpress CLEAR . Otherwise, the timer will automatically
exit the “B – MANUAL ALL” mode after all Program B stations
have run.
Manual Watering - Single Stations:
This will allow you to water a single station at a time.
• With the dial in the AUTO position press the MANUAL
button.
• Press the NEXT button until the display reads
“MANUAL STATION 1”.
• Press the NEXT button to select the station number
you want to water.
• Press the or buttons to select the number of min-
utes to water that station (from 1 to 120 minutes).
• Press the ENTER button.
To abort this process before the manual watering is finished,
press CLEAR . Otherwise, the timer will automatically exit
the “MANUAL – STATION” mode after the selected station has
run.
Rain Delay Function:
You can press the RAIN DELAY button to stop all programmed
watering from taking place for a certain number of hours or
days (for instance, after a rain storm).
• With the dial in the AUTO position press the RAIN DELAY
button.
• Press the or buttons to change the rain delay
period. The options are: 24 hours, 48 hours, 72 hours, 4
days, 5 days … and up to 99 days in one-day increments.
• Press the ENTER button to enter the rain delay mode.
The Rain Delay hours remaining will show on the display.
The timer will revert to the programmed schedule at the expiration of the rain delay period. To return to the programmed
schedule before the expiration of the rain delay period, press
the CLEAR button.
Manual Advance During Watering:
• Pressing the NEXT button will advance watering from
C
C
C
07WTM002598 57926-24 rA.indd 10 2/16/07 2:07:22 PM
Page 12

11
ENGLISH
the current station to the next station in the cycle. This can
be done during scheduled, manual, or remote actuated
watering.
Section 4: Using the Remote
Control Device
NOTE: The timer will accept commands from the remote control
device only when the selection dial is turned to AUTO or OFF. (If
the selection dial is turned to any other setting, commands from the
Remote Control Device will be stored in memory and executed when
the selection dial is turned to AUTO).
Install a Battery in the Remote Control Device:
• Open the battery compartment door.
• Install a 9-volt battery in the battery compartment.
• Replace the battery compartment door.
To Synchronize the Remote Control Device
with the Timer:
The remote device provided with your timer is already synchronized to your timer. If the remote is not functioning properly or
if you are adding a new remote or RF sensor to your system do
the following:
• With the remote device in your hand press the “RF Sync”
button on the timer (this will activate a red light on
the timer).
• Press the OFF button on the remote or depress the stem of
the RF sensor (the red light should start blinking).
• If the red light blinks you have successfully synchronized the
devices. If the light does not blink check that the remote has a
fresh 9V battery or that the RF sensor switch is not OFF and
try the steps again.
To Water All Stations:
• Press and release the ALL button on the remote control
device to select all stations for watering.
• Press and release the ON “X” MIN button to command the
timer to water all the stations sequentially for the desired
(“X”) number of minutes.
• If you wish to advance to the next station before a station's
watering duration is complete, press NEXT.
To Water One Station:
• Press the number of the station you wish to water.
• Press ON "X" MIN to water the station for the desired ("X")
number of minutes.
To Water More Than One Specific Station:
• Press the numbers of the stations you wish to water. (Example:
3, 7, 10, and 6. The timer will water in sequence from lowest
to the highest. 3, 6, 7, 10.) (No matter which order you press
the keys, the timer will water them sequentially from the
lowest to the highest number.)
07WTM002598 57926-24 rA.indd 11 2/16/07 2:07:22 PM
Page 13
12
• Press ON “X” MIN to water those stations for the desired
(“X”) number of minutes.
To Cancel Remote Control Device Operation
and Return Control to Timer:
• Press the OFF/CLEAR button on the Remote Control Device.
This cancels any current commands from the device
and returns control back to the timer.
Section 5: Using the Optional
Rain-Freeze Sensor
An optional rain-freeze sensor can be purchased separately to
prevent programmed watering for a specified period of time
after rain falls or during periods when temperatures fall below
a specified temperature. The sensor has settings for RAIN, OFF
and RAIN/FREEZE. Please refer to the manual that accompanies
the rain-freeze sensor for installation and programming instructions.
NOTE: The rain-freeze sensor will function only when the selection
dial on the timer is turned to AUTO.
Section 6: Installing Indoor Mount
Sprinkler Timer and Remote
Control Device Sleeve
NOTE: Before installation, please have the following tools on hand:
• Phillips screwdriver
• Wire strippers
Installing the Sprinkler Timer
in Five Easy Steps
1. Select a Location
Select a location with the following criteria:
• Near an electrical outlet. (Avoid using an outlet controlled
by a switch.)
• In a dry, indoor location, where operating temperatures
are not below 32° or above 122° Fahrenheit (below 0
degrees or above 50 degrees Celsius).
• Not in direct sunlight.
• Accessible to sprinkler wires from valves.
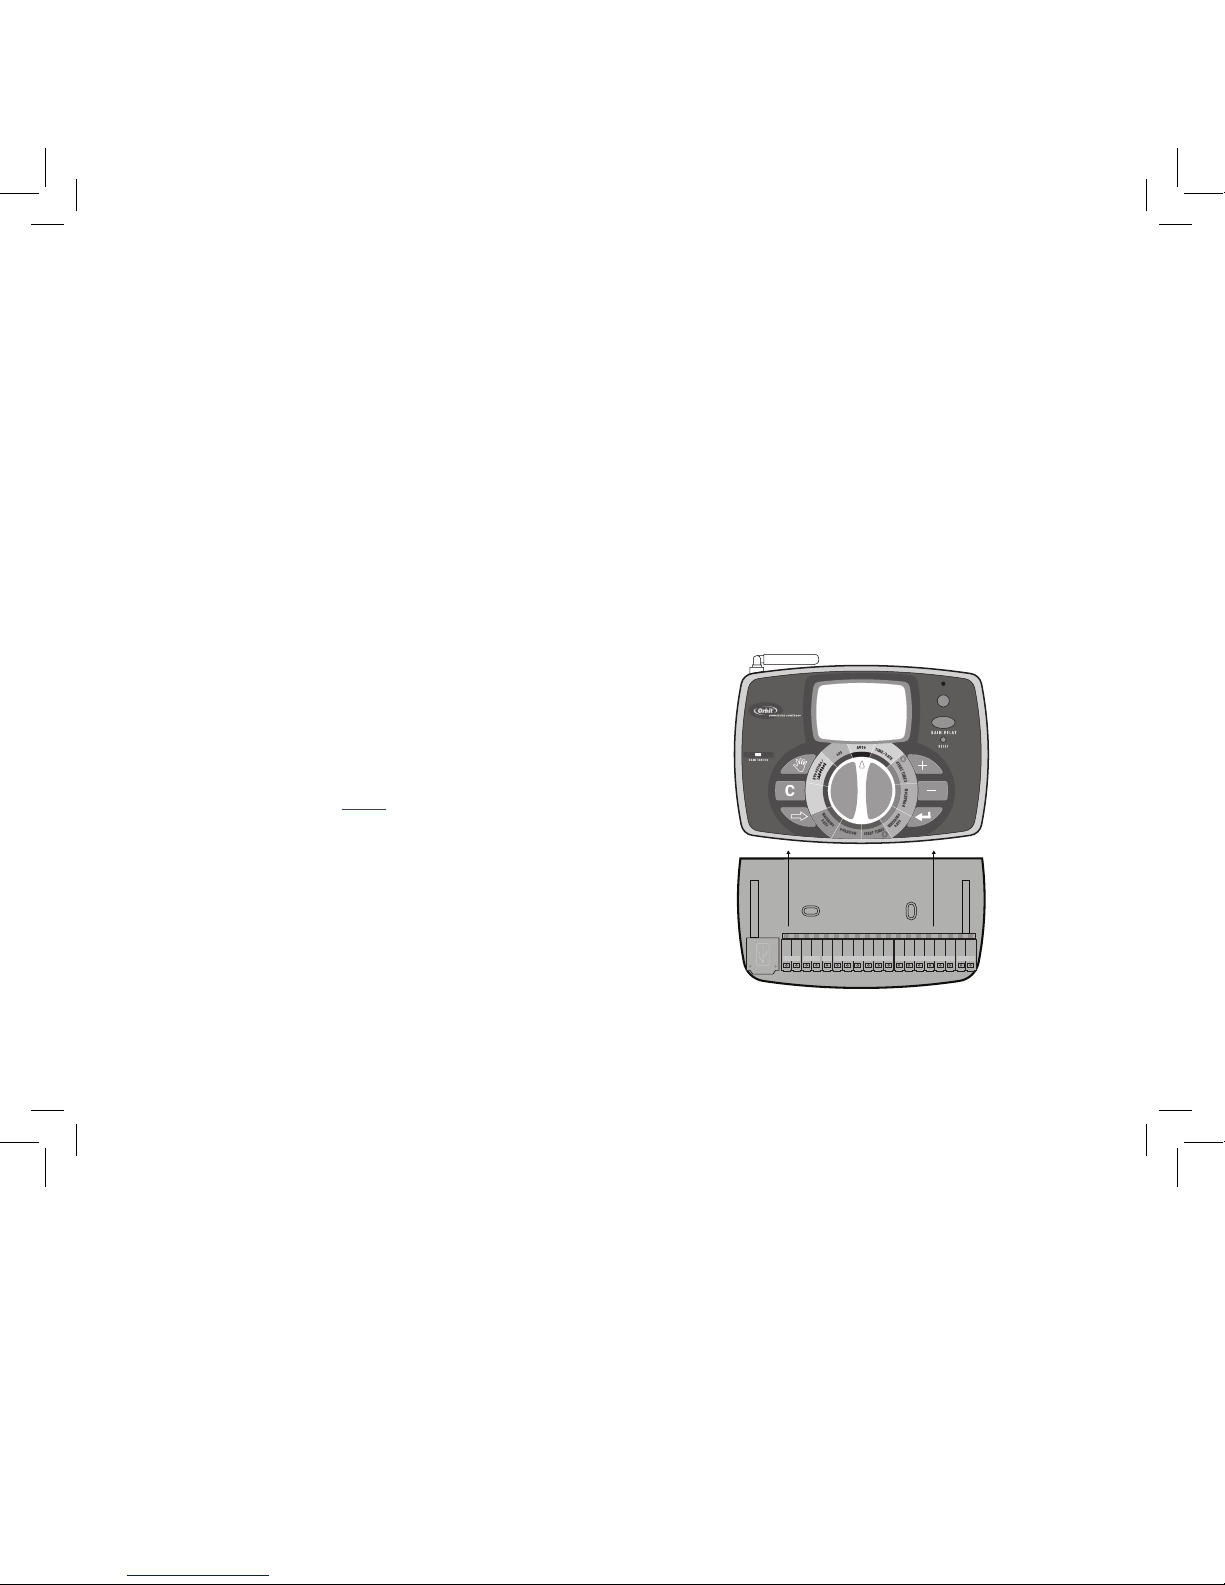
Figure 3: Mounting the Docking Port
Slide the Timer off the Docking Port
SENSOR COM PUMP 1 2 3 4 5 6 7 8 9 10 11 12
24 VAC
RF SYNC
ACTIVE BYPASS
N
O
W
A
T
E
R
I
N
G
D
A
Y
/
P
E
R
I
O
D
07WTM002598 57926-24 rA.indd 12 2/16/07 2:07:23 PM
Page 14
13
ENGLISH
2. Mount the Docking Port
• Slide the timer off the docking port. (See Figure 3)
• Using the mounting template (included), mark the two
screw locations on the wall, then drill holes at the marks
for No. 8 screws. Use the expanding anchors in plaster or
masonry if necessary.
• Place the docking port against the wall, aligning the two
holes in the docking port with the two drilled holes.
• Secure the docking port to the wall by screwing a No. 8
screw (included) through each of the two holes.
• Do not slide the timer back onto the docking port yet.
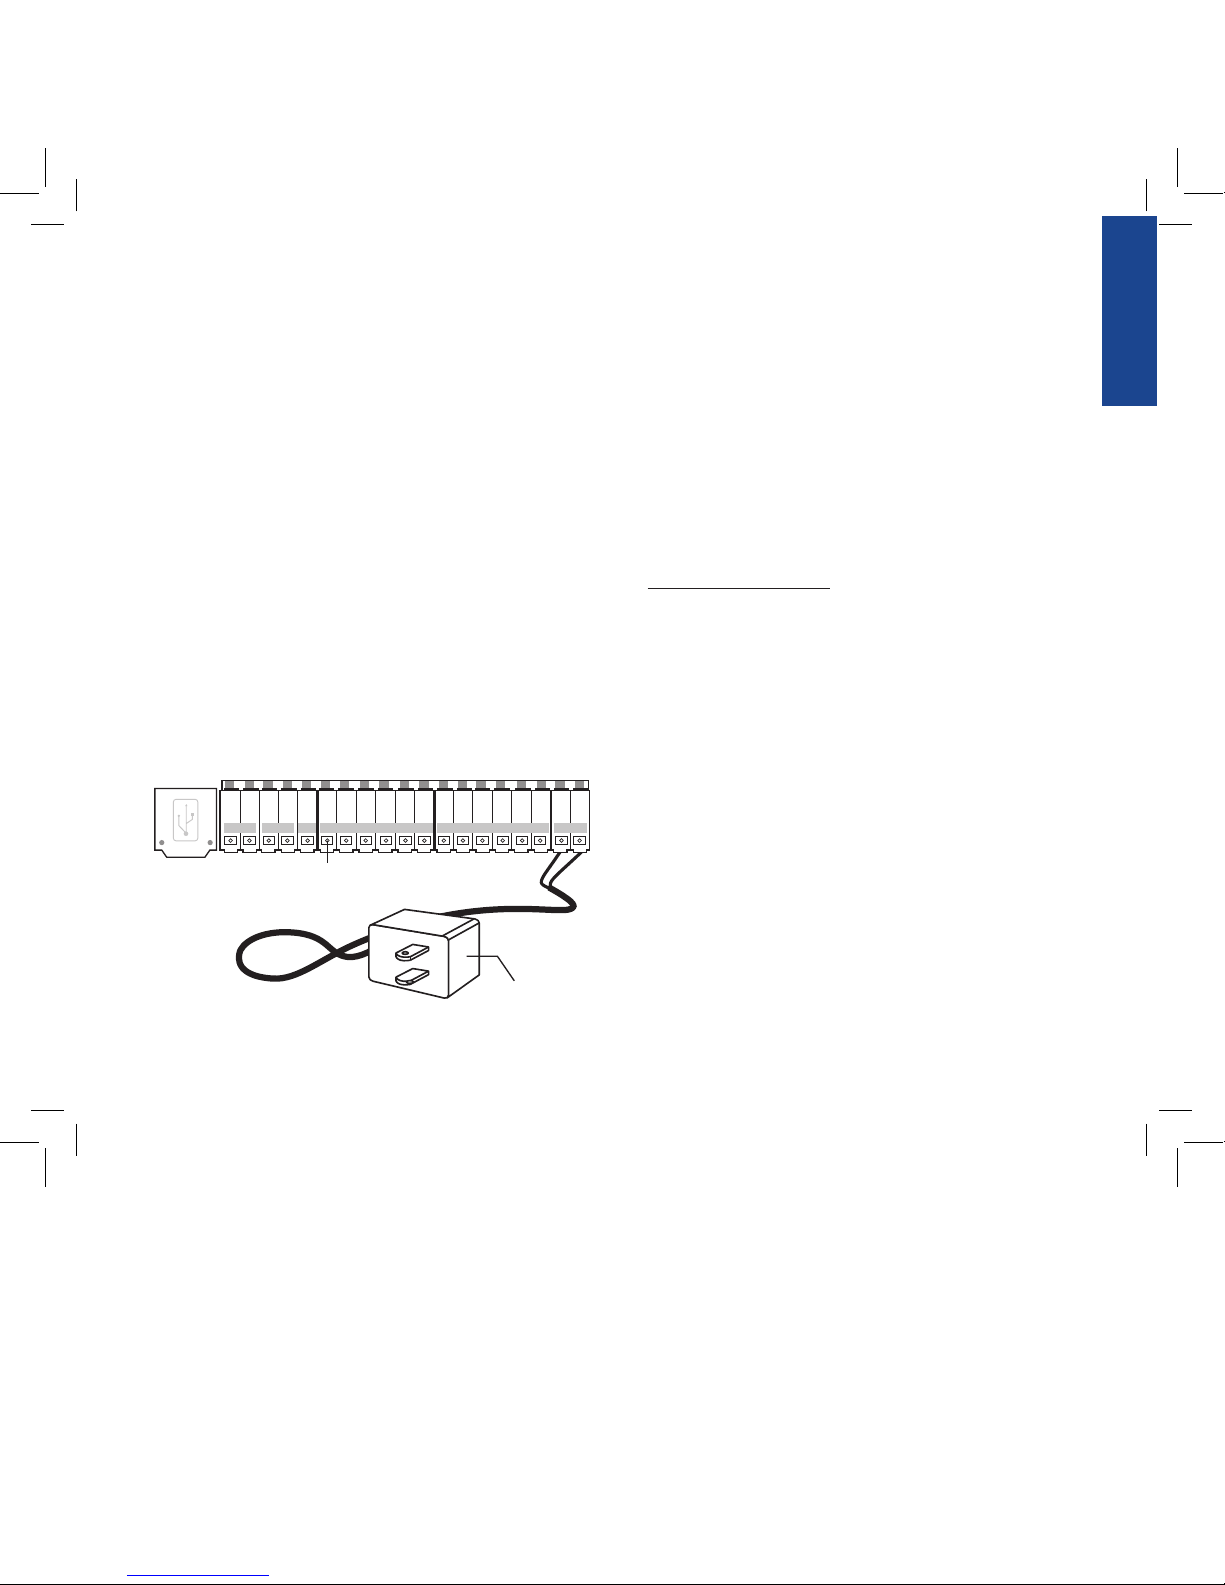
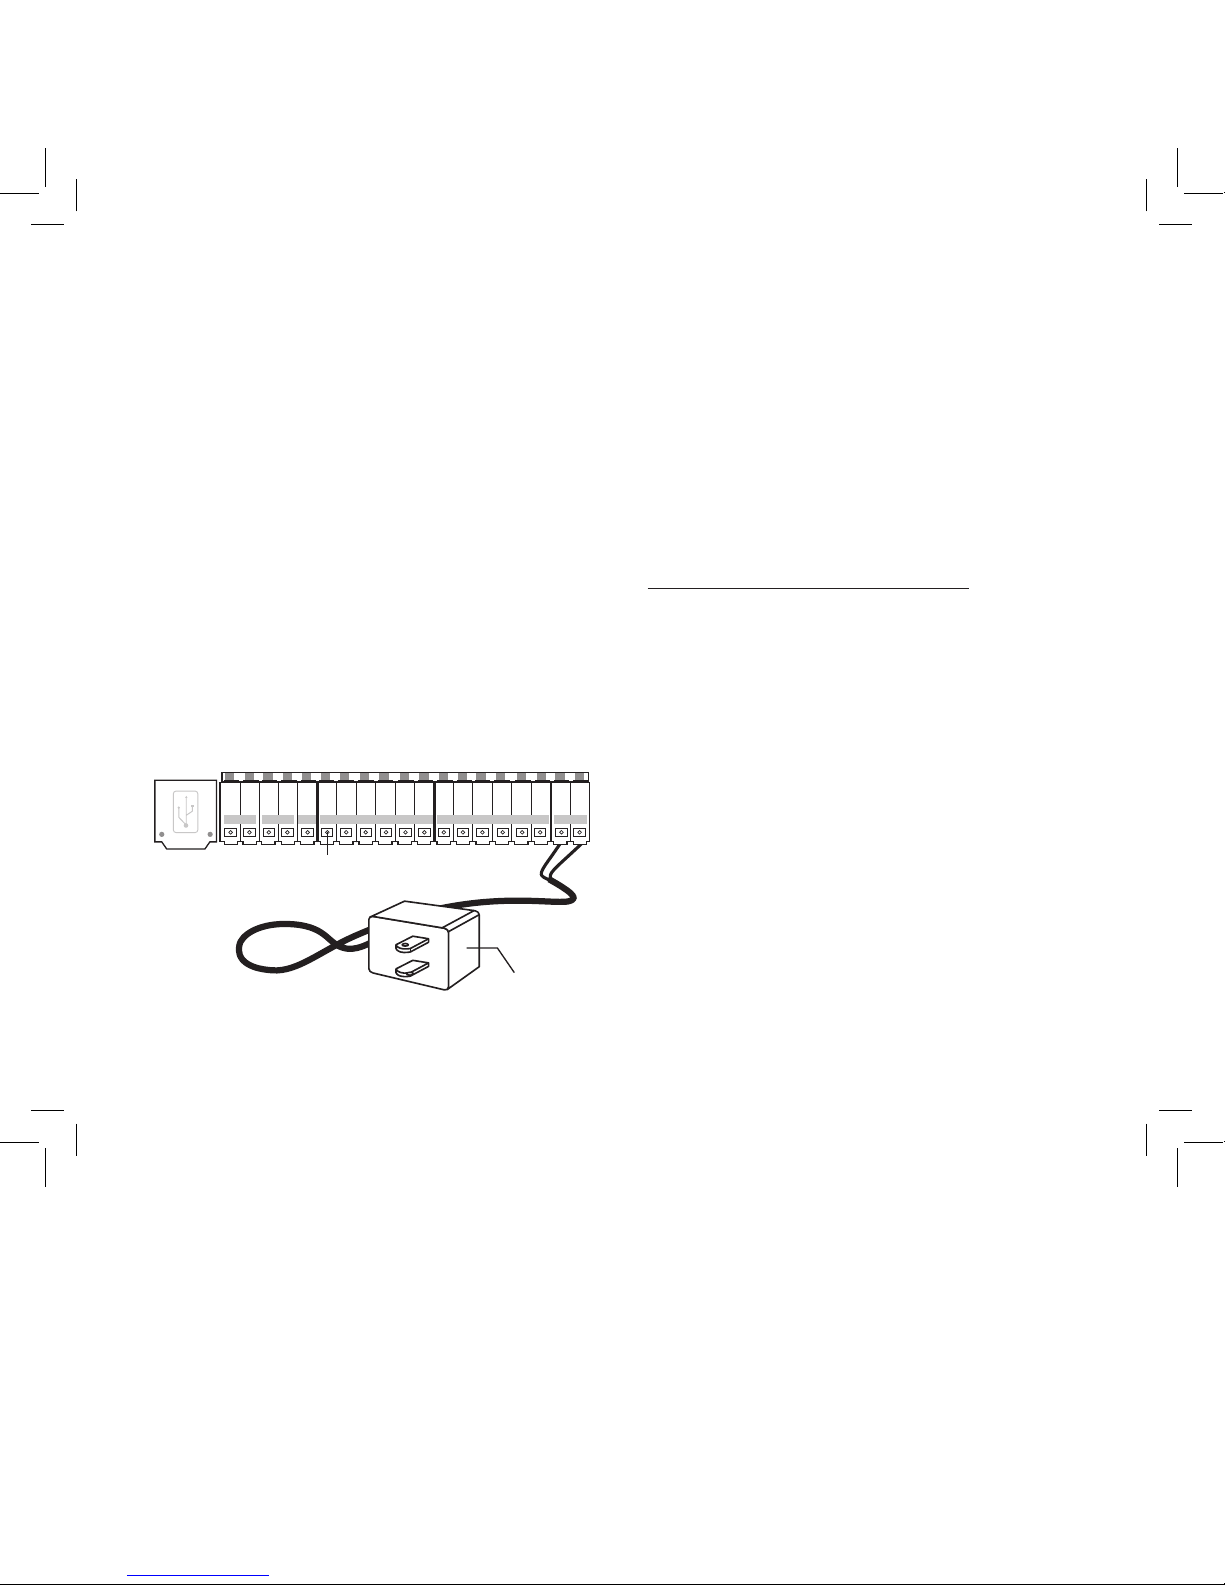
3. Connect the Transformer
• Find the two sockets at the bottom of the docking port
labeled “24VAC.” (See Figure 4)
• Insuring the transformer is not plugged in; insert one of
the two power leads from the transformer into each
terminal socket using the phillips screwdriver to depress
the terminal button (this allows for wire insertion or
removal).
• Plug in the transformer.
WARNING: Do not link two or more sprinkler timers together with
one transformer.
4. Connect Valve Wires to Timer, Pump Start and Master
Valve Sockets
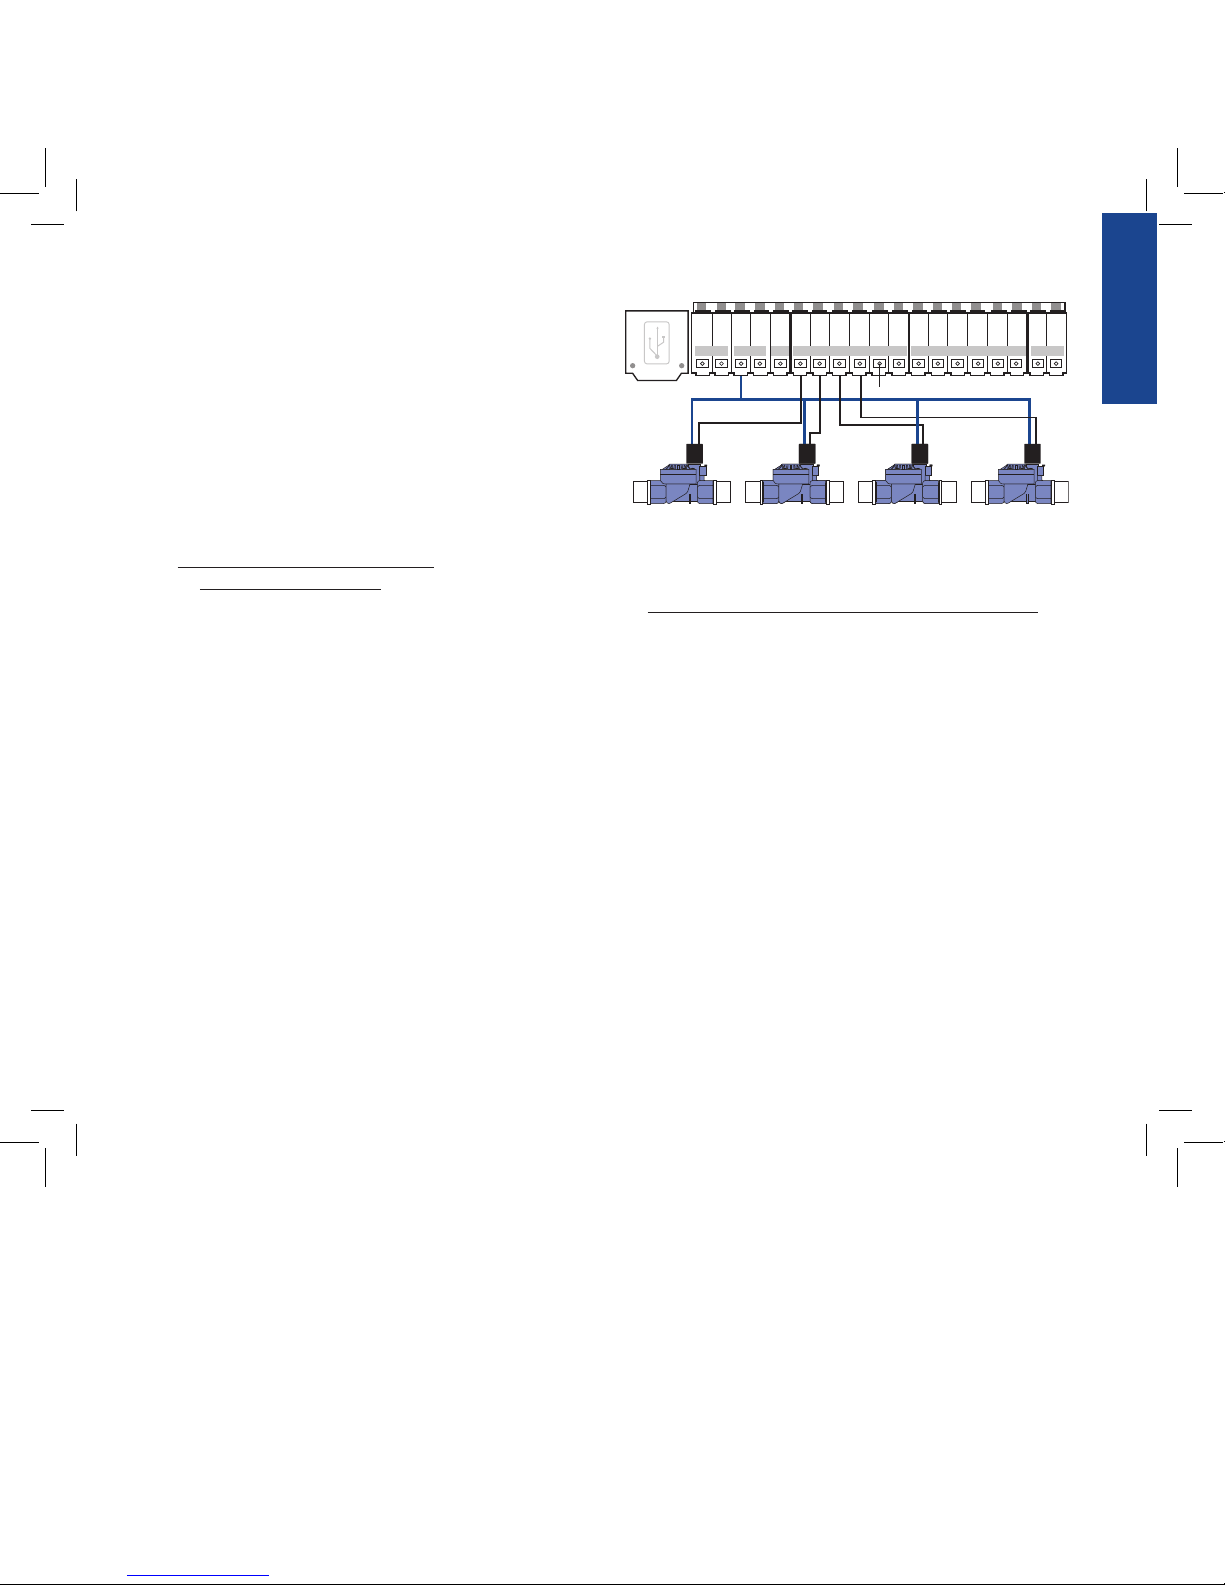
A. Wire the Electric Valves
NOTE: If the distance between the sprinkler timer and valves
is under 700’ (210 m), use Orbit® sprinkler wire or 20 gauge
(AWG) plastic jacketed thermostat wire to connect the sprinkler
timer to the valves. If the distance is over 700’ (210 m), use 16
gauge (AWG) wire.
• Taking the sprinkler wire, strip 1/2" (12 mm) of the
plastic insulation off the end of each individual wire.
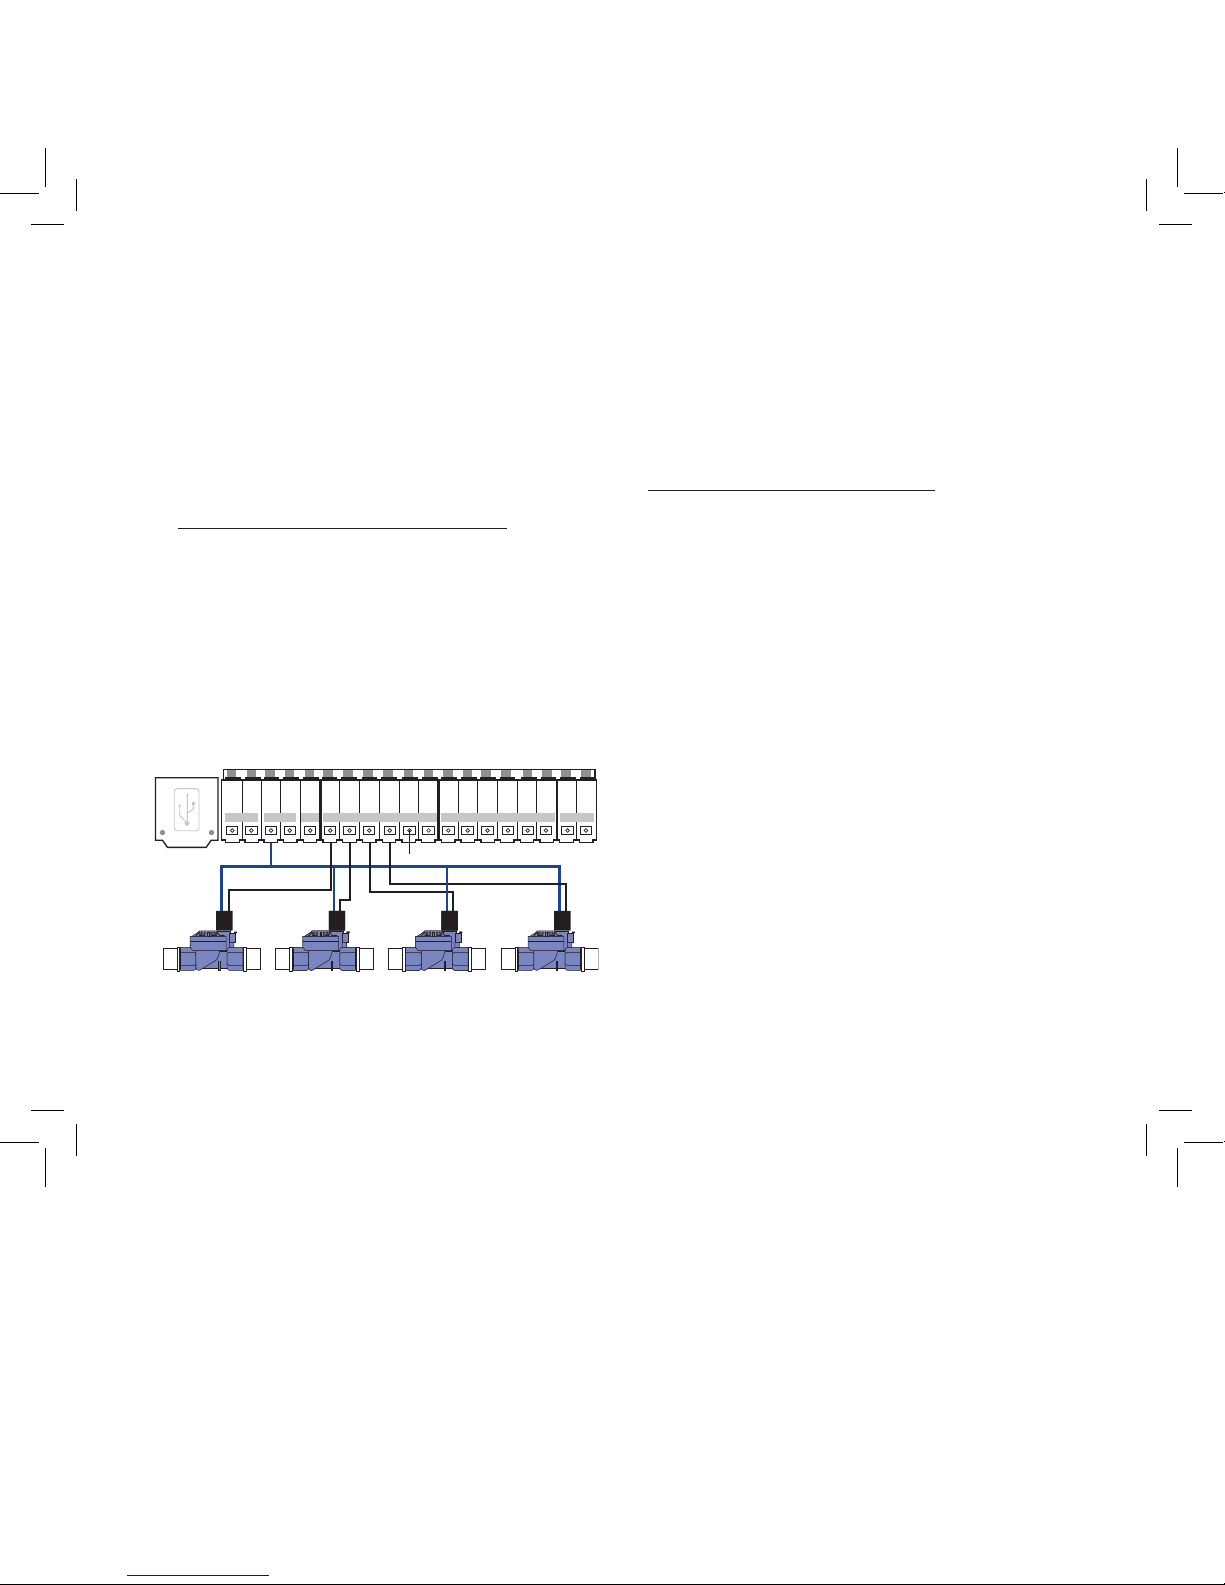
• Connect one wire from each valve (it doesn’t matter
which wire) to a single “common” sprinkler wire. This
is usually white. (See Figure 5)
IMPORTANT: All wires should be joined together using wire
nuts, solder and/or vinyl tape. For additional protection to
waterproof connections, an Orbit® grease cap can be used.
• Next, connect the remaining wire from each valve to a
separate colored sprinkler wire.
Transfo rmer
SENSOR COM PUMP
Termina l Butt on
1 2 3 4 5 6 7 8 9 10 11 12
24 VAC
Figure 4: Connecting the Transformer
07WTM002598 57926-24 rA.indd 13 2/16/07 2:07:24 PM
Page 15
14
• To avoid electrical hazards, only one valve should be
connected to each station.
IMPORTANT: The wire can be buried in the ground. However,
for greater protection, wires can be pulled through PVC pipe
and buried underground. Be careful to avoid burying the wires
in locations where they could be damaged by future digging or
trenching.
B. Connect Valve Wires to the Sprinkler Timer
• Strip 1/4" (6 mm) of the plastic insulation off the end
of each wire.
• Determine which valve you want to connect to which
station. Insert each sprinkler wire, excluding the
“common” wire, into a separate station socket (num bered above each socket) by inserting the bare wire
fully into the socket under each number. (See Figure 5)
• Connect the common wire to one of the two sockets
(white in color) labeled “COM.”
NOTE: Insert only one wire into each “COM” socket. If more
than two common wires are required, splice several together so
only one wire runs into each of the two “COM” terminals. Protect
the splice connection with a wire nut.
C. Connect Pump Start and Master Valve
This timer allows a master valve or pump start relay to operate whenever a station is on.
NOTE: If you are activating a pump from this timer, you must
purchase a Pump Start Relay.
From the pump start relay (or master valve); connect one
wire to the “PUMP” socket and the other wire to the “COM”
socket.
Once all connections to the docking port are made, you may
slide the timer back onto the docking port.
5. Mount the Sleeve for the Remote Control Device
• Using the mounting template (included) mark the two
screw locations on the wall, then drill holes at the marks
for No. 8 screws. Use the expanding anchors in plaster or
masonry if necessary. (The sleeve can be mounted any
where and does not need to be next to the timer.)
• Place the remote control device sleeve against the wall,
aligning the two holes in the sleeve with the two
drilled holes.
Station Val ves
Common Wire
SENSOR COM PUMP 1 2 3 4 5 6 7 8 9 10 11 12
24 VAC
Terminal Button
Figure 5: Connecting Sprinkler Wire
07WTM002598 57926-24 rA.indd 14 2/16/07 2:07:25 PM
Page 16
15
ENGLISH
• Secure the sleeve to the wall by screwing a No. 8 screw
(included) through each of the two holes.
• Slide the remote control device into the sleeve.
Section 7: Diagnostics Circuit Breaker
Smart-Scan® Diagnostic Fault Sensing
A diagnostic fault sensor will automatically scan for the
presence of a faulty solenoid or wiring short in a valve during
each watering sequence. If a faulty station is detected, the
sprinkler timer will move to the next working station. SmartScan® also detects faulty wiring for the Pump or Master Control.
Upon detection watering cycle is discontinued.
Fault Notification
• Faulty Station: “FAULT STN” and station number is
displayed. When multiple faulty stations are detected, only
the last faulty station will be displayed.
• Faulty wiring for pump/master control: “PUMP FAULT” is
displayed.
Correcting the Fault
1. First, repair the short in the wiring or replace the faulty
solenoid.
2. Test the station by operating a manual watering
sequence.
3. If the short is not detected after a few seconds, the fault
notification message will be terminated.
4. If the message continues, a short in the wiring still exists.
Internal Auto-Resetting Electronic Circuit Breaker
The sprinkler timer is equipped with an internal electronic
self-resetting circuit breaker.
Possible causes of a circuit breaker tripping:
1. If lightning strikes nearby.
2. When the power supply has an electric spike.
3. If a station has a wiring short.
Whenever one of these conditions occurs, the electronic circuit
breaker may trip, causing the station output from the sprinkler
timer to be halted momentarily. The batteries will continue
to activate the LCD. After a few moments, the sprinkler timer
will automatically retest the circuit to see if the condition has
stopped. If so, the circuit breaker will reset itself.
07WTM002598 57926-24 rA.indd 15 2/16/07 2:07:25 PM
Page 17
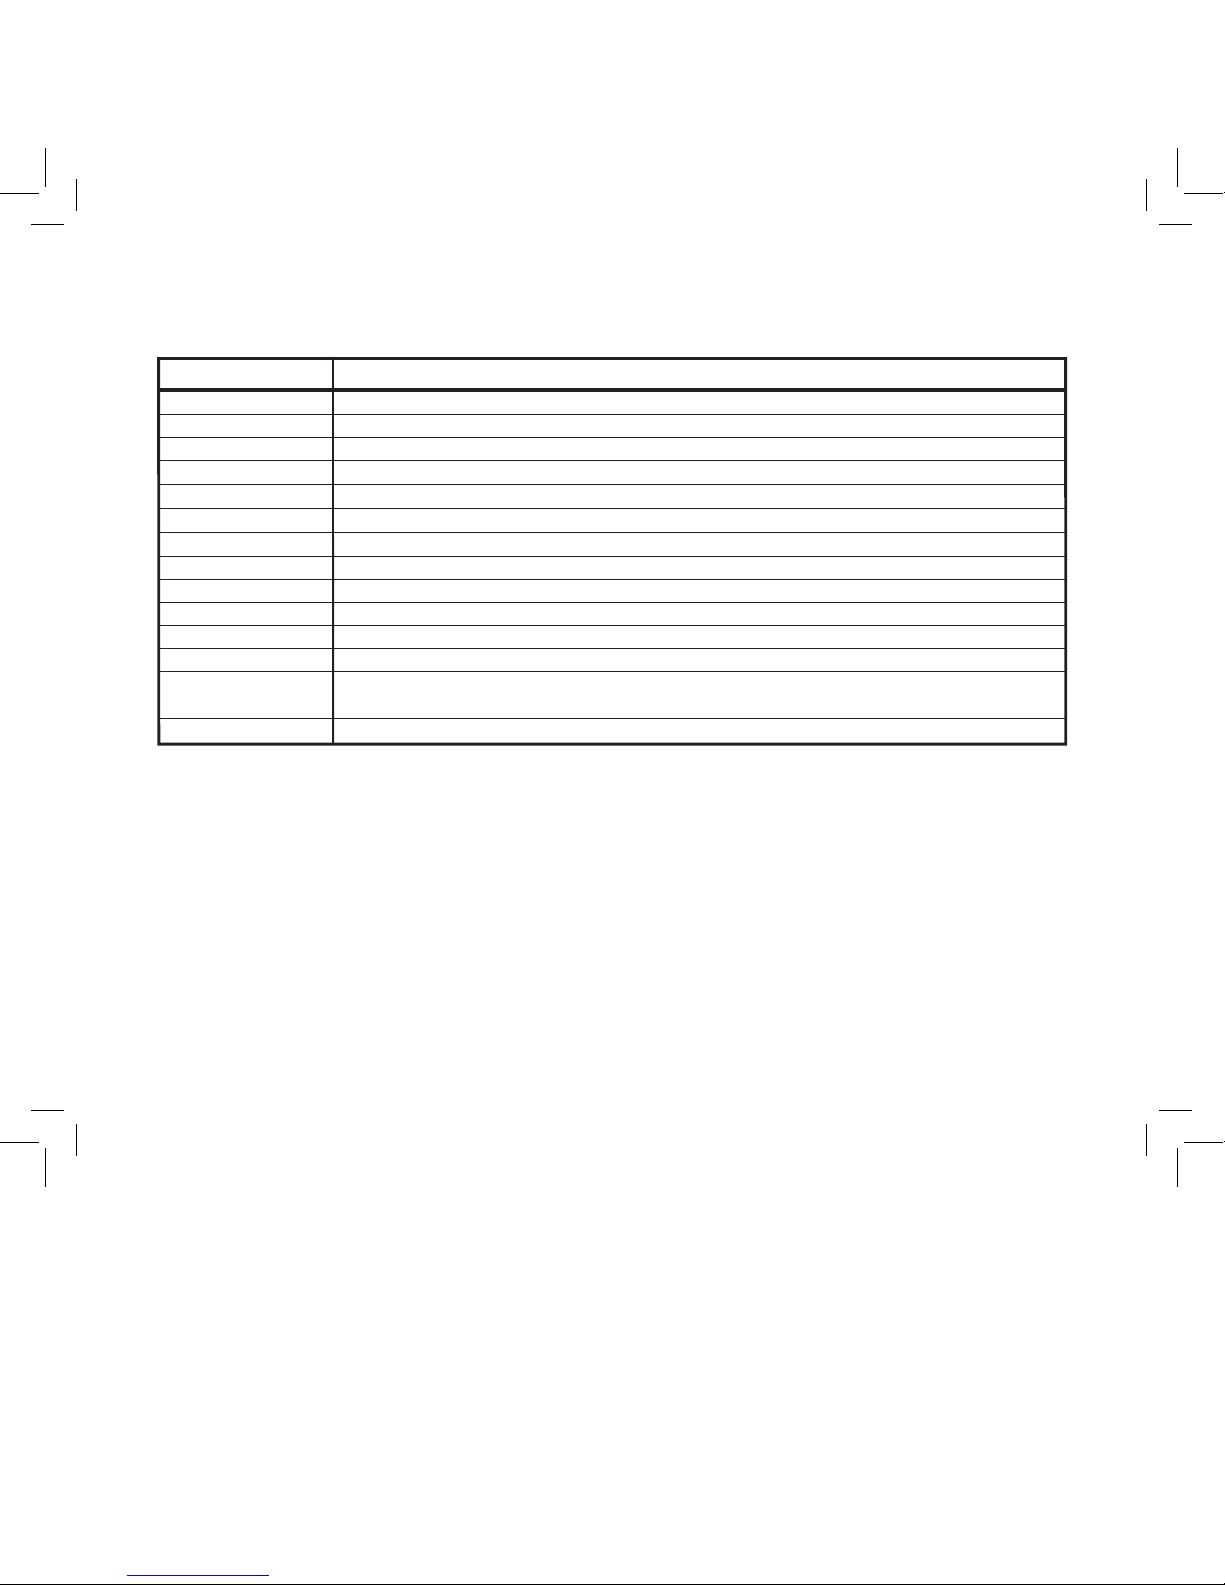
16
Cycle Start Time
Master Valve
Multiple Start Times
Program (A or B)
Rain Delay
Solenoid
Sprinkler Timer
Stacking
Station (Watering Station)
Terminal
Watering Program
Watering Restrictions
Watering Valve
(Irrigation Valve)
Zones
TERM
DEFINITION
The time the program begins watering the cycle
A valve that prohibits water from reaching station valves
A feature that allows a program to be operated multiple times on the same day
A schedule for a group of stations that determines the date and time for watering
A feature that prevents the sprinkler timer from running it's scheduled watering program for a specific duration
The electrical part on a sprinkler (irrigation) valve that opens and closes the valve
A device that is responsible for turning an automatic irrigation system on and off
When a start time is scheduled to begin before the previous cycle has completed
An area where the watering (irrigation) is all controlled by a single control valve
The connection point on the docking port where a wire is inserted
See “Program (A or B)”
Specific days and/or times that local municipalities prohibit watering
Used in conjunction with sprinkler timers – a convenient way to deliver water to lawns, plants and gardens
See “Station (Watering Station)”
Section 8: Glossary of Terms
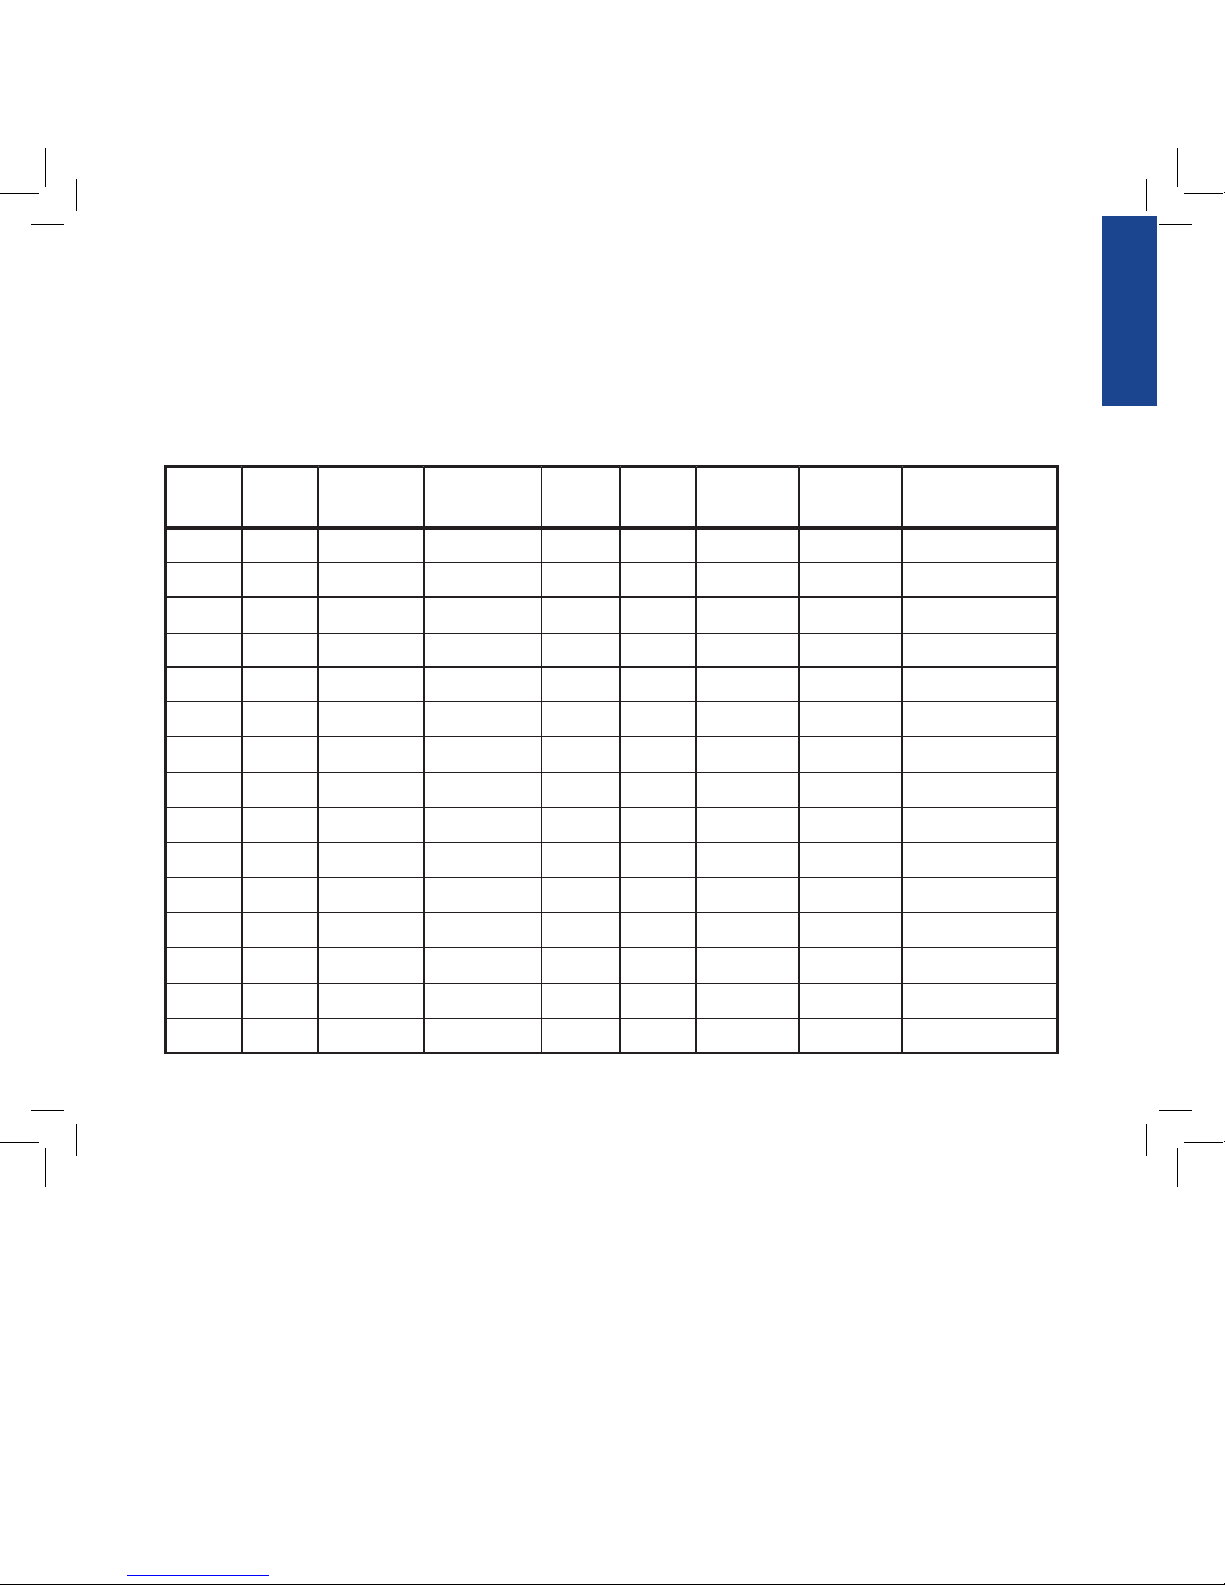
Determine a Watering Plan
Your timer has two programs: Program A and Program B. The
dual program capability allows you to assign certain watering stations to Program A and others to Program B. There are
various reasons why you would want to do so. For example,
you might want to assign the stations that water the garden and
flower beds to Program A and those that water the lawn areas
of your yard to Program B. That way, you can set Program A to
water the garden beds every day, and set Program B to water the
lawn every second or third day.
Your timer allows you to set up to six different watering cycle
start times for Program A or Program B. You cannot set a cycle
start time for each station. Stations can be assigned to either
Program A or Program B. Stations assigned to a program will turn
on sequentially according to the cycle start times assigned.
To help you visualize how best to program your timer, it might
be helpful to make a watering plan on paper. This will help you
establish the days, times and durations to water each station.
07WTM002598 57926-24 rA.indd 16 2/16/07 2:07:25 PM
Page 18
17
ENGLISH
A
A
B
B
Program
Days of Week
Days of Week
Odd/Even
Interval
Watering
Option
1
2
3
4
Station
M, W, Sat
M, W, Sat
Every other day
Every 5 days
Days
5:00 AM
6:45 AM
9:00 PM
Start
Time
15 min
15 min
30 min
30 min
Duration
Minutes
Front Strip
Front, North
Back, North
Front
Location
Spray Heads
Spray Heads
Gear Drive
Shrub Head
Sprinkler
Grass
Grass
Grass
Shrubs and Flowers
Plants
1. For each station (or valve) write down the watering
location, the type of sprinkler head and the types of
plants to be watered.
2. Using this list, determine the recommended watering
duration (for each type of sprinkler head and the
vegetation to be watered) and frequency for each station.
IMPORTANT: Be aware of any watering restrictions through
your local water district.
3. Determine, based on step 2, the ideal watering option for
each station.
Based on the preceding information your water program may
look like this:
07WTM002598 57926-24 rA.indd 17 2/16/07 2:07:25 PM
Page 19
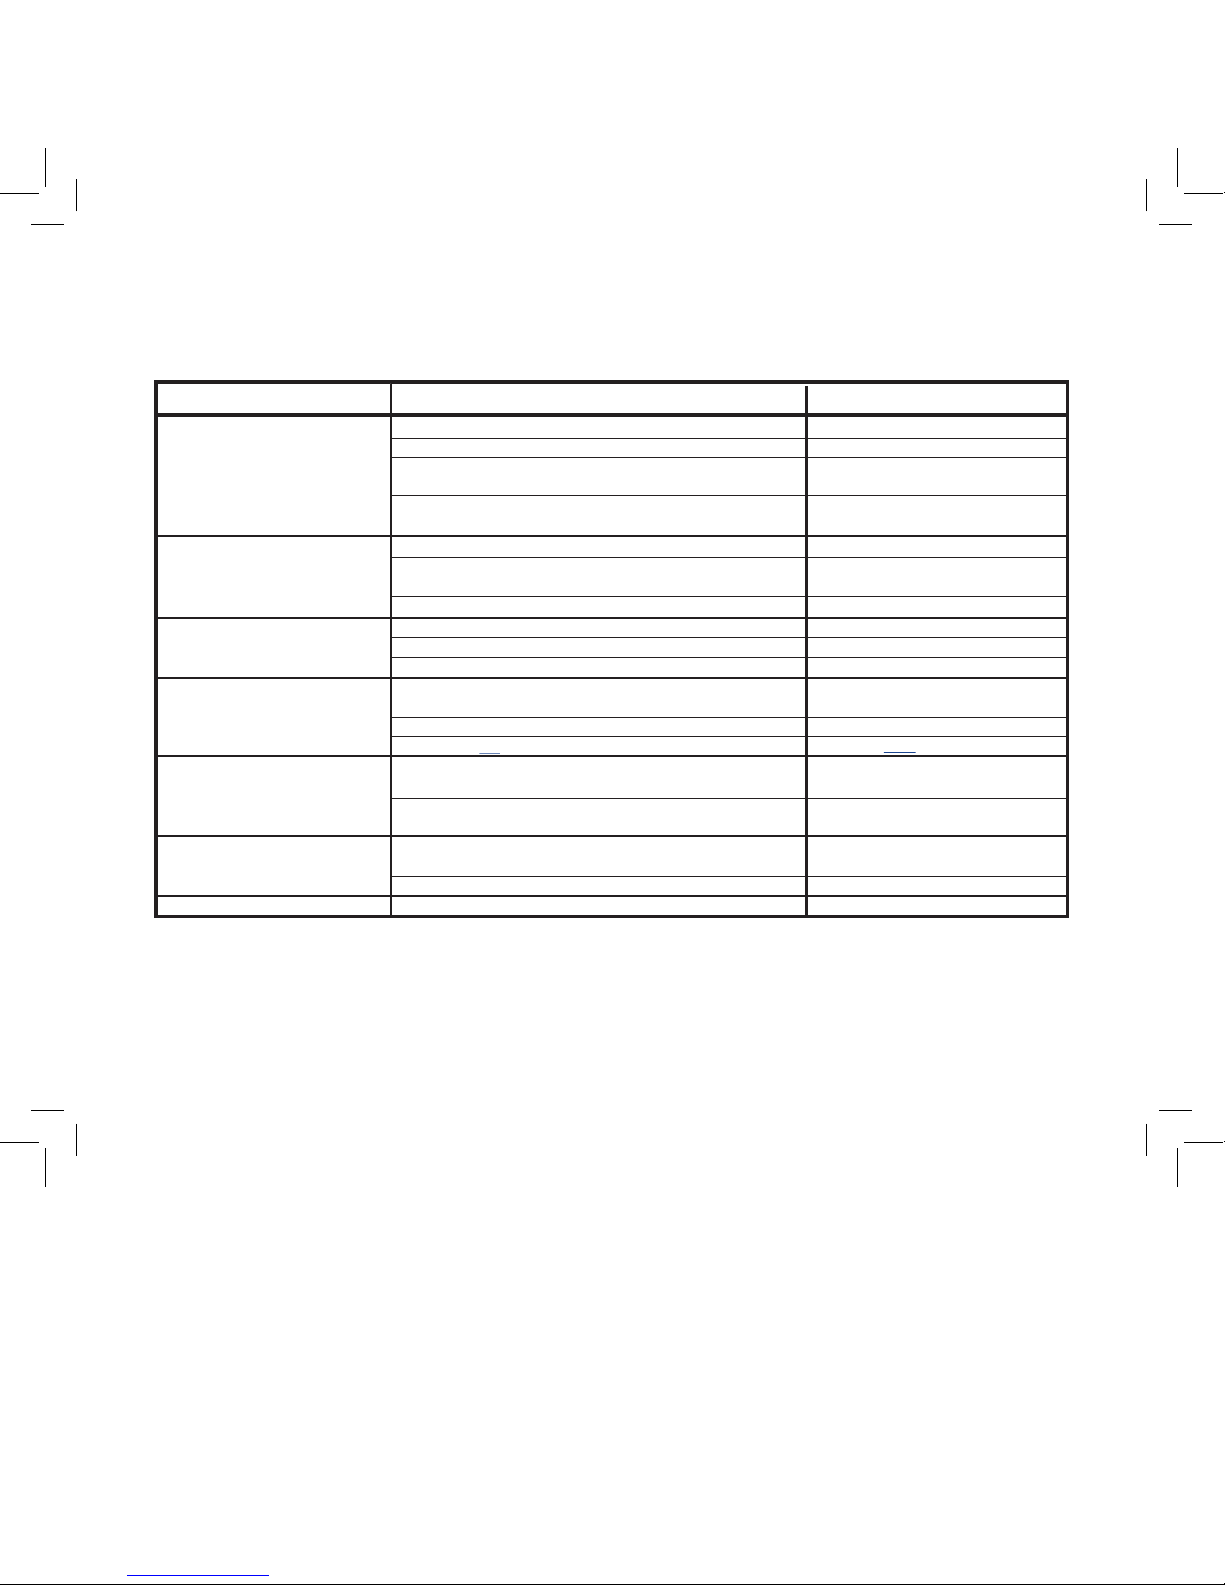
18
One or more stations do
not turn on
Stations turn on when
they are not supposed to
One station is stuck
on and will not shut off
Symptom
Possible Causes of Problems
All stations do not turn on
1. Faulty Solenoid
2. Wire broken or not connected
3. Flow control stem screwed down, shutting valve off
4. Programming is incorrect
1. Faulty valve
2. Particles of dirt or debris stuck in valve
3. Valve diaphragm faulty
Timer will not power up
Stations continue to turn on and off
when they are not programmed to
1. Transformer is defective or is not connected correctly
2. Programming is incorrect
3. Timer is in OFF mode
1. Water pressure is too high
2. More than one start time is programmed
3. Stations are set to water with both programs
1. Transformer is defective or is not connected correctly
2. Timer is not all the way down on the docking port
Correction
1. More than one start time is programmed with overlapping schedules
2. Excessive pressure
Persistant Fault
1. Short in wiring or solenoids
Replace solenoid
Repair wire and check connections
Turn flow control stem counter-clockwise
until desired flow is achieved
Check to make sure the station in
question is set to water with a program
Install a pressure reducer
Reduce the number of start times for that
program
Set station duration to 0 for suspect program
Check that valve is not installed backwards
Remove dirt or debris from valve
Replace diaphragm
Check connections and outlet if NO A/C
power persists replace transformer
Check Start Time and Watering Days
Turn dial to AUTO
Check connections and outlet if NO A/C
power persists replace transformer
Push down timer on docking port until back
light turns on.
Reduce the number of start times for that
program
Install pressure reducer
Check wiring or replace solenoid
Section 9: Trouble Shooting
07WTM002598 57926-24 rA.indd 18 2/16/07 2:07:26 PM
Page 20
19
ENGLISH
Help
Before returning this sprinkler timer to the store, contact Orbit®
Technical Service at:
1-800-488-6156, 1-801-299-5555.
Listings
The sprinkler timer is tested to UL-1951 (Models 57922,
57926, 91922, 91926, 94922, 94926) standard and is ETL®
listed. Appropriate international models are CSA® and CE®
approved.
Orbit® Irrigation Limited Six-Year Warranty
Orbit® Irrigation Products, Inc. warrants to its customers that its
products will be free from defects in materials and workmanship for a period of six years from the date of purchase.
We will replace, free of charge, the defective part or parts found
to be defective under normal use and service for a period of up
to six years after purchase (proof of purchase required).
We reserve the right to inspect the defective part prior to
replacement. Orbit® Irrigation Products, Inc. will not be responsible for consequential or incidental cost or damage caused
by the product failure. Orbit® liability under this warranty is
limited solely to the replacement or repair of defective parts.
To exercise your warranty, return the unit to your dealer with a
copy of the sales receipt.
SAFETY OF CHILDREN: The controller is not intended for use by
young children or infirm person without supervision. Young children
should be supervised to ensure they do not play with controller.
© 2007 Orbit® Irrigation Products, Inc.
All rights reserved. All trade names are registered
trademarks of respective manufacturers listed.
Orbit® Irrigation Products, Inc.
North Salt Lake, UT 84054 USA
www.orbitonline.com | 1-800-488-6156
07WTM002598 57926-24 rA.indd 19 2/16/07 2:07:26 PM
Page 21

20
Índice
ESPAÑOL
• Presentación . . . . . . . . . . . . . . . . . . . . . . . . . . . . . . . . . . . .20
• Primeros pasos . . . . . . . . . . . . . . . . . . . . . . . . . . . . . . . . . .22
• Cómo programar su temporizador . . . . . . . . . . . . . . . . . . . 24
• Uso del dispositivo de control remoto . . . . . . . . . . . . . . . . .29
• Uso del sensor opcional lluvia-helada . . . . . . . . . . . . . . . . . 31
• Instalación en interiores del temporizador del
aspersor y del manguito dispositivo de control remoto . . . .31
• Diagnóstico del interruptor de circuito . . . . . . . . . . . . . . . .34
• Glosario de términos . . . . . . . . . . . . . . . . . . . . . . . . . . . . . 35
• Localización y solución de problemas . . . . . . . . . . . . . . . . .38
Sección 1: Presentación
Gracias por seleccionar un temporizador de control Orbit®
Signature, el controlador más avanzado y versátil del mercado.
Los diseñadores de Orbit® han combinado las características
tecnológicas más recientes con un despliegue intuitivo para
crear un controlador que se adapta a cualquier necesidad de
riego.
Por favor lea este manual completamente antes de comenzar a
programar y utilizar el controlador.
Características y funciones importantes
PC Programable
Visite www.orbitonline.com para bajar el software que le
permitirá programar y monitorear su temporizador desde la
computadora de su casa.
Programas dobles
El temporizador incluye dos programas: Programa A y Programa
B, lo que le proporciona una flexibilidad de riego. Puede asignar
cualquier estación de riego a cualquiera de los dos programas.
Por ejemplo, puede asignarle al Programa A las estaciones
programadas para regar el jardín y canteros todos los días
comenzando a las 8 de la mañana; mientras que puede asignarle
al Programa B las estaciones programadas para regar su césped
cada tres días, comenzando a las 5 de la mañana.
Seis ciclos de horas de inicio por programa
El temporizador tiene capacidad para seis diferentes horas de
inicio para cada uno de los dos programas (A y B). La mayoría
de los temporizadores sólo permiten cuatro diferentes horas de
inicio de ciclo.
07WTM002598 57926-24 rA.indd 20 2/16/07 2:07:26 PM
Page 22

ESPAÑOL
21
Días y horas sin riego
Es fácil impedir el riego en uno o más días de la semana o
durante períodos específicos del día. Esta característica es útil
si se imponen restricciones de riego en su área.
Base de acoplamiento
Este temporizador ha sido diseñado para su mayor comodidad
y programación “móvil”. La base de acoplamiento del
temporizador está montada en la pared y los cables están
conectados a la misma. La unidad principal del temporizador
puede deslizarse y sacarse rápida y fácilmente de la base de
acoplamiento, permitiéndole trasladarse con el temporizador a
casi cualquier lugar para establecer o cambiar los programas de
riego.
Funciones del control remoto
(No se incluye en todos los modelos)
Este temporizador puede ser controlado por un control remoto
incluido, el cuál se activa mediante una antena y receptor de
radiofrecuencia (RF) fijos al temporizador. El control remoto
le permite encender y apagar las estaciones en el lugar y
configurar la programación desde cualquier lugar, siempre
dentro del alcance del dispositivo. La frecuencia remota de
433 megahertz está aprobada en EE.UU., Canadá, Europa y
Australia, y permite un alcance eficaz con visibilidad directa
de 300 pies (91,4 m) (la distancia se reduce a 200 pies (61 m)
cuando hay obstrucciones presentes).
Información de programación almacenada
de manera segura en una memoria no volátil
La información de programación del Programa A y el Programa
B se encuentra almacenada indefinidamente en la memoria no
volátil del temporizador (EEPROM) y la memoria interna. Esta
característica de alta calidad indica que su programación no se
perderá o borrará si se corta la electricidad o se acaban las pilas.
Conveniente pantalla con visualización LCD, fácil de leer
La pantalla táctil con visualización LCD retroiluminada del
temporizador está convenientemente programada y es fácil de
leer con cualquier tipo de iluminación. Puede usar su dedo o el
lápiz óptico incorporado a la pantalla táctil.
Opción de cinco idiomas
Puede configurar fácilmente la pantalla LCD para que la lectura
aparezca en cualquiera de los cinco idiomas: Inglés, español,
francés, alemán o italiano.
Presupuesto de agua
Esta conveniente característica proporciona una manera fácil y
rápida para aumentar o disminuir el tiempo de riego de todas
las estaciones de ambos programas para que se ajusten a las
necesidades de riego de cada temporada. No tendrá que regular
cada período de riego de cada estación.
Sensor de lluvia (opcional)
Puede comprar por separado un sensor de lluvia opcional para
evitar que se ejecute el riego programado a un cierto horario
luego de haber llovido (determinado por la cantidad de lluvia
y la rapidez de secado de los sensores.). Si su unidad es de RF
puede usar un sensor inalámbrico. De lo contrario, puede usar
un sensor de conexión fija.
Controles comúnmente utilizados
Pantalla digital con mensajes de texto
Un LCD grande (pantalla de cristal líquido, por sus siglas
en inglés) muestra la hora del día e indica muchas de las
configuraciones de programación. Los mensajes interactivos
de texto simplifican la programación y la condición actual del
aspersor. (Ver Figura 1)
07WTM002598 57926-24 rA.indd 21 2/16/07 2:07:26 PM
Page 23
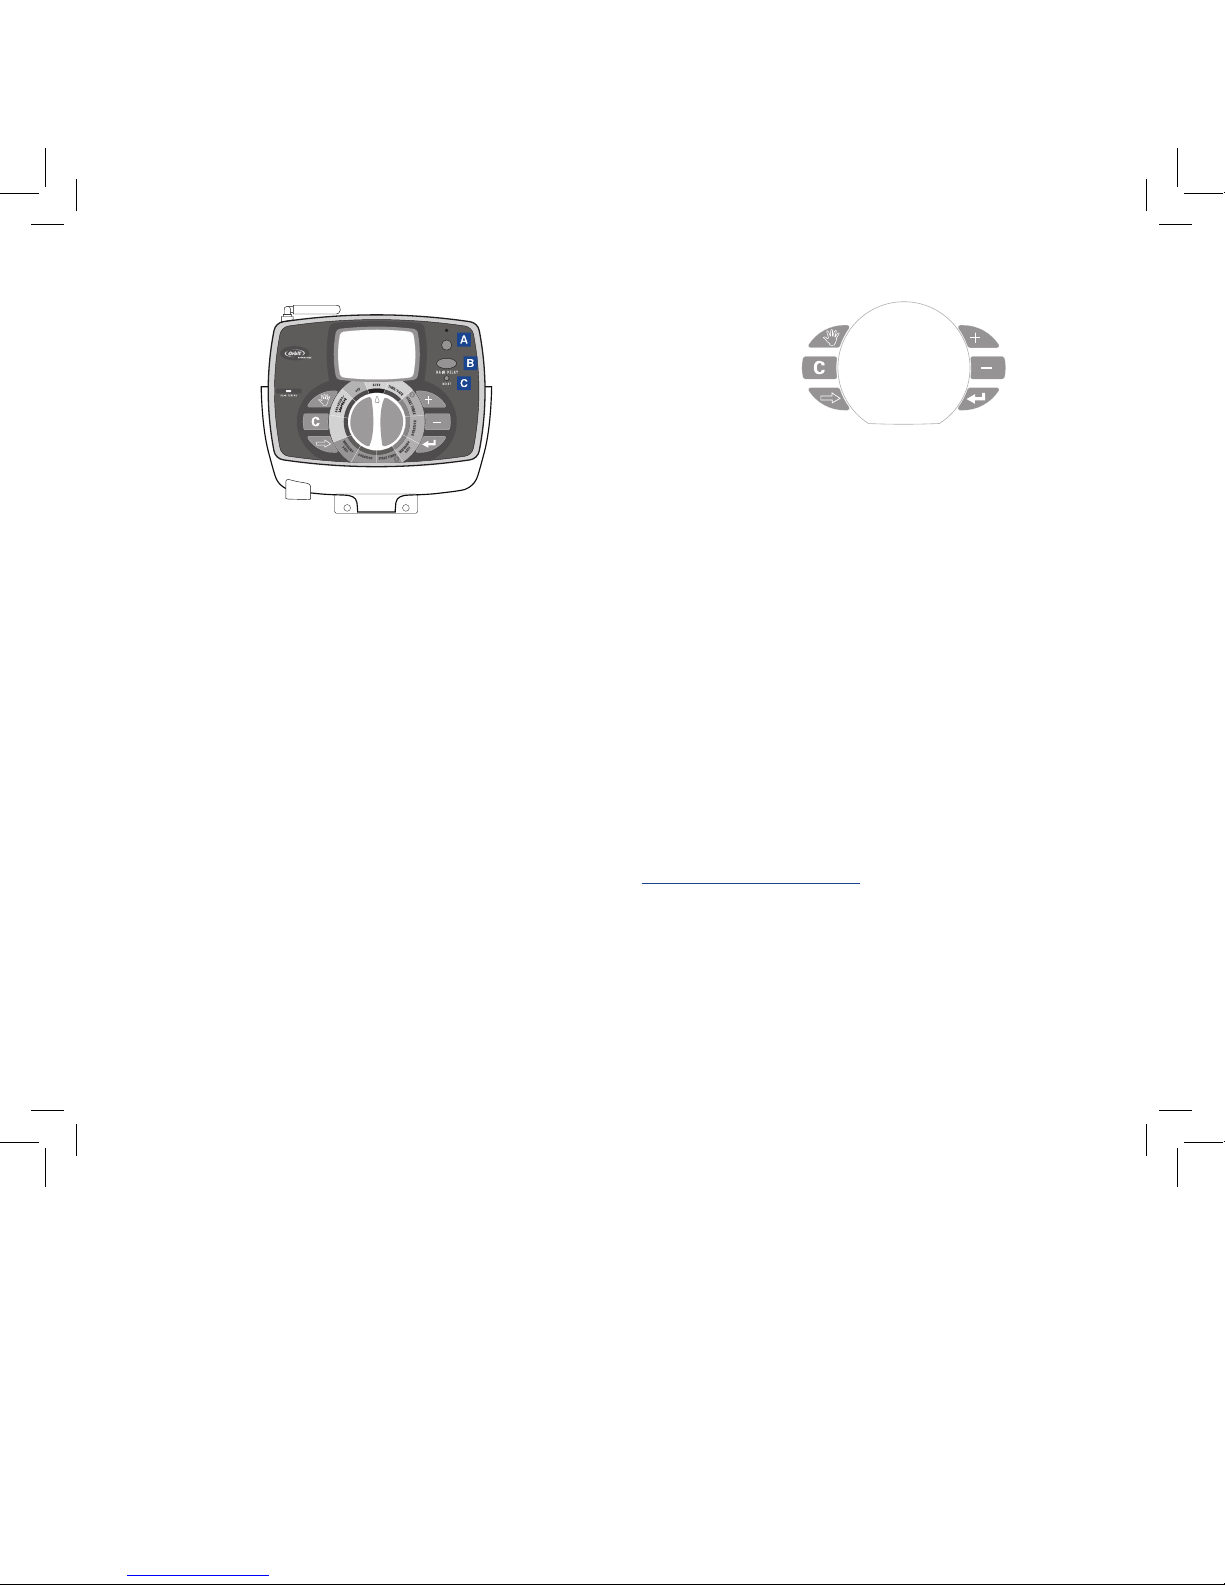
22
Programación de los botones
Estos nueve botones se utilizan para programar y otras funciones:
A Sincronización RF (sólo en el modelo a control remoto)
Permite al temporizador sincronizar con un nuevo remoto o
sensor inalámbrico.
b Retardo por lluvia
Oprima este botón una vez mientras esté en AUTO
(AUTOMÁTICO) para acceder a la opción de retardo
por lluvia NOTA: Oprimir este botón le dará acceso a las
opciones de Idioma y Período sin riego mientras esté en esas
respectivas posiciones de la esfera.
c Reiniciación (pequeño agujero)
Restaura el temporizador a la configuración de fábrica.
d Aumentar
e Disminuir
f Ingresar
g Siguiente
h Borrar
i Manual
Esfera de selección
Esta esfera se utiliza para programar, revisar y operar el
temporizador del aspersor.
Interruptor de desviación del sensor de lluvia
En la posición Activada el controlador monitorizará el sensor de
lluvia, en posición Desviada el controlador ignorará el sensor de
lluvia. (Este interruptor es para sensores cableados solamente
y no afecta los sensores inalámbricos de lluvia – los sensores se
venden por separado).
Sobre este manual
Hemos añadido las siguientes características a este manual para
asistirle:
• El TEXTO AZUL se relaciona con los botones que se utilizan
para programar.
• EL TEXTO AZUL SUBRAYADO se relaciona con las
posiciones de parada de la esfera de selección.
• Se incluye un glosario de los términos más comunes. (ver
Pág. 16)
RF SYNC
ACTIVE BYPASS
N
O
W
A
T
E
R
I
N
G
D
A
Y
/
P
E
R
I
O
D
Figura 1: Vista frontal del temporizador
d
e
f
g
h
i
07WTM002598 57926-24 rA.indd 22 2/16/07 2:07:26 PM
Page 24
ESPAÑOL
23
Sección 2: Primeros pasos
Puede programar este temporizador de aspersor en sólo unos
cuantos pasos básicos. Antes de que comience a programar, es
importante que:
• Active las baterías
• Ponga a cero el temporizador del aspersor
• Elija el idioma
• Coloque la hora del día y la fecha
• Determine un plan de riego
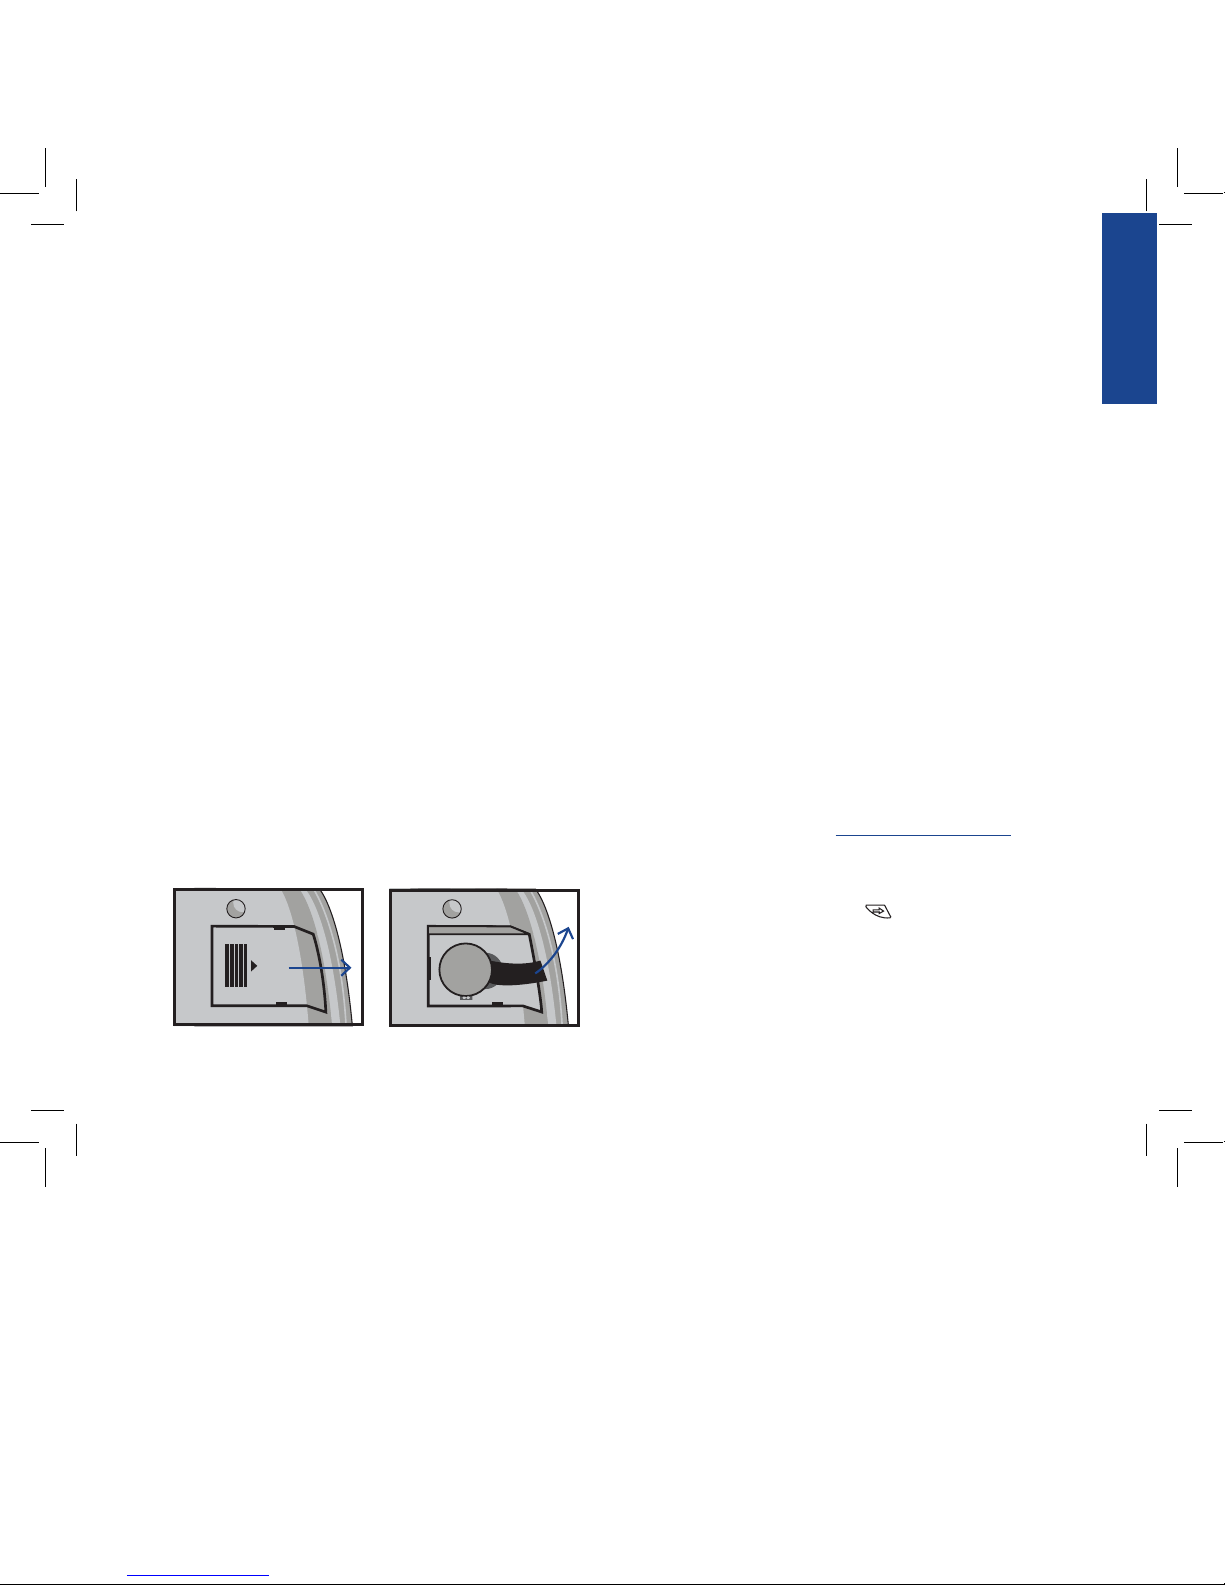
Activación de las baterías
• Deslice el terminal de conexión del temporizador para ac ceder a la tapa del compartimiento de las baterías.
• Deslice la tapa del compartimiento de las baterías en la direc ción de la flecha.
• Retire la cinta negra del compartimiento de las baterías.
• Vuelva a colocar la tapa del compartimiento de las baterías.
• Deslice el terminal de conexión de nuevo en la unidad con-
troladora principal.
La pantalla mostrará “LOW BATTERY” (“BATERÍA BAJA”)
cuando deba reemplazar las baterías.
NOTA: Las baterías por sí mismas no harán funcionar las válvulas
de su sistema de aspersión. El transformador deberá enchufarse y
tener energía para que el sistema funcione normalmente.
Reiniciación del temporizador
Si esta es la primera vez que se programa el temporizador
del aspersor, deberá presionar el botón pequeño embutido
identificado como REINICIACIÓN (ubicado bajo el botón de
RETARDO POR LLUVIA. Probablemente necesitará una pluma,
lápiz o un objeto pequeño similar para presionarlo.
No presione el botón REINICIACIÓN de nuevo a menos que
desee eliminar completamente toda la programación, incluyendo la hora y la fecha.
Si no ocurre ninguna programación después de que el botón
REINICIACIÓN bse haya oprimido y la esfera está en la
posición AUTOMÁTICO, el temporizador asumirá la modalidad
de programación con la que viene de fábrica. En esta modalidad, el temporizador regará automáticamente cada estación
durante 10 minutos, comenzando a las 5 a.m. todos los días.
Seleccione el idioma
• Gire la esfera de selección a PRESUPUESTO/IDIOMA.
• Presione el botón RETARDO POR LLUVIA.
• Presione el botón SIGUIENTE hasta que aparezca en
la esfera el idioma que desea.
• Salga de la modalidad de selección del idioma girando la
esfera de selección o presionando el botón RETARDO POR
LLUVIA.
07WTM002598 57926-24 rA.indd 23 2/16/07 2:07:26 PM
Page 25
24
N
O
R
I
E
G
O
D
I
A
/
P
E
R
Í
O
D
O
A
P
A
G
A
R
A
U
T
O
M
Á
T
I
C
O
H
O
R
A
R
I
O
D
E
C
O
M
I
E
N
Z
O
H
O
R
A
R
I
O
D
E
C
O
M
I
E
N
Z
O
D
U
R
A
C
I
Ó
N
D
E
L
C
I
C
L
O
D
U
R
A
C
I
Ó
N
D
E
L
C
I
C
L
O
D
Í
A
S
D
E
R
I
E
G
O
D
Í
A
S
D
E
R
I
E
G
O
T
I
E
M
P
O
/
F
E
C
H
A
P
R
E
S
U
P
U
E
S
T
O
/
L
E
N
G
U
A
J
E
Coloque la hora del día y la fecha
Si esta es la primera vez que programa el temporizador,
presione el botón pequeño embutido identificado como
REINICIACIÓN.
• Gire la esfera de selección a HORA/FECHA.
• La línea superior de la esfera muestra “HORA.” Coloque la
hora actual presionando bien sea el botón o .
NOTA: Para avanzar más rápidamente a través de la hora u otras
opciones, presione el botón o , en vez de simplemente
presionar y soltar.
• Presione el botón INGRESAR . La pantalla ahora
muestra “AÑO”. Coloque el año actual presionando bien sea
el botón o .
• Presione el botón INGRESAR . La pantalla ahora mues-
tra “MES”. Coloque el mes actual presionando bien sea el
botón o .
• Presione el botón INGRESAR . La pantalla ahora muestra
“FECHA”. Coloque el día actual del mes presionando bien
sea el botón o .
• Salga de la modalidad para colocar hora y fecha en cualquier
momento girando la esfera de selección.
Determine un plan de riego
Ver Pág. 20 para las instrucciones.
Sección 3: Cómo programar su
temporizador
Configure los horarios de comienzo
IMPORTANTE: Las horas múltiples de inicio en el Programa A repetirán el programa de riego. Generalmente, sólo se requiere una hora
de inicio de ciclo para cada programa (A y B) Las horas de inicio no
corresponden a las estaciones individuales.
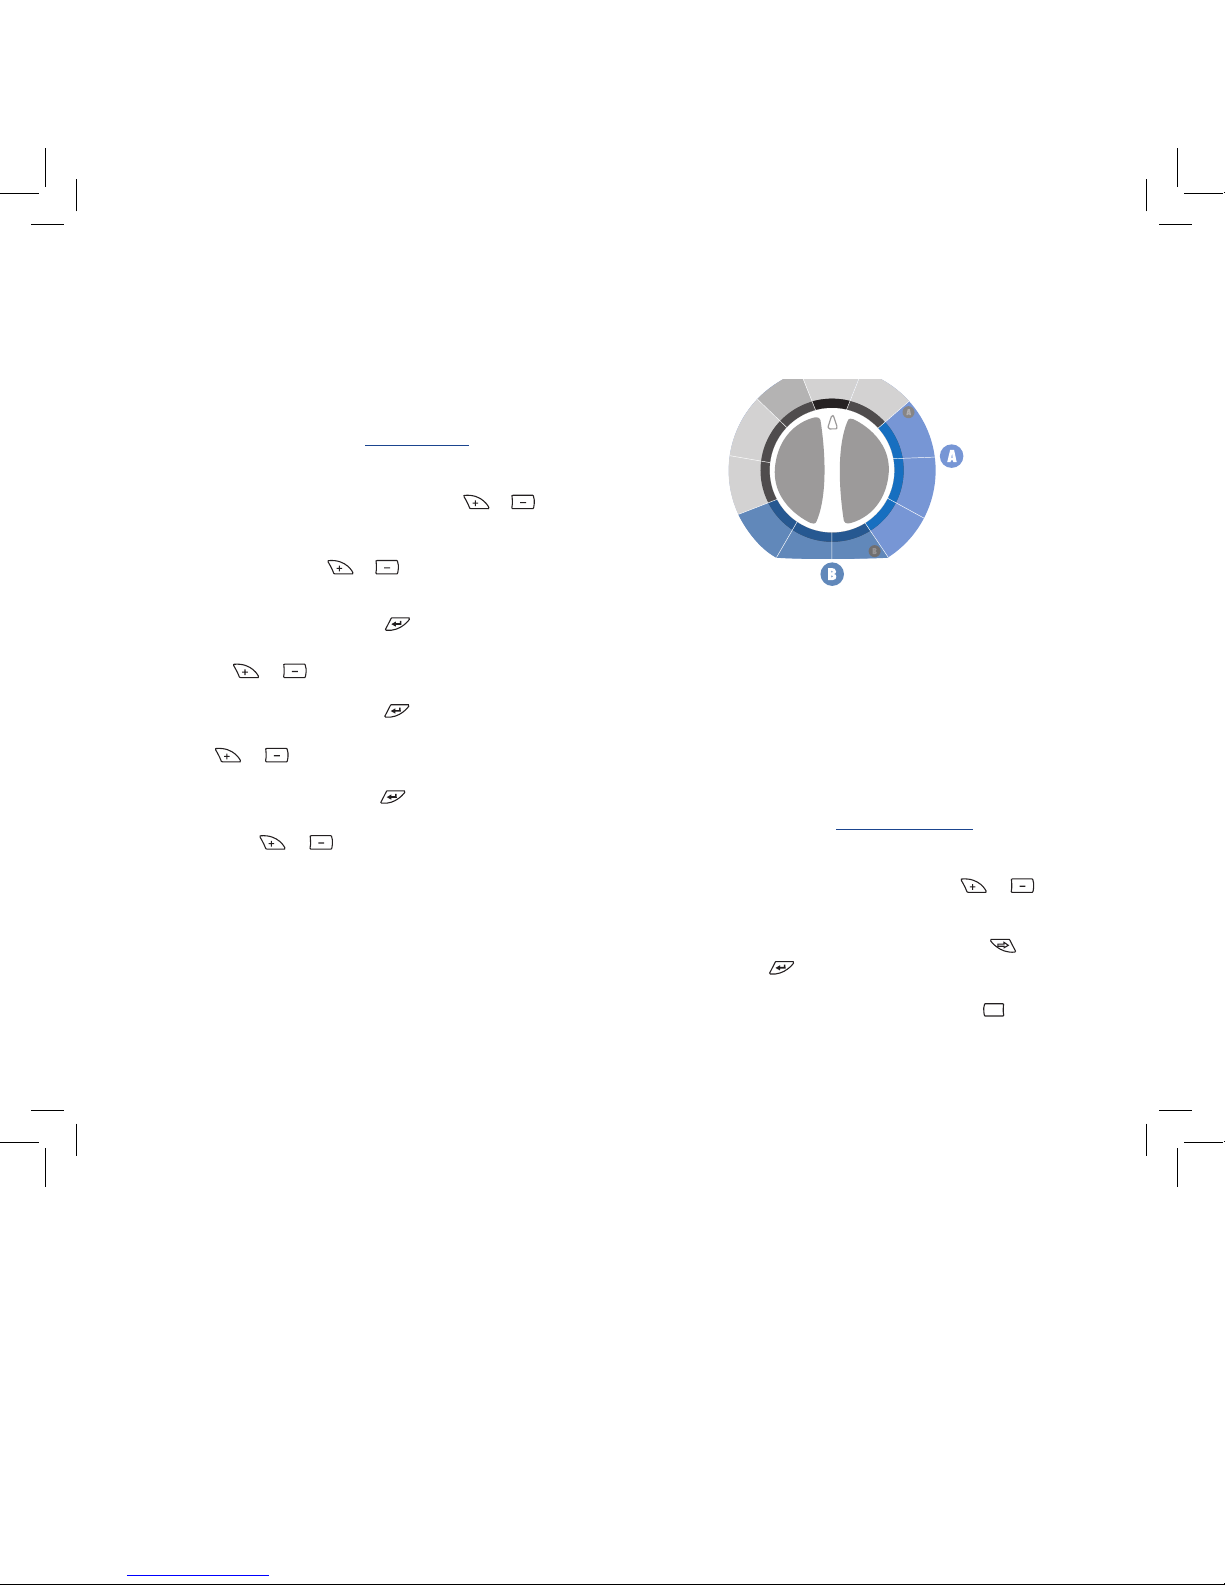
• Gire la esfera de selección a HORAS DE INICIO para el
programa que desee colocar (A o B).
• Fije la hora de inicio 1 utilizando los botones y .
• Si desea establecer horas adicionales de inicio (hasta seis) para
el mismo programa, presione el botón SIGUIENTE o el
botón INGRESAR .
• Para retirar una hora de inicio presione BORRAR .
Figura 2: Configuraciones de pantalla del Programa A y del
Programa B
C
07WTM002598 57926-24 rA.indd 24 2/16/07 2:07:27 PM
Page 26
ESPAÑOL
25
• Salga de la modalidad para colocar hora girando la esfera de
selección.
Coloque la duración del riego de la estación
• Gire la esfera de selección a DURACIÓN para el programa
que desee colocar (A o B).
• Coloque la duración que desee (0 - 120 minutos) para
la estación que se muestra. Presione SIGUIENTE o
INGRESAR para avanzar a la próxima estación. Presione
BORRAR para retirar una duración.
IMPORTANTE: Cada estación puede tener dos duraciones. Por
ejemplo: La estación 1 puede tener una duración de 5 minutos en
el Programa A y una duración de 25 minutos en el Programa B.
Generalmente una estación tiene sólo una duración bien sea en el
Programa A o B. Una estación con una configuración de 0 minutos
no regará con ese programa.
• Si necesita dos programas, repita estos pasos para el otro
programa.
• Salga de la modalidad para colocar duración del riego
girando la esfera de selección.
Establezca los días de riego
• Gire la esfera de selección DÍAS DE RIEGO para el programa
que desee colocar (A o B).
Establezca el riego – días de la semana:
• Presione el botón SIGUIENTE para moverse a
través de los días de la semana [Mo (Lunes), Tu (Martes),
We (Miércoles), Th (Jueves), Fr (Viernes), Sa (Sábado)
and Su (Domingo)]. El día seleccionado destellará. Presione
INGRESAR y aparecerá una gota de agua sobre ese día
de la semana. El programa está ahora configurado para regar
en ese día. El programa puede configurarse para regar con
cualquier combinación de días (Ej. Mo, We, Fr).
• Para desactivar el riego para ese día en particular, presione el
botón BORRAR . La gota de agua desaparecerá.
Configure para regar – días impares:
• Presione el botón SIGUIENTE hasta que el botón
“ODD” (IMPARES) destelle.
• Presione el botón INGRESAR . Aparecerá una gota de
agua sobre “ODD” (IMPARES).
• Puede desactivar la modalidad “ODD” (IMPARES) presionan do el botón BORRAR o seleccionando otra modalidad de
día de riego. La gota de agua desaparecerá.
Configure para regar – días pares:
• Presione el botón SIGUIENTE hasta que el botón
“EVEN” (PARES) destelle.
• Presione el botón INGRESAR . Aparecerá una gota de
agua sobre “EVEN” (PARES).
• Puede desactivar la modalidad “EVEN” (PARES) presionando
el botón BORRAR o seleccionando otra modalidad de
día de riego. La gota de agua desaparecerá.
C
C
C
C
07WTM002598 57926-24 rA.indd 25 2/16/07 2:07:27 PM
Page 27

26
Establezca el intervalo de riego
• Presione el botón SIGUIENTE hasta que el botón
“INT” (INTERVALO) destelle.
• Presione el botón o para seleccionar el intervalo
que desee (seleccione entre cada 1 día o cada 32 días). Un
intervalo de “2” significa que se regará en días alternos.
• Puede desactivar la modalidad “INTERVALO” presionando
el botón BORRAR o seleccionando otra modalidad de
día de riego. La gota de agua desaparecerá.
Configure el temporizador para que
corra los programas automáticamente:
• Gire la esfera de selección a AUTOMÁTICO. El temporiza-
dorestará automáticamente controlado por los parámetros
programados que hayan sido establecidos.
Para desactivar todo el riego:
• Gire la esfera de selección a APAGADO. Esto impide que
el temporizador active cualquier estación de riego en cu alquier momento, independientemente de la programación.
Para impedir el riego en un día en particular:
Puede que haya uno o más días de la semana cuando no quiera
tener el agua activada, independientemente de lo que diga el
programa. (Por ejemplo, en algunos distritos está prohibido
regar en ciertos días). Para cancelar el riego programado en días
específicos de la semana, siga estos pasos:
• Gire la esfera de selección a DÍA/PERÍODO SIN RIEGO. Verá
en la esfera los siete días de la semana con una gota de agua
sobre cada día. La gota de agua significa riego en ese día en
particular.
• Presione el botón SIGUIENTE para seleccionar el día
de la semana que no desea regar. (El día destellará).
• Presione el botón BORRAR . La gota de agua sobre ese
día desaparecerá y la señal de “ON” (MARCHE) en la esquina
inferior derecha de la esfera cambiará a “OFF” (ARRÊT). Esto
significa que el temporizador impedirá el riego ese día.
• Para desbloquear un día que ha sido seleccionado como
un día sin riego, seleccione el día (siguiendo los mismos
pasos), luego presione el botón INGRESAR . La gota
de agua reaparecerá y el “OFF” (ARRÊT) cambiará a “ON”
(MARCHE).
• Salga de la modalidad “DÍA SIN RIEGO” girando la esfera de
selección.
Para impedir el riego durante
un período particular del día:
Puede que haya una hora del día cuando no deseará que se
active el riego, independientemente de lo que esté establecido
en el programa. (Tal vez su comunidad haya prohibido el riego
durante ciertos períodos del día, o usted no desea que los niños
se mojen yendo a la escuela). He aquí lo que debe hacer:
• Gire la esfera de selección a DÍA/PERÍODO SIN RIEGO.
C
C
07WTM002598 57926-24 rA.indd 26 2/16/07 2:07:27 PM
Page 28
ESPAÑOL
27
• Presione el botón RETARDO POR LLUVIA. En la esfera
aparecerá “SIN AUGA INIC PERÍO”.
• Presione bien sea el botón o para establecer el
inicio del período en el que no desea que se active el agua.
• Presione el botón INGRESAR . En el selector aparece
“SIN AUGA FIN PERÍODO”.
• Presione bien sea el botón o para establecer el fin
del período en el que no desea que se active el agua.
• Salga de la modalidad “PERÍODO SIN RIEGO” girando la
esfera de selección.
NOTA: Si el riego programado se interrumpe con un período sin
riego, el temporizador retomará la programación de riego donde la
dejó tan pronto termine el período sin riego. Si el período sin riego
impide el riego programado desde el principio, el temporizador comenzará el riego tan pronto como termine el período sin riego. Esta
característica se conoce como “apilamiento.”
Establezca el presupuesto de riego:
El presupuesto de agua es una forma rápida de ajustar la
duración del riego (10 a 200%) con base a las necesidades de
la estación.
• Gire la esfera de selección a PRESUPUESTO/IDIOMA.
• Bien oprima el botón para aumentar los tiempos
de riego o presione el botón para disminuir las veces
en incrementos de 10 por ciento. Una configuración de
100% no cambiará la duración establecida, una configu-
ración del 200% aumentará la duración de 10 minutos a 20
minutos y la configuración del 10% disminuirá la duración
de 10 minutos a 1 minuto.
• Salga de la modalidad de presupuesto de riego girando la
esfera de selección.
Pruebe todas las estaciones:
Con la función “PROBAR TODAS” puede probar fácilmente
todas las estaciones de riego activándolas en secuencia durante
un minuto cada una.
• Con la esfera en la posición AUTOMÁTICO presione el
botón MANUAL .
• La esfera muestra “PROBAR TODO” a la derecha de las letras
“A” y “B.”
• Presione el botón INGRESAR .
Cada estación de riego se activará durante un minuto, en
secuencia. Para cancelar este proceso antes de que se termine la
prueba, presione el botón BORRAR . Para avanzar rápidamente de una estación a la próxima, presione SIGUIENTE .
De otro modo el temporizador saldrá automáticamente de la
modalidad “PROBAR TODAS” luego que todas las estaciones se
hayan activado durante un minuto.
Riego manual – Todas las estaciones:
Con la función “TODAS MANUALMENTE”, puede activar
manualmente las estaciones de riego en cualquier momento.
C
07WTM002598 57926-24 rA.indd 27 2/16/07 2:07:28 PM
Page 29
28
• Con la esfera en la posición AUTOMÁTICO presione el
botón MANUAL .
• Presione el botón SIGUIENTE .
• La esfera muestra “MANUAL TODO” a la derecha de las
letras “A” y “B.”
• Presione el botón INGRESAR .
Cada estación con una duración establecida regará en secuencia. Para avanzar rápidamente de una estación a la próxima,
presione SIGUIENTE .
Para cancelar este proceso antes que el riego manual se haya terminado, presione BORRAR . De otro modo el temporizador
saldrá automáticamente de la modalidad “TODAS MANUALMENTE” luego que todas las estaciones se hayan activado.
Riego manual – Programa A:
Este le permitirá regar solamente aquellas estaciones con duraciones establecidas en el Programa A.
• Con la esfera en la posición AUTOMÁTICO presione el
botón MANUAL .
• Presione el botón SIGUIENTE hasta que aparezca en la
esfera “A-MANUAL TODO”.
• Presione el botón INGRESAR .
Cada estación regará, en secuencia, una después de la otra,
durante la misma duración especificada en el Programa A. Para
avanzar rápidamente de una estación a la siguiente presione
SIGUIENTE .
Para cancelar este proceso antes que el riego manual se haya
terminado, presione BORRAR . De otro modo el temporizador saldrá automáticamente de la modalidad “A -MANUAL
TODO” luego que todas las estaciones del Programa A se hayan
activado.
Riego manual – Programa B:
Le permitirá regar solamente aquellas estaciones con duraciones
establecidas en el Programa B.
• Con la esfera en la posición AUTOMÁTICO presione el
botón MANUAL .
• Presione el botón SIGUIENTE hasta que aparezca en la
esfera “B-MANUAL TODO”.
• Presione el botón INGRESAR .
Cada estación regará, en secuencia, una después de la otra,
durante la misma duración especificada en el Programa B. Para
avanzar rápidamente de una estación a la siguiente presione
SIGUIENTE .
Para cancelar este proceso antes que el riego manual se haya
terminado, presione BORRAR . De otro modo el temporizador saldrá automáticamente de la modalidad “B-MANUAL
TODO”) luego que todas las estaciones del Programa B se hayan
activado.
C
C
C
07WTM002598 57926-24 rA.indd 28 2/16/07 2:07:28 PM
Page 30
ESPAÑOL
29
Riego manual – Estaciones individuales:
Le permitirá regar una estación individual de cada vez.
• Con la esfera en la posición AUTOMÁTICO presione el
botón MANUAL .
• Presione el botón SIGUIENTE hasta que aparezca en la
esfera “MANUAL ESTACIÓN 1”.
• Presione el botón SIGUIENTE para seleccionar el
número de estación que desea regar.
• Presione el botón o para seleccionar el número de
minutos para regar esa estación (desde 1 hasta 120 minutos).
• Presione el botón INGRESAR .
Para cancelar este proceso antes que el riego manual se haya
terminado, presione BORRAR . De otro modo el temporizador saldrá automáticamente de la modalidad “MANUAL
ESTACIÓN” luego que la estación elegida se haya activado.
Función de retardo por lluvia:
Puede presionar el botón RETARDO POR LLUVIA para cancelar
todo el riego programado durante un cierto número de horas o
días (por ejemplo, después de la lluvia).
• Con la esfera en la posición AUTOMÁTICO presione el
botón RETARDO POR LLUVIA.
• Presione el botón o para cambiar el período de
retardo por lluvia. Las opciones son: 24 horas, 48 horas, 72
horas, 4 días, 5 días… y hasta 99 días en incrementos de un
día.
• Presione el botón INGRESAR para cambiar la modali-
dad de retardo por lluvia. Las horas de postergación de lluvia
que queden aparecerán en la esfera.
El temporizador regresará a la programación establecida cuando
termine el período de retardo por lluvia. Para regresar a la
programación establecida antes de que termine el período de
retardo por lluvia, presione el botón BORRAR .
Avance manual durante el riego:
• Presionar el botón SIGUIENTE avanzará el riego
de la estación actual a la siguiente en el ciclo. Esto puede
hacerse durante el riego programado, manual o de activación
remota.
Sección 4: Uso del dispositivo
de control remoto
NOTA: El temporizador aceptará instrucciones del dispositivo
de control remoto solamente cuando la esfera de selección esté en
AUTOMÁTICO u APAGAR. (Si la esfera de selección se encuentra
en cualquier otra posición, las instrucciones del dispositivo de control
remoto se almacenarán en la memoria y se ejecutarán cuando la
esfera de selección se haya colocado en AUTOMÁTICO).
Coloque una batería en el dispositivo de
control remoto:
• Abra la tapa del compartimiento de la batería.
C
C
07WTM002598 57926-24 rA.indd 29 2/16/07 2:07:28 PM
Page 31

30
• Coloque una batería de 9 voltios en el compartimiento para
batería.
• Vuelva a colocar la tapa del compartimiento de la batería.
Para sincronizar el dispositivo de control
remoto con el temporizador:
El dispositivo de control remoto que se suministra con su
temporizador ya está sincronizado con él. Si el control remoto
no funciona adecuadamente o si añade un nuevo remoto o un
sensor RF a su sistema, haga lo siguiente:
• Con el dispositivo de remoto en su mano, presione el botón
“Sincronización RF” (Sincronización RF) en el temporizador
(lo cual activará una luz roja en el temporizador).
• Presione el botón APAGAR en el remoto u oprima el vástago
del sensor RF (la luz roja deberá comenzar a parpadear).
• Si la luz roja parpadea significa que ha sincronizado los
dispositivos acertadamente. Si la luz no parpadea verifique que
el remoto tenga una batería nueva de 9 V o que el interruptor
del sensor RF no esté en APAGAR y vuelva a ejecutar el
proceso nuevamente.
Para regar todas las estaciones:
• Presione y suelte el botón TOUTES del dispositivo de
control remoto para seleccionar todas las estaciones para el
riego.
• Presione y suelte el botón MARCHE “X” MIN para ordenar al
temporizador que riegue todas las estaciones en secuencia
durante el número de minutos “X” que se desea.
• Si desea avanzar a la próxima estación antes de que se haya
terminado el tiempo de riego de una estación, presione
SIGUIENTE.
Para regar una estación:
• Presione el número de la estación que desea regar.
• Presione MARCHE “X” MIN para regar la estación durante el
número de minutos “X” que se desea.
Para regar más de una estación específica:
• Presione los números de las estaciones que desea regar.
(Ejemplo: 3, 7, 10, y 6. El temporizador regará en secuen cia desde el más bajo hasta el más alto. 3, 6, 7, 10). (In dependientemente del orden en el cual presione las teclas, el
temporizador las regará en secuencia ascendente).
• Presione MARCHE “X” MIN para regar las estaciones para el
número “X” de minutos que desee.
Para cancelar el funcionamiento del
dispositivo de control remoto y regresar
al control del temporizador:
• Presione el botón ARRÊT en el dispositivo de control remoto.
Esto borra cualquier instrucción actual del dispositivo y
restituye el control al temporizador.
07WTM002598 57926-24 rA.indd 30 2/16/07 2:07:29 PM
Page 32
ESPAÑOL
31
Sección 5: Uso del sensor
Lluvia-helada opcional
Puede adquirirse por separado un sensor opcional de lluviahelada para impedir el riego programado por un período de
tiempo específico después de que llueva o durante las épocas en
las cuales las temperaturas caen por debajo de una temperatura específica. El sensor tiene configuraciones para LLUVIA,
APAGADO y LLUVIA/HELADA Por favor refiérase al manual
que acompaña el sensor de lluvia-helada para las instrucciones
de instalación y programación.
NOTA: El sensor de lluvia-helada funcionará solamente cuando el
selector en el temporizador se cambie a AUTOMÁTICO.
Sección 6: IInstalación del temporizador
del aspersor y el remoto para montaje
en interiores manguito de control
NOTA: Antes de la instalación, por favor tenga a mano las siguientes
herramientas:
• Destornillador Phillips
• Pelacables
Cómo instalar el temporizador del aspersor
siguiendo cinco fáciles pasos
1. Elija el lugar
Elija el lugar teniendo en cuenta lo siguiente:
• Ubicado cerca de una salida eléctrica (Evite usar un
tomacorriente controlado por un interruptor).
• En un área interna y seca, donde la temperatura de
funcionamiento sea menor a los 32° o superior a los
122° Fahrenheit (debajo de los 0 grados y superior a los
50 grados Celsius).
• No expuesto a la luz directa del sol.
• Accesible a los cables del aspersor desde las válvulas.
2. Monte la base de acoplamiento
• Saque el temporizador deslizándolo de la base de
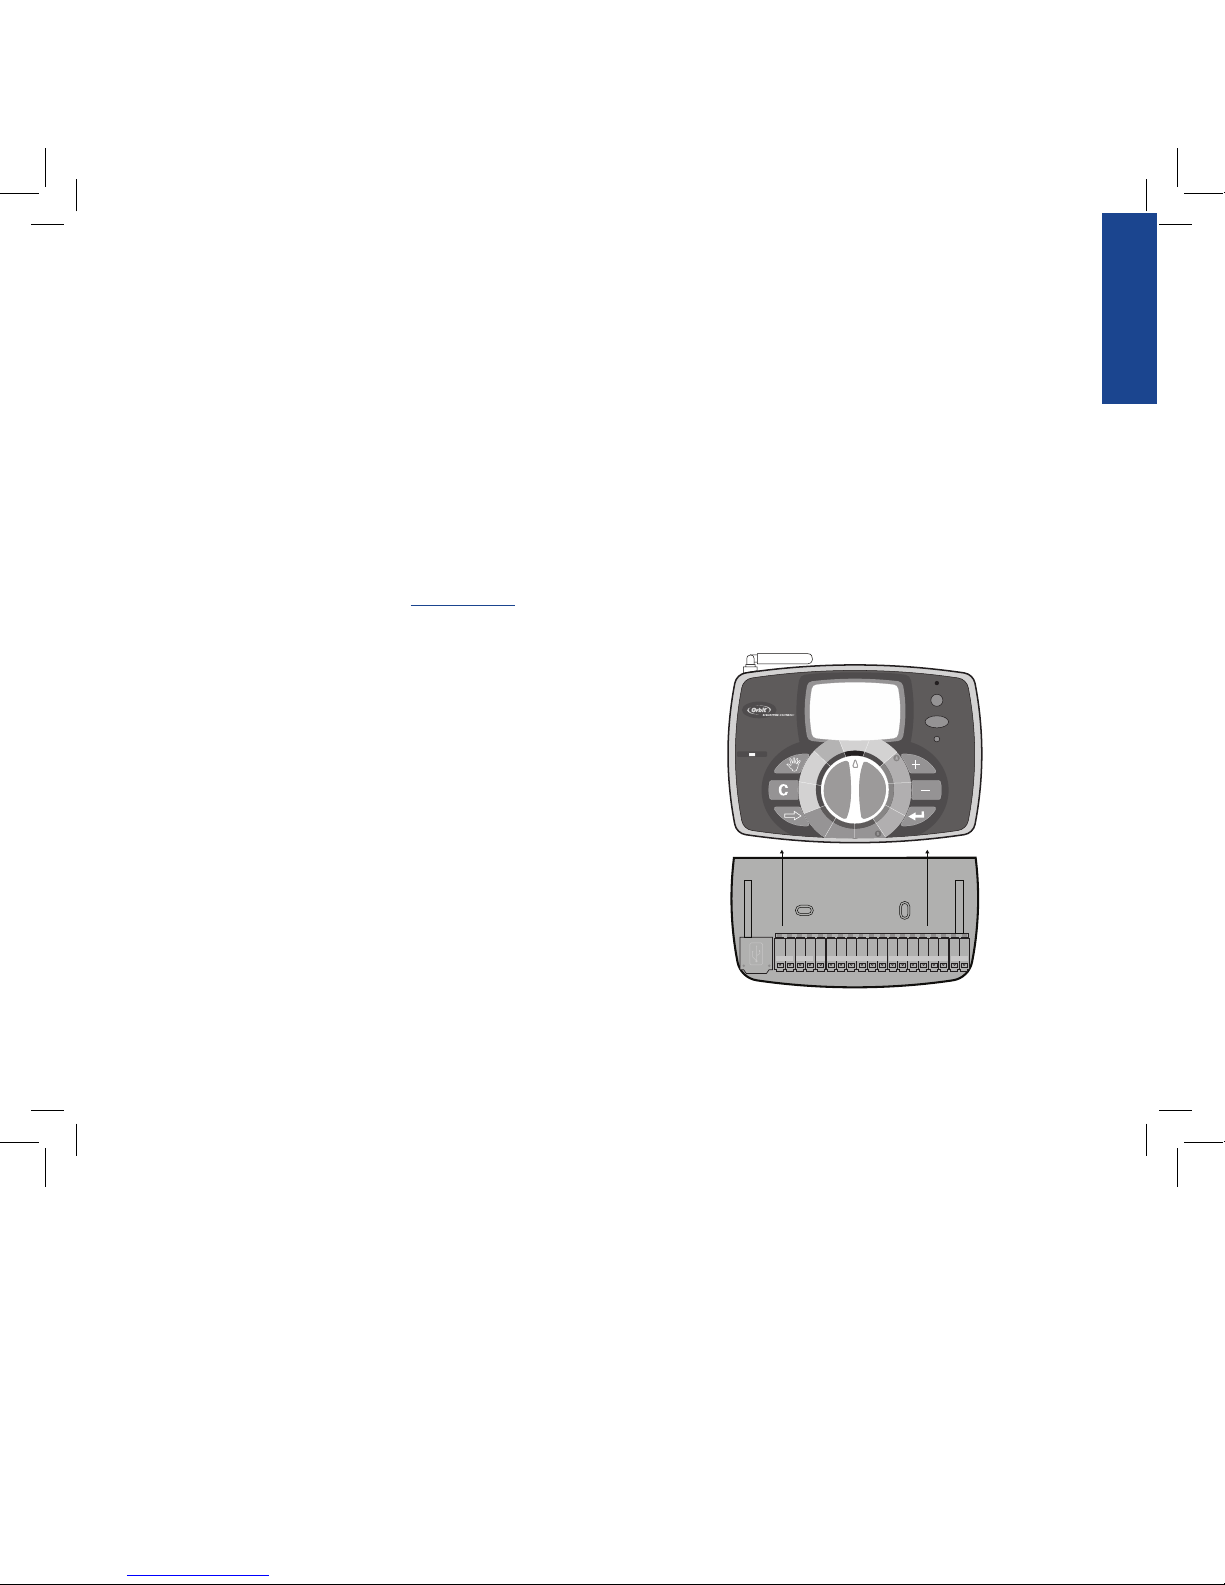
acoplamiento. (Vea la Figura 3)
• Con la plantilla de montaje (incluida), marque
en la pared el lugar donde colocará los dos tornillos,
Figura 3: Cómo montar la base de acoplamiento
Saque el temporizador deslizándolo
de la base de acoplamiento
SENSOR COM PUMP 1 2 3 4 5 6 7 8 9 10 11 12
24 VAC
ACTIVO PUENTE
N
O
W
A
T
E
R
I
N
G
D
A
Y
/
P
E
R
I
O
D
N
O
R
I
E
G
O
D
I
A
/
P
E
R
Í
O
D
O
A
P
A
G
A
R
A
U
T
O
M
Á
T
I
C
O
H
O
R
A
R
I
O
D
E
C
O
M
I
E
N
Z
O
H
O
R
A
R
I
O
D
E
C
O
M
I
E
N
Z
O
D
U
R
A
C
I
Ó
N
D
E
L
C
I
C
L
O
D
U
R
A
C
I
Ó
N
D
E
L
C
I
C
L
O
D
Í
A
S
D
E
R
I
E
G
O
D
Í
A
S
D
E
R
I
E
G
O
T
I
E
M
P
O
/
F
E
C
H
A
P
R
E
S
U
P
U
E
S
T
O
/
L
E
N
G
U
A
J
E
RETARDO POR LLUVIA
SINCRONIZACIÓN RF
RESTAURACIÓN
LLUVIA SENSOR
07WTM002598 57926-24 rA.indd 31 2/16/07 2:07:30 PM
Page 33
32
luego perfore los agujeros en el lugar marcado para los
tornillos No. 8. En caso de ser necesario, utilice tarugos
de expansión en paredes de yeso o mampostería.
• Coloque la base de acoplamiento contra la pared,
alineando los dos agujeros de la base de acoplamiento
con los dos agujeros perforados en la pared.
• Asegure la base de acoplamiento a la pared introduciendo
los tornillos No. 8 (incluidos) en cada uno de los
dos agujeros.
• Aún no coloque el temporizador en la base de
acoplamiento.
3. Conecte el transformador
• Detecte los dos receptáculos en la parte inferior de la base
de acoplamiento marcada “24VAC.” (Vea la Figura 4)
• Asegúrese de que el transformador no esté enchufado; lu ego, inserte uno de los dos conductores de alimentación
del transformador en cada receptáculo de la terminal
usando un destornillador Phillips para presionar el botón
de la terminal (esto permite la inserción o remoción del
cable).
• Enchufe el transformador.
ADVERTENCIA: No instale dos o más temporizadores para aspersores en un transformador.
4. Conecte los cables de la válvula al temporizador, termi nales de la válvula principal y la bomba de comienzo
A. Realice el cableado de las válvulas eléctricas
NOTA: Si la distancia entre el temporizador del aspersor y
las válvulas es menor a los 700ft. (210 m), use el cable para
aspersor o el cable termostático revestido en plástico de calibre 20
(AWG) de Orbit® para conectar el temporizador del aspersor a
las válvulas. Si la distancia es superior a los 700 ft. (210 m), use
un cable de calibre 16 (AWG).
• Sosteniendo el cable del aspersor, pele 1/2 in (12 mm)
del aislamiento plástico de la punta de cada cable.
• Conecte un cable de cada válvula (no importa qué cable)
a un cable del aspersor “común”. Generalmente es
blanco. (Vea la Figura 5)
IMPORTANTE: Todos los cables deben estar unidos con tuercas
para cable, soldaduras y/o cinta de vinilo. Para añadir protección
a las conexiones impermeables, puede utilizar un empaque de
grasa Orbit®.
Transfo rmador
SENSOR COM PUMP
Botón d e la t ermi nal
1 2 3 4 5 6 7 8 9 10 11 12
24 VAC
Figura 4: Cómo conectar el transformador
07WTM002598 57926-24 rA.indd 32 2/16/07 2:07:31 PM
Page 34
ESPAÑOL
33
• Luego, conecte el otro cable de cada válvula a un cable
de aspersor individual de color.
• Para evitar riesgos eléctricos, sólo una válvula debe
conectarse a cada estación.
IMPORTANTE: Puede sepultar el cable en la tierra. Sin
embargo, para lograr una mayor protección, puede pasar los
cables a través de una tubería PVC y colocar la misma debajo del
terreno. Cuidado de no enterrar los cables en áreas propensas a
excavaciones o excavaciones de zanjas.
B. Conecte los cables de la válvula al
temporizador del aspersor
• Quite 1/4 in (6 mm) de aislamiento de plástico del
extremo de cada cable.
• Determine qué válvula quiere conectar en cada
estación. Con un destornillador Phillips, presione el
botón de cada terminal para insertar cada cable del
aspersor, excluyendo el cable “común”, en una
terminal de estación individual (de color gris); inserte
completamente el cable pelado en la terminal debajo de
cada número. (Vea la Figura 5)
• Conecte el cable común a una de las dos terminales (de
color blanco) marcada con la palabra “COM”.
NOTA: Inserte sólo un cable en cada receptáculo “COM”. Si se
requieren más de dos cables en común, empalme varios juntos
para que sólo un cable atraviese cada una de las dos terminales
“COM”. Proteja la conexión empalmada con una tuerca para
cable.
C. Conecte la bomba de comienzo y la válvula principal
Este temporizador le permite a la válvula principal o relé de
inicio de la bomba funcionar siempre que una estación esté
andando.
NOTA: Si está activando una bomba desde este temporizador,
debe comprar un relé de inicio de bomba.
Desde el relé de inicio de bomba (o bomba principal);
conecte un cable a la terminal de la “BOMBA” y el otro cable
a la terminal “COM”.
Una vez que haya finalizado todas las conexiones a la base
de acoplamiento, puede volver a colocar el temporizador
deslizándolo en la base de acoplamiento.
5. Monte el estuche para el control remoto
• Con la plantilla de montaje (incluida), marque en la
pared el lugar donde colocará los dos tornillos,
luego perfore los agujeros en el lugar marcado para los
Válvula s de Estac ión
Cable C omún
SENSOR COM PUMP 1 2 3 4 5 6 7 8 9 10 11 12
24 VAC
Terminal Button
Figura 5: Cómo conectar el cable del aspersor
07WTM002598 57926-24 rA.indd 33 2/16/07 2:07:32 PM
Page 35

34
tornillos No.8. En caso de ser necesario, utilice tarugos
de expansión en paredes de yeso o mampostería. (El
estuche puede montarse en cualquier lugar y no necesita
estar al lado del temporizador).
• Coloque el estuche para el control remoto contra la pared,
alineando los dos agujeros del estuche con los dos agujeros
perforados en la pared.
• Asegure el estuche a la pared introduciendo los tornillos
No. 8 (incluidos) en cada uno de los dos agujeros.
• Coloque el control remoto deslizándolo en el estuche.
Sección 7: Interruptor de circuito
con diagnóstico
Detección y diagnóstico de fallas Smart-Scan
®
Un sensor de diagnóstico de fallas escaneará automáticamente
la presencia de un solenoide averiado o corto en una válvula
durante cada secuencia de riego. Si se detecta una estación
averiada, el temporizador del aspersor cambiará a la próxima
estación de riego. Smart-Scan® también detecta si el cableado
está dañado en la bomba o válvula principal. Una vez detectada
la estación de riego averiada, la misma es interrumpida.
Aviso de falla
• Estación averiada: Aparece “FAULT” (“FALLA”) y “Station
XX” (“Estación XX”). Cuando se detectan varias estaciones
averiadas, sólo aparecerá en la pantalla la última estación
averiada.
• Cableado averiado de la bomba/válvula principal: Aparece en
la pantalla “PUMUP FAULT” (“BOMBA AVERIADA”).
Cómo corregir la falla
1. Primero, repare el corto presente en el cableado o
reemplace el solenoide averiado.
2. Pruebe la estación haciendo andar manualmente la
secuencia de riego.
3. Si no se detecta el corto luego de unos segundos, el aviso
de falla desaparecerá.
4. Si el mensaje de aviso sigue en la pantalla, todavía existe
un corto en el cableado.
Interruptor electrónico interno auto-restaurable
El temporizador del aspersor está equipado con un interruptor
electrónico interno auto-restaurable.
Causas posibles de desconexión del interruptor:
1. Si hay relámpagos en el área.
2. Cuando la fuente de energía tiene una corriente de fuga
eléctrica.
3. Si la estación tiene un corto.
Siempre que una de estas condiciones esté presente, el
interruptor electrónico posiblemente se desconectará, haciendo
que la potencia generada de la estación del temporizador del
aspersor se detenga momentáneamente. Las pilas continuarán
activando el LCD.
07WTM002598 57926-24 rA.indd 34 2/16/07 2:07:32 PM
Page 36
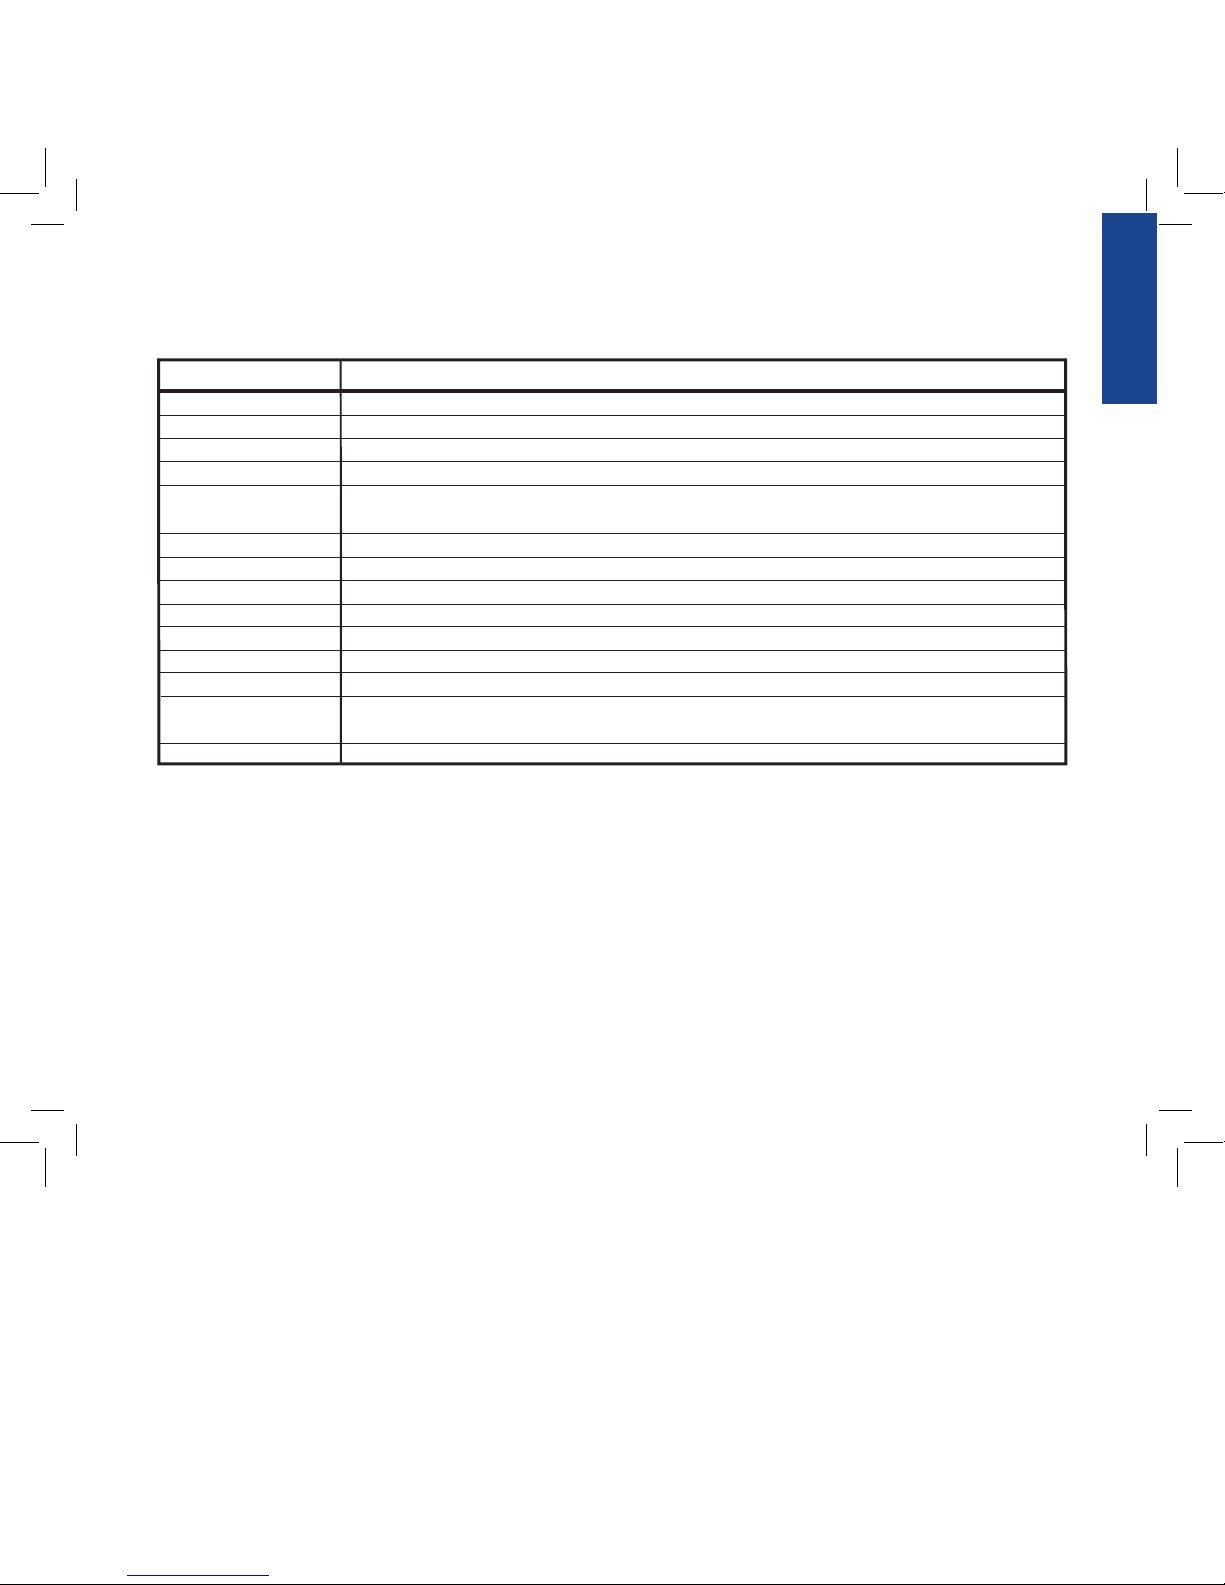
ESPAÑOL
35
Hora de inicio del ciclo
Válvula maestra
Horas de inicio múltiples
Programa (A o B)
Retardo por lluvia
Solenoide
Temporizador del aspersor
Apilamiento
Estación (Estación de riego)
Terminal
Programa de riego
Restricciones de riego
Válvula de riego
(Válvula de irrigación)
Zonas
TÉRMINO
DEFINICIÓN
La hora en que el programa comienza el ciclo de riego
Una válvula que impide que el agua alcance las válvulas de la estación
Una función que permite que un programa pueda operarse múltiples veces en el mismo día
Un horario para un grupo de estaciones que determina la fecha y hora del riego
Una función que impide que el temporizador del aspersor ejecute el programa de riego establecido para una
duración específica
La parte eléctrica de una válvula del aspersor (irrigación) que abre y cierra la válvula
Un dispositivo que es responsable de activar y desactivar un sistema de irrigación automática
Cuando una hora de inicio se programa para comenzar antes que el ciclo previo se haya completado
Un área donde el riego (irrigación) está totalmente controlado por una válvula única de control
El punto de conexión en el terminal de conexión donde se inserta un cable
Ver “Programa (A o B)”
Días y/o horas específicos cuando las municipalidades locales prohíben el riego
Se utiliza en combinación con los temporizadores del aspersor – una forma conveniente de llevar agua al césped,
plantas y jardines
Ver “Estación (Estación de riego)”
Sección 8: Glosario de términos
07WTM002598 57926-24 rA.indd 35 2/16/07 2:07:32 PM
Page 37

36
Determine un plan de riego
Su temporizador tiene dos programas: Programa A y Programa
B. La doble capacidad del programa le permite asignar ciertas
estaciones de riego al Programa A y otras al Programa B. Existen
varias razones por las cuales usted querría hacerlo. Por ejemplo,
puede que desee asignar las estaciones que riegan el jardín
y los canteros al Programa A y aquellas que riegan las áreas
con césped en el patio al Programa B. De esta forma, puede
programar el riego de los canteros todos los días y utilizar el
Programa B para regar el césped cada segundo o tercer día. Su
temporizador le permite establecer hasta seis horas de inicio
diferentes para los ciclos de riego en el Programa A o en el
B. No puede establecer una hora de inicio de ciclo para cada
estación. Las estaciones pueden asignarse bien al Programa A
o al B. Las estaciones asignadas a un programa se activarán en
secuencia de acuerdo a las horas de inicio de ciclo asignadas.
Para ayudarle a visualizar la mejor forma de programar su temporizador, puede resultarle útil elaborar un plan de riego por
escrito. Esto le ayudará a establecer los días, horas y duración
de riego de cada estación.
1. Para cada estación de riego, anote el área de riego, tipo
de cabezal del aspersor, y tipos de plantas a regar.
2. Establezca la mejor duración de riego y la frecuencia para
cada estación.
3. Establezca, basándose en el paso 2, la opción de riego
ideal para cada estación.
Basándose en la información anterior, su programa de riego
puede que se parezca al siguiente:
07WTM002598 57926-24 rA.indd 36 2/16/07 2:07:32 PM
Page 38
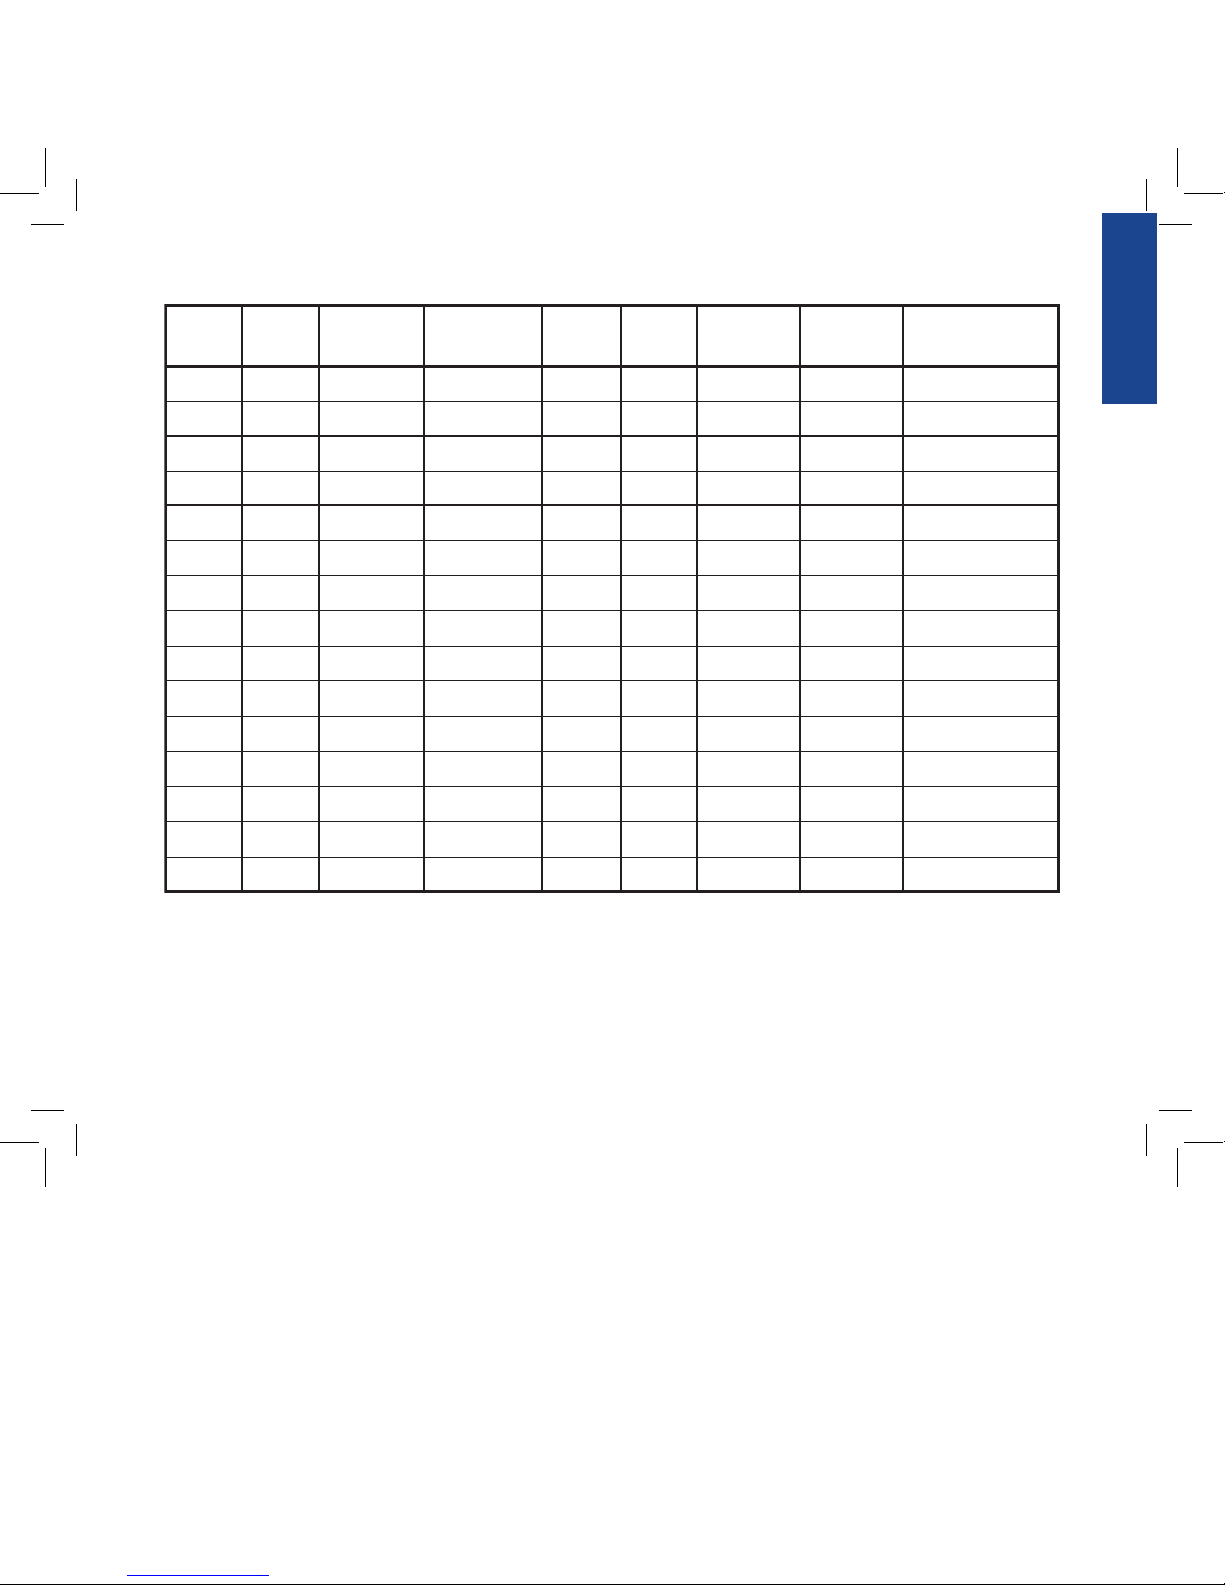
ESPAÑOL
37
A
A
B
Programa
Días de la semana
Días de la semana
Impar/Par
Riego
Opción
1
2
3
Estación
L, Mierc., S
L, Mierc., S
Día de por medio
Días
05:00 p.m.
21:00 p.m.
Horario
de
comienzo
15 min
15 min
30 min
Duración del
ciclo
Minutos
Área frontal
Frente, norte
Atrás, norte
Área
Cabezal del
aspersor
Cabezal del
aspersor
Impulsor por
engranajes
Aspersor
Césped
Césped
Césped
Plantas
07WTM002598 57926-24 rA.indd 37 2/16/07 2:07:33 PM
Page 39
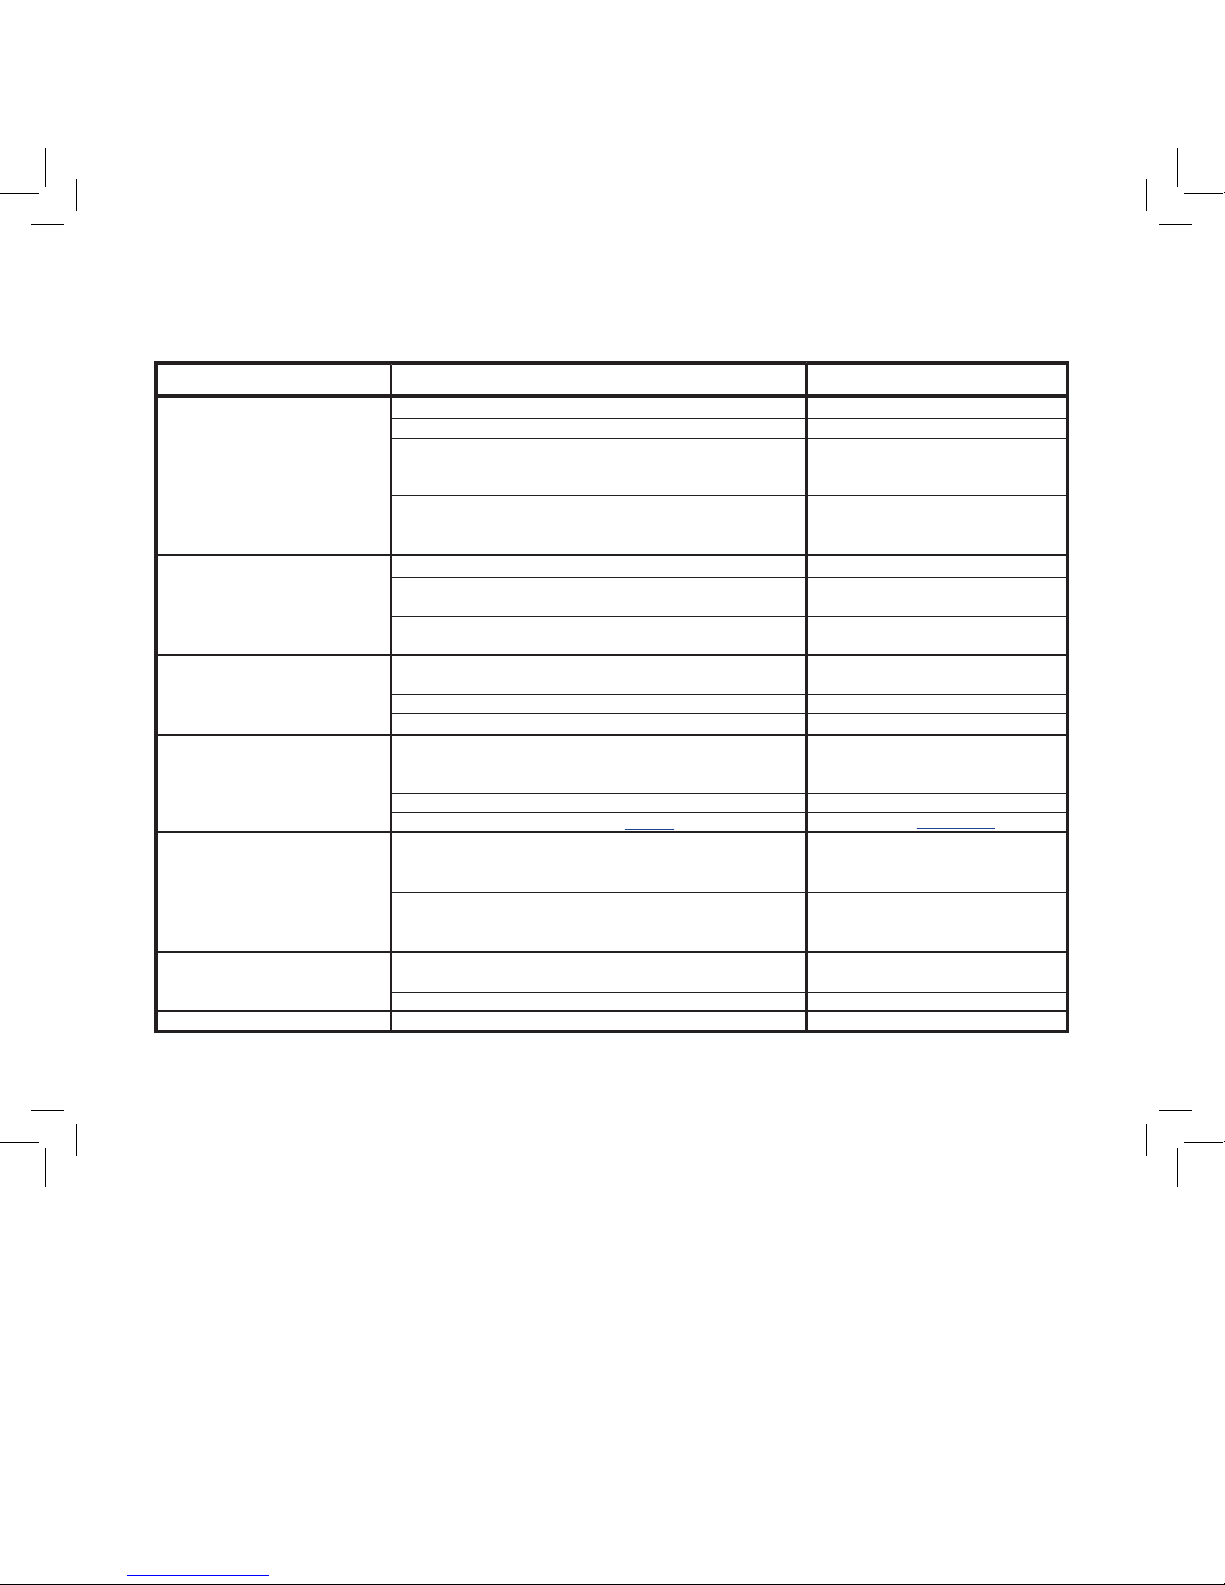
38
Una o más estaciones
no se activan
Las estaciones se activan cuando
no deben hacerlo
Una estación permanece activada
y no se desactiva
Síntoma
Posible causa del problema
Ninguna de las estaciones se activa
1. Solenoide defectuoso
2. Cable roto o no está conectado
3. Vástago de control de flujo hacia abajo, cerrando la válvula
4. La programación es incorrecta
1. Válvula defectuosa
2. Partículas de sucio o desechos atascados en la válvula
3. Diafragma de la válvula defectuoso
El temporizador no responde
Las estaciones continúan activándose
y desactivándose cuando no están
programadas para hacerlo
1. El transformador está defectuoso o no está conectado
adecuadamente
2. La programación es incorrecta
3. El temporizador está en la modalidad Apagado
1. La presión del agua está demasiado alta
2. Se ha programado más de un tiempo de inicio
3. Las estaciones están configuradas para regar con ambos programas
1. El transformador está defectuoso o no está onectado
adecuadamente
2. El temporizador no está completamente insertado en el terminal
de conexión
Corrección
1. Se ha programado más de un tiempo de inicio con horarios
superpuestos
2. Presión excesiva
Falla persistente
1. Corto en el cableado o los solenoides
Cambie el solenoide
Repare el cable y revise las conexiones
Gire el vástago de control de flujo en el
sentido anti-horario hasta que logre el flujo
deseado
Revise para comprobar si la estación en
cuestión está configurada para regar con
un programa
Instale un reductor de presión
Disminuya el número de tiempos de inicio
para ese programa
Coloque la duración de la estación en 0 para
el programa que supone
Compruebe que la válvula no esté instalada
hacia atrás
Retire el sucio o los desechos de la válvula
Cambie el diafragma
Revise las conexiones y el tomacorriente y
si la falla de potencia persiste (NO A/C)
cambie el transformador
Revise la hora de inicio y los días de riego
Gire el selector a AUTOMÁTICO
Revise las conexiones y el tomacorriente y
si la falla de potencia persiste (NO A/C)
cambie el transformador
Presione el temporizador hacia abajo en el
terminal de conexión hasta que la luz
posterior se encienda.
Disminuya el número de tiempos de inicio
para ese programa
Coloque un reductor de presión
Verifique el cableado o cambie el solenoide
Sección 9: Solución de problemas
07WTM002598 57926-24 rA.indd 38 2/16/07 2:07:34 PM
Page 40

ESPAÑOL
39
Asistencia
Antes de devolver el temporizador del aspersor a la tienda,
contáctese con el Departamento de servicios técnicos de Orbit®
al: 1-800-488-6156, 1-801-299-5555.
Clasificación
el temporizador del aspersor ha sido probado para UL-1951
(Models 57922, 57926, 91922, 91926, 94922, 94926) estándar
es ETL® clasificado. Los modelos internacionales apropiados
CSA® y CE® están aprobados.
La garantía limitada de seis años de productos de irrigación
Orbit® Irrigation Products, Inc. garantiza a sus clientes que sus
productos estarán libre de defectos en los materiales y la mano
de obra durante un período de seis años a partir de la fecha de
compra.
Reemplazaremos, sin cargo, la pieza defectuosa o las piezas
que presenten defectos debido al uso normal y servicio durante
un período de hasta seis años luego de realizada la compra (se
requiere comprobante de compra).
Reservamos el derecho a inspeccionar la pieza defectuosa
antes de reemplazarla. Orbit® Irrigation Products, Inc. no se
responsabilizará por daños ni costos incidentales o consiguientes ocasionados por la falla del producto. La responsabilidad de
Orbit® bajo esta garantía está solamente limitada al reemplazo o
reparación de este producto.
Para hacer uso de la garantía, devuelva la unidad a su proveedor
con una copia del recibo de ventas.
PROTECCIÓN PARA LOS NIÑOS: El controlador no está diseña-
do para ser usado por menores ni personas de salud delicada que no
se encuentren bajo supervisión. Los menores deben ser supervisados
para asegurarse de que no jueguen con el controlador.
© 2007 Orbit® Irrigation Products, Inc.
All rights reserved. All trade names are registered
trademarks of respective manufacturers listed.
Orbit® Irrigation Products, Inc.
North Salt Lake, UT 84054 USA
www.orbitonline.com | 1-800-488-6156
07WTM002598 57926-24 rA.indd 39 2/16/07 2:07:34 PM
 Loading...