

Page 1
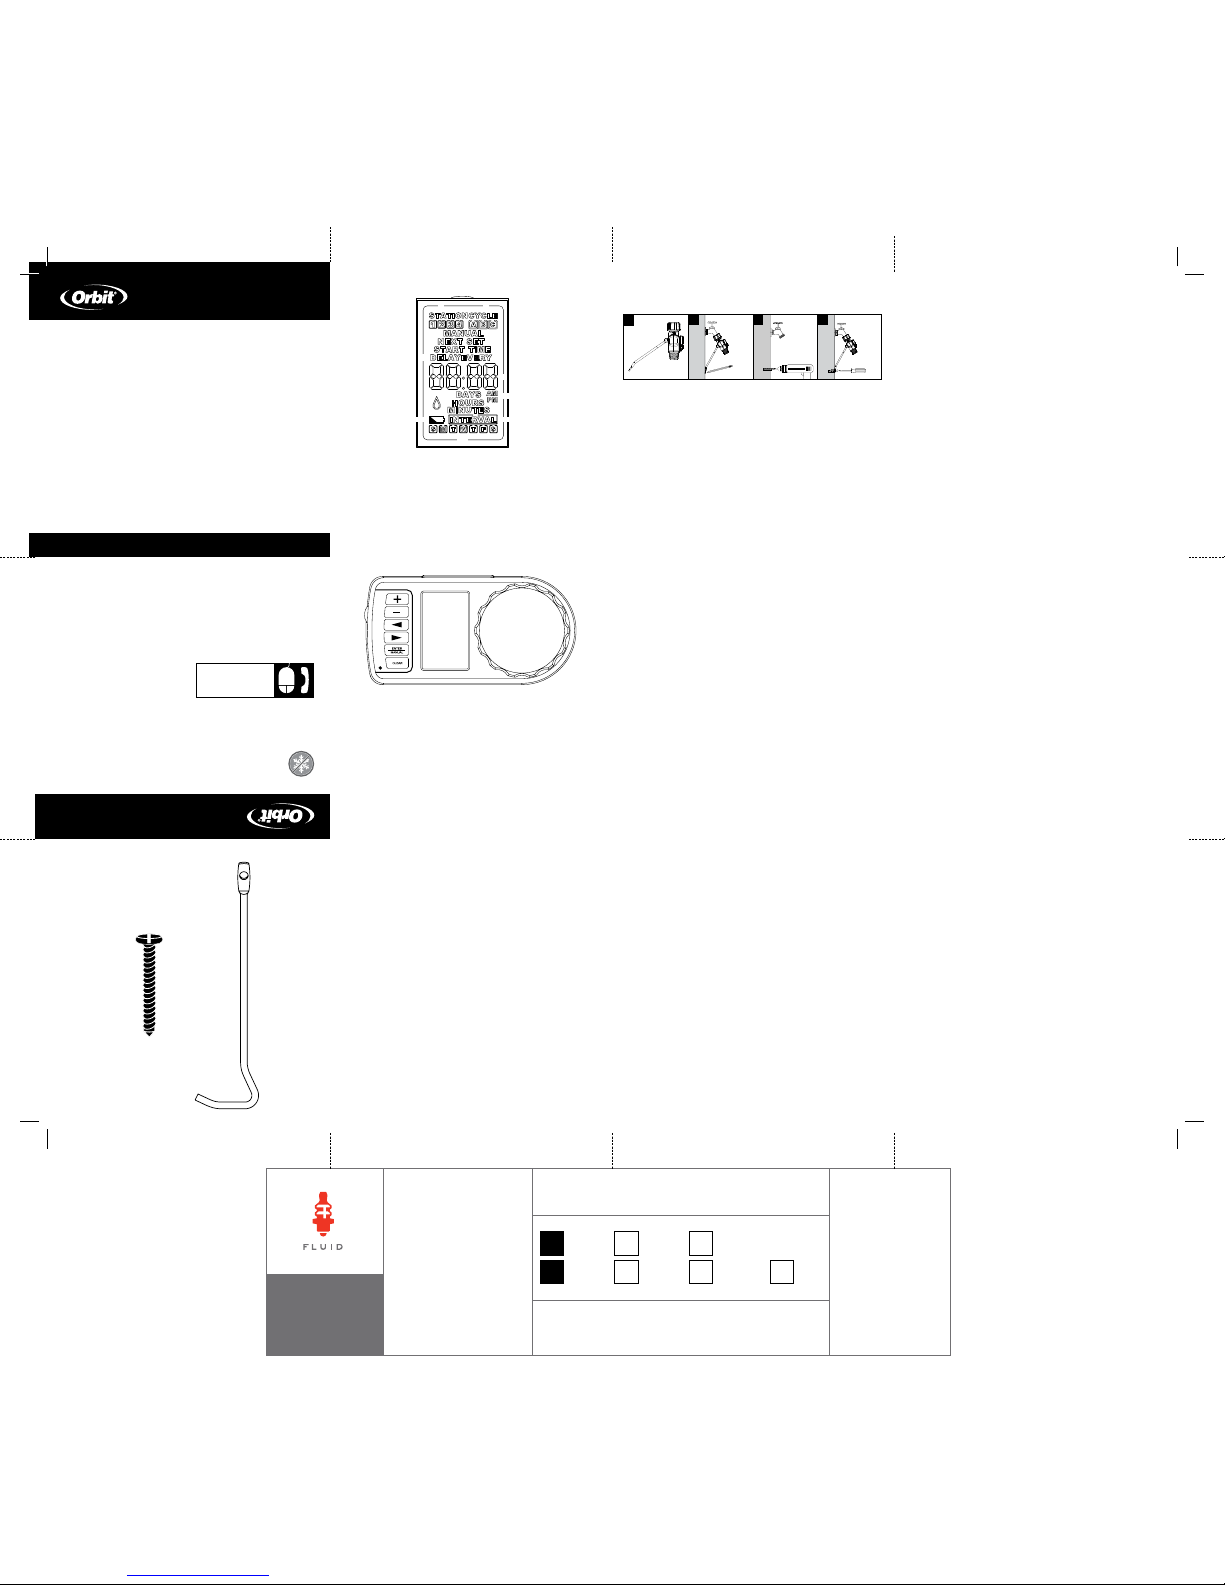
Model 56041
1 Watering stations
2 Indicates when next
watering cycle will start
3 Manual watering is on
4 How often timer will
water in interval mode
5 Cycle start times
6 Timer is in set mode
7 Rain delay is on
8 Timer is watering
1 Battery tray
2 LCD screen—displays setting and watering program for timer
3 Function dial—turns to set watering program
4 CLEAR button—clears individual settings of program
5 + – buttons—advance or reverse settings
6 < > buttons—move cursor to different settings
7 ENTER/MANUAL button—selects setting or turns on rain
delay when in AUTO
8 RESET—clears all programmed settings
INSTALLATION
1. Attach manifold to an outdoor hose faucet.
2. Secure manifold to wall using the mounting hardware and
instructions provided.
3. Attach up to 4 valves to the manifold outlets (the valves are
electronically operated and must be attached to the timer
for proper operation). Open fully each of the shut-offs with
a valve attached.
4. Connect the wire from each valve to one of the numbered ports on
the back of the timer. The numbers 1 through 4 are the “STATIONS”
used while programming your timer.
5. Install two AA alkaline batteries into the battery tray (battery tray
may be removed by pulling out to the left).
Please ensure that the valves are attached to the timer before installing
batteries. Once the batteries are installed the timer will immediately begin
a start-up sequence. A countdown from 150 down to 0 will begin on the
display and will take a few minutes. Your timer can be programmed during
the countdown, but the valves cannot be actuated until it is completed.
6. Create your timer program.
7. Slide timer onto a valve mounting bracket.
8. Turn on hose faucet.
Mounting the Manifold to the Wall
1. Attach support rod to manifold by inserting it into the two mounting
holes on the back of the manifold.
2. Mark where support rod touches the wall.
3. Drill a pilot hole using a 1/4 in. drill bit.
4. Attach the support rod using the screw provided.
Installing The Batteries
1. Remove the tray on the side of the timer by sliding it out.
2. Insert two AA (1.5V) alkaline batteries (not included) and replace the tray.
Low battery icon will appear when batteries need replacing. Replace
batteries within 30 seconds or timer programming will be lost.
Tip: Remove batteries when timer is not in use for extended periods.
PROGRAMMING
Rotate the dial to positions indicated for setup.
1. Turn Dial to Set Clock
1. Press the + button to advance clock time (hold button for quick
advance). Press the – button to reverse clock time (hold button for quick
advance). *Keep in mind am/pm.
2. Press ENTER or turn the knob to accept clock time.
2. Turn Dial to Set Day
1. Use the < and > buttons to move cursor (blinking line)
over current day.
2. Press ENTER or turn dial to accept the day.
3. Turn Dial to Start Time
Each start time cycles through all watering stations (1, 2, 3, and 4). Cycle A
is for if you want to water once a day. Add Cycle B if you want to water two
times a day (2 different start times). Add Cycle C if you want to water three
times a day (3 different start times).
1. Use < and > buttons to select start time A, B, or C.
2. Press ENTER to edit start time.
3. Use the + and – buttons to set desired start time.
* Keep in mind am/pm.
4. Press ENTER to accept the setting.
5. Repeat steps 1 through 4 for B and C if you want to water more than
once a day.
To clear a start time:
1. Use the < and > buttons to move the cursor over cycle letter (A, B, C).
2. Press ENTER to select.
3. Press CLEAR.
EXAMPLE: If cycle A is set for 6:00 am, then at 6:00 am your first valve will
turn on and run for its duration, then it will turn off and the second station
will automatically turn on and run for its duration.
4. Turn Dial to Run Time
Set watering duration from 1 to 240 minutes for up to 4 stations.
1. Use the < and > buttons to select the run time for valves stations
1, 2, 3, or 4.
2. Press ENTER after each selected Station. [ ] will appear around the
Stations selected to water.
3. Press CLEAR to deselect a Station.
Or
1. Use the + and – buttons to increase or decrease the number of
minutes to water.
2. Press ENTER to accept the setting.
3. Repeat steps 1 and 2 for each station you would like to water.
5. Turn Dial to How Often
Select which days to water or every 1 to 14 days. All stations and cycles
will water on selected days.
1. Use the < and > buttons to select which days to water Sunday
through Saturday.
2. Press ENTER after each selected day. [_] will appear around days
selected to water.
3. Press CLEAR to deselect a day.
Or select INTERVAL. 1 is every day, 2 is every other day etc. up to 14 days.
1. Use the + and – buttons to increase and decrease the number of days.
2. Press ENTER to accept the setting.
6. Turn Dial to Auto
Timer waters according to programmed start time(s), run time(s), on the
programmed days or interval; this is where you want the dial to have your
program run.
Manual Watering
Allows you to water immediately without interrupting
the set cycle(s).
1. Press the MANUAL button when dial is turned to AUTO
2. Press ENTER to run all stations once as previously
programmed in RUN TIME section. Or, use the < and >
buttons to select which station(s) to manually water.
3. Press ENTER when cursor is over desired watering station.
4. Use + and – buttons to set from 1 to 240 minutes
* There will be a 6 second delay till your cycle will begin
Screen will flash between clock and minutes remaining
on cycle. To remove manual watering and resume
programmed cycle press CLEAR.
Rain Delay
Delay watering cycle during precipitation to conserve water.
1. When in AUTO, press + button for 24 hrs, 48 hrs, or 72 hrs.
Screen will flash between clock and hours remaining before programmed
cycle resumes. To remove rain delay, press CLEAR, or turn dial to OFF and
then back to AUTO.
Off
Off stops the timer from watering and clears Rain Delay.
TROUBLESHOOTING
Water does not come on at desired time. Check if:
■
Clock is set to correct time including AM and PM.
■
Start time is set to desired time including AM and PM.
■
Start times begin after previous watering cycle has run
through all stations and set durations.
■
Rain Delay is on (DELAY appears on left side of screen if on).
Timer does not water. Check if:
■
Shut-off on the valve outlets are open.
■
Timer is set to AUTO.
■
Batteries are low.
■
Clock is set to correct time including AM and PM.
■
Rain Delay is on (DELAY appears on left side of screen if on).
■
Valve plugs are inserted in the correct corresponding timer outlet.
Water won’t turn off. Check if:
■
Watering duration is set to desired time.
■
Start times begin after previous watering cycle has run
through all stations and set duration.
AUTOMATIC YARD
WATERING SYSTEM
INSTRUCTIONS
■
Controls up to 4 stations (comes with 2 valves
that control stations, purchase additional
valves separately).
■
Up to 3 start times per day (cycles A,B,C).
■
Waters from 1-240 minutes per start time
(per valve).
■
For outdoor use with cold water only.
4
3
2
1
1
2
3
4
6
5
7
8
PN 56041-24 rD
Orbit
®
Irrigation Products, Inc.
North Salt Lake, UT 84054
© 2013 Orbit Irrigation Products, Inc.
All rights reserved. All trade names are registered
trademarks of respective manufacturers listed.
p 801 295 9820
f 801 951 5815
www.fluid-studio.net
1065 South 500 West
Bountiful, Utah 84010
proof no: 1
date: 01.11.13
des: SH
client: Orbit
sku: 56041
upc: NA
file name: 56041-24 rB.indd
software: InDesign CS5
colors
additional instructions:
· Font sizes cannot be smaller than 7 pt.
· Proofing Code:
·
color
non printing
PMS
????
PMS
????
color
non printing
PMS
????
Registration
K
Printers are responsible for
meeting print production
requirements. Any changes
must be approved by the
client and Fluid Studio.
printed piece must meet
designated specifications
on this form.
dimensions:
flat: w: 12" h: 9"
finished: w 3.0" d: " h 3.0"
© 2012 Fluid Studio. This
work is the property of Fluid
Studio, and cannot be used,
reproduced or distributed
in any way without their
express permission.
PN 56041-24 rB
9 Clock, start time, and
watering duration
10 AM or PM for clock
and start time
11 Low battery
12 Indicates numbers in clock
section as hours, minutes,
or days
13 Days of the week
14 Interval watering mode
Working Water Pressure
Minimum: 25 psi Maximum: 100 psi
Working Temperature
Maximum: Do not exceed 120° F
Minimum: Keep from freezing
Warnings:
For outdoor use with cold water only.
Customer Service
1.800.488.6156
orbitonline.com
1
2
4
9
8
6
7
5
3
14
13
11
12
10
Product Includes:
A (1) #14 Round Head Screw
B (1) 7 1/4 in. Support Rod
B
A
When expecting freezing temperatures,
timers should be removed from the hose
bib to avoid potential freeze damage.
Page 2
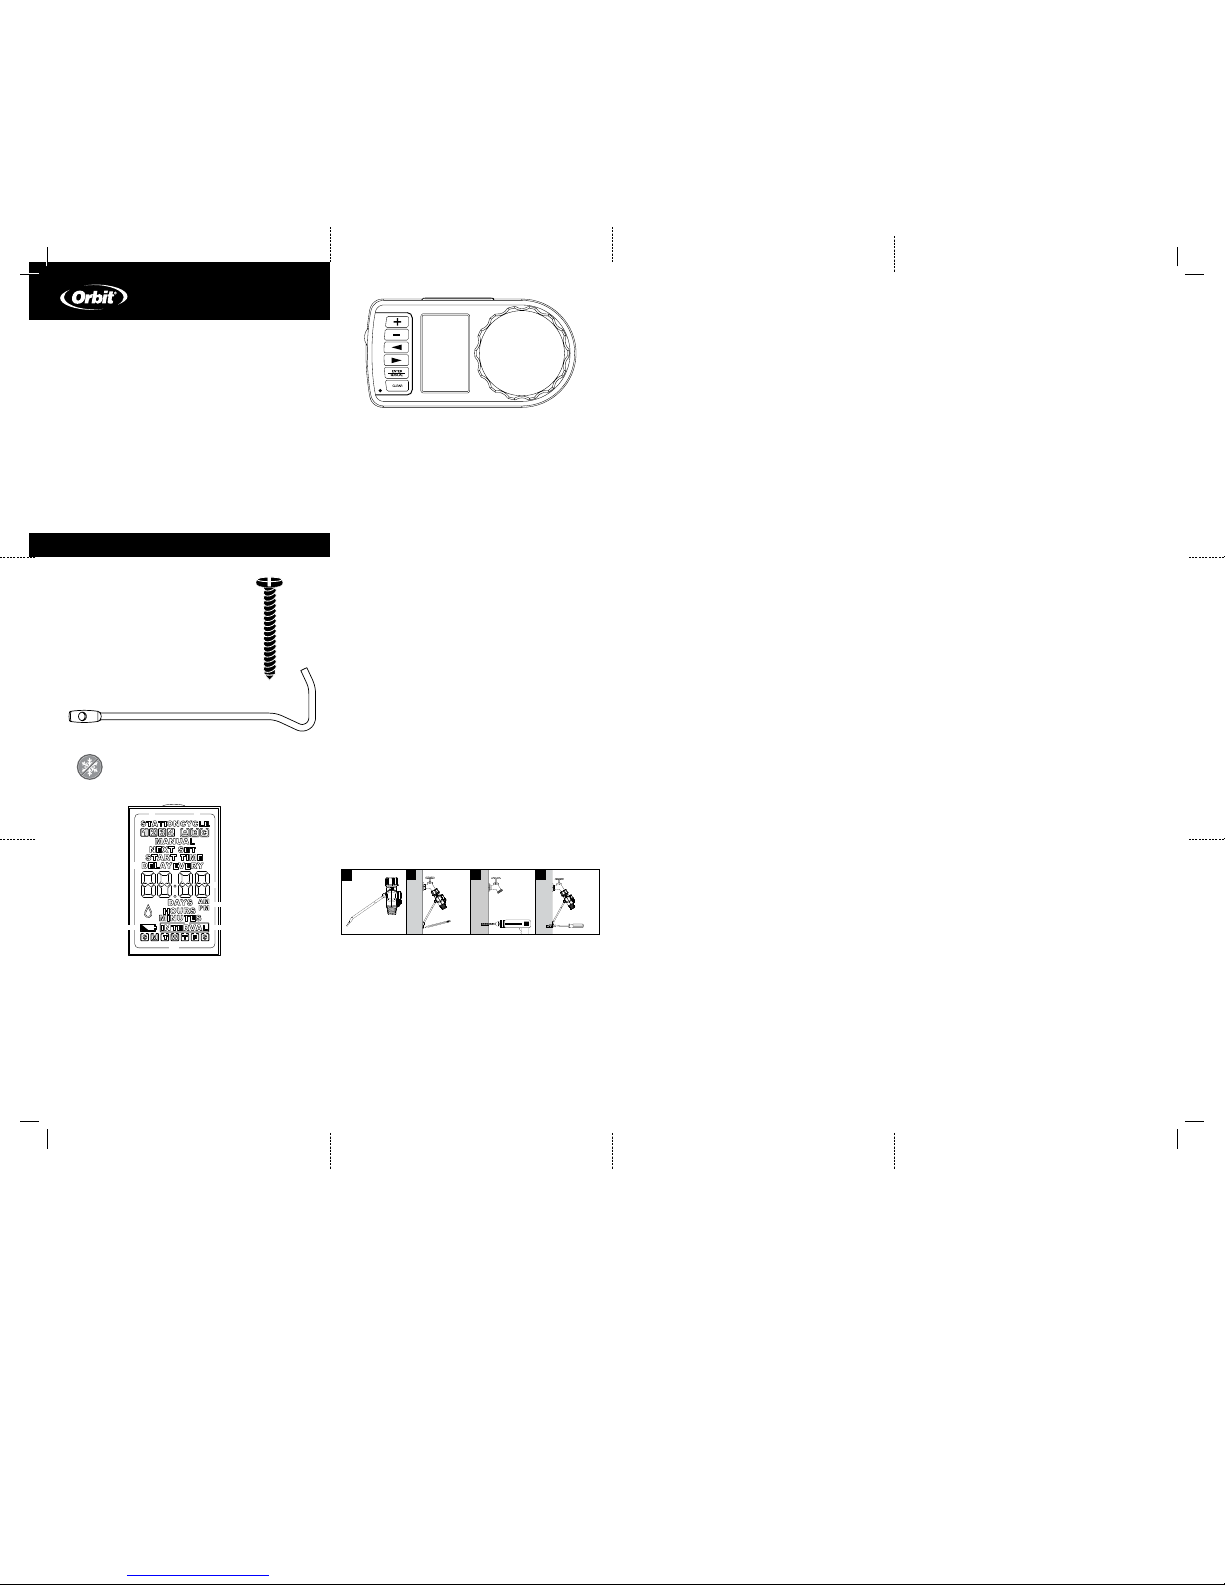
Modelo 56041
1 Estaciones de riego
2 Indica cuando comenzará
el próximo ciclo de riego
3 El riego manual está
activado
4 Con cuánta frecuencia
regará el temporizador en
la modalidad de intervalo
5 Horas de inicio de ciclo
6 El temporizador está en
la modalidad de configuración
7 La postergación por lluvia
está activada
1 Bandeja de la batería
2 Pantalla LCD—muestra la configuración y el programa de riego del
temporizador
3 Esfera de función—gira para configurar el programa de riego
4 Botón CLEAR—borra las configuraciones individuales del programa
5 Botones + – —para avanzar o retroceder configuraciones
6 Botones < > —mueva el cursor a diferentes configuraciones
7 Botón ENTER/MANUAL—selecciona la configuración o activa la
postergación por lluvia cuando está en AUTO
8 RESET—borra todas las configuraciones programadas
INSTALACIÓN
1. Fije el distribuidor a un grifo de manguera de exteriores.
2. Asegure el distribuidor a la pared utilizando los herrajes de montaje y
las instrucciones que se suministran.
3. Fije hasta 4 válvulas a las salidas del distribuidor (las válvulas
trabajan electrónicamente y deberán fijarse al temporizador para el
funcionamiento adecuado). Abre completamente cada una de las llaves
de paso con una válvula fijada.
4. Conecte el cable desde cada válvula a uno de los puertos numerados
en la parte posterior del temporizador. Los números 1 al 4 son las
“ESTACIONES” utilizadas mientras programa el temporizador.
5. Coloque dos baterías alcalinas AA en la bandeja para baterías (puede
retirar la bandeja para baterías halándola hacia la izquierda).
Cerciórese que las válvulas estén fijadas al temporizador antes de instalar
las baterías. Una vez que las baterías estén instaladas el temporizador
comenzará inmediatamente a iniciar la secuencia. En la pantalla aparecerá
una cuenta regresiva de 150 hacia abajo hasta 0, lo cual durará unos
minutos. Su temporizador puede programarse utilizando la cuenta
regresiva, pero las válvulas no pueden activarse hasta que se haya
terminado.
6. Cree su programa en el temporizador.
7. Deslice el temporizador en un soporte de montaje de la válvula.
8. Montaje del distribuidor a la pared.
Montaje del distribuidor a la pared
1. Fije la varilla de soporte al distribuidor insertándola en los dos agujeros
de montaje en la parte posterior del distribuidor.
2. Marque donde el soporte toca la pared.
3. Perfore un agujero guía utilizando una broca de 1/4".
4. Fije la varilla de soporte utilizando el tornillo que se suministra.
Colocación de las baterías
1. Retire la bandeja del costado del temporizador deslizándola
hacia afuera.
2. Inserte dos baterías alcalinas AA (1.5V) (no se suministran) y vuelva a
colocar la bandeja. Cuando las baterías necesiten reemplazo aparecerá
el icono de batería baja. Reemplace las baterías en 30 segundos o se
perderá la programación del temporizador.
Consejo: retire las baterías cuando el temporizador no esté en uso
durante un período prolongado de tiempo.
PROGRAMACIÓN
Gire la esfera a las posiciones indicadas para la configuración.
1. Gire la esfera a Set Clock (configurar reloj)
1. Presione el botón + para adelantar la hora del reloj (mantenga
presionado el botón para avanzar rápidamente). Presione el botón
– para atrasar la hora del reloj (mantenga presionado el botón para
avanzar rápidamente). *Mantenga presente am/pm.
2. Presione ENTER o gire la perilla para aceptar la hora del reloj.
2. Gire la esfera a Set Day (configurar día)
1. Utilice los botones < o > para mover el cursor (línea destellando) sobre
el día actual.
2. Presione "enter" o gire la esfera para aceptar el día.
3. Gire la esfera a Start Time (hora de inicio)
Cada hora de inicio de los ciclos alterna a través de todas las estaciones de
riego (1, 2, 3 y 4). El ciclo A se utiliza si desea regar una vez al día. Añada
el ciclo B si desea regar dos veces al día (2 horas de inicio diferentes).
Añada el ciclo C si desea regar tres veces al día (3 horas de inicio
diferentes).
1. Utilice los botones < o > para seleccionar la hora de inicio A, B o C.
2. Presione ENTER para editar la hora de inicio.
3. Utilice los botones + o – para configurar la hora de inicio que desee.
* Mantenga presente am/pm.
4. Presione ENTER para aceptar la configuración.
5. Repita los pasos 1 al 4 para B y C si desea regar más de una vez al día.
Para borrar una hora de inicio.
1. Use los botones < o > para mover el cursor sobre la letra del ciclo (A,
B, C).
2. Presione ENTER para seleccionar.
3. Presione CLEAR (borrar).
EJEMPLO: Si el ciclo A se ha establecido para las 6:00 a.m., la primera
válvula se activará a las 6:00 a.m. y regará durante el tiempo establecido;
luego se apagará y la segunda estación se activará automáticamente y
regará durante el tiempo establecido.
4. Gire la esfera a Run Time (hora de funcionamiento)
Configure la duración del riego de 1 minuto a 240 hasta para 4 estaciones.
1. Utilice los botones < o > para seleccionar el tiempo de funcionamiento
de las estaciones de las válvulas 1, 2, 3 o 4.
2. Presione ENTER después de cada estación seleccionada. [ ] aparecerá
alrededor de las estaciones seleccionadas para regar.
3. Presione CLEAR para cancelar la selección de una estación.
O
1. Utilice los botones + o – para aumentar o disminuir el número de
minutos de riego.
2. Presione ENTER para aceptar la configuración.
3. Repita los pasos 1 y 2 para cada estación con la que desea regar.
5. Gire la esfera a How Often (con cuánta frecuencia)
Seleccione cuáles días desea regar o cada 1 a 14 días. Todas las
estaciones y ciclos regarán en los días seleccionados.
1. Utilice los botones < o > para seleccionar cuáles días regar desde el
domingo hasta el sábado.
2. Presione ENTER después de cada día seleccionado. [_] aparecerá
alrededor de los días seleccionados para regar.
3. Presione CLEAR para cancelar la selección de un día.
O seleccione INTERVAL. 1 es todos los días, 2 es en días alternos, etc.
hasta 14 días.
1. Utilice los botones + y – para aumentar o disminuir el número de días.
2. Presione ENTER para aceptar la configuración.
6. Gire la esfera a Auto
El temporizador riega de acuerdo a la(s) hora(s) de inicio programada(s),
tiempo(s) de funcionamiento, en los días programados o el intervalo; es
aquí donde desea que la esfera haga funcionar su programa.
Riego manual
Le permite regar inmediatamente sin interrumpir el(los) ciclo(s)
configurados.
1. Presione el botón MANUAL cuando el dial esté en AUTO.
2. Presione ENTER para hacer funcionar todas las estaciones una vez
como lo programó en la sección RUN TIME (tiempo de funcionamiento).
O, utilice los botones < o > para seleccionar cuál(es) estación(es) regar
manualmente.
3. Presione ENTER cuando el cursor se encuentre sobre la estación de
riego deseada.
4. Utilice los botones + o – para configurar desde 1 a 240 minutos
* Habrá un retardo de 6 segundos hasta que el ciclo comience.
La pantalla destellará entre el reloj y los minutos que quedan en
el ciclo. Para retirar el riego manual y retomar el ciclo programado
presione CLEAR.
Postergación por lluvia
Posponga el ciclo de riego durante la precipitación para conservar agua.
1. Cuando está en AUTO, presione el botón + para 24 h, 48 h o 72 h.
La pantalla destellará entre el reloj y las horas restantes antes de que el
ciclo programado se reactive. Para eliminar la postergación por lluvia,
presione CLEAR, o gire la esfera a OFF y luego de nuevo a AUTO.
Off (apagar)
"Off" (apagar) impide que el temporizador riegue y borra la postergación
por lluvia
IDENTIFICACIÓN Y SOLUCIÓN DE PROBLEMAS
El agua no se activa a la hora deseada. Revise si:
■
El reloj se ha colocado en la hora correcta incluyendo AM y PM.
■
La hora de inicio se ha configurado en la hora deseada incluyendo AM y
PM.
■
Las horas de inicio comienzan después de que el ciclo de riego anterior
haya pasado por todas las estaciones y tiempo de duración establecido.
■
La postergación por lluvia está activada (DELAY aparece en el lado
izquierdo de la pantalla si está activada).
El temporizador no riega. Revise si:
■
Las llaves de paso de las salidas de la válvula están abiertas.
■
El temporizador está colocado en AUTO.
■
Las baterías tienen poca carga.
■
El reloj se ha colocado en la hora correcta incluyendo AM y PM.
■
La postergación por lluvia está activada (DELAY aparece en el lado
izquierdo de la pantalla si está activada).
■
Los conectores de las válvulas están insertados en la salida correcta y
correspondiente del temporizador.
El flujo de agua no se detiene. Revise si:
■ La duración del riego está configurada al tiempo deseado.
■ Las horas de inicio comienzan después de que el ciclo de riego anterior
haya pasado por todas las estaciones y tiempo de duración establecido.
INSTRUCCIONES PARA
EL SISTEMA DE RIEGO
AUTOMÁTICO PARA PATIO
■
Controla hasta 4 estaciones (viene con 2 válvulas
que controlan las estaciones; las válvulas
adicionales se adquieren por separado).
■
Hasta 3 horas de inicio por día (ciclos A, B, C).
■
Riega desde 1 hasta 240 minutos por hora de
inicio (por válvula).
■
Para uso en exteriores con agua fría solamente.
4
3
2
1
1
2
3
4
6
5
7
8
8 El temporizador está
regando
9 Reloj, hora de inicio y
duración del riego
10 AM o PM para el reloj y la
hora de inicio
11 Batería baja
12 Indica números en la sec-
ción del reloj como horas,
minutos o días
13 Días de la semana
14 Modalidad de intervalo de
riego
Presión de agua de riego
Mínima: 25 psi Máxima: 100 psi
Temperatura de trabajo
Máxima: no debe exceder de 120 °F (49 °C)
Mínima: Evite el congelamiento
Advertencias:
Para uso en exteriores con agua fría solamente.
1
2
4
9
8
6
7
5
3
14
13
11
12
10
El producto incluye:
A (1) Tornillo cabeza redonda n° 14
B (1) Varilla de soporte de 7 1/4” (18.4 cm)
B
A
cuando se esperen temperaturas de
congelamiento, los temporizadores deben
retirarse de los grifos para manguera para
evitar daÑos potenciales por congelamiento.
 Loading...