


Instruction Manual
SC400 Colorimeter
Copper
Switch the unit on using the ON/OFF key.
The display shows the following:
Attention:
The unit is designed to measure copper either with tablet reagents (Cut)
or with powder packs (CuP).
Please select the required method as described below.
Select the test required using the MODE key:
Cut → CuP → Cut → .......... (Scroll)
The display shows the following:
Fill a clean vial with the water sample up to the 10 ml mark, screw the cap on
and place in the sample chamber with the ∆-mark on the vial aligned with the
∇−mark on the instrument.
Press the ZERO/TEST key.
The method symbol flashes for approx. 8 seconds.
The display shows the following:
After zero calibration is completed, remove the vial from the sample chamber.
Add the appropriate reagent; a color will develop in the sample.
Screw the cap back on and place the vial in the sample chamber with the ∆ and
∇ marks aligned.
Press the ZERO/TEST key.
The method symbol flashes for approx. 3 seconds.
The result appears in the display.
The result is saved automatically.
Repeating the analysis:
Press the ZERO/TEST key again.
New zero calibration:
Press the MODE key until the desired method symbol appears in the display
again.
Operation
METHOD
METHOD
METHOD
0.0.0
RESULT
Cut
On
Off
Mode
Zero
Test
Zero
Test
Display backlight
Press the "!" key to turn the display backlight on or off. The backlight is switched
off automatically during the measurement.
!
Mode
Zero
Test
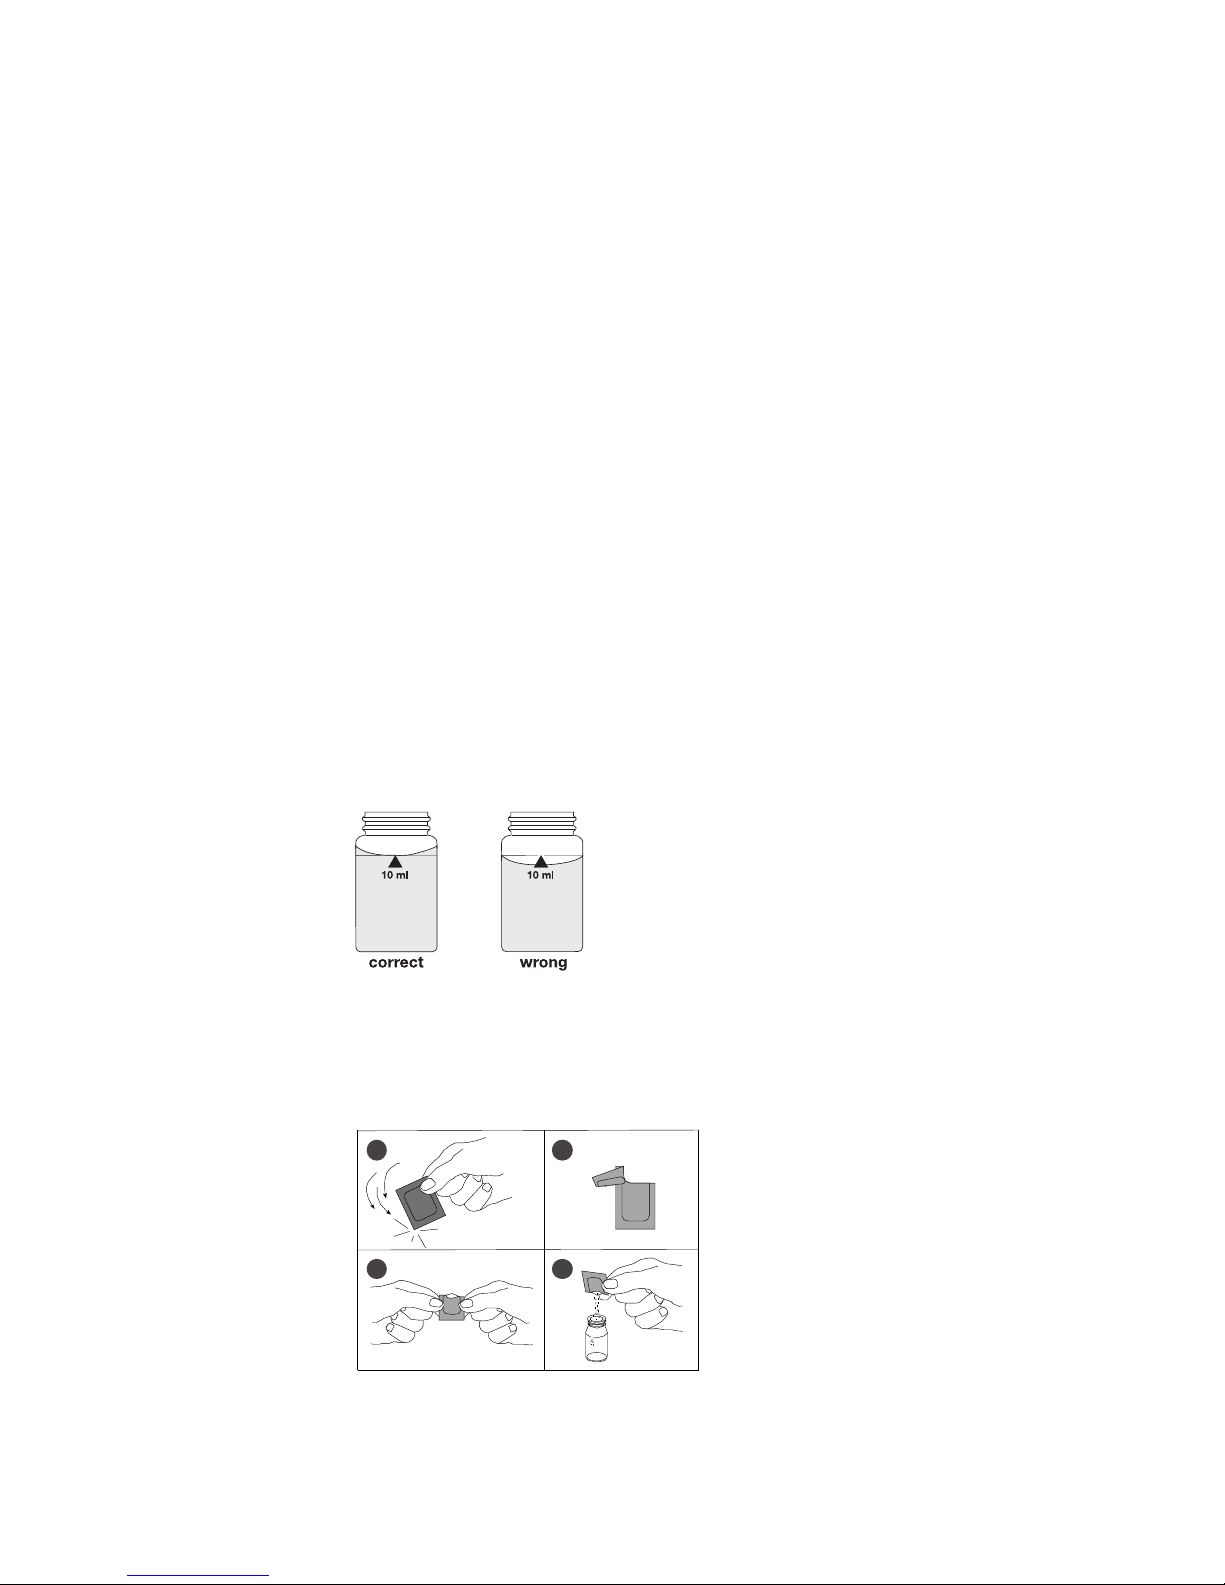
Correct filling of the vial
Opening powder packs
1 2
3
AB
4
Light source: LED, Filter (l = 528 nm)
Battery:
9 V-
block battery (Life 600 tests),
without display light.
Auto-OFF: Automatic switch off 7 minutes after last
keypress
Ambient conditions
:
5-40°C
30-90 % rel. humidity (non-condensing).
CE:
DIN EN 55 022, 61 000-4-2, 61 000-4-8,
50 082-2, 50 081-1, DIN V ENV 50 140, 50 204
Technical Data
Method notes
Prior to measurement ensure that the sample is suitable for analysis
(no major interferences) and does not require any preparation i.e. pH
adjustment, filtration etc.
Reagents are designed for use in chemical analysis only and should be
kept well out of the reach of children. Ensure proper disposal of reagent
solutions.
Material Safety Data Sheets: available on request.
Copper 0.05 - 5 mg/L with tablets (Cut)
0.0.0
(a) free copper
Perform zero calibration (see “Operation”).
Add one COPPER No. 1 tablet straight from the foil to the 10 ml water sample,
and crush using a clean stirring rod. Allow to dissolve completely, close the vial,
and position with ∇ and ∆ alignment.
Press the ZERO/TEST key.
The method symbol flashes for approx. 3 seconds.
The result is shown in the display in mg/L free copper.
(b) total copper
Add one COPPER No. 2 direct from the foil to the already colored sample
immediately after measurement, and crush using a clean stirring rod. Allow to
dissolve completely, close the vial, and position with ∇ and ∆ alignment.
Press the ZERO/TEST key.
The method symbol flashes for approx. 3 seconds.
The result is shown in the display in mg/L total copper.
(c) combined copper
combined copper = total copper - free copper
Measuring tolerance:
0.05 - 1.00 mg/L: ± 0.05 mg/L
1.00 - 5.00 mg/L: ± 0.10 mg/L
RESULT
Cut
Zero
Test
RESULT
Cut
Zero
Test

Copper, free 0.05 - 5 mg/L Cu with Powder Packs (CuP)
Perform zero calibration (see “Operation”).
Add one VARIO Cu 1 F10 powder pack straight from the foil to the
water sample.
Close the vial with the cap tightly and swirl the vial several times to mix the
contents (Note 3).
Place the vial in the sample chamber making sure that the marks are aligned.
Wait for a color reaction timeof 2 minutes.
Press the ZERO/TEST key.
The method symbol flashes for approx. 3 seconds.
The result is shown in the display in mg/L free copper.
Tolerance: ± 0.1 mg/L Cu.
Notes
1. For determination of total Copper digestion is required.
2. Extremely acid water samples (pH 2 or less) must be adjusted to between
pH 4 and pH 6 before the reagent is added (with 8 mol/l Potassium hydroxide
solution KOH).
3. Accuracy is not affected by undissolved powder.
Zero
Test
0.0.0
RESULT
CuP

Press the MODE key and hold.
Switch the unit on using the ON/OFF key.
Allow the 3 decimal points to be displayed before releasing the MODE key.
The “!” key allows for selection of the following menu points:
▲
1
recall stored data
▲
2
▼
3
setting the date and time
▼
4
user calibration
The selected menu is indicated by an arrow in the display.
Confirm the selection with the MODE key.
Recall of stored data
The meter shows the most recent measurements taken in the following format
(automatically proceeds every 3s until result is displayed):
Number n xx (xx: 16...1)
Year YYYY (i.e. 2007)
Date mm.dd (monthmonth:dayday)
Time hh:mm (hourhour:minuteminute)
Test Method
Result x,xx
The ZERO/TEST key repeats the current data set.
The MODE key scrolls through all stored data sets.
Quit the menu by pressing “!” key.
Setting date and time (24-hour-format)
After confirming the selection with the MODE key the value to be edited will be
shown for 2 sec.
The setting starts with the year (YYYY) followed by the actual value to be edited.
Same applies for month (mm), day (dd), hour (hh) and minutes (mm). Set the
minutes first in steps of 10, press the "!" key to continue setting of minutes in
steps of 1.
Increase the value by pressing the MODE key.
Decrease the value by pressing ZERO/TEST key.
Proceed to the next value to be edited by pressing “!” key.
After setting the minutes and pressing the “!” key the display will show “IS SET”
and instrument returns into the measurement mode.
When the battery is taken of for more than 1 minute, the unit will automatically
enter the date/time menu when switched on again.
On
Off
Mode
!
Mode
!
Zero
Test
Mode
!
Time Cal
Store Date
▼
2
▼
3
▼
4
▼
1
Mode
SET
DATE
YYYY
(2 sec.)
Zero
Test
Mode
Menu selections

User calibration
CAL
Cut
CAL
RESULT + x
0.0.0
RESULT
CAL
: :
METHOD
METHOD
CAL
Recommended calibration value
Copper: between 0.5 and 1.5 mg/L Cu
Note:
user calibration (Display in calibration mode)
factory calibration (Display in calibration mode)
Press MODE key and hold.
Switch the unit on using the ON/OFF switch,
Release the MODE key after approx. 1 second.
Select the required menu points using the "!" key.
After confirming the selection with the MODE key the instrument will show CAL/Cut.
Scroll through methods using the MODE key.
Perform zero calibration (see "Operation").
Press the ZERO/TEST key.
The method symbol flashes for approx. 8 seconds.
The display shows the following in alternating mode:
Perform calibration with a standard which concentration is known
(see "Operation").
Press the ZERO/TEST key.
The method symbol flashes for approx. 3 seconds.
The result is shown in the display, alternating with CAL.
If the reading corresponds with the value of the calibration standard (within the
specified tolerance), exit calibration mode by pressing the ON/OFF key.
Changing the shown value:
Otherwise, pressing the MODE key once increases the displayed value by 1 digit.
Pressing the ZERO/TEST key once decreases the displayed value by 1 digit.
Press the corresponding key until the reading equals the value of the calibration
standard.
By pressing the ON/OFF key, the new correction factor is calculated and stored
in the user calibration software.
Confirmation of calibration (3 seconds).
Zero
Test
Zero
Test
Zero
Test
Mode
On
Off
CAL
cAL
Mode
On
Off
!

LO BAT
Resetting the factory calibration
cAL
SEL
SEL
CAL
CAL
SEL
Resetting the user calibration to the oriinal factory setting resets all parameters.
A user calibrated method will be indicated by an arrow in the display.
To reset the calibration to the factory setting:
Press both the MODE and ZERO/TEST key and hold.
Switch the unit on using the ON/OFF key. Release the MODE and ZERO/TEST
keys after approx. 1 second.
The following messages will appear in turn on the display:
The factory setting is active.
(SEL stands for Select)
or:
Calibration has been set by the user.
(If the user calibration is to be retained, switch the unit off using the ON/OFF key.)
Calibration is reset to the factory setting by pressing the MODE key.
The following messages will appear in turn on the display:
Switch the unit off using the ON/OFF key.
Zero
Test
Mode
On
Off
Mode
On
Off
Time Cal
Store Date
▼
Changing the battery
RESULT

Error codes
General error codes
Light absorption too great. Reasons: dirty optics.
Measuring range exceeded or excessive turbidity.
Result below the lowest limit of the measuring range.
Replace 9 V battery, no further tests possible.
Calibration factor "out of range"
Individual error codes
Cut:
Factory calibration incorrect / erase
CuP:
Factory calibration incorrect / erase
Cut:
User calibration incorrect / erase
CuP:
User calibration incorrect / erase
HI
EOOI
LO
LO BAT
EOIO
E 70
E 72
E 71
E 73


Orbeco-Hellige Inc., 185 Marine Street, Farmingdale, NY 11735
Phone: 631-293-4110, Fax: 631-293-8258, service@orbeco.com, www.orbeco.com
 Loading...