

Page 1

GAIN TECHNICAL SPECIFICATIONS
1
BLUE
PAPERS
GAIN
TECHNICAL MANUAL
Page 2
GAIN TECHNICAL SPECIFICATIONS
2
CONTENT
GEOMETRY 3
ERGONOMY 4
CHARACTERISTICS 5
OPTIONS 6
PARTS & HARDWARE 8
CABLE ROUTING 11
INSTRUCTIONS 17
IWOK ONE 21
IWOK TRIO 24
PROTOCOL 27
SOFTWARE EBIKEMOTION 29
MANTEINANCE 30
FRAME & MATERIAL 31
WARRANTY 32
ADITIONAL INFORMATION 33
Page 3
GAIN TECHNICAL SPECIFICATIONS
3
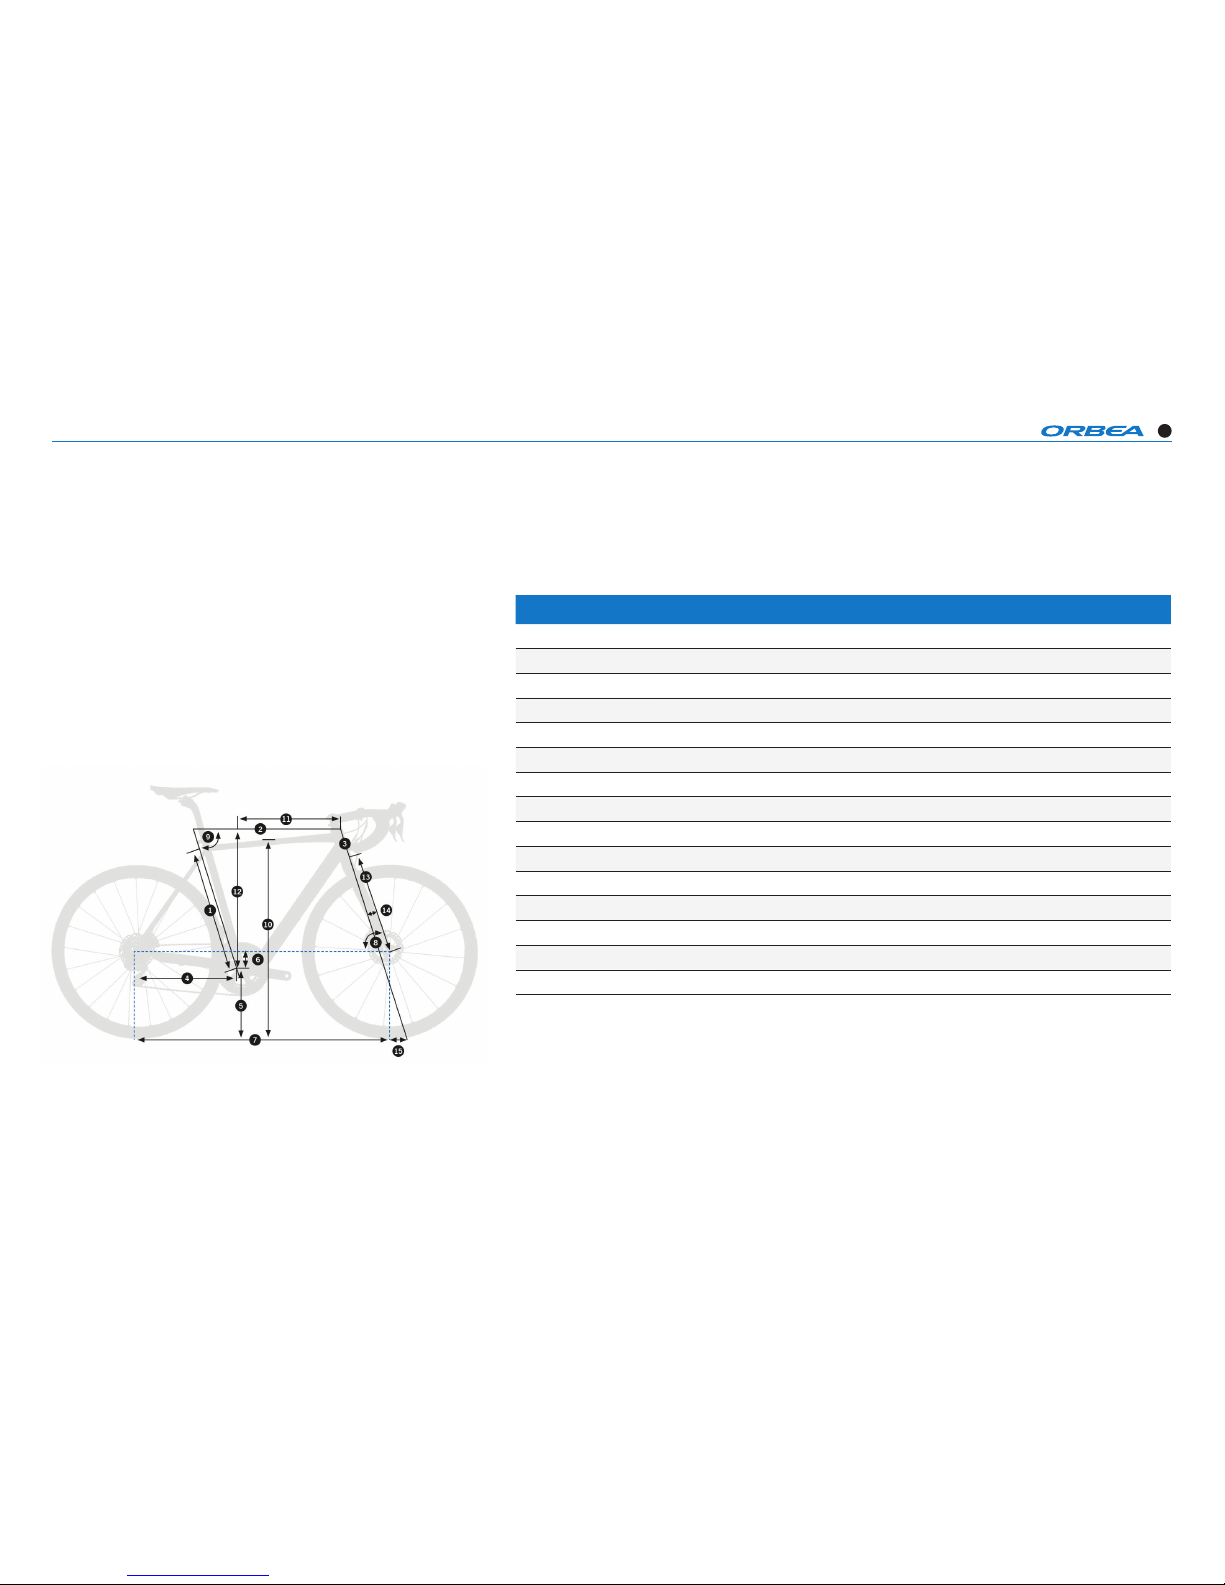
GEOMETRY
SIZE XS S M L XL
1 - SEAT TUBE (C -T) 460 510 555 585 610
2 - TOP TUBE (E FF) 522 546 560 574 595
3 - HEAD TU BE 109 127 150 176 203
4 - CHAINS TAY 430 430 430 430 430
5 - BB HEIGHT 281 281 283 283 285
6 - BB DROP 70 70 68 68 66
7 - WHEELBASE 1016 1022 103 7 1051 1067
8 - HEAD AN GLE 71 72 72 72 72,3
9 - SEAT ANGL E 75 74 74 74 73, 5
10 - STANDOVER 754 782 815 829 876
11 - REACH 378 387 395 402 410
12 - STACK 535 555 575 600 625
13 - FORK LENG TH 400 400 400 400 400
RAKE 51 51 51 51 51
WHEEL SIZE 683 683 683 683 683
Page 4
GAIN TECHNICAL SPECIFICATIONS
4
* Estimated measurements.
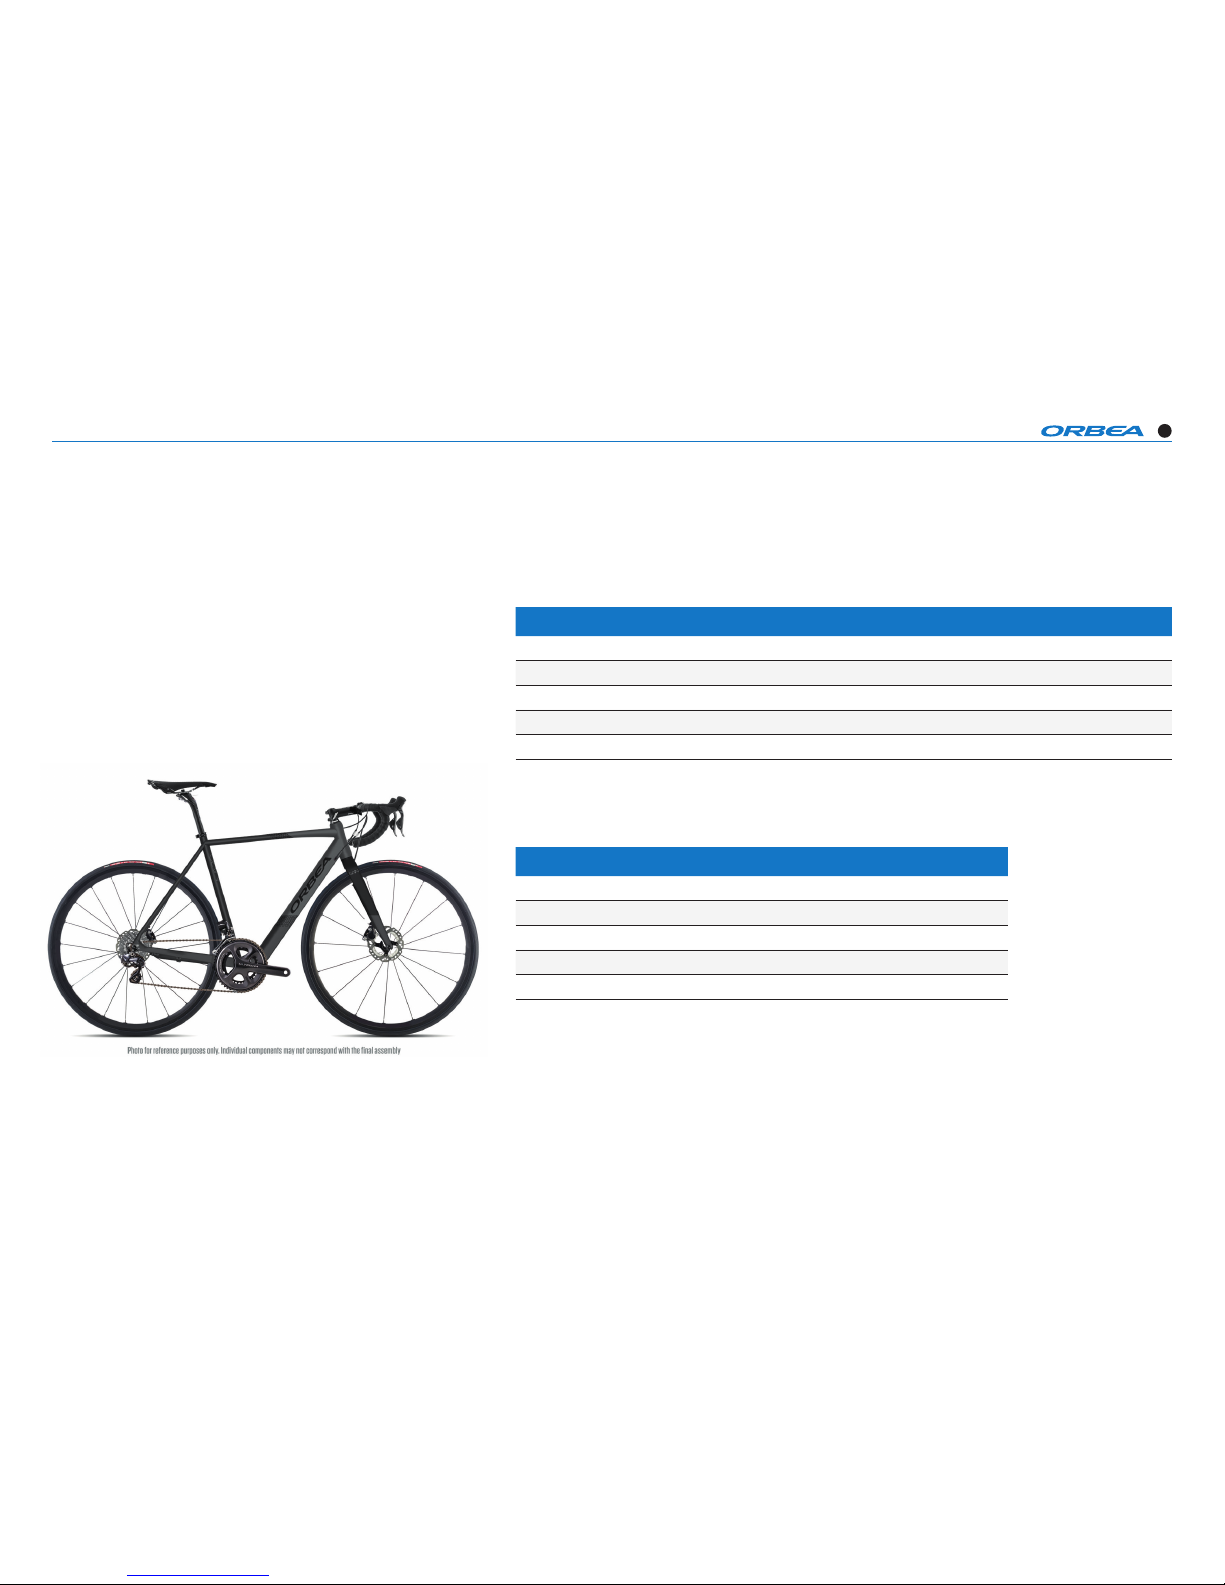
ERGONOMY
HEIGHT (cm) HEIGHT (in) SIZE
<160 XS
160 -170 S
170-180 M
180 -190 L
>19 0 XL
This result is only orientative. We can recommend the best size for you, based on your measurements, on our web: www.orbea.com/us-en/calculate-size/type/
* The handlebar size is centre-centre.
SIZE CRANK STEM HANDLEBAR
XS 170 90 400
S 170 100 420
M 170 100 420
L 172 110 440
XL 175 120 440
Page 5
GAIN TECHNICAL SPECIFICATIONS
5
CHARACTERISTICS
DIRECTION
1" ⅛ SEMI-INTEGR ATED
BB
BB68 TH READED
FRONT DERAILLEUR
C/C LA MP Ø31,8
FRONT DERAILLEUR TP/DP
DP
FD ANGLE
63º- 6 6º
SEAT POST DIAMETER
DIAM 27, 2 MM
SEAT CLAMP
INTERN AL DIAM 31,8 MM
DROPOUT
ALL ROAD E-B IKE
CHAINSTAY PROTECTOR
11160 033
OTHER PROTECTORS
NO
CABLE TYPE
ESTANDAR/EBIKEMOTION
REAR HUB LENGHT
135 MM.
Page 6
GAIN TECHNICAL SPECIFICATIONS
6
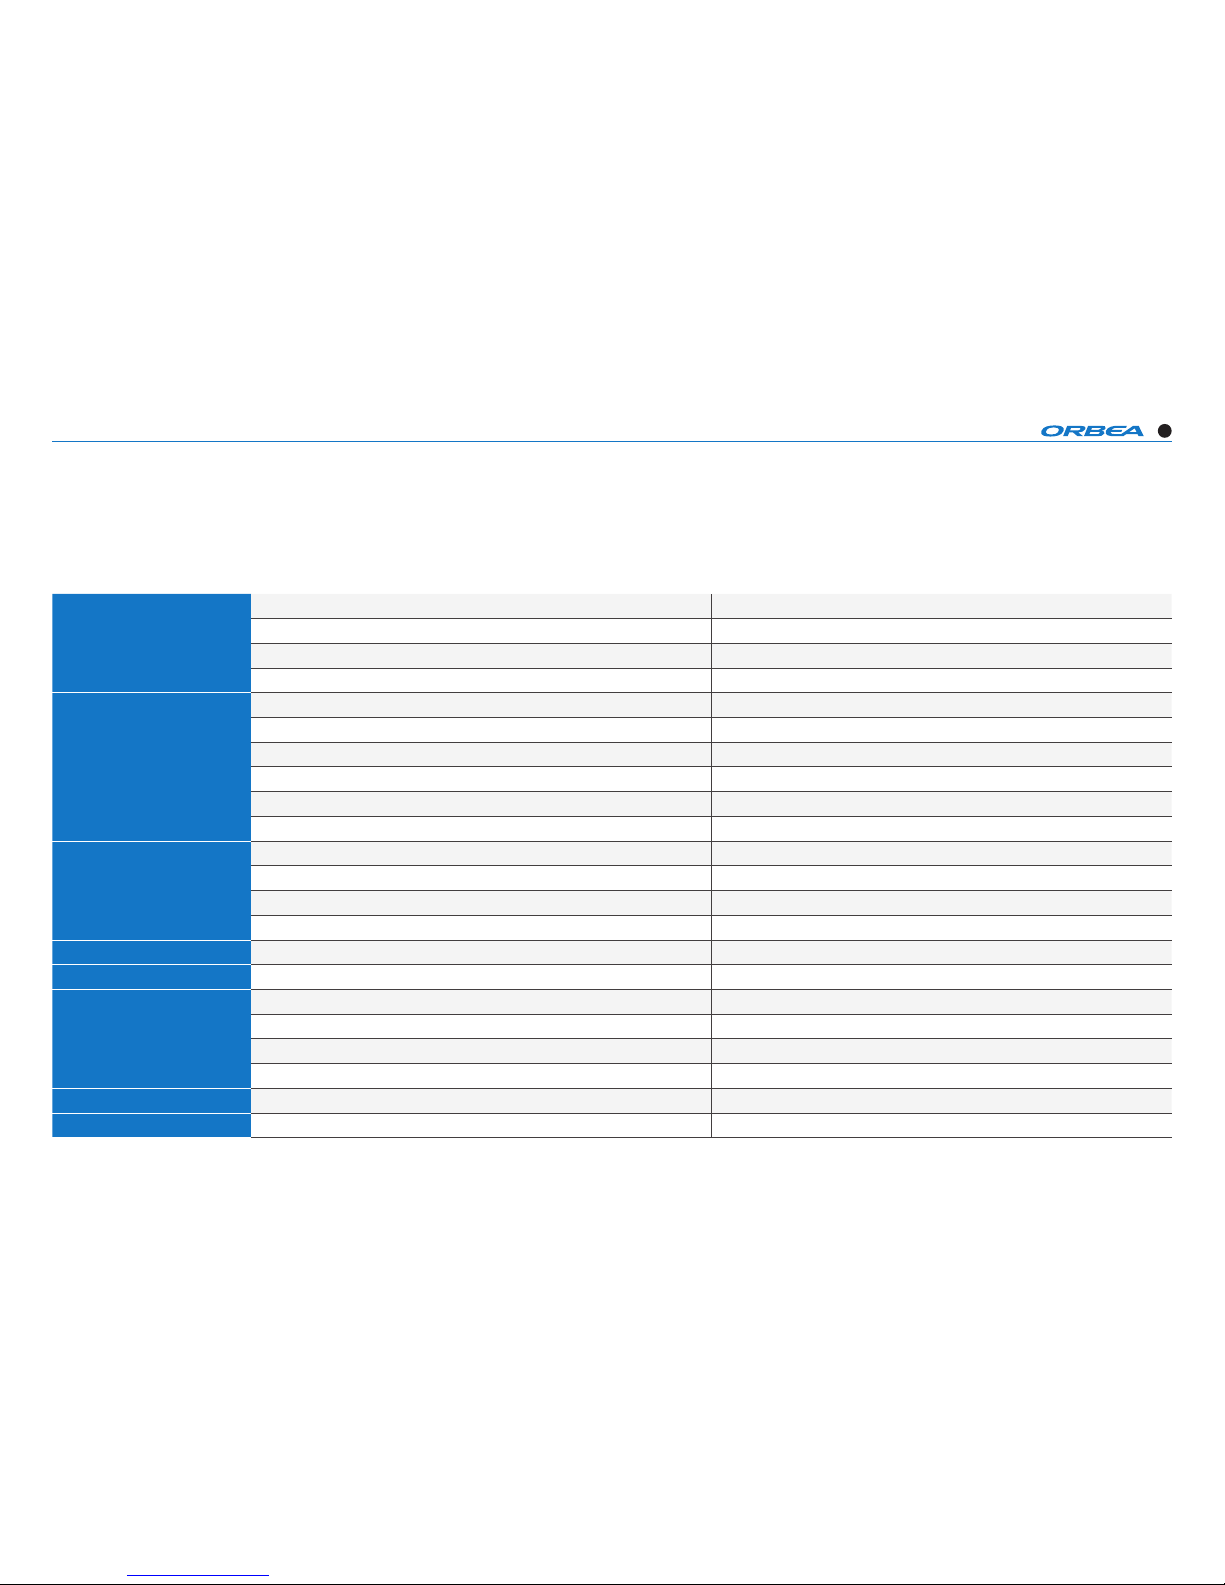
OPTIONS
BRAKE
V-BRAK E NO
DISC BRAKE YES
REAR BRAKE IS/PM+DIAMETER DISC FLAT MOUN T 140/160 DEL /TRAS (PO ST MOUNT C /ADAPTADOR )
CALIPER BRAKE NO
LUGGAGE
BAG OPTI ON IN TOP TUB E NO
BOTTLE CAGE DT AND ST [AL L SIZES)
OPTIO N AERO AND STAN DARD BOT TLE NO
REAR LUGGAGE OPTION YES
MUDGUARD OPTION YES
KIC KSTA ND NO
GEARS
11 SPEED YES
DOUBLE CRANK SI (MAX IMUN BIG CH AINRING 5 3, MAXIM UM SMALL R ING 46)
COMPACT CR ANK (34X50T) ( ROAD) YES
TRIPLE C RANK NO
WHEELS
MAXIMUM SIZE 70 0
TYRES
MAXIMUM SIZE 700X 40C
CABLE ROUTING
MECHANIC AL SYST EM (W/INT ERNAL CABLE ROU TING) CABLE ADO INTERNO EN TI
ELECTR ONIC DI2 SYS TEM (W/ INTERN AL CABLE R OUTING) NO
EXT ERNAL SHIMANO BAT TERY (IN LEFT C HAINSTAY) NO
CAMPAG NOLO EPS NO
POWER METERS
SRAM QUARK NO
OTHERS
UCI NO
Page 7
GAIN TECHNICAL SPECIFICATIONS
7
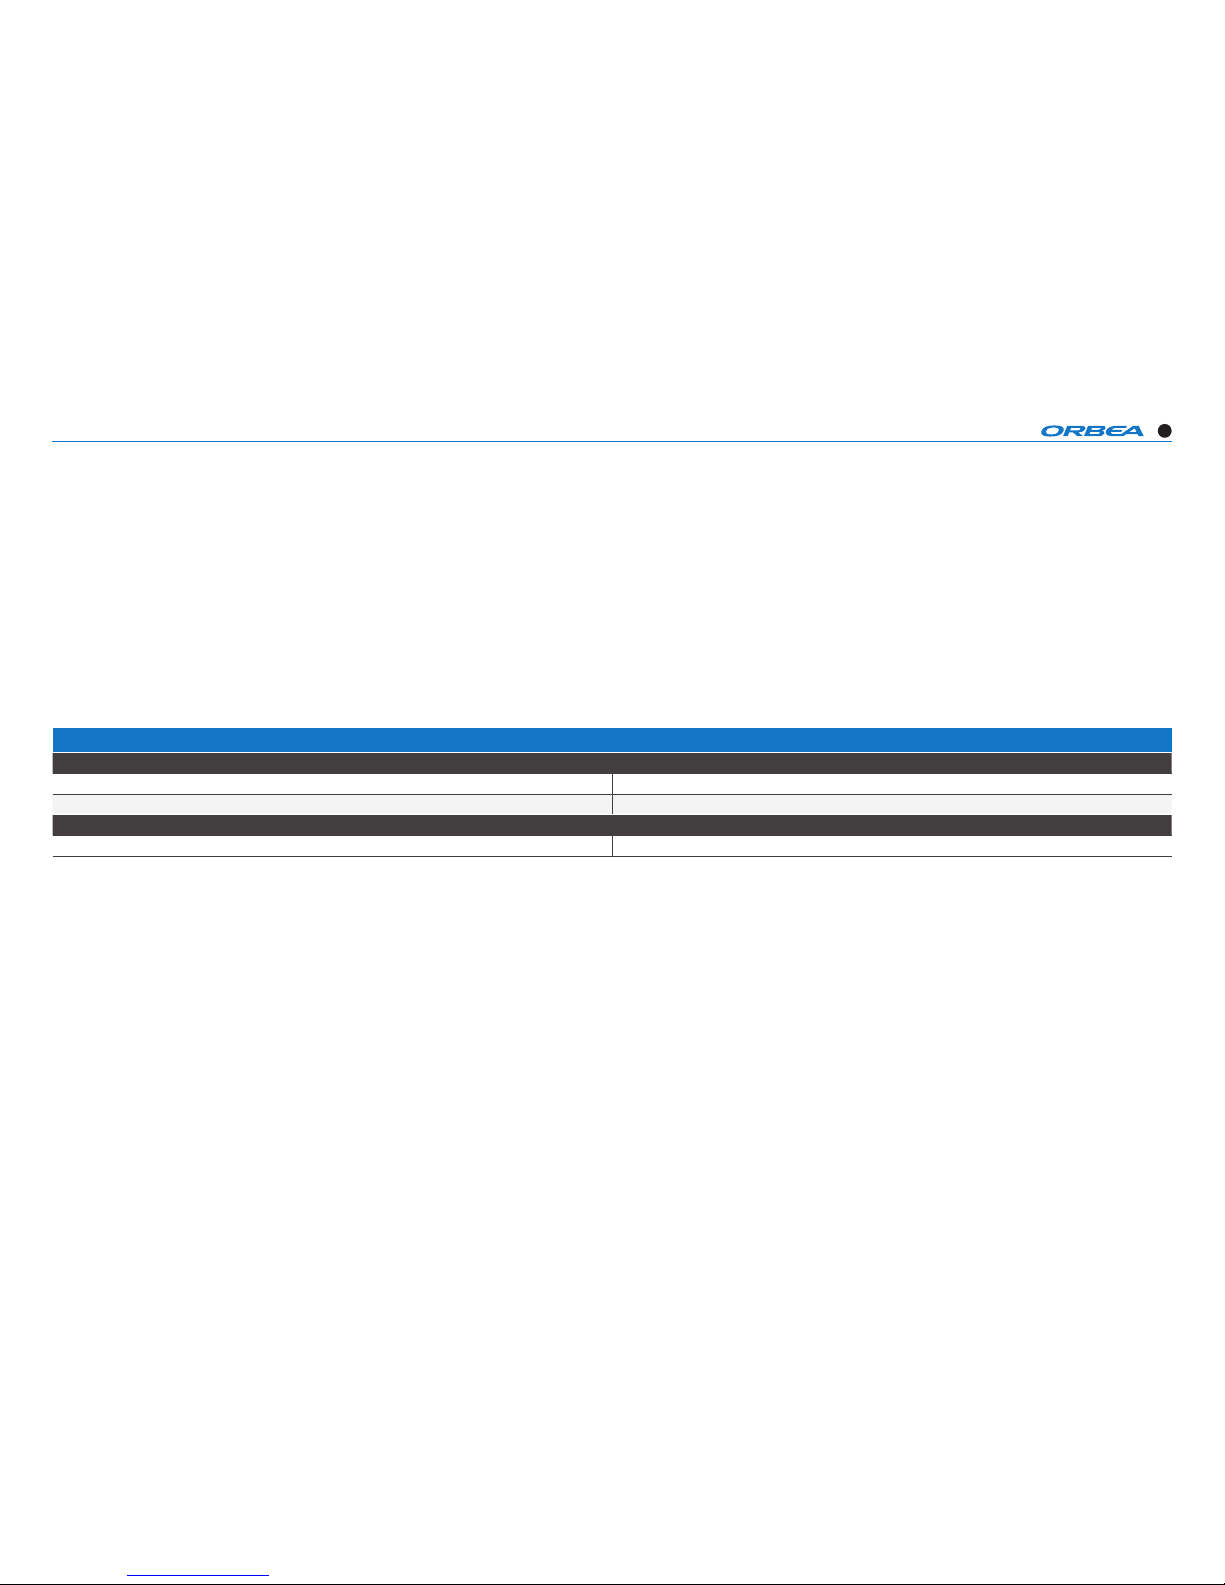
OPTIONS
Groupsets
ROAD
SHIMANO
SHIMANO DI 2 NO
SHIMANO DI 2 DISC NO
SRAM
SRAM DIS C YES (W ITH DROP OUTS MOD IFIED IN 57°)
Page 8
GAIN TECHNICAL SPECIFICATIONS
8
PARTS & HARDWARE
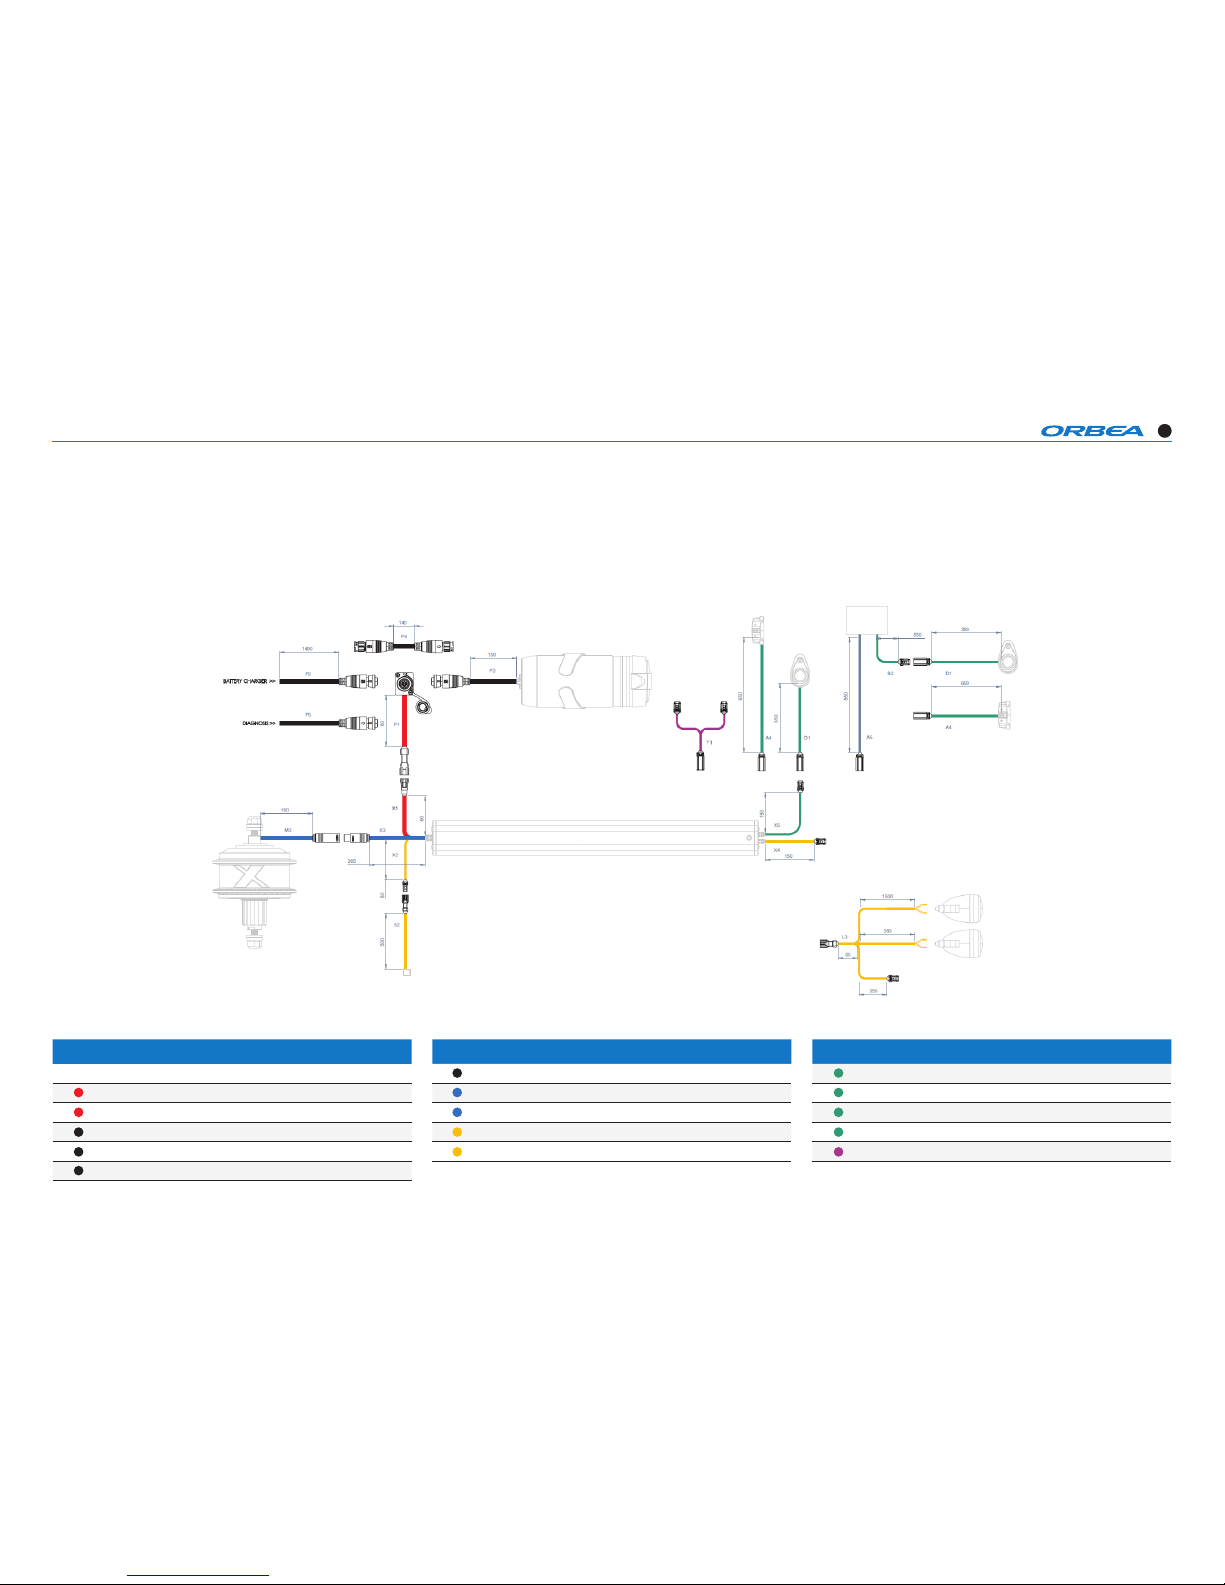
X35 of eBIKEMOTION
PART NUMBER ORBEA DESCRIPTION
X35 BATTERY
P1 CHARGIN G PORT AND C ONNECTION
X1 CHARGIN G PORT TO BAT TERY CONNECT ION
P2 BATTERY CHARGING CABLE
P5 DIAGNOSIS CABLE
P4 X35 EX WI RE
PART NUMBER ORBEA DESCRIPTION
P3 EXTERNAL BATTERY
X3 BATTE RY TO MOTOR CO NNECTIO N
M3 BATTE RY CONNEC TION CAB LE AND MOTO R
X2 BATTE RY CONNEC TION CAB LE TO SENS OR
S2 SPEED SENSOR CONNECTION
PART NUMBER ORBEA DESCRIPTION
D1 IWOK ONE START BU TTON A ND CABLE
X5 IWOK ONE STAR T BUT TON TO BATT ERY CABLE
A4 IW OK TRIO STAR T BUT TON AND CAB LE
A5 SCREEN CABLE
Y1 “Y” CO NNECTIO N FOR IWOK TRIO A ND IWOK ONE
EXTERNAL BATTERY
iWOOK TRIO
iWOOK TRIO
SCREEN
iWOOK ONE
iWOOK ONE
HEAD LIGHT
REAR LIGHT
INTERNAL BATTERY
CHARGING PORT
PAS SENSOR (RIGHT DROPOUT)
MOTOR (REAR WHEEL)
Page 9
GAIN TECHNICAL SPECIFICATIONS
9
4
10
3
3
3
5
5
9
9
11 12
12
12
6
7
8
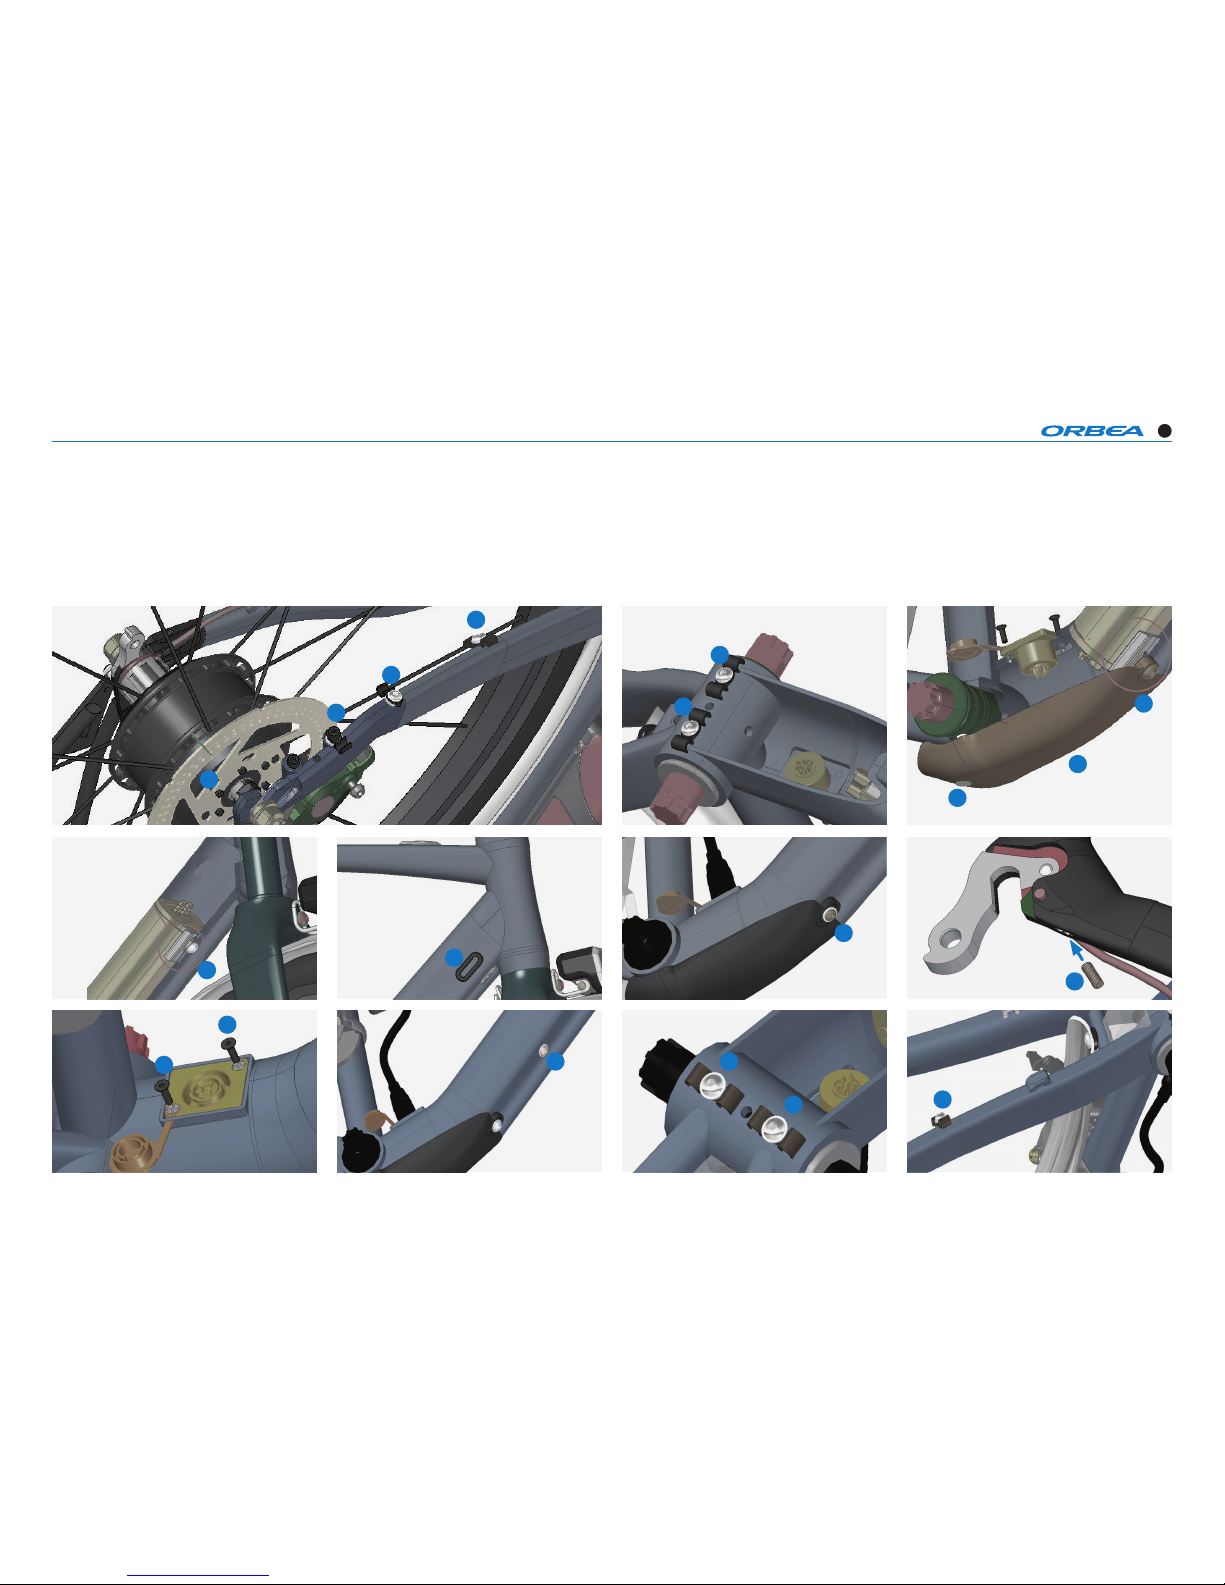
PARTS & HARDWARE
VARIOUS & CAPS
2
13
2
Page 10
GAIN TECHNICAL SPECIFICATIONS
10
4 632 51
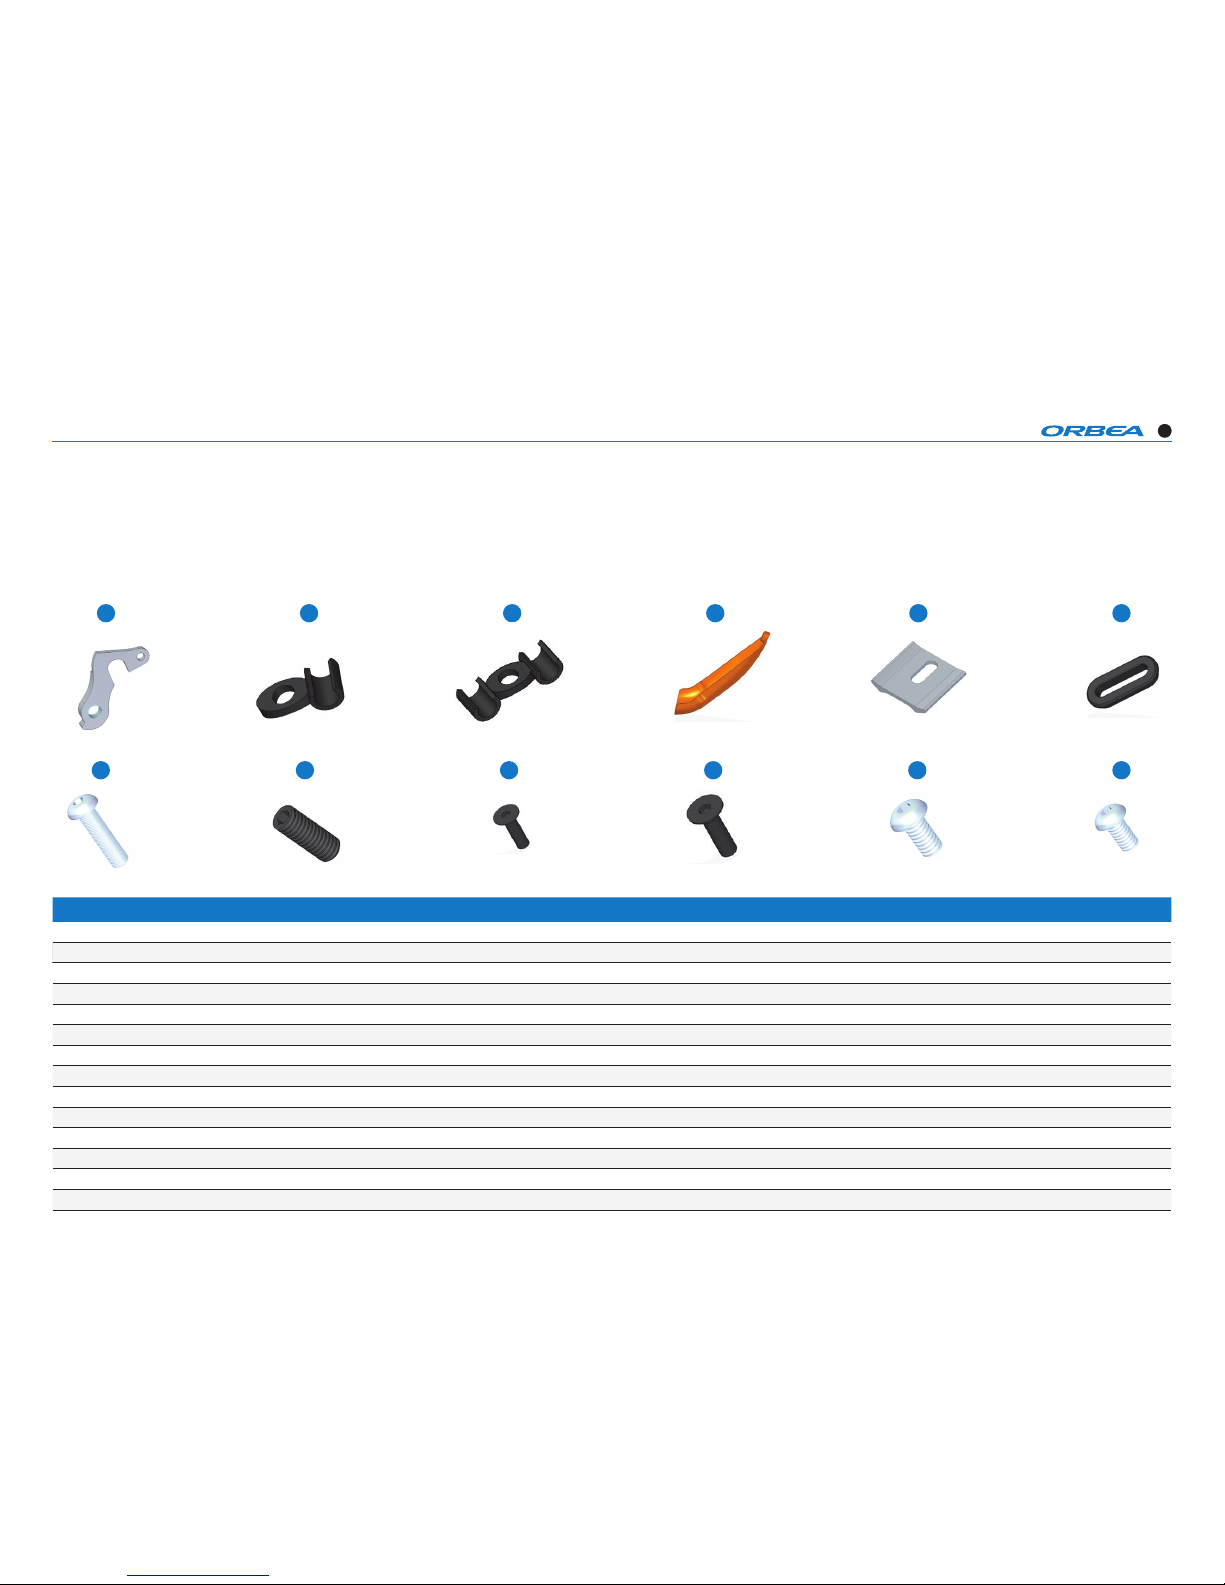
PARTS & HARDWARE
VARIOUS & CAPS
PART NUMBER REFERENCE ORBEA DESCRIPTION
1 154 30166 DROPOU T GAIN 2018
2 110 01181 CABLE CL IP 5,5 FOR 1 CAB LE
3 110 01182 CABLE C LIP 5,5 FOR 2 CA BLES
4 11000405 BOTTOM COV ER GAIN
5 11200460 GU IDE FOR BATT ERY GAIN
6 110 01161 RUBBER CA P 3 MM KEY HOLE 30X10
7 12300019 SC REW M5X 20 ISO 738 0 INOX
8 1230 1058 SETS CREW M4X 10 DIN 916 INOX
9 12309075 SCREW IN OX M3X12 DIN 7911 BLAC K
10 12300018 COUNT ERSINK SC REW M5X 25 DIN 7991 INOX
11 12306022 SCREW M5X10 ISO 73 80 INOX
12 1230 1078 SC REW M5X8 I SO 7380 INOX
13 123010 87 SCR EW M5X6 TOR X
14 123 21020 WASER M5 DIN 125 I NOX
8 9 10 117 12
Page 11
GAIN TECHNICAL SPECIFICATIONS
11
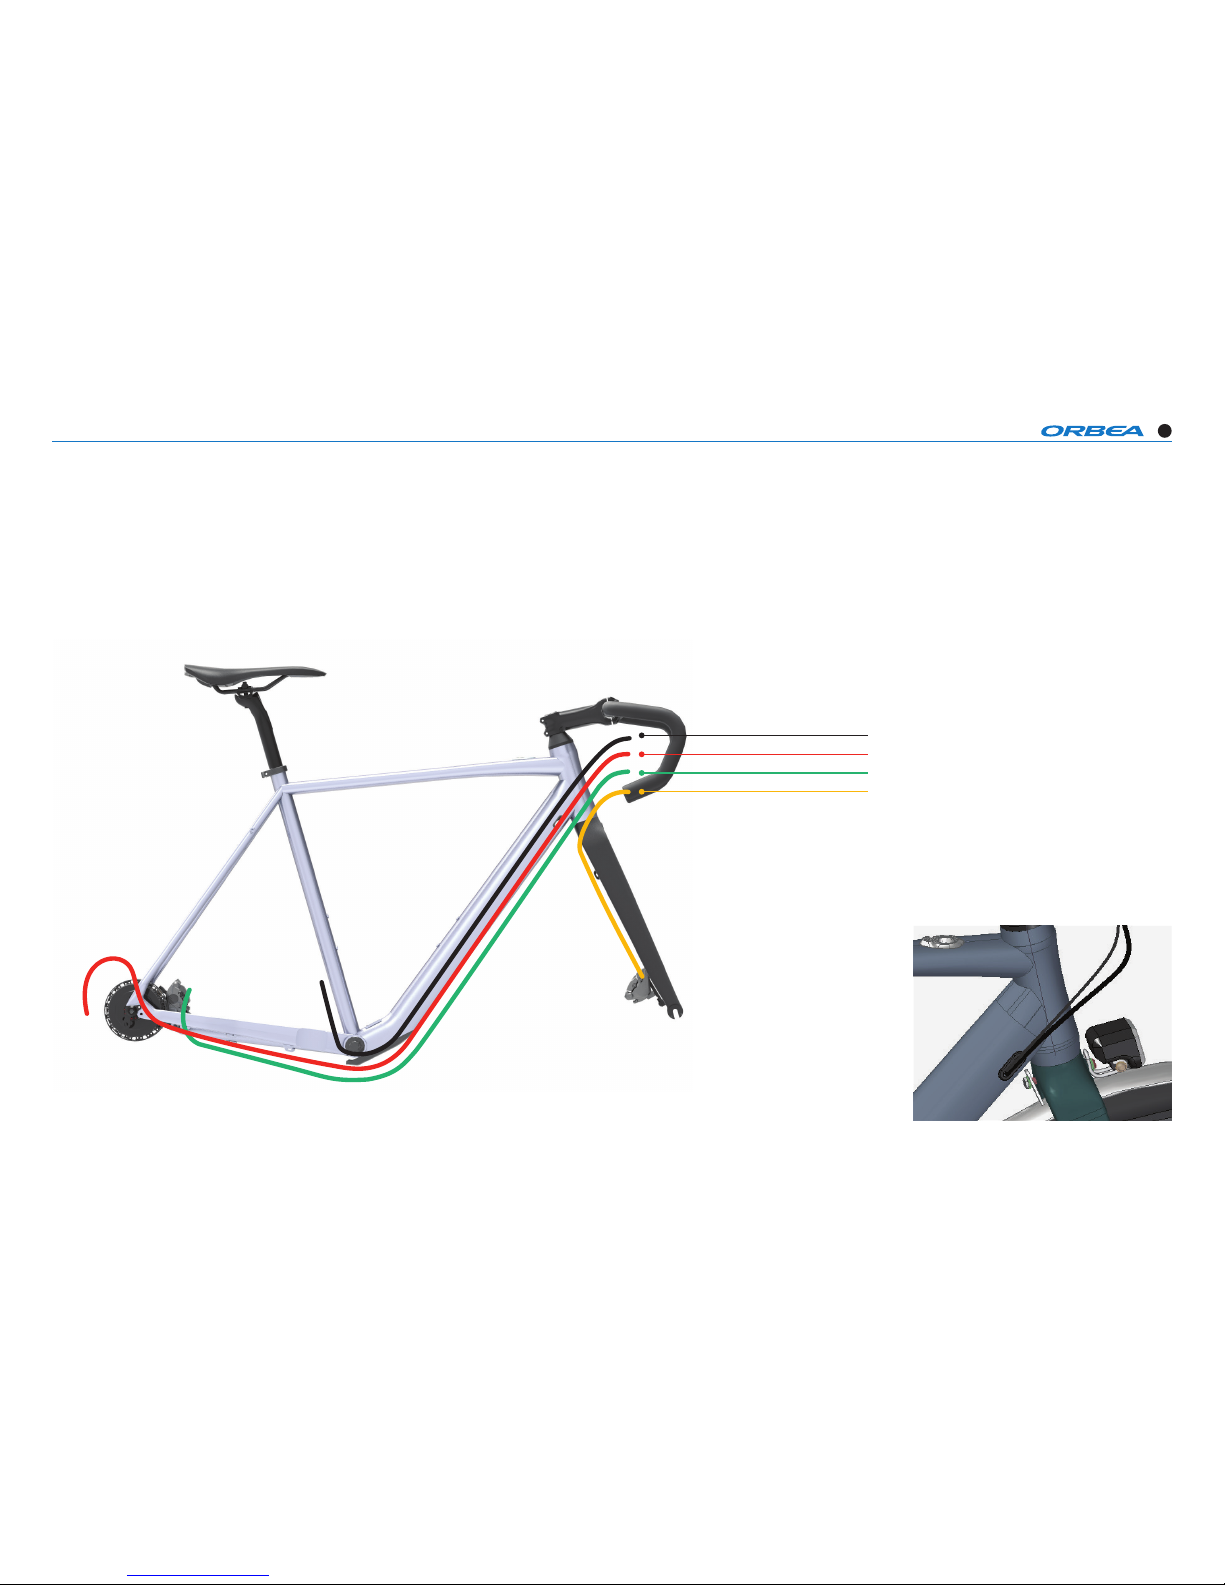
FRONT DERAILLEUR (INTERNAL)
REAR DISC BRAKE (INTERNAL)
FRONT DISC BRAKE
REAR DERAILLEUR (INTERNAL)
CABLE ROUTING
MECHANICAL
1/ Inserti on of the fron t and rear de railleur.
Page 12
GAIN TECHNICAL SPECIFICATIONS
12
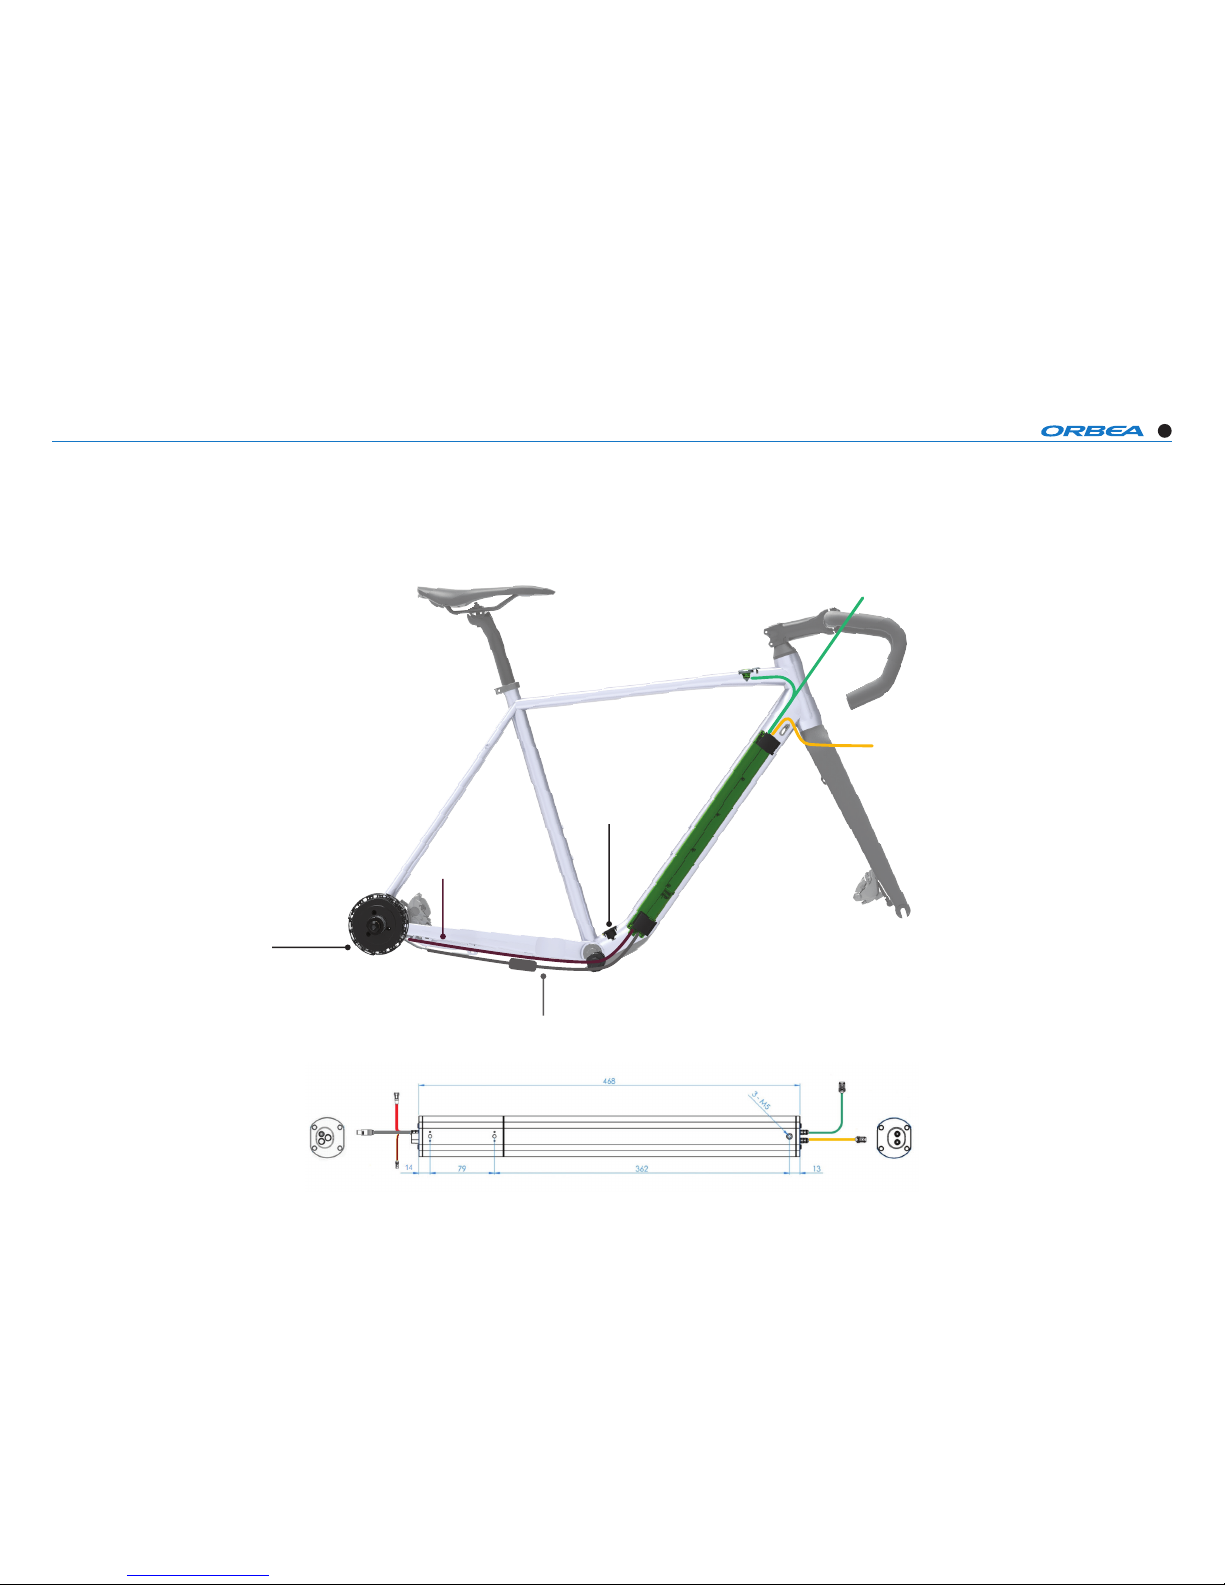
CHARGIN
PORT
HUB MOTOR
SENSOR (right chainstay)
MOTOR CABLE (LEFT CHAINSTAY)
iWOOK ONE
iWOOK ONE / SCREEN *
BATTERY X35
iWOOK ONE + TRIO + SCREEN
CHARGIN PORT
MOTOR
SENSOR
LIGHT
OPTIONAL LIGHT *
CABLE ROUTING
X35 SYSTEM
Page 13
GAIN TECHNICAL SPECIFICATIONS
13
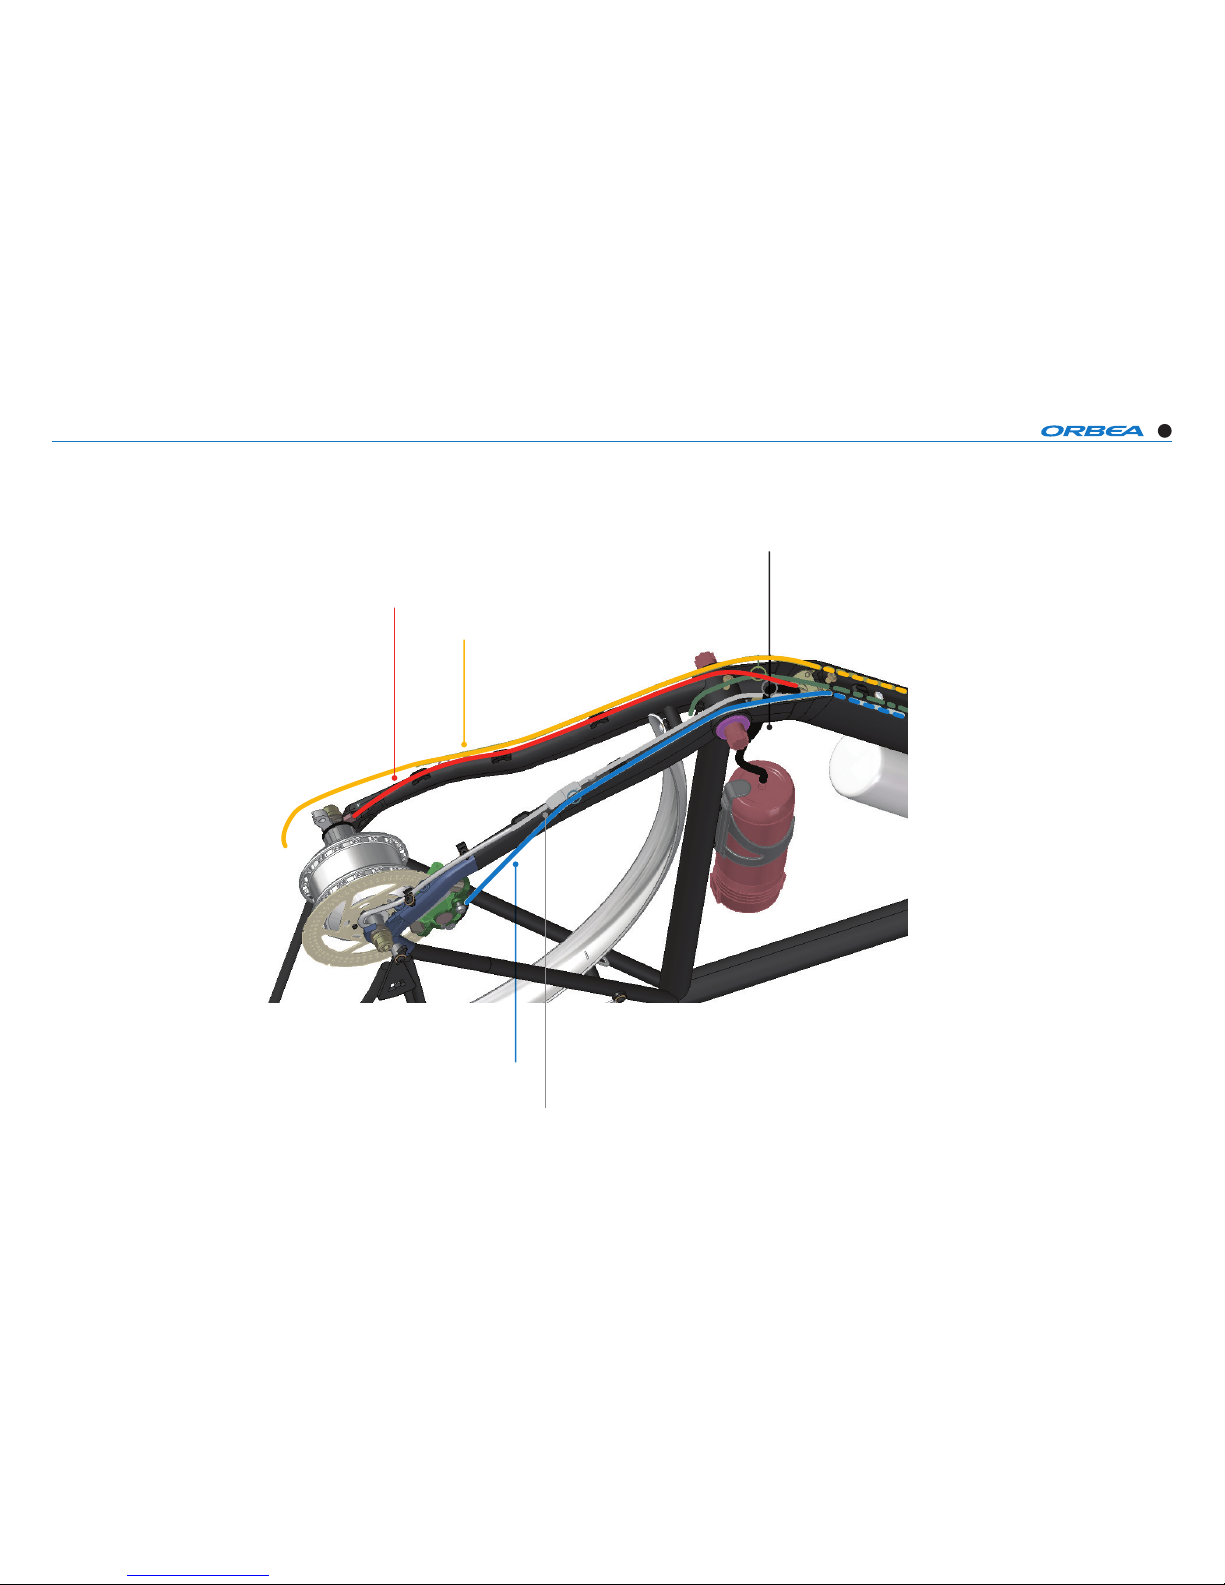
*
The X35 battery has 2 cables in one end (that
will stay in the top part of the frame) and 3 in the
opposed end.
CHARGING PORT
DERAILLEUR
DISC
BRAKE
MOTOR
PASS
SENSOR
CABLE ROUTING
X35 BATTERY
Page 14
GAIN TECHNICAL SPECIFICATIONS
14
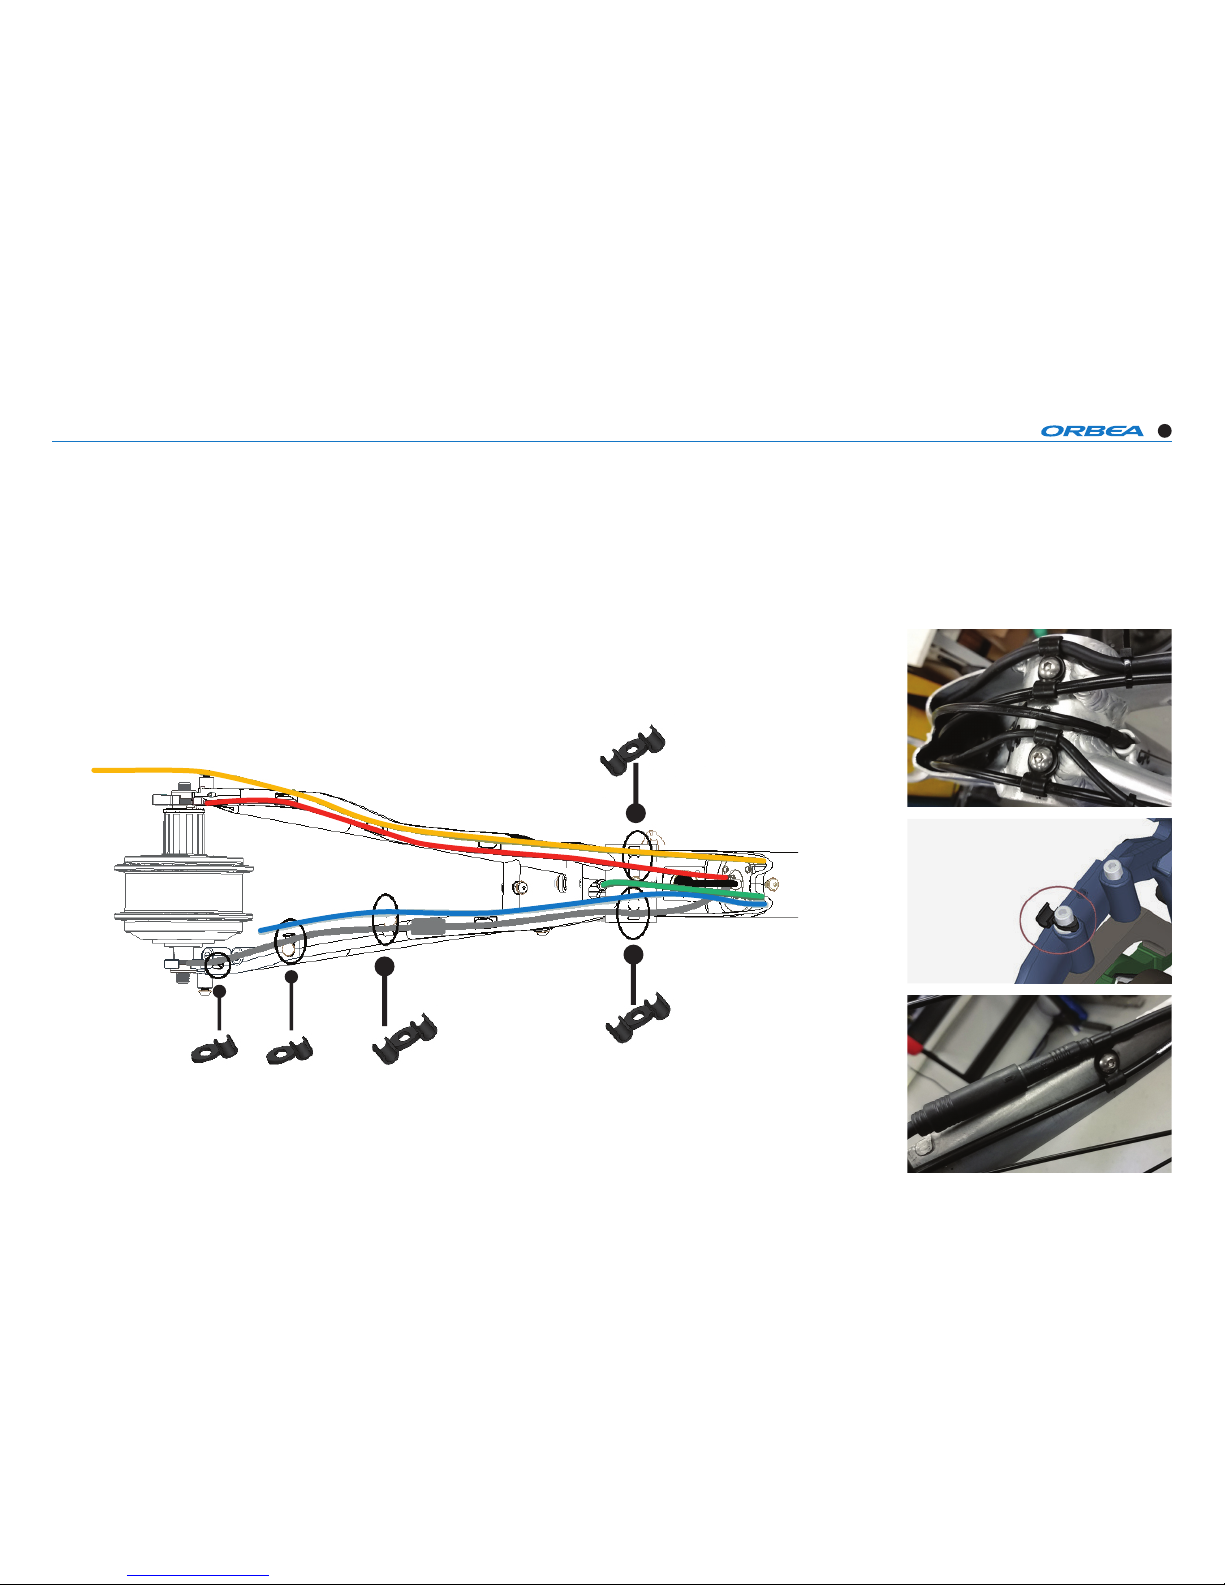
CABLE ROUTING
CABLE ROUTING ON THE BASE
1/ cable clip 5,5 f or 2 cable s
2-3/ cab le clip 5,5 for 1 c able
Page 15
GAIN TECHNICAL SPECIFICATIONS
15
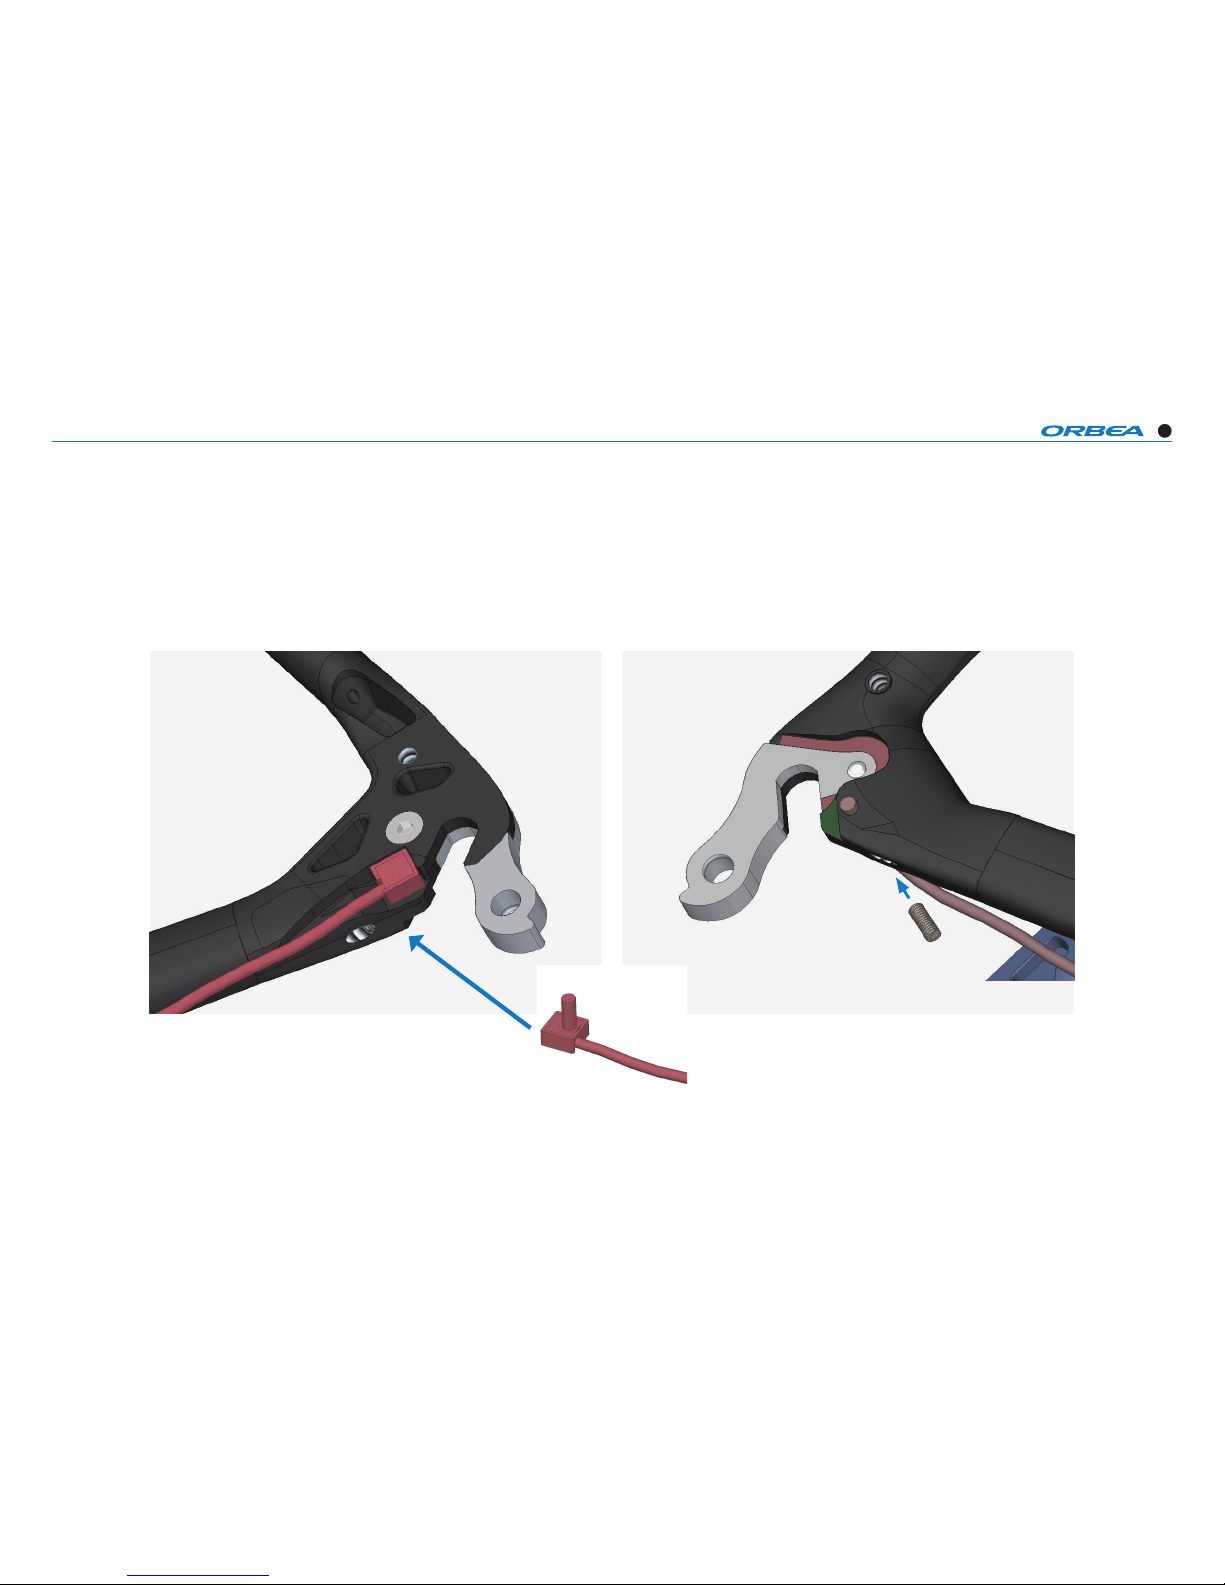
CABLE ROUTING
P.A.S SENSOR PLACEMENT
1- Place de sensor in the specic whole in the inner
side of the drop-out, inserting the pivot it´s housing.
2- Then, x it with the setscrew (M4x10)
SETSCREW
M4
Page 16
GAIN TECHNICAL SPECIFICATIONS
16
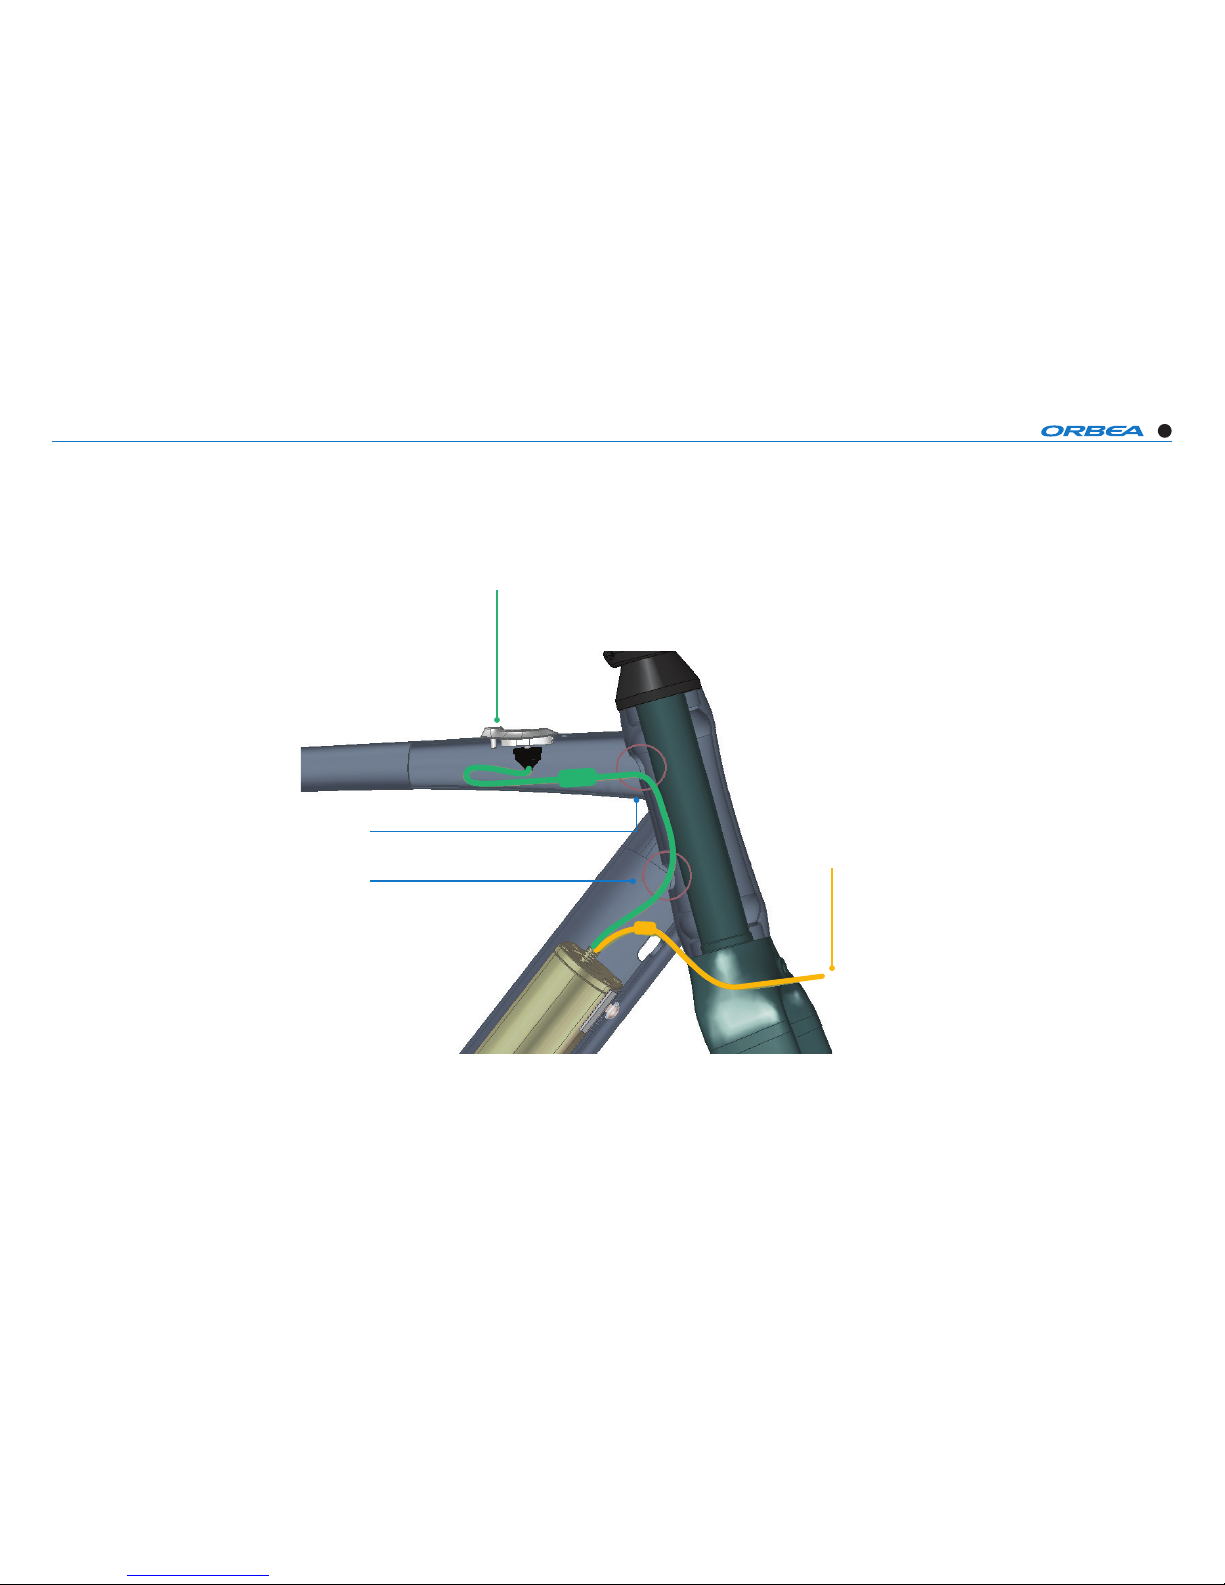
CABLE ROUTING
IWOC ONE CABLE ROUTING
*
The cable routing for the start button IWOK ONE
will be done through the steering tube.
iWOOK
ONE
LIGHT CABLE
(OPTIONAL)
Ø
20 HOLE
STEERING TUBE
Page 17
GAIN TECHNICAL SPECIFICATIONS
17
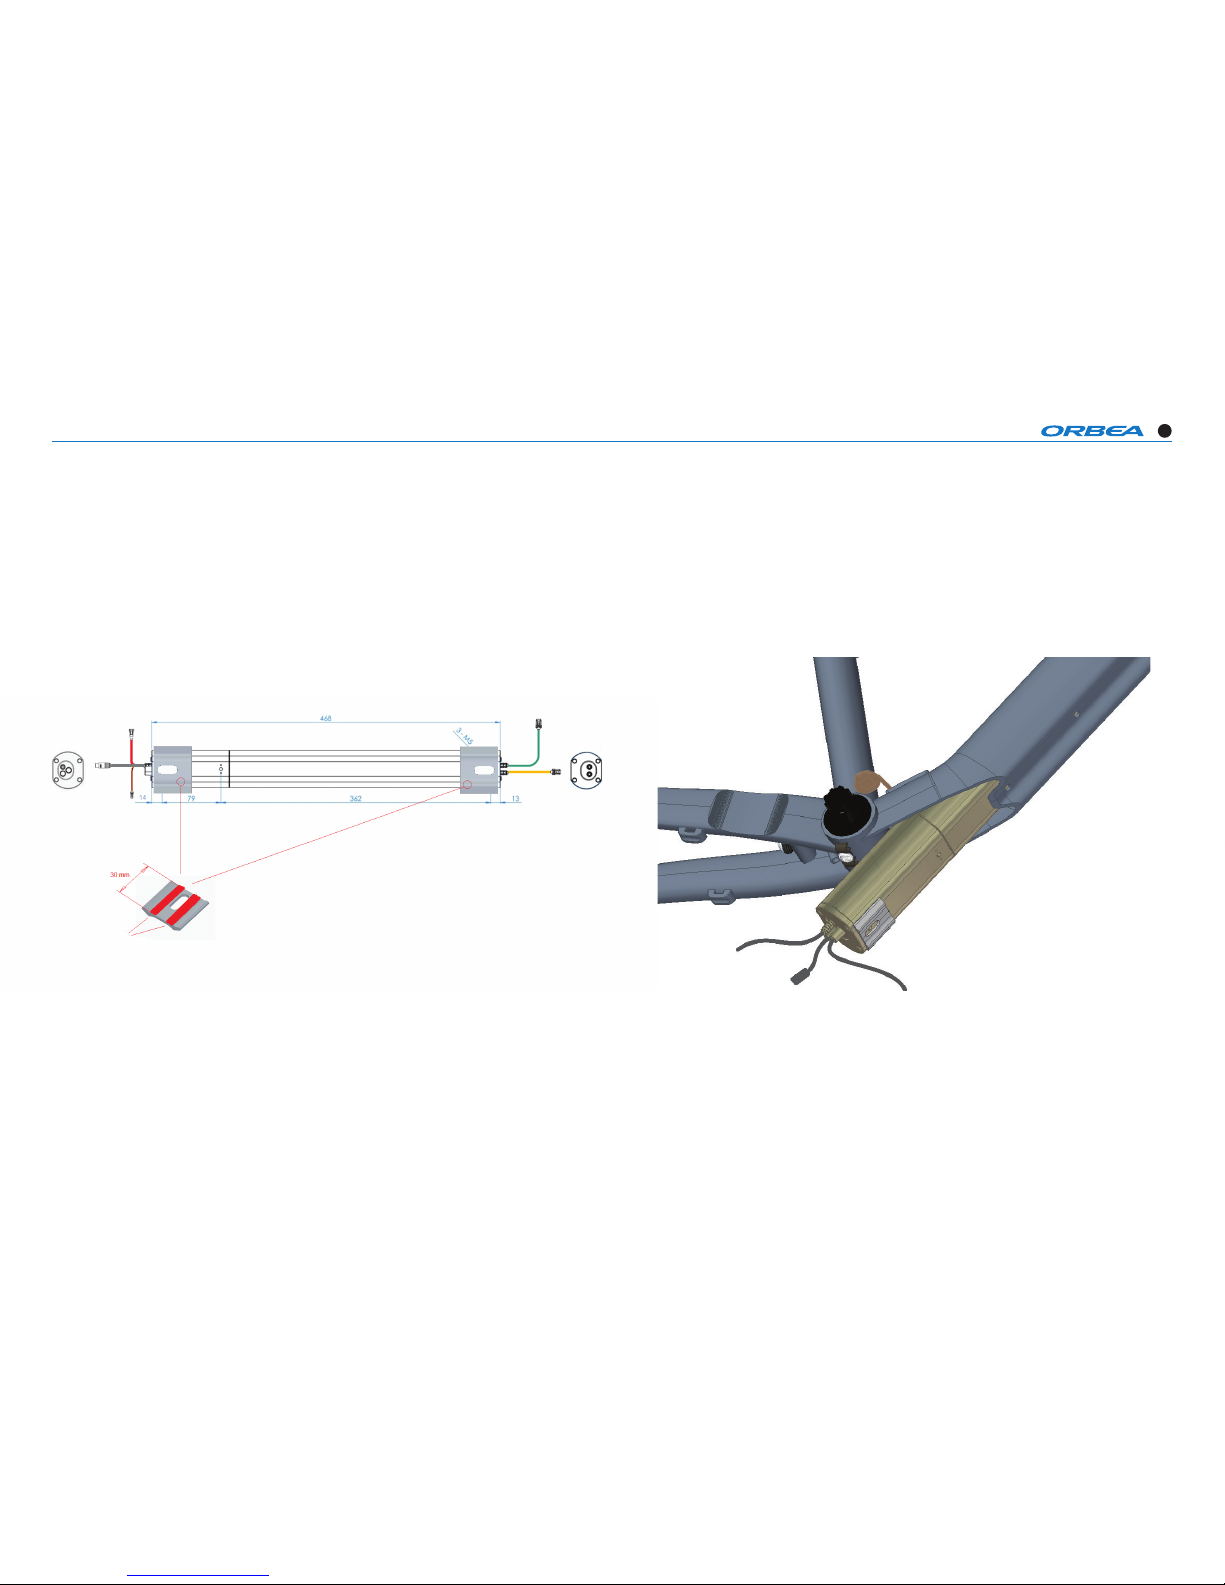
INSTRUCTIONS
GUIDE PLACEMENTE IN THE BATTERY
*
First, attach the guides in both ends of the battery
with the double sided Scotch tape before attaching
it to the frame.
iWOOK ONE + TRIO + SCREEN
CHARGIN PORT
BATTERY X35
DOUBLE SIDED
TAPE
LIGHT
MOTOR
SENSOR
INSTRUCTIONS
BATTERY PLACEMENT IN THE FRAME
*
Once the guides are attached in the battery, insert
it into the frame with 2 cables in one end and 3 in
the other (as shown in picture above) until matching
the 3 frame holes with the 3 in the battery.
Page 18
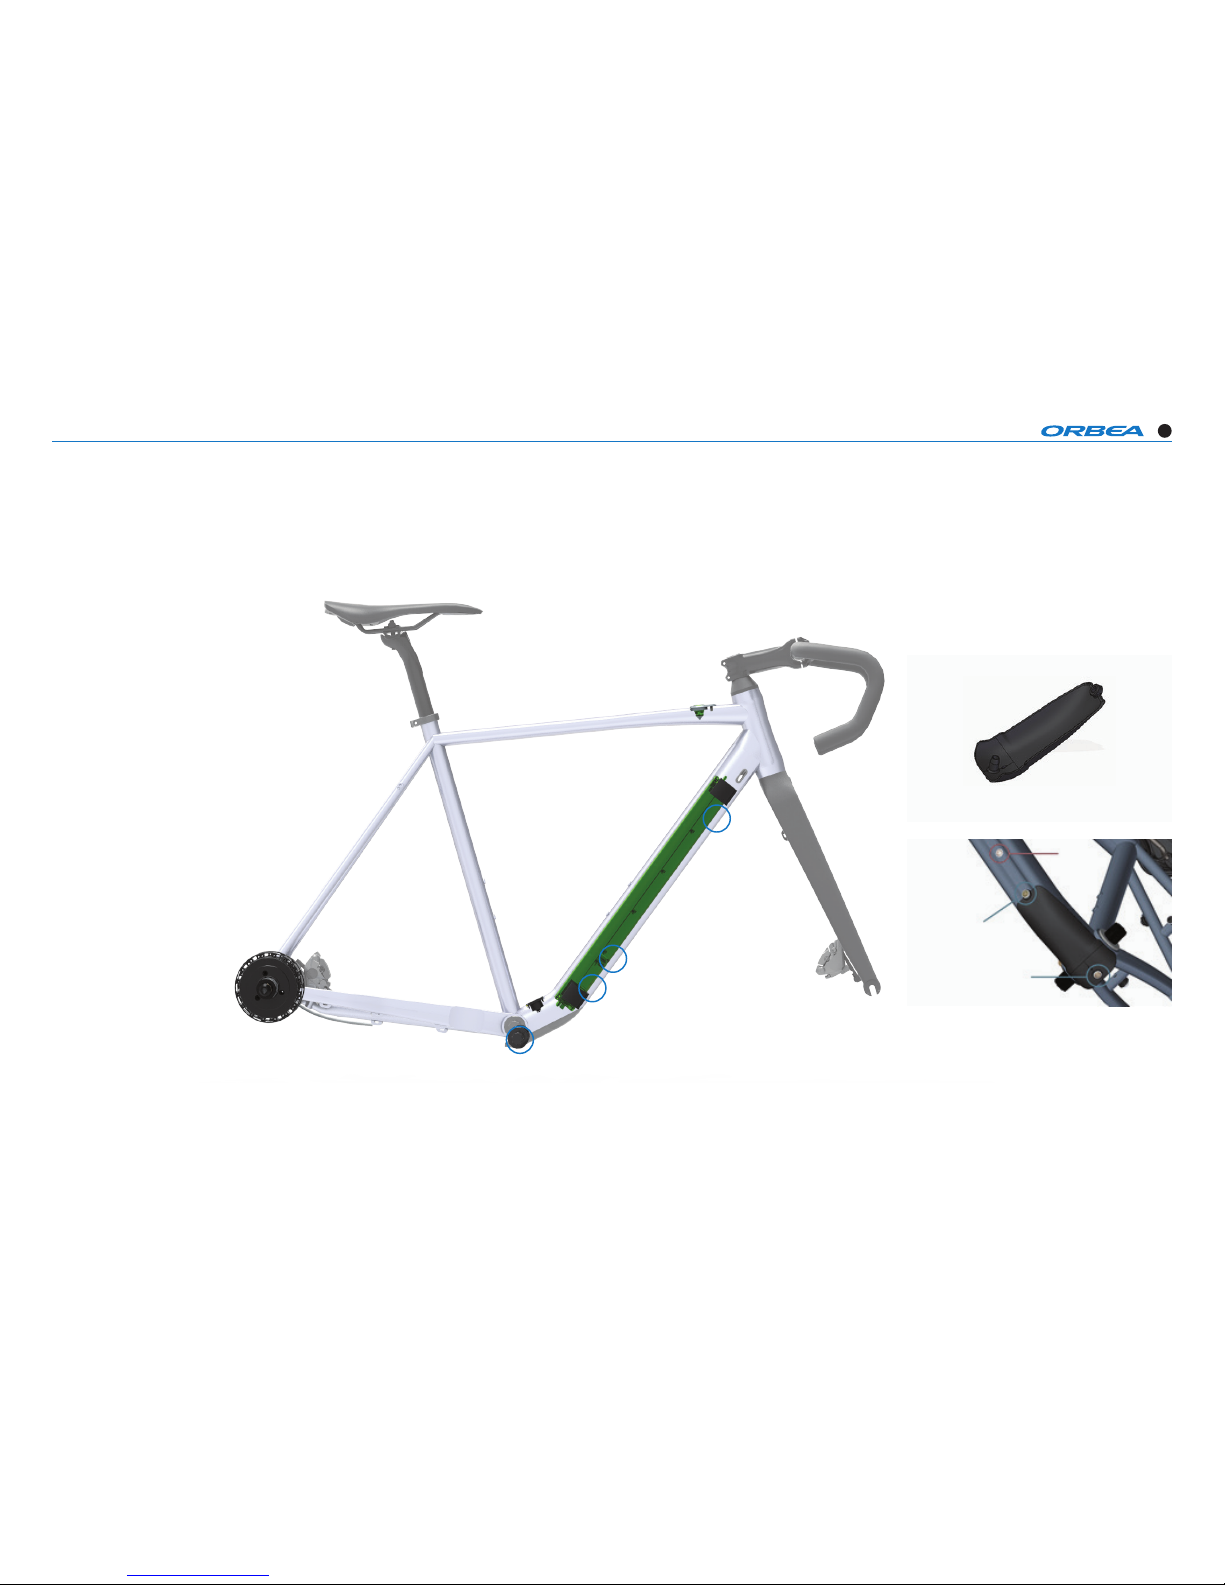
GAIN TECHNICAL SPECIFICATIONS
18
INSTRUCTIONS
BATTERY PLACEMENT AND COVER
1/ Secure the battery to the frame by the points A
and B with the M5x10 DIN 7380 screws and rout
the pertinent cables (derailleurs and disc brake).
2/ Later, x the bottom cover by the points C and
D, using the provided M5x20 INOX (DIN 7380) and
M5x25 INOX (DIN 7991) respectively.
A
B
B
C
C
D
D
bottom cover
Page 19
GAIN TECHNICAL SPECIFICATIONS
19
INSTRUCTIONS
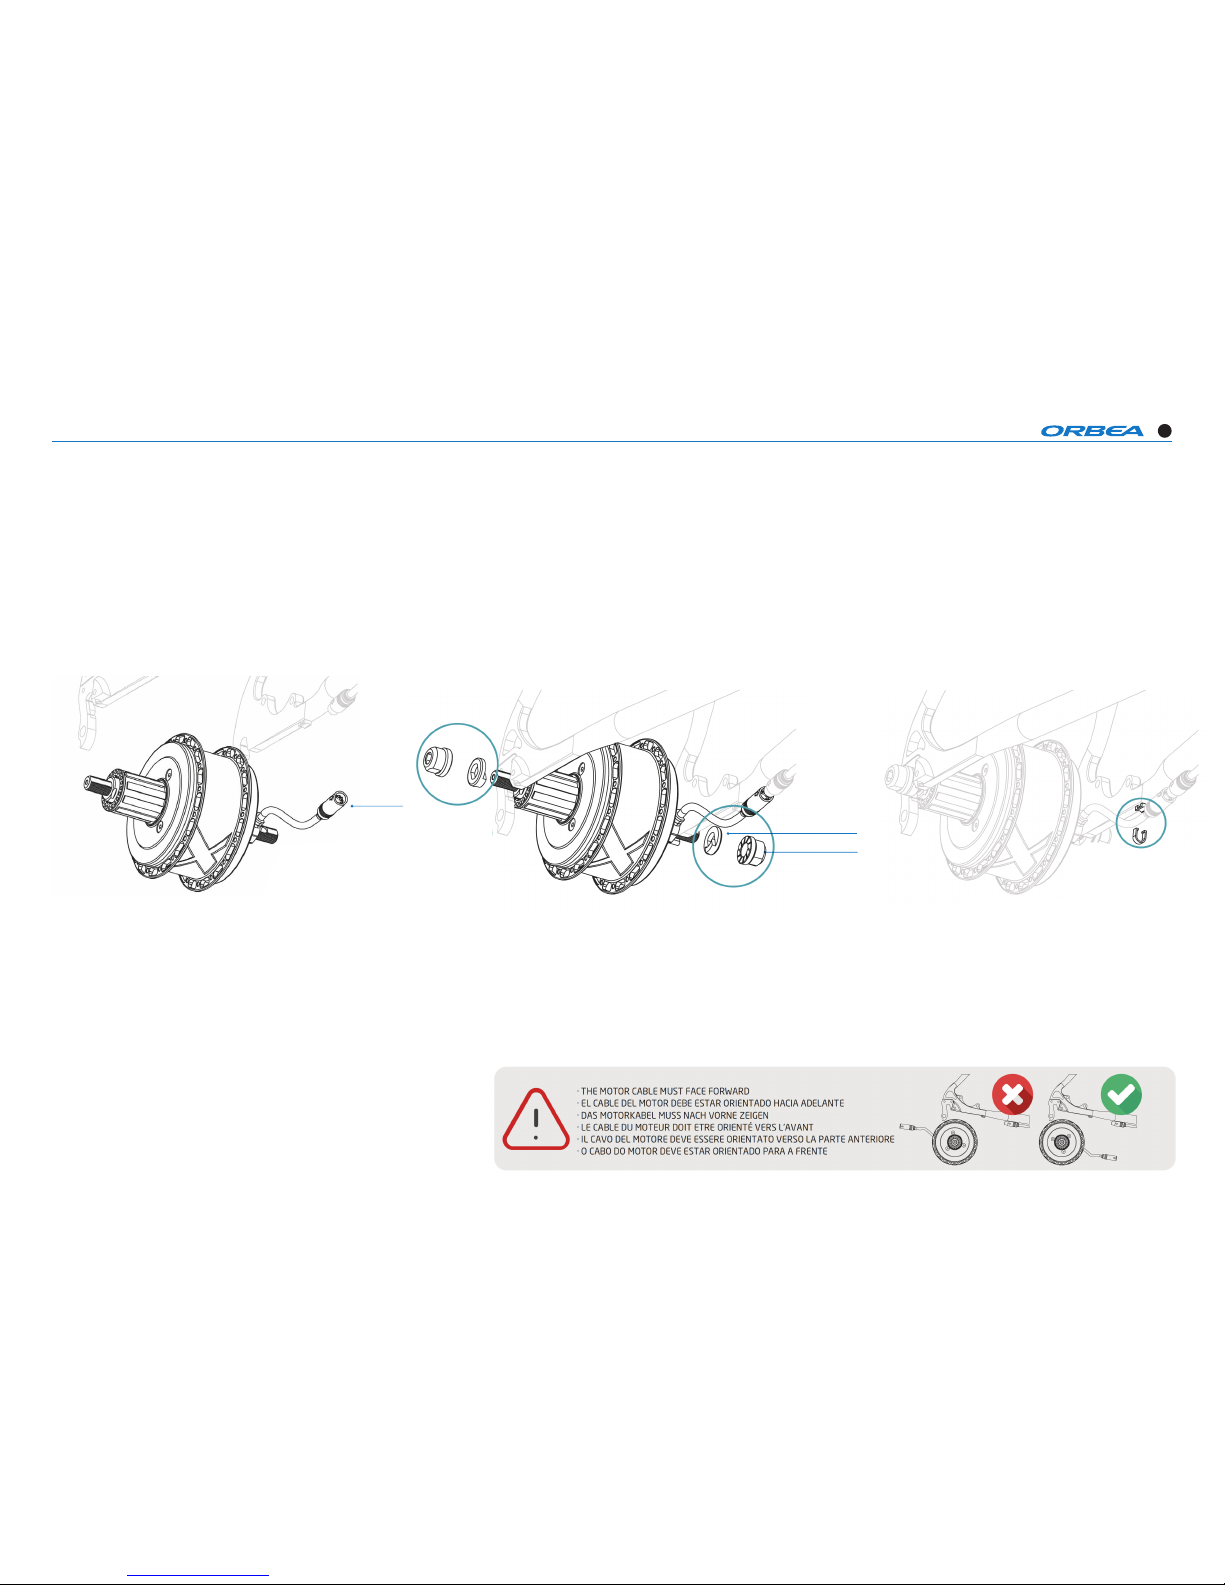
REAR WHEEL ASSEMBLY / DISMANTLING
1/ Place the wheel in the frame, making sure the
power cable stays between the chainstay and seat
stay (g.1) for a easy connection later on.
2/ Place the anti-rotation whasers in both axle ends
and tighten the M2 nuts with an 8 Allen key at the
right torque (Min. 18Nm/ max. 25Nm.)
M12 NUT
ANTI-ROTATION WASHER
1 2 3
CONECTOR
Page 20
GAIN TECHNICAL SPECIFICATIONS
20
INSTRUCTIONS
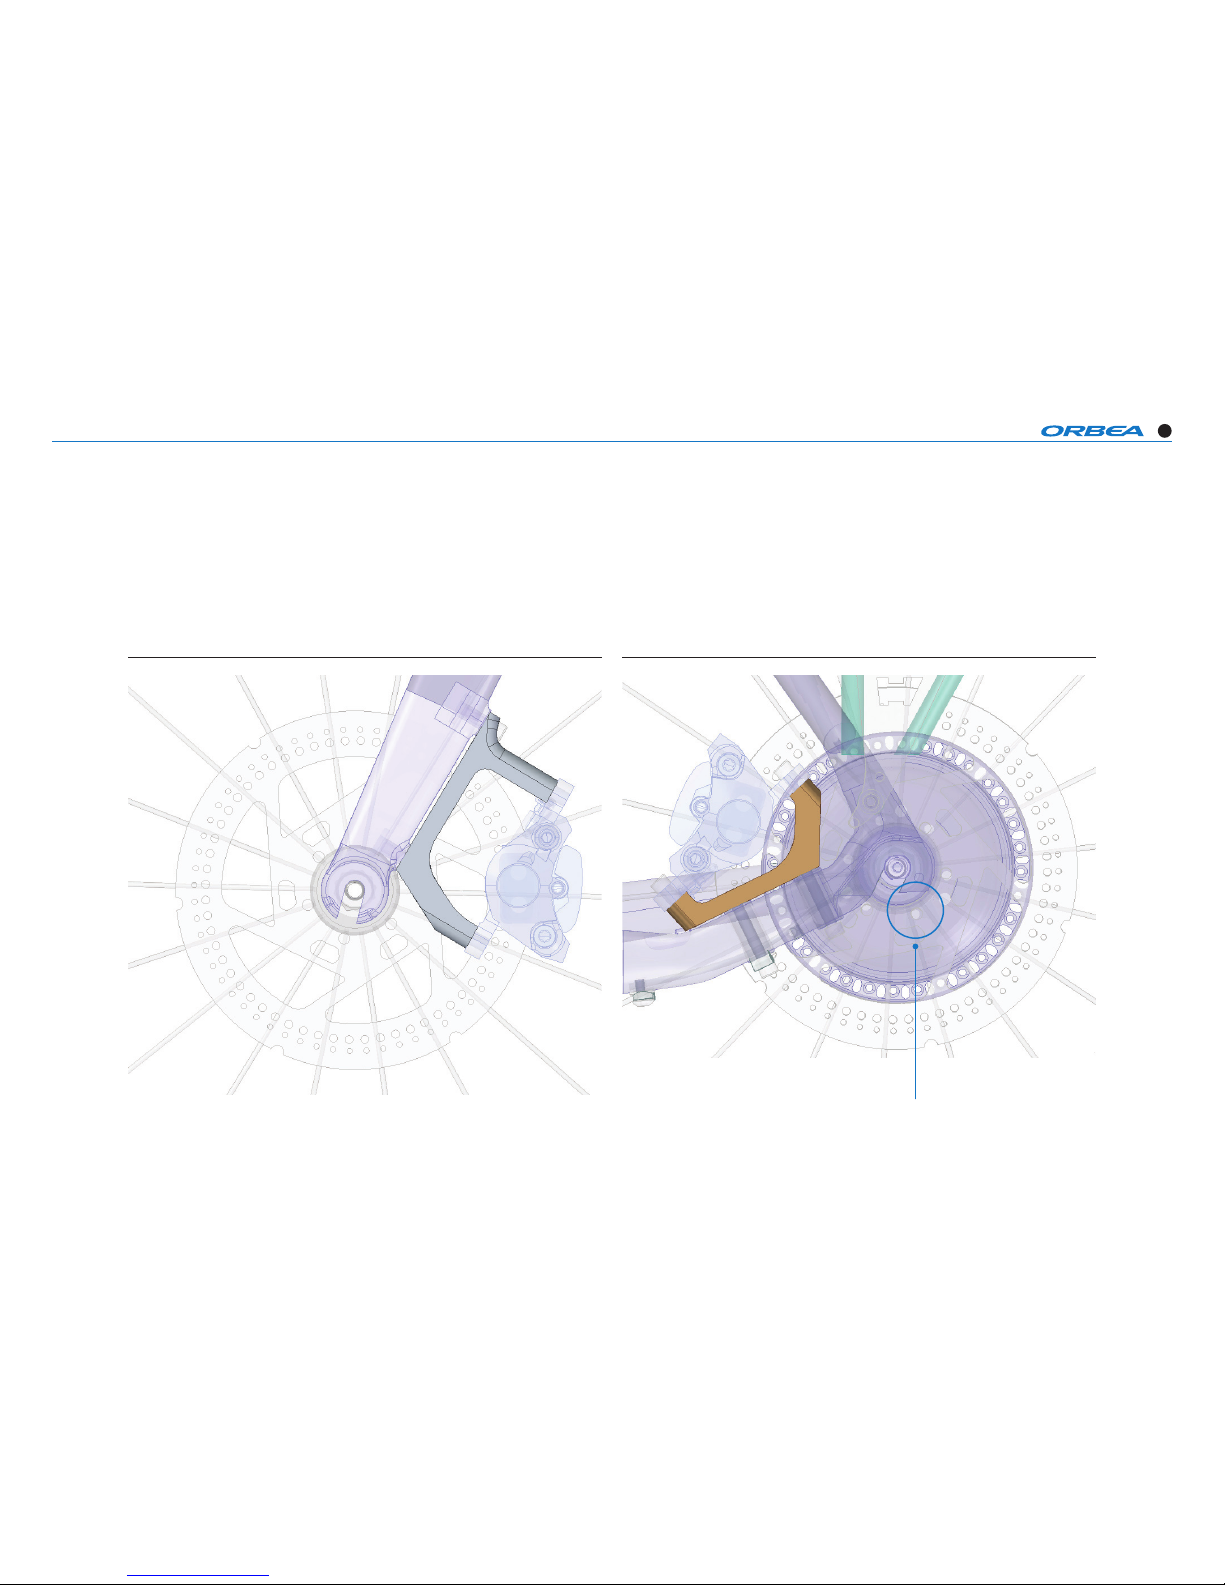
FLAT MOUNT-POST MOUNT / REAR DISC INSTALLATION
REARFRONT
1/ The rear disc brake must be
installed with specic M5x6 TORX
screws. (ref. 12301087)
Page 21
GAIN TECHNICAL SPECIFICATIONS
21
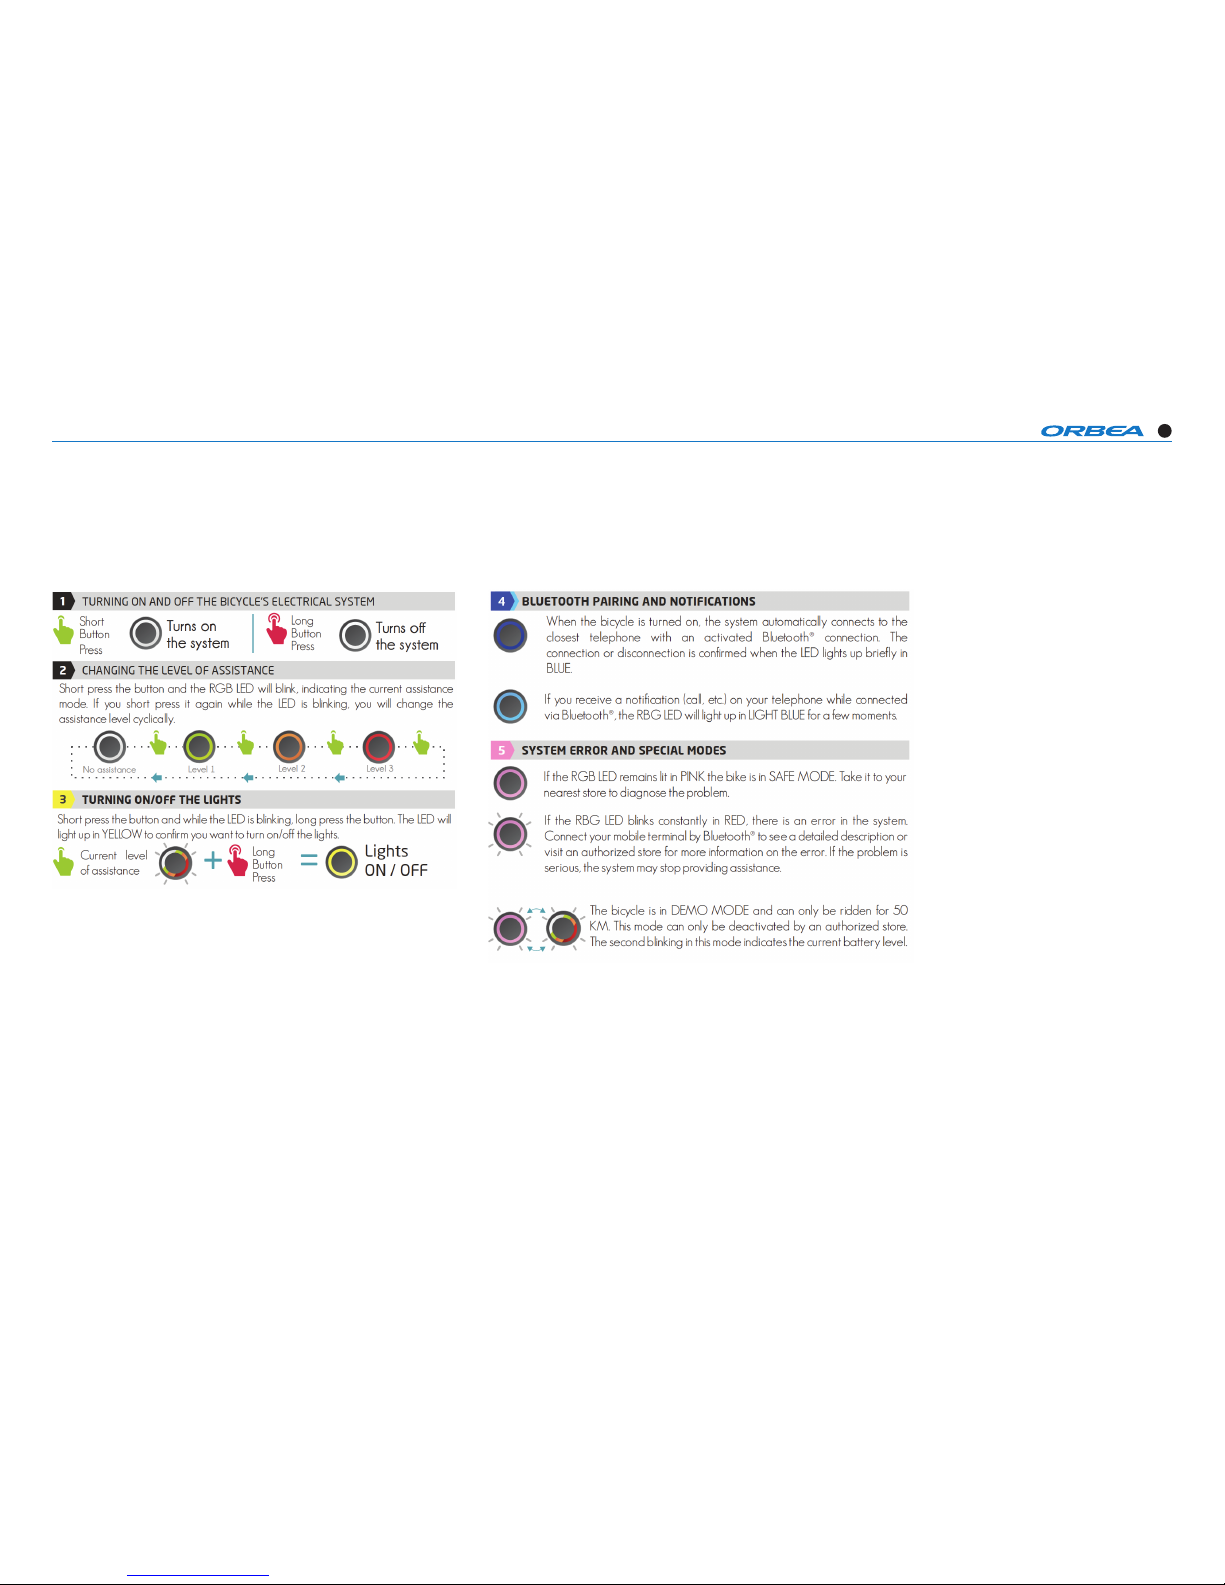
IWOK ONE BUTTON
OPERATING INSTRUCTIONS
Page 22
GAIN TECHNICAL SPECIFICATIONS
22
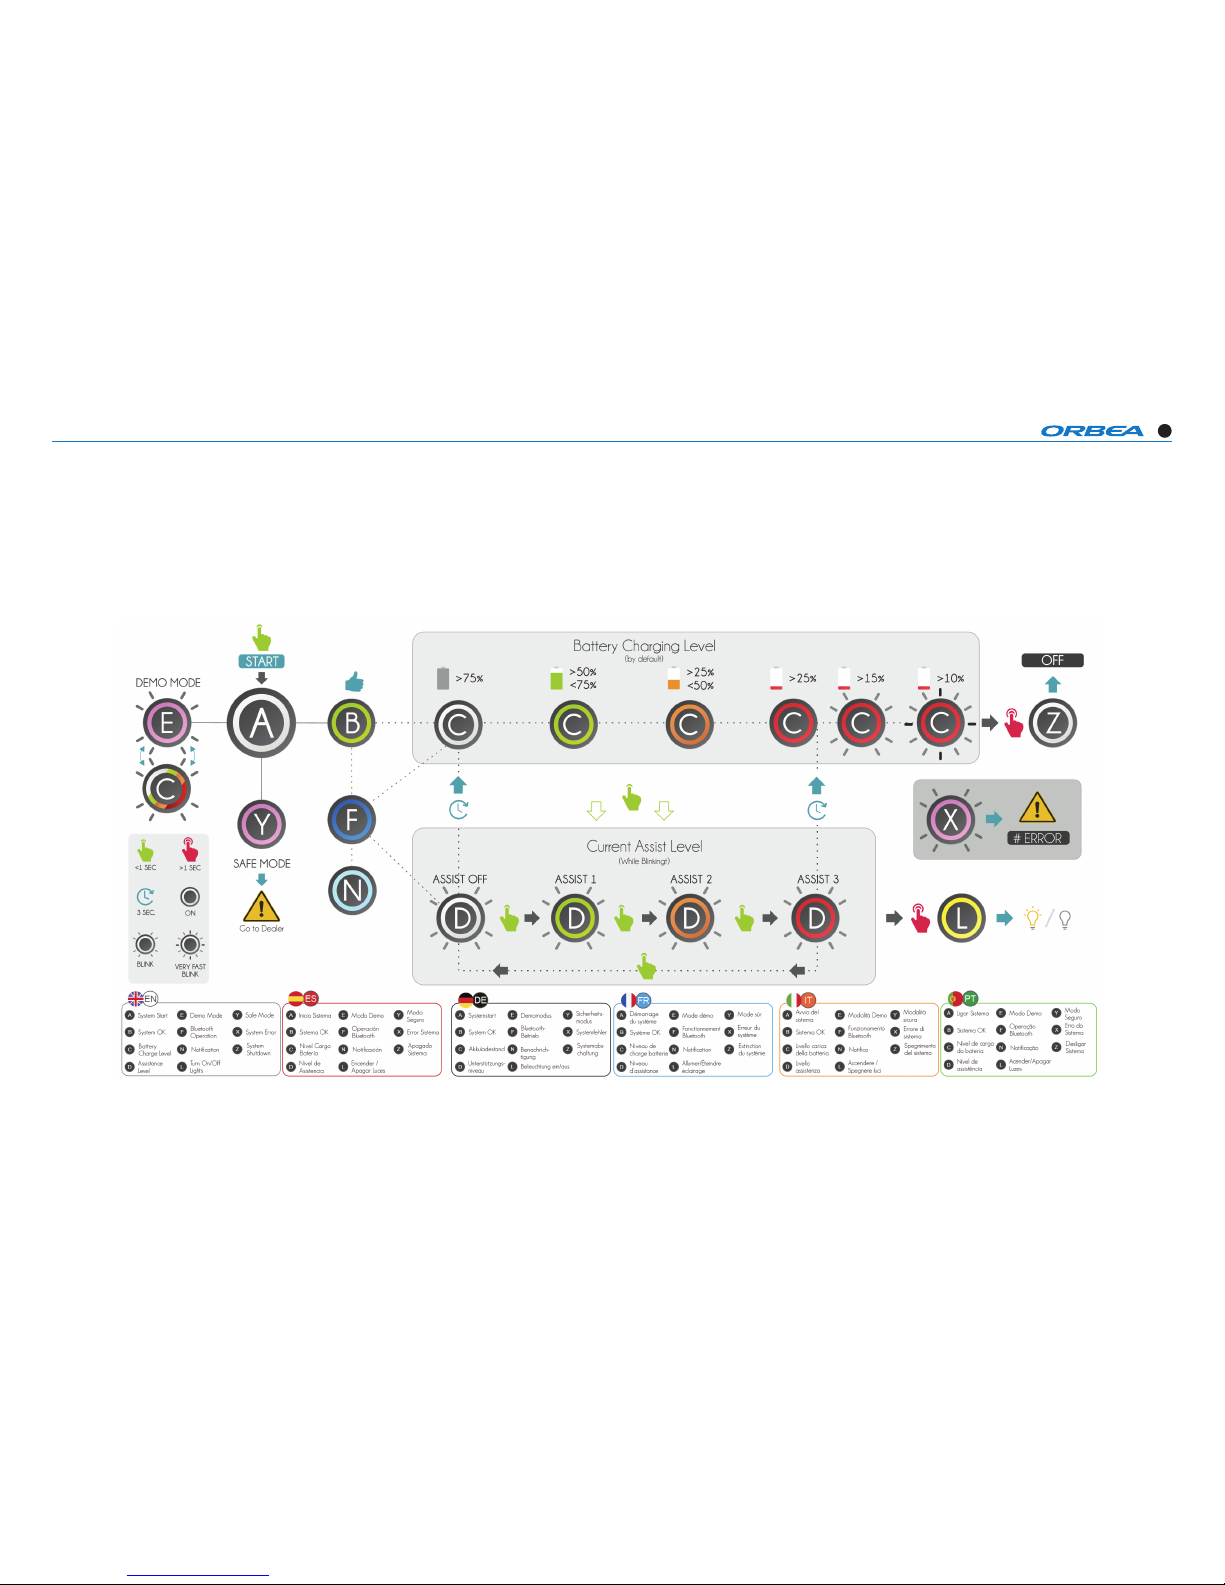
IWOK ONE BUTTON
GENERAL LIGHT SCHEME AND MEANING
Page 23
GAIN TECHNICAL SPECIFICATIONS
23
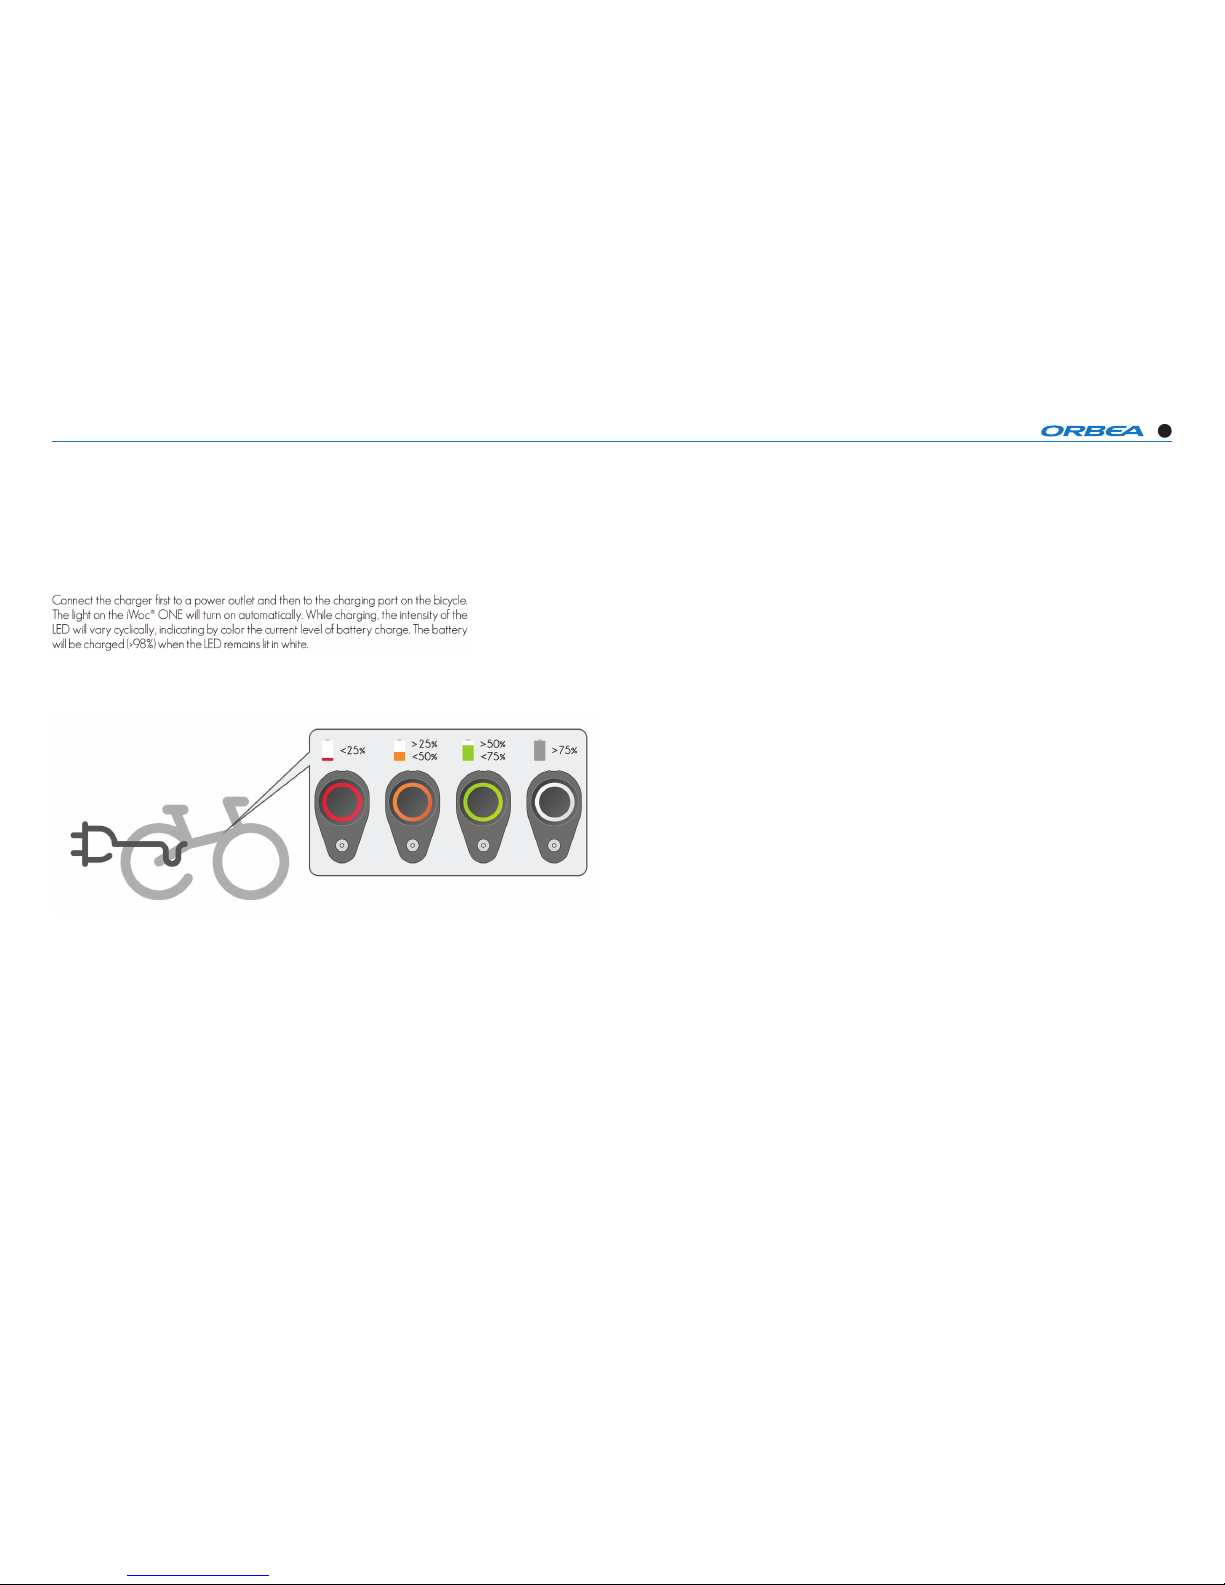
IWOK ONE BUTTON
LIGTH SCHEME WHEN CHARGING
Page 24
GAIN TECHNICAL SPECIFICATIONS
24
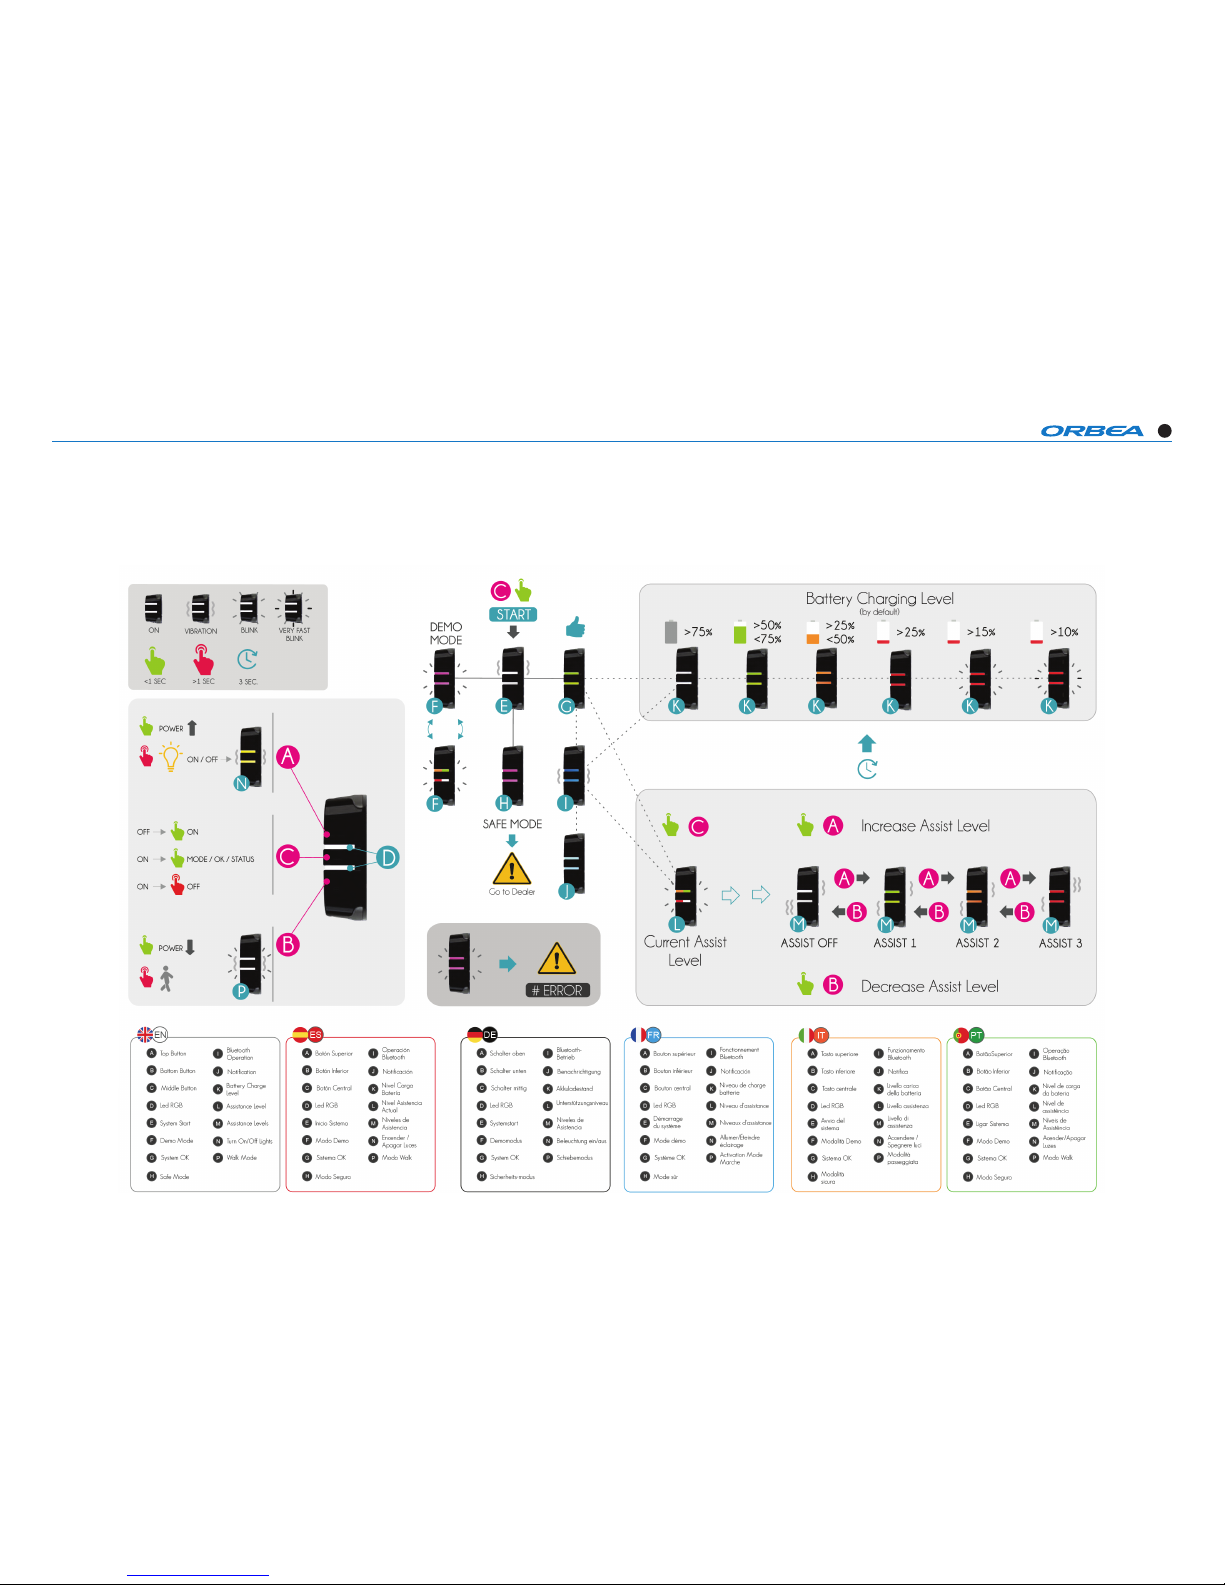
IWOK TRIO BUTTON
OPERATING INSTRUCTIONS
Page 25
GAIN TECHNICAL SPECIFICATIONS
25
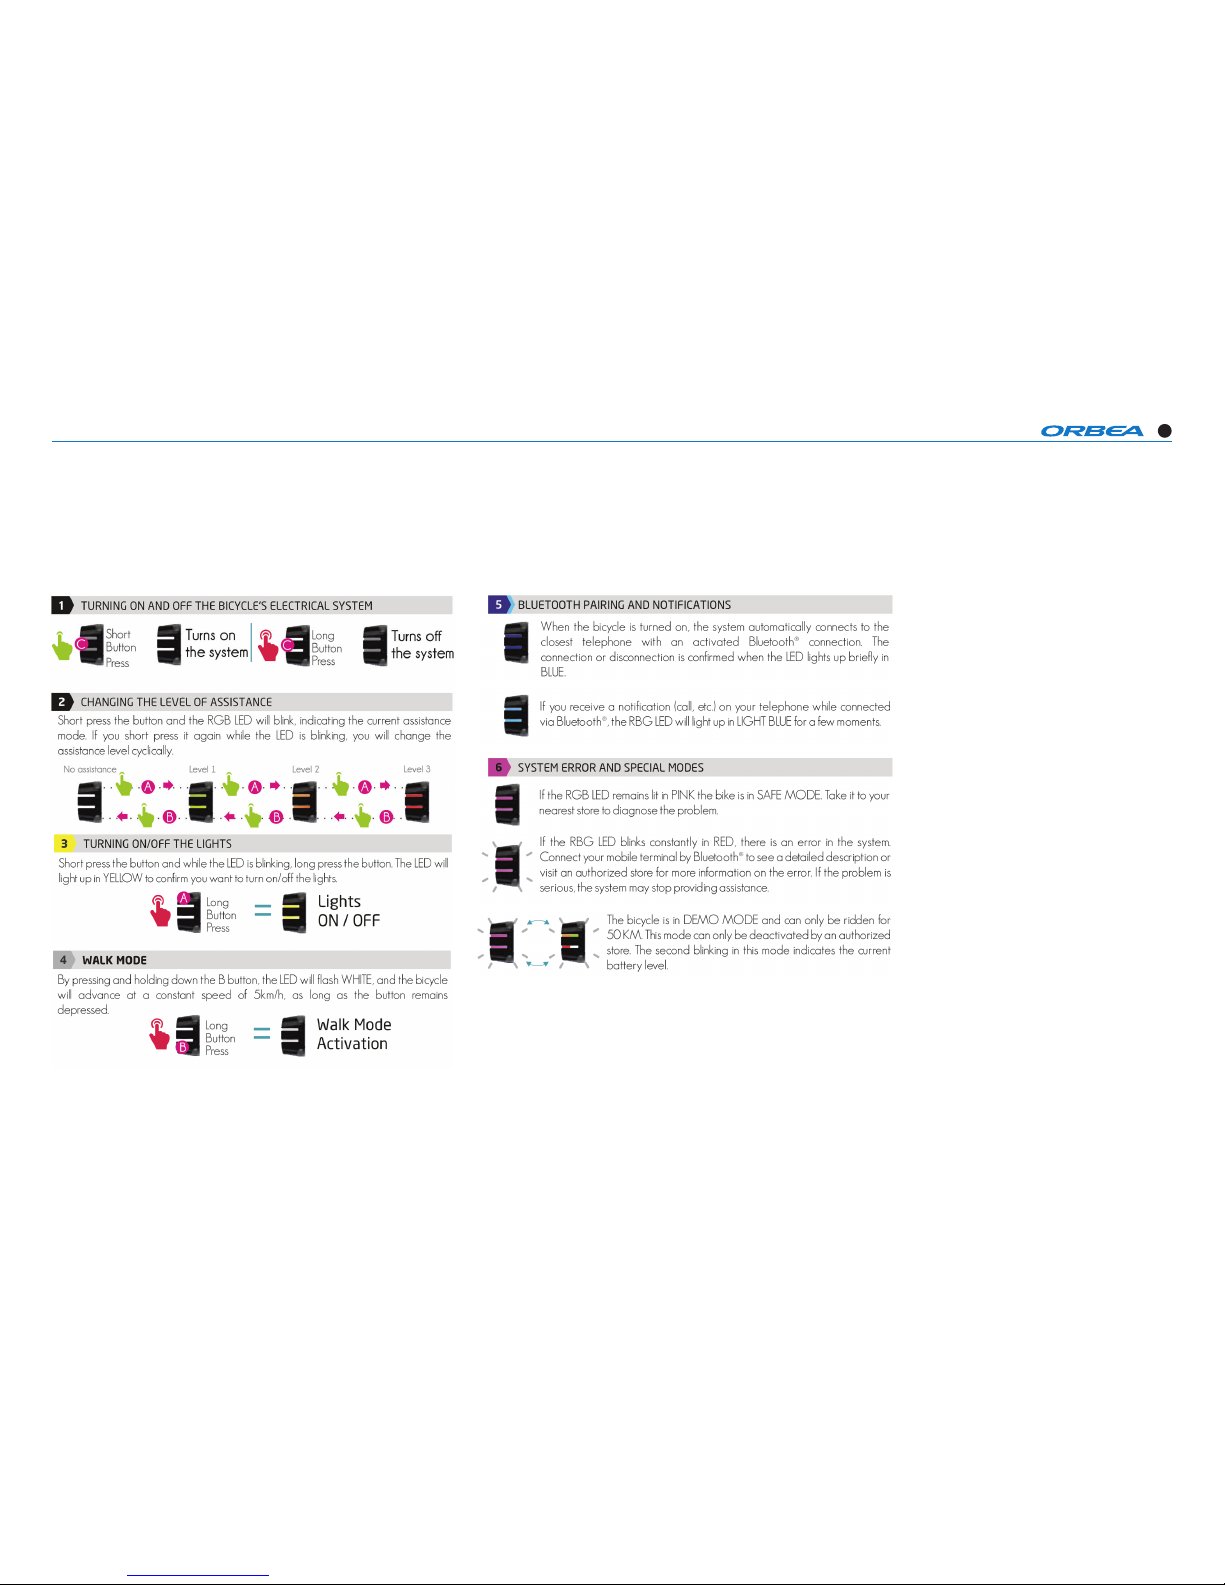
IWOK TRIO BUTTON
GENERAL LIGHT SCHEME AND MEANING
Page 26
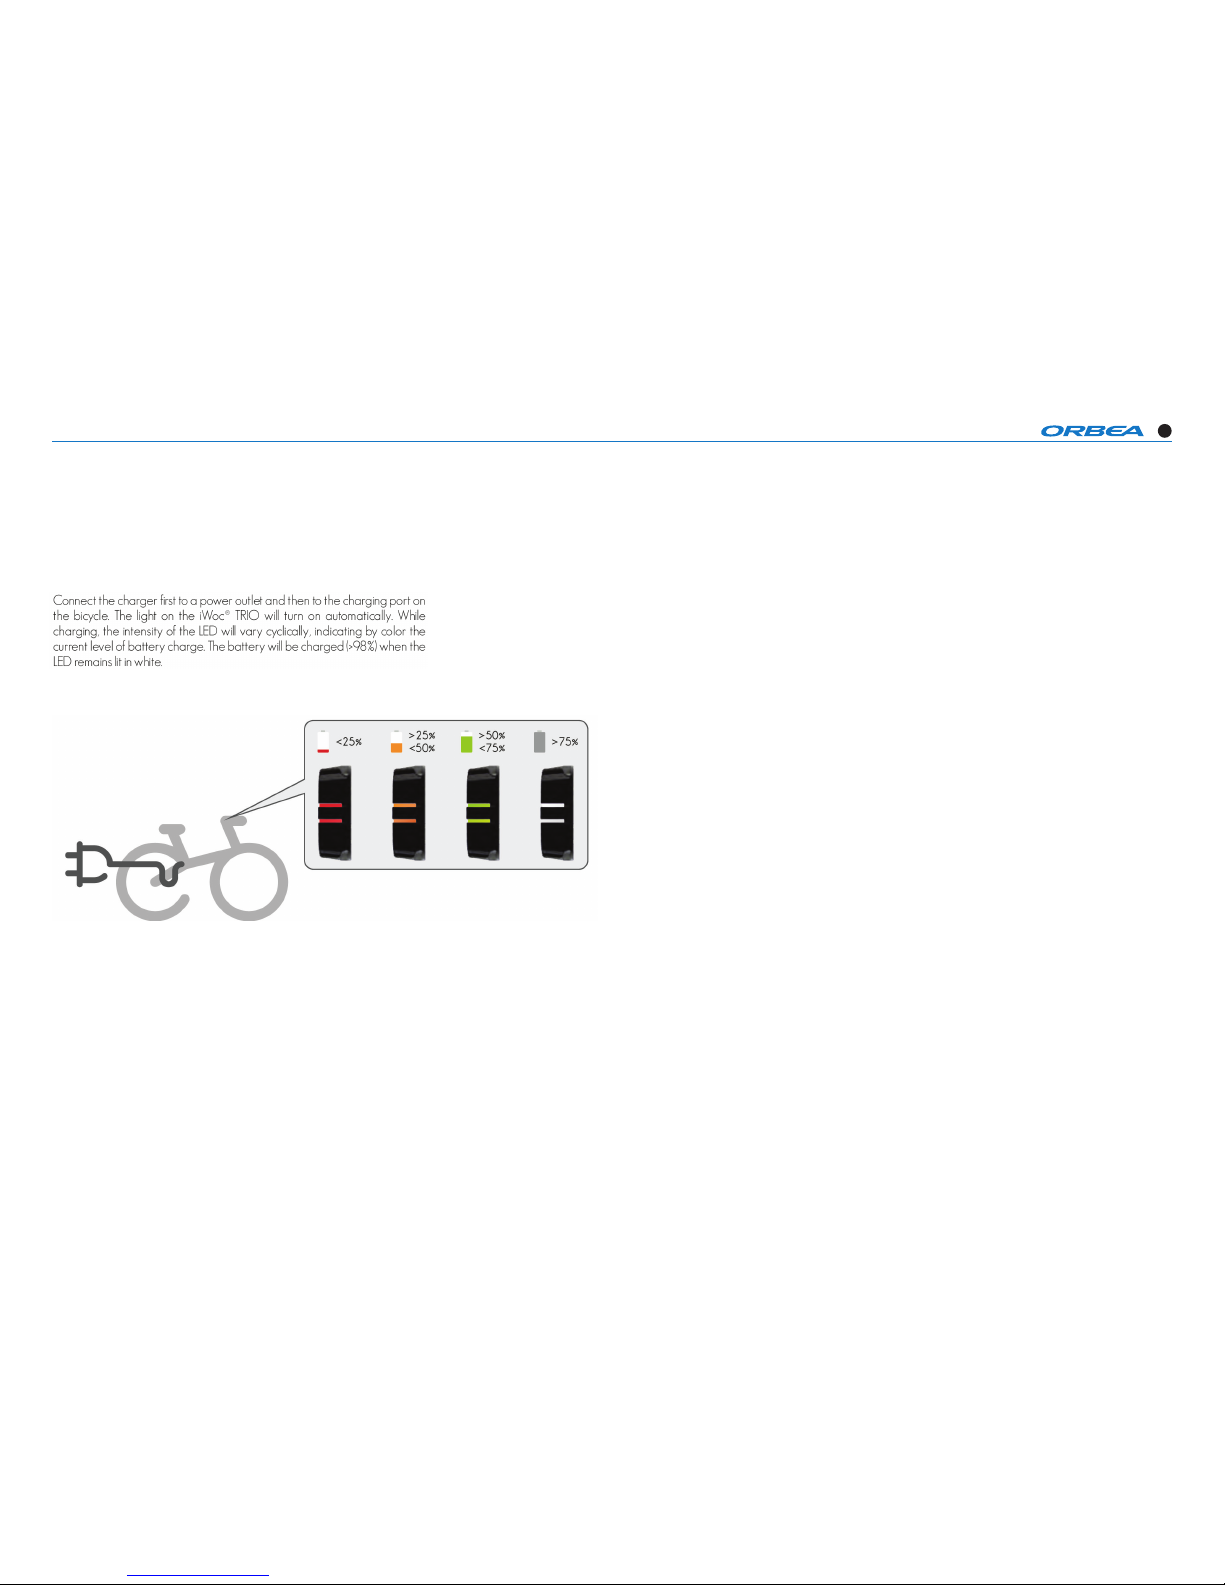
GAIN TECHNICAL SPECIFICATIONS
26
IWOK TRIO BUTTON
LIGHT SCHEME WHEN CHARGING
Page 27
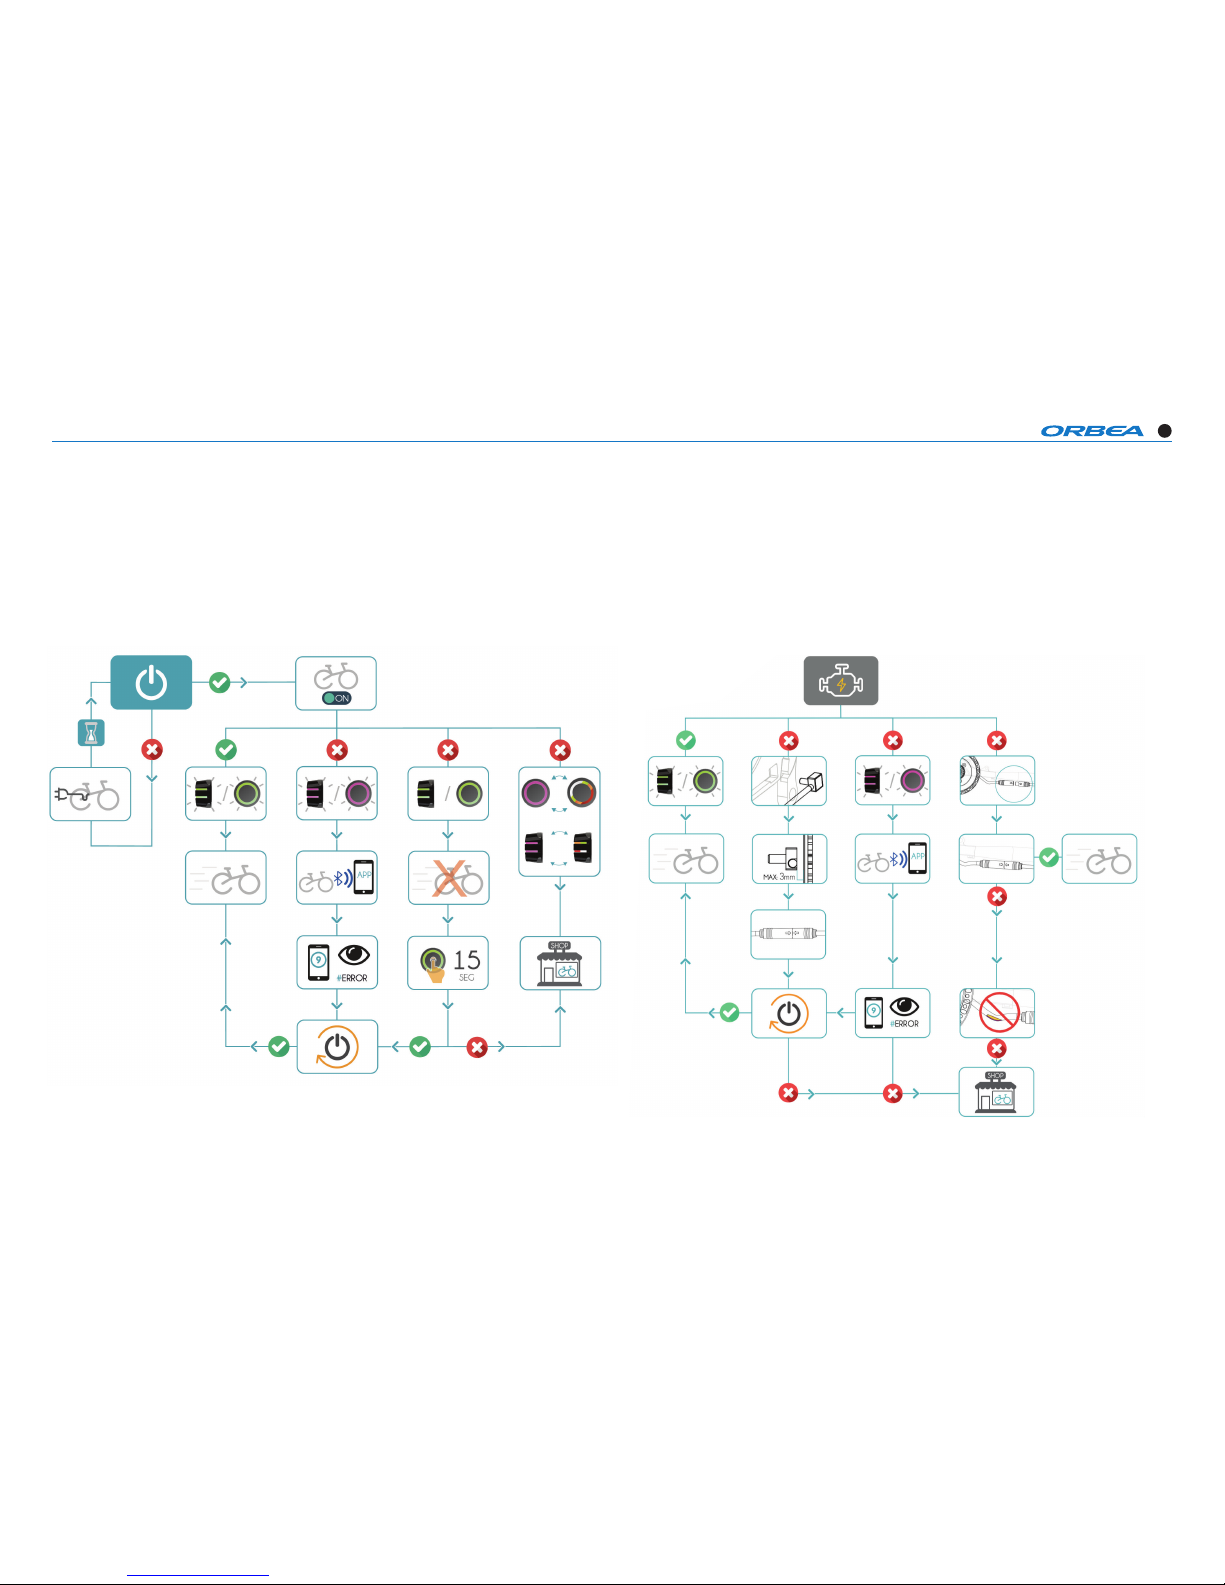
GAIN TECHNICAL SPECIFICATIONS
27
PROTOCOL
1/ START PROTOCOL 2/ MOTOR PROTOCOL
Page 28
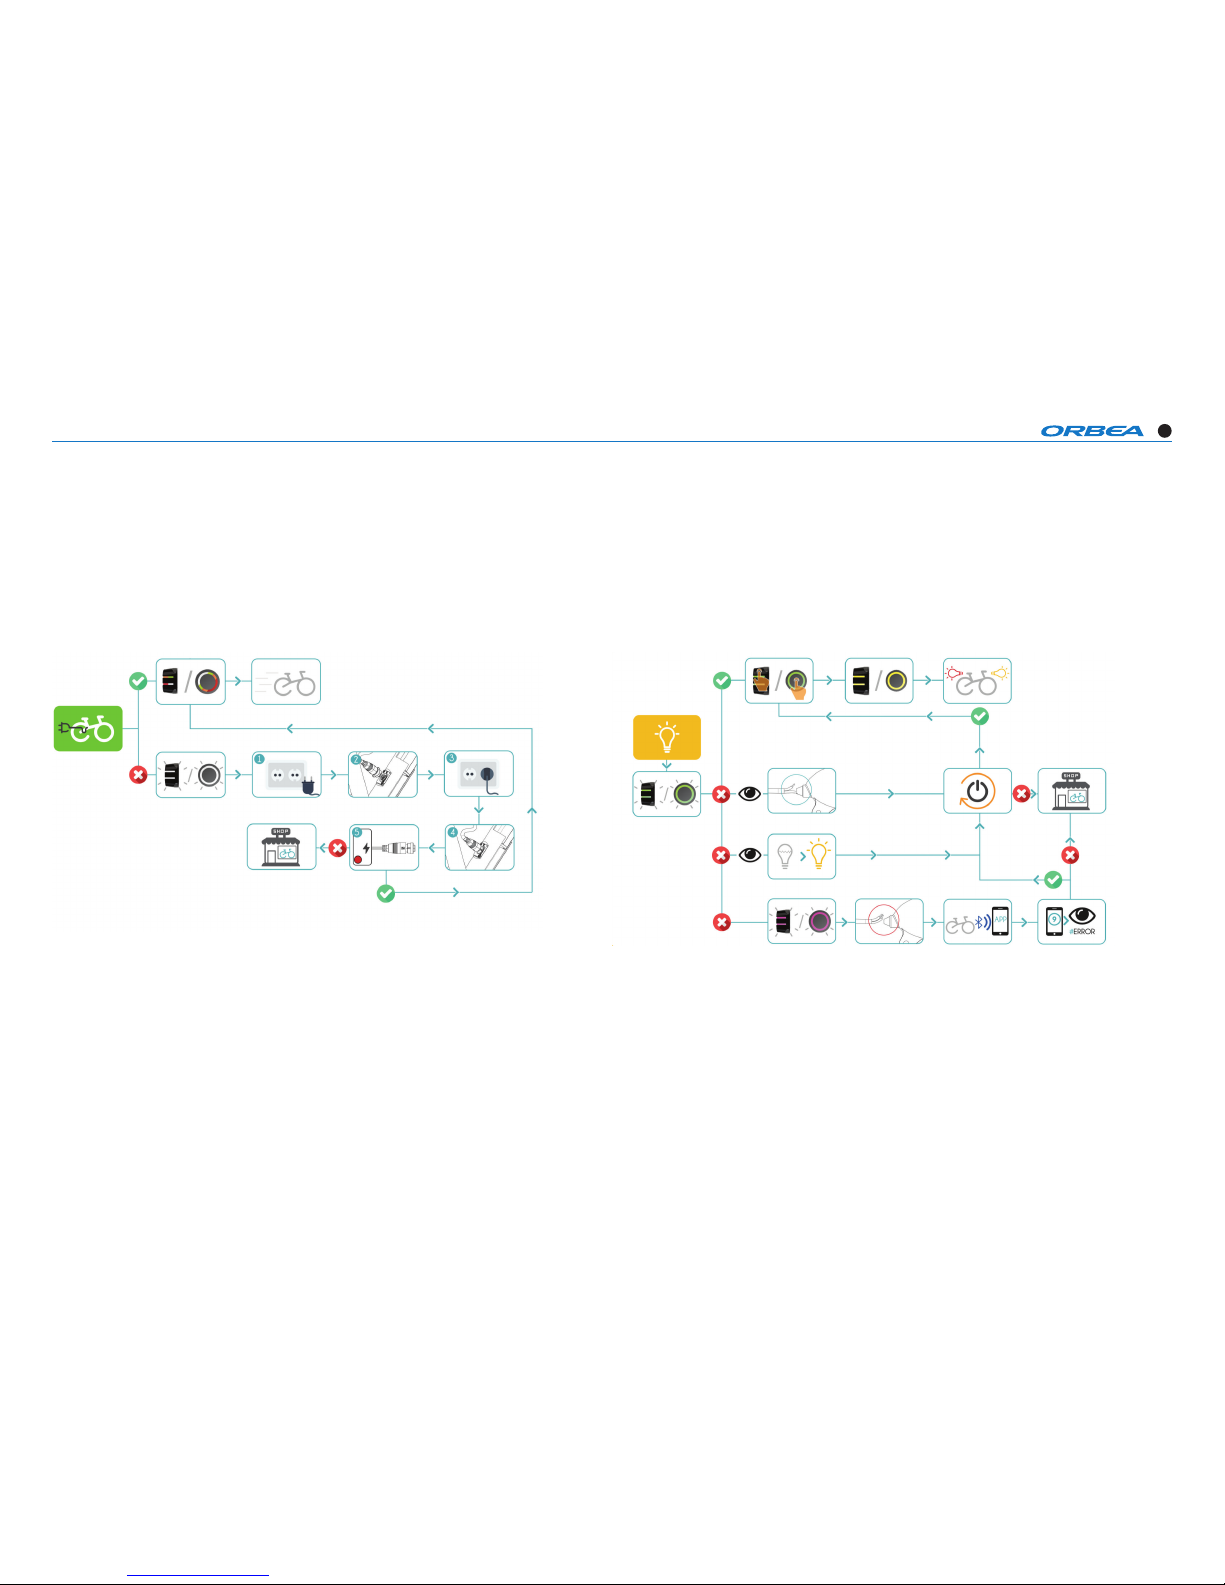
GAIN TECHNICAL SPECIFICATIONS
28
PROTOCOL
1/ CHARGING PROTOCOL 2/ LIGHTS PROTOCOL
Page 29
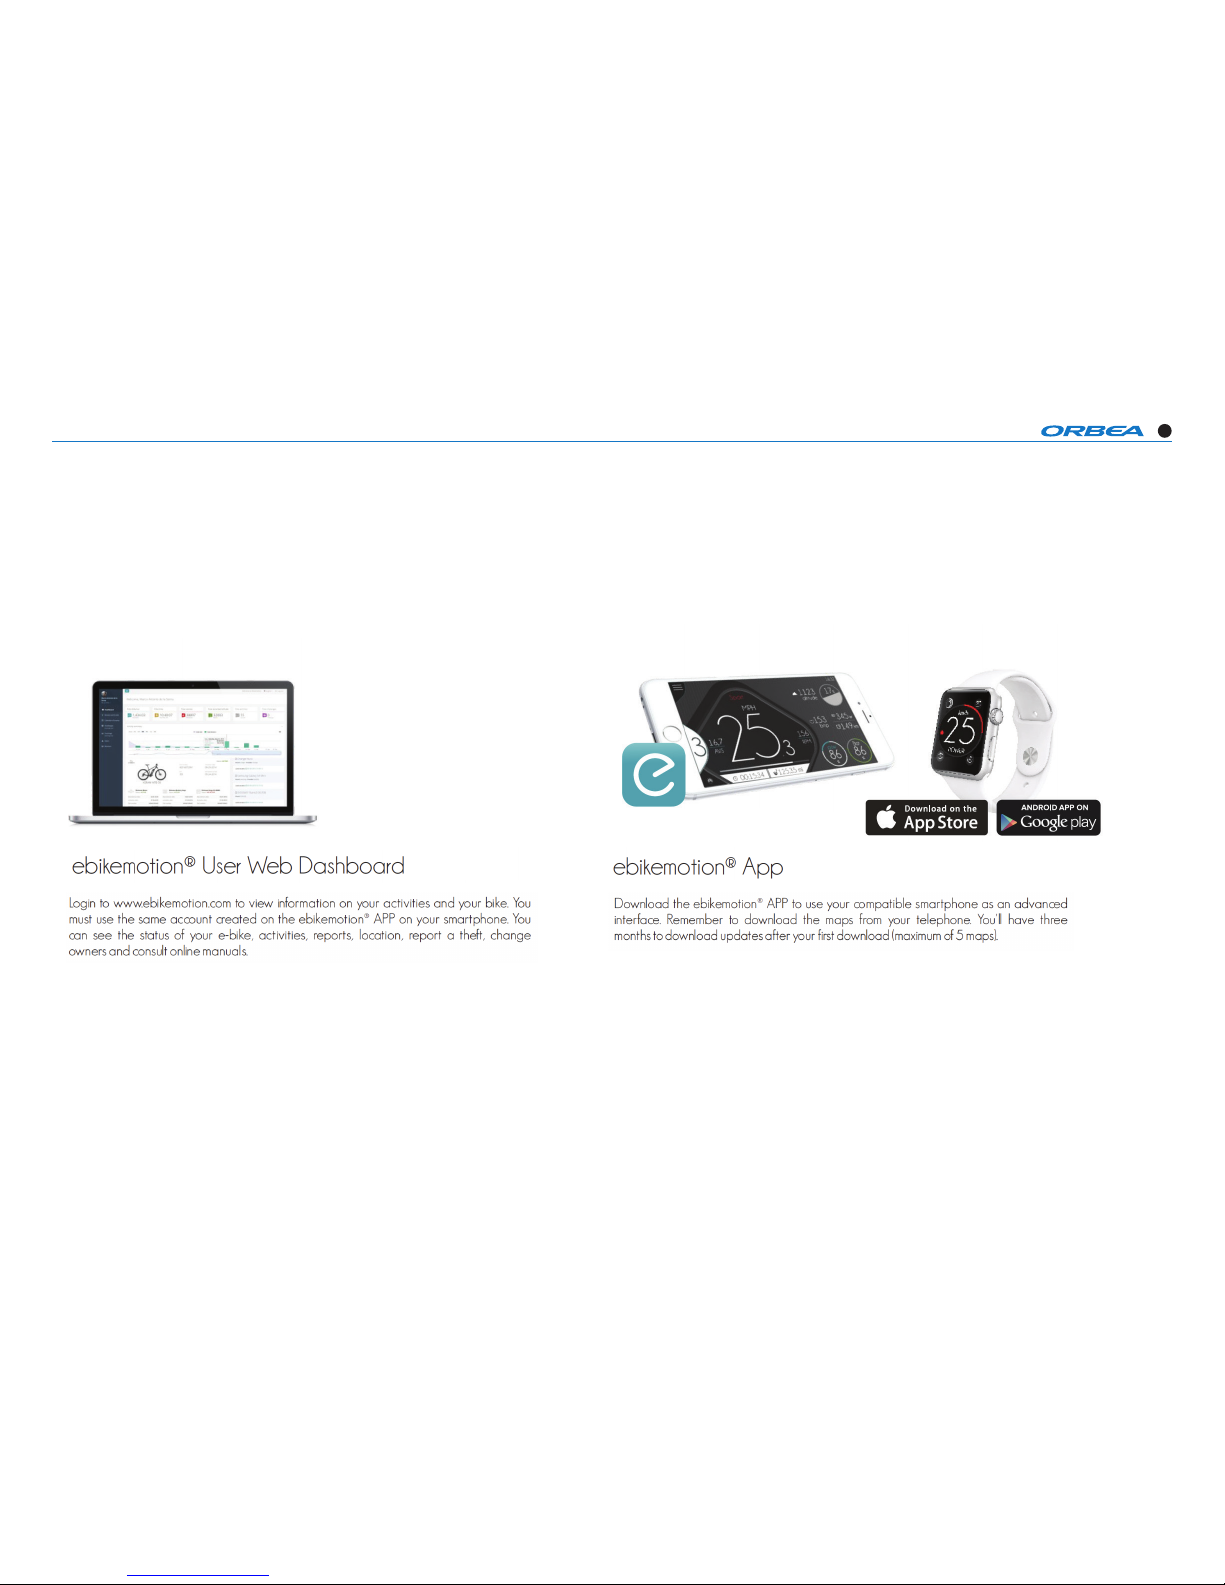
GAIN TECHNICAL SPECIFICATIONS
29
SOFTWARE
APP FOR YOUR GAIN (find the manuals in www.ebikemotion.com)
Page 30
GAIN TECHNICAL SPECIFICATIONS
30
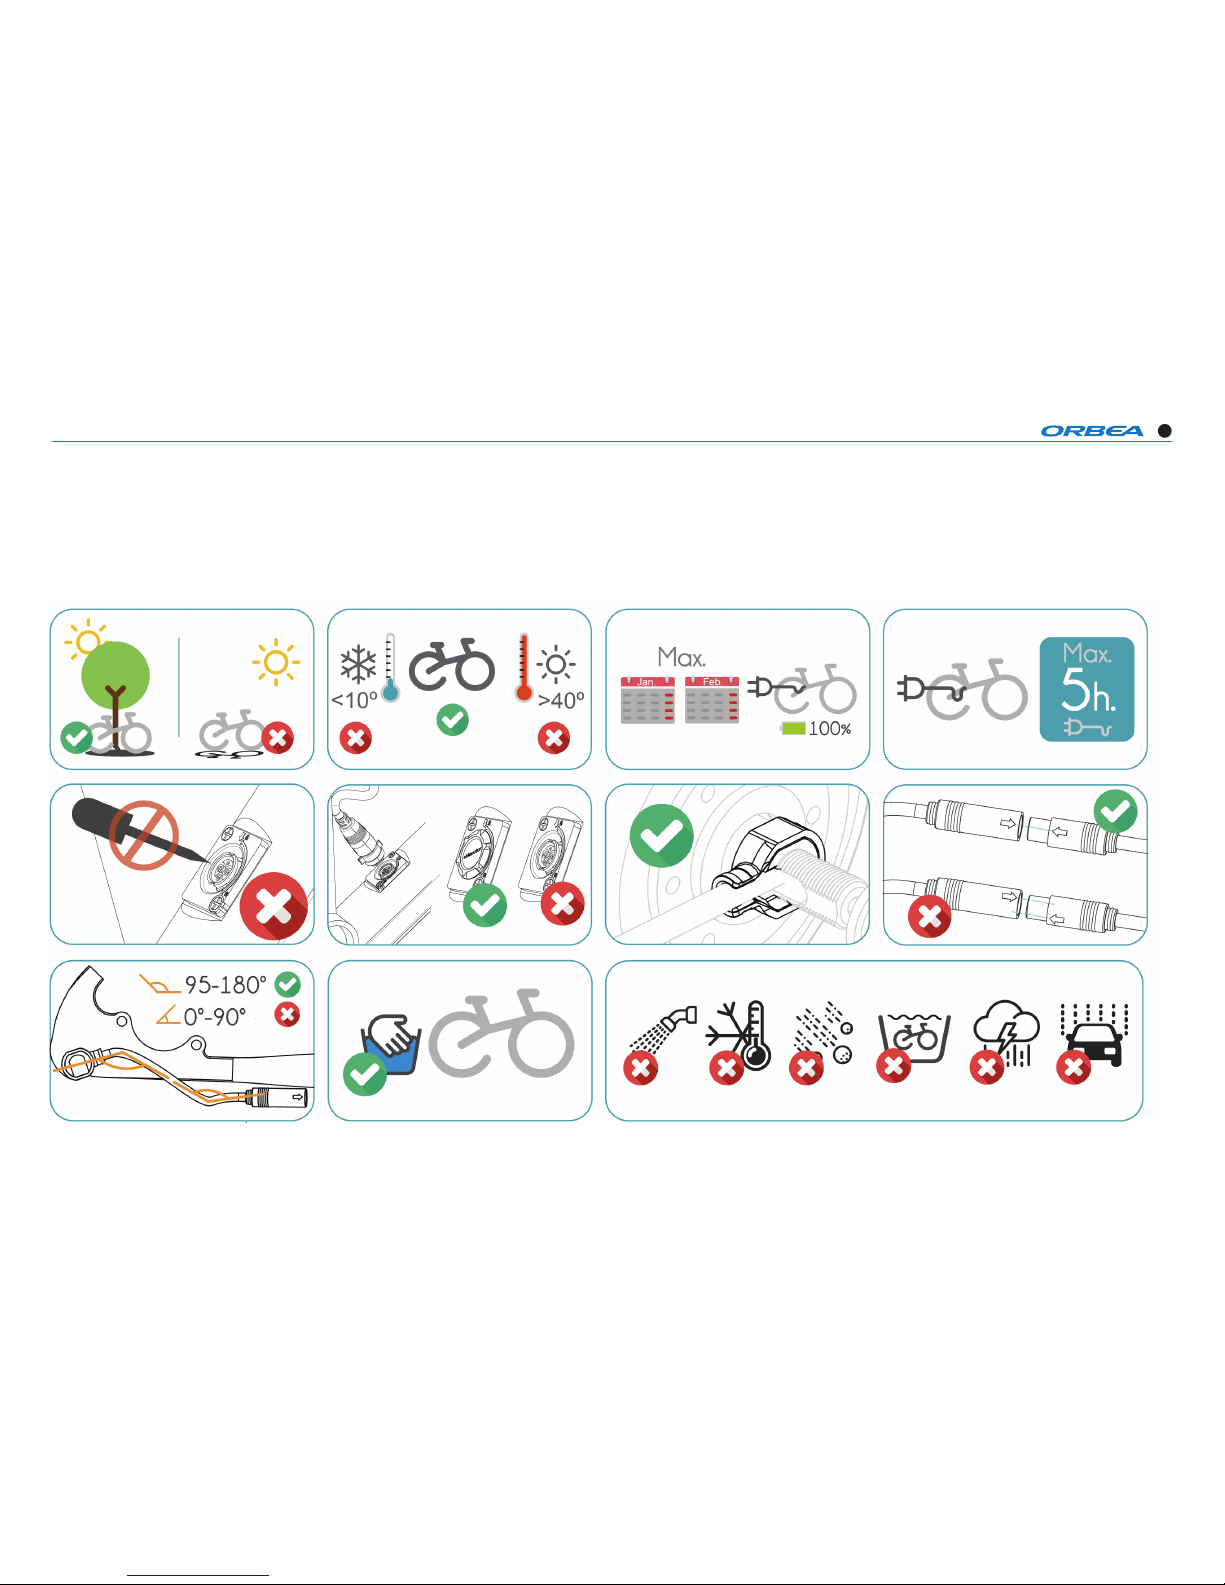
X35 MAINTENANCE
BATTERY, POWER CABLE AND CHARGING
Page 31

GAIN TECHNICAL SPECIFICATIONS
31
FRAME AND MATERIAL
Orbea frames are carefully designed to be durable,
efcient, and easy to maintain. Gain tubes are stiff
and light, giving excellent steering precision and pedaling efciency. Gain carbon frame is extremely resistant to corrosion, making it perfect for road. With
only a minimum amount of maintenance, it’s easy to
keep your Gain in top condition.
1) Keep your Gain clean
Washing your bike with mild soap and water will keep
you looking stylish and allow you to check the condition of the frame and components. Don’t use high
water pressure and avoid spraying water into bearings
or frame tubes. Citrus degreasers are biodegradeable and do a great job of removing dirty grease from
gears and chain.
2) Keep your Gain lubed
Once your bike is clean, it’s a good time to put fresh
lube on the chain. Use only enough to get inside the
links and wipe off any excess because it will attract
dirt. Headset and pivot bearings should be inspected
every few months for smoothness and to ensure that
the seals are intact and lube is clean.
3) Inspect your Gain before you ride
Do a quick check before every ride to make sure your
bike is in excellent condition. It is very common to discover small issues at home that can become big problems on the trail. CHAIN Is the chain dirty, noisy or
dry? Clean and lube your chain before riding. BRAKES
Check your brakes to make sure they are working
correctly. Check for missing/loose caliper and rotor
bolts. TIRES Look for damage to the sidewalls of your
tires. Check and adjust tire pressure. WHEELS Spin
the wheels and look for wobbles, check for loose or
broken spokes. Check quick release levers to make
sure they are functioning properly. FRONT END Stand
over the saddle, pull on the brakes and rock the bike
back and forth. Feel for any play or knocking that
might indicate a loose headset, loose brake rotors or
calipers, or worn fork bushings.
TEST RIDE Take a quick ride up and down the street to
make sure your bike is shifting and braking properly.
Listen for unusual noises.
AFTER A CRASH OR IMPACT
Falling is part of riding and it’s impossible to avoid
minor accidents. If you crash your Gain, please make
sure you are okay and seek medical attention if necessary. If you are not injured, you should check your
bike before continuing:
1) Inspect your frame and components for damage. Do not ride your bike if any problems are de-
tected.
WHAT TO LOOK FOR
Inspect Frame and fork for evidence of cracking or
bending. If cracks are discovered, discontinue use
immediately.
Check the drivetrain and spin the wheels to make sure
components are operating correctly. If you discover
damage to your components, discontinue use immediately.
Even if you don’t nd any damage, pay careful attention to the sound of your bike when you continue riding. Unusual noises can be caused by cracks or other
problems. A well-maintained bike will be quiet and
free of creaks or squeaks. Investigate and locate the
source of any new noises.
MAINTENANCE AND PART REPLACEMENT IN OUR
eBIKES
The components of your eBike are associated with
your frame number. If a component is6 replaced, it
must be linked to your bike through a special system
available at all technical6 service centers and shops
authorized by your brand. Visit one of these points
to complete6 the purchase and replacement operation. The components of your e-bike are designed to6
be used in poor weather conditions, such as rain and
snow, and are protected against6 splashing, but not
against immersion or pressurized water. It is important when transporting6 your eBike outside on a car
or camper to properly protect the bike, or at least the
most6 delicate electronic parts, such as the remote
control, display and USB port, with a tarp.6 Keep the
remote control free of dust and water. Never use pressurized water systems on6 the surface of the battery,
motor, remote control, display or charging port.
2) Bring your bike to your Orbea dealer for professional inspection. Some damage can only be de-
tected by disassembling the bike to check for cracks
or other signs of stress.
A crash or impact can put extraordinary stress
on your bike and components, causing them
to fail or to fatigue prematurely. Failure can
happen suddenly with no warning, causing loss
of control, serious injury or death.
Page 32

GAIN TECHNICAL SPECIFICATIONS
32
ORBEA WARRANTY
HOW DO I ACTIVATE MY
LIFETIME WARRANTY?
Orbea provides a lifetime warranty on all its frames.
Only a brand that knows the materials, masters the
technologies and has the skills can guarantee that
your frame is totally invincible. Only Orbea takes you
a step beyond.
Orbea’s lifetime warranty is activated using the regis-
tration number you will nd on all frames from the
2009 range onwards. When you have activated it at
your dealer or at www.orbea.com, your bike will automatically receive its lifetime warranty. The registration
number is a unique, non-transferable code that you
will nd on the underside of your bike’s downtube.
Activate your frame’s warranty using this number at
your dealer’s or at www.orbea.com.
WHAT ARE THE ADVANTAGES?
· Lifetime guarantee of your frame against breakage.
· Two-year guarantee on all components.
· Identication of your bicycle and all its characteristics to our Technical Assistance Service so that wecan
provide our best response to any problems. Access to
special offers, events and prize drawings.
ORBEA WARRANTY
The ongoing efforts we make at Orbea to design highend bicycles enable us to provide customerswith the
following warranty:
1) We back each frame and rigid fork in our bicycles
with a lifetime warranty against materials and manufacturing defects. Frames with travel longer than 170
mm are covered by a 2-year warranty. We warrant
each frame and fork in our bikes against paint or varnish defects and corrosion for 3 years. This warranty
covers the original purchaser only and is non-transferable. For the lifetime warranty to be valid,customers
must ll in t he online warranty form within one month of purchase, and proof of purchase in the form of
cash register receipt or sales ticket is required.
2) Warranty claims are subject to the decision made
by our technical staff about the nature of the defect
after thorough inspection of the faulty part.
3) All the parts assembled in our bicycles are protected against assembly or manufacturing defects for 2
years, and repairs qualifying under this warranty will
be performed by authorized dealers in each country.
4) This warranty does not cover parts that naturally
wear over time, such as tires, brake pads, handlebar
grips, cranksets, bearings, etc.
5) This warranty does not cover damages or defects
caused by negligence, improper use, assembly ofparts
or accessories that are not original, or defective repair
or maintenance work. of the bicycle, nonoriginal ac-
cessories being tted to it, or unsuitable maintenance
operations or handling.
6) This warranty includes only replacement or repair
coverage of the parts under it and in no case shall it
cover personal damages directly or indirectly caused
by the failure of said parts during use.
7) All claims must be reported to an authorized dealer.
In case there is no such a dealer near the buyer’s location, please contact Orbea so that we can decide
how to solve the problem.
8) In case of crashes, the Orbea warranty shall be considered null and void.
Page 33
GAIN TECHNICAL SPECIFICATIONS
33
ADDITIONAL INFORMATION
ORBEA participates actively on facebook and Twitter
with our fantastic global community of riders.
Looking to nd spots to ride or plan a vacation?
Someone will have the answers:
YOUR ORBEA DEALER
Our dealers are experts and should be able to assist
you with setting up and maintaining your Orbea bicycle. A complete listing of Orbea dealers and distributors
can be located on our website:
www.orbea.com/us-en/dealers/?country=INT
AFTER SALES SERVICE
Our service technicians are trained to handle any
questions you might have about your Orbea bicycle:
ORBEA CONTENT
View and download photos, videos and
documents.
content.orbea.com/us-en/
ORBEA UNIVERSITY
www.orbea.com/es-es/university/
BLOG ORBEA
www.orbea.com/es-es/blog/
FACEBOOK
INSTAGRAM
YOUTUBE
TWITTER
www.facebook.com/OrbeaBicycles
www.twitter.com/Orbea/
www.instagram.com/orbeabicycles
Visit our Orbea Channel on You Tube for a
variety of helpful setup and tech videos:
www.youtube.com/user/OrbeaBicycles
Page 34

 Loading...