

Page 1
SCSI INTERNAL ORB 2.2GB
• Installation Guide
• User’s Guide
• Troubleshooting
• How to Get Help
• Warr anty
• Registration
Owner’s Manual
Page 2

TABLE OF CONTENTS
SECTION 1 INSTALLATION GUIDE
Things to Consider . . . . . . . . . . . . . . . . . . . . . . . . . . . . . . . . . . . . . . .2
1.1 Introduction . . . . . . . . . . . . . . . . . . . . . . . . . . . . . . . . . . . . . . . .3
1.2 System Requirements . . . . . . . . . . . . . . . . . . . . . . . . . . . . . . . .3
1.3 Hardware and Tools for Installation . . . . . . . . . . . . . . . . . . . .3
1.4 Package Contents . . . . . . . . . . . . . . . . . . . . . . . . . . . . . . . . . . .3
1.5 Installation Precautions . . . . . . . . . . . . . . . . . . . . . . . . . . . . . .4
1.6 Hardware Installation . . . . . . . . . . . . . . . . . . . . . . . . . . . . . . . .4
1.7 Configuration Options . . . . . . . . . . . . . . . . . . . . . . . . . . . . . . . .6
1.8 Mounting the ORB Drive . . . . . . . . . . . . . . . . . . . . . . . . . . . . . .7
1.9 Cable Connection . . . . . . . . . . . . . . . . . . . . . . . . . . . . . . . . . . . .8
1.10 Final Installation Checks . . . . . . . . . . . . . . . . . . . . . . . . . . . . . .9
1.11 System Setup . . . . . . . . . . . . . . . . . . . . . . . . . . . . . . . . . . . . . . .9
1.12 ORB Tools and Backup Utility Software for PC . . . . . . . . . . .10
1.13 Mac Device Driver and Software Installation . . . . . . . . . . . .13
1.14 ORB Tools for Mac . . . . . . . . . . . . . . . . . . . . . . . . . . . . . . . . . .13
1.15 Connecting the ORB Drive to a SCSI Bus . . . . . . . . . . . . . . . .14
SECTION 2 USERS GUIDE
2.1 Operating your ORB Drive . . . . . . . . . . . . . . . . . . . . . . . . . . . . .16
2.2 Using ORB Disks . . . . . . . . . . . . . . . . . . . . . . . . . . . . . . . . . . . . .17
2.3 Accessing Your ORB Drive . . . . . . . . . . . . . . . . . . . . . . . . . . . . .19
2.4 Reassigning Drive Letters . . . . . . . . . . . . . . . . . . . . . . . . . . . . .19
2.5 Large Drive Support . . . . . . . . . . . . . . . . . . . . . . . . . . . . . . . . .20
2.6 Partitioning a Disk . . . . . . . . . . . . . . . . . . . . . . . . . . . . . . . . . . .20
2.7 Ultra Wide SCSI Performance . . . . . . . . . . . . . . . . . . . . . . . . . .22
2.8 SCSI Tips . . . . . . . . . . . . . . . . . . . . . . . . . . . . . . . . . . . . . . . . . . .22
SECTION 3 TROUBLESHOOTING . . . . . . . . . . . . . . . . . . .23
SECTION 4 SPECIFICATIONS . . . . . . . . . . . . . . . . . . . . . . .26
SECTION 5 CUSTOMER SUPPORT . . . . . . . . . . . . . . . . . .27
SECTION 6 WARRANTY . . . . . . . . . . . . . . . . . . . . . . . . . . . .28
SECTION 7 SOFTWARE LICENSE AGREEMENT . . . . .29
SECTION 8 STANDARDS AND REGULATIONS . . . . . .31
1
Page 3

THINGS TO CONSIDER:
In the process of installing the ORB drive, it will be necessary for you to open up
your computer and identify, as well as work with, various pieces of hardware inside
it (such as those mentioned in the questions below). If you feel in any way unsure
of performing this installation or if you cannot answer “yes” to most of the questions below, then we strongly recommend contacting a qualified computer technician to install or assist in the installation.
1. Have you opened your computer before?
2. Have you physically removed an internal SCSI device before?
3. Do you have access to technical assistance to help with the installation?
4. Are you familiar with the difference between a 3
1
/2 and a 5 1/4-inch bay?
5. Do you know what operating system is used on your computer?
6. Do you have a computer system user manual immediately available?
7. Have you read your computer Owner/User manual?
8. Are you familiar with your computer system motherboard or SCSI host bus
adapter?
9. Have you set up an internal SCSI device in the past?
10. Are you familiar with an internal SCSI ribbon cable?
11. Have you connected an internal SCSI ribbon cable to the motherboard or SCSI
host bus adapter in the past?
12. Are you familiar with jumper settings on an internal SCSI device?
13. Have you changed the SCSI ID on an internal SCSI device in the past?
14. Does your computer have an empty 3
1
/2 or 5 1/4-inch bay with front access?
15. Do you know which drive bay you intend to use to install the ORB drive?
16. If you selected the 5 1/4-inch bay, do you have a kit to enable the installation of
the 3
1
/2-inch ORB drive into a 5 1/4-inch drive bay?
2
Page 4
!
SECTION 1 INSTALLATION GUIDE
WELCOME TO ORB!
ORB offers you everything that you want in a removable disk drive - high capacity
and fast throughput speed at an affordable price that can be easily installed in your
computer.
1.1 INTRODUCTION
This installation guide provides detailed instructions, and illustrations, as well as
safety precautions that will help you to install your ORB disk drive. It is recommended that you use this guide along with your computer and SCSI host bus
adapter card manual (if applicable), for you will need to refer to the manual during
the installation process.
1.2 SYSTEM REQUIREMENTS
Hardware:
PC – Intel Pentium, AMD K6, Cyrix MMX with internal SCSI interface
Mac – Power Macintosh/Power PC, G3 and G4 with internal SCSI interface
Operating Systems:
PC – Windows 2000, 98, 95, 3.1x, NT 4.0 (SP4+), MS-DOS 5.0+
Mac – Mac OS 7.6.1 or later
1.3 HARDWARE/TOOLS FOR INSTALLATION
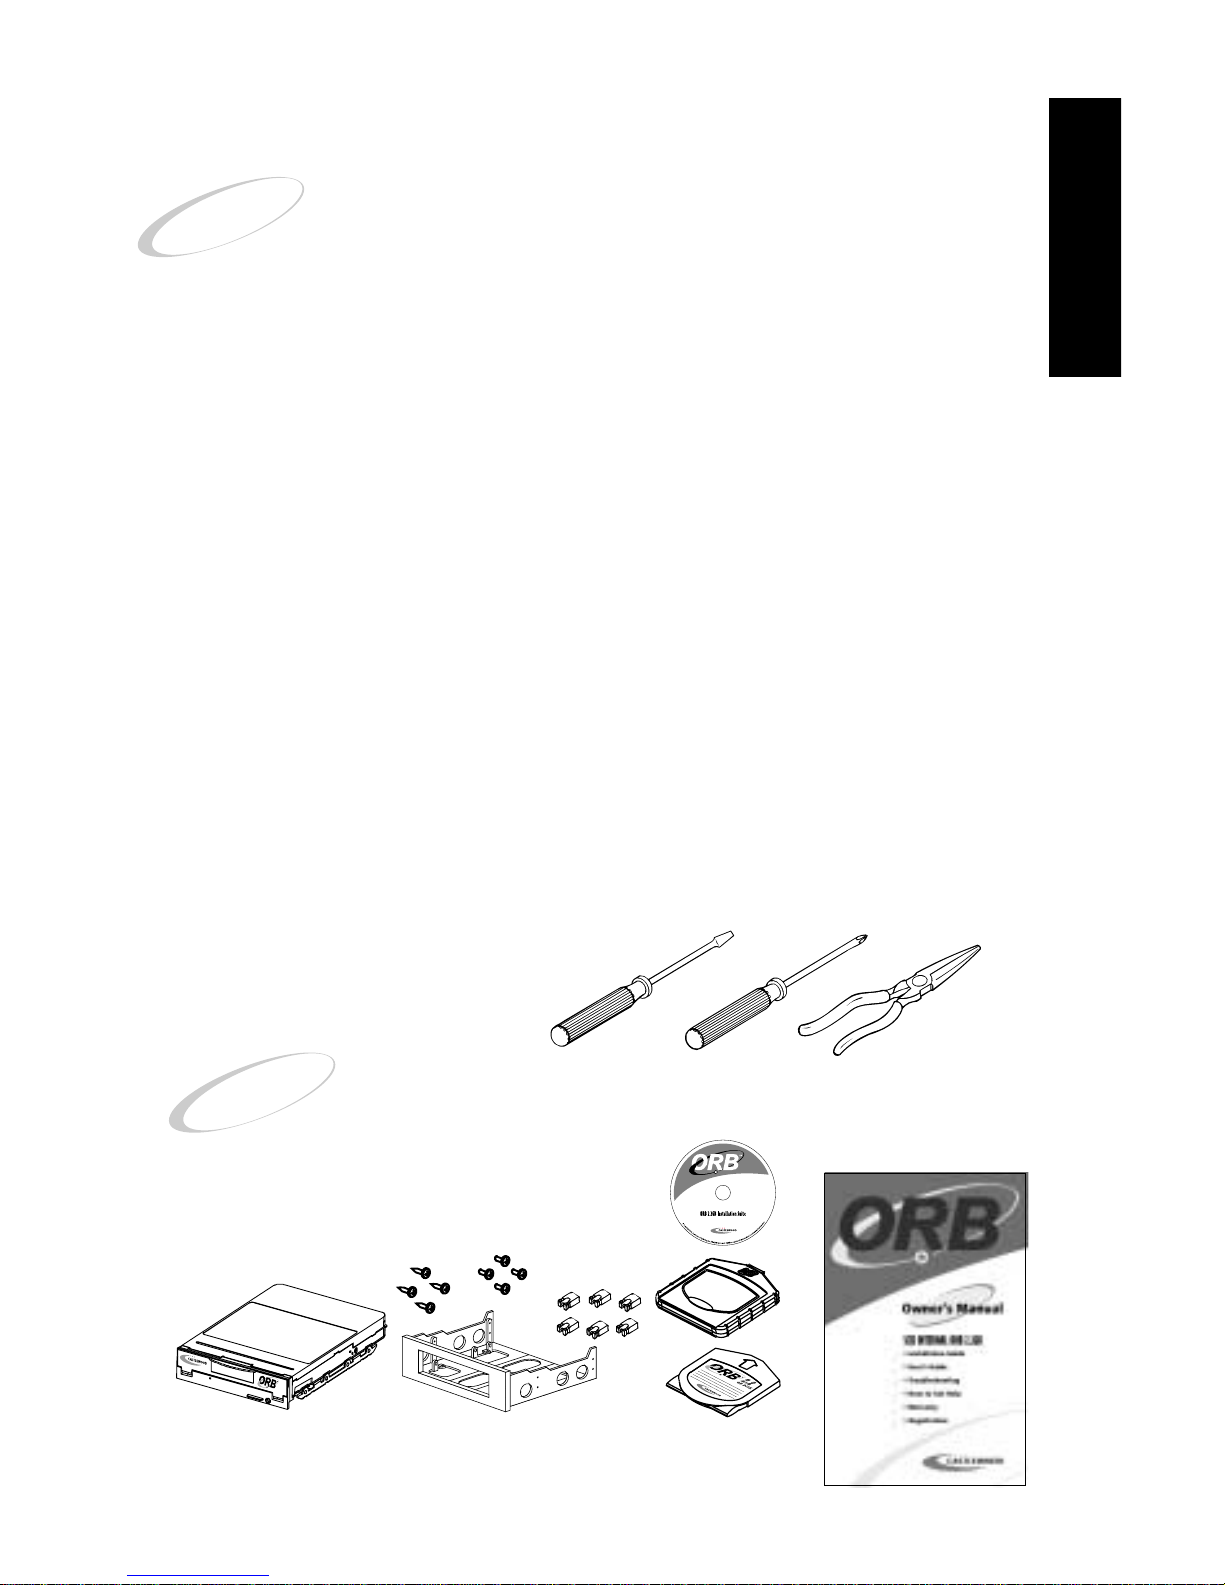
The following tools may be required for the installation of the ORB Drive:
Flat head screwdriver
Phillips head screw driver
Needle nose pliers
CAUTION: Do not use magnetic tools.
1.4 PACKAGE CONTENTS
The ORB Kit consists of:
ORB 2.2GB Disk Drive, ORB Disk with Disk Case, Owner’s
Manual/Quick Install Guide, ORB Installation Suite CD, Six Jumpers,
5
1
/4-inch adapter, and a set of four flat-ended machine screws and four
pointed-end tapping screws.
3
INSTALLATION GUIDE
Page 5
The ORB disk contains updated installation information, if applicable.
The mounting screws are provided with your drive to be used in the installation.
This drive is designed to mount in a 3
1
/2-inch drive bay. If a spare 3 1/2-inch drive
bay is not available, you will need to use an adapter to mount into a 5 1/4-inch bay.
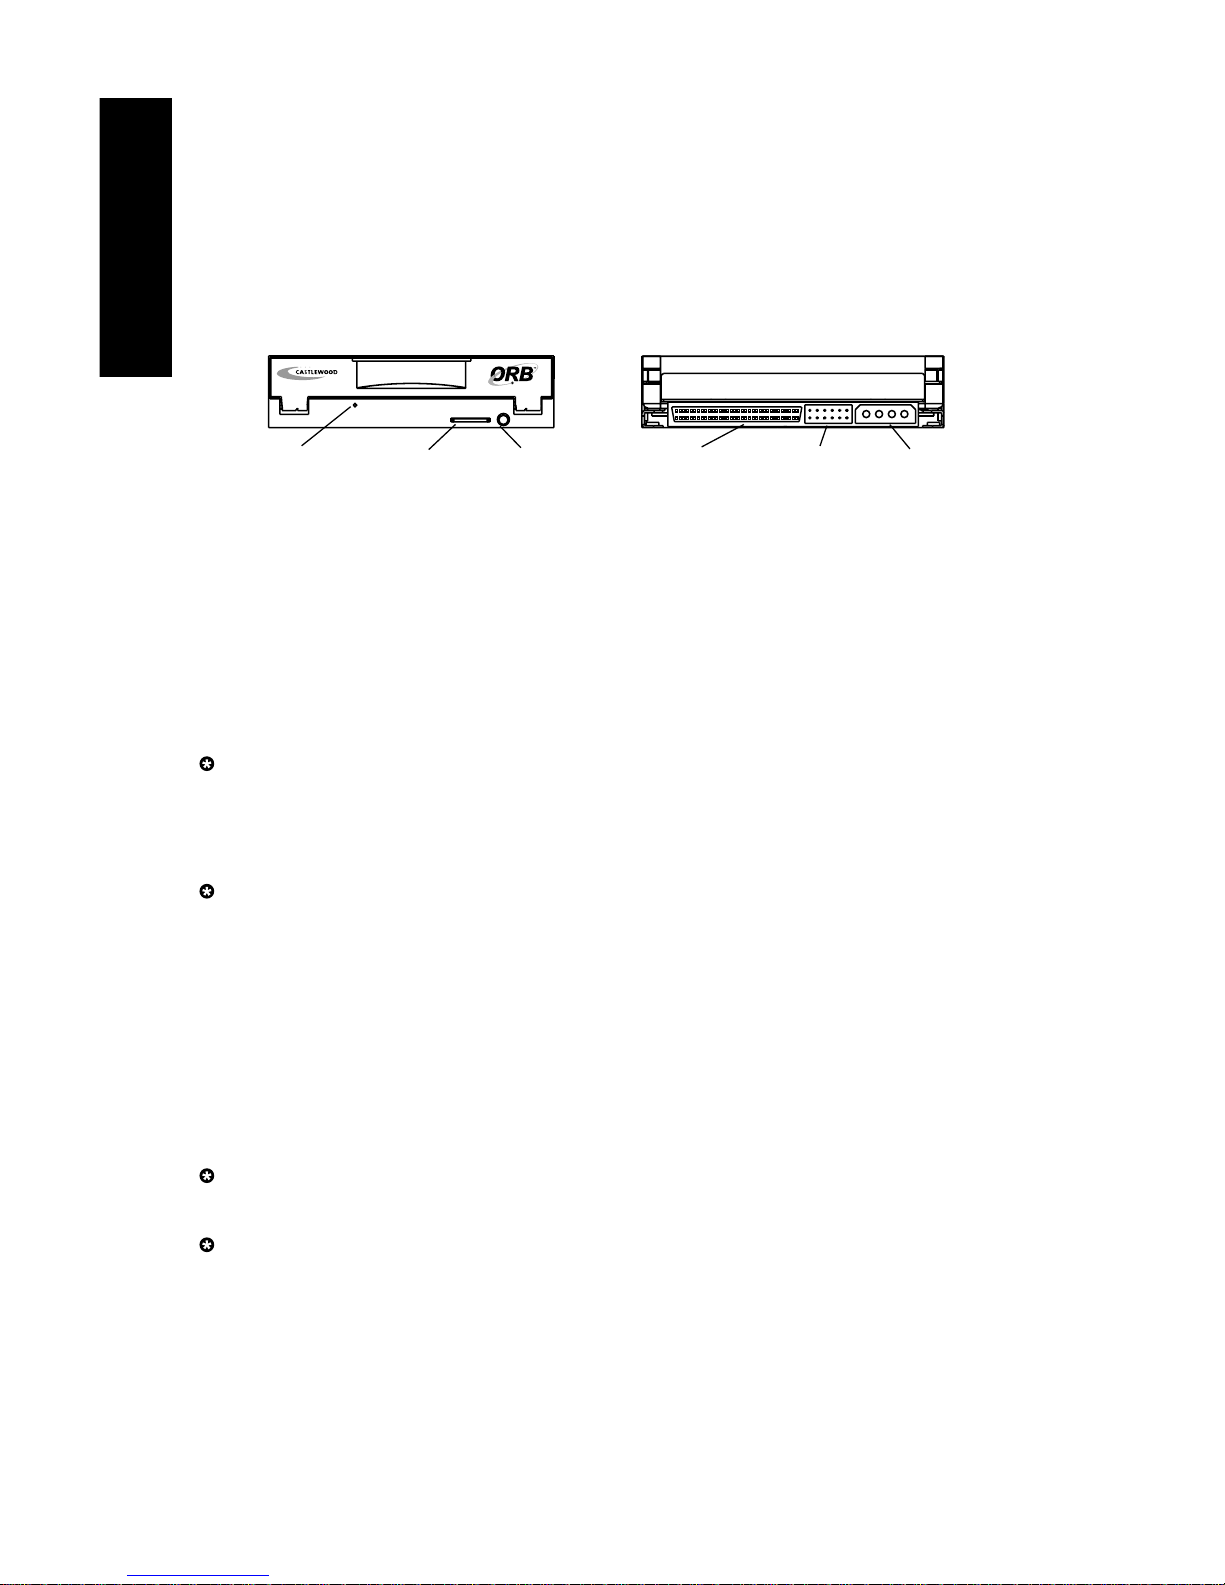
Become familiar with your ORB drive:
Figure 1 Figure 2
Front View of Drive Drive setup- Rear connector
1.5 INSTALLATION PRECAUTIONS
Be sure to read the following Installation Safety Instructions before proceeding on
to the actual installation steps. Damage could occur to your drive and disk if these
precautions are not followed. If for any reason you do not understand these
instructions, please contact a qualified computer technician to install or assist in
the installation.
Temperature Stabilization - Before removing the drive from its protective
plastic bag, ensure the drive has reached room temperature. This is accomplished by allowing the drive to sit in its protective plastic bag in the room environment for at least one hour.
ESD - This drive and its electronic components are sensitive to Electro Static
Discharge (ESD). Once the drive has been removed from its ESD protective
plastic bag, handle it only by its sides. Do not touch the Printed Circuit Board.
To prevent ESD problems, touch the metal chassis of the computer before handling the computer’s hard drive and periodically throughout the installation. If
you are working in a cold and/or dry climate, use an electrostatic discharge
wristband. Your clothing generates static electricity as well. Do not allow your
clothes to come into direct contact with the parts of the circuit board or the
hard drive.
Shock - Dropping, jarring, or moving the drive while it is spinning can cause
catastrophic damage. Do not install this drive when it is not secured in place.
Power - Always power off your system before installing or removing the drive.
1.6 HARDWARE INSTALLATION
If you are installing this drive in a Macintosh computer you should also refer to
Macintosh owner’s manual for detailed instructions in hardware installation.
Manual eject hole Disk eject button Status light SCSI cable connector Jumper pins Power cable connector
4
INSTALLATION GUIDE
Page 6
!
!
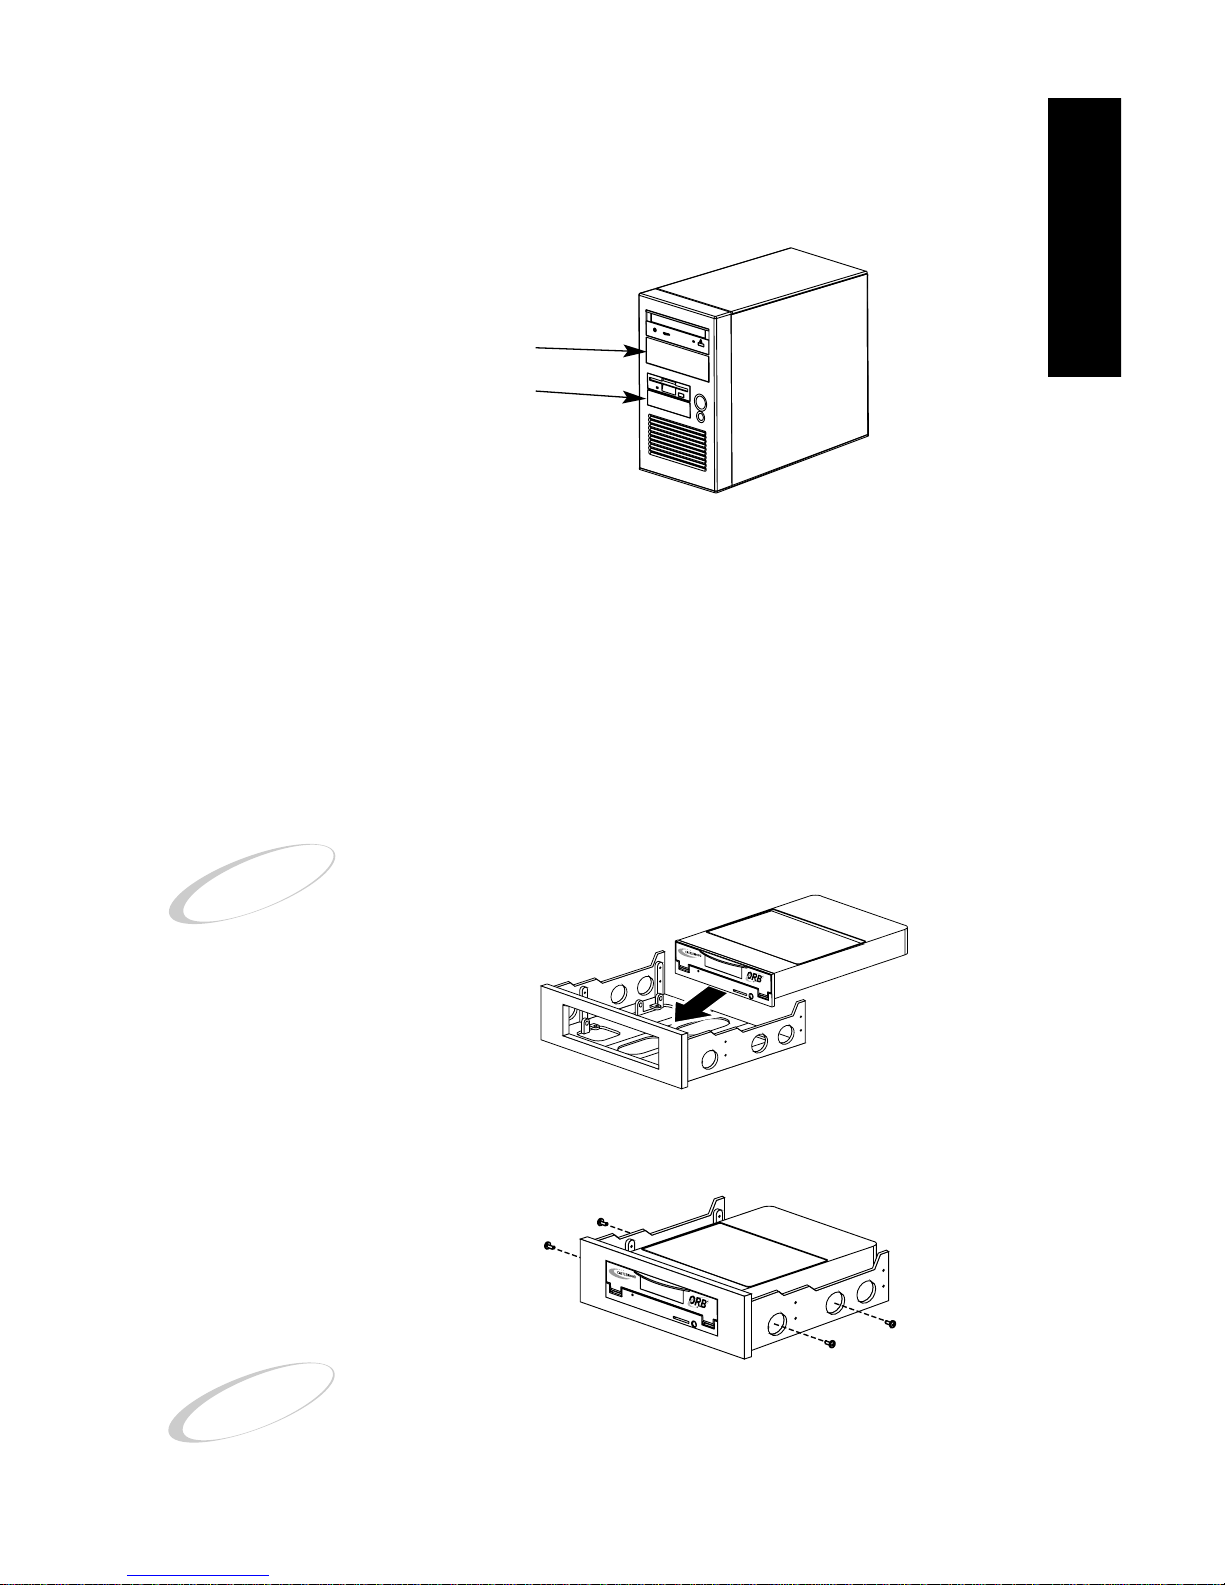
Locate an unused drive bay
You should see one or more plastic or metal plates on the face of your computer
near the floppy, CD-ROM or DVD drives. These are the unused drive bays. The
ORB drive mounts in a 3
1
/2- inch drive bay. If you only have a 5 1/4-inch drive bay,
you will need to use the 5
1
/4-inch bay adapter.
Figure 3
Tower with open 5
1
/4 and 3 1/2 -inch drive bays
Mounting the Drive Into a 5 1/4-inch Adapter
Note: The remainder of this section provides instructions for mounting your ORB
drive into a 5
1
/4-inch bay adapter.
1. Slide the drive into the adapter.
If installing the ORB drive into a 5
1
/4-inch bay with an adapter be sure to use the
screws provided with your adapter.
CAUTION: Be careful doing this to avoid damage to the drive.
Figure 4
ORB drive insertion
into 5 1/4 -inch adapter
2. Line the holes of the drive up with the holes of the adapter and
insert two flat-end screws into each side of the drive.
Figure 5
Mounting ORB drive
into 5
1
/4 -inch adapter
CAUTION: Mounting screw lengths have been chosen so that
no more than 1/8-inch of the screw enters the frame-mounting hole of the drive. The torque applied to the mounting
screws should be between 4 and 6 inch-pounds.
5
Empty 5 1/4 - inch bay
Empty 3
1
/2 - inch bay
INSTALLATION GUIDE
Page 7
!
Now that you have located the empty drive bay and mounted your
drive in an adapter if necessary, you are ready to install the drive in
the computer.
1. Shut down your operating system and power off your
computer. Unplug the AC power.
2. Remove the cover of your computer.
Refer to your computer manual for a description of how to remove the outer
cover of the computer.
CAUTION: Make sure you keep track of all screws and
fasteners during this process.
3. Prepare the bay for installation.
Make sure the bay is free from any extra screws or plates. Refer to your
computer’s user’s manual for more details on this step.
1.7 CONFIGURATION OPTIONS
Jumper Placement
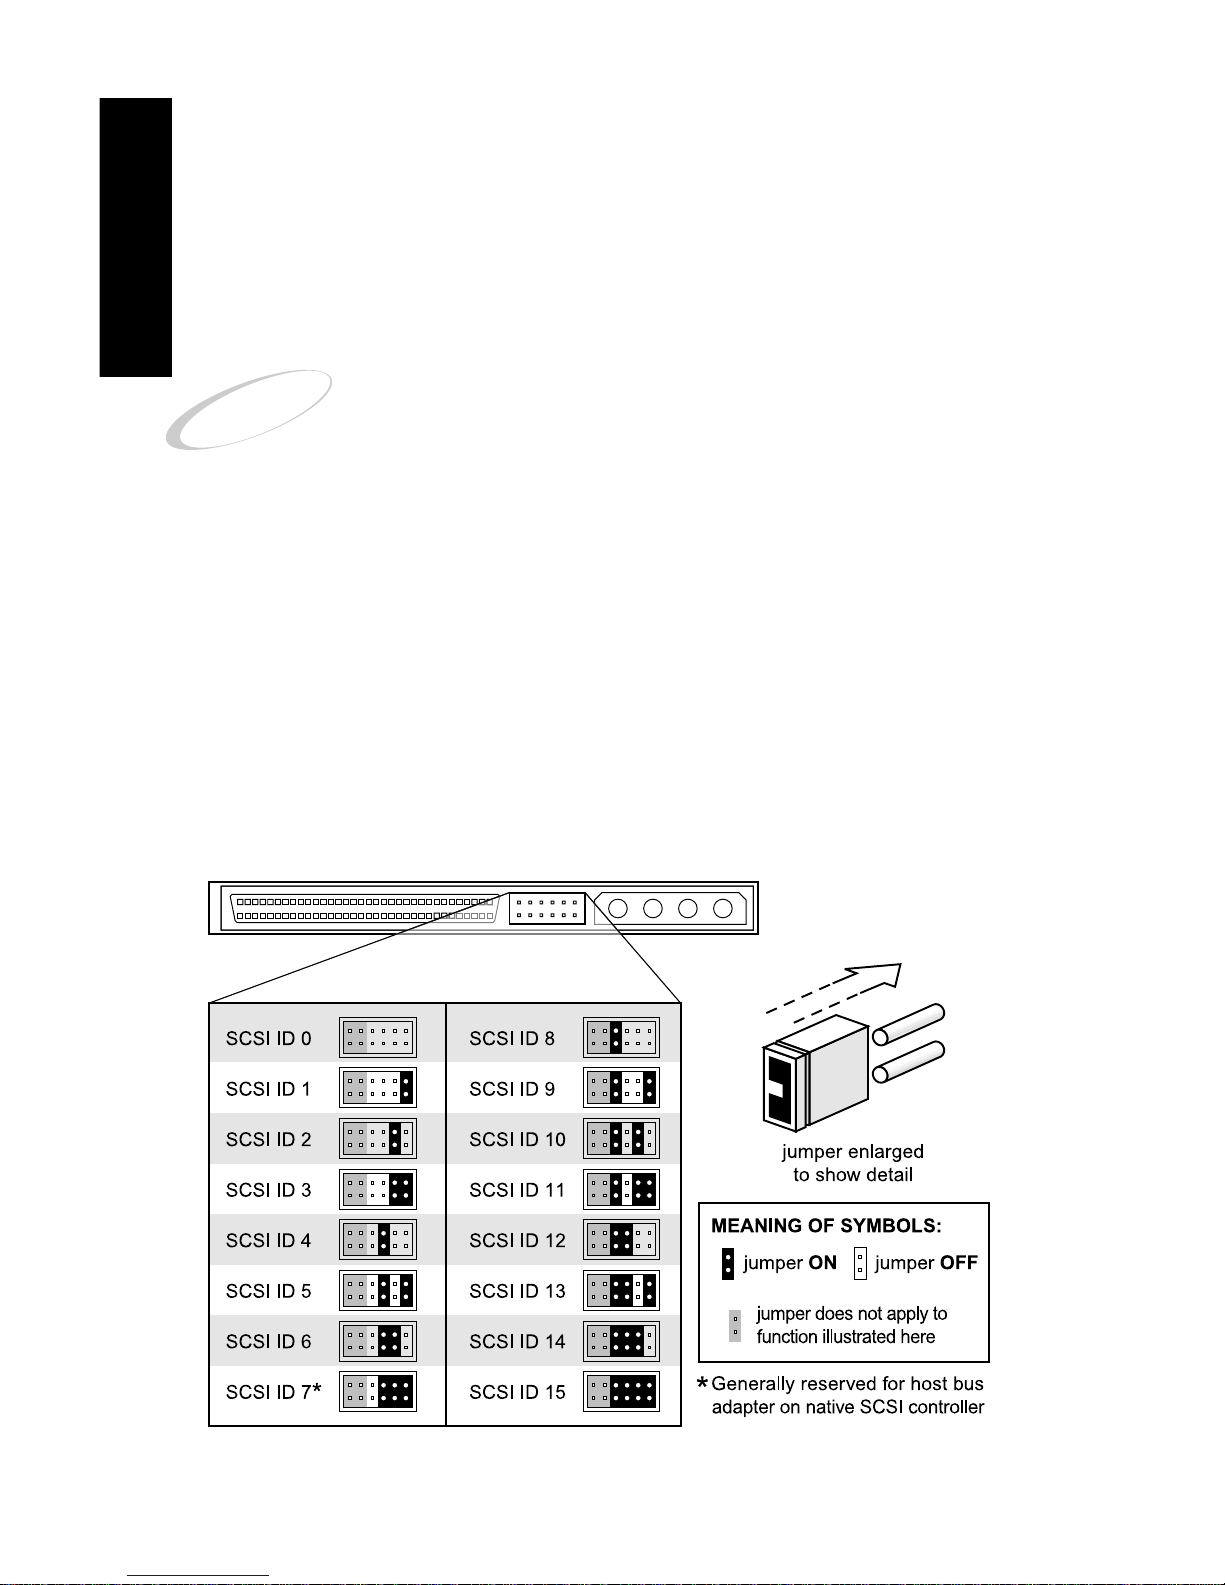
Jumper pins are located at the rear of the drive as the group of 12 pins in 6
vertical sets of two. Six jumpers are provided to configure the drive for SCSI IDs
and termination.
1. SCSI ID
Refer to Figure 6 for jumper placement for the desired SCSI ID. You may need
needle nose pliers to put on and/or remove a jumper.
6
INSTALLATION GUIDE
Figure 6
SCSI ID jumper placement
Page 8
!
As shown in the illustration, the jumper plug should be inserted vertically. This
means the jumper’s width should straddle one pin from the top row and the pin
directly below that pin on the bottom row.
SCSI ID 7 is usually reserved for the SCSI interface. Do not set your ORB drive
to SCSI ID 7.
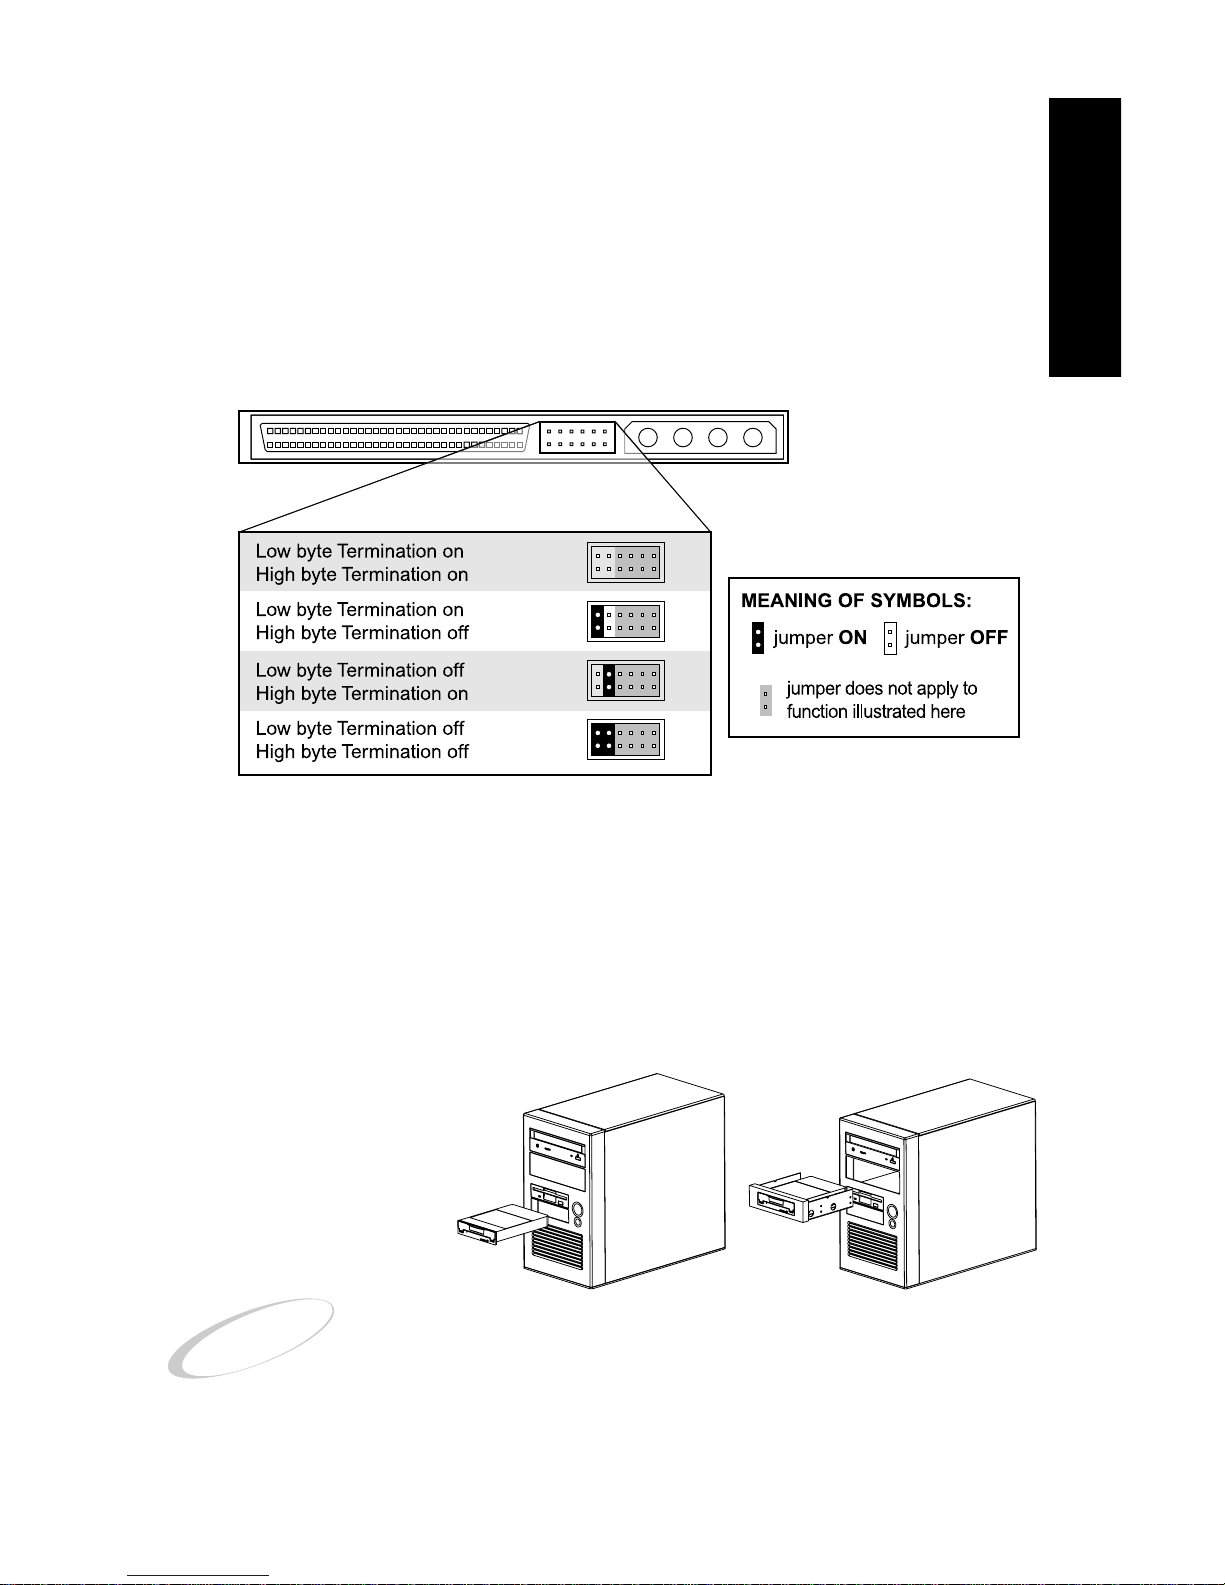
2. Termination
Refer to Figure 7 for jumper placement for the desired SCSI termination. You may
need needle nose pliers to put on and/or remove a jumper.
1.8 MOUNTING THE ORB DRIVE
1. Slide the drive into the open drive bay.
If you are installing the drive into a 5
1
/4-inch drive bay and are using an adapter,
then slide the drive adapter (with the drive already installed) into the 5 1/4-inch
drive bay. Do not put the chassis mounting screws in yet.
Figure 8
ORB drive insertion into tower
(3 1/2 and 5 1/4-inch bays)
CAUTION: Do not mount the ORB drive upside down. The
only valid mounting positions are: Circuit card (PCBA) facing
down, to the left, or to the right.
7
INSTALLATION GUIDE
Figure 7
SCSI termination settings
Page 9
!
2. Match the holes of the drive with the holes in the drive bay
enclosure and insert the screws.
If you are mounting the ORB drive directly into a
3
1
/2-inch bay, put two flat-ended screws provided
into each side of the drive. If there are no holes
in the sides of the enclosure, you will have to mount
the drive from the bottom. If you are using the
5
1
/4 -inch adapter, put two pointed-end screws
provided into each side of the adapter.
Figure 9
ORB drive mount
CAUTION: If installing the ORB drive into a 3 1/2-inch bay use
only the flat-end screws provided with your drive for installation of your drive. If installing the ORB drive into a 5
1
/4inch bay with an adapter be sure to use the screws provided
with your adapter. Mounting screw lengths must be chosen
so that no more than
1
/8 inch of the screw enters the framemounting hole of the drive. Do not overtighten the screws
or physically force the drive into the enclosure.
1.9 CABLE CONNECTION
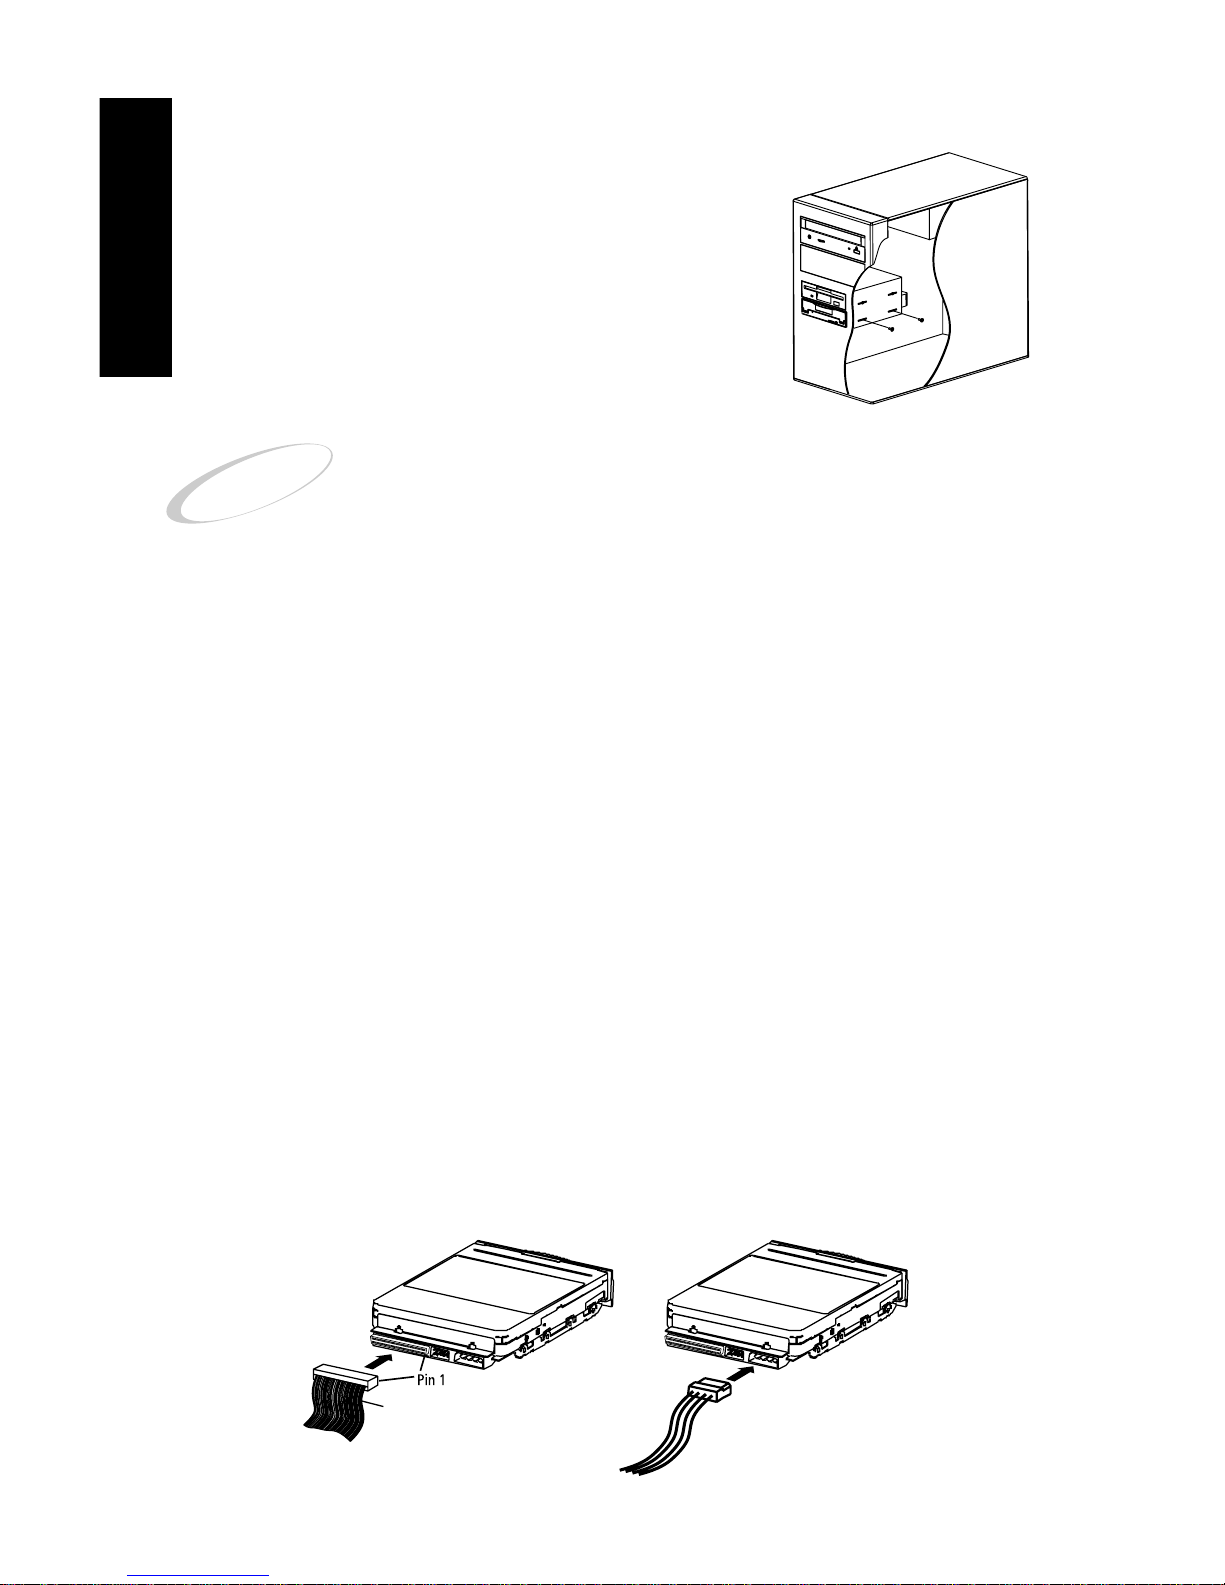
1. Connect the SCSI interface cable to the drive.
Insert the cable so that the banded or striped color edge of the ribbon cable is closest to
the jumpers (see illustration below). Seat the cable firmly , but do not use excessive force.
If you are using a narrow cable (50-pin) to connect the ORB drive on a narrow/ultra SCSI
adapter, be sure to use a 68 to 50-pin cable converter and place the ORB drive at the end
of the bus. Then set the jumpers for termination on both the low and high bytes.
If you are using a wide cable (68-pin) to connect to wide (68-pin) and narrow
(50-pin) devices on a wide SCSI adapter, make sure a wide device with active
termination, such as the ORB drive, is placed at the end of the bus. Then set the
jumpers for termination on both the low and high bytes.
You should use a wide cable (68-pin) to connect the ORB drive on a wide SCSI
adapter to achieve maximum performance.
Figure 10 Figure 11
SCSI cable insertion Power cable insertion
8
INSTALLATION GUIDE
Striped side of cable
Page 10
!
2. Connect the power cable to the drive.
The power cable has a 4-pin connector on the end of it that is shaped so that it
can only be installed one way. The slanted corners designate the top of the connector.
Insert an unused 4-pin power connector from inside the computer into the rear
of the ORB drive. Make sure that the connector is inserted completely into the
drive. If there are no unused power connectors in your computer you will need a
Y-adapter, which allows you to branch two power connectors off one of your computer’s power cables.
1.10 FINAL INSTALLATION CHECKS
1. Check cable connections.
Check that the SCSI interface cable is installed correctly with all 68 of the pins
on the rear of the drive inserted into the cable connector. Ensure also that the
4-pin power cable connector is completely inserted into the rear of the drive.
2. Confirm that the jumper block is installed in the correct position.
This position was determined in Section 1.7, Configuration Options.
3. Ensure that the cables connected to the other devices have not
been loosened or disconnected.
Cables running to devices other than the ORB drive may have been loosened or
disconnected during the installation process.
Replace the cover of the computer, reinsert the screws, connect any other
devices you may have disconnected from the computer, and reconnect the AC
cable.
1.11 SYSTEM SETUP
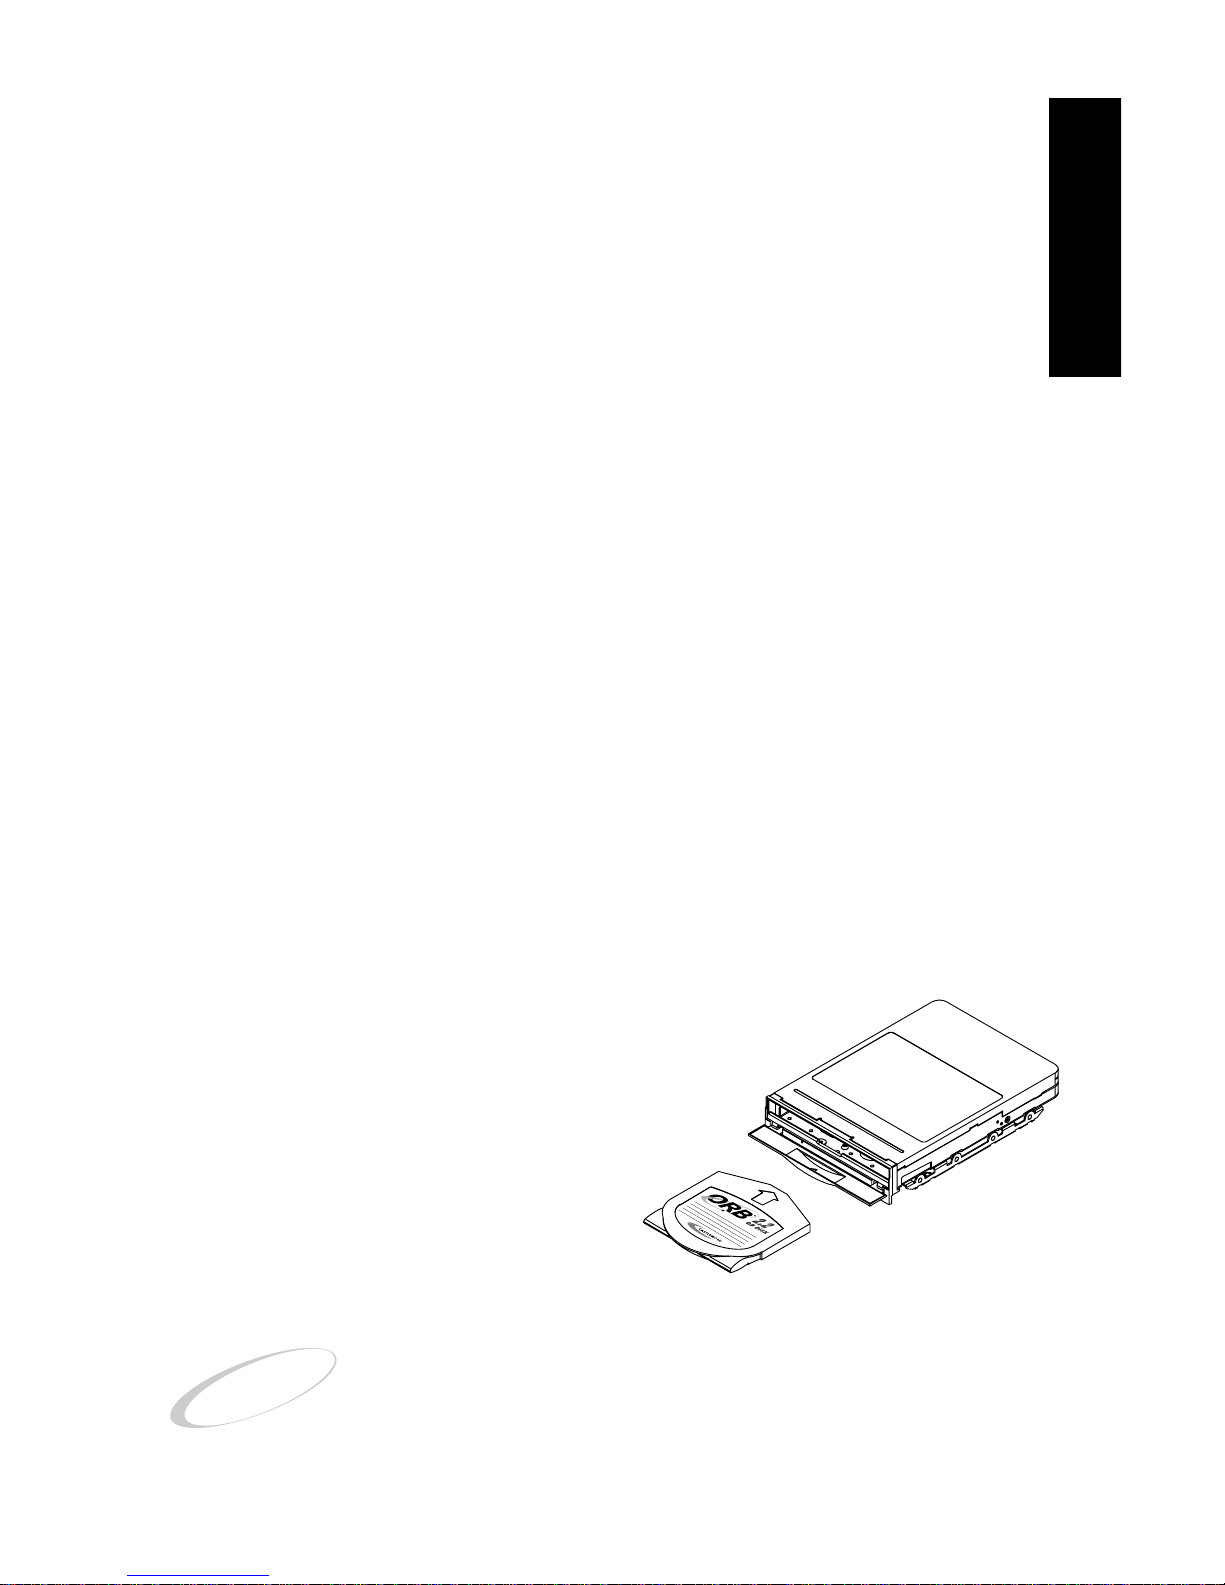
1. Orb disk insertion
Push a disk straight into the ORB drive with your finger
using an “in and down” motion to ensure that the
disk is seated.
Figure 12
Disk insertion
2. Power on your system.
The ORB drive should be detected during system startup.
CAUTION: If you insert an ORB disk in your ORB drive and
Windows asks you if you want to format the disk, be careful
how you respond. Formatting a disk with data on it will
destroy all the data.
9
INSTALLATION GUIDE
Page 11

If the drive is not detected, or your system hangs during the bootup process, you
may have to access your SCSI host bus adapter’s setup utility program.
You may need to refer to your SCSI host bus adapter’s manual for information
about how the SCSI setup utility program works.
3. Your Operating System should be loaded.
If you are using Windows 2000/98/95/NT proceed to Section 1.12, ORB Tools and
Backup Utility for PC.
Congratulations! Your ORB Drive is ready to use.
If you are installing the drive in a Macintosh computer with Mac OS 7.6.1 to OS 9.0,
proceed to Section 1.13, Mac Device Driver and Software Installation on page 13.
1.12 ORB TOOLS AND BACKUP UTILITY
SOFTWARE FOR PC
The ORB Installation Suite CD is used to install the ORB Tools when you are running Windows 2000/98/95/NT.
ORB Tools does not support Windows 3.1x, DOS, OS/2 or other operating systems.
Software Setup - Windows 2000/98/95/NT
1. Insert the ORB Installation Suite CD into your CD-ROM drive.
2. To install ORB Tools, click on the Install ORB Tools option in the window that
just opened.
• If no window opens up when your CD-ROM is ready, double-click on My
Computer on the Windows desktop.
• Double-click on the drive icon for the CD-ROM.
• In the window that just opened, double-click on the file named Setup
(setup.exe) to initiate the installation procedure.
3. You will be prompted for information as the installation proceeds. Follow the
instructions on the screen.
4. The ORB Tools installation is complete after Windows has restarted.
10
INSTALLATION GUIDE
Page 12
ORB Tools and Backup Utility
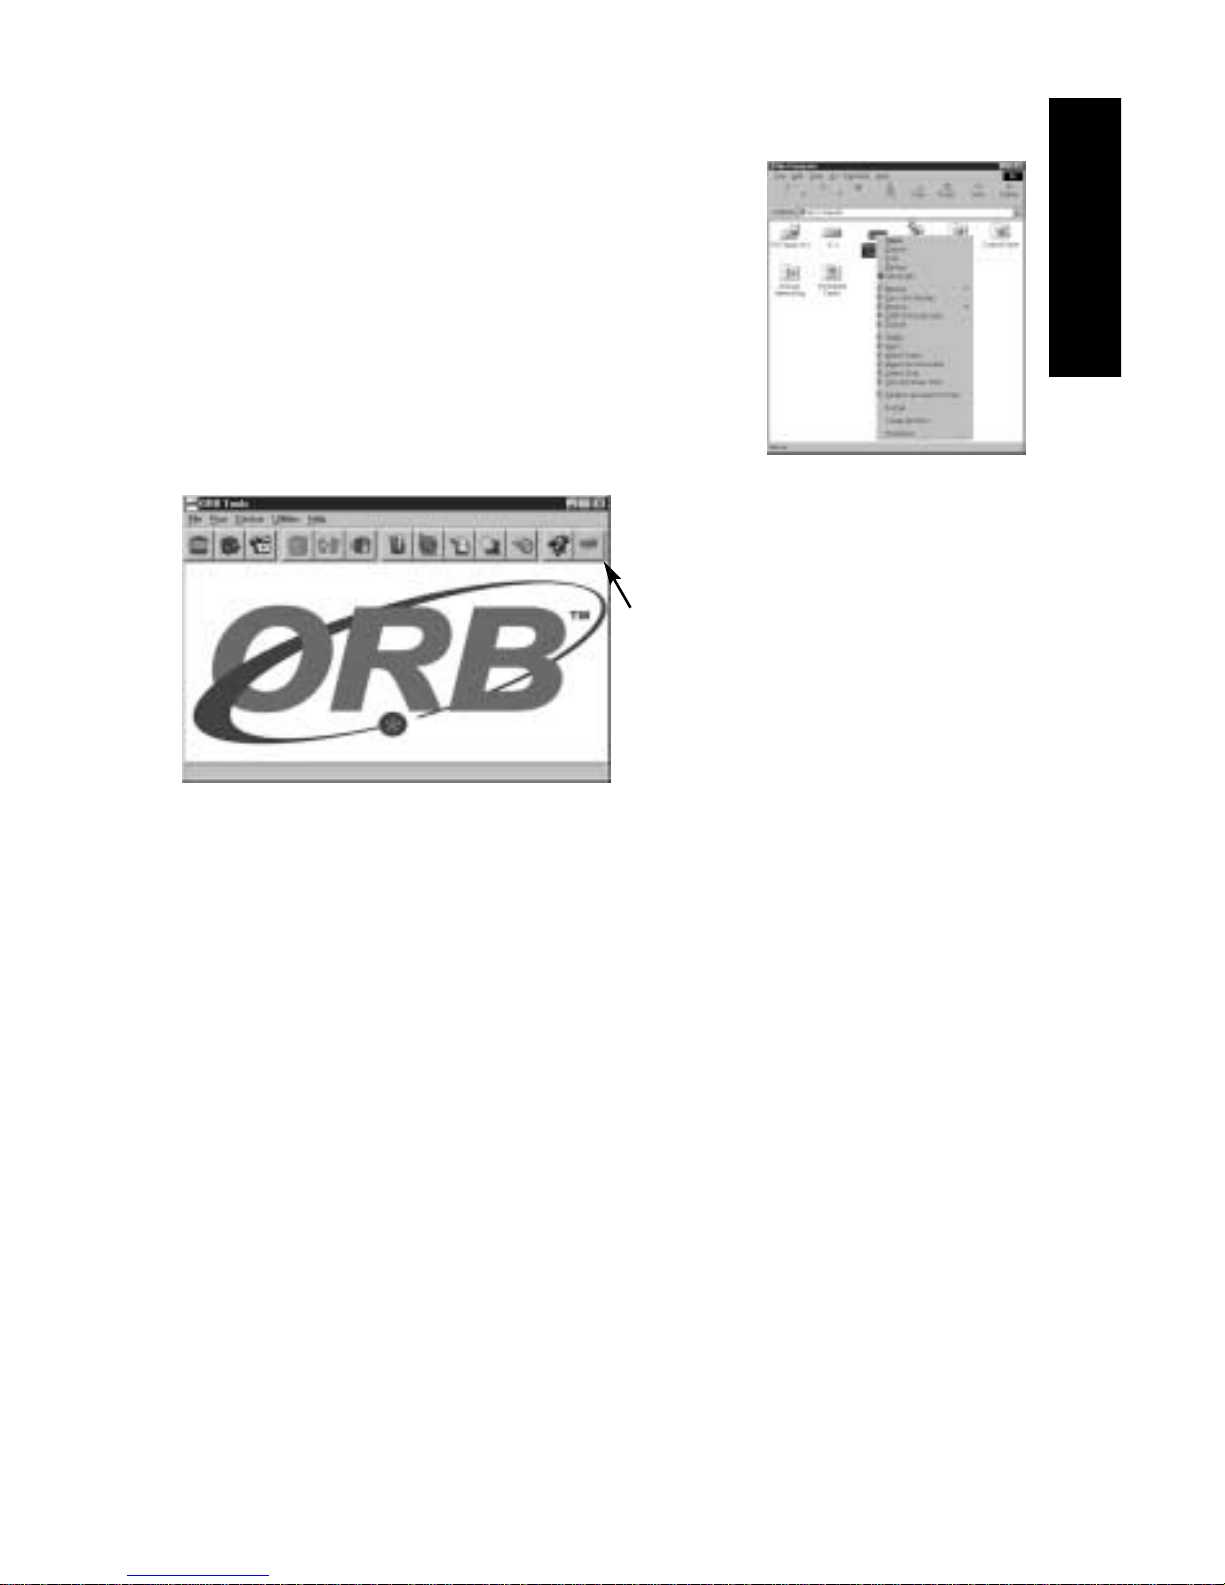
Once the ORB Tools is properly installed you can
right-click on the ORB Drive’s icon in My Computer
or Explorer to use the ORB Tools. You can also access
the ORB Tools from Start/Programs/Castlewood ORB
Drive/ORB Tools.
Figure 13
Once launched you will see this
ORB Tools screen.
You can select from the toolbar across
the top of the window to choose the
tools that you want to access.
Figure 14
The following icons represent functions of the ORB Tools and Backup Utilities
Note: Some of the icons can not be found on the ORB Tools main screen as seen in
Figure 14. You can find those applications by right-clicking on the ORB Drive’s icon
in My Computer or Explorer.
11
INSTALLATION GUIDE
Page 13
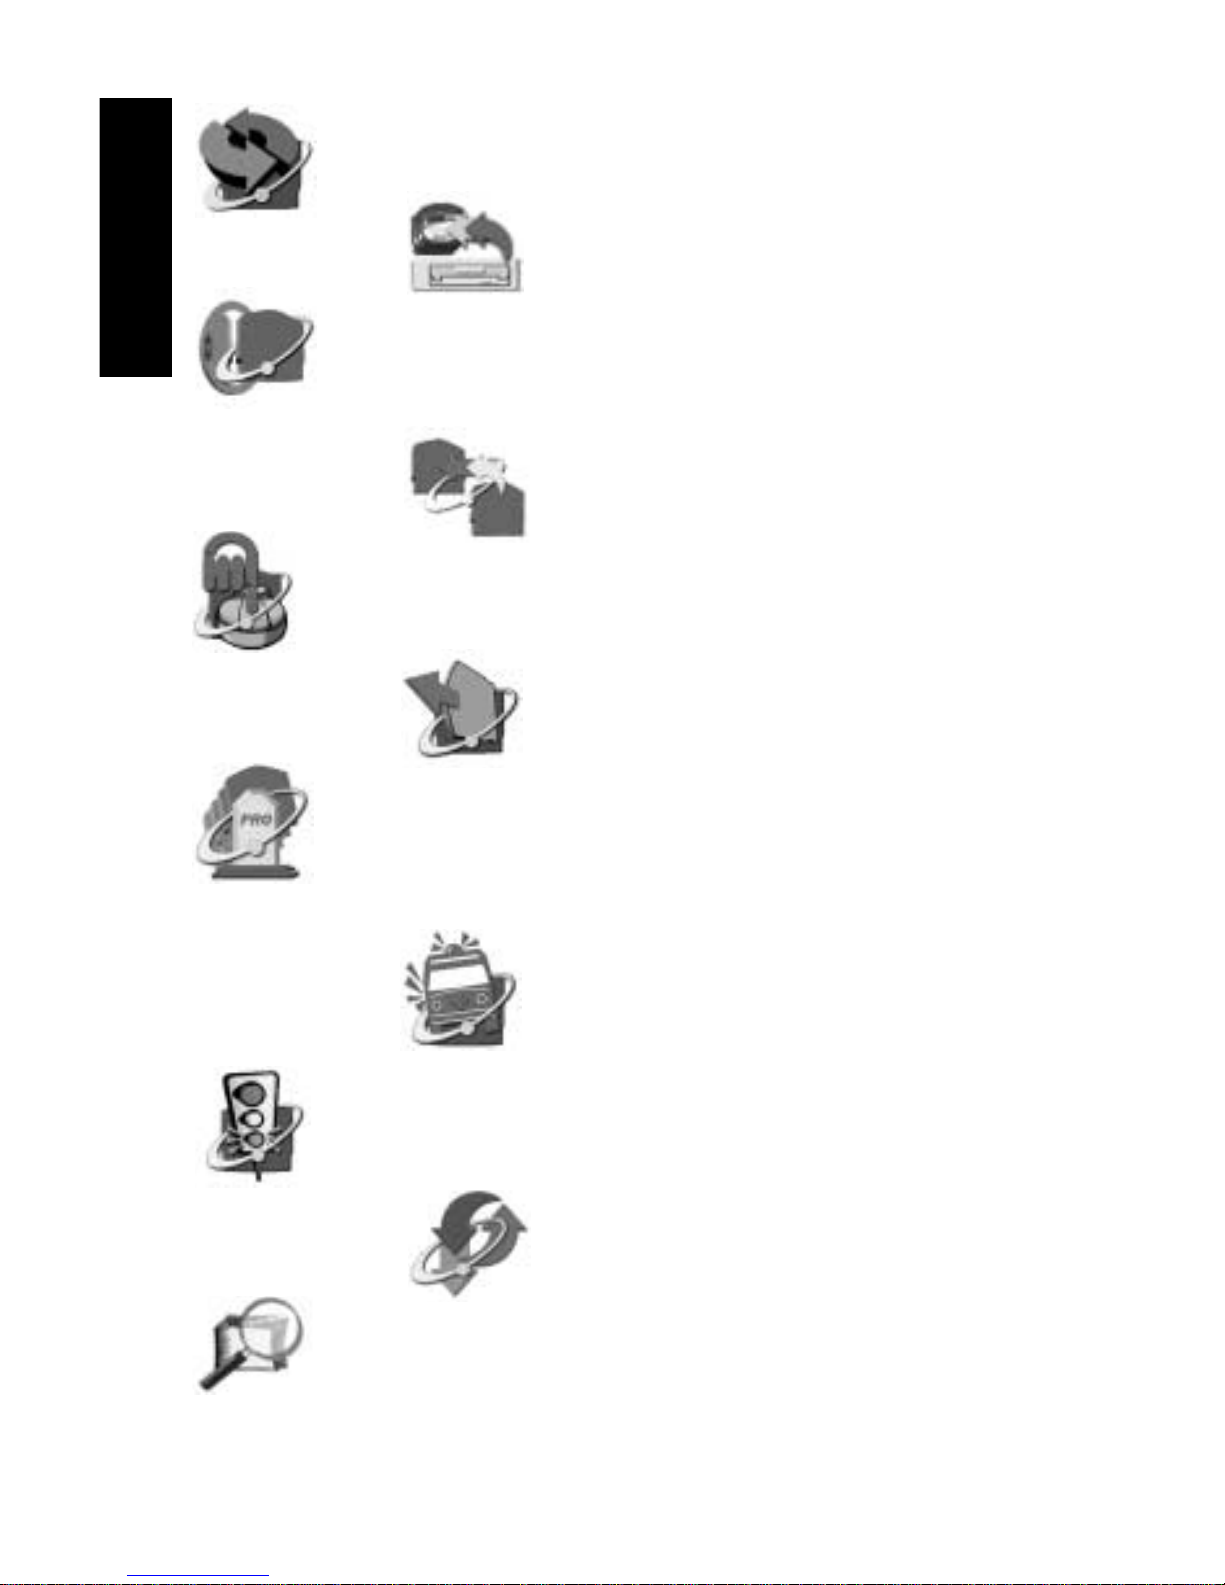
Restore from Backup:
Restores backed up files from ORB Disks.
Copy Volume Backup:
Performs file by file backup of system volumes.
Image Disk Backup:
Full disk image backup.
ORB Disk Duplicator:
Performs disk to disk duplication with
ORB Disks.
One Click Backup:
Simplified system backup with preset backup parameters.
Eject:
Easy access ORB Disk ejection function.
Professional Backup:
Backup for the professional that wants backup done their way,
on their schedule.
Rescue Disk:
When all else fails, ORB Tools can save the day
with a system boot disk and full restoration from
Image Disk Backup files stored on your ORB Disk.
Drive Status:
You are never in doubt about your ORB Drive configuration with
ORB Tools Status function.
Spin Down:
Set your preference for spin down time.
Tracker Catalog:
ORB Disk File Archive program Tracks all files on your ORB Disk
with ease.
12
INSTALLATION GUIDE
Page 14
!
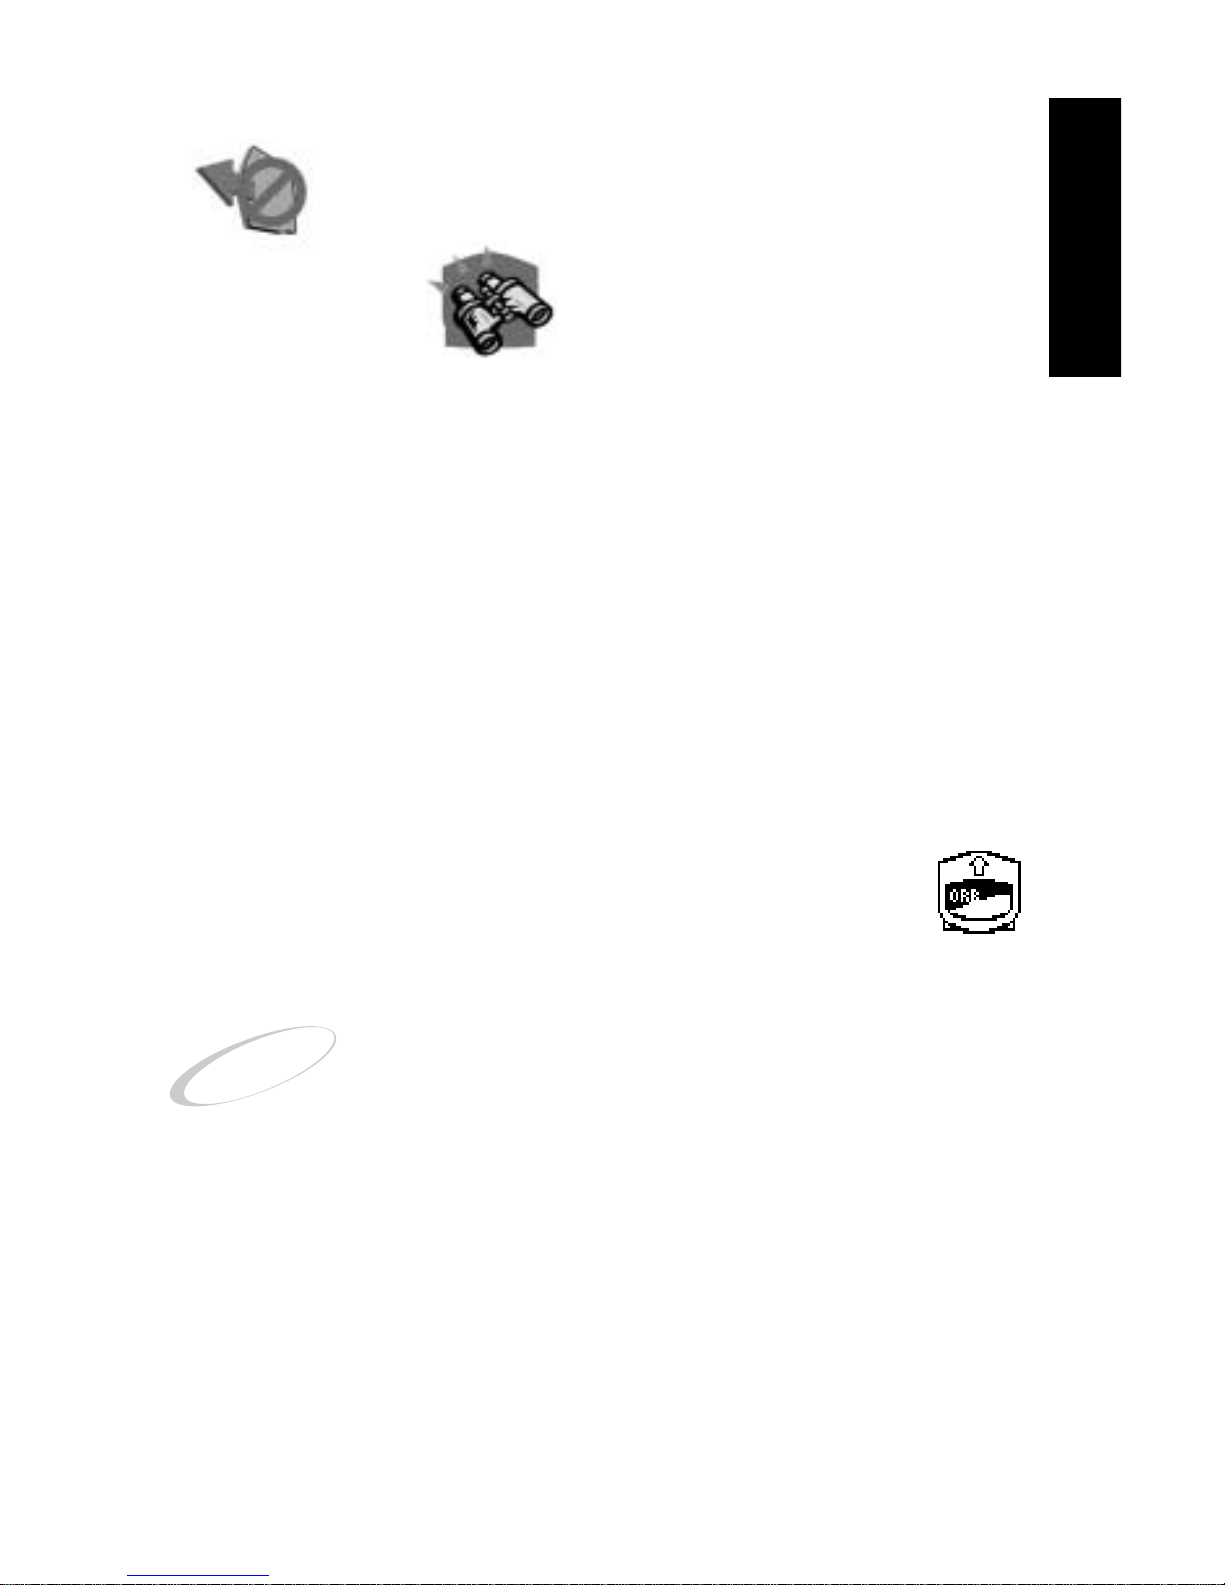
Make Non-Removable: Allows the user to set the ORB drive as a
fixed drive.
Scan Devices:
Performs a full system scan for ORB Drives
and identifies each drive’s system interface.
1.13 MAC DEVICE DRIVER AND SOFTWARE INSTALLATION
The ORB SCSI driver has to be installed before Mac OS is able to mount your ORB
SCSI Drive. This will also install ORB Tools for Mac on your system. Make sure you
are running Mac OS 7.6.1 to 9.0 on a Power Mac/Power PC, G3 or a G4.
Close all open applications and disable virus protection before
proceeding further.
1. Insert the ORB Installation CD into your CD-ROM drive.
2. Launch the installation by doing the following:
• double-click on the CD-ROM icon
• double-click on the MAC folder
• double-click on the file called ORB Tools Installer.
3. To install your ORB SCSI device driver, follow the instructions displayed.
4. The installer will ask you to restart the system to correctly install the
ORB SCSI device driver. Then your ORB SCSI Drive should appear as
an ORB Drive icon on the desktop.
5. If the ORB disk is PC formatted, you have the option to re-format it to Mac
format through the Mac OS or ORB Tools for Macintosh.
PROBLEM! If you can not see or access your ORB SCSI Drive,
refer to Section 3,Troubleshooting.
Congratulations! Your ORB Drive is ready to use.
1.14 ORB TOOLS FOR MAC
ORB Tools for Mac is a suite of utilities included on the ORB Installation Suite CD
supplied with your new ORB Drive that expand its functionality.
13
INSTALLATION GUIDE
Page 15

!
ORB Tools
Once the ORB Tools is properly installed, you can launch from its alias or the folder
in the hard drive where it was installed.
The utilities provide the following functions:
Under Bus Hierarchy:
Status – Display not only the SCSI bus the ORB drive is connected to and its SCSI
ID, but also other applicable computer buses (ATA, SCSI, USB).
Under Volumes Tab:
Mount / Unmount Volume – mount/unmount the drive on/from the Desktop.
Eject Media – Eject the disk from the drive.
Under Media Prep Tab:
Initialize – Set up drive for use with Macintosh or DOS file systems. Create
multiple partitions and format drive.
Verify – Check the media for errors. There are three levels of verification: light (read
only), medium (read and write) and full (destructive write).
Update – Update the driver on media to the latest and greatest. This is not applica-
ble if grayed out.
Under Settings Tab:
Spin Down Timer – Set your preference for spin down time.
Write Protect Drive – Prevent modification to media in the drive.
Drive Operating Mode – Set the drive to Write Verify mode for extra level of data
protection or two A/V Modes (authoring and streaming) for A/V recording.
You can also download ORB Power Tools developed by MacMedic from our website
www.castlewood.com. This suite of tools includes the following functions: Disk
Exam, Backup, Data Recovery, Defragmentation, and Space Maker (HFS to HFS+).
1.15 CONNECTING THE ORB DRIVE TO A SCSI BUS
If you have devices other than your ORB SCSI Drive on the same SCSI bus, you
need to go through this section carefully.
1. Power OFF your computer and all the attached devices.
Warning! Always turn OFF power to protect yourself from
injury and your equipment from damage.
2. Identify SCSI IDs of all devices on the same SCSI bus your ORB
SCSI Drive will be connected to.
A SCSI ID is an integer, ranging from 0 to 15, each identifies a SCSI device on the same
SCSI bus.
14
INSTALLATION GUIDE
Page 16

Each device on the same SCSI bus must have a unique ID, otherwise your system
will not work properly and data corruption may occur.
Refer to each device’s manual for detailed instructions on checking and setting its
SCSI ID.
3. Assign a unique SCSI ID to your ORB SCSI Drive.
Refer to Figure 6 on page 6 for jumper setting for the desired SCSI ID. Avoid setting
the ORB drive on SCSI ID 7 since that is usually reserved for either the native SCSI
interface or the SCSI host bus adapter.
4. Terminate the SCSI bus.
A SCSI bus has to be properly terminated at both ends to ensure data integrity. The
last physical internal device and the last physical external device on the SCSI bus
have to be terminated. If you do not have any external SCSI device, then your SCSI
Host Bus Adapter or your Mac’s main logic board has to be terminated.
Refer to Figure 7 on page 7 for jumper setting for enabling and disabling termination on the ORB SCSI drive.
5. To complete installing your ORB SCSI Drive, return to
Section 1.5 on page 4.
If you are installing the drive in a Macintosh computer, you should also refer to
Macintosh owner’s manual for detailed instructions in hardware installation.
15
INSTALLATION GUIDE
Page 17

SECTION 2 USER’S GUIDE
2.1 OPERATING YOUR ORB DRIVE
Now that you have successfully installed your ORB Drive, you will soon be able to
make use of the wide range of features and applications that it offers:
Important Record Storage – If you need a place to keep spe-
cial files (confidential information or any other valuable items like product
plans and designs, personnel files, budgets, company directories, computerized checkbooks, and tax records), the ORB Disk is a perfect solution.
Portable Information – With your new ORB Drive, you have the
ability to store vast amounts of information on a disk slightly larger than a
3
1
/2-inch floppy. This means you can put an ORB Disk in its case and then
in your pocket to take it wherever you go.
Multimedia – The ORB’s fast speed and high capacity make it the
ideal storage device for CD-ROM, video, and digital images. You can record
an entire movie onto ORB disks and play it back at your leisure.
Audio/Video Mastering & Playback– The ORB drive soft-
ware includes mode-setting controls that allow professional A/V specialists
direct control of the drive’s read/write characteristics. Use of A/V modes will
optimize the ORB drive for the unique requirements of Audio and Video specialists.
Instant Hard Disk Upgrade – The ORB Drive offers an easy
way to add an extra 2.2 gigabytes of storage space to your system.
Organization – If you have files from many different types of sources
and you want to organize them the ORB Disks allows you to group these files
by storing different types of files on different disks.
Hard Drive BackUp – The ORB Drive presents a simple way to
back up your hard drive. Just copy important files to the ORB disk, and you
can access those files at any time.
16
USERS GUIDE
Page 18
!
2.2 USING ORB DISKS
Disk Insertion Instructions
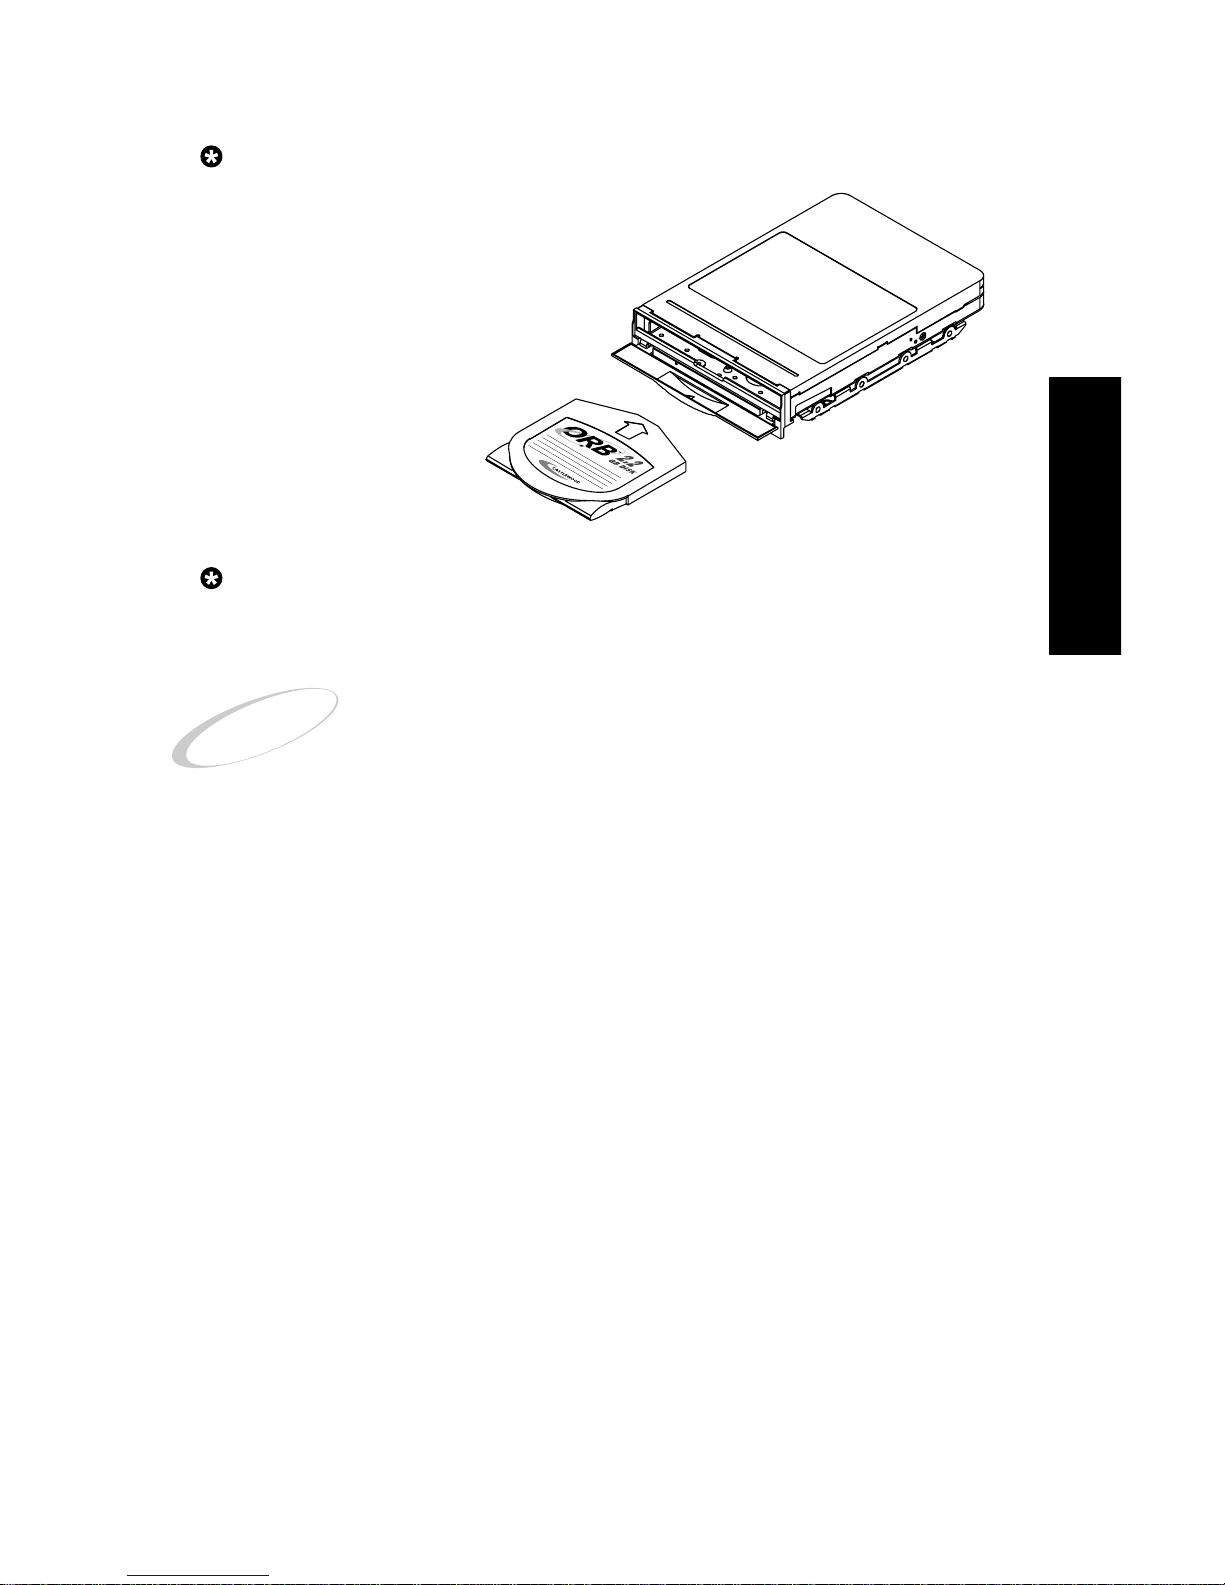
Push a disk straight into the ORB drive with
your finger using an “in and down”
motion to ensure that the
disk is seated.
Figure 15
Disk insertion
Disk Ejection Instructions
Make sure that you eject the disk before powering off your
computer system.
CAUTION: Do not try to remove disk by lifting up on the front
edge of the disk while it is in drive.
CAUTION: Do not move or transport the drive with the disk
installed. This can damage the heads and media. A disk
must not be in the drive when the drive is moved or shipped.
From Windows Desktop
1. Close all open applications and files on the ORB Disk before ejecting the disk
otherwise data could be corrupted.
2. From the Desktop, double click on My Computer.
3. Right click on ORB SCSI Drive Icon.
4. Select Eject.
5. Green LED will flash amber (Disk spin down and air purge cycle).
6. ORB Drive door will automatically open.
7. Disk will be ejected.
8. Remove ORB Disk.
9. Door will automatically close.
10. Place ORB Disk in protective ORB Disk case.
From Mac Desktop
1. Close all open applications and files on the ORB Disk before ejecting the disk
otherwise data could possibly be corrupted.
2. From the Desktop, highlight the ORB SCSI Drive Icon and hold the mouse.
3. Drag the icon and drop it in the Trash Can Icon or utilize the eject command
support by pressing the command key (Apple) and “E” or pressing the command
key (Apple) and “Y”.
17
USERS GUIDE
Page 19
!
4. Green LED will flash amber (Disk spin down).
5. ORB Drive door will automatically open.
6. Disk will be ejected.
7. ORB Drive Icon should disappear from Desktop.
8. Remove ORB Disk.
9. Door will automatically close.
10. Place ORB Disk in protective ORB Disk case.
From Drive
It is recommended to eject from Windows or Mac desktop as described above during routine operation.
1. Close all open applications and files on the ORB Disk before ejecting the disk
otherwise data could be corrupted.
2. Press the Insert/Eject button on the front of the drive.
3. Green LED will flash amber (Disk spin down).
4. ORB Drive door will automatically open.
5. Disk will be ejected.
6. Remove ORB Disk.
7. Door will close.
8. Place ORB Disk in protective ORB Disk case.
CAUTION: Do not leave an ORB Disk in the ejected position
with the drive door open.
Using the ORB Disk Case
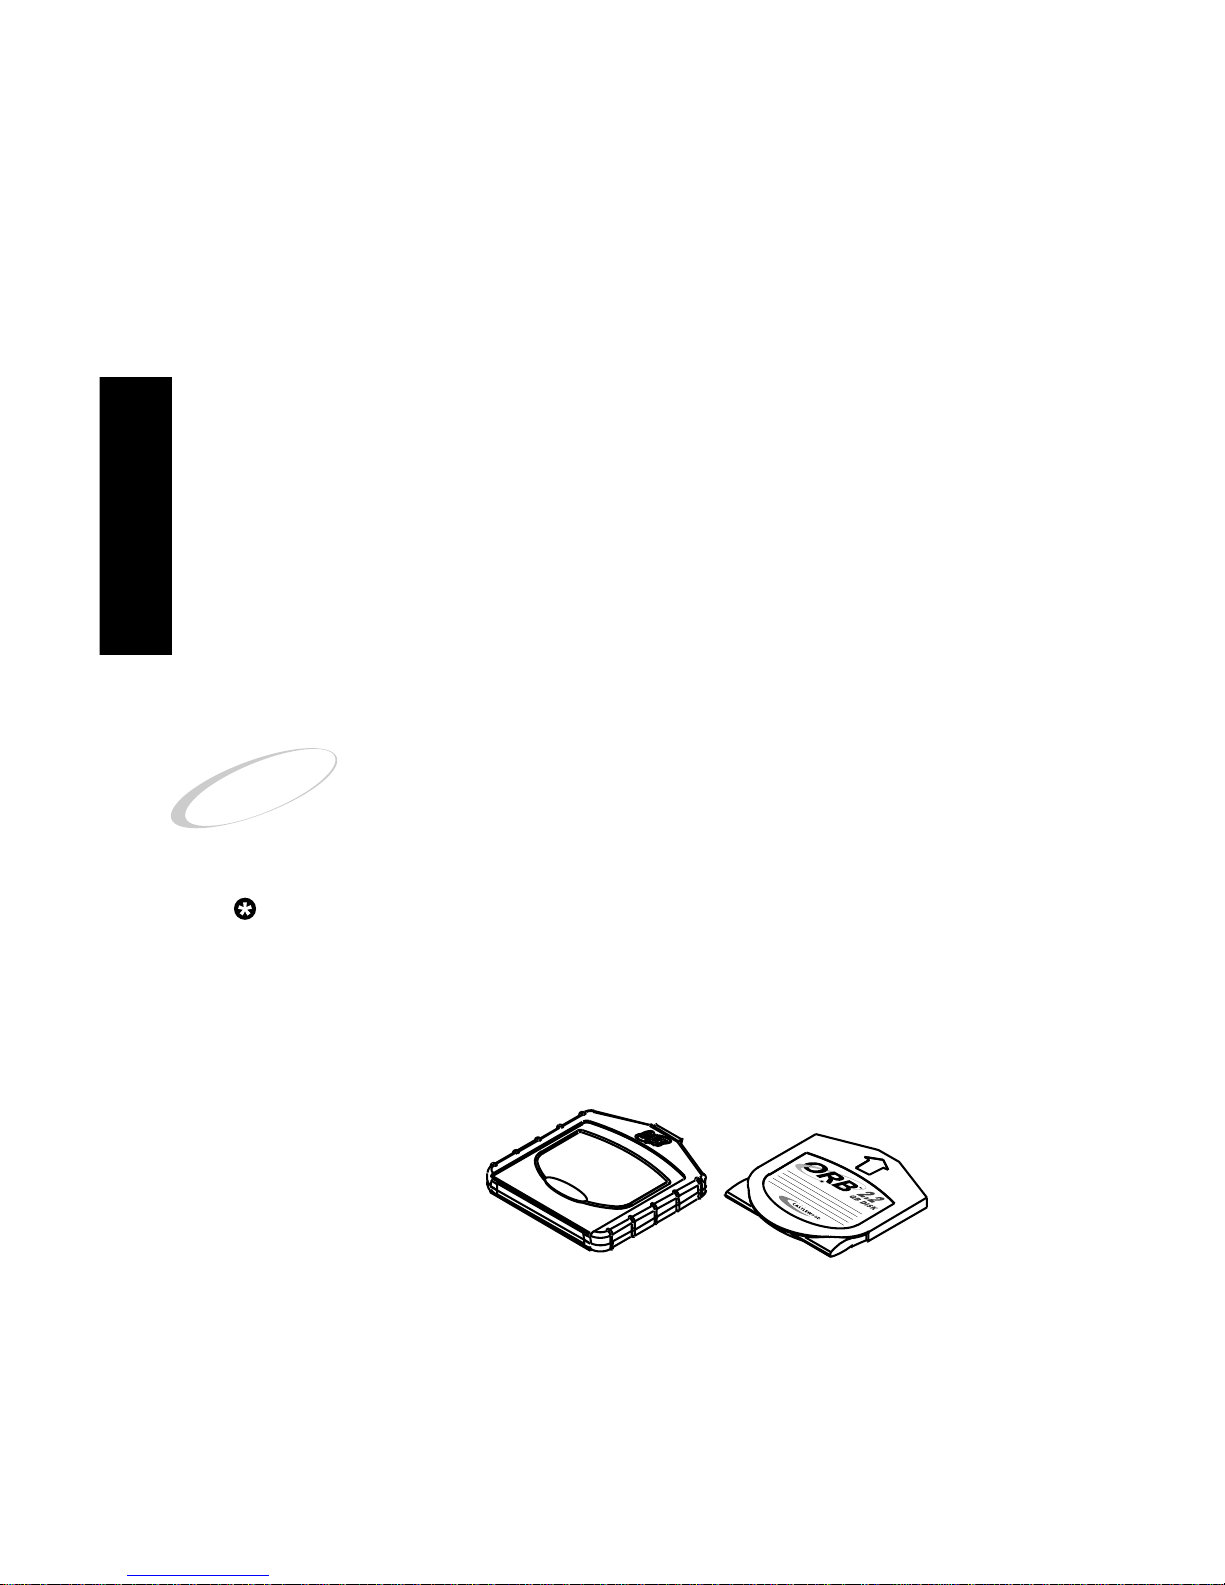
Your ORB Disk comes in a protective disk case. This case is provided to ensure
that your ORB Disk has the maximum protection from ambient conditions and
normal physical use. Place the ORB Disk into the ORB disk case when it is not
in immediate use. This will maximize your disk life and minimize your risk of
loss or damage.
Figure 16
Disk ORB Case and Disk
Warning about “foreign media damage”
Do not attempt to insert any media other than ORB Disks into the ORB
Drive. It is not compatible with any media other than an ORB Disk.
Inserting any media other than ORB Disks will result in damage to your
drive and will void any warranty for the product.
18
USERS GUIDE
Page 20
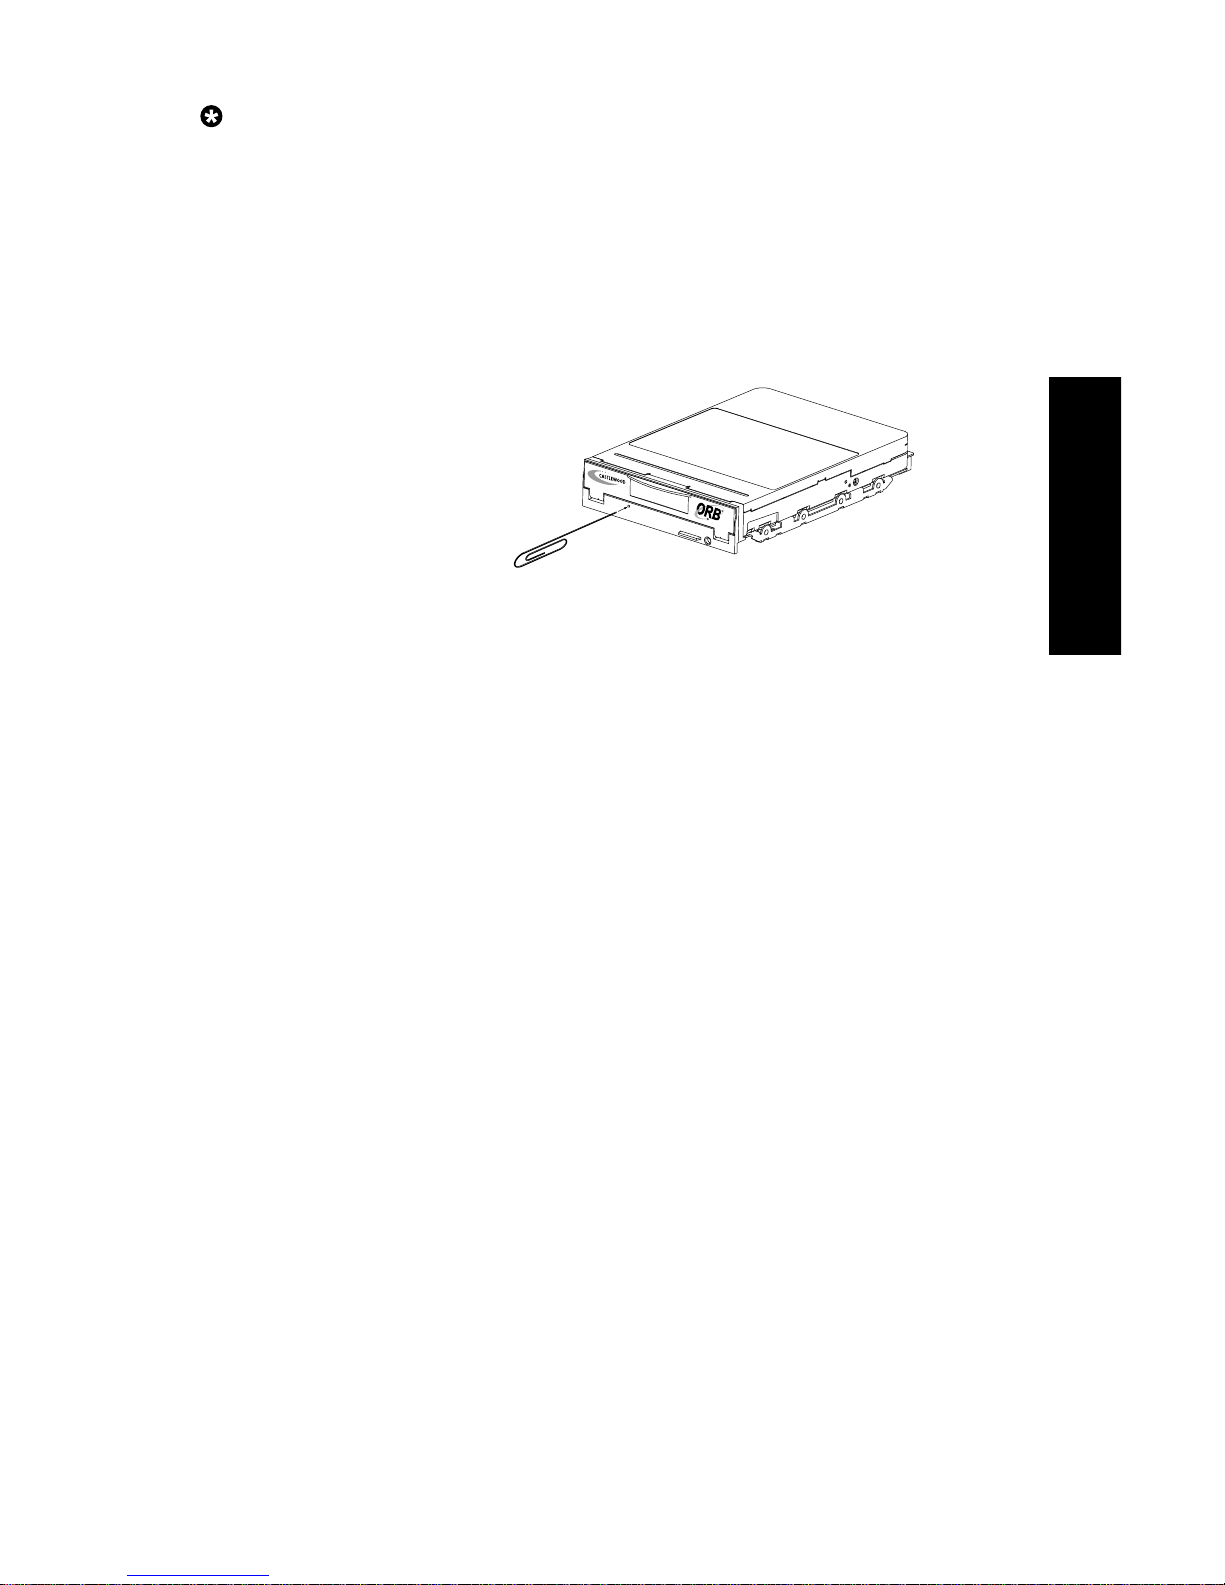
Emergency Ejection Method
1. Shut down your computer system (turn power off).
2. Wait 30 seconds.
3. Insert a paper clip into emergency eject hole.
CAUTION: Do not insert a paper clip into the emergency
eject hole while there is power to your computer and drive.
This may result in damage to your drive and disk.
Figure 17
Emergency eject
2.3 ACCESSING YOUR ORB DRIVE
My Computer: Windows 2000/98/95/NT
1. From the Desktop double-click on My Computer.
2. Identify the ORB Removable Drive and Double Click.
3. To Access the ORB Tools and other utility functions Right Click the
ORB Drive icon.
Explorer:Windows 2000/98/95/NT
1. From the Desktop click on the Start Button.
2. Select Programs.
3. Select Explorer.
4. Select My Computer.
5. Select the ORB Drive Icon from the drive hierarchy and Double Click.
6. Click on the ORB Drive Icon and then right click to access tools.
Mac OS 7.6.1 up to 9.0
Identify the ORB Drive Icon on Desktop and Double Click.
2.4 REASSIGNING DRIVE LETTERS
Under Windows 2000/98/95/NT you may be able to change the drive
letter assigned to your ORB Drive.
19
USERS GUIDE
Page 21

You may want to change the drive letter for convenience, or because there was a
change to existing drive letters when you installed your ORB Drive. Changes to
existing drive letters may cause problems with applications installed on the drives
with changed letters.
Installation Help Note 001, Drive Letter Assignment, covers in detail how drive letters are assigned and the ways available to reassign drive letters. This Help Note is
available on our web site at www.castlewood.com.
2.5 LARGE DRIVE SUPPORT
Windows Environment
Windows 2000, Windows 98, and Windows 95 OSR2 or later support the use of partitions greater than 2 GB (gigabytes) in capacity with FAT32. The maximum supported partition size is 2 TB (terabytes). Large drive partition support can help you dramatically reduce the amount of wasted space on your computer’s hard disk.
One should be aware that this FAT32 configured partition can only be recognized
and accessed by Windows 2000, Windows 98 and Windows 95 OSR2 or later. DOS,
Retail Windows 95 (original Windows 95), and Windows NT 4.0 or earlier cannot
access a FAT32 partition.
Mac Environment
Mac OS 8.1 and later supports Mac OS Extended File Format (HFS+). This large
drive partition support can help you dramatically reduce the amount of wasted
space on your ORB Disk.
One should be aware that this Mac OS Extended format can only be recognized and
accessed by Mac OS 8.1 or later.
ORB PC formatted (Fat 16 or Fat 32) disks are recognized by Mac OS 8.5 or higher
with File Exchange. PC Exchange on Mac OS 7.6.1 through 8.1 does not recognize
any PC formatted device larger than 1GB in capacity.
2.6 PARTITIONING A DISK
Your ORB Drive comes with a 2.2GB ORB Disk. The ORB Disk is a high quality and
high capacity hard disk. If you purchased an ORB SCSI Drive, the ORB Disk is preformatted with one 2.16GB extended FAT16 partition. The format can be set to your
preference. The ORB Drive and Disk partition behave like any Hard Disk Drive that
you have on your system. The following table shows the format options that exist to
you based on your operating system.
20
USERS GUIDE
Page 22
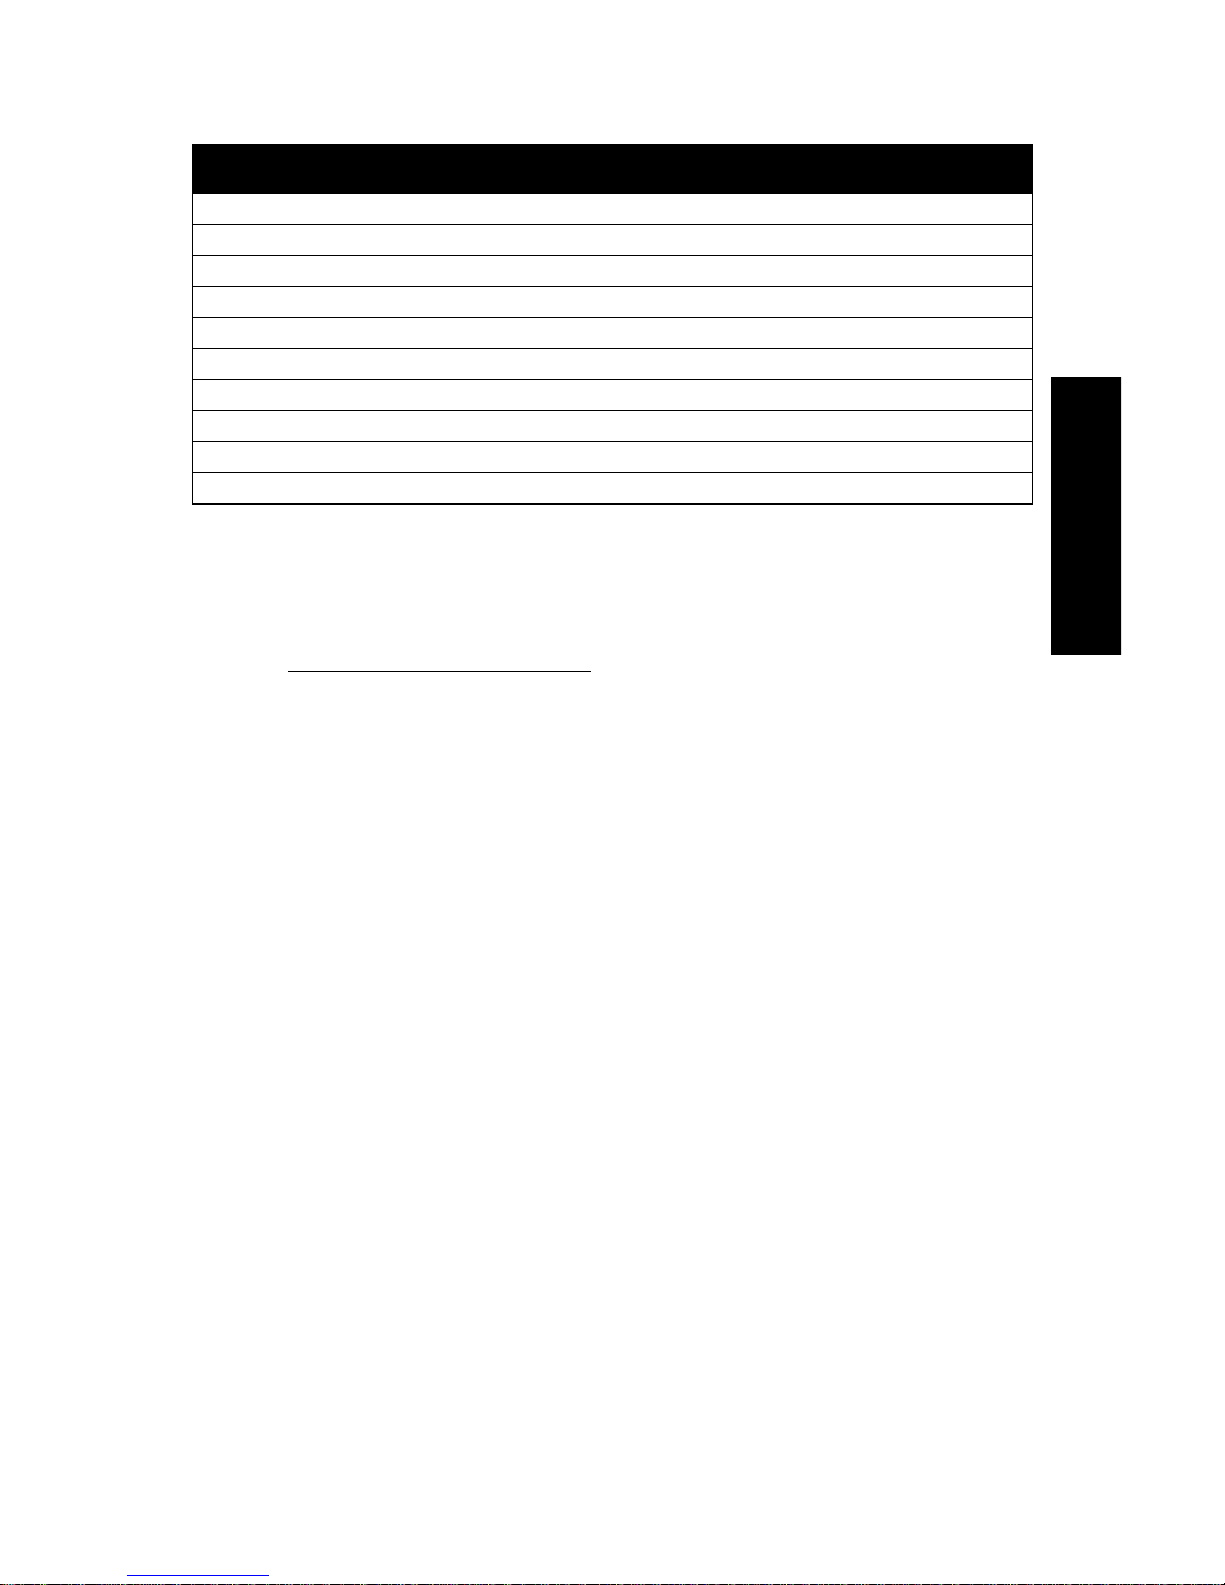
Partition Options Table
Table 1
Note: 1 GB = 1 billion bytes = 1,000,000,000 bytes
Value = Maximum Partition size
NVO = Not Valid Option
* Windows 95 OSR2 or later
† Mac with PC exchange
†† Mac with File Exchange
††† In fixed drive mode
Re-Partitioning the ORB Disk:
Windows 2000/NT
Using either ORB Tools to partition ORB Disks or NT Disk Administrator
to manage your hard disk if you want to use NTFS.
You can use Disk Administrator to manage your hard disk, such as partitioning new disks or further partitioning disks that do not contain
Windows 2000/NT system files.
Windows 98 and 95
Use ORB Tools to partition ORB Disks.
Mac OS 7.6.1 up to 9.0
Use ORB Tools for Mac to partition the ORB Disks. Either ORB Tools, any
third party format utilities or the operating system’s Erase Disk can be
used to reformat the ORB Disks. You can format a PC formatted disk to
Mac format with ORB Tools for Mac.
21
Operating System FAT16 FAT32 NTFS HPFS HFS (Mac OS HFS+ (Mac OS
Standard) Extended)
DOS 2.16GB NVO NVO NVO NVO NVO
Windows 3.1 2.16GB NVO NVO NVO NVO NVO
Windows 95 2.16GB 2.2GB* NVO NVO NVO NVO
Windows 98 2.16GB 2.2GB NVO NVO NVO NVO
NT 4.0 2.16GB NVO 2.2GB
†††
NVO NVO NVO
Windows 2000 2.16GB 2.2GB 2.2GB
†††
NVO NVO NVO
OS/2 2.16GB NVO NVO 2.2GB NVO NVO
UNIX 2.16GB NVO NVO NVO NVO NVO
Mac System 7.6.1+ 1GB
†
NVO NVO NVO 2.1GB NVO
Mac OS 8.5+
††
1GB
††
2.2GB††NVO NVO 2.1GB 2.1GB
USERS GUIDE
Page 23

2.7 ULTRA WIDE SCSI PERFORMANCE
In order for your ORB Drive to achieve Ultra Wide SCSI performance, all of the following conditions must be met.
• Ultra Wide SCSI host bus adapter – the SCSI host bus adapter used must support
Ultra Wide SCSI protocols.
• Use high quality cable.
• Minimize cable length – Keep the cables between SCSI devices as short as possible. For Ultra Wide SCSI performance, the maximum allowable total cable length
is 9.8 feet (3 meters) for a SCSI bus of 1 to 5 devices and 4.9 feet (1.5 meters) for
6 to 8 devices. It’s best to stay closer to 4.9 feet than 9.8 feet. Total cable length
includes the length of all internal cables, external cables and device impedance.
• SCSI bus is actively terminated on both ends– active termination is required for
Ultra Wide SCSI performance.
• All devices on the SCSI bus support Ultra Wide SCSI – backward compatible with
previous SCSI versions is possible but all devices will perform at the level of the
slowest connected SCSI devices.
2.8 SCSI TIPS
• Power on all internal and external devices on the SCSI bus while your computer
is powered on – even if a device on the SCSI bus is not intended to be used, it
must be powered on for a proper SCSI signal path.
• Terminate the first and the last device – if there is no external SCSI device, the
SCSI host bus adapter or the Mac’s main logic board should be terminated.
Otherwise, the last physical device on the external SCSI bus should be terminated.
• Do not need to terminate the same device twice – do not need to attach an active
terminator to a device that already has a built-in active terminator.
• Each SCSI device has a unique SCSI ID – If two SCSI devices have the same SCSI
IDs, they will not be properly recognized and data may be lost.
• Always power off your computer and all peripherals before reconfiguring the SCSI
bus – Electrical power should be turned off before connecting, disconnecting any
cables or changing SCSI ID; otherwise, your drive or computer equipment could
be damaged.
22
USERS GUIDE
Page 24

!
TROUBLESHOOTING
SECTION 3 TROUBLESHOOTING
If you encounter a problem while installing or using your ORB Drive, check this
Section for help.
If the information presented in this document does not help you resolve the problem, visit the Support Center on our web site: www.castlewood.com.
CAUTION! Always power off your computer and all peripherals before reconfiguring the SCSI bus. Electrical power
should be turned off before connecting, disconnecting any
cables or changing SCSI ID; otherwise, your drive or computer equipment could be damaged.
LED Indicator Definitions
Green: Power is present and drive has passed self-test.
Amber: Drive is being accessed.
Red: Error has occurred while checking the drive.
Upon Power On:
1. Steady Green – Drive ready to accept disk.
2. Flashing Amber and then steady Green – Disk is in and drive
ready for use.
3. Flashing amber, motor spins up and then spins down, disk
ejects and LED turns steady Green – Disk failed startup diagnostics.
4. Flashing Red – Drive Failure:
One flash - ROM failure
Two flashes - RAM failure
Three flashes - DRAM failure
Four flashes - Internal Bus Failure
Five flashes - Interface failure
During Operation:
1. Steady Green – Drive ready to accept an ORB Disk
– ORB Disk is loaded.
2. Flashing Amber – Disk loading or unloading.
– Disk in use.
3. Flashing Red – Possible disk error detected during spin up.
Your disk will either be write-protected or ejected to safeguard the data.
•One flash to four flashes – Note the number of red flashes and contact
technical support.
•Five flashes – Bad power on detected. Cycle the power to your
computer system.
23
Page 25

TROUBLESHOOTING
24
Green light (LED) does not illuminate
or light.
Red light (LED) remains in the “on”
state.
The ORB Drive does not “come ready”.
(Green light (LED) on the ORB Drive
does not come ready when disk is
inserted.)
An ORB Disk will not stay inserted.
After the ORB Drive is installed, the
computer hangs during startup or the
ORB Drive does not appear on the
Desktop
Data transfer problems or drive
operation is erratic.
• Make sure power connector to drive is
securely inserted in drive.
• Drive is defective - return to place of
purchase.
• A) Make sure the power cable connection
to the ORB SCSI drive is secure.
• B) Make sure the disk is inserted and
seated properly.
• Make sure that you are properly inserting
the disk. Refer to section 2.2, Using ORB
Disks.
• Try inserting a different disk. If it mounts
properly, there may be a problem with the
original disk.
This could be caused by several possible
problems related to an installation problem. The following entries will help you isolate the device that causes the problem.
• A) Make sure that the cable is properly
connected.
• B) Make sure that each device has a
unique SCSI ID and the bus is properly terminated. Refer to Section 1.7,
Configuration Options.
• C) Restart your computer. If the problem
still exists, continue with the following
steps.
• E) Connect other SCSI devices back to the
SCSI bus, one device at a time. You may
need to refer to their manuals for instructions on installation.
• F) If the last internal device does not have
active termination or if you are not sure,
connect ORB Drive as the last device on
the SCSI bus for proper termination. Refer
to Figure 7 on page 7 for termination
jumper settings.
• A) Make sure that the cable is properly
connected.
• B) Make sure each device on the SCSI bus
has a unique SCSI ID.
• C) Make sure the SCSI bus is actively terminated. If the last internal device does
not have active termination or if you are
not sure, connect the ORB Drive as the last
device on the SCSI bus for proper termination. Refer to Figure 7 on page 7 for termination jumper settings.
• D) Use only high quality cables.
Page 26

25
For the latest help information:
• E) Use the shortest length of cables possible. Make sure total cable length does not
exceed the maximum allowable.Total
cable length includes the length of internal cables, external cables and device
impedance. Refer to section 2.7 on page
22, Ultra Wide SCSI Performance.
Refer to the Support Center on our web site
at www.castlewood.com.
TROUBLESHOOTING
Page 27

26
SECTION 4 SPECIFICATIONS
Performance
Average Seek Time 11ms read/write 12 ms
Data Transfer Rate 12.2 MB/sec maximum
Burst Transfer Rate 40 MB/sec maximum
Rotation Speed 5400 rpm
Head MR (Magneto-Resistive)
CPU 25 MIPS DSP
Start/Stop Times 20 sec spin-up,10 sec stop
Long Format Time 9 Minutes
Short Format Time Less than one second
Reliability and Warranty
Reliability: Labyrinth Sealed Door with Auto Closure and Patented
enclosure environmental controls
MTBF 300,000 hours
Service Life 5 Years
Bit Error Rate 1 in 10
12
Disk (estimated shelf life) 20 Years
Drive and Disk Warranty 1 Year Limited
General Information
Interface 68-pin High-Density Wide ribbon cable
Disk Storage capacity 2.2 GB
Operating System Compatibility Windows 2000,98, 95,3.1x, NT4.0 (SP4)+, MS-DOS 5.0+,Mac OS 7.6.1+
Hardware Compatibility Macintosh: Power Macintosh/Power PC,G3 and G4
PC:Intel Pentium,AMD K6, Cyrix MMX
Power 5V (±5%), 1.5 amp (peak) start-up
.75 amp continuous read/write
.75 amp max seek, .2 amp standby mode
Power Management Via software, with idle and standby mode
Dimensions 6” X 1” X 4”
Weight 15 oz. / 426 gm
Write Protection Via Software
Acoustical Noise Less than 36 dB
Operating Conditions
Temperature
Operating 10°C to 46°C
Storage -40°C to +60°C
Shipping -40°C to +60°C
Relative Humidity (non-condensing)
Operating 10% to 80%
Non-Operating 10% to 90%
Vibration
Operational .03 inches p-p @ 5-10Hz, .5g p-p @ 10-300Hz, .2g p-p @ 300-500Hz
Non-Operational .04 inches p-p @ 5-10 Hz,4g p-p @ 10-500Hz
Shock @ 11ms duration 1/2 Sine wave
Operational 8g
Non-Operational 80g
Altitude
Operating 10,000 ft
All specifications are subject to change.Actual performance is dependent on your system configuration.
SPECIFICATIONS
Page 28

27
SECTION 5 CUSTOMER SUPPORT
Additional ORB Help Sources
Customer Support Phone
US and Canada 1 866 874 7878
Germany (D) 008000 ORB INFO (008000 672 4636)
Great Britain (UK) 008000 ORB INFO (008000 672 4636)
France (F) 008000 ORB INFO (008000 672 4636)
Italy(I) 008000 ORB INFO (008000 672 4636)
Spain (E) 008000 ORB INFO (008000 672 4636)
Switzerland (CH) 008000 ORB INFO (008000 672 4636)
Other European countries +49 (0)7000 ORB INFO (+49 (0)7000 672 4636)
Countries outside North.America and Europe See web site
Castlewood Systems,Inc., corporate 1 408 956 2500
Email [email protected]
Web site www.castlewood.com
CUSTOMER SUPPORT
Page 29

28
SECTION 6 WARRANTY
Warranty. Castlewood Systems, Inc. (“Castlewood”) warrants the ORB Drives (the “Drives”)
solely to the purchaser (“Purchaser”) against defects in workmanship and materials for a period
of one (1) year from the date of purchase. Castlewood warrants the ORB disks (the “Disks”) solely to the Purchaser against defects in workmanship and materials for a period of one (1) year
from the date of purchase (each a “Warranty Period”). The Drives and the Disks shall be collectively and individually referred to as “Product”. All warranty claims must be requested of
Castlewood prior to the expiration of the applicable Warranty Period. Purchaser may not transfer
this warranty. Purchaser’s sole remedy, and Castlewood’s sole liability for a covered warranty
defect shall be for Castlewood, at its sole discretion, to either repair or replace the defective
Product at no charge, or to refund the purchase price for the affected Product. These warranties
are void if the applicable Product has been altered in any way or damaged by accident, misuse, or
abuse, including, but not limited to, the use of unauthorized third party software or repairs, power
surges, excessive heat or humidity. Castlewood warranty obligations shall not be enlarged or
diminished by Castlewood’s provision of technical advice to Purchaser.
Exclusions. THE PRECEDING WARRANTY DOES NOT APPLY TO (I) ANY SOFTWARE COMPONENTS OF THE PRODUCT; (II) ANY THIRD PARTY SOFTWARE DISTRIBUTED ON OR WITH THE
PRODUCT; (III) ANY EXPENDABLE COMPONENTS INCLUDING, BUT NOT LIMITED TO, FUSES,
BULBS, AND CLEANING ACCESSORIES; AND (IV) ANY PRODUCTS NOT MANUFACTURED BY OR
FOR CASTLEWOOD (THE “EXCLUDED ITEMS”). THE EXCLUDED ITEMS ARE LICENSED TO
PURCHASER ON AN AS IS BASIS.
Disclaimer of Warranties. EXCEPT FOR THE EXPRESS WARRANTIES CONTAINED HEREIN,
CASTLEWOOD DISCLAIMS ALL OTHER WARRANTIES, WHETHER EXPRESS, IMPLIED OR
STATUTORY, INCLUDING WITHOUT LIMITATION, THE IMPLIED WARRANTIES OF MERCHANTABILITY, FITNESS FOR A PARTICULAR PURPOSE, NONINFRINGEMENT OR THEIR
EQUIVALENTS UNDER THE LAWS OF ANY JURISDICTION. THE REMEDIES SET FORTH HEREIN
SHALL BE THE SOLE AND EXCLUSIVE REMEDIES OF PURCHASER WITH RESPECT TO ANY
DEFECTIVE PRODUCT. SOME JURISDICTIONS DO NOT PERMIT THE PRECEDING EXCLUSION
OF IMPLIED WARRANTIES FOR CERTAIN CONSUMERS SO SOME OF THE ABOVE EXCLUSIONS
OR LIMITATIONS MAY NOT APPLY TO PURCHASER.
RMA Procedure. If Purchaser discovers a defect in a Product during the applicable Warranty
Period, then Purchaser should contact Castlewood for a Return Materials Authorization (RMA)
number before shipping the Product, freight and insurance prepaid, to Castlewood’s designated
repair facility. Purchaser should have the part number, serial number, date of purchase, and the
suspected problem ready when contacting Castlewood to obtain an RMA. Before shipping any
Product to Castlewood, Purchaser shall remove any removable storage media, and all programs,
data files and other data from any applicable storage media. Castlewood accepts no responsibility
or obligation to return any such materials that are shipped to Castlewood. If a Product returned
under warranty is found not to be defective, then Castlewood shall dispose of the Product per
Purchaser’s instructions after receiving full payment from Purchaser for Castlewood’s inspection
of the Product at Castlewood’s then current rates for such services.
Limitation of Liability. IN NO EVENT SHALL CASTLEWOOD BE LIABLE FOR ANY SPECIAL,
INDIRECT, INCIDENTAL, PUNITIVE OR CONSEQUENTIAL DAMAGES THAT PURCHASER MAY
SUFFER DIRECTLY OR INDIRECTLY FROM THE PURCHASE USE OF THE PRODUCT, INCLUDING, WITHOUT LIMITATION, FOR THE LOSS OF USE OR LOSS OF DATA, FILES OR PROGRAMS
STORED ON THE PRODUCT. CASTLEWOOD’S MAXIMUM LIABILITY FOR ANY CLAIM BY PURCHASER ARISING OUT OF PURCHASER’S PURCHASE AND USE OF THE PRODUCT SHALL IN NO
EVENT EXCEED THE PURCHASE PRICE OF THE APPLICABLE PRODUCT. Some states do not
allow the exclusion of incidental, punitive or consequential damages, so the above limitation may
not apply to Purchaser.
WARRANTY
Page 30

29
SECTION 7 SOFTWARE LICENSE AGREEMENT
CASTLEWOOD END USER LICENSE AGREEMENT
NOTICE TO END USER: CAREFULLY READ THE FOLLOWING LEGAL AGREEMENT (THE
“AGREEMENT”). USE OF THE SOFTWARE PROVIDED WITH THIS AGREEMENT CONSTITUTES
YOUR ACCEPTANCE OF THESE TERMS. IF YOU DO NOT AGREE TO THE TERMS OF THIS
AGREEMENT, PROMPTLY RETURN THE SOFTWARE AND THE ACCOMPANYING ITEMS (INCLUDING WRITTEN MATERIALS AND CONTAINERS) TO THE LOCATION WHERE YOU OBTAINED
THEM FOR A FULL REFUND.
License Grant. Castlewood Systems, Inc. (“Castlewood”) grants to You (either as an individual
or entity) a personal, and non-exclusive right to use the copy of the object code version of the software embedded in, or bundled with, the ORB Disks and ORB Drives provided with this license
(the “Software”) [solely as installed in the Product]. The ORB Drives and the ORB Disks shall be
collectively and individually referred to as the “Product”. The term of this Agreement will be for
the duration of Castlewood’s copyright in the Software. You agree that You may not copy any written materials accompanying the Products and/or the Software. You may make one (1) copy of the
Software, in object code form, solely for back-up or archival purposes. You may not rent or lease
your rights in the Software in any form. Notwithstanding the previous sentence, You may assign
Your rights under this Agreement only to a third party who previously agrees in writing to be
bound by this Agreement and provided that You transfer all copies of the Products, Software, and
related documentation to the third party or destroy any copies not transferred. Except as set
forth above, You may not assign Your rights under this Agreement.
Copyright. You acknowledge that no title to the intellectual property in the Software is transferred to You. You further acknowledge that title and full ownership rights to the Products and
the Software will remain the exclusive property of Castlewood or its suppliers, and You will not
acquire any rights to the Software except as expressly set forth above. You acknowledge and agree
that certain components of the Software may be licensed by Castlewood from third party suppliers
and that such suppliers are intended third party beneficiaries of this Agreement.
Reverse Engineering. You agree that You will not attempt, nor permit anyone else to attempt
to, reverse compile, modify, translate, or disassemble the Software in whole or in part. Nothing in
this Section shall prejudice any rights that You may have under the Copyright (Computer
Programs) Regulations 1992, as applicable. If this provision shall violate local law, then You shall
notify Castlewood in writing ninety (90) days prior to any proposed action in contravention of this
provision. Such written notice shall provide the parties an opportunity to discuss the scope of any
necessary reverse engineering that would be required to be permitted under local law.
Termination. The unauthorized copying of the Software or the accompanying documentation,
or any other failure to comply with the above license terms and restrictions will result in the automatic termination of this Agreement. You may terminate this Agreement at any time upon written
notice to Castlewood. Upon termination of this Agreement, You agree to promptly destroy all
copies of the Software and all accompanying documentation, or to promptly return such items to
Castlewood.
Warranty. Castlewood Systems, Inc. (“Castlewood”) warrants the ORB Drives (the “Drives”)
solely to the purchaser (“Purchaser”) against defects in workmanship and materials for a period
of one (1) year from the date of purchase. Castlewood warrants the ORB disks (the “Disks”) solely to the Purchase against defects in workmanship and materials a period of one (1) year from the
date of purchase (each a “Warranty Period”). The Drives and the Disks shall be collectively and
individually referred to as “Product”. All warranty claims must be requested of Castlewood prior
to the expiration of the applicable Warranty Period. Purchaser may not transfer this warranty.
Purchaser’s sole remedy, and Castlewood’s sole liability for a covered warranty defect shall be for
Castlewood, at its sole discretion, to either repair or replace the defective Product at no charge,
SOFTWARE LICENSE
Page 31

30
or to refund the purchase price for the affected Product. These warranties are void if the applicable Product has been altered in any way or damaged by accident, misuse, or abuse, including, but
not limited to, the use of unauthorized third party software or repairs, power surges, excessive
heat or humidity. Castlewood warranty obligations shall not be enlarged or diminished by
Castlewood’s provision of technical advice to Purchaser.
Exclusions. THE PRECEDING WARRANTY DOES NOT APPLY TO (I) ANY SOFTWARE COMPONENTS OF THE PRODUCT; (II) ANY THIRD PARTY SOFTWARE DISTRIBUTED ON OR WITH THE
PRODUCT; (III) ANY EXPENDABLE COMPONENTS INCLUDING, BUT NOT LIMITED TO, FUSES,
BULBS, AND CLEANING ACCESSORIES; AND (IV) ANY PRODUCTS NOT MANUFACTURED BY OR
FOR CASTLEWOOD (THE “EXCLUDED ITEMS”). THE EXCLUDED ITEMS ARE LICENSED TO
PURCHASER ON AN AS IS BASIS.
Disclaimer of Warranties. EXCEPT FOR THE EXPRESS WARRANTIES CONTAINED HEREIN,
CASTLEWOOD DISCLAIMS ALL OTHER WARRANTIES, WHETHER EXPRESS, IMPLIED OR
STATUTORY, INCLUDING WITHOUT LIMITATION, THE IMPLIED WARRANTIES OF MERCHANTABILITY, FITNESS FOR A PARTICULAR PURPOSE, NONINFRINGEMENT OR THEIR
EQUIVALENTS UNDER THE LAWS OF ANY JURISDICTION. THE REMEDIES SET FORTH HEREIN
SHALL BE THE SOLE AND EXCLUSIVE REMEDIES OF PURCHASER WITH RESPECT TO ANY
DEFECTIVE PRODUCT. SOME JURISDICTIONS DO NOT PERMIT THE PRECEDING EXCLUSION
OF IMPLIED WARRANTIES FOR CERTAIN CONSUMERS SO SOME OF THE ABOVE EXCLUSIONS
OR LIMITATIONS MAY NOT APPLY TO PURCHASER.
RMA Procedure. If Purchaser discovers a defect in a Product during the applicable Warranty
Period, then Purchaser should contact Castlewood for a Return Materials Authorization (RMA)
number before shipping the Product, freight and insurance prepaid, to Castlewood’s designated
repair facility. Purchaser should have the part number, serial number, date of purchase, and the
suspected problem ready when contacting Castlewood to obtain an RMA. Before shipping any
Product to Castlewood, Purchaser shall remove any removable storage media, and all programs,
data files and other data from any applicable storage media. Castlewood accepts no responsibility
or obligation to return any such materials that are shipped to Castlewood. If a Product returned
under warranty is found not to be defective, then Castlewood shall dispose of the Product per
Purchaser’s instructions after receiving full payment from Purchaser for Castlewood’s inspection
of the Product at Castlewood’s then current rates for such services.
Limitation of Liability. IN NO EVENT SHALL CASTLEWOOD BE LIABLE FOR ANY SPECIAL,
INDIRECT, INCIDENTAL, PUNITIVE OR CONSEQUENTIAL DAMAGES THAT PURCHASER MAY
SUFFER DIRECTLY OR INDIRECTLY FROM THE PURCHASE USE OF THE PRODUCT, INCLUDING, WITHOUT LIMITATION, FOR THE LOSS OR USE OR LOSS OF DATA, FILES OR PROGRAMS
STORED ON THE PRODUCT. CASTLEWOOD’S MAXIMUM LIABILITY FOR ANY CLAIM BY PURCHASER ARISING OUT OF PURCHASER’S PURCHASE AND USE OF THE PRODUCT SHALL IN NO
EVENT EXCEED THE PURCHASE PRICE OF THE APPLICABLE PRODUCT. Some states do not
allow the exclusion of incidental, punitive or consequential damages, so the above limitation may
not apply to Purchaser.
Severability. In the event of invalidity of any provision of this Agreement, the parties agree
that such invalidity shall not affect the validity of the remaining portions of this Agreement.
Export. You agree that You will not export or re-export the Products or the Software without the
appropriate United States or foreign government licenses.
Taxes. You agree to be responsible for the payment of any taxes, other than Castlewood’s income
taxes, resulting from this Agreement.
Governing Law. This Agreement will be governed by the laws of the State of California as they
are applied to agreements between California residents entered into and to be performed entirely
within California. The United Nations Convention on Contracts for the International Sale of
Goods is specifically disclaimed.
Entire Agreement. This is the entire agreement between You and Castlewood which supersedes any prior agreement, whether written or oral, relating to the subject matter of this
Agreement.
SOFTWARE LICENSE
Page 32

31
SECTION 8 STANDARDS AND REGULATIONS
The Castlewood ORB2II00 satisfies the following standards and regulations:
1) UL/CSA: – This product is certified and listed with UL/CSA, and meets safety compliance in
both U.S.A. and Canada.
2) CE Mark (EN 60950), TUV Rheinland Bauart: Safety and Evaluation to International Standard
for European Directives.
3) CB Report: Based on IEC 950, Safety of Information Technology Equipment. Certifies our prod-
uct is recognized by more than 30 countries.
4) EMC Test Mark (EMC directive 89/336/EEC): Certifies our product complies with EMC direc-
tive.
FCC Warnings
This equipment generates and uses radio frequency energy, and may cause interference to radio
and television reception if not installed and used in strict accordance with the instructions in this
manual.
It has been type-tested and found to comply with the limits for a Class B computing device in
accordance with the specifications in Subpart J of Part 15 of FCC Rules, which are designed to
provide reasonable protection against interference in a residential installation. However, there is
no guarantee that interference will not occur in a particular installation. If this equipment does
cause interference to radio or television reception, which can be determined by turning the equipment off and on, try to correct the interference by one or more of the following
measures:
1) Move the equipment away from the receiver.
2) Plug the equipment into a different outlet so that equipment and receiver are on different
branch circuits.
3) Combination of both options 1 and 2 above.
You may find the FCC booklet How to Identify and Resolve Radio TV Interference Problems help-
ful. This booklet is available from the United States Government printing office, Washington, D.C.,
20402, stock number 004-000-00345-4. Castlewood is not responsible for any radio or television
interference caused by unauthorized modifications to the drive.
Disclaimer
Castlewood Systems, Inc. makes no warranty of any kind with regard to this material, including,
but not limited to, implied warranties of merchantability and fitness for a particular purpose.
Castlewood Systems, Inc. shall not be liable for errors contained in this document or for incidental or consequential damages in connection with the furnishing, performance, or use of this information. The information contained in this document is subject to change without notice. The contents of this document may be revised without prior notice.
Castlewood Systems, Inc. also reserves the right to make changes and/or improvements to its
products without incurring any obligation to incorporate such changes or improvements in units
previously sold or shipped.
STANDARDS & REGULATIONS
Page 33

32
NOTICES
Trademarks
© 1998 Castlewood Systems, Inc. Castlewood Systems, Castlewood logo, the
Castlewood logo graphic, ORB, ORB logo, the ORB graphic, ORBit and ORBit logo
graphics and Traveler are registered trademarks of, Castlewood Systems, Inc. MSDOS, Windows and Windows NT are registered trademarks of Microsoft
Corporation. All other products and product references are the property of their
respective companies.
Patents:
The ORB 2.2 GB Drive and ORB Disk are protected by numerous patents which
have been applied for with the U.S. Patent Office.
Technical Data Restrictions (DOD)
In the case of sale to or use of units by the Department of Defense, use, duplication, or disclosure of any software, firmware, or related documentation is subject to
restrictions stated in paragraph (c) (1) (ii) of the “Rights in Technical Data and
Computer Software” clause at DFAR 252 227-7013. For civilian agencies, use, reproduction, or disclosure of the software and related documentation is subject to
restrictions set forth in FAR 52.227-19. Unpublished rights are reserved under the
copyright laws of the United States.
NOTICES
Page 34

33
Page 35
■■ Came installed in new computer (Please list brand)______________________________________
www.castlewood.com
Castlewood Systems Corporate
Phone: 1-408-956-2500
Fax: 1-408-956-1124
www.castlewood.com
Customer Support USA & Canada
Phone: 1-866-874-7878
Germany (D), Great Britain (UK),
France (F), Italy(I), Spain (E),
Switzerland (CH):
008000 ORB INFO (008000 672 4636)
Other European countries:
+49 (0)7000 ORB INFO (+49 (0)7000 672 4636)
Countries outside N. America & Europe:
See web site
Email: [email protected]
 Loading...