

Page 1

User Manual
ABOUT ANDRO ID ...............................................................................................................................................................................3
APPLICATIONS ....................................................................................................................................................................................3
YOUR PHONE ........................................................................................................................................................................................3
GETTING STARTED ............................................................................................................................................................................4
TOUCH SCREEN & KEYS ..................................................................................................................................................................4
TOUCH TIPS ..................................................................................................................................................................................................... 4
ZOOMING TIPS ................................................................................................................................................................................................. 5
ROTATE THE SCREEN ....................................................................................................................................................................................... 5
KEY TIPS........................................................................................................................................................................................................... 5
HOME SCREEN......................................................................................................................................................................................6
QUICK START: HOME SCREEN ........................................................................................................................................................................ 6
WORKING WITH MENUS ................................................................................................................................................................................. 6
SHORTCUT ....................................................................................................................................................................................................... 6
WIDGET ............................................................................................................................................................................................................ 7
ARRANGING YOUR HOME SCREEN .................................................................................................................................................................. 7
CHANGING THE BACKGROUND OF YOUR HOME SCREEN ............................................................................................................................... 7
APPLICATION MENU .........................................................................................................................................................................8
APPLICATION MENU ......................................................................................................................................................................................... 8
PHONE STATUS BAR AND NOTIFICATIONS ..........................................................................................................................8
CHECKING NOTIFICATIONS A ND ONGO ING ACTIVATES ................................................................................................................................ 8
TOOLKITS ......................................................................................................................................................................................................... 9
DIAL PAD ...............................................................................................................................................................................................9
MAKE A CALL .................................................................................................................................................................................................... 9
OPTIONS AVAILABLE DURING A CALL ............................................................................................................................................................. 9
TEXT ENTRY ........................................................................................................................................................................................ 10
ON-SCREEN KEYBOARD ................................................................................................................................................................................. 10
ENTER TEXT ................................................................................................................................................................................................... 10
ENTER VARIOUS CHARACTERS ..................................................................................................................................................................... 10
EDIT TEXT ...................................................................................................................................................................................................... 10
SELECT TEXT ................................................................................................................................................................................................. 10
CUT /COPY/PASTE TEXT .............................................................................................................................................................................. 11
COMMUNICATION ............................................................................................................................................................................ 11
MESSAGING ................................................................................................................................................................................................... 11
PEOPLE ........................................................................................................................................................................................................... 12
PHONE ............................................................................................................................................................................................................ 13
EMAIL ............................................................................................................................................................................................................. 13
MULTIMEDIA ...................................................................................................................................................................................... 14
Page 2

CAMERA .......................................................................................................................................................................................................... 14
MUSIC ............................................................................................................................................................................................................ 15
FM RADIO ...................................................................................................................................................................................................... 17
GALLERY ......................................................................................................................................................................................................... 18
SOUND RECORDE R ........................................................................................................................................................................................ 18
TOOLS .................................................................................................................................................................................................... 19
CALENDAR ...................................................................................................................................................................................................... 19
CLOCK ............................................................................................................................................................................................................ 19
CALCULATOR .................................................................................................................................................................................................. 19
BROWSER ............................................................................................................................................................................................. 20
CONNECT TO NETWORKS AND DEVICES .............................................................................................................................. 20
DETERMINE THE NETWORK YOU ARE USING .............................................................................................................................................. 20
EDIT OR CREATE NEW ACCESS POINTS ...................................................................................................................................................... 20
WI-FI NETWORKS ......................................................................................................................................................................................... 20
BLUETOOTH .................................................................................................................................................................................................... 21
CONNECT TO A COMPUTE R VIA USB ........................................................................................................................................................... 21
WORKING WITH SECURE CERTIFICATES ..................................................................................................................................................... 21
INSTALL SECURE CERTIFICATE FROM SD CARD ........................................................................................................................................ 21
SETTINGS ............................................................................................................................................................................................. 22
ACCESSING PASSWORD ............................................................................................................................................................... 22
PIN CODE ...................................................................................................................................................................................................... 23
PIN2 CODE ................................................................................................................................................................................................... 23
PUK CODE ..................................................................................................................................................................................................... 23
PUK2 CODE .................................................................................................................................................................................................. 23
PRECAUTIONS ................................................................................................................................................................................... 23
FREQUENTL Y AS KED QUESTIONS AND TROUBLESHOOTING ..................................................................................... 24
SAFETY INFORMATION AND NO T ICE S .................................................................................................................................. 25
USING THE MOBILE PHONE AND CHARGER................................................................................................................................................. 25
USING THE MOBILE PHONE .......................................................................................................................................................................... 26
USING THE BATTERY ..................................................................................................................................................................................... 26
USING THE CHARGER .................................................................................................................................................................................... 27
REQUIREMENTS FOR MOBILE PHONE ........................................................................................................................................................... 27
REQUIREMENTS FOR THE BATTERY .............................................................................................................................................................. 27
REQUIREMENTS FOR THE CHARGER AND AC ADAPTER .............................................................................................................................. 27
CLEANING AND MAINTENANCE ..................................................................................................................................................................... 27
Page 3
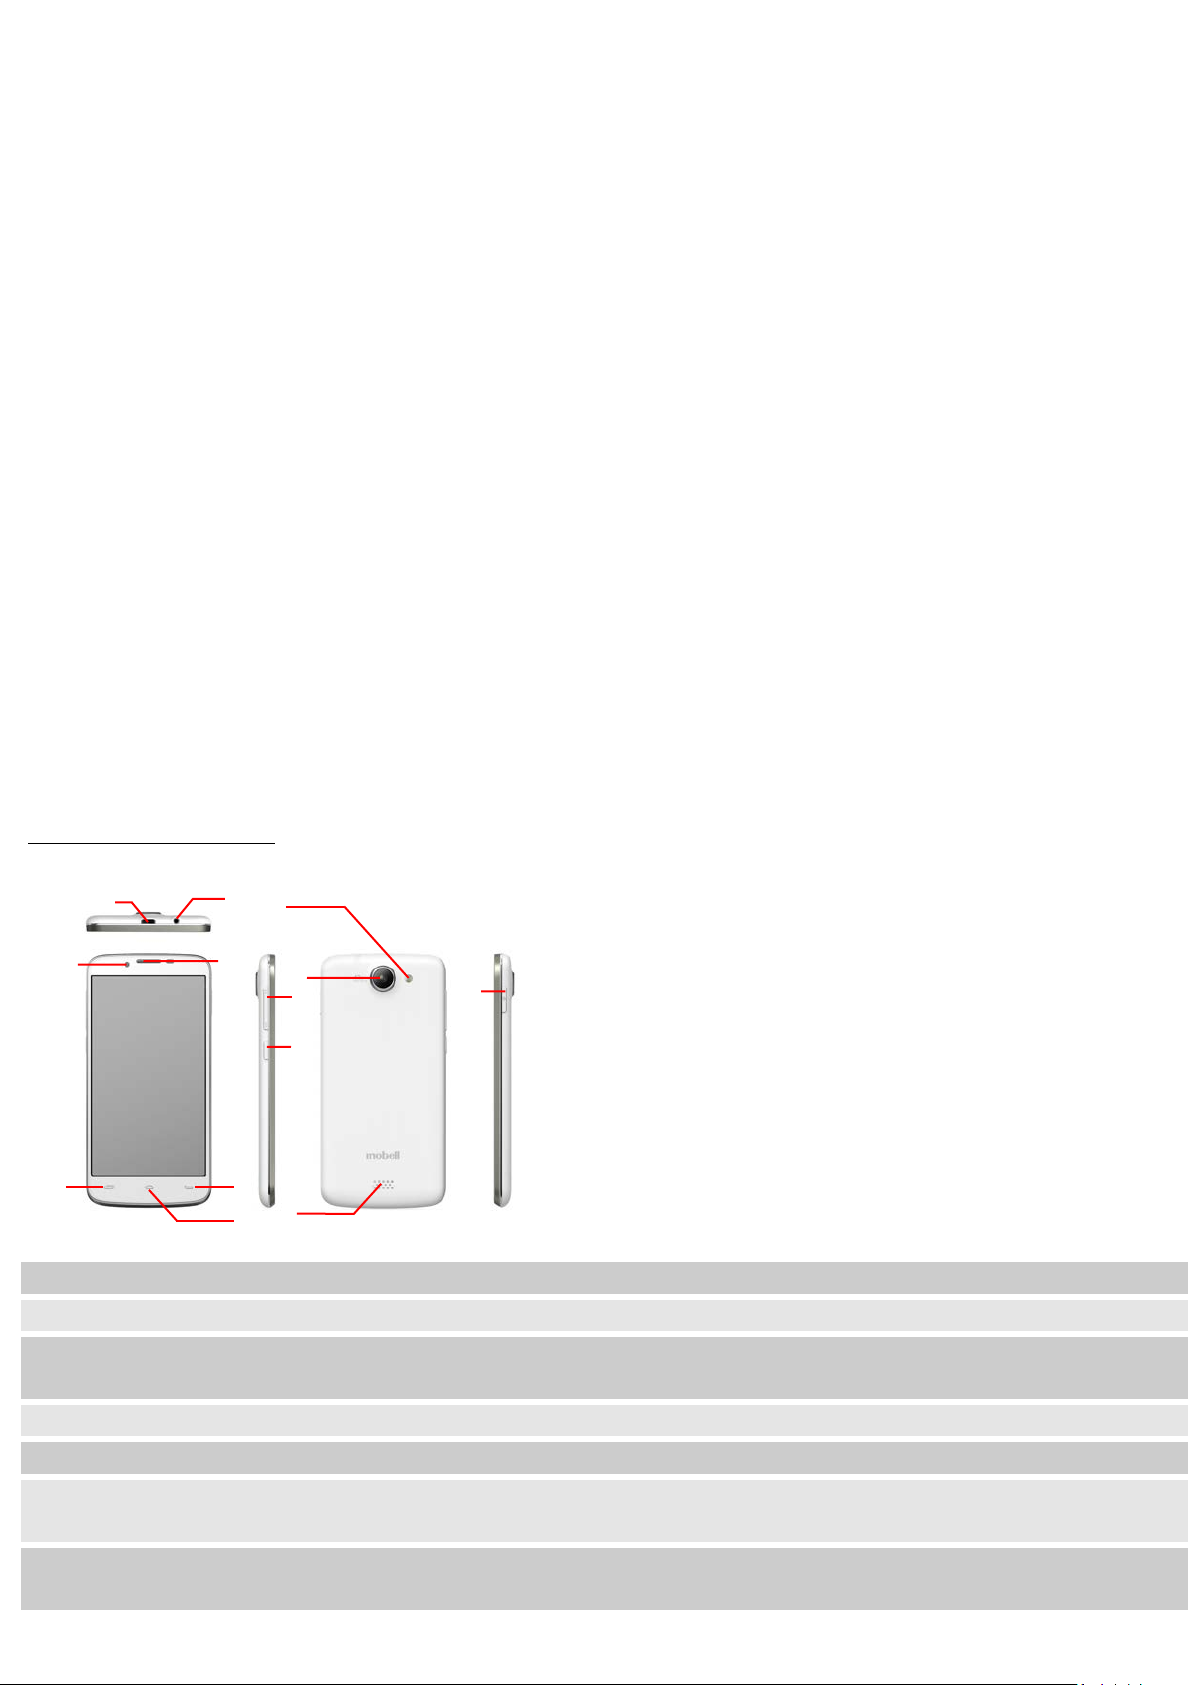
About Android
Charge/USB Port
To connect charger or USB data cable for data exchange.
Earphone Ja ck
To connect an earphone so you can listen to music/radio.
Lens
Menu Key
Open a list of options available in the current screen or application.
Go back to the previous screen;
An Android p hone can perfo rm many o f the same func tions as a com puter. But yo u can also adjus t it to better
suit your needs, to receive the informatio n you w ant, an d have fun at t he same time. Y o u can add and dele te
applications, or enhance them to improve functionality. At Android Market you can download a range of
applications and games from a constantly growing collection. You can also integrate applications on your
Android phone wi th your perso nal data and o nline accounts. For example , you can ba ck up your tr ack of you r
appointments, and engage in as much social networking as you like.
Applications
An application is a phone program that helps y ou perform a task. F or example, there are applications to mak e
calls, take photos and download more applications.
Note: The colors and specifications shown/mentioned in the user manual may differ from the actual product. Images shown are
for representation purpose only.
The content of th e manu al is correct w hen it is releas ed, b ut we reserve the righ t to mod ify th e techn ical spe cifica tion w ithout
additional notification.
Some content in th e manua l may be diff erent fr om the mob ile phone , as the accessory software, SIM card or service varies by
providers.
Your phone
the important keys & connectors
Phone overview
1
3
5
1
2
Front Camera
3
2
4
7
6
11
10
8
9
12
13
Allow you to take pictures while facing the screen.
4
Receiver To hear the voice of the other side when calling.
5
6
Home Key
7
Back Key
Go to Home screen;
Press and hold to open a window showing your most recently used applications.
Close the on-screen keypad, a dialog box, an optio ns menu, or the Notification pane l.
3
Page 4

8
To adjust the ringe r vo lu me, ad just the v oice vo lume d uring a cal l, a nd adj ust media
Long press to enter camera application; In camera application, short press to take
Back Camera
Lens
Speaker
To listen to music, and other sounds offered by your phone.
Press and hold to open phone options menu.
Volume Keys
9
Shutter key
volume.
picture.
10
11
Flashlight To take photos in low-light conditions.
12
13
Power/Lock Key
For taking pho to s.
Switch the phone on and off;
Getting started
let's get you up and running
Assemble & charge
SIM card in
Make sure that t he clipped co rner of the SI M card is faci ng the correc t direction an d the metall ic contacts ar e
facing the correct dire c tio n. Sl ide the SIM ca r d into the ca rd slot u nt il it stops.
SD card in
Slide the SD card into the SD card slot with the metallic pins facing downwards. Push the card until it locks
into place.
Battery in
With the metallic contacts of the battery facing the metallic contacts in the battery slot, press the battery
down until it locks into place.
Charge up
Ensure the battery is inserted in the handset. To charge the battery, plug in the charger connector at your
phone (USB interface) and then plug the other end into an AC power socket.
The battery sy mbo l i nd i cate s t he c ha r gin g s ta tu s. W hil e c ha r gin g, t h e cha r ge indicators will scroll. When all
the scroll ba rs are steady, t he battery is fully charged. Disco nnect the charge r from the phon e. Disconnect the
charger from the AC power socket.
Note: If the battery is powerless, the battery icon will reappear after a few minutes of charging.
Touch screen & keys
a few essentials
Touch tips
Here are some tips on how to navigate around your phone.
Touch
To choose an icon or option, touch it.
Touch & hold
Open special functions or additional options. Try it: From Application menu, touch Music icon to enter
Music library, then touch and hold an artist, a song , or an alb u m, so me o p tio n s will be available to you. Fo r
example: play, add to play li st, de le te, etc.
Drag
To scroll through a list or move slowly, drag across the touchscreen. Try it: on the Home screen, touch
4
Page 5

People icon to enter contacts list, you can drag contac ts list up or down to scroll list.
Slide
To slide by movin g your fi nger up o r down on the touch screen qui ckly. Scroll through a list or move quickly,
slide across the touchscre en (d rag quickly and release).
Double-touch
Touch quickly twice to zoom in/out. For example, double-touch a picture in Gallery to zoom in/out.
Zooming tips
When looking at maps, webpages or photos, place two fingers on the touch screen at once and pinch them
together to zoom out or spread them apart to zoom in.
Note: Use the zoom function when you view photos, maps or when you browsing the web.
Rotate the screen
On some screens, the orientation of the screen rotates with the phone as you turn it from upright to its slide
and back again. You can turn this feature on and off.
Key tip s
Power/Lock key
• When powering off status, press and hold to turn on the phone;
• When powering on status, press and hold to e nter phone options (Power off, Reboot, Airplane mode,
and so on);
• To save your battery, prevent accidental touches or when you want to wipe smudges off your touch
screen, put the to u ch screen to sleep by pressing Power/Lock key;
• T o w ake up the touch screen, just press Power /Lock key a gain, and t hen drag the lock icon to t he right
on the screen to unlock according to the clue on the screen.
Menu key
• Opens a menu with items related to the current screen/application.
Home key
• Press Home key to close any menu or app and return to the Home screen. If you are viewing the left
or right Extended Home screen, open the central Home screen.
• Press and hold Home key to view the applications you have used recently.
Back key
• Press Back key to return to the previous screen you were working on.
Volume keys
• Press Volume keys to change the volume. When playing music or video files, press Volume keys to
adjust media volume.
Shutter key
• Long press to enter camera application. In camera application, short press to take picture.
5
Page 6
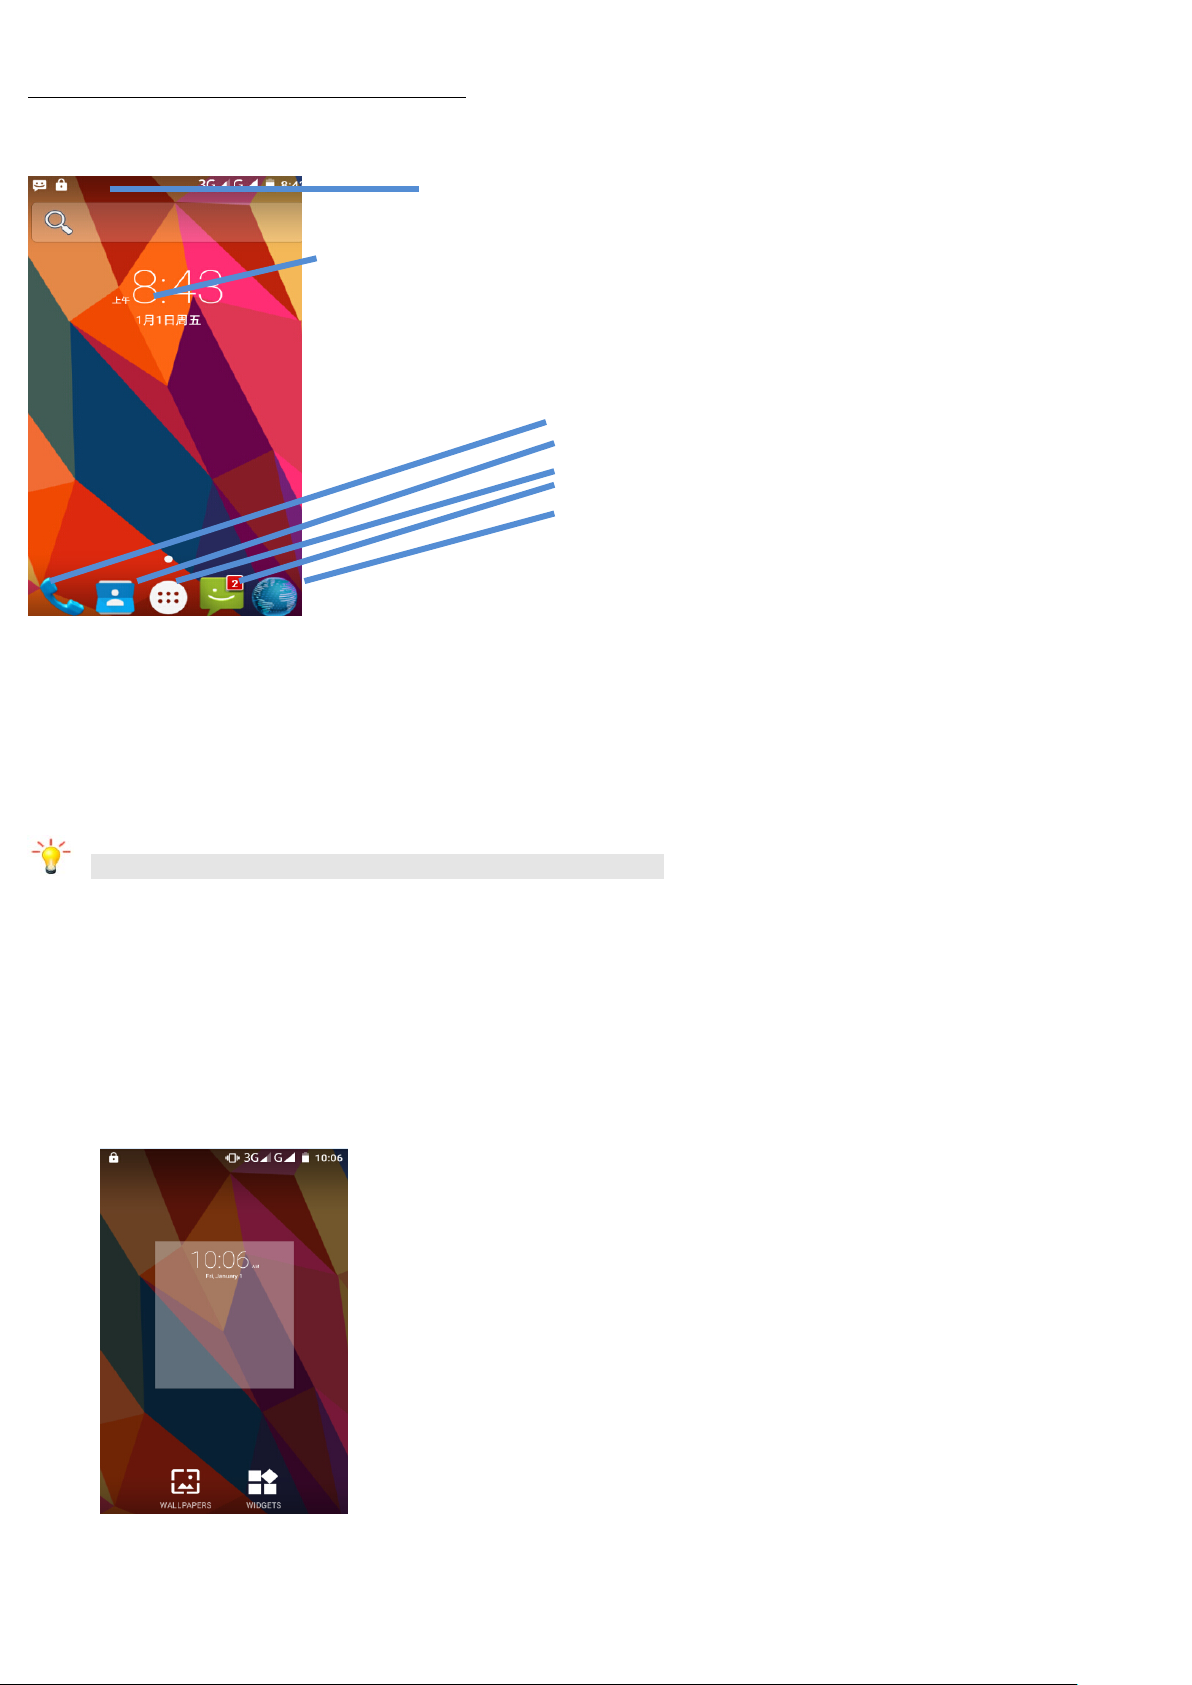
Home screen
Phone
notifications
Widgets
quick access to the t hings you need mos t
Quick start: Home screen
Phone status bar and
The Home screen gives you all your latest information in one place. It's what you
People
Launcher: Main menu
Messaging
Browser
see when yo u tur n on t he phone. It i s the e qui valen t of the desk top o n a c omp uter. I t’s yo ur ga teway to the
main features in your phone. You can customize your Home screen with shortcuts, widgets, folders, and
wallpapers.
You need slide the Home screen left or right to view more content in other panels on the Home screen. You
can add shortcuts, widgets, folders, etc. to Home screen.
Note: Your Home screen might look a litt le different.
Working with M enus
The phone provides you with Options menus and context menus.
Options menus
• Options men us contain too ls that apply to the activities of the current s creen or applicatio n, not to any
specific item on the screen. You can open options menu by pressing Menu key.
• Not all screens have options menus. If you press Menu key on
•
• a screen that has no options menu, nothing happens.
Shortcut
To add a shortcut to Home screen
6
Page 7

1. From Home screen, touch Launcher icon.
2. From APPS tab, you will see application menu.
3. Touch and hold an application icon until it vibrates, then back to the Home screen, and drag it to the
desired location.
To remove a shortcut on Home screen
If you wan t to remove the sho rtcut, you can touch and ho ld the shortc ut icon on Ho me screen until it vibrates,
and then drag it to Remove tab.
Widget
A widget is small application on the Home screen tha t typically displays information such as Analog clock,
Music and you can use directly on your Home screen. For example, the Music widget allows you to start
playing audio file s directly o n Home scree n. You can also add a widget s uch as Analog clock that shows time.
You can also download additional widgets from the library of Android widgets.
To add a widget to Home screen
1. From Home screen, touch Launcher icon.
2. Touch WIDGETS tab, you will see widget options menu.
3. Touch and hold a widget icon to pick up the widget, then back to the Home screen, and drag it to the
desired location.
To remove a widget on Home screen
If you wa nt to remove the widge t, yo u can touc h an d hol d the widge t ico n o n Home sc reen, and then dra g it
to Remove tab.
Arranging your Home screen
To move an item on Home screen
Touch and hold an item on Home screen until it vibrates, then drag it where you want.
To organize your apps with folders
To make a new folder on your Home screen, stack one app on top of another.
To name folder on Home screen
1. Touch the apps stack on Home screen to open
2. Touch the Unnamed Folder to show the name folder field.
3. Edit the folder name.
To move application shortcuts on Home screen to a folder
Touch and hold the item on Home screen until it vibrates, and then stack the app on top of others.
To move application shortcuts in a folder to Home screen
Touch and hold the item in a folder, and then drag the item out of the folder.
Changing the background of your Home screen
Adapt the Ho me s cree n to yo ur ow n s tyle usi ng w allpa pers f ro m Galle ry, Live wall pape rs, V ideo w allpape rs ,
or Wallpapers.
Touch and hold the Home screen to select wallpaper from Gallery, Live wallpapers, Video wallpapers, or
Wallpapers. Then set it as wallpaper.
Tip: You can use camera to take a photo, and then set it as wallpaper.
7
Page 8
Application menu
enjoy applications from the Application menu
Application menu
The Applica tion men u, which yo u open from your Home sc reen, co ntains the applica tions th at come in stalle d
with your phone .
The Application menu extends beyond the screen width, so you need to slide left and right to view all content.
To open the Application menu
1. On Home screen, touch Launcher icon.
2. Touch APPS tab.
To browse the Application menu
Open the Application menu, then slide the screen left or right.
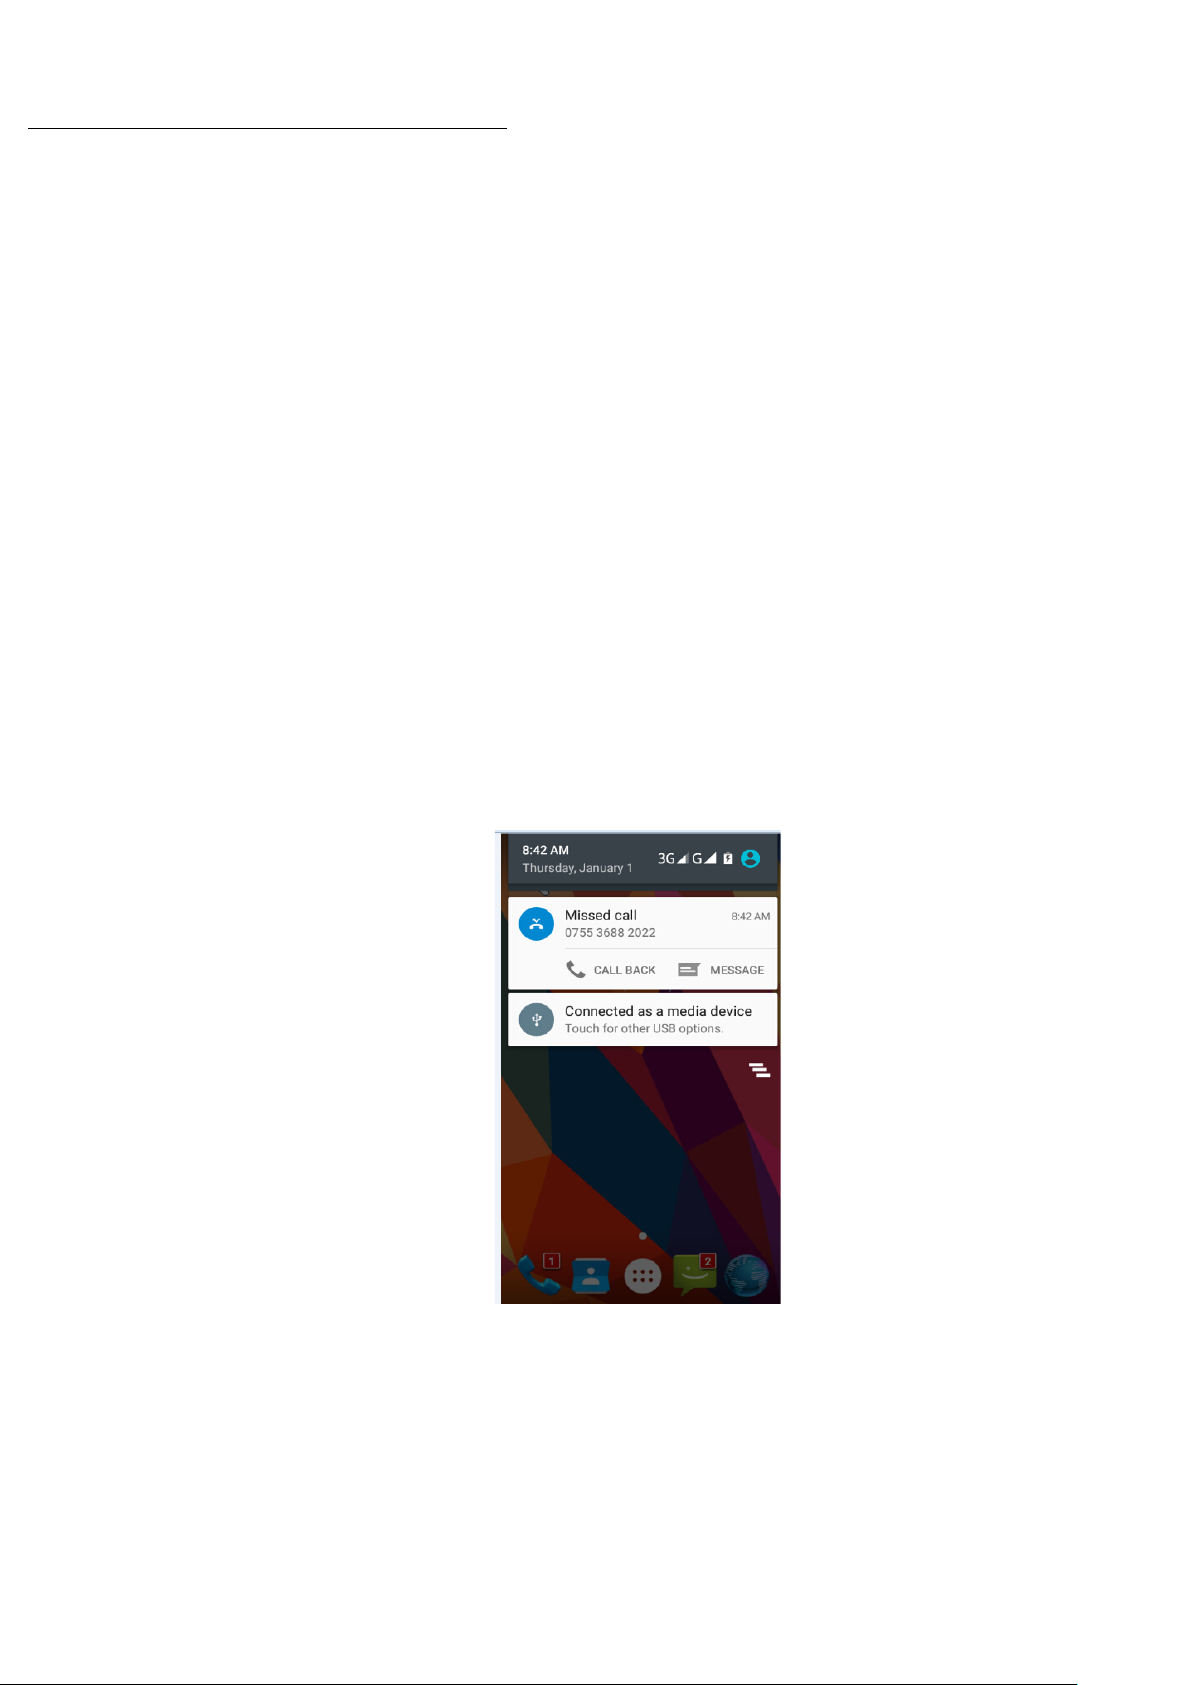
Phone status bar and notifications
The status bar at the top of the screen contains icons that tell you about messages and phone status and
shows what’s going on in your phone. At the top you get notifications when there is something new or
ongoing. For example, new message, missed call, signal strength, battery status and other information
appear here.
Checking notifica tion s an d on goi n g acti va te s
You can drag down the status bar to open
information. Fo r exampl e, view mi ssed calls f rom Notifi cation pane l. You c an also o pen runn ing applic ations,
such as the music player.
To open the Notification panel
Drag the status bar downwards.
To close the Notification panel
Drag the bottom of the Notifica tion pane l up w ar ds.
To open a running application from the Notification panel
From the Notification panel, touch the icon for the running application to open it.
8
the Notification panel and get more
Page 9
Key pad:
key
pad.
urn on/off
the speaker.
Mute your voice
so that the other party
cannot hear you.
To place a call on
hold.
Toolkits
In the toolkits you can quickly start the common applications such as Bluetooth, Wi-Fi and so on.
• Open the toolkits panel by touching
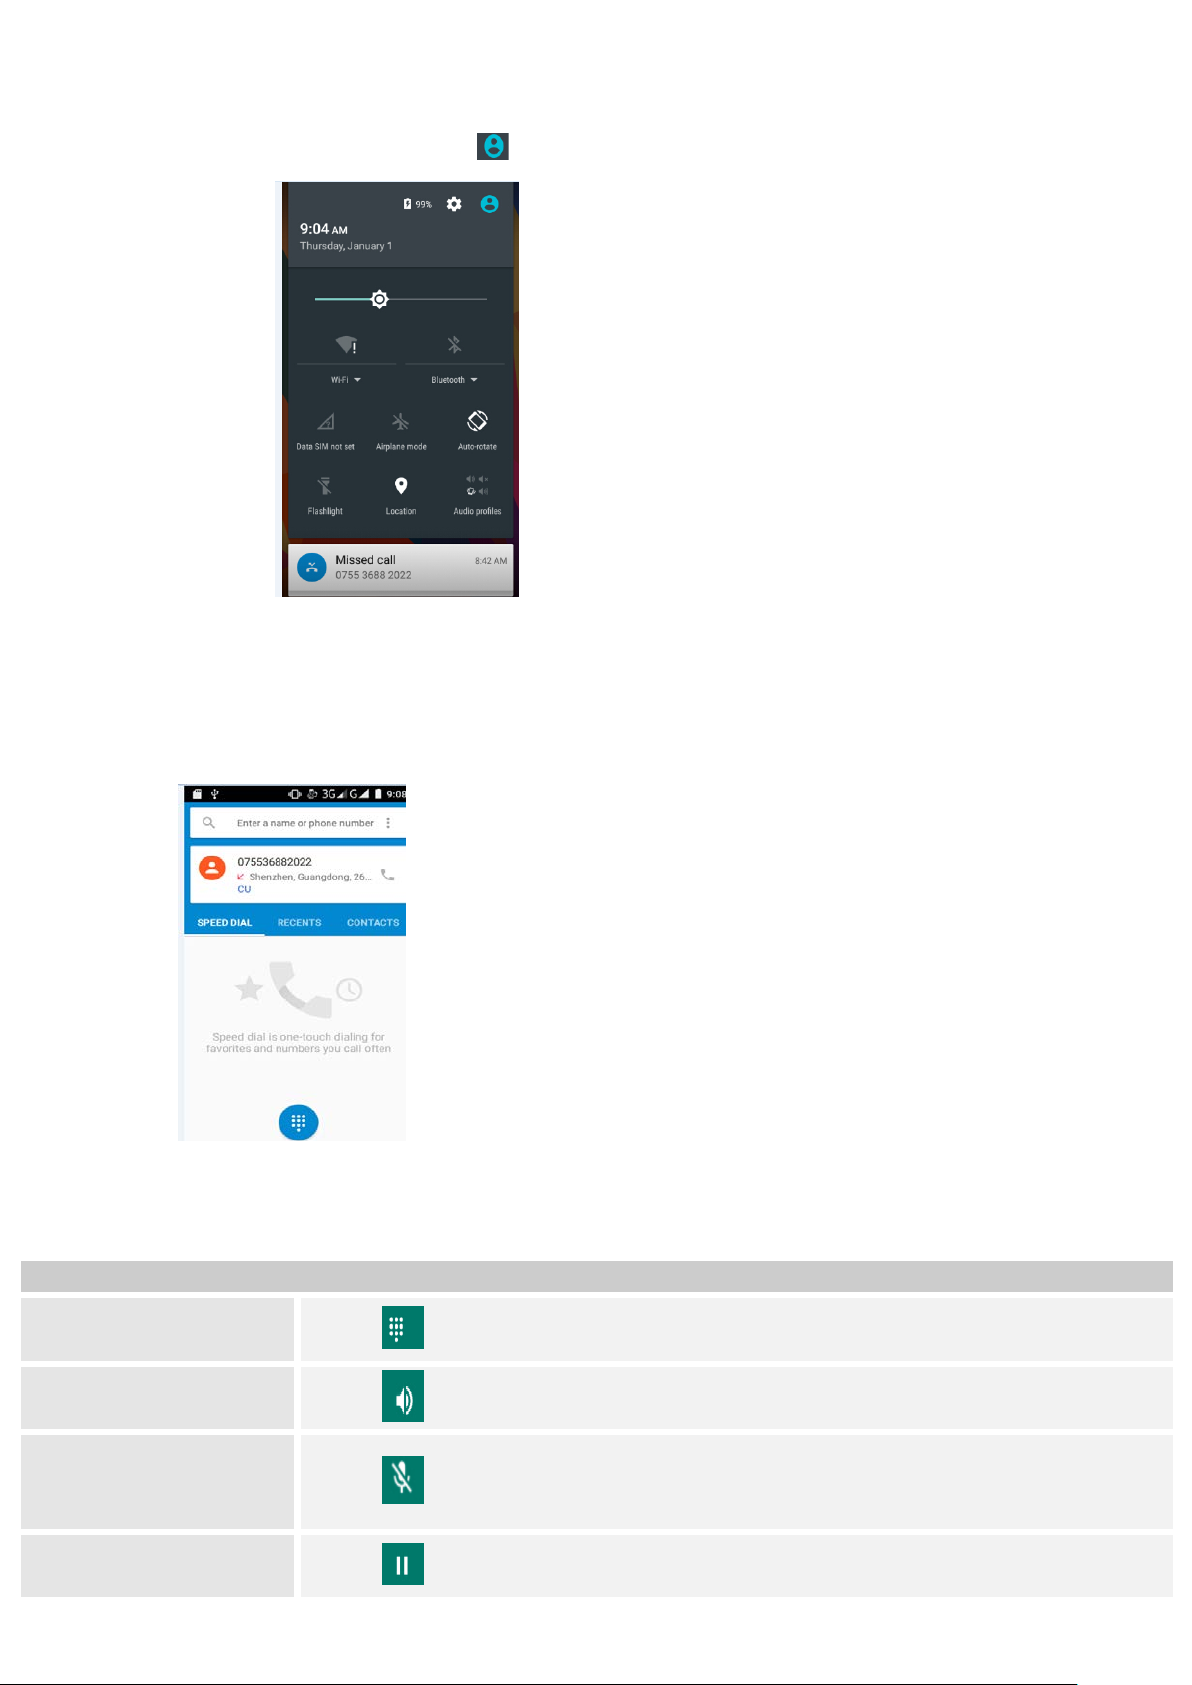
Dial pad
Make a call
Touch Phone icon on the Home screen.
In dialing screen, input number an d touch dial icon to dial the inputted number.
Options available duri n g a call
During a call, there are some call options available to you. These call option s ca n be seen on ly duri ng a call .
When a call is in progress, you can put it on hold, initiate a phone conference, mute your microphone etc.
To
Go to the
Speaker: To t
Mute:
Hold:
Touch
Touch
Touch
Touch
9
Page 10

Add call: Open dial pad
Touch this icon to select
phonebook.
Text
field
Send message
Touch to capitalize the
to dial the second call.
Touch
End: To end a cal l.
Touch
Press Volume keys to adjust the call volume.
Text entry
On-screen keyboard
T ouch the keys of the on-screen QWER TY keyboard to enter text conveniently . Y ou can open this keyboard by
touching a text f ie ld .
Android keyboard input method
desired contact from
next letter you type.
Enter text
• Touch the keys on the keyboard to type.
• Use the Delete key
to erase characters to the left of the cursor.
• When you finished typing, Press Back key to close the keyboard.
Enter Various Characters
• Touch the Symbols key
• Touch
on the symbols keyboard to view additional symbols.
to switch to the numbers and symbols keyboard.
Edit Text
You can edi t the te xt yo u enter i n text fi elds and use menu co mman ds to cut, cop y, an d paste text, wi thin o r
across applicatio ns. Some applications do not suppo rt editing so me or all of the text they di splay. Others may
offer their own way to select text you want to work with .
• Touch and hold the text fiel d tha t co ntains the text to sel e ct t he wo rd.
• Cut or copy the text.
Select Text
You can select text for cutting or copying. The selected text is highlighted in blue.
• Touch and hold the portion that contains text. Some options open with icons.
• Move the cursor to select the text.
10
Page 11

Copy
Select all
Cut
Cut /Copy/Paste Text
1. Touch Cut icon or Copy icon in the menu that opens.
2. Touch and hold the t e xt fie ld where you wa n t to pa s te the te xt .
3. Touch PASTE in the menu that opens. The text is inserted at the cursor.
Y o u ca n pa ste the te xt that you copie d from one application into a text field in any application.
Communication
it’s good to talk, te xt or email. . .
Messaging
Find it: Application menu > Messaging
Y ou can compose, send and receiv e text message s from your phone, and also can compose, se nd and receive
multimedia messages, which contain media files such as pictures, videos and audios.
When you view y our me ssages, they appear a s conve rsations, w hich mea ns that all me ssages to and from a
particular person are gro upe d to ge ther.
• Compose new message
1. From your Home screen, touch Messaging icon or find it: Application menu > Messaging.
2. Touch
.
3. To add recipient(s), touch
, then find a nd mark the co ntac t na me . To add more th an o ne co ntac t, mark
the contact name for the desired recipients. Y ou can also enter the recipient’s phone number manually.
4. After you finish marking contact(s), touch OK.
5. Touch Type message to enter your message text.
6. If you want to insert a media file, touch
7. Touch
, to send the message.
, and select an attachment.
When editing message, press Menu key, some additional options will be
11
Page 12

available to you. For example, add subject. You can touch the options to do actions.
Favor it es tab
Contacts tab
Touch a contact
to view its deta ils
Touch a contact
menu
Touch to search
Touch to add new
• Delete message threads
1. From your Home screen, touch Messaging icon or find it: Application menu > Messaging.
2. Touch and hold the message thread.
3. Select the conversations you want to delete.
4. Touch
, then touch Delete in the menu that pops up.
You can also press Menu key and touch Delete all threads to dele te all message threa ds from the window .
• Forward a message
1. From your Home screen, touch Messaging icon or find it: Application menu > Messaging.
2. Touch the conversation containing the message you want to forward.
3. Touch and hold the message you want to forward.
4. Touch Forward in the menu that opens.
5. Add recipient(s), to uch
, then find a nd mark the contact n ame. To add more th an one con tact, ma rk the
contact name for the desired recipients. You can al so e nter the recipient’s phone number manually.
6. Touch
, to send the message.
• Lock a message
You can lock a message.
1. From your Home screen, touch Messaging icon or find it: Application menu > Messaging.
2. Touch the conversation containing the message you want to lock.
3. Touch and hold the message you want to lock.
4. Touch Lock in the menu that opens. A lock icon appears. Unlock a message by touching and holding the
message and t he n to u ch Unlock.
• Messaging settings
1. From your Home screen, touch Messaging icon or find it: Application menu > Messaging.
2. Press Menu key, select Settings in the menu that opens.
3. You can cha nge me ssage s setti ngs, su ch as delete o ld me ssage s as li mits a re rea ched, reques t a del ivery
report for each message you send.
People
Find it: Application menu > People
The People application offers you to store and manage all your contacts.
• People screen overview
thumbnail to access
the quick contact
contact
• Add a contact
1. From your Home screen, touch People icon or find it: Application menu > People.
12
Page 13

2. Touch .
3. Select storage path to which you want to add this new contact.
4. Enter the information for the contact.
5. After you finish, touch DONE.
• Search a contact
1. From your Home screen, touch People icon or find it: Application menu > People.
2. Touch
.
3. Input the fi rst c har acter of t he na me yo u a re sea rching for i n the curso r, and then all record s mee ting t he
conditions will be displayed. Search results will be different due to different input content.
• Additional options
From contacts list screen, press Menu key, some additional options will be available to you. For example,
import/export, and share visible contacts.
• Delete contact: You can mark much more th an one contact, and then delete these marked contacts.
• Contacts to display: To select what sort of contacts to display in the contacts list.
• Import/export: Copy contacts to which you want import.
• Accounts: Yo u ca n s y nc h ro ni ze yo u r p ho ne c ontacts with a synch r o ni zati on account.
• Settings: Change the settings involved display options.
• Share visible contacts: You can share contacts via Bluetooth, Email, and so on.
To assign a contact to a group
1. From your Home screen, touch People icon or find it: Application menu > People.
2. Touch Groups tab.
3. Touch a group to which you want to assign contacts.
4. Press Menu key, touch Edit in the menu that opens.
5. T ouch Type person’s name to input the contact’s na me, then the corresponding contact entry will pop up,
select the desired contact entry.
6. After you finish editing, touch DONE.
• Favorites
You can set contacts as favorites so that you can get access to them from the People application.
To set a cont a ct as favorite
1. From your Home screen, touch People icon or find it: Application menu > People.
2. From contacts list, touch a contact which you want to set as favorite.
3. Touch
. If you want to cancel the favorite, touch .
Phone
Find it: Application menu > Phone
• Call log
Find it: Application menu > Phone > Call log tab
Touch different tabs such as All, Received, Dialed, and Missed call s on upside sc reen of Call log interface, and
then you can view different call logs.
Find it: Application menu > Email
The Email application in your phone offers you to compose, send and receive emails through your regular
email account.
You need create account first, and then create email to send. You can configure Email for most accounts in
just a few steps.
13
Page 14

• Set up an email account in your phone
1. From your Home screen, touch Launcher icon, then find it: Application menu > Email.
2. Enter your email addre s s an d pas sword, then touch Next.
3. If the settings fo r the email acco unt cannot be downloaded auto matically, com plete the setup manually. If
necessary, contact your email service provider for detailed settings.
4. When you are prompted, enter a name for your email account, so that it is easil y id entifia bl e. The same
name shows in the emails you send from this account.
5. After you fini sh, touch Next.
• Create and send an email
1. From your Home screen, touch Launcher icon, then find it: Application menu > Email.
2. Touch
.
3. Enter recipients’ addresses, and subject.
4. Compose e mail . P ress Menu key, you can attach a fi le , se l e ct t he type of a t ta ch ment, and sele ct the file
which you want to attach from the list that appears.
5. If you want to add Cc/Bcc, pres s Menu key, then to u ch Ad d Cc /B cc.
6. When you finish, touch
to send the email.
• Receive emails
1. From your Home screen, touch Launcher icon, then find it: Application menu > Email.
2. Touch
to refresh, you can downlo a d n ew emails.
• Read your emails
1. From your Home screen, touch Launcher icon, then find it: Application menu > Email.
2. In the email inbox, scroll up or down, and touch the email you want to read.
• Reply to an email
1. From your Home screen, touch Launcher icon, then find it: Application men u > Email.
2. In the email inbox, scroll up or down, and touch the email to which you want to reply.
3. Touch
4. Enter your reply, touch
to reply or press Menu key, to select Reply all.
to send the email.
• Forward an email
1. From your Home screen, touch Launcher icon, then find it: Application menu > Email.
2. In the email inbox, scroll up or down, and touch the email you want to forward.
3. Press Menu key, to select Forward.
4. Enter recipients’ addresses.
5. Touch
to send the email.
• View all folders
1. From your Home screen, touch Launcher icon, then find it: Application menu > Email.
2. Touch
at the bottom of the email inbox.
Multimedia
listen it, watch it, capture it, enjoy it!
Camera
Find it: Application menu > Camera
Take a photo or record a video with the camera in your phone. You can hold the camera horizontally or
vertically. Share a photo or a video with your friends, or upload your photos and videos to a web service.
14
Page 15

• Camera control overview
1
Preview your pictures or videos you captured
3
Record a video
5
Switch between fro n t c amera and back camera
6
Shooting mo de
8
Photo mode and panorama mode
1 8 2 3 5
6
7
4
2 Take a photo
4 Settings
7 Sime mode
• Take a photo
• Adjust your picture size, color effect, and other settings if you wish.
• Frame yo ur subje ct on screen. You can zoom i n or ou t by pl acing two fin gers on the touch s creen a nd
pinching them together to zoom out or spreading them apart to zoom in.
• Touch the shutter icon on the screen.
The picture you just took is displayed for a moment, and then is displayed as a thumbnail.
• Shoot a video
• Adjust the video quali t y, color effect, and other settings if you wish.
• Point the lens to the scene you want to shoot
• Touch the camcorder icon to start.
• Touch the camcorder icon again to stop shooting.
Music
Find it: Application menu > Music
The phone comes with a Music player that plays songs, listen to audi o book and podc asts you ha ve sto red. It
15
Page 16

gives you a host of setting options to make your listening experience interesting.
Artists:
Songs classified by singers
Songs:
Display all songs
Playlists:
Display playlists
Artists,Albums,Sons or Playlists.
You can easily transfer your favorite music from your PC to the SD card and experience a whole world of
interesting and melodious music.
When you copy music to your SD card, the Music pl ayer searc hes the card fo r music files and bui lds a catalog
of your music, based on information about each file that is stored in the file itself.
• Music libra ry
Categories Touch to select
The Music library offers the following multiple categories that you can select.
Categories
Albums: Songs classified by albums
If you touch and hold an artist, a song, or an albu m, some options will be available to you. For exam ple: play,
add to playlist, delete, e tc.
16
Page 17

Play/Pause
Touch /
Touch /
Rewind/Forward
Touch and hold /
Volume adjust
Press Volume keys
Touch
to repeat all
songs; touch
again to repeat
current song.
Settings controls
Now playing
Song details
Total song time
Progress bar
1 2 3 5 4 6 7 8 9
• Music player
Music controls
Y
ou can return to the music library scr een from music player screen in the Music applications by pressing
Menu key and touch Library.
Music and settings controls
Press Menu key, some additional options such as
Party shuffle, Add to playlist, and Library will be
available to you.
Previous/Next
FM radio
Find it: Application menu > FM radio
The phone come s wit h an in-built FM Radio. You can
Now playing
Touch
listen to FM radio statio ns, an d ad d the m to cha n nel
list. You have to plug in an earphone, as the antenna
Shuffle
Touch
of the FM radio. You can listen to the radio either
through an earphone, or through the speaker in the
Repeat:
Touch
phone.
17
Page 18

1
Channel list
2 record FM
3
Earphone or Speaker
5
To fine-tune the FM frequency
6
To fine-tune the FM frequency
8
To search for the next effective frequency
1
To start recording
2
Recording files list
4
To stop recording
Share via
Delete
Touch
4
3
4 Save or remove a channel as a favorite
7 To search for the previous effective frequency
9 Play or Pause
Gallery
Find it: Application menu > Gallery
The Gallery offers you to view photos and play videos which are downloaded as well as those taken by the
phone camera.
From Gallery, you can also share your photos and videos with your friends, via Messaging, Bluetooth, or
Email.
1. Touch an album to open it and view its contents.
2. Touch a picture or a video in an album to view it.
To
When viewing a picture, press Menu key, some
additional options will be available to you, such as
various ways
Touch
slideshow, edit, rotate left, rotate right, crop, set
picture as, and details.
• Share an Album
1. From your Home screen, touch Launcher icon, then find it: Application menu > Gallery.
2. Press Menu key, touch Select album in the menu that opens.
3. Select the albums you want to share.
4. Touch
.
5. In the menu that ope ns, touch the appli cation to use to sha re the selected albu ms. Yo u can share via Email,
Bluetooth, and Mess ag i ng.
Sound recorder
Find it: Applicati on men u > Sound recorder
Record sound and play sound file
.
1
2
5
3 To pause recording
18
Page 19

5
Review and play recorded file
Tools
stay on top of things
Calendar
Find it: Application menu > Calendar
Your phone has a calendar for managing your time schedule. You can use the calendar to keep track of
important events. After entering the calendar function menu, you can select year, month and date.
• To set the calendar view
1. From your Home screen, touch Launcher icon, then find it: Application menu > Calendar.
2. Touch
.
3. Select day, week, or month in the menu that opens.
• To add a calendar e ve nt
1. From your Home screen, touch Launcher icon, then find it: Application menu > Calendar.
2. Touch Menu key, then touch New event in the menu that opens.
3. Enter the name, location, time, and description for the event.
4. Select a reminder for the event.
5. After you finish, touch DONE.
Clock
Find it: Application menu > Clock
The clock allows you to view time and date. Yo u can also add an alarm, se t the alarm and turn it on. Then, the
alarm can ring at a specific time you set.
• Add an alarm
1. From your Home screen, touch Launcher icon, then find it: Application menu > Clock.
2. Touch
3. Touch
.
.
4. You need set time, ringtone, repeat, and vibrate. Then, turn it on.
Then the alarm can ring at a specific time you set.
Calculator
Find it: Application menu > Calculator
Keep your calculations on your finger tips with the calculator. Using this application allows you to make
calculations. The calculator prov ides the basic ari thmetic functions; addition, subtracti on, multiplication, and
division. Y o u can al so use an advanced panel.
• How to use the calculator
1. From your Home screen, touch Launcher icon or find it: Application menu > Calculator.
2. Enter the first number using the numeric keys.
3. Enter the oper a tion for your calcul ation by touching t he Plus, Minus, Multiplication, or Division key.
4. Enter the nex t nu m be r.
5. To view the result, touch the “=” (equals) key.
Press Menu key, you can open advanced panel to do calculation.
Touch
Touch and hold
, you can only erase one numeric before the cursor.
, you can erase all numeric before the cursor.
19
Page 20

Browser
Cancel the download
Enter a search word
View the download
progress of the
Use your web brow ser to view a nd naviga te web page s, add page s as bookma rks, and s ave pages f or offline
reading. You can open several windows at the same time and switch among them easily.
• Open the web browser
From your Ho me sc re e n, touch Browser icon or find it: Application menu > Browser.
• Search and address bar
of the current web
page
• Manage bookmarks
Bookmarks let you access your favorite and frequently visited web pages quickly. You can add bookmarks
directly from your phone browser.
To bookmar k a web page
1. When you are viewing the web page, press Menu key.
2. Touch Save to bookmarks.
3. If desired, you can edit the bookmark.
4. When you’re done, touch OK.
Connect to Networks and Devices
Your phone can connect to a variety of networks and devices, including Wi-Fi, Bluetooth, devices such as
headsets. You can also transfer files to/from your PC through the data cable.
Determine the Network You Are Using
1. Touch Launcher icon, and from Application menu, touch Settings.
2. Touch More... > Mobile networks > Access point names. The name of the wireless service provider
you are currently registered with is selected in the list.
Edit or Create New Access Points
If you and your wireless service provider determine that you need to change the settings of your current
access point name (AP N) or to cre ate a ne w o ne, yo u mu st obt ai n the APN and detailed settings from your
provider.
1. Touch Launcher icon, and from Application menu, touch Settings.
2. Touch More... > Mobile networks > Access point names.
3. T ouch an e xistin g APN to e dit it, o r press Menu key and touch New APN. Enter the AP N settings th at you
obtained from your wireless service provider.
4. When you finished, press Menu key and then Save.
5. If you created a new APN, touch it in the APNs screen to start using it.
Wi-Fi Networks
Wi-Fi is a wireless networking technology that can provide i nternet ac cess at distance of up to 20 meters. To
use Wi-Fi on your phone, y ou access a wirele ss acce ss poin t, or “ho tspot”. So me hot spots ar e open a nd you
can simply conne ct to the m. Other s are hid den or i mpleme nt othe r secu rity feat ures, so you m ust co nfig ure
your phone so it can connect to them.
TIP: Turn off Wi-Fi when you are not using it, to extend the life of your battery.
• Connect to Wi-Fi Network
1. Touch Launcher icon, and from Application menu, touch Settings.
to search for a web
page, or enter a web
page address to load
a web page
current web page
20
Page 21

2. Touch Wi-Fi.
3. Check Wi-Fi to turn it on. The phone scan s for av ailable Wi-Fi netw orks and display s the names of those it
finds. Secured networks are indicated with a Lock icon.
4. Touch a network to connect to it
If the network is secured, you are prompted to enter a password or other credentials (Ask your network
administrator for details)
• Receive Notifications
By default, when Wi-Fi is on, you receive notifications in the status bar when your phone detects an open
Wi-Fi network.
1. Turn on Wi-Fi, if it’s not alre ady on.
2. In the Wi-Fi list screen, press Menu key to open Advanced options, che ck Ne t wo rk no tification. You ca n
uncheck this op ti o n to sto p rece i v in g no ti fi c at io ns .
Bluetooth
Bluetooth is a short-range wireless communications technology that devices can use to ex change infor mation
over a distance of about 10 meters.
• Turn Bluetooth On/Off
1. Touch Launcher icon, and from Application menu, touch Settings.
2. Touch Bluetooth.
3. Check or uncheck Bluetooth to turn it on or off.
• Pair With Bluetooth Devices
You must pai r your phone wi th a device be fore you can co nnect to it. Once you pair yo ur phone with a device,
they stay paired unles s you unp air the m.
1. Touch Launcher icon, and from Application menu, touch Settings.
2. Touch Bluetooth.
3. If Bluetooth is not turned on, check Bluetooth to turn it on. Your phone scans for and displays the IDs of
all available Bluetooth devices in range.
4. If the device you want to pair with is not in the list, touch SEARCH FOR DEVICES.
5. Touch the ID of the desired device in the list to pair it.
Connect to a computer via USB
You can connect your phone to a computer with a USB cable to transfer music, pictures, and other files
between your p ho ne ’ s S D card and the computer.
You can no t share your pho ne’s data co nnection an d SD card via U SB cable at the s ame time. If you a re using
USB tethering, you must turn that off first.
The connection to USB interfaces has to be limited to USB 2.0 version or higher. The connection to so called
power USB is prohibited.
Working with Secure Certificates
If your or ganizatio n’s VPN o r Wi-Fi Network rel ies on secure ce rtificates, yo u must ob tain the cer tificates an d
store them in your pho ne’s se cure cre dential stor age, be fore you c an co nfigure access to those VPN or Wi-Fi
networks on your phone.
If your network admini strate instru cts you to downlo ad the certifica tes from a website , you are prom pted to
set a password for the credential storage when you download the certificates.
Install Secure Certificate from SD Card
1. Copy the certificate from your comp uter to the root of the SD ca r d.
2. Touch Launcher icon, and from Application menu, touch Settings.
3. Touch Security.
4. Touch Install from SD card.
5. Touch the file name of the certificate to install. Only the names of certificates that you have not already
21
Page 22

installed on your phone are displayed.
Wi-Fi
Turn Bluetoot h on or o ff, search for availabl e Bluetoo th devices, and ma ke your pho ne
visible or invisible to other Bluetooth devices.
management
ata traffic o n or off, and kee p track of y our dat a usage details ove r a
specified period of time.
Turn Airplane mode on or off, and configure settings for VPN and mobile networks,
Fi hotspot, o r
, select to switch orientation when you rotate your
phone, and configure other screen settings.
Configure how your phone rings, vibrates, or alerts you in other ways when you
receive communications, etc.
data
with the synchronization accounts that you add.
Language &
Scheduled power
6. If prompted, enter the certificate’s password.
7. From Wi-Fi list, search and select the certificate.
Settings
the settings for various features of the phone
Get to know the settings in your phone so that you can personalize them to your own requirements. Go to
Settings to co nfi gure h ow y o ur p ho ne lo ok s, so unds, co m muni ca tion , p riv acy, a nd o pe ratio ns in a v ari e ty o f
ways:
Turn Wi-Fi on or off, scan av ail abl e W i-Fi networks, or add the Wi-Fi netw ork.
Bluetooth
SIM
Data usage
More...
Display
Audio profiles
Storage Let you check out available space on your
Battery Check battery status a nd ba ttery level.
Apps Manage and remove installed applications.
Location acces s Enable or disable GPS satellites, an d so on.
Security Protect your phone by setting up different locks and passwords.
Set preferences on how you use SIMs inserted in your phone.
Turn the mobile d
enable your phone to s hare its mobile data co nnectio n as a portable Withrough USB te thering or Bl uetooth tet hering, and share Windows PC internet vi a USB
cable.
Let you set the screen brightness
Accounts
input
Backup & reset Manage your personal data and reset your phone .
Data & time Let you choose preferences such as format and time zone.
on & off
Accessibility Enable your installed a cce s sibi lit y services and adjust related set tin gs.
About phone View information about your phone, such as status, and legal information.
Let you add, and manage supported accounts. Enable your phone synchronize
Let you select the language for the text on your phone and for configuring the onscreen
keyboard.
Schedule automatic powering on/off of the ph one .
Accessing Password
The cell phone and SIM card use several accessing passwords. These passwords help to prevent the cell
phone from being embezzled.
You can use the function options in the security settings of settings menu to change accessing password
22
Page 23

(except for PUK and PUK2).
danger.
Safe transportation should be considered first when driving.
PIN Code
PIN code (P e rsonal I de ntifi catio n N umbe r) ca n prev e nt t he SIM c ard from bein g e mbez zled . The PIN code is
provided alon g wit h th e SIM c ard. If the PIN c ode c hecking is activated, it is necessary to inpu t the PI N code
when the cell phone powers on every time.
If a wrong PIN code ha s been i nput for 3 times str aig ht, it is needed to input the PUK co de, the n input a ne w
PIN code and input it again for confirmation.
PIN2 Code
Some SIM cards ma y p rovide PI N2 co de, while PIN2 code needs to be used in some functions like Call Cost.
These functions can be used only if the SIM card supports them.
If a wrong PIN2 code has been inp ut for 3 time s straight, it is neede d to input the PUK2 co de, then inpu t a new
PIN2 code and input it again fo r confirmation.
PUK Code
PUK code (P ersonal Unl ock K ey) is u sed to cha nge locke d PIN code . PUK code i s provi ded along with the SIM
card. If not provided, please contact your local service provider for PUK code.
If wrong PUK code has been input for 10 times straight, the SIM card can not be used any more. Please
contact your service provider for a new SIM card.
PUK code can not be changed. If the PUK code is lost, please contact your service provider.
PUK2 Code
PUK2 code is provided along with some SIM cards for changing locked PIN2 code.
If wrong PUK2 code has been inp ut fo r 10 tim es str ai ght, the SI M card c an not be use d an y more. Pl ease
contact your service provider for a new SIM card.
The PUK2 code can not be changed. If it is lost, please contact your service provider.
Precautions
Please carefully read and observe the terms below:
Safe power on
Do not use your mobile phone where it is forbidden to use or you might cause a disturbance or
Safe transportation first
Please observe all relate d local la ws a nd reg ul a tion s.
Do not use your mobile phone while driving.
Disturbance
All mobile phone performances might be disturbed.
Turn off when in the hospital
Please follow related limitati ons.
Please switch your mobile phone off when near a medical instrument.
Turn off on an airplane
Please follow related limitati ons.
Do not use your mobile phone on an airplane.
23
Page 24

Turn off when at a gasoline stati on
Only use the authorized accessories and batteries and do not connect to incompatible
Please read the user manual of the device to get more detailed security instructions before
Check if battery is appropriately charged.
ry and move to a location with strong signal and try
verage of service
for further information;
Display information
ck is activated, you have to input
Do not use your mobile phone at a filling station or around fuels or chemicals.
Turn off around exposure Area
Please observe related limitations and do not use your mobile phone near an area where
explosions can occur.
Proper use
As described in this manual, your mobile phone can be used only in the correct location.
If possible, please do not touch the antenna area of your phone.
Use qualified after sales service
Only a qualified te chnician can i nstall or repair your mobile p hone. Please contact the authorized
service center in case of phone failure.
Accessories and batteries
manufact urers or produc ts.
Waterproof
Your mobile phone is not waterproof. Please keep it away from water.
Backup
Remembe r to make a backup o r keep a writte n record of all importa nt informatio n sav ed in y our
mobile phone.
Connect to other devices
connecting to other devices and do not connect to an incompatible product.
SOS emergency calls
Make sure your mobile phone is switched on and in a service area. In idle mode, input the SOS
number, then press the Dial Ke y. Advise wher e y ou are and do not hang up wi thou t permi s sion.
Frequently Asked Questions and Troubleshooting
Frequently
Asked Questions
Cause and Solution
Press the power on key for over 1 second.
Fail to turn on
Check if the battery is properly connected. Please remove and install it again,
retry to turn it on;
Weak signal. Please t
connecting to the network again;
Fail to connect network
Please ensure that you are not beyond the network co
providers;
Please ensure yo u hav e a v ali d S IM card . Pl ease con tact y ou r ne two rk p ro vide r
Check if the SIM card is installed correctly
while turning on
Handset lock password. If the handset lo
handset password .
24
Page 25

SIM card. You need to input the PUK code provided by your network provider.
Poor quali ty of calli ng
While using the mobile phone in the peak period of communication, like
Standby duration
work. While the
not receive the
signal, the handset will continuously search for a base station. This will
significantly reduce battery charge. It is recommended that you turn off your
Need replacing the bat te ry. Please change a new ba ttery.
Please check if the fixed dial function is set.
shortened
SIM Card Error
Fail to dial out
Input PIN: Inputtin g P IN w hil e turning on e ach time is activated, you have to
input the PIN code.
Input PUK code: When you’ve input wrong PIN code for 3 times will lock the
Please check if the sound volume is tuned improperly
In an area with poo r re ceivi ng con ditio n, exa mple: base me nt, the sign al mi ght
be weak. Try searching a loca tion wit h strong er signal rece ption and call agai n.
commute time, you may be unable to call because of line congestion.
The standby duration is relative to the system setting of net
mobile phone is in an area with poor signal strength and can
mobile in area with no signal reception to save battery.
Dirt on the metal surface of an SIM ca rd. Use clean cloth to wi pe the metal touch
point on an SIM card.
The SIM card is not installed.
The SIM card is damaged. Please contact your network service provider.
Please check if you press the dial key after dialing.
Please check if calling is forbidden because of defaulting.
Please check if the SIM is valid.
Please check if the call barring is set.
Callers can not contact
you
Please check if the mobile phone is on and connected with the network.
Please check if the Call barring or call divert is activated.
Please check if the SIM card is valid.
Poor contact. Please check if the plug is connected well.
Fail to ch ar ge
Please confirm if the environment temperature is within the range of 0ºC ~40ºC
while charging.
The battery or charger is damaged. You need to replace it.
Fail to set some
functions
Wrong operation.
The network provide r does no t support the function , or you have no t applied f or
it.
Note: If the instruction above can not help you solve problems, please record,
Mobile phone model and serial number,
Specific content of warranty,
Clear statement of problems,
Then contact your local dealer or the authorized servi ce center in your area.
Safety Information and Notices
Using the Mobile Phone and Charger
Danger:
Only use authorized battery and charger. Using other brands may cause battery leakage, overheating,
explosion or even fire.
Caution:
Keep the phone awa y from d ust, w ater an d damp a reas. D ust, wa ter or o ther li quids ma y cause o verhe ating,
electrical leakage , an d /or phone failure.
The phone, battery, charger and AC adapter are not waterproof . Keep them away from rain and liquid.
Warning:
25
Page 26

Do not bump, shake or tamper with the phone or charger. This may cause battery leakage, overheating,
explosion or even fire.
Do not place the batte ry , phone or charger near a mi crowave or high-vo ltage device. This may cause battery
leakage, overheating, explosion or even fire; also prevent the phone and AC adapter from overheating,
smoking or short circuiting.
Do not use the phone aroun d vo la til e oil. Thi s ma y cause fire, breakdow n or dam age.
T o avoid an y damage or breakdo wn, do not disas semble t he phone, batte ry, charger or internal co mponents
by yourself.
Location:
The socket-outlet shall be inst all ed ne a r the e qui pme nt and s hall be e asil y accessible.
Using the Mobile Phone
Warning:
Please confirm if the environment temperature is within the range of 0ºC ~40ºC while charging.
Do not use the phone while you a re driving. P ull over an d stop you r automobile to dial or li sten to a p hone call.
Usage of mobile phones in aircrafts or hospitals is prohibited. Switch the phone off to prevent interference
with electronic medi cal device s . Follow any rule s or regul a tio ns i n su ch pla ces.
Do not use the pho ne at a gas st ati o n , ne a r fue l or near chemicals.
Do not use the phone near electron ic medical devices such as hearing aids, pacemakers and auto-control
devices such as fire detectors and automatic doors.
If you have to use y our mobile phone near an e lectronic me dical devi ce such a s a pace maker, please contact
your manufacturer or dealer for information about preventing interference.
Caution:
Electron ic systems in automobil es such as anti-lock brakes, speed control, or fuel spraying systems, are
usually not influenced by wireless devic es. Manufacturers of these systems will tell you whether they are
provided with good screening functions. If you suspect that an automobile failure is caused by a wireless
wave, please contact your automobile dealer.
Avoid using your phone in crowded places.
Do not store your mobile phone near or wit h a cre dit ca rd, disk or oth er magnetic mate rials. This ma y effect
informatio n sto red on your phone .
Keep your phone away from pins. Pins can be absorbed by the phone’s receiver magnet, which may cause
harm.
If you intend not to use your mobile phone for a long period of time, please remove the battery from th e
phone. Leaving the battery inside the mobile phone for a long period of time may cause moisture to the
battery, and it can damage the mobile phone or the battery.
Using the Battery
Danger:
Do not dispose of the battery into a fire. Doing so may cause battery explosion or even fire.
If you have difficulties installing the battery, do not force the installation. This may cause battery leakage,
overheating, explosion or even fire.
Keep me tal objects awa y so they do not come in contact with the battery or i ts connectors as it ma y cause the
battery to short circuit, overheat or explode.
Do not weld the polarities of the battery directly together. This may cause battery leakage, overheating,
explosion or even fire.
Battery liqui d is severely ha rmful for your ey es. If battery liquid ge ts in your eyes, do not rub them. Instead,
wash your eyes with water first and then go directly to a doctor for help.
Do not use or store your phone in high temperature areas. This may cause battery leakage, overheat ing,
explosion or even fire.
Warning:
Replace the battery when the normal usage time begins to decrease or if you notice the battery is overheated
26
Page 27

or has changed shape or color.
If battery liquid leaks onto your skin or clothes, immediately w as h t he affe cte d pa rt s with w ater.
If the battery begins to leak or emits a strange odor, properly dispose of the battery according to local
regulations. Do not throw it into a fire.
Caution:
Do not leav e the p rodu ct or i ts ba ttery insi de a v ehi cle. This may damage the product, ov erheat the b attery,
or pose a risk to the vehicle.
Warnings on Batt ery:
(a) Please use appointed battery in ca se of ex plosi on risk.
(b) Please dispose of lifele ss bat tery under guidance.
Using the Charger
Danger:
Only use the cha rger that came wit h the phone. Usi ng a different c harger may cau se the phone to breakdown
or explode.
If the charger short circuits, a fire may occur.
Do not use a damaged, worn or broken charger. This may cause a fire.
Clean dust away fro m the po wer socket to avoid the possibility of a fire.
Do not store the charger near any liquids. If liquids spill onto the charger it may cause it to overheat or
breakdown.
If liquid does spill onto the charger, immediately unplug the power cable to prevent overheating, fire or
another type of breakdown.
Do not use the charger in places with high humidity like a bathroom. This may cause a fire or other
breakdown.
Do not touch the charger, power cable or socket with wet hands. This may cause an electric shock.
Requirements for Mobile Phone
Avoid usi ng yo ur mobile phone in extremely high or low temperatures.
It is recommended that you do not use your mobile phone near a telephone, TV set, radio or other radio
frequency sensitive devices.
Requirements for the Battery
When not in use , store the battery i n a coo l, well-ve nti l ate d pl ac e with sunshine.
If you will not be using the mobile phone for an extended period of time, charge the battery on a regular basis
to avoid battery bre akdown.
The phone battery wears out fast. If charging the battery does not improve its performance, it is time to
replace the batte ry. Properly dispose of the battery according to local reg ulations. Do not thro w it into a fire.
Caution: Ri sk of e xplo sion if batte ry is replac ed by an i ncorrect ty pe. Di spose o f use d bat teries accor ding to
the instructions.
Requirements for the Charger and AC Adapter
Please confirm if the environment temperature is within the range of 0ºC ~40ºC while chargin g.
Cleaning and Mainte nance
The mobile phone, the battery and the charger are not waterproof. Do not use them in places with high
humidity like a bathroom and also avoid spilling any liquids on them.
Use a soft cloth to clean the mobile phone, the battery and the charger.
Do not use alcohol, diluted liquid or benzene to clean the mobile phone.
If dust gets in the sockets the phone can be damaged, short-circuit or even the lose the ability to be
re-charged. Be sure to clean the socket regularly.
27
Page 28

FFCCCC RReegguullaattiioonnss
This device complies with part 15 of the FCC Rules. Operation is subject to the following two conditions: (1) This device may not
cause harmful interference, and (2) this device must accept any interference received, including interference that may cause
undesired operation.
This device has been tested and found to comply with the limits for a Class B digital device, pursuant to Part 15 of the FCC Rules.
These limits are designed to provide reasonable protection against harmful interference in a residential installation. This equipment
generates, uses, and can radiate radio frequency energy, and, if not installed and used in accordance with the instructions, may cause
harmful interference to radio communications. However, there is no guarantee that interference will not occur in a particular
installation If this equipment does cause harmful interference to radio or television reception, which can be determined by turning
the equipment off and on, the user is encouraged to try to correct the interference by one or more of the following measures:
Reorient or relocate the receiving antenna.
Increase the separation between the equipment and receiver.
Connect the equipment into an outlet on a circuit different from that to which the receiver is connected.
Consult the dealer or an experienced radio/TV technician for help.
CC Caution:
F
Any Changes or modifications not expressly approved by the party responsible for compliance could void the user‘s authority to
operate the equipment.
The antenna(s) used for this transmitter must not be co-located or operating in conjunction with any other antenna or
transmitter.
The country code selection is for non-US model only and is not available to all US model. Per FCC regulation, all WiFi product
marketed in US must fixed to US operation channels only.
RF Exposure Information (SAR)
This device meets the government’s requirements for exposure to radio waves.
This device is designed and manufactured not to exceed the emission limits for exposure to radio frequency (RF) energy set by the
Federal Communications Commission of the U.S. Government.
The exposure standard for wireless device employs a unit of measurement known as the Specific Absorption Rate, or SAR. The SAR
*
limit set by the FCC is 1.6W/kg.
Tests for SAR are conducted using standard operating positions accepted by the FCC with the device
transmitting at its highest certified power level in all tested frequency bands. Although the SAR is determined at the highest
certified power level, the actual SAR level of the device while operating can be well below the maximum value. This is because the
device is designed to operate at multiple power levels so as to use only the poser required to reach the network. In general, the
closer you are to a wireless base station antenna, the lower the power output.
The highest SAR value for the model device as reported to the FCC when tested for use at the ear is 0.36 W/kg and when worn on the
body, as described in this user guide, is 0.43 W/kg (Body-worn measurements differ among device models, depending upon available
accessories and FCC requirements.)
28
Page 29

While there may be differences between the SAR levels of various devices and at various positions, they all meet the government
requirement.
The FCC has granted an Equipment Authorization for this model device with all reported SAR levels evaluated as in compliance with
the FCC RF exposure guidelines. SAR information on this model device is on file with the FCC and can be found under the Display
Grant section of www.fcc.gov/oet/ea/fccid
after searching on FCC ID: ZC4X120C.
For body worn operation, this device has been tested and meets the FCC RF exposure guidelines for use with an accessory that
contains no metal and be positioned a minimum of 10mm from the body. Use of other accessories may not ensure compliance with
FCC RF exposure guidelines. If you do not use a body-worn accessory and are not holding the device at the ear, position the handset
a minimum of 10mm from your body when the device is switched on.
29
 Loading...