

Page 1

Ilium W250
User Manual
1
Page 2

Get Started ....................................................................... 3
Insert SIM card ........................................................... 3
Insert Memory card .................................................... 3
Charge the Battery or Connect to a Computer ............... 4
Keys and Parts ................................................................... 5
Lock and Unlock the Screen ............................................... 6
Make it yours .................................................................... 7
Add more icons to Home Screen ........................................ 8
Adding icons to home screen ....................................... 8
Rearranging or removing icons on your Home screen..... 8
Enter Application screen.................................................... 9
Open and Switch Applications ...................................... 9
Switch to Recently Used Application ........................... 10
Make a Call ..................................................................... 11
Call Log ........................................................................... 12
Reject a Call by Sending a Busy Message .......................... 13
Add a Contact ................................................................. 14
Send and Receive Message(s) .......................................... 15
Browse the Web .............................................................. 18
Download Applications From Store .................................. 20
Maintenance & Safety ..................................................... 21
bluetooth ........................................................................ 22
Content
2
Page 3
SIM Card
Get Started
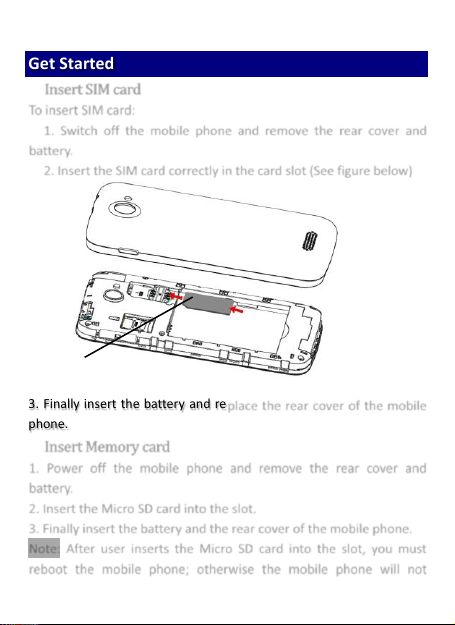
Insert SIM card
To insert SIM card:
1. Switch off the mobile phone and remove the rear cover and
battery.
2. Insert the SIM card correctly in the card slot (See figure below)
3. Finally insert the battery and replace the rear cover of the mobile
phone.
Insert Memory card
1. Power off the mobile phone and remove the rear cover and
battery.
2. Insert the Micro SD card into the slot.
3. Finally insert the battery and the rear cover of the mobile phone.
Note: After user inserts the Micro SD card into the slot, you must
reboot the mobile phone; otherwise the mobile phone will not
3
Page 4
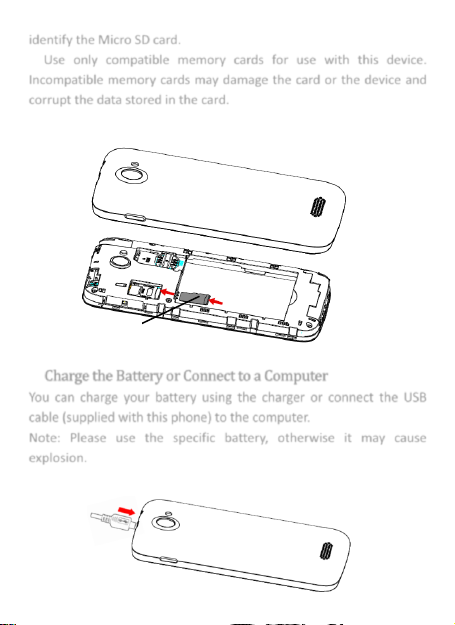
identify the Micro SD card.
Micro SD card
Use only compatible memory cards for use with this device.
Incompatible memory cards may damage the card or the device and
corrupt the data stored in the card.
Charge the Battery or Connect to a Computer
You can charge your battery using the charger or connect the USB
cable (supplied with this phone) to the computer.
Note: Please use the specific battery, otherwise it may cause
explosion.
4
Page 5
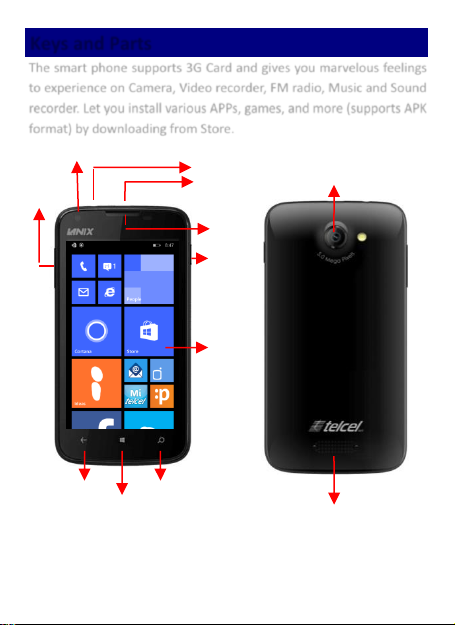
Keys and Parts
Front camera
Headset port
USB jack
Back
Windows key
Search
Volume
Up/down
Camera Lens
Speaker
LCD
Receiver
Power
The smart phone supports 3G Card and gives you marvelous feelings
to experience on Camera, Video recorder, FM radio, Music and Sound
recorder. Let you install various APPs, games, and more (supports APK
format) by downloading from Store.
5
Page 6
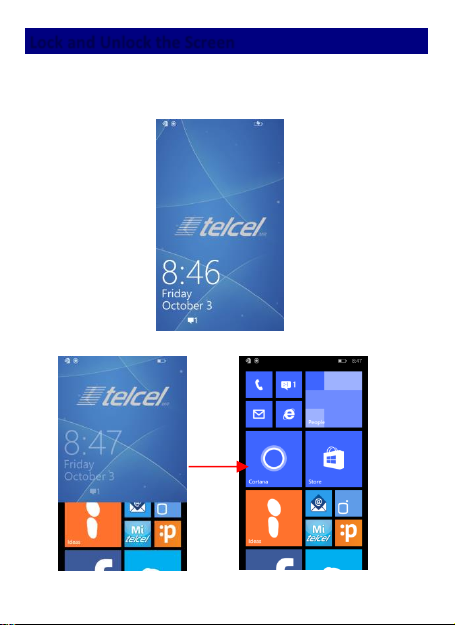
Lock and Unlock the Screen
Press power button to enter Sleep mode and meanwhile the screen
will be locked; press power button again to wake up and then from
down to up sliding screen.
6
Page 7
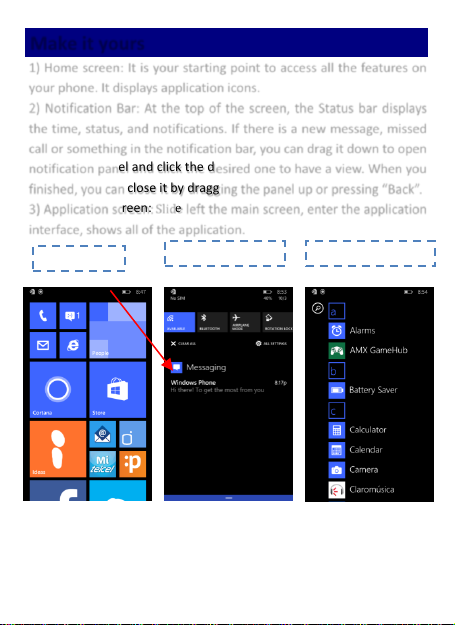
Make it yours
Notification Bar
Home screen
Application screen
1) Home screen: It is your starting point to access all the features on
your phone. It displays application icons.
2) Notification Bar: At the top of the screen, the Status bar displays
the time, status, and notifications. If there is a new message, missed
call or something in the notification bar, you can drag it down to open
notification panel and click the desired one to have a view. When you
finished, you can close it by dragging the panel up or pressing “Back”.
3) Application screen: Slide left the main screen, enter the application
interface, shows all of the application.
7
Page 8
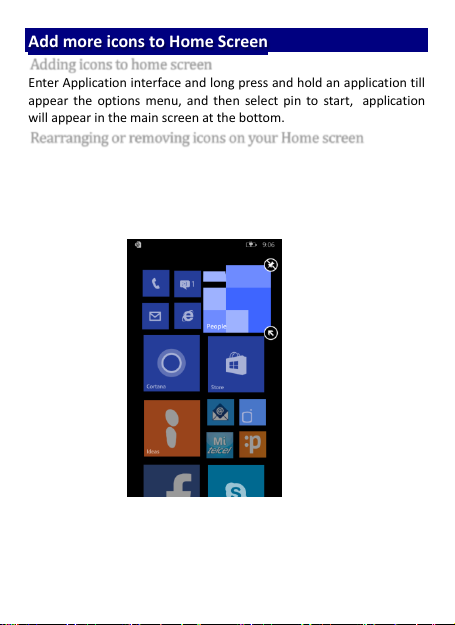
Add more icons to Home Screen
Adding icons to home screen
Enter Application interface and long press and hold an application till
appear the options menu, and then select pin to start, application
will appear in the main screen at the bottom.
Rearranging or removing icons on your Home screen
a). Long press and hold the icon you want to move. Until the icon
bigger. Drag the icon to a new location on the screen. b). Press and
hold on an icon till the icon bigger, then click on the upper right
corner of the icon, the application will removed.
8
Page 9
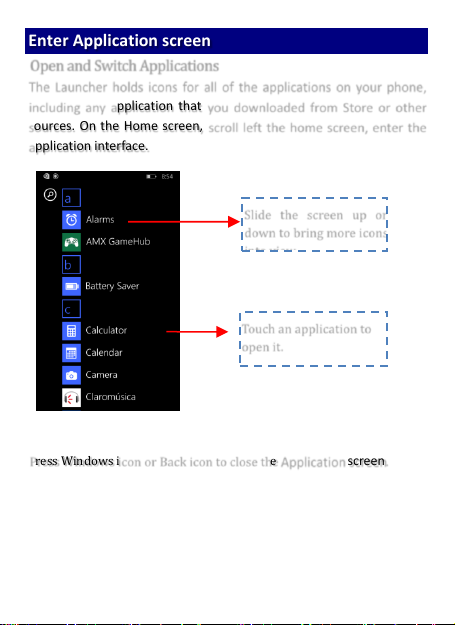
Enter Application screen
Touch an application to
open it.
Slide the screen up or
down to bring more icons
Open and Switch Applications
The Launcher holds icons for all of the applications on your phone,
including any application that you downloaded from Store or other
sources. On the Home screen, scroll left the home screen, enter the
application interface.
Press Windows icon or Back icon to close the Application screen.
9
Page 10
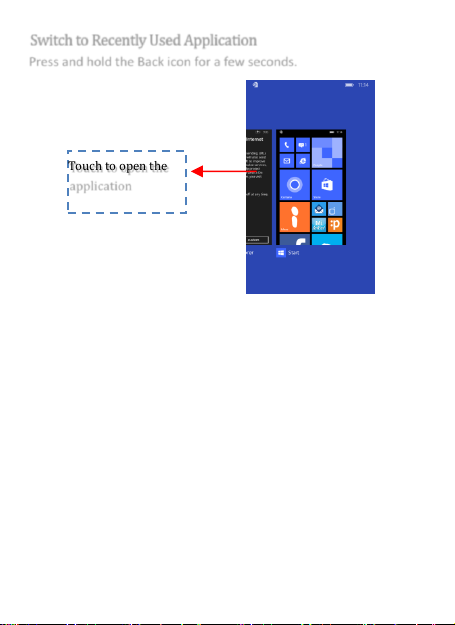
Switch to Recently Used Application
Touch to open the
application
Press and hold the Back icon for a few seconds.
10
Page 11

Make a Call
Slide the screen to right
Click the icon
Make a call
On the start screen choose Phone icon and enter a complete phone
number to make a call.
11
Page 12

Call Log
Short press this place.
Touch the number to
Dial out.
Short press this place to
add the new Contact.
In call log options, you can Make a call, add new contact and send
message etc.
12
Page 13

Reject a Call by Sending a Busy Message
While there is an incoming call, you are inconvenient to accept the
call, and then you can send a busy message for rejecting the call.
Click text reply, some busy messages will show on the screen, short
tap any of them to send out.
13
Page 14

Add a Contact
Select storage
location.
Tap People and then add a contact (see figure below.)
Tap “ ” to add a new contact to Phone or SIM card.
14
Page 15

Send and Receive Message(s)
Tap this to select
desired contact from
phonebook.
Click on the switch
digital keyboard.
Click on the add
attachments.
Enter Messaging, and then compose new message. You touch a text field
where you want to enter text, to open the keyboard.
a. When you are composing a new text message, you can select
text for cutting or copying. The selected text is highlighted in blue.
15
Page 16

Touch the text field or portion that contains text. (see the
Tap this to copy.
Tap this to paste.
below figure)
You can select all contexts, copy and paste.
b. When a new message comes, you can read by dragging
notification panel and click the message, or entering Message to read it
directly.
16
Page 17

11.. LLoonngg pprreessss oonnee ooff tthhee aallll mmeessssaaggee tthhrreeaadd,, yyoouu ccaann ddeelleettee tthhee mmeessssaaggee
tthhrreeaadd..
22.. TToouucchh aanndd hhoolldd aa mmeessssaaggee iinn aa mmeessssaaggee ccoonnvveerrssaattiioonn wwiinnddooww..
3. Touch Forward in the menu that opens.
4. Add a contact.
5. Touch Send icon to send the message.
17
Page 18

Browse the Web
Touch it to
switch on or
off WiFi or
Data
connection
a. Set up Internet/Data connection
Enter Settings > Cellular + SIM > SIM settings, scroll down to find out
edit internet APN, and then enter “Access Points Names, choose the
desired WAP account.
b. Switch on Data connection or WiFi
18
Page 19

To browse the web, you need switch on Data connection.
If there is WiFi around, you can switch on WiFi to use it browse the web.
Some may need password.
19
Page 20

Download Applications From Store
a. Add a Microsoft account
b. Enter Store and download apps.
20
Page 21

Maintenance & Safety
Please read and observe the following information for safe and proper
use of your phone and to prevent damage. Also, keep the user guide in
an accessible place at all the times after reading it.
1. After sales service
Kindly refer to the Warranty Card provided in the sales package box.
2. Charger and Adapter Safety
Charger and adapter are designed for indoor use only.
3. Battery Information and Care
o Please use the specific battery, otherwise it will cause explosion.
o Please dispose of your battery properly.
o Do not disassemble or short-circuit the battery.
o Keep the battery’s metal contacts clean.
o Recharge the battery after long periods of non-use to maximize
battery life.
o Battery life will vary due to usage patterns and environmental
conditions.
o The self-protection function of the battery cuts the power of the
phone when its operation is in an abnormal status. In this case, remove
the battery from the phone, reinsert it, and turn the phone on.
4. General Notice
Using a damaged battery or placing a battery in your mouth may cause
serious injury.
o Do not place items containing magnetic components such as a
credit card, phone card, bank book, or subway ticket near your phone.
The magnetism of the phone may damage the data stored in the
magnetic strip.
21
Page 22

o Talking on your phone for long period of time may reduce call
quality due to heat generated during use.
o When the phone is not used for a long period time, store it in a
safe place with the power cord unplugged.
o Using the phone in proximity to receiving equipment (i.e. TV or
Radio) may cause interference to the phone.
o Do not immerse your phone in water. If this happens, remove
the battery and take it to an Authorized Service Center.
o Do not paint your phone.
o The data saved in your phone might be deleted due to careless
use, repair of the phone, or upgrade of the software. Please backup your
important phone numbers. (Ring tones, text messages, voice messages,
picture, and videos could also be deleted.) The manufacturer is not
liable for damage due to the loss of data.
o Do not turn your phone on or off when the phone is close to
your ear.
Warning: Company will not bear any responsibility for any
incompliance with the above guidelines or improper use of the mobile
phone. Our company keeps the right to make modifications to any of
the content here in this user guide without public announcement in
advance. The content of this manual may vary from the actual content
displayed in the device. In such case, the latter shall govern.
22
Page 23

Bluetooth
1. Set the Bluetooth on. First select the “settings”,then select the
“bluetooth”,and then select the “on”.
23
Page 24

2. Select the pair phone you need.When the note change to
“connected”,the two phone have become a pair.
3. transmit
For an example,I transmit a photo ,I select the photo I need,and then
touch the “share” button.
24
Page 25

.
4. In the “share”, select the “Bluetooth”
25
Page 26

5. Choose the Bluetooth device
6. the photo transmit to meitu phone,and the meitu phone will
receive a message,
26
Page 27

7. when the photo transmit succeed,the note change to “ransfer
complete”.
27
Page 28

8. receive
I use the meitu phone transmit a photo to W6108-AOE phone,
the AOE phone receive a message.
28
Page 29

9. I select the “accept”,the meitu phone will transfer,and the AOE
phone will receive.When the AOE phone’s note is change to
“done and saved,tap to view”,it is succeed,you can press this note
to see the photo or go to the “photos” to see it .
29
Page 30

30 31
Page 31

FCC Regulations:
This mobile phone complies with part 15 of the FCC Rules. Operation
is subject to the following two conditions: (1) This device may not
cause harmful interference, and (2) this device must accept any
interference received, including interference that may cause
undesired operation.
This mobile phone has been tested and found to comply with the
limits for a Class B digital device, pursuant to Part 15 of the FCC
Rules. These limits are designed to provide reasonable protection
against harmful interference in a residential installation. This
equipment generates, uses and can radiated radio frequency energy
and, if not installed and used in accordance with the instructions,
may cause harmful interference to radio communications. However,
there is no guarantee that interference will not occur in a particular
installation If this equipment does cause harmful interference to
radio or television reception, which can be determined by turning
the equipment off and on, the user is encouraged to try to correct the
interference by one or more of the following measures:
-Reorient or relocate the receiving antenna.
-Increase the separation between the equipment and receiver.
-Connect the equipment into an outlet on a circuit different from that
to which the receiver is connected.
-Consult the dealer or an experienced radio/TV technician for help.
FCC Note:
Caution: Changes or modifications not expressly approved by the
party responsible for compliance could void the user‘s authority to
operate the equipment.
Page 32

RF Exposure Information (SAR)
This phone is designed and manufactured not to exceed the emission
limits for exposure to radio frequency (RF) energy set by the Federal
Communications Commission of the United States.
During SAR testing, this device was set to transmit at its highest
certified power level in all tested frequency bands, and placed in
positions that simulate RF exposure in usage against the head with
no separation, and near the body with the separation of 10 mm.
Although the SAR is determined at the highest certified power level,
the actual SAR level of the device while operating can be well below
the maximum value. This is because the phone is designed to
operate at multiple power levels so as to use only the power required
to reach the network. In general, the closer you are to a wireless
base station antenna, the lower the power output.
The exposure standard for wireless devices employing a unit of
measurement is known as the Specific Absorption Rate, or SAR.
The SAR limit set by the FCC is 1.6W/kg.
This device is complied with SAR for general population
/uncontrolled exposure limits in ANSI/IEEE C95.1-1992 and had
been tested in accordance with the measurement methods and
procedures specified in IEEE1528. This device has been tested and
meets the FCC RF exposure guidelines when tested with the device
directly contacted to the body.
The FCC has granted an Equipment Authorization for this model
phone with all reported SAR levels evaluated as in compliance with
the FCC RF exposure guidelines. SAR information on this model
32
Page 33

phone is on file with the FCC and can be found under the Display
Grant section of www.fcc.gov/oet/ea/fccid after searching on FCC ID:
ZC4W250.
For this device, the highest reported SAR value for usage against the
head is 1.13 W/kg, for usage near the body is 1.08 W/kg.
While there may be differences between the SAR levels of various
phones and at various positions, they all meet the government
requirements.
SAR compliance for body-worn operation is based on a separation
distance of 10 mm between the unit and the human body. Carry this
device at least 10 mm away from your body to ensure RF exposure
level compliant or lower to the reported level. To support body-worn
operation, choose the belt clips or holsters, which do not contain
metallic components, to maintain a separation of 10 mm between
this device and your body.
RF exposure compliance with any body-worn accessory, which
contains metal, was not tested and certified, and use such body-worn
accessory should be avoided.
33
 Loading...