

Page 1
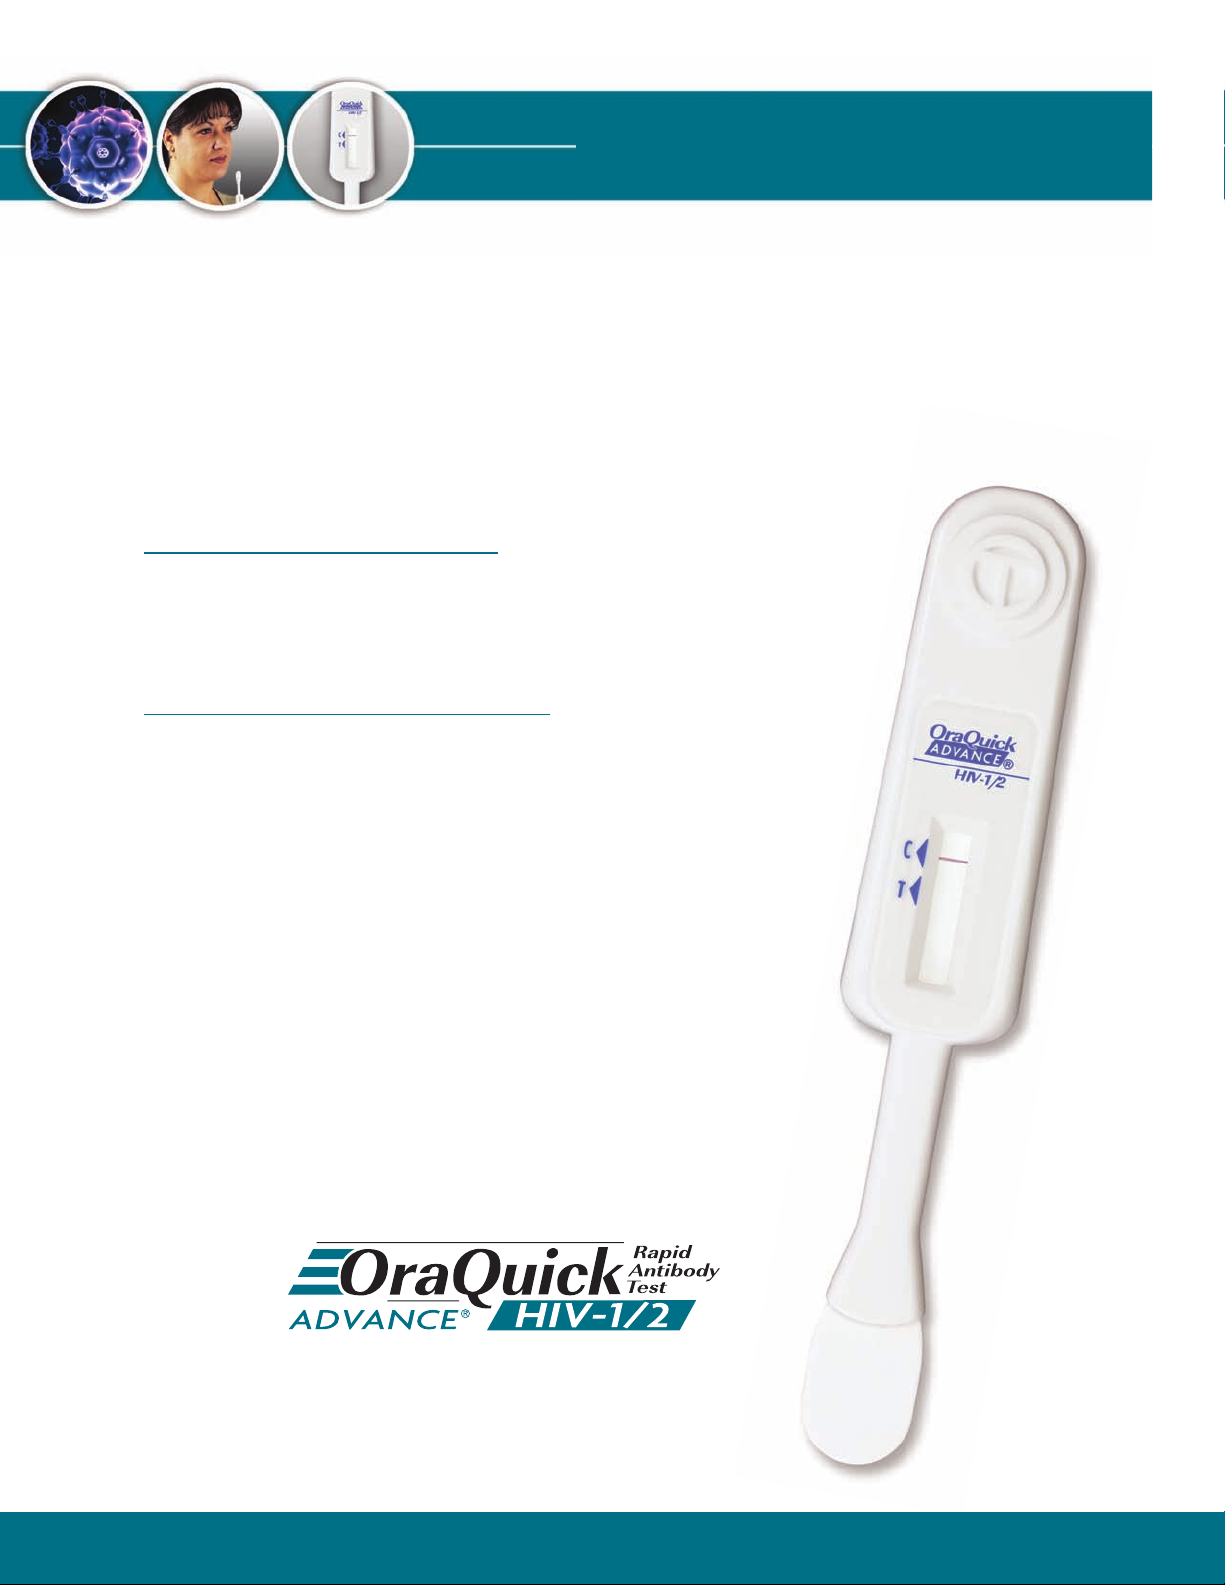
Linking People to Care
Step-by-Step Instructions for
®
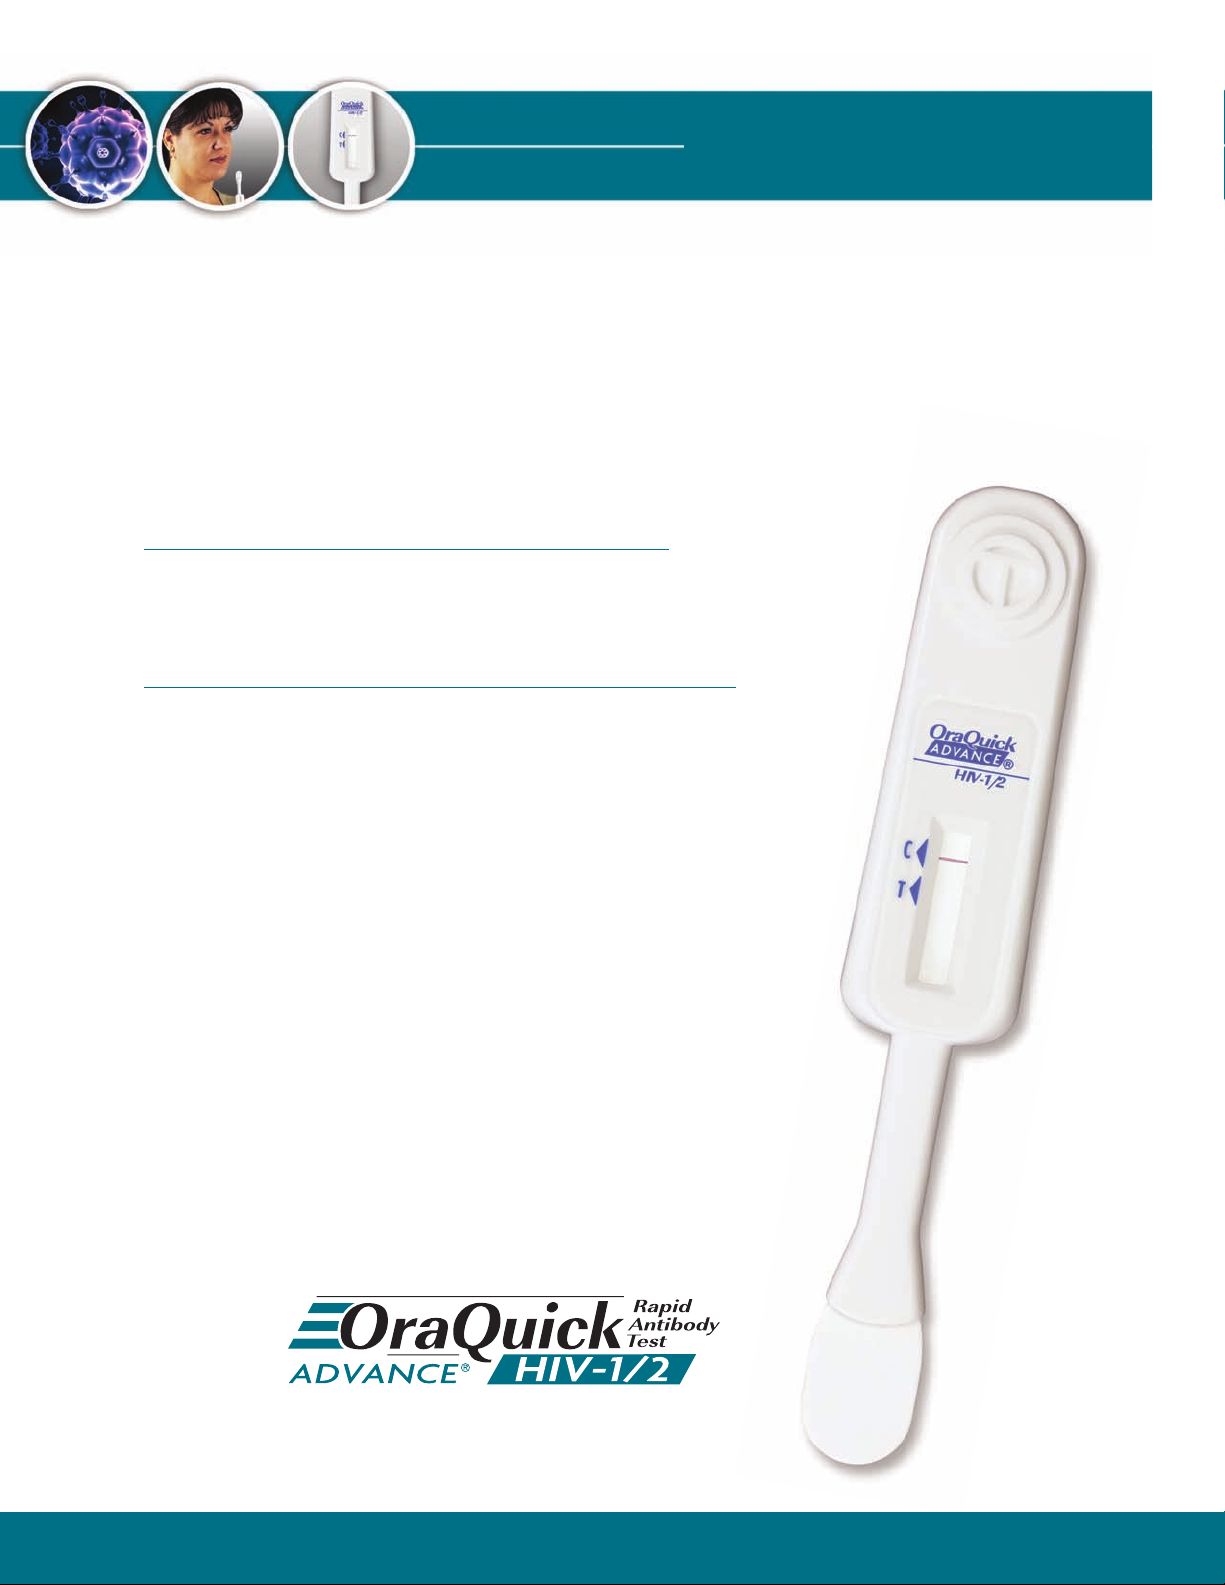
OraQuick ADVANCE
Complexity: WAIVED for Oral Fluid,
Fingerstick Whole Blood, and
Venipuncture Whole Blood
HIV Rapid HIV-1/2 Antibody Test
The Rapid HIV-1/2 Antibody Test
Complexity: MODERATE
• These instructions are only a Reference Guide.
For complete information, refer to the OraQuick
ADVANCE®Rapid HIV-1/2 Antibody Test Package Insert.
• Read these instructions completely before using the
product. Follow the instructions carefully when
performing testing. Not doing so may result in
inaccurate test results.
• Before performing testing, all operators MUST read
and become familiar with “ Universal Precautions for
Prevention of Transmission of Human Immunodeficiency
Virus, Hepatitis B Virus , and other Blood-borne
Pathogens in Health-Care Settings.”
for Plasma
1,2
Simple – Accurate – Versatile
Page 2
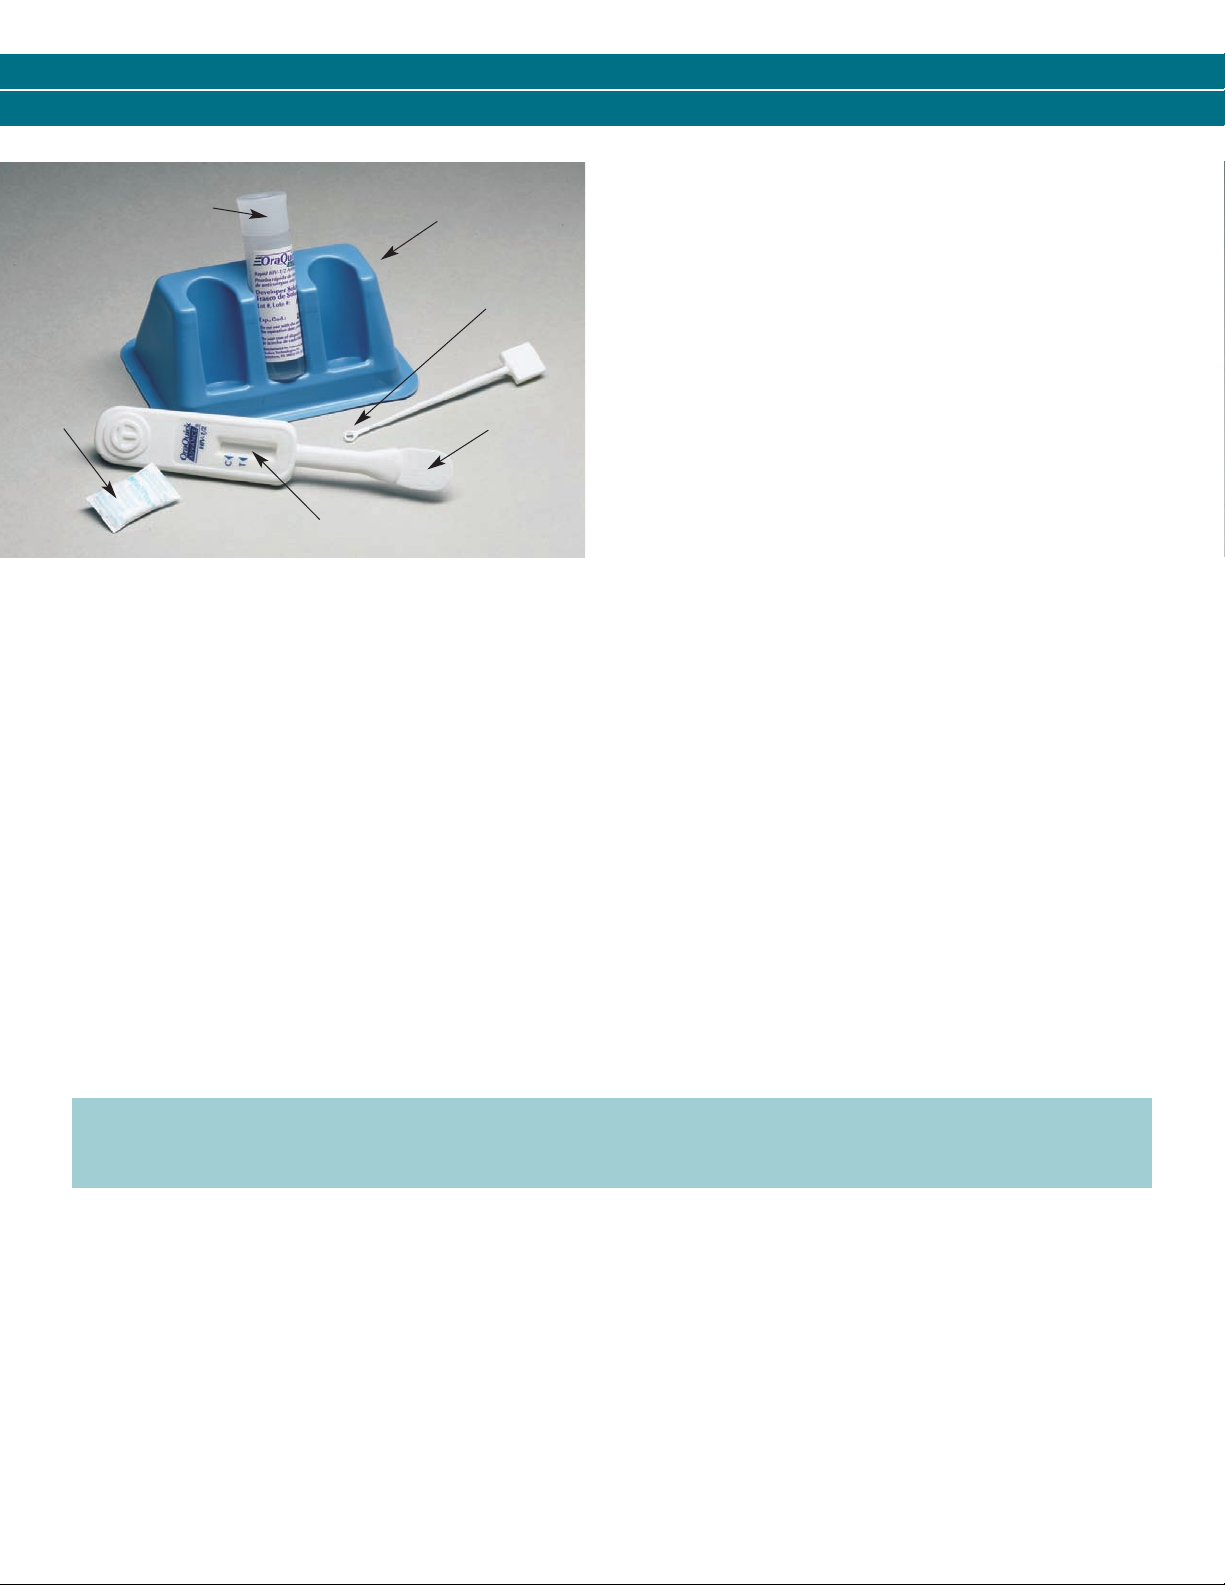
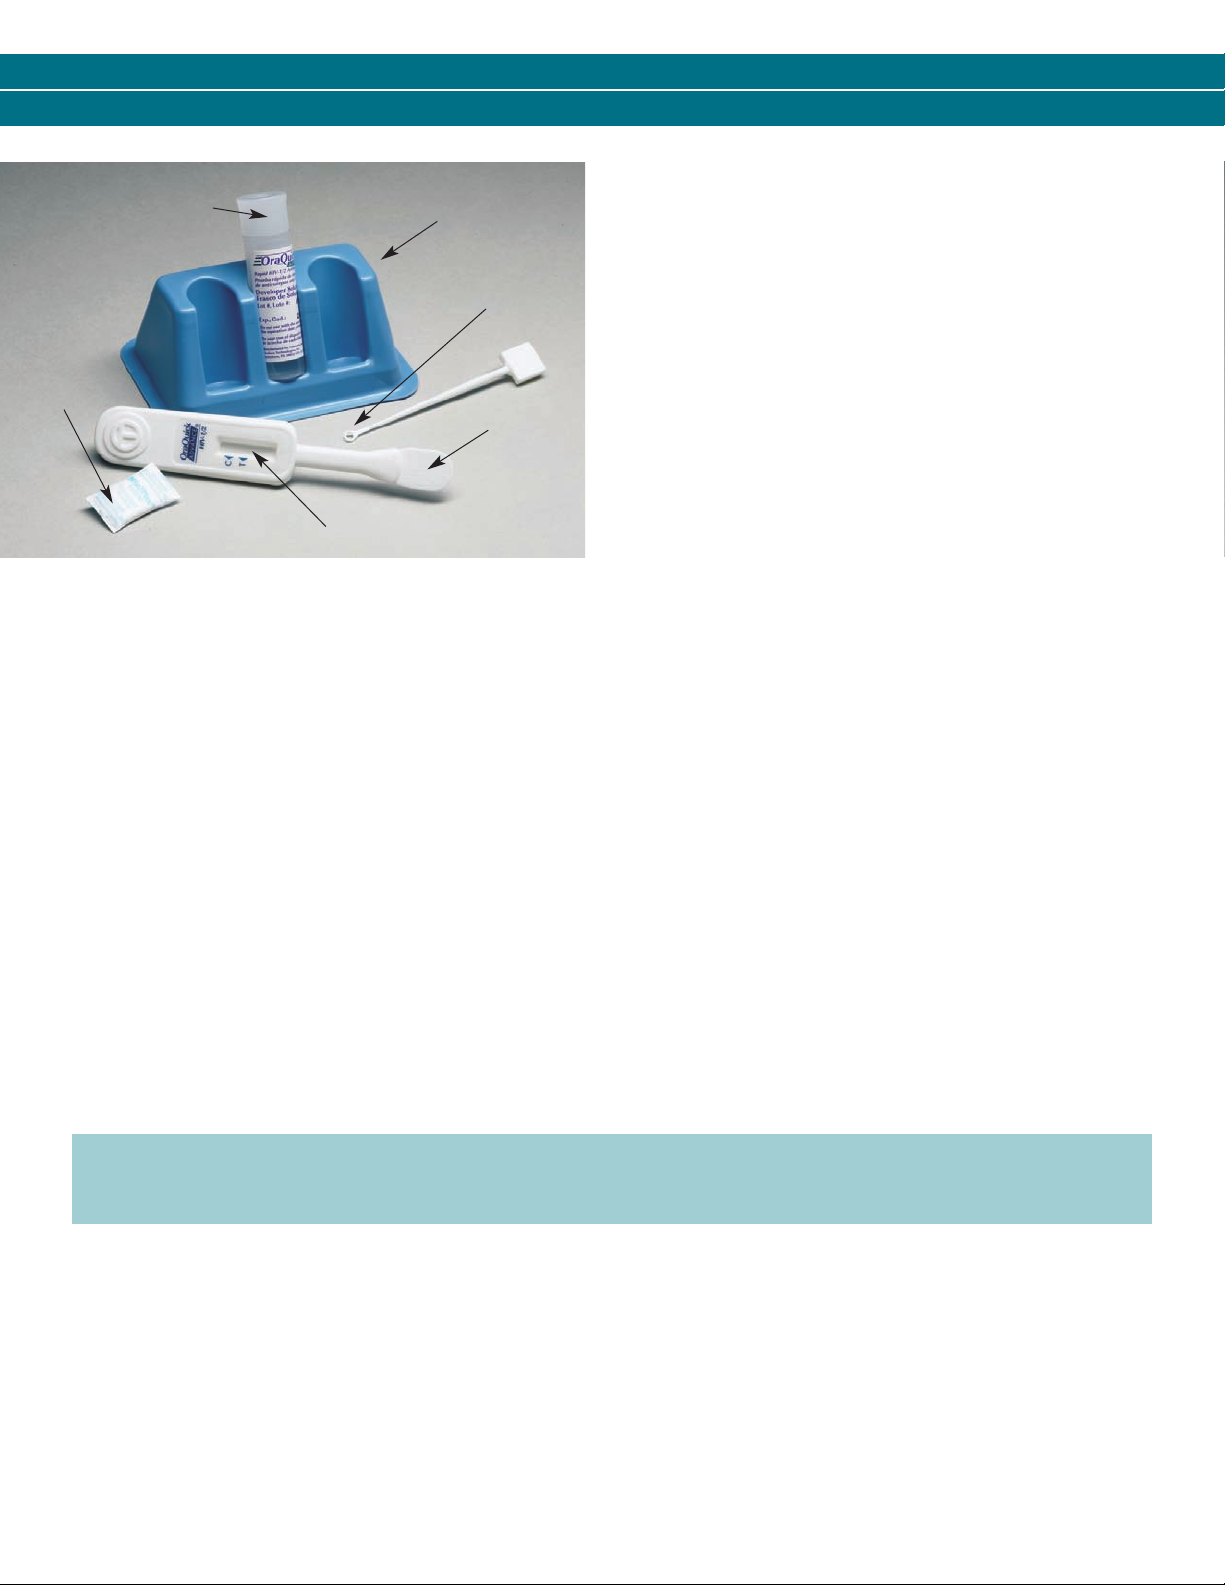
Absorbent
Packet
Developer
Solution Vial
Reusable
Test Stand
Specimen Collection
Loop
Flat
Pad
INTENDED USE:
The OraQuick ADVANCE®Rapid HIV-1/2 Antibody Test is a singleuse, qualitative, immunoassay to detect antibodies to Human
Immunodeficiency Virus Type 1 (HIV-1) and Type 2 (HIV-2) in oral
fluid, fingerstick whole blood, venipuncture whole blood, and
plasma specimens.
For In Vitro Diagnostic Use
This is a restricted device. Sales, distribution and
use restrictions apply. See customer letter and
package insert.
Te st
Device
Result
Window
THE FOLLOWING ITEMS ARE NEEDED TO DO THE TEST:
The OraQuick ADVANCE®Rapid HIV-1/2
Antibody Test Consists of a Divided Pouch
Containing the Following:
• Test Device (including an absorbent packet)
• Developer Solution Vial (containing 1 mL)
NOTE: The pouch is divided into two chambers.
One chamber holds the T
chamber holds the Developer Solution Vial.
est Device while the other
Materials Provided in the Master Shipping Carton:
• Reusable Test Stand
• Subject Information Pamphlet
• Customer Letter
• Specimen Collection Loop (5 microliter)
• Package Insert
Materials Required But Not Provided:
• Timer or watch capable of timing 20 to 40 minutes
• Clean, disposable, absorbent workspace cover
• Biohazard waste container
Additional Items Required for Fingerstick and
Venipuncture Whole Blood Collection, and
Plasma Specimens:
• Antiseptic wipe
• Sterile lancet to obtain a fingerstick whole blood specimen, or
materials required to obtain a venipuncture whole blood specimen
• Latex, vinyl or nitrile disposable gloves (optional for
oral fluid testing)
• Sterile gauze pads
• Centrifuge to process a plasma specimen
NOTE: Handle all blood specimens and materials contacting specimens as if capable of transmitting infectious
agents. Dispose of all test specimens and materials used in the test procedure in a biohazard waste container.
Oral fluid is not considered potentially infectious unless it contains blood.
1. See “Universal Precautions,”CDC, MMWR, 1988; 37(24):377-388. 2. “Guideline for Isolation Precautions, ”CDC, HICPAC, 2007; 12-93. 3. CDC, MMWR, 2005; 54 (RR-9): 1-17.
3
1
For answers to questions regarding the OraQuick ADVANCE®Rapid HIV-1/2 Antibody Test
or for more information on other products from OraSure Technologies,
call 1-800-ORASURE (1-800-672-7873) or visit our website: www.orasure.com
Page 3
EXTERNAL QUALITY CONTROL
SET UP YOUR WORKSPACE
OraQuick ADVANCE®Rapid HIV-1/2 Antibody Test Kit Controls are
available separately for use only with the OraQuick ADVANCE
Rapid HIV-1/2 Antibody Test. The Kit Controls are specifically
formulated and manufactured to ensure performance of the Test,
and are used to verify your ability to properly perform the test
and interpret the results. Refer to the Kit Control Package Insert
for complete instructions.
®
Run the Kit Controls under the following
circumstances:
• Each new operator prior to performing testing on patient specimens,
• When opening a new test kit lot,
• Whenever a new shipment of test kits is received,
• If the temperature of the test kit storage area falls outside of
2°– 27°C (36°– 80°F),
• If the temperature of the testing area falls outside of 15°– 37°C
(59°– 99°F),
• At periodic intervals as dictated by the user facility.
GENERAL TEST PREPARATION
• Gather the materials you will need.
• Allow the test kit to come to operating temperature
(15°– 37°C; 59°– 99°F) befor
• Refer to the External Quality Control section above to determine
when the Kit Controls should be run.
• Cover your workspace with a clean, disposable, absorbent
workspace cover.
• Set an OraQuick ADVANCE®Reusable Test Stand (“Stand”) up
on your workspace cover. Use only the Stand provided.
• Put on your disposable gloves if you are planning to perform
the test using a blood specimen. Use of gloves is optional for
oral fluid testing.
e use.
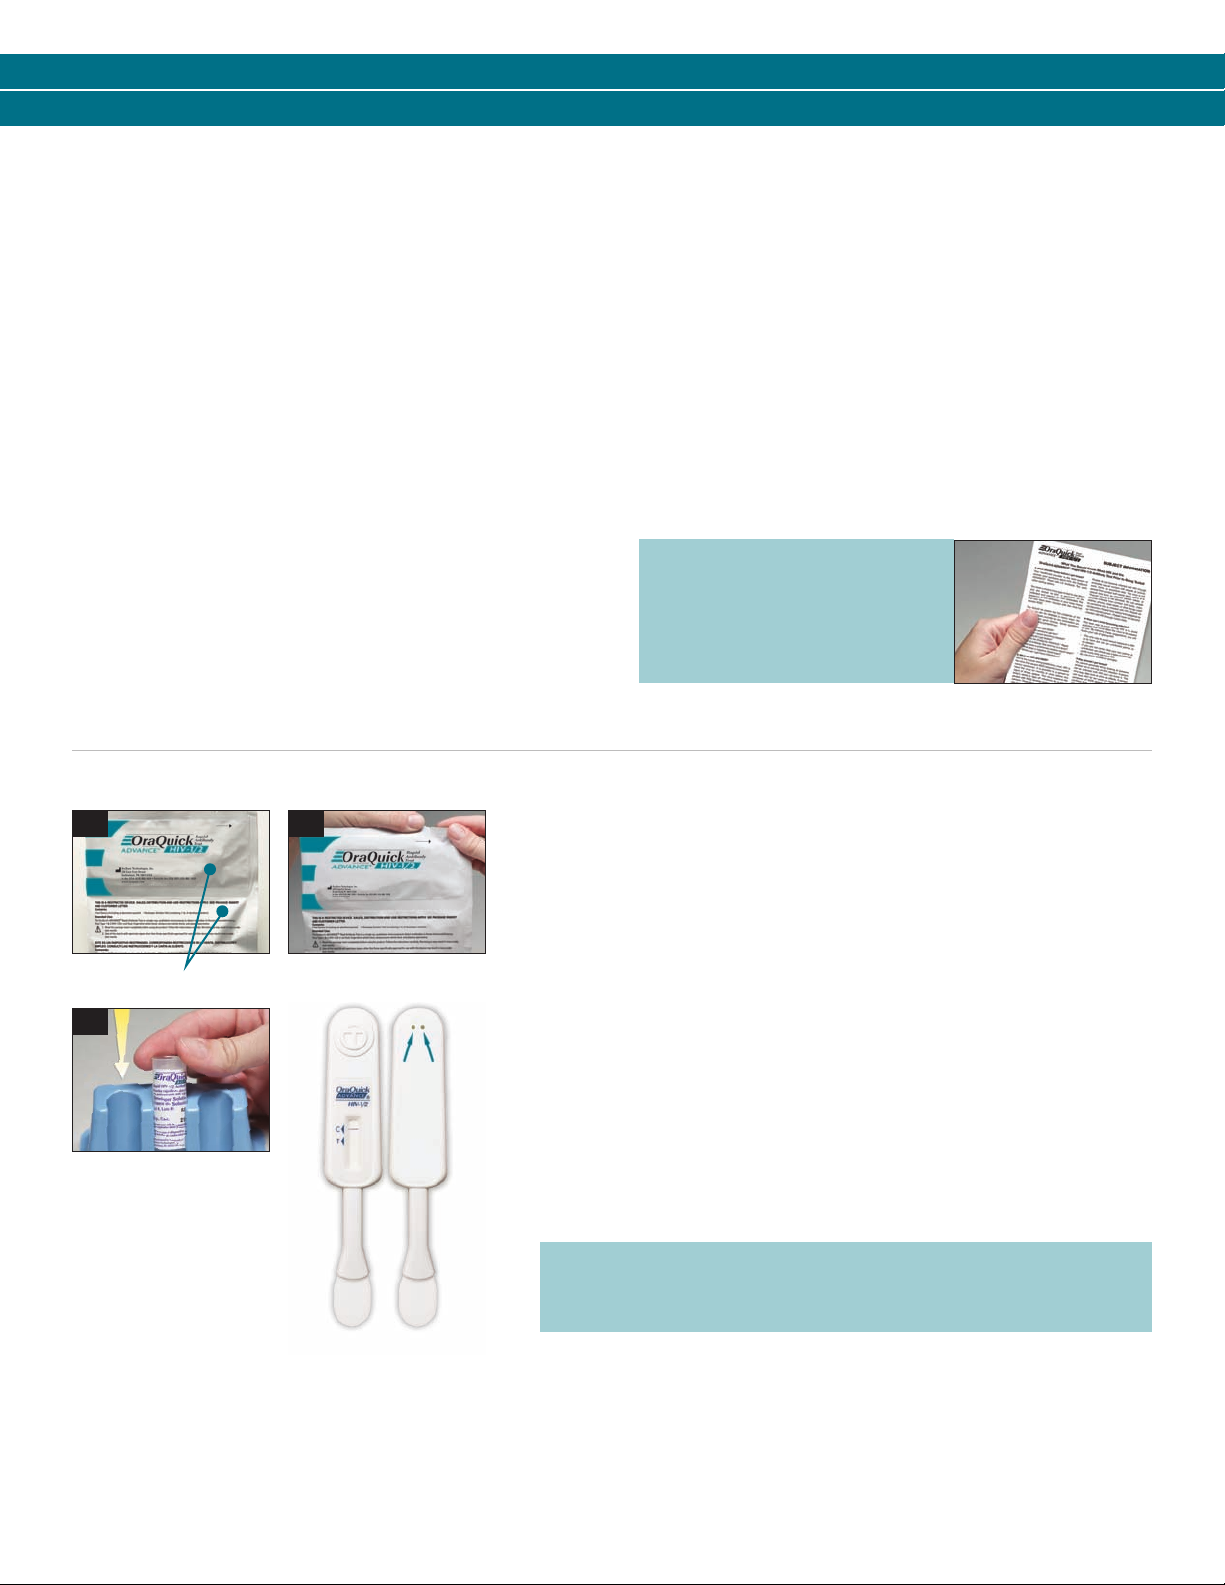
Prior to testing, provide
the “Subject Information”
pamphlet to the person
being tested.
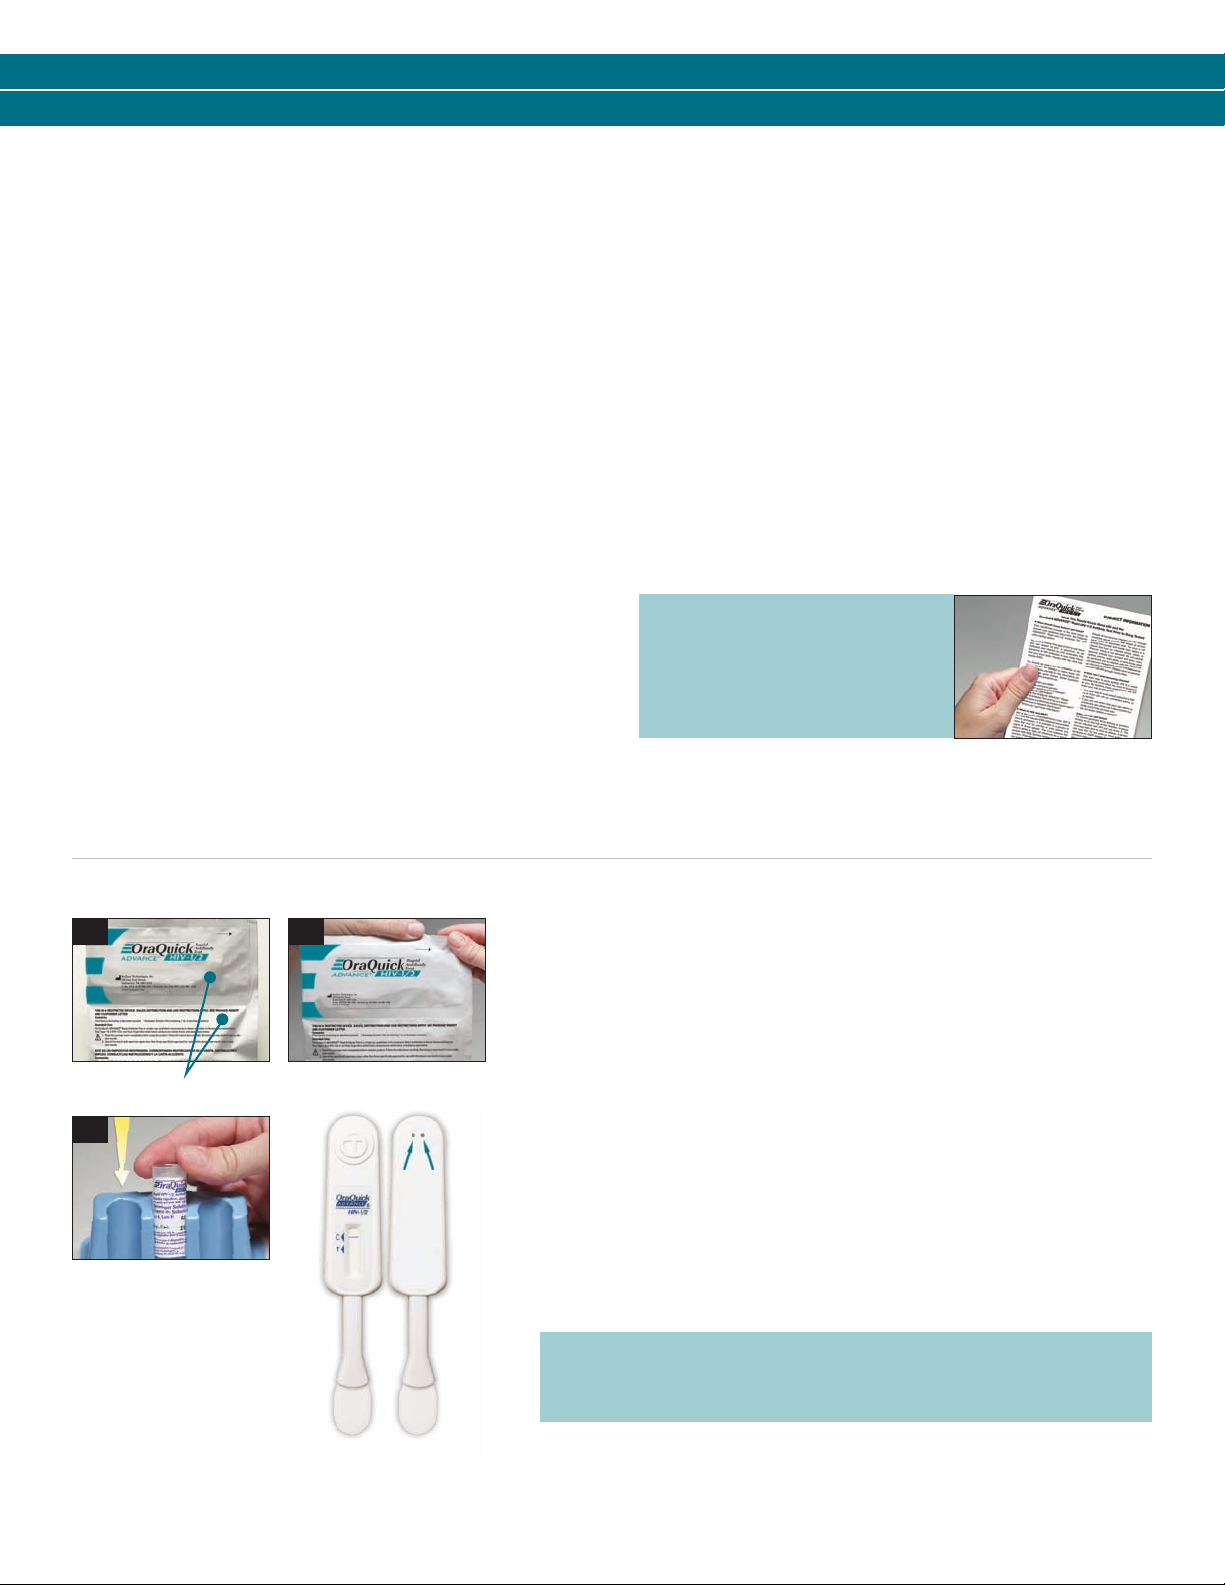
a b
Two Chambers
c
• Open the two chambers of the OraQuick ADV
(“Pouch”) by tearing at the notches on the top of each side of the Pouch
(see pictures a and b).
• To prevent contamination, leave the Test Device (“Device”) in the Pouch until
you ar
e ready to use it.
• Remove the Developer Solution Vial (“Vial”) from the Pouch.
• Hold the Vial firmly in your hand.
• Carefully remove the cap from the Vial by gently rocking the cap back and
forth while pulling it of
• Set the cap on your workspace cover.
• Slide the Vial into the top of one of the slots in the Stand (see picture c).
• DO NOT for
may occur.
• Make sure the Vial is pushed all the way to the bottom of the slot in the
stand (see picture c).
ce the Vial into the stand from the front of the slot as splashing
f.
ANCE®Divided Pouch
NOTE: DO NOT cover the two holes in the back of the Device
with labels or other materials. Blocking the holes may cause
an Invalid result.
Page 4
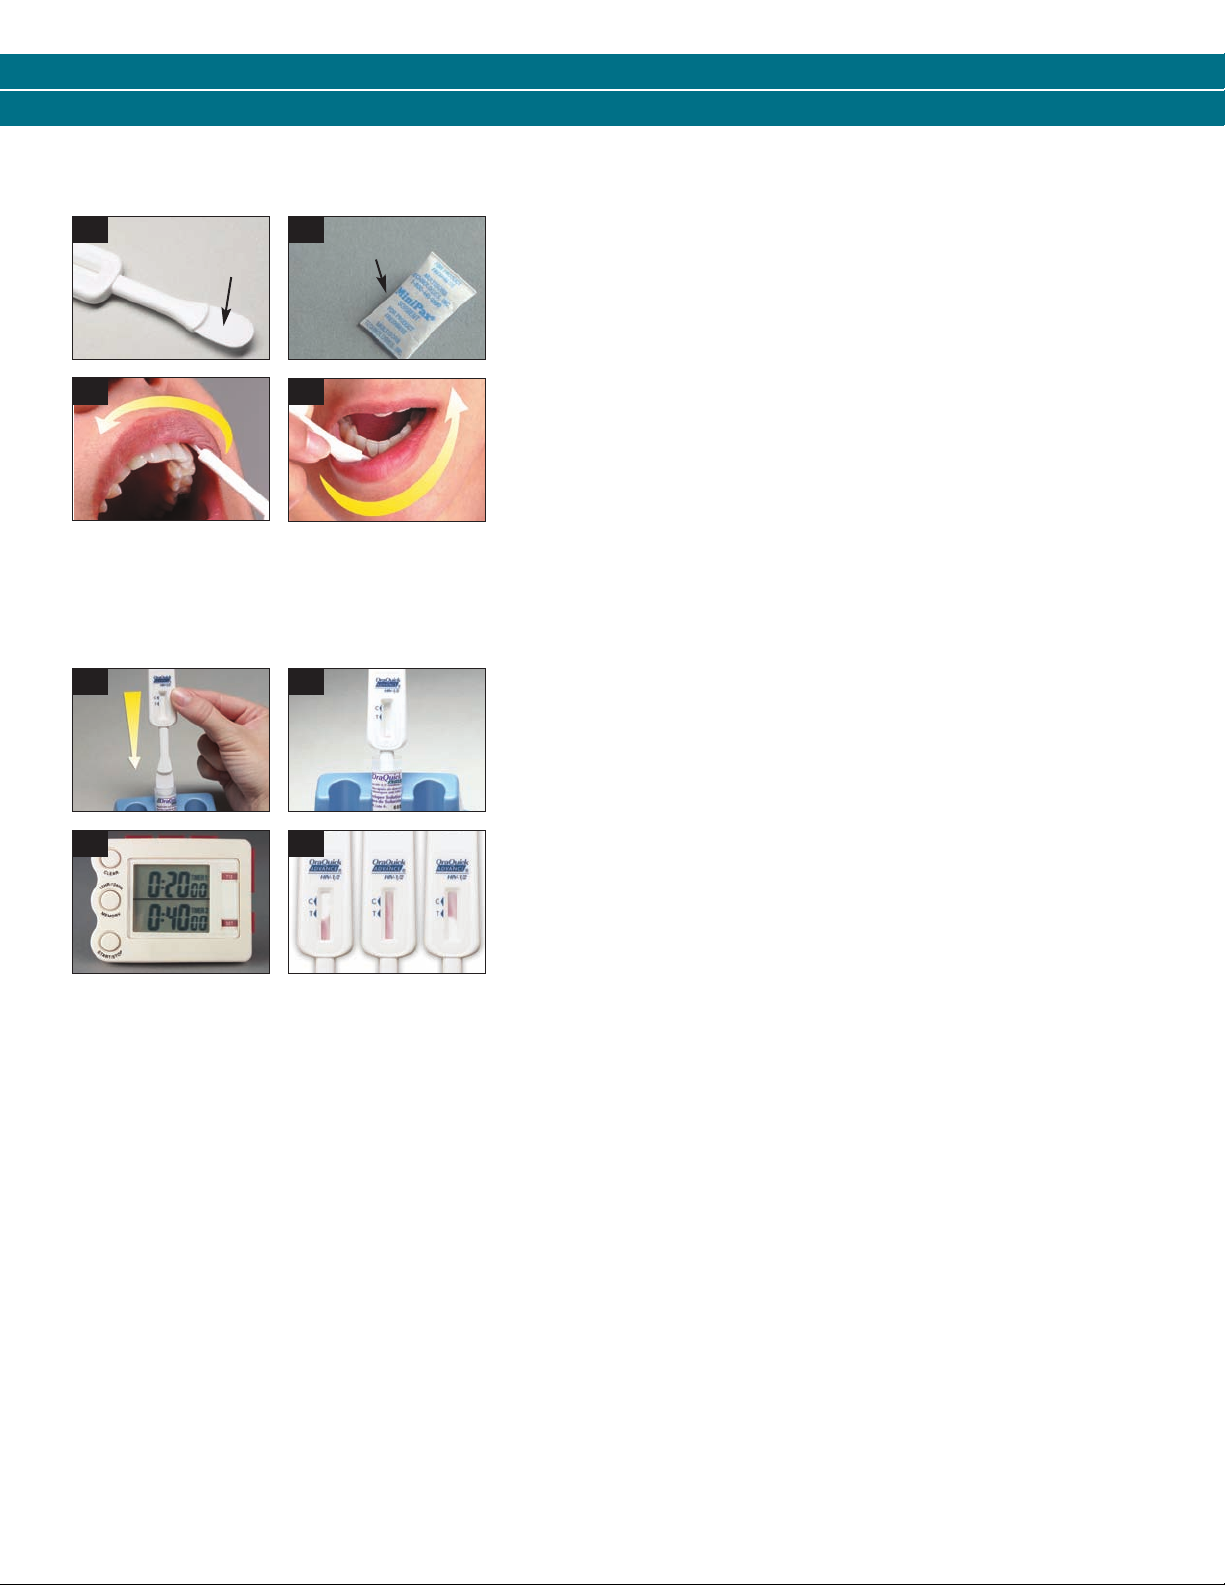
ORAL FLUID – SPECIMEN COLLECTION AND TESTING PROCEDURE
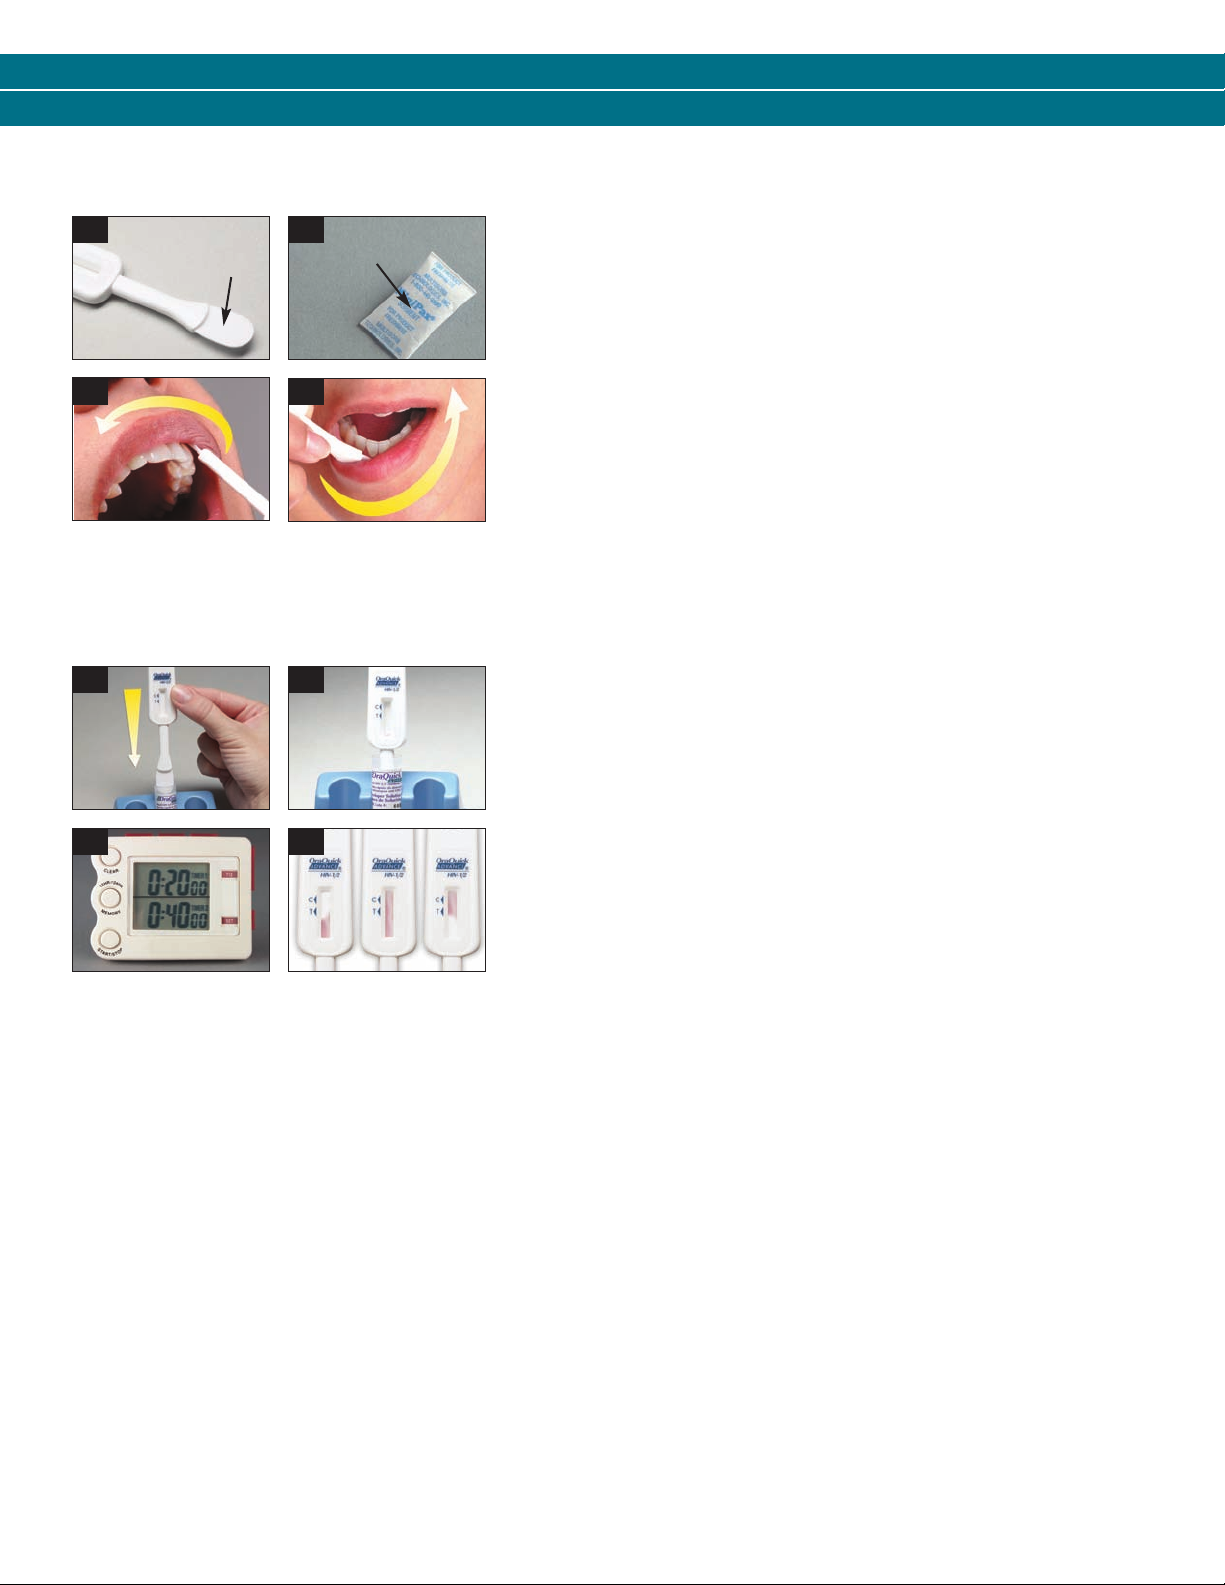
A1
A3 A4
A5 A6
A7 A8
Flat
Pad
A2
Absorbent
Packet
Step 1 – COLLECT
• Ensure prior to testing that the subject has not had anything to eat or drink,
or has chewed gum for at least 15 minutes. Have the subject wait for at
least 30 minutes prior to testing if they have used any oral car
e products.
• Have the person being tested remove the Device from its Pouch.
• DO NOT allow the person to touch the Flat Pad (see picture A1).
• Check to make sure that an Absorbent Packet is included with the Device
(see picture A2). If no Absorbent Packet is pr
esent, discard the Device and
obtain a new Pouch for testing.
• Direct the person to place the Flat Pad above the teeth against the outer
gum. Dir
ect the person to gently swab completely around the outer gums,
both upper and lower, one time around, using the Flat Pad (see pictures A3
and A4). DO NOT allow the person to swab the roof of the mouth, the
inside of the cheek or the tongue. NOTE: Both sides of the Flat Pad may be
used during this procedure.
Step 2 – TEST
• Insert the Flat Pad of the Device all the way into the Vial (see picture A5).
Make sure that the Flat Pad touches the bottom of the Vial. The Result
Window on the Device should be facing towards you
(see picture A6).
• Start timing the test (see picture A7). DO NOT r
Vial while the test is running. Pink fluid will appear and travel up the Result
Window. The pink fluid will gradually disappear as the test develops (see
picture A8).
• Read the results after 20 minutes but not more than 40 minutes in a fully
lighted ar
• Refer to the Reading T
ea.
est Result and Interpretation of Test Result sections on
the back of these instructions.
emove the Device from the
Page 5
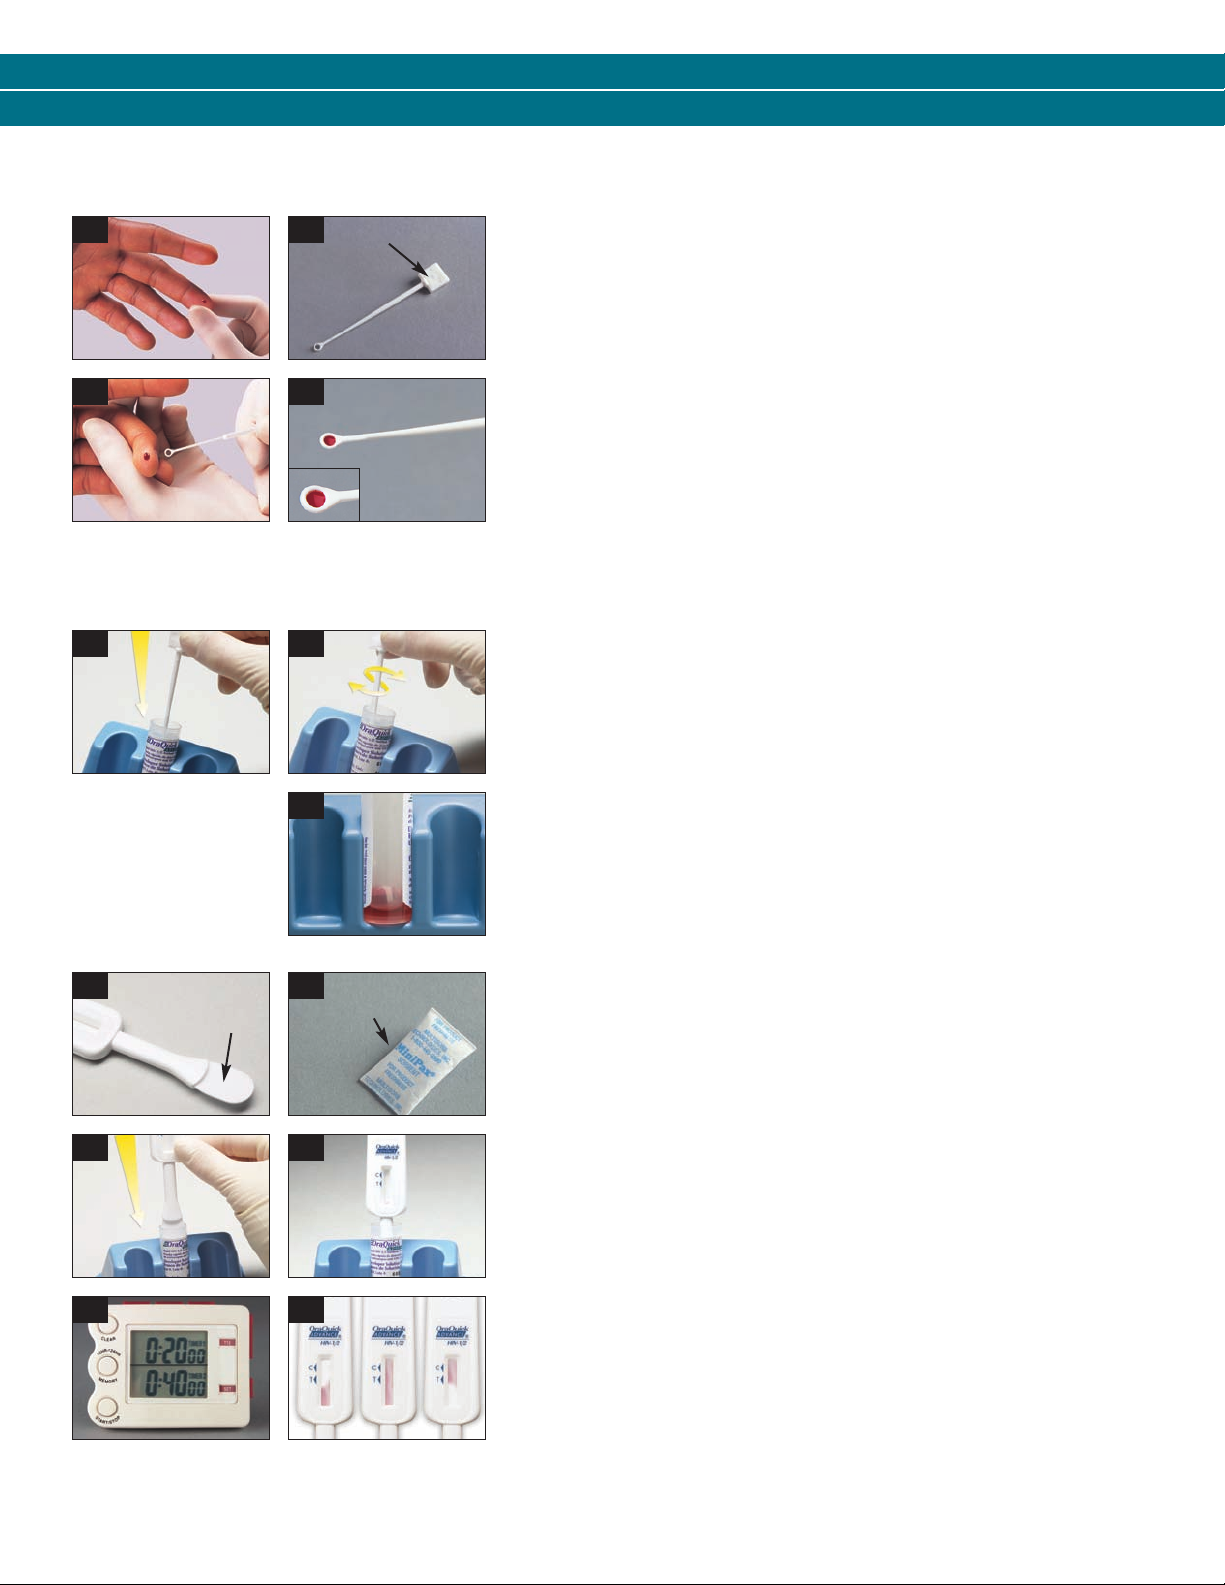
FINGERSTICK WHOLE BLOOD – SPECIMEN COLLECTION AND TESTING PROCEDURE
B1 B2
B3 B4
NOTE: If the Loop is dropped or comes in contact with
any other surface, discard it in a biohazard waste
container. Get a new Loop for the collection of the
blood sample.
B5 B6
B7
Handle
Step 1 – COLLECT
• Using an antiseptic wipe, clean the finger of the person being tested. After
cleansing the skin puncture site, allow the area to air dry, so the antiseptic
action of the alcohol can take effect.
• Using a sterile lancet, puncture the skin just off the center of the finger pad.
• Hold the finger downward. Apply gentle pressure beside the point of the
punctur
e. Avoid squeezing the finger to make it bleed (see picture B1).
• Wipe away this first drop of blood with a sterile gauze pad. Allow a new
op of blood to form.
dr
• Pick up an unused Specimen Collection Loop (“Loop”) by the thick “handle”
end (see picture B2).
• Put the “rounded” end of the Loop on the drop of blood (see picture B3).
Make sure that the Loop is completely filled with blood (see picture B4).
Step 2 – MIX
• Immediately insert the blood-filled end of the Loop all the way into the Vial
(see picture B5).
• Use the Loop to stir the blood sample in the Developer Solution (“Solution”)
(see picture B6).
• Remove the used Loop from the Solution. Throw the used Loop away in a
biohazar
• Check the Solution to make sure that it appears pink. This means that the
blood was correctly mixed into the Solution (see picture B7). If the Solution is
not pink, discard all the test materials in a biohazard waste container. Start
the test over. Use a new Pouch and a new blood sample.
d waste container.
B8 B9
B10 B11
B12
Flat
Pad
B13
Absorbent
Packet
Step 3 – TEST
• Remove the Device from the Pouch. DO NOT touch the Flat Pad
(see picture B8).
• Check to make sure that an Absorbent Packet is included with the Device
(see picture B9). If no Absorbent Packet is present, discard the Device and
obtain a new Pouch for testing.
• Insert the Flat Pad of the Device all the way into the Vial containing the
blood sample (see picture B10). Make sur
bottom of the Vial. The Result Window on the Device should be facing
towards you (see picture B11).
• Start timing the test (see picture B12). DO NOT r
Vial while the test is running. Pink fluid will appear and travel up the Result
Window. The pink fluid will gradually disappear as the test develops (see
picture B13).
• Read the results after 20 minutes but not more than 40 minutes in a fully
lighted ar
• Refer to the Reading T
ea.
est Result and Interpretation of Test Result sections on
the back of these instructions.
e that the Flat Pad touches the
emove the Device from the
Page 6
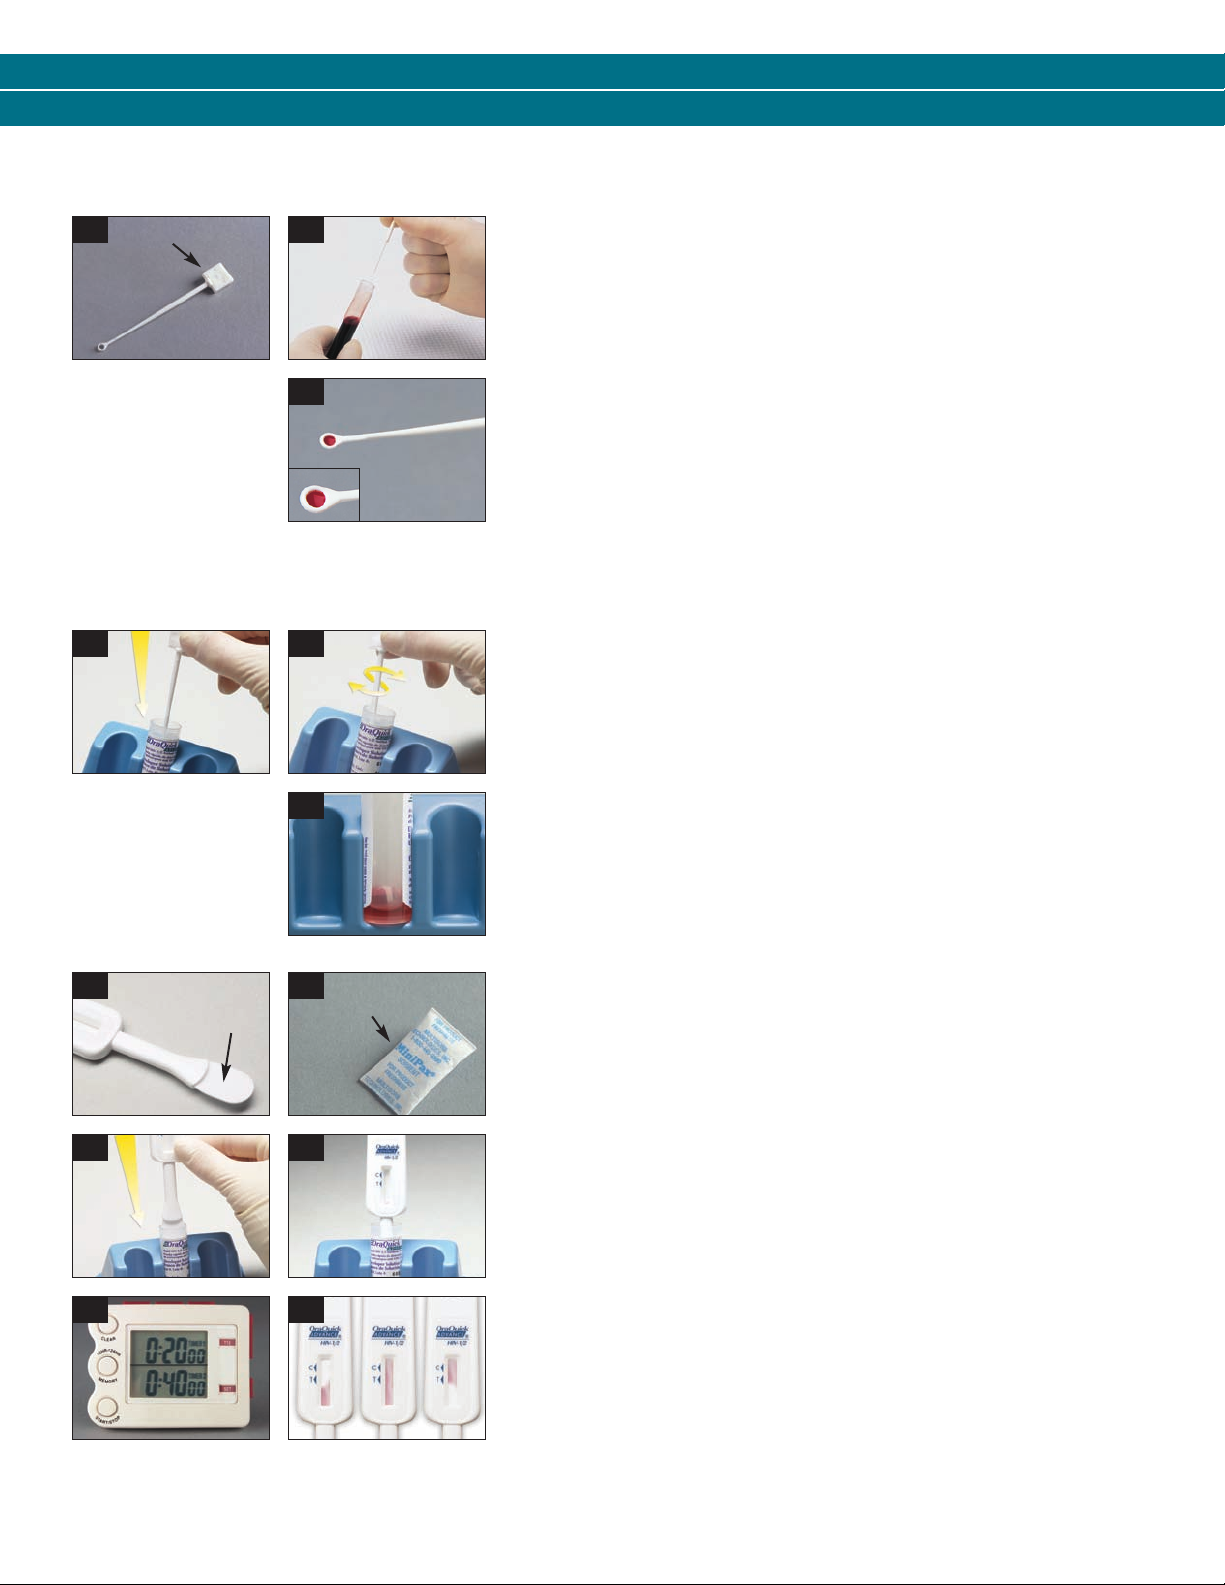
VENIPUNCTURE WHOLE BLOOD – SPECIMEN COLLECTION AND TESTING PROCEDURE
C1
NOTE: If the Loop is dropped or comes in contact with
any other surface, discard it in a biohazard waste
container. Get a new Loop for the collection of the
blood sample.
C4 C5
Handle
C2
C3
C6
Step 1 – COLLECT
• Using standard venous phlebotomy procedures, collect a whole blood
sample using a tube containing any of the following anticoagulants: EDTA
(lavender top), sodium heparin (green top), or sodium citrate (light blue top).
Other anticoagulants have not been tested and may give an incorrect
result. If the specimens are not tested at the time of collection, the whole
blood may be stored at 2°– 30°C (36°– 86°F) for up to 5 days.
• Prior to testing, mix the blood tube gently by inversion several times to
ensur
e a homogeneous sample.
• Pick up an unused Specimen Collection Loop ("Loop") by the thick “handle”
see picture C1).
end (
• Put the "rounded" end of the Loop into the tube of blood (see picture C2).
Make sure the Loop is completely filled with blood (see picture C3).
Step 2 – MIX
• Immediately insert the blood-filled end of the Loop all the way into the Vial
(see picture C4).
• Use the Loop to stir the blood sample in the Developer Solution (“Solution”)
(see picture C5).
• Remove the used Loop from the Solution. Throw the used Loop away in a
biohazar
• Check the Solution to make sure that it appears pink. This means that the
blood was correctly mixed into the Solution (see picture C6). If the Solution is
not pink, discard all the test materials in a biohazard waste container. Start
the test over. Use a new Pouch and a new blood sample.
d waste container.
C7 C8
C9 C10
C11
Flat
Pad
C12
Absorbent
Packet
Step 3 – TEST
• Remove the Device from the Pouch. DO NOT touch the Flat Pad (see
picture C7).
• Check to make sure that an Absorbent Packet is included with the Device
(see picture C8). If no Absorbent Packet is present, discard the Device and
obtain a new Pouch for testing.
• Insert the Flat Pad of the Device all the way into the Vial containing the
blood sample (
bottom of the Vial. The Result Window on the Device should be facing
towards you (see picture C10).
• Start timing the test (
Vial while the test is running. Pink fluid will appear and travel up the Result
Window. The pink fluid will gradually disappear as the test develops (see
picture C12).
• Read the results after 20 minutes but not more than 40 minutes in a fully
lighted ar
• Refer to the Reading T
the back of these instructions.
see picture C9). Make sure that the Flat Pad touches the
see picture C11). DO NOT remove the Device from the
ea.
est Result and Interpretation of Test Result sections on
Page 7
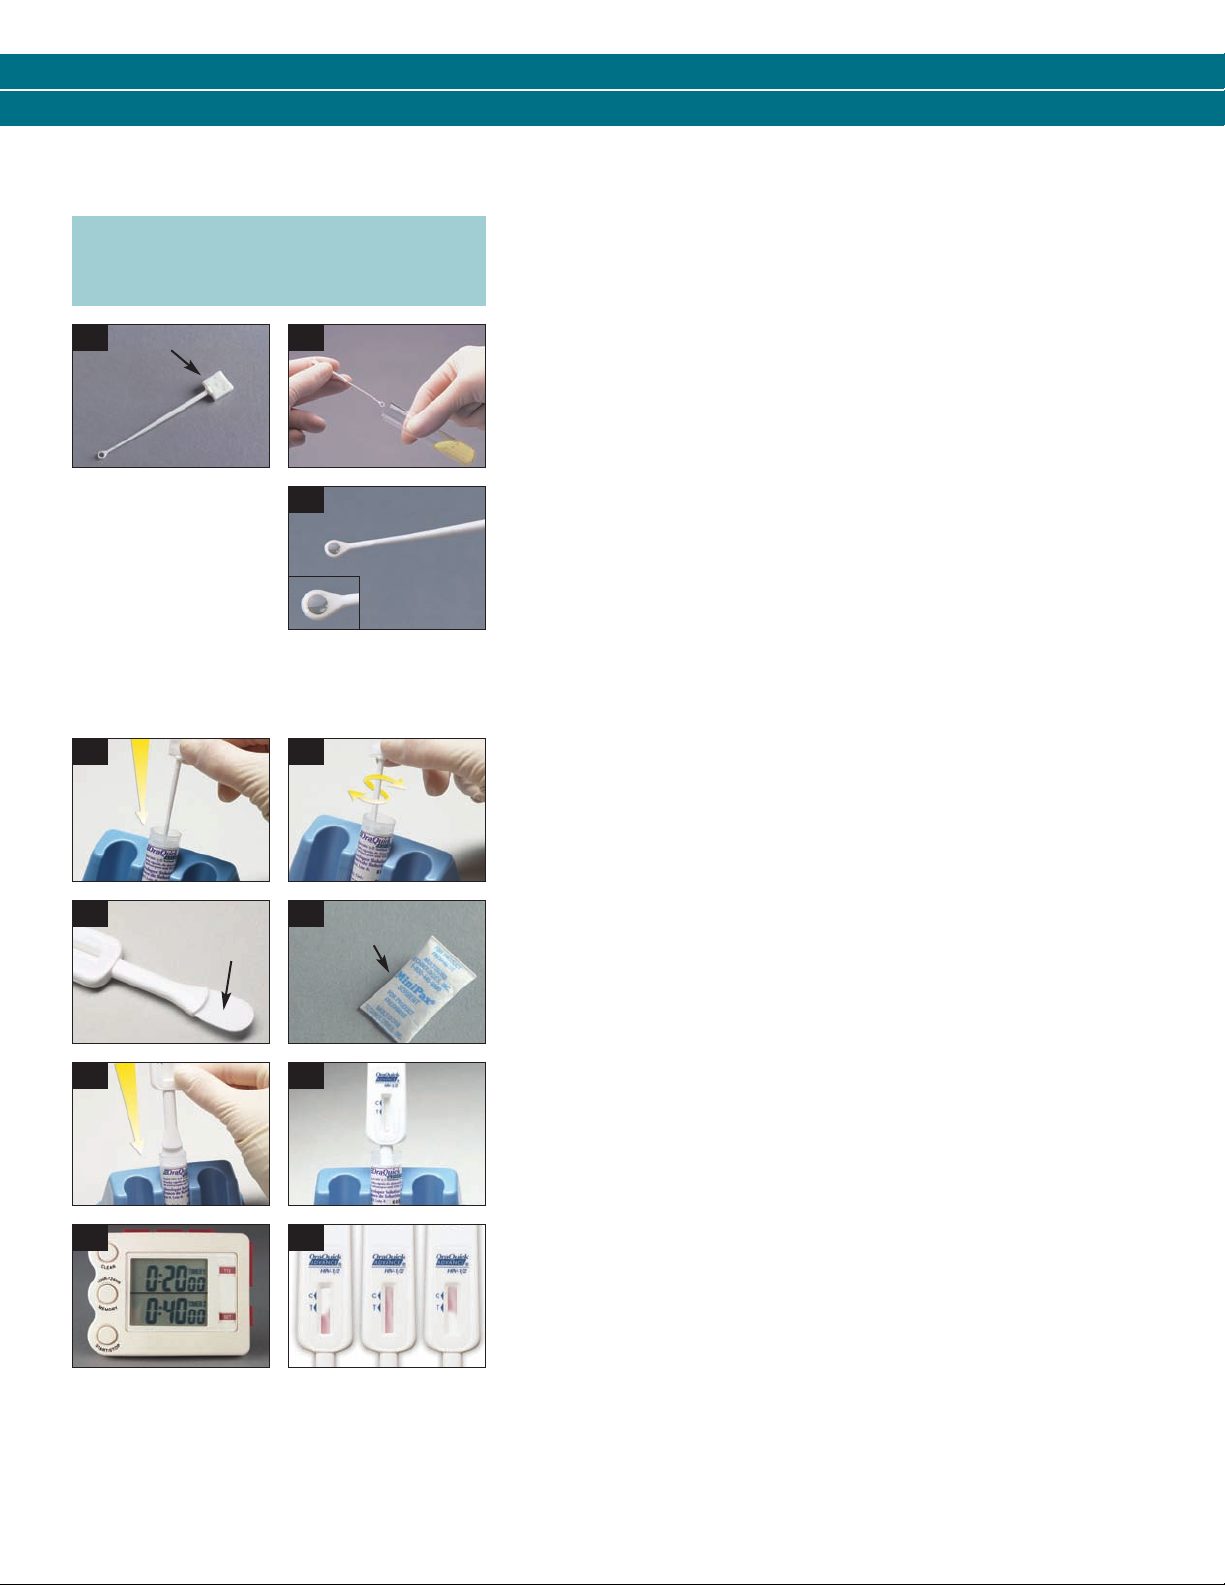
PLASMA – SPECIMEN COLLECTION AND TESTING PROCEDURE
NOTE: Testing of plasma samples may only
be performed by laboratories certified to
perform moderate complexity tests.
D1
NOTE: If the Loop is dropped or comes in contact with
any other surface, discard it in a biohazard waste
container. Get a new Loop for the collection of the
blood sample.
D4 D5
Handle
D2
D3
Step 1 – COLLECT
• Using standard venous phlebotomy procedures, collect a whole blood
sample using a tube containing EDTA (lavender top) anticoagulant. Other
anticoagulants have not been tested and may give an incorrect result.
If the specimens are not tested at the time of collection, the specimen may
be stored as whole blood for up to 5 days at 2°– 30°C (36°– 86°F) or as
plasma for up to 7 days at 2°– 8°C (36°– 46°F).
• Centrifuge the tube of blood (1000-1300 x g, for appr
oximately 5 minutes,
no refrigeration required) to separate the cells from the plasma.
• Carefully uncap the tube by gently rocking the stopper towards you so that
it vents away fr
om you.
• Pick up an unused Specimen Collection Loop (“Loop”) by the thick “handle”
end (see picture D1).
• Put the “rounded end” of the Loop into the tube of plasma (see picture D2).
• Make sure that the Loop is completely filled with plasma (see picture D3).
Step 2 – MIX
• Immediately insert the plasma-filled end of the Loop all the way into the Vial
(see picture D4).
• Use the Loop to stir the plasma sample in the Developer Solution (“Solution”)
(see picture D5).
• Remove the used Loop from the Solution. Throw the used Loop away in a
biohazar
d waste container.
D6 D7
D8 D9
D10
Flat
Pad
D11
GENERAL TEST CLEANUP
Absorbent
Packet
Step 3 – TEST
• Remove the Device from the Pouch. DO NOT touch the Flat Pad (see picture D6).
• Check to make sure that an Absorbent Packet is included with the Device
(see picture D7). If no Absorbent Packet is pr
obtain a new Pouch for testing.
• Insert the Flat Pad of the Device all the way into the Vial containing the
blood sample (see picture D8). Make sur
bottom of the Vial. The Result Window on the Device should be facing
towards you (see picture D9).
• Start timing the test (see picture D10). DO NOT r
Vial while the test is running. Pink fluid will appear and travel up the Result
Window. The pink fluid will gradually disappear as the test develops (see
picture D11).
• Read the results after 20 minutes but not more than 40 minutes in a fully
lighted ar
ea.
• Refer to the Reading Test Result and Interpretation of Test Result sections on
the back of these instructions.
esent, discard the Device and
e that the Flat Pad touches the
emove the Device from the
• Dispose of the used test materials in a biohazard waste container.
• When using gloves, change your gloves between each test to prevent contamination. Throw away the used gloves in a biohazard waste container
• Use a freshly prepared 10% solution of bleach to clean up any spills.
.
Page 8
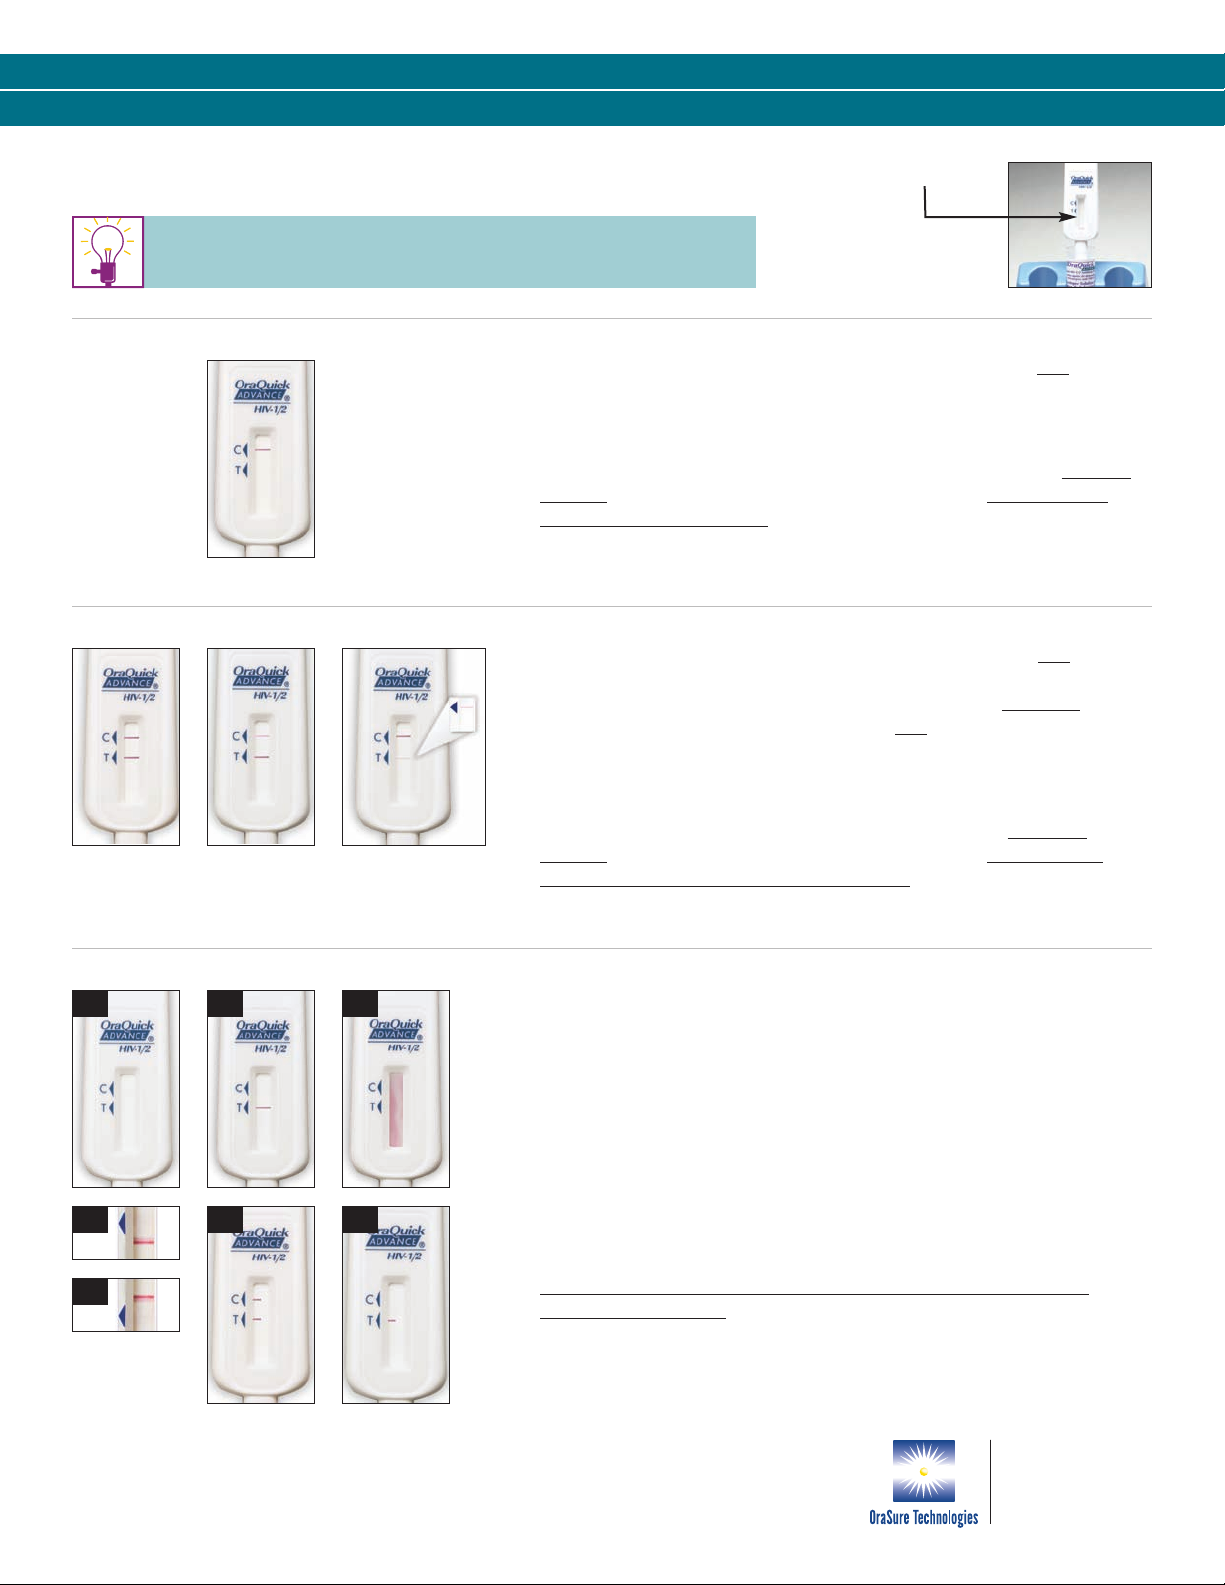
READING TEST RESULT – LOOK AT THE RESULT WINDOW OF THE TEST DEVICE
CAUTION: ADEQUATE LIGHTING REQUIRED.
Read results after 20 minutes but not more than 40 minutes.
NON-REACTIVE
REACTIVE
Test is NON-REACTIVE if:
• A reddish-purple line appears next to the triangle labeled “C” and NO line
appears next to the triangle labeled “T.”
Interpretation of Test Result:
A Non-Reactive test result means that HIV-1 and HIV-2 antibodies were not
detected in the specimen. The test result is interpreted as NEGATIVE for
HIV-1 and HIV-2 antibodies. Follow CDC guidelines to inform the test
subject of the test result and its interpretation.
3
Test is REACTIVE if:
• A reddish-purple line appears next to the triangle labeled “C” and a reddish-
purple line appears next to the triangle labeled “T.” One of these lines may
be darker than the other. NOTE: The test is Reactive if a complete
purple line appears next to the “T” triangle and
next to the “C” triangle, no
reddish-
matter how faint these lines are.
Interpretation of Test Result:
A Reactive test result means that HIV-1 or HIV-2 antibodies have been
detected in the specimen. The test result is interpreted as PRELIMINARY
POSITIVE for HIV-1 and/or HIV-2 antibodies.
INVALID
a b c
d1
d2
e f
Test is INVALID if:
• NO reddish-purple line appears next to the triangle labeled “C”
(see pictures a and b), or
• A red background in the Results Window makes it difficult to read the result
after 20 minutes (see picture c), or
• If any of the lines are NOT inside the “C” or “T” triangle areas
(see pictures d1 an d d2), or
• Any partial line on one side of the “C” or “T” triangle areas
(see pictures e and f).
Interpretation of Test Result:
An Invalid test result means that there was a problem running the test,
either related to the specimen or to the Device. An Invalid result
cannot be interpreted. Repeat the test with a new Pouch and a new oral
fluid, fingerstick or venipuncture whole blood, or plasma sample. Contact
OraSure Technologies’ Customer Service if you are unable to get a valid test
result upon repeat testing.
220 East First Street
©2012, 2001 OraSure Technologies, Inc. U.S. Patent #6,303,081,
#7,192,555, #7,541,194 and various international and
U.S. patents pending. OraQuick ADVANCE® is a registered trademark
of OraSure Technologies, Inc. Item #3001-1216 rev. 09/12
Bethlehem, PA 18015
Te l: 1-800-ORASURE
Fax: (610) 882-3572
Web: www.orasure.com
Page 9
Prueba rápida de detección de anticuerpos anti VIH-1/2
Personas vinculadas en
el cuidado de la salud
Instrucciones Paso a Paso para
La prueba rápida de detección de anticuerpos
anti VIH-1/2 OraQuick ADVANCE
Complejidad de la prueba: EXENTA para fluido
oral, sangre obtenida por pinchazo del dedo
y sangre obtenida por venopunción
Complejidad de la prueba: MODERADA
para plasma
• Estas instrucciones son tan sólo una guía de consulta.
Para obtener información completa, consulte el
instructivo de la prueba rápida de detección de
anticuerpos anti VIH-1/2 OraQuick ADVANCE®.
• Lea estas instrucciones en su totalidad antes de usar el
producto. Siga las instrucciones al pie de la letra al
realizar la prueba. De lo contrario, los resultados de la
prueba podrían ser inexactos.
®
• Antes de realizar las pruebas, todos los operadores
DEBEN leer y familiarizarse con las “Precauciones
universales para prevenir la transmisión del virus de la
inmunodeficiencia humana, el virus de la hepatitis B y
otros patógenos transmitidos por la sangre en los
entornos de atención de la salud”.
1,2
Simple – Preciso – Versátil
Page 10
Frasco de solución
reveladora
Soporte para
pruebas reutilizable
Aro para obtención
de muestras
USO PREVISTO:
La prueba rápida de detección de anticuerpos anti VIH-1/2
OraQuick ADVANCE
uso, para detectar anticuerpos contra el virus de la
inmunodeficiencia humana tipo 1 (VIH-1) y tipo 2 (VIH-2) en
muestras de fluido oral, sangre obtenida por pinchazo de dedo,
sangre obtenida por venopunción y plasma.
®
es un inmunoensayo cualitativo, de un solo
Paquete de
absorbente
Paleta
Para usar en diagnóstico in vitro
Este es un dispositivo restringido. Corresponden
restricciones en la venta, distribución y empleo.
Consulte la carta al cliente y el instructivo.
Dispositivo
para pruebas
Ventanilla de
resultados
SE REQUIEREN LOS SIGUIENTES ARTÍCULOS PARA HACER LA PRUEBA:
La prueba rápida de detección de anticuerpos anti
VIH-1/2 OraQuick ADVANCE®consiste en una bolsa
dividida que contiene lo siguiente:
• Dispositivo de prueba (incluido un paquete de absorbente)
• Frasco de solución reveladora (contiene 1 ml)
A: La bolsa está dividida en dos. En una división se
NOT
encuentra el dispositivo de prueba mientras que en la otra
hay un frasco de solución reveladora.
Materiales proporcionados en la caja de envío:
• Soporte para pruebas reutilizable
• Folleto de información para el paciente
• Carta al cliente
• Aro para obtención de muestras (5 microlitros)
• Instructivo
Materiales necesarios no suministrados:
Cronómetro o reloj capaz de medir 20 a 40 minutos
•
• Manto protector limpio, desechable, absorbente sobre el área
de trabajo
• Envase para desechar peligros biológicos
Otros artículos que se requieren para la obtención de
muestras de sangre por pinchazo de dedo, sangre por
venopunción y muestras de plasma:
•
Toallita antiséptica
• Lanceta estéril para obtener una muestra de sangre por
pinchazo o los materiales requeridos para obtener la muestra de
plasma una muestra de sangre por venopunción
• Guantes desechables de látex, vinilo o nitrilo (optativos para la
prueba de fluido oral)
• Gasas estériles
• Centrifugadora para procesar
NOTA: Maneje todas las muestras de sangre y los materiales que entren en contacto con las muestras como si fuesen capaces
de transmitir agentes infecciosos. Elimine todas las muestras de prueba y los materiales utilizados en las pruebas en un
envase para peligros biológicos
1. Vea “Universal Precautions,”CDC, MMWR, 1988; 37(24):377-388. 2. “Guideline for Isolation Precautions, ”CDC, HICPAC, 2007; 12-93. 3. CDC, MMWR, 2005; 54 (RR-9): 1-17.
1
. El fluido oral no se considera potencialmente infeccioso a menos que contenga sangre.
3
Para obtener respuestas a preguntas sobre la prueba rápida de detección de anticuerpos
anti VIH-1/2 OraQuick ADV
ANCE®o para obtener más información sobre otros productos de OraSure Technologies,
llame al 1-800-ORASURE (800-672-7873) o visite nuestro sitio web: www.orasure.com
Page 11
CONTROL DE CALIDAD EXTERNO
PREPARACIÓN DEL ÁREA DE TRABAJO
Los controles para el juego de materiales de la prueba rápida de
detección de anticuerpos anti VIH-1/2 OraQuick ADVANCE
®
se
venden por separado y deben utilizarse únicamente con la prueba
rápida de detección de anticuerpos anti VIH-1/2 OraQuick
ADVANCE
®
. Los controles se formulan y elaboran específicamente
para asegurar el rendimiento de la prueba y se usan para verificar
la habilidad del usuario para llevar a cabo la prueba e interpretar
los resultados correctamente. Consulte el instructivo del control
para juegos de prueba para las instrucciones completas.
Utilice los controles para el juego de materiales en las
siguientes circunstancias:
• Con cada nuevo operador antes de realizar pruebas en muestras
de pacientes,
• Cuando abra un lote nuevo de juegos de materiales de prueba,
• Cuando se reciba un nuevo envío de juegos de materiales
de prueba,
• Si la temperatura del área del juego de materiales de prueba se
encuentra fuera del margen de 2°C– 27°C (36°F– 80°F),
• Si la temperatura del área de prueba se encuentra fuera del
margen de 15°C– 37°C (59°F– 99°F),
• A intervalos periódicos según lo dicten las instalaciones
del usuario.
• Reúna los materiales necesarios.
• Deje que el juego de materiales se aclimate a la temperatura
equerida (15°C– 37°C; 59°F– 99°F) antes de usarlo.
r
• Consulte la sección Control de calidad externo, arriba, para
determinar cuándo se deben efectuar los controles del juego
de materiales.
• Cubra el área de trabajo con un manto limpio, absorbente y
desechable.
• Coloque un soporte para pruebas reutilizable OraQuick
ADV
®
ANCE
(en adelante “soporte”) sobre el manto que cubre el
área de trabajo. Use únicamente el soporte suministrado.
• Póngase guantes desechables si va a hacer una prueba con
muestra de sangre. El empleo de guantes es optativo si la
prueba es con fluido oral.
Prior to testing, provide
the “Subject Information”
pamphlet to the person
being tested.
PREPARACIÓN GENERAL PARA LA PRUEBA
a b
Dos divisiones
c
• Abra las dos divisiones de la bolsa del OraQuick ADVANCE®(en adelante la
“bolsa”) rasgando en las muescas situadas en la parte superior de cada lado
de la bolsa (vea las figuras a y b).
• Para prevenir la contaminación, deje el dispositivo de prueba (en adelante el
“dispositivo”) en la bolsa hasta que esté pr
eparado para usarlo.
• Saque el frasco de solución reveladora (en adelante el “frasco”) de la bolsa.
• Sujete el frasco firmemente con la mano.
• Quítele la tapa al frasco lentamente, moviendo la tapa hacia delante y hacia
atrás a la vez que tira de ella.
• Coloque la tapa sobe el manto del área de trabajo.
• Coloque el frasco en una de las ranuras del soporte (vea la figura c).
• NO lo intr
oduzca a la fuerza por la parte delantera, pues podría salpicar.
• Asegúrese de que el frasco esté hasta el fondo de la ranura del soporte
(vea la figura c).
NOTA: NO cubra los dos orificios situados en la parte posterior del
dispositivo con etiquetas ni con otros materiales. De lo contrario,
se odría invalidar el resultado.
Page 12
FLUIDO ORAL – OBTENCIÓN DE MUESTRA Y PROCEDIMIENTO DE PRUEBA
A1
Paleta
A3 A4
A5 A6
A7 A8
A2
Paquete de
absorbente
Paso 1 – OBTENER LA MUESTRA
• Asegúrese de que el sujeto no haya comido, bebido o usado goma de
mascar durante al menos 15 minutos antes de la prueba. Si ha usado algún
pr
oducto de limpieza bucal, espere 30 minutos como mínimo antes de hacer
la prueba.
• Pídale a la persona a quien le está haciendo la prueba que saque el
dispositivo de la bolsa.
• NO permita que la persona toque la paleta (vea la figura A1).
• Revise que con el dispositivo se incluya un paquete de absorbente (vea la
figura A2). Si no hay un paquete de absorbente, elimine el dispositivo y
obtenga una bolsa nueva para la prueba.
• Indíquele a la persona que se coloque la paleta arriba de los dientes, sobre el
exterior de la encía. Pídale a la persona que con la paleta se fr
ote
suavemente por toda la parte exterior de las encías superior e inferior, una
vez. (vea o consulte las figuras A3 y A4). NO permita que la persona se pase
la paleta por el paladar ni la lengua ni el interior de los cachetes. NOTA: Se
pueden usar ambos lados de la paleta.
Paso 2 – HACER LA PRUEBA
• Inserte la paleta del dispositivo completamente en el frasco (vea la figura
A5). Verifique que la paleta toque el fondo del frasco. La ventanilla de
resultados del dispositivo debe estar hacia usted (vea la figura A6).
• Comience a contar los minutos de la prueba (vea la figura A7). NO re
el dispositivo del frasco mientras está haciendo la prueba. Aparecerá un
líquido rosa que subirá a través de la ventanilla de resultados. El líquido
rosa desaparecerá gradualmente a medida que se revela la prueba (vea la
figura A8).
• Lea los resultados después de 20 minutos, pero no más de 40 minutos, en
un lugar completamente iluminado.
• Consulte las secciones Lectura del resultado de la prueba e Interpretación del
r
esultado de la prueba al dorso de estas instrucciones.
tire
Page 13
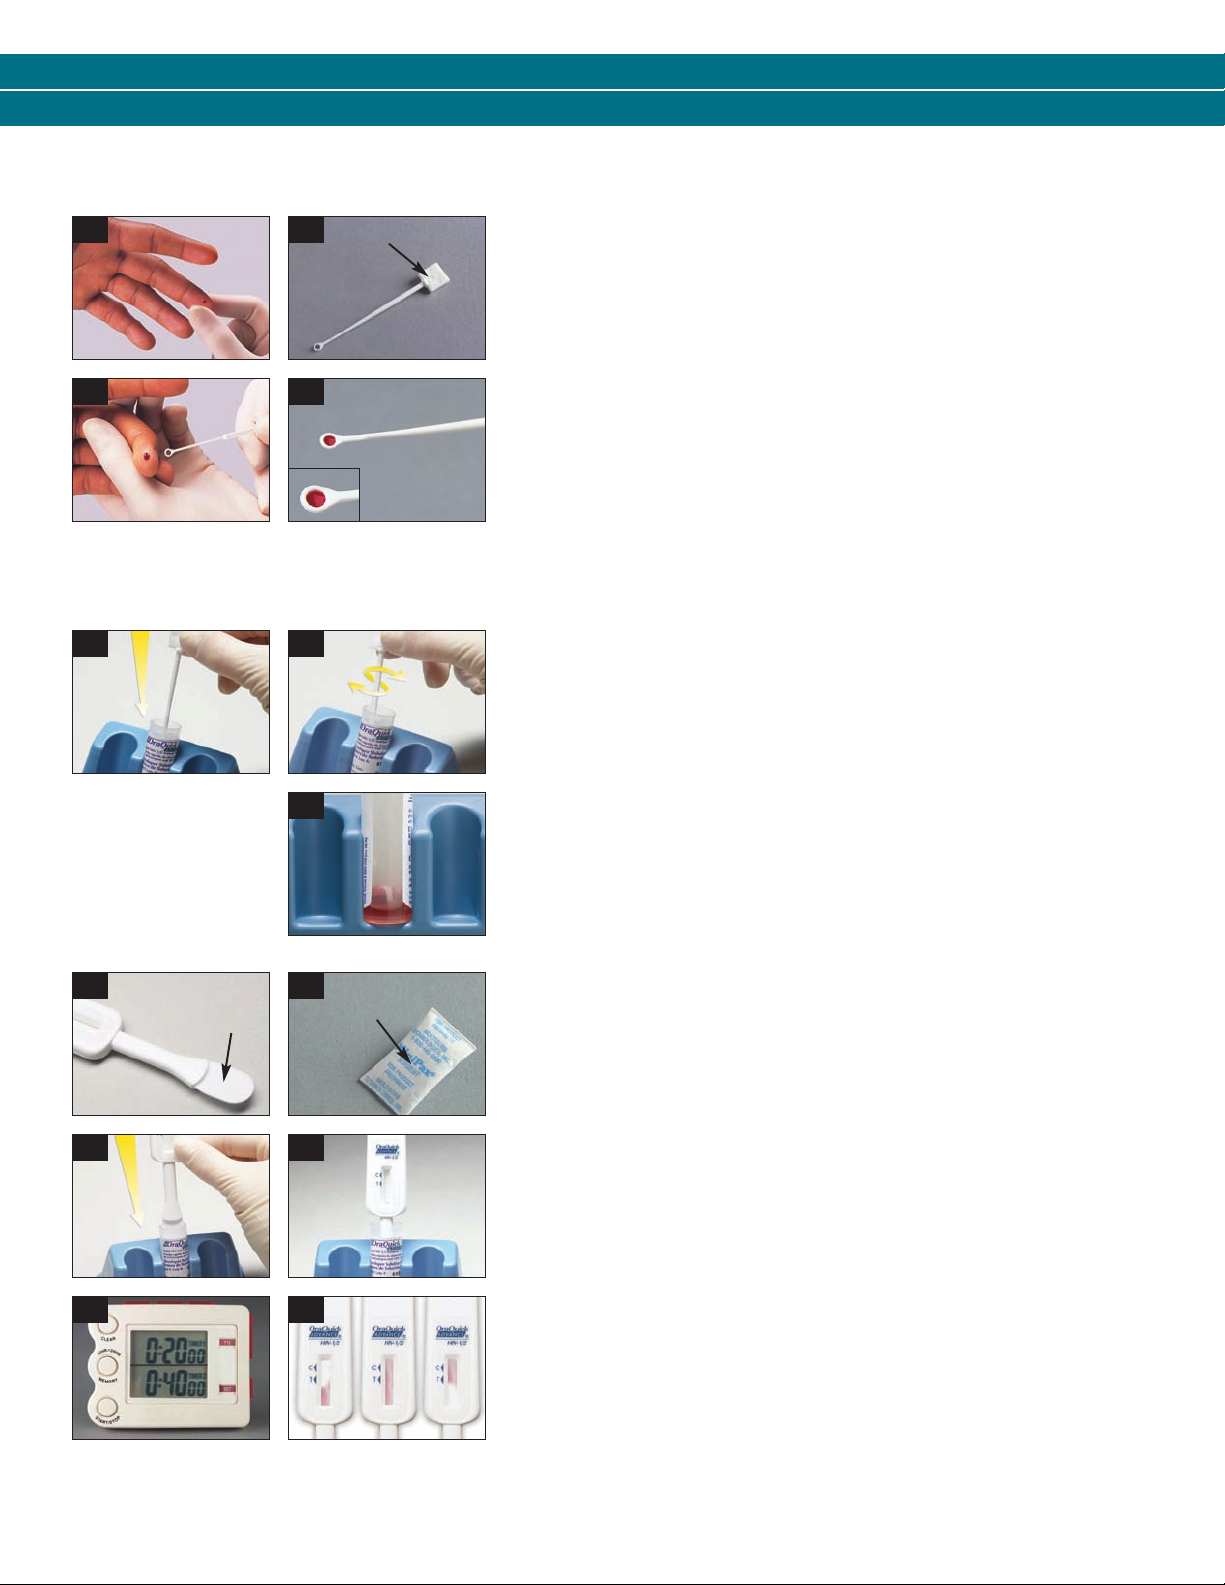
PINCHAZO DE DEDO SANGRE – OBTENCIÓN DE MUESTRA Y PROCEDIMIENTO DE PRUEBA
B1 B2
B3 B4
NOTA: Si deja caer el aro o si éste entra en contacto con
alguna superficie, elimínelo en un envase para peligros
biológicos. Obtenga un nuevo aro para la muestra.
B5 B6
B7
Mango
Paso 1 – OBTENER LA MUESTRA
• Con una toallita antiséptica limpie el dedo de la persona a quien le va a
hacer la prueba. Después de limpiar el sitio de la punción en la piel, deje que
la zona se seque al air
e para que la acción antiséptica del alcohol pueda
surtir efecto.
• Con una lanceta estéril, pinche la piel casi en el centro de la yema del dedo.
• Voltee el dedo hacia abajo. Aplique un poco de presión junto al lugar de la
punción. No apriete el dedo con el fin de hacerlo sangrar (vea la figura B1).
• Limpie la primera gota de sangre con una gasa estéril. Deje que se forme
otra gota de sangr
e.
• Tome un aro para obtención de muestras, sujetándolo por el extremo grueso
o “mango” (vea la figura B2).
• Coloque el aro sobre la gota de sangre (vea la figura B3). Verifique que el
aro esté completamente lleno de sangre (vea la figura B4).
Paso 2 – MEZCLAR
• Inmediatamente inserte el aro con sangre completamente en el frasco (vea la
figura B5).
• Use el aro para mezclar la muestra de sangre dentro de la solución
eveladora (en adelante la “solución”) (vea la figura B6).
r
• Retire el aro usado de la solución. Elimine el aro en un envase para
peligros biológicos.
• Revise la solución para asegurarse de que se ve de color rosa. Eso significa
que la sangre está correctamente mezclada con la solución (vea la figura B7).
Si la solución no se ve de color rosa, deseche los materiales de la prueba en
un envase para peligros biológicos. Comience la prueba otra vez. Use una
bolsa nueva y una nueva muestra de sangre.
B8
Paleta
B10 B11
B12
B9
B13
Paquete de
absorbente
Paso 3 – HACER LA PRUEBA
• Retire el dispositivo de la bolsa. NO toque la paleta (vea la figura B8).
• Revise que con el dispositivo se incluya un paquete de absorbente (vea la
figura B9). Si no hay un paquete de absorbente, elimine el dispositivo y
obtenga una bolsa nueva para la prueba.
• Inserte la paleta del dispositivo completamente en el frasco que contiene la
muestra de sangre (vea la figura B10). Verifique que la paleta toque el fondo
del frasco. La ventanilla de resultados del dispositivo debe estar hacia usted
(vea la figura B11).
• Comience a contar los minutos de la prueba (vea la figura B12). NO re
dispositivo del frasco mientras está haciendo la prueba. Aparecerá un líquido
rosa que subirá a través de la ventanilla de resultados. El líquido rosa
desaparecerá gradualmente a medida que se revela la prueba (vea la figura B13).
• Lea los resultados después de 20 minutos, pero no más de 40 minutos en un
lugar completamente iluminado.
• Consulte las secciones Lectura del resultado de la prueba e Interpretación del
r
esultado de la prueba al dorso de estas instrucciones.
tire el
Page 14
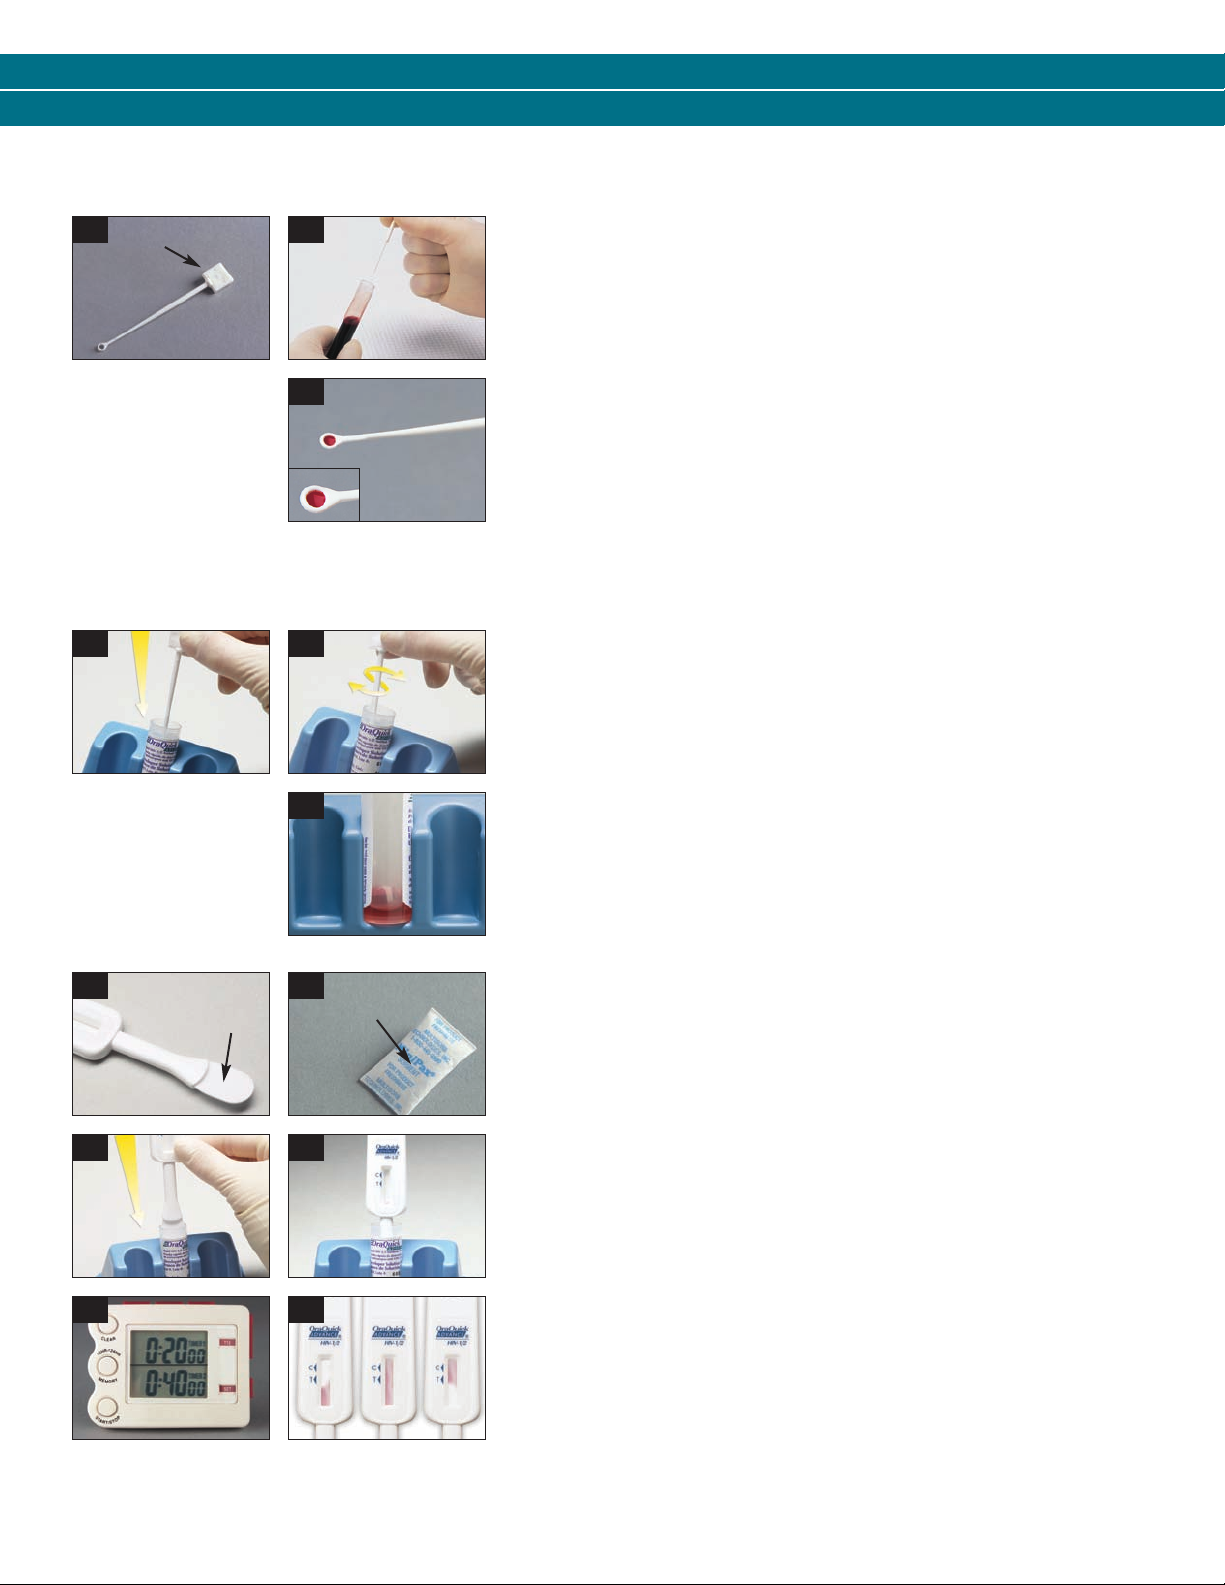
VENOPUNCIÓN SANGRE – OBTENCIÓN DE MUESTRA Y PROCEDIMIENTO DE PRUEBA
C1
Mango
NOTA: Si deja caer el aro o si éste entra en contacto con
alguna superficie, elimínelo en un envase para peligros
biológicos. Obtenga un nuevo aro para la muestra.
C4 C5
C2
C3
C6
Paso 1 – OBTENER LA MUESTRA
• Usando una técnica estándar de flebotomía venosa, obtenga una muestra de
sangre usando un tubo que contenga cualquiera de
los siguientes anticoagulantes: EDTA (tapa lavanda), heparina sódica (tapa
verde) o citrato de sodio (tapa azul claro). No se han puesto a prueba
otros coagulantes y es posible que den resultados incorrectos. Si no se
hace la prueba inmediatamente después de la obtención de la muestra, ésta
se puede almacenar a 2°C– 30°C (36°F– 86°F) por un periodo de hasta 5 días.
• Antes de hacer la prueba, mezcle el tubo suavemente invirtiéndolo varias
veces para asegurar la homogeneización de la muestra.
• Tome un aro para obtención de muestras nuevo, sujetándolo por el extremo
grueso o “mango” (vea la figura C1).
• Coloque el aro en el tubo de sangre (vea la figura C2). V
erifique que el aro
esté completamente lleno de sangre (vea la figura C3).
Paso 2 – MEZCLAR
• Inmediatamente inserte el aro con sangre completamente en el frasco
(vea la figura C4).
• Use el aro para mezclar la muestra de sangre dentro de la solución
eveladora (en adelante la “solución”) (vea la figura C5 ).
r
• Retire el aro usado de la solución. Elimine el aro en un envase para
peligros biológicos.
• Revise la solución para asegurarse de que se ve de color rosa. Eso significa
que la sangre está correctamente mezclada con la solución (vea la figura C6).
Si la solución no se ve de color rosa, deseche los materiales de la prueba en
un envase para peligros biológicos. Comience la prueba otra vez. Use una
bolsa nueva y una nueva muestra de sangre.
C7
Paleta
C9 C10
C11
C8
C12
Paquete de
absorbente
Paso 3 – HACER LA PRUEBA
• Retire el dispositivo de la bolsa. NO toque la paleta (vea la figura C7).
• Revise que con el dispositivo se incluya un paquete de absorbente (vea la
figura C8). Si no hay un paquete de absorbente, elimine el dispositivo y
obtenga una bolsa nueva para la prueba.
• Inserte la paleta del dispositivo completamente en el frasco que contiene la
muestra de sangre (vea la figura C9). Verifique que la paleta toque el fondo
del frasco. La ventanilla de resultados del dispositivo debe estar hacia usted
(vea la figura C10).
• Comience a contar los minutos de la prueba (vea la figura C11). NO re
dispositivo del frasco mientras está haciendo la prueba. Aparecerá un líquido
rosa que subirá a través de la ventanilla de resultados. El líquido rosa
• Lea los resultados después de 20 minutos, pero no más de 40 minutos en un
lugar completamente iluminado.
• Consulte las secciones Lectura del resultado de la prueba e Interpretación del
r
esultado de la prueba al dorso de estas instrucciones.
tire el
Page 15
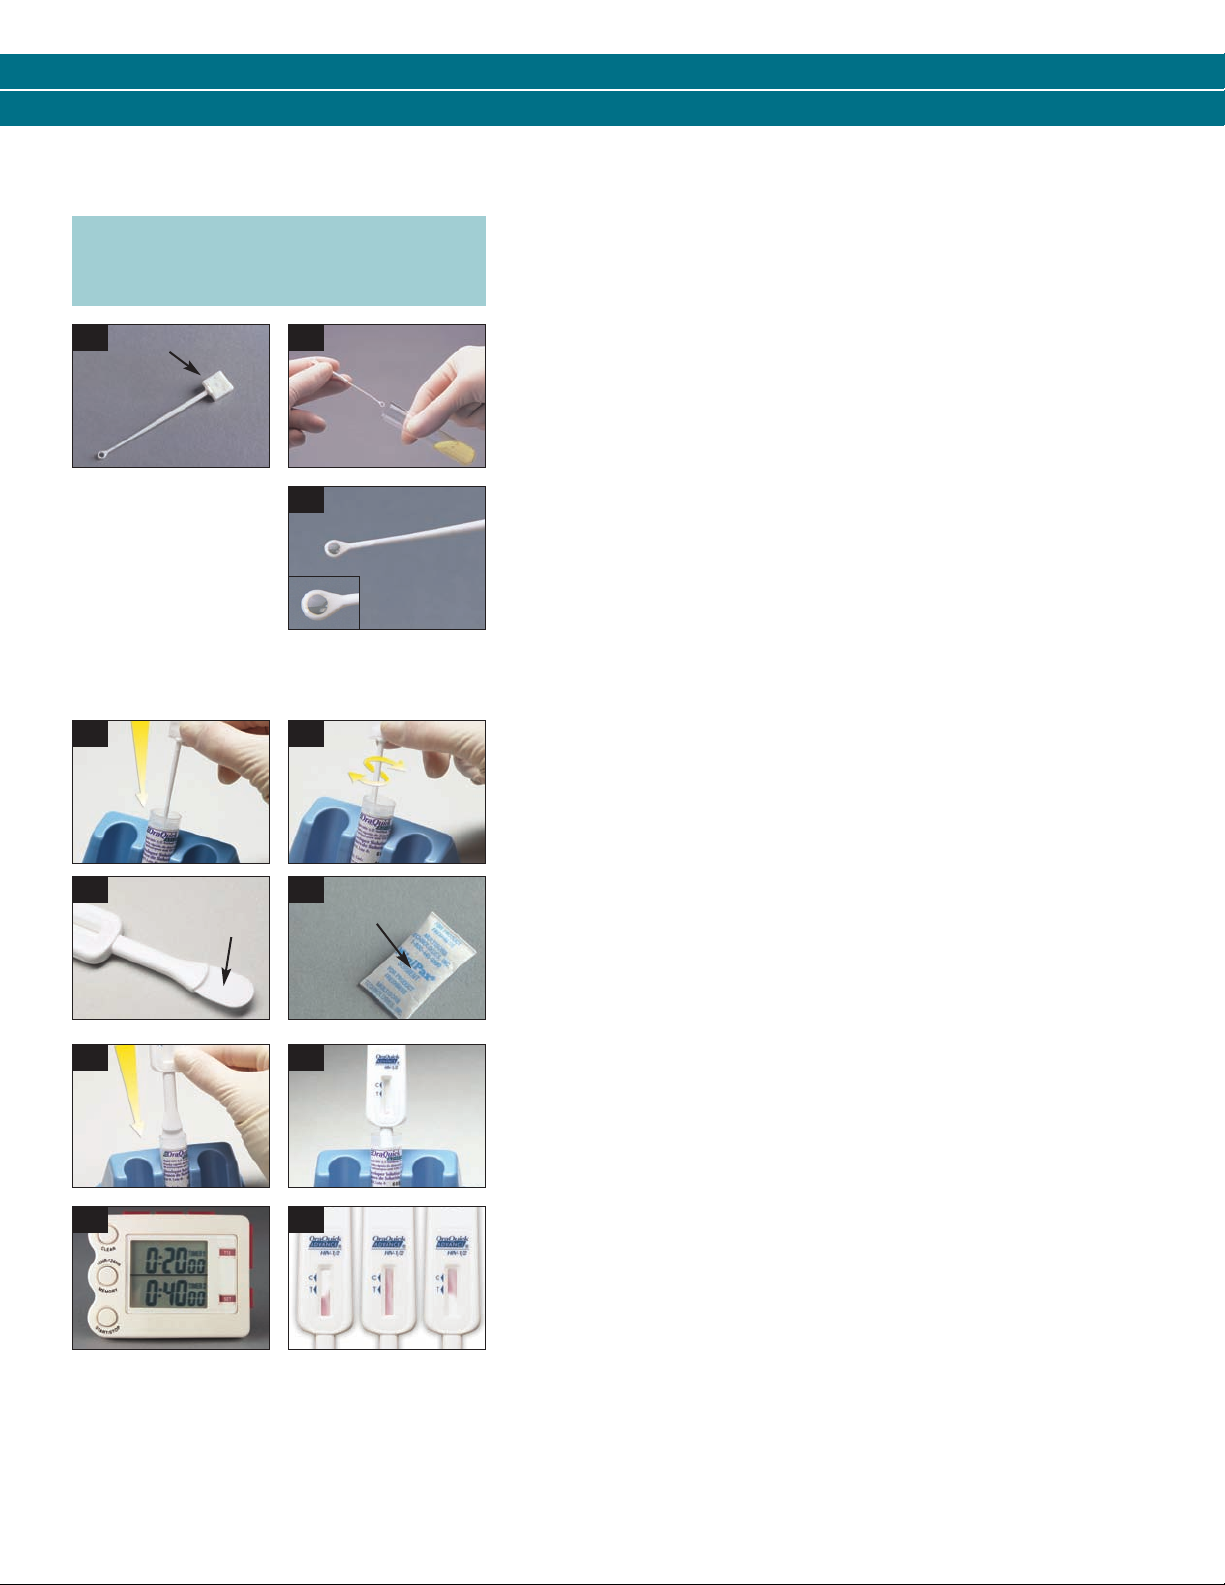
PLASMA – OBTENCIÓN DE MUESTRA Y PROCEDIMIENTO DE PRUEBA
NOTA: Las pruebas con plasma sólo se pueden
hacer en labora torios certificados para realizar
pruebas de complejidad moderada.
D1
NOTA: Si deja caer el aro o si éste entra en contacto con
alguna superficie, elimínelo en un envase para peligros
biológicos. Obtenga un nuevo aro para la muestra.
D4 D5
Mango
D2
D3
Paso 1 – OBTENER LA MUESTRA
• Usando una técnica estándar de flebotomía venosa, obtenga una muestra de
sangre usando un tubo que contenga el anticoagulante EDTA (tapa lavanda):
No se han puesto a prueba otros coagulantes y es posible que den
resultados incorrectos. Si no se hace la prueba inmediatamente después
de obtener la muestra, ésta se podrá almacenar como sangre por un periodo
de hasta 5 días a 2°C – 30°C (36°F– 86°F) o como plasma hasta 7 días a
2°C– 8°C (36°F– 46°F).
• Centrifuge el tubo de sangre (1000 - 1300 x g, durante apr
oximadamente
5 minutos, no se requiere refrigeración) para separar las células del plasma.
• Destape lentamente el tubo, moviendo el tapón hacia usted, para que los
vapores salgan por el lado opuesto.
• Tome un aro para obtención de muestras, sujetándolo por el extremo grueso
o “mango” (vea la figura D1).
• Coloque el aro en el tubo de plasma (vea la figura D2).
• Verifique que el aro esté completamente lleno de plasma (vea la figura D3).
Paso 2 – MEZCLAR
• Inmediatamente inserte el aro con plasma completamente en el frasco
(vea la figura D4).
• Use el aro para mezclar la muestra de plasma dentro de la solución
reveladora (en adelante la “solución”) (vea la figura D5).
• Retire el aro usado de la solución. Elimine el aro en un envase para
peligros biológicos.
D6
Paleta
D7
Paquete de
absorbente
Paso 3 – HACER LA PRUEBA
• Retire el dispositivo de la bolsa. NO toque la paleta (vea la figura D6).
• Revise que con el dispositivo se incluya un paquete de absorbente (vea la
figura D7). Si no
hay un paquete de absorbente, elimine el dispositivo y
obtenga una bolsa nueva para la prueba.
• Inserte la paleta del dispositivo completamente en el frasco que contiene la
D8 D9
muestra de sangr
del frasco. La ventanilla de resultados del dispositivo debe estar hacia usted
e (vea la figura D8). Verifique que la paleta toque el fondo
(vea la figura D9).
• Comience a contar los minutos de la prueba (vea la figura D10). NO re
dispositivo del frasco mientras está haciendo la prueba. Aparecerá un líquido
rosa que subirá a través de la ventanilla de resultados. El líquido rosa
desaparecerá gradualmente a medida que se revela la prueba (vea la figura D11).
D10
D11
• Lea los resultados después de 20 minutos, pero no más de 40 minutos en un
lugar completamente iluminado.
• Consulte las secciones Lectura del resultado de la prueba e Interpretación del
r
esultado de la prueba al dorso de estas instrucciones.
LIMPIEZA GENERAL DESPUÉS DE LA PRUEBA
• Elimine los materiales utilizados en la prueba en un envase para peligros biológicos.
• Cuando use guantes, cámbieselos entre cada prueba para evitar la contaminación. Elimine los guantes usados en un envase para peligr
• Use una solución recién preparada de blanqueador al 10% para limpiar cualquier derrame.
tire el
os biológicos.
Page 16
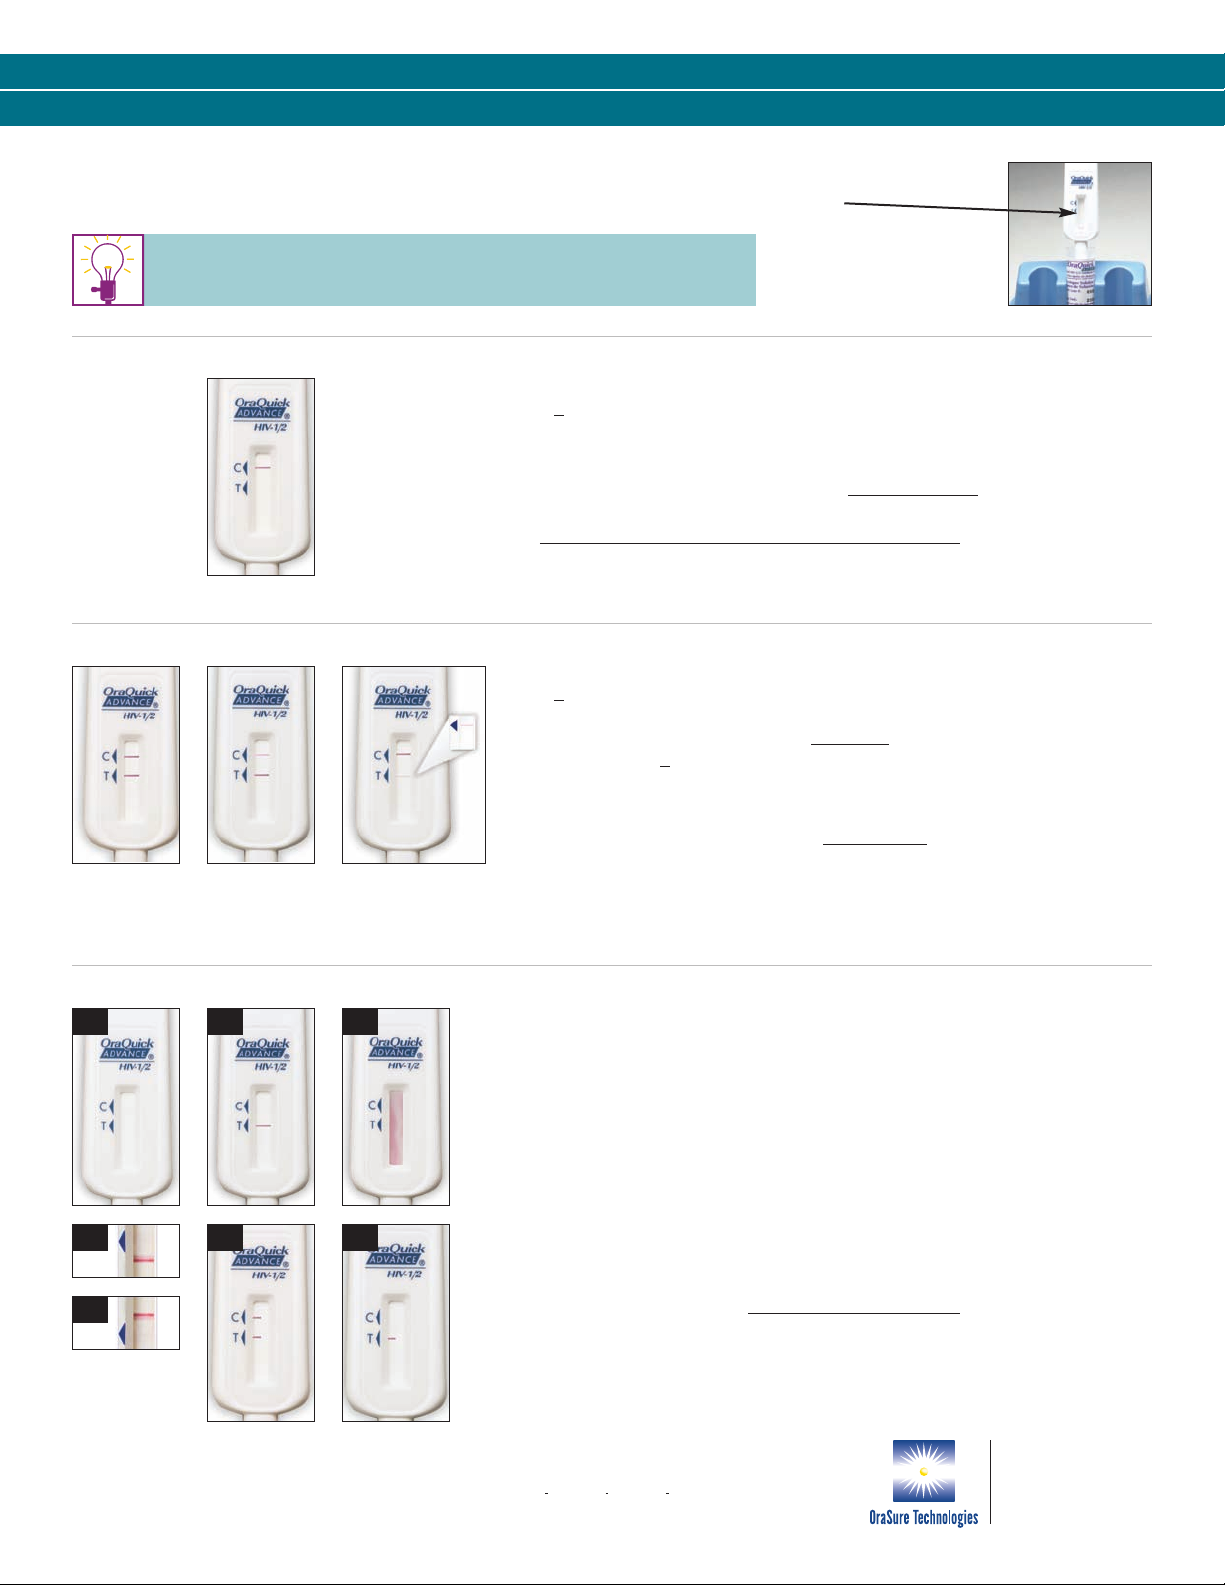
LECTURA DEL RESULTADO DE LA PRUEBA –
VEA LA VENTANILLA DE RESULTADOS DEL DISPOSITIVO DE PRUEBA
SE REQUIERE ILUMINACIÓN ADECUADA. Lea el resultado
después de 20 minutos, pero no deje transcurrir más de 40.
NO REACTIVO
REACTIVO
El resultado es NO REACTIVO si:
• Aparece una línea de color rojo-púrpura junto al triángulo que dice “C”
y
NO aparece ninguna línea junto al triángulo que dice “T.”
Interpretación del resultado de la prueba:
Un resultado No reactivo significa que no se detectaron anticuerpos anti
VIH-1 y VIH-2 en la muestra. El resultado de la prueba se interpreta como
NEGATIVO ante anticuerpos contra VIH-1 y VIH-2.
para informar al paciente del resultado y su interpretación.
Siga las pautas del CDC
3
El resultado es REACTIVO si:
• Aparece una línea de color rojo-púrpura junto al triángulo que dice “C”
y
aparece una línea rojo-púrpura junto al triángulo que dice “T.” Una de
esas líneas puede ser más oscura que la otra. NOTA: El resultado de la prueba
es Reactivo si aparece una línea completa
que dice “T” y
junto al triángulo “C”, sin importar si son muy tenues.
rojo-púrpura junto al triángulo
Interpretación del resultado de la prueba:
Un resultado Reactivo significa que se detectaron anticuerpos anti VIH-1
y VIH-2 en la muestra. El resultado de la prueba se interpreta como
PRELIMINAR POSITIVO ante anticuerpos anti VIH-1 y/o VIH-2. Siga las
pautas del CDC para informar al paciente del resultado y su interpretación.
INVÁLIDO
a b c
d1
d2
e f
El resultado es INVÁLIDO si:
• NO aparece ninguna línea rojo-púrpura junto al triángulo que dice “C”
(vea las figuras a y b), o
• Después de 20 minutos el fondo de la ventana de r
esultados se vuelve
rojizo y se dificulta la lectura de los resultados (vea la figura c), o
• Si alguna de las líneas NO está dentr
o de las áreas del triángulo “C” o “T”
(vea las figuras d1 y d2).
• Se observa una línea parcial en un lado de las áreas del triángulo “C” o “T”
(véa las figuras e y f).
Interpretación del resultado de la prueba:
Un resultado de prueba inválido significa que surgió algún problema al
ejecutar la prueba, bien sea relacionado con la muestra o con el dispositivo.
Los resultados inválidos no se pueden interpretar
una bolsa nueva y una nueva muestra de fluido oral, sangre de pinchazo de
dedo o venopunción, o una muestra de plasma. Comuníquese con el
Departamento de Atención a Clientes de OraSure Tecnologies si no puede
obtener un resultado de prueba válido después de repetir la prueba.
©2012, 2001 OraSure Technologies, Inc. Patente estadounidense
no6,303,081, no7,192,555, no7,541,194 varias patentes internacionales
y estadounidenses en trámite. OraQuick ADVANCE® es marca
registrada de OraSure Technologies, Inc. Item #3001-1216 rev. 09/12
. Repita la prueba con
220 East First Street
Bethlehem, PA 18015
Te l: 1-800-ORASURE
Fax: (610) 882-3572
Web: www.orasure.com
 Loading...