

Page 1
Orange Pi Manual Copy right by Shenzhen Xunlong Software Co., Ltd
I
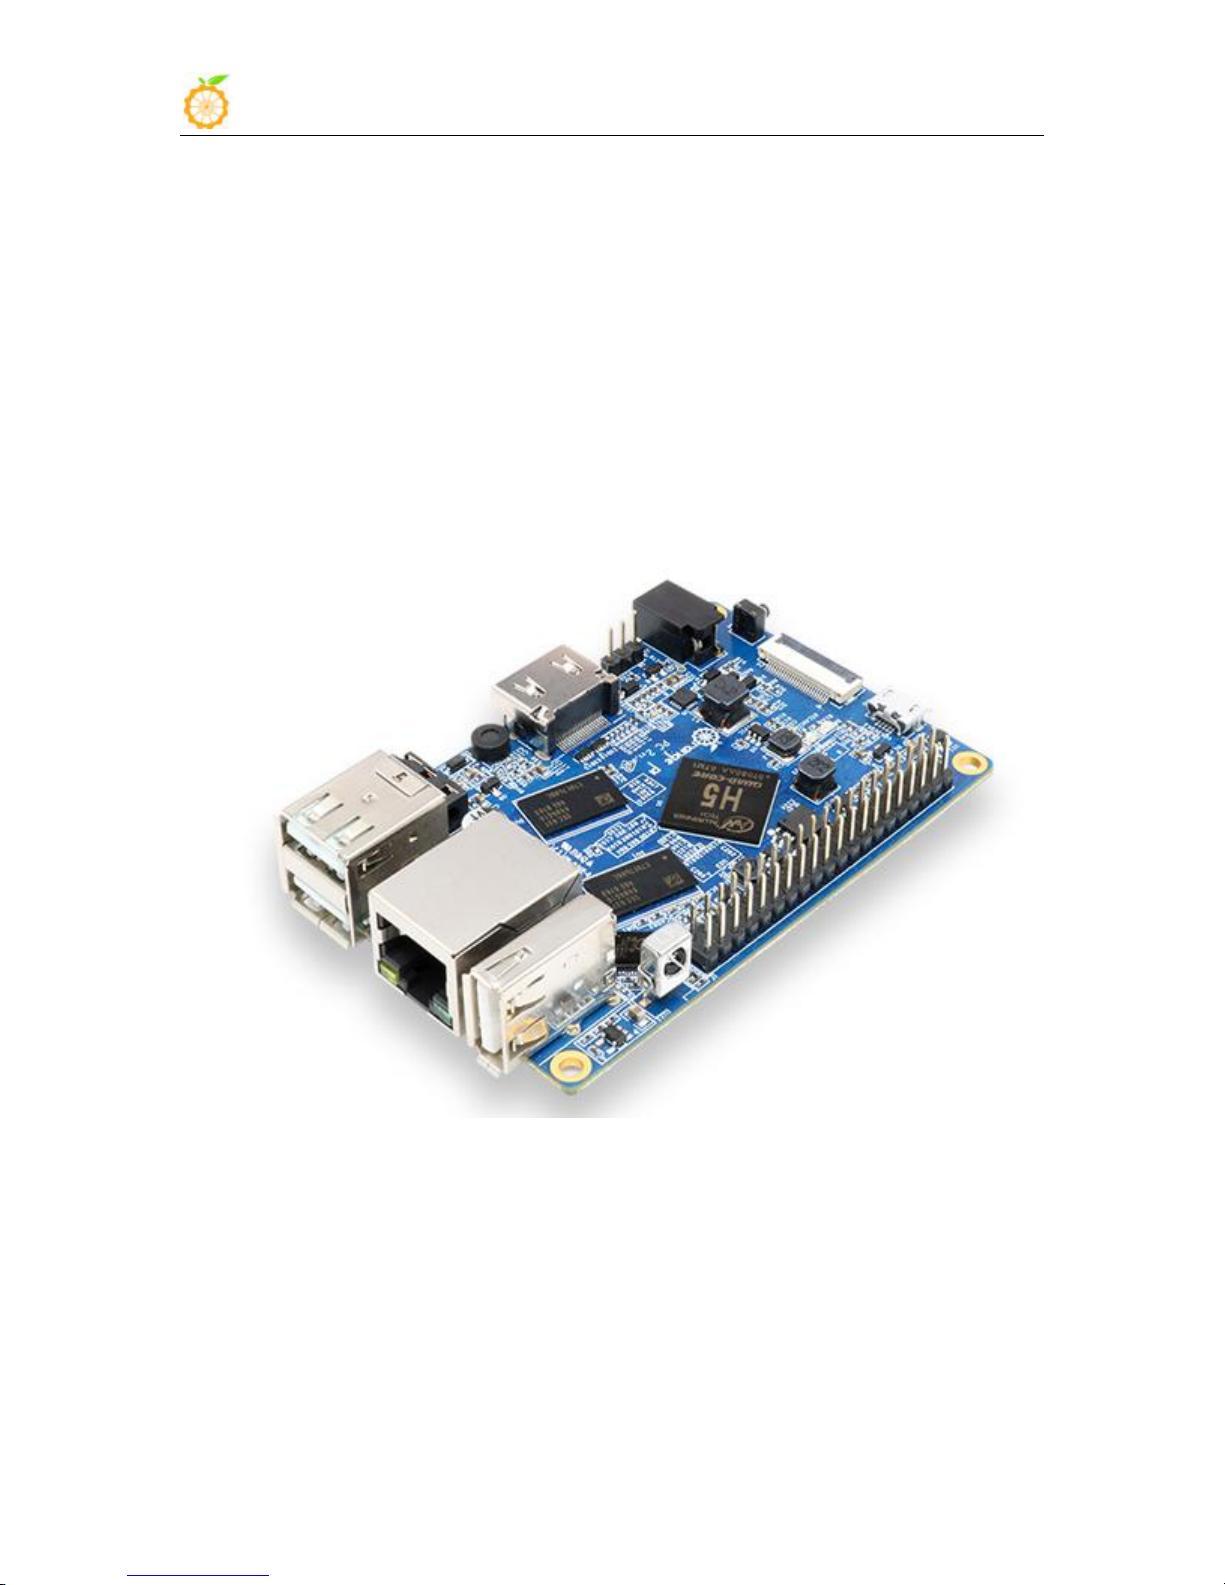
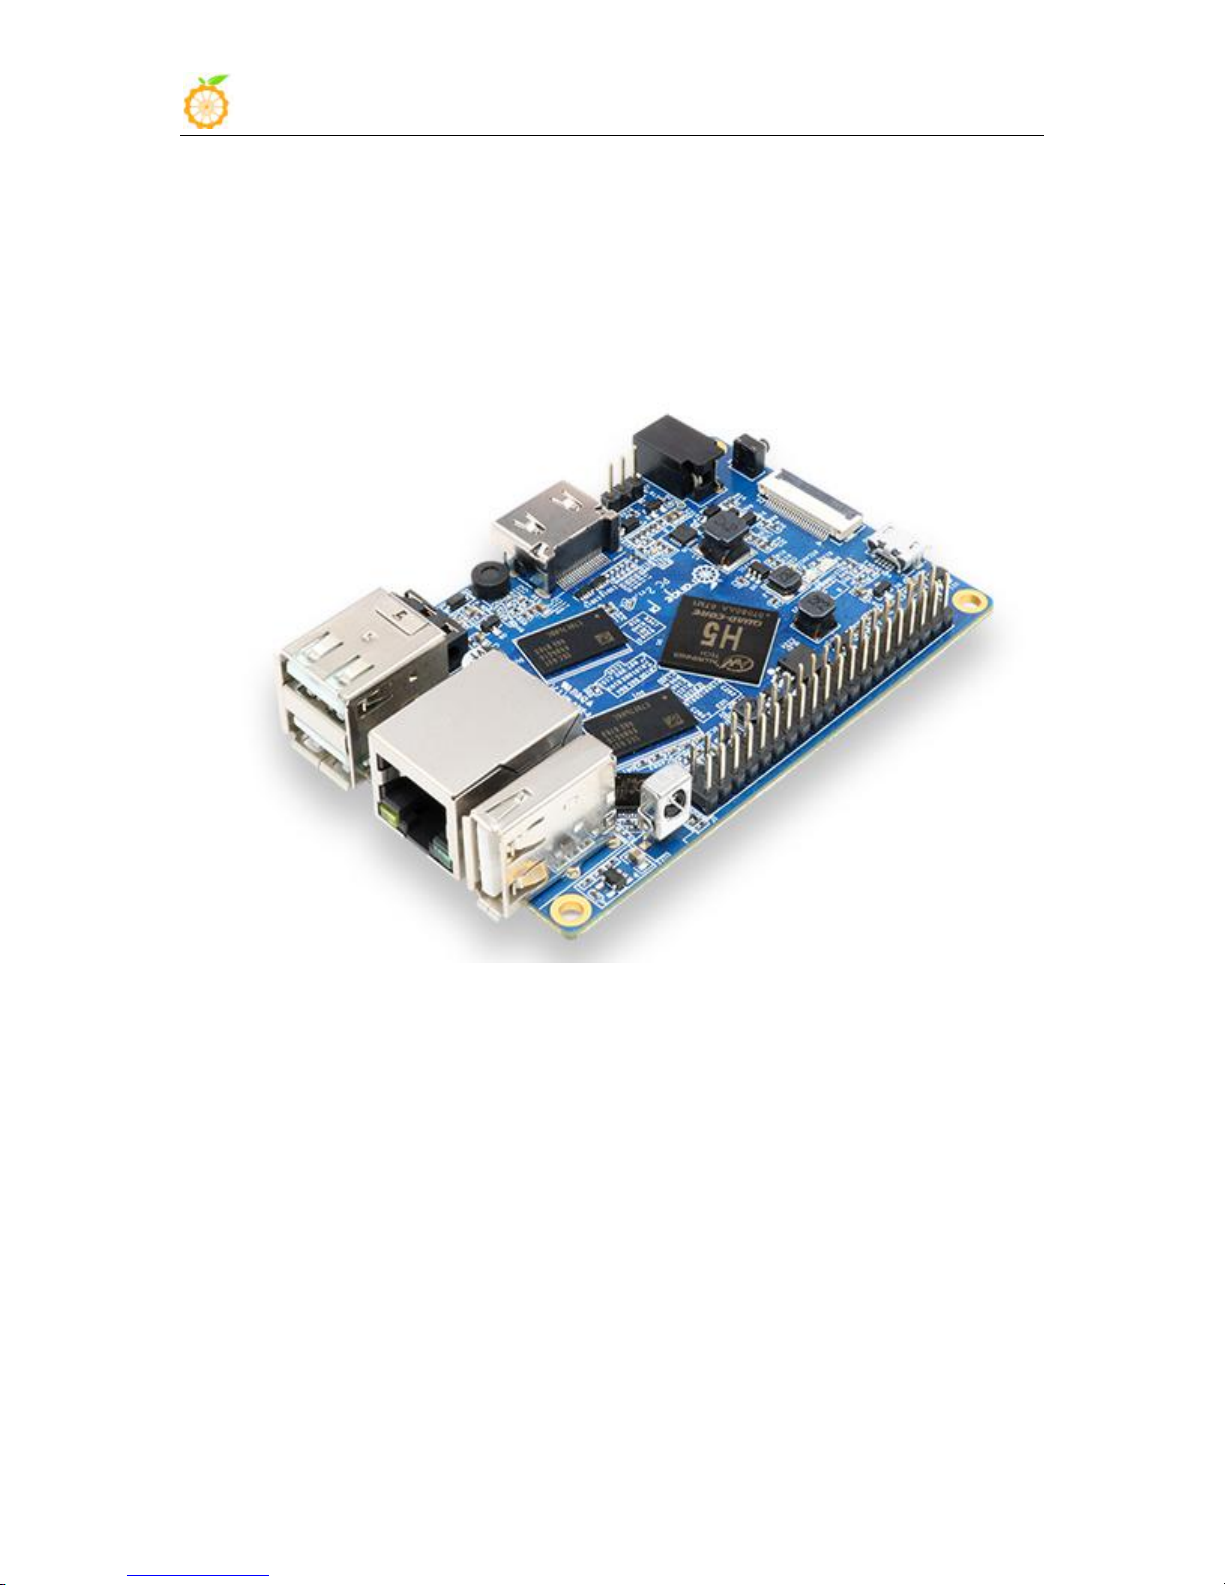
Orange Pi PC2
User Manual
www.orangepi.org www.xunlong.tv
Page 2

Orange Pi Manual Copy right by Shenzhen Xunlong Software Co., Ltd
II
Contents
I. Orange Pi Introduction...........................................................................................................................1
1. What is Orange Pi PC2?........................................................................................................1
2. What can I do with Orange Pi PC2?......................................................................................1
3. Whom is it for?......................................................................................................................1
4. Hardware specification of Orange Pi PC2............................................................................ 1
5. GPIO Specifications..............................................................................................................4
6. Specification of CSI Camera Connector...............................................................................6
II. Using Method Introduction...................................................................................................................7
1. Step 1: Prepare Accessories Needed..................................................................................... 7
2. Step 2: Prepare a TF Card for Booting..................................................................................8
3. Step 3: Start your Orange Pi................................................................................................14
4. Step 4: Turn off your Orange Pi correctly...........................................................................17
5. Other configuration............................................................................................................. 17
6. Universal software configurationr.......................................................................................19
III. Linux Kernel Source Code Compilation...........................................................................................32
1. Download Linux Source Code............................................................................................ 32
2. Compile Project Source Code............................................................................................. 33
3. Update the Kernal Image File and Replace Library........................................................... 35
IV. Android Kernel Source Code Compilation.......................................................................................38
1. Install JDK...........................................................................................................................38
2. Install Platform Supported Software...................................................................................39
3. Download Android Source Package....................................................................................39
4. Install Compiler Tool Chain................................................................................................ 40
5. Compile Lichee source Code.............................................................................................. 40
6. Compile Command of Android Code..................................................................................40
V. Use Project Configuration Files..........................................................................................................44
1. sys_config.fex Introduction.................................................................................................44
2. Examples..............................................................................................................................44
VI. OrangePi Driver development...........................................................................................................47
1. Device Driver and Application Programming.....................................................................47
2. Compile device driver......................................................................................................... 50
3. Corss-complile or compiled Application code....................................................................53
4. Running driver and application...........................................................................................55
VII. Using Debug tools on OrangePi...................................................................................................... 56
1. Operation Steps on Windows.............................................................................................. 56
2. Operation steps on Linux.....................................................................................................60
www.orangepi.org www.xunlong.tv
Page 3

Orange Pi Manual Copy right by Shenzhen Xunlong Software Co., Ltd
1
I. Orange Pi Introduction
1. What is Orange Pi PC2?
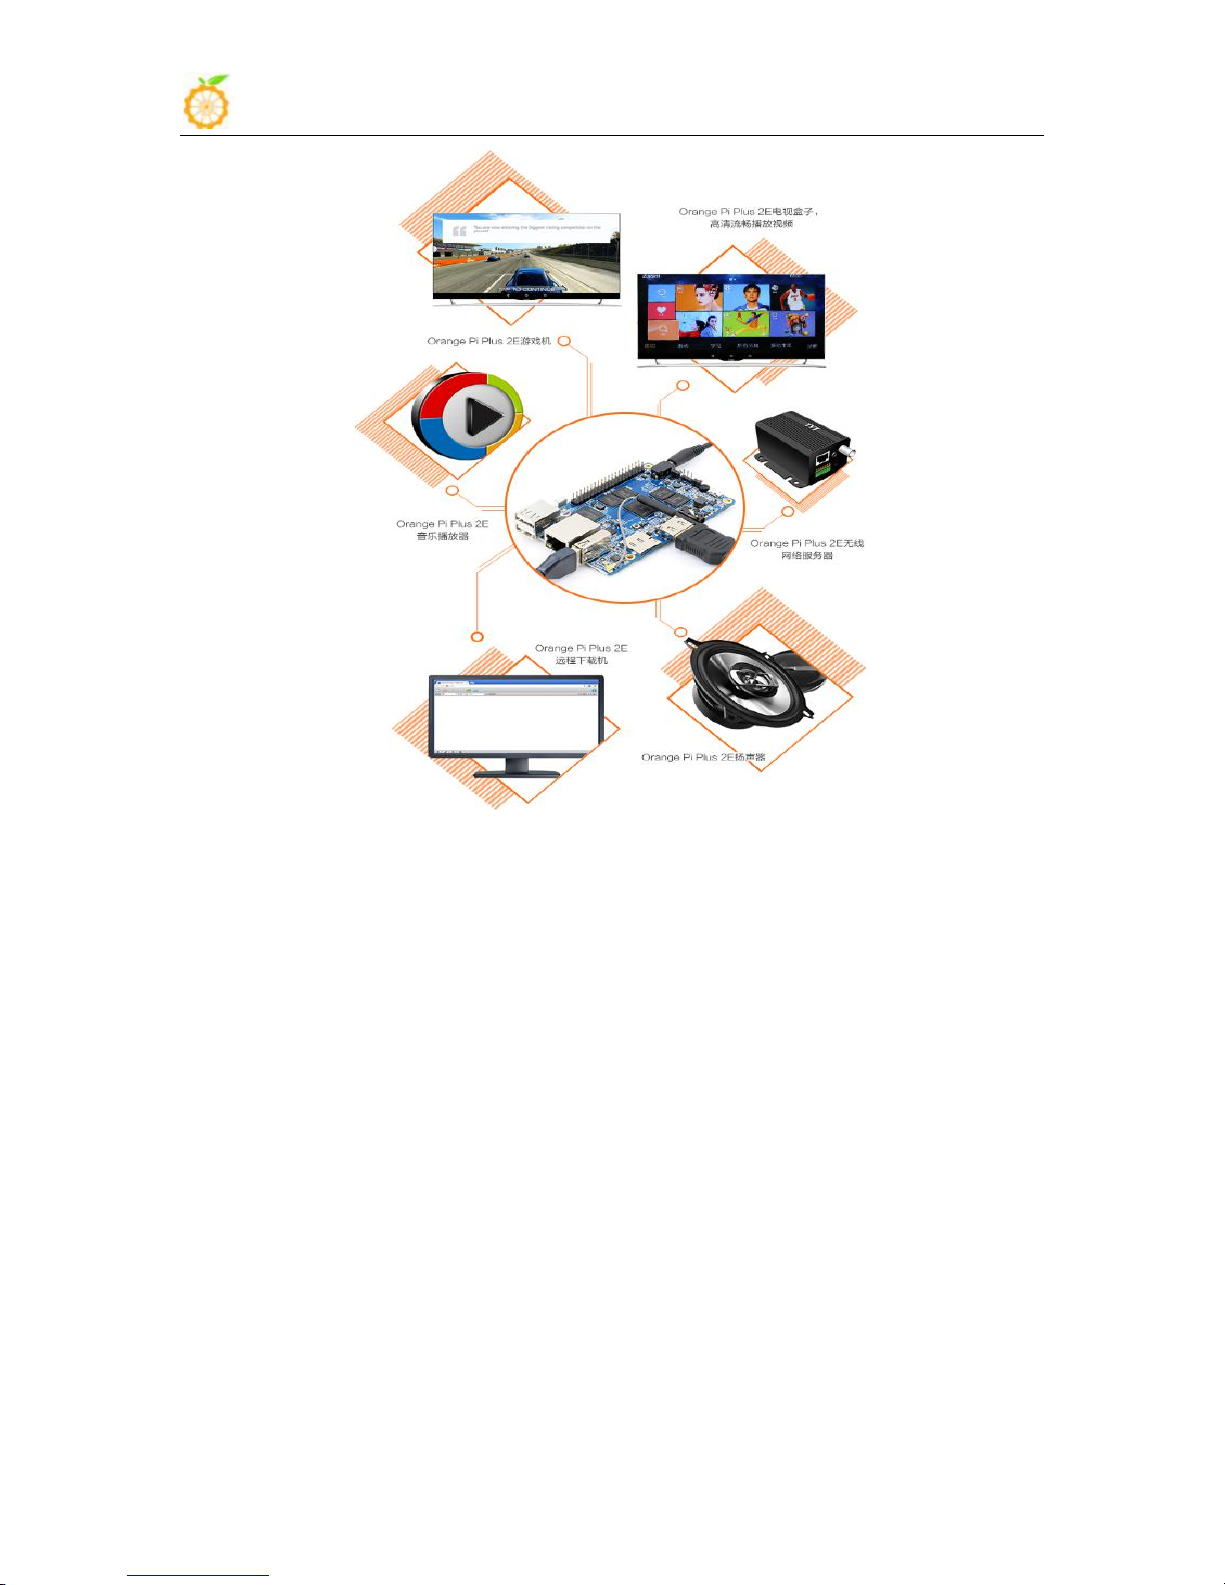
2. What can I do with Orange Pi PC2?
A computer
A wireless server
Games
Music and sounds
HD video
A speaker
Android
Scratch
......
Pretty much anything else, because Orange Pi PC2 is open source
3. Whom is it for?
4. Hardware specification of Orange Pi PC2
Hardware specification
CPU
H5 High Performance Quad-core 64-bit Cortex-A53
GPU
• High Performance Hexa-core Mali450
• OpenGL ES 2.0/1.1/1.0, OpenVG 1.1, EGL
• 40 GFlops, Pixel fill rate greater than 2.7GPixel/s
It’s an open-source single-board computer. It can run Android 5.1,
Ubuntu, Debian, Raspberry Pi Image. It uses the All-winner H5 Soc, and has
1GB DDR3 SDRAM.
You can use it to build…
Orange Pi PC2 is for anyone who wants to create with technology– not
just consuming. It's a simple, fun, useful tool and you can use it to take
control of the world around you.
www.orangepi.org www.xunlong.tv
Page 4

Orange Pi Manual Copy right by Shenzhen Xunlong Software Co., Ltd
2
Memory (SDRAM)
1GB DDR3 (shared with GPU)
On-board Storage
TF card (Max. 32GB) /Emmc slot/NOR flash(2MB)
On-board Network
10/100/1000M Ethernet RJ45
Video Input
A CSI input connector Camera
:
Supports 8-bit YUV422 CMOS sensor interface
Supports CCIR656 protocol for NTSC and PAL
Supports SM pixel camera sensor
Supports video capture solution up to 1080p@30fps
Audio Input
MIC
Video Outputs
Supports HDMI output with HDCP
Supports HDMI CEC
Supports HDMI 30 function
Integrated CVBS
Supports simultaneous output of HDMI and CVBS
Audio Output
3.5 mm Jack and HDMI
Power Source
DC input, USB OTG input don't supply power
USB 2.0 Ports
Three USB 2.0 HOST, one USB 2.0 OTG
Button
Power Button(SW4)
Low-level
peripherals
40 Pins Header,compatible with Raspberry Pi B+
GPIO(1x3) pin
UART, ground.
LED
Power led & Status led
Key
Power, IR input
Supported OS
Android Lubuntu, Debian, Raspberry Pi Image
Interface definition
Product size
85mm × 56mm
Weight
63g
Orange Pi™ is a trademark of the Shenzhen Xunlong Software CO., Limited
www.orangepi.org www.xunlong.tv
Page 5
Orange Pi Manual Copy right by Shenzhen Xunlong Software Co., Ltd
3
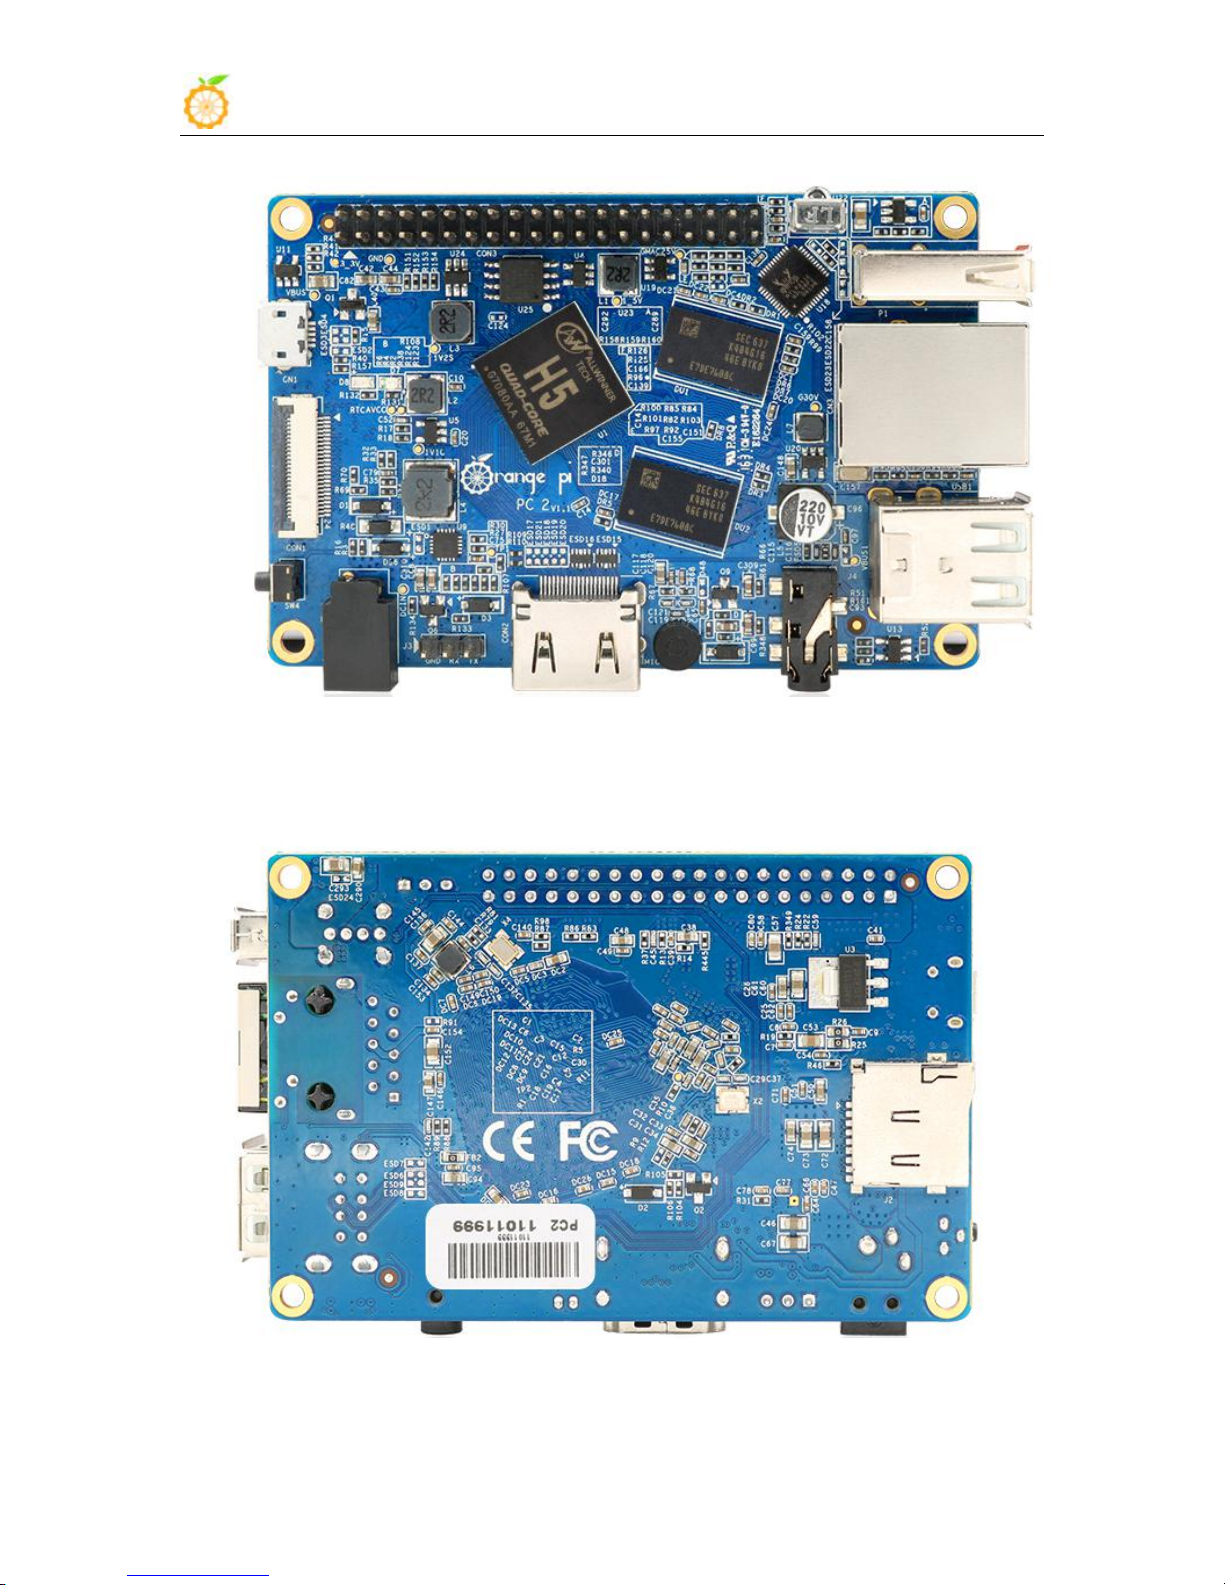
Top view
Bottom view
www.orangepi.org www.xunlong.tv
Page 6
Orange Pi Manual Copy right by Shenzhen Xunlong Software Co., Ltd
4
5. GPIO Specifications
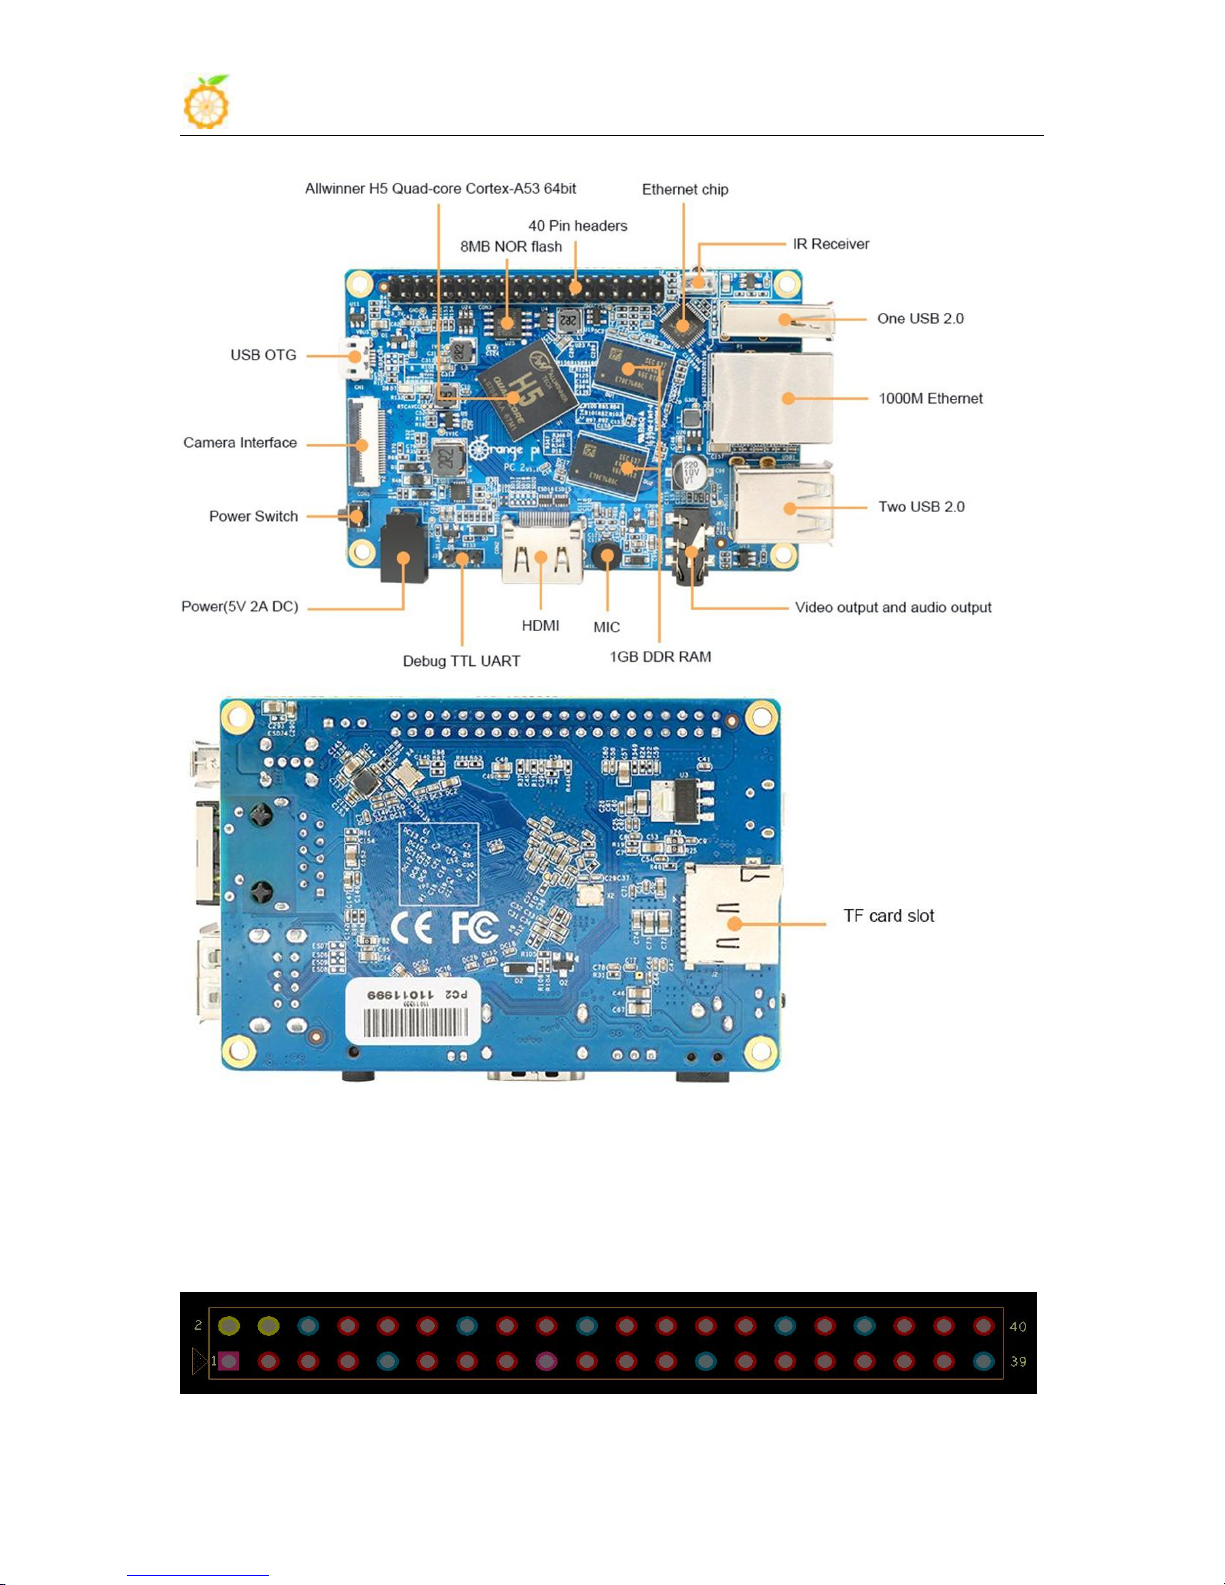
Interface instructions
A 40-pin GPIO interface on the Orange Pi PC2 is the same as Model A
and Model B of Raspberry Pi. The picture below is GPIO pin define of
Orange Pi PC2.
www.orangepi.org www.xunlong.tv
Page 7

Orange Pi Manual Copy right by Shenzhen Xunlong Software Co., Ltd
5
OrangePi(H5)
CON3-P01
VCC-3V3
CON3-P02
VCC-5V
CON3-P03
TWI0-SDA
PA12
CON3-P04
VCC-5V
CON3-P05
TWI0-SCK
PA11
CON3-P06
GND
CON3-P07
PWM1
PA6
CON3-P08
UART3_TX
PA13
CON3-P09
GND
CON3-P10
UART3_RX
PA14
CON3-P11
UART2_RX
PA1
CON3-P12
PD14
PD14
CON3-P13
UART2_TX
PA2
CON3-P14
GND
CON3-P15
UART2_CTS
PA3
CON3-P16
PC4
PC4
CON3-P17
VCC-3V3
CON3-P18
CAN_RX
PC7
CON3-P19
SPI0_MOSI
PC0
CON3-P20
GND
CON3-P21
SPI0_MISO
PC1
CON3-P22
UART2_RTS
PA2
CON3-P23
SPI0_CLK
PC2
CON3-P24
SPI0_CS0
PC3
CON3-P25
GND
CON3-P26
PA21
PA21
CON3-P27
TWI1-SDA
PA19
CON3-P28
TWI1-SCK
PA18
CON3-P29
PA7
PA7
CON3-P30
GND
CON3-P31
PA8
PA8
CON3-P32
UART1_RTS
PG8
CON3-P33
PA9
PA9
CON3-P34
GND
CON3-P35
PA10
PA10
CON3-P36
UART1_CTS
PG9
CON3-P37
PA20
PA20
CON3-P38
UART1_TX
PG6
CON3-P39
GND
CON3-P40
UART1_RX
PG7
www.orangepi.org www.xunlong.tv
Page 8
Orange Pi Manual Copy right by Shenzhen Xunlong Software Co., Ltd
6
6. Specification of CSI Camera Connector
CON1-P01
NC
CON1-P02
GND
CON1-P03
TWI2-SDA
PE13
CON1-P04
VCC-CSI
CON1-P05
TWI2-SCK
PE12
CON1-P06
CSI-RESET#
PE15
CON1-P07
CSI-VSYNC
PE3
CON1-P08
CSI-STBY-EN
PE15
CON1-P09
CSI-HSYNC
PE2
CON1-P10
VDD1V8-CSI
CON1-P11
VCC-CSI
CON1-P12
CSI-D7
PE11
CON1-P13
CSI-MCLK
PE1
CON1-P14
CSI-D6
PE10
CON1-P15
GND
CON1-P16
CSI-D5
PE9
CON1-P17
CSI-PCLK
PE0
CON1-P18
CSI-D4
PE8
CON1-P19
CSI-D0
PE4
CON1-P20
CSI-D3
PE7
CON1-P21
CSI-D1
PE5
CON1-P22
CSI-D2
PE6
CON1-P23
GND
CON1-P24
AFVCC-CSI
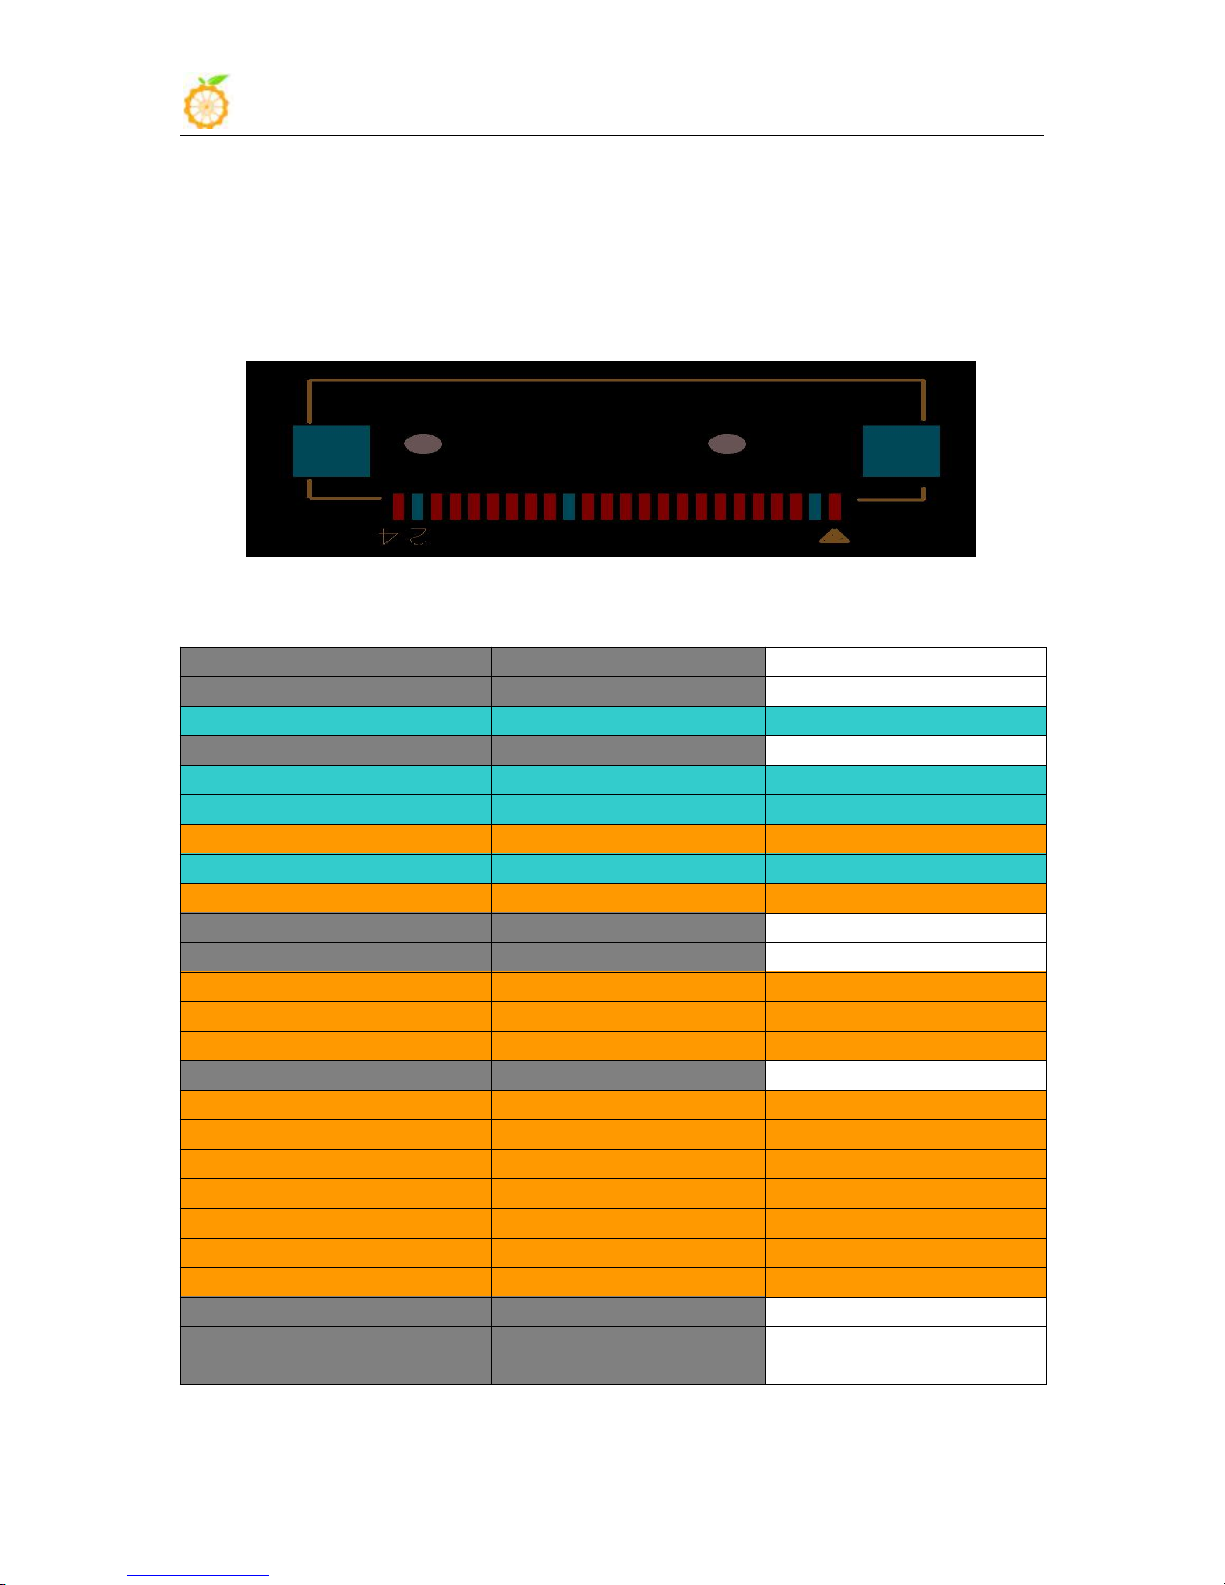
The CSI Camera Connector is a 24-pin FPC connector which can
connect external camera module with proper signal pin mappings. The pin of
CIS connector can be defined as follows. The connector marked with "CON
1" on the Orange Pi PC2 is camera connector.
Orange Pi PC2-CSI
www.orangepi.org www.xunlong.tv
Page 9

Orange Pi Manual Copy right by Shenzhen Xunlong Software Co., Ltd
7
II. Using Method Introduction
1. Step 1: Prepare Accessories Needed
No.
Items
Requirements and Instructions
1
TF card
8GB min.; class 10. Branded TF cards would
be reference which are much more reliable.
2
HDMI to HDMI
cable or HDMI to
DVI cable
HDMI to HDMI cable is used to connect HD
TV or HD monitor
3
AV video cable
A standard AV video cable can be used to
connect stimulated monitor if a HDMI monitor
is unavailable.
4
Keyboard and
mouse
Any keyboard and mouse with USB port is
applicable; Keyboard and mouse are
high-power, so a USB concentrator is required.
5
Ethernet cable/USB
WiFi(Optional)
Network is optional, It makes more convenient
to mount and upgrade software in your Orange
Pi PC.
6
DC power adapter
5V/2V min. high qualified power adapter, OTG
can not used a power supply.
7
Audio cable
(Optional)
You can select an audio cable with 3.5mm jack
to feel stereo audio.
Follow these steps, you can configure and run your Orange Pi in a very
short period of time. Boot your Orange Pi need to complete the following
steps.
You need at least some accessories like the following if it is your first
time to use the Orange Pi.
HDMI to HDMI cable HDMI to DVI cable AV video cable
www.orangepi.org www.xunlong.tv
Page 10
Orange Pi Manual Copy right by Shenzhen Xunlong Software Co., Ltd
8
2. Step 2: Prepare a TF Card for Booting
1) Write Linux into TF Card Based on Windows Platform
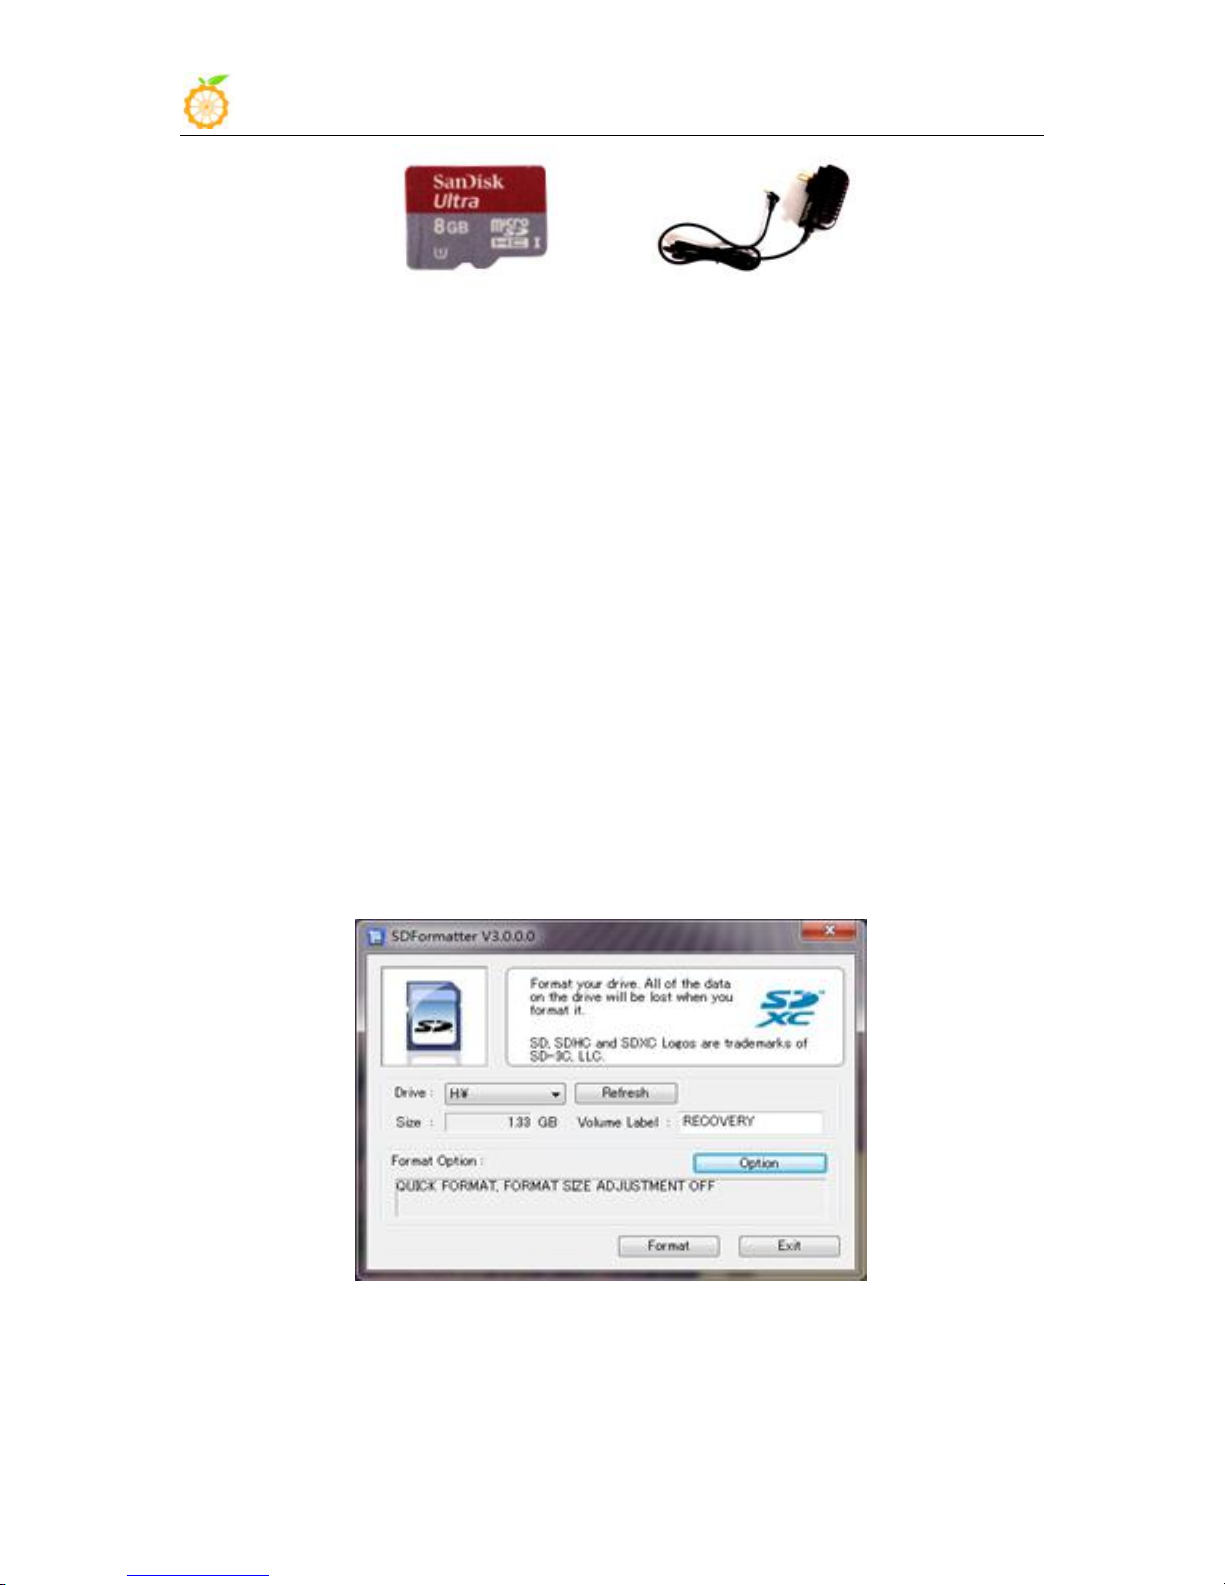
a. Inserting the TF card into the computer, the capacity of the card must be
b. Formatting the TF card.
i Download tools for formatting TF card, such as TF Formatter, it
ii Unzip the downloaded files, and run setup.exe
iii In the options settings select the "format" button for quick
TF card DC power adapter
In order to use Orange Pi normally, you must install the operating system
into TF card first.
bigger than the operating system, usually requires 8GB or bigger.
could be downloaded from:
https://www.sdcard.org/downloads/formatter_4/eula_windows/
formatting. "Format size adjustment" select "(ON)"
www.orangepi.org www.xunlong.tv
Page 11
Orange Pi Manual Copy right by Shenzhen Xunlong Software Co., Ltd
9
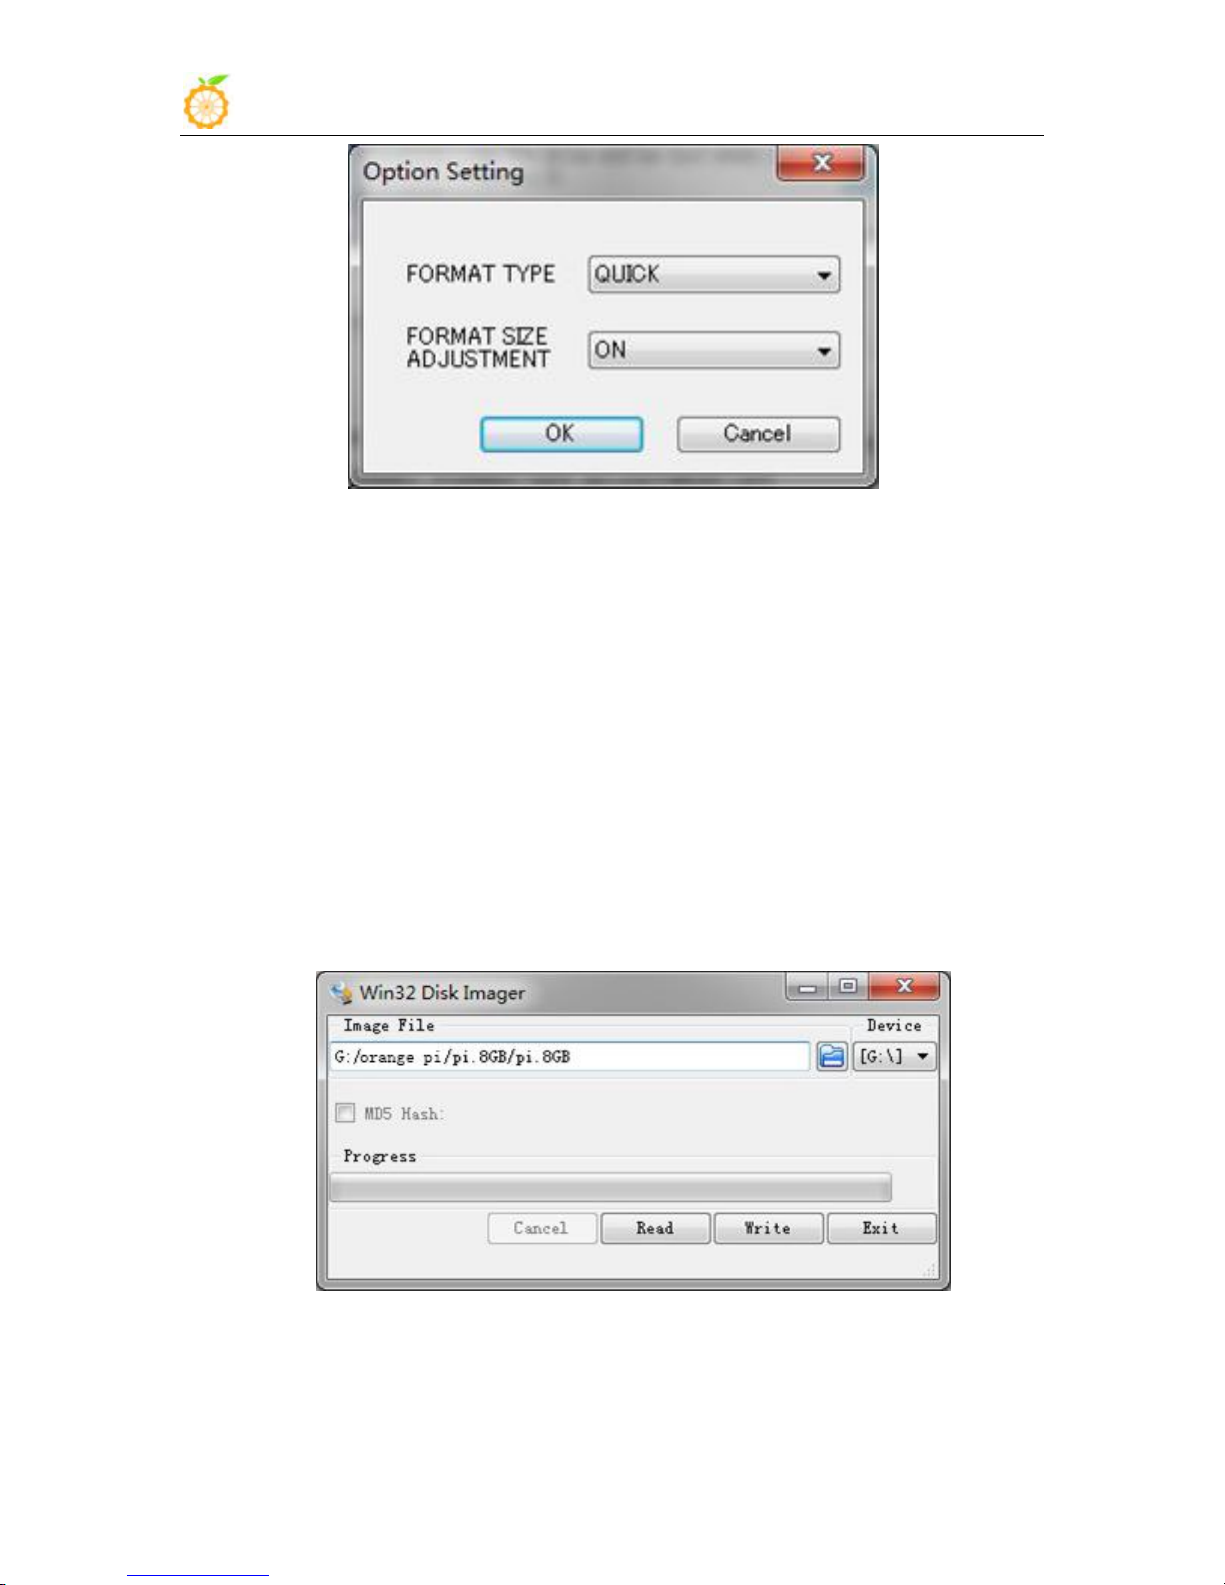
iv Make sure the inserted TF card disk are in accordance with the
v Click the "Format" button.
c. Download the operating system image file from the download page, the
d. Unzip the downloaded file (in addition to the Android system, this
e. Right click to download the file, select "Unzip file" to write image to TF
i Download tools to write image,such as Win32 Diskimager, here is the
ii Select the image file path that has been unzipped.
iii Click "Write" button and wait for the image to write.
iv After the image is written, click "Exit" button.
chosen disk.
page address is as following:
http://www.orangepi.org/downloadresources
method can be used to burn to write, the Android system need another
burn, the following will introduce)
card
download page:
http://sourceforge.net/projects/win32diskimager/files/Archive/
www.orangepi.org www.xunlong.tv
Page 12

Orange Pi Manual Copy right by Shenzhen Xunlong Software Co., Ltd
10
2) Write Linux into TF card based on Linux platform?
a. Inserting the TF card into the computer, the capacity of the card must be
b. Formatting the TF card.
i Run fdisk –l order to make sure TF disk.
ii Run umount /dev/sdxx to uninstall all partitions of TF Card.
iii Run sudo fdisk /dev/sdx order. Use o command to delete all
iv Run sudo mkfs.vfat /dev/sdx1 command to format the TF card
c. Download the OS image from download page
d. Unzip and right click the downloaded file, select " Unzip file"
e. Write image to TF card
i Run sudo fdisk –l order to make sure the TF card disk
ii make sure the image file hash key is the same as download page
iii Run umount /dev/sdxx order to uninstall all partitions in TF Card
iv Run sudo dd bs=4M if=[path]/[imagename] of=/dev/sdx to write
3) Use PhoenixCard tool to write Android image into TF card
larger than the operating system image, usually requires 4GB or greater
capacity.
partitions of TF Card, and then us n order to add a new partition, finally use
w command to save and exit.
partition set up last step to FAT32 form(according to your TF card disk to
replacex). Or you could skip this step since command in Linux will format
TF card automatic.
http://www.orangepi.org/`downloadresources
mention(optional). It will output sha1sum [path]/[imagename], which
should be same as the image paye "SHA-1"
down image file. Wait for the image to write. If it cannot work at 4M, then
replace a 1M which takes more time. You can run sudo pkill –USR1 –n –x
dd order to monitoring procedure.
It is impossible for Android image to be written into TF card by using
dd command under Linux or using Win32 Diskimager under Windows. Here
www.orangepi.org www.xunlong.tv
Page 13
Orange Pi Manual Copy right by Shenzhen Xunlong Software Co., Ltd
11
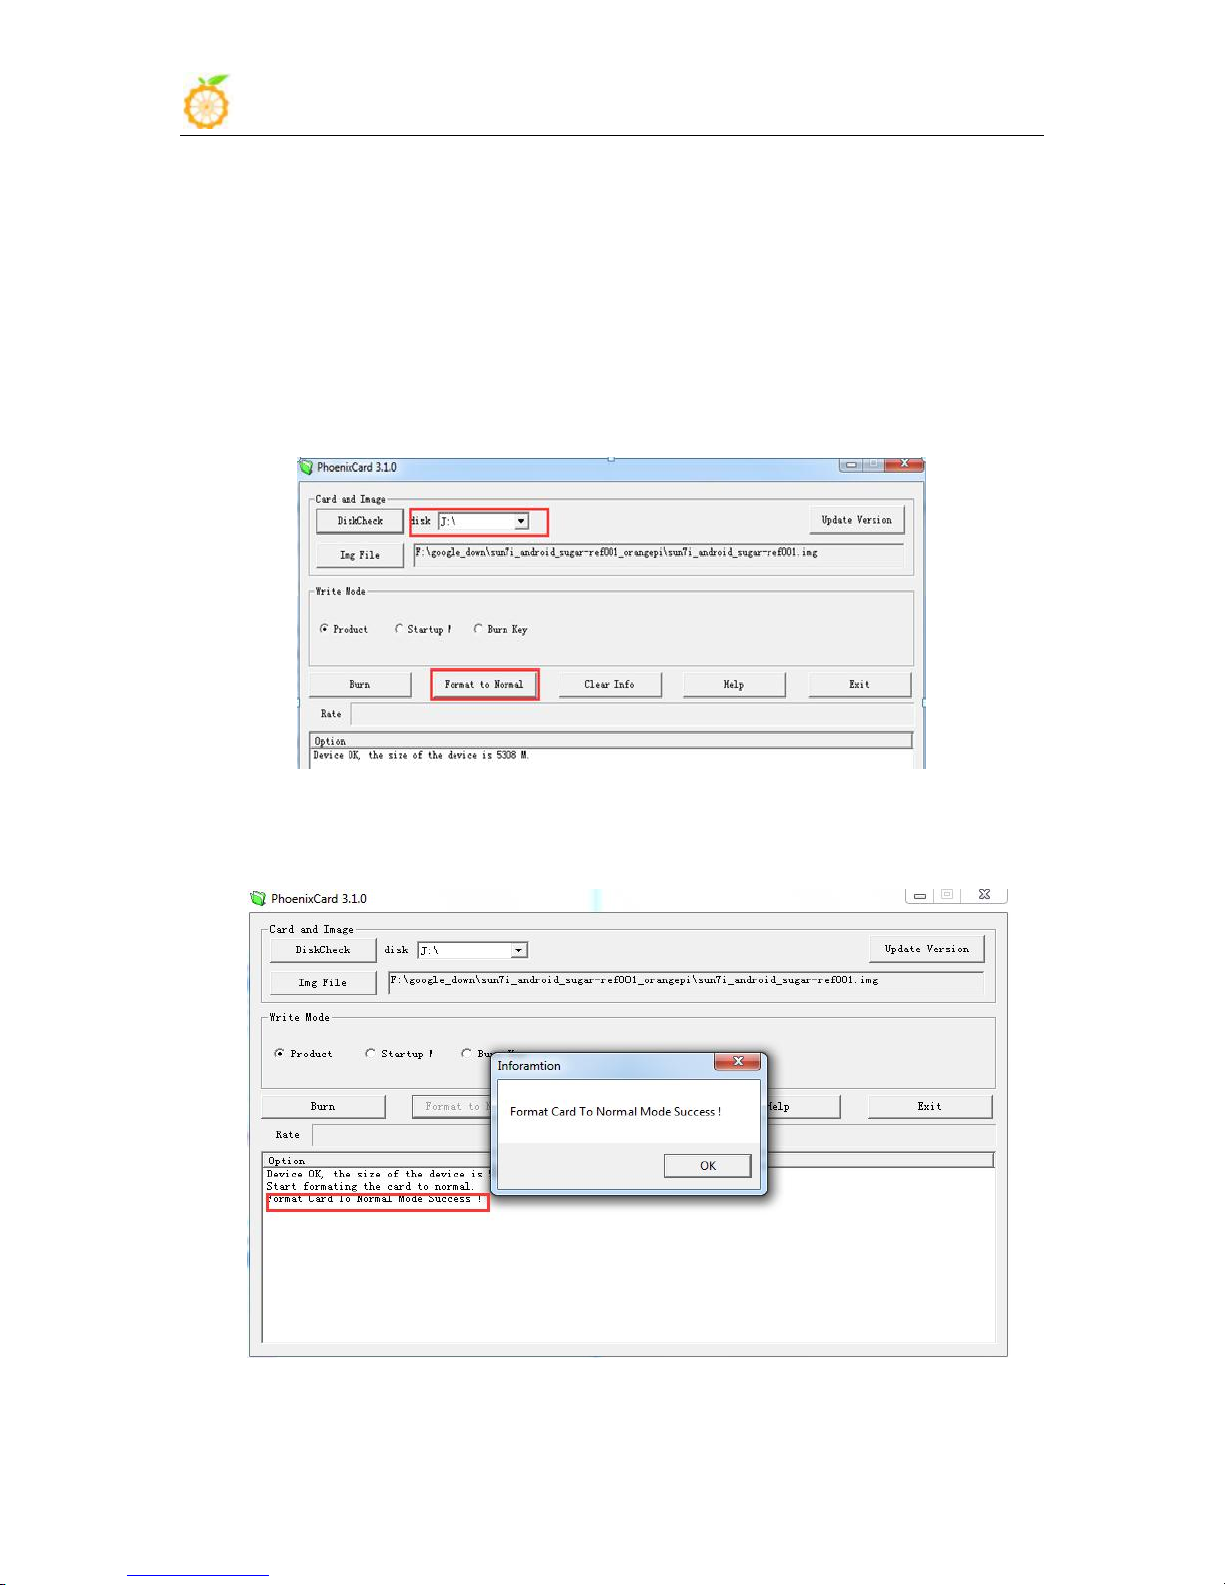
a. Download the Android OS image and PhoenixCard tool.
b. Format the TF card
c. Please make sure the inserted TF card is in accordance with the chosen
d. Click "OK" button after successfully formatted the TF card to normal.
PhoenixCard tool is applicable for Android image writing.
Download PhoenixCard from here:
https://drive.google.com/file/d/0B_VynIqhAcB7NTg2UkRDdHRWX2s/
edit?usp=sharing
Download Android OS image from here:
http://www.orangepi.org/downloadresources/
TF card, click "restore" button for TF card formatting.
www.orangepi.org www.xunlong.tv
Page 14
Orange Pi Manual Copy right by Shenzhen Xunlong Software Co., Ltd
12
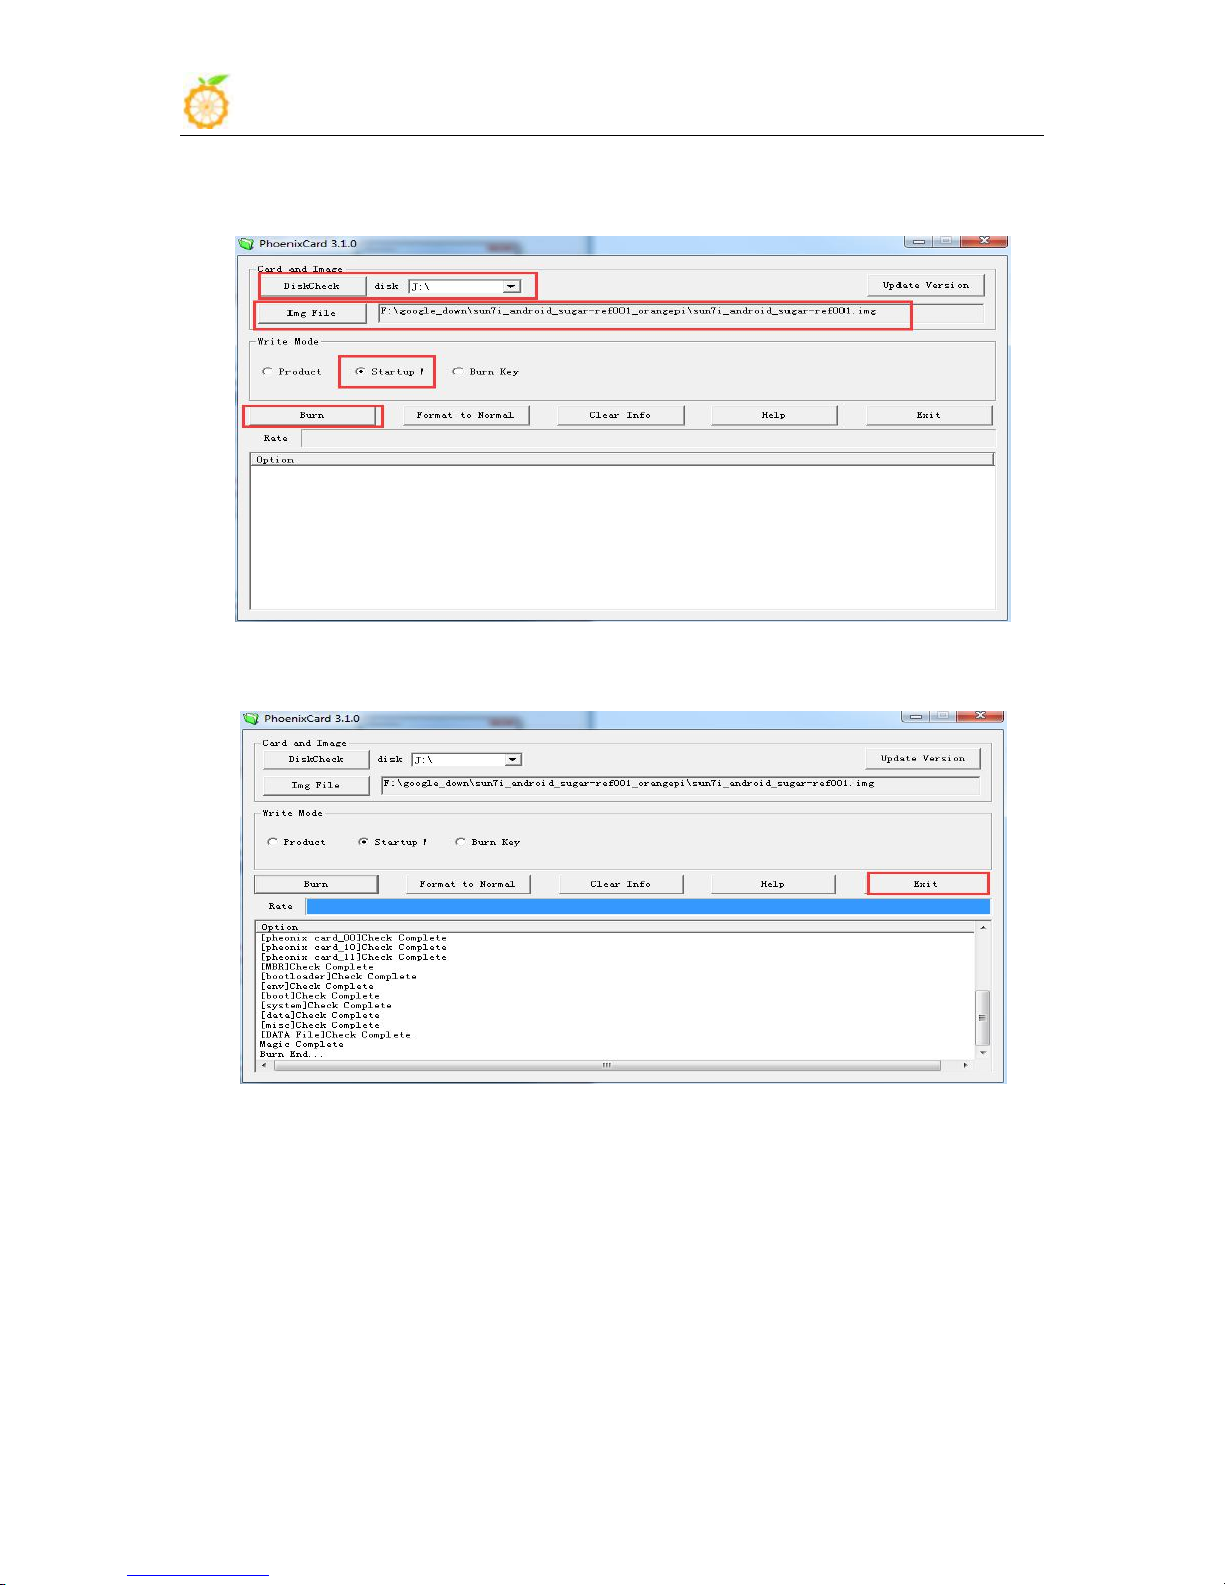
e. Burn the Android OS image into your TF card. Please pay attention to
f. Click "Burn" button for writing to TF card and wait for it finish
g. Click "Exit" button after burn Android image to TF card successfully.
4) Write Armbian Image into TF Card
a. Insert TF card into computer, please note that the TF card capacity must
b. Download the OS image file from the download page:
c. Write the image into TF card.
the following with red marks.
bigger than the operating system image, usually need to be 8GB or
bigger.
http://www.armbian.com/download/
www.orangepi.org www.xunlong.tv
Page 15
Orange Pi Manual Copy right by Shenzhen Xunlong Software Co., Ltd
13
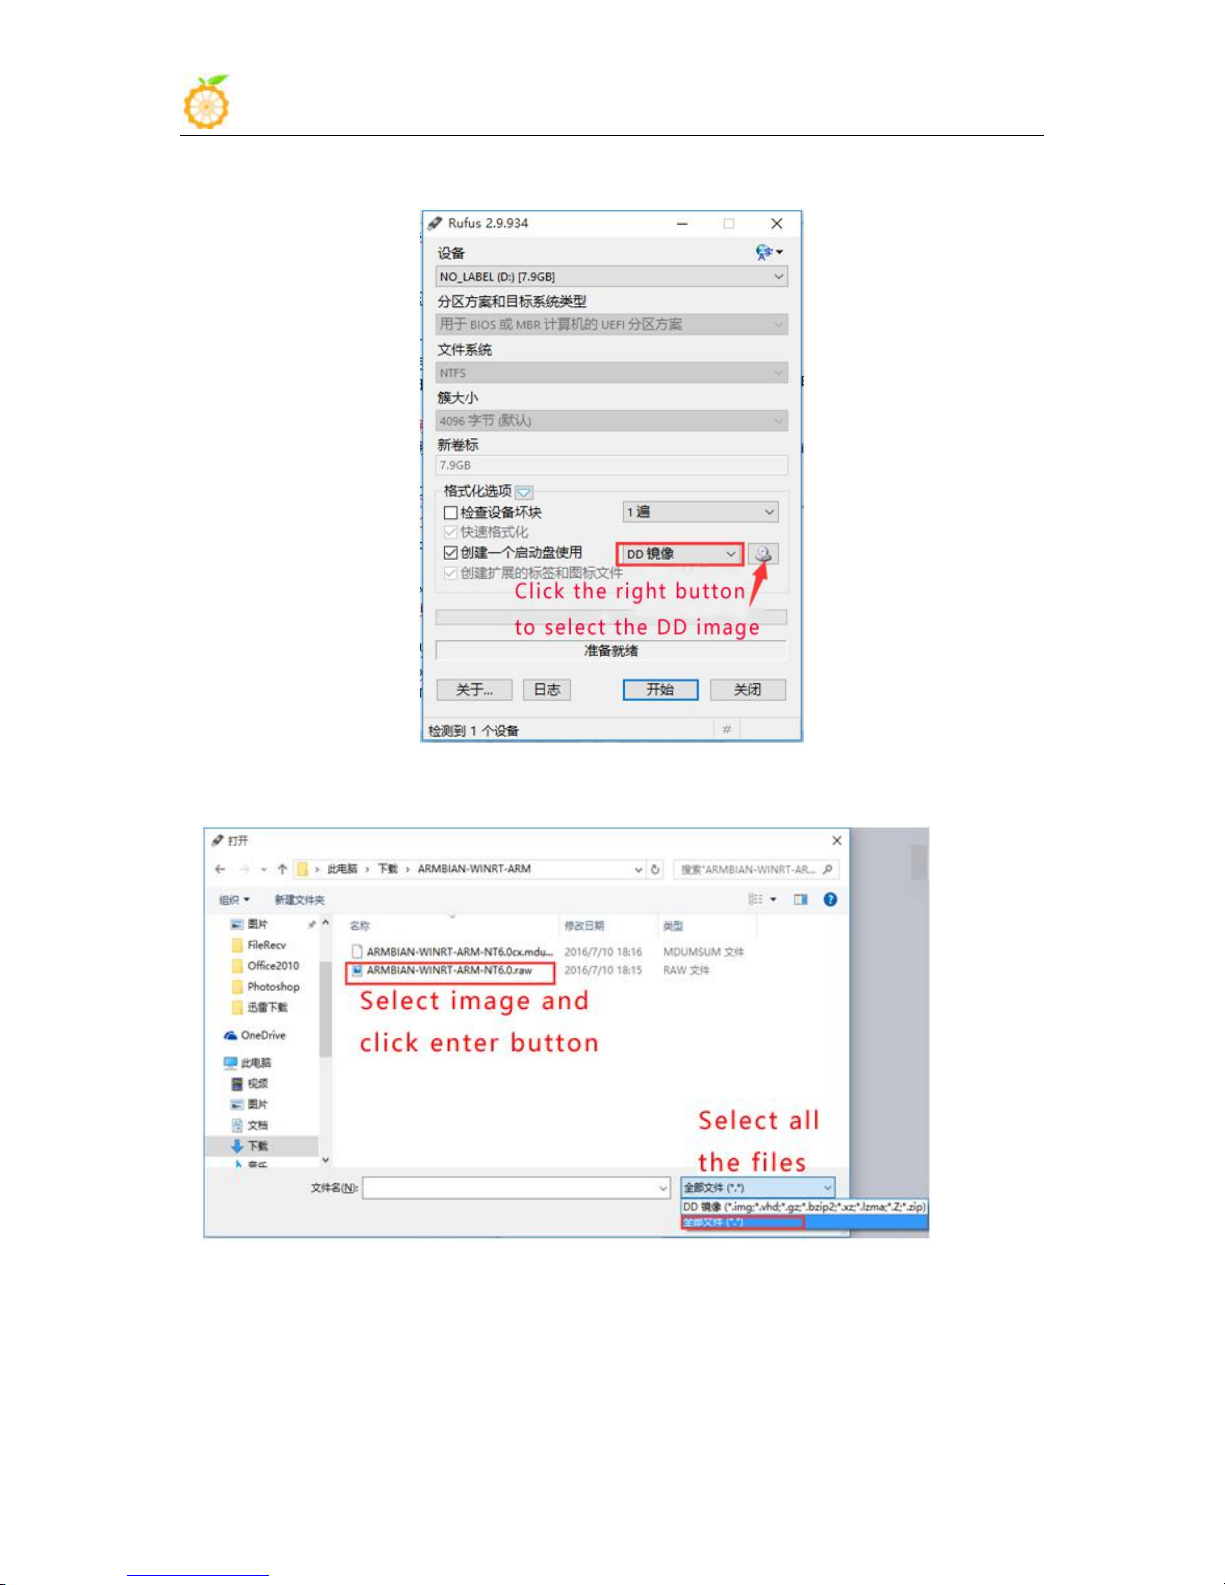
i Download image writing tool such as Rufus, the download page:
ii Select the image file path that has been unzipped
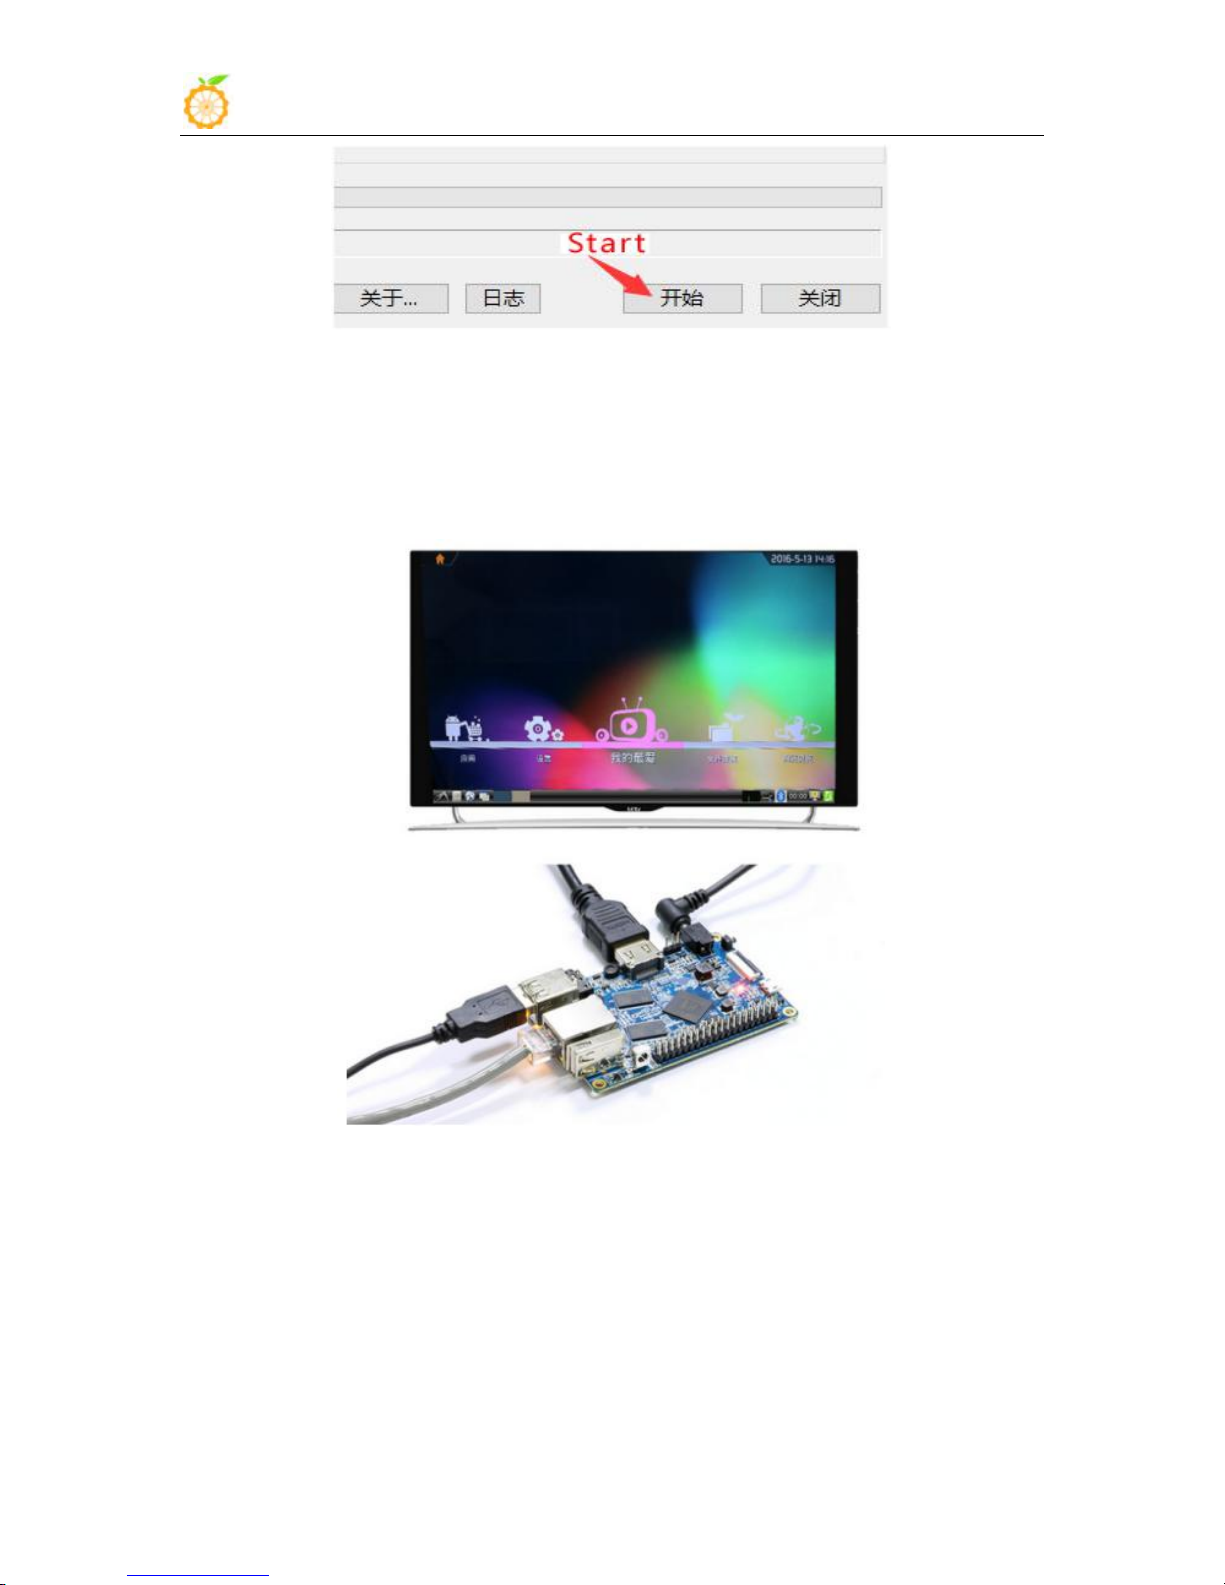
iii Click "start" button and wait for the image to write.
https://rufus.akeo.ie/
www.orangepi.org www.xunlong.tv
Page 16
Orange Pi Manual Copy right by Shenzhen Xunlong Software Co., Ltd
14
iv After the image is written, click "close" button
3. Step 3: Boot your Orange Pi
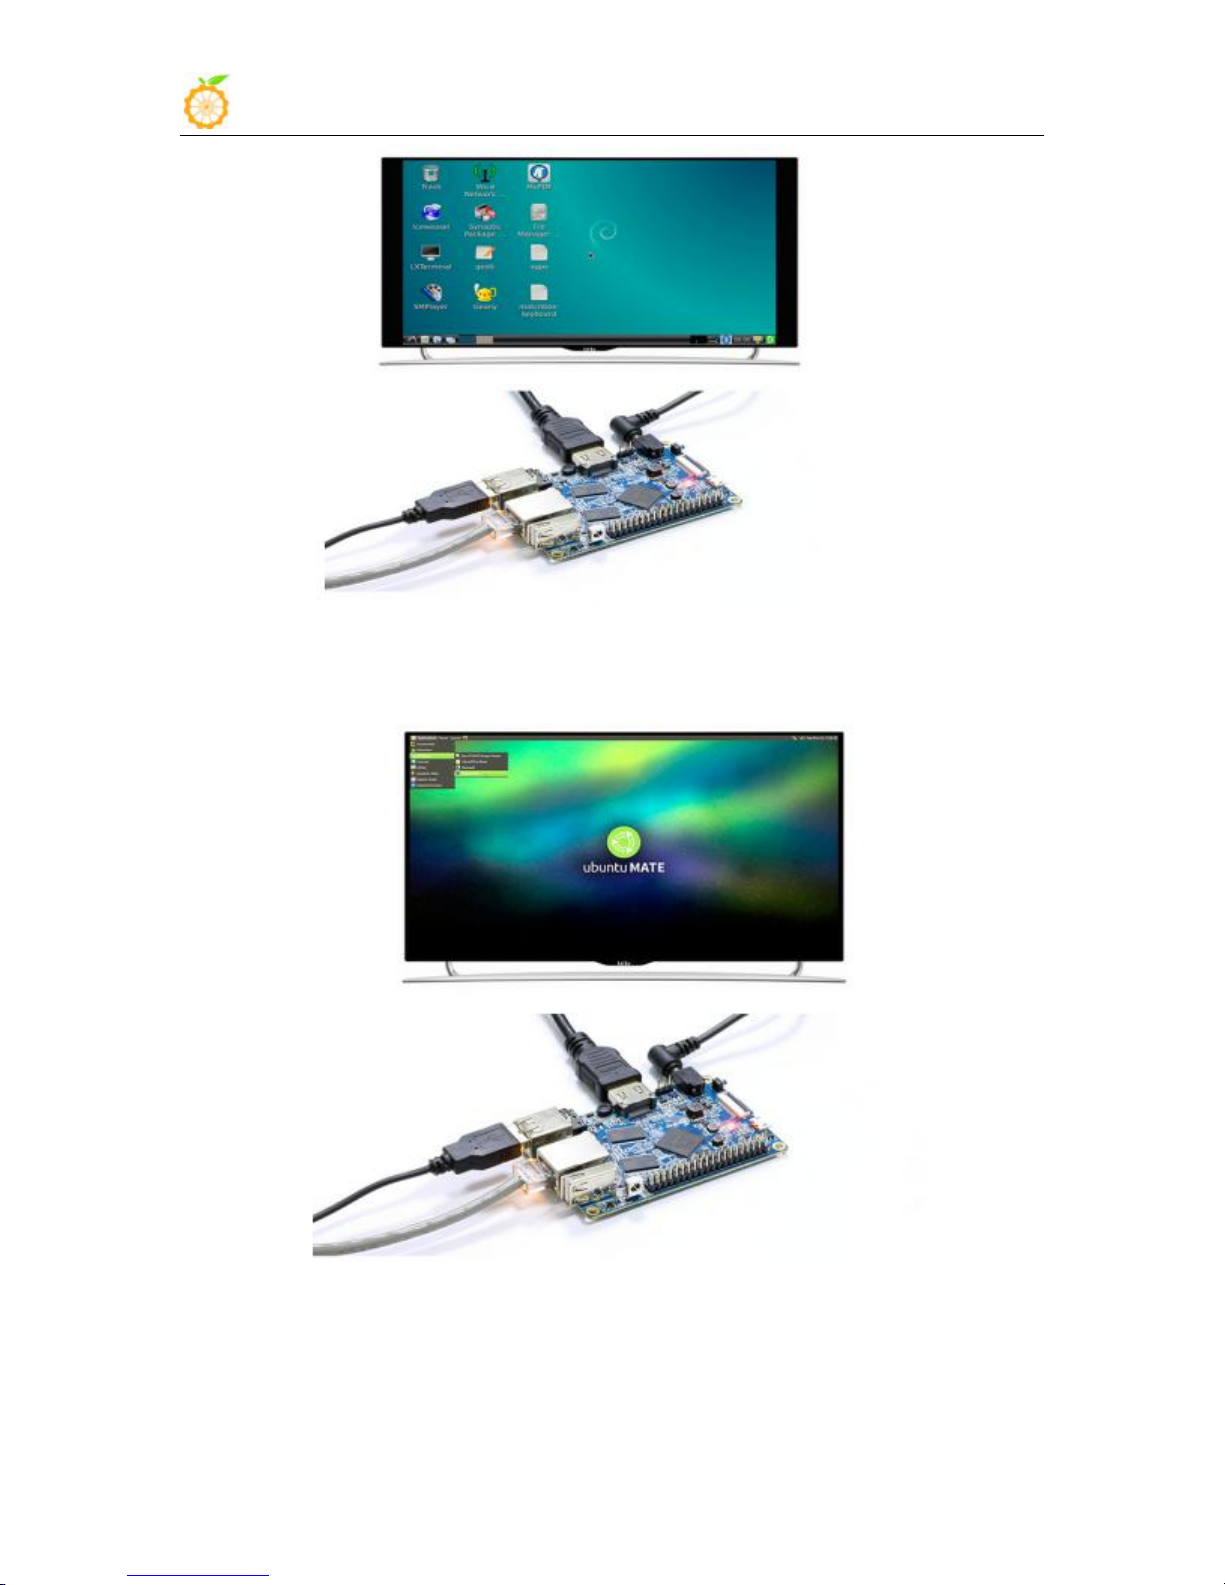
1) Hardware Connection Sketch Map
Orange Pi PC2 runs on Android 4.4 system
www.orangepi.org www.xunlong.tv
Page 17
Orange Pi Manual Copy right by Shenzhen Xunlong Software Co., Ltd
15
Orange Pi PC2 runs on Debian system
Orange Pi PC2 runs on Ubuntu system
www.orangepi.org www.xunlong.tv
Page 18
Orange Pi Manual Copy right by Shenzhen Xunlong Software Co., Ltd
16
2) Details of Booting Steps
a. Insert the TF card with written image in to the TF card slot.
b. It is HDMI interface on the bottom edge of the board. You could use
c. Insert USB keyboard and mouse into the USB interface.
d. It is the network port in the middle of 3USB interfaces, which you
e. It is the power input interface on the right side for connecting a
HDMI cable to connect your Orange Pi to HDMI TV or monitor.
You could also use AV interface and audio interface to connect output
video and audio to analog TV or display.
can access Orange Pi to the wired network.
power adapter up to or bigger than 5V/2A. Avoid using smaller
power GSM mobile phone charger, it is not able to output 2A even if
it marked "5V/2A ".
Note: Micro-USB(OTG)cannot use as power input which may cause the fail
boot of the OrangePi. Only the power interface could input power.
www.orangepi.org www.xunlong.tv
Page 19

Orange Pi Manual Copy right by Shenzhen Xunlong Software Co., Ltd
17
4. Step 4: Turn off your Orange Pi Correctly
You can use the shutdown button on the interface to safety close the
You can also close the system by entering commands in the shell:
5. Other configuration
1) Connect to the wired network
The Orange Pi will boot in a few minutes If the above steps are
successful. There will be graphical interface in he monitor. It may take a
long time to start the first time, please wait patiently. The next time will boot
very fast.
Orange Pi.
sudo halt
or
sudo shutdown –h
It will be safety to turn off the Orange Pi. If directly use the power
button to shut down the system may damage the file system on TF Card.
After the system is closed, the power can be cut off by more than 5 seconds’
press.
If the Orange Pi has connect to wire cable, then the system would obtain
the IP address automatically. If there is no wire cable connecting, then the
system would fail at obtaining IP address which could cause the booting
delay.
After connecting to wired network, it should be green LED lighting and
yellow LED flashing. You need to make sure the image you wrote is
correspondent since some boards are 100M Ethernet but some are 1000M
Ethernet.
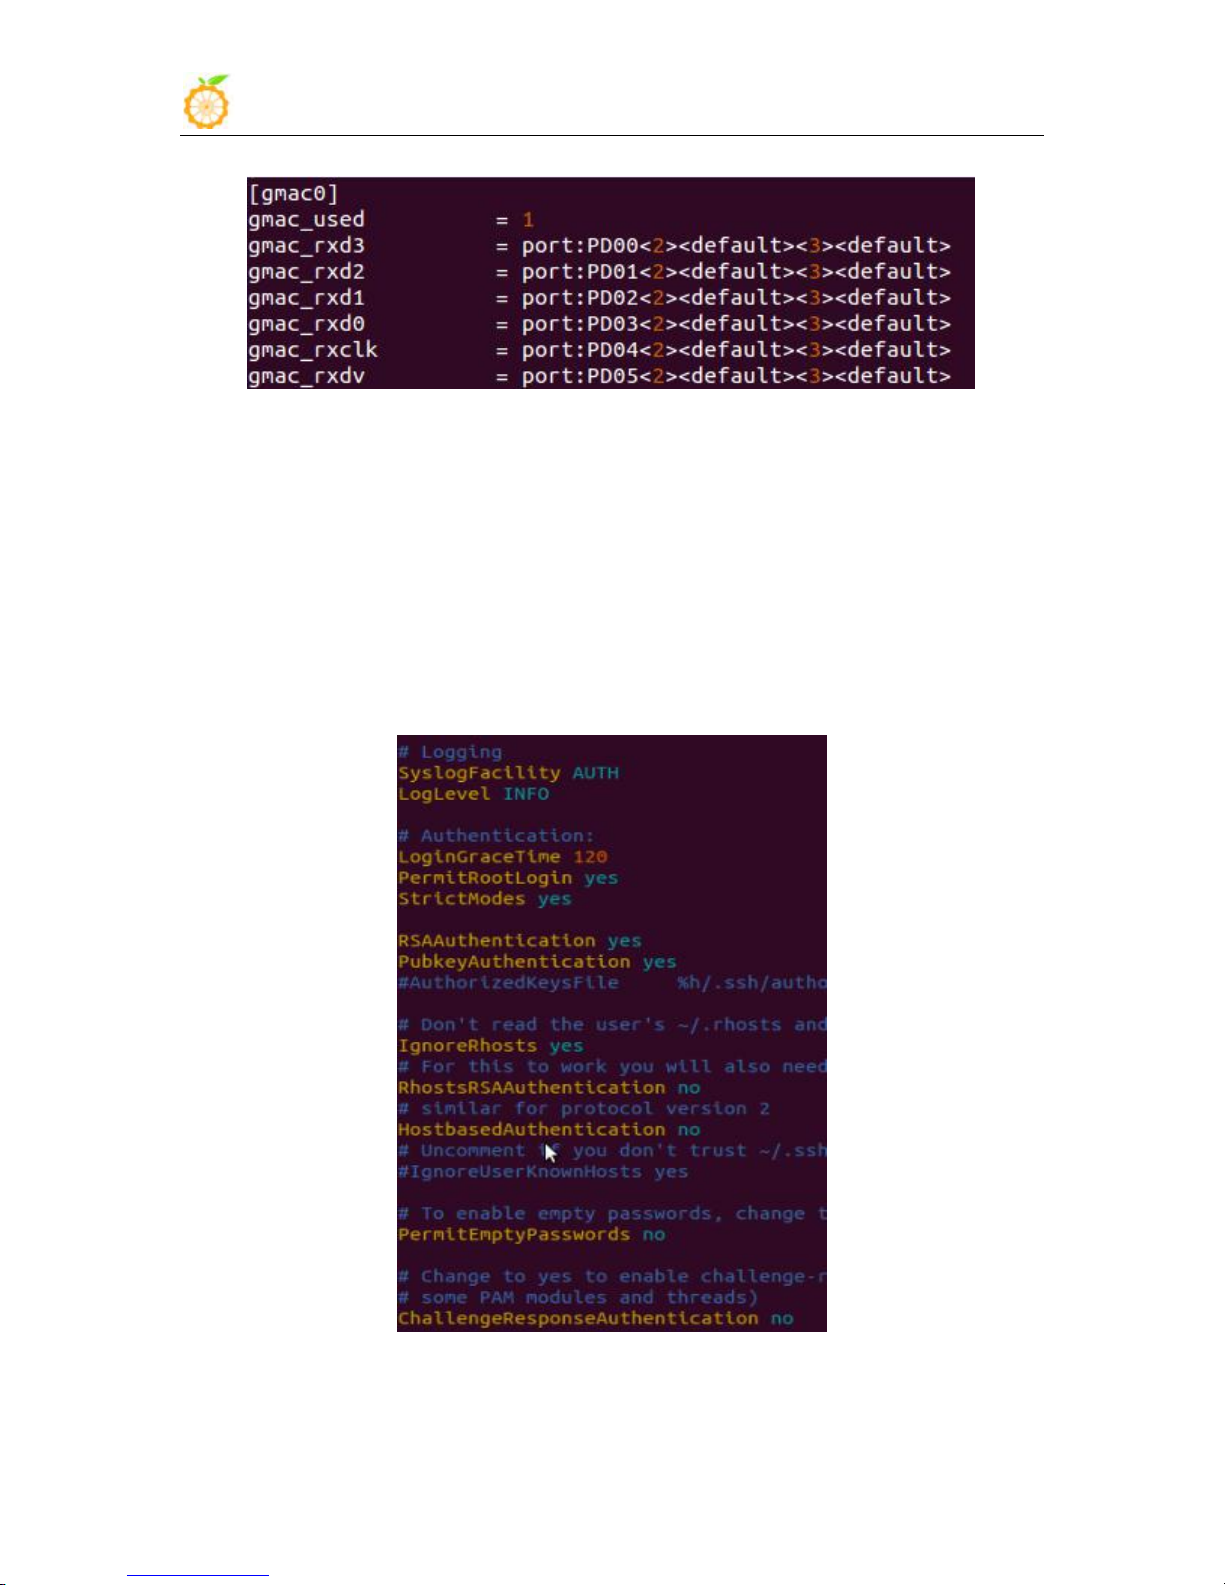
100M Ethernet is using internal phy, configuration just like the
following:
2 indicates internal phy
1000M Ethernet is using external phy
www.orangepi.org www.xunlong.tv
Page 20
Orange Pi Manual Copy right by Shenzhen Xunlong Software Co., Ltd
18
2) Login via vnc and ssh
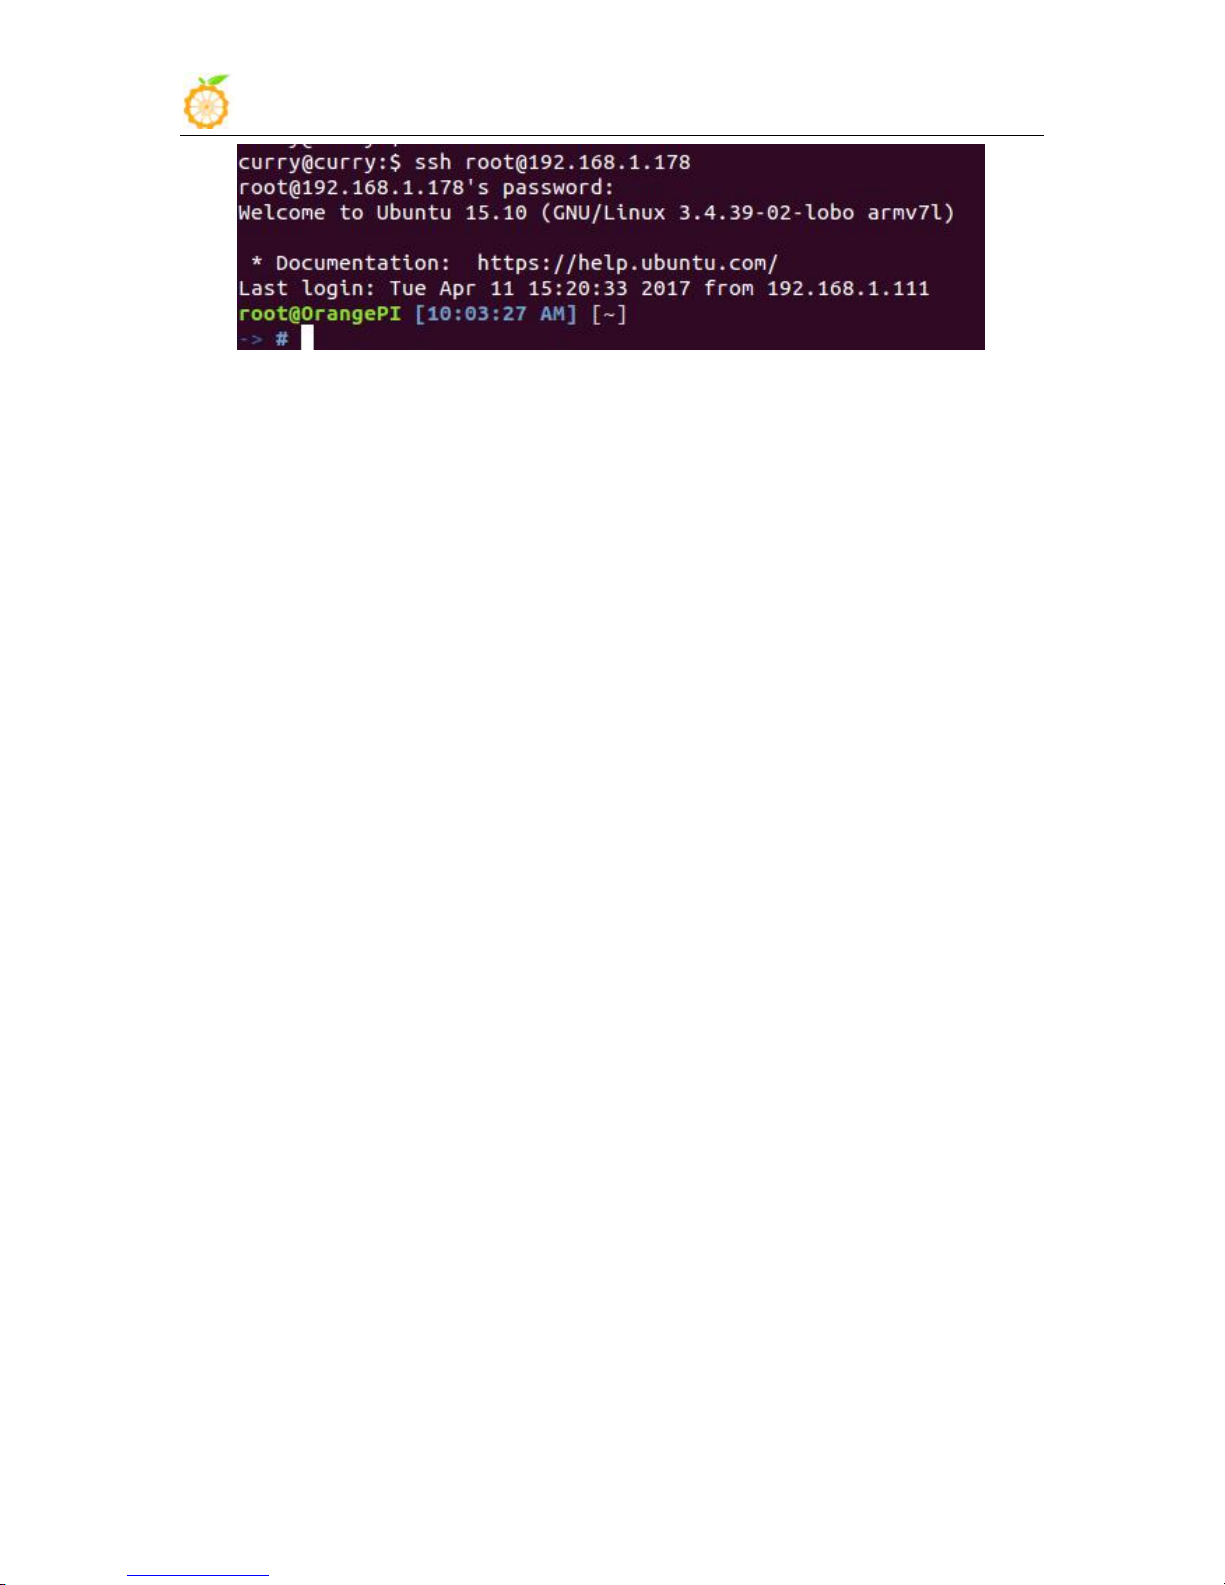
Login via serial port and install ssh
Modify ssh configuration file /etc/ssh/sshd_config
Check the IP with ifconfig, login via ssh of root user
1 indicates external phy
The above configuration has been configured, you could refer to it when
using.
If there is no condition for connecting HDMI, you could enter the system via
vnc or ssh remote login.
apt-get install ssh
www.orangepi.org www.xunlong.tv
Page 21
Orange Pi Manual Copy right by Shenzhen Xunlong Software Co., Ltd
19
3) HDMI or 3.5mm Sound Output
a. The sound was default to output via HDMI on image, it could check and
b. It needs to modify configuration on file system for output on 3.5mm of
c. How to use mic sound recording
6. Universal Software Configuration
1) Default Account Changing
a. Use root account to login Orange Pi(please note that do not login with
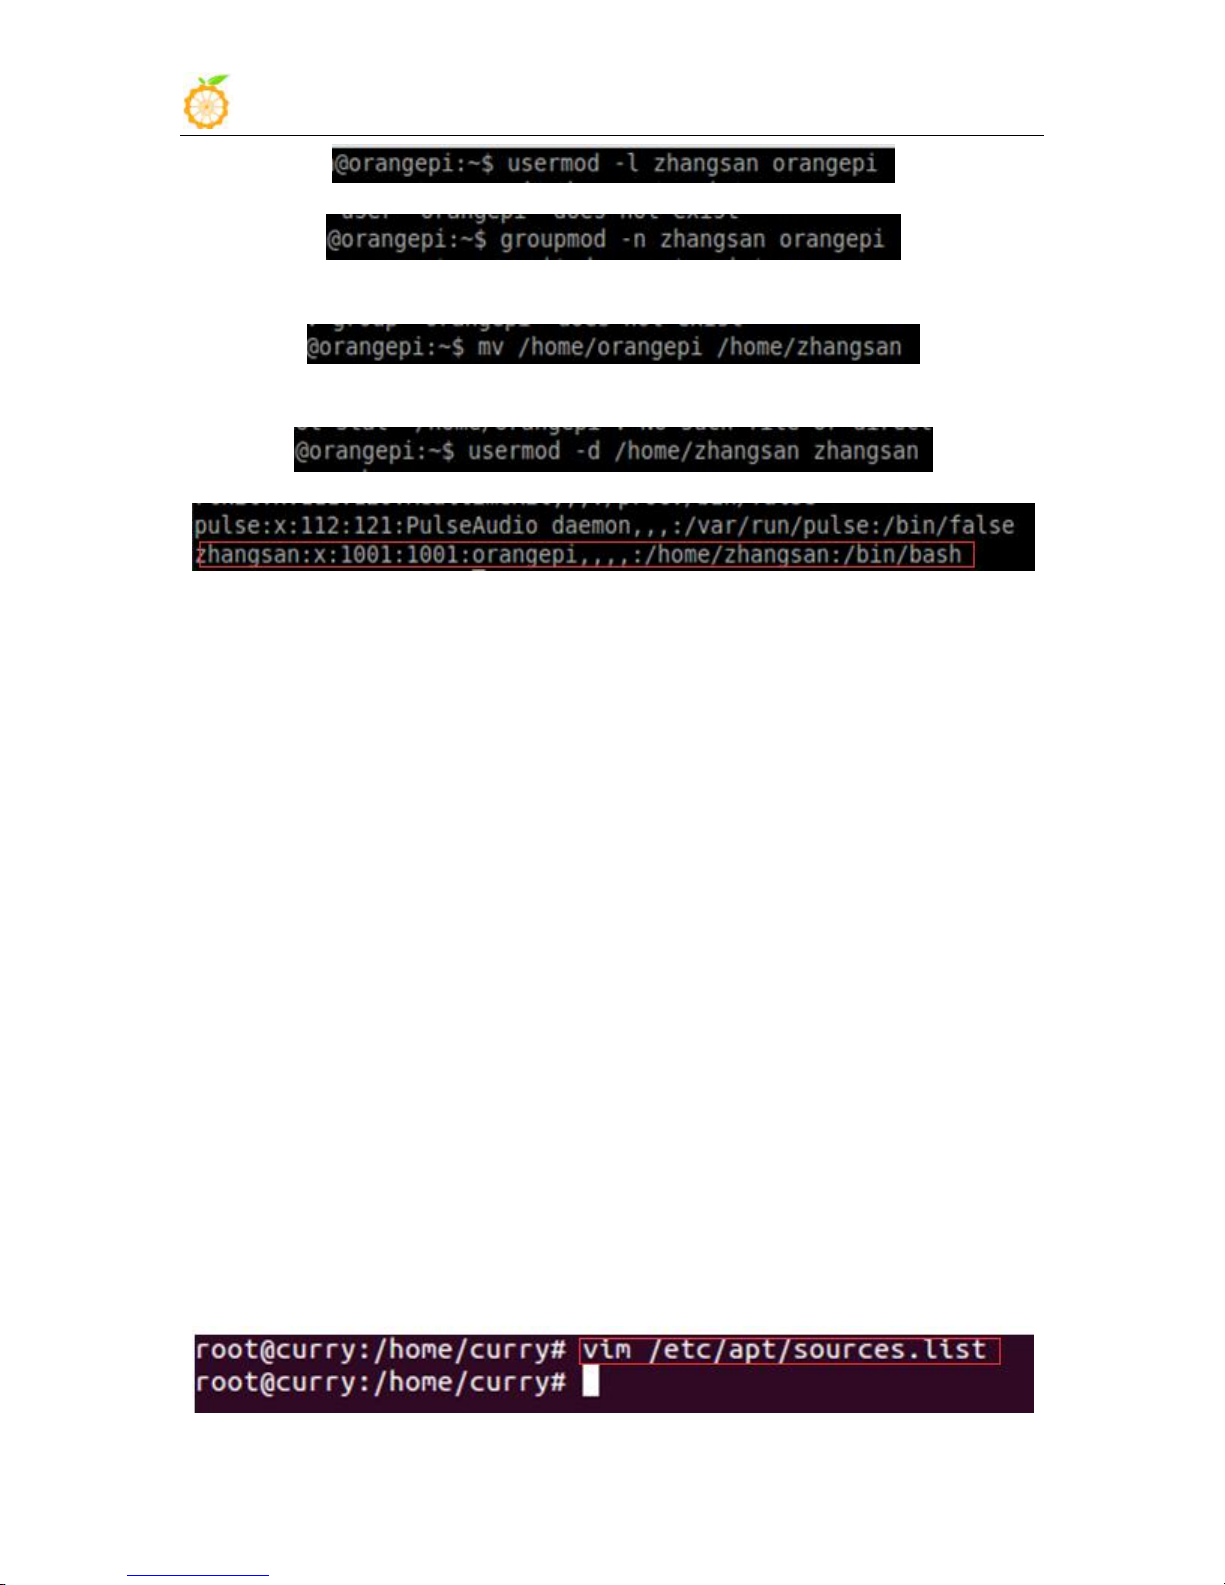
b. $ usermod -l zhangsan orangepi Change orangepi account into
change via alsamixer.
ls /etc/asound.conf
card indicates card number, device indicates device number.
aplay -l it could check the system to load the sound card number and
details
cat /proc/asound/cards it also could check the sound card and details
It could be used after use alsamixer to change the sound card.
alsactl store -f /var/lib/alsa/asound.state used for saving modified
parameters
/etc/asound.conf, modify card1 into card0, or use amixer to modify. The
default one is configured, or you could use player on graphical interface
to switch via sound channel selection.
arecord -d 5 -f cd -t wav 123.wav
After recording, use the following to play
aplay 123.wav
The default log in account is orangepi. In order to secure, it is
recommended to modify the default orangepi accounts to your own
account, for example Zhangsan. Steps are as follows:
the account of orangepi
Zhangsan
www.orangepi.org www.xunlong.tv
Page 22
Orange Pi Manual Copy right by Shenzhen Xunlong Software Co., Ltd
20
c. $ groupmod -n zhangsan orangepi Change group
d. $ mv /home/ornagepi /home/zhangsan Change directory of original
e. $ usermod -d /home/orangepi orangepi Set this directory to orangepi
f. $ cat /etc/passwd It should be shown as below:
2) U Disk Automatic Mounted Configuration
a. sudo apt-get install usbmount
b. sudo vim /etc/udev/rules.d/automount.rules
c. udevadm control –reload-rules
3) System Source Configuration
a. Open the source file
orangepi
user's home directory
After the modification of the above iterms, it can be used the new
account Zhangsan to land.
ACTION=="add",KERNEL=="sdb*", RUN+="/usr/bin/pmount --sync
--umask 000 %k"
ACTION=="remove", KERNEL=="sdb*", RUN+="/usr/bin/pumount %k"
ACTION=="add",KERNEL=="sdc*", RUN+="/usr/bin/pmount --sync
--umask 000 %k"
ACTION=="remove", KERNEL=="sdc*", RUN+="/usr/bin/pumount %k"
It could refer to this:
http://unix.stackexchange.com/questions/134797/how-to-automatically-mou
nt-an-usb-device-on-plugin-time-on-an-already-running-sy
Take Ubuntu as an example:
$ sudo vi /etc/apt/sources.list
www.orangepi.org www.xunlong.tv
Page 23

Orange Pi Manual Copy right by Shenzhen Xunlong Software Co., Ltd
21
b. Edit source file
4) Remote desktop installation
a. $sudo apt-get install tightvncserver Install VNC
b. vncpassw Set the password: do not execute this command but
Replace the source file with your favorite source. Take an
example of Ubuntu 16.04 on Zhonkeda source:
deb http://mirrors.ustc.edu.cn/ubuntu-ports/ xenial main
multiverse restricted universe
deb http://mirrors.ustc.edu.cn/ubuntu-ports/ xenial-backports
main multiverse restricted universe
deb http://mirrors.ustc.edu.cn/ubuntu-ports/ xenial-proposed
main multiverse restricted universe
deb http://mirrors.ustc.edu.cn/ubuntu-ports/ xenial-security main
multiverse restricted universe
deb http://mirrors.ustc.edu.cn/ubuntu-ports/ xenial-updates main
multiverse restricted universe
deb-src http://mirrors.ustc.edu.cn/ubuntu-ports/ xenial main
multiverse restricted universe
deb-src http://mirrors.ustc.edu.cn/ubuntu-ports/ xenial-backports
main multiverse restricted universe
deb-src http://mirrors.ustc.edu.cn/ubuntu-ports/ xenial-proposed
main multiverse restricted universe
deb-src http://mirrors.ustc.edu.cn/ubuntu-ports/ xenial-security
main multiverse restricted universe
deb-src http://mirrors.ustc.edu.cn/ubuntu-ports/ xenial-updates
main multiverse restricted universe
Note: xenial is the version of the code name in this source, if the other
version of Ubuntu needs to replace the corresponding version code which
can be found on the internet.
There are a lot of software, such as VNG, XRDP, X2GO, etc. For X2GO,
it has more functions, and desktop color restore is very good which does not
need too much configuration. And XRDP is much more safety than VNC.
executing vncserver directly. It will prompt you to enter the password
twice, when prompted whether can be read only to select the N.
www.orangepi.org www.xunlong.tv
Page 24

Orange Pi Manual Copy right by Shenzhen Xunlong Software Co., Ltd
22
c. Open one or more of desktops by vncserver or
5) NAS and DLAN Configuration
a. NAS:
b. DLNA:
i sudo apt-get minidlna
ii Execute the following command to modify the configuration file:
iii Add the following:
iv Established above folders respectively, noted that path consistency
v Re-start minidlna to take effect the configuration: /etc/init.d/minidlna
vncserver:1(vncserver:2)… you can also transfer more parameters
through the full command as below:
vncserver :1 -geometry 1024x768 -depth 16 -pixelformat rgb565
(Note: If it prompted you that cannot find the file or other error when
installing, please run sudo apt-get update to update the software source and
try installing again.)
There are many files could be reference from Internet, for example:
http://www.geekfan.net/5003/, it detailed descriptions on the operation and
the mounted of U disk is very useful.
Mainly through the minidlna software to achieve the sharing of media
resources within the LAN, such as sharing video, music, etc.. The
installation steps are as follows:
sudo nano /etc/minidlna.conf
Note: you can also use other text editor to modify.
media_dir=A,/nas, path: /DLNA/Music
media_dir=V,/nas, path: /DLNA/Video
media_dir=P,/nas, path: DLNA/Picture
db_dir=/nas, path: /DLNA/log
db_dir=/nas, path: /DLNA/db
ctrl +o and enter, ctrl +x to save and exit.
and assigned to read and write permissions. In order for convenient, it could
be Chmod 755, such as sudo Chmod 755 /nas path /DLNA/Music
restart.
Transmit the corresponding file on the computer to the corresponding folder
through samba.
www.orangepi.org www.xunlong.tv
Page 25
Orange Pi Manual Copy right by Shenzhen Xunlong Software Co., Ltd
23
6) Thunder remote download
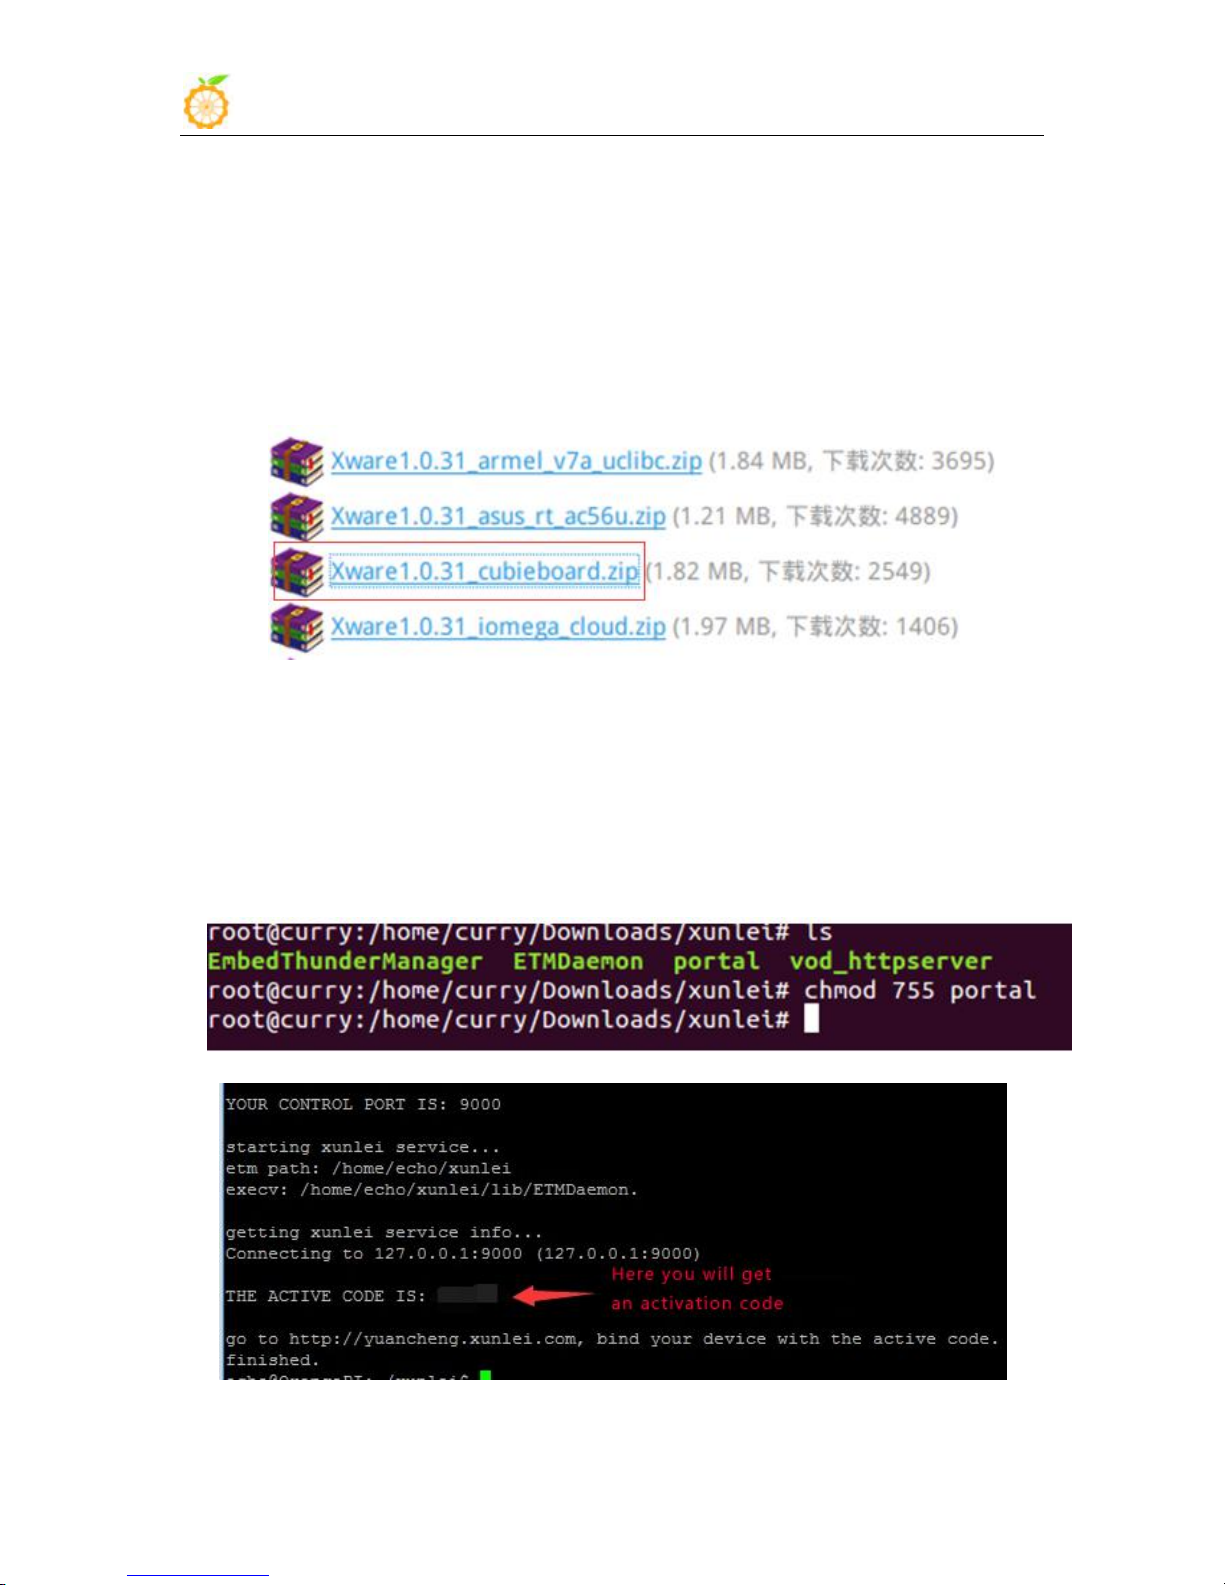
a. Go to the Thunder routing forum to download the required installation
b. Enter the directory after uploaded the unzip file to OrangePi. It is
c. Installation method of version 1.0.31:
i $ cd /xxx/xunlei The xxx is the directory of installation xunlei file
ii $ chmod 755 portal
iii $ ./portal
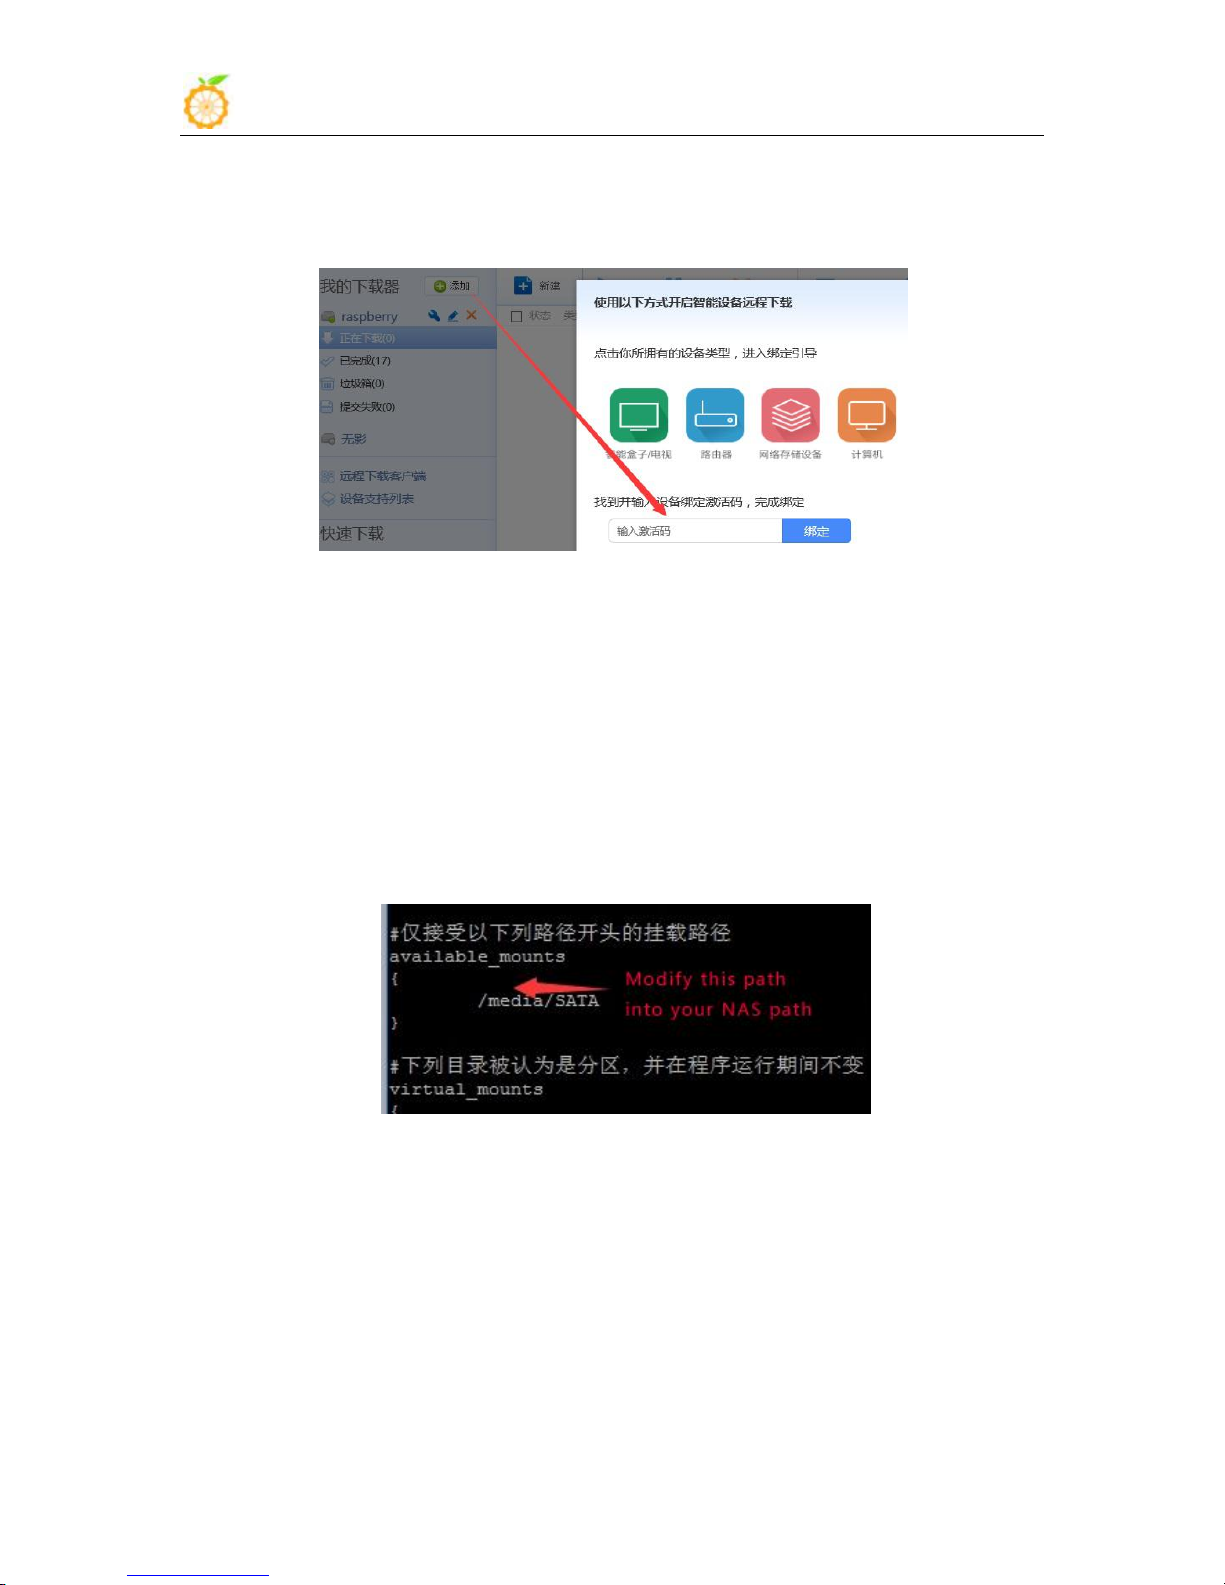
iv You will get an activation code after booting like the following:
v Copy this activation code to http://yuancheng.xunlei.com (Which
Note: It is recommended to download MoliPlayer on the mobile device. The
effect is good and no blue light pressure on both Android and IOS.
package first. The link for stable version:
http://luyou.xunlei.com/thread-12545-1-1.html.
Download Xware1.0.31_cubieboard zip file.
Note: If you want to try the latest version, you can download the latest test
version: http://luyou.xunlei.com/thread-15167-1-1.htm.
recommended to rename the file to xunlei
www.orangepi.org www.xunlong.tv
Page 26
Orange Pi Manual Copy right by Shenzhen Xunlong Software Co., Ltd
24
vi Setting start up
d. Installation of version 3.0.32.253:
i $ cd /xxx/xunlei The xxx is the directory of installation file of
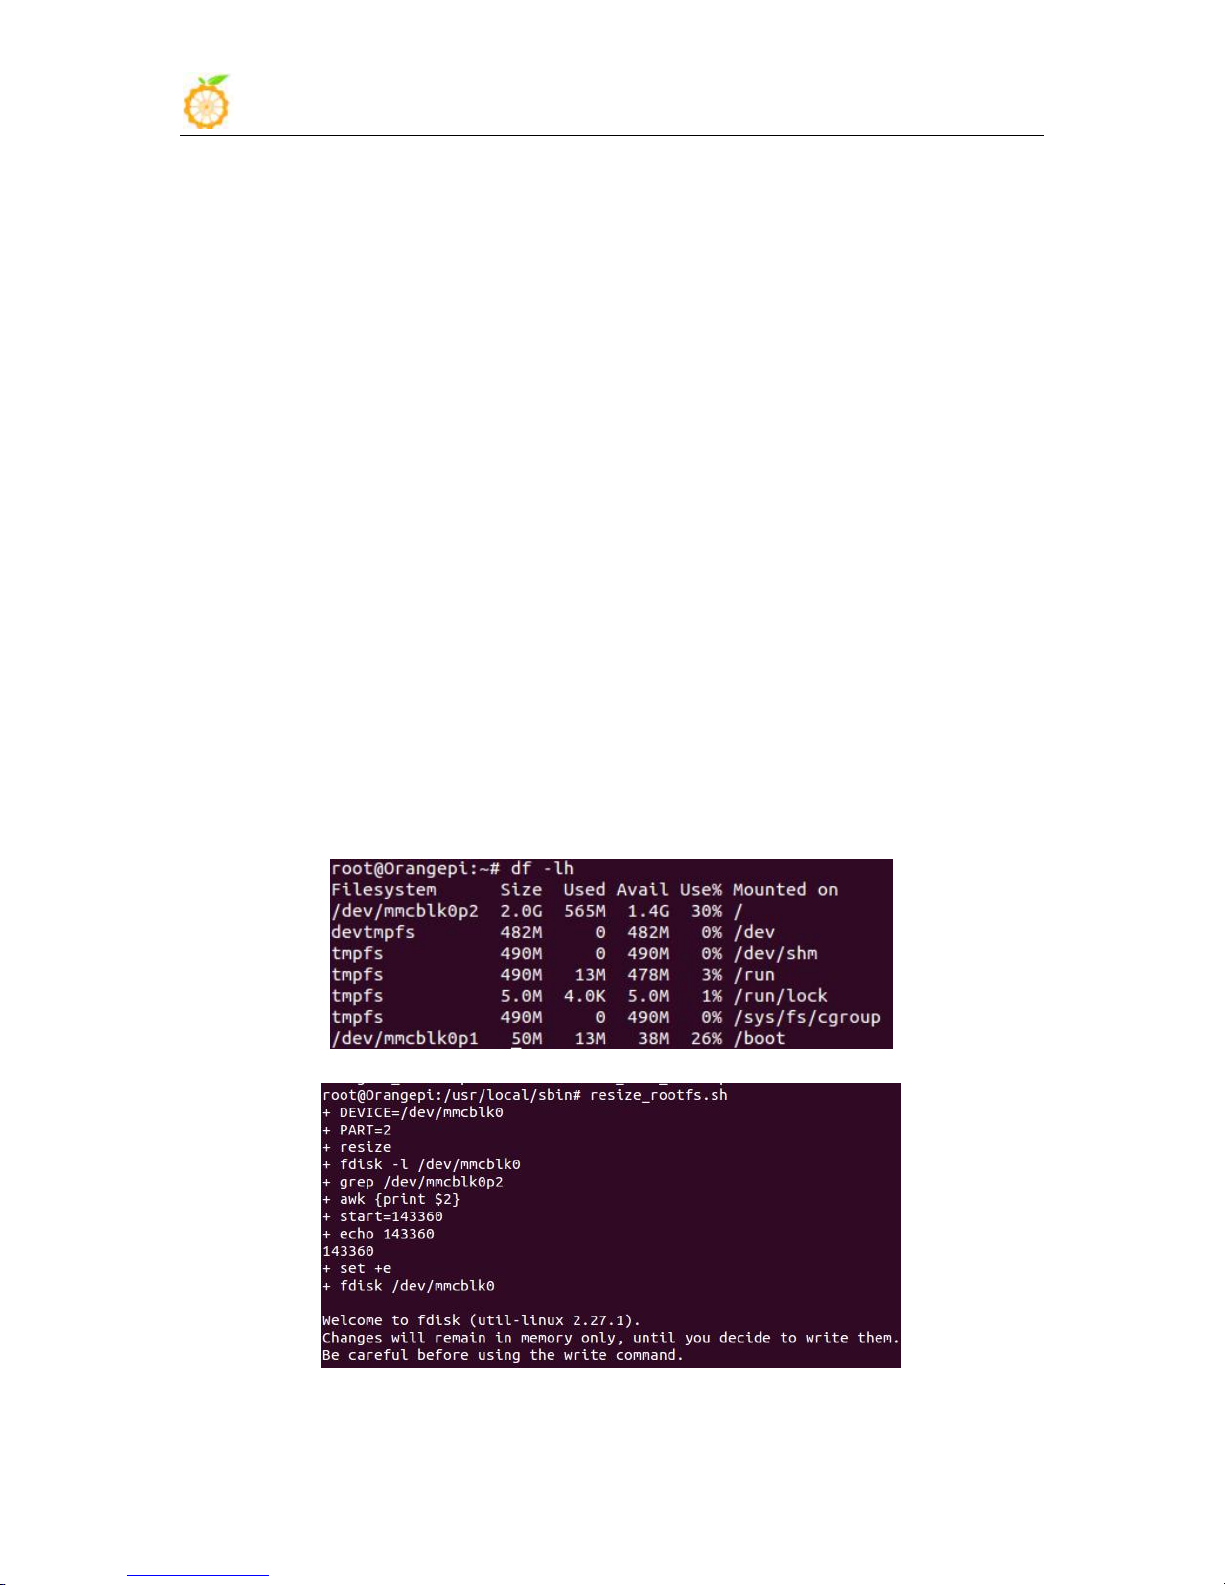
ii $ sudo nano thunder_mounts.cfg Modify the download path
iii chmod +x etm_monitor
iv Run ./etm_monitor, there will be an activation code page like
v Setting start up
required to log in with account of Thunder). Then click the tab on the top
right corner to add, fill in the activation code to complete the binding
according to the following figure.
$ sudo nano /etc/rc.loacl
add the following contents before exit 0
cd /xx/xunlei
./portal &
ctrl +o and enter, ctrl +x to save and exit.
xunlei
version 1.0.32. And then binding on the Thunder remote page (above steps 4,
5). There might be one or two errors while running, ignore it (selection type
of shell and generation of INI file).
sudo nano /etc/rc.loacl add the following contents before exit 0
cd /xx/xunlei
www.orangepi.org www.xunlong.tv
Page 27
Orange Pi Manual Copy right by Shenzhen Xunlong Software Co., Ltd
25
7) Modify the size of ext4 file system
Method 1
Method 2
./etm_monitor &
ctrl +o and enter, ctrl +x to save and exit.
It could be remote downloading on computer, mobile phone or tablet by
login yuancheng.xunlei.com
After made the written image into SD card for booting, enter into rootfs
partition’s expansion of file system. It could enhance the performance of SD
card to avoid limited storage cause prblem.
Extend rootfs file partition of TF card on PC:
Select the specified disk, right click and select the corresponding disk, select
"change size" and adjust it into your desired size, click "resize", close the
dialog box and click "apply all operations", select the application to
complete the expansion operation
Enter into the system and extend via shell
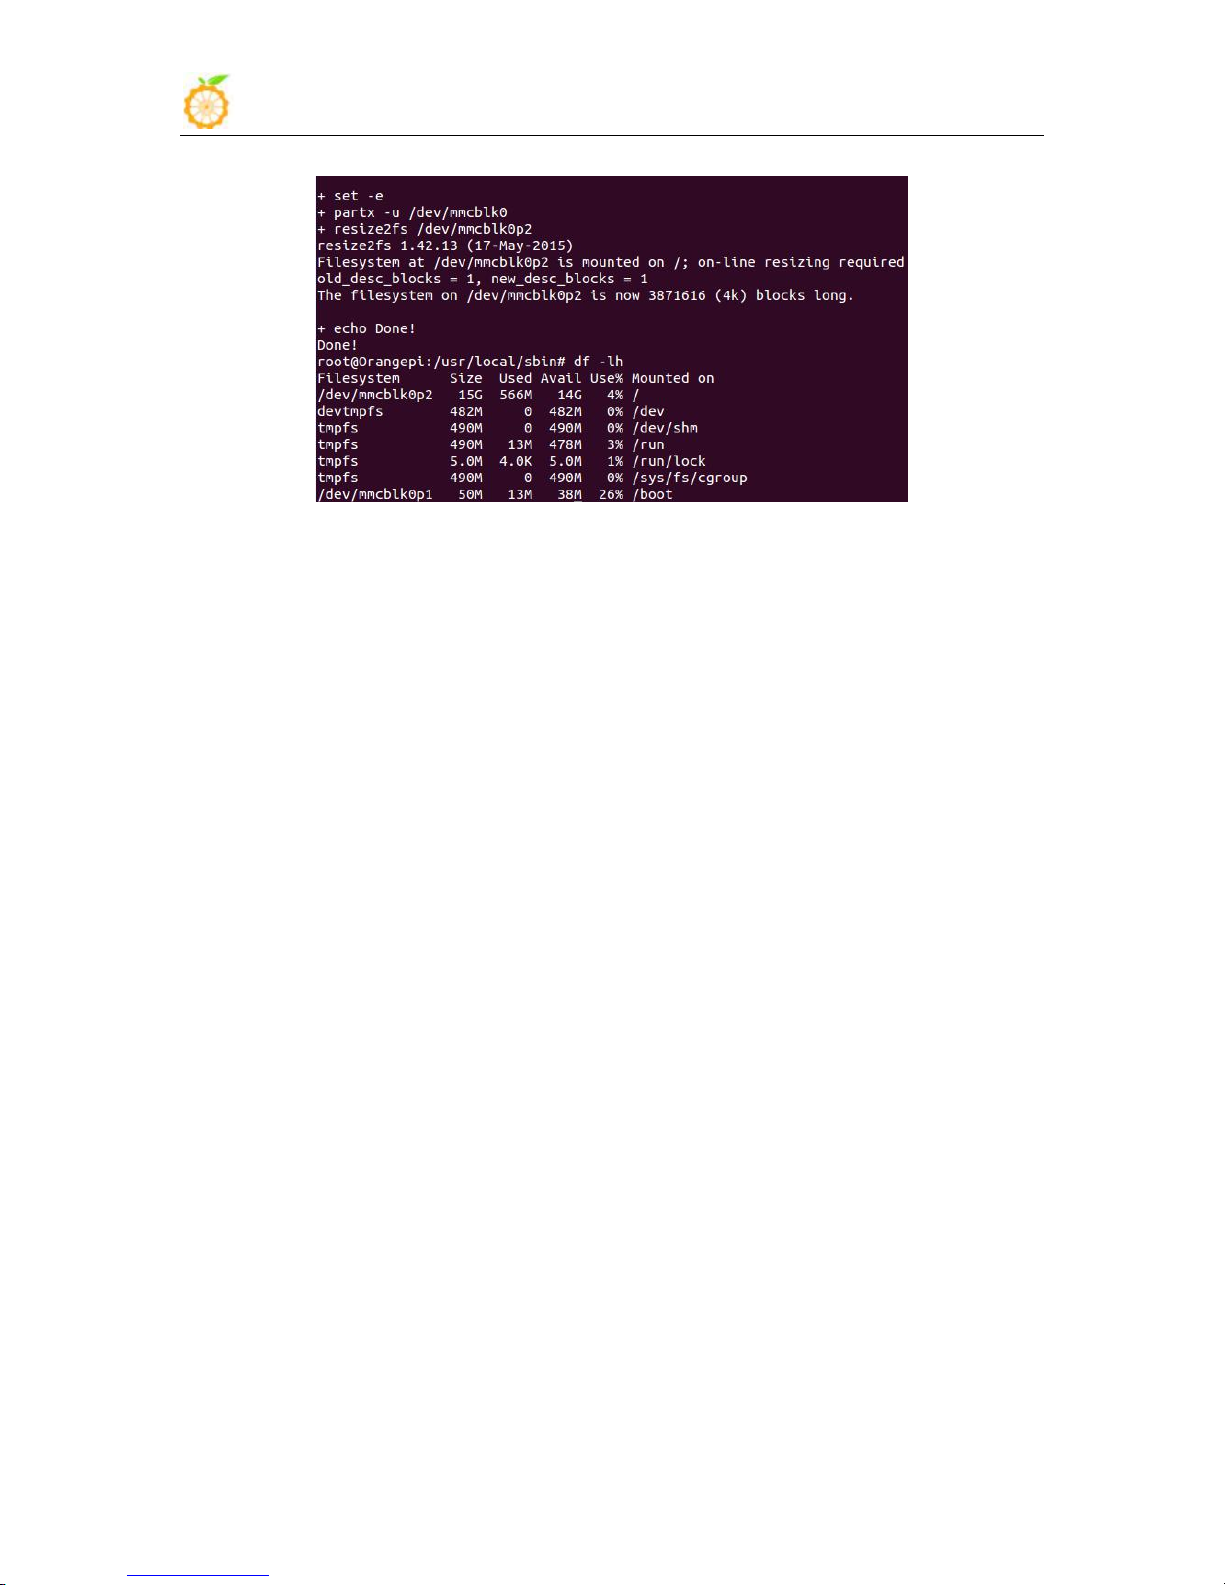
Before partition
Eneter into system and expend via resize_rootfs.sh
Enter resize_rootfs.sh on command line, the system will expending
automatically,
www.orangepi.org www.xunlong.tv
Page 28
Orange Pi Manual Copy right by Shenzhen Xunlong Software Co., Ltd
26
a. Expand file system
i Boot to Linux, umount /dev/sdb1 and /dev/sdb2, if it prompts disk
ii Use fdisk /dev/sdb to adjust the partition size, after into it, enter p,
iii Enter d to delete the partition need to change the size(my file system
iv Enter n to build a new partition, make sure the initial position is the
v Enter w to save the partition data.
vi Use the following command to check the file system(make sure it is
vii Adjust the partition size
viii It could mount a disk partition, you could check whether it has
b. Shrink file system
i Boot to Linux, umount /dev/sdb1 and /dev/sdb2, if it prompts disk
ii Use the following command to check the file system(make sure it is
iii Modify the size of file system(Use resize2fs)
Reboot the system and use df -lh to check whether expending is successful
busy, then use fuser to clean the using disk(we will recommend using
another Linux booting disk to lead the system).
and keep in mind about the initial position of needed extending size
partition.
is /dev/sdb2, which is the 2 partition ).
same as you deleted, and enter the number as you desire.
a right file system)
e2fsck -f /dev/sdb2
resize2fs /dev/sdb2
changed.
busy, then use fuser to clean the using disk(we will recommend using
another Linux booting disk to lead the system).
a right file system)
e2fsck -f /dev/sdb2
www.orangepi.org www.xunlong.tv
Page 29

Orange Pi Manual Copy right by Shenzhen Xunlong Software Co., Ltd
27
iv Use fdisk /dev/sdb to adjust the partition size, after into it, enter p,
v Enter d to delete the partition need to change the size(my file system
vi Enter n to build a new partition, make sure the initial position is the
8) How to use gc2035 on Linux
a. Use find command to find the location of the following files, and load it
b. Use camera in Linux
i Load up driver
ii Install motion
resize2fs /dev/sdb2 900M
The "s"after the number represents specifying the size of file system via
the sectors(every sector calculated by 512 bite). You could also specify it
into K(KB), M(MB), G(GB), etc.
and keep in mind about the initial position of needed extending size partition.
You need to first delete the partition then build a new one because the fdisk
could not modify the size dynamic(you need to calculate the size, it have to
enough to contain the file system adjusted in last step).
is /dev/sdb2, which is the 2 partition ).
same as you deleted, and enter the number as you desire. Besides, if it is
bootable partition you want to change, note that need to keep the bootable
mark in case cannot boot.
The above illustration is using fdisk and resize2fs to modify partition and
file system, you could also use gparted. Gparted has graphical interface and
it could help you to re-size file system at the same time of re-sizing partition.
Goarted is much easier to use and reduce the change to make mistake. For
now our offial Lubuntu and Raspbian could not use it.
according to the specified order
insmod videobuf-core.ko
insmod videobuf-dma-contig.ko
insmod uvcvideo.ko
insmod cci.ko
insmod vfe_os.ko
insmod vfe_subdev.ko
insmod gc2035.ko
insmod vfe_v4l2.ko
There should be generated video0 on /dev/ after loaded. After low-level
driver install, then the Andoird could be used directory.
sudo modprobe gc2035
sudo modprobe vfe_v4l2
www.orangepi.org www.xunlong.tv
Page 30

Orange Pi Manual Copy right by Shenzhen Xunlong Software Co., Ltd
28
iii Modify configuration
iv Create folder for images saving
v Modify permission
vi Continue modifying configuration
vii Boot the server
9) eth0 and wlan0 static mac address setting
a. If the system do not use systemd, you could modify rc.local directory
b. If the system used systemd, you also need to add the following besides
sudo apt-get install motion
sudo nano /etc/motion/motion.conf
stream_localhost off
mkdir ~/motion
chmod 777 motion
sudo nano /etc/default/motion
start_motion_daemon=yes
Sudo /etc/init.d/motion start
Enter the following in browser: localhost:8081
You could check image output from camera.
Besides, you could also refer to this link:
http://www.cnx-software.com/2015/09/26/how-to-use-orange-pi-camera-in-l
inux-with-motion/
and add the following:
$ vim /etc/rc.local
MAC=00:e0:4c:a1:2b:d4
ifconfig wlan0 down
ifconfig wlan0 hw ether $MAC
ifconfig wlan0 up
dhclient &
After rebooting, you could use ifconfig to check whether mac address has
changed.
the above steps:
$ cd /etc/systemd/system/
$ vim change_mac_address.service (You could name the server, format
just like the following)
[unit]
Description=Change OrangePi Wifi mac address
www.orangepi.org www.xunlong.tv
Page 31

Orange Pi Manual Copy right by Shenzhen Xunlong Software Co., Ltd
29
10) Orange Pi Android root
a. Open adb debug mode
b. After connected Orange PI and PC, open command mode of PC, enter
[Service]
ExecStart=/etc/rc.local
RemainAfterExit=yes
[Install]
sWantedBy=multi-user.target
$ systemctl enable change_mac_address.service
Modify mac address of eth0 is same as modifying wlan0’s, just need to
replace wlan0 into eth0.
There is defaulted with root permission on Android pre-installed, but
lacking authorization management software. The following is how to add
authorization management software.
You need to have UsbModeSwitch.apk and UPDATE-SuperSU-v2.46.zip,
install kingroot and make sure OTG on Orange Pi could connect to PC.
Use U disk or card reader to install UsbModeSwitch.apk into Orange Pi
OS and open it, tick "enable usb device mode" and use debug cable to
connect OTG port and PC (make sure it is micro usb-cable in case other
cables could not be recognized). Normally PC would search and install adb
driver software automatically. If PC failed to install, you could install PC
version’s Peasecod to install the driver software.
related command of adb(you need to install adb debug command, which
Peasecod has adb command ). Here is the command:
adb remount
adb shell
windows(win+r) command line enter into command mode, then enter into
kingroot directory and execute the following steps:
adb shell
root@rabbit-p1:/ # mkdir /tmp
root@rabbit-p1:/ # cd /system/bin
root@rabbit-p1:/ # mount -o remount, rw /system
www.orangepi.org www.xunlong.tv
Page 32

Orange Pi Manual Copy right by Shenzhen Xunlong Software Co., Ltd
30
11) WiringPi installation and usage
a. Install WiringPi
i Install compilation tools for source code compilation
ii Compile GPIO driver of H5
iii GPIO print out information
root@rabbit-p1:/system/bin # ln -s busybox-smp unzip
Logout adb shell Mode
root@rabbit-p1:/exit (Or Ctrl + C)
Unzip UPDATE-SuperSU-v2.46.zip
You will obtain META-INF/com/google/android/update-binary and put it
into specific catalog.
adb push /path/UPDATE-SuperSU-v2.46.zip /data/local/tmp path is file’s
path
adb push /path/ update-binary /data/local/tmp
adb shell
root@rabbit-p1:/ #cd /data/local/tmp
root@rabbit-p1:/ #sh update-binary 0 1
/data/local/tmp/UPDATE-SuperSU-v2.46.zip
......
......
After executed scripts, enter reboot command and reboot it, you could
use the device authorization management software normally.
After rebooted, there might be no super administrator icon, you need to
delete the desk configuration file and reboot the board.
$ sudo apt-get install gcc g++ make
git clone https://github.com/kazukioishi/WiringOP.git -b h5
cd WiringOP
chmod +x ./build
sudo ./build
# gpio -v
gpio version: 2.20
Copyright (c) 2012-2014 Gordon Henderson
This is free software with ABSOLUTELY NO WARRANTY.
For details type: gpio -warranty
Banana Pro Details:
www.orangepi.org www.xunlong.tv
Page 33
Orange Pi Manual Copy right by Shenzhen Xunlong Software Co., Ltd
31
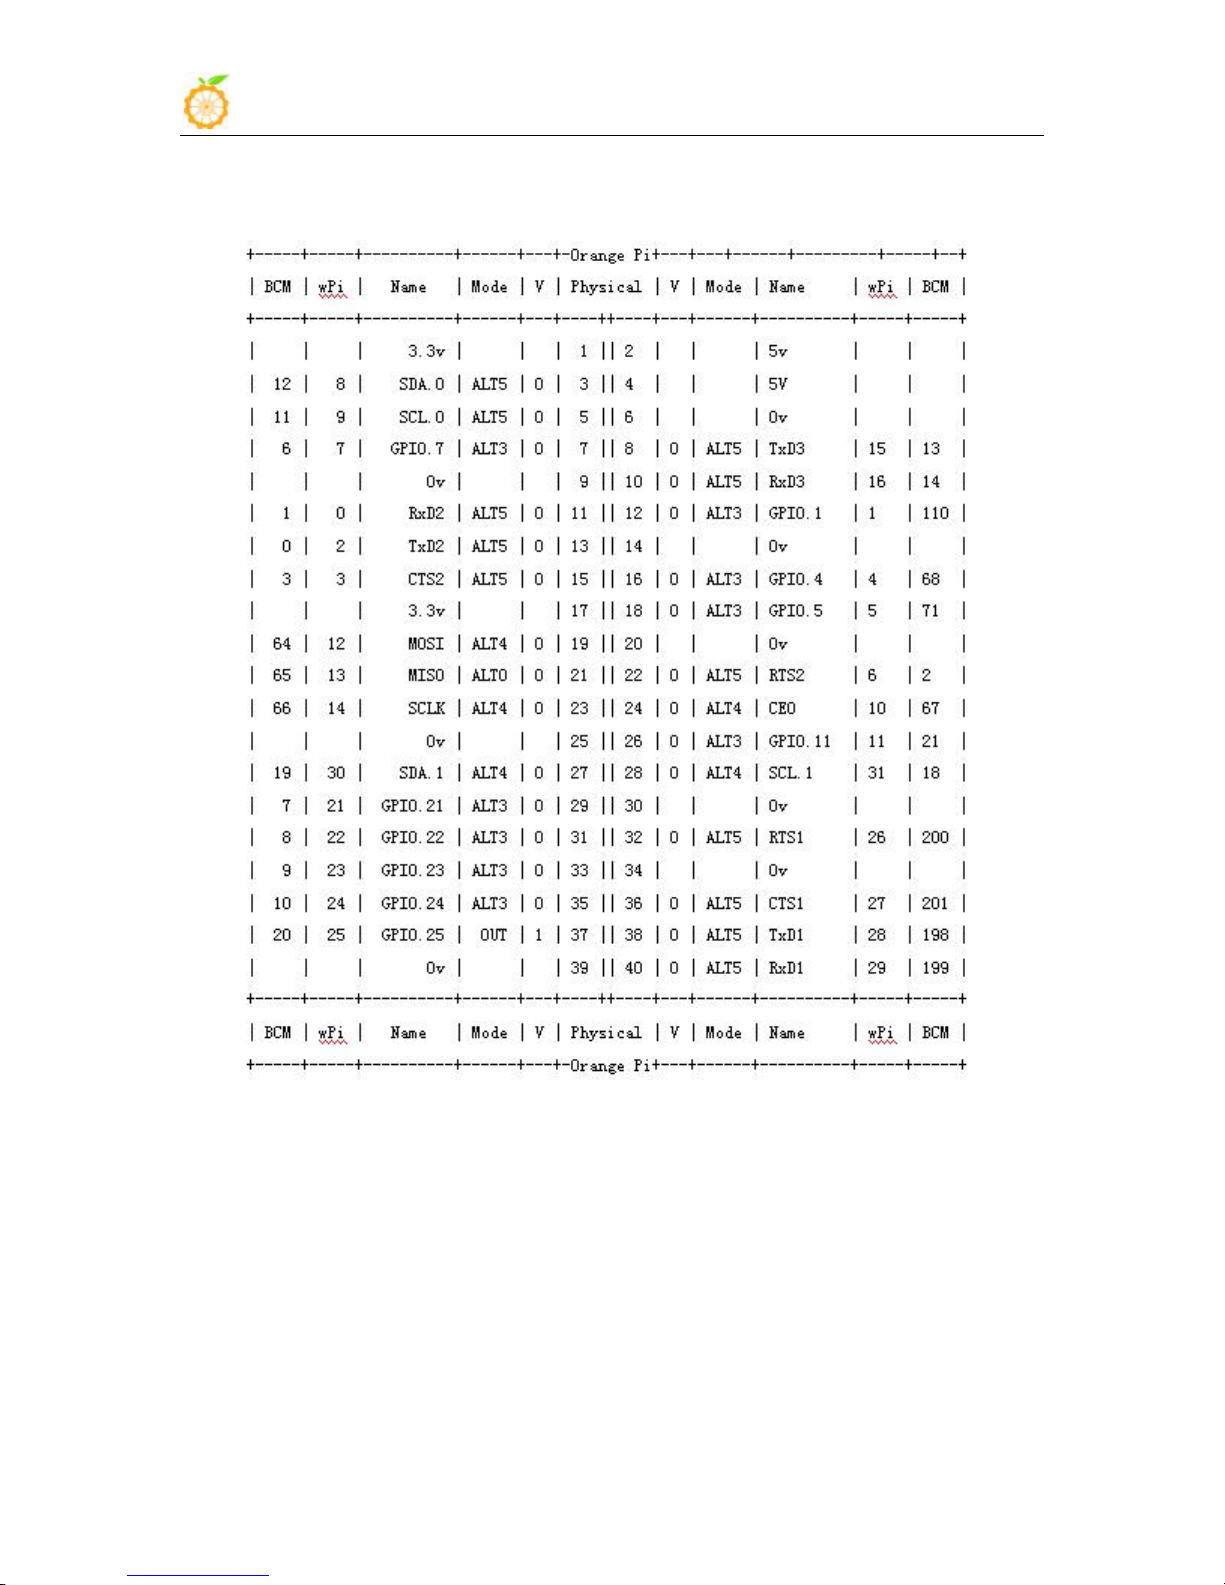
iv Display
Type: Banana Pro, Revision: 1.2, Memory: 1024MB, Maker: LeMaker
gpio readall
www.orangepi.org www.xunlong.tv
Page 34
Orange Pi Manual Copy right by Shenzhen Xunlong Software Co., Ltd
32
III. Linux Kernel Source Code Compilation
1. Download Linux Source Code
In order to support the rapid development of the project, we are writing
this sections for project configuration options to the binary file. When the
system is running, it can get the information of the system running by
reading the binary file, which can greatly simplify the time of project
development.
This manual describes how to use the binary file to speed up the
development of the project.
Hardware: Orange Pi development board*1, Card reader*1, TF card*1,
power supply*1
Note: In the following sections, * indicates wild-cards, you need to fill
in the actual values according to their file storage path.
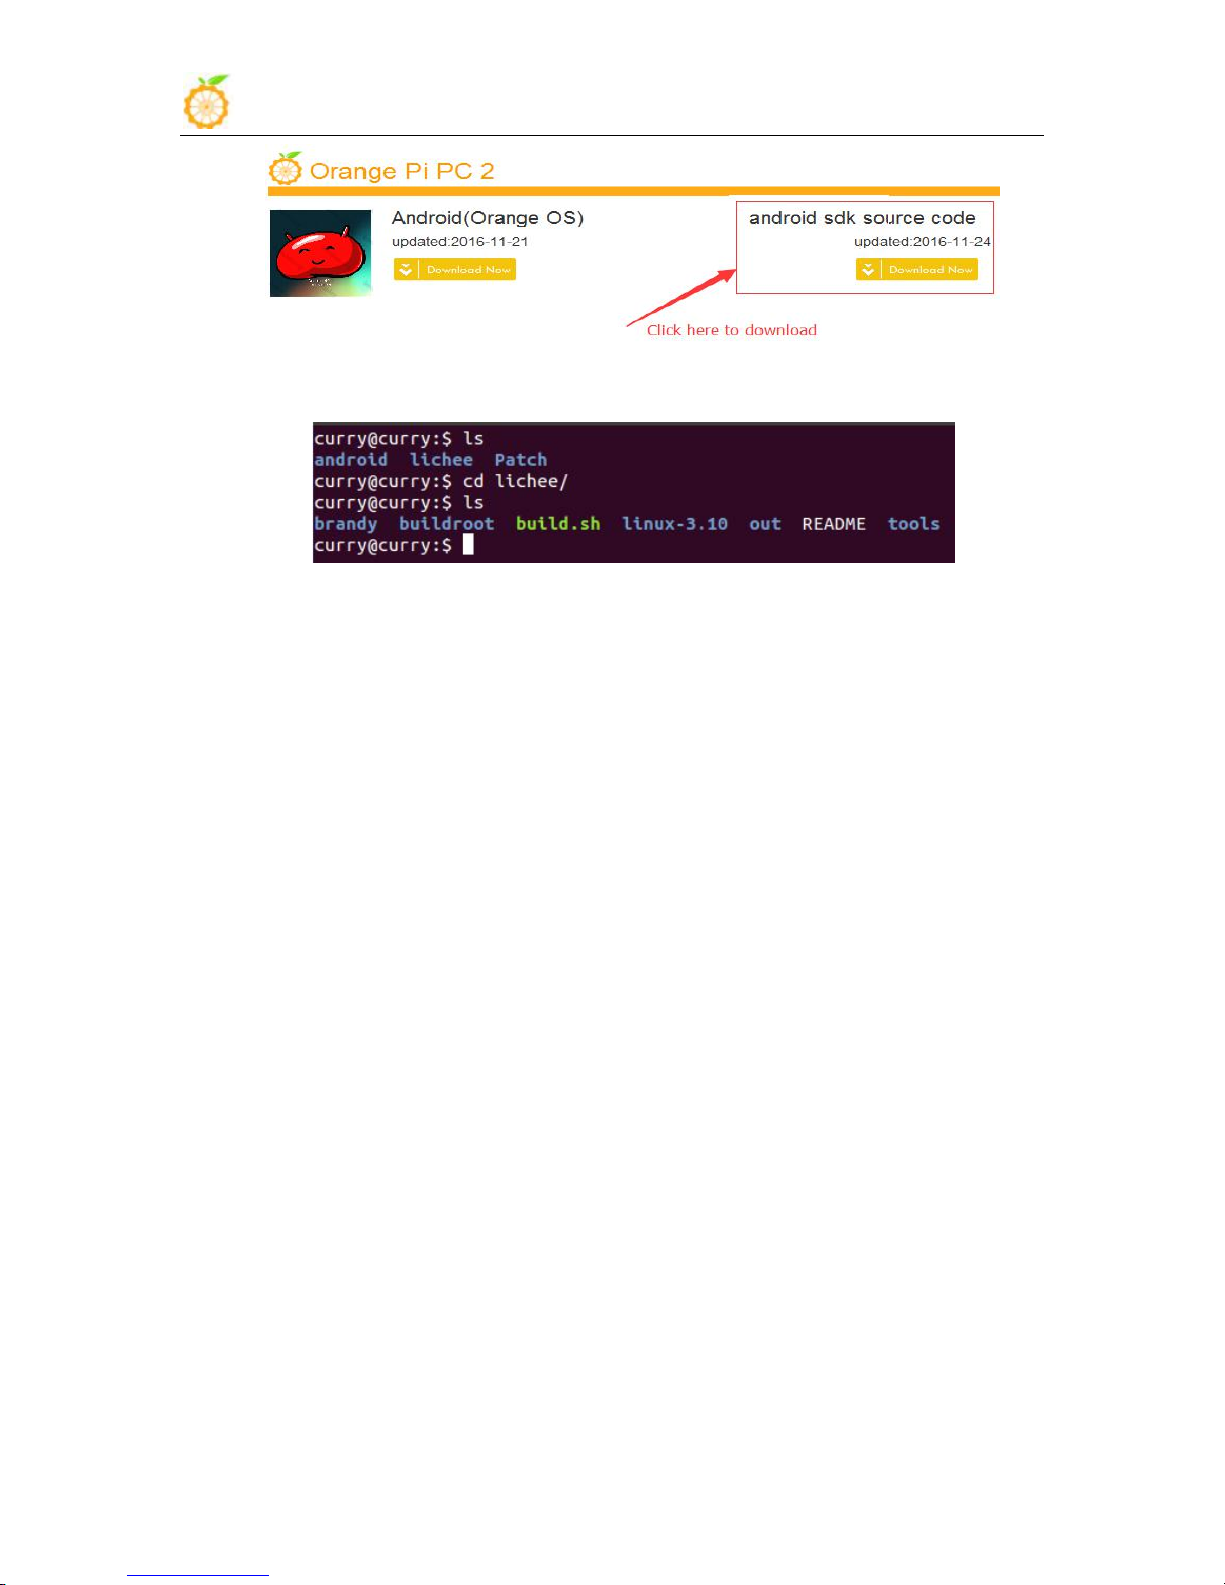
You could download the source code from the official website:
http://www.orangepi.org/downloadresources/
www.orangepi.org www.xunlong.tv
Page 35
Orange Pi Manual Copy right by Shenzhen Xunlong Software Co., Ltd
33
2. Compile Project Source Code
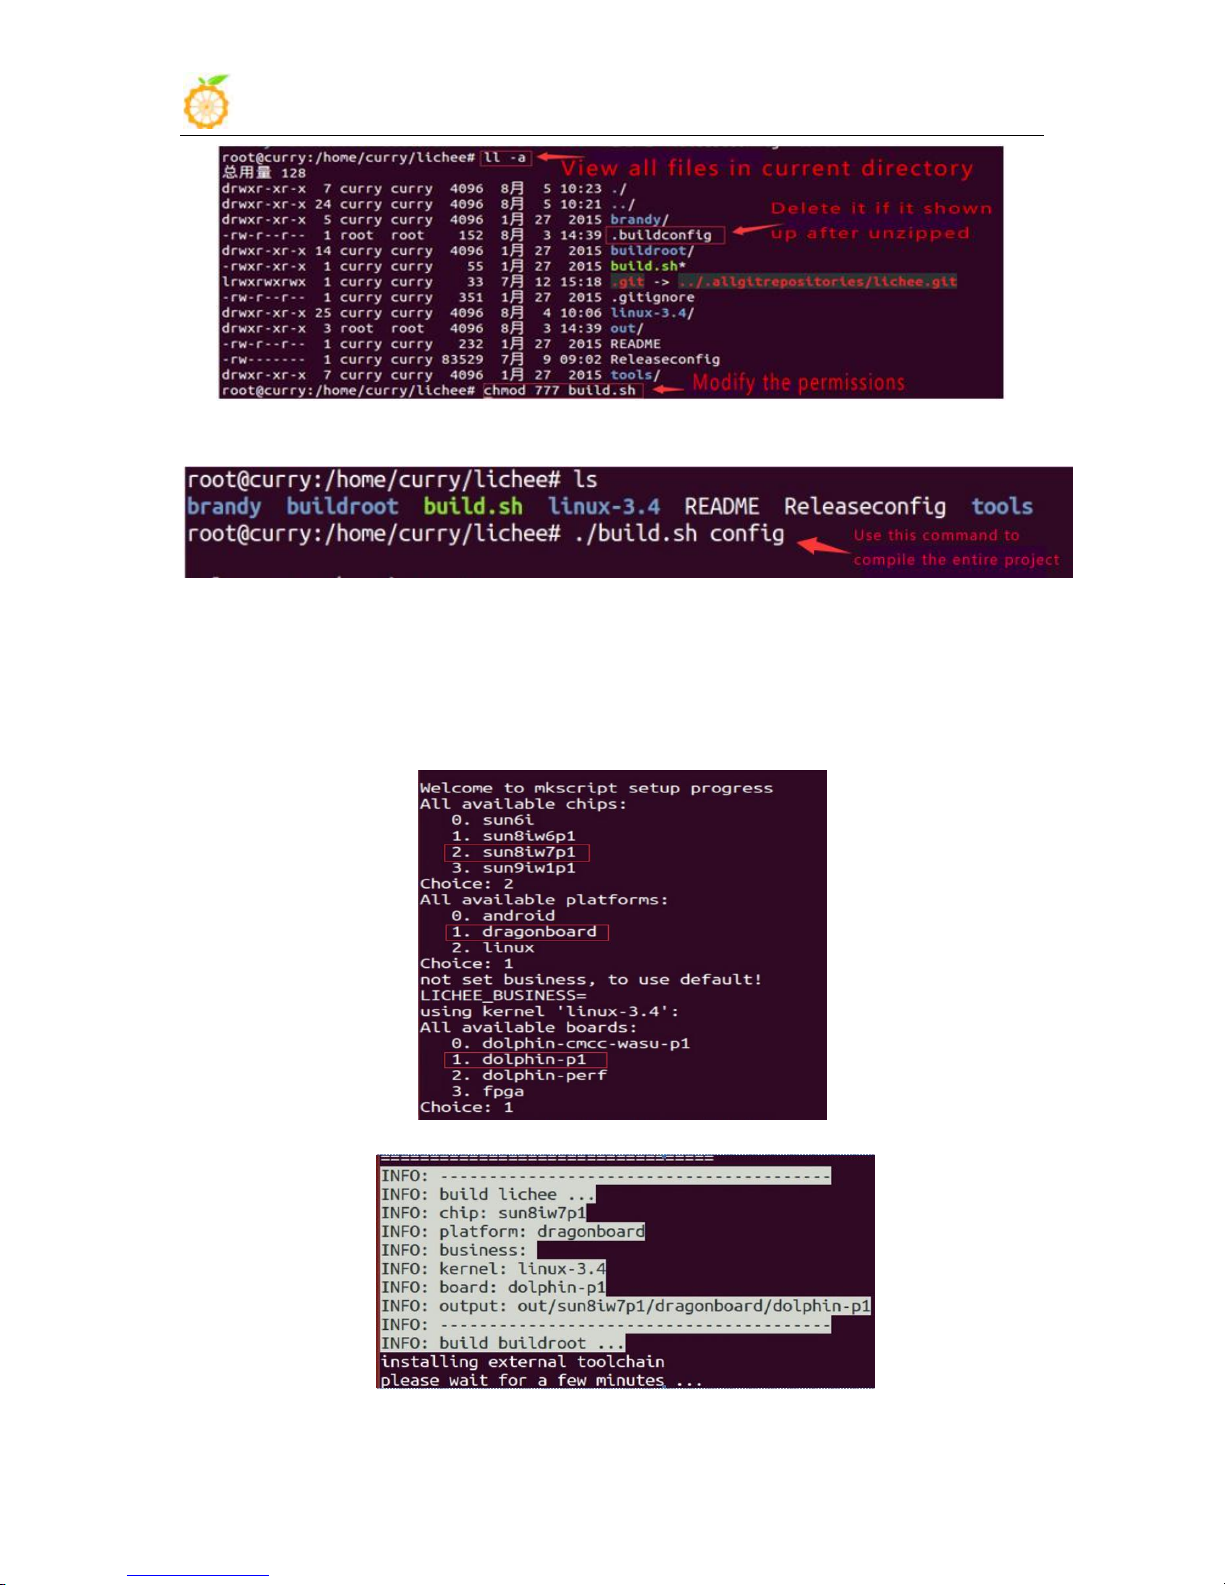
Enter into content of lichee, command
If there is .buildconfig after commanded ll –a, delete it
Subsection and compress the file, then unzip it after finish downloaded:
buildroot: Project compilation script
brandy: gcc-linaro, boot and uboot source code and open source cross
compiler tool
linux-3.10: Kernel source code
tools: Tools of project compilation
build.sh: compilation script
You need to compile the entire project while it is your first time to use
the source code. You can use the following commands in the /lichee
directory to complete the project:
$ ll -a
Check if there is an executable permission on build.sh, if not, modify the
permissions
$ chmod 755 build.sh
$ rm –rf .buildconfig
www.orangepi.org www.xunlong.tv
Page 36
Orange Pi Manual Copy right by Shenzhen Xunlong Software Co., Ltd
34
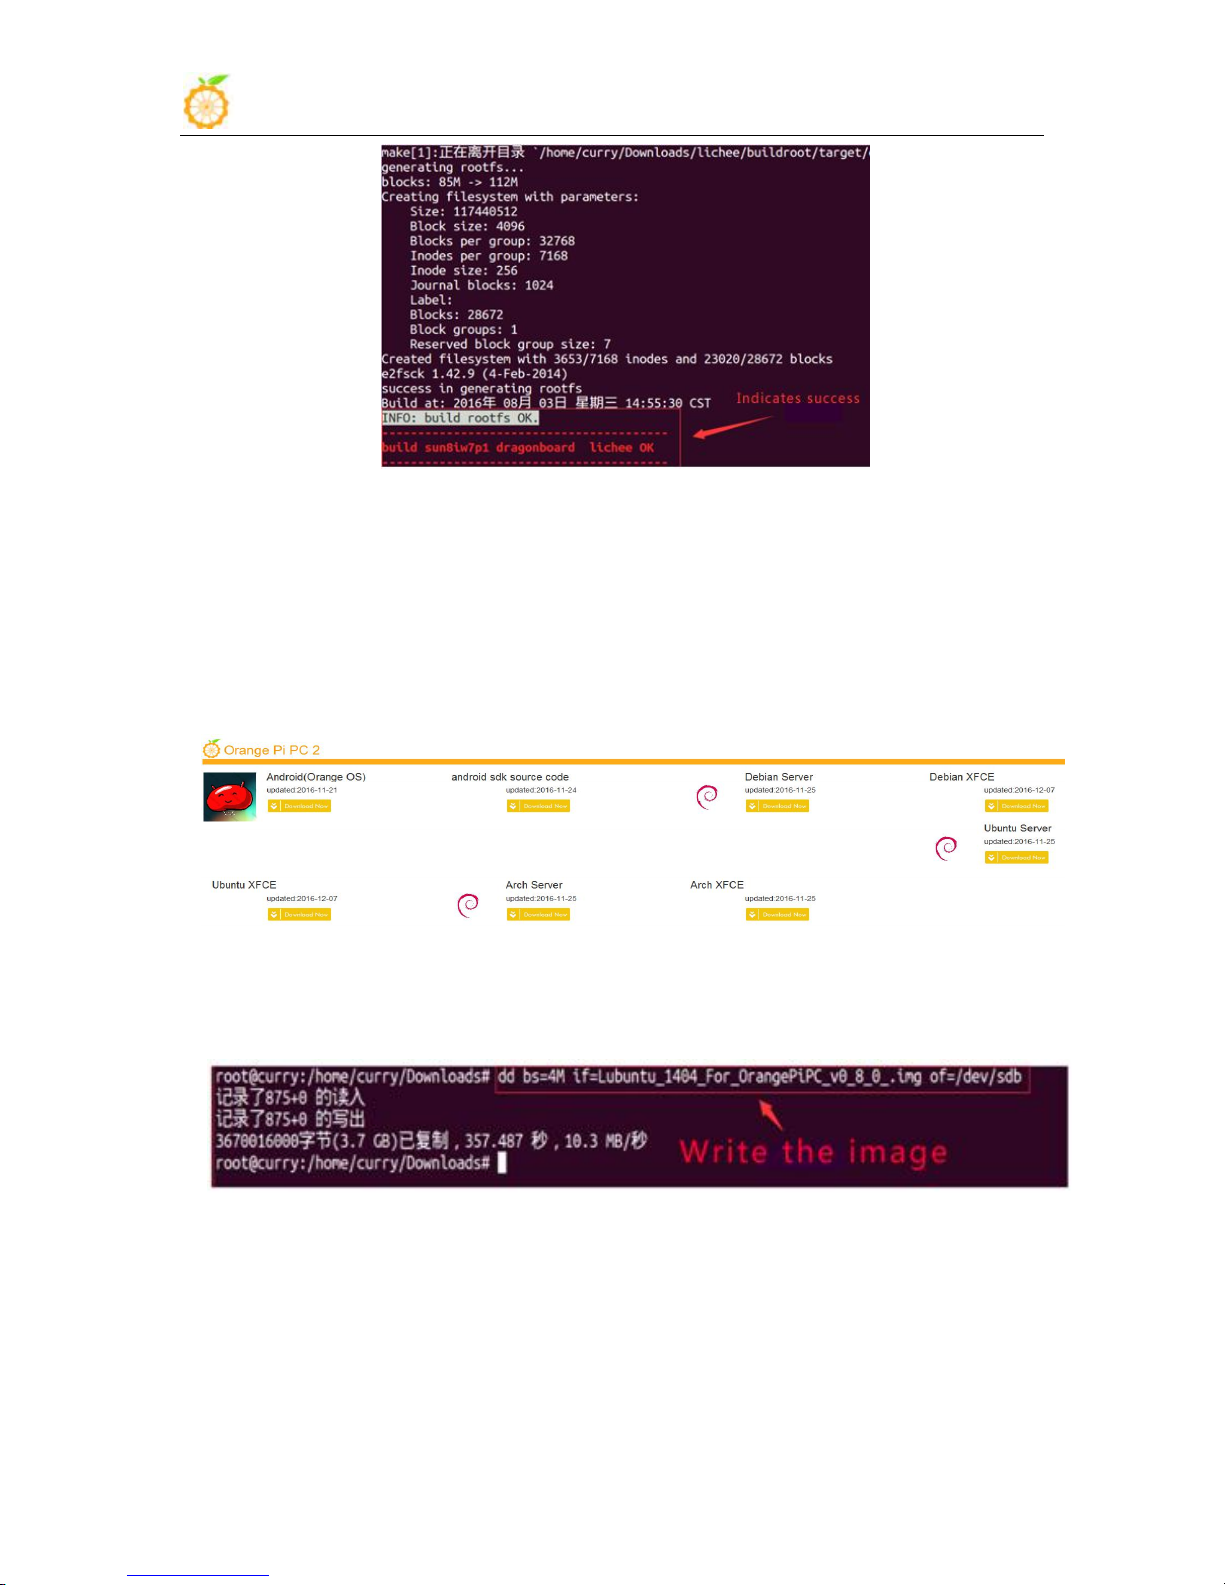
Use the following command to compile the entire project
$ ./build.sh config
At this point the system will prompt the choice of the chip, as shown
below, for OrangePi, select sun50iw2p1
At this point, the system will be prompted to select the platform, as
shown below, for OrangePi, select Android
At this point, the system will be prompted the choice of the board, as
shown below, for the OrangePi, select dolphin-p1
Appear this interface indicates waiting for the compiler.
Wait fifteen minutes or so, compile complete.
www.orangepi.org www.xunlong.tv
Page 37
Orange Pi Manual Copy right by Shenzhen Xunlong Software Co., Ltd
35
3. Update the Kernel Image File and Replace Library
After compilation is finished, the following files will be generated in the
Write the image
:
directory:
libs
:
lichee/out/sun50iw2p1/android/common/lib/modules/3.10.65
Download image from official website:
http://www.orangepi.org/downloadresources/
$ sudo dd bs=4M if=*.img of=/dev/sdb
Pull out the card reader, and then insert it again.
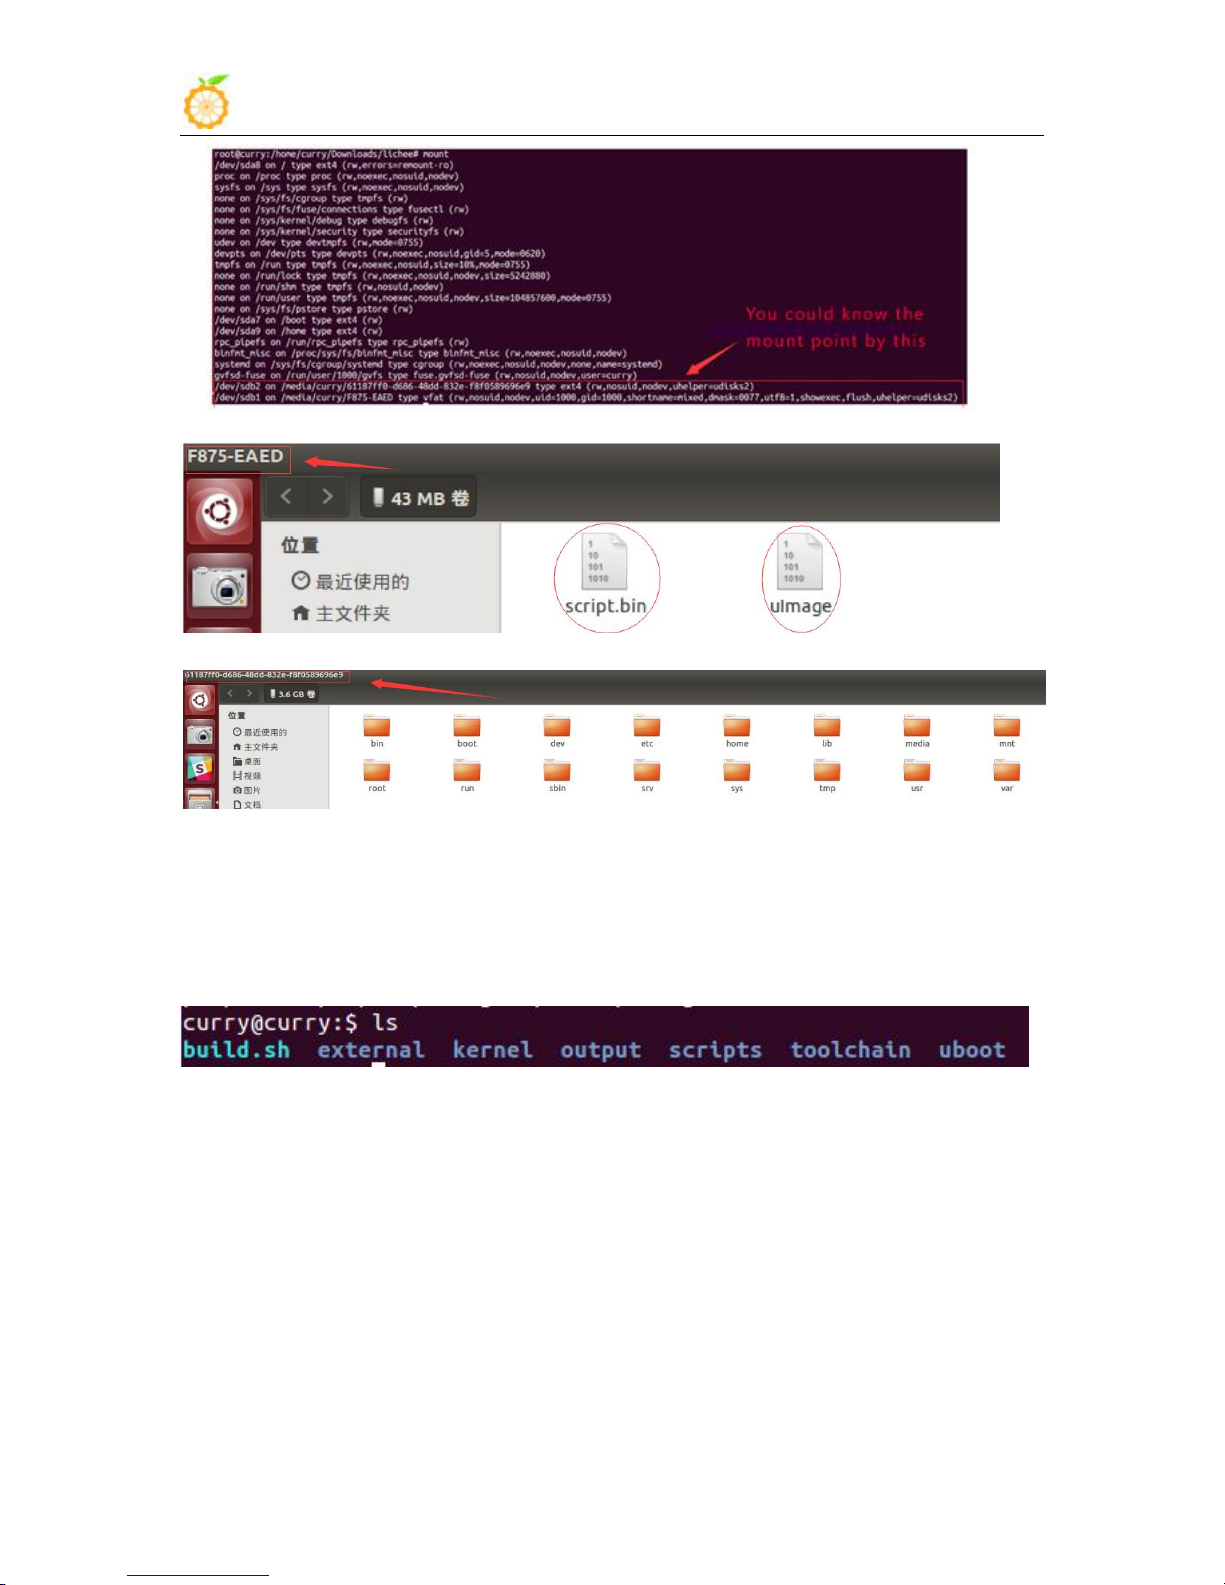
At this time, the SD card is inserted into PC, view the SD card mount
point (if you don't know how to get a mount point for the SD card, please
refer to the diagram below).
www.orangepi.org www.xunlong.tv
Page 38
Orange Pi Manual Copy right by Shenzhen Xunlong Software Co., Ltd
36
The first boot partition
The second rootfs partition
Copy the kernel image file generated by the compiler to the first partition
(boot partition)
Copy the lib library which generated after compilation to the second
partition (rootfs partition)
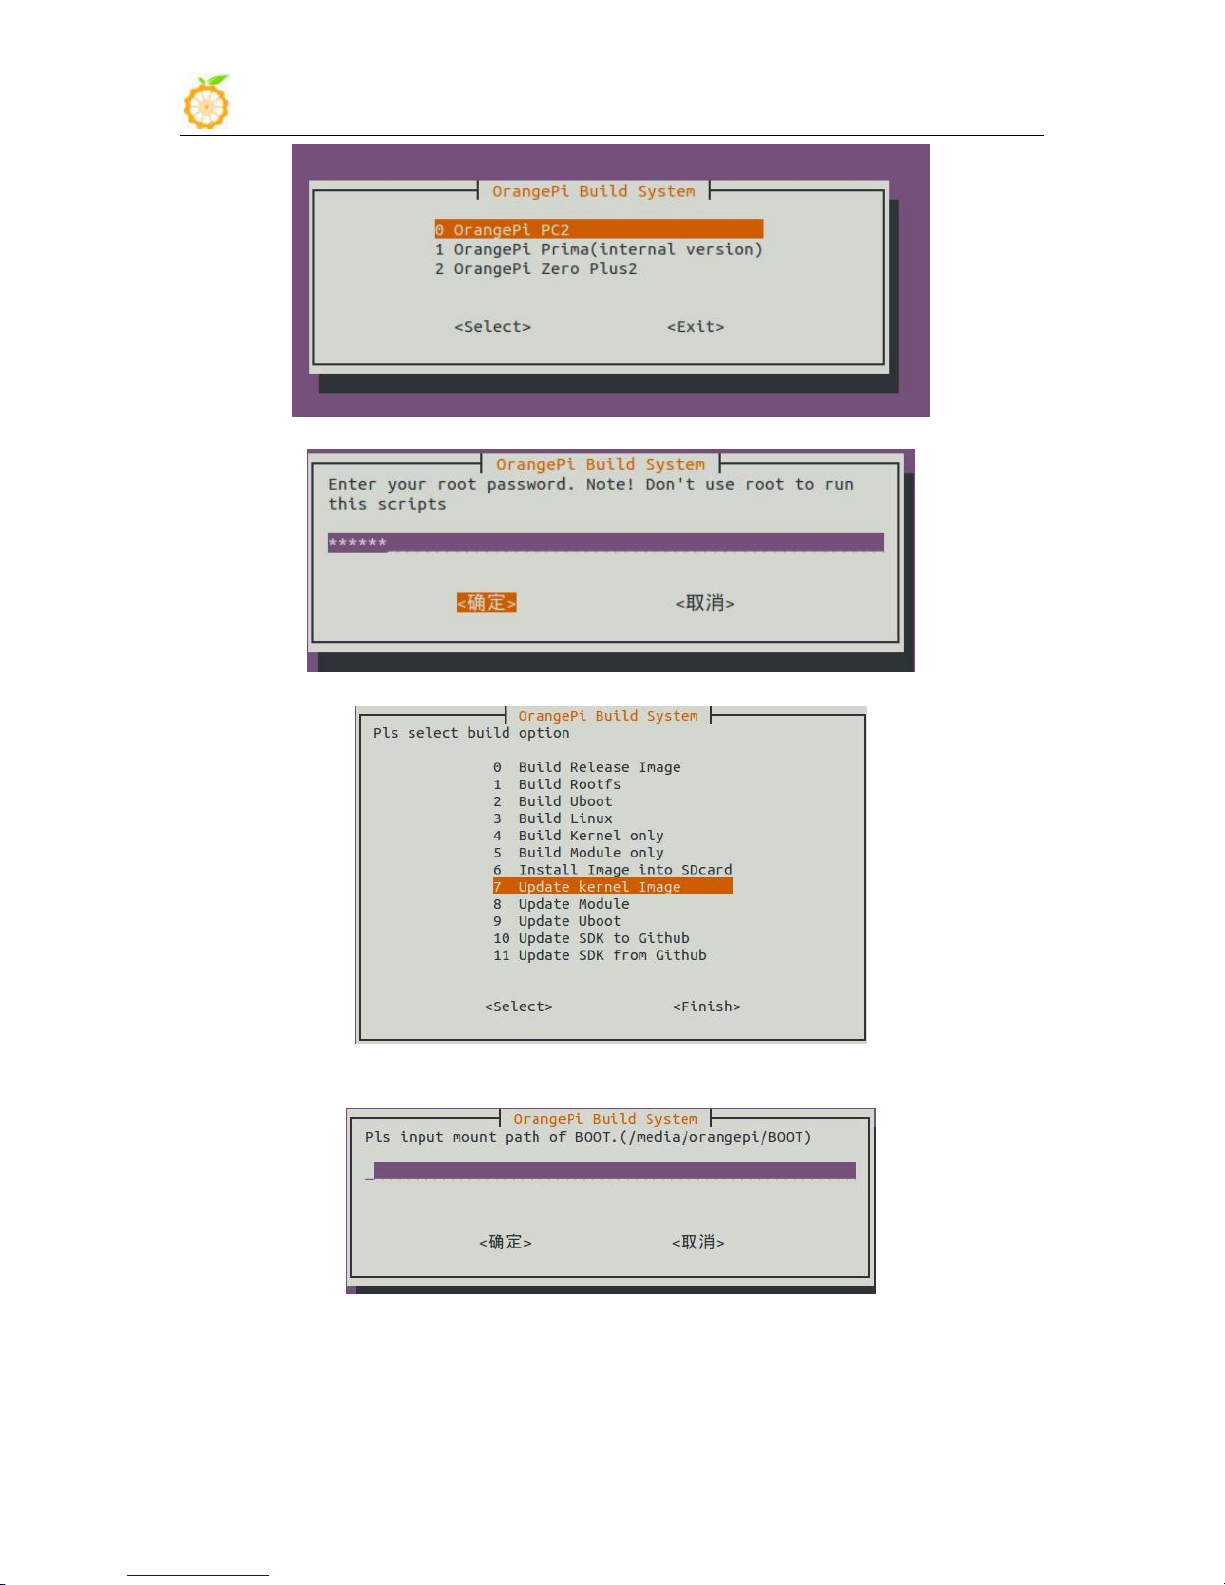
We would suggest using compilation system on github of official
website.
build.sh Execute script into the graphical interface of compilation
extenal Inside are patch and some configuration kernel file
output File generated
script Script compiled
toolchain Cross compiler location
uboot uboot source code
Execute./build.sh enter into graphical interface and select PC2
www.orangepi.org www.xunlong.tv
Page 39
Orange Pi Manual Copy right by Shenzhen Xunlong Software Co., Ltd
37
Enter password of root
Update Kernel directory and module
Select corresponding file directory and update uImage and modules
www.orangepi.org www.xunlong.tv
Page 40
Orange Pi Manual Copy right by Shenzhen Xunlong Software Co., Ltd
38
IV. Android Kernel Source Code Compilation
1. Install JDK
Hardware: Orange Pi development board*1, Card reader*1, TF card*1,
power supply*1
Software
Linux host computer, which hard disk space at least 50G (to meet a fully
compiled need)
Linux host computer needs:
Version 2.7.3 of Python;
Version 3.81-3.82 of GNU Make;
JDK 6;
Version 1.7 or higher version of Git.
www.orangepi.org www.xunlong.tv
Page 41
Orange Pi Manual Copy right by Shenzhen Xunlong Software Co., Ltd
39
Download and install JDK, you will obtain jdk-6u31-linux-x64.bin
Modify the permission of jdk-6u31-linux-x64.bin, which has no prior
$./jdk-6u31-linux-x64.bin
Input at terminal
Command line input Jav and press tab to see whether it can auto
2. Install Platform Supported Software
3. Download Android Source Package
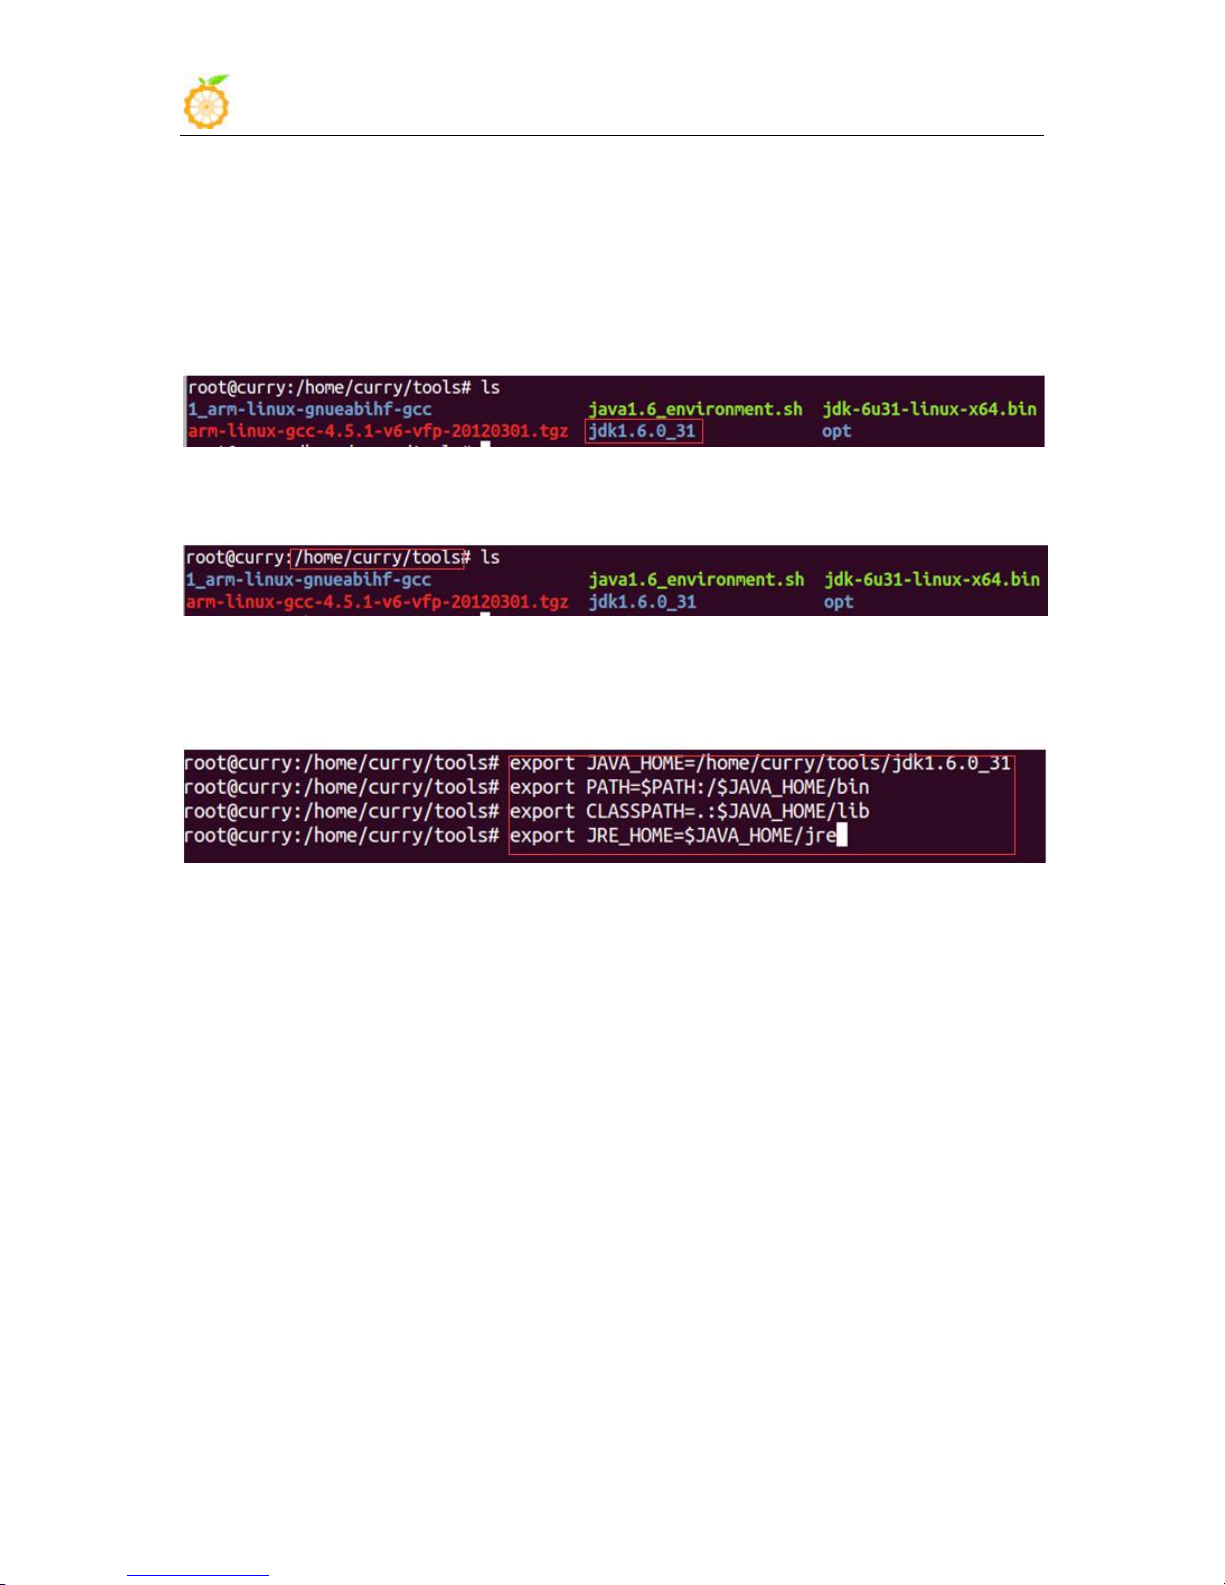
The following will be illustrating jdk1.6 installation, it would be same for
jdk1.7 installation.
permission
It will generate a folder:
Note that JAVA_HOME is the name of the current directory, you need to fill in
according to your own storage directory.
$ export JAVA_HOME=*/jdk1.6.0_31
$ export PATH=$PATH:/$JAVA_HOME/bin
$ export CLASSPATH=.:$JAVA_HOME/lib
$ export JRE_HOME=$JAVA_HOME/jre
completion (Java), which indicates it can successfully installed
$ sudo apt-get install git gnupg flex bison gperf build-essential \
zip curl libc6-dev libncurses5-dev:i386 x11proto-core-dev \
libx11-dev:i386 libreadline6-dev:i386 libgl1-mesa-glx:i386 \
libgl1-mesa-dev g++-multilib mingw32 tofrodos \
python-markdown libxml2-utils xsltproc zlib1g-dev:i386
$ sudo ln -s /usr/lib/i386-linux-gnu/mesa/libGL.so.1
/usr/lib/i386-linux-gnu/libGL.so
Download website: http://www.orangepi.org/downloadresources/
Then you will obtain the following directories:
www.orangepi.org www.xunlong.tv
Page 42
Orange Pi Manual Copy right by Shenzhen Xunlong Software Co., Ltd
40
4. Install Compiler Tool Chain
5. Compile Lichee source Code
6. Compile Command of Android Code
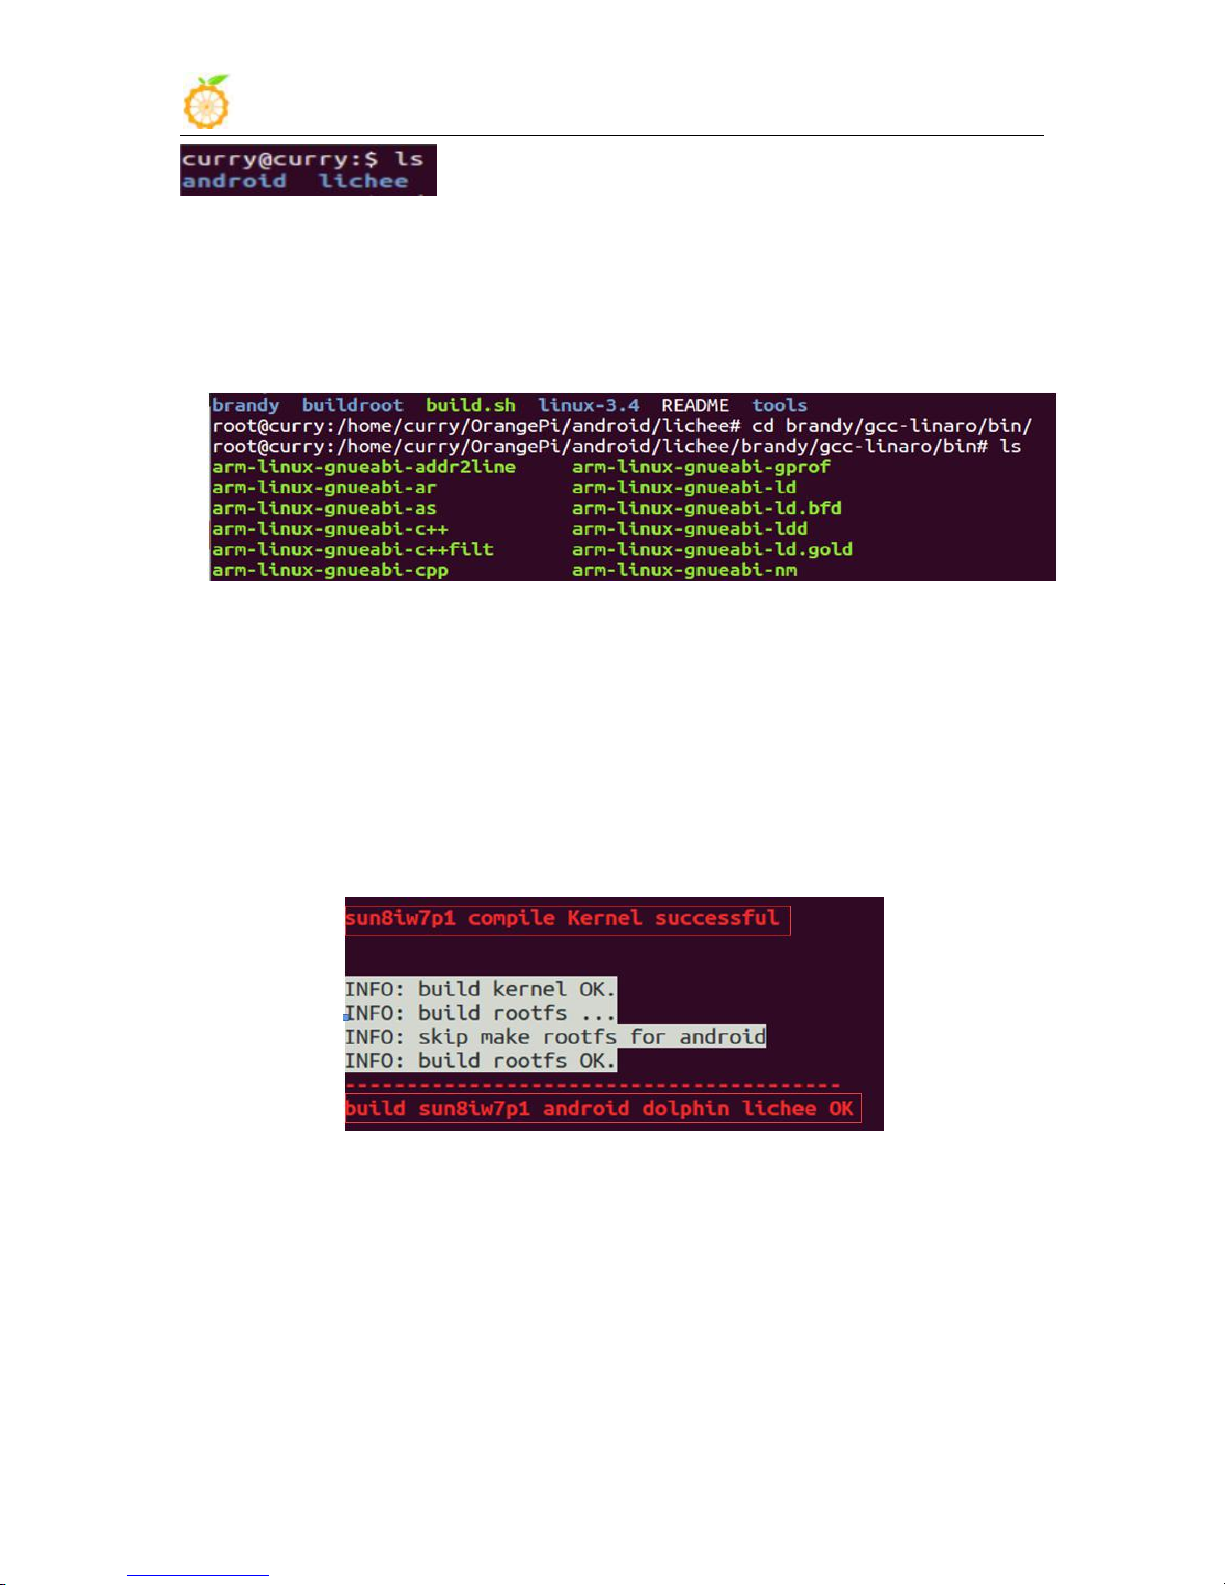
The compiler tool chain has been integrated in Android SDK. Tool chain
is on: lichee/brandy/gcc-linaro/ of Android SDK(already exist)
There are Android and Lichee after unzipped the package, enter the
directory of Lichee:
$ cd lichee
$ ./build.sh lunch
Select sun50iw2p1
Print information of successful compilation
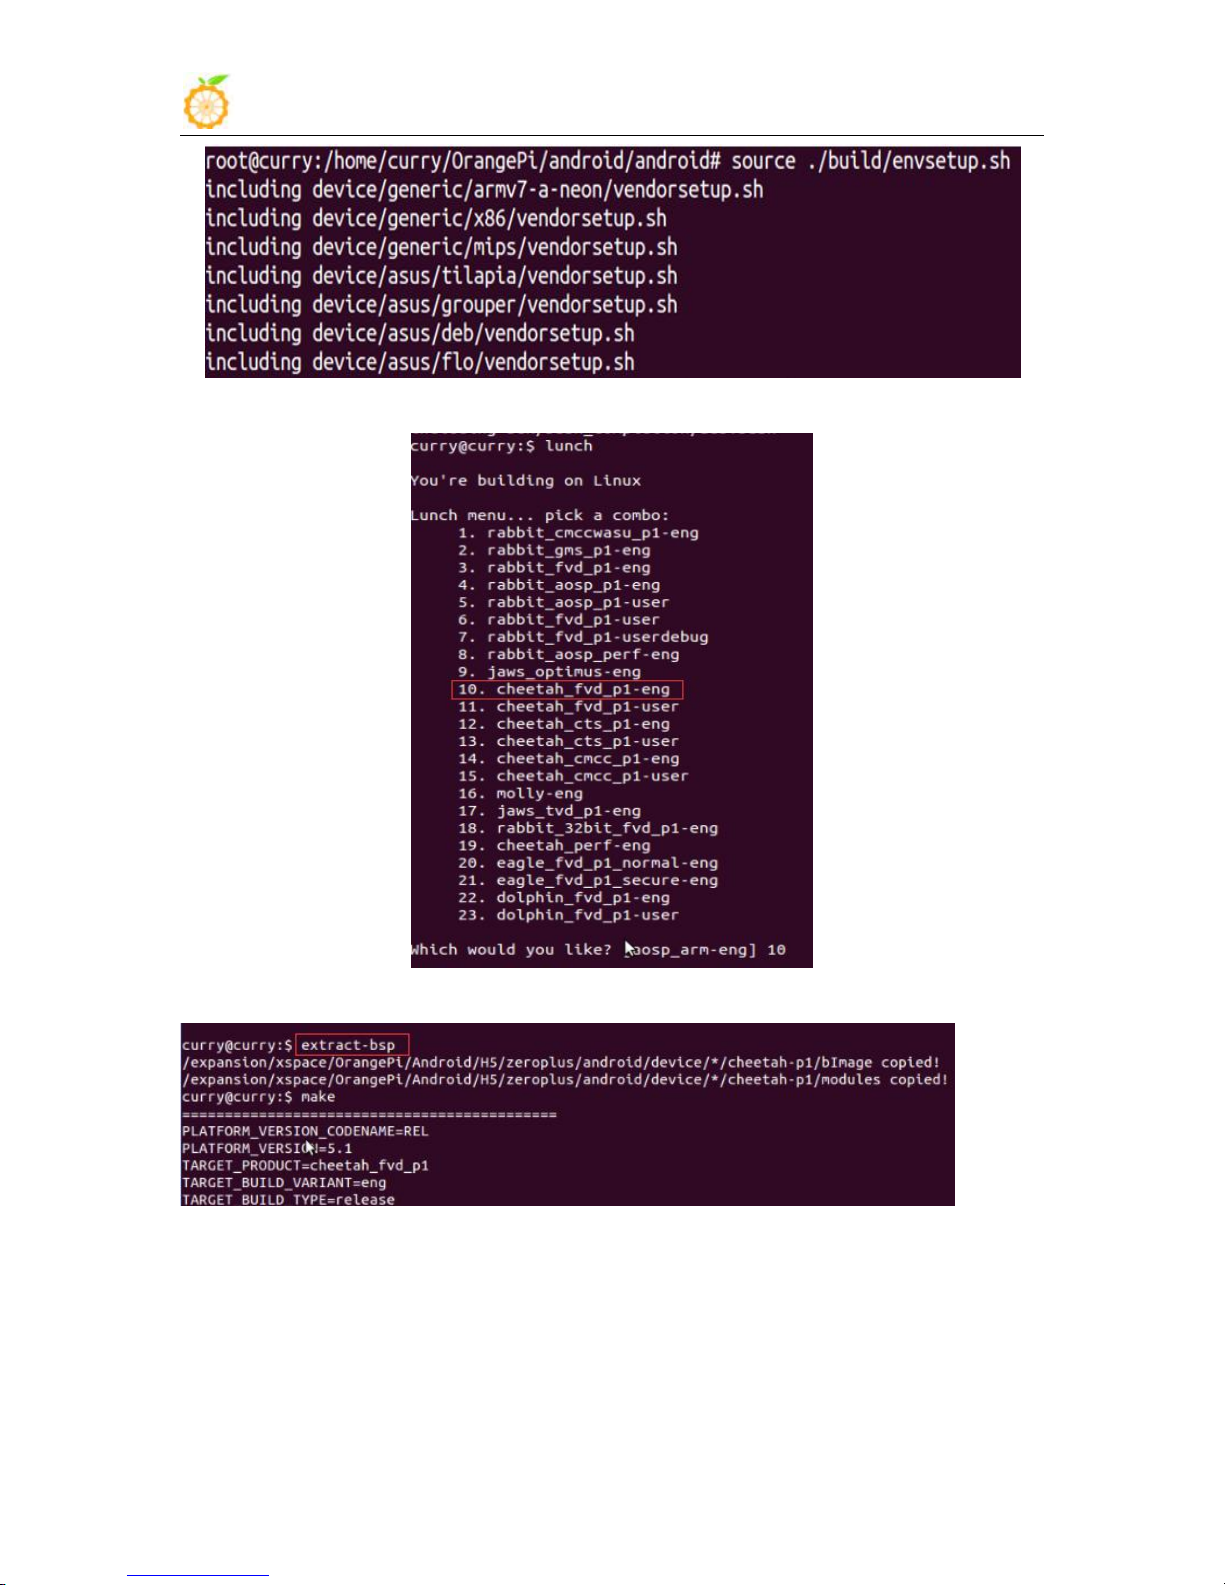
Input the command:
$ cd android
$ source ./build/envsetup.sh
www.orangepi.org www.xunlong.tv
Page 43
Orange Pi Manual Copy right by Shenzhen Xunlong Software Co., Ltd
41
$ lunch dolphin_fvd_p1-eng # Select the scheme number
$ extract-bsp # Copy the kernel and the drive module
$ make The rear values of # is for the simultaneous compilation
process, dependent on the host configuration
www.orangepi.org www.xunlong.tv
Page 44
Orange Pi Manual Copy right by Shenzhen Xunlong Software Co., Ltd
42
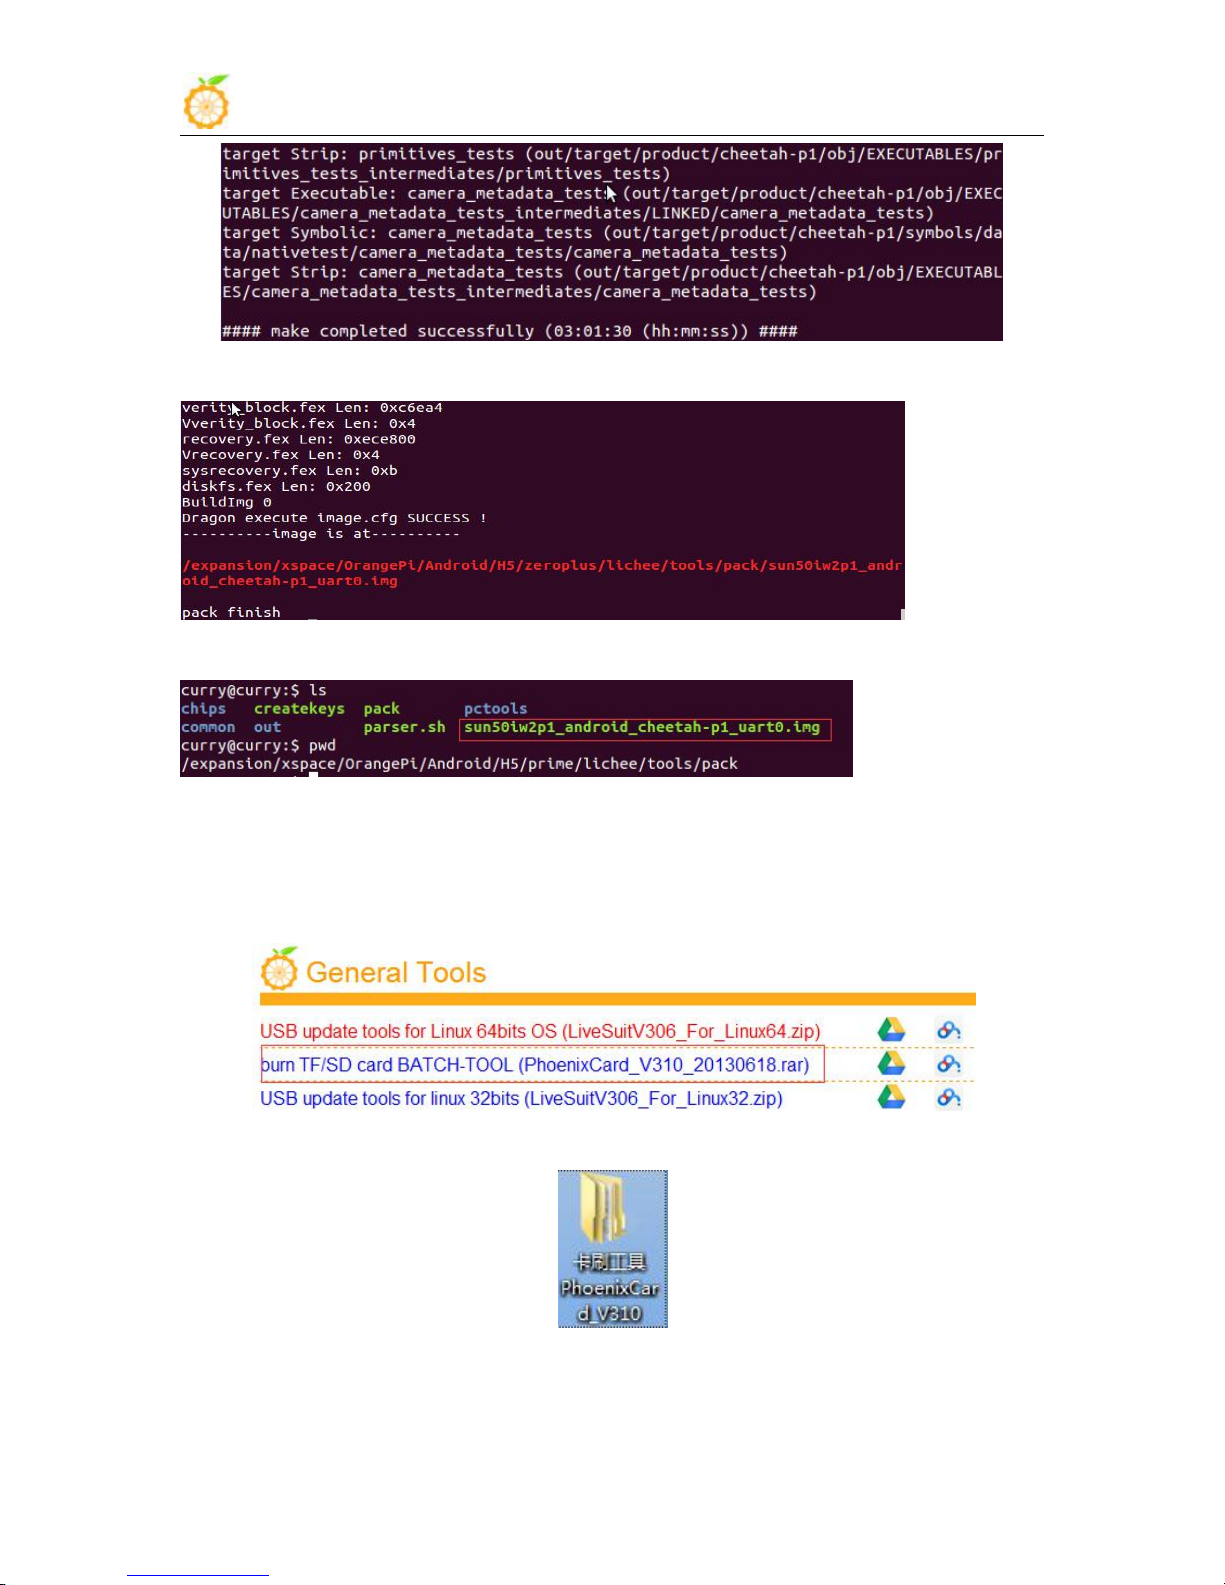
$ pack #Packaged into firmware
$ cd */lichee/tools/pack/
Write image:
Copy the generated image file i to the SD card, switch to the windows
operating system. Programming software download website
:
http://www.orangepi.org/downloadresources/
Download the compressed package, unzip and get the folder
Enter the folder, open the program to run as Administrator
www.orangepi.org www.xunlong.tv
Page 45
Orange Pi Manual Copy right by Shenzhen Xunlong Software Co., Ltd
43
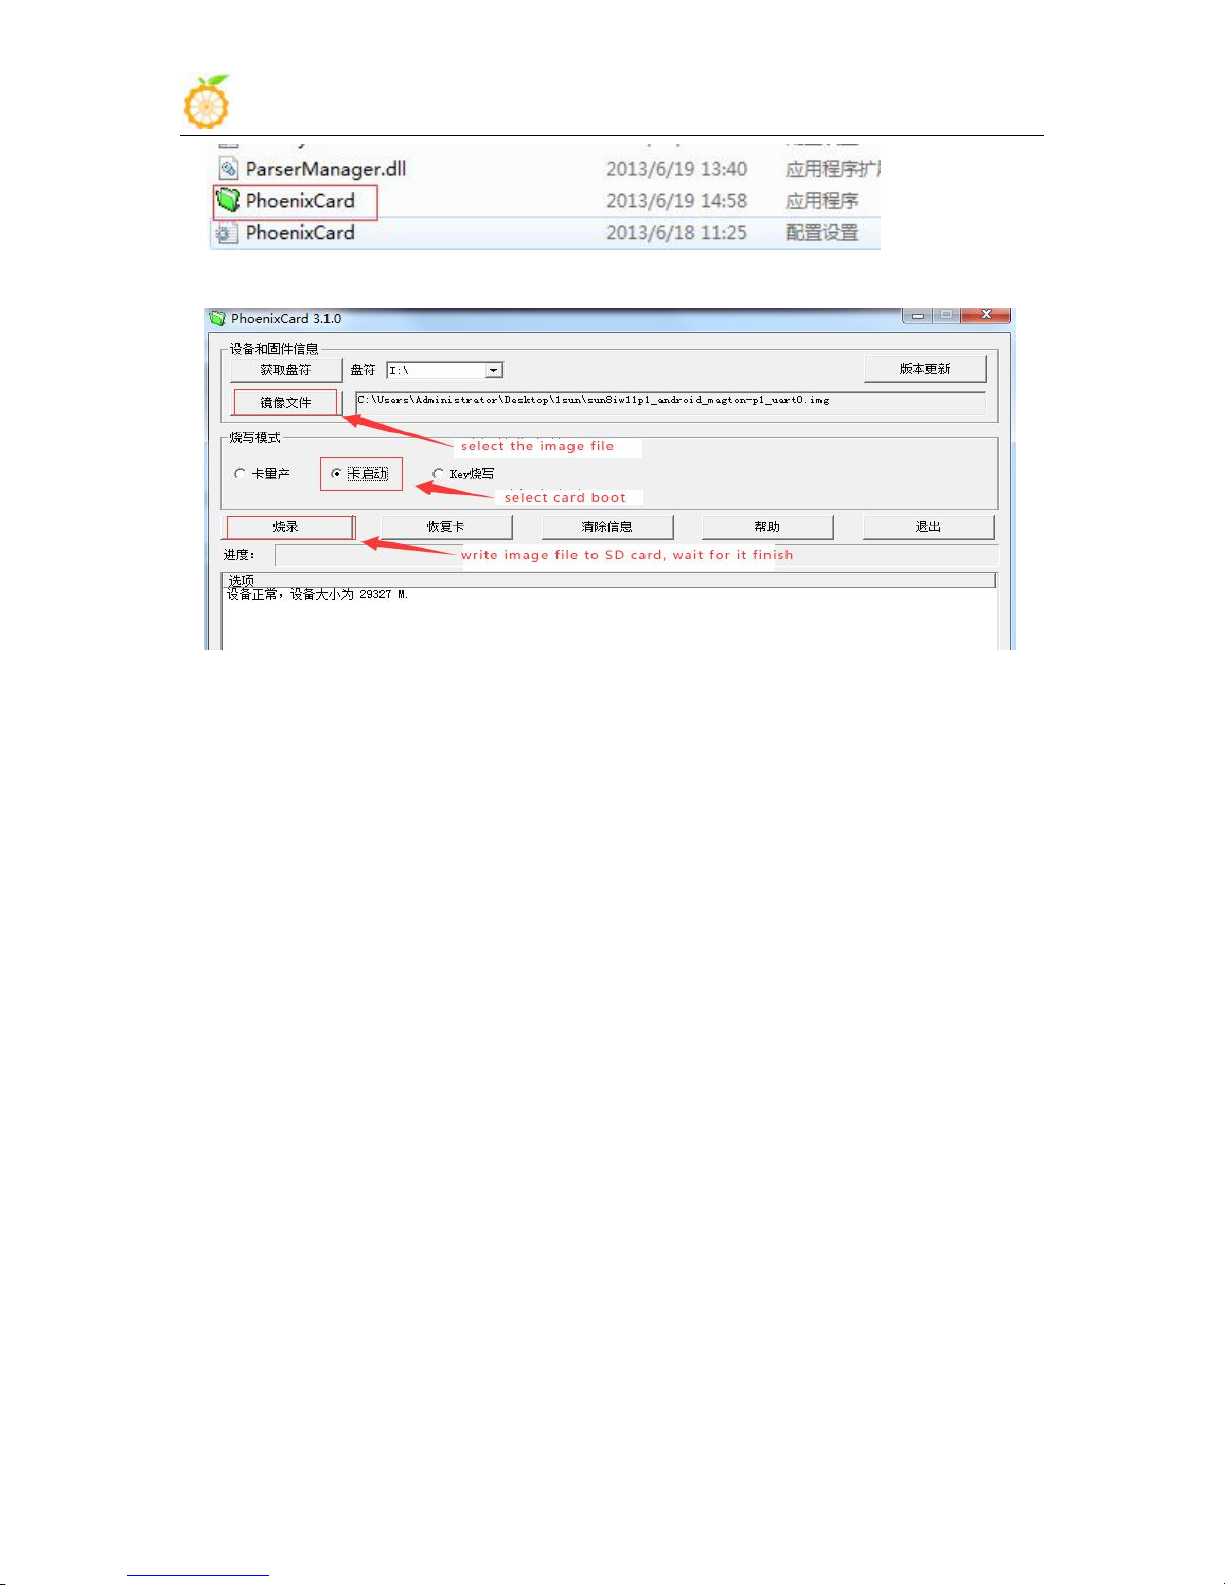
Write Android image on Windows with this tool:
Insert the TF card with written image to OrangePi, turn on the computer
then you could enter to Android system.
www.orangepi.org www.xunlong.tv
Page 46

Orange Pi Manual Copy right by Shenzhen Xunlong Software Co., Ltd
44
V. Use Project Configuration Files
1. sys_config.fex Introduction
2. Examples
1) Modify the output mode into tv
tv-out out, the output type of tv0 is invalid, you need to set the output
Configure hardware: sys_config.fe
The sys_config.fex is a binary configuration file that used by the SOC
kernel driver or LiveSuit for a particular target board, including how to set
up a variety of peripherals, ports, and I/O which based on the target version.
For OrangePi, the location of the project configuration document is
lichee/tools/pack/chips/sun8iw7p1/configs/dolphin-p1/sys_config.fex
Copy the file to the directory of /lichee, use command:
$ cd ./lichee
$ cp ./tools/pack/chips/sun8iw7p1/configs/dolphin-p1/sys_config.fex ./
You could personalized configuration of sys_config.fex according to
sysconfig1.fex_manul_linux_BSP_v0.4.pdf.
Direcotory of sysconfig1.fex_manul_linux_BSP_v0.4.pdf is
/lichee/buildroot/docs.
type of tv1 into pal.
Modify defaulted enable display output configuration into tv
[tv0]
used = 1
tv_dac_used = 1
dac_src0 = 0
dac_type0= 0
interface= 1
[tvout_para]
tvout_used= 1
tvout_channel_num= 1
:
[disp]
disp_init_enable= 1
disp_mode= 1
screen0_output_type= 2
www.orangepi.org www.xunlong.tv
Page 47

Orange Pi Manual Copy right by Shenzhen Xunlong Software Co., Ltd
45
2) Loading tv.ko module automatically after booted
Capacitance touch panel (capacitor tp)
Configuration Item
Configuration Meaning
ctp_used=xx
Whether turn on capacitance touch
panel, if so set the value as 1, and
vice verso 0.
ctp_name =xx
Indicates the control scheme used
in the specified scheme, for now
there are: "ft5x_ts" or
"Goodix-TS".
ctp_twi_id=xx
Used for selecting i2c adapter, there
are 0 and 2.
ctp_twi_addr =xx
Indicates the device address of i2c,
it is related to the specific
hardware.
ctp_screen_max_x=xx
Maximum coordinates of the X axis
of the touch panel
ctp_screen_max_y=xx
Maximum coordinates of the Y axis
o the touch panel
ctp_revert_x_flag=xx
Whether needed to flip the X
screen0_output_mode= 11
screen1_output_type= 2
screen1_output_mode= 11
dev0_output_type = 4
dev0_output_mode = 4
dev0_screen_id = 0
dev0_do_hpd = 1
dev1_output_type = 2
dev1_output_mode = 11
Modify sys_confi and replace it when it generated OrangePiH5.dtb. If
would be faster if use compilation system on githug. About compilation you
could refer to the charter of Linux Compilation.
Enter /lib/ directory, enter command:
depmod -a
Add one more line on /etc/modules
tv
It would be tv out after booted
www.orangepi.org www.xunlong.tv
Page 48

Orange Pi Manual Copy right by Shenzhen Xunlong Software Co., Ltd
46
coordinates, if so then set 1, and
vice verso 0.
ctp_revert_y_flag=xx
Whether needed to flip the Y
coordinates, if so then set 1, and
vice verso 0.
ctp_int_port=xx
GPIO configuration of the interrupt
signal of capacitive touch panel
ctp_wakeup=xx
GPIO configuration of the wake-up
signal of capacitive touch panel
ctp_io_port=xx
Capacitive screen IO signal,
currently share with interrupt signal
common pin
Configuration samples:
ctp_used = 1
ctp_name = "ft5x_ts"
ctp_twi_id = 2
ctp_twi_addr = 0x70
ctp_screen_max_x = 800
ctp_screen_max_y = 480
ctp_revert_x_flag = 0
ctp_revert_y_flag = 0
ctp_int_port = port:PH21<6><default>
ctp_wakeup = port:PB13<1><default><default><1>
ctp_io_port = port:PH21<0><default>
Note: If you want to support the new capacitive touch IC, you need to
combine the configuration of the BSP A10 layer, which should be based on
the original capacitive touch IC code, to make the appropriate changes.
Specifically, 1) ctp_twi_id should be consistent with the hardware
connection in sys_config; 2) In the drive part of the code: the use of twi from
the device name + address should be consistent with the ctp_name and
ctp_twi_addr in sys_config configuration. At the same time, the other sub
configuration in sysconfig should also be properly configured, these
configurations should be corresponding processing in the program.
www.orangepi.org www.xunlong.tv
Page 49
Orange Pi Manual Copy right by Shenzhen Xunlong Software Co., Ltd
47
VI. OrangePi Driver development
1. Device Driver and
Application Programming
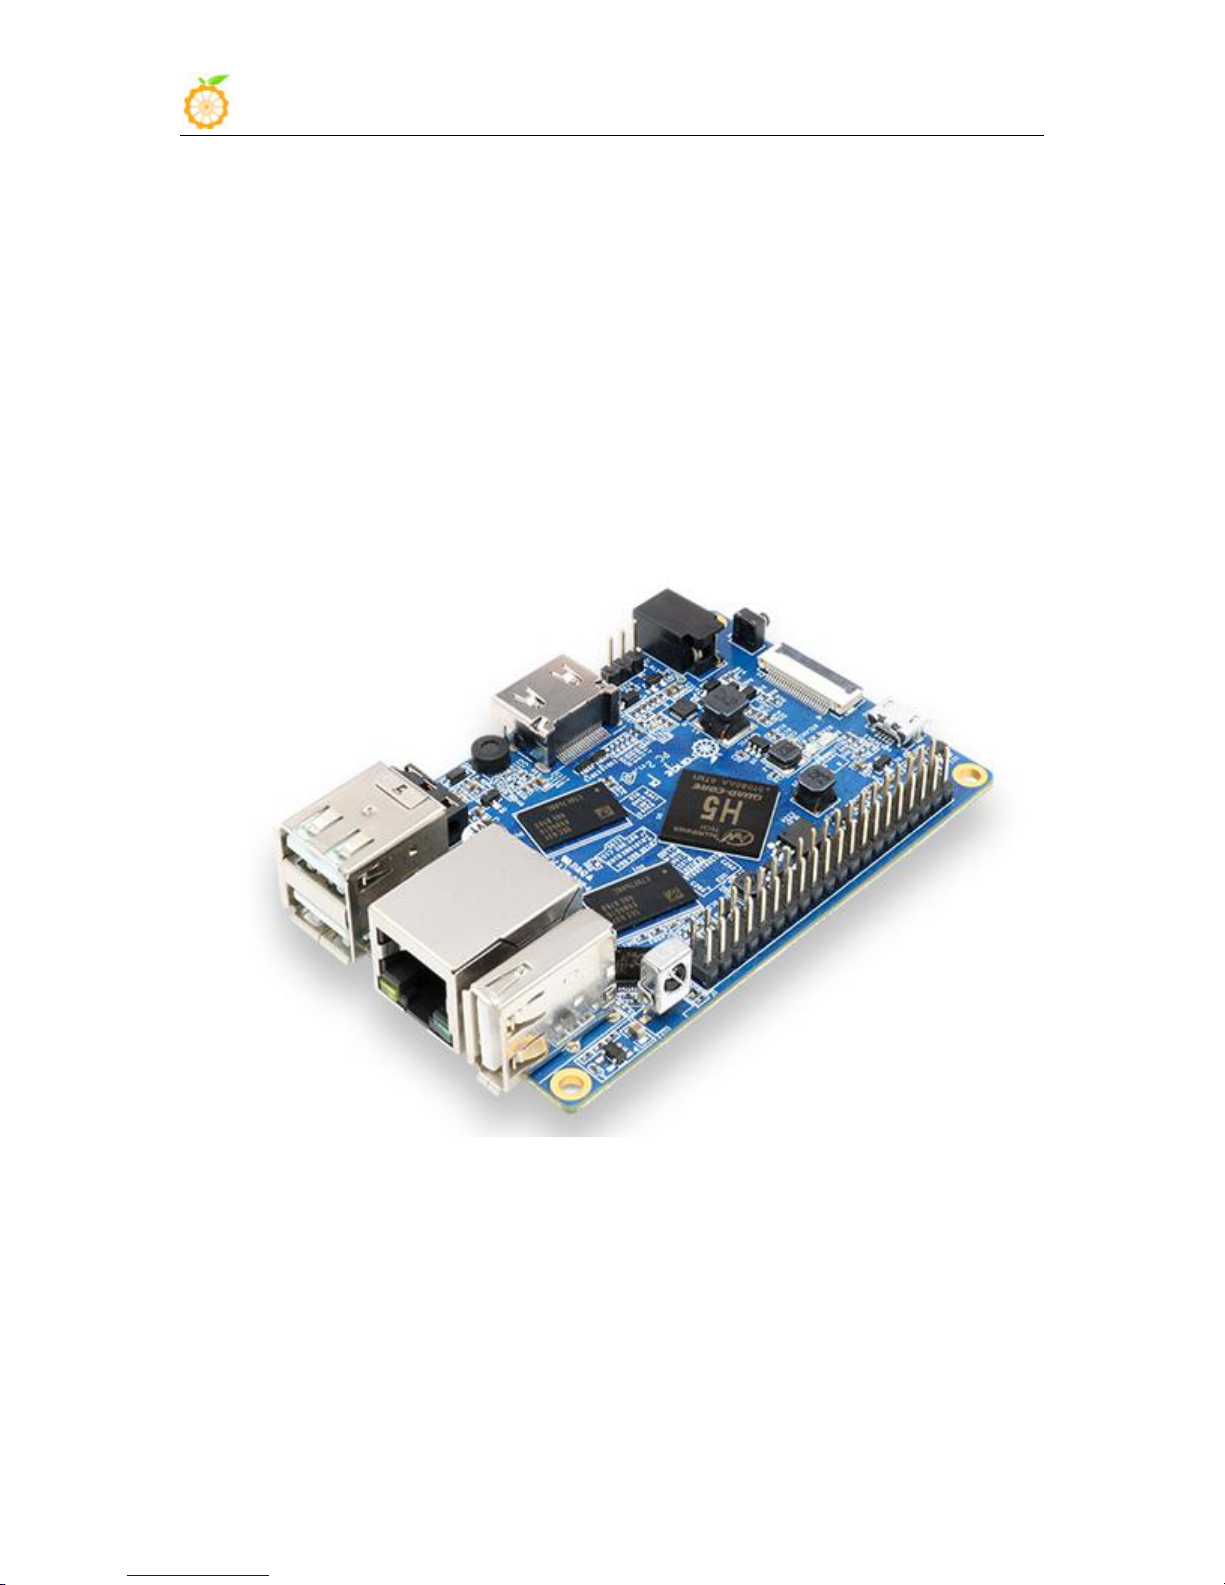
1) Application Program (app.c)
In order to help developers become more familiar with OrangePi, this
manual describes how to use simple device driver modules and applications
on the development board.
Hardware:
Orange Pi development board*1, Card reader*1, TF card*1,
power supply*1
www.orangepi.org www.xunlong.tv
Page 50
Orange Pi Manual Copy right by Shenzhen Xunlong Software Co., Ltd
48
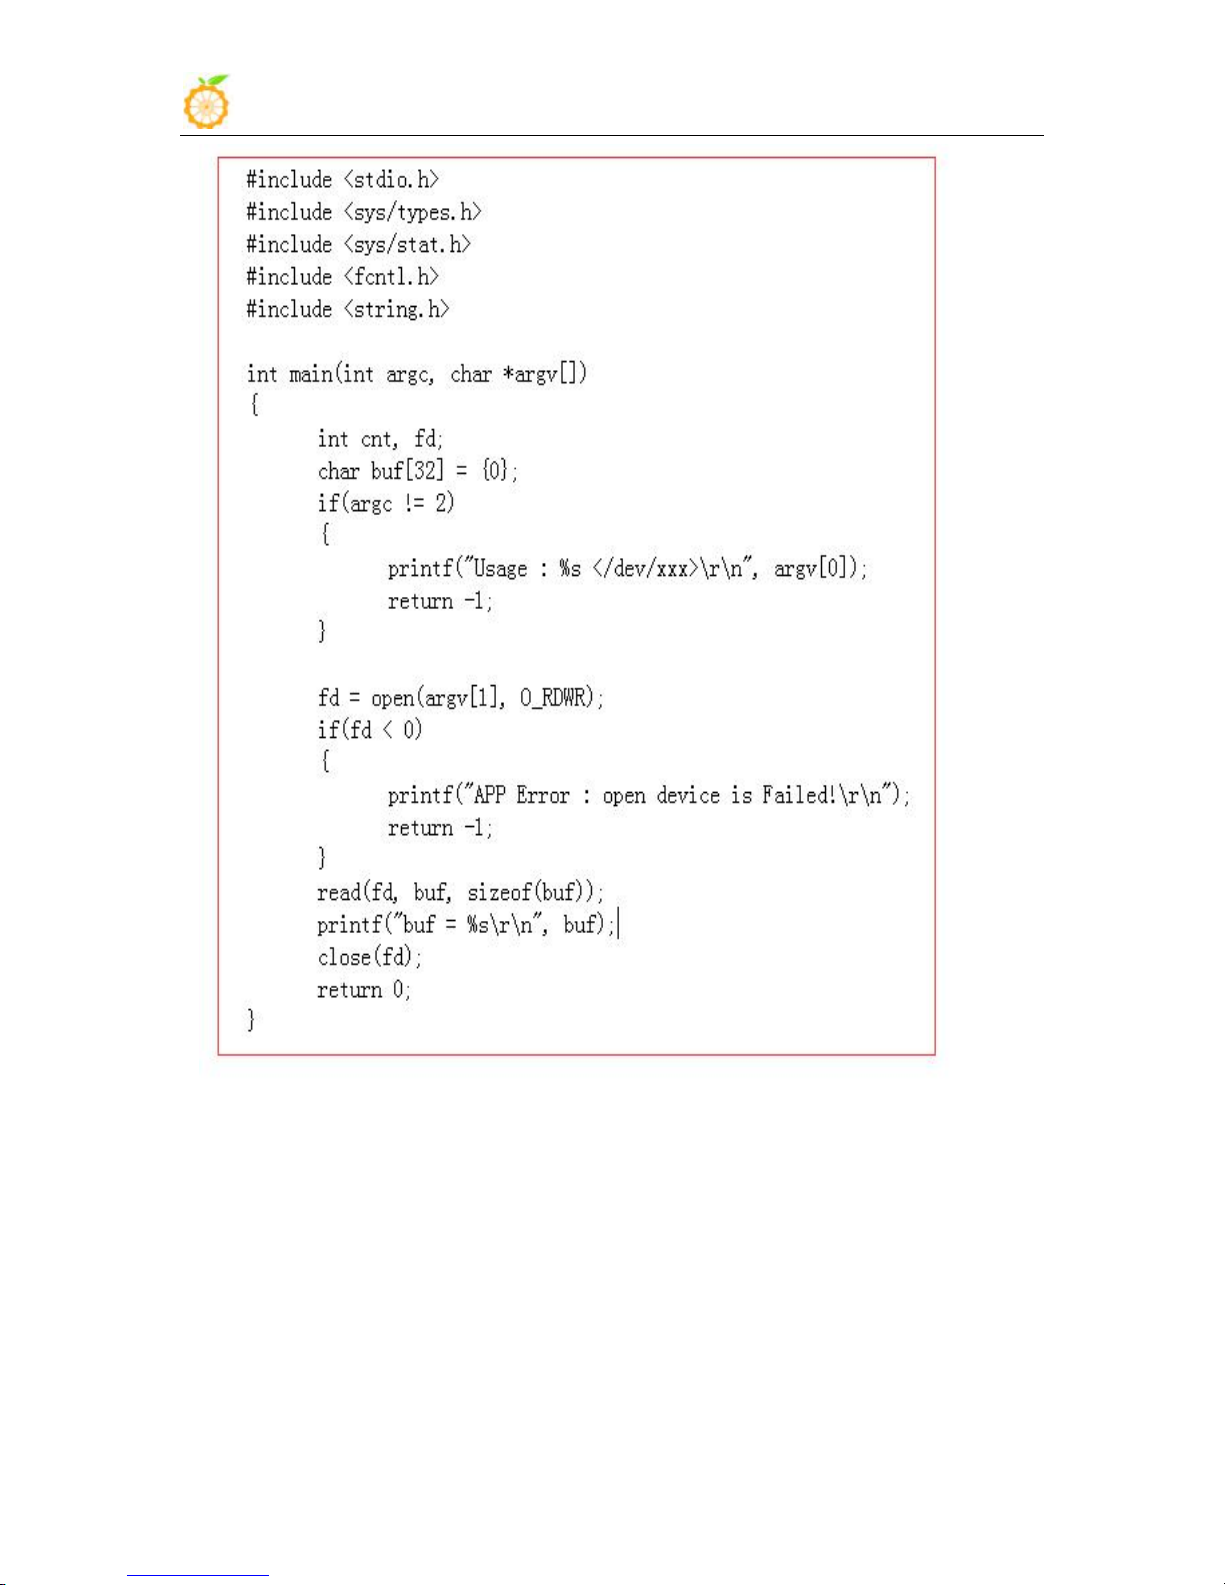
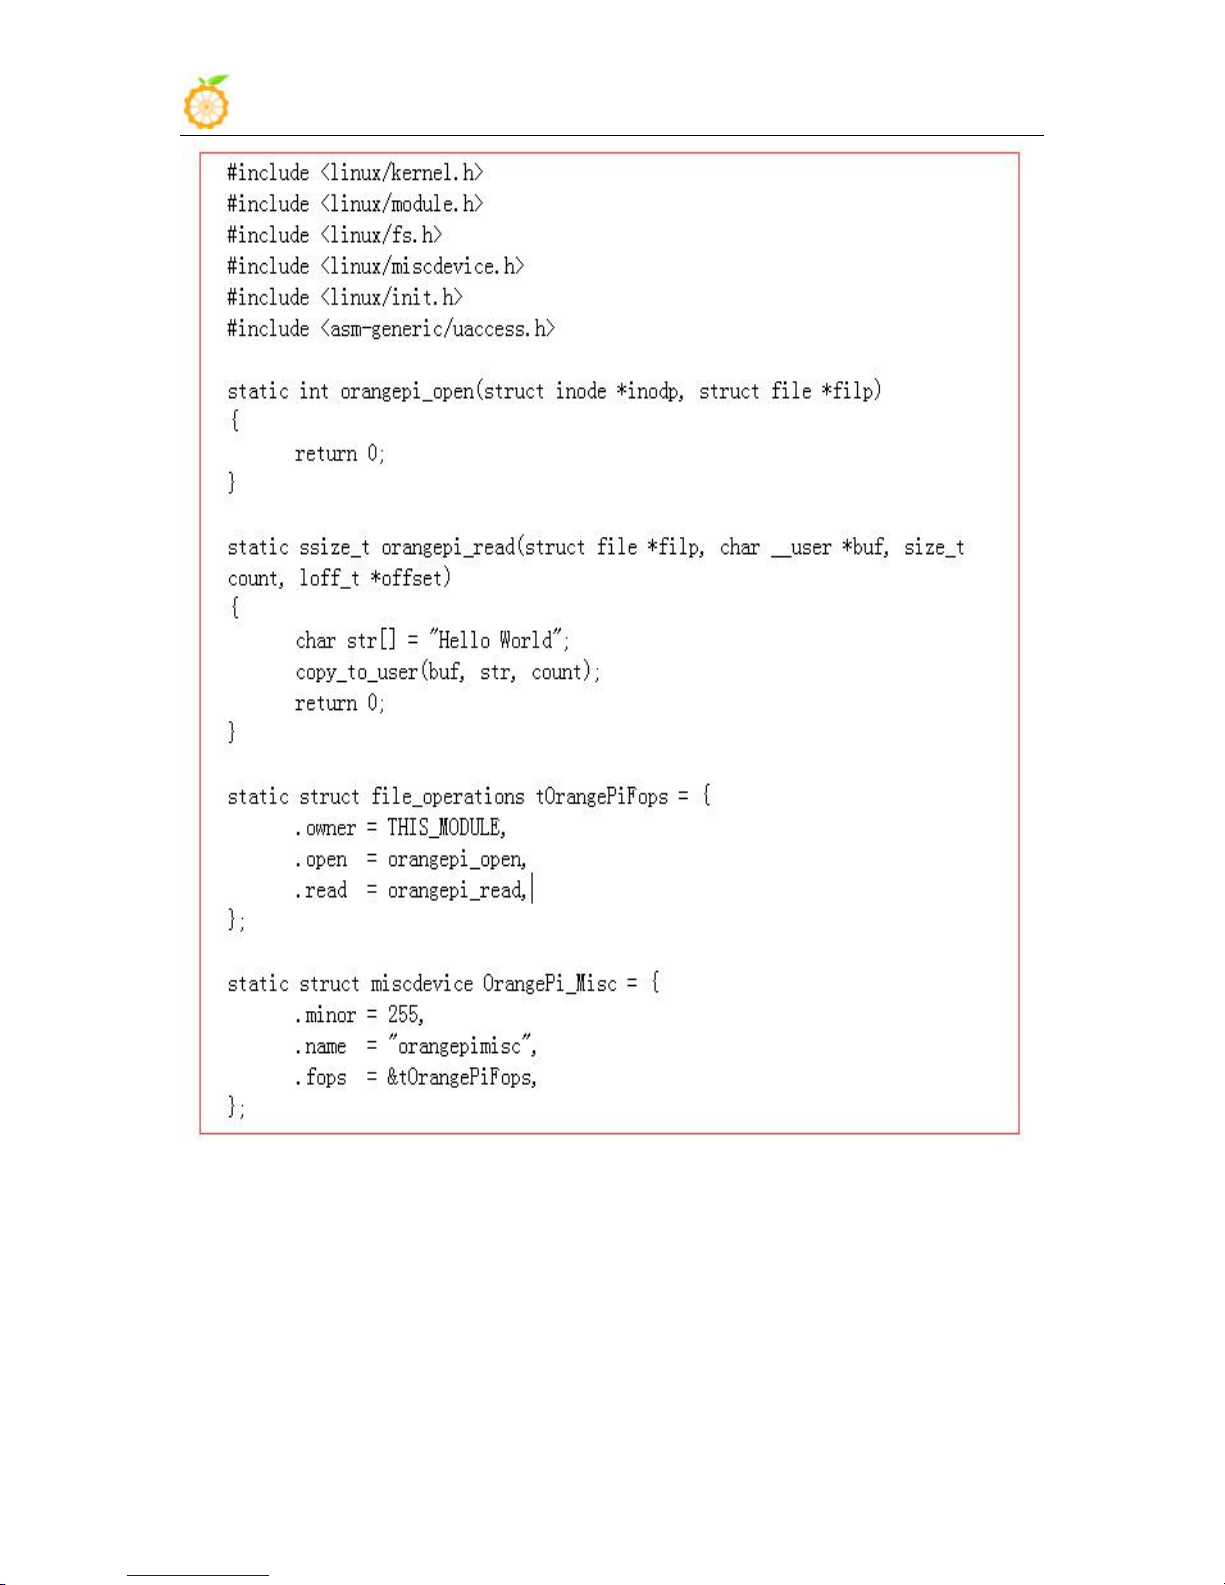
2) Driver Program (OrangePi_misc.c)
www.orangepi.org www.xunlong.tv
Page 51
Orange Pi Manual Copy right by Shenzhen Xunlong Software Co., Ltd
49
www.orangepi.org www.xunlong.tv
Page 52
Orange Pi Manual Copy right by Shenzhen Xunlong Software Co., Ltd
50
2. Compile device driver
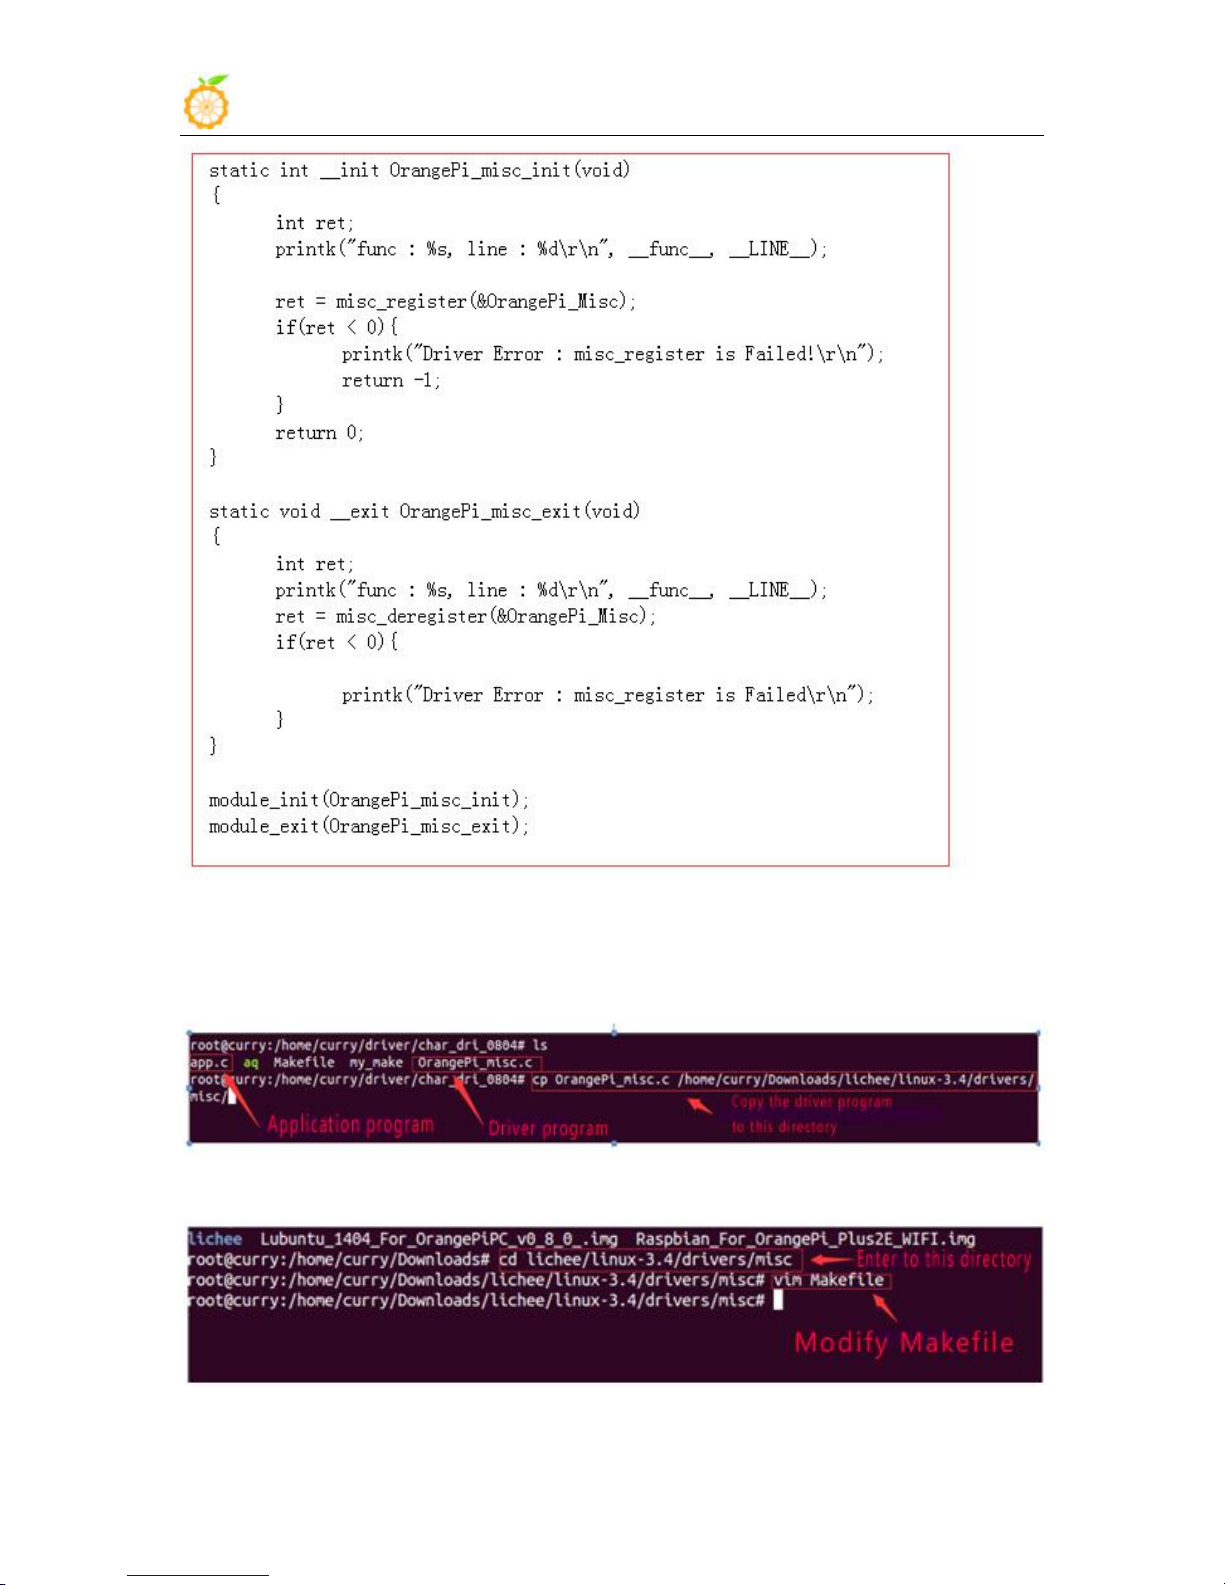
Copy the OrangePi_misc.c to the */lichee/linux-3.4/driver/misc directory:
Enter to */lichee/linux-3.4/drivers/misc/
www.orangepi.org www.xunlong.tv
Page 53
Orange Pi Manual Copy right by Shenzhen Xunlong Software Co., Ltd
51
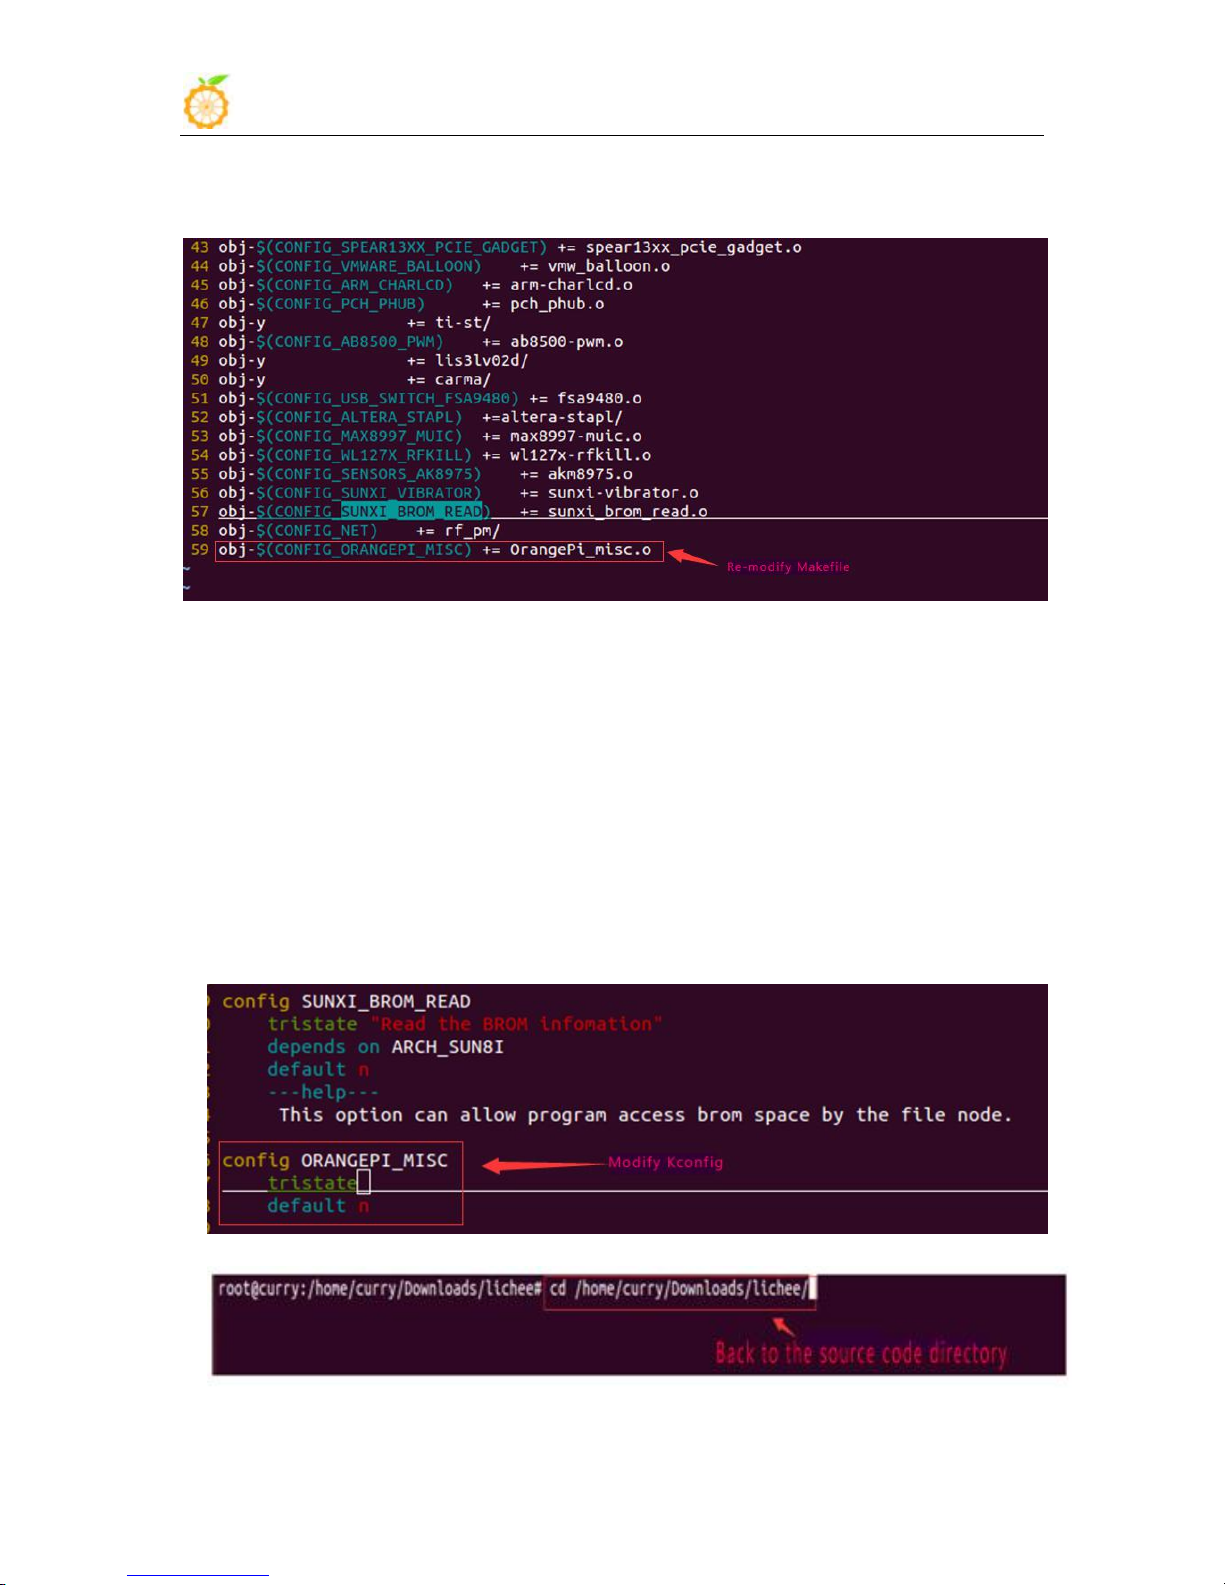
Modify Makefile on currently file, shown as following:
There is Kconfig on the same sibling folders with Makefile. Each
Kconfig respectively describes the the source directory file related kernel
configuration menu. In the kernel configuration making menuconfig, it read
from the Kconfig config menu and the user configuration saved to the config.
In the kernel compile, the main Makefile by calling this.Config could know
the user's configuration of the kernel.
Kconfig is corresponding to the kernel configuration menu. Add a new
driver to the kernel source code, you can modify the Kconfig to increase the
configuration menu for your drive, so you can choose whether the
menuconfig driver was compiled or not.
Back to the source code directory:
www.orangepi.org www.xunlong.tv
Page 54
Orange Pi Manual Copy right by Shenzhen Xunlong Software Co., Ltd
52
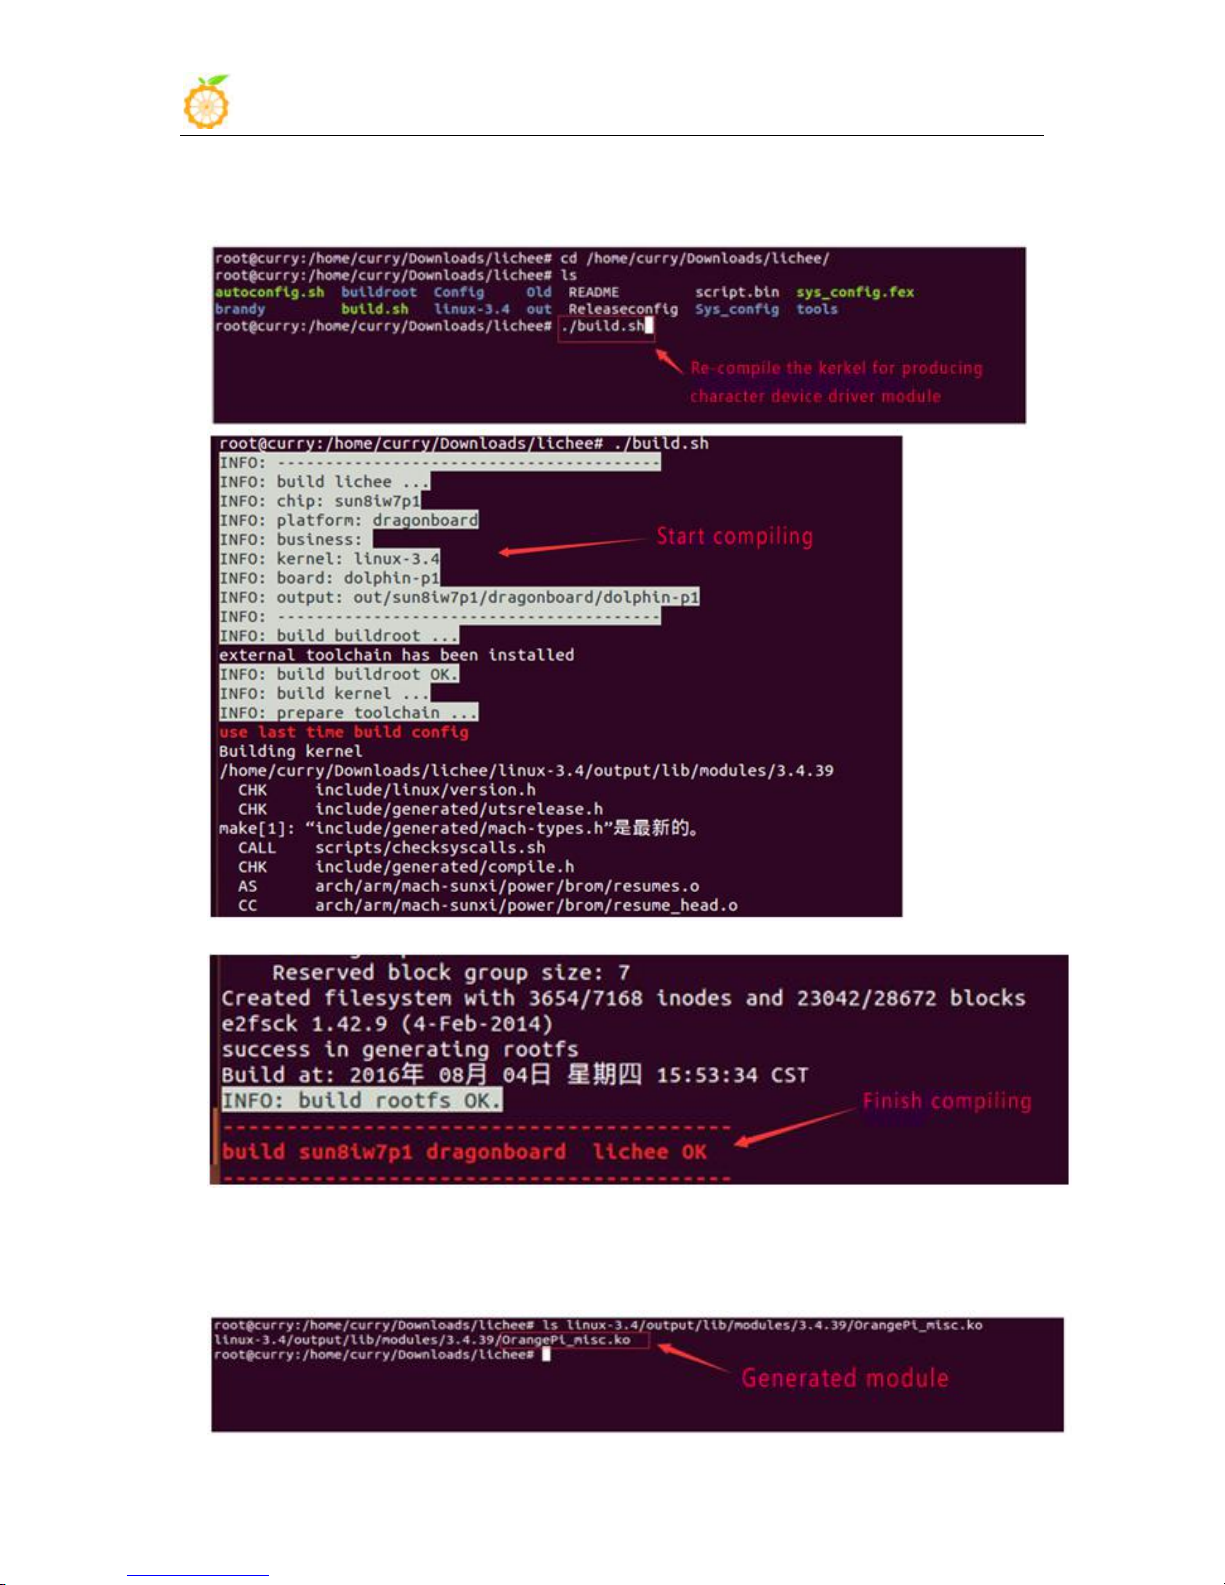
$ ./build.sh
After compiled the kernel, there will be an orangepi_misc.ko file
generated on the directory of lichee/linux-3.4/output/lib/modules/3.4.41
There is a .ko module which generated after compiled of
OrangePi_misc.c on */lichee/linux-3.4/output/lib/modules/3.4.39/
www.orangepi.org www.xunlong.tv
Page 55
Orange Pi Manual Copy right by Shenzhen Xunlong Software Co., Ltd
53
3. Corss-complile or compiled Application code
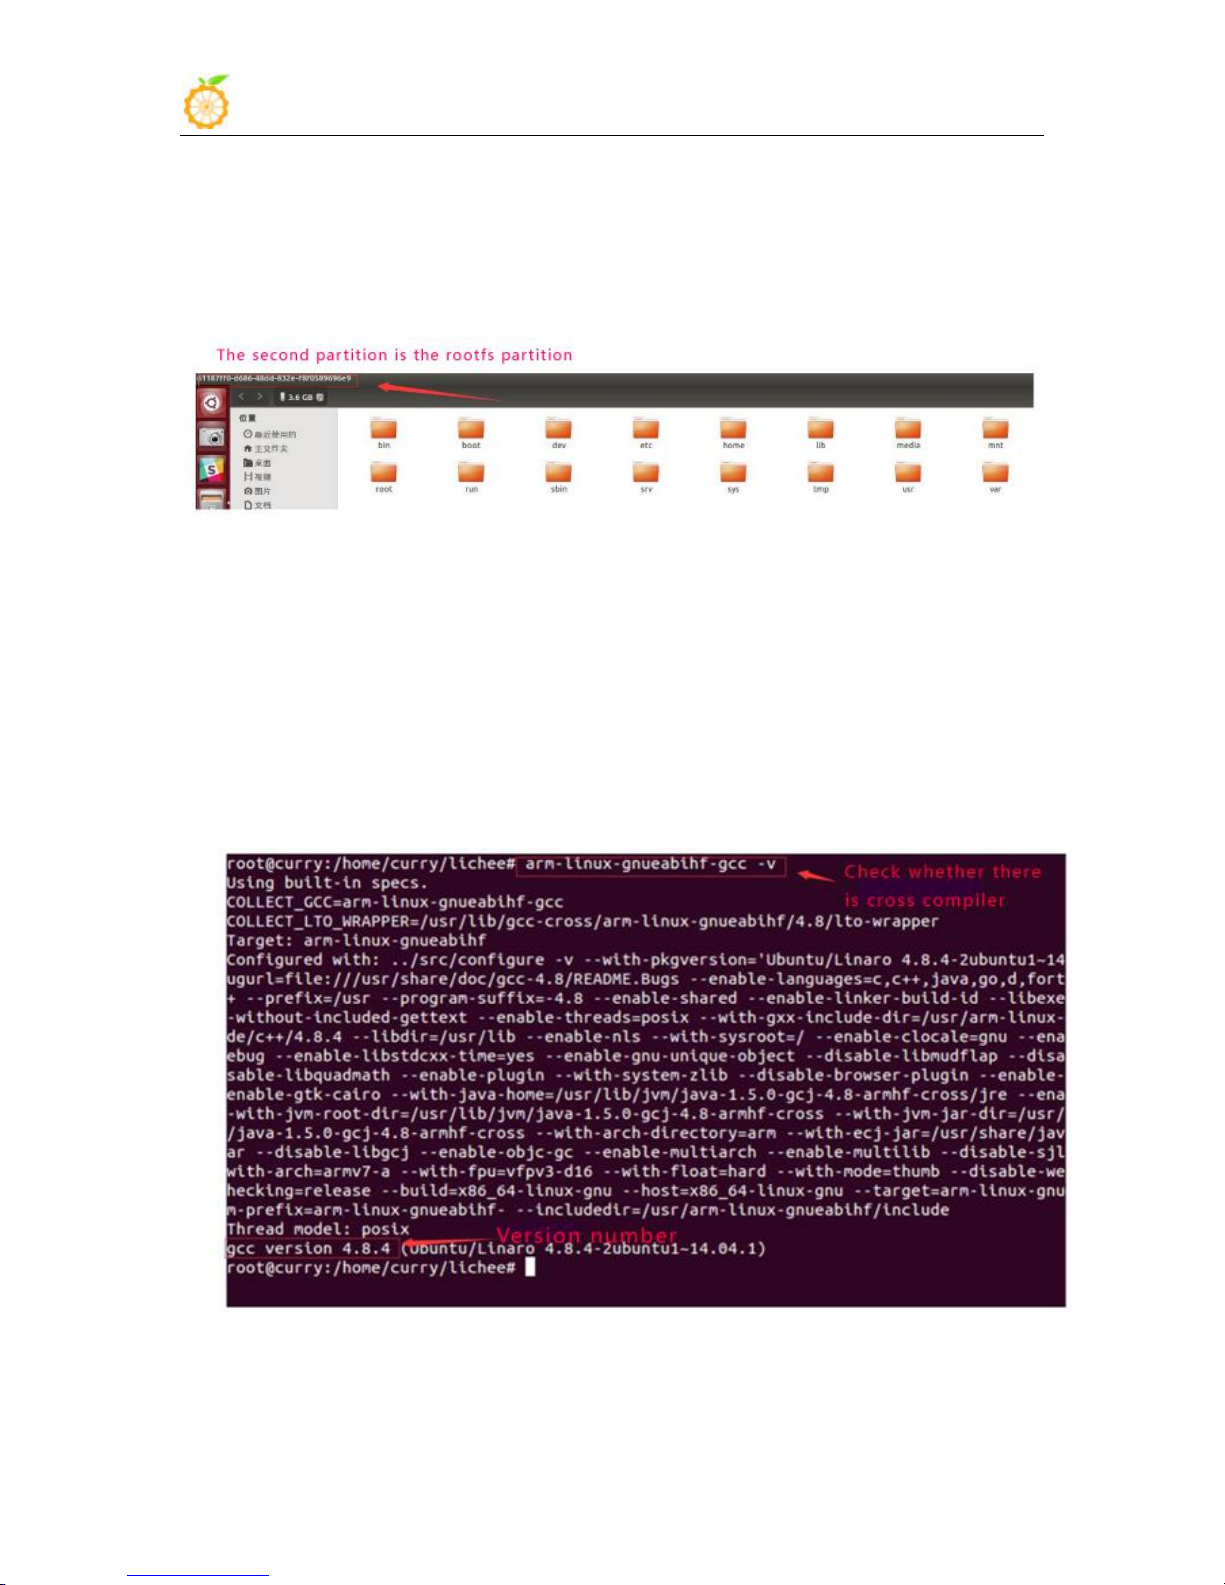
Insert U disk (please note the SD card should have been written image) if
the SD card system is mounted to the directory / dev / SDB, SD card will
have two sub mount points, respectively are / dev / sdb1 and /dev/sdb2. Two
partition of SD card will automatically mount to the PC /media/ directory,
the first partition is the boot partition and the second partition is the rootfs
partition.
Copy the OrangePi_misc.ko file to /media/*/lib/modules/3.4.39.
$ cp OrangePi_misc.ko /media/*/lib/modules/3.4.39
Check whether there is the cross compiler, if not, then download and
install it.
$ arm-linux-gnueabihf-gcc -v
While compiling the application, you will fill that you need the cross
compiler arm-linux-gnueabihf-gcc, download and install it.
www.orangepi.org www.xunlong.tv
Page 56
Orange Pi Manual Copy right by Shenzhen Xunlong Software Co., Ltd
54
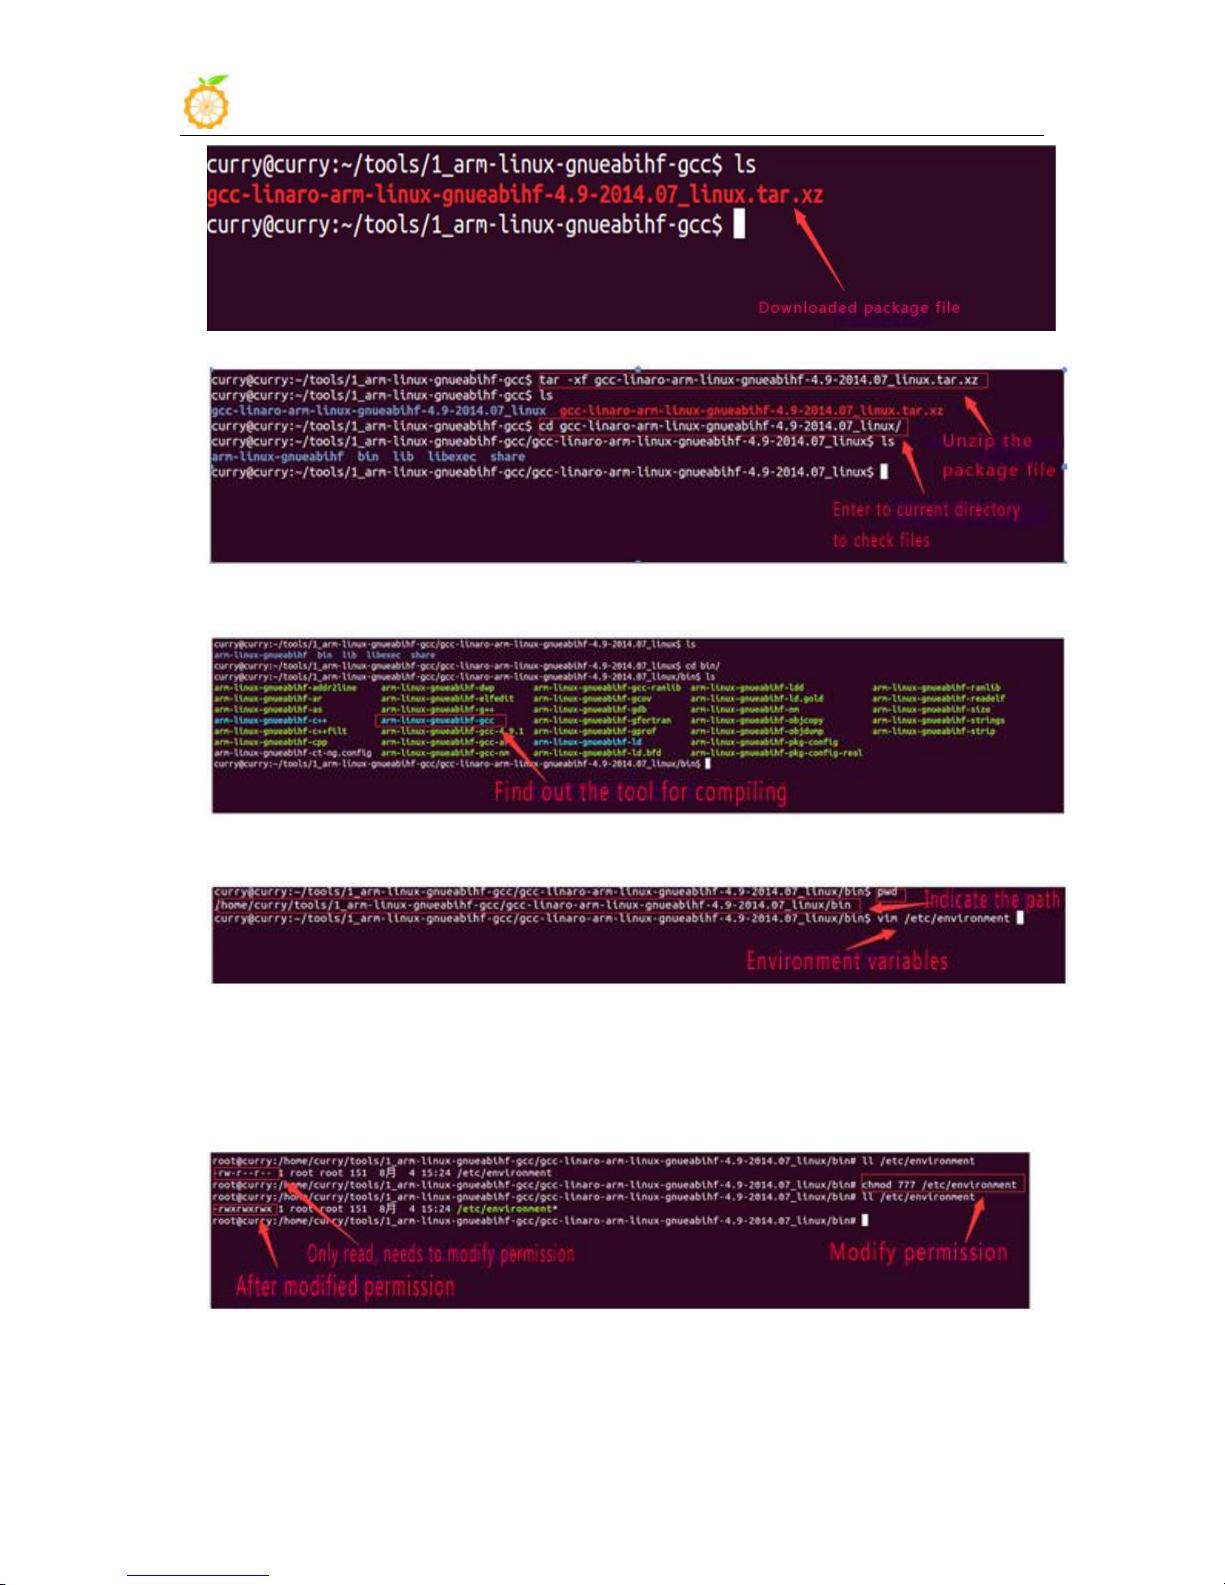
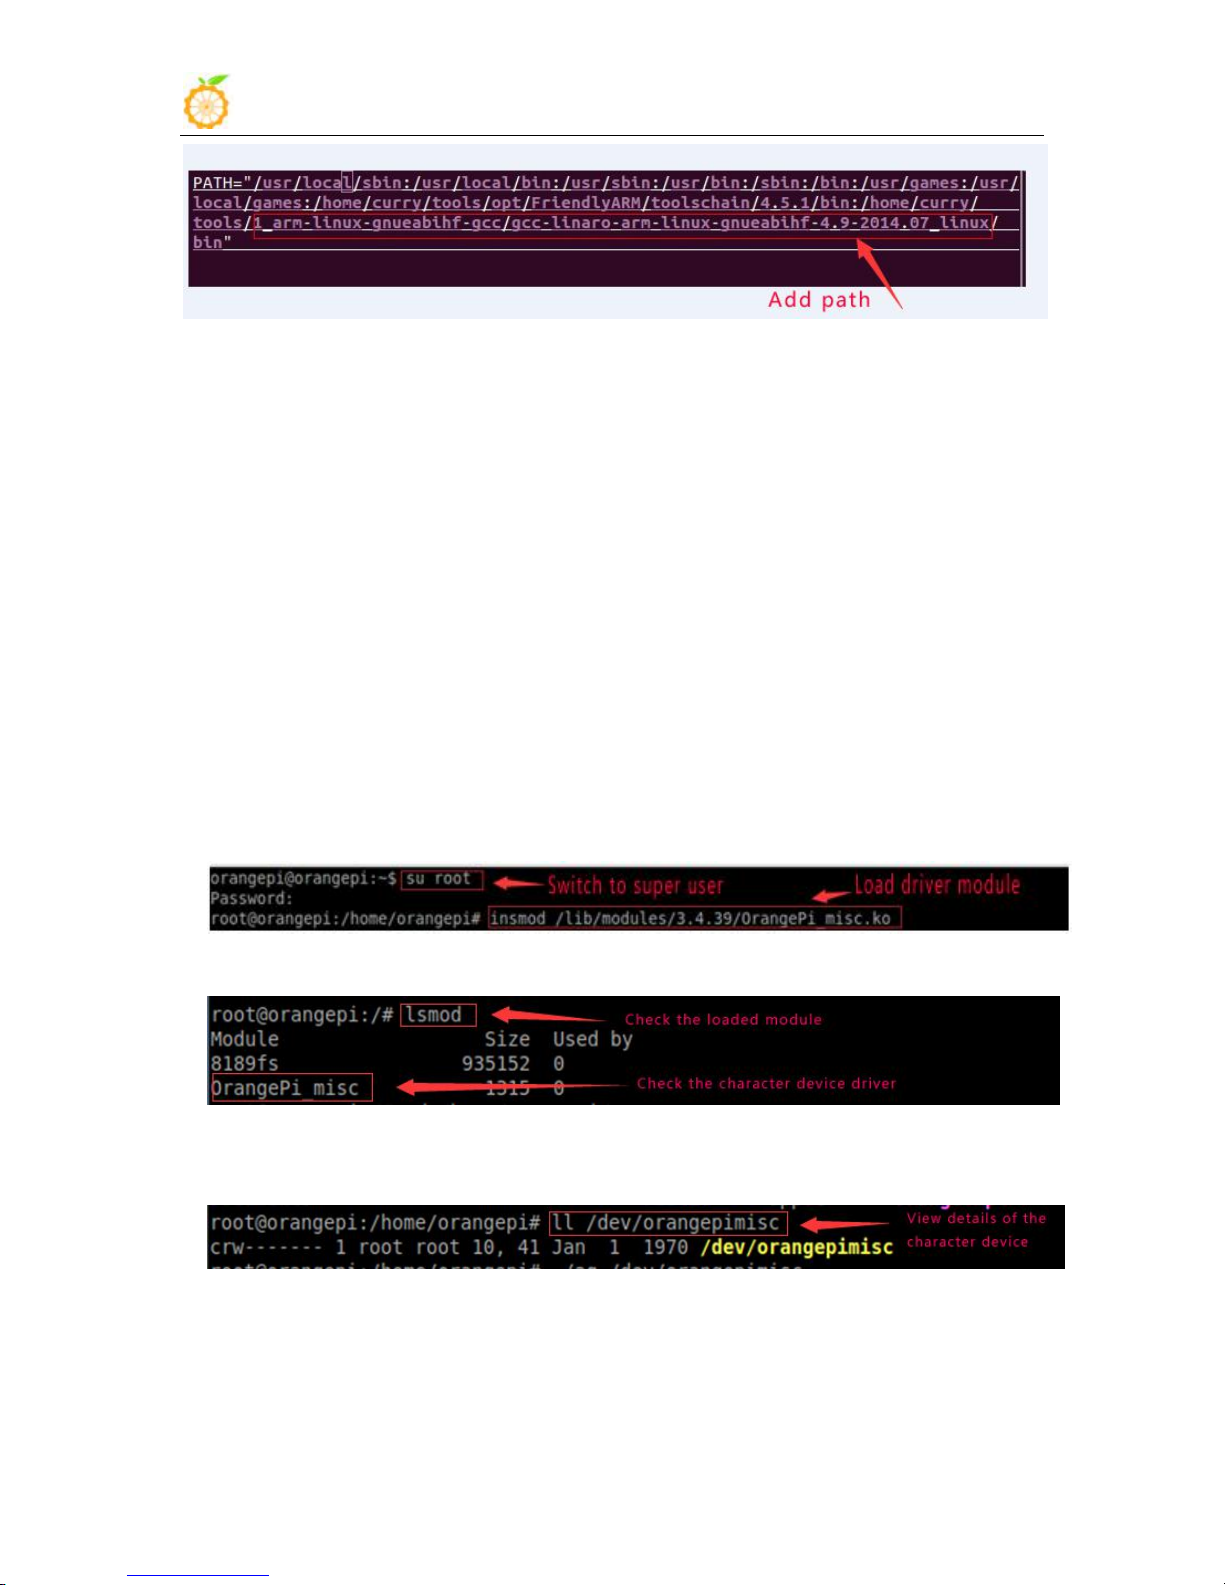
Unzip the downloaded file and enter the the directory
Check the information after entering bin directory
pwd hows the path and export it into the whole project
$ ll /etc/environment shows that the file can only read, need to modify
permissions
$ chmod 755 /etc/environment
Add the path to the whole environment variable
www.orangepi.org www.xunlong.tv
Page 57
Orange Pi Manual Copy right by Shenzhen Xunlong Software Co., Ltd
55
4. Running driver and application
Compile the application with cross compiler
$ arm-linux-gnueabihf-gcc app.c –o aq
There will be an ap application generated in the directory, copy it to the
development board file system(on the rootfs directory of
/home/orangepi/)
$ cp aq /media/*/home/orangepi/
Running Applications on Development Board
Removed the SD card and inserted it into the development board and
power on.
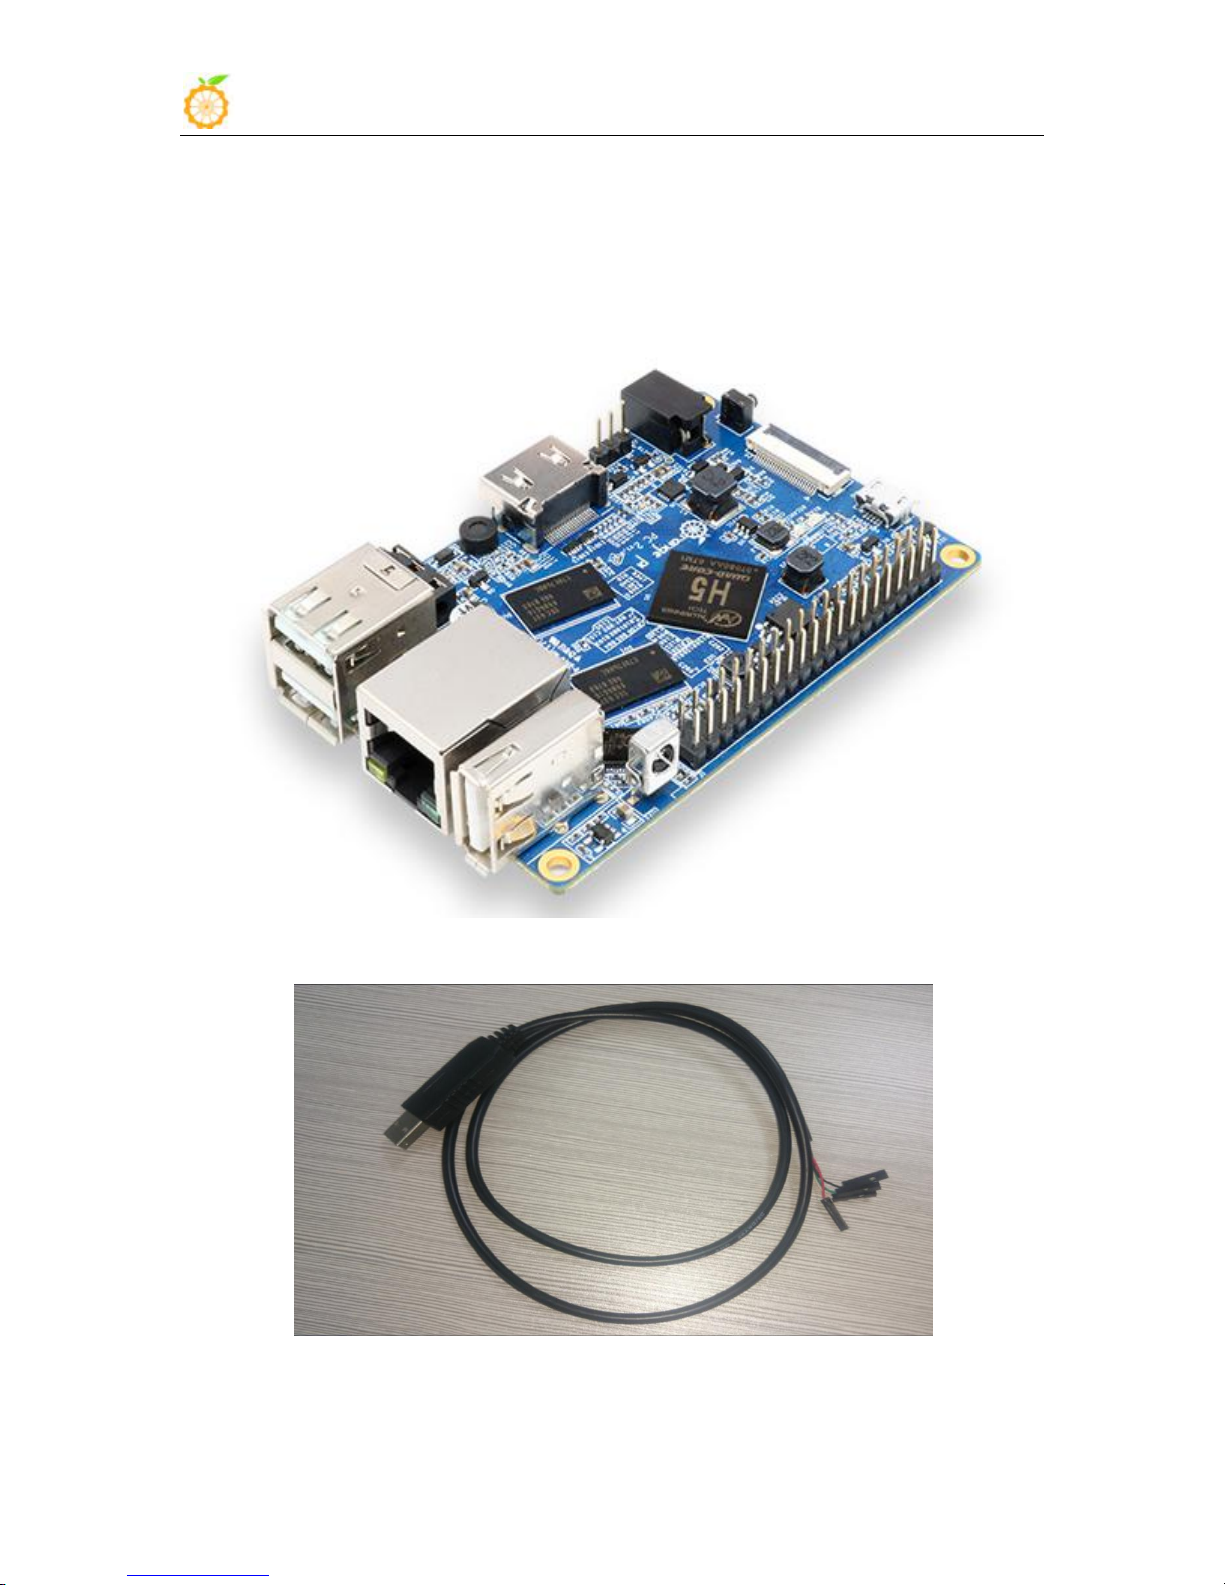
You need to switch to root users and load module driver module to
the development board first.
$ insmod /lib/modules/orangepi.ko
$ lsmod To check whether it is loaded
$ ll /dev/orangepimisc( Miscellaneous equipment automatically generated
device files, the specific look at the driver code)
Executive application (note the use of the application, the specific check
at the code)
$ ./aq /dev/orangepimisc
www.orangepi.org www.xunlong.tv
Page 58
Orange Pi Manual Copy right by Shenzhen Xunlong Software Co., Ltd
56
VII. Using Debug tools on OrangePi
1. Operation Steps on Windows
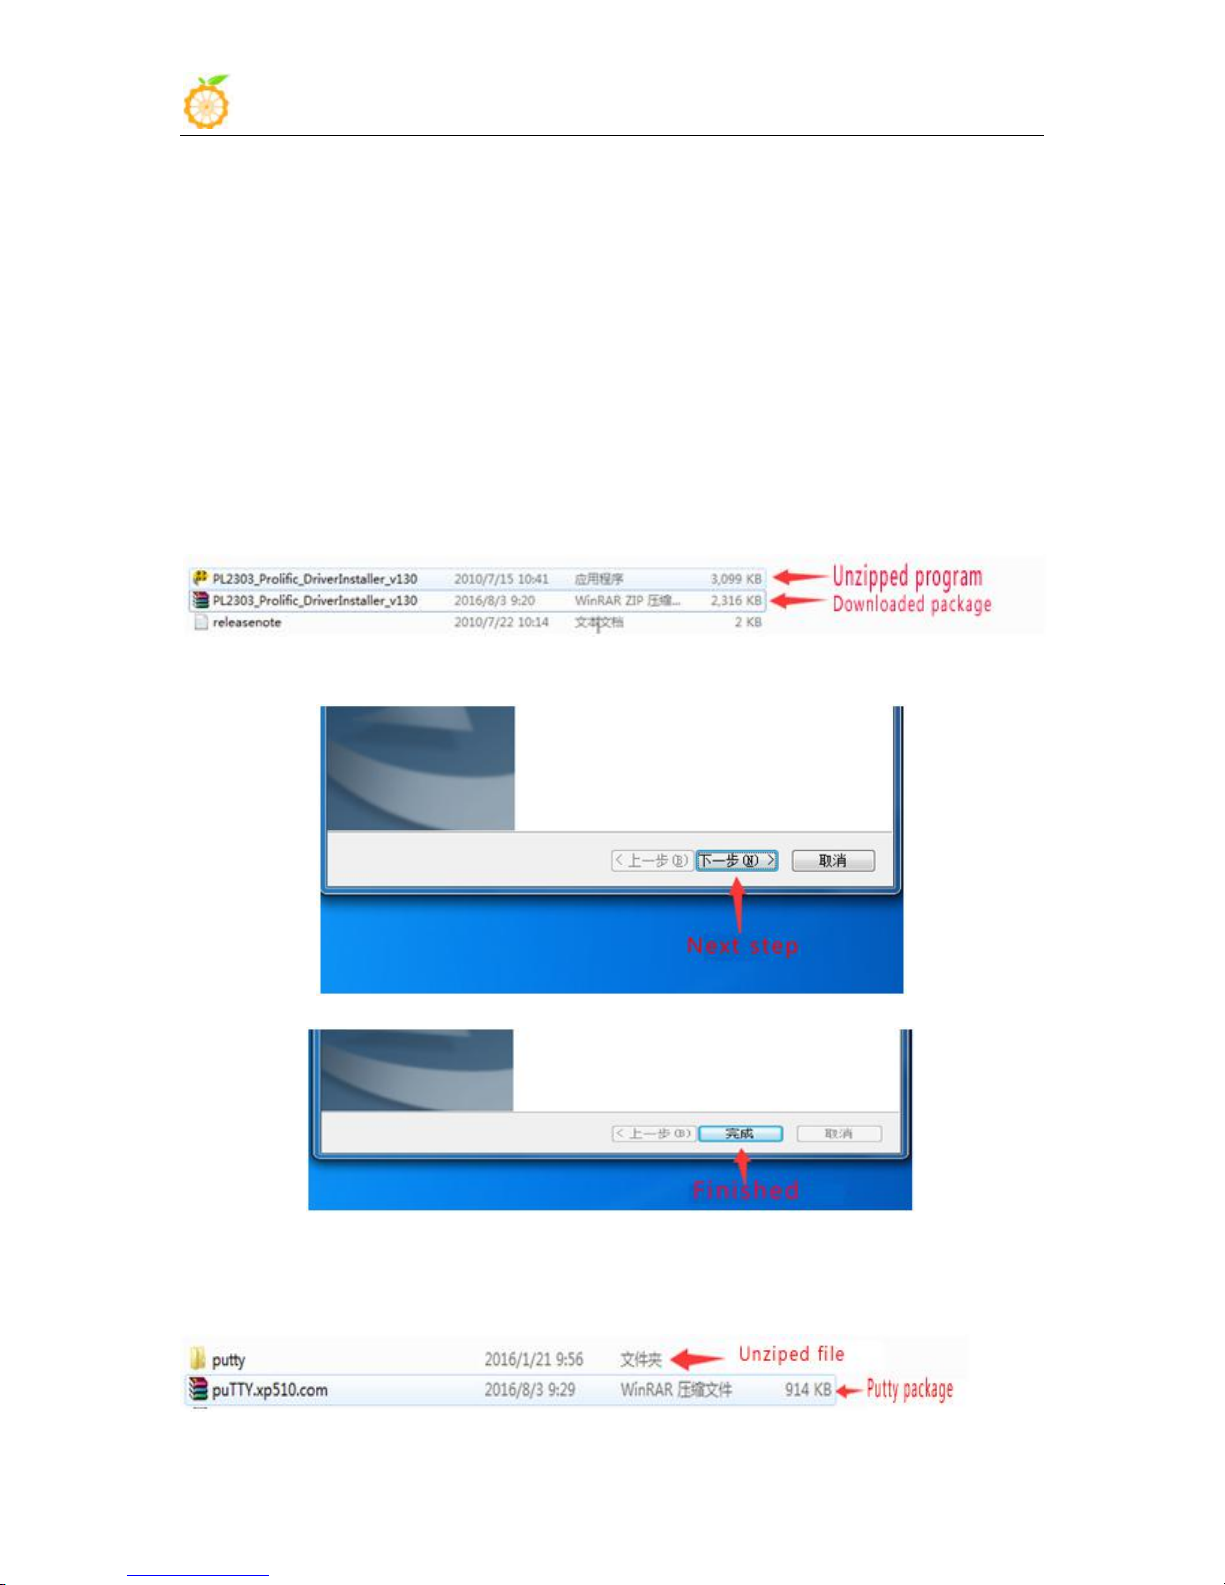
Hardware: Orange Pi development board*1, Card reader*1, TF card*1,
power supply*1
TTL to USB cable
www.orangepi.org www.xunlong.tv
Page 59
Orange Pi Manual Copy right by Shenzhen Xunlong Software Co., Ltd
57
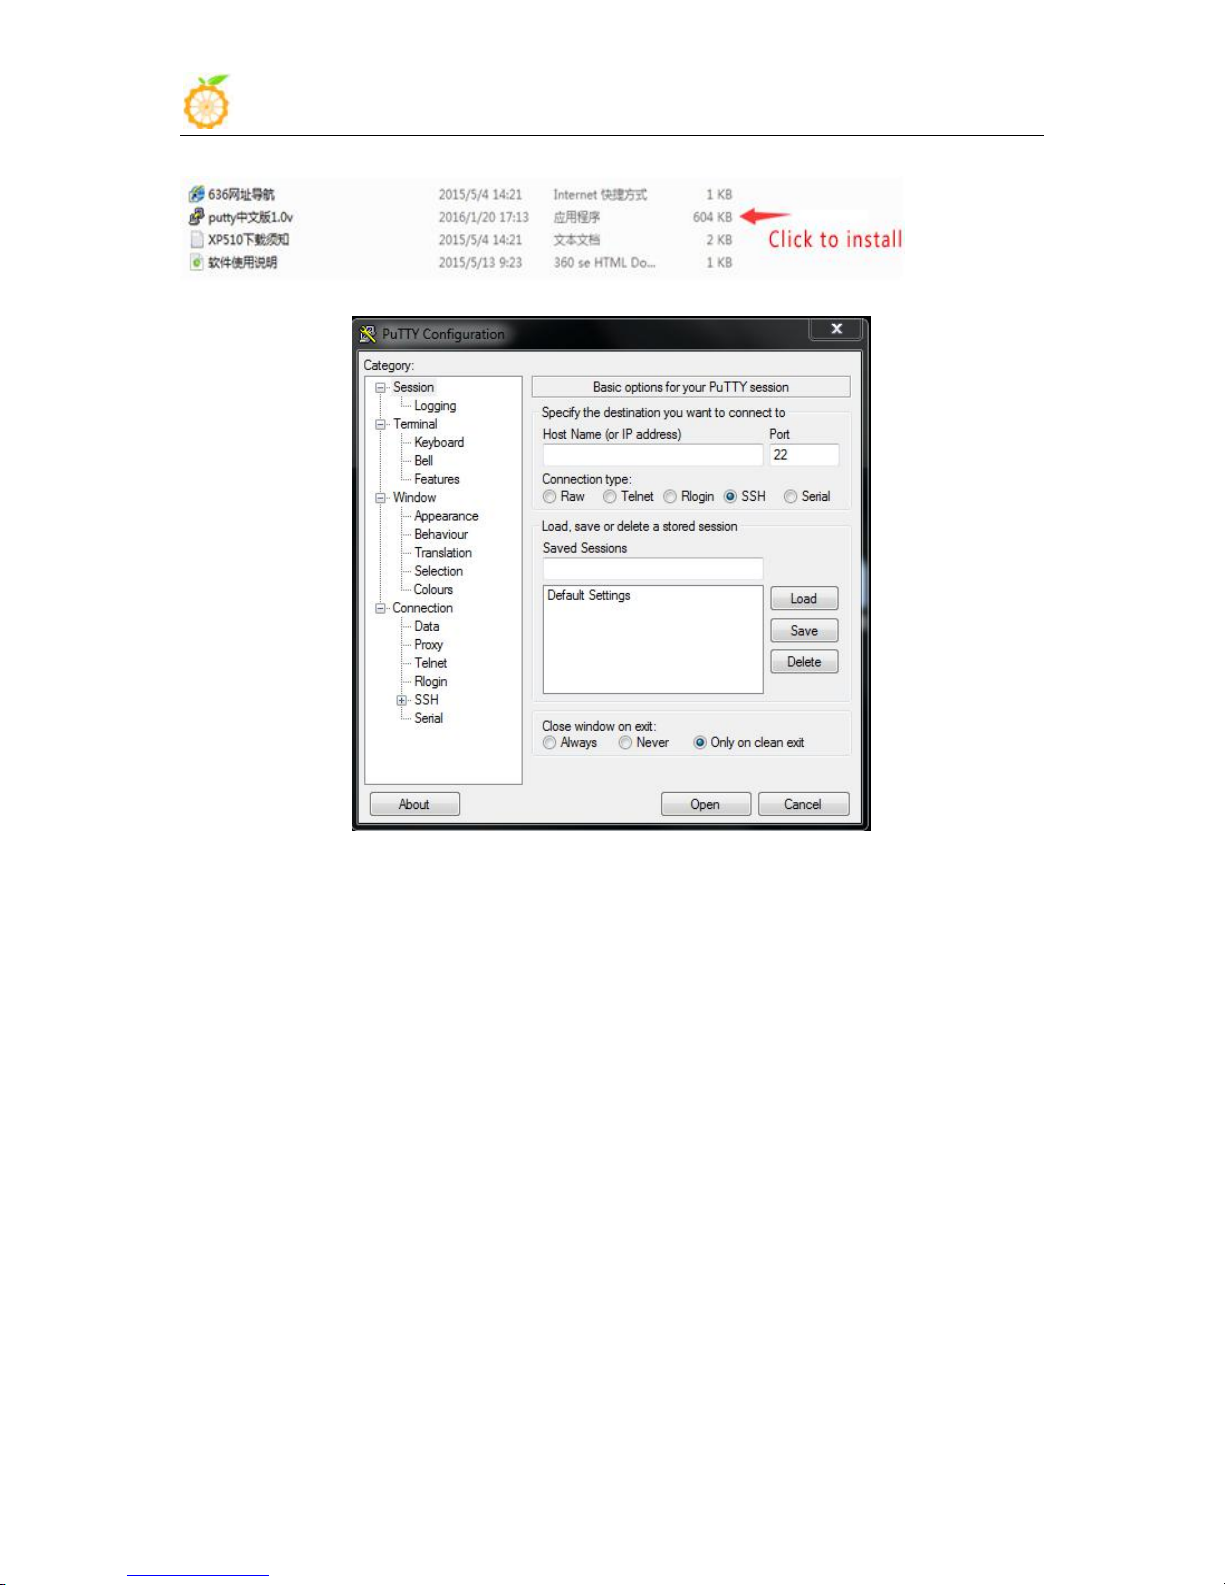
1) Install USB driver on Windows
Download and unzip the latest version of driver
Choose application installation as Administrator
Wait for completing installation
2) Install putty on Windows
Download putty installation package
In order to get more debugging information in the project development
process of using OrangePi, OrangePi default support for serial information
debugging. For developers, you can simply get the serial port debugging
information with the materials mentioned above. The host computer using
different serial debugging tools are similar, basically can reference with the
following manual for deployment. There are a lot of debugging tools for
Windows platform, the most commonly used tool is putty. This section takes
putty as an example to explain the deployment.
PL2303_Prolific_DriverInstaller_v130.zip
www.orangepi.org www.xunlong.tv
Page 60
Orange Pi Manual Copy right by Shenzhen Xunlong Software Co., Ltd
58
Unzip and install
Open program after installed, as shown below
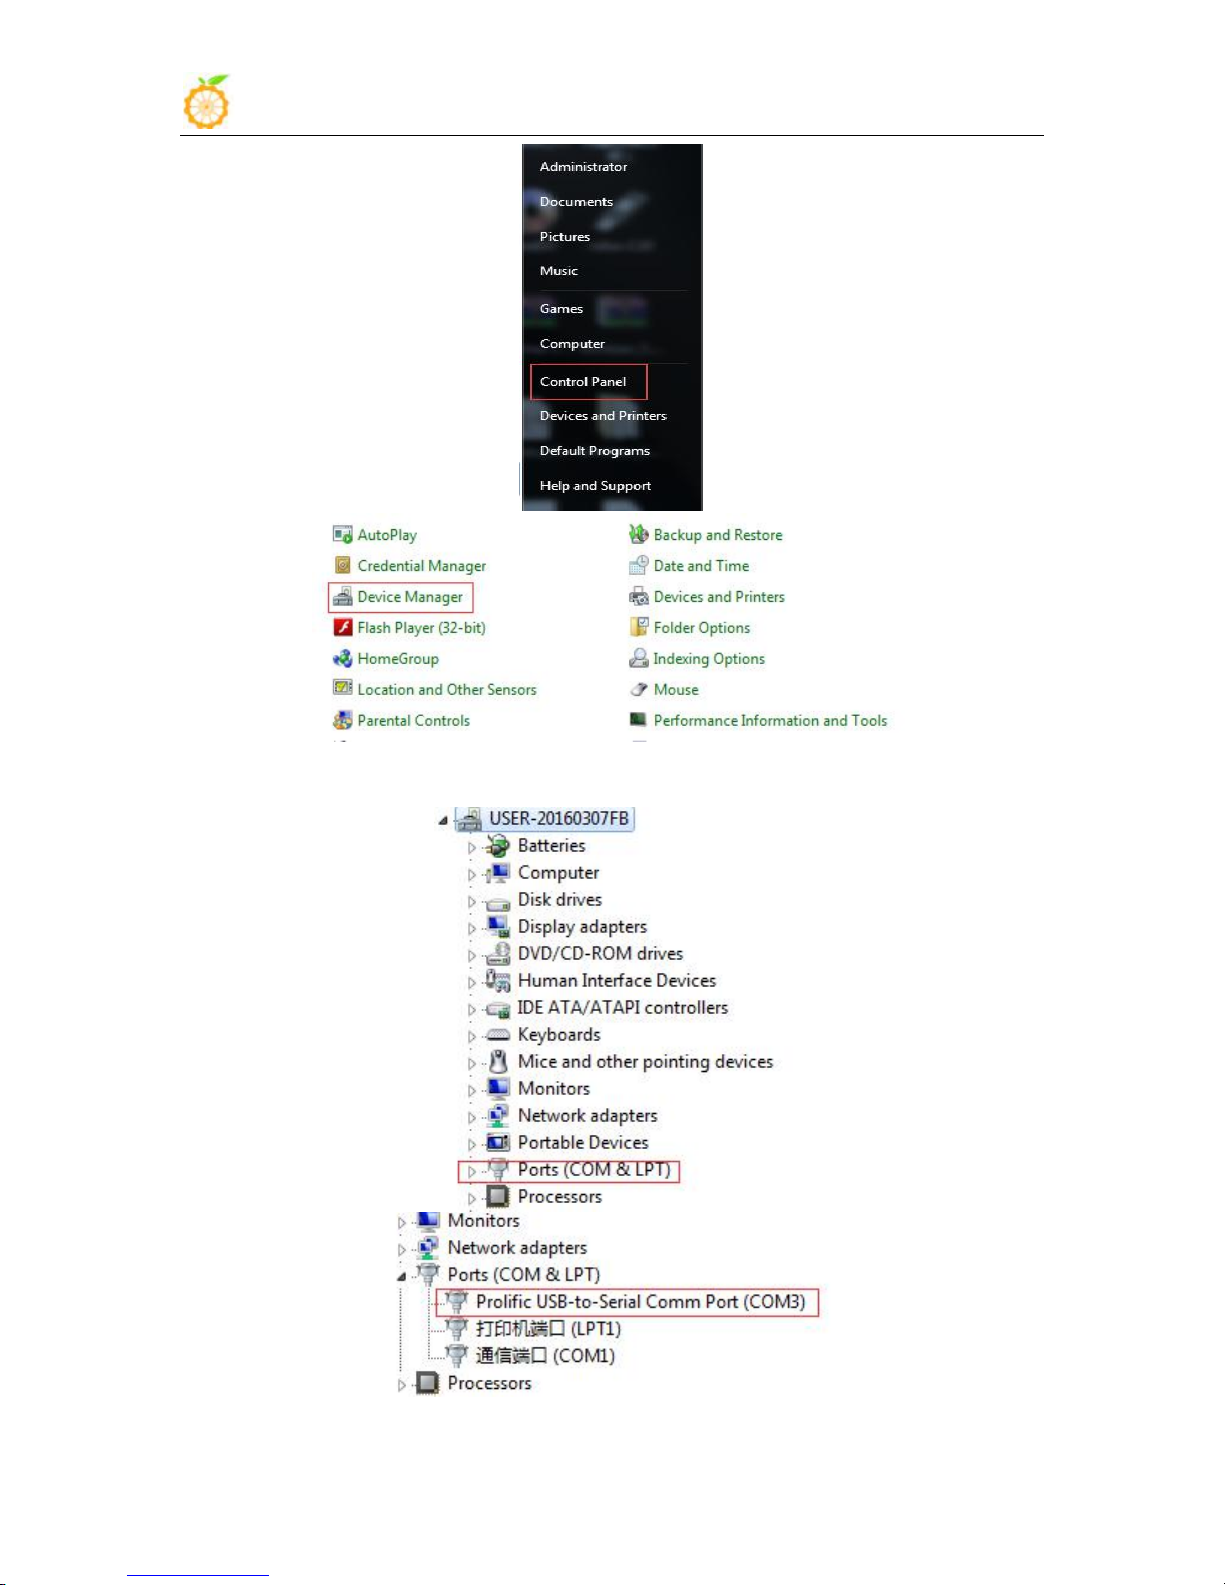
3) Connecting method
4) Equipment information acquisition
Start menu select control panel
Use the TTL to the serial port cable, one end connected to OrangePi,
the other end connected to PC
www.orangepi.org www.xunlong.tv
Page 61
Orange Pi Manual Copy right by Shenzhen Xunlong Software Co., Ltd
59
Click on the device manager to check the port number
www.orangepi.org www.xunlong.tv
Page 62
Orange Pi Manual Copy right by Shenzhen Xunlong Software Co., Ltd
60
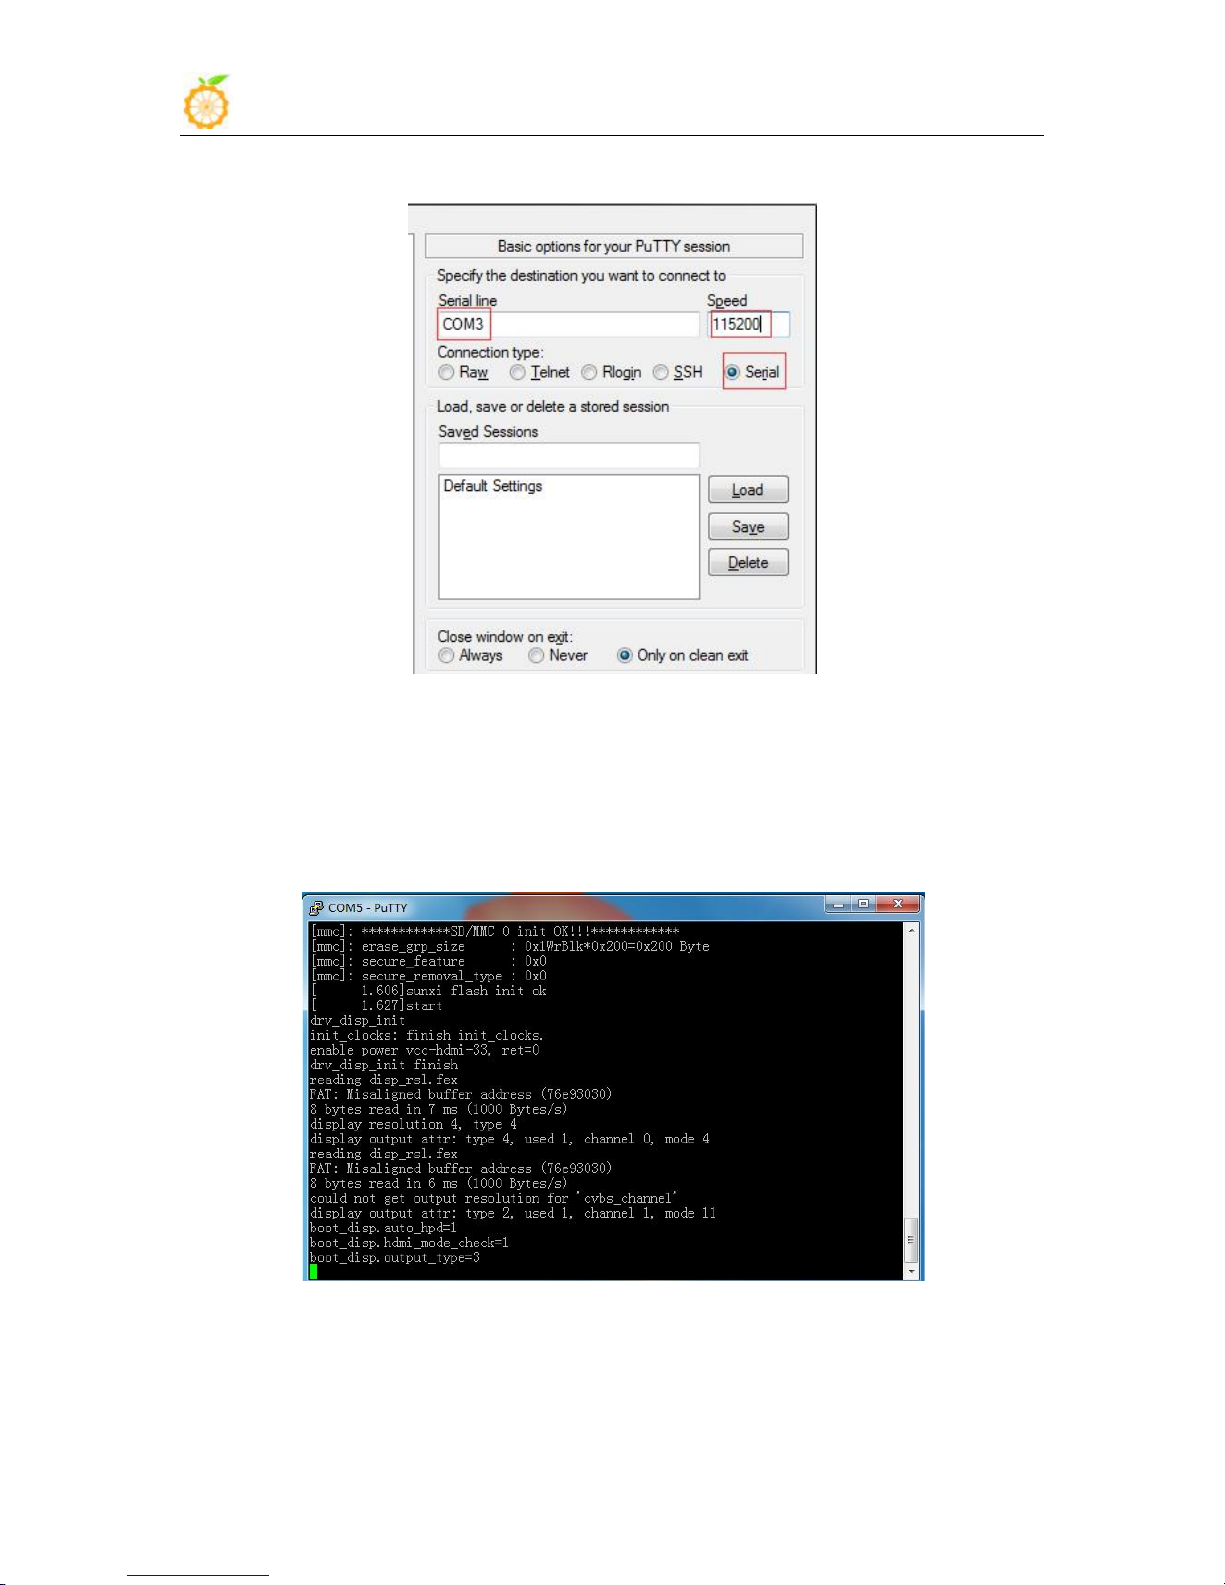
5) Putty Configuration
6) Serial debug port
2. Operation steps on Linux
Serial port should set to the corresponding port number (COM5), the
speed should set to 115200
Power on and boot OrangePi, the serial port will automatic print
debug log
There are Minicom and Kermit serial debugging tools for Linux, this
section will take Kermit as an example to have an illustrate.
www.orangepi.org www.xunlong.tv
Page 63

Orange Pi Manual Copy right by Shenzhen Xunlong Software Co., Ltd
61
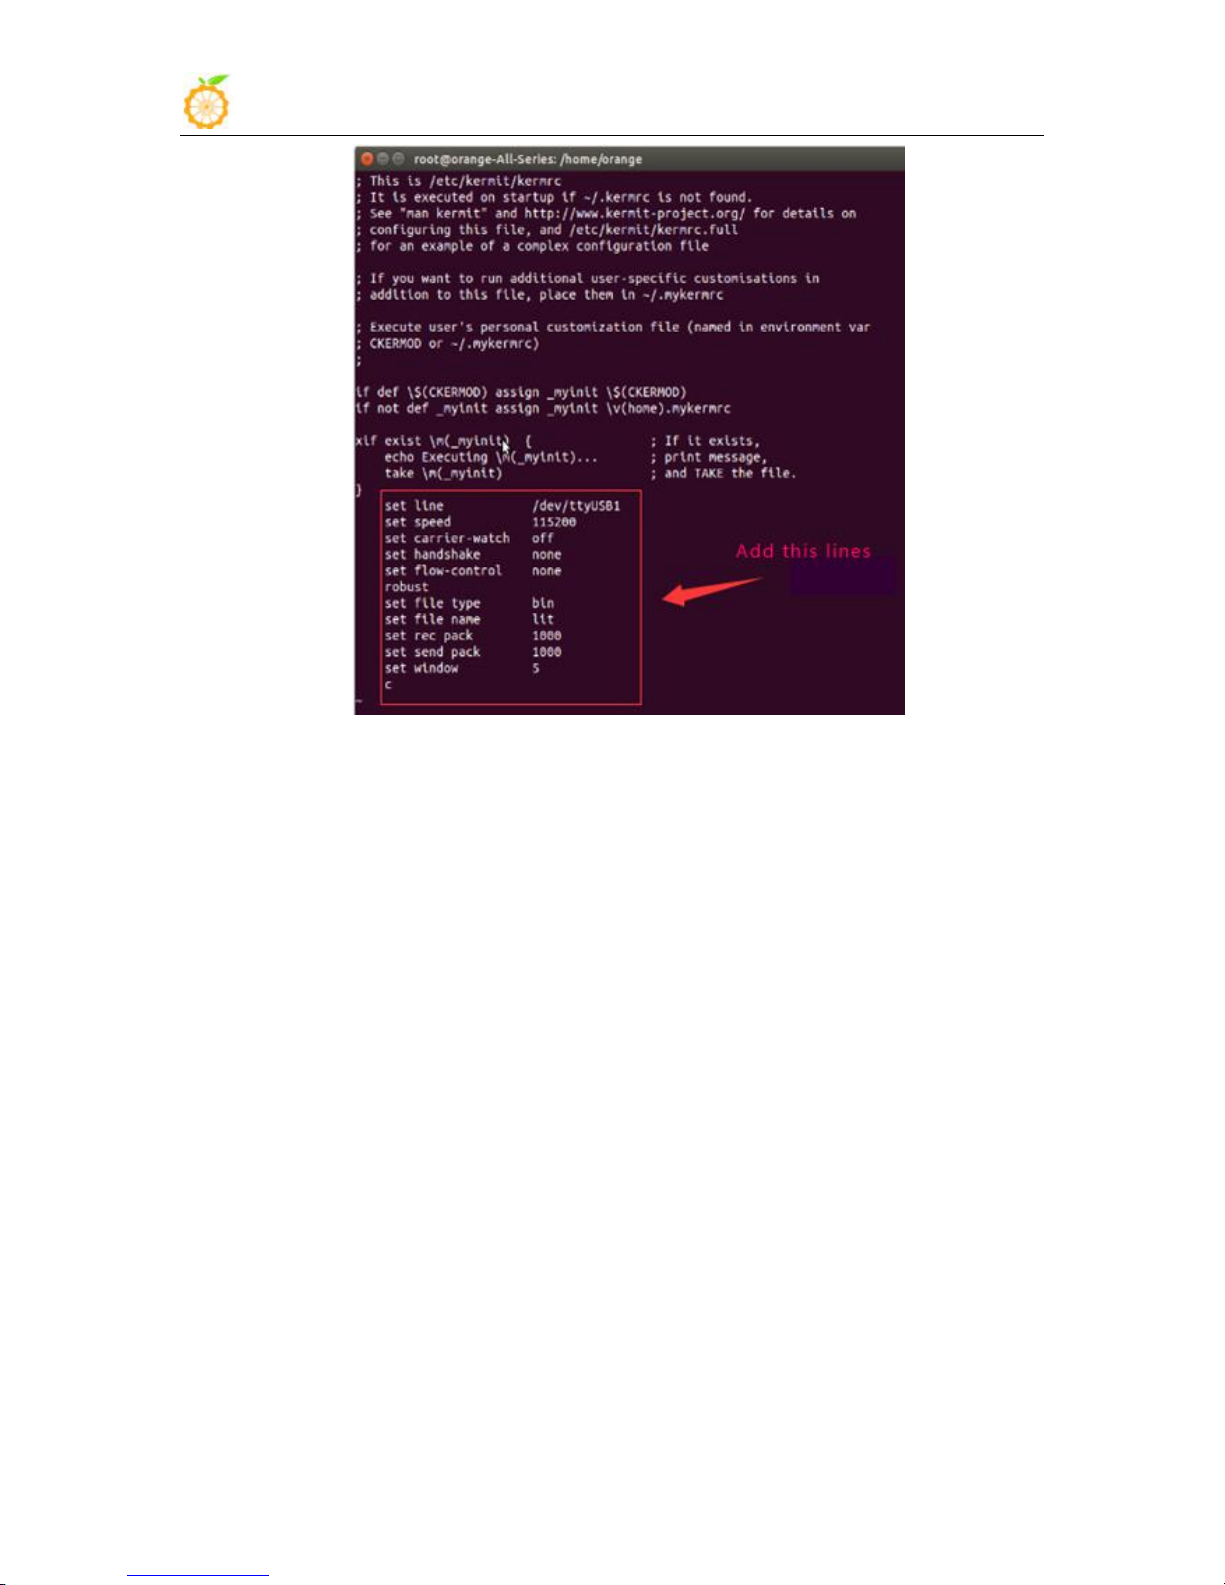
1) Install Kermit
Install the Kermit by execute command:
Configurate Kermit
Add lines:
$ sudo apt-get install ckermit
$ sudo vi /etc/kermit/kermrc
set line /dev/ttyUSB1
set speed 115200
set carrier-watch off
set handshake none
set flow-control none
robust
set file type bin
set file name lit
set rec pack 1000
set send pack 1000
set window 5
www.orangepi.org www.xunlong.tv
Page 64
Orange Pi Manual Copy right by Shenzhen Xunlong Software Co., Ltd
62
2) Connecting method
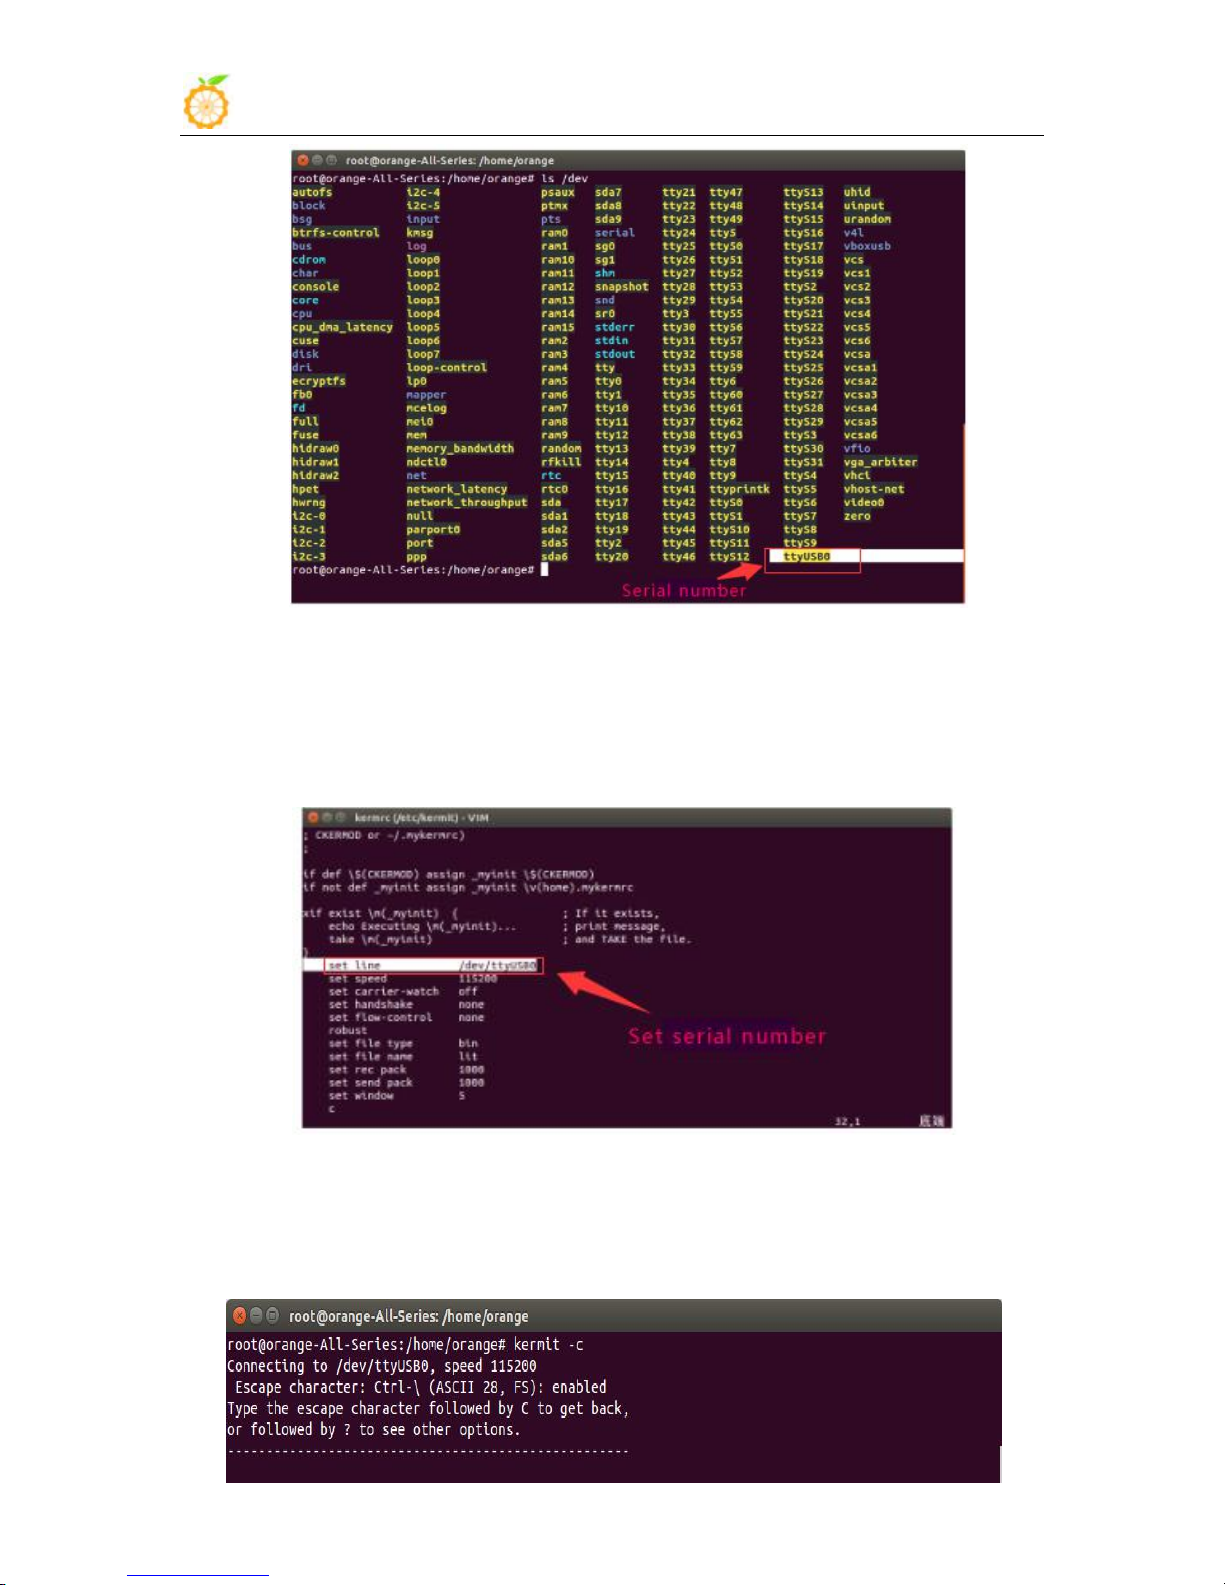
3) Equipment information acquisitio
Use the TTL to the serial port cable, one end connected to OrangePi, the
other end connected to PC
Input command in the PC terminal to check the device number of
TTL to the serial cable
$ ls /dev/
www.orangepi.org www.xunlong.tv
Page 65
Orange Pi Manual Copy right by Shenzhen Xunlong Software Co., Ltd
63
It can be seen from the figure that TTL to the serial port cable is
Set the value of setline into /dev/ttyUSB0
4) Start debug
Input command in the host computer terminal, enter the Kermit mode:
identified as ttyUSB0, configure the /ect/kermit/kermitc file, update the
serial port information.
$ sudo vi /etc/kermit/kermitc
$ sudo kermit –c
www.orangepi.org www.xunlong.tv
Page 66
Orange Pi Manual Copy right by Shenzhen Xunlong Software Co., Ltd
64
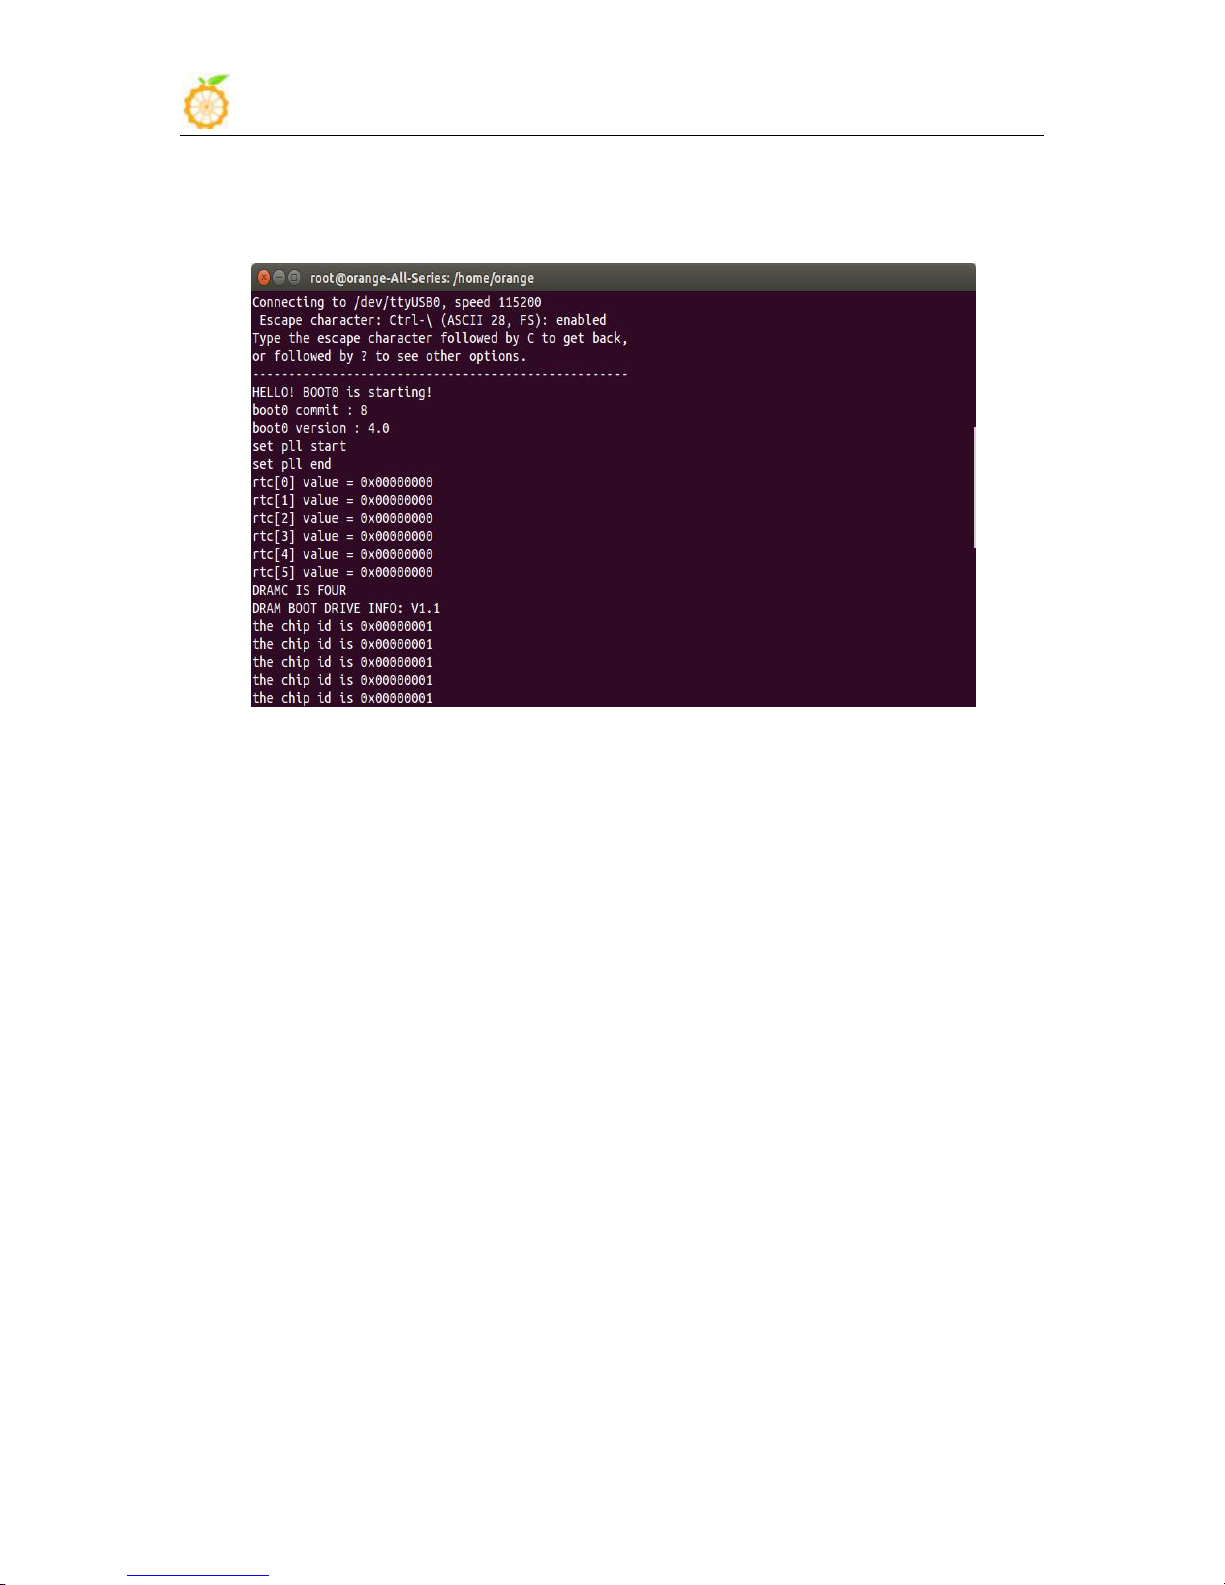
Power on and boot OrangePi, the serial port will automatic print debug
log
www.orangepi.org www.xunlong.tv
 Loading...