

Page 1
Orange Pi 2G-IOT User Manual Copy right by Shenzhen Xunlong Software Co., Ltd
I
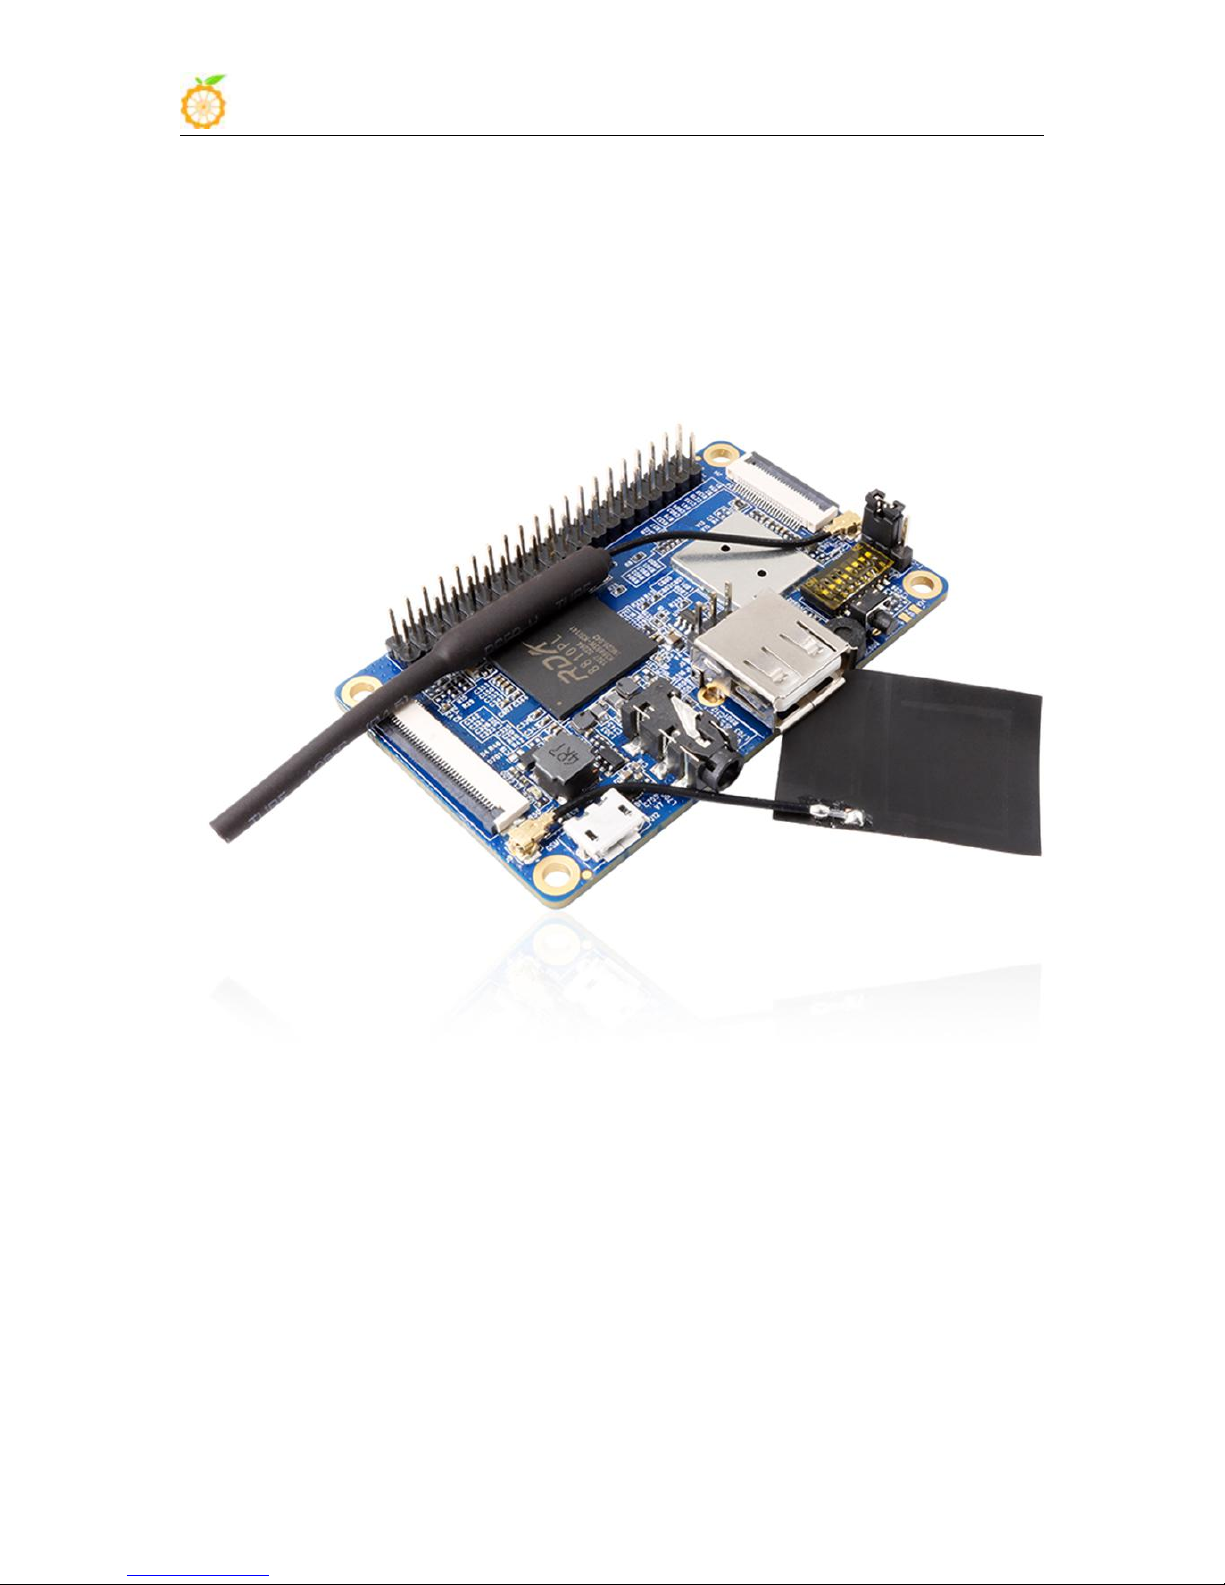
Orange Pi 2G-IOT
User Manual
www.orangepi.org www.xunlong.tv
Page 2

Orange Pi 2G-IOT User Manual Copy right by Shenzhen Xunlong Software Co., Ltd
II
Content
I. Orange Pi Introduction...........................................................................................................................1
1. What is Orange Pi 2G-IOT?
...................................................................................................
1
2. What can I do with Orange Pi 2G-IOT?
3. Whom is it for?
4. Hardware specification
5. GPIO Specifications
II. Using Method........................................................................................................................................6
.........................................................................................................................
.............................................................................................................
..................................................................................................................
...................................................................................
1. Step 1: Prepare Accessories Needed.........................................................................................6
2. Step 2: Prepare a TF Card.........................................................................................................6
3. Step 3: Start your Orange Pi..................................................................................................... 9
4. Step 4: Turn off your Orange Pi correctly.............................................................................. 12
5. Initialize settings for your Linux system.................................................................................12
6. Write Android into Nand........................................................................................................ 13
7. Android in no screen ADB mode............................................................................................16
8. Universal software configuration............................................................................................18
9. Usage of GPIO and WiringPi..................................................................................................21
10. Connect to Network via GSM...............................................................................................25
11. Use GSM to Connect Network............................................................................................. 51
1
1
1
4
III. Source Code Compilation of Android and Linux..............................................................................56
1. Install JDK.............................................................................................................................. 56
2. Install Platform Supported Software.......................................................................................57
3. Download the Source Package and Unzip it...........................................................................57
4. Android source code compiler................................................................................................57
5. Compile Linux source Code................................................................................................... 59
IV. Orange Pi Driver development.......................................................................................................... 64
1. Device driver and application programming.......................................................................... 64
2. Compile device driver.............................................................................................................66
4. Running driver and application...............................................................................................68
V. Using Debug tools on OrangePi..........................................................................................................70
1. Operations on Windows..........................................................................................................70
2. Operations on Linux................................................................................................................74
www.orangepi.org www.xunlong.tv
Page 3

Orange Pi 2G-IOT User Manual Copy right by Shenzhen Xunlong Software Co., Ltd
1
I. Orange Pi Introduction
1. What is Orange Pi 2G-IOT?
2. What can I do with Orange Pi 2G-IOT?
A computer
A wireless server
Games
Music and sounds
HD video
A speaker
Android
Scratch
Pretty much anything else, because Orange Pi 2G-IOT is open source.
3. Whom is it for?
4. Hardware specification
Hardware specification
CPU
ARM Cortex-A5 32bit
GPU
Separate graphic processor, Vivante's GC860
support OpenGLES1.1/2.0
support OpenVG1.4
support DirectFB
support GDI/DirecShow
30M Triangle/s, 250M Pixel/s
Memory (SDRAM)
Integrated 256MB LPDDR2 SDRAM
Onboard Storage
TF card / Integrated 500MB 8Bit 1.8V 4K SLC Nand Flash
It’s an open-source single-board computer. It can run Android 4.4, Ubuntu, Debian,
Raspberry Pi image. It uses the RDA8810 Soc, and has 256MB LPDDR2 SDRAM.
You can use it to build…
Orange Pi 2G-IOT is for anyone who wants to create with technology– not just
consuming. It's a simple, fun, useful tool and you can use it to take control of the world
around you.
www.orangepi.org www.xunlong.tv
Page 4

Orange Pi 2G-IOT User Manual Copy right by Shenzhen Xunlong Software Co., Ltd
2
Onboard WIFI+BT
RDA5991, WIFI+BT
2G model
The four frequency single card
GSM/GPRS Dedicated accelerators
SIM card
Video Input
A CSI input connector Camera:
Supports 8-bit YUV422 CMOS sensor interface
Supports CCIR656 protocol for NTSC and PAL
Supports SM pixel camera sensor
Supports video capture solution up to 1080p@30fps
Audio Input
MIC, 3.5 mm Jack
Video Outputs
LCD
Audio Output
3.5 mm Jack、 FM、SPEAK(Optional)
Power Source
USB OTG input can supply power
Battery input can supply power(Optional
)
USB 2.0 Ports
One USB 2.0 HOST, One USB 2.0 OTG
Buttons
Power Button(SW602)
Low-level
peripherals
40 Pins Header, compatible with Raspberry Pi B+
GPIO(1x3) pin
UART, ground.
LED
Power led
Supported OS
Android, Ubuntu, Debian, Rasbian
Interface definition
Product size
67mm × 42mm
Weight
35g
Orange Pi™ is a trademark of the Shenzhen Xunlong Software CO., Limited
www.orangepi.org www.xunlong.tv
Page 5
Orange Pi 2G-IOT User Manual Copy right by Shenzhen Xunlong Software Co., Ltd
3
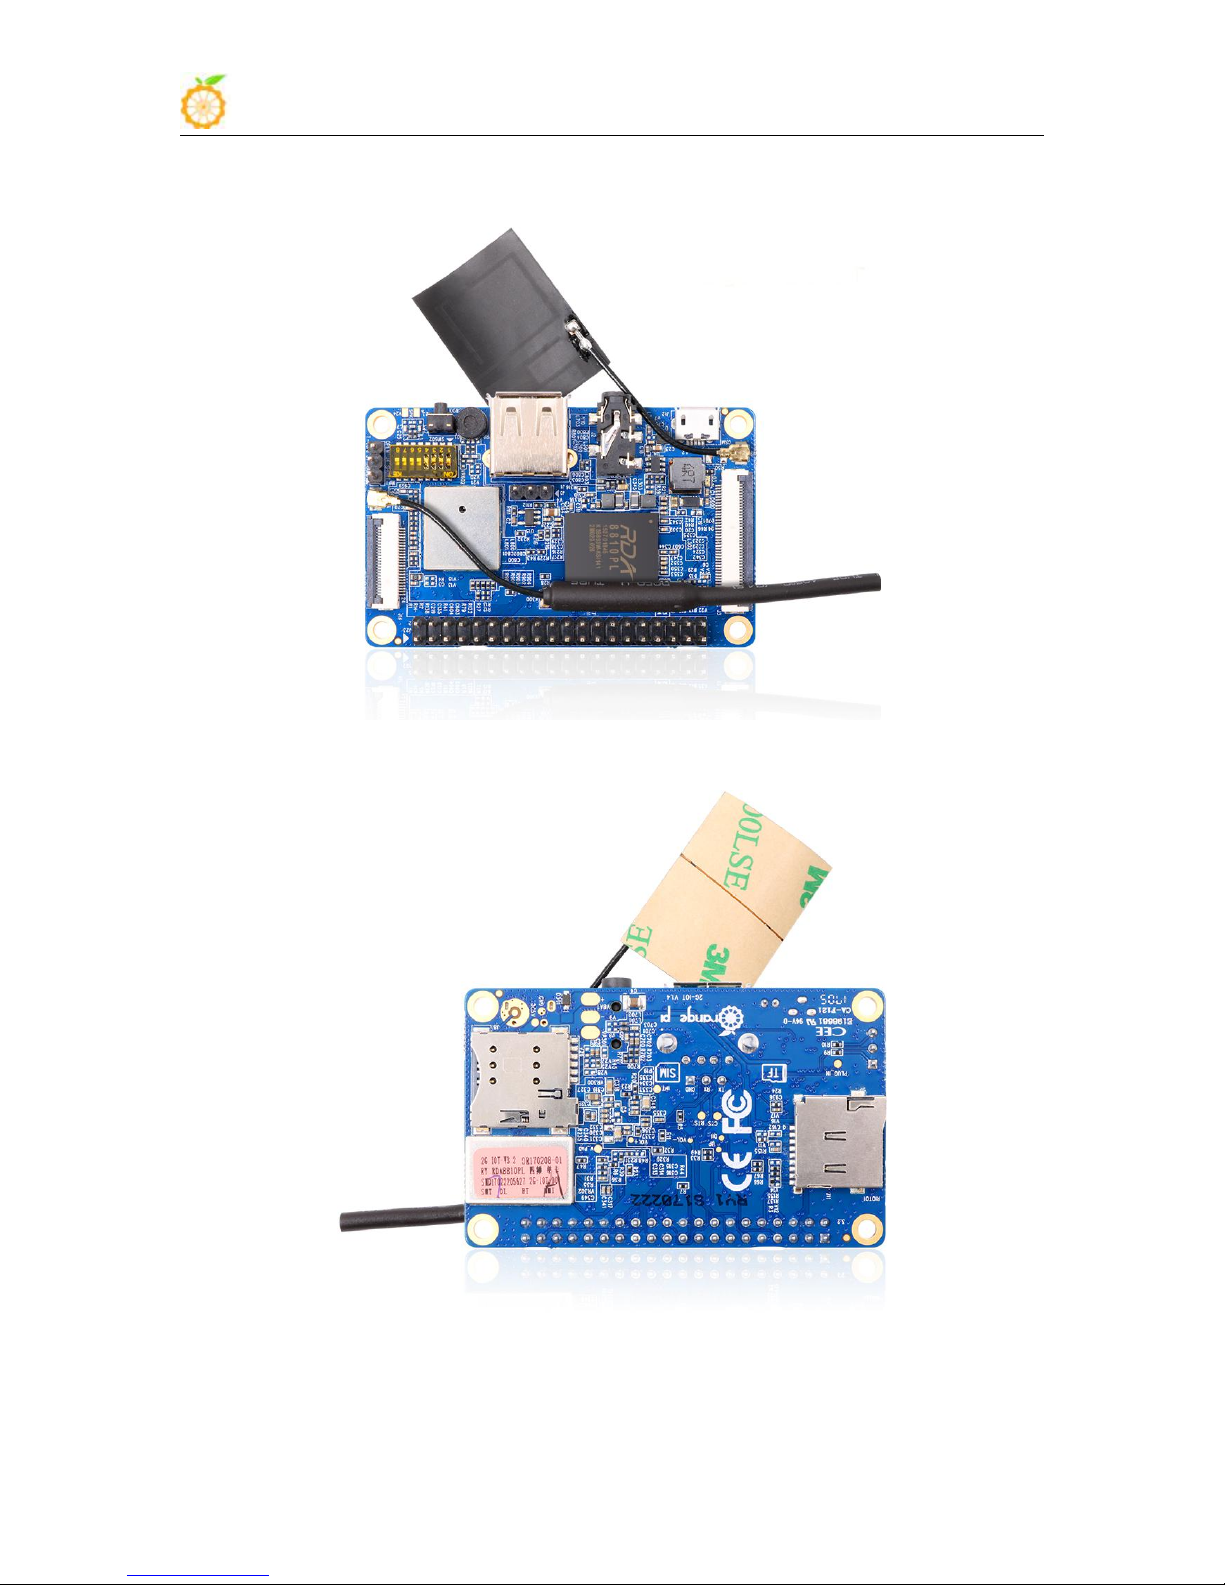
Top view
Bottom view
www.orangepi.org www.xunlong.tv
Page 6
Orange Pi 2G-IOT User Manual Copy right by Shenzhen Xunlong Software Co., Ltd
4
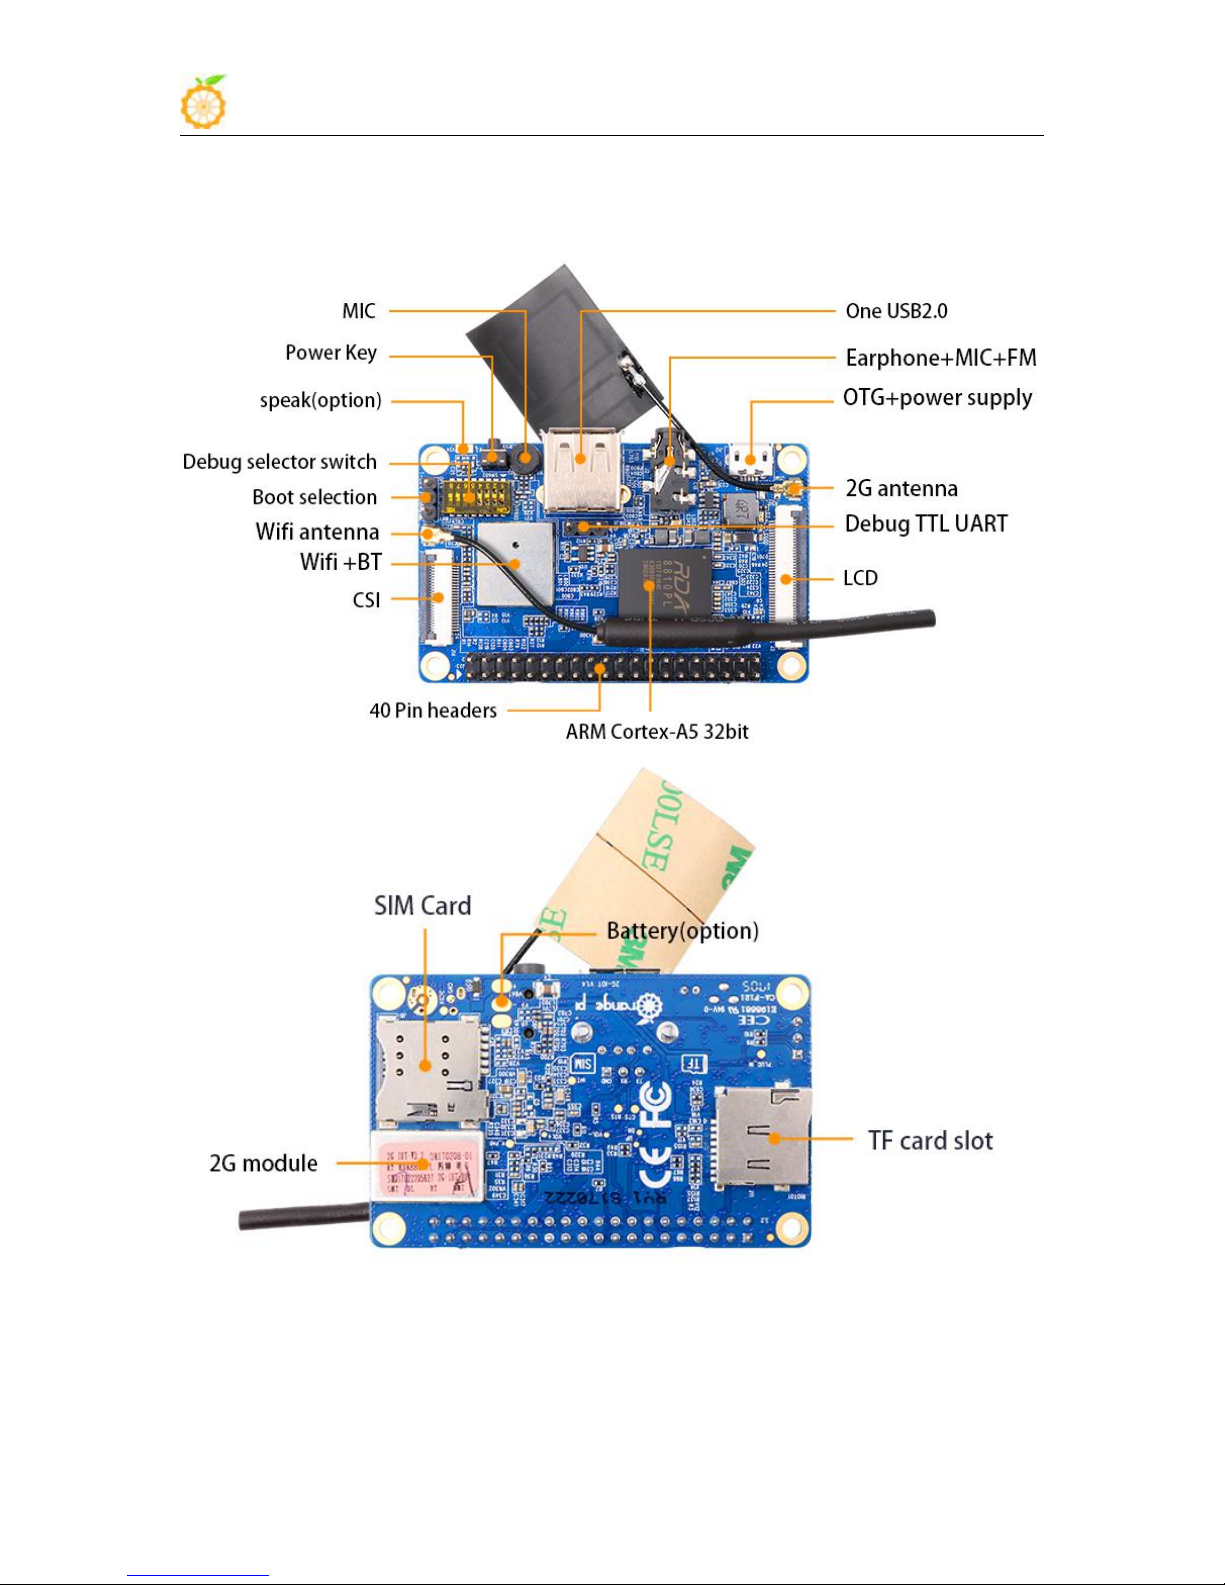
5. GPIO Specifications
Interface instructions:
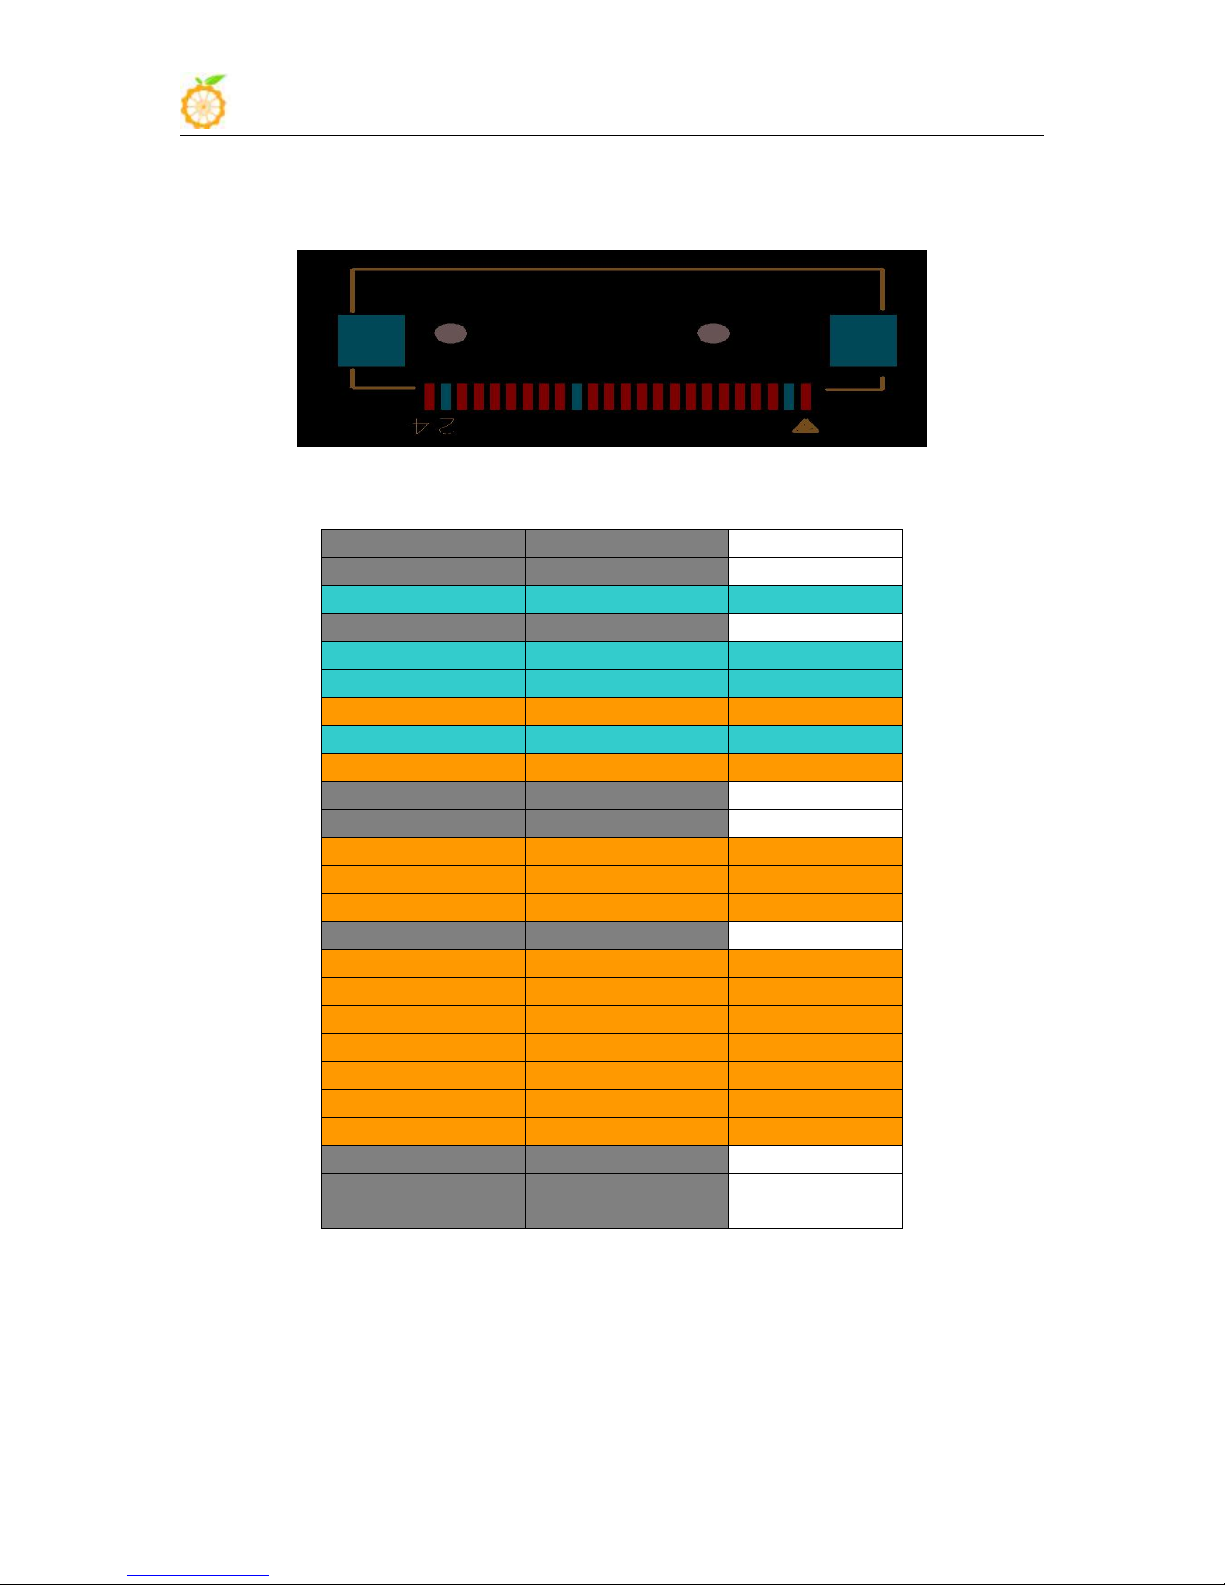
The CSI Camera Connector is a 24-pin FPC connector which can connect external
www.orangepi.org www.xunlong.tv
Page 7
Orange Pi 2G-IOT User Manual Copy right by Shenzhen Xunlong Software Co., Ltd
5
CON1-P01
NC
CON1-P02
GND
CON1-P03
TWI2-SDA
PE13
CON1-P04
VCC-CSI
CON1-P05
TWI2-SCK
PE12
CON1-P06
CSI-RESET#
PE15
CON1-P07
CSI-VSYNC
PE3
CON1-P08
CSI-STBY-EN
PE15
CON1-P09
CSI-HSYNC
PE2
CON1-P10
VDD1V8-CSI
CON1-P11
VCC-CSI
CON1-P12
CSI-D7
PE11
CON1-P13
CSI-MCLK
PE1
CON1-P14
CSI-D6
PE10
CON1-P15
GND
CON1-P16
CSI-D5
PE9
CON1-P17
CSI-PCLK
PE0
CON1-P18
CSI-D4
PE8
CON1-P19
CSI-D0
PE4
CON1-P20
CSI-D3
PE7
CON1-P21
CSI-D1
PE5
CON1-P22
CSI-D2
PE6
CON1-P23
GND
CON1-P24
AFVCC-CSI
camera module with proper signal pin mappings. The pin of CIS connector can be
defined as follows. The connector marked with "CON 1" on the Orange Pi 2G-IOT is
camera connector.
OrangePi 2G-IOT-CSI
www.orangepi.org www.xunlong.tv
Page 8

Orange Pi 2G-IOT User Manual Copy right by Shenzhen Xunlong Software Co., Ltd
6
II. Using Method
1. Step 1: Prepare Accessories Needed
No.
Items
Requirements and Instructions
1
TF card
8GB ; class 10 (for now it only supports 8GB SD
card).Branded TF cards which are much more
reliable are the good choice
2
Power adapter
At lease 5V/2A high quality power adapter, OTG
could use as power supply.
3
Keyboard and mouse
Any keyboard and mouse with USB port is
applicable; Keyboard and mouse are high-power, so
a USB concentrator is required.
4
TTL to USB cable
Support debug log in.
5
Audio cable (Optional)
You can select an audio cable with 3.5mm jack to
feel stereo audio.
6
SIM Card (Optional)
Support 2G SIM card
2. Step 2: Prepare a TF Card
You can configure your Orange Pi in a very short period of time and use it according
to the following steps. You need to fulfill the several steps before booting your Orange Pi.
The first time you use the Orange Pi, you need at least some parts for the following:
TF card OTG power adapter
In order to be able to us Orange Pi normally, you must first install the operating
system into the TF card or Nand. The following instructions will teach you how to write
the operating system image file to the Windows and Linux Platform. For now this board
could support boot from TF card with Android and Linux distro, and could support boot
from Nand with Android. It will illustrate about how to write image into Nand.
www.orangepi.org www.xunlong.tv
Page 9
Orange Pi 2G-IOT User Manual Copy right by Shenzhen Xunlong Software Co., Ltd
7
1) Writing image into a SD card on Windows:
a. Inserting the TF card into the computer, the capacity of the card must be larger than
b. Formatting the TF card.
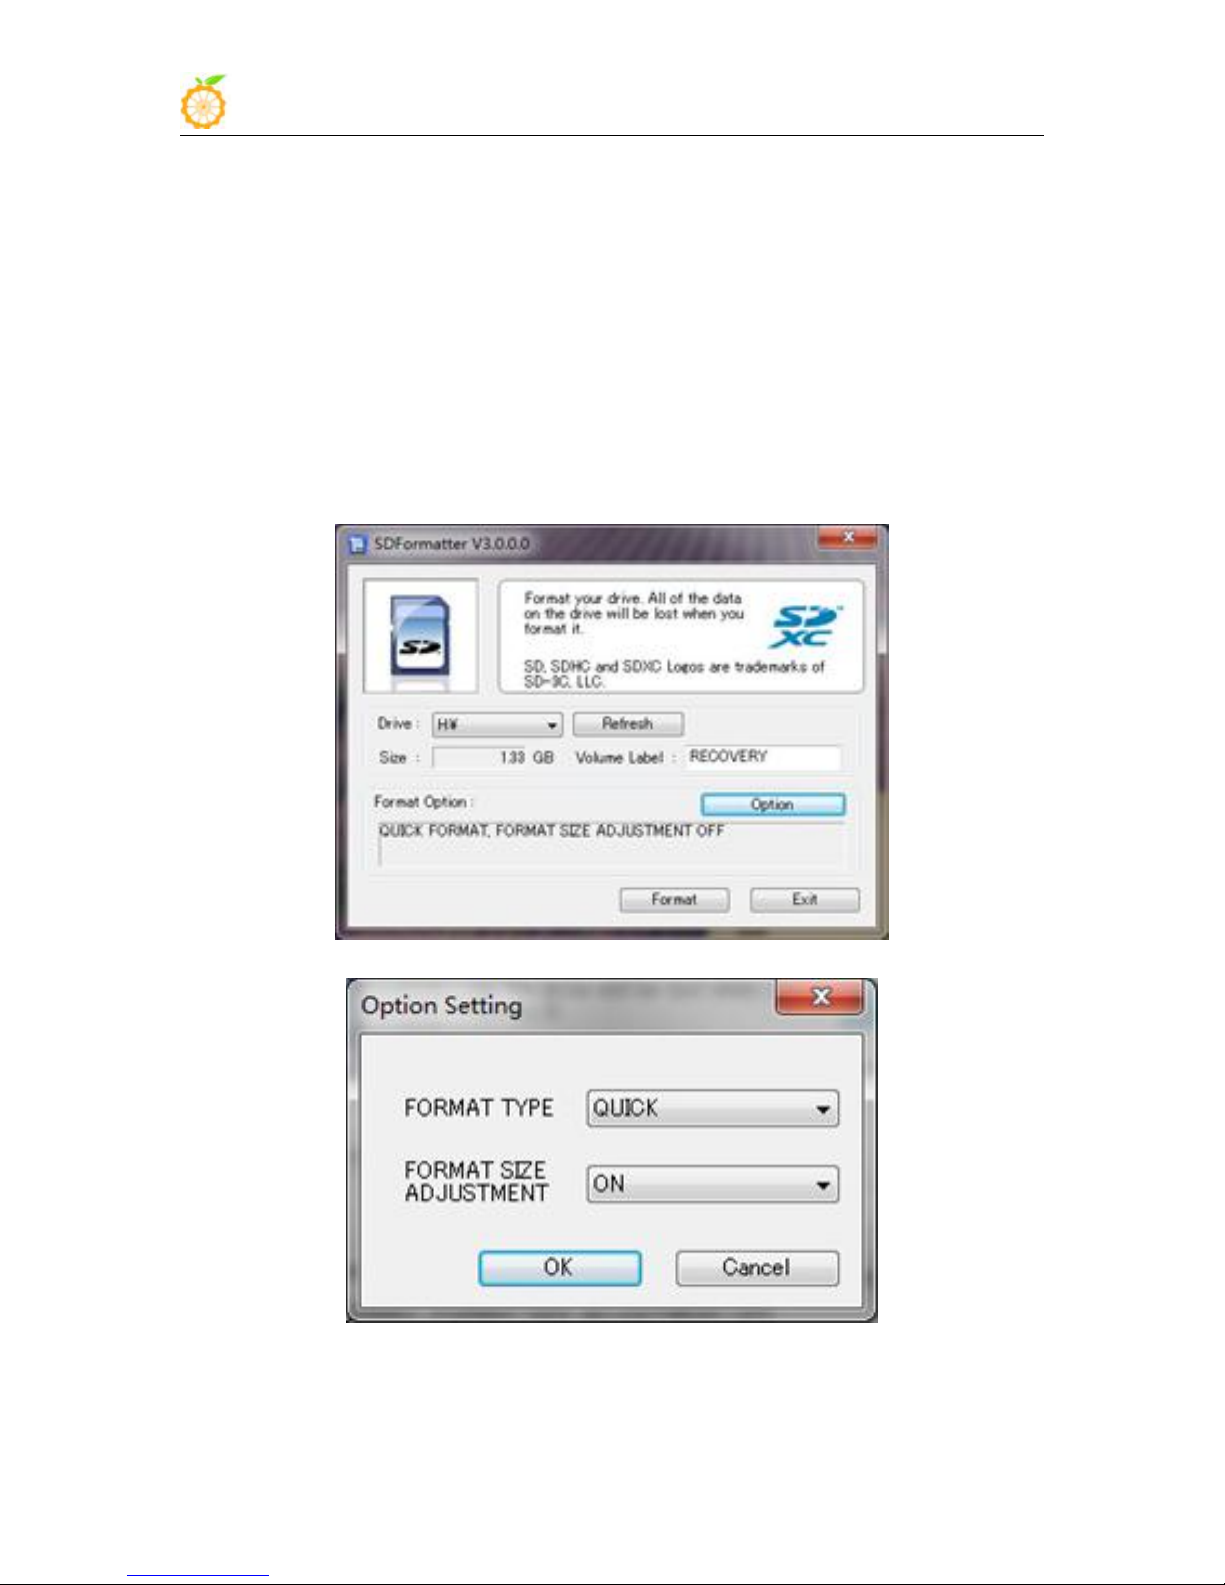
i. Download tools for formatting TF card, such as TF Formatter, could be
ii. Unzip the downloaded files, and run setup.exe
iii.In the options settings option set the format type option to quick
iv. Make sure the inserted TF card codes are in accordance with the chosen
v. Click the "Format"button.
c. Download the operating system image file from the download page, the page address
the operating system image, usually requires 8GB or bigger capacity.
download from
https://www.sdcard.org/downloads/formatter_4/eula_windows/
formatting. Logical size adjustment option to open "(ON)”
codes.
www.orangepi.org www.xunlong.tv
Page 10
Orange Pi 2G-IOT User Manual Copy right by Shenzhen Xunlong Software Co., Ltd
8
d. Unzip the downloaded file (in addition to the Android system, this method can be
e. Right click the downloaded file, select "Unzip file" to write image to TF card.
2) Writing image into a SD card on Linux:
a. Inserting the TF card into the computer, the capacity of the card must be larger than
b. Formatting the TF card.
c. Download the image OS from download page:
d. Unzip the downloaded file and right click it, select " Unzip file"
e. Write image into TF card
is as follows: http://www.orangepi.cn/downloadresourcescn/
used to burn to write, the Android system need another burn, the following will
introduce).
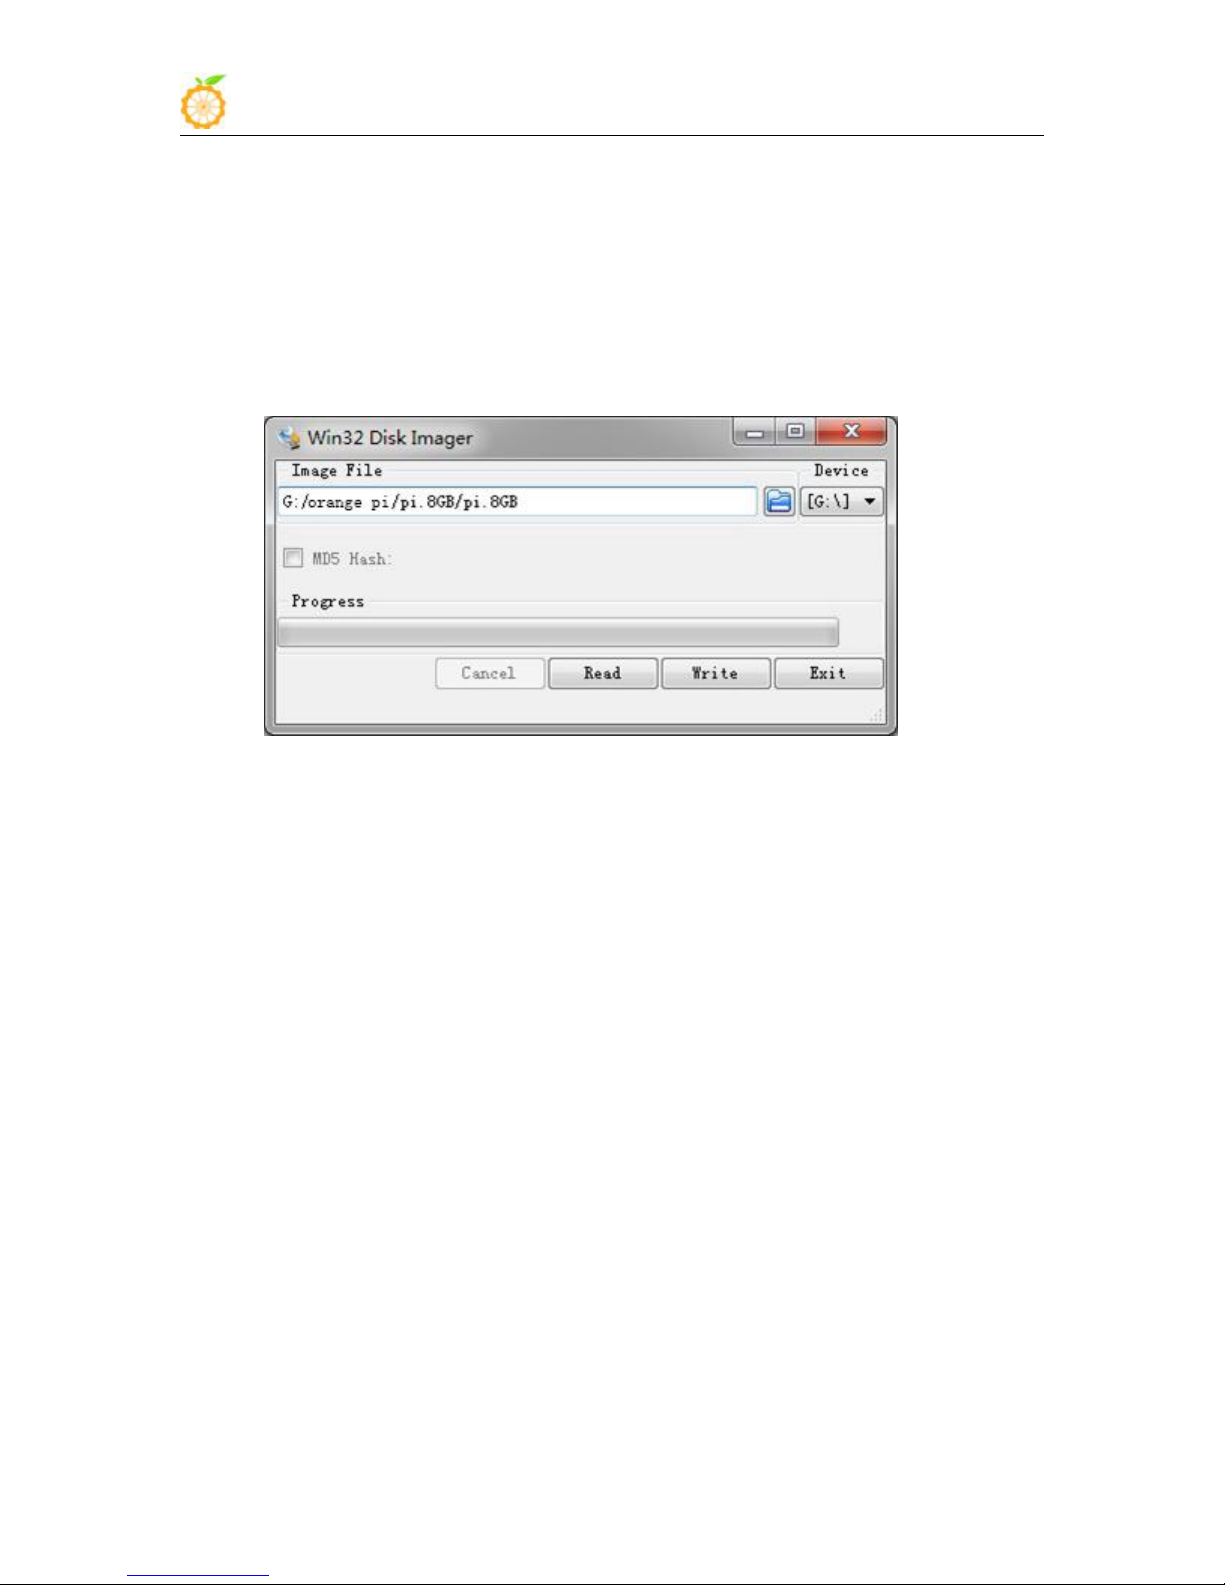
i. Download tools to write image, such as Win32 Diskimager,
http://sourceforge.net/projects/win32diskimager/files/Archive/.
ii. Select the path of image file that has been unzipped.
iii. Click the "Write" button and wait for the image writing.
iv. After the image is written, click the "Exit" button.
the operating system image, usually requires 8GB or bigger capacity.
i. Run fdisk –l command to make sure TF disk.
ii. Run umount /dev/sdxx to uninstall all partitions of TF Card.
iii. Run sudo fdisk /dev/sdx command. Use director to delete all partitions of
TF Card, and then us n command to add a new partition, finally use w
command to save and exit.
iv. Run sudo mkfs.vfat /dev/sdx1 command to format the TF card partition
set up last step to FAT32 form(according to your TF card disk to replacex ).
Or you could skip this step since command in Linux will format TF card
automatic.
http://www.orangepi.cn/`downloadresourcescn/
i. Run sudo fdisk –l command to make sure the TF card disk
www.orangepi.org www.xunlong.tv
Page 11
Orange Pi 2G-IOT User Manual Copy right by Shenzhen Xunlong Software Co., Ltd
9
3. Step 3: Start your Orange Pi
Insert the TF card with written image into the TF card slot
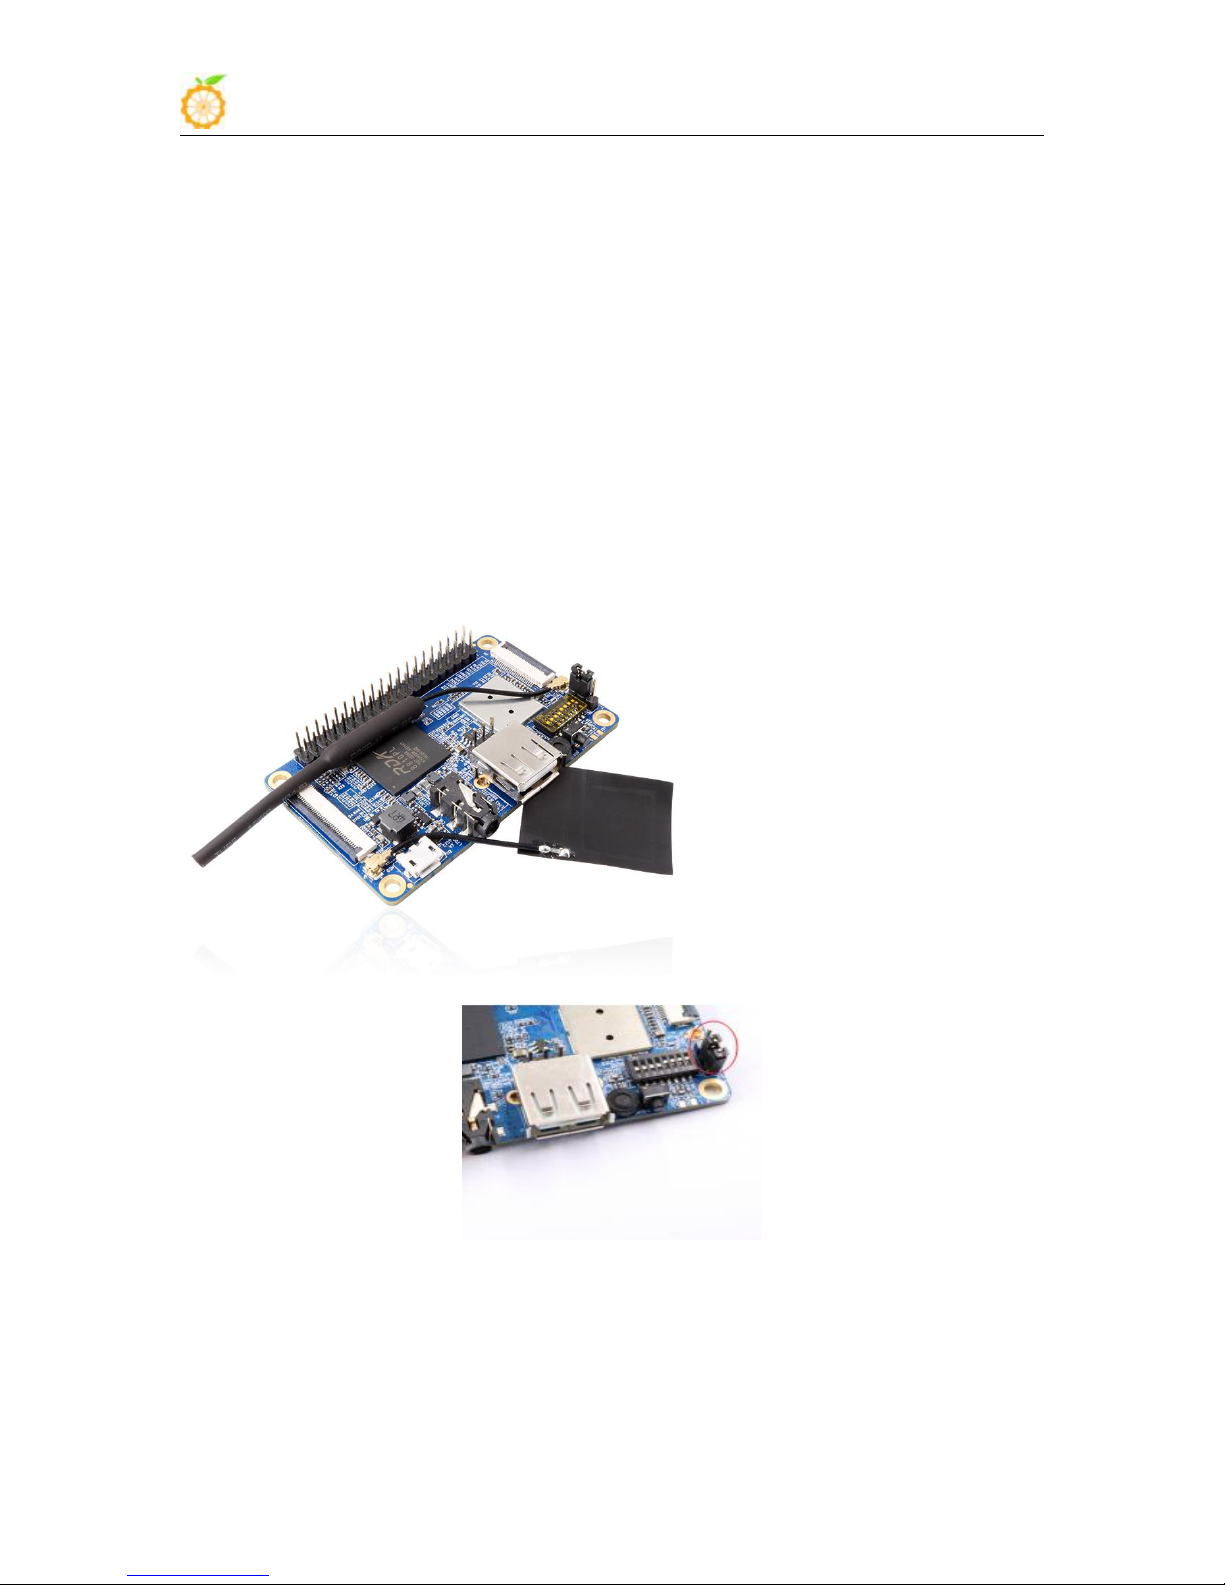
Make sure the toggle switch is showing like the following, booting from SD card.
Insert the keyboard or mouse into the USB port.
Connect wifi antenna and base-band antenna
ii. Make sure the image file hash key is the same as download page
offered(optional) :
sha1sum [path]/[imagename]
Here will be output some number which should be same as the image page
line of "SHA-1"
iii. Run umount /dev/sdxx command to uninstall all partitions in TF Card
iv. Run the command of sudo dd bs=4M if=[path]/[imagename]
of=/dev/sdx to write image file and wait for it finished. You can run sudo
pkill –USR1 –n –x dd command to check the procedure.
www.orangepi.org www.xunlong.tv
Page 12
Orange Pi 2G-IOT User Manual Copy right by Shenzhen Xunlong Software Co., Ltd
10
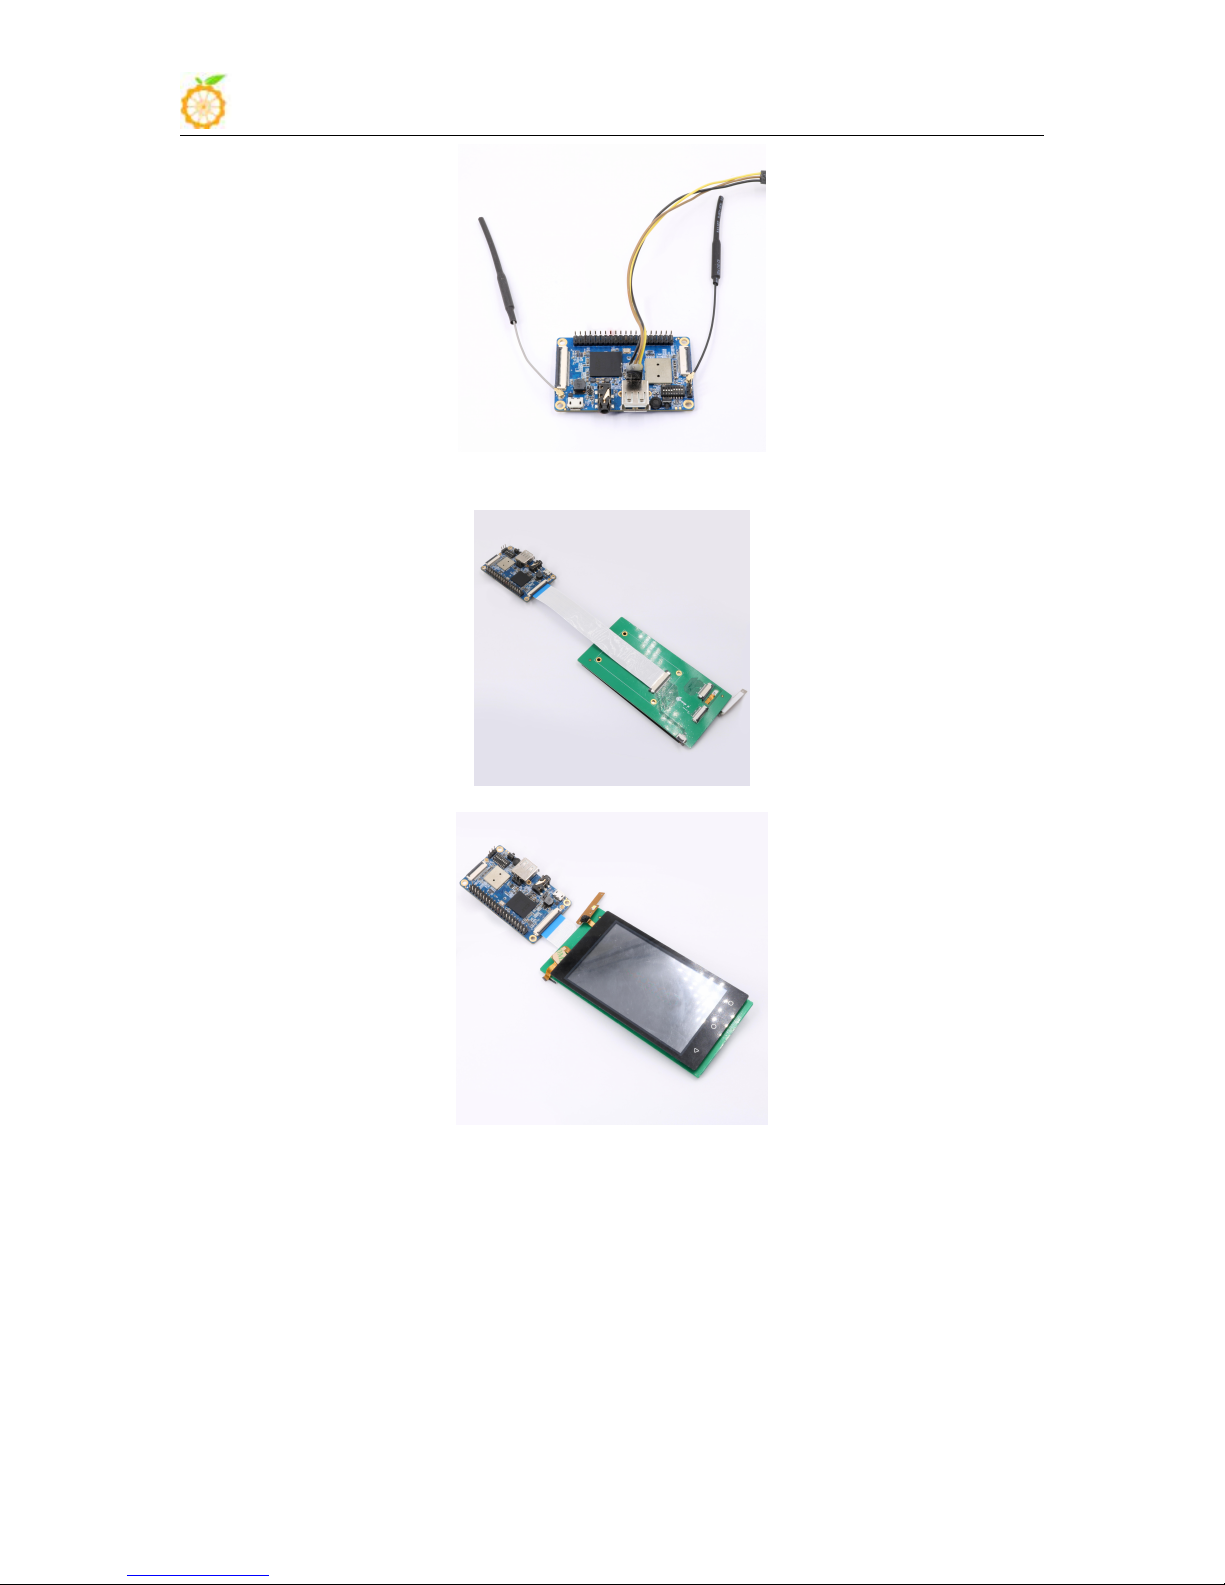
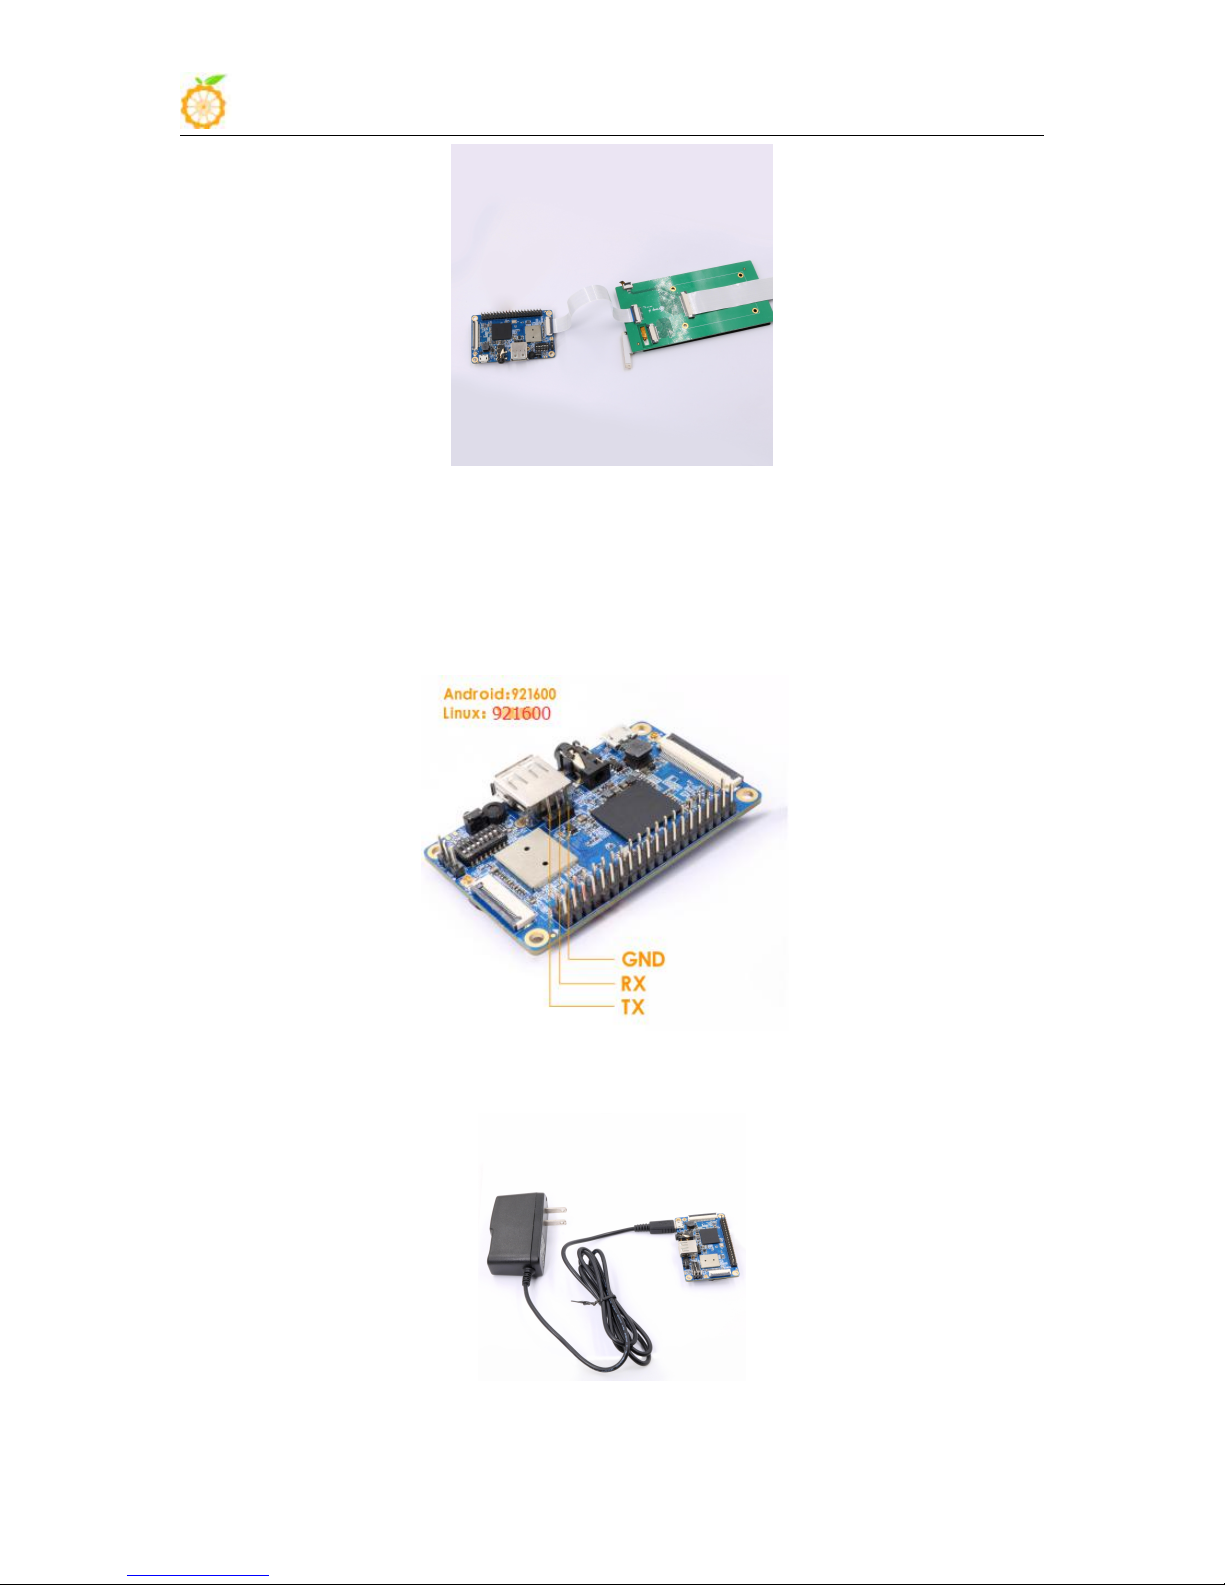
Connect LCD and Camera
www.orangepi.org www.xunlong.tv
Page 13
Orange Pi 2G-IOT User Manual Copy right by Shenzhen Xunlong Software Co., Ltd
11
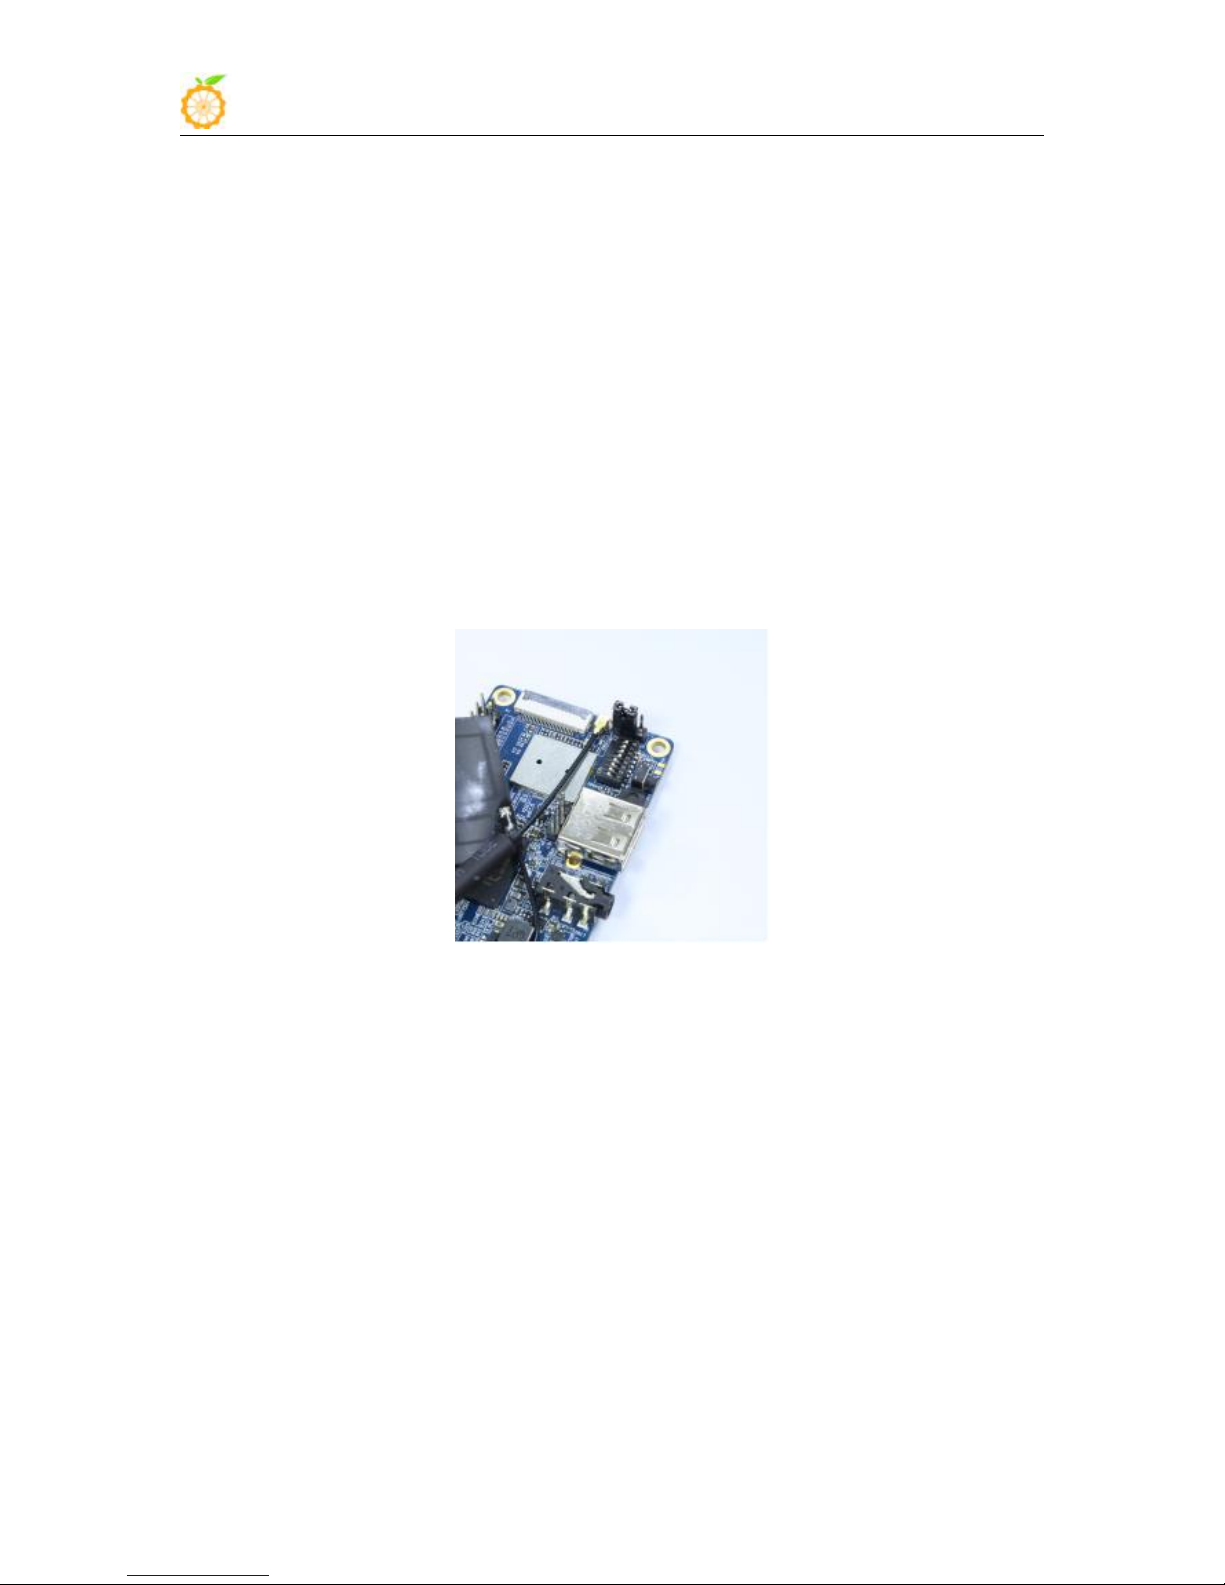
Connect TTL cable, you could refer to the Debug method in this instruction.
It is the power input interface on the right side for connecting a 5V and at least 2A or
Android and Linux use different Baud rate, please note the Baud rate setting.
Android Baud rate is 921600, Linux Baud rate is 921600
Serial port uses TTL to USB cable to connect.
bigger than 2A power adapter. Avoid using smaller power GSM mobile phone
charger, it is not able to output 2A even if it marked "5V/2A".
If the above steps are successful, the OrangePi will start in a few minutes. The
monitor Graphical interface of display system. It may take a long time to start the first
www.orangepi.org www.xunlong.tv
Page 14

Orange Pi 2G-IOT User Manual Copy right by Shenzhen Xunlong Software Co., Ltd
12
4. Step 4: Turn off your Orange Pi correctly
5. Initialize settings for your Linux system
1) Wifi setting on serial port
2) Use ssh to connect wifi
time, please wait patiently. The next time will boot very fast.
You can use the shutdown button on the interface to safety close the Orange Pi. You
can also close the system by entering command in the shell:
sudo halt
or
sudo shutdown –h
It will be safety to turn off the Orange Pi. If directly use the power button to shut
down the system may damage the file system on TF Card. After the system is closed, the
power can be cut off by more than 5 seconds’ press. If all the above steps run, then your
Orange Pi could shut down.
You need to make some basic settings when it is you first time to use Linux on
Orange Pi 2G-IOT, like wifi setting, audio setting, user setting.
In the use of serial login system, enter the login password the system will prompt
you to use the OrangePi_Settings tool to make some basic setting, including wifi setting.
You could use the following command in the order line:
sudo OrangePi_Settings
> wifi settings
This setting include the functions of WIFI statue setting, wifi searching and connect
to AP. You could use this method to set wifi.
You need to use two cellphones if you want to use this function. Please refer to this:
Orange Pi 2G-IOT is defaulted to connect the hotspot of orangepi, the password is
orangepi. Use another cellphone’s hotspot function, setting the hot spot name as orangepi,
password as orangepi. It will connect to orangepi hotspot default after booting the system.
After that, use another cellphone to connect the hotspot, and use “wifi assistant” to check
the IP of Orange Pi 2G-IOT.
After getting the IP of Orange Pi 2G-IOT, you could use SSH remote login in Linux
www.orangepi.org www.xunlong.tv
Page 15
Orange Pi 2G-IOT User Manual Copy right by Shenzhen Xunlong Software Co., Ltd
13
6. Write Android into Nand
1) Boot Android from NAND
2) Update Android in NAND
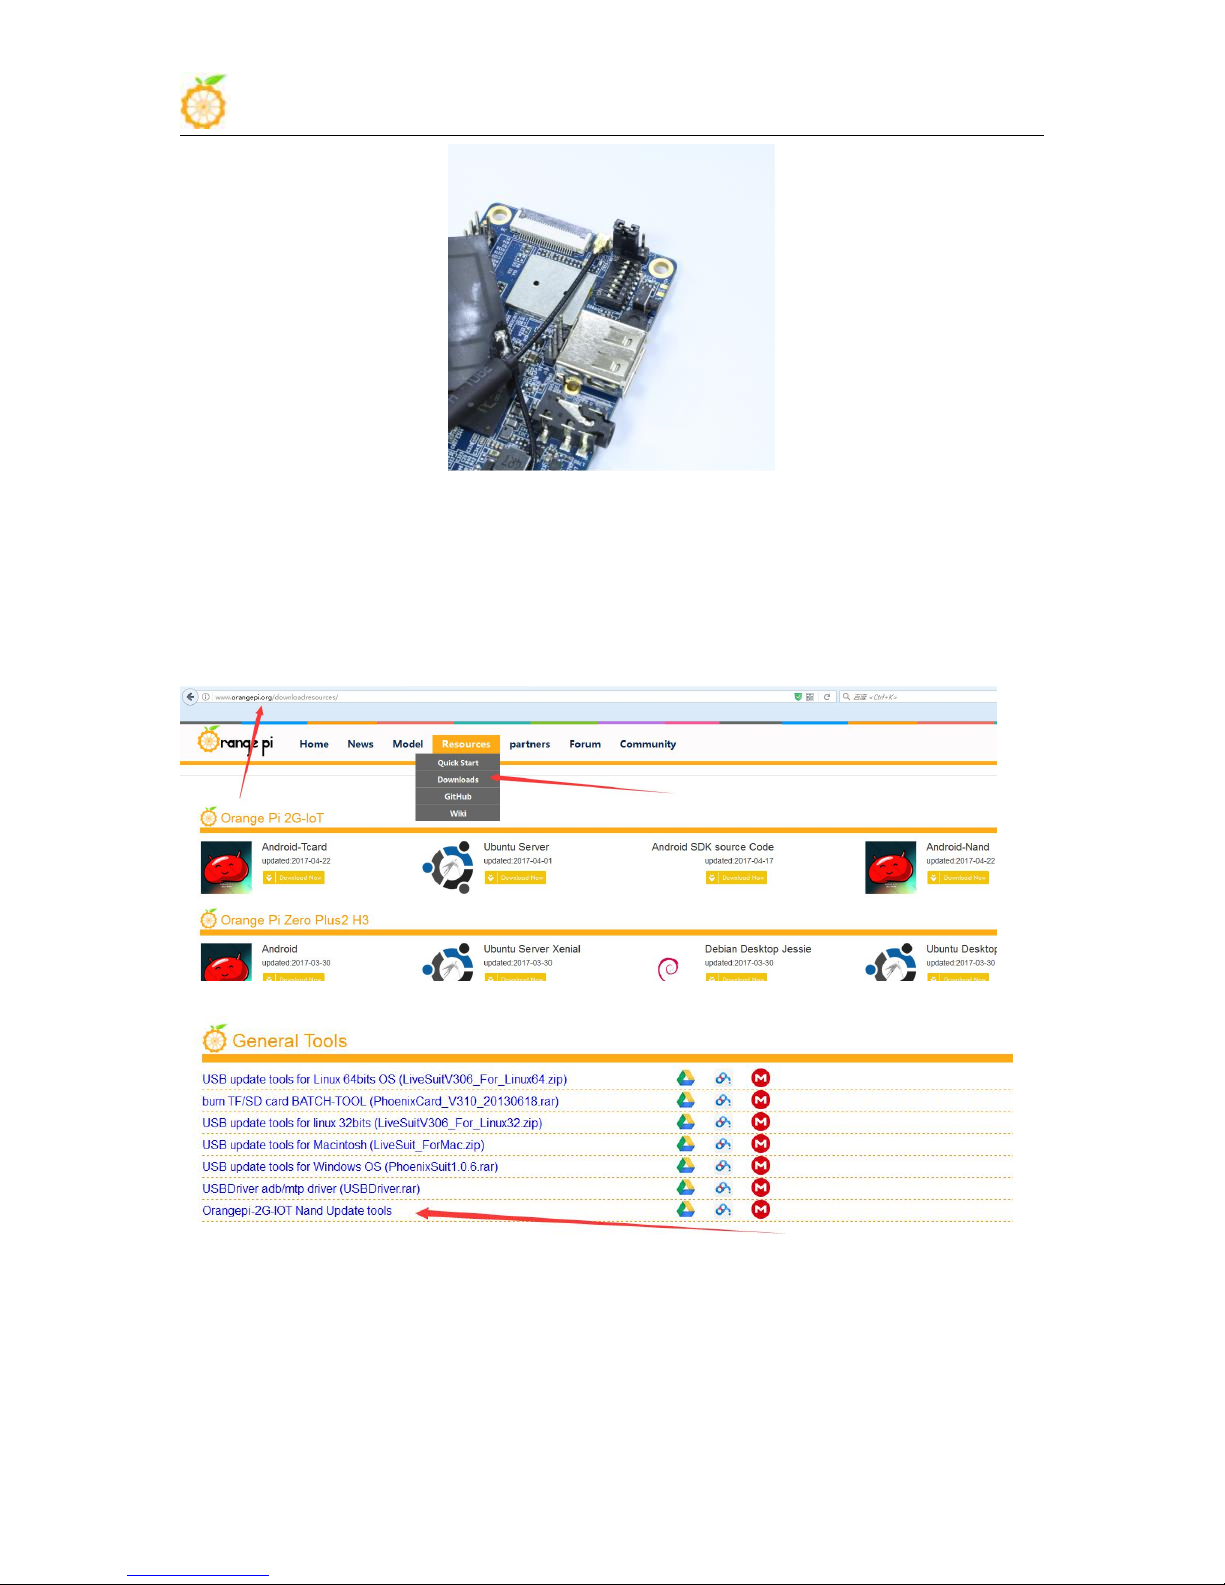
Short jumper cap to switch the system to boot from NAND, set toggle switch into
PC or Windows PC. Command as following:
Password: orangepi
After enter the system via ssh, run the following command to connect to router:
sudo OrangePi_Settings
Orange Pi 2G-IOT is supported boot from Nand, and also supported update Android
in Nand.
Switching the boot mode into NAND via short jumper cap.
Power it on, Orange Pi 2G-IOT will boot from NAND.
1234 UP, 5678 Down like the following:
www.orangepi.org www.xunlong.tv
Page 16
Orange Pi 2G-IOT User Manual Copy right by Shenzhen Xunlong Software Co., Ltd
14
3) Install writing tool on Windows
4) Install USB driver on Windows
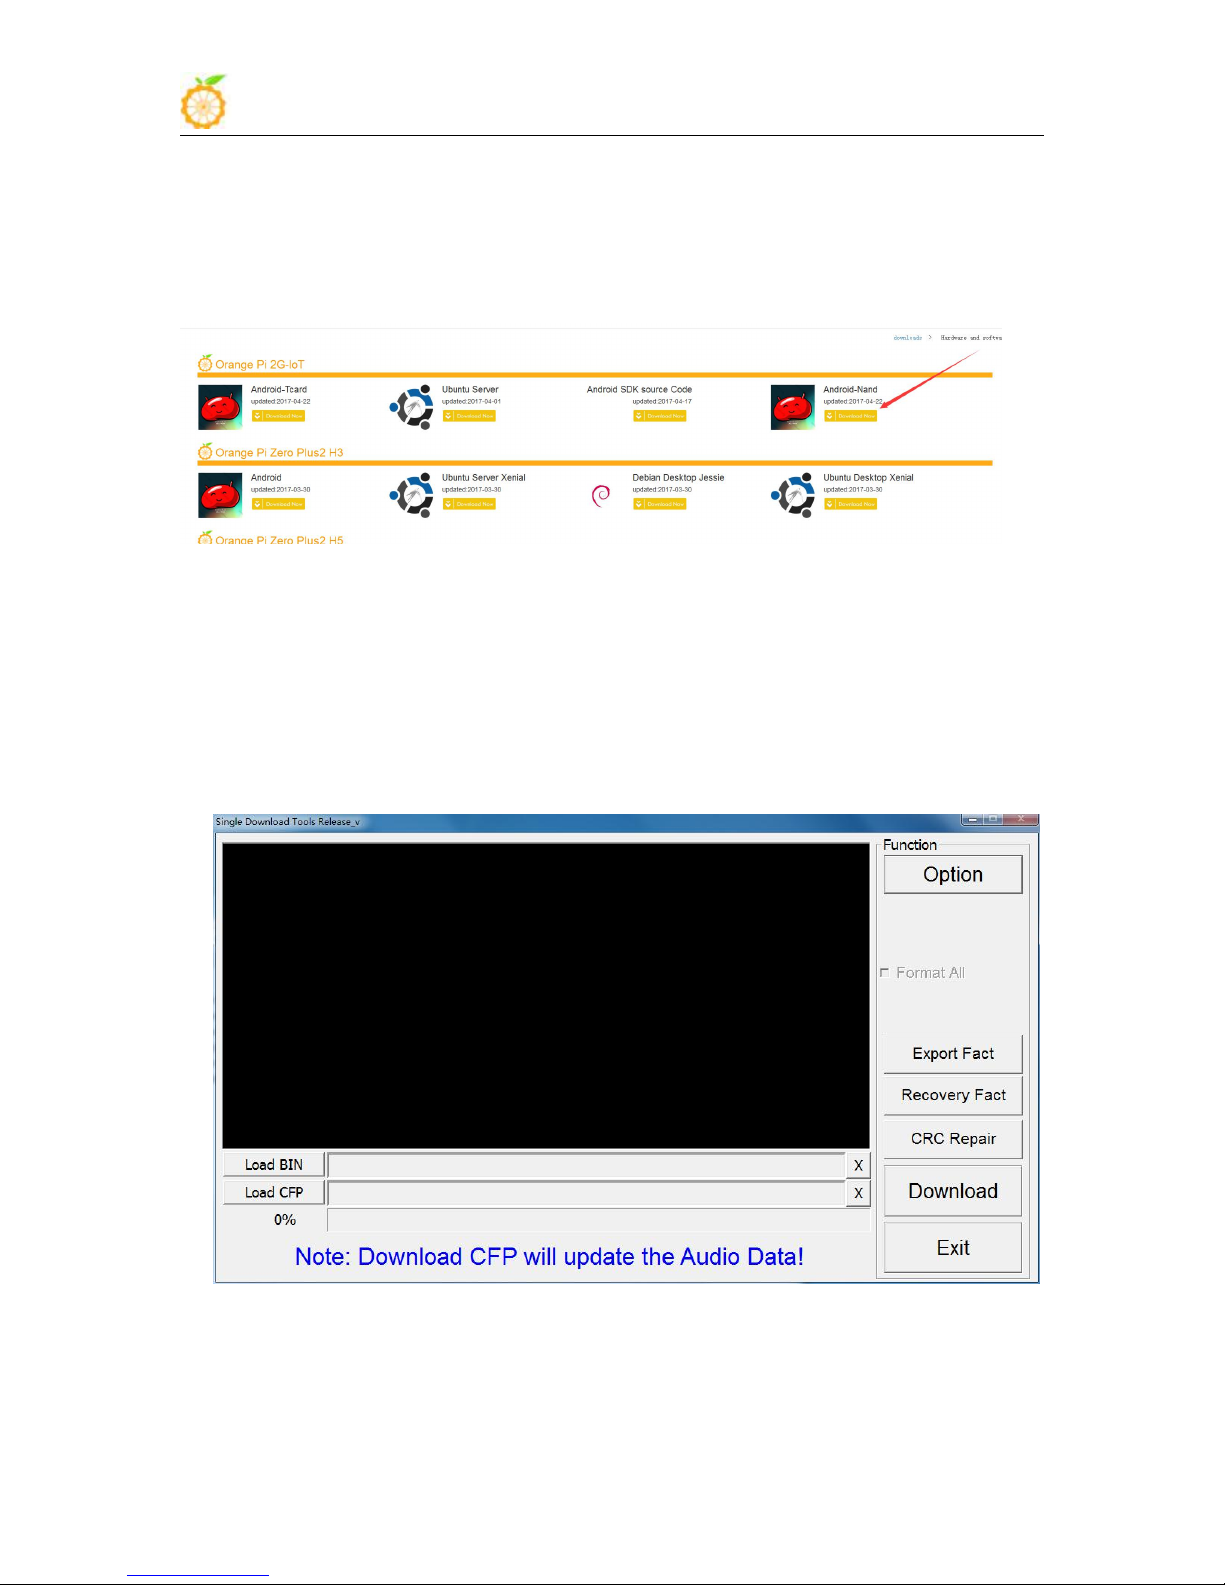
For now Nand writing tool could only support working on Windows, you could
download the tool from official website: http://www.orangepi.org/downloadresources/
Unzip the tool file, install the USB driver, here is the path:
*/OrangePi_2G-IOT_Toolschain/USB_Driver/USB-driver/
You should install it according to your PC, if your PC is 32bit, then install x86 USB
www.orangepi.org www.xunlong.tv
Page 17
Orange Pi 2G-IOT User Manual Copy right by Shenzhen Xunlong Software Co., Ltd
15
5) Download Android Nand image
6) Use writing tool
driver, if it is 64bit, then is x64 USB driver.
Here is the ink for Orange Pi 2G-IOT Nand version image:
http://www.orangepi.org/downloadresources/
Use writing tool to write NAND:
*/OrangePi_2G-IOT_Toolschain/OrangePi_2G-IOT_NandUpdate_Tools/OrangePi_2G-I
OT_Update.exe.
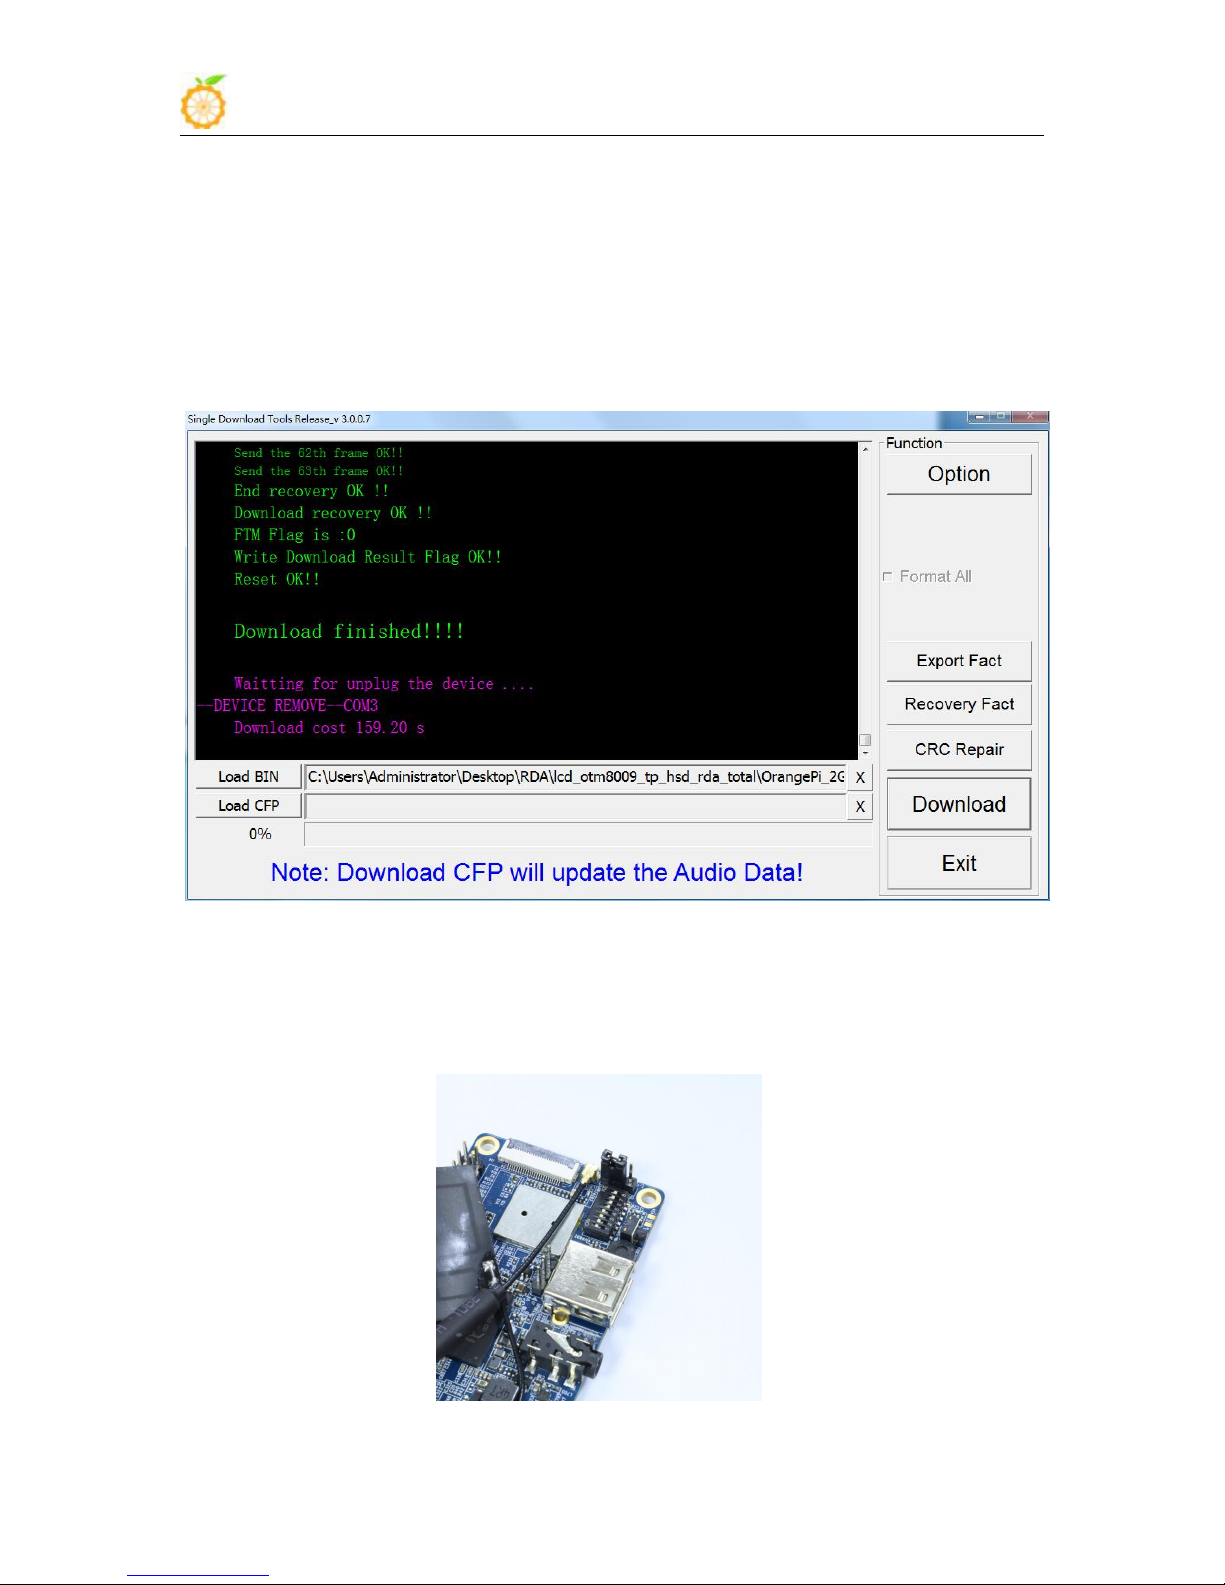
Click “load BIN” to import the image of NAND version into writing tool. After that,
click Download button to download the image. Meanwhile, the tool is waiting for the
download link of Orange Pi 2G-IOT.
www.orangepi.org www.xunlong.tv
Page 18
Orange Pi 2G-IOT User Manual Copy right by Shenzhen Xunlong Software Co., Ltd
16
7) Download Image
7. Android in no screen ADB mode
ADB setting: Set the toggle switch into 1234 “UP”, 5678 “Down”, the system will
Prepare an Android USB to DC cable, first connect to the OTG port of Orange Pi
2G-IOT, then push on the power button for 5s, and connect the cable to the Windows PC.
Meanwhile, the screen will indicate that connect successful and downloading. It will take
around 3min to finished downloaded, after that, reboot the system and then the system
will run on the update Android.
Note: If it could not download, please check the the shorting cap and switch.
switch into adb model, in this model, the USB is unable.
www.orangepi.org www.xunlong.tv
Page 19
Orange Pi 2G-IOT User Manual Copy right by Shenzhen Xunlong Software Co., Ltd
17
Connect to the OTG port of Oragne Pi 2G-IOT with the USB to DC cable, the other
If the PC haven’t set on adb, then please refer to the teaching method of Ubuntu and
After connect to OrangePi 2G-IOT via adb, you could refer to the adb debug method
side connect to PC, push the power button and then the system will be Android.
Windows adb in internet. Use adb command in the PC terminal to connect the adb:
adb shell
from the internet to enter into Orange Pi 2G-IOT
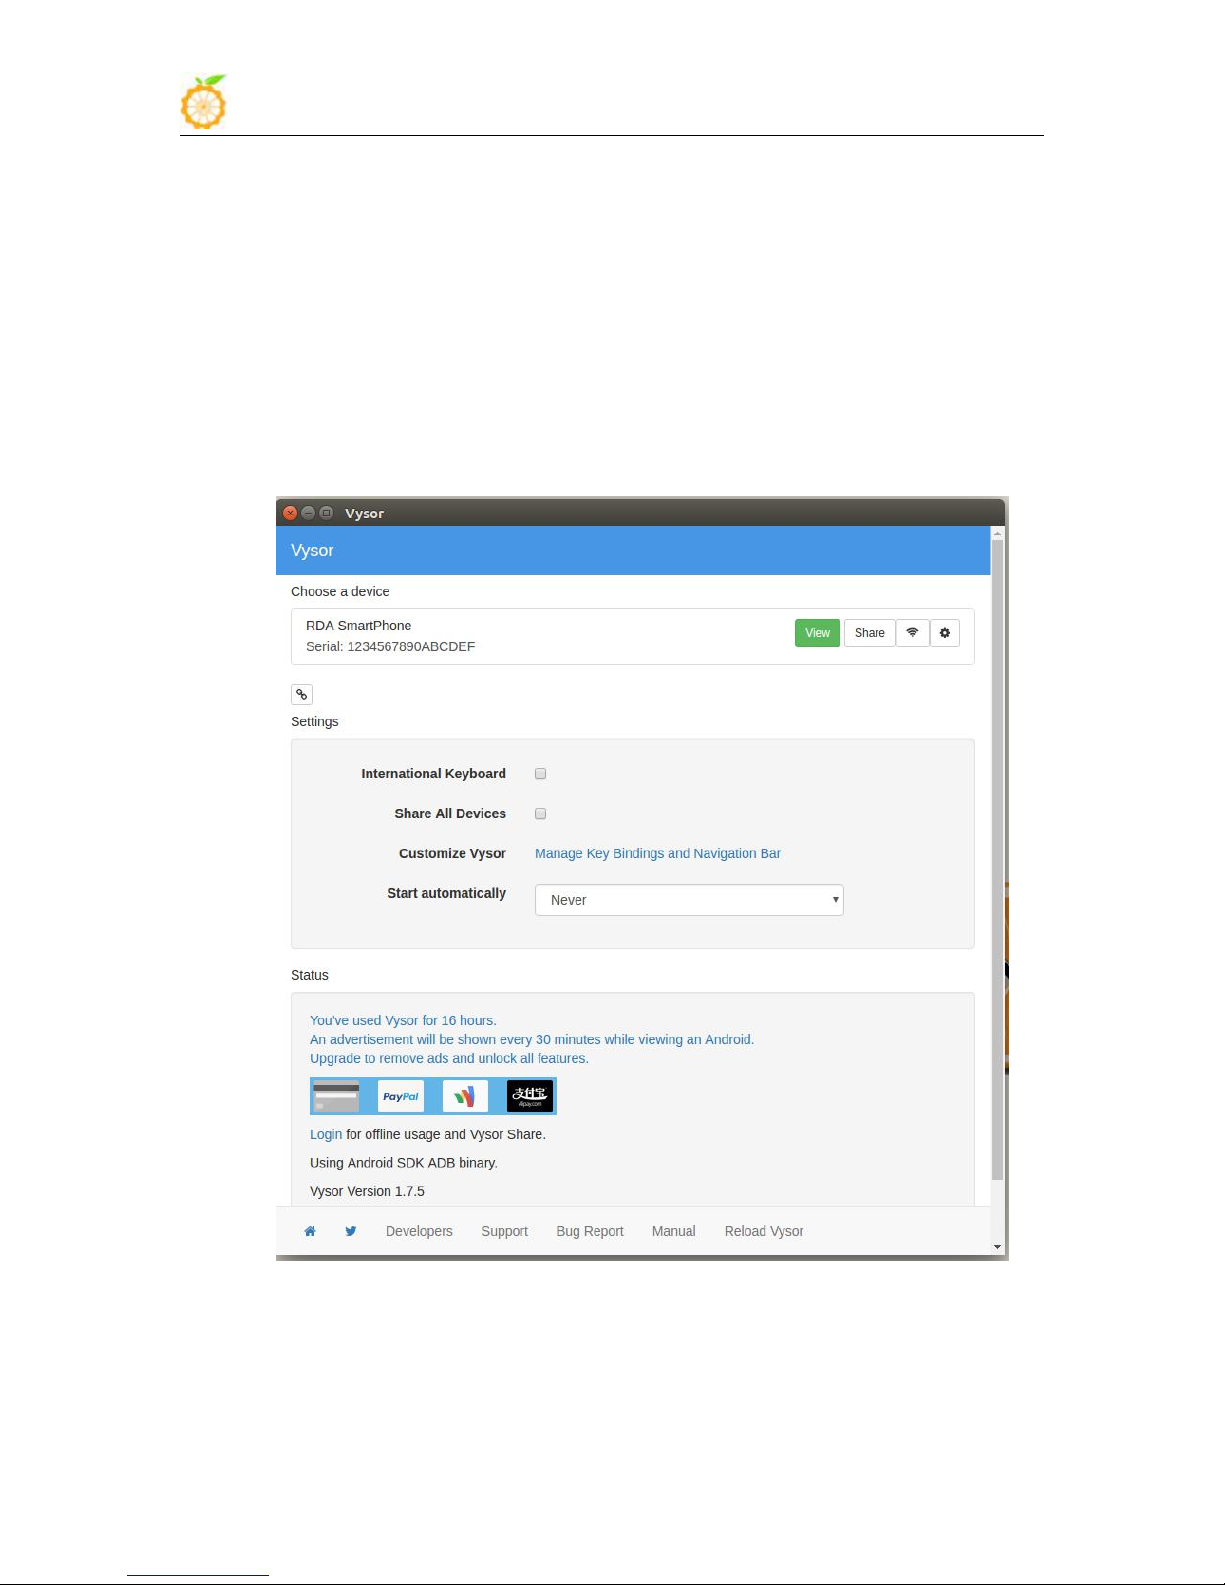
We would recommend you use Plug-in Vysor in Chrome browser, this tool could enter
Android via adb:
www.orangepi.org www.xunlong.tv
Page 20

Orange Pi 2G-IOT User Manual Copy right by Shenzhen Xunlong Software Co., Ltd
18
8. Universal software configuration
1) Change default account
a. Use root account to login Orange Pi
b. $ usermod -l zhangsan orangepi
c. $ groupmod -n zhangsan orangepi
d. $ mv /home/ornagepi /home/zhangsan
e. $ usermod -d /home/orangepi orangepi
The default log-in account and password is orangepi/orangepi or root/orangepi.
It is recommended to modify the default orangepi account to your own account for
secure sake. Take changing into Zhangsan as a sample. Steps are as follows:
Change account of orangepi into Zhangsan
Change group
Change directory of original orangepi
Set this directory into orangepi user's home directory
www.orangepi.org www.xunlong.tv
Page 21
Orange Pi 2G-IOT User Manual Copy right by Shenzhen Xunlong Software Co., Ltd
19
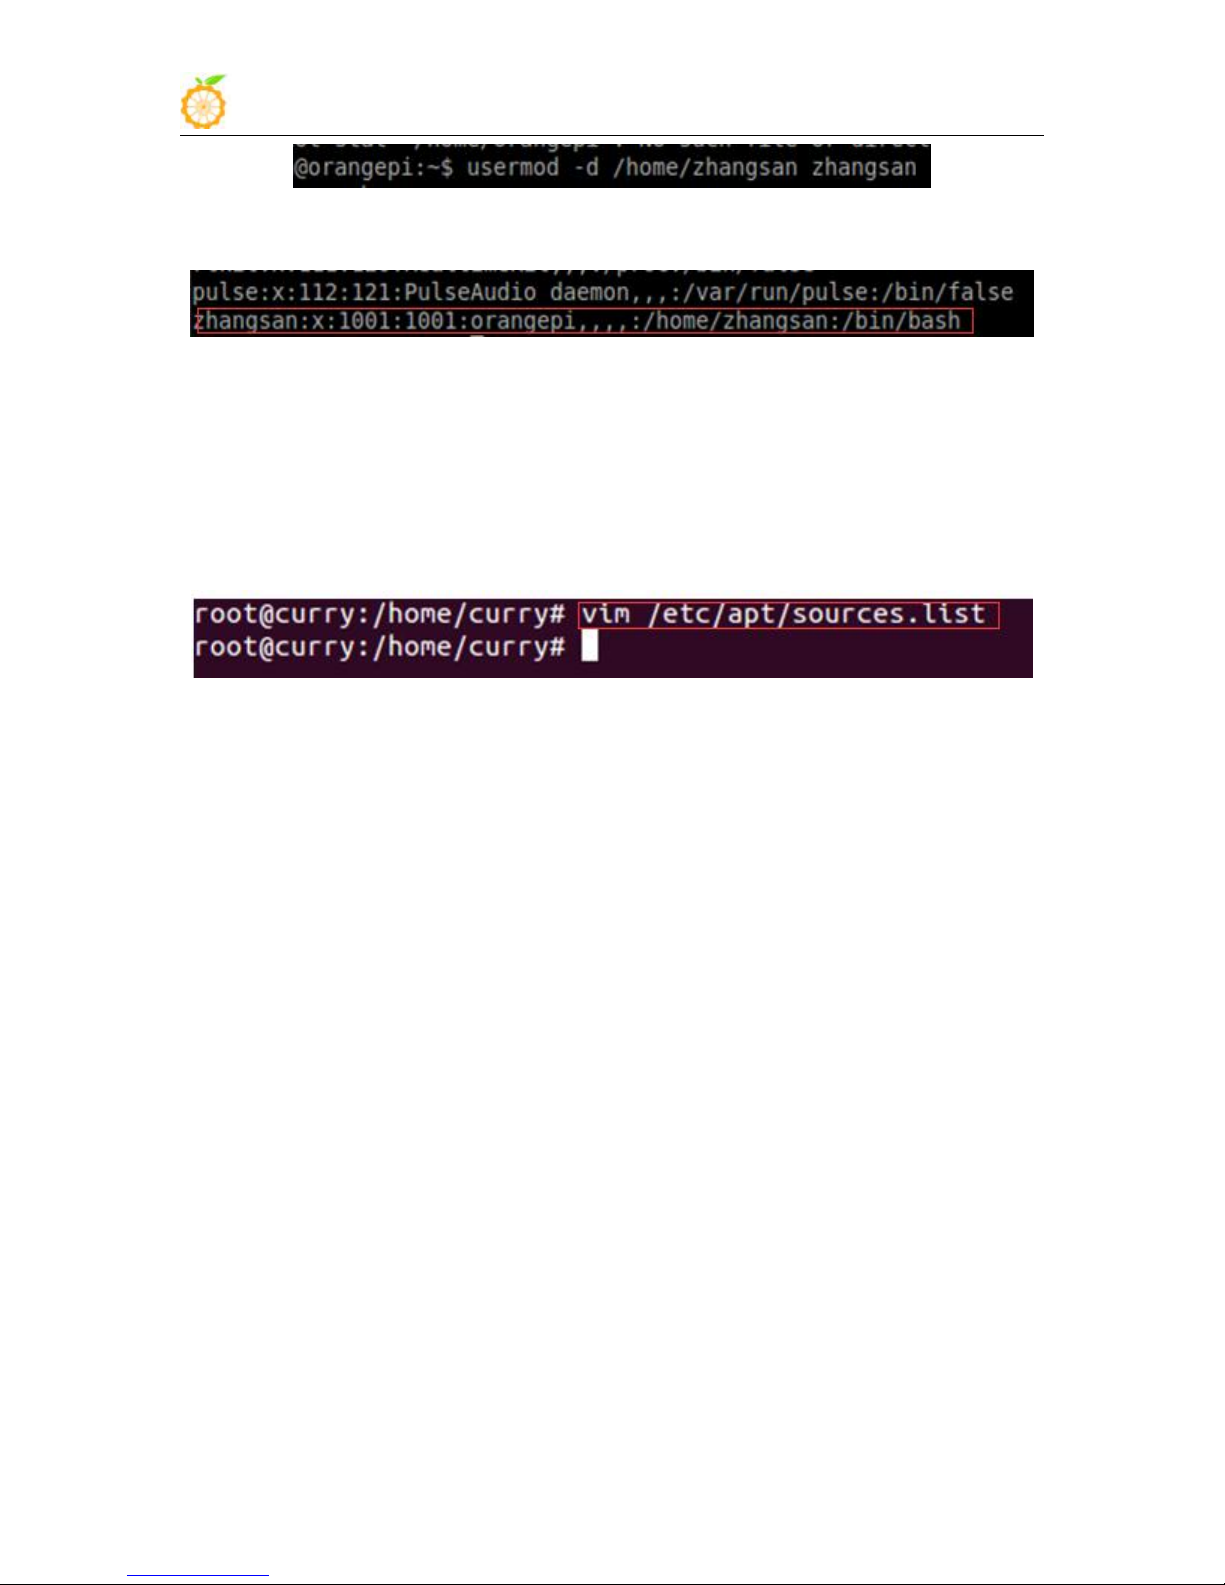
f. $ cat /etc/passwd
2) System source configuration
a. Open the source file
b. Edit source file
It should be shown as following:
After the modification of the above steps, you could use the new account
Zhangsan to log in.
This instruction will take Ubuntu as an example:
$ sudo vi /etc/apt/sources.list
Replace the source file with your favourite source. Take an example of
Ubuntu 16.04 on Zhonkeda source:
deb http://mirrors.ustc.edu.cn/ubuntu-ports/ xenial main multiverse
restricted universe
deb http://mirrors.ustc.edu.cn/ubuntu-ports/ xenial-backports main
multiverse restricted universe
deb http://mirrors.ustc.edu.cn/ubuntu-ports/ xenial-proposed main
multiverse restricted universe
deb http://mirrors.ustc.edu.cn/ubuntu-ports/ xenial-security main multiverse
restricted universe
deb http://mirrors.ustc.edu.cn/ubuntu-ports/ xenial-updates main multiverse
restricted universe
deb-src http://mirrors.ustc.edu.cn/ubuntu-ports/ xenial main multiverse
restricted universe
deb-src http://mirrors.ustc.edu.cn/ubuntu-ports/ xenial-backports main
multiverse restricted universe
deb-src http://mirrors.ustc.edu.cn/ubuntu-ports/ xenial-proposed main
multiverse restricted universe
deb-src http://mirrors.ustc.edu.cn/ubuntu-ports/ xenial-security main
multiverse restricted universe
deb-src http://mirrors.ustc.edu.cn/ubuntu-ports/ xenial-updates main
multiverse restricted universe
Note: xenial is the version of the code name in this source, if the other version of Ubuntu
needs to replace the corresponding version code which can be found on the internet.
www.orangepi.org www.xunlong.tv
Page 22

Orange Pi 2G-IOT User Manual Copy right by Shenzhen Xunlong Software Co., Ltd
20
3) Enter the system via SSH
4) Modify the size of ext4 file system
a. Expand file system
b. Shrink file system
You could refer to the previous charter 5. 2)Use SSH to connect Wifi.
It could promote system performance via expanding the rootfs partitions of file
system after writing image, which could avoid the problems caused by insufficient space.
Expanding rootfs partitions on TF card of PC:
Using GParted to adjust the size:
Select the specified letter, right-click the corresponding letter, select "change the
size" to adjust into the desired size, click "adjust the size", close the dialog box and click
"apply to all operations", select the "apply" to complete the expansion operation.
i. Boot to Linux, umount /dev/sdb1 and /dev/sdb2, if it prompts disk busy, then
use fuser to clean the using disk(we will recommend using another Linux booting
disk to lead the system).
ii. Use fdisk /dev/sdb to adjust the partition size, after into it, enter p, and keep in
mind about the initial position of needed extending size partition.
iii. Enter d to delete the partition need to change the size(my file system is
/dev/sdb2, which is the 2 partition ).
vi. Enter n to build a new partition, make sure the initial position is the same as
you deleted, and enter the number as you desire.
v. Enter w to save the partition data.
vi. Use the following command to check the file system(make sure it is a right
file system)
e2fsck -f /dev/sdb2
vii. Adjust the partition size
resize2fs /dev/sdb2
viii. It could mount a disk partition, you could check whether it has changed.
i. Boot to Linux, umount /dev/sdb1 and /dev/sdb2, if it prompts disk busy, then
use fuser to clean the using disk(we will recommend using another Linux booting
disk to lead the system).
ii. Use the following command to check the file system(make sure it is a right file
system)
e2fsck -f /dev/sdb2
iii. Modify the size of file system(Use resize2fs)
resize2fs /dev/sdb2 900M
The "s"after the number represents specifying the size of file system via the
sectors(every sector calculated by 512 bite). You could also specify it into K(KB),
M(MB), G(GB), etc.
vi. Use fdisk /dev/sdb to adjust the partition size, after into it, enter p, and keep
in mind about the initial position of needed extending size partition. You need to
www.orangepi.org www.xunlong.tv
Page 23
Orange Pi 2G-IOT User Manual Copy right by Shenzhen Xunlong Software Co., Ltd
21
9. Usage of GPIO and WiringPi
1) Use WiringPi on OrangePi 2G-IOT to connect network
first delete the partition then build a new one because the fdisk could not modify the
size dynamic(you need to calculate the size, it have to enough to contain the file
system adjusted in last step).
v. Enter d to delete the partition need to change the size(my file system is
/dev/sdb2, which is the 2 partition ).
vi. Enter n to build a new partition, make sure the initial position is the same as
you deleted, and enter the number as you desire. Besides, if it is boot-able partition
you want to change, note that need to keep the boot-able mark in case cannot boot.
The above illustration is using fdisk and resize2fs to modify partition and file
system, you could also use gparted. Gparted has graphical interface and it could
help you to re-size file system at the same time of re-sizing partition. Goarted is
much easier to use and reduce the change to make mistake. For now our official
Lubuntu and Raspbian could not use it.
OrangePi 2G-IOT could support WiringPi, you could have a try according to the
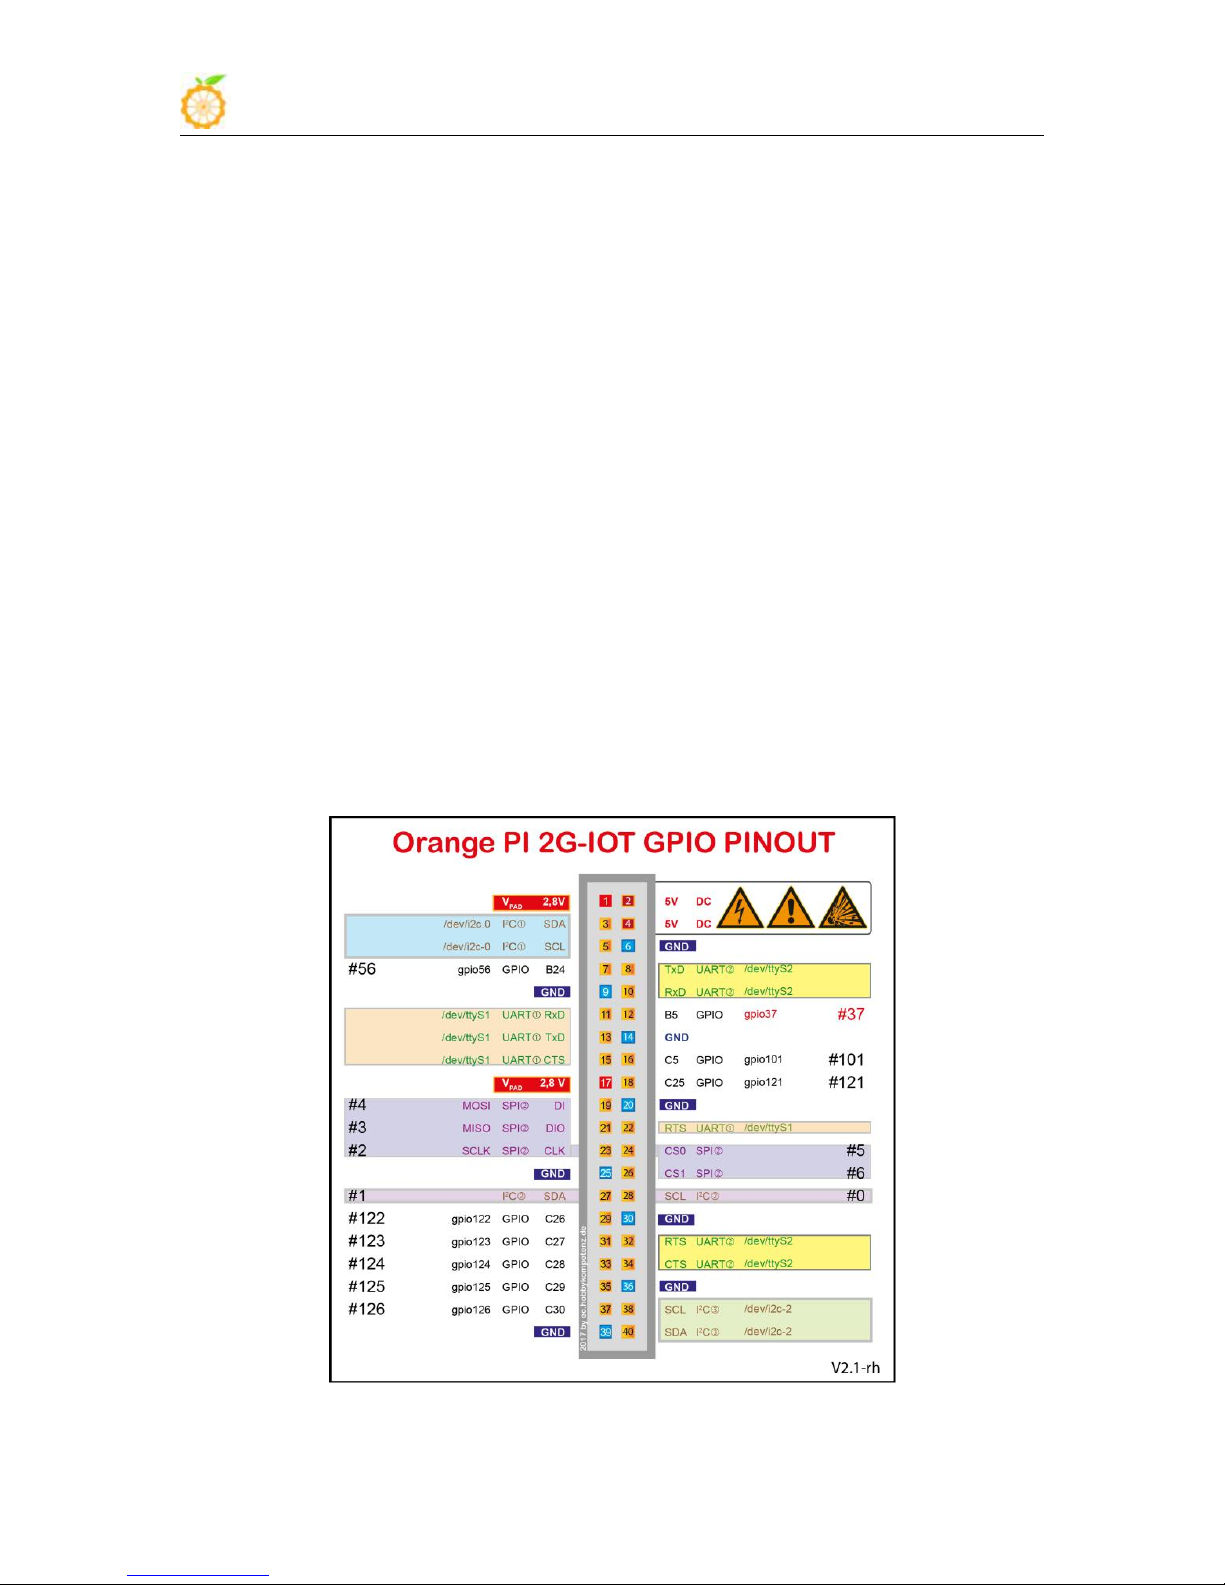
introduction on this section. The following is 40 Pin of OrangePi.
www.orangepi.org www.xunlong.tv
Page 24

Orange Pi 2G-IOT User Manual Copy right by Shenzhen Xunlong Software Co., Ltd
22
a. Download the latest WiringPi source code of Orange Pi 2G-IOT
b. Download the latest source code
c. Compile and install WiringPi
d. Test WiringPi with gpio command
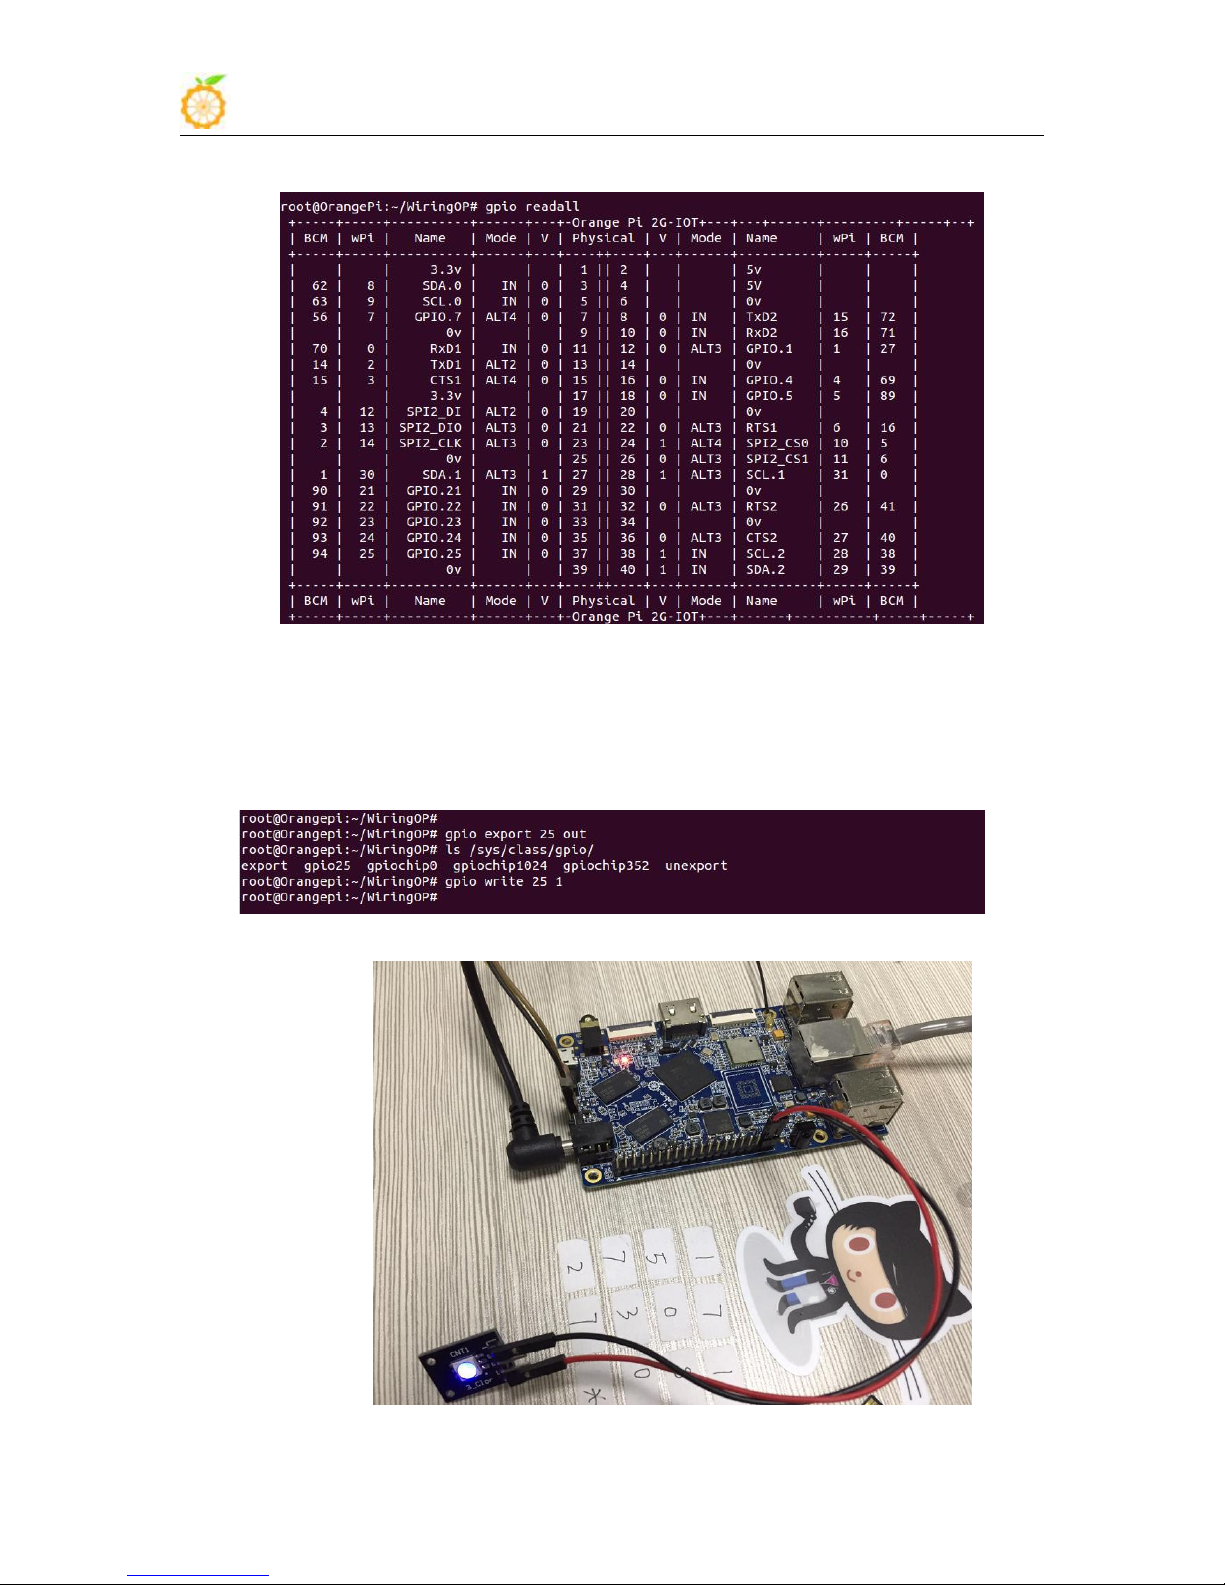
i Use "gpio readall" command to print out all WiringPi pin mapping as following.
Please confirm that the Orange Pi 2G-IOT has connect to wifi or network successfully, if
no, then you need to first make it connect to wifi or network. If you connect to network,
then you also need to install some essential tools:
sudo apt-get install git gcc make
You could download the latest WiringPi source code from official website:
www.orangepi.org
You could also download files from github:
https://github.com/OrangePiLibra/WiringPi.git with the following command:
env GIT_SSL_NO_VERIFY=true git clone
Use the following command to compile and install the WiringPi after get the latest source
code.
cd WiringOP/
./build OrangePi_2G-IOT
./build OrangePi_2G-IOT install
You could use gpio command to test GPIO on 40pin on Orange Pi 2G-IOT with WiringPi
installed.
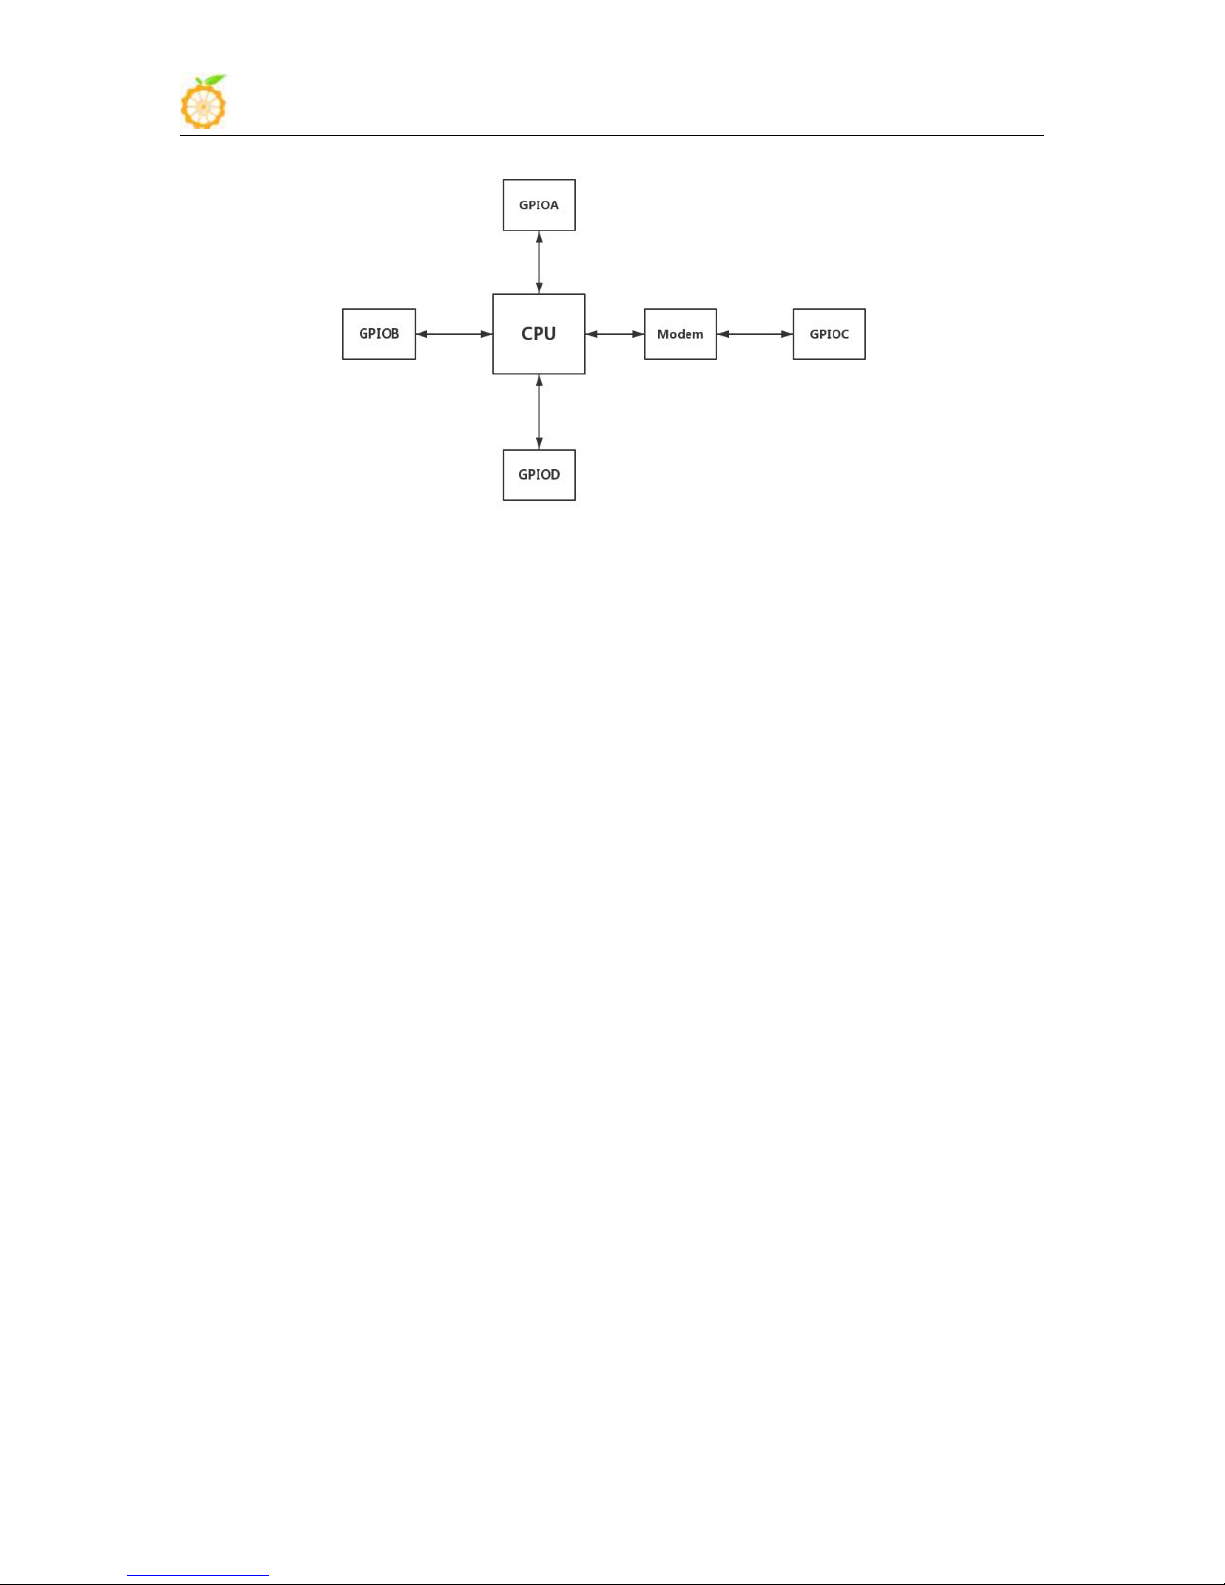
BCM line represents the actual hardware GPIO, there are 4 Groups GPIO and each
Group have 32pins, and the serial number start from Group PA. PA0 corresponds to BCM
colum number 0.
wPi line represents pins of wiringPi, you could use this group of data when use C library
and gpio command on wiringPi. For example, number 37 pin is corresponding to number
25 pin of wiringPi, you could operate the 37 via operating 25pin.
Name line represents the definition name of Pin.
Mode line represents the mode of pin, it could but both input and output.
V line represents the voltage value of the current pin.
Physical line represents the actual hardware number.
www.orangepi.org www.xunlong.tv
Page 25
Orange Pi 2G-IOT User Manual Copy right by Shenzhen Xunlong Software Co., Ltd
23
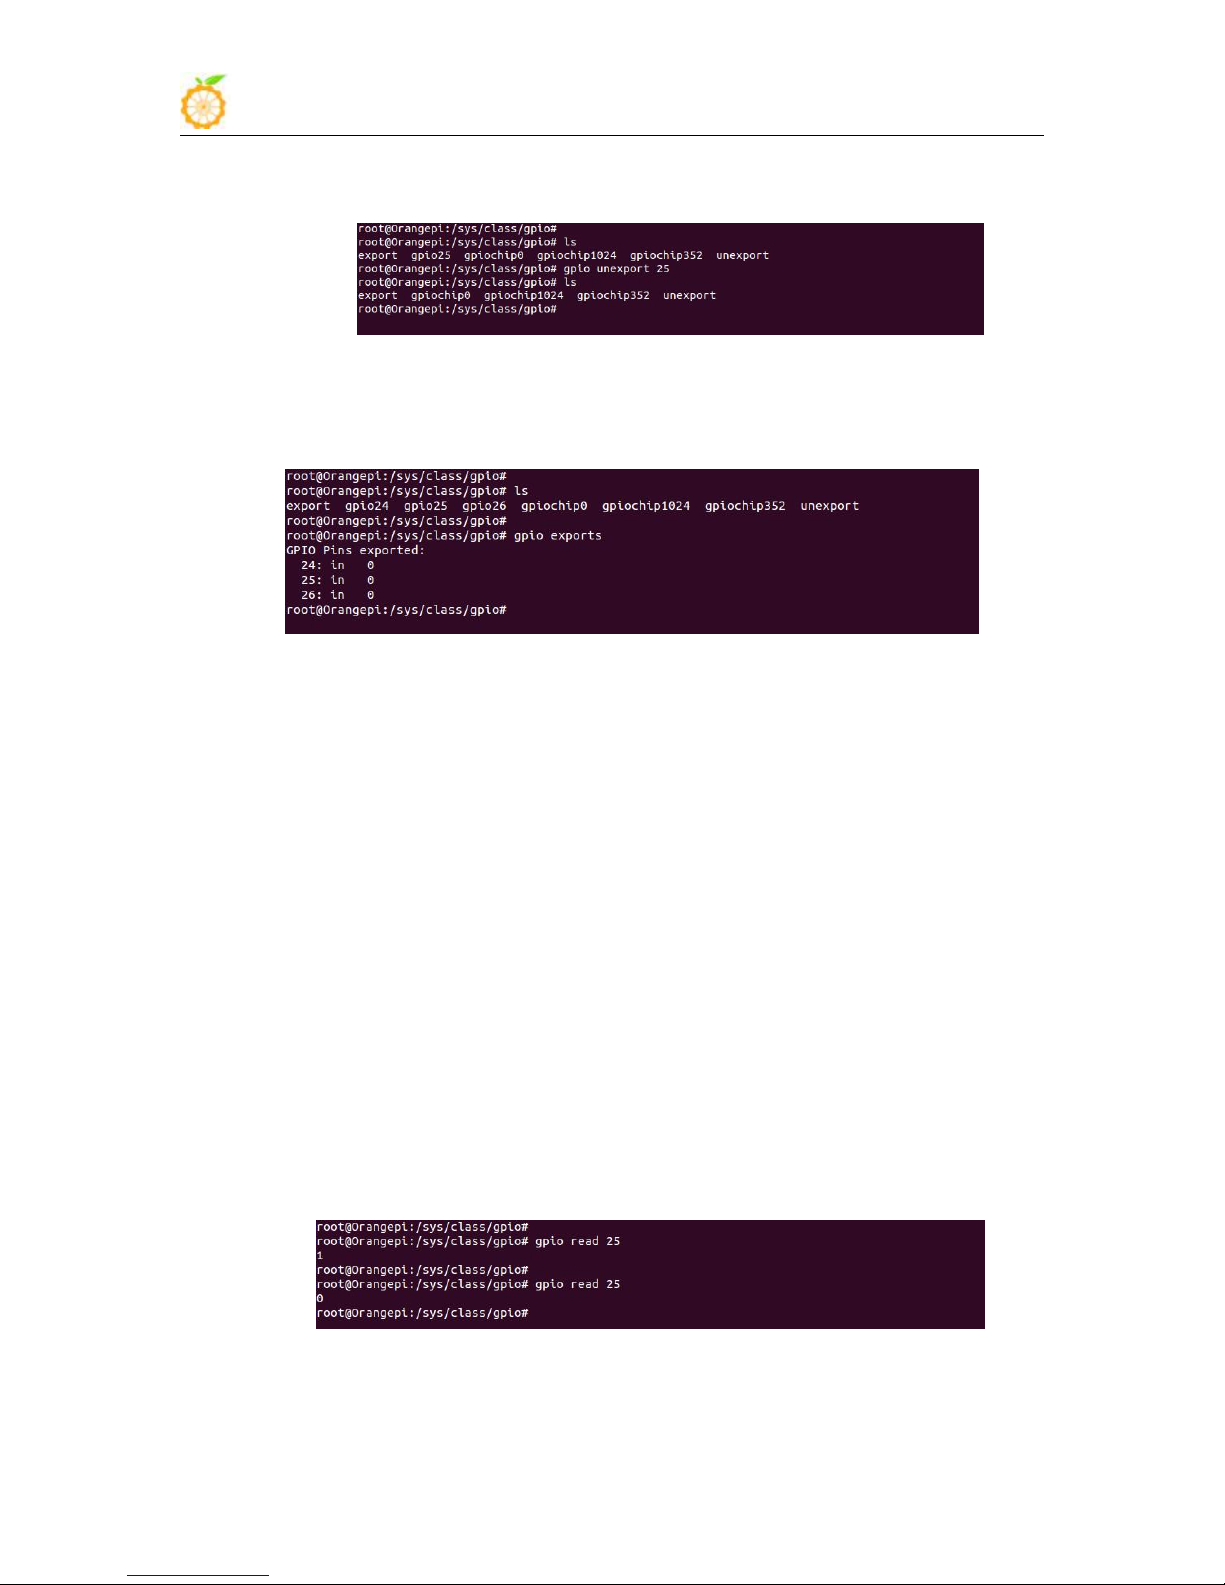
ii Use "gpio export pin mode" to explore wiringPi GPIO to the directory of
iii Use "gpio unexport pin" to cancel explore pin to /sys/class/gpio. For example:
/sys/class/gpio and set the GPIO mode into mode.
According to the above WiringPi pin mapping, hardware pin number 37 is corresponding
to WiringPi pin number GPIO 25, explore the number 25 and set it into output mode.
www.orangepi.org www.xunlong.tv
Page 26
Orange Pi 2G-IOT User Manual Copy right by Shenzhen Xunlong Software Co., Ltd
24
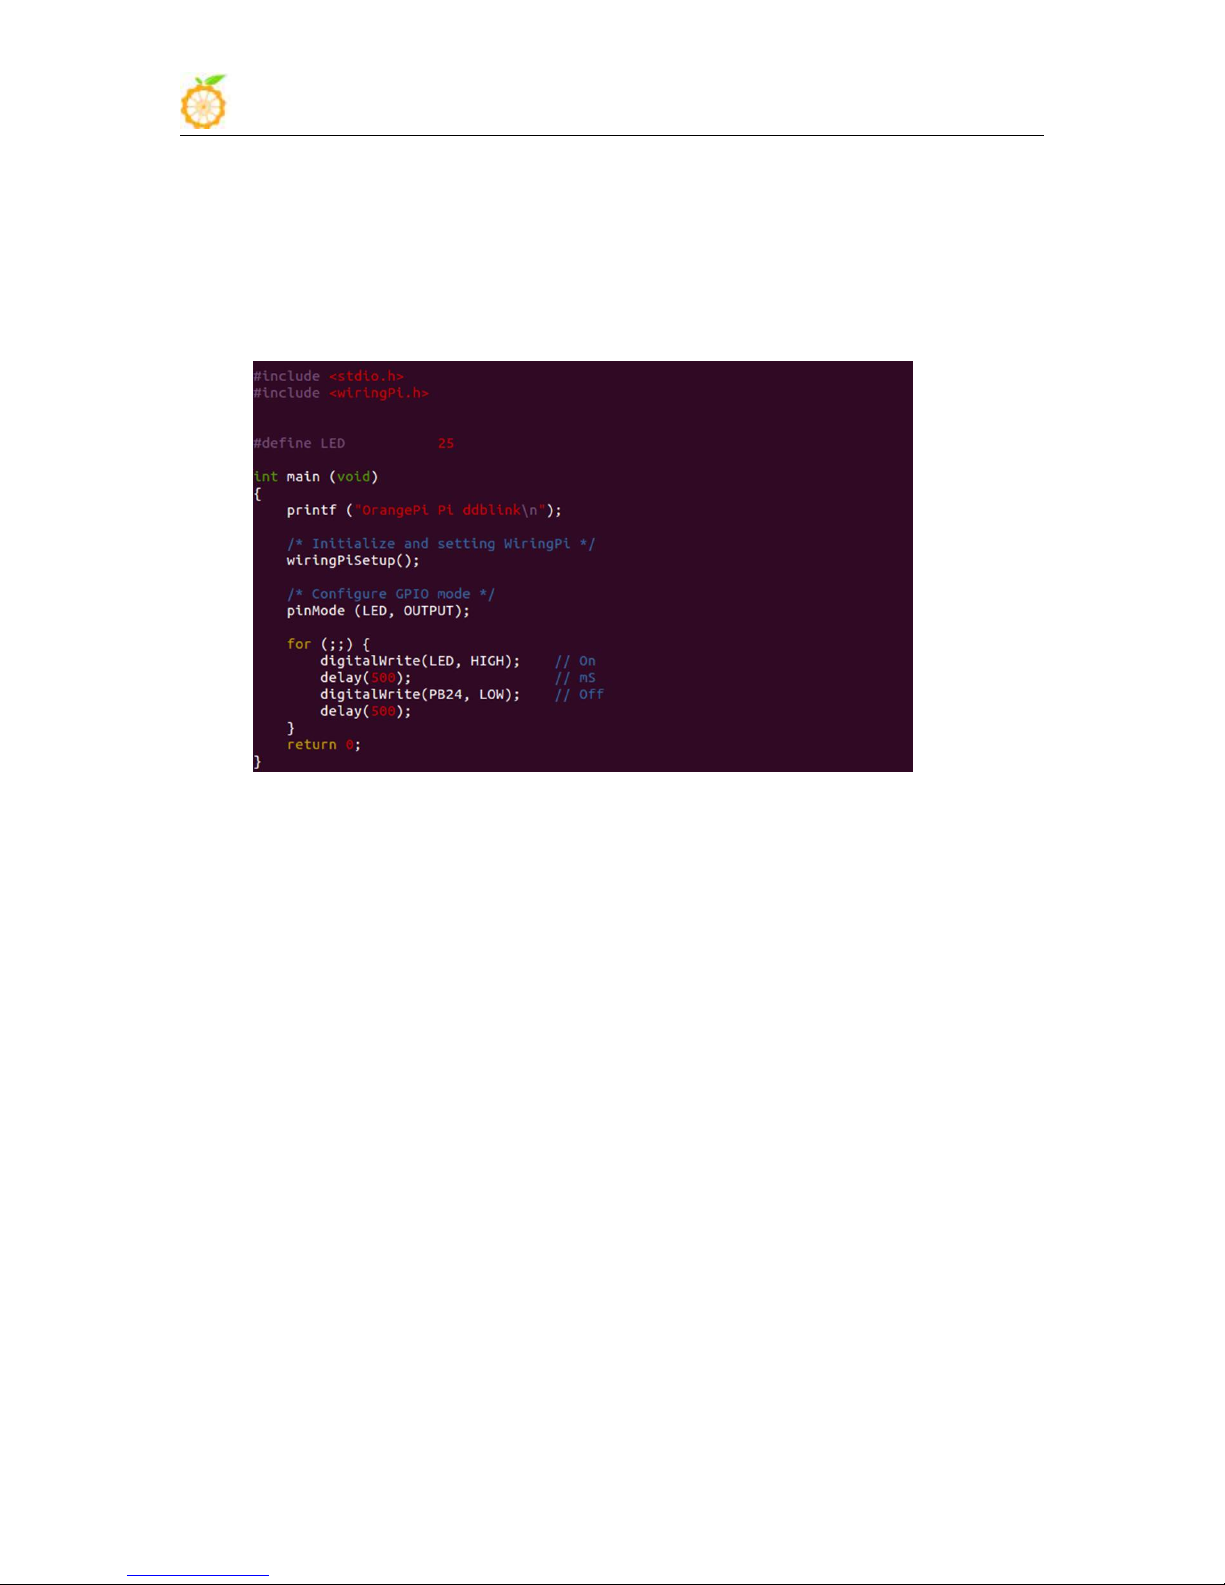
iv Use "gpio exports" to check the current explored gpio. For expample:
v Use "gpio mode pin mode" command to configure wiringPi pin mode. For example:
vi. Use "gpio write pin value" to write value of output mode pin, for example:
vii. Use "gpio read pin" command to read the value of input mode pin, for example:
viii. If you want to learn more "gpio" command, you could refer to "gpio -h" obtain.
orangepi# gpio unexport 25
orangepi# gpio exports
Configure pin wiringPi 25 as output mode
orangepi# gpio mode 25 out
Configure pin wiringPi 26 as input mode
orangepi# gpio mode 26 in
Configure pin wiringPi 25 as output pin
orangepi# gpio mode 25 out
Write 0 on wiringPi 25
orangepi# gpio write 25 0
Write 1 wiringPi 25
orangepi# gpio write 25 1
Configure pin wiringPi 25 as input pin
orangepi# gpio mode 25 in
read the value from wiringPi 25
orangepi# gpio read 25
:
www.orangepi.org www.xunlong.tv
Page 27
Orange Pi 2G-IOT User Manual Copy right by Shenzhen Xunlong Software Co., Ltd
25
e. Use WiringPi C Library
10. Connect to Network via GSM
1) Use 2G-IOT to send message
i. Prepare
WiringPi support C library and python library, you could use C language to
operation GPIO port, the example source code is on the directory of /example/OrangePi/.
Here is an example for C library usage on GPIO:
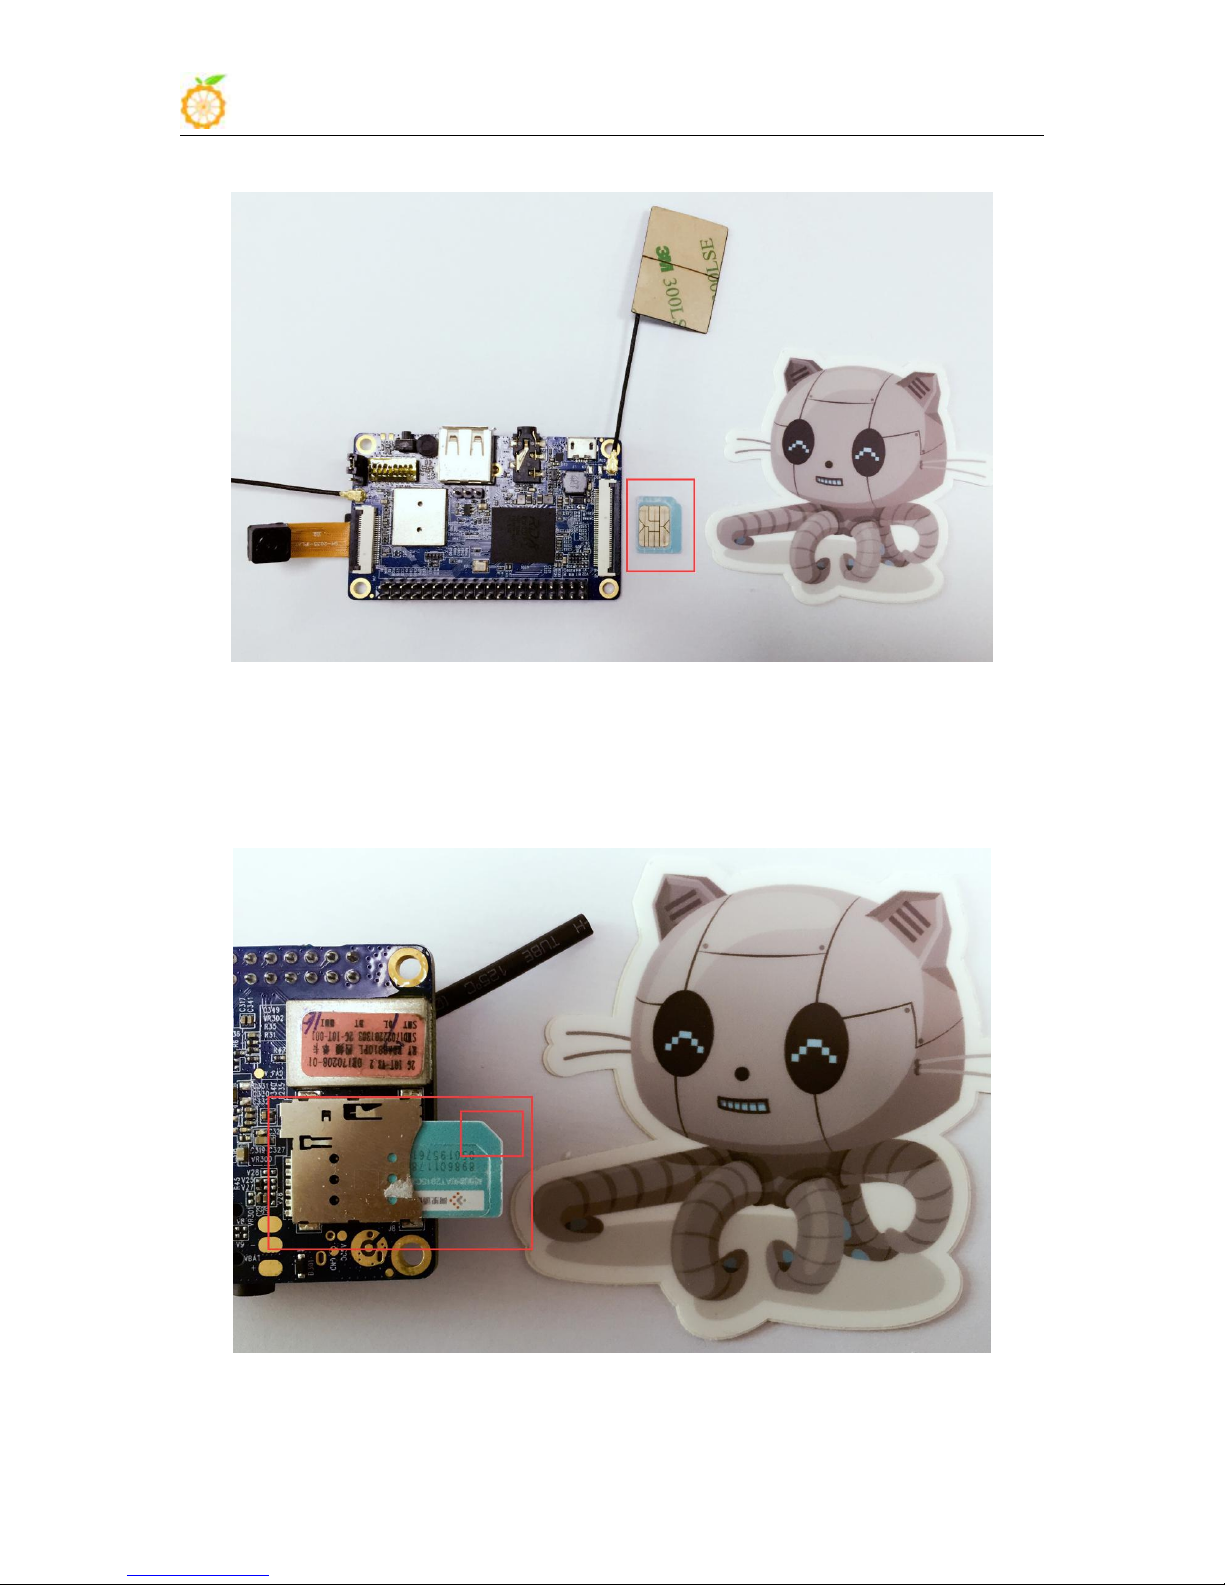
Complie GPIO LED
Usage of C library on wiringPi:
In order to use wiringPi C library, first you need to import file of "wiringPi.h". You
need to initialize wiringPi before using GPIO with function wiringPiSetup(). And then
you could configure pin mode into INPUT or OUTPUT. And please note that the pin
number should corresponding to wiringPi. Finally you could use function digitalWrite()
and digitalRead() to read and write.
For now the version of Ubuntu,Debian and Raspbian could support SMS sending
message. Before using the SMS function, please make sure the SIM card you use is
active.
First you need to prepare an activated Micro SIM card and insert into Orange Pi
2G-IOT, the Orange PI 2G-IOT could support the following frequency:
Frequency Range:850,900,1800,1900
Standard: GSM800
www.orangepi.org www.xunlong.tv
Page 28
Orange Pi 2G-IOT User Manual Copy right by Shenzhen Xunlong Software Co., Ltd
26
ii. Install SIM card
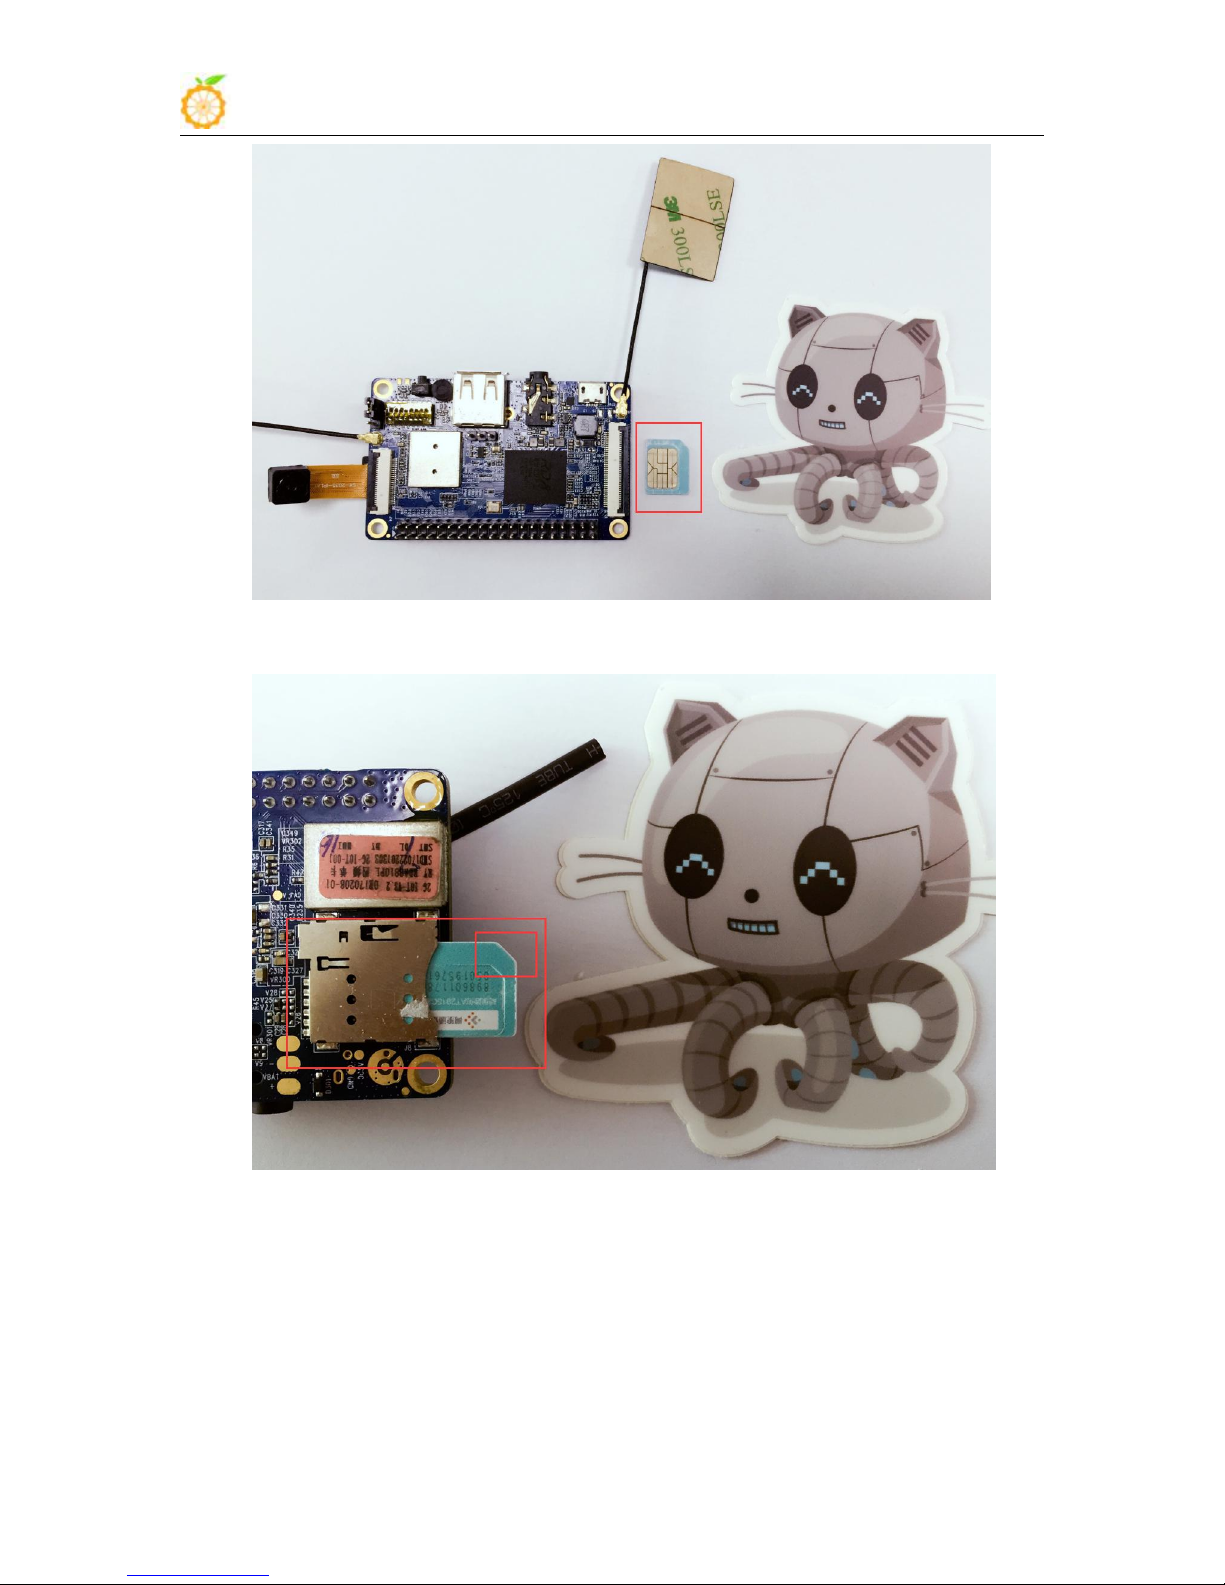
Please note the direction of when inserting SIM card.
www.orangepi.org www.xunlong.tv
Page 29
Orange Pi 2G-IOT User Manual Copy right by Shenzhen Xunlong Software Co., Ltd
27
iii. Login Linux system
iv. SMS Usage
a. With Serial Port
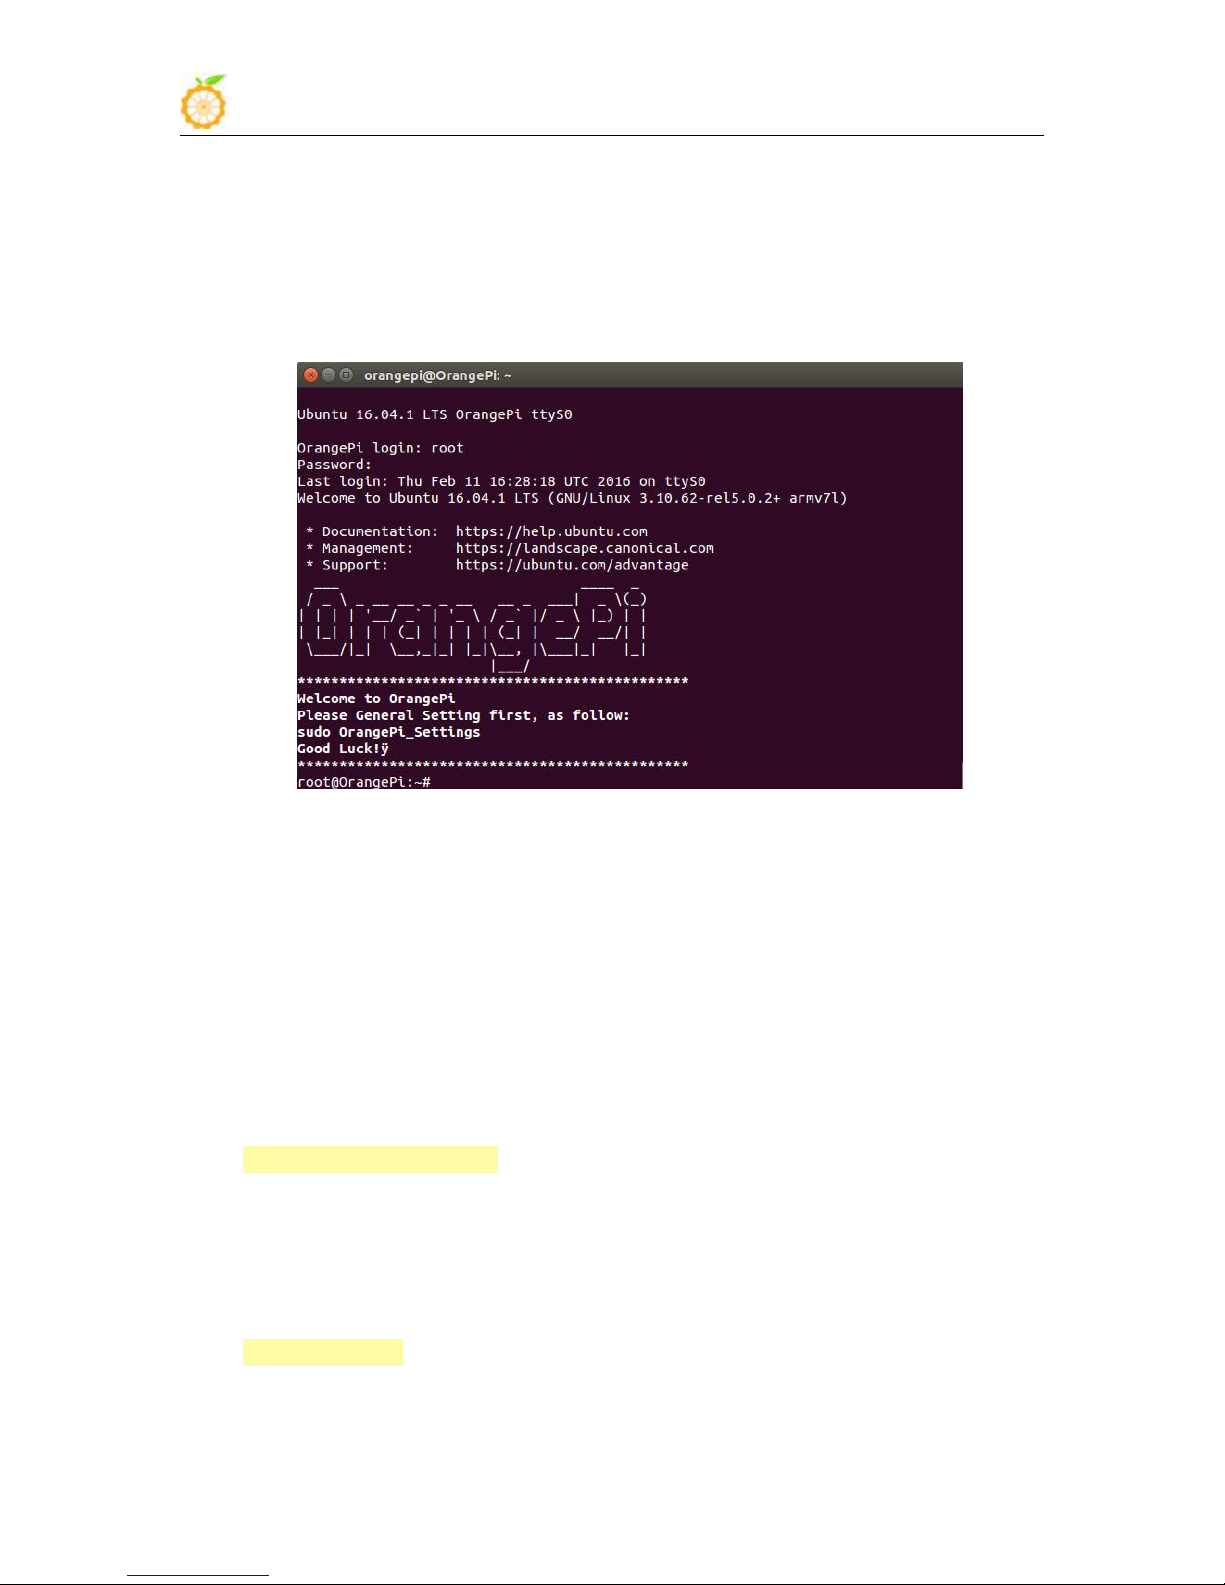
After inserting SIM card, power on and enter into Linux system. You could login the
system via serial port or SSH. If you are going to use serial port to login, please be
remember to set the baud rate into 921600.
There are many ways to use SMS, here will introduce the way with serial port and C
language.
You need to install the tool of minicom on Orange Pi 2G-IOT before using SMS. Please
make sure the board has already connect to wifi.
You could install minicom with the following command:
sudo apt-get install minico
The AP core and Modem will communicate via serial port. There will be a modem0 node
after booting into Linux system. You could use serial port tool to connect to the
/dev/modem0 node, which we recommend you use minicom, you could also try other
tools.
If you are using the minicom or other tools on serial port, please refer to the following:
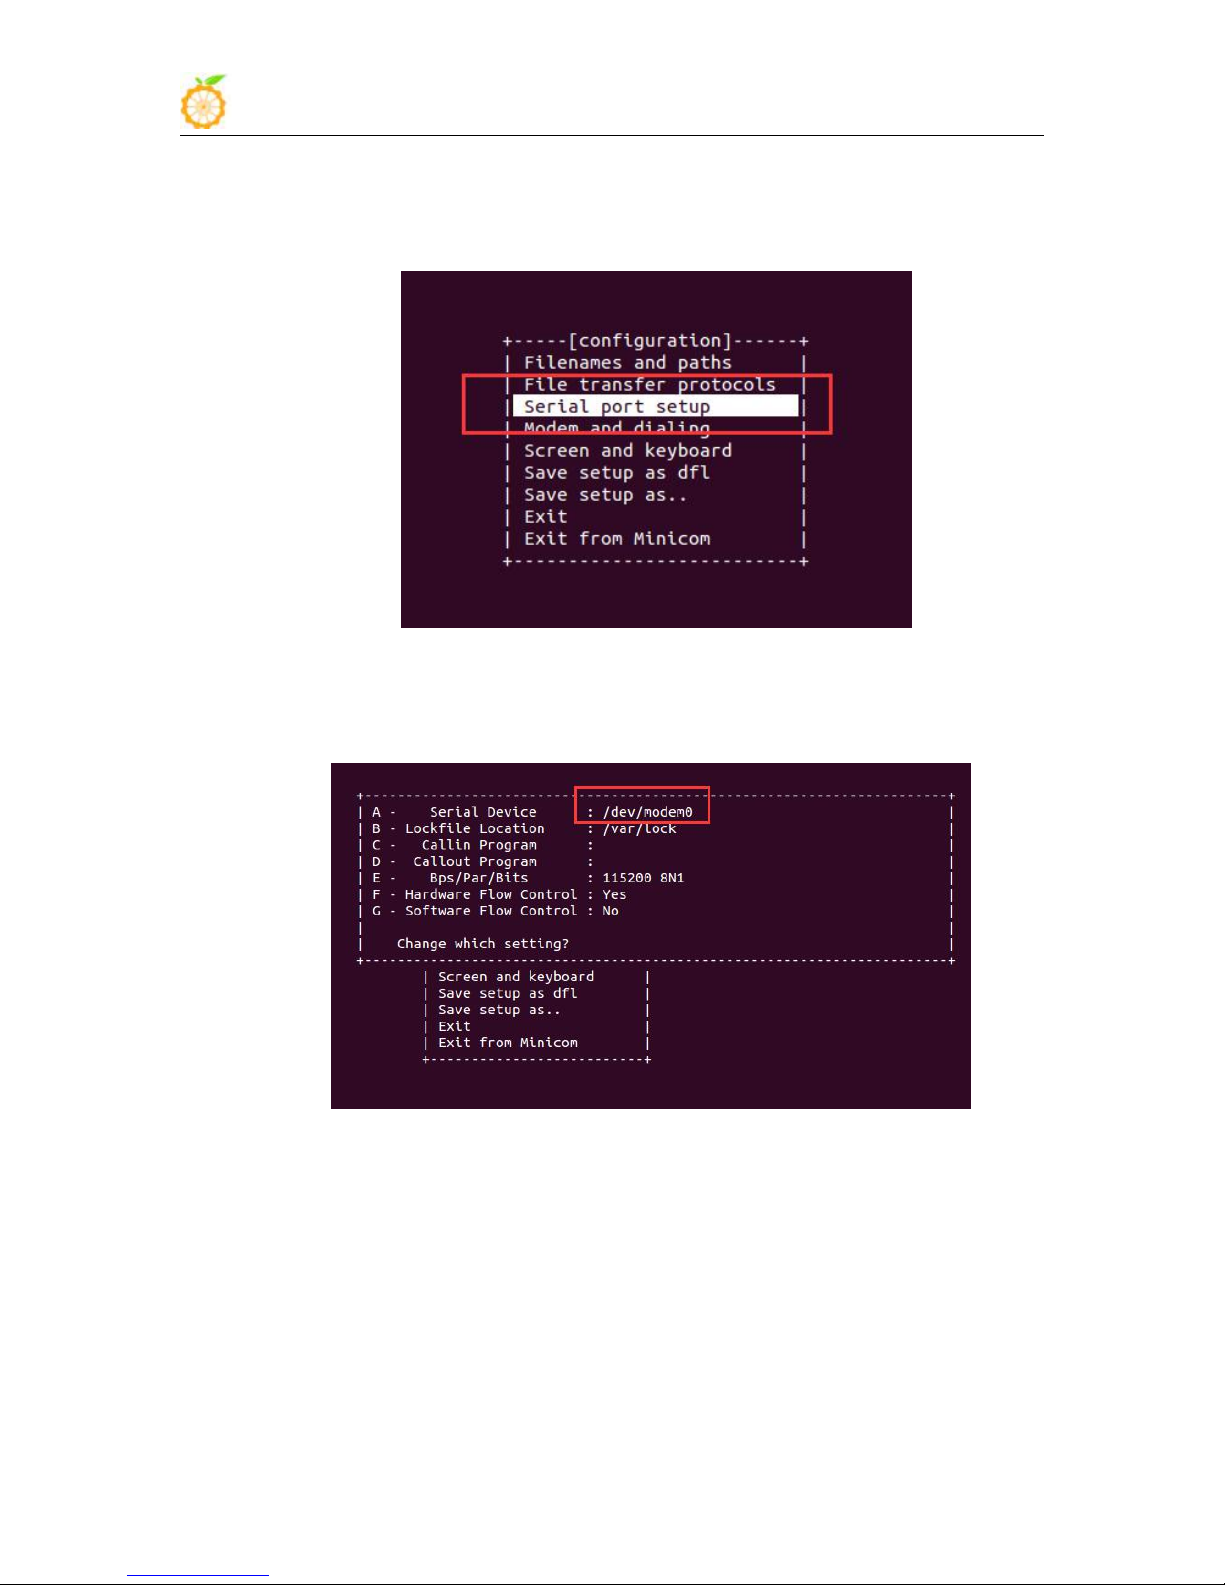
You could configure with the following command to connect /dev/modem0:
sudo minicmo -s
www.orangepi.org www.xunlong.tv
Page 30
Orange Pi 2G-IOT User Manual Copy right by Shenzhen Xunlong Software Co., Ltd
28
After input the command, you will enter the configure interface, select "Serial port
setup"
Push A to modify Serial Device into /dev/modem0
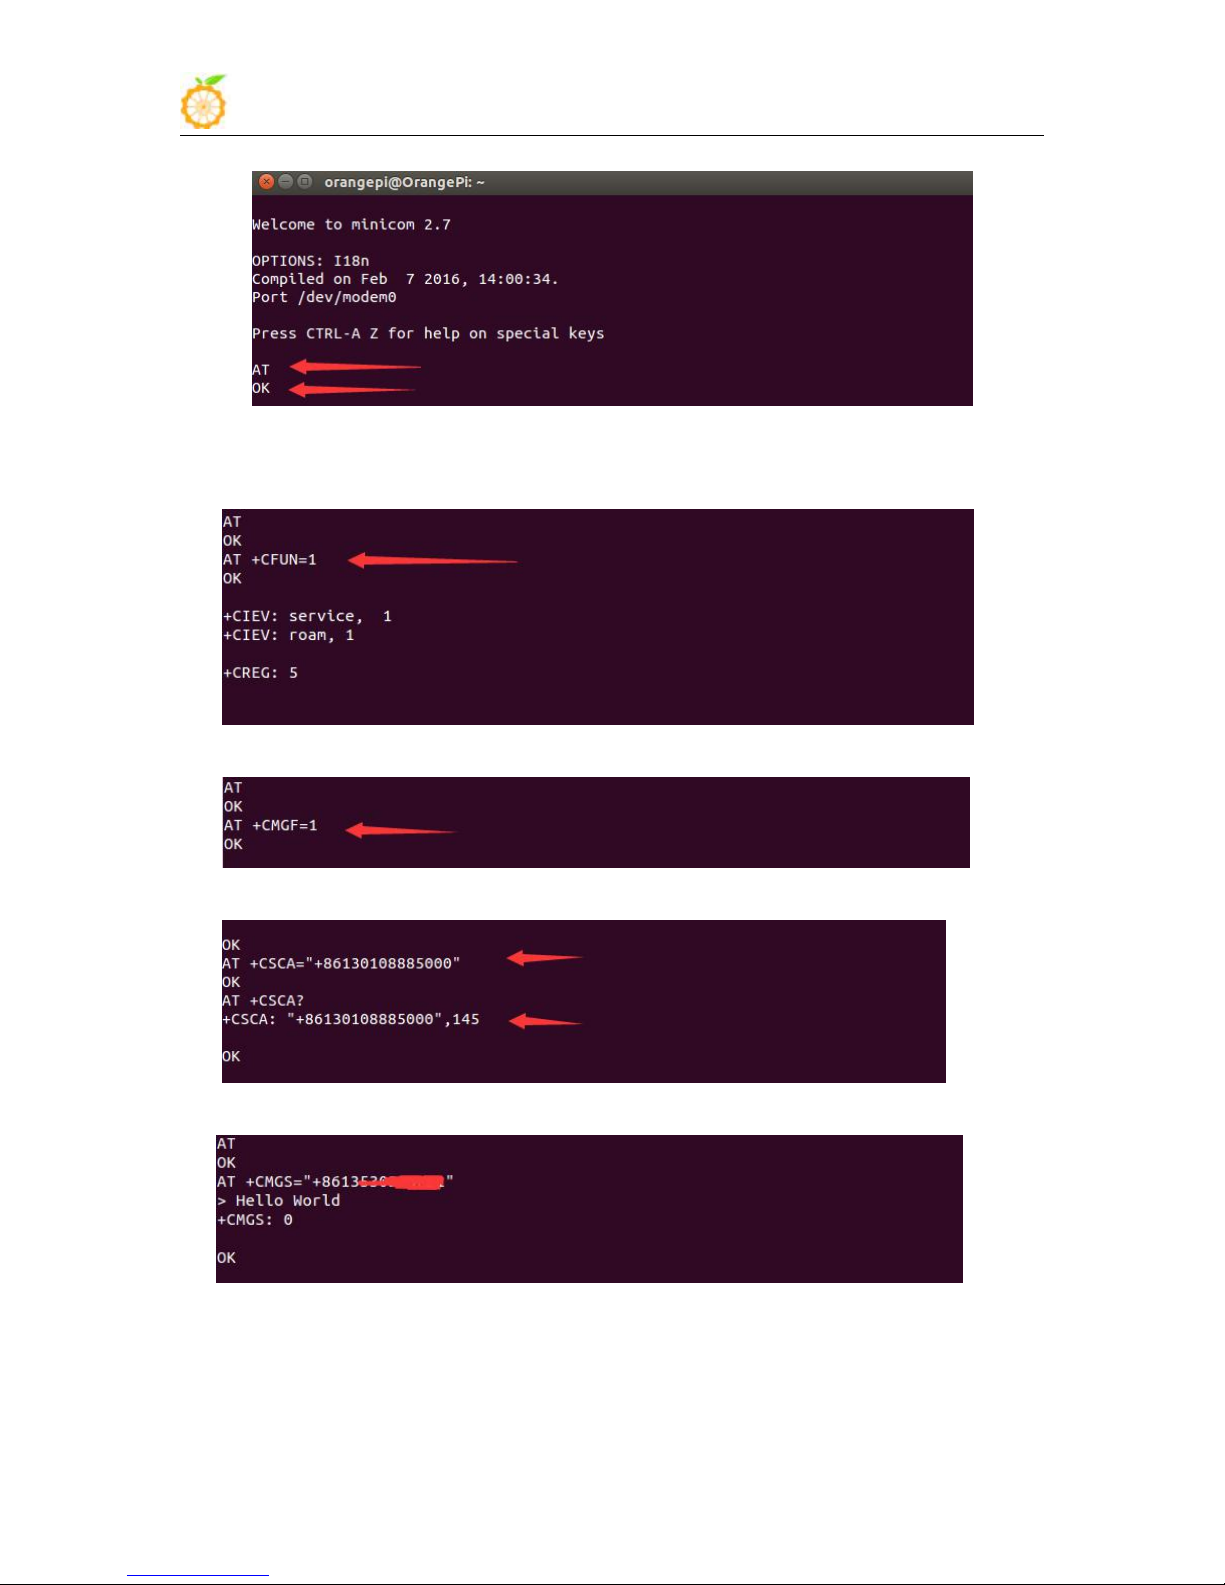
Use AT command to send message
First you need to input AT command to check the situation of Modem, if Modem replies
OK, then means Modem is connect correctly.
www.orangepi.org www.xunlong.tv
Page 31
Orange Pi 2G-IOT User Manual Copy right by Shenzhen Xunlong Software Co., Ltd
29
Input command of AT +cfun=1 to open Modem full function
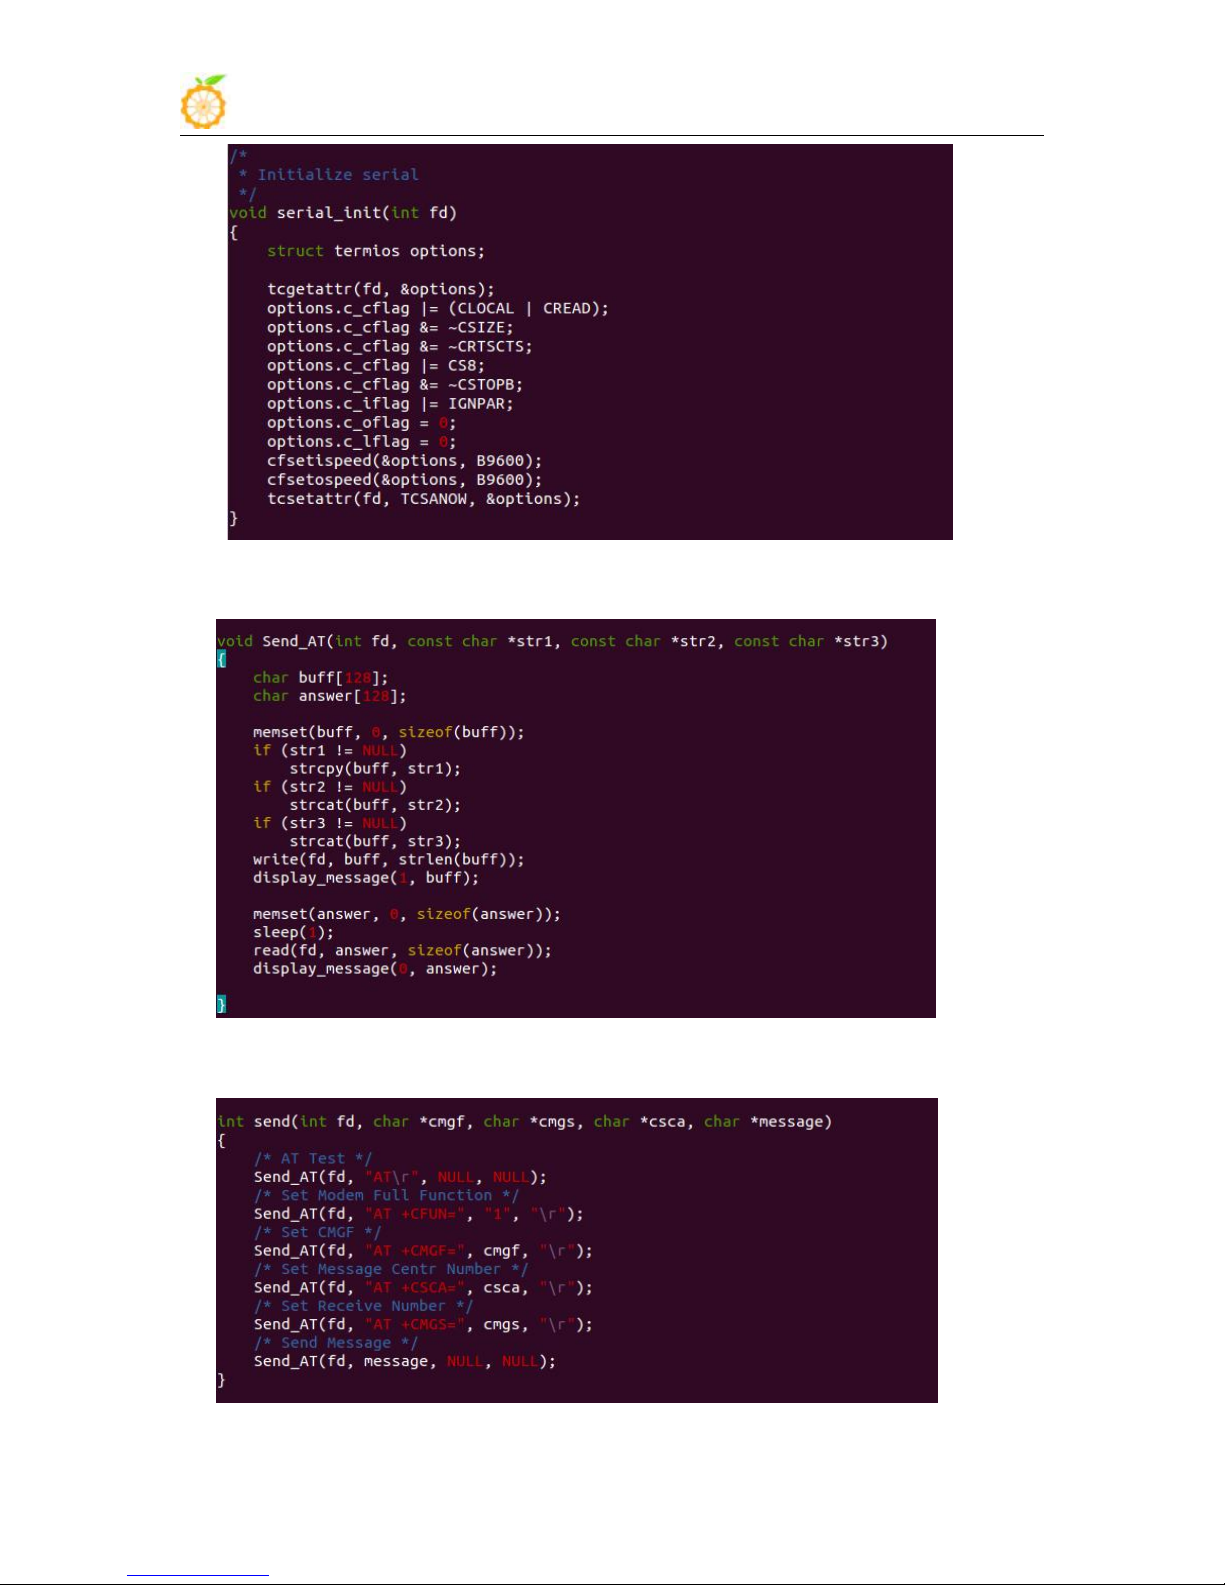
Initialize serial port:
www.orangepi.org www.xunlong.tv
Page 32
Orange Pi 2G-IOT User Manual Copy right by Shenzhen Xunlong Software Co., Ltd
30
Send AT command function
AT send message
www.orangepi.org www.xunlong.tv
Page 33
Orange Pi 2G-IOT User Manual Copy right by Shenzhen Xunlong Software Co., Ltd
31
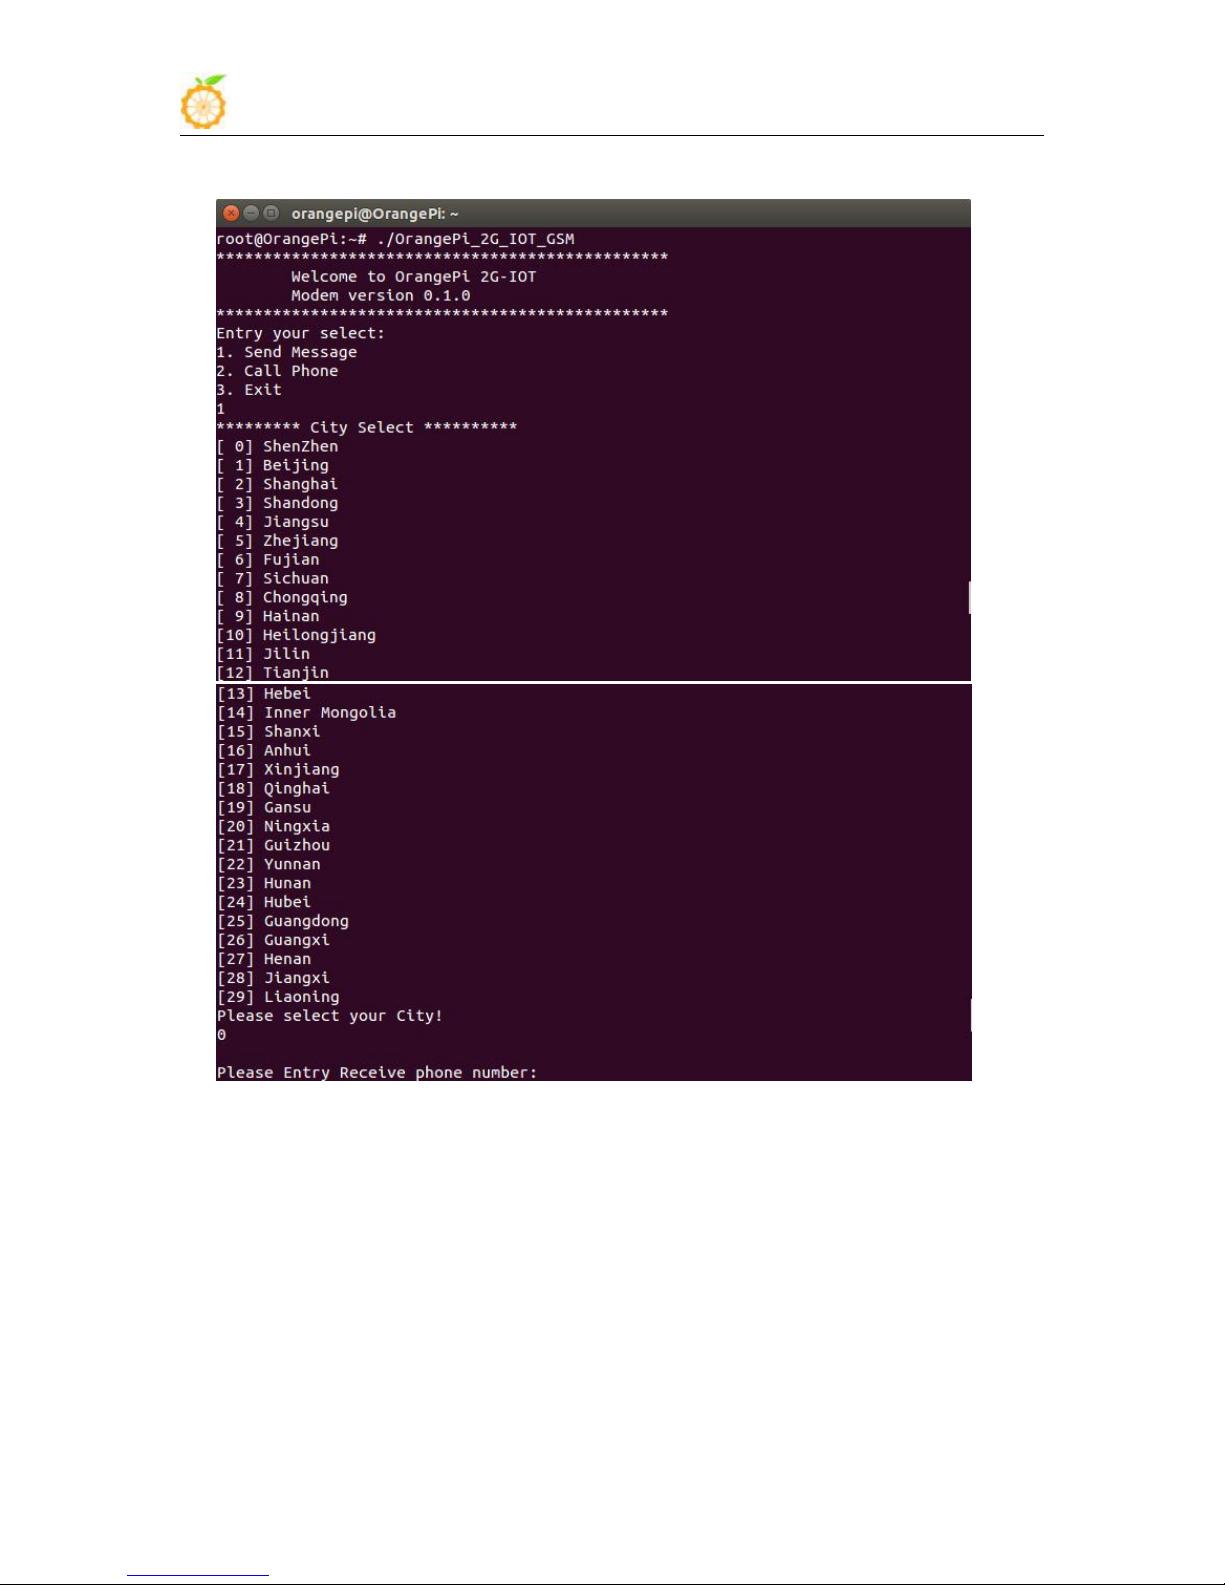
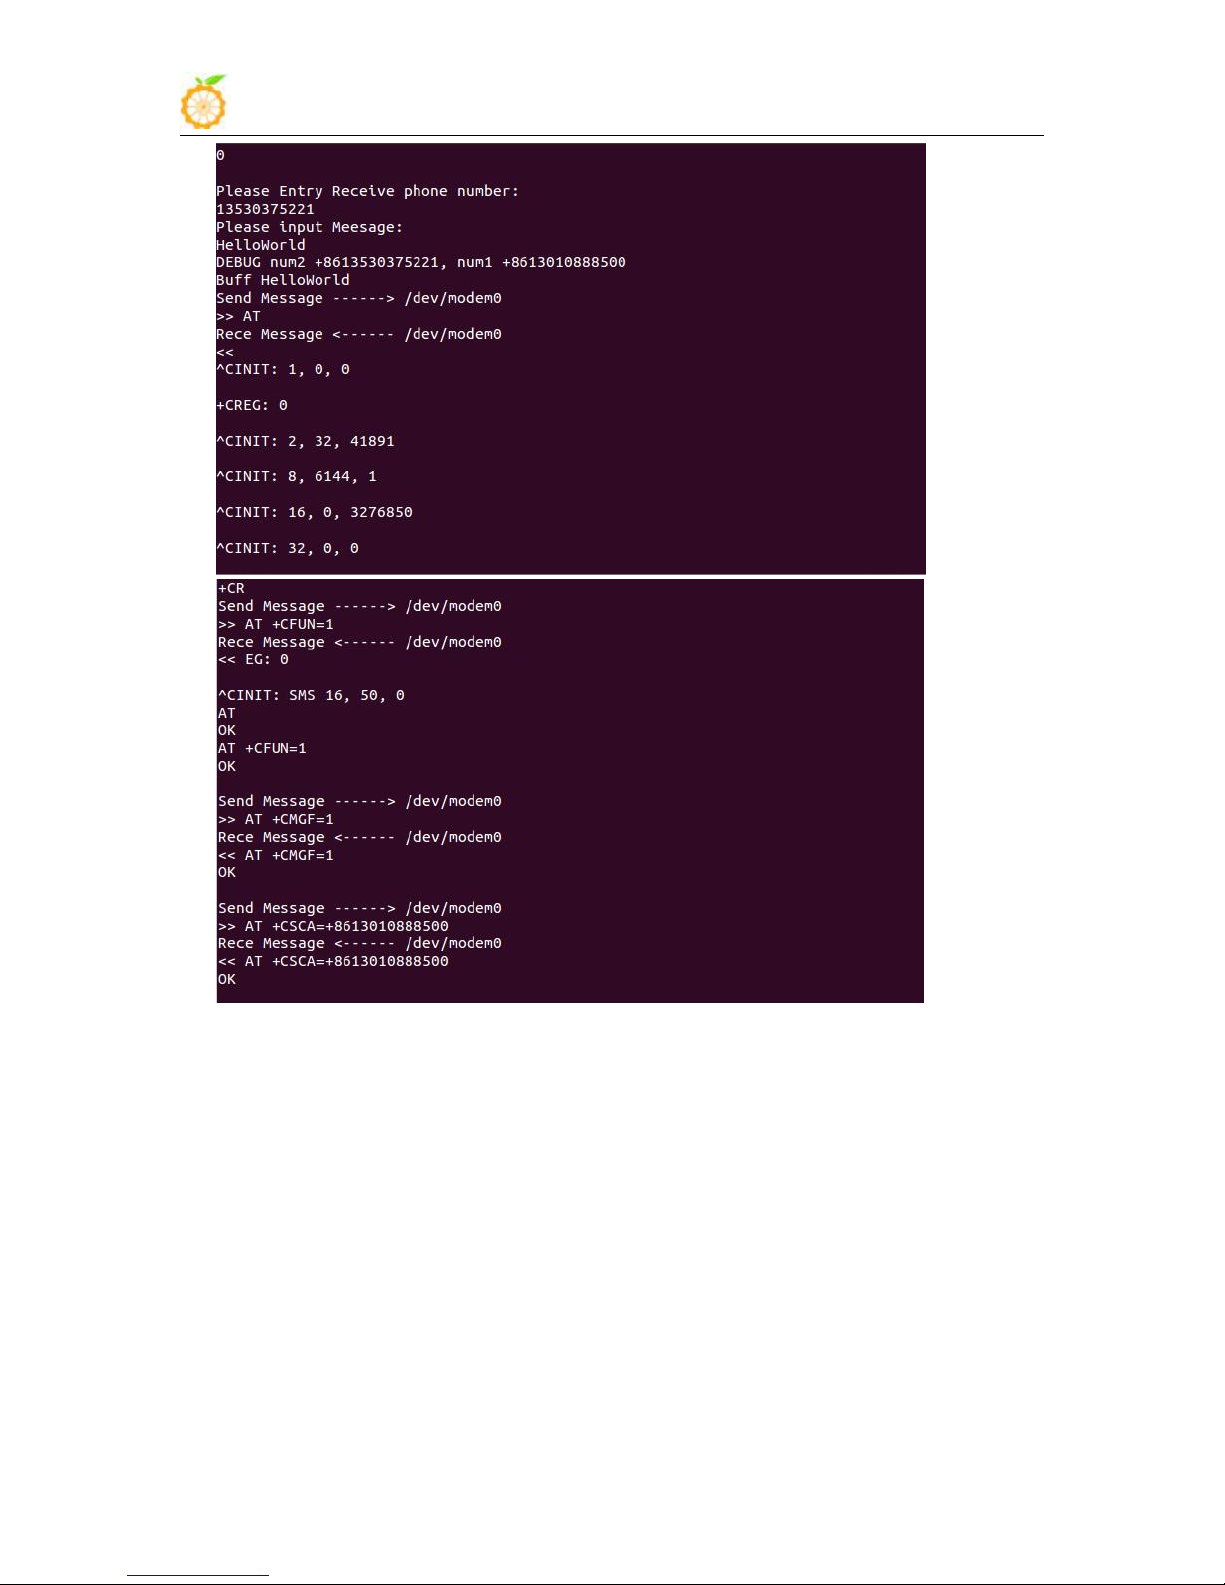
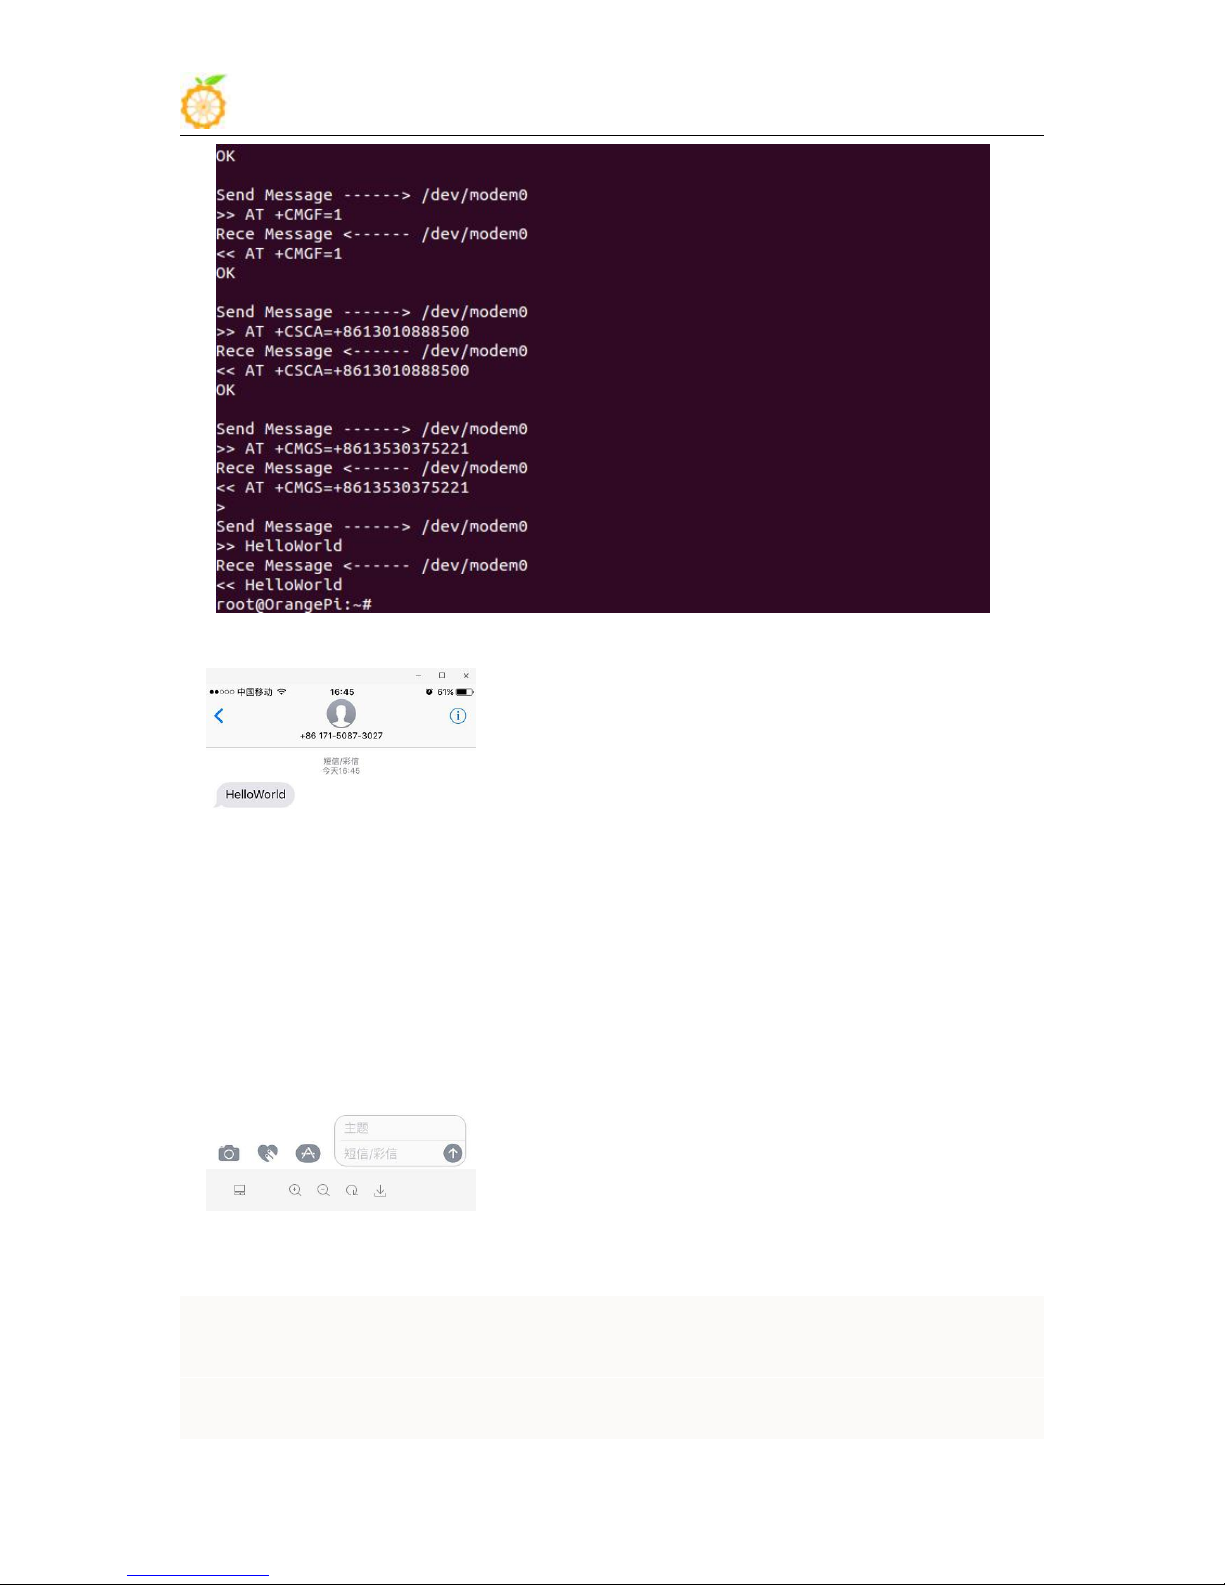
Detail steps you could refer to the following: “OrangePi_2G_IOT_GSM_Demo.c”
Here is the reflect of running C:
www.orangepi.org www.xunlong.tv
Page 34
Orange Pi 2G-IOT User Manual Copy right by Shenzhen Xunlong Software Co., Ltd
32
www.orangepi.org www.xunlong.tv
Page 35
Orange Pi 2G-IOT User Manual Copy right by Shenzhen Xunlong Software Co., Ltd
33
OrangePi_2G_IOT_GSM_Demo.c
Finally you will receive the message from OrangePi 2G-IOT
/*
* OrangePi 2G-IOT GSM Demo
* (C) Copyright 2017 OrangePi
*/
#include <stdio.h>
#include <stdlib.h>
#include <unistd.h>
www.orangepi.org www.xunlong.tv
Page 36

Orange Pi 2G-IOT User Manual Copy right by Shenzhen Xunlong Software Co., Ltd
34
#include <fcntl.h>
#include <string.h>
#include <termios.h>
#include <sys/types.h>
#include <sys/stat.h>
#define NR_CITY 30
#define MODEM_PATH "/dev/modem0"
#define VERSION "0.1.0"
struct Centry_number {
char *city;
char *number;
} City_Number[NR_CITY] = {
{ "ShenZhen", "13010888500" },
{ "Beijing", "13010112500" },
{ "Shanghai", "13010314500" },
{ "Shandong", "13010171500" },
{ "Jiangsu" , "13010341500" },
{ "Zhejiang", "13010360500" },
{ "Fujian", "13010380500" },
{ "Sichuan", "13010811500" },
{ "Chongqing", "13010831500" },
{ "Hainan" , "13010501500" },
{ "Heilongjiang", "13010980500" },
{ "Jilin", "13010911500" },
{ "Tianjin", "13010130500" },
{ "Hebei", "13010180500" },
{ "Inner Mongolia", "13010950500" },
{ "Shanxi", "13010701500" },
{ "Anhui", "13010305500" },
{ "Xinjiang", "13010969500" },
{ "Qinghai", "13010776500" },
{ "Gansu", "13010879500" },
{ "Ningxia", "13010796500" },
{ "Guizhou", "13010788500" },
{ "Yunnan", "13010868500" },
{ "Hunan", "13010731500" },
{ "Hubei", "13010710500" },
{ "Guangdong", "13010200500" },
{ "Guangxi", "13010591500" },
{ "Henan", "13010761500" },
{ "Jiangxi", "13010720500" },
{ "Liaoning", "13010240500"},
};
/*
* Initialize serial
*/
void serial_init(int fd)
{
struct termios options;
tcgetattr(fd, &options);
options.c_cflag |= (CLOCAL | CREAD);
options.c_cflag &= ~CSIZE;
options.c_cflag &= ~CRTSCTS;
options.c_cflag |= CS8;
options.c_cflag &= ~CSTOPB;
options.c_iflag |= IGNPAR;
options.c_oflag = 0;
options.c_lflag = 0;
cfsetispeed(&options, B9600);
www.orangepi.org www.xunlong.tv
Page 37

Orange Pi 2G-IOT User Manual Copy right by Shenzhen Xunlong Software Co., Ltd
35
cfsetospeed(&options, B9600);
tcsetattr(fd, TCSANOW, &options);
}
void display_message(int direction, const char *message)
{
if (direction) {
printf("Send Message ------> %s\n", MODEM_PATH);
printf(">> %s\n", message);
} else {
printf("Rece Message <------ %s\n", MODEM_PATH);
printf("<< %s\n", message);
}
}
void Send_AT(int fd, const char *str1, const char *str2, const char *str3)
{
char buff[128];
char answer[128];
memset(buff, 0, sizeof(buff));
if (str1 != NULL)
strcpy(buff, str1);
if (str2 != NULL)
strcat(buff, str2);
if (str3 != NULL)
strcat(buff, str3);
write(fd, buff, strlen(buff));
display_message(1, buff);
memset(answer, 0, sizeof(answer));
sleep(1);
read(fd, answer, sizeof(answer));
display_message(0, answer);
}
int send(int fd, char *cmgf, char *cmgs, char *csca, char *message)
{
/* AT Test */
Send_AT(fd, "AT\r", NULL, NULL);
/* Set Modem Full Function */
Send_AT(fd, "AT +CFUN=", "1", "\r");
/* Set CMGF */
Send_AT(fd, "AT +CMGF=", cmgf, "\r");
/* Set Message Centr Number */
Send_AT(fd, "AT +CSCA=", csca, "\r");
/* Set Receive Number */
Send_AT(fd, "AT +CMGS=", cmgs, "\r");
/* Send Message */
Send_AT(fd, message, NULL, NULL);
}
int Send_Message(int fd)
{
char buff[128];
char num1[64];
char num2[64];
int i;
int choice;
printf("********* City Select **********\n");
for (i = 0; i < NR_CITY; i++)
www.orangepi.org www.xunlong.tv
Page 38

Orange Pi 2G-IOT User Manual Copy right by Shenzhen Xunlong Software Co., Ltd
36
printf("[%2d] %s\n", i, City_Number[i].city);
printf("Please select your City!\n");
scanf("%d", &choice);
do {
memset(num1, 0, sizeof(num1));
printf("\nPlease Entry Receive phone number:\n");
scanf("%s", num1);
} while (strlen(num1) != 11);
sleep(1);
memset(buff, 0, sizeof(buff));
printf("Please input Meesage:\n");
scanf("%s", buff);
/* Restruct buff */
i = strlen(buff);
buff[i] = 0x1A;
buff[i+1] = '\r';
buff[i+2] = '\0';
memset(num2, 0, sizeof(num2));
strcpy(num2, "+86");
strcat(num2, num1);
memset(num1, 0, sizeof(num1));
strcpy(num1, "+86");
strcat(num1, City_Number[choice].number);
send(fd, "1", num2, num1, buff);
}
/*
* Call Phone.
*/
void Call_Phone(int fd)
{
char buff[128];
char number[20];
do {
memset(number, 0, sizeof(number));
printf("\nPlease input phone number:");
scanf("%s", number);
} while (strlen(number) != 11);
memset(buff, 0, sizeof(buff));
strcpy(buff, "+86");
strcat(buff, number);
strcat(buff, ";");
/* AT Test */
Send_AT(fd, "AT\r", NULL, NULL);
/* Call */
Send_AT(fd, "AT", " DT ", buff);
}
int main(int argc, char *argv[])
{
int fd;
char choice;
fd = open(MODEM_PATH, O_RDWR | O_NOCTTY | O_NDELAY);
if (fd < 0) {
www.orangepi.org www.xunlong.tv
Page 39

Orange Pi 2G-IOT User Manual Copy right by Shenzhen Xunlong Software Co., Ltd
37
OrangePi 2G-IOT Linux 发行版打电话
SMS 前期准备
printf("Can't open %s\n", MODEM_PATH);
return -1;
}
/* Initialize /dev/modem0 */
serial_init(fd);
printf("************************************************\n");
printf("\tWelcome to OrangePi 2G-IOT\n");
printf("\tModem version %s\n", VERSION);
printf("************************************************\n");
printf("Entry your select:\n");
printf("1. Send Message\n");
printf("2. Call Phone\n");
printf("3. Exit\n");
choice = getchar();
switch (choice) {
case '1':
Send_Message(fd);
break;
case '2':
Call_Phone(fd);
break;
default:
break;
}
close(fd);
return 0;
}
目前官方 OrangePi 2G-IOT Linux 发行版支持 Ubuntu, Debian 和 Raspbian, 这
些发新版已经支持打电话功能,开发者请到官网
(http://www.orangepi.cn/downloadresourcescn/) 下载最新的 Linux 发行版镜
像。在使用打电话功能之前,请自行准备一张移动或联通 SIM 卡,并确保激活可以
使用。
准备一张中国联通或移动 SIM 卡,国外开发者可以根据频段选择对应的运用商 SIM
卡,OrangePi 2G-IOT 支持的频段如下:
准好 SIM 卡之后,将其安装到 OrangePi 2G-IOT 卡槽中,注意,OrangePi 2G-IOT SIM
卡槽支持 Nano 类型的卡。
www.orangepi.org www.xunlong.tv
Page 40
Orange Pi 2G-IOT User Manual Copy right by Shenzhen Xunlong Software Co., Ltd
38
安装 SIM 卡,注意插入的方向,SIM 卡缺角方向在外侧
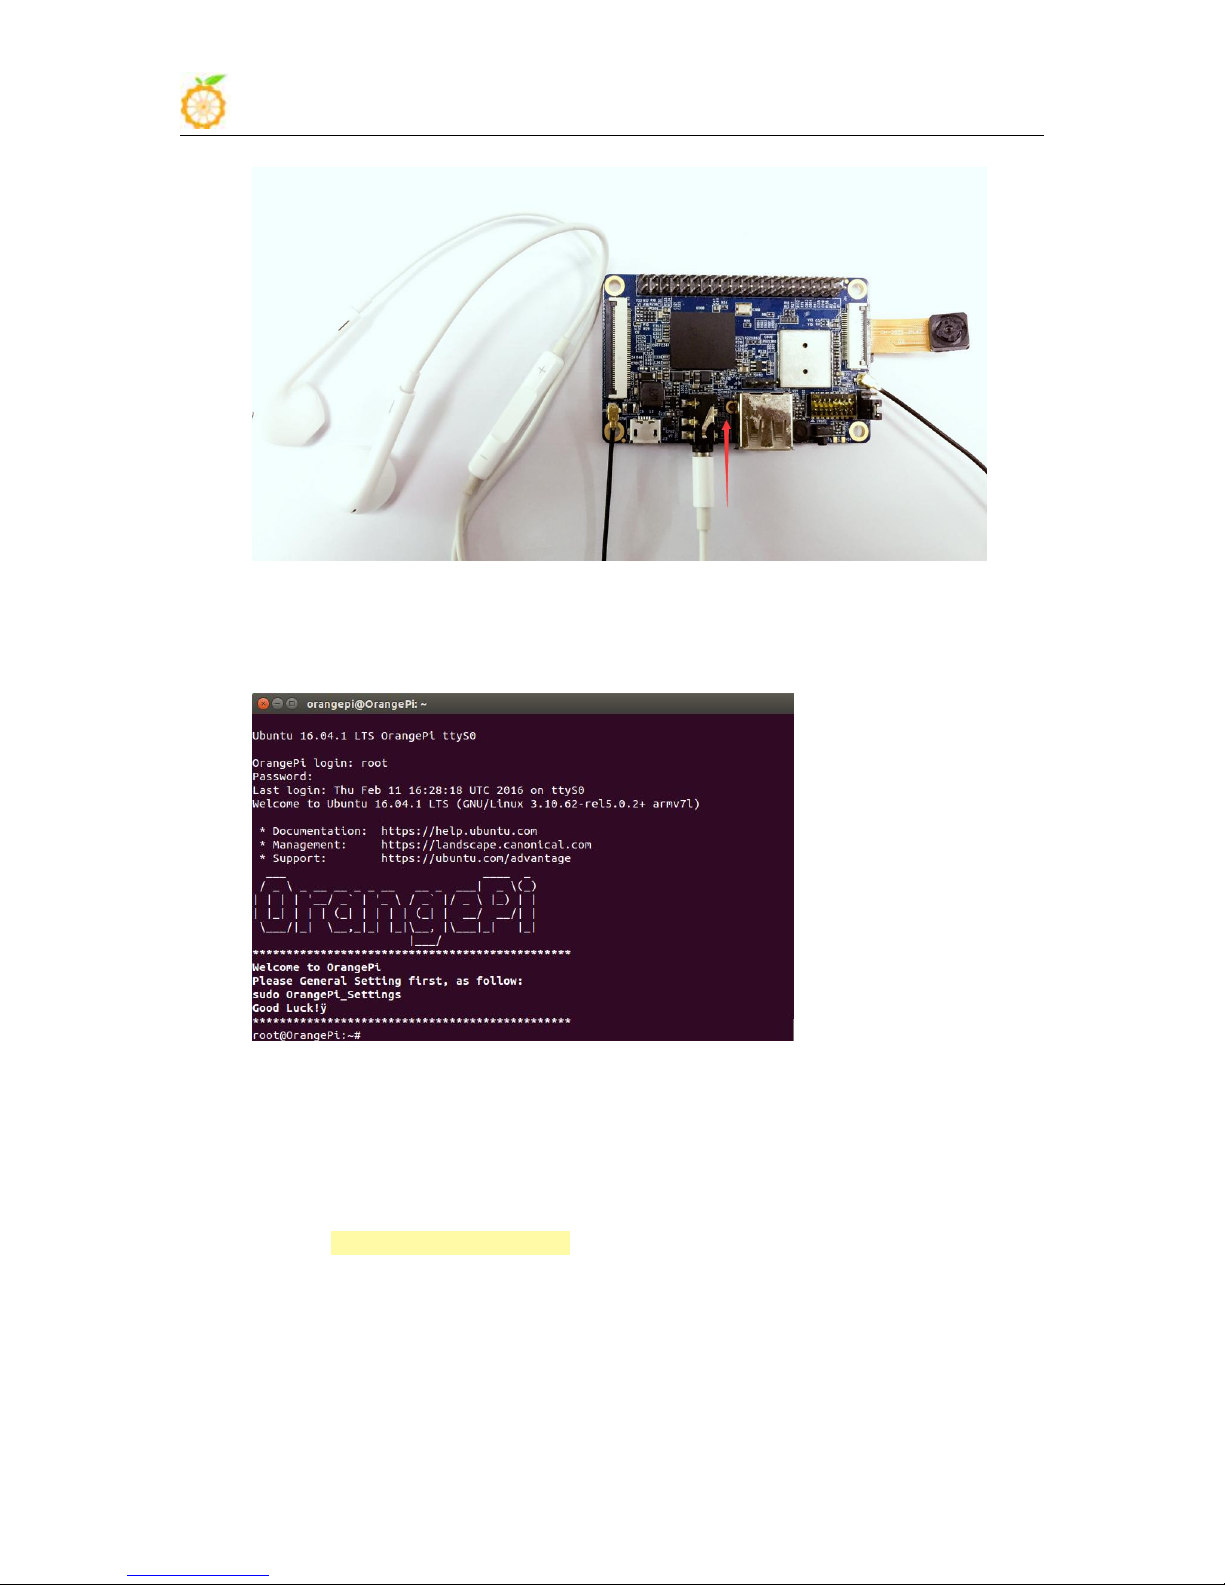
插入耳机
www.orangepi.org www.xunlong.tv
Page 41
Orange Pi 2G-IOT User Manual Copy right by Shenzhen Xunlong Software Co., Ltd
39
登录 Linux
多种方式打电话
插好卡之后,上电启动 Linux 系统,用户可以使用多种方式连接系统,其中包括串口
方式连接,ssh 方式连接等。具体连接方法,请参考官方 OrangePi 2G-IOT 的用户手册。
如果使用串口方式连接,波特率请设置为 921600。
OrangePi 2G-IOT 的 Linux 发行版有多种方式可以使用通话功能,本文重点介绍串口方
式和 C 程序方式。
1. 串口方式
该方式需要在 OrangePi 2G-IOT 上安装串口工具 minicom,开发者可以在 OrangePi
2G-IOT 上进行安装,安装之前请确保 OrangePi 2G-IOT 已经连上 wifi。
开发者使用如下命令进行 minicom 的安装:
sudo apt-get install minicom
OrangePi 中 AP 核与 Modem 之间通过串口进行通信,Linux 系统启动之后,会在
/dev/ 目录下生成 modem0 节点。
开发者可以使用串口工具连接到 /dev/modem0 节点上。其中推荐使用 minicom 进行连
接,开发者也可以参照使用其他串口工具。
开发者在使用 minicom 或其他串口工具进行连接时,请参考一下步骤:
1)在 OrangePi 2G-IOT Linux 系统上使用 minicom 连接 /dev/modem0, 用户可以使用
www.orangepi.org www.xunlong.tv
Page 42
Orange Pi 2G-IOT User Manual Copy right by Shenzhen Xunlong Software Co., Ltd
40
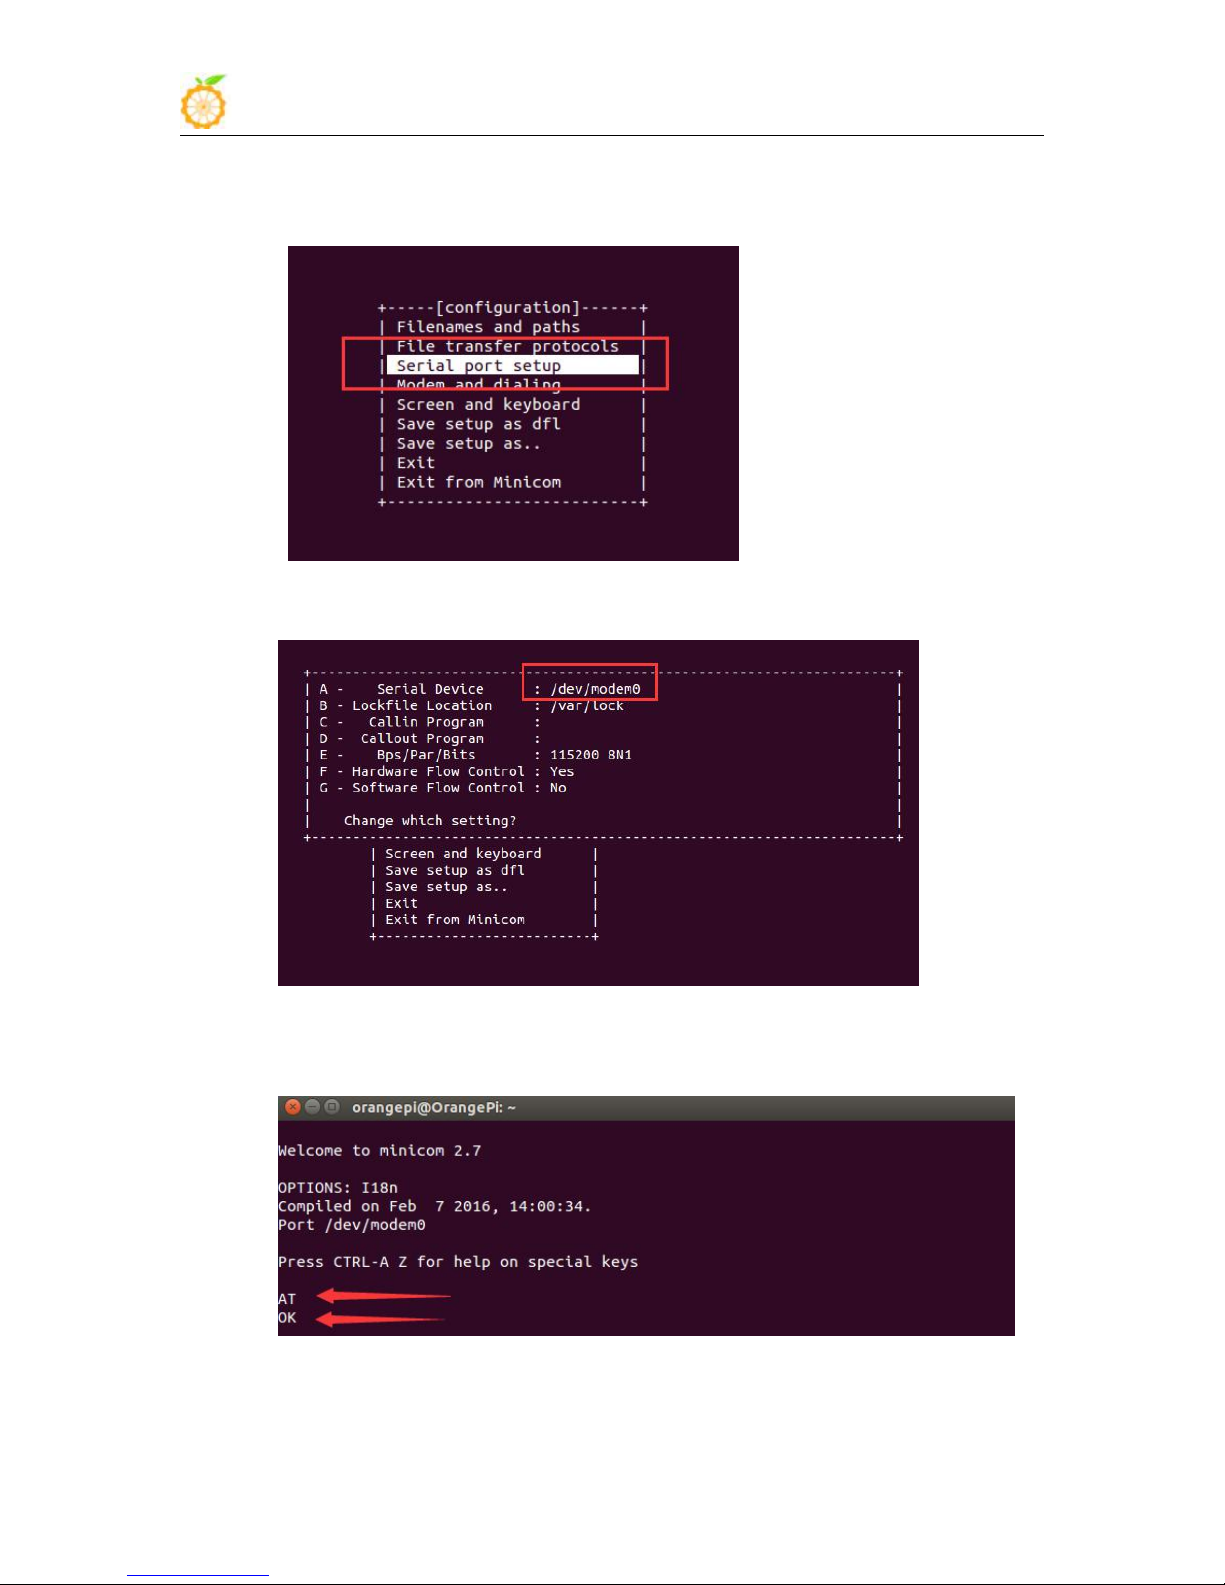
如下命令进行配置
sudo minicmo -s
输入命令之后,进入配置界面,如下图,选择 "Serial port setup"
按下 “A” 修改 Serial Device 为 /dev/modem0
2) 使用 AT 指令集进行短信的发送
首先输入 AT 命令对 Modem 状态进行检查,如果 Modem 回复 OK,表示 Modem
连接正常。
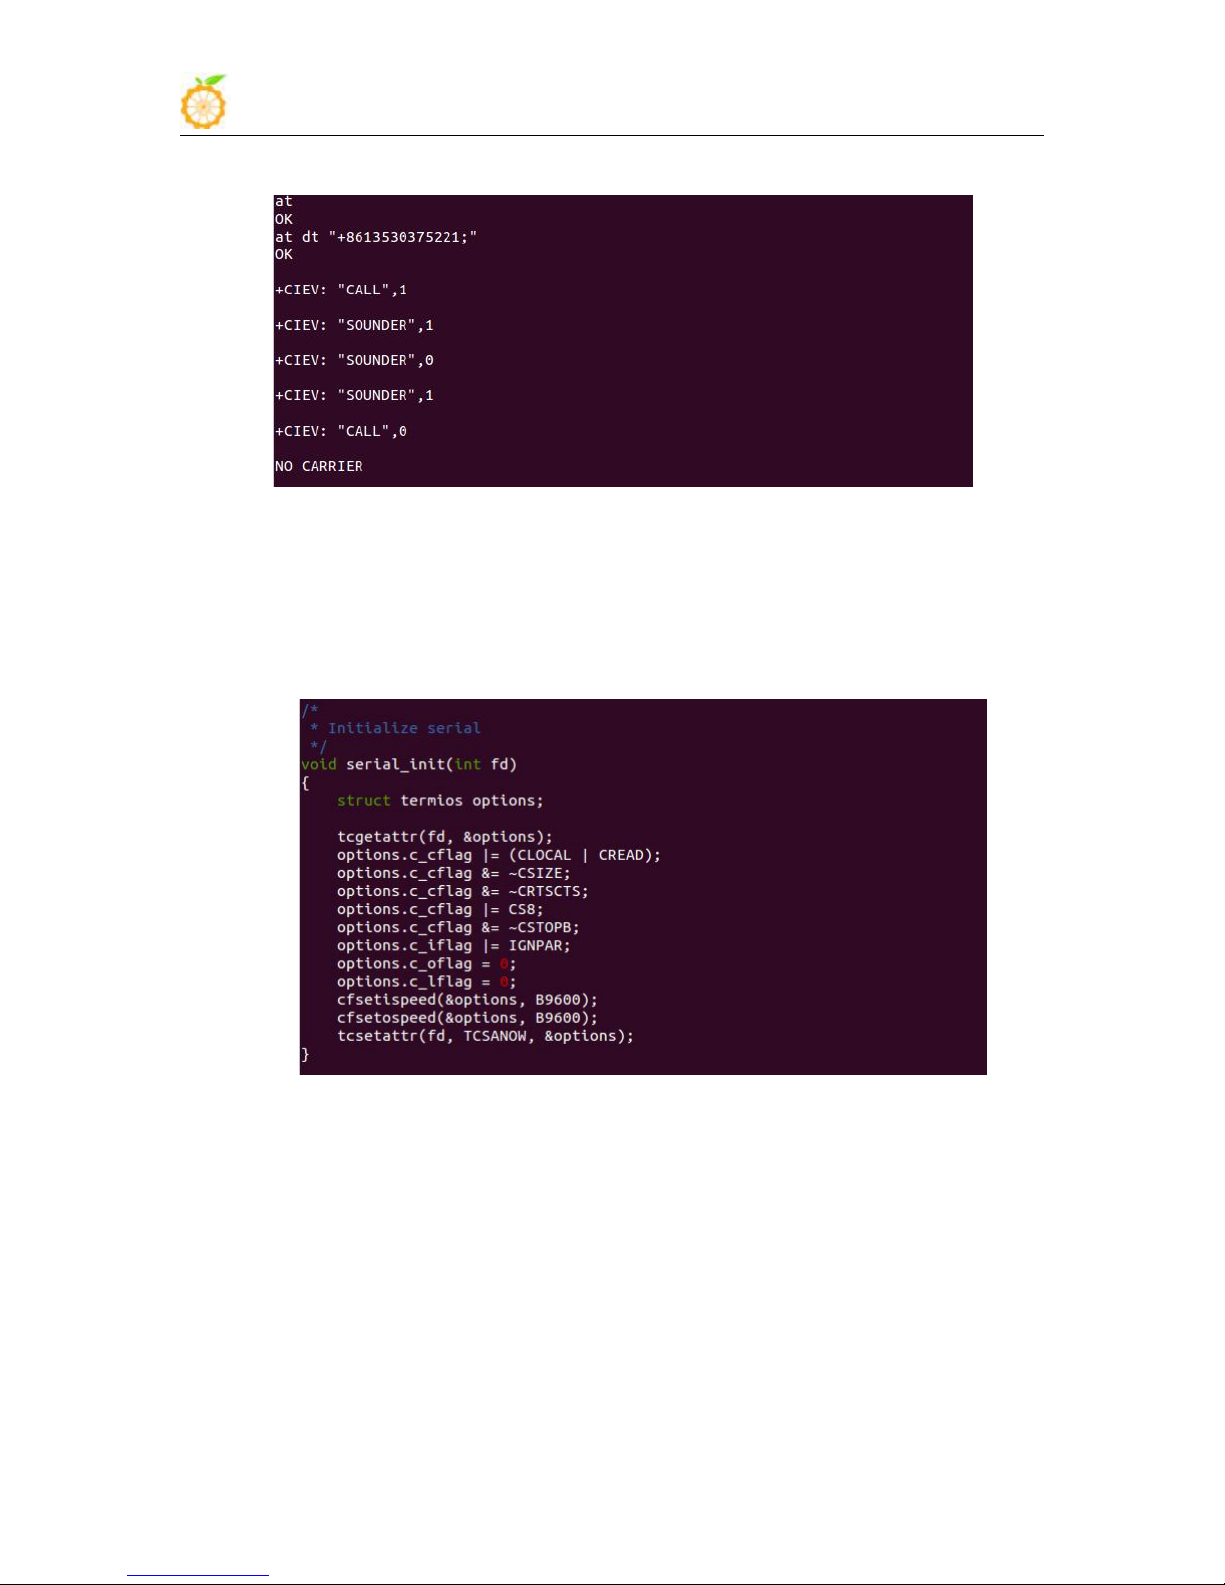
接着使用 "AT DT" 命令拨打电话,命令之后紧跟被呼叫的电话号码,并在电话号码
前加上国家编号,中国区为 +86。
www.orangepi.org www.xunlong.tv
Page 43
Orange Pi 2G-IOT User Manual Copy right by Shenzhen Xunlong Software Co., Ltd
41
输入完电话号码之后,以 “;” 结尾,例如 AT DT "+86135xxxxxxx;"
以上为一次完整的通话过程。
2. C 语言方式
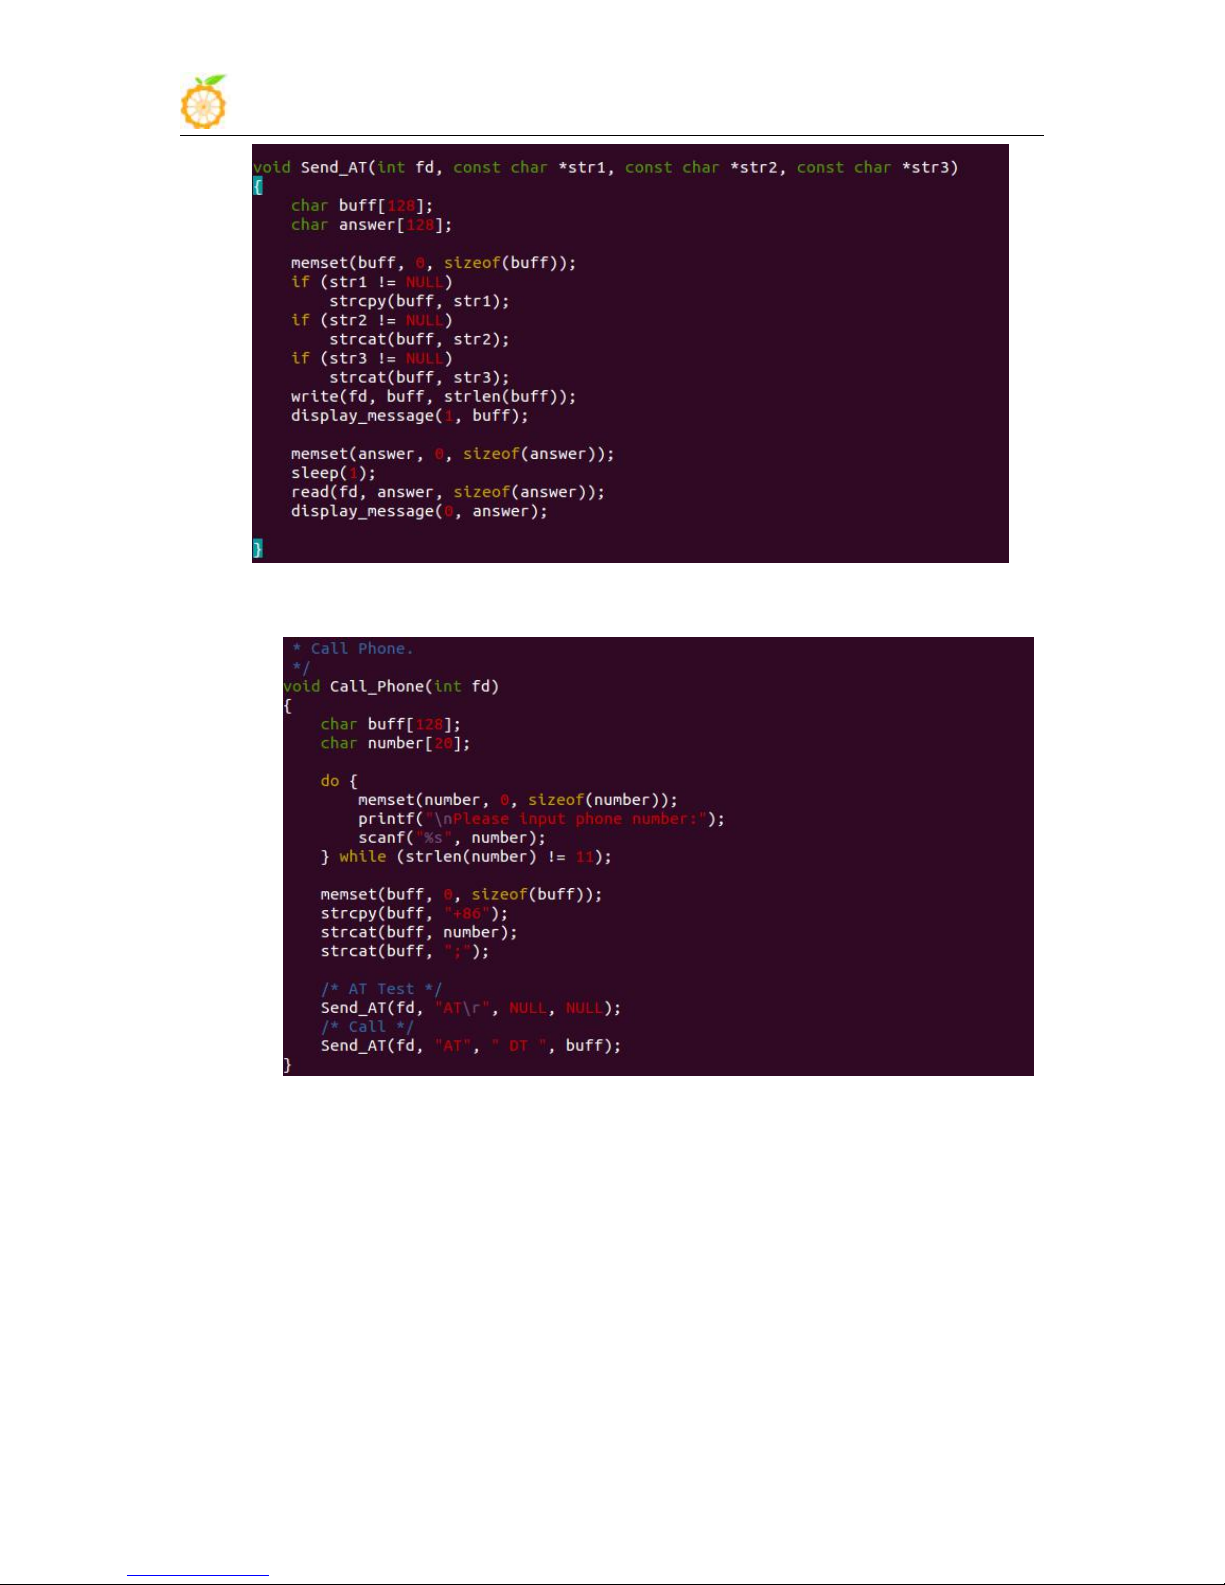
C 代码中发打电话的流程与 AT 发端的流程一样,也使用串口和 Modem 进行通
信,然后交换 AT 命令。具体流程如下:
首先,初始化串口:
发送 AT 命令函数
www.orangepi.org www.xunlong.tv
Page 44
Orange Pi 2G-IOT User Manual Copy right by Shenzhen Xunlong Software Co., Ltd
42
AT 发短信流程
完整程序见附录 “OrangePi_2G_IOT_GSM_Demo.c”
www.orangepi.org www.xunlong.tv
Page 45
Orange Pi 2G-IOT User Manual Copy right by Shenzhen Xunlong Software Co., Ltd
43
OrangePi_2G_IOT_GSM_Demo.c
OrangePi 2G-IOT Linux 发行版 GSM 上网
SMS 前期准备
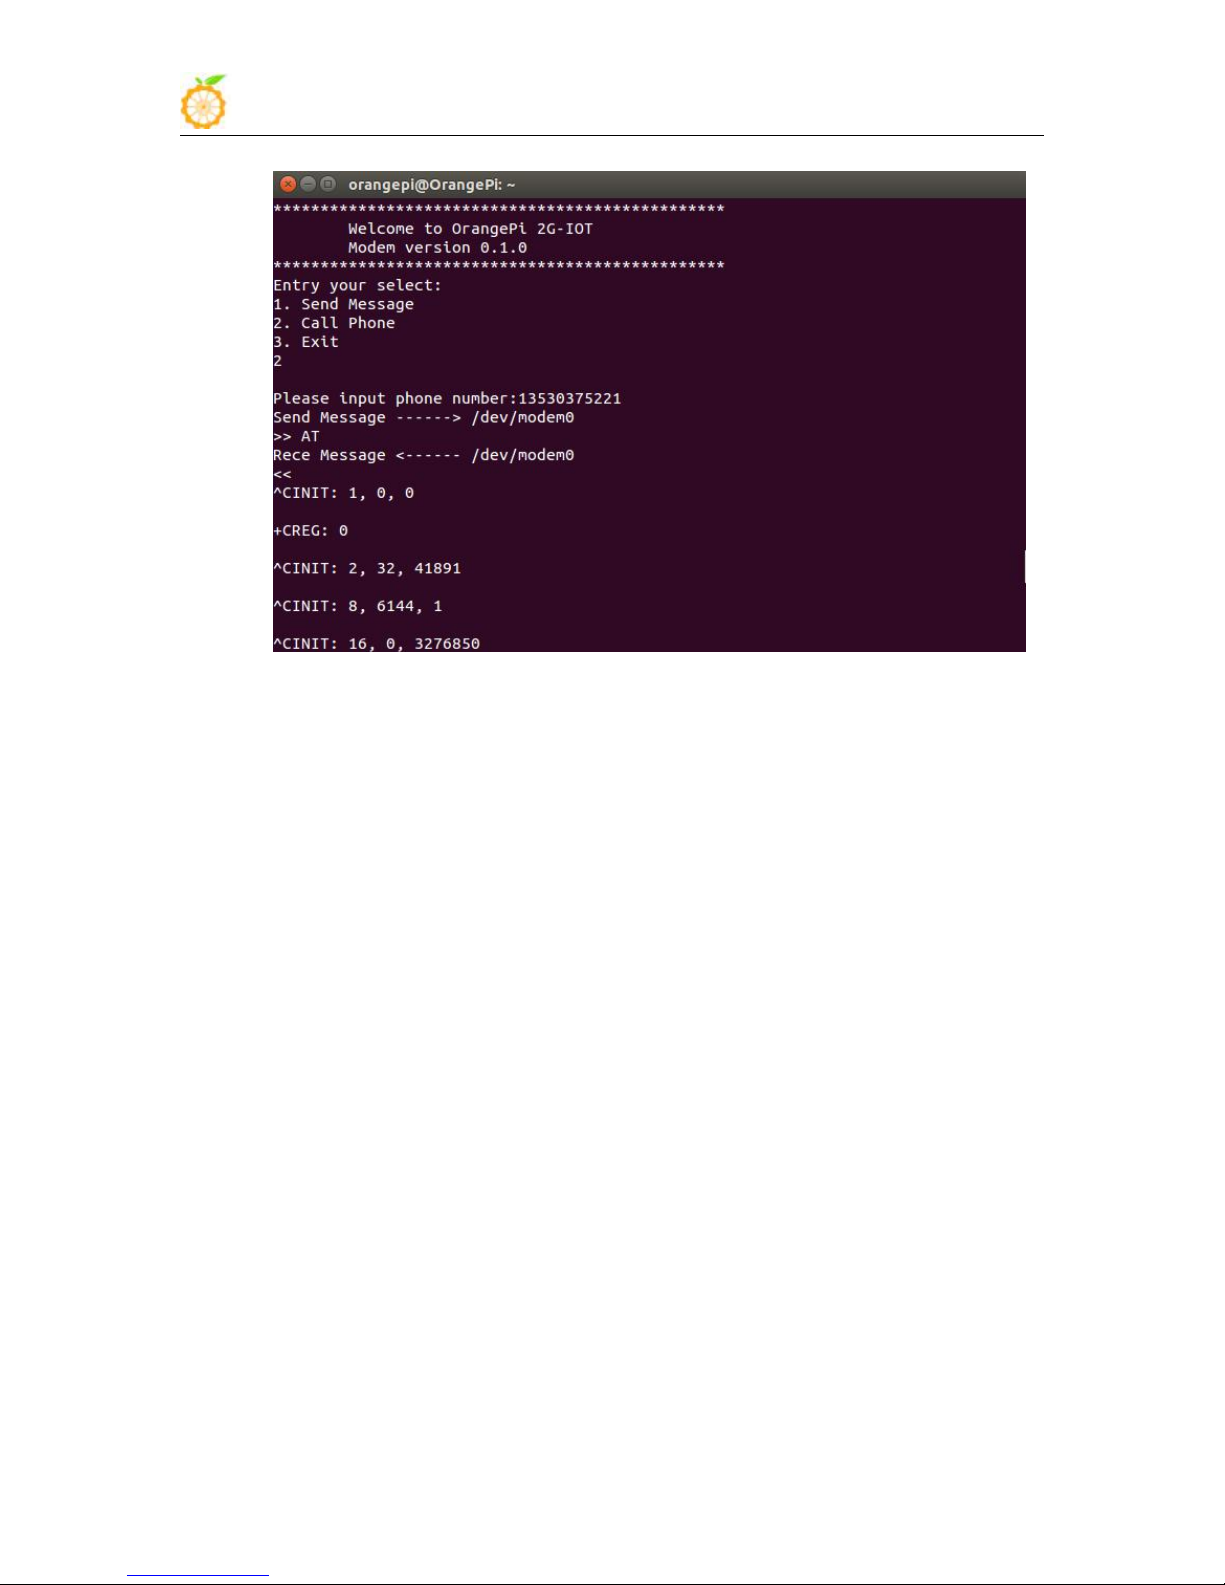
C 代码运行效果如下图:
Demo 程序请参考上一节。
目前官方 OrangePi 2G-IOT Linux 发行版支持 Ubuntu, Debian 和 Raspbian, 这
些发新版已经支持 GSM 上网功能,开发者请到官网
(http://www.orangepi.cn/downloadresourcescn/) 下载最新的 Linux 发行版镜
像。在使用 GSM 上网功能之前,请自行准备一张移动或联通 SIM 卡,并确保激活
可以使用。
准备一张中国联通或移动 SIM 卡,国外开发者可以根据频段选择对应的运用商 SIM
卡,OrangePi 2G-IOT 支持的频段如下:
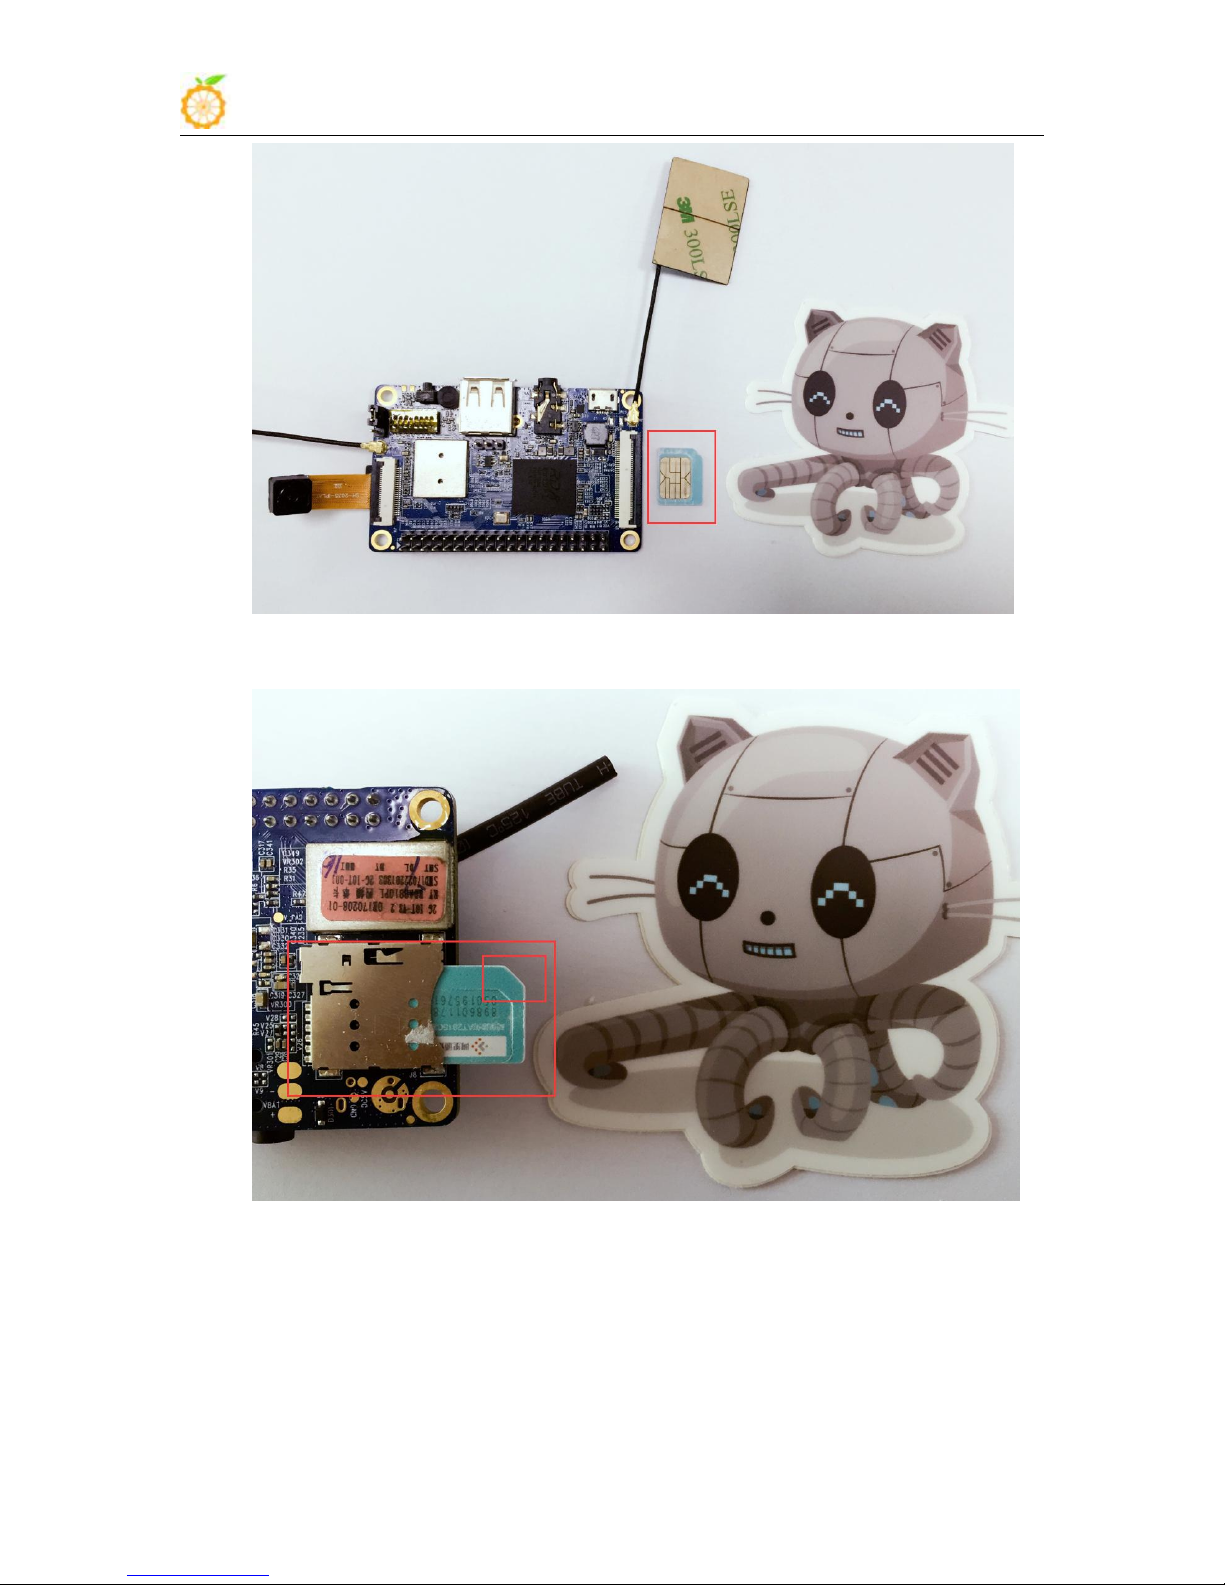
准好 SIM 卡之后,将其安装到 OrangePi 2G-IOT 卡槽中,注意,OrangePi 2G-IOT SIM
卡槽支持 Nano 类型的卡。
www.orangepi.org www.xunlong.tv
Page 46
Orange Pi 2G-IOT User Manual Copy right by Shenzhen Xunlong Software Co., Ltd
44
登录 Linux
安装 SIM 卡,注意插入的方向,SIM 卡缺角方向在外侧
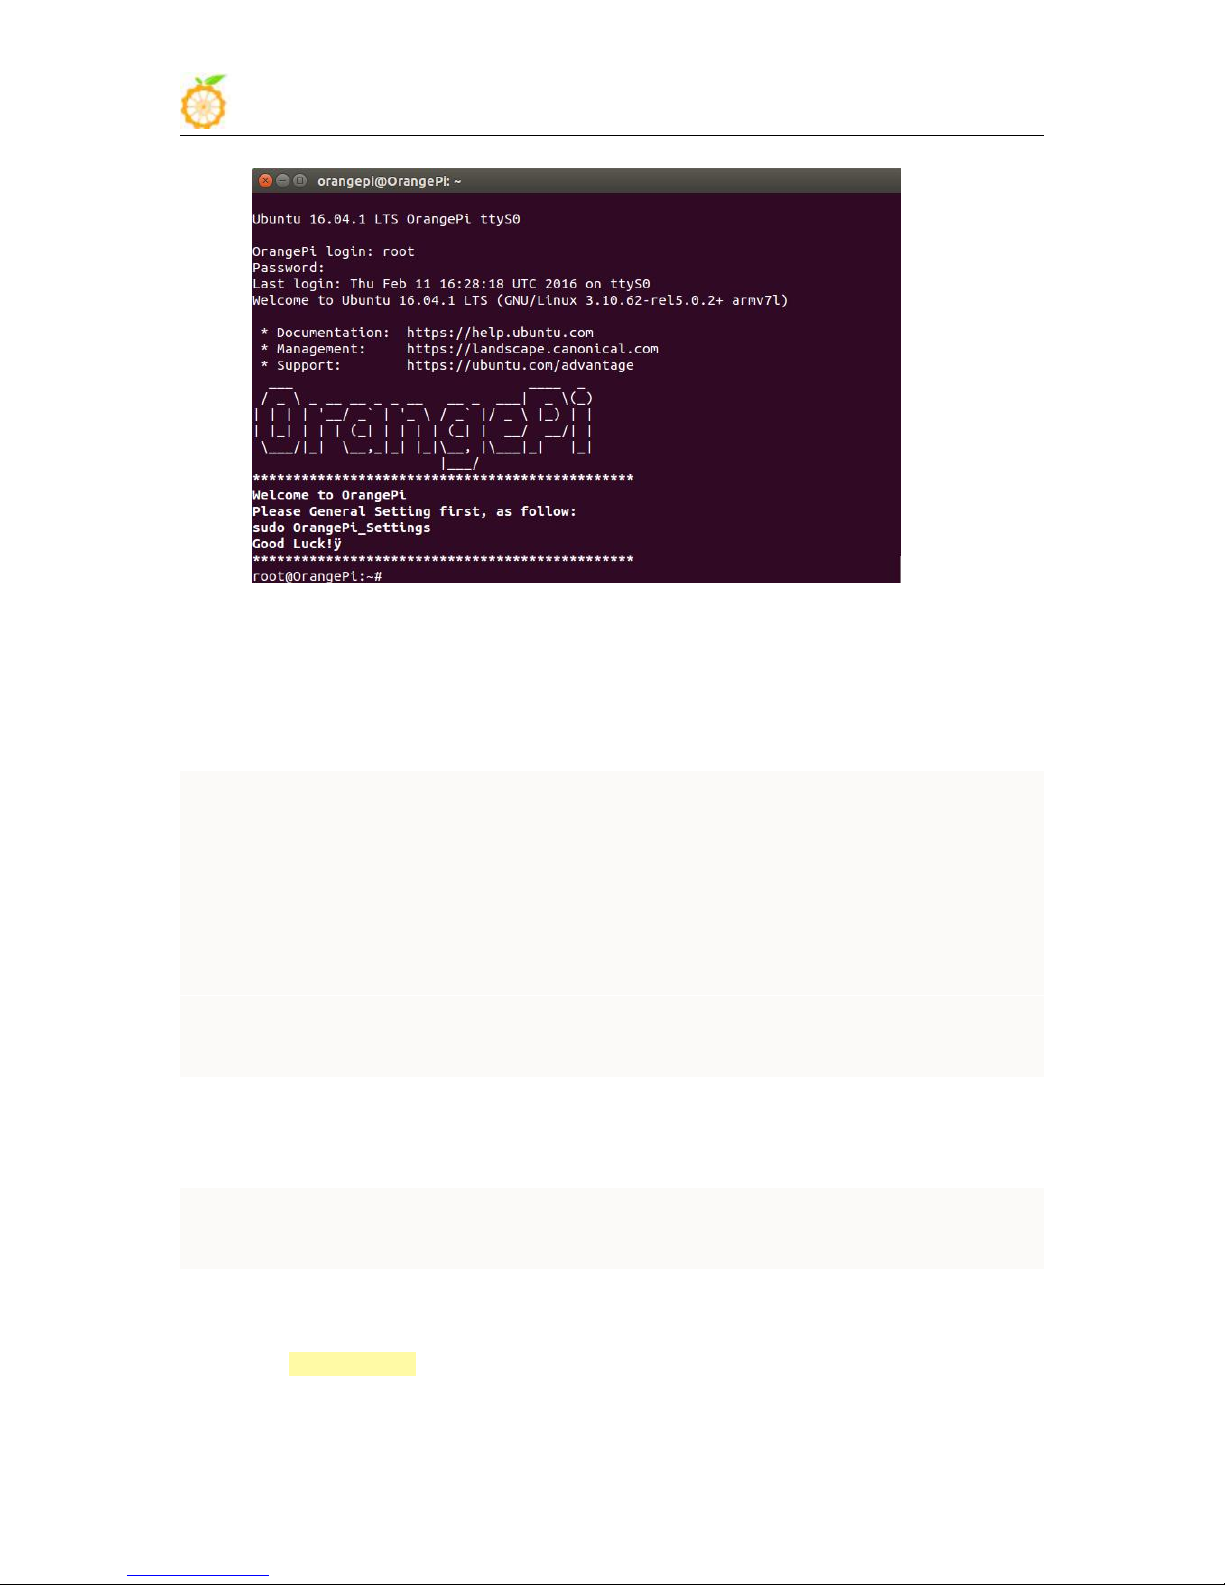
插好卡之后,上电启动 Linux 系统,用户可以使用多种方式连接系统,其中包括串口
方式连接,ssh 方式连接等。具体连接方法,请参考官方 OrangePi 2G-IOT 的用户手册。
如果使用串口方式连接,波特率请设置为 921600。
www.orangepi.org www.xunlong.tv
Page 47
Orange Pi 2G-IOT User Manual Copy right by Shenzhen Xunlong Software Co., Ltd
45
使用开源工具拨号上网
配置 wvdial
配置 ppp 工具
拨号上网
OrangePi 2G-IOT 目前支持 ppp 方式上网,其上网基于 ppp 和 wvdial 两个开源工具。
开发者首先在 OrangePi 2G-IOT 上安装这两个开源工具,可使用如下命令:
sudo apt-get install ppp wvdial
安装完毕后,对 wvdial 工具进行配置,修改 /etc/wvdial.conf 文件,如下
[Dialer defaults]
ISDN = 0
Modem Type = Analog Modem
Phone = *99***1#
Stupid Mode = 1
Dial Command = ATDT
Modem = /dev/modem0
Baud = 460800
Init1 = AT+COPS=0
Init2 = AT+CFUN=1
Init3 = AT+CGATT=1
Init4 = AT+CGDCONT=1,"IP","OrangePi_2G-IOT","",0,0
Init5 = AT+CGACT=1,1
Username = " "
Password = " "
安装完 ppp 之后,对 ppp 进行配置,修改 /etc/ppp/peers/wvdial 文件,如下:
noauth
name wvdial
defaultroute
replacedefaultroute
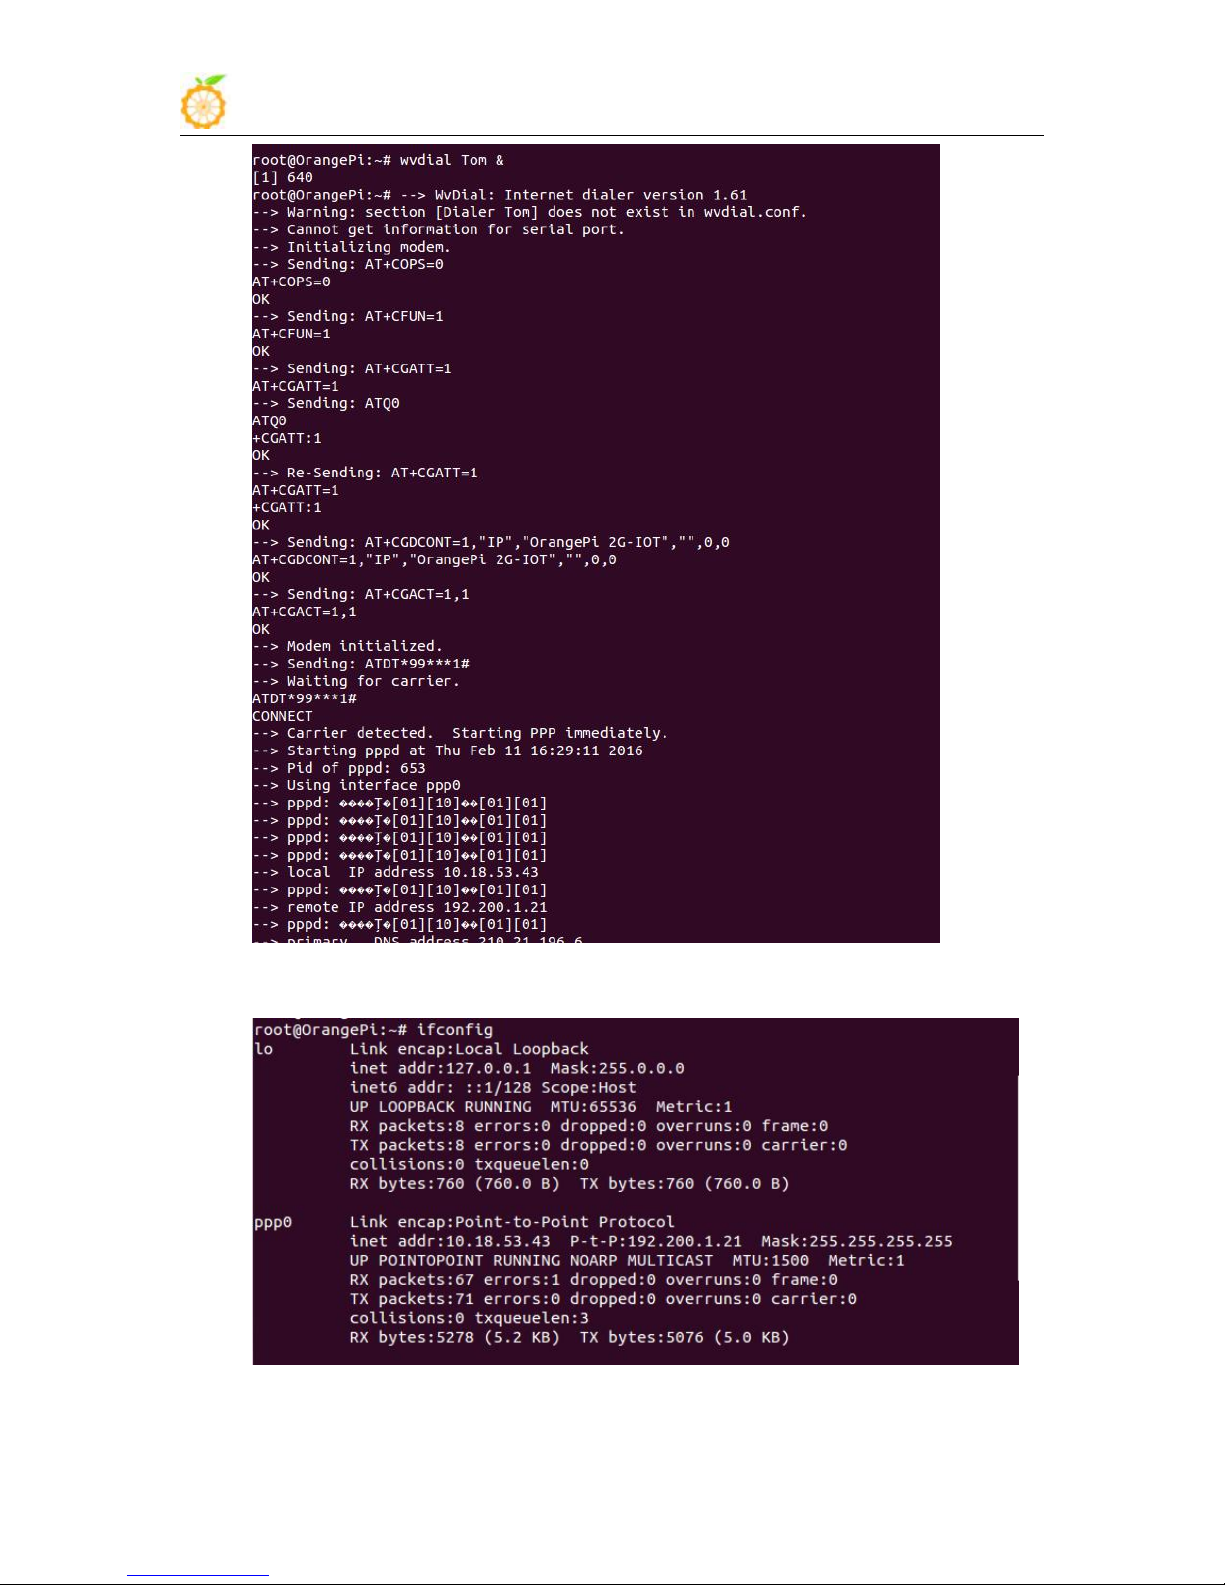
配置好 ppp 和 wvdial 之后,使用命令进行拨号上网,开发者可以使用如下命令:
wvdial Tom &
www.orangepi.org www.xunlong.tv
Page 48
Orange Pi 2G-IOT User Manual Copy right by Shenzhen Xunlong Software Co., Ltd
46
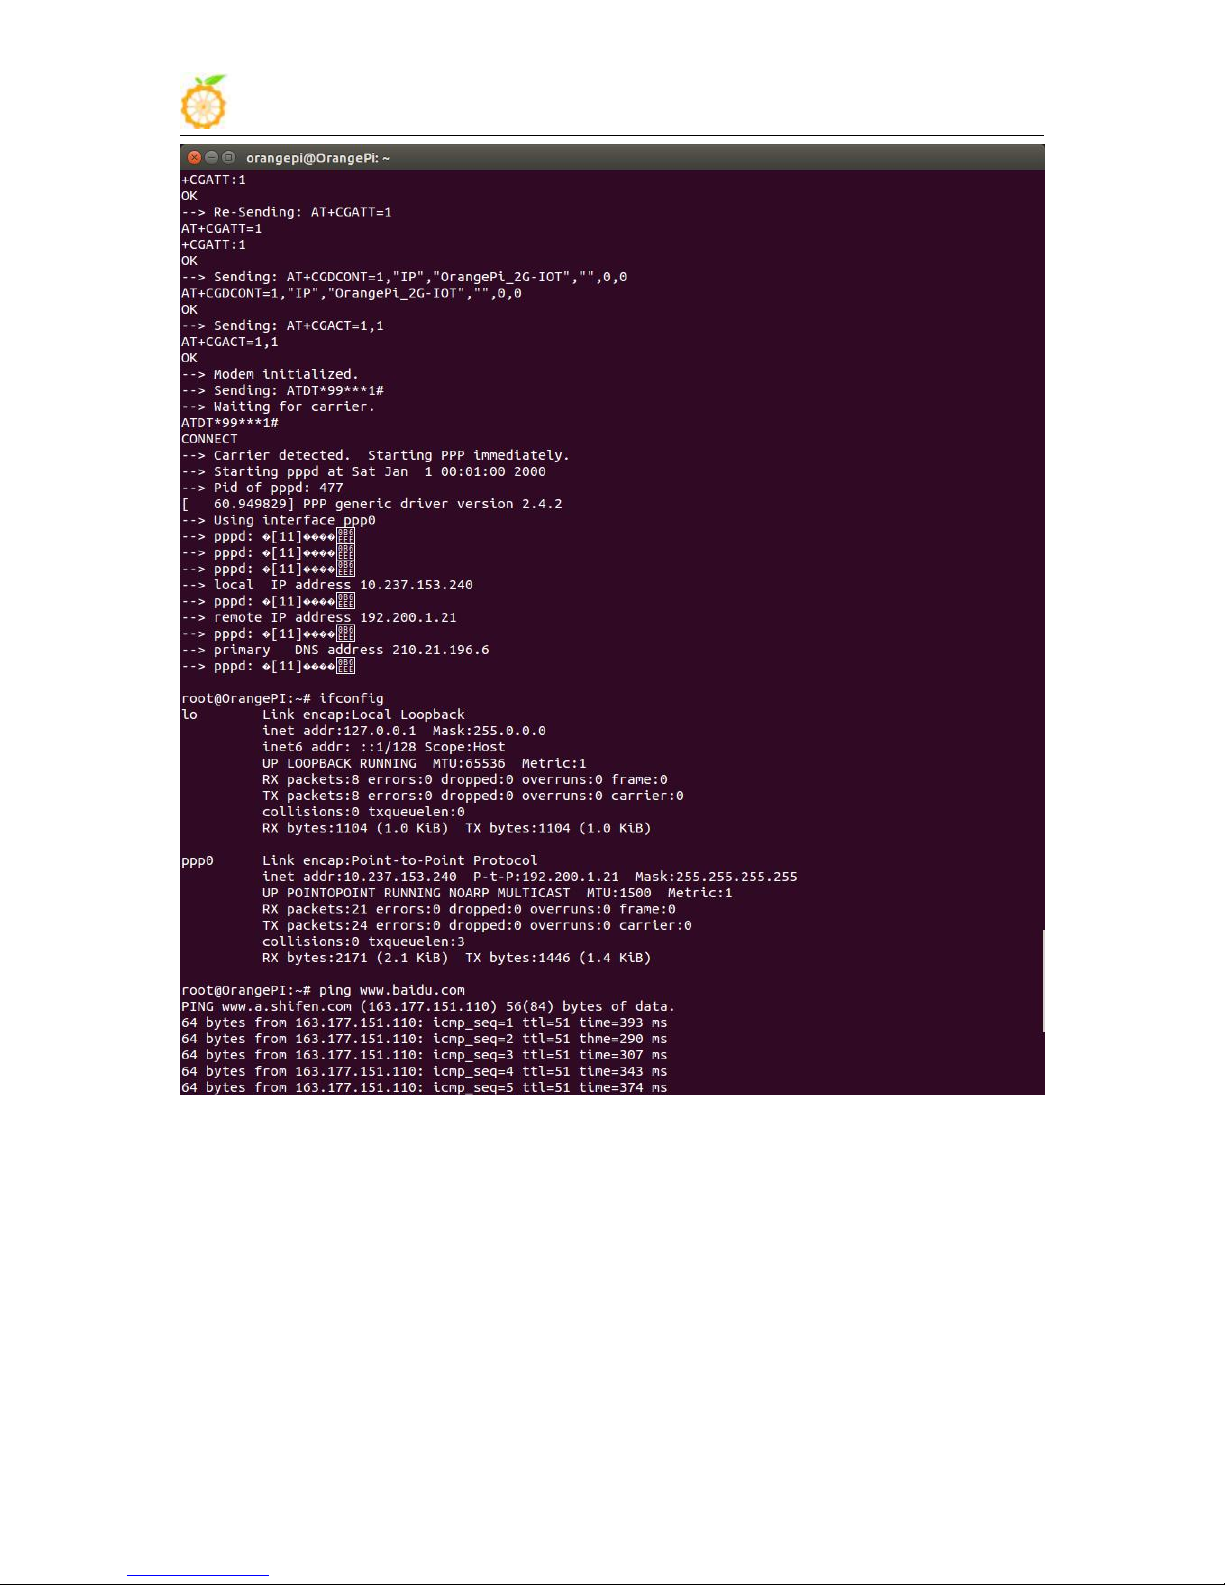
使用 ifconfig 查看网络信息
使用 ping 命令测试连通状态
www.orangepi.org www.xunlong.tv
Page 49
Orange Pi 2G-IOT User Manual Copy right by Shenzhen Xunlong Software Co., Ltd
47
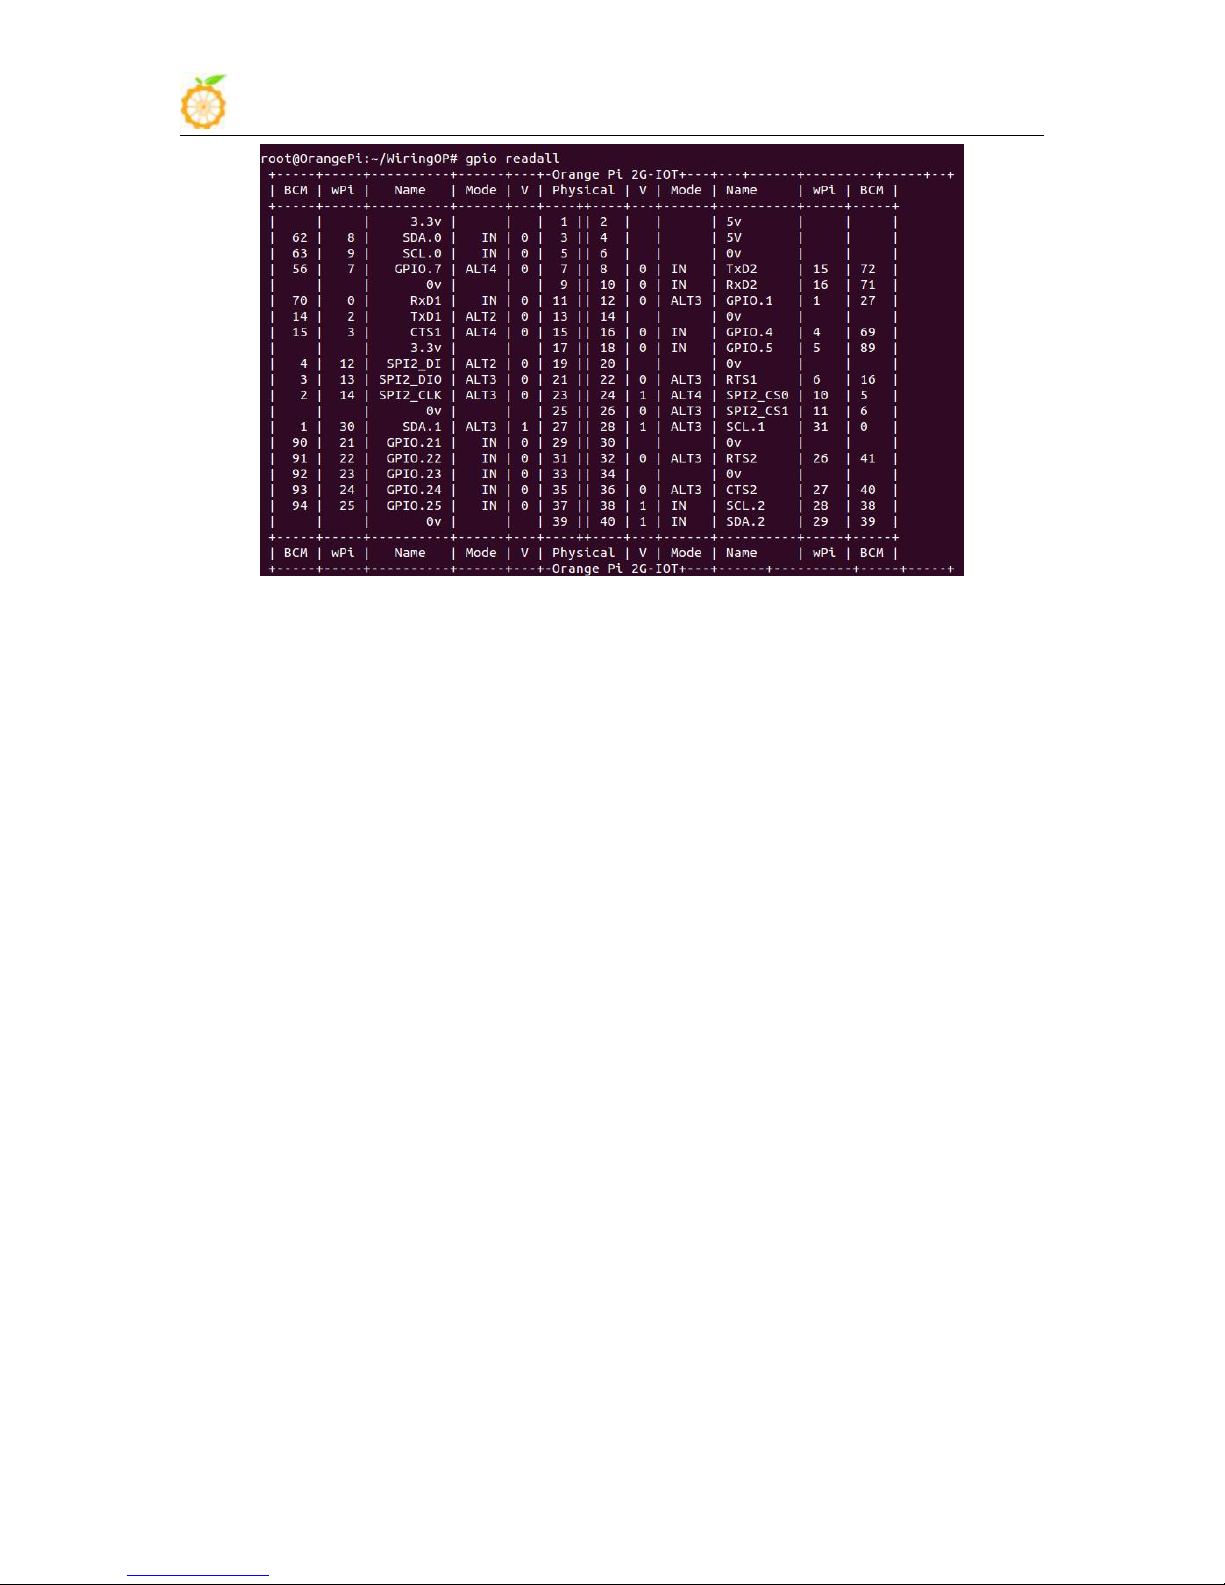
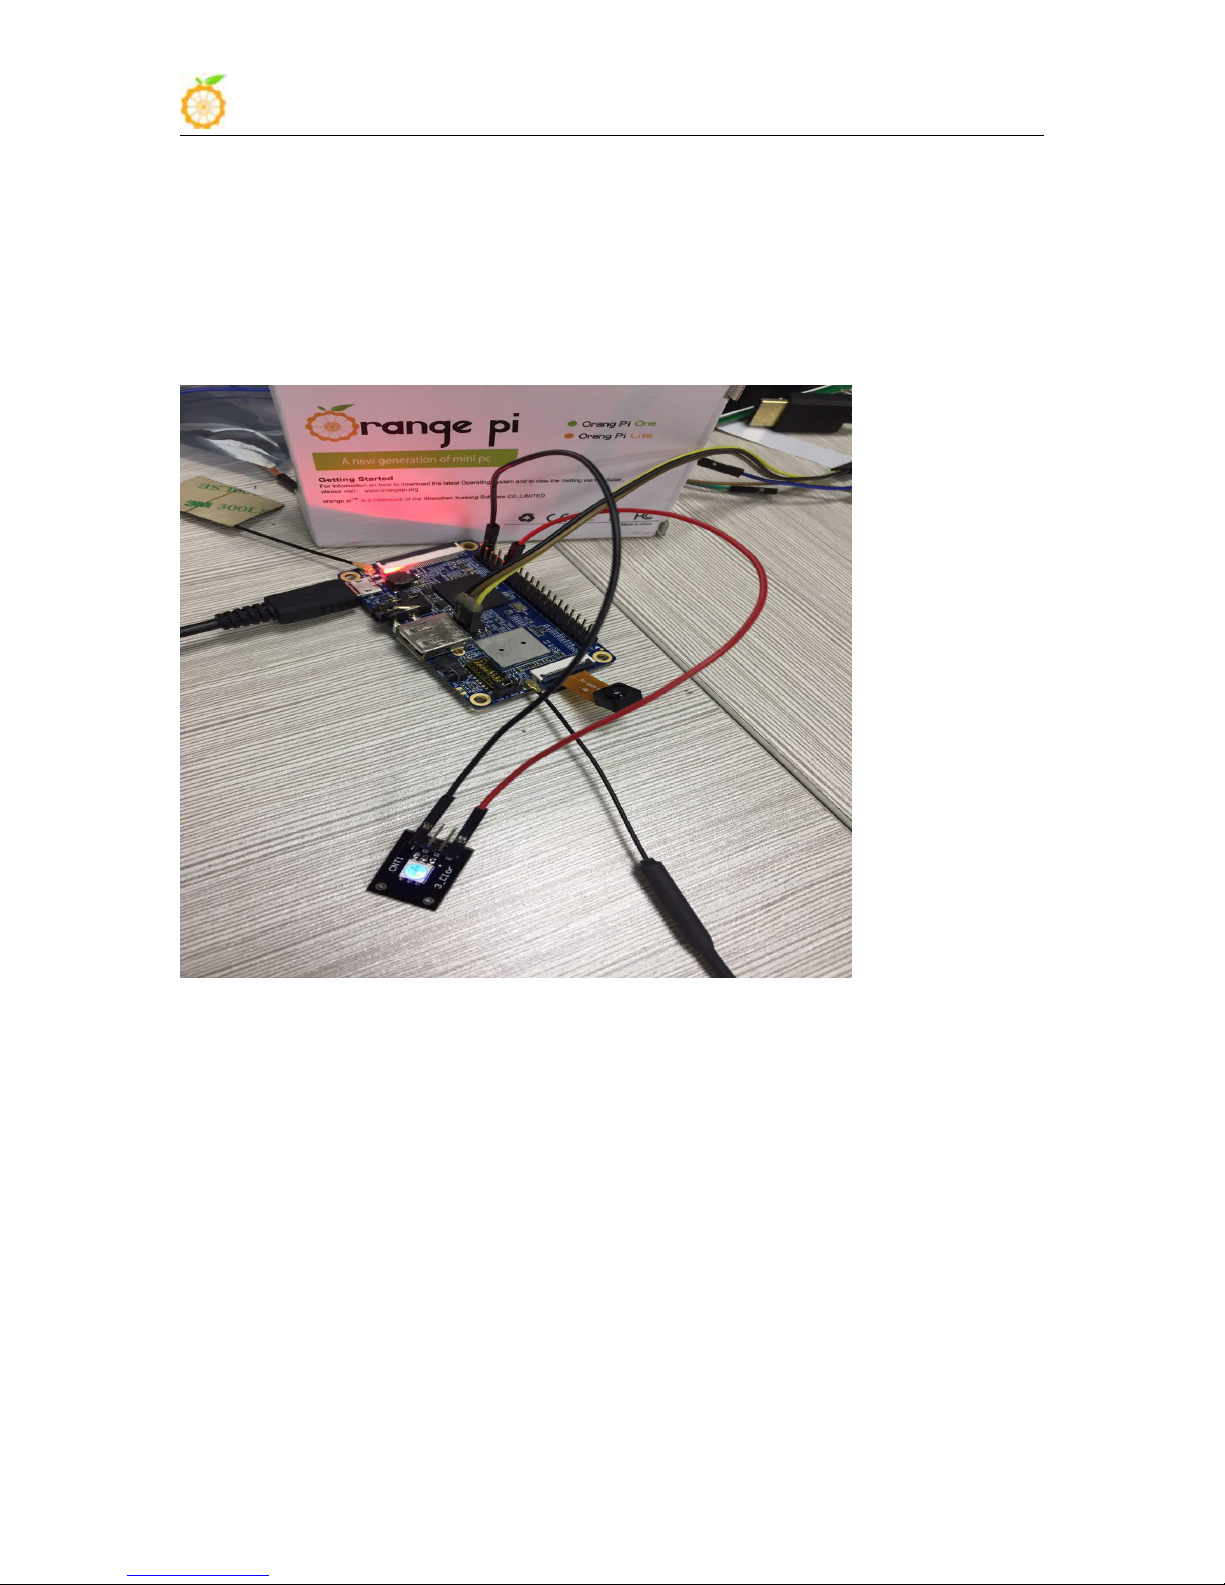
The open source project WiringPi is working on OrangePi 2G-IOT. This section will
introduce how to utilize WiringPi on OrangePi 2G-IOT. The following is definition of
40pin.
www.orangepi.org www.xunlong.tv
Page 50
Orange Pi 2G-IOT User Manual Copy right by Shenzhen Xunlong Software Co., Ltd
48
1) Download WiringPi image of OrangePi 2G-IOT
2) Compile and install WiringPi
3) Utilze WiringPi
4) Details GPIO infromation
Usage:
env GIT_SSL_NO_VERIFY=true git clone https://github.com/OrangePiLibra/WiringPi.git
cd WiringPi
sudo ./build OrangePi_2G-IOT
sudo ./build install
cd WiringPi/example/OrangePi
make OrangePi
./OrangePi
cd WiringPi/example/OrangePi
cat README.md
Reality Test
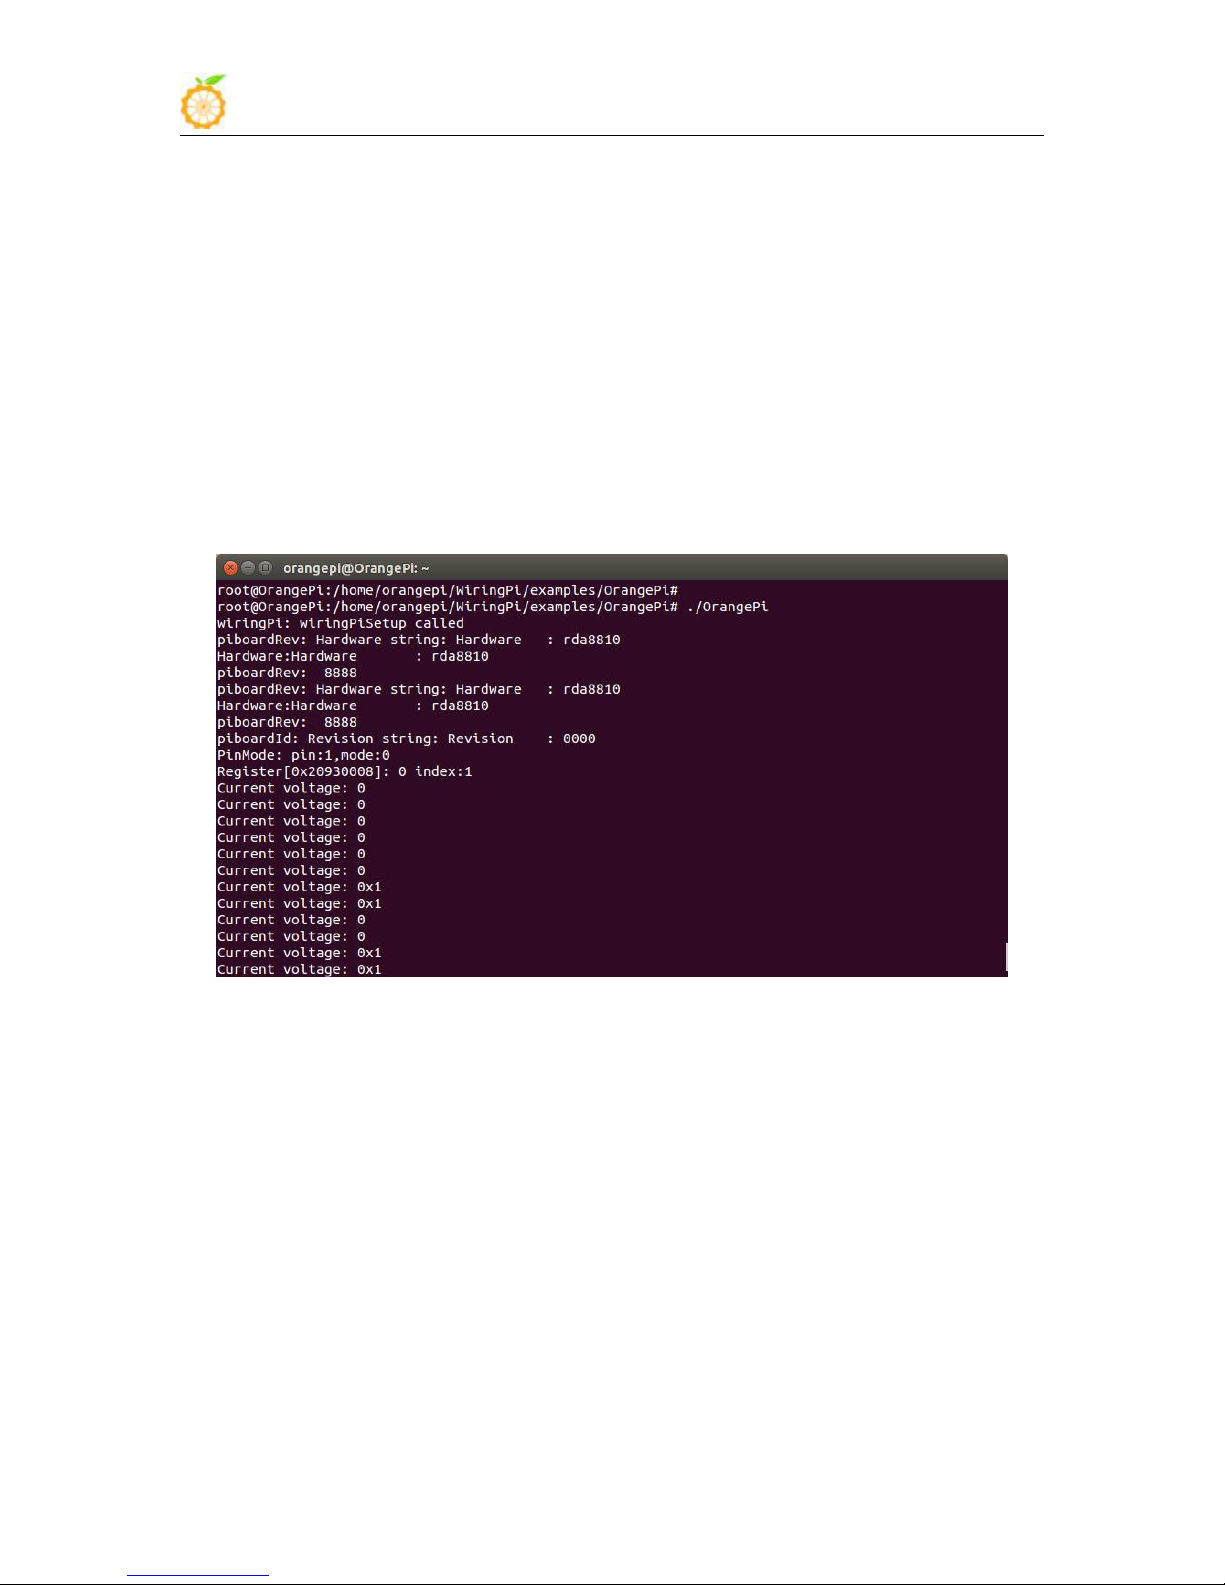
OrangePi 2G-IOT contains GPIOA, GPIOB, GPIOC and GPIOD. Each of group has 32
gpio. The type of GPIO is "Input", "Output" and "specify function" such as "I2C", "I2S"
and so on. On board, OrangePi 2G-IOT exports 40 pins as different function. User can
utilize these, GPIO on different application scenarios. For example, User can configure
the type of GPIO as "Input", and get current voltage from program. Another hand, User
can configure GPIO as specify function, such as "Uart", "I2C" and "SPI".
www.orangepi.org www.xunlong.tv
Page 51
Orange Pi 2G-IOT User Manual Copy right by Shenzhen Xunlong Software Co., Ltd
49
1) Set gpio as Input mode
Please note that: On OrangePi 2G-IOT, GPIOA, GPIOB and GPIOD tract as general
GPIO, but GPIOC as non-general GPIO. Because of some hardware design. The host of
GPIOC is modem not CPU. So, If CPU wanna control GPIOC, it must send message to
Modem, and Moden get message and control GPIOC, it's not good news. In other words.
on version 0.1, GPIOC only support "OUTPUT" mode.
The size of GPIOx group is 32, so we can get gpio map:
GPIOA: 0 - 31
GPIOB: 32 - 63
GPIOC: 64 - 95
GPIOD: 96 - 127
Each gpio have a unique ID, and the way of caculate as follow:
GPIO_A_x: ID = 0 + x
GPIO_B_x: ID = 32 + x
GPIO_C_x: ID = 64 + x
GPIO_D_x: ID = 96 + x
As General GPIO, we only offer the number of GPIOx. then, use library of wiringPi,
User can easily to control GPIO. GPIOC can not support "Input" mode.
#include <wiringPi.h>
/* Defind unique ID */
#define PA1 1
#define PB5 37
#define PD2 98
int main(void)
{
www.orangepi.org www.xunlong.tv
Page 52
Orange Pi 2G-IOT User Manual Copy right by Shenzhen Xunlong Software Co., Ltd
50
2) Set gpio as "OUTPUT" mode
unsigned int vol;
/* Setup wiringPi */
wiringPiSetup();
/* Set Input Mode */
pinMode(PA1, INPUT);
pinMode(PB5, INPUT);
pinMode(PD2, INPUT);
/* Get value from GPIO */
vol = digitalRead(PA1);
vol = digitalRead(PB5);
vol = digitalRead(PD2);
return 0;
}
All GPIO support "OUTPUT" mode. The demo code as follow:
#include <wiringPi.h>
/* Defind unique ID */
#define PA1 1
#define PB5 37
#define PC27 91
#defien PD2 98
int main(void)
{
/* Setup wiringPi */
iringPiSetup();
/* Set GPIO Mode */
pinMode(PA1, OUTPUT);
pinMode(PB5, OUTPUT);
www.orangepi.org www.xunlong.tv
Page 53
Orange Pi 2G-IOT User Manual Copy right by Shenzhen Xunlong Software Co., Ltd
51
11. Use GSM to Connect Network
pinMode(PC27, OUTPUT);
pinMode(PD2, OUTPUT);
digitalWrite(PA1, HIGH);
digitalWrite(PB5, LOW);
digitalWrite(PC27, HIGH);
digitalWrite(PD2, LOW);
return 0;
}
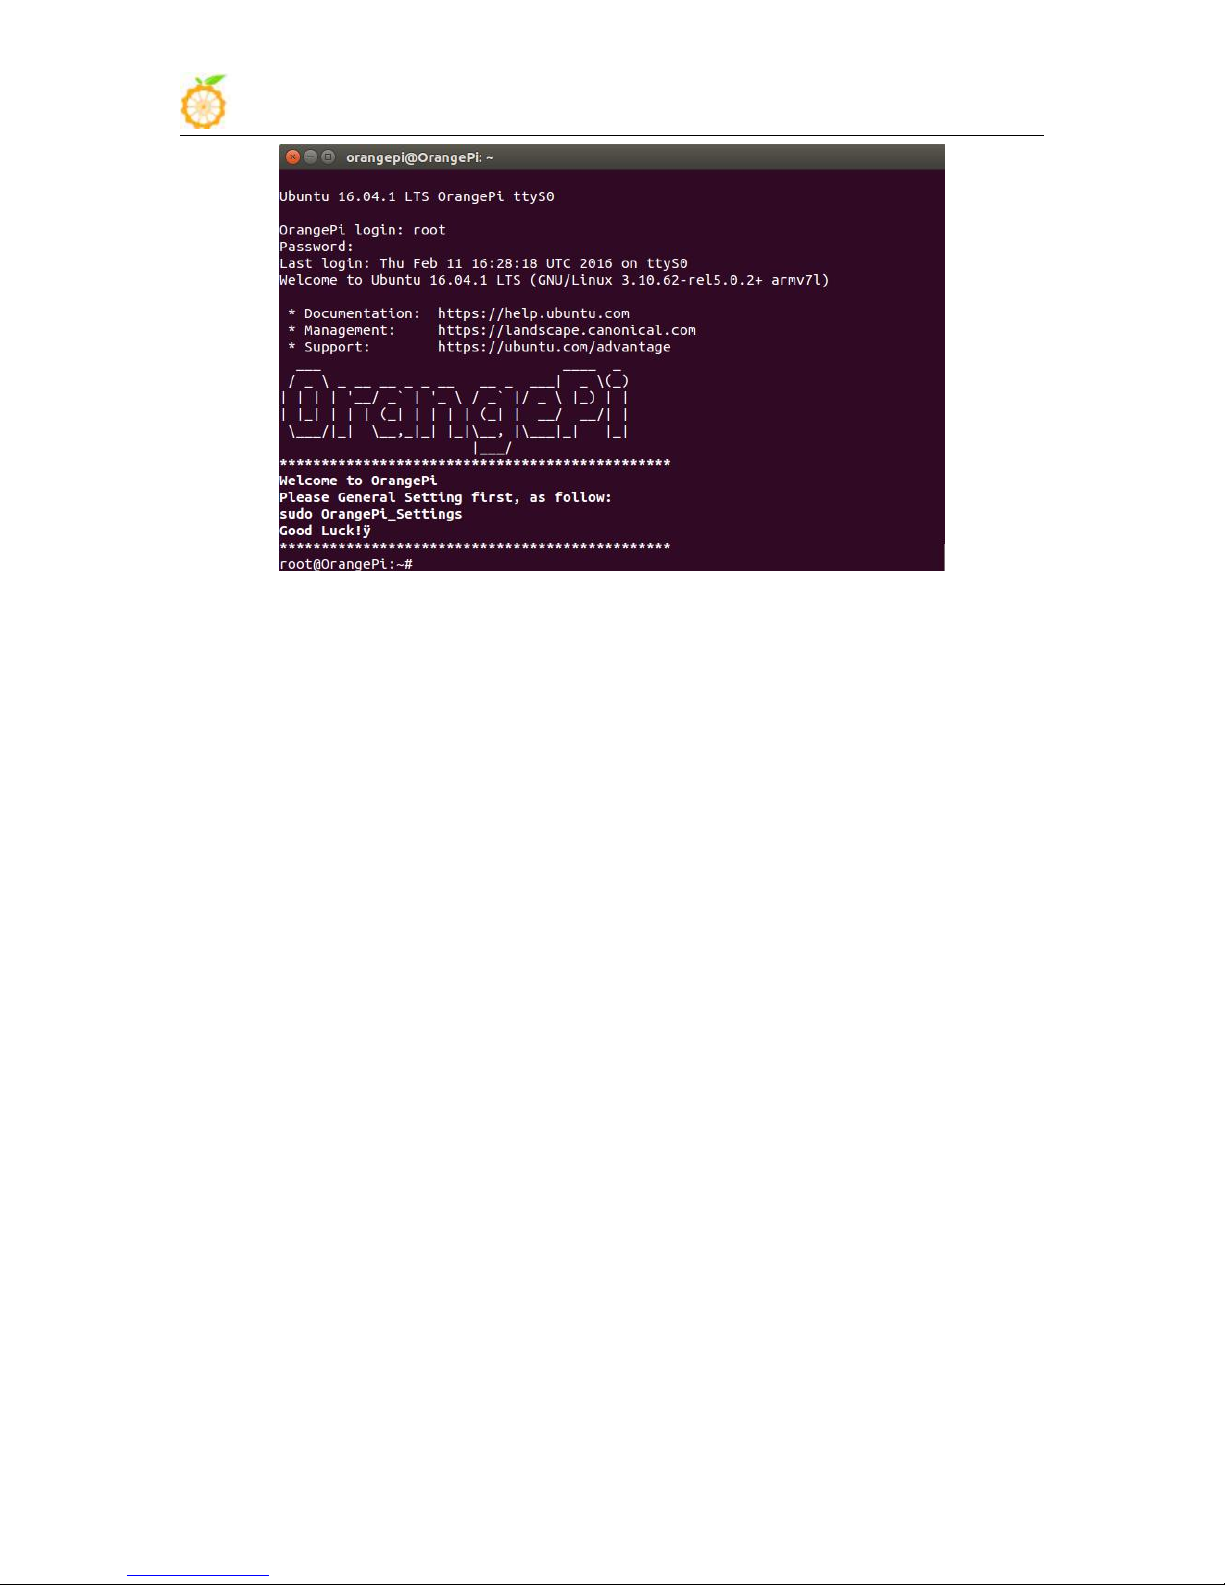
Orange Pi 2G-IOT Linux Dist has debugged to connect network via GSM. You
could first download Linux Dist from official website, Debian, Ubuntu and Raspbian
could support GSM function.
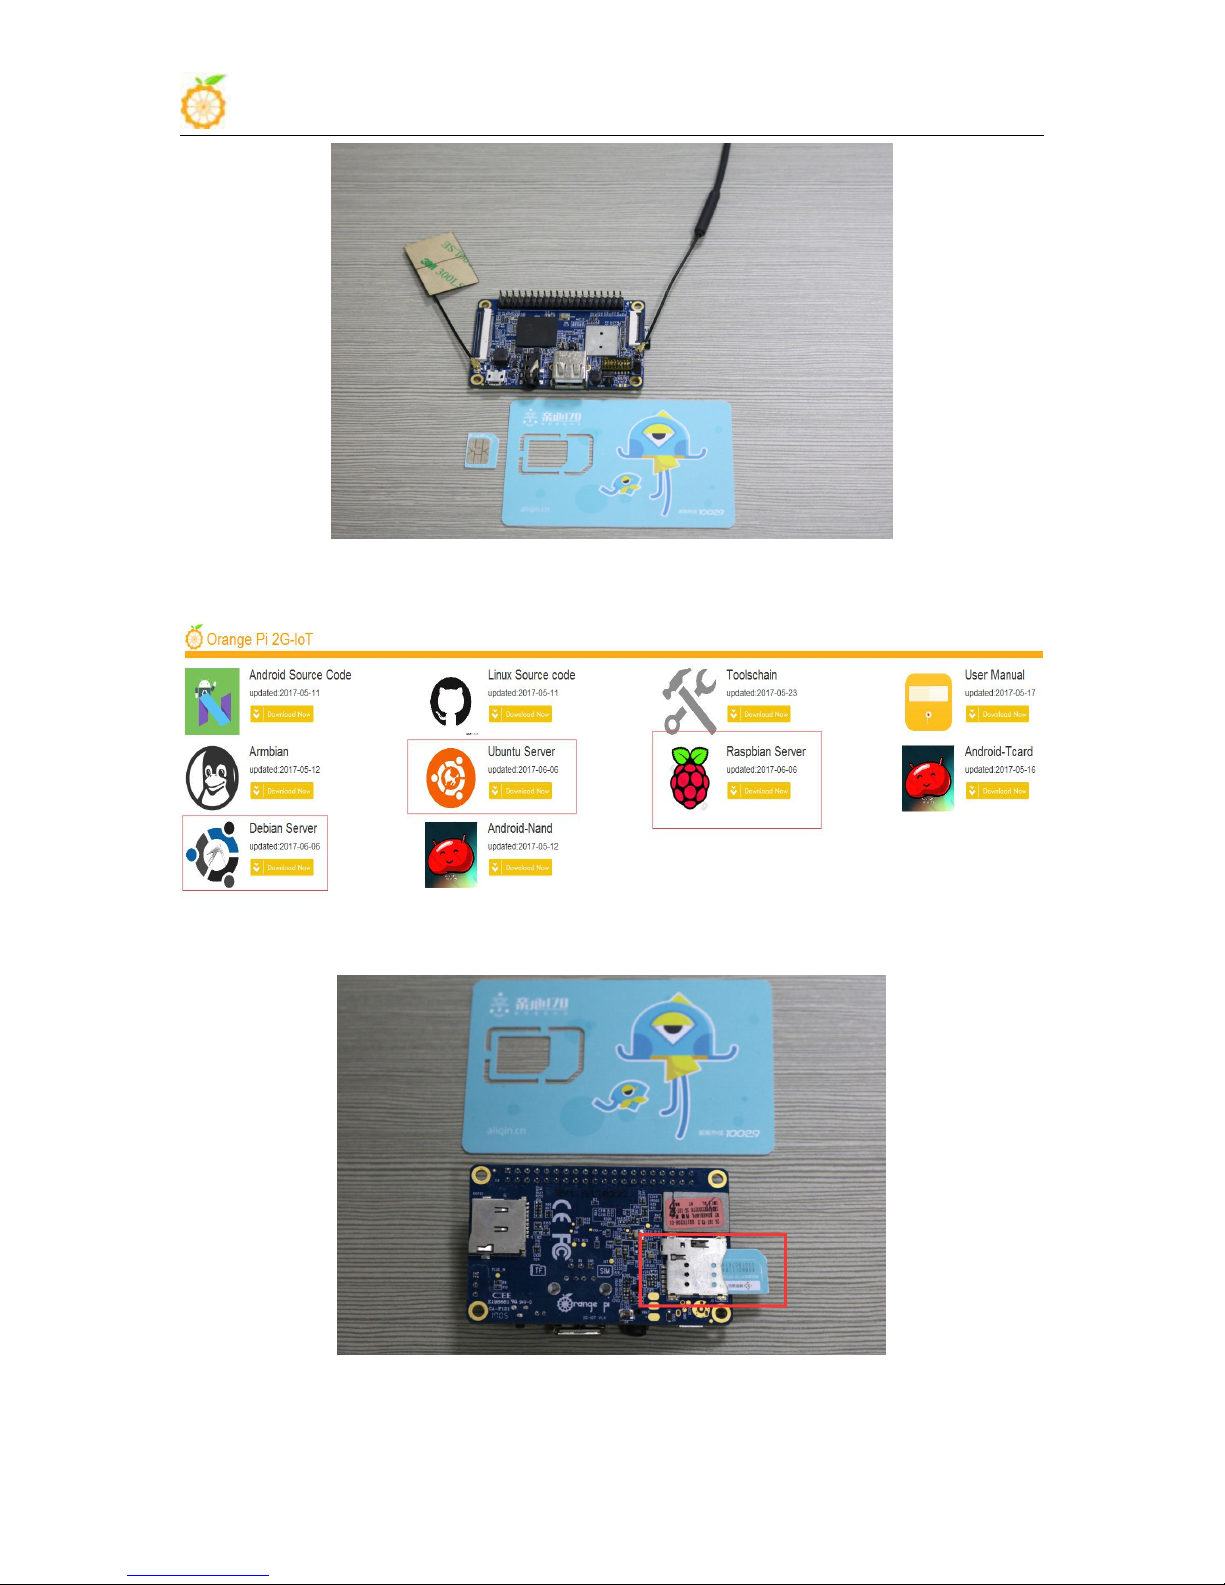
First you need to prepare an activated Micro SIM card, the Orange PI 2G-IOT could
support the following frequency:
Frequency Range:850,900,1800,1900
Standard: GSM800
The phone card we used is launched by China Unicom and Alibaba Group.
www.orangepi.org www.xunlong.tv
Page 54
Orange Pi 2G-IOT User Manual Copy right by Shenzhen Xunlong Software Co., Ltd
52
Download Linux Dist from official website: http://www.orangepi.org/downloadresources/
Download and write image into SD card, then insert SD card and SIM card into the board.
You could login the system via serial port and SSH. If via serial port, please remember to set the
baud rate into 921600.
www.orangepi.org www.xunlong.tv
Page 55
Orange Pi 2G-IOT User Manual Copy right by Shenzhen Xunlong Software Co., Ltd
53
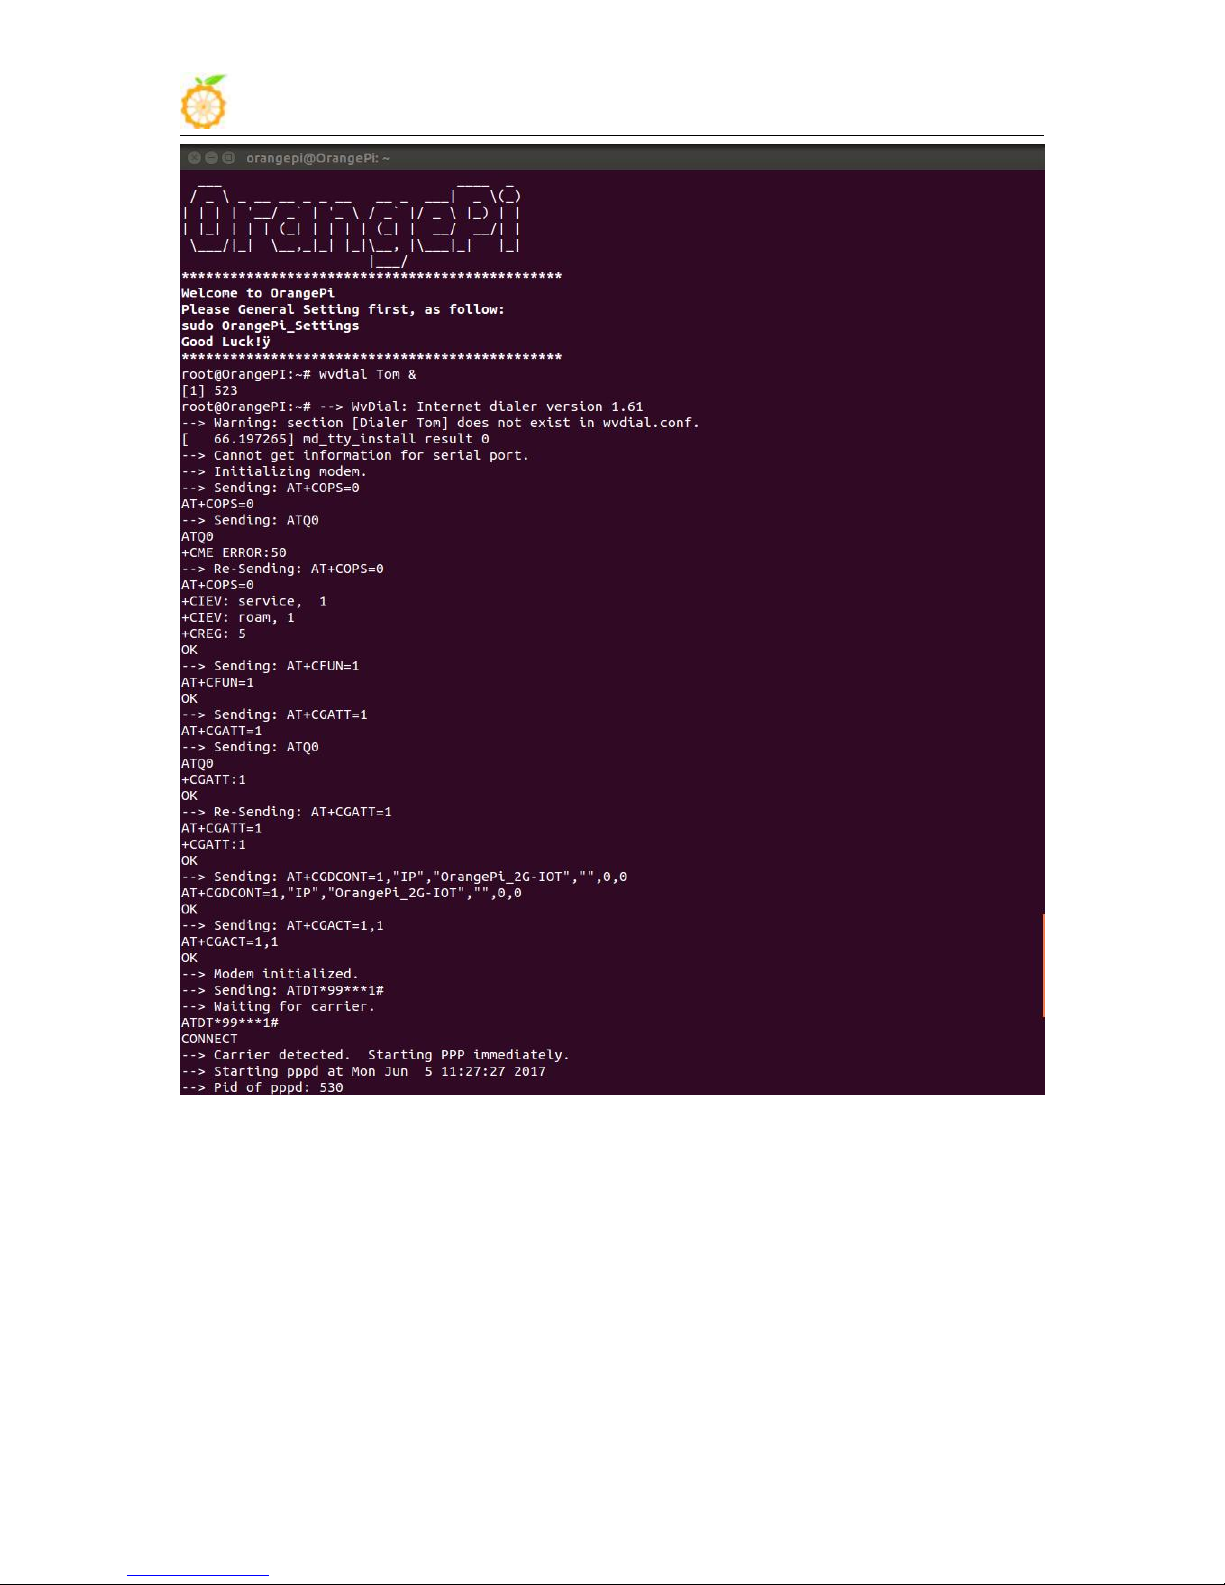
Execute the following command after power on and login to ppp dial up.
wvdia Tom &
This command will run at the backstage for dial up, after dial-up access, you could
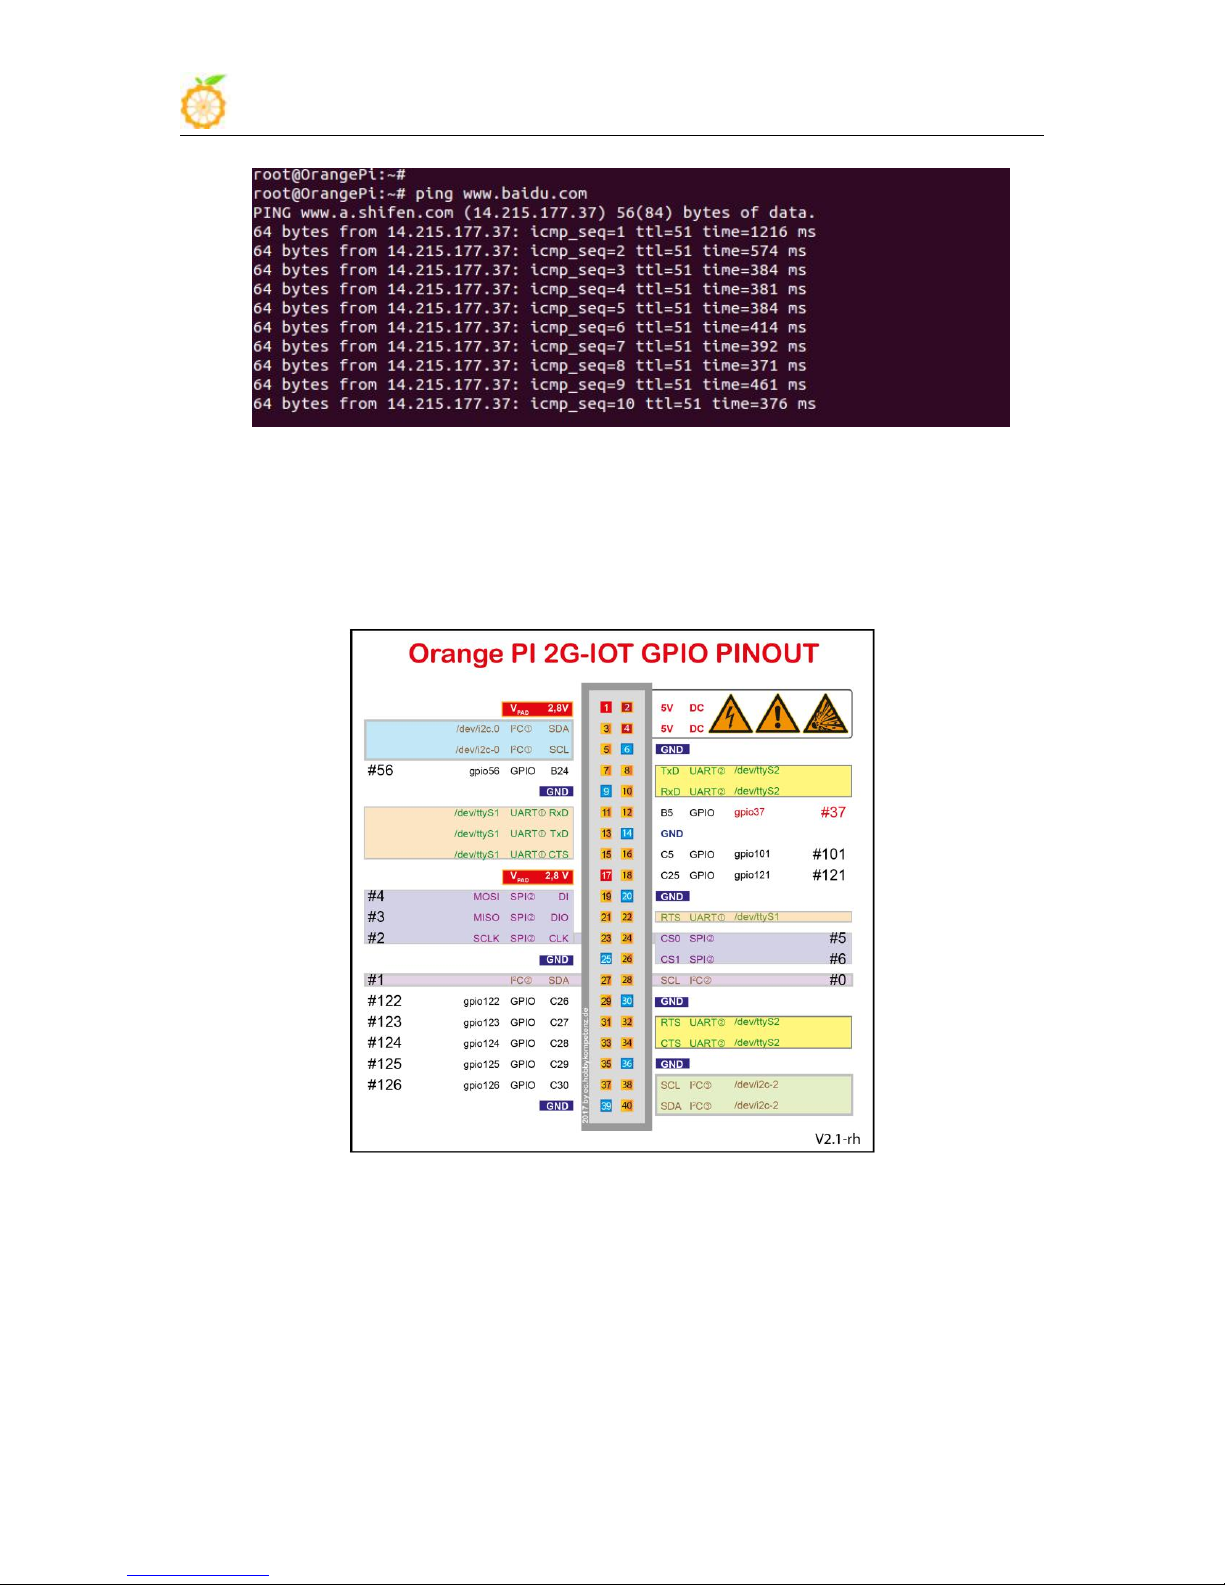
use ping and ifconfig to check the network. If network connect successful, then you could
use GSM to connect network.
www.orangepi.org www.xunlong.tv
Page 56
Orange Pi 2G-IOT User Manual Copy right by Shenzhen Xunlong Software Co., Ltd
54
www.orangepi.org www.xunlong.tv
Page 57
Orange Pi 2G-IOT User Manual Copy right by Shenzhen Xunlong Software Co., Ltd
55
www.orangepi.org www.xunlong.tv
Page 58
Orange Pi 2G-IOT User Manual Copy right by Shenzhen Xunlong Software Co., Ltd
56
III. Source Code Compilation of Android and Linux
1. Install JDK
Download and unzip JDK, you will get jdk-6u31-linux-x64.bin, copy it to the
Modify the permission of jdk-6u31-linux-x64.bin with following command:
Install jdk1.6
Configuration multi Java version coexistence mode with the following
Hardware: Orange Pi development board*1, Card reader*1, TF card*1, power supply*1
Software: Linux host computer, which hard disk space at least 50G (to meet a fully
compiled need)
Linux host computer needs:
Version 2.7.3 of Python;
Version 3.81-3.82 of GNU Make;
JDK1.6;
Version 1.7 or higher version of Git.
directory of /opt
sudo chmod 755 jdk-6u31-linux-x64.bin
/jdk-6u31-linux-x64.bin
command:
sudo update-alternatives --install /user/bin/java java /opt/jdk1.6.0_31/bin/java 300
sudo update-alternatives --install /user/bin/javap javap /opt/jdk1.6.0_31/bin/javap 300
sudo update-alternatives --install /user/bin/javac javac /opt/jdk1.6.0_31/bin/javac 300
sudo update-alternatives --install /user/bin/jar jar /opt/jdk1.6.0_31/bin/jar 300
sudo update-alternatives --install /user/bin/javaws javaws /opt/jdk1.6.0_31/bin/javaws
300
sudo update-alternatives --install /user/bin/javapdoc javadoc /opt/jdk1.6.0_31/bin/javadoc
www.orangepi.org www.xunlong.tv
Page 59
Orange Pi 2G-IOT User Manual Copy right by Shenzhen Xunlong Software Co., Ltd
57
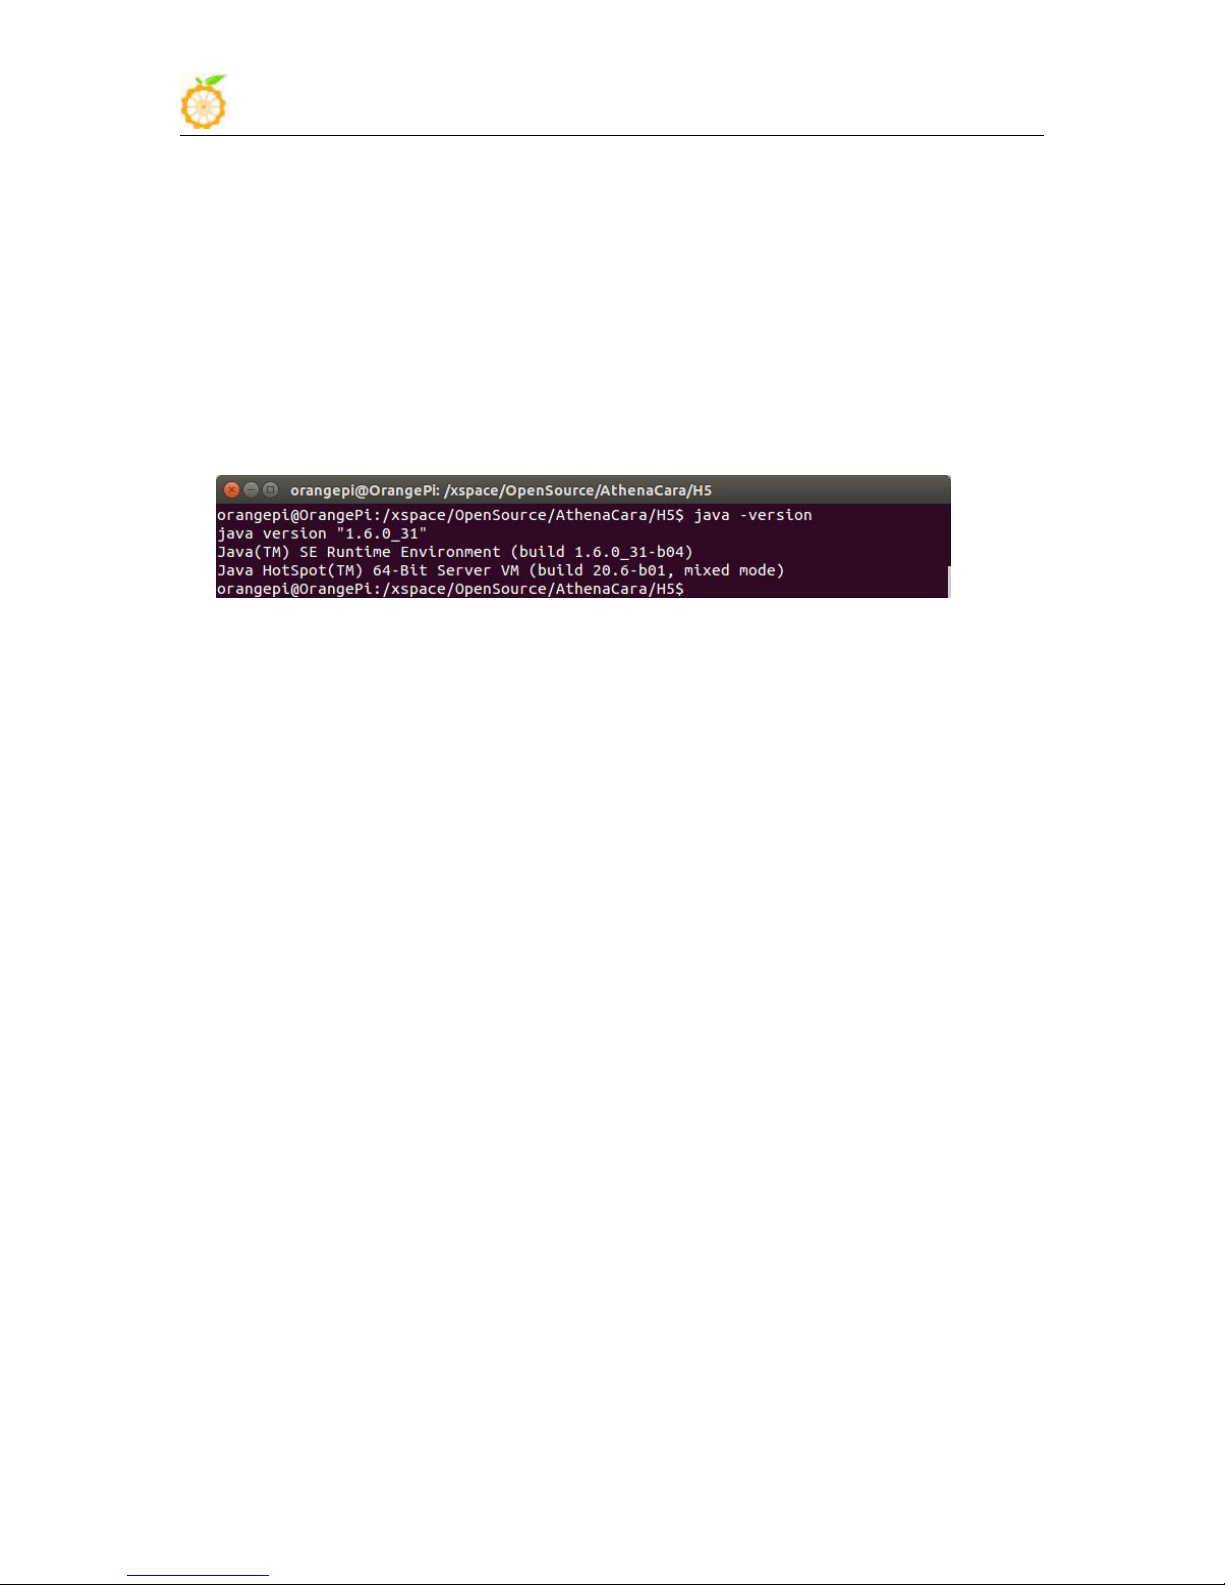
Switch to java version and select version 1.6, use the following command:
After confirmed it is version 1.6, you could use the following command:
2. Install Platform Supported Software
3. Download the Source Package and Unzip it
4. Android source code compiler
300
sudo update-alternatives --config java
sudo update-alternatives --config javac
sudo update-alternatives --config jar
sudo update-alternatives --config javap
sudo update-alternatives --config javaws
sudo update-alternatives --config javadoc
java -version
$ sudo apt-get install git gnupg flex bison gperf build-essential \
zip curl libc6-dev libncurses5-dev:i386 x11proto-core-dev \
libx11-dev:i386 libreadline6-dev:i386 libgl1-mesa-glx:i386 \
libgl1-mesa-dev g++-multilib mingw32 tofrodos \
python-markdown libxml2-utils xsltproc zlib1g-dev:i386
$ sudo ln -s /usr/lib/i386-linux-gnu/mesa/libGL.so.1/usr/lib/i386-linux-gnu/libGL.so
Download website: http://www.orangepi.org/downloadresources/
Downloaded source package and use the following command:
$cat OrangePi_2G-IOT* > tar.tar.gz
$ tar –xvzf tar.tar.gz
Unzip the file you will get the trunk directory, enter it via the terminal.
Before compiling Android source code, please make sure you have already installed
JAVA 1.6 version, if not, please refer to previous charter to install first. After you install
jave 1.6 successfully, you could begin to compile Android source code.
Before compile Android source code, you need to first compile modem kernel for
both Tcard Startup and Nand Startup. modem kernel is misp framework, you need to use
corresponding cross compilation tool.Youo could use the following command to unzip
the cross compilation tool file:
www.orangepi.org www.xunlong.tv
Page 60

Orange Pi 2G-IOT User Manual Copy right by Shenzhen Xunlong Software Co., Ltd
58
Select source code:
Import development variables
Select project
Compile system
Update image if boot from TF card
Nand update
$ tar -xvjf OrangePi_Doc.tar.bz2
$ cd Platform/RDA/modem-cross
$ tar -xvzf modem-cross-compiler-linux.tar.gz
$ cd cross-compiler
After you get the corresponding tool, install the cross compilation tool of modem as
the following steps:
Step 1: Cross-Compiler Installation
$ sudo tar -xzf ~/modem-cross-compiler-linux.tar.gz -C /opt
$ ls /opt/cross-compiler
$ sudo chown -R root:root /opt/cross-compiler
$ sudo chmod +x /opt/cross-compiler/bin/*
Step 2: Environment Configuration
$ sudo sh -c 'echo export PATH=$PATH:/opt/cross-compiler/bin >
/etc/profile.d/cross-compiler.sh'
$ sudo sh -c 'echo /opt/cross-compiler/lib > /etc/ld.so.conf.d/cross-compiler.conf'
$ sudo ldconfig -v
$ sudo ldconfig -v | grep '/opt/cross-compiler/lib'
$ mips-elf-gcc -v
Use command to switch to Android source code:
cd */trunk/
$ source build/envsetup.sh
$ lunch
If boot from TF card, select slt-userdebug, then select NollecA9V2VV8810P_ext4
If boot from Nand, select etu-userdebug, then select NollecA9V2VV8810P
$ make –j
After compile Android source code for booting from TF card, you will get a new image
on the directory of:
*/trunk/out/target/product/slt**/
And use the following commands to update it:
sudo dd if=bootloader.img of=/dev/sdc bs=512 seek=256 count=4096 && sync
sudo dd if=modem.img of=/dev/sdc bs=512 seek=12544 count=8192 && sync
sudo dd if=boot.img of=/dev/sdc bs=512 seek=20736 count=16384 && sync
sudo dd if=recovery.img of=/dev/sdc bs=512 seek=37120 count=20480 && sync
sudo dd if=system.ext4.img of=/dev/sdc bs=512 seek=57600 count=512000 && sync
sudo dd if=vendor.ext4.img of=/dev/sdc bs=512 seek=569600 count=512000 && sync
/dev/sdc is the mounted number on system of SD card.
www.orangepi.org www.xunlong.tv
Page 61
Orange Pi 2G-IOT User Manual Copy right by Shenzhen Xunlong Software Co., Ltd
59
5. Compile Linux source Code
Download Linux source code
Compile source code
There will be corespondent image on the directory of */trunk/out/target/product/etu**/
after compilation. Update the image into system with NAND update tool. About the
details steps you could refer to How to update Android Nand in the manual.
Linux source code of Orange Pi 2G-IOT has been updated to github, you could
download from github. Compile Linux would require you work under Linux environment.
We would recommend you use Ubuntu 16.04 of Linux PC.
You could download Linux source code from github:
https://github.com/OrangePiLibra/OrangePi
You could also use git command to update:
git clone https://github.com/OrangePiLibra/OrangePi.git
Use the following command to enter into source code directory after you get the source
code:
cd */OrangePi
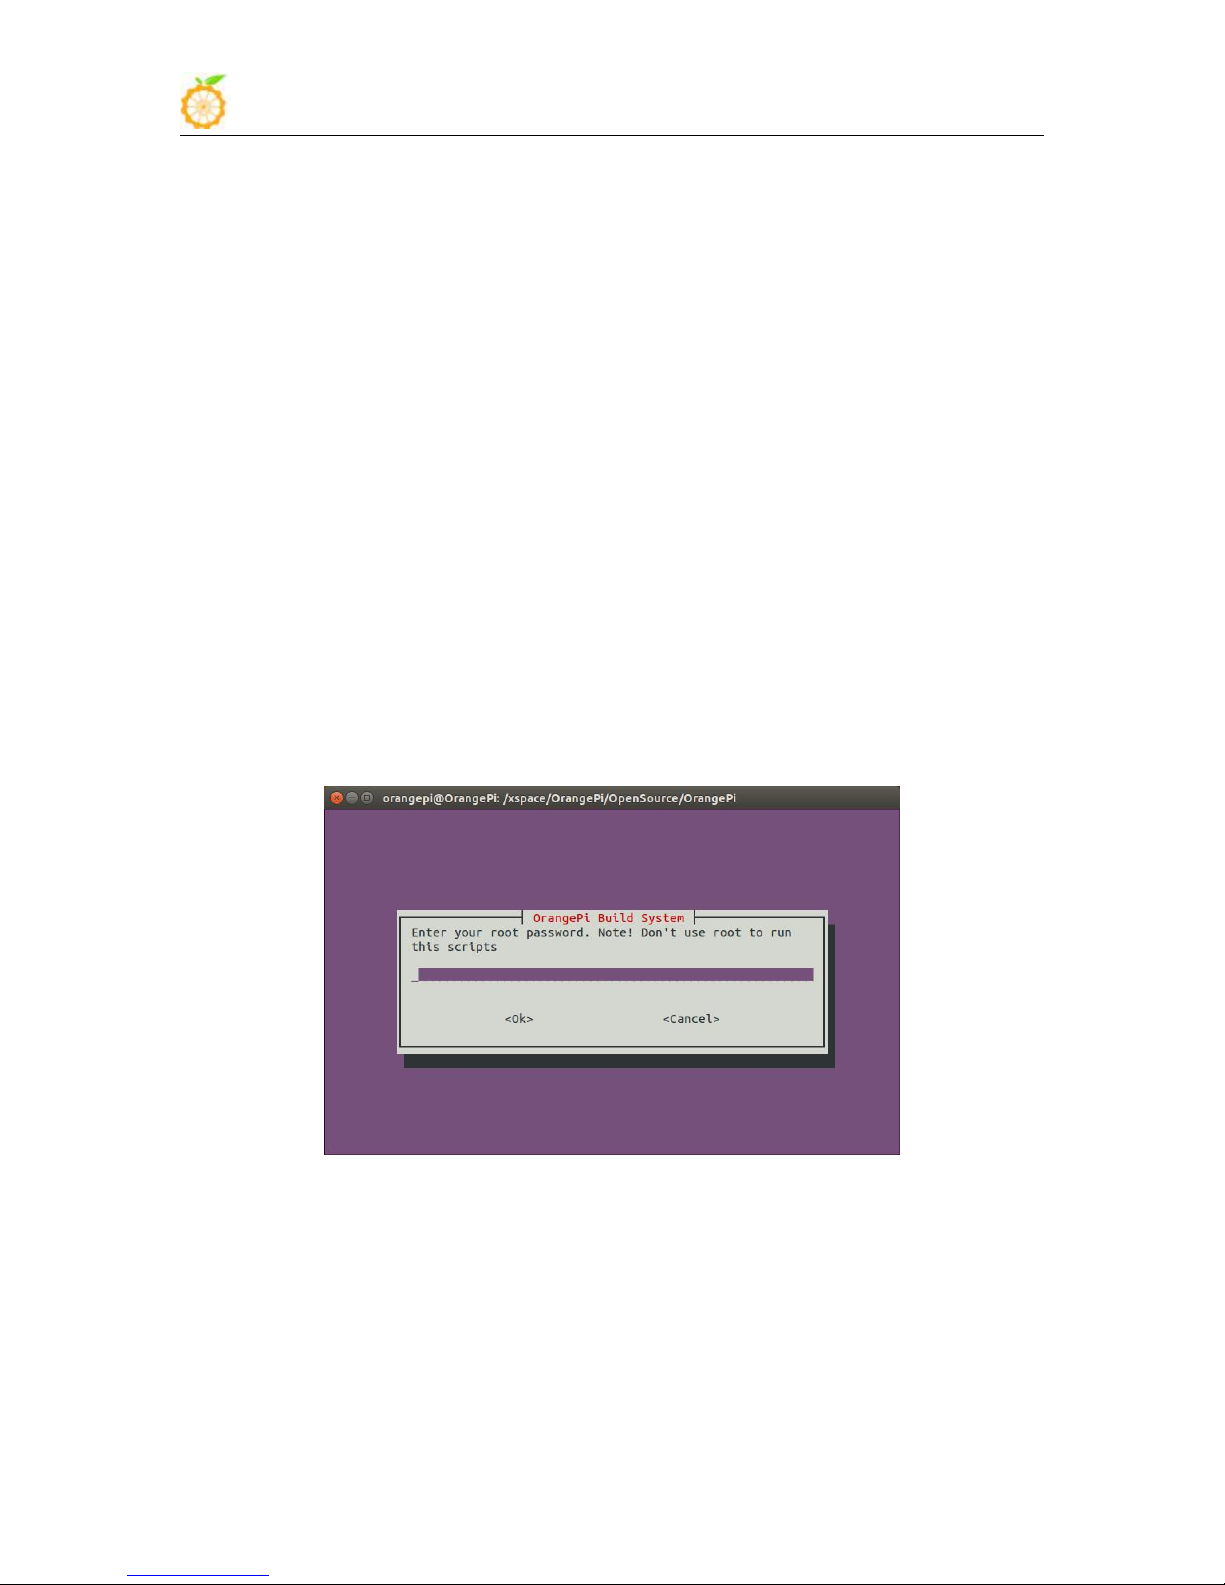
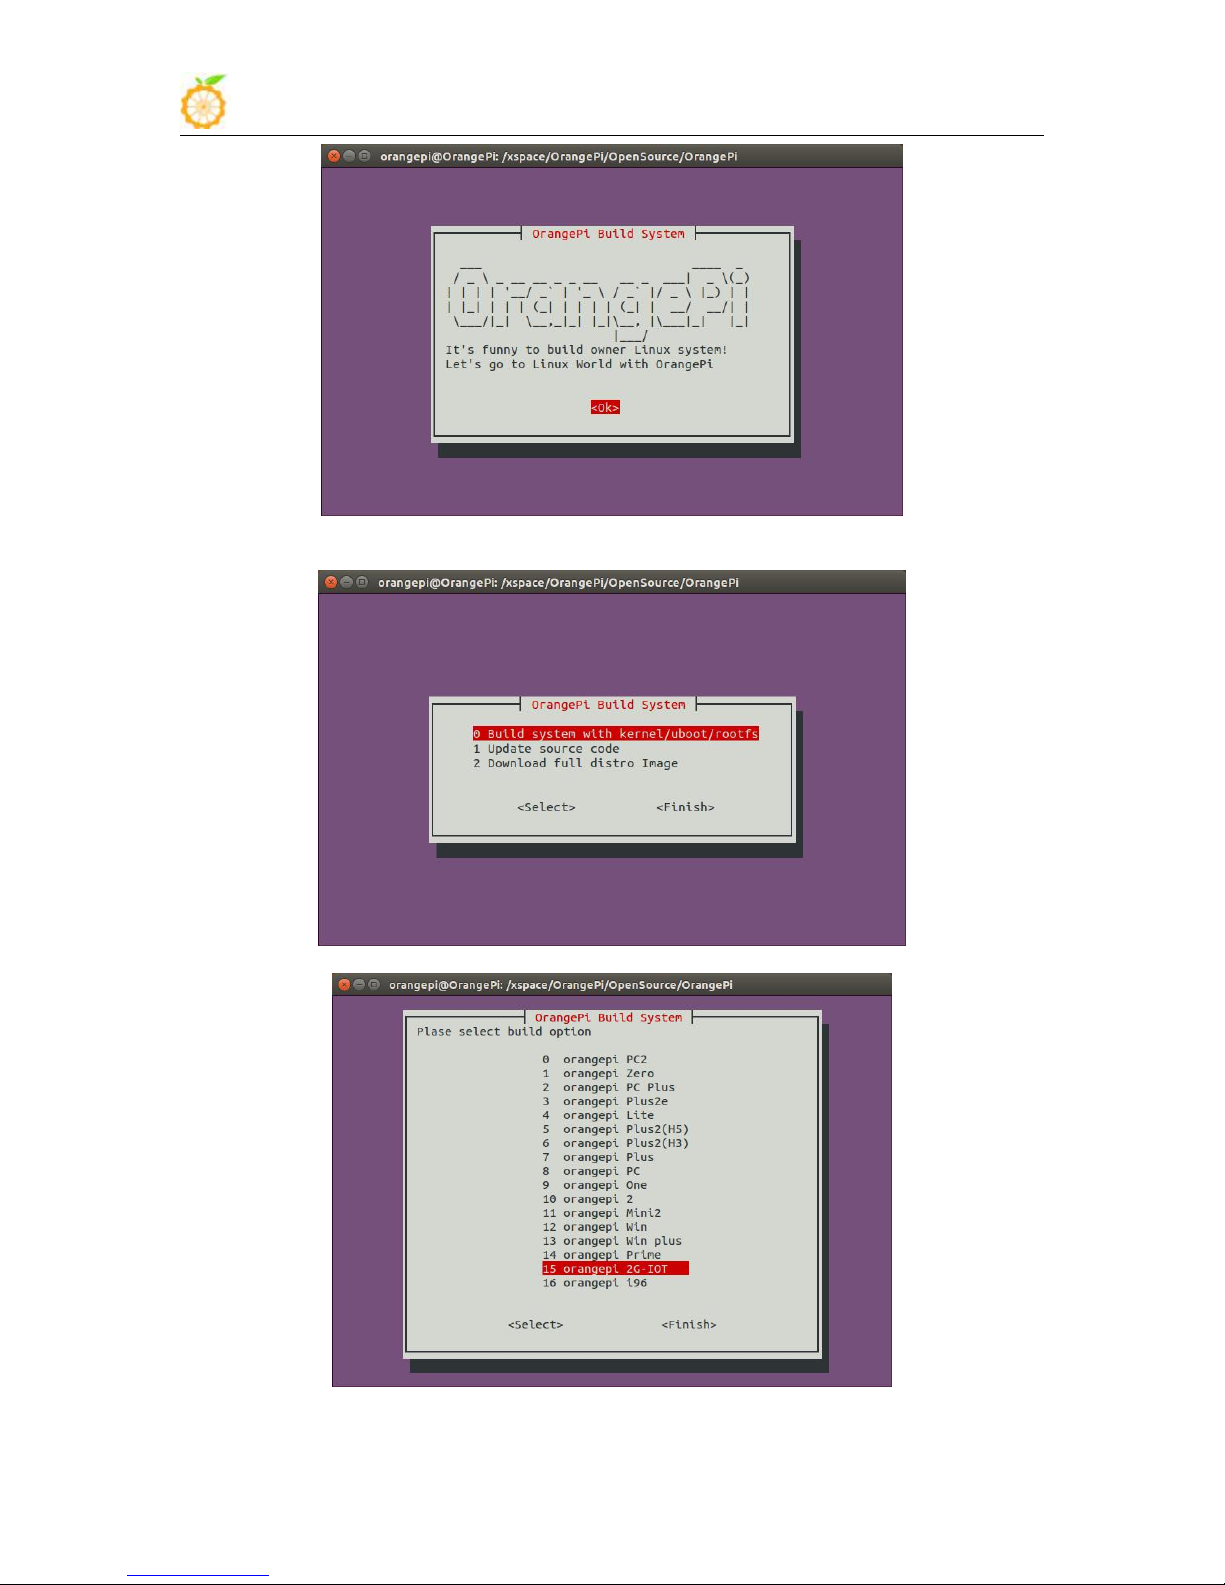
Execute the following script:
./Build_OrangePi.sh
Input root password:
After root password recognize successful, enter inter main interface and use Enter key.
www.orangepi.org www.xunlong.tv
Page 62
Orange Pi 2G-IOT User Manual Copy right by Shenzhen Xunlong Software Co., Ltd
60
Select “Build system with kernel/uboot/rootfs” on main functional interface and use
Enter key.
And then select “OrangePi 2G-IOT” with Enter key to update source code.
www.orangepi.org www.xunlong.tv
Page 63
Orange Pi 2G-IOT User Manual Copy right by Shenzhen Xunlong Software Co., Ltd
61
Compile Linux
It would take around 40minutes to update source code and corresponding scripts.
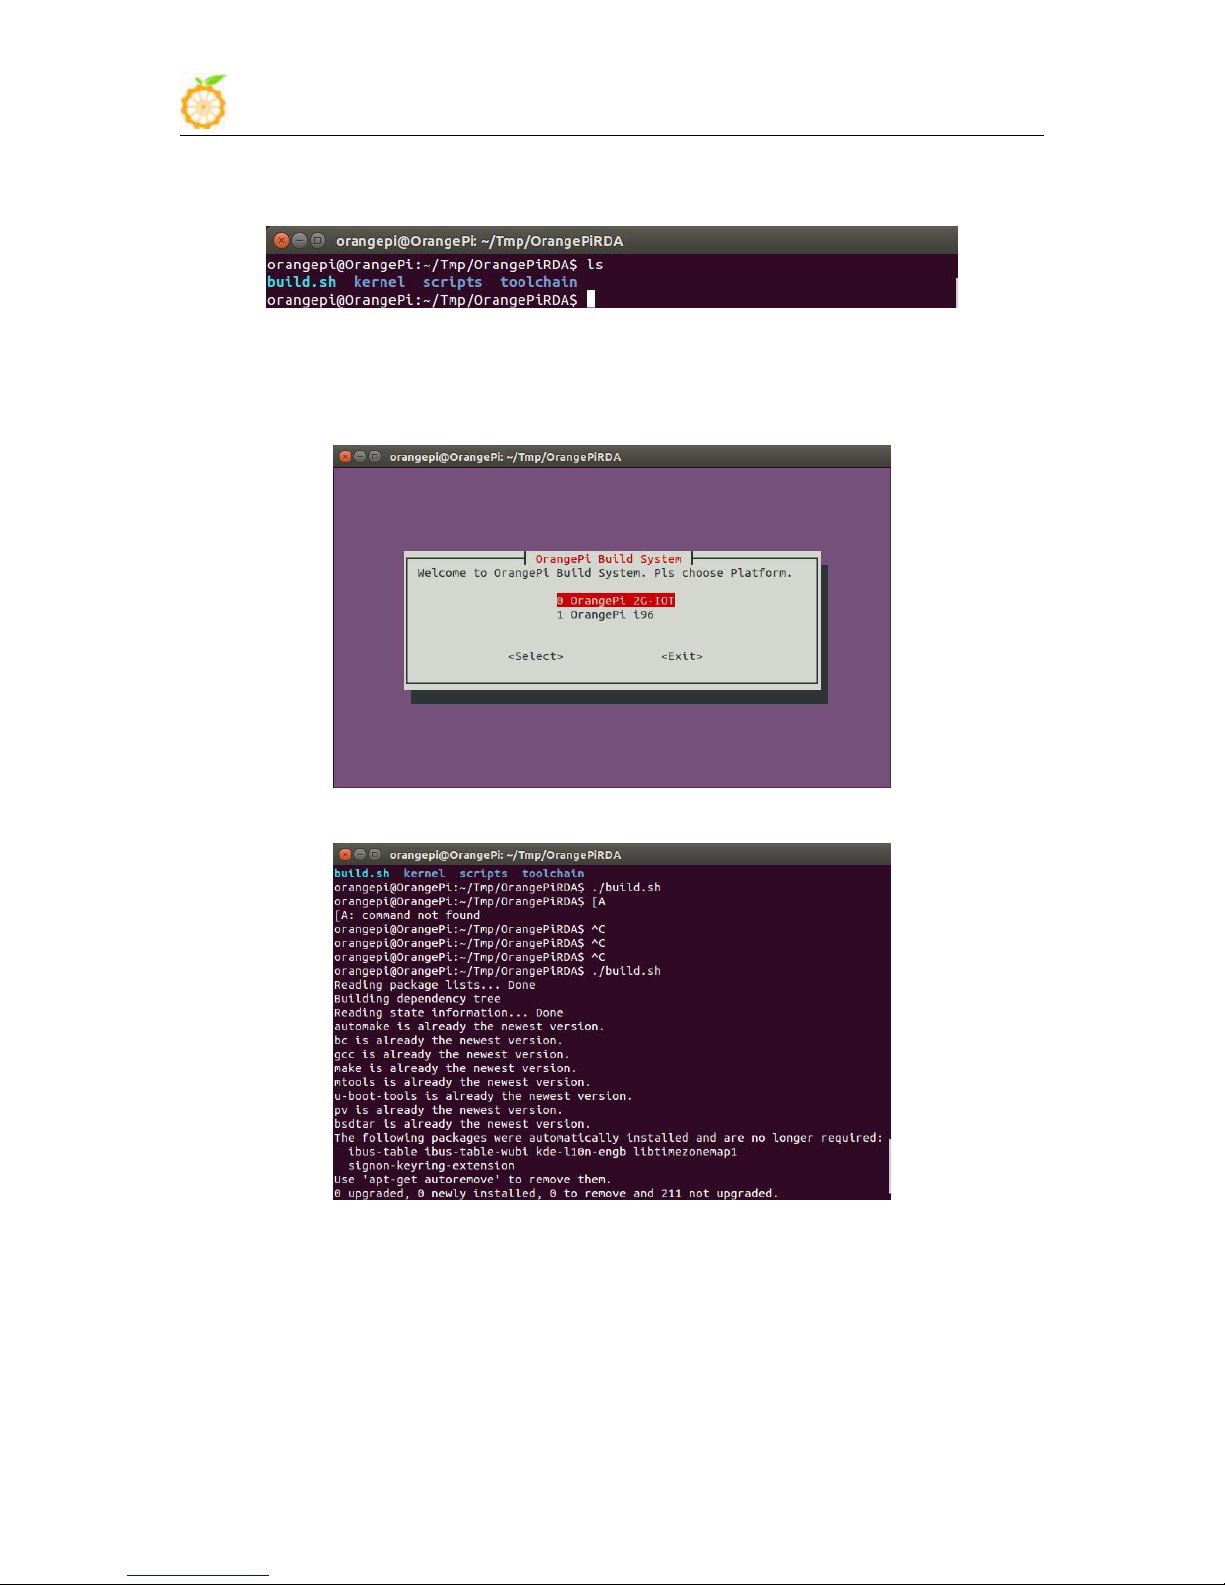
After updated the source code, there will be generated a directory of OrangePiRDA. This
directory contains both Linux source code and scripts:
Execute the following command after enter into directory of OrangePiRDA:
./build.sh
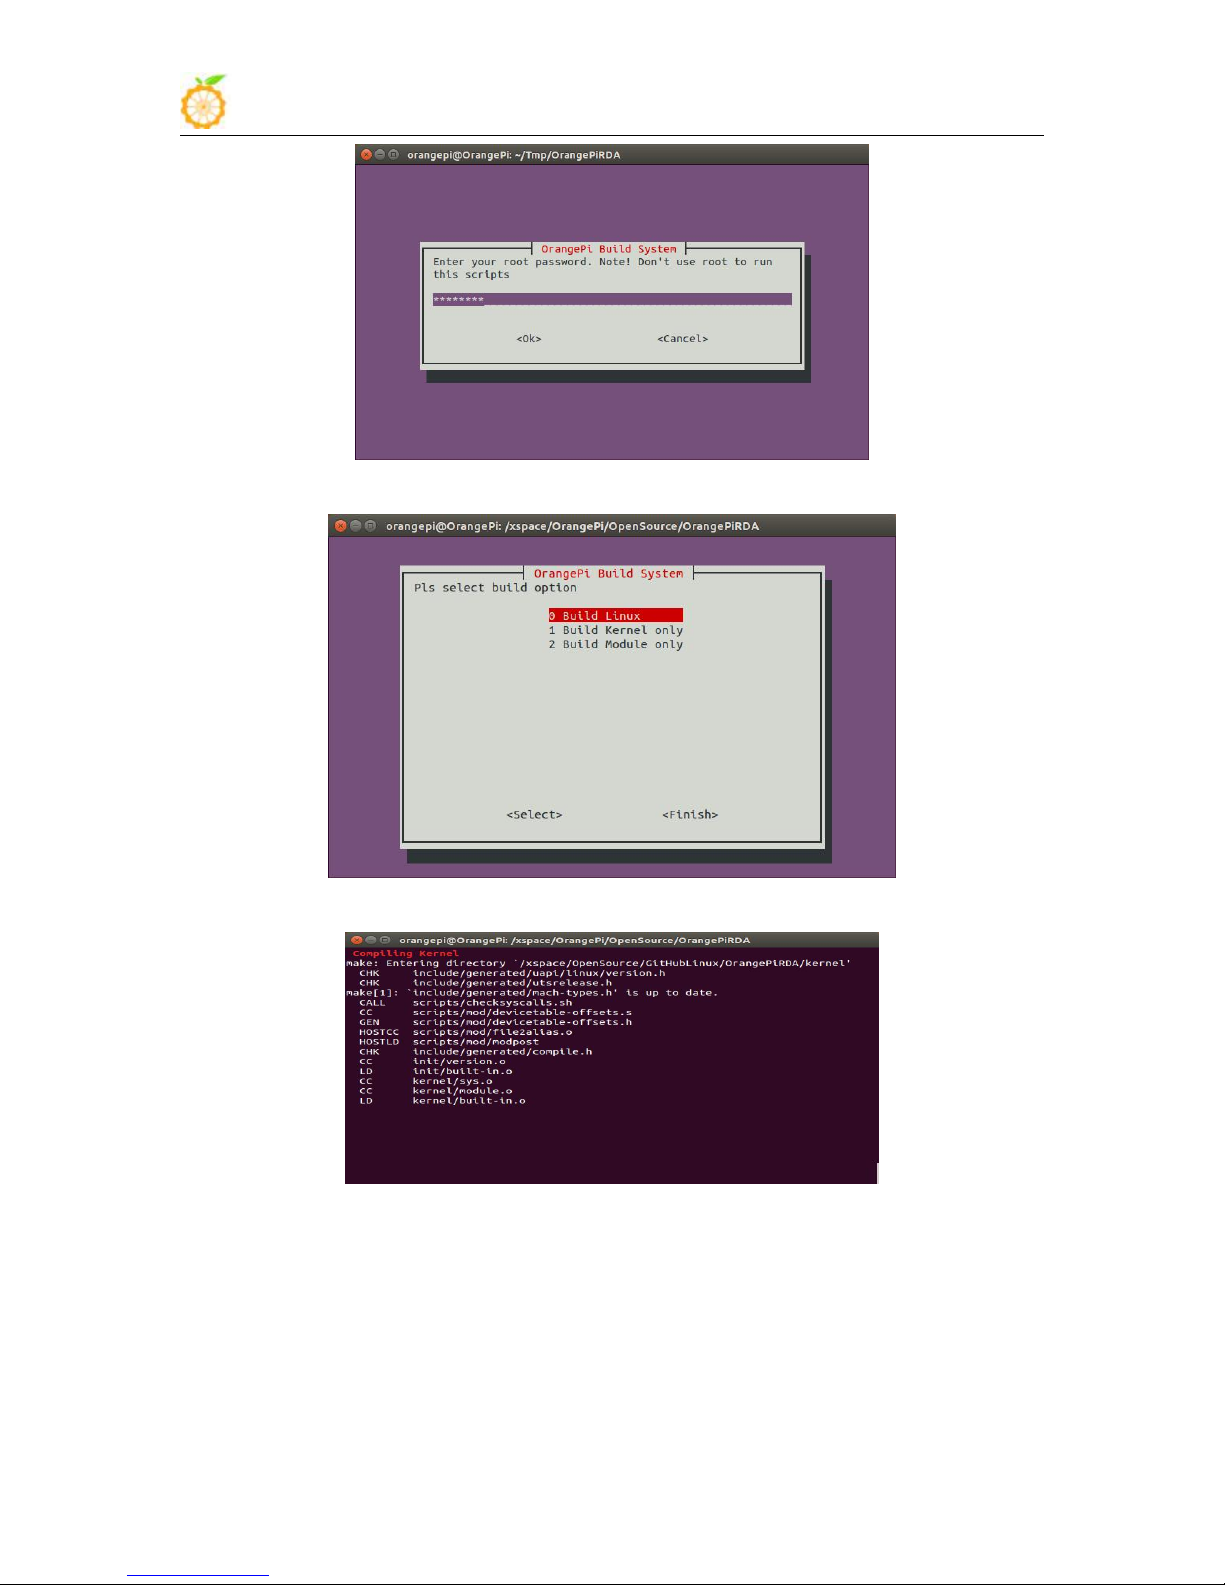
The script is is an automatic script, you could select a corresponding board which
you want to compile, here is “OrangePi 2G-IOT”.
If it is the first time you run the script, the system would install development tool
automatic to make sure the network is connecting.
After installed tool, enter root password and use Enter key.
www.orangepi.org www.xunlong.tv
Page 64
Orange Pi 2G-IOT User Manual Copy right by Shenzhen Xunlong Software Co., Ltd
62
You will enter into the main interface after entering password, select what you are going
to do:
This version is only support the above three options. After selecting the corresponding
option, the system would compile automatically.
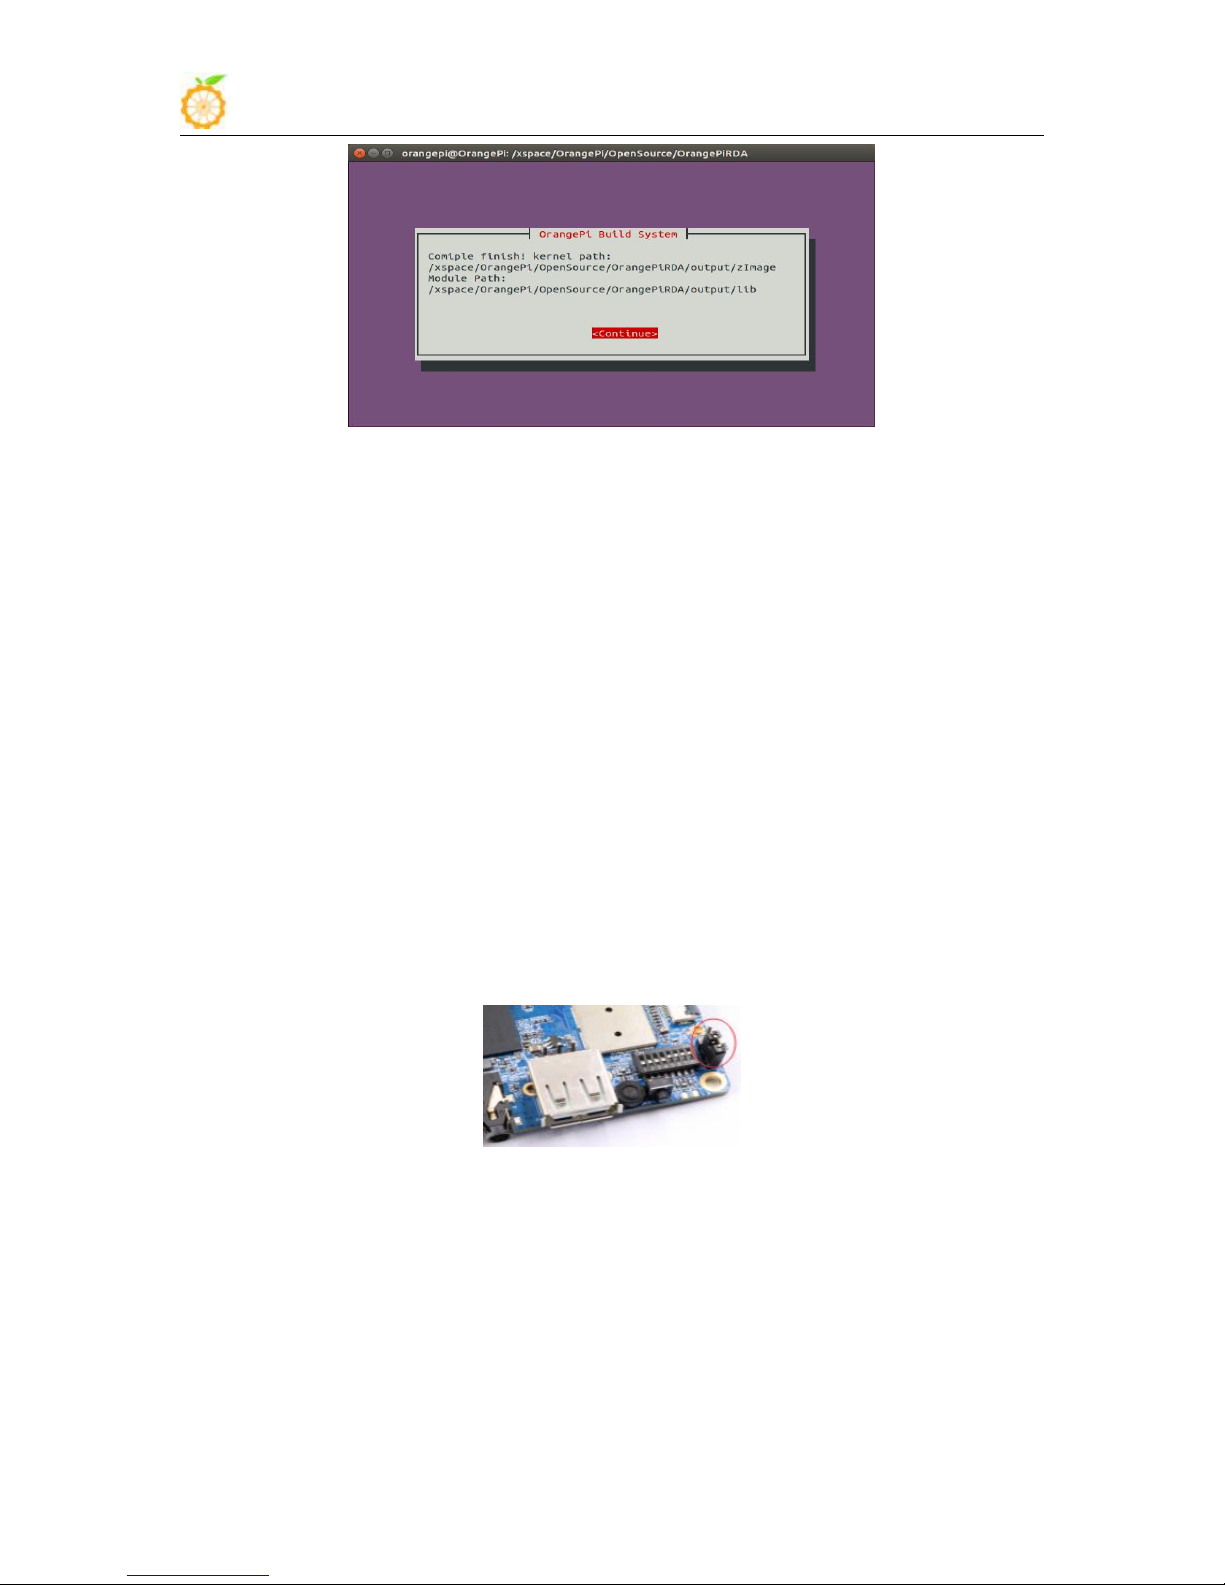
There will be prompt the location of kernel image and module after compilation.
www.orangepi.org www.xunlong.tv
Page 65
Orange Pi 2G-IOT User Manual Copy right by Shenzhen Xunlong Software Co., Ltd
63
Update Linux Kernel and module
After finished the above compilation steps, you could update the new kernel and
module into the board to run it. Before this, you could refer to the charter about Linux
image writing section to write a Linux distro into SD card. After written image, insert SD
card into PC and till now it would recognize there are two partitions, one is boot partition
with file of uboot, kernel and Ramdisk. The other partition is rootfs partion which
contains root file system.
There is already marked the location of generated kernel, you only need to copy the
generated zImage into first partition of SD card and replace zImage inside. Till now the
kernel has been updated.
And there is already marked the location of new generated module, the second SD
card partition is Rootfs partition, you need to have root permission to delete the directory
of rootfs/lib/modules/3.xxx with following command:
sudo rm -rf */rootfs/lib/modules/3.xxx
Copy the new generated module into rootfs partition you need to use the following
command:
sudo cp -rf */OrangePiRDA/output/lib/modules/3.xxx */rootfs/lib/modules/ sync
After all above steps, kernel and module update have been finished.
You could insert SD card into Orange pi, and make the jumper like the following, after
booting, it would enter into Linux.
www.orangepi.org www.xunlong.tv
Page 66
Orange Pi 2G-IOT User Manual Copy right by Shenzhen Xunlong Software Co., Ltd
64
IV. Orange Pi Driver development
1. Device driver and application programming
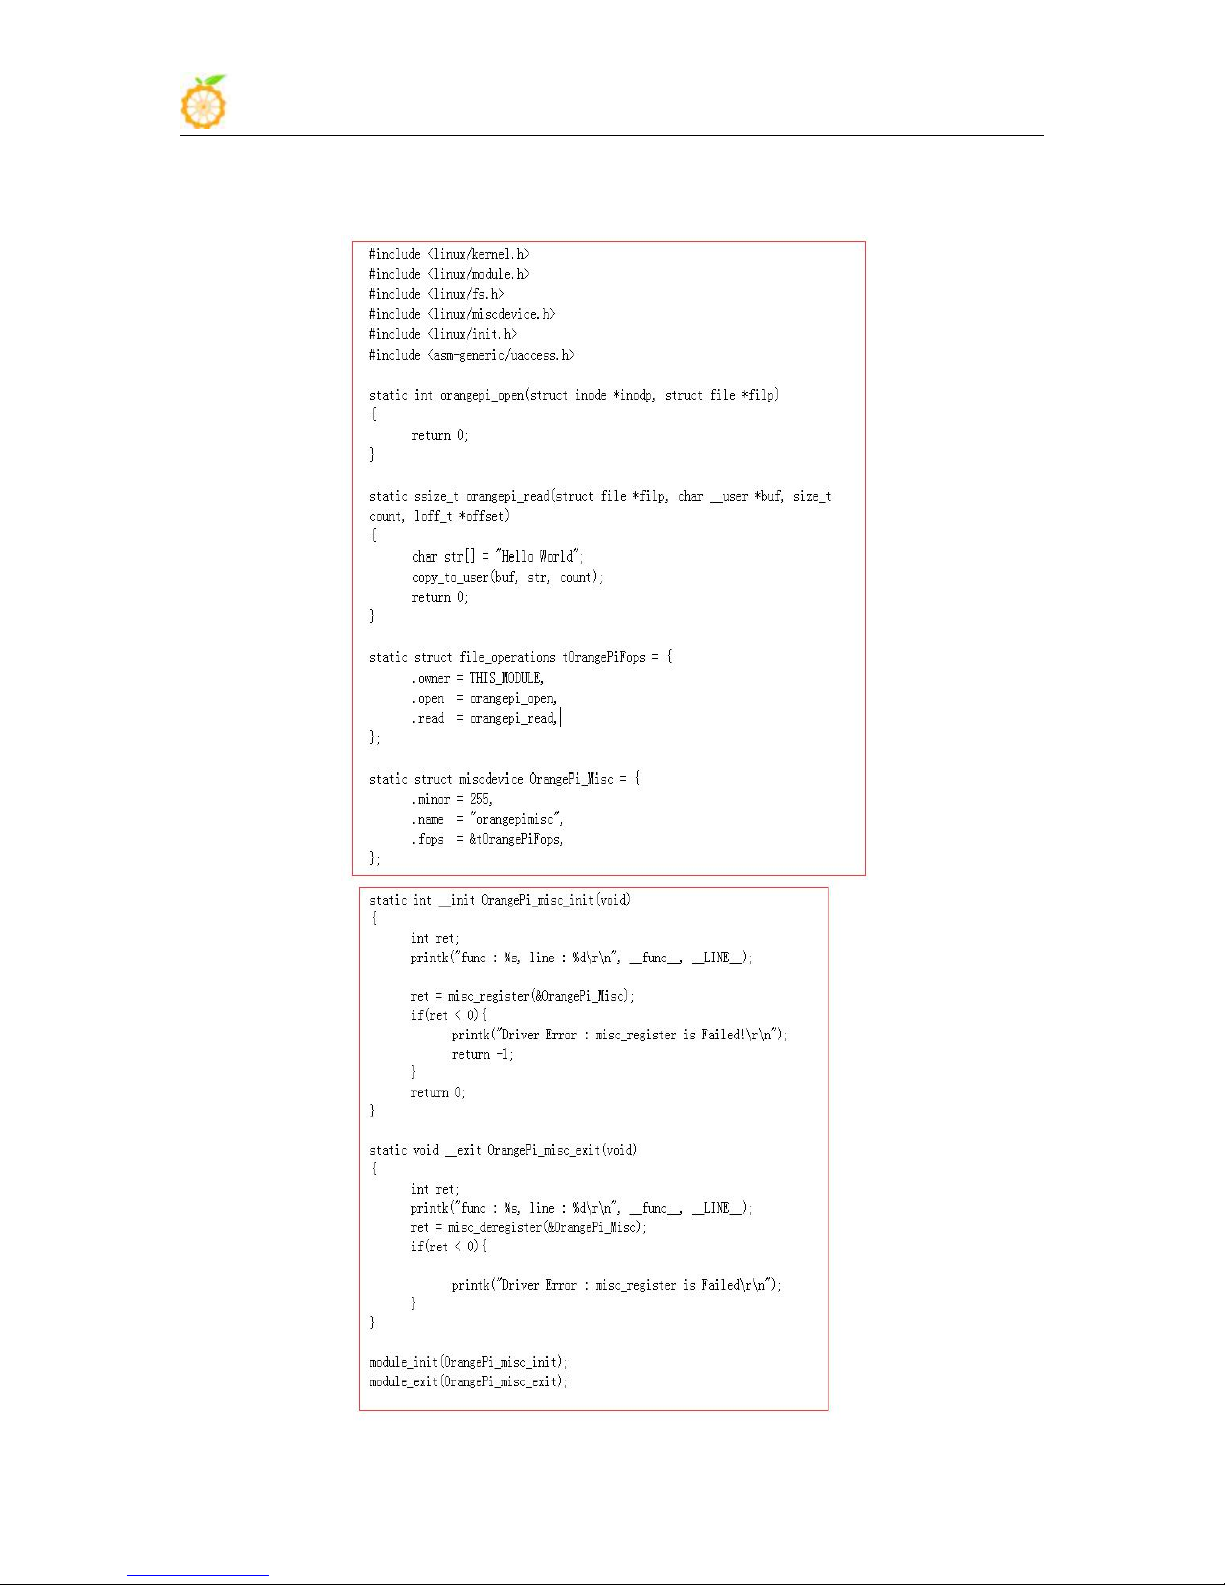
1) Application Program (app.c)
In order to help developers more familiar with Orange Pi, this instruction will make
a brief illustration on device driver module and application program.
Hardware: Orange Pi development board*1, Card reader*1, TF card*1, power supply*1
www.orangepi.org www.xunlong.tv
Page 67
Orange Pi 2G-IOT User Manual Copy right by Shenzhen Xunlong Software Co., Ltd
65
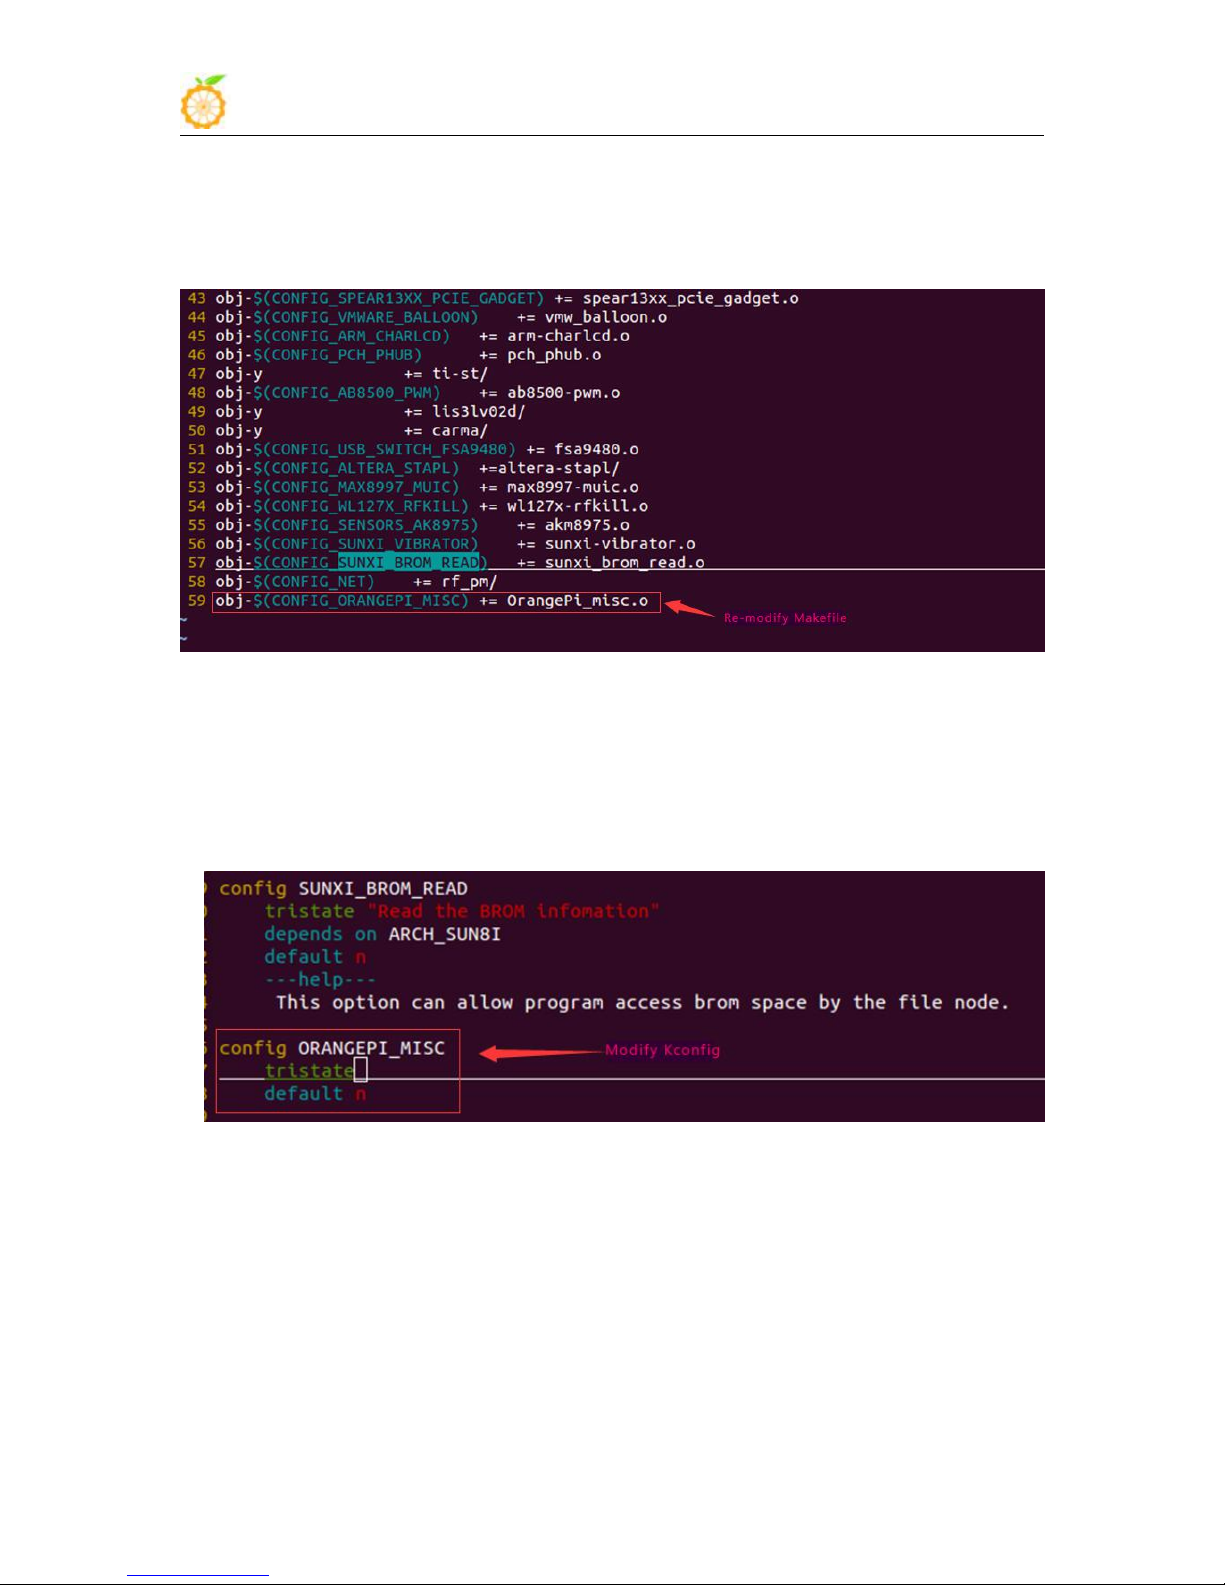
2) Driver Program (OrangePi_misc.c)
www.orangepi.org www.xunlong.tv
Page 68
Orange Pi 2G-IOT User Manual Copy right by Shenzhen Xunlong Software Co., Ltd
66
2. Compile device driver
Copy the OrangePi_misc.c to the */trunk/kernel/driver/misc:
Enter to */trunk/kernel/driver/misc
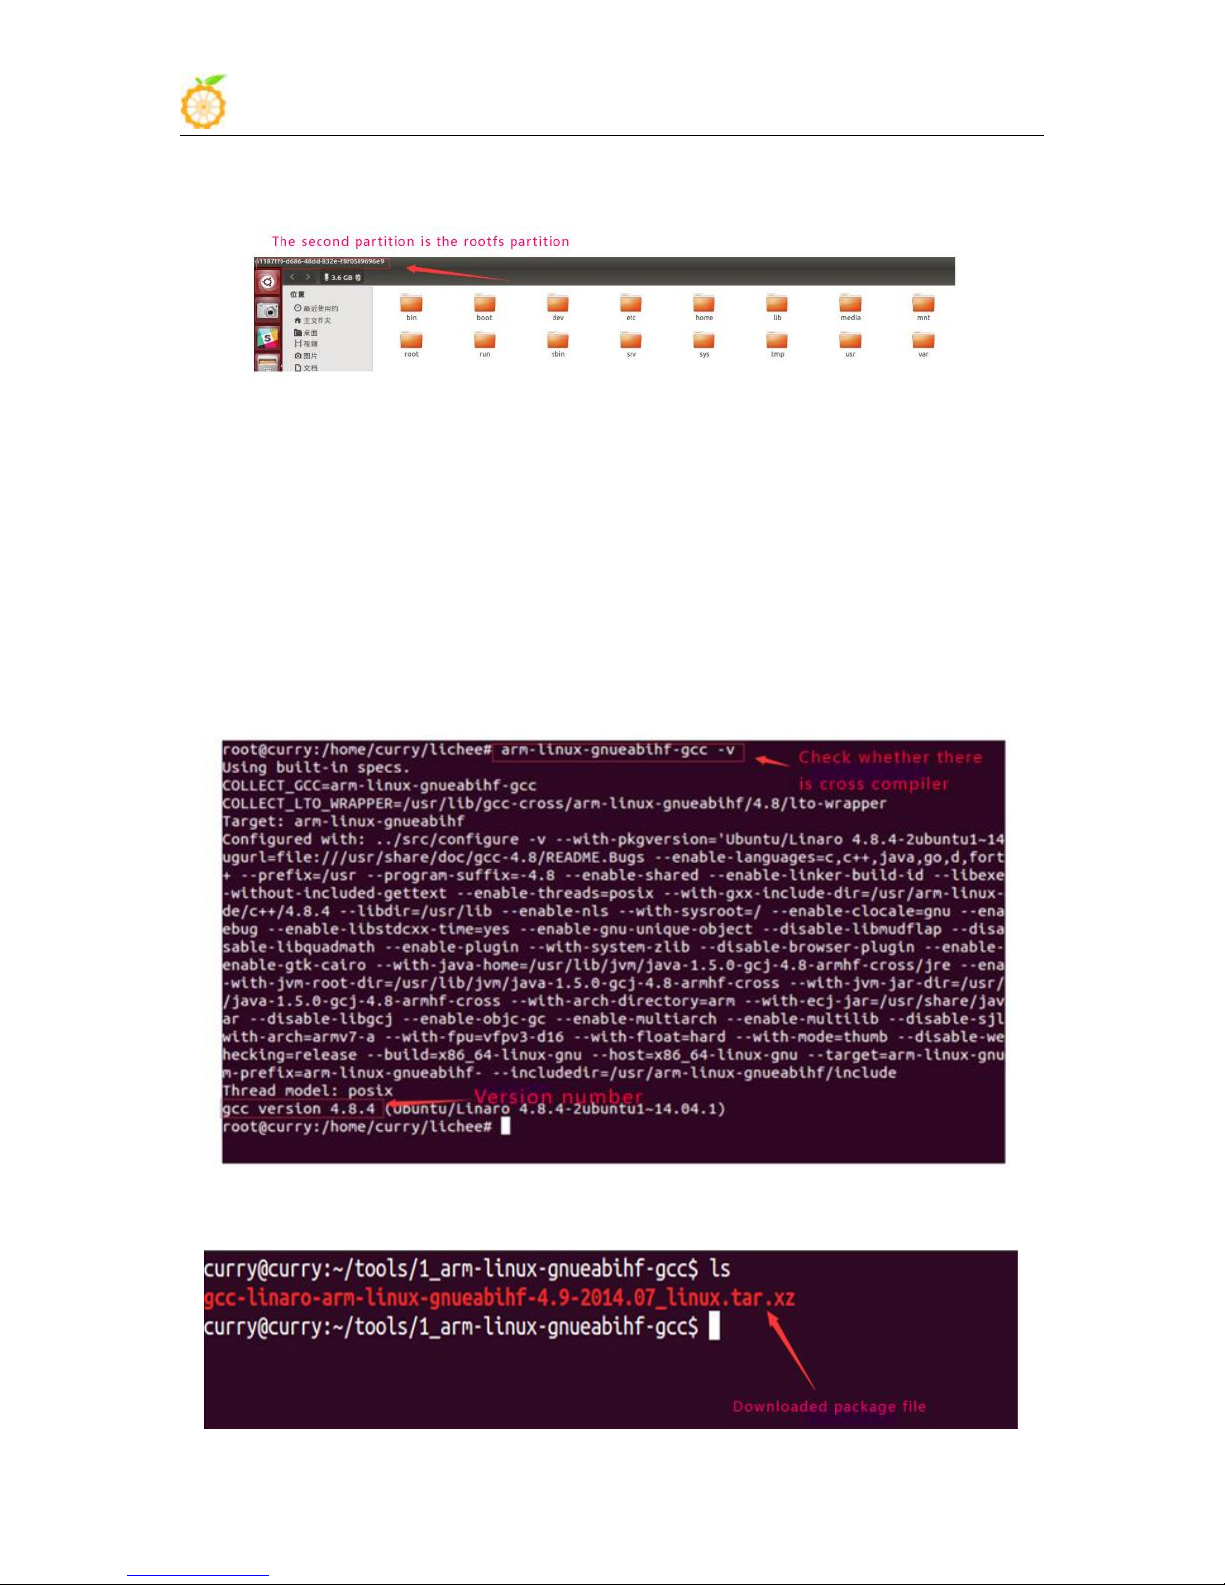
Modify Makefile on currently file, shown as following:
There is Kconfig on the same sibling folders with Makefile. Each Kconfig
respectively describes the the source directory file related kernel configuration menu. In
the kernel configuration making menuconfig, it read from the Kconfig config menu and
the user configuration saved to the config. In the kernel compile, the main Makefile by
calling this.Config could know the user's configuration of the kernel.
Kconfig is corresponding to the kernel configuration menu. Add a new driver to the
kernel source code, you can modify the Kconfig to increase the configuration menu for
your drive, so you can choose whether the menuconfig driver was compiled or not.
Back to the source code directory /trunk:
$ make bootimage
Make sure it have already finished make-engineer-configuration before execute this
command, if not, please refer to last section about Linux source code compilation.
Update the new generated module file into Linux system.
It will show on *cd
/trunk/out/target/product/slt-NollecA9V2VV8810P_ext4/obj/KERNEL/out/target/pr
oduct/slt-NollecA9V2VV8810P_ext4/obj/KERNEL/modules/lib/modules/3.10.62-rel5.0.
2/ generated corresponding .ko file, it is the module that generated after OrangePi_misc.c
compilation.
www.orangepi.org www.xunlong.tv
Page 69
Orange Pi 2G-IOT User Manual Copy right by Shenzhen Xunlong Software Co., Ltd
67
3. Compiling method of application
Insert U disk (please note the SD card should have written image) if the SD card is
mounted to the directory system of /dev/sdc, then SD card will mount to rootfs, which is
/dev/sdc7, and mounted to rootfs partition automatic.
Copy the directory file:
/trunk/out/target/product/slt-NollecA9V2VV8810P_ext4/obj/KERNEL/out/target/product
/slt-NollecA9V2VV8810P_ext4/obj/KERNEL/modules/lib/modules/3.10.62-rel5.0.2/
into:
/media/*/lib/modules/
Check whether there is the cross compiler, if not, then download and install it.
$ arm-linux-gnueabihf-gcc -v
While compiling the application, you will fill that you need the cross compiler
arm-linux-gnueabihf-gcc, download and install it.
www.orangepi.org www.xunlong.tv
Page 70
Orange Pi 2G-IOT User Manual Copy right by Shenzhen Xunlong Software Co., Ltd
68
4. Running driver and application
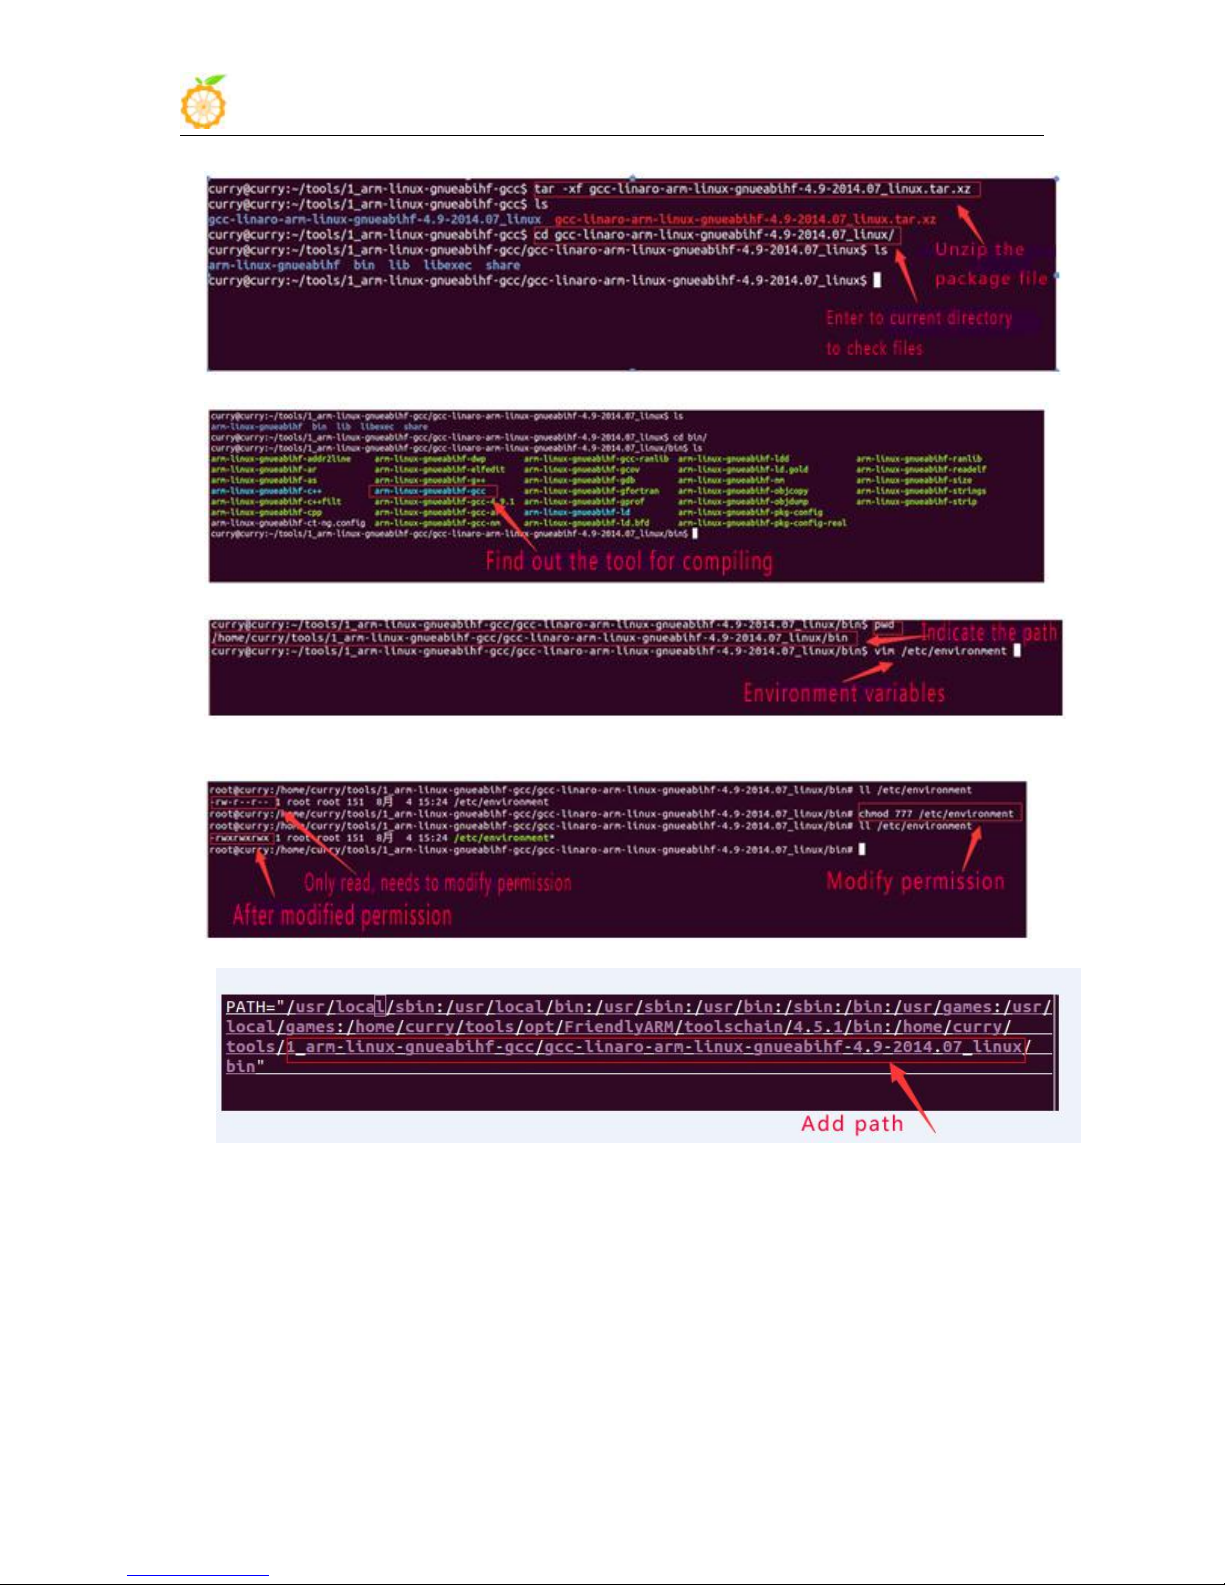
Unzip the downloaded file and enter the the directory
Check the information after entering bin directory
pwd hows the path and export it into the whole project
$ ll /etc/environment shows that the file can only read, need to modify permissions
$ chmod 755 /etc/environment
Add the path to the whole environment variable
Compile the application with cross compiler
$ arm-linux-gnueabihf-gcc app.c –o aq
There will be an ap application generated in the directory, copy it to the development
board file system(on the rootfs directory of /home/orangepi/)
$ cp aq /media/*/home/orangepi/
Removed the SD card and inserted it into the development board and power on.
www.orangepi.org www.xunlong.tv
Page 71
Orange Pi 2G-IOT User Manual Copy right by Shenzhen Xunlong Software Co., Ltd
69
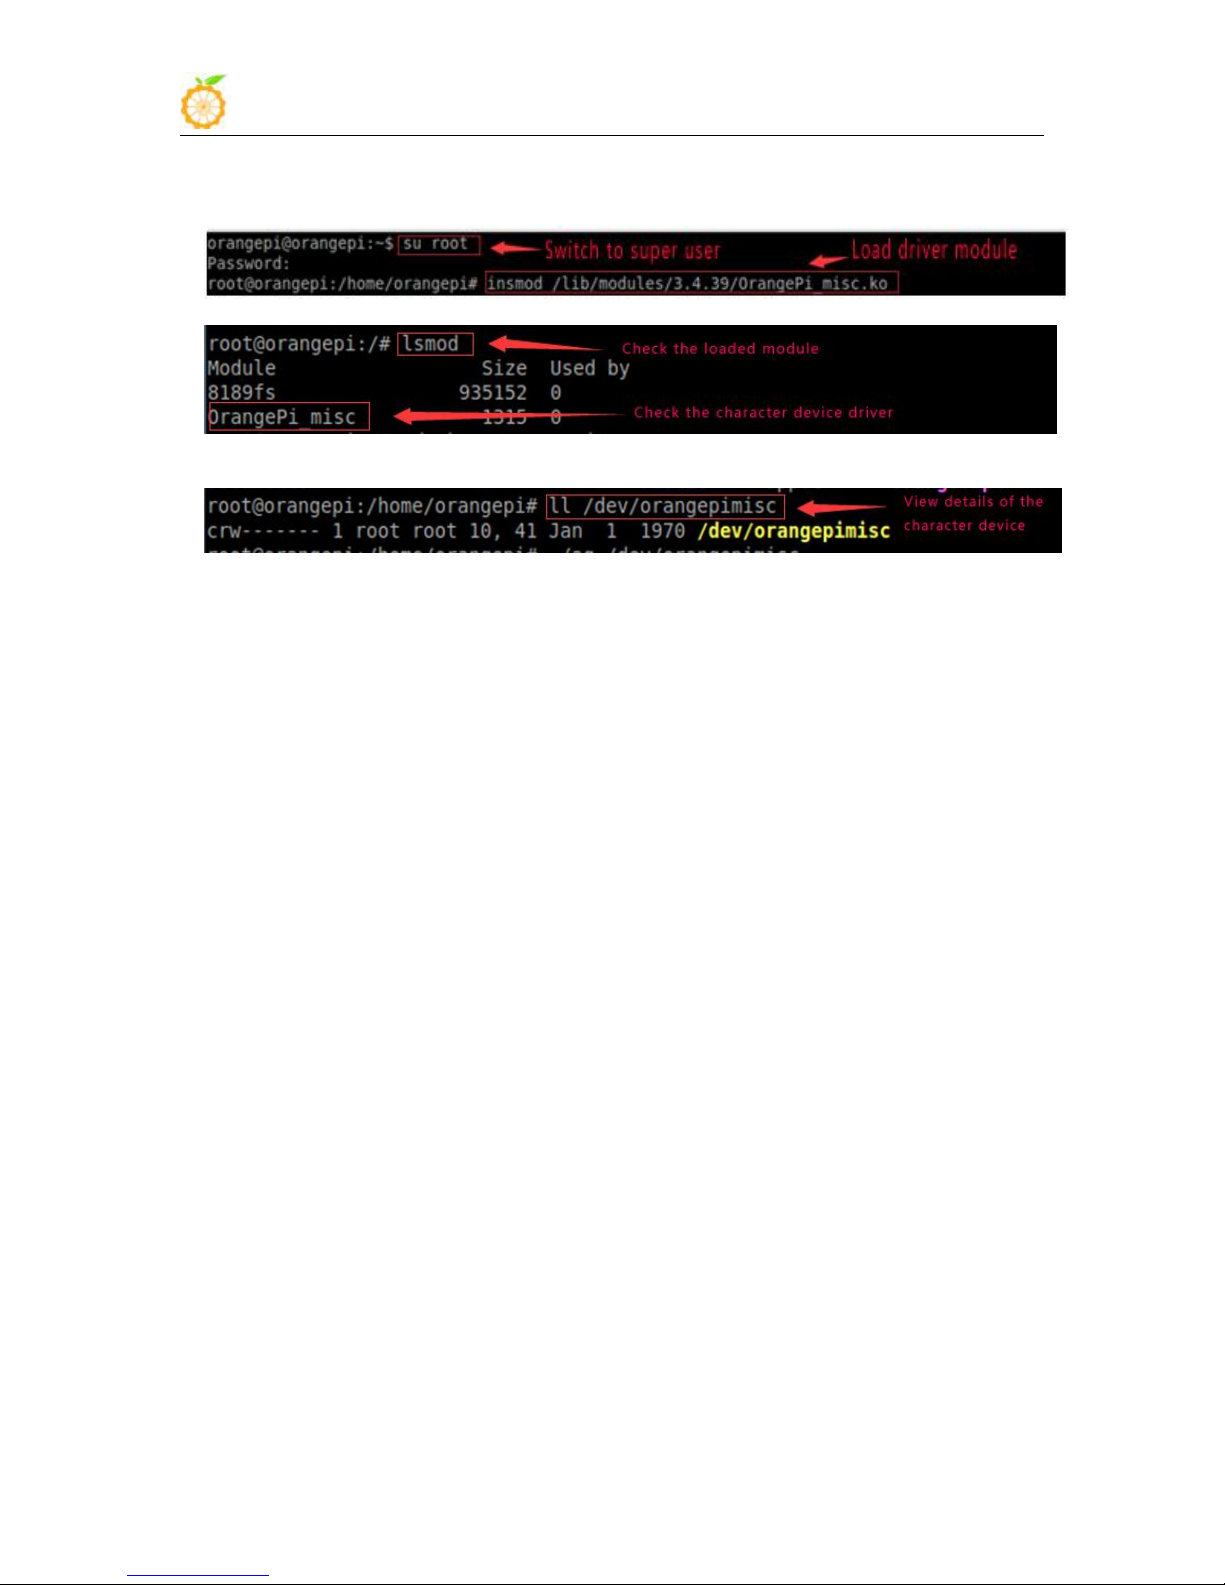
You need to switch to root users and load module driver module to the
development board first.
$ insmod /lib/modules/orangepi.ko
$ lsmod To check whether it is loaded
$ ll /dev/orangepimisc( Miscellaneous equipment automatically generated device files,
the specific look at the driver code)
Executive application (note the use of the application, check the code for specify)
$ ./aq /dev/orangepimisc
www.orangepi.org www.xunlong.tv
Page 72
Orange Pi 2G-IOT User Manual Copy right by Shenzhen Xunlong Software Co., Ltd
70
V. Using Debug tools on OrangePi
1. Operations on Windows
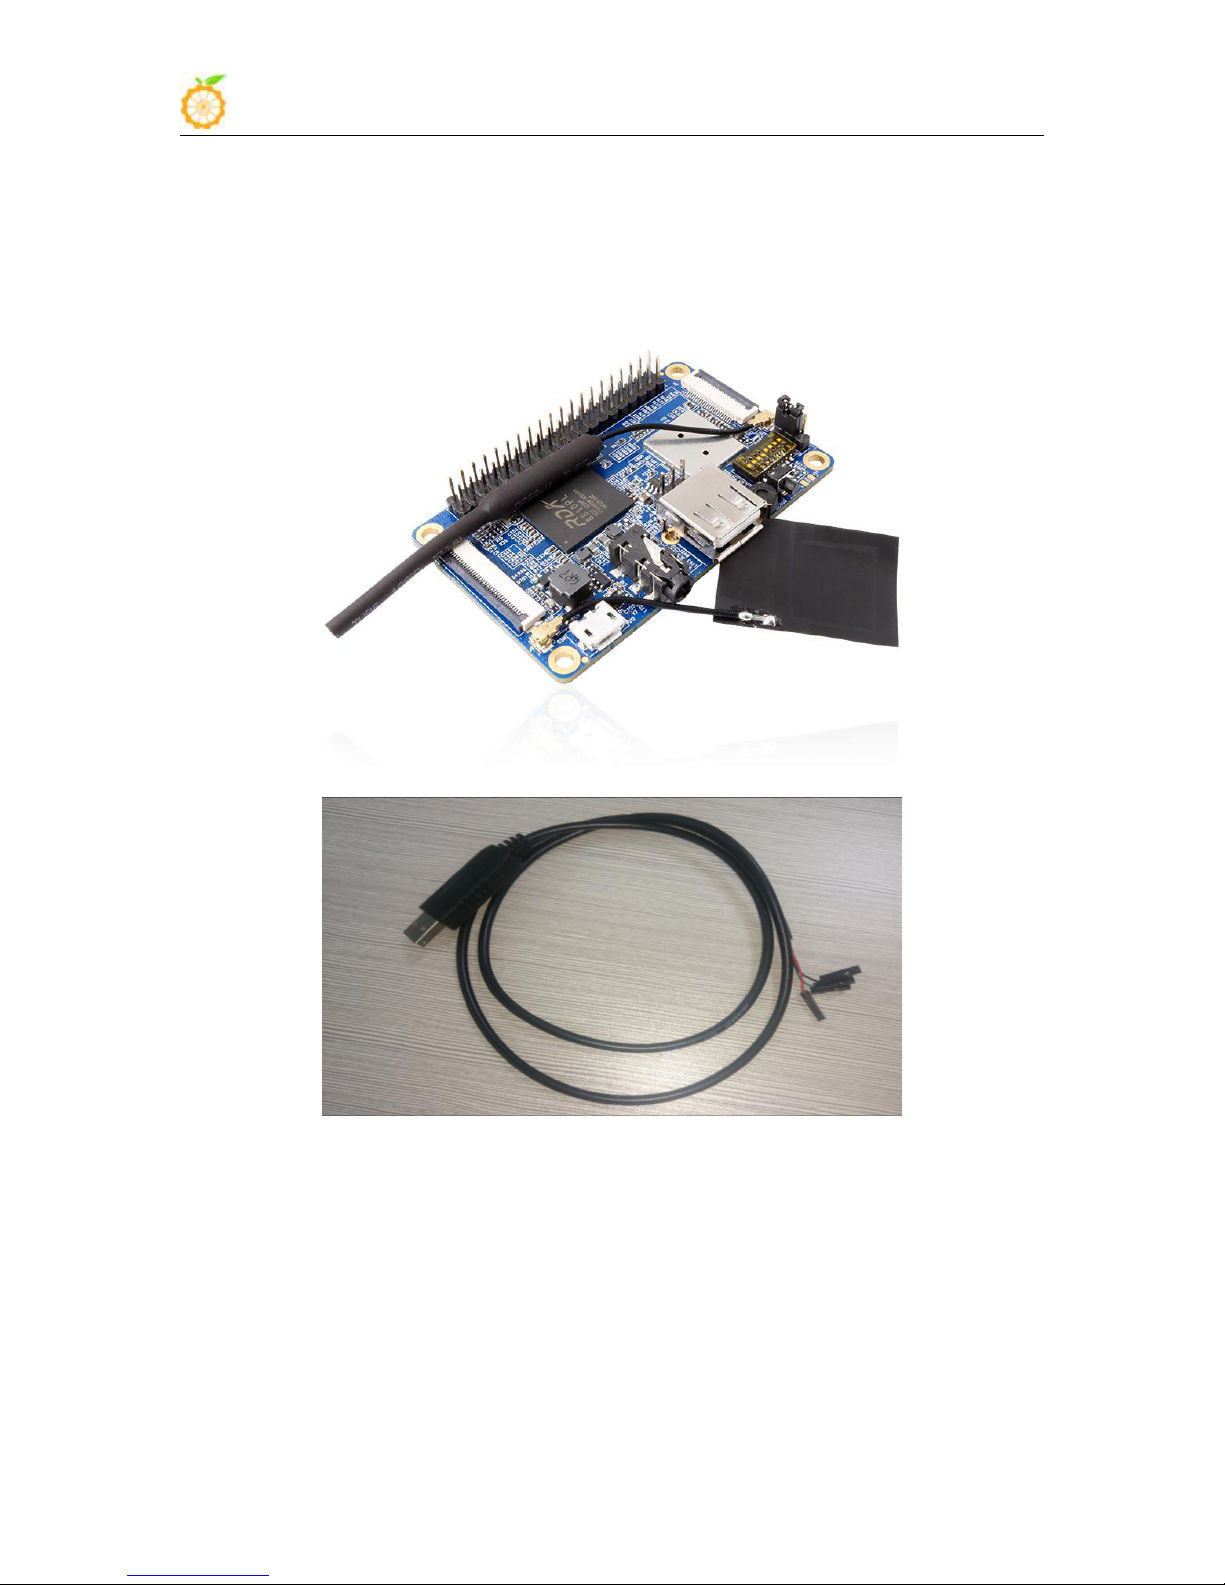
Hardware: Orange Pi development board*1, Card reader*1, TF card*1, power supply*1,
TTL to USB cable*1
TTL to USB cable
In order to get more debugging information in the project development process of
using OrangePi, OrangePi default support for serial information debugging. For
developers, you can simply get the serial port debugging information with the materials
mentioned above. The host computer using different serial debugging tools are similar,
basically can reference with the following manual for deployment. There are a lot of
debugging tools for Windows platform, the most commonly used tool is putty. This
section takes putty as an example to explain the deployment.
www.orangepi.org www.xunlong.tv
Page 73
Orange Pi 2G-IOT User Manual Copy right by Shenzhen Xunlong Software Co., Ltd
71
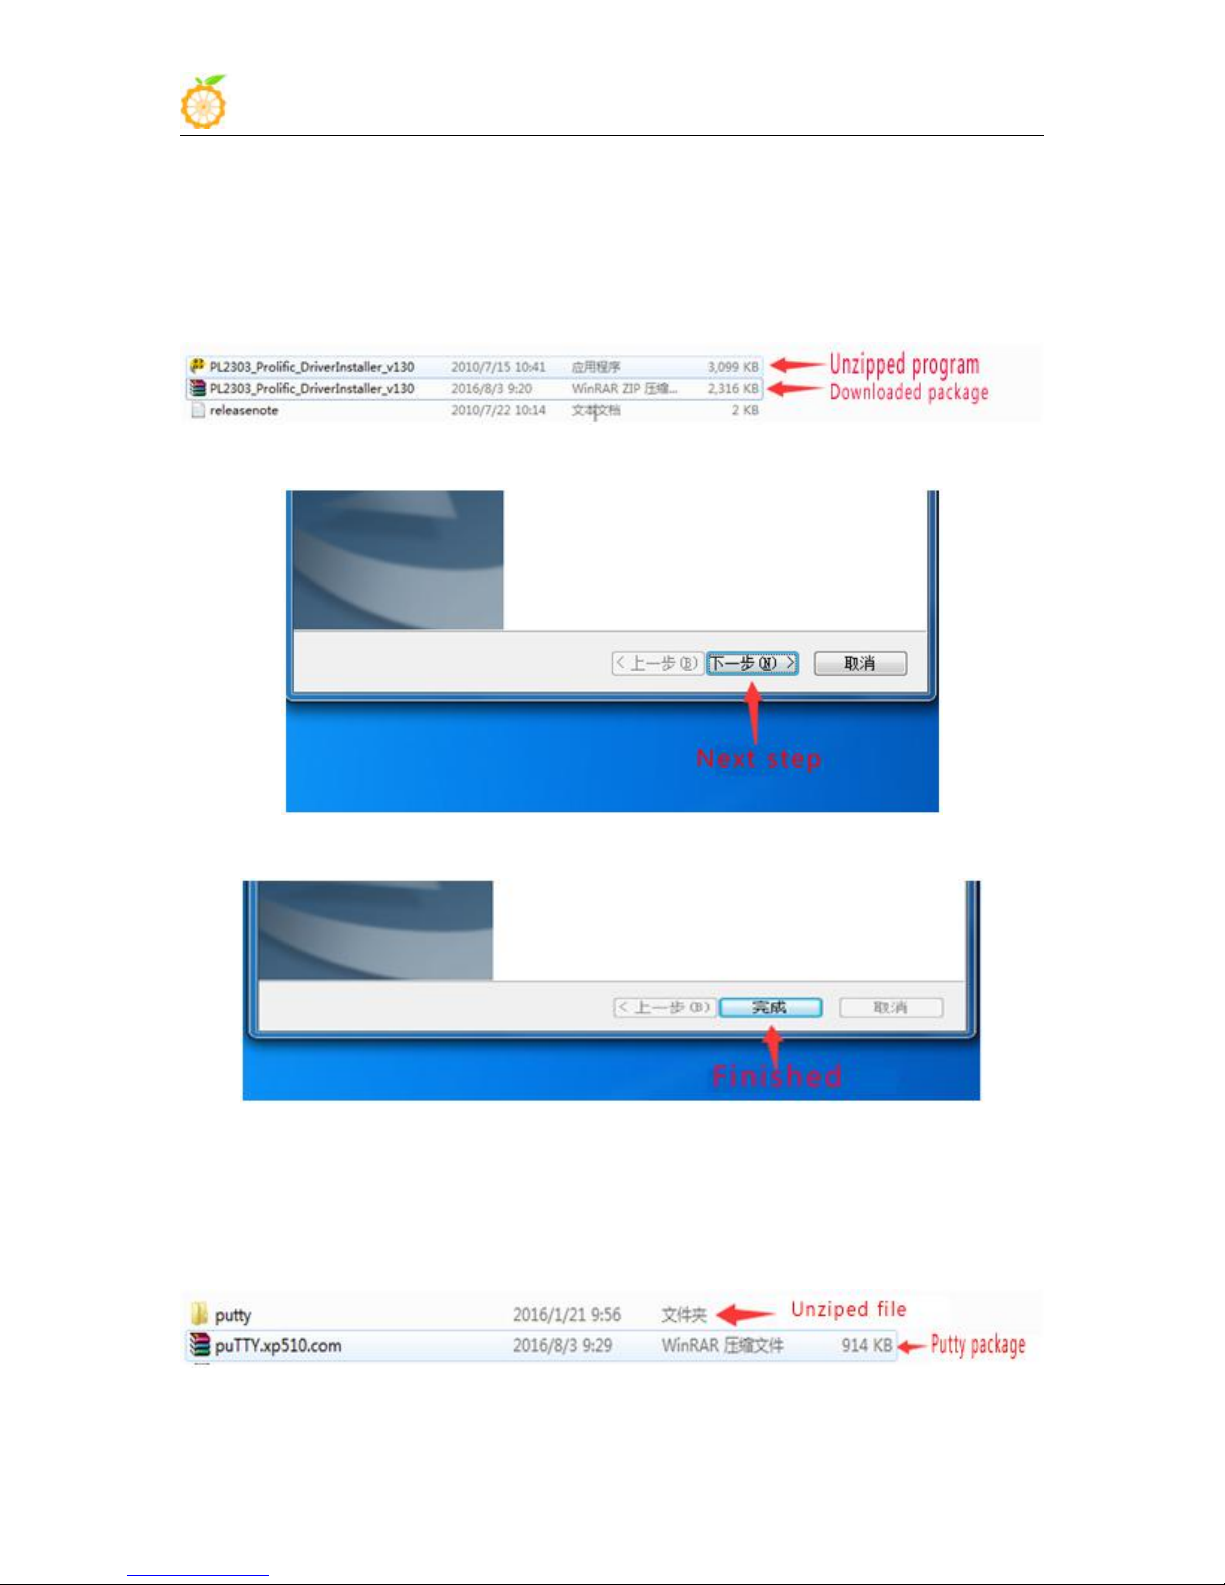
1) Install USB driver on Windows
Download and unzip the latest version of driver:
Choose application installation as Administrator
Wait for installation completing
2) Install putty on Windows
Download putty installation package
Unzip and install it
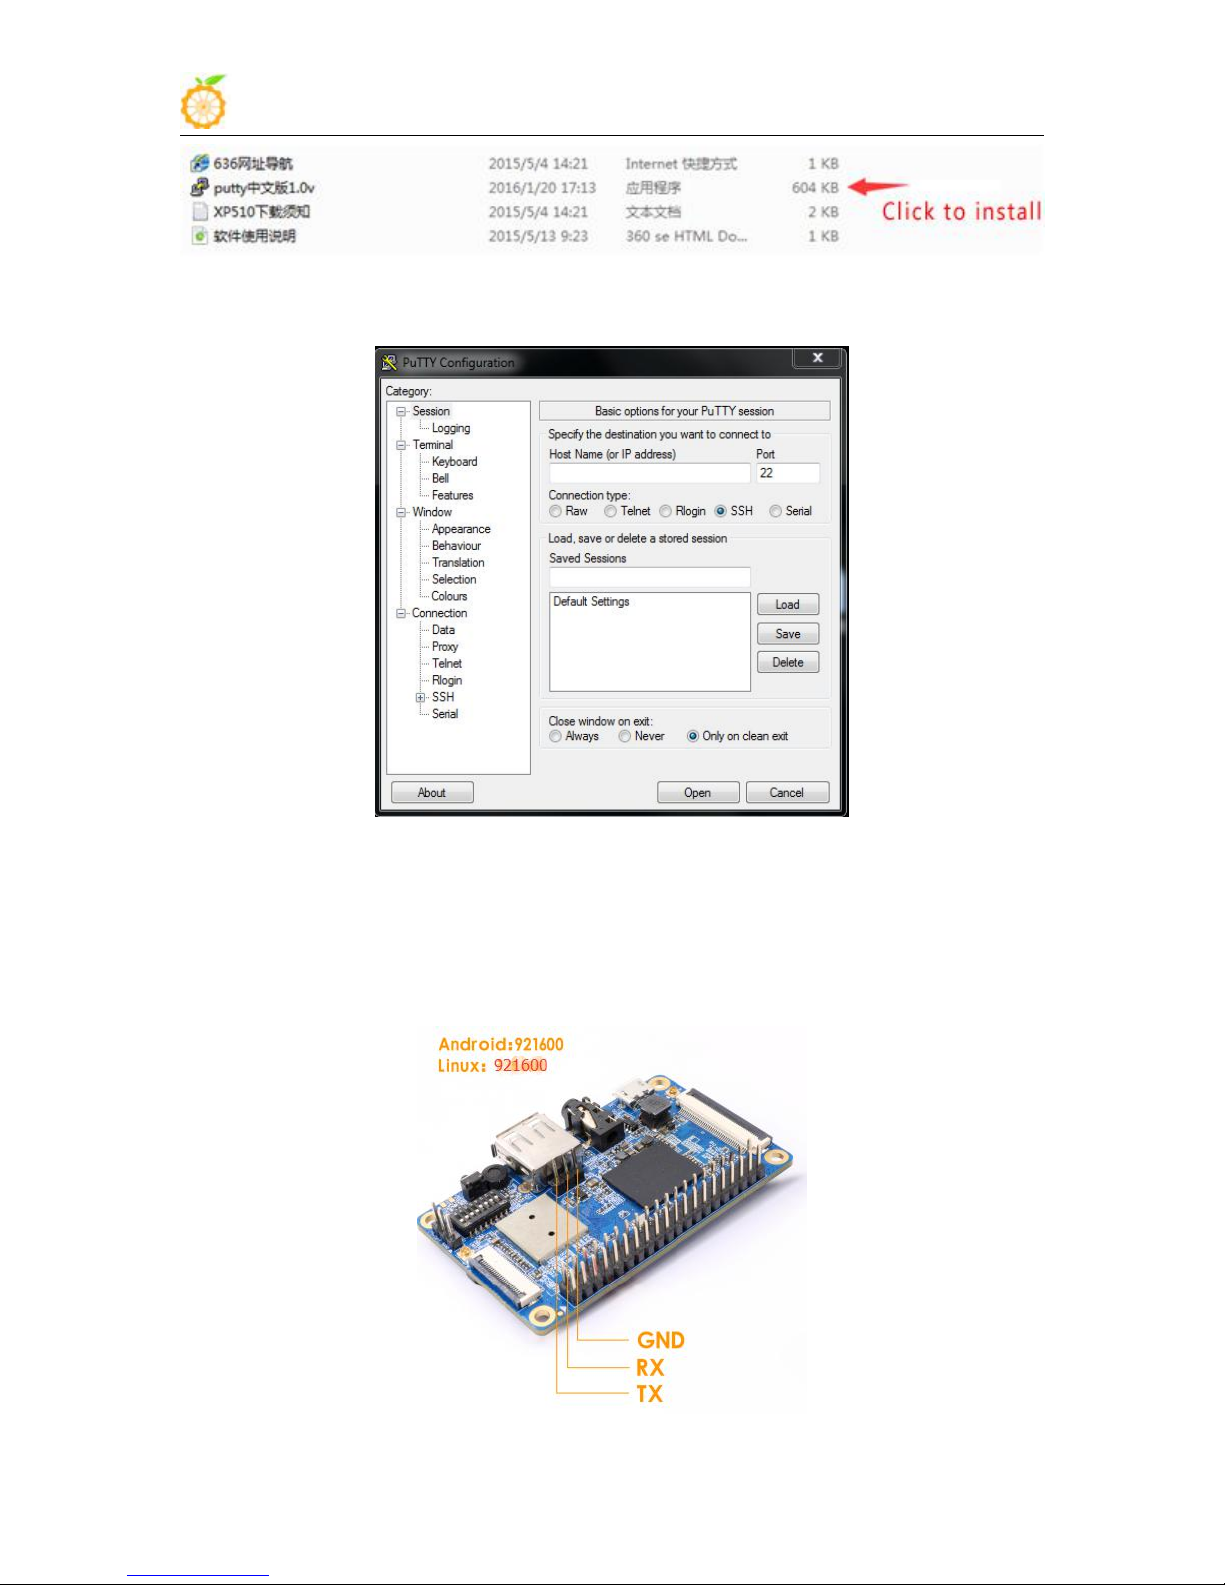
Android Baud rate set as 921600
Linux Baud rate set as 921600
PL2303_Prolific_DriverInstaller_v130.zip
www.orangepi.org www.xunlong.tv
Page 74
Orange Pi 2G-IOT User Manual Copy right by Shenzhen Xunlong Software Co., Ltd
72
Open it after installed, shown as below:
3) Connect method
Use the TTL to the serial port cable, one end connected to OrangePi, the other
end connected to PC
www.orangepi.org www.xunlong.tv
Page 75
Orange Pi 2G-IOT User Manual Copy right by Shenzhen Xunlong Software Co., Ltd
73
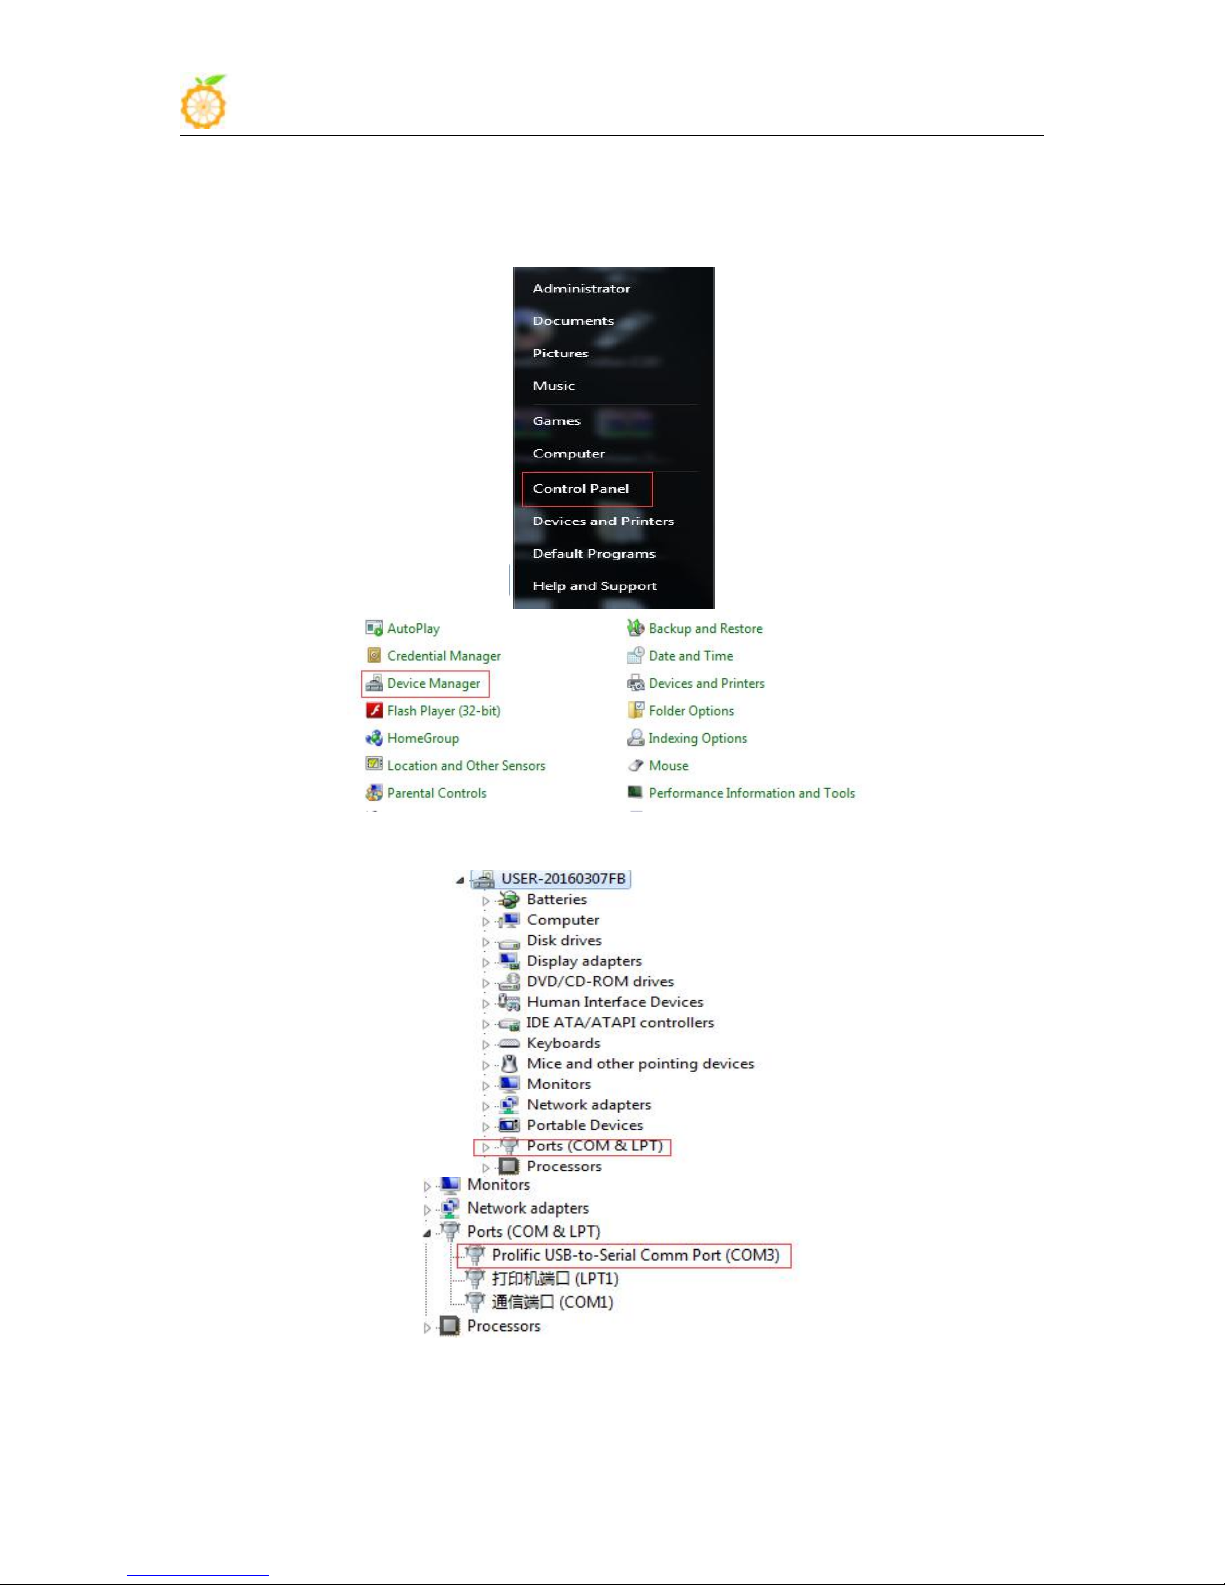
4) Equipment information acquisition
Select control panel on Start menu
Click on the device manager to check the port number
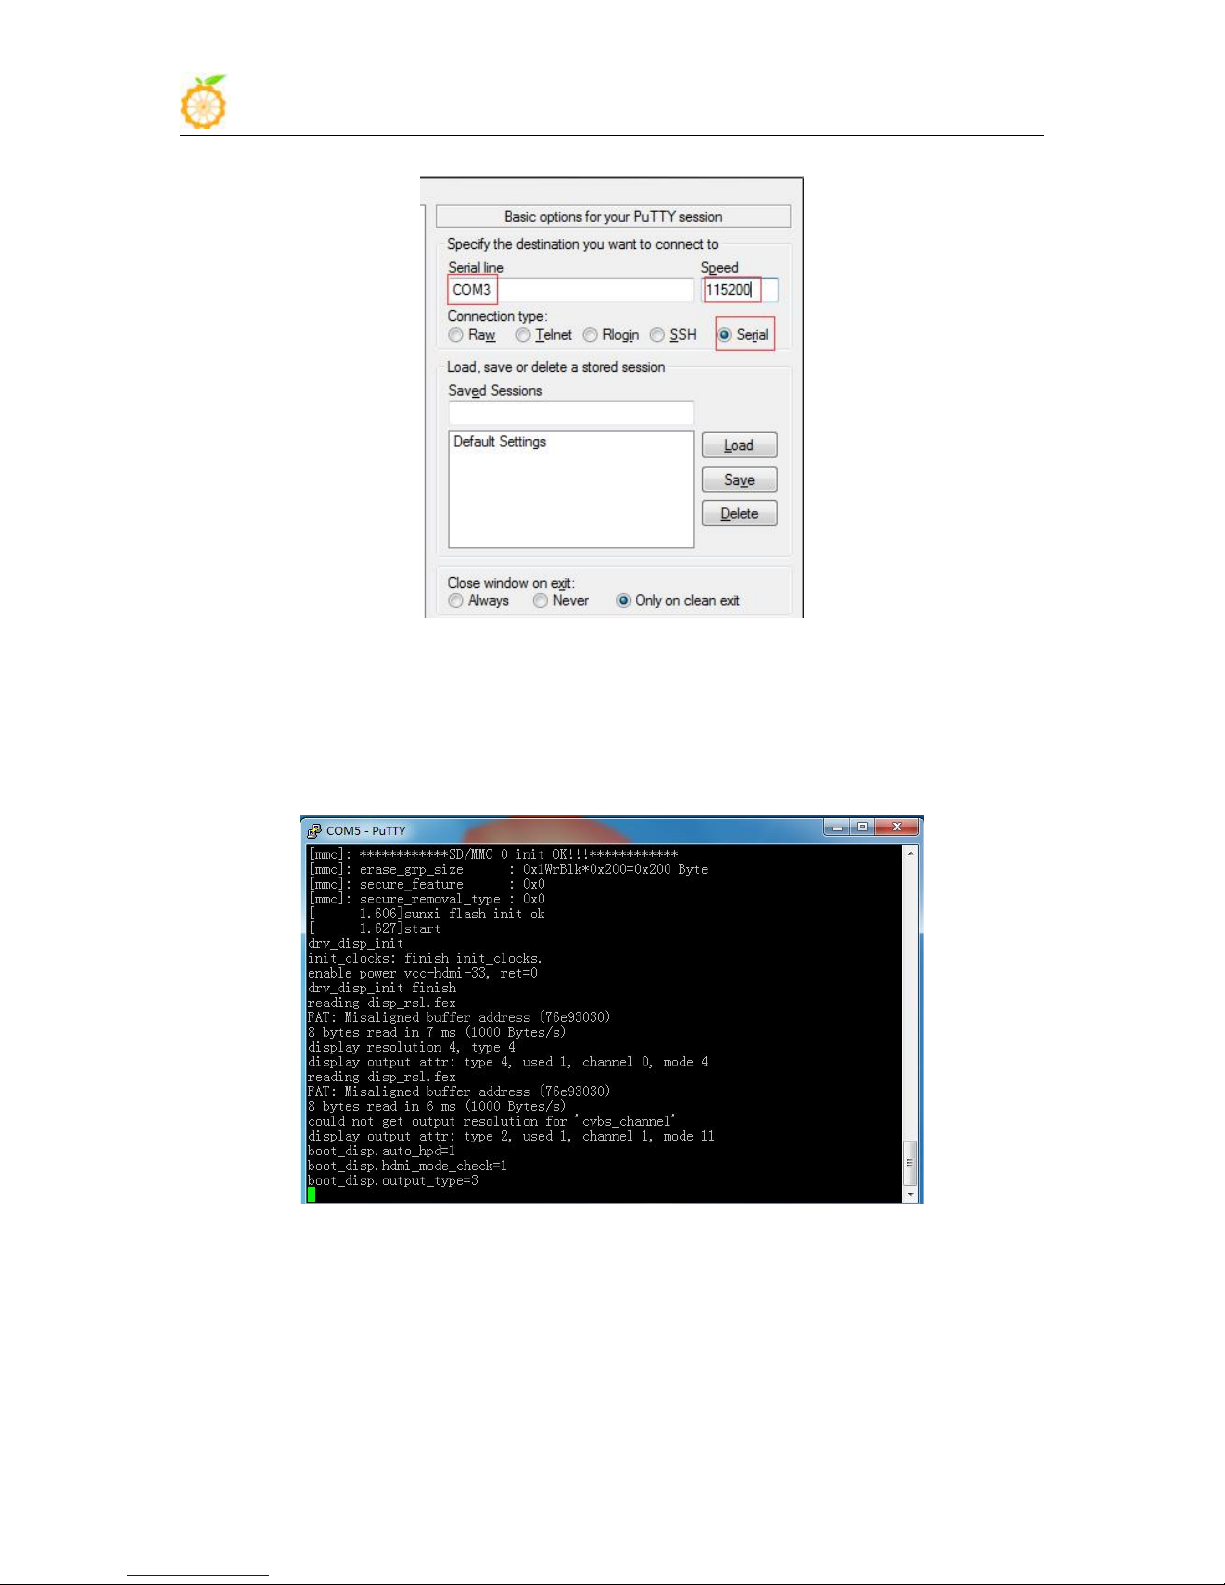
5) Putty configuration
www.orangepi.org www.xunlong.tv
Page 76
Orange Pi 2G-IOT User Manual Copy right by Shenzhen Xunlong Software Co., Ltd
74
6) Start debug
2. Operations on Linux
1) Install Kermit
Serial port should set to the corresponding port number (COM5), the speed should set to
115200
Power Orange Pi on and boot it, the serial port will automatic print out debug log.
There are Minicom and Kermit serial debugging tools for Linux, this section will take
Kermit as an example to have an illustrate.
www.orangepi.org www.xunlong.tv
Page 77
Orange Pi 2G-IOT User Manual Copy right by Shenzhen Xunlong Software Co., Ltd
75
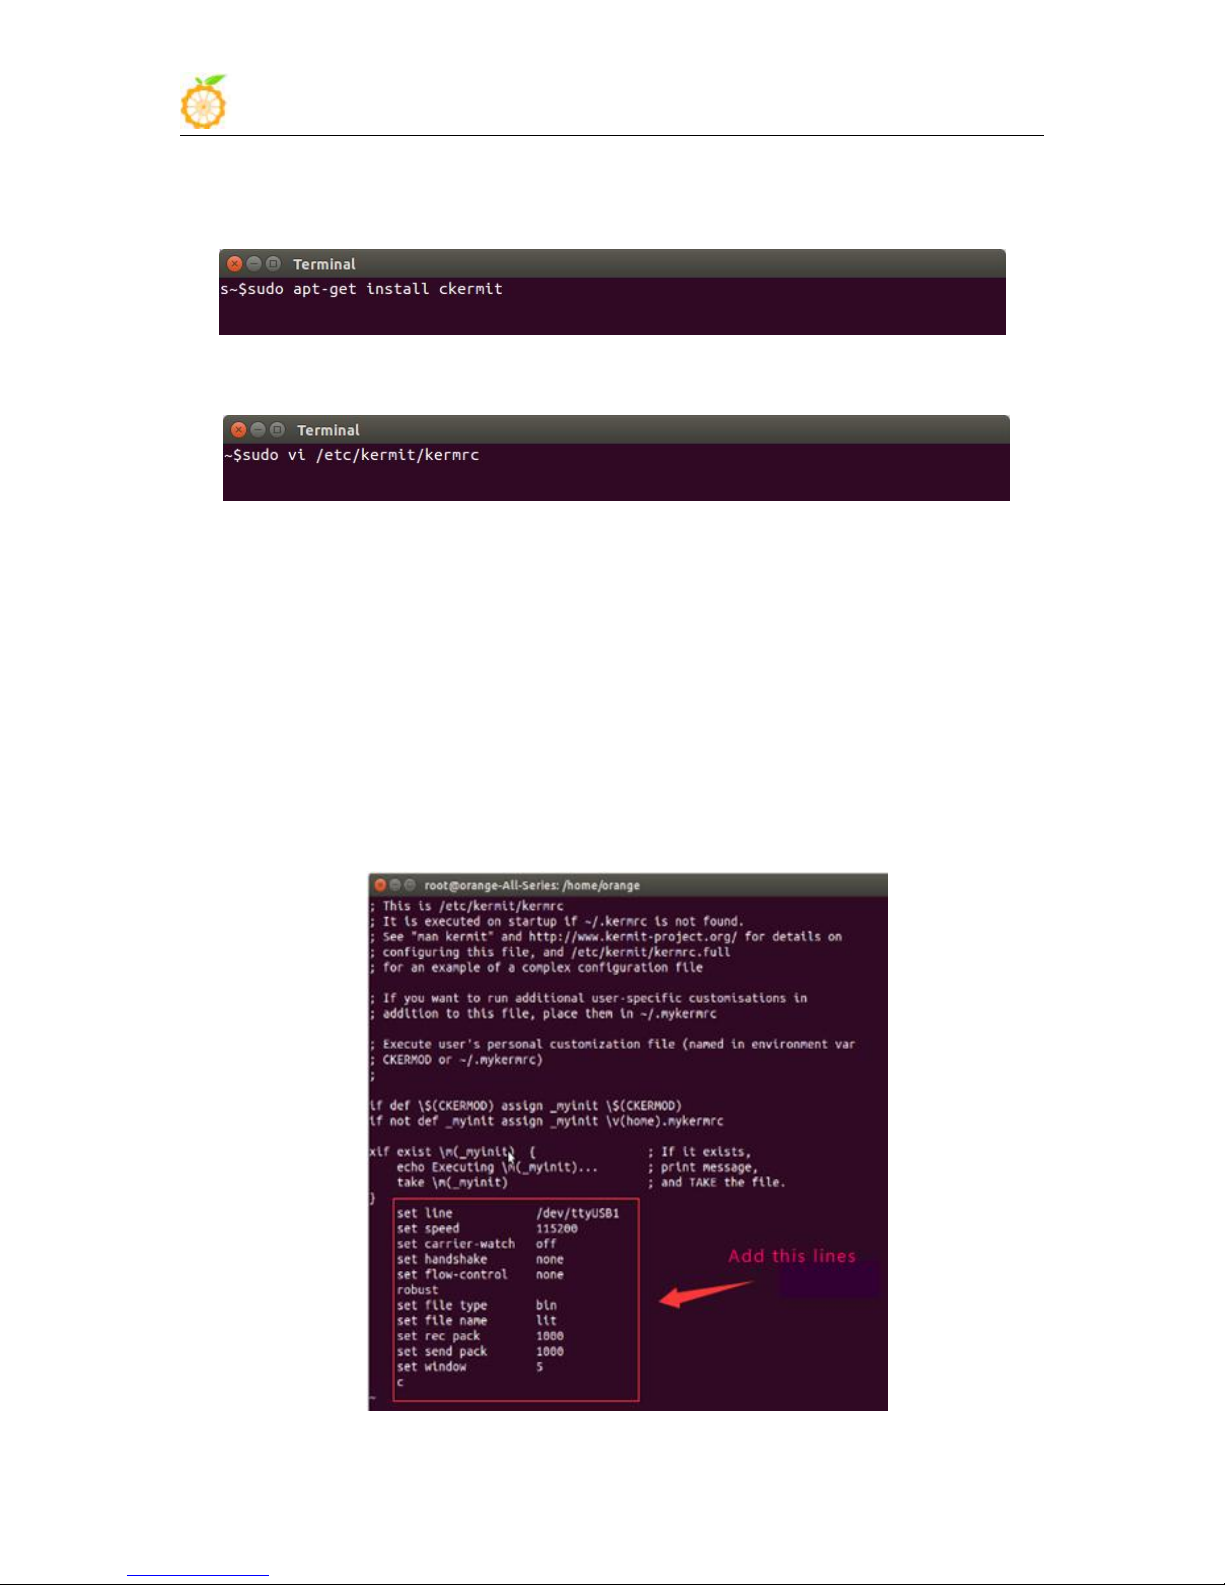
Install the Kermit by execute command:
Configurate Kermit
Add lines
:
$ sudo apt-get install ckermit
$ sudo vi /etc/kermit/kermrc
set line /dev/ttyUSB1
set speed 921600
set carrier-watch off
set handshake none
set flow-control none
robust
set file type bin
set file name lit
set rec pack 1000
set send pack 1000
set window 5
c
www.orangepi.org www.xunlong.tv
Page 78
Orange Pi 2G-IOT User Manual Copy right by Shenzhen Xunlong Software Co., Ltd
76
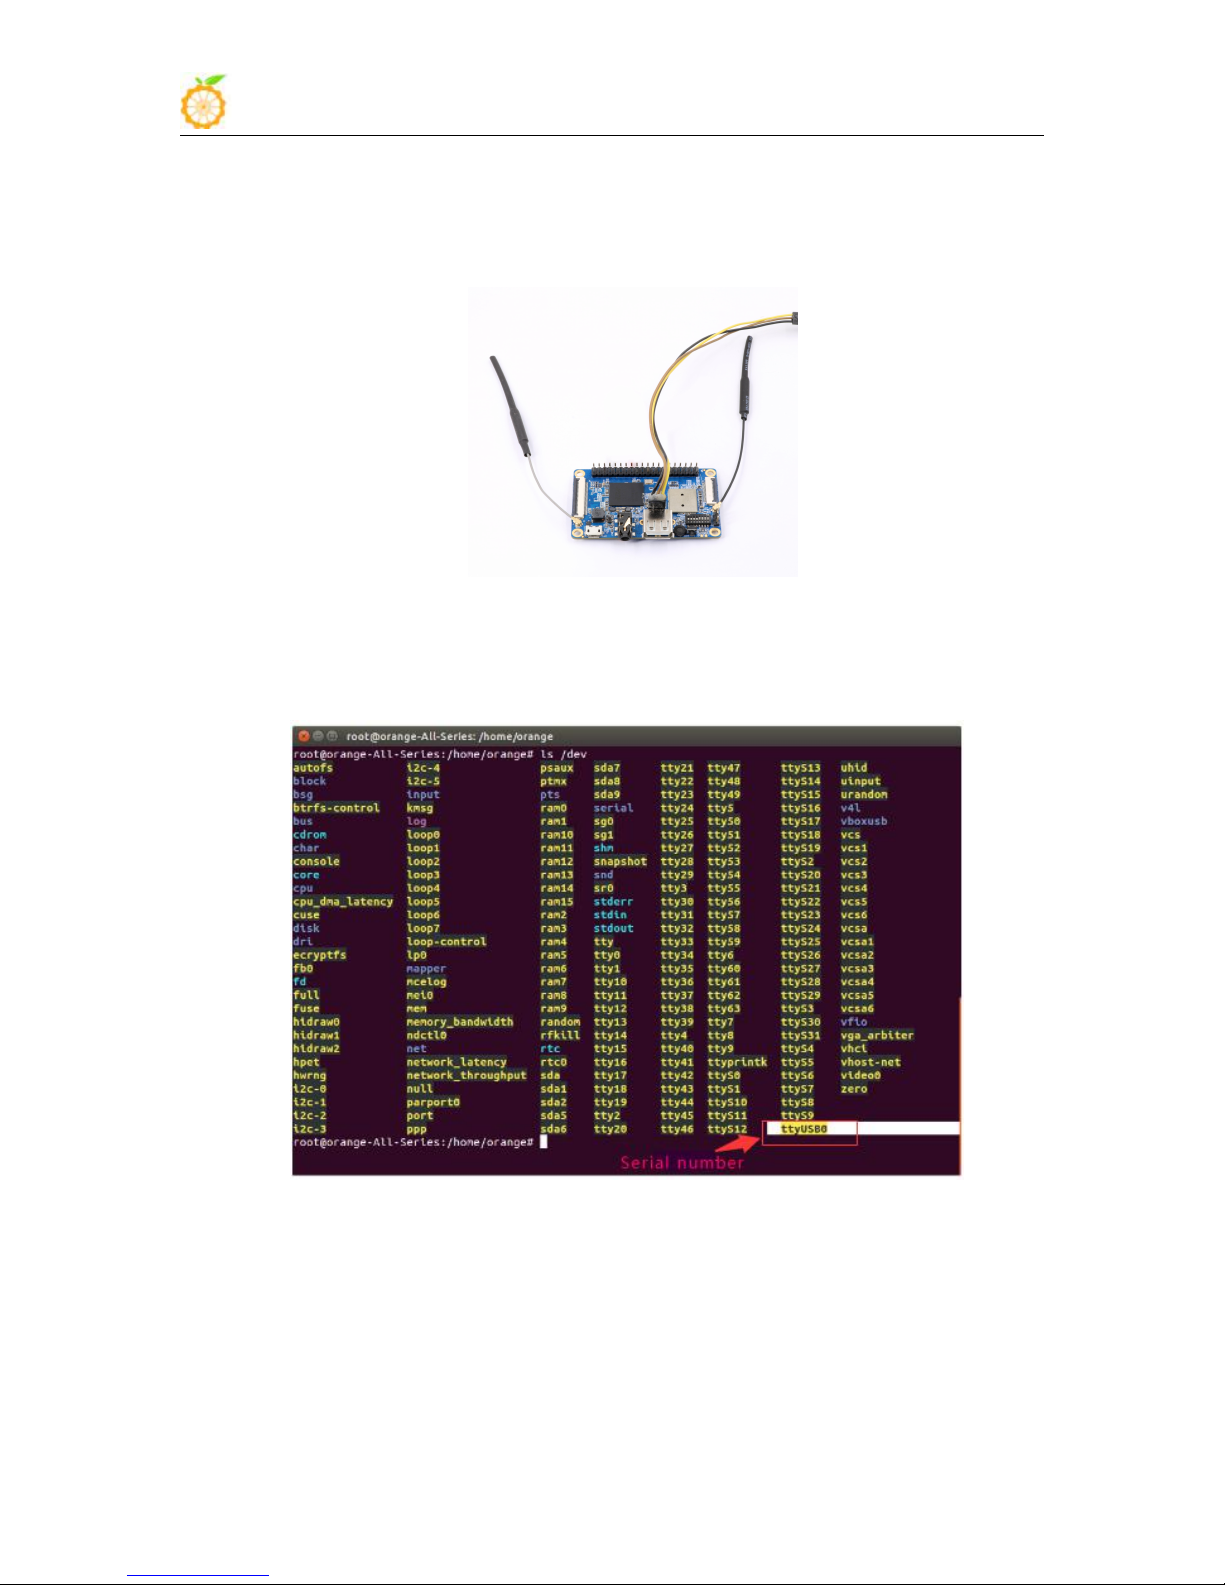
2) Connect method for debug
3) Equipment information acquisition
It can be seen from the figure that TTL to the serial port cable is identified as
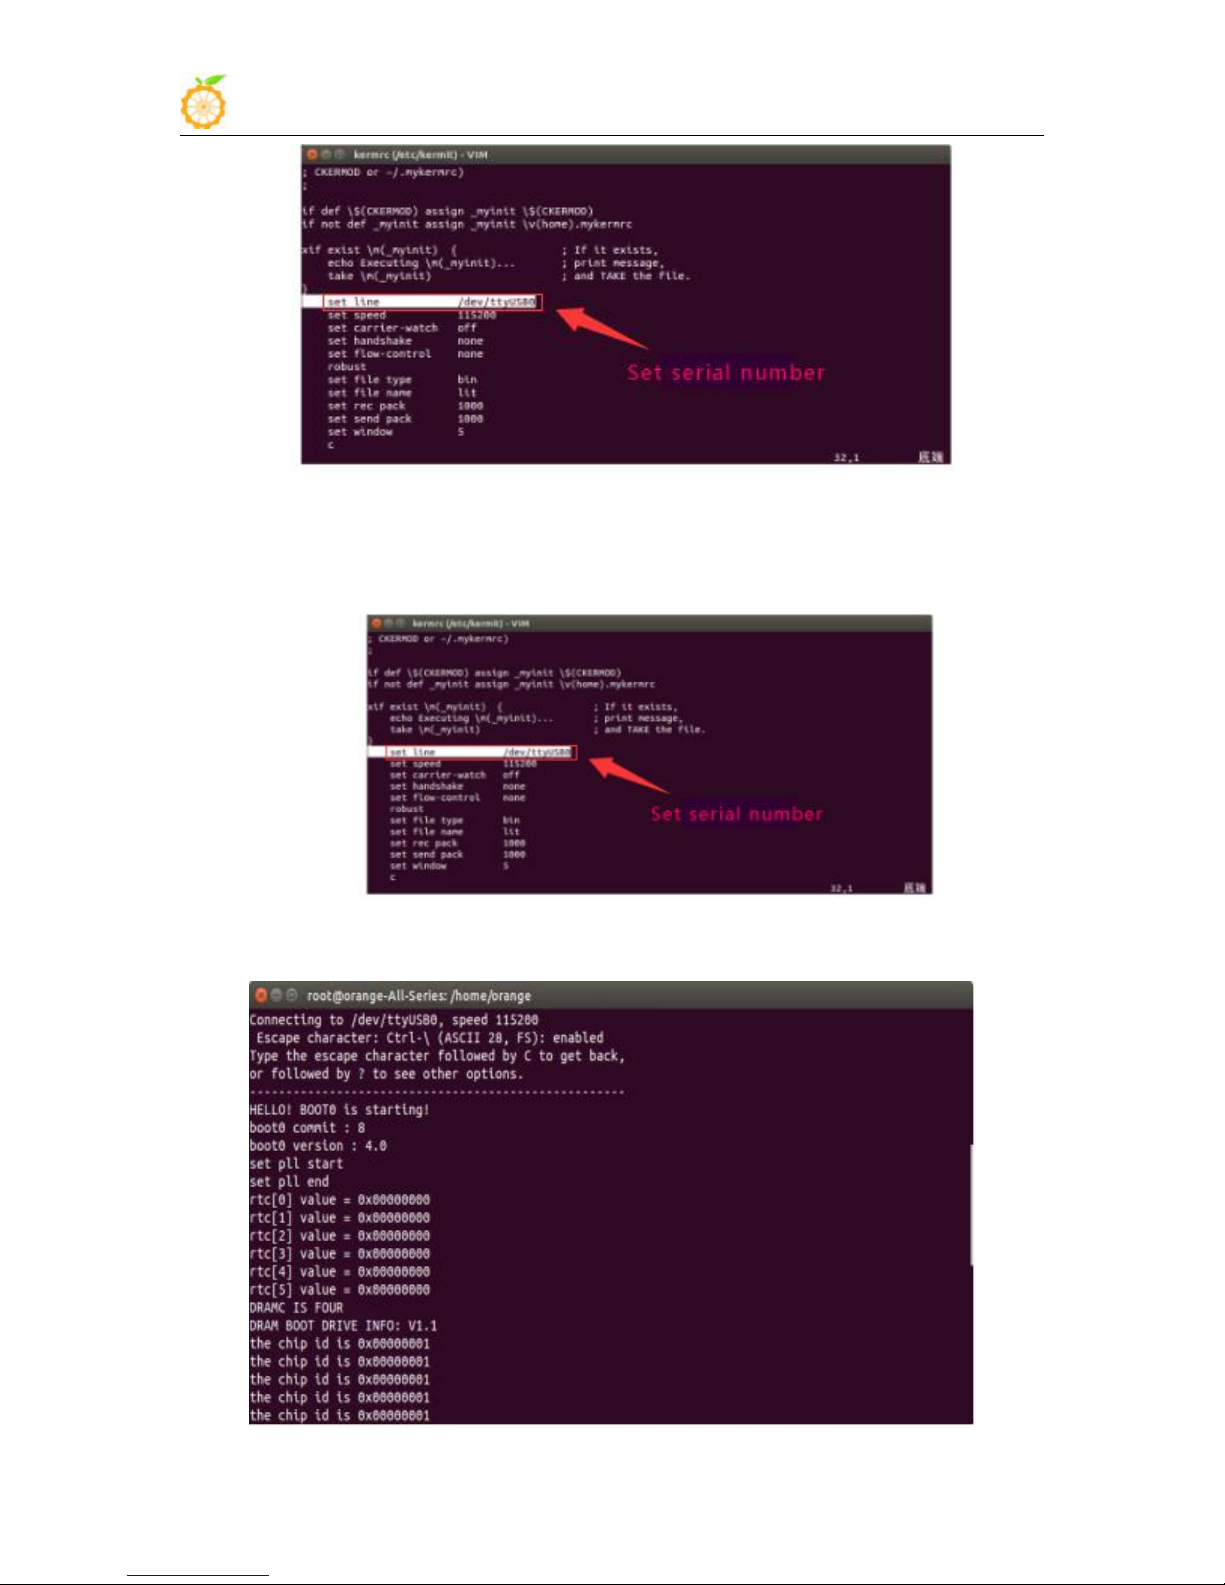
Set the value of setline into /dev/ttyUSB0
Use the TTL to the serial port cable, one end connected to OrangePi, the other end
connected to PC
$ ls /dev/ (Input command in the PC terminal to check the device number of
TTL to the serial cable)
ttyUSB0, configure the /ect/kermit/kermitc file, update the serial port information.
$ sudo vi /etc/kermit/kermitc
www.orangepi.org www.xunlong.tv
Page 79
Orange Pi 2G-IOT User Manual Copy right by Shenzhen Xunlong Software Co., Ltd
77
4) Start debug
Input command in the host computer terminal, enter the Kermit mode:
Power it on and boot Orange Pi, the serial port will automatic print debug log, the
$ sudo kermit –c
account and password ard root/orangepi and orangepi/orangepi
www.orangepi.org www.xunlong.tv
 Loading...