

Page 1
Operators Manual
Revision date: December 24, 2002
http://www.orangemicro.com
1
Page 2

About this manual
The information in this manual is subject to change without notice. We welcome your comments on any area of Orange
Micro products or services. Please send your comments to:
Product Manager
Orange Micro, Inc.
1400 N. Lakeview Ave.
Anaheim, California 92807
marketing@orangemicro.com
Orange Micro may use or distribute any of the information you supply in any way it deems appropriate without incurring any
obligations whatsoever.
Warning
This manual and the software described herein are protected by United States Copyright law (Title 17 United States Code).
Unauthorized reproduction and/or sales may result in imprisonment for up to one year and fines of up to $10,000 (17 USC
506). Copyright violators may also be subject to civil liability.
Copyright Information
iBOT2 is a trademark of Orange Micro, Inc.
Copyright © Orange Micro, Inc. 2003. All rights reserved.
No part of this manual may be reproduced in any form except by written permission from Orange Micro, Inc.
2
Page 3

Table of Contents
About this manual ...............................................................................................................................................................................2
Table of Contents................................................................................................................................................................................ 3
Package Contents............................................................................................................................................................................... 4
Software Included ............................................................................................................................................................................... 4
System Requirements.........................................................................................................................................................................4
Chapter 1............................................................................................................................................................................................. 5
Introduction.......................................................................................................................................................................................5
Installation Overview........................................................................................................................................................................5
Chapter 2............................................................................................................................................................................................. 6
How to install the USB 2.0 PCI Host Controller card .....................................................................................................................6
Installing OrangeUSB 2.0 Hi-Speed Drivers in Windows Me .....................................................................................................6
Installing OrangeUSB 2.0 Hi-Speed Drivers in Windows 2000 ..................................................................................................8
Installing OrangeUSB 2.0 Hi-Speed Drivers in Windows XP....................................................................................................10
Installing OrangeUSB 2.0 Hi-Speed Drivers in Windows 98 ....................................................................................................13
Chapter 3........................................................................................................................................................................................... 16
How to install the iBOT2 ................................................................................................................................................................16
Installing iBOT2 Drivers in Windows 98SE, Me, 2000 ..............................................................................................................16
Verify the proper installation of the iBOT2 Drivers..................................................................................................................................17
Installing iBOT2 Drivers in Windows XP....................................................................................................................................18
Verify the proper installation of the iBOT2 Drivers..................................................................................................................................19
ArcSoft Camera Suite .................................................................................................................................................................20
PhotoImpression ..........................................................................................................................................................................................20
VideoImpression..........................................................................................................................................................................................21
iVisit .............................................................................................................................................................................................22
Microsoft NetMeeting..................................................................................................................................................................22
How to Adjust iBOT2 Color and Format Properties......................................................................................................................23
AMCAP........................................................................................................................................................................................ 23
PhotoImpression .........................................................................................................................................................................23
VideoImpression ......................................................................................................................................................................... 24
iVisit .............................................................................................................................................................................................24
NetMeeting ..................................................................................................................................................................................25
TeVeo Suite.................................................................................................................................................................................25
Frequently Asked Questions .........................................................................................................................................................26
Additional iBOT2 Workflow Recommendations and Known Issues .........................................................................................27
Appendix A ........................................................................................................................................................................................28
Optional Hardware .........................................................................................................................................................................28
Appendix B ........................................................................................................................................................................................29
Specifications .................................................................................................................................................................................29
Appendix C........................................................................................................................................................................................30
Warranty Information .....................................................................................................................................................................30
FCC Class B Information...............................................................................................................................................................31
Index ..................................................................................................................................................................................................32
3
Page 4

Package Contents
• iBOT2 USB 2.0 Web Cam w/6 foot attached cable and USB Type A connector
• iBOT
• USB 2.0 PCI Host Controller add-in card (optional)
• Quickstart Card
2 Installation Software, Manual and Software CD-ROM
Software Included
• Apple QuickTime for Windows
• ArcSoft PhotoImpression for Windows (photo editing application)
• ArcSoft VideoImpression for Windows (video editing application)
• iVisit for Windows (video conferencing software)
• Microsoft NetMeeting (video conferencing software)
• TeVeo Suite (stream live video to the web)
System Requirements
Hardware
• 400 MHz or above Intel Pentium compatible with an available PCI slot
• iBOT
• 64 MB System RAM
• 200 MB free hard drive space
• CD-ROM drive (for software installation)
2 requires one available USB 2.0 Port supplying at least 5v 500mA of power
Operating System
• Windows 98SE, Me, 2000 or XP
4
Page 5

Chapter 1
Introduction
What is iBOT2?
Orange Micro is first to market the iBOT2, a USB 2.0-based desktop video camera. IBOT2 harnesses the speed and power
of USB 2.0 technology unmatched by the slower USB 1.1-based web cams. Orange Micro's iBOT
camera for the rest of us, providing crisp, clear video at a price you can afford.
What is USB 2.0?
USB 2.0 technology extends the speed of the USB connection from 12 Mbps on USB 1.1 up to 480 Mbps on USB 2.0,
providing an attachment point for next-generation peripherals which complement higher performance PCs and user
applications. USB 2.0 is both forward and backward compatible with USB 1.1, resulting in a seamless transition process for
the end user. In fact, USB 2.0 uses the same cables and connectors as USB 1.1.
iBOT2 Features
Exclusive USB 2.0 Speed and Clarity
With a data transfer rate that's 4000% times faster than traditional USB 1.1 web cams, you'll experience a Video Frame
Rate of 30 frames/second. And that's with a big 640 x 480 image size in living color.
Create, Edit and Retouch Photos
Create, edit and retouch your photos, then add special effects or place them in cards, calendars, frames and templates.
2 is the desktop video
Polish Your Presentations
With clarity only iBOT
presentations with film clips. Hone your persuasion skills with instant video feedback.
Affordable Movie Making
iBOT
2 can make you a star! Record special family events, such as Christmas, Thanksgiving dinner, or even just everyday
life. Produce your own documentaries. The iBOT
movies with pride.
Video Teleconferencing for the Internet
With Microsoft NetMeeting, you can talk to anyone, face-to-face, via the Internet, with a whole new level of clarity. Whether
it’s the grandparents, relatives, or old friends you haven't seen, only iBOT
by older USB 1.1 web cams.
Video E-Mail
Attach super-clear video clips to your email for a whole new dimension of communication. Show off brand-new additions to
your family immediately! Send video greetings from Fiji! Keep the people you love updated on what you're up to.
2 can provide, you can record and save super-crisp video in your home or office. Spice up important
2's 480 Mb/s data transfer speed lets you easily input, edit, and show-off
2 provides quality video conferencing unmatched
Installation Overview
In order to ensure proper operation of your iBOT2, it is important to install the hardware and software in the following order.
• Install the OrangeUSB 2.0 Hi-Speed drivers
• Install the USB 2.0 PCI Host Controller board
• Install the iBOT
• Attach the iBOT
• Install remaining software as needed
2 drivers
2 camera to the USB 2.0 PCI Host Controller
5
Page 6

Chapter 2
How to install the USB 2.0 PCI Host Controller card
Orange Micro USB 2.0 PCI Host Controller may be used on any Windows compatible system running Microsoft Windows
98, SE, Me, 2000 or Windows XP.
In order to ensure proper operation of your USB 2.0 Host Controller card, please follow the instructions in the order they
appear. Refer to the section below that represents the Operating system you have installed in your computer..
Note: Do not install USB 2.0 PCI Host Controller Board before installing OrangeUSB drivers in Windows.
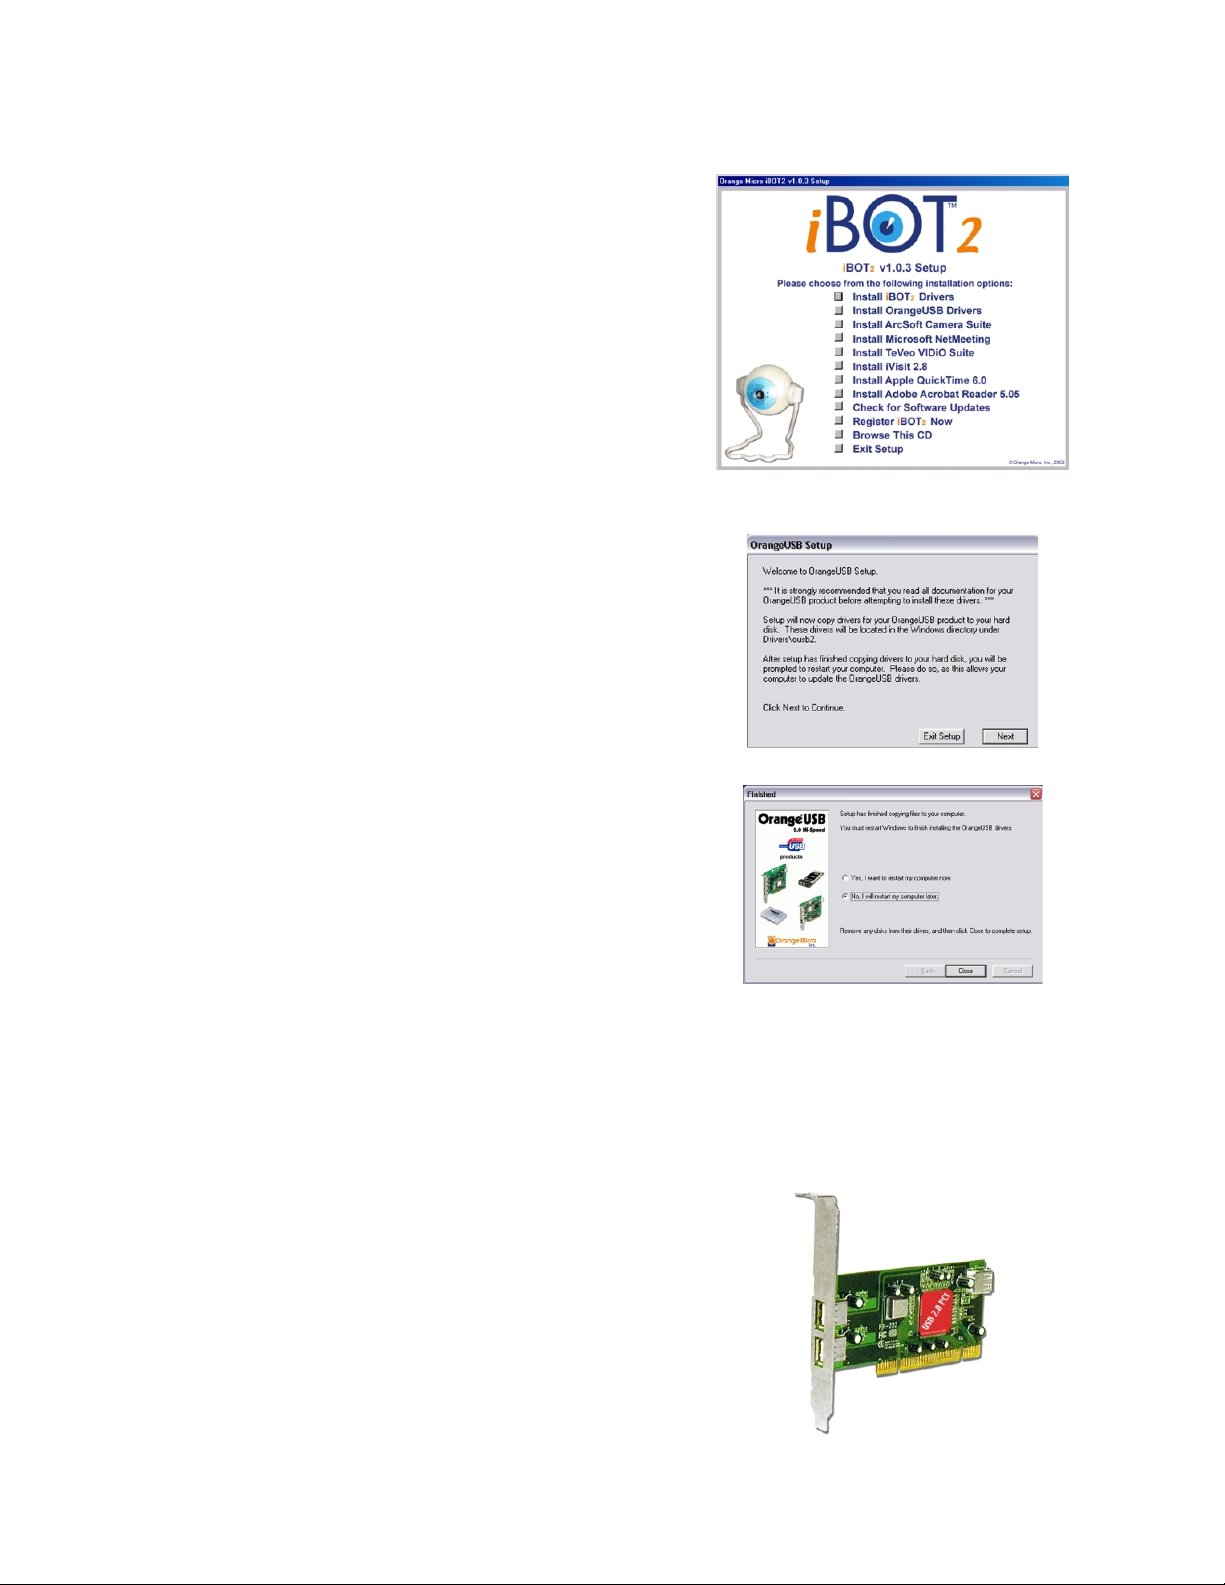
Installing OrangeUSB 2.0 Hi-Speed Drivers in Windows Me
Step 1
• Insert the iBOT2 Installer CD. Once
inserted, the iBOT
automatically start and display the menu to
the right.
• Click on "Install OrangeUSB Drivers"
• Follow the onscreen instructions.
• The OrangeUSB 2.0 drivers will be copied
to: C:\windows\drivers\ousb2\
2 Installer will
Step 2
Step 3
• The OrangeUSB Setup dialog to the right
will appear. Click “Next.” To continue.
• Another OrangeUSB Setup dialog will
appear. Click “Finish” to continue.
• The iBOT
Step 1 above, will appear. Click on the box
next to the “Exit Setup”.
• When Setup has finished, select “No, I will
restart my computer”.
• Click on the Close button,
• Shutdown Windows Me and install the USB
2.0 PCI Host Controller board.
2 Setup dialog, as displayed in
6
Page 7
NOTES: Refer to your computer’s manual for instructions on how to open your computer and install a
PCI card.
IMPORTANT: Before handling the PCI board or touching anything in the computer ground yourself by
touching the power supply for a couple of seconds. Failure to do this may damage the
board and/or your computer.
Step 4
• With your computer off, open your computer
case.
• Locate an open PCI slot. If there is a
faceplate covering the opening to the back
panel, remove it.
• Locate the USB 2.0 PCI Host Controller
board and insert it into the free slot. Once
inserted, screw the board in securely.
• Connect your internal devices as needed.
• Close computer.
• Turn the computer power on.
Step 5
Once the OrangeUSB card is installed and the computer is
restarted, all necessary USB drivers will be detected and
installed automatically.
• Restart Windows to activate the drivers.
• Congratulations your OrangeUSB driver
installation is complete!
Finalizing USB 2.0 Hi-Speed hardware settings
OrangeUSB 2.0 Hi-Speed products that use an NEC chipset have 3 USB host controller engines on board. Two of the host
controller engines handle USB 1.1 transactions. One of the host controllers engines handle, USB 2.0 transactions.
USB data traffic is automatically routed to the proper host controller engine depending on the speed of the device that is
plugged into the OrangeUSB port. This essentially creates 3 concurrent USB buses. These USB buses allow devices to run
in a less congested traffic environment. This helps devices such as color printers, scanners, video cameras and mass
storage devices, which require a high bandwidth, to work well together.
The OrangeUSB USB 2.0 Host Controller driver handles USB 2.0 Hi-Speed (480 Mbits/s) traffic. The two NEC USB Open
Host Controllers handle Full-Speed (12 Mb/s) and Low-Speed (1.5 Mb/s) traffic.
Check your Windows System/Device Manager to confirm proper installation of USB 2.0 Hi-Speed drivers:
Right click on the “My Computer” icon. Select Properties from the pop up menu, then click on the “Device Manager” tab.
Scroll down to the “Universal Serial Bus controllers” category and click on the plus sign next to it. There may be additional
devices in the list being displayed, but all of the below devices should appear.
An X through a device’s icon means the device as been disabled. A circled exclamation point through the device’s icon
means the device has a problem. The type of problem will appear in the Properties dialog box for the device. To view the
Properties dialog box for a device, double click on it.
7
Page 8
Installing OrangeUSB 2.0 Hi-Speed Drivers in Windows 2000
Step 1
• Insert the iBOT
inserted, the iBOT
automatically start and display the menu to
the right.
• Click on "Install OrangeUSB Drivers"
• Follow the onscreen instructions.
• The OrangeUSB 2.0 drivers will be copied
to: C:\winnt\drivers\ousb2\
Step 2
• The OrangeUSB Setup dialog to the right
will appear. Click “Next.” To continue.
• Another OrangeUSB Setup dialog will
appear. Click “Finish” to continue.
2 Installer CD. Once
2 Installer will
Step 3
• The iBOT
2 Setup dialog, as displayed in
Step 1 above, will appear. Click on the box
next to the “Exit Setup”.
• When Setup has finished, select “No, I will
restart my computer”.
• Click on the Close button,
• Shutdown Windows 2000 and install the
USB 2.0 PCI Host Controller board.
NOTES: Refer to your computer’s manual for instructions on how to open your computer and install a
PCI card.
IMPORTANT: Before handling the PCI board or touching anything in the computer ground yourself by
touching the power supply for a couple of seconds. Failure to do this may damage the
board and/or your computer.
8
Page 9
Step 4
• With your computer off, open your computer
case.
• Locate an open PCI slot. If there is a
faceplate covering the opening to the back
panel, remove it.
• Locate the USB 2.0 PCI Host Controller
board and insert it into the free slot. Once
inserted, screw the board in securely.
• Connect your internal devices as needed.
• Close computer.
• Turn the computer power on.
Step 5
Once the OrangeUSB card is installed and the computer is
restarted, all necessary USB drivers will be detected and
installed automatically.
• Restart Windows to activate the drivers.
• Congratulations your OrangeUSB driver
installation is complete!
Finalizing USB 2.0 Hi-Speed hardware settings
OrangeUSB 2.0 Hi-Speed products that use an NEC chipset have 3 USB host controller engines on board. Two of the host
controller engines handle USB 1.1 transactions. One of the host controllers engines handle, USB 2.0 transactions.
USB data traffic is automatically routed to the proper host controller engine depending on the speed of the device that is
plugged into the OrangeUSB port. This essentially creates 3 concurrent USB buses. These USB buses allow devices to run
in a less congested traffic environment. This helps devices such as color printers, scanners, video cameras and mass
storage devices, which require a high bandwidth, to work well together.
The OrangeUSB USB 2.0 Host Controller driver handles USB 2.0 Hi-Speed (480 Mbits/s) traffic. The two NEC USB Open
Host Controllers handle Full-Speed (12 Mb/s) and Low-Speed (1.5 Mb/s) traffic.
Check your Windows System/Device Manager to confirm proper installation of USB 2.0 Hi-Speed drivers:
Right click on the “My Computer” icon. Select Properties from the pop up menu, click on the “Hardware” tab then click on
the Device Manager button. Scroll down to the “Universal Serial Bus controllers” category and click on the plus sign next to
it. There may be additional devices in the list being displayed, but all of the below devices should appear.
An X through a device’s icon means the device as been disabled. A circled exclamation point through the device’s icon
means the device has a problem. The type of problem will appear in the Properties dialog box for the device. To view the
Properties dialog box for a device, double click on it.
9
Page 10
Installing OrangeUSB 2.0 Hi-Speed Drivers in Windows XP
Step 1
• Insert the iBOT
inserted, the iBOT
automatically start and display the menu to
the right.
• Click on "Install OrangeUSB Drivers"
• Follow the onscreen instructions.
• The OrangeUSB 2.0 drivers will be copied
to: C:\windows\drivers\ousb2\
Step 2
• The OrangeUSB Setup dialog to the right
will appear. Click “Next.” To continue
• Another OrangeUSB Setup dialog will
appear. Click “Finish” to continue.
2 Installer CD. Once
2 Installer will
Step 3
Step 4
• The iBOT
2 Setup dialog, as displayed in
Step 1 above, will appear. Click on the box
next to the “Exit Setup”.
• When Setup has finished, select “No, I will
restart my computer”.
• Click on the Close button,
• Shutdown Windows XP and install the USB
2.0 PCI Host Controller board.
NOTES: Refer to your computer’s manual for instructions on how to open your computer and install a
PCI card.
IMPORTANT: Before handling the PCI board or touching anything in the computer ground yourself by
touching the power supply for a couple of seconds. Failure to do this may damage the
board and/or your computer.
• With your computer off, open your computer
case.
• Locate an open PCI slot. If there is a
faceplate covering the opening to the back
panel, remove it.
• Locate the USB 2.0 PCI Host Controller
board and insert it into the free slot. Once
inserted, screw the board in securely.
• Connect your internal devices as needed.
• Close computer.
• Turn the computer power on.
10
Page 11

Step 5
Once the OrangeUSB card is installed and the computer is
restarted,
• Windows will detect “Universal Serial Bus
(USB) Controller”.
• Select “Install from a list or specific location”
• Click Next to continue.
Step 6
• The Windows “choose you search and
installation options” dialog appears.
• Select “Don’t search, I will choose the driver
to install”.
• Click Next to continue.
Step 7
• The Windows “Select the device driver you
want to install” dialog appears.
Step 8
Step 9
• Select “OrangeUSB USB 2.0 Host
Controller.
• Click Next to continue
• The Windows “wizard has finished installing
the software” dialog appears.
• Click “Finish” to continue
• Windows will detect “USB 2.0 Root Hub
Device”.
• Select “Install the software automatically”
• Click “Next” to continue
11
Page 12

Step 10
• The Windows “wizard has finished installing
the software” dialog appears.
• Click “Finish” to continue
Finalizing USB 2.0 Hi-Speed hardware settings
OrangeUSB 2.0 Hi-Speed products that use an NEC chipset have 3 USB host controller engines on board. Two of the host
controller engines handle USB 1.1 transactions. One of the host controllers engines handle, USB 2.0 transactions.
USB data traffic is automatically routed to the proper host controller engine depending on the speed of the device that is
plugged into the OrangeUSB port. This essentially creates 3 concurrent USB buses. These USB buses allow devices to run
in a less congested traffic environment. This helps devices such as color printers, scanners, video cameras and mass
storage devices, which require a high bandwidth, to work well together.
The OrangeUSB USB 2.0 Host Controller driver handles USB 2.0 Hi-Speed (480 Mbits/s) traffic. The two NEC USB Open
Host Controllers handle Full-Speed (12 Mb/s) and Low-Speed (1.5 Mb/s) traffic.
Check your Windows System/Device Manager to confirm proper installation of USB 2.0 Hi-Speed drivers:
Right click on the “My Computer” icon. Select Properties from the pop up menu, click on the “Hardware” tab then click on
the Device Manager button. Scroll down to the “Universal Serial Bus controllers” category and click on the plus sign next to
it. There may be additional devices in the list being displayed, but all of the below devices should appear.
An X through a device’s icon means the device as been disabled. A circled exclamation point through the device’s icon
means the device has a problem. The type of problem will appear in the Properties dialog box for the device. To view the
Properties dialog box for a device, double click on it.
If the Windows XP Device Manager “Universal Serial Bus controllers” category does not look the same as it does below,
Windows XP may have installed the Microsoft NEC PCI to USB Enhanced Host Controller instead of the OrangeUSB USB
2.0 Host Controller. This will work fine as long as the NEC PCI to USB Enhanced Host Controller (Driver Date 6/1/2002) is
from Windows XP Service Pack 1.
NOTES: To verify the NEC PCI to USB Enhanced Host Controller driver date, double click on it. Select
the Driver tab. The NEC PCI to USB Enhanced Host Controller driver date must be 6/1/2002 or
newer.
If you wish to use the OrangeUSB USB 2.0 drivers instead of the Microsoft USB 2.0 driver, double click on the “NEC PCI to
USB Enhanced Host Controller” driver. Click on the Driver tab, then the Update Driver button. Go back to Step 5 in the
Installing OrangeUSB 2.0 Hi-Speed Driver in Windows XP section and follow the instructions through Step 12.
12
Page 13

Installing OrangeUSB 2.0 Hi-Speed Drivers in Windows 98
Step 1
• Insert the iBOT2 Installer CD. Once
inserted, the iBOT2 Installer will
automatically start and display the menu to
the right.
• Click on "Install OrangeUSB Drivers"
• Follow the onscreen instructions.
• The OrangeUSB 2.0 drivers will be copied
to: C:\windows\drivers\ousb2\
Step 2
• Insert your Microsoft Windows 98 CD-ROM
into your CD-ROM bay. Some of the USB
drivers are provided by Microsoft.
• The OrangeUSB Setup dialog to the right
will appear. Click “Next.” To continue
Step 3
• Another OrangeUSB Setup dialog will
appear. Click “Finish” to continue.
• The iBOT
Step 1 above, will appear. Click on the box
next to the “Exit Setup”.
• When Setup has finished, select “No, I will
restart my computer”.
• Click on the Close button,
• Shutdown Windows 98 and install the USB
2.0 PCI Host Controller board.
NOTE: Refer to your computer’s manual for instructions on how to open your computer and install a
IMPORTANT: Before handling the PCI board or touching anything in the computer ground yourself by
2 Setup dialog, as displayed in
PCI card.
touching the power supply for a couple of seconds. Failure to do this may damage the
board and/or your computer.
13
Page 14

Step 4
• With your computer off, open your computer
case.
• Locate an open PCI slot. If there is a
faceplate covering the opening to the back
panel, remove it.
• Locate the USB 2.0 PCI Host Controller
board and insert it into the free slot. Once
inserted, screw the board in securely.
• Connect your internal devices as needed.
• Close computer.
• Turn the computer power on.
Step 5
Once the OrangeUSB card is installed and the computer is
restarted,
• Windows will detect “NEC USB Open Host
Controller”.
• The “This wizard searches for new driver
for:” dialog appears.
• Click Next to continue
Step 6
Step 7
Step 8
• The “What do you want Windows to do?”
dialog appears.
• Select “Search for the best driver for your
device”.
• Click Next to continue.
• The “Window will search for new drivers”
dialog appears.
• Deselect all check boxes.
• Click Next to continue.
• The “Windows has found an update driver
for this device” dialog appears.
• Select “The updated driver (Recommended)
NEC USB Open Host Controller”
• Click Next to continue
Step 9
• The “Windows driver file search for the
device” dialog appears.
• Click Next to continue.
14
Page 15

Step 10
• The “Windows has finished installing the
software” dialog appears.
• Click Finish to continue
• Repeat steps 4 through step 9 above
• Restart Windows
Congratulations your OrangeUSB driver installation is
complete!
Finalizing USB 2.0 Hi-Speed hardware settings
OrangeUSB 2.0 Hi-Speed products that use an NEC chipset have 3 USB host controller engines on board. Two of the host
controller engines handle USB 1.1 transactions. One of the host controllers engines handle, USB 2.0 transactions.
USB data traffic is automatically routed to the proper host controller engine depending on the speed of the device that is
plugged into the OrangeUSB port. This essentially creates 3 concurrent USB buses. These USB buses allow devices to run
in a less congested traffic environment. This helps devices such as color printers, scanners, video cameras and mass
storage devices, which require a high bandwidth, to work well together.
The OrangeUSB USB 2.0 Host Controller driver handles USB 2.0 Hi-Speed (480 Mbits/s) traffic. The two NEC USB Open
Host Controllers handle Full-Speed (12 Mb/s) and Low-Speed (1.5 Mb/s) traffic.
Check your Windows System/Device Manager to confirm proper installation of USB 2.0 Hi-Speed drivers:
Right click on the “My Computer” icon. Select Properties from the pop up menu, then click on the “Device Manager” tab.
Scroll down to the “Universal Serial Bus controllers” category and click on the plus sign next to it. There may be additional
devices in the list being displayed, but all of the below devices should appear.
An X through a device’s icon means the device as been disabled. A circled exclamation point through the device’s icon
means the device has a problem. The type of problem will appear in the Properties dialog box for the device. To view the
Properties dialog box for a device, double click on it.
Where to go for additional Troubleshooting assistance?
Visit the OrangeUSB Windows troubleshooting web site.
http://www.orangemicro.com/orangeusbwinfaqs.html
Contact Orange Micro for technical support.
http://www.orangemicro.com/supportform.html
15
Page 16

Chapter 3
How to install the iBOT2
In order to ensure proper operation of your iBOT2, please follow the instructions below in the order they appear. These
instructions document the installation process for the iBOT
2 on your Windows PC.
The Orange Micro iBOT
port.
NOTE: NON-ORANGE MICRO USB 2.0 HOST CONTROLLERS: The Orange Micro USB 2.0 drivers are
compatible with all known USB 2.0 Host controllers. It is recommended that you install the Orange
Micro USB 2.0 Host controller drivers. Double click on the USB 2.0 Enhanced Host Controller in your
Windows System Device Manager. Select the Driver tab and click on Update Drivers to begin the USB
2.0 driver update.
2 USB 2.0 Web Cam may be used on any Windows compatible system with an available USB 2.0
Installing iBOT2 Drivers in Windows 98SE, Me, 2000
Step 1
• Insert the iBOT
inserted, the iBOT
automatically start and display the menu to
the right.
• Click on "Install iBOT
drivers will be copied to:
Windows 98SE, Me
C:\windows\drivers\ibot2\
Windows 2000
C:\winnt\drivers\ibot2\
2 Installer CD. Once
2 Installer will
2 Drivers". The iBOT2
Step 2
• Follow the onscreen instructions. The iBOT
Setup dialog will appear. Click on the box
next to the “Exit Setup”.
• When prompted, restart your computer.
• Connect the iBOT2 Camera to an available
USB 2.0 port. Windows will detect the
iBOT2 camera, then automatically install all
necessary drivers.
• Restart Windows.
2
16
Page 17

Verify the proper installation of the iBOT2 Drivers
Windows 98SE, Me
Right click on the “My Computer” icon. Select Properties from the pop up menu, then click on the “Device Manager” tab.
Scroll down to the “Imaging Device” category and click on the plus sign next to it. There may be additional devices in the list
being displayed, but the “Orange Micro iBOT2 USB 2.0 Camera” should appear.
Windows 2000
Right click on the “My Computer” icon. Select Properties from the pop up menu, click on the “Hardware” tab then the
Device Manager button. Scroll down to the “Imaging Device” category and click on the plus sign next to it. There may be
additional devices in the list being displayed, but the “Orange Micro iBOT2 USB 2.0 Camera” should appear.
An X through a device’s icon means the device as been disabled. A circled exclamation point through the device’s icon
means the device has a problem. The type of problem will appear in the Properties dialog box for the device. To view the
Properties dialog box for a device, double click on it.
If the Orange Micro iBOT
2 driver shows up as displayed below the drivers have been installed successfully.
Use the AMCAP application to verify the iBOT2 functions properly. Click on the Windows Start/Programs menu and select
“Orange Micro iBOT”/AMCAP. Pull down the AMCAP “Options” menu and select Preview. A video stream should appear
from your iBOT
2 camera.
If you wish to adjust the brightness, pull down the AMCAP “Options” menu and select “Video Capture Filter…”. Then slide
the brightness bar with your mouse to the desired position.
NOTE: A Tripod mount is located on the bottom of the iBOT
Congratulations! You have successfully installed the iBOT
Additional software is included with the iBOT
2 for video editing, video teleconferencing, etc. Documentation may be provided
2 on your PC.
in Adobe Acrobat Reader format or as online help within the application.
17
2 Web Cam.
Page 18

Installing iBOT2 Drivers in Windows XP
Step 1
Step 2
• Insert the iBOT
inserted, the iBOT
automatically start and display the menu to
the right.
• Click on "Install iBOT
drivers will be copied to:
C:\windows\drivers\ibot2\
• Follow the onscreen instructions. The iBOT
Setup dialog will appear. Click on the box
next to the “Exit Setup”.
2 Installer CD. Once
2 Installer will
2 Drivers". The iBOT2
• When prompted, restart your computer.
• Connect the iBOT2 Camera to an available
USB 2.0 port. Windows will detect the
iBOT2 camera. The dialog to the right will
appear.
• Select “Install the software automatically
(Recommended)”
• Click Next to continue
2
Step 3
• The dialog “The software you are installing
for this hardware has not passed Windows
Logo testing” appears.
• Click Continue Anyway,
NOTE: The warning appears because the software
drivers have not yet been submitted to Microsoft
for certification. However, the drivers have been
thoroughly tested with Windows XP
Step 4
• The dialog “Completing the Found New
Hardware Wizard” appears.
• Click Finish to close the wizard
• Restart Windows
18
Page 19

Verify the proper installation of the iBOT2 Drivers
Windows XP
Right click on the “My Computer” icon. Select Properties from the pop up menu, click on the “Hardware” tab then the
Device Manager button. Scroll down to the “Imaging Device” category and click on the plus sign next to it. There may be
additional devices in the list being displayed, but the “Orange Micro iBOT2 USB 2.0 Camera” should appear.
An X through a device’s icon means the device as been disabled. A circled exclamation point through the device’s icon
means the device has a problem. The type of problem will appear in the Properties dialog box for the device. To view the
Properties dialog box for a device, double click on it.
If the Orange Micro iBOT
2 driver shows up as displayed below the drivers have been installed successfully.
Use the AMCAP application to verify the iBOT2 functions properly. Click on the Windows Start/Programs menu and select
“Orange Micro iBOT”/AMCAP. Pull down the AMCAP “Options” menu and select Preview. A video stream should appear
from your iBOT
2 camera.
If you wish to adjust the brightness, pull down the AMCAP “Options” menu and select “Video Capture Filter…”. Then slide
the brightness bar with your mouse to the desired position.
NOTE: A Tripod mount is located on the bottom of the iBOT
Congratulations! You have successfully installed the iBOT
Additional software is included with the iBOT
2 for video editing, video teleconferencing, etc. Documentation may be provided
2 on your PC.
2 Web Cam.
in Adobe Acrobat Reader format or as online help within the application.
Where to go for additional Troubleshooting assistance?
Visit the iBOT Windows troubleshooting web site.
http://www.orangemicro.com/faqs.html
Contact Orange Micro for technical support.
http://www.orangemicro.com/supportform.html
19
Page 20

ArcSoft Camera Suite
• Insert the iBOT2 Installer CD.
• Once the iBOT
prompts to complete the ArcSoft Camera Suite installation.
• When the iBOT
2 Installer window has opened, click on the box next to “Install ArcSoft Camera Suite and follow the
2 Installer window reappears, click on the box next to Exit Setup.
PhotoImpression
PhotoImpression is a full-featured and easy-to-use 32-bit photo image editing program.
Getting Started with PhotoImpression
Click on the Windows Start button then select Programs/ArcSoft Camera Suite/PhotoImpression.
• Click on the Camera/Scanner button.
• Click on the Video Camera icon as shown on the right.
• The “Capture Image from Video Camera” dialog will
appear.
• This dialog will allow you to verify the video source,
alter the video format, initiate live preview and capture
a photo.
• To preview iBOT2 video, click on the Live button
• For additional details on the operation of
PhotoImpression review the online help by clicking on
? as shown on the right.
the
20
Page 21

VideoImpression
With VideoImpression you can edit and combine your video files. New videos can be created using existing video,
animation, and image files. Quickly and easily create desktop video presentations for use at home, business or on the
Internet.
Getting Started with VideoImpression
Click on the Windows Start button then select Programs/ArcSoft Camera Suite/ArcSoft VideoImpression
• To create a new video project click on the New Project
button as shown on the right to go to the Album
Screen
• To preview iBOT2 video, click on the Capture Button
as shown on the right.
• The VideoImpression Capture window will appear.
.
• Use the Capture window to add live video clips or your
album.
• For details on editing video and making movies with
your video clips and photos review the online help by
clicking on the
? as shown on the right.
21
Page 22

iVisit
iVisit is a cross platform Internet communications solution providing you with basic Video Conferencing capabilities.
Versions are available for Macintosh OS 9 or Windows 98 operating systems (
http://www.ivisit.com). All you need to get
started is an Internet account, a Windows based system that meets the minimum system requirements, and a web cam.
With iVisit you can:
• Place and receive live full-motion video conference calls with other iVisit users.
Getting Started with iVisit
• Insert the iBOT
• Once the iBOT
2 Installer CD.
2 Installer window has opened, click on the box next to “Install iVisit” and follow the prompts to
complete the iVisit installation.
• When the iBOT
2 Installer window reappears, click on the box next to Exit Setup.
To launch iVisit click on the Windows Start button then select Programs/iVisit/iVisit. To get iVisit help, click on the Windows
Start button then select Programs/iVisit/FAQ.
Note: Currently iVisit does not display the entire video contents. We are working on this issue and the fix will be available
soon on our web site (http://www.orangemicro.com/softwareupdates.html).
Microsoft NetMeeting
NetMeeting is an Internet communications solution providing you with basic Video Conferencing capabilities. All you need to
get started is an Internet account, a Windows based computer that meets the minimum system requirements, and a video
camera.
With NetMeeting you can:
• Place and receive live full-motion video conference calls with other NetMeeting users.
Getting Started with NetMeeting
NetMeeting is usually preinstalled on Windows Me, Windows 2000 and Windows XP based systems. To launch NetMeeting
click on the Windows Start button then select Programs/Accessories/Communications/NetMeeting.
To Install NetMeeting in Windows
• Insert the iBOT
• Once the iBOT
2 Installer CD.
2 Installer window has opened, click on the box next to “Install Microsoft NetMeeting and follow the
prompts to complete the Microsoft NetMeeting installation.
• When the iBOT
2 Installer window reappears, click on the box next to Exit Setup.
• To preview video from your iBOT2 click on the
Play/Pause button.
• For additional online help pull down the Windows Help
menu.
22
Page 23

How to Adjust iBOT2 Color and Format Properties
AMCAP
Launch the Amcap application by clicking on the Windows Start/Programs menu and select Orange Micro iBOT2 /Amcap. Drop down
the Amcap Options menu and select:
• Video Capture Filter...
• Video Capture Pin
Video Capture Filter Video Capture Pin
PhotoImpression
Start PhotoImpression. Click on the Camera/Scanner button. Then click on the video camera icon and the “Capture Image from Video
Camera” dialog will appear. Click on the Source button to display the Camera Controls dialog. Click on the Format button to display
the Stream Format dialog.
Camera Controls Stream Format
23
Page 24

VideoImpression
Start PhotoImpression. Click on the New Project button. Then click on the Capture icon. The VideoImpression Capture
window will appear. Click on the Source button to display the “Camera Controls” dialog. Click on the Format button to
display the “Stream Format” dialog.
Format Source
iVisit
Start iVisit. Click on the Windows Start button. Then select Programs/iVisit/iVisit. Click on the iVisit Settings/Preferences
menu. Then click on the Video tab, below left. Click on the Source button, below left, to display the “Camera Controls”
dialog, below right. Click on the Format button, below left, to display the “Stream Settings” dialog.
24
Page 25

NetMeeting
A
Click on the Windows Start button. Then select Programs/Accessories/Communications/NetMeeting. Click on the
NetMeeting Play/Pause button to begin previewing video from the iBOT2. Click on the NetMeeting Tools/Options… menu
item. Click on the Video tab, then the Source tab. The Orange Micro iBOT2 USB 2.0 Camera dialog will appear. The
Device Settings and Camera Controls tabs in this dialog will allow you adjust the video camera properties.
TeVeo Suite
Click on the Windows Start button then select Programs/TeVeo/TeVeo VIDiO Suite. The VIDiO Suite window will appear.
Click on the Live button to open a Live video window.
Click on the Camera Controls icon
will appear.
Click on the “Advanced Camera Controls” icon to display the “Camera Controls” dialog.
at the bottom of the Live video window. The Camera and Video Controls window
dvanced Camera Controls icon
25
Page 26

Frequently Asked Questions
Problem – With the iBOT2 I get video, but it appears way off center and the colors are off. Also the only available
frame size is 256 x 240. What can I do to correct this?
Suggestion:
The iBOT2 requires a USB 2.0 port. These symptoms are typical of USB 1.1 operation. This is due to connecting the iBOT2
into a USB 1.1 port or failing to properly install the USB 2.0 drivers. If you do not have a USB 2.0 port, a low cost alternative
is available here:
http://www.orangemicro.com/LCusb2pci.html
Problem – My Windows XP Device Manager looks different than the screenshot in the “Installing the iBOT2 Drivers”
section.
Suggestion:
Windows XP may automatically install the Microsoft supplied USB 2.0 Enhanced Host Controller driver. As long as
Windows XP Service Pack 1 is installed, these drivers will work fine.
Verify the Windows XP supplied USB 2.0 driver was updated to the Windows XP Service Pack 1 USB 2.0 driver or newer.
Double click on the USB Enhanced Host Controller, Then click on the Drivers tab. As of 11/02/02, the driver
information below is most current for the Microsoft Enhanced Host Controller driver.
Driver Date: 6/1/2002
Driver Version: 5.1.2600.0
NON-ORANGE MICRO USB 2.0 HOST CONTROLLERS : If the USB Enhanced Host Controller Date and Version are not
equal to or newer than the above driver information, you do not have the USB 2.0 driver from Service Pack 1 or newer
installed. Select the Driver tab and click on Update Drivers to begin the USB 2.0 driver update.
Problem – My USB 2.0 host controller is not an OrangeUSB card. I am not getting streaming video from my iBOT2.
Suggestion:
The Orange Micro USB 2.0 drivers are compatible with all known USB 2.0 Host controllers. Install the Orange Micro USB
2.0 Host controller. Double click on the USB 2.0 Enhanced Host Controller in your Windows System Device Manager.
Select the Driver tab and click on Update Drivers to begin the USB 2.0 driver update.
Problem – I purchased an iBOT
Suggestion:
Rotate the blue part of the iBOT
Problem – I have an iBOT
Suggestion:
The "AMCAP Options\Video Capture PIN" dialog allows you to adjust the picture size and fps.
2 and the video is fuzzy. What can I do?
2 to the right or left until the video is clear and crisp.
2 running under Windows XP. How can I resize the picture?
26
Page 27

Problem – I cannot find the NetMeeting command on the Communications Menu in Windows XP.
Suggestion:
Ref: http://support.microsoft.com/support/kb/articles/Q304/8/01.ASP
This issue can occur because the NetMeeting functionality has been combined with the Windows Messenger Service in
Windows XP. To resolve this issue, use the Windows Messenger Service to communicate with others over the Internet or on
your intranet.
To start Windows Messenger Service:
Click Start on the taskbar. Point to Accessories, point to Communications, and then click Windows Messenger Service.
To work around this issue:
Run NetMeeting manually. Click Start on the taskbar, and then click Run. In the Open box, type conf.exe, and then press
ENTER.
Problem – I am a software developer and I am interested in developing a custom application for the iBOT
Does Orange Micro have a developers kit for the iBOT
2 camera?
2 camera.
Suggestion:
Microsoft® DirectShow® is the interface that most developers use to capture video from DVCAMs and Desktop Cameras,
including USB and FireWire Web Cams. We have no developer kit for this purpose. All the required information is available
from Microsoft.
Microsoft® DirectShow®
http://www.microsoft.com/DIRECTX/dxm/help/ds/default.htm
Problem – Why is using a USB 2.0 Web Cam better than a USB 1.1 Web Cam?
Suggestion:
The main benefit of using the iBOT
2 is that the video coming from the iBOT2 is uncompressed. Other cameras compress
video before it leaves the camera. Then the program that receives the video must decompress and then recompress the
video using a different type of compression before the video is usable. This technique tends to dramatically degrade the
quality and color of the video. Because the iBOT
and then recompress the video before it can be used. It will simply take the uncompressed video from the iBOT
2 sends uncompressed video the program does not have to uncompress
2 and
compress it using the appropriate compression. This will both allow for better quality video along with alleviating the demand
on the CPU to process more frames.
When using the iBOT
2 for video editing there are a few system requirements you should keep in mind. The first thing is the
transfer rate. This number will vary depending on the resolution and frame rate you capture. The formula used to determine
the transfer rate is “horizontal resolution x vertical resolution x 2 x frames per second = transfer rate”. If you capture 640x480
at 30 Frames/sec you simply multiply 640x480x2x30, which equals 18,432,000 Bytes/Sec or 18MB/s. If you intended to
capture 640x480 at 30 Frames/sec you need a hard drive that can sustain a transfer rate of 18 MB/s.
There are other factors to keep in mind other than hard drive speed. To properly perform video editing on a PC using the
iBOT
2 you will need at lease a Pentium 233MMX, 64 MB of RAM and a defragmented hard drive.
Additional iBOT2 Workflow Recommendations and Known Issues
Optimize your System
If you do not optimize your system you may get dropped audio or video frames. This can cause choppy sound or video that
does not appear smooth.
Run Disk Defragmenter on your hard disk. With all applications closed, click on the Windows Start menu and select Start /
Programs / Accessories / Systems Tools / Disk Defragmenter.
Enable DMA for IDE hard disks. In the Windows System/Device Manager double click on Disk Drives. Then double click on
the icon labeled Generic IDE Disk. Select the Settings tab and click on the DMA box. Close all windows and restart the
Windows operating system. Not all hard drives support DMA. If any problems result due to this procedure, restart Windows
in safe mode and remove the check on the DMA box.
27
Page 28

Appendix A
Optional Hardware
The following optional OrangeLink hardware accessories are available from Orange Micro:
FireWire cable Part# 70CAB13942
4.5 meter (15 feet) 6-pin to 6-pin
FireWire cable Part# 70CAB13943
4.5 meter (15 feet) 6-pin to 4-pin
USB 2.0 Certified cable Part# 70CAB90033
4.5 meter (15 feet)
FireWire Repeater Part# 70HTL00020
Allows an additional 4.5 meter extension for FireWire devices. Includes a 4.5 meter (15 foot) 6-pin to 6-pin cable.
FireWire Hub Part# 70HTL00030
Connects up to 8 devices. Also provides an additional 4.5 meter extension, and an enhanced 12 volts of power for FireWire
peripherals.
USB 2.0 Hub Part# 70USB90030
Connects up to 4 devices. Also provides an additional 4.5 meter extension.
FireWire PCI Board Part# 70HTL13943
Add 3 FireWire ports to your PCI based Mac or PC.
USB 2.0 Hi-Speed PCI Board Part# 70USB90010
Add 5 USB 2.0 Hi-Speed ports to your PCI based Mac or PC.
FireWire PC Card Part# 70HTL00040
Add 2 FireWire ports to your Mac or PC Laptop.
USB 2.0 Hi-Speed PC Card Part# 70USB90020
Add 4 USB 2.0 Hi-Speed ports to your Mac or PC Laptop.
USB 2.0 FireWire PCI Board Part# 70HTL00110
Add 3 FireWire and 4 USB 2.0 Hi-Speed port to your PCI based Mac or PC.
FireWire/Ethernet PCI Board Part# 70HTL00090
Add 2 FireWire ports and Ethernet support to your PCI based PC Only.
Optional OrangeLink FireWire PC Card Power Supply
Avoid buying a FireWire Hub for the purpose of supplying power to the FireWire Bus. Available from:
http://www.1394firestation.com/
For information about the USB Implementers Forum, Inc. and many other related products can be found at the following
URL:
http://www.usb.org/
28
Page 29

Appendix B
Specifications
General Features:
• 480 Mb/sec. USB 2.0 High Speed compatible
• Fully compatible with Windows
• Non-compressed full-motion digital video at rates of 30 Frames/sec @ 640 x 480 depending on your system
configuration
• 1/3" Color CMOS Image Sensor
• 60 degree angle of view
• Effective Pixels: 664 x 492
• Frame size up to 640 x 480
• Scanning System: Progressive scan / Interlaced scan
• Currently supports YUY2, I420 and RGB 24-bit formats
• Millions of colors (24 bit)
• Supports Plug-and-Play specification
• Tripod Mount
Cable / Connector:
• 6 foot attached iBOT
Software:
• Windows drivers for the USB 2.0 Host Controller
• Windows drivers for the iBOT
2 cable with a Type A connector
2 Web Cam
29
Page 30

Appendix C
Warranty Information
LIMITED WARRANTY
Every Orange Micro product is fully tested and checked for quality prior to shipment. It is warranted to be free from defects
in materials and workmanship for a period of one (1) year from date of purchase. During that time period, Orange Micro Inc.
will, at no charge to the purchaser of record, repair or replace the defective unit returned to the Customer Service
Department in accordance with the following instructions:
NOTE: DO NOT return the Orange Micro product to Orange Micro Inc. until you have received a Return
Material Authorization (RMA) Number. Customers outside the United States should contact the
Orange Micro distributor in that country and request service.
1. Phone the Orange Micro Customer Service Department at 714 779-2772. Customer Service hours of operation are
between 8AM and 4PM PST. Customer Service lines are closed from 12PM to 1PM PST for lunch. Obtain a Return
Material Authorization (RMA) number.
2. Provide Orange Micro, Inc. with Model, Serial Number, Proof of Purchase, Return Address, and preferred return
shipping method. Enclose a clear description of the problem experienced and any sample printouts showing the
problem, if possible.
3. Ship in the original carton or securely packed in a cardboard carton with at least two inches of cushioned packing
material on all sides. Mark the package “FRAGILE” and ship via UPS, Parcel Post, or Air Freight, insured and prepaid.
NOTE: DO NOT SEND COLLECT - collect shipments will be refused and returned to sender.
Orange Micro, Inc. disclaims any liability to users of the Orange Micro product for consequential damages of any kind arising
from or connected with the use of the Orange Micro product.
This warranty is void in cases of misuse, abuse, abnormal conditions of operations or attempts to alter or modify the function
of a part or assembly.
This limited warranty is in lieu of all other warranties expressed or implied, and no representative or other person is
authorized to represent or assume for Orange Micro, Inc. any warranty liability beyond that set forth herein.
This warranty gives you specific legal rights, and you may also have additional rights, which vary, from state to state. The
warranty expressed herein applies to the Orange Micro product sold and used in the United States of America.
30
Page 31

FCC Class B Information
This equipment has been tested and found to comply with the limits of a Class B digital device, pursuant to Part 15 of the
FCC Rules. These limits are designed to provide reasonable protection against harmful interference in a residential
installation. This equipment generates, uses and can radiate radio frequency energy and, if not installed and used in
accordance with the instructions, may cause harmful interference to radio or television reception, which can be determined
by turning the equipment off and on, the user is encouraged to try to correct the interference by one or more of the following
measures:
• Reorient or relocate the receiving antenna.
• Increase the separation between the equipment and receiver.
• Connect the equipment into an outlet on a circuit different from that to which the receiver is connected.
• Consult the dealer or an experienced radio/TV technician for help.
Any changes or modifications not expressly approved by the manufacturer could void the user’s authority to operate the
equipment.
The user may find the following booklet prepared by the Federal Communications Commission helpful: “How to Identify and
Resolve Radio/TV Interference Problems. This booklet is available from the US Government Printing Office, Washington,
DC 20402. Stock No. 004-000-00345-4
31
Page 32

Index
My USB 2.0 host controller is not an OrangeUSB card, 26
AMCAP, 17, 19, 23, 26
choppy sound, 27
Customer Service, 30
Customer Service hours of operation, 30
developers kit, 27
Device Manager, 27
Ethernet, 28
FCC Class B Information, 31
FireWire cable, 28
FireWire PC Card, 28
FireWire PCI, 28
FireWire/Ethernet, 28
General Features, 29
How to Adjust iBOT2 Color, 23
How to install an iBOT in your PC, 9
How to install an iBOT2, 16
Installing OrangeUSB 2.0 Hi-Speed Drivers in Windows,
6, 8, 10, 13, 16, 18
iVisit, 4, 22, 24
NetMeeting, 4, 5, 22, 25, 27
Non-Orange Micro USB 2.0 Host Controllers, 16, 26
OrangeLink Hardware Accessories, 28
FireWire cable, 28
FireWire Hub, 28
FireWire Repeater, 28
Orange Converter, 28
PhotoImpression, 4, 20, 23, 24
power consumption, 4
Software included with iBOT2, 4
Specifications, 29
System Requirements, 4
TeVeo, 4, 25
Tripod mount, 17, 19
USB 2.0, 28
USB 2.0 Certified cable, 28
USB 2.0 Enhanced Host Controller, 16, 26
USB 2.0 Hi-Speed, 28
Verify the proper installation, 17, 19
Video E-Mail, 5
VideoImpression, 4, 21, 24
Warranty Information, 30
32
 Loading...